Embed Size (px)
Citation preview
INSTRUCTION MANUAL
Cordless Chain Saw
XCU02
014677
ENGLISH (Original instructions)
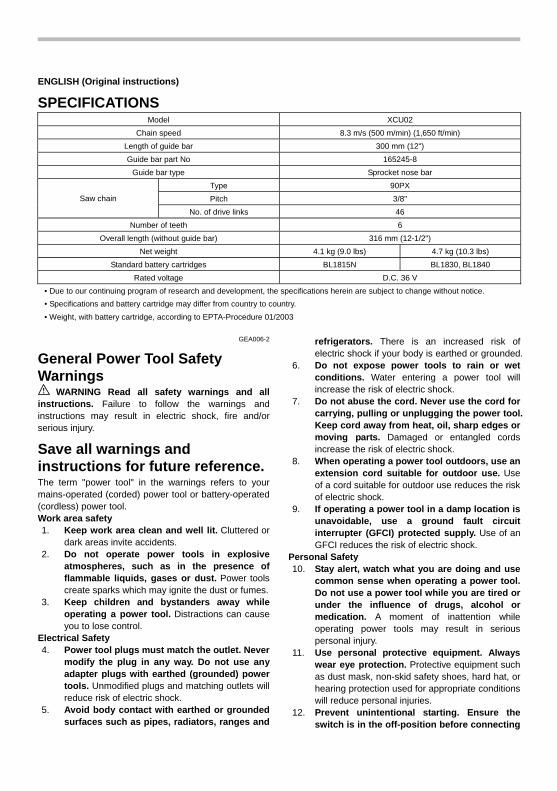
SPECIFICATIONS Model XCU02
Chain speed 8.3 m/s (500 m/min) (1,650 ft/min) Length of guide bar 300 mm (12") Guide bar part No 165245-8
Guide bar type Sprocket nose bar Type 90PXPitch 3/8"Saw chain
No. of drive links 46 Number of teeth 6
Overall length (without guide bar) 316 mm (12-1/2") Net weight 4.1 kg (9.0 lbs) 4.7 kg (10.3 lbs)
Standard battery cartridges BL1815N BL1830, BL1840 Rated voltage D.C. 36 V
• Due to our continuing program of research and development, the specifications herein are subject to change without notice. • Specifications and battery cartridge may differ from country to country.• Weight, with battery cartridge, according to EPTA-Procedure 01/2003
GEA006-2
General Power Tool Safety Warnings
WARNING Read all safety warnings and all instructions. Failure to follow the warnings and instructions may result in electric shock, fire and/or serious injury.
Save all warnings and instructions for future reference. The term "power tool" in the warnings refers to your mains-operated (corded) power tool or battery-operated (cordless) power tool. Work area safety 1. Keep work area clean and well lit. Cluttered or
dark areas invite accidents. 2. Do not operate power tools in explosive
atmospheres, such as in the presence of flammable liquids, gases or dust. Power tools create sparks which may ignite the dust or fumes.
3. Keep children and bystanders away whileoperating a power tool. Distractions can cause you to lose control.
Electrical Safety 4. Power tool plugs must match the outlet. Never
modify the plug in any way. Do not use any adapter plugs with earthed (grounded) power tools. Unmodified plugs and matching outlets will reduce risk of electric shock.
5. Avoid body contact with earthed or groundedsurfaces such as pipes, radiators, ranges and
refrigerators. There is an increased risk of electric shock if your body is earthed or grounded.
6. Do not expose power tools to rain or wetconditions. Water entering a power tool will increase the risk of electric shock.
7. Do not abuse the cord. Never use the cord forcarrying, pulling or unplugging the power tool. Keep cord away from heat, oil, sharp edges or moving parts. Damaged or entangled cords increase the risk of electric shock.
8. When operating a power tool outdoors, use an extension cord suitable for outdoor use. Use of a cord suitable for outdoor use reduces the risk of electric shock.
9. If operating a power tool in a damp location isunavoidable, use a ground fault circuit interrupter (GFCI) protected supply. Use of an GFCI reduces the risk of electric shock.
Personal Safety 10. Stay alert, watch what you are doing and use
common sense when operating a power tool. Do not use a power tool while you are tired or under the influence of drugs, alcohol or medication. A moment of inattention while operating power tools may result in serious personal injury.
11. Use personal protective equipment. Alwayswear eye protection. Protective equipment such as dust mask, non-skid safety shoes, hard hat, or hearing protection used for appropriate conditions will reduce personal injuries.
12. Prevent unintentional starting. Ensure theswitch is in the off-position before connecting
to power source and/or battery pack, picking up or carrying the tool. Carrying power tools with your finger on the switch or energising power tools that have the switch on invites accidents.
13. Remove any adjusting key or wrench beforeturning the power tool on. A wrench or a keyleft attached to a rotating part of the power toolmay result in personal injury.
14. Do not overreach. Keep proper footing andbalance at all times. This enables better controlof the power tool in unexpected situations.
15. Dress properly. Do not wear loose clothing orjewellery. Keep your hair, clothing, and glovesaway from moving parts. Loose clothes,jewellery or long hair can be caught in movingparts.
16. If devices are provided for the connection ofdust extraction and collection facilities,ensure these are connected and properlyused. Use of dust collection can reduce dust-related hazards.
Power tool use and care 17. Do not force the power tool. Use the correct
power tool for your application. The correctpower tool will do the job better and safer at therate for which it was designed.
18. Do not use the power tool if the switch doesnot turn it on and off. Any power tool thatcannot be controlled with the switch is dangerousand must be repaired.
19. Disconnect the plug from the power sourceand/or the battery pack from the power toolbefore making any adjustments, changingaccessories, or storing power tools. Suchpreventive safety measures reduce the risk ofstarting the power tool accidentally.
20. Store idle power tools out of the reach ofchildren and do not allow persons unfamiliarwith the power tool or these instructions tooperate the power tool. Power tools aredangerous in the hands of untrained users.
21. Maintain power tools. Check for misalignmentor binding of moving parts, breakage of partsand any other condition that may affect thepower tool’s operation. If damaged, have thepower tool repaired before use. Manyaccidents are caused by poorly maintained powertools.
22. Keep cutting tools sharp and clean. Properlymaintained cutting tools with sharp cutting edgesare less likely to bind and are easier to control.
23. Use the power tool, accessories and tool bitsetc. in accordance with these instructions,taking into account the working conditionsand the work to be performed. Use of the
power tool for operations different from those intended could result in a hazardous situation.
Battery tool use and care 24. Recharge only with the charger specified by
the manufacturer. A charger that is suitable forone type of battery pack may create a risk of firewhen used with another battery pack.
25. Use power tools only with specificallydesignated battery packs. Use of any otherbattery packs may create a risk of injury and fire.
26. When battery pack is not in use, keep it awayfrom other metal objects, like paper clips,coins, keys, nails, screws or other small metalobjects, that can make a connection from oneterminal to another. Shorting the batteryterminals together may cause burns or a fire.
27. Under abusive conditions, liquid may beejected from the battery; avoid contact. Ifcontact accidentally occurs, flush with water.If liquid contacts eyes, additionally seekmedical help. Liquid ejected from the batterymay cause irritation or burns.
Service 28. Have your power tool serviced by a qualified
repair person using only identicalreplacement parts. This will ensure that thesafety of the power tool is maintained.
29. Follow instruction for lubricating andchanging accessories.
30. Keep handles dry, clean and free from oil andgrease.
GEB071-7
Cordless Chain saw safety warnings: 1. Keep all parts of the body away from the saw
chain when the chain saw is operating. Beforeyou start the chain saw, make sure the sawchain is not contacting anything. A moment ofinattention while operating chain saws may causeentanglement of your clothing or body with thesaw chain.
2. Always hold the chain saw with your righthand on the rear handle and your left hand onthe front handle. Holding the chain saw with areversed hand configuration increases the risk ofpersonal injury and should never be done.
3. Hold the power tool by insulated grippingsurfaces only, because the saw chain maycontact hidden wiring. Saw chains contacting a"live" wire may make exposed metal parts of thepower tool "live" and could give the operator anelectric shock.
4. Wear safety glasses and hearing protection.Further protective equipment for head, hands,legs and feet is recommended. Adequateprotective clothing will reduce personal injury byflying debris or accidental contact with the saw chain.
5. Do not operate a chain saw in a tree. Operation of a chain saw while up in a tree may result inpersonal injury.
6. Always keep proper footing and operate thechain saw only when standing on fixed,secure and level surface. Slippery or unstablesurfaces such as ladders may cause a loss ofbalance or control of the chain saw.
7. When cutting a limb that is under tension bealert for spring back. When the tension in thewood fibres is released the spring loaded limbmay strike the operator and/or throw the chainsaw out of control.
8. Use extreme caution when cutting brush andsaplings. The slender material may catch thesaw chain and be whipped toward you or pull youoff balance.
9. Carry the chain saw by the front handle withthe chain saw switched off and away from yourbody. When transporting or storing the chainsaw always fit the guide bar cover. Properhandling of the chain saw will reduce the likelihoodof accidental contact with the moving saw chain.
10. Follow instructions for lubricating, chaintensioning and changing accessories. Improperly tensioned or lubricated chain mayeither break or increase the chance for kickback.
11. Keep handles dry, clean, and free from oil andgrease. Greasy, oily handles are slippery causingloss of control.
12. Cut wood only. Do not use chain saw forpurposes not intended. For example: do notuse chain saw for cutting plastic, masonry ornon-wood building materials. Use of the chainsaw for operations different than intended couldresult in a hazardous situation.
13. Causes and Operator Prevention of Kickback: Kickback may occur when the nose or tip of theguide bar touches an object, or when the woodcloses in and pinches the saw chain in the cut.Tip contact in some cases may cause a suddenreverse reaction, kicking the guide bar up andback towards the operator. Pinching the saw chain along the top of the guidebar may push the guide bar rapidly back towardsthe operator. Either of these reactions may cause you to losecontrol of the saw which could result in seriouspersonal injury. Do not rely exclusively upon thesafety devices built into your saw. As a chain saw
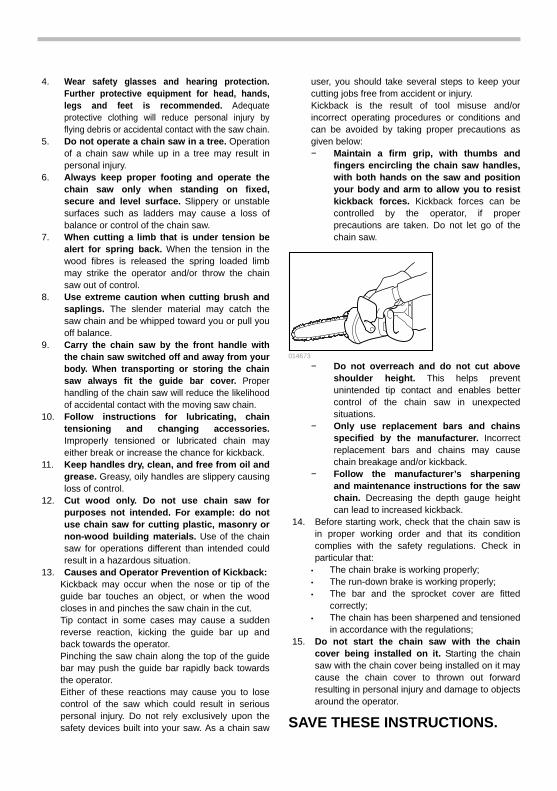
user, you should take several steps to keep your cutting jobs free from accident or injury. Kickback is the result of tool misuse and/or incorrect operating procedures or conditions and can be avoided by taking proper precautions as given below: − Maintain a firm grip, with thumbs and
fingers encircling the chain saw handles, with both hands on the saw and position your body and arm to allow you to resist kickback forces. Kickback forces can be controlled by the operator, if proper precautions are taken. Do not let go of the chain saw.
014673
− Do not overreach and do not cut above shoulder height. This helps prevent unintended tip contact and enables better control of the chain saw in unexpected situations.
− Only use replacement bars and chains specified by the manufacturer. Incorrect replacement bars and chains may cause chain breakage and/or kickback.
− Follow the manufacturer’s sharpening and maintenance instructions for the saw chain. Decreasing the depth gauge height can lead to increased kickback.
14. Before starting work, check that the chain saw isin proper working order and that its condition complies with the safety regulations. Check in particular that:
• The chain brake is working properly; • The run-down brake is working properly; • The bar and the sprocket cover are fitted
correctly; • The chain has been sharpened and tensioned
in accordance with the regulations; 15. Do not start the chain saw with the chain
cover being installed on it. Starting the chainsaw with the chain cover being installed on it maycause the chain cover to thrown out forwardresulting in personal injury and damage to objects around the operator.
SAVE THESE INSTRUCTIONS.
WARNING: DO NOT let comfort or familiarity with product (gained from repeated use) replace strict adherence to safety rules for the subject product. MISUSE or failure to follow the safety rules stated in this instruction manual may cause serious personal injury.
USD307-1
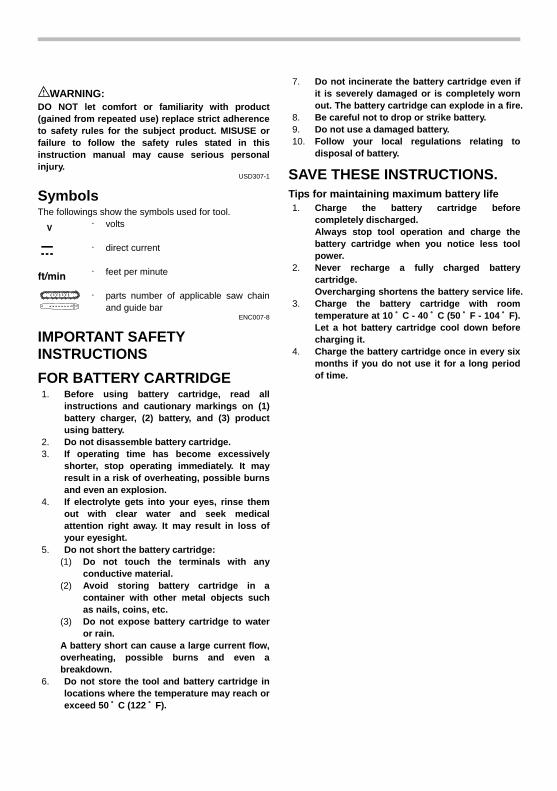
Symbols The followings show the symbols used for tool.
・ volts
・ direct current
・ feet per minute
・ parts number of applicable saw chain and guide bar
ENC007-8
IMPORTANT SAFETY INSTRUCTIONS FOR BATTERY CARTRIDGE 1. Before using battery cartridge, read all
instructions and cautionary markings on (1)battery charger, (2) battery, and (3) productusing battery.
2. Do not disassemble battery cartridge. 3. If operating time has become excessively
shorter, stop operating immediately. It mayresult in a risk of overheating, possible burnsand even an explosion.
4. If electrolyte gets into your eyes, rinse themout with clear water and seek medicalattention right away. It may result in loss ofyour eyesight.
5. Do not short the battery cartridge: (1) Do not touch the terminals with any
conductive material. (2) Avoid storing battery cartridge in a
container with other metal objects such as nails, coins, etc.
(3) Do not expose battery cartridge to water or rain.
A battery short can cause a large current flow, overheating, possible burns and even a breakdown.
6. Do not store the tool and battery cartridge inlocations where the temperature may reach orexceed 50 ゚ C (122 ゚ F).
7. Do not incinerate the battery cartridge even ifit is severely damaged or is completely wornout. The battery cartridge can explode in a fire.
8. Be careful not to drop or strike battery.9. Do not use a damaged battery.10. Follow your local regulations relating to
disposal of battery.
SAVE THESE INSTRUCTIONS. Tips for maintaining maximum battery life 1. Charge the battery cartridge before
completely discharged. Always stop tool operation and charge thebattery cartridge when you notice less toolpower.
2. Never recharge a fully charged batterycartridge. Overcharging shortens the battery service life.
3. Charge the battery cartridge with roomtemperature at 10 ゚ C - 40 ゚ C (50 ゚ F - 104 ゚ F). Let a hot battery cartridge cool down beforecharging it.
4. Charge the battery cartridge once in every sixmonths if you do not use it for a long periodof time.
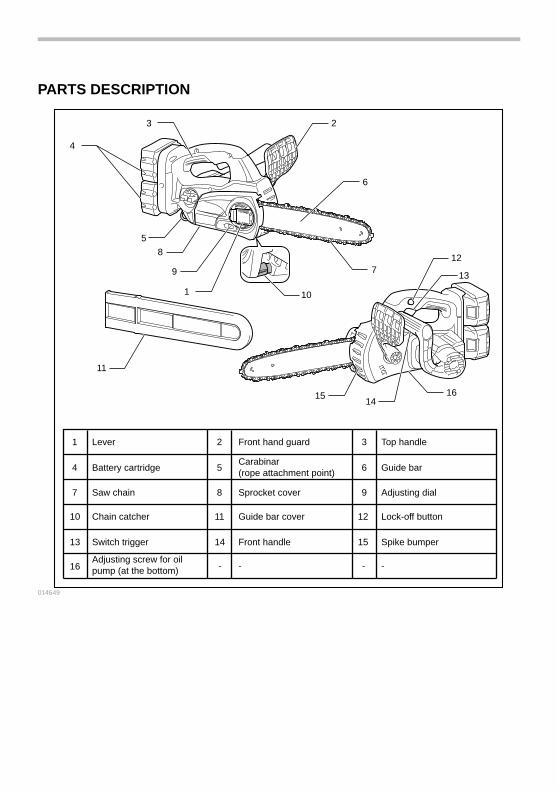
PARTS DESCRIPTION
Front hand guard Top handle
Battery cartridgeCarabinar
(rope attachment point)
Lever
Guide bar
Saw chain
-- --
Sprocket cover Adjusting dial
Chain catcher
Switch trigger Front handle Spike bumper
Guide bar cover Lock-off button
1 2 3
4 5 6
7 8 9
10
1413
16
11 12
15
16
Adjusting screw for oil
pump (at the bottom)
1
23
4
5
6
7
8
9
10
14
13
11
12
15
014649

FUNCTIONAL DESCRIPTION
CAUTION: • Always be sure that the tool is switched off and the
battery cartridge is removed before adjusting or checking function on the tool.
Installing or removing battery cartridge
1 2
3
014650
CAUTION: • Always switch off the tool before installing or
removing of the battery cartridge. • Hold the tool and the battery cartridge firmly
when installing or removing battery cartridge. Failure to hold the tool and the battery cartridge firmly may cause them to slip off your hands and result in damage to the tool and battery cartridge and a personal injury.
To remove the battery cartridge, slide it from the tool while sliding the button on the front of the cartridge. To install the battery cartridge, align the tongue on the battery cartridge with the groove in the housing and slip it into place. Insert it all the way until it locks in place with a little click. If you can see the red indicator on the upper side of the button, it is not locked completely.
CAUTION: • Always install the battery cartridge fully until the
red indicator cannot be seen. If not, it may accidentally fall out of the tool, causing injury to you or someone around you.
• Do not install the battery cartridge forcibly. If thecartridge does not slide in easily, it is not being inserted correctly.
NOTE: • The tool does not work with only one battery
cartridge.
Tool / battery protection system The tool is equipped with a tool/battery protection system. This system automatically cuts off power to the motor to extend tool and battery life. The tool will automatically stop during operation if the tool or battery are placed under one of the following conditions. In some conditions, the indicators light up.
Overload protection When the tool is operated in a manner that causes it to draw an abnormally high current, the tool automatically stops without any indication. In this situation, turn the tool off and stop the application that caused the tool to become overloaded. Then turn the tool on to restart. Overheat protection for battery / tool When the battery / tool is overheated, the tool stops automatically without any indication. The tool does not start even if pulling the switch trigger. In this situation, let the battery / tool cool before turning the tool on again.
NOTE: The battery overheat protection works only with a battery cartridge with a star marking.
1
012128
Overdischarge protection
1
014658
When the remaining battery capacity gets low, the battery indicator blinks on the applicable battery side. By further use, the tool stops and the battery indicator lights up about 10 seconds. In this situation, charge the battery cartridge.
Switch action
CAUTION: • Before inserting the battery cartridge into the tool,
always check to see that the switch trigger actuates properly and returns to the "OFF" position when released.
1. Battery indicator
1. Star marking
1. Red indicator 2. Button 3. Battery cartridge
12
014662
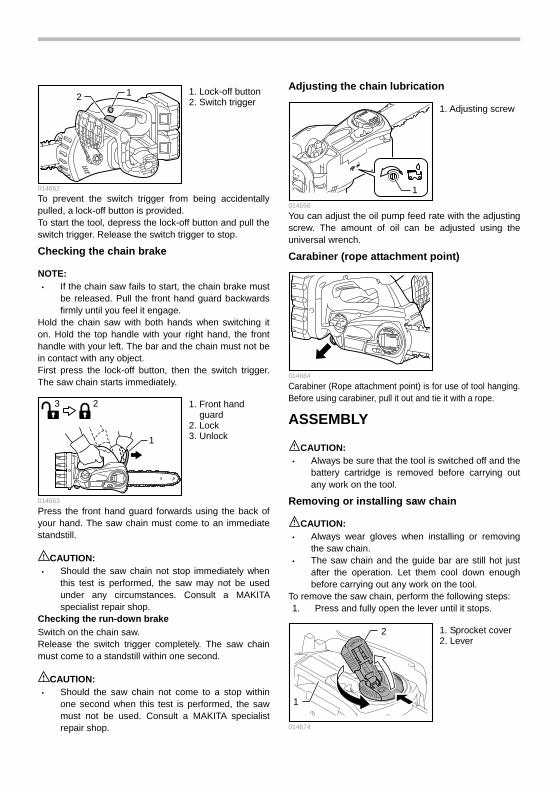
To prevent the switch trigger from being accidentally pulled, a lock-off button is provided. To start the tool, depress the lock-off button and pull the switch trigger. Release the switch trigger to stop.
Checking the chain brake
NOTE: • If the chain saw fails to start, the chain brake must
be released. Pull the front hand guard backwardsfirmly until you feel it engage.
Hold the chain saw with both hands when switching it on. Hold the top handle with your right hand, the front handle with your left. The bar and the chain must not be in contact with any object. First press the lock-off button, then the switch trigger. The saw chain starts immediately.
1
23
014663
Press the front hand guard forwards using the back of your hand. The saw chain must come to an immediate standstill.
CAUTION: • Should the saw chain not stop immediately when
this test is performed, the saw may not be usedunder any circumstances. Consult a MAKITAspecialist repair shop.
Checking the run-down brake Switch on the chain saw. Release the switch trigger completely. The saw chain must come to a standstill within one second.
CAUTION: • Should the saw chain not come to a stop within
one second when this test is performed, the sawmust not be used. Consult a MAKITA specialistrepair shop.
Adjusting the chain lubrication
1014656
You can adjust the oil pump feed rate with the adjusting screw. The amount of oil can be adjusted using the universal wrench.
Carabiner (rope attachment point)
014664
Carabiner (Rope attachment point) is for use of tool hanging. Before using carabiner, pull it out and tie it with a rope.
ASSEMBLY
CAUTION: • Always be sure that the tool is switched off and the
battery cartridge is removed before carrying outany work on the tool.
Removing or installing saw chain
CAUTION: • Always wear gloves when installing or removing
the saw chain. • The saw chain and the guide bar are still hot just
after the operation. Let them cool down enoughbefore carrying out any work on the tool.
To remove the saw chain, perform the following steps: 1. Press and fully open the lever until it stops.
2
1
014674
1. Sprocket cover 2. Lever
1. Adjusting screw
1. Front hand guard
2. Lock 3. Unlock
1. Lock-off button2. Switch trigger
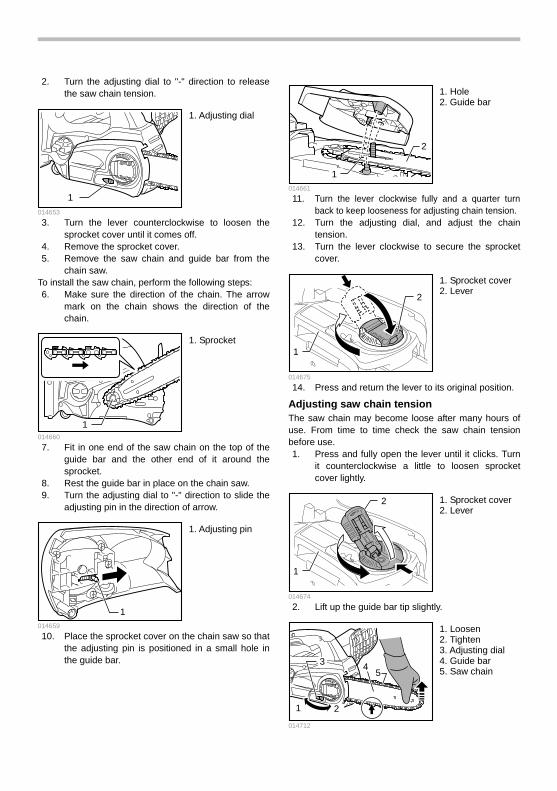
2. Turn the adjusting dial to "-" direction to releasethe saw chain tension.
1014653
3. Turn the lever counterclockwise to loosen thesprocket cover until it comes off.
4. Remove the sprocket cover.5. Remove the saw chain and guide bar from the
chain saw.To install the saw chain, perform the following steps: 6. Make sure the direction of the chain. The arrow
mark on the chain shows the direction of the chain.
1014660
7. Fit in one end of the saw chain on the top of theguide bar and the other end of it around thesprocket.
8. Rest the guide bar in place on the chain saw.9. Turn the adjusting dial to "-" direction to slide the
adjusting pin in the direction of arrow.
1014659
10. Place the sprocket cover on the chain saw so that the adjusting pin is positioned in a small hole inthe guide bar.
1
2
014661
11. Turn the lever clockwise fully and a quarter turnback to keep looseness for adjusting chain tension.
12. Turn the adjusting dial, and adjust the chaintension.
13. Turn the lever clockwise to secure the sprocketcover.
2
1
014675
14. Press and return the lever to its original position.
Adjusting saw chain tension The saw chain may become loose after many hours of use. From time to time check the saw chain tension before use. 1. Press and fully open the lever until it clicks. Turn
it counterclockwise a little to loosen sprocket cover lightly.
2
1
014674
2. Lift up the guide bar tip slightly.
1 2
3 4 5
014712
1. Loosen 2. Tighten 3. Adjusting dial 4. Guide bar 5. Saw chain
1. Sprocket cover 2. Lever
1. Sprocket cover 2. Lever
1. Hole 2. Guide bar
1. Adjusting pin
1. Sprocket
1. Adjusting dial
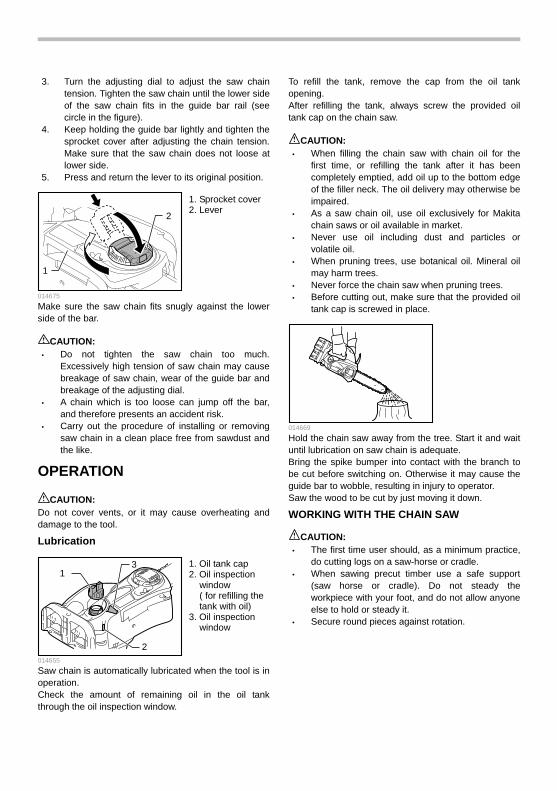
3. Turn the adjusting dial to adjust the saw chaintension. Tighten the saw chain until the lower side of the saw chain fits in the guide bar rail (seecircle in the figure).
4. Keep holding the guide bar lightly and tighten thesprocket cover after adjusting the chain tension.Make sure that the saw chain does not loose atlower side.
5. Press and return the lever to its original position.
2
1
014675
Make sure the saw chain fits snugly against the lower side of the bar.
CAUTION: • Do not tighten the saw chain too much.
Excessively high tension of saw chain may cause breakage of saw chain, wear of the guide bar and breakage of the adjusting dial.
• A chain which is too loose can jump off the bar,and therefore presents an accident risk.
• Carry out the procedure of installing or removingsaw chain in a clean place free from sawdust and the like.
OPERATION
CAUTION: Do not cover vents, or it may cause overheating and damage to the tool.
Lubrication
13
2014655
Saw chain is automatically lubricated when the tool is in operation. Check the amount of remaining oil in the oil tank through the oil inspection window.
To refill the tank, remove the cap from the oil tank opening. After refilling the tank, always screw the provided oil tank cap on the chain saw.
CAUTION: • When filling the chain saw with chain oil for the
first time, or refilling the tank after it has been completely emptied, add oil up to the bottom edge of the filler neck. The oil delivery may otherwise be impaired.
• As a saw chain oil, use oil exclusively for Makitachain saws or oil available in market.
• Never use oil including dust and particles orvolatile oil.
• When pruning trees, use botanical oil. Mineral oilmay harm trees.
• Never force the chain saw when pruning trees. • Before cutting out, make sure that the provided oil
tank cap is screwed in place.
014669
Hold the chain saw away from the tree. Start it and wait until lubrication on saw chain is adequate. Bring the spike bumper into contact with the branch to be cut before switching on. Otherwise it may cause the guide bar to wobble, resulting in injury to operator. Saw the wood to be cut by just moving it down.
WORKING WITH THE CHAIN SAW
CAUTION: • The first time user should, as a minimum practice,
do cutting logs on a saw-horse or cradle. • When sawing precut timber use a safe support
(saw horse or cradle). Do not steady the workpiece with your foot, and do not allow anyone else to hold or steady it.
• Secure round pieces against rotation.
1. Oil tank cap 2. Oil inspection
window( for refilling the tank with oil)
3. Oil inspection window
1. Sprocket cover2. Lever
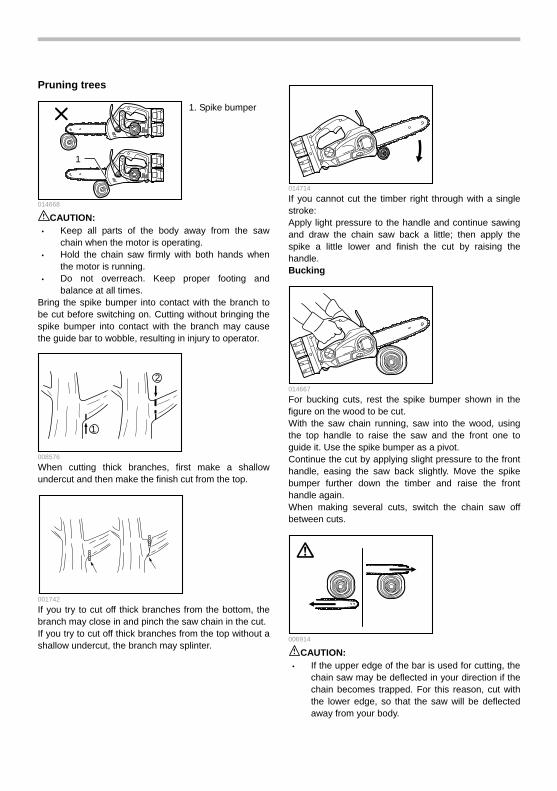
Pruning trees
1
014668
CAUTION: • Keep all parts of the body away from the saw
chain when the motor is operating. • Hold the chain saw firmly with both hands when
the motor is running. • Do not overreach. Keep proper footing and
balance at all times. Bring the spike bumper into contact with the branch to be cut before switching on. Cutting without bringing the spike bumper into contact with the branch may cause the guide bar to wobble, resulting in injury to operator.
1
2
008576
When cutting thick branches, first make a shallow undercut and then make the finish cut from the top.
001742
If you try to cut off thick branches from the bottom, the branch may close in and pinch the saw chain in the cut. If you try to cut off thick branches from the top without a shallow undercut, the branch may splinter.
014714
If you cannot cut the timber right through with a single stroke: Apply light pressure to the handle and continue sawing and draw the chain saw back a little; then apply the spike a little lower and finish the cut by raising the handle. Bucking
014667
For bucking cuts, rest the spike bumper shown in the figure on the wood to be cut. With the saw chain running, saw into the wood, using the top handle to raise the saw and the front one to guide it. Use the spike bumper as a pivot. Continue the cut by applying slight pressure to the front handle, easing the saw back slightly. Move the spike bumper further down the timber and raise the front handle again. When making several cuts, switch the chain saw off between cuts.
006914
CAUTION: • If the upper edge of the bar is used for cutting, the
chain saw may be deflected in your direction if thechain becomes trapped. For this reason, cut withthe lower edge, so that the saw will be deflectedaway from your body.
1. Spike bumper
A
B
A
B
006915
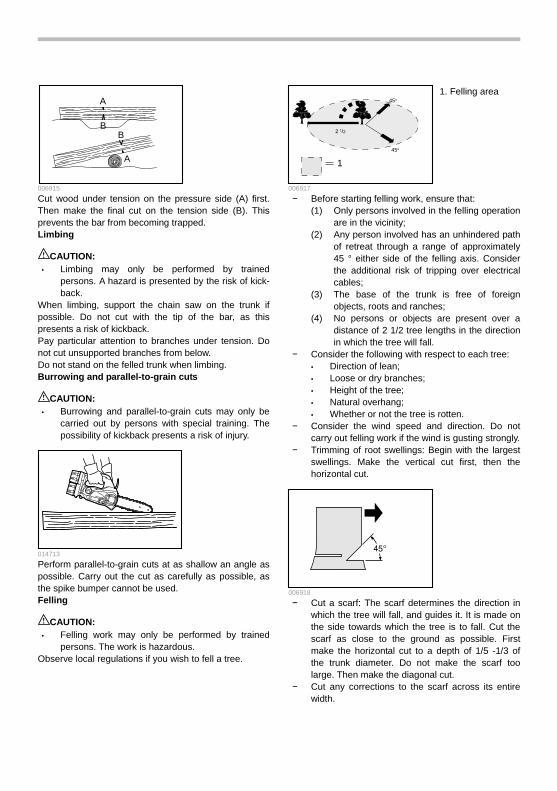
Cut wood under tension on the pressure side (A) first. Then make the final cut on the tension side (B). This prevents the bar from becoming trapped. Limbing
CAUTION: • Limbing may only be performed by trained
persons. A hazard is presented by the risk of kick-back.
When limbing, support the chain saw on the trunk if possible. Do not cut with the tip of the bar, as this presents a risk of kickback. Pay particular attention to branches under tension. Do not cut unsupported branches from below. Do not stand on the felled trunk when limbing. Burrowing and parallel-to-grain cuts
CAUTION: • Burrowing and parallel-to-grain cuts may only be
carried out by persons with special training. Thepossibility of kickback presents a risk of injury.
014713
Perform parallel-to-grain cuts at as shallow an angle as possible. Carry out the cut as carefully as possible, as the spike bumper cannot be used. Felling
CAUTION: • Felling work may only be performed by trained
persons. The work is hazardous. Observe local regulations if you wish to fell a tree.
45o
2 1/2
45o
1
006917
− Before starting felling work, ensure that: (1) Only persons involved in the felling operation
are in the vicinity; (2) Any person involved has an unhindered path
of retreat through a range of approximately 45 ° either side of the felling axis. Consider the additional risk of tripping over electrical cables;
(3) The base of the trunk is free of foreign objects, roots and ranches;
(4) No persons or objects are present over a distance of 2 1/2 tree lengths in the direction in which the tree will fall.
− Consider the following with respect to each tree: • Direction of lean; • Loose or dry branches; • Height of the tree; • Natural overhang; • Whether or not the tree is rotten.
− Consider the wind speed and direction. Do not carry out felling work if the wind is gusting strongly.
− Trimming of root swellings: Begin with the largest swellings. Make the vertical cut first, then the horizontal cut.
006918
− Cut a scarf: The scarf determines the direction in which the tree will fall, and guides it. It is made on the side towards which the tree is to fall. Cut the scarf as close to the ground as possible. First make the horizontal cut to a depth of 1/5 -1/3 of the trunk diameter. Do not make the scarf too large. Then make the diagonal cut.
− Cut any corrections to the scarf across its entire width.
1. Felling area
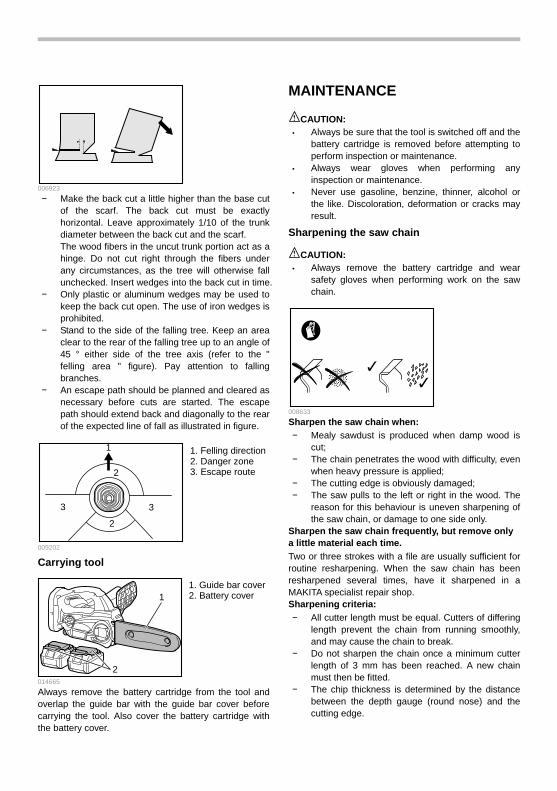
006923
− Make the back cut a little higher than the base cut of the scarf. The back cut must be exactly horizontal. Leave approximately 1/10 of the trunk diameter between the back cut and the scarf. The wood fibers in the uncut trunk portion act as a hinge. Do not cut right through the fibers under any circumstances, as the tree will otherwise fall unchecked. Insert wedges into the back cut in time.
− Only plastic or aluminum wedges may be used to keep the back cut open. The use of iron wedges is prohibited.
− Stand to the side of the falling tree. Keep an area clear to the rear of the falling tree up to an angle of 45 ° either side of the tree axis (refer to the " felling area " figure). Pay attention to falling branches.
− An escape path should be planned and cleared as necessary before cuts are started. The escape path should extend back and diagonally to the rear of the expected line of fall as illustrated in figure.
1
2
2
3 3
009202
Carrying tool
2
1
014665
Always remove the battery cartridge from the tool and overlap the guide bar with the guide bar cover before carrying the tool. Also cover the battery cartridge with the battery cover.
MAINTENANCE
CAUTION: • Always be sure that the tool is switched off and the
battery cartridge is removed before attempting to perform inspection or maintenance.
• Always wear gloves when performing anyinspection or maintenance.
• Never use gasoline, benzine, thinner, alcohol orthe like. Discoloration, deformation or cracks may result.
Sharpening the saw chain
CAUTION: • Always remove the battery cartridge and wear
safety gloves when performing work on the saw chain.
008633
Sharpen the saw chain when: − Mealy sawdust is produced when damp wood is
cut; − The chain penetrates the wood with difficulty, even
when heavy pressure is applied; − The cutting edge is obviously damaged; − The saw pulls to the left or right in the wood. The
reason for this behaviour is uneven sharpening of the saw chain, or damage to one side only.
Sharpen the saw chain frequently, but remove only a little material each time. Two or three strokes with a file are usually sufficient for routine resharpening. When the saw chain has been resharpened several times, have it sharpened in a MAKITA specialist repair shop. Sharpening criteria: − All cutter length must be equal. Cutters of differing
length prevent the chain from running smoothly, and may cause the chain to break.
− Do not sharpen the chain once a minimum cutter length of 3 mm has been reached. A new chain must then be fitted.
− The chip thickness is determined by the distance between the depth gauge (round nose) and the cutting edge.
1. Guide bar cover2. Battery cover
1. Felling direction2. Danger zone 3. Escape route
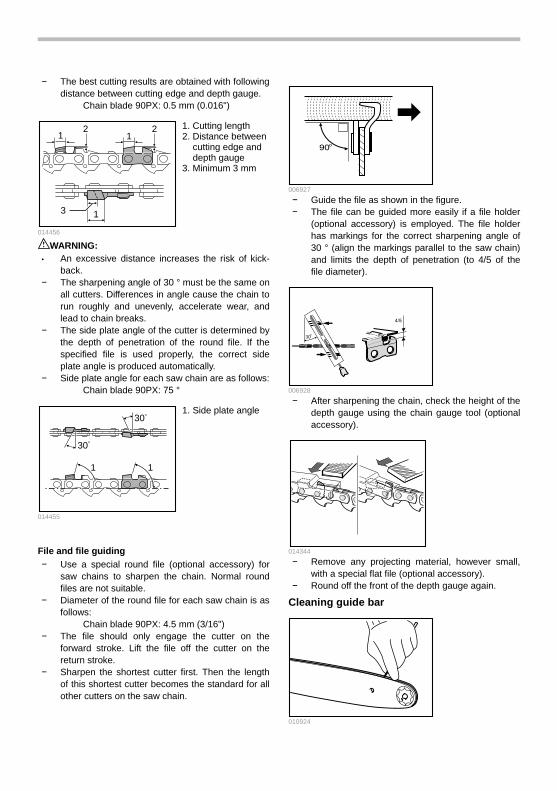
− The best cutting results are obtained with following distance between cutting edge and depth gauge.
Chain blade 90PX: 0.5 mm (0.016")
221 1
3 1
014456
WARNING: • An excessive distance increases the risk of kick-
back. − The sharpening angle of 30 ° must be the same on
all cutters. Differences in angle cause the chain to run roughly and unevenly, accelerate wear, and lead to chain breaks.
− The side plate angle of the cutter is determined by the depth of penetration of the round file. If the specified file is used properly, the correct side plate angle is produced automatically.
− Side plate angle for each saw chain are as follows: Chain blade 90PX: 75 °
30
30
11
014455
File and file guiding − Use a special round file (optional accessory) for
saw chains to sharpen the chain. Normal round files are not suitable.
− Diameter of the round file for each saw chain is as follows:
Chain blade 90PX: 4.5 mm (3/16") − The file should only engage the cutter on the
forward stroke. Lift the file off the cutter on the return stroke.
− Sharpen the shortest cutter first. Then the length of this shortest cutter becomes the standard for all other cutters on the saw chain.
006927
− Guide the file as shown in the figure. − The file can be guided more easily if a file holder
(optional accessory) is employed. The file holder has markings for the correct sharpening angle of 30 ° (align the markings parallel to the saw chain) and limits the depth of penetration (to 4/5 of the file diameter).
30
006928
− After sharpening the chain, check the height of the depth gauge using the chain gauge tool (optional accessory).
014344
− Remove any projecting material, however small, with a special flat file (optional accessory).
− Round off the front of the depth gauge again.
Cleaning guide bar
010924
1. Side plate angle
1. Cutting length 2. Distance between
cutting edge and depth gauge
3. Minimum 3 mm
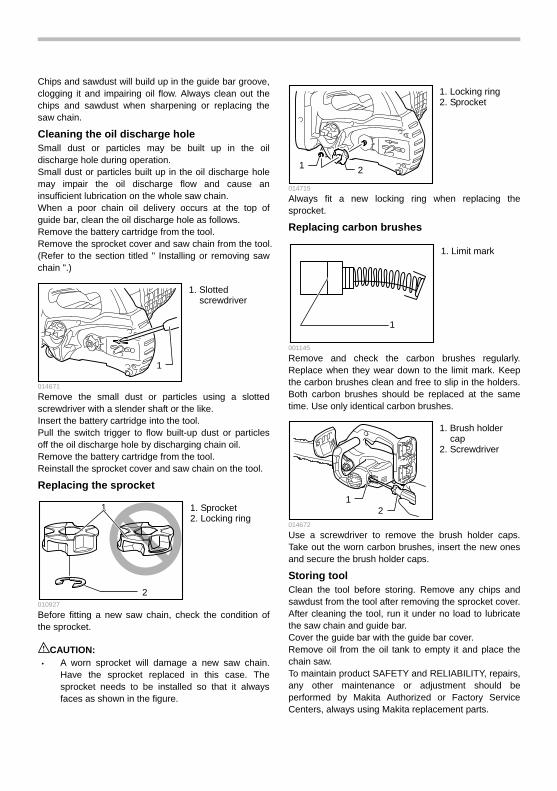
Chips and sawdust will build up in the guide bar groove, clogging it and impairing oil flow. Always clean out the chips and sawdust when sharpening or replacing the saw chain.
Cleaning the oil discharge hole Small dust or particles may be built up in the oil discharge hole during operation. Small dust or particles built up in the oil discharge hole may impair the oil discharge flow and cause an insufficient lubrication on the whole saw chain. When a poor chain oil delivery occurs at the top of guide bar, clean the oil discharge hole as follows. Remove the battery cartridge from the tool. Remove the sprocket cover and saw chain from the tool. (Refer to the section titled " Installing or removing saw chain ".)
1
014671
Remove the small dust or particles using a slotted screwdriver with a slender shaft or the like. Insert the battery cartridge into the tool. Pull the switch trigger to flow built-up dust or particles off the oil discharge hole by discharging chain oil. Remove the battery cartridge from the tool. Reinstall the sprocket cover and saw chain on the tool.
Replacing the sprocket
1
2010927
Before fitting a new saw chain, check the condition of the sprocket.
CAUTION: • A worn sprocket will damage a new saw chain.
Have the sprocket replaced in this case. The sprocket needs to be installed so that it always faces as shown in the figure.
1 2
014715
Always fit a new locking ring when replacing the sprocket.
Replacing carbon brushes
1
001145
Remove and check the carbon brushes regularly. Replace when they wear down to the limit mark. Keep the carbon brushes clean and free to slip in the holders. Both carbon brushes should be replaced at the same time. Use only identical carbon brushes.
21
014672
Use a screwdriver to remove the brush holder caps. Take out the worn carbon brushes, insert the new ones and secure the brush holder caps.
Storing tool Clean the tool before storing. Remove any chips and sawdust from the tool after removing the sprocket cover. After cleaning the tool, run it under no load to lubricate the saw chain and guide bar. Cover the guide bar with the guide bar cover. Remove oil from the oil tank to empty it and place the chain saw. To maintain product SAFETY and RELIABILITY, repairs, any other maintenance or adjustment should be performed by Makita Authorized or Factory Service Centers, always using Makita replacement parts.
1. Brush holder cap
2. Screwdriver
1. Limit mark
1. Locking ring 2. Sprocket
1. Sprocket 2. Locking ring
1. Slotted screwdriver
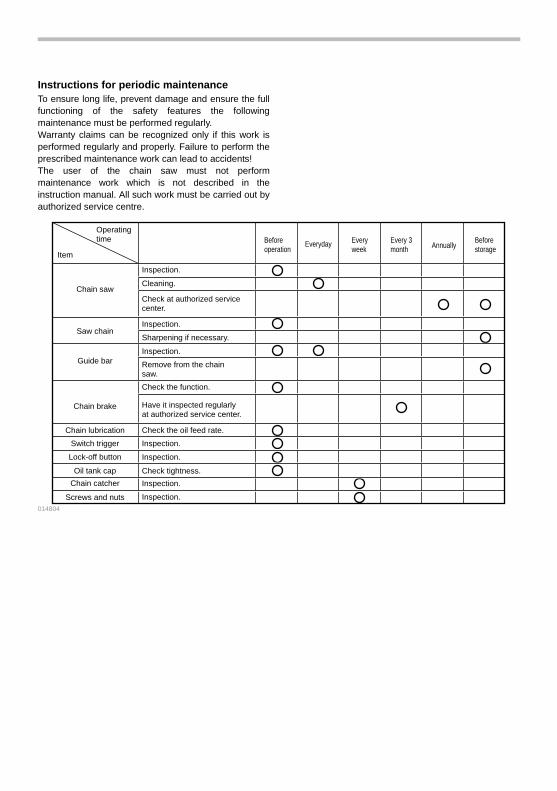
Instructions for periodic maintenance To ensure long life, prevent damage and ensure the full functioning of the safety features the following maintenance must be performed regularly. Warranty claims can be recognized only if this work is performed regularly and properly. Failure to perform the prescribed maintenance work can lead to accidents! The user of the chain saw must not perform maintenance work which is not described in the instruction manual. All such work must be carried out by authorized service centre.
Remove from the chain saw.
Guide bar
Chain brake
Chain lubrication
Switch trigger
Lock-off button
Oil tank cap
Chain catcher
Screws and nuts
Chain saw
Saw chain
Before storage
AnnuallyEvery 3 month
Every week
EverydayBefore operation
Item
Operating time
Inspection.
Cleaning.
Check at authorized service center.
Inspection.
Inspection.
Inspection.
Inspection.
Inspection.
Inspection.
Sharpening if necessary.
Check the function.
Have it inspected regularly at authorized service center.
Check the oil feed rate.
Check tightness.
014804
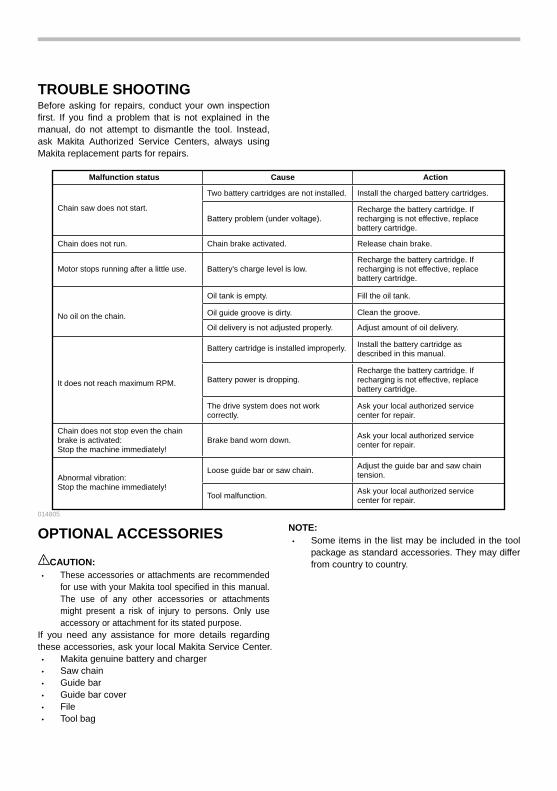
TROUBLE SHOOTING Before asking for repairs, conduct your own inspection first. If you find a problem that is not explained in the manual, do not attempt to dismantle the tool. Instead, ask Makita Authorized Service Centers, always using Makita replacement parts for repairs.
Adjust the guide bar and saw chain tension.
Ask your local authorized service center for repair.
Malfunction status Cause Action
Chain saw does not start.
Chain does not run.
Motor stops running after a little use.
No oil on the chain.
It does not reach maximum RPM.
Chain does not stop even the chain brake is activated: Stop the machine immediately!
Abnormal vibration: Stop the machine immediately!
Two battery cartridges are not installed.
Battery problem (under voltage).
Battery's charge level is low.
Chain brake activated.
Oil tank is empty.
Oil guide groove is dirty.
Oil delivery is not adjusted properly.
Battery cartridge is installed improperly.
Battery power is dropping.
The drive system does not work correctly.
Brake band worn down.
Loose guide bar or saw chain.
Tool malfunction.
Install the charged battery cartridges.
Recharge the battery cartridge. If recharging is not effective, replace battery cartridge.
Release chain brake.
Recharge the battery cartridge. If recharging is not effective, replace battery cartridge.
Fill the oil tank.
Clean the groove.
Adjust amount of oil delivery.
Install the battery cartridge as described in this manual.
Recharge the battery cartridge. If recharging is not effective, replace battery cartridge.
Ask your local authorized service center for repair.
Ask your local authorized service center for repair.
014805
OPTIONAL ACCESSORIES
CAUTION: • These accessories or attachments are recommended
for use with your Makita tool specified in this manual. The use of any other accessories or attachments might present a risk of injury to persons. Only use accessory or attachment for its stated purpose.
If you need any assistance for more details regarding these accessories, ask your local Makita Service Center.
• Makita genuine battery and charger • Saw chain • Guide bar • Guide bar cover • File • Tool bag
NOTE: • Some items in the list may be included in the tool
package as standard accessories. They may differ from country to country.