Embed Size (px)
Citation preview
K3C36/G
Cooker with electricventilated oven andceramic hobInstructions for installation and use
Cooker with electric ventilated oven and ceramichobInstructions for installation and use
3
Important safety warnings
1 This appliance is intended for nonprofessional usewithin the home.
2 These instructions are only for those countries whosesymbols appear in the booklet and on the serial no.plate of the appliance.
3 This owner’s manual is for a class 1 appliance (in-sulated) or class 2, subclass 1 appliances (installedbetween two cabinets.
4 Before using your appliance, read the instructions inthis owner’s manual carefully since it provides all theinformation you need to ensure safe installation, useand maintenance. Always keep this owner’s manualclose to hand since you may need to refer to it in thefuture.
5 When you have removed the packing, check that theappliance is not damaged. If you have any doubts, donot use the appliance and contact your nearest AristonService Centre. Never leave the packing components(plastic bags, polystyrene foam, nails, etc.) within thereach of children since they are a source of potentialdanger.
6 The appliance must be installed only by a qualified tech-nician in compliance with the instructions provided. Themanufacturer declines all liability for improper installa-tion, which may result in personal injury and damageto property.
7 The electrical safety of this appliance can only be guar-anteed if it is correctly and efficiently earthed, in com-pliance with regulations on electrical safety. Alwaysensure that the earthing is efficient. If you have anydoubts, contact a qualified technician to check the sys-tem. The manufacturer declines all liability for damageresulting from a system which has not been earthed.
8 Before plugging the appliance into the mains, checkthat the specifications indicated on the date plate (onthe appliance and/or packaging) correspond with thoseof the electrical and gas systems in your home.
9 Check that the electrical capacity of the system andsockets will support the maximum power of the appli-ance, as indicated on the data plate. If you have anydoubts, contact a qualified technician.
10 An omnipolar switch with a contact opening of at least3 mm or more is required for installation.
11 If the socket and appliance plug are not compatible,have the socket replaced with a suitable model by aqualified technician, who should also check that thecross-section of the socket cable is sufficient for thepower absorbed by the appliance. The use of adap-tors, multiple sockets and/or extensions, is not recom-mended. If their use cannot be avoided, remember touse only single or multiple adapters and extensionswhich comply with current safety regulations. In thesecases, never exceed the maximum current capacityindicated on the individual adaptor or extension andthe maximum power indicated on the multiple adapter.
12 Do not leave the appliance plugged in if it is not in use.Switch off the main switch and gas supply when youare not using the appliance.
13 The openings and slots used for ventilation and heatdispersion must never be covered.
14 The user must not replace the supply cable of this ap-pliance. Always contact an after-sales service centrewhich has been authorised by the manufacturer if thecable has been damaged or needs replacement.
15 This appliance must be used for the purpose for whichit was expressly designed. Any other use (e.g. heatingrooms) is considered to be improper and consequentlydangerous. The manufacturer declines all liability fordamage resulting from improper and irresponsible use.
16 A number of fundamental rules must be followed whenusing electrical appliances. The following are of par-ticular importance:• Do not touch the appliance when your hands or feet
are wet.• Do not use the appliance barefooted.• Do not use extensions, but if they are necessary,
caution must be exercised.• Never pull the power supply cable or the appliance
to unplug the appliance plug from the mains.• Never leave the appliance exposed to atmospheric
agents (rain, sun etc.)• Do not allow children or persons who are not famil-
iar with the appliance to use it, without supervision.17 Always unplug the appliance from the mains or switch
off the main switch before cleaning or carrying out main-tenance.
18 If you are no longer using an appliance of this type,remember to make it unserviceable by unplugging theappliance from the mains and cutting the supply cable.Also make all potentially dangerous parts of the appli-ance safe, above all for children who could play withthe appliance.
19 To avoid accidental spillage do not use cookware withuneven or deformed bottoms on the electric plates. Turnthe handles of pots and pans inwards to avoid knock-ing them over accidentally.
20 Never use flammable liquids such as alcohol or gaso-line, etc. near the appliance when it is in use.
21 When using small electric appliances near the hob,keep the supply cord away from the hot parts.
22 Make sure the knobs are in the “•”/”¡” position whenthe appliance is not in use.
23 When the appliance is in use, the heating elementsand some parts of the oven door become extremelyhot. Make sure you don’t touch them and keep chil-dren well away.
24 If the cooker is placed on a pedestal, take thenecessary precautions to prevent the same from slidingoff the pedestal itself.
To maintain the EFFICIENCY and SAFETY of this appliance, we recommend:• call only the Service Centers authorized by the manufacturer• always use original Spare Parts
4
The following instructions should be read by a qualified technicianto ensure that the appliance is installed, regulated and technicallyserviced correctly in compliance with current regulations.Important: disconnect the cooker from the electricity whenmaking any adjustement, maintenance operation, etc.
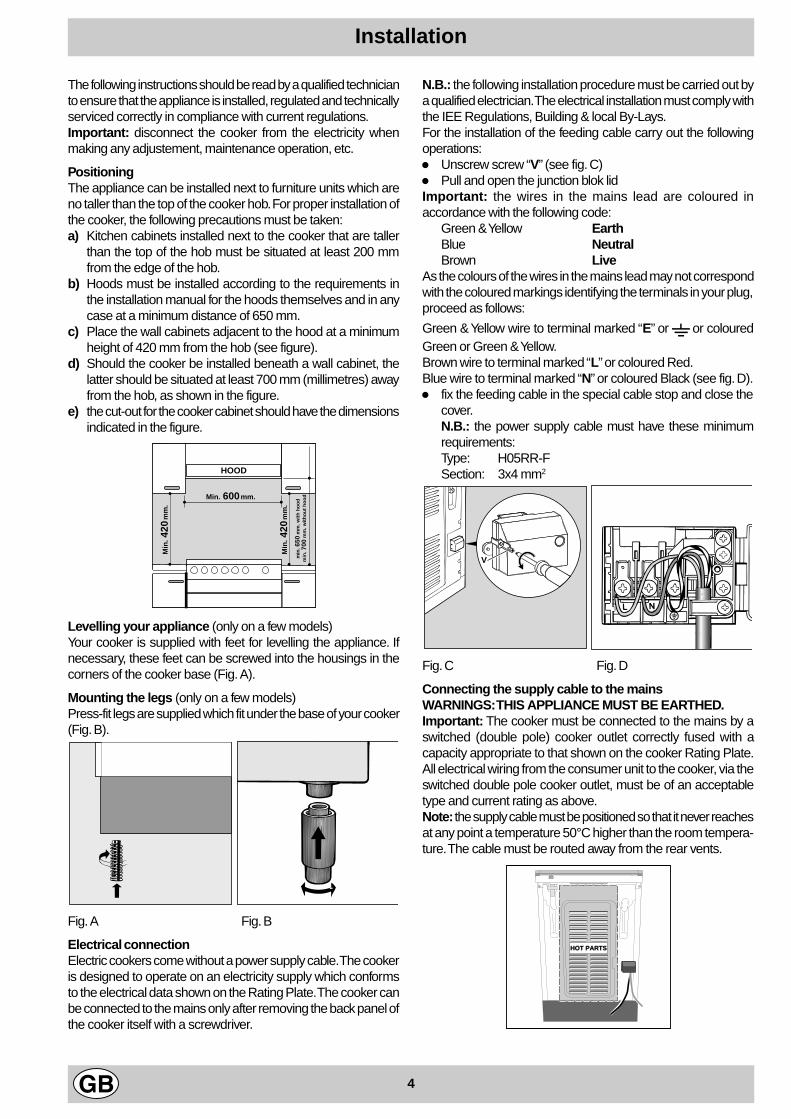
PositioningThe appliance can be installed next to furniture units which areno taller than the top of the cooker hob. For proper installation ofthe cooker, the following precautions must be taken:a) Kitchen cabinets installed next to the cooker that are taller
than the top of the hob must be situated at least 200 mmfrom the edge of the hob.
b) Hoods must be installed according to the requirements inthe installation manual for the hoods themselves and in anycase at a minimum distance of 650 mm.
c) Place the wall cabinets adjacent to the hood at a minimumheight of 420 mm from the hob (see figure).
d) Should the cooker be installed beneath a wall cabinet, thelatter should be situated at least 700 mm (millimetres) awayfrom the hob, as shown in the figure.
e) the cut-out for the cooker cabinet should have the dimensionsindicated in the figure.
Levelling your appliance (only on a few models)Your cooker is supplied with feet for levelling the appliance. Ifnecessary, these feet can be screwed into the housings in thecorners of the cooker base (Fig. A).
Mounting the legs (only on a few models)Press-fit legs are supplied which fit under the base of your cooker(Fig. B).
Fig. A Fig. B
Electrical connectionElectric cookers come without a power supply cable. The cookeris designed to operate on an electricity supply which conformsto the electrical data shown on the Rating Plate. The cooker canbe connected to the mains only after removing the back panel ofthe cooker itself with a screwdriver.
N.B.: the following installation procedure must be carried out bya qualified electrician. The electrical installation must comply withthe IEE Regulations, Building & local By-Lays.For the installation of the feeding cable carry out the followingoperations:l Unscrew screw “V” (see fig. C)l Pull and open the junction blok lidImportant: the wires in the mains lead are coloured inaccordance with the following code:
Green & Yellow EarthBlue NeutralBrown Live
As the colours of the wires in the mains lead may not correspondwith the coloured markings identifying the terminals in your plug,proceed as follows:
Green & Yellow wire to terminal marked “E” or 6 or colouredGreen or Green & Yellow.Brown wire to terminal marked “L” or coloured Red.Blue wire to terminal marked “N” or coloured Black (see fig. D).l fix the feeding cable in the special cable stop and close the
cover.N.B.: the power supply cable must have these minimumrequirements:Type: H05RR-FSection: 3x4 mm2
Fig. C Fig. D
Connecting the supply cable to the mainsWARNINGS: THIS APPLIANCE MUST BE EARTHED.Important: The cooker must be connected to the mains by aswitched (double pole) cooker outlet correctly fused with acapacity appropriate to that shown on the cooker Rating Plate.All electrical wiring from the consumer unit to the cooker, via theswitched double pole cooker outlet, must be of an acceptabletype and current rating as above.Note: the supply cable must be positioned so that it never reachesat any point a temperature 50°C higher than the room tempera-ture. The cable must be routed away from the rear vents.
Installation
HOOD
420
Min
.
min
. 65
0 m
m. w
ith h
ood
min
. 70
0 m
m. w
ithou
t hoo
d
mm
.
600Min. mm.
420
Min
.m
m.
V
HOT PARTS
5
104 60 50
85/90
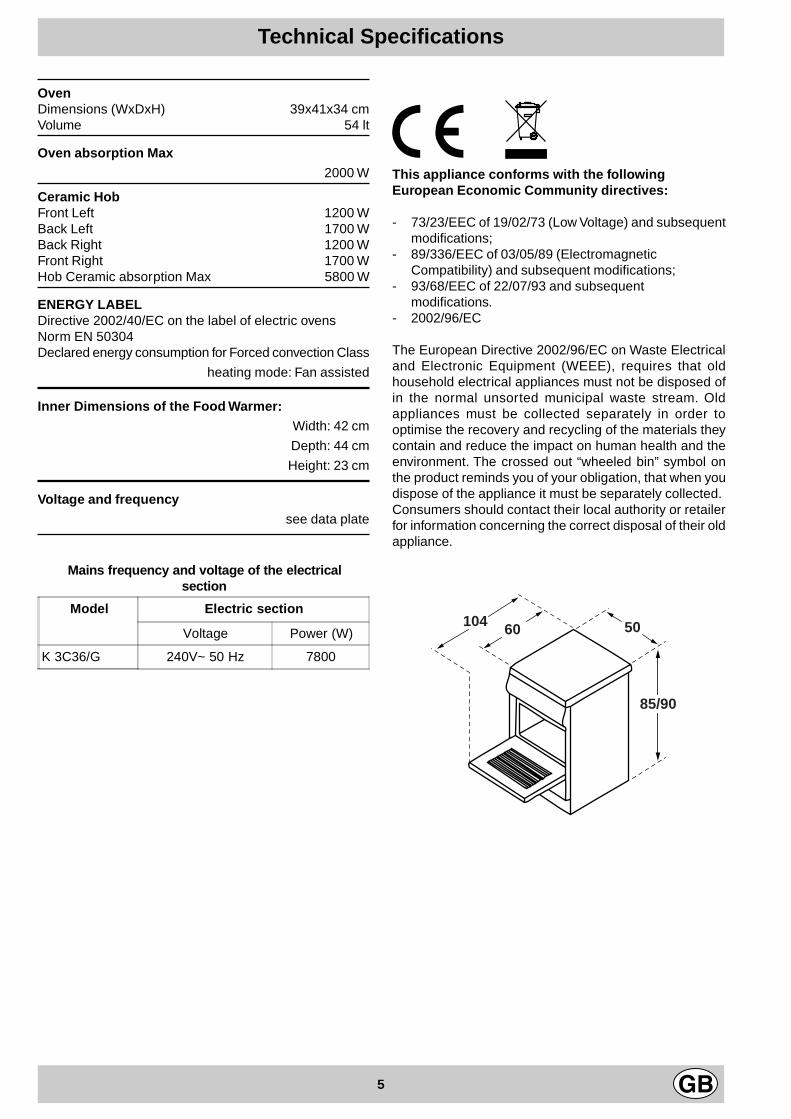
OvenDimensions (WxDxH) 39x41x34 cmVolume 54 lt
Oven absorption Max
2000 W
Ceramic HobFront Left 1200 WBack Left 1700 WBack Right 1200 WFront Right 1700 WHob Ceramic absorption Max 5800 W
ENERGY LABELDirective 2002/40/EC on the label of electric ovensNorm EN 50304Declared energy consumption for Forced convection Class
heating mode: Fan assisted
Inner Dimensions of the Food Warmer:Width: 42 cm
Depth: 44 cm
Height: 23 cm
Voltage and frequency
see data plate
7This appliance conforms with the followingEuropean Economic Community directives:
- 73/23/EEC of 19/02/73 (Low Voltage) and subsequentmodifications;
- 89/336/EEC of 03/05/89 (ElectromagneticCompatibility) and subsequent modifications;
- 93/68/EEC of 22/07/93 and subsequentmodifications.
- 2002/96/EC
The European Directive 2002/96/EC on Waste Electricaland Electronic Equipment (WEEE), requires that oldhousehold electrical appliances must not be disposed ofin the normal unsorted municipal waste stream. Oldappliances must be collected separately in order tooptimise the recovery and recycling of the materials theycontain and reduce the impact on human health and theenvironment. The crossed out “wheeled bin” symbol onthe product reminds you of your obligation, that when youdispose of the appliance it must be separately collected.Consumers should contact their local authority or retailerfor information concerning the correct disposal of their oldappliance.
Technical Specifications
Mains frequency and voltage of the electricalsection
Model Electric section
Voltage Power (W)
K 3C36/G 240V~ 50 Hz 7800
6
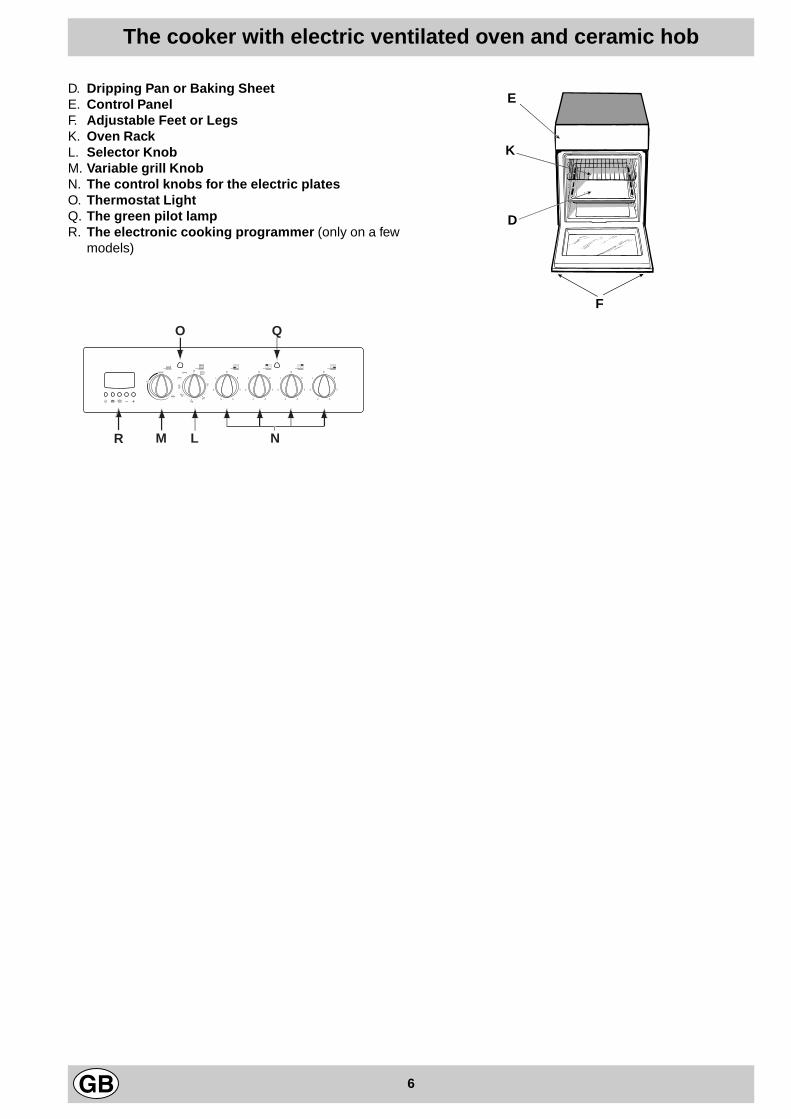
D. Dripping Pan or Baking SheetE. Control PanelF. Adjustable Feet or LegsK. Oven RackL. Selector KnobM. Variable grill KnobN. The control knobs for the electric platesO. Thermostat LightQ. The green pilot lampR. The electronic cooking programmer (only on a few
models)
The cooker with electric ventilated oven and ceramic hob
F
E
K
D
M L NR
O Q

7
The various functions included in the cooker are selected byoperating the control devices located on the cooker controlpanel.
Notice: The first time you use your appliance, we recom-mend that you set the thermostat to the highest settingand leave the oven on for about half an hour with nothingin it, with the oven door shut. Then, open the oven doorand let the room air. The odour that is often detected dur-ing this initial use is due to the evaporation of substancesused to protect the oven during storage and until it is in-stalled.
Attention: Only use the bottom shelf of the oven when usingthe rotisserie to cook (where present). For all other types ofcooking, never use the bottom shelf and never place anythingon the bottom of the oven when it is in operation becausethis could damage the enamel. Always place your cookware(dishes, aluminium foil, etc. etc.) on the grate provided withthe appliance inserted especially along the oven guides.
N.B.: Should the appliance be equipped with an electronicprogrammer, to use the electric oven, just press buttons
and at the same time (the m symbol will appearon the display) before selecting the desired cookingfunction.
Using the ovenWhen the oven control knob (L) is turned in a clockwise
direction to the symbol X the fan and oven light willcome on to assist in the defrosting of frozen food. Rotatingfurther to the complete range of temperatures shown onthe dial you can choose which is most suitable for the foodyou are going to cook. The temperature is reachedautomatically and controlled by the oven thermostat (from50°C to Max).Note: Whilst using tag oven for conventional cooking knob(M) must be set with “MAX” in line with the reference markon the control panel.
Grill The top centre heating element will come on. On thissetting, food is cooked by the thermal radiation given offin the downward direction by the electric heating element.The very high temperature and direct heat of the grill makeit possible to brown meats on the surface while locking inthe juices to keep them tender.
Double Grill Both of the top heating elements turn on.This over-sized grill has a completely new design, whichis the reason why cooking efficiency has increased by50%. In addition, the double grill eliminates heat gaps inthe corners of the oven.
Oven Light
The light comes on when the “L” knob is turned to the Xsetting. The light illuminates the oven and remains on whenany of the heating elements is turned on.
Thermostat Light (O)This light indicates that the oven is heating. When it turns off, thetemperature inside the oven has reached the setting made withthe thermostat knob. At this point, the light will turn on and off asthe oven maintains the temperature at a constant level.
AttentionAvoid the children touch the oven door because it is very hotduring the cooking.
Important: when using the grill, the oven door must be left partlyopen by positioning the deflector “D” between door and panel toprevent the cooker knobs from overheating.
How To Use Your Appliance
D
8
This feature allows you to program the oven or the grill asfollows :• delayed start for a specific length of time;• immediate start for a specific length of time;• timer.Button Functions:
: timer - hours and minutes;: cooking time;
: end cooking time;
s : set cooking time - backward;
t : set cooking time - forward.
How to reset the digital clock.After the appliance has been connected to the power supply,or when the power has gone out, the clock display willautomatically reset to 0:00 and begin to blink.
• Press the and buttons consecutively and
then reset the time (within 4 seconds) using the sand t buttons.
The t button sets the time forward.
The s button sets the time backward.Whenever the time must be reset, follow this same procedu-re.
Manual Operation of the OvenAfter resetting the time, the program automatically switchesto the manual mode.Note: To reset the manual mode after each “automatic”
cooking, press the and buttons simultaneously.
Start delayed cooking with preset durationThe length of the cooking program as well as the time atwhich the cooking program ends must be set. If we assumethat the time displayed on the timer is 10:00:1. Turn the oven control knobs to the feature and tempera-
ture desired (e.g. conventional oven, 200°C);
2. Press the button and then set the cooking time (within
four seconds) using the s and t buttons. Let us sup-pose that we set the cooking time at 30 minutes. Thedisplay will read as follows:
NAfter the button has been released, the current time willbe displayed again after approximately 4 seconds, along
with the m symbol and the letter “A” (AUTO);
3. Press the button and then use the s and t buttonsto set the time for when the cooking program should end.Let us suppose this time to be 1:00 p.m.
O4. After the button has been released, the current time will
be displayed after approximately 4 seconds:
P
The letter “A” will light up reminding you that the lengthand end cooking time were programmed in automaticmode. At this point, the oven will turn on automatically at12:30 and then turn off after 30 minutes. When the oven is
turned on, the m symbol will be displayed for the entirecooking time. At any time during the cooking process, thelength of the cooking time can be displayed by pressing
the button, and the end cooking time by pressing the
button.After the cooking time has expired, the timer will ringfor several minutes; to turn it off, simply press any of
the buttons except the s and t buttons.
Immediate start with preset durationBy programming just the duration (points 1 and 2 of the“Start delayed cooking with preset duration” section),cooking will start up immediately.
To cancel a cooking schedule already programmed
Press the and buttons simultaneously.
Timer FeatureThe timer feature allows you to enter a given amount of timefrom which the timer begins to count down. This feature doesnot turn the oven on or off; it merely sounds when the timehas expired.
When the button has been pressed, the display will readas follows:
QThen use the t and s buttons to set the desired time.After the button has been released, the timer will start tocount down and the current time will be displayed.
RAfter the time has expired, an acoustical signal will be emitted,which can be turned off by pressing any of the buttons (except
the t and s buttons) at this point the symbol will alsoturn off.
Correction/Cancellation of Data• The data entered can be changed at any time by pressing
the corresponding button and the t or s buttons.• When the data for the length of the cooking time is
cancelled, the data for the end cooking time are alsocancelled automatically, and vice versa.
• If the oven has been programmed, it will not accept endcooking times which are before the start of the cookingprocess.
Buzzer volume controlOnce you have made and confirmed the clock settings,
use button s to adjust the volume of the alarm buzzer.
Electronic Cooking Programmer
9
The oven offers a wide range of alternatives which allowyou to cook any type of food in the best possible way. Withtime you will learn to make the best use of this versatilecooking appliance and the following directions are only aguideline which may be varied according to your own per-sonal experience.
Using the GrillGrilling may be carried out with a two stage heatingelement situated in the top of the oven chamber. Thecentre, or the complete area of the grill can be selectedby turning the oven control knob (L) in a clockwise directionto align the symbols ( for the centre, for the com-plete area) with the mark on the control panel. The variabletemperature control (M) is positioned to right of the ovenknob. This knob will provide varying grill temperatureswhen rotated from “max ” to “min ” and may be adjusted tovary the level of heat at any time during the grillingoperation.
To operate the grill1. Turn the oven control knob (L) clockwise until the
required grilling symbol is in line with the mark on thecontrol panel. The element is now “on”.
2. The variable grill control (M) can now be operated toselect the required heat.
Important: when using the grill, the oven door mustbe left partly open.When using the grill, place the rack at the 4 rack heights(see cooking table) and place the dripping-pan beneaththe oven rack to prevent grease from falling onto the bot-tom of the oven.
Baking PastriesWhen baking pastries, always place them in the oven af-ter it has been preheated. Make sure you wait until theoven has been preheated thoroughly (the red “O” light willturn off). The temperature is normally around 160°C. Donot open the door while the pastry is cooking in order toprevent it from dropping. Batters must not be too runny,as this will result in prolonged cooking times. In general:
Cooking fish and meatWhen cooking white meat, fowl and fish use lowtemperatures. (150°C-175°C). When red meat must besuperficially well-cooked but succulent inside, it isadvisable to start with a high temperature (200-220°C)for a short time, and then to reduce it at a later point.Generally speaking, the more meat there is, the lower thetemperature and the longer the cooking time shouldbe.Place the meat in the centre of the grid and put a spill-tray underneath to catch grease drips. Insert the grid sothat it is in the middle of the oven. If more heat from belowis required, use the 1° bottom shelf.
Cooking advice
Pastry is too dry
Increase the temperature by 10°C and reduce thecooking time.
Pastry dropped
Use less liquid or lower the temperature by 10°C.
Cooked well on the inside but sticky on theoutside
Use less liquid, lower the temperature, and increasethe cooking time.
The pastry sticks to the pan
Grease the pan well and sprinkle it with a dusting offlour.
Pastry is too dark on top
Place it on a lower rack, lower the temperature, andincrease the cooking time.
I used more than one level and they are not all atthe same cooking point
Use a lower temperature setting. It is not necessary toremove the food from all the racks at the same time.
10
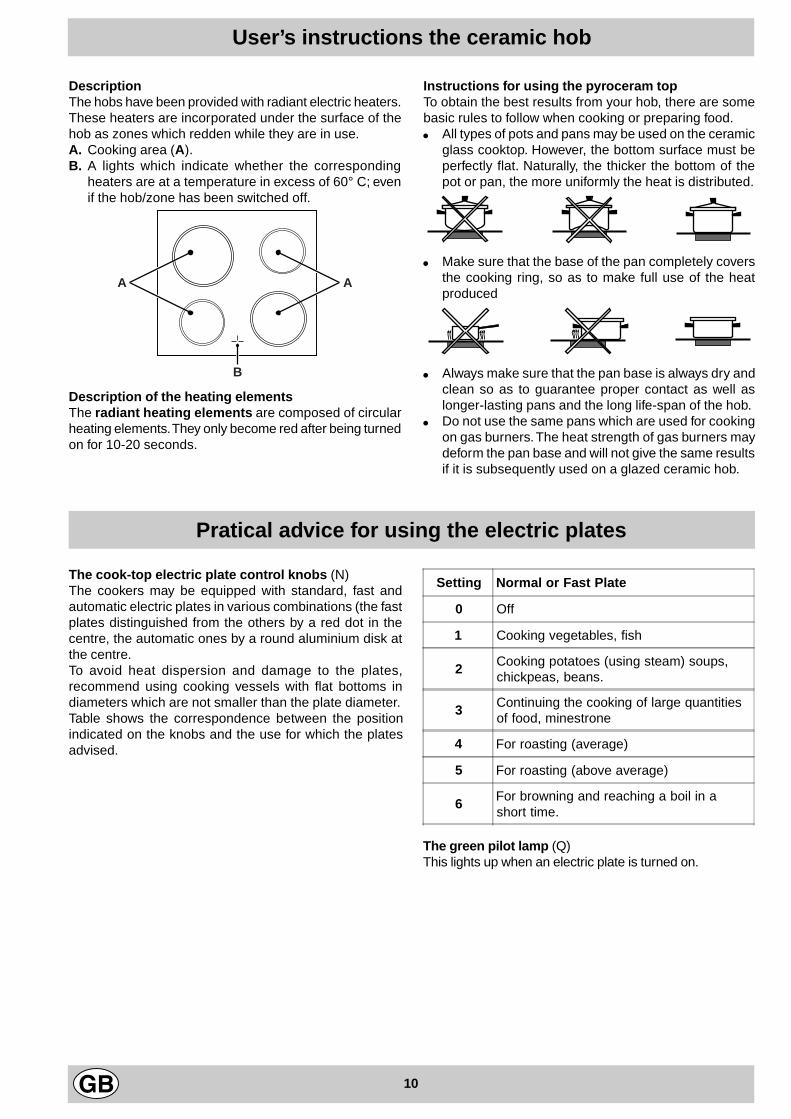
DescriptionThe hobs have been provided with radiant electric heaters.These heaters are incorporated under the surface of thehob as zones which redden while they are in use.A. Cooking area (A).B. A lights which indicate whether the corresponding
heaters are at a temperature in excess of 60° C; evenif the hob/zone has been switched off.
Description of the heating elementsThe radiant heating elements are composed of circularheating elements. They only become red after being turnedon for 10-20 seconds.
Instructions for using the pyroceram topTo obtain the best results from your hob, there are somebasic rules to follow when cooking or preparing food.· All types of pots and pans may be used on the ceramic
glass cooktop. However, the bottom surface must beperfectly flat. Naturally, the thicker the bottom of thepot or pan, the more uniformly the heat is distributed.
· Make sure that the base of the pan completely coversthe cooking ring, so as to make full use of the heatproduced
· Always make sure that the pan base is always dry andclean so as to guarantee proper contact as well aslonger-lasting pans and the long life-span of the hob.
· Do not use the same pans which are used for cookingon gas burners. The heat strength of gas burners maydeform the pan base and will not give the same resultsif it is subsequently used on a glazed ceramic hob.
User’s instructions the ceramic hob
A A
B
Pratical advice for using the electric plates
The cook-top electric plate control knobs (N)The cookers may be equipped with standard, fast andautomatic electric plates in various combinations (the fastplates distinguished from the others by a red dot in thecentre, the automatic ones by a round aluminium disk atthe centre.To avoid heat dispersion and damage to the plates,recommend using cooking vessels with flat bottoms indiameters which are not smaller than the plate diameter.Table shows the correspondence between the positionindicated on the knobs and the use for which the platesadvised.
The green pilot lamp (Q)This lights up when an electric plate is turned on.
Setting Normal or Fast Plate
0 Off
1 Cooking vegetables, fish
2 Cooking potatoes (using steam) soups,chickpeas, beans.
3 Continuing the cooking of large quantitiesof food, minestrone
4 For roasting (average)
5 For roasting (above average)
6 For browning and reaching a boil in ashort time.
11
Food to be cooked Wt.(wt)
Cookingposition of
shelves frombottom
Temperature(°C)
Variablegrill
Pre-heating time(min)
Cookingtime(min.)
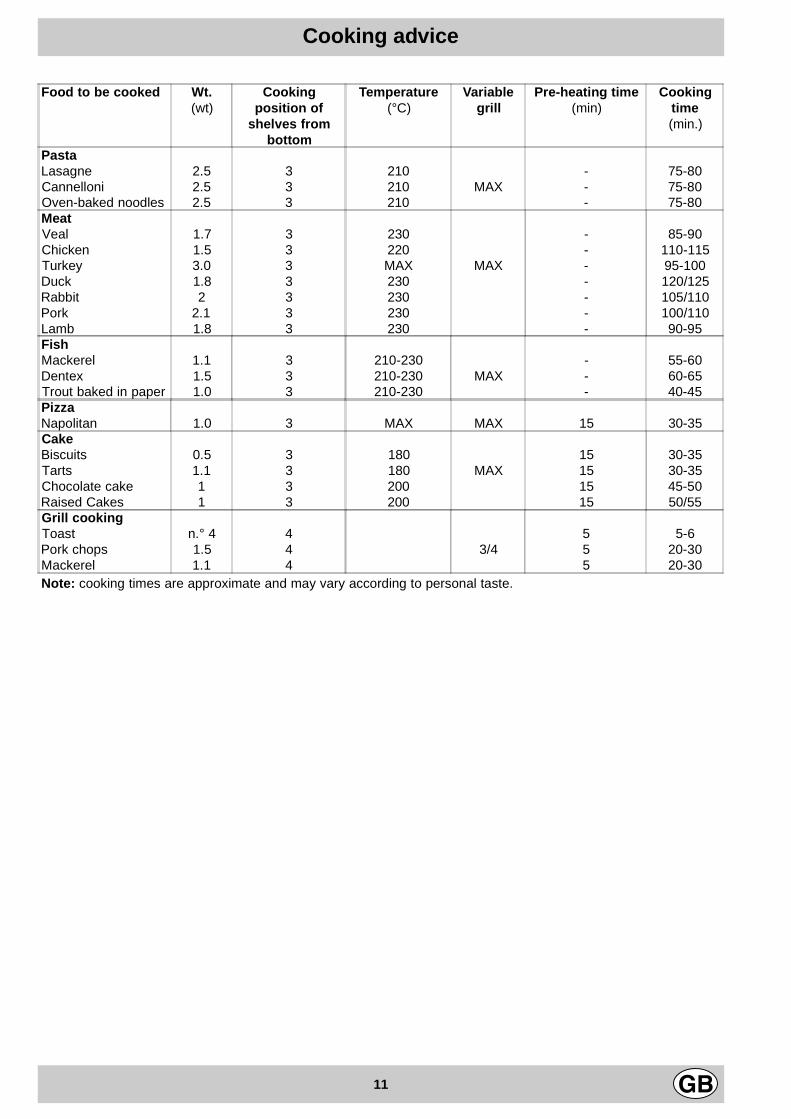
PastaLasagne 2.5 3 210 - 75-80Cannelloni 2.5 3 210 MAX - 75-80Oven-baked noodles 2.5 3 210 - 75-80MeatVeal 1.7 3 230 - 85-90Chicken 1.5 3 220 - 110-115Turkey 3.0 3 MAX MAX - 95-100Duck 1.8 3 230 - 120/125Rabbit 2 3 230 - 105/110Pork 2.1 3 230 - 100/110Lamb 1.8 3 230 - 90-95FishMackerel 1.1 3 210-230 - 55-60Dentex 1.5 3 210-230 MAX - 60-65Trout baked in paper 1.0 3 210-230 - 40-45PizzaNapolitan 1.0 3 MAX MAX 15 30-35CakeBiscuits 0.5 3 180 15 30-35Tarts 1.1 3 180 MAX 15 30-35Chocolate cake 1 3 200 15 45-50Raised Cakes 1 3 200 15 50/55Grill cookingToast n.° 4 4 5 5-6Pork chops 1.5 4 3/4 5 20-30Mackerel 1.1 4 5 20-30Note: cooking times are approximate and may vary according to personal taste.
Cooking advice
12
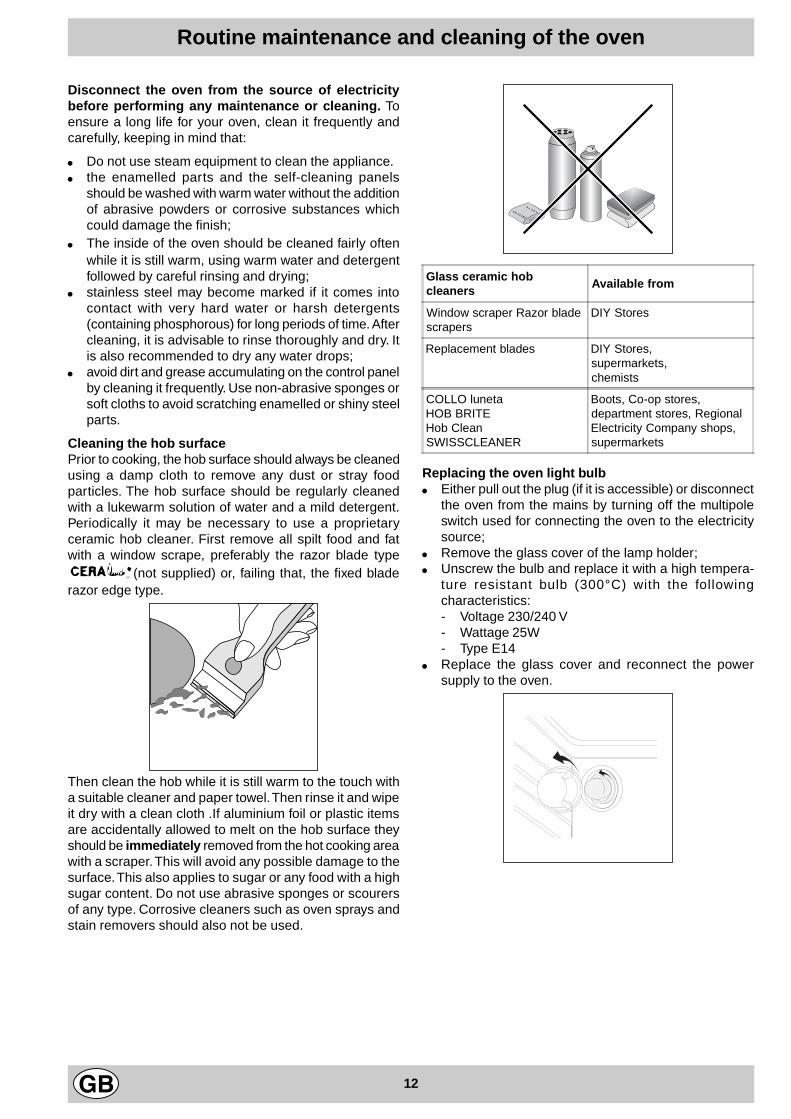
Disconnect the oven from the source of electricitybefore performing any maintenance or cleaning. Toensure a long life for your oven, clean it frequently andcarefully, keeping in mind that:
· Do not use steam equipment to clean the appliance.· the enamelled parts and the self-cleaning panels
should be washed with warm water without the additionof abrasive powders or corrosive substances whichcould damage the finish;
· The inside of the oven should be cleaned fairly oftenwhile it is still warm, using warm water and detergentfollowed by careful rinsing and drying;
· stainless steel may become marked if it comes intocontact with very hard water or harsh detergents(containing phosphorous) for long periods of time. Aftercleaning, it is advisable to rinse thoroughly and dry. Itis also recommended to dry any water drops;
· avoid dirt and grease accumulating on the control panelby cleaning it frequently. Use non-abrasive sponges orsoft cloths to avoid scratching enamelled or shiny steelparts.
Cleaning the hob surfacePrior to cooking, the hob surface should always be cleanedusing a damp cloth to remove any dust or stray foodparticles. The hob surface should be regularly cleanedwith a lukewarm solution of water and a mild detergent.Periodically it may be necessary to use a proprietaryceramic hob cleaner. First remove all spilt food and fatwith a window scrape, preferably the razor blade typeB (not supplied) or, failing that, the fixed bladerazor edge type.
Then clean the hob while it is still warm to the touch witha suitable cleaner and paper towel. Then rinse it and wipeit dry with a clean cloth .If aluminium foil or plastic itemsare accidentally allowed to melt on the hob surface theyshould be immediately removed from the hot cooking areawith a scraper. This will avoid any possible damage to thesurface. This also applies to sugar or any food with a highsugar content. Do not use abrasive sponges or scourersof any type. Corrosive cleaners such as oven sprays andstain removers should also not be used.
Replacing the oven light bulb· Either pull out the plug (if it is accessible) or disconnect
the oven from the mains by turning off the multipoleswitch used for connecting the oven to the electricitysource;
· Remove the glass cover of the lamp holder;· Unscrew the bulb and replace it with a high tempera-
ture resistant bulb (300°C) with the followingcharacteristics:- Voltage 230/240 V- Wattage 25W- Type E14
· Replace the glass cover and reconnect the powersupply to the oven.
Routine maintenance and cleaning of the oven
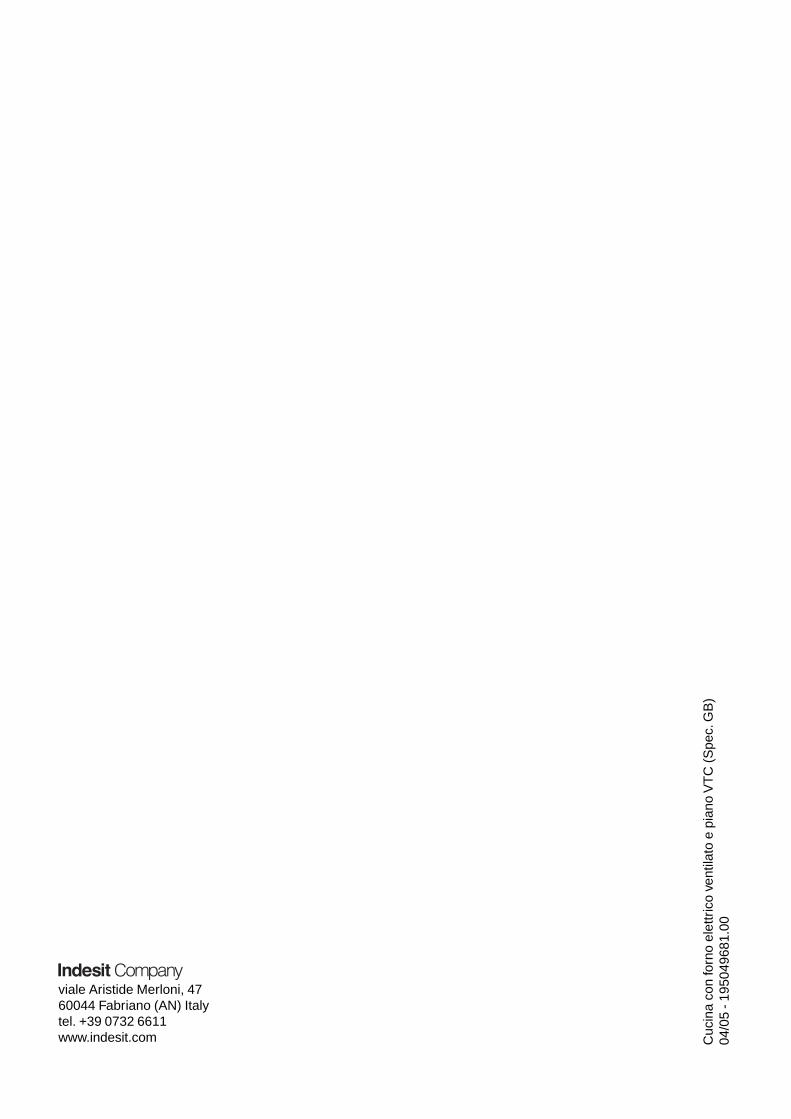
Glass ceramic hobcleaners
Available from
Window scraper Razor bladescrapers
DIY Stores
Replacement blades DIY Stores,supermarkets,chemists
COLLO lunetaHOB BRITEHob CleanSWISSCLEANER
Boots, Co-op stores,department stores, RegionalElectricity Company shops,supermarkets

13

14

15
04/0
5 - 1
9504
9681
.00
Cuc
ina
con
forn
o el
ettr
ico
vent
ilato
e p
iano
VT
C (
Spe
c. G
B)
viale Aristide Merloni, 4760044 Fabriano (AN) Italytel. +39 0732 6611www.indesit.com


![Indesit Wg935tpf [ET]](https://img.pdfslide.us/doc/110x75/577cc77f1a28aba711a120bd/indesit-wg935tpf-et.jpg)