Embed Size (px)
Citation preview
Cooker with gas ovenand gas grillInstructions for installation and useK 642 G/GK 642 GS/GK 642R GS/GK 643 G/GK 6432 G/GK 645 G/GK 645R G/GK 647 GS/GK 647R G/G
Cooker with gas oven and gas grillInstructions for installation and use
3
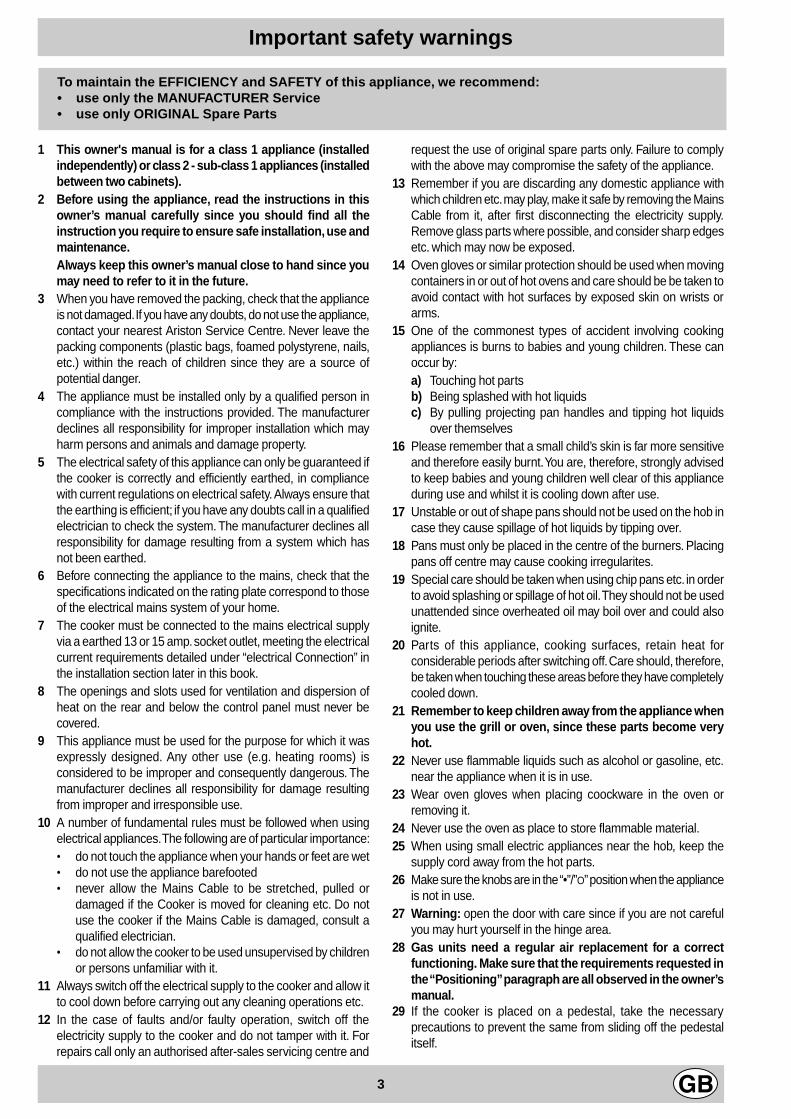
Important safety warnings
1 This owner's manual is for a class 1 appliance (installedindependently) or class 2 - sub-class 1 appliances (installedbetween two cabinets).
2 Before using the appliance, read the instructions in thisowner’s manual carefully since you should find all theinstruction you require to ensure safe installation, use andmaintenance.Always keep this owner’s manual close to hand since youmay need to refer to it in the future.
3 When you have removed the packing, check that the applianceis not damaged. If you have any doubts, do not use the appliance,contact your nearest Ariston Service Centre. Never leave thepacking components (plastic bags, foamed polystyrene, nails,etc.) within the reach of children since they are a source ofpotential danger.
4 The appliance must be installed only by a qualified person incompliance with the instructions provided. The manufacturerdeclines all responsibility for improper installation which mayharm persons and animals and damage property.
5 The electrical safety of this appliance can only be guaranteed ifthe cooker is correctly and efficiently earthed, in compliancewith current regulations on electrical safety. Always ensure thatthe earthing is efficient; if you have any doubts call in a qualifiedelectrician to check the system. The manufacturer declines allresponsibility for damage resulting from a system which hasnot been earthed.
6 Before connecting the appliance to the mains, check that thespecifications indicated on the rating plate correspond to thoseof the electrical mains system of your home.
7 The cooker must be connected to the mains electrical supplyvia a earthed 13 or 15 amp. socket outlet, meeting the electricalcurrent requirements detailed under “electrical Connection” inthe installation section later in this book.
8 The openings and slots used for ventilation and dispersion ofheat on the rear and below the control panel must never becovered.
9 This appliance must be used for the purpose for which it wasexpressly designed. Any other use (e.g. heating rooms) isconsidered to be improper and consequently dangerous. Themanufacturer declines all responsibility for damage resultingfrom improper and irresponsible use.
10 A number of fundamental rules must be followed when usingelectrical appliances. The following are of particular importance:• do not touch the appliance when your hands or feet are wet• do not use the appliance barefooted• never allow the Mains Cable to be stretched, pulled or
damaged if the Cooker is moved for cleaning etc. Do notuse the cooker if the Mains Cable is damaged, consult aqualified electrician.
• do not allow the cooker to be used unsupervised by childrenor persons unfamiliar with it.
11 Always switch off the electrical supply to the cooker and allow itto cool down before carrying out any cleaning operations etc.
12 In the case of faults and/or faulty operation, switch off theelectricity supply to the cooker and do not tamper with it. Forrepairs call only an authorised after-sales servicing centre and
request the use of original spare parts only. Failure to complywith the above may compromise the safety of the appliance.
13 Remember if you are discarding any domestic appliance withwhich children etc. may play, make it safe by removing the MainsCable from it, after first disconnecting the electricity supply.Remove glass parts where possible, and consider sharp edgesetc. which may now be exposed.
14 Oven gloves or similar protection should be used when movingcontainers in or out of hot ovens and care should be be taken toavoid contact with hot surfaces by exposed skin on wrists orarms.
15 One of the commonest types of accident involving cookingappliances is burns to babies and young children. These canoccur by:a) Touching hot partsb) Being splashed with hot liquidsc) By pulling projecting pan handles and tipping hot liquids
over themselves16 Please remember that a small child’s skin is far more sensitive
and therefore easily burnt. You are, therefore, strongly advisedto keep babies and young children well clear of this applianceduring use and whilst it is cooling down after use.
17 Unstable or out of shape pans should not be used on the hob incase they cause spillage of hot liquids by tipping over.
18 Pans must only be placed in the centre of the burners. Placingpans off centre may cause cooking irregularites.
19 Special care should be taken when using chip pans etc. in orderto avoid splashing or spillage of hot oil. They should not be usedunattended since overheated oil may boil over and could alsoignite.
20 Parts of this appliance, cooking surfaces, retain heat forconsiderable periods after switching off. Care should, therefore,be taken when touching these areas before they have completelycooled down.
21 Remember to keep children away from the appliance whenyou use the grill or oven, since these parts become veryhot.
22 Never use flammable liquids such as alcohol or gasoline, etc.near the appliance when it is in use.
23 Wear oven gloves when placing coockware in the oven orremoving it.
24 Never use the oven as place to store flammable material.25 When using small electric appliances near the hob, keep the
supply cord away from the hot parts.26 Make sure the knobs are in the “•”/”O” position when the appliance
is not in use.27 Warning: open the door with care since if you are not careful
you may hurt yourself in the hinge area.28 Gas units need a regular air replacement for a correct
functioning. Make sure that the requirements requested inthe “Positioning” paragraph are all observed in the owner’smanual.
29 If the cooker is placed on a pedestal, take the necessaryprecautions to prevent the same from sliding off the pedestalitself.
To maintain the EFFICIENCY and SAFETY of this appliance, we recommend:• use only the MANUFACTURER Service• use only ORIGINAL Spare Parts

4
Installation
The following instructions should be read by a qualified technicianto ensure that the appliance is installed, regulated and technicallyserviced correctly in compliance with current regulations.Important: remember to unplug the appliance from themains before regulating the appliance or carrying out anymaintenance work.
PositioningImportant: this unit may be installed and used only in permanentlyventilated rooms according to the British Standards Codes OfPractice: B.S. 6172/B.S. 5440, Par. 2 and B.S. 6891 Current Editions.The following requirements must be observed:
a) The cooker should not be installed in a bed sitting room with avolume of less than 20m3. If it is installed in a room of volumeless than 5m3 an air vent of effective area of 110cm2 is required,if it is installed in a room of volume between 5m3 and 10m3 asupplementary airvent area of 50cm2 is required, if the volumeexceeds 11m3 no airvent is required. However, if the room hasa door or a window which opens directly to the outside no airvent is required even when the volume is between 5m3 and11m3.
b) During prolonged use of the appliance you may consider itnecessary to open a window to the outside to improve ventilation.
c) If there are other fuel burning appliances in the same room,B.S.5440 Part 2 Current Edition, should, be consulted todetermine the requisite air vent requirements.
Levelling your appliance (only on a few models)Your cooker is supplied with feet for levelling the appliance. Ifnecessary, these feet can be screwed into the housings in thecorners of the cooker base.
Mounting the legs (only on a few models)Press-fit legs are supplied which fit under the base of your cooker.
Installation of the cookerThe cooker is prepared with protection degree against excessiveheating of type X, the appliance can therefore be installed nextto cabinets, provided the height does not exceed that of the hob.If the cooker is placed touching walls or sides of neighbouringcabinets, these must be capable of withstanding a temperaturerise of 50°C above room temperature. For a correct installation
of the cooker the following precautions must be followed:a) The cooker may be located in a kitchen, a kitonen/diner or
bed sitting room, but not in a bathroom or shower room.b) The furniture units next to the cooker, that is higher than the
working boards, must be placed at least 110mm from theedge of the board. Curtains must not be fitted immediatelybehind the cooker or within 110 mm. of the sides of the cooker.
c) The hoods must be installed according to the requirementsin the hood handbook.
d) Wall cabinets may be fitted in line with the sides of the baseunits, providing that the lower edge of the wall cabinet is aminimum of 420 mm. above the worktop. The minimumdistance combustible material kitchen units can be fitteddirectly above the worktop is 700 mm (Fig. A).
e) The wall in contact with the back of the cooker must be offlameproof material.
f) The cooker is fitted with a safety chain that must be attached toa hook, secured to the wall behind the appliance.Note: some models can have their gas connection inverted.It is important to make sure the safety chain is always situatedon the side which corresponds to the hose holder (Fig. B).
HOOD42
0M
in.
min
. 65
0 m
m. w
ith h
ood
min
. 70
0 m
m. w
ithou
t hoo
d
mm
.
600Min. mm.
420
Min
.m
m.
Fig. A Fig. BGas connectionThe cooker should be connected to the gas-supply by a corgiregistered installer. During installation of this product it is essentialto fit an approved gas tap to isolate the supply from the appliancefor the convenience of any subsequent removal or servicing.Connection of the appliance to the gas mains or liquid gas mustbe carried out according to the prescribed regulation in force,and only after it is ascertained that it is adaptable to the type ofgas to be used. If not, follow the instructions indicated in theparagraph headed “Adaptation to different gas types”. On somemodels the gas supply can be connected on the left or on theright, as necessary; to change the connection, reverse the positionof the hose holder with that of the cap and replace the gasket(supplied with the appliance). In the case of connection to liquidgas, by tank, use pressure regulators that conform to theregulation in force. The gas supply must be connected to the leftof the appliance. Be sure that the hose does not pass throughthe rear of the cooker touching hot parts.
HOT PARTS
5
Important: make sure the supply pressure conforms with the valuesshown in the table entitled “Caracteristics of the burners and nozzles”.When the cooker is installed between cabinets (recessed),the gas connection must be effected by an approved flexiblehose with bayonet fitting (BS 669 Current Edition). The gasinlet for the cookers is a threaded G 1/2 gas female fitting.
Connecting the gas supplyTo make the connection, a flexible hose should be usedcorresponding to the current gas regulations which are:• the hose must never be at any point in its lenght in contact with
the “hot” parts of the cooker;• the hose must never be longer than 1,5 metre;• the hose must not be subject to any tension or torsional stress
and it must not have any excessively narrow curves orbottlenecks;
• the hose must be easy to inspect along its entire length to checkits condition;
• the hose must always be in good condition, never attempt torepair.
Important: the installation must comply with gas safety (installationand use) regulations 1984. In all cases for the above, by low, aqualified, corgi approved engineer must be called for installation.
Electrial connectionPower supply voltage and frequency: 230-240V a.c. 50 Hz.Note: the supply cable must be positioned so that it never reachesat any point a temperature 50°C higher than the room temperature.The cable must be routed away from the rear vents. Should yourequire it, you may use a longer cable, however, you must ensurethat the cable supplied with the appliance is replaced by one of thesame specifications in accordance with current standards andlegislation.Your appliance is supplied with a 13 amp fused plug that can beplugged into a 13 amp socket for immediate use. Before using theappliance please read the instructions below.WARNING - THIS APPLIANCE MUST BE EARTHED.THE FOLLOWING OPERATIONS SHOULD BE CARRIED OUTBY A QUALIFIED ELECTRICIAN.
Replacing the fuse:When replacing a faulty fuse, a 13 amp ASTA approved fuse to BS1362 should always be used, and the fuse cover re-fitted. If the fusecover is lost, the plug must not be used until a replacement is obtained.
Replacement fuse covers:If a replacement fuse cover is fitted, it must be of the correct colouras indicated by the coloured marking or the colour that is embossedin words on the base of the plug. Replacements can be obtaineddirectly from your nearest Service Depot.
Removing the plug:If your appliance has a non-rewireable moulded plug and you shouldwish to remove it to add a cable extension or to re-route the mainscable through partitions, units etc., please ensure that either:
• the plug is replaced by a fused 13 amp re-wireable plug bearingthe BSI mark of approval.
or:
• the mains cable is wired directly into a 13 amp cable outlet,controlled by a switch, (in compliance with BS 5733) which isaccessible without moving the appliance.
Please note: for appliances with a rating greater than 13 amp (eg:electric hob, double ovens and freestanding electric cookers etc.)
the mains cable must be wired into a cooker output point with arating of 45 amp. In this case the cable is not supplied.
Disposing of the plug:Ensure that before disposing of the plug itself, you make the pinsunusable so that it cannot be accidentally inserted into a socket.Instructions for connecting cable to an alternative plug:Important: the wires in the mains lead are coloured in accordancewith the following code:
Green & Yellow - EarthBlue - NeutralBrown - Live
If the colours of the wires in the mains lead do not correspond withthe coloured markings identifying the terminals in your plug, proceedas follows:Connect Green & Yellow wire to terminal marked “E” or orcoloured Green or Green & Yellow.Connect Brown wire to terminal marked “L” or coloured Red.Connect Blue wire to terminal marked “N” or coloured Black.If a 13 amp plug (BS 1363) is used it must be fitted with a 13 ampfuse. A 15 amp plug must be protected by a 15 amp fuse, either inthe plug or adaptor or at the distribution board. If you are in anydoubt about the electrical supply to your machine, consult a qualifiedelectrician before use.
How to connect an alternative plug:The wires in this mains lead are coloured in accordance with thefollowing code:BLUE “NEUTRAL” (“N”)BROWN “LIVE” (“L”)GREEN AND YELLOW “EARTH” (“E”)
GREEN &YELLOW
BROWN
BLUE
13 amp fuse
CROSS-BARCORD GRIP
Disposing of the applianceWhen disposing of the appliance please remove the plug by cuttingthe mains cable as close as possible to the plug body and disposeof it as described above.
Adapting the cooker to different types of gasIn order to adapt the cooker to a different type of gas with respectto the gas for which it was produced (indicated on the labelattached to the lid), follow these steps:a) replace the hose holder mounted on the appliance with that
supplied in the bag of “cooker accessories”.Important: the hose holder for liquid gas is marked 8, the hoseholder for methane gas is marked 13. Always fit the sealinggasket.b) Replacing the burner nozzles on the hob:• remove the grids and slide the burners from their housings;• unscrew the nozzles using a 7 mm socket spanner, and
replace them with nozzles for the new type of gas (see table1 “Burner and nozzle characteristics”).
• replace all the components by repeating the steps in reverseorder.
6
c) Minimum regulation of the hob burners:• turn the tap to minimum;• remove the knob and adjust the regulation screw, which is
positioned in or next to the tap pin, until the flame is small butsteady.N.B.: in the case of liquid gas, the regulation screw must bescrewed in to the bottom.
• check that the flame does not turn off when you turn the tapquickly from high to low.
d) Regulating the primary air of the burners:The primary air of the burners requires no regulation.
Adapting the gas oven to different types of gasa) Replacing the oven burner nozzle:• remove the warming drawer;• in the case of models without warming drawer, remove the
panel “P” as indicated in Fig. A. Open the door, release thetwo top inserts by pressing them downwards, and then thetwo bottom inserts by pressing them upwards.
• remove the sliding protection “A”;• remove the two screws to dismount the protection “B”; (see
Fig. B);• remove the screw and then the oven burner “V”(see Fig. C).
Remove the oven door to facilitate this operation.• unscrew the oven burner nozzle using the special socket
spanner for the nozzles (see Fig. D), or better still a 7 mmsocket spanner, and replace it with a nozzle suited to thenew type of gas (see table 1).
A B
Fig. A Fig. B
V
Fig. C Fig. Db) Minimum regulation of the gas oven burner with thermostat
(see fig.):• light the burner as described in the paragraph “the oven knob”
of the instruction booklet.• turn the knob to Max for about 10 minutes and then turn the
knob to the Min setting;• remove the knob;• regulate the screw positioned outside the thermostat pin
until the flame is small but steady.N.B.: in the case of liquid gas, the regulation screw mustbe screwed in to the bottom.
• check that the burner does not turn off when you turn theknob from Max to Min and and when you open and closethe oven door quickly.
Adapting the gas grill to different types of gasReplacing the nozzle of the grill burner:• remove the screw and then slide out the grill burner “V”
(see Fig. E);• unscrew the grill burner nozzle using the special socket
spanner for the nozzles (see Fig. F) or better still a 7 mmsocket spanner; replace the nozzle with a nozzle for the newtype of gas (see table 1).
V
I
Fig. E Fig. F
7
Important: when mounting the grill burner check that there is aspace of at least 4 mm between the security thermocouple (ifinstalled) and the burner.
4 mm
ImportantOn completion of the operation, replace the old rating stickerwith one indicating the new type of gas used. This sticker isavailable from our Service Centres.NoteShould the pressure of the gas used be different (or vary) fromthe recommended pressure, it is necessary to fit a suitablepressure regulator onto the inlet pipe in compliance with currentNational Regulations relative to “regulators for channelled gas”.
Raised border assembly (only on a few models)To assemble the raised border correctly, please follow theinstructions below:· Unscrew the 4 screws and the 2 spacers on the rear
part of the worktop;· Place the raised border on the rear part of the worktop;· Screw the raised border onto the worktop using the
four screws you previously removed, ensuring that youreposition the spacers on the outermost screws.
8
Burner and nozzle characteristics
Table 1 Liquid Gas Natural Gas
Burner Diameter(mm)
Thermal PowerkW (p.c.s.*)
By-Pass1/100
Nozzle1/100
Flow*g/h
Nozzle1/100
Flow*l/h
Nominal Reduced (mm) (mm) *** ** (mm)
Fast(Large)(R)
100 3.00 0.7 41 86 218 214 116 286
Semi Fast(Medium)(S)
75 1.90 0.4 30 70 138 136 106 181
Auxiliary(Small)(A)
55 1.00 0.4 30 50 73 71 79 95
Triple Crown(TC)
130 3.25 1.5 63 91 236 232 133 309
Oven - 3.02 1.0 49 85 219 216 132 288
Grill - 2.50 - - 80 182 179 122 227
SupplyPressures
Nominal (mbar)Minimum (mbar)Maximum (mbar)
28-302035
372545
201725
* At 15°C and 1013 mbar- dry gas** Propane P.C.S. = 50,37 MJ/Kg*** Butane P.C.S. = 49,47 MJ/Kg
Natural P.C.S. = 37,78 MJ/m3
S S
R A TC A
S R
K 642 G/G K 647 GS/GK 642 GS/G K 647R G/GK 642R GS/GK 643 G/GK 6432 G/GK 645 G/GK 645R G/G
9
Technical characteristics
Inner dimensions of the oven:Width: 40.7 cm
Depth: 41 cm
Height: 31 cm
Inner Volume of the Oven:
50 lt
Innder dimensions of the plate plate warmer:
Width: 43 cm
Depth: 43 cm
Height: 8 cm
Voltage and Frequency of Power Supply:see data plate
Burners:
adaptable for use with all the types of gas indicated onthe data plate
This appliance conforms with the following EuropeanEconomic Community directives:
- 73/23/EEC of 19/02/73 (Low Voltage) and subsequentmodifications;
- 89/336/EEC of 03/05/89 (ElectromagneticCompatibility) and subsequent modifications;
- 90/396/EEC of 29/06/90 (Gas) and subsequentmodifications;
- 93/68/EEC of 22/07/93 and subsequent modifications.
Mains frequency and voltage of the electric section and characteristics of the gas section
Model Gas section Electric section
ClassRated power
kW (1)Voltage
K 642 G/GK 642 GS/G
K 642R GS/GK 643 G/G
K 6432 G/GK 645 G/G
K 645R G/G
II2H3+10,82 (787 g/h - G30)
(773 g/h - G31)230V~ 50/60Hz
K 647 GS/GK 647R G/G
II2H3+12,17 (885 g/h - G30)
(869 g/h - G31)230V~ 50/60Hz
(1) The values in g/h refer to the capacities with liquid gas (Butane, Propane).
10
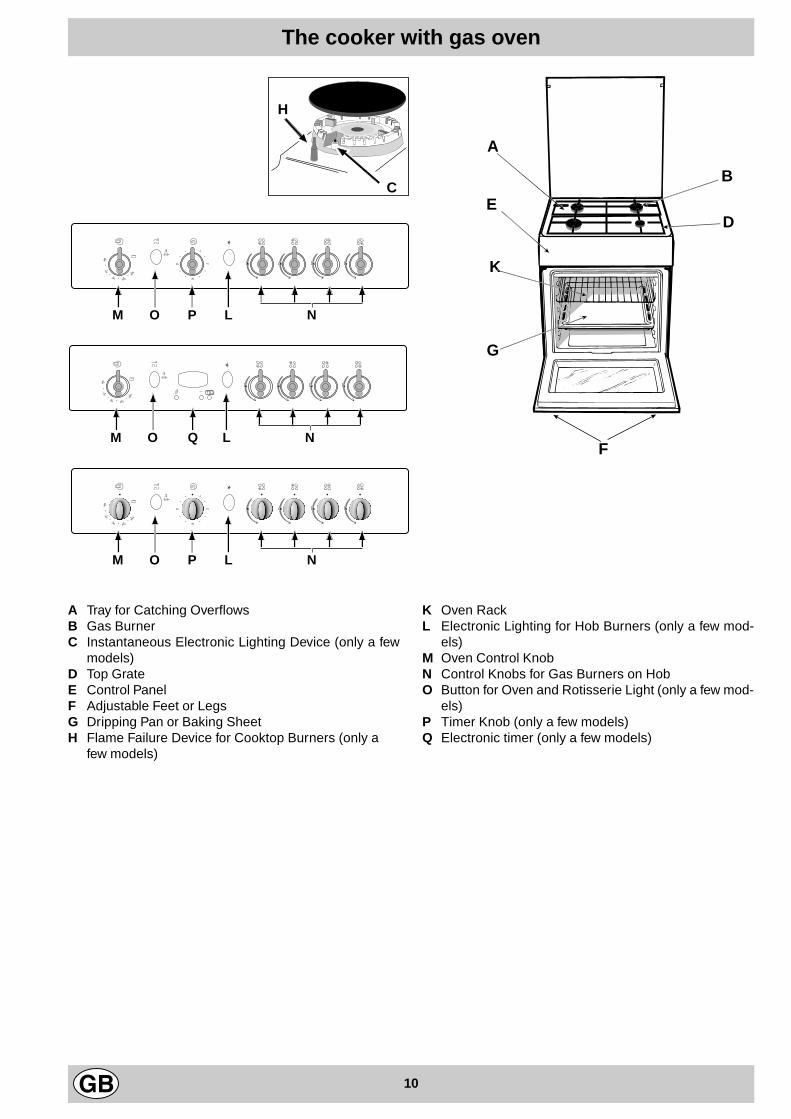
The cooker with gas oven
A Tray for Catching OverflowsB Gas BurnerC Instantaneous Electronic Lighting Device (only a few
models)D Top GrateE Control PanelF Adjustable Feet or LegsG Dripping Pan or Baking SheetH Flame Failure Device for Cooktop Burners (only a
few models)
K Oven RackL Electronic Lighting for Hob Burners (only a few mod-
els)M Oven Control KnobN Control Knobs for Gas Burners on HobO Button for Oven and Rotisserie Light (only a few mod-
els)P Timer Knob (only a few models)Q Electronic timer (only a few models)
F
A
E
K
G
D
B
M O P L N
C
H
M O P L N
M O Q L N
11
The different functions and uses of the oven
The various functions included in the cooker are selectedby operating the control devices located on the cookercontrol panel.
Control Knobs for the Gas Burners on the HobThe position of the gas burner controlled by each one of
the knobs is shown by a symbol of a solid ring:•. To lightone of the burners, hold a lighted match or lighter nearthe burner. Press down and turn the corresponding knob
in the counter-clockwise direction to the maximum setting. Each burner can be operated at its maximum,minimum or intermediate power. Shown on the knob are
the different symbols for off • (the knob is on this settingwhen the symbol lines up with the reference mark on the
control panel), for maximum and minimum .To obtain these settings, turn the knob counter-clockwisewith respect to the off position. To turn off the burner, turnthe knob clockwise until it stops (corresponding again with
the • symbol).
Electronic Lighting of the Hob Burners (only a fewmodels)Some models are equipped with instant electronic light-ing of the gas burners located on the hob, which can beidentified by the presence of an igniter device (see detailC). This device is activated by lighting pressing on the “L”
button, identified by the symbol. To turn on a burner,simply press the “L” button and then press while, at thesame time, pressing in and turning the control knob forthe burner in the anticlockwise direction until the burnerlights. To light the burner immediately, it is recom-mended that the button be pressed first and then theknob turned.Caution: If the burner accidentally goes out, turn offthe burner using the knob and wait at least one minutebefore relighting.
Models with Flame Failure Device (only a few models)These models are identified by the presence of a flamedetection device (see detail H).Important: Since the top burners are equipped with asafety device, after lighting the burner keep the knobpressed in for about 6 seconds to allow the gas to passuntil the safety thermocouple is heated.
Gas Cut Off (only a few models)This cooker has a safety cut out feature which switchesoff the burners when you close the cover. This device isprovided as a safety feature in case the cover is loweredwith the burners on. Always turn off the gas and allow theburners to cool before closing the cover. Failure to followthese instructions may cause the glass cover to shatter.Keep the cover open when using the oven.
Attention: before using the oven and grill for the first time,turn the oven on for approximately one half hour. Makesure that the oven is empty, the thermostat on high, thedoor open, and the room properly ventilated. The odorwhich can be detected at times is due to the evaporationoff the substances used to protect the oven and the grill
during the period between the time of production andinstallation of the appliance.
Attention: Only use the bottom shelf of the oven whenusing the rotisserie to cook (where present). For all othertypes of cooking, never use the bottom shelf and neverplace anything on the bottom of the oven when it is inoperation because this could damage the enamel. Alwaysplace your cookware (dishes, aluminium foil, etc. etc.) onthe grate provided with the appliance inserted especiallyalong the oven guides.
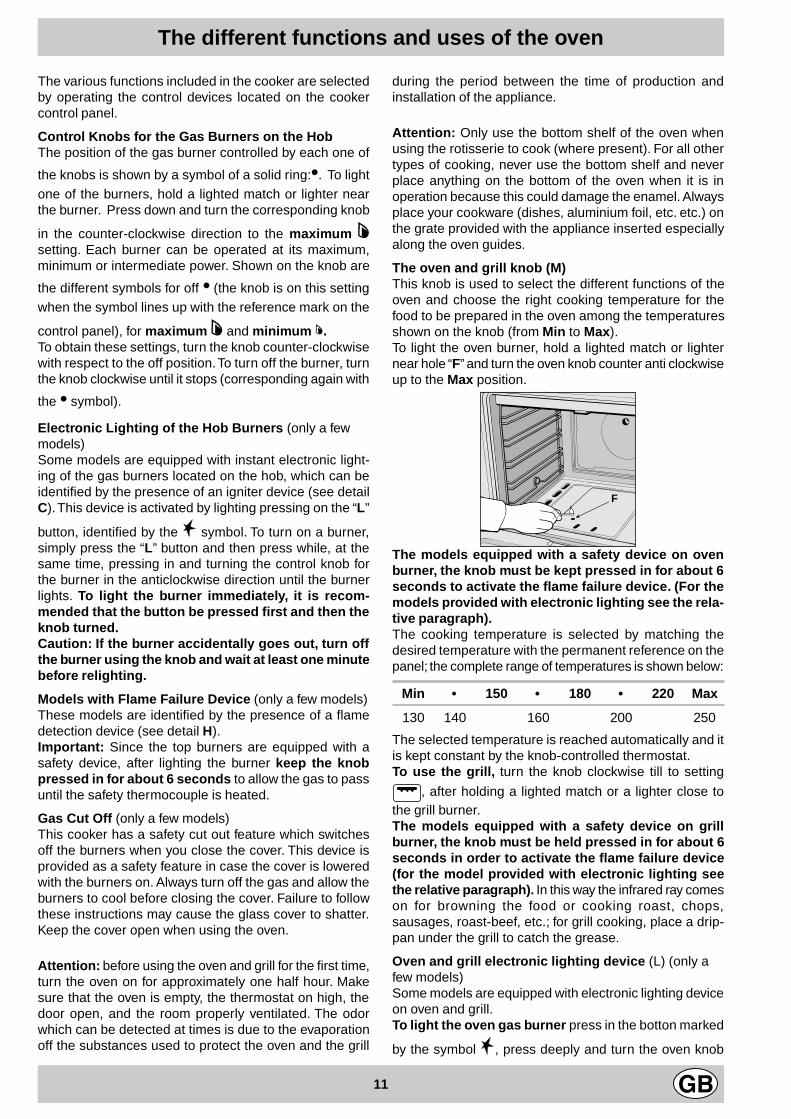
The oven and grill knob (M)This knob is used to select the different functions of theoven and choose the right cooking temperature for thefood to be prepared in the oven among the temperaturesshown on the knob (from Min to Max).To light the oven burner, hold a lighted match or lighternear hole “F” and turn the oven knob counter anti clockwiseup to the Max position.
F
The models equipped with a safety device on ovenburner, the knob must be kept pressed in for about 6seconds to activate the flame failure device. (For themodels provided with electronic lighting see the rela-tive paragraph).The cooking temperature is selected by matching thedesired temperature with the permanent reference on thepanel; the complete range of temperatures is shown below:
Min • 150 • 180 • 220 Max
130 140 160 200 250
The selected temperature is reached automatically and itis kept constant by the knob-controlled thermostat.To use the grill, turn the knob clockwise till to setting
, after holding a lighted match or a lighter close tothe grill burner.The models equipped with a safety device on grillburner, the knob must be held pressed in for about 6seconds in order to activate the flame failure device(for the model provided with electronic lighting seethe relative paragraph). In this way the infrared ray comeson for browning the food or cooking roast, chops,sausages, roast-beef, etc.; for grill cooking, place a drip-pan under the grill to catch the grease.
Oven and grill electronic lighting device (L) (only afew models)Some models are equipped with electronic lighting deviceon oven and grill.To light the oven gas burner press in the botton marked
by the symbol , press deeply and turn the oven knob
12
Oven light button (O)
This is marked by the symbol and switchs on the lightinside the oven so that you can control the cooking withoutopening the door.
Timer Knob (only a few models)To use the timer, the ringer "S" must be wound up by turn-
ing the knob one full turn clockwise ; then turn it back
, to the desired time so that the number of minutes onthe knob matches the reference mark on the panel.
AttentionAvoid the children touch the oven door because it is veryhot during the cooking.
Practical advice for burner useIn order to get the maximum yield it is important toremember the following:· Use appropriate cookware for each burner (see table)
so as to avoid flames overshooting the edges.· At boiling point turn the knob to minimum.· Use cookware with lids.· Always use cookware with flat bottoms.
Burner ø Cookware Diameter (cm)
Fast (R) 24 - 26
Semi Fast (S) 16 - 20
Auxiliary (A) 10 - 14
Triple Crown (TC) 24 - 26
N.B. On the models supplied with a reducer shelf,remember that this should be used only for the auxiliaryburner when you use casserole dishes with a diameterunder 12 cm.
clockwise, till to the position “Max”.It is necessary to hold pressed in the knob for about6 seconds in order to activate the flame failure device.To light on the grill burner press in the bottom marked
by the symbol , press deeply and turn the oven knob
counter clock wise till to the position (grill).It is necessary to hold pressed in the knob for about6 seconds in order to activate the flame failure device.In case of lack of electricity light the oven or grill manuall,following the instruction of “the oven knob paragraph”.
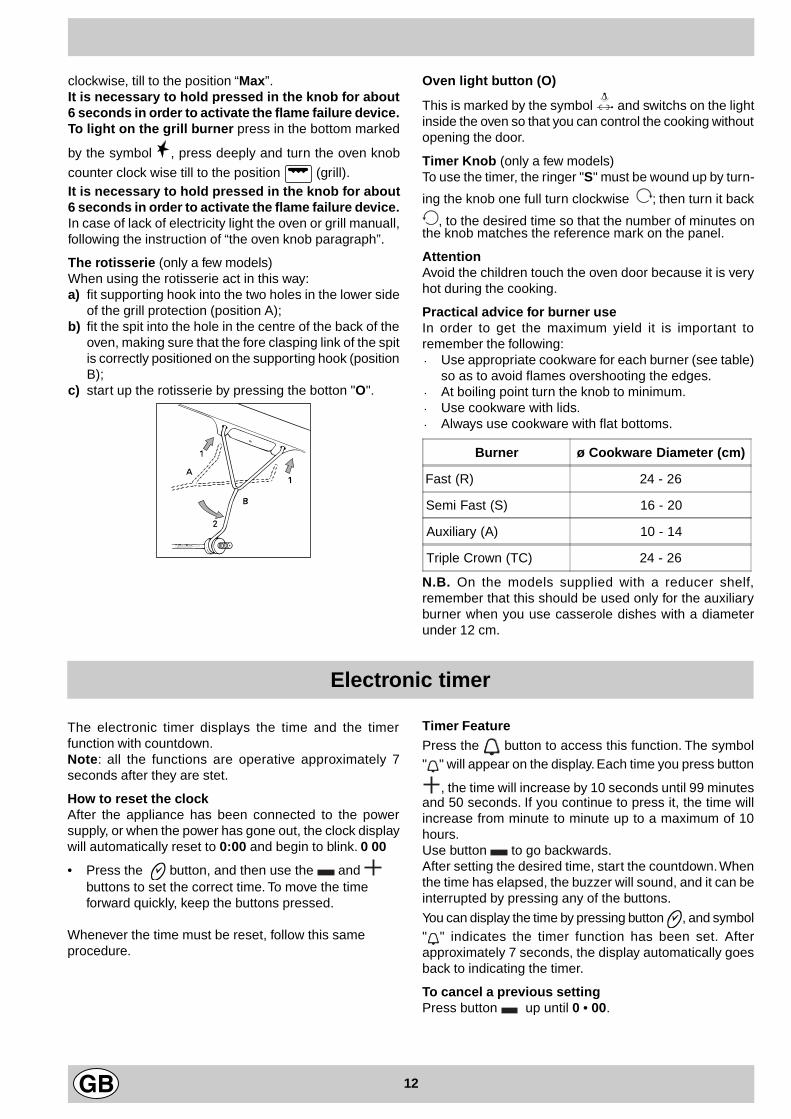
The rotisserie (only a few models)When using the rotisserie act in this way:a) fit supporting hook into the two holes in the lower side
of the grill protection (position A);b) fit the spit into the hole in the centre of the back of the
oven, making sure that the fore clasping link of the spitis correctly positioned on the supporting hook (positionB);
c) start up the rotisserie by pressing the botton "O".
Electronic timer
The electronic timer displays the time and the timerfunction with countdown.Note : all the functions are operative approximately 7seconds after they are stet.
How to reset the clockAfter the appliance has been connected to the powersupply, or when the power has gone out, the clock displaywill automatically reset to 0:00 and begin to blink. 0 00
• Press the button, and then use the and buttons to set the correct time. To move the timeforward quickly, keep the buttons pressed.
Whenever the time must be reset, follow this sameprocedure.
Timer FeaturePress the button to access this function. The symbol" " will appear on the display. Each time you press button
, the time will increase by 10 seconds until 99 minutesand 50 seconds. If you continue to press it, the time willincrease from minute to minute up to a maximum of 10hours.Use button to go backwards.After setting the desired time, start the countdown. Whenthe time has elapsed, the buzzer will sound, and it can beinterrupted by pressing any of the buttons.
You can display the time by pressing button , and symbol" " indicates the timer function has been set. Afterapproximately 7 seconds, the display automatically goesback to indicating the timer.
To cancel a previous settingPress button up until 0 • 00.
13
The oven offers a wide range of alternatives which allowyou to cook any type of food in the best possible way. Withtime you will learn to make the best use of this versatilecooking appliance and the following directions are only aguideline which may be varied according to your own per-sonal experience.
Baking cakesThe oven should always be warm before putting in cakeswait till the end of preheating (about 15 min.). Cake-bakingtemperatures are normally around 160°C. Do not openthe oven door during the baking process as this couldcause the cake to sink.Beaten cake mixtures should not be too soft as this couldconsiderably lengthen cooking times. In general:
Pastry is too dry
Increase the temperature by 10°C and reduce thecooking time.
Pastry dropped
Use less liquid or lower the temperature by 10°C.
Pastry is too dark on top
Place it on a lower rack, lower the temperature, andincrease the cooking time.
C ooked w ell on the ins ide bu t s ticky on theou ts ide
U se less liqu id , low er the tem perature , and increasethe cooking tim e.
The pastry sticks to the pan
Grease the pan well and sprinkle it with a dusting offlour.
I used more than one level and they are not all atthe same cooking point
Use a lower temperature setting. It is not necessary toremove the food from all the racks at the same time.
Cooking fish and meatMeat must weigh at least one Kg. to stop it becoming toodry. When cooking white meat, fowl and fish use lowtemperatures. (150°C-175°C). When red meat must besuperficially well-cooked but succulent inside, it isadvisable to start with a high temperature (200-220°C)for a short time, and then to reduce it at a later point.Generally speaking, the more meat there is, the lower thetemperature and the longer the cooking time shouldbe.Place the meat in the centre of the grid and put a spill-tray underneath to catch grease drips. Insert the grid sothat it is in the middle of the oven. If more heat from belowis required, use the 1° bottom shelf. For tastier roasts,wrap the meat with bacon rashers or dot the meat withlard and place it in the upper part of the oven. When sometypes of food are cooked in the ventilated oven (duck,rabbit, large fowl) they become too dry; in these cases,better results are obtained using the combined oven.
Cooking advice
14
Cooker routine maintenance and cleaning
Before each operation, disconnect the cooker fromthe electricity. To assure the long life of the cooker, it mustbe thoroughly cleaned frequently, keeping in mind that:· Do not use steam equipment to clean the appliance.· the enamelled parts and the self-cleaning panels are
washed with warm water without using any abrasivepowders or corrosive substances which could ruinthem;
· the inside of the oven should be cleaned fairly oftenwhile it is still warm using warm water and detergent,followed by careful rinsing and drying;
· the flame spreaders should be washed frequently withhot water and detergent taking care to eliminate anyscale;
· in cookers equipped with automatic lighting, theterminal part of the electronic instant lighting devicesshould be cleaned frequently and the gas outlet holesof the flame spreaders should be checked to makesure they are free of any obstructions;
· Stainless steel may become marked if it comes intocontact with very hard water or harsh detergents(containing phosphorous) for long periods of time. Aftercleaning, it is advisable to rinse thoroughly and dry. Itis also recommended to dry any water drops;
• On models with glass covers, the covers should becleaned with hot water; the use of rough cloths orabrasives is to be avoided.
N.B: avoid closing the cover while the gas burnersare still warm. Remove any liquid from the lid beforeopening it.Important: periodically check the wear of the gas hoseand substitute it if there are any defects; we recommendedchanging it every year.
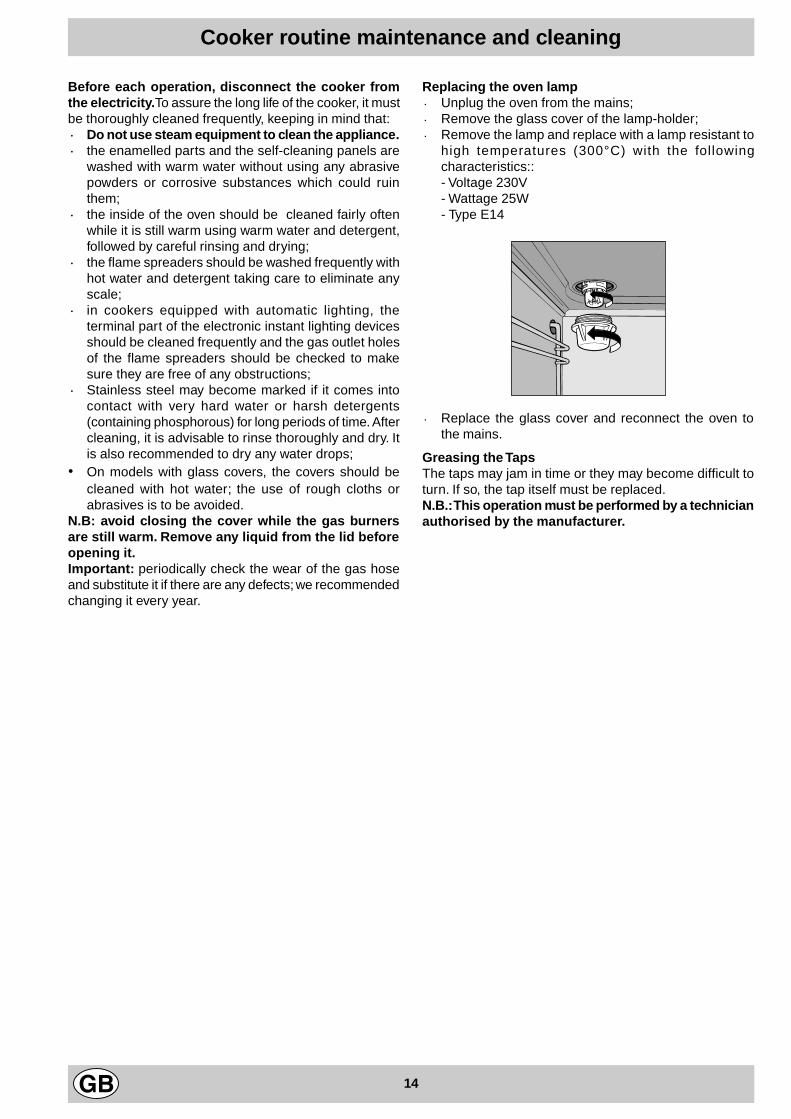
Replacing the oven lamp· Unplug the oven from the mains;· Remove the glass cover of the lamp-holder;· Remove the lamp and replace with a lamp resistant to
high temperatures (300°C) with the followingcharacteristics::- Voltage 230V- Wattage 25W- Type E14
· Replace the glass cover and reconnect the oven tothe mains.
Greasing the TapsThe taps may jam in time or they may become difficult toturn. If so, the tap itself must be replaced.N.B.: This operation must be performed by a technicianauthorised by the manufacturer.
15
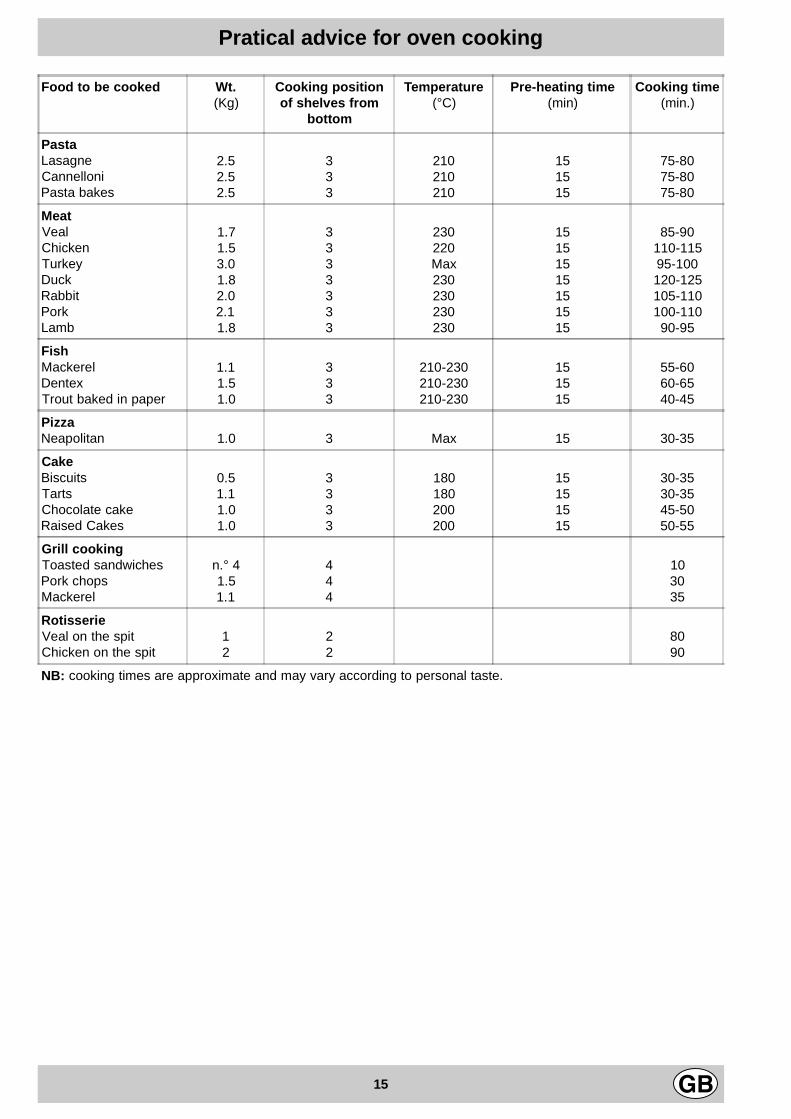
Pratical advice for oven cooking
Food to be cooked Wt.(Kg)
Cooking positionof shelves from
bottom
Temperature(°C)
Pre-heating time(min)
Cooking time(min.)
PastaLasagneCannelloniPasta bakes
2.52.52.5
333
210210210
151515
75-8075-8075-80
MeatVealChickenTurkeyDuckRabbitPorkLamb
1.71.53.01.82.02.11.8
3333333
230220Max230230230230
15151515151515
85-90110-11595-100120-125105-110100-11090-95
FishMackerelDentexTrout baked in paper
1.11.51.0
333
210-230210-230210-230
151515
55-6060-6540-45
PizzaNeapolitan 1.0 3 Max 15 30-35
CakeBiscuitsTartsChocolate cakeRaised Cakes
0.51.11.01.0
3333
180180200200
15151515
30-3530-3545-5050-55
Grill cookingToasted sandwichesPork chopsMackerel
n.° 41.51.1
444
103035
RotisserieVeal on the spitChicken on the spit
12
22
8090
NB: cooking times are approximate and may vary according to personal taste.
Merloni ElettrodomesticiViale Aristide Merloni 4760044 FabrianoItalyTel +39 0732 6611Fax +39 0732 662501www.merloni.com
Cuc
ina
con
forn
o e
grill
gas
09/0
2 - 1
9502
6721
.05
Xer
ox B
usin
ess
Ser
vice
s -
Doc
utec
h


![Indesit Wg935tpf [ET]](https://img.pdfslide.us/doc/110x75/577cc77f1a28aba711a120bd/indesit-wg935tpf-et.jpg)