Embed Size (px)
Citation preview
3-856-663-02 (1)
Color Video Camera
EN
Operating Instructions
EVI-D30EVI-D31 (For European model only)
2EN
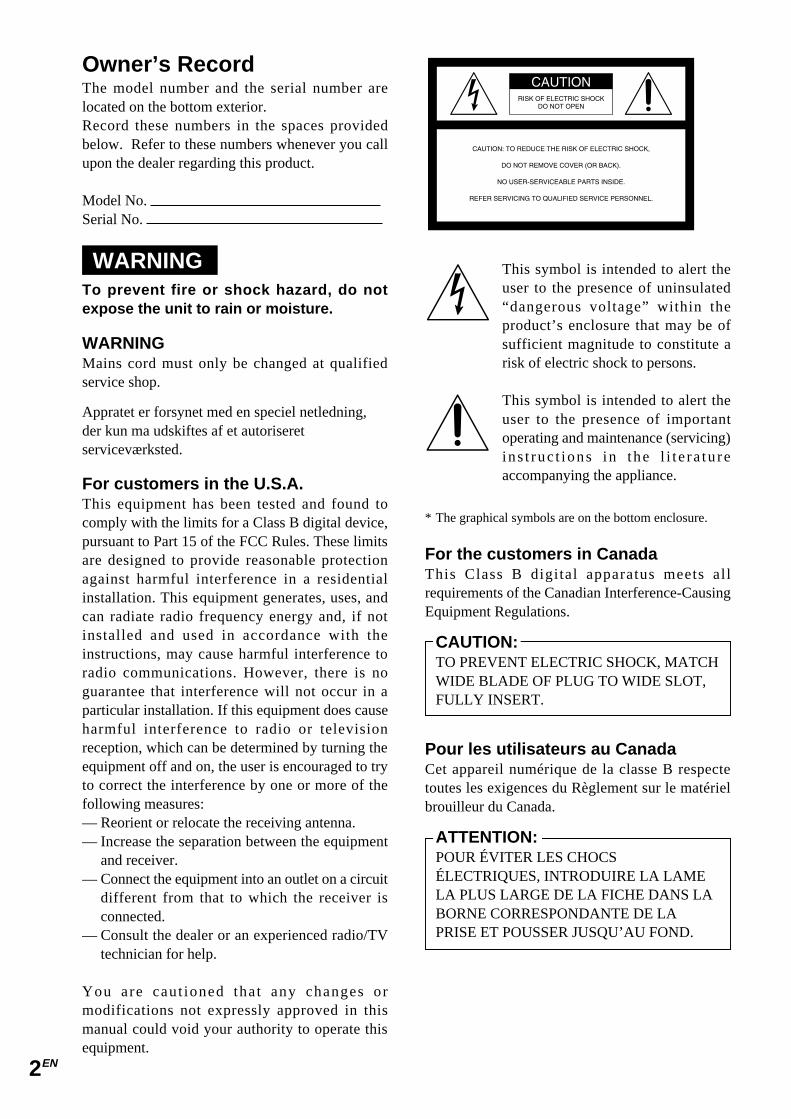
Owner’s RecordThe model number and the serial number arelocated on the bottom exterior.Record these numbers in the spaces providedbelow. Refer to these numbers whenever you callupon the dealer regarding this product.
Model No. Serial No.
WARNINGTo prevent fire or shock hazard, do notexpose the unit to rain or moisture.
WARNINGMains cord must only be changed at qualifiedservice shop.
Appratet er forsynet med en speciel netledning,der kun ma udskiftes af et autoriseretserviceværksted.
For customers in the U.S.A.This equipment has been tested and found tocomply with the limits for a Class B digital device,pursuant to Part 15 of the FCC Rules. These limitsare designed to provide reasonable protectionagainst harmful interference in a residentialinstallation. This equipment generates, uses, andcan radiate radio frequency energy and, if notinstalled and used in accordance with theinstructions, may cause harmful interference toradio communications. However, there is noguarantee that interference will not occur in aparticular installation. If this equipment does causeharmful interference to radio or televisionreception, which can be determined by turning theequipment off and on, the user is encouraged to tryto correct the interference by one or more of thefollowing measures:— Reorient or relocate the receiving antenna.— Increase the separation between the equipment
and receiver.— Connect the equipment into an outlet on a circuit
different from that to which the receiver isconnected.
— Consult the dealer or an experienced radio/TVtechnician for help.
You are caut ioned that any changes ormodifications not expressly approved in thismanual could void your authority to operate thisequipment.
This symbol is intended to alert theuser to the presence of uninsulated“dangerous voltage” within theproduct’s enclosure that may be ofsufficient magnitude to constitute arisk of electric shock to persons.
This symbol is intended to alert theuser to the presence of importantoperating and maintenance (servicing)ins t ruc t ions in the l i te ra tureaccompanying the appliance.
* The graphical symbols are on the bottom enclosure.
For the customers in CanadaThis Class B digital apparatus meets al lrequirements of the Canadian Interference-CausingEquipment Regulations.
CAUTION:TO PREVENT ELECTRIC SHOCK, MATCHWIDE BLADE OF PLUG TO WIDE SLOT,FULLY INSERT.
Pour les utilisateurs au CanadaCet appareil numérique de la classe B respectetoutes les exigences du Règlement sur le matérielbrouilleur du Canada.
ATTENTION:POUR ÉVITER LES CHOCSÉLECTRIQUES, INTRODUIRE LA LAMELA PLUS LARGE DE LA FICHE DANS LABORNE CORRESPONDANTE DE LAPRISE ET POUSSER JUSQU’AU FOND.
3EN
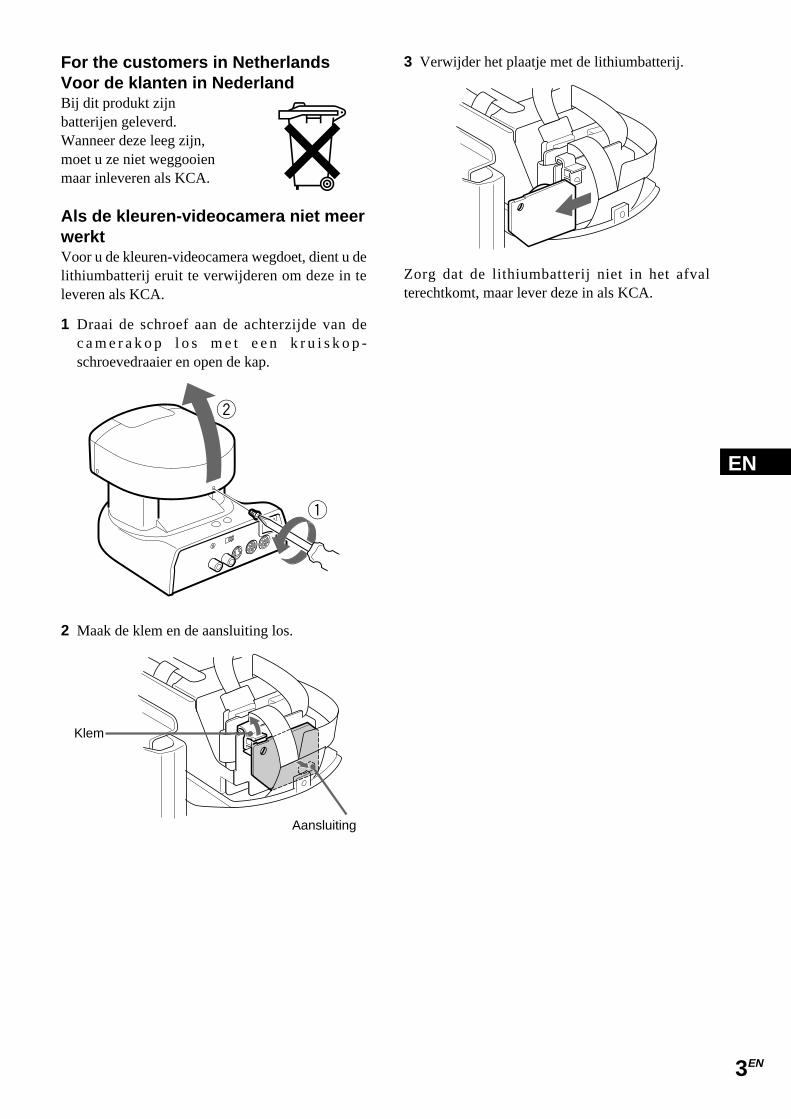
For the customers in NetherlandsVoor de klanten in NederlandBij dit produkt zijnbatterijen geleverd.Wanneer deze leeg zijn,moet u ze niet weggooienmaar inleveren als KCA.
Als de kleuren-videocamera niet meerwerktVoor u de kleuren-videocamera wegdoet, dient u delithiumbatterij eruit te verwijderen om deze in televeren als KCA.
1 Draai de schroef aan de achterzijde van dec a m e r a k o p l o s m e t e e n k r u i s k o p -schroevedraaier en open de kap.
3 Verwijder het plaatje met de lithiumbatterij.
Zorg dat de lithiumbatterij niet in het afvalterechtkomt, maar lever deze in als KCA.
w
q
2 Maak de klem en de aansluiting los.
Aansluiting
Klem
EN
4EN
• The CCD features effective picture elements of380,000 (EVI-D30)/440,000 (EVI-D31), whichenables you high-resolution shooting.
• In addition to high-speed pan/tilt action, AT(Automatic target tracking) and MD (Motiondetector) features are integrated, which lets youuse Color Video Camera for a variety ofpurposes.
• VISCA lets you operate Color Video Camerawith a personal computer.
• Up to six combinations of the camera's positionand status can be memorized.
• Multi-function remote commander provided.
Features
5EN
Table of Contents
PreparationsConnections ........................................... 6
If you have a personal computer oraudio/video equipment with theS-video input ............................................. 7
Turning on the Power ............................ 8Setting the Clock .................................... 8
Basic OperationsPan/Tilt Operation ................................ 10Adjusting the Camera .......................... 11Having the Camera Memorize the
Setting ................................................ 12
Advanced OperationsTracking a Subject Automatically ....... 14
Fine-tuning the setting ................................ 16If a subject cannot be recognized or
captured ................................................... 17Detecting the Change Taking Place in
the Picture .......................................... 18Fine-tuning the setting ................................ 20
GeneralLocations of Controls .......................... 22Precautions ........................................... 25Maintenance ......................................... 26Troubleshooting ................................... 26Specifications ....................................... 27
6EN
Preparations
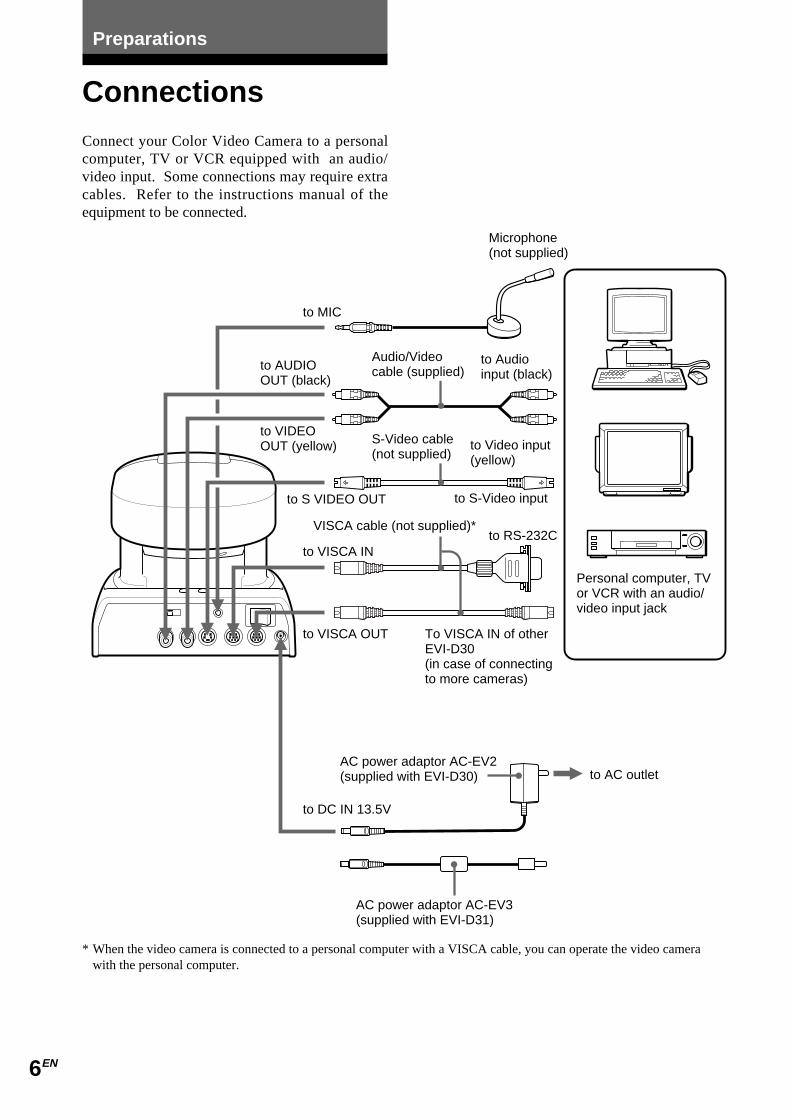
ConnectionsConnect your Color Video Camera to a personalcomputer, TV or VCR equipped with an audio/video input. Some connections may require extracables. Refer to the instructions manual of theequipment to be connected.
to S-Video input
Microphone(not supplied)
Personal computer, TVor VCR with an audio/video input jack
to Audioinput (black)
to Video input(yellow)
to AUDIOOUT (black)
to MIC
to VIDEOOUT (yellow)
VISCA cable (not supplied)*
to VISCA IN
to S VIDEO OUT
S-Video cable(not supplied)
Audio/Videocable (supplied)
to RS-232C
to VISCA OUT To VISCA IN of otherEVI-D30(in case of connectingto more cameras)
to DC IN 13.5V
AC power adaptor AC-EV2(supplied with EVI-D30) to AC outlet
* When the video camera is connected to a personal computer with a VISCA cable, you can operate the video camerawith the personal computer.
AC power adaptor AC-EV3(supplied with EVI-D31)
7EN
If you have a personalcomputer or audio/videoequipment with theS-Video inputYou can connect it to your Color Video Camerawith a commercially available S-video cable.
Notes• You cannot connect your Color Video Camera to a
personal computer that is not equipped with either audio/video input or S-Video input jack. And you might not beable to use your existing personal computer with yourColor Video Camera unless you provide the computerwith a video capture board, sound board, and/orsoftware. Consult your computer dealer or manufacturerfor details.
• Use only the AC-EV2 (for EVI-D30)/AC-EV3 (for EVI-D31) AC power adaptor (supplied). Do not use any otherAC power adaptor.
• Do not grasp the camera head when carrying the videocamera.
• Do not turn the camera head manually. Doing so willresult in the camera malfunctioning.
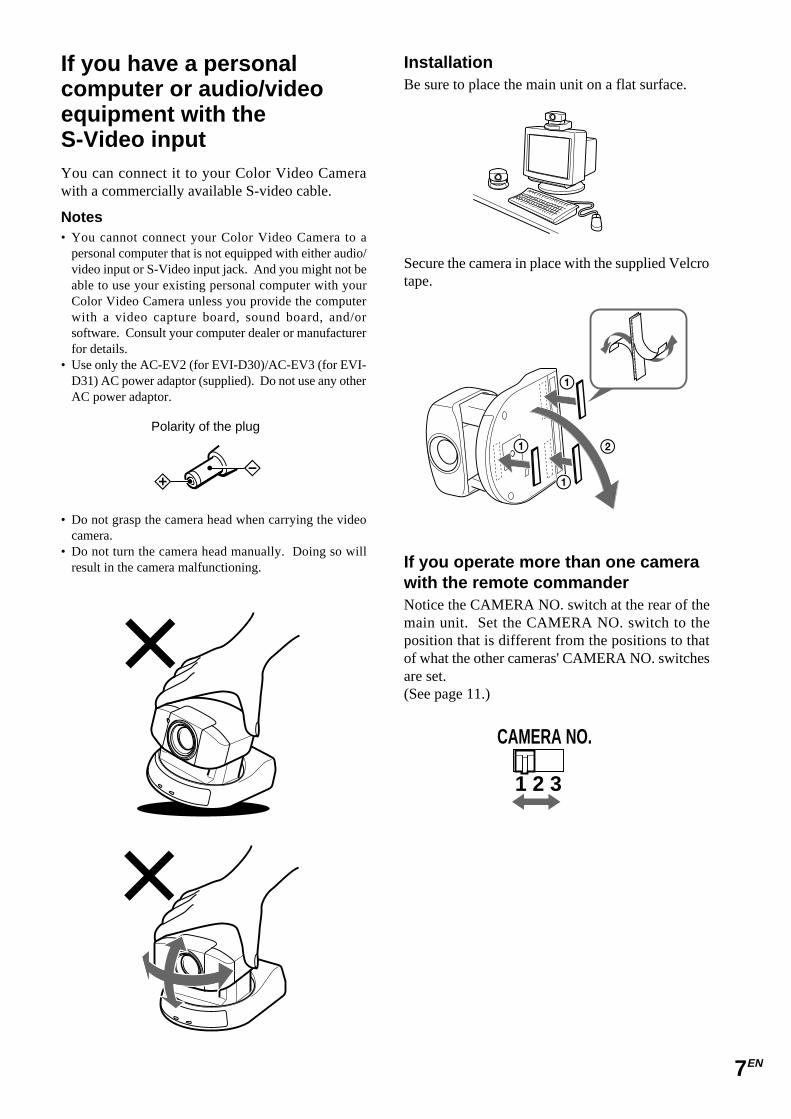
Secure the camera in place with the supplied Velcrotape.
InstallationBe sure to place the main unit on a flat surface.
If you operate more than one camerawith the remote commanderNotice the CAMERA NO. switch at the rear of themain unit. Set the CAMERA NO. switch to theposition that is different from the positions to thatof what the other cameras' CAMERA NO. switchesare set.(See page 11.)
Polarity of the plug
CAMERA NO.
1 2 3
8EN
Turning on the Power Setting the Clock
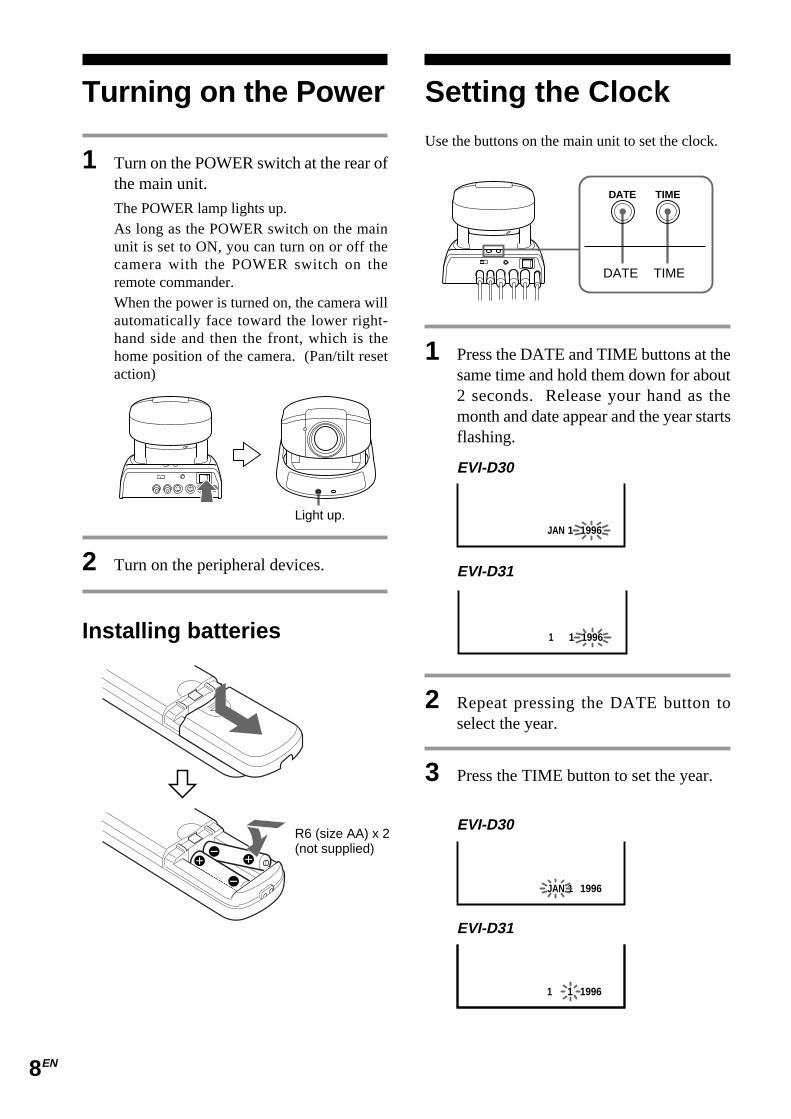
1 Turn on the POWER switch at the rear ofthe main unit.
The POWER lamp lights up.As long as the POWER switch on the mainunit is set to ON, you can turn on or off thecamera with the POWER switch on theremote commander.When the power is turned on, the camera willautomatically face toward the lower right-hand side and then the front, which is thehome position of the camera. (Pan/tilt resetaction)
2 Turn on the peripheral devices.
Use the buttons on the main unit to set the clock.
TIMEDATE
TIMEDATE
1 Press the DATE and TIME buttons at thesame time and hold them down for about2 seconds. Release your hand as themonth and date appear and the year startsflashing.
2 Repeat pressing the DATE button toselect the year.
3 Press the TIME button to set the year.
Light up.
R6 (size AA) x 2(not supplied)
Installing batteries
EVI-D30
1996JAN 1
EVI-D31
19961 1
1996JAN 1
19961 1
EVI-D30
EVI-D31
9EN
4 Repeat the steps 2 and 3 to set the othertime elements in the order of month,date, hour, and minute.
The clock starts operating as you press theTIME button to set the minute.
Having the clock displayedYou can select the clock display from either time ordate.To have the time displayed, press the TIMEbutton.To have the date displayed, press the DATEbutton.To turn off the clock display, press thecorresponding button again.
NoteWhen the POWER switch on the main unit is set to OFF,the clock will be as originally was. To retain the memoryof the clock setting even if the power is turned off, set theBACKUP switch, at the rear of the camera head, to ON.(See “About backup” on page 25.)
EVI-D30
EVI-D31
3:15:01 PM19964JUL
15:15:01199674

10EN
Basic Operations
1 Press the POWER button.
The camera will be turned on, performing thepan/tilt reset action automatically.
2 Press the arrow button to perform thepan/tilt operation.
While checking the picture on the screen,press a desired arrow button.To move the camera inch by inch, pressthe button for a moment.To move the camera in a wide range,press and hold down the button.To move the camera diagonally, pressthe arrow button ( or ) while holdingdown the arrow button ( or ).
To face the camera back to the frontPress the HOME button.
If you accidentally move the camerawith your handPress the PAN-TILT RESET button to reset thepan/tilt position.The deviation from the position that the cameramemorizes will be corrected and the operation willbe back in order.
If you wish to face the camera towardthe opposite direction in which thearrow on a pressed button pointsThe camera is preset to face toward the rightwhenever the arrow ( ) button is pressed. Youmight wish to face the camera toward the oppositedirection in which the arrow on a pressed buttonpoints, in such a case when you change thedirection of the camera while checking the pictureon the screen. In this case, press the REV buttonwhile holding down the L/R DIRECTION SETbutton.To reset that setting, press the STD button whileholding down the L/R DIRECTION SET button.
Pan/Tilt Operation
1
2STD
REV
HOME
PAN-TILTRESET
L/R DIRECTIONSET
1
AUTO
2
3
CAMERA SELE
CT
ON/OFF
FAR
ENTRY
OFFSET
FOCUS
POWER
BACK LIGHT
CHASEAT
MD
NEAR
MENU
HOME
CURSOR
L/R
DIRECTION SET
PAN-TILT
RESET
AUTO ZO
OM
AEON/O
FF
MANUAL
DETECT
FRAME
PRESET
RESET
POSITION
PAN-TILT
/CURSOR
SLOW·ZO
OM·FAST
T
TW
W
DATA SCREEN
STD
REV1
23
45
6
START/S
TOP FR
AME DISPLAY
CAMERA SELECT
Arrowbutton
SettingMovement ofthe camera
While holdingdown
L/R DIRECTION SET
STD
1
Press
While holdingdown
L/R DIRECTION SET
PressREV
2
NoteRepeat the above-mentioned procedure for each remotecommander if you are using more than one remotecommander. This is because the setting is performed bychanging the signal emitted from each remote commander,not by changing the setting of the camera itself.
If the lamp at the side of the lensflashes redThe micro computer inside the camera might notmemorize the current pan/tilt position properly.Press the PAN-TILT RESET button to reset thepan/tilt position.
Flashes.
11EN
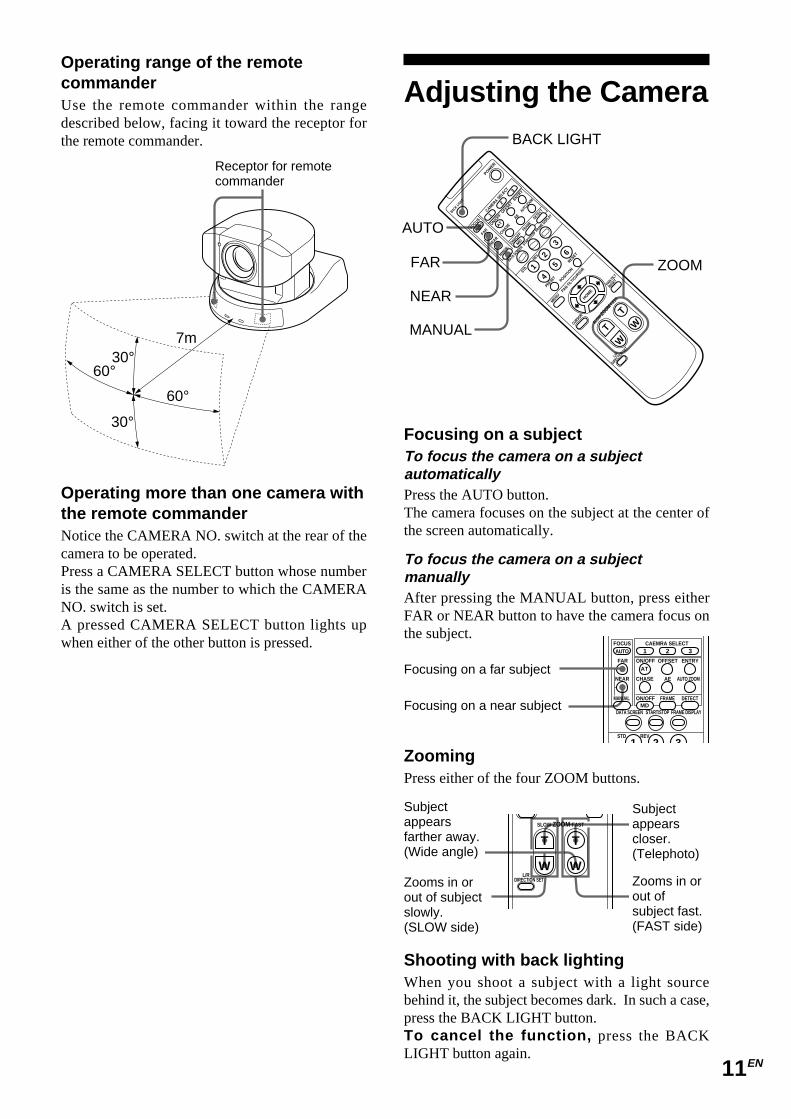
Focusing on a subjectTo focus the camera on a subjectautomaticallyPress the AUTO button.The camera focuses on the subject at the center ofthe screen automatically.
To focus the camera on a subjectmanuallyAfter pressing the MANUAL button, press eitherFAR or NEAR button to have the camera focus onthe subject.
Operating range of the remotecommanderUse the remote commander within the rangedescribed below, facing it toward the receptor forthe remote commander.
30°
30°
60°
7m
60°
Receptor for remotecommander
Operating more than one camera withthe remote commanderNotice the CAMERA NO. switch at the rear of thecamera to be operated.Press a CAMERA SELECT button whose numberis the same as the number to which the CAMERANO. switch is set.A pressed CAMERA SELECT button lights upwhen either of the other button is pressed.
Adjusting the Camera
1AUTO 2 3CAEMRA SELECT
ON/OFFFAR ENTRYOFFSET
FOCUS
CHASE
AT
MD
NEAR AUTO ZOOMAE
ON/OFFMANUAL DETECTFRAME
DATA SCREEN
STD REV
1 2 3
START/STOP FRAME DISPLAY
Focusing on a far subject
Focusing on a near subject
ZoomingPress either of the four ZOOM buttons.
L/R DIRECTION SET
SLOW·ZOOM·FAST
T T
W W
Subjectappearsfarther away.(Wide angle)
Zooms in orout ofsubject fast.(FAST side)
Subjectappearscloser.(Telephoto)
Zooms in orout of subjectslowly.(SLOW side)
Shooting with back lightingWhen you shoot a subject with a light sourcebehind it, the subject becomes dark. In such a case,press the BACK LIGHT button.To cancel the function, press the BACKLIGHT button again.
AUTO
FAR
NEAR
BACK LIGHT
ZOOM
MANUAL
1
AUTO
2
3
CAMERA SELE
CT
ON/OFF
FAR
ENTRY
OFFSET
FOCUS
POWER
BACK LIGHT
CHASEAT
MD
NEAR
MENU
HOME
CURSOR
L/R
DIRECTION SET
PAN-TILT
RESET
AUTO ZO
OM
AEON/O
FF
MANUAL
DETECT
FRAME
PRESET
RESET
POSITION
PAN-TILT
/CURSOR
SLOW·ZO
OM·FAST
T
TW
W
DATA SCREEN
STD
REV1
23
45
6
START/S
TOP FR
AME DISPLAY
12EN
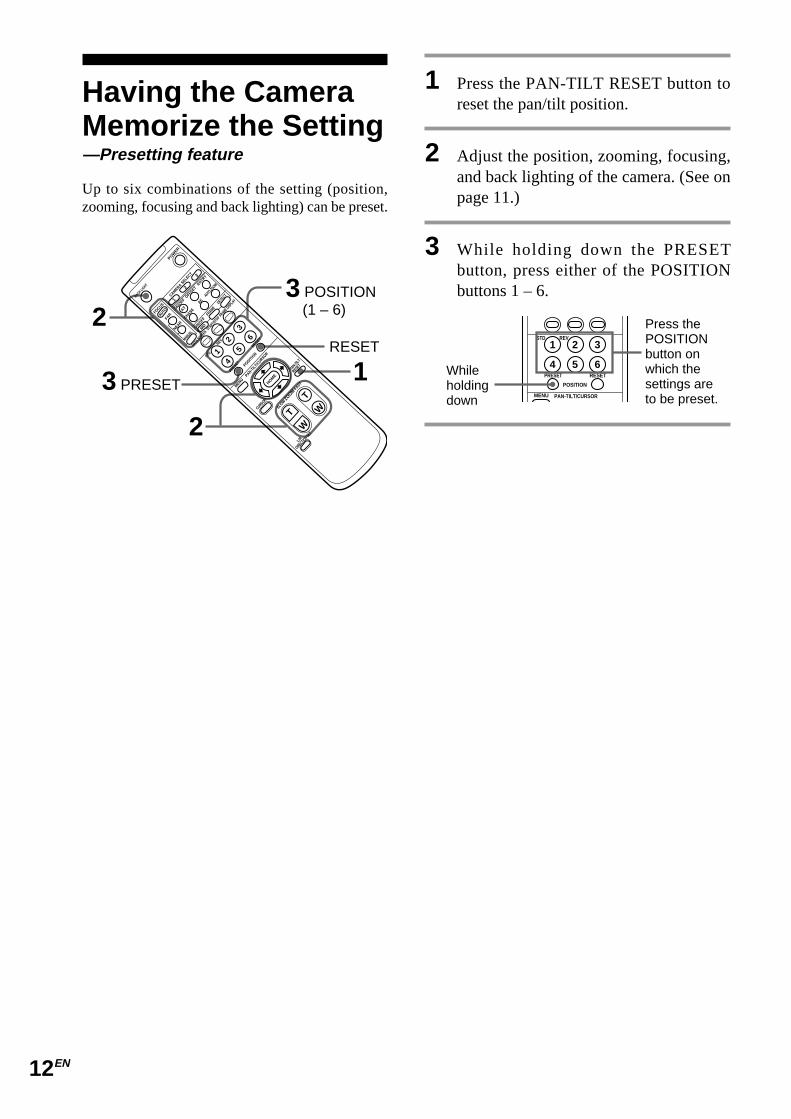
Having the CameraMemorize the Setting—Presetting feature
Up to six combinations of the setting (position,zooming, focusing and back lighting) can be preset.
1 Press the PAN-TILT RESET button toreset the pan/tilt position.
2 Adjust the position, zooming, focusing,and back lighting of the camera. (See onpage 11.)
3 While holding down the PRESETbutton, press either of the POSITIONbuttons 1 – 6.
MENU
PRESET RESET
POSITION
PAN-TILT/CURSOR
STD REV
1 2 3
4 5 6Whileholdingdown
Press thePOSITIONbutton onwhich thesettings areto be preset.
1
2
2
3 POSITION(1 – 6)
3 PRESET
RESET
1
AUTO
2
3
CAMERA SELE
CT
ON/OFF
FAR
ENTRY
OFFSET
FOCUS
POWER
BACK LIGHT
CHASEAT
MD
NEAR
MENU
HOME
CURSOR
L/R
DIRECTION SET
PAN-TILT
RESET
AUTO ZO
OM
AEON/O
FF
MANUAL
DETECT
FRAME
PRESET
RESET
POSITION
PAN-TILT
/CURSOR
SLOW·ZO
OM·FAST
T
TW
W
DATA SCREEN
STD
REV1
23
45
6
START/S
TOP FR
AME DISPLAY
13EN
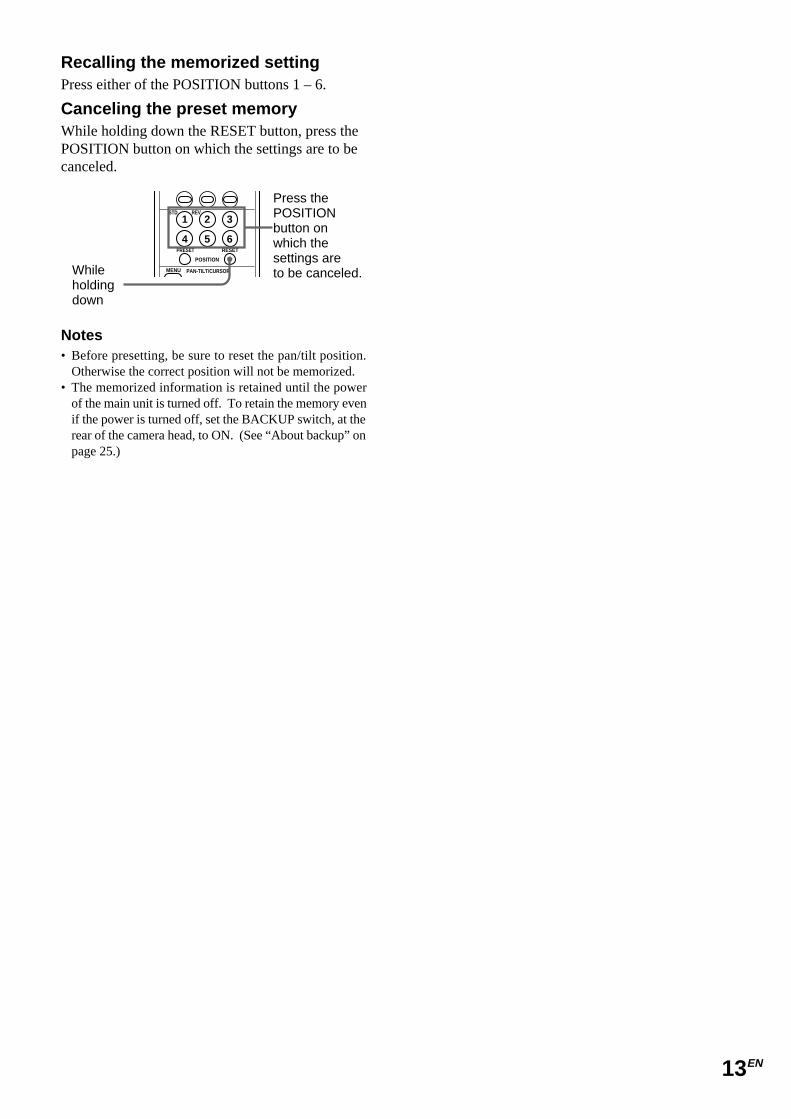
Recalling the memorized settingPress either of the POSITION buttons 1 – 6.
Canceling the preset memoryWhile holding down the RESET button, press thePOSITION button on which the settings are to becanceled.
Notes• Before presetting, be sure to reset the pan/tilt position.
Otherwise the correct position will not be memorized.• The memorized information is retained until the power
of the main unit is turned off. To retain the memory evenif the power is turned off, set the BACKUP switch, at therear of the camera head, to ON. (See “About backup” onpage 25.)
MENU
PRESET RESET
POSITION
PAN-TILT/CURSOR
STD REV
1 2 3
4 5 6
Press thePOSITIONbutton onwhich thesettings areto be canceled.While
holdingdown
14EN
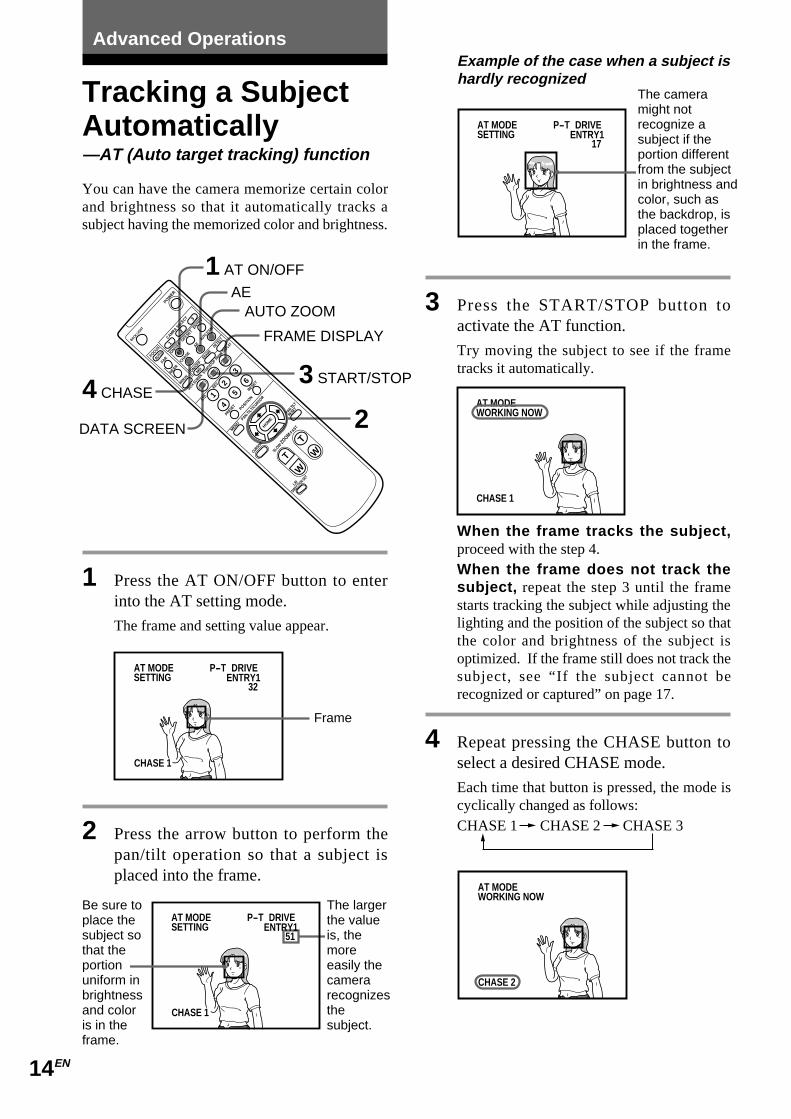
Example of the case when a subject ishardly recognized
3 Press the START/STOP button toactivate the AT function.
Try moving the subject to see if the frametracks it automatically.
When the frame tracks the subject,proceed with the step 4.When the frame does not track thesubject, repeat the step 3 until the framestarts tracking the subject while adjusting thelighting and the position of the subject so thatthe color and brightness of the subject isoptimized. If the frame still does not track thesubject, see “If the subject cannot berecognized or captured” on page 17.
4 Repeat pressing the CHASE button toselect a desired CHASE mode.
Each time that button is pressed, the mode iscyclically changed as follows:CHASE 1 CHASE 2 CHASE 3
Advanced Operations
Tracking a SubjectAutomatically—AT (Auto target tracking) function
1
AUTO
2
3
CAMRA SELE
CT
ON/OFF
FAR
ENTRY
OFFSET
FOCUS
POWER
BACK LIGHT
CHASEAT
MD
NEAR
MENU
HOME
CURSOR
L/R
DIRECTION SET
PAN-TILT
RESET
AUTO ZO
OM
AEON/O
FF
MANUAL
DETECT
ERAME
PRESET
RESET
POSITION
PAN-TILT
/CURSOR
SLOW·ZO
OM·FAST
T
TW
W
DETA SCREEN
STD
REV1
23
45
6
START/S
TOP FR
AME DISPLAY
2
3 START/STOP4 CHASE
1 AT ON/OFF
DATA SCREEN
FRAME DISPLAY
AEAUTO ZOOM
The cameramight notrecognize asubject if theportion differentfrom the subjectin brightness andcolor, such asthe backdrop, isplaced togetherin the frame.
1 Press the AT ON/OFF button to enterinto the AT setting mode.
The frame and setting value appear.
2 Press the arrow button to perform thepan/tilt operation so that a subject isplaced into the frame.
You can have the camera memorize certain colorand brightness so that it automatically tracks asubject having the memorized color and brightness.
Frame
The largerthe valueis, themoreeasily thecamerarecognizesthesubject.
Be sure toplace thesubject sothat theportionuniform inbrightnessand coloris in theframe.
CHASE 1
AT MODE P-T DRIVEENTRY1
32SETTING
CHASE 1
AT MODE P-T DRIVEENTRY1
51SETTING
CHASE 2
AT MODEWORKING NOW
CHASE 1
AT MODEWORKING NOW
AT MODE P-T DRIVEENTRY1
17SETTING
15EN
To keep the brightness of the subjectas is (Auto back lighting function)After the step 2, press the AE button.
To disactivate the function, press that buttonagain.
NoteBe sure to press the AE button before proceeding with thestep 3. This function is not activated after the START/STOP button is pressed.
To keep the size of the memorizedsubject as isAfter the step 2, press the AUTO ZOOM button.To cancel the function, press that button again.
To cancel the AT functionPress the START/STOP button.The information of the memorized subject iserased.To exit from the AT setting mode, press theAT ON/OFF button.
If the lamp at the side of the lens lightupThe camera is not capturing the memorized subjectcorrectly.Press the arrow button to perform the pan/tiltoperation so that the subject comes into the screen.Or have the subject memorized onto the cameraagain.
continue to next page
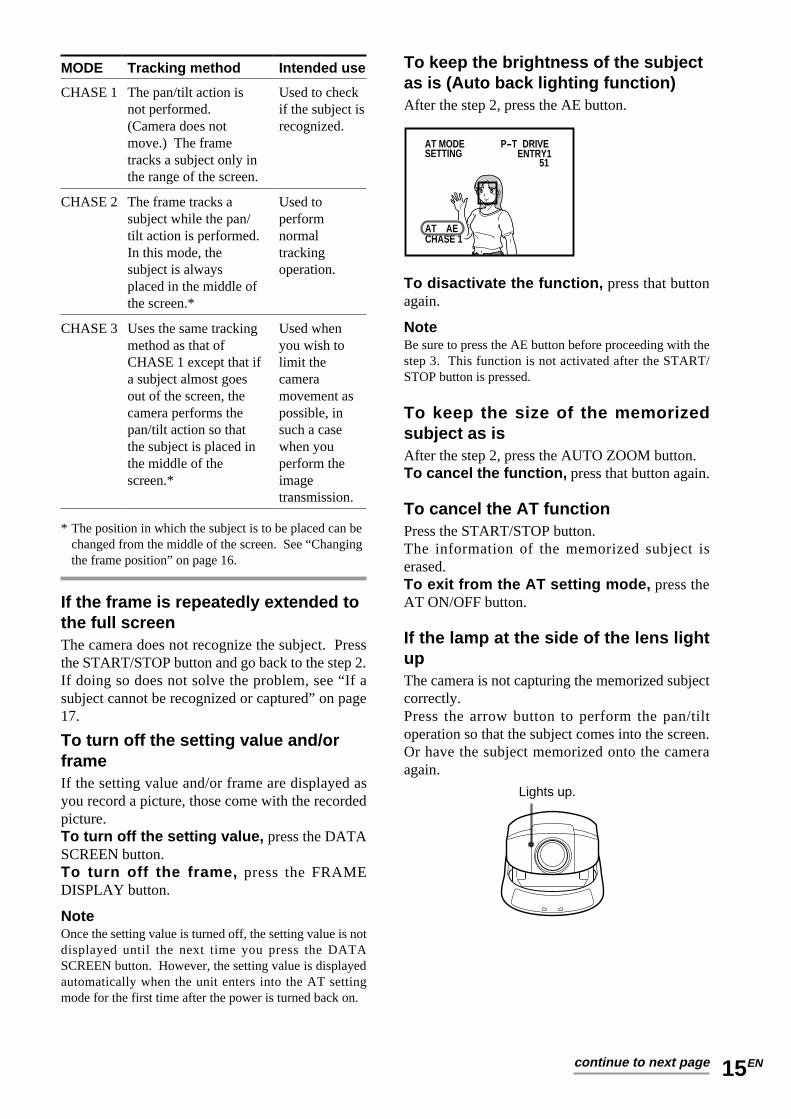
MODE
CHASE 1
CHASE 2
CHASE 3
Tracking method
The pan/tilt action isnot performed.(Camera does notmove.) The frametracks a subject only inthe range of the screen.
The frame tracks asubject while the pan/tilt action is performed.In this mode, thesubject is alwaysplaced in the middle ofthe screen.*
Uses the same trackingmethod as that ofCHASE 1 except that ifa subject almost goesout of the screen, thecamera performs thepan/tilt action so thatthe subject is placed inthe middle of thescreen.*
Intended use
Used to checkif the subject isrecognized.
Used toperformnormaltrackingoperation.
Used whenyou wish tolimit thecameramovement aspossible, insuch a casewhen youperform theimagetransmission.
* The position in which the subject is to be placed can bechanged from the middle of the screen. See “Changingthe frame position” on page 16.
If the frame is repeatedly extended tothe full screenThe camera does not recognize the subject. Pressthe START/STOP button and go back to the step 2.If doing so does not solve the problem, see “If asubject cannot be recognized or captured” on page17.
To turn off the setting value and/orframeIf the setting value and/or frame are displayed asyou record a picture, those come with the recordedpicture.To turn off the setting value, press the DATASCREEN button.To turn off the frame, press the FRAMEDISPLAY button.
NoteOnce the setting value is turned off, the setting value is notdisplayed until the next time you press the DATASCREEN button. However, the setting value is displayedautomatically when the unit enters into the AT settingmode for the first time after the power is turned back on.
CHASE 1AT AE
AT MODE P-T DRIVEENTRY1
51SETTING
Lights up.
16EN
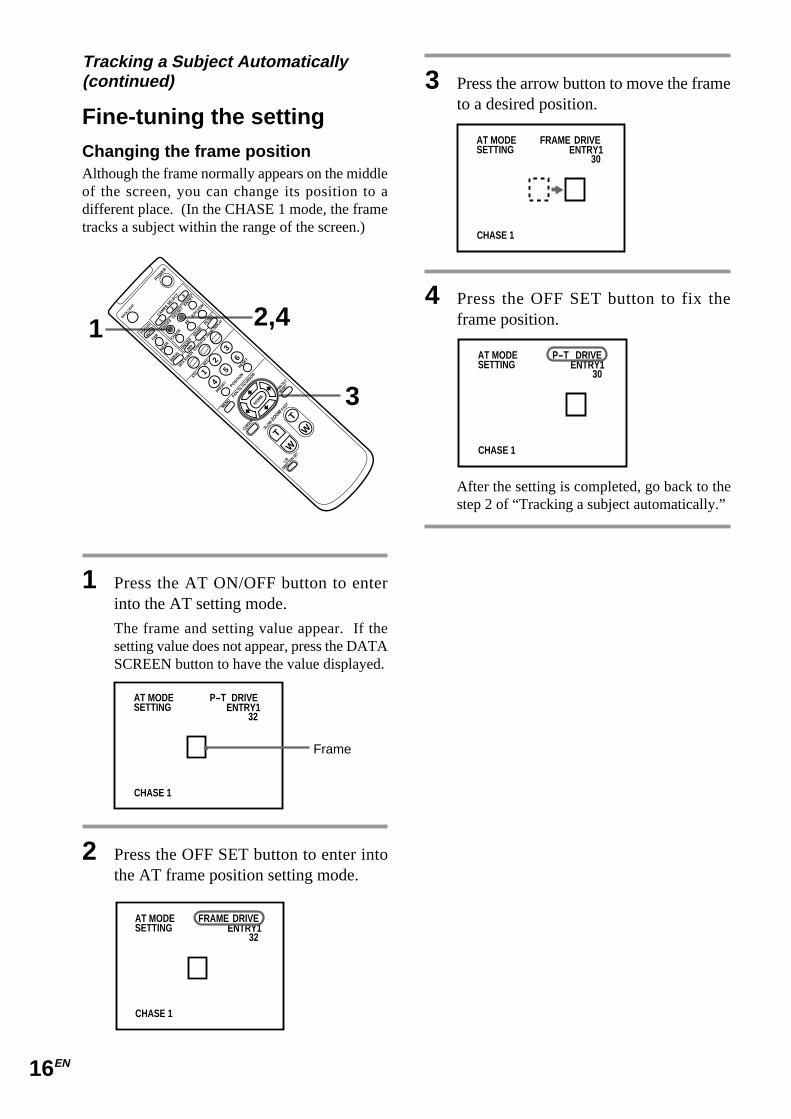
3 Press the arrow button to move the frameto a desired position.
4 Press the OFF SET button to fix theframe position.
After the setting is completed, go back to thestep 2 of “Tracking a subject automatically.”
Fine-tuning the settingChanging the frame positionAlthough the frame normally appears on the middleof the screen, you can change its position to adifferent place. (In the CHASE 1 mode, the frametracks a subject within the range of the screen.)
1
AUTO
2
3
CAMRA SELE
CT
ON/OFF
FAR
ENTRY
OFFSET
FOCUS
POWER
BACK LIGHT
CHASEAT
MD
NEAR
MENU
HOME
CURSOR
L/R
DIRECTION SET
PAN-TILT
RESET
AUTO ZO
OM
AEON/O
FF
MANUAL
DETECT
ERAME
PRESET
RESET
POSITION
PAN-TILT
/CURSOR
SLOW·ZO
OM·FAST
T
TW
W
DETA SCREEN
STD
REV1
23
45
6
START/S
TOP FR
AME DISPLAY
3
1 2,4
1 Press the AT ON/OFF button to enterinto the AT setting mode.
The frame and setting value appear. If thesetting value does not appear, press the DATASCREEN button to have the value displayed.
2 Press the OFF SET button to enter intothe AT frame position setting mode.
Tracking a Subject Automatically(continued)
Frame
CHASE 1
AT MODE P-T DRIVEENTRY1
32SETTING
CHASE 1
AT MODE FRAME DRIVEENTRY1
32SETTING
CHASE 1
AT MODE P-T DRIVEENTRY1
30SETTING
CHASE 1
AT MODE FRAME DRIVEENTRY1
30SETTING
17EN
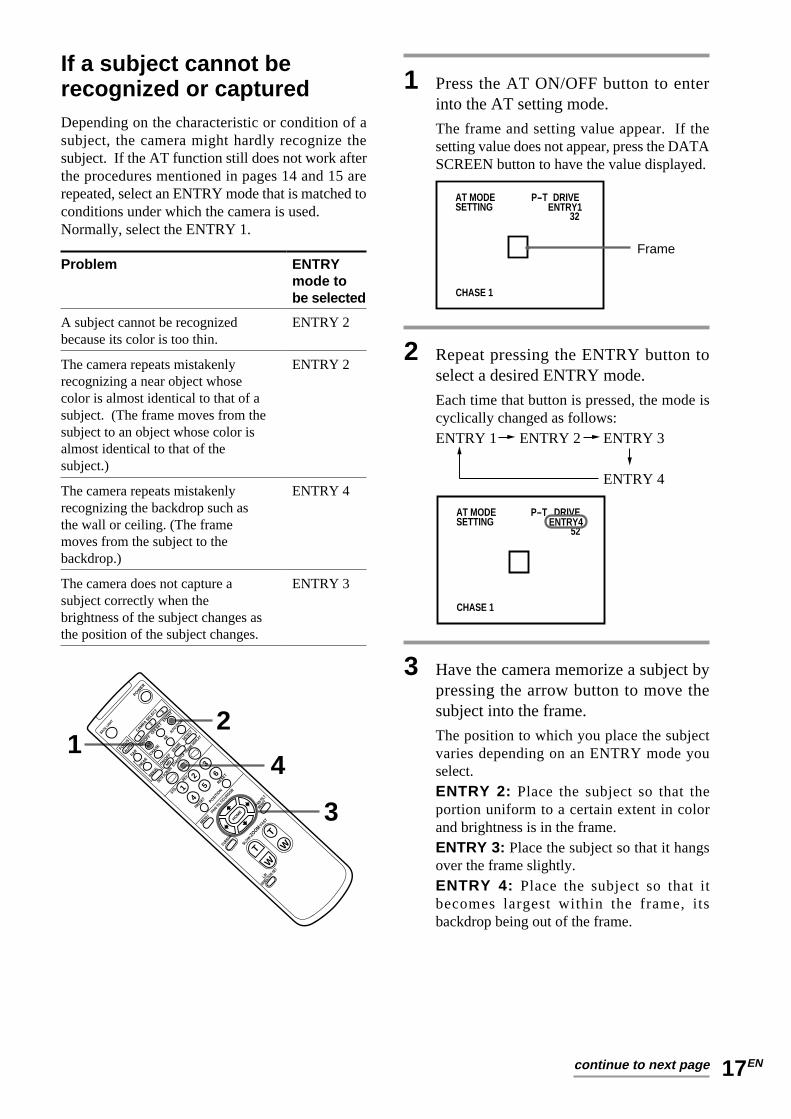
1 Press the AT ON/OFF button to enterinto the AT setting mode.
The frame and setting value appear. If thesetting value does not appear, press the DATASCREEN button to have the value displayed.
2 Repeat pressing the ENTRY button toselect a desired ENTRY mode.
Each time that button is pressed, the mode iscyclically changed as follows:ENTRY 1 ENTRY 2 ENTRY 3
ENTRY 4
3 Have the camera memorize a subject bypressing the arrow button to move thesubject into the frame.
The position to which you place the subjectvaries depending on an ENTRY mode youselect.ENTRY 2: Place the subject so that theportion uniform to a certain extent in colorand brightness is in the frame.ENTRY 3: Place the subject so that it hangsover the frame slightly.ENTRY 4: Place the subject so that itbecomes largest within the frame, itsbackdrop being out of the frame.
If a subject cannot berecognized or capturedDepending on the characteristic or condition of asubject, the camera might hardly recognize thesubject. If the AT function still does not work afterthe procedures mentioned in pages 14 and 15 arerepeated, select an ENTRY mode that is matched toconditions under which the camera is used.Normally, select the ENTRY 1.
ENTRYmode tobe selected
ENTRY 2
ENTRY 2
ENTRY 4
ENTRY 3
Problem
A subject cannot be recognizedbecause its color is too thin.
The camera repeats mistakenlyrecognizing a near object whosecolor is almost identical to that of asubject. (The frame moves from thesubject to an object whose color isalmost identical to that of thesubject.)
The camera repeats mistakenlyrecognizing the backdrop such asthe wall or ceiling. (The framemoves from the subject to thebackdrop.)
The camera does not capture asubject correctly when thebrightness of the subject changes asthe position of the subject changes.
continue to next page
1
AUTO
2
3
CAMRA SELE
CT
ON/OFF
FAR
ENTRY
OFFSET
FOCUS
POWER
BACK LIGHT
CHASEAT
MD
NEAR
MENU
HOME
CURSOR
L/R
DIRECTION SET
PAN-TILT
RESET
AUTO ZO
OM
AEON/O
FF
MANUAL
DETECT
ERAME
PRESET
RESET
POSITION
PAN-TILT
/CURSOR
SLOW·ZO
OM·FAST
T
TW
W
DETA SCREEN
STD
REV1
23
45
6
START/S
TOP FR
AME DISPLAY
3
12
4
CHASE 1
AT MODE P-T DRIVEENTRY1
32SETTING
Frame
CHASE 1
AT MODE P-T DRIVEENTRY4
52SETTING
18EN
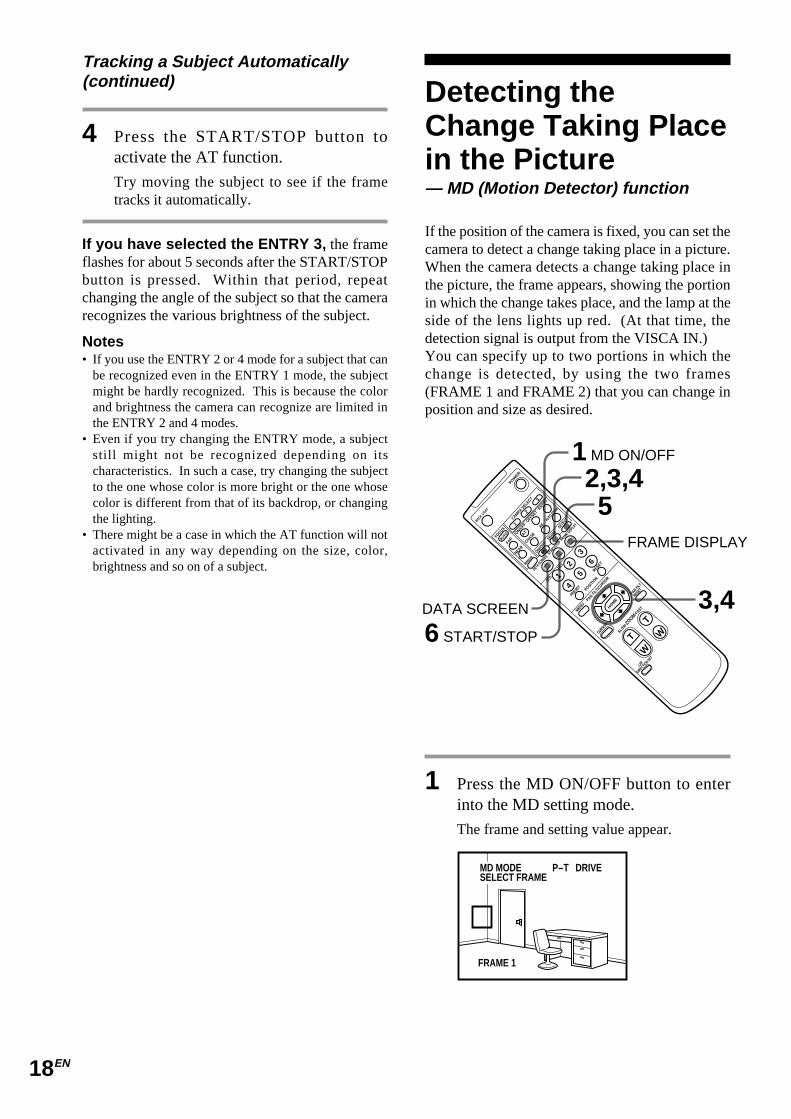
Detecting theChange Taking Placein the Picture— MD (Motion Detector) function
If the position of the camera is fixed, you can set thecamera to detect a change taking place in a picture.When the camera detects a change taking place inthe picture, the frame appears, showing the portionin which the change takes place, and the lamp at theside of the lens lights up red. (At that time, thedetection signal is output from the VISCA IN.)You can specify up to two portions in which thechange is detected, by using the two frames(FRAME 1 and FRAME 2) that you can change inposition and size as desired.
1
AUTO
2
3
CAMRA SELE
CT
ON/OFF
FAR
ENTRY
OFFSET
FOCUS
POWER
BACK LIGHT
CHASEAT
MD
NEAR
MENU
HOME
CURSOR
L/R
DIRECTION SET
PAN-TILT
RESET
AUTO ZO
OM
AEON/O
FF
MANUAL
DETECT
ERAME
PRESET
RESET
POSITION
PAN-TILT
/CURSOR
SLOW·ZO
OM·FAST
T
TW
W
DETA SCREEN
STD
REV1
23
45
6
START/S
TOP FR
AME DISPLAY
3,4
52,3,4
6 START/STOP
1 MD ON/OFF
DATA SCREEN
FRAME DISPLAY
1 Press the MD ON/OFF button to enterinto the MD setting mode.
The frame and setting value appear.
4 Press the START/STOP button toactivate the AT function.
Try moving the subject to see if the frametracks it automatically.
If you have selected the ENTRY 3, the frameflashes for about 5 seconds after the START/STOPbutton is pressed. Within that period, repeatchanging the angle of the subject so that the camerarecognizes the various brightness of the subject.
Notes• If you use the ENTRY 2 or 4 mode for a subject that can
be recognized even in the ENTRY 1 mode, the subjectmight be hardly recognized. This is because the colorand brightness the camera can recognize are limited inthe ENTRY 2 and 4 modes.
• Even if you try changing the ENTRY mode, a subjectstill might not be recognized depending on itscharacteristics. In such a case, try changing the subjectto the one whose color is more bright or the one whosecolor is different from that of its backdrop, or changingthe lighting.
• There might be a case in which the AT function will notactivated in any way depending on the size, color,brightness and so on of a subject.
Tracking a Subject Automatically(continued)
FRAME 1
MD MODE P-T DRIVESELECT FRAME

19EN
5 Repeat pressing the DETECT button toselect a frame to be used.
Each time that button is pressed, the frame tobe used is cyclically changed as follows:FRAME 1 FRAME 2 F1 & F2*
* If a change is detected even in either of FRAME 1or FRAME 2, the lamp at the side of the lens lightsup red.
6 Press the START/STOP button toactivate the MD function.
To turn off the setting value and/orframeIf the setting value and/or frame are displayed asyou record a picture, those come with the recordedpicture.To turn off the setting value, press the DATASCREEN button.To turn off the frame, press the FRAMEDISPLAY button.
To cancel the MD functionPress the START/STOP button.To exit from the MD mode, press the MD ON/OFF button.
NoteOnce the frame is set, it remains memorized until thepower is turned off.To retain the memory of the frame setting even if the poweris turned off, set the BACKUP switch, at the rear of thecamera head, to ON. (See “About backup” on page 25.)
2 Press the FRAME button to enter into thedetection frame setting mode.
3 Decide the position and size of theFRAME 1.
q Press the arrow button to set the positionof the FRAME 1. Then press the FRAMEbutton.
w Press the arrow button to set the size of theFRAME 1. Then press the FRAMEbutton.
That completes the settings of the FRAME 1’sposition and size, and enter into the settingmode of the FRAME 2.If you choose not to set the FRAME 2,proceed with the step 5.
4 Repeat the procedure of the step 3 to setthe FRAME 2’s position and size.
continue to next page
FRAME 1
MD MODE FRAME DRIVESET FRAME
FRAME 1
MD MODE FRAME DRIVESET FRAME
FRAME 1
MD MODE FRAME DRIVESET FRAME
FRAME 1
MD MODEWORKING NOW
F1&F2
MD MODE FRAME DRIVESET FRAME

20EN
1 Press the MD ON/OFF button to enterinto the MD setting mode.
The frame and setting value appear. If thesetting value does not appear, press the DATASCREEN button to have the setting valuedisplayed.
2 Press the START/STOP button to startthe detection operation.
3 Press the MENU button to enter into theMD ADJUST MODE.
4 While holding down the CURSORbutton, press the arrow button (or ) to select a desired referencepicture refreshing mode (1 – 3).
1
AUTO
2
3
CAMRA SELE
CT
ON/OFF
FAR
ENTRY
OFFSET
FOCUS
POWER
BACK LIGHT
CHASEAT
MD
NEAR
MENU
HOME
CURSOR
L/R
DIRECTION SET
PAN-TILT
RESET
AUTO ZO
OM
AEON/O
FF
MANUAL
DETECT
ERAME
PRESET
RESET
POSITION
PAN-TILT
/CURSOR
SLOW·ZO
OM·FAST
T
TW
W
DETA SCREEN
STD
REV1
23
45
6
START/S
TOP FR
AME DISPLAY
4,5
4,5
51
2 START/STOP
3,6 MENU
Fine-tuning the settingsThe MD function works in the following manner:the camera memorizes a picture of a certainmoment as the “reference picture,” and comparesthe current picture with the reference picture todetect whether or not a change takes place.Although the camera is factory-set to refresh areference picture after a certain period of time, youcan change the timing when a reference picture isrefreshed or can set the camera not to refresh thereference picture, according to conditions underwhich the camera is used.In addition, you can adjust the parameter that setsthe camera to detect a certain kind of change suchas color and brightness.
Condition underwhich thecamera is used
Sunlight comesin, and the lightsource changesover time.
• Sunlight comesin, and thequantity of lightchanges overtime.
• You wish tohave thecamera detectonly a suddenchange.
• Sunlight does notcome in, and thebrightness of thelight source doesnot change.
• You wish to havethe camera detecteven a slightchange.
Referencepicturerefreshingmode tobeselected
MODE 1
MODE 2
MODE 3
When to refresh
The reference pictureis automaticallyrefreshed after acertain period of time(Factory-setting :approx. 0.1 second)
The reference pictureis automaticallyrefreshed after acertain period oftime unless a changehas taken place inthe picture. When achange is beingdetected, thereference picture isnot refreshed.
The referencepicture is alwaysas originally was.
Detecting the Change Taking Place inthe Picture (continued)
FRAME 1
MD MODE P-T DRIVESELECT FRAME
MD ADJUST MODE
MODEBRIGHTHUESIZEREFRESHDISPLAY
12
15013
21EN
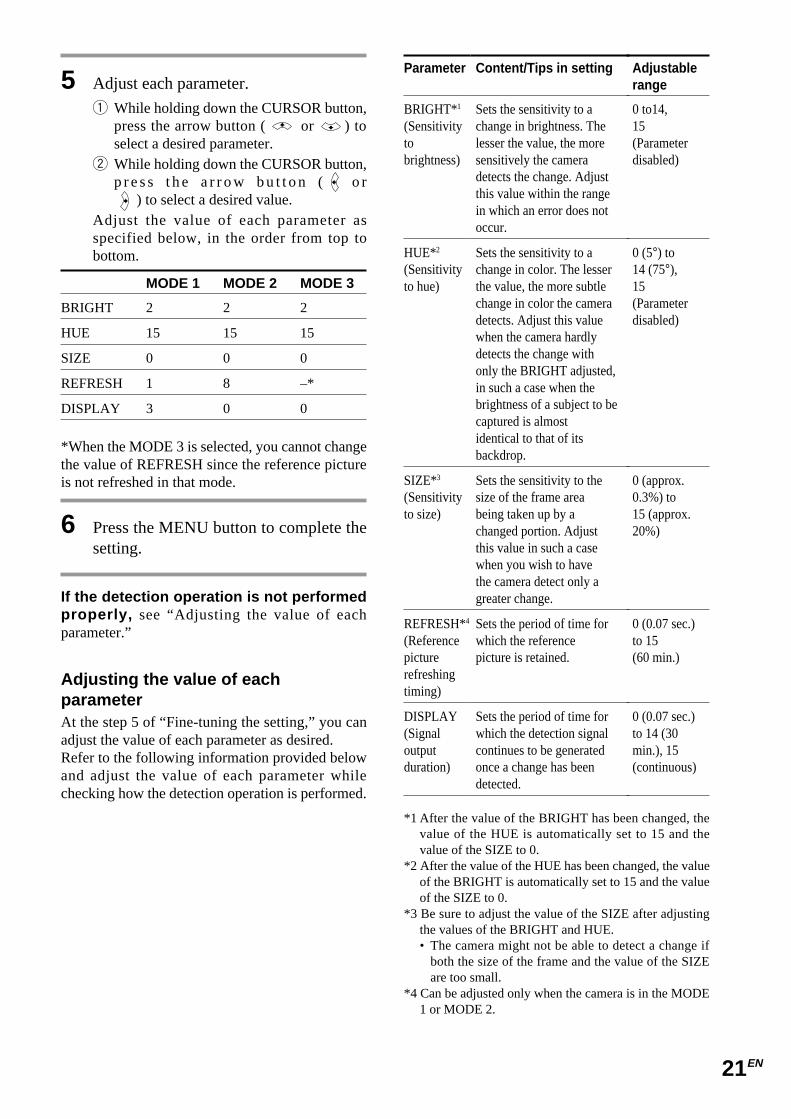
5 Adjust each parameter.
q While holding down the CURSOR button,press the arrow button ( or ) toselect a desired parameter.
w While holding down the CURSOR button,p r e s s t h e a r r o w b u t t o n ( o r
) to select a desired value.Adjust the value of each parameter asspecified below, in the order from top tobottom.
MODE 1 MODE 2 MODE 3
BRIGHT 2 2 2
HUE 15 15 15
SIZE 0 0 0
REFRESH 1 8 –*
DISPLAY 3 0 0
*When the MODE 3 is selected, you cannot changethe value of REFRESH since the reference pictureis not refreshed in that mode.
6 Press the MENU button to complete thesetting.
If the detection operation is not performedproperly, see “Adjusting the value of eachparameter.”
Adjusting the value of eachparameterAt the step 5 of “Fine-tuning the setting,” you canadjust the value of each parameter as desired.Refer to the following information provided belowand adjust the value of each parameter whilechecking how the detection operation is performed.
Parameter
BRIGHT*1
(Sensitivitytobrightness)
HUE*2
(Sensitivityto hue)
SIZE*3
(Sensitivityto size)
REFRESH*4
(Referencepicturerefreshingtiming)
DISPLAY(Signaloutputduration)
Content/Tips in setting
Sets the sensitivity to achange in brightness. Thelesser the value, the moresensitively the cameradetects the change. Adjustthis value within the rangein which an error does notoccur.
Sets the sensitivity to achange in color. The lesserthe value, the more subtlechange in color the cameradetects. Adjust this valuewhen the camera hardlydetects the change withonly the BRIGHT adjusted,in such a case when thebrightness of a subject to becaptured is almostidentical to that of itsbackdrop.
Sets the sensitivity to thesize of the frame areabeing taken up by achanged portion. Adjustthis value in such a casewhen you wish to havethe camera detect only agreater change.
Sets the period of time forwhich the referencepicture is retained.
Sets the period of time forwhich the detection signalcontinues to be generatedonce a change has beendetected.
Adjustablerange
0 to14,15(Parameterdisabled)
0 (5°) to14 (75°),15(Parameterdisabled)
0 (approx.0.3%) to15 (approx.20%)
0 (0.07 sec.)to 15(60 min.)
0 (0.07 sec.)to 14 (30min.), 15(continuous)
*1 After the value of the BRIGHT has been changed, thevalue of the HUE is automatically set to 15 and thevalue of the SIZE to 0.
*2 After the value of the HUE has been changed, the valueof the BRIGHT is automatically set to 15 and the valueof the SIZE to 0.
*3 Be sure to adjust the value of the SIZE after adjustingthe values of the BRIGHT and HUE.• The camera might not be able to detect a change if
both the size of the frame and the value of the SIZEare too small.
*4 Can be adjusted only when the camera is in the MODE1 or MODE 2.
22EN
General
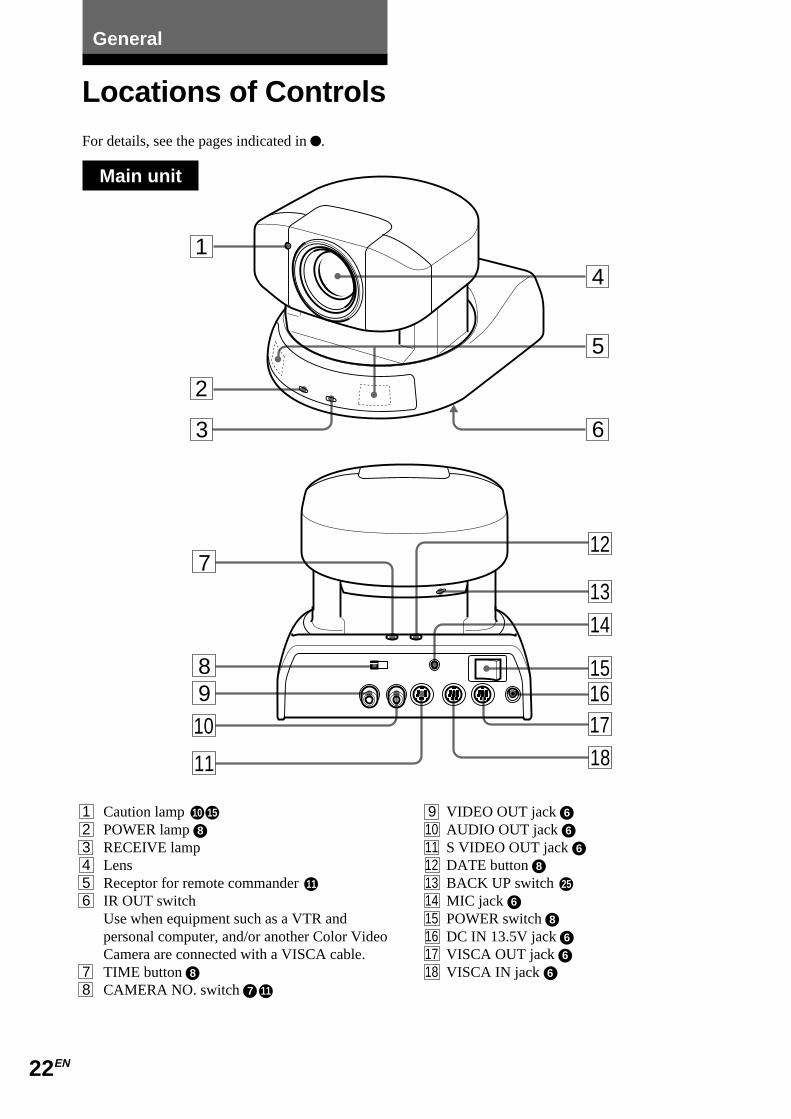
Locations of Controls
1 Caution lamp 10 15
2 POWER lamp 83 RECEIVE lamp4 Lens5 Receptor for remote commander 11
6 IR OUT switchUse when equipment such as a VTR andpersonal computer, and/or another Color VideoCamera are connected with a VISCA cable.
7 TIME button 88 CAMERA NO. switch 7 11
For details, see the pages indicated in .
Main unit
1
2
3
4
6
5
7
89
10
11
12
13
14
151617
18
9 VIDEO OUT jack 610 AUDIO OUT jack 611 S VIDEO OUT jack 612 DATE button 813 BACK UP switch 25
14 MIC jack 615 POWER switch 816 DC IN 13.5V jack 617 VISCA OUT jack 618 VISCA IN jack 6
23ENcontinue to next page
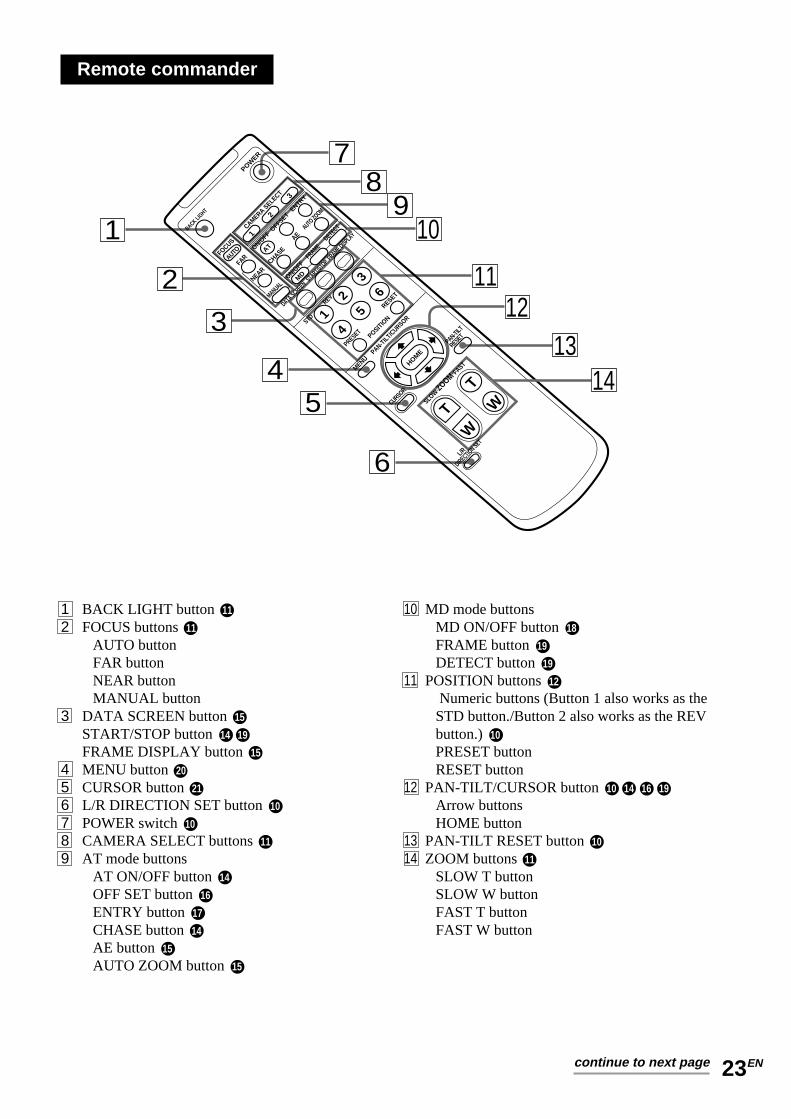
Remote commander
1
AUTO
2
3
CAMERA SELECT
ON/OFF
FAR
ENTRY
OFFSET
FOCUS
POWER
BACK LIGHT
CHASEAT
MD
NEAR
MENU
HOME
CURSOR
L/R
DIRECTION SET
PAN-TILT
RESET
AUTO ZO
OM
AEON/O
FF
MANUAL
DETECT
FRAME
PRESET
RESET
POSITION
PAN-TILT/CURSOR
SLOW·ZOOM·FAST
T
TW
W
DATA SCREEN
STD
REV1
2
3
4
5
6
START/S
TOP FR
AME DISPLAY1
2
3
45
6
78
910
1112
1314
1 BACK LIGHT button 11
2 FOCUS buttons 11
AUTO buttonFAR buttonNEAR buttonMANUAL button
3 DATA SCREEN button 15
START/STOP button 14 19
FRAME DISPLAY button 15
4 MENU button 20
5 CURSOR button 21
6 L/R DIRECTION SET button 10
7 POWER switch 10
8 CAMERA SELECT buttons 11
9 AT mode buttonsAT ON/OFF button 14
OFF SET button 16
ENTRY button 17
CHASE button 14
AE button 15
AUTO ZOOM button 15
10 MD mode buttonsMD ON/OFF button 18
FRAME button 19
DETECT button 19
11 POSITION buttons 12
Numeric buttons (Button 1 also works as theSTD button./Button 2 also works as the REVbutton.) 10
PRESET buttonRESET button
12 PAN-TILT/CURSOR button 10 14 16 19
Arrow buttonsHOME button
13 PAN-TILT RESET button 10
14 ZOOM buttons 11
SLOW T buttonSLOW W buttonFAST T buttonFAST W button
24EN
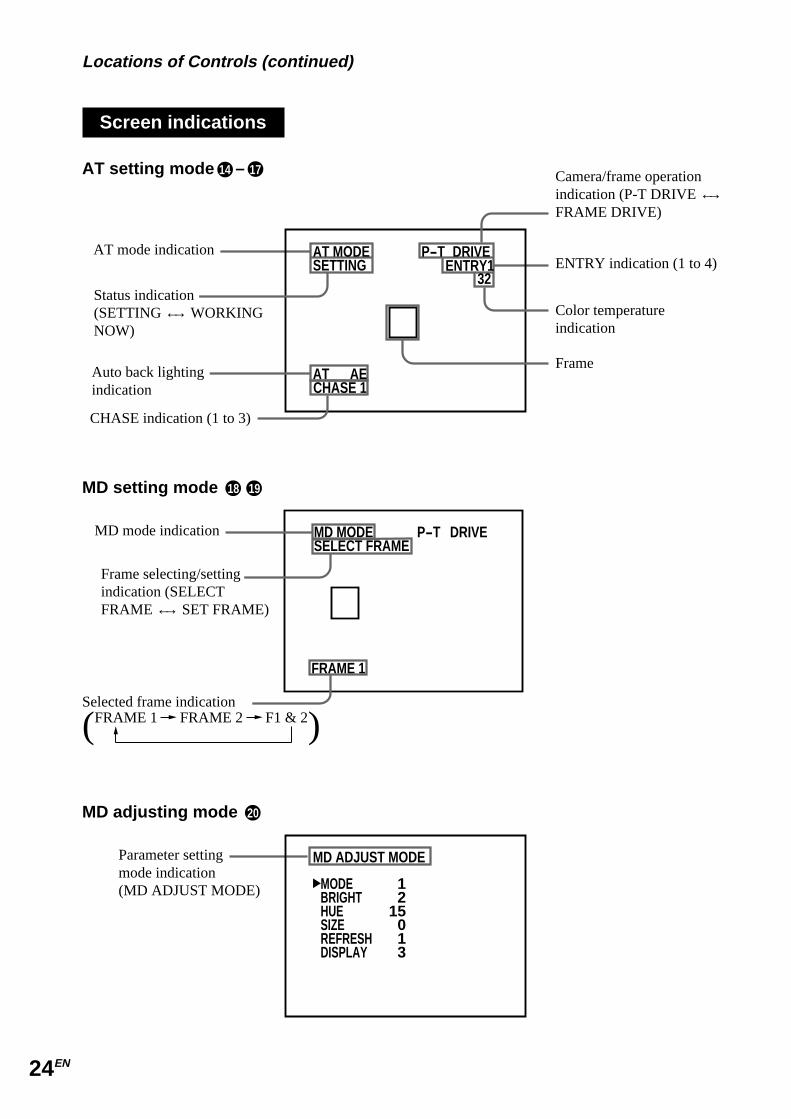
FRAME 1
MD MODE P-T DRIVESELECT FRAME
CHASE 1
AT MODE P-T DRIVEENTRY1
32SETTING
AT AE
AT setting mode 14 – 17
ENTRY indication (1 to 4)
Color temperatureindication
Frame
MD setting mode 18 19
MD adjusting mode 20
Screen indications
Camera/frame operationindication (P-T DRIVE ←→FRAME DRIVE)
MD mode indication
Frame selecting/settingindication (SELECTFRAME ←→ SET FRAME)
Selected frame indication
(FRAME 1 FRAME 2 F1 & 2)
Locations of Controls (continued)
Status indication(SETTING ←→ WORKINGNOW)
Auto back lightingindication
CHASE indication (1 to 3)
AT mode indication
MD ADJUST MODE
MODEBRIGHTHUESIZEREFRESHDISPLAY
12
15013
Parameter settingmode indication(MD ADJUST MODE)
25EN
Dispose of the lithium battery according to the locallaw.
About backupThe memories of the settings such as the clock,camera's position and MD function are erased whenthe POWER switch on the main unit is set to OFF.To retain those memories, set the BACK UPswitch, at the rear of the camera head, to ON.
Notes• In this unit, the built-in lithium battery acts as the power
source for retaining the memories and is kept charged aslong as the unit is used. If the unit is used for shorterperiod of time with the BACKUP switch set to ON,however, the battery is gradually discharged. Besides, ifyou do not use the unit at all for almost 12 weeks, thebattery is completely discharged. To retain thememories of the settings, you should recharge thebattery.
• To recharge the battery, plug in the unit to an AC outletwith the AC power adaptor and leave i t forapproximately 48 hours with the POWER switch on themain unit set to ON.
Precautions• The name plate indication operating voltage,
power consumption, etc. is located on the bottomexterior.
• After operating the unit with an AC poweradaptor, disconnect the AC power adaptpr fromthe wall outlet if the set is not to be used for anextended period of time. The POWER switch onthe rear of the main unit, does not turn the ACadaptor off.
Brightness of a subjectColor Video Camera might not work with its bestperformance in a place where brightness exceedsthe illumination range (such as a place exposed todirect sunlight).
Avoid specializedapplicationAvoid using Color Video Camera for monitoringapplication where it would be forced to focus on astationary object for a long period of time. Alsoavoid focusing the camera on an extremely brightobject such as sunlight or a fluorescent lamp.Otherwise the color filter might be damaged.
Precaution on copyrightTelevision programs, pictures, magazines, andother materials may be copyrighted. Unauthorizedrecording or storing of such materials violates theprovision of the copyright laws.
When you discard ColorVideo CameraFor environmental reasons, take out a lithiumbattery from the camera and discard it accordingly.
1 Remove the screw at the rear of the camera headusing a Phillips type screw driver and detach thecabinet.
2 Remove the stopper and connector.
3 Remove the lithium battery together with theboard.
Connector
Stopper
w
q
BACKUP
ONOFF
26EN
MaintenanceClean dirt and soil with a soft cloth or tissue paper.
Cleaning the main unit• When the body is too dirty, clean it with a soft
cloth that is soaked with a diluted neutraldetergent and tightly wrung. Then finish with adry cloth.
• Do not use any type of solvents, which maydamage the finish.
• When you use a chemical cloth, follow itsinstructions.
• Do not sprinkle volatile matter such as pesticideover Color Video Camera nor allow rubber orvinyl to come in contact with Color VideoCamera for a long period of time. Doing so maydamage the finish.
Replacing the batteries ofthe remote commanderIf the remote commander does not operate from alonger distance, the batteries may be worn out.Replace the batteries with new ones (AA × 2).
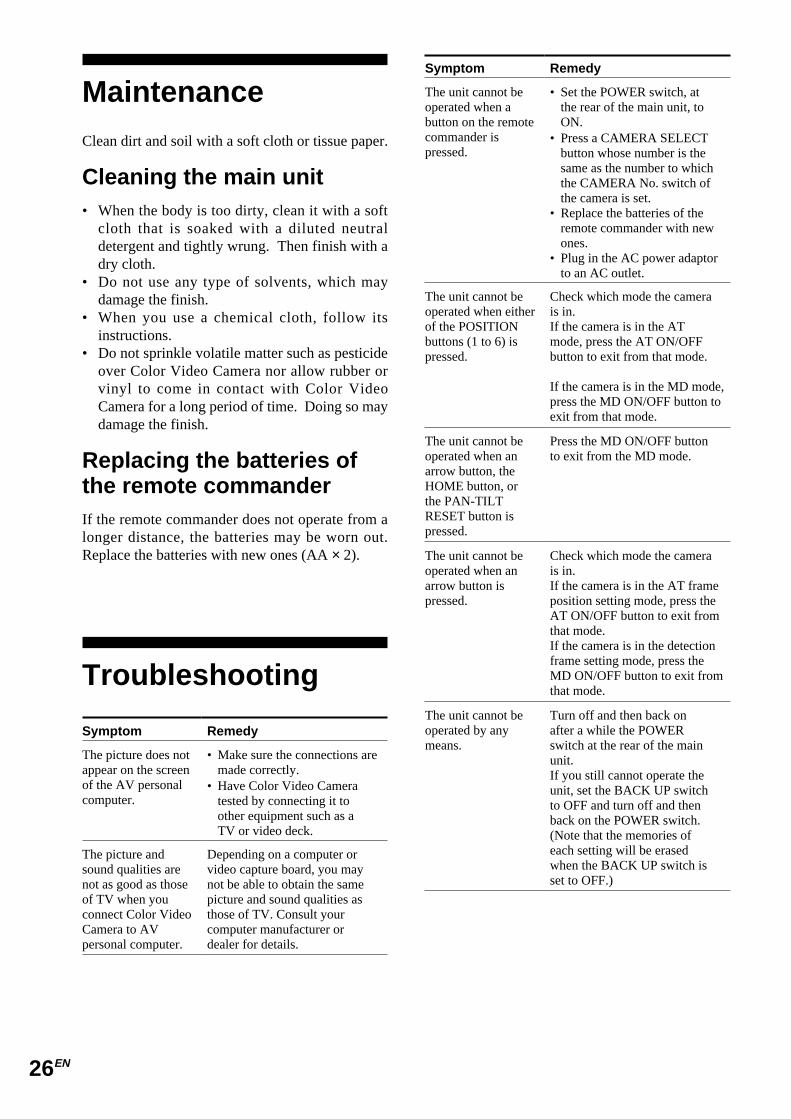
Troubleshooting
Remedy
• Make sure the connections aremade correctly.
• Have Color Video Cameratested by connecting it toother equipment such as aTV or video deck.
Depending on a computer orvideo capture board, you maynot be able to obtain the samepicture and sound qualities asthose of TV. Consult yourcomputer manufacturer ordealer for details.
Symptom
The picture does notappear on the screenof the AV personalcomputer.
The picture andsound qualities arenot as good as thoseof TV when youconnect Color VideoCamera to AVpersonal computer.
Remedy
• Set the POWER switch, atthe rear of the main unit, toON.
• Press a CAMERA SELECTbutton whose number is thesame as the number to whichthe CAMERA No. switch ofthe camera is set.
• Replace the batteries of theremote commander with newones.
• Plug in the AC power adaptorto an AC outlet.
Check which mode the camerais in.If the camera is in the ATmode, press the AT ON/OFFbutton to exit from that mode.
If the camera is in the MD mode,press the MD ON/OFF button toexit from that mode.
Press the MD ON/OFF buttonto exit from the MD mode.
Check which mode the camerais in.If the camera is in the AT frameposition setting mode, press theAT ON/OFF button to exit fromthat mode.If the camera is in the detectionframe setting mode, press theMD ON/OFF button to exit fromthat mode.
Turn off and then back onafter a while the POWERswitch at the rear of the mainunit.If you still cannot operate theunit, set the BACK UP switchto OFF and turn off and thenback on the POWER switch.(Note that the memories ofeach setting will be erasedwhen the BACK UP switch isset to OFF.)
Symptom
The unit cannot beoperated when abutton on the remotecommander ispressed.
The unit cannot beoperated when eitherof the POSITIONbuttons (1 to 6) ispressed.
The unit cannot beoperated when anarrow button, theHOME button, orthe PAN-TILTRESET button ispressed.
The unit cannot beoperated when anarrow button ispressed.
The unit cannot beoperated by anymeans.
27EN
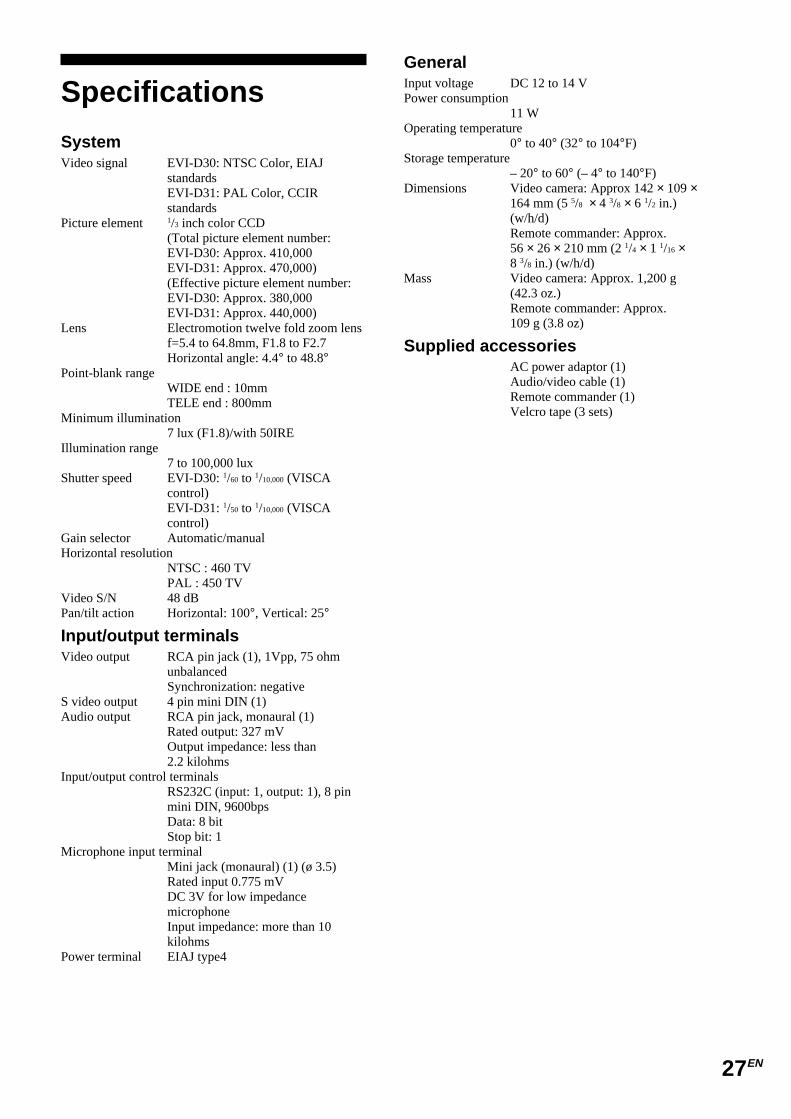
SystemVideo signal EVI-D30: NTSC Color, EIAJ
standardsEVI-D31: PAL Color, CCIRstandards
Picture element 1/3 inch color CCD(Total picture element number:EVI-D30: Approx. 410,000EVI-D31: Approx. 470,000)(Effective picture element number:EVI-D30: Approx. 380,000EVI-D31: Approx. 440,000)
Lens Electromotion twelve fold zoom lensf=5.4 to 64.8mm, F1.8 to F2.7Horizontal angle: 4.4° to 48.8°
Point-blank rangeWIDE end : 10mmTELE end : 800mm
Minimum illumination7 lux (F1.8)/with 50IRE
Illumination range7 to 100,000 lux
Shutter speed EVI-D30: 1/60 to 1/10,000 (VISCAcontrol)EVI-D31: 1/50 to 1/10,000 (VISCAcontrol)
Gain selector Automatic/manualHorizontal resolution
NTSC : 460 TVPAL : 450 TV
Video S/N 48 dBPan/tilt action Horizontal: 100°, Vertical: 25°
Input/output terminalsVideo output RCA pin jack (1), 1Vpp, 75 ohm
unbalancedSynchronization: negative
S video output 4 pin mini DIN (1)Audio output RCA pin jack, monaural (1)
Rated output: 327 mVOutput impedance: less than2.2 kilohms
Input/output control terminalsRS232C (input: 1, output: 1), 8 pinmini DIN, 9600bpsData: 8 bitStop bit: 1
Microphone input terminalMini jack (monaural) (1) (ø 3.5)Rated input 0.775 mVDC 3V for low impedancemicrophoneInput impedance: more than 10kilohms
Power terminal EIAJ type4
SpecificationsGeneralInput voltage DC 12 to 14 VPower consumption
11 WOperating temperature
0° to 40° (32° to 104°F)Storage temperature
– 20° to 60° (– 4° to 140°F)Dimensions Video camera: Approx 142 × 109 ×
164 mm (5 5/8 × 4 3/8 × 6 1/2 in.)(w/h/d)Remote commander: Approx.56 × 26 × 210 mm (2 1/4 × 1 1/16 ×8 3/8 in.) (w/h/d)
Mass Video camera: Approx. 1,200 g(42.3 oz.)Remote commander: Approx.109 g (3.8 oz)
Supplied accessoriesAC power adaptor (1)Audio/video cable (1)Remote commander (1)Velcro tape (3 sets)