Embed Size (px)
Citation preview
Integrated Real Estate Management System Chapter 9: Property Attributes
Contract Administrator User’s Guide
February 2018 Page 9-1
Chapter 9: Property Attributes
Table of Contents
Chapter 9: Property Attributes ............................................................................................. 9-1
9.1 Property Name and Address ................................................................................... 9-3
9.2 Buildings .................................................................................................................. 9-4
9.3 Rents (TRACS) ......................................................................................................... 9-6
9.4 Neighborhood Network Center ............................................................................... 9-6 9.4.1 Resident Organization Contact ................................................................................... 9-7 9.4.2 Summary Narratives.................................................................................................. 9-11
9.5 Non-HUD Information List ......................................................................................9-12
9.6 Energy Benchmarking Score .................................................................................9-13
9.7 Pay for Success ......................................................................................................9-16
List of Figures
Figure 9-1. Property Name Page ..................................................................... 9-3
Figure 9-2. Buildings Tab ................................................................................ 9-5
Figure 9-3. Property Address page ................................................................. 9-5
Figure 9-4. Rent Detail from TRACS ............................................................... 9-6
Figure 9-5. Neighborhood Network Center ..................................................... 9-7
Figure 9-6. Contact Search page .................................................................... 9-7
Figure 9-7. Blank Contact Detail page............................................................ 9-8
Figure 9-8. Contact Search page .................................................................... 9-9
Figure 9-9. Select Contact Information ........................................................ 9-10
Figure 9-10. Contact Detail page .................................................................. 9-10
Figure 9-11. Delete Confirmation .................................................................. 9-11
Figure 9-12. Summary Narratives ................................................................. 9-12
Figure 9-13. Energy Benchmarking Score .................................................... 9-13
Figure 9-14. Energy Benchmarking Score Validation ................................... 9-15
Figure 9-15. Energy Benchmarking Score Saved Successfully .................... 9-15
Figure 9-16. “Expired” Scores in Energy Benchmarking Score History Tab 9-16
Figure 9-17. Energy Benchmarking Score Tab “Refreshed” ......................... 9-16
Integrated Real Estate Management System Chapter 9: Property Attributes
Contract Administrator User’s Guide
February 2018 Page 9-2
Figure 9-18. Pay for Success (PFS) Tab Default Setting .............................. 9-17
Figure 9-19. PFS Required Fields .................................................................. 9-18
Figure 9-20. PFS Field Validation ................................................................. 9-18
Figure 9-21. PFS Information Saved Successfully ........................................ 9-19
Figure 9-22. Read Only View of PFS Tab ...................................................... 9-19
Integrated Real Estate Management System Chapter 9: Property Attributes
Contract Administrator User’s Guide
February 2018 Page 9-1
9 Property Attributes
The Property Attributes page is the default page whenever a property is selected from the My
Properties tab on the Portfolio/Dashboard page. This page displays specific address and property
information for each property. The following tabs: Property Name/Address, Buildings, Rents
(TRACS), Neighborhood Network Center and Non-HUD Information List display on the Property
Attribute page. The Property Name, Address tab is the default and automatically opens when a
property is selected. This page displays the current property name, the AKA name, primary address,
servicing site, the HUB and the Workshare Company (if applicable). The Buildings tab displays all
applicable building types for the property. The primary address, other individual building addresses and
the associated building description (from PASS) are also displayed in a table. The Rents (TRACS) tab
displays rent information from TRACS for all contracted units and non-contract units listed for the
property. The rent information includes the rent effective date, the contract status, the contract rent, total
number of units, and fair market rents. The Neighborhood Network Center tab displays information
specific to the Neighborhood Network center approved and established dates, contract information for
the resident organization and narrative fields. The Non-HUD Information List tab displays a list of
Other Agency information. This list includes: Other Agency Name, Other Property ID, Other Property
Name, Other Agency Alias Name, and # of Assisted Units. The Energy Benchmarking Score tab
displays the performance metrics for a given property, this is the means by which the EPA compares the
energy and water usage efficiency of similar properties nationally. The Pay for Success tab displays the
information used as part of the pilot implementation for the energy and water conservation pay-for-
success (PFS) pilot program
Objectives:
By the end of this chapter, you will be able to:
Integrated Real Estate Management System Chapter 9: Property Attributes
Contract Administrator User’s Guide
February 2018 Page 9-2
• Access the Property Attributes page
• Navigate through the Property Attributes page
• View a property name
• View a Building address
Integrated Real Estate Management System Chapter 9: Property Attributes
Contract Administrator User’s Guide
February 2018 Page 9-3
9.1 Property Name and Address
The Property Attributes page displays with the Property Name, Address tab as the default when a
property is selected from the Portfolio/Dashboard page. The Property Attributes link in the iREMS
sidebar can also be accessed once a property is selected using the search feature.
The Property Name, Address tab displays the current property name and any other names associated
with the property (e.g. the AKA name). This page also displays the primary address, the servicing site the
Hub and the Workshare Company. The Servicing Site field displays the HUD office responsible for the
management and/or servicing functions for a property. The HUB field is view-only and displays the name
of the Multifamily Housing Hub office that is associated with the servicing site you select. The
Workshare Company field is displayed only when a project, with financing and assistance, has been
transferred to an outside contract company to perform the asset management responsibilities. This field
is read-only and will not display if no contract company is assigned.
Accessing the Property Name Page:
To access the Property Attributes page you must first select a property from the property lists displayed
on the Asset Management Portfolio/Dashboard page. Once you have selected a property the Property
Name page automatically displays with detailed information on the selected property.
Figure 9-1. Property Name Page
Tab
menu
bar
Integrated Real Estate Management System Chapter 9: Property Attributes
Contract Administrator User’s Guide
February 2018 Page 9-4
Note: Properties with Financing and assistance are being transferred to other offices, and
being transferred to outside contract companies to perform the asset management
responsibilities. A new read-only field is on the Property Name Address tab called
“Workshare Company”. This field will identify if this property has a record that is
currently effective and not expired in the new table called property_workshare_tracking.
If no record is detected, this field will not display
9.2 Buildings
The Buildings tab displays information about a property’s physical location and building type. The
primary address and all site addresses associated with the property are displayed in a table at the bottom
of the page. View only information from PASS, such as the Building Name, the year it was built is also
included in the table.
Grants and loans are made available through HUD’s Office of Affordable Housing Preservation (OAHP)
for eligible property owners to make energy and green retrofit investments in the property. OAHP and
the M2M system mark the projects/properties that are qualified and eligible for the recovery money to go
green. iREMS displays the OAHP Green flag for only those properties that have gone through the M2M
Green process. In addition iREMS displays the OAHP Green Retrofit (GRP) flag. These view only
fields display on the Buildings page and come from the M2M system.
The OAHP Green flag and the OAHP Green Retrofit (GRP) flag are at the property/project level and not
the contract level. This will eliminate the problem with phased or scattered sites.
To access building information:
1. From the Property Name page, click on the Buildings tab and the Buildings page displays.
Integrated Real Estate Management System Chapter 9: Property Attributes
Contract Administrator User’s Guide
February 2018 Page 9-5
Figure 9-2. Buildings Tab
2. View building information.
3. Click on another tab or a sidebar option to exit this page.
Note: The navigational buttons display on pages when more than 10 records exist. If there
are 10 or less records, the “first”, “previous”, “next”, or “last” buttons will not display.
To view building information:
1. On the Buildings page, click on the one of the addresses listed in the Address table. The
Property Address page displays.
Figure 9-3. Property Address page
2. View property address information.
3. Click on the button to return to the Buildings page.
Integrated Real Estate Management System Chapter 9: Property Attributes
Contract Administrator User’s Guide
February 2018 Page 9-6
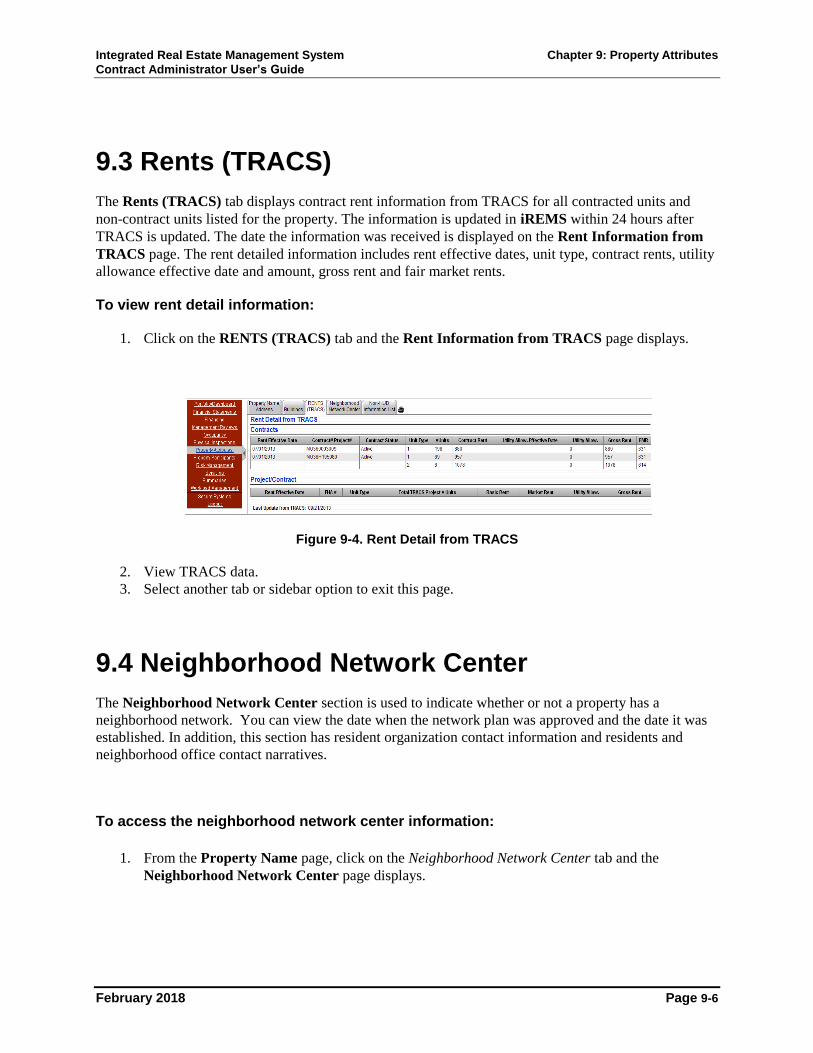
9.3 Rents (TRACS)
The Rents (TRACS) tab displays contract rent information from TRACS for all contracted units and
non-contract units listed for the property. The information is updated in iREMS within 24 hours after
TRACS is updated. The date the information was received is displayed on the Rent Information from
TRACS page. The rent detailed information includes rent effective dates, unit type, contract rents, utility
allowance effective date and amount, gross rent and fair market rents.
To view rent detail information:
1. Click on the RENTS (TRACS) tab and the Rent Information from TRACS page displays.
Figure 9-4. Rent Detail from TRACS
2. View TRACS data.
3. Select another tab or sidebar option to exit this page.
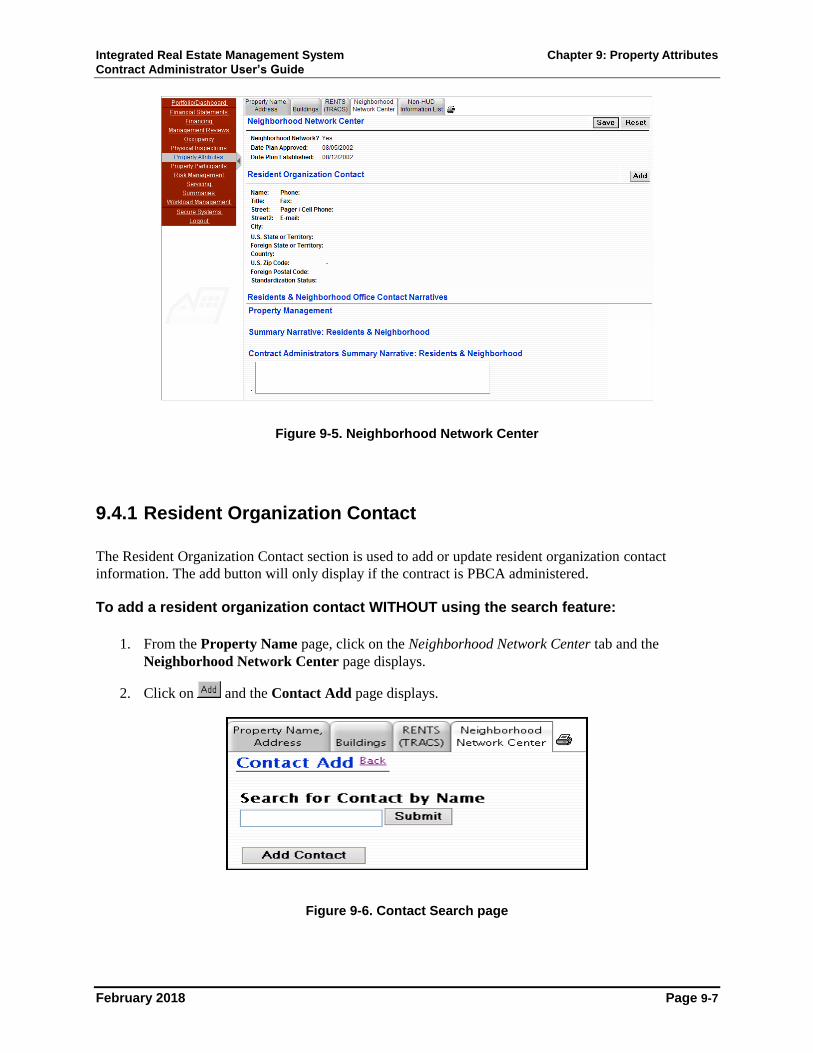
9.4 Neighborhood Network Center
The Neighborhood Network Center section is used to indicate whether or not a property has a
neighborhood network. You can view the date when the network plan was approved and the date it was
established. In addition, this section has resident organization contact information and residents and
neighborhood office contact narratives.
To access the neighborhood network center information:
1. From the Property Name page, click on the Neighborhood Network Center tab and the
Neighborhood Network Center page displays.
Integrated Real Estate Management System Chapter 9: Property Attributes
Contract Administrator User’s Guide
February 2018 Page 9-7
Figure 9-5. Neighborhood Network Center
9.4.1 Resident Organization Contact
The Resident Organization Contact section is used to add or update resident organization contact
information. The add button will only display if the contract is PBCA administered.
To add a resident organization contact WITHOUT using the search feature:
1. From the Property Name page, click on the Neighborhood Network Center tab and the
Neighborhood Network Center page displays.
2. Click on and the Contact Add page displays.
Figure 9-6. Contact Search page

Integrated Real Estate Management System Chapter 9: Property Attributes
Contract Administrator User’s Guide
February 2018 Page 9-8
3. Click on and the Contact Detail page displays.
Figure 9-7. Blank Contact Detail page
4. Enter the contact information:
• Name (first, last)
• Title, from the drop-down list
• Address
• City
Note: A country must be selected from the drop-down list before the US state or territory or
a foreign state or territory can be selected.
• Country, from the drop-down list
• US State or Territory, from the drop-down list
• US Zip Code
OR
• Foreign State or Territory, from the drop-down list
• Foreign Postal Code
• Phone
• Fax
Integrated Real Estate Management System Chapter 9: Property Attributes
Contract Administrator User’s Guide
February 2018 Page 9-9
• Pager/Cell Phone
5. Click on and the Contact Detail page displays the save was successful message. The
Resident Organization Contact section of the page is now populated with the new data.
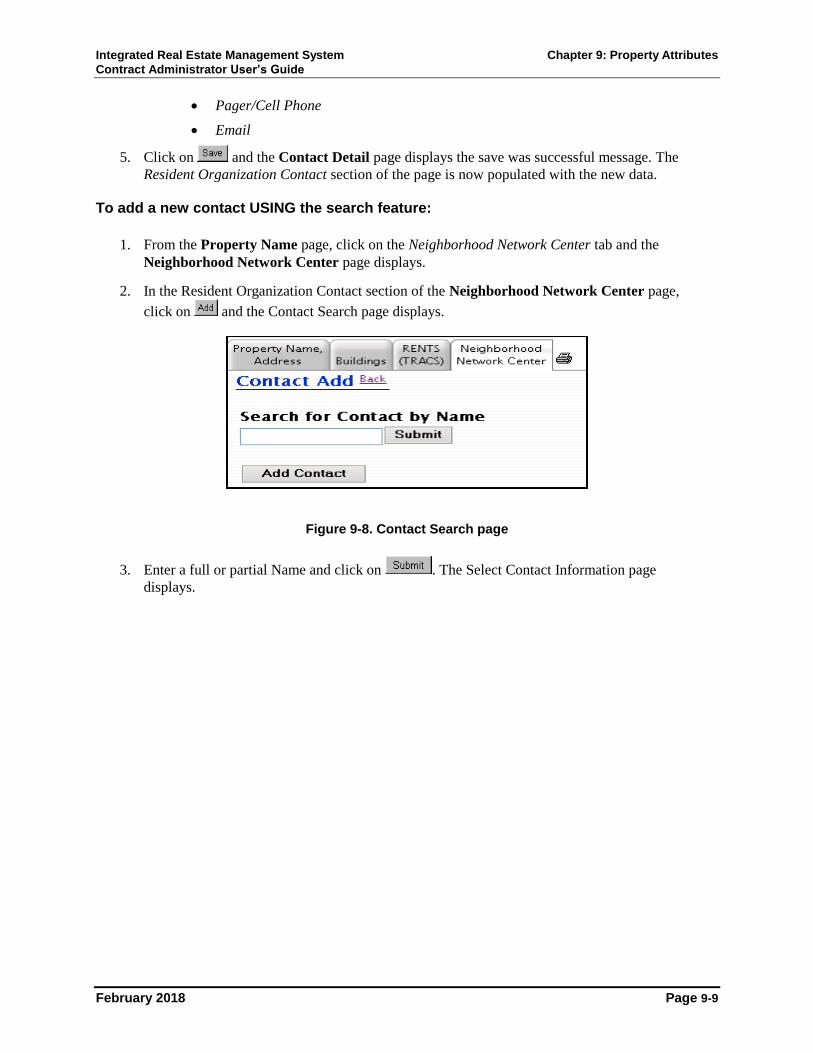
To add a new contact USING the search feature:
1. From the Property Name page, click on the Neighborhood Network Center tab and the
Neighborhood Network Center page displays.
2. In the Resident Organization Contact section of the Neighborhood Network Center page,
click on and the Contact Search page displays.
Figure 9-8. Contact Search page
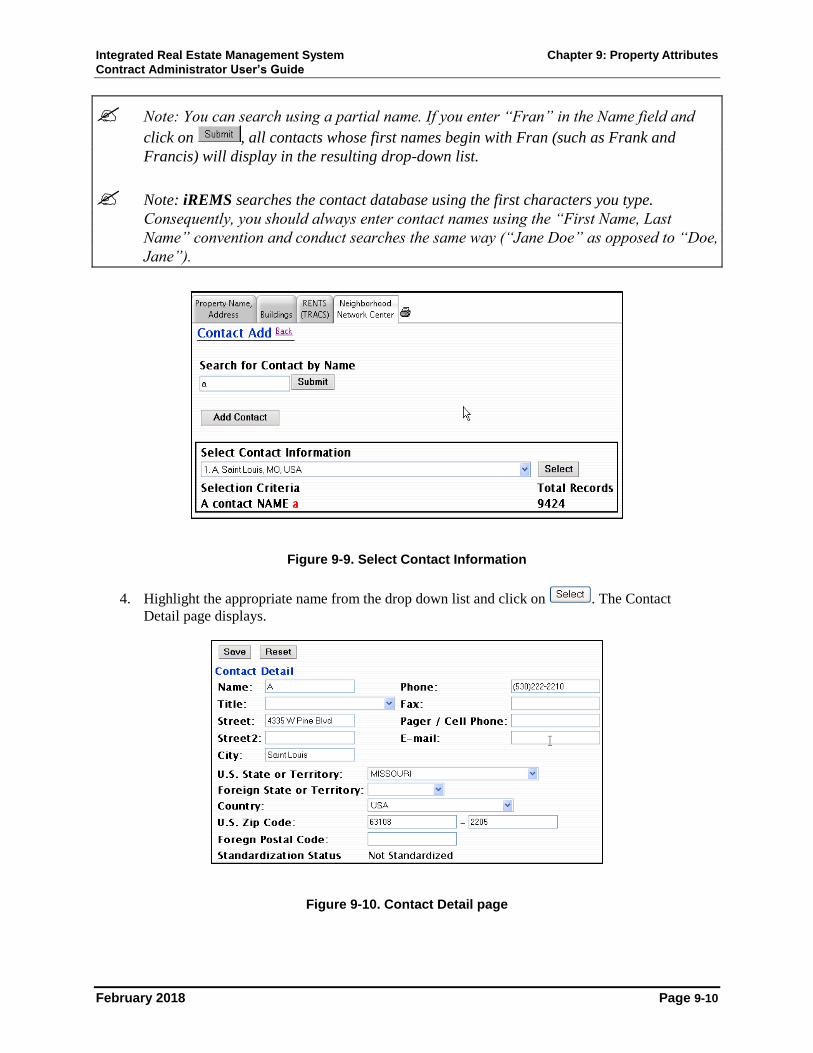
3. Enter a full or partial Name and click on . The Select Contact Information page
displays.
Integrated Real Estate Management System Chapter 9: Property Attributes
Contract Administrator User’s Guide
February 2018 Page 9-10
Note: You can search using a partial name. If you enter “Fran” in the Name field and
click on , all contacts whose first names begin with Fran (such as Frank and
Francis) will display in the resulting drop-down list.
Note: iREMS searches the contact database using the first characters you type.
Consequently, you should always enter contact names using the “First Name, Last
Name” convention and conduct searches the same way (“Jane Doe” as opposed to “Doe,
Jane”).
Figure 9-9. Select Contact Information
4. Highlight the appropriate name from the drop down list and click on . The Contact
Detail page displays.
Figure 9-10. Contact Detail page
Integrated Real Estate Management System Chapter 9: Property Attributes
Contract Administrator User’s Guide
February 2018 Page 9-11
5. Click on and the Contact Detail page displays the save was successful message. The
Resident Organization Contact section of the page is now populated with the new data.
To delete a contact:
1. From the Property Name page, click on the Neighborhood Network Center tab and the
Neighborhood Network Center page displays.
2. In the Resident Organization Contact section of the Neighborhood Network Center page,
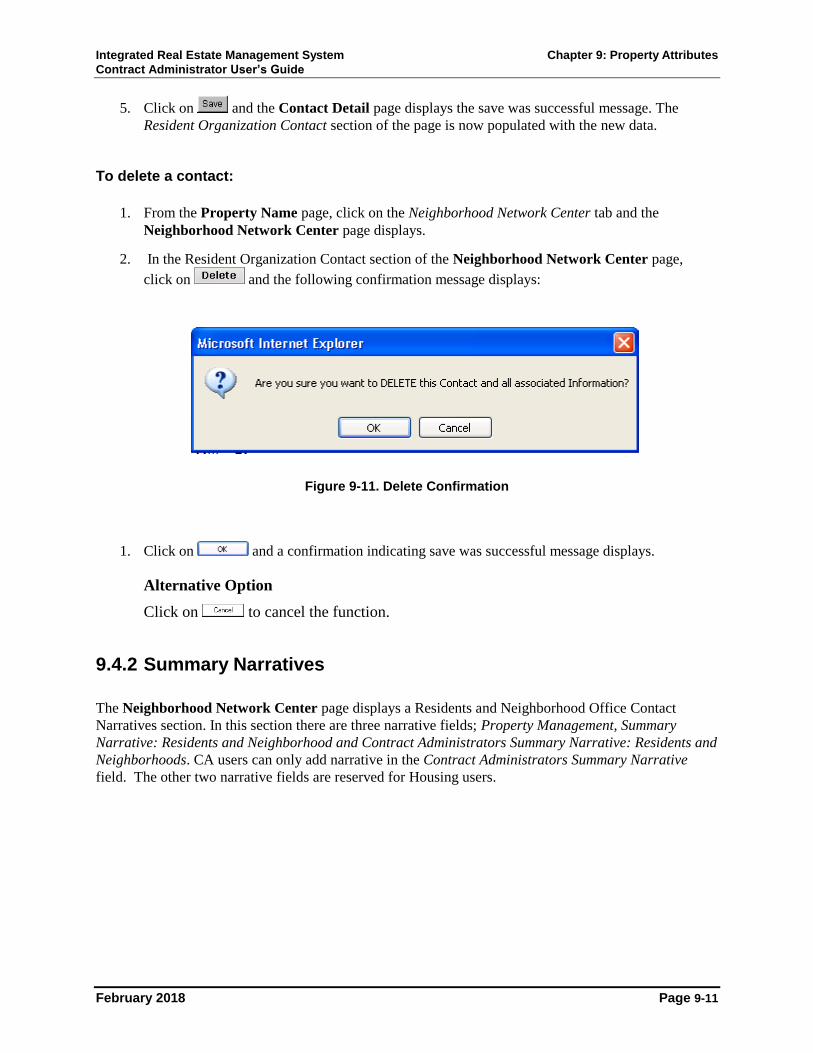
click on and the following confirmation message displays:
Figure 9-11. Delete Confirmation
1. Click on and a confirmation indicating save was successful message displays.
Alternative Option
Click on to cancel the function.
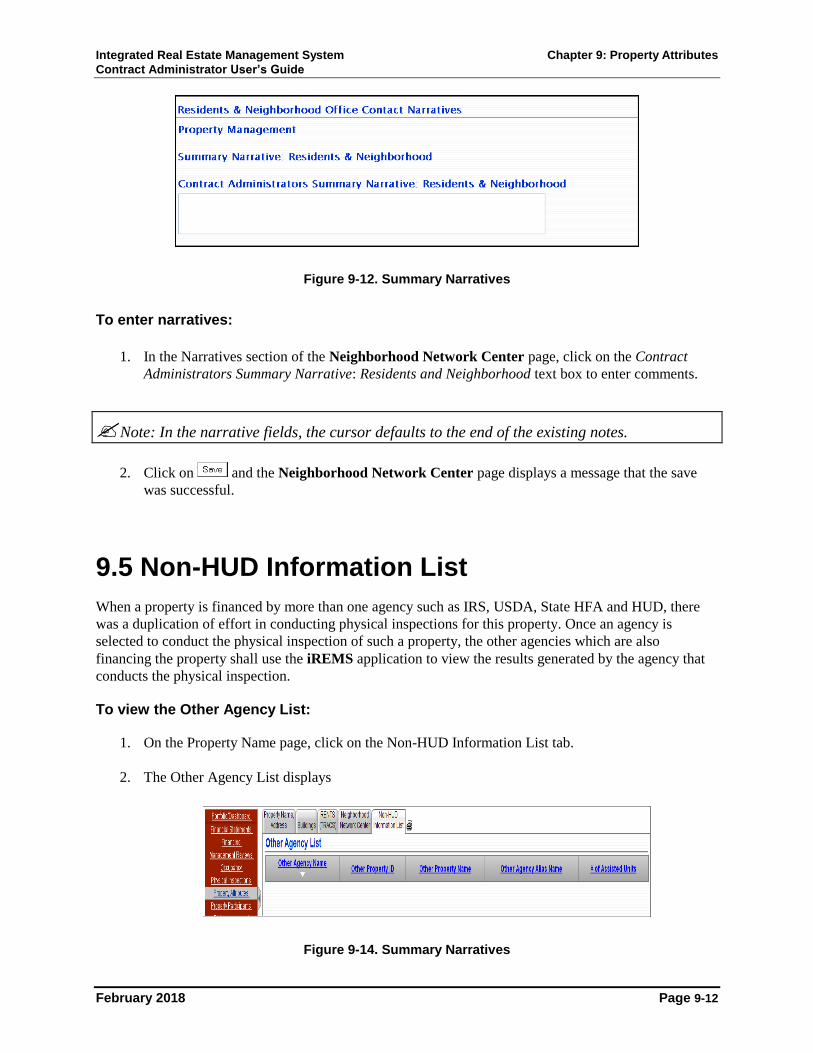
9.4.2 Summary Narratives
The Neighborhood Network Center page displays a Residents and Neighborhood Office Contact
Narratives section. In this section there are three narrative fields; Property Management, Summary
Narrative: Residents and Neighborhood and Contract Administrators Summary Narrative: Residents and
Neighborhoods. CA users can only add narrative in the Contract Administrators Summary Narrative
field. The other two narrative fields are reserved for Housing users.
Integrated Real Estate Management System Chapter 9: Property Attributes
Contract Administrator User’s Guide
February 2018 Page 9-12
Figure 9-12. Summary Narratives
To enter narratives:
1. In the Narratives section of the Neighborhood Network Center page, click on the Contract
Administrators Summary Narrative: Residents and Neighborhood text box to enter comments.
Note: In the narrative fields, the cursor defaults to the end of the existing notes.
2. Click on and the Neighborhood Network Center page displays a message that the save
was successful.
9.5 Non-HUD Information List
When a property is financed by more than one agency such as IRS, USDA, State HFA and HUD, there
was a duplication of effort in conducting physical inspections for this property. Once an agency is
selected to conduct the physical inspection of such a property, the other agencies which are also
financing the property shall use the iREMS application to view the results generated by the agency that
conducts the physical inspection.
To view the Other Agency List:
1. On the Property Name page, click on the Non-HUD Information List tab.
2. The Other Agency List displays
Figure 9-14. Summary Narratives
Integrated Real Estate Management System Chapter 9: Property Attributes
Contract Administrator User’s Guide
February 2018 Page 9-13
9.6 Energy Benchmarking Score
In order to meet OAMPO’s ( Office of Asset Management & Portfolio ) Energy Benchmarking Initiative,
iREMS has been modified ( as of April 2018 ) to create new functionality that will allow designated
users to enter the Energy Benchmarking Score ( Energy Performance Metrics ) for each property. The
Energy Benchmarking Score is used by the Environmental Protection Agency (EPA ) to see how similar
properties across the nation perform against each other in terms of energy efficiency.
To view the Energy Benchmarking Score:
1. On the Property Name page, click on the Energy Benchmarking Score tab.
2. The Energy Benchmarking Score for that property displays. If there is no “current” data then the
fields are blank.
1.
Figure 9-13. Energy Benchmarking Score
3. There key performance metrics correspond to the 8 required fields for the Energy Benchmarking
Score:
a. Energy Star Account Number ( 10 characters ): A unique 10 digit identifier for each
property provided by the Energy Star Portfolio Manager for property owners
participating in the EPA’s Energy Star program. Each property can have one and only
one Energy Star Account Number.
b. EUI : Energy Use Intensity number, or the total energy consumed per square foot per
year ( a number between 1-100,000 kBtu/sq-ft having one decimal place ), provided by
the property owners from their Energy Star Portfolio Manager Account.
c. WUI: Water Use Intensity number, or the water consumed per square foot per year ( a
number between 1-100,000 gal/sq-ft having one decimal place), provided by the property
owners from their Energy Star Portfolio Manager Account.
Integrated Real Estate Management System Chapter 9: Property Attributes
Contract Administrator User’s Guide
February 2018 Page 9-14
d. Energy Star score for electricity usage ( a whole number between 1 -100 ). This is a
percentile value provided by the Energy Star Portfolio Manager that ranks how the
property is performing in relation to similar properties nationally. The higher the
percentile, the better the performance. A score of 75 or higher means the property is a
top performer.
e. Energy Star score for water usage ( a whole number between 1 – 100 ). This is a
percentile value provided by the Energy Star Porfolio Manager that ranks how the
property is performing in relation to similar properties nationally. The higher the
percentile, the better the performance. A score of 75 or higher means the property is a
top performer.
f. Reporting Anniversary Date ( MM/DD/YYYY): The Reporting Anniversary Date
coupled with the frequency count determines status of the Energy Benchmarking Score.
The date has to be in the past.
g. Frequency Count : Three options (1 Year, 2 Year, 3 Year ), used with the Reporting
Anniversary Date to determine the status of the Energy Benchmarking Score.
h. Energy Benchmark Score Status : The Status can be “Current” or “Expired”. Current
scores are always editable and displayed in the Energy Benchmarking Score tab. Expired
scores are read-only and displayed in the Energy Benchmarking Score History tab.
4. Designated HUD users with access to the property owner’s Energy Benchmarking Score
information will enter the values in the tab.
a. HUD users with access to the Property Attributes tab and with edit roles will be able to
enter Energy Benchmarking Score values.
b. All other users with read-only roles will be able to view the information in the tab.
5. The Energy Benchmarking Score tab always shows the “current” values of the Energy
Benchmarking Score for a given property. As long as the status is “Current” the fields are
editable ( except for the Energy Star Account Number ). Whether the status is “Current” or
“Expired” depends on the Reporting Anniversary Date plus Frequency Count fields.
a. For example, if a Reporting Anniversary Date of Jan 12, 2017 and a Frequency Count of
2 years is entered, then the data will remain “Current” until midnight of Jan 12, 2019.
b. At 12:00 AM Jan 13, 2019, iREMS will change the status of the entry to “Expired” and
the data will no longer be editable.
c. Data that is “Expired” will no longer be editable and will be archived. All archived data
will still be visible to the user, but in “read-only” mode.
d. This “Expired” data will be moved to the Energy Benchmarking Score History tab.
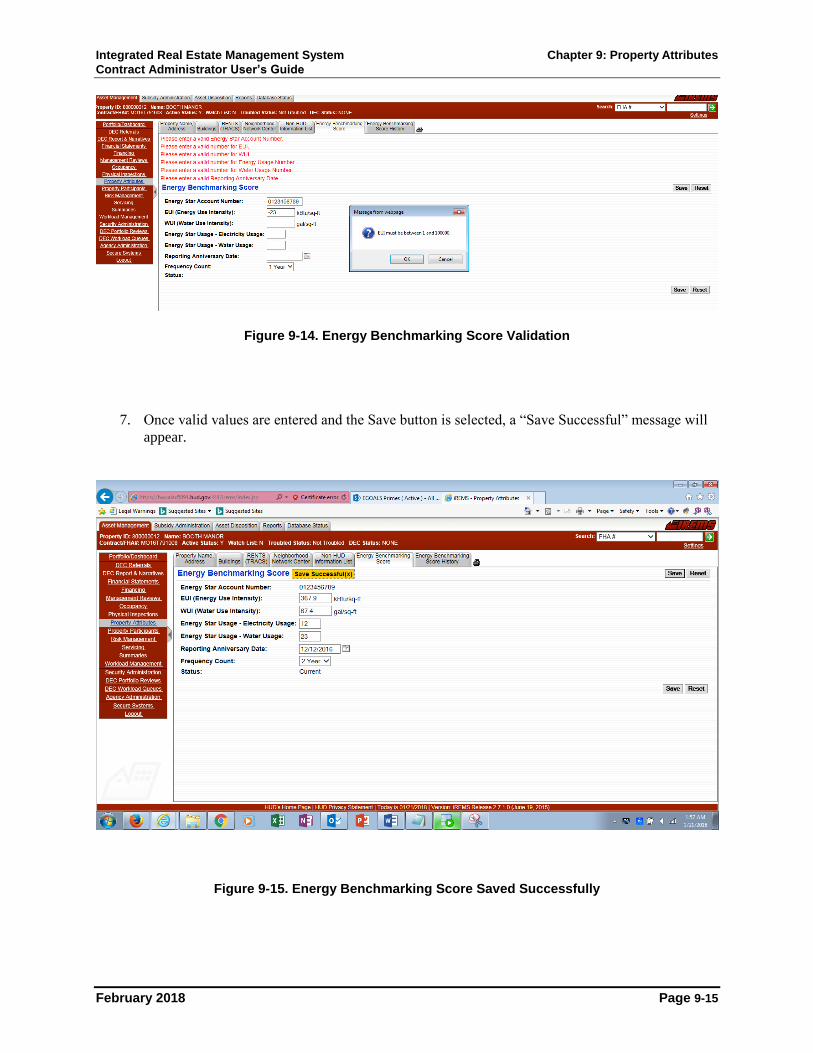
6. The figure below shows validation that occurs when entering incorrect values for the Energy
Benchmark Score:
Integrated Real Estate Management System Chapter 9: Property Attributes
Contract Administrator User’s Guide
February 2018 Page 9-15
Figure 9-14. Energy Benchmarking Score Validation
7. Once valid values are entered and the Save button is selected, a “Save Successful” message will
appear.
Figure 9-15. Energy Benchmarking Score Saved Successfully
Integrated Real Estate Management System Chapter 9: Property Attributes
Contract Administrator User’s Guide
February 2018 Page 9-16
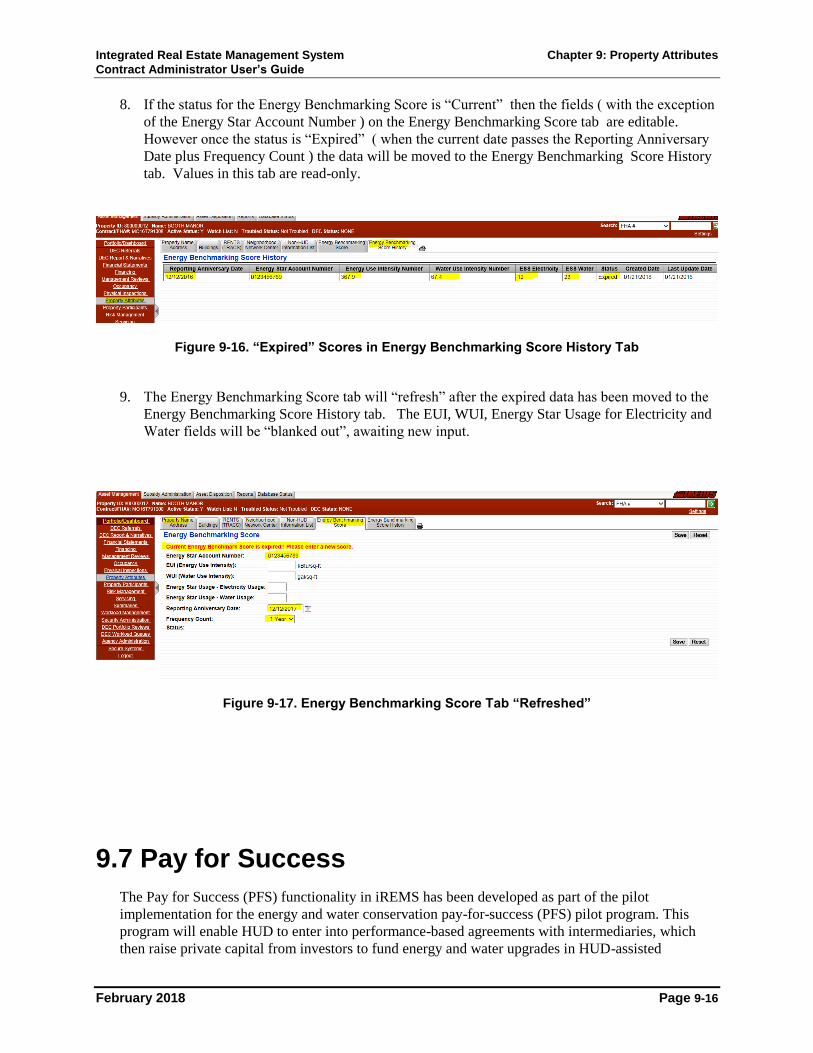
8. If the status for the Energy Benchmarking Score is “Current” then the fields ( with the exception
of the Energy Star Account Number ) on the Energy Benchmarking Score tab are editable.
However once the status is “Expired” ( when the current date passes the Reporting Anniversary
Date plus Frequency Count ) the data will be moved to the Energy Benchmarking Score History
tab. Values in this tab are read-only.
Figure 9-16. “Expired” Scores in Energy Benchmarking Score History Tab
9. The Energy Benchmarking Score tab will “refresh” after the expired data has been moved to the
Energy Benchmarking Score History tab. The EUI, WUI, Energy Star Usage for Electricity and
Water fields will be “blanked out”, awaiting new input.
Figure 9-17. Energy Benchmarking Score Tab “Refreshed”
9.7 Pay for Success
The Pay for Success (PFS) functionality in iREMS has been developed as part of the pilot
implementation for the energy and water conservation pay-for-success (PFS) pilot program. This
program will enable HUD to enter into performance-based agreements with intermediaries, which
then raise private capital from investors to fund energy and water upgrades in HUD-assisted
Integrated Real Estate Management System Chapter 9: Property Attributes
Contract Administrator User’s Guide
February 2018 Page 9-17
properties. Investors are paid back when certain cost savings are realized. The following information
is captured in the Pay for Success (PFS) tab:
1. A means for identifying properties that are participating in the PFS pilot
2. For participating PFS properties, the following required parameters will be captured:
a. The PFS total project cost ( a value greater than $0 but less than $1 billion )
b. The PFS reserve for replacement amount (a value greater than or equal to $0 but less
than $1 billion )
c. PFS reserve for replacement uses: This is a comments section with a 4000 character
limit.
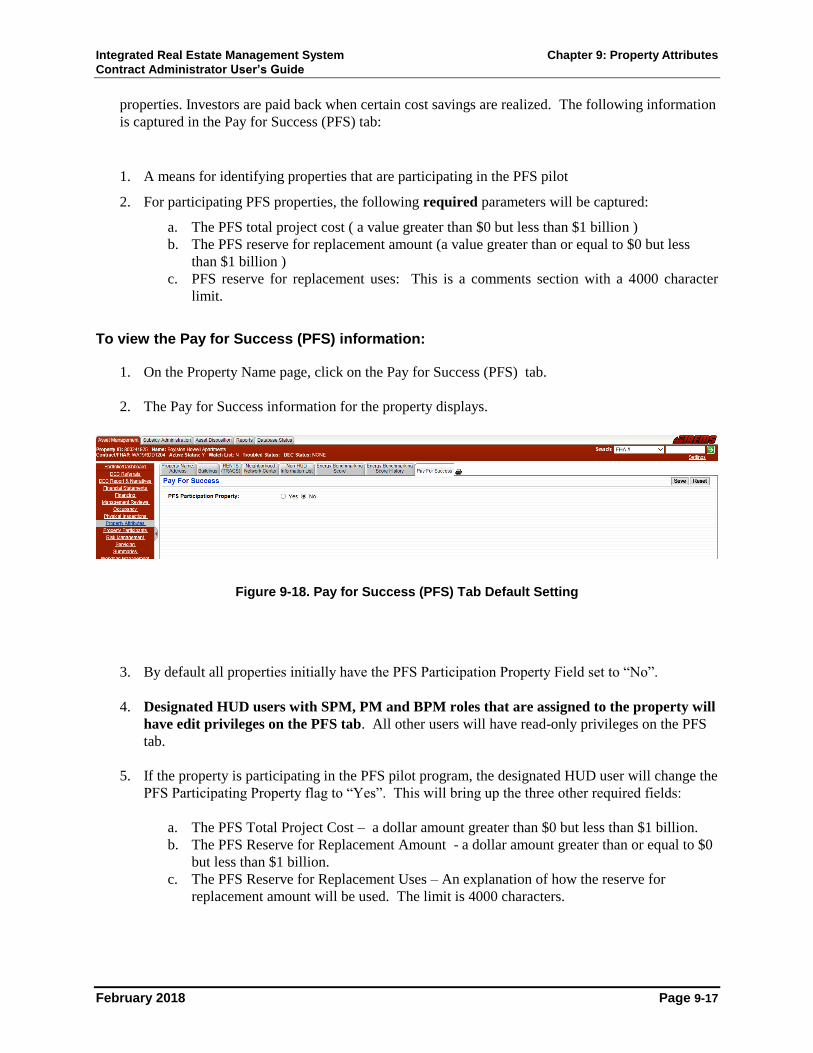
To view the Pay for Success (PFS) information:
1. On the Property Name page, click on the Pay for Success (PFS) tab.
2. The Pay for Success information for the property displays.
Figure 9-18. Pay for Success (PFS) Tab Default Setting
3. By default all properties initially have the PFS Participation Property Field set to “No”.
4. Designated HUD users with SPM, PM and BPM roles that are assigned to the property will
have edit privileges on the PFS tab. All other users will have read-only privileges on the PFS
tab.
5. If the property is participating in the PFS pilot program, the designated HUD user will change the
PFS Participating Property flag to “Yes”. This will bring up the three other required fields:
a. The PFS Total Project Cost – a dollar amount greater than $0 but less than $1 billion.
b. The PFS Reserve for Replacement Amount - a dollar amount greater than or equal to $0
but less than $1 billion.
c. The PFS Reserve for Replacement Uses – An explanation of how the reserve for
replacement amount will be used. The limit is 4000 characters.

Integrated Real Estate Management System Chapter 9: Property Attributes
Contract Administrator User’s Guide
February 2018 Page 9-18
Figure 9-19. PFS Required Fields
6. Validation will ensure that only the proper values can be inserted into the fields.
Figure 9-20. PFS Field Validation
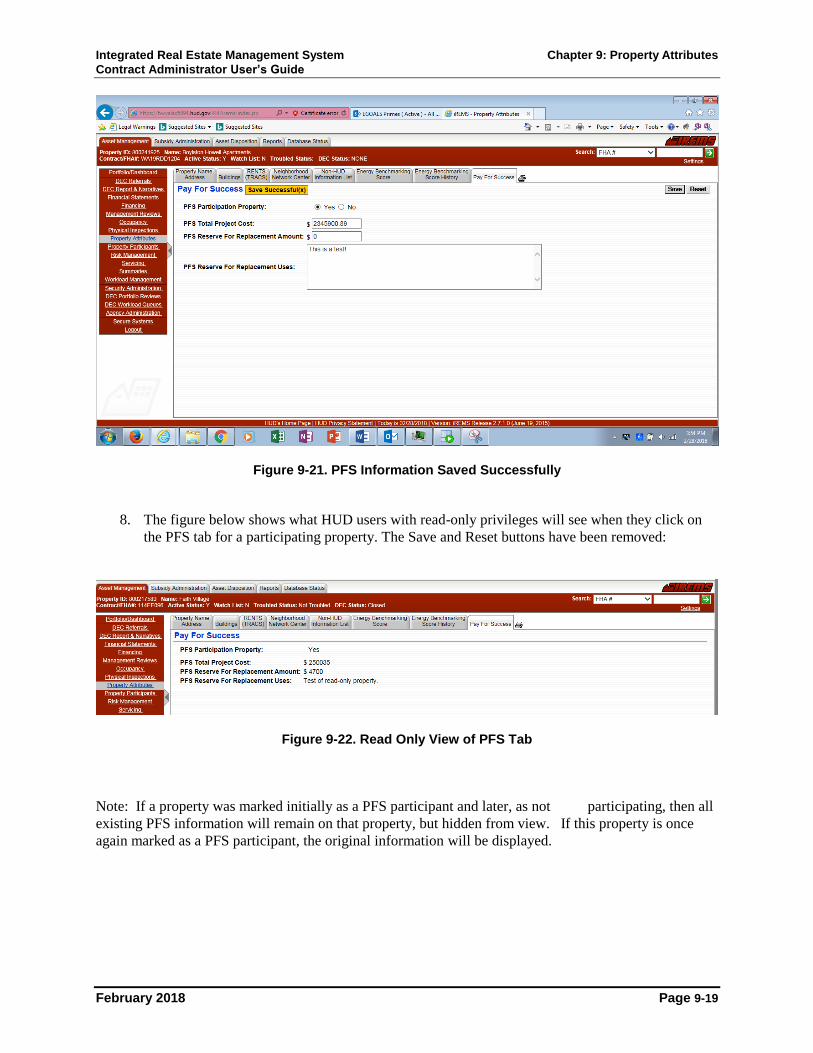
7. Once the appropriate values have been inserted, the HUD user can click on the Save Button and a
“Save Successful” message should appear.
Integrated Real Estate Management System Chapter 9: Property Attributes
Contract Administrator User’s Guide
February 2018 Page 9-19
Figure 9-21. PFS Information Saved Successfully
8. The figure below shows what HUD users with read-only privileges will see when they click on
the PFS tab for a participating property. The Save and Reset buttons have been removed:
Figure 9-22. Read Only View of PFS Tab
Note: If a property was marked initially as a PFS participant and later, as not participating, then all
existing PFS information will remain on that property, but hidden from view. If this property is once
again marked as a PFS participant, the original information will be displayed.