Embed Size (px)
Citation preview
5.1Quest® ChangeAuditor®FOR ACTIVE DIRECTORY
User Guide

© Copyright Quest Software, Inc. 2010. All rights reserved.
This guide contains proprietary information protected by copyright. The software described in this guide is furnished under a software license or nondisclosure agreement. This software may be used or copied only in accordance with the terms of the applicable agreement. No part of this guide may be reproduced or transmitted in any form or by any means, electronic or mechanical, including photocopying and recording for any purpose other than the purchaser's personal use without the written permission of Quest Software, Inc.
If you have any questions regarding your potential use of this material, contact:
Quest Software World HeadquartersLEGAL Dept5 Polaris WayAliso Viejo, CA 92656 USAwww.quest.comemail: [email protected]
Refer to our Web site for regional and international office information.
TRADEMARKS
Quest, Quest Software, the Quest Software logo, and ChangeAuditor are trademarks and registered trademarks of Quest Software, Inc in the United States of America and other countries. For a complete list of Quest Software’s trademarks, please see http://www.quest.com/legal/trademark-information.aspx. Other trademarks and registered trademarks are property of their respective owners.
Disclaimer
The information in this document is provided in connection with Quest products. No license, express or implied, by estoppel or otherwise, to any intellectual property right is granted by this document or in connection with the sale of Quest products. EXCEPT AS SET FORTH IN QUEST'S TERMS AND CONDITIONS AS SPECIFIED IN THE LICENSE AGREEMENT FOR THIS PRODUCT, QUEST ASSUMES NO LIABILITY WHATSOEVER AND DISCLAIMS ANY EXPRESS, IMPLIED OR STATUTORY WARRANTY RELATING TO ITS PRODUCTS INCLUDING, BUT NOT LIMITED TO, THE IMPLIED WARRANTY OF MERCHANTABILITY, FITNESS FOR A PARTICULAR PURPOSE, OR NON-INFRINGEMENT. IN NO EVENT SHALL QUEST BE LIABLE FOR ANY DIRECT, INDIRECT, CONSEQUENTIAL, PUNITIVE, SPECIAL OR INCIDENTAL DAMAGES (INCLUDING, WITHOUT LIMITATION, DAMAGES FOR LOSS OF PROFITS, BUSINESS INTERRUPTION OR LOSS OF INFORMATION) ARISING OUT OF THE USE OR INABILITY TO USE THIS DOCUMENT, EVEN IF QUEST HAS BEEN ADVISED OF THE POSSIBILITY OF SUCH DAMAGES. Quest makes no representations or warranties with respect to the accuracy or completeness of the contents of this document and reserves the right to make changes to specifications and product descriptions at any time without notice. Quest does not make any commitment to update the information contained in this document.
ChangeAuditor for Active Directory User GuideUpdated - September 2010Software Version - 5.1
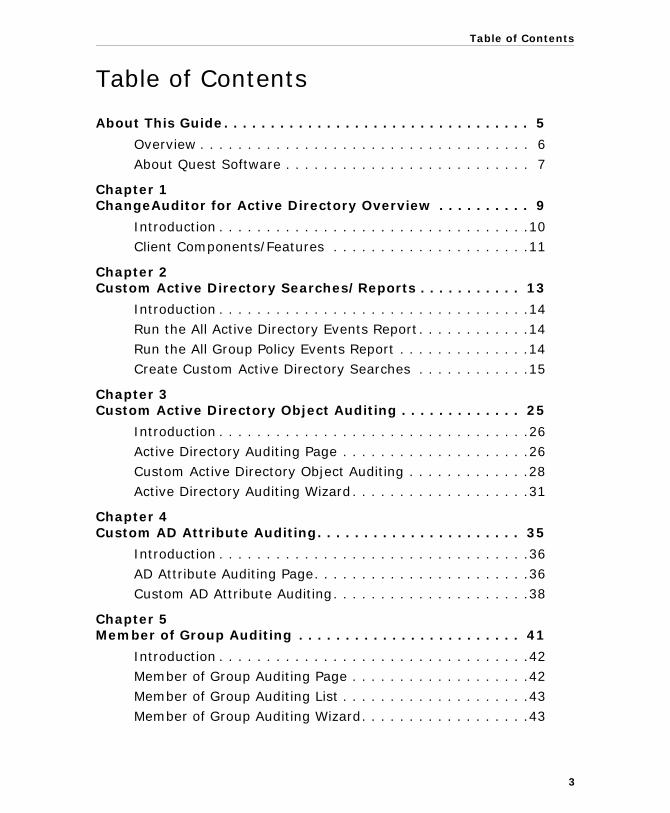
Table of Contents
Table of Contents
About This Guide. . . . . . . . . . . . . . . . . . . . . . . . . . . . . . . . . 5
Overview . . . . . . . . . . . . . . . . . . . . . . . . . . . . . . . . . . . 6About Quest Software . . . . . . . . . . . . . . . . . . . . . . . . . . 7
Chapter 1ChangeAuditor for Active Directory Overview . . . . . . . . . . 9
Introduction . . . . . . . . . . . . . . . . . . . . . . . . . . . . . . . . .10Client Components/Features . . . . . . . . . . . . . . . . . . . . .11
Chapter 2Custom Active Directory Searches/Reports . . . . . . . . . . . 13
Introduction . . . . . . . . . . . . . . . . . . . . . . . . . . . . . . . . .14Run the All Active Directory Events Report. . . . . . . . . . . .14Run the All Group Policy Events Report . . . . . . . . . . . . . .14Create Custom Active Directory Searches . . . . . . . . . . . .15
Chapter 3Custom Active Directory Object Auditing . . . . . . . . . . . . . 25
Introduction . . . . . . . . . . . . . . . . . . . . . . . . . . . . . . . . .26Active Directory Auditing Page . . . . . . . . . . . . . . . . . . . .26Custom Active Directory Object Auditing . . . . . . . . . . . . .28Active Directory Auditing Wizard. . . . . . . . . . . . . . . . . . .31
Chapter 4Custom AD Attribute Auditing. . . . . . . . . . . . . . . . . . . . . . 35
Introduction . . . . . . . . . . . . . . . . . . . . . . . . . . . . . . . . .36AD Attribute Auditing Page. . . . . . . . . . . . . . . . . . . . . . .36Custom AD Attribute Auditing. . . . . . . . . . . . . . . . . . . . .38
Chapter 5Member of Group Auditing . . . . . . . . . . . . . . . . . . . . . . . . 41
Introduction . . . . . . . . . . . . . . . . . . . . . . . . . . . . . . . . .42Member of Group Auditing Page . . . . . . . . . . . . . . . . . . .42Member of Group Auditing List . . . . . . . . . . . . . . . . . . . .43Member of Group Auditing Wizard. . . . . . . . . . . . . . . . . .43
3
Quest ChangeAuditor for Active Directory
Chapter 6ADAM (AD LDS) Auditing . . . . . . . . . . . . . . . . . . . . . . . . . 45
Introduction . . . . . . . . . . . . . . . . . . . . . . . . . . . . . . . . .46ADAM (AD LDS) Auditing Page . . . . . . . . . . . . . . . . . . . .47ADAM (AD LDS) Attribute Auditing Page . . . . . . . . . . . . .48Enable ADAM (AD LDS) Auditing . . . . . . . . . . . . . . . . . . .51ADAM (AD LDS) Auditing Wizard. . . . . . . . . . . . . . . . . . .52
Chapter 7Active Directory Protection. . . . . . . . . . . . . . . . . . . . . . . . 57
Introduction . . . . . . . . . . . . . . . . . . . . . . . . . . . . . . . . .58Active Directory Object Protection. . . . . . . . . . . . . . . . . .59Group Policy Object Protection . . . . . . . . . . . . . . . . . . . .71ADAM (AD LDS) Object Protection. . . . . . . . . . . . . . . . . .81
Index. . . . . . . . . . . . . . . . . . . . . . . . . . . . . . . . . . . . . . . . . 93
4
About This Guide
• Overview
• Conventions
• About Quest Software
• Contacting Quest Software
• Contacting Quest Support
Quest ChangeAuditor for Active Directory
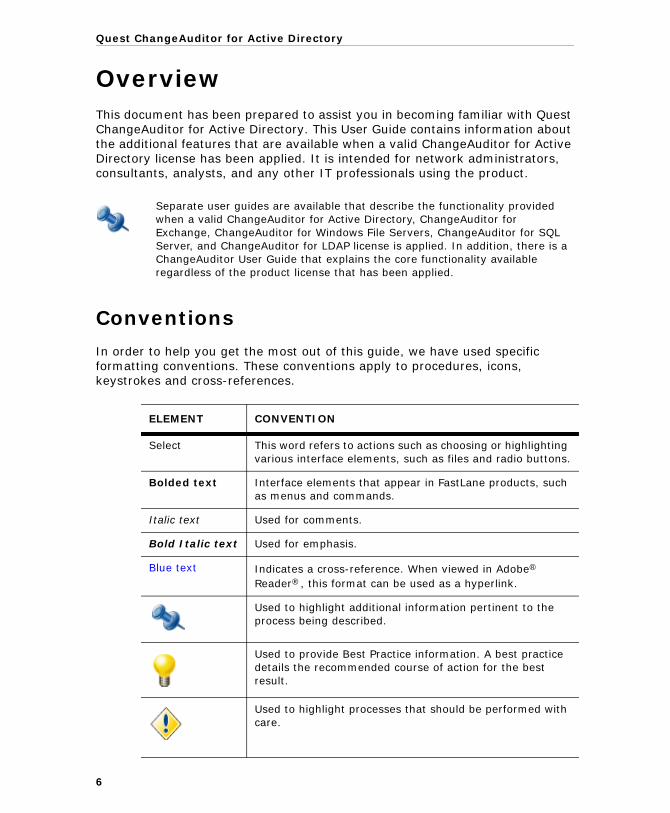
OverviewThis document has been prepared to assist you in becoming familiar with Quest ChangeAuditor for Active Directory. This User Guide contains information about the additional features that are available when a valid ChangeAuditor for Active Directory license has been applied. It is intended for network administrators, consultants, analysts, and any other IT professionals using the product.
Conventions
In order to help you get the most out of this guide, we have used specific formatting conventions. These conventions apply to procedures, icons, keystrokes and cross-references.
Separate user guides are available that describe the functionality provided when a valid ChangeAuditor for Active Directory, ChangeAuditor for Exchange, ChangeAuditor for Windows File Servers, ChangeAuditor for SQL Server, and ChangeAuditor for LDAP license is applied. In addition, there is a ChangeAuditor User Guide that explains the core functionality available regardless of the product license that has been applied.
ELEMENT CONVENTION
Select This word refers to actions such as choosing or highlighting various interface elements, such as files and radio buttons.
Bolded text Interface elements that appear in FastLane products, such as menus and commands.
Italic text Used for comments.
Bold Italic text Used for emphasis.
Blue text Indicates a cross-reference. When viewed in Adobe® Reader®, this format can be used as a hyperlink.
Used to highlight additional information pertinent to the process being described.
Used to provide Best Practice information. A best practice details the recommended course of action for the best result.
Used to highlight processes that should be performed with care.
6
About This Guide
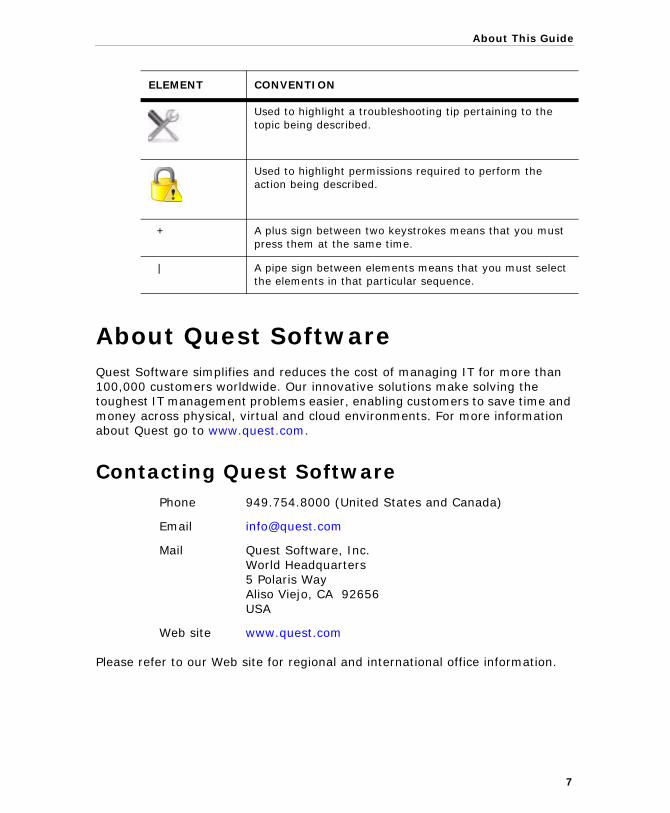
About Quest SoftwareQuest Software simplifies and reduces the cost of managing IT for more than 100,000 customers worldwide. Our innovative solutions make solving the toughest IT management problems easier, enabling customers to save time and money across physical, virtual and cloud environments. For more information about Quest go to www.quest.com.
Contacting Quest SoftwarePhone 949.754.8000 (United States and Canada)
Email [email protected]
Mail Quest Software, Inc.World Headquarters5 Polaris WayAliso Viejo, CA 92656USA
Web site www.quest.com
Please refer to our Web site for regional and international office information.
Used to highlight a troubleshooting tip pertaining to the topic being described.
Used to highlight permissions required to perform the action being described.
+ A plus sign between two keystrokes means that you must press them at the same time.
| A pipe sign between elements means that you must select the elements in that particular sequence.
ELEMENT CONVENTION
7
Quest ChangeAuditor for Active Directory
Contacting Quest Support
Quest Support is available to customers who have a trial version of a Quest product or who have purchased a Quest product and have a valid maintenance contract. Quest Support provides unlimited 24x7 access to SupportLink, our self-service portal. Visit SupportLink at http://support.quest.com.
From SupportLink, you can do the following:
• Review thousands of solutions from our online Knowledgebase
• Download the latest releases and service packs
• Create, update and review Support cases
View the Global Support Guide for a detailed explanation of support programs, online services, contact information, and policy and procedures. The guide is available at: http://support.quest.com.
8
1
ChangeAuditor for Active Directory Overview
• Introduction
• Client Components/Features
Quest ChangeAuditor for Active Directory
IntroductionChangeAuditor for Active Directory drives the security and control of Active Directory by tracking all AD configuration changes in real-time. From GPO and Schema to critical group and operational changes, ChangeAuditor for Active Directory tracks, audits, reports and alerts on changes that impact your directory -- without the overhead of native auditing.
In addition, ChangeAuditor for Active Directory allows you to lock down critical Active Directory, ADAM (AD LDS) and Group Policy objects, to protect them from unauthorized or accidental modifications or deletions.
To verify you have a valid ChangeAuditor for Active Directory license:
1. Open the ChangeAuditor Client and select the Help | About menu command.
2. Verify that the License Type associated with the ChangeAuditor for Active Directory component reads ’Ongoing’.
3. Also verify that the Expiration Date field reads ’No Expiration’ or contains a date that has not expired.
4. Select the close button in the upper right-hand corner or use the OK button to close the About dialog.
Active Directory auditing and protection are only available if you have licensed the ChangeAuditor for Active Directory service. The product will not prevent you from using these features, however, associated events or protection will not be captured/enforced unless the proper license is applied.
10
ChangeAuditor for Active Directory Overview
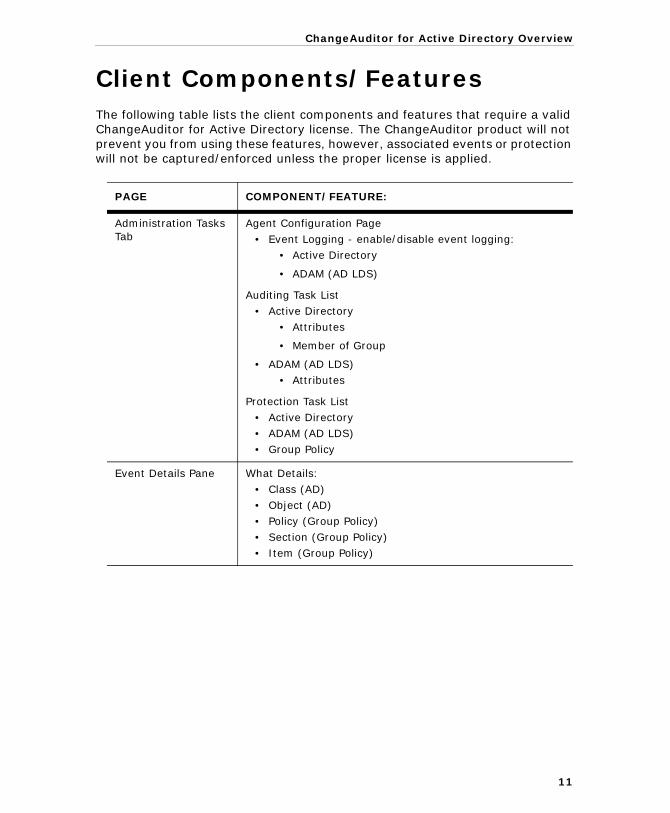
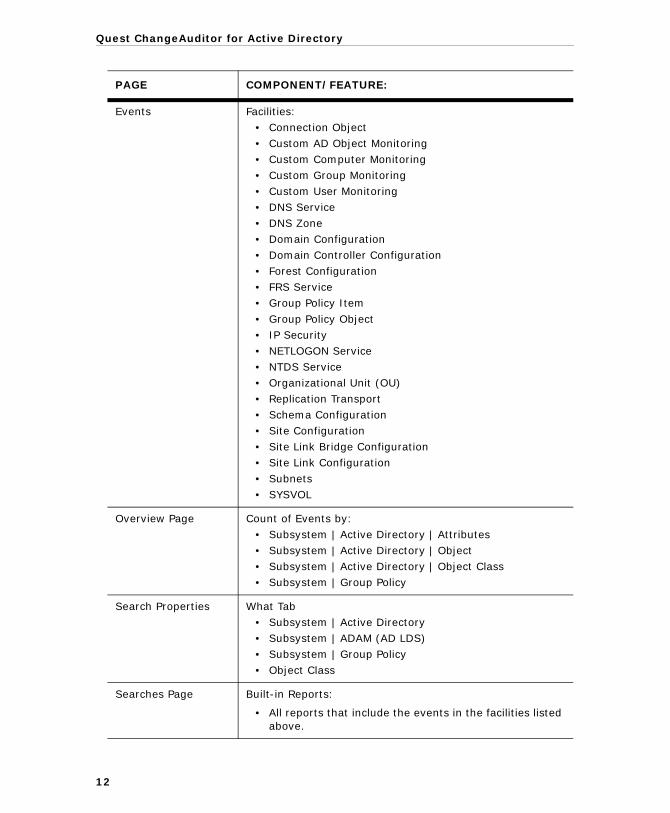
Client Components/FeaturesThe following table lists the client components and features that require a valid ChangeAuditor for Active Directory license. The ChangeAuditor product will not prevent you from using these features, however, associated events or protection will not be captured/enforced unless the proper license is applied.
PAGE COMPONENT/FEATURE:
Administration Tasks Tab
Agent Configuration Page• Event Logging - enable/disable event logging:
• Active Directory
• ADAM (AD LDS)
Auditing Task List
• Active Directory• Attributes
• Member of Group
• ADAM (AD LDS)• Attributes
Protection Task List• Active Directory• ADAM (AD LDS)• Group Policy
Event Details Pane What Details:• Class (AD)• Object (AD)• Policy (Group Policy)• Section (Group Policy)• Item (Group Policy)
11
Quest ChangeAuditor for Active Directory
12
Events Facilities:• Connection Object• Custom AD Object Monitoring• Custom Computer Monitoring• Custom Group Monitoring• Custom User Monitoring• DNS Service• DNS Zone• Domain Configuration• Domain Controller Configuration• Forest Configuration• FRS Service• Group Policy Item
• Group Policy Object• IP Security• NETLOGON Service• NTDS Service• Organizational Unit (OU)• Replication Transport• Schema Configuration• Site Configuration• Site Link Bridge Configuration• Site Link Configuration• Subnets• SYSVOL
Overview Page Count of Events by:• Subsystem | Active Directory | Attributes• Subsystem | Active Directory | Object• Subsystem | Active Directory | Object Class• Subsystem | Group Policy
Search Properties What Tab• Subsystem | Active Directory• Subsystem | ADAM (AD LDS)• Subsystem | Group Policy• Object Class
Searches Page Built-in Reports:
• All reports that include the events in the facilities listed above.
PAGE COMPONENT/FEATURE:
2
Custom Active Directory Searches/Reports
• Introduction
• Run the All Active Directory Events Report
• Create Custom Active Directory Searches
Quest ChangeAuditor for Active Directory
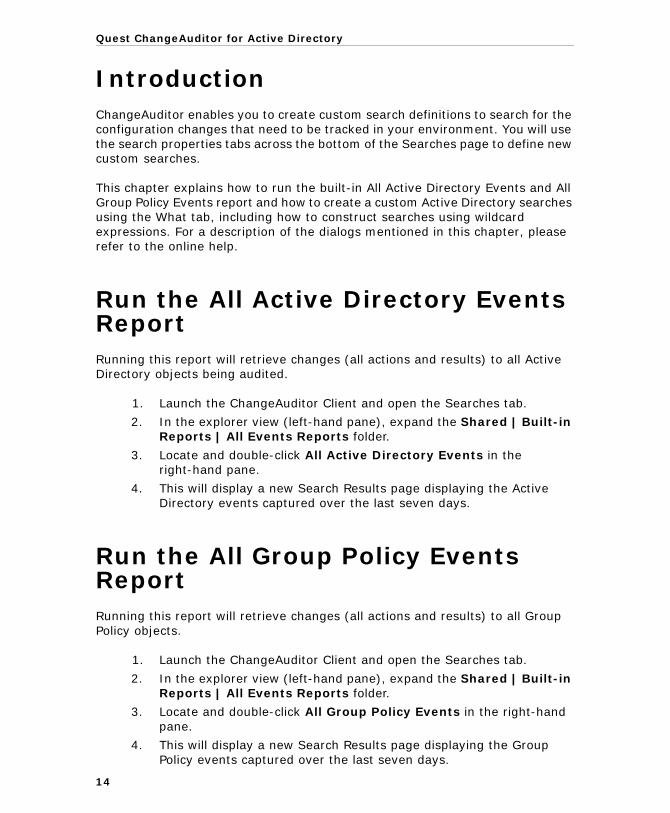
IntroductionChangeAuditor enables you to create custom search definitions to search for the configuration changes that need to be tracked in your environment. You will use the search properties tabs across the bottom of the Searches page to define new custom searches.
This chapter explains how to run the built-in All Active Directory Events and All Group Policy Events report and how to create a custom Active Directory searches using the What tab, including how to construct searches using wildcard expressions. For a description of the dialogs mentioned in this chapter, please refer to the online help.
Run the All Active Directory Events ReportRunning this report will retrieve changes (all actions and results) to all Active Directory objects being audited.
1. Launch the ChangeAuditor Client and open the Searches tab.
2. In the explorer view (left-hand pane), expand the Shared | Built-in Reports | All Events Reports folder.
3. Locate and double-click All Active Directory Events in the right-hand pane.
4. This will display a new Search Results page displaying the Active Directory events captured over the last seven days.
Run the All Group Policy Events ReportRunning this report will retrieve changes (all actions and results) to all Group Policy objects.
1. Launch the ChangeAuditor Client and open the Searches tab.
2. In the explorer view (left-hand pane), expand the Shared | Built-in Reports | All Events Reports folder.
3. Locate and double-click All Group Policy Events in the right-hand pane.
4. This will display a new Search Results page displaying the Group Policy events captured over the last seven days.
14
Custom Active Directory Searches/Reports
Create Custom Active Directory SearchesTo search for changes to a specific Active Directory container:
1. Open the Searches page.
2. In the explorer view, expand and select the folder where you want to save your search.
Selecting the Private folder will create a search that only you can run and view, whereas selecting the Shared folder will create a search which can be run and viewed by all ChangeAuditor users.
3. Select the New tool bar button at the top of the Searches page (or right-click a folder and select the New | New Search menu command). This will activate the search properties tabs at the bottom of the page.
4. On the Info tab, enter a name and description for the search.
5. On the What tab, expand the Add tool bar button and select Subsystem | Active Directory.
6. On the Add Active Directory Container dialog, select one of the following options to define the scope of coverage:
• All Active Directory Objects - select to include all objects. (Default when the Add tool bar button is used).
• This Object - select to include the selected object(s) only. (Default when the Add With Events tool bar button is used).
• This Object and Child Objects Only - select to include the selected object(s) and its direct child objects.
• This Object and All Child Objects - select to include the selected object(s) and all subordinate objects (in all levels).
7. By default, All Actions is selected meaning that all of the activity associated with the object will generate an audited event. However, you can clear the All Actions option and select individual options. The options available are:
• All Actions - select to include when any of the following actions occur (Default)
• Add Attribute - select to include when an attribute is added• Delete Attribute - select to include when an attribute is deleted• Modify Attribute - select to include when an attribute is
modified
You can use the Add with Events | Subsystem | Active Directory command (instead of Add | Subsystem | Active Directory) to search for an entity that already has an audited event in the database.
15
Quest ChangeAuditor for Active Directory
• Rename Object - select to include when an object is renamed• Add Object - select to include when an object is added• Delete Object - select to include when an object is deleted• Move Object - select to include when an object is moved• Other - select to include other types of activity against the
selected object
8. By default, All Results is selected meaning that all actions regardless of their results will be included in the search. However, you can clear the All Results option and select individual options. The results options available are:
• All Results - select to include all results (Default)• Success - select to include actions that completed successfully• Failed - select to include actions that failed to complete• Protected - select to include actions that failed because they
are protected using the ChangeAuditor object locking feature
9. When a scope other than All Active Directory Objects is selected, the directory object picker is activated allowing you to select the object(s) to be included in the search definition.
Use either the Browse or Search page to search your environment to locate and select the Active Directory object(s) to be included. Use the Options page to view or modify the search options or global catalog to be used to retrieve directory objects.
Once you select the directory object to be included, use the Add button to add it to the list at the bottom of the dialog.
10. Once you have added all the Active Directory objects to be included in the search, use the OK button to save your selection and close the dialog.
11. Once you have defined the search criteria to be used, you can either save the search definition or run the search.
• To save the search definition without running it, select Save. • To save and run the search, select Run.
12. When this search is run, ChangeAuditor will search for changes to the Active Directory object(s) specified on the What tab.
Select the Exclude the Above Selection(s) check box if you want to search for changes to all directory objects EXCEPT those listed in the ’what’ list.
Select the Runtime Prompt check box on this dialog to prompt for a directory object every time the search is run.
16
Custom Active Directory Searches/Reports
To construct an Active Directory Object search using a wildcard expression:
1. Open the Searches page.
2. In the explorer view, expand and select the folder where you want to save your search.
Selecting the Private folder will create a search that only you can run and view, whereas selecting the Shared folder will create a search which can be run and viewed by all ChangeAuditor users.
3. Select the New tool bar button at the top of the Searches page (or right-click a folder and select the New | New Search menu command).
4. On the Info tab, enter a name and description for the search.
5. On the What tab, expand the Add tool bar button and select Subsystem | Active Directory.
6. On the Add Active Directory Container dialog, select the This Object scope.
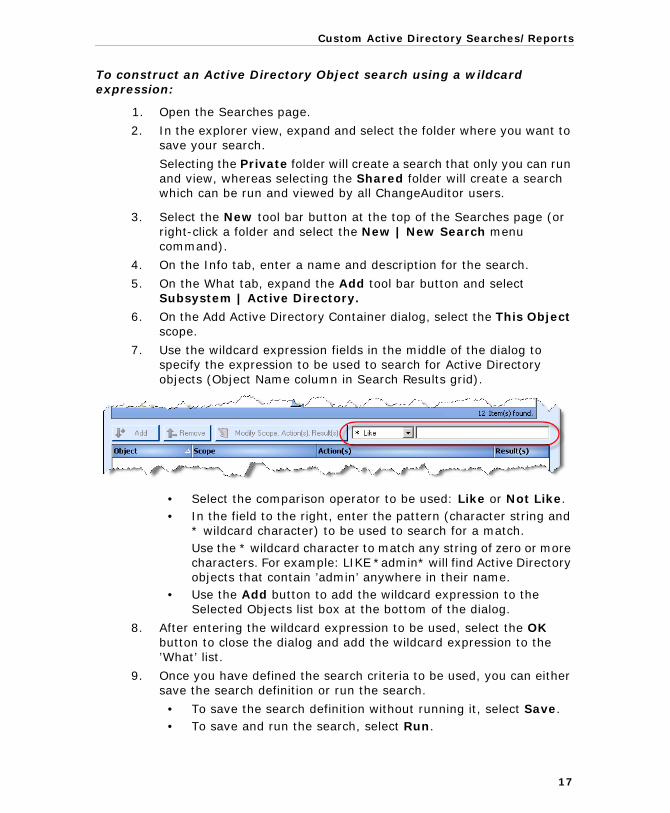
7. Use the wildcard expression fields in the middle of the dialog to specify the expression to be used to search for Active Directory objects (Object Name column in Search Results grid).
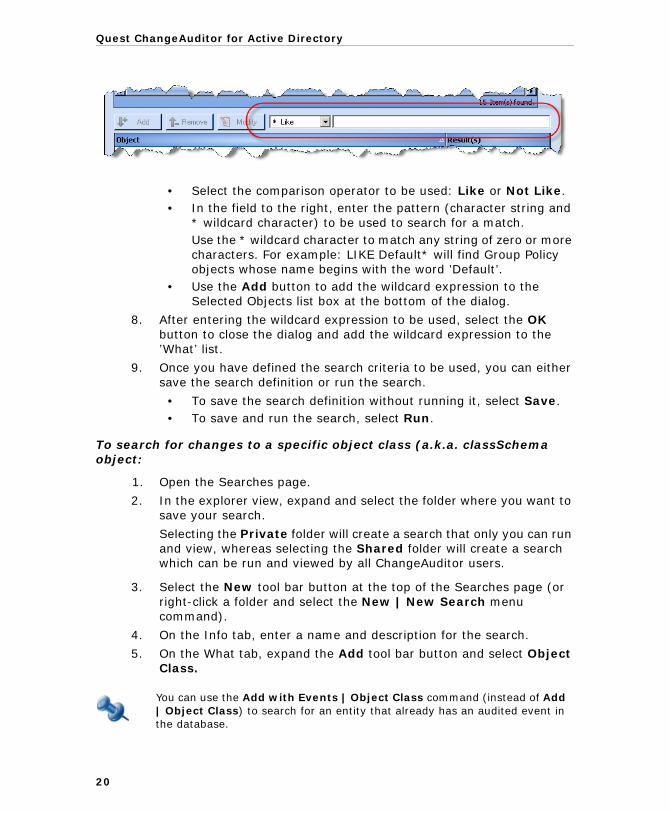
• Select the comparison operator to be used: Like or Not Like.• In the field to the right, enter the pattern (character string and
* wildcard character) to be used to search for a match.Use the * wildcard character to match any string of zero or more characters. For example: LIKE *admin* will find Active Directory objects that contain ’admin’ anywhere in their name.
• Use the Add button to add the wildcard expression to the Selected Objects list box at the bottom of the dialog.
8. After entering the wildcard expression to be used, select the OK button to close the dialog and add the wildcard expression to the ’What’ list.
9. Once you have defined the search criteria to be used, you can either save the search definition or run the search.
• To save the search definition without running it, select Save. • To save and run the search, select Run.
17
Quest ChangeAuditor for Active Directory
To search for changes to a specific Group Policy container:
1. Open the Searches page.
2. In the explorer view, expand and select the folder where you want to save your search.
Selecting the Private folder will create a search that only you can run and view, whereas selecting the Shared folder will create a search which can be run and viewed by all ChangeAuditor users.
3. Select the New tool bar button at the top of the Searches page (or right-click a folder and select the New | New Search menu command).
4. On the Info tab, enter a name and description for the search.
5. On the What tab, expand the Add tool bar button and select Subsystem | Group Policy.
6. On the Add Group Policy Container dialog, select one of the following options to define the scope of coverage:
• All Objects - select to include all objects (Default)• This Object - select to include the selected object only
7. By default, All Results is selected meaning that all actions regardless of their results will be included in the search. However, you can clear the All Results option and select individual options. The results options available are:
• All Results - select to include all results (Default)• Success - select to include actions that completed successfully• Failed - select to include actions that failed to complete• Protected - select to include actions that failed because they
are protected using the ChangeAuditor object locking feature
8. When the This Object scope option is selected, use either the Browse or Search page to search your environment to locate and select the Group Policy object(s) to be included in the search. Use the Options page to view or modify the search options or global catalog to be used to retrieve directory objects.
You can use the Add with Events | Subsystem | Group Policy command (instead of Add | Subsystem | Group Policy) to search for an entity that already has an audited event in the database.
On the Add Group Policy Container, the Search page is initially displayed which contains GroupPolicyContainer in the Find field and an * wildcard character in the Name field. Simply select the Search button on this page to locate the Group Policy containers in your environment.
18
Custom Active Directory Searches/Reports
Once you select the Group Policy container to be included, use the Add button to add it to the list at the bottom of the dialog.
9. Once you have added all the Group Policy Objects to be included in the search, use the OK button to save your selection and close the dialog.
10. Once you have defined the search criteria to be used, you can either save the search definition or run the search.
• To save the search definition without running it, select Save. • To save and run the search, select Run.
11. When this search is run, ChangeAuditor will search for changes to the Group Policy Object(s) specified on the What tab.
To construct a Group Policy Object search using a wildcard expression:
1. Open the Searches page.
2. In the explorer view, expand and select the folder where you want to save your search.
Selecting the Private folder will create a search that only you can run and view, whereas selecting the Shared folder will create a search which can be run and viewed by all ChangeAuditor users.
3. Select the New tool bar button at the top of the Searches page (or right-click a folder and select the New | New Search menu command).
4. On the Info tab, enter a name and description for the search.
5. On the What tab, expand the Add tool bar button and select Subsystem | Group Policy.
6. On the Add Group Policy Container dialog, select the This Object scope.
7. Use the wildcard expression fields in the middle of the dialog to specify the expression to be used to search for Group Policy objects (Object Name column in Search Results grid).
Select the Exclude the Above Selection(s) check box if you want to search for change to all Group Policy Objects EXCEPT those listed in the ’what’ list.
Select the Runtime Prompt check box on this dialog to prompt for a Group Policy Object every time the search is run.
19
Quest ChangeAuditor for Active Directory
• Select the comparison operator to be used: Like or Not Like.• In the field to the right, enter the pattern (character string and
* wildcard character) to be used to search for a match.Use the * wildcard character to match any string of zero or more characters. For example: LIKE Default* will find Group Policy objects whose name begins with the word ’Default’.
• Use the Add button to add the wildcard expression to the Selected Objects list box at the bottom of the dialog.
8. After entering the wildcard expression to be used, select the OK button to close the dialog and add the wildcard expression to the ’What’ list.
9. Once you have defined the search criteria to be used, you can either save the search definition or run the search.
• To save the search definition without running it, select Save. • To save and run the search, select Run.
To search for changes to a specific object class (a.k.a. classSchema object:
1. Open the Searches page.
2. In the explorer view, expand and select the folder where you want to save your search.
Selecting the Private folder will create a search that only you can run and view, whereas selecting the Shared folder will create a search which can be run and viewed by all ChangeAuditor users.
3. Select the New tool bar button at the top of the Searches page (or right-click a folder and select the New | New Search menu command).
4. On the Info tab, enter a name and description for the search.
5. On the What tab, expand the Add tool bar button and select Object Class.
You can use the Add with Events | Object Class command (instead of Add | Object Class) to search for an entity that already has an audited event in the database.
20
Custom Active Directory Searches/Reports
6. On the Add Object Class dialog select an object class and use the Add button to add it to the list box located across the bottom of the dialog. Repeat this step to add additional object classes.
7. Once you have made your selection(s), use the OK button to save your selection and close the dialog.
8. Once you have defined the search criteria to be used, you can either save the search definition or run the search.
• To save the search definition without running it, select Save. • To save and run the search, select Run.
9. When this search is run, ChangeAuditor will search for changes to the object class(es) specified on the What tab.
To search for changes to a specific ADAM (AD LDS) container:
1. Open the Searches page.
2. In the explorer view, expand and select the folder where you want to save your search.
Selecting the Private folder will create a search that only you can run and view, whereas selecting the Shared folder will create a search which can be run and viewed by all ChangeAuditor users.
3. Select the New tool bar button at the top of the Searches page (or right-click a folder and select the New | New Search menu command). This will activate the search properties tabs at the bottom of the page.
4. On the Info tab, enter a name and description for the search.
5. On the What tab, expand the Add tool bar button and select Subsystem | ADAM (AD LDS).
Select the Exclude the Above Selection(s) check box if you want to search for changes to all object classes EXCEPT those listed in the ’what’ list.
Select the Runtime Prompt check box on this dialog to prompt for an object class every time the search is run.
You can use the Add with Events | Subsystem | ADAM (AD LDS) command (instead of Add | Subsystem | ADAM (AD LDS)) to search for an entity that already has an audited event in the database.
21

Quest ChangeAuditor for Active Directory
6. On the Select the agent that hosts the ADAM/AD LDS instance dialog, use the Browse or Search page to locate and select the agent that hosts the ADAM (AD LDS) instance to be searched.
7. If credentials are required, a Credentials Required dialog appears allowing you to enter the credentials to be used to access the selected instance.
8. On the Add ADAM (AD LDS) Container dialog, select one of the following options to define the scope of coverage:
• All ADAM (AD LDS) Objects - select to include all objects. (Default when the Add tool bar button is selected.)
• This Object - select to include the selected object(s) only. (Default when the Add With Events button is selected.)
• This Object and Child Objects Only - select to include the selected object(s) and its direct child objects.
• This Object and All Child Objects - select to include the selected object(s) and all subordinate objects (in all levels).
9. By default, All Actions is selected meaning that all of the activity associated with the object will generate an audited event. However, you can clear the All Actions option and select individual options. The options available are:
• All Actions - select to include when any of the following actions occur (Default)
• Add Attribute - select to include when an attribute is added• Delete Attribute - select to include when an attribute is deleted• Modify Attribute - select to include when an attribute is
modified• Rename Object - select to include when an object is renamed• Add Object - select to include when an object is added• Delete Object - select to include when an object is deleted• Move Object - select to include when an object is moved• Other - select to include other types of activity against the
selected object
10. By default, All Results is selected meaning that all actions regardless of their results will be included in the search. However, you can clear the All Results option and select individual options. The results options available are:
• All Results - select to include all results (Default)• Success - select to include actions that completed successfully
The Explorer View is displayed by default; however, this display will not include member servers. Therefore, if you have installed ADAM (AD LDS) on a workgroup server, select the Grid View option at the top of the dialog to select from a list of workgroup servers.
22
Custom Active Directory Searches/Reports
• Failed - select to include actions that failed to complete• Protected - select to include actions that failed because they
are protected using the ChangeAuditor object locking feature
11. When a scope other than All ADAM (AD LDS) Objects is selected, the directory object picker is activated allowing you to select the ADAM (AD LDS) container(s) to be included in the search definition.
Use either the Browse or Search page to search your environment to locate and select the ADAM (AD LDS) container(s) to be included. Use the Options page to view or modify the search options or ADAM instance to be used to retrieve directory objects.
Once you select a container to be included, use the Add button to add it to the list at the bottom of the dialog.
12. Once you have added all the ADAM (AD LDS) containers to be included in the search, use the OK button to save your selection and close the dialog.
13. Once you have defined the search criteria to be used, you can either save the search definition or run the search.
• To save the search definition without running it, select Save. • To save and run the search, select Run.
14. When this search is run, ChangeAuditor will search for changes to the ADAM container(s) specified on the What tab.
Select the Exclude the Above Selection(s) check box if you want to search for changes to all ADAM (AD LDS) containers EXCEPT those listed in the ’what’ list.
Select the Runtime Prompt check box on this dialog to prompt for an ADAM (AD LDS) container every time the search is run.
23

3
Custom Active Directory Object Auditing
• Introduction
• Active Directory Auditing Page
• Custom Active Directory Object Auditing
• Active Directory Auditing Wizard
Quest ChangeAuditor for Active Directory
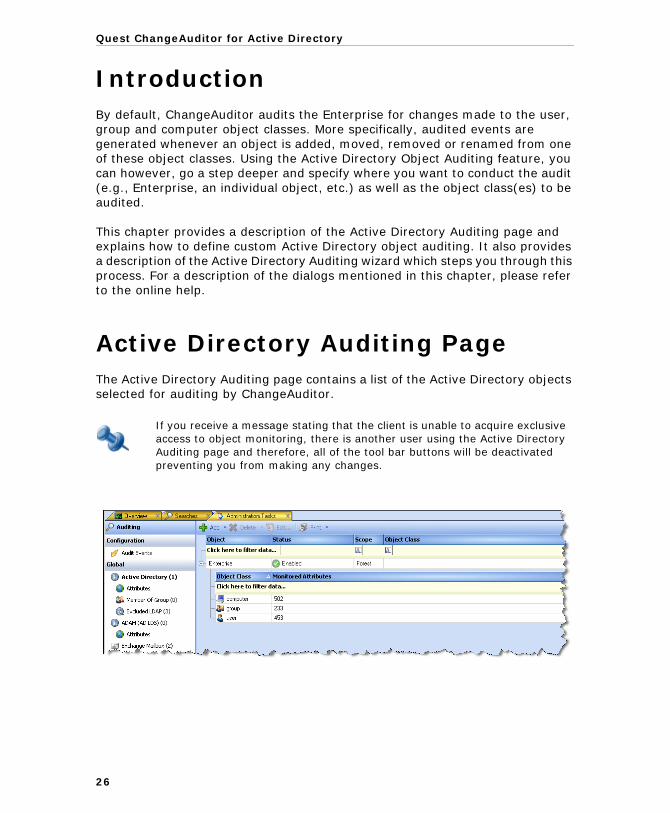
IntroductionBy default, ChangeAuditor audits the Enterprise for changes made to the user, group and computer object classes. More specifically, audited events are generated whenever an object is added, moved, removed or renamed from one of these object classes. Using the Active Directory Object Auditing feature, you can however, go a step deeper and specify where you want to conduct the audit (e.g., Enterprise, an individual object, etc.) as well as the object class(es) to be audited.
This chapter provides a description of the Active Directory Auditing page and explains how to define custom Active Directory object auditing. It also provides a description of the Active Directory Auditing wizard which steps you through this process. For a description of the dialogs mentioned in this chapter, please refer to the online help.
Active Directory Auditing PageThe Active Directory Auditing page contains a list of the Active Directory objects selected for auditing by ChangeAuditor.
If you receive a message stating that the client is unable to acquire exclusive access to object monitoring, there is another user using the Active Directory Auditing page and therefore, all of the tool bar buttons will be deactivated preventing you from making any changes.
26

Custom Active Directory Object Auditing
The Active Directory Auditing page contains an expandable view of the Active Directory objects selected for auditing. Initially, the list box will contain an entry for auditing all user, computer and group object classes in the entire enterprise.
To add an object to this list, use the Add tool bar button (or to add multiple objects, expand the Add tool bar button and select the Select Multiple Objects option). Once added, the following information will be displayed:
If the view is not already expanded, click the expansion box to the left of an object to expand the view to display the object class(es) and monitored attributed to be audited in the object.
FIELD DESCRIPTION
Object Displays the distinguished name of object.
Status Indicates whether the auditing for a selected object is enabled or disabled.
Scope Displays the scope of coverage:
• Forest
• Object
• One Level
• SubTree
Object Class This cell is used for filtering data. That is, as you enter characters into this cell, the client will redisplay only the object classes that start with the character(s) entered, regardless of the Active Directory object to which they belong.
FIELD DESCRIPTION
Object Class Displays the object class being audited (e.g., computer, user, group, etc.)
Monitored Attributes Displays the number of schema attributes selected for auditing by ChangeAuditor for each object class listed.
Note: Attribute auditing is specified using the AD Attribute Auditing page.
27
Quest ChangeAuditor for Active Directory
Custom Active Directory Object AuditingTo define custom Active Directory object auditing, use the Active Directory Auditing page, which is accessible through the Administration Tasks tab.
To add an Active Directory object to the auditing list:
1. Open the Administration Tasks tab.
2. Select the Auditing task button at the bottom of the navigation pane (left-hand pane).
3. Select Active Directory in the Auditing task list to display the Active Directory Auditing page.
4. Use the Add tool bar button to launch the Active Directory Auditing wizard, which steps you through the process of defining the objects and object classes to be audited by ChangeAuditor.
5. Select where to conduct the audit:
• Enterprise (Default)• This Object• This Object and Child Objects Only• This Object and All Child Objects
6. If you selected the This Object, The Object and Child Objects Only, or This Object and All Child Objects option, use the Browse or Search pages to locate the directory object or container to be audited.
7. If you selected either the This Object and Child Objects Only or This Object and All Child Objects option, select Next to proceed to the next page to define the object classes to be audited.
From this page, use one of the following methods to move an object class to the Audited Object Class list (right-hand pane):
• Select one or more object classes in the UnAudited Object Class list and select the Add button.
• Select one or more object classes in the UnAudited Object Class list and ’drag and drop’ the selected object classes into the Audited Object Class list.
• Double-click an object class in the UnAudited Object Class list.
You must select at least one object class for auditing.
8. After selecting the Active Directory objects (and object classes) to be audited, select the Finish button to save your selection, close the wizard and return to the Active Directory Auditing page. The selected Active Directory object will now be listed on the Active Directory Auditing page.
28

Custom Active Directory Object Auditing
To add multiple Active Directory objects to the auditing list:
1. Open the Active Directory Auditing page.
2. Expand the Add tool bar button and select Select Multiple Objects.
3. On the Active Directory Auditing wizard, select where to conduct the audit:
• Enterprise (Default)• This Object• This Object and Child Objects Only• This Object and All Child Objects
4. If you selected the This Object, The Object and Child Objects Only, or This Object and All Child Objects option, use the Browse or Search pages to locate the directory object or container to be audited.
After selecting a directory object or container, use the Add button to add the selected object to the list box at the bottom of the page.
Repeat this step to add multiple Active Directory objects.
5. If you selected either the This Object and Child Objects Only or This Object and All Child Objects option, select Next to proceed to the next page to define the object classes to be audited.
From this page, use one of the following methods to move an object class to the Audited Object Class list (right-hand pane):
• Select one or more object classes in the UnAudited Object Class list and then select the Add button.
• Select one or more object classes in the UnAudited Object Class and ’drag and drop’ the selected object classes into the Audited Object Class list.
• Double-click an object class in the UnAudited Object Class list.
You must select at least one object class for auditing.
6. After selecting the Active Directory objects (and object classes) to be audited, select the Finish button to save your selection, close the wizard and return to the Active Directory Auditing page.
The selected Active Directory objects will now be listed on the Active Directory Auditing page.
If you have selected multiple objects on the first page of the wizard, the object classes selected on this second page will apply to all of these objects.
29
Quest ChangeAuditor for Active Directory
To modify an object in the auditing list:
1. On the Active Directory Auditing page, select the object to be modified and select the Edit tool bar button or right-click command.
2. This will display the Active Directory Auditing wizard, where you can select a different Active Directory object or object classes for auditing.
3. Select the Finish button to save your selection, close the wizard and return to the Active Directory Auditing page.
The changes made will now be reflected in the Active Directory Auditing page.
To disable the auditing of an object in the auditing list:
The disable feature allows you to temporarily disable the auditing of a directory object without having to remove it from the Active Directory auditing list.
1. On the Active Directory Auditing page, use one of the following methods to disable an object in the auditing list:
• Click in the Status cell for the object to be disabled and select Disabled
• Right-click the object to be disabled and select Disable
The entry in the Status column for the object will change to ’Disabled’.
2. To re-enable the auditing of an object, use the Enable option in either the Status cell or right-click menu.
To delete an object from the auditing list:
1. On the Active Directory Auditing page, use one of the following methods to delete an object from the auditing list:
• Select the object to be deleted and use the Delete tool bar button
• Right-click the object to be deleted and select Delete
2. A dialog will be displayed confirming that you want to delete the object from the auditing list. Select Yes.
To delete an object class from the auditing list:
1. On the Active Directory Auditing page, use one of the following methods to delete an object class from the auditing list:
• Select the object class to be deleted and Select the Delete | Delete Object Class tool bar button
• Right-click the object class to be deleted and select Delete
30

Custom Active Directory Object Auditing
2. A dialog will be displayed confirming that you want to delete the object class from the auditing list. Select Yes.
Active Directory Auditing WizardThe Active Directory Auditing wizard is launched when the Add or Add | Select Multiple Objects button is selected from the tool bar of the Active Directory Auditing page. This wizard will step you through the process of defining additional Active Directory objects to be audited by ChangeAuditor.
The following table proves a description of the fields and controls in the Active Directory Auditing wizard.
You cannot delete the last object class in an object entry in the auditing list. In order to delete this last object class, you must delete the entire object from the auditing list.
SELECT ACTIVE DIRECTORY OBJECTS PAGE
31
Quest ChangeAuditor for Active Directory
Scope Select the appropriate option to specify the scope of coverage:
• Enterprise - to audit the entire enterprise (default)
• This Object - to audit an individual object
• This Object and Child Objects Only - to audit an object and its direct child objects
• This Object and All Child Objects - to audit an object and all of its subordinate objects (all levels)
When an option other than Enterprise is selected, the Browse and Search pages will be enabled allowing you to locate and select the Active Directory object(s) to be audited.
Browse Page Displays a hierarchical view of the containers in your environment allowing you to locate and select the Active Directory object(s) to be audited.
If you used the Add | Select Multiple Objects option, once you have selected an object, use the Add button to add it to the list at the bottom of the page.
Search Page Use the controls at the top of the Search page to search your environment to locate an Active Directory object.
If you used the Add | Select Multiple Object option, once you have selected an account, use the Add button to add it to the list at the bottom of the page.
Options Page Use the Options page to modify the search options or global catalog to be used to retrieve directory objects.
Note: For more information on using the Browse, Search or Options pages, please refer to Directory Object Picker in the ChangeAuditor User Guide.
32
Custom Active Directory Object Auditing
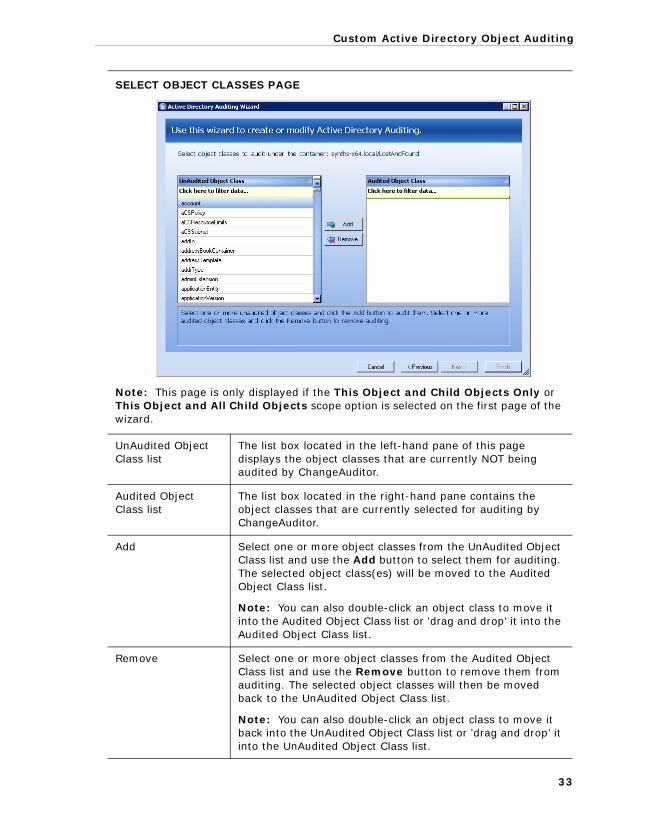
SELECT OBJECT CLASSES PAGE
Note: This page is only displayed if the This Object and Child Objects Only or This Object and All Child Objects scope option is selected on the first page of the wizard.
UnAudited Object Class list
The list box located in the left-hand pane of this page displays the object classes that are currently NOT being audited by ChangeAuditor.
Audited Object Class list
The list box located in the right-hand pane contains the object classes that are currently selected for auditing by ChangeAuditor.
Add Select one or more object classes from the UnAudited Object Class list and use the Add button to select them for auditing. The selected object class(es) will be moved to the Audited Object Class list.
Note: You can also double-click an object class to move it into the Audited Object Class list or ’drag and drop’ it into the Audited Object Class list.
Remove Select one or more object classes from the Audited Object Class list and use the Remove button to remove them from auditing. The selected object classes will then be moved back to the UnAudited Object Class list.
Note: You can also double-click an object class to move it back into the UnAudited Object Class list or ’drag and drop’ it into the UnAudited Object Class list.
33

4
Custom AD Attribute Auditing
• Introduction
• AD Attribute Auditing Page
• Custom AD Attribute Auditing
Quest ChangeAuditor for Active Directory
IntroductionUsing the Custom Attribute Auditing feature, you can customize ChangeAuditor by specifying the individual schema attributes to be audited. In addition to specifying individual attributes for auditing, you can also assign a severity to the attributes being audited.
This chapter provides a description of the AD Attribute Auditing page and how to define custom AD attribute auditing.
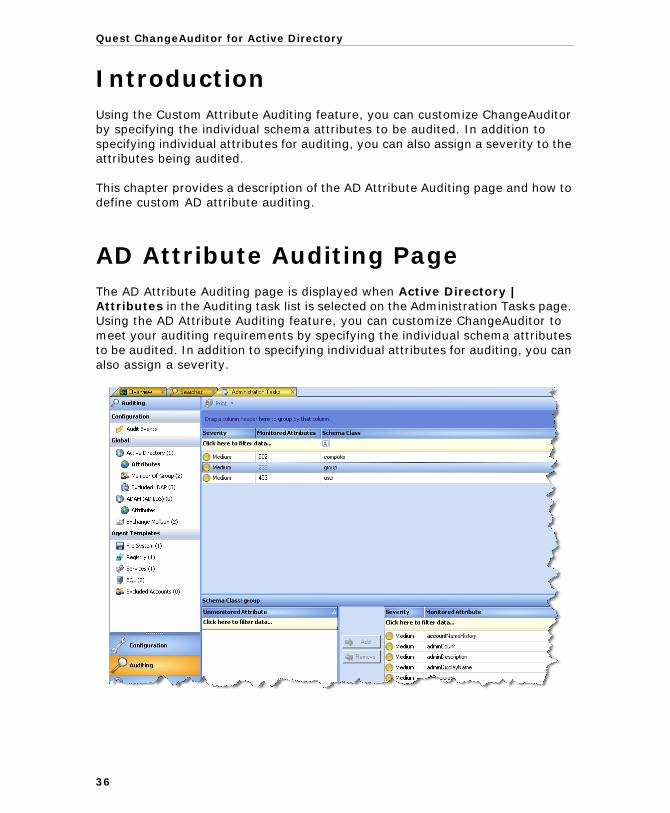
AD Attribute Auditing PageThe AD Attribute Auditing page is displayed when Active Directory | Attributes in the Auditing task list is selected on the Administration Tasks page. Using the AD Attribute Auditing feature, you can customize ChangeAuditor to meet your auditing requirements by specifying the individual schema attributes to be audited. In addition to specifying individual attributes for auditing, you can also assign a severity.
36
Custom AD Attribute Auditing
The AD Attribute Auditing page consists of the following information/controls:
FIELD/CONTROL DESCRIPTION
Attributes list The list box located across the top of this page lists the object classes that can be selected to define attribute auditing. More specifically, this list contains the object classes selected on the Active Directory Auditing page.
In addition to the name of the object class, the assigned severity and number of custom attributes selected for auditing within each object class are also displayed.
Note: The default set of attributes (added, moved, removed and renamed) are always being audited, but they are not included in the Monitored Attributes count on this page. This count only includes the custom attributes selected for auditing.
Selecting an entry in this list, will populate the list boxes across the bottom of the dialog with the applicable attributes.
Unmonitored Attribute list
The list box located in the lower left-hand pane of this page displays the attributes that are currently NOT being audited by ChangeAuditor for the schema class selected in the Attributes list.
Monitored Attribute list
The list box located in the lower right-hand pane contains the attributes that are currently selected for auditing by ChangeAuditor for the schema class selected in the Attributes list.
In addition to the attribute, the assigned severity is also displayed. To change the severity level assigned to an attribute, place your cursor in the Severity cell and use the drop-down arrow to select the severity you want to assign to the selected attribute.
Add Select one or more attributes from the Unmonitored Attribute list and use the Add button to select them for auditing. The selected attribute(s) will be moved to the Monitored Attribute list.
Note: You can also double-click an attribute to select it for auditing or ’drag and drop’ it into the Monitored Attribute list.
37
Quest ChangeAuditor for Active Directory
Custom AD Attribute AuditingTo define custom attribute auditing:
1. Open the Administration Tasks tab.
2. Select the Auditing task button at the bottom of the navigation pane (left-hand pane).
3. Select Attributes under Active Directory in the Auditing task list to open the AD Attribute Auditing page.
4. Select an object class from the list located across the top of this page. (This list box contains the default object classes and the object classes selected on the Active Directory Auditing page.)
Selecting an entry in this list will populate the lists across the bottom of the dialog with the applicable attributes.
5. In the Unmonitored Attribute list, located in the lower left-hand pane of this page, select one or more attributes and use the Add button to select them for auditing.
You can also double-click an attribute to select it for auditing or ’drag and drop’ it into the Monitored Attribute list.
6. To change the severity level assigned to an attribute, in the right-hand list box, place your cursor in the Severity cell and use the drop-down arrow to select the severity you want to assign to the selected attribute.
7. To remove an attribute from auditing, select the attribute from the right-pane and select the Remove button. Selecting this button will move the selected attribute back into the Unmonitored Attribute list.
You can also double-click an attribute to remove it from auditing or ’drag and drop’ it back into the Unmonitored Attribute list.
Remove Select one or more attributes from the Monitored Attributes list and use the Remove button to remove them for auditing. The selected attribute will then be moved back to the Unmonitored Attribute list.
Note: You can also double-click an attribute to remove it or ’drag and drop’ it back into the Unmonitored Attribute list.
FIELD/CONTROL DESCRIPTION
38
Custom AD Attribute Auditing
8. Once you have selected at least one attribute for auditing, the associated Monitored Attributes column in the list box across the top of this page will display the number of attributes selected for auditing. This value will also be displayed in the Monitor Attributes column back on the Active Directory Auditing page.
39

5
Member of Group Auditing
• Introduction
• Member of Group Auditing Page
• Member of Group Auditing List
• Member of Group Auditing Wizard
Quest ChangeAuditor for Active Directory
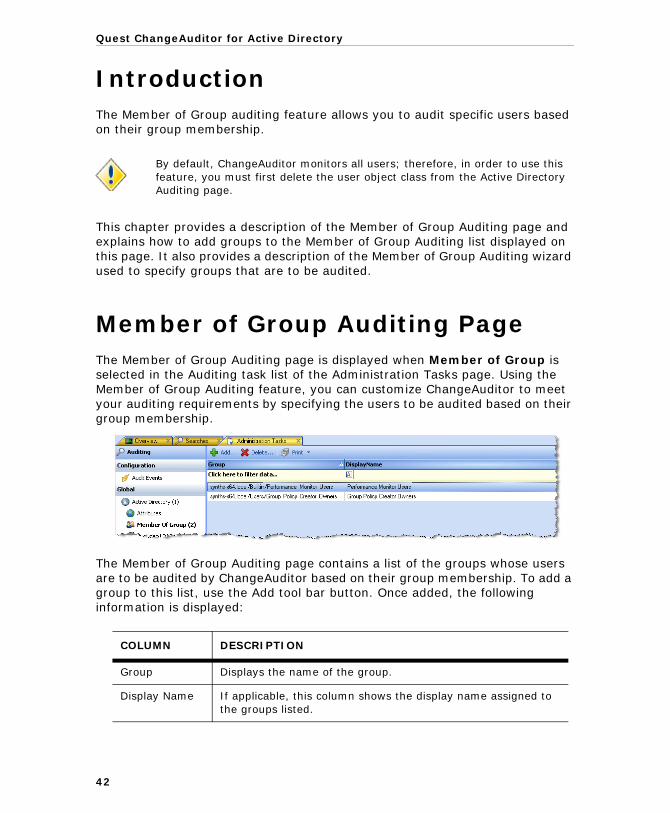
IntroductionThe Member of Group auditing feature allows you to audit specific users based on their group membership.
This chapter provides a description of the Member of Group Auditing page and explains how to add groups to the Member of Group Auditing list displayed on this page. It also provides a description of the Member of Group Auditing wizard used to specify groups that are to be audited.
Member of Group Auditing PageThe Member of Group Auditing page is displayed when Member of Group is selected in the Auditing task list of the Administration Tasks page. Using the Member of Group Auditing feature, you can customize ChangeAuditor to meet your auditing requirements by specifying the users to be audited based on their group membership.
The Member of Group Auditing page contains a list of the groups whose users are to be audited by ChangeAuditor based on their group membership. To add a group to this list, use the Add tool bar button. Once added, the following information is displayed:
By default, ChangeAuditor monitors all users; therefore, in order to use this feature, you must first delete the user object class from the Active Directory Auditing page.
COLUMN DESCRIPTION
Group Displays the name of the group.
Display Name If applicable, this column shows the display name assigned to the groups listed.
42
Member of Group Auditing
Member of Group Auditing ListTo add a group to the Member of Group Auditing list:
1. Open the Administration Tasks tab.
2. Select the Auditing task button at the bottom of the navigation pane (left-hand pane).
3. Select Active Directory under the Auditing task list to display the Active Directory Auditing page. Check to ensure that the user object class is removed from auditing and NOT listed on this page. If it is still listed, select it and use the Delete button to remove it from the Active Directory auditing list.
4. Once the user object class has been removed, select Member of Group in the Auditing task list to display the Member of Group Auditing page.
5. Use the Add tool bar button to display the Member of Group Auditing Wizard to locate and select the group(s) whose users are to be audited by ChangeAuditor.
6. Use the Browse and Search pages to locate and select a group and use the Add button to add the selected group to the Selected Objects list box at the bottom of the dialog.
Repeat this step to add addition groups to the Member of Groups Auditing list.
7. Use the Select button to save your selections, close the wizard and return to the Member of Group Auditing page, where your selections will now be listed.
To delete a group from the Member of Group Auditing list:
1. On the Member of Group Auditing page, select the group to be deleted from the auditing list.
2. Select the Delete tool bar button.
3. A dialog will be displayed confirming that you want to delete the selected group from the auditing list. Select Yes.
Member of Group Auditing WizardThe Member of Group Auditing wizard is displayed when you select the Add tool bar button on the Member of Group Auditing page. This wizard consists of a single page which allows you to locate and select Active Directory groups that are to be added to the Member of Group Auditing list.
43
Quest ChangeAuditor for Active Directory
The following table provides a description of the fields and controls in the Member of Group Auditing wizard.
SELECT GROUP(S) TO AUDIT PAGE
Browse page Displays a hierarchical view of the containers in your environment allowing you to locate and select the group(s) to be audited.
Once you have selected a group, use the Add button to move the entry to the list at the bottom of the page.
Search page Use the controls at the top of the Search page to search your environment to locate the group(s) to be audited.
Once you have selected a group, use the Add button to move the entry to the list at the bottom of the page.
Options page Use the Options page to modify the search options or global catalog to be used to retrieve directory objects.
Selection List The groups selected for auditing are displayed in the list box located across the bottom of this page. Use the buttons located above this list box to add and remove groups:
Add - select a group in the Browse or Search page and select the Add button to add it to the list.
Remove - select an entry in the list and then select the Remove button to remove it.
44
6
ADAM (AD LDS) Auditing
• Introduction
• ADAM (AD LDS) Auditing Page
• ADAM (AD LDS) Attribute Auditing Page
• Enable ADAM (AD LDS) Auditing
• ADAM (AD LDS) Auditing Wizard
Quest ChangeAuditor for Active Directory
IntroductionChangeAuditor allows you to monitor Active Directory Application Mode (ADAM) and Active Directory Lightweight Directory Services (AD LDS) events. One use case scenario for this feature is the use of an ADAM (AD LDS) instance for the Exchange 2007 Edge Transport Server Role.
To use the ADAM (AD LDS) auditing feature, you must first define the ADAM instances, the directory object(s) or container(s), the object classes and optionally the individual attributes to be audited. In order to do this, you will use the following pages on the Administration Tasks tab:
• Use the ADAM (AD LDS) Auditing page to create a list of ADAM instances, directory object(s) or container(s), and object classes to be monitored.
• Use the ADAM (AD LDS) Attribute Auditing page to select the individual schema attributes to be monitored for the selected object classes.
This chapter provides a description of the ADAM (AD LDS) Auditing page and ADAM (AD LDS) Attribute Auditing page. It explains how to define custom ADAM (AD LDS) object and attribute auditing. It also provides a description of the ADAM (AD LDS) Auditing wizard which steps you through the process of defining the ADAM instances to be audited. For a description of the dialogs mentioned in this chapter, please refer to the online help.
The File and Printer Sharing feature must be enabled under the Windows Firewall before you can set up ADAM auditing or protection.
There are some special installation considerations for auditing ADAM (AD LDS) on workgroup servers. Please refer to the Installing ChangeAuditor to Monitor ADAM (AD LDS) on Workgroup Servers appendix in the ChangeAuditor Installation Guide for more information.
46
ADAM (AD LDS) Auditing
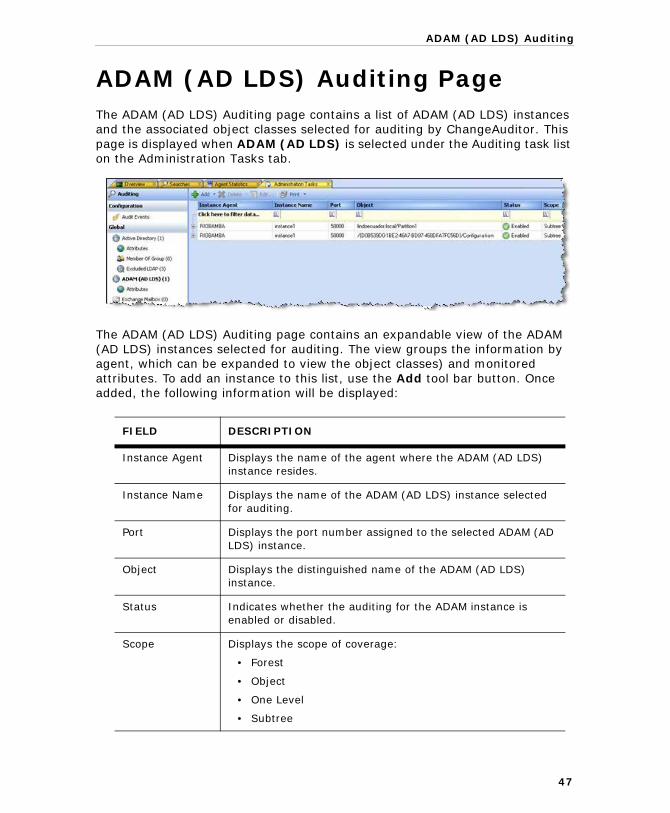
ADAM (AD LDS) Auditing PageThe ADAM (AD LDS) Auditing page contains a list of ADAM (AD LDS) instances and the associated object classes selected for auditing by ChangeAuditor. This page is displayed when ADAM (AD LDS) is selected under the Auditing task list on the Administration Tasks tab.
The ADAM (AD LDS) Auditing page contains an expandable view of the ADAM (AD LDS) instances selected for auditing. The view groups the information by agent, which can be expanded to view the object classes) and monitored attributes. To add an instance to this list, use the Add tool bar button. Once added, the following information will be displayed:
FIELD DESCRIPTION
Instance Agent Displays the name of the agent where the ADAM (AD LDS) instance resides.
Instance Name Displays the name of the ADAM (AD LDS) instance selected for auditing.
Port Displays the port number assigned to the selected ADAM (AD LDS) instance.
Object Displays the distinguished name of the ADAM (AD LDS) instance.
Status Indicates whether the auditing for the ADAM instance is enabled or disabled.
Scope Displays the scope of coverage:
• Forest
• Object
• One Level
• Subtree
47
Quest ChangeAuditor for Active Directory
If the view is not already expanded, click the expansion box to the left of the Instance Agent name to expand the view to display the following details:
ADAM (AD LDS) Attribute Auditing PageThe ADAM (AD LDS) Attribute Auditing page is displayed when Attributes under the ADAM (AD LDS) heading in the Auditing task list is selected on the Administration Tasks tab. Using the ADAM (AD LDS) Attribute Auditing feature, you can specify the individual schema attributes to be audited for the selected object class(es). In addition to specifying individual attributes for auditing, you can also assign a severity.
Object Class This cell is used for filtering data. That is, as you enter characters into this cell, the client will redisplay only the object classes that start with the character(s) entered, regardless of the ADAM (AD LDS) instance to which they belong.
FIELD DESCRIPTION
Object Class Displays the object class selected for auditing (e.g., container, user, group, etc.)
Monitored Attributes Displays the number of schema attributes selected for auditing by ChangeAuditor for each object class listed.
If credentials are needed in order to connect to the selected ADAM (AD LDS) instance, a credentials required dialog will be displayed prompting you to enter the appropriate credentials.
FIELD DESCRIPTION
48
ADAM (AD LDS) Auditing
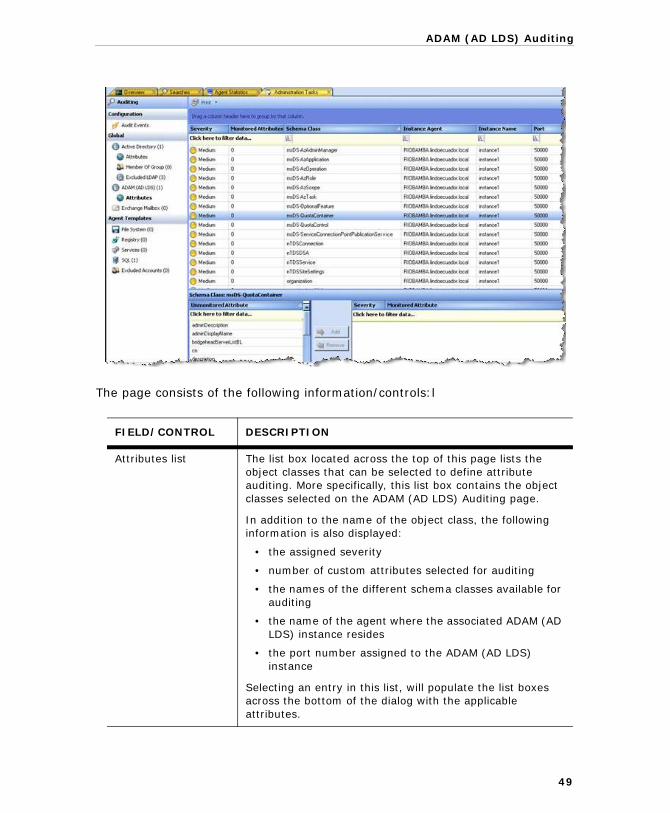
The page consists of the following information/controls:l
FIELD/CONTROL DESCRIPTION
Attributes list The list box located across the top of this page lists the object classes that can be selected to define attribute auditing. More specifically, this list box contains the object classes selected on the ADAM (AD LDS) Auditing page.
In addition to the name of the object class, the following information is also displayed:
• the assigned severity
• number of custom attributes selected for auditing
• the names of the different schema classes available for auditing
• the name of the agent where the associated ADAM (AD LDS) instance resides
• the port number assigned to the ADAM (AD LDS) instance
Selecting an entry in this list, will populate the list boxes across the bottom of the dialog with the applicable attributes.
49
Quest ChangeAuditor for Active Directory
Unmonitored Attribute list
The list located in the lower left-hand pane of this page displays the attributes that are currently NOT being audited by ChangeAuditor for the schema class selected in the Attributes list.
Monitored Attribute list
The list located in the lower right-hand pane contains the attributes that are currently selected for auditing by ChangeAuditor for the schema class selected in the Attributes list.
In addition to the attribute, the assigned severity is also displayed. To change the severity level assigned to an attribute, place your cursor in the Severity cell and use the drop-down arrow to select the severity you want to assign to the selected attribute.
Add Select one or more attributes from the Unmonitored Attribute list and use the Add button to select them for auditing. The selected attribute(s) will be moved to the Monitored Attribute list box.
Note: You can also double-click an attribute to select it for auditing or ’drag and drop’ it into the Monitored Attribute list.
Remove Select one or more attributes from the Monitored Attribute list and use the Remove button to remove them from auditing. The selected attribute will then be moved back to the Unmonitored Attribute list box.
Note: You can also double-click an attribute to remove it from auditing or ’drag and drop’ it back into the Unmonitored Attribute list.
FIELD/CONTROL DESCRIPTION
50
ADAM (AD LDS) Auditing
Enable ADAM (AD LDS) AuditingTo enable ADAM (AD LDS) auditing:
1. Open the Administration Tasks page.
2. Select the Auditing task button at the bottom of the navigation pane (left-hand pane).
3. Select ADAM (AD LDS) in the Auditing task list to open the ADAM (AD LDS) Auditing page.
4. Select the Add tool bar button to launch the ADAM (AD LDS) Auditing Wizard.
5. On the first page of the wizard, select an ADAM (AD LDS) instance from the displayed list.
6. Use the Browse or Search pages to locate and select a directory object or container to be audited. Use the Add button to add the selected object or container to the Selected Object list at the bottom of this dialog.
7. On the Select Object Class page, use one of the following methods to move an object class from the UnAudited Object Class list (left-hand pane) to the Audited Object Class list (right-hand pane):
• Select one or more object classes in the UnAudited Object Class list and select the Add button.
• Select one or more object classes in the UnAudited Object Class list and ’drag and drop’ the selected object classes into the Audited Object Class list.
• Double-click an object class in the UnAudited Object Class list.
8. After selecting one or more object classes, select Finish to save your selection and close the wizard. The ADAM (AD LDS) instance, directory object(s) or container(s), and selected object class(es) will then be displayed back on the ADAM (AD LDS) Auditing page.
ChangeAuditor will then audit for change events such as object created, deleted, moved, renamed and modified for the objects selected. However, to audit individual ADAM (AD LDS) attributes for these objects, you must specify the attributes to be audited using the ADAM (AD LDS) Attribute Auditing page.
9. Back on the Administration Tasks tab, select ADAM (AD LDS) | Attributes in the Auditing task list to open the ADAM (AD LDS) Attribute Auditing page.
If the ADAM (AD LDS) instance belongs to a workgroup server, a Credentials Required dialog will be displayed prompting you to specify the credentials of a user that can access the selected ADAM (AD LDS) instance.
51
Quest ChangeAuditor for Active Directory
10. Select an object class from the list box located across the top of this page. (This list contains the object classes selected on the ADAM (AD LDS) Auditing page.) Selecting an entry in this list will populate the list boxes across the bottom of the page with the applicable attributes.
11. In the Unmonitored Attribute list, located in the lower left-hand pane of this page, select one or more attributes and use the Add button to select them for auditing. The selected attribute(s) will be moved to the Monitored Attribute list.
You can also double-click an attribute to select it for auditing or ’drag and drop’ it into the Monitored Attribute list.
12. To change the severity level assigned to an attribute, in the Monitored Attribute list, place your cursor in the Severity cell and use the drop-down arrow to select the severity you want to assign to the selected attribute.
13. To remove an attribute from auditing, select the attribute in the Monitored Attribute list and select the Remove button. The selected attribute will then be moved back into the Unmonitored Attribute list.
You can also double-click an attribute to remove it from auditing or ’drag and drop’ it into the Unmonitored Attribute list.
14. Once you have selected at least one attribute for auditing, the associated Monitored Attribute column in the list box across the top of this page will display the number of attributes selected for auditing. This value will also be displayed in the Monitored Attribute column back on the ADAM (AD LDS) Auditing page.
ADAM (AD LDS) Auditing WizardThe ADAM (AD LDS) Auditing wizard is launched when the Add button is selected from the tool bar of the ADAM (AD LDS) Auditing page. This wizard will step you through the process of defining the ADAM (AD LDS) instance, directory object(s) or container(s), and object classes to be audited by ChangeAuditor.
52
ADAM (AD LDS) Auditing
The following table provides a description of the fields and controls in the Audited ADAM (AD LDS) Object wizard:
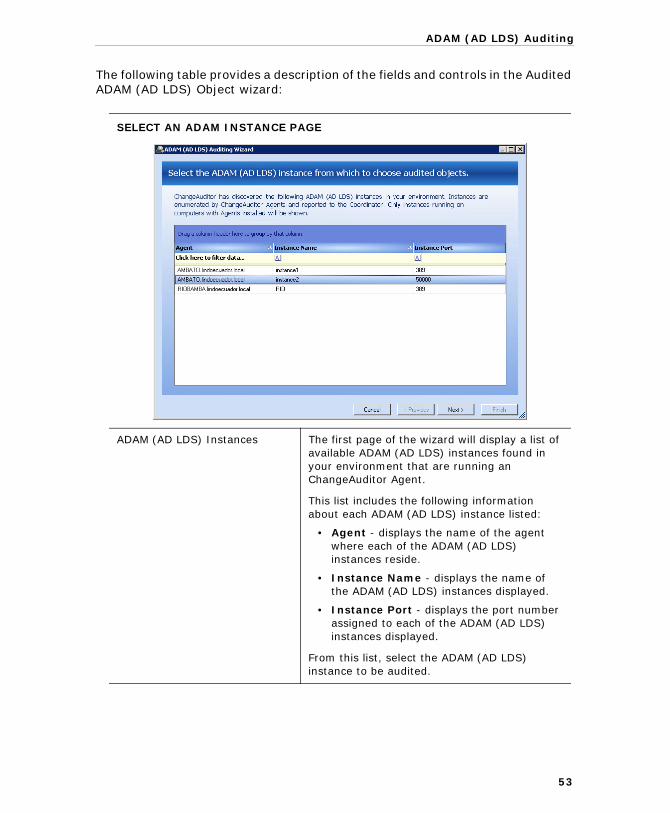
SELECT AN ADAM INSTANCE PAGE
ADAM (AD LDS) Instances The first page of the wizard will display a list of available ADAM (AD LDS) instances found in your environment that are running an ChangeAuditor Agent.
This list includes the following information about each ADAM (AD LDS) instance listed:
• Agent - displays the name of the agent where each of the ADAM (AD LDS) instances reside.
• Instance Name - displays the name of the ADAM (AD LDS) instances displayed.
• Instance Port - displays the port number assigned to each of the ADAM (AD LDS) instances displayed.
From this list, select the ADAM (AD LDS) instance to be audited.
53
Quest ChangeAuditor for Active Directory
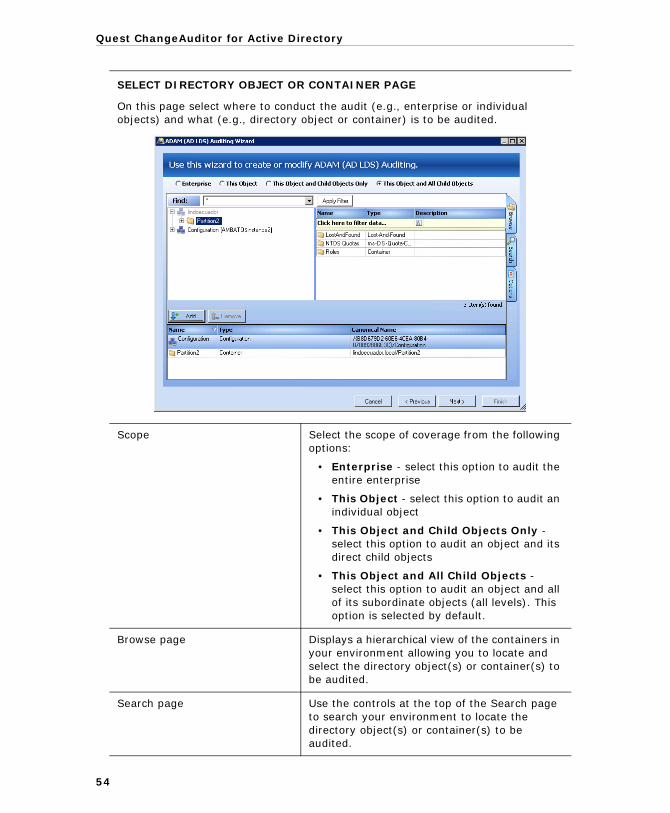
SELECT DIRECTORY OBJECT OR CONTAINER PAGE
On this page select where to conduct the audit (e.g., enterprise or individual objects) and what (e.g., directory object or container) is to be audited.
Scope Select the scope of coverage from the following options:
• Enterprise - select this option to audit the entire enterprise
• This Object - select this option to audit an individual object
• This Object and Child Objects Only - select this option to audit an object and its direct child objects
• This Object and All Child Objects - select this option to audit an object and all of its subordinate objects (all levels). This option is selected by default.
Browse page Displays a hierarchical view of the containers in your environment allowing you to locate and select the directory object(s) or container(s) to be audited.
Search page Use the controls at the top of the Search page to search your environment to locate the directory object(s) or container(s) to be audited.
54
ADAM (AD LDS) Auditing
Options page Use the Options page to modify the search options or ADAM instance to be used to retrieve directory objects.
Note: For more information on using the Browse, Search or Options pages, please refer to Directory Object Picker in the ChangeAuditor User Guide.
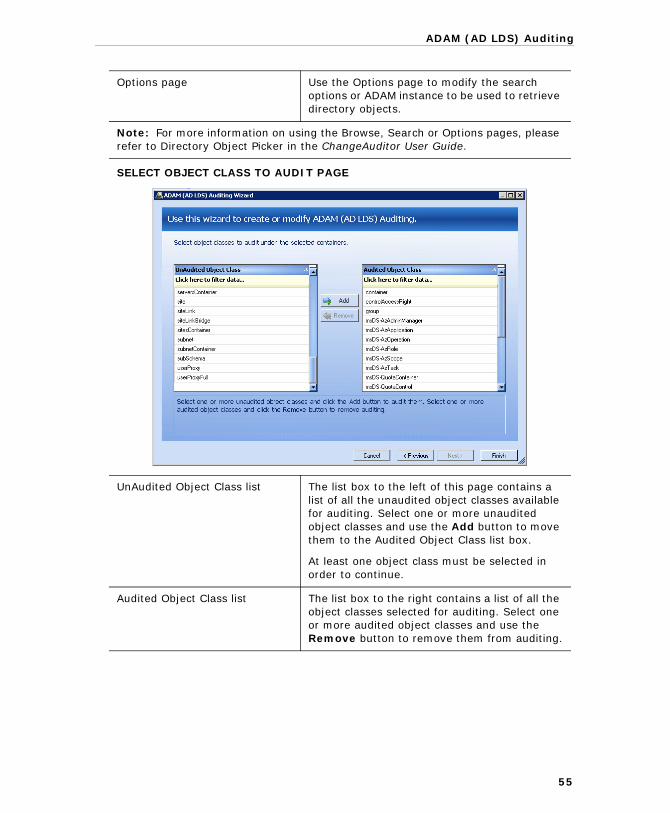
SELECT OBJECT CLASS TO AUDIT PAGE
UnAudited Object Class list The list box to the left of this page contains a list of all the unaudited object classes available for auditing. Select one or more unaudited object classes and use the Add button to move them to the Audited Object Class list box.
At least one object class must be selected in order to continue.
Audited Object Class list The list box to the right contains a list of all the object classes selected for auditing. Select one or more audited object classes and use the Remove button to remove them from auditing.
55
Quest ChangeAuditor for Active Directory
Add Select one or more object classes from the UnAudited Object Class list and use the Add button to select them for auditing. The selected object class(es) will be moved to the Audited Object Class list.
Note: You can also double-click an object class to move it into the Audited Object Class list or ’drag and drop’ it into the Audited Object Class list.
Remove Select one or more object classes from the Audited Object Class list and use the Remove button to remove them from auditing. The selected object classes will then be moved back to the UnAudited Object Class list.
Note: You can also double-click an object class to move it back into the UnAudited Object Class list or ’drag and drop’ it into the UnAudited Object Class list.
56
7
Active Directory Protection
• Introduction
• Active Directory Object Protection
• Group Policy Object Protection
• ADAM (AD LDS) Object Protection
Quest ChangeAuditor for Active Directory
IntroductionThe Active Directory Protection feature in ChangeAuditor enables administrators to lock down critical objects and attributes in Active Directory in order to prevent accidental or unauthorized modifications. This protection feature allows you to protect the environment from harmful changes that could open security holes or cause resources to become unavailable. Using this feature, when an unauthorized modification or deletion is attempted, ChangeAuditor will prevent the change from happening and capture these events.
With ChangeAuditor for Active Directory, protection can be defined for any Active Directory, Group Policy or ADAM (AD LDS) object that you consider critical. Examples of such objects may include Organizational Units, Group Policy Object and service accounts.
PROTECTION NOTES AND RECOMMENDATIONS:
1. Reserve protection for locking ONLY critical objects.
2. Do NOT protect regular user accounts as this could prevent users from changing their passwords, etc.
3. Certain applications and services need to make harmless changes to the Configuration and Schema NCs through the LocalSystem account. Therefore, it is recommended that you do NOT protect the following applications/services:
• Active Directory Knowledge Consistency Checker (KCC)• Quest’s Directory Analyzer• Microsoft Operations Manager (MOM)• Microsoft Licensing Computer• Microsoft Message Queuing Service (MSMQ)• Terminal Services Licensing Computer• HP OpenView’s Active Directory SPI• Microsoft Exchange
4. If you protect a User object and prevent it from being deleted or modified, you are protecting all of the user attributes and the forward links. You are NOT protecting any back linked attributes as back links are maintained by the system to ensure referential integrity only.
Hence, if you modify the user’s memberOf attribute and add the user to a group, although you get an error or warning message, the user will get added to any group that is not protected.
Therefore, if you want to prevent anyone from being added to a Group, you would protect the Group object and prevent it from being modified. By locking the Group object, you are locking its member attribute. Hence its membership cannot be modified.
5. The File and Printer Sharing feature must be enabled under the Windows Firewall before you can set up ADAM auditing or protection.
58
Active Directory Protection
This chapter provides a description of the Active Directory Object Protection, Group Policy Object Protection, and ADAM (ADLS) Object Protection features. Including a description of the protection pages on the Administration Tasks tab, the procedures for creating protection templates, and a description of the protection wizards used to define object protection.
Active Directory Object ProtectionWhen configured, ChangeAuditor for Active Directory prevents changes from occurring to a protected object regardless of who attempts to make the change and the tool or method used to make the change. Attempts to make changes to protected objects fail and generate an audited event.
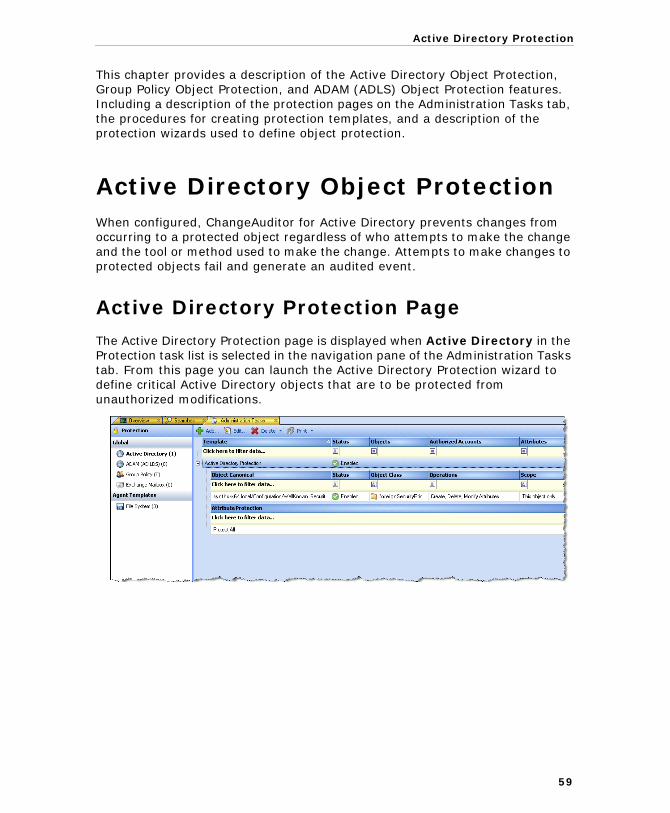
Active Directory Protection Page
The Active Directory Protection page is displayed when Active Directory in the Protection task list is selected in the navigation pane of the Administration Tasks tab. From this page you can launch the Active Directory Protection wizard to define critical Active Directory objects that are to be protected from unauthorized modifications.
59
Quest ChangeAuditor for Active Directory
The Active Directory Protection page contains an expandable view of all the Active Directory Protection templates that have been previously defined. To add new Active Directory protection to this list, use the Add tool bar button. Once added, the following information is provided for each template:
Click the expansion box to the left of the template name to expand this view and display the following details for each template:
FIELD DESCRIPTION
Template Displays the name assigned to the protection template when it was created.
Status Indicates whether the protection template is enabled or disabled.
Objects This cell is used for filtering data. That is, as you enter characters into this cell, the client will redisplay only the objects that contain the character(s) entered, regardless of the Active Directory Protection template to which they belong.
Authorized Accounts
This cell is used for filtering data. That is, as you enter characters into this cell, the client will redisplay only the authorized accounts (excluded from protection) that contain the character(s) entered, regardless of the Active Directory Protection template to which they belong.
Attributes This cell is used for filtering data. That is, as you enter characters into this cell, the client will redisplay only the attributes that contain the character(s) entered, regardless of the Active Directory Protection template to which they belong.
FIELD DESCRIPTION
Object Canonical Displays the canonical name of the object being protected.
Status Indicates whether protection for the object is enabled or disabled.
Object Class Displays the type of object being protected (e.g., computer, group, user, etc.)
60
Active Directory Protection
61
Active Directory Protection Templates
The Active Directory protection templates defined on this page are global settings and apply to all ChangeAuditor Agents.
To create a AD Protection template:
1. Open the Administration Tasks tab.
2. Select the Protection task button at the bottom of the navigation pane (left-hand pane).
3. Select Active Directory in the Protection task list to open the Active Directory Protection page.
4. Select the Add tool bar button to launch the Active Directory Protection wizard which allows you to specify the Active Directory objects to be protected.
5. Enter a name for the protection template.
Operations Displays the type of operations to be denied for the selected object:
• Create
• Delete
• Modify Attribute
• Move
Scope Displays the scope of coverage for the protected object:
• This object
• This object and child objects only
• This object and all child objects
Authorized Account (Excluded from Protection)
If applicable, this section of the grid displays the user and group accounts that are excluded from protection. That is, they can make changes to the protected object(s).
Attribute Protection Displays the attribute setting specified in the wizard:
• Protect All
• Protect Only
• Protect Except
For Protect Only and Protect Except, click the expansion box to the left of the field to display the individual attributes included in the protection template.
FIELD DESCRIPTION
Quest ChangeAuditor for Active Directory
6. Use the Browse or Search pages to search your environment to locate and select the object to be protected. Use the Add button to add the selected object to the list at the bottom of the page. Repeat this step to add additional objects.
7. By default, the create, modify attributes and delete operations are selected; however, you can change this by using the drop-down arrow in the Operations cell in the list box and selecting/clearing the different operations.
8. By default, the scope of coverage is for This object only; however, you can change this by using the drop-down arrow in the Scope cell in the list box and selecting one of the other two options:
• This object and child objects only• This object and all child objects
9. By default, all attributes for the object will be protected. However, if you want to protect individual attributes instead, select Next to proceed to the next page.
Select one of the following options to activate the attributes list:
• Only Selected• All EXCEPT Selected
From the attributes list box on the left, select the individual attributes to be included in this protection template and use the Add button to move them to the Selected Attributes list on the right.
10. If you would like to specify individual users or groups that are to be allowed to make changes to the protected object, select Next to proceed to the next page.
Use the Browse or Search pages to search your environment to locate and select the user or group account(s) that are to be excluded from this protection template. Use the Add button to add the account(s) to the list at the bottom of the page.
11. On the last page of the wizard, you can optionally specify individual users or groups who are authorized to mange this protection template.
By default members of the ChangeAuditor Administrators group are authorized to access the Administration Tasks tab and perform administration tasks, including defining Active Directory and Group Policy protection; however, once you enter a user or group account on this page you will be relinquishing your rights to modify the selected protection template to the user(s)/group(s) specified on the last page of this protection wizard.
62
Active Directory Protection
12. Select Finish to save the protection template, close the wizard and return to the Active Directory Protection page, where the specified protection details will now be listed.
To modify a protection template:
1. On the Active Directory Protection page, select the template to be modified and select the Edit tool bar button or right-click command.
2. This will display the Active Directory Protection wizard, where you can modify the current list of objects, as well as the attribute selection, the authorized accounts selected, and the accounts authorized to manage this protection template.
3. Select the Finish button to save your changes and return to the Active Directory Protection page.
To disable a protection template:
The disable feature allows you to temporarily stop protection for the specified objects without having to remove the protection template.
1. On the Active Directory Protection page, use one of the following methods to disable a protection template:
• Click in the Status cell for the protection template to be disabled and select Disabled
• Right-click the template to be disabled and select Disable
The entry in the Status column for the template will change to ’Disabled’.
2. To re-enable the protection template, use the Enable option in either the Status cell or right-click menu.
If the user(s)/group(s) specified on this page are NOT members of the ChangeAuditor Administrators group, you will need to add them to the AD Protection Role in order for them to view the Administration Tasks tab to access Active Directory and Group Policy protection templates. For more information on adding members to the AD Protection role using the Application User Interface Authorization page (in the Configuration task list of the Administration Tasks tab), please refer to the ChangeAuditor User Guide.
If the curent user who is creating the protection template is NOT in the authorized accounts list, a warning message is displayed prompting the user to continue or stop with the creation of the protection template.
Please keep in mind, that if you are in the authorized accounts list at template creation time, you MAY find yourself locked out later if someone else in the authorized accounts list decides to edit the template and remove you.
63
Quest ChangeAuditor for Active Directory
To disable an object’s protection within a protection template:
1. On the Active Directory Protection page, use one of the following methods to disable an object’s protection:
• Click in the Status cell for the object to be disabled and select Disabled
• Right-click the object to be disabled and select Disable
The entry in the Status column for the object will change to ’Disabled’.
2. To re-enable the protection of an object, use the Enable option in either the Status cell or right-click menu.
To delete a protection template:
1. On the Active Directory Protection page, use one of the following methods to delete a protection template:
• Select the template to be deleted and select the Delete | Delete Template tool bar button
• Right-click the template to be deleted and select Delete
2. A dialog will be displayed confirming that you want to delete the selected protection template. Select Yes.
To delete an object from a protection template:
1. On the Active Directory Protection page, use one of the following methods to delete an object from a protection template:
• Select the object to be deleted and select the Delete | Delete Object tool bar button
• Right-click the object to be deleted and select Delete
2. A dialog will be displayed confirming that you want to delete the object from the template. Select Yes.
If you disable all of the objects in a protection template, the template itself will become disabled. Similarly, when you re-enable an object in the protection template, the template will automatically be re-enabled.
When you delete the last object in a protection template, the entire protection template will be deleted.
64
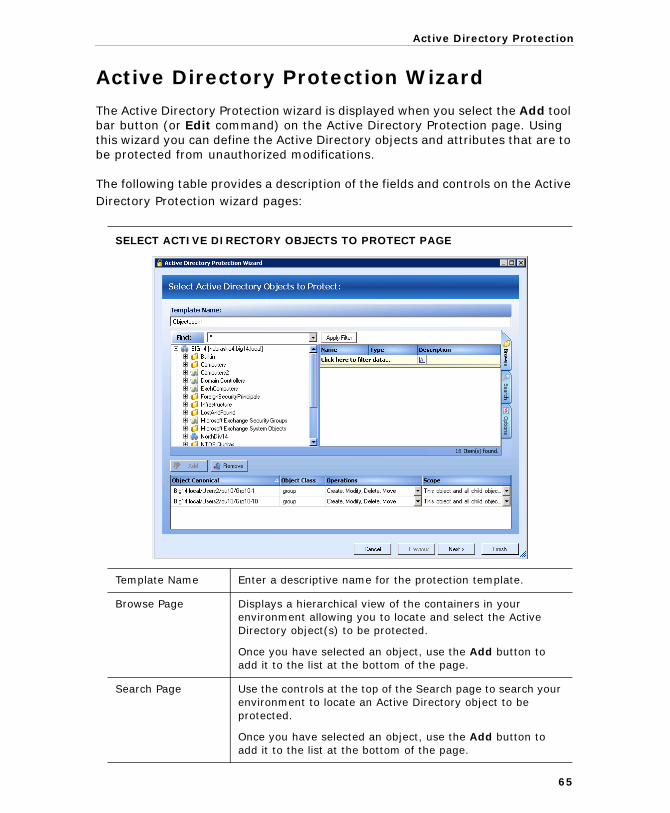
Active Directory Protection
Active Directory Protection Wizard
The Active Directory Protection wizard is displayed when you select the Add tool bar button (or Edit command) on the Active Directory Protection page. Using this wizard you can define the Active Directory objects and attributes that are to be protected from unauthorized modifications.
The following table provides a description of the fields and controls on the Active Directory Protection wizard pages:
SELECT ACTIVE DIRECTORY OBJECTS TO PROTECT PAGE
Template Name Enter a descriptive name for the protection template.
Browse Page Displays a hierarchical view of the containers in your environment allowing you to locate and select the Active Directory object(s) to be protected.
Once you have selected an object, use the Add button to add it to the list at the bottom of the page.
Search Page Use the controls at the top of the Search page to search your environment to locate an Active Directory object to be protected.
Once you have selected an object, use the Add button to add it to the list at the bottom of the page.
65
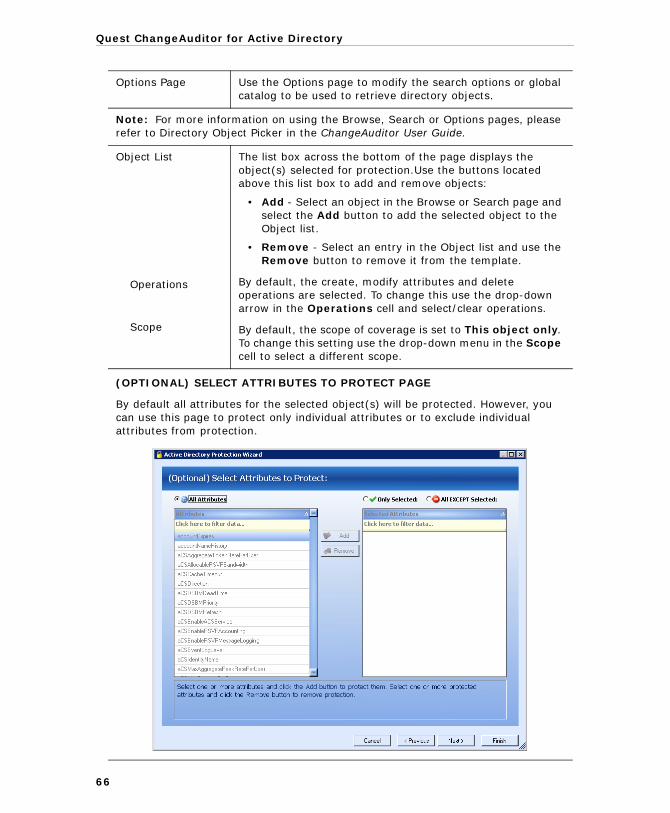
Quest ChangeAuditor for Active Directory
Options Page Use the Options page to modify the search options or global catalog to be used to retrieve directory objects.
Note: For more information on using the Browse, Search or Options pages, please refer to Directory Object Picker in the ChangeAuditor User Guide.
Object List
Operations
Scope
The list box across the bottom of the page displays the object(s) selected for protection.Use the buttons located above this list box to add and remove objects:
• Add - Select an object in the Browse or Search page and select the Add button to add the selected object to the Object list.
• Remove - Select an entry in the Object list and use the Remove button to remove it from the template.
By default, the create, modify attributes and delete operations are selected. To change this use the drop-down arrow in the Operations cell and select/clear operations.
By default, the scope of coverage is set to This object only. To change this setting use the drop-down menu in the Scope cell to select a different scope.
(OPTIONAL) SELECT ATTRIBUTES TO PROTECT PAGE
By default all attributes for the selected object(s) will be protected. However, you can use this page to protect only individual attributes or to exclude individual attributes from protection.
66
Active Directory Protection
All AttributesSelect this option to protect all attributes for the selected object.
Only Selected Select this option to protect individual attributes. Selecting this option will activate the list boxes on this page allowing you to select the individual attributes to be protected.
All EXCEPT Selected Select this option to protect all attributes EXCEPT those selected. Selecting this option will activate the list boxes on this page allowing you to select the individual attributes that are not to be protected.
Attributes List The list box to the left displays all of the available attributes which may be selected for inclusion in the protection template.
Note: This list box is not enabled when the All Attributes option is selected.
Add Use the Add button to move the attributes selected in the Attributes list over to the Selected Attributes list.
Remove Use the Remove button to move the attributes selected in the Selected Attributes list back over to the Attributes list.
Selected Attributes List
The list box to the right displays the attributes to be included in the protection template.
Note: This list box is not enabled when the All Attributes option is selected.
67
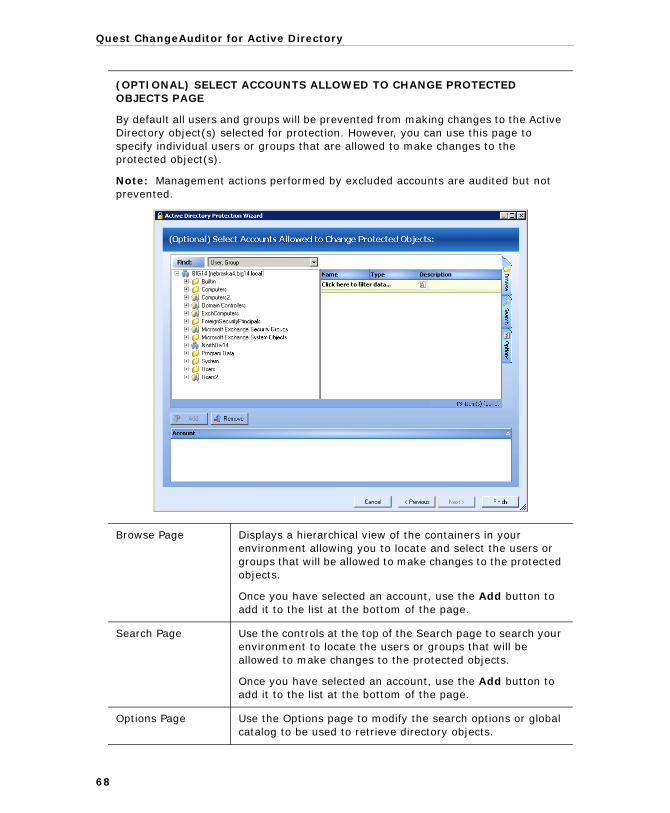
Quest ChangeAuditor for Active Directory
(OPTIONAL) SELECT ACCOUNTS ALLOWED TO CHANGE PROTECTED OBJECTS PAGE
By default all users and groups will be prevented from making changes to the Active Directory object(s) selected for protection. However, you can use this page to specify individual users or groups that are allowed to make changes to the protected object(s).
Note: Management actions performed by excluded accounts are audited but not prevented.
Browse Page Displays a hierarchical view of the containers in your environment allowing you to locate and select the users or groups that will be allowed to make changes to the protected objects.
Once you have selected an account, use the Add button to add it to the list at the bottom of the page.
Search Page Use the controls at the top of the Search page to search your environment to locate the users or groups that will be allowed to make changes to the protected objects.
Once you have selected an account, use the Add button to add it to the list at the bottom of the page.
Options Page Use the Options page to modify the search options or global catalog to be used to retrieve directory objects.
68

Active Directory Protection
Note: For more information on using the Browse, Search or Options pages, please refer to Directory Object Picker in the ChangeAuditor User Guide.
Authorized Accounts List
The list box across the bottom of the page displays the user and group account(s) that will be allowed to make changes to the protected objects selected on the previous page of the wizard. Use the buttons located above this list box to add and remove objects.
Add - select an account in the Browse or Search page and select the Add button to add it to the Authorized Accounts list.
Remove - select an entry in the list and use the Remove button to remove it.
(OPTIONAL) SELECT ACCOUNTS AUTHORIZED TO MANAGE THIS PROTECTION TEMPLATE PAGE
By default members of the ChangeAuditor Administrators group are authorized to access the Administration Tasks tab and perform administration tasks, including defining Active Directory and Group Policy protection; however, once you enter a user or group account on this page you will be relinquishing your rights to modify the selected protection template to the user(s)/group(s) specified on this page of the protection wizard.
69
Quest ChangeAuditor for Active Directory
Browse Page Displays a hierarchical view of the containers in your environment allowing you to locate and select the users or groups that will be authorized to manage this protection template.
Once you have selected an account, use the Add button to add it to the list at the bottom of the page.
Search Page Use the controls at the top of the Search page to search your environment to locate the users or groups that will be authorized to manage this protection template.
Once you have selected an account, use the Add button to add it to the list at the bottom of the page.
Options Page Use the Options page to modify the search options or global catalog to be used to retrieve directory objects.
Note: For more information on using the Browse, Search or Options pages, please refer to Directory Object Picker in the ChangeAuditor User Guide.
Authorized Accounts List
The list box across the bottom of the page displays the user and group account(s) that will be authorized to manage this protection template.
Note: Please remember, by adding accounts to this authorized accounts list, you are relinquishing your rights to modify this protection template. Only those accounts specified on this page will have access to modify this protection template.
Use the buttons located above this list box to add and remove objects.
Add - select an account in the Browse or Search page and select the Add button to add it to the Authorized Accounts list.
Remove - select an entry in the list and use the Remove button to remove it.
70
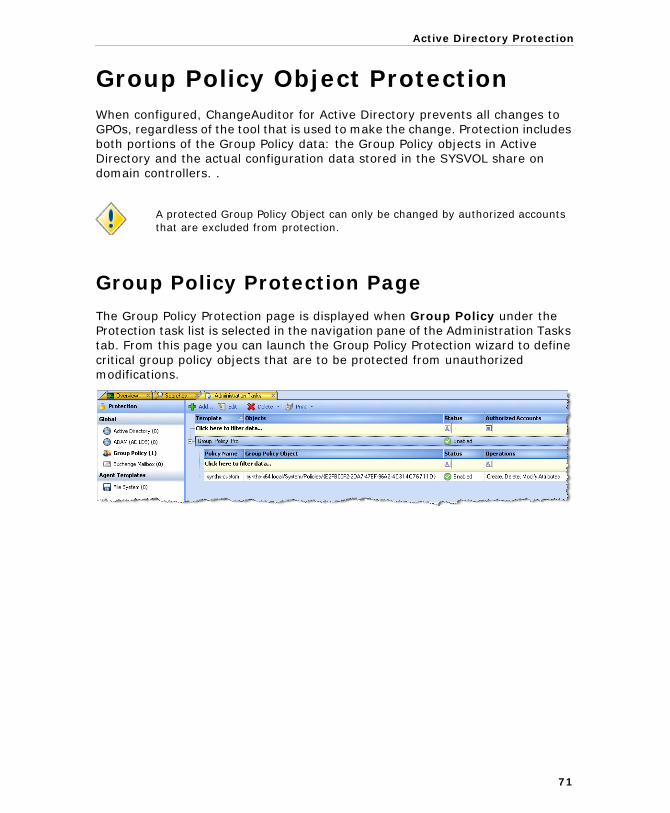
Active Directory Protection
Group Policy Object ProtectionWhen configured, ChangeAuditor for Active Directory prevents all changes to GPOs, regardless of the tool that is used to make the change. Protection includes both portions of the Group Policy data: the Group Policy objects in Active Directory and the actual configuration data stored in the SYSVOL share on domain controllers. .
Group Policy Protection Page
The Group Policy Protection page is displayed when Group Policy under the Protection task list is selected in the navigation pane of the Administration Tasks tab. From this page you can launch the Group Policy Protection wizard to define critical group policy objects that are to be protected from unauthorized modifications.
A protected Group Policy Object can only be changed by authorized accounts that are excluded from protection.
71
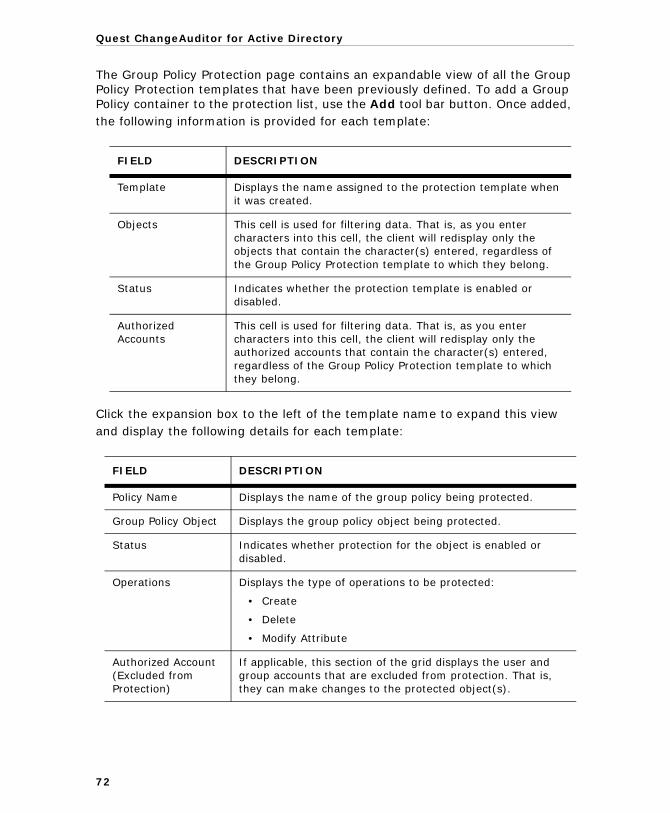
Quest ChangeAuditor for Active Directory
The Group Policy Protection page contains an expandable view of all the Group Policy Protection templates that have been previously defined. To add a Group Policy container to the protection list, use the Add tool bar button. Once added, the following information is provided for each template:
Click the expansion box to the left of the template name to expand this view and display the following details for each template:
FIELD DESCRIPTION
Template Displays the name assigned to the protection template when it was created.
Objects This cell is used for filtering data. That is, as you enter characters into this cell, the client will redisplay only the objects that contain the character(s) entered, regardless of the Group Policy Protection template to which they belong.
Status Indicates whether the protection template is enabled or disabled.
Authorized Accounts
This cell is used for filtering data. That is, as you enter characters into this cell, the client will redisplay only the authorized accounts that contain the character(s) entered, regardless of the Group Policy Protection template to which they belong.
FIELD DESCRIPTION
Policy Name Displays the name of the group policy being protected.
Group Policy Object Displays the group policy object being protected.
Status Indicates whether protection for the object is enabled or disabled.
Operations Displays the type of operations to be protected:
• Create
• Delete
• Modify Attribute
Authorized Account (Excluded from Protection)
If applicable, this section of the grid displays the user and group accounts that are excluded from protection. That is, they can make changes to the protected object(s).
72
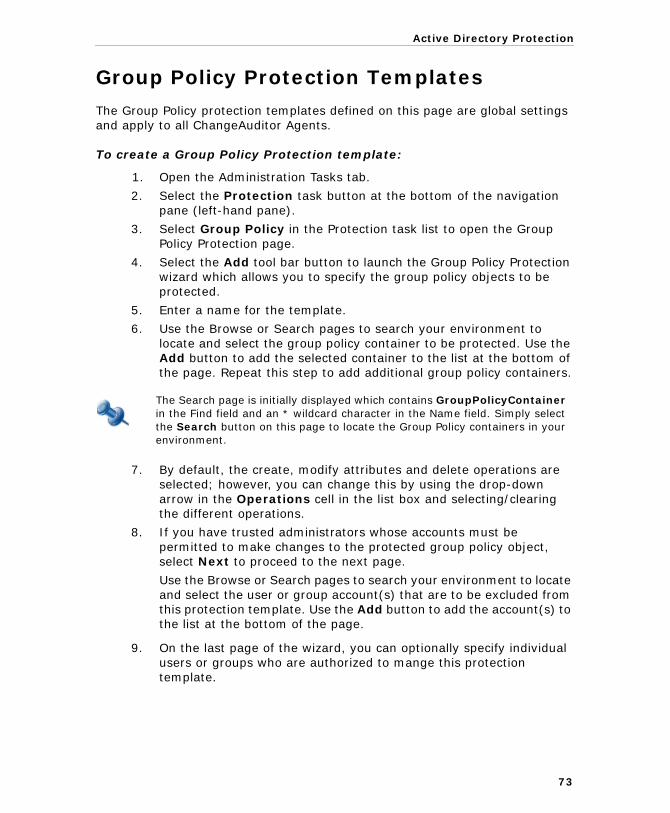
Active Directory Protection
73
Group Policy Protection Templates
The Group Policy protection templates defined on this page are global settings and apply to all ChangeAuditor Agents.
To create a Group Policy Protection template:
1. Open the Administration Tasks tab.
2. Select the Protection task button at the bottom of the navigation pane (left-hand pane).
3. Select Group Policy in the Protection task list to open the Group Policy Protection page.
4. Select the Add tool bar button to launch the Group Policy Protection wizard which allows you to specify the group policy objects to be protected.
5. Enter a name for the template.
6. Use the Browse or Search pages to search your environment to locate and select the group policy container to be protected. Use the Add button to add the selected container to the list at the bottom of the page. Repeat this step to add additional group policy containers.
7. By default, the create, modify attributes and delete operations are selected; however, you can change this by using the drop-down arrow in the Operations cell in the list box and selecting/clearing the different operations.
8. If you have trusted administrators whose accounts must be permitted to make changes to the protected group policy object, select Next to proceed to the next page.
Use the Browse or Search pages to search your environment to locate and select the user or group account(s) that are to be excluded from this protection template. Use the Add button to add the account(s) to the list at the bottom of the page.
9. On the last page of the wizard, you can optionally specify individual users or groups who are authorized to mange this protection template.
The Search page is initially displayed which contains GroupPolicyContainer in the Find field and an * wildcard character in the Name field. Simply select the Search button on this page to locate the Group Policy containers in your environment.
Quest ChangeAuditor for Active Directory
10. Select Finish to save the protection template, close the wizard and return to the Group Policy Protection page, where the specified protection details will now be listed.
To modify a protection template:
1. On the Group Policy Protection page, select the template to be modified and select the Edit tool bar button or right-click command.
2. This will display the Group Policy Protection wizard, where you can modify the current list of objects and the authorized accounts selected.
3. Select the Finish button to save your changes and return to the Group Policy Protection page.
To disable a protection template:
The disable feature allows you to temporarily stop protection for the specified objects without having to remove the protection template.
1. On the Group Policy Protection page, use one of the following methods to disable a protection template:
• Click in the Status cell for the protection template to be disabled and select Disabled
By default members of the ChangeAuditor Administrators group are authorized to access the Administration Tasks tab and perform administration tasks, including defining Active Directory and Group Policy protection; however, once you enter a user or group account on this page you will be relinquishing your rights to modify the selected protection template to the user(s)/group(s) specified on the last page of this protection wizard.
If the user(s)/group(s) specified on this page are NOT members of the ChangeAuditor Administrators group, you will need to add them to the AD Protection Role in order for them to view the Administration Tasks tab to access Active Directory and Group Policy protection templates. For more information on adding members to the AD Protection role using the Application User Interface Authorization page (in the Configuration task list of the Administration Tasks tab), please refer to the ChangeAuditor User Guide.
If the curent user who is creating the protection template is NOT in the authorized accounts list, a warning message is displayed prompting the user to continue or stop with the creation of the protection template.
Please keep in mind, that if you are in the authorized accounts list at template creation time, you MAY find yourself locked out later if someone else in the authorized accounts list decides to edit the template and remove you.
74
Active Directory Protection
• Right-click the template to be disabled and select Disable
The entry in the Status column for the template will change to ’Disabled’.
2. To re-enable the protection template, use the Enable option in either the Status cell or right-click menu.
To disable an object’s protection within a protection template:
1. On the Group Policy Protection page, use one of the following methods to disable an object’s protection:
• Click in the Status cell for the object to be disabled and select Disabled
• Right-click the object to be disabled and select Disable
The entry in the Status column for the object will change to ’Disabled’.
2. To re-enable an object’s protection, use the Enable option in either the Status cell or right-click menu.
To delete a protection template:
1. On the Group Policy Protection page, use one of the following methods to delete a protection template:
• Select the template to be deleted and select the Delete | Delete Template tool bar button
• Right-click the template to be deleted and select Delete
2. A dialog will be displayed confirming that you want to delete the selected protection template. Select Yes.
To delete an object from a protection template:
1. On the Group Policy Protection page, use one of the following methods to delete an object from a protection template:
• Select the object to be deleted and select the Delete | Delete Object tool bar button
• Right-click the object to be deleted and select Delete
2. A dialog will be displayed confirming that you want to delete the object from the template. Select Yes.
If you disable all of the objects in a protection template, the template itself will become disabled. Similarly, when you re-enable an object in the protection template, the template will automatically be re-enabled.
When you delete the last object in a protection template, the entire protection template will be deleted.
75
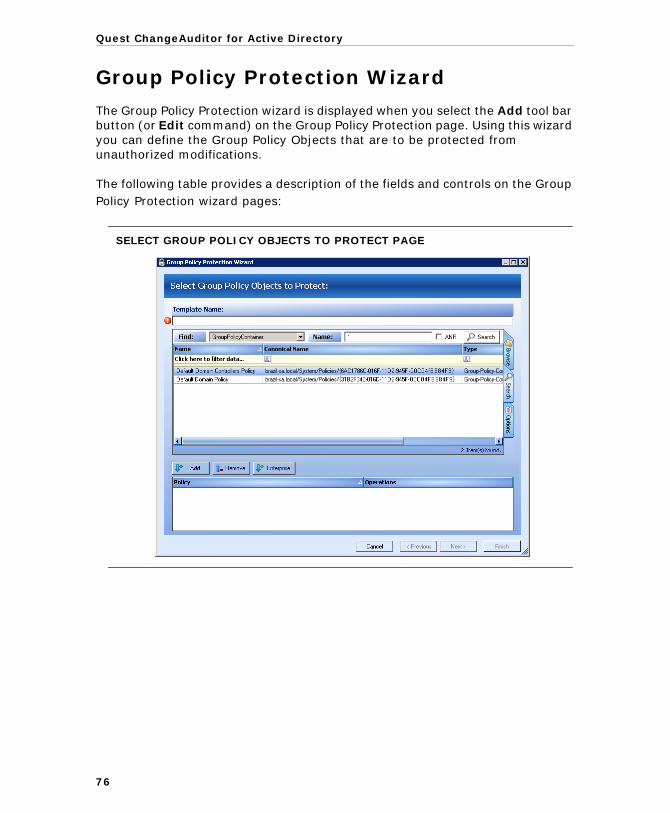
Quest ChangeAuditor for Active Directory
Group Policy Protection Wizard
The Group Policy Protection wizard is displayed when you select the Add tool bar button (or Edit command) on the Group Policy Protection page. Using this wizard you can define the Group Policy Objects that are to be protected from unauthorized modifications.
The following table provides a description of the fields and controls on the Group Policy Protection wizard pages:
SELECT GROUP POLICY OBJECTS TO PROTECT PAGE
76
Active Directory Protection
Template Name Enter a descriptive name for the template.
Browse Page Displays a hierarchical view of the containers in your environment allowing you to locate and select the group policy container to be protected.
Once you have selected a container, use the Add button to add it to the list at the bottom of the page.
Search Page Use the controls at the top of the Search page to search your environment to locate a group policy container to be protected.
Note: The Search page is initially displayed which contains GroupPolicyContainer in the Find field and an * wildcard character in the Name field. Simply select the Search button on this page to locate the Group Policy containers in your environment.
Once you have selected a container, use the Add button to add it to the list at the bottom of the page.
Options Page Use the Options page to modify the search options or global catalog to be used to retrieve directory objects.
Note: For more information on using the Browse, Search or Options pages, please refer to Directory Object Picker in the ChangeAuditor User Guide.
Policy List The list box across the bottom of the page displays the group policy container(s) selected for protection.Use the buttons located above this list box to add and remove containers.
Add - select a container in the Browse or Search page and select the Add button to add it to the list.
Remove - select an entry in the Policy list and use the Remove button to remove it from the template.
Operations By default, the create, modify attributes and delete operations are selected. To change this use the drop-down arrow in the Operations cell and select/clear operations.
77

Quest ChangeAuditor for Active Directory
(OPTIONAL) SELECT ACCOUNTS ALLOWED TO CHANGE PROTECTED OBJECTS PAGE
By default all users and groups will be prevented from making changes to the Group Policy container(s) selected for protection. However, you can use this page to specify individual users or groups that are allowed to make changes to the protected object(s).
Note: Management actions performed by excluded accounts are audited but not prevented.
Browse Page Displays a hierarchical view of the containers in your environment allowing you to locate and select the users or groups that will be allowed to make changes to the protected objects.
Once you have selected an account, use the Add button to add it to the list at the bottom of the page.
Search Page Use the controls at the top of the Search page to search your environment to locate the users or groups that will be allowed to make changes to the protected objects.
Once you have selected an account, use the Add button to add it to the list at the bottom of the page.
Options Page Use the Options page to modify the search options or global catalog to be used to retrieve directory objects.
78
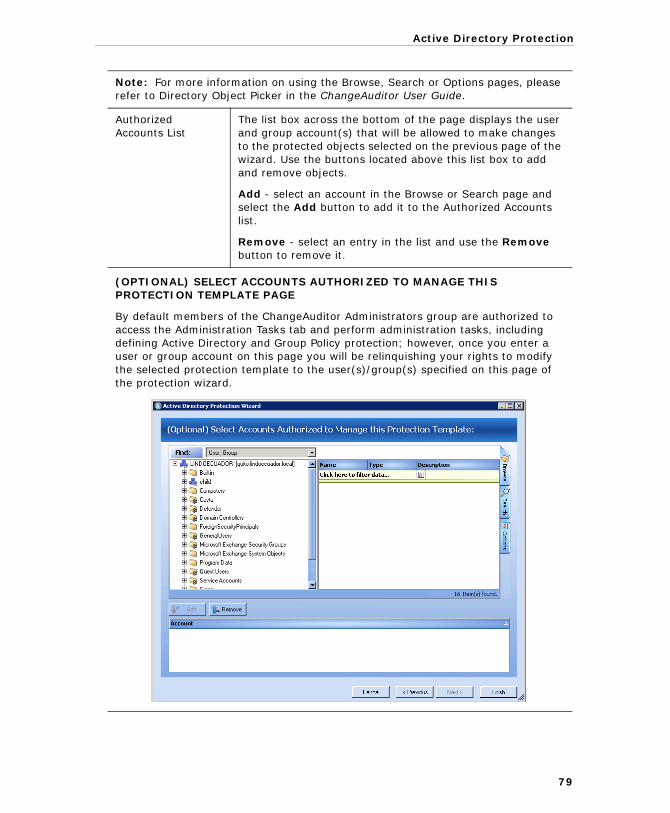
Active Directory Protection
Note: For more information on using the Browse, Search or Options pages, please refer to Directory Object Picker in the ChangeAuditor User Guide.
Authorized Accounts List
The list box across the bottom of the page displays the user and group account(s) that will be allowed to make changes to the protected objects selected on the previous page of the wizard. Use the buttons located above this list box to add and remove objects.
Add - select an account in the Browse or Search page and select the Add button to add it to the Authorized Accounts list.
Remove - select an entry in the list and use the Remove button to remove it.
(OPTIONAL) SELECT ACCOUNTS AUTHORIZED TO MANAGE THIS PROTECTION TEMPLATE PAGE
By default members of the ChangeAuditor Administrators group are authorized to access the Administration Tasks tab and perform administration tasks, including defining Active Directory and Group Policy protection; however, once you enter a user or group account on this page you will be relinquishing your rights to modify the selected protection template to the user(s)/group(s) specified on this page of the protection wizard.
79
Quest ChangeAuditor for Active Directory
Browse Page Displays a hierarchical view of the containers in your environment allowing you to locate and select the users or groups that will be authorized to manage this protection template.
Once you have selected an account, use the Add button to add it to the list at the bottom of the page.
Search Page Use the controls at the top of the Search page to search your environment to locate the users or groups that will be authorized to manage this protection template.
Once you have selected an account, use the Add button to add it to the list at the bottom of the page.
Options Page Use the Options page to modify the search options or global catalog to be used to retrieve directory objects.
Note: For more information on using the Browse, Search or Options pages, please refer to Directory Object Picker in the ChangeAuditor User Guide.
Authorized Accounts List
The list box across the bottom of the page displays the user and group account(s) that will be authorized to manage this protection template.
Note: Please remember, by adding accounts to this authorized accounts list, you are relinquishing your rights to modify this protection template. Only those accounts specified on this page will have access to modify this protection template.
Use the buttons located above this list box to add and remove objects.
Add - select an account in the Browse or Search page and select the Add button to add it to the Authorized Accounts list.
Remove - select an entry in the list and use the Remove button to remove it.
80
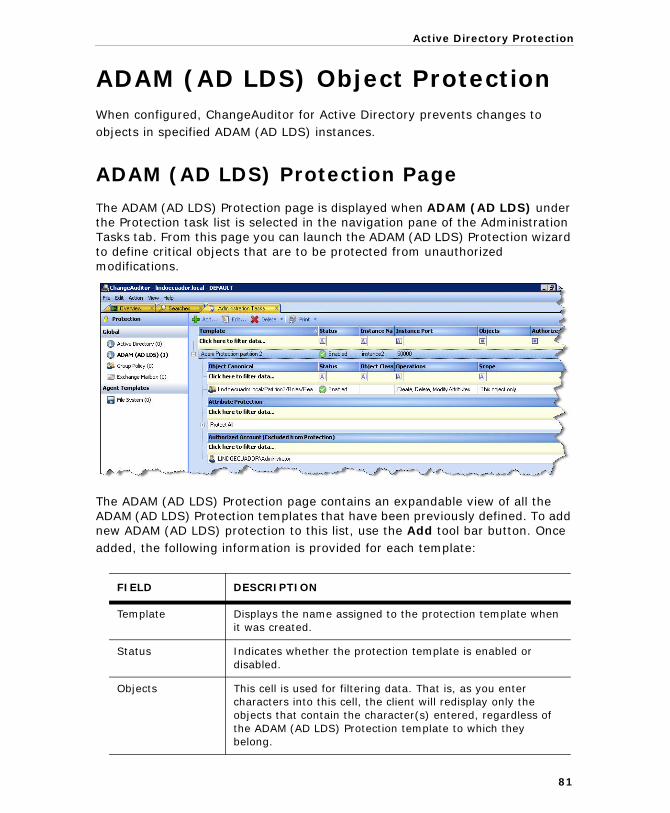
Active Directory Protection
ADAM (AD LDS) Object ProtectionWhen configured, ChangeAuditor for Active Directory prevents changes to objects in specified ADAM (AD LDS) instances.
ADAM (AD LDS) Protection Page
The ADAM (AD LDS) Protection page is displayed when ADAM (AD LDS) under the Protection task list is selected in the navigation pane of the Administration Tasks tab. From this page you can launch the ADAM (AD LDS) Protection wizard to define critical objects that are to be protected from unauthorized modifications.
The ADAM (AD LDS) Protection page contains an expandable view of all the ADAM (AD LDS) Protection templates that have been previously defined. To add new ADAM (AD LDS) protection to this list, use the Add tool bar button. Once added, the following information is provided for each template:
FIELD DESCRIPTION
Template Displays the name assigned to the protection template when it was created.
Status Indicates whether the protection template is enabled or disabled.
Objects This cell is used for filtering data. That is, as you enter characters into this cell, the client will redisplay only the objects that contain the character(s) entered, regardless of the ADAM (AD LDS) Protection template to which they belong.
81
Quest ChangeAuditor for Active Directory
Click the expansion box to the left of the template name to expand this view and display the following details for each template:
Instance Name Displays the name of the agent where the associated ADAM (AD LDS) instance resides.
Instance Port Displays the port number assigned to the ADAM (AD LDS) instance.
Authorized Accounts
This cell is used for filtering data. That is, as you enter characters into this cell, the client will redisplay only the authorized accounts that contain the character(s) entered, regardless of the ADAM (AD LDS) Protection template to which they belong.
Attributes This cell is used for filtering data. That is, as you enter characters into this cell, the client will redisplay only the attributes that contain the character(s) entered, regardless of the ADAM (AD LDS) Protection template to which they belong.
FIELD DESCRIPTION
Object Canonical Displays the canonical name of the object being protected.
Status Indicates whether protection for the object is enabled or disabled.
Object Class Displays the type of object being protected (e.g., computer, group, user, etc.)
Operations Displays the type of operations to be denied for the selected object:
• Create
• Delete
• Modify Attribute
• Move
Scope Displays the scope of coverage for the protected object:
• This object
• This object and child objects only
• This object and all child objects
Authorized Account (Excluded from Protection)
If applicable, this section of the grid displays the user and group accounts that are excluded from protection. That is, they can make changes to the protected object(s).
FIELD DESCRIPTION
82
Active Directory Protection
ADAM (AD LDS) Protection Templates
The ADAM (AD LDS) protection templates defined on this page are global settings and apply to all ADAM instances associated with a ChangeAuditor Agent.
To create a ADAM Protection template:
1. Open the Administration Tasks tab.
2. Select the Protection task button at the bottom of the navigation pane (left-hand pane).
3. Select ADAM (AD LDS) in the Protection task list to open the ADAM (AD LDS) Protection page.
4. Select the Add tool bar button to launch the ADAM (AD LDS) Protection wizard which allows you to specify the objects to be protected.
5. Select the ADAM (AD LDS) instance from which to choose protected objects.
6. Enter a name for the template.
7. Use the Browse or Search pages to search your environment to locate and select the object to be protected. Use the Add button to add the selected object to the list at the bottom of the page. Repeat this step to add additional objects.
8. By default, the create, modify attributes and delete operations are selected; however, you can change this by using the drop-down arrow in the Denied Operations cell in the list box and selecting/clearing the different operations.
Attribute Protection Displays the attribute setting specified in the wizard:
• Protect All
• Protect Only
• Protect Except
For Protect Only and Protect Except, click the expansion box to the left of the field to display the individual attributes included in the protection template.
If credentials are needed in order to connect to the selected ADAM (AD LDS) instance, a credentials required dialog will be displayed prompting you to enter the appropriate credentials.
FIELD DESCRIPTION
83
Quest ChangeAuditor for Active Directory
9. By default, the scope of coverage is for This object only; however, you can change this by using the drop-down arrow in the Scope cell of the list box and selecting one of the other two options:
• This object and child objects only• This object and all child objects
10. By default, all attributes for the object will be protected. However, if you want to protect individual attributes instead, select Next to proceed to the next page.
Select one of the following options to activate the attributes list:
• Only Selected• All EXCEPT Selected
From the attributes list box on the left, select the individual attributes to be included in this protection template and use the Add button to move them to the Selected Attributes list on the right.
11. If you would like to specify individual users or groups that are to be allowed to make changes to the protected object, select Next to proceed to the next page.
Use the Browse or Search pages to search your environment to locate and select the user or group account(s) that are to be excluded from this protection template. Use the Add button to add the account(s) to the list at the bottom of the page.
12. Select Finish to save the protection template, close the wizard and return to the ADAM (AD LDS) Protection page, where the specified protection details will now be listed.
To modify a protection template:
1. On the ADAM (AD LDS) Protection page, select the template to be modified and select the Edit tool bar button or right-click command.
2. This will display the ADAM (AD LDS) Protection wizard, where you can modify the current list of objects, as well as the attribute selection and the authorized accounts selected.
3. Select the Finish button to save your changes and return to the ADAM (AD LDS) Protection page.
To disable a protection template:
The disable feature allows you to temporarily stop protection for the specified objects without having to remove the protection template.
1. On the ADAM (AD LDS) Protection page, use one of the following methods to disable a protection template:
• Click in the Status cell for the protection template to be disabled and select Disabled
84

Active Directory Protection
• Right-click the template to be disabled and select Disable
The entry in the Status column for the template will change to ’Disabled’.
2. To re-enable a protection template, use the Enable option in either the Status cell or right-click menu.
To disable an object’s protection within a protection template:
1. On the ADAM (AD LDS) Protection page, use one of the following methods to disable an object’s protection:
• Click in the Status cell for the object to be disabled and select Disabled
• Right-click the object to be disabled and select Disable
The entry in the Status column for the object will change to ’Disabled’.
2. To re-enable an object’s protection, use the Enable option in either the Status cell or right-click menu.
To delete a protection template:
1. On the ADAM (AD LDS) Protection page, use one of the following methods to delete a protection template:
• Select the template to be deleted and select the Delete | Delete Template tool bar button
• Right-click the template to be deleted and select Delete
2. A dialog will be displayed confirming that you want to delete the selected protection template. Select Yes.
To delete an object from a protection template:
1. On the ADAM (AD LDS) Protection page, use one of the following methods to delete an object from a protection template:
• Select the object to be deleted and select the Delete | Delete Object tool bar button
• Right-click the object to be deleted and select Delete
2. A dialog will be displayed confirming that you want to delete the object from the template. Select Yes.
If you disable all of the objects in a protection template, the template itself will become disabled. Similarly, when you re-enable an object in the protection template, the template will automatically be re-enabled.
When you delete the last object in a protection template, the entire protection template will be deleted.
85
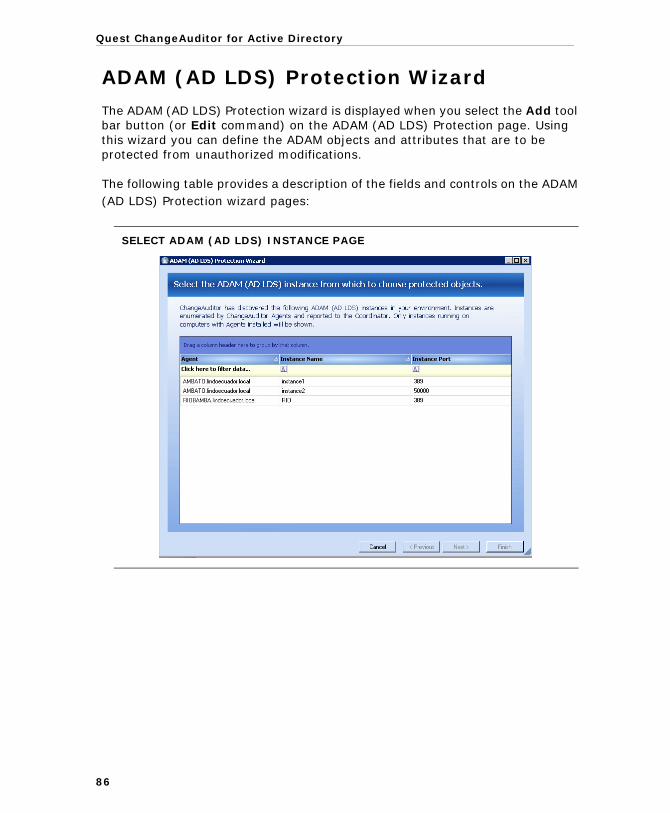
Quest ChangeAuditor for Active Directory
ADAM (AD LDS) Protection Wizard
The ADAM (AD LDS) Protection wizard is displayed when you select the Add tool bar button (or Edit command) on the ADAM (AD LDS) Protection page. Using this wizard you can define the ADAM objects and attributes that are to be protected from unauthorized modifications.
The following table provides a description of the fields and controls on the ADAM (AD LDS) Protection wizard pages:
SELECT ADAM (AD LDS) INSTANCE PAGE
86
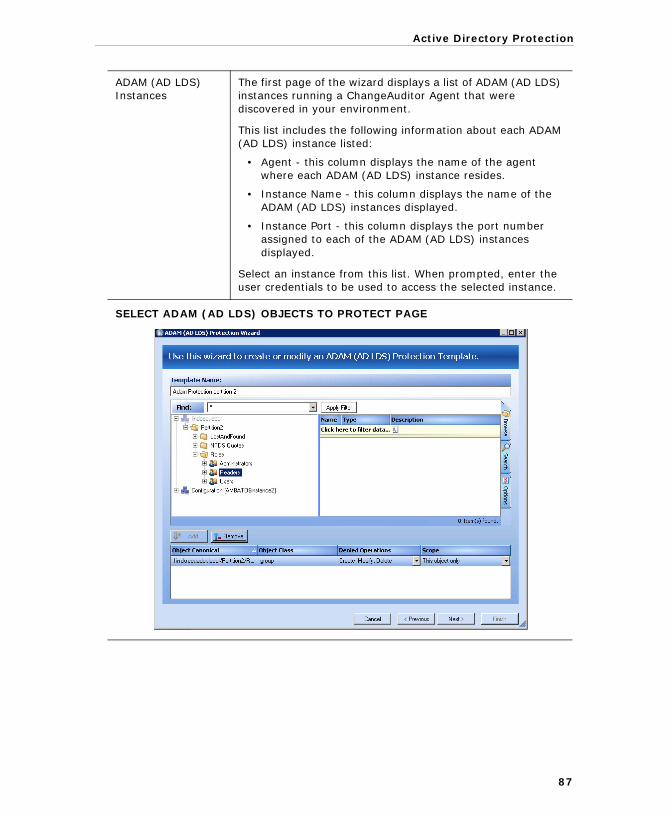
Active Directory Protection
ADAM (AD LDS) Instances
The first page of the wizard displays a list of ADAM (AD LDS) instances running a ChangeAuditor Agent that were discovered in your environment.
This list includes the following information about each ADAM (AD LDS) instance listed:
• Agent - this column displays the name of the agent where each ADAM (AD LDS) instance resides.
• Instance Name - this column displays the name of the ADAM (AD LDS) instances displayed.
• Instance Port - this column displays the port number assigned to each of the ADAM (AD LDS) instances displayed.
Select an instance from this list. When prompted, enter the user credentials to be used to access the selected instance.
SELECT ADAM (AD LDS) OBJECTS TO PROTECT PAGE
87
Quest ChangeAuditor for Active Directory
Template Name Enter a descriptive name for the protection template.
Browse Page Displays a hierarchical view of the containers in your environment allowing you to locate and select the Active Directory object(s) to be protected.
Once you have selected an object, use the Add button to add it to the list at the bottom of the page.
Search Page Use the controls at the top of the Search page to search your environment to locate an Active Directory object to be protected.
Once you have selected an object, use the Add button to add it to the list at the bottom of the page.
Options Page Use the Options page to modify the search options or ADAM instance to be used to retrieve directory objects.
Note: For more information on using the Browse, Search or Options pages, please refer to Directory Object Picker in the ChangeAuditor User Guide.
Object List
Denied Operations
Scope
The list box across the bottom of the page displays the object(s) selected for protection.Use the buttons located above this list box to add and remove objects.
• Add - Select an object in the Browse or Search page and select the Add button to add it to the Object list.
• Remove - Select an entry in the Object list and use the Remove button to remove it from the template.
By default, the create, modify attributes and delete operations are selected. To change this setting, use the drop-down arrow in the Denied Operations cell and select/clear operations.
By default, the scope of coverage is set to This object only. To change this setting, use the drop-down menu in the Scope cell to select a different scope.
88
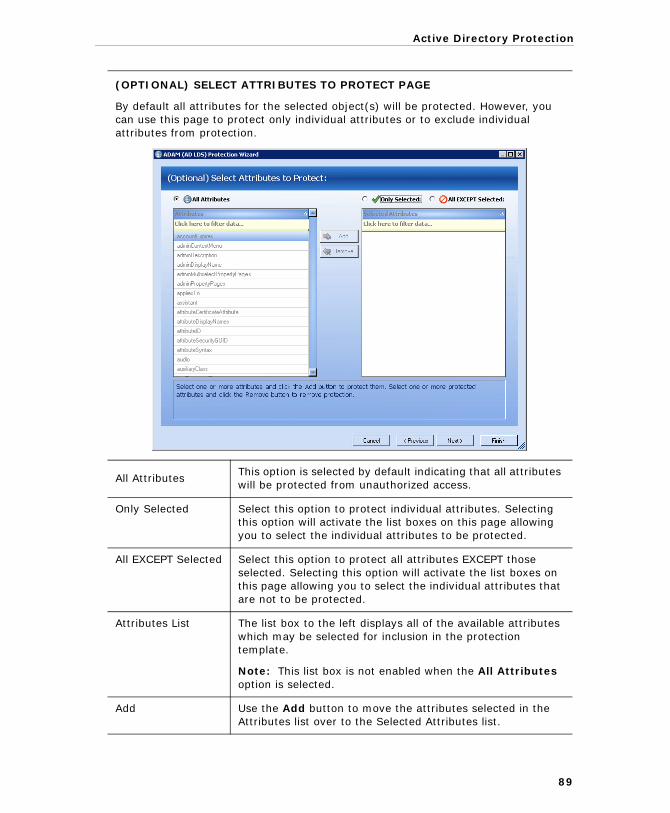
Active Directory Protection
(OPTIONAL) SELECT ATTRIBUTES TO PROTECT PAGE
By default all attributes for the selected object(s) will be protected. However, you can use this page to protect only individual attributes or to exclude individual attributes from protection.
All AttributesThis option is selected by default indicating that all attributes will be protected from unauthorized access.
Only Selected Select this option to protect individual attributes. Selecting this option will activate the list boxes on this page allowing you to select the individual attributes to be protected.
All EXCEPT Selected Select this option to protect all attributes EXCEPT those selected. Selecting this option will activate the list boxes on this page allowing you to select the individual attributes that are not to be protected.
Attributes List The list box to the left displays all of the available attributes which may be selected for inclusion in the protection template.
Note: This list box is not enabled when the All Attributes option is selected.
Add Use the Add button to move the attributes selected in the Attributes list over to the Selected Attributes list.
89
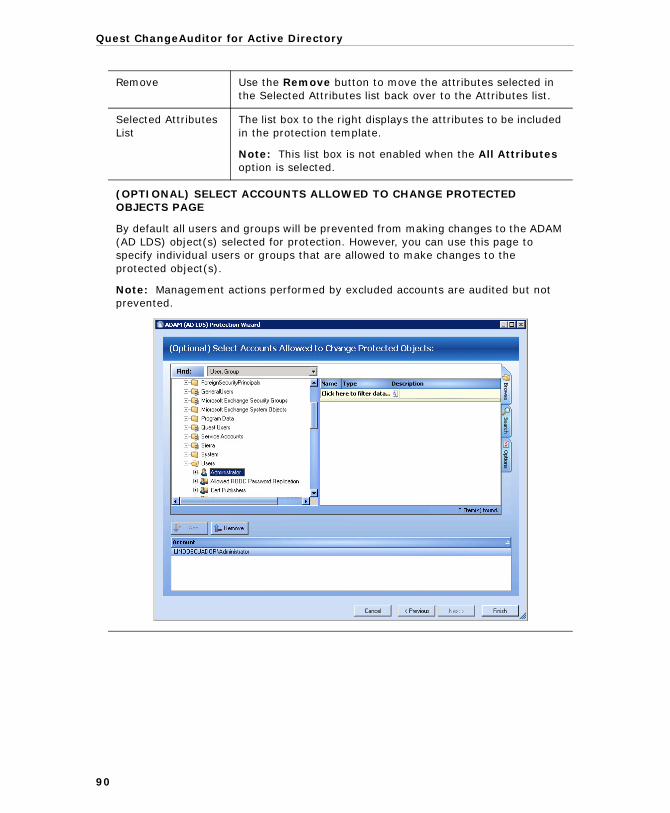
Quest ChangeAuditor for Active Directory
Remove Use the Remove button to move the attributes selected in the Selected Attributes list back over to the Attributes list.
Selected Attributes List
The list box to the right displays the attributes to be included in the protection template.
Note: This list box is not enabled when the All Attributes option is selected.
(OPTIONAL) SELECT ACCOUNTS ALLOWED TO CHANGE PROTECTED OBJECTS PAGE
By default all users and groups will be prevented from making changes to the ADAM (AD LDS) object(s) selected for protection. However, you can use this page to specify individual users or groups that are allowed to make changes to the protected object(s).
Note: Management actions performed by excluded accounts are audited but not prevented.
90
Active Directory Protection
Browse Page Displays a hierarchical view of the containers in your environment allowing you to locate and select the users or groups that will be allowed to make changes to the protected objects.
Once you have selected an account, use the Add button to add it to the list at the bottom of the page.
Search Page Use the controls at the top of the Search page to search your environment to locate the users or groups that will be allowed to make changes to the protected objects.
Once you have selected an account, use the Add button to add it to the list at the bottom of the page.
Options Page Use the Options page to modify the search options or global catalog to be used to retrieve directory objects.
Note: For more information on using the Browse, Search or Options pages, please refer to Directory Object Picker in the ChangeAuditor User Guide.
Authorized Accounts List
The list box across the bottom of the page displays the user and group account(s) that will be allowed to make changes to the protected objects selected on the previous page of the wizard. Use the buttons located above this list box to add and remove objects.
Add - select an account in the Browse or Search page and select the Add button to add it to the Authorized Accounts list.
Remove - select an entry in the list and use the Remove button to remove it.
91

Index
INDEX
AActive Directory Auditing
Add Active Directory object 28Add multiple Active Directory
objects 29Attribute Auditing page 36Delete object class from auditing
list 30Delete object from auditing list 30Disable an object 30Member of Group Auditing page 42Modify an object in auditing list 30Page 26Wizard 31
Active Directory Events report 14Active Directory Protection
Create template 61Delete object from template 64Delete template 64Disable template 63Modify template 63Page 59Wizard 65
AD Attribute AuditingDefine custom attribute auditing 38Page 36
ADAM (AD LDS)Attribute Auditing page 48Auditing page 47Auditing Wizard 52Create protection template 83Delete object from protection
template 85Delete protection template 85Disable protection template 84Enable auditing 51Modify protection template 84Protection page 81Protection templates 83Protection wizard 86
Administration Tasks tabActive Directory Auditing page 26Active Directory Protection page 59AD Attribute Auditing page 36ADAM (AD LDS) Attribute Auditing
page 48ADAM (AD LDS) Auditing page 47ADAM (AD LDS) Protection page 81Group Policy Protection page 71
All Group Policy Events report 14
CCustom Auditing
Active Directory objects 28AD Attributes 36ADAM (AD LDS) auditing 51Member of Group 42
GGroup Policy Protection
Create template 73Delete object from template 75Delete template 75Disable template 74Modify template 74Page 71Templates 73Wizard 76
MMember of Group Auditing 42
Add a group to auditing list 43Delete group from auditing list 43Page 42Wizard 43
PProtection
Active Directory Objects 59ADAM (AD LDS) Objects 81Group Policy Objects 71
QQuest Software
Contacting headquarters 7Contacting support 8
SSearch for changes to
Specific Active Directory container 15
Specific ADAM (AD LDS) container 21
Specific Group Policy container 18Specific object class 20
Searches pageCreate custom Active Directory
searches 15Run built-in Active Directory Events
report 14
93
Quest ChangeAuditor for Active Directory
Run built-in Group Policy Events report 14
Wwildcard expression 17, 19Wizards
Active Directory Auditing 31Active Directory Protection 65ADAM (AD LDS) Auditing 52ADAM (AD LDS) Protection 86Group Policy Protection 76Member of Group Auditing 43
94