Embed Size (px)
Citation preview
8.0Reference Guide
JProbe®
© 2008 Quest Software, Inc. ALL RIGHTS RESERVED.This guide contains proprietary information protected by copyright. The software described in this guide is furnished under a software license or nondisclosure agreement. This software may be used or copied only in accordance with the terms of the applicable agreement. No part of this guide may be reproduced or transmitted in any form or by any means, electronic or mechanical, including photocopying and recording for any purpose other than the purchaser’s personal use without the written permission of Quest Software, Inc.
If you have any questions regarding your potential use of this material, contact:
Quest Software World HeadquartersLEGAL Dept5 Polaris WayAliso Viejo, CA 92656Email: [email protected]
TrademarksQuest, Quest Software, the Quest Software logo, and JProbe are trademarks and registered trademarks of Quest Software, Inc in the United States of America and other countries. Other trademarks and registered trademarks used in this guide are the property of their respective owners.
Third Party ContributionsSee Third_Party_Contributions.htm in your JProbe installation directory.
DisclaimerThe information in this document is provided in connection with Quest products. No license, express or implied, by estoppel or otherwise, to any intellectual property right is granted by this document or in connection with the sale of Quest products. EXCEPT AS SET FORTH IN QUEST'S TERMS AND CONDITIONS AS SPECIFIED IN THE LICENSE AGREEMENT FOR THIS PRODUCT, QUEST ASSUMES NO LIABILITY WHATSOEVER AND DISCLAIMS ANY EXPRESS, IMPLIED OR STATUTORY WARRANTY RELATING TO ITS PRODUCTS INCLUDING, BUT NOT LIMITED TO, THE IMPLIED WARRANTY OF MERCHANTABILITY, FITNESS FOR A PARTICULAR PURPOSE, OR NON-INFRINGEMENT. IN NO EVENT SHALL QUEST BE LIABLE FOR ANY DIRECT, INDIRECT, CONSEQUENTIAL, PUNITIVE, SPECIAL OR INCIDENTAL DAMAGES (INCLUDING, WITHOUT LIMITATION, DAMAGES FOR LOSS OF PROFITS, BUSINESS INTERRUPTION OR LOSS OF INFORMATION) ARISING OUT OF THE USE OR INABILITY TO USE THIS DOCUMENT, EVEN IF QUEST HAS BEEN ADVISED OF THE POSSIBILITY OF SUCH DAMAGES. Quest makes no representations or warranties with respect to the accuracy or completeness of the contents of this document and reserves the right to make changes to specifications and product descriptions at any time without notice. Quest does not make any commitment to update the information contained in this document.
Reference GuideMay 2008Version 8.0
Table of Contents
Preface ..................................................................................................................................................5About this Guide .............................................................................................................................5
How to Use this Guide............................................................................................................5Where to Find Information Not in this Guide ..........................................................................6
About Quest Software, Inc..............................................................................................................6Contacting Quest Software.....................................................................................................7Contacting Quest Support ......................................................................................................7Quest Communities ................................................................................................................7
Automating a JProbe Analysis Session.............................................................................................9Creating Settings for an Automated Session................................................................................10Running an Automated Session ...................................................................................................12Creating a Script to Run Sessions and Utilities ............................................................................13
Example Script to Run Memory and Performance ...............................................................13Example Script to Run Coverage .........................................................................................13
Using Jakarta Ant to Automate Tasks ..........................................................................................14
jplauncher ...........................................................................................................................................15Purpose ........................................................................................................................................16Syntax...........................................................................................................................................16Options .........................................................................................................................................18
General Options ...................................................................................................................18Memory Options ...................................................................................................................19Performance Options............................................................................................................20Coverage Options.................................................................................................................21Advanced Options ................................................................................................................21
4 JProbe Reference Guide
Filters ................................................................................................................................... 22Triggers................................................................................................................................ 24
Settings Files (JPL Files) .................................................................................................................. 27Sample Java EE JPL File ............................................................................................................ 28Sample Java SE JPL File ............................................................................................................ 30
Command Line Utilities..................................................................................................................... 33jpattach ........................................................................................................................................ 34jpcovbaseline ............................................................................................................................... 35jpcovmerge .................................................................................................................................. 38jplicense....................................................................................................................................... 40jpprepare...................................................................................................................................... 42jpreport......................................................................................................................................... 43
Index ................................................................................................................................................... 49

Preface
This guide walks you through automating a JProbe session and describes all the available command line utilities.
About this GuideYou can use this guide to create automated sessions and to learn how to run the command line utilities.
How to Use this GuideWe recommend the following path through this guide.
1 Start with Chapter 1, “Automating a JProbe Analysis Session” on page 9. This chapter provides a walkthrough of how to create an automated session. It refers to the command line utilities that are defined later in the guide.
2 To become more familiar with the tool that launches JProbe sessions, see Chapter 2, “jplauncher” on page 15.
3 To review sample JPL files (the files that define a session and that are passed to jplauncher), see Chapter 3, “Settings Files (JPL Files)” on page 27.
4 All other command line utilities are defined in Chapter 4, “Command Line Utilities” on page 33.
6 JProbe Reference Guide
Where to Find Information Not in this GuideThe following table shows where you can find other types of information:
About Quest Software, Inc.Quest Software, Inc., a leading enterprise systems management vendor, delivers innovative products that help organizations get more performance and productivity from their applications, databases, Windows infrastructure and virtual environments. Through a deep expertise in IT operations and a continued focus on what works best, Quest helps more than 90,000 customers worldwide meet higher expectations for enterprise IT. Quest provides customers with client management as well as server and desktop virtualization solutions through its subsidiaries, ScriptLogic, Vizioncore and Provision Networks. Quest’s Foglight application management solution unifies IT services with end users and the business, resolves problems faster to reduce downtime, and lowers the operating cost of managing applications. Quest Software can be found in offices around the globe and at www.quest.com.
Information about: Refer to:
Configuring JProbe to run your application or application server
• JProbe Getting Started Guide (PDF/online help)• Online community: See “Quest Communities” on
page 7• Support: See “Contacting Quest Support” on
page 7
Running sessions from the JProbe Console
JProbe User Guide (PDF/online help)
Adding JProbe to an Ant system
JProbe Ant Task Documentation (HTML)
Using JProbe inside Eclipse • JProbe Plugins for Eclipse Guide (PDF)• Install the plugins and open the Eclipse online
help. Select JProbe User Guide.
System requirements, licensing, and installation notes
JProbe Installation Guide (PDF)
Known and resolved issues JProbe Release Notes (HTML/text)
Preface 7About Quest Software, Inc.
Contacting Quest Software
Refer to our Web site for regional and international office information.
Contacting Quest SupportQuest Support is available to customers who have a trial version of a Quest product or who have purchased a commercial version and have a valid maintenance contract. Quest Support provides around the clock coverage with SupportLink, our web self-service. Visit SupportLink at: http://support.quest.com.
From SupportLink, you can do the following:
• Quickly find thousands of solutions (Knowledgebase articles/documents).
• Download patches and upgrades.
• Seek help from a Support engineer.
• Log and update your case, and check its status.
View the Global Support Guide for a detailed explanation of support programs, online services, contact information, and policy and procedures. The guide is available at: http://support.quest.com/pdfs/Global Support Guide.pdf.
Quest CommunitiesGet the latest product information, find helpful resources, and join a discussion with the JProbe Quest team and other community members. Join the JProbe community at http://jprobe.inside.quest.com/.
Email [email protected]
Mail Quest Software, Inc.World Headquarters5 Polaris WayAliso Viejo, CA 92656USA
Web site www.quest.com

8 JProbe Reference Guide
1
Automating a JProbe Analysis Session
A fully automated JProbe session runs from the command line or from a script, and it does not require user interaction with either the application or the JProbe Console. You can use automated sessions to collect data overnight and review the resulting snapshots in the morning.
This chapter contains the following sections:
Creating Settings for an Automated Session...............................................................................10Running an Automated Session ..................................................................................................12Creating a Script to Run Sessions and Utilities ...........................................................................13Creating a Script to Run Sessions and Utilities ...........................................................................13Using Jakarta Ant to Automate Tasks..........................................................................................14
10 JProbe Reference Guide
Creating Settings for an Automated SessionThe easiest way to set up for an automated session is to begin by configuring your session from the JProbe Console or jpconfig tool. Using this approach creates a startup script that launches your application with JProbe attached and a JPL file that contains the JProbe settings for the session. When you have your session running the way you want it to, you can use the startup script to run the automated session.
Your goal when defining the settings for an automated session is to automate user interaction. User interaction can happen in two ways: with the JProbe Console and with the application.
User interaction with the JProbe Console centers around the toolbar buttons on the Runtime views, including the Start Use Case and Finish Use Case buttons. To automate user interaction with the JProbe Console, you can use the use case controls (available with the Performance and Coverage tools), triggers, or a combination of both.
User interaction with the application occurs when the application has a text-based or graphical user interface. If you are interested in automation, chances are that you have already automated the user input required by your application for common use cases. If this automation takes the form of a file that you pass to the application as an argument on the command line, you can specify the file name in the session settings. If it is something that you run independently after launching your application, you do not need to add anything to your session settings.
To create settings for an automated session:
1 Launch the JProbe Console on computer where you run your application server.
Windows: Select Start > Programs > JProbe > JProbe Console.
UNIX: Change to JPROBE_HOME/bin/ and execute ./jpconsole
2 Select Create/Edit Settings on the Welcome page or the Tools menu.Tip Alternatively, you can use the standalone version of the Create/Edit Settings tool,
called jpconfig. You can launch jpconfig from the Start menu in Windows, or from the JPROBE_HOME/bin directory.
3 Do one of the following:
• If you already have a configuration for your application, select it and click Copy. Provide a name for the configuration and click Save.
• If not, create a new configuration by following the wizard and referring to the online help as necessary. When you reach the summary screen, select the Continue option and click Finish.
Chapter 1: Automating a JProbe Analysis Session 11Creating Settings for an Automated Session
4 Click Edit.
5 For a Memory analysis, you replace JProbe Console interaction with triggers.
a Select the Triggers tab. Note To learn how to define triggers, click Help. Unless you fully understand how
triggers work, you should set Start Use Case and Finish Use Case triggers on methods that are called before and after the use case respectively. If you set triggers on methods called during the use case, data collection is turned on and off during the session and the results will likely not be what you expect.
b Define a trigger on a method that is called before your use case and select the Start Use Case action.
c Define a trigger on a method that is called after your use case is finished and select the Finish Use Case action.
6 For a Performance or Coverage analysis, you replace JProbe Console interaction with use case controls and triggers.
• If the analysis should start and end when the application’s JVM starts and ends, select End-to-End Analysis (default).
• If the analysis should start and end when particular methods are encountered, deselect End-to-End Analysis and select the Triggers tab. Define a trigger on a method that is called before your use case and select the Start Use Case action. Define a trigger on a method that is called after your use case is finished and select the Finish Use Case action.Note To learn how to define triggers, click Help in the Triggers tab. Unless you fully
understand how triggers work, you should set Start Use Case and Finish Use Case triggers on methods that are called before and after the use case respectively. If you set triggers on methods called during the use case, data collection is turned on and off during the session and the results will likely not be what you expect.
• If the analysis should start when the JVM launches and end when a particular method is encountered, deselect End-to-End Analysis and select Start Use Case at JVM Launch. In the Triggers tab, define a trigger on a method that is called after your use case is finished and select the Finish Use Case action.
• If the analysis should start when a particular method is encountered and end when the JVM exits, deselect End-to-End Analysis and select Finish Use Case at JVM Exit. In the Triggers tab, define a trigger on a method that is called before your use case and select the Start Use Case action.
7 To pass a user input file to a Java SE application as an application argument:
a Select the Java Application tab.
12 JProbe Reference Guide
b Click the browse button beside the Application Arguments summary.
c Enter the syntax that you use on the command line to specify the input file and click Parse Arguments.
d Click OK.
The list of parsed arguments is shown in the Application Arguments summary.
8 Click Save.
9 Click Integrate.
10 When prompted, specify a name and location for the JPL file and startup script.
You now have the files you need to run an automated session. Close the dialog box and exit JProbe.
Running an Automated SessionYou run your automated session using the startup script that was created by JProbe when you integrated your application. For more information, see “Creating Settings for an Automated Session” on page 10.
By default, snapshots are saved to the current working directory if JProbe has write access, or if not to the system’s temp directory. You can set your own snapshot directory by adding the jp_snapshot_dir option to the JProbe Options text box and specifying the fully qualified path to the new directory.
To run the automated session:
• From the command line, run the startup script created by JProbe in the same way that you would run any script on your operating system.
For example, on Windows you could enter the following at the command prompt:
c:\JProbe\Sessions\myApp_Memory.bat
Chapter 1: Automating a JProbe Analysis Session 13Creating a Script to Run Sessions and Utilities
Creating a Script to Run Sessions and UtilitiesIn many cases, you may want to run multiple sessions in a row. For example, you may want to run a Memory analysis followed by a Performance analysis. In this case, creating a script (or batch file) is more convenient than the command line. For more information about creating scripts to automate tasks, see your operating system documentation.
You can also run JProbe utilities from within the same script. For example, when running Memory analyses on your application, you may want to preprocess the resulting snapshots so that they opens faster the first time you view them in the JProbe Console. You would create a script that runs the session and then calls the jpprepare utility on the resulting snapshots. For more information, see “Command Line Utilities” on page 33.
The following sections contain example scripts for Windows systems. These examples assume that JProbe is installed in the default directory and that start up scripts were created when the application was integrated with JProbe. They also assume that sessions and snapshots are saved in user-defined directories c:\JProbe\Sessions and c:\JProbe\Snapshots.
Example Script to Run Memory and PerformanceThe following snippet of a batch file runs an automated Memory analysis followed by a Performance analysis. It then preprocesses the Memory snapshot.
REM Run the analyses and save snapshots to snapshot directoryc:\JProbe\Sessions\myApp_Memory.batc:\JProbe\Sessions\myApp_Performance.bat
REM Preprocess Memory snapshotjpprepare c:\JProbe\Snapshots\myApp_run_entry_raw_1.jph
Example Script to Run CoverageThe following snippet of a batch file runs two Coverage analyses, each representing a different test case. It then runs utilities to create a baseline Coverage snapshot and merge all snapshots.
REM Run the Coverage analysesc:\JProbe\Sessions\myApp_Coverage_A.batc:\JProbe\Sessions\myApp_Coverage_B.bat
14 JProbe Reference Guide
REM Create a baseline snapshot (enter commands all on one line)jpcovbaseline -jp_input=c:\JProbe\Sessions\myApp_Coverage_A.jpl
c:\JProbe\Snapshots\myApp_Baseline.jpc
REM Merge the three snapshots (enter commands all on one line)jpcovmerge c:\JProbe\Snapshots\myApp_Baseline.jpc
c:\JProbe\Snapshots\myApp_Coverage_A.jpcc:\JProbe\Snapshots\myApp_Coverage_B.jpcc:\JProbe\Snapshots\myApp_Coverage_Merged.jpc
Using Jakarta Ant to Automate TasksJProbe includes some helpful automation utilities created using Jakarta Ant build scripts. These contain targets for running both Java EE and Java SE automated sessions, including examples of integrating JUnit tests into your automated sessions. If you are familiar with Ant, these are an excellent starting point for creating your own automations. For more information, see the JPROBE_HOME/automation directory.
2
jplauncher
JProbe uses the jplauncher tool to start Java applications in such a way that JProbe can collect data about how they run. For Java EE applications, when you integrate your application server, calls to java in the startup script are automatically replaced with calls to jplauncher in the new startup script. For Java SE applications, the script that JProbe creates starts your application with jplauncher.
You can also use jplauncher directly from the command line. This chapter describes what you can do with jplauncher.
This chapter contains the following sections:
Purpose .......................................................................................................................................16Syntax..........................................................................................................................................16Options ........................................................................................................................................18
16 JProbe Reference Guide
Purposejplauncher runs Java applications under JProbe. jplauncher works exactly like java, but with additional JProbe options available. JProbe options are identified with the -jp_ prefix.
SyntaxYou run jplauncher from the JPROBE_HOME/bin directory. When entering paths on the command line, use the quoting and path separator conventions for the command shell that you are using (Windows, sh, csh, etc.).
To run a Java SE application with settings specified in a JPL filejplauncher -jp_input=<JPL_file>
where JPL_file is the fully qualified path to a JPL file.
To run a Java SE application with settings specified on the command linejplauncher -jp_function=[memory|performance|coverage|none]
[<jprobe_options>][<java_options>]
where
• -jp_function specifies the type of JProbe analysis to run. If the option is omitted or set to none, the application runs as if you used java.
• jprobe_options represent additional JProbe options. • java_options represent Java options to use when launching the JVM. Here is
where you specify your application’s main class or the JAR file containing a main class plus all the Java options you usually use.
Memory Example
jplauncher -jp_function=memory -jp_java=c:\jdk1.6\bin\java.exe-server demos.memory.leakexample.LeakExample -fix
Performance Example
jplauncher -jp_function=performance-jp_java=c:\jdk1.6\bin\java.exe-jp_collect_data=demos.performance.polynomial.*.*():method-server demos.performance.polynomial.Polynomial
Chapter 2: jplauncher 17Syntax
Coverage Example
jplauncher -jp_function=coverage-jp_java=c:\jdk1.6\bin\java.exe-jp_collect_data=demos.coverage.adventure.*.*():include-server demos.coverage.adventure.Adventure
To run a Java SE application with settings both in a file and on the command line
If you specify the application and/or options in both a JPL file and on the command line, the command line overrides the JPL file. On the command line, be sure to specify all options before the application class name. jplauncher assumes that any arguments after the class name are application arguments.
jplauncher -jp_input=<JPL_file> [<jprobe_options>][<java_options>]
where
• -jp_input=<JPL_file> specifies the fully qualified path to a JPL file. • jprobe_options represent JProbe options.• java_options represent Java options to use when launching the JVM.
To create a JPL file from command line arguments and/or an existing JPL filejplauncher -jp_input=<JPL_file> [<jprobe_options>]
[<java_options>] -jp_export_jpl=<new_JPL_file>
where
• JPL_file is the fully qualified path to an existing JPL file. • jprobe_options represent JProbe options to add to the new JPL file. If you
specify an option on the command line that also exists in the current JPL file, the new JPL file contains the value specified on the command line.
• java_options represent Java options to include in the new JPL file.• new_JPL_file is either a relative or absolute path to the file where you want
to save the settings. If the output file already exists, it is overwritten.
Options contained in JPL files from other versions of JProbe are not checked for correctness. Invalid or deprecated options are not updated and may cause errors; use -jp_help to find a list of current options. After the process finishes, the file is saved but no session is run.
18 JProbe Reference Guide
To get command line help on jplauncher and JProbe optionsjplauncher -jp_help
A list of options and their descriptions is displayed in the system console window.
OptionsAll jplauncher options use the prefix “-jp_” so that they can be clearly distinguished from Java options.
General OptionsThe following options can be set for all types of analyses.
Option Values Description
-jp_console_port <port_number> Specifies the port used by JProbe. The default port number is 52991.
-jp_export_jpl <new_JPL_file> Creates a new JPL file from command line arguments and/or a JPL file specified with -jp_input. Requires the fully qualified path to the new JPL file. See “To create a JPL file from command line arguments and/or an existing JPL file” on page 17.
-jp_function coverage|memory|performance|none
Specifies the type of analysis. If omitted or set to none, the application runs as if it were started with java.
-jp_help n/a Displays help on jplauncher and JProbe options in the system console.
Chapter 2: jplauncher 19Options
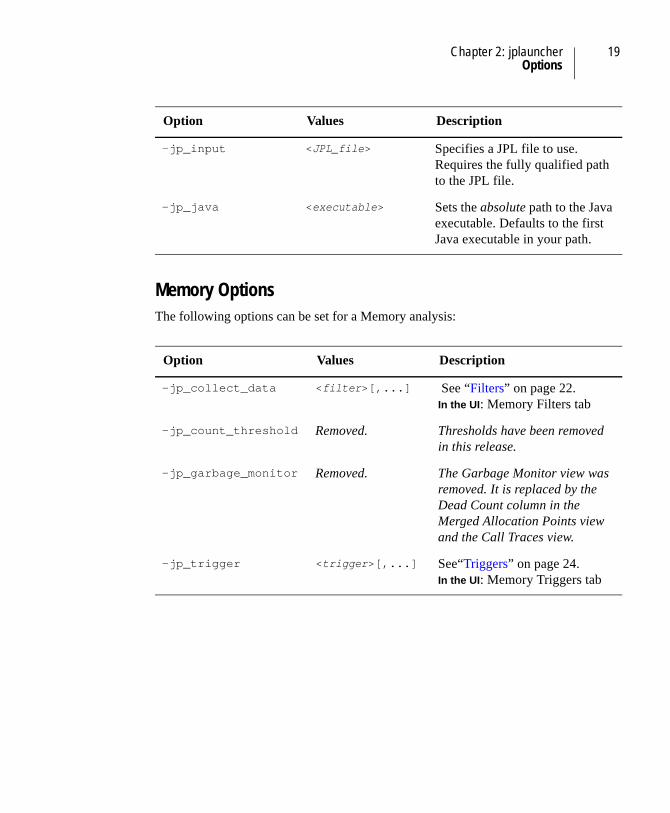
Memory OptionsThe following options can be set for a Memory analysis:
-jp_input <JPL_file> Specifies a JPL file to use. Requires the fully qualified path to the JPL file.
-jp_java <executable> Sets the absolute path to the Java executable. Defaults to the first Java executable in your path.
Option Values Description
-jp_collect_data <filter>[,...] See “Filters” on page 22.In the UI: Memory Filters tab
-jp_count_threshold Removed. Thresholds have been removed in this release.
-jp_garbage_monitor Removed. The Garbage Monitor view was removed. It is replaced by the Dead Count column in the Merged Allocation Points view and the Call Traces view.
-jp_trigger <trigger>[,...] See“Triggers” on page 24.In the UI: Memory Triggers tab
Option Values Description
20 JProbe Reference Guide
Performance OptionsThe following options can be set for a Performance analysis:
Option Values Description
-jp_collect_data <filter>[,...] See “Filters” on page 22.In the UI: Performance Filters tab
-jp_collect_encapsulated
full|grouped|none
Sets how data for encapsulated methods is collected and represented.In the UI: See Collect Encapsulated in the Settings tool.
-jp_detect_deadlocks
true|false Set to true to collect data on deadlocks.In the UI: See Deadlock Detection in the Settings tool.
-jp_granularity method|line
Deprecated. Granularity is best controlled using filter actions.
-jp_measurement elapsed|cpu Sets the time measurement.elapsed: wall clock timecpu: per thread cpu timeIn the UI: See Timing in the Settings tool.
-jp_track_objects Removed. This feature has been removed. Use the Memory analysis tool to collect object allocation data.
-jp_trigger <trigger>[,...] See“Triggers” on page 24.In the UI: Performance Triggers tab
-jp_use_case end_to_end|start_entry|finish_exit|none
Determines how the use case is controlled. In the UI: See Use Case Controls in the Settings tool.
Chapter 2: jplauncher 21Options
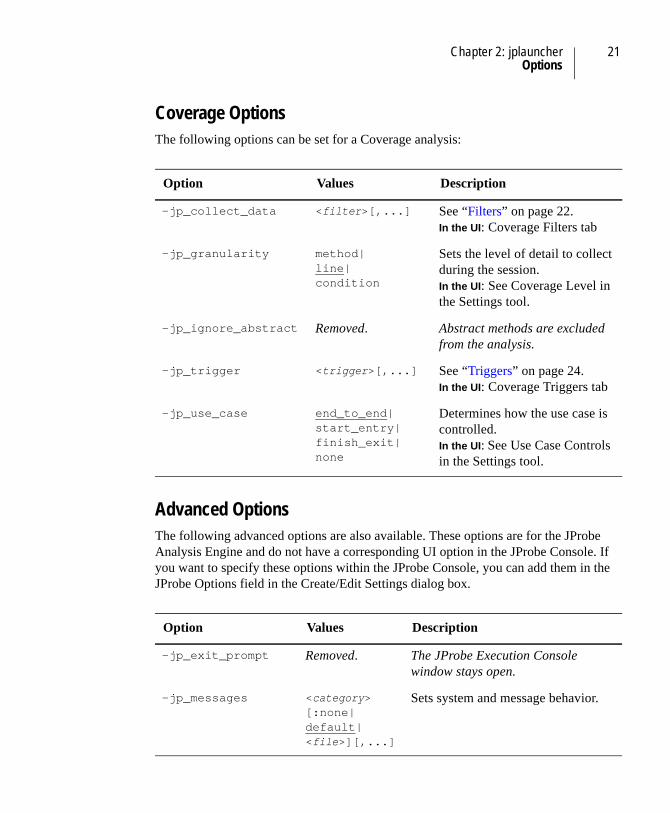
Coverage OptionsThe following options can be set for a Coverage analysis:
Advanced OptionsThe following advanced options are also available. These options are for the JProbe Analysis Engine and do not have a corresponding UI option in the JProbe Console. If you want to specify these options within the JProbe Console, you can add them in the JProbe Options field in the Create/Edit Settings dialog box.
Option Values Description
-jp_collect_data <filter>[,...] See “Filters” on page 22.In the UI: Coverage Filters tab
-jp_granularity method|line|condition
Sets the level of detail to collect during the session.In the UI: See Coverage Level in the Settings tool.
-jp_ignore_abstract Removed. Abstract methods are excluded from the analysis.
-jp_trigger <trigger>[,...] See “Triggers” on page 24.In the UI: Coverage Triggers tab
-jp_use_case end_to_end|start_entry|finish_exit|none
Determines how the use case is controlled. In the UI: See Use Case Controls in the Settings tool.
Option Values Description
-jp_exit_prompt Removed. The JProbe Execution Console window stays open.
-jp_messages <category>[:none|default|<file>][,...]
Sets system and message behavior.
22 JProbe Reference Guide
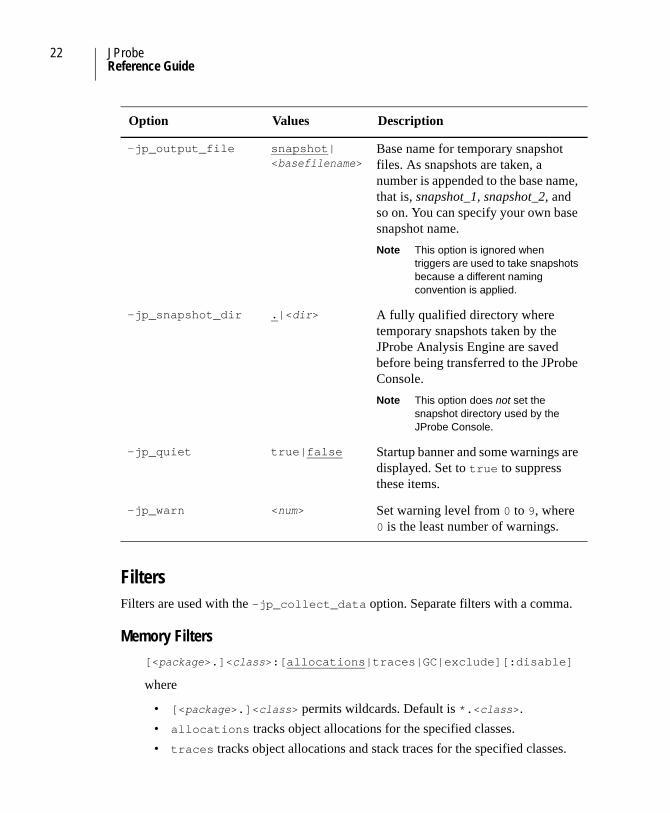
FiltersFilters are used with the -jp_collect_data option. Separate filters with a comma.
Memory Filters[<package>.]<class>:[allocations|traces|GC|exclude][:disable]
where
• [<package>.]<class> permits wildcards. Default is *.<class>.• allocations tracks object allocations for the specified classes.• traces tracks object allocations and stack traces for the specified classes.
-jp_output_file snapshot|<basefilename>
Base name for temporary snapshot files. As snapshots are taken, a number is appended to the base name, that is, snapshot_1, snapshot_2, and so on. You can specify your own base snapshot name.Note This option is ignored when
triggers are used to take snapshots because a different naming convention is applied.
-jp_snapshot_dir .|<dir> A fully qualified directory where temporary snapshots taken by the JProbe Analysis Engine are saved before being transferred to the JProbe Console.Note This option does not set the
snapshot directory used by the JProbe Console.
-jp_quiet true|false Startup banner and some warnings are displayed. Set to true to suppress these items.
-jp_warn <num> Set warning level from 0 to 9, where 0 is the least number of warnings.
Option Values Description
Chapter 2: jplauncher 23Options
• GCs tracks object allocations and stack traces for the specified classes, and also keeps stack traces for garbage collected objects.
• disable is added only if the filter is to be ignored during the session.
Example:
-jp_collect_data=mypkg.*:allocations,mypkg.MyClass:GC
Basic allocation data is collected for all objects of classes in mypkg, and traces are collected for objects of class mypkg.MyClass. The objects allocated by all other classes are not tracked.
Performance Filters[<package>.]<class>[.<method>()]
:[encapsulated|method|line|native][:disable]
where
• [<package>.]<class>[.<method>()] permits wildcards. Default is *.<class>.*().
• encapsulated rolls up data for methods you are not interested in• method collects method-level data on methods you are interested in.• line collects line-level data on selected methods.• native is a way of encapsulating data on native methods. • disable is only added if the entire filter is to be ignored during the session.
Example:
-jp_collect_data=mypkg.*.*():method,mypkg.MyClass.hotMethod():line:disable
Method level data is collected on all code in the mypkg package. The second filter is disabled and therefore ignored. Data on all other code is encapsulated (default).
Coverage Filters[<package>.]<class>[.<method>()]:[include|exclude][:disable]
where
• [<package>.]<class>[.<method>()] permits wildcards.Default is *.<class>.*().
• include collects data.• exclude does not collect data.
24 JProbe Reference Guide
• disable is added only if the filter is to be ignored during the session.
Example
-jp_collect_data=mypkg.*.*():include,mypkg.MyClass.aMethod():exclude:disable
Data is collected on the code in the mypkg package only. The second filter is disabled and therefore ignored. Data on all other code is excluded (default).
TriggersTriggers are used with the -jp_trigger option. Separate triggers with a comma. Snapshots taken with triggers are named using the following format: <application>_<method>_<event>_raw_#.
To specify a trigger[<package>.]<class>.<method>()
:<event>[([<start>];[<frequency>];[<end>])]:<action>
where
• [<package>.]<class>.<method>() defines the method on which you want to have the trigger execute.
• event represents when the action occurs, that is, on entry to a method or exit from a method. The short form for entry is en and exit is ex.
• start, frequency, and end provide control over when the trigger first executes, how often, and for how long. When undefined, the default is (1;1;all), which means the trigger fires the first time the method is encountered and every time thereafter until the end of the session. You can specify time in minutes using this format: (2m;2m;5m). You can also specify a mix of method calls and time, such as (1;2m;all), which is unique to the command line interface. For an explanation of advanced trigger controls, see the JProbe User Guide or the online help.
• action can be start_use_case, finish_use_case, or take_snapshot. For a Memory analysis, you can also request a garbage collection using gc.
Method-Based Example
-jp_trigger=com.bea.medrec.entities.PatientEJB.getPatient():entry(2;2;all):take_snapshot
Chapter 2: jplauncher 25Options
This trigger takes a snapshot the second time the getPatient() method is entered and every second time thereafter until the program exits.
Time-Based Example
-jp_trigger=com.bea.medrec.entities.PatientEJB.getPatient():entry(2m;2m;50m):take_snapshot
This trigger waits for two minutes after the application was started., then it takes a snapshot when getPatient() is entered. Thereafter, when the method getPatient() is entered, if a snapshot has not been taken in the last two minutes, JProbe takes another snapshot. This process continues until the program has run for 50 minutes, after which time no other snapshots are taken.

26 JProbe Reference Guide
3
Settings Files (JPL Files)
The sample settings files in this chapter were created using the Create/Edit Settings dialog box.
This chapter contains the following sections:
Sample Java EE JPL File ............................................................................................................28Sample Java SE JPL File ............................................................................................................30
28 JProbe Reference Guide
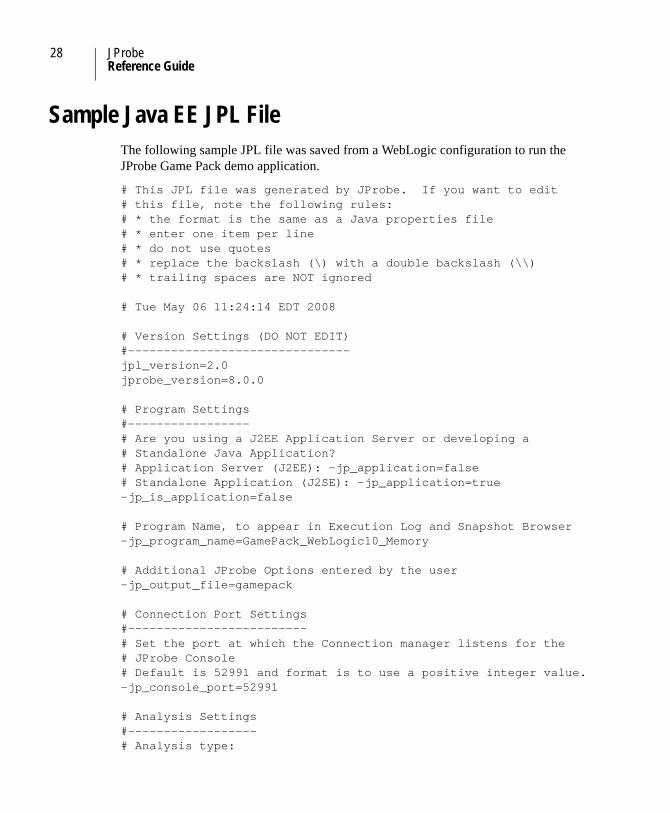
Sample Java EE JPL FileThe following sample JPL file was saved from a WebLogic configuration to run the JProbe Game Pack demo application.
# This JPL file was generated by JProbe. If you want to edit# this file, note the following rules:# * the format is the same as a Java properties file# * enter one item per line# * do not use quotes# * replace the backslash (\) with a double backslash (\\)# * trailing spaces are NOT ignored
# Tue May 06 11:24:14 EDT 2008
# Version Settings (DO NOT EDIT)#-------------------------------jpl_version=2.0jprobe_version=8.0.0
# Program Settings#-----------------# Are you using a J2EE Application Server or developing a# Standalone Java Application?# Application Server (J2EE): -jp_application=false# Standalone Application (J2SE): -jp_application=true-jp_is_application=false
# Program Name, to appear in Execution Log and Snapshot Browser-jp_program_name=GamePack_WebLogic10_Memory
# Additional JProbe Options entered by the user-jp_output_file=gamepack
# Connection Port Settings#-------------------------# Set the port at which the Connection manager listens for the# JProbe Console# Default is 52991 and format is to use a positive integer value.-jp_console_port=52991
# Analysis Settings#------------------# Analysis type:
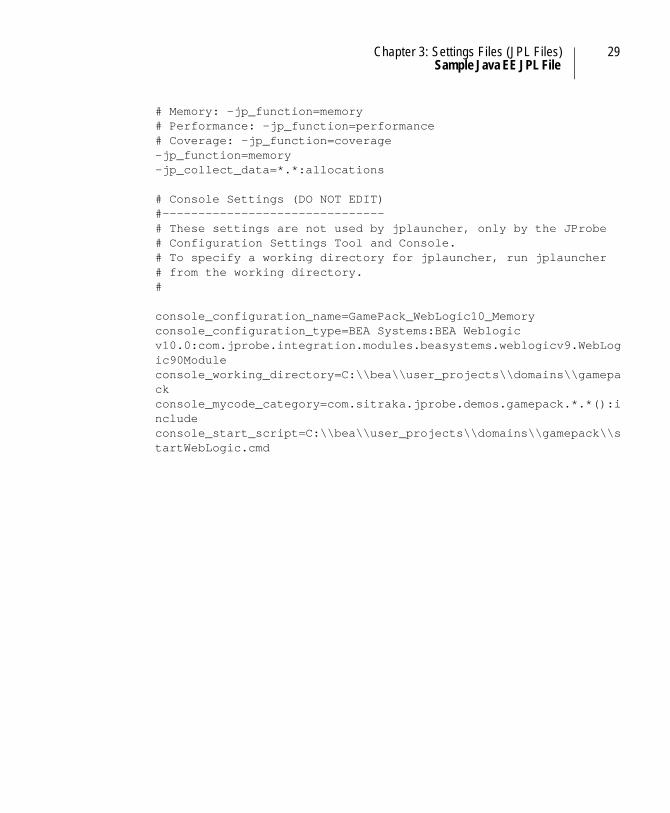
Chapter 3: Settings Files (JPL Files) 29Sample Java EE JPL File
# Memory: -jp_function=memory# Performance: -jp_function=performance# Coverage: -jp_function=coverage-jp_function=memory-jp_collect_data=*.*:allocations
# Console Settings (DO NOT EDIT)#-------------------------------# These settings are not used by jplauncher, only by the JProbe# Configuration Settings Tool and Console.# To specify a working directory for jplauncher, run jplauncher# from the working directory.#
console_configuration_name=GamePack_WebLogic10_Memoryconsole_configuration_type=BEA Systems:BEA Weblogic v10.0:com.jprobe.integration.modules.beasystems.weblogicv9.WebLogic90Moduleconsole_working_directory=C:\\bea\\user_projects\\domains\\gamepackconsole_mycode_category=com.sitraka.jprobe.demos.gamepack.*.*():includeconsole_start_script=C:\\bea\\user_projects\\domains\\gamepack\\startWebLogic.cmd
30 JProbe Reference Guide
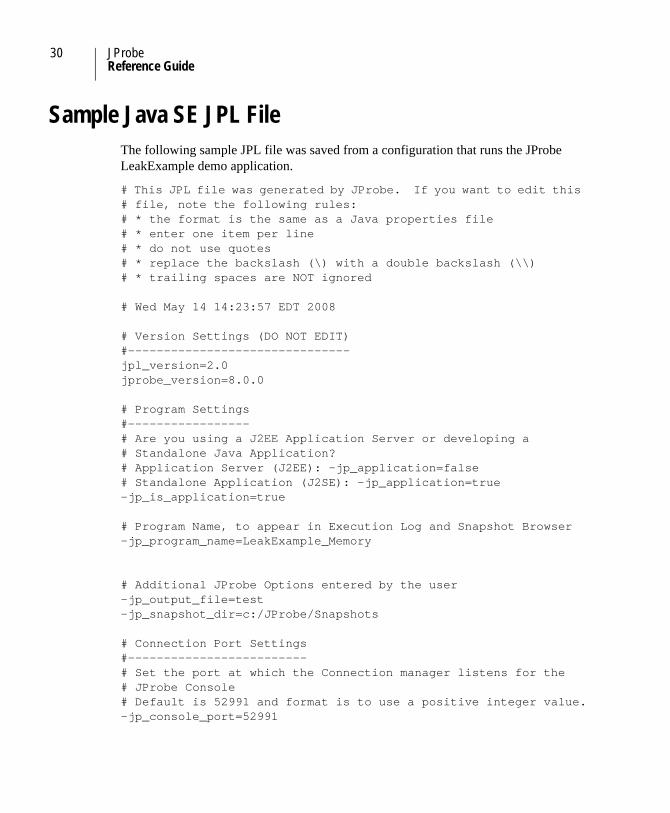
Sample Java SE JPL FileThe following sample JPL file was saved from a configuration that runs the JProbe LeakExample demo application.
# This JPL file was generated by JProbe. If you want to edit this # file, note the following rules:# * the format is the same as a Java properties file# * enter one item per line# * do not use quotes# * replace the backslash (\) with a double backslash (\\)# * trailing spaces are NOT ignored
# Wed May 14 14:23:57 EDT 2008
# Version Settings (DO NOT EDIT)#-------------------------------jpl_version=2.0jprobe_version=8.0.0
# Program Settings#-----------------# Are you using a J2EE Application Server or developing a # Standalone Java Application?# Application Server (J2EE): -jp_application=false# Standalone Application (J2SE): -jp_application=true-jp_is_application=true
# Program Name, to appear in Execution Log and Snapshot Browser-jp_program_name=LeakExample_Memory
# Additional JProbe Options entered by the user-jp_output_file=test-jp_snapshot_dir=c:/JProbe/Snapshots
# Connection Port Settings#-------------------------# Set the port at which the Connection manager listens for the # JProbe Console# Default is 52991 and format is to use a positive integer value.-jp_console_port=52991
Chapter 3: Settings Files (JPL Files) 31Sample Java SE JPL File
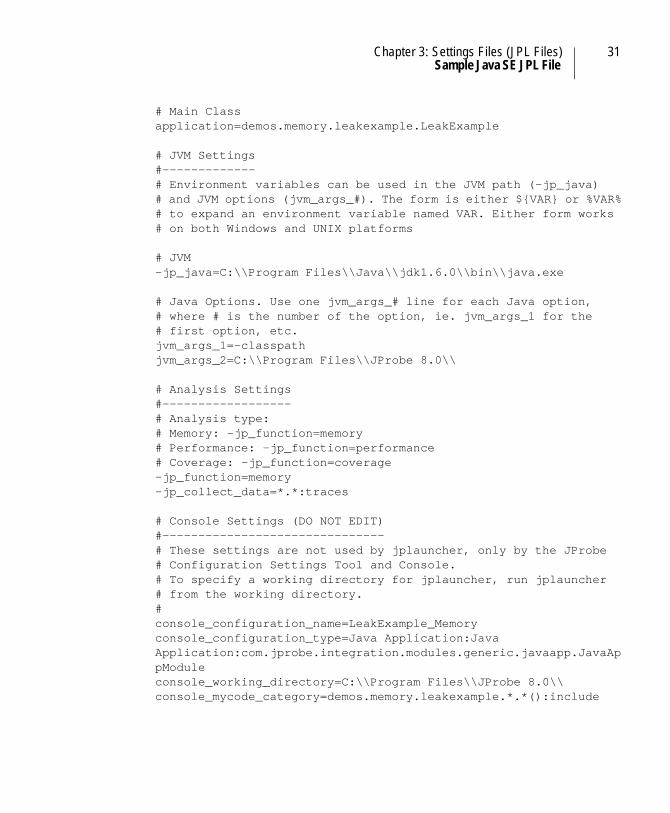
# Main Classapplication=demos.memory.leakexample.LeakExample
# JVM Settings#-------------# Environment variables can be used in the JVM path (-jp_java)# and JVM options (jvm_args_#). The form is either ${VAR} or %VAR%# to expand an environment variable named VAR. Either form works# on both Windows and UNIX platforms
# JVM-jp_java=C:\\Program Files\\Java\\jdk1.6.0\\bin\\java.exe
# Java Options. Use one jvm_args_# line for each Java option,# where # is the number of the option, ie. jvm_args_1 for the# first option, etc.jvm_args_1=-classpathjvm_args_2=C:\\Program Files\\JProbe 8.0\\
# Analysis Settings#------------------# Analysis type:# Memory: -jp_function=memory# Performance: -jp_function=performance# Coverage: -jp_function=coverage-jp_function=memory-jp_collect_data=*.*:traces
# Console Settings (DO NOT EDIT)#-------------------------------# These settings are not used by jplauncher, only by the JProbe# Configuration Settings Tool and Console.# To specify a working directory for jplauncher, run jplauncher# from the working directory.#console_configuration_name=LeakExample_Memoryconsole_configuration_type=Java Application:Java Application:com.jprobe.integration.modules.generic.javaapp.JavaAppModuleconsole_working_directory=C:\\Program Files\\JProbe 8.0\\console_mycode_category=demos.memory.leakexample.*.*():include

32 JProbe Reference Guide
4
Command Line Utilities
You run utilities from the JPROBE_HOME/bin directory. When entering options on the command line, use the quoting and path separator conventions for the command shell you are using (Windows, sh, csh, etc.). In a properties file, you do not need quotes.
JProbe offers the following command line utilities:
jpattach ........................................................................................................................................34Attach to a remote JVM that was started without JProbe.
jpcovbaseline...............................................................................................................................35Generate a Coverage baseline snapshot for your application.
jpcovmerge..................................................................................................................................38Merge Coverage snapshots.
jplicense.......................................................................................................................................40Manage licenses.
jpprepare .....................................................................................................................................42Preprocess large Memory snapshots so that they open faster.
jpreport ........................................................................................................................................43Creates reports from snapshots.
34 JProbe Reference Guide
jpattach
Note This utility is designed for the Memory analysis tool only. It is available on Windows, Linux IA-32/x86_64, Solaris, and may become available for other platforms. If jpattach is supported for your platform, the utility is installed in the JPROBE_HOME/bin directory.
PurposeYou can use jpattach to attach JProbe to a Sun 1.6 or later JVM that was not started with JProbe. For more information, see “Monitoring a JVM Started Without JProbe” in the JProbe User Guide.
Syntax
To get a list of active JVMs by JVM IDjpattach
jpattach lists the JVMs on the local machine in the format jvmid: description. Locate the JVM running your application and rerun jpattach with this jvmid.
To attach to a running JVMjpattach <jvmid>
where jvmid is the JVM to which you want to attach JProbe.
When jpattach attaches to the JVM, it displays a port number that you can use to connect a JProbe Console to the analysis session, just as you would if the JVM had been launched with jplauncher. While connected, you can request garbage collections and take snapshots, but the use case controls are inactive. For more information, see “Remote Sessions” in the JProbe User Guide.
While JProbe is attached to your JVM, you may notice some impact on your application’s performance. When the JProbe Console detaches, jpattach exits and the target JVM returns to its preconnection state.
OptionsThere are no options for this utility.
Chapter 4: Command Line Utilities 35jpcovbaseline
jpcovbaseline
Note This utility is designed for the Coverage analysis tool only.
PurposeYou can use jpcovbaseline to create a baseline Coverage snapshot that includes all the classes in your application and assigns a value “missed” to all methods in those classes. For more information, see “Creating a Baseline Coverage Snapshot” in the JProbe User Guide.
Syntax
To create a baseline snapshot using options in an existing JPL filejpcovbaseline -jp_ref_classpath=<classpath>[:append|prepend]
-jp_input=<JPL_file> [<options>] <output>
where
• classpath list paths to all your EAR/WAR files, JAR files, or package directories. For Java EE programs, you must include -jp_ref_classpath; for standalone applications, -jp_ref_classpath is optional because the class path is taken from the JPL file.
• JPL_file is the fully qualified path to a JPL file that contains the settings that you use when you run your test cases in JProbe.
• options represents other jpcovbaseline options. See Options.• output is the fully qualified path to a file where the snapshot is saved.
To create a baseline snapshot using command line options onlyjpcovbaseline -jp_ref_classpath=<classpath>
-jp_collect_data=<filter> [<options>] <output>
where
• classpath list paths to all your EAR/WAR files, JAR files, or package directories.
• filter is a list of comma-separated filters that matches the filter settings you use for your test case analyses.
• options represents other jpcovbaseline options. See Options.

36 JProbe Reference Guide
• output is the fully qualified path to a file where the snapshot is saved.
When run, the utility travels your class path automatically drilling into EAR, WAR, and JAR files. All methods it discovers are assigned a value of missed. If a class has no methods, the class is excluded from the snapshot.
Caution Because jpcovbaseline is pure Java and does not use native code, the hostname (and other fields) identified by jpcovbaseline in the execution log may not be the same as those found in Coverage snapshots create by JProbe itself.
You can merge the baseline snapshot with your regular Coverage snapshots to see a complete assessment of test case coverage on your code. For more information, see “Merging Test Case Results” in the JProbe User Guide or “jpcovmerge” on page 38.
OptionsIf an option is not specified, its default value is assumed.
Options Values Description
-jp_input <JPL_file> The fully qualified path to a JPL file that contains the settings that you use when you run your test cases in JProbe.
-jp_collect_data <filter>[,...] Filters can be specified in the JPL file or on the command line. When not using the -jp_input option, you need to use this option to specify at least one package, class, or method to include in the baseline snapshot. Filters need to match the filters specified for your test case analyses. For syntax, see“Coverage Filters” on page 23.
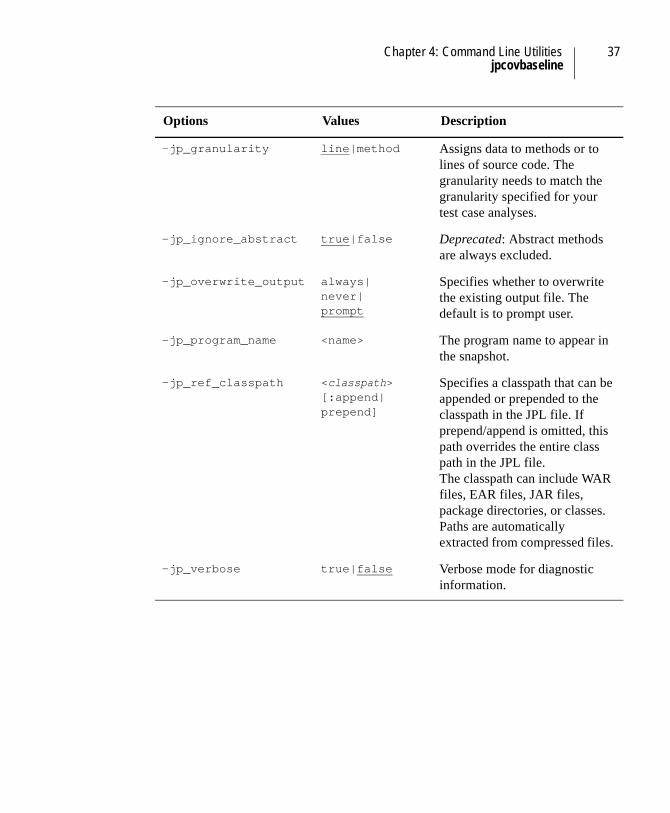
Chapter 4: Command Line Utilities 37jpcovbaseline
-jp_granularity line|method Assigns data to methods or to lines of source code. The granularity needs to match the granularity specified for your test case analyses.
-jp_ignore_abstract true|false Deprecated: Abstract methods are always excluded.
-jp_overwrite_output always|never|prompt
Specifies whether to overwrite the existing output file. The default is to prompt user.
-jp_program_name <name> The program name to appear in the snapshot.
-jp_ref_classpath <classpath>[:append|prepend]
Specifies a classpath that can be appended or prepended to the classpath in the JPL file. If prepend/append is omitted, this path overrides the entire class path in the JPL file.The classpath can include WAR files, EAR files, JAR files, package directories, or classes.Paths are automatically extracted from compressed files.
-jp_verbose true|false Verbose mode for diagnostic information.
Options Values Description
38 JProbe Reference Guide
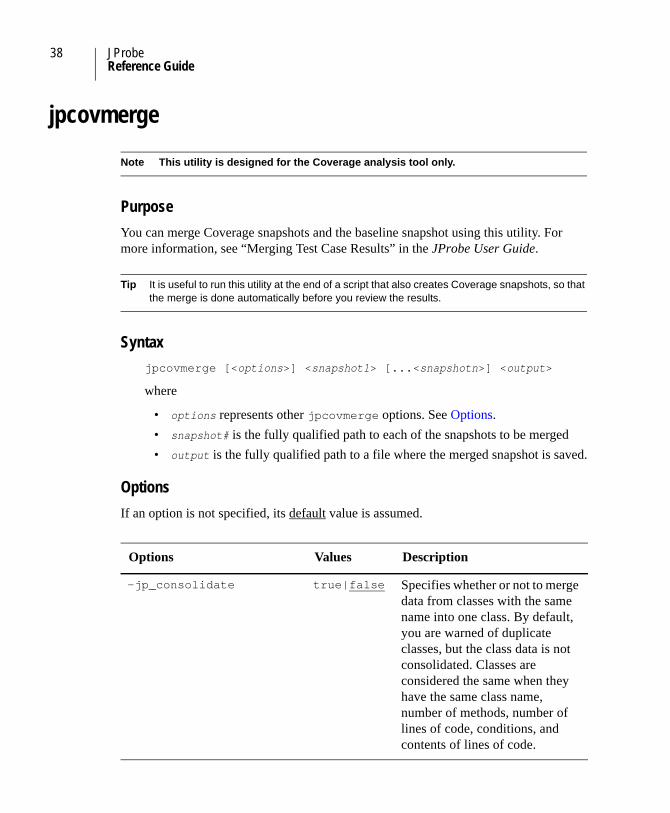
jpcovmerge
Note This utility is designed for the Coverage analysis tool only.
PurposeYou can merge Coverage snapshots and the baseline snapshot using this utility. For more information, see “Merging Test Case Results” in the JProbe User Guide.
Tip It is useful to run this utility at the end of a script that also creates Coverage snapshots, so that the merge is done automatically before you review the results.
Syntaxjpcovmerge [<options>] <snapshot1> [...<snapshotn>] <output>
where
• options represents other jpcovmerge options. See Options.• snapshot# is the fully qualified path to each of the snapshots to be merged• output is the fully qualified path to a file where the merged snapshot is saved.
OptionsIf an option is not specified, its default value is assumed.
Options Values Description
-jp_consolidate true|false Specifies whether or not to merge data from classes with the same name into one class. By default, you are warned of duplicate classes, but the class data is not consolidated. Classes are considered the same when they have the same class name, number of methods, number of lines of code, conditions, and contents of lines of code.
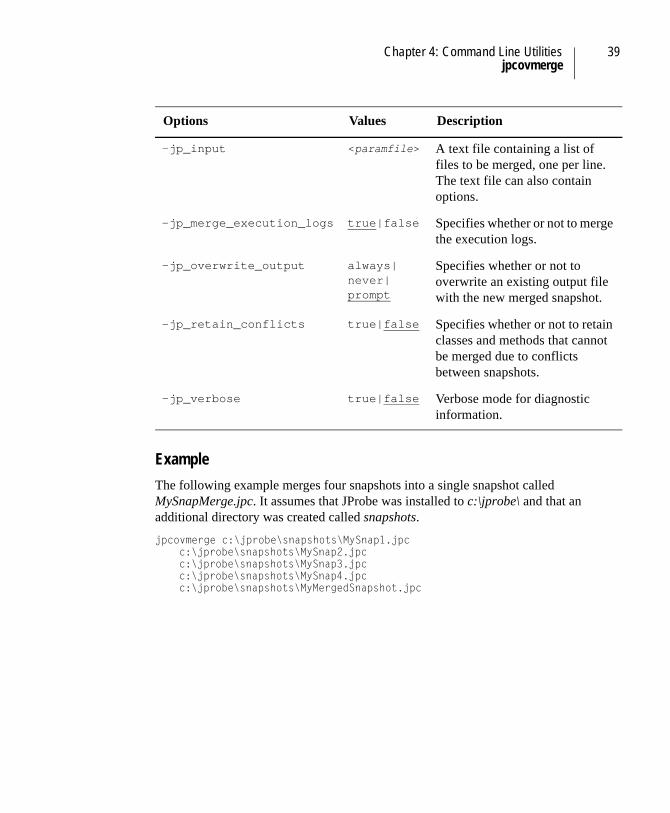
Chapter 4: Command Line Utilities 39jpcovmerge
ExampleThe following example merges four snapshots into a single snapshot called MySnapMerge.jpc. It assumes that JProbe was installed to c:\jprobe\ and that an additional directory was created called snapshots.
jpcovmerge c:\jprobe\snapshots\MySnap1.jpc c:\jprobe\snapshots\MySnap2.jpcc:\jprobe\snapshots\MySnap3.jpcc:\jprobe\snapshots\MySnap4.jpcc:\jprobe\snapshots\MyMergedSnapshot.jpc
-jp_input <paramfile> A text file containing a list of files to be merged, one per line. The text file can also contain options.
-jp_merge_execution_logs true|false Specifies whether or not to merge the execution logs.
-jp_overwrite_output always|never|prompt
Specifies whether or not to overwrite an existing output file with the new merged snapshot.
-jp_retain_conflicts true|false Specifies whether or not to retain classes and methods that cannot be merged due to conflicts between snapshots.
-jp_verbose true|false Verbose mode for diagnostic information.
Options Values Description
40 JProbe Reference Guide
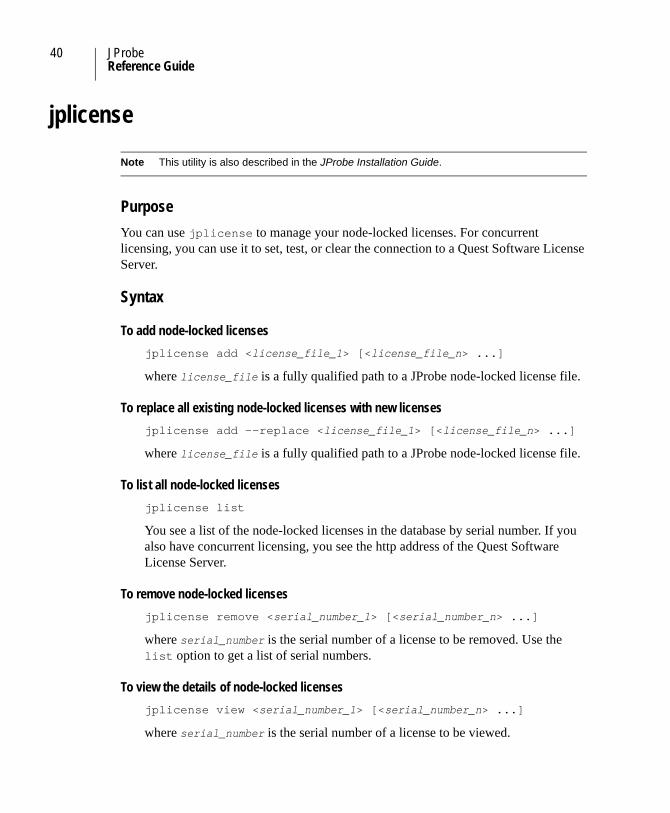
jplicense
Note This utility is also described in the JProbe Installation Guide.
PurposeYou can use jplicense to manage your node-locked licenses. For concurrent licensing, you can use it to set, test, or clear the connection to a Quest Software License Server.
Syntax
To add node-locked licensesjplicense add <license_file_1> [<license_file_n> ...]
where license_file is a fully qualified path to a JProbe node-locked license file.
To replace all existing node-locked licenses with new licensesjplicense add --replace <license_file_1> [<license_file_n> ...]
where license_file is a fully qualified path to a JProbe node-locked license file.
To list all node-locked licensesjplicense list
You see a list of the node-locked licenses in the database by serial number. If you also have concurrent licensing, you see the http address of the Quest Software License Server.
To remove node-locked licensesjplicense remove <serial_number_1> [<serial_number_n> ...]
where serial_number is the serial number of a license to be removed. Use the list option to get a list of serial numbers.
To view the details of node-locked licensesjplicense view <serial_number_1> [<serial_number_n> ...]
where serial_number is the serial number of a license to be viewed.
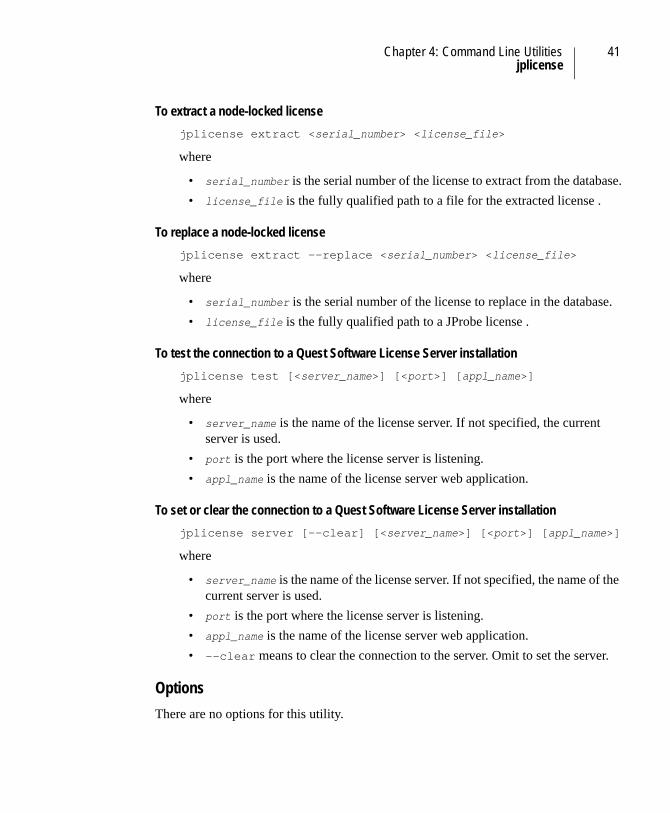
Chapter 4: Command Line Utilities 41jplicense
To extract a node-locked licensejplicense extract <serial_number> <license_file>
where
• serial_number is the serial number of the license to extract from the database.• license_file is the fully qualified path to a file for the extracted license .
To replace a node-locked licensejplicense extract --replace <serial_number> <license_file>
where
• serial_number is the serial number of the license to replace in the database.• license_file is the fully qualified path to a JProbe license .
To test the connection to a Quest Software License Server installationjplicense test [<server_name>] [<port>] [appl_name>]
where
• server_name is the name of the license server. If not specified, the current server is used.
• port is the port where the license server is listening.• appl_name is the name of the license server web application.
To set or clear the connection to a Quest Software License Server installationjplicense server [--clear] [<server_name>] [<port>] [appl_name>]
where
• server_name is the name of the license server. If not specified, the name of the current server is used.
• port is the port where the license server is listening.• appl_name is the name of the license server web application.• --clear means to clear the connection to the server. Omit to set the server.
OptionsThere are no options for this utility.
42 JProbe Reference Guide
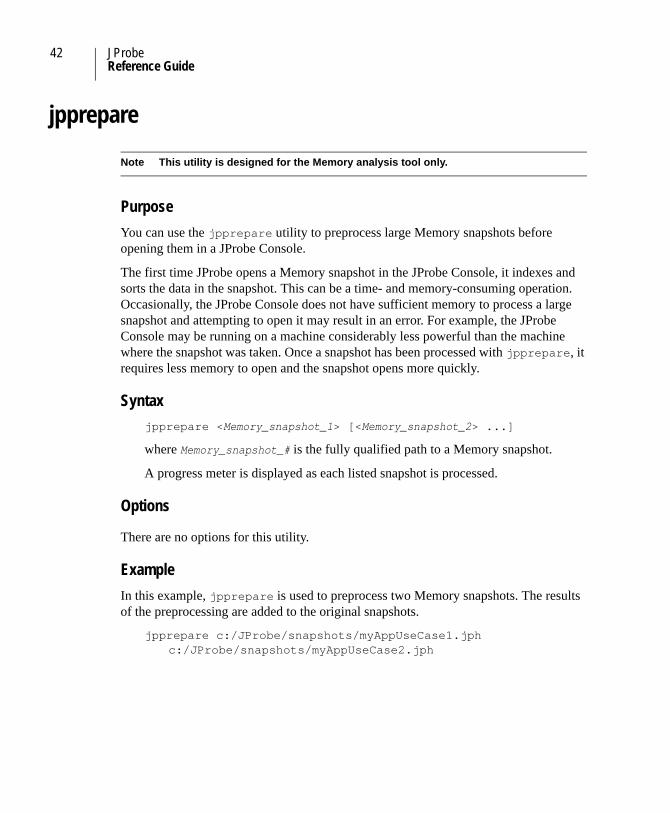
jpprepare
Note This utility is designed for the Memory analysis tool only.
PurposeYou can use the jpprepare utility to preprocess large Memory snapshots before opening them in a JProbe Console.
The first time JProbe opens a Memory snapshot in the JProbe Console, it indexes and sorts the data in the snapshot. This can be a time- and memory-consuming operation. Occasionally, the JProbe Console does not have sufficient memory to process a large snapshot and attempting to open it may result in an error. For example, the JProbe Console may be running on a machine considerably less powerful than the machine where the snapshot was taken. Once a snapshot has been processed with jpprepare, it requires less memory to open and the snapshot opens more quickly.
Syntaxjpprepare <Memory_snapshot_1> [<Memory_snapshot_2> ...]
where Memory_snapshot_# is the fully qualified path to a Memory snapshot.
A progress meter is displayed as each listed snapshot is processed.
Options
There are no options for this utility.
ExampleIn this example, jpprepare is used to preprocess two Memory snapshots. The results of the preprocessing are added to the original snapshots.
jpprepare c:/JProbe/snapshots/myAppUseCase1.jphc:/JProbe/snapshots/myAppUseCase2.jph
Chapter 4: Command Line Utilities 43jpreport
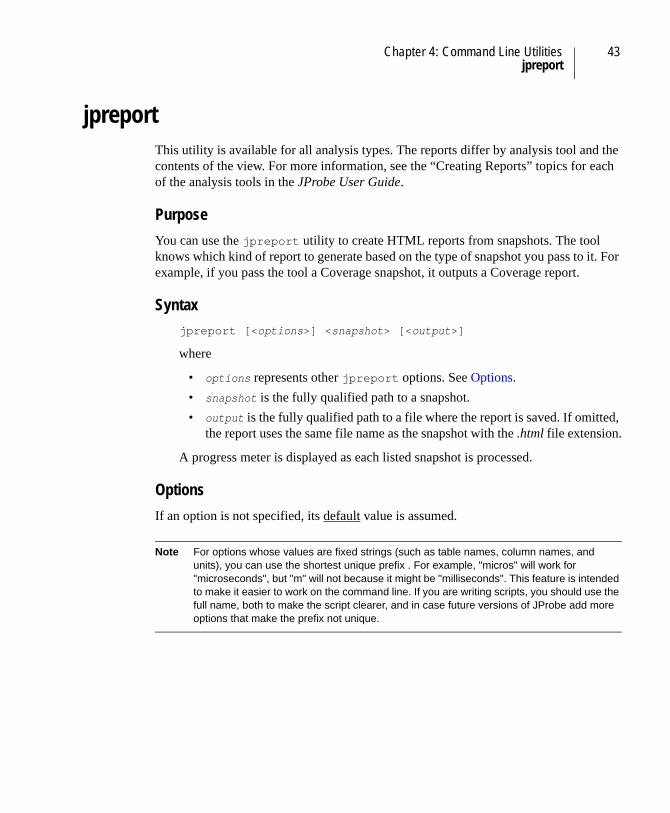
jpreportThis utility is available for all analysis types. The reports differ by analysis tool and the contents of the view. For more information, see the “Creating Reports” topics for each of the analysis tools in the JProbe User Guide.
PurposeYou can use the jpreport utility to create HTML reports from snapshots. The tool knows which kind of report to generate based on the type of snapshot you pass to it. For example, if you pass the tool a Coverage snapshot, it outputs a Coverage report.
Syntaxjpreport [<options>] <snapshot> [<output>]
where
• options represents other jpreport options. See Options.• snapshot is the fully qualified path to a snapshot.• output is the fully qualified path to a file where the report is saved. If omitted,
the report uses the same file name as the snapshot with the .html file extension.
A progress meter is displayed as each listed snapshot is processed.
OptionsIf an option is not specified, its default value is assumed.
Note For options whose values are fixed strings (such as table names, column names, and units), you can use the shortest unique prefix . For example, "micros" will work for "microseconds", but "m" will not because it might be "milliseconds". This feature is intended to make it easier to work on the command line. If you are writing scripts, you should use the full name, both to make the script clearer, and in case future versions of JProbe add more options that make the prefix not unique.
44 JProbe Reference Guide
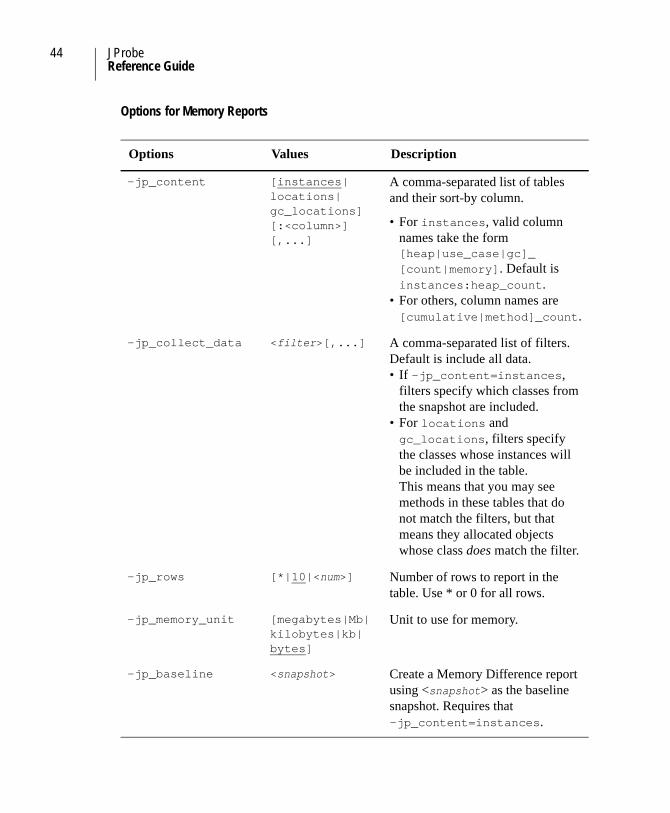
Options for Memory Reports
Options Values Description
-jp_content [instances|locations|gc_locations][:<column>][,...]
A comma-separated list of tables and their sort-by column.
• For instances, valid column names take the form [heap|use_case|gc]_ [count|memory]. Default is instances:heap_count.
• For others, column names are [cumulative|method]_count.
-jp_collect_data <filter>[,...] A comma-separated list of filters. Default is include all data.• If -jp_content=instances,
filters specify which classes from the snapshot are included.
• For locations and gc_locations, filters specify the classes whose instances will be included in the table.This means that you may see methods in these tables that do not match the filters, but that means they allocated objects whose class does match the filter.
-jp_rows [*|10|<num>] Number of rows to report in the table. Use * or 0 for all rows.
-jp_memory_unit [megabytes|Mb|kilobytes|kb|bytes]
Unit to use for memory.
-jp_baseline <snapshot> Create a Memory Difference report using <snapshot> as the baseline snapshot. Requires that-jp_content=instances.
Chapter 4: Command Line Utilities 45jpreport
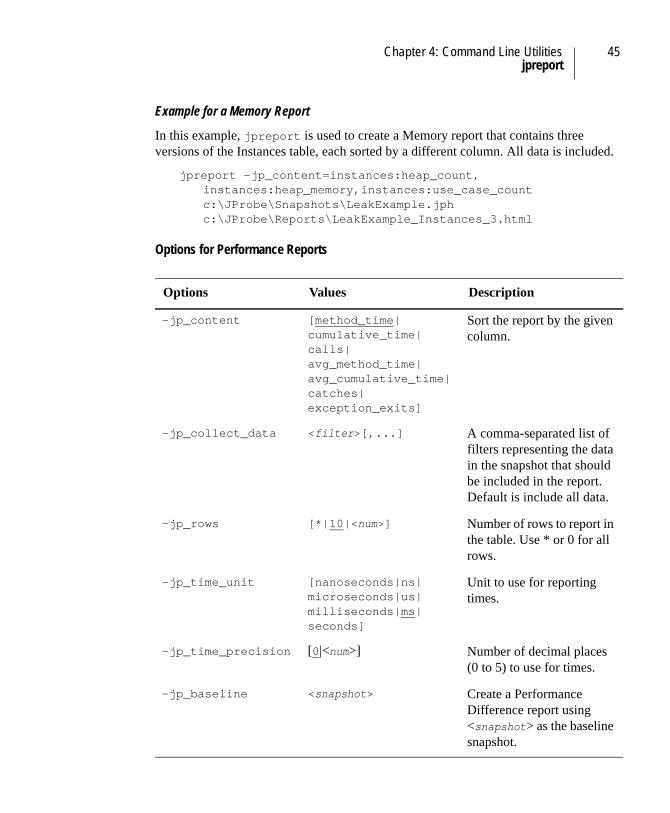
Example for a Memory Report
In this example, jpreport is used to create a Memory report that contains three versions of the Instances table, each sorted by a different column. All data is included.
jpreport -jp_content=instances:heap_count,instances:heap_memory,instances:use_case_countc:\JProbe\Snapshots\LeakExample.jphc:\JProbe\Reports\LeakExample_Instances_3.html
Options for Performance Reports
Options Values Description
-jp_content [method_time|cumulative_time|calls|avg_method_time|avg_cumulative_time|catches|exception_exits]
Sort the report by the given column.
-jp_collect_data <filter>[,...] A comma-separated list of filters representing the data in the snapshot that should be included in the report. Default is include all data.
-jp_rows [*|10|<num>] Number of rows to report in the table. Use * or 0 for all rows.
-jp_time_unit [nanoseconds|ns|microseconds|us|milliseconds|ms|seconds]
Unit to use for reporting times.
-jp_time_precision [0|<num>] Number of decimal places (0 to 5) to use for times.
-jp_baseline <snapshot> Create a Performance Difference report using <snapshot> as the baseline snapshot.

46 JProbe Reference Guide
Example for a Performance Report
In this example, jpreport is used to create a Method List report from a Performance Snapshot. All data is included and the table is sorted by number of calls. Time is reported in microseconds up to three decimal places.
jpreport -jp_content=calls -jp_time_unit=microseconds-jp_time_precision=3 c:\JProbe\Snapshots\Polynomial.jppc:\JProbe\Reports\Polynomial_By_Calls.html
Options for Coverage Reports
Options Values Description
-jp_collect_data <filter>[,...] A comma-separated list of filters representing the classes in the snapshot that should be included in the report. Default is include all classes.
-jp_content [application|packages|classes|source]
The level of detail to be included in the report.
-jp_coverage_threshold [0|<num>] An integer between 0 and 100. Classes and methods are included in the report if they have a coverage percentage that is greater than or equal to the specified integer.
-jp_filter_catch_blocks [true|false] Specify whether or not to filter out catch blocks when calculating coverage.
-jp_source_path [,|<directory>[;<directory>;...]]
A list of source paths. The default is the current directory.Note Use the platform-specific
separator between paths. For example, on UNIX systems use a colon.
Chapter 4: Command Line Utilities 47jpreport
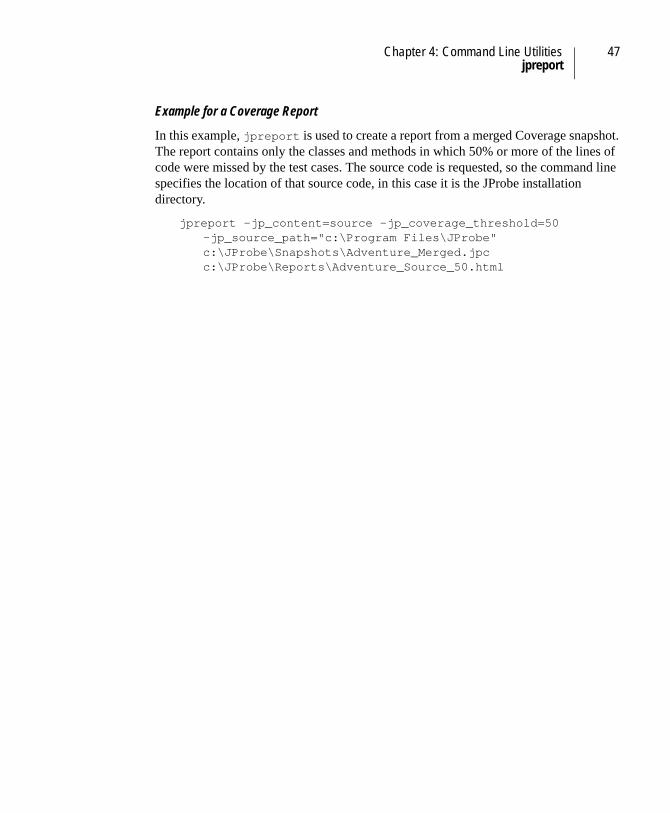
Example for a Coverage Report
In this example, jpreport is used to create a report from a merged Coverage snapshot. The report contains only the classes and methods in which 50% or more of the lines of code were missed by the test cases. The source code is requested, so the command line specifies the location of that source code, in this case it is the JProbe installation directory.
jpreport -jp_content=source -jp_coverage_threshold=50-jp_source_path="c:\Program Files\JProbe"c:\JProbe\Snapshots\Adventure_Merged.jpcc:\JProbe\Reports\Adventure_Source_50.html

48 JProbe Reference Guide
Index
AAnt tasks 14attaching to a JVM started without JProbe 34automated session, running
running a session 12automating
a JProbe analysis 9using Ant 14
Bbaseline Coverage snapshot, creating 35batch file, creating 13
Ccontacting Quest 6Coverage
baseline snapshot, creating 35snapshots, merging 38
Ffilters syntax 22
Jjpattach 34jpcovbaseline 35jpcovmerge 38JPL file
creating for an automated session 10
samples 27jplauncher 15jplicense 40jpprepare 42jpreport 43JProbe options, syntax 18JVM started without JProbe, attaching to 34
Llaunching JProbe from the command line 15licenses, managing 40
MMemory snapshot, preprocessing 42
Ppreprocessing a Memory snapshot 42
Rreport, creating 43
Ssample JPL files 27scripts
creating 13using Ant 14
settings filecreating for an automated session 10
50 JProbeReference Guide
samples 27snapshot
base file name, setting 22directory, setting the temporary 22preprocessing Memory 42
starting JProbe from the command line 15support 7syntax
filters 22JProbe session options 18triggers 24
Ttechnical support 7triggers syntax 24