Embed Size (px)
Citation preview
CFN Series
CFN III Manager’s Manual for Windows® XP Embedded
MDE-4871
Version 3.6
Computer Programs and DocumentationAll Gasboy computer programs (including software on diskettes and within memory chips) and documentation are copyrighted by, and shall remain the property of, Gasboy. Such computer programs and documents may also contain trade secret information. The duplication, disclosure, modification, or unauthorized use of computer programs or documentation is strictly prohibited, unless otherwise licensed by Gasboy.
Federal Communications Commission (FCC) WarningThis equipment has been tested and found to comply with the limits for a Class A digital device pursuant to Part 15 of the FCC Rules. These limits are designed to provide reasonable protection against harmful interference when the equipment is operated in a commercial environment. This equipment generates, uses, and can radiate radio frequency energy, and if not installed and used in accordance with the instruction manual, may cause harmful interference to radio communications. Operation of this equipment in a residential area is likely to cause harmful interference in which case the user will be required to correct the interference at his own expense. Changes or modifications not expressly approved by the manufacturer could void the user’s authority to operate this equipment.
Approvals
PatentsGasboy products are manufactured or sold under one or more of the following US patents:
Dispensers
Point of Sale/Back Office Equipment
Trademarks
5,257,720
D335,673
Gasboy, Greensboro, is an ISO 9001:2000 registered facility.Underwriters Laboratories (UL): UL File# Products listed with UL
MH4314 All dispensers and self-contained pumping units
MH10581 Key control unit, Model GKE-B SeriesCard reader terminals, Models 1000, 1000PSite Controller, Model 2000S CFN SeriesData entry terminals, Model TPK-900 SeriesFuel Point Reader System
National Conference of Weights and Measures (NCWM) - Certificate of Compliance (CoC):Gasboy pumps and dispensers are evaluated by NCWM under the National Type Evaluation Program (NTEP). NCWM has issued the following CoC:CoC# Product Model # CoC# Product Model # CoC# Product Model #
95-179 Dispenser 9100 Retail Series, 8700 Series, 9700 Series 91-019 Dispenser 9100 Commercial
Series 05-002 Atlas 8700K, 8800K, 9100K, 9200K, 9800K
95-136 Dispenser 9800 Series 91-057 Controller 1000 Series FMS, 2000S-CFN Series
California Air Resources Board (CARB):Executive Order # ProductG-70-52-AM Balance Vapor RecoveryG-70-150-AE VaporVac
Registered trademarks ASTRA®
Fuel Point®
Gasboy®
Keytrol®
Slimline®
Additional US and foreign trademarks pending.
Other brand or product names shown may be trademarks or registered trademarks of their respective holders.
Non-registered trademarks Atlas™
Consola™
Infinity™
This document is subject to change without notice. E-mail: [email protected] · Internet: http://www.gasboy.com© 2010 GASBOY. All Rights Reserved.
Additional US and foreign patents pending.
Table of Contents
Table of Contents
1 – Introduction 1-1Operating System . . . . . . . . . . . . . . . . . . . . . . . . . . . . . . . . . . . . . . . . . . . . . . . . . . . . . . . . . . . . . . . . 1-1
Starting the SC III . . . . . . . . . . . . . . . . . . . . . . . . . . . . . . . . . . . . . . . . . . 1-1Quitting the CFN3 Application . . . . . . . . . . . . . . . . . . . . . . . . . . . . . . . . 1-2Minimizing the Command Window. . . . . . . . . . . . . . . . . . . . . . . . . . . . . 1-2Levels of Operation . . . . . . . . . . . . . . . . . . . . . . . . . . . . . . . . . . . . . . . . 1-2
Logging onto Windows XP as Administrator . . . . . . . . . . . . . . . . . . . . . . . . . . . . . . . . . . . . . . . . . . . . 1-4Miscellaneous Windows XP Information . . . . . . . . . . . . . . . . . . . . . . . . . . . . . . . . . . . . . . . . . . . . . . . 1-6
Profit Point . . . . . . . . . . . . . . . . . . . . . . . . . . . . . . . . . . . . . . . . . . . . . . . 1-6Online Documentation . . . . . . . . . . . . . . . . . . . . . . . . . . . . . . . . . . . . . . 1-7
Related Documents . . . . . . . . . . . . . . . . . . . . . . . . . . . . . . . . . . . . . . . . . . . . . . . . . . . . . . . . . . . . . . . 1-7Cabling and Wiring . . . . . . . . . . . . . . . . . . . . . . . . . . . . . . . . . . . . . . . . . . . . . . . . . . . . . . . . . . . . . . . 1-9
2 – Important Safety Information 2-1
3 – Site Controller III 3-1System Overview. . . . . . . . . . . . . . . . . . . . . . . . . . . . . . . . . . . . . . . . . . . . . . . . . . . . . . . . . . . . . . . . . 3-1
CFN3 Command Window . . . . . . . . . . . . . . . . . . . . . . . . . . . . . . . . . . . 3-1Consoles . . . . . . . . . . . . . . . . . . . . . . . . . . . . . . . . . . . . . . . . . . . . . . . . . . . . . . . . . . . . . . . . . . . . . . . 3-1Readers . . . . . . . . . . . . . . . . . . . . . . . . . . . . . . . . . . . . . . . . . . . . . . . . . . . . . . . . . . . . . . . . . . . . . . . . 3-2Log Printer . . . . . . . . . . . . . . . . . . . . . . . . . . . . . . . . . . . . . . . . . . . . . . . . . . . . . . . . . . . . . . . . . . . . . . 3-2Command Terminals . . . . . . . . . . . . . . . . . . . . . . . . . . . . . . . . . . . . . . . . . . . . . . . . . . . . . . . . . . . . . . 3-3Commands . . . . . . . . . . . . . . . . . . . . . . . . . . . . . . . . . . . . . . . . . . . . . . . . . . . . . . . . . . . . . . . . . . . . . 3-3
Command Keys . . . . . . . . . . . . . . . . . . . . . . . . . . . . . . . . . . . . . . . . . . . 3-3System-response Problems . . . . . . . . . . . . . . . . . . . . . . . . . . . . . . . . . . . . . . . . . . . . . . . . . . . . . . . . 3-3CFN3 Command Sessions . . . . . . . . . . . . . . . . . . . . . . . . . . . . . . . . . . . . . . . . . . . . . . . . . . . . . . . . . 3-4
How to Sign On . . . . . . . . . . . . . . . . . . . . . . . . . . . . . . . . . . . . . . . . . . . 3-4How to Sign Off . . . . . . . . . . . . . . . . . . . . . . . . . . . . . . . . . . . . . . . . . . . 3-4Automatic Sign Off . . . . . . . . . . . . . . . . . . . . . . . . . . . . . . . . . . . . . . . . . 3-4How to Enter Commands and Data . . . . . . . . . . . . . . . . . . . . . . . . . . . . 3-4How to Use Options with Commands . . . . . . . . . . . . . . . . . . . . . . . . . . 3-6How to Enter Multiple Blocks of Information . . . . . . . . . . . . . . . . . . . . . 3-7How to Verify Commands . . . . . . . . . . . . . . . . . . . . . . . . . . . . . . . . . . . 3-8How to Use Ranges with Commands . . . . . . . . . . . . . . . . . . . . . . . . . . 3-8Shortcut for Entering Data . . . . . . . . . . . . . . . . . . . . . . . . . . . . . . . . . . . 3-8How to Use Disk-based Commands . . . . . . . . . . . . . . . . . . . . . . . . . . . 3-9
Redirecting Command Input and Output . . . . . . . . . . . . . . . . . . . . . . . . . . . . . . . . . . . . . . . . . . . . . . . 3-9How to Redirect Input for a Command. . . . . . . . . . . . . . . . . . . . . . . . . 3-10How to Redirect Output from a Command . . . . . . . . . . . . . . . . . . . . . . 3-10
Log Printer . . . . . . . . . . . . . . . . . . . . . . . . . . . . . . . . . . . . . . . . . . . . . . . . . . . . . . . . . . . . . . . . . . . . . 3-10How to Print a File on a Log Printer . . . . . . . . . . . . . . . . . . . . . . . . . . . 3-10How to Print a Message on a Log Printer . . . . . . . . . . . . . . . . . . . . . . 3-11
Keyboard Control Characters . . . . . . . . . . . . . . . . . . . . . . . . . . . . . . . . . . . . . . . . . . . . . . . . . . . . . . 3-11The CONTROL Key . . . . . . . . . . . . . . . . . . . . . . . . . . . . . . . . . . . . . . . 3-11How to Terminate a Command . . . . . . . . . . . . . . . . . . . . . . . . . . . . . . 3-12How to Delete Characters . . . . . . . . . . . . . . . . . . . . . . . . . . . . . . . . . . 3-12How to Delete a Line . . . . . . . . . . . . . . . . . . . . . . . . . . . . . . . . . . . . . . 3-12How to Pause Printout . . . . . . . . . . . . . . . . . . . . . . . . . . . . . . . . . . . . . 3-12How to Pause Printout with the L Option . . . . . . . . . . . . . . . . . . . . . . . 3-12
MDE-4871 CFN III Manager’s Manual for Windows® XP Embedded - Version 3.6 · August 2010 Page i
Table of Contents
Permission Levels . . . . . . . . . . . . . . . . . . . . . . . . . . . . . . . . . . . . . . . . . . . . . . . . . . . . . . . . . . . . . . .3-13Remote Access Command. . . . . . . . . . . . . . . . . . . . . . . . . . . . . . . . . . . . . . . . . . . . . . . . . . . . . . . . .3-13Optional Commands. . . . . . . . . . . . . . . . . . . . . . . . . . . . . . . . . . . . . . . . . . . . . . . . . . . . . . . . . . . . . .3-14HELP Command. . . . . . . . . . . . . . . . . . . . . . . . . . . . . . . . . . . . . . . . . . . . . . . . . . . . . . . . . . . . . . . . .3-14
4 – Users 4-1User ID Numbers . . . . . . . . . . . . . . . . . . . . . . . . . . . . . . . . . . . . . . . . . . . . . . . . . . . . . . . . . . . . . . . . .4-1
How to Add a User . . . . . . . . . . . . . . . . . . . . . . . . . . . . . . . . . . . . . . . . .4-1How to Print a List of User Numbers. . . . . . . . . . . . . . . . . . . . . . . . . . . .4-5
Permission Levels . . . . . . . . . . . . . . . . . . . . . . . . . . . . . . . . . . . . . . . . . . . . . . . . . . . . . . . . . . . . . . . .4-6How to Use Permission Levels . . . . . . . . . . . . . . . . . . . . . . . . . . . . . . . .4-7
New Security.bin Program . . . . . . . . . . . . . . . . . . . . . . . . . . . . . . . . . . . . . . . . . . . . . . . . . . . . . . . . . .4-7System Key Management . . . . . . . . . . . . . . . . . . . . . . . . . . . . . . . . . . . .4-7Menu Item 1: Enter New System Pass Key . . . . . . . . . . . . . . . . . . . . . .4-8Menu Item 2: Save Pass Key to Diskette . . . . . . . . . . . . . . . . . . . . . . . .4-8Menu Item 3: Enter New System Master Key . . . . . . . . . . . . . . . . . . . . .4-8Menu Item 4: Save Master Key to Diskette. . . . . . . . . . . . . . . . . . . . . . .4-9Menu Item 5: Get Pass Key from Diskette . . . . . . . . . . . . . . . . . . . . . . .4-9Menu Item 6: Get Master Key from Diskette . . . . . . . . . . . . . . . . . . . . . .4-9Menu Item 7: Update System Keys. . . . . . . . . . . . . . . . . . . . . . . . . . . . .4-9
5 – Audit Trail 5-1PC and CFN Time Synchronization . . . . . . . . . . . . . . . . . . . . . . . . . . . .5-1Miscellaneous Items . . . . . . . . . . . . . . . . . . . . . . . . . . . . . . . . . . . . . . . .5-1
6 – Receipts, Messages, and Date 6-1Date and Time . . . . . . . . . . . . . . . . . . . . . . . . . . . . . . . . . . . . . . . . . . . . . . . . . . . . . . . . . . . . . . . . . . .6-1Receipt Heading and Footing . . . . . . . . . . . . . . . . . . . . . . . . . . . . . . . . . . . . . . . . . . . . . . . . . . . . . . . .6-1
How to Enter Receipt Heading and Footing . . . . . . . . . . . . . . . . . . . . . .6-1Special Printer Functions . . . . . . . . . . . . . . . . . . . . . . . . . . . . . . . . . . . .6-2How to Print Receipt Heading and Footing . . . . . . . . . . . . . . . . . . . . . . .6-3How to Change Heading and Footing Lines . . . . . . . . . . . . . . . . . . . . . .6-3How to Delete Heading and Footing Lines . . . . . . . . . . . . . . . . . . . . . . .6-4
Island Card Reader Messages . . . . . . . . . . . . . . . . . . . . . . . . . . . . . . . . . . . . . . . . . . . . . . . . . . . . . . .6-4How to Enter Messages . . . . . . . . . . . . . . . . . . . . . . . . . . . . . . . . . . . . .6-4How to Print Messages . . . . . . . . . . . . . . . . . . . . . . . . . . . . . . . . . . . . . .6-5How to Change Messages . . . . . . . . . . . . . . . . . . . . . . . . . . . . . . . . . . .6-5How to Load Messages. . . . . . . . . . . . . . . . . . . . . . . . . . . . . . . . . . . . . .6-6How to Delete Messages . . . . . . . . . . . . . . . . . . . . . . . . . . . . . . . . . . . .6-6
7 – Fuel Products 7-1How to Add or Change Fuel Products . . . . . . . . . . . . . . . . . . . . . . . . . . . . . . . . . . . . . . . . . . . . . . . . .7-1How to Initialize Fuel Product Information . . . . . . . . . . . . . . . . . . . . . . . . . . . . . . . . . . . . . . . . . . . . . .7-2How to Create a New Fuel Product . . . . . . . . . . . . . . . . . . . . . . . . . . . . . . . . . . . . . . . . . . . . . . . . . . .7-2How to Change Fuel Product Information . . . . . . . . . . . . . . . . . . . . . . . . . . . . . . . . . . . . . . . . . . . . . .7-3How to Print Fuel Product Information . . . . . . . . . . . . . . . . . . . . . . . . . . . . . . . . . . . . . . . . . . . . . . . . .7-3How to Remove a Fuel Product . . . . . . . . . . . . . . . . . . . . . . . . . . . . . . . . . . . . . . . . . . . . . . . . . . . . . .7-4Fuel Product Inventory . . . . . . . . . . . . . . . . . . . . . . . . . . . . . . . . . . . . . . . . . . . . . . . . . . . . . . . . . . . . .7-4How to Enter Fuel Product Inventory . . . . . . . . . . . . . . . . . . . . . . . . . . . . . . . . . . . . . . . . . . . . . . . . . .7-5
Page ii MDE-4871 CFN III Manager’s Manual for Windows® XP Embedded - Version 3.6 · August 2010

Table of Contents
8 – Tank and Pump Commands 8-1Tank Commands . . . . . . . . . . . . . . . . . . . . . . . . . . . . . . . . . . . . . . . . . . . . . . . . . . . . . . . . . . . . . . . . . 8-1
How to View Current Tank Inventory . . . . . . . . . . . . . . . . . . . . . . . . . . . 8-1How to Add to and Subtract from Tank Inventory Counters. . . . . . . . . . 8-1How to Set Tank Inventory Counters . . . . . . . . . . . . . . . . . . . . . . . . . . . 8-2
Method-of-payment Pricing . . . . . . . . . . . . . . . . . . . . . . . . . . . . . . . . . . . . . . . . . . . . . . . . . . . . . . . . . 8-3Price Code Levels . . . . . . . . . . . . . . . . . . . . . . . . . . . . . . . . . . . . . . . . . 8-4How to View Current Price Code Levels and Prices . . . . . . . . . . . . . . . 8-5How to Enter Price Code Levels and Prices . . . . . . . . . . . . . . . . . . . . . 8-5How to Change Price-code Prices . . . . . . . . . . . . . . . . . . . . . . . . . . . . . 8-5How to Delete a Price Code or Price Level . . . . . . . . . . . . . . . . . . . . . . 8-7How to Set Up Day-Night Pricing . . . . . . . . . . . . . . . . . . . . . . . . . . . . . . 8-7
Pump Commands . . . . . . . . . . . . . . . . . . . . . . . . . . . . . . . . . . . . . . . . . . . . . . . . . . . . . . . . . . . . . . . . 8-8How to Assign Products, Prices, and Tanks to Hoses . . . . . . . . . . . . . . 8-8How to View Pump Information . . . . . . . . . . . . . . . . . . . . . . . . . . . . . . . 8-9How to Set the Pump Totalizers. . . . . . . . . . . . . . . . . . . . . . . . . . . . . . 8-11How to Reset the Pump Totalizers. . . . . . . . . . . . . . . . . . . . . . . . . . . . 8-11How to Enter the Pump-Fill-Limit and Slow-to-Cutoff. . . . . . . . . . . . . . 8-11
9 – Merchandise Products 9-1How to Add or Change Merchandise Products . . . . . . . . . . . . . . . . . . . . . . . . . . . . . . . . . . . . . . . . . . 9-1How to Create a New Merchandise Product . . . . . . . . . . . . . . . . . . . . . . . . . . . . . . . . . . . . . . . . . . . . 9-1How to Create Special Merchandise Products . . . . . . . . . . . . . . . . . . . . . . . . . . . . . . . . . . . . . . . . . . 9-2How to Print Merchandise Product Information . . . . . . . . . . . . . . . . . . . . . . . . . . . . . . . . . . . . . . . . . . 9-3How to Change Merchandise Product Information . . . . . . . . . . . . . . . . . . . . . . . . . . . . . . . . . . . . . . . 9-4Change Price Lookup . . . . . . . . . . . . . . . . . . . . . . . . . . . . . . . . . . . . . . . . . . . . . . . . . . . . . . . . . . . . . 9-4How to Print Merchandise Product Information . . . . . . . . . . . . . . . . . . . . . . . . . . . . . . . . . . . . . . . . . . 9-4How to Remove a Merchandise Product . . . . . . . . . . . . . . . . . . . . . . . . . . . . . . . . . . . . . . . . . . . . . . . 9-5How to Enter Merchandise Product Price Lookups . . . . . . . . . . . . . . . . . . . . . . . . . . . . . . . . . . . . . . . 9-6Merchandise Product Inventory. . . . . . . . . . . . . . . . . . . . . . . . . . . . . . . . . . . . . . . . . . . . . . . . . . . . . . 9-6
How to Enter Merchandise Product Inventory . . . . . . . . . . . . . . . . . . . . 9-7How to Add to Merchandise Product Inventory . . . . . . . . . . . . . . . . . . . 9-7How to Subtract from Merchandise Product Inventory. . . . . . . . . . . . . . 9-7How to Enable Merchandise Dollar Inventory . . . . . . . . . . . . . . . . . . . . 9-8How to Disable Merchandise Inventory Tracking. . . . . . . . . . . . . . . . . . 9-8
10 – Setting Up Tax Tables 10-1Tax Types . . . . . . . . . . . . . . . . . . . . . . . . . . . . . . . . . . . . . . . . . . . . . . . . . . . . . . . . . . . . . . . . . . . . . 10-1Tax Accumulators . . . . . . . . . . . . . . . . . . . . . . . . . . . . . . . . . . . . . . . . . . . . . . . . . . . . . . . . . . . . . . . 10-1
How to Enter Tax Accumulator Names . . . . . . . . . . . . . . . . . . . . . . . . 10-2How to Print Tax Accumulators . . . . . . . . . . . . . . . . . . . . . . . . . . . . . . 10-2How to Reset Cumulative Tax Totals. . . . . . . . . . . . . . . . . . . . . . . . . . 10-2
Tax as Percentage . . . . . . . . . . . . . . . . . . . . . . . . . . . . . . . . . . . . . . . . . . . . . . . . . . . . . . . . . . . . . . 10-3When to Use Tax Tables . . . . . . . . . . . . . . . . . . . . . . . . . . . . . . . . . . . . . . . . . . . . . . . . . . . . . . . . . . 10-3How to Set Up a Tax Table . . . . . . . . . . . . . . . . . . . . . . . . . . . . . . . . . . . . . . . . . . . . . . . . . . . . . . . . 10-3
Preparing a Compressed Description of Tax Data. . . . . . . . . . . . . . . . 10-4Allot Storage Space for Your Tax Information . . . . . . . . . . . . . . . . . . . 10-7Assign a Tax Number and Name to Each Table . . . . . . . . . . . . . . . . . 10-7Build a Tax Table . . . . . . . . . . . . . . . . . . . . . . . . . . . . . . . . . . . . . . . . . 10-7Back Up Your Tax Data . . . . . . . . . . . . . . . . . . . . . . . . . . . . . . . . . . . 10-10
MDE-4871 CFN III Manager’s Manual for Windows® XP Embedded - Version 3.6 · August 2010 Page iii
Table of Contents
11 – Reports, Cash Drawer, and Shifts 11-1Reports . . . . . . . . . . . . . . . . . . . . . . . . . . . . . . . . . . . . . . . . . . . . . . . . . . . . . . . . . . . . . . . . . . . . . . . .11-1
How to Print Sales Reports . . . . . . . . . . . . . . . . . . . . . . . . . . . . . . . . . .11-2How to Print Quantity Reports. . . . . . . . . . . . . . . . . . . . . . . . . . . . . . . .11-5How to Print Quantity and Dollar Totals . . . . . . . . . . . . . . . . . . . . . . . .11-7How to Print a Sales Summary Report . . . . . . . . . . . . . . . . . . . . . . . . .11-9How to Reset Sales Totals . . . . . . . . . . . . . . . . . . . . . . . . . . . . . . . . . .11-9
Cash Drawer Commands . . . . . . . . . . . . . . . . . . . . . . . . . . . . . . . . . . . . . . . . . . . . . . . . . . . . . . . . .11-10How to Enter Cash Drawer Amount . . . . . . . . . . . . . . . . . . . . . . . . . .11-10How to Add To or Subtract From Cash Drawer . . . . . . . . . . . . . . . . .11-11How to Print Cash Drawer Totals . . . . . . . . . . . . . . . . . . . . . . . . . . . .11-11
Shift Change. . . . . . . . . . . . . . . . . . . . . . . . . . . . . . . . . . . . . . . . . . . . . . . . . . . . . . . . . . . . . . . . . . .11-12NEXT SHIFT Command . . . . . . . . . . . . . . . . . . . . . . . . . . . . . . . . . . .11-12Other Shift Change Commands . . . . . . . . . . . . . . . . . . . . . . . . . . . . .11-12NEXT DAY Command. . . . . . . . . . . . . . . . . . . . . . . . . . . . . . . . . . . . .11-13
12 – Transactions 12-1Printing Transactions . . . . . . . . . . . . . . . . . . . . . . . . . . . . . . . . . . . . . . . . . . . . . . . . . . . . . . . . . . . . .12-1
How to Print Transactions . . . . . . . . . . . . . . . . . . . . . . . . . . . . . . . . . . .12-2How to Sort a Transaction Printout . . . . . . . . . . . . . . . . . . . . . . . . . . . .12-2How to Print Specified Types of Transactions . . . . . . . . . . . . . . . . . . .12-3How to Print a Range of Transactions . . . . . . . . . . . . . . . . . . . . . . . . .12-4How to Print Transactions in Progress . . . . . . . . . . . . . . . . . . . . . . . . .12-4How to Print Receipts from the Transaction File. . . . . . . . . . . . . . . . . .12-5
Transaction File . . . . . . . . . . . . . . . . . . . . . . . . . . . . . . . . . . . . . . . . . . . . . . . . . . . . . . . . . . . . . . . . .12-5How to Reset the Transaction-begin Pointer . . . . . . . . . . . . . . . . . . . .12-6How to Automatically Reset the Transaction Pointer . . . . . . . . . . . . . .12-7Detailed Report . . . . . . . . . . . . . . . . . . . . . . . . . . . . . . . . . . . . . . . . . . .12-7
13 – Proprietary Cards 13-1Proprietary Card Format. . . . . . . . . . . . . . . . . . . . . . . . . . . . . . . . . . . . . . . . . . . . . . . . . . . . . . . . . . .13-1How to Restrict Purchases . . . . . . . . . . . . . . . . . . . . . . . . . . . . . . . . . . . . . . . . . . . . . . . . . . . . . . . . .13-2Lockouts . . . . . . . . . . . . . . . . . . . . . . . . . . . . . . . . . . . . . . . . . . . . . . . . . . . . . . . . . . . . . . . . . . . . . . .13-2
Bit-mapped Lockout . . . . . . . . . . . . . . . . . . . . . . . . . . . . . . . . . . . . . . .13-2Limited Lockout . . . . . . . . . . . . . . . . . . . . . . . . . . . . . . . . . . . . . . . . . . .13-3
Positive and Negative Lockout Options . . . . . . . . . . . . . . . . . . . . . . . . . . . . . . . . . . . . . . . . . . . . . . .13-4How to Select Negative Lockout . . . . . . . . . . . . . . . . . . . . . . . . . . . . . .13-4How to Select Positive Lockout. . . . . . . . . . . . . . . . . . . . . . . . . . . . . . .13-5
Disk-based Bit-mapped Lockout. . . . . . . . . . . . . . . . . . . . . . . . . . . . . . . . . . . . . . . . . . . . . . . . . . . . .13-5How to Check a Card’s Lockout Status . . . . . . . . . . . . . . . . . . . . . . . . . . . . . . . . . . . . . . . . . . . . . . .13-5How to Lock Out and Unlock Cards . . . . . . . . . . . . . . . . . . . . . . . . . . . . . . . . . . . . . . . . . . . . . . . . . .13-6How to Print a Lockout List. . . . . . . . . . . . . . . . . . . . . . . . . . . . . . . . . . . . . . . . . . . . . . . . . . . . . . . . .13-7Authorization Codes . . . . . . . . . . . . . . . . . . . . . . . . . . . . . . . . . . . . . . . . . . . . . . . . . . . . . . . . . . . . . .13-7
How to Assign Product Codes to Authorization Codes . . . . . . . . . . . . .13-8How to Print Authorization Code Definitions . . . . . . . . . . . . . . . . . . . . .13-9How to Remove Product Codes . . . . . . . . . . . . . . . . . . . . . . . . . . . . . .13-9
Fuel Limitation Codes. . . . . . . . . . . . . . . . . . . . . . . . . . . . . . . . . . . . . . . . . . . . . . . . . . . . . . . . . . . .13-10How to Assign Fuel Limits to Fuel Limitation Codes . . . . . . . . . . . . . .13-10How to Print Fuel Limitation Codes. . . . . . . . . . . . . . . . . . . . . . . . . . .13-10How to Remove a Fuel Limitation Code . . . . . . . . . . . . . . . . . . . . . . .13-11
Patron/Loyalty Cards . . . . . . . . . . . . . . . . . . . . . . . . . . . . . . . . . . . . . . . . . . . . . . . . . . . . . . . . . . . .13-11Example of the Patron.ini file . . . . . . . . . . . . . . . . . . . . . . . . . . . . . . .13-11Price Levels, Authorization Codes, and Limitation Codes . . . . . . . . .13-12Using the Patron Card as Payment. . . . . . . . . . . . . . . . . . . . . . . . . . .13-12
Page iv MDE-4871 CFN III Manager’s Manual for Windows® XP Embedded - Version 3.6 · August 2010
Table of Contents
Attendant Cards. . . . . . . . . . . . . . . . . . . . . . . . . . . . . . . . . . . . . . . . . . . . . . . . . . . . . . . . . . . . . . . . 13-13Procedure. . . . . . . . . . . . . . . . . . . . . . . . . . . . . . . . . . . . . . . . . . . . . . 13-13Reports. . . . . . . . . . . . . . . . . . . . . . . . . . . . . . . . . . . . . . . . . . . . . . . . 13-13
Key Option. . . . . . . . . . . . . . . . . . . . . . . . . . . . . . . . . . . . . . . . . . . . . . . . . . . . . . . . . . . . . . . . . . . . 13-14Communicating with the Site Controller . . . . . . . . . . . . . . . . . . . . . . . 13-14Restrictions Using the CFN with Key Option System. . . . . . . . . . . . . 13-15
Fueler ID - Fleet Packages Only . . . . . . . . . . . . . . . . . . . . . . . . . . . . . . . . . . . . . . . . . . . . . . . . . . . 13-16Assigning a Fueler ID to a Cluster . . . . . . . . . . . . . . . . . . . . . . . . . . . 13-16
14 – Lookup Program 14-1Definitions . . . . . . . . . . . . . . . . . . . . . . . . . . . . . . . . . . . . . . . . . . . . . . . . . . . . . . . . . . . . . . . . . . . . . 14-1
Records . . . . . . . . . . . . . . . . . . . . . . . . . . . . . . . . . . . . . . . . . . . . . . . . 14-5Menus . . . . . . . . . . . . . . . . . . . . . . . . . . . . . . . . . . . . . . . . . . . . . . . . . . . . . . . . . . . . . . . . . . . . . . . . 14-5
Short and Long Menus. . . . . . . . . . . . . . . . . . . . . . . . . . . . . . . . . . . . . 14-5Default Actions in Fields. . . . . . . . . . . . . . . . . . . . . . . . . . . . . . . . . . . . 14-6
Main Menu. . . . . . . . . . . . . . . . . . . . . . . . . . . . . . . . . . . . . . . . . . . . . . . . . . . . . . . . . . . . . . . . . . . . . 14-6Update from Keyboard . . . . . . . . . . . . . . . . . . . . . . . . . . . . . . . . . . . . . . . . . . . . . . . . . . . . . . . . . . . 14-6
Add New Records . . . . . . . . . . . . . . . . . . . . . . . . . . . . . . . . . . . . . . . . 14-7Delete Records . . . . . . . . . . . . . . . . . . . . . . . . . . . . . . . . . . . . . . . . . . 14-8Edit Existing Records . . . . . . . . . . . . . . . . . . . . . . . . . . . . . . . . . . . . . . 14-9Search and Replace. . . . . . . . . . . . . . . . . . . . . . . . . . . . . . . . . . . . . . 14-10
Merge Updates to/from File . . . . . . . . . . . . . . . . . . . . . . . . . . . . . . . . . . . . . . . . . . . . . . . . . . . . . . . 14-11Copying from a Source File . . . . . . . . . . . . . . . . . . . . . . . . . . . . . . . . 14-11Copying to a Target File. . . . . . . . . . . . . . . . . . . . . . . . . . . . . . . . . . . 14-13
List Records . . . . . . . . . . . . . . . . . . . . . . . . . . . . . . . . . . . . . . . . . . . . . . . . . . . . . . . . . . . . . . . . . . 14-14List Records to a Text File . . . . . . . . . . . . . . . . . . . . . . . . . . . . . . . . . 14-14Display a Text File . . . . . . . . . . . . . . . . . . . . . . . . . . . . . . . . . . . . . . . 14-16Unsorted List of Records . . . . . . . . . . . . . . . . . . . . . . . . . . . . . . . . . . 14-16Sorted List of Records . . . . . . . . . . . . . . . . . . . . . . . . . . . . . . . . . . . . 14-17
Configuration . . . . . . . . . . . . . . . . . . . . . . . . . . . . . . . . . . . . . . . . . . . . . . . . . . . . . . . . . . . . . . . . . . 14-17Optimize . . . . . . . . . . . . . . . . . . . . . . . . . . . . . . . . . . . . . . . . . . . . . . . . . . . . . . . . . . . . . . . . . . . . . 14-18
15 – Fuel Allocation and Miles-per-Gallon 15-1Fuel Allocation . . . . . . . . . . . . . . . . . . . . . . . . . . . . . . . . . . . . . . . . . . . . . . . . . . . . . . . . . . . . . . . . . . 15-1
How to Set Up an Allocation System . . . . . . . . . . . . . . . . . . . . . . . . . . 15-1How to Initialize the Allocation File. . . . . . . . . . . . . . . . . . . . . . . . . . . . 15-2How to Set Up Allocation Numbers . . . . . . . . . . . . . . . . . . . . . . . . . . . 15-2How to Change Allocated Amounts . . . . . . . . . . . . . . . . . . . . . . . . . . . 15-3How to Print Currently Allocated Amounts . . . . . . . . . . . . . . . . . . . . . . 15-4How to Remove an Allocation Number . . . . . . . . . . . . . . . . . . . . . . . . 15-5
Miles per Gallon System . . . . . . . . . . . . . . . . . . . . . . . . . . . . . . . . . . . . . . . . . . . . . . . . . . . . . . . . . . 15-5How to Set Up an MPG System. . . . . . . . . . . . . . . . . . . . . . . . . . . . . . 15-6How MPG Information is Calculated . . . . . . . . . . . . . . . . . . . . . . . . . . 15-7How to Set Up Vehicle Numbers . . . . . . . . . . . . . . . . . . . . . . . . . . . . . 15-7How to Reset MPG Period for All Vehicles . . . . . . . . . . . . . . . . . . . . . 15-7How to Print MPG Report. . . . . . . . . . . . . . . . . . . . . . . . . . . . . . . . . . . 15-8How to Remove a Vehicle Number . . . . . . . . . . . . . . . . . . . . . . . . . . . 15-8
16 – Backup System Data and Disk Files 16-1Why Take Backups? . . . . . . . . . . . . . . . . . . . . . . . . . . . . . . . . . . . . . . . . . . . . . . . . . . . . . . . . . . . . . 16-1
Floppy Diskettes. . . . . . . . . . . . . . . . . . . . . . . . . . . . . . . . . . . . . . . . . . 16-2Backup Files . . . . . . . . . . . . . . . . . . . . . . . . . . . . . . . . . . . . . . . . . . . . . . . . . . . . . . . . . . . . . . . . . . . 16-2
MDE-4871 CFN III Manager’s Manual for Windows® XP Embedded - Version 3.6 · August 2010 Page v
Table of Contents
How to Back Up System Data . . . . . . . . . . . . . . . . . . . . . . . . . . . . . . . . . . . . . . . . . . . . . . . . . . . . . 16-2Backing Up CFN3 Files with Backup. . . . . . . . . . . . . . . . . . . . . . . . . . 16-3How to Do a Custom System Backup . . . . . . . . . . . . . . . . . . . . . . . . . 16-3
How to Back Up Transactions . . . . . . . . . . . . . . . . . . . . . . . . . . . . . . . . . . . . . . . . . . . . . . . . . . . . . 16-4TRANBACK. . . . . . . . . . . . . . . . . . . . . . . . . . . . . . . . . . . . . . . . . . . . . 16-4BACKTRAN. . . . . . . . . . . . . . . . . . . . . . . . . . . . . . . . . . . . . . . . . . . . . 16-4
How to Restore Your Backup Data. . . . . . . . . . . . . . . . . . . . . . . . . . . . . . . . . . . . . . . . . . . . . . . . . . 16-5How to Write-protect Backup Diskettes . . . . . . . . . . . . . . . . . . . . . . . . . . . . . . . . . . . . . . . . . . . . . . 16-5How to Restore System or Transaction Data . . . . . . . . . . . . . . . . . . . . . . . . . . . . . . . . . . . . . . . . . . 16-6
17 – CFN3 File System 17-1What is a CFN3 File . . . . . . . . . . . . . . . . . . . . . . . . . . . . . . . . . . . . . . . . . . . . . . . . . . . . . . . . . . . . . 17-1
Filename Restrictions . . . . . . . . . . . . . . . . . . . . . . . . . . . . . . . . . . . . . 17-1Filename Extensions . . . . . . . . . . . . . . . . . . . . . . . . . . . . . . . . . . . . . . 17-2Wildcards in Filenames . . . . . . . . . . . . . . . . . . . . . . . . . . . . . . . . . . . . 17-2
File System . . . . . . . . . . . . . . . . . . . . . . . . . . . . . . . . . . . . . . . . . . . . . . . . . . . . . . . . . . . . . . . . . . . . 17-2Disk Drive Names . . . . . . . . . . . . . . . . . . . . . . . . . . . . . . . . . . . . . . . . 17-3How to Specify Files on Other Drives . . . . . . . . . . . . . . . . . . . . . . . . . 17-4
Site Controller Files . . . . . . . . . . . . . . . . . . . . . . . . . . . . . . . . . . . . . . . . . . . . . . . . . . . . . . . . . . . . . 17-4How to Create Site Controller Files . . . . . . . . . . . . . . . . . . . . . . . . . . . 17-4How to Print the Contents of Files. . . . . . . . . . . . . . . . . . . . . . . . . . . . 17-5How to Remove User Files . . . . . . . . . . . . . . . . . . . . . . . . . . . . . . . . . 17-5How to Copy Files . . . . . . . . . . . . . . . . . . . . . . . . . . . . . . . . . . . . . . . . 17-6How to Rename Files . . . . . . . . . . . . . . . . . . . . . . . . . . . . . . . . . . . . . 17-6How to Move Files Between Directories of the RAM Drive . . . . . . . . . 17-7How to Set Permissions of Files . . . . . . . . . . . . . . . . . . . . . . . . . . . . . 17-7
Directory Commands . . . . . . . . . . . . . . . . . . . . . . . . . . . . . . . . . . . . . . . . . . . . . . . . . . . . . . . . . . . . 17-8How to List Files in a Directory . . . . . . . . . . . . . . . . . . . . . . . . . . . . . . 17-8How to Print a Short File List . . . . . . . . . . . . . . . . . . . . . . . . . . . . . . . . 17-8How to List All Files Below a Directory . . . . . . . . . . . . . . . . . . . . . . . . 17-9How to Create Directories . . . . . . . . . . . . . . . . . . . . . . . . . . . . . . . . . . 17-9How to Change to a Different Directory. . . . . . . . . . . . . . . . . . . . . . . . 17-9How to Change to a Different Disk Drive from a Remote Site. . . . . . . 17-9How to Print the Current Directory Name . . . . . . . . . . . . . . . . . . . . . 17-10How to Copy a Directory . . . . . . . . . . . . . . . . . . . . . . . . . . . . . . . . . . 17-10How to Remove a Directory . . . . . . . . . . . . . . . . . . . . . . . . . . . . . . . 17-10
Disk Commands . . . . . . . . . . . . . . . . . . . . . . . . . . . . . . . . . . . . . . . . . . . . . . . . . . . . . . . . . . . . . . . 17-11How to Format the RAM Drive . . . . . . . . . . . . . . . . . . . . . . . . . . . . . 17-11How to Check a Disk for Errors . . . . . . . . . . . . . . . . . . . . . . . . . . . . . 17-11
18 – Using Text Editors 18-1Windows XP Text Editors . . . . . . . . . . . . . . . . . . . . . . . . . . . . . . . . . . . . . . . . . . . . . . . . . . . . . . . . . 18-1FRED . . . . . . . . . . . . . . . . . . . . . . . . . . . . . . . . . . . . . . . . . . . . . . . . . . . . . . . . . . . . . . . . . . . . . . . . 18-2Editor’s Modes . . . . . . . . . . . . . . . . . . . . . . . . . . . . . . . . . . . . . . . . . . . . . . . . . . . . . . . . . . . . . . . . . 18-3
How to Change Editor Modes . . . . . . . . . . . . . . . . . . . . . . . . . . . . . . . 18-3Command Mode . . . . . . . . . . . . . . . . . . . . . . . . . . . . . . . . . . . . . . . . . 18-3
Using the Editor . . . . . . . . . . . . . . . . . . . . . . . . . . . . . . . . . . . . . . . . . . . . . . . . . . . . . . . . . . . . . . . . 18-4How to Enter Text . . . . . . . . . . . . . . . . . . . . . . . . . . . . . . . . . . . . . . . . 18-4How to Correct Text as You Type It . . . . . . . . . . . . . . . . . . . . . . . . . . 18-4Command Case . . . . . . . . . . . . . . . . . . . . . . . . . . . . . . . . . . . . . . . . . 18-4Work Buffer . . . . . . . . . . . . . . . . . . . . . . . . . . . . . . . . . . . . . . . . . . . . . 18-4How to Name Files . . . . . . . . . . . . . . . . . . . . . . . . . . . . . . . . . . . . . . . 18-5How to Save New Files . . . . . . . . . . . . . . . . . . . . . . . . . . . . . . . . . . . . 18-5How to Resave Files . . . . . . . . . . . . . . . . . . . . . . . . . . . . . . . . . . . . . . 18-5
Page vi MDE-4871 CFN III Manager’s Manual for Windows® XP Embedded - Version 3.6 · August 2010
Table of Contents
How to Exit the Editor. . . . . . . . . . . . . . . . . . . . . . . . . . . . . . . . . . . . . . 18-5How to Exit the Editor without Saving . . . . . . . . . . . . . . . . . . . . . . . . . 18-6How to Move the Cursor . . . . . . . . . . . . . . . . . . . . . . . . . . . . . . . . . . . 18-6How to Insert Text . . . . . . . . . . . . . . . . . . . . . . . . . . . . . . . . . . . . . . . . 18-7How to Delete Text. . . . . . . . . . . . . . . . . . . . . . . . . . . . . . . . . . . . . . . . 18-7How to Open a Line . . . . . . . . . . . . . . . . . . . . . . . . . . . . . . . . . . . . . . . 18-7How to Undo Changes to a Line . . . . . . . . . . . . . . . . . . . . . . . . . . . . . 18-7How to Join Two Lines . . . . . . . . . . . . . . . . . . . . . . . . . . . . . . . . . . . . . 18-7How to Split Two Lines. . . . . . . . . . . . . . . . . . . . . . . . . . . . . . . . . . . . . 18-7How to Copy a Line . . . . . . . . . . . . . . . . . . . . . . . . . . . . . . . . . . . . . . . 18-8How to Replace One Character . . . . . . . . . . . . . . . . . . . . . . . . . . . . . . 18-8
Advanced Editing. . . . . . . . . . . . . . . . . . . . . . . . . . . . . . . . . . . . . . . . . . . . . . . . . . . . . . . . . . . . . . . . 18-8How to Move the Cursor to a Specified Character. . . . . . . . . . . . . . . . 18-8How to Move the Cursor to Specified Line. . . . . . . . . . . . . . . . . . . . . . 18-9How to Search for a Specified String . . . . . . . . . . . . . . . . . . . . . . . . . . 18-9How to Search for and Print a String . . . . . . . . . . . . . . . . . . . . . . . . . . 18-9How to Execute a Global Search and Replace . . . . . . . . . . . . . . . . . 18-10How to Erase the Entire Work Buffer . . . . . . . . . . . . . . . . . . . . . . . . . 18-10How to Delete Specified Lines . . . . . . . . . . . . . . . . . . . . . . . . . . . . . . 18-10How to Delete Up to a Specified Character . . . . . . . . . . . . . . . . . . . . 18-11How to Append a File to the Current File . . . . . . . . . . . . . . . . . . . . . . 18-11How to Set Tab Stops . . . . . . . . . . . . . . . . . . . . . . . . . . . . . . . . . . . . 18-11How to Edit a New File without Leaving FRED . . . . . . . . . . . . . . . . . 18-12
Editor Command Summary . . . . . . . . . . . . . . . . . . . . . . . . . . . . . . . . . . . . . . . . . . . . . . . . . . . . . . . 18-12
19 – Making Your Own Commands 19-1Restrictions on Command File Names . . . . . . . . . . . . . . . . . . . . . . . . . . . . . . . . . . . . . . . . . . . . . . . 19-1Program Space . . . . . . . . . . . . . . . . . . . . . . . . . . . . . . . . . . . . . . . . . . . . . . . . . . . . . . . . . . . . . . . . . 19-1Search Path for Commands . . . . . . . . . . . . . . . . . . . . . . . . . . . . . . . . . . . . . . . . . . . . . . . . . . . . . . . 19-2How to Execute User Command Files. . . . . . . . . . . . . . . . . . . . . . . . . . . . . . . . . . . . . . . . . . . . . . . . 19-2Comments in Command Files . . . . . . . . . . . . . . . . . . . . . . . . . . . . . . . . . . . . . . . . . . . . . . . . . . . . . . 19-3How to Use Terminal Input with Command Files . . . . . . . . . . . . . . . . . . . . . . . . . . . . . . . . . . . . . . . 19-3Command File Commands . . . . . . . . . . . . . . . . . . . . . . . . . . . . . . . . . . . . . . . . . . . . . . . . . . . . . . . . 19-4
How to Print a Line with ECHO . . . . . . . . . . . . . . . . . . . . . . . . . . . . . . 19-4How to Wait with SLEEP . . . . . . . . . . . . . . . . . . . . . . . . . . . . . . . . . . . 19-5From Command File to Command File . . . . . . . . . . . . . . . . . . . . . . . . 19-5Wait for User Input . . . . . . . . . . . . . . . . . . . . . . . . . . . . . . . . . . . . . . . . 19-5
Line Length Limitations . . . . . . . . . . . . . . . . . . . . . . . . . . . . . . . . . . . . . . . . . . . . . . . . . . . . . . . . . . . 19-6~0A Control Code. . . . . . . . . . . . . . . . . . . . . . . . . . . . . . . . . . . . . . . . . 19-6@P Console Destinations . . . . . . . . . . . . . . . . . . . . . . . . . . . . . . . . . . 19-6
Command Files Executed from a Console . . . . . . . . . . . . . . . . . . . . . . . . . . . . . . . . . . . . . . . . . . . . 19-6Command Files at Sign On . . . . . . . . . . . . . . . . . . . . . . . . . . . . . . . . . . . . . . . . . . . . . . . . . . . . . . . . 19-7How to Save Output from a Command File. . . . . . . . . . . . . . . . . . . . . . . . . . . . . . . . . . . . . . . . . . . . 19-7
Output of a Single Command. . . . . . . . . . . . . . . . . . . . . . . . . . . . . . . . 19-7Output of Several Commands . . . . . . . . . . . . . . . . . . . . . . . . . . . . . . . 19-7
How to Output to Log Printer . . . . . . . . . . . . . . . . . . . . . . . . . . . . . . . . . . . . . . . . . . . . . . . . . . . . . . . 19-8How to Output to a Receipt Printer . . . . . . . . . . . . . . . . . . . . . . . . . . . . . . . . . . . . . . . . . . . . . . . . . . 19-8How to Add an Event to the Disk Journal . . . . . . . . . . . . . . . . . . . . . . . . . . . . . . . . . . . . . . . . . . . . . 19-9Variables for Use in Command Files . . . . . . . . . . . . . . . . . . . . . . . . . . . . . . . . . . . . . . . . . . . . . . . . . 19-9
System Variables . . . . . . . . . . . . . . . . . . . . . . . . . . . . . . . . . . . . . . . . . 19-9Command-line-argument Variables . . . . . . . . . . . . . . . . . . . . . . . . . . 19-11User Variables . . . . . . . . . . . . . . . . . . . . . . . . . . . . . . . . . . . . . . . . . . 19-12EXECUTE Command. . . . . . . . . . . . . . . . . . . . . . . . . . . . . . . . . . . . . 19-12
How to Exit from Command Files . . . . . . . . . . . . . . . . . . . . . . . . . . . . . . . . . . . . . . . . . . . . . . . . . . 19-13
MDE-4871 CFN III Manager’s Manual for Windows® XP Embedded - Version 3.6 · August 2010 Page vii
Table of Contents
20 – Advanced Command Files 20-1How to Use the IF Command . . . . . . . . . . . . . . . . . . . . . . . . . . . . . . . . . . . . . . . . . . . . . . . . . . . . . . .20-1
How to Use Loops in Command Files. . . . . . . . . . . . . . . . . . . . . . . . . .20-4How to Use Case Statements in Command Files . . . . . . . . . . . . . . . . .20-5Prompt String . . . . . . . . . . . . . . . . . . . . . . . . . . . . . . . . . . . . . . . . . . . .20-6How to Set User Variables in Command Files . . . . . . . . . . . . . . . . . . .20-7ECHO with the p1 Option . . . . . . . . . . . . . . . . . . . . . . . . . . . . . . . . . . .20-9How to Use Branching and Subroutines . . . . . . . . . . . . . . . . . . . . . . .20-10How to Search for a String in a File . . . . . . . . . . . . . . . . . . . . . . . . . .20-12
Advanced Commands . . . . . . . . . . . . . . . . . . . . . . . . . . . . . . . . . . . . . . . . . . . . . . . . . . . . . . . . . . .20-12NEXT CLERK Command . . . . . . . . . . . . . . . . . . . . . . . . . . . . . . . . . .20-12SCREEN Command . . . . . . . . . . . . . . . . . . . . . . . . . . . . . . . . . . . . . .20-13
21 – Automatic Cron Commands 21-1What Conditions can be Specified for Cron . . . . . . . . . . . . . . . . . . . . . . . . . . . . . . . . . . . . . . . . . . . .21-1
Timed Cron Entry . . . . . . . . . . . . . . . . . . . . . . . . . . . . . . . . . . . . . . . . .21-2Restart Cron Entry . . . . . . . . . . . . . . . . . . . . . . . . . . . . . . . . . . . . . . . .21-3Reboot Cron Entry . . . . . . . . . . . . . . . . . . . . . . . . . . . . . . . . . . . . . . . .21-4Transaction-memory Cron Entry . . . . . . . . . . . . . . . . . . . . . . . . . . . . . .21-4
Where To Put Command Files for Cron . . . . . . . . . . . . . . . . . . . . . . . . . . . . . . . . . . . . . . . . . . . . . . .21-5How To Enter Cron Commands . . . . . . . . . . . . . . . . . . . . . . . . . . . . . . . . . . . . . . . . . . . . . . . . . . . . .21-5
How To Keep Cron Command Output from the Log . . . . . . . . . . . . . . .21-5How To Print a Listing of Cron Entries . . . . . . . . . . . . . . . . . . . . . . . . . . . . . . . . . . . . . . . . . . . . . . . .21-6
22 – Communications 22-1Remote Authorizations . . . . . . . . . . . . . . . . . . . . . . . . . . . . . . . . . . . . . . . . . . . . . . . . . . . . . . . . . . . .22-1
Dial-out Phone Numbers. . . . . . . . . . . . . . . . . . . . . . . . . . . . . . . . . . . .22-1How to Initiate a Call . . . . . . . . . . . . . . . . . . . . . . . . . . . . . . . . . . . . . . .22-2
Kermit . . . . . . . . . . . . . . . . . . . . . . . . . . . . . . . . . . . . . . . . . . . . . . . . . . . . . . . . . . . . . . . . . . . . . . . . .22-3
23 – Configuration Command Summary 23-1Disk-based Configuration Commands . . . . . . . . . . . . . . . . . . . . . . . . . . . . . . . . . . . . . . . . . . . . . . . .23-1
24 – Preventive Maintenance 24-1How to Clean the Diskette Drive . . . . . . . . . . . . . . . . . . . . . . . . . . . . . .24-1When Batteries Fail . . . . . . . . . . . . . . . . . . . . . . . . . . . . . . . . . . . . . . . .24-1
Island Card Reader . . . . . . . . . . . . . . . . . . . . . . . . . . . . . . . . . . . . . . . . . . . . . . . . . . . . . . . . . . . . . .24-1How to Clean the Magnetic Strip Reader . . . . . . . . . . . . . . . . . . . . . . .24-1
POS Terminals . . . . . . . . . . . . . . . . . . . . . . . . . . . . . . . . . . . . . . . . . . . . . . . . . . . . . . . . . . . . . . . . . .24-2Magnetic Card Reader . . . . . . . . . . . . . . . . . . . . . . . . . . . . . . . . . . . . .24-2Keyboard. . . . . . . . . . . . . . . . . . . . . . . . . . . . . . . . . . . . . . . . . . . . . . . .24-2
25 – Diagnostic Commands 25-1System Diagnostics . . . . . . . . . . . . . . . . . . . . . . . . . . . . . . . . . . . . . . . . . . . . . . . . . . . . . . . . . . . . . .25-1
How to Print System Diagnostics . . . . . . . . . . . . . . . . . . . . . . . . . . . . .25-1How to Reset System Diagnostics . . . . . . . . . . . . . . . . . . . . . . . . . . . .25-2How to Reset System Diagnostics after Reconfiguration . . . . . . . . . . .25-2Diagnostic Error Codes . . . . . . . . . . . . . . . . . . . . . . . . . . . . . . . . . . . . .25-2
Event History . . . . . . . . . . . . . . . . . . . . . . . . . . . . . . . . . . . . . . . . . . . . . . . . . . . . . . . . . . . . . . . . . . .25-4How to Enable and Disable Event History . . . . . . . . . . . . . . . . . . . . . .25-4How to Print the Event History List . . . . . . . . . . . . . . . . . . . . . . . . . . . .25-5
Page viii MDE-4871 CFN III Manager’s Manual for Windows® XP Embedded - Version 3.6 · August 2010
Table of Contents
System Status . . . . . . . . . . . . . . . . . . . . . . . . . . . . . . . . . . . . . . . . . . . . . . . . . . . . . . . . . . . . . . . . . . 25-5How to Print System Monitor Messages . . . . . . . . . . . . . . . . . . . . . . . 25-5How to Display Current System State . . . . . . . . . . . . . . . . . . . . . . . . . 25-7How to Display Buffers in Use . . . . . . . . . . . . . . . . . . . . . . . . . . . . . . . 25-7How to Examine Contents of Memory . . . . . . . . . . . . . . . . . . . . . . . . . 25-9How to Display Site Controller Status . . . . . . . . . . . . . . . . . . . . . . . . 25-10
How to Test a Pump Control Unit’s Memory . . . . . . . . . . . . . . . . . . . . . . . . . . . . . . . . . . . . . . . . . . 25-11How to Test a Receipt Printer . . . . . . . . . . . . . . . . . . . . . . . . . . . . . . . . . . . . . . . . . . . . . . . . . . . . . 25-11
SHOW Command . . . . . . . . . . . . . . . . . . . . . . . . . . . . . . . . . . . . . . . 25-11
26 – Enabling and Disabling Devices 26-1Shut Down and Restart a Site . . . . . . . . . . . . . . . . . . . . . . . . . . . . . . . . . . . . . . . . . . . . . . . . . . . . . . 26-1
How to Shut Down a Site . . . . . . . . . . . . . . . . . . . . . . . . . . . . . . . . . . . 26-1Disable Pumps . . . . . . . . . . . . . . . . . . . . . . . . . . . . . . . . . . . . . . . . . . . 26-1How to Do an Emergency Stop from the Terminal. . . . . . . . . . . . . . . . 26-2How to Do and Emergency Stop from the Console . . . . . . . . . . . . . . . 26-2How to Restart a Site . . . . . . . . . . . . . . . . . . . . . . . . . . . . . . . . . . . . . . 26-2How to Restart from a Console ALL Stop . . . . . . . . . . . . . . . . . . . . . . 26-2How to Restart a Site from a Serious Crash . . . . . . . . . . . . . . . . . . . . 26-3How to Reboot the Site Controller . . . . . . . . . . . . . . . . . . . . . . . . . . . . 26-3
Site Devices. . . . . . . . . . . . . . . . . . . . . . . . . . . . . . . . . . . . . . . . . . . . . . . . . . . . . . . . . . . . . . . . . . . . 26-4How to Disable and Enable a Pump . . . . . . . . . . . . . . . . . . . . . . . . . . 26-4How to Disable and Enable a Pump Control Unit . . . . . . . . . . . . . . . . 26-5How to Disable and Enable a Reader Terminal . . . . . . . . . . . . . . . . . . 26-5How to Disable and Enable a Console. . . . . . . . . . . . . . . . . . . . . . . . . 26-6How to Disable and Enable a Tank Monitor System . . . . . . . . . . . . . . 26-6How to Disable and Enable a Gate Reader . . . . . . . . . . . . . . . . . . . . . 26-6How to Disable and Enable a Fuel Point Reader. . . . . . . . . . . . . . . . . 26-7How to Disable, Enable, and Download SDIs . . . . . . . . . . . . . . . . . . . 26-7
Operating Pumps Manually . . . . . . . . . . . . . . . . . . . . . . . . . . . . . . . . . . . . . . . . . . . . . . . . . . . . . . . . 26-8How to Activate a Pump from the Command Window . . . . . . . . . . . . . 26-8How to Deactivate a Pump from the Command Window . . . . . . . . . . . 26-9How to Put a Pump into Full-service Mode . . . . . . . . . . . . . . . . . . . . . 26-9How to Bypass the Pump Control Unit . . . . . . . . . . . . . . . . . . . . . . . . 26-10
27 – Invoice Printing 27-1Requirements and Restrictions . . . . . . . . . . . . . . . . . . . . . . . . . . . . . . . . . . . . . . . . . . . . . . . . . . . . . 27-1Invoice Setup. . . . . . . . . . . . . . . . . . . . . . . . . . . . . . . . . . . . . . . . . . . . . . . . . . . . . . . . . . . . . . . . . . . 27-1Printing an Invoice . . . . . . . . . . . . . . . . . . . . . . . . . . . . . . . . . . . . . . . . . . . . . . . . . . . . . . . . . . . . . . . 27-2Sample Invoice . . . . . . . . . . . . . . . . . . . . . . . . . . . . . . . . . . . . . . . . . . . . . . . . . . . . . . . . . . . . . . . . . 27-3Duplicates . . . . . . . . . . . . . . . . . . . . . . . . . . . . . . . . . . . . . . . . . . . . . . . . . . . . . . . . . . . . . . . . . . . . . 27-3
28 – Site Controller III Optional Packages 28-1
Appendix A: SC III Ports and Switches A-1Front Panel Components. . . . . . . . . . . . . . . . . . . . . . . . . . . . . . . . . . . . . . . . . . . . . . . . . . . . . . . . . . . A-1Serial/Parallel Ports . . . . . . . . . . . . . . . . . . . . . . . . . . . . . . . . . . . . . . . . . . . . . . . . . . . . . . . . . . . . . . . A-1DIP Switch Settings . . . . . . . . . . . . . . . . . . . . . . . . . . . . . . . . . . . . . . . . . . . . . . . . . . . . . . . . . . . . . . . A-2
Memory Board DIP Switch SC-Memory I/O - S1 . . . . . . . . . . . . . . . . . . A-2Memory Board DIP Switch SC-Memory I/O - S2 . . . . . . . . . . . . . . . . . . A-2PC IRQ Switch, SC-COMM CPU - S1 . . . . . . . . . . . . . . . . . . . . . . . . . . A-2PC Address Switch, SC-COMM CPU - S2. . . . . . . . . . . . . . . . . . . . . . . A-3
MDE-4871 CFN III Manager’s Manual for Windows® XP Embedded - Version 3.6 · August 2010 Page ix
Table of Contents
Jumper Settings . . . . . . . . . . . . . . . . . . . . . . . . . . . . . . . . . . . . . . . . . . . . . . . . . . . . . . . . . . . . . . . . . A-3SC-Comm CPU Board Settings . . . . . . . . . . . . . . . . . . . . . . . . . . . . . . A-3SC-Comm Memory I/O Board Settings . . . . . . . . . . . . . . . . . . . . . . . . . A-4
Appendix B: Modem Settings and Cables B-1Setup Instructions for C01533 - Answer Modem . . . . . . . . . . . . . . . . . . . . . . . . . . . . . . . . . . . . . . . . B-1
Configuring to Use as an Answer Modem. . . . . . . . . . . . . . . . . . . . . . . B-1Setup Instructions for C05899 - Credit/Debit Network Modem. . . . . . . . . . . . . . . . . . . . . . . . . . . . . . B-2
Configuring to Use as a Credit/Debit Card Network Modem. . . . . . . . . B-3Modem DIN Cabling . . . . . . . . . . . . . . . . . . . . . . . . . . . . . . . . . . . . . . . . . . . . . . . . . . . . . . . . . . . . . . B-4Null Modem Cross Cable . . . . . . . . . . . . . . . . . . . . . . . . . . . . . . . . . . . . . . . . . . . . . . . . . . . . . . . . . . B-5
Appendix C: Printed Receipt Regulations C-1EFT Regulation E . . . . . . . . . . . . . . . . . . . . . . . . . . . . . . . . . . . . . . . . . . . . . . . . . . . . . . . . . . . . . . . . C-1
Section 205.9(a)—Documentation of Transfers . . . . . . . . . . . . . . . . . . C-1Section 205.9(b)(1)(iv) . . . . . . . . . . . . . . . . . . . . . . . . . . . . . . . . . . . . . C-2
Gasboy Receipt . . . . . . . . . . . . . . . . . . . . . . . . . . . . . . . . . . . . . . . . . . . . . . . . . . . . . . . . . . . . . . . . . C-3
Appendix D: Status and Error Messages D-1Messages on the Log Printer . . . . . . . . . . . . . . . . . . . . . . . . . . . . . . . . . . . . . . . . . . . . . . . . . . . . . . . D-1
Name Table Reconstructed . . . . . . . . . . . . . . . . . . . . . . . . . . . . . . . . . D-1[Pump #] Card #XXXXXXXXXXXX denial_reason WED 11/29/08 12:34 PM . . . . . . . . . . . . . . . . . . . . . . . . . . . . . . . . . . . D-2Bank Verification Came Up . . . . . . . . . . . . . . . . . . . . . . . . . . . . . . . . . . D-3Battery FAILED . . . . . . . . . . . . . . . . . . . . . . . . . . . . . . . . . . . . . . . . . . . D-3Battery OK. . . . . . . . . . . . . . . . . . . . . . . . . . . . . . . . . . . . . . . . . . . . . . . D-3Card Reader Terminal #X Came Up . . . . . . . . . . . . . . . . . . . . . . . . . . . D-3Card Reader Terminal #X Disabled . . . . . . . . . . . . . . . . . . . . . . . . . . . D-3Card Reader Terminal #X Paper Low . . . . . . . . . . . . . . . . . . . . . . . . . . D-3Card Reader Terminal #X Out of Paper . . . . . . . . . . . . . . . . . . . . . . . . D-3Card Reader Terminal #X Paper Refilled . . . . . . . . . . . . . . . . . . . . . . . D-4Card Reader Terminal #X Printer Down . . . . . . . . . . . . . . . . . . . . . . . . D-4Card Reader Terminal #X Printer Jammed. . . . . . . . . . . . . . . . . . . . . . D-4Card Reader Terminal #X Printer Unjammed . . . . . . . . . . . . . . . . . . . . D-4Card Reader Terminal #X Printer Up . . . . . . . . . . . . . . . . . . . . . . . . . . D-4Card Reader Terminal #X Reader Jammed . . . . . . . . . . . . . . . . . . . . . D-4Card Reader Terminal #X Reader Unjammed . . . . . . . . . . . . . . . . . . . D-4Card Reader Terminal #X Went Down . . . . . . . . . . . . . . . . . . . . . . . . . D-4CFN Verification Came Up . . . . . . . . . . . . . . . . . . . . . . . . . . . . . . . . . . D-5CFN Verification Did Not Respond . . . . . . . . . . . . . . . . . . . . . . . . . . . . D-5Profit PT #X Came Up. . . . . . . . . . . . . . . . . . . . . . . . . . . . . . . . . . . . . . D-5Profit Pt #X Disabled . . . . . . . . . . . . . . . . . . . . . . . . . . . . . . . . . . . . . . . D-5Profit Pt #X Went Down . . . . . . . . . . . . . . . . . . . . . . . . . . . . . . . . . . . . D-5Data Corrupted in Table . . . . . . . . . . . . . . . . . . . . . . . . . . . . . . . . . . . . D-5CARD: XXXXXXXXXX DES Not Ready . . . . . . . . . . . . . . . . . . . . . . . . D-6Diagnostics Table Too Small . . . . . . . . . . . . . . . . . . . . . . . . . . . . . . . . D-6Disk Full . . . . . . . . . . . . . . . . . . . . . . . . . . . . . . . . . . . . . . . . . . . . . . . . D-6EMERGENCY STOP . . . . . . . . . . . . . . . . . . . . . . . . . . . . . . . . . . . . . . D-6End EMERGENCY STOP. . . . . . . . . . . . . . . . . . . . . . . . . . . . . . . . . . . D-6Fuel Point Reader # on Loop # Went Down . . . . . . . . . . . . . . . . . . . . . D-6Fuel Point Reader # Came Up . . . . . . . . . . . . . . . . . . . . . . . . . . . . . . . D-6Gate # on Loop # Went Down. . . . . . . . . . . . . . . . . . . . . . . . . . . . . . . . D-6Gate # Came Up . . . . . . . . . . . . . . . . . . . . . . . . . . . . . . . . . . . . . . . . . . D-7
Page x MDE-4871 CFN III Manager’s Manual for Windows® XP Embedded - Version 3.6 · August 2010
Table of Contents
Island EMERGENCY STOP. . . . . . . . . . . . . . . . . . . . . . . . . . . . . . . . . . D-7Island Reader Only . . . . . . . . . . . . . . . . . . . . . . . . . . . . . . . . . . . . . . . . D-7Loop Table Overflow . . . . . . . . . . . . . . . . . . . . . . . . . . . . . . . . . . . . . . . D-7Master Key Loaded . . . . . . . . . . . . . . . . . . . . . . . . . . . . . . . . . . . . . . . . D-7Memory Available. . . . . . . . . . . . . . . . . . . . . . . . . . . . . . . . . . . . . . . . . . D-7Memory Full . . . . . . . . . . . . . . . . . . . . . . . . . . . . . . . . . . . . . . . . . . . . . . D-7XPE PC-SCIII Interface V#.# Started. . . . . . . . . . . . . . . . . . . . . . . . . . . D-8PC Not Responding . . . . . . . . . . . . . . . . . . . . . . . . . . . . . . . . . . . . . . . . D-8PC Responding . . . . . . . . . . . . . . . . . . . . . . . . . . . . . . . . . . . . . . . . . . . D-8Product #XX Name Below Reorder Level . . . . . . . . . . . . . . . . . . . . . . . D-8Pump #X Disabled . . . . . . . . . . . . . . . . . . . . . . . . . . . . . . . . . . . . . . . . . D-8Pump #X Disabled, No Quantity . . . . . . . . . . . . . . . . . . . . . . . . . . . . . . D-8Pump #X Disabled, No Price . . . . . . . . . . . . . . . . . . . . . . . . . . . . . . . . . D-9Pump #X Enabled . . . . . . . . . . . . . . . . . . . . . . . . . . . . . . . . . . . . . . . . . D-9Pump Control Unit #X Came Up . . . . . . . . . . . . . . . . . . . . . . . . . . . . . . D-9Pump Control Unit #X Disabled . . . . . . . . . . . . . . . . . . . . . . . . . . . . . . . D-9Pump Control Unit #X Down, Bad Memory . . . . . . . . . . . . . . . . . . . . . . D-9Pump Control Unit #X Found Unassigned Transaction . . . . . . . . . . . . . D-9Pump Control Unit #X Went Down. . . . . . . . . . . . . . . . . . . . . . . . . . . . D-10Remote Command: command . . . . . . . . . . . . . . . . . . . . . . . . . . . . . . . D-10Remote Verification Did Not Respond . . . . . . . . . . . . . . . . . . . . . . . . . D-10SC III Vx (HHMM/MMDDYY) Router:r_name, Handler:h_name Day MM/DD/YY HH:MM AM/PM . . . . . . . . . . . . . . . . . . . . . . . . . . . . . D-10Tank #X Below Reorder Level . . . . . . . . . . . . . . . . . . . . . . . . . . . . . . . D-10Tank #X Fuel Leak . . . . . . . . . . . . . . . . . . . . . . . . . . . . . . . . . . . . . . . . D-11Tank #X Probe Error . . . . . . . . . . . . . . . . . . . . . . . . . . . . . . . . . . . . . . D-11Tank #X Excess Water. . . . . . . . . . . . . . . . . . . . . . . . . . . . . . . . . . . . . D-11Tank #X YYY Gal Delivery . . . . . . . . . . . . . . . . . . . . . . . . . . . . . . . . . . D-11Warm Boot . . . . . . . . . . . . . . . . . . . . . . . . . . . . . . . . . . . . . . . . . . . . . . D-11
Messages in the Transaction Printout . . . . . . . . . . . . . . . . . . . . . . . . . . . . . . . . . . . . . . . . . . . . . . . . D-11error #. . . . . . . . . . . . . . . . . . . . . . . . . . . . . . . . . . . . . . . . . . . . . . . . . . D-11Aborted. . . . . . . . . . . . . . . . . . . . . . . . . . . . . . . . . . . . . . . . . . . . . . . . . D-12Limit . . . . . . . . . . . . . . . . . . . . . . . . . . . . . . . . . . . . . . . . . . . . . . . . . . . D-12Mem Lost . . . . . . . . . . . . . . . . . . . . . . . . . . . . . . . . . . . . . . . . . . . . . . . D-12Pwr Fail . . . . . . . . . . . . . . . . . . . . . . . . . . . . . . . . . . . . . . . . . . . . . . . . D-12Payout . . . . . . . . . . . . . . . . . . . . . . . . . . . . . . . . . . . . . . . . . . . . . . . . . D-12Prod Out. . . . . . . . . . . . . . . . . . . . . . . . . . . . . . . . . . . . . . . . . . . . . . . . D-12Pump Down . . . . . . . . . . . . . . . . . . . . . . . . . . . . . . . . . . . . . . . . . . . . . D-12Refund . . . . . . . . . . . . . . . . . . . . . . . . . . . . . . . . . . . . . . . . . . . . . . . . . D-12Return . . . . . . . . . . . . . . . . . . . . . . . . . . . . . . . . . . . . . . . . . . . . . . . . . D-12Reversal . . . . . . . . . . . . . . . . . . . . . . . . . . . . . . . . . . . . . . . . . . . . . . . . D-12Timed Out . . . . . . . . . . . . . . . . . . . . . . . . . . . . . . . . . . . . . . . . . . . . . . D-12Unassigned . . . . . . . . . . . . . . . . . . . . . . . . . . . . . . . . . . . . . . . . . . . . . D-13Withdrawal . . . . . . . . . . . . . . . . . . . . . . . . . . . . . . . . . . . . . . . . . . . . . . D-13
Messages in Command Mode. . . . . . . . . . . . . . . . . . . . . . . . . . . . . . . . . . . . . . . . . . . . . . . . . . . . . . D-13Already exists. . . . . . . . . . . . . . . . . . . . . . . . . . . . . . . . . . . . . . . . . . . . D-13Bad Data Input . . . . . . . . . . . . . . . . . . . . . . . . . . . . . . . . . . . . . . . . . . . D-13BAD MESS. . . . . . . . . . . . . . . . . . . . . . . . . . . . . . . . . . . . . . . . . . . . . . D-13Can’t activate . . . . . . . . . . . . . . . . . . . . . . . . . . . . . . . . . . . . . . . . . . . . D-13Can’t open file . . . . . . . . . . . . . . . . . . . . . . . . . . . . . . . . . . . . . . . . . . . D-13Cannot run program . . . . . . . . . . . . . . . . . . . . . . . . . . . . . . . . . . . . . . . D-14Card is not valid . . . . . . . . . . . . . . . . . . . . . . . . . . . . . . . . . . . . . . . . . . D-14Card is valid . . . . . . . . . . . . . . . . . . . . . . . . . . . . . . . . . . . . . . . . . . . . . D-14Command failed . . . . . . . . . . . . . . . . . . . . . . . . . . . . . . . . . . . . . . . . . . D-14Device out of service . . . . . . . . . . . . . . . . . . . . . . . . . . . . . . . . . . . . . . D-14
MDE-4871 CFN III Manager’s Manual for Windows® XP Embedded - Version 3.6 · August 2010 Page xi
Table of Contents
Does not exist . . . . . . . . . . . . . . . . . . . . . . . . . . . . . . . . . . . . . . . . . . . D-14Error loading program . . . . . . . . . . . . . . . . . . . . . . . . . . . . . . . . . . . . . D-14Invalid option . . . . . . . . . . . . . . . . . . . . . . . . . . . . . . . . . . . . . . . . . . . . D-14Manager key required . . . . . . . . . . . . . . . . . . . . . . . . . . . . . . . . . . . . . D-15No more file space . . . . . . . . . . . . . . . . . . . . . . . . . . . . . . . . . . . . . . . D-15Permission denied. . . . . . . . . . . . . . . . . . . . . . . . . . . . . . . . . . . . . . . . D-15Program checksum error. . . . . . . . . . . . . . . . . . . . . . . . . . . . . . . . . . . D-15Pump deactivated . . . . . . . . . . . . . . . . . . . . . . . . . . . . . . . . . . . . . . . . D-15Pump is not on . . . . . . . . . . . . . . . . . . . . . . . . . . . . . . . . . . . . . . . . . . D-15Pump is ready . . . . . . . . . . . . . . . . . . . . . . . . . . . . . . . . . . . . . . . . . . . D-15Site is stopped. . . . . . . . . . . . . . . . . . . . . . . . . . . . . . . . . . . . . . . . . . . D-15Some valid, some not . . . . . . . . . . . . . . . . . . . . . . . . . . . . . . . . . . . . . D-15String too long . . . . . . . . . . . . . . . . . . . . . . . . . . . . . . . . . . . . . . . . . . . D-16Transactions in progress. . . . . . . . . . . . . . . . . . . . . . . . . . . . . . . . . . . D-16Unknown command . . . . . . . . . . . . . . . . . . . . . . . . . . . . . . . . . . . . . . D-16
Appendix E: Files on the Hard Disk E-1Customer Diskette . . . . . . . . . . . . . . . . . . . . . . . . . . . . . . . . . . . . . . . . . . . . . . . . . . . . . . . . . . . . . . . E-1
Root Directory: Operating System . . . . . . . . . . . . . . . . . . . . . . . . . . . . E-1SC III Root (C:\SC3) Directory . . . . . . . . . . . . . . . . . . . . . . . . . . . . . . . E-1SC3\BIN Directory: Disk-based Commands and Command Files . . . . E-2
Appendix F: Dialout Communications F-1Type of Cards . . . . . . . . . . . . . . . . . . . . . . . . . . . . . . . . . . . . . . . . . . . . . . . . . . . . . . . . . . . . . . . . . . . .F-1Credit Card Numbering. . . . . . . . . . . . . . . . . . . . . . . . . . . . . . . . . . . . . . . . . . . . . . . . . . . . . . . . . . . . .F-2Handling Transactions . . . . . . . . . . . . . . . . . . . . . . . . . . . . . . . . . . . . . . . . . . . . . . . . . . . . . . . . . . . . .F-2
Authorization (verification). . . . . . . . . . . . . . . . . . . . . . . . . . . . . . . . . . . .F-3Data Capture. . . . . . . . . . . . . . . . . . . . . . . . . . . . . . . . . . . . . . . . . . . . . .F-3Settlement . . . . . . . . . . . . . . . . . . . . . . . . . . . . . . . . . . . . . . . . . . . . . . . .F-4
Card Networks Certifying CFN III . . . . . . . . . . . . . . . . . . . . . . . . . . . . . . . . . . . . . . . . . . . . . . . . . . . . .F-4Upper Case Error Messages. . . . . . . . . . . . . . . . . . . . . . . . . . . . . . . . . .F-5
Modems . . . . . . . . . . . . . . . . . . . . . . . . . . . . . . . . . . . . . . . . . . . . . . . . . . . . . . . . . . . . . . . . . . . . . . . .F-5Troubleshooting - Quick Diagnostic Checks . . . . . . . . . . . . . . . . . . . . . .F-7
Glossary Glossary-1
Index Index-1
Page xii MDE-4871 CFN III Manager’s Manual for Windows® XP Embedded - Version 3.6 · August 2010
Operating System Introduction
1 – Introduction
This reference manual explains commands that are used to set up, maintain, produce reports on, and diagnose problems for a CFN III system.
Your service technician will set up your CFN III and introduce you to some of its features. This manual can help you avoid many unnecessary service calls, and help assure that your CFN III works the way you want it to.
This manual is for anyone who requires to know how to issue commands to the CFN III, or interpret the log printout and other reports. The Site Manager or person in charge of operations at the site must be familiar with this manual and its contents so you can operate and maintain the CFN III information. Attendants are not required to read this manual in order to operate the Profit Point consoles, which are covered in other manuals.
This manual is not intended to be read cover to cover, but you must become familiar with its contents so you can look up information when you require it.
Operating SystemThe Site Controller III (SC III) comes with a PC operating system called Windows® XP Embedded (XPE) from Microsoft®. Windows XPE is set up with restricted services. The Windows XPE system is not set up as a general PC and must be used only for the purpose of housing the CFN embedded payment controller. Microsoft Windows XPE license states that a Windows XPE system cannot be used as a general purpose PC. For example, the restrictions would include general software such as Microsoft Word, Microsoft Excel®, or other general applications. This new system is icon based, that is, you must use your mouse to access the command window and/or applications. You must move the mouse (which is represented as the arrow on the screen) over the icon that you want to open and double click the left mouse button. Your technician will instruct you on the basics of this system and accessing your CFN3 command window. The CFN3 command window must remain running at all times. It can be minimized (more about that later), but once closed, you will lose contact with the Site Controller.
When the CFN3 software was installed, your technician or system administrator configured it with your particular devices and the procedures your company follows. For example, if your site accepts cash for fuel, the CFN III has been told whether the customer is required to pay before pumping (a prepay system) or is allowed to pay after pumping (a postpay system).
Starting the SC IIIThe computer is turned on (booted) by pressing the button on the front of the computer. Ensure that the monitor is turned on and there are no diskettes in the A: drive. It will take a few moments to start. Not required to double-click the CFN3 icon to start operations, the operating system has been programmed to do this for you. The CFN3 command window automatically opens. Press the return key if your signon prompt does not display immediately.
MDE-4871 CFN III Manager’s Manual for Windows® XP Embedded - Version 3.6 · August 2010 Page 1-1
Introduction Operating System
Quitting the CFN3 ApplicationThe preferred way to quit the CFN3 application is to press Alt and when continuing to press the Alt key, press the X key. This will terminate your site operations. If you forget this, this method is mentioned when you log on at the top of the screen as illustrated in Figure 1-1 on page 1-3.
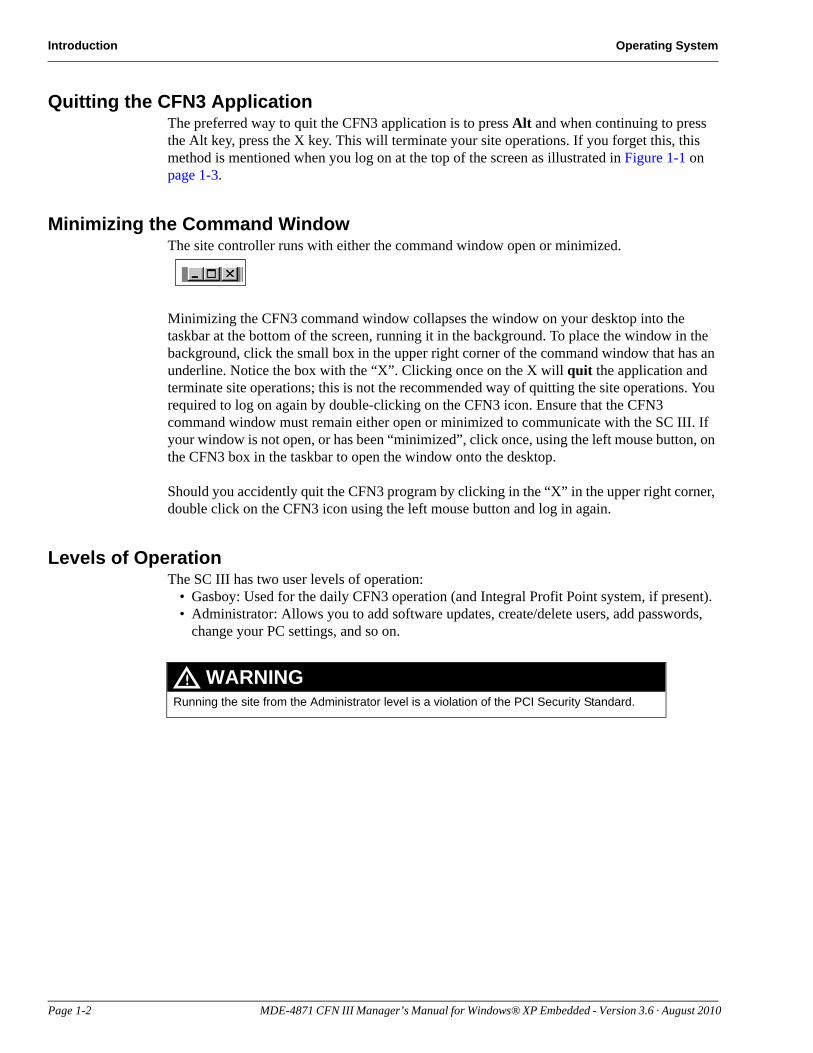
Minimizing the Command WindowThe site controller runs with either the command window open or minimized.
Minimizing the CFN3 command window collapses the window on your desktop into the taskbar at the bottom of the screen, running it in the background. To place the window in the background, click the small box in the upper right corner of the command window that has an underline. Notice the box with the “X”. Clicking once on the X will quit the application and terminate site operations; this is not the recommended way of quitting the site operations. You required to log on again by double-clicking on the CFN3 icon. Ensure that the CFN3 command window must remain either open or minimized to communicate with the SC III. If your window is not open, or has been “minimized”, click once, using the left mouse button, on the CFN3 box in the taskbar to open the window onto the desktop.
Should you accidently quit the CFN3 program by clicking in the “X” in the upper right corner, double click on the CFN3 icon using the left mouse button and log in again.
Levels of OperationThe SC III has two user levels of operation:
• Gasboy: Used for the daily CFN3 operation (and Integral Profit Point system, if present).• Administrator: Allows you to add software updates, create/delete users, add passwords,
change your PC settings, and so on.
Running the site from the Administrator level is a violation of the PCI Security Standard.
WARNING
Page 1-2 MDE-4871 CFN III Manager’s Manual for Windows® XP Embedded - Version 3.6 · August 2010
Operating System Introduction
Gasboy Level
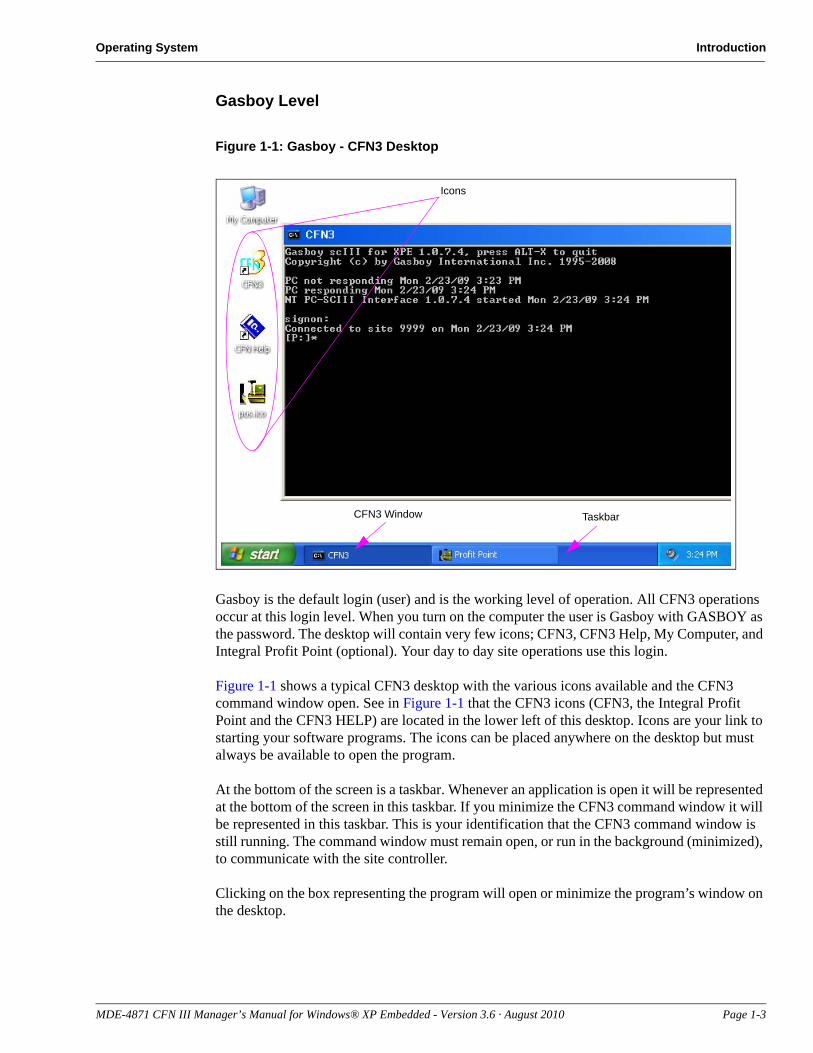
Figure 1-1: Gasboy - CFN3 Desktop
CFN3 Window Taskbar
Icons
Gasboy is the default login (user) and is the working level of operation. All CFN3 operations occur at this login level. When you turn on the computer the user is Gasboy with GASBOY as the password. The desktop will contain very few icons; CFN3, CFN3 Help, My Computer, and Integral Profit Point (optional). Your day to day site operations use this login.
Figure 1-1 shows a typical CFN3 desktop with the various icons available and the CFN3 command window open. See in Figure 1-1 that the CFN3 icons (CFN3, the Integral Profit Point and the CFN3 HELP) are located in the lower left of this desktop. Icons are your link to starting your software programs. The icons can be placed anywhere on the desktop but must always be available to open the program.
At the bottom of the screen is a taskbar. Whenever an application is open it will be represented at the bottom of the screen in this taskbar. If you minimize the CFN3 command window it will be represented in this taskbar. This is your identification that the CFN3 command window is still running. The command window must remain open, or run in the background (minimized), to communicate with the site controller.
Clicking on the box representing the program will open or minimize the program’s window on the desktop.
MDE-4871 CFN III Manager’s Manual for Windows® XP Embedded - Version 3.6 · August 2010 Page 1-3
Introduction Logging onto Windows XP as Administrator
Administrator LevelAdministrator is where users are added or deleted, your hardware settings changed, passwords changed, and so on. You can also add software updates. The Administrator requires a separate login, has a different password, and has additional features/options. There are more icons displayed on the desktop.Note: Administrator level accounts must not be shared between multiple users. Therefore,
each administrator level user must have an individual account. Accounts can be created by logging to the Windows XPE as an administrator user. Access Control Panel > User Account, to add a user.
The RUN command, used to install software from the Start button, is only available from the Administrator level. This command is a Windows XP operating system command and is different from the CFN3 RUN command.
Logging onto Windows XP as AdministratorWhen the computer boots, the default login is Gasboy. To make any changes to your CFN3 setup you must log in as Administrator. To log in as the Administrator, proceed as follows:
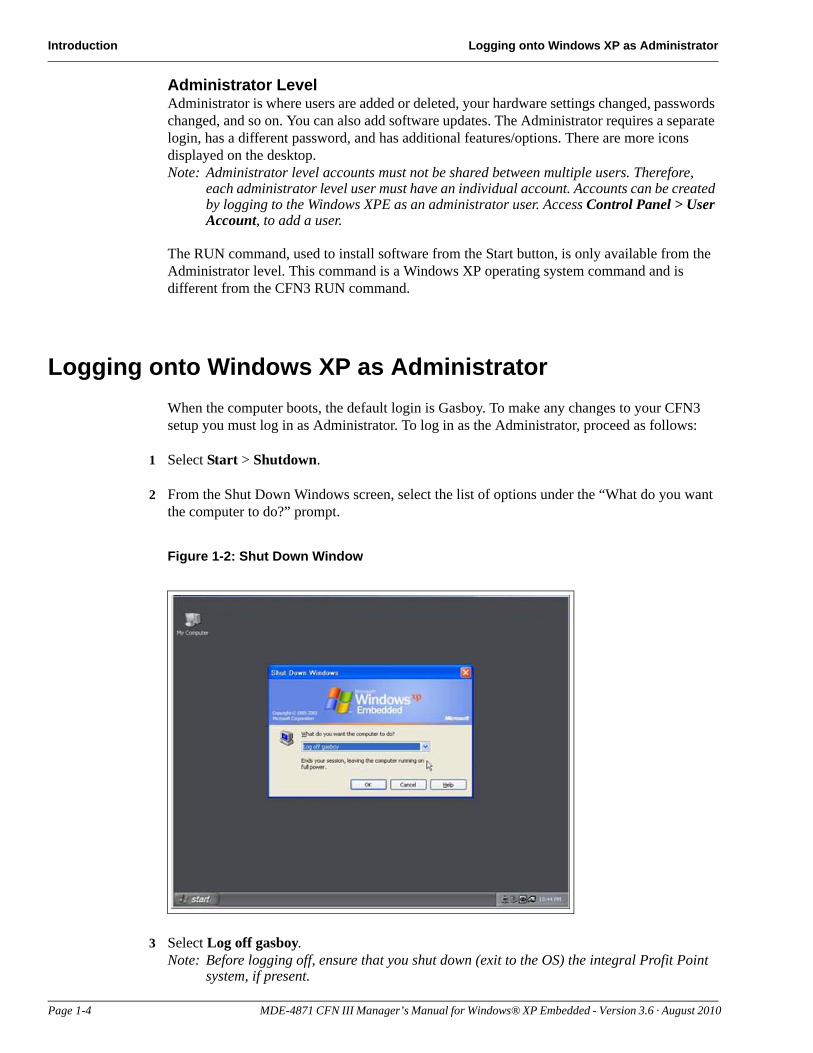
1 Select Start > Shutdown.
2 From the Shut Down Windows screen, select the list of options under the “What do you want the computer to do?” prompt.
Figure 1-2: Shut Down Window
3 Select Log off gasboy.Note: Before logging off, ensure that you shut down (exit to the OS) the integral Profit Point
system, if present.
Page 1-4 MDE-4871 CFN III Manager’s Manual for Windows® XP Embedded - Version 3.6 · August 2010
Logging onto Windows XP as Administrator Introduction
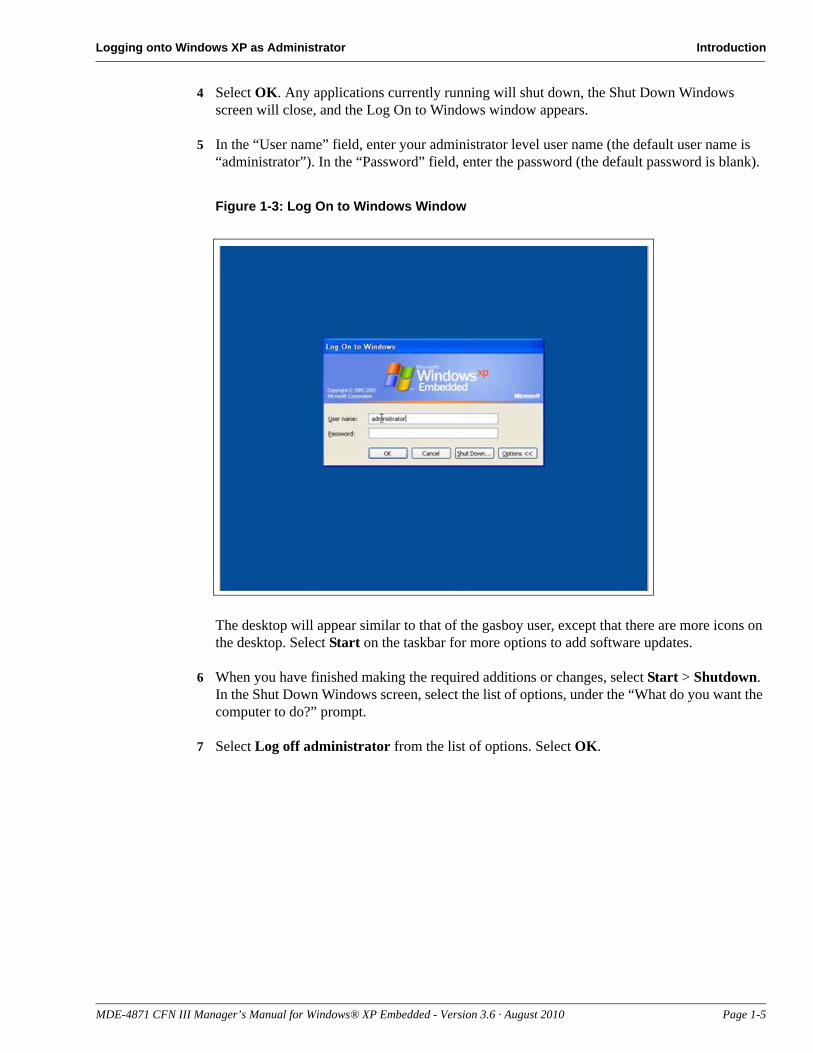
4 Select OK. Any applications currently running will shut down, the Shut Down Windows screen will close, and the Log On to Windows window appears.
5 In the “User name” field, enter your administrator level user name (the default user name is “administrator”). In the “Password” field, enter the password (the default password is blank).
Figure 1-3: Log On to Windows Window
The desktop will appear similar to that of the gasboy user, except that there are more icons on the desktop. Select Start on the taskbar for more options to add software updates.
6 When you have finished making the required additions or changes, select Start > Shutdown. In the Shut Down Windows screen, select the list of options, under the “What do you want the computer to do?” prompt.
7 Select Log off administrator from the list of options. Select OK.
MDE-4871 CFN III Manager’s Manual for Windows® XP Embedded - Version 3.6 · August 2010 Page 1-5

Introduction Miscellaneous Windows XP Information
8 When the Log On to Windows window appears, relogin as gasboy.Note: The default password for gasboy user name is “GASBOY”.
Figure 1-4: Log On to Windows Window
Miscellaneous Windows XP InformationIf you do not like the arrangement of the icons on the desktop, you can change the arrangement by clicking once with the right mouse button anywhere on the open desktop. Select an option from the list that appears.
To refresh your desktop, press F5. If using the Profit Point keyboard, F5 is All Stop.
Profit Point
If you have an integral Profit Point system, it will start automatically. If not, start the Profit Point system by double-clicking on the Profit Point icon using the left-most mouse button. For the Profit Point system to operate, the SC III must be running with the CFN3 window on the desktop, either open or minimized.
Page 1-6 MDE-4871 CFN III Manager’s Manual for Windows® XP Embedded - Version 3.6 · August 2010
Related Documents Introduction
Online Documentation
Online documentation is available on the CFN III. The online system is viewed using your browser that comes with your PC system. Use the online documentation for a quick reference when you do not want to pull the manual off the shelf.
To open the online system, double-click the CFN3 HELP icon. The browser will open displaying the online library available. Click once on the manual that you would like to review.
Related Documents
CFN III - Version 3.5 and LaterDocument Number Document Title GOLD LibraryC35923 Point of Sale and Shift Change Gasboy® Fuel Management Products
MDE-4355 Profit Point Clerk’s Manual Gasboy Fuel Management Products
MDE-4356 Profit Point Reference Manual Gasboy Fuel Management Products
MDE-4759 CFN III Payment Application Best Practices Implementation Requirements
CFN Series Networks, Card Handlers & Pump Interface
MDE-4773 CFN III Configuration Manual for Windows XP CFN Series Controllers and POS
MDE-4870 CFN III Fuel Management System PA-DSS Implementation Guide Version 3.6
CFN Series Controllers and POS
MDE-4872 CFN Series CFN III Configuration Manual for Windows XP Version 3.6
CFN Series Controllers and POSs
Credit and Debit Card NetworkDocument Number Title GOLD LibraryMDE-4390 CFN Series NBS (GL3) Credit and Debit Card Network CFN Series Networks, Card Handlers
and Pump Interface
MDE-4560 VisaNet® Credit and Debit Card Networks Gasboy Fuel Management Products
MDE-4572 PaymenTech™ 005 Credit and Debit Card Networks Gasboy Fuel Management Products
MDE-4606 BuypassSM Credit and Debit Card Networks Gasboy Fuel Management Products
Pump InterfaceDocument Number Title GOLD LibraryMDE-4337 Gilbarco CRIND® PC Interface for Site Controller III
with Windows NT or Windows XPEGasboy Fuel Management Products
MDE-4501 Wayne® CAT PC Interface for Site Controller III with Windows NT or Windows XPE
Gasboy Fuel Management Products
MDE-4559 Insight Interface Gasboy Fuel Management Products
MDE-4871 CFN III Manager’s Manual for Windows® XP Embedded - Version 3.6 · August 2010 Page 1-7
Introduction Related Documents
Card Encoding and MiscellaneousDocument Number Title GOLD LibraryC01687 CFN Series Card Encoding Manual Gasboy Fuel Management Products
Remote CommunicationsDocument Number Title GOLD LibraryMDE-4489 PC/CFN Users Guide N/A
Technical PublicationsDocument Number Title GOLD LibraryC01759 CFN Diagnostic Manual Gasboy Fuel Management Products
MDE-4624 Gasboy CFN Series Tokheim® Pump PC Interface for CFN III with Windows NT or XPE
Gasboy Fuel Management Products
MDE-4634 CFN Series Gilbarco Pump PC Interface Gasboy Fuel Management Products
MDE-4651 Wayne Pump PC Interface for Site Controller III with Windows NT or Windows XPE
Gasboy Fuel Management Products
Document Number Title GOLD Library
Page 1-8 MDE-4871 CFN III Manager’s Manual for Windows® XP Embedded - Version 3.6 · August 2010
Cabling and Wiring Introduction
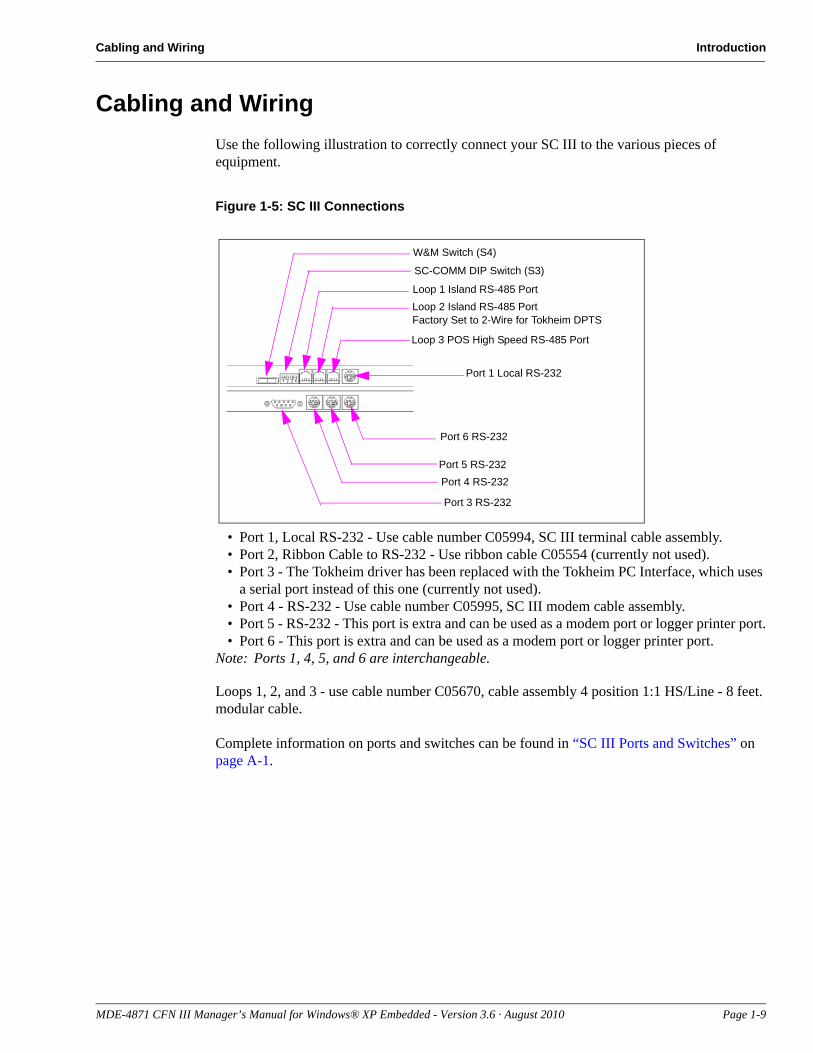
Cabling and WiringUse the following illustration to correctly connect your SC III to the various pieces of equipment.
Figure 1-5: SC III Connections
W&M Switch (S4)
SC-COMM DIP Switch (S3)
Loop 1 Island RS-485 PortLoop 2 Island RS-485 PortFactory Set to 2-Wire for Tokheim DPTS
Loop 3 POS High Speed RS-485 Port
Port 1 Local RS-232
Port 6 RS-232
Port 5 RS-232Port 4 RS-232
Port 3 RS-232
• Port 1, Local RS-232 - Use cable number C05994, SC III terminal cable assembly.• Port 2, Ribbon Cable to RS-232 - Use ribbon cable C05554 (currently not used).• Port 3 - The Tokheim driver has been replaced with the Tokheim PC Interface, which uses
a serial port instead of this one (currently not used).• Port 4 - RS-232 - Use cable number C05995, SC III modem cable assembly.• Port 5 - RS-232 - This port is extra and can be used as a modem port or logger printer port.• Port 6 - This port is extra and can be used as a modem port or logger printer port.
Note: Ports 1, 4, 5, and 6 are interchangeable.
Loops 1, 2, and 3 - use cable number C05670, cable assembly 4 position 1:1 HS/Line - 8 feet. modular cable.
Complete information on ports and switches can be found in “SC III Ports and Switches” on page A-1.
MDE-4871 CFN III Manager’s Manual for Windows® XP Embedded - Version 3.6 · August 2010 Page 1-9

Introduction Cabling and Wiring
This page is intentionally left blank.
Page 1-10 MDE-4871 CFN III Manager’s Manual for Windows® XP Embedded - Version 3.6 · August 2010
Important Safety Information
2 – Important Safety Information
This section introduces the hazards and safety precautions associated with installing, inspecting, maintaining or servicing this product. Before performing any task on this product, read this safety information and the applicable sections in this manual, where additional hazards and safety precautions for your task will be found. Fire, explosion, electrical shock or pressure release could occur and cause death or serious injury, if these safe service procedures are not followed.Preliminary PrecautionsYou are working in a potentially dangerous environment of flammable fuels, vapors, and high voltage or pressures. Only trained or authorized individuals knowledgeable in the related procedures should install, inspect, maintain or service this equipment.
Emergency Total Electrical Shut-OffThe first and most important information you must know is how to stop all fuel flow to the pump/dispenser and island. Locate the switch or circuit breakers that shut off all power to all fueling equipment, dispensing devices, and Submerged Turbine Pumps (STPs).
The EMERGENCY STOP, ALL STOP, and PUMP STOP buttons at the cashier’s station WILL NOT shut off electrical power to the pump/dispenser. This means that even if you activate these stops, fuel may continue to flow uncontrolled.
You must use the TOTAL ELECTRICAL SHUT-OFF in the case of an emergency and not the console’s ALL STOP and PUMP STOP or similar keys.
! WARNING!
Total Electrical Shut-Off Before AccessAny procedure that requires access to electrical components or the electronics of the dispenser requires total electrical shut off of that unit. Understand the function and location of this switch or circuit breaker before inspecting, installing, maintaining, or servicing Gasboy equipment.
Evacuating, Barricading and Shutting OffAny procedure that requires access to the pump/dispenser or STPs requires the following actions:
• An evacuation of all unauthorized persons and vehicles from the work area
• Use of safety tape, cones or barricades at the affected unit(s)
• A total electrical shut-off of the affected unit(s)
Read the ManualRead, understand and follow this manual and any other labels or related materials supplied with this equipment. If you do not understand a procedure, call a Gasboy Authorized Service Contractor or call the Gasboy Service Center at 1-800-444-5529. It is imperative to your safety and the safety of others to understand the procedures before beginning work.
Follow the RegulationsApplicable information is available in National Fire Protection Association (NFPA) 30A; Code for Motor Fuel Dispensing Facilities and Repair Garages, NFPA 70; National Electrical Code (NEC), Occupational Safety and Hazard Association (OSHA) regulations and federal, state, and local codes. All these regulations must be followed. Failure to install, inspect, maintain or service this equipment in accordance with these codes, regulations and standards may lead to legal citations with penalties or affect the safe use and operation of the equipment.
Replacement PartsUse only genuine Gasboy replacement parts and retrofit kits on your pump/dispenser. Using parts other than genuine Gasboy replacement parts could create a safety hazard and violate local regulations.
Safety Symbols and Warning WordsThis section provides important information about warning symbols and boxes.Alert Symbol
This safety alert symbol is used in this manual and on warning labels to alert you to a precaution which must be followed to prevent potential personal safety hazards. Obey safety directives that follow this symbol to avoid possible injury or death.Signal WordsThese signal words used in this manual and on warning labels tell you the seriousness of particular safety hazards. The precautions below must be followed to prevent death, injury or damage to the equipment:
DANGER: Alerts you to a hazard or unsafe practice which will result in death or serious injury.WARNING: Alerts you to a hazard or unsafe practice that could result in death or serious injury. CAUTION with Alert symbol: Designates a hazard or unsafe practice which may result in minor injury.CAUTION without Alert symbol: Designates a hazard or unsafe practice which may result in property or equipment damage
Working With Fuels and Electrical Energy
Prevent Explosions and FiresFuels and their vapors will explode or burn, if ignited. Spilled or leaking fuels cause vapors. Even filling customer tanks will cause potentially dangerous vapors in the vicinity of the dispenser or island.
!
!
!
MDE-4871 CFN III Manager’s Manual for Windows® XP Embedded - Version 3.6 · August 2010 Page 2-1
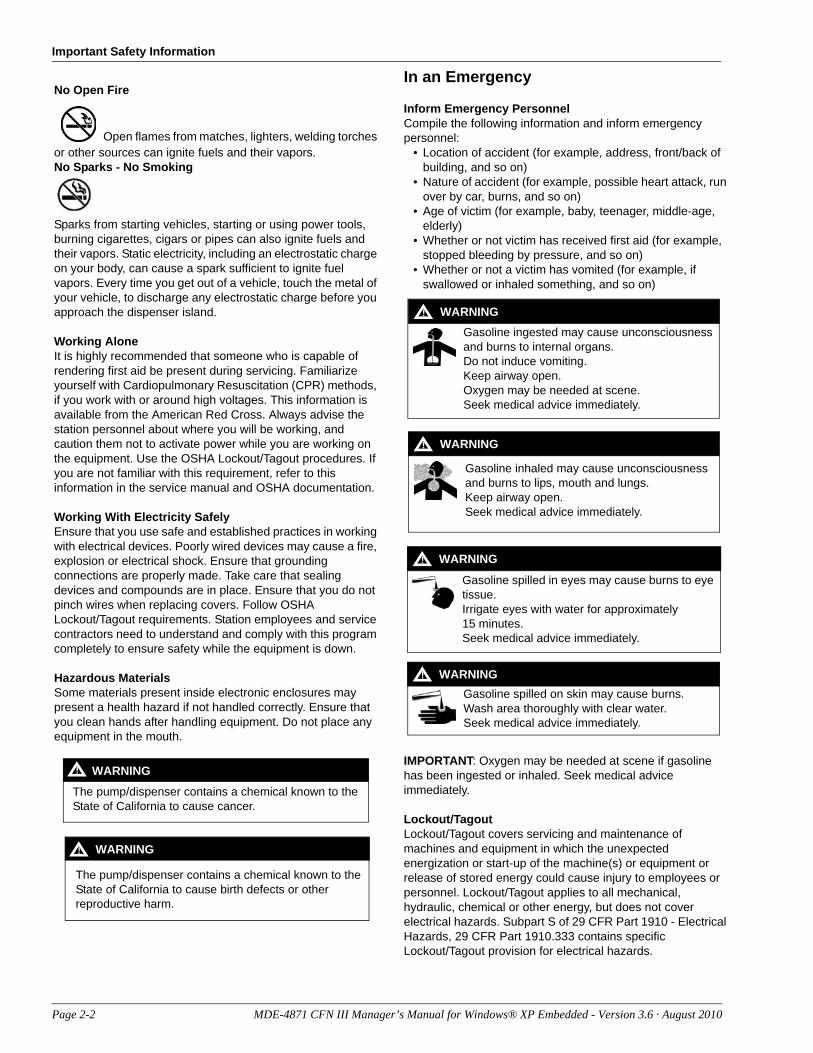
Important Safety Information
No Open Fire
Open flames from matches, lighters, welding torches or other sources can ignite fuels and their vapors.No Sparks - No Smoking
Sparks from starting vehicles, starting or using power tools, burning cigarettes, cigars or pipes can also ignite fuels and their vapors. Static electricity, including an electrostatic charge on your body, can cause a spark sufficient to ignite fuel vapors. Every time you get out of a vehicle, touch the metal of your vehicle, to discharge any electrostatic charge before you approach the dispenser island.
Working AloneIt is highly recommended that someone who is capable of rendering first aid be present during servicing. Familiarize yourself with Cardiopulmonary Resuscitation (CPR) methods, if you work with or around high voltages. This information is available from the American Red Cross. Always advise the station personnel about where you will be working, and caution them not to activate power while you are working on the equipment. Use the OSHA Lockout/Tagout procedures. If you are not familiar with this requirement, refer to this information in the service manual and OSHA documentation.
Working With Electricity SafelyEnsure that you use safe and established practices in working with electrical devices. Poorly wired devices may cause a fire, explosion or electrical shock. Ensure that grounding connections are properly made. Take care that sealing devices and compounds are in place. Ensure that you do not pinch wires when replacing covers. Follow OSHA Lockout/Tagout requirements. Station employees and service contractors need to understand and comply with this program completely to ensure safety while the equipment is down.
Hazardous MaterialsSome materials present inside electronic enclosures may present a health hazard if not handled correctly. Ensure that you clean hands after handling equipment. Do not place any equipment in the mouth.
The pump/dispenser contains a chemical known to the State of California to cause cancer.
WARNING!
The pump/dispenser contains a chemical known to the State of California to cause birth defects or other reproductive harm.
WARNING!
In an Emergency
Inform Emergency PersonnelCompile the following information and inform emergency personnel:
• Location of accident (for example, address, front/back of building, and so on)
• Nature of accident (for example, possible heart attack, run over by car, burns, and so on)
• Age of victim (for example, baby, teenager, middle-age, elderly)
• Whether or not victim has received first aid (for example, stopped bleeding by pressure, and so on)
• Whether or not a victim has vomited (for example, if swallowed or inhaled something, and so on)
Gasoline ingested may cause unconsciousness and burns to internal organs.Do not induce vomiting.Keep airway open. Oxygen may be needed at scene.Seek medical advice immediately.
WARNING!
Gasoline inhaled may cause unconsciousness and burns to lips, mouth and lungs.Keep airway open.Seek medical advice immediately.
WARNING!
Gasoline spilled in eyes may cause burns to eye tissue.Irrigate eyes with water for approximately 15 minutes.Seek medical advice immediately.
!
WARNING!
Gasoline spilled on skin may cause burns.Wash area thoroughly with clear water.Seek medical advice immediately.
WARNING!
IMPORTANT: Oxygen may be needed at scene if gasoline has been ingested or inhaled. Seek medical advice immediately.
Lockout/TagoutLockout/Tagout covers servicing and maintenance of machines and equipment in which the unexpected energization or start-up of the machine(s) or equipment or release of stored energy could cause injury to employees or personnel. Lockout/Tagout applies to all mechanical, hydraulic, chemical or other energy, but does not cover electrical hazards. Subpart S of 29 CFR Part 1910 - Electrical Hazards, 29 CFR Part 1910.333 contains specific Lockout/Tagout provision for electrical hazards.
Page 2-2 MDE-4871 CFN III Manager’s Manual for Windows® XP Embedded - Version 3.6 · August 2010
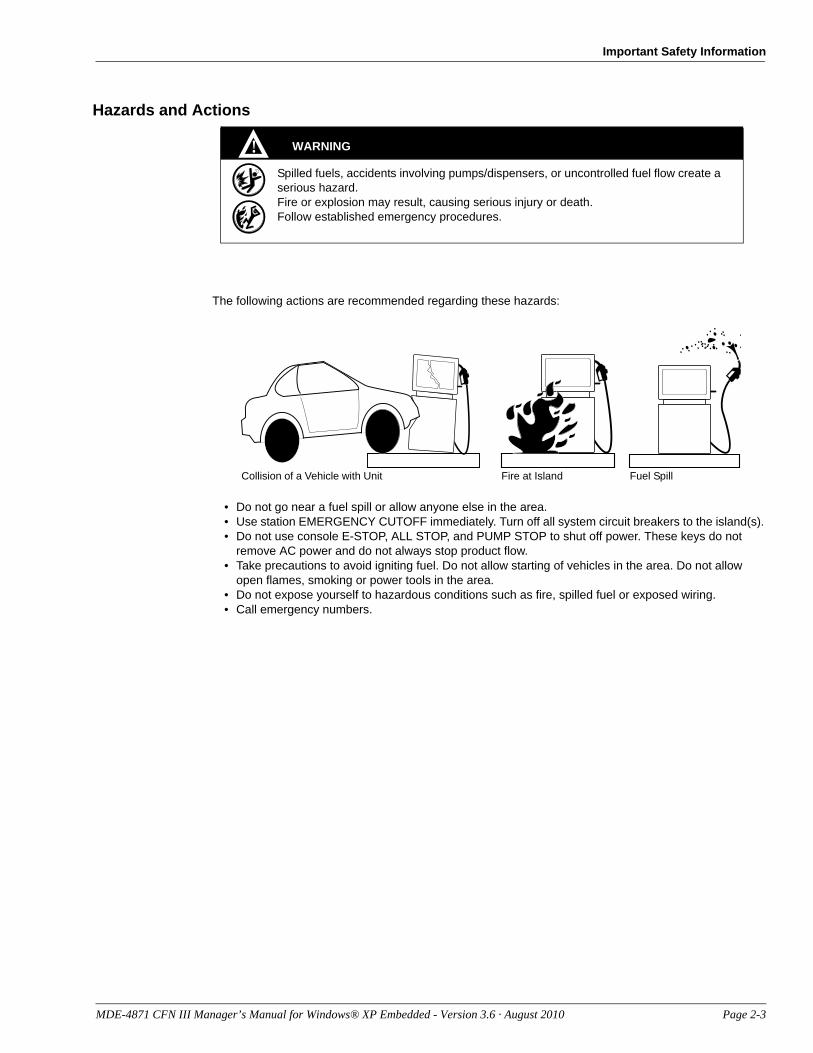
Important Safety Information
Hazards and Actions
WARNING
Spilled fuels, accidents involving pumps/dispensers, or uncontrolled fuel flow create a serious hazard.Fire or explosion may result, causing serious injury or death.Follow established emergency procedures.
!
Collision of a Vehicle with Unit Fire at Island Fuel Spill
The following actions are recommended regarding these hazards:
• Do not go near a fuel spill or allow anyone else in the area.• Use station EMERGENCY CUTOFF immediately. Turn off all system circuit breakers to the island(s).• Do not use console E-STOP, ALL STOP, and PUMP STOP to shut off power. These keys do not
remove AC power and do not always stop product flow.• Take precautions to avoid igniting fuel. Do not allow starting of vehicles in the area. Do not allow
open flames, smoking or power tools in the area.• Do not expose yourself to hazardous conditions such as fire, spilled fuel or exposed wiring.• Call emergency numbers.
MDE-4871 CFN III Manager’s Manual for Windows® XP Embedded - Version 3.6 · August 2010 Page 2-3

Important Safety Information
This page is intentionally left blank.
Page 2-4 MDE-4871 CFN III Manager’s Manual for Windows® XP Embedded - Version 3.6 · August 2010
System Overview Site Controller III
3 – Site Controller III
System OverviewThe Site Controller III (SC III) is the brain of the CFN III System. Its job is to keep you informed of what is going on at your site and to enable you to control the various pieces of equipment involved in a fueling operation, such as fuel pumps or dispensers, automatic gates, and tank gauges.
The SC III collects information about what each device is doing and makes that information available to you in a convenient format. When you issue commands to the Site Controller-for example, to tell it to authorize a sale on a fuel pump-it forwards the request to the pump hardware, then monitors the sale in case something goes wrong. It puts control of all the connected devices at your fingertips.
When the SC III was installed, your technician or system administrator configured it with the PC operating system, along with your particular devices and the procedures your company follows. For example, if your site accepts cash for fuel, the SC III has been told whether the customer is required to pay before pumping (a prepay system) or is allowed to pay after pumping (a postpay system).
CFN3 Command WindowThe P: drive is your CFN3 prompt and the location of the SC3 root directory.
The command window has a [drive:/directory]* prompt where you will enter your commands to the SC III. If you do not see this prompt you must press Enter to bring up the signon prompt. Sign on as instructed and press Enter. The [P:]* prompt will display. The command window must be “active” to communicate with the SC III. Active means that the window appears on the desktop with a colored band at the top displaying the words CFN3. If the band is gray then the window is not active. To activate the window, move the desktop arrow over the window (using the mouse) and click once using the left mouse button. For more information about your command window and the desktop refer to “Introduction” on page 1-1.
ConsolesThe Point Of Sale (POS) device that communicate with the SC III is the Profit Point console.
The console combines pump control and cash-register functions. They allow you to turn on pumps and accept cash or other payment. They are used at sites that do retail business, accept cash or Credit Cards in the store. The Profit Point manuals describe console operations.
MDE-4871 CFN III Manager’s Manual for Windows® XP Embedded - Version 3.6 · August 2010 Page 3-1
Site Controller III Readers
ReadersReaders are devices that communicate with the CFN system and allow input from the end user. They can activate pumps, display messages, and print receipts. Readers can consist of any combination of a customer display, keypad, card reader, and receipt printer. Some readers are “in dispenser” and are specifically assigned to a single pump. Stand-alone readers can represent multiple pumps and require a pump selection from the user. To obtain a receipt from these readers, the user must return to the reader after completing a fuel sale and re-swipe the card or enter the pump number that was used.
Log PrinterAnother device, the log printer prints a continuous record of transactions and may also be used to print reports. Every site requires some type of printer. It is important to know how to read the information that comes out of the printer, since it includes data about completed sales and messages about any errors that have occurred.
The log printer generates an on-going record on paper of important events at the site. These include sales transactions and system messages generated when certain commands are run or when errors are detected during operation.
The log printer, such as an Okidata® 184 plain printer, must be located where site personnel can read its output. The output of the log printer serves both as a maintenance log and an audit trail. For example, the log printer records an entry as each sale is concluded and also any time a problem is detected in an attached pump, island card reader, or other device.
Since the printed log is an important business record, it is important not to let the log printer jam or run out of paper.
IMPORTANT INFORMATION
In order to print, the log printer must be in the state called on-line or ready. This is usually indicated by a light on the front panel of the printer. The log printer normally goes off-line automatically when it jams or runs out of paper. You can take the log printer off-line to load paper. Most printers have a switch labeled on-line or select for taking them on- and off-line.
A properly connected and configured log printer will notify the SC III whenever it goes off-line, so that no data will be sent to it until it is again ready to print. However, the space available for storing such output is limited, so the log printer must not be left off-line for long periods when the site is operating.
It is possible to print a file on a log printer. This is usually done at shift change or by a local automatic command file. When a file is printed on the log this way, the terminal beeps and prints the header - Printing: filename date time where filename is the name of the file being printed.
Page 3-2 MDE-4871 CFN III Manager’s Manual for Windows® XP Embedded - Version 3.6 · August 2010
Command Terminals Site Controller III
Command TerminalsSite commands can be entered through local or remote terminals. The local terminal is the command window on your CFN III PC. A remote terminal is connected to the site through one of the SC III’s RS-232 ports. It can be any dumb terminal such as the LINK or another PC running terminal emulator software capable of supporting VT100 or VT52 (such as Procomm Plus®). The remote terminal can also be a modem connection.
CommandsIn order to use the SC III fully, you must know how to give it commands and to understand its replies. Commands are instructions you type in the CFN3 Command window. CFN3 commands must be typed in exactly the format shown in this manual. Most commands are words or abbreviations for the action to be performed. For example, typing PRINT DATE and then pressing Enter causes the SC III to print the current date and time according to its internal clock.
Some commands, as explained in this manual, have short forms that you can use instead of typing the whole command in order to save time. In the above example, PRINT DATE could have been typed P DA.
Besides command words, other special symbols, such as < and >, provide flexibility in redirecting the input to or output from commands.
Command KeysThe keyboards on all types of PCs have much in common. The SC III uses several specific keys for specific functions. These keys may be located in different positions on different keyboards.
Locate the Delete, Control, Enter, and EscapE keys on your keyboard. Note that:• Delete key may be marked Del• Control key may be marked Ctrl or Ctl• Enter key may be marked Return, RTN or ↵
• Escape key may be marked Esc
System-response ProblemsWhen you open the CFN3 command window, it must display a [P:]* at the top left of the screen. If not, press Enter or Return on your local terminal, the system must respond with a signon prompt. Should the system not respond, close the window by pressing Alt, hold it down, and then press X. Release both keys. Open the CFN3 window again by double-clicking the CFN3 icon. Press Enter to get the signon prompt.
MDE-4871 CFN III Manager’s Manual for Windows® XP Embedded - Version 3.6 · August 2010 Page 3-3
Site Controller III CFN3 Command Sessions
CFN3 Command SessionsAfter signing on, you may enter data and commands until you either sign off or are signed off automatically. The time during which you are signed on is referred to as a command session.
How to Sign OnTo sign on to the Site Controller, enter a user number and password. The information below provide information to add new users and change the password.
To sign on, proceed as follows:
1 Press Enter. The terminal will print the message signon:
2 Type your user number, a comma, and your password. Press Enter.
For example, if your user number is 3, and your password is AGENT007, type 3, AGENT007. If your password has any upper case letters, ensure that you enter them in upper case. The terminal will not echo the password you type for security reasons.
When you are properly signed on, the terminal prints a message such as Connected to site 1010 on Tue 7/27/04 1:12PM to show that the command session has begun and it is ready to accept commands. The next line displays the command prompt [P:]*.
How to Sign OffTo end a command session, press Escape (usually marked ESC) or type Exit or Quit and press Enter.
The terminal will accept no further commands until you or someone else signs on again. When you sign off, the terminal prints Sign off Tue 10/26/04 1:25PM. Do not click X in the upper right corner of the window.
Automatic Sign OffIf you do not type anything on the terminal for 5 minutes, the terminal ends the command session automatically. This protects the system if you forget to sign off.
How to Enter Commands and DataCommands tell the site controller to perform particular actions, such as printing reports or changing prices.
To enter a command, type the command on the terminal keyboard and press Enter.
After the site controller finishes performing the action requested by a command, it will respond with the current drive letter followed by an asterisk [P:]* to show that it is ready to accept another command. This letter-asterisk combination is called the command prompt, since it prompts you to enter a command. Anytime you see the command prompt, the site controller is ready to accept a command.
Page 3-4 MDE-4871 CFN III Manager’s Manual for Windows® XP Embedded - Version 3.6 · August 2010

CFN3 Command Sessions Site Controller III
For example, if you type the PRINT DATE command and press Enter, the terminal prints the date and time, followed by the command prompt to indicate that the command has been executed and the terminal is ready to accept another command.Note: Any time you enter a command, you can type the full command or use the short form,
such as P DA for Print Date in the section immediately above. You can use either upper case or lower case letters when typing commands. For the short form of system commands, type HELP and press Enter at the command prompt. The essential part of the command will appear in upper case. For the Print DAte command, the P DA command is shown in upper case and this is all that is required to execute the command.
If a command requires that you enter data, the terminal will ask a question—which is called a data entry prompt—indicating what type of data you must enter. If the terminal displays a data entry prompt:
• Type the data and press Enter.• If the command has several prompts, type the requested data and press Enter after each
one.• After the last prompt in the series, the terminal will print the command prompt to indicate
the command has been executed and the terminal is ready to accept another command.
[P:]* PRINT DATE ↵
Tue 10/26/04 11:40AM,Trans=57, Seq=624 SCIIIv3.x[P:]*
To print the date, type PRINT DATE and press Enter.
CFN3 will display the date.Command prompt will be displayed.
To load the date, proceed as follows:
1 Type LOAD DATE.
[P:]* LOAD DATE ↵MONTH? 10 ↵DAY OF MONTH? 26 ↵YEAR? 04 ↵HOUR? 13 ↵MINUTE? 31 ↵Tue 10/26/04 1:31PM, Trans=154, Seq=332 SCIIIv3.x[P:]*
2 Enter the month (mm format).
3 Enter the day (dd format).
4 Enter the year (yy format).
5 Enter the hour (military time format).
6 Enter the minute. CFN3 will display the date and time.
MDE-4871 CFN III Manager’s Manual for Windows® XP Embedded - Version 3.6 · August 2010 Page 3-5

Site Controller III CFN3 Command Sessions
[P:]* RESET DIAGNOSTICS ↵[P:]*
If a command does not print data or require data to be entered, the terminal prints just a command prompt to indicate the command has been executed and the terminal is ready to accept another command as illustrated.
How to Use Options with CommandsMany commands take options that modify how the command works. These options are additional letters or symbols typed on the command line after the command.
A semicolon (;) separates the command and the option(s). Do not put a space between the command and the option(s); if you insert a space, the option will be interpreted as an argument.
If both options and arguments (data) are used on a command line, the options come first, then a space, then the arguments:command;options arguments
When more than one option is used with a command, the options may be listed in any order. Complex options (P1=, P2=, >, >>, <) are separated by commas.
The common options are:
Option Function DescriptionA All Usually expands the effect of a command.I Initialize Usually initializes data affected by the command.
C Chain Allows you to enter multiple sets (a chain) of data to commands requiring data. See below.
P1=,P2= Parameter Allows you to specify fields for sorting. Field name is given as data immediately following parameter; for example, PRINT TRANSACTION;P1=AUTH would print a list of transactions sorted by authorization codes.
> Redirect output to a new file
Saves output of a command in a file you specify. If the file already exists, that file is overwritten. Requires destination (file name or LOG) as argument.
>> Redirect output to an existing file
Output is appended to the end of the specified file. Requires destination (file name) as argument. If a file does not exist, it will be created.
< Redirect input Allows you to use a file as the source of input to a command. Requires source (file name) as argument.
L Lines Used with any command to page output for CRT screen. May also be used to set number of lines per screen (for example, L=20). Stays in effect for all subsequent commands until the user signs off or the L option is redefined by using it on another command.
T Text Used in command files intended to be run from the console so that single lines of text can be displayed on the console.
H Home Used with any command, clears from the current cursor position to the end of the screen and puts the cursor in the home position on a CRT.
Page 3-6 MDE-4871 CFN III Manager’s Manual for Windows® XP Embedded - Version 3.6 · August 2010
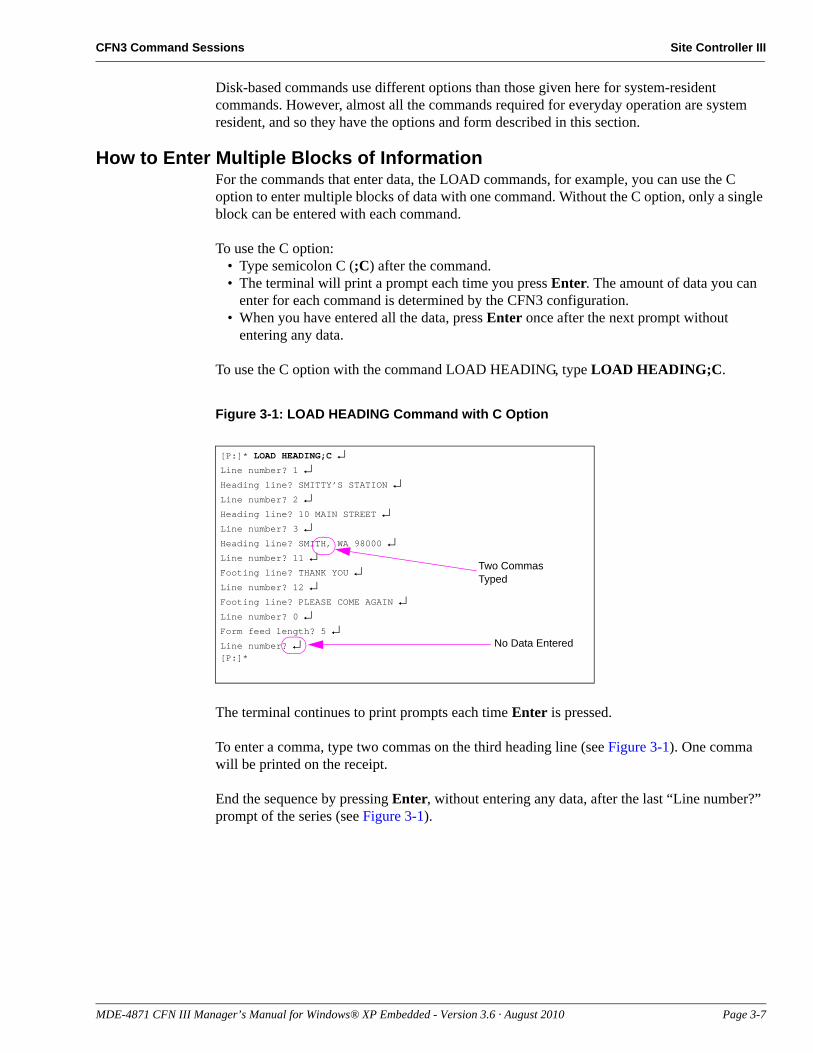
CFN3 Command Sessions Site Controller III
Disk-based commands use different options than those given here for system-resident commands. However, almost all the commands required for everyday operation are system resident, and so they have the options and form described in this section.
How to Enter Multiple Blocks of InformationFor the commands that enter data, the LOAD commands, for example, you can use the C option to enter multiple blocks of data with one command. Without the C option, only a single block can be entered with each command.
To use the C option:• Type semicolon C (;C) after the command.• The terminal will print a prompt each time you press Enter. The amount of data you can
enter for each command is determined by the CFN3 configuration.• When you have entered all the data, press Enter once after the next prompt without
entering any data.
To use the C option with the command LOAD HEADING, type LOAD HEADING;C.
Figure 3-1: LOAD HEADING Command with C Option
[P:]* LOAD HEADING;C ↵Line number? 1 ↵Heading line? SMITTY’S STATION ↵Line number? 2 ↵Heading line? 10 MAIN STREET ↵Line number? 3 ↵Heading line? SMITH, WA 98000 ↵Line number? 11 ↵Footing line? THANK YOU ↵Line number? 12 ↵Footing line? PLEASE COME AGAIN ↵Line number? 0 ↵
Form feed length? 5 ↵Line number? ↵[P:]*
Two Commas Typed
No Data Entered
The terminal continues to print prompts each time Enter is pressed.
To enter a comma, type two commas on the third heading line (see Figure 3-1). One comma will be printed on the receipt.
End the sequence by pressing Enter, without entering any data, after the last “Line number?” prompt of the series (see Figure 3-1).
MDE-4871 CFN III Manager’s Manual for Windows® XP Embedded - Version 3.6 · August 2010 Page 3-7
Site Controller III CFN3 Command Sessions
How to Verify CommandsSome commands require verification before they are executed. These commands give you a chance to terminate the action if you entered the command inadvertently.
If a command requires verification, the terminal will print the prompt Verify (y/n)?. Type a Y to continue execution, or an N to terminate the command. Do not type a Y unless you are sure the command does what you want to do.
Try not to get in the bad habit of typing Y automatically when prompted with Verify (y/n)?. Look at the command line you typed and think first.
Note: Verification is not required when one of these commands is included in a command file.
How to Use Ranges with CommandsMost PRINT commands allow you to act on specified ranges of data.
• A range has the form N-M, which means numbers N through M (in entering the command, actual numbers are substituted for N and M).
• A -N means numbers from the beginning of the file through N.• An N- means number N through the end of the file.• An N means print only number N.
If the starting number specified is not in the file, no data is printed. The printout stops after the last number specified or at the end of the file if the ending number is not in the file.
You can specify more than one range for a command:• PRINT TRANSACTION 23-150 prints transactions 23 through 150.• PRINT TRANSACTION 23-150 200-250 prints transactions 23 through 150 and 200
through 250.• PRINT TRANSACTION 23- prints transaction number 23 through the end of the
transaction file.• PRINT TRANSACTION -5 prints transactions from the beginning of the file through
transaction 5.• PRINT TRANSACTION 34 prints only transaction number 34.• PRINT TRANSACTION;P2=ACC=54, 1-10 prints transactions whose account number
starts with 54, in the transaction range 1 through 10.
The only PRINT commands that do not allow ranges are PRINT CARD, PRINT CONSOLE, PRINT DATE, PRINT PHONE, PRINT RECEIPT, and PRINT TIP. PRINT LOCKOUT does not allow ranges in systems with limited lockout.
Shortcut for Entering DataAfter you are familiar with some of the commands, you may no longer require the prompts to remind you how to enter data. You can type the command and all the data you want to enter on one line before you press Enter.
Separate items with a comma. To enter a comma as part of the text, type two commas. Remember that if you use the C option, you must press Enter twice to enter and terminate the command.
Page 3-8 MDE-4871 CFN III Manager’s Manual for Windows® XP Embedded - Version 3.6 · August 2010
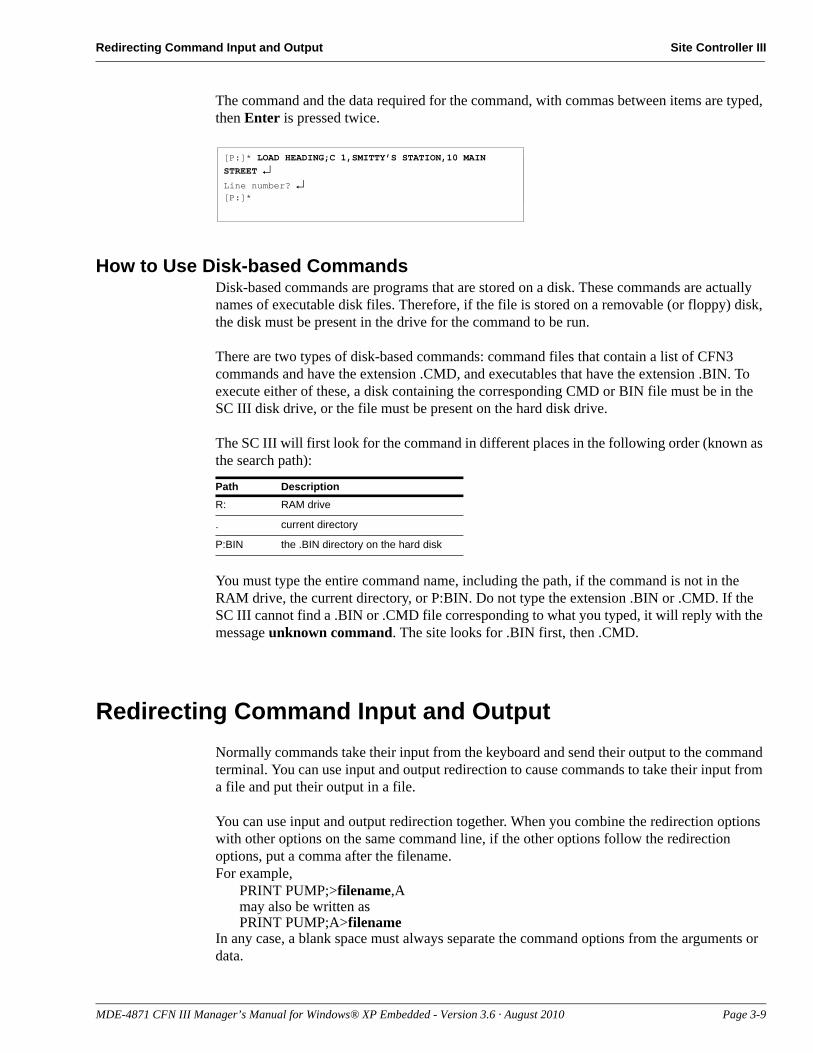
Redirecting Command Input and Output Site Controller III
[P:]* LOAD HEADING;C 1,SMITTY’S STATION,10 MAIN STREET ↵Line number? ↵[P:]*
The command and the data required for the command, with commas between items are typed, then Enter is pressed twice.
How to Use Disk-based CommandsDisk-based commands are programs that are stored on a disk. These commands are actually names of executable disk files. Therefore, if the file is stored on a removable (or floppy) disk, the disk must be present in the drive for the command to be run.
There are two types of disk-based commands: command files that contain a list of CFN3 commands and have the extension .CMD, and executables that have the extension .BIN. To execute either of these, a disk containing the corresponding CMD or BIN file must be in the SC III disk drive, or the file must be present on the hard disk drive.
The SC III will first look for the command in different places in the following order (known as the search path):
You must type the entire command name, including the path, if the command is not in the RAM drive, the current directory, or P:BIN. Do not type the extension .BIN or .CMD. If the SC III cannot find a .BIN or .CMD file corresponding to what you typed, it will reply with the message unknown command. The site looks for .BIN first, then .CMD.
Redirecting Command Input and OutputNormally commands take their input from the keyboard and send their output to the command terminal. You can use input and output redirection to cause commands to take their input from a file and put their output in a file.
You can use input and output redirection together. When you combine the redirection options with other options on the same command line, if the other options follow the redirection options, put a comma after the filename.For example,
PRINT PUMP;>filename,Amay also be written asPRINT PUMP;A>filename
In any case, a blank space must always separate the command options from the arguments or data.
Path DescriptionR: RAM drive
. current directory
P:BIN the .BIN directory on the hard disk
MDE-4871 CFN III Manager’s Manual for Windows® XP Embedded - Version 3.6 · August 2010 Page 3-9
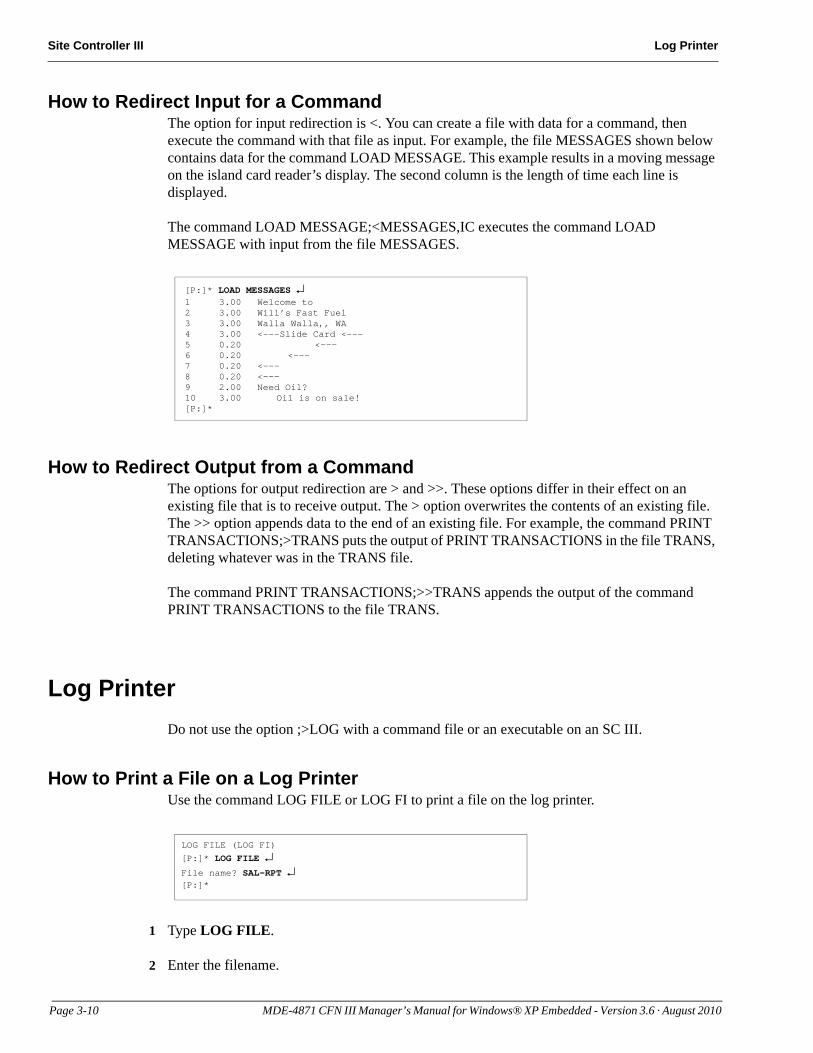
Site Controller III Log Printer
How to Redirect Input for a CommandThe option for input redirection is <. You can create a file with data for a command, then execute the command with that file as input. For example, the file MESSAGES shown below contains data for the command LOAD MESSAGE. This example results in a moving message on the island card reader’s display. The second column is the length of time each line is displayed.
[P:]* LOAD MESSAGES ↵1 3.00 Welcome to2 3.00 Will’s Fast Fuel3 3.00 Walla Walla,, WA4 3.00 <---Slide Card <---5 0.20 <---6 0.20 <---7 0.20 <---8 0.20 <---9 2.00 Need Oil?10 3.00 Oil is on sale![P:]*
The command LOAD MESSAGE;<MESSAGES,IC executes the command LOAD MESSAGE with input from the file MESSAGES.
How to Redirect Output from a CommandThe options for output redirection are > and >>. These options differ in their effect on an existing file that is to receive output. The > option overwrites the contents of an existing file. The >> option appends data to the end of an existing file. For example, the command PRINT TRANSACTIONS;>TRANS puts the output of PRINT TRANSACTIONS in the file TRANS, deleting whatever was in the TRANS file.
The command PRINT TRANSACTIONS;>>TRANS appends the output of the command PRINT TRANSACTIONS to the file TRANS.
Log PrinterDo not use the option ;>LOG with a command file or an executable on an SC III.
How to Print a File on a Log PrinterUse the command LOG FILE or LOG FI to print a file on the log printer.
LOG FILE (LOG FI)[P:]* LOG FILE ↵File name? SAL-RPT ↵[P:]*
1 Type LOG FILE.
2 Enter the filename.
Page 3-10 MDE-4871 CFN III Manager’s Manual for Windows® XP Embedded - Version 3.6 · August 2010
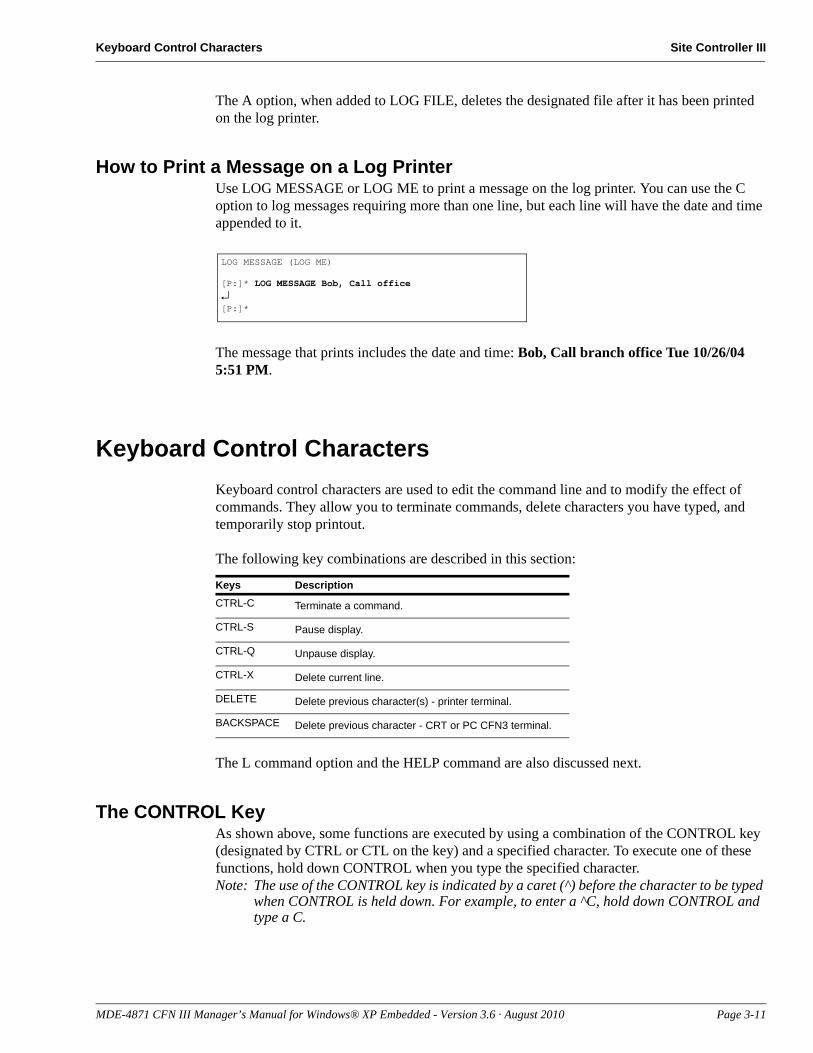
Keyboard Control Characters Site Controller III
The A option, when added to LOG FILE, deletes the designated file after it has been printed on the log printer.
How to Print a Message on a Log PrinterUse LOG MESSAGE or LOG ME to print a message on the log printer. You can use the C option to log messages requiring more than one line, but each line will have the date and time appended to it.
LOG MESSAGE (LOG ME)
[P:]* LOG MESSAGE Bob, Call office ↵[P:]*
The message that prints includes the date and time: Bob, Call branch office Tue 10/26/04 5:51 PM.
Keyboard Control CharactersKeyboard control characters are used to edit the command line and to modify the effect of commands. They allow you to terminate commands, delete characters you have typed, and temporarily stop printout.
The following key combinations are described in this section:
The L command option and the HELP command are also discussed next.
The CONTROL KeyAs shown above, some functions are executed by using a combination of the CONTROL key (designated by CTRL or CTL on the key) and a specified character. To execute one of these functions, hold down CONTROL when you type the specified character.Note: The use of the CONTROL key is indicated by a caret (^) before the character to be typed
when CONTROL is held down. For example, to enter a ^C, hold down CONTROL and type a C.
Keys DescriptionCTRL-C Terminate a command.
CTRL-S Pause display.
CTRL-Q Unpause display.
CTRL-X Delete current line.
DELETE Delete previous character(s) - printer terminal.
BACKSPACE Delete previous character - CRT or PC CFN3 terminal.
MDE-4871 CFN III Manager’s Manual for Windows® XP Embedded - Version 3.6 · August 2010 Page 3-11
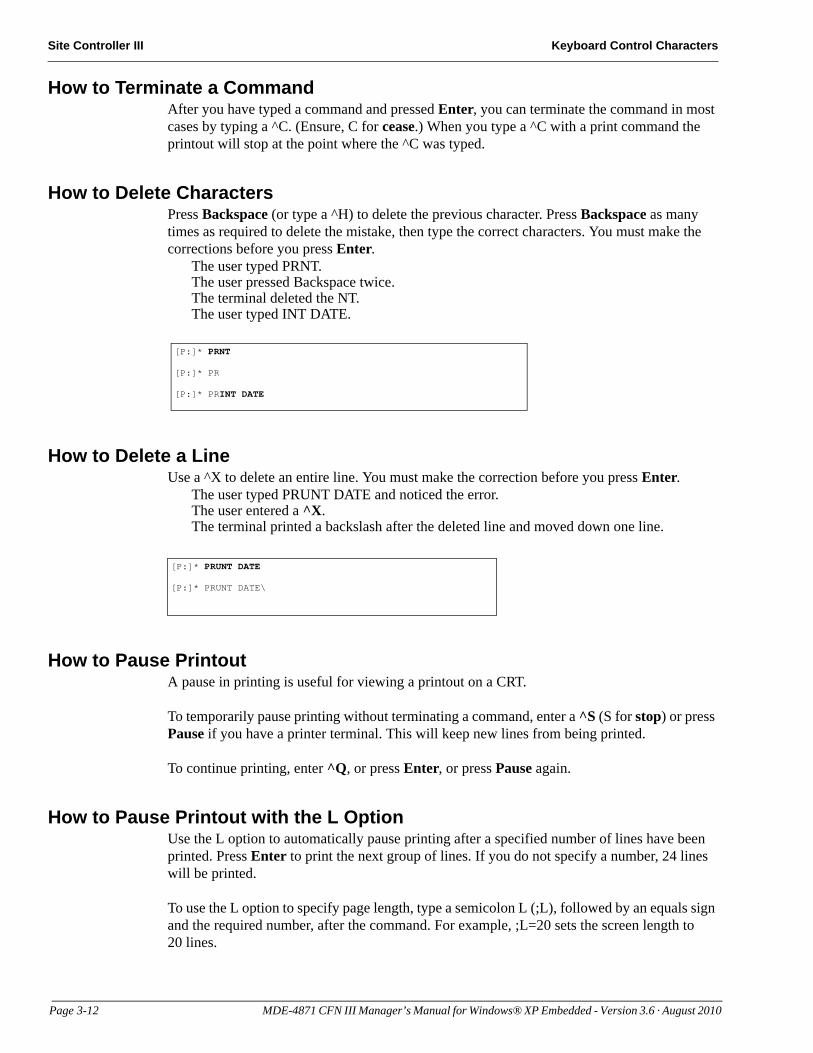
Site Controller III Keyboard Control Characters
How to Terminate a CommandAfter you have typed a command and pressed Enter, you can terminate the command in most cases by typing a ^C. (Ensure, C for cease.) When you type a ^C with a print command the printout will stop at the point where the ^C was typed.
How to Delete CharactersPress Backspace (or type a ^H) to delete the previous character. Press Backspace as many times as required to delete the mistake, then type the correct characters. You must make the corrections before you press Enter.
The user typed PRNT.The user pressed Backspace twice.The terminal deleted the NT.The user typed INT DATE.
[P:]* PRNT
[P:]* PR
[P:]* PRINT DATE
How to Delete a LineUse a ^X to delete an entire line. You must make the correction before you press Enter.
The user typed PRUNT DATE and noticed the error.The user entered a ^X.The terminal printed a backslash after the deleted line and moved down one line.
[P:]* PRUNT DATE
[P:]* PRUNT DATE\
How to Pause PrintoutA pause in printing is useful for viewing a printout on a CRT.
To temporarily pause printing without terminating a command, enter a ^S (S for stop) or press Pause if you have a printer terminal. This will keep new lines from being printed.
To continue printing, enter ^Q, or press Enter, or press Pause again.
How to Pause Printout with the L OptionUse the L option to automatically pause printing after a specified number of lines have been printed. Press Enter to print the next group of lines. If you do not specify a number, 24 lines will be printed.
To use the L option to specify page length, type a semicolon L (;L), followed by an equals sign and the required number, after the command. For example, ;L=20 sets the screen length to 20 lines.
Page 3-12 MDE-4871 CFN III Manager’s Manual for Windows® XP Embedded - Version 3.6 · August 2010
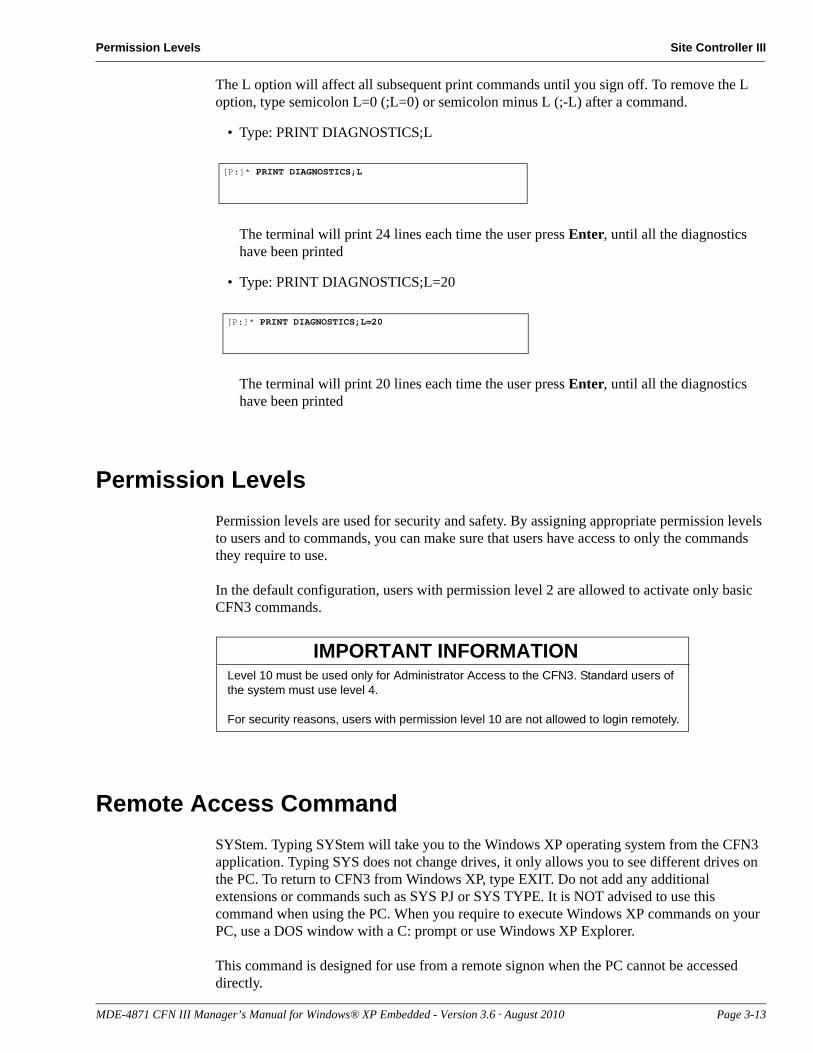
Permission Levels Site Controller III
The L option will affect all subsequent print commands until you sign off. To remove the L option, type semicolon L=0 (;L=0) or semicolon minus L (;-L) after a command.
• Type: PRINT DIAGNOSTICS;L
[P:]* PRINT DIAGNOSTICS;L
The terminal will print 24 lines each time the user press Enter, until all the diagnostics have been printed
• Type: PRINT DIAGNOSTICS;L=20
[P:]* PRINT DIAGNOSTICS;L=20
The terminal will print 20 lines each time the user press Enter, until all the diagnostics have been printed
Permission LevelsPermission levels are used for security and safety. By assigning appropriate permission levels to users and to commands, you can make sure that users have access to only the commands they require to use.
Level 10 must be used only for Administrator Access to the CFN3. Standard users of the system must use level 4.
For security reasons, users with permission level 10 are not allowed to login remotely.
IMPORTANT INFORMATION
In the default configuration, users with permission level 2 are allowed to activate only basic CFN3 commands.
Remote Access CommandSYStem. Typing SYStem will take you to the Windows XP operating system from the CFN3 application. Typing SYS does not change drives, it only allows you to see different drives on the PC. To return to CFN3 from Windows XP, type EXIT. Do not add any additional extensions or commands such as SYS PJ or SYS TYPE. It is NOT advised to use this command when using the PC. When you require to execute Windows XP commands on your PC, use a DOS window with a C: prompt or use Windows XP Explorer.
This command is designed for use from a remote signon when the PC cannot be accessed directly.
MDE-4871 CFN III Manager’s Manual for Windows® XP Embedded - Version 3.6 · August 2010 Page 3-13
Site Controller III Optional Commands
Optional CommandsSeveral of the commands shown on the help list, such as DISABLE FPR and ENABLE FPR, work only with the optional programs you may not have installed. If you try to run these commands without having installed the program, an error message appears.
HELP CommandType HELP to list all valid commands and options for the permission level you are signed on at (the short form of the commands are shown in uppercase letters).
The following illustration shows a printout for a user who has access to all commands. The number before each command is the number that runs that command from a console.
If you specify the first word of a command with the HELP command, only the commands that start with that word will be printed. For example, HELP LOAD prints all the commands that start with LOAD.
If you type HELP * and the second part of a command, you will see all the commands whose second word starts with what you specified. For example, HELP * VEHICLE (note the blank space before and after the *) prints all the commands whose second word is VEHICLE.
Page 3-14 MDE-4871 CFN III Manager’s Manual for Windows® XP Embedded - Version 3.6 · August 2010
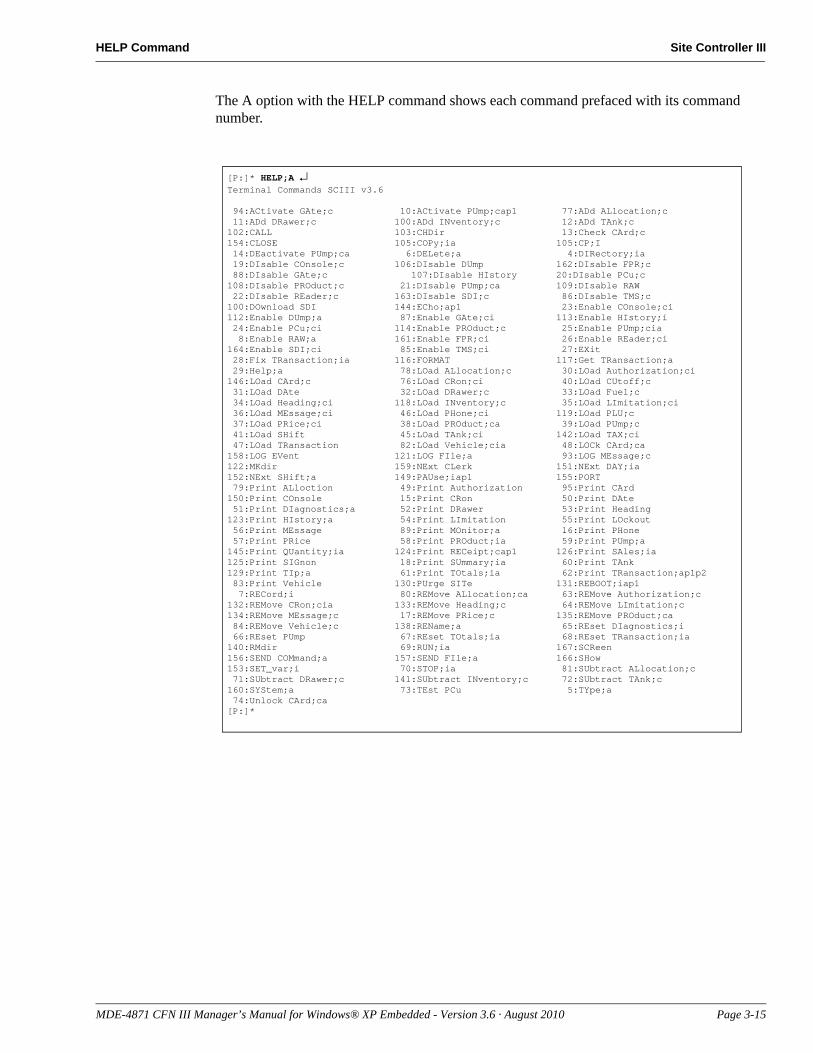
HELP Command Site Controller III
The A option with the HELP command shows each command prefaced with its command number.
[P:]* HELP;A ↵Terminal Commands SCIII v3.6
94:ACtivate GAte;c 10:ACtivate PUmp;cap1 77:ADd ALlocation;c 11:ADd DRawer;c 100:ADd INventory;c 12:ADd TAnk;c102:CALL 103:CHDir 13:Check CArd;c154:CLOSE 105:COPy;ia 105:CP;I 14:DEactivate PUmp;ca 6:DELete;a 4:DIRectory;ia 19:DIsable COnsole;c 106:DIsable DUmp 162:DIsable FPR;c 88:DIsable GAte;c 107:DIsable HIstory 20:DIsable PCu;c 108:DIsable PROduct;c 21:DIsable PUmp;ca 109:DIsable RAW 22:DIsable REader;c 163:DIsable SDI;c 86:DIsable TMS;c100:DOwnload SDI 144:ECho;ap1 23:Enable COnsole;ci112:Enable DUmp;a 87:Enable GAte;ci 113:Enable HIstory;i 24:Enable PCu;ci 114:Enable PROduct;c 25:Enable PUmp;cia 8:Enable RAW;a 161:Enable FPR;ci 26:Enable REader;ci164:Enable SDI;ci 85:Enable TMS;ci 27:EXit 28:Fix TRansaction;ia 116:FORMAT 117:Get TRansaction;a 29:Help;a 78:LOad ALlocation;c 30:LOad Authorization;ci146:LOad CArd;c 76:LOad CRon;ci 40:LOad CUtoff;c 31:LOad DAte 32:LOad DRawer;c 33:LOad Fuel;c 34:LOad Heading;ci 118:LOad INventory;c 35:LOad LImitation;ci 36:LOad MEssage;ci 46:LOad PHone;ci 119:LOad PLU;c 37:LOad PRice;ci 38:LOad PROduct;ca 39:LOad PUmp;c 41:LOad SHift 45:LOad TAnk;ci 142:LOad TAX;ci 47:LOad TRansaction 82:LOad Vehicle;cia 48:LOCk CArd;ca158:LOG EVent 121:LOG FIle;a 93:LOG MEssage;c122:MKdir 159:NExt CLerk 151:NExt DAY;ia152:NExt SHift;a 149:PAUse;iap1 155:PORT 79:Print ALloction 49:Print Authorization 95:Print CArd150:Print COnsole 15:Print CRon 50:Print DAte 51:Print DIagnostics;a 52:Print DRawer 53:Print Heading123:Print HIstory;a 54:Print LImitation 55:Print LOckout 56:Print MEssage 89:Print MOnitor;a 16:Print PHone 57:Print PRice 58:Print PROduct;ia 59:Print PUmp;a145:Print QUantity;ia 124:Print RECeipt;cap1 126:Print SAles;ia125:Print SIGnon 18:Print SUmmary;ia 60:Print TAnk129:Print TIp;a 61:Print TOtals;ia 62:Print TRansaction;ap1p2 83:Print Vehicle 130:PUrge SITe 131:REBOOT;iap1 7:RECord;i 80:REMove ALlocation;ca 63:REMove Authorization;c132:REMove CRon;cia 133:REMove Heading;c 64:REMove LImitation;c134:REMove MEssage;c 17:REMove PRice;c 135:REMove PROduct;ca 84:REMove Vehicle;c 138:REName;a 65:REset DIagnostics;i 66:REset PUmp 67:REset TOtals;ia 68:REset TRansaction;ia140:RMdir 69:RUN;ia 167:SCReen156:SEND COMmand;a 157:SEND FIle;a 166:SHow153:SET_var;i 70:STOP;ia 81:SUbtract ALlocation;c 71:SUbtract DRawer;c 141:SUbtract INventory;c 72:SUbtract TAnk;c160:SYStem;a 73:TEst PCu 5:TYpe;a 74:Unlock CArd;ca[P:]*
MDE-4871 CFN III Manager’s Manual for Windows® XP Embedded - Version 3.6 · August 2010 Page 3-15

Site Controller III HELP Command
This page is intentionally left blank.
Page 3-16 MDE-4871 CFN III Manager’s Manual for Windows® XP Embedded - Version 3.6 · August 2010
User ID Numbers Users
4 – Users
The system administrator is usually responsible for assigning the initial user-identification number and a password to each person who will require to use the SC III data terminal for accessing the CFN III system. Some systems also require users to sign on to the Profit Point. For these, the system administrator is also responsible for assigning password to people who use the console.
In its normal configuration the SC III allows up to 99 users; the default number is 5. Each user has three attributes, a user number (0 through 99), a password of up to 16 alphanumeric characters, and a permission level (0-10):
• User numbers identify users. They are also used in the output of PRINT HISTORY command to show which user executed which commands.
• Passwords are used for security. By controlling who knows the password you can control who has access to your system. For PCI compliance, each user must have a unique user number and password. Users must not share passwords.
• Permission levels are used for security and safety. By assigning appropriate permission levels to users and to commands, you can ensure that users have access only to commands that they require to use. In the default configuration, users with permission level 2 are allowed to activate only basic SC III commands. Only PCI Administrators are granted permission level 10 and are allowed to activate all SC III commands. All other users are only granted permission levels 0-9.
User ID NumbersThe SC III is capable of controlling 99 users. Users 97 and 98 are reserved for backup access purposes. If there are fewer than 97 employees at a site, each employee must have their own user number.
How to Add a User
Using the admpass.bin ProgramThe admpass program is designed for an administrator to setup and control users access to the system. The admpass program will allow new users to setup, modify some parameters for existing users, enable or disable a user, and remove a user from the system.
MDE-4871 CFN III Manager’s Manual for Windows® XP Embedded - Version 3.6 · August 2010 Page 4-1
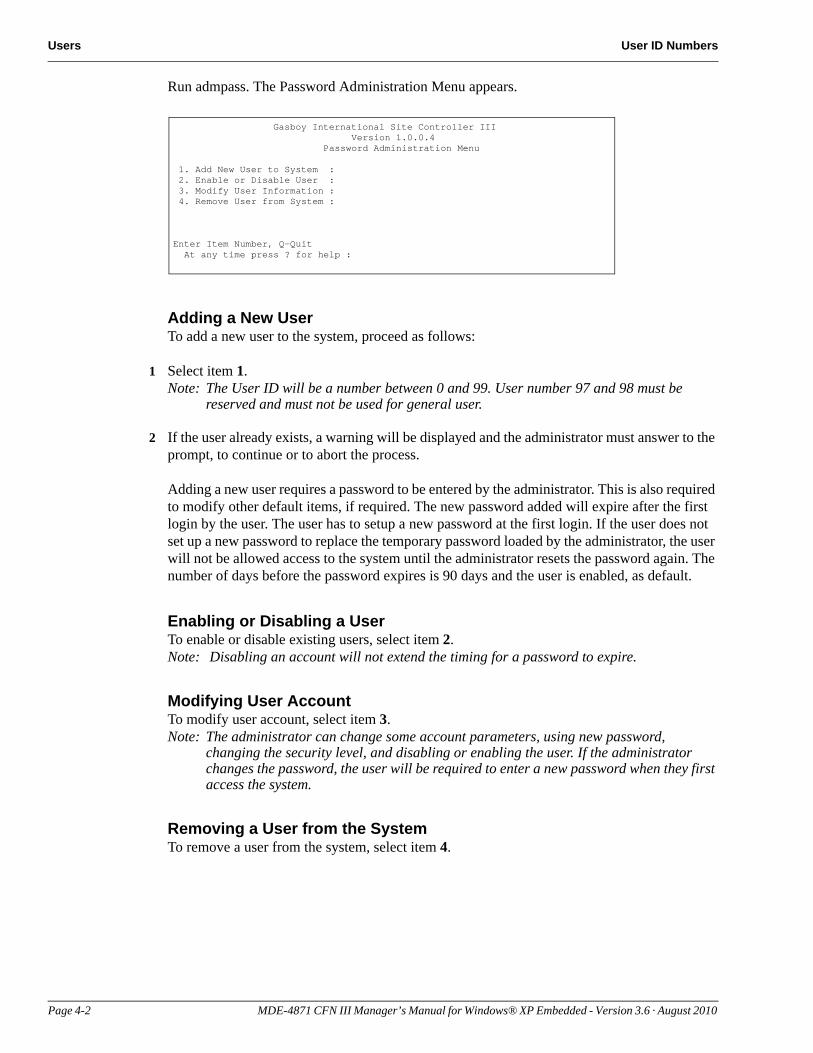
Users User ID Numbers
Gasboy International Site Controller III Version 1.0.0.4 Password Administration Menu
1. Add New User to System : 2. Enable or Disable User : 3. Modify User Information : 4. Remove User from System :
Enter Item Number, Q-Quit At any time press ? for help :
Run admpass. The Password Administration Menu appears.
Adding a New UserTo add a new user to the system, proceed as follows:
1 Select item 1.Note: The User ID will be a number between 0 and 99. User number 97 and 98 must be
reserved and must not be used for general user.
2 If the user already exists, a warning will be displayed and the administrator must answer to the prompt, to continue or to abort the process.
Adding a new user requires a password to be entered by the administrator. This is also required to modify other default items, if required. The new password added will expire after the first login by the user. The user has to setup a new password at the first login. If the user does not set up a new password to replace the temporary password loaded by the administrator, the user will not be allowed access to the system until the administrator resets the password again. The number of days before the password expires is 90 days and the user is enabled, as default.
Enabling or Disabling a UserTo enable or disable existing users, select item 2.Note: Disabling an account will not extend the timing for a password to expire.
Modifying User AccountTo modify user account, select item 3.Note: The administrator can change some account parameters, using new password,
changing the security level, and disabling or enabling the user. If the administrator changes the password, the user will be required to enter a new password when they first access the system.
Removing a User from the SystemTo remove a user from the system, select item 4.
Page 4-2 MDE-4871 CFN III Manager’s Manual for Windows® XP Embedded - Version 3.6 · August 2010
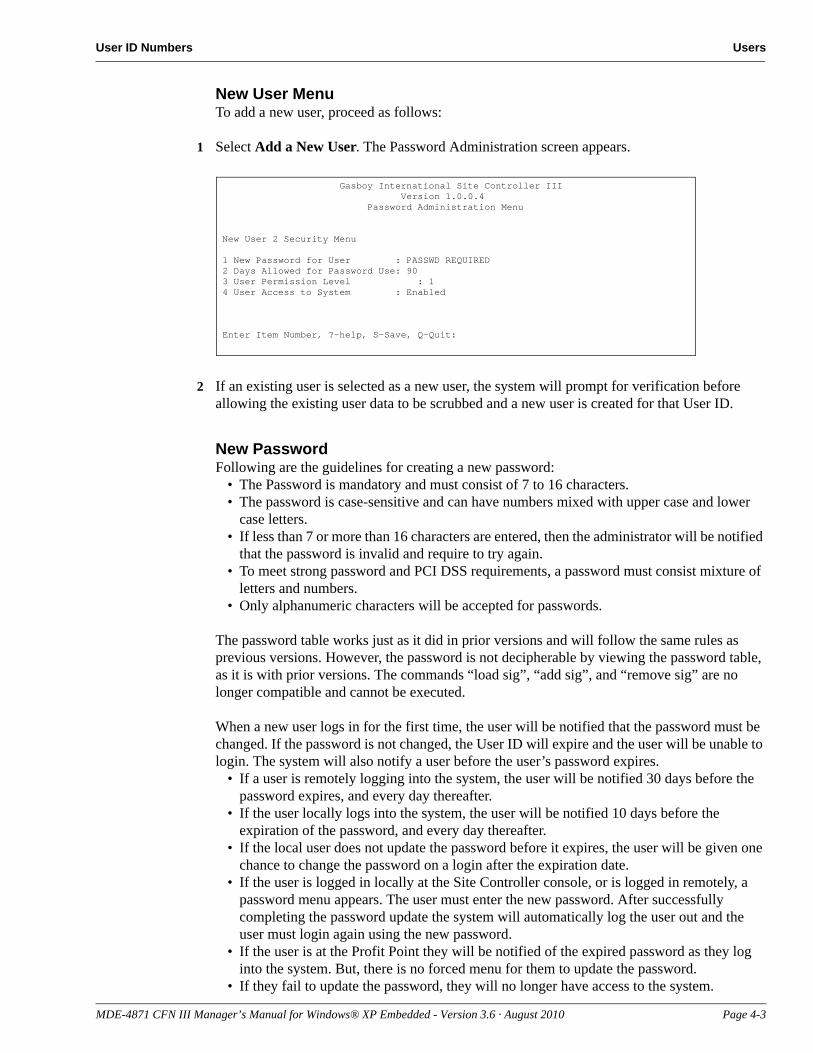
User ID Numbers Users
New User MenuTo add a new user, proceed as follows:
1 Select Add a New User. The Password Administration screen appears.
Gasboy International Site Controller III Version 1.0.0.4 Password Administration Menu
New User 2 Security Menu
1 New Password for User : PASSWD REQUIRED2 Days Allowed for Password Use: 903 User Permission Level : 14 User Access to System : Enabled
Enter Item Number, ?-help, S-Save, Q-Quit:
2 If an existing user is selected as a new user, the system will prompt for verification before allowing the existing user data to be scrubbed and a new user is created for that User ID.
New PasswordFollowing are the guidelines for creating a new password:
• The Password is mandatory and must consist of 7 to 16 characters.• The password is case-sensitive and can have numbers mixed with upper case and lower
case letters.• If less than 7 or more than 16 characters are entered, then the administrator will be notified
that the password is invalid and require to try again.• To meet strong password and PCI DSS requirements, a password must consist mixture of
letters and numbers.• Only alphanumeric characters will be accepted for passwords.
The password table works just as it did in prior versions and will follow the same rules as previous versions. However, the password is not decipherable by viewing the password table, as it is with prior versions. The commands “load sig”, “add sig”, and “remove sig” are no longer compatible and cannot be executed.
When a new user logs in for the first time, the user will be notified that the password must be changed. If the password is not changed, the User ID will expire and the user will be unable to login. The system will also notify a user before the user’s password expires.
• If a user is remotely logging into the system, the user will be notified 30 days before the password expires, and every day thereafter.
• If the user locally logs into the system, the user will be notified 10 days before the expiration of the password, and every day thereafter.
• If the local user does not update the password before it expires, the user will be given one chance to change the password on a login after the expiration date.
• If the user is logged in locally at the Site Controller console, or is logged in remotely, a password menu appears. The user must enter the new password. After successfully completing the password update the system will automatically log the user out and the user must login again using the new password.
• If the user is at the Profit Point they will be notified of the expired password as they log into the system. But, there is no forced menu for them to update the password.
• If they fail to update the password, they will no longer have access to the system.
MDE-4871 CFN III Manager’s Manual for Windows® XP Embedded - Version 3.6 · August 2010 Page 4-3
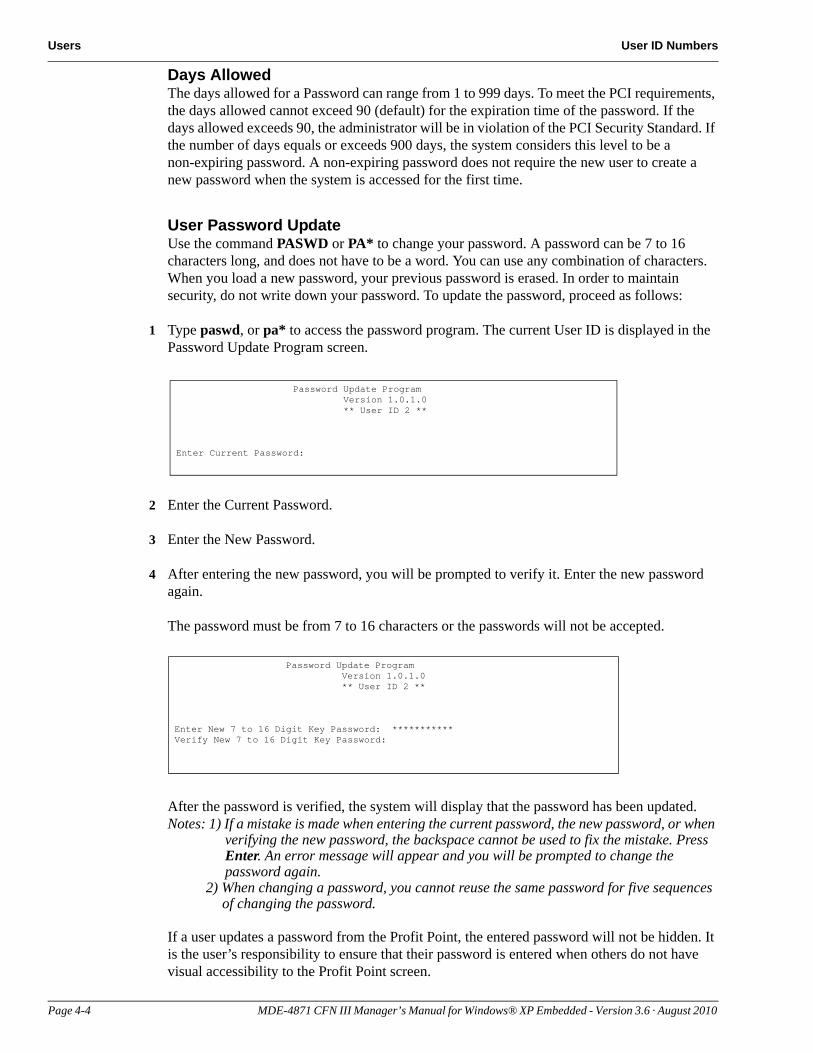
Users User ID Numbers
Days AllowedThe days allowed for a Password can range from 1 to 999 days. To meet the PCI requirements, the days allowed cannot exceed 90 (default) for the expiration time of the password. If the days allowed exceeds 90, the administrator will be in violation of the PCI Security Standard. If the number of days equals or exceeds 900 days, the system considers this level to be a non-expiring password. A non-expiring password does not require the new user to create a new password when the system is accessed for the first time.
User Password UpdateUse the command PASWD or PA* to change your password. A password can be 7 to 16 characters long, and does not have to be a word. You can use any combination of characters. When you load a new password, your previous password is erased. In order to maintain security, do not write down your password. To update the password, proceed as follows:
1 Type paswd, or pa* to access the password program. The current User ID is displayed in the Password Update Program screen.
Password Update Program Version 1.0.1.0 ** User ID 2 **
Enter Current Password:
2 Enter the Current Password.
3 Enter the New Password.
4 After entering the new password, you will be prompted to verify it. Enter the new password again.
Password Update Program Version 1.0.1.0 ** User ID 2 ** Enter New 7 to 16 Digit Key Password: ***********Verify New 7 to 16 Digit Key Password:
The password must be from 7 to 16 characters or the passwords will not be accepted.
After the password is verified, the system will display that the password has been updated.Notes: 1) If a mistake is made when entering the current password, the new password, or when
verifying the new password, the backspace cannot be used to fix the mistake. Press Enter. An error message will appear and you will be prompted to change the password again.
2) When changing a password, you cannot reuse the same password for five sequences of changing the password.
If a user updates a password from the Profit Point, the entered password will not be hidden. It is the user’s responsibility to ensure that their password is entered when others do not have visual accessibility to the Profit Point screen.
Page 4-4 MDE-4871 CFN III Manager’s Manual for Windows® XP Embedded - Version 3.6 · August 2010
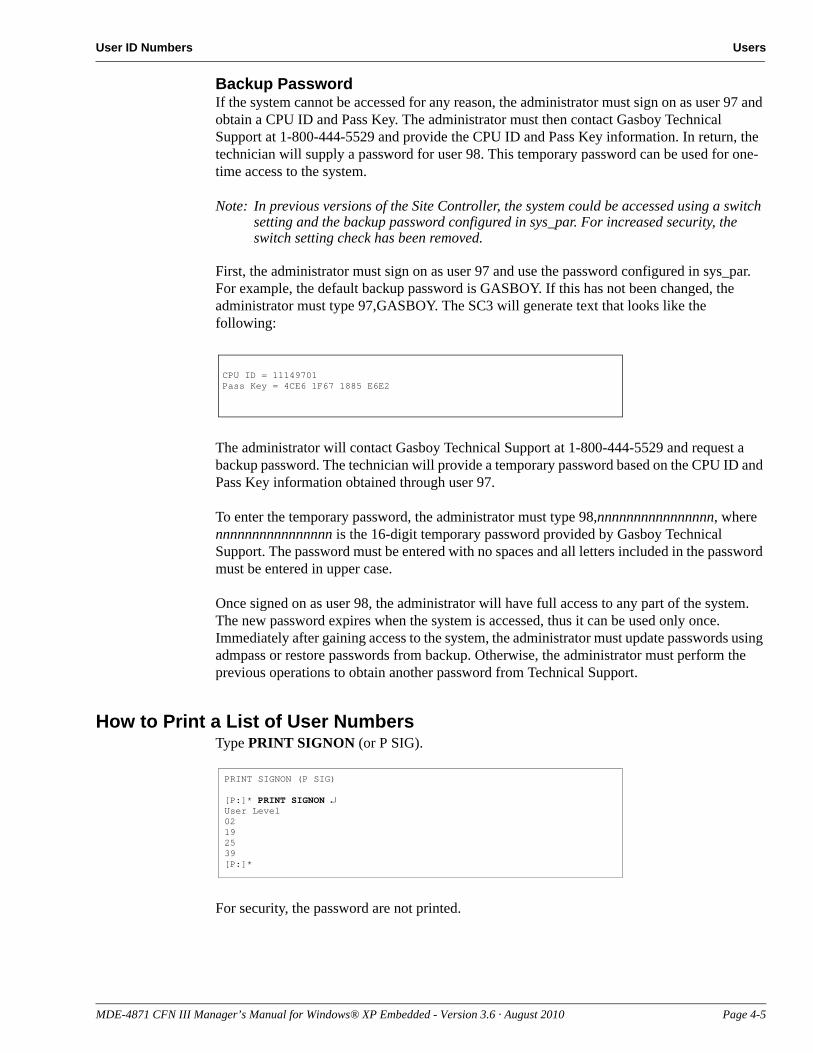
User ID Numbers Users
Backup PasswordIf the system cannot be accessed for any reason, the administrator must sign on as user 97 and obtain a CPU ID and Pass Key. The administrator must then contact Gasboy Technical Support at 1-800-444-5529 and provide the CPU ID and Pass Key information. In return, the technician will supply a password for user 98. This temporary password can be used for one-time access to the system.
Note: In previous versions of the Site Controller, the system could be accessed using a switch setting and the backup password configured in sys_par. For increased security, the switch setting check has been removed.
CPU ID = 11149701Pass Key = 4CE6 1F67 1885 E6E2
First, the administrator must sign on as user 97 and use the password configured in sys_par. For example, the default backup password is GASBOY. If this has not been changed, the administrator must type 97,GASBOY. The SC3 will generate text that looks like the following:
The administrator will contact Gasboy Technical Support at 1-800-444-5529 and request a backup password. The technician will provide a temporary password based on the CPU ID and Pass Key information obtained through user 97.
To enter the temporary password, the administrator must type 98,nnnnnnnnnnnnnnnn, where nnnnnnnnnnnnnnnn is the 16-digit temporary password provided by Gasboy Technical Support. The password must be entered with no spaces and all letters included in the password must be entered in upper case.
Once signed on as user 98, the administrator will have full access to any part of the system. The new password expires when the system is accessed, thus it can be used only once. Immediately after gaining access to the system, the administrator must update passwords using admpass or restore passwords from backup. Otherwise, the administrator must perform the previous operations to obtain another password from Technical Support.
How to Print a List of User NumbersType PRINT SIGNON (or P SIG).
PRINT SIGNON (P SIG)
[P:]* PRINT SIGNON ↵User Level02 192539[P:]*
For security, the password are not printed.
MDE-4871 CFN III Manager’s Manual for Windows® XP Embedded - Version 3.6 · August 2010 Page 4-5
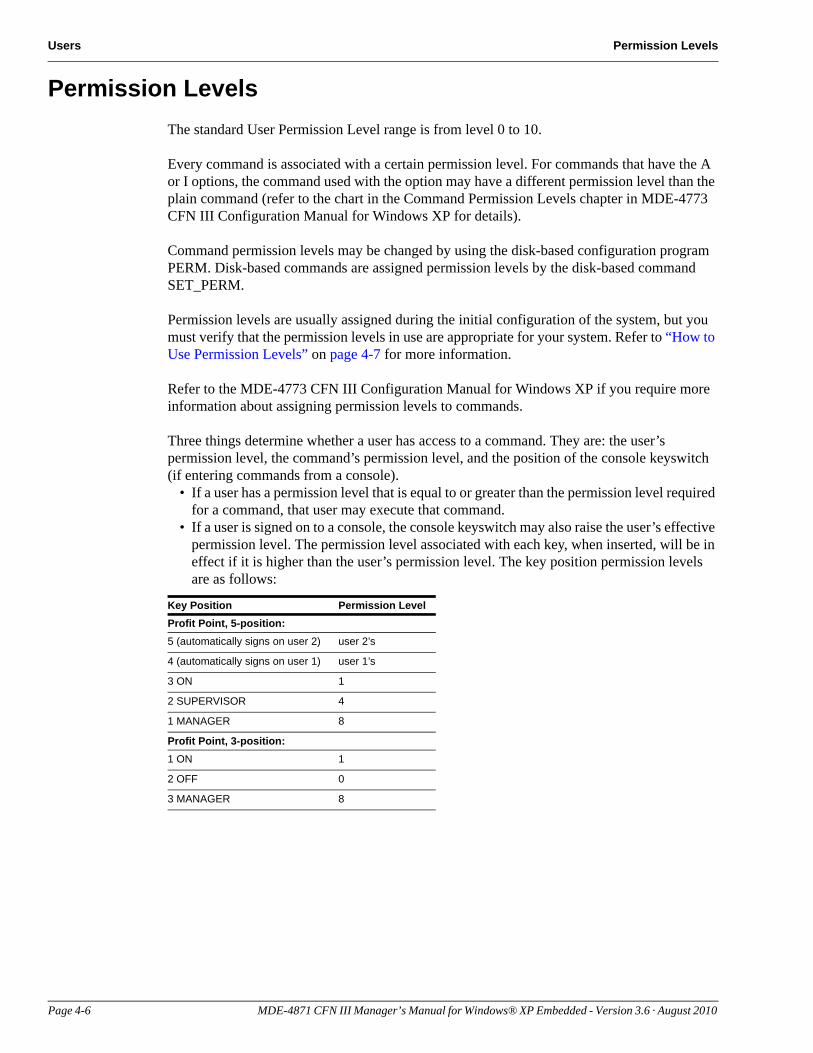
Users Permission Levels
Permission LevelsThe standard User Permission Level range is from level 0 to 10.
Every command is associated with a certain permission level. For commands that have the A or I options, the command used with the option may have a different permission level than the plain command (refer to the chart in the Command Permission Levels chapter in MDE-4773 CFN III Configuration Manual for Windows XP for details).
Command permission levels may be changed by using the disk-based configuration program PERM. Disk-based commands are assigned permission levels by the disk-based command SET_PERM.
Permission levels are usually assigned during the initial configuration of the system, but you must verify that the permission levels in use are appropriate for your system. Refer to “How to Use Permission Levels” on page 4-7 for more information.
Refer to the MDE-4773 CFN III Configuration Manual for Windows XP if you require more information about assigning permission levels to commands.
Three things determine whether a user has access to a command. They are: the user’s permission level, the command’s permission level, and the position of the console keyswitch (if entering commands from a console).
• If a user has a permission level that is equal to or greater than the permission level required for a command, that user may execute that command.
• If a user is signed on to a console, the console keyswitch may also raise the user’s effective permission level. The permission level associated with each key, when inserted, will be in effect if it is higher than the user’s permission level. The key position permission levels are as follows:
Key Position Permission LevelProfit Point, 5-position:5 (automatically signs on user 2) user 2’s
4 (automatically signs on user 1) user 1’s
3 ON 1
2 SUPERVISOR 4
1 MANAGER 8
Profit Point, 3-position:1 ON 1
2 OFF 0
3 MANAGER 8
Page 4-6 MDE-4871 CFN III Manager’s Manual for Windows® XP Embedded - Version 3.6 · August 2010
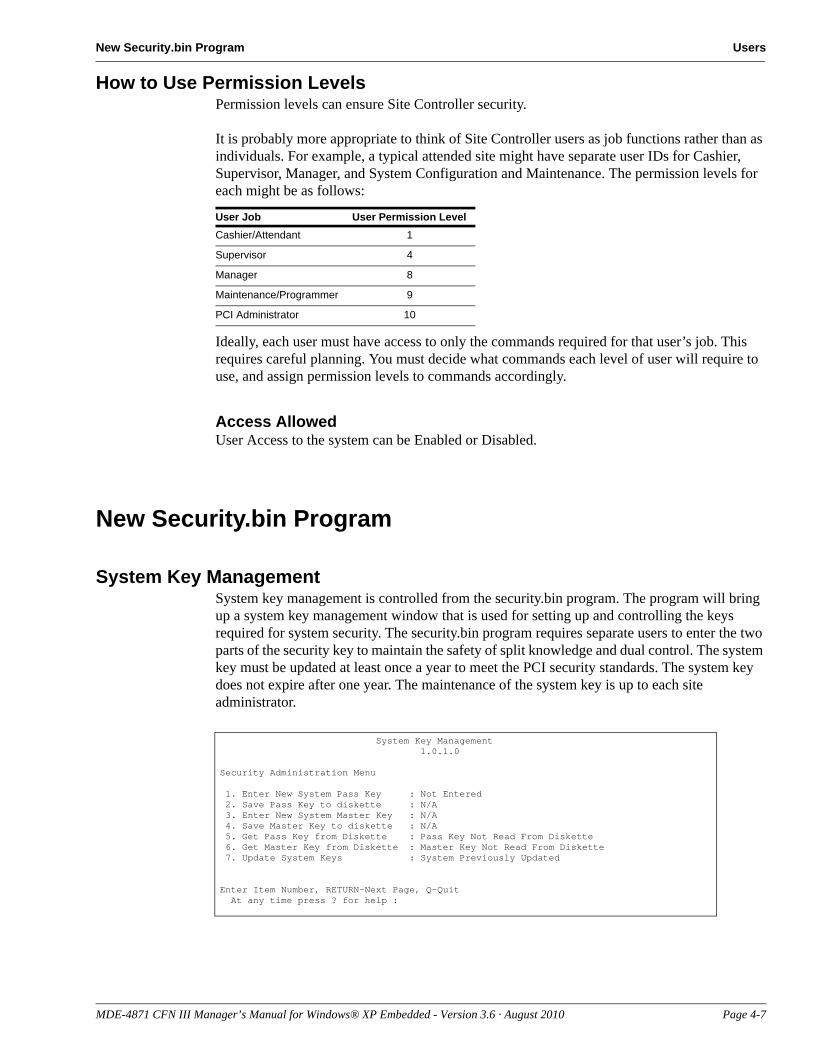
New Security.bin Program Users
How to Use Permission LevelsPermission levels can ensure Site Controller security.
It is probably more appropriate to think of Site Controller users as job functions rather than as individuals. For example, a typical attended site might have separate user IDs for Cashier, Supervisor, Manager, and System Configuration and Maintenance. The permission levels for each might be as follows:
Ideally, each user must have access to only the commands required for that user’s job. This requires careful planning. You must decide what commands each level of user will require to use, and assign permission levels to commands accordingly.
Access AllowedUser Access to the system can be Enabled or Disabled.
New Security.bin Program
System Key ManagementSystem key management is controlled from the security.bin program. The program will bring up a system key management window that is used for setting up and controlling the keys required for system security. The security.bin program requires separate users to enter the two parts of the security key to maintain the safety of split knowledge and dual control. The system key must be updated at least once a year to meet the PCI security standards. The system key does not expire after one year. The maintenance of the system key is up to each site administrator.
System Key Management 1.0.1.0
Security Administration Menu
1. Enter New System Pass Key : Not Entered 2. Save Pass Key to diskette : N/A 3. Enter New System Master Key : N/A 4. Save Master Key to diskette : N/A 5. Get Pass Key from Diskette : Pass Key Not Read From Diskette 6. Get Master Key from Diskette : Master Key Not Read From Diskette 7. Update System Keys : System Previously Updated
Enter Item Number, RETURN-Next Page, Q-Quit At any time press ? for help :
User Job User Permission LevelCashier/Attendant 1
Supervisor 4
Manager 8
Maintenance/Programmer 9
PCI Administrator 10
MDE-4871 CFN III Manager’s Manual for Windows® XP Embedded - Version 3.6 · August 2010 Page 4-7
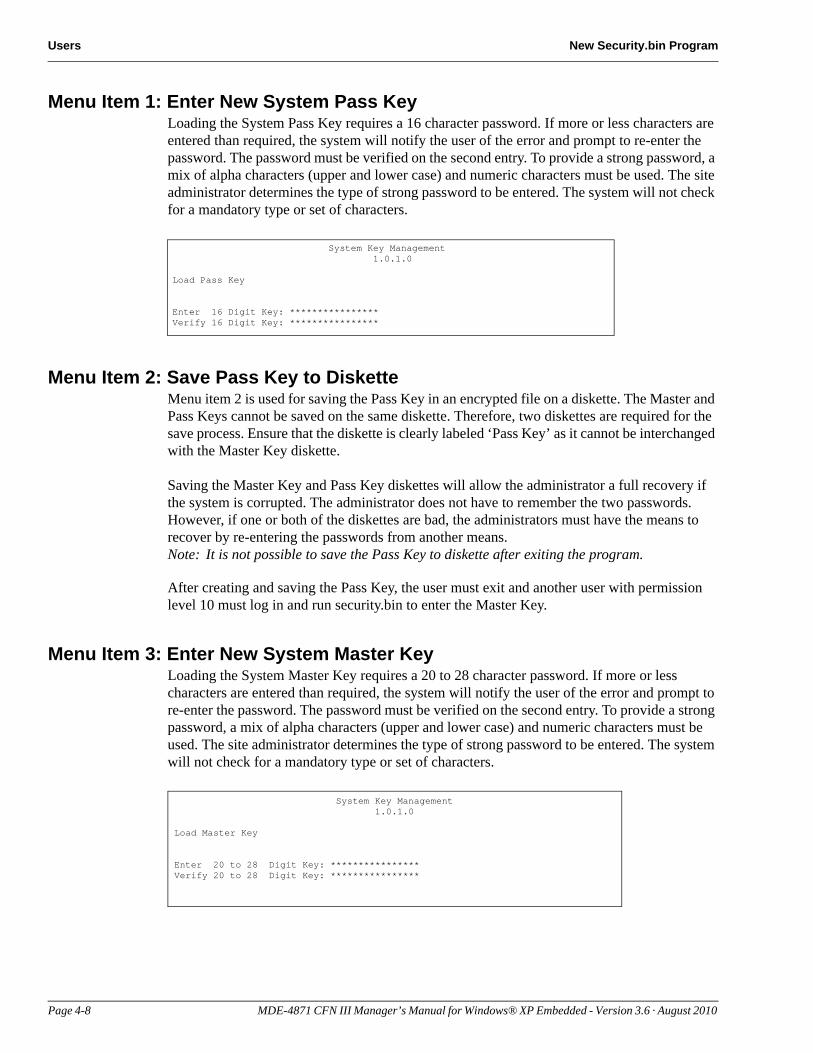
Users New Security.bin Program
Menu Item 1: Enter New System Pass KeyLoading the System Pass Key requires a 16 character password. If more or less characters are entered than required, the system will notify the user of the error and prompt to re-enter the password. The password must be verified on the second entry. To provide a strong password, a mix of alpha characters (upper and lower case) and numeric characters must be used. The site administrator determines the type of strong password to be entered. The system will not check for a mandatory type or set of characters.
System Key Management 1.0.1.0
Load Pass Key
Enter 16 Digit Key: ****************Verify 16 Digit Key: ****************
Menu Item 2: Save Pass Key to DisketteMenu item 2 is used for saving the Pass Key in an encrypted file on a diskette. The Master and Pass Keys cannot be saved on the same diskette. Therefore, two diskettes are required for the save process. Ensure that the diskette is clearly labeled ‘Pass Key’ as it cannot be interchanged with the Master Key diskette.
Saving the Master Key and Pass Key diskettes will allow the administrator a full recovery if the system is corrupted. The administrator does not have to remember the two passwords. However, if one or both of the diskettes are bad, the administrators must have the means to recover by re-entering the passwords from another means.Note: It is not possible to save the Pass Key to diskette after exiting the program.
After creating and saving the Pass Key, the user must exit and another user with permission level 10 must log in and run security.bin to enter the Master Key.
Menu Item 3: Enter New System Master KeyLoading the System Master Key requires a 20 to 28 character password. If more or less characters are entered than required, the system will notify the user of the error and prompt to re-enter the password. The password must be verified on the second entry. To provide a strong password, a mix of alpha characters (upper and lower case) and numeric characters must be used. The site administrator determines the type of strong password to be entered. The system will not check for a mandatory type or set of characters.
System Key Management 1.0.1.0
Load Master Key
Enter 20 to 28 Digit Key: ****************Verify 20 to 28 Digit Key: ****************
Page 4-8 MDE-4871 CFN III Manager’s Manual for Windows® XP Embedded - Version 3.6 · August 2010
New Security.bin Program Users
Menu Item 4: Save Master Key to DisketteMenu item 4 is for saving the Master Key in an encrypted file on a diskette. The Master Key cannot be saved on the same diskette as the Pass Key. Therefore, another diskette is required for the save process. Ensure that the diskette is clearly labeled ‘Master Key’ as it cannot be interchanged with the Pass Key diskette.
Saving the Master Key and Pass Key diskettes will allow the administrator a full recovery if the system is corrupted. The administrator does not have to remember the two passwords. However, if one or both of the diskettes are bad, the administrators must have the means to recover by re-entering the passwords from another means. Note: It is not possible to save the Master Key to diskette after updating the System Keys or
exiting the program.
Menu Item 5: Get Pass Key from DisketteMenu item 5 is used to restore the Pass Key from diskette to allow full recovery, if the system becomes corrupted or loses its Security key information.
Menu Item 6: Get Master Key from DisketteMenu item 6 is used to restore the Master Key from diskette to allow full recovery, if the system becomes corrupted or loses its Security key information.
Menu Item 7: Update System KeysMenu item 7 is used to update the system with the new keys or the keys restored from diskette. If the system is not updated, the new keys will not take effect. The menu will let you know when the system is being updated and when the update is complete.
Security for your company and patrons using your equipment is the uppermost concern. The key information and diskettes must be kept in a secure location such as a safe. A compromised system must be reported immediately and can result in fines and other monetary losses if the compromised cards are the result of poor key management and/or the lack of security.
MDE-4871 CFN III Manager’s Manual for Windows® XP Embedded - Version 3.6 · August 2010 Page 4-9

Users New Security.bin Program
This page is intentionally left blank.
Page 4-10 MDE-4871 CFN III Manager’s Manual for Windows® XP Embedded - Version 3.6 · August 2010
Audit Trail
5 – Audit Trail
To provide traceability for system access and actions taken that may affect sensitive data, an audit log is created. A directory c:\cfn3audit is used and daily audit files are created and stored in that directory. The audit files will start with the prefix of AU and will be followed with a two-digit year, two-digit month, and two-digit day. The file type or suffix is ADX.
The following is a list of items that will be logged in the audit file:• Any command typed from SC3 window or from the Profit Point SPCL Func 30 will be
recorded in the system audit file.• Any command executed by the system as a cron will be logged in the system audit file.• If a script is run, such as in a cmd file, it is possible that every command in the script will
be logged in the audit file.• When a bin command is executed that results in the change to the system configuration a
message is sent to the audit log that the system has been updated.
PC and CFN Time SynchronizationA cron is provided with a command file to allow the two systems to be synchronized. The command timetont.cmd is used to set the PC clock to the same time as the CFN embedded system clock. A cron is provided to provide a hidden background task to set the PC clock every day at 2:30 A.M.
Miscellaneous Items• If the security.cfg is missing, on reboot;a the system will send a message “Security File
Missing.”. If the security.cfg does not match the file size expected, the system will display a message, “Security File Corrupt”.
• On page one of sys_par there is a setting used for backup password. Though it is no longer used for obtaining a backup password it is used by the system and must be left to a default of GASBOY.
• On page one of sys_par there is a setting for using the disk journal. This is set to a default of yes and must be left in the default state if PCI logging requirements are to be met.
• SC3.SYS driver is located in the C:/sc3drv directory. The sc3.ini and sc3drv.exe files used to configure the SC3 are also located in the same directory. The Gasboy user must not be allowed to delete these three files.
• The audit files are located in the c:\sc3audit directory along with the cfn3audit.exe file. The gasboy user must not be allowed to access audit files or the cfn3audit.exe file.
MDE-4871 CFN III Manager’s Manual for Windows® XP Embedded - Version 3.6 · August 2010 Page 5-1

Audit Trail
This page is intentionally left blank.
Page 5-2 MDE-4871 CFN III Manager’s Manual for Windows® XP Embedded - Version 3.6 · August 2010
Date and Time Receipts, Messages, and Date
6 – Receipts, Messages, and Date
Date and TimeThe system has a battery-back-up clock, and even after a power failure the clock maintains the correct date and time, so you normally will not have to enter the date. The Site Controller does not automatically adjust for daylight-savings time, so you will have to adjust the Site Controller’s clock manually if daylight-savings time is observed in your area.
Also, the Site Controller’s clock can gain or lose time over a period, just as a watch can. You may require to adjust it periodically. For information on how to enter the date and time or display the date, refer to “How to Enter Commands and Data” on page 3-4.
Receipt Heading and FootingThe receipt heading is printed above and the receipt footing is printed below the body of each printed receipt. The information in the receipt heading and footing usually includes the name of the store or gas station, and may also include the address and some other messages, such as Thank You and Please Come Again.Note: If your site is connected to a financial network and allows debit transactions, Federal
regulations for receipts for electronic funds transfers apply (these regulations are included in an appendix to this manual).
Characters @C, @N, and @ONote: The card reader device must support track 1 to make use of this feature.
The characters @C are used to center text.
If the characters @N are found, they will be replaced by the customer’s name if known. The line will print regardless of whether or not the name has been found.
If the characters @O are found with the @N, the line will not be displayed unless the customer’s name is known.
How to Enter Receipt Heading and FootingUse the command LOAD HEADING or LO H to enter the heading and footing to be printed on the receipt and to enter the form feed length. The heading and footing you load will print on all printers at the site.
MDE-4871 CFN III Manager’s Manual for Windows® XP Embedded - Version 3.6 · August 2010 Page 6-1
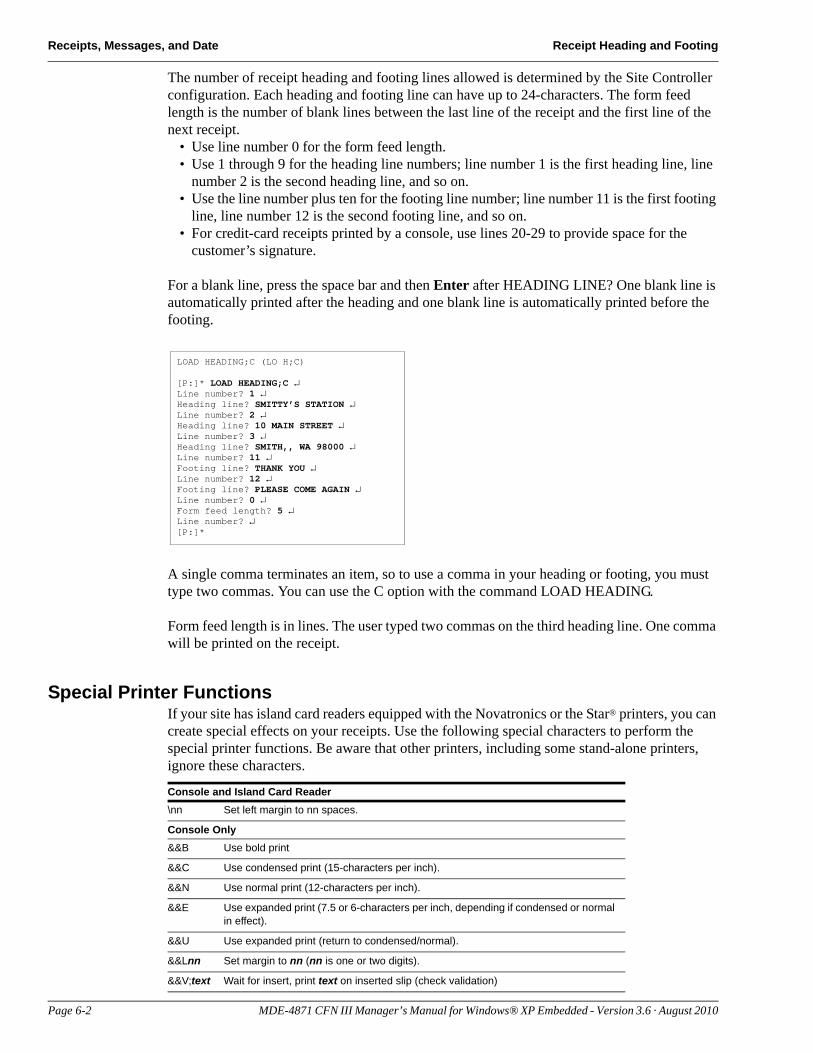
Receipts, Messages, and Date Receipt Heading and Footing
The number of receipt heading and footing lines allowed is determined by the Site Controller configuration. Each heading and footing line can have up to 24-characters. The form feed length is the number of blank lines between the last line of the receipt and the first line of the next receipt.
• Use line number 0 for the form feed length.• Use 1 through 9 for the heading line numbers; line number 1 is the first heading line, line
number 2 is the second heading line, and so on.• Use the line number plus ten for the footing line number; line number 11 is the first footing
line, line number 12 is the second footing line, and so on.• For credit-card receipts printed by a console, use lines 20-29 to provide space for the
customer’s signature.
LOAD HEADING;C (LO H;C)
[P:]* LOAD HEADING;C ↵Line number? 1 ↵Heading line? SMITTY’S STATION ↵Line number? 2 ↵Heading line? 10 MAIN STREET ↵ Line number? 3 ↵Heading line? SMITH,, WA 98000 ↵Line number? 11 ↵Footing line? THANK YOU ↵Line number? 12 ↵ Footing line? PLEASE COME AGAIN ↵Line number? 0 ↵Form feed length? 5 ↵Line number? ↵[P:]*
For a blank line, press the space bar and then Enter after HEADING LINE? One blank line is automatically printed after the heading and one blank line is automatically printed before the footing.
A single comma terminates an item, so to use a comma in your heading or footing, you must type two commas. You can use the C option with the command LOAD HEADING.
Form feed length is in lines. The user typed two commas on the third heading line. One comma will be printed on the receipt.
Special Printer FunctionsIf your site has island card readers equipped with the Novatronics or the Star® printers, you can create special effects on your receipts. Use the following special characters to perform the special printer functions. Be aware that other printers, including some stand-alone printers, ignore these characters.
Console and Island Card Reader\nn Set left margin to nn spaces.
Console Only&&B Use bold print
&&C Use condensed print (15-characters per inch).
&&N Use normal print (12-characters per inch).
&&E Use expanded print (7.5 or 6-characters per inch, depending if condensed or normal in effect).
&&U Use expanded print (return to condensed/normal).
&&Lnn Set margin to nn (nn is one or two digits).
&&V;text Wait for insert, print text on inserted slip (check validation)
Page 6-2 MDE-4871 CFN III Manager’s Manual for Windows® XP Embedded - Version 3.6 · August 2010
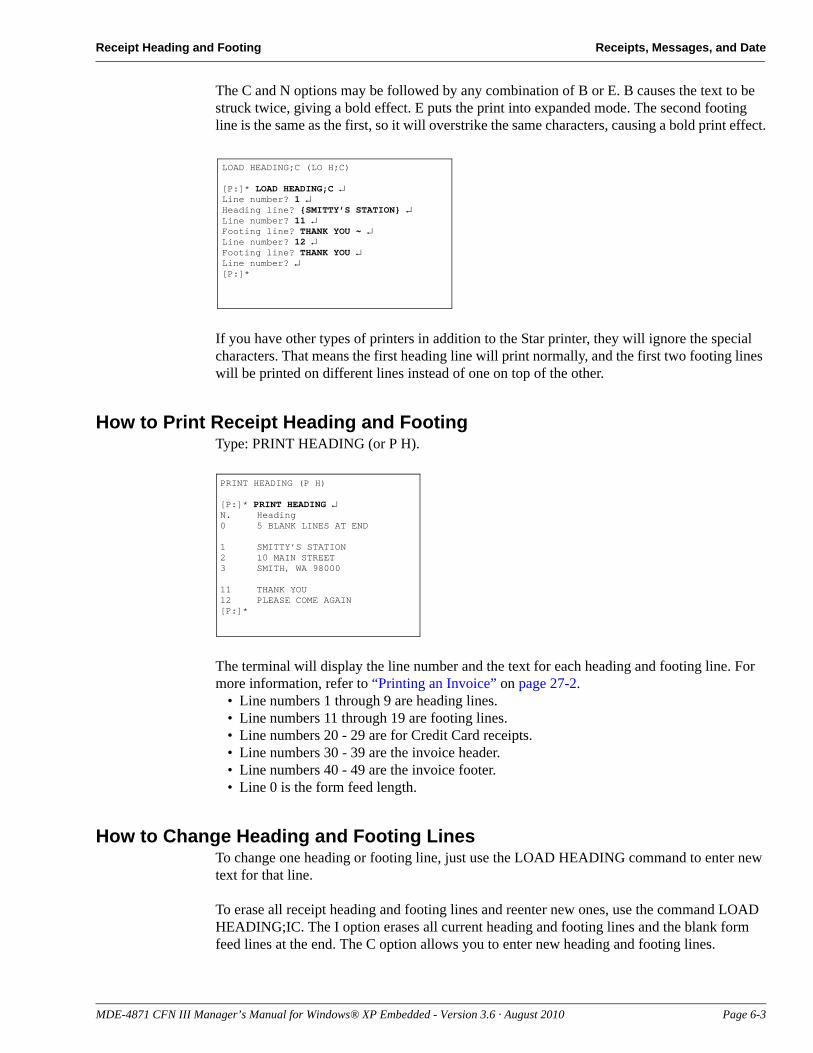
Receipt Heading and Footing Receipts, Messages, and Date
LOAD HEADING;C (LO H;C)
[P:]* LOAD HEADING;C ↵Line number? 1 ↵Heading line? {SMITTY’S STATION} ↵Line number? 11 ↵Footing line? THANK YOU ~ ↵Line number? 12 ↵ Footing line? THANK YOU ↵Line number? ↵[P:]*
The C and N options may be followed by any combination of B or E. B causes the text to be struck twice, giving a bold effect. E puts the print into expanded mode. The second footing line is the same as the first, so it will overstrike the same characters, causing a bold print effect.
If you have other types of printers in addition to the Star printer, they will ignore the special characters. That means the first heading line will print normally, and the first two footing lines will be printed on different lines instead of one on top of the other.
How to Print Receipt Heading and FootingType: PRINT HEADING (or P H).
PRINT HEADING (P H)
[P:]* PRINT HEADING ↵N. Heading0 5 BLANK LINES AT END
1 SMITTY’S STATION2 10 MAIN STREET3 SMITH, WA 98000
11 THANK YOU12 PLEASE COME AGAIN[P:]*
The terminal will display the line number and the text for each heading and footing line. For more information, refer to “Printing an Invoice” on page 27-2.
• Line numbers 1 through 9 are heading lines.• Line numbers 11 through 19 are footing lines.• Line numbers 20 - 29 are for Credit Card receipts.• Line numbers 30 - 39 are the invoice header.• Line numbers 40 - 49 are the invoice footer.• Line 0 is the form feed length.
How to Change Heading and Footing LinesTo change one heading or footing line, just use the LOAD HEADING command to enter new text for that line.
To erase all receipt heading and footing lines and reenter new ones, use the command LOAD HEADING;IC. The I option erases all current heading and footing lines and the blank form feed lines at the end. The C option allows you to enter new heading and footing lines.
MDE-4871 CFN III Manager’s Manual for Windows® XP Embedded - Version 3.6 · August 2010 Page 6-3

Receipts, Messages, and Date Island Card Reader Messages
How to Delete Heading and Footing LinesTo remove heading and footing lines, proceed as follows:
1 Type REMOVE HEADING.
2 Enter Line number.
REMOVE HEADING (REM H)
[P:]* REMOVE HEADING ↵Line number? 2 ↵[P:]*
You can use the C option.
Island Card Reader MessagesThe island card reader messages appear on the reader display when it is inactive. You can use these as promotional messages, or as instructional messages that tell your customers how to begin a transaction.
How to Enter MessagesUse the command LOAD MESSAGE or LO ME to enter the messages. The number of messages allowed is determined by the Site Controller configuration; 20 is the default number allowed. Each message can be up to 20-characters long.
For a blank display, press the space bar and Enter after Message to display?. A single comma terminates an item, so to use a comma in your message, you must type two commas. At this time, curly braces are reserved characters and are not to be used in messages. They are no longer used to allow text to flash or blink on the reader.
Display Multiple LinesTo display multiple lines, use the C option with the command LOAD MESSAGE. Enter each line separately and specify the display time.
LOAD MESSAGES (LO ME)
[P:]* LOAD MESSAGE;C ↵Message number? 1 ↵Display in sec? 2 ↵Message? TRY A HOT SANDWICH ↵Message number? 2 ↵Display in sec? 2 ↵Message? FROM OUR DELI ↵Message number? 3 ↵Display in sec? .5 ↵Message? (space) ↵Message number? ↵[P:]*
Page 6-4 MDE-4871 CFN III Manager’s Manual for Windows® XP Embedded - Version 3.6 · August 2010
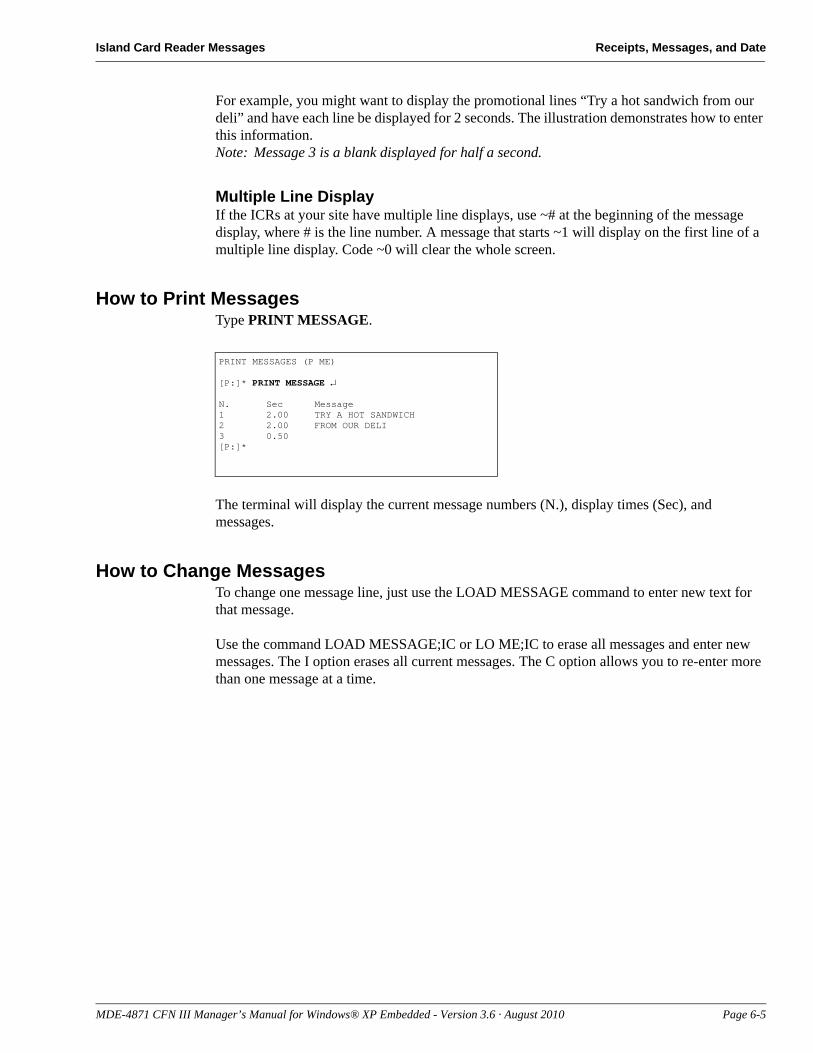
Island Card Reader Messages Receipts, Messages, and Date
For example, you might want to display the promotional lines “Try a hot sandwich from our deli” and have each line be displayed for 2 seconds. The illustration demonstrates how to enter this information.Note: Message 3 is a blank displayed for half a second.
Multiple Line DisplayIf the ICRs at your site have multiple line displays, use ~# at the beginning of the message display, where # is the line number. A message that starts ~1 will display on the first line of a multiple line display. Code ~0 will clear the whole screen.
How to Print MessagesType PRINT MESSAGE.
PRINT MESSAGES (P ME)
[P:]* PRINT MESSAGE ↵
N. Sec Message1 2.00 TRY A HOT SANDWICH2 2.00 FROM OUR DELI3 0.50[P:]*
The terminal will display the current message numbers (N.), display times (Sec), and messages.
How to Change MessagesTo change one message line, just use the LOAD MESSAGE command to enter new text for that message.
Use the command LOAD MESSAGE;IC or LO ME;IC to erase all messages and enter new messages. The I option erases all current messages. The C option allows you to re-enter more than one message at a time.
MDE-4871 CFN III Manager’s Manual for Windows® XP Embedded - Version 3.6 · August 2010 Page 6-5
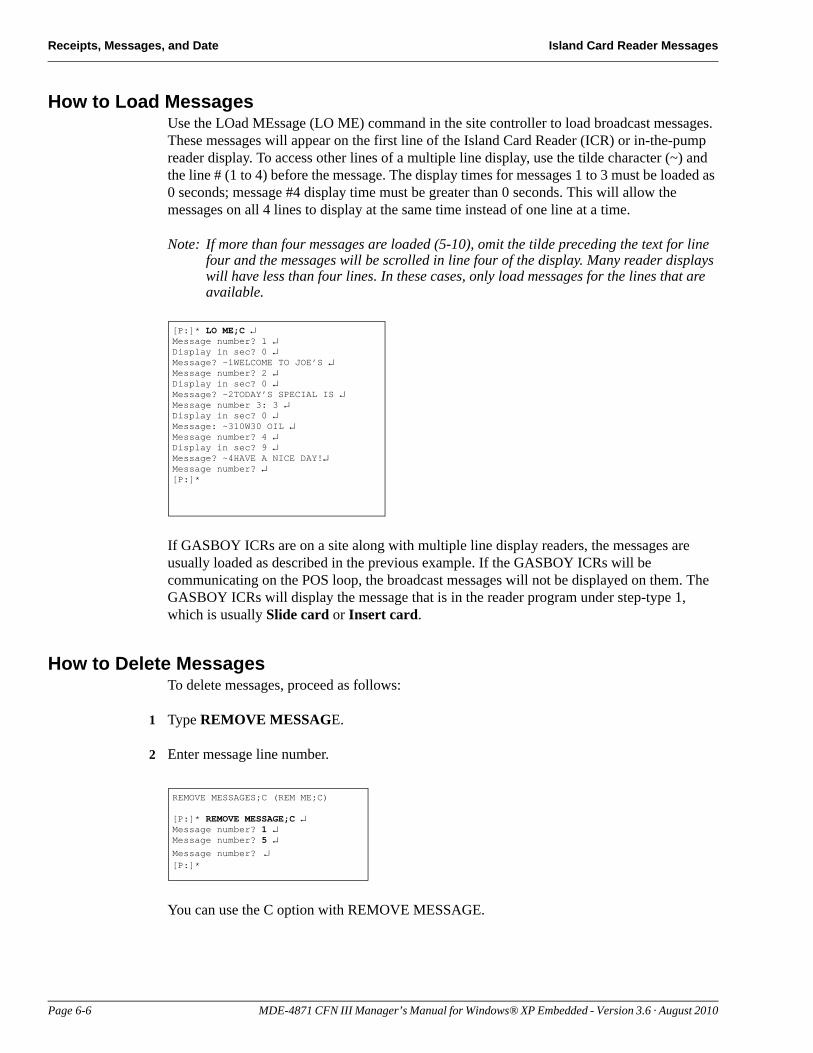
Receipts, Messages, and Date Island Card Reader Messages
How to Load MessagesUse the LOad MEssage (LO ME) command in the site controller to load broadcast messages. These messages will appear on the first line of the Island Card Reader (ICR) or in-the-pump reader display. To access other lines of a multiple line display, use the tilde character (~) and the line # (1 to 4) before the message. The display times for messages 1 to 3 must be loaded as 0 seconds; message #4 display time must be greater than 0 seconds. This will allow the messages on all 4 lines to display at the same time instead of one line at a time.
Note: If more than four messages are loaded (5-10), omit the tilde preceding the text for line four and the messages will be scrolled in line four of the display. Many reader displays will have less than four lines. In these cases, only load messages for the lines that are available.
[P:]* LO ME;C ↵Message number? 1 ↵Display in sec? 0 ↵Message? ~1WELCOME TO JOE’S ↵Message number? 2 ↵Display in sec? 0 ↵Message? ~2TODAY’S SPECIAL IS ↵Message number 3: 3 ↵Display in sec? 0 ↵Message: ~310W30 OIL ↵Message number? 4 ↵Display in sec? 9 ↵Message? ~4HAVE A NICE DAY!↵Message number? ↵[P:]*
If GASBOY ICRs are on a site along with multiple line display readers, the messages are usually loaded as described in the previous example. If the GASBOY ICRs will be communicating on the POS loop, the broadcast messages will not be displayed on them. The GASBOY ICRs will display the message that is in the reader program under step-type 1, which is usually Slide card or Insert card.
How to Delete MessagesTo delete messages, proceed as follows:
1 Type REMOVE MESSAGE.
2 Enter message line number.
REMOVE MESSAGES;C (REM ME;C)
[P:]* REMOVE MESSAGE;C ↵Message number? 1 ↵ Message number? 5 ↵Message number? ↵[P:]*
You can use the C option with REMOVE MESSAGE.
Page 6-6 MDE-4871 CFN III Manager’s Manual for Windows® XP Embedded - Version 3.6 · August 2010

How to Add or Change Fuel Products Fuel Products
7 – Fuel Products
When you are creating products, you must make several choices about how you will set up your products, tanks, and price codes. Things to remember include:
• Fuel products are usually in category 1 or categories 1 and 2.• The command LOAD FUEL lets you assign the product code, price code, and tank
number that will be used for a transaction. The command does this by letting you assign a product code, price code, and tank number to a hose.
• When fuel is pumped, the price charged is determined by the price code assigned to the hose by LOAD FUEL. You do not require to assign a price to the product itself.
• A product is also assigned to a tank by LOAD TANK. The product you assign this way is used only for the PRINT TANK report; it is not used for transactions. To avoid confusion, you must usually assign the same product to a tank with LOAD TANK that is assigned with LOAD FUEL.
• If you charge different prices for the same type of fuel, you may want to create different products in the system with the LOAD PRODUCT command. For example, if you have a bulk diesel pump that has a different price from diesel at the other pumps, you may want to set up a separate bulk diesel product. Or, if you have some pumps on the system that are full serve, you may want to set up separate full-serve and self-serve products. (creating different products from the same fuel allows you to separate the products in reports. If you do not want to separate them in reports, you can use the LOAD PRICE command to create different price codes for the same fuel).
• You normally do not require to use inventory tracking for fuel products. Use Tank inventory.
How to Add or Change Fuel ProductsUse the following procedure to add a new product:
• Ensure that the product information has been initialized with REMOVE PRODUCT;A. Do not use this command if you have already loaded product information into the system; it will clear all product information.
• Create a new product with LOAD PRODUCT;A. The product codes are used to assign products to tanks and for fuel authorizations for Proprietary Cards. They are included in the transaction data, and in the product, sales, and totals reports. Each product is assigned a product code, product name, category.
• The low price and high price are not used for fuel products. The tax code for fuel products is currently ignored (no tax), as taxes are included in the price.
• Assign products to pumps or hoses with LOAD FUEL. Price codes are also assigned to pumps or hoses with this command.
MDE-4871 CFN III Manager’s Manual for Windows® XP Embedded - Version 3.6 · August 2010 Page 7-1
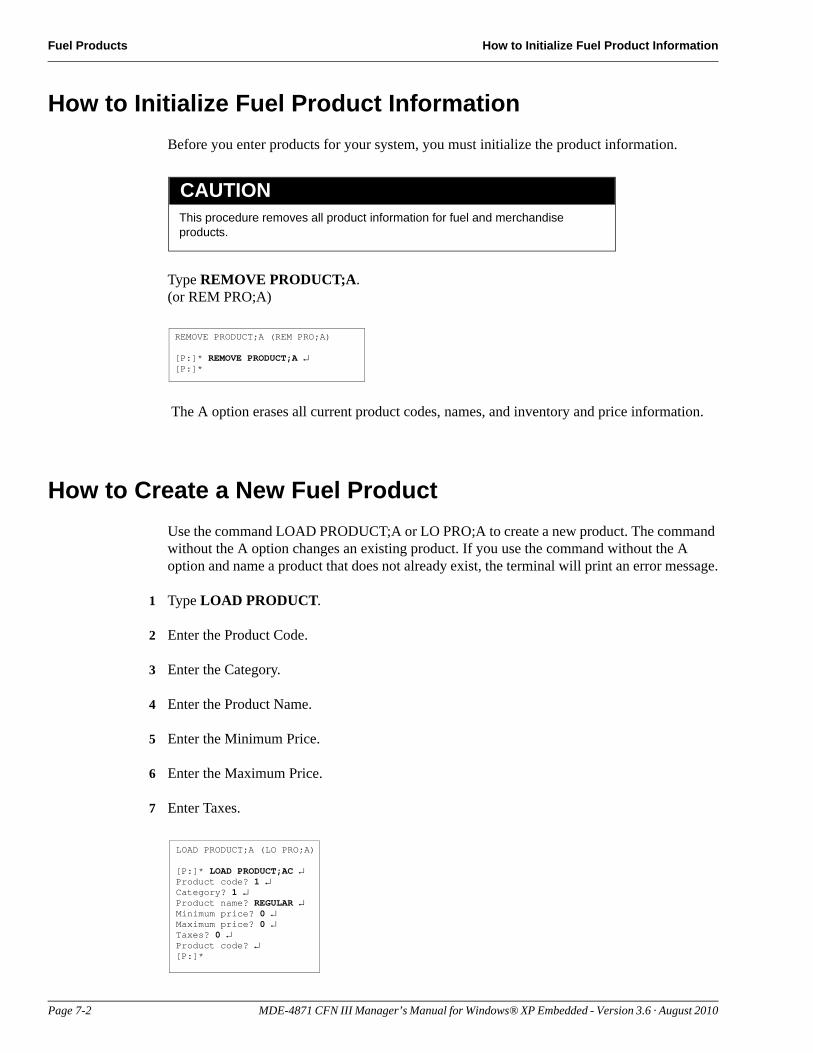
Fuel Products How to Initialize Fuel Product Information
How to Initialize Fuel Product InformationBefore you enter products for your system, you must initialize the product information.
This procedure removes all product information for fuel and merchandise products.
CAUTION
Type REMOVE PRODUCT;A.(or REM PRO;A)
REMOVE PRODUCT;A (REM PRO;A)
[P:]* REMOVE PRODUCT;A ↵[P:]*
The A option erases all current product codes, names, and inventory and price information.
How to Create a New Fuel ProductUse the command LOAD PRODUCT;A or LO PRO;A to create a new product. The command without the A option changes an existing product. If you use the command without the A option and name a product that does not already exist, the terminal will print an error message.
1 Type LOAD PRODUCT.
2 Enter the Product Code.
3 Enter the Category.
4 Enter the Product Name.
5 Enter the Minimum Price.
6 Enter the Maximum Price.
7 Enter Taxes.
LOAD PRODUCT;A (LO PRO;A)
[P:]* LOAD PRODUCT;AC ↵Product code? 1 ↵Category? 1 ↵Product name? REGULAR ↵Minimum price? 0 ↵Maximum price? 0 ↵Taxes? 0 ↵ Product code? ↵[P:]*
Page 7-2 MDE-4871 CFN III Manager’s Manual for Windows® XP Embedded - Version 3.6 · August 2010
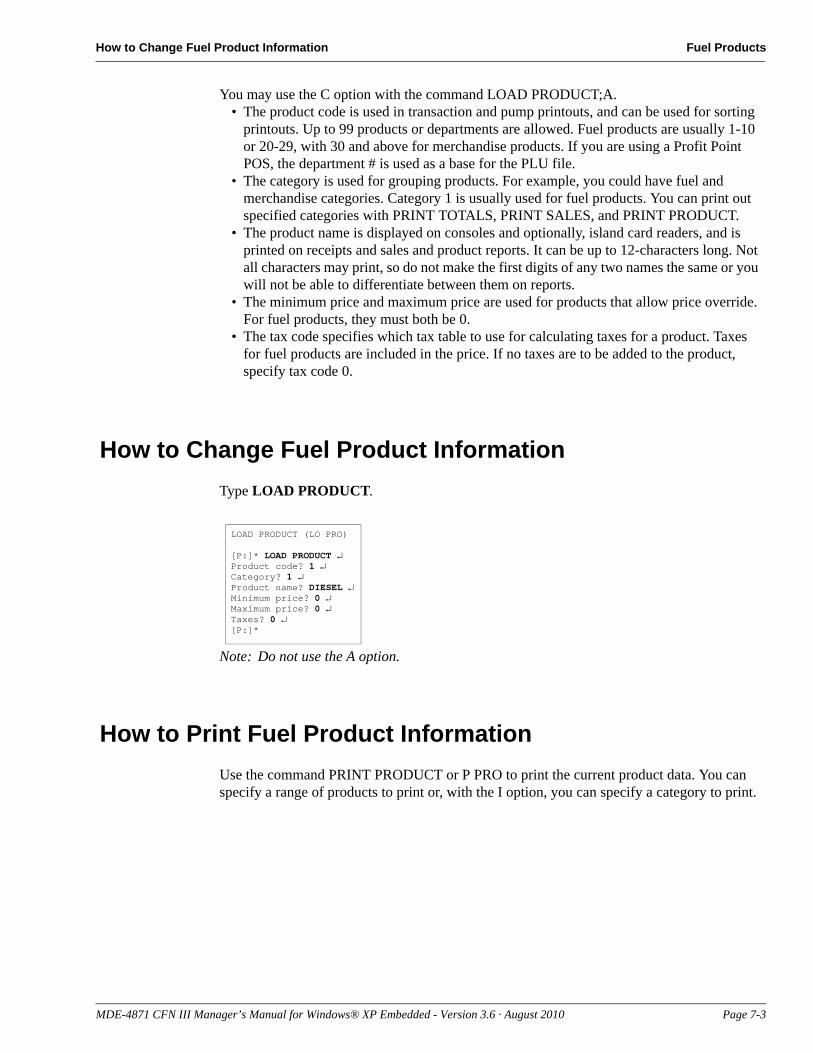
How to Change Fuel Product Information Fuel Products
You may use the C option with the command LOAD PRODUCT;A.• The product code is used in transaction and pump printouts, and can be used for sorting
printouts. Up to 99 products or departments are allowed. Fuel products are usually 1-10 or 20-29, with 30 and above for merchandise products. If you are using a Profit Point POS, the department # is used as a base for the PLU file.
• The category is used for grouping products. For example, you could have fuel and merchandise categories. Category 1 is usually used for fuel products. You can print out specified categories with PRINT TOTALS, PRINT SALES, and PRINT PRODUCT.
• The product name is displayed on consoles and optionally, island card readers, and is printed on receipts and sales and product reports. It can be up to 12-characters long. Not all characters may print, so do not make the first digits of any two names the same or you will not be able to differentiate between them on reports.
• The minimum price and maximum price are used for products that allow price override. For fuel products, they must both be 0.
• The tax code specifies which tax table to use for calculating taxes for a product. Taxes for fuel products are included in the price. If no taxes are to be added to the product, specify tax code 0.
How to Change Fuel Product InformationType LOAD PRODUCT.
LOAD PRODUCT (LO PRO)
[P:]* LOAD PRODUCT ↵Product code? 1 ↵Category? 1 ↵Product name? DIESEL ↵Minimum price? 0 ↵Maximum price? 0 ↵Taxes? 0 ↵ [P:]*
Note: Do not use the A option.
How to Print Fuel Product InformationUse the command PRINT PRODUCT or P PRO to print the current product data. You can specify a range of products to print or, with the I option, you can specify a category to print.
MDE-4871 CFN III Manager’s Manual for Windows® XP Embedded - Version 3.6 · August 2010 Page 7-3
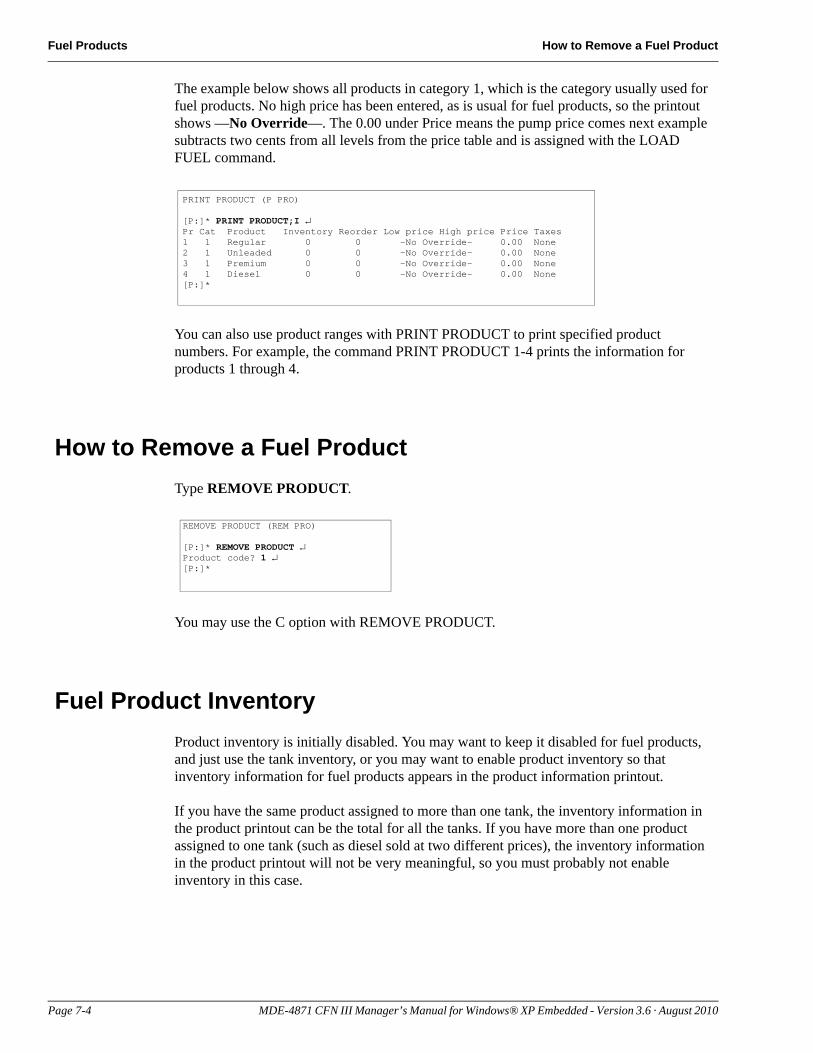
Fuel Products How to Remove a Fuel Product
PRINT PRODUCT (P PRO)
[P:]* PRINT PRODUCT;I ↵Pr Cat Product Inventory Reorder Low price High price Price Taxes1 1 Regular 0 0 -No Override- 0.00 None2 1 Unleaded 0 0 -No Override- 0.00 None3 1 Premium 0 0 -No Override- 0.00 None4 1 Diesel 0 0 -No Override- 0.00 None[P:]*
The example below shows all products in category 1, which is the category usually used for fuel products. No high price has been entered, as is usual for fuel products, so the printout shows —No Override—. The 0.00 under Price means the pump price comes next example subtracts two cents from all levels from the price table and is assigned with the LOAD FUEL command.
You can also use product ranges with PRINT PRODUCT to print specified product numbers. For example, the command PRINT PRODUCT 1-4 prints the information for products 1 through 4.
How to Remove a Fuel ProductType REMOVE PRODUCT.
REMOVE PRODUCT (REM PRO)
[P:]* REMOVE PRODUCT ↵Product code? 1 ↵[P:]*
You may use the C option with REMOVE PRODUCT.
Fuel Product InventoryProduct inventory is initially disabled. You may want to keep it disabled for fuel products, and just use the tank inventory, or you may want to enable product inventory so that inventory information for fuel products appears in the product information printout.
If you have the same product assigned to more than one tank, the inventory information in the product printout can be the total for all the tanks. If you have more than one product assigned to one tank (such as diesel sold at two different prices), the inventory information in the product printout will not be very meaningful, so you must probably not enable inventory in this case.
Page 7-4 MDE-4871 CFN III Manager’s Manual for Windows® XP Embedded - Version 3.6 · August 2010

How to Enter Fuel Product Inventory Fuel Products
When you use the commands ADD TANK and SUBTRACT TANK, the inventory for the corresponding products is also adjusted if inventory recording is enabled. However, the ADD INVENTORY and SUBTRACT INVENTORY commands do not adjust the tank inventory, since more than one tank could be assigned the same product. This means that it is better to use the TANK commands to adjust inventory for fuel products.
The LOAD TANK command does not adjust the inventory for products, so enter 0 for the inventory when you do the LOAD TANK and use ADD TANK to enter the inventory amount when inventory is enabled.
When the commands ADD or SUBTRACT TANK or INVENTORY are executed, the amount added or subtracted is logged.
If the site has tank gauges, the gauges can be set up to adjust product inventory, but such an arrangement is not required by the Site Controller.
How to Enter Fuel Product InventoryType LOAD INVENTORY.
LOAD INVENTORY (LO IN)
[P:]* LOAD INVENTORY;C ↵Product? 1 ↵Quantity? 4300 ↵Reorder level? 1000 ↵Product? 3 ↵Quantity? 2900 ↵Reorder level? 800 ↵Product? ↵ [P:]*
When inventory goes below the reorder level a message is printed on the log printer.
When the product inventory and tank figures do not match, one use of the LOAD INVENTORY command is to set the book inventory to equal the physical inventory.
MDE-4871 CFN III Manager’s Manual for Windows® XP Embedded - Version 3.6 · August 2010 Page 7-5

Fuel Products How to Enter Fuel Product Inventory
This page is intentionally left bank.
Page 7-6 MDE-4871 CFN III Manager’s Manual for Windows® XP Embedded - Version 3.6 · August 2010

Tank Commands Tank and Pump Commands
8 – Tank and Pump Commands
Tank Commands
How to View Current Tank InventoryTo display the tank inventory for all tanks, use the command PRINT TANK or P TA. The terminal will display the tank number (T#), total quantity (Totals), and reorder level.
PRINT TANK (P TA)
[P:]* PRINT TANK ↵T# Product Total Reorder Gauge Diff % Temp Ullage1 Regular 5000.000 5000.000 4995 5 0.1 65.2 50052 Unleaded 6240.000 5000.000 6240 0 0.0 65.2 37603 Diesel 19840.000 8000.000 19844 4 0.1 65.2 1564 Premium 10000.000 5000.000 9999 1 0.1 65.2 1[P:]*
In addition, if a CFN-compatible Tank Monitor™ System (electronic tank gauge) is installed on the tank and connected to the Site Controller, then the measured tank quantities and tank ullage will be displayed. Ullage is the amount of remaining space or unused capacity in the tank.
Commands DescriptionT# Tank number of tank.
Product Name of product stored in tank.
Total Inventory quantity in tank.
Reorder Reorder level at which a warning message will be logged.
Gauge Measured quantity in tank according to Tank Monitor System (TMS).
Diff Difference between inventory and measured quantities.
% Difference expressed as a percentage over or short.
Temp Measured temperature as reported by the TMS. Used by the TMS to compute temperature-corrected gallons.
Ullage The amount of usable empty space remaining in the tank.
How to Add to and Subtract from Tank Inventory CountersIf a TMS is present, the site can be configured to automatically add deliveries that are detected by the TMS to the inventory totals. If your site has this capability, you will not require to add deliveries to inventory manually and to do so will produce an error in the totals.
You might wish to make this adjustment if a physical measurement of the fuel gives a result more or less than the amount indicated by the counter, in order to bring the perpetual inventory amount back into line with the physical inventory amount.
MDE-4871 CFN III Manager’s Manual for Windows® XP Embedded - Version 3.6 · August 2010 Page 8-1
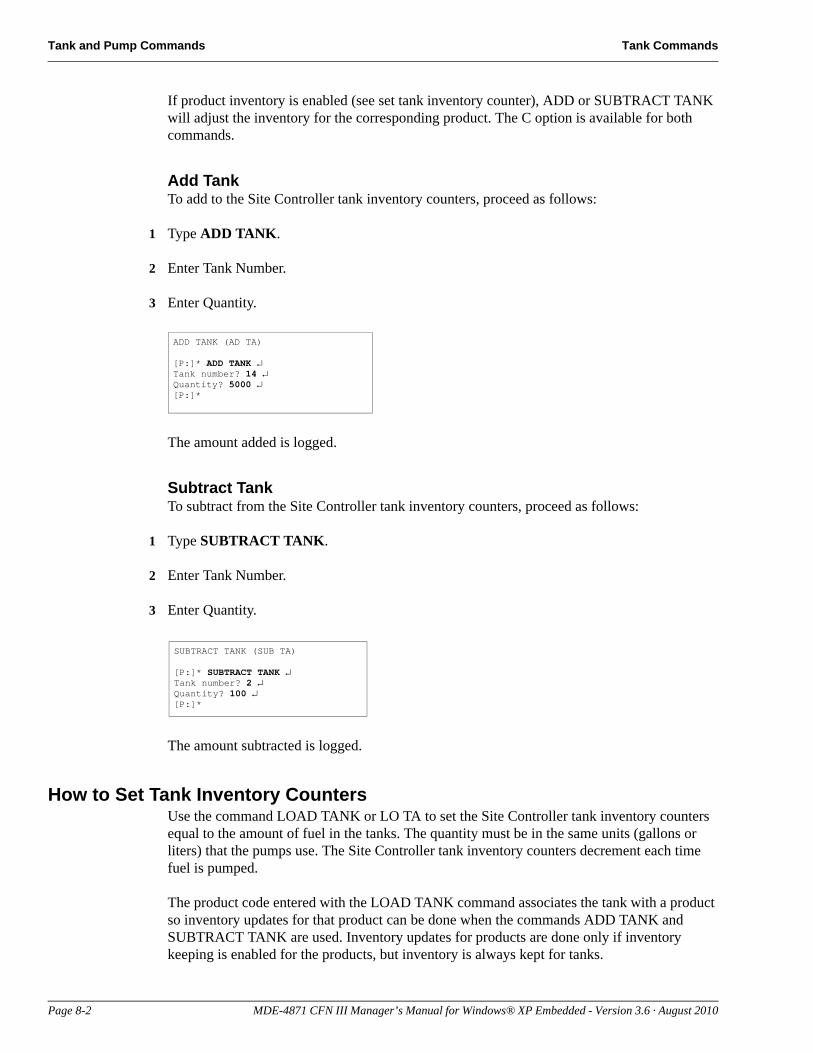
Tank and Pump Commands Tank Commands
If product inventory is enabled (see set tank inventory counter), ADD or SUBTRACT TANK will adjust the inventory for the corresponding product. The C option is available for both commands.
Add TankTo add to the Site Controller tank inventory counters, proceed as follows:
1 Type ADD TANK.
2 Enter Tank Number.
3 Enter Quantity.
ADD TANK (AD TA)
[P:]* ADD TANK ↵Tank number? 14 ↵Quantity? 5000 ↵[P:]*
The amount added is logged.
Subtract TankTo subtract from the Site Controller tank inventory counters, proceed as follows:
1 Type SUBTRACT TANK.
2 Enter Tank Number.
3 Enter Quantity.
SUBTRACT TANK (SUB TA)
[P:]* SUBTRACT TANK ↵Tank number? 2 ↵Quantity? 100 ↵[P:]*
The amount subtracted is logged.
How to Set Tank Inventory CountersUse the command LOAD TANK or LO TA to set the Site Controller tank inventory counters equal to the amount of fuel in the tanks. The quantity must be in the same units (gallons or liters) that the pumps use. The Site Controller tank inventory counters decrement each time fuel is pumped.
The product code entered with the LOAD TANK command associates the tank with a product so inventory updates for that product can be done when the commands ADD TANK and SUBTRACT TANK are used. Inventory updates for products are done only if inventory keeping is enabled for the products, but inventory is always kept for tanks.
Page 8-2 MDE-4871 CFN III Manager’s Manual for Windows® XP Embedded - Version 3.6 · August 2010
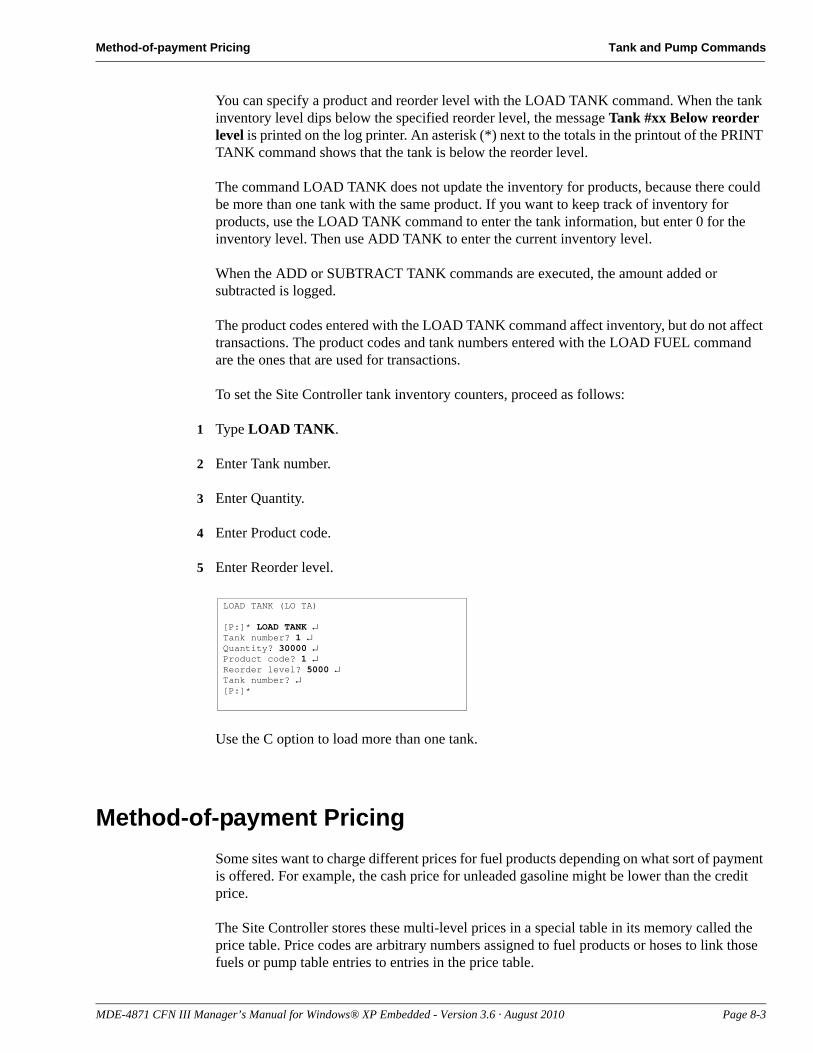
Method-of-payment Pricing Tank and Pump Commands
You can specify a product and reorder level with the LOAD TANK command. When the tank inventory level dips below the specified reorder level, the message Tank #xx Below reorder level is printed on the log printer. An asterisk (*) next to the totals in the printout of the PRINT TANK command shows that the tank is below the reorder level.
The command LOAD TANK does not update the inventory for products, because there could be more than one tank with the same product. If you want to keep track of inventory for products, use the LOAD TANK command to enter the tank information, but enter 0 for the inventory level. Then use ADD TANK to enter the current inventory level.
When the ADD or SUBTRACT TANK commands are executed, the amount added or subtracted is logged.
The product codes entered with the LOAD TANK command affect inventory, but do not affect transactions. The product codes and tank numbers entered with the LOAD FUEL command are the ones that are used for transactions.
To set the Site Controller tank inventory counters, proceed as follows:
1 Type LOAD TANK.
2 Enter Tank number.
3 Enter Quantity.
4 Enter Product code.
5 Enter Reorder level.
LOAD TANK (LO TA)
[P:]* LOAD TANK ↵Tank number? 1 ↵Quantity? 30000 ↵Product code? 1 ↵Reorder level? 5000 ↵Tank number? ↵[P:]*
Use the C option to load more than one tank.
Method-of-payment PricingSome sites want to charge different prices for fuel products depending on what sort of payment is offered. For example, the cash price for unleaded gasoline might be lower than the credit price.
The Site Controller stores these multi-level prices in a special table in its memory called the price table. Price codes are arbitrary numbers assigned to fuel products or hoses to link those fuels or pump table entries to entries in the price table.
MDE-4871 CFN III Manager’s Manual for Windows® XP Embedded - Version 3.6 · August 2010 Page 8-3
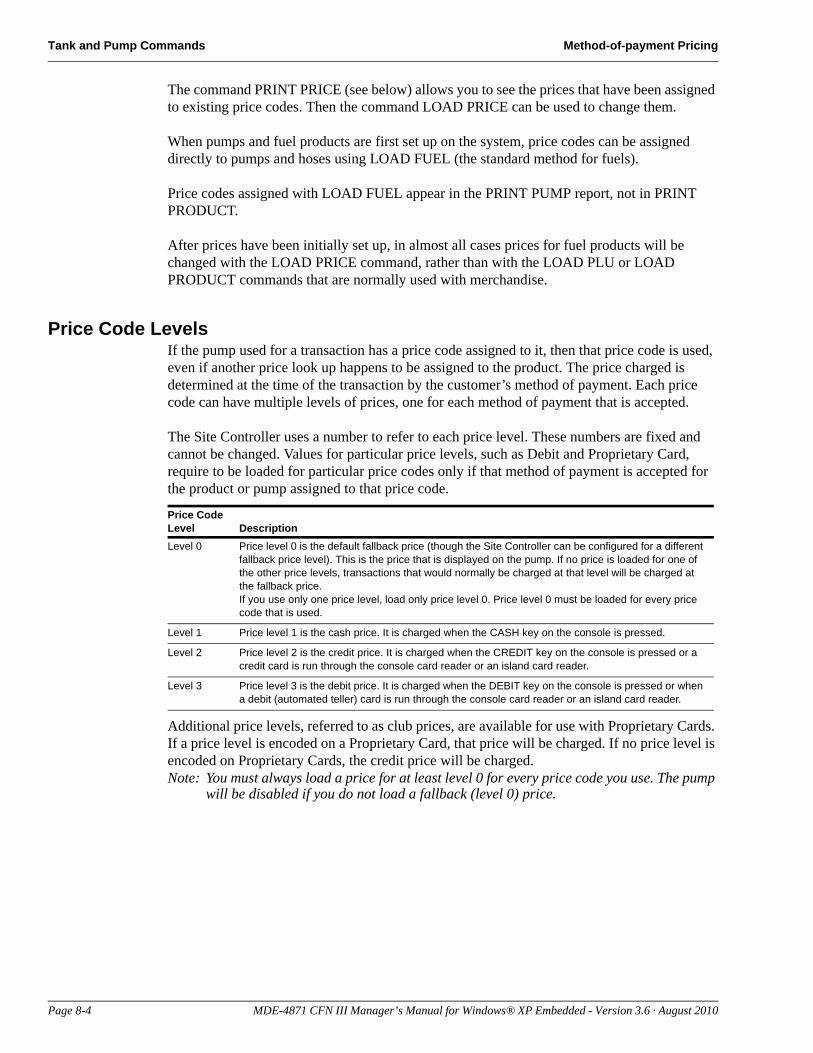
Tank and Pump Commands Method-of-payment Pricing
The command PRINT PRICE (see below) allows you to see the prices that have been assigned to existing price codes. Then the command LOAD PRICE can be used to change them.
When pumps and fuel products are first set up on the system, price codes can be assigned directly to pumps and hoses using LOAD FUEL (the standard method for fuels).
Price codes assigned with LOAD FUEL appear in the PRINT PUMP report, not in PRINT PRODUCT.
After prices have been initially set up, in almost all cases prices for fuel products will be changed with the LOAD PRICE command, rather than with the LOAD PLU or LOAD PRODUCT commands that are normally used with merchandise.
Price Code LevelsIf the pump used for a transaction has a price code assigned to it, then that price code is used, even if another price look up happens to be assigned to the product. The price charged is determined at the time of the transaction by the customer’s method of payment. Each price code can have multiple levels of prices, one for each method of payment that is accepted.
The Site Controller uses a number to refer to each price level. These numbers are fixed and cannot be changed. Values for particular price levels, such as Debit and Proprietary Card, require to be loaded for particular price codes only if that method of payment is accepted for the product or pump assigned to that price code.
Additional price levels, referred to as club prices, are available for use with Proprietary Cards. If a price level is encoded on a Proprietary Card, that price will be charged. If no price level is encoded on Proprietary Cards, the credit price will be charged.Note: You must always load a price for at least level 0 for every price code you use. The pump
will be disabled if you do not load a fallback (level 0) price.
Price Code Level DescriptionLevel 0 Price level 0 is the default fallback price (though the Site Controller can be configured for a different
fallback price level). This is the price that is displayed on the pump. If no price is loaded for one of the other price levels, transactions that would normally be charged at that level will be charged at the fallback price.If you use only one price level, load only price level 0. Price level 0 must be loaded for every price code that is used.
Level 1 Price level 1 is the cash price. It is charged when the CASH key on the console is pressed.
Level 2 Price level 2 is the credit price. It is charged when the CREDIT key on the console is pressed or a credit card is run through the console card reader or an island card reader.
Level 3 Price level 3 is the debit price. It is charged when the DEBIT key on the console is pressed or when a debit (automated teller) card is run through the console card reader or an island card reader.
Page 8-4 MDE-4871 CFN III Manager’s Manual for Windows® XP Embedded - Version 3.6 · August 2010

Method-of-payment Pricing Tank and Pump Commands
How to View Current Price Code Levels and PricesUse the command PRINT PRICE or P PR. The terminal will display the price levels (Pl) and prices for each price code (Pc). Price codes are rows and price levels are columns.
[P:]* PRINT PRICE 1 ↵Pc Pl Price1 0 1.169 1 1.169 2 1.199[P:]*
Type PRINT PRICE.
To specify price codes to display, enter the code number at the command.
How to Enter Price Code Levels and PricesUse the command LOAD PRICE or LO PR to enter price levels and prices for price codes. The number of price levels and prices allowed is determined by the Site Controller configuration.
LOAD PRICE (LO PR)[P:]* LOAD PRICE ↵Price code? 2 ↵Price level? 1 ↵Price? 1.119 ↵Price level? ↵[P:]*
If you are changing prices when the site is open for business, first shut down the site with the command STOP. This will allow transactions in progress to finish, but prevent new transactions from starting when you are changing prices. When you have finished changing prices, use the command RUN to restart the site.
How to Change Price-code PricesIt is a good idea to write down or print existing prices before making changes, and again after making changes to check your work.
To change prices for a price code, use LOAD PRICE or LO PR to enter new prices for the price levels for that price code.
There are two methods for changing prices for price codes.
PRINT PRICE (P PR)
[P:]* PRINT PRICE ↵Pc Pl Price1 0 1.169 1 1.169 2 1.1992 0 1.229 1 1.229 2 1.2993 0 1.299 1 1.299 2 1.306[P:]*
MDE-4871 CFN III Manager’s Manual for Windows® XP Embedded - Version 3.6 · August 2010 Page 8-5
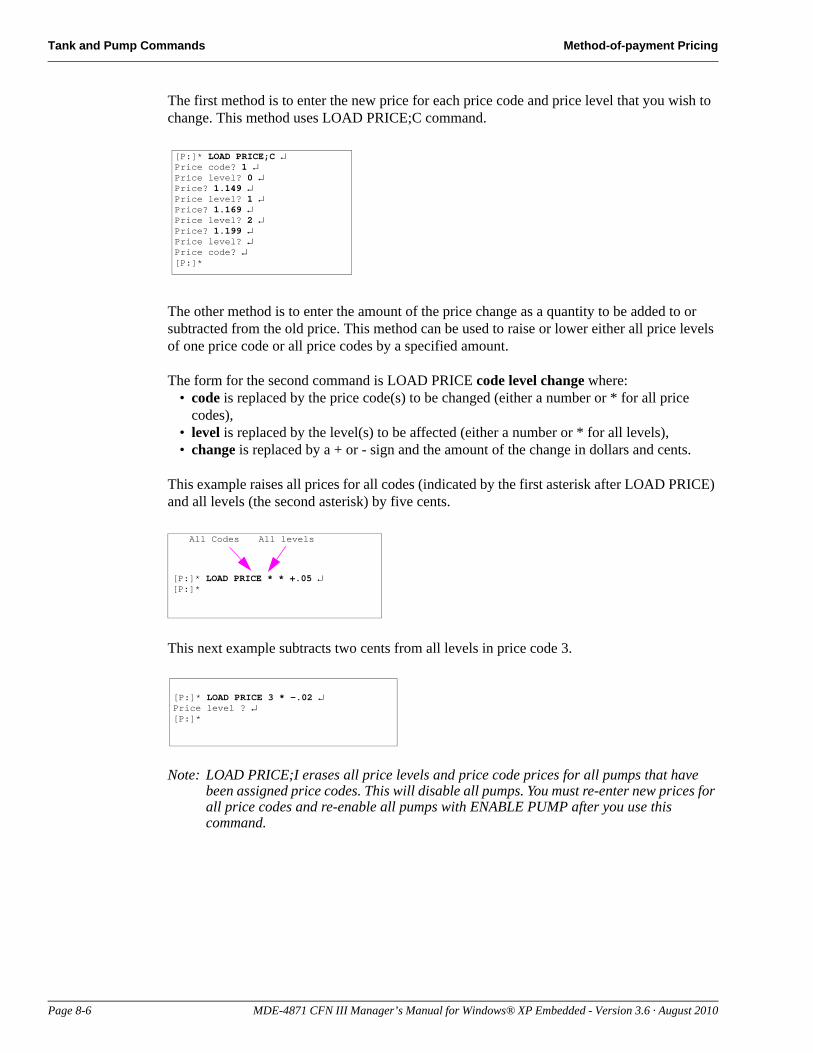
Tank and Pump Commands Method-of-payment Pricing
[P:]* LOAD PRICE;C ↵Price code? 1 ↵Price level? 0 ↵Price? 1.149 ↵ Price level? 1 ↵Price? 1.169 ↵Price level? 2 ↵Price? 1.199 ↵Price level? ↵Price code? ↵[P:]*
The first method is to enter the new price for each price code and price level that you wish to change. This method uses LOAD PRICE;C command.
The other method is to enter the amount of the price change as a quantity to be added to or subtracted from the old price. This method can be used to raise or lower either all price levels of one price code or all price codes by a specified amount.
The form for the second command is LOAD PRICE code level change where:• code is replaced by the price code(s) to be changed (either a number or * for all price
codes),• level is replaced by the level(s) to be affected (either a number or * for all levels),• change is replaced by a + or - sign and the amount of the change in dollars and cents.
[P:]* LOAD PRICE * * +.05 ↵[P:]*
All Codes All levels
[P:]* LOAD PRICE 3 * -.02 ↵Price level ? ↵[P:]*
This example raises all prices for all codes (indicated by the first asterisk after LOAD PRICE) and all levels (the second asterisk) by five cents.
This next example subtracts two cents from all levels in price code 3.
Note: LOAD PRICE;I erases all price levels and price code prices for all pumps that have been assigned price codes. This will disable all pumps. You must re-enter new prices for all price codes and re-enable all pumps with ENABLE PUMP after you use this command.
Page 8-6 MDE-4871 CFN III Manager’s Manual for Windows® XP Embedded - Version 3.6 · August 2010

Method-of-payment Pricing Tank and Pump Commands
How to Delete a Price Code or Price LevelUse the command REMOVE PRICE or REM PR to delete one or more price levels for a given price code.
REMOVE PRICE (REM PR)
[P:]* REMOVE PRICE ↵Price code? 4 ↵Price level? 3 ↵Price level? ↵[P:]*
To delete an entire price code, delete all the price levels under that price code.Use the C option to remove more than one price code.
How to Set Up Day-Night PricingYou can have day-night pricing by using the RECORD command or one of the editors to create command files that contain the LOAD PRICE commands for the day and night prices. Then the command files can be executed automatically at the appropriate times by loading the proper cron (user-defined commands executed at specified times) entries with LOAD CRON (refer to “Advanced Commands” on page 20-12).
[P:]* TYPE PRC1.CMD ↵stoplo pri;c1 0 .799 1 .759 2 .7992 0 .859 1 .819 2 .8593 0 .919 1 .879 2 .9194 0 1.069 1 1.029 2 1.069
run
[P:]* TYPE PRC2.CMD ↵stoplo pri;c1 0 1.279 1 1.239 2 1.2792 0 1.339 1 1.299 2 1.3393 0 1.459 1 1.419 2 1.4594 0 1.179 1 1.139 2 1.179
run
[P:]*
The example above shows two command files used for changing the pricing for day-night pricing.
MDE-4871 CFN III Manager’s Manual for Windows® XP Embedded - Version 3.6 · August 2010 Page 8-7
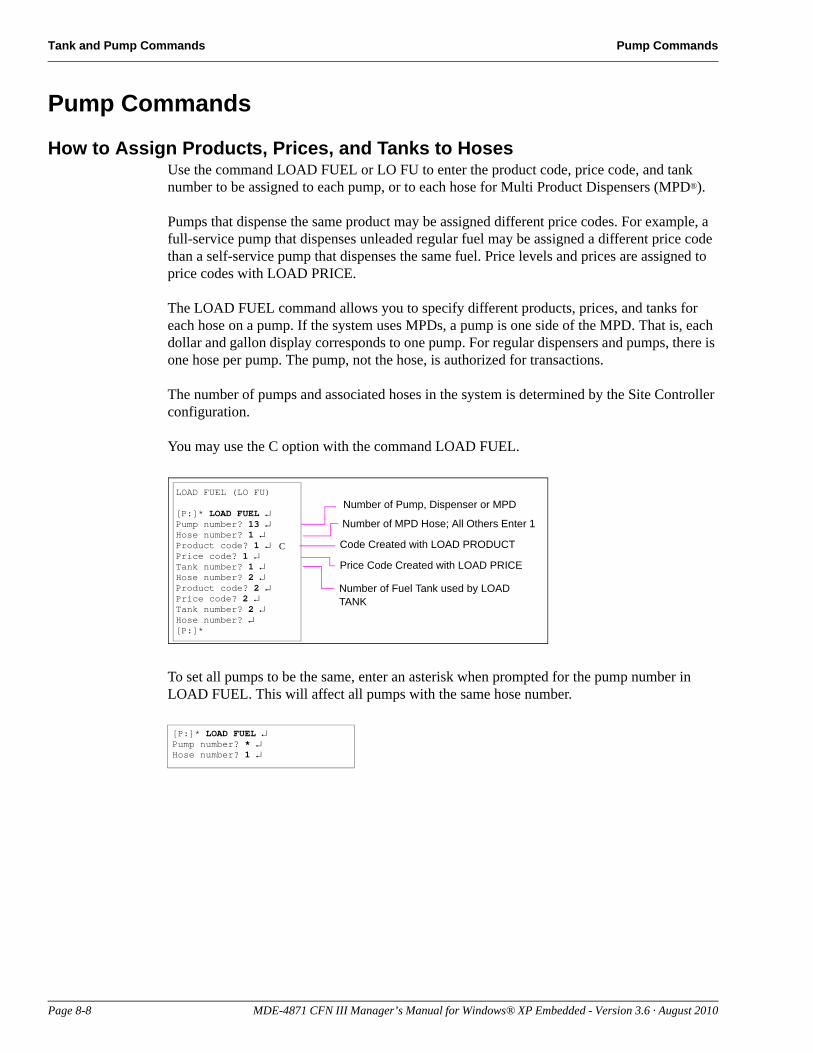
Tank and Pump Commands Pump Commands
Pump Commands
How to Assign Products, Prices, and Tanks to HosesUse the command LOAD FUEL or LO FU to enter the product code, price code, and tank number to be assigned to each pump, or to each hose for Multi Product Dispensers (MPD®).
LOAD FUEL (LO FU)
[P:]* LOAD FUEL ↵Pump number? 13 ↵Hose number? 1 ↵Product code? 1 ↵Price code? 1 ↵Tank number? 1 ↵Hose number? 2 ↵Product code? 2 ↵Price code? 2 ↵Tank number? 2 ↵Hose number? ↵[P:]*
C
Number of Pump, Dispenser or MPD
Number of MPD Hose; All Others Enter 1
Code Created with LOAD PRODUCT
Price Code Created with LOAD PRICE
Number of Fuel Tank used by LOAD TANK
[P:]* LOAD FUEL ↵Pump number? * ↵Hose number? 1 ↵
Pumps that dispense the same product may be assigned different price codes. For example, a full-service pump that dispenses unleaded regular fuel may be assigned a different price code than a self-service pump that dispenses the same fuel. Price levels and prices are assigned to price codes with LOAD PRICE.
The LOAD FUEL command allows you to specify different products, prices, and tanks for each hose on a pump. If the system uses MPDs, a pump is one side of the MPD. That is, each dollar and gallon display corresponds to one pump. For regular dispensers and pumps, there is one hose per pump. The pump, not the hose, is authorized for transactions.
The number of pumps and associated hoses in the system is determined by the Site Controller configuration.
You may use the C option with the command LOAD FUEL.
To set all pumps to be the same, enter an asterisk when prompted for the pump number in LOAD FUEL. This will affect all pumps with the same hose number.
Page 8-8 MDE-4871 CFN III Manager’s Manual for Windows® XP Embedded - Version 3.6 · August 2010
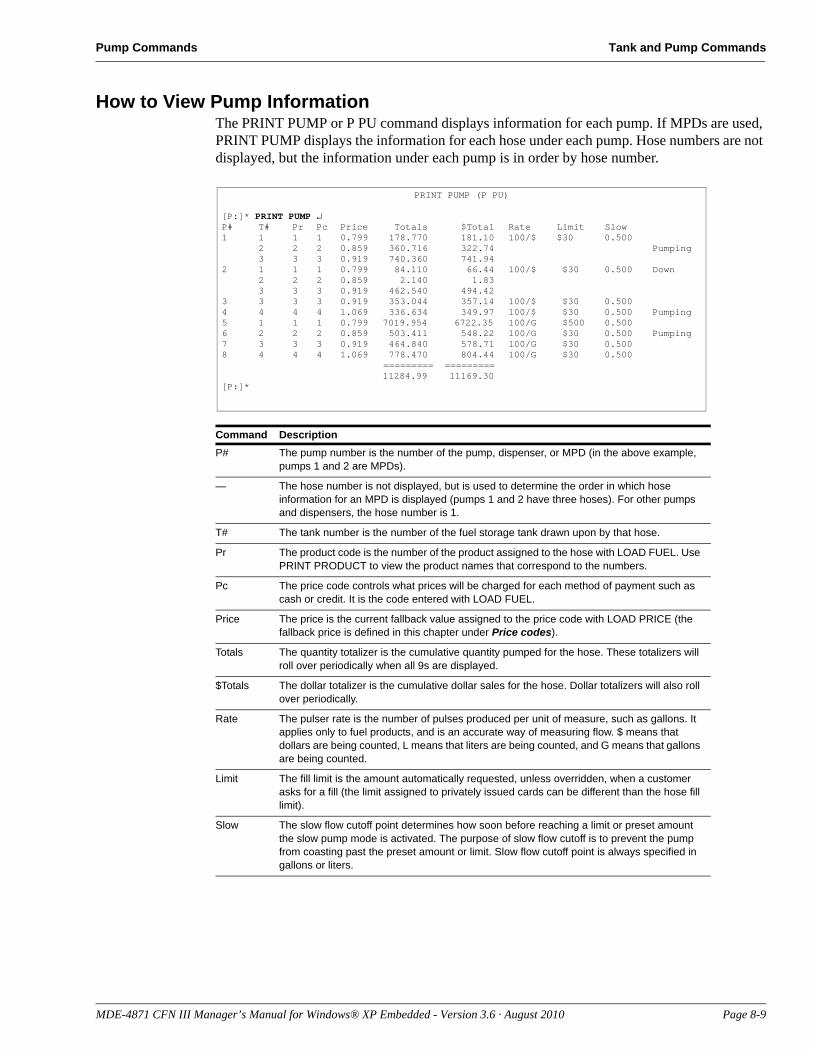
Pump Commands Tank and Pump Commands
How to View Pump InformationThe PRINT PUMP or P PU command displays information for each pump. If MPDs are used, PRINT PUMP displays the information for each hose under each pump. Hose numbers are not displayed, but the information under each pump is in order by hose number.
PRINT PUMP (P PU)
[P:]* PRINT PUMP ↵P# T# Pr Pc Price Totals $Total Rate Limit Slow1 1 1 1 0.799 178.770 181.10 100/$ $30 0.500
2 2 2 0.859 360.716 322.74 Pumping3 3 3 0.919 740.360 741.94
2 1 1 1 0.799 84.110 66.44 100/$ $30 0.500 Down2 2 2 0.859 2.140 1.833 3 3 0.919 462.540 494.42
3 3 3 3 0.919 353.044 357.14 100/$ $30 0.5004 4 4 4 1.069 336.634 349.97 100/$ $30 0.500 Pumping5 1 1 1 0.799 7019.954 6722.35 100/G $500 0.5006 2 2 2 0.859 503.411 548.22 100/G $30 0.500 Pumping7 3 3 3 0.919 464.840 578.71 100/G $30 0.5008 4 4 4 1.069 778.470 804.44 100/G $30 0.500
========= =========11284.99 11169.30
[P:]*
Command DescriptionP# The pump number is the number of the pump, dispenser, or MPD (in the above example,
pumps 1 and 2 are MPDs).
— The hose number is not displayed, but is used to determine the order in which hose information for an MPD is displayed (pumps 1 and 2 have three hoses). For other pumps and dispensers, the hose number is 1.
T# The tank number is the number of the fuel storage tank drawn upon by that hose.
Pr The product code is the number of the product assigned to the hose with LOAD FUEL. Use PRINT PRODUCT to view the product names that correspond to the numbers.
Pc The price code controls what prices will be charged for each method of payment such as cash or credit. It is the code entered with LOAD FUEL.
Price The price is the current fallback value assigned to the price code with LOAD PRICE (the fallback price is defined in this chapter under Price codes).
Totals The quantity totalizer is the cumulative quantity pumped for the hose. These totalizers will roll over periodically when all 9s are displayed.
$Totals The dollar totalizer is the cumulative dollar sales for the hose. Dollar totalizers will also roll over periodically.
Rate The pulser rate is the number of pulses produced per unit of measure, such as gallons. It applies only to fuel products, and is an accurate way of measuring flow. $ means that dollars are being counted, L means that liters are being counted, and G means that gallons are being counted.
Limit The fill limit is the amount automatically requested, unless overridden, when a customer asks for a fill (the limit assigned to privately issued cards can be different than the hose fill limit).
Slow The slow flow cutoff point determines how soon before reaching a limit or preset amount the slow pump mode is activated. The purpose of slow flow cutoff is to prevent the pump from coasting past the preset amount or limit. Slow flow cutoff point is always specified in gallons or liters.
MDE-4871 CFN III Manager’s Manual for Windows® XP Embedded - Version 3.6 · August 2010 Page 8-9
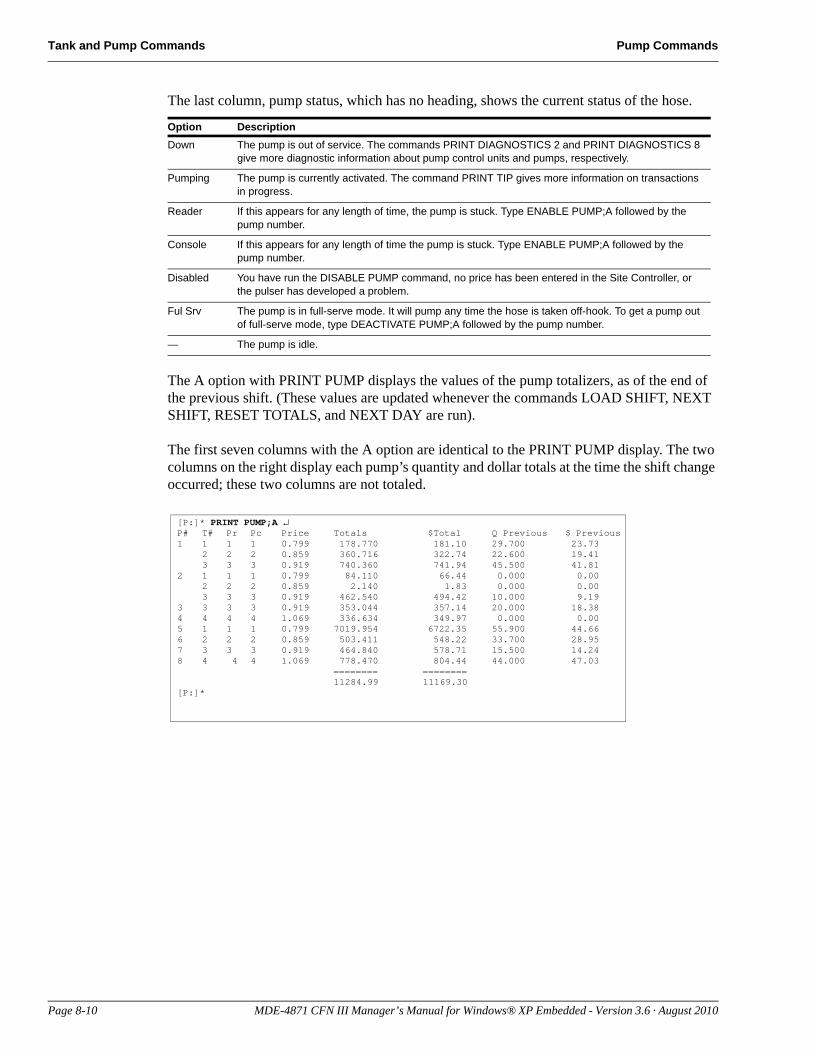
Tank and Pump Commands Pump Commands
[P:]* PRINT PUMP;A ↵P# T# Pr Pc Price Totals $Total Q Previous $ Previous1 1 1 1 0.799 178.770 181.10 29.700 23.73
2 2 2 0.859 360.716 322.74 22.600 19.413 3 3 0.919 740.360 741.94 45.500 41.81
2 1 1 1 0.799 84.110 66.44 0.000 0.002 2 2 0.859 2.140 1.83 0.000 0.003 3 3 0.919 462.540 494.42 10.000 9.19
3 3 3 3 0.919 353.044 357.14 20.000 18.384 4 4 4 1.069 336.634 349.97 0.000 0.005 1 1 1 0.799 7019.954 6722.35 55.900 44.666 2 2 2 0.859 503.411 548.22 33.700 28.957 3 3 3 0.919 464.840 578.71 15.500 14.248 4 4 4 1.069 778.470 804.44 44.000 47.03 ======== ========
11284.99 11169.30[P:]*
The last column, pump status, which has no heading, shows the current status of the hose.
The A option with PRINT PUMP displays the values of the pump totalizers, as of the end of the previous shift. (These values are updated whenever the commands LOAD SHIFT, NEXT SHIFT, RESET TOTALS, and NEXT DAY are run).
The first seven columns with the A option are identical to the PRINT PUMP display. The two columns on the right display each pump’s quantity and dollar totals at the time the shift change occurred; these two columns are not totaled.
Option DescriptionDown The pump is out of service. The commands PRINT DIAGNOSTICS 2 and PRINT DIAGNOSTICS 8
give more diagnostic information about pump control units and pumps, respectively.
Pumping The pump is currently activated. The command PRINT TIP gives more information on transactions in progress.
Reader If this appears for any length of time, the pump is stuck. Type ENABLE PUMP;A followed by the pump number.
Console If this appears for any length of time the pump is stuck. Type ENABLE PUMP;A followed by the pump number.
Disabled You have run the DISABLE PUMP command, no price has been entered in the Site Controller, or the pulser has developed a problem.
Ful Srv The pump is in full-serve mode. It will pump any time the hose is taken off-hook. To get a pump out of full-serve mode, type DEACTIVATE PUMP;A followed by the pump number.
— The pump is idle.
Page 8-10 MDE-4871 CFN III Manager’s Manual for Windows® XP Embedded - Version 3.6 · August 2010
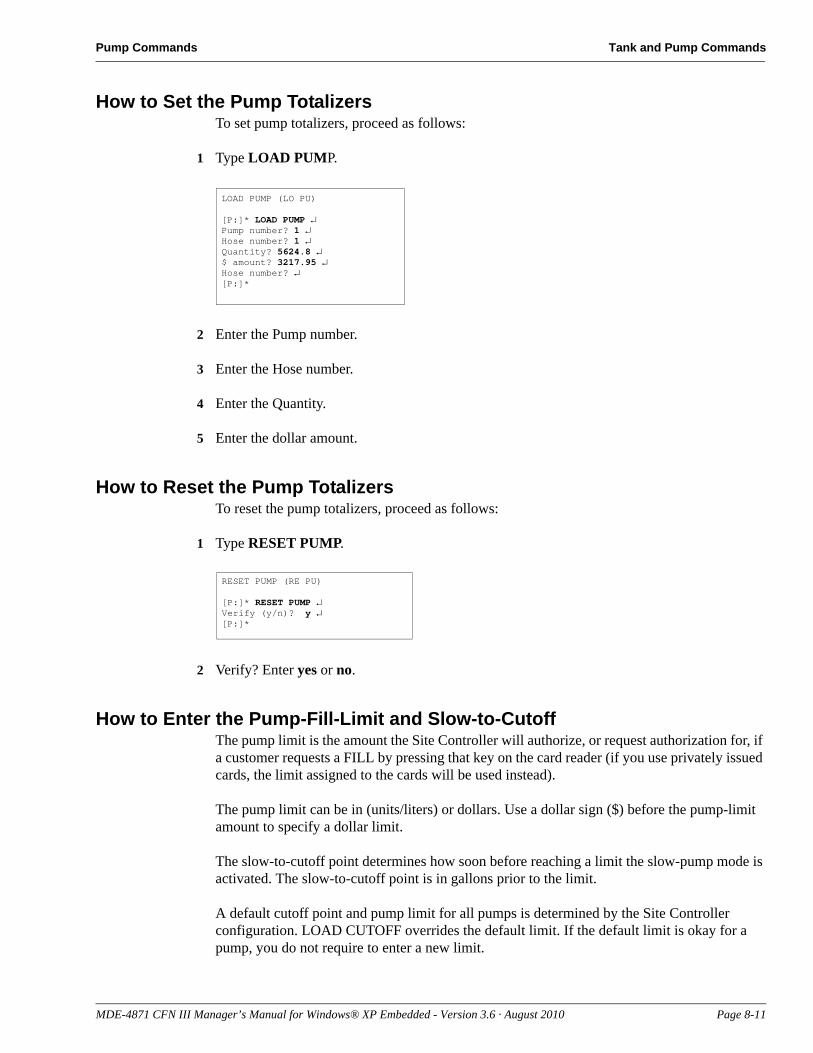
Pump Commands Tank and Pump Commands
How to Set the Pump TotalizersTo set pump totalizers, proceed as follows:
1 Type LOAD PUMP.
LOAD PUMP (LO PU)
[P:]* LOAD PUMP ↵Pump number? 1 ↵Hose number? 1 ↵Quantity? 5624.8 ↵$ amount? 3217.95 ↵Hose number? ↵[P:]*
2 Enter the Pump number.
3 Enter the Hose number.
4 Enter the Quantity.
5 Enter the dollar amount.
How to Reset the Pump TotalizersTo reset the pump totalizers, proceed as follows:
1 Type RESET PUMP.
RESET PUMP (RE PU)
[P:]* RESET PUMP ↵Verify (y/n)? y ↵[P:]*
2 Verify? Enter yes or no.
How to Enter the Pump-Fill-Limit and Slow-to-CutoffThe pump limit is the amount the Site Controller will authorize, or request authorization for, if a customer requests a FILL by pressing that key on the card reader (if you use privately issued cards, the limit assigned to the cards will be used instead).
The pump limit can be in (units/liters) or dollars. Use a dollar sign ($) before the pump-limit amount to specify a dollar limit.
The slow-to-cutoff point determines how soon before reaching a limit the slow-pump mode is activated. The slow-to-cutoff point is in gallons prior to the limit.
A default cutoff point and pump limit for all pumps is determined by the Site Controller configuration. LOAD CUTOFF overrides the default limit. If the default limit is okay for a pump, you do not require to enter a new limit.
MDE-4871 CFN III Manager’s Manual for Windows® XP Embedded - Version 3.6 · August 2010 Page 8-11
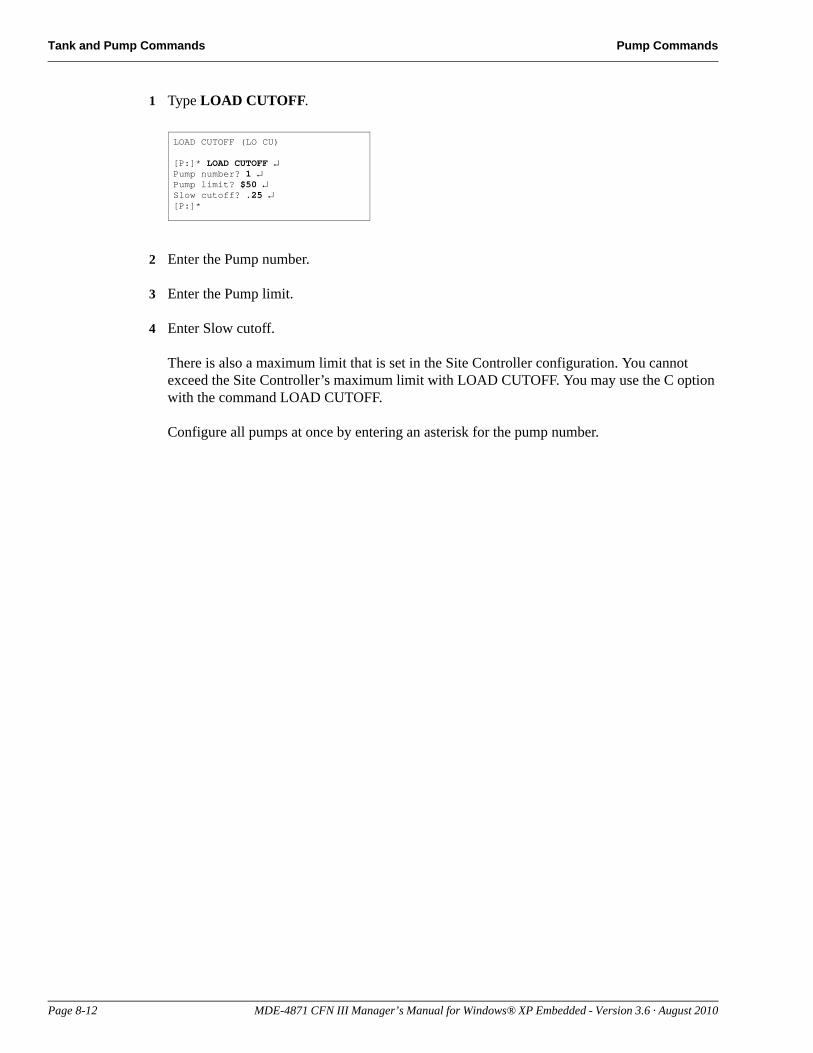
Tank and Pump Commands Pump Commands
1 Type LOAD CUTOFF.
LOAD CUTOFF (LO CU)
[P:]* LOAD CUTOFF ↵Pump number? 1 ↵Pump limit? $50 ↵Slow cutoff? .25 ↵[P:]*
2 Enter the Pump number.
3 Enter the Pump limit.
4 Enter Slow cutoff.
There is also a maximum limit that is set in the Site Controller configuration. You cannot exceed the Site Controller’s maximum limit with LOAD CUTOFF. You may use the C option with the command LOAD CUTOFF.
Configure all pumps at once by entering an asterisk for the pump number.
Page 8-12 MDE-4871 CFN III Manager’s Manual for Windows® XP Embedded - Version 3.6 · August 2010
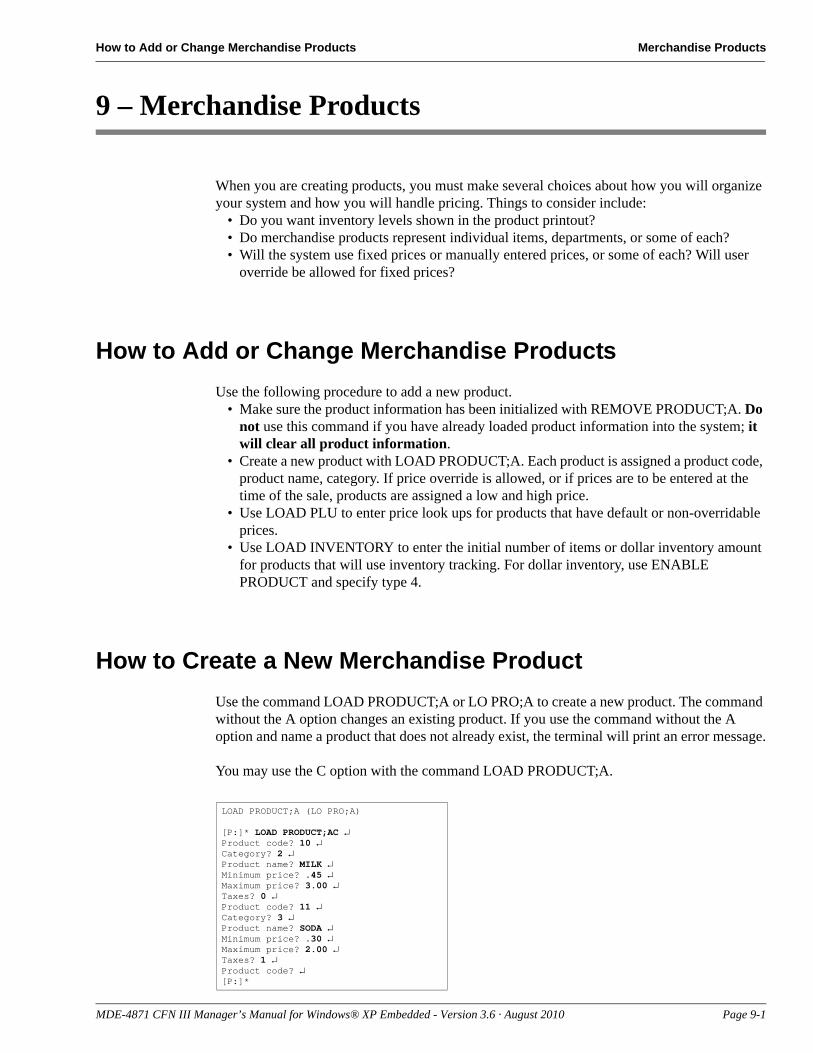
How to Add or Change Merchandise Products Merchandise Products
9 – Merchandise Products
When you are creating products, you must make several choices about how you will organize your system and how you will handle pricing. Things to consider include:
• Do you want inventory levels shown in the product printout?• Do merchandise products represent individual items, departments, or some of each?• Will the system use fixed prices or manually entered prices, or some of each? Will user
override be allowed for fixed prices?
How to Add or Change Merchandise ProductsUse the following procedure to add a new product.
• Make sure the product information has been initialized with REMOVE PRODUCT;A. Do not use this command if you have already loaded product information into the system; it will clear all product information.
• Create a new product with LOAD PRODUCT;A. Each product is assigned a product code, product name, category. If price override is allowed, or if prices are to be entered at the time of the sale, products are assigned a low and high price.
• Use LOAD PLU to enter price look ups for products that have default or non-overridable prices.
• Use LOAD INVENTORY to enter the initial number of items or dollar inventory amount for products that will use inventory tracking. For dollar inventory, use ENABLE PRODUCT and specify type 4.
How to Create a New Merchandise ProductUse the command LOAD PRODUCT;A or LO PRO;A to create a new product. The command without the A option changes an existing product. If you use the command without the A option and name a product that does not already exist, the terminal will print an error message.
LOAD PRODUCT;A (LO PRO;A)
[P:]* LOAD PRODUCT;AC ↵Product code? 10 ↵Category? 2 ↵Product name? MILK ↵Minimum price? .45 ↵Maximum price? 3.00 ↵Taxes? 0 ↵Product code? 11 ↵Category? 3 ↵Product name? SODA ↵Minimum price? .30 ↵Maximum price? 2.00 ↵Taxes? 1 ↵Product code? ↵[P:]*
You may use the C option with the command LOAD PRODUCT;A.
MDE-4871 CFN III Manager’s Manual for Windows® XP Embedded - Version 3.6 · August 2010 Page 9-1
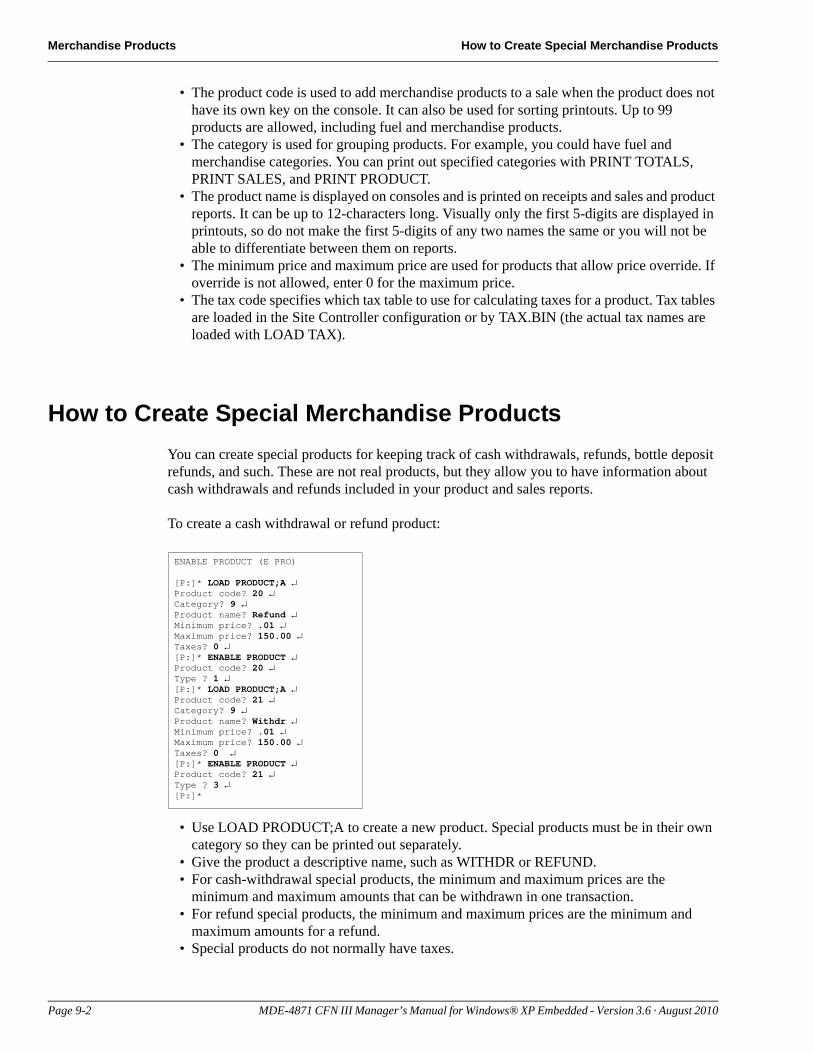
Merchandise Products How to Create Special Merchandise Products
• The product code is used to add merchandise products to a sale when the product does not have its own key on the console. It can also be used for sorting printouts. Up to 99 products are allowed, including fuel and merchandise products.
• The category is used for grouping products. For example, you could have fuel and merchandise categories. You can print out specified categories with PRINT TOTALS, PRINT SALES, and PRINT PRODUCT.
• The product name is displayed on consoles and is printed on receipts and sales and product reports. It can be up to 12-characters long. Visually only the first 5-digits are displayed in printouts, so do not make the first 5-digits of any two names the same or you will not be able to differentiate between them on reports.
• The minimum price and maximum price are used for products that allow price override. If override is not allowed, enter 0 for the maximum price.
• The tax code specifies which tax table to use for calculating taxes for a product. Tax tables are loaded in the Site Controller configuration or by TAX.BIN (the actual tax names are loaded with LOAD TAX).
How to Create Special Merchandise ProductsYou can create special products for keeping track of cash withdrawals, refunds, bottle deposit refunds, and such. These are not real products, but they allow you to have information about cash withdrawals and refunds included in your product and sales reports.
ENABLE PRODUCT (E PRO)
[P:]* LOAD PRODUCT;A ↵Product code? 20 ↵Category? 9 ↵Product name? Refund ↵Minimum price? .01 ↵Maximum price? 150.00 ↵Taxes? 0 ↵[P:]* ENABLE PRODUCT ↵Product code? 20 ↵Type ? 1 ↵[P:]* LOAD PRODUCT;A ↵Product code? 21 ↵Category? 9 ↵Product name? Withdr ↵Minimum price? .01 ↵Maximum price? 150.00 ↵Taxes? 0 ↵[P:]* ENABLE PRODUCT ↵Product code? 21 ↵Type ? 3 ↵[P:]*
To create a cash withdrawal or refund product:
• Use LOAD PRODUCT;A to create a new product. Special products must be in their own category so they can be printed out separately.
• Give the product a descriptive name, such as WITHDR or REFUND.• For cash-withdrawal special products, the minimum and maximum prices are the
minimum and maximum amounts that can be withdrawn in one transaction.• For refund special products, the minimum and maximum prices are the minimum and
maximum amounts for a refund.• Special products do not normally have taxes.
Page 9-2 MDE-4871 CFN III Manager’s Manual for Windows® XP Embedded - Version 3.6 · August 2010
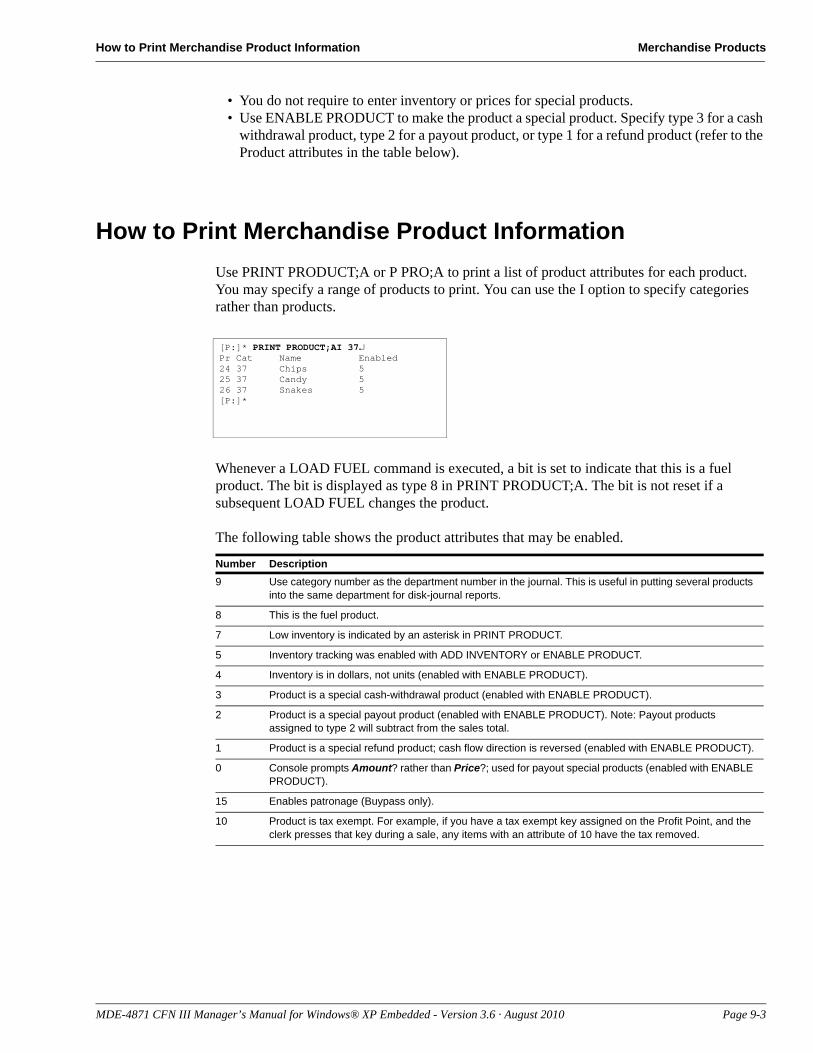
How to Print Merchandise Product Information Merchandise Products
• You do not require to enter inventory or prices for special products.• Use ENABLE PRODUCT to make the product a special product. Specify type 3 for a cash
withdrawal product, type 2 for a payout product, or type 1 for a refund product (refer to the Product attributes in the table below).
How to Print Merchandise Product InformationUse PRINT PRODUCT;A or P PRO;A to print a list of product attributes for each product. You may specify a range of products to print. You can use the I option to specify categories rather than products.
[P:]* PRINT PRODUCT;AI 37↵Pr Cat Name Enabled24 37 Chips 525 37 Candy 526 37 Snakes 5[P:]*
Whenever a LOAD FUEL command is executed, a bit is set to indicate that this is a fuel product. The bit is displayed as type 8 in PRINT PRODUCT;A. The bit is not reset if a subsequent LOAD FUEL changes the product.
The following table shows the product attributes that may be enabled.
Number Description9 Use category number as the department number in the journal. This is useful in putting several products
into the same department for disk-journal reports.
8 This is the fuel product.
7 Low inventory is indicated by an asterisk in PRINT PRODUCT.
5 Inventory tracking was enabled with ADD INVENTORY or ENABLE PRODUCT.
4 Inventory is in dollars, not units (enabled with ENABLE PRODUCT).
3 Product is a special cash-withdrawal product (enabled with ENABLE PRODUCT).
2 Product is a special payout product (enabled with ENABLE PRODUCT). Note: Payout products assigned to type 2 will subtract from the sales total.
1 Product is a special refund product; cash flow direction is reversed (enabled with ENABLE PRODUCT).
0 Console prompts Amount? rather than Price?; used for payout special products (enabled with ENABLE PRODUCT).
15 Enables patronage (Buypass only).
10 Product is tax exempt. For example, if you have a tax exempt key assigned on the Profit Point, and the clerk presses that key during a sale, any items with an attribute of 10 have the tax removed.
MDE-4871 CFN III Manager’s Manual for Windows® XP Embedded - Version 3.6 · August 2010 Page 9-3
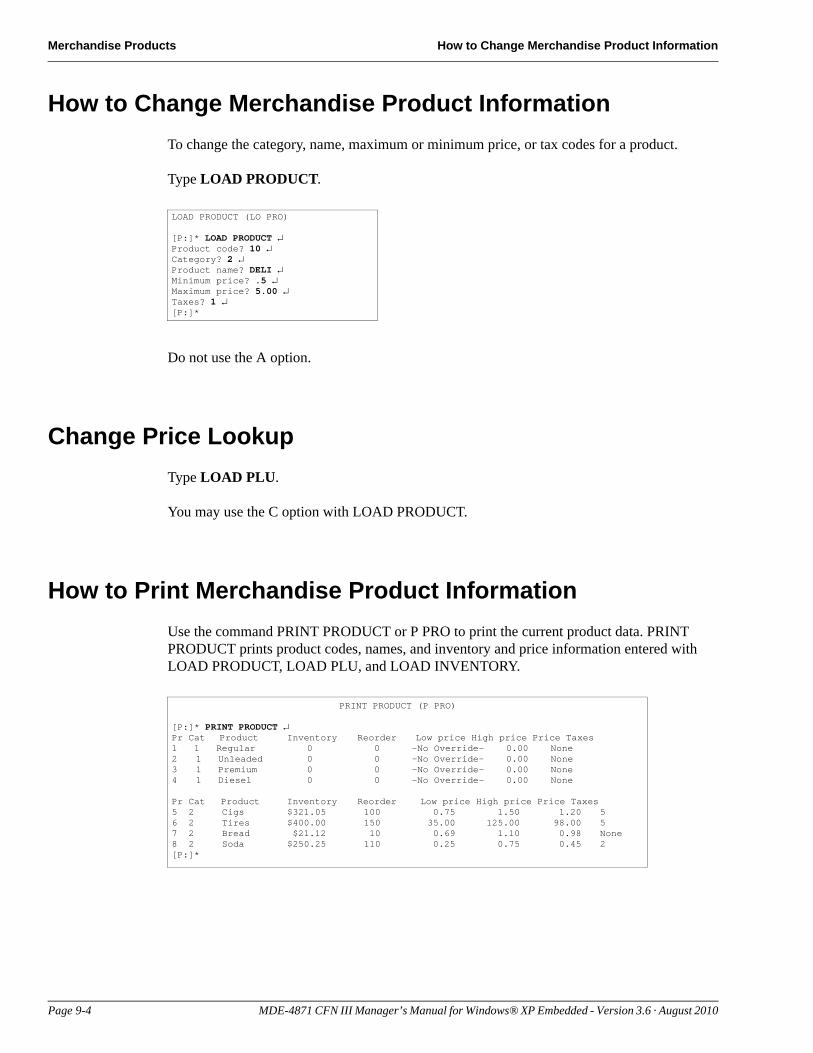
Merchandise Products How to Change Merchandise Product Information
How to Change Merchandise Product InformationTo change the category, name, maximum or minimum price, or tax codes for a product.
LOAD PRODUCT (LO PRO)
[P:]* LOAD PRODUCT ↵Product code? 10 ↵Category? 2 ↵Product name? DELI ↵Minimum price? .5 ↵Maximum price? 5.00 ↵Taxes? 1 ↵[P:]*
Type LOAD PRODUCT.
Do not use the A option.
Change Price LookupType LOAD PLU.
You may use the C option with LOAD PRODUCT.
How to Print Merchandise Product InformationUse the command PRINT PRODUCT or P PRO to print the current product data. PRINT PRODUCT prints product codes, names, and inventory and price information entered with LOAD PRODUCT, LOAD PLU, and LOAD INVENTORY.
PRINT PRODUCT (P PRO)
[P:]* PRINT PRODUCT ↵Pr Cat Product Inventory Reorder Low price High price Price Taxes1 1 Regular 0 0 -No Override- 0.00 None2 1 Unleaded 0 0 -No Override- 0.00 None3 1 Premium 0 0 -No Override- 0.00 None4 1 Diesel 0 0 -No Override- 0.00 None
Pr Cat Product Inventory Reorder Low price High price Price Taxes5 2 Cigs $321.05 100 0.75 1.50 1.20 56 2 Tires $400.00 150 35.00 125.00 98.00 57 2 Bread $21.12 10 0.69 1.10 0.98 None8 2 Soda $250.25 110 0.25 0.75 0.45 2[P:]*
Page 9-4 MDE-4871 CFN III Manager’s Manual for Windows® XP Embedded - Version 3.6 · August 2010
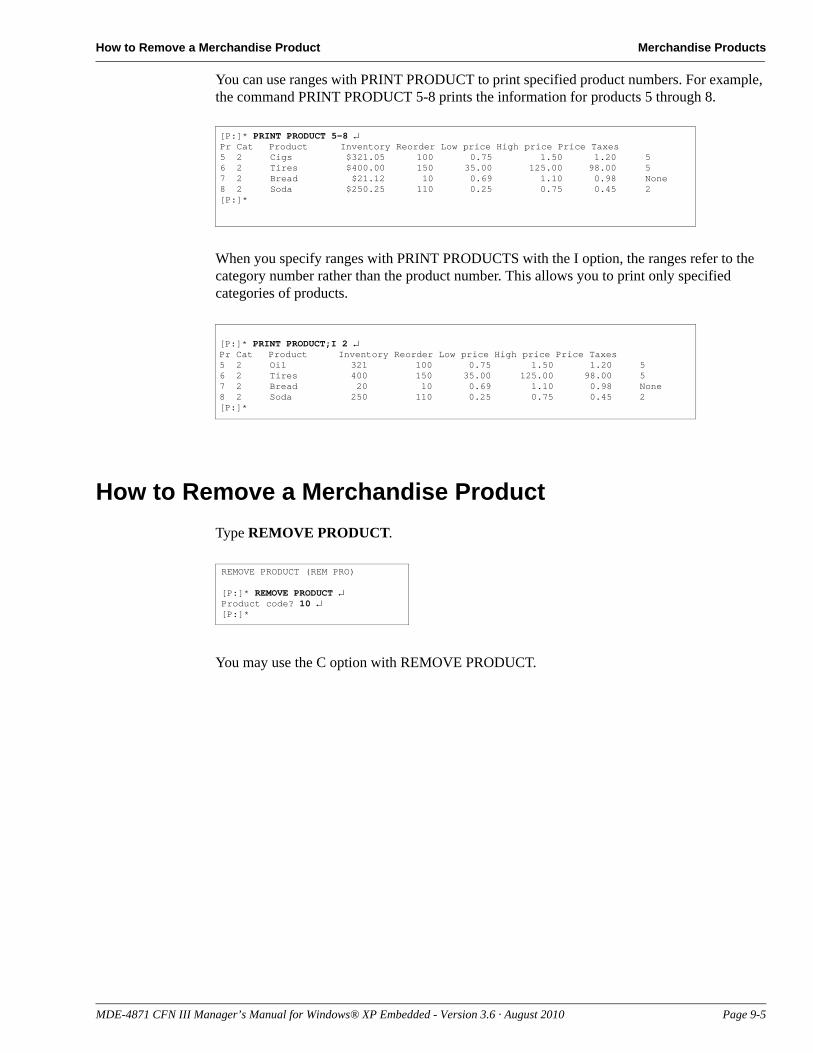
How to Remove a Merchandise Product Merchandise Products
[P:]* PRINT PRODUCT 5-8 ↵Pr Cat Product Inventory Reorder Low price High price Price Taxes5 2 Cigs $321.05 100 0.75 1.50 1.20 56 2 Tires $400.00 150 35.00 125.00 98.00 57 2 Bread $21.12 10 0.69 1.10 0.98 None8 2 Soda $250.25 110 0.25 0.75 0.45 2[P:]*
[P:]* PRINT PRODUCT;I 2 ↵Pr Cat Product Inventory Reorder Low price High price Price Taxes5 2 Oil 321 100 0.75 1.50 1.20 56 2 Tires 400 150 35.00 125.00 98.00 57 2 Bread 20 10 0.69 1.10 0.98 None8 2 Soda 250 110 0.25 0.75 0.45 2[P:]*
You can use ranges with PRINT PRODUCT to print specified product numbers. For example, the command PRINT PRODUCT 5-8 prints the information for products 5 through 8.
When you specify ranges with PRINT PRODUCTS with the I option, the ranges refer to the category number rather than the product number. This allows you to print only specified categories of products.
How to Remove a Merchandise ProductType REMOVE PRODUCT.
REMOVE PRODUCT (REM PRO)
[P:]* REMOVE PRODUCT ↵Product code? 10 ↵[P:]*
You may use the C option with REMOVE PRODUCT.
MDE-4871 CFN III Manager’s Manual for Windows® XP Embedded - Version 3.6 · August 2010 Page 9-5
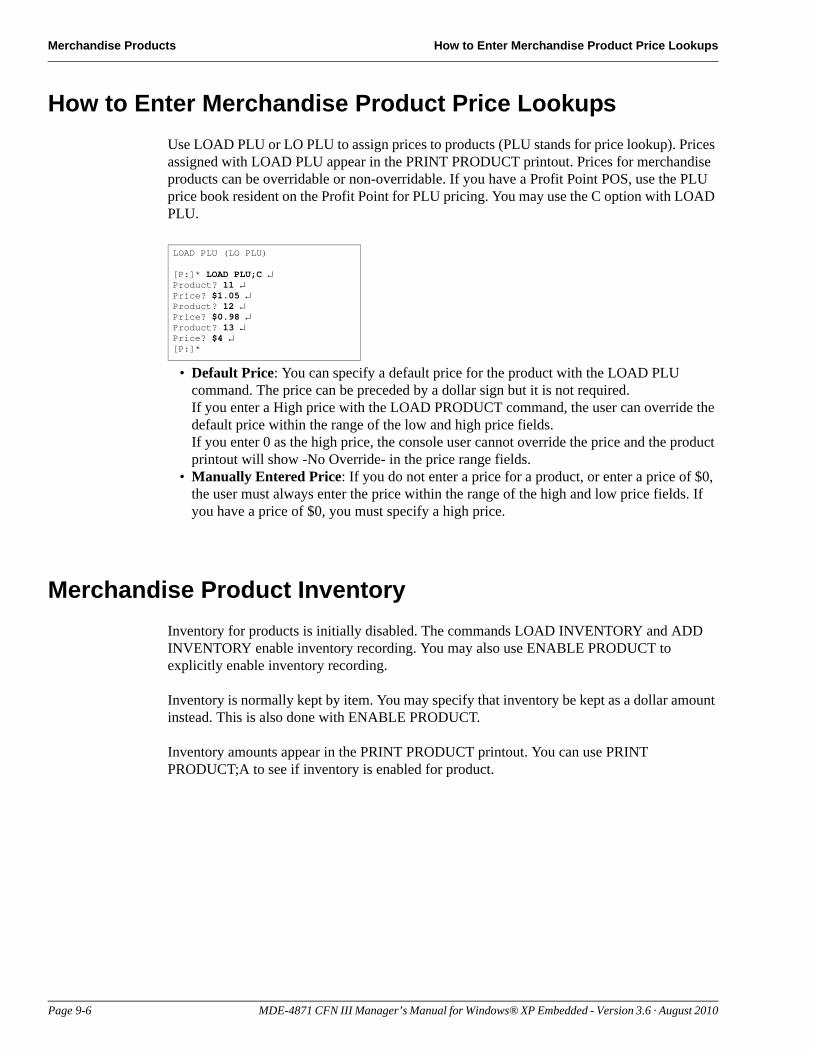
Merchandise Products How to Enter Merchandise Product Price Lookups
How to Enter Merchandise Product Price LookupsUse LOAD PLU or LO PLU to assign prices to products (PLU stands for price lookup). Prices assigned with LOAD PLU appear in the PRINT PRODUCT printout. Prices for merchandise products can be overridable or non-overridable. If you have a Profit Point POS, use the PLU price book resident on the Profit Point for PLU pricing. You may use the C option with LOAD PLU.
LOAD PLU (LO PLU)
[P:]* LOAD PLU;C ↵Product? 11 ↵Price? $1.05 ↵Product? 12 ↵Price? $0.98 ↵Product? 13 ↵Price? $4 ↵[P:]*
• Default Price: You can specify a default price for the product with the LOAD PLU command. The price can be preceded by a dollar sign but it is not required. If you enter a High price with the LOAD PRODUCT command, the user can override the default price within the range of the low and high price fields. If you enter 0 as the high price, the console user cannot override the price and the product printout will show -No Override- in the price range fields.
• Manually Entered Price: If you do not enter a price for a product, or enter a price of $0, the user must always enter the price within the range of the high and low price fields. If you have a price of $0, you must specify a high price.
Merchandise Product InventoryInventory for products is initially disabled. The commands LOAD INVENTORY and ADD INVENTORY enable inventory recording. You may also use ENABLE PRODUCT to explicitly enable inventory recording.
Inventory is normally kept by item. You may specify that inventory be kept as a dollar amount instead. This is also done with ENABLE PRODUCT.
Inventory amounts appear in the PRINT PRODUCT printout. You can use PRINT PRODUCT;A to see if inventory is enabled for product.
Page 9-6 MDE-4871 CFN III Manager’s Manual for Windows® XP Embedded - Version 3.6 · August 2010
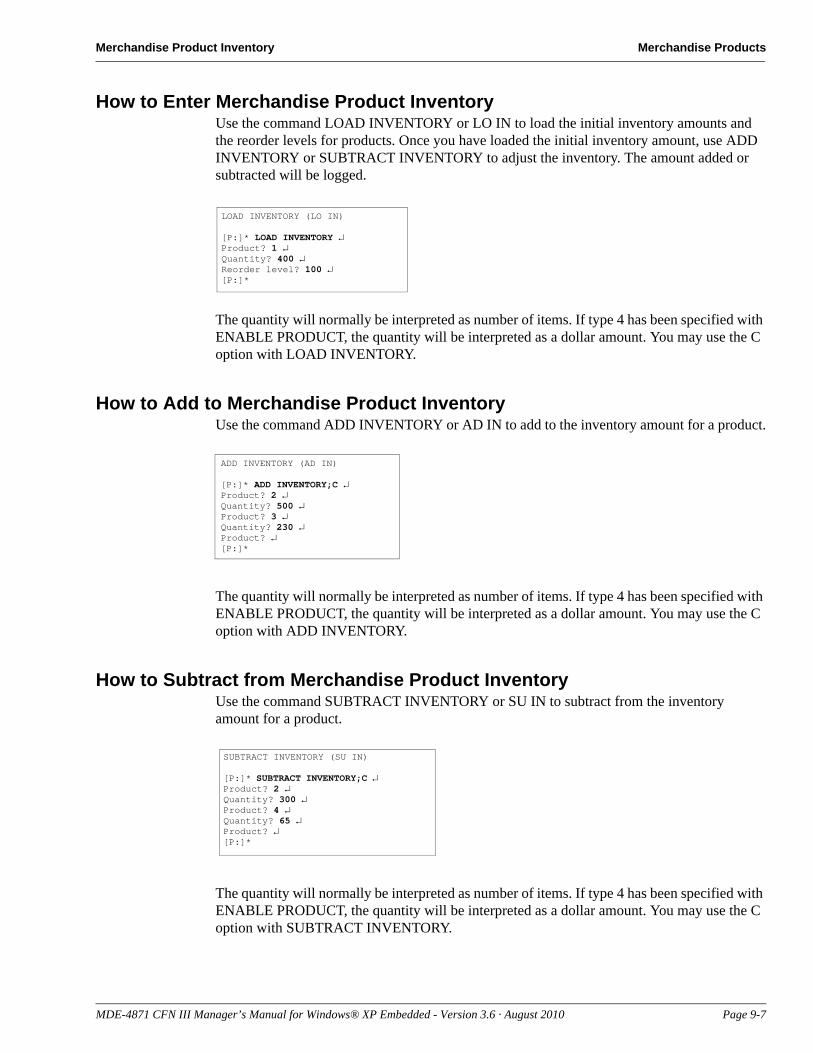
Merchandise Product Inventory Merchandise Products
How to Enter Merchandise Product InventoryUse the command LOAD INVENTORY or LO IN to load the initial inventory amounts and the reorder levels for products. Once you have loaded the initial inventory amount, use ADD INVENTORY or SUBTRACT INVENTORY to adjust the inventory. The amount added or subtracted will be logged.
LOAD INVENTORY (LO IN)
[P:]* LOAD INVENTORY ↵Product? 1 ↵Quantity? 400 ↵Reorder level? 100 ↵[P:]*
The quantity will normally be interpreted as number of items. If type 4 has been specified with ENABLE PRODUCT, the quantity will be interpreted as a dollar amount. You may use the C option with LOAD INVENTORY.
How to Add to Merchandise Product InventoryUse the command ADD INVENTORY or AD IN to add to the inventory amount for a product.
ADD INVENTORY (AD IN)
[P:]* ADD INVENTORY;C ↵Product? 2 ↵Quantity? 500 ↵Product? 3 ↵Quantity? 230 ↵Product? ↵[P:]*
The quantity will normally be interpreted as number of items. If type 4 has been specified with ENABLE PRODUCT, the quantity will be interpreted as a dollar amount. You may use the C option with ADD INVENTORY.
How to Subtract from Merchandise Product InventoryUse the command SUBTRACT INVENTORY or SU IN to subtract from the inventory amount for a product.
SUBTRACT INVENTORY (SU IN)
[P:]* SUBTRACT INVENTORY;C ↵Product? 2 ↵Quantity? 300 ↵Product? 4 ↵Quantity? 65 ↵Product? ↵[P:]*
The quantity will normally be interpreted as number of items. If type 4 has been specified with ENABLE PRODUCT, the quantity will be interpreted as a dollar amount. You may use the C option with SUBTRACT INVENTORY.
MDE-4871 CFN III Manager’s Manual for Windows® XP Embedded - Version 3.6 · August 2010 Page 9-7
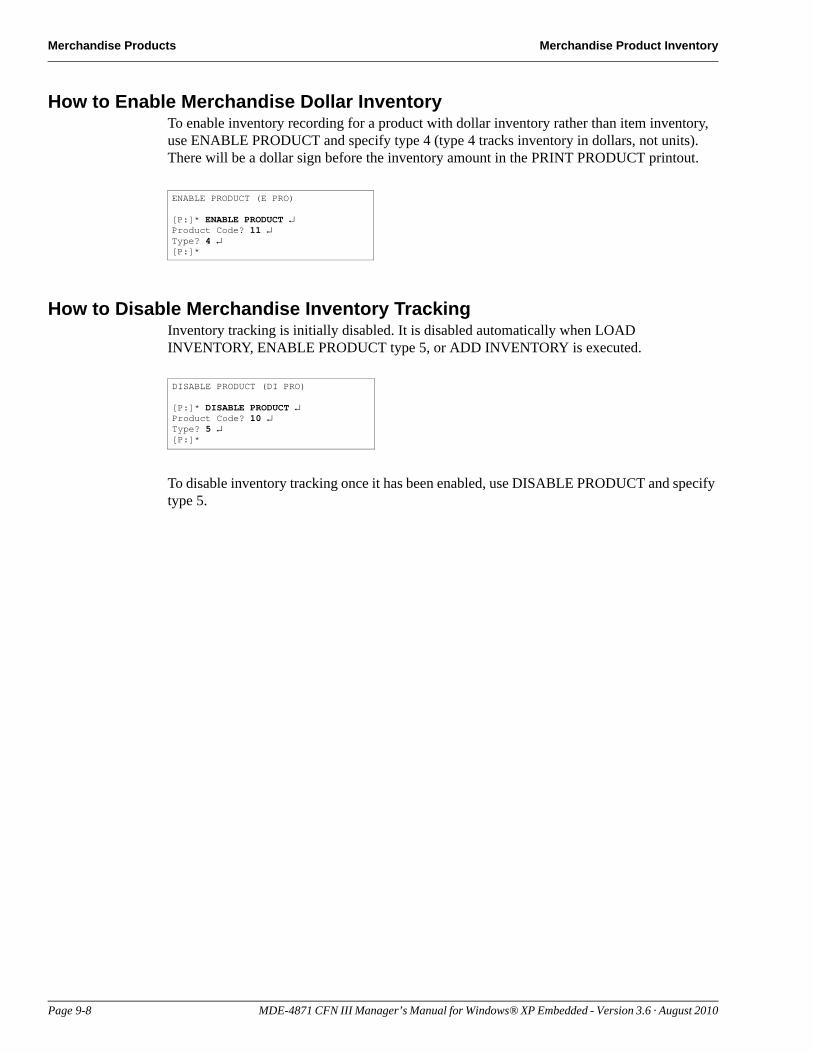
Merchandise Products Merchandise Product Inventory
How to Enable Merchandise Dollar InventoryTo enable inventory recording for a product with dollar inventory rather than item inventory, use ENABLE PRODUCT and specify type 4 (type 4 tracks inventory in dollars, not units). There will be a dollar sign before the inventory amount in the PRINT PRODUCT printout.
ENABLE PRODUCT (E PRO)
[P:]* ENABLE PRODUCT ↵Product Code? 11 ↵Type? 4 ↵[P:]*
How to Disable Merchandise Inventory TrackingInventory tracking is initially disabled. It is disabled automatically when LOAD INVENTORY, ENABLE PRODUCT type 5, or ADD INVENTORY is executed.
DISABLE PRODUCT (DI PRO)
[P:]* DISABLE PRODUCT ↵Product Code? 10 ↵Type? 5 ↵[P:]*
To disable inventory tracking once it has been enabled, use DISABLE PRODUCT and specify type 5.
Page 9-8 MDE-4871 CFN III Manager’s Manual for Windows® XP Embedded - Version 3.6 · August 2010
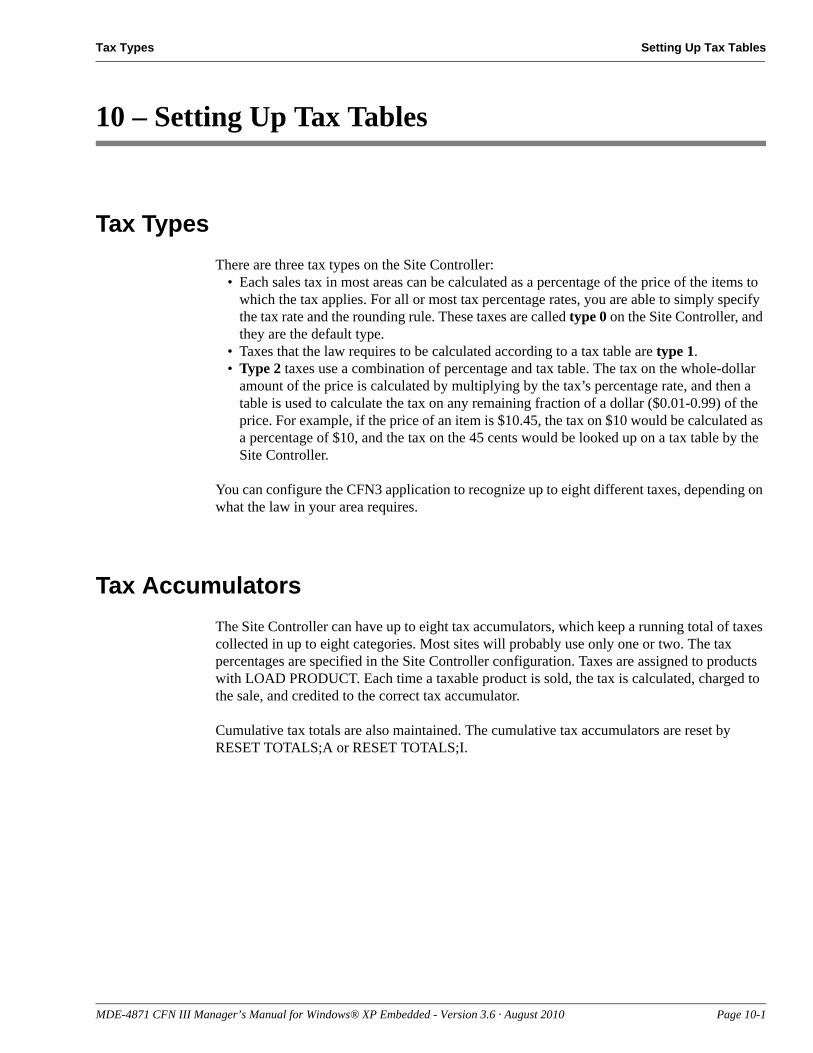
Tax Types Setting Up Tax Tables
10 – Setting Up Tax Tables
Tax TypesThere are three tax types on the Site Controller:
• Each sales tax in most areas can be calculated as a percentage of the price of the items to which the tax applies. For all or most tax percentage rates, you are able to simply specify the tax rate and the rounding rule. These taxes are called type 0 on the Site Controller, and they are the default type.
• Taxes that the law requires to be calculated according to a tax table are type 1.• Type 2 taxes use a combination of percentage and tax table. The tax on the whole-dollar
amount of the price is calculated by multiplying by the tax’s percentage rate, and then a table is used to calculate the tax on any remaining fraction of a dollar ($0.01-0.99) of the price. For example, if the price of an item is $10.45, the tax on $10 would be calculated as a percentage of $10, and the tax on the 45 cents would be looked up on a tax table by the Site Controller.
You can configure the CFN3 application to recognize up to eight different taxes, depending on what the law in your area requires.
Tax AccumulatorsThe Site Controller can have up to eight tax accumulators, which keep a running total of taxes collected in up to eight categories. Most sites will probably use only one or two. The tax percentages are specified in the Site Controller configuration. Taxes are assigned to products with LOAD PRODUCT. Each time a taxable product is sold, the tax is calculated, charged to the sale, and credited to the correct tax accumulator.
Cumulative tax totals are also maintained. The cumulative tax accumulators are reset by RESET TOTALS;A or RESET TOTALS;I.
MDE-4871 CFN III Manager’s Manual for Windows® XP Embedded - Version 3.6 · August 2010 Page 10-1
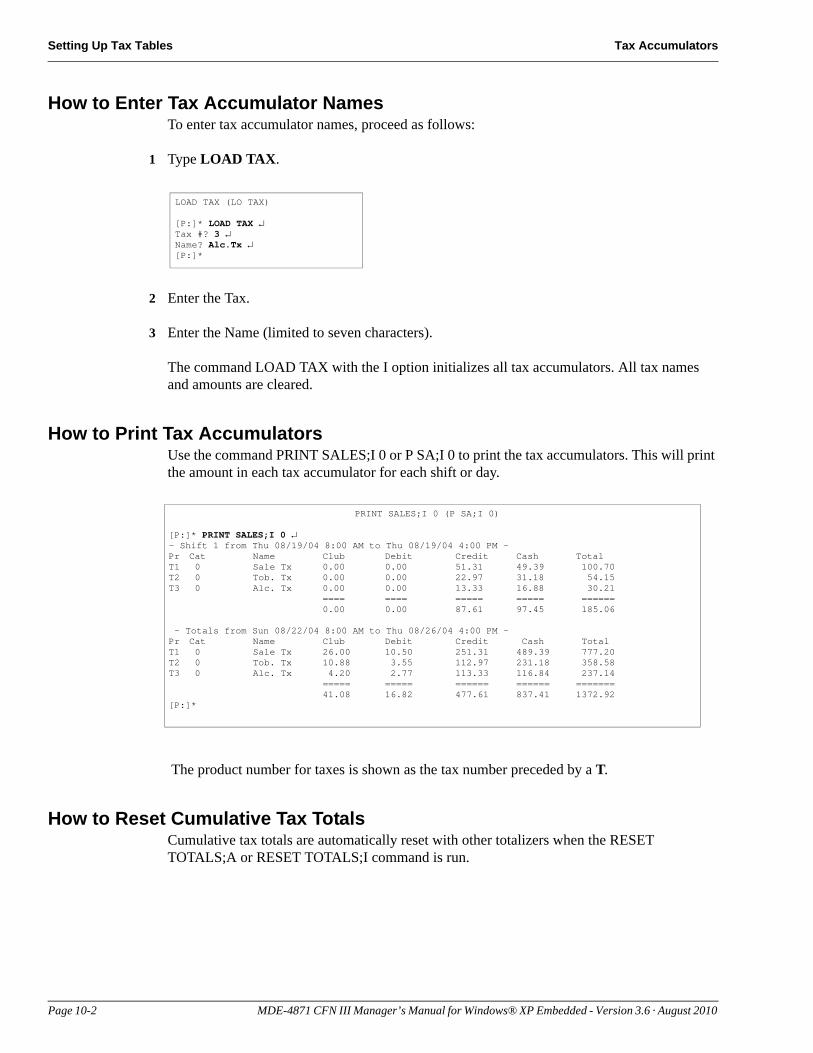
Setting Up Tax Tables Tax Accumulators
How to Enter Tax Accumulator NamesTo enter tax accumulator names, proceed as follows:
1 Type LOAD TAX.
LOAD TAX (LO TAX)
[P:]* LOAD TAX ↵Tax #? 3 ↵Name? Alc.Tx ↵[P:]*
2 Enter the Tax.
3 Enter the Name (limited to seven characters).
The command LOAD TAX with the I option initializes all tax accumulators. All tax names and amounts are cleared.
How to Print Tax AccumulatorsUse the command PRINT SALES;I 0 or P SA;I 0 to print the tax accumulators. This will print the amount in each tax accumulator for each shift or day.
PRINT SALES;I 0 (P SA;I 0)
[P:]* PRINT SALES;I 0 ↵- Shift 1 from Thu 08/19/04 8:00 AM to Thu 08/19/04 4:00 PM -Pr Cat Name Club Debit Credit Cash TotalT1 0 Sale Tx 0.00 0.00 51.31 49.39 100.70T2 0 Tob. Tx 0.00 0.00 22.97 31.18 54.15T3 0 Alc. Tx 0.00 0.00 13.33 16.88 30.21
==== ==== ===== ===== ======0.00 0.00 87.61 97.45 185.06
- Totals from Sun 08/22/04 8:00 AM to Thu 08/26/04 4:00 PM -Pr Cat Name Club Debit Credit Cash TotalT1 0 Sale Tx 26.00 10.50 251.31 489.39 777.20T2 0 Tob. Tx 10.88 3.55 112.97 231.18 358.58T3 0 Alc. Tx 4.20 2.77 113.33 116.84 237.14
===== ===== ====== ====== =======41.08 16.82 477.61 837.41 1372.92
[P:]*
The product number for taxes is shown as the tax number preceded by a T.
How to Reset Cumulative Tax TotalsCumulative tax totals are automatically reset with other totalizers when the RESET TOTALS;A or RESET TOTALS;I command is run.
Page 10-2 MDE-4871 CFN III Manager’s Manual for Windows® XP Embedded - Version 3.6 · August 2010
Tax as Percentage Setting Up Tax Tables
Tax as PercentageIf the tax laws in your area allow type-0 tax calculations for all items-and most areas do allow this, you do not require to use this chapter. Instead, refer to the Tax Rate and Tax Rounding Boundaries parameters on menu 3 of the CONSOLE configuration program (which is discussed in MDE-4773 CFN III Configuration Manual for Windows XP) for instructions on setting up a type 0 tax.
For each product you define through the LOAD PRODUCT command, you will use CONSOLE to specify the tax that applies. Tax rates are specified in hundredths of a percent. For example, a 7.8 percent tax is specified as 780, though it displays as 7.80.
You can also specify the upward rounding breakpoint, in tenths of a cent (which is hundredths of a dollar). For example, if taxes are to be rounded up at $0.005 and down below $0.005, you will use CONSOLE to enter a 5 for the tax rounding boundary.Note: The tax rates and tax rounding boundaries are ignored if the tax tables are loaded using
the TAX program.
When to Use Tax TablesSetting up tax tables is a complicated procedure, so use tax tables only if the law in your area requires them. If you are required by your local or state tax laws to use a tax table instead of tax percentages, read through this entire chapter carefully before starting to construct the table; then come back to the beginning of the chapter and start to work.
For each different tax lookup table the law requires you to use, use the TAX program explained in this chapter to build a tax table. The table you build through the TAX program is similar to the kind traditionally used in many (POS) terminals and cash registers.
You may set up 1-8 different taxes using these tables. Determine how many tax lookup tables you require to build. Then for each one, follow the instructions in the remainder of this chapter.
How to Set Up a Tax TableThe following are the five major steps involved in setting up a tax table:
• “Preparing a Compressed Description of Tax Data” on page 10-4.• “Allot Storage Space for Your Tax Information” on page 10-7.• “Assign a Tax Number and Name to Each Table” on page 10-7.• “Build a Tax Table” on page 10-7.• “Back Up Your Tax Data” on page 10-10.
This chapter explains how to complete all those steps. It also explains how to use TAX to print your tax information and how to update a tax table when tax rates change.
MDE-4871 CFN III Manager’s Manual for Windows® XP Embedded - Version 3.6 · August 2010 Page 10-3
Setting Up Tax Tables How to Set Up a Tax Table
Preparing a Compressed Description of Tax DataIf your local taxing authorities require a tax lookup table, Gasboy or your local distributor may already have a compressed (short and concise) description of it. Otherwise, use the instructions in this section to compose a compressed description of each tax table you will use. (an example of a compressed description follows item 7 in the list immediately below).
1 Obtain a complete tax lookup table from the taxing authorities. Using the instructions in this section, you will examine your tax table and prepare a compressed description of it. Then you will enter the compressed description into the CFN3 software.
2 You will require to determine what type of tax table you are using, type 1 or type 2.• Type 1 taxes are determined from a lookup table only.• Type 2 breaks the taxable amount into two parts. The first part is a whole dollar amount,
with its tax calculated at a percentage, possibly rounded. The second part of the taxable amount is the remainder after the whole dollar amount is taken out. Its tax is calculated by the table lookup (similar to the type 1 lookup table). The total tax is the sum of the tax on the two parts.
3 Construct a worksheet for the tax table. Include the following columns (refer to the sample graphic that follows):
Option DescriptionFrom In this column, write the low amount in each range of taxable amounts
for which a constant tax amount applies. For example, a customer may pay a tax of $0.03 on any sales amounts from $0.46 to $0.63. You will place $0.46 in the From column for that range.
To In this column, write the high amount in the range, for example, $0.63 in the example immediately above.
Tax For each range, write the tax charged on the amounts in the range.
Amt Diff Subtract the From amount of the preceding range from the From amount of the current range, and write the result in this column.
Tax Diff Subtract the Tax amount on the preceding row from the Tax amount on the current row, and write the result in this column.
The sample graphic below shows information from a typical tax table. The columns labeled From, To, and Tax correspond to the columns on a tax table like those issued by taxing authorities. The columns labeled Amt Diff and Tax Diff have been calculated from the tax table information. The Tax Diff is usually a constant. Note: In the sample table, it is always $0.01.
Page 10-4 MDE-4871 CFN III Manager’s Manual for Windows® XP Embedded - Version 3.6 · August 2010
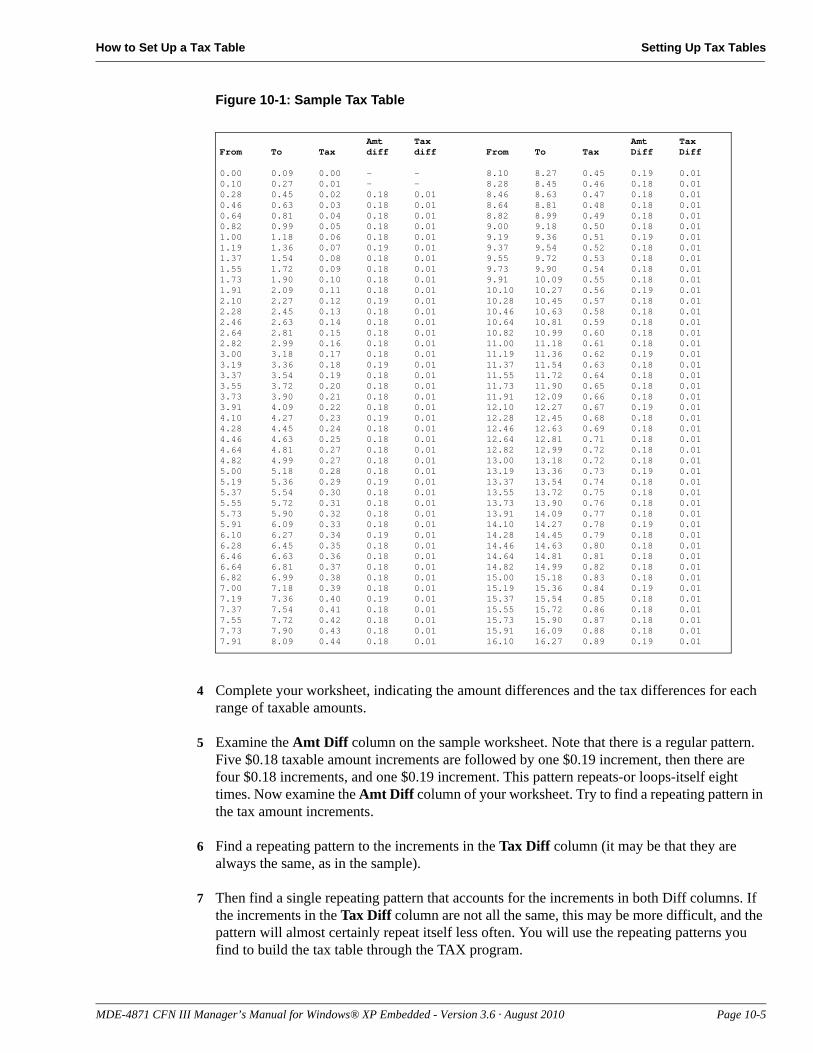
How to Set Up a Tax Table Setting Up Tax Tables
Figure 10-1: Sample Tax Table
Amt Tax Amt TaxFrom To Tax diff diff From To Tax Diff Diff
0.00 0.09 0.00 - - 8.10 8.27 0.45 0.19 0.010.10 0.27 0.01 - - 8.28 8.45 0.46 0.18 0.010.28 0.45 0.02 0.18 0.01 8.46 8.63 0.47 0.18 0.010.46 0.63 0.03 0.18 0.01 8.64 8.81 0.48 0.18 0.010.64 0.81 0.04 0.18 0.01 8.82 8.99 0.49 0.18 0.010.82 0.99 0.05 0.18 0.01 9.00 9.18 0.50 0.18 0.011.00 1.18 0.06 0.18 0.01 9.19 9.36 0.51 0.19 0.011.19 1.36 0.07 0.19 0.01 9.37 9.54 0.52 0.18 0.011.37 1.54 0.08 0.18 0.01 9.55 9.72 0.53 0.18 0.011.55 1.72 0.09 0.18 0.01 9.73 9.90 0.54 0.18 0.011.73 1.90 0.10 0.18 0.01 9.91 10.09 0.55 0.18 0.011.91 2.09 0.11 0.18 0.01 10.10 10.27 0.56 0.19 0.012.10 2.27 0.12 0.19 0.01 10.28 10.45 0.57 0.18 0.012.28 2.45 0.13 0.18 0.01 10.46 10.63 0.58 0.18 0.012.46 2.63 0.14 0.18 0.01 10.64 10.81 0.59 0.18 0.012.64 2.81 0.15 0.18 0.01 10.82 10.99 0.60 0.18 0.012.82 2.99 0.16 0.18 0.01 11.00 11.18 0.61 0.18 0.013.00 3.18 0.17 0.18 0.01 11.19 11.36 0.62 0.19 0.013.19 3.36 0.18 0.19 0.01 11.37 11.54 0.63 0.18 0.013.37 3.54 0.19 0.18 0.01 11.55 11.72 0.64 0.18 0.013.55 3.72 0.20 0.18 0.01 11.73 11.90 0.65 0.18 0.013.73 3.90 0.21 0.18 0.01 11.91 12.09 0.66 0.18 0.013.91 4.09 0.22 0.18 0.01 12.10 12.27 0.67 0.19 0.014.10 4.27 0.23 0.19 0.01 12.28 12.45 0.68 0.18 0.014.28 4.45 0.24 0.18 0.01 12.46 12.63 0.69 0.18 0.014.46 4.63 0.25 0.18 0.01 12.64 12.81 0.71 0.18 0.014.64 4.81 0.27 0.18 0.01 12.82 12.99 0.72 0.18 0.014.82 4.99 0.27 0.18 0.01 13.00 13.18 0.72 0.18 0.015.00 5.18 0.28 0.18 0.01 13.19 13.36 0.73 0.19 0.015.19 5.36 0.29 0.19 0.01 13.37 13.54 0.74 0.18 0.015.37 5.54 0.30 0.18 0.01 13.55 13.72 0.75 0.18 0.015.55 5.72 0.31 0.18 0.01 13.73 13.90 0.76 0.18 0.015.73 5.90 0.32 0.18 0.01 13.91 14.09 0.77 0.18 0.015.91 6.09 0.33 0.18 0.01 14.10 14.27 0.78 0.19 0.016.10 6.27 0.34 0.19 0.01 14.28 14.45 0.79 0.18 0.016.28 6.45 0.35 0.18 0.01 14.46 14.63 0.80 0.18 0.016.46 6.63 0.36 0.18 0.01 14.64 14.81 0.81 0.18 0.016.64 6.81 0.37 0.18 0.01 14.82 14.99 0.82 0.18 0.016.82 6.99 0.38 0.18 0.01 15.00 15.18 0.83 0.18 0.017.00 7.18 0.39 0.18 0.01 15.19 15.36 0.84 0.19 0.017.19 7.36 0.40 0.19 0.01 15.37 15.54 0.85 0.18 0.017.37 7.54 0.41 0.18 0.01 15.55 15.72 0.86 0.18 0.017.55 7.72 0.42 0.18 0.01 15.73 15.90 0.87 0.18 0.017.73 7.90 0.43 0.18 0.01 15.91 16.09 0.88 0.18 0.017.91 8.09 0.44 0.18 0.01 16.10 16.27 0.89 0.19 0.01
4 Complete your worksheet, indicating the amount differences and the tax differences for each range of taxable amounts.
5 Examine the Amt Diff column on the sample worksheet. Note that there is a regular pattern. Five $0.18 taxable amount increments are followed by one $0.19 increment, then there are four $0.18 increments, and one $0.19 increment. This pattern repeats-or loops-itself eight times. Now examine the Amt Diff column of your worksheet. Try to find a repeating pattern in the tax amount increments.
6 Find a repeating pattern to the increments in the Tax Diff column (it may be that they are always the same, as in the sample).
7 Then find a single repeating pattern that accounts for the increments in both Diff columns. If the increments in the Tax Diff column are not all the same, this may be more difficult, and the pattern will almost certainly repeat itself less often. You will use the repeating patterns you find to build the tax table through the TAX program.
MDE-4871 CFN III Manager’s Manual for Windows® XP Embedded - Version 3.6 · August 2010 Page 10-5

Setting Up Tax Tables How to Set Up a Tax Table
To compose your compressed description, write down the following:• The tax number (1-8: defined in configuration).• The tax type. For tax tables, it is type 1 or 2.• The method for figuring taxes on amounts that exceed the largest amount in the table: you
can use a fixed rate with a rounding rule, or you can apply the table to the excess amounts.• The tax increment; almost always 1 cent.• The smallest taxable amount.• The formula for determining the individual entries in the table. You do this by means of
three TAX program commands: increment, loop, and end loop.
An increment tells the TAX program an Amt Diff and a Tax Diff and the number of consecutive times to apply those differences. For example, in the sample worksheet, the first Amt Diff is 0.18, and that difference occurs five consecutive times. For the sample table, and for most tax tables, the tax increment is always $0.01.
A loop tells the TAX program to repeat the commands within the loop the number of times you specify. You start a loop with a loop command and end it with an end loop command. So, when two or more increments occur in a repeating pattern, you can describe the repeating pattern in terms of a loop. Loops may be nested-that is, the steps repeated by a loop may include other loops.
An end loop terminates the last loop that was started. Thus, if there are two loop commands and then an end loop, the end loop will terminate the second loop. Another end loop is required to terminate the first loop.
A compressed description of the sample table follows:• Tax number: 1• Tax type: 1• Tax increment: 1 cent• Smallest taxable amount: $0.10• Loop 8 times
Increment taxable amount by $0.18 and tax by $0.01 five timesIncrement taxable amount by $0.19 and tax by $0.01 one timeIncrement taxable amount by $0.18 and tax by $0.01 four timesIncrement taxable amount by $0.19 and tax by $0.01 one timeEnd loop
The sample table is a simple example. In your table, you may have a non-repeated sequence of increment commands before the first loop. Or, you may have many loops, or loops within loops. Or, you may have a non-repeated sequence of increment commands at the end of the table, after all loops are ended.
Most tax tables must reduce to a compressed description. However, if you encounter some difficulty, consult your salesman or distributor for help.
Page 10-6 MDE-4871 CFN III Manager’s Manual for Windows® XP Embedded - Version 3.6 · August 2010
How to Set Up a Tax Table Setting Up Tax Tables
Allot Storage Space for Your Tax InformationThe CFN3 software already has eight records in its storage space for its 1-8 tax rates, and it must create additional records for the information in your tax tables.
When you have a compressed table description, count the additional records it will require. Allow one additional record for each of the following:
• The table beginning.• Each increment command.• Each loop command.• Each end-loop command.• The end of the table.
After you have prepared a compressed description of all your tax tables, determine the total number of additional records you will require for all of them. Then add eight to your total. This gives the total number of records you require for your tax.
You may use up to 200 records for tax. If your total is larger than 200, consult your ASR or distributor to help you reduce the commands in your compressed descriptions.
When you have determined the number of records you require, use the TABLE program to define the number of records in table number 27, the tax table (for instructions, refer to MDE-4773 CFN III Configuration Manual for Windows XP). Ensure that your total includes the original eight records required by the CFN3 software and all the additional records required for your tax tables.
Assign a Tax Number and Name to Each TableUse the LOAD TAX command to assign a tax number (1-8) and name for each table you will use. Be sure you also assign a number and name to each of the taxes you want the CFN3 software to calculate as percentages with a rounding factor-that is, those taxes for which you do not require to build a table.
Build a Tax TableThe example that follows shows the prompts and user responses to enter the sample table into the CFN3 software. After entering the compressed description, the user requests a printed summary of the table, then quits and saves the table.
Study the sample and compare it with the compressed description to help you see how to use the TAX program.
If you respond with n at the All tax increments one cent prompt, you will subsequently be prompted for the tax increment amount after each Increment how many times? prompt. Otherwise, the command assumes that one cent applies to all increments.Note: The printed summary is a representation of the commands (increment, loop, and end
loop) that are defined in the table.
The Loop Level column shows each loop. A plus sign (+) marks the beginning and end of the loop, and a dashed vertical line extends over the interior of the loop. If there were loops nested within loops, other pairs of plus signs and dashed lines would be printed, indented so they would not overlap.
MDE-4871 CFN III Manager’s Manual for Windows® XP Embedded - Version 3.6 · August 2010 Page 10-7
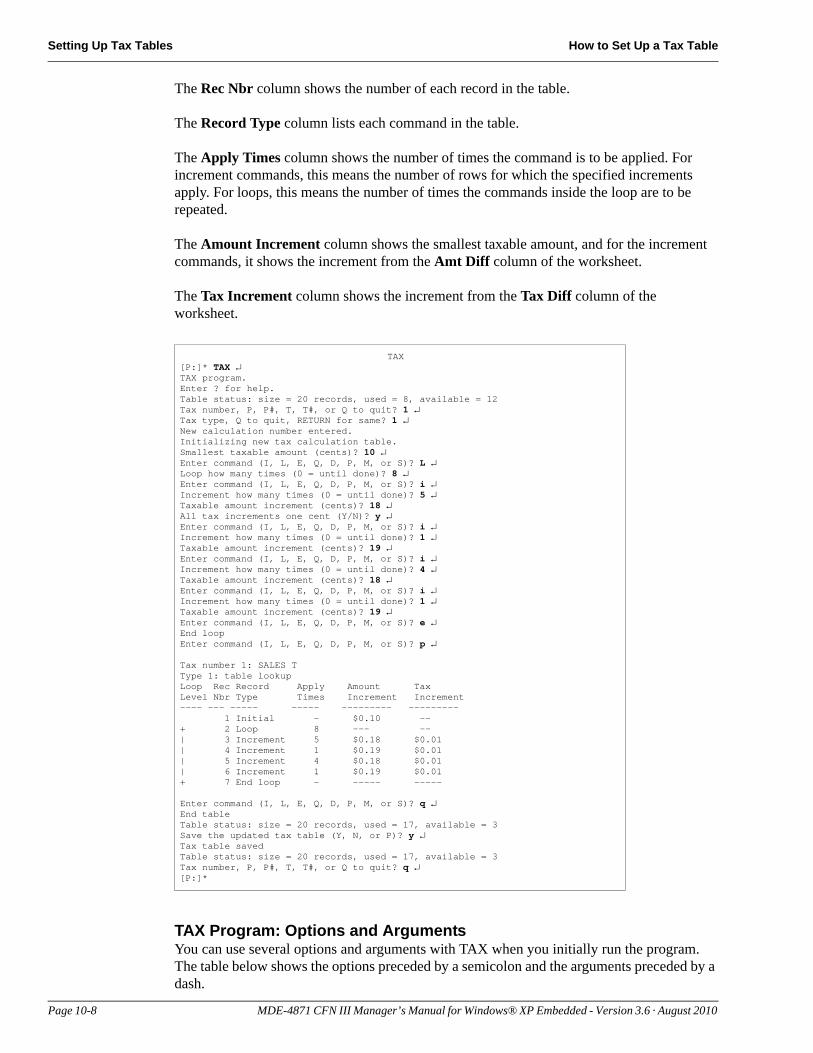
Setting Up Tax Tables How to Set Up a Tax Table
TAX[P:]* TAX ↵TAX program.Enter ? for help.Table status: size = 20 records, used = 8, available = 12Tax number, P, P#, T, T#, or Q to quit? 1 ↵Tax type, Q to quit, RETURN for same? 1 ↵New calculation number entered.Initializing new tax calculation table.Smallest taxable amount (cents)? 10 ↵Enter command (I, L, E, Q, D, P, M, or S)? L ↵Loop how many times (0 = until done)? 8 ↵Enter command (I, L, E, Q, D, P, M, or S)? i ↵Increment how many times (0 = until done)? 5 ↵Taxable amount increment (cents)? 18 ↵All tax increments one cent (Y/N)? y ↵Enter command (I, L, E, Q, D, P, M, or S)? i ↵Increment how many times (0 = until done)? 1 ↵Taxable amount increment (cents)? 19 ↵Enter command (I, L, E, Q, D, P, M, or S)? i ↵Increment how many times (0 = until done)? 4 ↵Taxable amount increment (cents)? 18 ↵Enter command (I, L, E, Q, D, P, M, or S)? i ↵Increment how many times (0 = until done)? 1 ↵Taxable amount increment (cents)? 19 ↵Enter command (I, L, E, Q, D, P, M, or S)? e ↵End loopEnter command (I, L, E, Q, D, P, M, or S)? p ↵
Tax number 1: SALES TType 1: table lookupLoop Rec Record Apply Amount TaxLevel Nbr Type Times Increment Increment---- --- ----- ----- --------- --------- 1 Initial - $0.10 --+ 2 Loop 8 --- --| 3 Increment 5 $0.18 $0.01| 4 Increment 1 $0.19 $0.01| 5 Increment 4 $0.18 $0.01| 6 Increment 1 $0.19 $0.01+ 7 End loop - ----- -----
Enter command (I, L, E, Q, D, P, M, or S)? q ↵End tableTable status: size = 20 records, used = 17, available = 3Save the updated tax table (Y, N, or P)? y ↵Tax table savedTable status: size = 20 records, used = 17, available = 3Tax number, P, P#, T, T#, or Q to quit? q ↵[P:]*
The Rec Nbr column shows the number of each record in the table.
The Record Type column lists each command in the table.
The Apply Times column shows the number of times the command is to be applied. For increment commands, this means the number of rows for which the specified increments apply. For loops, this means the number of times the commands inside the loop are to be repeated.
The Amount Increment column shows the smallest taxable amount, and for the increment commands, it shows the increment from the Amt Diff column of the worksheet.
The Tax Increment column shows the increment from the Tax Diff column of the worksheet.
TAX Program: Options and ArgumentsYou can use several options and arguments with TAX when you initially run the program. The table below shows the options preceded by a semicolon and the arguments preceded by a dash.
Page 10-8 MDE-4871 CFN III Manager’s Manual for Windows® XP Embedded - Version 3.6 · August 2010
How to Set Up a Tax Table Setting Up Tax Tables
To enter an option, type a semicolon, then the option letter. To enter an argument, type a space, then a dash, then the argument character. Options and arguments for TAX are not case-sensitive. That means you may type them in upper case or lower case. They are shown below in upper case.
If you specify an option not on this list, TAX will print Invalid option and quit. If you specify an argument not on this list, it will print a list of valid options and arguments, then quit.
When you are ready to build your tax table, use the TAX program. The following paragraphs list the prompts that TAX displays and explains how to respond to them.
Tax number, P, P#, T, T#, or Q to quit?• Enter a tax number to create or edit a table for that tax code number (remember that you
must already have assigned, with the LOAD TAX command, the number you enter to create a new table). If you enter a tax number, the next prompt appears.
• Enter P to print a summary of all taxes whose names have been loaded with LOAD TAX. The summary is the same report that prints if you use the -P argument with the TAX program.
• Enter P# to print a summary of the specified tax (specify the tax’s number in place of the # sign).
• Enter T to print a tax table. Then, in response to the next prompt, enter the number of the table you want to print. You can compare this printout with the tax table you obtained from the taxing authorities or a bank to verify that the tax has been entered correctly.
• Enter T# to print a table of the specified tax (specify the table’s number in place of the # sign).
• To exit the program, enter Q or press RETURN.
Tax type, Q to quit, RETURN for same?• Enter 0, 1, or 2 to specify the tax type for the tax number you entered. The default is zero.• 0 (zero) indicates a tax rate with rounding. If the tax number you specified had been
defined as a type 1 or 2, entering a zero here redefines it as a type 0. For taxes of type 0, TAX does not do anything other than set tax type and table maximum.
• 1 (one) indicates a table created through a compressed description (as explained in this chapter). The program continues the prompts through Smallest taxable amount (cents)? Then it begins at the point where it was when you last entered data for the table. You can add commands to the end of the table or delete commands from the end of the table.
Option Effect;I CAUTION: Do not use this option after you have entered tax information you want to save. It initializes
the tax tables-that is, it erases all the tax information. All taxes become type 0 (rate tables rather than lookup tables), but tax numbers and names remain unchanged. The program prompts you to confirm that you want to initialize, then it erases the tax information and quits.
-P Used with this argument, TAX prints a summary of all taxes whose names have been loaded with LOAD TAX.
-R Used with this argument, TAX prints all information from the tax rate table in a raw form suitable for the RESTORE command to use in restoring the tax table. The standard command file SYSBACK calls TAX with this argument. Normally, you will not use this argument.
-? Used with this argument, TAX runs in tutorial mode. When any prompt is displayed for the first time, it is preceded by its help message. You can print the help message again by entering a question mark (?) in response to the prompt when it appears again. This mode is useful if you have not run TAX many times.
MDE-4871 CFN III Manager’s Manual for Windows® XP Embedded - Version 3.6 · August 2010 Page 10-9
Setting Up Tax Tables How to Set Up a Tax Table
• 2 (two) indicates a tax that is calculated as a percentage of the whole dollar amount, and then uses a lookup table for any remaining centsPress RETURN to use the same type-that is, to indicate you are not changing the tax type. If the tax number is type 0, the program returns to the first prompt. Zero is the default type, so if you have not defined the tax number as a type 1 or 2, it is a type 0.
• To exit the program, enter Q.
Enter command (I, L, E, Q, D, P, M, or S)?This prompt will be repeated until you enter Q to quit. Enter the commands, in order, that define the compressed description of your tax table. Each command you enter causes the program to ask for other information:
• Enter I to give an increment command. You will be prompted for the number of times the increment applies and the taxable amount increment (Amt Diff on your worksheet).
• Enter L to start a loop. You will be prompted for the number of times to repeat the commands that occur before the end loop command (the program will not allow you to quit until you end all the loops you start).
• Enter E to end the last loop that was started.• Enter Q to quit the program. You will be asked whether or not you want to save the
changes you have made to the table. You may respond with Y to save the changes, N not to save the changes, or P to print the current table definition so you can decide whether or not to save it (ensure that you cannot quit if there are loops that have been started but not ended).
• Enter D to delete the last command you entered, including your responses to the command prompts. If you enter D again, the previous command is deleted. You can continue entering D until you delete as many entries as you wish, back to the Smallest taxable amount prompt.
• Enter P to print the current table definition so you can review it. Refer back to the example for a sample printout of the table definition.
• Enter M to modify a record. You will be asked for the number of the record to be modified, then you can change that record’s smallest taxable amount.
• Enter S to see a display of the table’s status showing the record size and the number of records used and available.
If you want to quit the program without saving any changes or ending your loops, use ^C (press and hold the CTRL key, then press C).
Back Up Your Tax DataAfter you have used the TAX program to enter a tax table, run SYSBACK to back up the data.
Page 10-10 MDE-4871 CFN III Manager’s Manual for Windows® XP Embedded - Version 3.6 · August 2010
Reports Reports, Cash Drawer, and Shifts
11 – Reports, Cash Drawer, and Shifts
Note: The material covered in this chapter is not the same as the material in the Point Of Sale (POS) and Shift Change manual. For example, the reports discussed in this chapter contain dollar and quantity amounts of fuel and merchandise; the POS and Shift Change reports include everything that occurred at a site during a shift or day.
The following similar commands are not identical in their functions: NEXT SHIFT and NEXTSHFT, NEXT DAY and NEXTDAY, LOAD DRAWER and LDDRAWER, ADD DRAWER and ADDDRAWER.
IMPORTANT INFORMATION
ReportsThe Site Controller maintains sales totals for the last three shifts, the current shift, daily totals for the current and previous days, and cumulative totals.
The shift totals are changed when a shift change is entered with the LOAD SHIFT, NEXT SHIFT, and NEXT DAY commands. Up to a total of nine shifts can be loaded.
The daily totals are reset with the RESET TOTALS command. This command moves the current daily totals to the previous day’s totals.
The daily, cumulative, and shift totals are reset to zero with the A option (RESET TOTALS;A). The I option (RESET TOTALS;I) resets only the cumulative totals to zero.
Each transaction is entered in three places: daily totals, current shift totals, and cumulative totals (see Figure 11-1 on page 11-2).
The cumulative, current day, and current shift totals are running totals, and they are added to whenever a sale takes place. All other totals are buffered totals. The RESET TOTALS command resets the buffered totals to zero.
Cash drawer totals are also kept for one day’s worth of shifts plus the current shift. Sales totals and cash drawer totals are usually printed at shift-change time, but they can be printed at any time, since the totals are available until the next day’s shifts.
MDE-4871 CFN III Manager’s Manual for Windows® XP Embedded - Version 3.6 · August 2010 Page 11-1
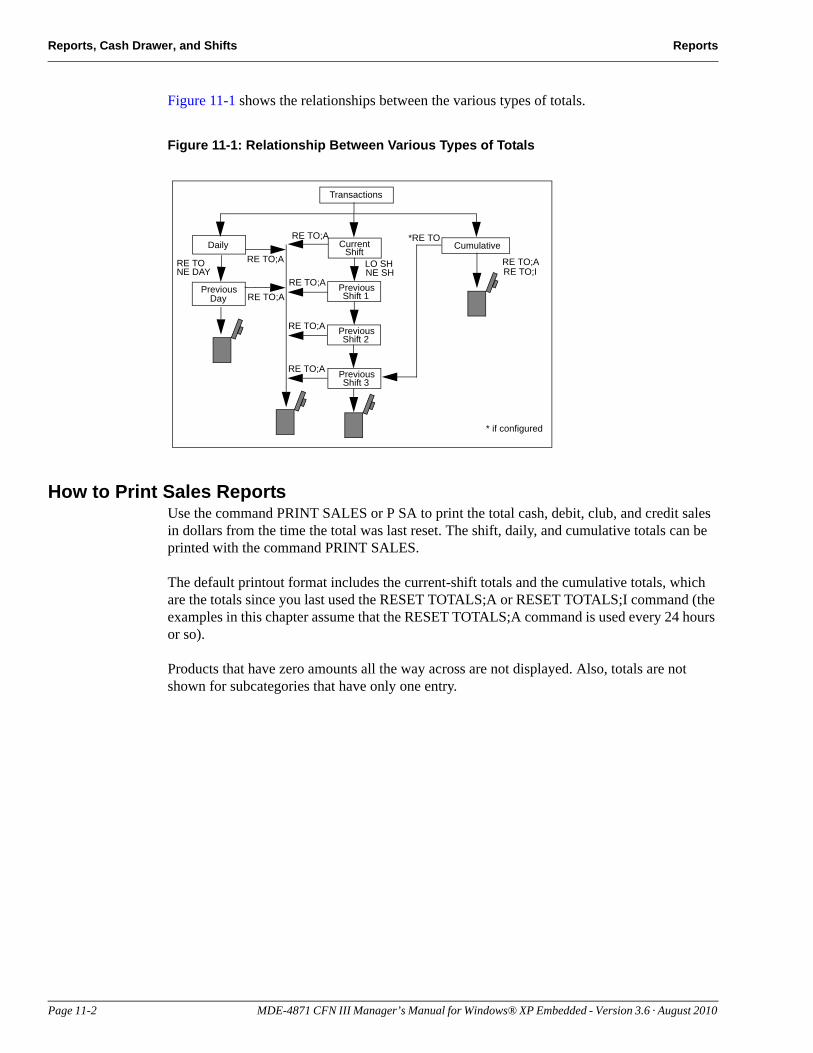
Reports, Cash Drawer, and Shifts Reports
Figure 11-1 shows the relationships between the various types of totals.
Figure 11-1: Relationship Between Various Types of Totals
Transactions
Daily
Previous Day
CurrentShift
Cumulative
RE TO;ARE TONE DAY
PreviousShift 1
PreviousShift 2
PreviousShift 3
RE TO;I
*RE TORE TO;A
RE TO;A
RE TO;ARE TO;A
RE TO;A
RE TO;A
* if configured
LO SHNE SH
How to Print Sales ReportsUse the command PRINT SALES or P SA to print the total cash, debit, club, and credit sales in dollars from the time the total was last reset. The shift, daily, and cumulative totals can be printed with the command PRINT SALES.
The default printout format includes the current-shift totals and the cumulative totals, which are the totals since you last used the RESET TOTALS;A or RESET TOTALS;I command (the examples in this chapter assume that the RESET TOTALS;A command is used every 24 hours or so).
Products that have zero amounts all the way across are not displayed. Also, totals are not shown for subcategories that have only one entry.
Page 11-2 MDE-4871 CFN III Manager’s Manual for Windows® XP Embedded - Version 3.6 · August 2010
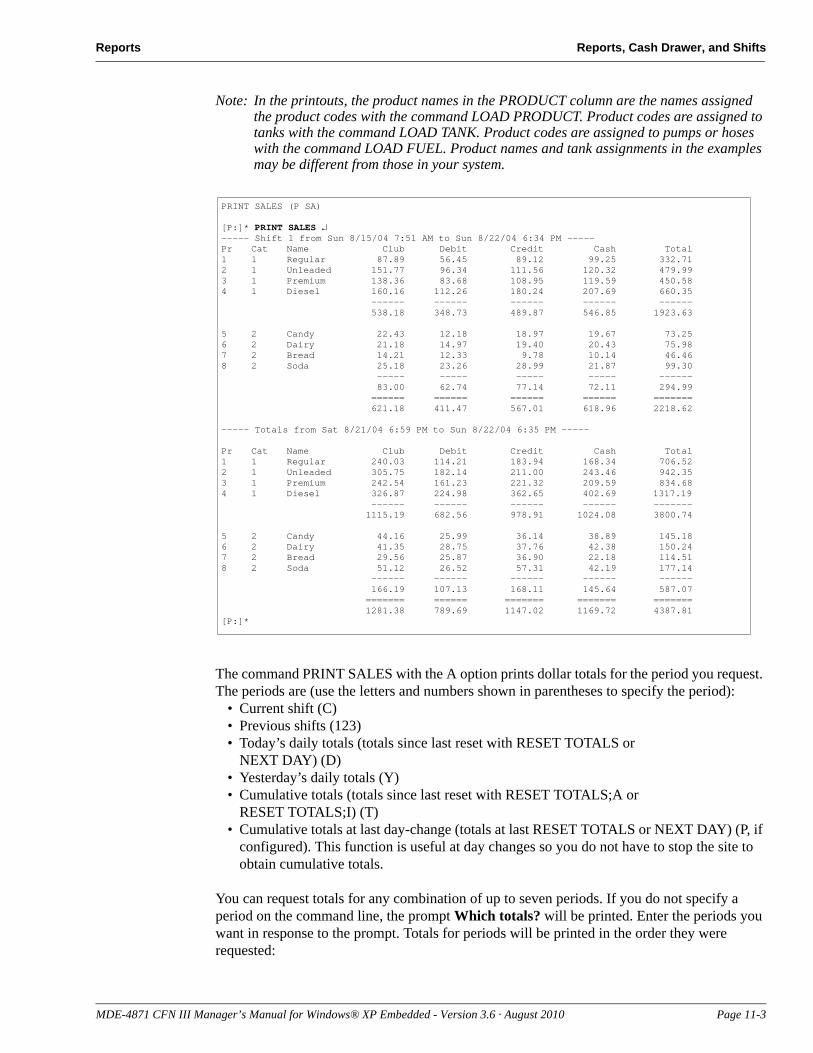
Reports Reports, Cash Drawer, and Shifts
Note: In the printouts, the product names in the PRODUCT column are the names assigned the product codes with the command LOAD PRODUCT. Product codes are assigned to tanks with the command LOAD TANK. Product codes are assigned to pumps or hoses with the command LOAD FUEL. Product names and tank assignments in the examples may be different from those in your system.
PRINT SALES (P SA)
[P:]* PRINT SALES ↵----- Shift 1 from Sun 8/15/04 7:51 AM to Sun 8/22/04 6:34 PM -----Pr Cat Name Club Debit Credit Cash Total1 1 Regular 87.89 56.45 89.12 99.25 332.712 1 Unleaded 151.77 96.34 111.56 120.32 479.993 1 Premium 138.36 83.68 108.95 119.59 450.584 1 Diesel 160.16 112.26 180.24 207.69 660.35
------ ------ ------ ------ ------538.18 348.73 489.87 546.85 1923.63
5 2 Candy 22.43 12.18 18.97 19.67 73.256 2 Dairy 21.18 14.97 19.40 20.43 75.987 2 Bread 14.21 12.33 9.78 10.14 46.468 2 Soda 25.18 23.26 28.99 21.87 99.30
----- ----- ----- ----- ------83.00 62.74 77.14 72.11 294.99
====== ====== ====== ====== =======621.18 411.47 567.01 618.96 2218.62
----- Totals from Sat 8/21/04 6:59 PM to Sun 8/22/04 6:35 PM -----
Pr Cat Name Club Debit Credit Cash Total1 1 Regular 240.03 114.21 183.94 168.34 706.522 1 Unleaded 305.75 182.14 211.00 243.46 942.353 1 Premium 242.54 161.23 221.32 209.59 834.684 1 Diesel 326.87 224.98 362.65 402.69 1317.19
------ ------ ------ ------ -------1115.19 682.56 978.91 1024.08 3800.74
5 2 Candy 44.16 25.99 36.14 38.89 145.186 2 Dairy 41.35 28.75 37.76 42.38 150.247 2 Bread 29.56 25.87 36.90 22.18 114.518 2 Soda 51.12 26.52 57.31 42.19 177.14
------ ------ ------ ------ ------ 166.19 107.13 168.11 145.64 587.07======= ====== ======= ======= =======
1281.38 789.69 1147.02 1169.72 4387.81[P:]*
The command PRINT SALES with the A option prints dollar totals for the period you request. The periods are (use the letters and numbers shown in parentheses to specify the period):
• Current shift (C)• Previous shifts (123)• Today’s daily totals (totals since last reset with RESET TOTALS or
NEXT DAY) (D)• Yesterday’s daily totals (Y)• Cumulative totals (totals since last reset with RESET TOTALS;A or
RESET TOTALS;I) (T)• Cumulative totals at last day-change (totals at last RESET TOTALS or NEXT DAY) (P, if
configured). This function is useful at day changes so you do not have to stop the site to obtain cumulative totals.
You can request totals for any combination of up to seven periods. If you do not specify a period on the command line, the prompt Which totals? will be printed. Enter the periods you want in response to the prompt. Totals for periods will be printed in the order they were requested:
MDE-4871 CFN III Manager’s Manual for Windows® XP Embedded - Version 3.6 · August 2010 Page 11-3
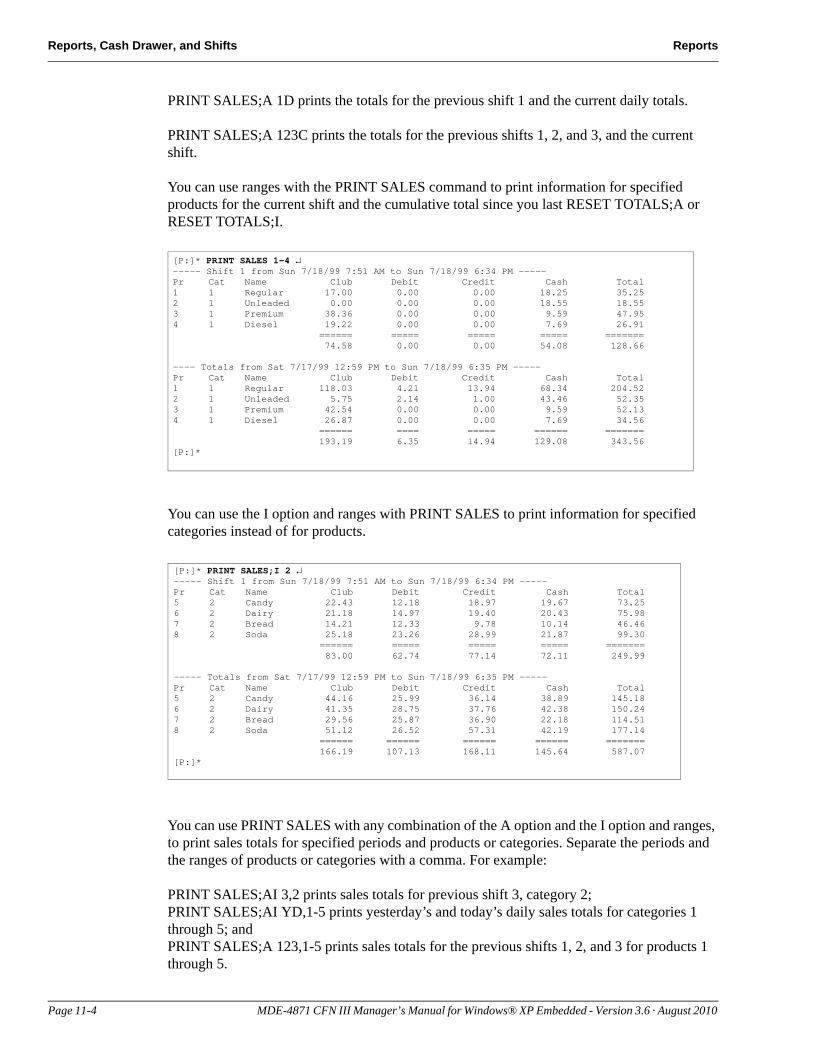
Reports, Cash Drawer, and Shifts Reports
[P:]* PRINT SALES 1-4 ↵----- Shift 1 from Sun 7/18/99 7:51 AM to Sun 7/18/99 6:34 PM -----Pr Cat Name Club Debit Credit Cash Total1 1 Regular 17.00 0.00 0.00 18.25 35.252 1 Unleaded 0.00 0.00 0.00 18.55 18.553 1 Premium 38.36 0.00 0.00 9.59 47.954 1 Diesel 19.22 0.00 0.00 7.69 26.91
====== ===== ===== ===== =======74.58 0.00 0.00 54.08 128.66
---- Totals from Sat 7/17/99 12:59 PM to Sun 7/18/99 6:35 PM -----Pr Cat Name Club Debit Credit Cash Total1 1 Regular 118.03 4.21 13.94 68.34 204.522 1 Unleaded 5.75 2.14 1.00 43.46 52.353 1 Premium 42.54 0.00 0.00 9.59 52.134 1 Diesel 26.87 0.00 0.00 7.69 34.56 ====== ==== ===== ====== =======
193.19 6.35 14.94 129.08 343.56[P:]*
[P:]* PRINT SALES;I 2 ↵----- Shift 1 from Sun 7/18/99 7:51 AM to Sun 7/18/99 6:34 PM -----Pr Cat Name Club Debit Credit Cash Total5 2 Candy 22.43 12.18 18.97 19.67 73.256 2 Dairy 21.18 14.97 19.40 20.43 75.987 2 Bread 14.21 12.33 9.78 10.14 46.468 2 Soda 25.18 23.26 28.99 21.87 99.30
====== ===== ===== ===== =======83.00 62.74 77.14 72.11 249.99
----- Totals from Sat 7/17/99 12:59 PM to Sun 7/18/99 6:35 PM -----Pr Cat Name Club Debit Credit Cash Total5 2 Candy 44.16 25.99 36.14 38.89 145.186 2 Dairy 41.35 28.75 37.76 42.38 150.247 2 Bread 29.56 25.87 36.90 22.18 114.518 2 Soda 51.12 26.52 57.31 42.19 177.14
====== ====== ====== ====== =======166.19 107.13 168.11 145.64 587.07
[P:]*
PRINT SALES;A 1D prints the totals for the previous shift 1 and the current daily totals.
PRINT SALES;A 123C prints the totals for the previous shifts 1, 2, and 3, and the current shift.
You can use ranges with the PRINT SALES command to print information for specified products for the current shift and the cumulative total since you last RESET TOTALS;A or RESET TOTALS;I.
You can use the I option and ranges with PRINT SALES to print information for specified categories instead of for products.
You can use PRINT SALES with any combination of the A option and the I option and ranges, to print sales totals for specified periods and products or categories. Separate the periods and the ranges of products or categories with a comma. For example:
PRINT SALES;AI 3,2 prints sales totals for previous shift 3, category 2;PRINT SALES;AI YD,1-5 prints yesterday’s and today’s daily sales totals for categories 1 through 5; andPRINT SALES;A 123,1-5 prints sales totals for the previous shifts 1, 2, and 3 for products 1 through 5.
Page 11-4 MDE-4871 CFN III Manager’s Manual for Windows® XP Embedded - Version 3.6 · August 2010
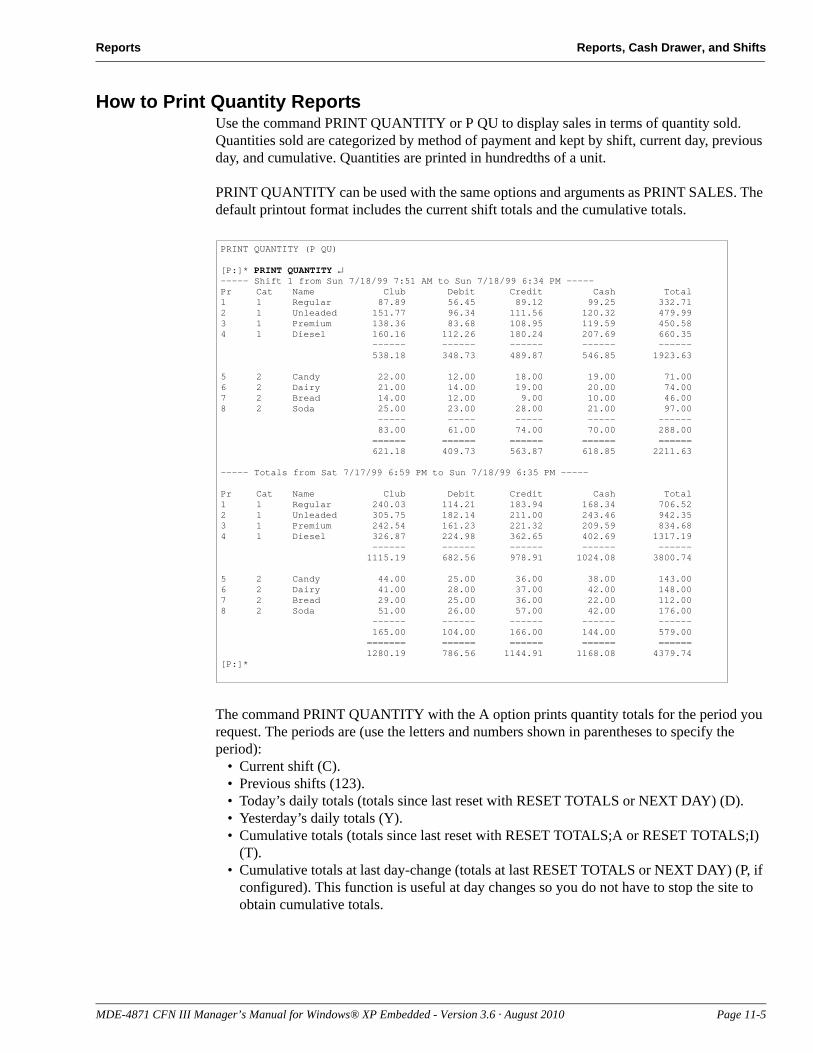
Reports Reports, Cash Drawer, and Shifts
How to Print Quantity ReportsUse the command PRINT QUANTITY or P QU to display sales in terms of quantity sold. Quantities sold are categorized by method of payment and kept by shift, current day, previous day, and cumulative. Quantities are printed in hundredths of a unit.
PRINT QUANTITY (P QU)
[P:]* PRINT QUANTITY ↵----- Shift 1 from Sun 7/18/99 7:51 AM to Sun 7/18/99 6:34 PM -----Pr Cat Name Club Debit Credit Cash Total1 1 Regular 87.89 56.45 89.12 99.25 332.712 1 Unleaded 151.77 96.34 111.56 120.32 479.993 1 Premium 138.36 83.68 108.95 119.59 450.584 1 Diesel 160.16 112.26 180.24 207.69 660.35
------ ------ ------ ------ ------538.18 348.73 489.87 546.85 1923.63
5 2 Candy 22.00 12.00 18.00 19.00 71.006 2 Dairy 21.00 14.00 19.00 20.00 74.007 2 Bread 14.00 12.00 9.00 10.00 46.008 2 Soda 25.00 23.00 28.00 21.00 97.00
----- ----- ----- ----- ------83.00 61.00 74.00 70.00 288.00
====== ====== ====== ====== ====== 621.18 409.73 563.87 618.85 2211.63
----- Totals from Sat 7/17/99 6:59 PM to Sun 7/18/99 6:35 PM -----
Pr Cat Name Club Debit Credit Cash Total1 1 Regular 240.03 114.21 183.94 168.34 706.522 1 Unleaded 305.75 182.14 211.00 243.46 942.353 1 Premium 242.54 161.23 221.32 209.59 834.684 1 Diesel 326.87 224.98 362.65 402.69 1317.19
------ ------ ------ ------ ------1115.19 682.56 978.91 1024.08 3800.74
5 2 Candy 44.00 25.00 36.00 38.00 143.006 2 Dairy 41.00 28.00 37.00 42.00 148.007 2 Bread 29.00 25.00 36.00 22.00 112.008 2 Soda 51.00 26.00 57.00 42.00 176.00
------ ------ ------ ------ ------ 165.00 104.00 166.00 144.00 579.00======= ====== ====== ====== ======
1280.19 786.56 1144.91 1168.08 4379.74[P:]*
PRINT QUANTITY can be used with the same options and arguments as PRINT SALES. The default printout format includes the current shift totals and the cumulative totals.
The command PRINT QUANTITY with the A option prints quantity totals for the period you request. The periods are (use the letters and numbers shown in parentheses to specify the period):
• Current shift (C).• Previous shifts (123).• Today’s daily totals (totals since last reset with RESET TOTALS or NEXT DAY) (D).• Yesterday’s daily totals (Y).• Cumulative totals (totals since last reset with RESET TOTALS;A or RESET TOTALS;I)
(T).• Cumulative totals at last day-change (totals at last RESET TOTALS or NEXT DAY) (P, if
configured). This function is useful at day changes so you do not have to stop the site to obtain cumulative totals.
MDE-4871 CFN III Manager’s Manual for Windows® XP Embedded - Version 3.6 · August 2010 Page 11-5
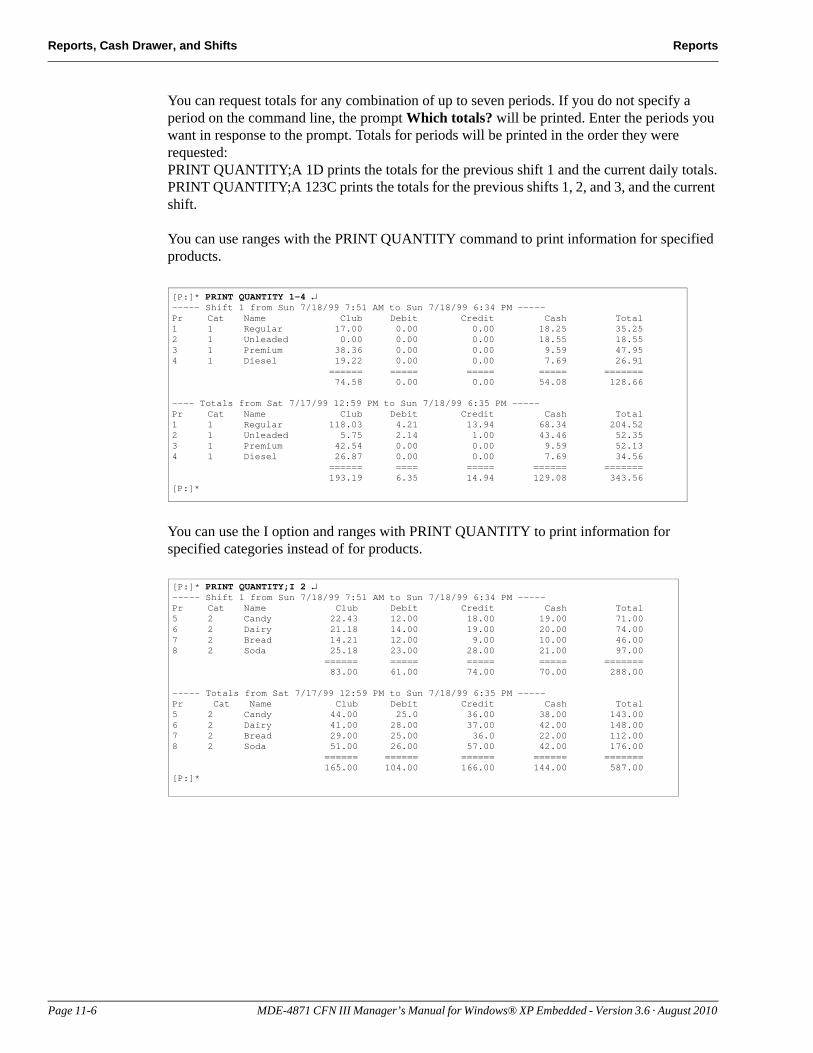
Reports, Cash Drawer, and Shifts Reports
You can request totals for any combination of up to seven periods. If you do not specify a period on the command line, the prompt Which totals? will be printed. Enter the periods you want in response to the prompt. Totals for periods will be printed in the order they were requested:PRINT QUANTITY;A 1D prints the totals for the previous shift 1 and the current daily totals.PRINT QUANTITY;A 123C prints the totals for the previous shifts 1, 2, and 3, and the current shift.
[P:]* PRINT QUANTITY 1-4 ↵----- Shift 1 from Sun 7/18/99 7:51 AM to Sun 7/18/99 6:34 PM -----Pr Cat Name Club Debit Credit Cash Total1 1 Regular 17.00 0.00 0.00 18.25 35.252 1 Unleaded 0.00 0.00 0.00 18.55 18.553 1 Premium 38.36 0.00 0.00 9.59 47.954 1 Diesel 19.22 0.00 0.00 7.69 26.91
====== ===== ===== ===== =======74.58 0.00 0.00 54.08 128.66
---- Totals from Sat 7/17/99 12:59 PM to Sun 7/18/99 6:35 PM -----Pr Cat Name Club Debit Credit Cash Total1 1 Regular 118.03 4.21 13.94 68.34 204.522 1 Unleaded 5.75 2.14 1.00 43.46 52.353 1 Premium 42.54 0.00 0.00 9.59 52.134 1 Diesel 26.87 0.00 0.00 7.69 34.56 ====== ==== ===== ====== =======
193.19 6.35 14.94 129.08 343.56[P:]*
[P:]* PRINT QUANTITY;I 2 ↵----- Shift 1 from Sun 7/18/99 7:51 AM to Sun 7/18/99 6:34 PM -----Pr Cat Name Club Debit Credit Cash Total5 2 Candy 22.43 12.00 18.00 19.00 71.006 2 Dairy 21.18 14.00 19.00 20.00 74.007 2 Bread 14.21 12.00 9.00 10.00 46.008 2 Soda 25.18 23.00 28.00 21.00 97.00
====== ===== ===== ===== =======83.00 61.00 74.00 70.00 288.00
----- Totals from Sat 7/17/99 12:59 PM to Sun 7/18/99 6:35 PM -----Pr Cat Name Club Debit Credit Cash Total5 2 Candy 44.00 25.0 36.00 38.00 143.006 2 Dairy 41.00 28.00 37.00 42.00 148.007 2 Bread 29.00 25.00 36.0 22.00 112.008 2 Soda 51.00 26.00 57.00 42.00 176.00
====== ====== ====== ====== =======165.00 104.00 166.00 144.00 587.00
[P:]*
You can use ranges with the PRINT QUANTITY command to print information for specified products.
You can use the I option and ranges with PRINT QUANTITY to print information for specified categories instead of for products.
Page 11-6 MDE-4871 CFN III Manager’s Manual for Windows® XP Embedded - Version 3.6 · August 2010
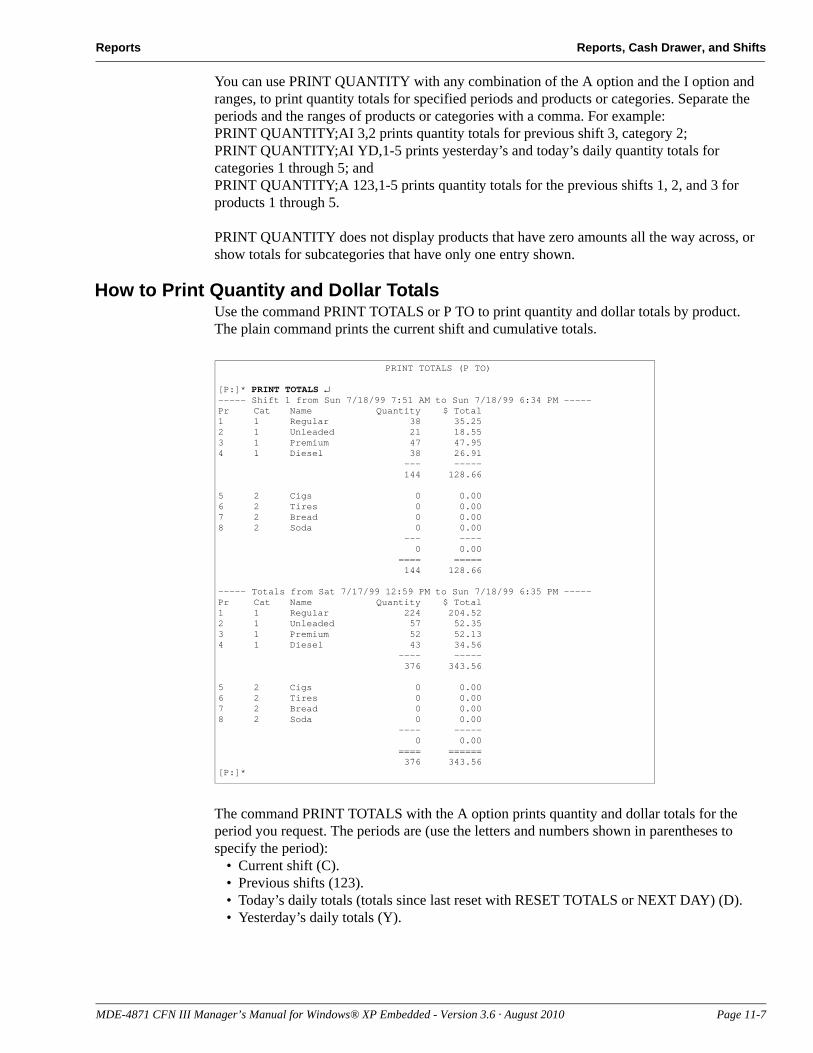
Reports Reports, Cash Drawer, and Shifts
You can use PRINT QUANTITY with any combination of the A option and the I option and ranges, to print quantity totals for specified periods and products or categories. Separate the periods and the ranges of products or categories with a comma. For example:PRINT QUANTITY;AI 3,2 prints quantity totals for previous shift 3, category 2;PRINT QUANTITY;AI YD,1-5 prints yesterday’s and today’s daily quantity totals for categories 1 through 5; andPRINT QUANTITY;A 123,1-5 prints quantity totals for the previous shifts 1, 2, and 3 for products 1 through 5.
PRINT QUANTITY does not display products that have zero amounts all the way across, or show totals for subcategories that have only one entry shown.
How to Print Quantity and Dollar TotalsUse the command PRINT TOTALS or P TO to print quantity and dollar totals by product. The plain command prints the current shift and cumulative totals.
PRINT TOTALS (P TO)
[P:]* PRINT TOTALS ↵----- Shift 1 from Sun 7/18/99 7:51 AM to Sun 7/18/99 6:34 PM -----Pr Cat Name Quantity $ Total1 1 Regular 38 35.252 1 Unleaded 21 18.553 1 Premium 47 47.954 1 Diesel 38 26.91
--- -----144 128.66
5 2 Cigs 0 0.006 2 Tires 0 0.007 2 Bread 0 0.008 2 Soda 0 0.00
--- ---- 0 0.00
==== =====144 128.66
----- Totals from Sat 7/17/99 12:59 PM to Sun 7/18/99 6:35 PM -----Pr Cat Name Quantity $ Total1 1 Regular 224 204.522 1 Unleaded 57 52.353 1 Premium 52 52.134 1 Diesel 43 34.56
---- -----376 343.56
5 2 Cigs 0 0.006 2 Tires 0 0.007 2 Bread 0 0.008 2 Soda 0 0.00
---- ----- 0 0.00
==== ======376 343.56
[P:]*
The command PRINT TOTALS with the A option prints quantity and dollar totals for the period you request. The periods are (use the letters and numbers shown in parentheses to specify the period):
• Current shift (C).• Previous shifts (123).• Today’s daily totals (totals since last reset with RESET TOTALS or NEXT DAY) (D).• Yesterday’s daily totals (Y).
MDE-4871 CFN III Manager’s Manual for Windows® XP Embedded - Version 3.6 · August 2010 Page 11-7
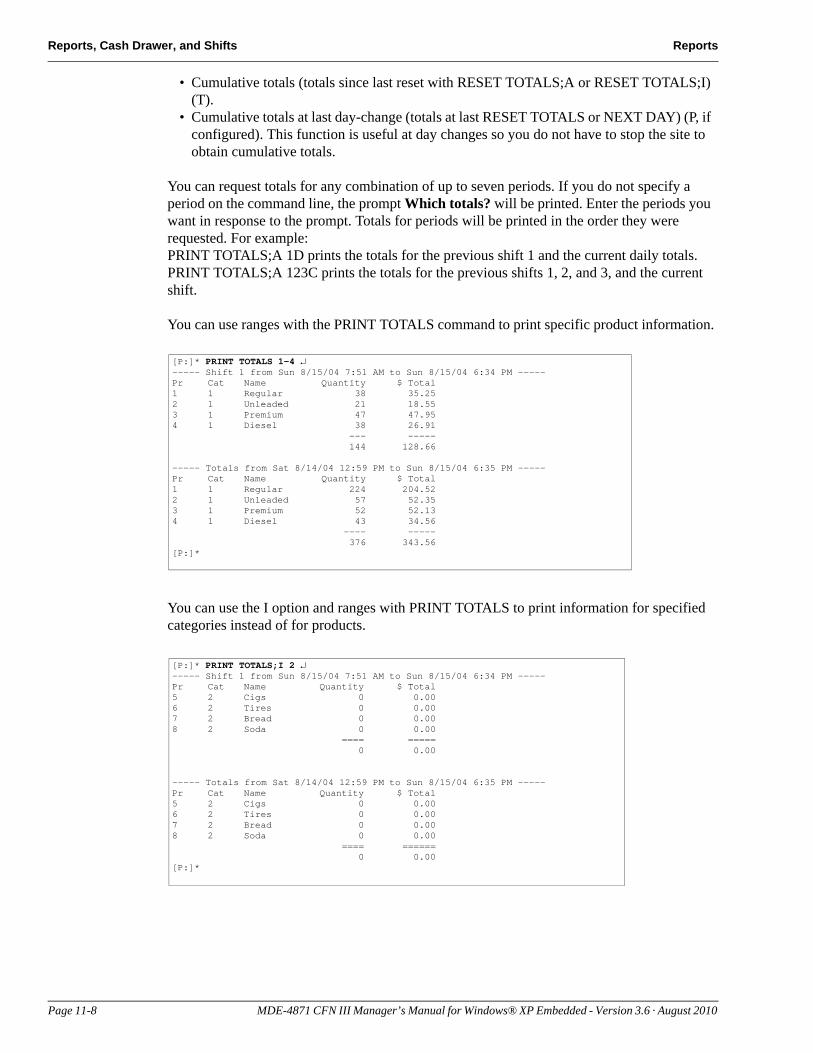
Reports, Cash Drawer, and Shifts Reports
• Cumulative totals (totals since last reset with RESET TOTALS;A or RESET TOTALS;I) (T).
• Cumulative totals at last day-change (totals at last RESET TOTALS or NEXT DAY) (P, if configured). This function is useful at day changes so you do not have to stop the site to obtain cumulative totals.
You can request totals for any combination of up to seven periods. If you do not specify a period on the command line, the prompt Which totals? will be printed. Enter the periods you want in response to the prompt. Totals for periods will be printed in the order they were requested. For example:PRINT TOTALS;A 1D prints the totals for the previous shift 1 and the current daily totals.PRINT TOTALS;A 123C prints the totals for the previous shifts 1, 2, and 3, and the current shift.
[P:]* PRINT TOTALS 1-4 ↵----- Shift 1 from Sun 8/15/04 7:51 AM to Sun 8/15/04 6:34 PM -----Pr Cat Name Quantity $ Total1 1 Regular 38 35.252 1 Unleaded 21 18.553 1 Premium 47 47.954 1 Diesel 38 26.91
--- -----144 128.66
----- Totals from Sat 8/14/04 12:59 PM to Sun 8/15/04 6:35 PM -----Pr Cat Name Quantity $ Total1 1 Regular 224 204.522 1 Unleaded 57 52.353 1 Premium 52 52.134 1 Diesel 43 34.56
---- -----376 343.56
[P:]*
[P:]* PRINT TOTALS;I 2 ↵----- Shift 1 from Sun 8/15/04 7:51 AM to Sun 8/15/04 6:34 PM -----Pr Cat Name Quantity $ Total5 2 Cigs 0 0.006 2 Tires 0 0.007 2 Bread 0 0.008 2 Soda 0 0.00
==== =====0 0.00
----- Totals from Sat 8/14/04 12:59 PM to Sun 8/15/04 6:35 PM -----Pr Cat Name Quantity $ Total5 2 Cigs 0 0.006 2 Tires 0 0.007 2 Bread 0 0.008 2 Soda 0 0.00
==== ======0 0.00
[P:]*
You can use ranges with the PRINT TOTALS command to print specific product information.
You can use the I option and ranges with PRINT TOTALS to print information for specified categories instead of for products.
Page 11-8 MDE-4871 CFN III Manager’s Manual for Windows® XP Embedded - Version 3.6 · August 2010
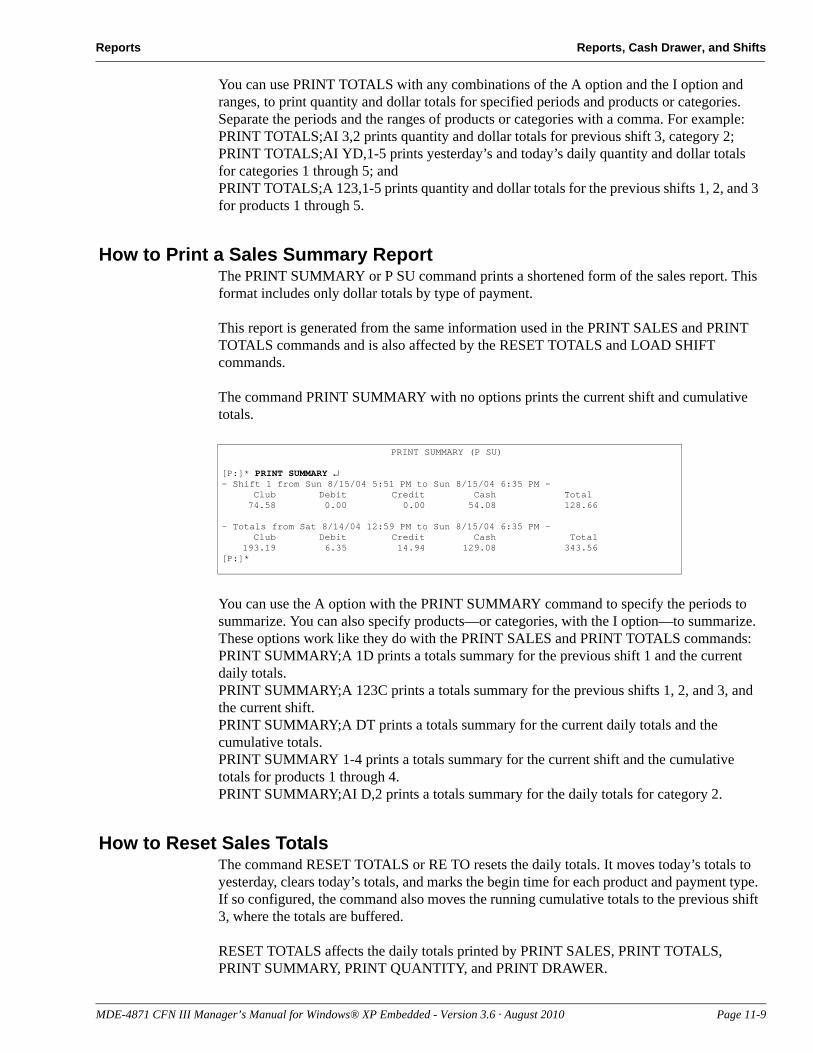
Reports Reports, Cash Drawer, and Shifts
You can use PRINT TOTALS with any combinations of the A option and the I option and ranges, to print quantity and dollar totals for specified periods and products or categories. Separate the periods and the ranges of products or categories with a comma. For example:PRINT TOTALS;AI 3,2 prints quantity and dollar totals for previous shift 3, category 2;PRINT TOTALS;AI YD,1-5 prints yesterday’s and today’s daily quantity and dollar totals for categories 1 through 5; andPRINT TOTALS;A 123,1-5 prints quantity and dollar totals for the previous shifts 1, 2, and 3 for products 1 through 5.
How to Print a Sales Summary ReportThe PRINT SUMMARY or P SU command prints a shortened form of the sales report. This format includes only dollar totals by type of payment.
PRINT SUMMARY (P SU)
[P:]* PRINT SUMMARY ↵- Shift 1 from Sun 8/15/04 5:51 PM to Sun 8/15/04 6:35 PM -
Club Debit Credit Cash Total74.58 0.00 0.00 54.08 128.66
- Totals from Sat 8/14/04 12:59 PM to Sun 8/15/04 6:35 PM -Club Debit Credit Cash Total
193.19 6.35 14.94 129.08 343.56[P:]*
This report is generated from the same information used in the PRINT SALES and PRINT TOTALS commands and is also affected by the RESET TOTALS and LOAD SHIFT commands.
The command PRINT SUMMARY with no options prints the current shift and cumulative totals.
You can use the A option with the PRINT SUMMARY command to specify the periods to summarize. You can also specify products—or categories, with the I option—to summarize. These options work like they do with the PRINT SALES and PRINT TOTALS commands:PRINT SUMMARY;A 1D prints a totals summary for the previous shift 1 and the current daily totals.PRINT SUMMARY;A 123C prints a totals summary for the previous shifts 1, 2, and 3, and the current shift.PRINT SUMMARY;A DT prints a totals summary for the current daily totals and the cumulative totals.PRINT SUMMARY 1-4 prints a totals summary for the current shift and the cumulative totals for products 1 through 4.PRINT SUMMARY;AI D,2 prints a totals summary for the daily totals for category 2.
How to Reset Sales TotalsThe command RESET TOTALS or RE TO resets the daily totals. It moves today’s totals to yesterday, clears today’s totals, and marks the begin time for each product and payment type. If so configured, the command also moves the running cumulative totals to the previous shift 3, where the totals are buffered.
RESET TOTALS affects the daily totals printed by PRINT SALES, PRINT TOTALS, PRINT SUMMARY, PRINT QUANTITY, and PRINT DRAWER.
MDE-4871 CFN III Manager’s Manual for Windows® XP Embedded - Version 3.6 · August 2010 Page 11-9
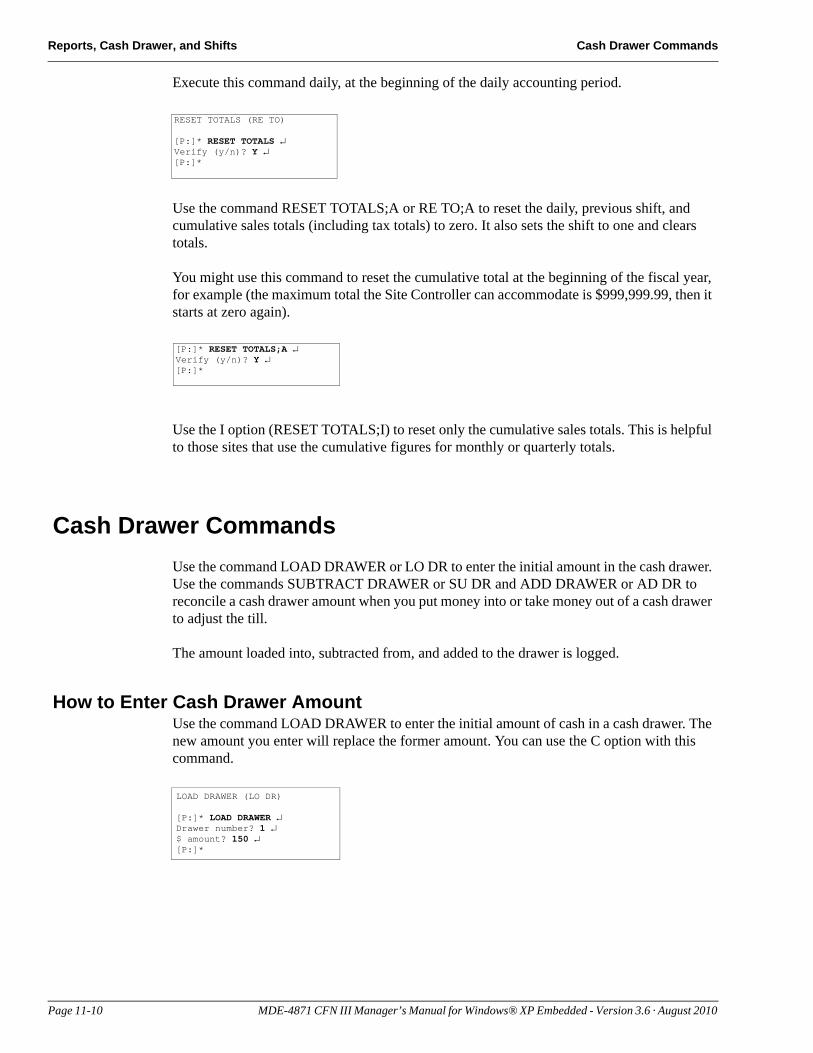
Reports, Cash Drawer, and Shifts Cash Drawer Commands
RESET TOTALS (RE TO)
[P:]* RESET TOTALS ↵Verify (y/n)? Y ↵[P:]*
[P:]* RESET TOTALS;A ↵Verify (y/n)? Y ↵[P:]*
Execute this command daily, at the beginning of the daily accounting period.
Use the command RESET TOTALS;A or RE TO;A to reset the daily, previous shift, and cumulative sales totals (including tax totals) to zero. It also sets the shift to one and clears totals.
You might use this command to reset the cumulative total at the beginning of the fiscal year, for example (the maximum total the Site Controller can accommodate is $999,999.99, then it starts at zero again).
Use the I option (RESET TOTALS;I) to reset only the cumulative sales totals. This is helpful to those sites that use the cumulative figures for monthly or quarterly totals.
Cash Drawer CommandsUse the command LOAD DRAWER or LO DR to enter the initial amount in the cash drawer. Use the commands SUBTRACT DRAWER or SU DR and ADD DRAWER or AD DR to reconcile a cash drawer amount when you put money into or take money out of a cash drawer to adjust the till.
The amount loaded into, subtracted from, and added to the drawer is logged.
How to Enter Cash Drawer AmountUse the command LOAD DRAWER to enter the initial amount of cash in a cash drawer. The new amount you enter will replace the former amount. You can use the C option with this command.
LOAD DRAWER (LO DR)
[P:]* LOAD DRAWER ↵Drawer number? 1 ↵$ amount? 150 ↵[P:]*
Page 11-10 MDE-4871 CFN III Manager’s Manual for Windows® XP Embedded - Version 3.6 · August 2010
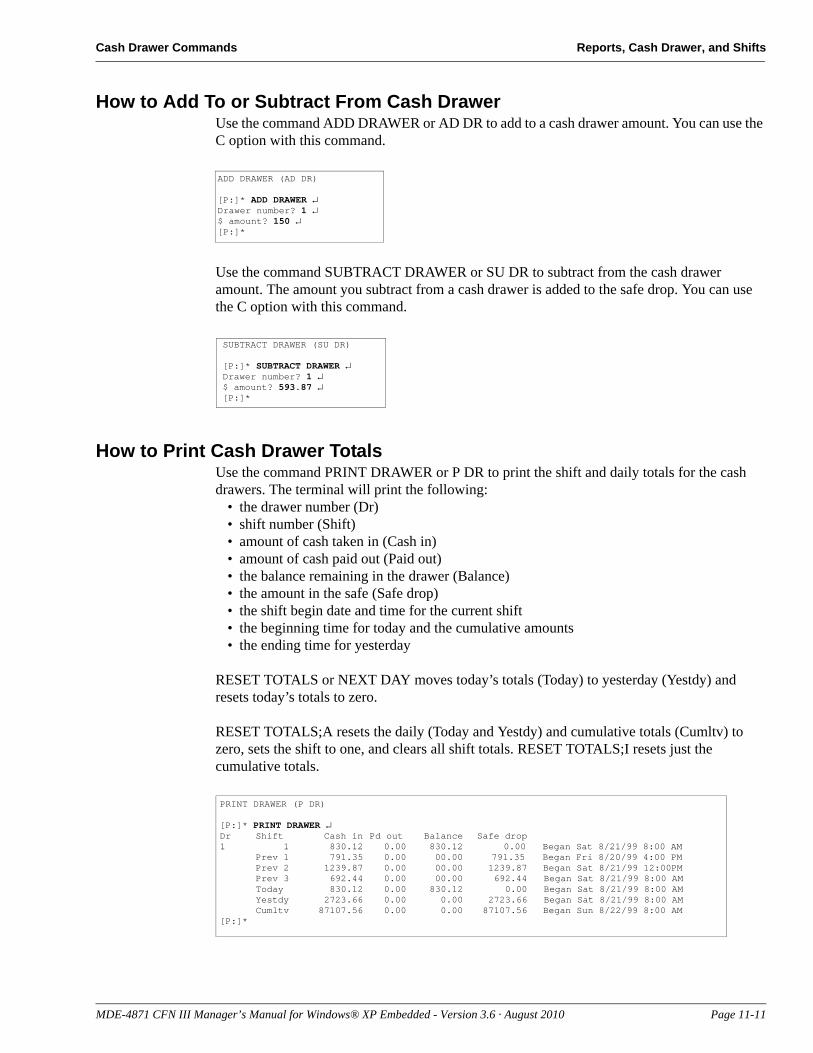
Cash Drawer Commands Reports, Cash Drawer, and Shifts
How to Add To or Subtract From Cash DrawerUse the command ADD DRAWER or AD DR to add to a cash drawer amount. You can use the C option with this command.
ADD DRAWER (AD DR)
[P:]* ADD DRAWER ↵Drawer number? 1 ↵$ amount? 150 ↵[P:]*
SUBTRACT DRAWER (SU DR)
[P:]* SUBTRACT DRAWER ↵Drawer number? 1 ↵$ amount? 593.87 ↵[P:]*
Use the command SUBTRACT DRAWER or SU DR to subtract from the cash drawer amount. The amount you subtract from a cash drawer is added to the safe drop. You can use the C option with this command.
How to Print Cash Drawer TotalsUse the command PRINT DRAWER or P DR to print the shift and daily totals for the cash drawers. The terminal will print the following:
• the drawer number (Dr)• shift number (Shift)• amount of cash taken in (Cash in)• amount of cash paid out (Paid out)• the balance remaining in the drawer (Balance)• the amount in the safe (Safe drop)• the shift begin date and time for the current shift• the beginning time for today and the cumulative amounts• the ending time for yesterday
PRINT DRAWER (P DR)
[P:]* PRINT DRAWER ↵Dr Shift Cash in Pd out Balance Safe drop1 1 830.12 0.00 830.12 0.00 Began Sat 8/21/99 8:00 AM
Prev 1 791.35 0.00 00.00 791.35 Began Fri 8/20/99 4:00 PMPrev 2 1239.87 0.00 00.00 1239.87 Began Sat 8/21/99 12:00PMPrev 3 692.44 0.00 00.00 692.44 Began Sat 8/21/99 8:00 AM Today 830.12 0.00 830.12 0.00 Began Sat 8/21/99 8:00 AMYestdy 2723.66 0.00 0.00 2723.66 Began Sat 8/21/99 8:00 AMCumltv 87107.56 0.00 0.00 87107.56 Began Sun 8/22/99 8:00 AM
[P:]*
RESET TOTALS or NEXT DAY moves today’s totals (Today) to yesterday (Yestdy) and resets today’s totals to zero.
RESET TOTALS;A resets the daily (Today and Yestdy) and cumulative totals (Cumltv) to zero, sets the shift to one, and clears all shift totals. RESET TOTALS;I resets just the cumulative totals.
MDE-4871 CFN III Manager’s Manual for Windows® XP Embedded - Version 3.6 · August 2010 Page 11-11
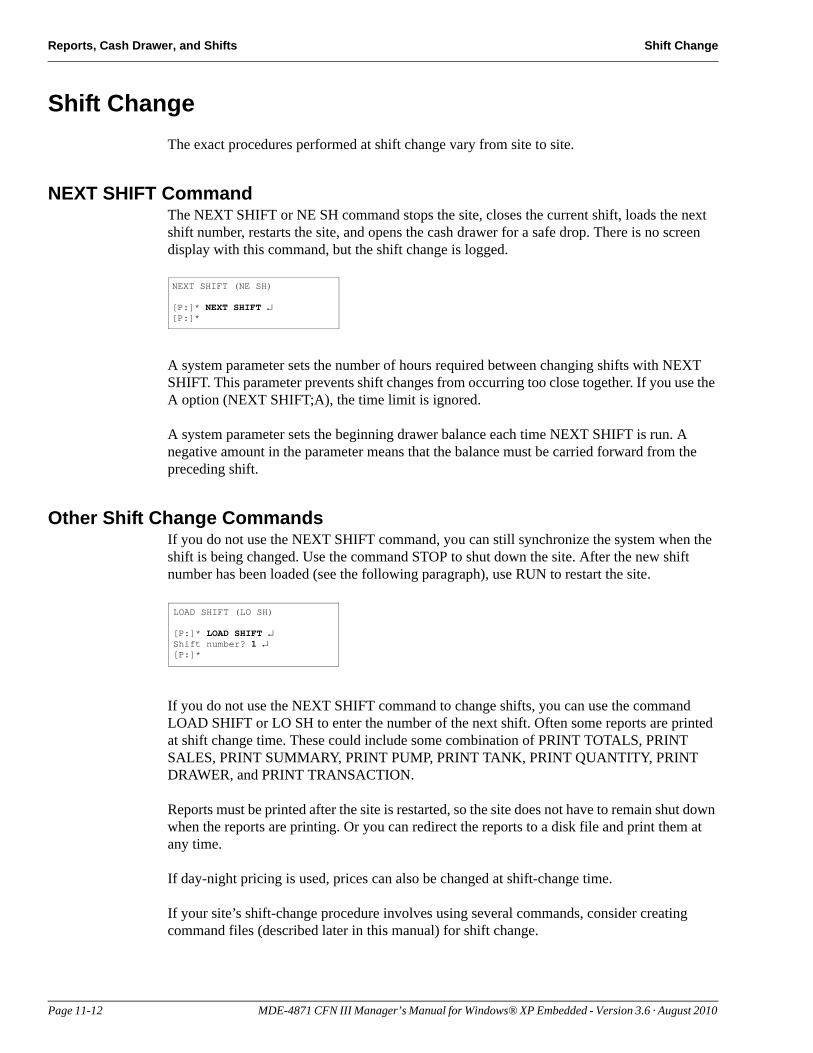
Reports, Cash Drawer, and Shifts Shift Change
Shift ChangeThe exact procedures performed at shift change vary from site to site.
NEXT SHIFT CommandThe NEXT SHIFT or NE SH command stops the site, closes the current shift, loads the next shift number, restarts the site, and opens the cash drawer for a safe drop. There is no screen display with this command, but the shift change is logged.
NEXT SHIFT (NE SH)
[P:]* NEXT SHIFT ↵[P:]*
A system parameter sets the number of hours required between changing shifts with NEXT SHIFT. This parameter prevents shift changes from occurring too close together. If you use the A option (NEXT SHIFT;A), the time limit is ignored.
A system parameter sets the beginning drawer balance each time NEXT SHIFT is run. A negative amount in the parameter means that the balance must be carried forward from the preceding shift.
Other Shift Change CommandsIf you do not use the NEXT SHIFT command, you can still synchronize the system when the shift is being changed. Use the command STOP to shut down the site. After the new shift number has been loaded (see the following paragraph), use RUN to restart the site.
LOAD SHIFT (LO SH)
[P:]* LOAD SHIFT ↵Shift number? 1 ↵[P:]*
If you do not use the NEXT SHIFT command to change shifts, you can use the command LOAD SHIFT or LO SH to enter the number of the next shift. Often some reports are printed at shift change time. These could include some combination of PRINT TOTALS, PRINT SALES, PRINT SUMMARY, PRINT PUMP, PRINT TANK, PRINT QUANTITY, PRINT DRAWER, and PRINT TRANSACTION.
Reports must be printed after the site is restarted, so the site does not have to remain shut down when the reports are printing. Or you can redirect the reports to a disk file and print them at any time.
If day-night pricing is used, prices can also be changed at shift-change time.
If your site’s shift-change procedure involves using several commands, consider creating command files (described later in this manual) for shift change.
Page 11-12 MDE-4871 CFN III Manager’s Manual for Windows® XP Embedded - Version 3.6 · August 2010
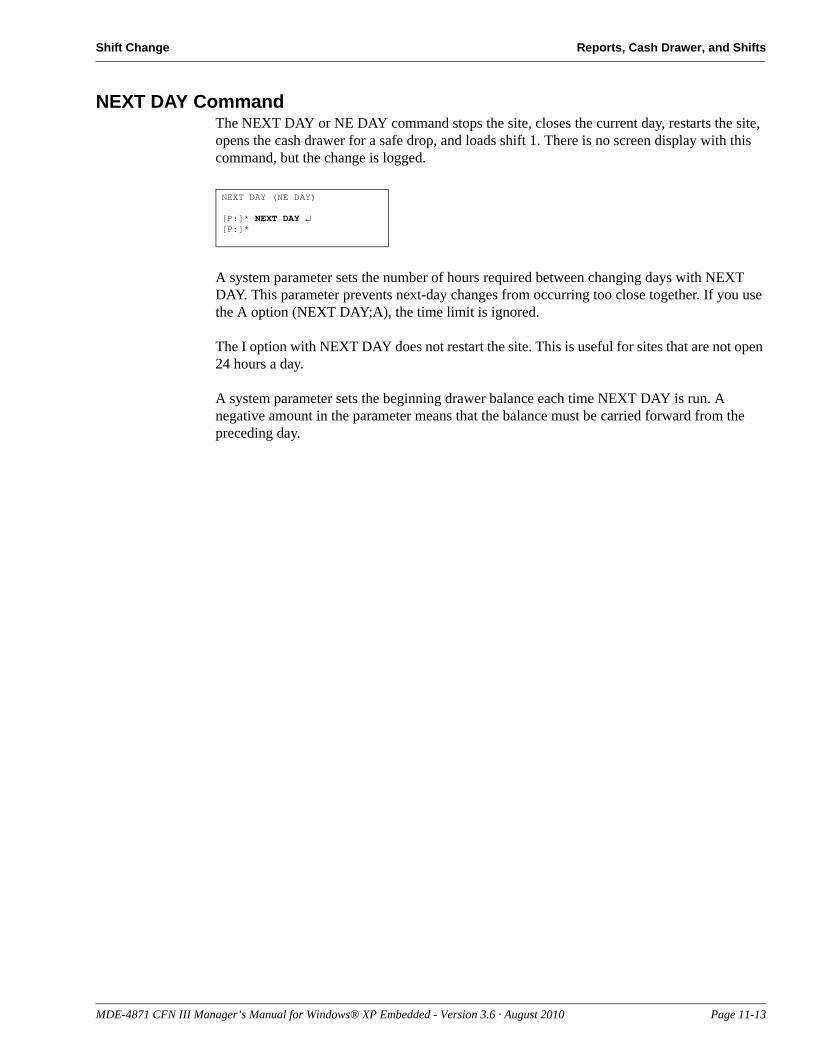
Shift Change Reports, Cash Drawer, and Shifts
NEXT DAY CommandThe NEXT DAY or NE DAY command stops the site, closes the current day, restarts the site, opens the cash drawer for a safe drop, and loads shift 1. There is no screen display with this command, but the change is logged.
NEXT DAY (NE DAY)
[P:]* NEXT DAY ↵[P:]*
A system parameter sets the number of hours required between changing days with NEXT DAY. This parameter prevents next-day changes from occurring too close together. If you use the A option (NEXT DAY;A), the time limit is ignored.
The I option with NEXT DAY does not restart the site. This is useful for sites that are not open 24 hours a day.
A system parameter sets the beginning drawer balance each time NEXT DAY is run. A negative amount in the parameter means that the balance must be carried forward from the preceding day.
MDE-4871 CFN III Manager’s Manual for Windows® XP Embedded - Version 3.6 · August 2010 Page 11-13

Reports, Cash Drawer, and Shifts Shift Change
This page is intentionally left blank.
Page 11-14 MDE-4871 CFN III Manager’s Manual for Windows® XP Embedded - Version 3.6 · August 2010
Printing Transactions Transactions
12 – Transactions
Printing TransactionsTransactions are stored so that they can be used later for bookkeeping purposes or for billing proprietary-card customers. A record for each transaction is printed on the log printer as the transaction is completed.
The Site Controller can be configured to not save or not print cash transactions, in which case they will not appear on the log (you might not want to save or to not print your cash transactions if they are taking up too much memory in the Site Controller). The Site Controller can also be configured to not save hand-authorized transactions.
Transactions that are not saved in the main transaction file, but are logged, are numbered with negative numbers, so they are easily distinguished from normal transaction numbers. The numbers range from -2 to -999. These numbers allow you to easily tell if any logged transactions are missing from a given printout.
Merchandise items in transactions are not saved in itemized form, but are recorded in the log following the main transaction entry. They are printed three per line in the same format that is displayed on the console.
Whenever a merchandise item is voided on the console, a void is recorded in the log for that item. If all merchandise in a sale is voided, that is printed also.
The format of the transaction printout is specified in the Site Controller configuration. Transactions printed on the log printer and transactions printed in response to the PRINT TRANSACTION command use the same format. The transaction printout format at your site may be different from the format used in the examples in this manual.
From time to time stored transactions must be cleared out to make room for new transactions. If transactions are not polled from your site periodically by a host computer, you must reset the transaction-begin pointer manually. Before doing so, it is important that a record of the transactions be produced, either electronically on another computer or as a report in a Site Controller disk file or on paper.
The transaction-begin pointer in the transaction file determines which transaction the transaction printout begins with. Also, transactions before the transaction-begin pointer are overwritten by new transactions as they occur. So if transactions from your site are not collected and processed electronically by a host computer, you will require to reset the transaction-begin pointer after you print the current transactions to make room to store new transactions (refer to “Transaction File” on page 12-5).
MDE-4871 CFN III Manager’s Manual for Windows® XP Embedded - Version 3.6 · August 2010 Page 12-1
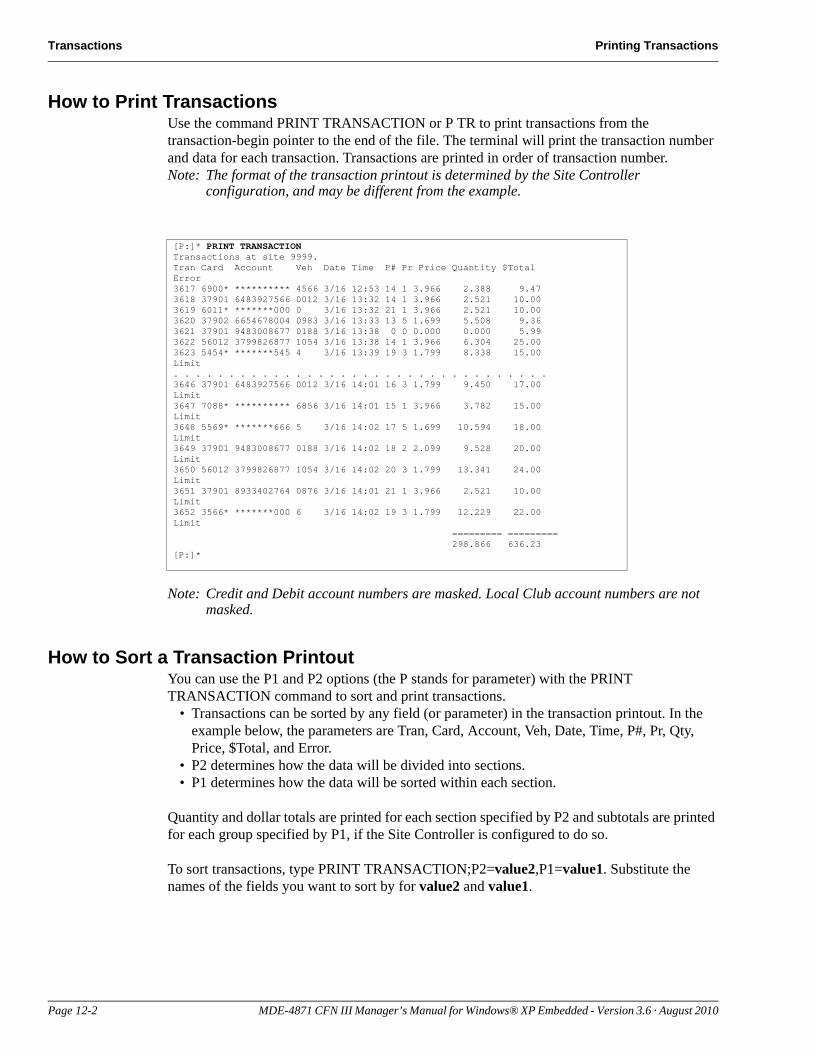
Transactions Printing Transactions
How to Print TransactionsUse the command PRINT TRANSACTION or P TR to print transactions from the transaction-begin pointer to the end of the file. The terminal will print the transaction number and data for each transaction. Transactions are printed in order of transaction number.Note: The format of the transaction printout is determined by the Site Controller
configuration, and may be different from the example.
Note: Credit and Debit account numbers are masked. Local Club account numbers are not masked.
How to Sort a Transaction PrintoutYou can use the P1 and P2 options (the P stands for parameter) with the PRINT TRANSACTION command to sort and print transactions.
• Transactions can be sorted by any field (or parameter) in the transaction printout. In the example below, the parameters are Tran, Card, Account, Veh, Date, Time, P#, Pr, Qty, Price, $Total, and Error.
• P2 determines how the data will be divided into sections.• P1 determines how the data will be sorted within each section.
Quantity and dollar totals are printed for each section specified by P2 and subtotals are printed for each group specified by P1, if the Site Controller is configured to do so.
To sort transactions, type PRINT TRANSACTION;P2=value2,P1=value1. Substitute the names of the fields you want to sort by for value2 and value1.
[P:]* PRINT TRANSACTION Transactions at site 9999. Tran Card Account Veh Date Time P# Pr Price Quantity $Total Error 3617 6900* ********** 4566 3/16 12:53 14 1 3.966 2.388 9.47 3618 37901 6483927566 0012 3/16 13:32 14 1 3.966 2.521 10.00 3619 6011* *******000 0 3/16 13:32 21 1 3.966 2.521 10.00 3620 37902 6654678004 0983 3/16 13:33 13 5 1.699 5.508 9.36 3621 37901 9483008677 0188 3/16 13:38 0 0 0.000 0.000 5.99 3622 56012 3799826877 1054 3/16 13:38 14 1 3.966 6.304 25.00 3623 5454* *******545 4 3/16 13:39 19 3 1.799 8.338 15.00 Limit . . . . . . . . . . . . . . . . . . . . . . . . . . . . . . . . . .3646 37901 6483927566 0012 3/16 14:01 16 3 1.799 9.450 17.00 Limit 3647 7088* ********** 6856 3/16 14:01 15 1 3.966 3.782 15.00 Limit 3648 5569* *******666 5 3/16 14:02 17 5 1.699 10.594 18.00 Limit 3649 37901 9483008677 0188 3/16 14:02 18 2 2.099 9.528 20.00 Limit 3650 56012 3799826877 1054 3/16 14:02 20 3 1.799 13.341 24.00 Limit 3651 37901 8933402764 0876 3/16 14:01 21 1 3.966 2.521 10.00 Limit 3652 3566* *******000 6 3/16 14:02 19 3 1.799 12.229 22.00 Limit ========= ========= 298.866 636.23 [P:]*
Page 12-2 MDE-4871 CFN III Manager’s Manual for Windows® XP Embedded - Version 3.6 · August 2010
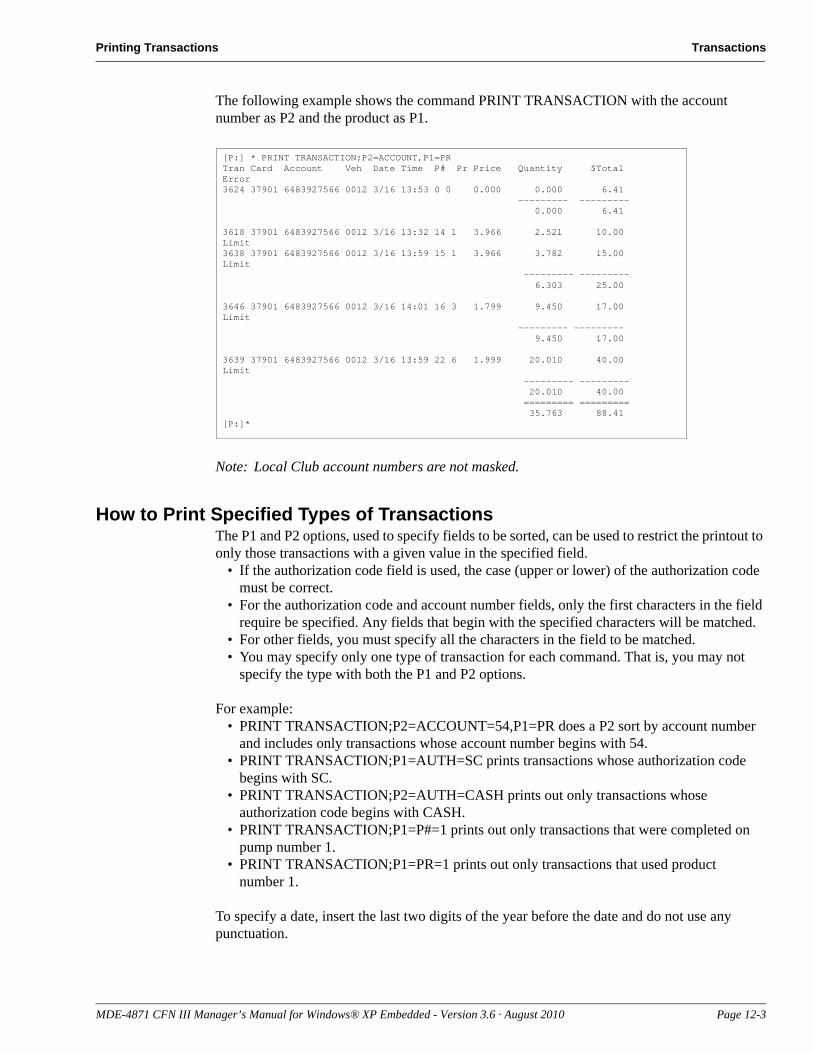
Printing Transactions Transactions
[P:] * PRINT TRANSACTION;P2=ACCOUNT,P1=PRTran Card Account Veh Date Time P# Pr Price Quantity $Total Error3624 37901 6483927566 0012 3/16 13:53 0 0 0.000 0.000 6.41 --------- --------- 0.000 6.41
3618 37901 6483927566 0012 3/16 13:32 14 1 3.966 2.521 10.00 Limit3638 37901 6483927566 0012 3/16 13:59 15 1 3.966 3.782 15.00 Limit --------- --------- 6.303 25.00
3646 37901 6483927566 0012 3/16 14:01 16 3 1.799 9.450 17.00Limit --------- --------- 9.450 17.00
3639 37901 6483927566 0012 3/16 13:59 22 6 1.999 20.010 40.00 Limit --------- --------- 20.010 40.00 ========= ========= 35.763 88.41[P:]*
The following example shows the command PRINT TRANSACTION with the account number as P2 and the product as P1.
Note: Local Club account numbers are not masked.
How to Print Specified Types of TransactionsThe P1 and P2 options, used to specify fields to be sorted, can be used to restrict the printout to only those transactions with a given value in the specified field.
• If the authorization code field is used, the case (upper or lower) of the authorization code must be correct.
• For the authorization code and account number fields, only the first characters in the field require be specified. Any fields that begin with the specified characters will be matched.
• For other fields, you must specify all the characters in the field to be matched.• You may specify only one type of transaction for each command. That is, you may not
specify the type with both the P1 and P2 options.
For example:• PRINT TRANSACTION;P2=ACCOUNT=54,P1=PR does a P2 sort by account number
and includes only transactions whose account number begins with 54.• PRINT TRANSACTION;P1=AUTH=SC prints transactions whose authorization code
begins with SC.• PRINT TRANSACTION;P2=AUTH=CASH prints out only transactions whose
authorization code begins with CASH.• PRINT TRANSACTION;P1=P#=1 prints out only transactions that were completed on
pump number 1.• PRINT TRANSACTION;P1=PR=1 prints out only transactions that used product
number 1.
To specify a date, insert the last two digits of the year before the date and do not use any punctuation.
MDE-4871 CFN III Manager’s Manual for Windows® XP Embedded - Version 3.6 · August 2010 Page 12-3
Transactions Printing Transactions
For example, PRINT TRANSACTION;P2=DATE=930610 prints out transactions that occurred on June 10, 1993.
To specify amounts-either quantity or dollar totals - do not use any punctuation. For example, to see all $5.00 sales, enter PRINT TRANSACTION;P1=$TOTAL=500.
You must always enter quantity in thousandths, even if your site displays quantity only in hundredths (the PRINT TRANSACTION examples in this chapter show thousandths). For example, to see all ten-gallon sales, enter PRINT TRANSACTION;P1=QTY=10000.
How to Print a Range of TransactionsYou can specify a range of transactions to print with the PRINT TRANSACTION command.
• A range has the form N-M, which means transaction numbers N through M. N stands for the beginning number you specify, and M stands for the ending number.
• A -N means transaction numbers from the beginning of the file through transaction N.• An N- means transaction number N through the end of the file.• An N means print only transaction number N.
If the starting transaction number specified is not in the file, no transactions are printed.
The printout stops after the last transaction number specified or at the end of the file if the ending number is not in the file:
• PRINT TRANSACTION 23-150 prints transactions 23 through 150.• PRINT TRANSACTION 23- prints transaction number 23 through the end of the
transaction file.• PRINT TRANSACTION -5 prints transactions from the beginning of file through
transaction 5.• PRINT TRANSACTION 34 prints only transaction number 34.• PRINT TRANSACTION;P2=ACC=54, 1-10 prints transactions whose account number
starts with 54, in the transaction range 1 through 10.
How to Print Transactions in ProgressThe command PRINT TIP or P TI prints transactions in progress. You can use this command before changing prices to verify that there are no transactions in progress.
Command DescriptionSeq is the transaction sequence number.
P# is the number of the pump being used.
Pr is the product number of the product being pumped.
Device is the type of device the transaction was started from: reader (island card reader), POS console, site (full serve mode or ACTIVATE PUMP).
As per PCI requirements, the permission level for P TIP is now at level 10 [PCI Administrator level].
IMPORTANT INFORMATION
Page 12-4 MDE-4871 CFN III Manager’s Manual for Windows® XP Embedded - Version 3.6 · August 2010
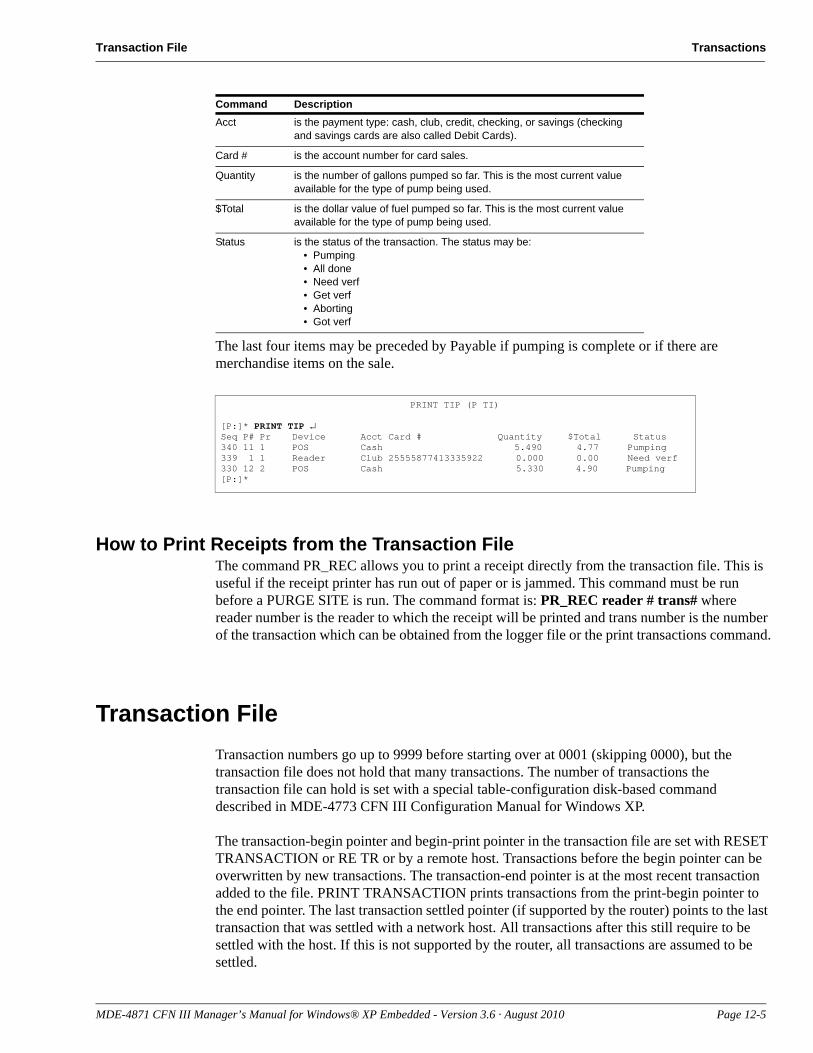
Transaction File Transactions
PRINT TIP (P TI)
[P:]* PRINT TIP ↵Seq P# Pr Device Acct Card # Quantity $Total Status340 11 1 POS Cash 5.490 4.77 Pumping339 1 1 Reader Club 25555877413335922 0.000 0.00 Need verf330 12 2 POS Cash 5.330 4.90 Pumping[P:]*
The last four items may be preceded by Payable if pumping is complete or if there are merchandise items on the sale.
How to Print Receipts from the Transaction FileThe command PR_REC allows you to print a receipt directly from the transaction file. This is useful if the receipt printer has run out of paper or is jammed. This command must be run before a PURGE SITE is run. The command format is: PR_REC reader # trans# where reader number is the reader to which the receipt will be printed and trans number is the number of the transaction which can be obtained from the logger file or the print transactions command.
Transaction FileTransaction numbers go up to 9999 before starting over at 0001 (skipping 0000), but the transaction file does not hold that many transactions. The number of transactions the transaction file can hold is set with a special table-configuration disk-based command described in MDE-4773 CFN III Configuration Manual for Windows XP.
The transaction-begin pointer and begin-print pointer in the transaction file are set with RESET TRANSACTION or RE TR or by a remote host. Transactions before the begin pointer can be overwritten by new transactions. The transaction-end pointer is at the most recent transaction added to the file. PRINT TRANSACTION prints transactions from the print-begin pointer to the end pointer. The last transaction settled pointer (if supported by the router) points to the last transaction that was settled with a network host. All transactions after this still require to be settled with the host. If this is not supported by the router, all transactions are assumed to be settled.
Acct is the payment type: cash, club, credit, checking, or savings (checking and savings cards are also called Debit Cards).
Card # is the account number for card sales.
Quantity is the number of gallons pumped so far. This is the most current value available for the type of pump being used.
$Total is the dollar value of fuel pumped so far. This is the most current value available for the type of pump being used.
Status is the status of the transaction. The status may be:• Pumping• All done• Need verf• Get verf• Aborting• Got verf
Command Description
MDE-4871 CFN III Manager’s Manual for Windows® XP Embedded - Version 3.6 · August 2010 Page 12-5
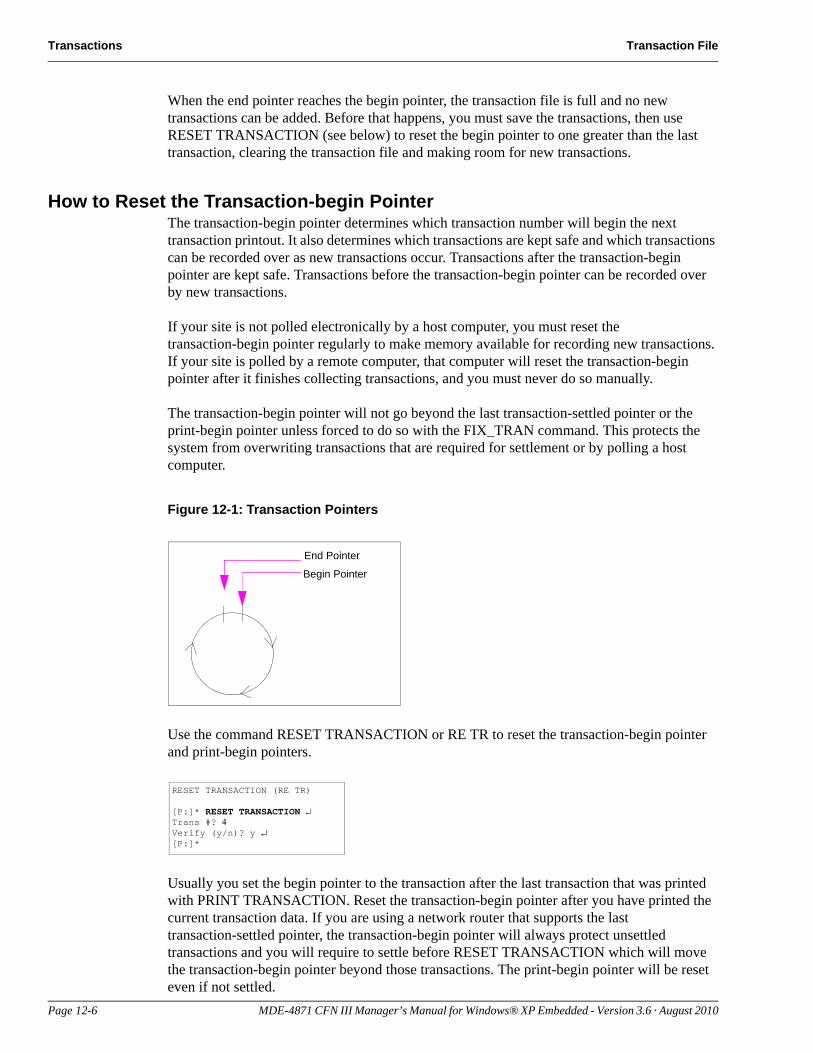
Transactions Transaction File
Page 12-6 MDE-4871 CFN III Manager’s Manual for Windows® XP Embedded - Version 3.6 · August 2010
When the end pointer reaches the begin pointer, the transaction file is full and no new transactions can be added. Before that happens, you must save the transactions, then use RESET TRANSACTION (see below) to reset the begin pointer to one greater than the last transaction, clearing the transaction file and making room for new transactions.
How to Reset the Transaction-begin PointerThe transaction-begin pointer determines which transaction number will begin the next transaction printout. It also determines which transactions are kept safe and which transactions can be recorded over as new transactions occur. Transactions after the transaction-begin pointer are kept safe. Transactions before the transaction-begin pointer can be recorded over by new transactions.
If your site is not polled electronically by a host computer, you must reset the transaction-begin pointer regularly to make memory available for recording new transactions. If your site is polled by a remote computer, that computer will reset the transaction-begin pointer after it finishes collecting transactions, and you must never do so manually.
The transaction-begin pointer will not go beyond the last transaction-settled pointer or the print-begin pointer unless forced to do so with the FIX_TRAN command. This protects the system from overwriting transactions that are required for settlement or by polling a host computer.
Figure 12-1: Transaction Pointers
End Pointer
Begin Pointer
RESET TRANSACTION (RE TR)
[P:]* RESET TRANSACTION ↵Trans #? 4Verify (y/n)? y ↵[P:]*
Use the command RESET TRANSACTION or RE TR to reset the transaction-begin pointer and print-begin pointers.
Usually you set the begin pointer to the transaction after the last transaction that was printed with PRINT TRANSACTION. Reset the transaction-begin pointer after you have printed the current transaction data. If you are using a network router that supports the last transaction-settled pointer, the transaction-begin pointer will always protect unsettled transactions and you will require to settle before RESET TRANSACTION which will move the transaction-begin pointer beyond those transactions. The print-begin pointer will be reset even if not settled.
Transaction File Transactions
The A option resets all transaction table pointers, including the next transaction to send to the CFN host and the next transaction to log, as well as the first transaction to print. If a number is provided with the A option, the CFN host poll pointer is set to that transaction number.Notes: 1) Transactions before the transaction-begin pointer will be erased as new
transactions are recorded over them. This means that if you make a mistake and reset the transaction-begin pointer without first printing or otherwise saving the transactions, you must correct your error immediately by resetting the transaction-begin pointer to the correct place; otherwise transaction data could be lost.
2) Ensure that you reset the transaction begin pointer to the next consecutive number. If you skip numbers, some transactions will never be printed, and you will see the message Does not exist.
3) If the number option is used it will sometimes cause some transactions not to be sent when other transactions are sent twice or will not stop at the end of the file and will wrap around and send all the transactions in the file to the CFN host.
How to Automatically Reset the Transaction PointerUse the command PURGE SITE or PU SIT to automatically reset the transaction pointer to one greater than the last transaction number.
PURGE SITE (PU SIT)
[P:]* PURGE SITE ↵Verify (y/n)? y ↵[P:]*
This is handy to use in a command file that contains PRINT TRANSACTION to print the transaction, and PURGE SITE to reset the transaction-begin pointer.Note: You will ordinarily use the PURGE SITE command only if you are manually printing
transactions and using the printed record as a basis for billing.
PURGE SITE;A will reset (catch up) the transaction-begin pointer to the oldest transaction that must remain protected without affecting the print-begin pointer. You may want to use this command if the print-begin pointer was reset before a network settlement, followed by the network settlement leaving the transaction-begin pointer protecting already settled transactions.
Detailed ReportThe Shift Change Package gives you the ability to have a more detailed report with a PJ option. The disk-based PJ command gives a more detailed report on transactions than the PRINT TRANSACTION command.
The name PJ stands for Print Journal, but is not an abbreviation for print journal. In other words, you have to type PJ to run this command; typing print journal will not work.
The journal referred to by the PJ command is the disk journal. To use PJ, first make sure that you have configured your Site Controller to store a disk journal. This configuration is under page 1 of the SYS_PAR program (refer to the Systems parameters chapter in MDE-4773 CFN III Configuration Manual for Windows XP).
MDE-4871 CFN III Manager’s Manual for Windows® XP Embedded - Version 3.6 · August 2010 Page 12-7
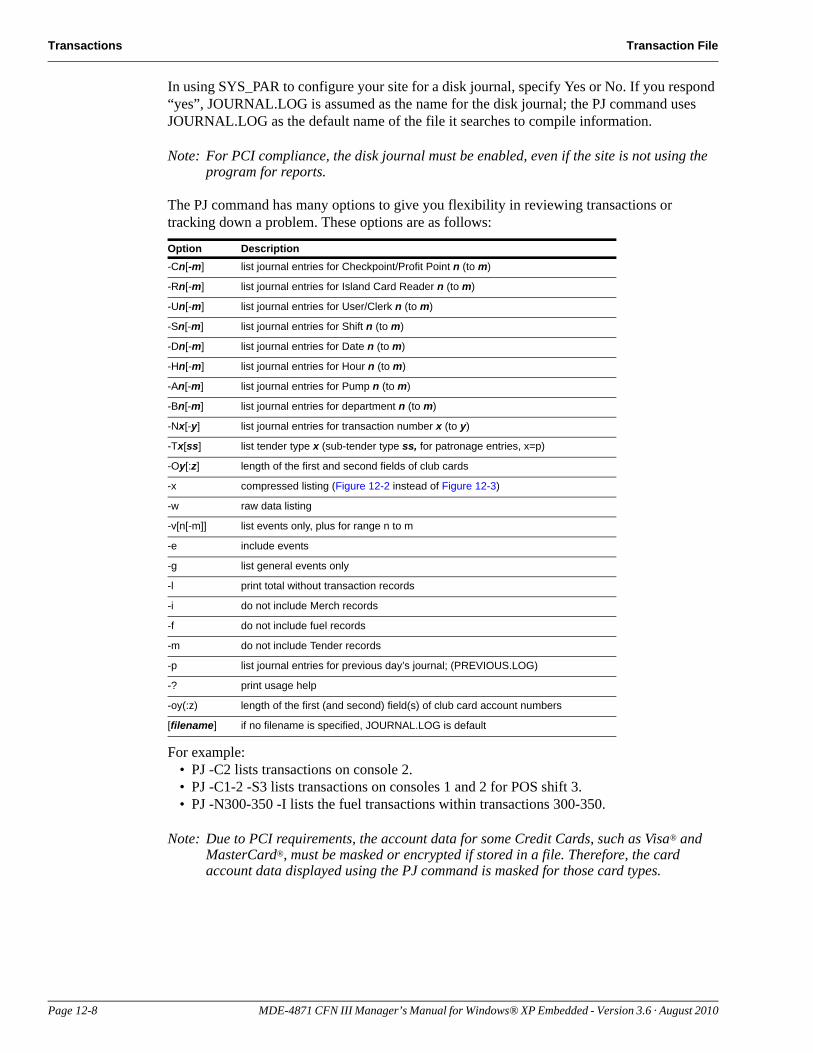
Transactions Transaction File
In using SYS_PAR to configure your site for a disk journal, specify Yes or No. If you respond “yes”, JOURNAL.LOG is assumed as the name for the disk journal; the PJ command uses JOURNAL.LOG as the default name of the file it searches to compile information.
Note: For PCI compliance, the disk journal must be enabled, even if the site is not using the program for reports.
The PJ command has many options to give you flexibility in reviewing transactions or tracking down a problem. These options are as follows:
For example:• PJ -C2 lists transactions on console 2.• PJ -C1-2 -S3 lists transactions on consoles 1 and 2 for POS shift 3.• PJ -N300-350 -I lists the fuel transactions within transactions 300-350.
Note: Due to PCI requirements, the account data for some Credit Cards, such as Visa® and MasterCard®, must be masked or encrypted if stored in a file. Therefore, the card account data displayed using the PJ command is masked for those card types.
Option Description-Cn[-m] list journal entries for Checkpoint/Profit Point n (to m)
-Rn[-m] list journal entries for Island Card Reader n (to m)
-Un[-m] list journal entries for User/Clerk n (to m)
-Sn[-m] list journal entries for Shift n (to m)
-Dn[-m] list journal entries for Date n (to m)
-Hn[-m] list journal entries for Hour n (to m)
-An[-m] list journal entries for Pump n (to m)
-Bn[-m] list journal entries for department n (to m)
-Nx[-y] list journal entries for transaction number x (to y)
-Tx[ss] list tender type x (sub-tender type ss, for patronage entries, x=p)
-Oy[:z] length of the first and second fields of club cards
-x compressed listing (Figure 12-2 instead of Figure 12-3)
-w raw data listing
-v[n[-m]] list events only, plus for range n to m
-e include events
-g list general events only
-l print total without transaction records
-i do not include Merch records
-f do not include fuel records
-m do not include Tender records
-p list journal entries for previous day’s journal; (PREVIOUS.LOG)
-? print usage help
-oy(:z) length of the first (and second) field(s) of club card account numbers
[filename] if no filename is specified, JOURNAL.LOG is default
Page 12-8 MDE-4871 CFN III Manager’s Manual for Windows® XP Embedded - Version 3.6 · August 2010
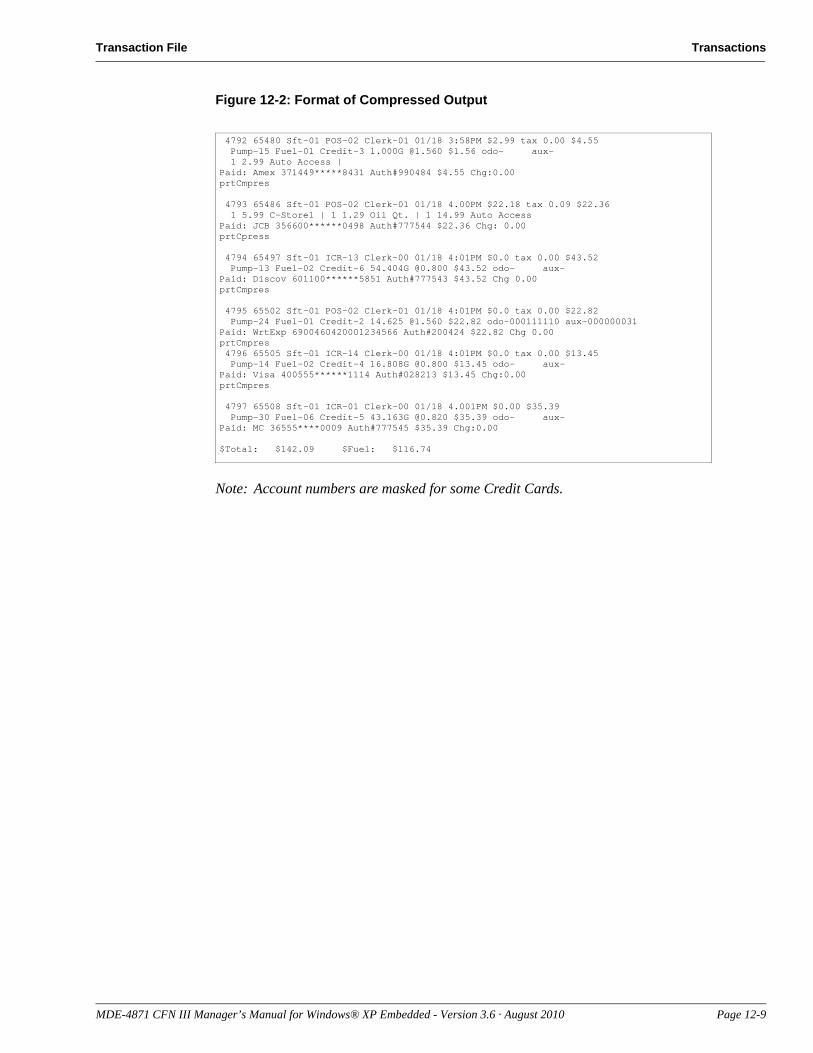
Transaction File Transactions
Figure 12-2: Format of Compressed Output
4792 65480 Sft-01 POS-02 Clerk-01 01/18 3:58PM $2.99 tax 0.00 $4.55 Pump-15 Fuel-01 Credit-3 1.000G @1.560 $1.56 odo- aux- 1 2.99 Auto Access |Paid: Amex 371449*****8431 Auth#990484 $4.55 Chg:0.00prtCmpres
4793 65486 Sft-01 POS-02 Clerk-01 01/18 4.00PM $22.18 tax 0.09 $22.36 1 5.99 C-Store1 | 1 1.29 Oil Qt. | 1 14.99 Auto AccessPaid: JCB 356600******0498 Auth#777544 $22.36 Chg: 0.00prtCpress
4794 65497 Sft-01 ICR-13 Clerk-00 01/18 4:01PM $0.0 tax 0.00 $43.52 Pump-13 Fuel-02 Credit-6 54.404G @0.800 $43.52 odo- aux-Paid: Discov 601100******5851 Auth#777543 $43.52 Chg 0.00prtCmpres
4795 65502 Sft-01 POS-02 Clerk-01 01/18 4:01PM $0.0 tax 0.00 $22.82 Pump-24 Fuel-01 Credit-2 14.625 @1.560 $22.82 odo-000111110 aux-000000031Paid: WrtExp 6900460420001234566 Auth#200424 $22.82 Chg 0.00prtCmpres 4796 65505 Sft-01 ICR-14 Clerk-00 01/18 4:01PM $0.0 tax 0.00 $13.45 Pump-14 Fuel-02 Credit-4 16.808G @0.800 $13.45 odo- aux-Paid: Visa 400555******1114 Auth#028213 $13.45 Chg:0.00prtCmpres
4797 65508 Sft-01 ICR-01 Clerk-00 01/18 4.001PM $0.00 $35.39 Pump-30 Fuel-06 Credit-5 43.163G @0.820 $35.39 odo- aux-Paid: MC 36555****0009 Auth#777545 $35.39 Chg:0.00
$Total: $142.09 $Fuel: $116.74
Note: Account numbers are masked for some Credit Cards.
MDE-4871 CFN III Manager’s Manual for Windows® XP Embedded - Version 3.6 · August 2010 Page 12-9
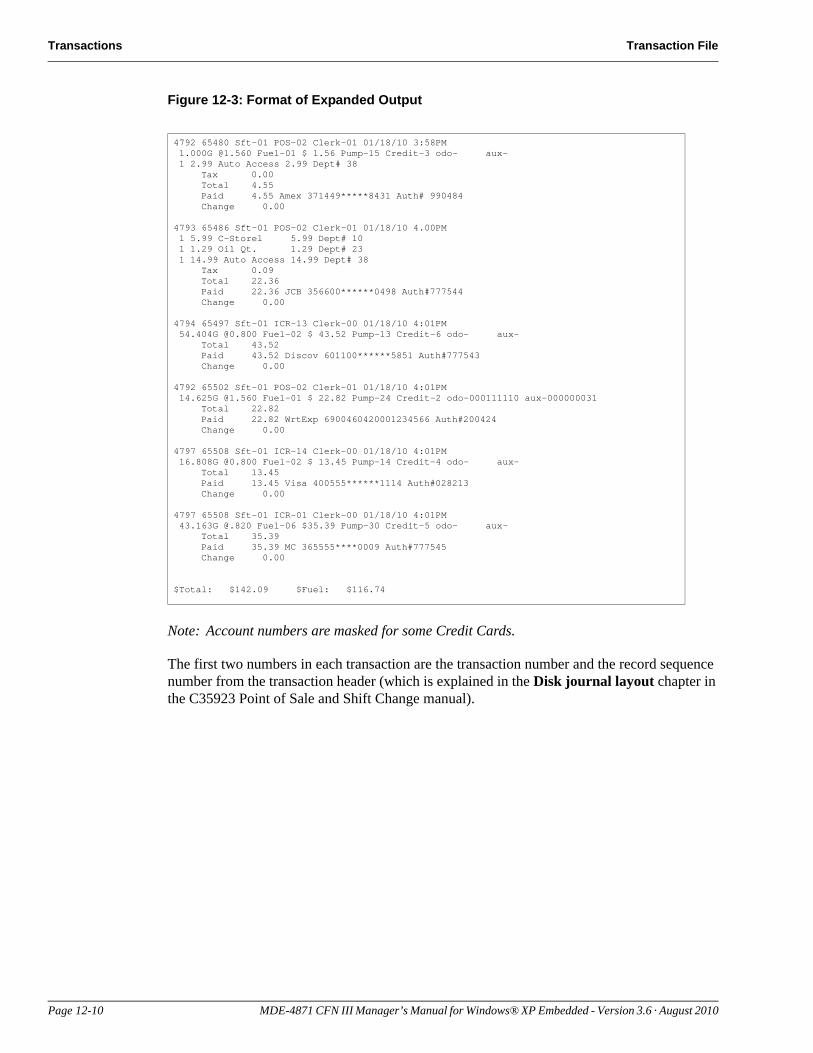
Transactions Transaction File
Figure 12-3: Format of Expanded Output
4792 65480 Sft-01 POS-02 Clerk-01 01/18/10 3:58PM 1.000G @1.560 Fuel-01 $ 1.56 Pump-15 Credit-3 odo- aux- 1 2.99 Auto Access 2.99 Dept# 38
Tax 0.00Total 4.55Paid 4.55 Amex 371449*****8431 Auth# 990484Change 0.00
4793 65486 Sft-01 POS-02 Clerk-01 01/18/10 4.00PM 1 5.99 C-Storel 5.99 Dept# 10 1 1.29 Oil Qt. 1.29 Dept# 23 1 14.99 Auto Access 14.99 Dept# 38
Tax 0.09Total 22.36Paid 22.36 JCB 356600******0498 Auth#777544Change 0.00
4794 65497 Sft-01 ICR-13 Clerk-00 01/18/10 4:01PM 54.404G @0.800 Fuel-02 $ 43.52 Pump-13 Credit-6 odo- aux-
Total 43.52Paid 43.52 Discov 601100******5851 Auth#777543Change 0.00
4792 65502 Sft-01 POS-02 Clerk-01 01/18/10 4:01PM 14.625G @1.560 Fuel-01 $ 22.82 Pump-24 Credit-2 odo-000111110 aux-000000031
Total 22.82Paid 22.82 WrtExp 6900460420001234566 Auth#200424Change 0.00
4797 65508 Sft-01 ICR-14 Clerk-00 01/18/10 4:01PM 16.808G @0.800 Fuel-02 $ 13.45 Pump-14 Credit-4 odo- aux-
Total 13.45Paid 13.45 Visa 400555******1114 Auth#028213Change 0.00
4797 65508 Sft-01 ICR-01 Clerk-00 01/18/10 4:01PM 43.163G @.820 Fuel-06 $35.39 Pump-30 Credit-5 odo- aux-
Total 35.39Paid 35.39 MC 365555****0009 Auth#777545Change 0.00
$Total: $142.09 $Fuel: $116.74
Note: Account numbers are masked for some Credit Cards.
The first two numbers in each transaction are the transaction number and the record sequence number from the transaction header (which is explained in the Disk journal layout chapter in the C35923 Point of Sale and Shift Change manual).
Page 12-10 MDE-4871 CFN III Manager’s Manual for Windows® XP Embedded - Version 3.6 · August 2010
Proprietary Card Format Proprietary Cards
13 – Proprietary Cards
This chapter discusses the authorization and limitation codes on Proprietary (also called club or private) Cards.
When a card is offered as payment on a CFN system, where the system looks to see if the card must be accepted (that is, if it is a valid card) depends on how the system is configured and what type of card is offered. The system may contact a remote computer or CFN host, or it may consult its own local restrictions, called lockouts, which are discussed in this chapter.Note: Proprietary Cards cannot be used to buy a car wash at Unitec® sites.
Proprietary Card FormatPrivately issued cards used with the Gasboy CFN system have the following format for information which is optically or magnetically encoded on the card:
Format: #ssssss#CCCCCCVVVVEEEE#yymmllaapx• # is a field separator.• ssssss is the CFN III system ID number, which can be 4-6 digits. It is encoded on the card
and is assigned by Gasboy. Leading zeros are significant in system ID numbers.• CCCCCCVVVVEEEE is the card information, totaling 1-19 digits in subfields (card
number, vehicle number, and employee number). These digits are encoded on the card and may also be shown in the numbers on the front of the card.
The remaining fields are optional information, which is encoded on the card. These fields, which are discussed in the Card Encoding Manual and in the System parameters chapter of MDE-4773 CFN III Configuration Manual for Windows XP, include:
• yymm is the expiration date: year and month. This can be 2 or 4 digits; if it’s 2, it is only the year.
• ll is the limitation code, which can be one or two digits.• aa is the authorization code, which can be one or two digits.• p is the price level, which can be one or two digits.• x is the restriction code, which can be one or two digits.
Once you know the format for the Proprietary Cards you want to issue, you can make the cards with a Gasboy card encoder, have Gasboy make the cards for you, or go to a card-encoding company.
MDE-4871 CFN III Manager’s Manual for Windows® XP Embedded - Version 3.6 · August 2010 Page 13-1
Proprietary Cards How to Restrict Purchases
How to Restrict PurchasesThere are three ways you can restrict the fuel and merchandise that can be purchased on your Proprietary Cards that conform to the standard Gasboy format; you may assign authorization codes, limitation codes, and/or cumulative limits to the cards.
• Authorization codes determine the types of fuel and merchandise a card can access.• Limitation codes determine how much fuel can be purchased on the card in a single
transaction.• Cumulative limits are explained in “Fuel Allocation and Miles-per-Gallon” on page 15-1.
LockoutsThere are two types of lockout available for the CFN system, bit-mapped lockout and limited lockout. In addition, either type of lockout may be set up as a positive or negative system. The type of lockout used is determined by the Site Controller configuration.
Bit-mapped lockout is used with Proprietary Cards. Limited lockout can be used with Proprietary Cards and bank cards.
A typical format for the customer information field of privately issued cards is ccccccvvvveeee where
• cccccc is the card number (a six digit number can lock out up to 999,999 cards; a five-digit number can lock out up to 99,999 cards)
• vvvv is the vehicle number• eeee is the employee number, and• ccccccvvvveeee is the account number. Account number here refers to the entire
customer-information field of the Proprietary Card. This field is usually divided into subfields that may include a card number, vehicle number, employee number, customer account number, or other fields. Although it may seem confusing to call the entire field the account number, when it can contain a subfield called account number, this terminology conforms with the track II standard as defined by the American Bankers Association (cards have three tracks and CFN card readers read track II).
With bit-mapped lockout, only the card number (six digits in this example) is used for lockout. With limited lockout, the entire customer information field (14 digits in this example) must be entered for lockout.
An offset can now be set in SYS_PAR to determine what card data is used. Refer to MDE-4773 CFN III Configuration Manual for Windows XP for more information.
Bit-mapped LockoutBit-mapped lockout uses less memory than limited lockout, but is less flexible.
In a system that uses bit-mapped lockout, the card number is the configurable offset group of digits (4-8) of the section of the card that identifies the customer. The number of digits used is configured in SYS_PAR.
Page 13-2 MDE-4871 CFN III Manager’s Manual for Windows® XP Embedded - Version 3.6 · August 2010
Lockouts Proprietary Cards
If your site has bit-mapped lockout, you do not require to type leading zeros when you enter a card number. For example, to lock out card number 0056, just type 56.
How to Use Card RangesIf your system uses bit-mapped lockout, you can specify a range of cards to be acted on by the commands LOCK CARD, UNLOCK CARD. Use a hyphen (-) between two card numbers to specify the range of cards to be acted on. For example, 56000-56999 specifies all cards with card numbers 56000 through 56999. When using CHECK CARD, specifying 100-200 checks 100 cards.
Limited Lockout
Note: Only an administrator can use the limited lockout feature.
Limited lockout lets you lock out privately issued cards and other cards as well. It is more flexible than bit-mapped lockout, but it takes up more memory.
For a system that uses limited lockout, the account number includes all the fields on the card that identify the customer. To lock out or unlock a card, you must enter the entire account number, and the fields must be in the order they appear on the card. The order in which the fields appear on the transaction printout may not be the same as the order in which they appear on the card.
For example, if your system uses Proprietary Cards with a five-digit card number, a 10-digit account number, and a four-digit vehicle number, the number used for lockout is a 19-digit number.
For bank cards, the account number is the entire account number as defined by the ABA track II standards.
If your site has limited lockout you must type the leading zeros of a number, and you must type a C before the number of a privately issued card. For example, to lock out or unlock privately issued card number 0056300044000121132, use the LOCK CARD or UNLOCK CARD command and type C0056300044000121132. To lock out or unlock bank card number 4842150958999, type the appropriate command and 4842150958999.
How to Use WildcardsIf your system uses limited lockout, you can use wildcards in the account numbers you specify for the commands LOCK CARD, UNLOCK CARD, and CHECK CARD. Use a period (.) in the account number to denote a wildcard. The period matches any digit at that position. More than one period can be used in an account number.
For example, if you use LOCK CARD to lock out number ...464..., all cards with nine digit account numbers, whose middle three digits are 464, will be locked out. Similarly,
• ...........9 specifies all 12-digit account numbers that end in 9.• 484215095899. specifies account numbers 4842150958990 through 4842150958999.
MDE-4871 CFN III Manager’s Manual for Windows® XP Embedded - Version 3.6 · August 2010 Page 13-3
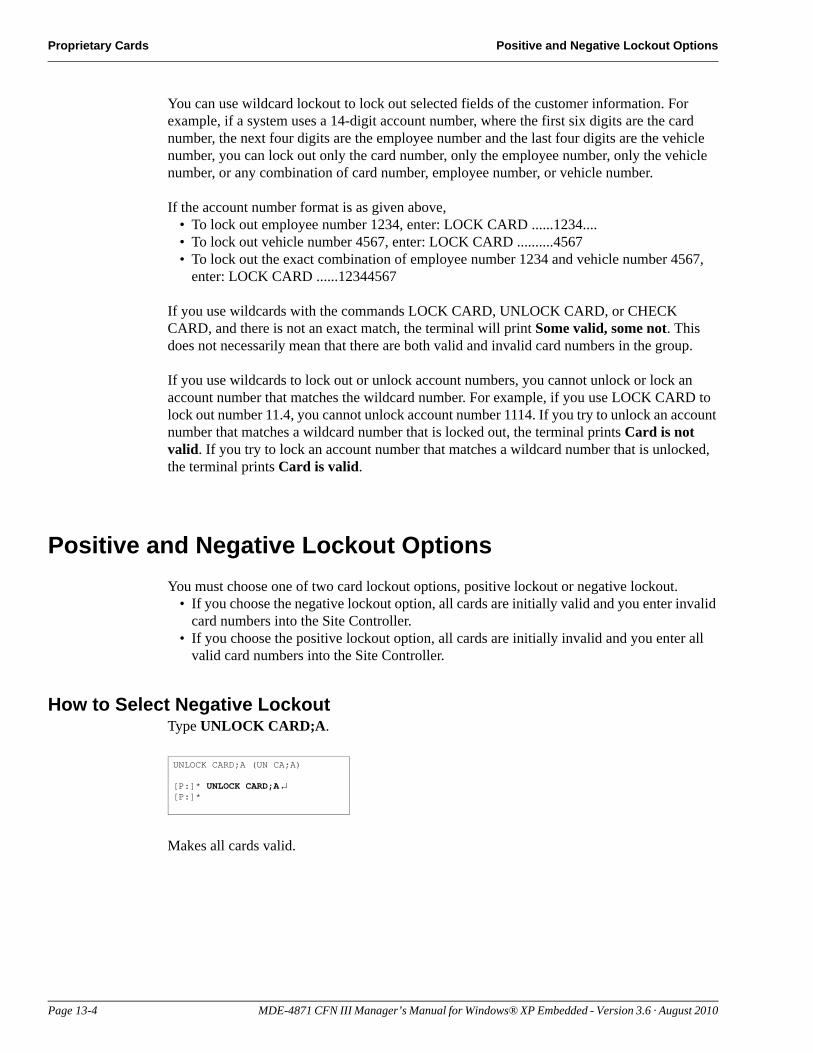
Proprietary Cards Positive and Negative Lockout Options
You can use wildcard lockout to lock out selected fields of the customer information. For example, if a system uses a 14-digit account number, where the first six digits are the card number, the next four digits are the employee number and the last four digits are the vehicle number, you can lock out only the card number, only the employee number, only the vehicle number, or any combination of card number, employee number, or vehicle number.
If the account number format is as given above,• To lock out employee number 1234, enter: LOCK CARD ......1234....• To lock out vehicle number 4567, enter: LOCK CARD ..........4567• To lock out the exact combination of employee number 1234 and vehicle number 4567,
enter: LOCK CARD ......12344567
If you use wildcards with the commands LOCK CARD, UNLOCK CARD, or CHECK CARD, and there is not an exact match, the terminal will print Some valid, some not. This does not necessarily mean that there are both valid and invalid card numbers in the group.
If you use wildcards to lock out or unlock account numbers, you cannot unlock or lock an account number that matches the wildcard number. For example, if you use LOCK CARD to lock out number 11.4, you cannot unlock account number 1114. If you try to unlock an account number that matches a wildcard number that is locked out, the terminal prints Card is not valid. If you try to lock an account number that matches a wildcard number that is unlocked, the terminal prints Card is valid.
Positive and Negative Lockout OptionsYou must choose one of two card lockout options, positive lockout or negative lockout.
• If you choose the negative lockout option, all cards are initially valid and you enter invalid card numbers into the Site Controller.
• If you choose the positive lockout option, all cards are initially invalid and you enter all valid card numbers into the Site Controller.
How to Select Negative LockoutType UNLOCK CARD;A.
UNLOCK CARD;A (UN CA;A)
[P:]* UNLOCK CARD;A ↵[P:]*
Makes all cards valid.
Page 13-4 MDE-4871 CFN III Manager’s Manual for Windows® XP Embedded - Version 3.6 · August 2010
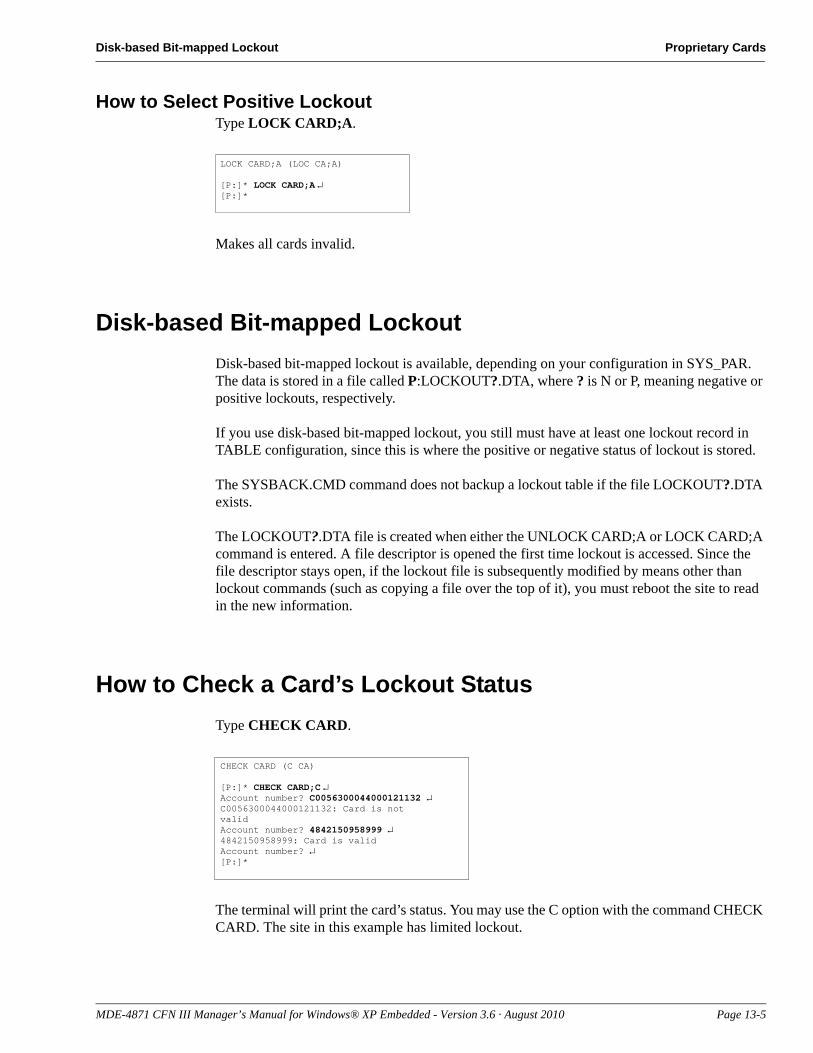
Disk-based Bit-mapped Lockout Proprietary Cards
How to Select Positive LockoutType LOCK CARD;A.
LOCK CARD;A (LOC CA;A)
[P:]* LOCK CARD;A ↵[P:]*
Makes all cards invalid.
Disk-based Bit-mapped LockoutDisk-based bit-mapped lockout is available, depending on your configuration in SYS_PAR. The data is stored in a file called P:LOCKOUT?.DTA, where ? is N or P, meaning negative or positive lockouts, respectively.
If you use disk-based bit-mapped lockout, you still must have at least one lockout record in TABLE configuration, since this is where the positive or negative status of lockout is stored.
The SYSBACK.CMD command does not backup a lockout table if the file LOCKOUT?.DTA exists.
The LOCKOUT?.DTA file is created when either the UNLOCK CARD;A or LOCK CARD;A command is entered. A file descriptor is opened the first time lockout is accessed. Since the file descriptor stays open, if the lockout file is subsequently modified by means other than lockout commands (such as copying a file over the top of it), you must reboot the site to read in the new information.
How to Check a Card’s Lockout StatusType CHECK CARD.
CHECK CARD (C CA)
[P:]* CHECK CARD;C ↵Account number? C0056300044000121132 ↵C0056300044000121132: Card is not validAccount number? 4842150958999 ↵4842150958999: Card is validAccount number? ↵[P:]*
The terminal will print the card’s status. You may use the C option with the command CHECK CARD. The site in this example has limited lockout.
MDE-4871 CFN III Manager’s Manual for Windows® XP Embedded - Version 3.6 · August 2010 Page 13-5
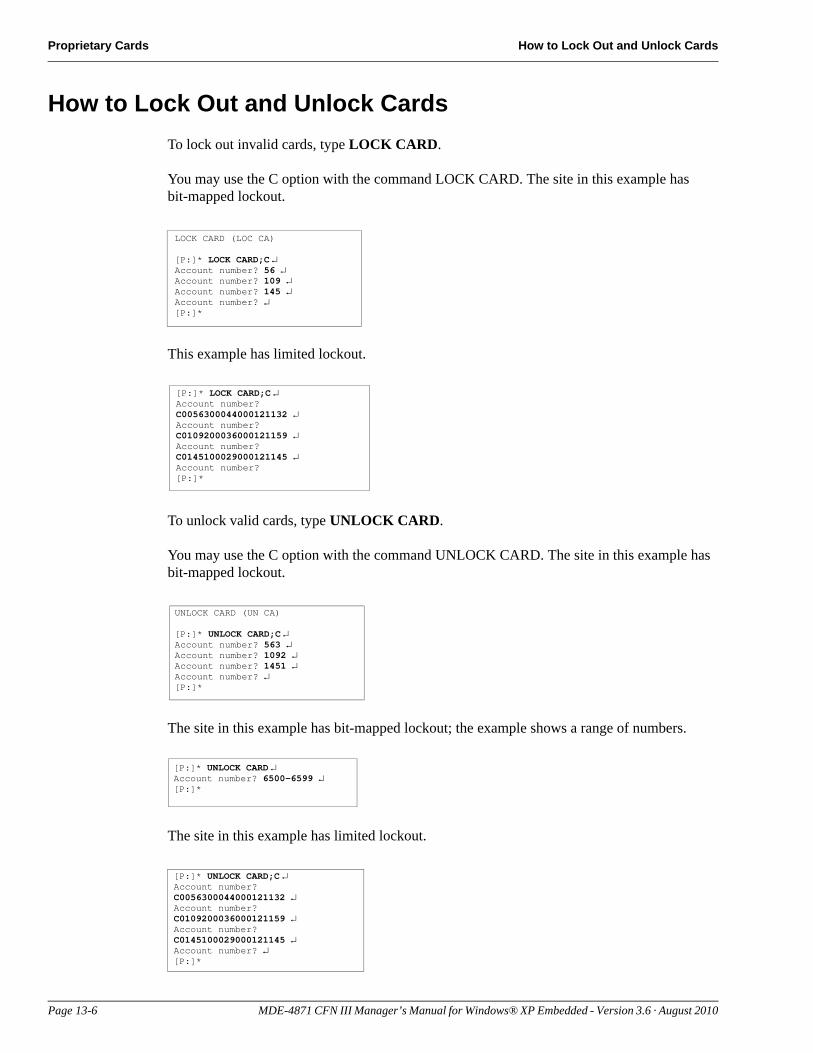
Proprietary Cards How to Lock Out and Unlock Cards
How to Lock Out and Unlock CardsTo lock out invalid cards, type LOCK CARD.
LOCK CARD (LOC CA)
[P:]* LOCK CARD;C ↵Account number? 56 ↵Account number? 109 ↵ Account number? 145 ↵Account number? ↵[P:]*
[P:]* LOCK CARD;C ↵Account number? C0056300044000121132 ↵Account number? C0109200036000121159 ↵ Account number? C0145100029000121145 ↵Account number? [P:]*
UNLOCK CARD (UN CA)
[P:]* UNLOCK CARD;C ↵Account number? 563 ↵Account number? 1092 ↵ Account number? 1451 ↵Account number? ↵[P:]*
[P:]* UNLOCK CARD ↵Account number? 6500-6599 ↵[P:]*
[P:]* UNLOCK CARD;C ↵Account number? C0056300044000121132 ↵Account number? C0109200036000121159 ↵ Account number? C0145100029000121145 ↵Account number? ↵[P:]*
You may use the C option with the command LOCK CARD. The site in this example has bit-mapped lockout.
This example has limited lockout.
To unlock valid cards, type UNLOCK CARD.
You may use the C option with the command UNLOCK CARD. The site in this example has bit-mapped lockout.
The site in this example has bit-mapped lockout; the example shows a range of numbers.
The site in this example has limited lockout.
Page 13-6 MDE-4871 CFN III Manager’s Manual for Windows® XP Embedded - Version 3.6 · August 2010
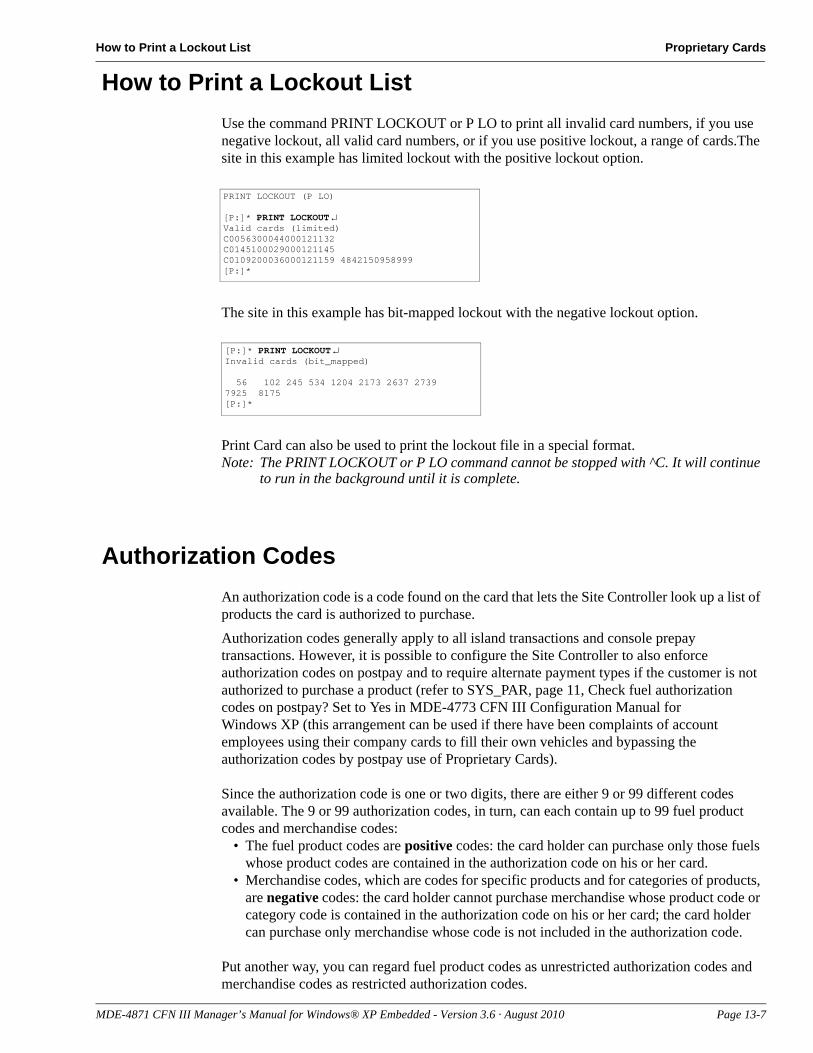
How to Print a Lockout List Proprietary Cards
How to Print a Lockout ListUse the command PRINT LOCKOUT or P LO to print all invalid card numbers, if you use negative lockout, all valid card numbers, or if you use positive lockout, a range of cards.The site in this example has limited lockout with the positive lockout option.
PRINT LOCKOUT (P LO)
[P:]* PRINT LOCKOUT ↵Valid cards (limited)C0056300044000121132C0145100029000121145C0109200036000121159 4842150958999[P:]*
[P:]* PRINT LOCKOUT ↵Invalid cards (bit_mapped)
56 102 245 534 1204 2173 2637 27397925 8175[P:]*
The site in this example has bit-mapped lockout with the negative lockout option.
Print Card can also be used to print the lockout file in a special format.Note: The PRINT LOCKOUT or P LO command cannot be stopped with ^C. It will continue
to run in the background until it is complete.
Authorization CodesAn authorization code is a code found on the card that lets the Site Controller look up a list of products the card is authorized to purchase.Authorization codes generally apply to all island transactions and console prepay transactions. However, it is possible to configure the Site Controller to also enforce authorization codes on postpay and to require alternate payment types if the customer is not authorized to purchase a product (refer to SYS_PAR, page 11, Check fuel authorization codes on postpay? Set to Yes in MDE-4773 CFN III Configuration Manual for Windows XP (this arrangement can be used if there have been complaints of account employees using their company cards to fill their own vehicles and bypassing the authorization codes by postpay use of Proprietary Cards).
Since the authorization code is one or two digits, there are either 9 or 99 different codes available. The 9 or 99 authorization codes, in turn, can each contain up to 99 fuel product codes and merchandise codes:
• The fuel product codes are positive codes: the card holder can purchase only those fuels whose product codes are contained in the authorization code on his or her card.
• Merchandise codes, which are codes for specific products and for categories of products, are negative codes: the card holder cannot purchase merchandise whose product code or category code is contained in the authorization code on his or her card; the card holder can purchase only merchandise whose code is not included in the authorization code.
Put another way, you can regard fuel product codes as unrestricted authorization codes and merchandise codes as restricted authorization codes.
MDE-4871 CFN III Manager’s Manual for Windows® XP Embedded - Version 3.6 · August 2010 Page 13-7
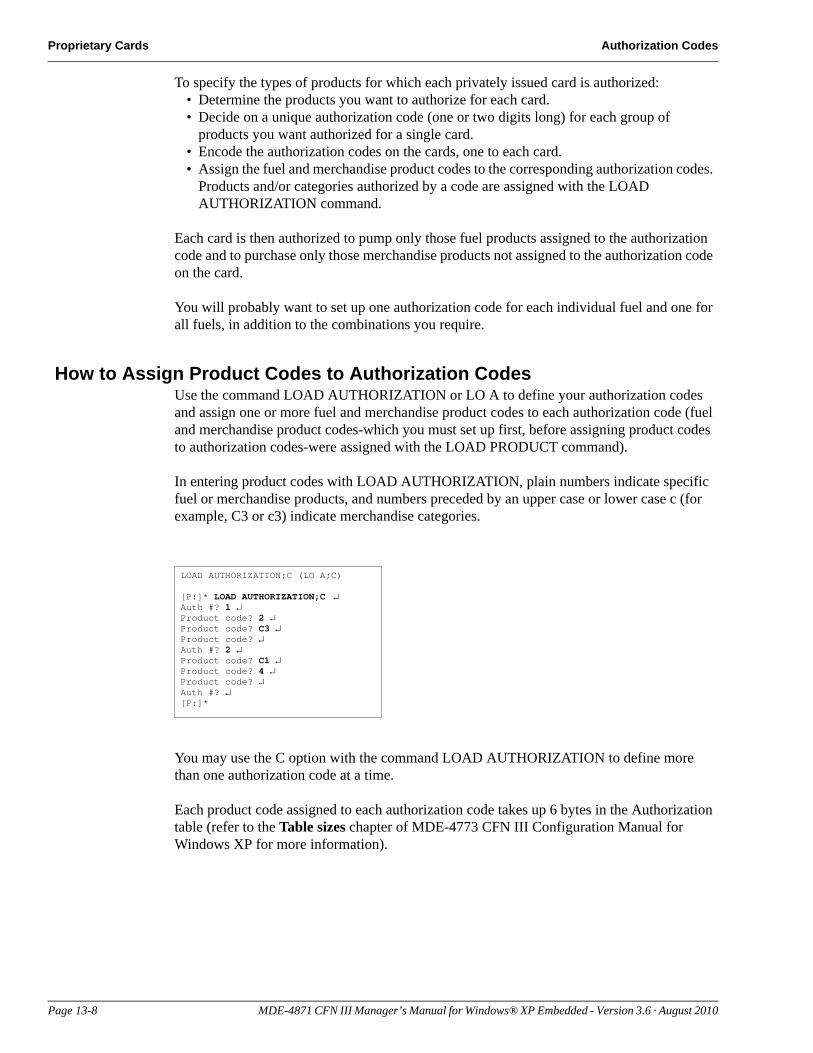
Proprietary Cards Authorization Codes
To specify the types of products for which each privately issued card is authorized:• Determine the products you want to authorize for each card.• Decide on a unique authorization code (one or two digits long) for each group of
products you want authorized for a single card.• Encode the authorization codes on the cards, one to each card.• Assign the fuel and merchandise product codes to the corresponding authorization codes.
Products and/or categories authorized by a code are assigned with the LOAD AUTHORIZATION command.
Each card is then authorized to pump only those fuel products assigned to the authorization code and to purchase only those merchandise products not assigned to the authorization code on the card.
You will probably want to set up one authorization code for each individual fuel and one for all fuels, in addition to the combinations you require.
How to Assign Product Codes to Authorization CodesUse the command LOAD AUTHORIZATION or LO A to define your authorization codes and assign one or more fuel and merchandise product codes to each authorization code (fuel and merchandise product codes-which you must set up first, before assigning product codes to authorization codes-were assigned with the LOAD PRODUCT command).
In entering product codes with LOAD AUTHORIZATION, plain numbers indicate specific fuel or merchandise products, and numbers preceded by an upper case or lower case c (for example, C3 or c3) indicate merchandise categories.
You may use the C option with the command LOAD AUTHORIZATION to define more than one authorization code at a time.
Each product code assigned to each authorization code takes up 6 bytes in the Authorization table (refer to the Table sizes chapter of MDE-4773 CFN III Configuration Manual for Windows XP for more information).
LOAD AUTHORIZATION;C (LO A;C)
[P:]* LOAD AUTHORIZATION;C ↵Auth #? 1 ↵Product code? 2 ↵Product code? C3 ↵Product code? ↵Auth #? 2 ↵Product code? C1 ↵Product code? 4 ↵Product code? ↵Auth #? ↵[P:]*
Page 13-8 MDE-4871 CFN III Manager’s Manual for Windows® XP Embedded - Version 3.6 · August 2010
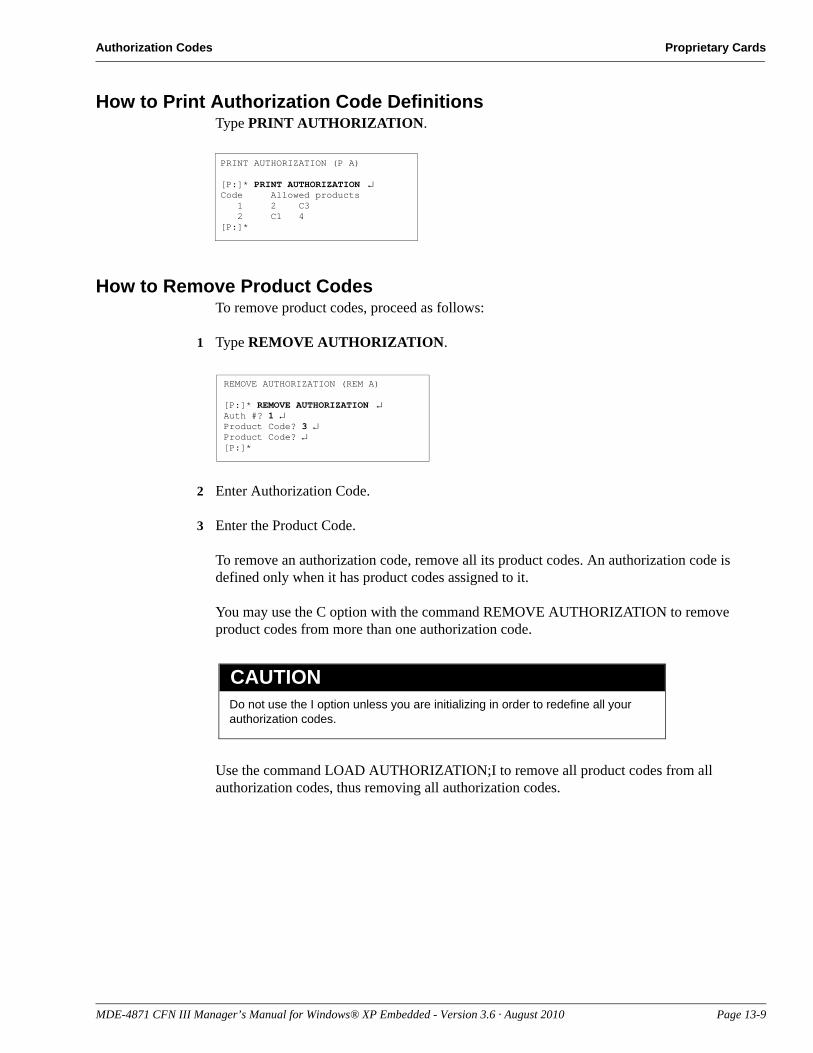
Authorization Codes Proprietary Cards
How to Print Authorization Code DefinitionsType PRINT AUTHORIZATION.
PRINT AUTHORIZATION (P A)
[P:]* PRINT AUTHORIZATION ↵Code Allowed products 1 2 C3 2 C1 4[P:]*
How to Remove Product CodesTo remove product codes, proceed as follows:
1 Type REMOVE AUTHORIZATION.
REMOVE AUTHORIZATION (REM A)
[P:]* REMOVE AUTHORIZATION ↵Auth #? 1 ↵Product Code? 3 ↵Product Code? ↵[P:]*
2 Enter Authorization Code.
3 Enter the Product Code.
Do not use the I option unless you are initializing in order to redefine all your authorization codes.
CAUTION
To remove an authorization code, remove all its product codes. An authorization code is defined only when it has product codes assigned to it.
You may use the C option with the command REMOVE AUTHORIZATION to remove product codes from more than one authorization code.
Use the command LOAD AUTHORIZATION;I to remove all product codes from all authorization codes, thus removing all authorization codes.
MDE-4871 CFN III Manager’s Manual for Windows® XP Embedded - Version 3.6 · August 2010 Page 13-9
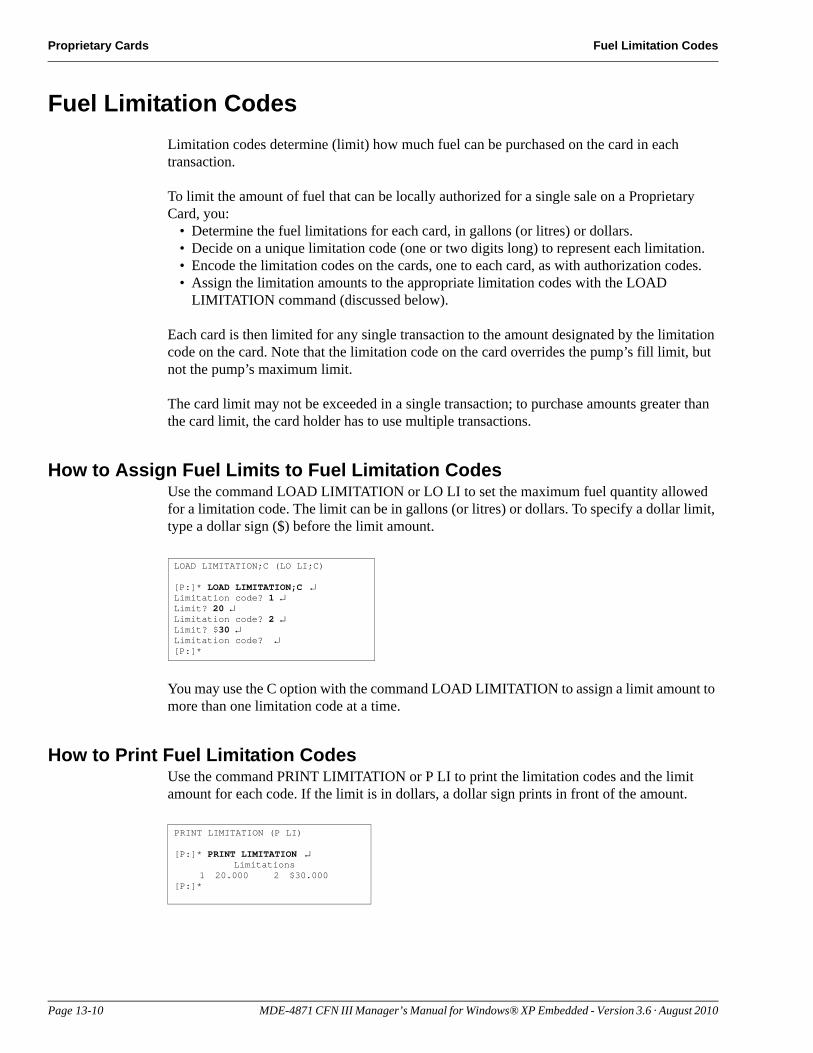
Proprietary Cards Fuel Limitation Codes
Fuel Limitation CodesLimitation codes determine (limit) how much fuel can be purchased on the card in each transaction.
To limit the amount of fuel that can be locally authorized for a single sale on a Proprietary Card, you:
• Determine the fuel limitations for each card, in gallons (or litres) or dollars.• Decide on a unique limitation code (one or two digits long) to represent each limitation.• Encode the limitation codes on the cards, one to each card, as with authorization codes.• Assign the limitation amounts to the appropriate limitation codes with the LOAD
LIMITATION command (discussed below).
Each card is then limited for any single transaction to the amount designated by the limitation code on the card. Note that the limitation code on the card overrides the pump’s fill limit, but not the pump’s maximum limit.
The card limit may not be exceeded in a single transaction; to purchase amounts greater than the card limit, the card holder has to use multiple transactions.
How to Assign Fuel Limits to Fuel Limitation CodesUse the command LOAD LIMITATION or LO LI to set the maximum fuel quantity allowed for a limitation code. The limit can be in gallons (or litres) or dollars. To specify a dollar limit, type a dollar sign ($) before the limit amount.
LOAD LIMITATION;C (LO LI;C)
[P:]* LOAD LIMITATION;C ↵Limitation code? 1 ↵Limit? 20 ↵Limitation code? 2 ↵Limit? $30 ↵Limitation code? ↵[P:]*
You may use the C option with the command LOAD LIMITATION to assign a limit amount to more than one limitation code at a time.
How to Print Fuel Limitation CodesUse the command PRINT LIMITATION or P LI to print the limitation codes and the limit amount for each code. If the limit is in dollars, a dollar sign prints in front of the amount.
PRINT LIMITATION (P LI)
[P:]* PRINT LIMITATION ↵Limitations
1 20.000 2 $30.000[P:]*
Page 13-10 MDE-4871 CFN III Manager’s Manual for Windows® XP Embedded - Version 3.6 · August 2010
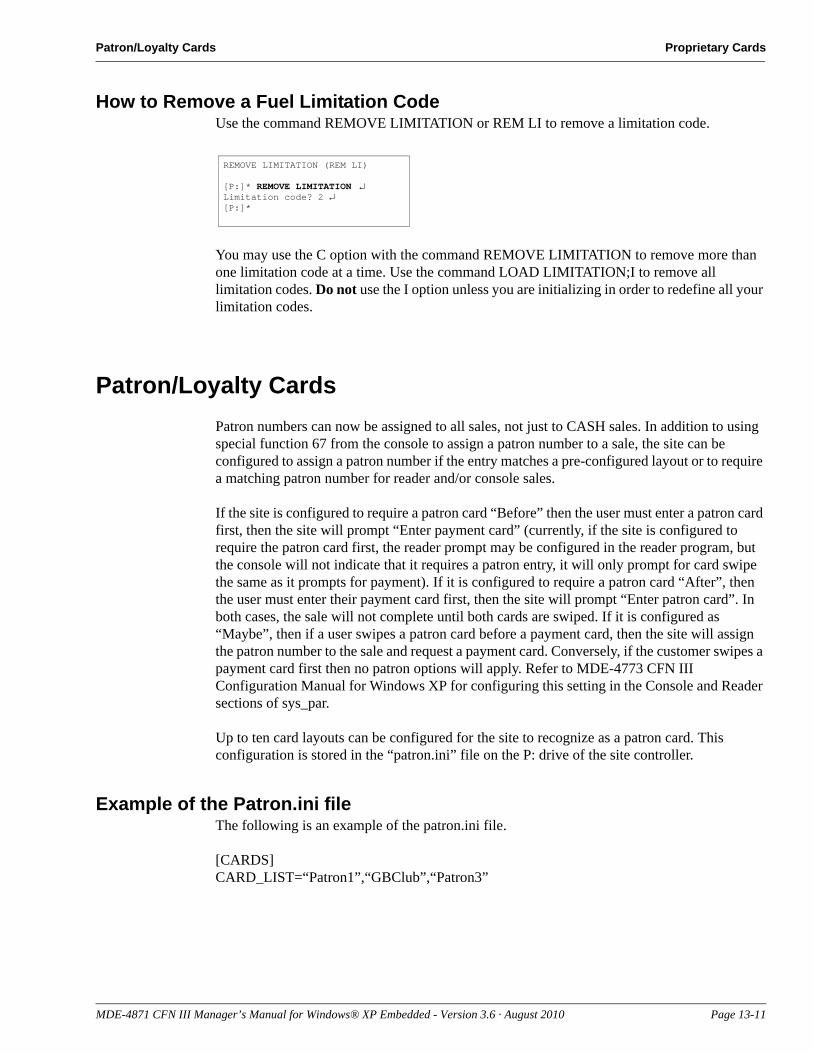
Patron/Loyalty Cards Proprietary Cards
How to Remove a Fuel Limitation CodeUse the command REMOVE LIMITATION or REM LI to remove a limitation code.
REMOVE LIMITATION (REM LI)
[P:]* REMOVE LIMITATION ↵Limitation code? 2 ↵[P:]*
You may use the C option with the command REMOVE LIMITATION to remove more than one limitation code at a time. Use the command LOAD LIMITATION;I to remove all limitation codes. Do not use the I option unless you are initializing in order to redefine all your limitation codes.
Patron/Loyalty CardsPatron numbers can now be assigned to all sales, not just to CASH sales. In addition to using special function 67 from the console to assign a patron number to a sale, the site can be configured to assign a patron number if the entry matches a pre-configured layout or to require a matching patron number for reader and/or console sales.
If the site is configured to require a patron card “Before” then the user must enter a patron card first, then the site will prompt “Enter payment card” (currently, if the site is configured to require the patron card first, the reader prompt may be configured in the reader program, but the console will not indicate that it requires a patron entry, it will only prompt for card swipe the same as it prompts for payment). If it is configured to require a patron card “After”, then the user must enter their payment card first, then the site will prompt “Enter patron card”. In both cases, the sale will not complete until both cards are swiped. If it is configured as “Maybe”, then if a user swipes a patron card before a payment card, then the site will assign the patron number to the sale and request a payment card. Conversely, if the customer swipes a payment card first then no patron options will apply. Refer to MDE-4773 CFN III Configuration Manual for Windows XP for configuring this setting in the Console and Reader sections of sys_par.
Up to ten card layouts can be configured for the site to recognize as a patron card. This configuration is stored in the “patron.ini” file on the P: drive of the site controller.
Example of the Patron.ini fileThe following is an example of the patron.ini file.
[CARDS]CARD_LIST=“Patron1”,“GBClub”,“Patron3”
MDE-4871 CFN III Manager’s Manual for Windows® XP Embedded - Version 3.6 · August 2010 Page 13-11
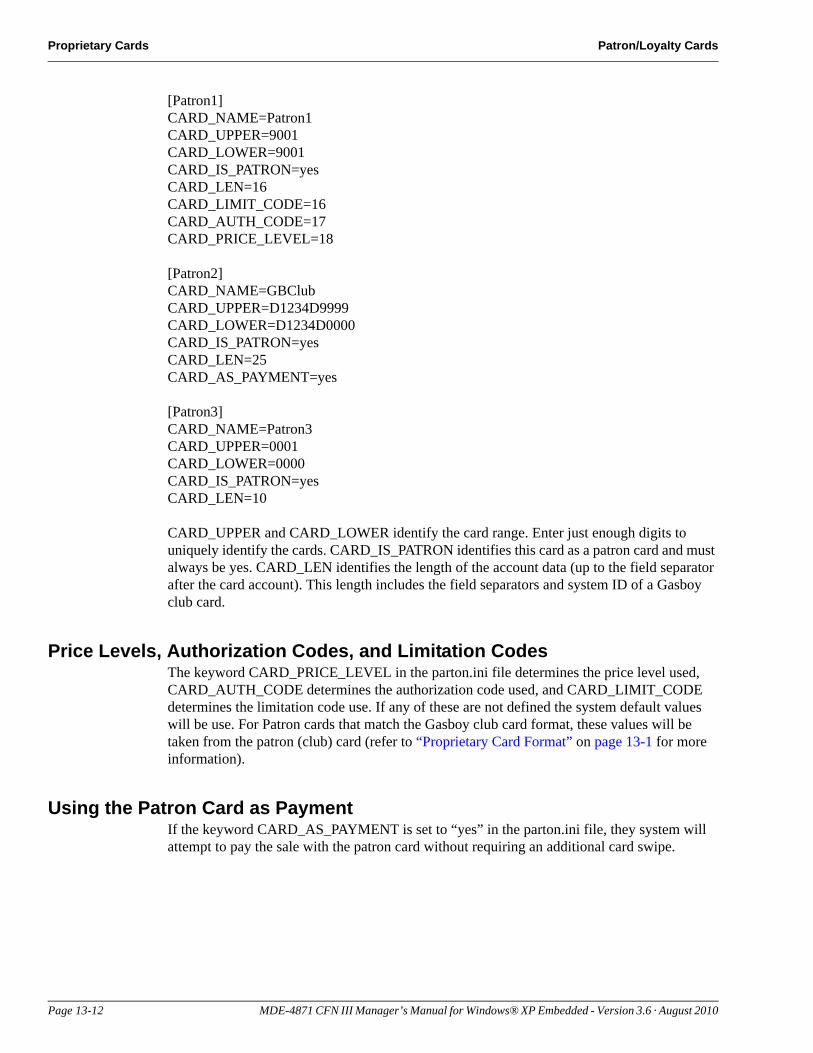
Proprietary Cards Patron/Loyalty Cards
[Patron1]CARD_NAME=Patron1CARD_UPPER=9001CARD_LOWER=9001CARD_IS_PATRON=yesCARD_LEN=16CARD_LIMIT_CODE=16CARD_AUTH_CODE=17CARD_PRICE_LEVEL=18
[Patron2]CARD_NAME=GBClubCARD_UPPER=D1234D9999CARD_LOWER=D1234D0000CARD_IS_PATRON=yesCARD_LEN=25CARD_AS_PAYMENT=yes
[Patron3]CARD_NAME=Patron3CARD_UPPER=0001CARD_LOWER=0000CARD_IS_PATRON=yesCARD_LEN=10
CARD_UPPER and CARD_LOWER identify the card range. Enter just enough digits to uniquely identify the cards. CARD_IS_PATRON identifies this card as a patron card and must always be yes. CARD_LEN identifies the length of the account data (up to the field separator after the card account). This length includes the field separators and system ID of a Gasboy club card.
Price Levels, Authorization Codes, and Limitation CodesThe keyword CARD_PRICE_LEVEL in the parton.ini file determines the price level used, CARD_AUTH_CODE determines the authorization code used, and CARD_LIMIT_CODE determines the limitation code use. If any of these are not defined the system default values will be use. For Patron cards that match the Gasboy club card format, these values will be taken from the patron (club) card (refer to “Proprietary Card Format” on page 13-1 for more information).
Using the Patron Card as PaymentIf the keyword CARD_AS_PAYMENT is set to “yes” in the parton.ini file, they system will attempt to pay the sale with the patron card without requiring an additional card swipe.
Page 13-12 MDE-4871 CFN III Manager’s Manual for Windows® XP Embedded - Version 3.6 · August 2010
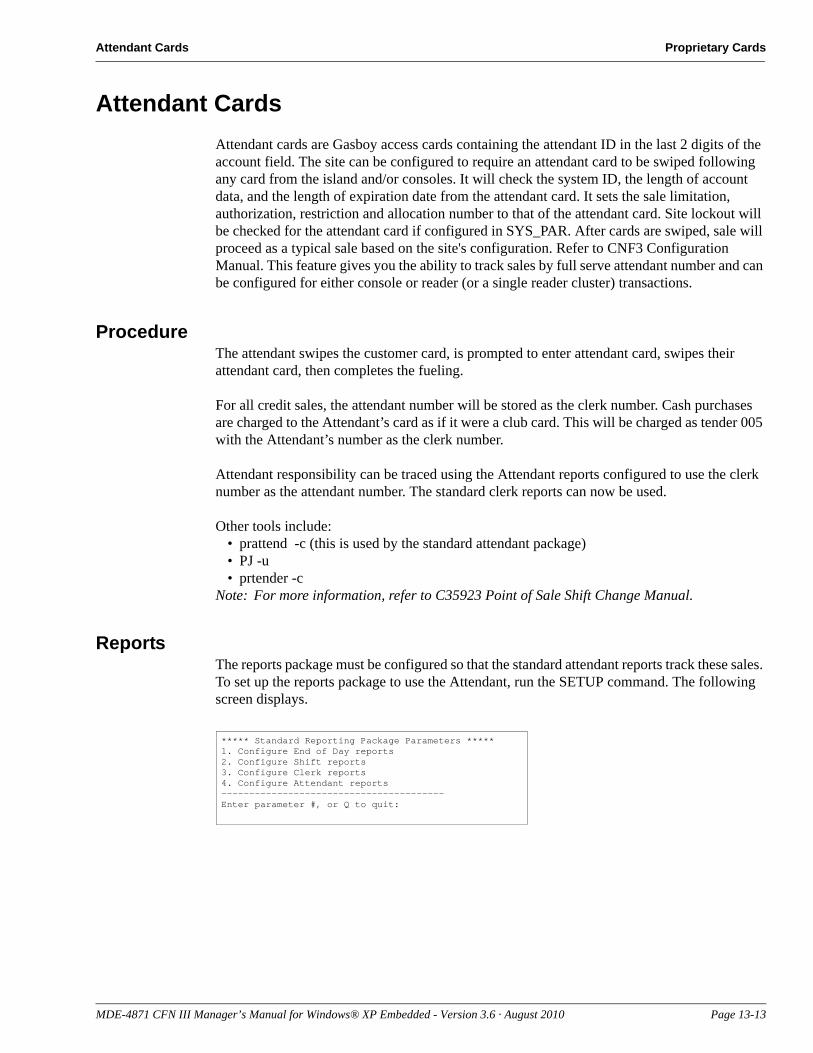
Attendant Cards Proprietary Cards
Attendant CardsAttendant cards are Gasboy access cards containing the attendant ID in the last 2 digits of the account field. The site can be configured to require an attendant card to be swiped following any card from the island and/or consoles. It will check the system ID, the length of account data, and the length of expiration date from the attendant card. It sets the sale limitation, authorization, restriction and allocation number to that of the attendant card. Site lockout will be checked for the attendant card if configured in SYS_PAR. After cards are swiped, sale will proceed as a typical sale based on the site's configuration. Refer to CNF3 Configuration Manual. This feature gives you the ability to track sales by full serve attendant number and can be configured for either console or reader (or a single reader cluster) transactions.
ProcedureThe attendant swipes the customer card, is prompted to enter attendant card, swipes their attendant card, then completes the fueling.
For all credit sales, the attendant number will be stored as the clerk number. Cash purchases are charged to the Attendant’s card as if it were a club card. This will be charged as tender 005 with the Attendant’s number as the clerk number.
Attendant responsibility can be traced using the Attendant reports configured to use the clerk number as the attendant number. The standard clerk reports can now be used.
Other tools include:• prattend -c (this is used by the standard attendant package)• PJ -u• prtender -c
Note: For more information, refer to C35923 Point of Sale Shift Change Manual.
ReportsThe reports package must be configured so that the standard attendant reports track these sales. To set up the reports package to use the Attendant, run the SETUP command. The following screen displays.
***** Standard Reporting Package Parameters *****1. Configure End of Day reports2. Configure Shift reports3. Configure Clerk reports4. Configure Attendant reports----------------------------------------Enter parameter #, or Q to quit:
MDE-4871 CFN III Manager’s Manual for Windows® XP Embedded - Version 3.6 · August 2010 Page 13-13
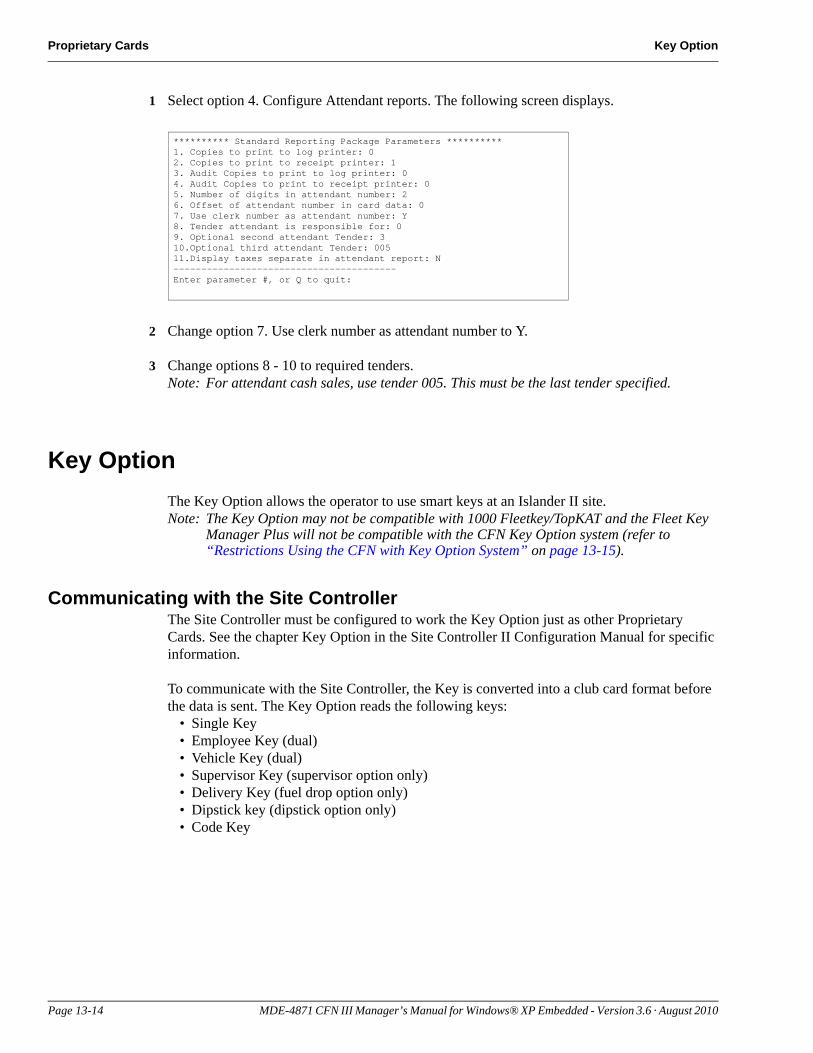
Proprietary Cards Key Option
1 Select option 4. Configure Attendant reports. The following screen displays.
********** Standard Reporting Package Parameters **********1. Copies to print to log printer: 02. Copies to print to receipt printer: 13. Audit Copies to print to log printer: 04. Audit Copies to print to receipt printer: 05. Number of digits in attendant number: 26. Offset of attendant number in card data: 07. Use clerk number as attendant number: Y8. Tender attendant is responsible for: 09. Optional second attendant Tender: 310.Optional third attendant Tender: 00511.Display taxes separate in attendant report: N----------------------------------------Enter parameter #, or Q to quit:
2 Change option 7. Use clerk number as attendant number to Y.
3 Change options 8 - 10 to required tenders.Note: For attendant cash sales, use tender 005. This must be the last tender specified.
Key OptionThe Key Option allows the operator to use smart keys at an Islander II site.Note: The Key Option may not be compatible with 1000 Fleetkey/TopKAT and the Fleet Key
Manager Plus will not be compatible with the CFN Key Option system (refer to “Restrictions Using the CFN with Key Option System” on page 13-15).
Communicating with the Site ControllerThe Site Controller must be configured to work the Key Option just as other Proprietary Cards. See the chapter Key Option in the Site Controller II Configuration Manual for specific information.
To communicate with the Site Controller, the Key is converted into a club card format before the data is sent. The Key Option reads the following keys:
• Single Key• Employee Key (dual)• Vehicle Key (dual)• Supervisor Key (supervisor option only)• Delivery Key (fuel drop option only)• Dipstick key (dipstick option only)• Code Key
Page 13-14 MDE-4871 CFN III Manager’s Manual for Windows® XP Embedded - Version 3.6 · August 2010
Key Option Proprietary Cards
Restrictions Using the CFN with Key Option SystemThe restrictions in using the CFN with key option system are listed below:
1 You cannot use a 1000 FleetKey key that uses PINs in a CFN system and vice-versa. On a 1000 FleetKey system, the PIN number is encrypted. On a CFN Key Option the PIN number is decrypted.
2 In a CFN with Key Option system, if you use a code key, the odometer is not stored on the key (for more information, refer to “Lookup Program” on page 13-1).
3 In a CFN w/Key Option system, if you use a code key with PIN loaded in the Lookup Table, verification will be done by the Site Controller (for more information, refer to “Lookup Program” on page 13-1).
4 The following Key data will not be used on the CFN Key Option system and their values will be ignored:
• Previous Odometer (old location)• Last Odometer (old location) • Vehicle Class• Maintenance A Odom• Maintenance A Date• Maintenance B Odom• Maintenance B Date• Maintenance C Odom• Maintenance C Date
5 CFN w/Key Option system single, dual and supervisor key limitation codes, authorization codes, price level and restriction codes are restricted as follows:
• Cannot be omitted.• Digits must be set to one for each. • Offsets at the Site Controller must be set to the following:
Limitation code = 0Authorization code = 1Price Level = 2Restrictions = 3
• Dollar amount restriction code is not available.
6 CFN w/Key Option system single, dual, supervisor, dipstick and delivery key Expiration Dates are restricted as follows:
• Cannot be omitted.• Digits must be set to four.
7 CFN w/Key Option system allows a Key/Card combination for dual cards with the following restrictions:
• The key/card combinations is limited to a vehicle key and an employee card.• The check digit on the vehicle key cannot include a pin check.• If the check digit on the employee card includes a pin check, the pin verification is done
by the Site controller.
8 CFN w/FleetKey system Key ID characters can only be numbers, field separators and Supervisor characters. The Key Option system allows them to be alpha characters, as well.
MDE-4871 CFN III Manager’s Manual for Windows® XP Embedded - Version 3.6 · August 2010 Page 13-15
Proprietary Cards Fueler ID - Fleet Packages Only
9 CFN w/Key Option system account number on a key is 1 to 19 of the 20 key ID characters.
10 CFN w/Key Option keys may not be compatible with 1000 FleetKey/TopKAT keys. They may be if encoded under the 1000 FleetKey/TopKAT mode and no PIN.
11 The CFN w/Key Option system does not use key numbers.The KE200 Key Encoder in the CFN mode sets key numbers to a default value of 9999.
12 The Key Option Manager Plus will not be compatible with the CFN w/Key Option system.
13 TopKAT keys are not compatible with the CFN w/Key Option system.
Fueler ID - Fleet Packages OnlyFueler ID cards are now supported. For the card to be accepted, the system ID and site ID must be correct for that site. The Fueler ID is set by either swiping a card or entering the ID in the FUELER.BIN program. From then on the Fuel Point® and island reader transactions will be marked in the disk journal with the clerk ID as the fueler ID. All pumps in the cluster assigned to the reader the card was swiped on belong to that fueler.
Assigning a Fueler ID to a ClusterUse the program FUELER.BIN to set the fueler ID for a cluster. The syntax is:fueler [<cluster> <fueler-ID>]
If the arguments are not provided, the current state of all fuelers is shown. Currently only clusters 1-9 can have a fueler. Entry of a Fuel ID card generates a disk journal event type 197 with the first two characters of the text field containing the cluster number.
For reference, the Fueler ID card format is:.xxxxxx.ssssssii.yymm2
Symbols Description. field separator
xxxxxx system ID
ssssss site ID
ii fueler ID
Page 13-16 MDE-4871 CFN III Manager’s Manual for Windows® XP Embedded - Version 3.6 · August 2010

Definitions Lookup Program
14 – Lookup Program
The Lookup program is part of the Fleet Options package (which is briefly described in “Site Controller III Optional Packages” on page 28-1), and it requires version 3.0 or later of the Site Controller software.
The Lookup program lets you quickly set up accounts for customers, using these types of cards:
• code card-which can also be cardless, when a user manually enters the account number at a keypad. In this manual, discussions of code cards must be taken as also referring to cardless accounts.
• club card (private-issue)• bank card (credit or debit card)
Under the Lookup program you do not have to encode restrictions on the cards. The restrictions and customer information are contained in records in a lookup file.
Before the Lookup program, all the restrictions-such as gallon limit per purchase or types of merchandise that could be bought-on a club card had to be encoded on the card itself. Now, you can make up a group of numbered cards, say 990-999, in advance, and quickly pass them out to your next ten club card customers. Then, in the lookup file under records 990, 991, and so on, you enter the restrictions for each card.
If the restrictions subsequently change (for example, a company decides to let its employees purchase 25 gallons at a time, instead of only 10) you no longer have to make up and issue new cards. Instead, you quickly and easily change the lookup file.
Also, you do not have to create a lookup file record for each card. You can, for instance, use as a record’s lookup number the field in a card’s number that identifies a company’s account, and keep all cards for that company in one record. In other words, if you have a thousand cards, you do not have to have a thousand records as long as some cards have a field in common.
DefinitionsThe Lookup program contains a series of menus. This section defines the prompts and fields used on the menus.
Lookup number - the number assigned to a card or account. This number can be up to 19 digits (numeric characters only; alphabetic characters are not allowed). Lookup type - the type of the lookup number.
There are three lookup types that apply to code cards:N = this type of lookup matches the entire number on the code card (or cardless entry). Applies only to code cards or manually entered code numbers.
MDE-4871 CFN III Manager’s Manual for Windows® XP Embedded - Version 3.6 · August 2010 Page 14-1
Lookup Program Definitions
P = this type of lookup matches the first part of the number on the card (P stands for the primary or first part; the length of the primary part is set in the configuration menu). Applies only to code cards or manually entered code numbers.S = this type of lookup matches the last part of the number on the card (S stands for the secondary or last part of the code that comes after the primary part). Applies only to code cards or manually entered code numbers.
There are four types that apply to club cards:C = club-card type. This type uses the entire number on a club card (up to a maximum of 19 digits).1 = this type of lookup matches field 1 of a club card. Applies only to club cards. 2 = this type of lookup matches field 2 of a club card. Applies only to club cards.3 = this type of lookup matches field 3 of a club card. Applies only to club cards.
There is one type that applies to bank cards:B = bank-card type, including credit and Debit Cards.
Each lookup number is not necessarily unique because two or more lookup types could have the same lookup number, especially when P, S, 1, 2, or 3 is the lookup type. However, each combination of lookup number and lookup type is unique. For example, there could be two lookups 444, one of type S and another of type C, but there can be only one 444S or one 444C.
Tender type - usually 0. The choices are: 0=Club, 1=Checking, 2=Savings, 3=Credit, SPACEBAR=User-entered (to be entered by customer)Tender subtype - usually 0. If the tender type is club (0) or credit (3), the tender subtype is a way of specifying which type of club or credit account is used, according to the table on the next page. The first digit in each number is the tender type and the other two digits are the tender subtype:
Code Tender Code Tender000 Gasboy club card 332 TesoroSM
001 Country EnergySM regional club card 333 Sinclair® Fleet
002 Country Energy local club card 334 Gascard
005 Attendant/Access card 335 Amerada HessSM
100 Debit checking 336 Voyager
200 Debit savings 337 JCBSM
300 Bank credit card 338 Gulf®
301 Hand Authorized credit card 339 FuelmanSM
302 Wright ExpressSM card 340 IAES
303 American Express® card 341 Country Mark
304 VISA card 342 Southern States
305 MasterCard 343 Amoco® Multi card
306 DiscoverSM card 344 Amoco Torch
307 FINA® card 345 Amoco Transi card
308 AMOCO card 346 MasterCard Fleet
309 CITGO® Plus card 347 VISA Fleet
310 Diamond ShamrockSM card 348 Amoco Co Brand
311 Texaco® card 349 API
312 Sinclair card 350 Citgo Fleet
313 Carte BlancheSM card 351 Gasboy Fleet One
314 Diners ClubSM card 352 Gasboy Debit
Page 14-2 MDE-4871 CFN III Manager’s Manual for Windows® XP Embedded - Version 3.6 · August 2010
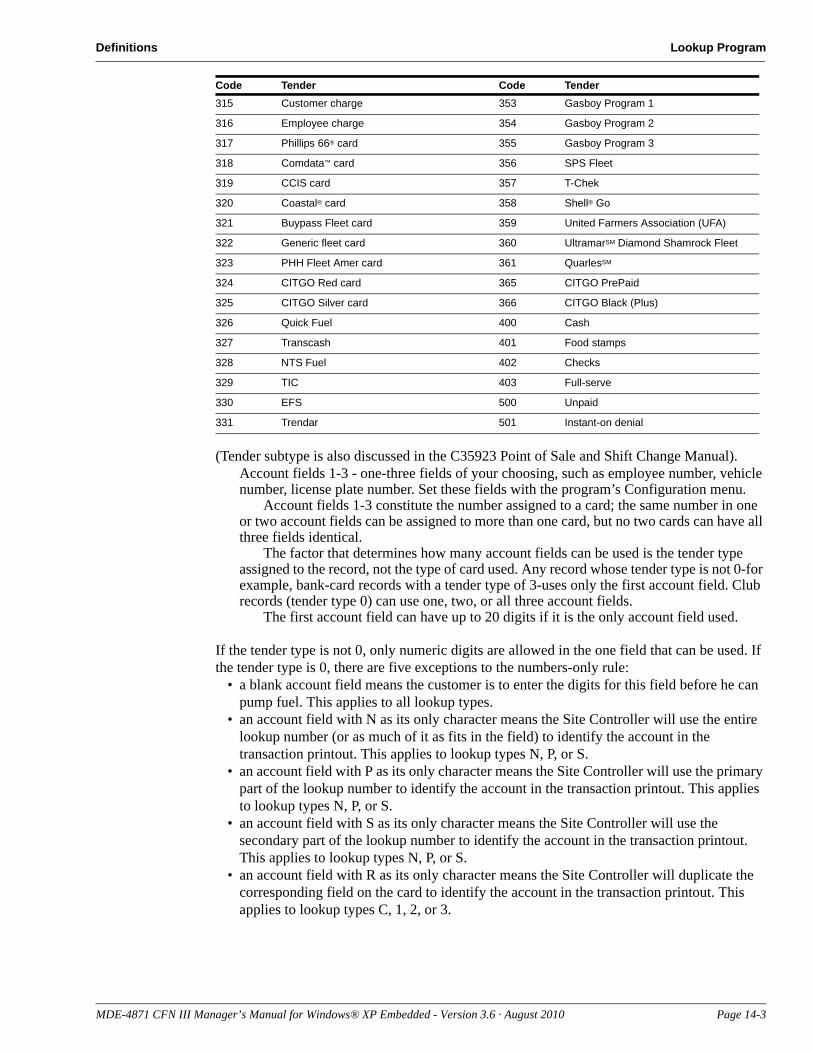
Definitions Lookup Program
(Tender subtype is also discussed in the C35923 Point of Sale and Shift Change Manual).Account fields 1-3 - one-three fields of your choosing, such as employee number, vehicle number, license plate number. Set these fields with the program’s Configuration menu.
Account fields 1-3 constitute the number assigned to a card; the same number in one or two account fields can be assigned to more than one card, but no two cards can have all three fields identical.
The factor that determines how many account fields can be used is the tender type assigned to the record, not the type of card used. Any record whose tender type is not 0-for example, bank-card records with a tender type of 3-uses only the first account field. Club records (tender type 0) can use one, two, or all three account fields.
The first account field can have up to 20 digits if it is the only account field used.
If the tender type is not 0, only numeric digits are allowed in the one field that can be used. If the tender type is 0, there are five exceptions to the numbers-only rule:
• a blank account field means the customer is to enter the digits for this field before he can pump fuel. This applies to all lookup types.
• an account field with N as its only character means the Site Controller will use the entire lookup number (or as much of it as fits in the field) to identify the account in the transaction printout. This applies to lookup types N, P, or S.
• an account field with P as its only character means the Site Controller will use the primary part of the lookup number to identify the account in the transaction printout. This applies to lookup types N, P, or S.
• an account field with S as its only character means the Site Controller will use the secondary part of the lookup number to identify the account in the transaction printout. This applies to lookup types N, P, or S.
• an account field with R as its only character means the Site Controller will duplicate the corresponding field on the card to identify the account in the transaction printout. This applies to lookup types C, 1, 2, or 3.
315 Customer charge 353 Gasboy Program 1
316 Employee charge 354 Gasboy Program 2
317 Phillips 66® card 355 Gasboy Program 3
318 Comdata™ card 356 SPS Fleet
319 CCIS card 357 T-Chek
320 Coastal® card 358 Shell® Go
321 Buypass Fleet card 359 United Farmers Association (UFA)
322 Generic fleet card 360 UltramarSM Diamond Shamrock Fleet
323 PHH Fleet Amer card 361 QuarlesSM
324 CITGO Red card 365 CITGO PrePaid
325 CITGO Silver card 366 CITGO Black (Plus)
326 Quick Fuel 400 Cash
327 Transcash 401 Food stamps
328 NTS Fuel 402 Checks
329 TIC 403 Full-serve
330 EFS 500 Unpaid
331 Trendar 501 Instant-on denial
Code Tender Code Tender
MDE-4871 CFN III Manager’s Manual for Windows® XP Embedded - Version 3.6 · August 2010 Page 14-3
Lookup Program Definitions
Two account field examples:
1 A customer has account 123456 and he swipes a code card encoded with that number or enters it at a PIN pad. The primary code length is configured to 3. In the lookup file, there is a record 123 type P (and no record 123456 type N). The tender type of that record is 0 (club). Account field 1 is P and is configured to be 6 digits long; account field 2 is S, configured to be 9 digits long; account field 3 is blank and configured to be 4 digits long. When the card is used, the customer is asked to enter account field 3-for example, 7890. The Lookup program then substitutes the club card (from tender type 0) numbered 0001230000004567890 in place of the code card in the transaction printout, just as if the customer had swiped/entered that club card’s number. Note the leading zeros automatically added to fill out account fields 1 and 2 to 6 and 9 digits.
2 A customer uses club card 1234 123456789 1234. In the lookup file there is a record 1234 type 1 (and no 1234 123456789 1234 type C). The tender type for the record is 0 (club). Account fields 1, 2, and 3 are each set to R. The club card shown in the transaction printout is 1234 123456789 1234, but the limitation, authorization, price level and other restrictions enforced on that transaction were those in the record, not those encoded on the club card.
Exp date: The expiration date of the account. Enter the date as MM/YY or M/YY. For example, January of 2000 would be 1/00.
Limitation code: Limitation code; determines how much fuel can be purchased on the card in a single transaction. These codes are loaded with the LOAD LIMITATION command.
Auth code: Authorization code; determines the types of fuel and merchandise a card can access. These levels are entered with the LOAD AUTHORIZATION command.
Price level: Determines what price will be charged per gallon. 0=fallback; 1=cash price; 2=credit price; 3=debit price; 4-79=club prices. These levels are entered with the LOAD PRICE command.
Message: The optional message displayed when the card is used.
Rejection code: 0=okay; any other number means the card will be rejected when presented by the customer and Denied will be displayed on the reader. This can be useful to temporarily block access when payment is overdue.
PIN: The optional PIN for this account.
Require odometer: Indicates whether the card user is required to enter the odometer reading; the default is no. If an odometer reading is required, the Enter odometer step in the Site Controller’s READER configuration program must be set to optional. If an odometer reading is required and the Ask for $ amount field is set to no, set the Digits in restriction code in SYS_PAR to 1 or 2; if an odometer reading is required and the Ask for $ amount field is set to yes, set the Digits in restriction code in SYS_PAR to 2.
Page 14-4 MDE-4871 CFN III Manager’s Manual for Windows® XP Embedded - Version 3.6 · August 2010
Menus Lookup Program
Require manual #: Indicates whether the card user is required to manually enter a number, such as a vehicle number; the default is no. If a manual number is required, the Enter auxiliary number step in the Site Controller’s READER configuration program must be set to optional. If a manual number is required and the Ask for $ amount field is set to no, set the Digits in restriction code in SYS_PAR to 1 or 2; if a manual number is required and the Ask for $ amount field is set to yes, set the Digits in restriction code in SYS_PAR to 2.
Require PIN: Indicates whether the card user is required to enter a Personal Identification Number; the default is no. If a PIN is required, the Enter PIN step in the Site Controller’s READER configuration program must be set to optional. If a PIN is required and the Ask for $ amount field is set to no, set the Digits in restriction code in SYS_PAR to 1 or 2; if a PIN is required and the Ask for $ amount field is set to yes, set the Digits in restriction code in SYS_PAR to 2.
Ask for $ amount: Should the customer be asked to enter a dollar amount for fuel to be purchased; the default is no. If the customer enters an amount, the pump will stop once that amount has been pumped. The customer can either enter an amount or press FILL. If a $ amount is required, the Enter amount step in the Site Controller’s READER configuration program must be set to optional. If a $ amount is required, set the Digits in restriction code in SYS_PAR to 2.
RecordsThe Lookup program stores its data in records. Each lookup number and lookup type together require one record (more than one record can contain the same lookup number, but in that case, each record will have a different lookup type).
All records have the same number of fields (18 at the time this manual was written), but few, if any, records will have all fields filled in.
The records are stored in a file named LOOKUP.DTA.
MenusYou call up the Lookup program by typing LOOKUP at the system prompt [P:]* and press Enter. You run the Lookup program through a series of menus and submenus.Note: The menus in this chapter are shown as they initially appear on the screen, where one
field (usually the first) is automatically selected. However, as you select other fields, the instructions at the bottom of the menu change, depending on which field is selected.
Short and Long MenusMost menus are one of two types: short or long. A short menu lets you enter only a lookup number and, optionally, a lookup type.
Once you enter the lookup number (and lookup type) on a short menu, a long menu is displayed that contains all fields. You can then add or delete records, edit fields, and so on.
MDE-4871 CFN III Manager’s Manual for Windows® XP Embedded - Version 3.6 · August 2010 Page 14-5
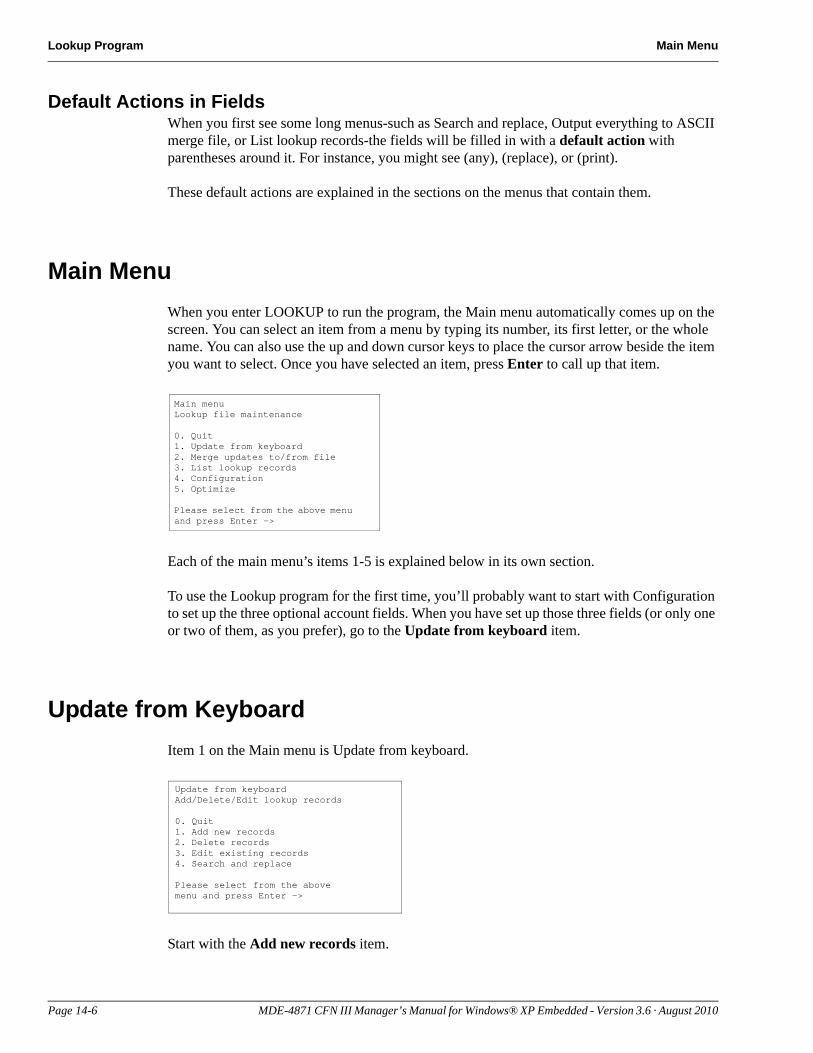
Lookup Program Main Menu
Default Actions in FieldsWhen you first see some long menus-such as Search and replace, Output everything to ASCII merge file, or List lookup records-the fields will be filled in with a default action with parentheses around it. For instance, you might see (any), (replace), or (print).
These default actions are explained in the sections on the menus that contain them.
Main MenuWhen you enter LOOKUP to run the program, the Main menu automatically comes up on the screen. You can select an item from a menu by typing its number, its first letter, or the whole name. You can also use the up and down cursor keys to place the cursor arrow beside the item you want to select. Once you have selected an item, press Enter to call up that item.
Main menuLookup file maintenance
0. Quit1. Update from keyboard2. Merge updates to/from file3. List lookup records4. Configuration5. Optimize
Please select from the above menu and press Enter ->
Each of the main menu’s items 1-5 is explained below in its own section.
To use the Lookup program for the first time, you’ll probably want to start with Configuration to set up the three optional account fields. When you have set up those three fields (or only one or two of them, as you prefer), go to the Update from keyboard item.
Update from KeyboardItem 1 on the Main menu is Update from keyboard.
Update from keyboardAdd/Delete/Edit lookup records
0. Quit1. Add new records2. Delete records3. Edit existing records4. Search and replace
Please select from the above menu and press Enter ->
Start with the Add new records item.
Page 14-6 MDE-4871 CFN III Manager’s Manual for Windows® XP Embedded - Version 3.6 · August 2010
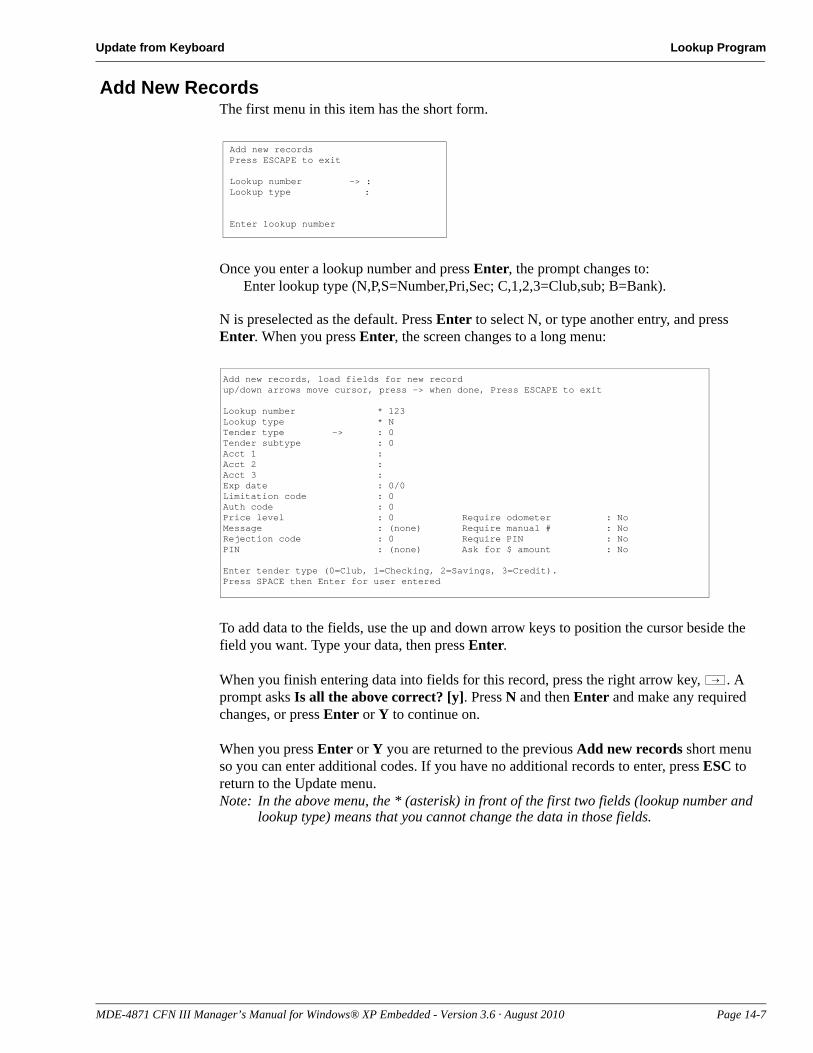
Update from Keyboard Lookup Program
Add New RecordsThe first menu in this item has the short form.
Add new recordsPress ESCAPE to exit
Lookup number -> :Lookup type :
Enter lookup number
Once you enter a lookup number and press Enter, the prompt changes to:Enter lookup type (N,P,S=Number,Pri,Sec; C,1,2,3=Club,sub; B=Bank).
Add new records, load fields for new recordup/down arrows move cursor, press -> when done, Press ESCAPE to exit
Lookup number * 123Lookup type * NTender type -> : 0Tender subtype : 0Acct 1 : Acct 2 : Acct 3 : Exp date : 0/0Limitation code : 0Auth code : 0Price level : 0 Require odometer : NoMessage : (none) Require manual # : NoRejection code : 0 Require PIN : NoPIN : (none) Ask for $ amount : No
Enter tender type (0=Club, 1=Checking, 2=Savings, 3=Credit).Press SPACE then Enter for user entered
N is preselected as the default. Press Enter to select N, or type another entry, and press Enter. When you press Enter, the screen changes to a long menu:
To add data to the fields, use the up and down arrow keys to position the cursor beside the field you want. Type your data, then press Enter.
When you finish entering data into fields for this record, press the right arrow key, . A prompt asks Is all the above correct? [y]. Press N and then Enter and make any required changes, or press Enter or Y to continue on.
When you press Enter or Y you are returned to the previous Add new records short menu so you can enter additional codes. If you have no additional records to enter, press ESC to return to the Update menu.Note: In the above menu, the * (asterisk) in front of the first two fields (lookup number and
lookup type) means that you cannot change the data in those fields.
→
MDE-4871 CFN III Manager’s Manual for Windows® XP Embedded - Version 3.6 · August 2010 Page 14-7
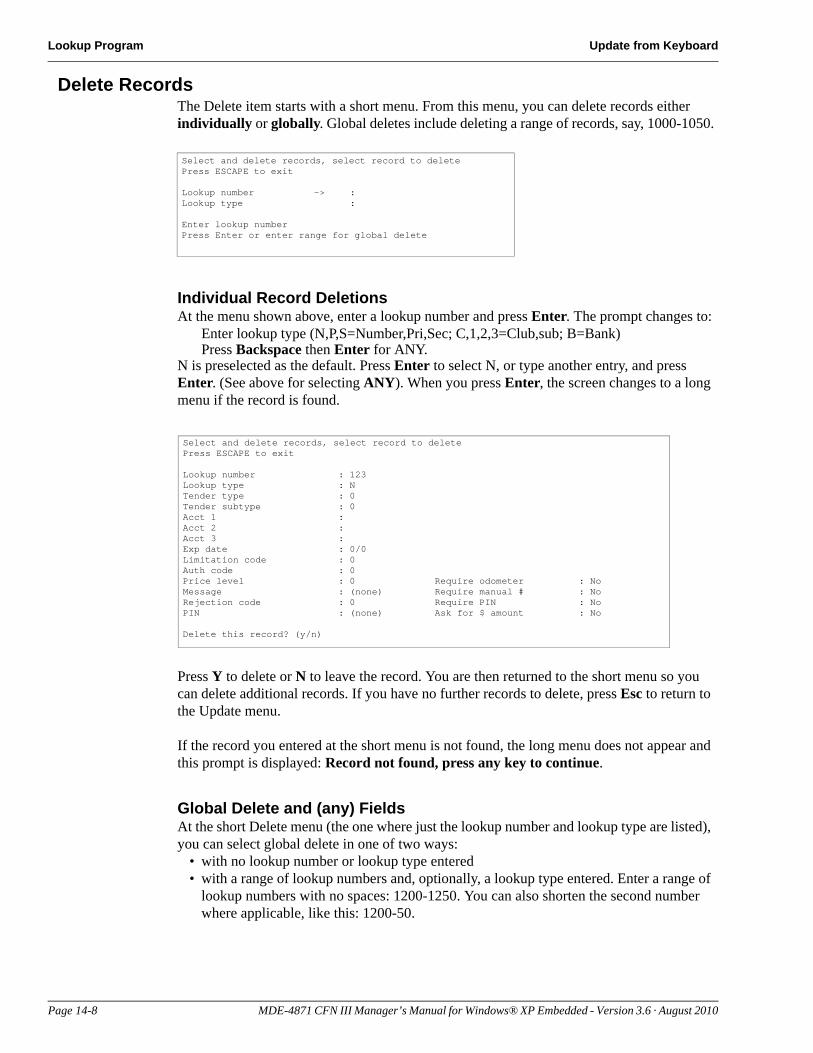
Lookup Program Update from Keyboard
Delete RecordsThe Delete item starts with a short menu. From this menu, you can delete records either individually or globally. Global deletes include deleting a range of records, say, 1000-1050.
Select and delete records, select record to deletePress ESCAPE to exit
Lookup number -> :Lookup type :
Enter lookup numberPress Enter or enter range for global delete
Individual Record DeletionsAt the menu shown above, enter a lookup number and press Enter. The prompt changes to:
Enter lookup type (N,P,S=Number,Pri,Sec; C,1,2,3=Club,sub; B=Bank) Press Backspace then Enter for ANY.
N is preselected as the default. Press Enter to select N, or type another entry, and press Enter. (See above for selecting ANY). When you press Enter, the screen changes to a long menu if the record is found.
Select and delete records, select record to deletePress ESCAPE to exit
Lookup number : 123Lookup type : NTender type : 0Tender subtype : 0Acct 1 : Acct 2 : Acct 3 : Exp date : 0/0Limitation code : 0Auth code : 0Price level : 0 Require odometer : NoMessage : (none) Require manual # : NoRejection code : 0 Require PIN : NoPIN : (none) Ask for $ amount : No
Delete this record? (y/n)
Press Y to delete or N to leave the record. You are then returned to the short menu so you can delete additional records. If you have no further records to delete, press Esc to return to the Update menu.
If the record you entered at the short menu is not found, the long menu does not appear and this prompt is displayed: Record not found, press any key to continue.
Global Delete and (any) FieldsAt the short Delete menu (the one where just the lookup number and lookup type are listed), you can select global delete in one of two ways:
• with no lookup number or lookup type entered• with a range of lookup numbers and, optionally, a lookup type entered. Enter a range of
lookup numbers with no spaces: 1200-1250. You can also shorten the second number where applicable, like this: 1200-50.
Page 14-8 MDE-4871 CFN III Manager’s Manual for Windows® XP Embedded - Version 3.6 · August 2010
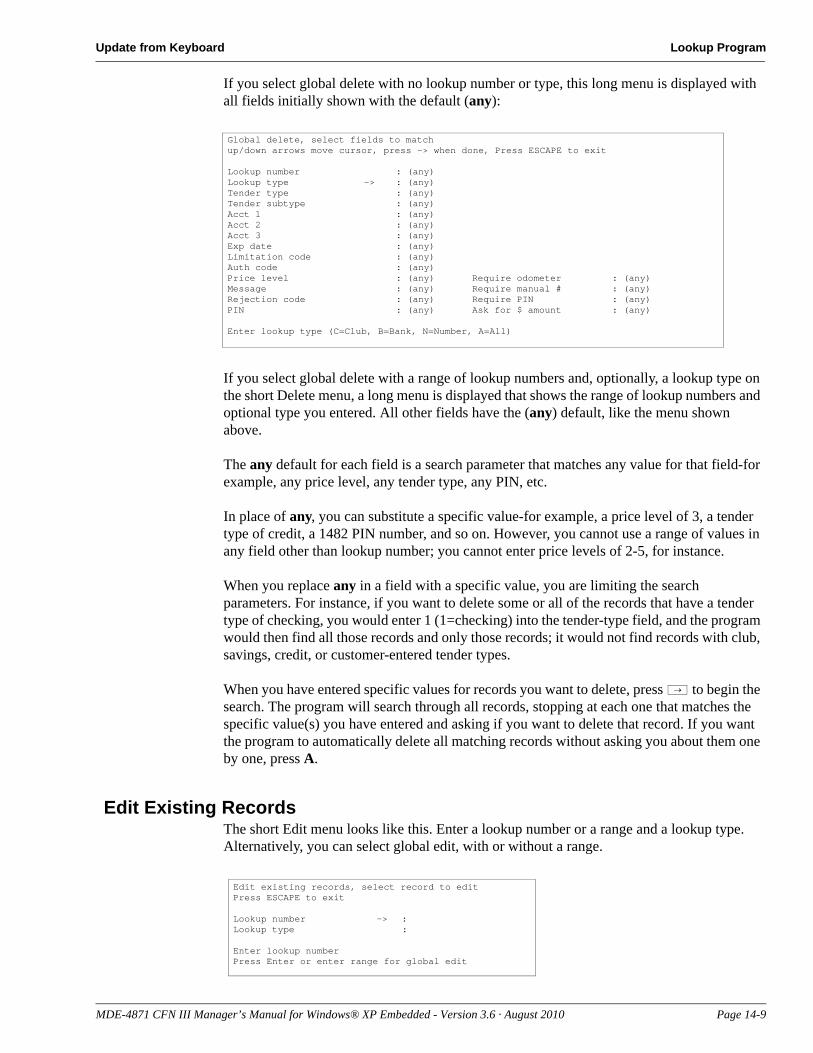
Update from Keyboard Lookup Program
If you select global delete with no lookup number or type, this long menu is displayed with all fields initially shown with the default (any):
Global delete, select fields to matchup/down arrows move cursor, press -> when done, Press ESCAPE to exit
Lookup number : (any)Lookup type -> : (any)Tender type : (any)Tender subtype : (any)Acct 1 : (any)Acct 2 : (any)Acct 3 : (any)Exp date : (any)Limitation code : (any)Auth code : (any)Price level : (any) Require odometer : (any)Message : (any) Require manual # : (any)Rejection code : (any) Require PIN : (any)PIN : (any) Ask for $ amount : (any)
Enter lookup type (C=Club, B=Bank, N=Number, A=All)
If you select global delete with a range of lookup numbers and, optionally, a lookup type on the short Delete menu, a long menu is displayed that shows the range of lookup numbers and optional type you entered. All other fields have the (any) default, like the menu shown above.
The any default for each field is a search parameter that matches any value for that field-for example, any price level, any tender type, any PIN, etc.
In place of any, you can substitute a specific value-for example, a price level of 3, a tender type of credit, a 1482 PIN number, and so on. However, you cannot use a range of values in any field other than lookup number; you cannot enter price levels of 2-5, for instance.
When you replace any in a field with a specific value, you are limiting the search parameters. For instance, if you want to delete some or all of the records that have a tender type of checking, you would enter 1 (1=checking) into the tender-type field, and the program would then find all those records and only those records; it would not find records with club, savings, credit, or customer-entered tender types.
When you have entered specific values for records you want to delete, press to begin the search. The program will search through all records, stopping at each one that matches the specific value(s) you have entered and asking if you want to delete that record. If you want the program to automatically delete all matching records without asking you about them one by one, press A.
Edit Existing RecordsThe short Edit menu looks like this. Enter a lookup number or a range and a lookup type. Alternatively, you can select global edit, with or without a range.
Edit existing records, select record to editPress ESCAPE to exit
Lookup number -> :Lookup type :
Enter lookup numberPress Enter or enter range for global edit
→
MDE-4871 CFN III Manager’s Manual for Windows® XP Embedded - Version 3.6 · August 2010 Page 14-9
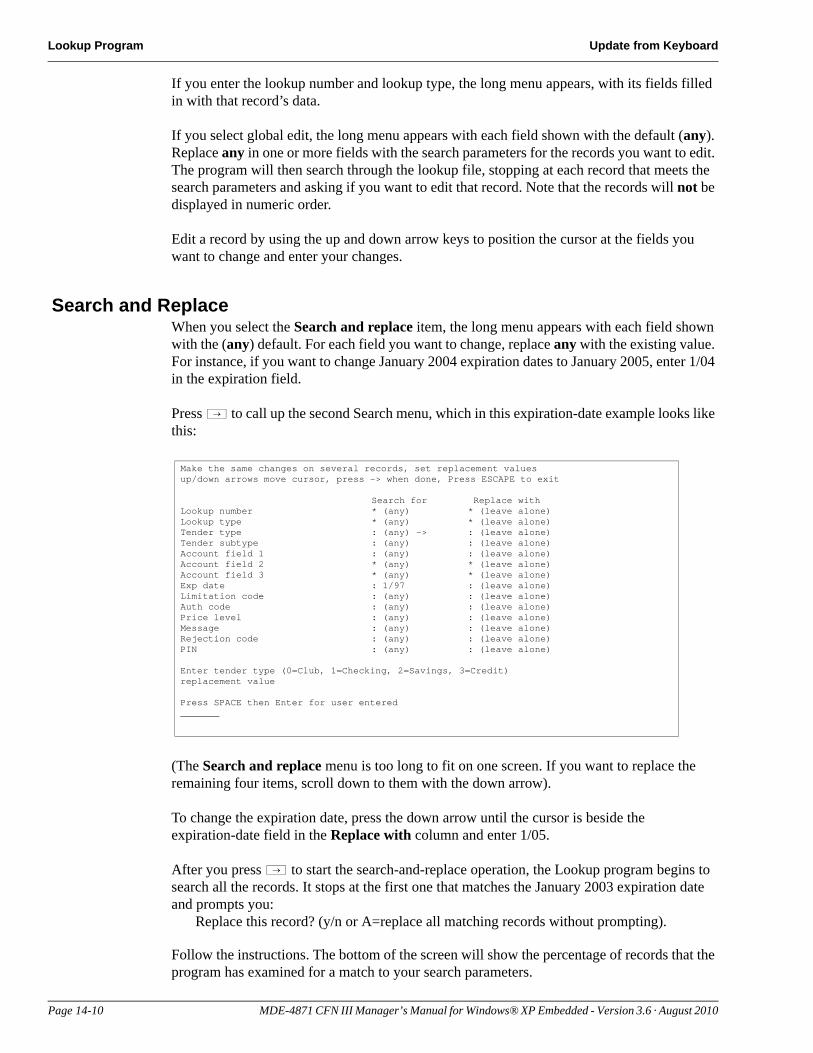
Lookup Program Update from Keyboard
If you enter the lookup number and lookup type, the long menu appears, with its fields filled in with that record’s data.
If you select global edit, the long menu appears with each field shown with the default (any). Replace any in one or more fields with the search parameters for the records you want to edit. The program will then search through the lookup file, stopping at each record that meets the search parameters and asking if you want to edit that record. Note that the records will not be displayed in numeric order.
Edit a record by using the up and down arrow keys to position the cursor at the fields you want to change and enter your changes.
Search and ReplaceWhen you select the Search and replace item, the long menu appears with each field shown with the (any) default. For each field you want to change, replace any with the existing value. For instance, if you want to change January 2004 expiration dates to January 2005, enter 1/04 in the expiration field.
Make the same changes on several records, set replacement valuesup/down arrows move cursor, press -> when done, Press ESCAPE to exit
Search for Replace withLookup number * (any) * (leave alone)Lookup type * (any) * (leave alone)Tender type : (any) -> : (leave alone)Tender subtype : (any) : (leave alone)Account field 1 : (any) : (leave alone)Account field 2 * (any) * (leave alone)Account field 3 * (any) * (leave alone)Exp date : 1/97 : (leave alone)Limitation code : (any) : (leave alone)Auth code : (any) : (leave alone)Price level : (any) : (leave alone)Message : (any) : (leave alone)Rejection code : (any) : (leave alone)PIN : (any) : (leave alone)
Enter tender type (0=Club, 1=Checking, 2=Savings, 3=Credit) replacement value
Press SPACE then Enter for user entered_______
Press to call up the second Search menu, which in this expiration-date example looks like this:
(The Search and replace menu is too long to fit on one screen. If you want to replace the remaining four items, scroll down to them with the down arrow).
To change the expiration date, press the down arrow until the cursor is beside the expiration-date field in the Replace with column and enter 1/05.
After you press to start the search-and-replace operation, the Lookup program begins to search all the records. It stops at the first one that matches the January 2003 expiration date and prompts you:
Replace this record? (y/n or A=replace all matching records without prompting).
Follow the instructions. The bottom of the screen will show the percentage of records that the program has examined for a match to your search parameters.
→
→
Page 14-10 MDE-4871 CFN III Manager’s Manual for Windows® XP Embedded - Version 3.6 · August 2010
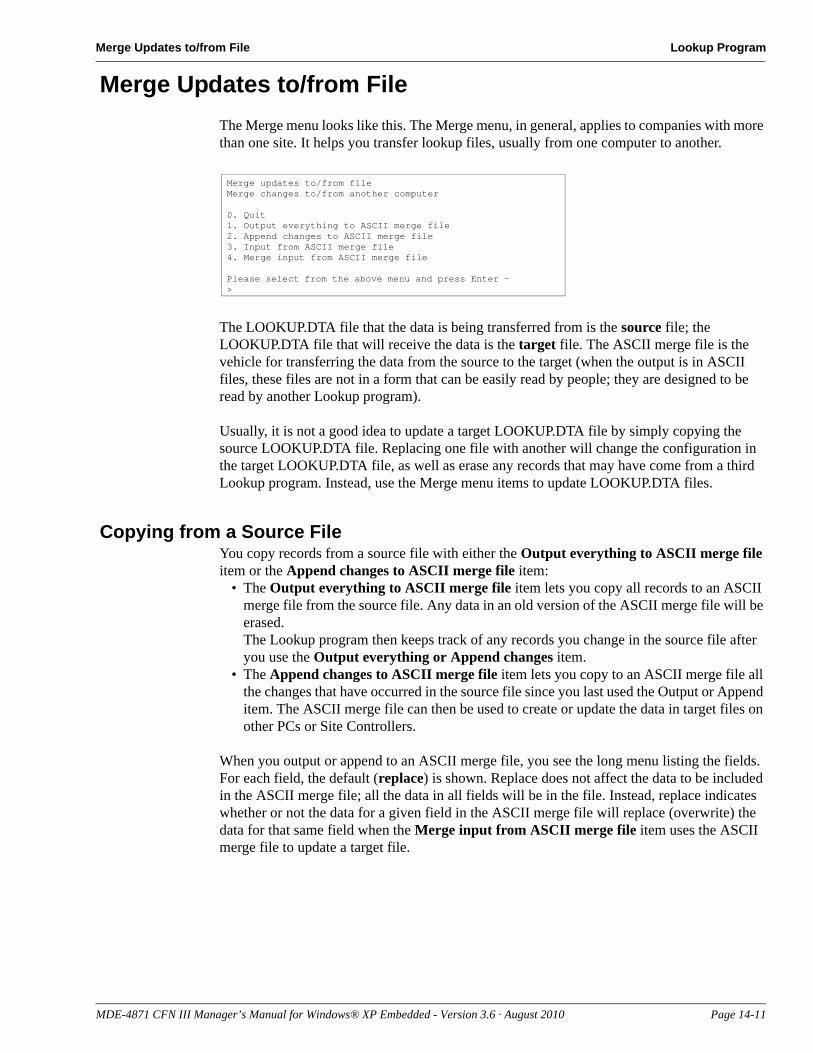
Merge Updates to/from File Lookup Program
Merge Updates to/from FileThe Merge menu looks like this. The Merge menu, in general, applies to companies with more than one site. It helps you transfer lookup files, usually from one computer to another.
Merge updates to/from fileMerge changes to/from another computer
0. Quit1. Output everything to ASCII merge file2. Append changes to ASCII merge file3. Input from ASCII merge file4. Merge input from ASCII merge file
Please select from the above menu and press Enter ->
The LOOKUP.DTA file that the data is being transferred from is the source file; the LOOKUP.DTA file that will receive the data is the target file. The ASCII merge file is the vehicle for transferring the data from the source to the target (when the output is in ASCII files, these files are not in a form that can be easily read by people; they are designed to be read by another Lookup program).
Usually, it is not a good idea to update a target LOOKUP.DTA file by simply copying the source LOOKUP.DTA file. Replacing one file with another will change the configuration in the target LOOKUP.DTA file, as well as erase any records that may have come from a third Lookup program. Instead, use the Merge menu items to update LOOKUP.DTA files.
Copying from a Source FileYou copy records from a source file with either the Output everything to ASCII merge file item or the Append changes to ASCII merge file item:
• The Output everything to ASCII merge file item lets you copy all records to an ASCII merge file from the source file. Any data in an old version of the ASCII merge file will be erased. The Lookup program then keeps track of any records you change in the source file after you use the Output everything or Append changes item.
• The Append changes to ASCII merge file item lets you copy to an ASCII merge file all the changes that have occurred in the source file since you last used the Output or Append item. The ASCII merge file can then be used to create or update the data in target files on other PCs or Site Controllers.
When you output or append to an ASCII merge file, you see the long menu listing the fields. For each field, the default (replace) is shown. Replace does not affect the data to be included in the ASCII merge file; all the data in all fields will be in the file. Instead, replace indicates whether or not the data for a given field in the ASCII merge file will replace (overwrite) the data for that same field when the Merge input from ASCII merge file item uses the ASCII merge file to update a target file.
MDE-4871 CFN III Manager’s Manual for Windows® XP Embedded - Version 3.6 · August 2010 Page 14-11
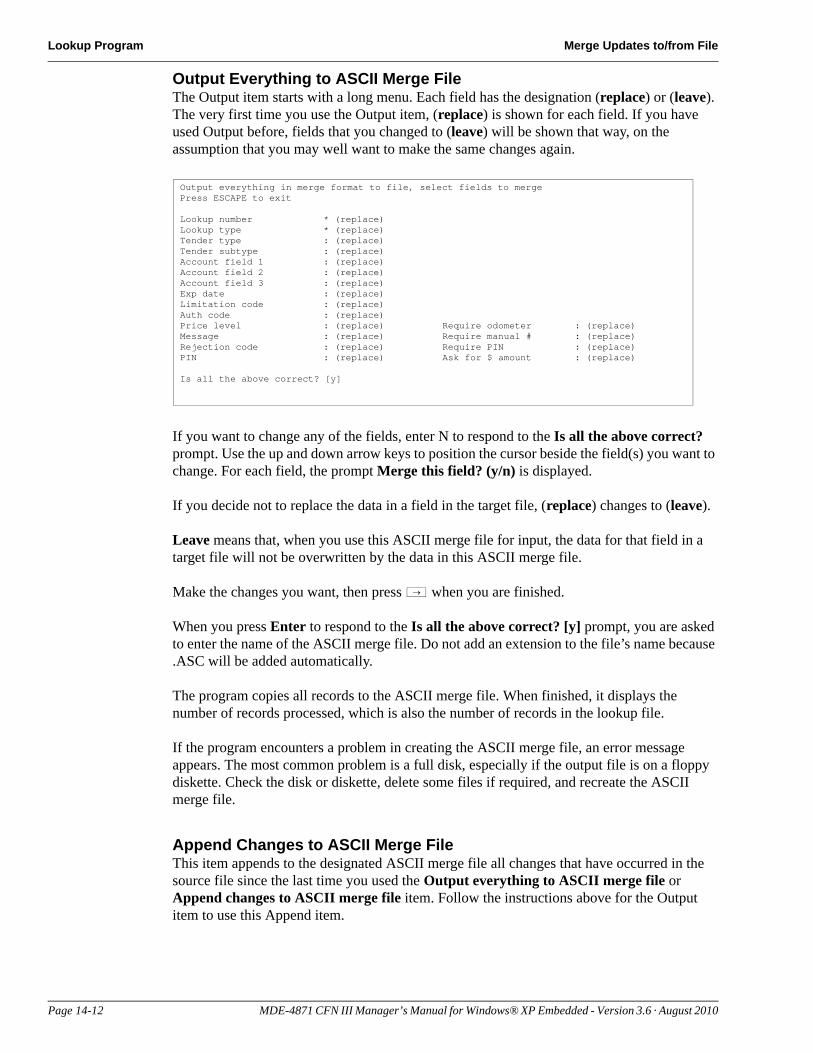
Lookup Program Merge Updates to/from File
Output Everything to ASCII Merge FileThe Output item starts with a long menu. Each field has the designation (replace) or (leave). The very first time you use the Output item, (replace) is shown for each field. If you have used Output before, fields that you changed to (leave) will be shown that way, on the assumption that you may well want to make the same changes again.
Output everything in merge format to file, select fields to mergePress ESCAPE to exit
Lookup number * (replace)Lookup type * (replace)Tender type : (replace)Tender subtype : (replace)Account field 1 : (replace)Account field 2 : (replace)Account field 3 : (replace)Exp date : (replace)Limitation code : (replace)Auth code : (replace)Price level : (replace) Require odometer : (replace)Message : (replace) Require manual # : (replace)Rejection code : (replace) Require PIN : (replace)PIN : (replace) Ask for $ amount : (replace)
Is all the above correct? [y]
If you want to change any of the fields, enter N to respond to the Is all the above correct? prompt. Use the up and down arrow keys to position the cursor beside the field(s) you want to change. For each field, the prompt Merge this field? (y/n) is displayed.
If you decide not to replace the data in a field in the target file, (replace) changes to (leave).
Leave means that, when you use this ASCII merge file for input, the data for that field in a target file will not be overwritten by the data in this ASCII merge file.
Make the changes you want, then press when you are finished.
When you press Enter to respond to the Is all the above correct? [y] prompt, you are asked to enter the name of the ASCII merge file. Do not add an extension to the file’s name because .ASC will be added automatically.
The program copies all records to the ASCII merge file. When finished, it displays the number of records processed, which is also the number of records in the lookup file.
If the program encounters a problem in creating the ASCII merge file, an error message appears. The most common problem is a full disk, especially if the output file is on a floppy diskette. Check the disk or diskette, delete some files if required, and recreate the ASCII merge file.
Append Changes to ASCII Merge FileThis item appends to the designated ASCII merge file all changes that have occurred in the source file since the last time you used the Output everything to ASCII merge file or Append changes to ASCII merge file item. Follow the instructions above for the Output item to use this Append item.
→
Page 14-12 MDE-4871 CFN III Manager’s Manual for Windows® XP Embedded - Version 3.6 · August 2010
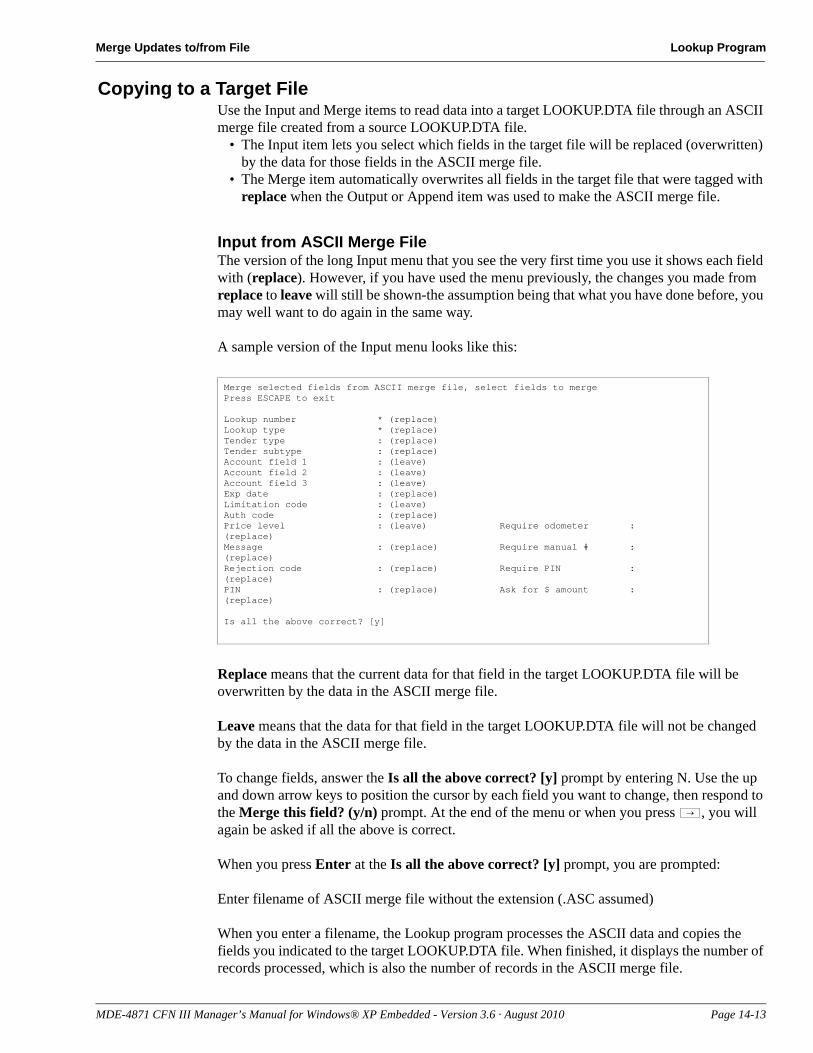
Merge Updates to/from File Lookup Program
Copying to a Target FileUse the Input and Merge items to read data into a target LOOKUP.DTA file through an ASCII merge file created from a source LOOKUP.DTA file.
• The Input item lets you select which fields in the target file will be replaced (overwritten) by the data for those fields in the ASCII merge file.
• The Merge item automatically overwrites all fields in the target file that were tagged with replace when the Output or Append item was used to make the ASCII merge file.
Input from ASCII Merge FileThe version of the long Input menu that you see the very first time you use it shows each field with (replace). However, if you have used the menu previously, the changes you made from replace to leave will still be shown-the assumption being that what you have done before, you may well want to do again in the same way.
Merge selected fields from ASCII merge file, select fields to mergePress ESCAPE to exit
Lookup number * (replace)Lookup type * (replace)Tender type : (replace)Tender subtype : (replace)Account field 1 : (leave)Account field 2 : (leave)Account field 3 : (leave)Exp date : (replace)Limitation code : (leave)Auth code : (replace)Price level : (leave) Require odometer : (replace)Message : (replace) Require manual # : (replace)Rejection code : (replace) Require PIN : (replace)PIN : (replace) Ask for $ amount : (replace)
Is all the above correct? [y]
A sample version of the Input menu looks like this:
Replace means that the current data for that field in the target LOOKUP.DTA file will be overwritten by the data in the ASCII merge file.
Leave means that the data for that field in the target LOOKUP.DTA file will not be changed by the data in the ASCII merge file.
To change fields, answer the Is all the above correct? [y] prompt by entering N. Use the up and down arrow keys to position the cursor by each field you want to change, then respond to the Merge this field? (y/n) prompt. At the end of the menu or when you press , you will again be asked if all the above is correct.
When you press Enter at the Is all the above correct? [y] prompt, you are prompted:
Enter filename of ASCII merge file without the extension (.ASC assumed)
When you enter a filename, the Lookup program processes the ASCII data and copies the fields you indicated to the target LOOKUP.DTA file. When finished, it displays the number of records processed, which is also the number of records in the ASCII merge file.
→
MDE-4871 CFN III Manager’s Manual for Windows® XP Embedded - Version 3.6 · August 2010 Page 14-13
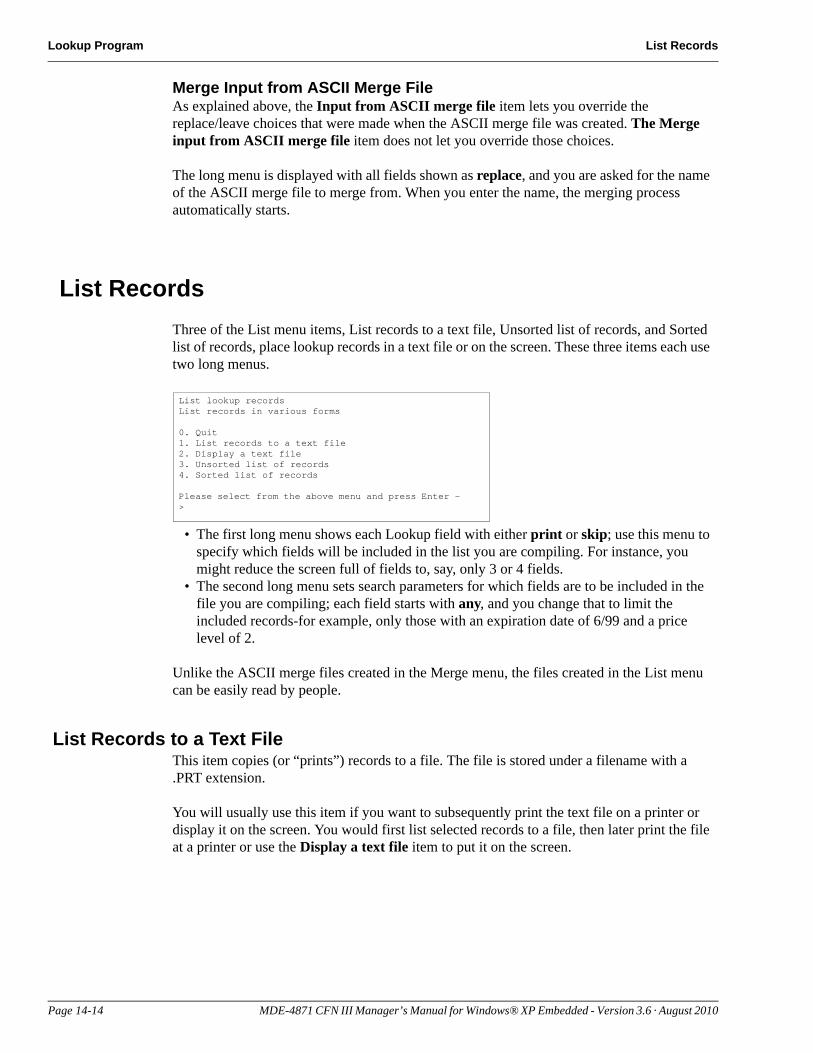
Lookup Program List Records
Merge Input from ASCII Merge FileAs explained above, the Input from ASCII merge file item lets you override the replace/leave choices that were made when the ASCII merge file was created. The Merge input from ASCII merge file item does not let you override those choices.
The long menu is displayed with all fields shown as replace, and you are asked for the name of the ASCII merge file to merge from. When you enter the name, the merging process automatically starts.
List RecordsThree of the List menu items, List records to a text file, Unsorted list of records, and Sorted list of records, place lookup records in a text file or on the screen. These three items each use two long menus.
List lookup recordsList records in various forms
0. Quit1. List records to a text file2. Display a text file3. Unsorted list of records4. Sorted list of records
Please select from the above menu and press Enter ->
• The first long menu shows each Lookup field with either print or skip; use this menu to specify which fields will be included in the list you are compiling. For instance, you might reduce the screen full of fields to, say, only 3 or 4 fields.
• The second long menu sets search parameters for which fields are to be included in the file you are compiling; each field starts with any, and you change that to limit the included records-for example, only those with an expiration date of 6/99 and a price level of 2.
Unlike the ASCII merge files created in the Merge menu, the files created in the List menu can be easily read by people.
List Records to a Text FileThis item copies (or “prints”) records to a file. The file is stored under a filename with a .PRT extension.
You will usually use this item if you want to subsequently print the text file on a printer or display it on the screen. You would first list selected records to a file, then later print the file at a printer or use the Display a text file item to put it on the screen.
Page 14-14 MDE-4871 CFN III Manager’s Manual for Windows® XP Embedded - Version 3.6 · August 2010
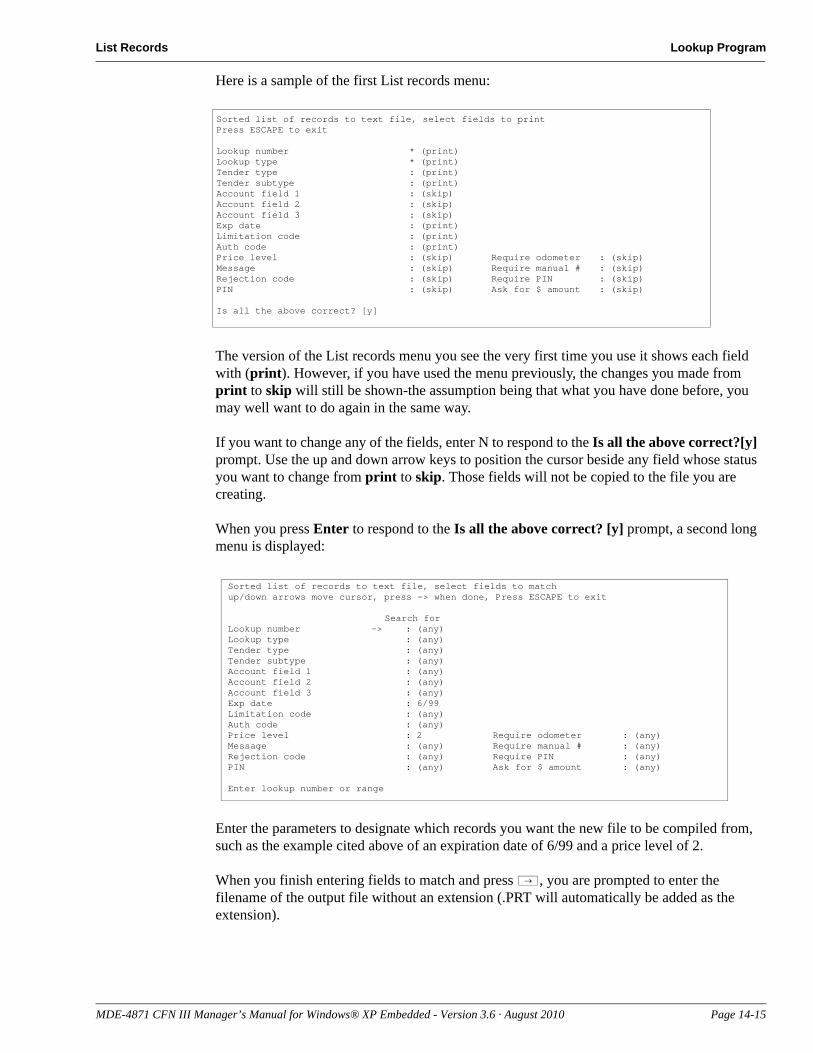
List Records Lookup Program
Sorted list of records to text file, select fields to printPress ESCAPE to exit
Lookup number * (print)Lookup type * (print)Tender type : (print)Tender subtype : (print)Account field 1 : (skip)Account field 2 : (skip)Account field 3 : (skip)Exp date : (print)Limitation code : (print)Auth code : (print)Price level : (skip) Require odometer : (skip)Message : (skip) Require manual # : (skip)Rejection code : (skip) Require PIN : (skip)PIN : (skip) Ask for $ amount : (skip)
Is all the above correct? [y]
Sorted list of records to text file, select fields to matchup/down arrows move cursor, press -> when done, Press ESCAPE to exit
Search forLookup number -> : (any)Lookup type : (any)Tender type : (any)Tender subtype : (any)Account field 1 : (any)Account field 2 : (any)Account field 3 : (any)Exp date : 6/99Limitation code : (any)Auth code : (any)Price level : 2 Require odometer : (any)Message : (any) Require manual # : (any)Rejection code : (any) Require PIN : (any)PIN : (any) Ask for $ amount : (any)
Enter lookup number or range
Here is a sample of the first List records menu:
The version of the List records menu you see the very first time you use it shows each field with (print). However, if you have used the menu previously, the changes you made from print to skip will still be shown-the assumption being that what you have done before, you may well want to do again in the same way.
If you want to change any of the fields, enter N to respond to the Is all the above correct?[y] prompt. Use the up and down arrow keys to position the cursor beside any field whose status you want to change from print to skip. Those fields will not be copied to the file you are creating.
When you press Enter to respond to the Is all the above correct? [y] prompt, a second long menu is displayed:
Enter the parameters to designate which records you want the new file to be compiled from, such as the example cited above of an expiration date of 6/99 and a price level of 2.
When you finish entering fields to match and press , you are prompted to enter the filename of the output file without an extension (.PRT will automatically be added as the extension).
→
MDE-4871 CFN III Manager’s Manual for Windows® XP Embedded - Version 3.6 · August 2010 Page 14-15
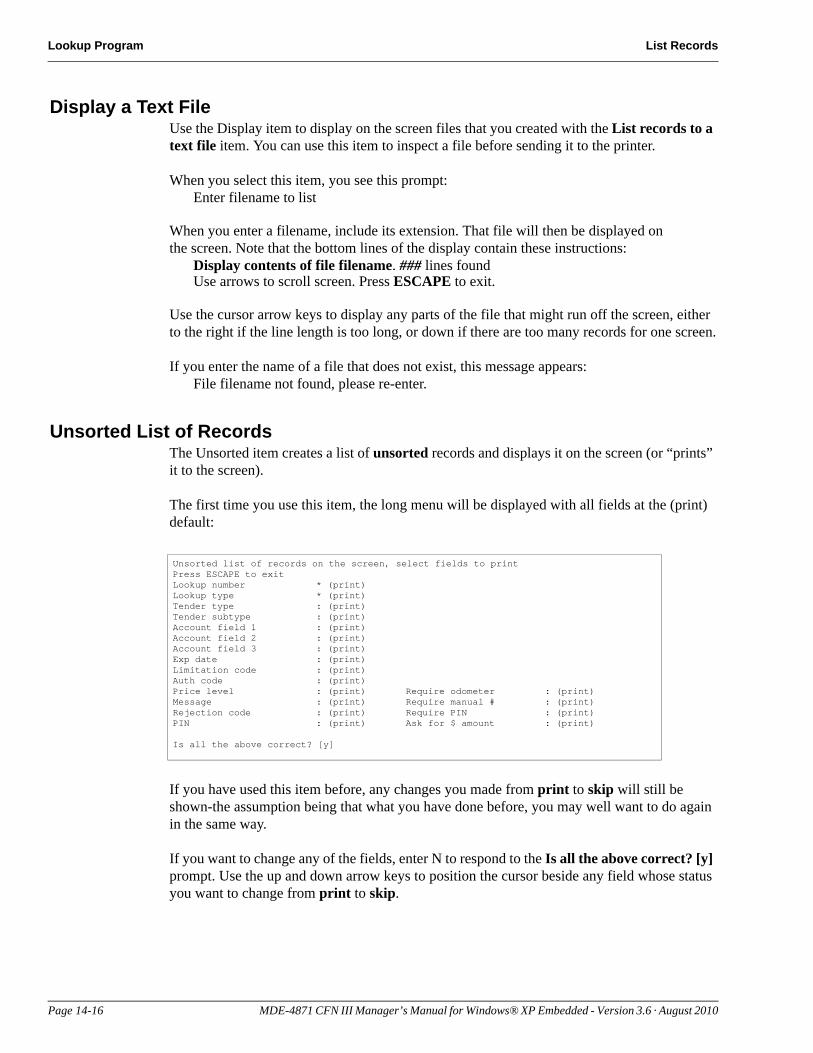
Lookup Program List Records
Display a Text FileUse the Display item to display on the screen files that you created with the List records to a text file item. You can use this item to inspect a file before sending it to the printer.
When you select this item, you see this prompt:Enter filename to list
When you enter a filename, include its extension. That file will then be displayed on the screen. Note that the bottom lines of the display contain these instructions:
Display contents of file filename. ### lines found Use arrows to scroll screen. Press ESCAPE to exit.
Use the cursor arrow keys to display any parts of the file that might run off the screen, either to the right if the line length is too long, or down if there are too many records for one screen.
If you enter the name of a file that does not exist, this message appears:File filename not found, please re-enter.
Unsorted List of RecordsThe Unsorted item creates a list of unsorted records and displays it on the screen (or “prints” it to the screen).
Unsorted list of records on the screen, select fields to printPress ESCAPE to exitLookup number * (print)Lookup type * (print)Tender type : (print)Tender subtype : (print)Account field 1 : (print)Account field 2 : (print)Account field 3 : (print)Exp date : (print)Limitation code : (print)Auth code : (print)Price level : (print) Require odometer : (print)Message : (print) Require manual # : (print)Rejection code : (print) Require PIN : (print)PIN : (print) Ask for $ amount : (print)
Is all the above correct? [y]
The first time you use this item, the long menu will be displayed with all fields at the (print) default:
If you have used this item before, any changes you made from print to skip will still be shown-the assumption being that what you have done before, you may well want to do again in the same way.
If you want to change any of the fields, enter N to respond to the Is all the above correct? [y] prompt. Use the up and down arrow keys to position the cursor beside any field whose status you want to change from print to skip.
Page 14-16 MDE-4871 CFN III Manager’s Manual for Windows® XP Embedded - Version 3.6 · August 2010
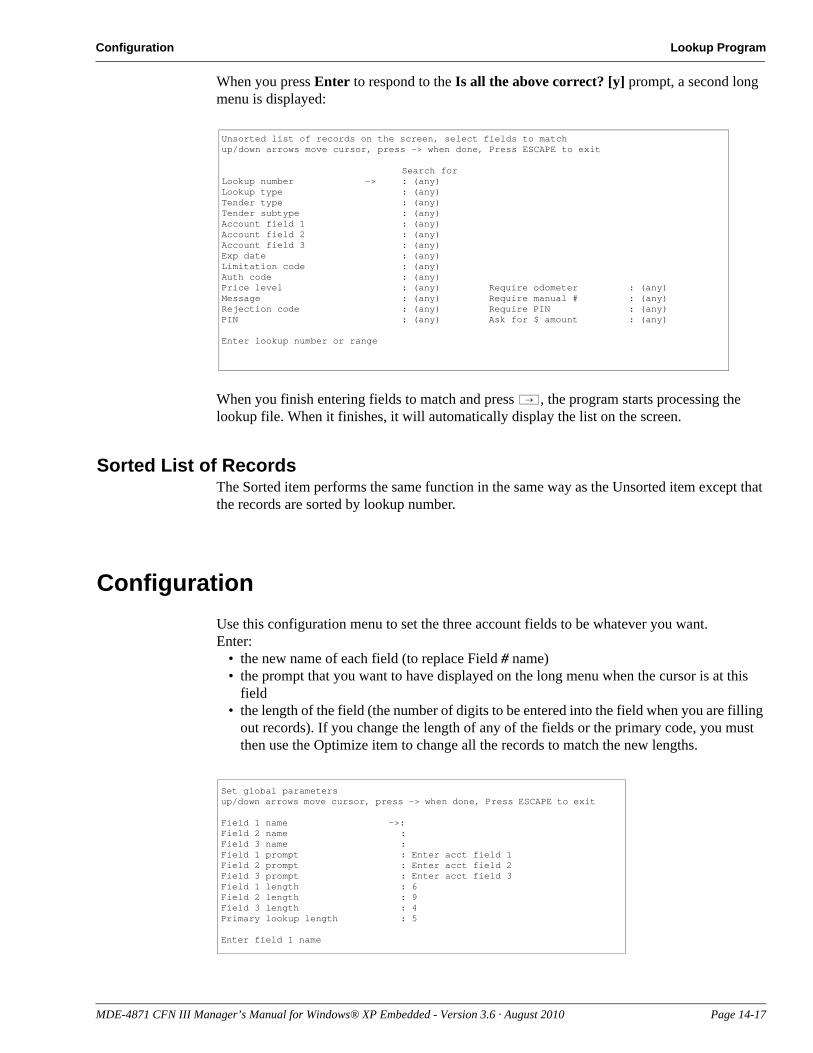
Configuration Lookup Program
Unsorted list of records on the screen, select fields to matchup/down arrows move cursor, press -> when done, Press ESCAPE to exit
Search forLookup number -> : (any)Lookup type : (any)Tender type : (any)Tender subtype : (any)Account field 1 : (any)Account field 2 : (any)Account field 3 : (any)Exp date : (any)Limitation code : (any)Auth code : (any)Price level : (any) Require odometer : (any)Message : (any) Require manual # : (any)Rejection code : (any) Require PIN : (any)PIN : (any) Ask for $ amount : (any)
Enter lookup number or range
When you press Enter to respond to the Is all the above correct? [y] prompt, a second long menu is displayed:
When you finish entering fields to match and press , the program starts processing the lookup file. When it finishes, it will automatically display the list on the screen.
Sorted List of RecordsThe Sorted item performs the same function in the same way as the Unsorted item except that the records are sorted by lookup number.
ConfigurationUse this configuration menu to set the three account fields to be whatever you want. Enter:
• the new name of each field (to replace Field # name)• the prompt that you want to have displayed on the long menu when the cursor is at this
field• the length of the field (the number of digits to be entered into the field when you are filling
out records). If you change the length of any of the fields or the primary code, you must then use the Optimize item to change all the records to match the new lengths.
Set global parametersup/down arrows move cursor, press -> when done, Press ESCAPE to exit
Field 1 name ->: Field 2 name : Field 3 name : Field 1 prompt : Enter acct field 1Field 2 prompt : Enter acct field 2Field 3 prompt : Enter acct field 3Field 1 length : 6Field 2 length : 9Field 3 length : 4Primary lookup length : 5
Enter field 1 name
→
MDE-4871 CFN III Manager’s Manual for Windows® XP Embedded - Version 3.6 · August 2010 Page 14-17
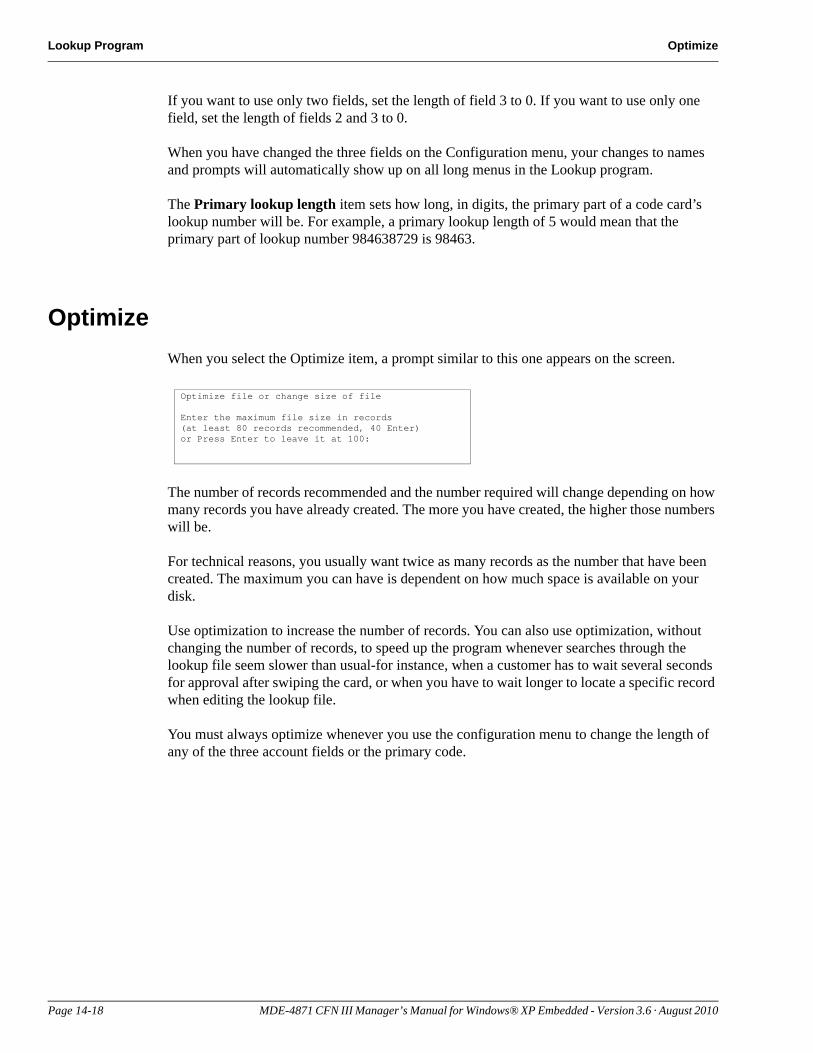
Lookup Program Optimize
If you want to use only two fields, set the length of field 3 to 0. If you want to use only one field, set the length of fields 2 and 3 to 0.
When you have changed the three fields on the Configuration menu, your changes to names and prompts will automatically show up on all long menus in the Lookup program.
The Primary lookup length item sets how long, in digits, the primary part of a code card’s lookup number will be. For example, a primary lookup length of 5 would mean that the primary part of lookup number 984638729 is 98463.
OptimizeWhen you select the Optimize item, a prompt similar to this one appears on the screen.
Optimize file or change size of file Enter the maximum file size in records (at least 80 records recommended, 40 Enter) or Press Enter to leave it at 100:
The number of records recommended and the number required will change depending on how many records you have already created. The more you have created, the higher those numbers will be.
For technical reasons, you usually want twice as many records as the number that have been created. The maximum you can have is dependent on how much space is available on your disk.
Use optimization to increase the number of records. You can also use optimization, without changing the number of records, to speed up the program whenever searches through the lookup file seem slower than usual-for instance, when a customer has to wait several seconds for approval after swiping the card, or when you have to wait longer to locate a specific record when editing the lookup file.
You must always optimize whenever you use the configuration menu to change the length of any of the three account fields or the primary code.
Page 14-18 MDE-4871 CFN III Manager’s Manual for Windows® XP Embedded - Version 3.6 · August 2010

Fuel Allocation Fuel Allocation and Miles-per-Gallon
15 – Fuel Allocation and Miles-per-Gallon
Fuel AllocationThe CFN III system allows you to allocate a set amount of fuel to a customer or group of customers with Proprietary Cards. The allocation number is a field on the Proprietary Card. The CFN III uses allocation totalizers to track the amount used. When all of the allocated amount has been used, the Site Controller denies access to the customer or customer group.
You can use a fuel allocation system to ration fuel or to ensure that only a designated amount of fuel will be available to a specific customer group.
This chapter explains how to set up and maintain an allocation system.
Do not confuse this type of allocation with hourly allocation. Hourly allocation limits the amount of fuel that may be accessed by a card within a specified time period. It applies to bank cards as well as Proprietary Cards. Hourly allocation is set up in the Site Controller configuration (refer to the Cumulative Limit Time parameter in the System parameters chapter of MDE-4773 CFN III Configuration Manual for Windows XP for details).
How to Set Up an Allocation SystemTo set up an allocation system:
• Determine the allocation numbers you want to use, and the number of gallons (or liters) or dollars you want to assign to each one. Refer to the allocation bulleted list below to help you decide how you want to allocate fuel.
• Decide the length of the allocation numbers and the location of the allocation number within the card account number (for more information, refer to “Proprietary Cards” on page 13-1 and the Allocation Account Offset parameter in the System parameters chapter of MDE-4773 CFN III Configuration Manual for Windows XP).
• Encode the allocation numbers on the cards in the location you decided. The allocation numbers can be from 0 through 32,766. The allocation field must be the same length on all cards.
• Configure the Site Controller for the maximum number of allocation numbers you will use, the number of digits in allocation numbers, and the location of the allocation number within the card account number. The CFN III system maintains allocation totalizers only for allocation numbers currently defined. Configure for as many allocation numbers as you will require; you can remove one temporarily if you are not currently using it. However, do not configure for more than you plan to use since extra numbers needlessly take up memory space.
• Use the commands in the rest of this chapter to maintain the amounts in the allocation totalizers.
MDE-4871 CFN III Manager’s Manual for Windows® XP Embedded - Version 3.6 · August 2010 Page 15-1
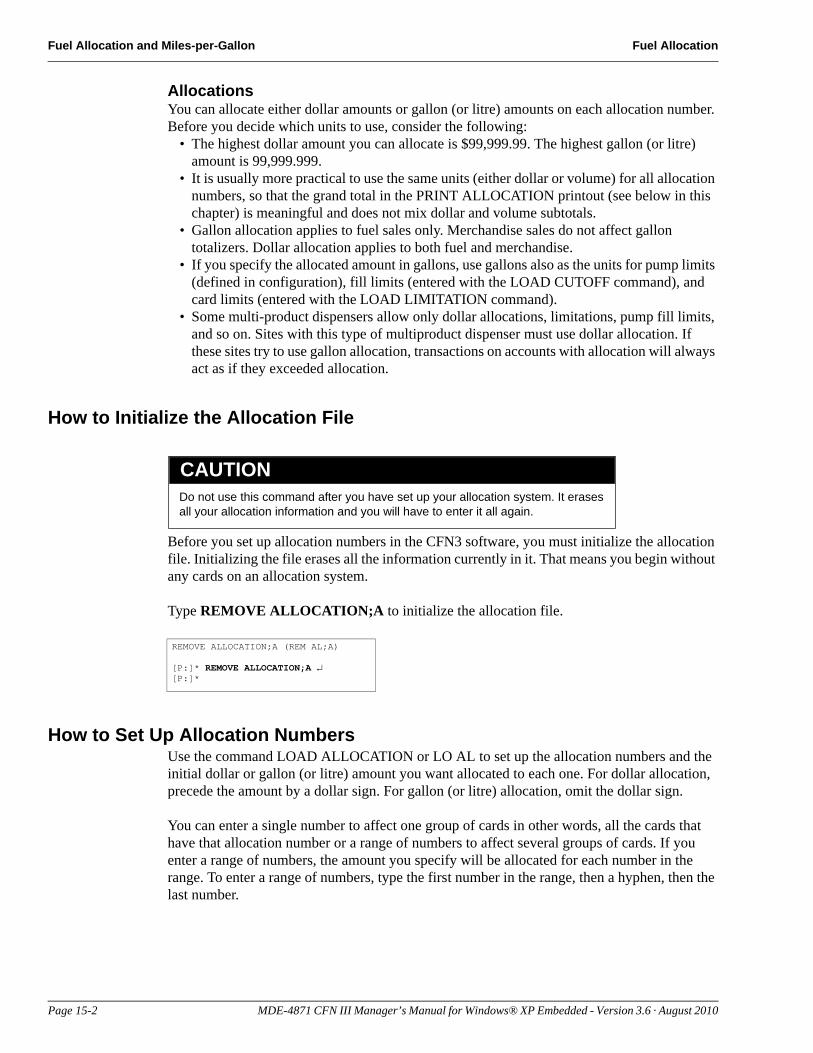
Fuel Allocation and Miles-per-Gallon Fuel Allocation
AllocationsYou can allocate either dollar amounts or gallon (or litre) amounts on each allocation number. Before you decide which units to use, consider the following:
• The highest dollar amount you can allocate is $99,999.99. The highest gallon (or litre) amount is 99,999.999.
• It is usually more practical to use the same units (either dollar or volume) for all allocation numbers, so that the grand total in the PRINT ALLOCATION printout (see below in this chapter) is meaningful and does not mix dollar and volume subtotals.
• Gallon allocation applies to fuel sales only. Merchandise sales do not affect gallon totalizers. Dollar allocation applies to both fuel and merchandise.
• If you specify the allocated amount in gallons, use gallons also as the units for pump limits (defined in configuration), fill limits (entered with the LOAD CUTOFF command), and card limits (entered with the LOAD LIMITATION command).
• Some multi-product dispensers allow only dollar allocations, limitations, pump fill limits, and so on. Sites with this type of multiproduct dispenser must use dollar allocation. If these sites try to use gallon allocation, transactions on accounts with allocation will always act as if they exceeded allocation.
How to Initialize the Allocation File
Do not use this command after you have set up your allocation system. It erases all your allocation information and you will have to enter it all again.
CAUTION
Before you set up allocation numbers in the CFN3 software, you must initialize the allocation file. Initializing the file erases all the information currently in it. That means you begin without any cards on an allocation system.
REMOVE ALLOCATION;A (REM AL;A)
[P:]* REMOVE ALLOCATION;A ↵[P:]*
Type REMOVE ALLOCATION;A to initialize the allocation file.
How to Set Up Allocation NumbersUse the command LOAD ALLOCATION or LO AL to set up the allocation numbers and the initial dollar or gallon (or litre) amount you want allocated to each one. For dollar allocation, precede the amount by a dollar sign. For gallon (or litre) allocation, omit the dollar sign.
You can enter a single number to affect one group of cards in other words, all the cards that have that allocation number or a range of numbers to affect several groups of cards. If you enter a range of numbers, the amount you specify will be allocated for each number in the range. To enter a range of numbers, type the first number in the range, then a hyphen, then the last number.
Page 15-2 MDE-4871 CFN III Manager’s Manual for Windows® XP Embedded - Version 3.6 · August 2010
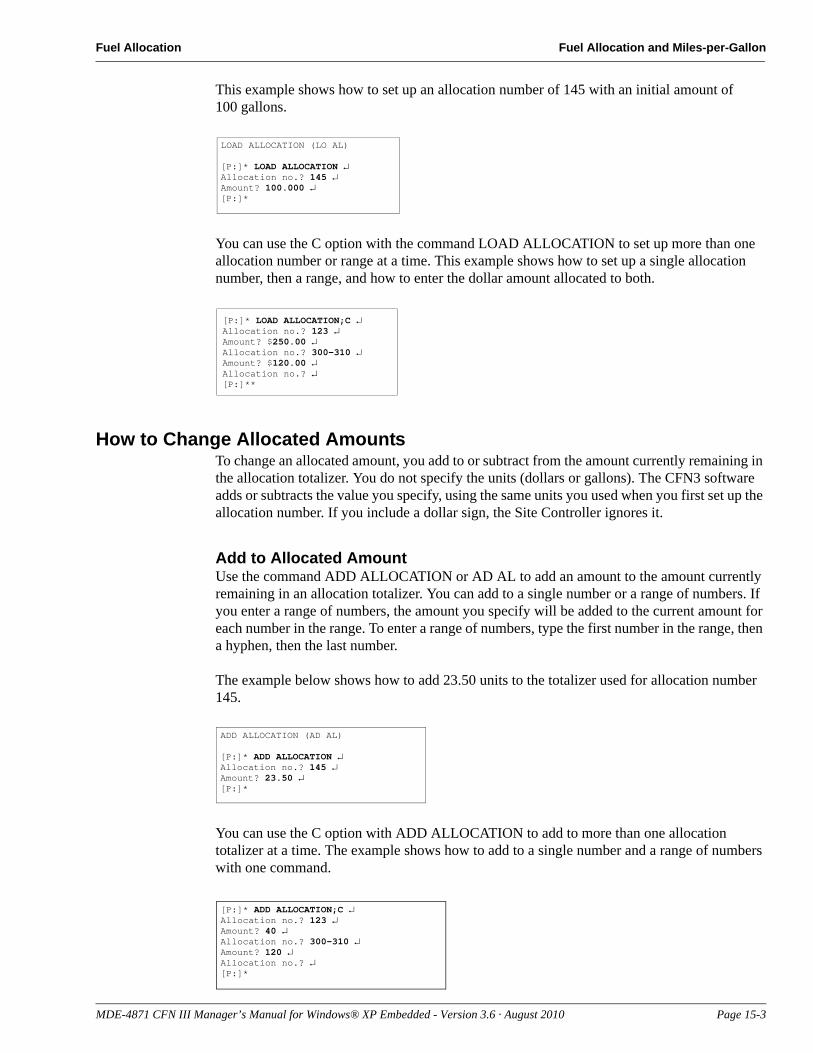
Fuel Allocation Fuel Allocation and Miles-per-Gallon
LOAD ALLOCATION (LO AL)
[P:]* LOAD ALLOCATION ↵Allocation no.? 145 ↵Amount? 100.000 ↵[P:]*
[P:]* LOAD ALLOCATION;C ↵Allocation no.? 123 ↵Amount? $250.00 ↵Allocation no.? 300-310 ↵Amount? $120.00 ↵Allocation no.? ↵[P:]**
This example shows how to set up an allocation number of 145 with an initial amount of 100 gallons.
You can use the C option with the command LOAD ALLOCATION to set up more than one allocation number or range at a time. This example shows how to set up a single allocation number, then a range, and how to enter the dollar amount allocated to both.
How to Change Allocated AmountsTo change an allocated amount, you add to or subtract from the amount currently remaining in the allocation totalizer. You do not specify the units (dollars or gallons). The CFN3 software adds or subtracts the value you specify, using the same units you used when you first set up the allocation number. If you include a dollar sign, the Site Controller ignores it.
Add to Allocated AmountUse the command ADD ALLOCATION or AD AL to add an amount to the amount currently remaining in an allocation totalizer. You can add to a single number or a range of numbers. If you enter a range of numbers, the amount you specify will be added to the current amount for each number in the range. To enter a range of numbers, type the first number in the range, then a hyphen, then the last number.
ADD ALLOCATION (AD AL)
[P:]* ADD ALLOCATION ↵Allocation no.? 145 ↵Amount? 23.50 ↵[P:]*
[P:]* ADD ALLOCATION;C ↵Allocation no.? 123 ↵Amount? 40 ↵Allocation no.? 300-310 ↵Amount? 120 ↵Allocation no.? ↵[P:]*
The example below shows how to add 23.50 units to the totalizer used for allocation number 145.
You can use the C option with ADD ALLOCATION to add to more than one allocation totalizer at a time. The example shows how to add to a single number and a range of numbers with one command.
MDE-4871 CFN III Manager’s Manual for Windows® XP Embedded - Version 3.6 · August 2010 Page 15-3
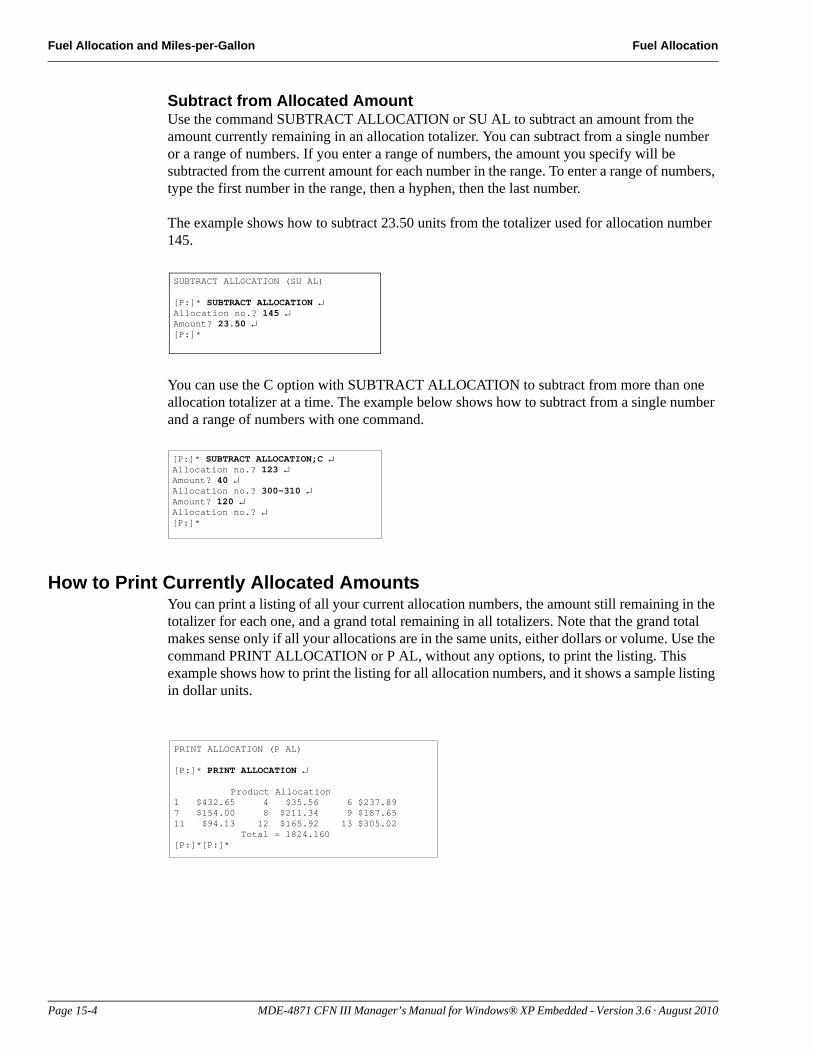
Fuel Allocation and Miles-per-Gallon Fuel Allocation
Subtract from Allocated AmountUse the command SUBTRACT ALLOCATION or SU AL to subtract an amount from the amount currently remaining in an allocation totalizer. You can subtract from a single number or a range of numbers. If you enter a range of numbers, the amount you specify will be subtracted from the current amount for each number in the range. To enter a range of numbers, type the first number in the range, then a hyphen, then the last number.
SUBTRACT ALLOCATION (SU AL)
[P:]* SUBTRACT ALLOCATION ↵Allocation no.? 145 ↵Amount? 23.50 ↵[P:]*
[P:]* SUBTRACT ALLOCATION;C ↵Allocation no.? 123 ↵Amount? 40 ↵Allocation no.? 300-310 ↵Amount? 120 ↵Allocation no.? ↵[P:]*
The example shows how to subtract 23.50 units from the totalizer used for allocation number 145.
You can use the C option with SUBTRACT ALLOCATION to subtract from more than one allocation totalizer at a time. The example below shows how to subtract from a single number and a range of numbers with one command.
How to Print Currently Allocated AmountsYou can print a listing of all your current allocation numbers, the amount still remaining in the totalizer for each one, and a grand total remaining in all totalizers. Note that the grand total makes sense only if all your allocations are in the same units, either dollars or volume. Use the command PRINT ALLOCATION or P AL, without any options, to print the listing. This example shows how to print the listing for all allocation numbers, and it shows a sample listing in dollar units.
PRINT ALLOCATION (P AL)
[P:]* PRINT ALLOCATION ↵
Product Allocation1 $432.65 4 $35.56 6 $237.897 $154.00 8 $211.34 9 $187.6511 $94.13 12 $165.92 13 $305.02 Total = 1824.160[P:]*[P:]*
Page 15-4 MDE-4871 CFN III Manager’s Manual for Windows® XP Embedded - Version 3.6 · August 2010
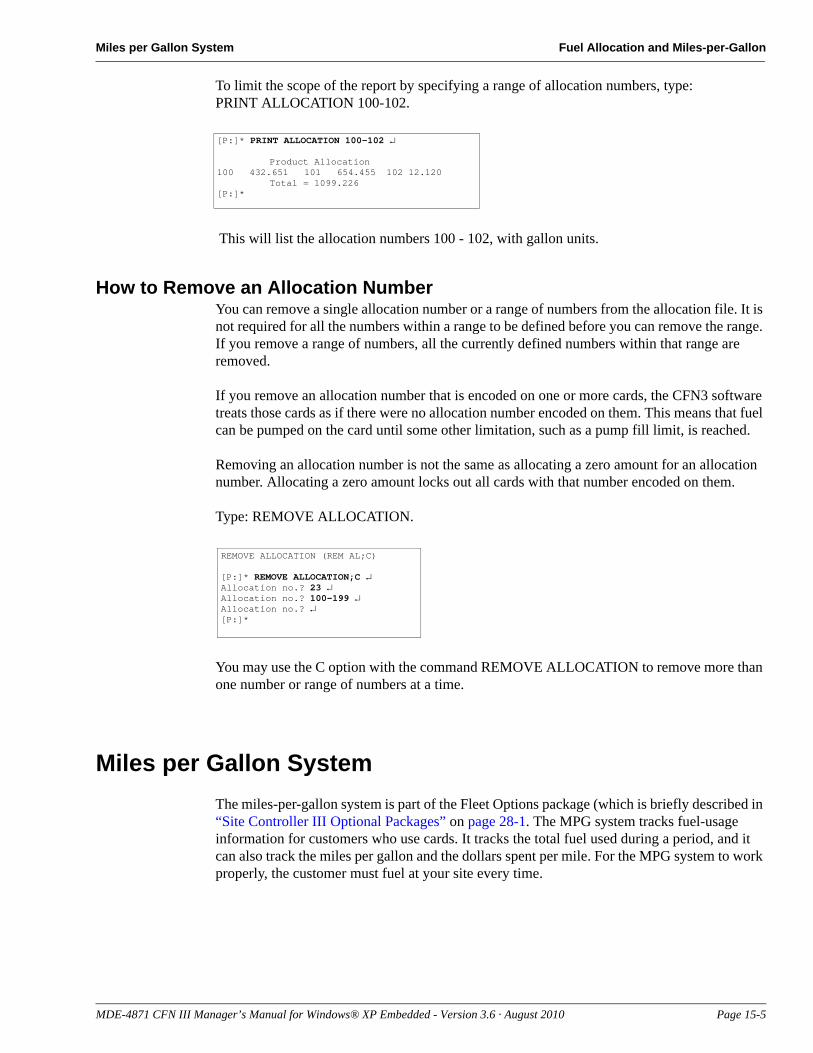
Miles per Gallon System Fuel Allocation and Miles-per-Gallon
To limit the scope of the report by specifying a range of allocation numbers, type:PRINT ALLOCATION 100-102.
[P:]* PRINT ALLOCATION 100-102 ↵
Product Allocation100 432.651 101 654.455 102 12.120
Total = 1099.226[P:]*
This will list the allocation numbers 100 - 102, with gallon units.
How to Remove an Allocation NumberYou can remove a single allocation number or a range of numbers from the allocation file. It is not required for all the numbers within a range to be defined before you can remove the range. If you remove a range of numbers, all the currently defined numbers within that range are removed.
REMOVE ALLOCATION (REM AL;C)
[P:]* REMOVE ALLOCATION;C ↵Allocation no.? 23 ↵Allocation no.? 100-199 ↵Allocation no.? ↵[P:]*
If you remove an allocation number that is encoded on one or more cards, the CFN3 software treats those cards as if there were no allocation number encoded on them. This means that fuel can be pumped on the card until some other limitation, such as a pump fill limit, is reached.
Removing an allocation number is not the same as allocating a zero amount for an allocation number. Allocating a zero amount locks out all cards with that number encoded on them.
Type: REMOVE ALLOCATION.
You may use the C option with the command REMOVE ALLOCATION to remove more than one number or range of numbers at a time.
Miles per Gallon SystemThe miles-per-gallon system is part of the Fleet Options package (which is briefly described in “Site Controller III Optional Packages” on page 28-1. The MPG system tracks fuel-usage information for customers who use cards. It tracks the total fuel used during a period, and it can also track the miles per gallon and the dollars spent per mile. For the MPG system to work properly, the customer must fuel at your site every time.
MDE-4871 CFN III Manager’s Manual for Windows® XP Embedded - Version 3.6 · August 2010 Page 15-5
Fuel Allocation and Miles-per-Gallon Miles per Gallon System
How to Set Up an MPG SystemYou set up the system by assigning a vehicle number to each customer with a Proprietary Card or Bank Card, then tracking the fuel-usage information by vehicle number. This means you can provide this service to all customers who use cards to purchase fuel.
There are two ways for the vehicle number to be entered during a fuel purchase. It can be encoded on Proprietary Cards, so the number is entered automatically when the card is read. Or, you can have the customer enter the number manually at the card reader. For customers who use bank cards, the number must be entered manually.
To set up the system, follow these steps:• In the CFN3 configuration, define the number of digits in the vehicle number and the
location of the vehicle number within the account number. Refer to the chapter on System parameters in MDE-4773 CFN III Configuration Manual for Windows XP for instructions.
• Encode a unique vehicle number on each Proprietary Card in the location you specified in configuration. Ensure that you keep track of the vehicle numbers you assign and the customers to whom they are assigned.
• If you want to track only the fuel usage, and not miles driven, set up the reader terminal to not request the odometer reading, set up the Proprietary Card restriction code to not require an odometer entry, set retries to 0, and use the LOAD VEHICLE command explained in this chapter to enter an initial odometer reading of zero for all vehicle numbers.
• If you want to track odometer readings to calculate miles per gallon and dollars per mile, set up the reader terminal to request the customer’s odometer reading at the time of sale, but let the odometer entry be optional. Also, configure the Site Controller for the number of times the customer can re-enter the odometer reading to try to be within a reasonable range of the reading at the last fueling, and how the Site Controller will handle an out-of-range entry.When a customer enters an odometer reading that indicates the miles driven are outside the range of miles specified in configuration for all vehicles, the Site Controller allows the customer to try again as many times as you specify in configuration. Once the customer has exhausted the retry limit, the Site Controller will accept the reading. The printout for that vehicle will indicate the odometer reading was BAD. The Site Controller can be configured to record a bad odometer reading as a new, valid entry (refer to SYS_PAR, page 13 in MDE-4773 CFN III Configuration Manual for Windows XP); this will appear on a PRINT VEHICLE printout as NEW.If the odometer reading is accepted the first time, the printout shows whether the miles driven were HIGH or LOW.
• If you want to include bank card customers in the system, set up the reader terminal to request the vehicle number at the time of sale.
• If the Site Controller tracks the miles per gallon and dollars per mile, you can set up the reader terminal receipt to print that information.
• Use the commands in this chapter to maintain the vehicle numbers, fueling periods, and odometer readings.
Page 15-6 MDE-4871 CFN III Manager’s Manual for Windows® XP Embedded - Version 3.6 · August 2010
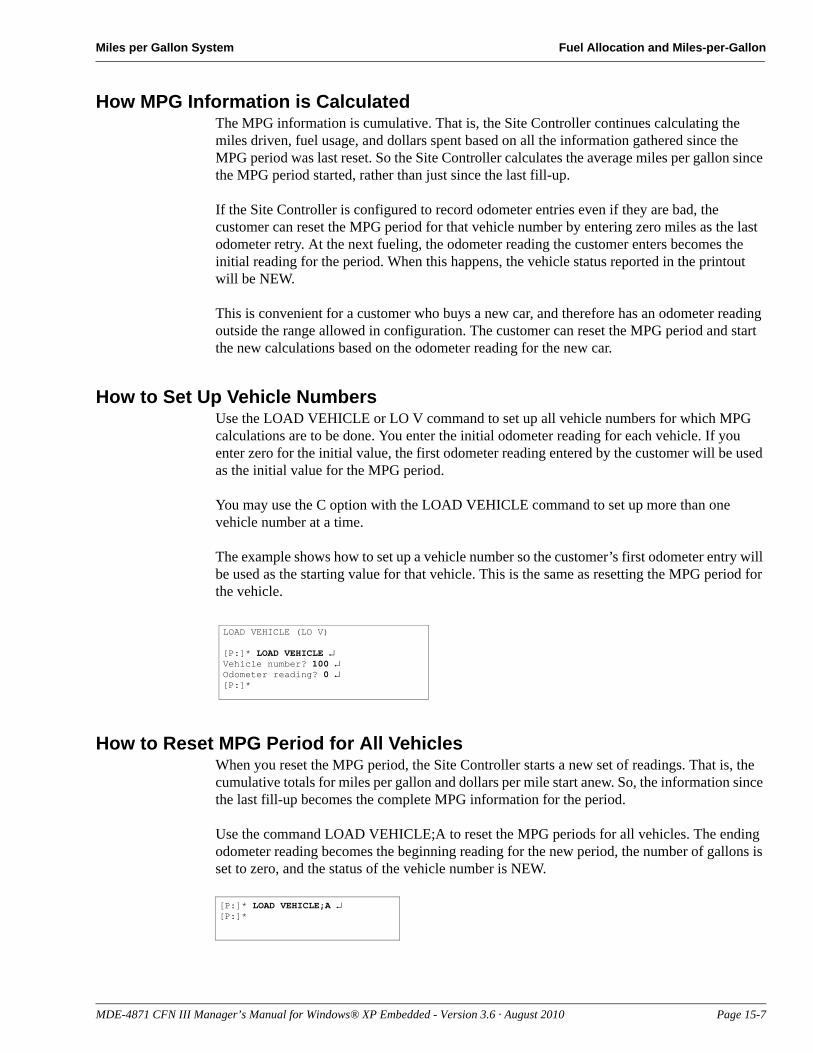
Miles per Gallon System Fuel Allocation and Miles-per-Gallon
How MPG Information is CalculatedThe MPG information is cumulative. That is, the Site Controller continues calculating the miles driven, fuel usage, and dollars spent based on all the information gathered since the MPG period was last reset. So the Site Controller calculates the average miles per gallon since the MPG period started, rather than just since the last fill-up.
If the Site Controller is configured to record odometer entries even if they are bad, the customer can reset the MPG period for that vehicle number by entering zero miles as the last odometer retry. At the next fueling, the odometer reading the customer enters becomes the initial reading for the period. When this happens, the vehicle status reported in the printout will be NEW.
This is convenient for a customer who buys a new car, and therefore has an odometer reading outside the range allowed in configuration. The customer can reset the MPG period and start the new calculations based on the odometer reading for the new car.
How to Set Up Vehicle NumbersUse the LOAD VEHICLE or LO V command to set up all vehicle numbers for which MPG calculations are to be done. You enter the initial odometer reading for each vehicle. If you enter zero for the initial value, the first odometer reading entered by the customer will be used as the initial value for the MPG period.
LOAD VEHICLE (LO V)
[P:]* LOAD VEHICLE ↵Vehicle number? 100 ↵Odometer reading? 0 ↵[P:]*
You may use the C option with the LOAD VEHICLE command to set up more than one vehicle number at a time.
The example shows how to set up a vehicle number so the customer’s first odometer entry will be used as the starting value for that vehicle. This is the same as resetting the MPG period for the vehicle.
How to Reset MPG Period for All VehiclesWhen you reset the MPG period, the Site Controller starts a new set of readings. That is, the cumulative totals for miles per gallon and dollars per mile start anew. So, the information since the last fill-up becomes the complete MPG information for the period.
[P:]* LOAD VEHICLE;A ↵[P:]*
Use the command LOAD VEHICLE;A to reset the MPG periods for all vehicles. The ending odometer reading becomes the beginning reading for the new period, the number of gallons is set to zero, and the status of the vehicle number is NEW.
MDE-4871 CFN III Manager’s Manual for Windows® XP Embedded - Version 3.6 · August 2010 Page 15-7
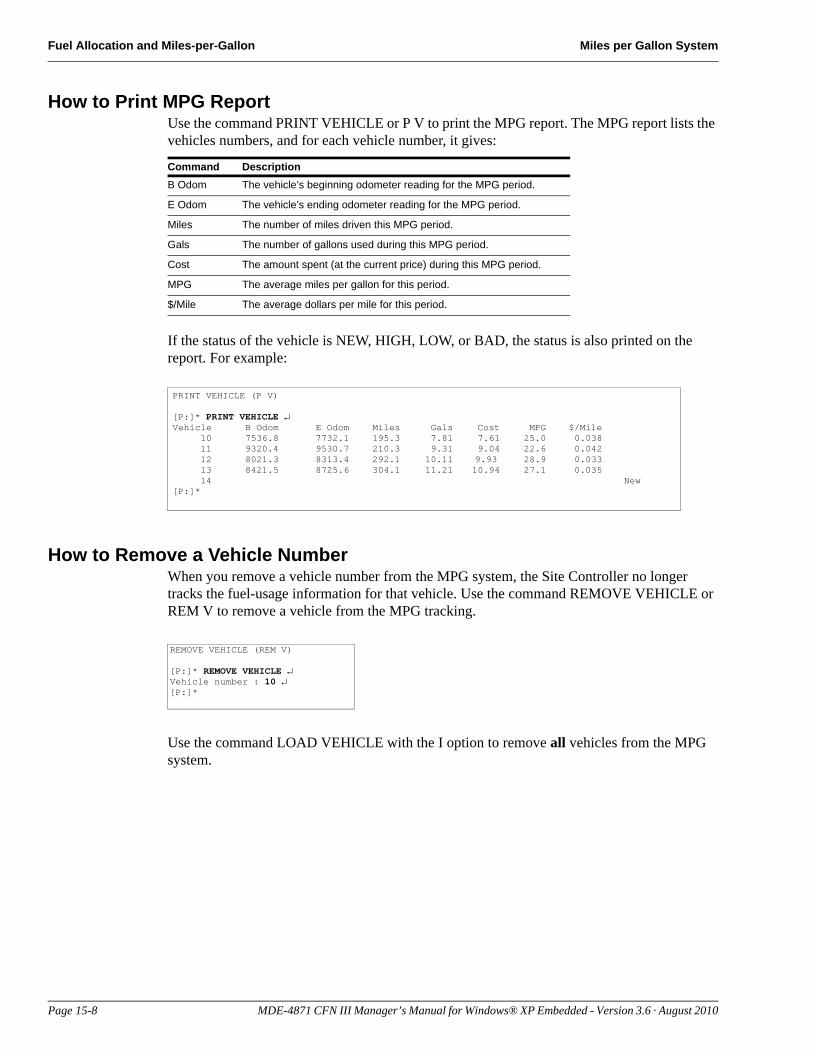
Fuel Allocation and Miles-per-Gallon Miles per Gallon System
How to Print MPG ReportUse the command PRINT VEHICLE or P V to print the MPG report. The MPG report lists the vehicles numbers, and for each vehicle number, it gives:
Command DescriptionB Odom The vehicle’s beginning odometer reading for the MPG period.
E Odom The vehicle’s ending odometer reading for the MPG period.
Miles The number of miles driven this MPG period.
Gals The number of gallons used during this MPG period.
Cost The amount spent (at the current price) during this MPG period.
MPG The average miles per gallon for this period.
$/Mile The average dollars per mile for this period.
PRINT VEHICLE (P V)
[P:]* PRINT VEHICLE ↵Vehicle B Odom E Odom Miles Gals Cost MPG $/Mile 10 7536.8 7732.1 195.3 7.81 7.61 25.0 0.038 11 9320.4 9530.7 210.3 9.31 9.04 22.6 0.042 12 8021.3 8313.4 292.1 10.11 9.93 28.9 0.033 13 8421.5 8725.6 304.1 11.21 10.94 27.1 0.035 14 New[P:]*
If the status of the vehicle is NEW, HIGH, LOW, or BAD, the status is also printed on the report. For example:
How to Remove a Vehicle NumberWhen you remove a vehicle number from the MPG system, the Site Controller no longer tracks the fuel-usage information for that vehicle. Use the command REMOVE VEHICLE or REM V to remove a vehicle from the MPG tracking.
REMOVE VEHICLE (REM V)
[P:]* REMOVE VEHICLE ↵Vehicle number : 10 ↵[P:]*
Use the command LOAD VEHICLE with the I option to remove all vehicles from the MPG system.
Page 15-8 MDE-4871 CFN III Manager’s Manual for Windows® XP Embedded - Version 3.6 · August 2010
Why Take Backups? Backup System Data and Disk Files
16 – Backup System Data and Disk Files
Why Take Backups?Backups prevent data disasters.
A backup is a copy of data or files that is kept separate from the original for safety and security. For example, you must make a backup copy of the Site Controller release disk. You must also make backup copies of command files that you use on your Site Controller. Gasboy provides some programs and command files that allow you to back up Site Controller system data. You must use these to back up data that has been loaded into or collected on the Site Controller.
There are several reasons for keeping current backups of files and system data.• When you install a new release of the operating system, some of the tables that contain
system data may be reconstructed and the data will be lost. If you have a current backup, you can restore the data from the backup.
• The software for a Site Controller is supplied on the hard disk and also on a backup floppy disk. During normal system use, any configuration changes or command files that you add to the Site Controller are can be placed on the hard disk. These changes must be copied onto the backup floppy disk to keep your backup current.
• The tables that contain system data may be reconstructed if the Site Controller crashes.• Data may inadvertently become corrupted through user error.• Files may be deleted or changed by accident.• Floppy disks or hard disks can become damaged or corrupted.• Although unlikely, the system could fall victim to deliberate sabotage.• In spite of every precaution in the design and installation of the system, it could
experience a physical failure (or fire, flood, or other disaster).
To ensure you always have an up-to-date backup, it is a good idea to back up the system data every day. If your site is polled for transactions by a remote system at least once a day, you do not require to back up transactions, as there will be a record of them on the remote system.
The amount of time it takes to back up the system is very small compared to the time it would take to reconstruct the data if a current backup were not available when required.
At a minimum, you must back up system data before you install a new release, and after you change any system data, such as price or product data.
You must always make a backup copy of the release disk and any other diskettes that are shipped to you. You must also make a backup copy of FRAMOS.CFG every time you change the configuration, and you must make backup copies of any command files or other important files you create.
MDE-4871 CFN III Manager’s Manual for Windows® XP Embedded - Version 3.6 · August 2010 Page 16-1
Backup System Data and Disk Files Backup Files
Floppy DiskettesGasboy recommends that you make backups on double-sided, high-density, 3.5-inch floppy diskettes. Format the diskette before use if you did not purchase pre-formatted diskettes. Pre-formatted diskettes are readily available and will save you the time of formatting. BACKUP requires blank, formatted diskettes.
Backup FilesThe command files for backing up system data are:
File DescriptionSYSBACK.CMD Command file to back up all system tables in RAM, except transactions,
to a file called SYSBACK.DTA.
TRANBACK.CMD Command file to back up transaction data to a file called TRANBACK.DTA.
BACKTRAN.BIN Disk-based program to back up transaction data to a file with a name of your choosing.
RESTORE.BIN Disk-based program to restore system tables and transaction data backed up with SYSBACK, TRANBACK, or BACKTRAN. Note: RESTORE.BIN cannot restore a transaction data file if the size of the trans table has changed between the time of running BACKTRAN and RESTORE.BIN.
INSTALL.CMD Command file to restore data backed up with HARDBACK.
TAX.BIN Optional program for setting up tax tables.
All these files are in the C:\SC3\BIN directory.
The batch files used to backup your CFN3 files are:
How to Back Up System DataNote: Before backup, run TRANBACK and SYSBACK to backup items in the SC III memory.
The SYSBACK command backs up all the system data. Data will be put in a file called SYSBACK.DTA. Type the command SYSBACK. The backup will take a few minutes.
Replace the disks every three months if you do daily backups. If you do less frequent backups, you do not require to replace the disks as often.
File DescriptionBACKUP This command is used to backup your CFN3 files onto diskettes.
Command file that takes all files excluding .BINs, .EXEs, and HTML files, and using a compression program places them onto floppy diskette(s).
RESTORE Command file that extracts the files compressed with the BACKUP command and returns the files to the SC3 directory.
Page 16-2 MDE-4871 CFN III Manager’s Manual for Windows® XP Embedded - Version 3.6 · August 2010
How to Back Up System Data Backup System Data and Disk Files
Backing Up CFN3 Files with BackupTo back up files, proceed as follows:
1 Log in as an Administrator.
2 Sign on to SC III and run TRANBACK and SYSBACK.
3 Open a Windows XP command window (Select Start > Programs > Command Prompt).
4 Go to the SC3 directory using the command: C:\ cd SC3
5 Insert a BLANK diskette in the A:drive.
6 At the Windows XP command prompt type: C:\ SC3 \ BACKUPYou will be prompted to insert diskettes, if more than one is required.
7 When backup is completed, quit the command window.
The command will take all files except for any .EXE, .BIN and HTML files, compress them using a compression program and place them on blank diskettes in the A: drive. You do not require to backup the .BIN, .EXE, and HTML files. These can be found on the software CD or diskettes that came with your system.
How to Do a Custom System BackupThe above procedure will back up all system data, but sometimes you may want to back up just a part of the system data. To back up system data, other than transactions, use the following procedure (it is easier to do this with a command file).
1 Shut down the Site Controller with STOP so that the system data does not change when you are doing the backup.
2 Use ENABLE RAW to enable raw mode.
3 Use the PRINT commands with the output redirection options to print the data to a backup file. Refer to “How to Restore System or Transaction Data” on page 16-6 for examples.
4 Use DISABLE RAW to disable raw mode.
5 Restart the Site Controller with RUN.
MDE-4871 CFN III Manager’s Manual for Windows® XP Embedded - Version 3.6 · August 2010 Page 16-3
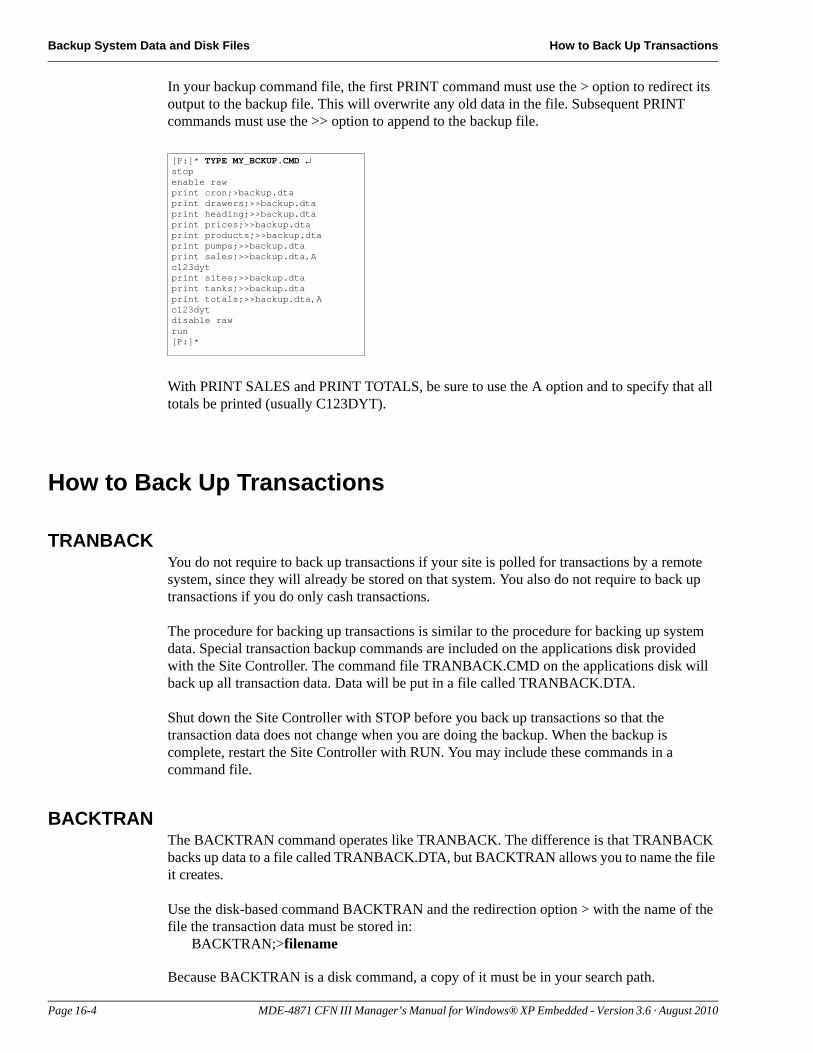
Backup System Data and Disk Files How to Back Up Transactions
[P:]* TYPE MY_BCKUP.CMD ↵stopenable rawprint cron;>backup.dtaprint drawers;>>backup.dtaprint heading;>>backup.dtaprint prices;>>backup.dtaprint products;>>backup.dtaprint pumps;>>backup.dtaprint sales;>>backup.dta,A c123dytprint sites;>>backup.dtaprint tanks;>>backup.dtaprint totals;>>backup.dta,A c123dytdisable rawrun[P:]*
In your backup command file, the first PRINT command must use the > option to redirect its output to the backup file. This will overwrite any old data in the file. Subsequent PRINT commands must use the >> option to append to the backup file.
With PRINT SALES and PRINT TOTALS, be sure to use the A option and to specify that all totals be printed (usually C123DYT).
How to Back Up Transactions
TRANBACKYou do not require to back up transactions if your site is polled for transactions by a remote system, since they will already be stored on that system. You also do not require to back up transactions if you do only cash transactions.
The procedure for backing up transactions is similar to the procedure for backing up system data. Special transaction backup commands are included on the applications disk provided with the Site Controller. The command file TRANBACK.CMD on the applications disk will back up all transaction data. Data will be put in a file called TRANBACK.DTA.
Shut down the Site Controller with STOP before you back up transactions so that the transaction data does not change when you are doing the backup. When the backup is complete, restart the Site Controller with RUN. You may include these commands in a command file.
BACKTRANThe BACKTRAN command operates like TRANBACK. The difference is that TRANBACK backs up data to a file called TRANBACK.DTA, but BACKTRAN allows you to name the file it creates.
Use the disk-based command BACKTRAN and the redirection option > with the name of the file the transaction data must be stored in:
BACKTRAN;>filename
Because BACKTRAN is a disk command, a copy of it must be in your search path.
Page 16-4 MDE-4871 CFN III Manager’s Manual for Windows® XP Embedded - Version 3.6 · August 2010
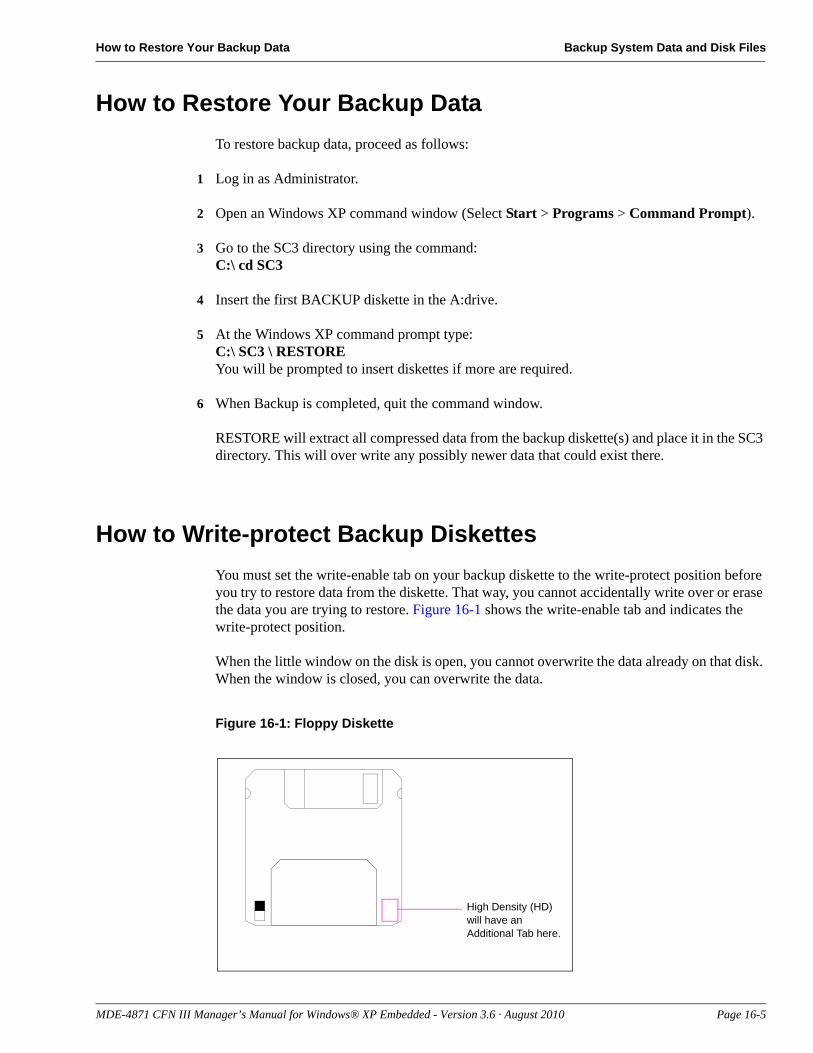
How to Restore Your Backup Data Backup System Data and Disk Files
How to Restore Your Backup DataTo restore backup data, proceed as follows:
1 Log in as Administrator.
2 Open an Windows XP command window (Select Start > Programs > Command Prompt).
3 Go to the SC3 directory using the command: C:\ cd SC3
4 Insert the first BACKUP diskette in the A:drive.
5 At the Windows XP command prompt type: C:\ SC3 \ RESTOREYou will be prompted to insert diskettes if more are required.
6 When Backup is completed, quit the command window.
RESTORE will extract all compressed data from the backup diskette(s) and place it in the SC3 directory. This will over write any possibly newer data that could exist there.
How to Write-protect Backup DiskettesYou must set the write-enable tab on your backup diskette to the write-protect position before you try to restore data from the diskette. That way, you cannot accidentally write over or erase the data you are trying to restore. Figure 16-1 shows the write-enable tab and indicates the write-protect position.
When the little window on the disk is open, you cannot overwrite the data already on that disk. When the window is closed, you can overwrite the data.
Figure 16-1: Floppy Diskette
High Density (HD) will have an Additional Tab here.
MDE-4871 CFN III Manager’s Manual for Windows® XP Embedded - Version 3.6 · August 2010 Page 16-5
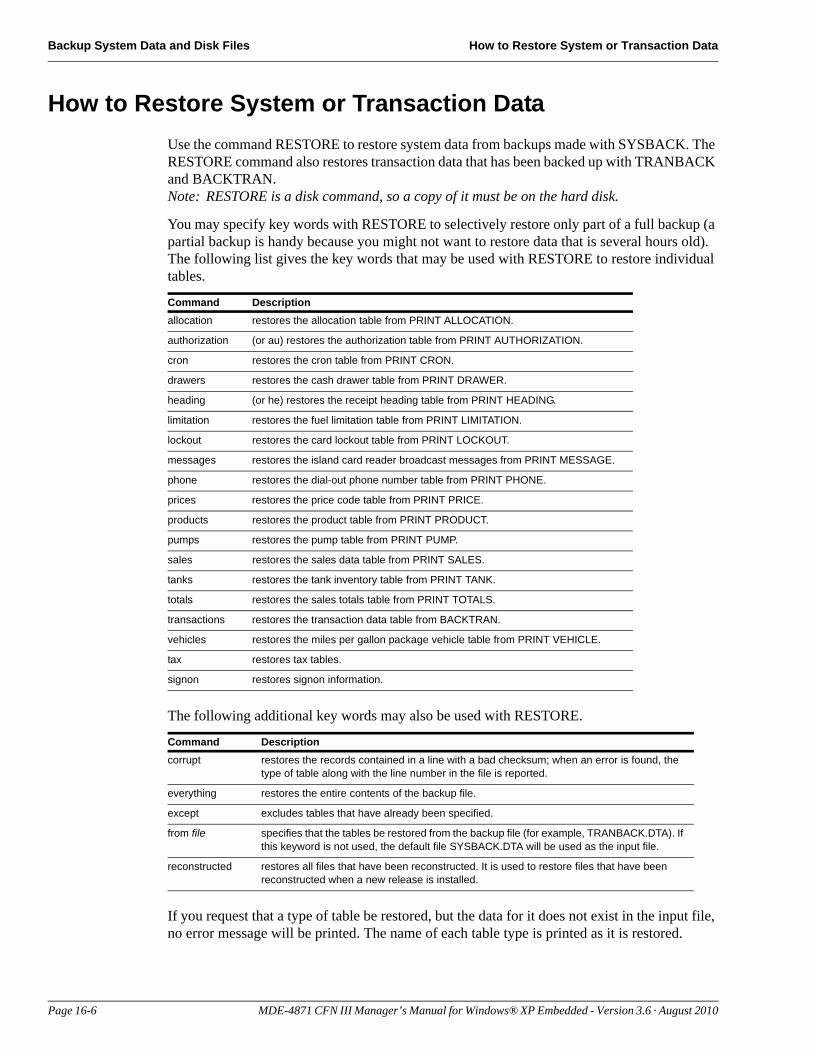
Backup System Data and Disk Files How to Restore System or Transaction Data
How to Restore System or Transaction DataUse the command RESTORE to restore system data from backups made with SYSBACK. The RESTORE command also restores transaction data that has been backed up with TRANBACK and BACKTRAN.Note: RESTORE is a disk command, so a copy of it must be on the hard disk.
You may specify key words with RESTORE to selectively restore only part of a full backup (a partial backup is handy because you might not want to restore data that is several hours old). The following list gives the key words that may be used with RESTORE to restore individual tables.
The following additional key words may also be used with RESTORE.
If you request that a type of table be restored, but the data for it does not exist in the input file, no error message will be printed. The name of each table type is printed as it is restored.
Command Descriptionallocation restores the allocation table from PRINT ALLOCATION.
authorization (or au) restores the authorization table from PRINT AUTHORIZATION.
cron restores the cron table from PRINT CRON.
drawers restores the cash drawer table from PRINT DRAWER.
heading (or he) restores the receipt heading table from PRINT HEADING.
limitation restores the fuel limitation table from PRINT LIMITATION.
lockout restores the card lockout table from PRINT LOCKOUT.
messages restores the island card reader broadcast messages from PRINT MESSAGE.
phone restores the dial-out phone number table from PRINT PHONE.
prices restores the price code table from PRINT PRICE.
products restores the product table from PRINT PRODUCT.
pumps restores the pump table from PRINT PUMP.
sales restores the sales data table from PRINT SALES.
tanks restores the tank inventory table from PRINT TANK.
totals restores the sales totals table from PRINT TOTALS.
transactions restores the transaction data table from BACKTRAN.
vehicles restores the miles per gallon package vehicle table from PRINT VEHICLE.
tax restores tax tables.
signon restores signon information.
Command Descriptioncorrupt restores the records contained in a line with a bad checksum; when an error is found, the
type of table along with the line number in the file is reported.
everything restores the entire contents of the backup file.
except excludes tables that have already been specified.
from file specifies that the tables be restored from the backup file (for example, TRANBACK.DTA). If this keyword is not used, the default file SYSBACK.DTA will be used as the input file.
reconstructed restores all files that have been reconstructed. It is used to restore files that have been reconstructed when a new release is installed.
Page 16-6 MDE-4871 CFN III Manager’s Manual for Windows® XP Embedded - Version 3.6 · August 2010
How to Restore System or Transaction Data Backup System Data and Disk Files
Below are some examples of commands for restoring system data from backups.• RESTORE EVERYTHING restores all tables that are backed up in the file
SYSBACK.DTA and prints the name of each table as it is restored.• RESTORE EVERYTHING CORRUPT FROM filename (where filename is
SYSBACK.DTA, TRANBACK.DTA, or whatever you named the backup file you made your custom system backup) restores the records contained in a line, even if they have a bad checksum. When an error is found, the type of table along with the line number in the file is reported.
• RESTORE EVERYTHING EXCEPT TANKS TOTALS FROM filename (where filename is SYSBACK.DTA, TRANBACK.DTA, or whatever you named the backup file restores all tables that are backed up in the file filename except tanks and totals tables, and prints the name of each table as it is restored.
• RESTORE RECONSTRUCTED restores all tables that are backed up in the file SYSBACK.DTA and that have been reconstructed. This is useful after installing a new release of the software that has caused some tables to be reconstructed.
• RESTORE TRANSACTIONS FROM filename (where filename is TRANBACK.DTA, or whatever you named the backup file you made with BACKTRAN) restores the transaction table that has been backed up with TRANBACK or BACKTRAN.
• RESTORE PUMPS PRODUCTS PRICES restores the pump, product, and price tables from the file SYSBACK.DTA.
MDE-4871 CFN III Manager’s Manual for Windows® XP Embedded - Version 3.6 · August 2010 Page 16-7

Backup System Data and Disk Files How to Restore System or Transaction Data
This page is intentionally left blank.
Page 16-8 MDE-4871 CFN III Manager’s Manual for Windows® XP Embedded - Version 3.6 · August 2010
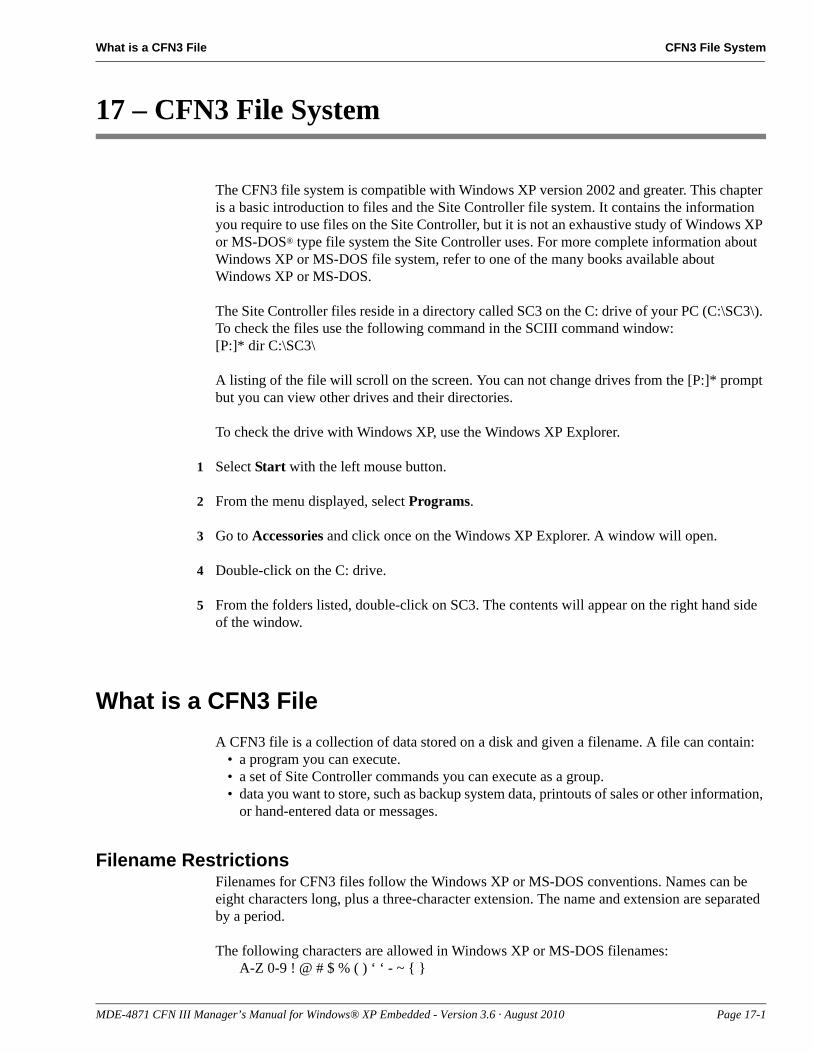
What is a CFN3 File CFN3 File System
17 – CFN3 File System
The CFN3 file system is compatible with Windows XP version 2002 and greater. This chapter is a basic introduction to files and the Site Controller file system. It contains the information you require to use files on the Site Controller, but it is not an exhaustive study of Windows XP or MS-DOS® type file system the Site Controller uses. For more complete information about Windows XP or MS-DOS file system, refer to one of the many books available about Windows XP or MS-DOS.
The Site Controller files reside in a directory called SC3 on the C: drive of your PC (C:\SC3\). To check the files use the following command in the SCIII command window:[P:]* dir C:\SC3\
A listing of the file will scroll on the screen. You can not change drives from the [P:]* prompt but you can view other drives and their directories.
To check the drive with Windows XP, use the Windows XP Explorer.
1 Select Start with the left mouse button.
2 From the menu displayed, select Programs.
3 Go to Accessories and click once on the Windows XP Explorer. A window will open.
4 Double-click on the C: drive.
5 From the folders listed, double-click on SC3. The contents will appear on the right hand side of the window.
What is a CFN3 FileA CFN3 file is a collection of data stored on a disk and given a filename. A file can contain:
• a program you can execute.• a set of Site Controller commands you can execute as a group.• data you want to store, such as backup system data, printouts of sales or other information,
or hand-entered data or messages.
Filename RestrictionsFilenames for CFN3 files follow the Windows XP or MS-DOS conventions. Names can be eight characters long, plus a three-character extension. The name and extension are separated by a period.
The following characters are allowed in Windows XP or MS-DOS filenames:A-Z 0-9 ! @ # $ % ( ) ‘ ‘ - ~ { }
MDE-4871 CFN III Manager’s Manual for Windows® XP Embedded - Version 3.6 · August 2010 Page 17-1
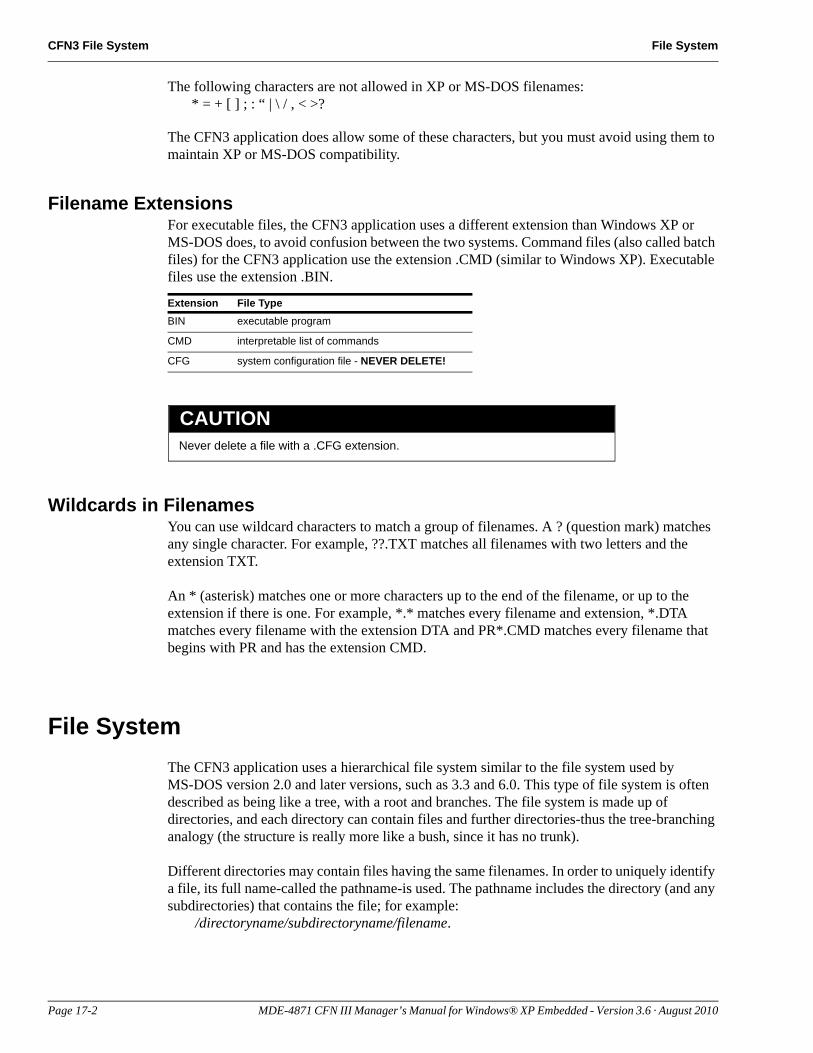
CFN3 File System File System
The following characters are not allowed in XP or MS-DOS filenames:* = + [ ] ; : “ | \ / , < >?
The CFN3 application does allow some of these characters, but you must avoid using them to maintain XP or MS-DOS compatibility.
Filename ExtensionsFor executable files, the CFN3 application uses a different extension than Windows XP or MS-DOS does, to avoid confusion between the two systems. Command files (also called batch files) for the CFN3 application use the extension .CMD (similar to Windows XP). Executable files use the extension .BIN.
Extension File TypeBIN executable program
CMD interpretable list of commands
CFG system configuration file - NEVER DELETE!
Never delete a file with a .CFG extension.
CAUTION
Wildcards in FilenamesYou can use wildcard characters to match a group of filenames. A ? (question mark) matches any single character. For example, ??.TXT matches all filenames with two letters and the extension TXT.
An * (asterisk) matches one or more characters up to the end of the filename, or up to the extension if there is one. For example, *.* matches every filename and extension, *.DTA matches every filename with the extension DTA and PR*.CMD matches every filename that begins with PR and has the extension CMD.
File SystemThe CFN3 application uses a hierarchical file system similar to the file system used by MS-DOS version 2.0 and later versions, such as 3.3 and 6.0. This type of file system is often described as being like a tree, with a root and branches. The file system is made up of directories, and each directory can contain files and further directories-thus the tree-branching analogy (the structure is really more like a bush, since it has no trunk).
Different directories may contain files having the same filenames. In order to uniquely identify a file, its full name-called the pathname-is used. The pathname includes the directory (and any subdirectories) that contains the file; for example:
/directoryname/subdirectoryname/filename.
Page 17-2 MDE-4871 CFN III Manager’s Manual for Windows® XP Embedded - Version 3.6 · August 2010
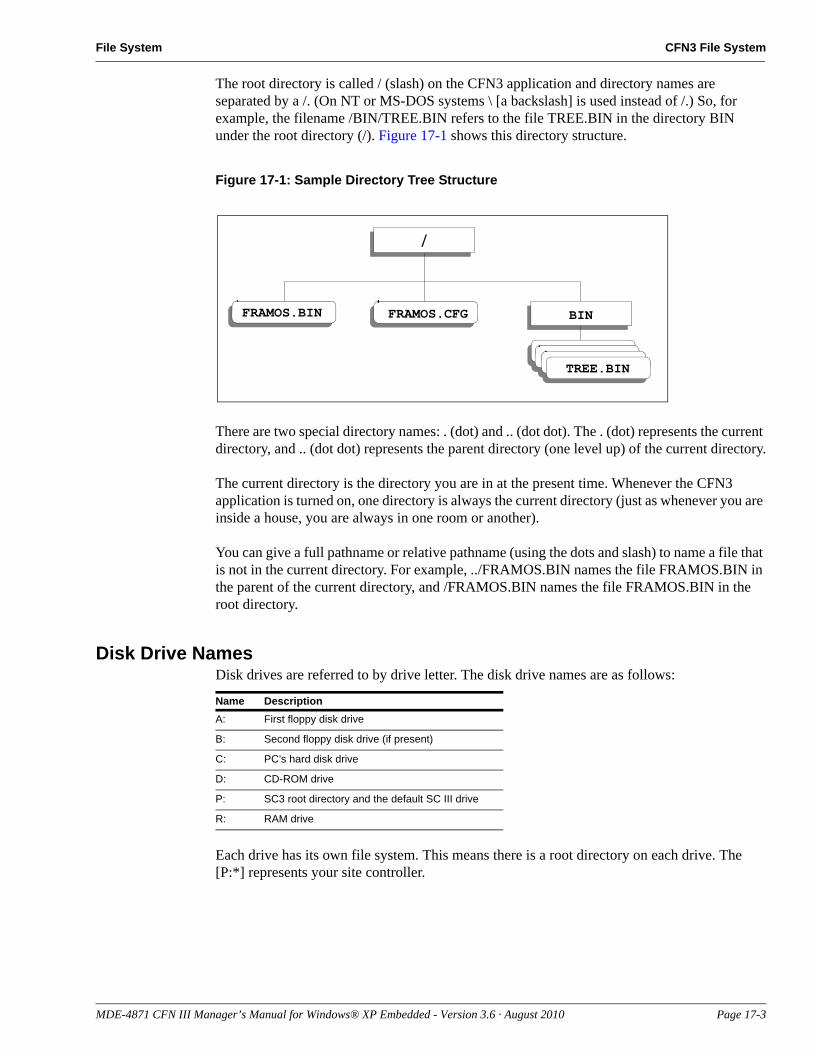
File System CFN3 File System
The root directory is called / (slash) on the CFN3 application and directory names are separated by a /. (On NT or MS-DOS systems \ [a backslash] is used instead of /.) So, for example, the filename /BIN/TREE.BIN refers to the file TREE.BIN in the directory BIN under the root directory (/). Figure 17-1 shows this directory structure.
Figure 17-1: Sample Directory Tree Structure
/
BIN
TREE.BIN
FRAMOS.CFGFRAMOS.BIN
/
BIN
TREE.BIN
FRAMOS.CFGFRAMOS.BIN
There are two special directory names: . (dot) and .. (dot dot). The . (dot) represents the current directory, and .. (dot dot) represents the parent directory (one level up) of the current directory.
The current directory is the directory you are in at the present time. Whenever the CFN3 application is turned on, one directory is always the current directory (just as whenever you are inside a house, you are always in one room or another).
You can give a full pathname or relative pathname (using the dots and slash) to name a file that is not in the current directory. For example, ../FRAMOS.BIN names the file FRAMOS.BIN in the parent of the current directory, and /FRAMOS.BIN names the file FRAMOS.BIN in the root directory.
Disk Drive NamesDisk drives are referred to by drive letter. The disk drive names are as follows:
Name DescriptionA: First floppy disk drive
B: Second floppy disk drive (if present)
C: PC’s hard disk drive
D: CD-ROM drive
P: SC3 root directory and the default SC III drive
R: RAM drive
Each drive has its own file system. This means there is a root directory on each drive. The [P:*] represents your site controller.
MDE-4871 CFN III Manager’s Manual for Windows® XP Embedded - Version 3.6 · August 2010 Page 17-3
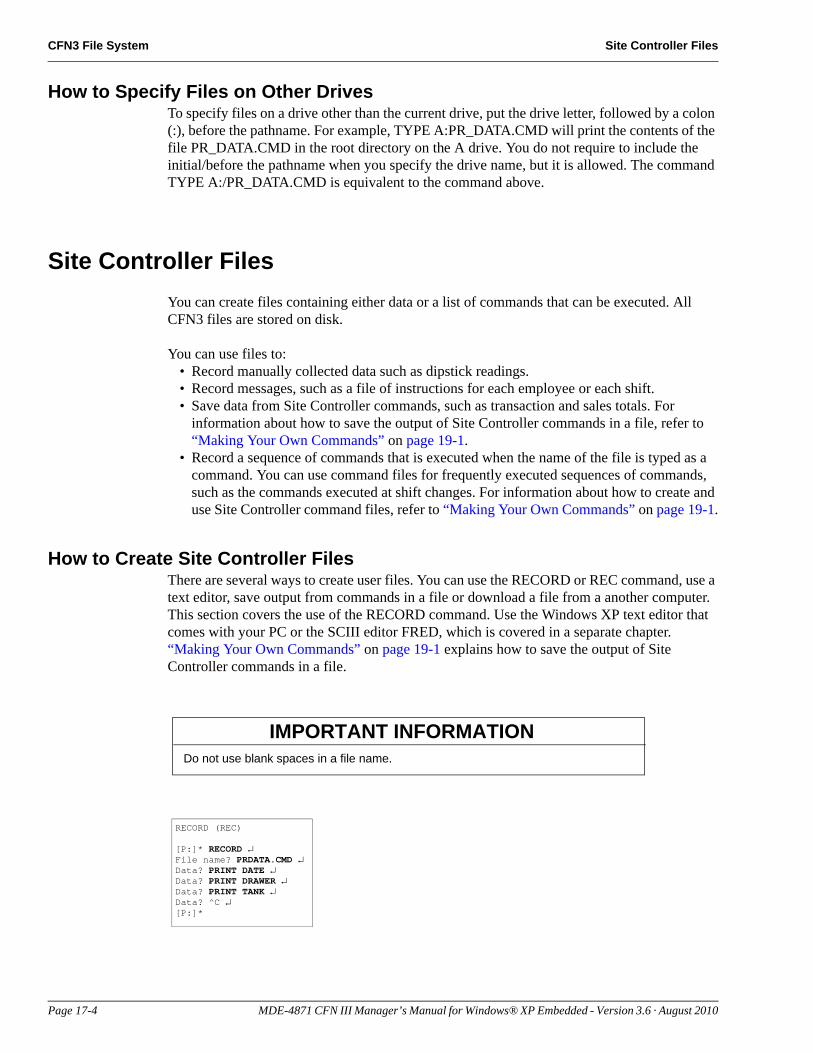
CFN3 File System Site Controller Files
How to Specify Files on Other DrivesTo specify files on a drive other than the current drive, put the drive letter, followed by a colon (:), before the pathname. For example, TYPE A:PR_DATA.CMD will print the contents of the file PR_DATA.CMD in the root directory on the A drive. You do not require to include the initial/before the pathname when you specify the drive name, but it is allowed. The command TYPE A:/PR_DATA.CMD is equivalent to the command above.
Site Controller FilesYou can create files containing either data or a list of commands that can be executed. All CFN3 files are stored on disk.
You can use files to:• Record manually collected data such as dipstick readings.• Record messages, such as a file of instructions for each employee or each shift.• Save data from Site Controller commands, such as transaction and sales totals. For
information about how to save the output of Site Controller commands in a file, refer to “Making Your Own Commands” on page 19-1.
• Record a sequence of commands that is executed when the name of the file is typed as a command. You can use command files for frequently executed sequences of commands, such as the commands executed at shift changes. For information about how to create and use Site Controller command files, refer to “Making Your Own Commands” on page 19-1.
How to Create Site Controller FilesThere are several ways to create user files. You can use the RECORD or REC command, use a text editor, save output from commands in a file or download a file from a another computer. This section covers the use of the RECORD command. Use the Windows XP text editor that comes with your PC or the SCIII editor FRED, which is covered in a separate chapter. “Making Your Own Commands” on page 19-1 explains how to save the output of Site Controller commands in a file.
Do not use blank spaces in a file name.
IMPORTANT INFORMATION
RECORD (REC)
[P:]* RECORD ↵File name? PRDATA.CMD ↵Data? PRINT DATE ↵Data? PRINT DRAWER ↵Data? PRINT TANK ↵Data? ^C ↵[P:]*
Page 17-4 MDE-4871 CFN III Manager’s Manual for Windows® XP Embedded - Version 3.6 · August 2010
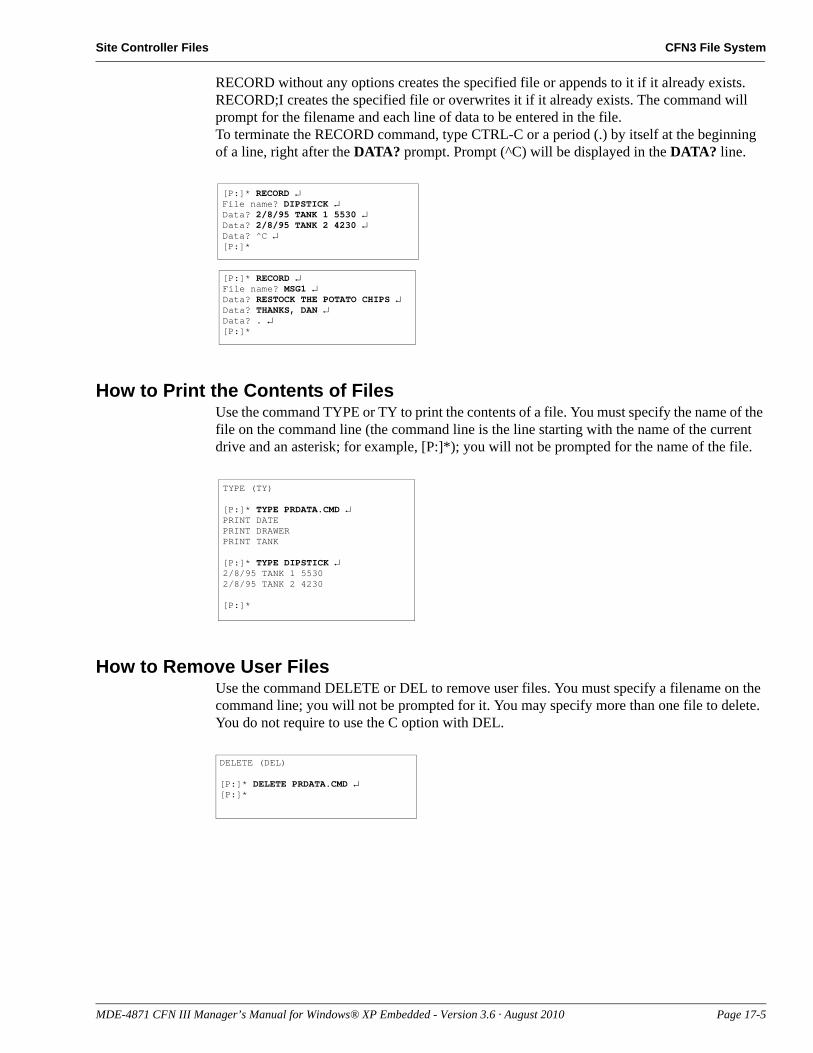
Site Controller Files CFN3 File System
RECORD without any options creates the specified file or appends to it if it already exists. RECORD;I creates the specified file or overwrites it if it already exists. The command will prompt for the filename and each line of data to be entered in the file.To terminate the RECORD command, type CTRL-C or a period (.) by itself at the beginning of a line, right after the DATA? prompt. Prompt (^C) will be displayed in the DATA? line.
[P:]* RECORD ↵File name? DIPSTICK ↵Data? 2/8/95 TANK 1 5530 ↵Data? 2/8/95 TANK 2 4230 ↵Data? ^C ↵[P:]*
[P:]* RECORD ↵File name? MSG1 ↵Data? RESTOCK THE POTATO CHIPS ↵Data? THANKS, DAN ↵Data? . ↵[P:]*
How to Print the Contents of FilesUse the command TYPE or TY to print the contents of a file. You must specify the name of the file on the command line (the command line is the line starting with the name of the current drive and an asterisk; for example, [P:]*); you will not be prompted for the name of the file.
TYPE (TY)
[P:]* TYPE PRDATA.CMD ↵PRINT DATEPRINT DRAWERPRINT TANK
[P:]* TYPE DIPSTICK ↵2/8/95 TANK 1 55302/8/95 TANK 2 4230
[P:]*
How to Remove User FilesUse the command DELETE or DEL to remove user files. You must specify a filename on the command line; you will not be prompted for it. You may specify more than one file to delete. You do not require to use the C option with DEL.
DELETE (DEL)
[P:]* DELETE PRDATA.CMD ↵[P:]*
MDE-4871 CFN III Manager’s Manual for Windows® XP Embedded - Version 3.6 · August 2010 Page 17-5
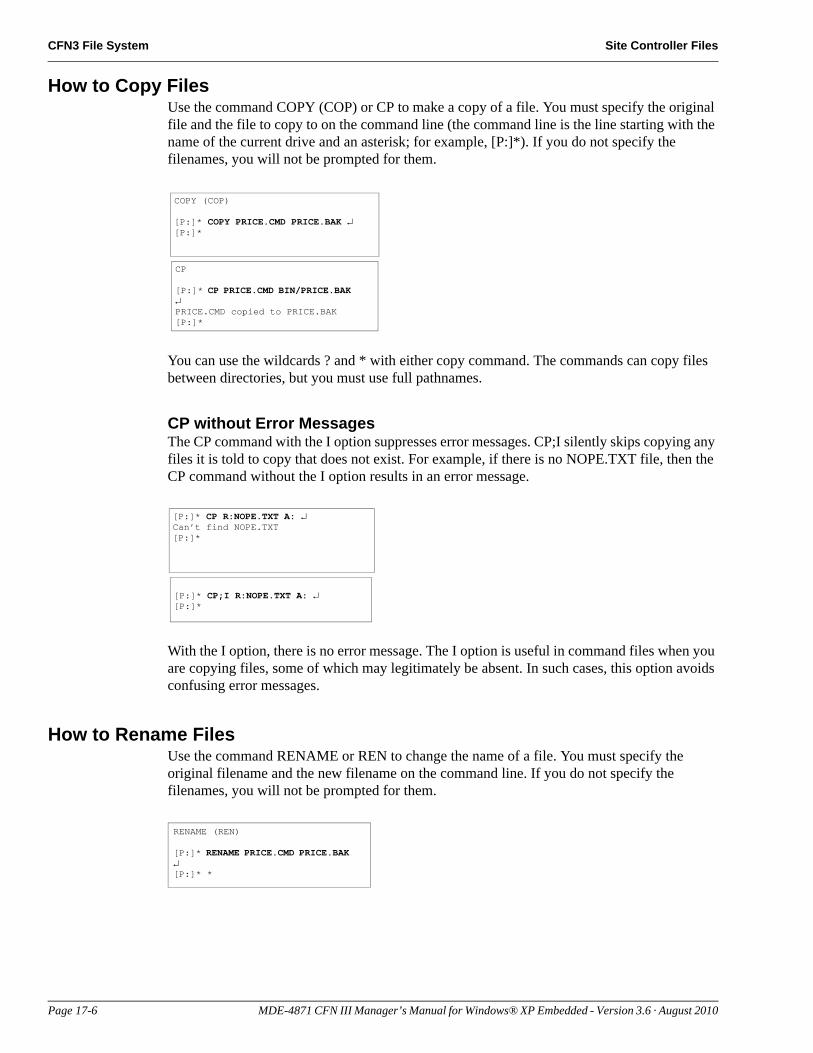
CFN3 File System Site Controller Files
How to Copy FilesUse the command COPY (COP) or CP to make a copy of a file. You must specify the original file and the file to copy to on the command line (the command line is the line starting with the name of the current drive and an asterisk; for example, [P:]*). If you do not specify the filenames, you will not be prompted for them.
COPY (COP)
[P:]* COPY PRICE.CMD PRICE.BAK ↵[P:]*
CP
[P:]* CP PRICE.CMD BIN/PRICE.BAK ↵PRICE.CMD copied to PRICE.BAK[P:]*
You can use the wildcards ? and * with either copy command. The commands can copy files between directories, but you must use full pathnames.
CP without Error MessagesThe CP command with the I option suppresses error messages. CP;I silently skips copying any files it is told to copy that does not exist. For example, if there is no NOPE.TXT file, then the CP command without the I option results in an error message.
[P:]* CP R:NOPE.TXT A: ↵Can’t find NOPE.TXT[P:]*
[P:]* CP;I R:NOPE.TXT A: ↵[P:]*
With the I option, there is no error message. The I option is useful in command files when you are copying files, some of which may legitimately be absent. In such cases, this option avoids confusing error messages.
How to Rename FilesUse the command RENAME or REN to change the name of a file. You must specify the original filename and the new filename on the command line. If you do not specify the filenames, you will not be prompted for them.
RENAME (REN)
[P:]* RENAME PRICE.CMD PRICE.BAK ↵[P:]* *
Page 17-6 MDE-4871 CFN III Manager’s Manual for Windows® XP Embedded - Version 3.6 · August 2010
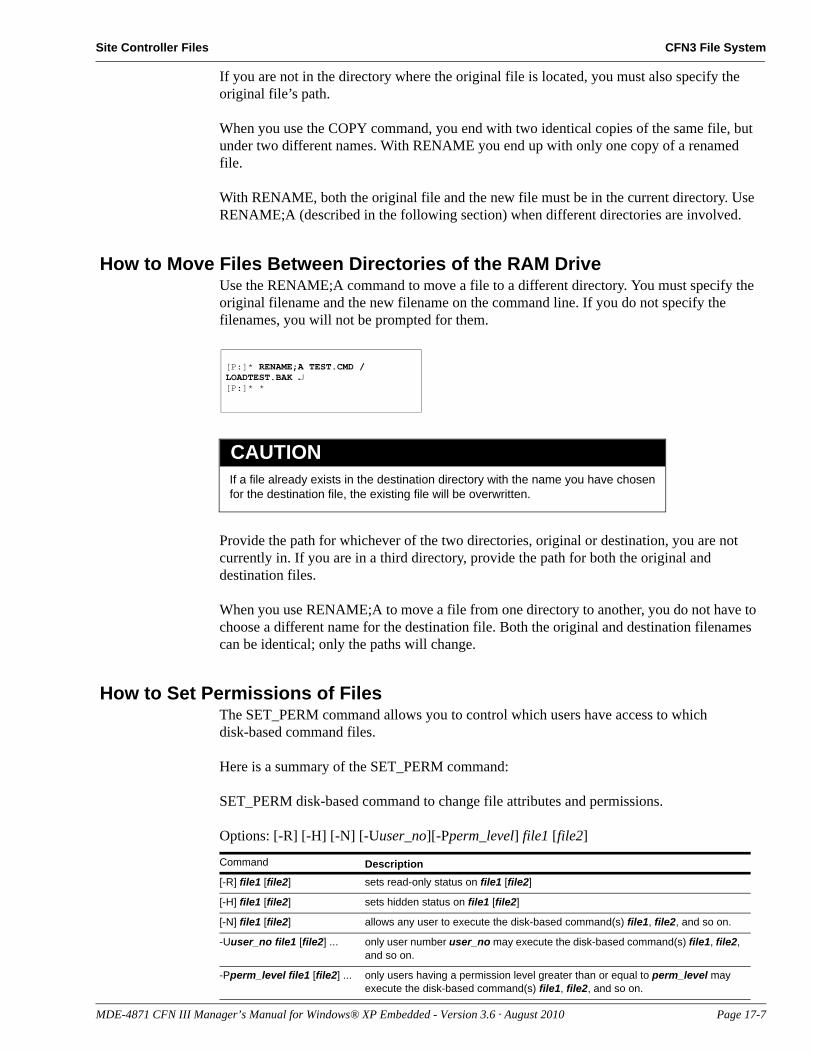
Site Controller Files CFN3 File System
If you are not in the directory where the original file is located, you must also specify the original file’s path.
When you use the COPY command, you end with two identical copies of the same file, but under two different names. With RENAME you end up with only one copy of a renamed file.
With RENAME, both the original file and the new file must be in the current directory. Use RENAME;A (described in the following section) when different directories are involved.
How to Move Files Between Directories of the RAM DriveUse the RENAME;A command to move a file to a different directory. You must specify the original filename and the new filename on the command line. If you do not specify the filenames, you will not be prompted for them.
[P:]* RENAME;A TEST.CMD /LOADTEST.BAK ↵[P:]* *
If a file already exists in the destination directory with the name you have chosen for the destination file, the existing file will be overwritten.
CAUTION
Provide the path for whichever of the two directories, original or destination, you are not currently in. If you are in a third directory, provide the path for both the original and destination files.
When you use RENAME;A to move a file from one directory to another, you do not have to choose a different name for the destination file. Both the original and destination filenames can be identical; only the paths will change.
How to Set Permissions of FilesThe SET_PERM command allows you to control which users have access to which disk-based command files.
Here is a summary of the SET_PERM command:
SET_PERM disk-based command to change file attributes and permissions.
Options: [-R] [-H] [-N] [-Uuser_no][-Pperm_level] file1 [file2]
Command Description[-R] file1 [file2] sets read-only status on file1 [file2]
[-H] file1 [file2] sets hidden status on file1 [file2]
[-N] file1 [file2] allows any user to execute the disk-based command(s) file1, file2, and so on.
-Uuser_no file1 [file2] ... only user number user_no may execute the disk-based command(s) file1, file2, and so on.
-Pperm_level file1 [file2] ... only users having a permission level greater than or equal to perm_level may execute the disk-based command(s) file1, file2, and so on.
MDE-4871 CFN III Manager’s Manual for Windows® XP Embedded - Version 3.6 · August 2010 Page 17-7
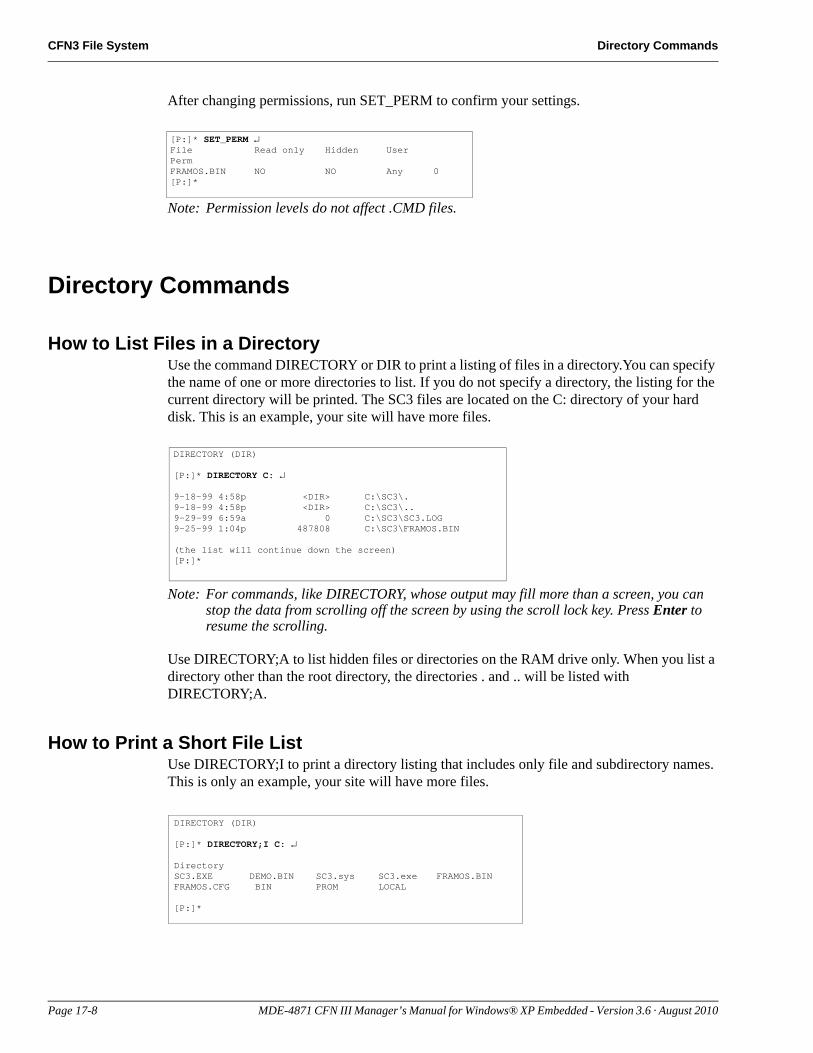
CFN3 File System Directory Commands
[P:]* SET_PERM ↵File Read only Hidden UserPermFRAMOS.BIN NO NO Any 0[P:]*
After changing permissions, run SET_PERM to confirm your settings.
Note: Permission levels do not affect .CMD files.
Directory Commands
How to List Files in a DirectoryUse the command DIRECTORY or DIR to print a listing of files in a directory.You can specify the name of one or more directories to list. If you do not specify a directory, the listing for the current directory will be printed. The SC3 files are located on the C: directory of your hard disk. This is an example, your site will have more files.
DIRECTORY (DIR)
[P:]* DIRECTORY C: ↵
9-18-99 4:58p <DIR> C:\SC3\.9-18-99 4:58p <DIR> C:\SC3\..9-29-99 6:59a 0 C:\SC3\SC3.LOG9-25-99 1:04p 487808 C:\SC3\FRAMOS.BIN
(the list will continue down the screen)[P:]*
Note: For commands, like DIRECTORY, whose output may fill more than a screen, you can stop the data from scrolling off the screen by using the scroll lock key. Press Enter to resume the scrolling.
Use DIRECTORY;A to list hidden files or directories on the RAM drive only. When you list a directory other than the root directory, the directories . and .. will be listed with DIRECTORY;A.
How to Print a Short File ListUse DIRECTORY;I to print a directory listing that includes only file and subdirectory names. This is only an example, your site will have more files.
DIRECTORY (DIR)
[P:]* DIRECTORY;I C: ↵
DirectorySC3.EXE DEMO.BIN SC3.sys SC3.exe FRAMOS.BINFRAMOS.CFG BIN PROM LOCAL
[P:]*
Page 17-8 MDE-4871 CFN III Manager’s Manual for Windows® XP Embedded - Version 3.6 · August 2010
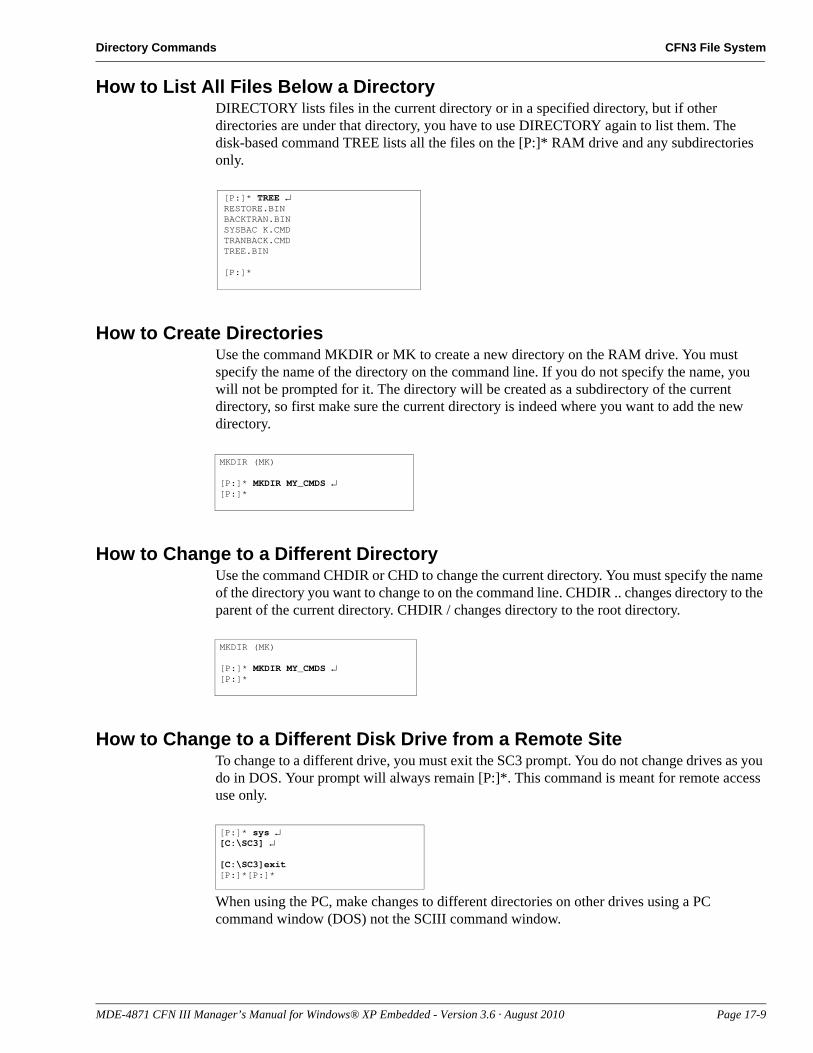
Directory Commands CFN3 File System
How to List All Files Below a DirectoryDIRECTORY lists files in the current directory or in a specified directory, but if other directories are under that directory, you have to use DIRECTORY again to list them. The disk-based command TREE lists all the files on the [P:]* RAM drive and any subdirectories only.
[P:]* TREE ↵RESTORE.BINBACKTRAN.BINSYSBAC K.CMDTRANBACK.CMDTREE.BIN
[P:]*
How to Create DirectoriesUse the command MKDIR or MK to create a new directory on the RAM drive. You must specify the name of the directory on the command line. If you do not specify the name, you will not be prompted for it. The directory will be created as a subdirectory of the current directory, so first make sure the current directory is indeed where you want to add the new directory.
MKDIR (MK)
[P:]* MKDIR MY_CMDS ↵[P:]*
How to Change to a Different DirectoryUse the command CHDIR or CHD to change the current directory. You must specify the name of the directory you want to change to on the command line. CHDIR .. changes directory to the parent of the current directory. CHDIR / changes directory to the root directory.
MKDIR (MK)
[P:]* MKDIR MY_CMDS ↵[P:]*
How to Change to a Different Disk Drive from a Remote SiteTo change to a different drive, you must exit the SC3 prompt. You do not change drives as you do in DOS. Your prompt will always remain [P:]*. This command is meant for remote access use only.
[P:]* sys ↵[C:\SC3] ↵
[C:\SC3]exit[P:]*[P:]*
When using the PC, make changes to different directories on other drives using a PC command window (DOS) not the SCIII command window.
MDE-4871 CFN III Manager’s Manual for Windows® XP Embedded - Version 3.6 · August 2010 Page 17-9
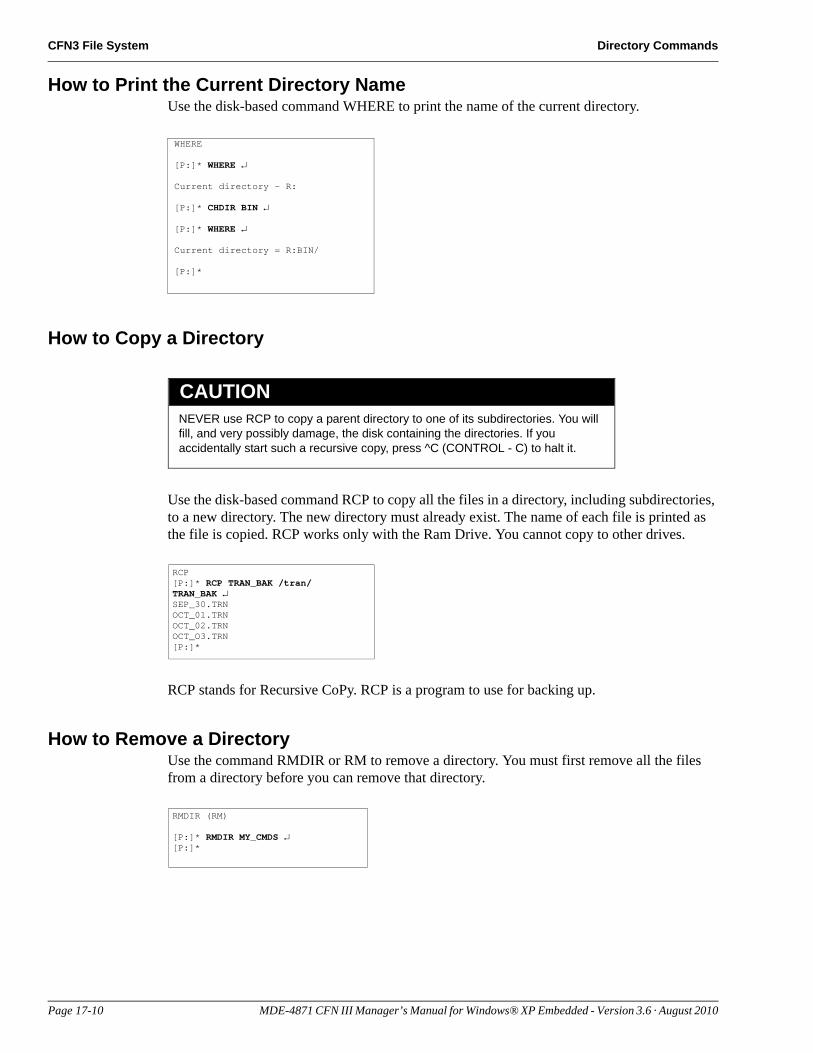
CFN3 File System Directory Commands
How to Print the Current Directory NameUse the disk-based command WHERE to print the name of the current directory.
WHERE
[P:]* WHERE ↵
Current directory - R:
[P:]* CHDIR BIN ↵
[P:]* WHERE ↵
Current directory = R:BIN/
[P:]*
How to Copy a Directory
NEVER use RCP to copy a parent directory to one of its subdirectories. You will fill, and very possibly damage, the disk containing the directories. If you accidentally start such a recursive copy, press ^C (CONTROL - C) to halt it.
CAUTION
RCP[P:]* RCP TRAN_BAK /tran/TRAN_BAK ↵SEP_30.TRNOCT_01.TRNOCT_02.TRN OCT_O3.TRN[P:]*
Use the disk-based command RCP to copy all the files in a directory, including subdirectories, to a new directory. The new directory must already exist. The name of each file is printed as the file is copied. RCP works only with the Ram Drive. You cannot copy to other drives.
RCP stands for Recursive CoPy. RCP is a program to use for backing up.
How to Remove a DirectoryUse the command RMDIR or RM to remove a directory. You must first remove all the files from a directory before you can remove that directory.
RMDIR (RM)
[P:]* RMDIR MY_CMDS ↵[P:]*
Page 17-10 MDE-4871 CFN III Manager’s Manual for Windows® XP Embedded - Version 3.6 · August 2010
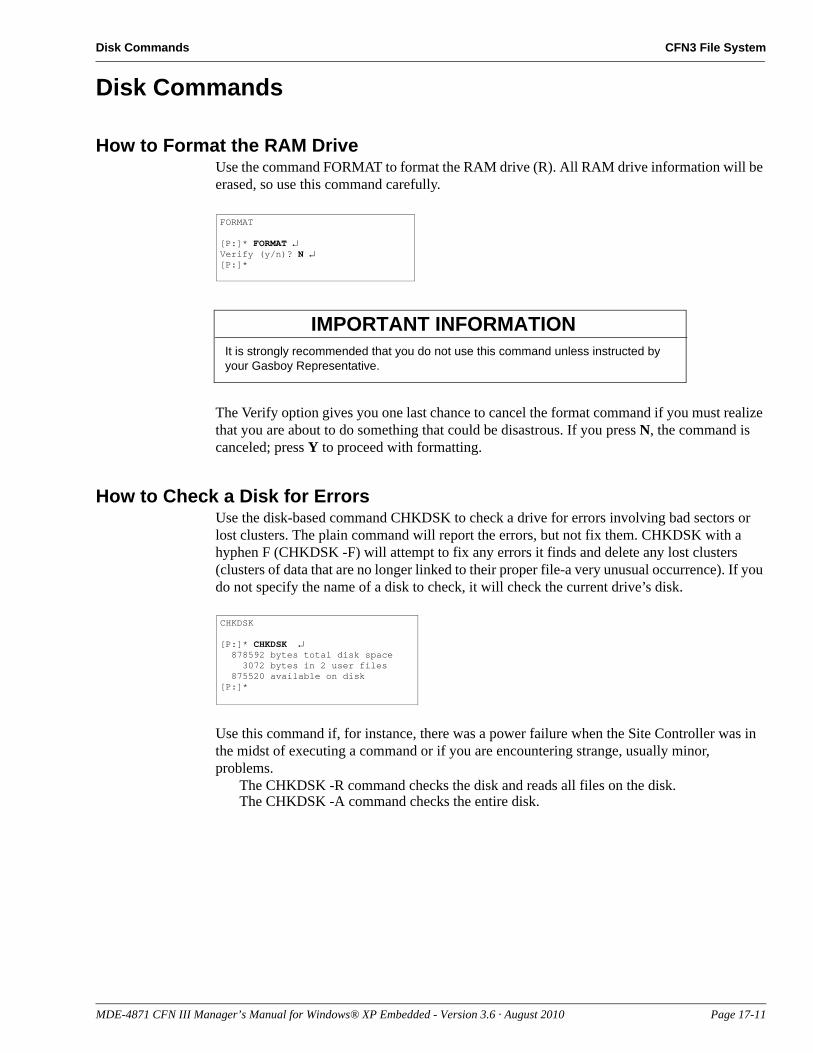
Disk Commands CFN3 File System
Disk Commands
How to Format the RAM DriveUse the command FORMAT to format the RAM drive (R). All RAM drive information will be erased, so use this command carefully.
FORMAT
[P:]* FORMAT ↵Verify (y/n)? N ↵[P:]*
It is strongly recommended that you do not use this command unless instructed by your Gasboy Representative.
IMPORTANT INFORMATION
The Verify option gives you one last chance to cancel the format command if you must realize that you are about to do something that could be disastrous. If you press N, the command is canceled; press Y to proceed with formatting.
How to Check a Disk for ErrorsUse the disk-based command CHKDSK to check a drive for errors involving bad sectors or lost clusters. The plain command will report the errors, but not fix them. CHKDSK with a hyphen F (CHKDSK -F) will attempt to fix any errors it finds and delete any lost clusters (clusters of data that are no longer linked to their proper file-a very unusual occurrence). If you do not specify the name of a disk to check, it will check the current drive’s disk.
CHKDSK
[P:]* CHKDSK ↵ 878592 bytes total disk space 3072 bytes in 2 user files 875520 available on disk[P:]*
Use this command if, for instance, there was a power failure when the Site Controller was in the midst of executing a command or if you are encountering strange, usually minor, problems.
The CHKDSK -R command checks the disk and reads all files on the disk.The CHKDSK -A command checks the entire disk.
MDE-4871 CFN III Manager’s Manual for Windows® XP Embedded - Version 3.6 · August 2010 Page 17-11

CFN3 File System Disk Commands
This page is intentionally left blank.
Page 17-12 MDE-4871 CFN III Manager’s Manual for Windows® XP Embedded - Version 3.6 · August 2010
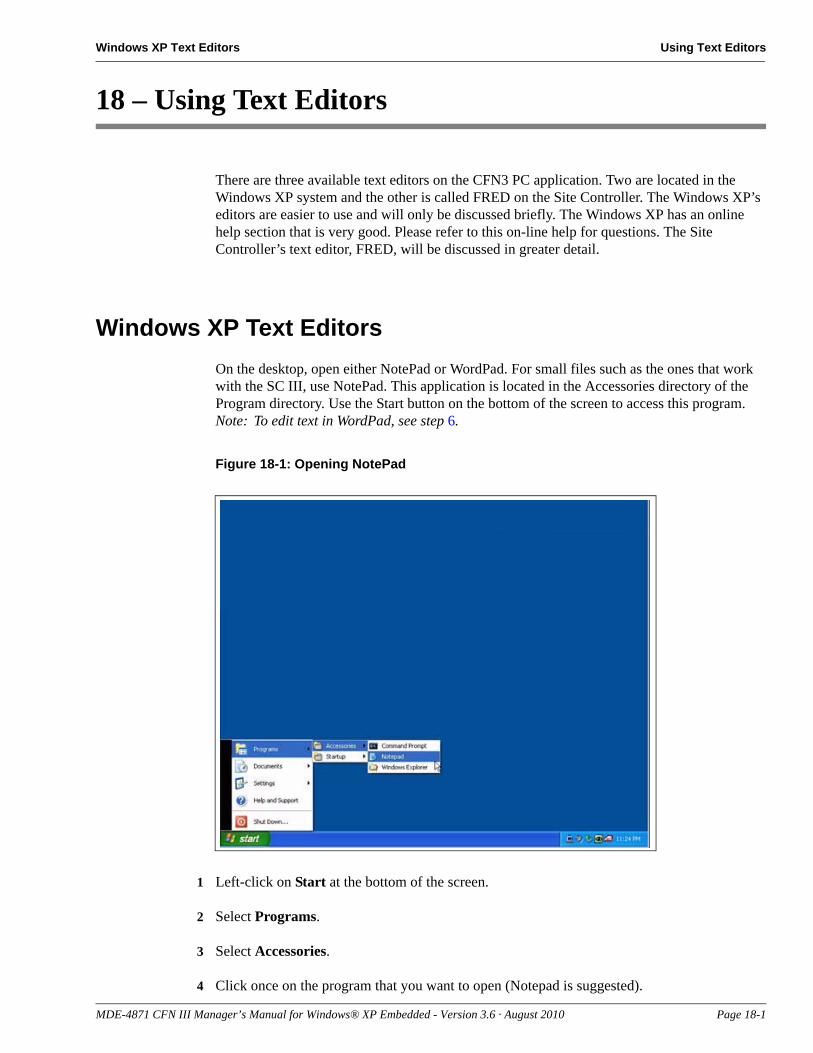
Windows XP Text Editors Using Text Editors
18 – Using Text Editors
There are three available text editors on the CFN3 PC application. Two are located in the Windows XP system and the other is called FRED on the Site Controller. The Windows XP’s editors are easier to use and will only be discussed briefly. The Windows XP has an online help section that is very good. Please refer to this on-line help for questions. The Site Controller’s text editor, FRED, will be discussed in greater detail.
Windows XP Text EditorsOn the desktop, open either NotePad or WordPad. For small files such as the ones that work with the SC III, use NotePad. This application is located in the Accessories directory of the Program directory. Use the Start button on the bottom of the screen to access this program.Note: To edit text in WordPad, see step 6.
Figure 18-1: Opening NotePad
1 Left-click on Start at the bottom of the screen.
2 Select Programs.
3 Select Accessories.
4 Click once on the program that you want to open (Notepad is suggested).
MDE-4871 CFN III Manager’s Manual for Windows® XP Embedded - Version 3.6 · August 2010 Page 18-1
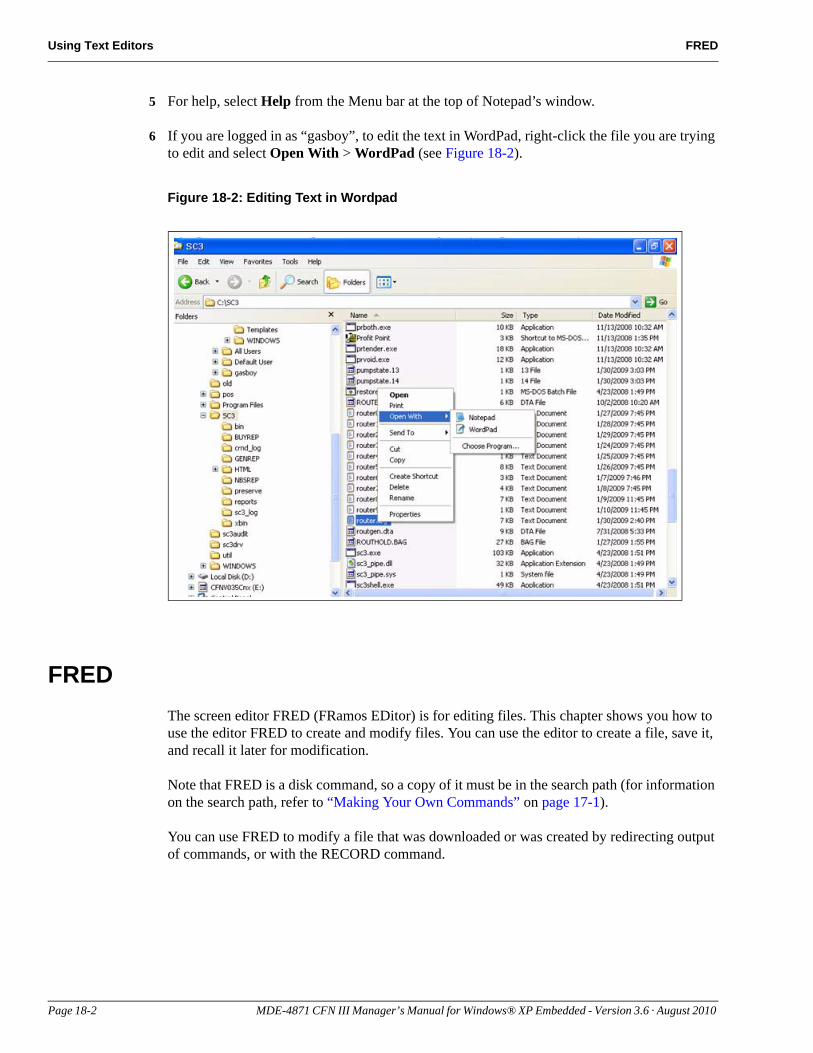
Using Text Editors FRED
5 For help, select Help from the Menu bar at the top of Notepad’s window.
6 If you are logged in as “gasboy”, to edit the text in WordPad, right-click the file you are trying to edit and select Open With > WordPad (see Figure 18-2).
Figure 18-2: Editing Text in Wordpad
FREDThe screen editor FRED (FRamos EDitor) is for editing files. This chapter shows you how to use the editor FRED to create and modify files. You can use the editor to create a file, save it, and recall it later for modification.
Note that FRED is a disk command, so a copy of it must be in the search path (for information on the search path, refer to “Making Your Own Commands” on page 17-1).
You can use FRED to modify a file that was downloaded or was created by redirecting output of commands, or with the RECORD command.
Page 18-2 MDE-4871 CFN III Manager’s Manual for Windows® XP Embedded - Version 3.6 · August 2010
Editor’s Modes Using Text Editors
Editor’s ModesThe editor has three modes: Insert Mode, Edit Mode, and Command Mode. When you use the editor you will mostly use insert mode.
• In Insert Mode the editor accepts regular characters as text. Text that is inserted on a line pushes characters on the right side of the cursor to the right.
• In Edit Mode the editor accepts regular characters as commands. There are some special characters-control characters and the arrow keys-that are accepted as commands in both insert and edit modes.
• When you enter Command Mode a prompt (#) appears on the last line of the screen, and the cursor moves to the last line of the screen. In Command Mode the editor accepts commands of one or more letters. You must press Enter after you type command-mode commands. Some Command Mode commands require additional information, which they prompt for.
How to Change Editor ModesWhen you first invoke the editor (by typing FRED filename), it is in edit mode. From edit mode you can enter insert mode or command mode. To enter insert mode from command mode or edit mode, type ^N (remember, the ^ character means you are to hold down the CONTROL key when you type N).
To enter edit mode from command mode or insert mode, type ^E. To enter command mode from insert mode or edit mode, type ^C.
Command ModeYou will do most of your editing in insert mode or edit mode, but you will return to Command Mode to save your files and exit the editor.
Command Mode is also used for global search-and-replace functions and a few other complex editing functions, but these are seldom required for editing Site Controller files.
All commands used in Command Mode require you to type several characters then press Enter.
1 To enter command mode from insert or edit mode, type ^C.The cursor will go to the bottom (command) line of the screen.
2 Type the command-mode command you want to execute.What you type will be displayed on the command line. (If you make a mistake typing, use BACKSPACE to delete the last character typed. To delete the entire line, use ^U or ^X).
3 Press Enter to enter the command.If the command requires an argument (additional information), it will prompt you to enter the information.
Some Command Mode commands take arguments that specify line numbers or a file name. Depending on the command, line-number arguments can specify a single line or a range of lines. Range arguments specify the range of lines in a file that a command will act upon. To specify a range, enter the lower line number, a space, and the higher line number. For example, 10 15 will cause the command to act on lines 10 through 15.
MDE-4871 CFN III Manager’s Manual for Windows® XP Embedded - Version 3.6 · August 2010 Page 18-3
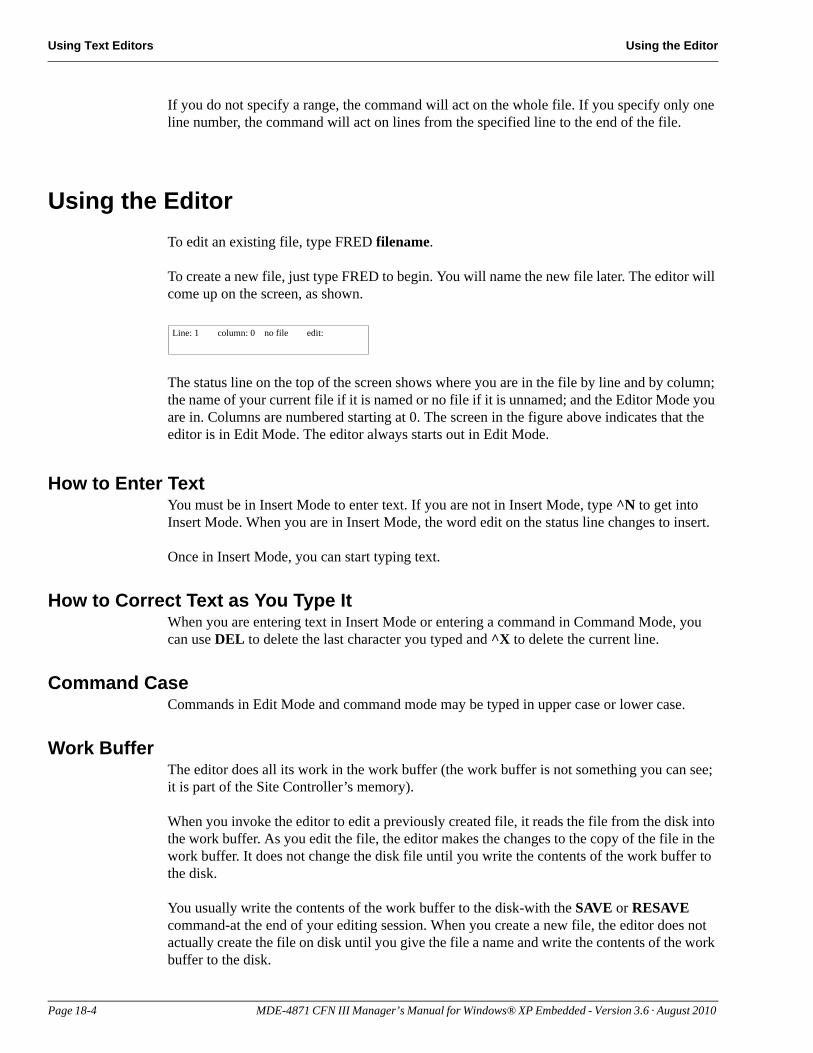
Using Text Editors Using the Editor
If you do not specify a range, the command will act on the whole file. If you specify only one line number, the command will act on lines from the specified line to the end of the file.
Using the EditorTo edit an existing file, type FRED filename.
Line: 1 column: 0 no file edit:
To create a new file, just type FRED to begin. You will name the new file later. The editor will come up on the screen, as shown.
The status line on the top of the screen shows where you are in the file by line and by column; the name of your current file if it is named or no file if it is unnamed; and the Editor Mode you are in. Columns are numbered starting at 0. The screen in the figure above indicates that the editor is in Edit Mode. The editor always starts out in Edit Mode.
How to Enter TextYou must be in Insert Mode to enter text. If you are not in Insert Mode, type ^N to get into Insert Mode. When you are in Insert Mode, the word edit on the status line changes to insert.
Once in Insert Mode, you can start typing text.
How to Correct Text as You Type ItWhen you are entering text in Insert Mode or entering a command in Command Mode, you can use DEL to delete the last character you typed and ^X to delete the current line.
Command CaseCommands in Edit Mode and command mode may be typed in upper case or lower case.
Work BufferThe editor does all its work in the work buffer (the work buffer is not something you can see; it is part of the Site Controller’s memory).
When you invoke the editor to edit a previously created file, it reads the file from the disk into the work buffer. As you edit the file, the editor makes the changes to the copy of the file in the work buffer. It does not change the disk file until you write the contents of the work buffer to the disk.
You usually write the contents of the work buffer to the disk-with the SAVE or RESAVE command-at the end of your editing session. When you create a new file, the editor does not actually create the file on disk until you give the file a name and write the contents of the work buffer to the disk.
Page 18-4 MDE-4871 CFN III Manager’s Manual for Windows® XP Embedded - Version 3.6 · August 2010

Using the Editor Using Text Editors
How to Name FilesWhen you create a new file you must name it before you can save it.
Filenames can be up to 8 characters long, plus an extension (the characters that follow the period) of up to three characters: filename.ext. For restrictions on the characters that can be used in filenames, refer to “CFN3 File System” on page 17-1.
To name a file:• Ensure that you are in command mode. If you are not in command mode, type ^C to get
into command mode.• Type the command NAME filename after the command mode prompt (#).• The file name will appear on the status line at the top of the screen.
Note: Naming a file does not automatically also save it. You must subsequently use the SAVE command too.
How to Save New FilesUse the SAVE command to save a file when it is initially created. Once the file has been saved for the first time, use the RESAVE command to resave the file. You must name the file with the NAME command before you can save it with SAVE.
To save a new file, proceed as follows:
1 Ensure that you are in command mode.If you are not in command mode, type ^C to get into command mode.Ensure that you have named the file with the name command.
2 Type save. The file name is not required.If the file has not been named, the editor displays the message Use name command to name file first.
How to Resave FilesUse the RESAVE command to resave files that have already been saved with SAVE. To resave a file, proceed as follows:
1 Ensure that you are in command mode.If you are not in command mode, type ^C to get into command mode.
2 Type resave. The file name is not required.
How to Exit the EditorThe q command exits the editor and returns to the operating system.
To exit the Editor, proceed as follows:
1 Ensure that you are in command mode.If you are not in command mode, type ^C to get into command mode.
MDE-4871 CFN III Manager’s Manual for Windows® XP Embedded - Version 3.6 · August 2010 Page 18-5

Using Text Editors Using the Editor
2 Save the file.If it is a new file, use save; if it has been saved before, use RESAVE.
3 Type q to exit the Editor.
How to Exit the Editor without SavingNormally before you exit the editor you will use the SAVE or RESAVE command to save the changes you made. But sometimes you may make changes to a file that you decide you do not want to keep.
You can use the command-mode command q to exit without saving. The editor will ask File not saved, proceed? Type a Y to exit without saving. The disk file will contain whatever was saved the last time you used the SAVE (or RESAVE) command. Type N to stay in the editor.
How to Move the CursorTo move around in the file you must be in Edit or Insert Mode. Type ̂ E to enter Edit Mode, or ^N to enter Insert Mode. The commands to move the cursor a character or line at a time work in both Edit Mode and Insert Mode.
In Edit Mode and Insert Mode you can move the cursor with the arrow keys or with control characters. The right arrow key and ^L move the cursor one character to the right. The left arrow key and ^H move the cursor one character to the left. The up arrow key and ^K move the cursor up one line. The down arrow key and ^J move the cursor down one line.
The following table gives the cursor movement keys:
Press the tab key or type ^I to move the cursor to the next tab stop. In Insert Mode this will insert tabs.
Moving Rapidly Forward/Backward through FileTo move rapidly forward or backward through a file, proceed as follows:
1 If you are not in Edit Mode, type ^E to get into edit mode.
2 Type u or U to start moving rapidly backward or up through the file. Type anything else to stop.The cursor will automatically stop when it gets to the first line of the file.
3 Type d or D to start moving forward or down through the file. Type anything else to stop.The cursor will automatically stop when it gets to the last line of the file.
Action KeysMove one right right arrow or ^L
Move one left left arrow or ^H
Up one line up arrow or ^K
Down one line down arrow or ^J
Page 18-6 MDE-4871 CFN III Manager’s Manual for Windows® XP Embedded - Version 3.6 · August 2010
Using the Editor Using Text Editors
Moving the Cursor to the Beginning or End of a LineTo move the cursor to the beginning or to the end of the line, proceed as follows:
1 If you are not in Edit Mode, type ^E to get into Edit Mode.
2 To move the cursor to the beginning of the current line, type b or B. To move the cursor to the end of the current line, type e or E.
How to Insert TextTo enter text you must be in insert mode. If you are not already in insert mode, type ^N to switch to Insert Mode.
Text inserted in the file pushes characters on the right side of the cursor to the right. Text does not automatically wrap from the end of one line to the beginning of the next. You must press Enter to end a typing line and start a new one.
How to Delete TextThe Delete command works in edit mode and insert mode. ^D deletes the character at the cursor, moving the rest of the line one character to the left.
• To delete a character, move the cursor to the character, then type ^D.• Use the DEL key to delete a character to the left of the cursor.
Note: DEL works in Edit and Insert Mode.
How to Open a LineThe command to Open a line may be executed in edit or insert mode. To open a line above the current typing line, use ^O.
How to Undo Changes to a LineThe command to Undo changes to a line may be executed in edit or insert mode. Use ^U to undo changes to a line. You must type ^U when you are still on the line, before you move to another line or make any new changes. ^U will restore the line to the way it was before you made any changes.
How to Join Two LinesThe command to join two lines can be executed from Edit or Insert Mode. To join two lines, place the cursor anywhere on the second line and type ^R. The command joins the line containing the cursor to the line immediately above it. The command will not work if the resulting line would be 80 or more characters long.
How to Split Two LinesThe command to Split a line can be executed from edit or insert mode. Lines can be broken at the cursor by using ^S. Place the cursor where you want the lines to be split and type ^S (if this does not work on your remote terminal, change your terminal’s setting from XON-XOFF to DTK).
MDE-4871 CFN III Manager’s Manual for Windows® XP Embedded - Version 3.6 · August 2010 Page 18-7
Using Text Editors Advanced Editing
How to Copy a LineYou can use the commands to copy a line in edit mode and insert mode. ^Y Yanks a copy of the current line into a temporary buffer, and ^P puts the copy below the current line.
1 Move the cursor to the line you want to copy.
2 Type ^Y. The current line is unchanged, and a duplicate of it is placed in a temporary buffer.
3 Move the cursor to the line above where you want the copied line to go.
4 Type ^P. The copied line will be placed below the current line.
How to Replace One CharacterThe command to replace one character with another can be executed only in Edit mode. The command x or X replaces one character with another.
1 If you are not in edit mode, type ^E to get into edit mode.
2 Put the cursor on the character you want replaced.
3 Type x.The status line will display edit: eXchange.
4 Type the character that will replace the one under the cursor.
You can cancel the x command by typing ^H (H for halt) instead of entering the exchange character (^H functions only to terminate the command).
Advanced EditingThe commands described in this section allow you to do complex editing functions. They are not usually required for editing Site Controller files.
How to Move the Cursor to a Specified CharacterUse the Edit Mode SEARCH command to search for a specified character on the current line only (not in the entire document). The search starts to the right of the cursor. You must be in Edit mode to use the search command.
1 If you are not in Edit mode, type ^E to get into Edit mode.
2 Type s or S.The status line will display edit: search.
3 Enter the character you want to search for.• The cursor will move to the next occurrence of that character to the right on the current
line.• If the character is not on the current line, the cursor will move to the end of the line.
Page 18-8 MDE-4871 CFN III Manager’s Manual for Windows® XP Embedded - Version 3.6 · August 2010
Advanced Editing Using Text Editors
How to Move the Cursor to Specified LineYou must be in edit or Command mode to use the goto command to move the cursor to a specified line.
1 If you are not in edit mode, type ^E to get into edit mode.
2 Type g or G.The cursor will move to the status line, which will display edit: goto:.
3 Type the number of the line you want to go to, and press Enter.• The cursor will move to the line you specified.• If you type a line number that is greater than the number of lines in your file, the cursor
moves to the last file line.
How to Search for a Specified StringUse the Command Mode FIND command to search for the next occurrence of a specified string of characters. The cursor will move to the beginning of the next occurrence of the specified string, and the editor will enter Insert Mode. If the string is not found, the editor remains in command mode.
A question mark (?) in the search string is treated as a wild card. It will match any character in that position.
A caret (^) as the first character of the string indicates the beginning of a line. A caret that is not the first character is not treated specially. (Note that the ^ symbol does double duty. It usually stands for holding down the CONTROL key when you press another key, or it can stand for itself as the first character of a string).
FIND CommandTo search for a specified string, proceed as follows:
1 If you are not in command mode, type ^C to enter command mode.
2 Type find. The command line will display the prompt Search mask.
3 Type the character or characters to search for.• The cursor will move to the first character in the specified string and the editor will enter
insert mode.• If the string is not found, the editor stays in command mode.
How to Search for and Print a StringUse the command-mode SEARCH command to print all lines containing a specified string. To execute the search command, the editor must be in command mode.
1 If you are not in command mode, type ^C to enter command mode.
2 Type search. The command line will display the prompt Search mask?
3 Type the character or characters to search for.FRED will print the line numbers and the lines that contain the specified string.
MDE-4871 CFN III Manager’s Manual for Windows® XP Embedded - Version 3.6 · August 2010 Page 18-9
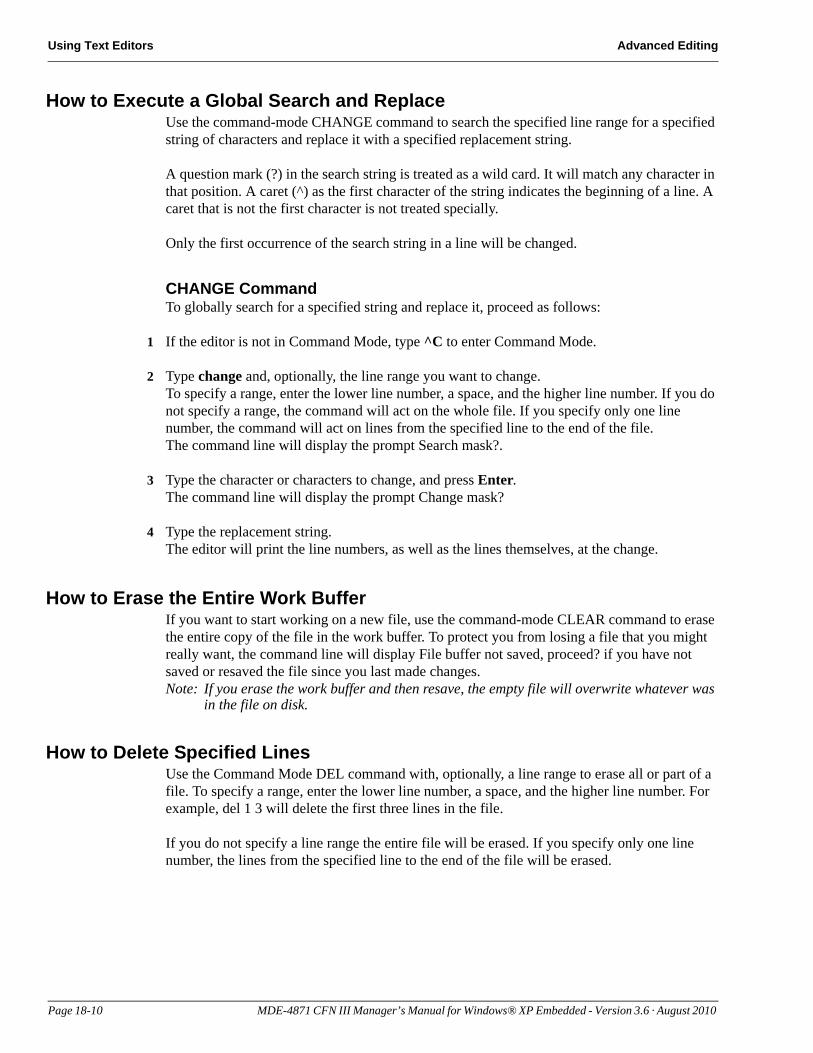
Using Text Editors Advanced Editing
How to Execute a Global Search and ReplaceUse the command-mode CHANGE command to search the specified line range for a specified string of characters and replace it with a specified replacement string.
A question mark (?) in the search string is treated as a wild card. It will match any character in that position. A caret (^) as the first character of the string indicates the beginning of a line. A caret that is not the first character is not treated specially.
Only the first occurrence of the search string in a line will be changed.
CHANGE CommandTo globally search for a specified string and replace it, proceed as follows:
1 If the editor is not in Command Mode, type ^C to enter Command Mode.
2 Type change and, optionally, the line range you want to change.To specify a range, enter the lower line number, a space, and the higher line number. If you do not specify a range, the command will act on the whole file. If you specify only one line number, the command will act on lines from the specified line to the end of the file.The command line will display the prompt Search mask?.
3 Type the character or characters to change, and press Enter.The command line will display the prompt Change mask?
4 Type the replacement string.The editor will print the line numbers, as well as the lines themselves, at the change.
How to Erase the Entire Work BufferIf you want to start working on a new file, use the command-mode CLEAR command to erase the entire copy of the file in the work buffer. To protect you from losing a file that you might really want, the command line will display File buffer not saved, proceed? if you have not saved or resaved the file since you last made changes.Note: If you erase the work buffer and then resave, the empty file will overwrite whatever was
in the file on disk.
How to Delete Specified LinesUse the Command Mode DEL command with, optionally, a line range to erase all or part of a file. To specify a range, enter the lower line number, a space, and the higher line number. For example, del 1 3 will delete the first three lines in the file.
If you do not specify a line range the entire file will be erased. If you specify only one line number, the lines from the specified line to the end of the file will be erased.
Page 18-10 MDE-4871 CFN III Manager’s Manual for Windows® XP Embedded - Version 3.6 · August 2010
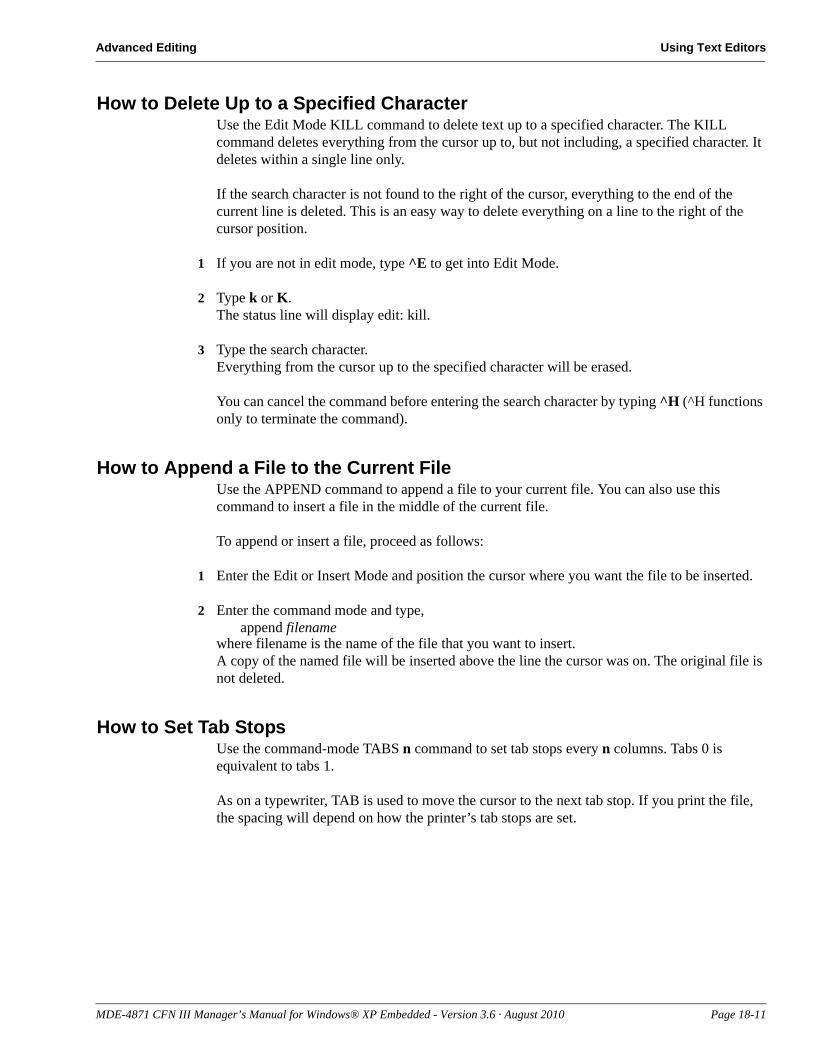
Advanced Editing Using Text Editors
How to Delete Up to a Specified CharacterUse the Edit Mode KILL command to delete text up to a specified character. The KILL command deletes everything from the cursor up to, but not including, a specified character. It deletes within a single line only.
If the search character is not found to the right of the cursor, everything to the end of the current line is deleted. This is an easy way to delete everything on a line to the right of the cursor position.
1 If you are not in edit mode, type ^E to get into Edit Mode.
2 Type k or K.The status line will display edit: kill.
3 Type the search character.Everything from the cursor up to the specified character will be erased.
You can cancel the command before entering the search character by typing ^H (^H functions only to terminate the command).
How to Append a File to the Current FileUse the APPEND command to append a file to your current file. You can also use this command to insert a file in the middle of the current file.
To append or insert a file, proceed as follows:
1 Enter the Edit or Insert Mode and position the cursor where you want the file to be inserted.
2 Enter the command mode and type,append filename
where filename is the name of the file that you want to insert.A copy of the named file will be inserted above the line the cursor was on. The original file is not deleted.
How to Set Tab StopsUse the command-mode TABS n command to set tab stops every n columns. Tabs 0 is equivalent to tabs 1.
As on a typewriter, TAB is used to move the cursor to the next tab stop. If you print the file, the spacing will depend on how the printer’s tab stops are set.
MDE-4871 CFN III Manager’s Manual for Windows® XP Embedded - Version 3.6 · August 2010 Page 18-11
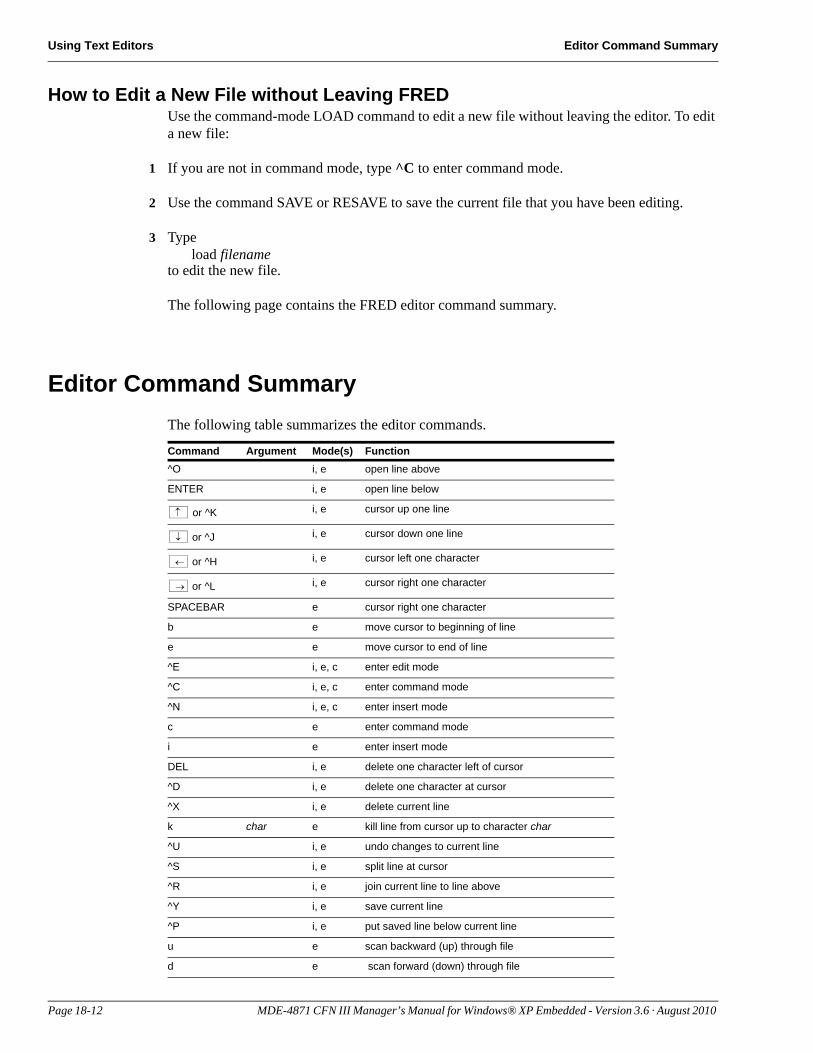
Using Text Editors Editor Command Summary
How to Edit a New File without Leaving FREDUse the command-mode LOAD command to edit a new file without leaving the editor. To edit a new file:
1 If you are not in command mode, type ^C to enter command mode.
2 Use the command SAVE or RESAVE to save the current file that you have been editing.
3 Typeload filename
to edit the new file.
The following page contains the FRED editor command summary.
Editor Command SummaryThe following table summarizes the editor commands.
Command Argument Mode(s) Function^O i, e open line above
ENTER i, e open line below
↑ or ^K i, e cursor up one line
↓ or ^J i, e cursor down one line
← or ^H i, e cursor left one character
→ or ^L i, e cursor right one character
SPACEBAR e cursor right one character
b e move cursor to beginning of line
e e move cursor to end of line
^E i, e, c enter edit mode
^C i, e, c enter command mode
^N i, e, c enter insert mode
c e enter command mode
i e enter insert mode
DEL i, e delete one character left of cursor
^D i, e delete one character at cursor
^X i, e delete current line
k char e kill line from cursor up to character char
^U i, e undo changes to current line
^S i, e split line at cursor
^R i, e join current line to line above
^Y i, e save current line
^P i, e put saved line below current line
u e scan backward (up) through file
d e scan forward (down) through file
Page 18-12 MDE-4871 CFN III Manager’s Manual for Windows® XP Embedded - Version 3.6 · August 2010
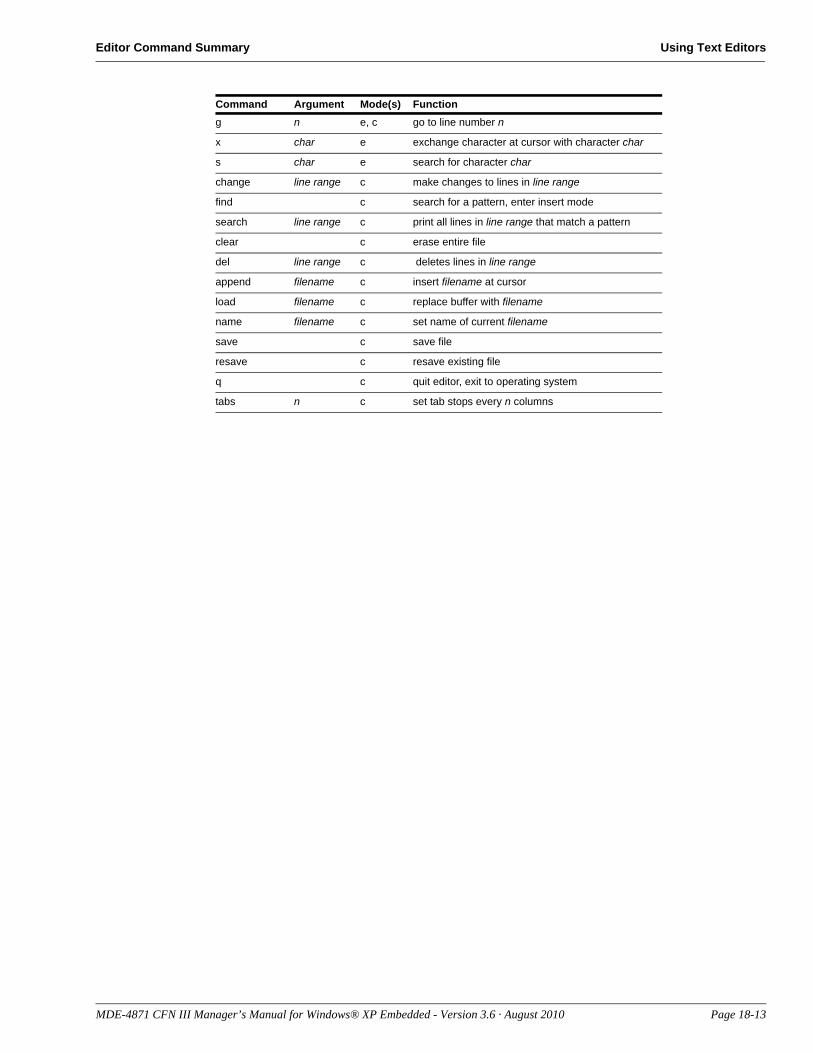
Editor Command Summary Using Text Editors
g n e, c go to line number n
x char e exchange character at cursor with character char
s char e search for character char
change line range c make changes to lines in line range
find c search for a pattern, enter insert mode
search line range c print all lines in line range that match a pattern
clear c erase entire file
del line range c deletes lines in line range
append filename c insert filename at cursor
load filename c replace buffer with filename
name filename c set name of current filename
save c save file
resave c resave existing file
q c quit editor, exit to operating system
tabs n c set tab stops every n columns
Command Argument Mode(s) Function
MDE-4871 CFN III Manager’s Manual for Windows® XP Embedded - Version 3.6 · August 2010 Page 18-13

Using Text Editors Editor Command Summary
This page is intentionally left blank.
Page 18-14 MDE-4871 CFN III Manager’s Manual for Windows® XP Embedded - Version 3.6 · August 2010
Restrictions on Command File Names Making Your Own Commands
19 – Making Your Own Commands
Many times you will have procedures at your site that require the use of several Site Controller commands. The most common example is a shift-break procedure. When you break shift at your site you may want to load the new shift, reset some totals, and print reports.
You can create a command file that contains several Site Controller commands, then have your users execute that single command file rather than having to give a series of complicated commands. When you execute a command file, all the commands in it are automatically performed. You can even create command files that can be executed from the console.
As another example, other procedures may require you to enter a lot of data to load prices for fuel price codes or to load broadcast messages. You can use one of the editors to create a command file that will load the data. Once you have created the command file, you can easily make small changes in it to reload new data.
Command files must contain only Site Controller system commands, disk-based commands, and comments.
Restrictions on Command File NamesCommand files must follow MS-DOS filename restrictions given in “CFN3 File System” on page 17-1. Command files also have two additional name restrictions:
First, command file names must have the extension .CMD. That is how the Site Controller can tell they are command files.
Second, the first part of the command file name (the part before the period and the extension) cannot match any of the names reserved for Site Controller system commands, including any abbreviations for commands. For example, P, PR, PRI, PRIN, and PRINT are all reserved names. But PRXX is not a reserved name, because the third and fourth characters do not match a reserved name.
Program SpaceOnly one disk-based program or command file can be run at once. If a cron or command file attempts to run a disk-based program and finds another program is running, it will wait until the program space is free (however, if you invoke a disk-based command directly at the prompt and another program is running, the command will be terminated with the error message Program space is busy).
MDE-4871 CFN III Manager’s Manual for Windows® XP Embedded - Version 3.6 · August 2010 Page 19-1
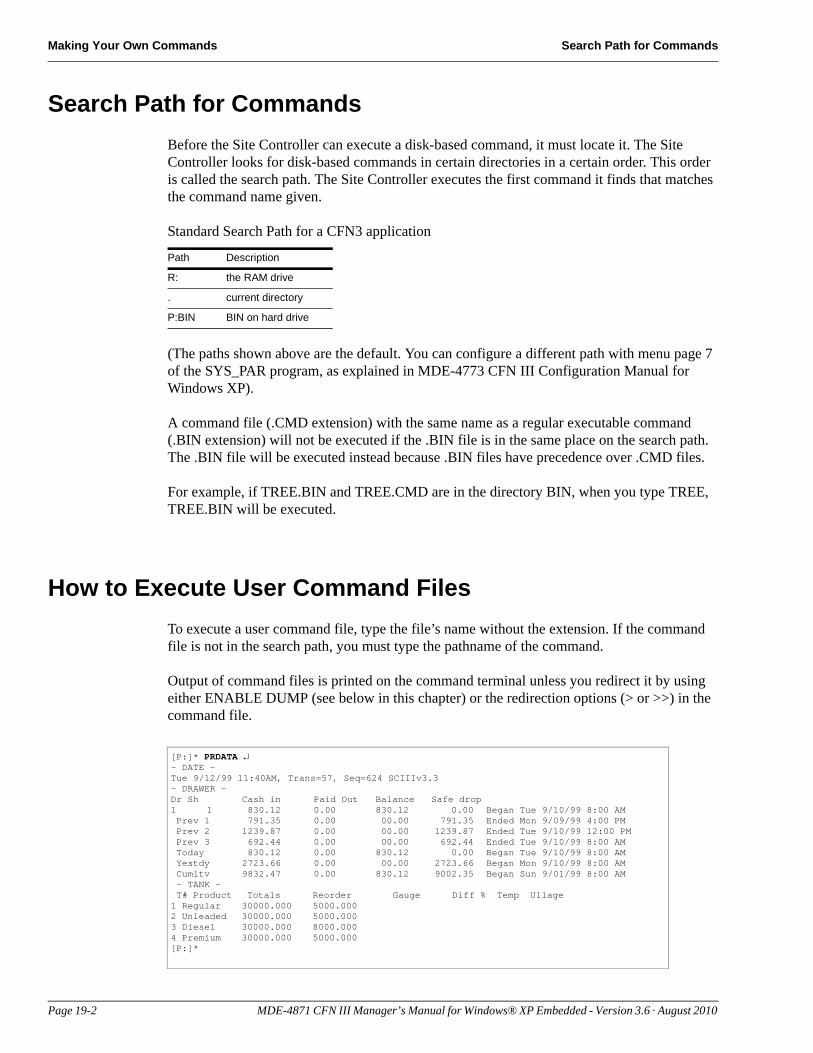
Making Your Own Commands Search Path for Commands
Search Path for CommandsBefore the Site Controller can execute a disk-based command, it must locate it. The Site Controller looks for disk-based commands in certain directories in a certain order. This order is called the search path. The Site Controller executes the first command it finds that matches the command name given.
Standard Search Path for a CFN3 application
(The paths shown above are the default. You can configure a different path with menu page 7 of the SYS_PAR program, as explained in MDE-4773 CFN III Configuration Manual for Windows XP).
A command file (.CMD extension) with the same name as a regular executable command (.BIN extension) will not be executed if the .BIN file is in the same place on the search path. The .BIN file will be executed instead because .BIN files have precedence over .CMD files.
For example, if TREE.BIN and TREE.CMD are in the directory BIN, when you type TREE, TREE.BIN will be executed.
How to Execute User Command FilesTo execute a user command file, type the file’s name without the extension. If the command file is not in the search path, you must type the pathname of the command.
[P:]* PRDATA ↵- DATE -Tue 9/12/99 11:40AM, Trans=57, Seq=624 SCIIIv3.3- DRAWER -Dr Sh Cash in Paid Out Balance Safe drop1 1 830.12 0.00 830.12 0.00 Began Tue 9/10/99 8:00 AM Prev 1 791.35 0.00 00.00 791.35 Ended Mon 9/09/99 4:00 PM Prev 2 1239.87 0.00 00.00 1239.87 Ended Tue 9/10/99 12:00 PM Prev 3 692.44 0.00 00.00 692.44 Ended Tue 9/10/99 8:00 AM Today 830.12 0.00 830.12 0.00 Began Tue 9/10/99 8:00 AM Yestdy 2723.66 0.00 00.00 2723.66 Began Mon 9/10/99 8:00 AM Cumltv 9832.47 0.00 830.12 9002.35 Began Sun 9/01/99 8:00 AM - TANK - T# Product Totals Reorder Gauge Diff % Temp Ullage1 Regular 30000.000 5000.0002 Unleaded 30000.000 5000.0003 Diesel 30000.000 8000.0004 Premium 30000.000 5000.000[P:]*
Output of command files is printed on the command terminal unless you redirect it by using either ENABLE DUMP (see below in this chapter) or the redirection options (> or >>) in the command file.
Path Description
R: the RAM drive
. current directory
P:BIN BIN on hard drive
Page 19-2 MDE-4871 CFN III Manager’s Manual for Windows® XP Embedded - Version 3.6 · August 2010

Comments in Command Files Making Your Own Commands
Comments in Command FilesA line in a command file that begins with an asterisk (*) is a comment. A comment is usually an informative note to yourself or to the next person who might edit the file; the note is usually about the previous or next command in the file. The command interpreter ignores any line in a command file that begins with an asterisk.
If the very first character in the whole command file is an asterisk, it has a special meaning. When the first character is an asterisk, the lines in the command file are not printed on the command terminal when that command file is executed. So, if you are having problems with a command file, removing the first asterisk can be useful in debugging.
If the first character is not an asterisk, all the lines in the command file, including comment lines, are printed on the command terminal when the file is executed. Except when you are testing your command files, you almost always want an asterisk as the first character.
If a line in a command file has a backquote (‘) as its last character, the command may be continued on the next line. This is useful for echo strings that are too long to fit in 80 columns.
How to Use Terminal Input with Command FilesTo have a command in a command file print prompts and take input from the terminal, you can use the T (terminal) option with that command in the command file. The T option disables redirection for that command and causes the command to prompt for all input from the terminal instead of taking input from the file. Any other output from the command will also be printed on the terminal.
[P:]* TYPE NEWSHIFT.CMD ↵stop* stop halts any new transactions* from starting until shift change* is completedload shift;tprint totals;atrun* run resumes operations after stop
[P:]*
MDE-4871 CFN III Manager’s Manual for Windows® XP Embedded - Version 3.6 · August 2010 Page 19-3
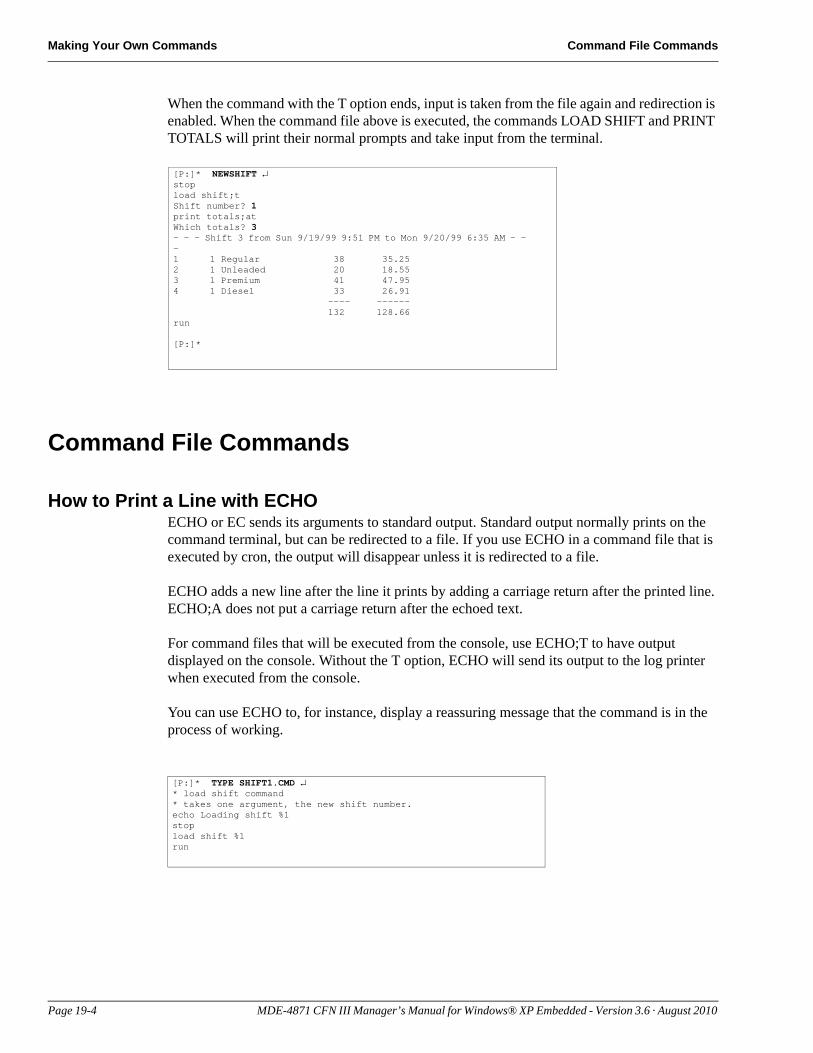
Making Your Own Commands Command File Commands
[P:]* NEWSHIFT ↵stopload shift;tShift number? 1print totals;atWhich totals? 3- - - Shift 3 from Sun 9/19/99 9:51 PM to Mon 9/20/99 6:35 AM - - -1 1 Regular 38 35.252 1 Unleaded 20 18.553 1 Premium 41 47.954 1 Diesel 33 26.91
---- ------132 128.66
run
[P:]*
When the command with the T option ends, input is taken from the file again and redirection is enabled. When the command file above is executed, the commands LOAD SHIFT and PRINT TOTALS will print their normal prompts and take input from the terminal.
Command File Commands
How to Print a Line with ECHOECHO or EC sends its arguments to standard output. Standard output normally prints on the command terminal, but can be redirected to a file. If you use ECHO in a command file that is executed by cron, the output will disappear unless it is redirected to a file.
ECHO adds a new line after the line it prints by adding a carriage return after the printed line. ECHO;A does not put a carriage return after the echoed text.
For command files that will be executed from the console, use ECHO;T to have output displayed on the console. Without the T option, ECHO will send its output to the log printer when executed from the console.
You can use ECHO to, for instance, display a reassuring message that the command is in the process of working.
[P:]* TYPE SHIFT1.CMD ↵* load shift command* takes one argument, the new shift number.echo Loading shift %1stopload shift %1run
Page 19-4 MDE-4871 CFN III Manager’s Manual for Windows® XP Embedded - Version 3.6 · August 2010
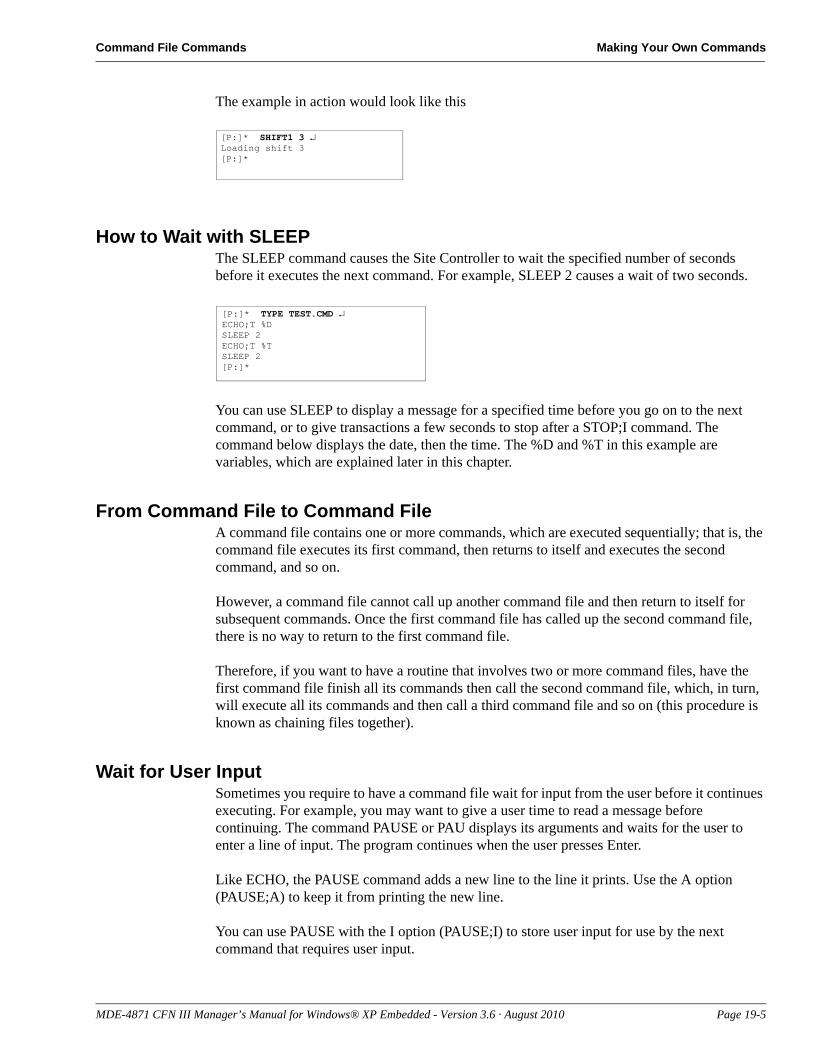
Command File Commands Making Your Own Commands
[P:]* SHIFT1 3 ↵Loading shift 3[P:]*
The example in action would look like this
How to Wait with SLEEPThe SLEEP command causes the Site Controller to wait the specified number of seconds before it executes the next command. For example, SLEEP 2 causes a wait of two seconds.
[P:]* TYPE TEST.CMD ↵ECHO;T %DSLEEP 2ECHO;T %TSLEEP 2[P:]*
You can use SLEEP to display a message for a specified time before you go on to the next command, or to give transactions a few seconds to stop after a STOP;I command. The command below displays the date, then the time. The %D and %T in this example are variables, which are explained later in this chapter.
From Command File to Command FileA command file contains one or more commands, which are executed sequentially; that is, the command file executes its first command, then returns to itself and executes the second command, and so on.
However, a command file cannot call up another command file and then return to itself for subsequent commands. Once the first command file has called up the second command file, there is no way to return to the first command file.
Therefore, if you want to have a routine that involves two or more command files, have the first command file finish all its commands then call the second command file, which, in turn, will execute all its commands and then call a third command file and so on (this procedure is known as chaining files together).
Wait for User InputSometimes you require to have a command file wait for input from the user before it continues executing. For example, you may want to give a user time to read a message before continuing. The command PAUSE or PAU displays its arguments and waits for the user to enter a line of input. The program continues when the user presses Enter.
Like ECHO, the PAUSE command adds a new line to the line it prints. Use the A option (PAUSE;A) to keep it from printing the new line.
You can use PAUSE with the I option (PAUSE;I) to store user input for use by the next command that requires user input.
MDE-4871 CFN III Manager’s Manual for Windows® XP Embedded - Version 3.6 · August 2010 Page 19-5
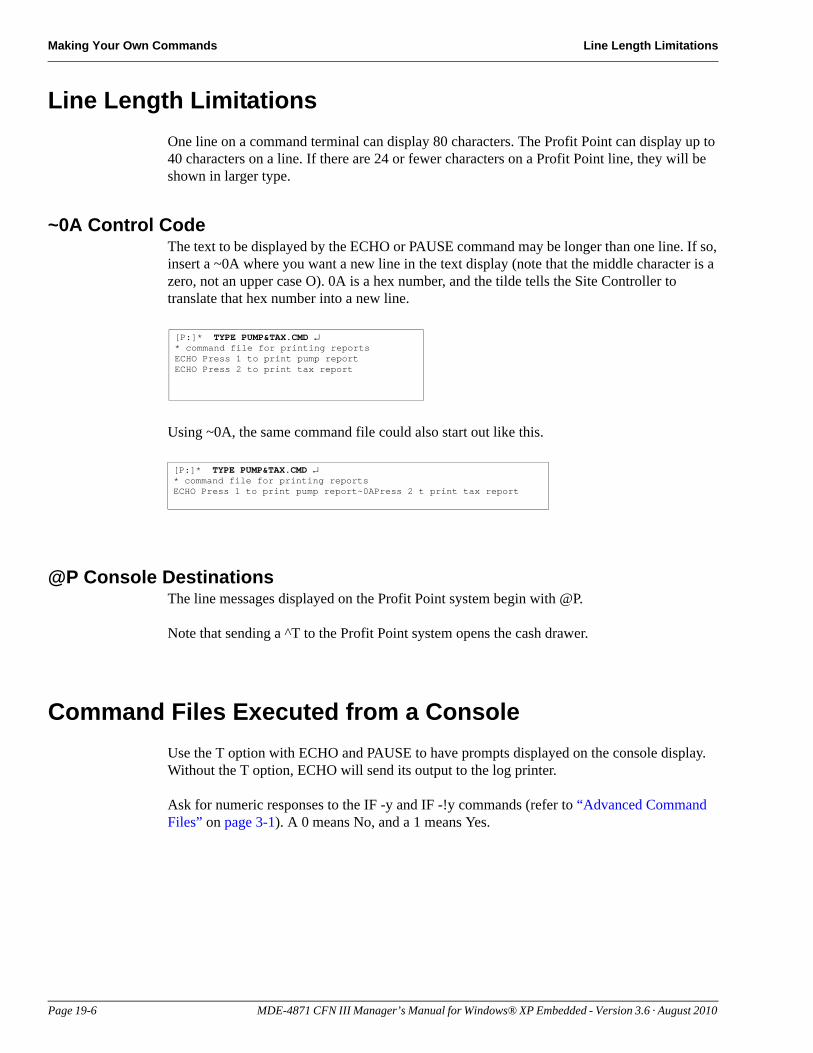
Making Your Own Commands Line Length Limitations
Line Length LimitationsOne line on a command terminal can display 80 characters. The Profit Point can display up to 40 characters on a line. If there are 24 or fewer characters on a Profit Point line, they will be shown in larger type.
~0A Control CodeThe text to be displayed by the ECHO or PAUSE command may be longer than one line. If so, insert a ~0A where you want a new line in the text display (note that the middle character is a zero, not an upper case O). 0A is a hex number, and the tilde tells the Site Controller to translate that hex number into a new line.
[P:]* TYPE PUMP&TAX.CMD ↵* command file for printing reportsECHO Press 1 to print pump reportECHO Press 2 to print tax report
[P:]* TYPE PUMP&TAX.CMD ↵* command file for printing reportsECHO Press 1 to print pump report~0APress 2 t print tax report
Using ~0A, the same command file could also start out like this.
@P Console DestinationsThe line messages displayed on the Profit Point system begin with @P.
Note that sending a ^T to the Profit Point system opens the cash drawer.
Command Files Executed from a ConsoleUse the T option with ECHO and PAUSE to have prompts displayed on the console display. Without the T option, ECHO will send its output to the log printer.
Ask for numeric responses to the IF -y and IF -!y commands (refer to “Advanced Command Files” on page 3-1). A 0 means No, and a 1 means Yes.
Page 19-6 MDE-4871 CFN III Manager’s Manual for Windows® XP Embedded - Version 3.6 · August 2010
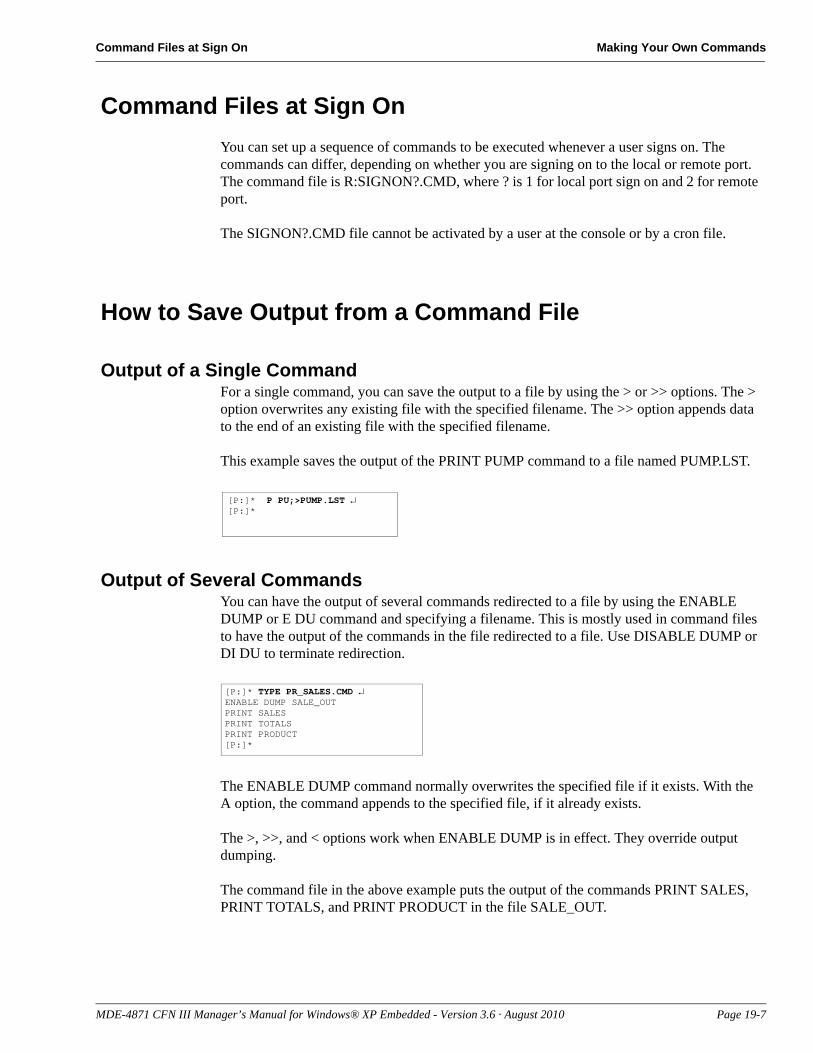
Command Files at Sign On Making Your Own Commands
Command Files at Sign OnYou can set up a sequence of commands to be executed whenever a user signs on. The commands can differ, depending on whether you are signing on to the local or remote port. The command file is R:SIGNON?.CMD, where ? is 1 for local port sign on and 2 for remote port.
The SIGNON?.CMD file cannot be activated by a user at the console or by a cron file.
How to Save Output from a Command File
Output of a Single CommandFor a single command, you can save the output to a file by using the > or >> options. The > option overwrites any existing file with the specified filename. The >> option appends data to the end of an existing file with the specified filename.
[P:]* P PU;>PUMP.LST ↵[P:]*
This example saves the output of the PRINT PUMP command to a file named PUMP.LST.
Output of Several CommandsYou can have the output of several commands redirected to a file by using the ENABLE DUMP or E DU command and specifying a filename. This is mostly used in command files to have the output of the commands in the file redirected to a file. Use DISABLE DUMP or DI DU to terminate redirection.
[P:]* TYPE PR_SALES.CMD ↵ENABLE DUMP SALE_OUTPRINT SALESPRINT TOTALSPRINT PRODUCT[P:]*
The ENABLE DUMP command normally overwrites the specified file if it exists. With the A option, the command appends to the specified file, if it already exists.
The >, >>, and < options work when ENABLE DUMP is in effect. They override output dumping.
The command file in the above example puts the output of the commands PRINT SALES, PRINT TOTALS, and PRINT PRODUCT in the file SALE_OUT.
MDE-4871 CFN III Manager’s Manual for Windows® XP Embedded - Version 3.6 · August 2010 Page 19-7
Making Your Own Commands How to Output to Log Printer
How to Output to Log PrinterRefer to “Site Controller III” on page 3-1 for more information on output to the log printer.
How to Output to a Receipt PrinterThe PRINT RECEIPT or P REC command lets you print text on a receipt printer (its name reflects the fact that it involves the receipt printer, not that it prints receipts).
The simple use of the PRINT RECEIPT command is to test the receipt printer. However, it can also be used to print reports, and for this reason, you might want to use it in command files.
PRINT RECEIPT allows long receipts with widths up to the maximum of the receipt printer. This allows reports, as well as receipts, to be printed by a receipt printer (also, a full-carriage printer could be tied to a console through a parallel port).
The address of the receipt printer either comes from the first data in the standard input, or it can be specified as a P1 option (this avoids having to require the printer number to be put in the file that is being redirected to a receipt printer). The printer address can be specified in four ways:
• If only a number is given, it is the address of the printer.• If the address is only C, the output is sent to the printer associated with the console where
the command file is being run.• If the command is run from the local or remote port (in human mode) and C is specified,
the output goes to the printer associated with console #1.• If the address is C1 - C4 the output goes to the printer associated with the specified
console number (which is set in console parameters).
When you send a file to a printer, you may want to put a heading line or to include printer-control codes that do not appear in the file. If so, put the heading or codes on the same line in the command file as the PRINT RECEIPT command; the extra characters will be sent to the printer before the file text. Any text sent to the printer is checked for ~ and ^ control codes, such as ^M for a new line.Note: Sending a ^T to the console opens the cash drawer.
See your printer and command terminal manuals for these control codes, as they may vary from device to device. If the control codes are given as hex numbers, insert a ~ before the hex number; if the codes are letters or characters, insert a ^ before the letter or character.
Use the C option to print more than one line with PRINT RECEIPT. Unlike most Site Controller commands, in this case you do not indicate the end of the lines you want printed by responding to the last Line to print? prompt with only a carriage return. Instead, type only a period (.) and press Return (this is so you can include blank lines in what is printed on the receipt printer, if you want).
You can use PRINT RECEIPT to print the entire contents of a file on the receipt printer. The format is:
PRINT RECEIPT;<filename
Page 19-8 MDE-4871 CFN III Manager’s Manual for Windows® XP Embedded - Version 3.6 · August 2010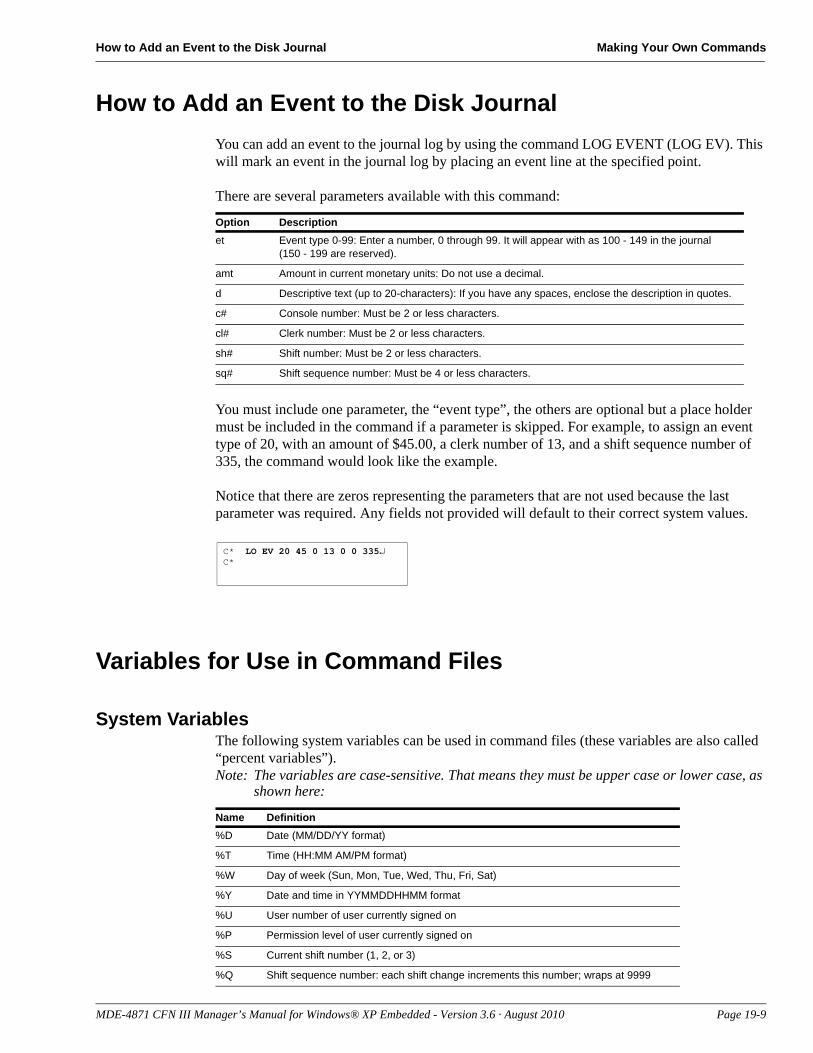
How to Add an Event to the Disk Journal Making Your Own Commands
How to Add an Event to the Disk JournalYou can add an event to the journal log by using the command LOG EVENT (LOG EV). This will mark an event in the journal log by placing an event line at the specified point.
C* LO EV 20 45 0 13 0 0 335↵C*
There are several parameters available with this command:
You must include one parameter, the “event type”, the others are optional but a place holder must be included in the command if a parameter is skipped. For example, to assign an event type of 20, with an amount of $45.00, a clerk number of 13, and a shift sequence number of 335, the command would look like the example.
Notice that there are zeros representing the parameters that are not used because the last parameter was required. Any fields not provided will default to their correct system values.
Variables for Use in Command Files
System VariablesThe following system variables can be used in command files (these variables are also called “percent variables”). Note: The variables are case-sensitive. That means they must be upper case or lower case, as
shown here:
Option Descriptionet Event type 0-99: Enter a number, 0 through 99. It will appear with as 100 - 149 in the journal
(150 - 199 are reserved).
amt Amount in current monetary units: Do not use a decimal.
d Descriptive text (up to 20-characters): If you have any spaces, enclose the description in quotes.
c# Console number: Must be 2 or less characters.
cl# Clerk number: Must be 2 or less characters.
sh# Shift number: Must be 2 or less characters.
sq# Shift sequence number: Must be 4 or less characters.
Name Definition%D Date (MM/DD/YY format)
%T Time (HH:MM AM/PM format)
%W Day of week (Sun, Mon, Tue, Wed, Thu, Fri, Sat)
%Y Date and time in YYMMDDHHMM format
%U User number of user currently signed on
%P Permission level of user currently signed on
%S Current shift number (1, 2, or 3)
%Q Shift sequence number: each shift change increments this number; wraps at 9999
MDE-4871 CFN III Manager’s Manual for Windows® XP Embedded - Version 3.6 · August 2010 Page 19-9
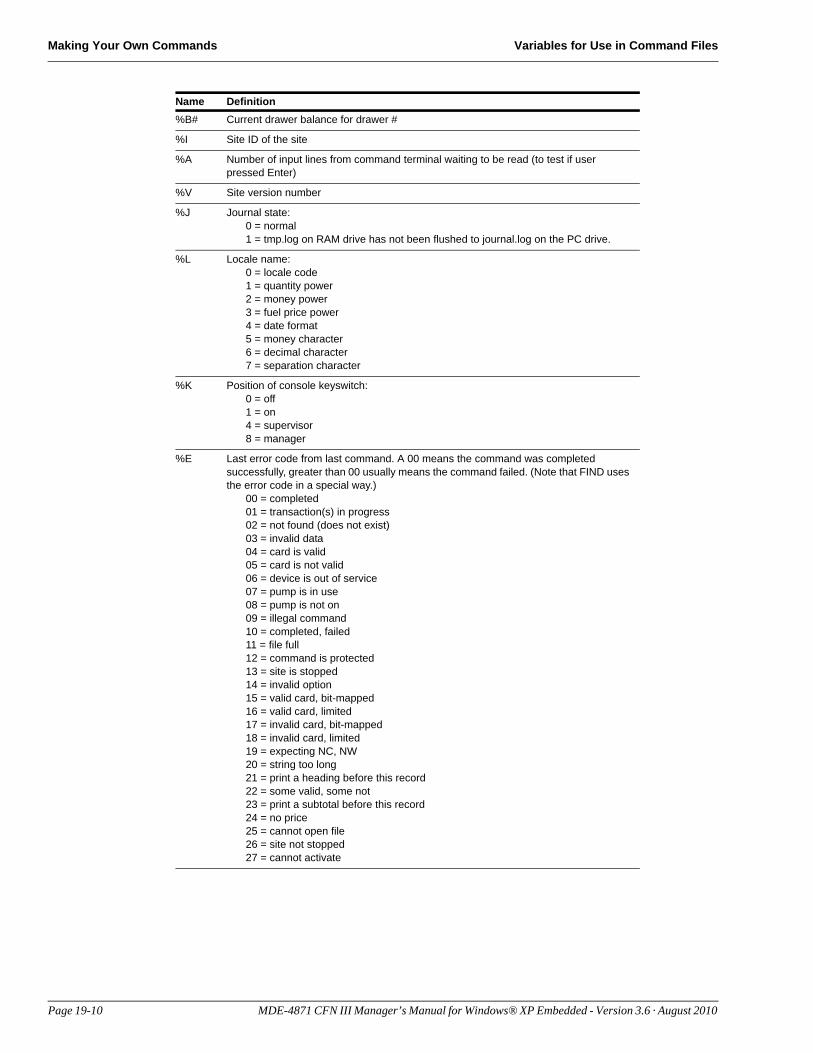
Making Your Own Commands Variables for Use in Command Files
%B# Current drawer balance for drawer #
%I Site ID of the site
%A Number of input lines from command terminal waiting to be read (to test if user pressed Enter)
%V Site version number
%J Journal state:0 = normal1 = tmp.log on RAM drive has not been flushed to journal.log on the PC drive.
%L Locale name:0 = locale code1 = quantity power2 = money power3 = fuel price power4 = date format5 = money character6 = decimal character7 = separation character
%K Position of console keyswitch:0 = off1 = on4 = supervisor8 = manager
%E Last error code from last command. A 00 means the command was completed successfully, greater than 00 usually means the command failed. (Note that FIND uses the error code in a special way.)
00 = completed01 = transaction(s) in progress02 = not found (does not exist)03 = invalid data04 = card is valid05 = card is not valid06 = device is out of service07 = pump is in use08 = pump is not on09 = illegal command10 = completed, failed11 = file full12 = command is protected13 = site is stopped14 = invalid option15 = valid card, bit-mapped16 = valid card, limited17 = invalid card, bit-mapped18 = invalid card, limited19 = expecting NC, NW20 = string too long21 = print a heading before this record22 = some valid, some not23 = print a subtotal before this record24 = no price25 = cannot open file26 = site not stopped27 = cannot activate
Name Definition
Page 19-10 MDE-4871 CFN III Manager’s Manual for Windows® XP Embedded - Version 3.6 · August 2010

Variables for Use in Command Files Making Your Own Commands
In two of the last three variables above, %M7C# and %M8C#, the # can be replaced by the console number, as described, or it can be replaced by a %a-%z user variable (discussed in this chapter and the Advanced command files chapter) to allow variable selection of the console number.
Command-line-argument VariablesThese are the variables that can be used in command-line arguments:
Name Definition%0 Number of arguments on command line.
%1 - %9 Command line arguments one through nine.
You can use command-line arguments in command files. Command-line arguments are strings typed on the command line after the command and separated by spaces. The form is the same as is used by Windows XP or MS-DOS.
Where you want to use the argument in the file, put a percent sign (%) followed by the position number of the arguments on the command line. Arguments entered after a command are numbered from left to right, starting with 1. The first argument after the command is %1, the second argument is %2, and so on.
%C Where command is being executed from:1 = local command port (command terminal)2 = remote command port3 = cron8 = Profit Point #19 = Profit Point #210 = Profit Point #311 = Profit Point #4
%R Site run level:0 = running1 = blocking new transactions2 = stopped3 = emergency stopped4 = memory full5 = crashed
%Fd Returns the amount of free space on the specified drive (where d is the drive)
%M Miscellaneous options where # stands for:0 = returns the value (in cents) contained in a non-resettable totalizer that adds the absolute value of all sale-related items; that is, all sales add to the totalizer, regardless if they are reversals, returns, payouts, etc. (Must have JOURNAL.LOG enabled.)1 = returns the initial drawer balance in SYS_PAR2 = transaction number of first transaction in file3 = transaction number of last transaction in file4 = status of bank modem (0=down, 1=available, 3=connected)5 = status of CFN modem (0=down, 1=available, 3=connected)
(for 6 - 8 see the discussion in the NEXT CLERK command about the unique shift #s for every console parameter in SYS_PAR)
6 = if the SYS_PAR parameter is enabled, returns a 1; if disabled, returns a zero7C# = if the SYS_PAR parameter is enabled, returns the shift number of console #; if disabled, returns the system’s shift number8C# = if the SYS_PAR parameter is enabled, returns the shift serial number of console #; if disabled, returns the system’s shift serial number9 = returns CFN Remote port config 0=Dumb, 1=ANSI, 2=VT52
Name Definition
MDE-4871 CFN III Manager’s Manual for Windows® XP Embedded - Version 3.6 · August 2010 Page 19-11
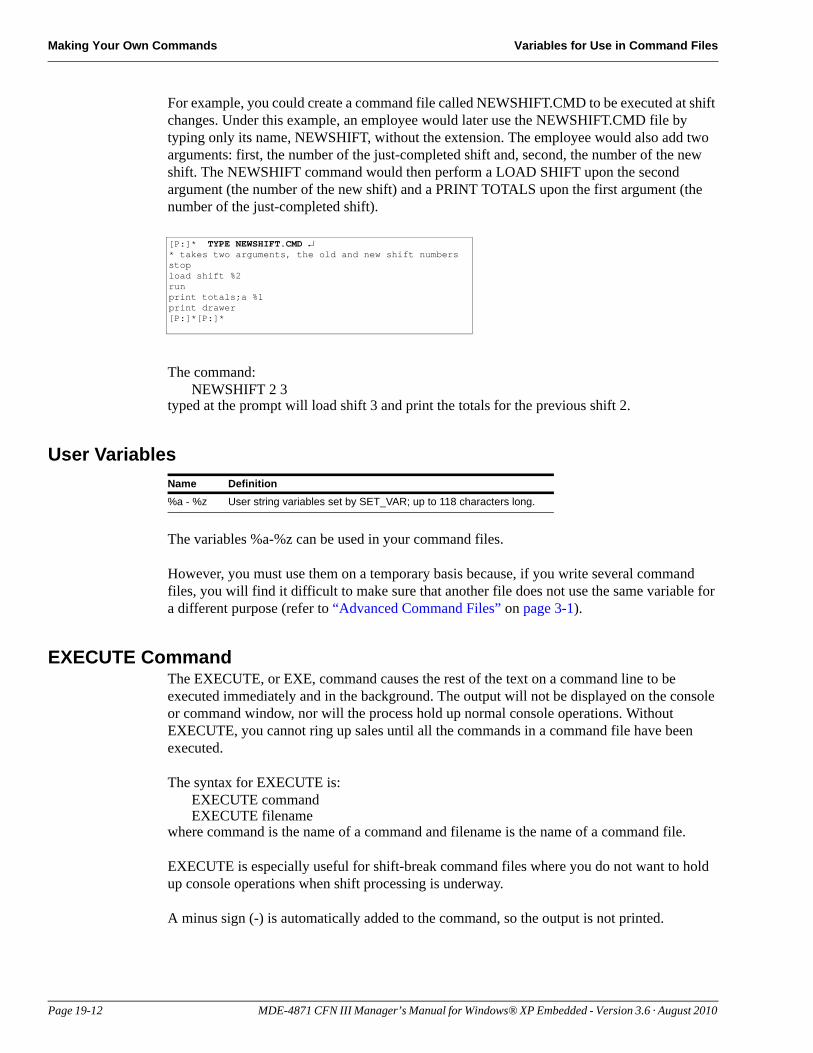
Making Your Own Commands Variables for Use in Command Files
[P:]* TYPE NEWSHIFT.CMD ↵* takes two arguments, the old and new shift numbersstopload shift %2runprint totals;a %1print drawer[P:]*[P:]*
For example, you could create a command file called NEWSHIFT.CMD to be executed at shift changes. Under this example, an employee would later use the NEWSHIFT.CMD file by typing only its name, NEWSHIFT, without the extension. The employee would also add two arguments: first, the number of the just-completed shift and, second, the number of the new shift. The NEWSHIFT command would then perform a LOAD SHIFT upon the second argument (the number of the new shift) and a PRINT TOTALS upon the first argument (the number of the just-completed shift).
The command:NEWSHIFT 2 3
typed at the prompt will load shift 3 and print the totals for the previous shift 2.
User VariablesName Definition%a - %z User string variables set by SET_VAR; up to 118 characters long.
The variables %a-%z can be used in your command files.
However, you must use them on a temporary basis because, if you write several command files, you will find it difficult to make sure that another file does not use the same variable for a different purpose (refer to “Advanced Command Files” on page 3-1).
EXECUTE CommandThe EXECUTE, or EXE, command causes the rest of the text on a command line to be executed immediately and in the background. The output will not be displayed on the console or command window, nor will the process hold up normal console operations. Without EXECUTE, you cannot ring up sales until all the commands in a command file have been executed.
The syntax for EXECUTE is:EXECUTE commandEXECUTE filename
where command is the name of a command and filename is the name of a command file.
EXECUTE is especially useful for shift-break command files where you do not want to hold up console operations when shift processing is underway.
A minus sign (-) is automatically added to the command, so the output is not printed.
Page 19-12 MDE-4871 CFN III Manager’s Manual for Windows® XP Embedded - Version 3.6 · August 2010

How to Exit from Command Files Making Your Own Commands
As many commands as there are available entries in the cron table may be queued simultaneously.
Since cron and the console use the same command processor, commands queued with EXECUTE will not start until the console is logged off remote command mode.
Since EXECUTE runs commands in the background, make sure all your command files that are run with EXECUTE do not contain any indefinite loops. Otherwise, you can lock up the program space. If you must fill the program space, use the REMOVE CRON;AI command to remove all running or pending executable or cron commands.
How to Exit from Command FilesThe Site Controller command EXIT, if encountered in a command file, will cause the command file to terminate. This will not log the user off the data terminal or console. To terminate the command file and log off the user, use QUIT.
MDE-4871 CFN III Manager’s Manual for Windows® XP Embedded - Version 3.6 · August 2010 Page 19-13

Making Your Own Commands How to Exit from Command Files
This page is intentionally left blank.
Page 19-14 MDE-4871 CFN III Manager’s Manual for Windows® XP Embedded - Version 3.6 · August 2010
How to Use the IF Command Advanced Command Files
20 – Advanced Command Files
If you have had some computer programming experience, this chapter must be self-explanatory. If you have not had any computer programming experience, you might want to discuss this chapter with the person in your organization who has the most knowledge about computers.
How to Use the IF CommandThe IF command allows conditional execution of the next one or more commands in a command file. IF uses several switches that allow you to specify conditions.
IF supports block-structured statements, and uses Pascal-type blocking. The format of an IF statement is:
IF condition [text]BEGINcommand1command2command3. . . .END
ELSEBEGINcommand1command2command3. . . .
END
If condition is true, the commands following IF will be executed. If condition is not true, the commands following the optional ELSE will be executed. The ELSE part is optional and may be omitted if not required.
BEGIN and END, on lines by themselves, delimit the commands. They are not required if only one command line follows IF or ELSE.
IF statements can be nested.Note: The indents are not required. Blank lines and tabs and spaces at the beginning of lines
are ignored (but is a good way to keep track of subsections in your code).
MDE-4871 CFN III Manager’s Manual for Windows® XP Embedded - Version 3.6 · August 2010 Page 20-1
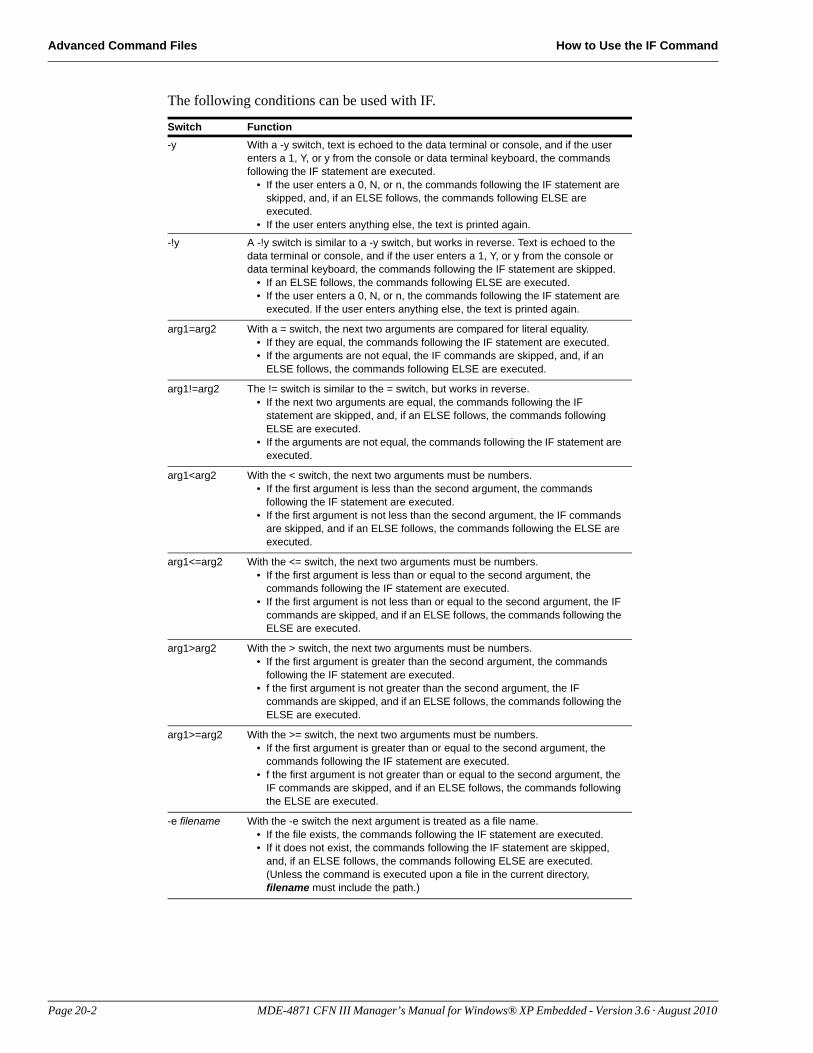
Advanced Command Files How to Use the IF Command
The following conditions can be used with IF.
Switch Function-y With a -y switch, text is echoed to the data terminal or console, and if the user
enters a 1, Y, or y from the console or data terminal keyboard, the commands following the IF statement are executed.
• If the user enters a 0, N, or n, the commands following the IF statement are skipped, and, if an ELSE follows, the commands following ELSE are executed.
• If the user enters anything else, the text is printed again.
-!y A -!y switch is similar to a -y switch, but works in reverse. Text is echoed to the data terminal or console, and if the user enters a 1, Y, or y from the console or data terminal keyboard, the commands following the IF statement are skipped.
• If an ELSE follows, the commands following ELSE are executed.• If the user enters a 0, N, or n, the commands following the IF statement are
executed. If the user enters anything else, the text is printed again.
arg1=arg2 With a = switch, the next two arguments are compared for literal equality.• If they are equal, the commands following the IF statement are executed.• If the arguments are not equal, the IF commands are skipped, and, if an
ELSE follows, the commands following ELSE are executed.
arg1!=arg2 The != switch is similar to the = switch, but works in reverse.• If the next two arguments are equal, the commands following the IF
statement are skipped, and, if an ELSE follows, the commands following ELSE are executed.
• If the arguments are not equal, the commands following the IF statement are executed.
arg1<arg2 With the < switch, the next two arguments must be numbers.• If the first argument is less than the second argument, the commands
following the IF statement are executed.• If the first argument is not less than the second argument, the IF commands
are skipped, and if an ELSE follows, the commands following the ELSE are executed.
arg1<=arg2 With the <= switch, the next two arguments must be numbers.• If the first argument is less than or equal to the second argument, the
commands following the IF statement are executed.• If the first argument is not less than or equal to the second argument, the IF
commands are skipped, and if an ELSE follows, the commands following the ELSE are executed.
arg1>arg2 With the > switch, the next two arguments must be numbers.• If the first argument is greater than the second argument, the commands
following the IF statement are executed.• f the first argument is not greater than the second argument, the IF
commands are skipped, and if an ELSE follows, the commands following the ELSE are executed.
arg1>=arg2 With the >= switch, the next two arguments must be numbers.• If the first argument is greater than or equal to the second argument, the
commands following the IF statement are executed.• f the first argument is not greater than or equal to the second argument, the
IF commands are skipped, and if an ELSE follows, the commands following the ELSE are executed.
-e filename With the -e switch the next argument is treated as a file name.• If the file exists, the commands following the IF statement are executed.• If it does not exist, the commands following the IF statement are skipped,
and, if an ELSE follows, the commands following ELSE are executed. (Unless the command is executed upon a file in the current directory, filename must include the path.)
Page 20-2 MDE-4871 CFN III Manager’s Manual for Windows® XP Embedded - Version 3.6 · August 2010
How to Use the IF Command Advanced Command Files
When using the IF statement the next line must not wrap into the following line or the system will bypass the first command line and pick up the second line and only execute it. For example:IF (condition)
pause;a ~10~14Switch Drawers~0AInsert new drawer containing$%M1 ‘~0APress Enter to continue
The system will bypass the pause;a ... command line and only execute the ~0APress Enter to continue line.
It is possible to link the Boolean options together with “and” and “or”. An & (ampersand) is the AND operator and an | (pipe or vertical bar) is the OR operator.
The & and | functions are evaluated left to right:• & terminates when the first false result is obtained• | terminates when the first true result is obtained
Avoid using both & and | in the same IF statement because your result may not be what you expect.
-!e filename With the -!e switch the next argument is treated as a file name.• If the file does not exist, the commands following the IF statement are
executed.• If it exists, the commands following the IF statement are skipped, and, if an
ELSE follows, the commands following ELSE are executed. (Unless the command is executed upon a file in the current directory, filename must include the path.)
Switch Function
MDE-4871 CFN III Manager’s Manual for Windows® XP Embedded - Version 3.6 · August 2010 Page 20-3
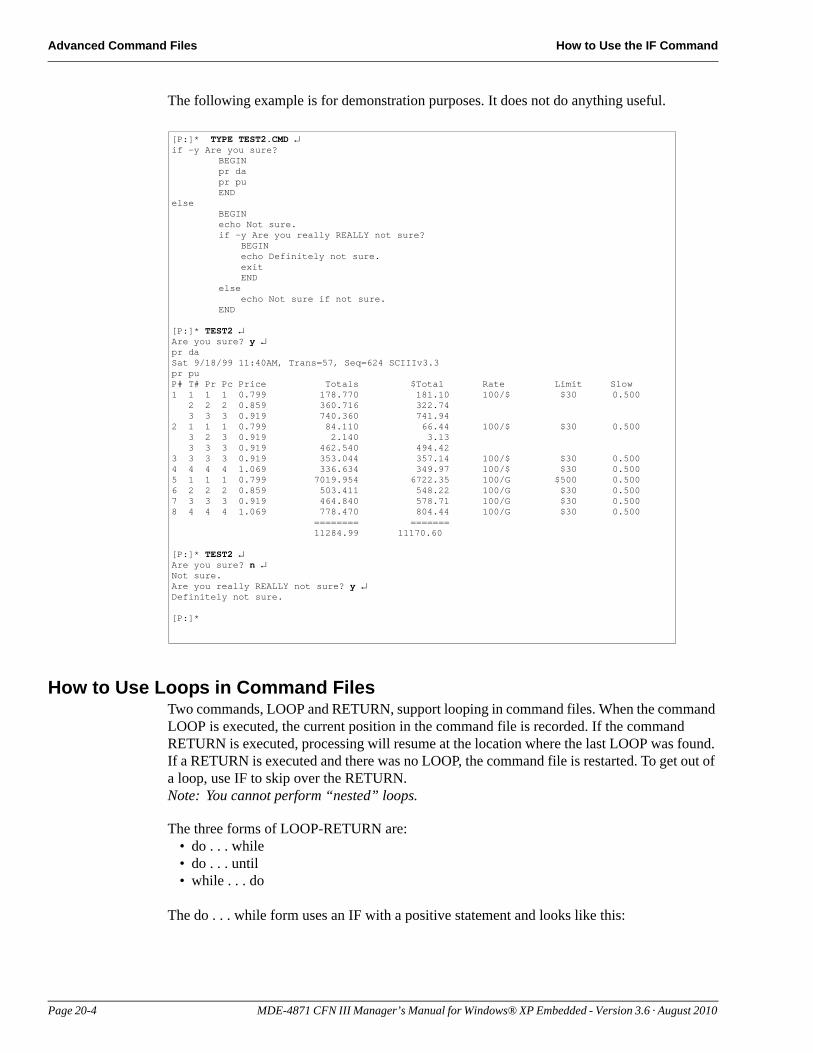
Advanced Command Files How to Use the IF Command
[P:]* TYPE TEST2.CMD ↵if -y Are you sure?
BEGINpr dapr puEND
elseBEGINecho Not sure.if -y Are you really REALLY not sure? BEGIN echo Definitely not sure. exit ENDelse echo Not sure if not sure.END
[P:]* TEST2 ↵Are you sure? y ↵pr daSat 9/18/99 11:40AM, Trans=57, Seq=624 SCIIIv3.3pr puP# T# Pr Pc Price Totals $Total Rate Limit Slow1 1 1 1 0.799 178.770 181.10 100/$ $30 0.500 2 2 2 0.859 360.716 322.74 3 3 3 0.919 740.360 741.942 1 1 1 0.799 84.110 66.44 100/$ $30 0.500 3 2 3 0.919 2.140 3.13 3 3 3 0.919 462.540 494.423 3 3 3 0.919 353.044 357.14 100/$ $30 0.5004 4 4 4 1.069 336.634 349.97 100/$ $30 0.5005 1 1 1 0.799 7019.954 6722.35 100/G $500 0.5006 2 2 2 0.859 503.411 548.22 100/G $30 0.5007 3 3 3 0.919 464.840 578.71 100/G $30 0.5008 4 4 4 1.069 778.470 804.44 100/G $30 0.500
======== =======11284.99 11170.60
[P:]* TEST2 ↵Are you sure? n ↵Not sure.Are you really REALLY not sure? y ↵Definitely not sure.
[P:]*
The following example is for demonstration purposes. It does not do anything useful.
How to Use Loops in Command FilesTwo commands, LOOP and RETURN, support looping in command files. When the command LOOP is executed, the current position in the command file is recorded. If the command RETURN is executed, processing will resume at the location where the last LOOP was found. If a RETURN is executed and there was no LOOP, the command file is restarted. To get out of a loop, use IF to skip over the RETURN.Note: You cannot perform “nested” loops.
The three forms of LOOP-RETURN are:• do . . . while• do . . . until• while . . . do
The do . . . while form uses an IF with a positive statement and looks like this:
Page 20-4 MDE-4871 CFN III Manager’s Manual for Windows® XP Embedded - Version 3.6 · August 2010
How to Use the IF Command Advanced Command Files
LOOPcommand1command2 ...commandnIF -[condition]RETURN
The do . . . until form uses an IF with a negative statement and looks like this:
LOOPcommand1command2 ...commandnIF -![condition]RETURN
The while . . . do form uses an IF with a positive statement and looks like this:
IF -[condition]BEGIN
LOOPcommand1command2...commandnIF -[condition]RETURN
END
How to Use Case Statements in Command FilesThe command CASE, when used in a command file, allows the user to pick one command to execute from a list of several. The maximum number of cases in a CASE statement is 99.
There are two forms of case statement. The first is:
CASE [-d] -p n1 n2command1command2. . . .commandn1[default command]
MDE-4871 CFN III Manager’s Manual for Windows® XP Embedded - Version 3.6 · August 2010 Page 20-5
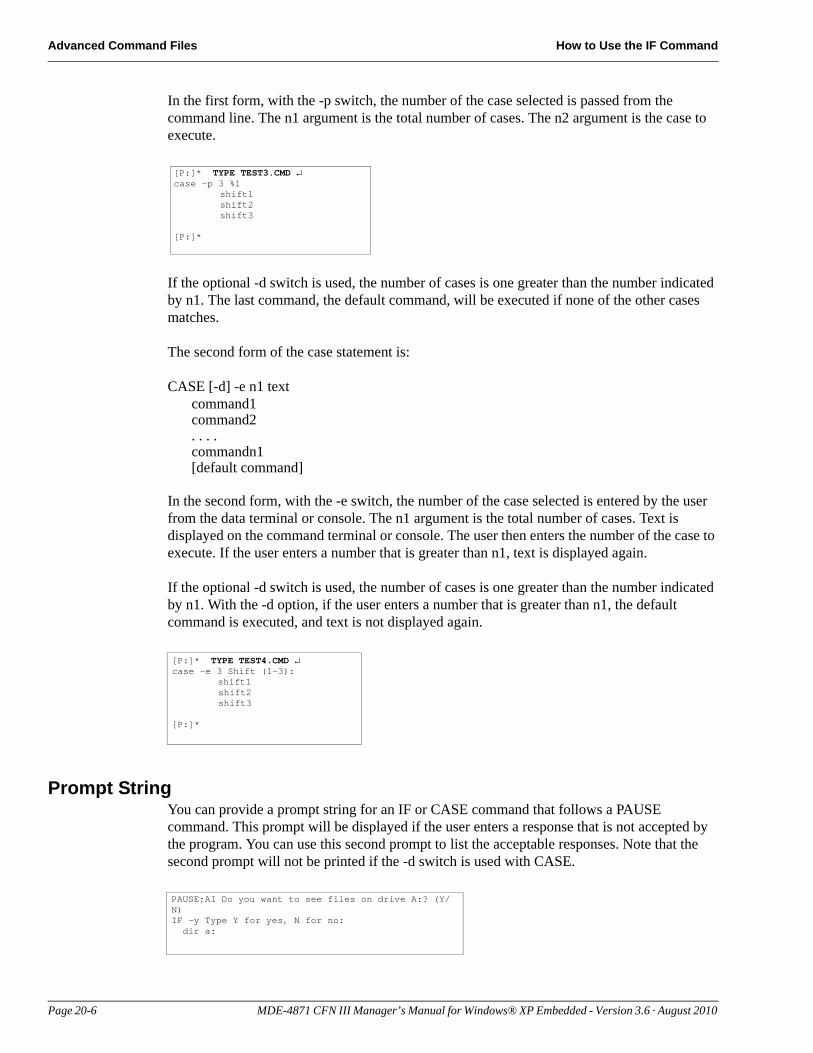
Advanced Command Files How to Use the IF Command
[P:]* TYPE TEST3.CMD ↵case -p 3 %1
shift1shift2shift3
[P:]*
In the first form, with the -p switch, the number of the case selected is passed from the command line. The n1 argument is the total number of cases. The n2 argument is the case to execute.
If the optional -d switch is used, the number of cases is one greater than the number indicated by n1. The last command, the default command, will be executed if none of the other cases matches.
The second form of the case statement is:
CASE [-d] -e n1 textcommand1command2. . . .commandn1[default command]
[P:]* TYPE TEST4.CMD ↵case -e 3 Shift (1-3):
shift1shift2shift3
[P:]*
In the second form, with the -e switch, the number of the case selected is entered by the user from the data terminal or console. The n1 argument is the total number of cases. Text is displayed on the command terminal or console. The user then enters the number of the case to execute. If the user enters a number that is greater than n1, text is displayed again.
If the optional -d switch is used, the number of cases is one greater than the number indicated by n1. With the -d option, if the user enters a number that is greater than n1, the default command is executed, and text is not displayed again.
Prompt StringYou can provide a prompt string for an IF or CASE command that follows a PAUSE command. This prompt will be displayed if the user enters a response that is not accepted by the program. You can use this second prompt to list the acceptable responses. Note that the second prompt will not be printed if the -d switch is used with CASE.
PAUSE;AI Do you want to see files on drive A:? (Y/N)IF -y Type Y for yes, N for no: dir a:
Page 20-6 MDE-4871 CFN III Manager’s Manual for Windows® XP Embedded - Version 3.6 · August 2010
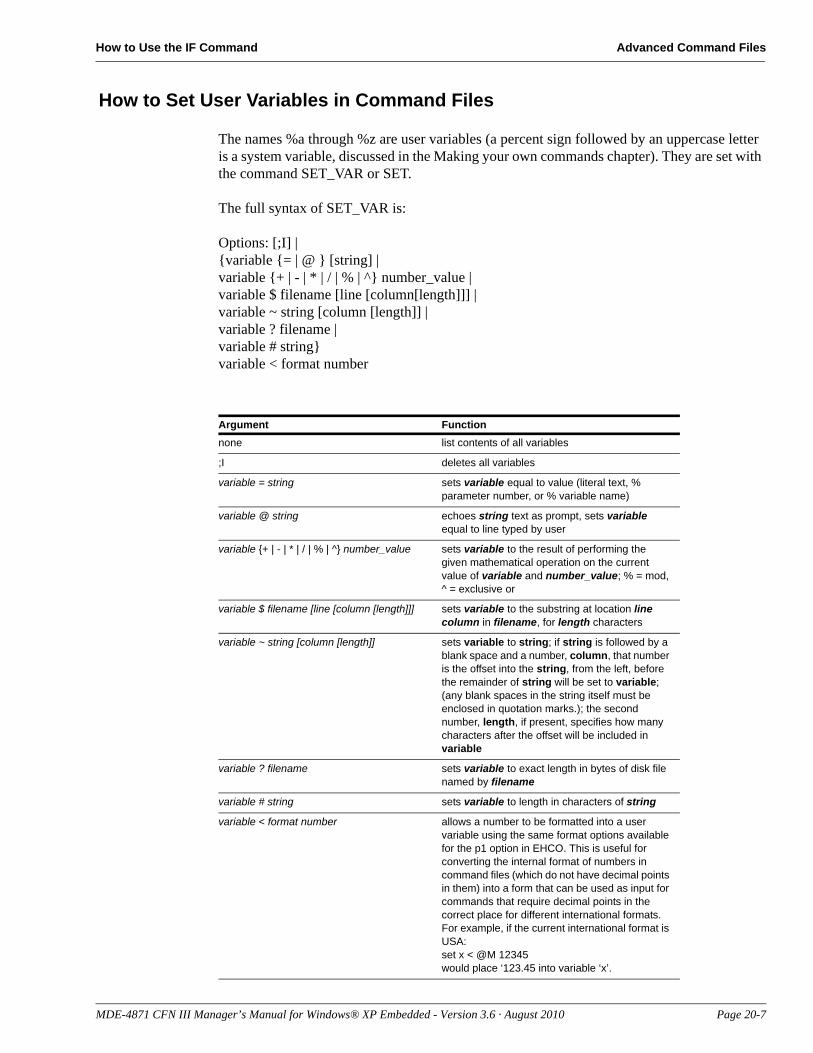
How to Use the IF Command Advanced Command Files
How to Set User Variables in Command Files
The names %a through %z are user variables (a percent sign followed by an uppercase letter is a system variable, discussed in the Making your own commands chapter). They are set with the command SET_VAR or SET.
The full syntax of SET_VAR is:
Options: [;I] |{variable {= | @ } [string] |variable {+ | - | * | / | % | ^} number_value |variable $ filename [line [column[length]]] |variable ~ string [column [length]] |variable ? filename |variable # string}variable < format number
Argument Functionnone list contents of all variables
;I deletes all variables
variable = string sets variable equal to value (literal text, % parameter number, or % variable name)
variable @ string echoes string text as prompt, sets variable equal to line typed by user
variable {+ | - | * | / | % | ^} number_value sets variable to the result of performing the given mathematical operation on the current value of variable and number_value; % = mod, ^ = exclusive or
variable $ filename [line [column [length]]] sets variable to the substring at location line column in filename, for length characters
variable ~ string [column [length]] sets variable to string; if string is followed by a blank space and a number, column, that number is the offset into the string, from the left, before the remainder of string will be set to variable; (any blank spaces in the string itself must be enclosed in quotation marks.); the second number, length, if present, specifies how many characters after the offset will be included in variable
variable ? filename sets variable to exact length in bytes of disk file named by filename
variable # string sets variable to length in characters of string
variable < format number allows a number to be formatted into a user variable using the same format options available for the p1 option in EHCO. This is useful for converting the internal format of numbers in command files (which do not have decimal points in them) into a form that can be used as input for commands that require decimal points in the correct place for different international formats. For example, if the current international format is USA:set x < @M 12345would place ‘123.45 into variable ‘x’.
MDE-4871 CFN III Manager’s Manual for Windows® XP Embedded - Version 3.6 · August 2010 Page 20-7
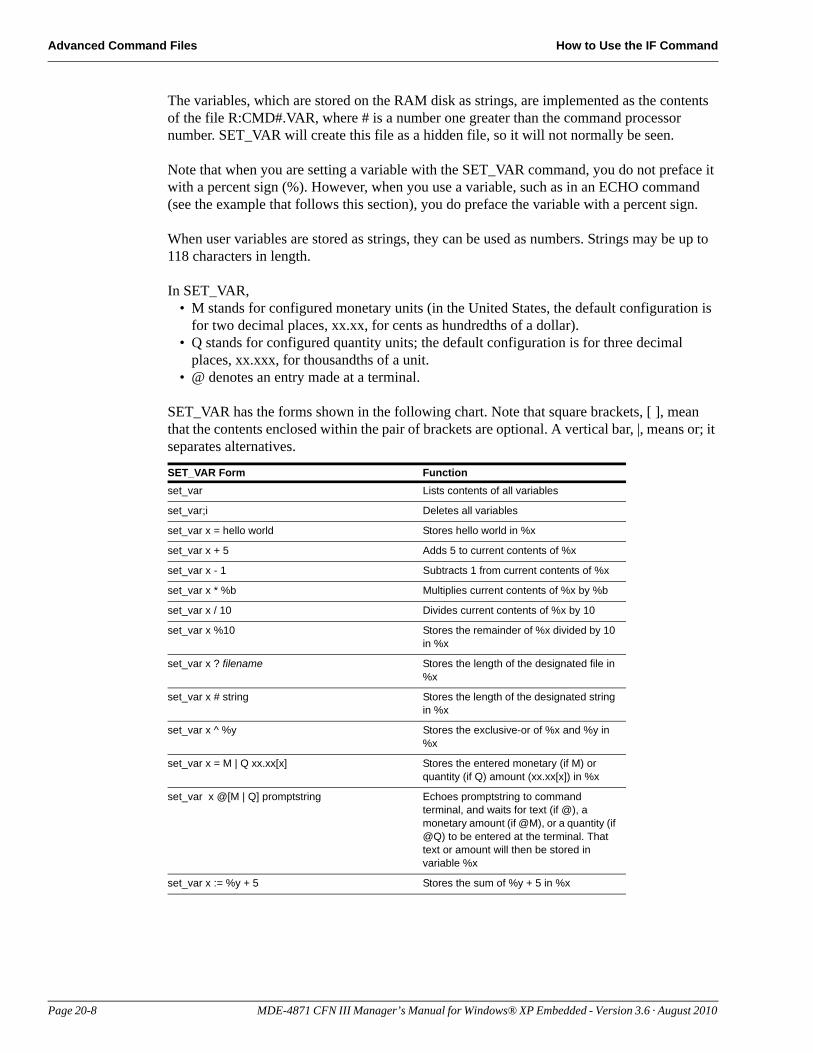
Advanced Command Files How to Use the IF Command
The variables, which are stored on the RAM disk as strings, are implemented as the contents of the file R:CMD#.VAR, where # is a number one greater than the command processor number. SET_VAR will create this file as a hidden file, so it will not normally be seen.
Note that when you are setting a variable with the SET_VAR command, you do not preface it with a percent sign (%). However, when you use a variable, such as in an ECHO command (see the example that follows this section), you do preface the variable with a percent sign.
When user variables are stored as strings, they can be used as numbers. Strings may be up to 118 characters in length.
In SET_VAR,• M stands for configured monetary units (in the United States, the default configuration is
for two decimal places, xx.xx, for cents as hundredths of a dollar).• Q stands for configured quantity units; the default configuration is for three decimal
places, xx.xxx, for thousandths of a unit.• @ denotes an entry made at a terminal.
SET_VAR has the forms shown in the following chart. Note that square brackets, [ ], mean that the contents enclosed within the pair of brackets are optional. A vertical bar, |, means or; it separates alternatives.
SET_VAR Form Functionset_var Lists contents of all variables
set_var;i Deletes all variables
set_var x = hello world Stores hello world in %x
set_var x + 5 Adds 5 to current contents of %x
set_var x - 1 Subtracts 1 from current contents of %x
set_var x * %b Multiplies current contents of %x by %b
set_var x / 10 Divides current contents of %x by 10
set_var x %10 Stores the remainder of %x divided by 10 in %x
set_var x ? filename Stores the length of the designated file in %x
set_var x # string Stores the length of the designated string in %x
set_var x ^ %y Stores the exclusive-or of %x and %y in %x
set_var x = M | Q xx.xx[x] Stores the entered monetary (if M) or quantity (if Q) amount (xx.xx[x]) in %x
set_var x @[M | Q] promptstring Echoes promptstring to command terminal, and waits for text (if @), a monetary amount (if @M), or a quantity (if @Q) to be entered at the terminal. That text or amount will then be stored in variable %x
set_var x := %y + 5 Stores the sum of %y + 5 in %x
Page 20-8 MDE-4871 CFN III Manager’s Manual for Windows® XP Embedded - Version 3.6 · August 2010
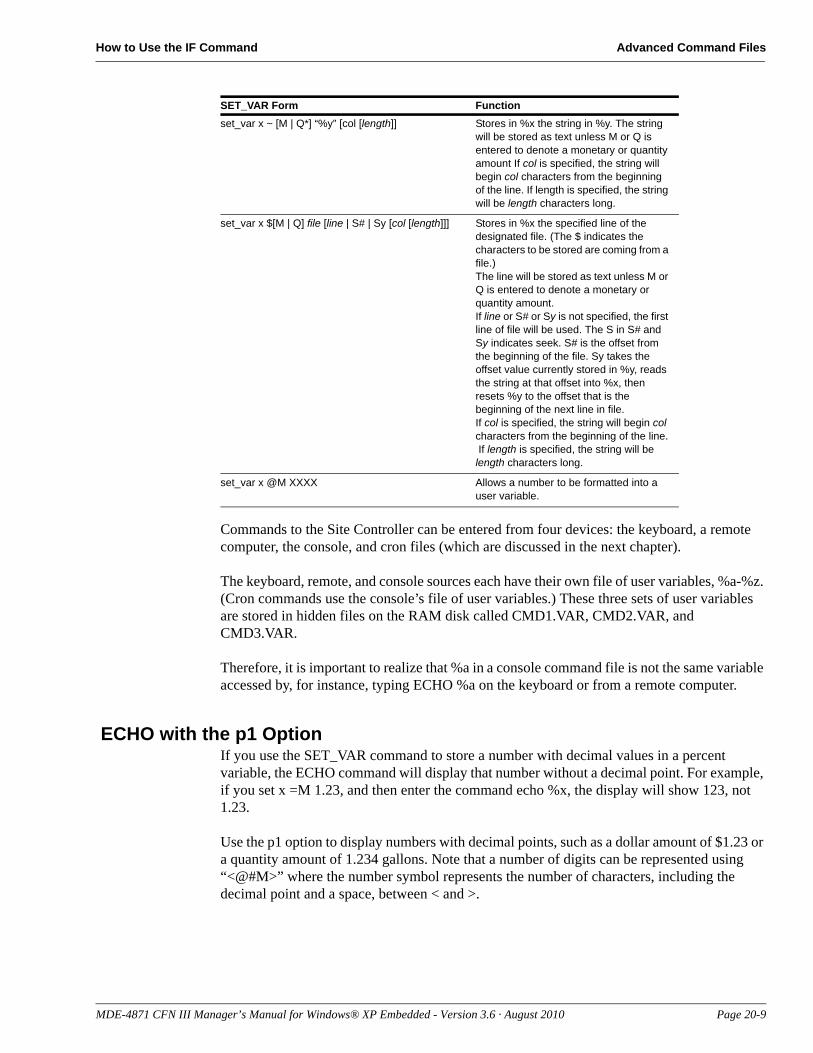
How to Use the IF Command Advanced Command Files
Commands to the Site Controller can be entered from four devices: the keyboard, a remote computer, the console, and cron files (which are discussed in the next chapter).
The keyboard, remote, and console sources each have their own file of user variables, %a-%z. (Cron commands use the console’s file of user variables.) These three sets of user variables are stored in hidden files on the RAM disk called CMD1.VAR, CMD2.VAR, and CMD3.VAR.
Therefore, it is important to realize that %a in a console command file is not the same variable accessed by, for instance, typing ECHO %a on the keyboard or from a remote computer.
ECHO with the p1 OptionIf you use the SET_VAR command to store a number with decimal values in a percent variable, the ECHO command will display that number without a decimal point. For example, if you set x =M 1.23, and then enter the command echo %x, the display will show 123, not 1.23.
Use the p1 option to display numbers with decimal points, such as a dollar amount of $1.23 or a quantity amount of 1.234 gallons. Note that a number of digits can be represented using “<@#M>” where the number symbol represents the number of characters, including the decimal point and a space, between < and >.
set_var x ~ [M | Q*] “%y” [col [length]] Stores in %x the string in %y. The string will be stored as text unless M or Q is entered to denote a monetary or quantity amount If col is specified, the string will begin col characters from the beginning of the line. If length is specified, the string will be length characters long.
set_var x $[M | Q] file [line | S# | Sy [col [length]]] Stores in %x the specified line of the designated file. (The $ indicates the characters to be stored are coming from a file.)The line will be stored as text unless M or Q is entered to denote a monetary or quantity amount.If line or S# or Sy is not specified, the first line of file will be used. The S in S# and Sy indicates seek. S# is the offset from the beginning of the file. Sy takes the offset value currently stored in %y, reads the string at that offset into %x, then resets %y to the offset that is the beginning of the next line in file.If col is specified, the string will begin col characters from the beginning of the line. If length is specified, the string will be length characters long.
set_var x @M XXXX Allows a number to be formatted into a user variable.
SET_VAR Form Function
MDE-4871 CFN III Manager’s Manual for Windows® XP Embedded - Version 3.6 · August 2010 Page 20-9
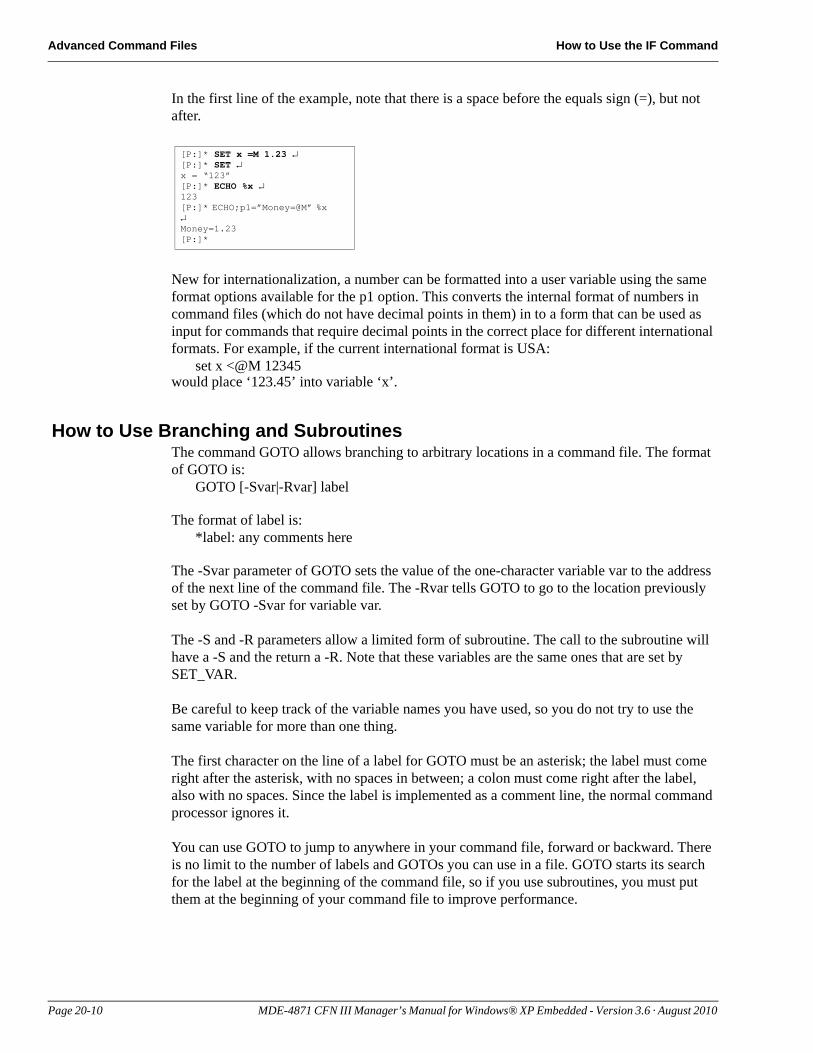
Advanced Command Files How to Use the IF Command
In the first line of the example, note that there is a space before the equals sign (=), but not after.
[P:]* SET x =M 1.23 ↵[P:]* SET ↵x = “123”[P:]* ECHO %x ↵123[P:]* ECHO;p1=”Money=@M” %x ↵Money=1.23[P:]*
New for internationalization, a number can be formatted into a user variable using the same format options available for the p1 option. This converts the internal format of numbers in command files (which do not have decimal points in them) in to a form that can be used as input for commands that require decimal points in the correct place for different international formats. For example, if the current international format is USA:
set x <@M 12345would place ‘123.45’ into variable ‘x’.
How to Use Branching and SubroutinesThe command GOTO allows branching to arbitrary locations in a command file. The format of GOTO is:
GOTO [-Svar|-Rvar] label
The format of label is:*label: any comments here
The -Svar parameter of GOTO sets the value of the one-character variable var to the address of the next line of the command file. The -Rvar tells GOTO to go to the location previously set by GOTO -Svar for variable var.
The -S and -R parameters allow a limited form of subroutine. The call to the subroutine will have a -S and the return a -R. Note that these variables are the same ones that are set by SET_VAR.
Be careful to keep track of the variable names you have used, so you do not try to use the same variable for more than one thing.
The first character on the line of a label for GOTO must be an asterisk; the label must come right after the asterisk, with no spaces in between; a colon must come right after the label, also with no spaces. Since the label is implemented as a comment line, the normal command processor ignores it.
You can use GOTO to jump to anywhere in your command file, forward or backward. There is no limit to the number of labels and GOTOs you can use in a file. GOTO starts its search for the label at the beginning of the command file, so if you use subroutines, you must put them at the beginning of your command file to improve performance.
Page 20-10 MDE-4871 CFN III Manager’s Manual for Windows® XP Embedded - Version 3.6 · August 2010
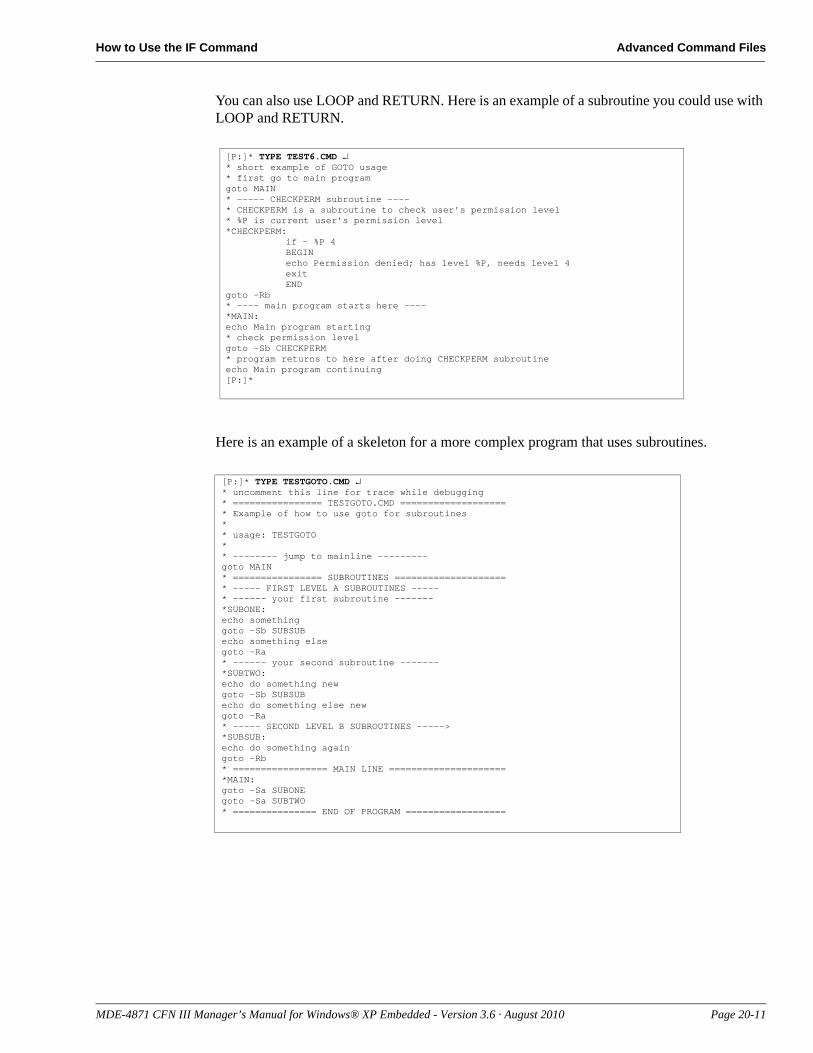
How to Use the IF Command Advanced Command Files
[P:]* TYPE TEST6.CMD ↵* short example of GOTO usage* first go to main programgoto MAIN* ----- CHECKPERM subroutine ----* CHECKPERM is a subroutine to check user’s permission level* %P is current user’s permission level*CHECKPERM:
if - %P 4BEGINecho Permission denied; has level %P, needs level 4exitEND
goto -Rb* ---- main program starts here ----*MAIN:echo Main program starting* check permission levelgoto -Sb CHECKPERM* program returns to here after doing CHECKPERM subroutineecho Main program continuing[P:]*
[P:]* TYPE TESTGOTO.CMD ↵* uncomment this line for trace while debugging* ================ TESTGOTO.CMD ===================* Example of how to use goto for subroutines** usage: TESTGOTO** -------- jump to mainline ---------goto MAIN* ================ SUBROUTINES ====================* ----- FIRST LEVEL A SUBROUTINES -----* ------ your first subroutine -------*SUBONE:echo somethinggoto -Sb SUBSUBecho something elsegoto -Ra* ------ your second subroutine -------*SUBTWO:echo do something newgoto -Sb SUBSUBecho do something else newgoto -Ra* ----- SECOND LEVEL B SUBROUTINES ----->*SUBSUB:echo do something againgoto -Rb* ================= MAIN LINE =====================*MAIN:goto -Sa SUBONEgoto -Sa SUBTWO* =============== END OF PROGRAM ==================
You can also use LOOP and RETURN. Here is an example of a subroutine you could use with LOOP and RETURN.
Here is an example of a skeleton for a more complex program that uses subroutines.
MDE-4871 CFN III Manager’s Manual for Windows® XP Embedded - Version 3.6 · August 2010 Page 20-11

Advanced Command Files Advanced Commands
How to Search for a String in a FileUse the disk-based program FIND to find and print all occurrences of a specified string in one or more files. The format of FIND is:
FIND[;[A][I]] pattern file1 [file2] . . .
[P:]* TYPE TEST5.CMD ↵* test for number of island card readers downPRINT DIAG;>SCRATCH 3FIND;>NULL “went down” SCRATCHECHO Island readers down = %EDEL SCRATCH[P:]*
FIND prints all lines that include one or more occurrences of the specified pattern. If pattern contains spaces, it must be enclosed in double quote marks (“). With A option, FIND prints the name of the file and the line number of each occurrence of the pattern.
FIND maintains a counter with how many times the pattern was found. The value of this counter (up to 9999) is returned as the error code from FIND. The %E variable contains the error code from the last command executed. If a line has more than one occurrence of the pattern on it, the line will be printed only once, but the counter will reflect the correct number of total occurrences. With the I option, the counter will give the total number of lines the pattern was found on, rather than the total number of occurrences of the pattern.
Advanced Commands
NEXT CLERK CommandThe NEXT CLERK or NE CL command allows the disk journal to keep separate shifts for each console. Separate shift numbers (1-99) and separate shift serial numbers (1-999) can be kept for each console.
NEXT CLERK (NE CL)
[P:]* NEXT CLERK ↵Console number? 1 ↵[P:]*
Before the command can be used, set the Unique shift #’s for every console parameter on page 9 of SYS_PAR to Yes. If this SYS_PAR parameter is set to No, when you try to run the command, a Command failed message appears.
When the NEXT CLERK command is run, there is no screen display, but the change in shift number for the designated console is noted in the disk journal.
If non-fuel sales have not been paid off on the designated console, the command will terminate with a Transaction(s) in progress message.
Page 20-12 MDE-4871 CFN III Manager’s Manual for Windows® XP Embedded - Version 3.6 · August 2010
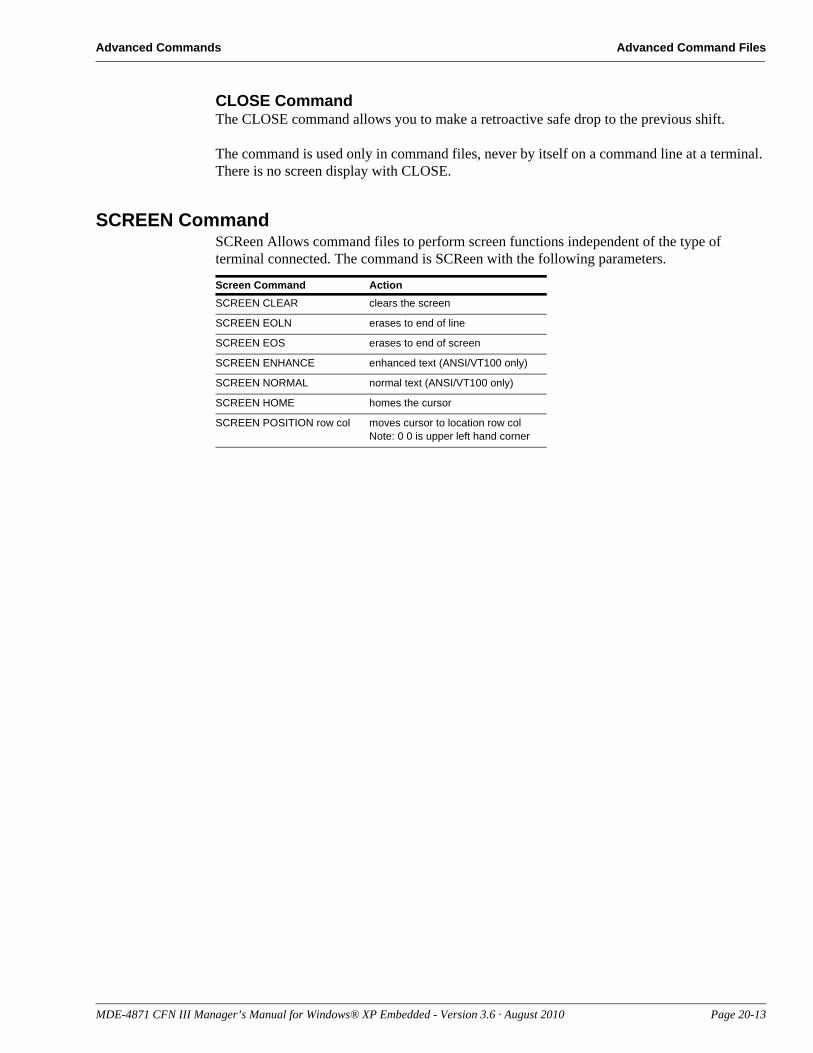
Advanced Commands Advanced Command Files
CLOSE CommandThe CLOSE command allows you to make a retroactive safe drop to the previous shift.
The command is used only in command files, never by itself on a command line at a terminal. There is no screen display with CLOSE.
SCREEN CommandSCReen Allows command files to perform screen functions independent of the type of terminal connected. The command is SCReen with the following parameters.
Screen Command ActionSCREEN CLEAR clears the screen
SCREEN EOLN erases to end of line
SCREEN EOS erases to end of screen
SCREEN ENHANCE enhanced text (ANSI/VT100 only)
SCREEN NORMAL normal text (ANSI/VT100 only)
SCREEN HOME homes the cursor
SCREEN POSITION row col moves cursor to location row colNote: 0 0 is upper left hand corner
MDE-4871 CFN III Manager’s Manual for Windows® XP Embedded - Version 3.6 · August 2010 Page 20-13

Advanced Command Files Advanced Commands
This page is intentionally left blank.
Page 20-14 MDE-4871 CFN III Manager’s Manual for Windows® XP Embedded - Version 3.6 · August 2010
What Conditions can be Specified for Cron Automatic Cron Commands
21 – Automatic Cron Commands
The CFN3 application’s cron (chronological) function allows you to have commands executed automatically at specified times or when certain events occur.
Like EXECUTE commands, cron commands run in background and do not delay normal sales operations.
Each cron entry loaded by LOAD CRON is numbered and has two parts:• a string of characters representing the conditions for execution• a command that will be executed every time the conditions become true. The Site
Controller tests the conditions of each entry at least once per minute as part of its normal housekeeping activities.
An entry remains in effect until it is overwritten with LOAD CRON or erased with REMOVE CRON or LOAD CRON;I.
Commands executed by cron can be regular Site Controller system commands, disk-based commands (.BIN commands), or command files (.CMD commands). Most of the time, cron is used to execute user command files.
Almost any sequence of commands that can be executed interactively by a human user can be put into a command file to be executed automatically by cron. Commands that require data must have data supplied, either by including the data in the command file or by redirecting it from a separate file. Cron will search the normal command search path for command files.
The commands that can be executed by a cron entry follow the permission level of the user that loads the cron.
Note: If a cron or command file attempts to run a disk-based program and finds that the program space is busy, it will wait until the space is free. This is the opposite of the case where if you invoke a disk-based command directly at the prompt and the program space is busy, the command will be terminated with an error.
What Conditions can be Specified for CronThe first character of a cron entry determines what condition will cause that entry to be executed. The four types of cron entries are:
• timed entry• restart entry• boot entry• transaction memory full
The most common type of cron entry is a timed entry. A timed entry begins with an at sign (@). Timed entries will be executed whenever the system date and time matches the date and time specified in the entry.
MDE-4871 CFN III Manager’s Manual for Windows® XP Embedded - Version 3.6 · August 2010 Page 21-1
Automatic Cron Commands What Conditions can be Specified for Cron
A restart entry begins with an exclamation mark (!). It will be executed whenever the system suffers a general failure (crash). A restart entry could execute a command file that saves the diagnostics and history reports in a disk file for later examination, then restarts the system automatically. Cron must not have more than one restart entry. Shows in When column as RESTART.
A reboot entry begins with caret (^). It will be executed whenever the system is rebooted. It works when the REBOOT command is executed and when the system is rebooted after a power failure. Like the restart entry, it can be used to execute a command file that saves diagnostic and status information in a disk file. Cron must not have more than one reboot entry. Shows in When column of P CR as REBOOT.
A transaction-memory-full entry begins with a percent sign (%). It will be executed at the same time as the message on transaction memory, Transfile XX% full, is logged. (The XX% at which the Transfile full message is logged is set in SYS_PAR).
Transaction memory shows up as Memory in the When column of PRINT CRON output.
Timed Cron EntryA cron entry that begins with an at sign (@) is taken as a timed cron command. You can specify the day of the week, month, date, year, hour, and minute that you want the command executed. Days of the week are numbered from 01 starting with Sunday. The hour is specified in 24-hour time.
You must use leading zeros, if required, so each number is two digits. For example, Sunday is 01, not just 1, and June is 06, not 6.
The format of a timed cron entry is:@DWMMDDYYHHMM [-]command
• DW is the day of the week as a two digits number (Sunday=01, Monday=02, Tuesday=03, and so on).
• MM is the month as a two digits number (January=01, February=02, and so on).• DD is the day of the month as a two digits number.• YY is the last two digits of the year (97 for 1997).• HH is the hour as a two digits number, in 24-hour time.• MM is the minute as a two digits number.• [-] The optional hyphen (-) before the command name suppresses output to the printer.
This allows the command to execute when someone is logged on to the command terminal. CRON runs using command processor 33. If console is in command mode, CRON waits.
• command is the name of the Site Controller command or user command file to execute.
The time field is right justified, which means that it is read by the Site Controller from the right, not from the left. That is, if you do not care about one or more of the left-most time intervals, you do not have to specify them.
An ** also indicates that you do not care about that time interval. For example, @01********00 indicates every hour on Sundays, @1200 indicates at 12:00 noon every day, and @01**0400 indicates at 4:00 A.M. on the first of every month.
Page 21-2 MDE-4871 CFN III Manager’s Manual for Windows® XP Embedded - Version 3.6 · August 2010
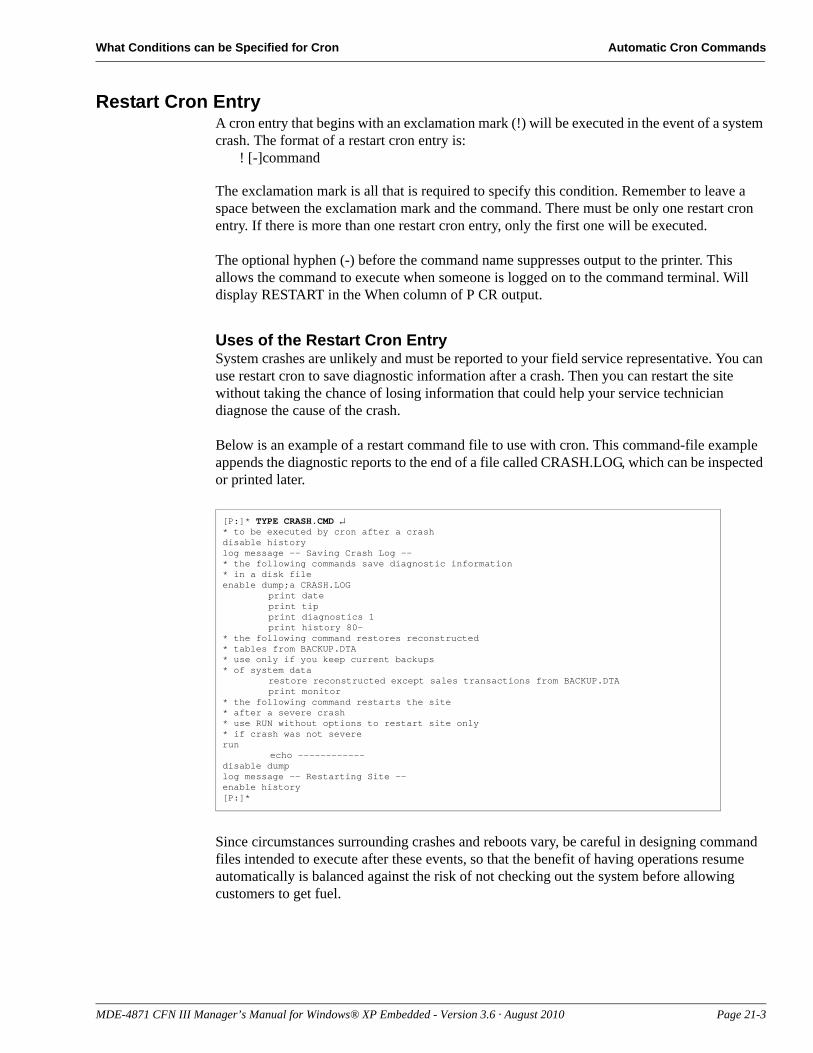
What Conditions can be Specified for Cron Automatic Cron Commands
Restart Cron EntryA cron entry that begins with an exclamation mark (!) will be executed in the event of a system crash. The format of a restart cron entry is:
! [-]command
The exclamation mark is all that is required to specify this condition. Remember to leave a space between the exclamation mark and the command. There must be only one restart cron entry. If there is more than one restart cron entry, only the first one will be executed.
The optional hyphen (-) before the command name suppresses output to the printer. This allows the command to execute when someone is logged on to the command terminal. Will display RESTART in the When column of P CR output.
Uses of the Restart Cron EntrySystem crashes are unlikely and must be reported to your field service representative. You can use restart cron to save diagnostic information after a crash. Then you can restart the site without taking the chance of losing information that could help your service technician diagnose the cause of the crash.
[P:]* TYPE CRASH.CMD ↵* to be executed by cron after a crashdisable historylog message -- Saving Crash Log --* the following commands save diagnostic information* in a disk fileenable dump;a CRASH.LOG
print dateprint tipprint diagnostics 1print history 80-
* the following command restores reconstructed* tables from BACKUP.DTA* use only if you keep current backups* of system data
restore reconstructed except sales transactions from BACKUP.DTAprint monitor
* the following command restarts the site* after a severe crash* use RUN without options to restart site only* if crash was not severerun
echo ------------disable dumplog message -- Restarting Site --enable history[P:]*
Below is an example of a restart command file to use with cron. This command-file example appends the diagnostic reports to the end of a file called CRASH.LOG, which can be inspected or printed later.
Since circumstances surrounding crashes and reboots vary, be careful in designing command files intended to execute after these events, so that the benefit of having operations resume automatically is balanced against the risk of not checking out the system before allowing customers to get fuel.
MDE-4871 CFN III Manager’s Manual for Windows® XP Embedded - Version 3.6 · August 2010 Page 21-3
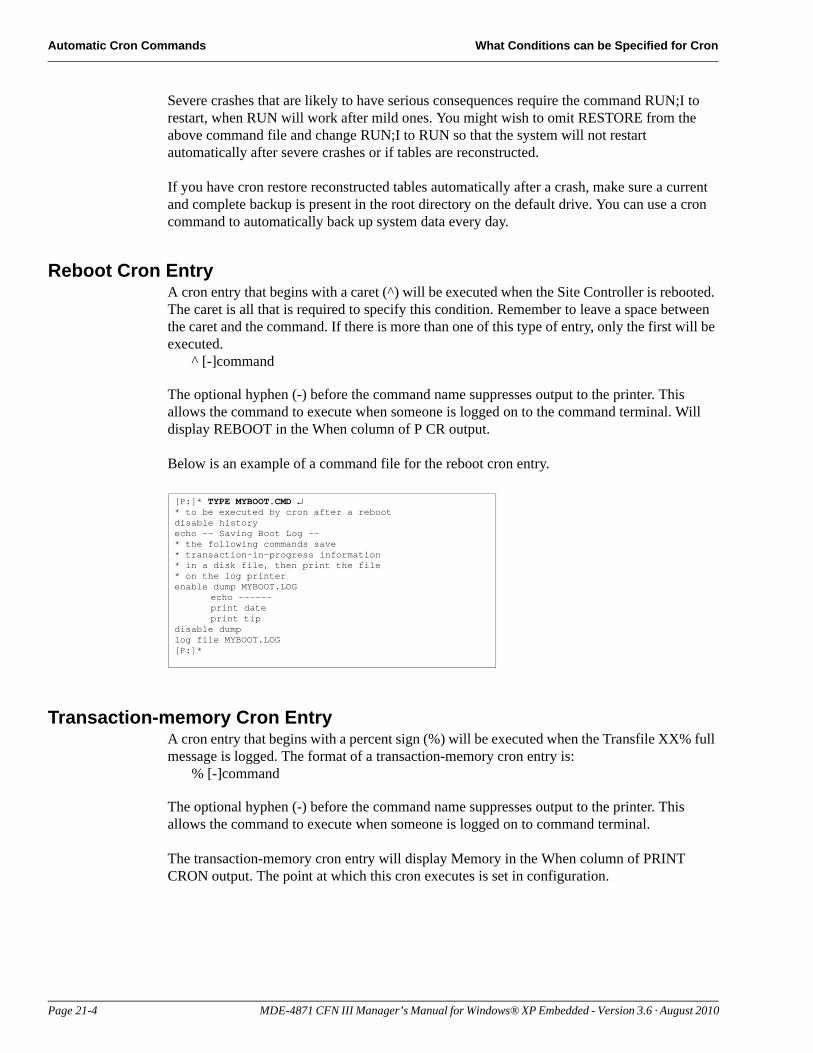
Automatic Cron Commands What Conditions can be Specified for Cron
Severe crashes that are likely to have serious consequences require the command RUN;I to restart, when RUN will work after mild ones. You might wish to omit RESTORE from the above command file and change RUN;I to RUN so that the system will not restart automatically after severe crashes or if tables are reconstructed.
If you have cron restore reconstructed tables automatically after a crash, make sure a current and complete backup is present in the root directory on the default drive. You can use a cron command to automatically back up system data every day.
Reboot Cron EntryA cron entry that begins with a caret (^) will be executed when the Site Controller is rebooted. The caret is all that is required to specify this condition. Remember to leave a space between the caret and the command. If there is more than one of this type of entry, only the first will be executed.
^ [-]command
[P:]* TYPE MYBOOT.CMD ↵* to be executed by cron after a rebootdisable historyecho -- Saving Boot Log --* the following commands save* transaction-in-progress information* in a disk file, then print the file* on the log printerenable dump MYBOOT.LOG
echo ------print dateprint tip
disable dumplog file MYBOOT.LOG[P:]*
The optional hyphen (-) before the command name suppresses output to the printer. This allows the command to execute when someone is logged on to the command terminal. Will display REBOOT in the When column of P CR output.
Below is an example of a command file for the reboot cron entry.
Transaction-memory Cron EntryA cron entry that begins with a percent sign (%) will be executed when the Transfile XX% full message is logged. The format of a transaction-memory cron entry is:
% [-]command
The optional hyphen (-) before the command name suppresses output to the printer. This allows the command to execute when someone is logged on to command terminal.
The transaction-memory cron entry will display Memory in the When column of PRINT CRON output. The point at which this cron executes is set in configuration.
Page 21-4 MDE-4871 CFN III Manager’s Manual for Windows® XP Embedded - Version 3.6 · August 2010

Where To Put Command Files for Cron Automatic Cron Commands
Where To Put Command Files for CronCron will search the normal command search path for command files and disk-based commands. The command search path used depends on how the site is configured.
Standard search path for a CFN3 application
If you want to keep your command files for cron in a separate directory that is not on the command search path, you can always use the full pathname to execute the command. For example, you could keep your command files for cron in /CRON. Another approach is to reconfigure the site.
How To Enter Cron CommandsUse the command LOAD CRON or LO CR to enter cron commands. You may use the C option with LOAD CRON to load more than one entry with a single command.
LOAD CRON (LO CR)
[P:]* LOAD CRON;C ↵Command number? 1 ↵Command? @0800 SHIFT1 ↵Command number? 2 ↵Command? @1201 PRINT PUMP;>PUMPLOG ↵Command number? 3 ↵Command? ! CRASH ↵Command number? 4 ↵Command? ^ MYBOOT ↵[P:]*
How To Keep Cron Command Output from the LogUnless it is redirected, the output from cron commands is printed on the log. To prevent output from printing on the log, put a hyphen (-) before the command. If you want to save the output of a cron command, you may redirect its output to a file by using the redirection options (> or >>) or by putting the commands in a command file and using ENABLE DUMP in the file (refer to “How to Use Options with Commands” on page 3-6). The cron entry in the example below executes a command file and prints nothing on the log.
[P:]* LOAD CRON ↵Command number? 5 ↵Command? @1203 -PR_DATA ↵
Path Destination
P: the RAM drive
. CFN3 root directory
P:\BIN \BIN on hard drive
MDE-4871 CFN III Manager’s Manual for Windows® XP Embedded - Version 3.6 · August 2010 Page 21-5

Automatic Cron Commands How To Print a Listing of Cron Entries
How To Print a Listing of Cron EntriesUse the command PRINT CRON or P CR to print a listing of cron entries. The listing shows the command number, when the command will be executed, and the name of the command.
PRINT CRON (P CR)
[P:]* PRINT CRON ↵# When Command1 *** **/**/** 8:00 SHIFT12 *** **/**/** 12:01 PRINT PUMP;>>PUMPLOG3 RESTART MYCRASH4 REBOOT MYBOOT5 *** **/**/** 12:03 -PR_DATA6 *** **/**/** 17:00 SHIFT27 *** **/**/** 1:00 SHIFT3[P:]*
Asterisks are substituted for time fields that were not specified. For example, if no day of the week were specified, only three asterisks would appear where Mon, Tue, and so on would otherwise be printed. Also, the listing will automatically separate the time fields by spaces or slashes.How to Remove Cron CommandsTo remove a single CRON entry, use REMOVE CRON or REM CR and specify the entry number. You may use the C option with the REMOVE CRON command.
REMOVE CRON (REM CR)
[P:]* REMOVE CRON;C ↵Command number? 4 ↵Command number? 6 ↵Command number? ↵[P:]*
The REMOVE CRON command has two options:• The A option attempts to terminate a currently running disk-based program. It also
terminates any currently running cron command and any Site Controller commands running from a console.
• The I option deletes any pending EXECUTE commands.
[P:]* LOAD CRON;I ↵[P:]*
Use the command LOAD CRON with the I option to clear all cron entries from the cron file.
Page 21-6 MDE-4871 CFN III Manager’s Manual for Windows® XP Embedded - Version 3.6 · August 2010
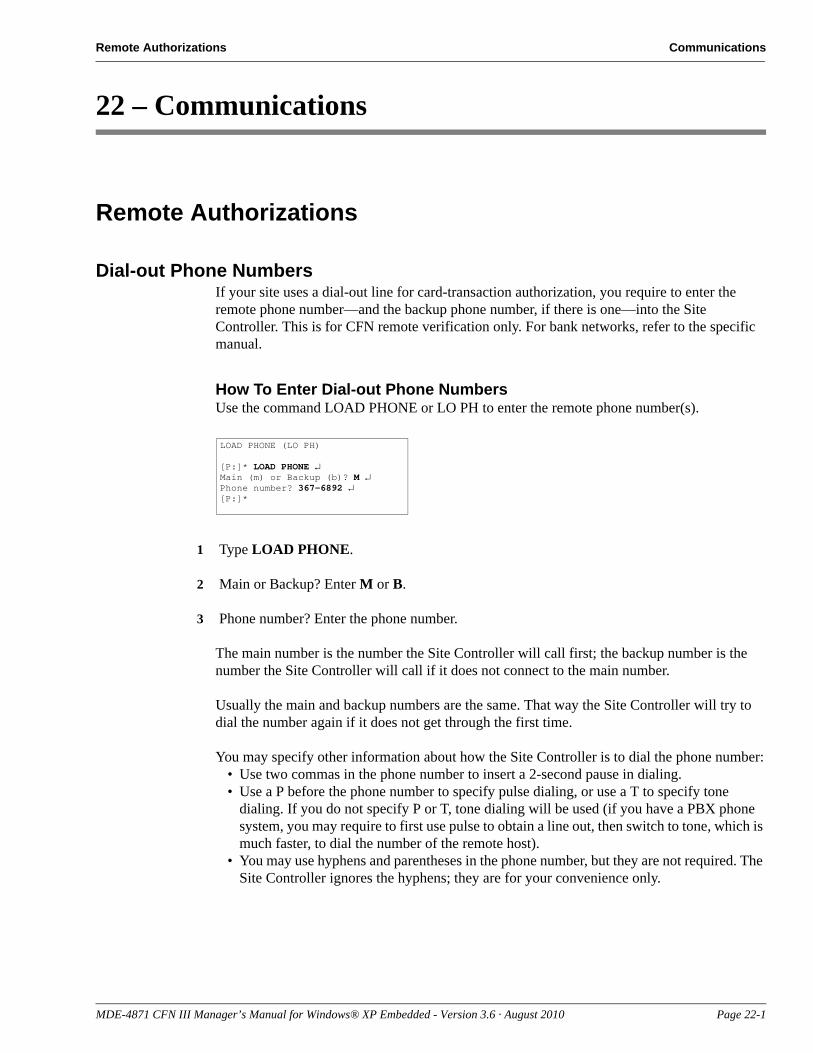
Remote Authorizations Communications
22 – Communications
Remote Authorizations
Dial-out Phone NumbersIf your site uses a dial-out line for card-transaction authorization, you require to enter the remote phone number—and the backup phone number, if there is one—into the Site Controller. This is for CFN remote verification only. For bank networks, refer to the specific manual.
How To Enter Dial-out Phone NumbersUse the command LOAD PHONE or LO PH to enter the remote phone number(s).
LOAD PHONE (LO PH)
[P:]* LOAD PHONE ↵Main (m) or Backup (b)? M ↵Phone number? 367-6892 ↵[P:]*
1 Type LOAD PHONE.
2 Main or Backup? Enter M or B.
3 Phone number? Enter the phone number.
The main number is the number the Site Controller will call first; the backup number is the number the Site Controller will call if it does not connect to the main number.
Usually the main and backup numbers are the same. That way the Site Controller will try to dial the number again if it does not get through the first time.
You may specify other information about how the Site Controller is to dial the phone number:• Use two commas in the phone number to insert a 2-second pause in dialing.• Use a P before the phone number to specify pulse dialing, or use a T to specify tone
dialing. If you do not specify P or T, tone dialing will be used (if you have a PBX phone system, you may require to first use pulse to obtain a line out, then switch to tone, which is much faster, to dial the number of the remote host).
• You may use hyphens and parentheses in the phone number, but they are not required. The Site Controller ignores the hyphens; they are for your convenience only.
MDE-4871 CFN III Manager’s Manual for Windows® XP Embedded - Version 3.6 · August 2010 Page 22-1
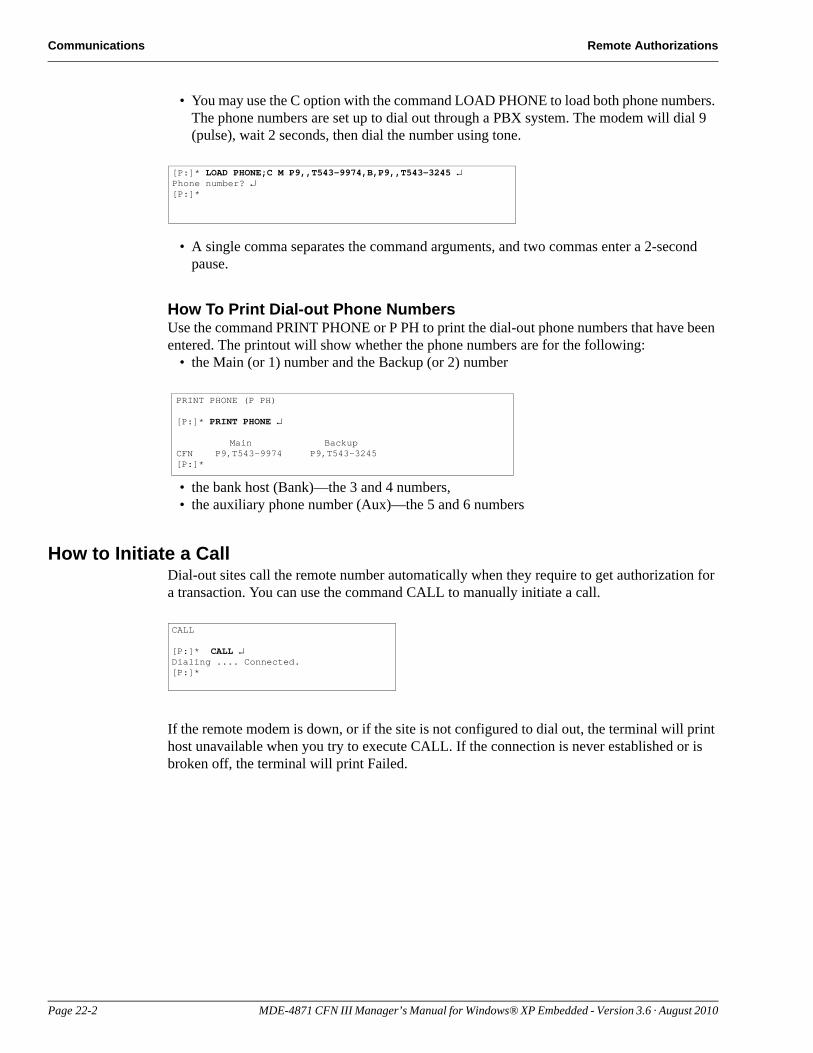
Communications Remote Authorizations
• You may use the C option with the command LOAD PHONE to load both phone numbers. The phone numbers are set up to dial out through a PBX system. The modem will dial 9 (pulse), wait 2 seconds, then dial the number using tone.
[P:]* LOAD PHONE;C M P9,,T543-9974,B,P9,,T543-3245 ↵Phone number? ↵[P:]*
• A single comma separates the command arguments, and two commas enter a 2-second pause.
How To Print Dial-out Phone NumbersUse the command PRINT PHONE or P PH to print the dial-out phone numbers that have been entered. The printout will show whether the phone numbers are for the following:
• the Main (or 1) number and the Backup (or 2) number
PRINT PHONE (P PH)
[P:]* PRINT PHONE ↵
Main BackupCFN P9,T543-9974 P9,T543-3245 [P:]*
• the bank host (Bank)—the 3 and 4 numbers,• the auxiliary phone number (Aux)—the 5 and 6 numbers
How to Initiate a CallDial-out sites call the remote number automatically when they require to get authorization for a transaction. You can use the command CALL to manually initiate a call.
CALL
[P:]* CALL ↵Dialing .... Connected.[P:]*
If the remote modem is down, or if the site is not configured to dial out, the terminal will print host unavailable when you try to execute CALL. If the connection is never established or is broken off, the terminal will print Failed.
Page 22-2 MDE-4871 CFN III Manager’s Manual for Windows® XP Embedded - Version 3.6 · August 2010
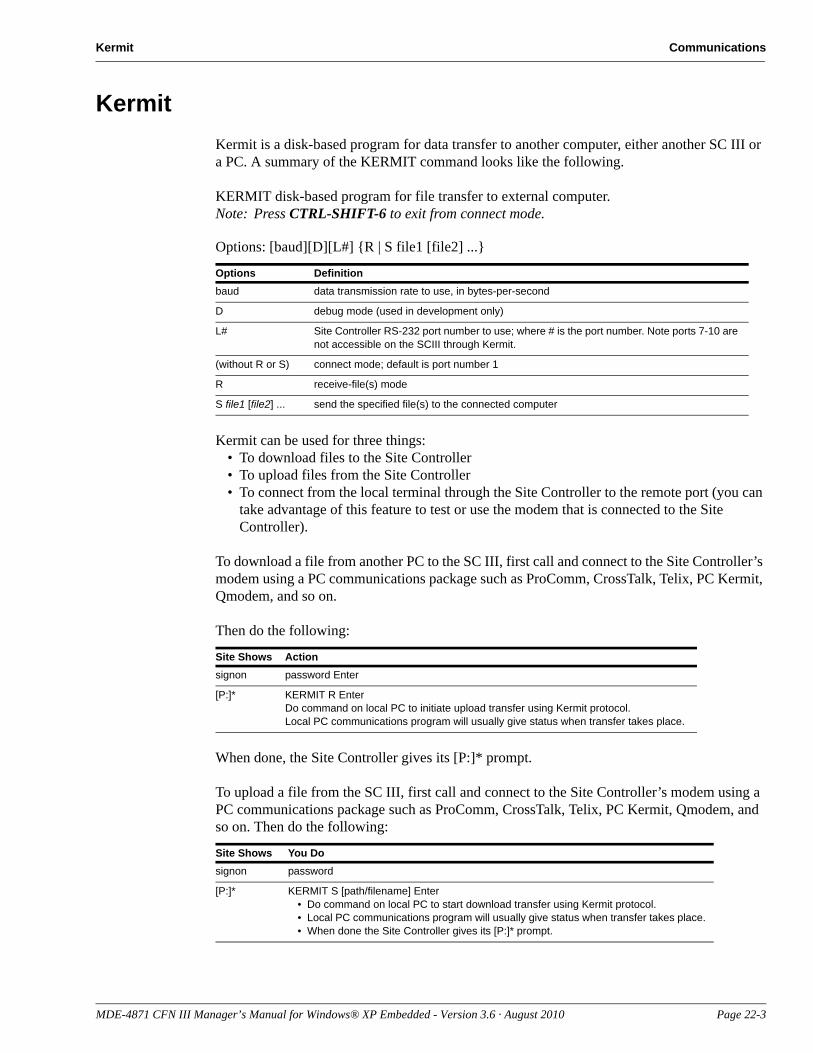
Kermit Communications
KermitKermit is a disk-based program for data transfer to another computer, either another SC III or a PC. A summary of the KERMIT command looks like the following.
KERMIT disk-based program for file transfer to external computer.Note: Press CTRL-SHIFT-6 to exit from connect mode.
Options: [baud][D][L#] {R | S file1 [file2] ...}
Kermit can be used for three things:• To download files to the Site Controller• To upload files from the Site Controller• To connect from the local terminal through the Site Controller to the remote port (you can
take advantage of this feature to test or use the modem that is connected to the Site Controller).
To download a file from another PC to the SC III, first call and connect to the Site Controller’s modem using a PC communications package such as ProComm, CrossTalk, Telix, PC Kermit, Qmodem, and so on.
Then do the following:
When done, the Site Controller gives its [P:]* prompt.
To upload a file from the SC III, first call and connect to the Site Controller’s modem using a PC communications package such as ProComm, CrossTalk, Telix, PC Kermit, Qmodem, and so on. Then do the following:
Options Definitionbaud data transmission rate to use, in bytes-per-second
D debug mode (used in development only)
L# Site Controller RS-232 port number to use; where # is the port number. Note ports 7-10 are not accessible on the SCIII through Kermit.
(without R or S) connect mode; default is port number 1
R receive-file(s) mode
S file1 [file2] ... send the specified file(s) to the connected computer
Site Shows Actionsignon password Enter
[P:]* KERMIT R EnterDo command on local PC to initiate upload transfer using Kermit protocol.Local PC communications program will usually give status when transfer takes place.
Site Shows You Dosignon password
[P:]* KERMIT S [path/filename] Enter• Do command on local PC to start download transfer using Kermit protocol.• Local PC communications program will usually give status when transfer takes place.• When done the Site Controller gives its [P:]* prompt.
MDE-4871 CFN III Manager’s Manual for Windows® XP Embedded - Version 3.6 · August 2010 Page 22-3

Communications Kermit
This page is intentionally left blank.
Page 22-4 MDE-4871 CFN III Manager’s Manual for Windows® XP Embedded - Version 3.6 · August 2010
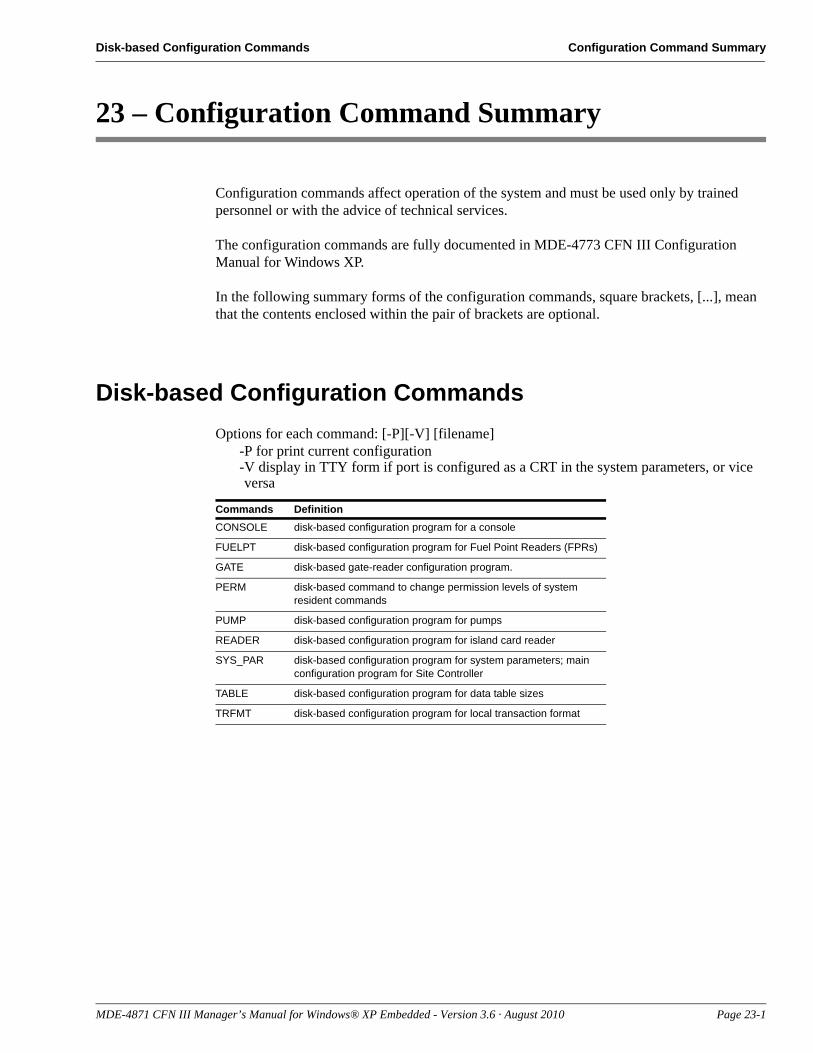
Disk-based Configuration Commands Configuration Command Summary
23 – Configuration Command Summary
Configuration commands affect operation of the system and must be used only by trained personnel or with the advice of technical services.
The configuration commands are fully documented in MDE-4773 CFN III Configuration Manual for Windows XP.
In the following summary forms of the configuration commands, square brackets, [...], mean that the contents enclosed within the pair of brackets are optional.
Disk-based Configuration CommandsOptions for each command: [-P][-V] [filename]
-P for print current configuration-V display in TTY form if port is configured as a CRT in the system parameters, or vice versa
Commands DefinitionCONSOLE disk-based configuration program for a console
FUELPT disk-based configuration program for Fuel Point Readers (FPRs)
GATE disk-based gate-reader configuration program.
PERM disk-based command to change permission levels of system resident commands
PUMP disk-based configuration program for pumps
READER disk-based configuration program for island card reader
SYS_PAR disk-based configuration program for system parameters; main configuration program for Site Controller
TABLE disk-based configuration program for data table sizes
TRFMT disk-based configuration program for local transaction format
MDE-4871 CFN III Manager’s Manual for Windows® XP Embedded - Version 3.6 · August 2010 Page 23-1

Configuration Command Summary Disk-based Configuration Commands
This page is intentionally left blank.
Page 23-2 MDE-4871 CFN III Manager’s Manual for Windows® XP Embedded - Version 3.6 · August 2010
Island Card Reader Preventive Maintenance
24 – Preventive Maintenance
The SC III comes housed in a standard PC “mini-tower” case. For information on routine maintenance of equipment, consult the supplied PC manuals.
How to Clean the Diskette DriveLike the more familiar magnetic read and write heads in tape recorders and VCRs, diskette drive heads benefit from periodic cleaning. Just how often you require to clean the diskette drive heads at your site depends on how much you use the diskette drive(s). This will vary from site to site. Many sites will not use the diskette drive at all for day-to-day operation. Others may choose to store reports, such as shift-break reports, in diskette files. If your site has a hard-disk drive, then you probably will not use the diskette drive very often.
If you use a diskette drive three or four times a day, you must probably clean the heads every six months. In any case you must clean the diskette heads once a year whether or not the drives have been used. This removes any accumulated dust.
Special diskette drive cleaning kits are available from Gasboy and other vendors, and must be used to clean the diskette drive on the Site Controller. A kit is available for the 3.5-inch drive.
When Batteries FailIf your Site Controller logs the message Battery X failed, it means that battery number X, used to back up RAM memory, has failed. There are two coin batteries that maintain the memory when AC power fails. A red light on the SC III memory PCB indicates that one of the batteries is bad. Close S2 position 2 and open position 1 to switch to battery 2. When any one battery must maintain the memory without AC power for a short period of time, you must replace a battery as soon as it goes bad.
Do not turn off power to the Site Controller if this message has occurred, or memory may be lost.
Island Card Reader
How to Clean the Magnetic Strip ReaderIf your system reads magnetic cards in one or more island card readers or consoles, then you require to clean the magnetic strip reader units periodically. A magnetic strip reader that requires cleaning has a harder time reading cards, requiring several passes to read some cards.
How often magnetic strip readers require to be cleaned depends on how often they are used and also the type of environment. Generally, island card readers require to be cleaned about once a month, but island card readers with many diesel fuel transactions may require to be cleaned weekly.
MDE-4871 CFN III Manager’s Manual for Windows® XP Embedded - Version 3.6 · August 2010 Page 24-1
Preventive Maintenance POS Terminals
A special cleaning card is used to clean magnetic strip card reader units. Magnetic strip cleaning cards are available from Gasboy (part number C08757). These cards are individually packed in foil wrappers containing an alcohol-based cleaning solution. After removing the card from the wrapper, pass it several times in the usual direction through the strip reader, then discard it.
POS Terminals
Magnetic Card ReaderFollow the procedure discussed above under Island Card Reader for cleaning the magnetic strip reader.
KeyboardYou require to clean the keyboard only if the key caps become noticeably grimy or if loose debris has collected in the key wells.
To clean the key caps, use a soft, lint-free cloth. Spay a small amount of general purpose wall cleaner (products such as 409® or Fantastik®) on the cloth. Never spray anything directly on the keyboard. Turn the keyswitch to OFF and remove the key. Wipe the key caps with a circular motion until clean. Replace the key and you are ready to resume normal operation.
To clean debris from the key wells, use a vacuum cleaner with a drapery attachment. Use a plastic attachment only, not a metal one, to avoid scratching the case. First make sure all clear key covers are firmly seated by pressing down on each key. Then pass the vacuum attachment over the keys without actually touching them. Any loose matter that has fallen into the keyboard will be removed.
Page 24-2 MDE-4871 CFN III Manager’s Manual for Windows® XP Embedded - Version 3.6 · August 2010

System Diagnostics Diagnostic Commands
25 – Diagnostic Commands
System Diagnostics
How to Print System DiagnosticsUse the command PRINT DIAGNOSTICS or P DI to print the diagnostics. The terminal will print the status of each site device. If any errors have occurred since the diagnostics were last reset, it will also print the error codes and the number of times the error has occurred.
Diagnostics must be printed monthly, or whenever a problem occurs. The most common errors that you might observe are:
• No response (NOR) from a pump control unit, reader terminal, or console. This means that the device did not respond to a Site Controller poll or command.
• A card-read error (RDE) from a island card reader or console. This could be the result of an user error or a bad card, or could mean that a card reader is malfunctioning.
• A no-quantity transaction (NQN) from a pump. This could mean a pump is not registering fuel sold. After several no-quantity transactions, a pump will shut down.
• PIN errors are from the reader and console. They indicate a customer entered an incorrect PIN number.
• DIE means the device went down.
PRINT DIAGNOSTICS (P DI)
[P:]* PRINT DIAGNOSTICS ↵
D I A G N O S T I C SDiagnostics reset: Tue 6/22/04 4:52 PM
Site Controller (1001, 1) came up Mon 5/31/04 9:31 AM Reader terminal(s) down POS terminal(s) down Pump(s) down Fuel Point readers(s) down SDI(s) downPrinter/PINpad #1 on loop 4 went down Wed 6/09/04 3:24 PM DIE 41Island Card Reader #2 never came upIsland Card Reader #3 on loop 4 went down Fri 5/21/04 9:58 AM Printer down DIE 2Island Card Reader #4 on loop 4 went down Fri 5/21/04 9:56 AM Printer down DIE 1Printer/PINpad #5 never came upProfitpoint #1 on loop 4 went down Wed 6/02/04 3:24 PM DIE 47Checkpoint #2 on loop 2 went down Thu 5/27/04 12:06 PM DIE 2 NOR 14 DIE 1Fuel Point Reader #1 never came upSDI #1 never came up[P:]*
The diagnostic error codes are given later in this chapter. If any of these errors occur frequently, report the problem to your service representative.
MDE-4871 CFN III Manager’s Manual for Windows® XP Embedded - Version 3.6 · August 2010 Page 25-1
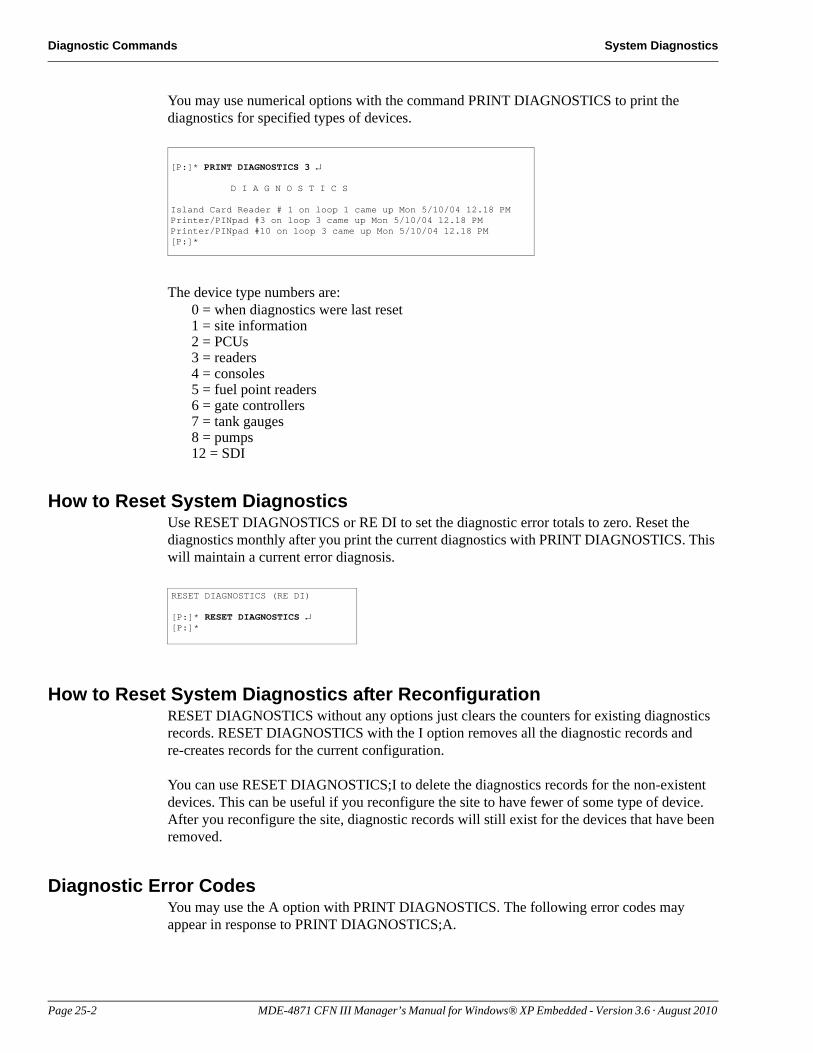
Diagnostic Commands System Diagnostics
[P:]* PRINT DIAGNOSTICS 3 ↵
D I A G N O S T I C S
Island Card Reader # 1 on loop 1 came up Mon 5/10/04 12.18 PMPrinter/PINpad #3 on loop 3 came up Mon 5/10/04 12.18 PMPrinter/PINpad #10 on loop 3 came up Mon 5/10/04 12.18 PM[P:]*
You may use numerical options with the command PRINT DIAGNOSTICS to print the diagnostics for specified types of devices.
The device type numbers are:0 = when diagnostics were last reset1 = site information2 = PCUs3 = readers4 = consoles5 = fuel point readers6 = gate controllers7 = tank gauges8 = pumps12 = SDI
How to Reset System DiagnosticsUse RESET DIAGNOSTICS or RE DI to set the diagnostic error totals to zero. Reset the diagnostics monthly after you print the current diagnostics with PRINT DIAGNOSTICS. This will maintain a current error diagnosis.
RESET DIAGNOSTICS (RE DI)
[P:]* RESET DIAGNOSTICS ↵[P:]*
How to Reset System Diagnostics after ReconfigurationRESET DIAGNOSTICS without any options just clears the counters for existing diagnostics records. RESET DIAGNOSTICS with the I option removes all the diagnostic records and re-creates records for the current configuration.
You can use RESET DIAGNOSTICS;I to delete the diagnostics records for the non-existent devices. This can be useful if you reconfigure the site to have fewer of some type of device. After you reconfigure the site, diagnostic records will still exist for the devices that have been removed.
Diagnostic Error CodesYou may use the A option with PRINT DIAGNOSTICS. The following error codes may appear in response to PRINT DIAGNOSTICS;A.
Page 25-2 MDE-4871 CFN III Manager’s Manual for Windows® XP Embedded - Version 3.6 · August 2010
System Diagnostics Diagnostic Commands
Pump Control Unit Error CodesErrors in pump control unit-to-Site Controller messages:
CRC — bad cyclical redundancy check (CRC)DIE — device went downNOR — no responseNQN — no quantity
Errors in Site Controller-to-pump control unit messages:NB0 — invalid hose number or price levelNB1 — pump in useNB2 — transaction data unavailableNB4 — not hexadecimalNB5 — invalid commandNB6 — invalid pump numberNB7 — overrunNB8 — buffer overflowNB9 — testNBA — bad cyclical redundancy check (CRC)NBD — power failureNBE — RAM contains transaction data
Island Card Reader or Gate Reader Error CodesErrors in island card reader-to-Site Controller messages:
CRC — bad cyclical redundancy check (CRC)DIE — device went downNOR — no responsePIN — PIN errorsRDE — read error
Errors in Site Controller-to-island card reader messages:NB3 — buffer in useNB4 — not hexadecimalNB5 — invalid commandNB6 — undefined EE command numberNB7 — overflow/framing errorNB8 — input buffer overrunNB9 — alphanumeric display busyNBA — bad cyclical redundancy check (CRC)
Console Error CodesErrors in console-to-Site Controller messages:
CRC — bad cyclical redundancy check (CRC)DIE — device went downNOR — no responsePIN — PIN errorsRDE — card read error
Errors in Site Controller-to-console messages:NB3 — buffer busyNB5 — invalid commandNB7 — receiver overrunNBA — bad cyclical redundancy check (CRC)
MDE-4871 CFN III Manager’s Manual for Windows® XP Embedded - Version 3.6 · August 2010 Page 25-3
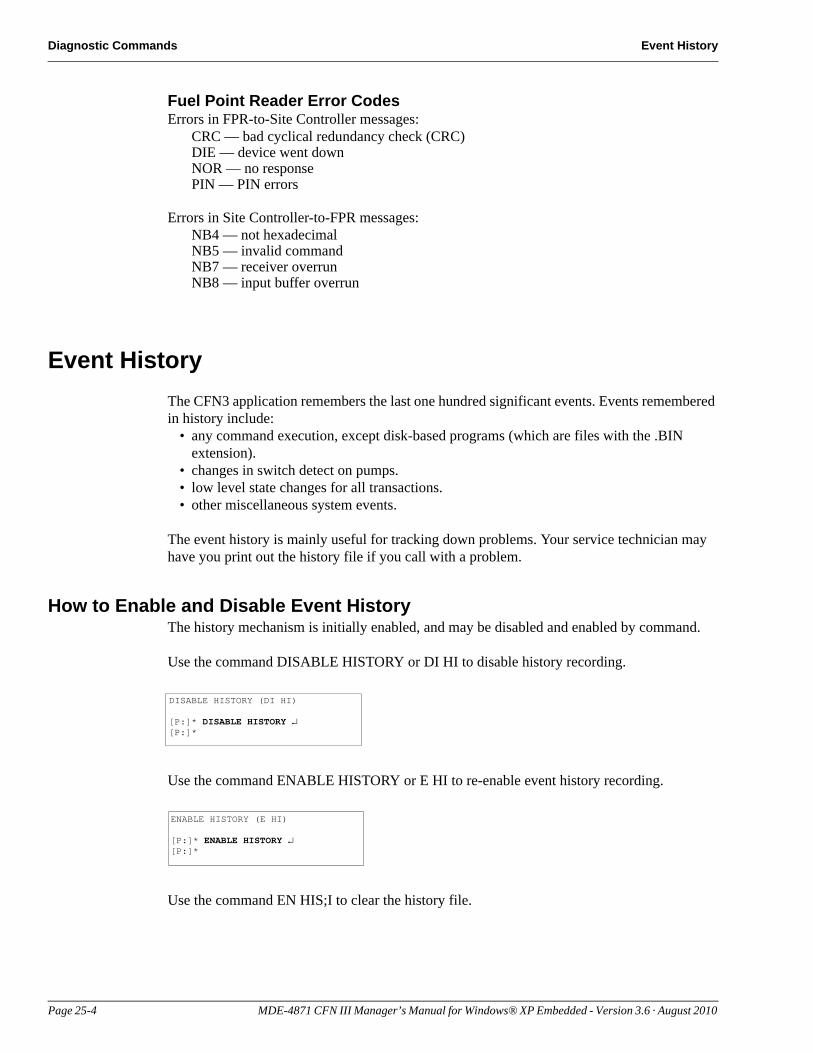
Diagnostic Commands Event History
Fuel Point Reader Error CodesErrors in FPR-to-Site Controller messages:
CRC — bad cyclical redundancy check (CRC)DIE — device went downNOR — no responsePIN — PIN errors
Errors in Site Controller-to-FPR messages:NB4 — not hexadecimalNB5 — invalid commandNB7 — receiver overrunNB8 — input buffer overrun
Event HistoryThe CFN3 application remembers the last one hundred significant events. Events remembered in history include:
• any command execution, except disk-based programs (which are files with the .BIN extension).
• changes in switch detect on pumps.• low level state changes for all transactions.• other miscellaneous system events.
The event history is mainly useful for tracking down problems. Your service technician may have you print out the history file if you call with a problem.
How to Enable and Disable Event HistoryThe history mechanism is initially enabled, and may be disabled and enabled by command.
DISABLE HISTORY (DI HI)
[P:]* DISABLE HISTORY ↵[P:]*
ENABLE HISTORY (E HI)
[P:]* ENABLE HISTORY ↵[P:]*
Use the command DISABLE HISTORY or DI HI to disable history recording.
Use the command ENABLE HISTORY or E HI to re-enable event history recording.
Use the command EN HIS;I to clear the history file.
Page 25-4 MDE-4871 CFN III Manager’s Manual for Windows® XP Embedded - Version 3.6 · August 2010
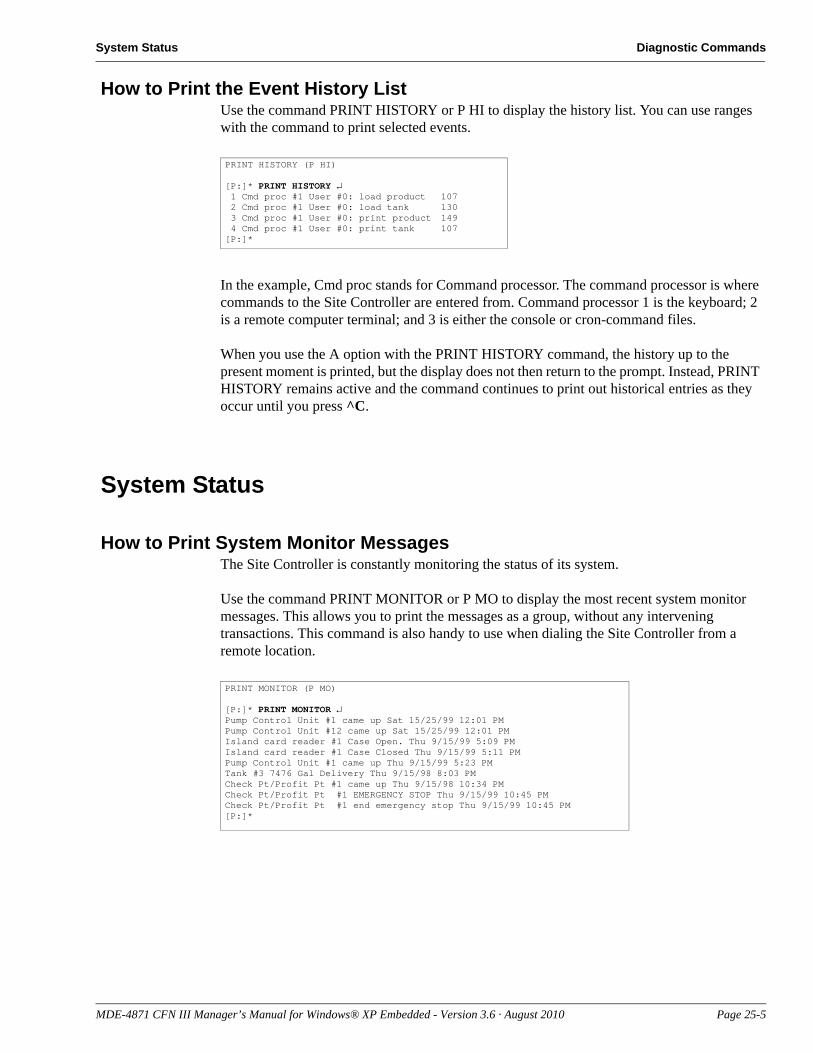
System Status Diagnostic Commands
How to Print the Event History ListUse the command PRINT HISTORY or P HI to display the history list. You can use ranges with the command to print selected events.
PRINT HISTORY (P HI)
[P:]* PRINT HISTORY ↵ 1 Cmd proc #1 User #0: load product 107 2 Cmd proc #1 User #0: load tank 130 3 Cmd proc #1 User #0: print product 149 4 Cmd proc #1 User #0: print tank 107[P:]*
In the example, Cmd proc stands for Command processor. The command processor is where commands to the Site Controller are entered from. Command processor 1 is the keyboard; 2 is a remote computer terminal; and 3 is either the console or cron-command files.
When you use the A option with the PRINT HISTORY command, the history up to the present moment is printed, but the display does not then return to the prompt. Instead, PRINT HISTORY remains active and the command continues to print out historical entries as they occur until you press ^C.
System Status
How to Print System Monitor MessagesThe Site Controller is constantly monitoring the status of its system.
PRINT MONITOR (P MO)
[P:]* PRINT MONITOR ↵Pump Control Unit #1 came up Sat 15/25/99 12:01 PMPump Control Unit #12 came up Sat 15/25/99 12:01 PMIsland card reader #1 Case Open. Thu 9/15/99 5:09 PMIsland card reader #1 Case Closed Thu 9/15/99 5:11 PMPump Control Unit #1 came up Thu 9/15/99 5:23 PMTank #3 7476 Gal Delivery Thu 9/15/98 8:03 PMCheck Pt/Profit Pt #1 came up Thu 9/15/98 10:34 PMCheck Pt/Profit Pt #1 EMERGENCY STOP Thu 9/15/99 10:45 PMCheck Pt/Profit Pt #1 end emergency stop Thu 9/15/99 10:45 PM[P:]*
Use the command PRINT MONITOR or P MO to display the most recent system monitor messages. This allows you to print the messages as a group, without any intervening transactions. This command is also handy to use when dialing the Site Controller from a remote location.
MDE-4871 CFN III Manager’s Manual for Windows® XP Embedded - Version 3.6 · August 2010 Page 25-5
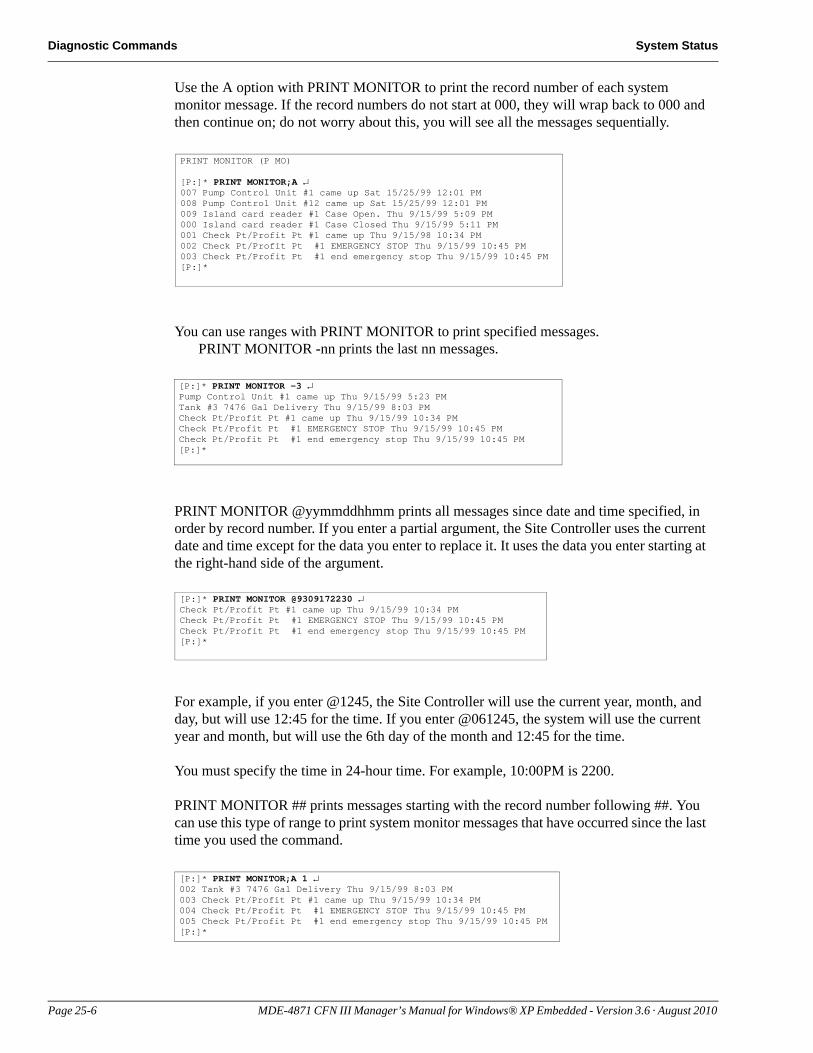
Diagnostic Commands System Status
PRINT MONITOR (P MO)
[P:]* PRINT MONITOR;A ↵007 Pump Control Unit #1 came up Sat 15/25/99 12:01 PM008 Pump Control Unit #12 came up Sat 15/25/99 12:01 PM009 Island card reader #1 Case Open. Thu 9/15/99 5:09 PM000 Island card reader #1 Case Closed Thu 9/15/99 5:11 PM001 Check Pt/Profit Pt #1 came up Thu 9/15/98 10:34 PM002 Check Pt/Profit Pt #1 EMERGENCY STOP Thu 9/15/99 10:45 PM003 Check Pt/Profit Pt #1 end emergency stop Thu 9/15/99 10:45 PM[P:]*
Use the A option with PRINT MONITOR to print the record number of each system monitor message. If the record numbers do not start at 000, they will wrap back to 000 and then continue on; do not worry about this, you will see all the messages sequentially.
You can use ranges with PRINT MONITOR to print specified messages. PRINT MONITOR -nn prints the last nn messages.
[P:]* PRINT MONITOR -3 ↵Pump Control Unit #1 came up Thu 9/15/99 5:23 PMTank #3 7476 Gal Delivery Thu 9/15/99 8:03 PMCheck Pt/Profit Pt #1 came up Thu 9/15/99 10:34 PMCheck Pt/Profit Pt #1 EMERGENCY STOP Thu 9/15/99 10:45 PMCheck Pt/Profit Pt #1 end emergency stop Thu 9/15/99 10:45 PM[P:]*
[P:]* PRINT MONITOR @9309172230 ↵Check Pt/Profit Pt #1 came up Thu 9/15/99 10:34 PMCheck Pt/Profit Pt #1 EMERGENCY STOP Thu 9/15/99 10:45 PMCheck Pt/Profit Pt #1 end emergency stop Thu 9/15/99 10:45 PM[P:]*
[P:]* PRINT MONITOR;A 1 ↵002 Tank #3 7476 Gal Delivery Thu 9/15/99 8:03 PM003 Check Pt/Profit Pt #1 came up Thu 9/15/99 10:34 PM004 Check Pt/Profit Pt #1 EMERGENCY STOP Thu 9/15/99 10:45 PM005 Check Pt/Profit Pt #1 end emergency stop Thu 9/15/99 10:45 PM[P:]*
PRINT MONITOR @yymmddhhmm prints all messages since date and time specified, in order by record number. If you enter a partial argument, the Site Controller uses the current date and time except for the data you enter to replace it. It uses the data you enter starting at the right-hand side of the argument.
For example, if you enter @1245, the Site Controller will use the current year, month, and day, but will use 12:45 for the time. If you enter @061245, the system will use the current year and month, but will use the 6th day of the month and 12:45 for the time.
You must specify the time in 24-hour time. For example, 10:00PM is 2200.
PRINT MONITOR ## prints messages starting with the record number following ##. You can use this type of range to print system monitor messages that have occurred since the last time you used the command.
Page 25-6 MDE-4871 CFN III Manager’s Manual for Windows® XP Embedded - Version 3.6 · August 2010
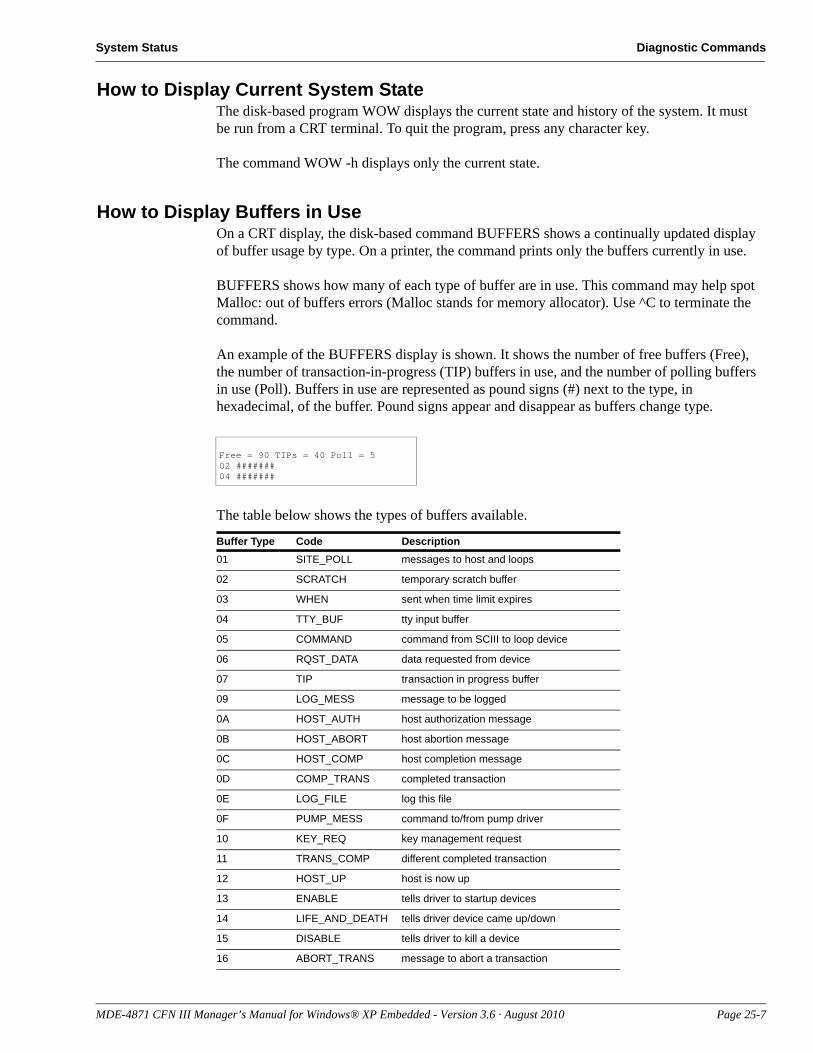
System Status Diagnostic Commands
How to Display Current System StateThe disk-based program WOW displays the current state and history of the system. It must be run from a CRT terminal. To quit the program, press any character key.
The command WOW -h displays only the current state.
How to Display Buffers in UseOn a CRT display, the disk-based command BUFFERS shows a continually updated display of buffer usage by type. On a printer, the command prints only the buffers currently in use.
Free = 90 TIPs = 40 Poll = 502 #######04 #######
BUFFERS shows how many of each type of buffer are in use. This command may help spot Malloc: out of buffers errors (Malloc stands for memory allocator). Use ^C to terminate the command.
An example of the BUFFERS display is shown. It shows the number of free buffers (Free), the number of transaction-in-progress (TIP) buffers in use, and the number of polling buffers in use (Poll). Buffers in use are represented as pound signs (#) next to the type, in hexadecimal, of the buffer. Pound signs appear and disappear as buffers change type.
The table below shows the types of buffers available.
Buffer Type Code Description01 SITE_POLL messages to host and loops
02 SCRATCH temporary scratch buffer
03 WHEN sent when time limit expires
04 TTY_BUF tty input buffer
05 COMMAND command from SCIII to loop device
06 RQST_DATA data requested from device
07 TIP transaction in progress buffer
09 LOG_MESS message to be logged
0A HOST_AUTH host authorization message
0B HOST_ABORT host abortion message
0C HOST_COMP host completion message
0D COMP_TRANS completed transaction
0E LOG_FILE log this file
0F PUMP_MESS command to/from pump driver
10 KEY_REQ key management request
11 TRANS_COMP different completed transaction
12 HOST_UP host is now up
13 ENABLE tells driver to startup devices
14 LIFE_AND_DEATH tells driver device came up/down
15 DISABLE tells driver to kill a device
16 ABORT_TRANS message to abort a transaction
MDE-4871 CFN III Manager’s Manual for Windows® XP Embedded - Version 3.6 · August 2010 Page 25-7
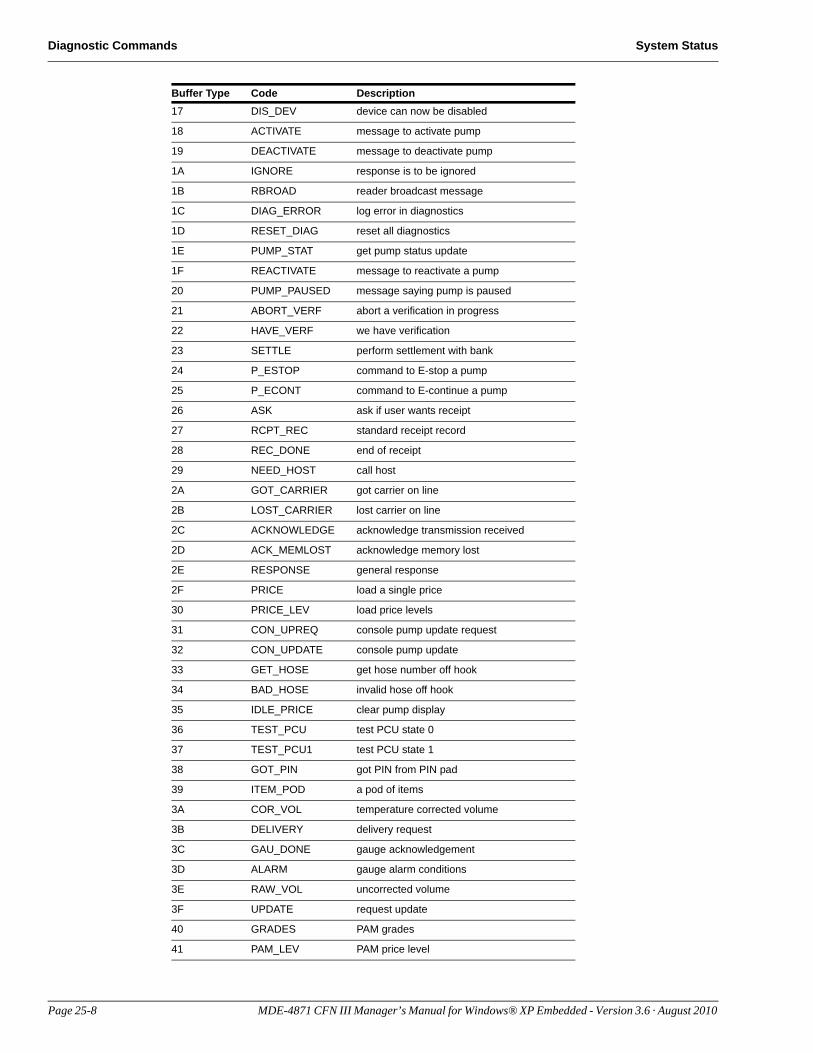
Diagnostic Commands System Status
17 DIS_DEV device can now be disabled
18 ACTIVATE message to activate pump
19 DEACTIVATE message to deactivate pump
1A IGNORE response is to be ignored
1B RBROAD reader broadcast message
1C DIAG_ERROR log error in diagnostics
1D RESET_DIAG reset all diagnostics
1E PUMP_STAT get pump status update
1F REACTIVATE message to reactivate a pump
20 PUMP_PAUSED message saying pump is paused
21 ABORT_VERF abort a verification in progress
22 HAVE_VERF we have verification
23 SETTLE perform settlement with bank
24 P_ESTOP command to E-stop a pump
25 P_ECONT command to E-continue a pump
26 ASK ask if user wants receipt
27 RCPT_REC standard receipt record
28 REC_DONE end of receipt
29 NEED_HOST call host
2A GOT_CARRIER got carrier on line
2B LOST_CARRIER lost carrier on line
2C ACKNOWLEDGE acknowledge transmission received
2D ACK_MEMLOST acknowledge memory lost
2E RESPONSE general response
2F PRICE load a single price
30 PRICE_LEV load price levels
31 CON_UPREQ console pump update request
32 CON_UPDATE console pump update
33 GET_HOSE get hose number off hook
34 BAD_HOSE invalid hose off hook
35 IDLE_PRICE clear pump display
36 TEST_PCU test PCU state 0
37 TEST_PCU1 test PCU state 1
38 GOT_PIN got PIN from PIN pad
39 ITEM_POD a pod of items
3A COR_VOL temperature corrected volume
3B DELIVERY delivery request
3C GAU_DONE gauge acknowledgement
3D ALARM gauge alarm conditions
3E RAW_VOL uncorrected volume
3F UPDATE request update
40 GRADES PAM grades
41 PAM_LEV PAM price level
Buffer Type Code Description
Page 25-8 MDE-4871 CFN III Manager’s Manual for Windows® XP Embedded - Version 3.6 · August 2010
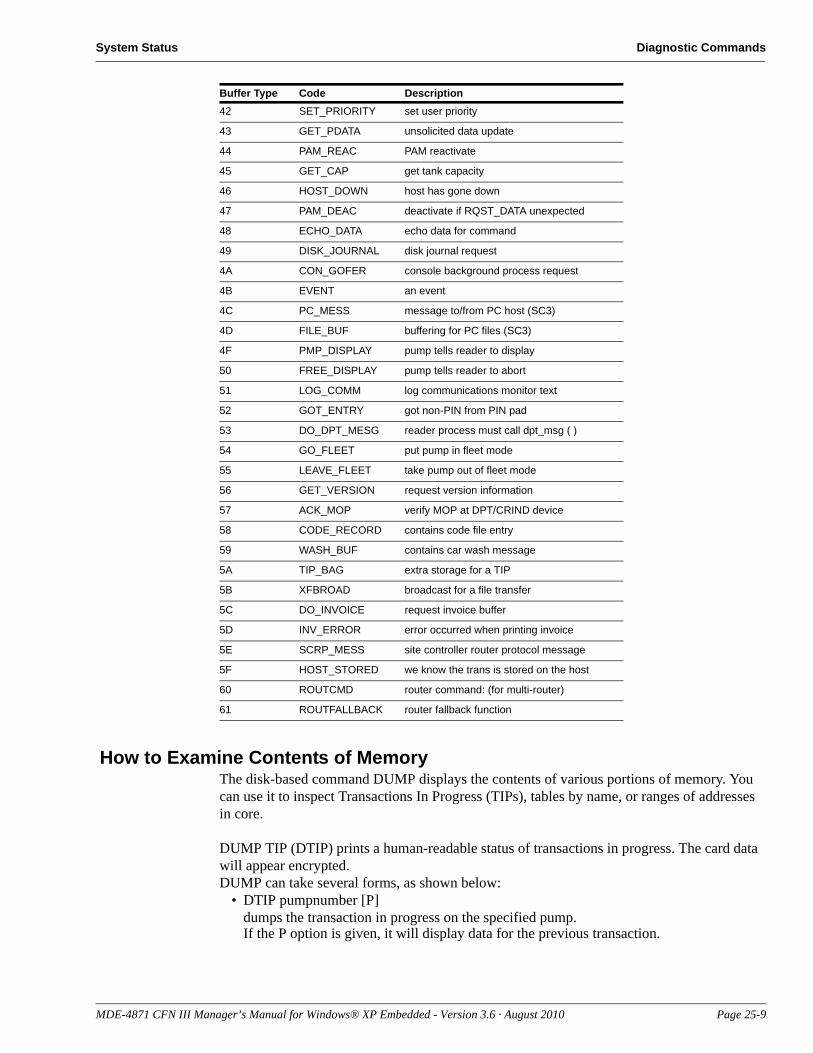
System Status Diagnostic Commands
How to Examine Contents of MemoryThe disk-based command DUMP displays the contents of various portions of memory. You can use it to inspect Transactions In Progress (TIPs), tables by name, or ranges of addresses in core.
DUMP TIP (DTIP) prints a human-readable status of transactions in progress. The card data will appear encrypted.DUMP can take several forms, as shown below:
• DTIP pumpnumber [P]dumps the transaction in progress on the specified pump.If the P option is given, it will display data for the previous transaction.
42 SET_PRIORITY set user priority
43 GET_PDATA unsolicited data update
44 PAM_REAC PAM reactivate
45 GET_CAP get tank capacity
46 HOST_DOWN host has gone down
47 PAM_DEAC deactivate if RQST_DATA unexpected
48 ECHO_DATA echo data for command
49 DISK_JOURNAL disk journal request
4A CON_GOFER console background process request
4B EVENT an event
4C PC_MESS message to/from PC host (SC3)
4D FILE_BUF buffering for PC files (SC3)
4F PMP_DISPLAY pump tells reader to display
50 FREE_DISPLAY pump tells reader to abort
51 LOG_COMM log communications monitor text
52 GOT_ENTRY got non-PIN from PIN pad
53 DO_DPT_MESG reader process must call dpt_msg ( )
54 GO_FLEET put pump in fleet mode
55 LEAVE_FLEET take pump out of fleet mode
56 GET_VERSION request version information
57 ACK_MOP verify MOP at DPT/CRIND device
58 CODE_RECORD contains code file entry
59 WASH_BUF contains car wash message
5A TIP_BAG extra storage for a TIP
5B XFBROAD broadcast for a file transfer
5C DO_INVOICE request invoice buffer
5D INV_ERROR error occurred when printing invoice
5E SCRP_MESS site controller router protocol message
5F HOST_STORED we know the trans is stored on the host
60 ROUTCMD router command: (for multi-router)
61 ROUTFALLBACK router fallback function
Buffer Type Code Description
MDE-4871 CFN III Manager’s Manual for Windows® XP Embedded - Version 3.6 · August 2010 Page 25-9
Diagnostic Commands System Status
• DTIP NF consolenumber [P] dumps the transaction in progress on the specified console.If the P option is given, it will display data for the previous transaction.
• DUMP CORE [addressrange [page size]]dumps the specified range of addresses from memory.
• DUMP tablename [major range [minor range]]dumps, from the specified table, record numbers included in the major range (or subrecords in the minor range).
Ranges of address may be specified using hexadecimal numbers separated by a hyphen (-) character. Record number ranges are given in decimal numbers separated by a hyphen.
How to Display Site Controller StatusThe disk-based command STATUS provides various system information, depending upon what options are given it. Options may be combined as a string of letters.
STATUS takes one or more of the options shown below.
If no option string is given, STATUS just reports on switch, transaction table, and version. You can halt the repeating STATUS command by pressing ^C.
Options DescriptionsB Backup: Backs up user data in a file of your choosing (enter the command as
STATUS;>>filename B).
C CPU: Calculates percentage of CPU being used at site. Program requests all available CPU for five seconds and reports how much it was not able to get.
D Prints daily settlement control information.
H Host: Reports last transaction number sent to a CFN host.
N No-sale: Reports all non-zero no-sale counters.
O Oldest: Returns oldest transaction number as its error code %E.
R Reports. Prints reports on users (sign-ons). The reports give statistics on no-sales, item voids, sale voids, and how long that user was signed on during the requested period.The default report is for the previous shift. A character following the R indicates the period requested:
C = Current shiftD = Current dayY = YesterdayT = Cumulative totals1 = Previous shift2 = One before previous shift3 = Two before previous shiftP = Cumulative totals at last day-change
S Switch: Reports current DIP switch settings.
T Transaction table: Reports how full the transaction table is and how many more transactions can be put in it. If site has crashed, tells which transactions have bad check sums.
U Unpaid: Reports all non-zero unpaid totalizers.
V Version: Reports operating system version.
! Repeat: Causes specified reports to be repeated every 1 second (longer if report takes longer to generate). For user on CRT.
Page 25-10 MDE-4871 CFN III Manager’s Manual for Windows® XP Embedded - Version 3.6 · August 2010
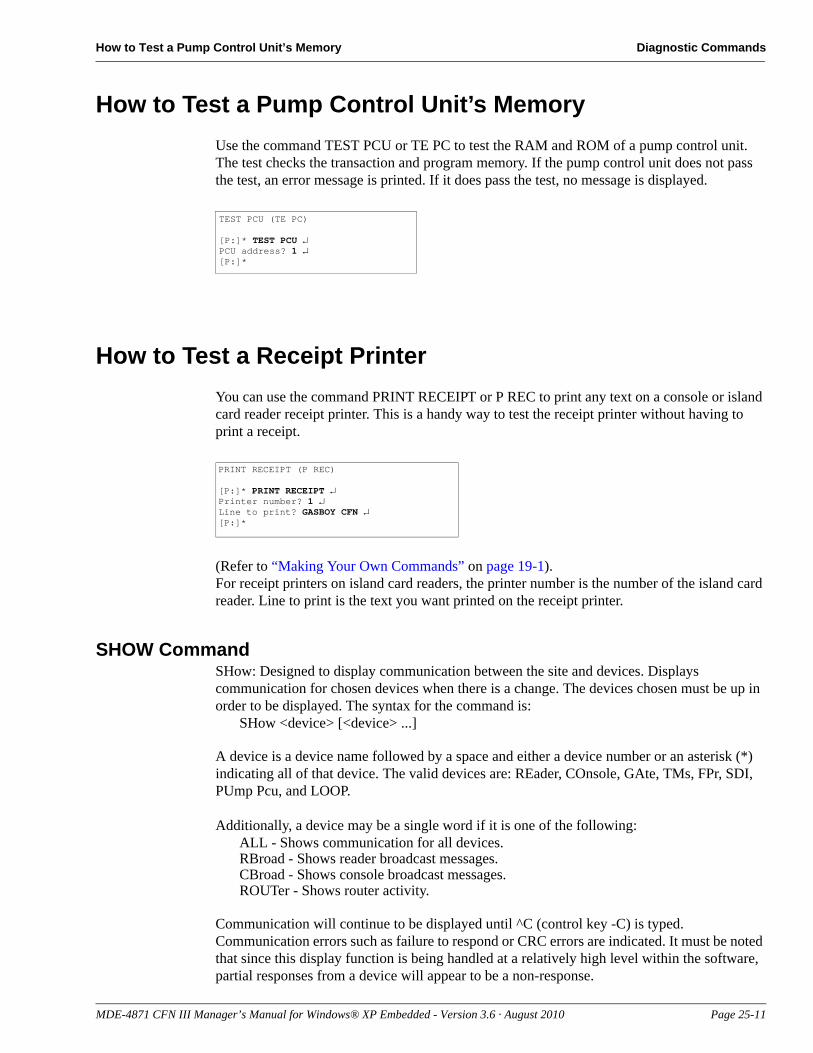
How to Test a Pump Control Unit’s Memory Diagnostic Commands
How to Test a Pump Control Unit’s MemoryUse the command TEST PCU or TE PC to test the RAM and ROM of a pump control unit. The test checks the transaction and program memory. If the pump control unit does not pass the test, an error message is printed. If it does pass the test, no message is displayed.
TEST PCU (TE PC)
[P:]* TEST PCU ↵PCU address? 1 ↵[P:]*
How to Test a Receipt PrinterYou can use the command PRINT RECEIPT or P REC to print any text on a console or island card reader receipt printer. This is a handy way to test the receipt printer without having to print a receipt.
PRINT RECEIPT (P REC)
[P:]* PRINT RECEIPT ↵Printer number? 1 ↵Line to print? GASBOY CFN ↵[P:]*
(Refer to “Making Your Own Commands” on page 19-1).For receipt printers on island card readers, the printer number is the number of the island card reader. Line to print is the text you want printed on the receipt printer.
SHOW CommandSHow: Designed to display communication between the site and devices. Displays communication for chosen devices when there is a change. The devices chosen must be up in order to be displayed. The syntax for the command is:
SHow <device> [<device> ...]
A device is a device name followed by a space and either a device number or an asterisk (*) indicating all of that device. The valid devices are: REader, COnsole, GAte, TMs, FPr, SDI, PUmp Pcu, and LOOP.
Additionally, a device may be a single word if it is one of the following:ALL - Shows communication for all devices.RBroad - Shows reader broadcast messages.CBroad - Shows console broadcast messages.ROUTer - Shows router activity.
Communication will continue to be displayed until ^C (control key -C) is typed. Communication errors such as failure to respond or CRC errors are indicated. It must be noted that since this display function is being handled at a relatively high level within the software, partial responses from a device will appear to be a non-response.
MDE-4871 CFN III Manager’s Manual for Windows® XP Embedded - Version 3.6 · August 2010 Page 25-11

Diagnostic Commands How to Test a Receipt Printer
This page is intentionally left blank.
Page 25-12 MDE-4871 CFN III Manager’s Manual for Windows® XP Embedded - Version 3.6 · August 2010
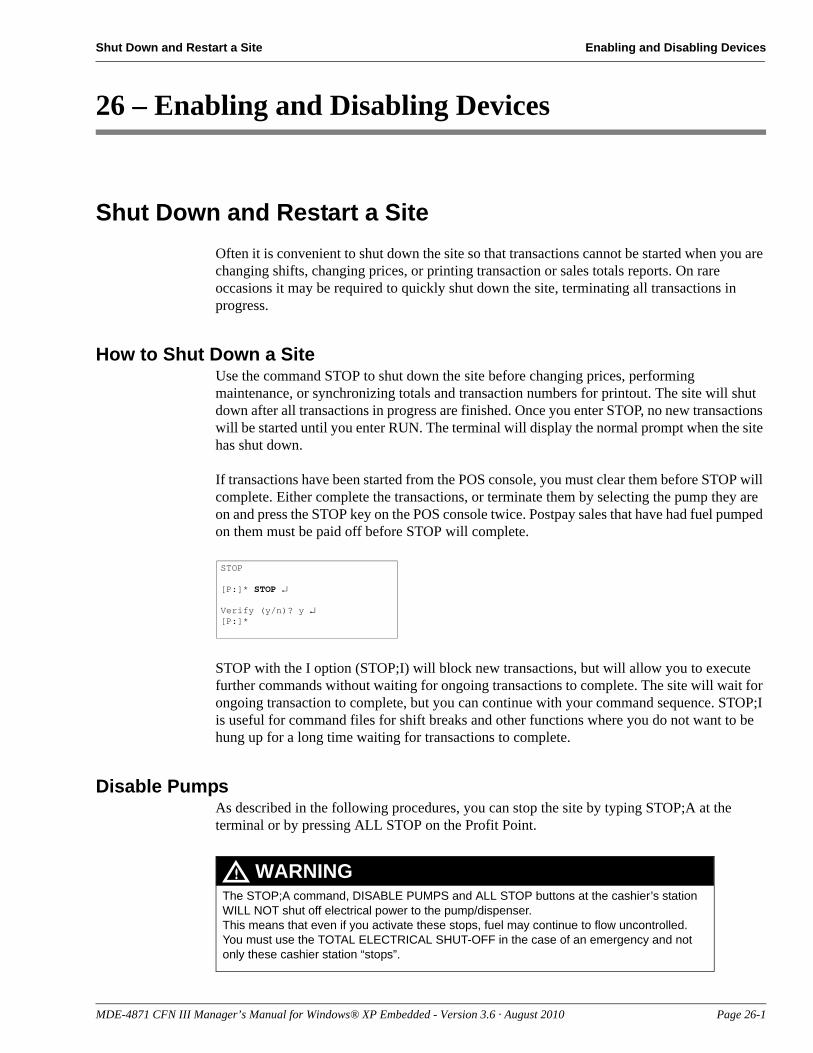
Shut Down and Restart a Site Enabling and Disabling Devices
26 – Enabling and Disabling Devices
Shut Down and Restart a SiteOften it is convenient to shut down the site so that transactions cannot be started when you are changing shifts, changing prices, or printing transaction or sales totals reports. On rare occasions it may be required to quickly shut down the site, terminating all transactions in progress.
How to Shut Down a SiteUse the command STOP to shut down the site before changing prices, performing maintenance, or synchronizing totals and transaction numbers for printout. The site will shut down after all transactions in progress are finished. Once you enter STOP, no new transactions will be started until you enter RUN. The terminal will display the normal prompt when the site has shut down.
STOP
[P:]* STOP ↵
Verify (y/n)? y ↵[P:]*
If transactions have been started from the POS console, you must clear them before STOP will complete. Either complete the transactions, or terminate them by selecting the pump they are on and press the STOP key on the POS console twice. Postpay sales that have had fuel pumped on them must be paid off before STOP will complete.
STOP with the I option (STOP;I) will block new transactions, but will allow you to execute further commands without waiting for ongoing transactions to complete. The site will wait for ongoing transaction to complete, but you can continue with your command sequence. STOP;I is useful for command files for shift breaks and other functions where you do not want to be hung up for a long time waiting for transactions to complete.
Disable PumpsAs described in the following procedures, you can stop the site by typing STOP;A at the terminal or by pressing ALL STOP on the Profit Point.
The STOP;A command, DISABLE PUMPS and ALL STOP buttons at the cashier’s station WILL NOT shut off electrical power to the pump/dispenser.This means that even if you activate these stops, fuel may continue to flow uncontrolled.You must use the TOTAL ELECTRICAL SHUT-OFF in the case of an emergency and not only these cashier station “stops”.
WARNING
MDE-4871 CFN III Manager’s Manual for Windows® XP Embedded - Version 3.6 · August 2010 Page 26-1
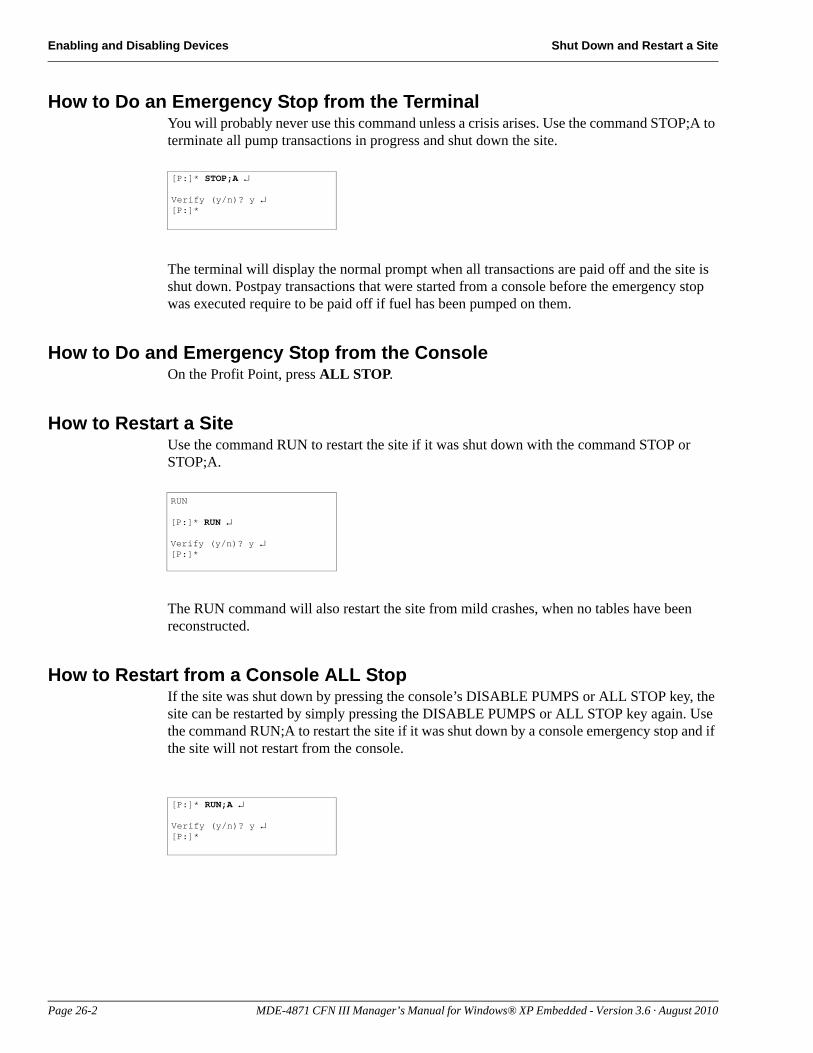
Enabling and Disabling Devices Shut Down and Restart a Site
How to Do an Emergency Stop from the TerminalYou will probably never use this command unless a crisis arises. Use the command STOP;A to terminate all pump transactions in progress and shut down the site.
[P:]* STOP;A ↵
Verify (y/n)? y ↵[P:]*
The terminal will display the normal prompt when all transactions are paid off and the site is shut down. Postpay transactions that were started from a console before the emergency stop was executed require to be paid off if fuel has been pumped on them.
How to Do and Emergency Stop from the ConsoleOn the Profit Point, press ALL STOP.
How to Restart a SiteUse the command RUN to restart the site if it was shut down with the command STOP or STOP;A.
RUN
[P:]* RUN ↵
Verify (y/n)? y ↵[P:]*
The RUN command will also restart the site from mild crashes, when no tables have been reconstructed.
How to Restart from a Console ALL StopIf the site was shut down by pressing the console’s DISABLE PUMPS or ALL STOP key, the site can be restarted by simply pressing the DISABLE PUMPS or ALL STOP key again. Use the command RUN;A to restart the site if it was shut down by a console emergency stop and if the site will not restart from the console.
[P:]* RUN;A ↵
Verify (y/n)? y ↵[P:]*
Page 26-2 MDE-4871 CFN III Manager’s Manual for Windows® XP Embedded - Version 3.6 · August 2010
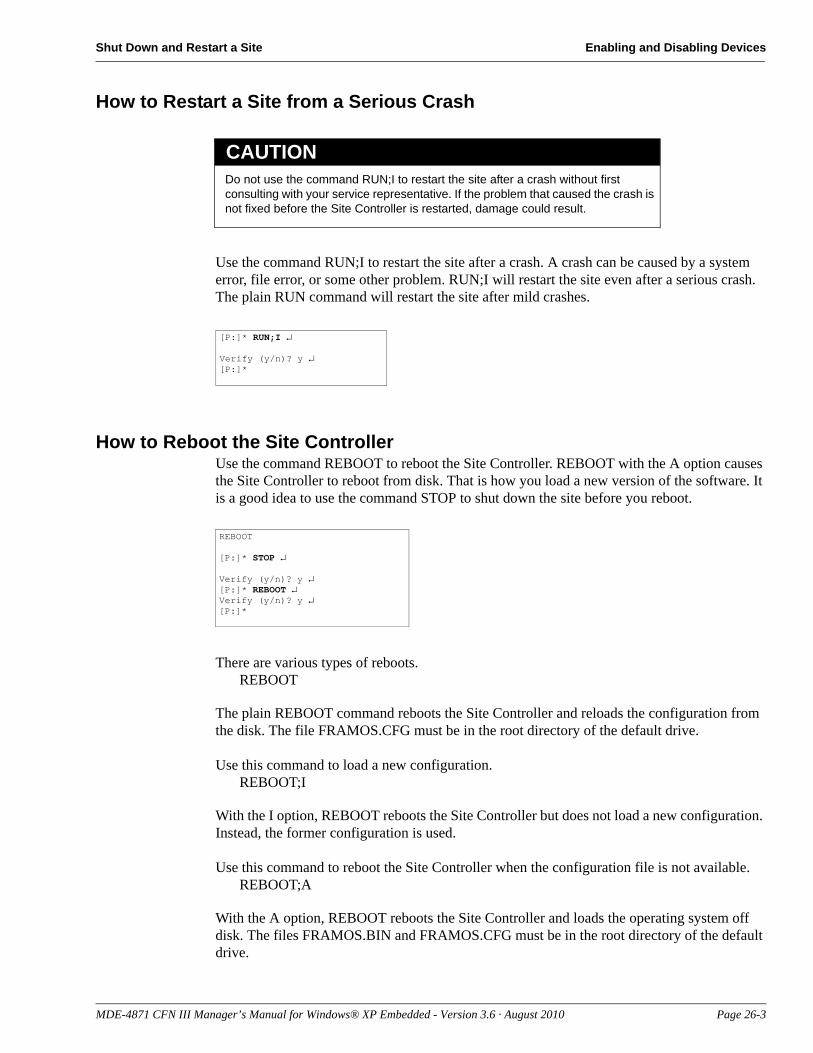
Shut Down and Restart a Site Enabling and Disabling Devices
How to Restart a Site from a Serious Crash
Do not use the command RUN;I to restart the site after a crash without first consulting with your service representative. If the problem that caused the crash is not fixed before the Site Controller is restarted, damage could result.
CAUTION
[P:]* RUN;I ↵
Verify (y/n)? y ↵[P:]*
Use the command RUN;I to restart the site after a crash. A crash can be caused by a system error, file error, or some other problem. RUN;I will restart the site even after a serious crash. The plain RUN command will restart the site after mild crashes.
How to Reboot the Site ControllerUse the command REBOOT to reboot the Site Controller. REBOOT with the A option causes the Site Controller to reboot from disk. That is how you load a new version of the software. It is a good idea to use the command STOP to shut down the site before you reboot.
REBOOT
[P:]* STOP ↵
Verify (y/n)? y ↵[P:]* REBOOT ↵Verify (y/n)? y ↵[P:]*
There are various types of reboots.REBOOT
The plain REBOOT command reboots the Site Controller and reloads the configuration from the disk. The file FRAMOS.CFG must be in the root directory of the default drive.
Use this command to load a new configuration.REBOOT;I
With the I option, REBOOT reboots the Site Controller but does not load a new configuration. Instead, the former configuration is used.
Use this command to reboot the Site Controller when the configuration file is not available.REBOOT;A
With the A option, REBOOT reboots the Site Controller and loads the operating system off disk. The files FRAMOS.BIN and FRAMOS.CFG must be in the root directory of the default drive.
MDE-4871 CFN III Manager’s Manual for Windows® XP Embedded - Version 3.6 · August 2010 Page 26-3
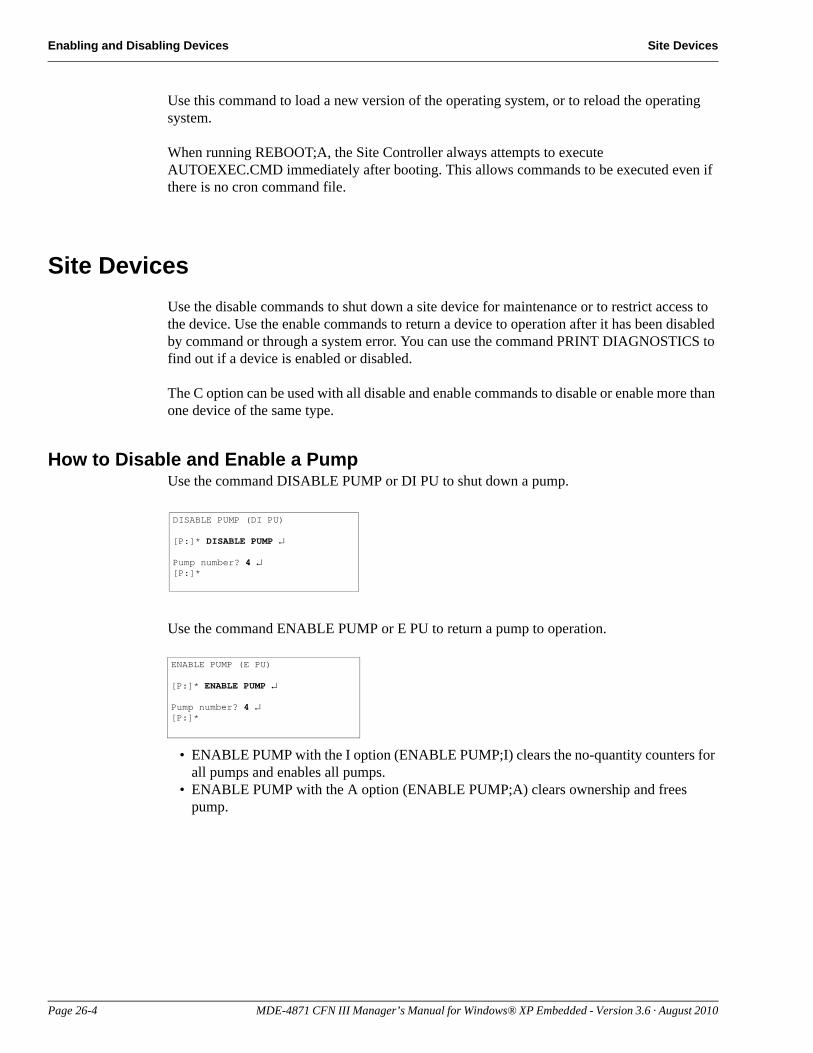
Enabling and Disabling Devices Site Devices
Use this command to load a new version of the operating system, or to reload the operating system.
When running REBOOT;A, the Site Controller always attempts to execute AUTOEXEC.CMD immediately after booting. This allows commands to be executed even if there is no cron command file.
Site DevicesUse the disable commands to shut down a site device for maintenance or to restrict access to the device. Use the enable commands to return a device to operation after it has been disabled by command or through a system error. You can use the command PRINT DIAGNOSTICS to find out if a device is enabled or disabled.
The C option can be used with all disable and enable commands to disable or enable more than one device of the same type.
How to Disable and Enable a PumpUse the command DISABLE PUMP or DI PU to shut down a pump.
DISABLE PUMP (DI PU)
[P:]* DISABLE PUMP ↵
Pump number? 4 ↵[P:]*
ENABLE PUMP (E PU)
[P:]* ENABLE PUMP ↵
Pump number? 4 ↵[P:]*
Use the command ENABLE PUMP or E PU to return a pump to operation.
• ENABLE PUMP with the I option (ENABLE PUMP;I) clears the no-quantity counters for all pumps and enables all pumps.
• ENABLE PUMP with the A option (ENABLE PUMP;A) clears ownership and frees pump.
Page 26-4 MDE-4871 CFN III Manager’s Manual for Windows® XP Embedded - Version 3.6 · August 2010
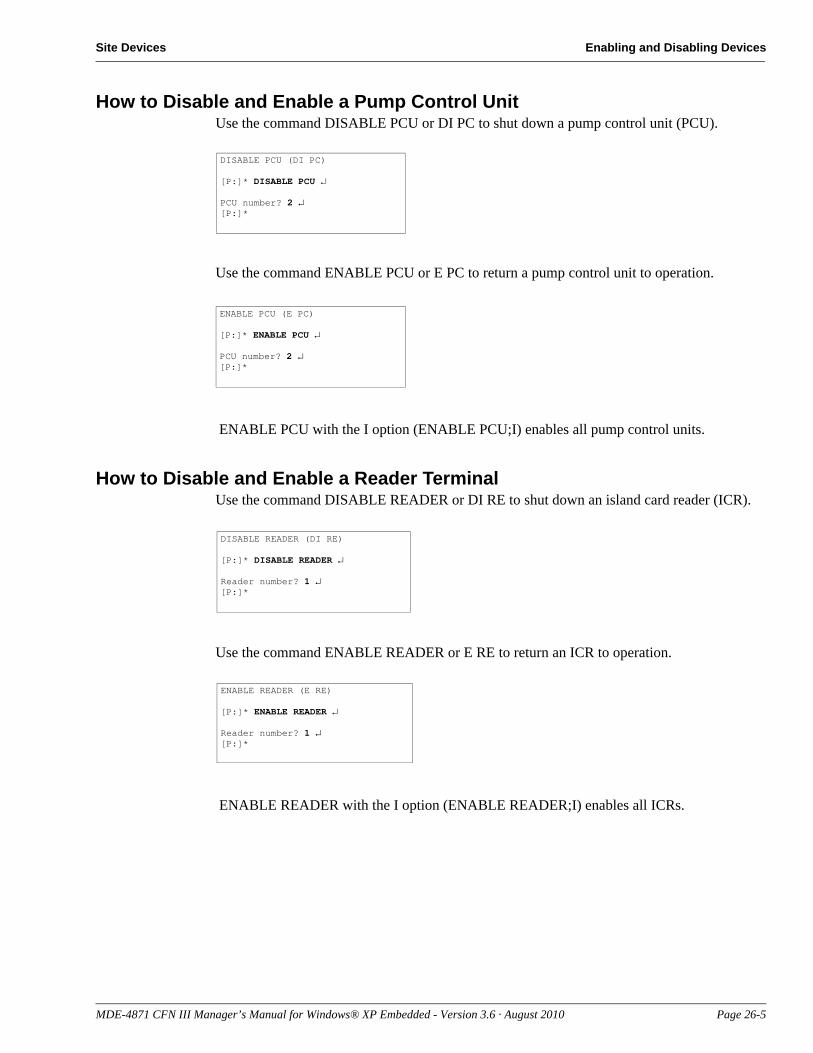
Site Devices Enabling and Disabling Devices
How to Disable and Enable a Pump Control UnitUse the command DISABLE PCU or DI PC to shut down a pump control unit (PCU).
DISABLE PCU (DI PC)
[P:]* DISABLE PCU ↵
PCU number? 2 ↵[P:]*
ENABLE PCU (E PC)
[P:]* ENABLE PCU ↵
PCU number? 2 ↵[P:]*
Use the command ENABLE PCU or E PC to return a pump control unit to operation.
ENABLE PCU with the I option (ENABLE PCU;I) enables all pump control units.
How to Disable and Enable a Reader TerminalUse the command DISABLE READER or DI RE to shut down an island card reader (ICR).
DISABLE READER (DI RE)
[P:]* DISABLE READER ↵
Reader number? 1 ↵[P:]*
ENABLE READER (E RE)
[P:]* ENABLE READER ↵
Reader number? 1 ↵[P:]*
Use the command ENABLE READER or E RE to return an ICR to operation.
ENABLE READER with the I option (ENABLE READER;I) enables all ICRs.
MDE-4871 CFN III Manager’s Manual for Windows® XP Embedded - Version 3.6 · August 2010 Page 26-5
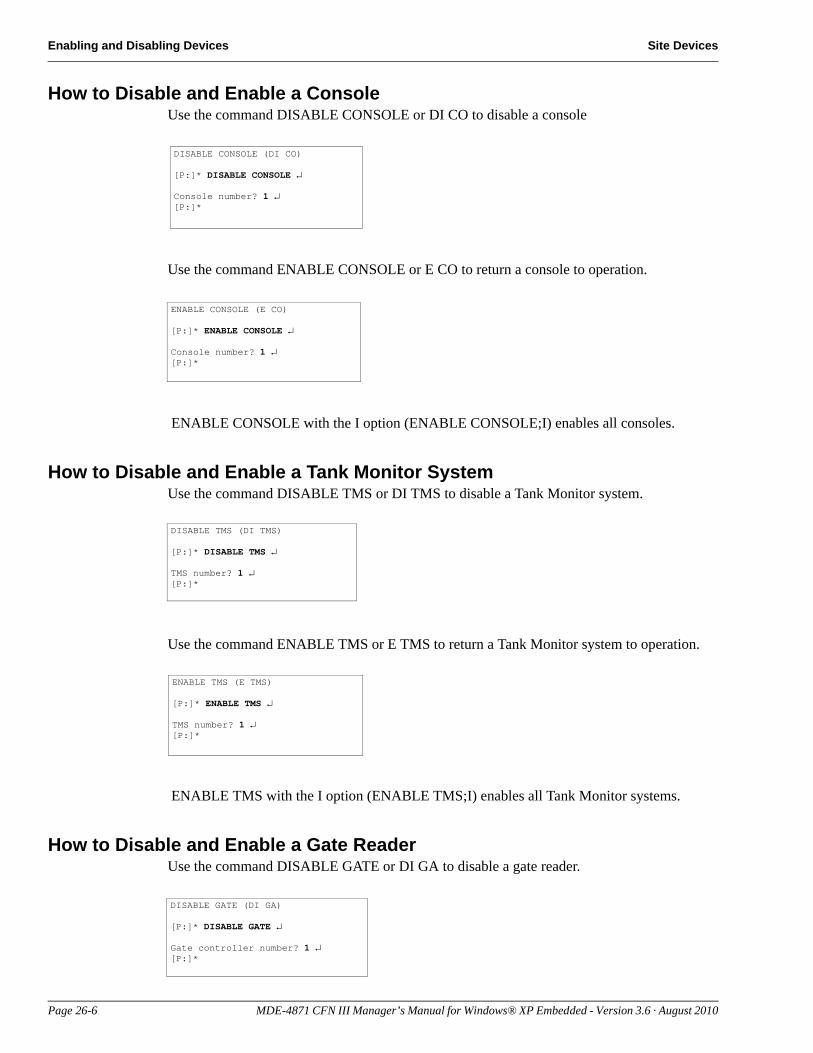
Enabling and Disabling Devices Site Devices
How to Disable and Enable a ConsoleUse the command DISABLE CONSOLE or DI CO to disable a console
DISABLE CONSOLE (DI CO)
[P:]* DISABLE CONSOLE ↵
Console number? 1 ↵[P:]*
ENABLE CONSOLE (E CO)
[P:]* ENABLE CONSOLE ↵
Console number? 1 ↵[P:]*
Use the command ENABLE CONSOLE or E CO to return a console to operation.
ENABLE CONSOLE with the I option (ENABLE CONSOLE;I) enables all consoles.
How to Disable and Enable a Tank Monitor SystemUse the command DISABLE TMS or DI TMS to disable a Tank Monitor system.
DISABLE TMS (DI TMS)
[P:]* DISABLE TMS ↵
TMS number? 1 ↵[P:]*
ENABLE TMS (E TMS)
[P:]* ENABLE TMS ↵
TMS number? 1 ↵[P:]*
Use the command ENABLE TMS or E TMS to return a Tank Monitor system to operation.
ENABLE TMS with the I option (ENABLE TMS;I) enables all Tank Monitor systems.
How to Disable and Enable a Gate ReaderUse the command DISABLE GATE or DI GA to disable a gate reader.
DISABLE GATE (DI GA)
[P:]* DISABLE GATE ↵
Gate controller number? 1 ↵[P:]*
Page 26-6 MDE-4871 CFN III Manager’s Manual for Windows® XP Embedded - Version 3.6 · August 2010
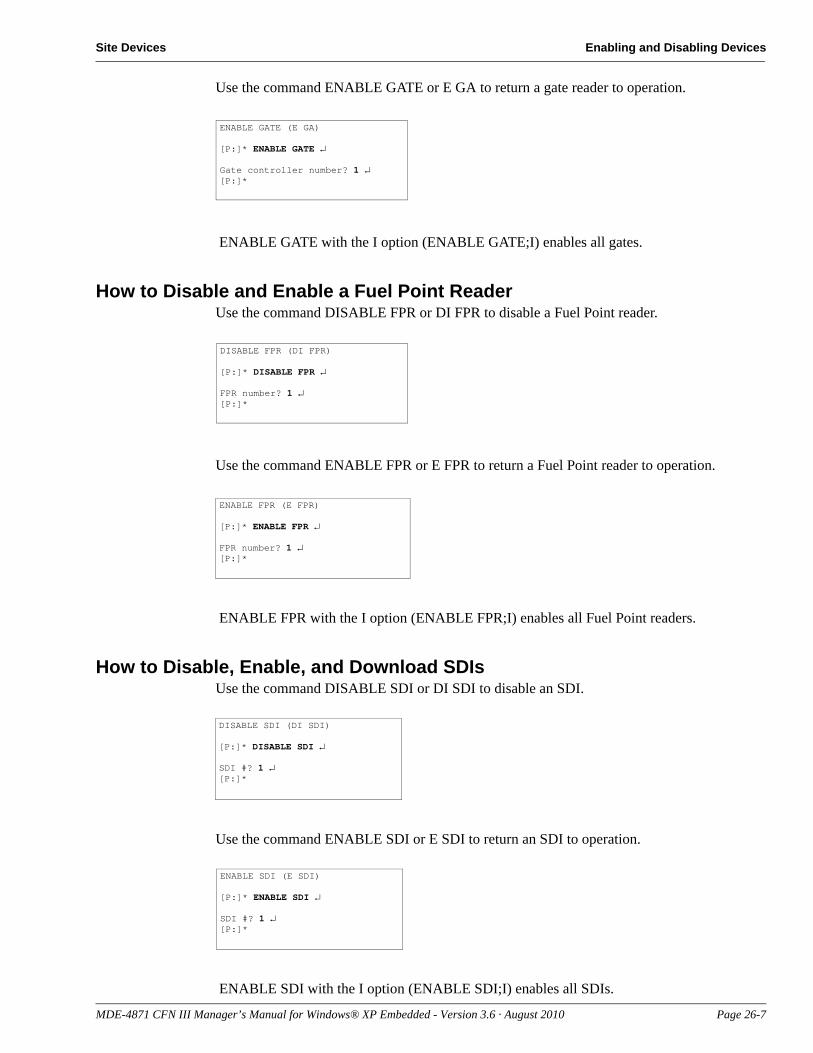
Site Devices Enabling and Disabling Devices
ENABLE GATE (E GA)
[P:]* ENABLE GATE ↵
Gate controller number? 1 ↵[P:]*
Use the command ENABLE GATE or E GA to return a gate reader to operation.
ENABLE GATE with the I option (ENABLE GATE;I) enables all gates.
How to Disable and Enable a Fuel Point ReaderUse the command DISABLE FPR or DI FPR to disable a Fuel Point reader.
DISABLE FPR (DI FPR)
[P:]* DISABLE FPR ↵
FPR number? 1 ↵[P:]*
ENABLE FPR (E FPR)
[P:]* ENABLE FPR ↵
FPR number? 1 ↵[P:]*
Use the command ENABLE FPR or E FPR to return a Fuel Point reader to operation.
ENABLE FPR with the I option (ENABLE FPR;I) enables all Fuel Point readers.
How to Disable, Enable, and Download SDIsUse the command DISABLE SDI or DI SDI to disable an SDI.
DISABLE SDI (DI SDI)
[P:]* DISABLE SDI ↵
SDI #? 1 ↵[P:]*
ENABLE SDI (E SDI)
[P:]* ENABLE SDI ↵
SDI #? 1 ↵[P:]*
Use the command ENABLE SDI or E SDI to return an SDI to operation.
ENABLE SDI with the I option (ENABLE SDI;I) enables all SDIs.
MDE-4871 CFN III Manager’s Manual for Windows® XP Embedded - Version 3.6 · August 2010 Page 26-7
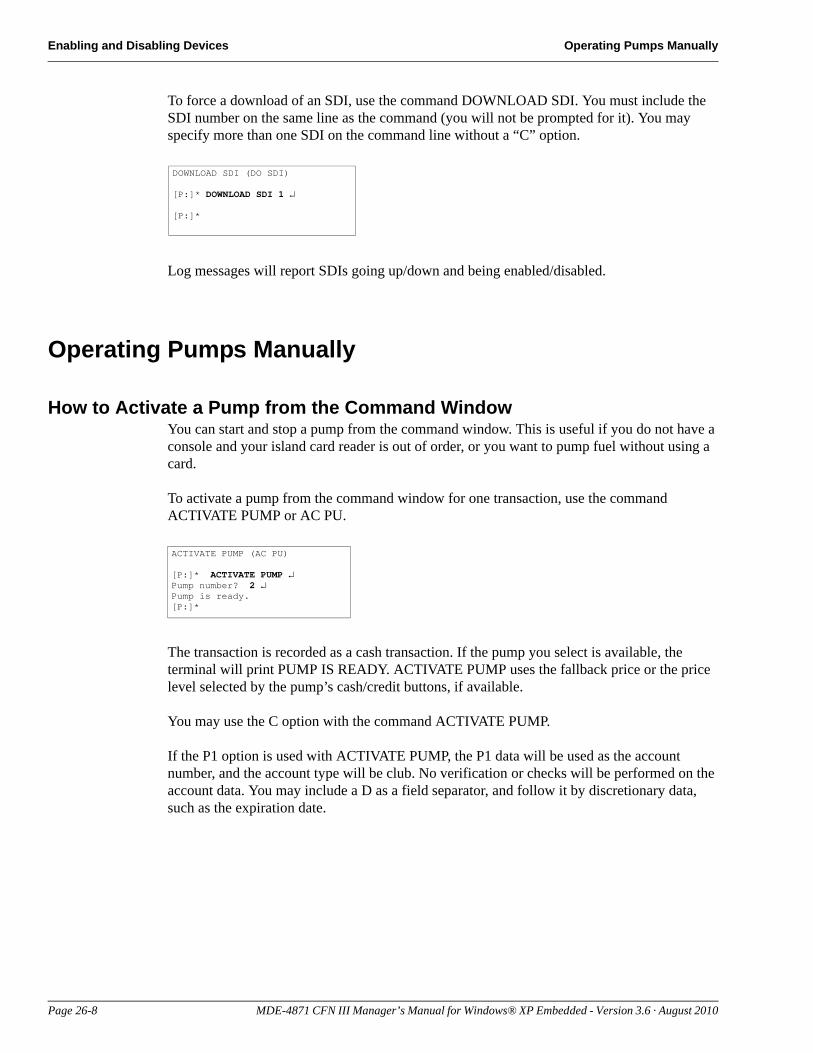
Enabling and Disabling Devices Operating Pumps Manually
DOWNLOAD SDI (DO SDI)
[P:]* DOWNLOAD SDI 1 ↵
[P:]*
To force a download of an SDI, use the command DOWNLOAD SDI. You must include the SDI number on the same line as the command (you will not be prompted for it). You may specify more than one SDI on the command line without a “C” option.
Log messages will report SDIs going up/down and being enabled/disabled.
Operating Pumps Manually
How to Activate a Pump from the Command WindowYou can start and stop a pump from the command window. This is useful if you do not have a console and your island card reader is out of order, or you want to pump fuel without using a card.
ACTIVATE PUMP (AC PU)
[P:]* ACTIVATE PUMP ↵Pump number? 2 ↵Pump is ready.[P:]*
To activate a pump from the command window for one transaction, use the command ACTIVATE PUMP or AC PU.
The transaction is recorded as a cash transaction. If the pump you select is available, the terminal will print PUMP IS READY. ACTIVATE PUMP uses the fallback price or the price level selected by the pump’s cash/credit buttons, if available.
You may use the C option with the command ACTIVATE PUMP.
If the P1 option is used with ACTIVATE PUMP, the P1 data will be used as the account number, and the account type will be club. No verification or checks will be performed on the account data. You may include a D as a field separator, and follow it by discretionary data, such as the expiration date.
Page 26-8 MDE-4871 CFN III Manager’s Manual for Windows® XP Embedded - Version 3.6 · August 2010
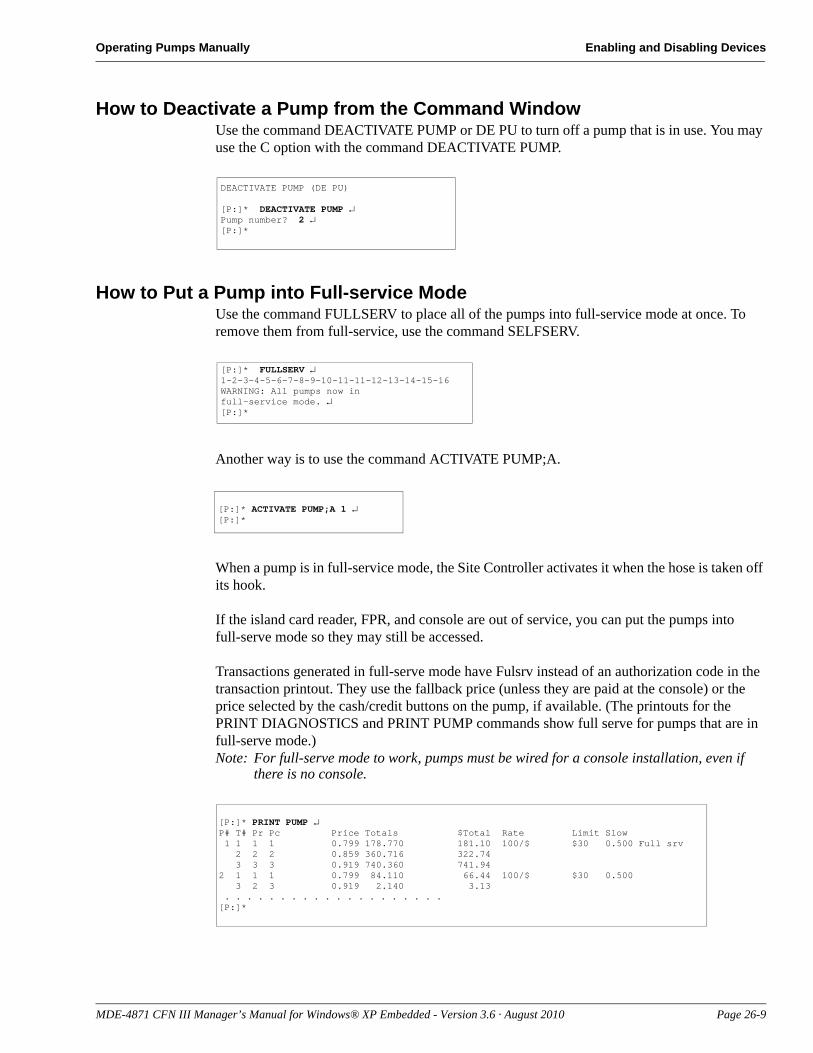
Operating Pumps Manually Enabling and Disabling Devices
How to Deactivate a Pump from the Command WindowUse the command DEACTIVATE PUMP or DE PU to turn off a pump that is in use. You may use the C option with the command DEACTIVATE PUMP.
DEACTIVATE PUMP (DE PU)
[P:]* DEACTIVATE PUMP ↵Pump number? 2 ↵[P:]*
How to Put a Pump into Full-service ModeUse the command FULLSERV to place all of the pumps into full-service mode at once. To remove them from full-service, use the command SELFSERV.
[P:]* FULLSERV ↵1-2-3-4-5-6-7-8-9-10-11-11-12-13-14-15-16 WARNING: All pumps now infull-service mode. ↵[P:]*
[P:]* ACTIVATE PUMP;A 1 ↵[P:]*
Another way is to use the command ACTIVATE PUMP;A.
When a pump is in full-service mode, the Site Controller activates it when the hose is taken off its hook.
If the island card reader, FPR, and console are out of service, you can put the pumps into full-serve mode so they may still be accessed.
Transactions generated in full-serve mode have Fulsrv instead of an authorization code in the transaction printout. They use the fallback price (unless they are paid at the console) or the price selected by the cash/credit buttons on the pump, if available. (The printouts for the PRINT DIAGNOSTICS and PRINT PUMP commands show full serve for pumps that are in full-serve mode.)Note: For full-serve mode to work, pumps must be wired for a console installation, even if
there is no console.
[P:]* PRINT PUMP ↵P# T# Pr Pc Price Totals $Total Rate Limit Slow 1 1 1 1 0.799 178.770 181.10 100/$ $30 0.500 Full srv 2 2 2 0.859 360.716 322.74 3 3 3 0.919 740.360 741.942 1 1 1 0.799 84.110 66.44 100/$ $30 0.500 3 2 3 0.919 2.140 3.13 . . . . . . . . . . . . . . . . . . . .[P:]*
MDE-4871 CFN III Manager’s Manual for Windows® XP Embedded - Version 3.6 · August 2010 Page 26-9
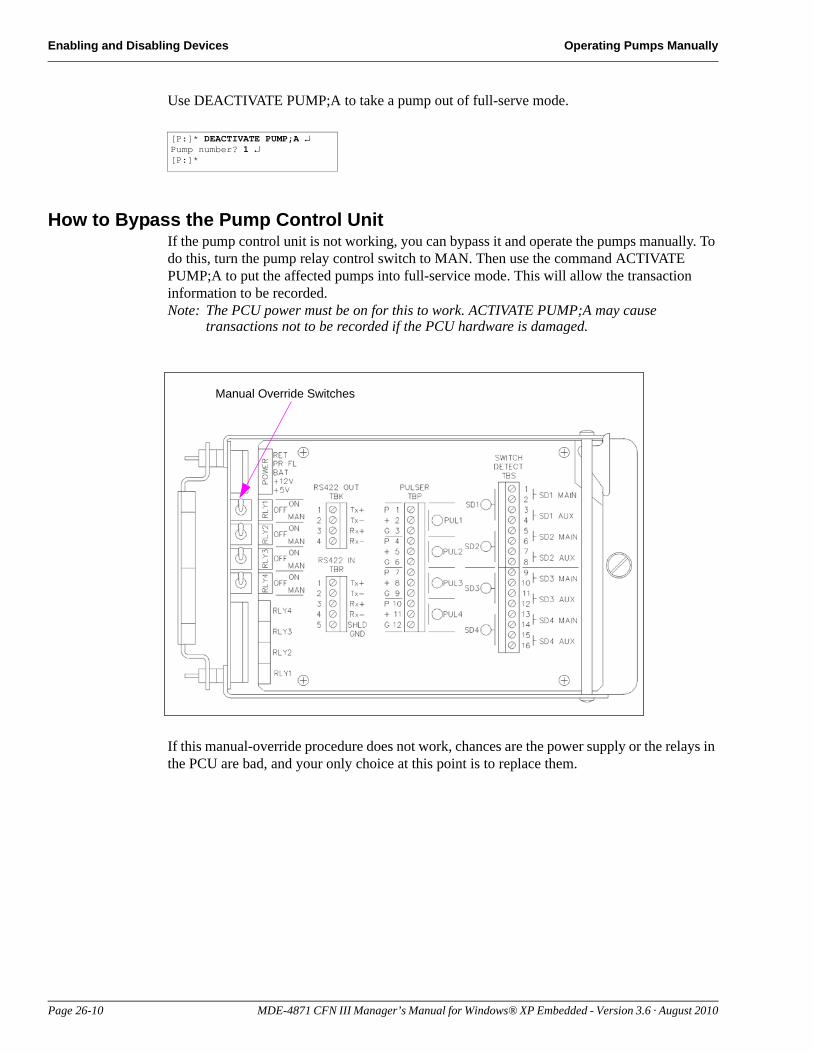
Enabling and Disabling Devices Operating Pumps Manually
[P:]* DEACTIVATE PUMP;A ↵Pump number? 1 ↵[P:]*
Use DEACTIVATE PUMP;A to take a pump out of full-serve mode.
How to Bypass the Pump Control UnitIf the pump control unit is not working, you can bypass it and operate the pumps manually. To do this, turn the pump relay control switch to MAN. Then use the command ACTIVATE PUMP;A to put the affected pumps into full-service mode. This will allow the transaction information to be recorded.Note: The PCU power must be on for this to work. ACTIVATE PUMP;A may cause
transactions not to be recorded if the PCU hardware is damaged.
If this manual-override procedure does not work, chances are the power supply or the relays in the PCU are bad, and your only choice at this point is to replace them.
Manual Override Switches
Page 26-10 MDE-4871 CFN III Manager’s Manual for Windows® XP Embedded - Version 3.6 · August 2010
Requirements and Restrictions Invoice Printing
27 – Invoice Printing
Invoice printing is new feature available from Gasboy. When only one invoice style is currently supported, others can be made available. Contact your Gasboy Representative.
Requirements and RestrictionsInvoice printing has several requirements and restrictions:
• You must be using the Profit Point system as your POS, running software version 2.2.• Invoices can only be printed on a dedicated impact printer connected to the parallel printer
port on the Profit Point.• The Profit Point system must have a dedicated key for the invoice printer. Refer to the
Profit Point Reference Manual version 2.2 or above, for setting up the dedicated key. The default key is “N”.
• You must configure the CONSOLE.BIN program, submenu 3 to use invoice printers.• Invoices can only be printed for the current transaction.• Multiple sales are not supported at this time.• Only CENTRAK form 881 is currently available.
Invoice SetupHeader and footer lines of text are set up for the invoice printer the same way as the receipt printer. Use these line number ranges:
Ranges Function1 - 9 Receipt header
11 - 19 Receipt footer
31 - 39 Invoice header
41 - 49 Invoice footer
The number of lines and characters is limited by the space available on the invoice form. Enter the invoice information by using the command LOad Heading. For additional information, refer to “Receipts, Messages, and Date” on page 6-1. Note: You may require to increase the Receipt Heading Table in TABLE config. Refer to
MDE-4773 CFN III Configuration Manual for Windows XP.
MDE-4871 CFN III Manager’s Manual for Windows® XP Embedded - Version 3.6 · August 2010 Page 27-1
Invoice Printing Printing an Invoice
The Profit Point must be running software version 2.2b or later and must have a dedicated key, the default is “N”, and set up with the Profit Point menu options.
1 Select option 4-Keyboard Configuration.
2 From the Keyboard configuration menu, select option 4 Function.
3 From the list, select option 14 - Print Form.
Refer to the Profit Point Reference Manual, version 2.2 for more information.
Printing an InvoiceOnce your equipment has been set up by your Gasboy representative and your invoice header and footer information has been entered, test your form feed of the printer and your system setup by running some sample invoices.
Enter your sales as regular sales of fuel or merchandise. After the sale is completed, press N, to print the invoice.
The current form allows for 13 sale items on a page. If there are more items, another page will automatically feed with the word “Continued...” printing on the bottom replacing the footer lines. All pages will contain the same header and general layout with the final page containing the subtotal, discount, tax, total, and footer lines.
Page 27-2 MDE-4871 CFN III Manager’s Manual for Windows® XP Embedded - Version 3.6 · August 2010
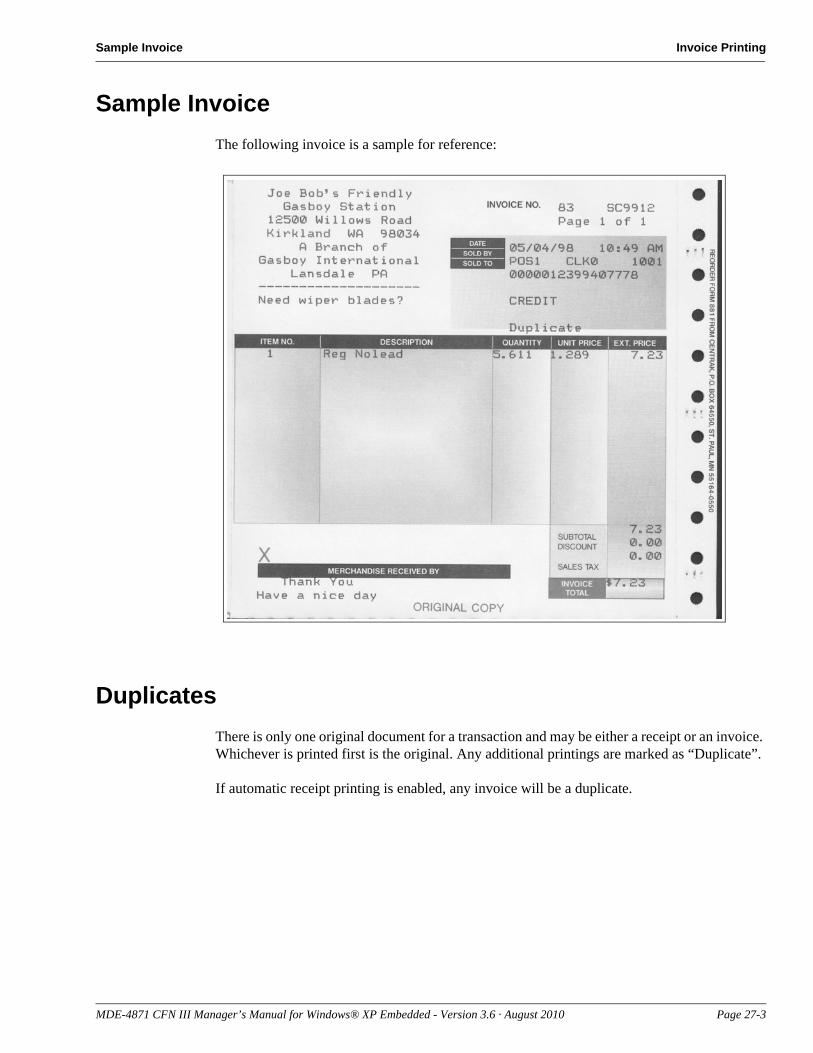
Sample Invoice Invoice Printing
Sample InvoiceThe following invoice is a sample for reference:
DuplicatesThere is only one original document for a transaction and may be either a receipt or an invoice. Whichever is printed first is the original. Any additional printings are marked as “Duplicate”.
If automatic receipt printing is enabled, any invoice will be a duplicate.
MDE-4871 CFN III Manager’s Manual for Windows® XP Embedded - Version 3.6 · August 2010 Page 27-3

Invoice Printing Duplicates
This page is intentionally left blank.
Page 27-4 MDE-4871 CFN III Manager’s Manual for Windows® XP Embedded - Version 3.6 · August 2010
Site Controller III Optional Packages
28 – Site Controller III Optional Packages
Almost all of the Site Controller’s functions are included in its standard package, but there are some features that are optional.
Several options are grouped together in the Fleet package:• The Lookup Program: Refer to “Lookup Program” on page 14-1.• The MPG System: Refer to “Miles per Gallon System” on page 15-5.• Supervisor Cards: Are coded to allow (and have the Site Controller accept) the manual
entry of any valid card number, employee number, and vehicle number. This allows a supervisor to enter information for an employee with a lost or damaged card. For an ICR only.
• Fuel-drop Cards: Are swiped through an island card reader by a tank-truck driver who can then enter the number of the tank that received fuel and the number of gallons/liters received.
• Dipstick Cards: Are swiped at a reader by a site employee who has just used a tank dipstick and who then enters the tank number and gallons/liters in the tank, as seen on the dipstick.
• Fueler ID Cards: Are swiped at an island card reader by a site employee who is then responsible for all transactions at that island or on a particular pump.
• Chain-pumping Feature: Turns on all “pumps” in a cluster (including such “pumps” as a grease gun or air hose) when a master pump in the cluster is turned on. This feature is useful at sites that have fully equipped repair bays.
• Optical Cards: Can be read in an optical reader.
Other options are available individually, not as part of a package:• Fuel Point System: Which automatically reads vehicle identification, fuel authorization,
and odometer information directly from a module installed on the vehicle.• Tank Gauge Interface: Supports Tank gauges that have the Veeder-Root® protocol.• Bank-card Network Router: Allows the use of one of the routers described in the Credit
and Debit Card Network manuals.• Special Card Types: Allow the use of cards that are authorized locally and that do not
follow the standard Gasboy card format.• Dpt String Selection: Allows the use of special CITGO network messages.• Gate Reader Interface: Allows the site to have a gate reader.• Currency.• SDI: Allows the site to use various devices. SDI is the interface.• Key Option: Allows operators to use smart keys at an Islander II.• Pump PC Interfaces: Gilbarco, Wayne, Tokheim.• In-the-pump Reader PC Interfaces: Gilbarco CRIND, Wayne CAT, Tokheim Insight.
MDE-4871 CFN III Manager’s Manual for Windows® XP Embedded - Version 3.6 · August 2010 Page 28-1

Site Controller III Optional Packages
This page is intentionally left blank.
Page 28-2 MDE-4871 CFN III Manager’s Manual for Windows® XP Embedded - Version 3.6 · August 2010
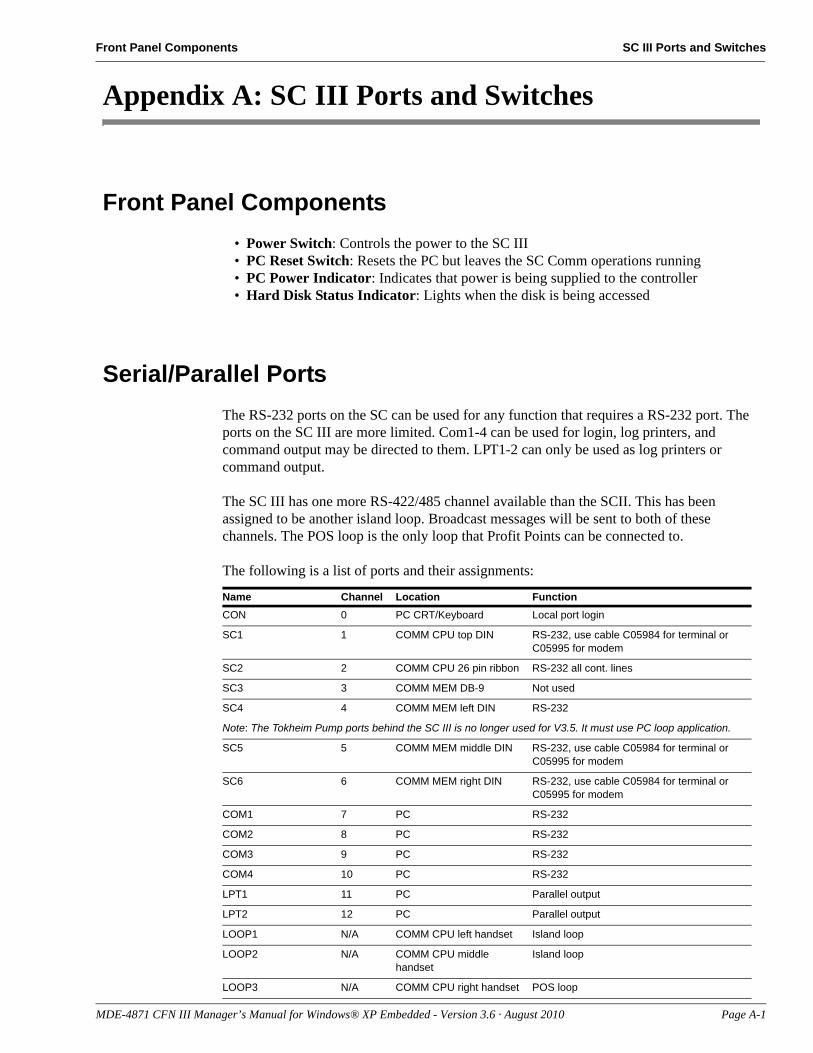
Front Panel Components SC III Ports and Switches
Appendix A: SC III Ports and Switches
Front Panel Components• Power Switch: Controls the power to the SC III• PC Reset Switch: Resets the PC but leaves the SC Comm operations running• PC Power Indicator: Indicates that power is being supplied to the controller• Hard Disk Status Indicator: Lights when the disk is being accessed
Serial/Parallel PortsThe RS-232 ports on the SC can be used for any function that requires a RS-232 port. The ports on the SC III are more limited. Com1-4 can be used for login, log printers, and command output may be directed to them. LPT1-2 can only be used as log printers or command output.
The SC III has one more RS-422/485 channel available than the SCII. This has been assigned to be another island loop. Broadcast messages will be sent to both of these channels. The POS loop is the only loop that Profit Points can be connected to.
The following is a list of ports and their assignments:
Name Channel Location FunctionCON 0 PC CRT/Keyboard Local port login
SC1 1 COMM CPU top DIN RS-232, use cable C05984 for terminal or C05995 for modem
SC2 2 COMM CPU 26 pin ribbon RS-232 all cont. lines
SC3 3 COMM MEM DB-9 Not used
SC4 4 COMM MEM left DIN RS-232
Note: The Tokheim Pump ports behind the SC III is no longer used for V3.5. It must use PC loop application.
SC5 5 COMM MEM middle DIN RS-232, use cable C05984 for terminal or C05995 for modem
SC6 6 COMM MEM right DIN RS-232, use cable C05984 for terminal or C05995 for modem
COM1 7 PC RS-232
COM2 8 PC RS-232
COM3 9 PC RS-232
COM4 10 PC RS-232
LPT1 11 PC Parallel output
LPT2 12 PC Parallel output
LOOP1 N/A COMM CPU left handset Island loop
LOOP2 N/A COMM CPU middle handset
Island loop
LOOP3 N/A COMM CPU right handset POS loop
MDE-4871 CFN III Manager’s Manual for Windows® XP Embedded - Version 3.6 · August 2010 Page A-1

SC III Ports and Switches DIP Switch Settings
DIP Switch Settings
Memory Board DIP Switch SC-Memory I/O - S1On the SC MEMORY I/O board top left DIP switch:
Position and Definition Setting1 Boot to monitor after reset
Boot to OS after resetopenclosed
2 Debug modeNormal
openclosed
3 Do not talk to PC when in monitorMonitor I/O goes to PC also
openclosed
4 Monitor I/O goes to SC port 1No monitor I/O to SC port 1
openclosed
Memory Board DIP Switch SC-Memory I/O - S2On the SC MEMORY I/O board top right DIP switch:
Position and Definition Setting1 Battery 1 open=disabled
closed=enabled
2 Battery 2 External open=disabledclosed=enabled
3 N/A unused
4 N/A unused
PC IRQ Switch, SC-COMM CPU - S1On the SC-COMM CPU board on the card edge side, the middle DIP switch is the IRQ-enable DIP switch. The IRQ-enable switch chooses one of four possible interrupt priorities. Only one may be selected and no other device on the PC can cause that interrupt. SC3.EXE currently assumes level 10. Other choices are 15, 12, and 11.
Positions Definition Setting1 Closed IRQ-15 Default - open
2 Closed IRQ-12 Default - open
3 Closed IRQ-11 Default - open
4 Closed IRQ-10 Default - closed
Page A-2 MDE-4871 CFN III Manager’s Manual for Windows® XP Embedded - Version 3.6 · August 2010
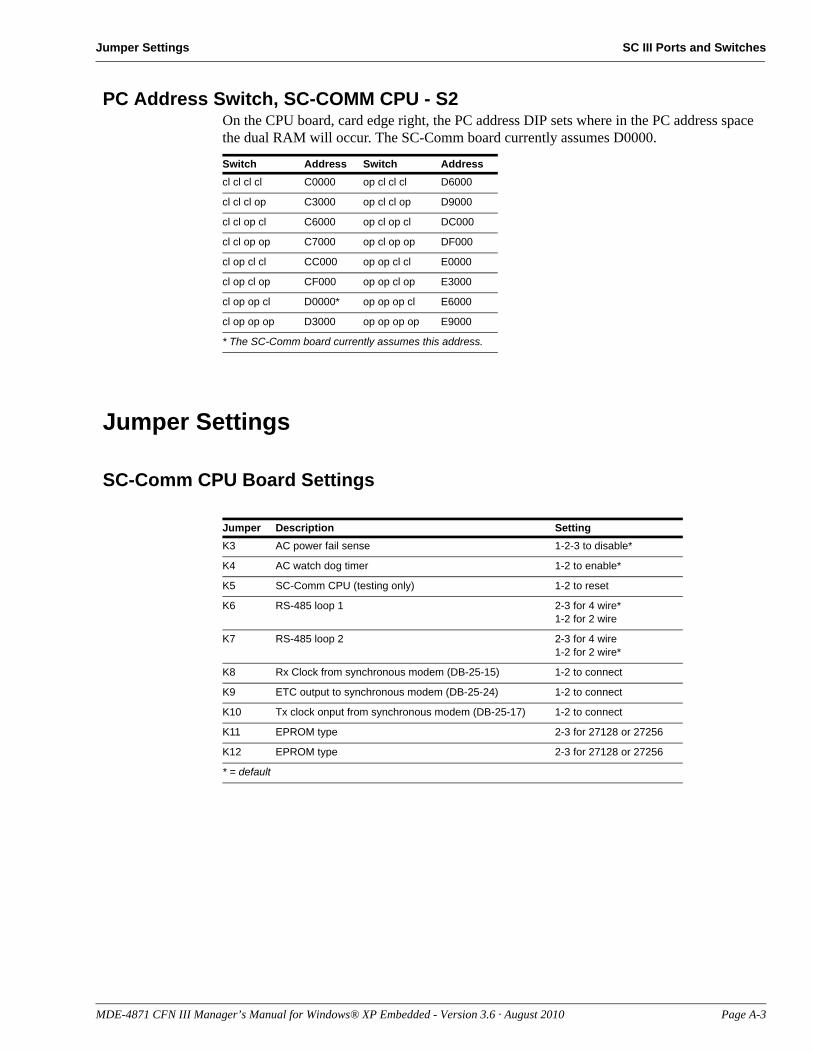
Jumper Settings SC III Ports and Switches
PC Address Switch, SC-COMM CPU - S2On the CPU board, card edge right, the PC address DIP sets where in the PC address space the dual RAM will occur. The SC-Comm board currently assumes D0000.
Switch Address Switch Addresscl cl cl cl C0000 op cl cl cl D6000
cl cl cl op C3000 op cl cl op D9000
cl cl op cl C6000 op cl op cl DC000
cl cl op op C7000 op cl op op DF000
cl op cl cl CC000 op op cl cl E0000
cl op cl op CF000 op op cl op E3000
cl op op cl D0000* op op op cl E6000
cl op op op D3000 op op op op E9000
* The SC-Comm board currently assumes this address.
Jumper Settings
SC-Comm CPU Board Settings
Jumper Description SettingK3 AC power fail sense 1-2-3 to disable*
K4 AC watch dog timer 1-2 to enable*
K5 SC-Comm CPU (testing only) 1-2 to reset
K6 RS-485 loop 1 2-3 for 4 wire*1-2 for 2 wire
K7 RS-485 loop 2 2-3 for 4 wire1-2 for 2 wire*
K8 Rx Clock from synchronous modem (DB-25-15) 1-2 to connect
K9 ETC output to synchronous modem (DB-25-24) 1-2 to connect
K10 Tx clock onput from synchronous modem (DB-25-17) 1-2 to connect
K11 EPROM type 2-3 for 27128 or 27256
K12 EPROM type 2-3 for 27128 or 27256
* = default
MDE-4871 CFN III Manager’s Manual for Windows® XP Embedded - Version 3.6 · August 2010 Page A-3
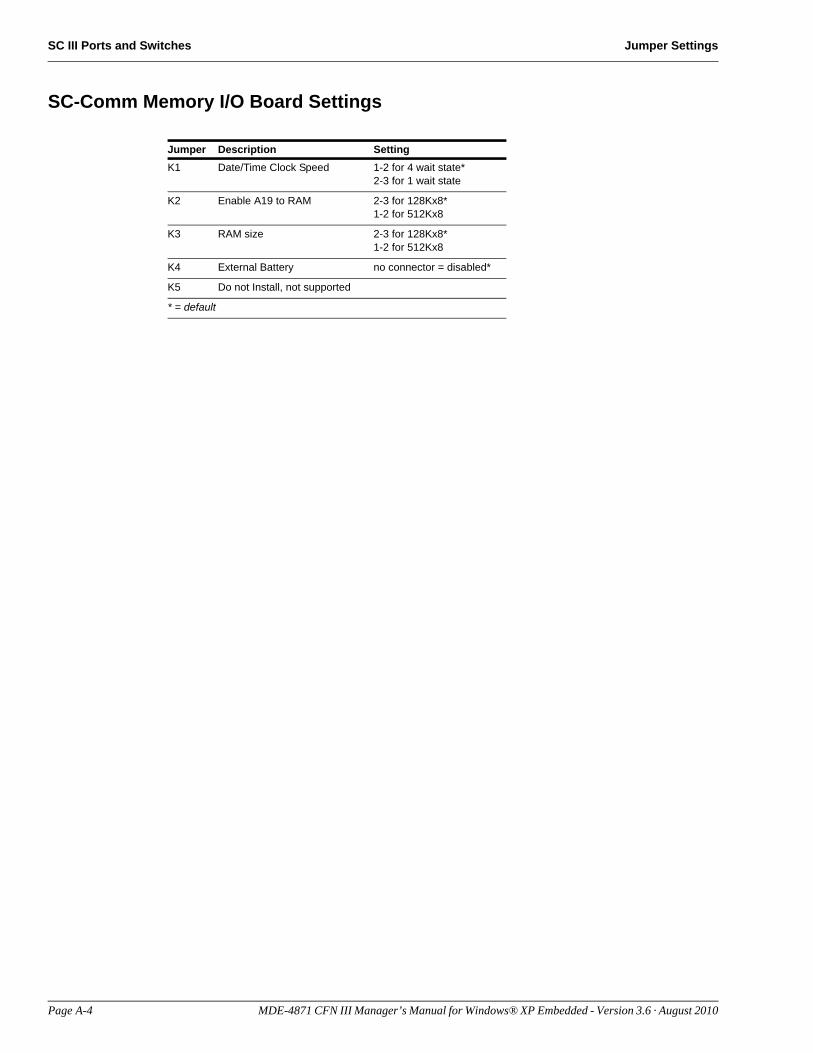
SC III Ports and Switches Jumper Settings
SC-Comm Memory I/O Board Settings
Jumper Description SettingK1 Date/Time Clock Speed 1-2 for 4 wait state*
2-3 for 1 wait state
K2 Enable A19 to RAM 2-3 for 128Kx8*1-2 for 512Kx8
K3 RAM size 2-3 for 128Kx8*1-2 for 512Kx8
K4 External Battery no connector = disabled*
K5 Do not Install, not supported
* = default
Page A-4 MDE-4871 CFN III Manager’s Manual for Windows® XP Embedded - Version 3.6 · August 2010
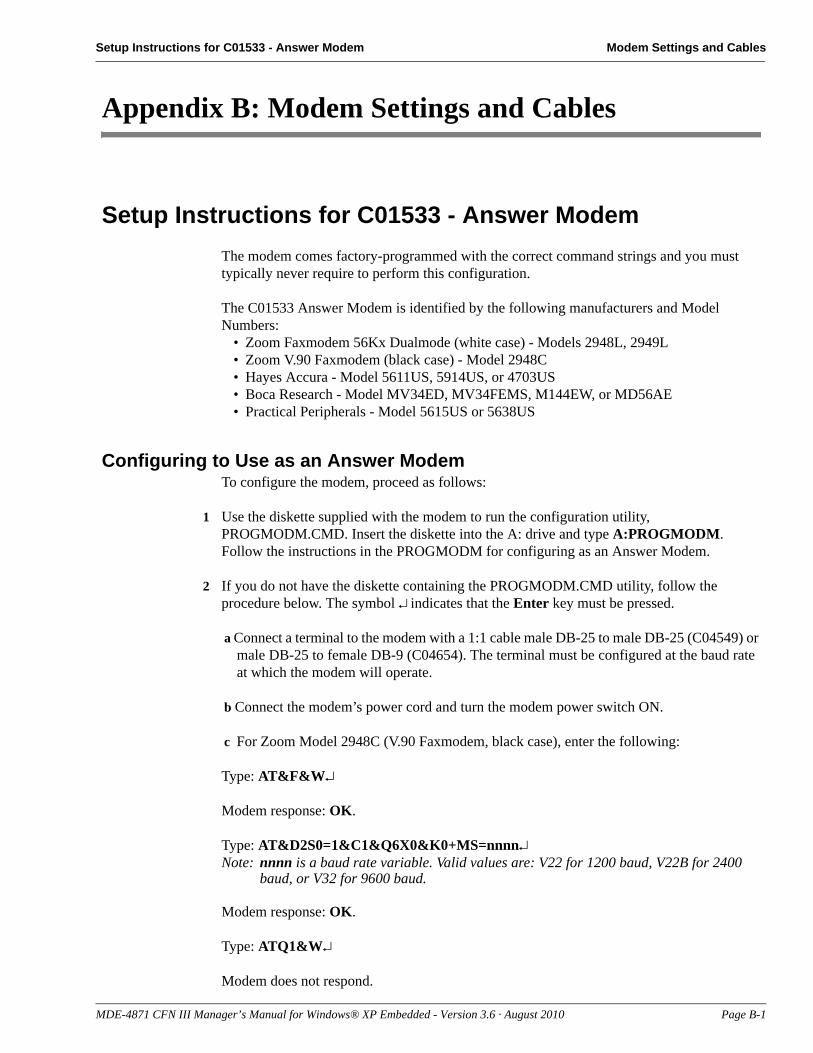
Setup Instructions for C01533 - Answer Modem Modem Settings and Cables
Appendix B: Modem Settings and Cables
Setup Instructions for C01533 - Answer ModemThe modem comes factory-programmed with the correct command strings and you must typically never require to perform this configuration.
The C01533 Answer Modem is identified by the following manufacturers and Model Numbers:
• Zoom Faxmodem 56Kx Dualmode (white case) - Models 2948L, 2949L• Zoom V.90 Faxmodem (black case) - Model 2948C• Hayes Accura - Model 5611US, 5914US, or 4703US• Boca Research - Model MV34ED, MV34FEMS, M144EW, or MD56AE• Practical Peripherals - Model 5615US or 5638US
Configuring to Use as an Answer ModemTo configure the modem, proceed as follows:
1 Use the diskette supplied with the modem to run the configuration utility, PROGMODM.CMD. Insert the diskette into the A: drive and type A:PROGMODM. Follow the instructions in the PROGMODM for configuring as an Answer Modem.
2 If you do not have the diskette containing the PROGMODM.CMD utility, follow the procedure below. The symbol ↵ indicates that the Enter key must be pressed.
a Connect a terminal to the modem with a 1:1 cable male DB-25 to male DB-25 (C04549) or male DB-25 to female DB-9 (C04654). The terminal must be configured at the baud rate at which the modem will operate.
b Connect the modem’s power cord and turn the modem power switch ON.
c For Zoom Model 2948C (V.90 Faxmodem, black case), enter the following:
Type: AT&F&W↵
Modem response: OK.
Type: AT&D2S0=1&C1&Q6X0&K0+MS=nnnn↵
Note: nnnn is a baud rate variable. Valid values are: V22 for 1200 baud, V22B for 2400 baud, or V32 for 9600 baud.
Modem response: OK.
Type: ATQ1&W↵
Modem does not respond.
MDE-4871 CFN III Manager’s Manual for Windows® XP Embedded - Version 3.6 · August 2010 Page B-1
Modem Settings and Cables Setup Instructions for C05899 - Credit/Debit Network Modem
For all other modem types enter the following:
Type: AT&F&W↵
Modem response: OK.
Type: AT&D2S0=1&C1B1&Q6X0&K0&W↵
Modem response: OK.
Type: ATQ1&W↵
Modem does not respond.
The modem is now ready for testing. The settings are saved and power may be turned off without losing the configuration.
Setup Instructions for C05899 - Credit/Debit Network Modem
The modem comes factory-programmed with the correct command strings and you must typically never require to perform this configuration. Refer to “CFN Router Configurations” on page B-3.
The C05899 Credit/Debit Card Network Modem is for SC III with a network interface which requires the fuel management system to contact a credit or debit network for verification of a user’s card. This modem is identified by the following manufacturers and Model Numbers:
• Multitech - Model MT2834ZDXb or MT1932ZDX• Zoom - Model 2948L, 2949L• Hayes Accura - Model 4703US• Boca Research - Model M024ED
Modems to be used for dial-out to a bank network require a dedicated phone line.
IMPORTANT INFORMATION
Page B-2 MDE-4871 CFN III Manager’s Manual for Windows® XP Embedded - Version 3.6 · August 2010
Setup Instructions for C05899 - Credit/Debit Network Modem Modem Settings and Cables
Configuring to Use as a Credit/Debit Card Network ModemTo configure the modem, proceed as follows:
1 Use the diskette supplied with the modem to run the configuration utility, PROGMODM.CMD. Insert the diskette into the A: drive and type A:PROGMODM. Follow the instructions in PROGMODM for configuring as a bank network modem.Note: Network modems are setup using a Network Setup menu, or by using the command
“MODEMS” and following the prompts that appear.
2 If you do not have the diskette containing the PROGMODM.CMD utility, follow the procedure below. The symbol ↵ indicates that the Enter key must be pressed. After you perform the following steps, run the commands in the following table for your specific modem.
a Connect a terminal to the modem with a male DB-25 1:1 cable to male DB-25 (C04549) or male DB-25 cable to female DB-9 (C04654). The terminal must be configured at the baud rate at which the modem will operate.
b Type: AT&F&W↵.
Modem response: No response from Multitech. All others respond with OK.
The modem is now ready for testing. The settings are saved, and power may be turned off without losing the configuration.
CFN Router ConfigurationsIf the router you are using does not use a MODEMS.INI file, choose the correct modem in the router’s configuration menu. If the correct modem is not listed, choose Hayes 1200 for any of these modems.
Modem Baud Rate CommandMultitech 1200 Type:
ATE0Q0V0X4&B1&Q1&D2&E3$MB1200S0=0S6=1S11=60&W↵Modem response: 0
2400 Type: ATE0Q0V0X4&B1&Q1&D2&E3$MB2400S0=0S6=1S11=60&W↵Modem response: 0
Zoom 1200 Type: ATV0E0X4\N1S0=0S37=5S7=255S11=70&K0%C0&W ↵Modem response: 0
2400 Type: ATV0E0X4\N1S0=0S37=6S7=255S11=70&K0%C0&W↵ Modem response: 0
Boca Research 1200 or 2400 Type: ATV0X0E0L1&Q0&D2&C1&S0&W↵ Modem response: 0
Hayes 1200 or 2400 Type: ATV0X0E0L1&Q0&D2&C1&S0&W ↵Modem response: 0
MDE-4871 CFN III Manager’s Manual for Windows® XP Embedded - Version 3.6 · August 2010 Page B-3
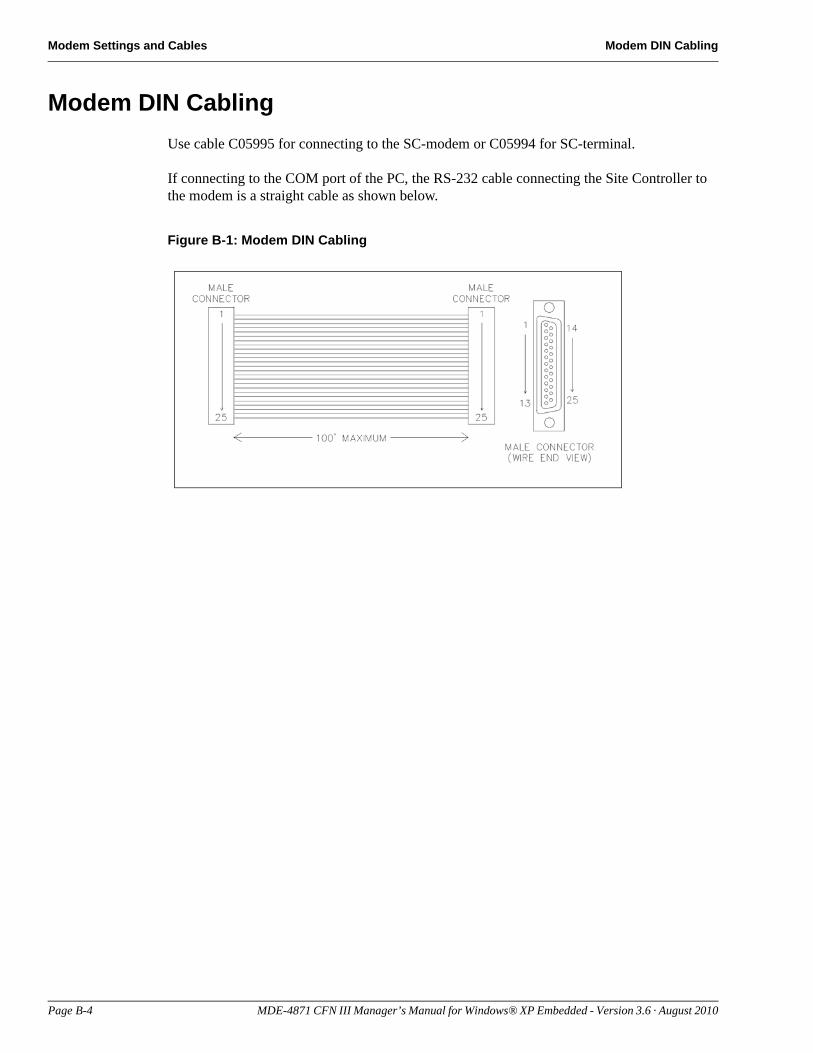
Modem Settings and Cables Modem DIN Cabling
Modem DIN CablingUse cable C05995 for connecting to the SC-modem or C05994 for SC-terminal.
If connecting to the COM port of the PC, the RS-232 cable connecting the Site Controller to the modem is a straight cable as shown below.
Figure B-1: Modem DIN Cabling
Page B-4 MDE-4871 CFN III Manager’s Manual for Windows® XP Embedded - Version 3.6 · August 2010
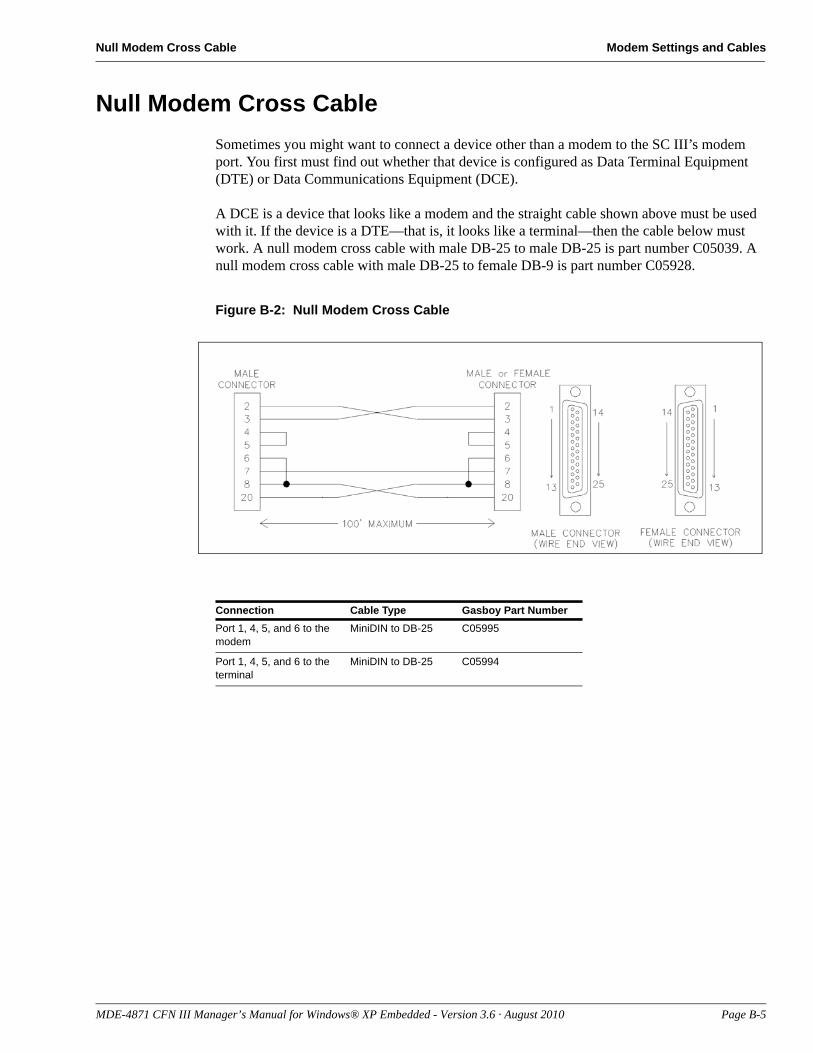
Null Modem Cross Cable Modem Settings and Cables
Null Modem Cross CableSometimes you might want to connect a device other than a modem to the SC III’s modem port. You first must find out whether that device is configured as Data Terminal Equipment (DTE) or Data Communications Equipment (DCE).
A DCE is a device that looks like a modem and the straight cable shown above must be used with it. If the device is a DTE—that is, it looks like a terminal—then the cable below must work. A null modem cross cable with male DB-25 to male DB-25 is part number C05039. A null modem cross cable with male DB-25 to female DB-9 is part number C05928.
Figure B-2: Null Modem Cross Cable
Connection Cable Type Gasboy Part NumberPort 1, 4, 5, and 6 to the modem
MiniDIN to DB-25 C05995
Port 1, 4, 5, and 6 to the terminal
MiniDIN to DB-25 C05994
MDE-4871 CFN III Manager’s Manual for Windows® XP Embedded - Version 3.6 · August 2010 Page B-5

Modem Settings and Cables Null Modem Cross Cable
This page is intentionally left blank.
Page B-6 MDE-4871 CFN III Manager’s Manual for Windows® XP Embedded - Version 3.6 · August 2010
EFT Regulation E Printed Receipt Regulations
Appendix C: Printed Receipt Regulations
The Federal Regulations on Electronic Funds Transfer Regulation E set standards for the documentation of electronic transfers, including the information that must appear on printed receipts.
The applicable sections of Regulation E are printed below.Note: When these are the regulations that were in effect at the time this manual was written,
Gasboy obviously cannot guarantee that these regulations have not since been amended or rewritten. Check with your company’s lawyer.
EFT Regulation E
Section 205.9(a)—Documentation of Transfers
(a) Receipts at electronic terminals. At the time an electronic fund transfer is initiated at an electronic terminal by a consumer, the financial institution shall make available1 to the consumer a written receipt of the transfer(s) that clearly sets forth the following information as applicable:
(1) The amount of transfer. A charge for the transfer may be included in this amount if the terminal is owned or operated by a person other than a financial institution holding the consumer’s account, provided the amount of the charge is disclosed on the receipt and on a sign posted on or at the terminal.
(2) The calendar date the consumer initiated the transfer.
(3) The type of transfer and the type of the consumer’s account(s)2 to or from which the funds are transferred, such as “withdrawal from checking,” “transfer from savings to checking,” or “payment from savings.” These descriptions may be used for transfers to or from accounts that are similar in function to checking accounts (such as share draft or negotiable order of withdrawal accounts) or to savings accounts (such as share accounts). Codes may be used only if they are explained elsewhere on the receipt.
(4) A number or code that uniquely identifies the consumer initiating the transfer, the consumer’s account(s) or the access device used to initiate that transfer.
1. A financial institution may arrange for a third party, such as a merchant, to make the receipt available.2. If more than one account of the same type may be accessed by a single access device, the accounts must be uniquely identified unless the
terminal is incapable of such identification and was purchased or ordered by the financial institution prior to February 6, 1980. In a POS transfer, the type of account must not be identified if the access device used may access only one account at POS.
MDE-4871 CFN III Manager’s Manual for Windows® XP Embedded - Version 3.6 · August 2010 Page C-1
Printed Receipt Regulations EFT Regulation E
(5) The location (in a form prescribed by paragraph (b)(1)(iv) of this section) of the terminal at which the transfer was initiated or an identification (such as a code or terminal number).
(6) The name of any third party to or from whom funds are transferred; a code may be used only if it is explained elsewhere on the receipt. This requirement does not apply if the name is provided by the consumer in a form that the electronic terminal cannot duplicate on the receipt.
Section 205.9(b)(1)(iv)
(A) The address, including number and street (the number may be omitted if the street alone uniquely identifies the terminal location) or intersection, city, and state or foreign country1;
(B) A generally accepted name for a specific location (such as a branch of the financial institution, a shopping center, or an airport), city, and state2 or foreign country, or
(C) The name of the entity at whose place of business the terminal is located or which owns or operates the terminal (such as the financial institution3 or the seller of goods or services), city, and state4 or foreign country.
1. The city and state may be omitted if all the terminals owned or operated by the financial institution providing the statement (or by the system in which it participates) are located in the same city. The state may be omitted if all the terminals owned or operated by the financial institution providing the statement (or by the system in which it participates) are located in that state. The state may also be omitted for transfers occurring at terminals within 50 miles of the financial institution’s main office.
2. See footnote 3.3. If the financial institution providing the statement owns or operates terminals at more than one location, it shall describe the location of its elec-
tronic terminals by use of paragraphs (b)(1)(iv)(A) or (B) of this section.4. See footnote 3.
Page C-2 MDE-4871 CFN III Manager’s Manual for Windows® XP Embedded - Version 3.6 · August 2010
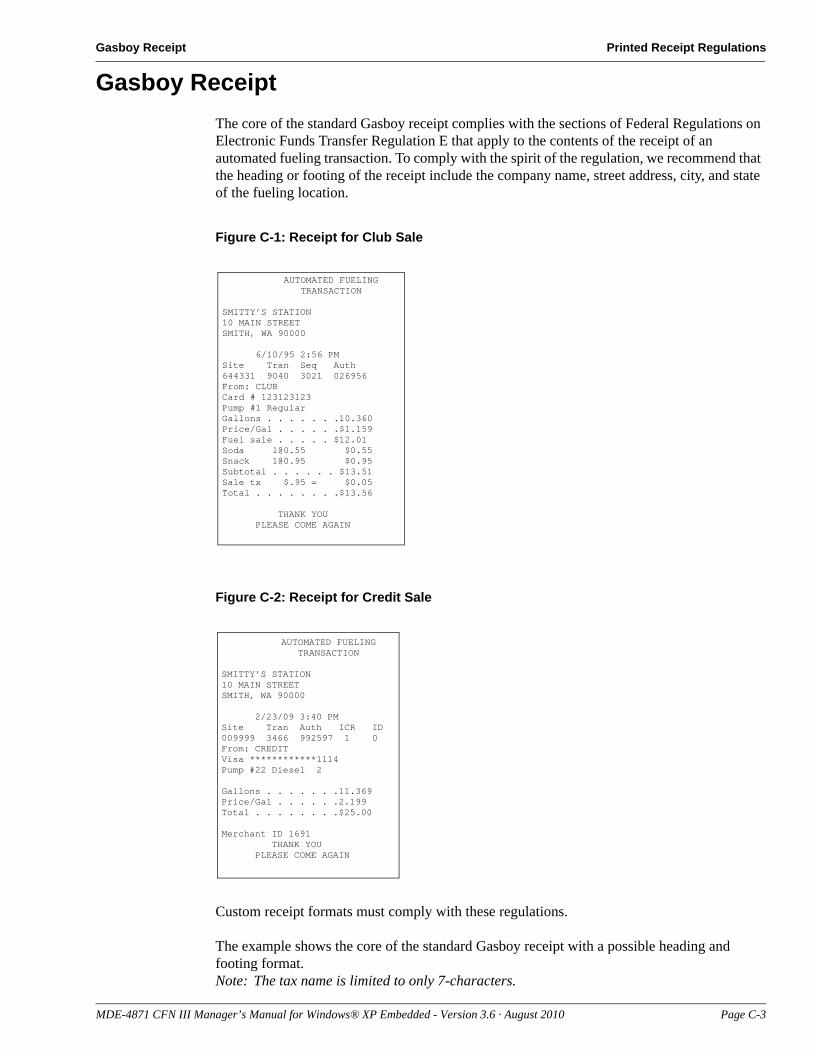
Gasboy Receipt Printed Receipt Regulations
Gasboy ReceiptThe core of the standard Gasboy receipt complies with the sections of Federal Regulations on Electronic Funds Transfer Regulation E that apply to the contents of the receipt of an automated fueling transaction. To comply with the spirit of the regulation, we recommend that the heading or footing of the receipt include the company name, street address, city, and state of the fueling location.
Figure C-1: Receipt for Club Sale
AUTOMATED FUELINGTRANSACTION
SMITTY’S STATION10 MAIN STREETSMITH, WA 90000
6/10/95 2:56 PMSite Tran Seq Auth644331 9040 3021 026956From: CLUBCard # 123123123Pump #1 RegularGallons . . . . . . .10.360Price/Gal . . . . . .$1.159Fuel sale . . . . . $12.01Soda [email protected] $0.55Snack [email protected] $0.95Subtotal . . . . . . $13.51Sale tx $.95 = $0.05Total . . . . . . . .$13.56
THANK YOU PLEASE COME AGAIN
Figure C-2: Receipt for Credit Sale
AUTOMATED FUELINGTRANSACTION
SMITTY’S STATION10 MAIN STREETSMITH, WA 90000
2/23/09 3:40 PMSite Tran Auth ICR ID009999 3466 992597 1 0From: CREDITVisa ************1114Pump #22 Diesel 2
Gallons . . . . . . .11.369Price/Gal . . . . . .2.199Total . . . . . . . .$25.00
Merchant ID 1691 THANK YOU PLEASE COME AGAIN
Custom receipt formats must comply with these regulations.
The example shows the core of the standard Gasboy receipt with a possible heading and footing format.Note: The tax name is limited to only 7-characters.
MDE-4871 CFN III Manager’s Manual for Windows® XP Embedded - Version 3.6 · August 2010 Page C-3

Printed Receipt Regulations Gasboy Receipt
This page is intentionally left blank.
Page C-4 MDE-4871 CFN III Manager’s Manual for Windows® XP Embedded - Version 3.6 · August 2010
Messages on the Log Printer Status and Error Messages
Appendix D: Status and Error Messages
This chapter is divided into three sections:• Messages on the log printer or in diagnostics• Messages in the transaction printout• Messages in command mode
Messages within each section are listed alphabetically. If the first word of the message may vary, it is listed at the beginning of the section.
Messages on the Log PrinterThe following messages may appear on the log printer or terminal when it is in log printer mode, or may be printed in response to the command PRINT DIAGNOSTICS.
Name Table ReconstructedTable name has been reconstructed because of an error. Some or all of the data in the specified table may be missing.
The SC III will reboot itself to crashed state.
Call your service representative and report the table name.
You may use the appropriate print command to inspect the data. However, if the Global table was reconstructed, the transaction data may still be there even though it does not print out.
Do not restart the SC III until you have talked to a service technician. Then use the command RUN;I to restart the SC III.
Switch the pumps to manual mode until the problem is fixed. Ensure to record pump totalizer readings before switching the pumps to manual, than again after the problem is solved and before switching back to automatic so fuel inventory can be balanced. Follow your normal procedure for manually writing proprietary-card transactions.
linename DSR not presentlinename DSR regainedlinename CTS not presentlinename CTS regained
These messages report changes in the status of devices connected to the SC III through RS-232 Ports. DSR stands for data set ready, and CTS stands for clear to send.
Linename describes the function of the port on which the status change occurred. Possible functions are: CFN host port, Bank host port.
MDE-4871 CFN III Manager’s Manual for Windows® XP Embedded - Version 3.6 · August 2010 Page D-1
Status and Error Messages Messages on the Log Printer
These messages indicate interruptions in communications, but are not in themselves serious.
In particular, a DSR regained message when a Hayes Modem establishes a connection, followed by a DSR not present message when the modem hangs up, does not indicate a problem.
For local devices like Tokheim or special pump controllers, use PRINT DIAGNOSTICS to see if the corresponding device is down or is reporting a large number of errors.
[Pump #] Card #XXXXXXXXXXXX denial_reason WED 11/29/08 12:34 PMThe pump number does not appear if the pump has not yet been selected.
XXXXXXXXXXXX is the number read from card or VM or entered.
A customer has been denied access to the system.
Possible denial reasons are:Invalid PIN, abortInvalid PIN, retryCard is not validCard has expiredDown, try laterCannot verify cardExceeded allocationExceeded daily limitInvalid fuelInvalid pumpPump disabledInvalid card formatInvalid system IDNot accepted hereCard is locked out
Another possibility is that the customer was granted access, but then one of these conditions arose:
Timed outMem lostPower fail
If your site is connected to a remote host—either PC or a bank network—for card authorization, the remote host may provide a denial message.
For Invalid PIN, Card is not valid, and Card has expired errors on Proprietary Cards, refer the customer to your company’s business office (ensure to follow company policy on what to tell customers about Card is not valid denials).
No further action is required, unless all cards suddenly give the same denial error or a particular pump gives Down, try later repeatedly.
Page D-2 MDE-4871 CFN III Manager’s Manual for Windows® XP Embedded - Version 3.6 · August 2010
Messages on the Log Printer Status and Error Messages
Bank Verification Came UpCommunication with the bank network has been re-established.
No action is required.
Bank verification went down
Communication with the bank network has been lost.
Check modem cable, connections, and switch settings, if any. Call network number from another computer to make sure host is available and that passwords work.
Battery FAILEDOne of the two SC III back-up batteries has failed.
Do not turn off power to the SC III; data may be lost.
Call your service representative and report the problem.
Battery OKA SC III back-up battery that had failed is now functioning properly.
Intermittent failure of a battery is a serious problem. Call your service representative.
Card Reader Terminal #X Came UpThe indicated island card reader is functioning normally.
No action is required.
Card Reader Terminal #X DisabledThe indicated island card reader has been disabled by the command DISABLE READER.
No action is required. Use the command ENABLE READER to return the card reader to operation when appropriate.
Card Reader Terminal #X Paper LowThe indicated island card reader receipt printer is low on paper.
Replace paper in the receipt printer.
Card Reader Terminal #X Out of PaperThe indicated island card reader receipt printer is out of paper.
Replace paper in the receipt printer.
MDE-4871 CFN III Manager’s Manual for Windows® XP Embedded - Version 3.6 · August 2010 Page D-3
Status and Error Messages Messages on the Log Printer
Card Reader Terminal #X Paper RefilledPaper has been replaced in the indicated island card reader receipt printer.
No action is required.
Card Reader Terminal #X Printer DownThe indicated island card reader receipt printer is not functioning.
If you cannot find and correct the problem, call your service representative.
If the island card reader in question is not equipped with a receipt printer, then ignore this message.
Card Reader Terminal #X Printer JammedThe indicated island card reader receipt printer is not functioning.
If you cannot find and correct the problem, call your service representative.
Card Reader Terminal #X Printer UnjammedThe indicated island card reader receipt printer is now functioning.
Card Reader Terminal #X Printer UpThe indicated island card reader receipt printer is now functioning.
Card Reader Terminal #X Reader JammedA unit in the indicated island card reader is not functioning.
If you cannot find and correct the problem, call your service representative.
Card Reader Terminal #X Reader UnjammedThe indicated island card reader is functioning properly.
No action is required.
Card Reader Terminal #X Went DownThe indicated island card reader is not functioning.
Try to bring the unit up with the command ENABLE READER.
If that does not work, execute the command PRINT DIAGNOSTICS and report the results to your service representative.
Page D-4 MDE-4871 CFN III Manager’s Manual for Windows® XP Embedded - Version 3.6 · August 2010
Messages on the Log Printer Status and Error Messages
CFN Verification Came UpCommunication to a remote SC III or PC used for card verification has been re-established.
No action is required.
CFN Verification Did Not RespondThe SC III did not get a response when it contacted the host for remote verification of a card transaction.
If this error occurs repeatedly, contact the system administrator.
CFN Verification Went DownRemote communication has been lost.
Ensure that the modem is plugged in and the baud rate is set correctly. If everything looks okay at your site, report the problem to the network administrator.
Profit PT #X Came UpThe indicated POS console has been returned to operation.
No action is required.
Profit Pt #X DisabledThe indicated POS console has been disabled by the command DISABLE CONSOLE.
No action is required. Return the console to operation with the command ENABLE CONSOLE if appropriate.
Profit Pt #X Went DownThe indicated POS console is not functioning.
Try to return the console to operation with the command ENABLE CONSOLE.
If that does not work, check to make sure the console power cord is plugged in and that the RS-422/485 Data Cable (small 4-wire Modular Connector) is connected.
If the console still does not work, execute the command PRINT DIAGNOSTICS 4 and report the results to your service representative.
Data Corrupted in TableData in table has become corrupted. The SC III will reconstruct the table and reboot itself in the crashed state.
Refer to “Name Table Reconstructed” on page D-1.
MDE-4871 CFN III Manager’s Manual for Windows® XP Embedded - Version 3.6 · August 2010 Page D-5
Status and Error Messages Messages on the Log Printer
CARD: XXXXXXXXXX DES Not ReadyDES (data encryption standard) encryption unit in a card reader was not ready to process a bank card, probably because one of the two keys was not loaded.
Contact your bank network representative.
Diagnostics Table Too SmallNot enough available records in the diagnostic table.
The size of the diagnostic table is set in the SC III configuration.
If this message occurs at startup, you will require to configure for a larger diagnostic table size.
Disk FullThe RAM disk is full.
Delete unnecessary files from the disk.
EMERGENCY STOPAn ALL stop has been done from the POS console, or a STOP; a command was issued.
No action is required. Press the ALL STOP key on the console again when all is secure to end the emergency stop, or issue a RUN;A command from the terminal keyboard.
End EMERGENCY STOPALL stop done from the console is no longer in effect.
No action is required.
Fuel Point Reader # on Loop # Went DownA Fuel Point Reader has gone down.
Check reader.
Fuel Point Reader # Came UpA Fuel Point Reader has come back online.
No action is required.
Gate # on Loop # Went DownA Gate has gone down.
Check gate.
Page D-6 MDE-4871 CFN III Manager’s Manual for Windows® XP Embedded - Version 3.6 · August 2010
Messages on the Log Printer Status and Error Messages
Gate # Came UpA Gate has come back online.
No action is required.
Island EMERGENCY STOPThe DISABLE PUMP button on the island has been pressed, or a communications problem has developed on the RS-422 loop to the island.
To end an island emergency stop, enter a RUN;A command from the terminal keyboard, or press the ALL STOP key on the console twice.
If the island button was not pressed (or does not exist), contact your service representative.
Island Reader OnlyDisplays when you try to use Fueler ID, Supervisor cards, Fuel Drop cards, Dipstick cards and Fueler cards at the Console. These can only be used at the Island Reader.
Loop Table OverflowThere can be 64 loop devices.
If there are more than 64 loop devices, this error occurs.
Loop devices are consoles, island card readers, pump control units, electronic pumps, MPDs, and so on.
If you do not have more than 64 loop devices and experience this error, contact your service representative.
Master Key LoadedDES decryption master key is present.
No action is required.
Memory AvailableMemory is available for new transaction records.
Memory FullThere is no room in memory for additional transactions.
The SC III will not accept new transactions.
If your site is connected to a host site, contact your system administrator.
MDE-4871 CFN III Manager’s Manual for Windows® XP Embedded - Version 3.6 · August 2010 Page D-7
Status and Error Messages Messages on the Log Printer
If your site is not connected to a host site or polled by a remote computer, then print transactions in memory using the command PRINT TRANSACTIONS, or transfer them to your billing computer, according to your usual procedure.
After the transactions are securely recorded for billing or accounting purposes, use the command RESET TRANSACTION to make room in memory for additional transactions.
XPE PC-SCIII Interface V#.# StartedBoot message that the SC#.EXE interface program has started.
PC Not RespondingThe site is running but not getting a response from the PC through the SC3.EXE program. Check the PC. May see this on startup. Site must still open.
PC RespondingSite is communicating with the PC.
No action is required.
Product #XX Name Below Reorder LevelThe product inventory of the indicated product is below the reorder level configured with the LOAD INVENTORY command.
Follow your company’s procedures for reordering products.
Pump #X DisabledThe indicated pump has been disabled by the command DISABLE PUMP.
No action is required. Return the pump to operation with the command ENABLE PUMP when appropriate.
Pump #X Disabled, No QuantityThe indicated pump has been disabled because the SC III has received too many zero-quantity transactions from that pump.
A zero-quantity transaction is one in which the pump is activated but no fuel is pumped. The SC III will automatically disable any pump that exceeds a certain number (set in SYS_PAR) of zero-quantity transactions. This is a precaution against pump pulser (flow sensor) or pulser cable failure.
Check the pump no-quantity transaction (NQN) count in the diagnostics printout, using the command PRINT DIAGNOSTICS 8. If there are several NQNs, try to determine the cause or consult your service representative.
If a pulser unit or attached cables have failed, fuel can flow until the pump times out, but no gallons or dollars will be recorded.
Page D-8 MDE-4871 CFN III Manager’s Manual for Windows® XP Embedded - Version 3.6 · August 2010
Messages on the Log Printer Status and Error Messages
To re-enable a pump that has been disabled because of too many zero-quantity transactions, after first identifying and correcting the cause, type the command ENABLE PUMP.
To reset the NQN counters for all pumps back to zero, give the command ENABLE PUMP;I. Wait until no fuel transactions are in progress.
Pump #X Disabled, No PriceThe SC III has disabled the pump because no price or price code has been assigned for that pump.
Use PRINT PUMP to determine if a price code has been assigned to the pump. If one has, then use PRINT PRICE to see if a price has been assigned to that code for level 0 and for the level for each method of payment that is accepted. If a price is missing for that code or for some required level, use LOAD PRICE to load it.
If no price code has been assigned to the hose, then use LOAD FUEL to assign a price code to the pump. (Some sites may choose to assign a product that has a price to the pump instead of a price code, if multi-level prices for cash, credit, etc., are not required.)
Pump #X EnabledThe indicated pump is operating normally.
No action is required.
Pump Control Unit #X Came UpThe indicated pump control unit is now functioning properly.
No action is required.
Pump Control Unit #X DisabledThe indicated pump control unit has been disabled by the command DISABLE PCU.
No action is required. Use the command ENABLE PCU to return the pump control unit to operation, when appropriate.
Pump Control Unit #X Down, Bad MemoryThe indicated pump control unit is not functioning because of a memory failure.
Call your service representative.
Pump Control Unit #X Found Unassigned TransactionThe SC III received unexpected information from the indicated pump control unit. This is recorded as an unpaid transaction.
MDE-4871 CFN III Manager’s Manual for Windows® XP Embedded - Version 3.6 · August 2010 Page D-9
Status and Error Messages Messages on the Log Printer
You will require to determine whether the information recorded as an unassigned transaction really is a CFN sale that is not recorded anywhere else, or a duplicate of an already recorded sale, or a transaction that was accomplished and recorded manually.
First, locate the unassigned transaction(s) in the log printout. Watch for Unassigned in the ERROR column. Unassigned transactions look like proprietary-card transactions with no card or account number, but in fact may have used any method of payment.
Compare any unassigned transactions found to adjacent normal transactions with respect to time and quantity. Try to determine whether the unassigned transactions are duplicates of other normal transactions, or really represent new transactions.
This is a potentially serious error. Call your service representative.
Pump Control Unit #X Went DownThe indicated pump control unit is not functioning.
Try to return the unit to operation with the command ENABLE PCU.
If that does not work, execute the command PRINT DIAGNOSTICS and report the results to your service representative.
Remote Command: commandApplies only if the logging of remote commands is selected in configuration (system parameters).
The command was executed by a remote user.
Command can be any command listed in HELP.
Options and data typed by the remote user are not shown.
Remote Verification Did Not RespondAn attempt to verify a card on the remote host was unsuccessful.
Check modem, cable, and switch settings. Contact your service representative or communications network representative.
SC III Vx (HHMM/MMDDYY) Router:r_name, Handler:h_name Day MM/DD/YY HH:MM AM/PM
Boot message. Gives the version of the site and the date the version was created, what bank card router and handler are installed, and the current date and time.
Tank #X Below Reorder LevelThe indicated tank is below the reorder level entered with LOAD TANK.
Page D-10 MDE-4871 CFN III Manager’s Manual for Windows® XP Embedded - Version 3.6 · August 2010
Messages in the Transaction Printout Status and Error Messages
Tank #X Fuel LeakApplies only to systems connected to tank level monitors.
The tank level monitor has detected a decrease in level when in tank testing mode that could indicate a leak.
Consult tank level monitor documentation for additional steps to take to confirm or refute this measurement.
Leaking underground tanks can create serious environmental and health hazards.
Tank #X Probe ErrorApplies only to systems connected to tank level monitors.
The tank level monitor reports trouble with probe.
Consult tank level monitor documentation.
Tank #X Excess WaterThe tank level monitor reports excess water in the indicated tank.
Use the tank stick and water-detecting paste to confirm measurement. If no water is found, consult the manual of the tank level monitor for possible causes of erroneous water readings.
Tank #X YYY Gal DeliveryThe tank level monitor reports delivery of YYY gallons of product.
No action is required unless the delivery does not match scheduled deliveries.
Warm BootAppears on log printout when the CFN3 operating system has been reset.
Usually, no action is required. If the site was stopped before rebooting, you will require to type a RUN command.
Messages in the Transaction PrintoutThe following messages may be printed in the error/status column of the transaction printout.
error #The pump control unit sent an error code that the SC III did not recognize. Report the problem to your service representative.
MDE-4871 CFN III Manager’s Manual for Windows® XP Embedded - Version 3.6 · August 2010 Page D-11
Status and Error Messages Messages in the Transaction Printout
AbortedThe transaction was terminated before it was completed.
LimitA customer pumped the maximum amount of fuel authorized.
Mem LostThe SC III could not get the information that it expected for this transaction from the pump control unit that the transaction was assigned to.
Pwr FailThe transaction was terminated when a power failure occurred at the pump control unit.
PayoutThe transaction was a pay out. The amount is positive, but is not included in the total of PRINT TRANSACTION.
Prod OutProduct is out of stock.
Pump DownA pump is down.
RefundThe transaction was a refund. Dollar total is negative.
ReturnTransaction was a return. Dollar total is negative.
ReversalTransaction was reversed. Dollar and quantity total is negative. There must be a completed transaction that matches the reversal.
Timed OutThe customer did not pick up the hose in the allotted time; or the customer did not start pumping fuel in time after picking up the hose; or the customer stopped pumping and did not resume pumping in the allotted time.
Page D-12 MDE-4871 CFN III Manager’s Manual for Windows® XP Embedded - Version 3.6 · August 2010
Messages in Command Mode Status and Error Messages
UnassignedThe SC III did not expect this transaction from this pump. If pumps were reassigned during the transaction, this transaction will be accompanied by a transaction with the message MEM LOST. See the error message Pump control unit #X found unassigned transaction.
WithdrawalTransaction was a withdrawal.
Messages in Command ModeThe following messages may be printed in response to commands entered by the user.
Already existsYou are trying to load a price code, product, or other data element that is already on file.
Look up the ;I option of the command to see if it is appropriate for what you want to do.
Bad Data InputYou entered a string that contained invalid characters or data that was outside the acceptable range.
Check data and retype.
BAD MESSThis message stands for bad message. It indicates that a program error has occurred.
Call your service representative.
Can’t activateYou tried to activate a pump with the command ACTIVATE PUMP, but the action was terminated because of an error—such as no price loaded—or because the pump was already in use.
Can’t open fileYou tried to create a file on a non-existent directory or disk drive, or with an illegal name, or the disk is full.
Check the path, the file names, and the disk used with the command.
MDE-4871 CFN III Manager’s Manual for Windows® XP Embedded - Version 3.6 · August 2010 Page D-13
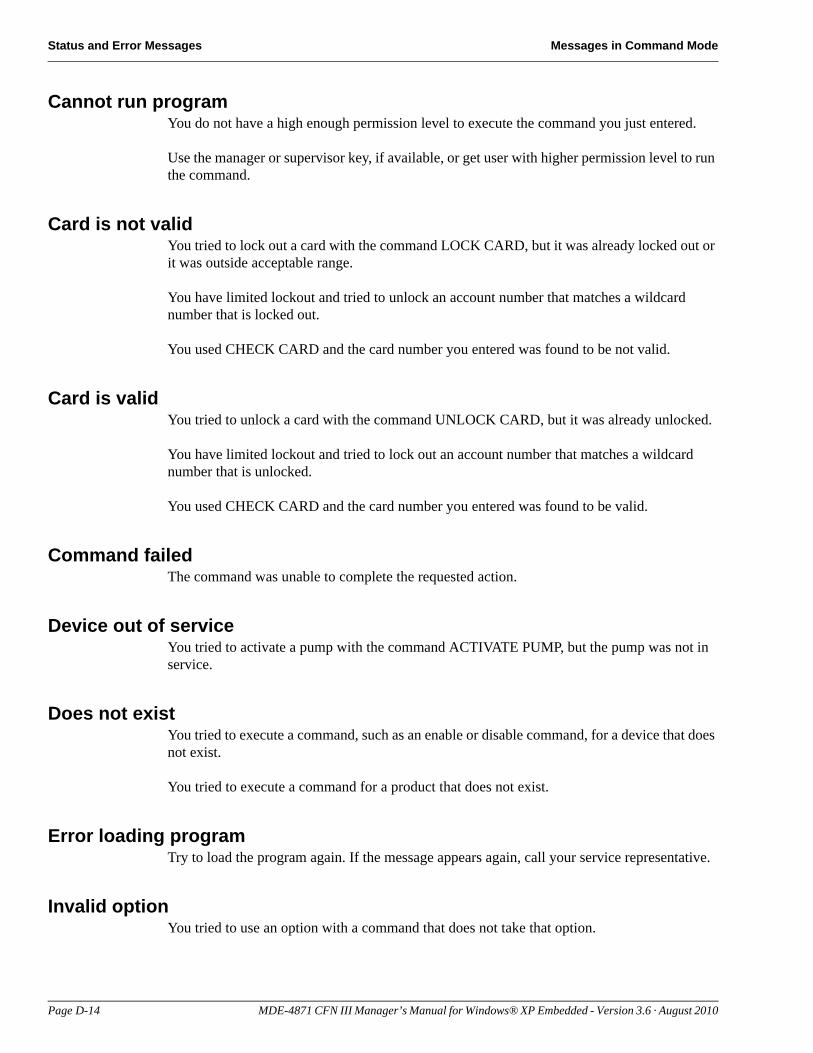
Status and Error Messages Messages in Command Mode
Cannot run programYou do not have a high enough permission level to execute the command you just entered.
Use the manager or supervisor key, if available, or get user with higher permission level to run the command.
Card is not validYou tried to lock out a card with the command LOCK CARD, but it was already locked out or it was outside acceptable range.
You have limited lockout and tried to unlock an account number that matches a wildcard number that is locked out.
You used CHECK CARD and the card number you entered was found to be not valid.
Card is validYou tried to unlock a card with the command UNLOCK CARD, but it was already unlocked.
You have limited lockout and tried to lock out an account number that matches a wildcard number that is unlocked.
You used CHECK CARD and the card number you entered was found to be valid.
Command failedThe command was unable to complete the requested action.
Device out of serviceYou tried to activate a pump with the command ACTIVATE PUMP, but the pump was not in service.
Does not existYou tried to execute a command, such as an enable or disable command, for a device that does not exist.
You tried to execute a command for a product that does not exist.
Error loading programTry to load the program again. If the message appears again, call your service representative.
Invalid optionYou tried to use an option with a command that does not take that option.
Page D-14 MDE-4871 CFN III Manager’s Manual for Windows® XP Embedded - Version 3.6 · August 2010
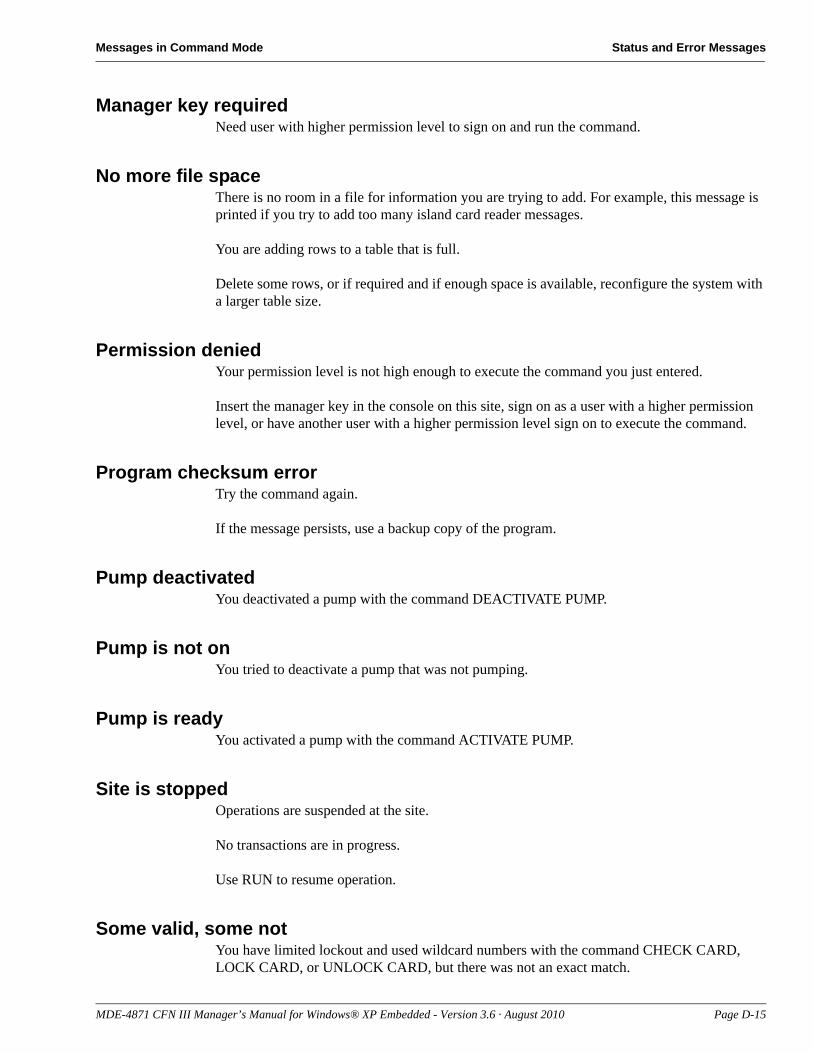
Messages in Command Mode Status and Error Messages
Manager key requiredNeed user with higher permission level to sign on and run the command.
No more file spaceThere is no room in a file for information you are trying to add. For example, this message is printed if you try to add too many island card reader messages.
You are adding rows to a table that is full.
Delete some rows, or if required and if enough space is available, reconfigure the system with a larger table size.
Permission deniedYour permission level is not high enough to execute the command you just entered.
Insert the manager key in the console on this site, sign on as a user with a higher permission level, or have another user with a higher permission level sign on to execute the command.
Program checksum errorTry the command again.
If the message persists, use a backup copy of the program.
Pump deactivatedYou deactivated a pump with the command DEACTIVATE PUMP.
Pump is not onYou tried to deactivate a pump that was not pumping.
Pump is readyYou activated a pump with the command ACTIVATE PUMP.
Site is stoppedOperations are suspended at the site.
No transactions are in progress.
Use RUN to resume operation.
Some valid, some notYou have limited lockout and used wildcard numbers with the command CHECK CARD, LOCK CARD, or UNLOCK CARD, but there was not an exact match.
MDE-4871 CFN III Manager’s Manual for Windows® XP Embedded - Version 3.6 · August 2010 Page D-15
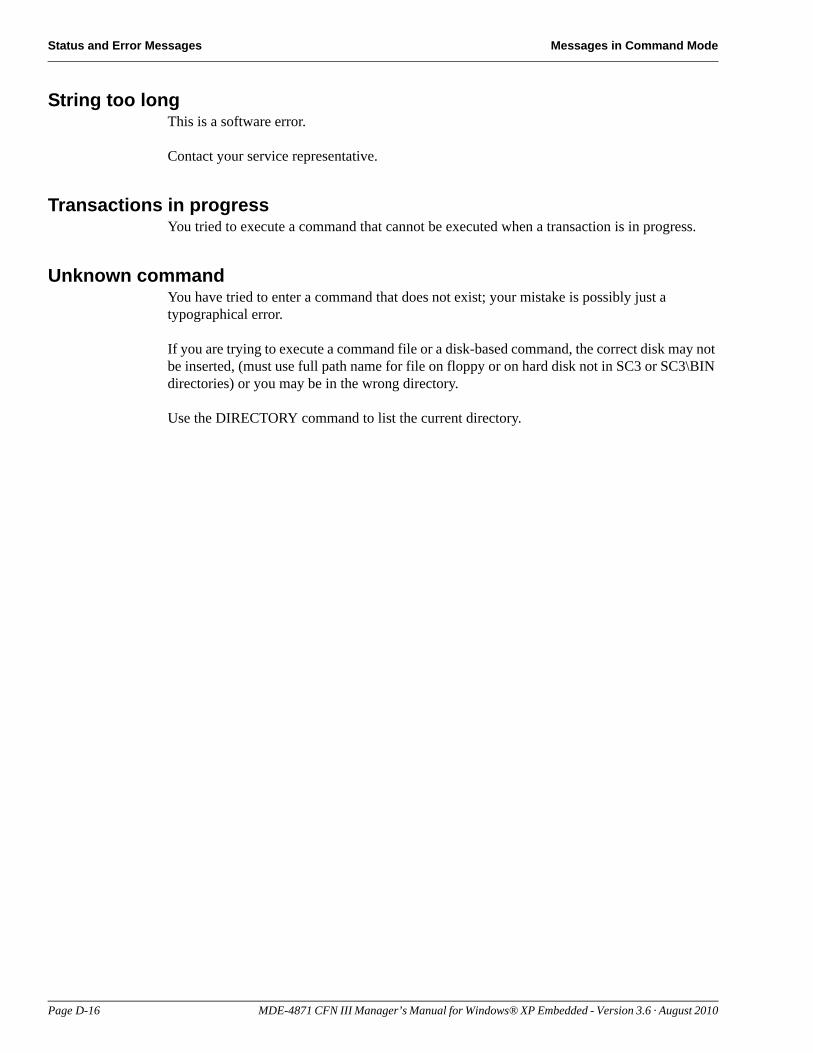
Status and Error Messages Messages in Command Mode
String too longThis is a software error.
Contact your service representative.
Transactions in progressYou tried to execute a command that cannot be executed when a transaction is in progress.
Unknown commandYou have tried to enter a command that does not exist; your mistake is possibly just a typographical error.
If you are trying to execute a command file or a disk-based command, the correct disk may not be inserted, (must use full path name for file on floppy or on hard disk not in SC3 or SC3\BIN directories) or you may be in the wrong directory.
Use the DIRECTORY command to list the current directory.
Page D-16 MDE-4871 CFN III Manager’s Manual for Windows® XP Embedded - Version 3.6 · August 2010
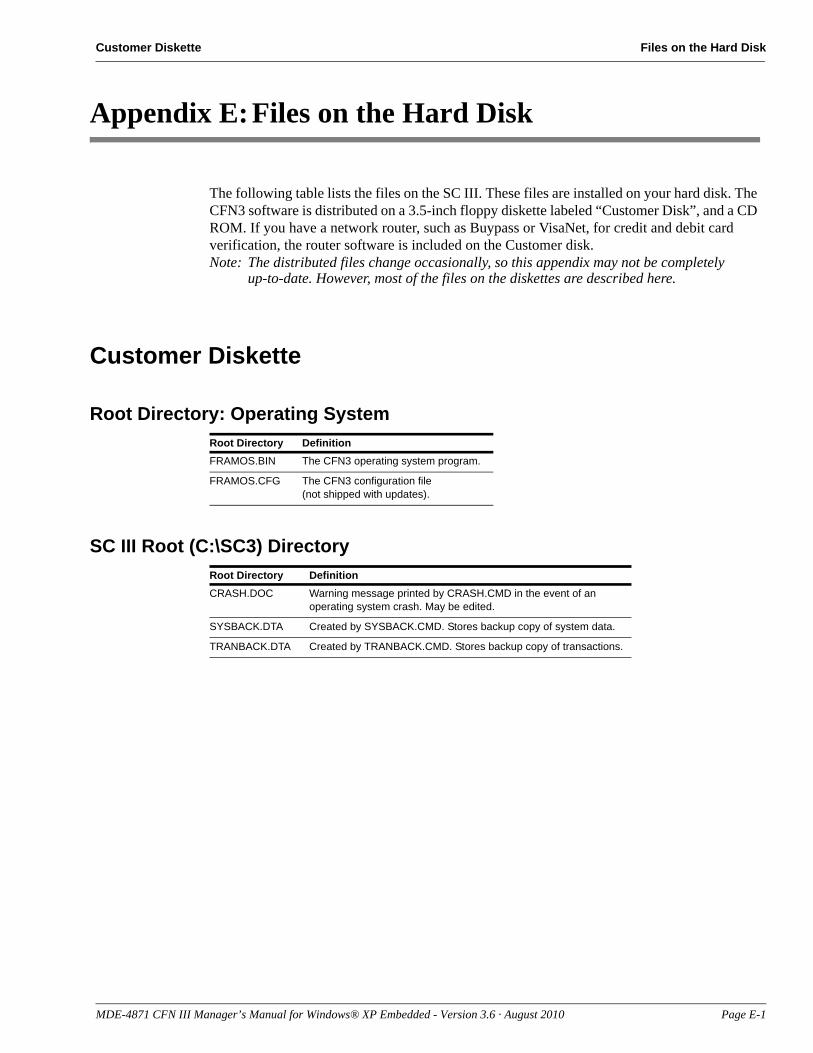
Customer Diskette Files on the Hard Disk
Appendix E: Files on the Hard Disk
The following table lists the files on the SC III. These files are installed on your hard disk. The CFN3 software is distributed on a 3.5-inch floppy diskette labeled “Customer Disk”, and a CD ROM. If you have a network router, such as Buypass or VisaNet, for credit and debit card verification, the router software is included on the Customer disk.Note: The distributed files change occasionally, so this appendix may not be completely
up-to-date. However, most of the files on the diskettes are described here.
Customer Diskette
Root Directory: Operating SystemRoot Directory DefinitionFRAMOS.BIN The CFN3 operating system program.
FRAMOS.CFG The CFN3 configuration file(not shipped with updates).
SC III Root (C:\SC3) DirectoryRoot Directory DefinitionCRASH.DOC Warning message printed by CRASH.CMD in the event of an
operating system crash. May be edited.
SYSBACK.DTA Created by SYSBACK.CMD. Stores backup copy of system data.
TRANBACK.DTA Created by TRANBACK.CMD. Stores backup copy of transactions.
MDE-4871 CFN III Manager’s Manual for Windows® XP Embedded - Version 3.6 · August 2010 Page E-1
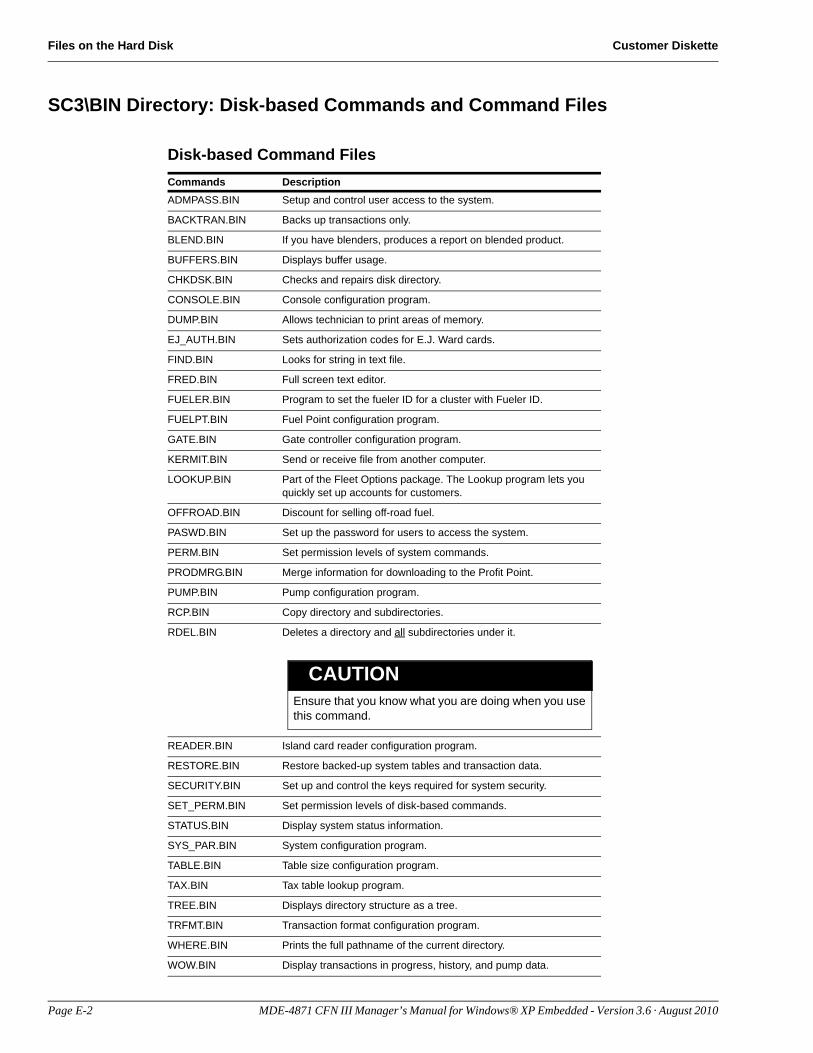
Files on the Hard Disk Customer Diskette
SC3\BIN Directory: Disk-based Commands and Command Files
Disk-based Command FilesCommands DescriptionADMPASS.BIN Setup and control user access to the system.
BACKTRAN.BIN Backs up transactions only.
BLEND.BIN If you have blenders, produces a report on blended product.
BUFFERS.BIN Displays buffer usage.
CHKDSK.BIN Checks and repairs disk directory.
CONSOLE.BIN Console configuration program.
DUMP.BIN Allows technician to print areas of memory.
EJ_AUTH.BIN Sets authorization codes for E.J. Ward cards.
FIND.BIN Looks for string in text file.
FRED.BIN Full screen text editor.
FUELER.BIN Program to set the fueler ID for a cluster with Fueler ID.
FUELPT.BIN Fuel Point configuration program.
GATE.BIN Gate controller configuration program.
KERMIT.BIN Send or receive file from another computer.
LOOKUP.BIN Part of the Fleet Options package. The Lookup program lets you quickly set up accounts for customers.
OFFROAD.BIN Discount for selling off-road fuel.
PASWD.BIN Set up the password for users to access the system.
PERM.BIN Set permission levels of system commands.
PRODMRG.BIN Merge information for downloading to the Profit Point.
PUMP.BIN Pump configuration program.
RCP.BIN Copy directory and subdirectories.
RDEL.BIN Deletes a directory and all subdirectories under it.
Ensure that you know what you are doing when you use this command.
CAUTION
READER.BIN Island card reader configuration program.
RESTORE.BIN Restore backed-up system tables and transaction data.
SECURITY.BIN Set up and control the keys required for system security.
SET_PERM.BIN Set permission levels of disk-based commands.
STATUS.BIN Display system status information.
SYS_PAR.BIN System configuration program.
TABLE.BIN Table size configuration program.
TAX.BIN Tax table lookup program.
TREE.BIN Displays directory structure as a tree.
TRFMT.BIN Transaction format configuration program.
WHERE.BIN Prints the full pathname of the current directory.
WOW.BIN Display transactions in progress, history, and pump data.
Page E-2 MDE-4871 CFN III Manager’s Manual for Windows® XP Embedded - Version 3.6 · August 2010
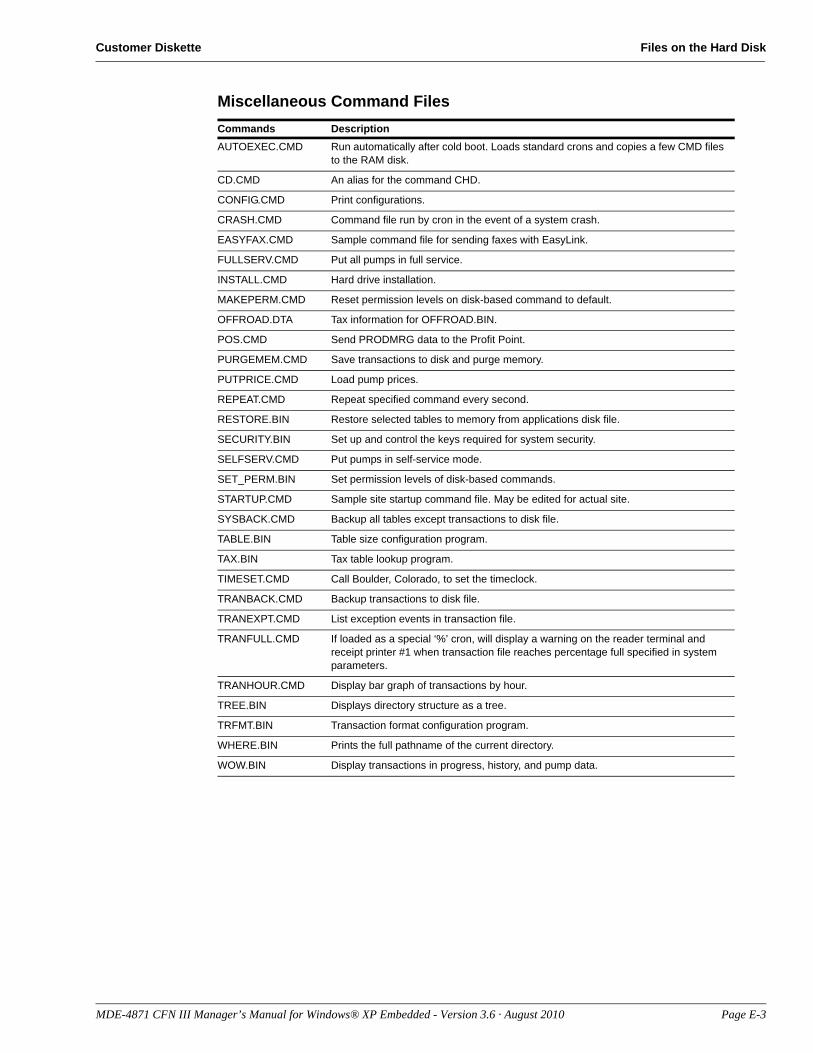
Customer Diskette Files on the Hard Disk
Miscellaneous Command FilesCommands DescriptionAUTOEXEC.CMD Run automatically after cold boot. Loads standard crons and copies a few CMD files
to the RAM disk.
CD.CMD An alias for the command CHD.
CONFIG.CMD Print configurations.
CRASH.CMD Command file run by cron in the event of a system crash.
EASYFAX.CMD Sample command file for sending faxes with EasyLink.
FULLSERV.CMD Put all pumps in full service.
INSTALL.CMD Hard drive installation.
MAKEPERM.CMD Reset permission levels on disk-based command to default.
OFFROAD.DTA Tax information for OFFROAD.BIN.
POS.CMD Send PRODMRG data to the Profit Point.
PURGEMEM.CMD Save transactions to disk and purge memory.
PUTPRICE.CMD Load pump prices.
REPEAT.CMD Repeat specified command every second.
RESTORE.BIN Restore selected tables to memory from applications disk file.
SECURITY.BIN Set up and control the keys required for system security.
SELFSERV.CMD Put pumps in self-service mode.
SET_PERM.BIN Set permission levels of disk-based commands.
STARTUP.CMD Sample site startup command file. May be edited for actual site.
SYSBACK.CMD Backup all tables except transactions to disk file.
TABLE.BIN Table size configuration program.
TAX.BIN Tax table lookup program.
TIMESET.CMD Call Boulder, Colorado, to set the timeclock.
TRANBACK.CMD Backup transactions to disk file.
TRANEXPT.CMD List exception events in transaction file.
TRANFULL.CMD If loaded as a special ‘%’ cron, will display a warning on the reader terminal and receipt printer #1 when transaction file reaches percentage full specified in system parameters.
TRANHOUR.CMD Display bar graph of transactions by hour.
TREE.BIN Displays directory structure as a tree.
TRFMT.BIN Transaction format configuration program.
WHERE.BIN Prints the full pathname of the current directory.
WOW.BIN Display transactions in progress, history, and pump data.
MDE-4871 CFN III Manager’s Manual for Windows® XP Embedded - Version 3.6 · August 2010 Page E-3

Files on the Hard Disk Customer Diskette
This page is intentionally left blank.
Page E-4 MDE-4871 CFN III Manager’s Manual for Windows® XP Embedded - Version 3.6 · August 2010
Type of Cards Dialout Communications
Appendix F: Dialout Communications
In addition to accepting privately issued cards, the SC III can be configured to accept cards issued by financial institutions (FI). This appendix covers card-authorization networks supported by the CFN System.
The CFN system can handle many types of credit and Debit Cards. You must decide which cards (if any) fit the needs of your operation and set up the required business relationships to accept those cards profitably.
With privately issued cards you have a billing relationship directly with your customer. With cards issued by FIs, your billing relationship is with the financial network that governs the card and with the FI you select to do your transaction processing.
You must order your system with the particular network interface you want. Then, you require to set up an agreement with the bank or network for the system to be able to work. The bank or network representative will provide information on loading the system, such as phone numbers, merchant IDs, and type of cards accepted.
The following sections cover many aspects of the system which have to be set up according to the dictates of the network. Make sure that all aspects of the system have been set up correctly, because sometimes the response of the network to invalid parameters can be confusing to diagnose.
Be sure to check with your local fire marshal for approval to accept credit and Debit Cards when the site is unattended.
Type of CardsCards issued by FIs fall into two, occasionally overlapping, categories:
• Debit cards electronically move the customer’s funds from a checking or savings account to pay for the sale. Debit cards are also used in automatic teller machines at banks and thrifts, and they are usually issued only by banks and savings and loan associations.
• Credit cards obligate the customer to pay the issuing financial institution (issuer) the amount of the sale. The FI that does your processing pays you, and the issuing financial institution pays your FI.
Familiar examples of Credit Cards are MasterCard, VISA, and American Express. MasterCard and VISA are issued by banks that are participating members in those credit organizations, when American Express (issued by American Express) and Discover (issued by Sears Financial Services) are issued by non-banks.
Credit cards may sometimes be used to initiate debit transactions, provided that the customer enters a PIN (Personal Identification Number) at the time of sale. Less frequently, Debit Cards may bear VISA or MasterCard symbols so that they may be used as Credit Cards.
MDE-4871 CFN III Manager’s Manual for Windows® XP Embedded - Version 3.6 · August 2010 Page F-1
Dialout Communications Credit Card Numbering
Credit Card NumberingCredit Cards are identified by the account number prefix (the first digit or digits) and the number of digits in the account number. For example, VISA credit card account numbers all start with 4, and they have either 13- or 16-digits.
However, electronic card readers cannot always distinguish a card’s type (for example, Credit Card, Phone Card, Library Card, or Video Rental Card) just by that card’s magnetically encoded number. And some of these other special purpose cards, which you certainly do not want to accept for payment, may even have the same encoded numbers as valid Credit Cards. Confusion can even occur between different types of Credit Cards.
Consult your bank or card network for current information about the account number prefix and length.
Handling TransactionsAccepting debit or Credit Cards in transactions usually consists of three parts: authorization (called verification by Gasboy), data capture, and settlement.
Page F-2 MDE-4871 CFN III Manager’s Manual for Windows® XP Embedded - Version 3.6 · August 2010
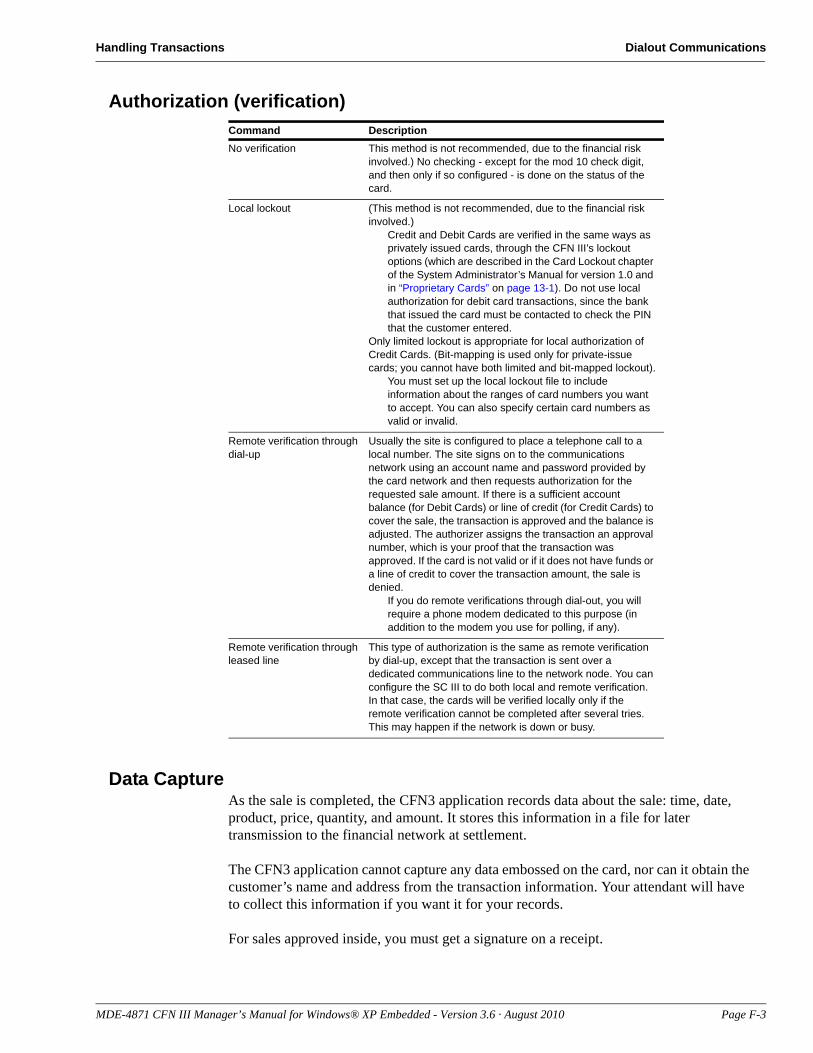
M
Handling Transactions Dialout Communications
Authorization (verification)Command DescriptionNo verification This method is not recommended, due to the financial risk
involved.) No checking - except for the mod 10 check digit, and then only if so configured - is done on the status of the card.
Local lockout (This method is not recommended, due to the financial risk involved.)
Credit and Debit Cards are verified in the same ways as privately issued cards, through the CFN III’s lockout options (which are described in the Card Lockout chapter of the System Administrator’s Manual for version 1.0 and in “Proprietary Cards” on page 13-1). Do not use local authorization for debit card transactions, since the bank that issued the card must be contacted to check the PIN that the customer entered.
Only limited lockout is appropriate for local authorization of Credit Cards. (Bit-mapping is used only for private-issue cards; you cannot have both limited and bit-mapped lockout).
You must set up the local lockout file to include information about the ranges of card numbers you want to accept. You can also specify certain card numbers as valid or invalid.
Remote verification through dial-up
Usually the site is configured to place a telephone call to a local number. The site signs on to the communications network using an account name and password provided by the card network and then requests authorization for the requested sale amount. If there is a sufficient account balance (for Debit Cards) or line of credit (for Credit Cards) to cover the sale, the transaction is approved and the balance is adjusted. The authorizer assigns the transaction an approval number, which is your proof that the transaction was approved. If the card is not valid or if it does not have funds or a line of credit to cover the transaction amount, the sale is denied.
If you do remote verifications through dial-out, you will require a phone modem dedicated to this purpose (in addition to the modem you use for polling, if any).
Remote verification through leased line
This type of authorization is the same as remote verification by dial-up, except that the transaction is sent over a dedicated communications line to the network node. You can configure the SC III to do both local and remote verification. In that case, the cards will be verified locally only if the remote verification cannot be completed after several tries. This may happen if the network is down or busy.
Data CaptureAs the sale is completed, the CFN3 application records data about the sale: time, date, product, price, quantity, and amount. It stores this information in a file for later transmission to the financial network at settlement.
The CFN3 application cannot capture any data embossed on the card, nor can it obtain the customer’s name and address from the transaction information. Your attendant will have to collect this information if you want it for your records.
For sales approved inside, you must get a signature on a receipt.
DE-4871 CFN III Manager’s Manual for Windows® XP Embedded - Version 3.6 · August 2010 Page F-3
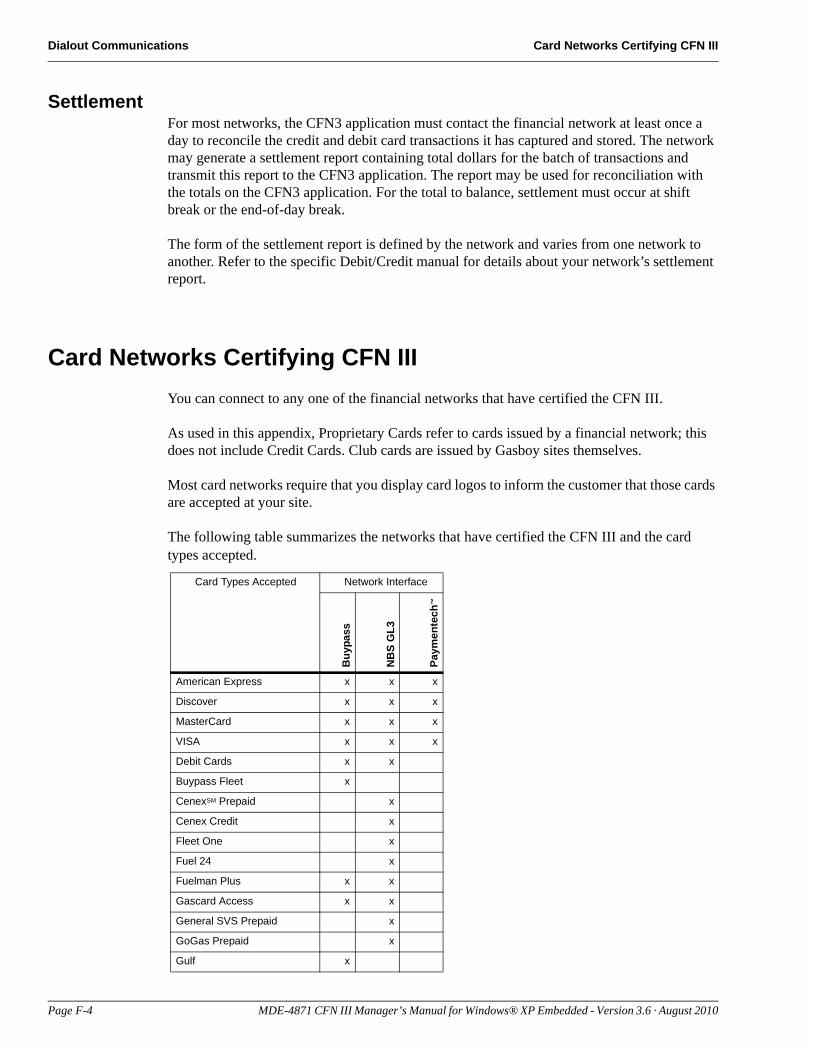
Dialout Communications Card Networks Certifying CFN III
SettlementFor most networks, the CFN3 application must contact the financial network at least once a day to reconcile the credit and debit card transactions it has captured and stored. The network may generate a settlement report containing total dollars for the batch of transactions and transmit this report to the CFN3 application. The report may be used for reconciliation with the totals on the CFN3 application. For the total to balance, settlement must occur at shift break or the end-of-day break.
The form of the settlement report is defined by the network and varies from one network to another. Refer to the specific Debit/Credit manual for details about your network’s settlement report.
Card Networks Certifying CFN IIIYou can connect to any one of the financial networks that have certified the CFN III.
As used in this appendix, Proprietary Cards refer to cards issued by a financial network; this does not include Credit Cards. Club cards are issued by Gasboy sites themselves.
Most card networks require that you display card logos to inform the customer that those cards are accepted at your site.
The following table summarizes the networks that have certified the CFN III and the card types accepted.
Card Types Accepted Network Interface
Buy
pass
NB
S G
L3
Paym
ente
ch™
American Express x x x
Discover x x x
MasterCard x x x
VISA x x x
Debit Cards x x
Buypass Fleet x
CenexSM Prepaid x
Cenex Credit x
Fleet One x
Fuel 24 x
Fuelman Plus x x
Gascard Access x x
General SVS Prepaid x
GoGas Prepaid x
Gulf x
Page F-4 MDE-4871 CFN III Manager’s Manual for Windows® XP Embedded - Version 3.6 · August 2010
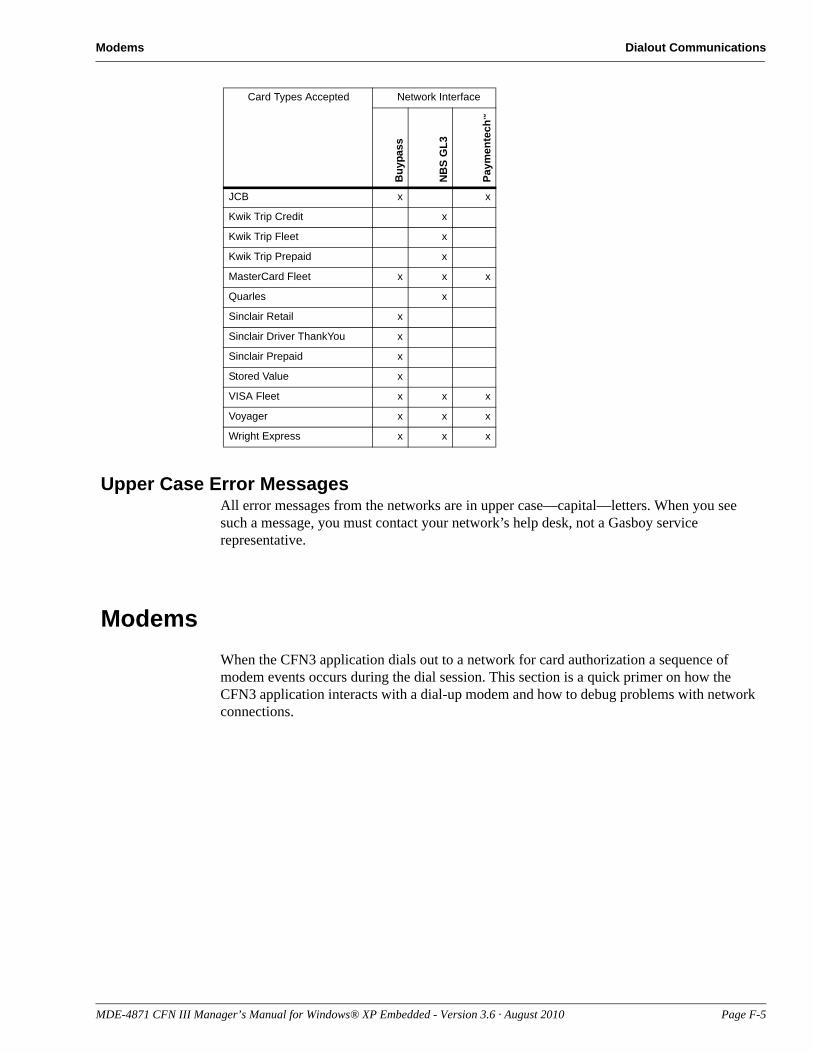
Modems Dialout Communications
Upper Case Error MessagesAll error messages from the networks are in upper case—capital—letters. When you see such a message, you must contact your network’s help desk, not a Gasboy service representative.
ModemsWhen the CFN3 application dials out to a network for card authorization a sequence of modem events occurs during the dial session. This section is a quick primer on how the CFN3 application interacts with a dial-up modem and how to debug problems with network connections.
JCB x x
Kwik Trip Credit x
Kwik Trip Fleet x
Kwik Trip Prepaid x
MasterCard Fleet x x x
Quarles x
Sinclair Retail x
Sinclair Driver ThankYou x
Sinclair Prepaid x
Stored Value x
VISA Fleet x x x
Voyager x x x
Wright Express x x x
Card Types Accepted Network Interface
Buy
pass
NB
S G
L3
Paym
ente
ch™
MDE-4871 CFN III Manager’s Manual for Windows® XP Embedded - Version 3.6 · August 2010 Page F-5
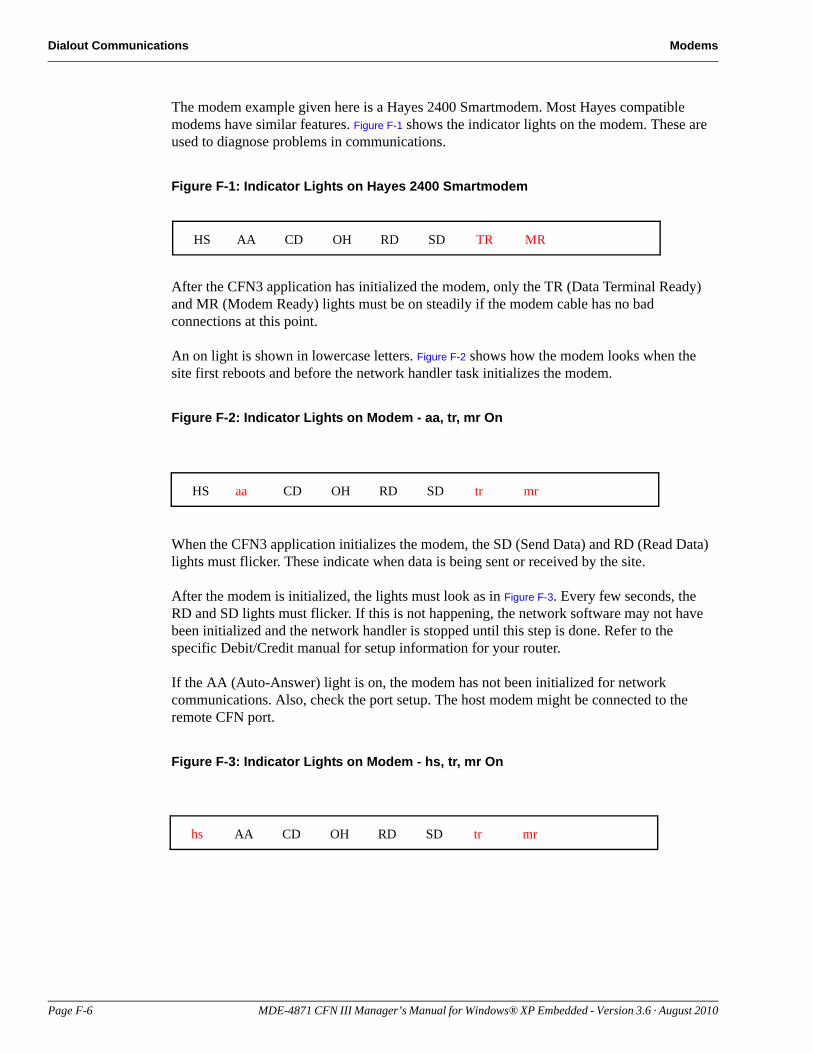
Dialout Communications Modems
The modem example given here is a Hayes 2400 Smartmodem. Most Hayes compatible modems have similar features. Figure F-1 shows the indicator lights on the modem. These are used to diagnose problems in communications.
Figure F-1: Indicator Lights on Hayes 2400 Smartmodem
HS AA CD OH RD SD TR MR
After the CFN3 application has initialized the modem, only the TR (Data Terminal Ready) and MR (Modem Ready) lights must be on steadily if the modem cable has no bad connections at this point.
An on light is shown in lowercase letters. Figure F-2 shows how the modem looks when the site first reboots and before the network handler task initializes the modem.
Figure F-2: Indicator Lights on Modem - aa, tr, mr On
HS aa CD OH RD SD tr mr
When the CFN3 application initializes the modem, the SD (Send Data) and RD (Read Data) lights must flicker. These indicate when data is being sent or received by the site.
After the modem is initialized, the lights must look as in Figure F-3. Every few seconds, the RD and SD lights must flicker. If this is not happening, the network software may not have been initialized and the network handler is stopped until this step is done. Refer to the specific Debit/Credit manual for setup information for your router.
If the AA (Auto-Answer) light is on, the modem has not been initialized for network communications. Also, check the port setup. The host modem might be connected to the remote CFN port.
Figure F-3: Indicator Lights on Modem - hs, tr, mr On
hs AA CD OH RD SD tr mr
Page F-6 MDE-4871 CFN III Manager’s Manual for Windows® XP Embedded - Version 3.6 · August 2010
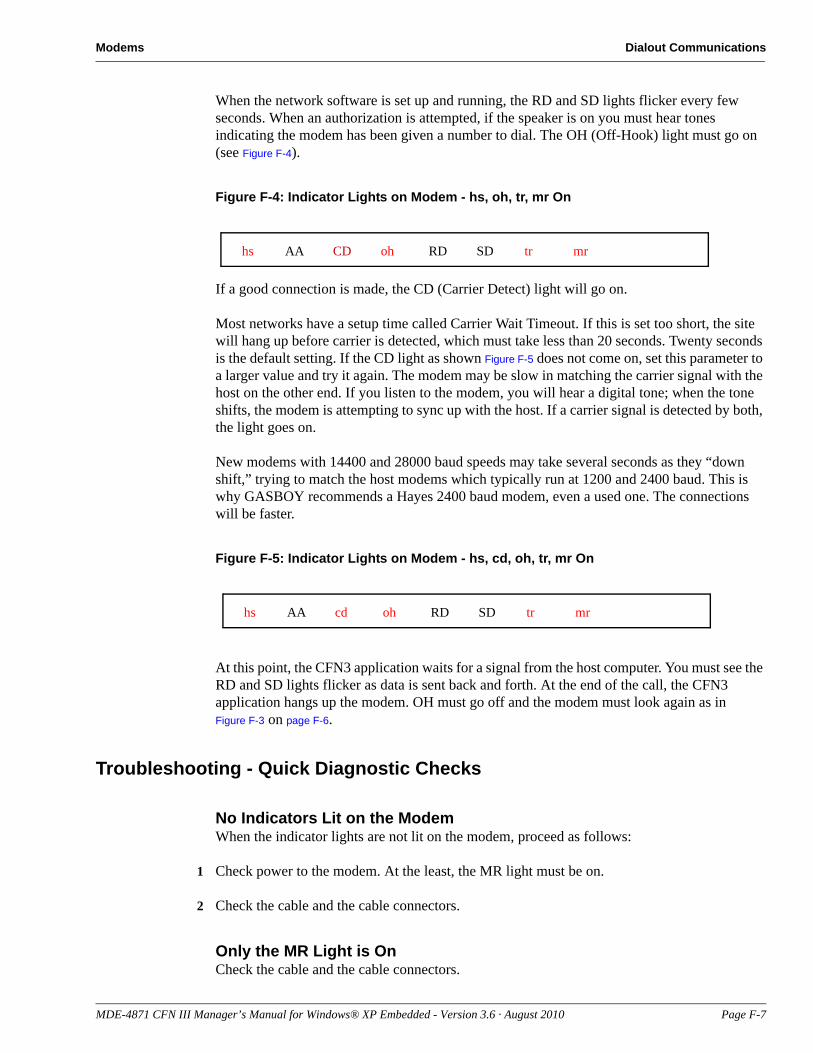
Modems Dialout Communications
When the network software is set up and running, the RD and SD lights flicker every few seconds. When an authorization is attempted, if the speaker is on you must hear tones indicating the modem has been given a number to dial. The OH (Off-Hook) light must go on (see Figure F-4).
Figure F-4: Indicator Lights on Modem - hs, oh, tr, mr On
hs AA CD oh RD SD tr mr
If a good connection is made, the CD (Carrier Detect) light will go on.
Most networks have a setup time called Carrier Wait Timeout. If this is set too short, the site will hang up before carrier is detected, which must take less than 20 seconds. Twenty seconds is the default setting. If the CD light as shown Figure F-5 does not come on, set this parameter to a larger value and try it again. The modem may be slow in matching the carrier signal with the host on the other end. If you listen to the modem, you will hear a digital tone; when the tone shifts, the modem is attempting to sync up with the host. If a carrier signal is detected by both, the light goes on.
New modems with 14400 and 28000 baud speeds may take several seconds as they “down shift,” trying to match the host modems which typically run at 1200 and 2400 baud. This is why GASBOY recommends a Hayes 2400 baud modem, even a used one. The connections will be faster.
Figure F-5: Indicator Lights on Modem - hs, cd, oh, tr, mr On
hs AA cd oh RD SD tr mr
At this point, the CFN3 application waits for a signal from the host computer. You must see the RD and SD lights flicker as data is sent back and forth. At the end of the call, the CFN3 application hangs up the modem. OH must go off and the modem must look again as in Figure F-3 on page F-6.
Troubleshooting - Quick Diagnostic Checks
No Indicators Lit on the ModemWhen the indicator lights are not lit on the modem, proceed as follows:
1 Check power to the modem. At the least, the MR light must be on.
2 Check the cable and the cable connectors.
Only the MR Light is OnCheck the cable and the cable connectors.
MDE-4871 CFN III Manager’s Manual for Windows® XP Embedded - Version 3.6 · August 2010 Page F-7
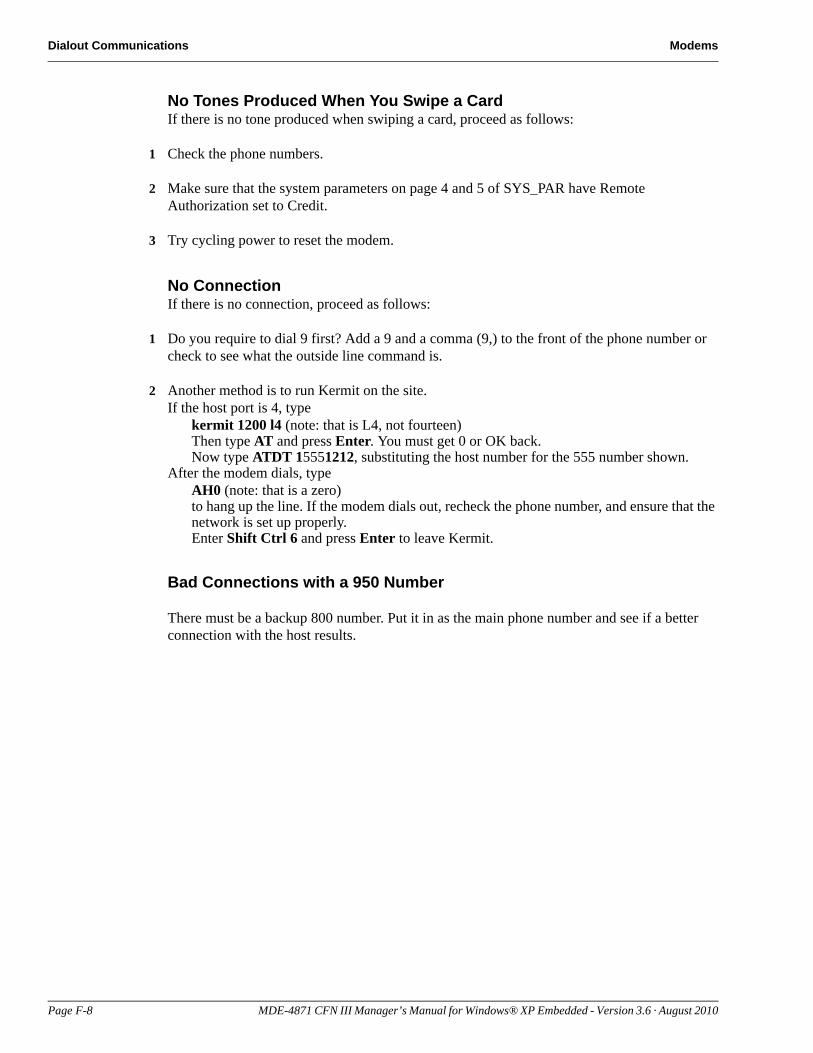
Dialout Communications Modems
No Tones Produced When You Swipe a CardIf there is no tone produced when swiping a card, proceed as follows:
1 Check the phone numbers.
2 Make sure that the system parameters on page 4 and 5 of SYS_PAR have Remote Authorization set to Credit.
3 Try cycling power to reset the modem.
No ConnectionIf there is no connection, proceed as follows:
1 Do you require to dial 9 first? Add a 9 and a comma (9,) to the front of the phone number or check to see what the outside line command is.
2 Another method is to run Kermit on the site.If the host port is 4, type
kermit 1200 l4 (note: that is L4, not fourteen)Then type AT and press Enter. You must get 0 or OK back.Now type ATDT 15551212, substituting the host number for the 555 number shown.
After the modem dials, typeAH0 (note: that is a zero)to hang up the line. If the modem dials out, recheck the phone number, and ensure that the network is set up properly. Enter Shift Ctrl 6 and press Enter to leave Kermit.
Bad Connections with a 950 Number
There must be a backup 800 number. Put it in as the main phone number and see if a better connection with the host results.
Page F-8 MDE-4871 CFN III Manager’s Manual for Windows® XP Embedded - Version 3.6 · August 2010
Glossary
Glossary
Account NumberAccount number in CFN documentation refers to the entire customer-information field of a Proprietary Card or the account-number field of a bank card. For Proprietary Cards, the account-number field is usually divided into sub-fields that may include a card number, vehicle number, employee number, customer account number, or other fields. Although it may seem confusing to call the entire field the account number when it can contain a sub-field called account number, this terminology conforms with the Track II Standard as defined by the American Banking Association. Refer to “Card Number” also.
Account Number LockoutRefer to “Limited Lockout”.
Activate Pump must be activated before a customer can pump fuel. A console user can active a pump by selecting the pump with the pump number key, accepting payment (for prepaid sales only), and pressing the START key. A customer can activate a pump from the island card reader by entering a valid card and keying in the required information, including the pump number. The Site Controller command ACTIVATE PUMP also activates a pump for one transaction. A pump in full-serve mode is always active. ACTIVATE is also used to activate a gate using the command ACTIVATE GATE.
Allocation, FuelQuantities or dollar amounts of fuel can be allocated to totalizers for each allocation number. When a card with an allocation number pumps fuel, the totalizer for that allocation number is decremented. When the totalizer is zero, cards with that allocation number cannot access fuel.
AlphanumericConsisting of characters of the alphabet and numbers. An alphanumeric display can display letters and numbers, and usually other characters such as punctuation.
ApplicationA computer program designed to solve a specific problem. PC Site control is an application program.
ASCIIPronounced as “askee”. An acronym for American Standard Code for Information Interchange. A standard 8-bit code used by the CFN System and many other computers. An ASCII character is a character encoded in ASCII. An ASCII file is a file made of ASCII characters.
MDE-4871 CFN III Manager’s Manual for Windows® XP Embedded - Version 3.6 · August 2010 Glossary-1
Glossary
ApprovedA transaction is approved when the customer’s card has been authorized for use at that site (if it is a Prepaid Card sale), a pump has been reserved, and all other conditions have been met so pumping can start
AuthorizationAuthorization refers to bank or club-card transactions. The steps required for card authorization depend on the type of card used and the system configuration. Authorization may include checking the local lockout file, the card expiration date, and the customer’s PIN, and getting approval from a bank network.
Backup An extra copy of information stored on a disk as a precaution against damaging the original. It is a good idea to make a backup copy of your transaction records. On the Site Controller, you can back up transaction and other data to a floppy disk.
Batch To group a set of commands and data to be executed together. On the Site Controller, you can create BATCH FILES (files with .CMD extensions) for the Site Controller to execute. When you enter commands as a batch file, all the commands are executed before you see a new prompt.
Batch File A file that contains commands and their data, which can be executed as a group. Refer to “Command File”.
Baud A measure of the rate data is transmitted, expressed in bits per second.
BitAn abbreviation for binary digit, the smallest unit of information in a computer. A bit can have a value of either 0 or 1.
Bit-mapped Lockout Uses less memory but is less flexible than “Limited Lockout”. Bit-mapped lockout can be used with privately issued cards. The number used for lockout can be up to eight digits long. Same as “Card Number Lockout”.
BootTo start or restart the operating system of a Site Controller restoring power after a power failure.
Glossary-2 MDE-4871 CFN III Manager’s Manual for Windows® XP Embedded - Version 3.6 · August 2010
Glossary
BrowserShort for Web browser, a software application used to locate and display Web pages. Graphical browsers can display graphics as well as text. In addition, most modern browsers can present multimedia information, including sound and video. Text browsers display only text, no images.
BufferA temporary data-storage location for information.
BugAn error in a program.
ByteThe storage space required for one character of information. In the CFN System, a byte is 8 bits.
CableA group of plastic-encased wires with a connector on each end, used to connect one electronic device to another.
Card NumberFor CFN System Proprietary Cards, the sub-field of the account number used for bit-mapped lockout.
Card Number Lockout See “Bit-mapped Lockout”.
Cathode Ray TubeA vacuum tube resembling a television screen, used as a display device. Also refers to a terminal with a CRT display.
CD-ROMA compact disk, read-only memory. A form of storage characterized by high capacity (roughly 600 megabytes) and the use of laser optics rather than magnetic means for reading data.
Central Processing Unit (CPU)The computer’s “brain,” comprising all the required circuits for handling information or instructions.
CFN3The software application running on the Site Controller III unit. The application includes commands, windows, and icons.
MDE-4871 CFN III Manager’s Manual for Windows® XP Embedded - Version 3.6 · August 2010 Glossary-3

Glossary
CFN IIIThe POS system consisting of Site Controller, Islander, Profit Point, Distribution Boxes, and peripherals. Also refer to “Site Controller” and “System”.
CharacterAny letter, digit, punctuation mark, or symbol (usually represented by a unique binary code consisting of 8 bits). Also refer to“Control Character”.
Club CardSame as “Proprietary Card”.
CommandA direct instruction to the CFN Site Controller or console that is carried out immediately.
Command FileA command file contains a list of Site Controller commands and data for the commands. Command files for the SC III have the extension CMD. When you type the name of the command file (without the extension), all the commands in it are executed.
Command ModeWhen the data terminal is in command mode, it will accept user commands.
ConfigurationThe configuration for a CFN site refers to the hardware and software options that were selected for that site.
Control CharacterCharacter obtained by holding down the key marked CONTROL or ^ when pressing another key on the keyboard.
CPURefer to “Central Processing Unit (CPU)”.
CrashWhen the Site Controller cannot complete or restart a program as the result of a hardware or software malfunction.
CronA user-defined command file or command that is to be executed at a specific time or event. Cron is short for chronological.
CRTRefer to “Cathode Ray Tube”.
Glossary-4 MDE-4871 CFN III Manager’s Manual for Windows® XP Embedded - Version 3.6 · August 2010
Glossary
Current SaleThe POS console can keep track of two sales for each pump. The current sale for a pump is the sale that is displayed when you first press a Pn key. Also refer to “Previous Sale”.
CursorA visible mark or character (sometimes flashing) on a CRT monitor indicating where the next character you type will appear.
DataInformation in the form of characters or words.
DatabaseA large, organized collection of information that can be retrieved by the Site Controller or other computer. The transaction information is a database.
DefaultThe actions the CFN System automatically takes or the configurations it initially uses, unless and until you tell it otherwise.
Department KeyThe product keys on the POS console can be used for departments, such as deli, grocery, or miscellaneous non-taxable.
Dip SwitchStands for dual in-line package switch. DIP switches are mounted on the printed circuit boards of some CFN System components. DIP switch settings can be changed to configure some functions.
DirectoryFiles on a SC III hard disk, RAM disk, or floppy disk can be organized in directories. Directories have been compared to drawers in a file cabinet, but a CFN3 directory can have other directories (subdirectories) under it.
DiskA flat circular device with a magnetic surface upon which Site Controller III programs and data are stored. Though the disk itself is circular, it is enclosed in a square casing, so you cannot see its circular shape.
Disk-based CommandA disk-based command is a CFN3 command that is on a hard or floppy disk instead of being part of the Site Controller’s operating system. Disk-based commands work just like other, system-based, CFN3 commands, but the command must be on the SC III’s hard disk (if there is one) or a floppy disk with the command on it must be in the SC III’s disk drive to execute the command.
MDE-4871 CFN III Manager’s Manual for Windows® XP Embedded - Version 3.6 · August 2010 Glossary-5
Glossary
Disk DriveA device for reading and writing magnetic data on a floppy or hard disk. The SC III may have one floppy disk drive. SC IIIs also have a hard disk drive.
DisketteRefer to “Floppy Diskette”.
Disk FileA file saved on disk. It may contain text, data, batch commands, or executable programs.
DocumentationThe manuals; the printed descriptions and instructions for the CFN System hardware and software.
Dot-matrix PrinterA printer in which each character is formed from a pattern of dots made by moving pins. The standard printers for the Site Controller I, II and III are dot-matrix printers.
DownThe condition of a CFN System or system component that is shut off or not working.
DownloadTo transfer data from another computer to your Site Controller.
EditTo make changes in an established file. The CFN3 application has editors—programs that allow you to edit files.
Electronic MailComputer messages sent from one user to another. You can send mail from one SC III to another, and have it print on the log printer, if required. Also known as E-mail or e-mail.
Enter KeyThe key on the console that you press to complete a numeric entry. On some computer keyboards, the key is called Return instead of Enter.
ExecuteTo carry out or perform an operation. When you type the name of a command at the prompt and press Enter, you are telling the Site Controller to execute that command.
Glossary-6 MDE-4871 CFN III Manager’s Manual for Windows® XP Embedded - Version 3.6 · August 2010
Glossary
Fallback PriceOne price level (usually level 0) is designated as the fallback price level. The fallback price level is used if prices for other price levels have not been entered, or if another price level has not been selected for the sale yet. The fallback price is the price loaded for the fallback price level.
FieldOne piece of information from a record. For example, the transaction number and the account number are fields in the transaction record. Also refer to “Record”.
FileRelated information treated as a unit and stored on a disk for the SC III. Data for pumps, tanks, totals, and so on is stored in special files. On the SC III, it is called “Table”. Also refer to “User File”, “Command File”, and “Disk File”.
FillA sale is approved for a fill if an amount is not specified before authorization is requested. The amount of a fill depends on the various limits in effect for that sale.
Floppy DisketteA circular plastic storage medium that is soft, flexible, and permanently enclosed in a square, rigid, plastic protective sleeve. Information is stored and retrieved on the smooth magnetic surface of the disk by a head similar to those used in tape recorders. SC III uses 3.5-inch floppy disks.
Fuel Point ReaderOptional program and hardware for automated fleet fueling. Prevents unauthorized dispensing when automatically recording vehicle information.
Graphical User InterfaceA program interface that takes advantage of the computer's graphics capabilities to make the program easier to use.
GUIRefer to “Graphical User Interface”. Pronounced “goo-ee”.
Hard Disk
A disk that is similar to a floppy disk, but rigid and built into its computer. All SC IIIs have hard disks.
HardwareThe physical equipment that makes up a computer system.
MDE-4871 CFN III Manager’s Manual for Windows® XP Embedded - Version 3.6 · August 2010 Glossary-7

Glossary
HostThe computer that your Site Controller may be connected to. The host can be at a remote location with the connection over a direct connect or dial-up phone line, or the host can be at the same location as the Site Controller with the connection made by only a cable.
HTMLShort for Hypertext Markup Language, the authoring language used to create documents on the World Wide Web. Gasboy’s Online documentation uses HTML.
ID NumberSee “User ID”.
InputData for a Site Controller command.
Intelligent ModemA modem that, among other things, is able to dial and answer your phone. Hayes Smartmodem, used with the CFN System for dial-out and dial-in, is an intelligent modem.
InteractiveWhen you enter commands interactively, you type each command in response to the prompt, the Site Controller executes the command, and then gives you a new prompt. Refer to “Batch”.
InterfaceAnything connecting two or more electronic devices together.
InternetA global web connecting more than a million computers.
Internet Service Provider (ISP)A company that provides access to the Internet. For a monthly fee, the service provider gives you a software package, user name, password and access phone number. Equipped with a modem, you can then log on to the Internet and browse the World Wide Web, and send and receive e-mail.
KAbbreviation for kilo, meaning one thousand.
KeyboardAn input device that generates a character when you depress a key.
Glossary-8 MDE-4871 CFN III Manager’s Manual for Windows® XP Embedded - Version 3.6 · August 2010
Glossary
KeyswitchA switch that looks like a lock and that requires a key to operate. CFN devices, such as Site Controller IIs and POS consoles, have keyswitches that can be used to change the operating modes of the devices. For example, the manager keyswitch on Site Controller IIs allows them to be put into manager mode. Site Controller III has no keyswitch.
LCDLiquid crystal display. One system for displaying characters and background on a computer screen. The island reader terminal uses an LCD.
LEDLight-emitting diode. LEDs are used as indicators on CFN devices. Some displays use LEDs; for example, the Site Controller status lights are LEDs.
Limited Lockout
Flexible type of card lockout. Uses more memory than “Bit-mapped Lockout”. Can be used with bank cards and privately issued cards. The number used for lockout can be up to 19 digits. Same as “Account Number Lockout”.
Load
To enter data or cause data or programs to be read into memory.
Local
A local command means the Site Controller is accessed directly, through its data terminal or console. Local verification means transactions are authorized by the Site Controller initiating them, without going through a CFN network or a host system. Refer to “Remote”.
Log OffRefer to “Sign Off”.
Log OnRefer to “Sign On”.
Log-printing ModeWhen the data terminal is in log-printing mode, it prints transaction data when transactions are completed, and system errors as they occur.
MAn abbreviation for mega, meaning million.
MDE-4871 CFN III Manager’s Manual for Windows® XP Embedded - Version 3.6 · August 2010 Glossary-9
Glossary
MPDMulti Product Dispenser. In CFN documentation, one set of hoses (one side) of a Multi Product Dispenser.
MPGMiles per gallon.
MemoryA device, or series of devices, within a Site Controller capable of storing information on a temporary or permanent basis. Floppy disks and RAM are types of memory.
MenuA program that displays a list of options for selection by the user. Each selection leads down a different branch of the program, which may contain more menus for further choices.
Method of PaymentHow a transaction is paid. Methods of payment the CFN System allows include cash, Credit Cards, Debit Cards, and Proprietary Cards.
ModemAn abbreviation for modulator-demodulator. A modem is a device that can send data to or from a computer over telephone lines.
NetworkA group of interconnected terminals or computer systems that exchange data electronically, usually through telecommunications devices (such as modems). A CFN III connected to other CFN sites and bank networks makes up a network.
Non-fuel ProductAny product that is not assigned to a pump. Motor oil, antifreeze, and grocery items are non-fuel products, also called merchandise. The Site Controller II and III allow non-fuel products; the Site Controller I does not.
OnlineThe state of being connected (usually through telephone lines) to a computer.
Operating SystemA program, usually built into the computer, that controls the operation of the computer. The Site Controller II and III operating system is FRAMOS.
OutputResults produced by a Site Controller command and usually printed on the terminal.
Glossary-10 MDE-4871 CFN III Manager’s Manual for Windows® XP Embedded - Version 3.6 · August 2010
Glossary
ParallelMeans more than one event happening at a time or occurring simultaneously. Printers and other devices are said to be either parallel or serial. Parallel means the device is capable of receiving more than one bit at a time (that is, it receives several bits in parallel). Most printers are parallel.
Parallel PortA parallel interface for connecting an external device such as a printer. Most personal computers have both a parallel port and at least one serial port. On PCs, the parallel port uses a 25-pin connector (type DB-25) and is used almost exclusively to connect printers.
PathnameThe path that leads to a file, including the drive name, directory, and any applicable subdirectories, where the file is located.
Pn KEYIn CFN documentation, this symbol represents one of the pump-select keys on a POS console.
PCUPump control unit. A device that controls one or more pumps.
PINPersonal identification number. A PIN is required at some sites for bank cards or Proprietary Cards. If a PIN is required to use a card, the customer must enter a correct PIN on the POS console PIN pad or the island card reader keypad.
PortA place where the connection is made between the Site Controller and other devices. What you plug a “Cable” into.
PostpayTo pay for a sale after fuel is pumped. The POS console can start postpay sales if the site is configured to allow postpay sales. Also refer to “Prepay”.
PPPShort for Point-to-Point Protocol, an Internet standards for transmitting Internet Protocol (IP) packets over serial lines (phone lines). Internet information is packaged into IP packets, a method for enclosing data into small, transmittable units (wrapped up on one end, unbundled on the other). A service provider might offer “PPP”, SLIP, or both. Your computer must use connection software (usually provided by the service provider) that matches the protocol of the server's connection software. PPP is a more recent and robust protocol than SLIP.
PrepayTo pay for a sale before fuel is pumped. Sales started from the island card reader are always prepaid. Sales started from the POS console can be prepay or postpay sales. Also refer to “Postpay”.
MDE-4871 CFN III Manager’s Manual for Windows® XP Embedded - Version 3.6 · August 2010 Glossary-11
Glossary
PresetA preset sale is one where a specific dollar amount or volume is requested before pumping starts. Both prepay and postpay sales can have preset amounts.
Previous SaleThe POS console can keep track of two sales for each pump. The previous sale for a pump is the sale that is displayed when you first press the PREV key. Also refer to “Current Sale”.
Printed Circuit BoardA computer board that an electronic circuit has been printed or etched on.
PrinterAn output device that prints data from the Site Controller.
PrintoutA printed copy of the information produced by the Site Controller.
ProgramA set of prepared instructions that a computer such as the Site Controller carries out in sequence to provide a solution to a problem.
Programmable Read Only MemoryA type of read-only memory (ROM) chip that can be programmed.
PROMRefer to “Programmable Read Only Memory”.
PROMPTThe character the Site Controller uses to indicate that it’s waiting for your response. The prompt for the Site Controller II is the current drive letter (A, B, C, or D) followed by an asterisk. The prompt for the Site Controller III is P. Commands that require you to enter additional information display prompts to tell you what information to enter. The console and island card reader also display prompts when additional information must be entered.
Proprietary CardA magnetic strip card issued for use with a specific CFN system. Proprietary Cards must conform to the CFN Proprietary Card format.
PumpIn CFN System documentation, one hose on a single or dual dispenser or pump, or one set of hoses on a multi-product dispenser.
RAMRefer to “Random Access Memory” on page Glossary-13.
Glossary-12 MDE-4871 CFN III Manager’s Manual for Windows® XP Embedded - Version 3.6 · August 2010
Glossary
Random Access MemoryThe temporary storage device for programs and data for a computer’s central processing unit. CFN System devices use battery-backed-up RAM, so the contents of the memory are preserved even during a power failure.
Read Only MemoryComputer memory that stores information permanently and that cannot be altered by normal operation of the computer.
RecordA collection of related information treated as a unit. For example, all the information about a completed transaction makes one transaction record.
RemoteA remote command means the Site Controller is accessed through its remote port by a remote host. Remote verification means transactions are authorized by a host system.
Return KeyThe key that on a typewriter would actually return the carriage. On the Site Controller data terminal it signals the end of a line or the entry of a command. Also known on some terminals as the Enter key.
ROMRefer to “Read Only Memory”.
RS-232An industry-standard serial interface used to attach devices such as modems, printers, to your Site Controller. A type of cable.
RS-422/485An industry-standard serial interface used to attach reader terminals, pump control units, and other CFN System devices to the Site Controller. A type of cable. The 422 is a single device, the 485 a multiple device.
RunWhen the Site Controller is running, it is allowing transactions. You can also run—that is, execute—a program or command file.
SCSIAbbreviation of small computer system interface. Pronounced scuzzy, SCSI is a parallel interface standard used by Macintosh® computers, some PCs, and many UNIX® systems for attaching peripheral devices to computers. SCSI interfaces provide for faster data transmission rates (up to 40 megabytes per second) than standard serial and parallel ports. In addition, you can attach many devices to a single SCSI port, so that SCSI is really an I/O bus rather than simply an interface.
MDE-4871 CFN III Manager’s Manual for Windows® XP Embedded - Version 3.6 · August 2010 Glossary-13

Glossary
SerialAn interface that transmits information bit-by-bit, rather than in whole bytes like a parallel interface.
Serial PortA port, or interface, that can be used for serial communication, in which only1 bit is transmitted at a time. Most serial ports on personal computers conform to the RS-232C or RS-422 standards. A serial port is a general-purpose interface that can be used for almost any type of device, including modems, mice, and printers (although most printers are connected to a parallel port).
Sign OffTo exit command-entry mode on the Site Controller. After you sign off, the Site Controller will not allow you to enter commands until you sign on again.
Sign OnTo enter command-entry mode. When you are signed on, the Site Controller will allow you to enter commands. To sign on you must enter a user ID number (for the Site Controller II and III) and a password.
Site A complete CFN System installed at a location. Also, the business location that uses a CFN System, such as a gasoline station or a convenience store with fuel pumps.
Site ControllerThe PC that controls the CFN system. Site Controller is sometimes abbreviated according to its version, such as SC I, SC II, and SC III. The SC III has a CFN 3 logo on the front of the tower. Refer to “CFN III” and “System”.
SLIPShort for Serial Line Internet Protocol, an Internet standard for transmitting Internet Protocol (IP) packets over serial lines (phone lines). Internet information is packaged into IP packets, a method for enclosing data into small, transmittable units (wrapped up on one end, unbundled on the other). A service provider might offer SLIP, “PPP”, or both. Your computer must use connection software (usually provided by the service provider) that matches the protocol of the server’s connection software. PPP is a more recent and robust protocol than SLIP.
StringA set of consecutive alphabetic and/or numeric characters.
SystemAn organized collection of hardware and software that works together. The CFN System is made up of a Site Controller I, II or III and the devices connected to it. Refer to “CFN III”.
Glossary-14 MDE-4871 CFN III Manager’s Manual for Windows® XP Embedded - Version 3.6 · August 2010
Glossary
System-based CommandA command that is included within the SC III’s operating system. This means that if you load the operating system into the SC III’s memory from a floppy disk, you can subsequently remove the floppy disk containing the operating system from the floppy disk drive and still be able to use all system-based commands. In comparison, a disk-based command requires that the disk containing it be in the disk drive or you cannot use that command.
Syntax ErrorAn error in the way you entered a command or its options, if any.
TableA collection of data organized for quick reference. The Site Controller II and III store data for pumps, products, tanks, and so forth in tables. These are called files on the Site Controller I.
TelecommunicationsThe communication from one computer to another over distances, usually through a telephone line and modems.
TerminalA peripheral device used for input and output, usually including a keyboard and a screen monitor or printer.
TextWords (as opposed to graphics, programming commands, or formulas).
UploadTo enter data from your computer into another computer. For example, you could upload transaction data from a Site Controller to another computer.
UserA person who makes use of a CFN System.
User FileFiles that you or other users create. On the Site Controller II and III, user files are saved on disk. On the Site Controller I, user files are saved in memory.
User IDA number that when combined with a password, will allow you access to a Site Controller II and III or console. Each user ID is assigned a permission level.
World Wide WebA system of Internet servers that support specially formatted documents. The documents are formatted in a language called HyperText Mark-up Language (“HTML”) that supports links to other documents, as well as graphics, audio, and video files. This means you can jump from one document to another simply by clicking on hot spots. Not all Internet servers are part of the World Wide Web.
MDE-4871 CFN III Manager’s Manual for Windows® XP Embedded - Version 3.6 · August 2010 Glossary-15

Glossary
This page is intentionally left blank.
Glossary-16 MDE-4871 CFN III Manager’s Manual for Windows® XP Embedded - Version 3.6 · August 2010
Index
Index
Symbols% variable 20-8* prompt 3-1* wildcard 17-2. directory 17-3.. directory 17-3.BIN extension 25-4/ (slash) 17-3? wildcard 17-2@N 6-1@O 6-1\ (backslash) 17-3~0A control code 19-6
Numerics14400 baud F-728000 baud F-7
AA command 17-7ACTIVATE PUMP command 26-8, 26-
9, 26-10Activate the window 3-1ADD ALLOCATION command 15-3ADD DRAWER command 11-10, 11-
11ADD INVENTORY command 7-5, 9-
6, 9-7, 9-8ADD TANK command 7-5, 8-2Adding
fuel products 7-1merchandise products 9-1merchandise-product inventory 9-7software 1-4to cash drawer amount 11-11to tank inventory counters 8-1
Administratoradding software 1-4logon 1-4Run command 1-4
Alert symbol 2-1AND operator 20-3Applications diskette E-3Assigning
fuel limits to fuel limitation codes 13-10
prices to hoses 8-8product codes to authorization
codes 13-8products to hoses 8-8tanks to hoses 8-8
AA
AAAA
AA
BB
BBBBBBBBBBBBBBB
BBB
BB
CC
C
MDE-4871 CFN III Manager’s Manual for W
ssigning a Fueler ID 13-16sterisk 3-4
as first character in file 19-3wildcard 17-2
sterisk as first character in line 19-3t sign (@) 21-1uthorization (verification) F-3uthorization codes 13-7
assigning product codes to 13-8fuel-product codes 13-7merchandise codes 13-7printing code definitions 13-9removing product codes from 13-9
UTOEXEC.CMD file E-3utomatic sign off 3-4
acking up 16-1, 23-1custom system 16-3restore 16-5system data 16-2system files 16-3transactions 16-4
ackslash as last character in line 19-3ACKSPACE key 3-11, 3-12ACKTRAN command 16-2, 16-4ACKTRAN.BIN file E-2ACKUP command 16-3ack-up files 16-2ank host 22-2ank-card network router 28-1arricading 2-1attery failure 24-1IN extension 3-9, 17-2, 19-2, 21-1IN files 3-9LEND.BIN file E-2oolean options 20-3rackets, square
in commands 23-1ranching in command file 20-10uffered totals 11-1, 11-9uffers
in use 25-7types 25-7
UFFERS command 25-7UFFERS.BIN file E-2
abling and wiring 1-9see also Appendix A
ALL command 22-2
Cardauthorization codes 13-7
Card lockoutsbit-mapped 13-2bit-mapped, disk-based 13-5checking card’s status 13-5limited 13-2, 13-3locking out 13-6negative 13-2, 13-4negative, selecting 13-4positive 13-2, 13-4positive, selecting 13-5printing list 13-7unlocking 13-6wildcards 13-3
Caret sign (^) 21-2CASE command 20-5Case statements in command files 20-5Cash drawer 11-10
adding to 11-11entering amount 11-10printing totals 11-11subtracting from 11-11totals 11-1
Cash-withdrawal special product 9-2Caution warnings 2-1CD.CMD file E-3Certifying CFN F-4CFN III 3-1
cabling and wiring 1-9see also Appendix A
command window 1-2, 3-1commands 3-3desktop 1-3operation 1-3ports 1-9quitting 1-2restarting 1-2start up 1-1system ID number 13-1user levels 1-2
CFN III icon 1-3CFN3
command window 1-3Chaining command files 19-5Chain-pumping feature 28-1
indows® XP Embedded - Version 3.6 · August 2010 Index-1

Index
Changingdirectories 17-9disk drives 17-9fuel price codes 8-5fuel product information 7-3fuel products 7-1island card reader messages 6-5merchandise products 9-1merchandise-product
information 9-4receipt heading and footing 6-3shifts 11-12
CHDIR command 17-9CHECK CARD command 13-3, 13-5Checking
a diskette 17-11card’s lockout status 13-5
CHKDSK command 17-11CHKDSK.BIN file E-2CLOSE command 20-13CMD extension 3-9, 17-2, 19-2, 21-1CMD files 3-9CMD#.VAR file 20-8CMD1.VAR file 20-9CMD2.VAR file 20-9CMD3.VAR file 20-9Command 3-3
arguments with 3-6disk-based 3-7EXIT 3-13how to enter 3-5how to verify 3-8LO ME 6-6LOAD DATE 3-5PRINT DATE 3-5redirecting input 3-10redirecting input and output 3-9redirecting output 3-10SCReen 20-13short forms 3-3SHow 25-11SYStem 3-13terminating 3-12using options with 3-6using ranges with 3-8
Command file 19-1branching 20-10calling a command file 19-5case statements 20-5commands 19-4comments in 19-3contents 19-1debugging 19-3executed from console 19-6exit from 19-13extension 19-1how to execute 19-2log event 19-9loops 20-4name restrictions 19-1output 19-2printing output 19-8saving output 19-7sign on 19-7string search 20-12subroutines 20-10terminal input 19-3user input 19-5user variables 20-7variables 19-9
Command line 17-5Command options 3-6
A option 3-6C option 3-7C option, press ENTER twice 3-8H option 3-6I option 3-6L option for lines 3-6P1 and P2 options 3-6parameters 3-6redirect input option 3-6redirect output option 3-6semicolon needed 3-6T option 3-6
Command prompt 3-4Command terminal 3-3
how to sign off 3-4how to sign on 3-4keyboard 3-3
Command window 3-3activating 3-1minimizing 1-2
Command-line arguments 19-11Commands
entering devices 20-9making your own 19-1
Commasentering two commas to print one 3-
7Comments in command files 19-3
CONFIG.CMD file E-3Console 3-1
error codes 25-3, 25-4executing command file from 19-6
CONSOLE configuration command 23-1
CONSOLE configuration program 10-3CONSOLE.BIN file E-2Control characters
keyboard 3-11Control codes 19-8CONTROL key 3-11COPY command 17-6Copying
a directory 17-10files 17-6
Crash cron entry 21-2CRASH.CMD file E-3CRASH.DOC E-1Creating
directories 17-9new fuel product 7-2new merchandise product 9-1Site Controller files 17-4special merchandise products 9-2
Credit card numbering F-2Credit cards F-1Cron
crash 21-3defined 21-1permission level 21-1program space 21-1purpose 21-1reboot 21-4specified conditions 21-1timed 21-2transaction memory 21-4
Cron command output 21-5redirected from log 21-5
Cron commands 21-1entering 21-5hyphen for redirection 21-5removing 21-6search path 21-5
Cron entrycrash 21-2printing a list 21-6reboot 21-2timed 21-1transaction memory 21-2
CTRL-C 3-11CTRL-Q 3-11CTRL-S 3-11CTRL-X 3-11Cumulative tax totals 10-2
Index-2 MDE-4871 CFN III Manager’s Manual for Windows® XP Embedded - Version 3.6 · August 2010

Index
Cumulative totals 11-1curly braces 6-4Currency 28-1Current day totals 11-1Current directory 17-3Current shift totals 11-1Current system status 25-7
DDaily totals 11-1Danger warnings 2-1Data
how to enter 3-5restoring 16-6
Data entryprompt 3-5shortcut 3-8
Data transfer 22-3Date 6-1Day-night pricing 8-7DEACTIVATE PUMP command 26-10Debit cards F-1Decimal points
displaying with p1 option 20-9DELETE command 17-5DELETE key 3-11Deleting
a line 3-12characters 3-12fuel-product price codes 8-7island card reader messages 6-6receipt heading and footing 6-4
Desktop 1-2icons 1-3refreshing 1-6Run command
used by Windows NT 1-4taskbar 1-3
Diagnostic commands 25-1Diagnostic error codes 25-2Dial-out phone number 22-1, 22-2DIP switch
memory A-2settings A-2
Dipstick cards 28-1DIRECTORY 17-8
Directory. 17-3.. 17-3/ 17-3changing 17-9commands 17-8copying 17-10creating 17-9current 17-3files, listing 17-8name, printing 17-10removing 17-10root 17-2
DIRECTORY command 17-8, 17-9DISABLE DUMP command 19-7DISABLE HISTORY command 25-4DISABLE PRODUCT command 9-8Disabling
event history 25-4merchandise inventory tracking 9-8redirection 19-3
Disk commands 17-11Disk drive
changing from remote site 17-9name of 17-3
Disk full D-6Disk-based commands 3-7, 3-9, 21-1Diskette
checking for errors 17-11Diskette drive
cleaning 24-1cleaning kit 24-1
Display multiple lines 6-4Displaying
buffers in use 25-7current system status 25-7Site Controller status 25-10
Dollar totalsprinting 11-7
DPT string selection 28-1P 3-1DUMP command 25-9DUMP.BIN file E-2
EEASYFAX.CMD file E-3ECHO command 19-4, 19-6
p1 option 20-9Echo string
more than 80 characters 19-3editing a file 18-4EJ_AUTH.BIN file E-2Electrical
Shut-off 2-1Electronic funds transfer regulation C-1
EmergencyElectrical shut-off 2-1In Case Of 2-3Personnel (contacting) 2-2
ENABLE DUMP command 19-2, 19-7, 21-5
ENABLE HISTORY command 25-4ENABLE PRODUCT command 9-1, 9-
3, 9-6, 9-7, 9-8Enabling
event history 25-4merchandise-product dollar
inventory 9-8Entering
cash drawer amount 11-10fuel-product inventory 7-5fuel-product price codes 8-5island card reader messages 6-4merchandise-product inventory 9-7merchandise-product price
lookups 9-6multiple blocks of information 3-7receipt heading and footing 6-1tax accumulator names 10-2
Entering cron commands 21-5Evacuation 2-1Event history 25-4
disabling 25-4enabling 25-4printing 25-5
Exclamation mark 21-2EXECUTE 19-13EXECUTE command 19-12Executing a command file 19-2Executing command file from
console 19-6EXIT command 19-13Exiting from command file 19-13Explosions
Preventing 2-1
FFallback price 8-4File list
short 17-8File system 17-2Filename
extensions 17-2restrictions 17-1wildcards 17-2
MDE-4871 CFN III Manager’s Manual for Windows® XP Embedded - Version 3.6 · August 2010 Index-3
Index
Filescopying 17-6listing 17-9moving between directories 17-7on other drives 17-4printing contents 17-5removing 17-5renaming 17-6
FIND command 20-12FIND.BIN file E-2Fires
Preventing 2-1Fleet packages
FleetKey Option 13-16fueler ID 13-16
Floppy disketteformatting 17-11
FORMAT command 17-11Formatting
floppy diskette 17-11FRAMOS.BIN file E-1FRAMOS.CFG file E-1FRED screen editor 18-1, 18-4
advanced editing 18-8appending files 18-11changing modes 18-3command mode 18-3command summary 18-12copying a line 18-8correcting text 18-4deleting specified lines 18-10deleting text 18-7deleting to a specified character 18-
11edit mode 18-3editing a new file 18-12entering text 18-4erasing work buffer 18-10exiting 18-5exiting without saving 18-6insert mode 18-3inserting text 18-7joining 2 lines 18-7moving cursor 18-6, 18-8, 18-9naming files 18-5opening a line 18-7replacing a character 18-8resaving files 18-5saving files 18-5search & replace 18-10searching & printing a string 18-9searching for a string 18-9setting tab stops 18-11splitting 2 lines 18-7undoing changes 18-7
FRED.BIN file E-2Fuel allocation 15-1Fuel limitation code 13-10
assigning fuel limits to 13-10printing 13-10removing 13-11
Fuel Point system 28-1Fuel product
adding 7-1category 7-3changing 7-1changing information 7-3creating 7-2day-night pricing 8-7deleting price codes 8-7entering inventory 7-5entering price codes 8-5inventory 7-4maximum price 7-3minimum price 7-3printing information 7-3product code 7-3product name 7-3removing 7-4tax code 7-3
Fuel-drop cards 28-1Fueler ID
card format 13-16cards 13-16
Fueler ID cards 28-1FUELER.BIN 13-16, E-2FUELPT.BIN file E-2Fuel-related commands 7-1FULLSERV command 26-9FULLSERV.CMD file E-3
GGasboy login 1-3Gate reader
interface 28-1GATE.BIN file E-2GOTO command 20-10
HHandling transactions F-2Help 3-14HELP command 3-14Help system 1-7How to load messages 6-6
II command 17-8
IconsCFN system 1-3double clicking 1-3Help 1-7Profit Point 1-6
IF command 20-1IF switches 20-2Indicator lights F-6Initializing
product information 7-2INSTALL command 16-2INSTALL.CMD file E-3Internationalization
currency decimal points 20-10Inventory
fuel product 7-4tracking 9-8
Inventory counterstank 8-2
Invoice Printinghow to print 27-2Profit Point setup 27-1requirements 27-1setting up 27-1
IRQ switchsettings A-2
Island card readercleaning 24-1display multiple lines 6-4error codes 25-3messages 6-4messages, changing 6-5messages, deleting 6-6messages, entering 6-4messages, printing 6-5multiple line displays 6-5
JJOURNAL.LOG 12-8Jumper settings A-3
KKERMIT command 22-3KERMIT.BIN file E-2Keyboard
cleaning 24-2command keys 3-3control characters 3-11
LLimitation code 13-10Line breaks 19-6Line length limitations 19-6List of all commands 3-15
Index-4 MDE-4871 CFN III Manager’s Manual for Windows® XP Embedded - Version 3.6 · August 2010
Index
Listing files 17-9in directory 17-8
LOAD AUTHORIZATION command 13-8, 13-9
LOAD CRON command 21-1, 21-5, 21-6
LOAD CUTOFF command 8-11LOAD DRAWER command 11-10LOAD FUEL command 7-1, 8-4, 8-
8, 9-3, 11-3LOAD HEADING command 6-1, 6-3LOAD INVENTORY command 7-5, 9-
1, 9-6, 9-7, 9-8LOAD LIMITATION code 13-11LOAD LIMITATION command 13-10LOAD MESSAGE command 6-4, 6-5LOAD PHONE command 22-1LOAD PLU command 9-1, 9-4, 9-6
use of dollar sign 9-6LOAD PRICE command 8-4, 8-5LOAD PRODUCT command 7-1, 7-
2, 7-3, 9-1, 9-2, 9-4, 10-1, 11-3LOAD PUMP command 8-11LOAD SHIFT command 11-1, 11-12LOAD TANK command 7-1, 7-5, 8-2LOAD TAX command 9-2, 10-2LOAD VEHICLE command 15-7, 15-8Loading receipt heading and footing 6-3LOCK CARD command 13-3, 13-5, 13-
6Locking out cards 13-6LOCKOUT?.DTA file 13-5LOG EVENT 19-9LOG FILE command 3-10LOG MESSAGE command 3-11Log off
Administrator 1-5Log on
Administrator 1-4Log printer 3-2, 3-10, 19-8
Lookupaccount fields 14-3adding records 14-7ask for $ amount 14-5authorization code 14-4configuration 14-17deleting records 14-8editing records 14-9expiration date 14-4global delete 14-8limitation code 14-4listing records 14-14lookup number 14-1lookup type 14-1main menu 14-6merging data 14-11message 14-4optimizing 14-18PIN 14-4price level 14-4records 14-5rejection code 14-4require manual # 14-5require odometer 14-4require PIN 14-5search and replace 14-10tender subtype 14-2tender type 14-2updating 14-6
LOOKUP command 14-5Lookup program 14-1
types of accounts 14-1LOOKUP.BIN E-2LOOKUP.DTA file 14-5LOOP command 20-4Loops in command files 20-4
MMagnetic card reader
cleaning 24-2Maintenance 24-1MAKEPERM.CMD file E-3Making your own commands 19-1Memory
contents 25-9Memory I/O
settings A-4
Merchandise product 9-1adding inventory 9-7cash-withdrawal 9-2category 9-2changing product information 9-4creating new 9-1creating special 9-2default price 9-6disabling inventory tracking 9-8enabling dollar inventory 9-8entering inventory 9-7entering price lookups 9-6inventory 9-6manually entered price 9-6maximum price 9-2minimum price 9-2printing attributes 9-3printing information 9-4product code 9-1, 9-2product name 9-2refund special product 9-2removing 9-5subtracting inventory 9-7tax code 9-2
MDE-4871 CFN III Manager’s Manual for Windows® XP Embedded - Version 3.6 · August 2010 Index-5
Index
Message D-1, F-1, F-5______ CTS not present D-1______ CTS regained D-1______ DSR not present D-1______ table reconstruction D-1______DSR regained D-1Already exists D-13Bad data input D-13Bad mess D-13Bank verification came up D-3Bank verification went down D-3Battery failed D-3Battery ok D-3Can’t activate D-13Can’t open file D-13Cannot run program D-14card denied D-2Card is not valid D-14Card is valid D-14Card reader terminal # came up D-3Card reader terminal # disabled D-3Card reader terminal # out of
paper D-3Card reader terminal # paper low D-
3Card reader terminal # paper ok D-4Card reader terminal # printer
down D-4Card reader terminal # printer
jammed D-4Card reader terminal # printer
unjammed D-4Card reader terminal # printer up D-
4Card reader terminal # reader
jammed D-4Card reader terminal # reader
unjammed D-4Card reader terminal # went
down D-4CFN verification came up D-5CFN verification did not respond D-
5CFN verification went down D-5Check Pt/Profit Pt # came up D-5Check PT/Profit Pt # went down D-
5Command failed D-14Data corrupted in table D-5DES not ready D-6Device out of service D-14Diagnostics table too small D-6Does not exist D-14EMERGENCY STOP D-6End EMERGENCY STOP D-6
Error loading program D-14Fuel Point Reader # came up D-6Fuel Point Reader # on loop # went
down D-6Gate # came up D-7Gate # on loop # went down D-6Invalid option D-14Island card reader 6-4Island EMERGENCY STOP D-7Island Reader Only D-7Loop table overflow D-7Manager key required D-15Master key loaded D-7Mem lost D-12Memory available D-7Memory full D-7No more file space D-15PC not responding D-8PC responding D-8Permission denied D-15Product # (name) below reorder
level D-8Program checksum error D-15Pump # disabled D-8Pump # disabled, no price D-9Pump # disabled, no quantity D-8Pump # enabled D-9Pump contol unit # came up D-9Pump contol unit # disabled D-9Pump contol unit # found
unassigned transaction D-9
Pump contol unit # went down D-10Pump control unit #X down, bad
memory D-9Pump deactivated D-15Pump is not on D-15Pump is ready D-15Pwr fail D-12Remote command D-10Remote verification did not
respond D-10SC III boot message D-10Site is stopped D-15Some valid, some not D-15String too long D-16Tank # below reorder level D-10Tank # excess water D-11Tank # fuel leak D-11Tank # gal delivery D-11Tank # probe error D-11Timed out D-12Transactions in progress D-16Unknown command D-16Warm boot D-11
Minimizing the command window 1-2MKDIR command 17-9Modem B-1
cabling B-1switch settings B-1
Modem indicator lights F-6Modems F-5Moving files between directories 17-7MPG system 15-5
cumulative totals, resetting 15-7information calculation 15-7report, printing 15-8setting up 15-6vehicle numbers, removing 15-8vehicle numbers, setting up 15-7
Multiple line displays 6-5Multi-product dispensers 8-8
NNew line 19-6NEXT CLERK command 19-11, 20-12NEXT DAY command 11-11, 11-13
beginning drawer balance 11-13required hours between 11-13
NEXT SHIFT command 11-12beginning drawer balance 11-12required hours between 11-12
Novatronics printer 6-2
OOFFROAD.BIN file E-2OFFROAD.DTA file E-3On line documentation 1-7Operating system
Windows NT 1-1Optical cards 28-1Optional packages 28-1OR operator 20-3Output
printing 19-8Output redirection 19-2
PPassword 3-4Pathname 17-2, 17-3PAUSE command 19-5, 19-6Pausing printout 3-12
L option 3-12Percent sign (%) 19-11, 21-2Percent variables 19-9PERM command 4-6PERM configuration command 23-1PERM.BIN file E-2Permission level 4-6
Index-6 MDE-4871 CFN III Manager’s Manual for Windows® XP Embedded - Version 3.6 · August 2010
Index
Permission levels 3-13Personnel
Emergency (informing) 2-2Phone number
auxiliary 22-2backup 22-2main 22-2
PJ command 12-7Port 1-9, A-1POS.CMD file E-3Postpay 3-1Prepay 3-1Price codes 7-1, 8-3, 8-5, 8-6, 8-8
levels 8-4Price level 0 8-4PRINT ALLOCATION command 15-4PRINT AUTHORIZATION
command 13-9PRINT CRON command 21-6PRINT DIAGNOSTICS command 25-1PRINT DRAWER command 11-11PRINT HEADING command 6-3PRINT HISTORY command 25-5PRINT LIMITATION command 13-10PRINT LOCKOUT command 13-7PRINT MONITOR command 25-5PRINT PHONE command 22-2PRINT PRICE command 8-4, 8-5PRINT PRODUCT command 7-3, 9-
3, 9-4printout 9-6
PRINT PUMP command 8-9, 8-10PRINT QUANTITY command 11-
5, 11-6, 11-7PRINT RECEIPT command 19-8, 25-
11PRINT SALES command 10-2, 11-
2, 11-3, 11-4PRINT SIGNON command 4-5PRINT SUMMARY command 11-9PRINT TANK command 8-1PRINT TIP command 12-4PRINT TOTALS command 11-7, 11-
8, 11-9PRINT TRANSACTION command 12-
1, 12-2, 12-3, 12-4, 12-5, 12-6PRINT VEHICLE command 15-8PRINT VEHICLE printout 15-8Printed
receipt regulations C-1
Printinga file 3-10a sales summary report 11-9an invoice 27-2authorization code definitions 13-9card lockout list 13-7cash drawer totals 11-11cron entries 21-6directory name 17-10event history 25-5files 17-5fuel limitation codes 13-10fuel-product information 7-3island card reader messages 6-5list of user numbers 4-5merchandise-product attributes 9-3merchandise-product
information 9-4messages 3-11output from command file 19-8quantity and dollar totals 11-7quantity reports 11-5range of transactions 12-4receipt heading and footing 6-3sales reports 11-2short file list 17-8specified transactions 12-3system diagnostics 25-1system monitor messages 25-5tax accumulators 10-2transactions 12-1, 12-2transactions in progress 12-4
Printoutpausing 3-12pausing with L option 3-12
Private cardsallocation file 15-2allocation numbers 15-2allocations, changing 15-3allocations, printing 15-4allocations, removing 15-5authorization code 13-1authorization codes 13-2codes 13-1cumulative limits 13-2dollar allocations 15-2expiration date 13-1field separator 13-1format 13-1fuel allocation 15-1fuel allocation system 15-1fuel allocations 15-2limitation code 13-1limitation codes 13-2price level 13-1restricting purchases 13-2restriction code 13-1volume allocations 15-2
PRODMRG.BIN file E-2Profit Point
connecting to POS loop A-1icon 1-6invoice printing setup 27-2
Program space 19-1Pump commands 8-8PUMP configuration command 23-1Pump control unit
error codes 25-3testing memory of 25-11
Pump informationviewing 8-9
Pump totalizerssetting up 8-11
PUMP.BIN file E-2Pumps
fill limit 8-11slow-to-cutoff 8-11totalizers 8-11totalizers, resetting 8-11
PURGE SITE command 12-7PURGEMEM.CMD file E-3PUTPRICE.CMD file E-3
QQuantity reports 11-5Quantity totals
printing 11-7Question-mark wildcard 17-2QUIT command 19-13Quiting the CFN III application 1-2
MDE-4871 CFN III Manager’s Manual for Windows® XP Embedded - Version 3.6 · August 2010 Index-7
Index
RRanges in commands 3-8RCP command 17-10RCP.BIN file E-2RDEL.BIN file E-2READER configuration command 23-1READER.BIN file E-2REBOOT command 21-2Reboot cron command 21-4Reboot cron entry 21-2Receipt printer 19-8
testing 25-11Receipts
changing heading and footing 6-3customer name line 6-1deleting heading and footing 6-4heading and footing 6-1no customer name line 6-1printing heading and footing 6-3regulation C-1
RECORD command 8-7, 17-4Redirecting command input and
output 3-9Redirection
options 19-2terminating 19-7
Remote accesschanging drives 17-9EXIT 3-13SYStem command 3-13
Remote authorizations 22-1Remote communications 22-1Remote host 22-2REMOVE ALLOCATION
command 15-2, 15-5REMOVE AUTHORIZATION
codes 13-9REMOVE CRON command 19-13, 21-
1, 21-6REMOVE HEADING command 6-4REMOVE LIMITATION command 13-
11REMOVE MESSAGE command 6-6REMOVE PRICE command 8-7REMOVE PRODUCT command 7-2, 7-
4, 9-1, 9-5REMOVE VEHICLE command 15-8
Removinga directory 17-10cron commands 21-6files 17-5fuel limitation code 13-11fuel product 7-4merchandise products 9-5product codes from authorization
codes 13-9RENAME 17-7RENAME command 17-6Renaming files 17-6Reports 11-1
daily totals 11-1quantity, printing 11-5sales summary, printing 11-9sales totals 11-1sales, printing 11-2shift totals 11-1
RESET DIAGNOSTICS command 25-2RESET PUMP command 8-11RESET TOTALS command 10-2, 11-
1, 11-9, 11-10, 11-11RESET TRANSACTION command 12-
5, 12-6Resetting
pump totalizers 8-11sales totals 11-9system diagnostics 25-2tax totals 10-2transaction-begin pointer 12-5, 12-
6transaction-begin pointer,
automatically 12-7Restart cron command 21-3RESTORE command 16-2, 16-5, 16-
6, 21-4Restore from backup 16-5RESTORE.BIN file E-2Restoring
data 16-6RETURN command 20-4RMDIR command 17-10Root directory 17-3RS-232 cable B-4, B-5RUN command 11-12, 21-4RUN command used by Windows NT 1-
4Running totals 11-1
SSafety Information 2-1
Alert symbol 2-1Barricading 2-1Emergency electrical shut-off 2-1Emergency personnel 2-2Evacuation 2-1NFPA regulations 2-1Open flames 2-2Preventing explosions and fires 2-1Regulations 2-1Replacement parts 2-1Safety symbols 2-1Shut-off 2-1Signal words 2-1Smoking 2-2Sparks 2-2Warning words 2-1Working alone 2-2
Safety symbols 2-1Sales reports
printing 11-2summary 11-9
Sales totals 11-1, 11-9Saving command file output 19-7SC3 files 17-1Screen editor 18-1
FRED 18-2, 18-4SDI 28-1Search path 19-2Search path for cron commands 21-5Searching for string 20-12Selecting
negative card lockout 13-4positive card lockout 13-5
SELFSERV command 26-9SELFSERV.CMD file E-3SET_PERM command 4-6, 17-7SET_PERM.BIN file E-2, E-3SET_VAR
international format 20-7SET_VAR command 20-7Setting
tank inventory counters 8-2user variables in command files 20-
7Settlement F-4Shift change 11-12
day-night pricing 11-12printing reports 11-12
Shift totals 11-1Shifts 11-1Shut-off 2-1
Emergency electrical 2-1
Index-8 MDE-4871 CFN III Manager’s Manual for Windows® XP Embedded - Version 3.6 · August 2010
Index
Sign offfrom a command terminal 3-4
Sign onchanging code 4-4command file 19-7to command terminal 3-4
Signal wordsSafety 2-1
SIGNON?.CMD file 19-7Site Controller
current status 25-7displaying status 25-10event history 25-4file system 17-1files 17-1switches A-1system monitoring 25-5
Site Controller files 17-4creating 17-4
Site record 3-2SLEEP command 19-5Software
Run command 1-4Sorting
transaction printout 12-2Special card types 28-1Specified conditions for cron 21-1Specifying files on other drives 17-4Star printer 6-2Starting the Profit Point 1-6Starting your CFN III 1-1STARTUP.CMD file E-3STATUS command 25-10STATUS.BIN file E-2STOP command 11-12Strings 19-11Subroutines 20-10SUBTRACT ALLOCATION
command 15-4SUBTRACT DRAWER command 11-
10, 11-11SUBTRACT INVENTORY
command 7-5, 9-7SUBTRACT TANK command 7-5, 8-2Subtracting
cash drawer amount 11-11merchandise-product inventory 9-7tank inventory 8-1
Supervisor cards 28-1SYS_PAR configuration command 23-1SYS_PAR.BIN file E-2SYSBACK command 10-10, 13-5, 16-2SYSBACK.CMD file E-3SYSBACK.DTA file 16-2, E-1
System databacking up 16-2
System diagnostics 25-1error codes 25-2printing 25-1resetting 25-2
System diskette E-1System monitor messages 25-5System overview 3-1System variables 19-9
TT option 19-3TABLE configuration command 23-1TABLE.BIN file E-2, E-3Tank
setting inventory counters 8-2Tank commands 8-1Tank gauge interface 28-1Tank inventory counters 8-1Tank monitoring system 8-1Taskbar
opening windows 1-3start button 1-4Windows NT 1-3
Tax accumulators 10-1names 10-2printing 10-2
Tax as percentage 10-3Tax data
backing up 10-10TAX program 10-7, 10-8, 10-9Tax rates
percentage 10-1, 10-3rounding boundaries 10-3
Tax tables 10-1building 10-7setting up 10-3storage space 10-7tax number 10-7
TAX.BIN file 9-2, E-2, E-3Taxes 10-1
cumulative totals 10-2Tender
type 14-2Terminal
input in command file 19-3option 19-3
Terminating redirection 19-7TEST PCU command 25-11Testing
pump control unit’s memory 25-11receipt printer 25-11
Text editorFred 18-1, 18-2NotePad 18-1Windows NT 18-1WordPad 18-1
Time 6-1Timed cron
commands 21-2entry 21-1
TIMESET.CMD file E-3Tokheim pump driver 28-1Totals
buffered 11-1cash drawer 11-1dollar, printing 11-7quantity, printing 11-7running 11-1sales 11-1sales, resetting 11-9
TRANBACK command 16-2, 16-4TRANBACK.CMD file E-3TRANBACK.DTA file 16-2, E-1TRANEXPT.CMD file E-3TRANFULL.CMD file E-3TRANHOUR.CMD file E-3Transaction-begin pointer 12-1, 12-
5, 12-6, 12-7resetting automatically 12-7
Transaction-memory cron command 21-4
Transaction-memory cron entry 21-2Transactions 12-1
backing up 16-4file 12-5handling F-2in progress 12-4logged transactions 12-1negative numbers 12-1printing 12-2printing a range 12-4printing specified types 12-3printing transactions in progress 12-
4printout 12-2reports 11-1resetting begin pointer 12-5, 12-6sorting 12-2
TREE command 17-9TREE.BIN file E-2, E-3TRFMT configuration command 23-1TRFMT.BIN file E-2, E-3
MDE-4871 CFN III Manager’s Manual for Windows® XP Embedded - Version 3.6 · August 2010 Index-9
Index
TroubleshootingBad connections with a 950
number F-8No connection F-8No indicators lit on the modem F-7No tones produced when you swipe
a card F-8Only the MR light is on F-7Quick diagnostic checks F-7
TYPE command 17-5Types of cards F-1
UUllage 8-1UNLOCK CARD command 13-3, 13-
4, 13-5, 13-6Unlocking cards 13-6Use
levels 1-2User
Administrator 1-4Gasboy 1-3
User ID numbers 4-1User number 4-1
printing a list 4-5User string variables 20-7User variables in command files 20-7
VVariables in command file 19-9Verifying commands 3-8Viewing
current tank inventory 8-1fuel prices and price codes 8-5pump information 8-9
WWaiting for user input 19-5Warning words 2-1Warnings 2-1WHERE command 17-10WHERE.BIN file E-2, E-3Wildcards 17-2Windows NT 1-1Windows NT Explorer 17-1WOW command 25-7WOW.BIN file E-2, E-3Write-protecting diskettes 16-5
Index-10 MDE-4871 CFN III Manager’s Manual for Windows® XP Embedded - Version 3.6 · August 2010
Index
This page is intentionally left blank.
MDE-4871 CFN III Manager’s Manual for Windows® XP Embedded - Version 3.6 · August 2010 Index-11

409® is a registered trademark of the Clorox Company. Amerada HessSM is a service mark of Amerada Hess Corporation. American Express® is a registered trademark of American Express Co. Amoco® is a registered trademark of Amoco Oil Company. BuypassSM is a service mark of Buypass Inco Corporation. Carte BlancheSM is a service mark of Diners Club International Ltd. CenexSM is a service mark of Cenex Harvest States Cooperatives. CITGO® is a registered trademark of Citgo Petroleum Corporation. Coastal® is a registered trademark of The Coastal Corporation. Comdata™ is a trademark of Comdata Network Inc. Country EnergySM is a service mark of CHS Inc. CRIND® and MPD® are registered trademarks of Gilbarco Inc. Diamond ShamrockSM is a service mark of Diamond Shamrock Refining and Marketing Company. Diners ClubSM is a service mark of CitiCorp Diners Club Inc. DiscoverSM is a service mark of Novus Credit Services Inc. Fantastik® is a registered trademark of Dow Consumer Products Inc. FINA® is a registered trademark of FinaMark Inc. FuelmanSM is a service mark of FleetCor Technologies Inc. Gulf® and Texaco® are registered trademarks of Chevron U.S.A. Inc. Hayes® is a registered trademark of Zoom Telephonics Inc. JCBSM is a service mark of JCB Co., Ltd. Macintosh® is a registered trademark of Apple Computer Inc. MasterCard® is a registered trademark of MasterCard International Incorporated. Excel®, MS-DOS® and Windows® are registered trademarks of Microsoft Corporation. Okidata® is a registered trademark of Oki Electric Industry Company Ltd. Paymentech™ is a trademark of Paymentech LLC. Phillips 66® is a registered trademark of ConocoPhillips Company. Procomm Plus™ is a trademark of Symantec Corporation. QuarlesSM is a service mark of Qualres Petroleum Inc. Quick FuelSM is a service mark of Jacobus Energy Inc. Shell® is a registered trademark of Shell Oil Company. Sinclair® is a registered trademark of Sinclair Oil Corporation. Star® is a registered trademark of Star Micronics America Inc. Tank Monitor™ is a trademark of Gilbarco Inc. TesoroSM is a service mark of Tesoro Petroleum Corporation. Tokheim® is a registered trademark of Tokheim Holding B.V. Corporation. UltramarSM is a service mark of Ultramar Inc. UNIX® is a registered trademark of Unix System Laboratories Inc. Veeder-Root® is a registered trademark of Danaher Corporation. Visa® is a registered trademark of Visa International Service Association. Wayne® is a registered trademark of Dresser Equipment Group Inc. Wright ExpressSM is a service mark of Wright Express LLC.
© 2010 GASBOY7300 West Friendly Avenue · Post Office Box 22087
Greensboro, North Carolina 27420Phone 1-800-444-5529 · http://www.gasboy.com · Printed in the U.S.A.MDE-4871 CFN III Manager’s Manual for Windows® XP Embedded - Version 3.6 · August 2010