Embed Size (px)
Citation preview
MMMMMMMM
Centergy Server Operations and Maintenance
EADS TELECOM North America – 2471-003 i
About this Document
ii EADS TELECOM North America – 2471-003
MMMMMMMM
Centergy Server Operations and Maintenance
EADS TELECOM North America – 2471-003 iii
3rd Edition (December 30, 2002)
© Copyright 2002 EADS TELECOM North America. All rights reserved.
Information in this manual is subject to change with product revisions. Technical Publications will incorporate such changes into new editions of the publications. EADS TELECOM North America may add features or enhancements to the product(s) and/or program(s) described in this manual at any time. EADS TELECOM North America Technical Publications freezes the information in this manual based on the software and hardware releases on which the information in the manual is based and will not include updates until the next release.
The application described in this manual is furnished under a license agreement and may be used or copied only in accordance with the terms of the agreement.
Contact Information
Address any reader comments to:
EADS TELECOM North America Technical Publications Manager, M/S 5A Liberty Plaza II 5057 Keller Springs Road Addison, TX 75001
You may also send email to [email protected].
What to Expect when Contacting Company
Technical Publications will email responses to customers within seven business days of the contact. Note that product support is not available through this email address. For product support, contact the EADS TELECOM North America Technical Service Center (TSC) at 1-800-729-1872. EADS TELECOM North America may use or distribute review comments and information without incurring obligation.
Trademarks and Acknowledgements
Centergy is a registered trademark of EADS TELECOM North America.
Seagate Crystal Reports is a trademark of Crystal Decision.
pcAnywhere is a trademark of Symantec.
This document identifies all other products or services mentioned herein by the trademarks, service marks, or product names designated by the companies that market those products. The companies producing these trademarks and registered trademarks control ownership of them. Make all inquiries concerning such trademarks directly to those companies.
About this Document
iv EADS TELECOM North America – 2471-003
Revision History
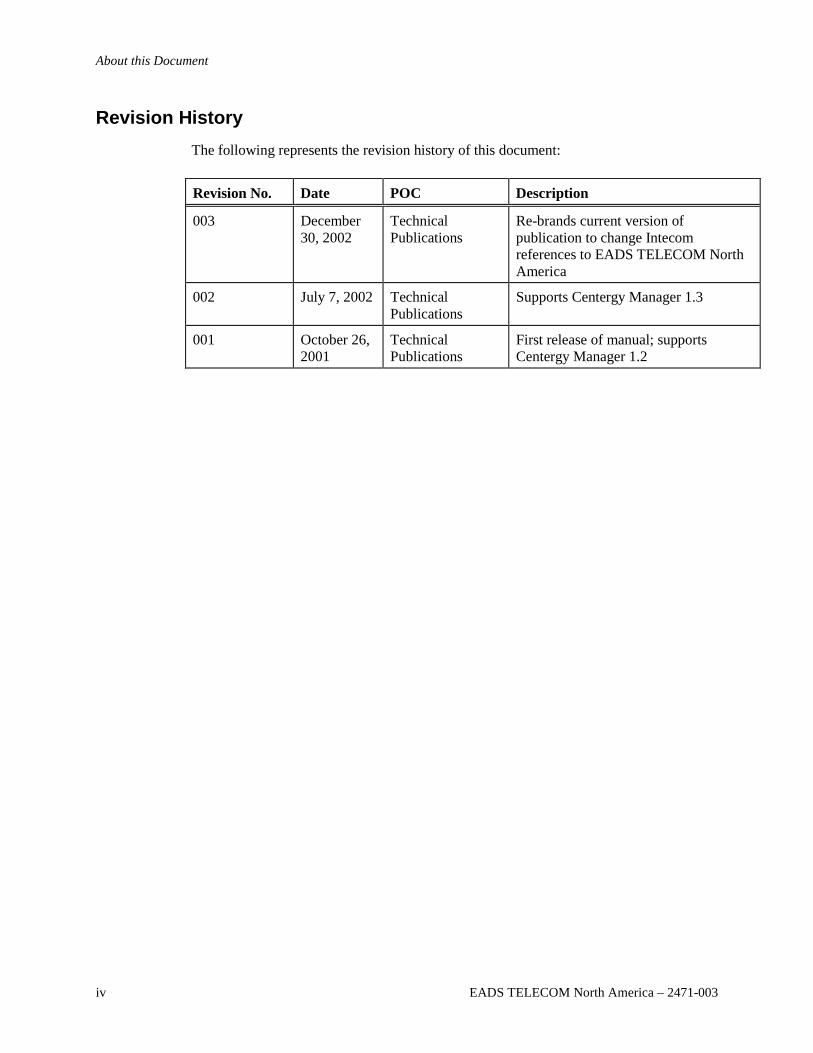
The following represents the revision history of this document:
Revision No. Date POC Description
003 December 30, 2002
Technical Publications
Re-brands current version of publication to change Intecom references to EADS TELECOM North America
002 July 7, 2002 Technical Publications
Supports Centergy Manager 1.3
001 October 26, 2001
Technical Publications
First release of manual; supports Centergy Manager 1.2
MMMMMMMM
Centergy Server Operations and Maintenance
EADS TELECOM North America – 2471-003 v
Table of Contents
Chapter 1: Centergy Network Management Server ..................1
Overview of a Centergy Network Management Server...............................1
Diagram of a CNMS ....................................................................................1
Software Components of a Centergy Network Management Server...........2
Hardware Requirements for a Centergy Network Management Server ......3
Primary Components of a Centergy Network Management Server ............3
CCMS Support Services ..............................................................................4
MTS CCMS Functions ................................................................................6
Event Service ...............................................................................................7
Chapter 2: Server Structure .........................................................9
Structure of a Centergy Network Management Server................................9
Single-server Configuration.........................................................................9
Dual-server Configuration .........................................................................10
Centergy Server Directory .........................................................................10
Backup Directory.......................................................................................12
Diagnostics Directory ................................................................................13
Local Files Directory .................................................................................13
MTS Components Directory......................................................................14
Report Templates Directory.......................................................................15
Services Directory......................................................................................16
SQL Scripts Directory................................................................................17
Testers Directory........................................................................................18
Chapter 3: Databases, Data Objects, and Statistics .................21
Centergy Databases....................................................................................21
Centergy System Database ........................................................................22

About this Document
vi EADS TELECOM North America – 2471-003
Call Center Databases ................................................................................22
Centergy Data Call Center (Statistics) Databases......................................22
Synchronization of Centergy Data Call Center Databases with EADS TELECOM North America Switch Databases ..........................................23
Saving Statistics to Data Call Center Databases........................................28
Event Rewind.............................................................................................29
Loss of Centergy Statistics.........................................................................33
Loss of Connection Between a CNMS and an EADS TELECOM North America Switch..........................................................................................34
Event Scenarios..........................................................................................35
Agent Answers Call ...................................................................................36
Calling Party Abandons Call Before Agent Answer .................................37
Agent Places a Call ....................................................................................38
Agent Puts a Call on Hold .........................................................................39
Agent Makes Consultation Call with Original Caller on Hold..................40
Agent Transfers Call without Announcement ...........................................41
Agent Transfers Call with Announcement ................................................42
Agent Initiates a Conference Call ..............................................................43
Agent Parks a Call .....................................................................................44
Agent in Wrap............................................................................................45
Agent Initiates Work..................................................................................46
Agent Does or Does Not Answer Call within Answer Threshold .............47
Agent Handles Call: Centergy Calculates Duration ..................................48
Calling Party Abandons Call .....................................................................49
Calling Party Abandons Call within Short Abandon Threshold................50
Calling Party Abandons Call in First IVR Step .........................................51
Calling Party Abandons Call in Queue......................................................52
Calling Party Abandons Call While Ringing.............................................53
Chapter 4: Server Configuration Options.................................55
Domain Account for Centergy Network Management Server ..................55
MMMMMMMM
Centergy Server Operations and Maintenance
EADS TELECOM North America – 2471-003 vii
Printer Availability on a Centergy Network Management Server.............55
Enabling Access to Data Call Center Databases........................................55
Chapter 5: Server Utilities ..........................................................59
Overview of Centergy Server Utilities ......................................................59
Centergy Tools Directory ..........................................................................59
EADS TELECOM North America Utilities to Operate and Maintain Centergy.....................................................................................................60
Microsoft and Symantec Utilities for Centergy .........................................62
Chapter 6: Verify Centergy Components..................................65
Verifying Versions for Centergy Server Components...............................65
List of Centergy Server Components with Version Level.........................66
Chapter 7: Control Centergy Services .......................................67
Control Services for Maintenance or Shutdown........................................67
Stopping or Starting Centergy Services .....................................................67
Impact of Stopping Windows Before Stopping Centergy Services...........67
Impact of Power Failures and System Crashes..........................................68
Event Rewind Implications........................................................................68
CCMS Support Services and Corresponding States ..................................69
Shutting Down the Centergy Server ..........................................................69
Verifying Centergy Operations After Restarting Services ........................70
Stopping All Centergy Services.................................................................70
Starting All Centergy Services...................................................................71
Stopping a Single Centergy Service ..........................................................72
Starting a Single Centergy Service ............................................................72
Shutting Down Centergy with a Single-server Configuration...................73
Restarting Centergy with a Single-server Configuration...........................74
Shutting Down Centergy with a Dual-server Configuration .....................74
Restarting Centergy with a Dual-server Configuration .............................75
Verifying the Operation of Centergy Services...........................................76
Centergy Services Status After Restart......................................................76
About this Document
viii EADS TELECOM North America – 2471-003
Verify Display Session Updates in Centergy Manager .............................77
Verifying the Operation of OAI Drivers....................................................77
Verifying Reception of Switch Events ......................................................80
Chapter 8: Feature Tracing ........................................................83
Feature Tracing and the CCMS Support Services Log..............................83
Opening the CCMS Support Services Log File.........................................83
Controlling Feature Tracing.......................................................................84
Filtering Options ........................................................................................86
Checking the Size of the CCMS Support Services Log File .....................87
Clearing the CCMS Support Services Log File.........................................88
Chapter 9: Open Application Interface Communications.......89
Open Application Interface Connection for a Centergy Server.................89
Viewing the Open Application Interface Log............................................89
Clearing the Open Application Interface Log............................................90
Chapter 10: Data Backup and Recovery ...................................93
SQL Database Backups..............................................................................93
Creating SQL Database Backups on a Network Directory........................93
Backup Order for SQL Databases..............................................................94
When to Run Backups ...............................................................................94
Backup Interfaces.......................................................................................95
Assigning a Network Backup Device ......................................................100
Assigning an Account to the Local Administrators Group for a Centergy Network Management Server ..................................................................101
Enabling the SQL Server to Log onto the Network.................................102
Manually Creating a Backup Tape for SQL Databases ...........................104
Scheduling a Tape Backup for SQL Server Databases............................106
Manually Creating a Backup of SQL Databases on a Network Directory111
Scheduling a Backup of SQL Server Databases to a Network Directory112
Manually Creating a Backup Using the Parameters of a Scheduled Job.117
Chapter 11: Custom Reports ....................................................119

MMMMMMMM
Centergy Server Operations and Maintenance
EADS TELECOM North America – 2471-003 ix
Implement a Custom Report for Centergy...............................................119
Define a Custom Report...........................................................................119
Assigning an Account to the SQL Readers Group for a Centergy Network Management Server .................................................................................120
Enabling Crystal Reports on a Report Development PC to Access a Centergy SQL Server...............................................................................122
Creating a Custom Report for Centergy ..................................................124
Dynamic P_ Formulas..............................................................................126
Static "P_" Formulas................................................................................126
Adding a Custom Report Template .........................................................127
Chapter 12: Run Centergy Manager .......................................129
Starting Centergy Manager from a Centergy Network Management Server129

About this Document
x EADS TELECOM North America – 2471-003
MMMMMMMM
Centergy Server Operations and Maintenance
EADS TELECOM North America – 2471-003 xi
About This Document
Overview
Welcome to Centergy. Centergy is a powerful tool that integrates with EADS TELECOM North America systems to enable effective call center and contact center management. The Centergy Network Management Server (CNMS) is a set of software components that operate with Centergy Manager desktop application software to provide an array of functions. Centergy Manager provides a PC user interface. The CNMS software, running on a dedicated physical server, interfaces with an EADS TELECOM North America switch to obtain and manage switch input data. The CNMS makes that data available to Centergy Manager.
Audience
This manual helps system administrators perform operations, maintenance, and troubleshooting functions for Centergy through the EADS TELECOM North America CNMS. The Centergy Manager Administrator Guide (590-2503) supports call center and contact center administrators in using the Centergy Manager application. This manual extends the information in the administrator's guide. It gives additional information for technical system administrators who have all the general Centergy administration responsibilities plus direct access to the server and PC resources. Such users provide technical Information Services (IS) functions, such as troubleshooting and server maintenance, that other Centergy administrators do not. The administrators should have Microsoft Certified System Engineer (MCSE) credentials or equivalent experience and knowledge.
Organization
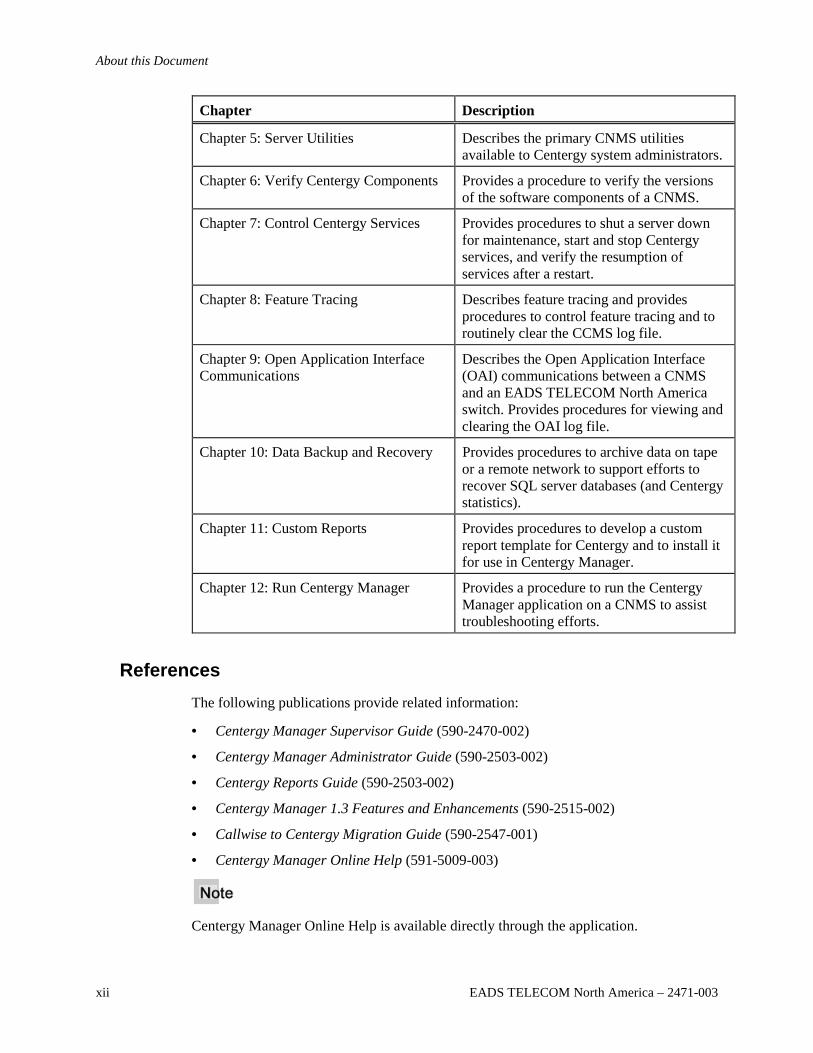
This manual contains the following chapters:
Chapter Description
Chapter 1: Centergy Network Management Server
Provides an introduction and overview of a CNMS and its components.
Chapter 2: Server Structure Describes single- and dual-server CNMS configurations and describes the general directly structure.
Chapter 3: Databases, Data Objects, and Statistics
Defines all of the databases on a CNMS and provides important process information that affects data objects and statistics.
Chapter 4: Server Configuration Options Provides information and procedures for important CNMS options, including the use of a domain account and printer availability.
About this Document
xii EADS TELECOM North America – 2471-003
Chapter Description
Chapter 5: Server Utilities Describes the primary CNMS utilities available to Centergy system administrators.
Chapter 6: Verify Centergy Components Provides a procedure to verify the versions of the software components of a CNMS.
Chapter 7: Control Centergy Services Provides procedures to shut a server down for maintenance, start and stop Centergy services, and verify the resumption of services after a restart.
Chapter 8: Feature Tracing Describes feature tracing and provides procedures to control feature tracing and to routinely clear the CCMS log file.
Chapter 9: Open Application Interface Communications
Describes the Open Application Interface (OAI) communications between a CNMS and an EADS TELECOM North America switch. Provides procedures for viewing and clearing the OAI log file.
Chapter 10: Data Backup and Recovery Provides procedures to archive data on tape or a remote network to support efforts to recover SQL server databases (and Centergy statistics).
Chapter 11: Custom Reports Provides procedures to develop a custom report template for Centergy and to install it for use in Centergy Manager.
Chapter 12: Run Centergy Manager Provides a procedure to run the Centergy Manager application on a CNMS to assist troubleshooting efforts.
References
The following publications provide related information:
• Centergy Manager Supervisor Guide (590-2470-002)
• Centergy Manager Administrator Guide (590-2503-002)
• Centergy Reports Guide (590-2503-002)
• Centergy Manager 1.3 Features and Enhancements (590-2515-002)
• Callwise to Centergy Migration Guide (590-2547-001)
• Centergy Manager Online Help (591-5009-003)
Centergy Manager Online Help is available directly through the application.

MMMMMMMM
Centergy Server Operations and Maintenance
EADS TELECOM North America – 2471-003 1
Chapter 1
Centergy Network Management Server
Overview of a Centergy Network Management Server
The Centergy Network Management Server (CNMS) operates with the Centergy Manager application to provide an array of functions that help users manage call centers and contact centers. The CNMS is software, running on a dedicated physical server, that interfaces with an EADS TELECOM North America switch to obtain and manage switch input data. The CNMS makes that data available to Centergy Manager.
CNMS software runs on the Microsoft Windows 2000 Server operating system.
The server is also called a Call Center Management Server (CCMS). Many of the internal server software services include the acronym CCMS.
Diagram of a CNMS
The diagram of a CNMS shows its major components and its connections to an EADS TELECOM North America switch and client applications.
Centergy Network Management Server
2 EADS TELECOM North America – 2471-003
The CNMS applies a three-tiered, object-oriented architecture. This architecture neatly partitions CNMS applications into a data services tier, a business logic tier, and a user presentation tier. The major CNMS services are core components of the business logic tier. All CNMS services are objects that comply with Microsoft’s Distributed Component Object Model (DCOM) architecture.
Event Service software, using the Computer Supported Telephony Application (CSTA) standard, receives event data over TCP/IP connections from an EADS TELECOM North America switch for call centers or contact centers. The Event Service software translates event data into statistics for agents, agent groups, and call types for each call center.
Database Service software, using an Open Application Interface (OAI) connection, synchronizes the data in the Centergy database with the data from an EADS TELECOM North America switch. The Database Service also coordinates with other CNMS services to write the statistical data to a Structured Query Language (SQL) database.
The CNMS services apply DCOM over TCP/IP to communicate with external client applications. Client applications and the SQL database apply the Microsoft Open Database Connectivity (ODBC) standard to communicate. An EADS TELECOM North America DBBridge is an alternate means for clients and the SQL database to communicate.
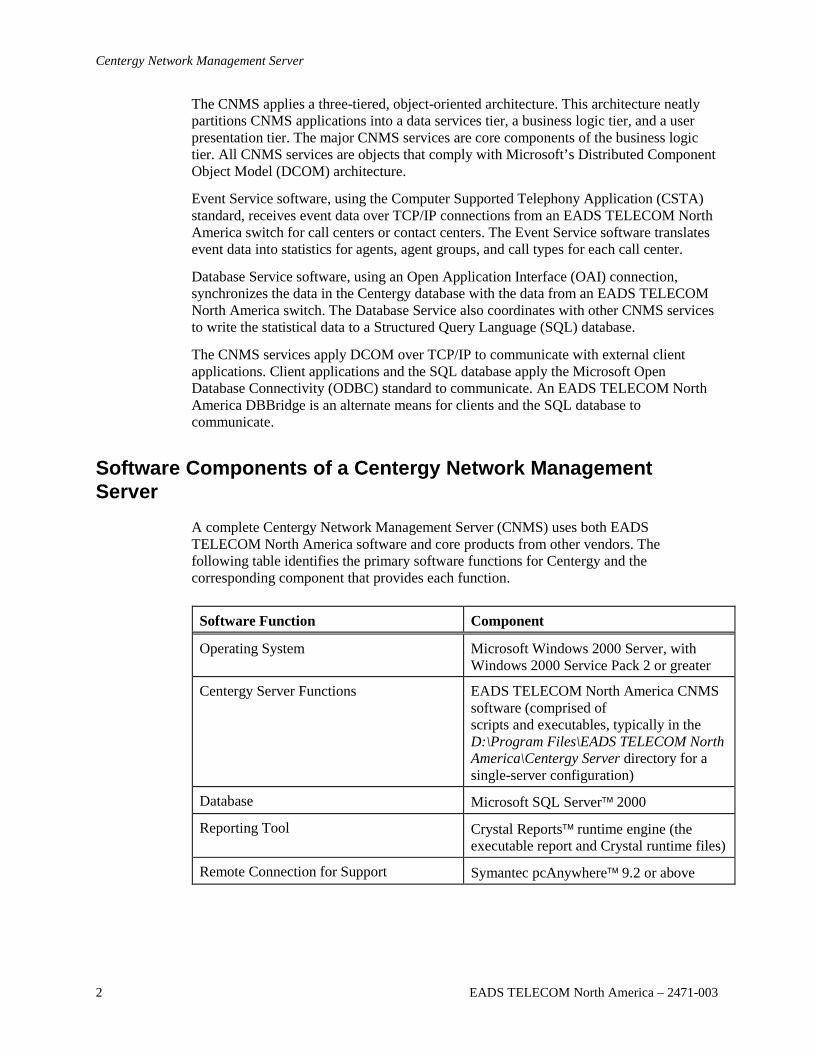
Software Components of a Centergy Network Management Server
A complete Centergy Network Management Server (CNMS) uses both EADS TELECOM North America software and core products from other vendors. The following table identifies the primary software functions for Centergy and the corresponding component that provides each function.
Software Function Component
Operating System Microsoft Windows 2000 Server, with Windows 2000 Service Pack 2 or greater
Centergy Server Functions EADS TELECOM North America CNMS software (comprised of scripts and executables, typically in the D:\Program Files\EADS TELECOM North America\Centergy Server directory for a single-server configuration)
Database Microsoft SQL Server 2000
Reporting Tool Crystal Reports runtime engine (the executable report and Crystal runtime files)
Remote Connection for Support Symantec pcAnywhere 9.2 or above
MMMMMMMM
Centergy Server Operations and Maintenance
EADS TELECOM North America – 2471-003 3
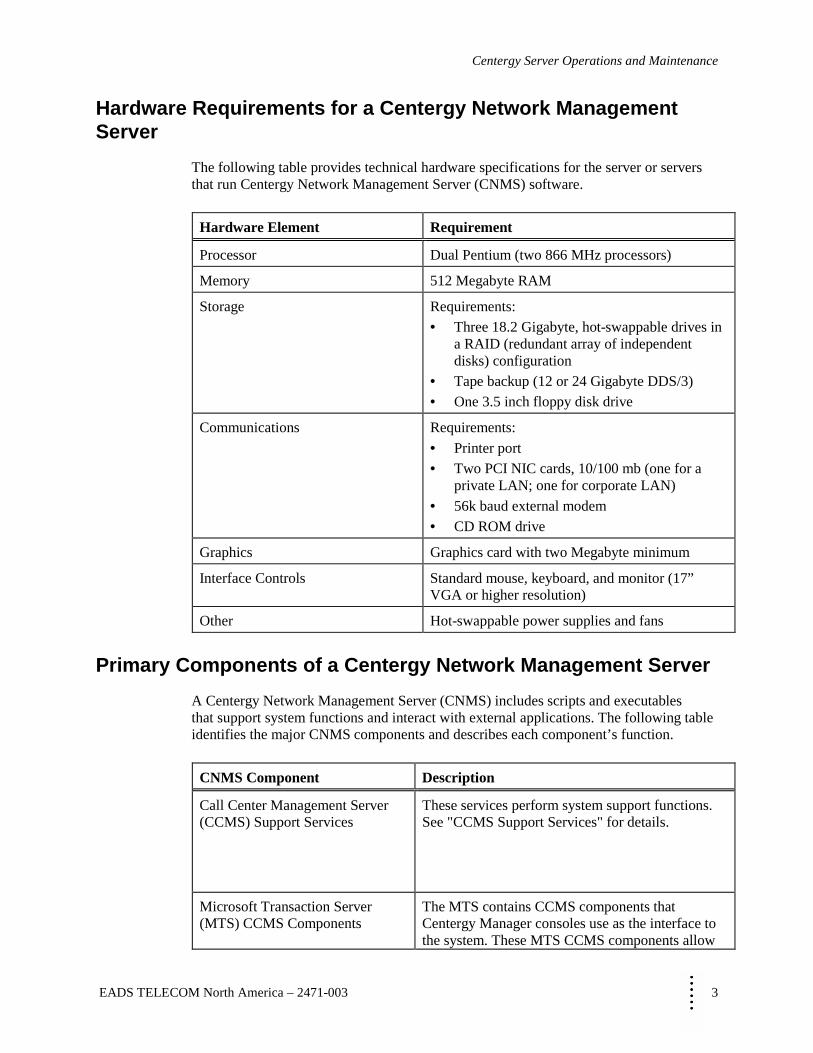
Hardware Requirements for a Centergy Network Management Server
The following table provides technical hardware specifications for the server or servers that run Centergy Network Management Server (CNMS) software.
Hardware Element Requirement
Processor Dual Pentium (two 866 MHz processors)
Memory 512 Megabyte RAM
Storage Requirements: • Three 18.2 Gigabyte, hot-swappable drives in
a RAID (redundant array of independent disks) configuration
• Tape backup (12 or 24 Gigabyte DDS/3) • One 3.5 inch floppy disk drive
Communications Requirements: • Printer port • Two PCI NIC cards, 10/100 mb (one for a
private LAN; one for corporate LAN) • 56k baud external modem • CD ROM drive
Graphics Graphics card with two Megabyte minimum
Interface Controls Standard mouse, keyboard, and monitor (17” VGA or higher resolution)
Other Hot-swappable power supplies and fans
Primary Components of a Centergy Network Management Server
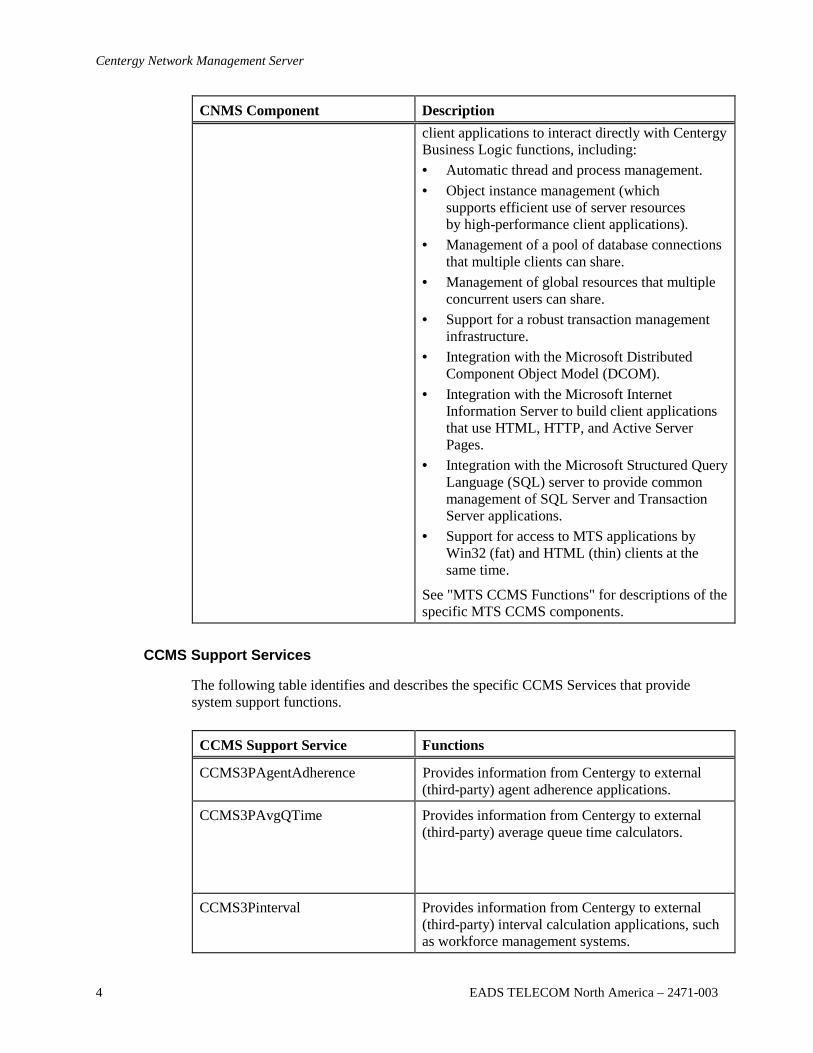
A Centergy Network Management Server (CNMS) includes scripts and executables that support system functions and interact with external applications. The following table identifies the major CNMS components and describes each component’s function.
CNMS Component Description
Call Center Management Server (CCMS) Support Services
These services perform system support functions. See "CCMS Support Services" for details.
Microsoft Transaction Server (MTS) CCMS Components
The MTS contains CCMS components that Centergy Manager consoles use as the interface to the system. These MTS CCMS components allow
Centergy Network Management Server
4 EADS TELECOM North America – 2471-003
CNMS Component Description client applications to interact directly with Centergy Business Logic functions, including: • Automatic thread and process management. • Object instance management (which
supports efficient use of server resources by high-performance client applications).
• Management of a pool of database connections that multiple clients can share.
• Management of global resources that multiple concurrent users can share.
• Support for a robust transaction management infrastructure.
• Integration with the Microsoft Distributed Component Object Model (DCOM).
• Integration with the Microsoft Internet Information Server to build client applications that use HTML, HTTP, and Active Server Pages.
• Integration with the Microsoft Structured Query Language (SQL) server to provide common management of SQL Server and Transaction Server applications.
• Support for access to MTS applications by Win32 (fat) and HTML (thin) clients at the same time.
See "MTS CCMS Functions" for descriptions of the specific MTS CCMS components.
CCMS Support Services
The following table identifies and describes the specific CCMS Services that provide system support functions.
CCMS Support Service Functions
CCMS3PAgentAdherence Provides information from Centergy to external (third-party) agent adherence applications.
CCMS3PAvgQTime Provides information from Centergy to external (third-party) average queue time calculators.
CCMS3Pinterval Provides information from Centergy to external (third-party) interval calculation applications, such as workforce management systems.
MMMMMMMM
Centergy Server Operations and Maintenance
EADS TELECOM North America – 2471-003 5
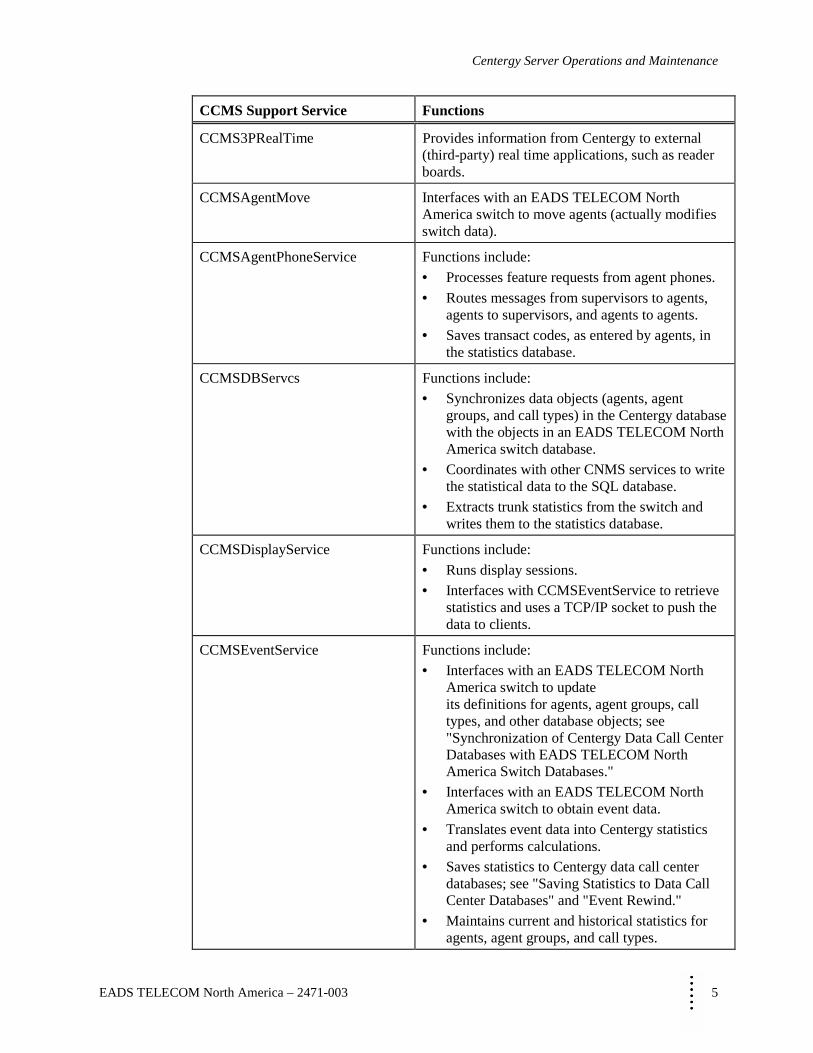
CCMS Support Service Functions
CCMS3PRealTime Provides information from Centergy to external (third-party) real time applications, such as reader boards.
CCMSAgentMove Interfaces with an EADS TELECOM North America switch to move agents (actually modifies switch data).
CCMSAgentPhoneService Functions include: • Processes feature requests from agent phones. • Routes messages from supervisors to agents,
agents to supervisors, and agents to agents. • Saves transact codes, as entered by agents, in
the statistics database.
CCMSDBServcs Functions include: • Synchronizes data objects (agents, agent
groups, and call types) in the Centergy database with the objects in an EADS TELECOM North America switch database.
• Coordinates with other CNMS services to write the statistical data to the SQL database.
• Extracts trunk statistics from the switch and writes them to the statistics database.
CCMSDisplayService Functions include: • Runs display sessions. • Interfaces with CCMSEventService to retrieve
statistics and uses a TCP/IP socket to push the data to clients.
CCMSEventService Functions include: • Interfaces with an EADS TELECOM North
America switch to update its definitions for agents, agent groups, call types, and other database objects; see "Synchronization of Centergy Data Call Center Databases with EADS TELECOM North America Switch Databases."
• Interfaces with an EADS TELECOM North America switch to obtain event data.
• Translates event data into Centergy statistics and performs calculations.
• Saves statistics to Centergy data call center databases; see "Saving Statistics to Data Call Center Databases" and "Event Rewind."
• Maintains current and historical statistics for agents, agent groups, and call types.
Centergy Network Management Server
6 EADS TELECOM North America – 2471-003
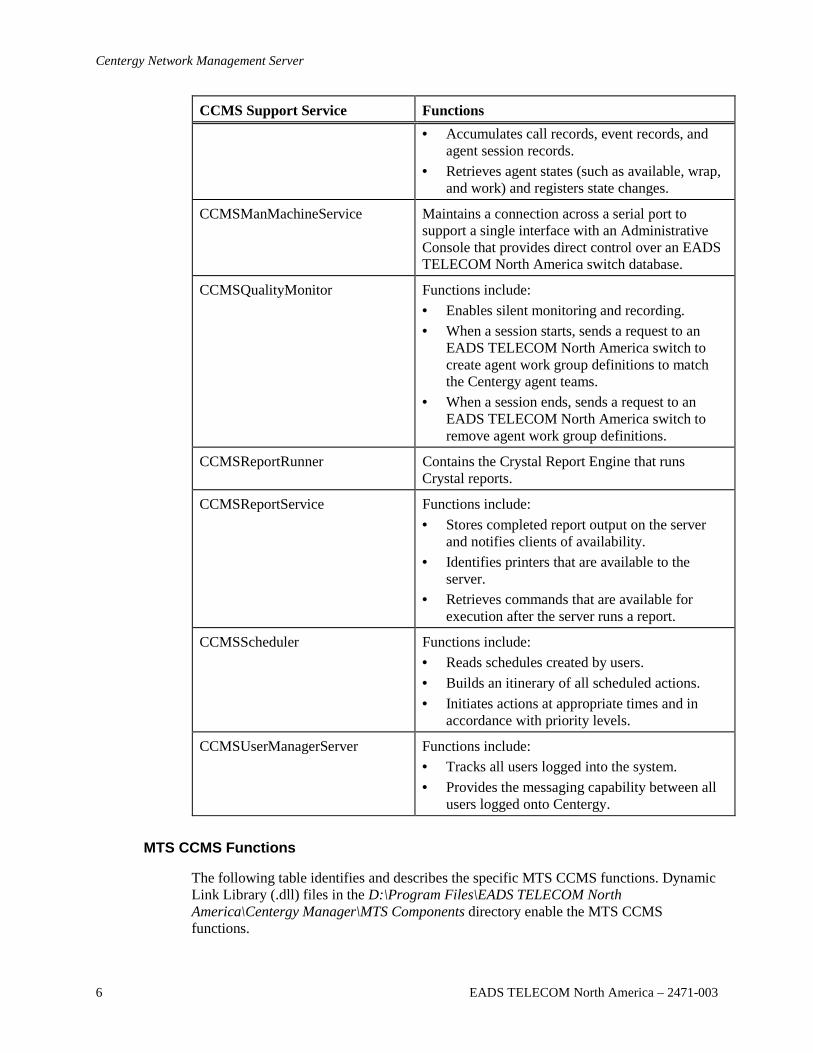
CCMS Support Service Functions • Accumulates call records, event records, and
agent session records. • Retrieves agent states (such as available, wrap,
and work) and registers state changes.
CCMSManMachineService Maintains a connection across a serial port to support a single interface with an Administrative Console that provides direct control over an EADS TELECOM North America switch database.
CCMSQualityMonitor Functions include: • Enables silent monitoring and recording. • When a session starts, sends a request to an
EADS TELECOM North America switch to create agent work group definitions to match the Centergy agent teams.
• When a session ends, sends a request to an EADS TELECOM North America switch to remove agent work group definitions.
CCMSReportRunner Contains the Crystal Report Engine that runs Crystal reports.
CCMSReportService Functions include: • Stores completed report output on the server
and notifies clients of availability. • Identifies printers that are available to the
server. • Retrieves commands that are available for
execution after the server runs a report.
CCMSScheduler Functions include: • Reads schedules created by users. • Builds an itinerary of all scheduled actions. • Initiates actions at appropriate times and in
accordance with priority levels.
CCMSUserManagerServer Functions include: • Tracks all users logged into the system. • Provides the messaging capability between all
users logged onto Centergy.
MTS CCMS Functions
The following table identifies and describes the specific MTS CCMS functions. Dynamic Link Library (.dll) files in the D:\Program Files\EADS TELECOM North America\Centergy Manager\MTS Components directory enable the MTS CCMS functions.
MMMMMMMM
Centergy Server Operations and Maintenance
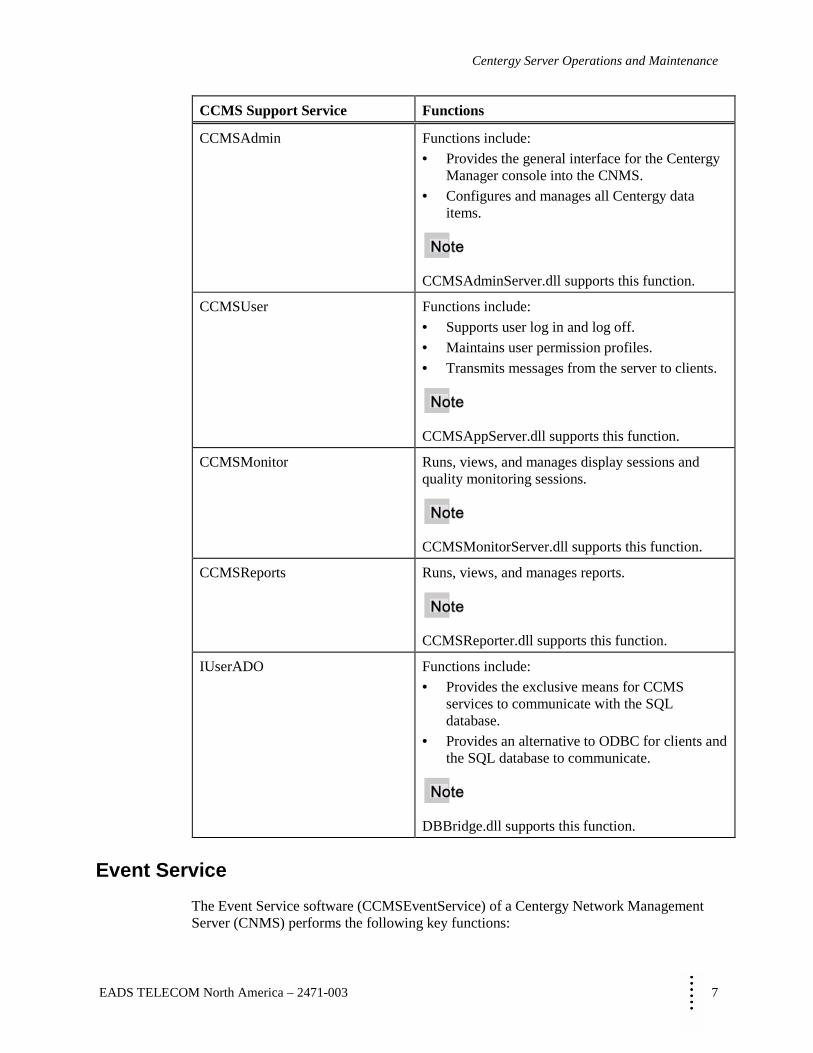
EADS TELECOM North America – 2471-003 7
CCMS Support Service Functions
CCMSAdmin Functions include: • Provides the general interface for the Centergy
Manager console into the CNMS. • Configures and manages all Centergy data
items.
CCMSAdminServer.dll supports this function.
CCMSUser Functions include: • Supports user log in and log off. • Maintains user permission profiles. • Transmits messages from the server to clients.
CCMSAppServer.dll supports this function.
CCMSMonitor
Runs, views, and manages display sessions and quality monitoring sessions.
CCMSMonitorServer.dll supports this function.
CCMSReports
Runs, views, and manages reports.
CCMSReporter.dll supports this function.
IUserADO
Functions include: • Provides the exclusive means for CCMS
services to communicate with the SQL database.
• Provides an alternative to ODBC for clients and the SQL database to communicate.
DBBridge.dll supports this function.
Event Service
The Event Service software (CCMSEventService) of a Centergy Network Management Server (CNMS) performs the following key functions:
Centergy Network Management Server
8 EADS TELECOM North America – 2471-003
• Interfaces with an EADS TELECOM North America switch to update its definitions for agents, agent groups, call types, and other database objects; see "Synchronization of Centergy Data Call Center Databases with EADS TELECOM North America Switch Databases"
• Interfaces with an EADS TELECOM North America switch to obtain event data
• Translates event data into Centergy statistics and performs calculations
• Saves statistics to Centergy data call center databases; see "Saving Statistics to Data Call Center Databases" and "Event Rewind"
The Event Service process to save statistics to a data call center database is sometimes referred to as an "interval flush."
• Maintains current and historical statistics for agents, agent groups, and call types
• Accumulates call records, event records, and agent session records
• Retrieves agent states (such as available, wrap, and work) and registers state changes

MMMMMMMM
Centergy Server Operations and Maintenance
EADS TELECOM North America – 2471-003 9
Chapter 2
Server Structure
Structure of a Centergy Network Management Server
A Centergy Network Management Server (CNMS) uses either a single-server or a dual-server configuration. Using two servers, one for real time data and another for reports, enhances operating performance.
Single-server Configuration
In a single-server configuration, the Centergy server uses three drive partitions (C, D, and E) for data and program files. The following table describes the contents of the three single-server partitions.
Partition Contents
C:
Contents include: • Windows 2000 OS. • SQL Server program files, including scripts and
executables. • Norton AntiVirus.
D:
Contents include: • Centergy program files, including Centergy Server and
Centergy Manager. • Symantec pcAnywhere. • OAI Toolkit, including the Driver Control Program (DCP)
and OAI logs. • Centergy log files. • Centergy reports (saved).
E: SQL Server database files.
The Centergy Server Operations and Maintenance manual assumes a single-server configuration. Some drive locations and directory paths differ slightly for a dual-server configuration.
Server Structure
10 EADS TELECOM North America – 2471-003
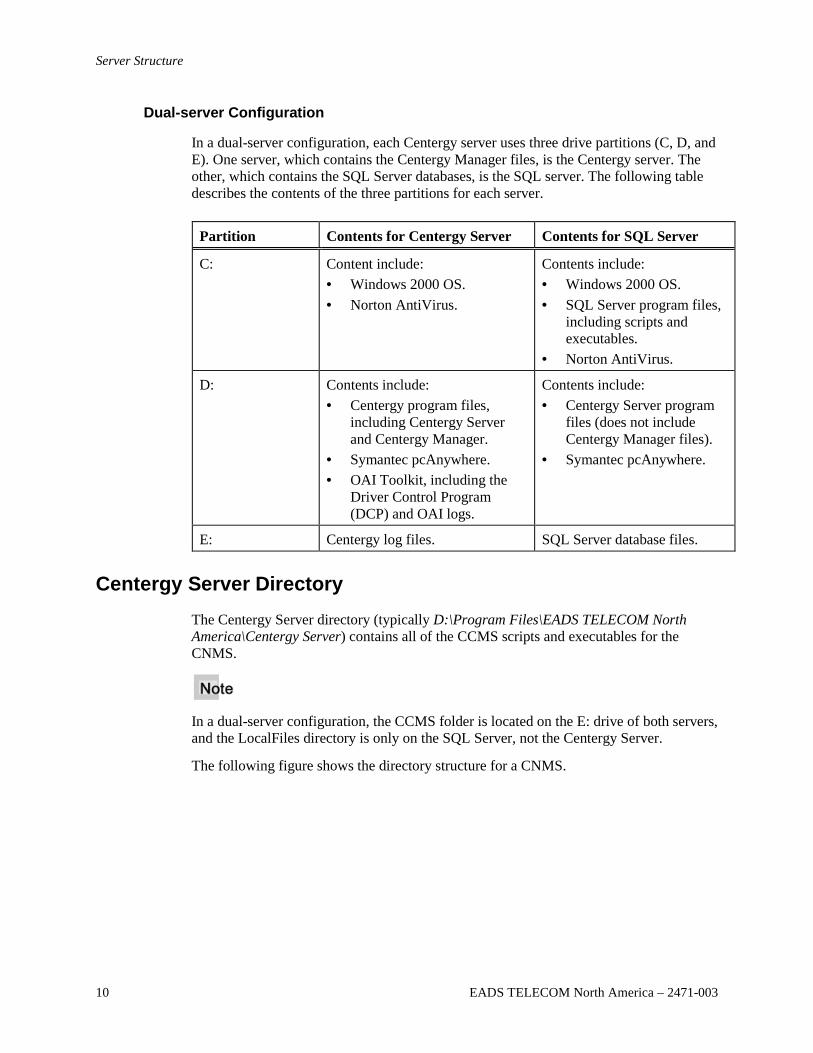
Dual-server Configuration
In a dual-server configuration, each Centergy server uses three drive partitions (C, D, and E). One server, which contains the Centergy Manager files, is the Centergy server. The other, which contains the SQL Server databases, is the SQL server. The following table describes the contents of the three partitions for each server.
Partition Contents for Centergy Server Contents for SQL Server
C:
Content include: • Windows 2000 OS. • Norton AntiVirus.
Contents include: • Windows 2000 OS. • SQL Server program files,
including scripts and executables.
• Norton AntiVirus.
D:
Contents include: • Centergy program files,
including Centergy Server and Centergy Manager.
• Symantec pcAnywhere. • OAI Toolkit, including the
Driver Control Program (DCP) and OAI logs.
Contents include: • Centergy Server program
files (does not include Centergy Manager files).
• Symantec pcAnywhere.
E: Centergy log files. SQL Server database files.
Centergy Server Directory
The Centergy Server directory (typically D:\Program Files\EADS TELECOM North America\Centergy Server) contains all of the CCMS scripts and executables for the CNMS.
In a dual-server configuration, the CCMS folder is located on the E: drive of both servers, and the LocalFiles directory is only on the SQL Server, not the Centergy Server.
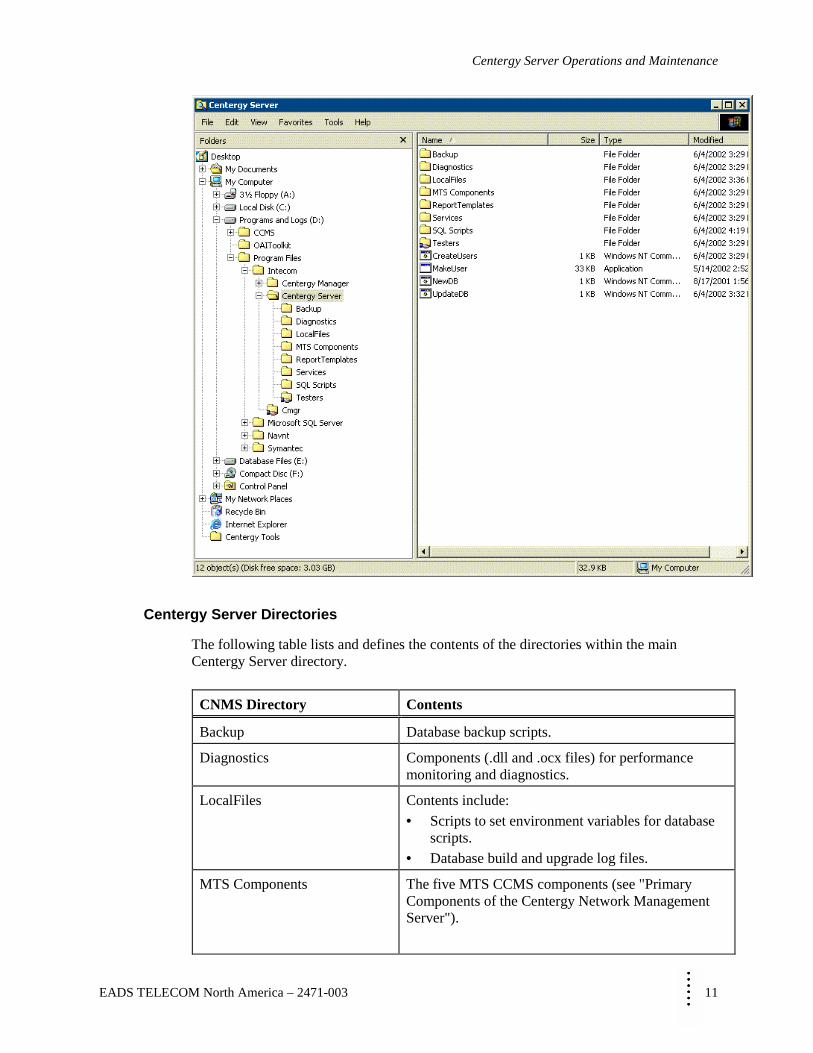
The following figure shows the directory structure for a CNMS.
MMMMMMMM
Centergy Server Operations and Maintenance
EADS TELECOM North America – 2471-003 11
Centergy Server Directories
The following table lists and defines the contents of the directories within the main Centergy Server directory.
CNMS Directory Contents
Backup Database backup scripts.
Diagnostics Components (.dll and .ocx files) for performance monitoring and diagnostics.
LocalFiles Contents include: • Scripts to set environment variables for database
scripts. • Database build and upgrade log files.
MTS Components The five MTS CCMS components (see "Primary Components of the Centergy Network Management Server").
Server Structure
12 EADS TELECOM North America – 2471-003
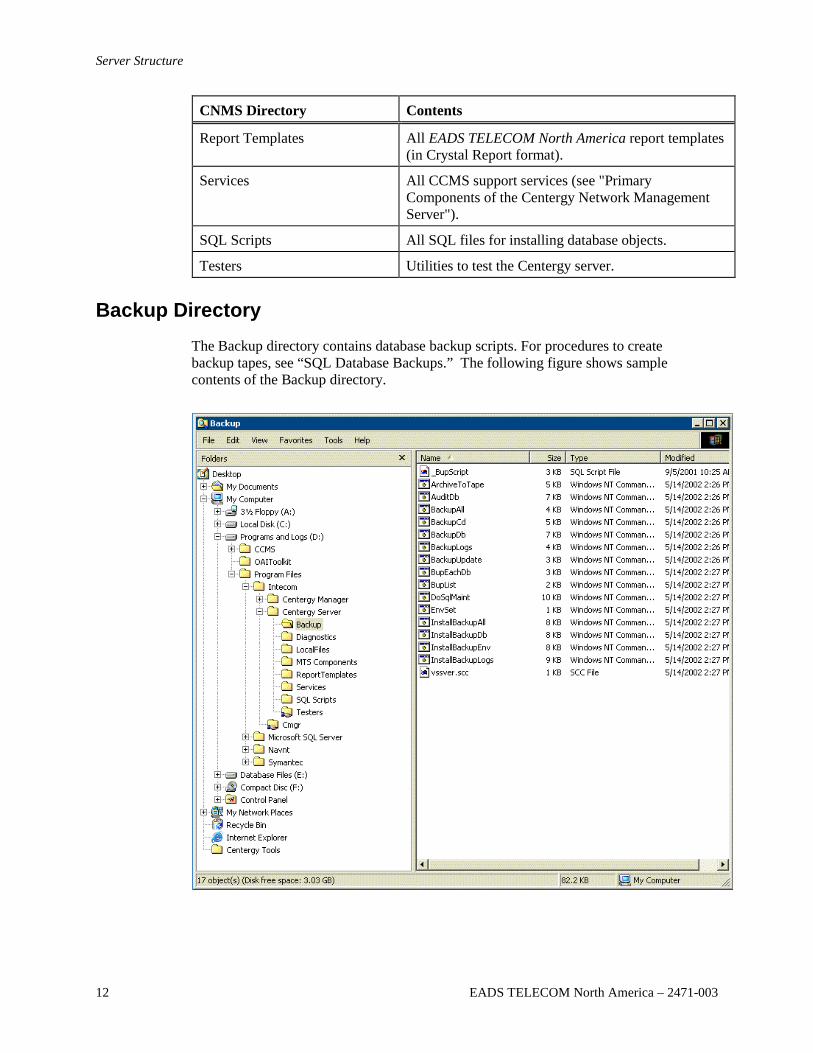
CNMS Directory Contents
Report Templates All EADS TELECOM North America report templates (in Crystal Report format).
Services All CCMS support services (see "Primary Components of the Centergy Network Management Server").
SQL Scripts All SQL files for installing database objects.
Testers Utilities to test the Centergy server.
Backup Directory
The Backup directory contains database backup scripts. For procedures to create backup tapes, see “SQL Database Backups.” The following figure shows sample contents of the Backup directory.

MMMMMMMM
Centergy Server Operations and Maintenance
EADS TELECOM North America – 2471-003 13
Diagnostics Directory
The Diagnostics directory contains components for performance monitoring and diagnostics.
These utilities are for use by EADS TELECOM North America or with direct assistance from EADS TELECOM North America only. Before using any of the components in this directory, contact the EADS TELECOM North America Technical Service Center (TSC) at 1-800-729-1872.
The following figure shows sample contents of the Diagnostics directory.
Local Files Directory
The Local Files directory contains scripts to set environment variables for database scripts. It also contains database build and upgrade log files. The following figure shows sample contents of the Local Files directory.
Server Structure
14 EADS TELECOM North America – 2471-003
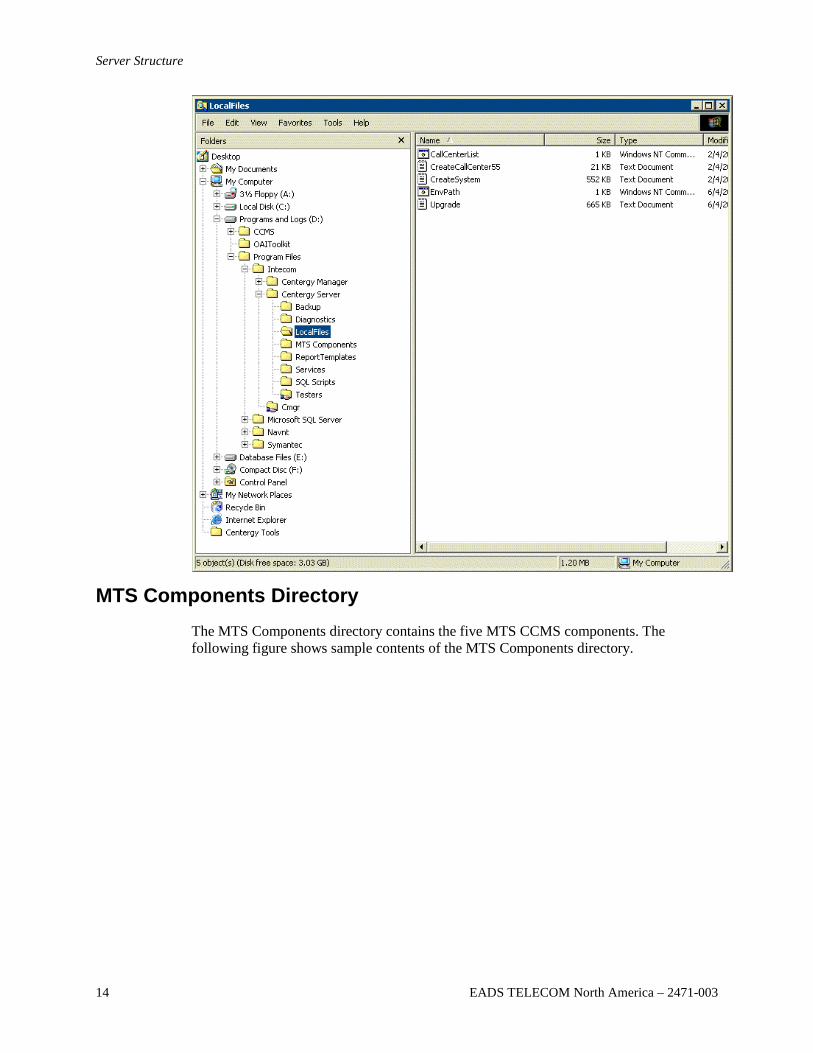
MTS Components Directory
The MTS Components directory contains the five MTS CCMS components. The following figure shows sample contents of the MTS Components directory.
MMMMMMMM
Centergy Server Operations and Maintenance
EADS TELECOM North America – 2471-003 15
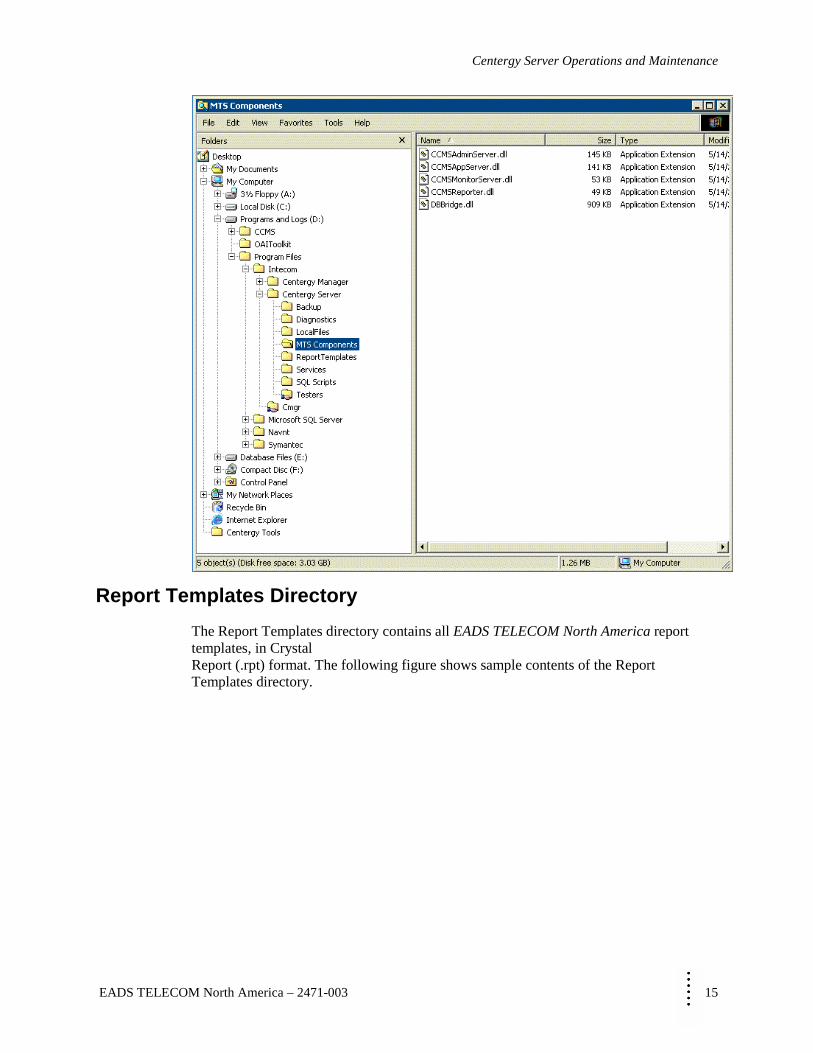
Report Templates Directory
The Report Templates directory contains all EADS TELECOM North America report templates, in Crystal Report (.rpt) format. The following figure shows sample contents of the Report Templates directory.
Server Structure
16 EADS TELECOM North America – 2471-003
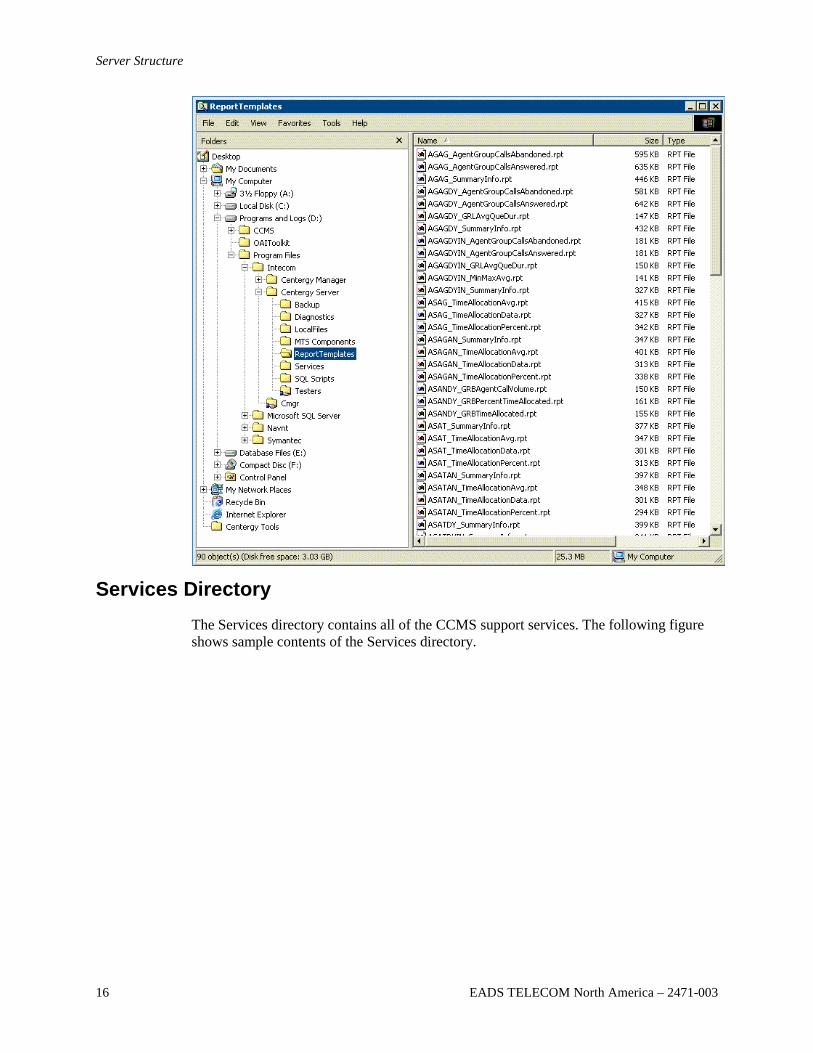
Services Directory
The Services directory contains all of the CCMS support services. The following figure shows sample contents of the Services directory.
MMMMMMMM
Centergy Server Operations and Maintenance
EADS TELECOM North America – 2471-003 17
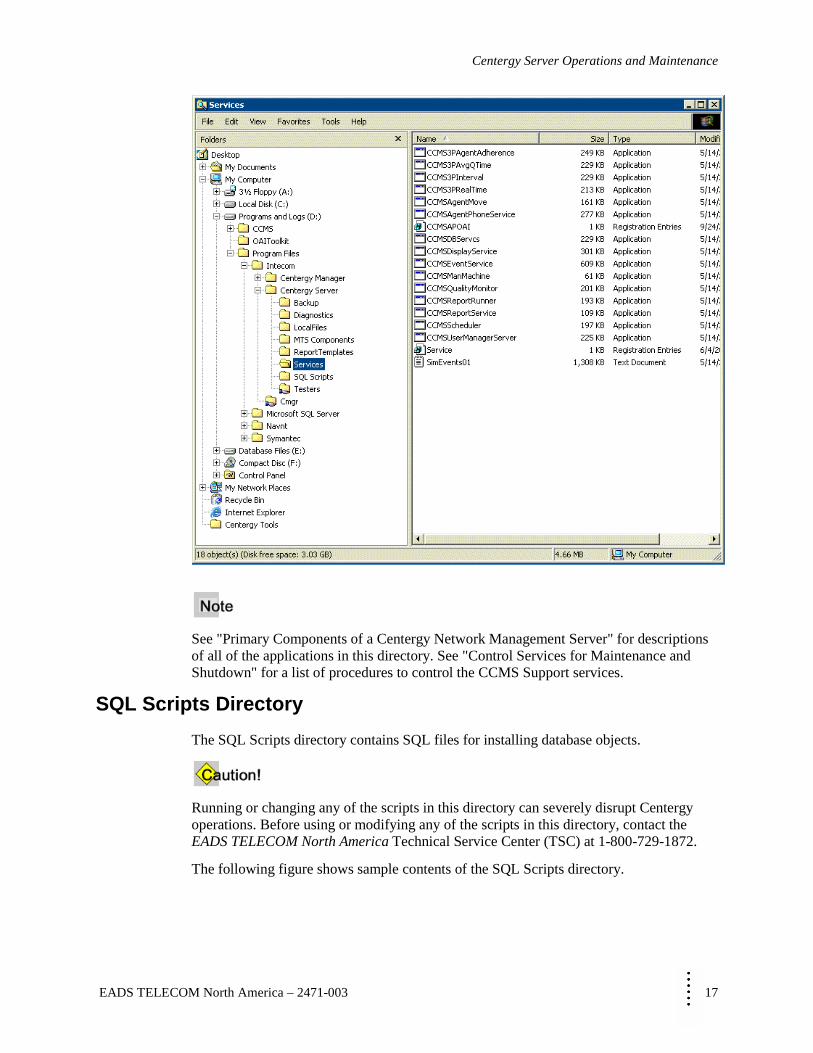
See "Primary Components of a Centergy Network Management Server" for descriptions of all of the applications in this directory. See "Control Services for Maintenance and Shutdown" for a list of procedures to control the CCMS Support services.
SQL Scripts Directory
The SQL Scripts directory contains SQL files for installing database objects.
Running or changing any of the scripts in this directory can severely disrupt Centergy operations. Before using or modifying any of the scripts in this directory, contact the EADS TELECOM North America Technical Service Center (TSC) at 1-800-729-1872.
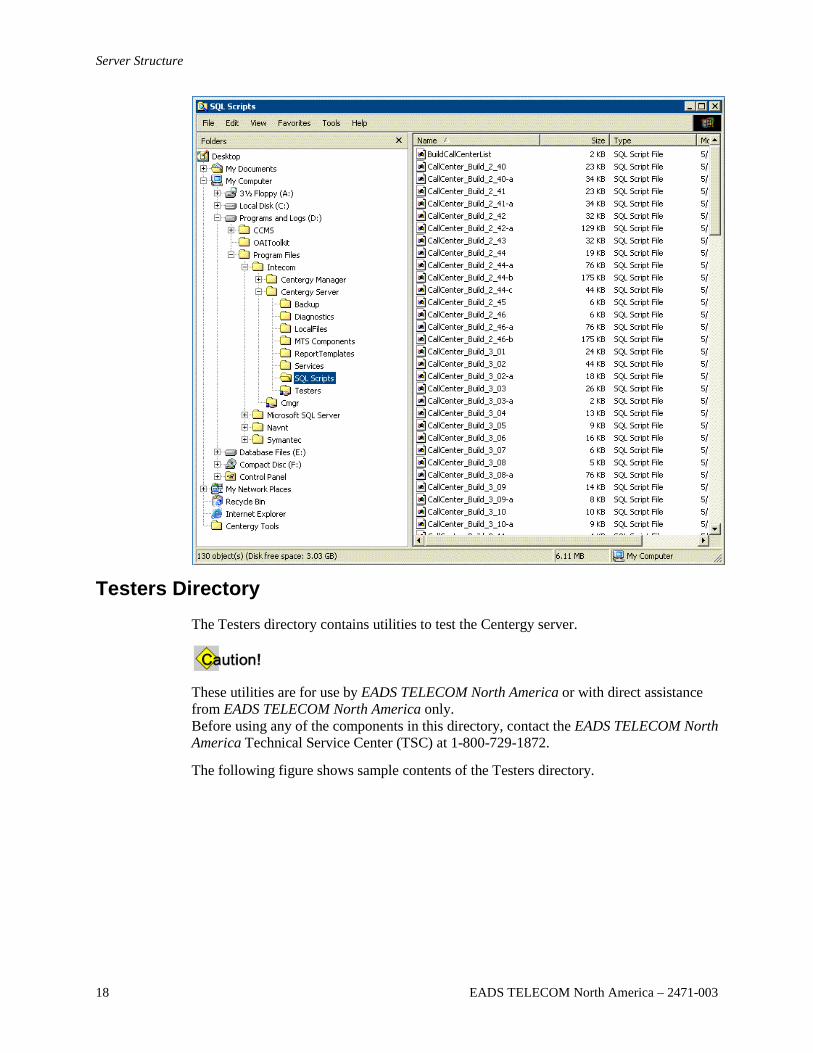
The following figure shows sample contents of the SQL Scripts directory.
Server Structure
18 EADS TELECOM North America – 2471-003
Testers Directory
The Testers directory contains utilities to test the Centergy server.
These utilities are for use by EADS TELECOM North America or with direct assistance from EADS TELECOM North America only. Before using any of the components in this directory, contact the EADS TELECOM North America Technical Service Center (TSC) at 1-800-729-1872.
The following figure shows sample contents of the Testers directory.

MMMMMMMM
Centergy Server Operations and Maintenance
EADS TELECOM North America – 2471-003 19
Server Structure
20 EADS TELECOM North America – 2471-003
MMMMMMMM
Centergy Server Operations and Maintenance
EADS TELECOM North America – 2471-003 21
Chapter 3
Databases, Data Objects, and Statistics
Centergy Databases
A Centergy Network Management server (CNMS) contains many databases, as defined in the following table.
Database Description
Master The SQL Server’s repository for information it uses to manage operations. This information is critical to SQL Server functionality.
Model Provides a template for all new databases.
MSDB Provides an area that the SQL Server Agent service uses when handling alerts, notifications, and scheduled tasks.
System Contains resources that are shared by all of the call centers supported by Centergy. See “Centergy System Database” for details.
CallCenternnn Contains Centergy Manager files that are unique to one specific call center. The Centergy server contains one call center database for each call center it supports. By convention, each call center database has a unique number (nnn). See “Call Center Databases” for details.
Data_CallCenternnn The Centergy statistics databases. Each data call center database stores SQL files that contain statistics translated from EADS TELECOM North America switch event data associated with one specific call center. The Centergy server contains one data call center database for each call center it supports. By convention, each data call center database has a unique number (nnn). See “Centergy Data Call Center (Statistics) Databases” for details.
Databases, Data Objects, and Statistics
22 EADS TELECOM North America – 2471-003
Centergy System Database
The Centergy System database contains the following information:
• OAI Toolkit driver information
• Statistic names
• Statistic formulas
• Statistic aliases
• Client build information (current and compatibility)
• Third-party session information
• Vendor information
• System schedules and actions
Call Center Databases
Each call center database contains the following information:
• Schedules
• Shifts
• Folders
• Users
• Monitor sessions
• Report profiles
• Call center configurations
Centergy Data Call Center (Statistics) Databases
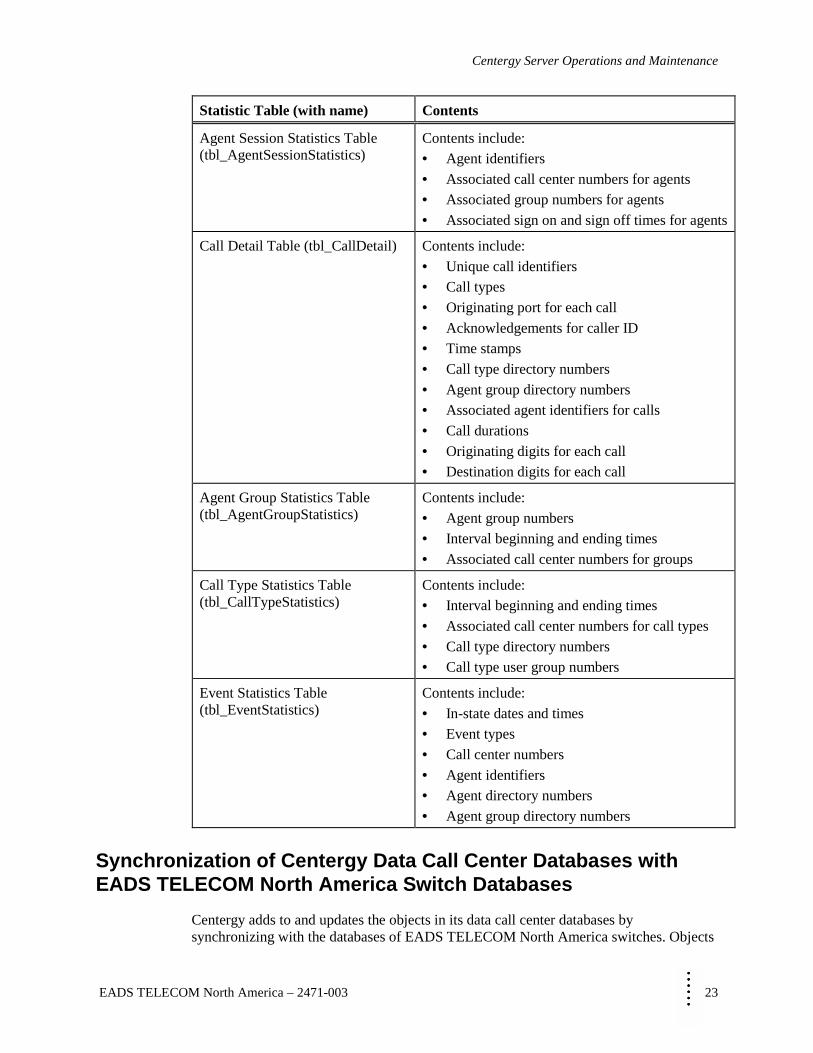
Centergy classifies all statistics as either agent statistics, agent group statistics, or call type statistics. The data call center databases use tables to contain and further classify the statistics. The Centergy Event Service processes incoming event data from an EADS TELECOM North America switch to generate these statistics. The following table identifies the statistics tables and describes their contents.
Statistic Table (with name) Contents
Agent Statistics Table (tbl_AgentStatistics)
Contents include: • Agent identifiers • Interval beginning and ending times • Associated call center numbers for agents • Associated group numbers for agents
MMMMMMMM
Centergy Server Operations and Maintenance
EADS TELECOM North America – 2471-003 23
Statistic Table (with name) Contents
Agent Session Statistics Table (tbl_AgentSessionStatistics)
Contents include: • Agent identifiers • Associated call center numbers for agents • Associated group numbers for agents • Associated sign on and sign off times for agents
Call Detail Table (tbl_CallDetail)
Contents include: • Unique call identifiers • Call types • Originating port for each call • Acknowledgements for caller ID • Time stamps • Call type directory numbers • Agent group directory numbers • Associated agent identifiers for calls • Call durations • Originating digits for each call • Destination digits for each call
Agent Group Statistics Table (tbl_AgentGroupStatistics)
Contents include: • Agent group numbers • Interval beginning and ending times • Associated call center numbers for groups
Call Type Statistics Table (tbl_CallTypeStatistics)
Contents include: • Interval beginning and ending times • Associated call center numbers for call types • Call type directory numbers • Call type user group numbers
Event Statistics Table (tbl_EventStatistics)
Contents include: • In-state dates and times • Event types • Call center numbers • Agent identifiers • Agent directory numbers • Agent group directory numbers
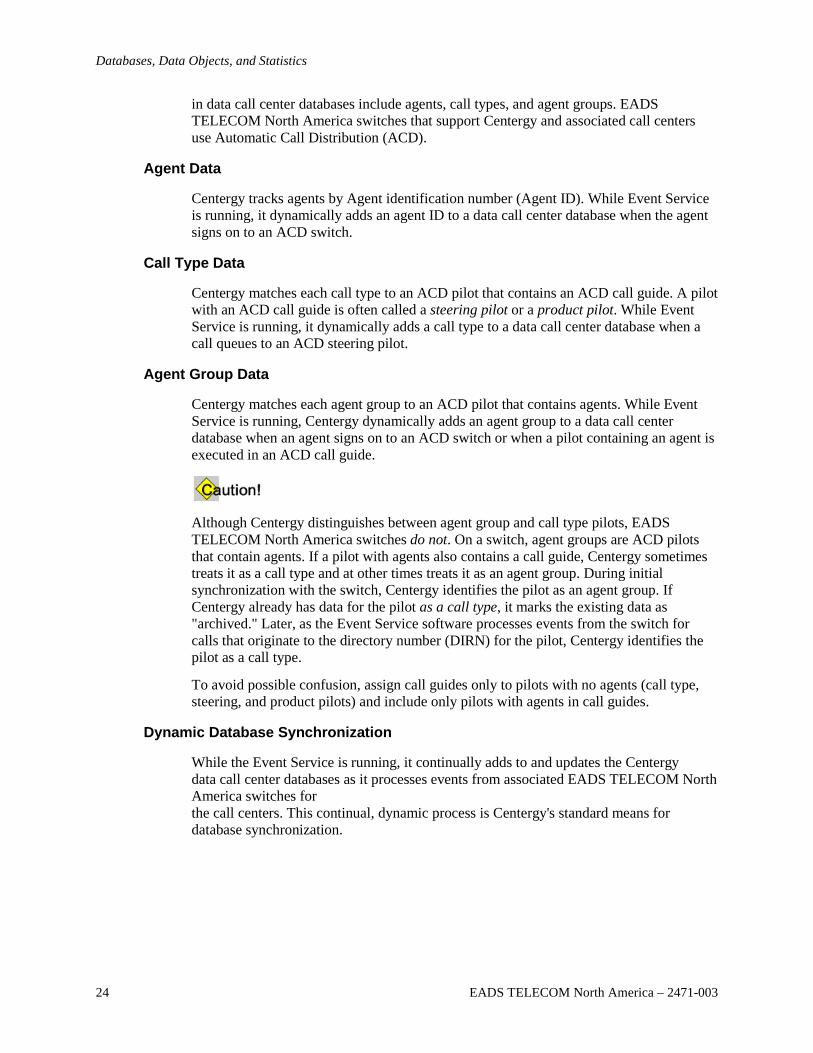
Synchronization of Centergy Data Call Center Databases with EADS TELECOM North America Switch Databases
Centergy adds to and updates the objects in its data call center databases by synchronizing with the databases of EADS TELECOM North America switches. Objects
Databases, Data Objects, and Statistics
24 EADS TELECOM North America – 2471-003
in data call center databases include agents, call types, and agent groups. EADS TELECOM North America switches that support Centergy and associated call centers use Automatic Call Distribution (ACD).
Agent Data
Centergy tracks agents by Agent identification number (Agent ID). While Event Service is running, it dynamically adds an agent ID to a data call center database when the agent signs on to an ACD switch.
Call Type Data
Centergy matches each call type to an ACD pilot that contains an ACD call guide. A pilot with an ACD call guide is often called a steering pilot or a product pilot. While Event Service is running, it dynamically adds a call type to a data call center database when a call queues to an ACD steering pilot.
Agent Group Data
Centergy matches each agent group to an ACD pilot that contains agents. While Event Service is running, Centergy dynamically adds an agent group to a data call center database when an agent signs on to an ACD switch or when a pilot containing an agent is executed in an ACD call guide.
Although Centergy distinguishes between agent group and call type pilots, EADS TELECOM North America switches do not. On a switch, agent groups are ACD pilots that contain agents. If a pilot with agents also contains a call guide, Centergy sometimes treats it as a call type and at other times treats it as an agent group. During initial synchronization with the switch, Centergy identifies the pilot as an agent group. If Centergy already has data for the pilot as a call type, it marks the existing data as "archived." Later, as the Event Service software processes events from the switch for calls that originate to the directory number (DIRN) for the pilot, Centergy identifies the pilot as a call type.
To avoid possible confusion, assign call guides only to pilots with no agents (call type, steering, and product pilots) and include only pilots with agents in call guides.
Dynamic Database Synchronization
While the Event Service is running, it continually adds to and updates the Centergy data call center databases as it processes events from associated EADS TELECOM North America switches for the call centers. This continual, dynamic process is Centergy's standard means for database synchronization.
MMMMMMMM
Centergy Server Operations and Maintenance
EADS TELECOM North America – 2471-003 25
Database synchronization does not add new call centers to Centergy. You must add new call centers manually. For assistance adding new call centers to Centergy, contact the EADS TELECOM North America Technical Service Center (TSC) at 1-800-729-1872.
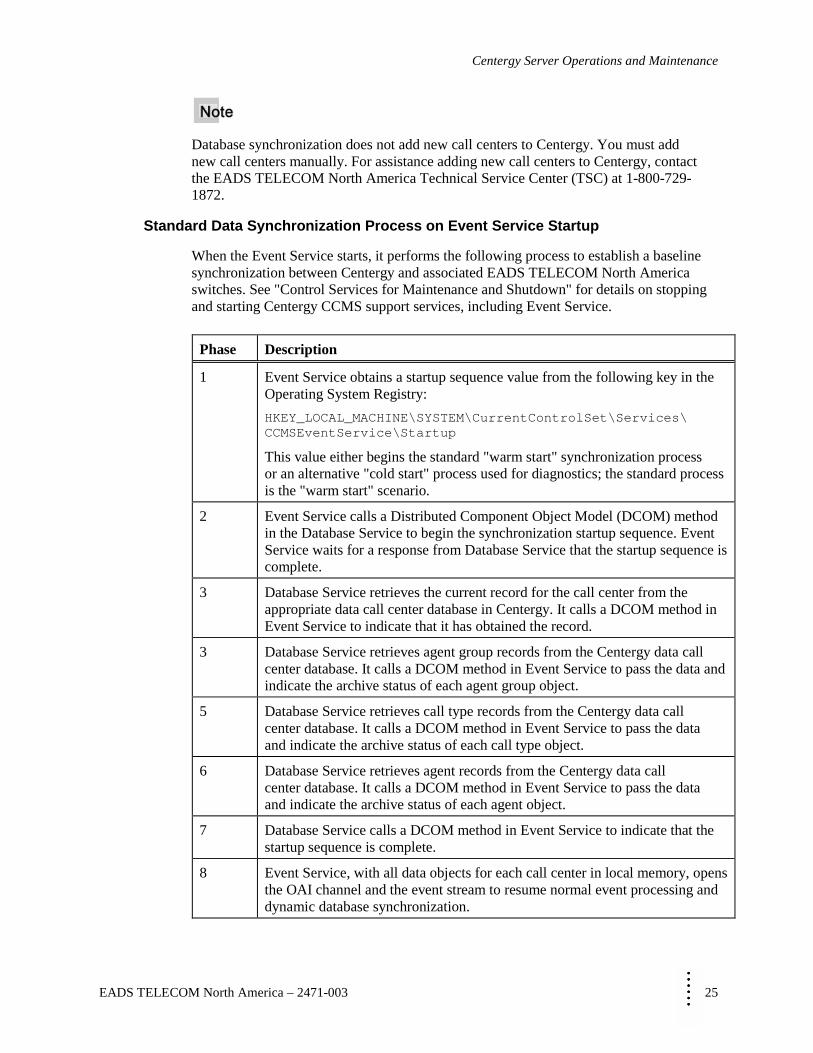
Standard Data Synchronization Process on Event Service Startup
When the Event Service starts, it performs the following process to establish a baseline synchronization between Centergy and associated EADS TELECOM North America switches. See "Control Services for Maintenance and Shutdown" for details on stopping and starting Centergy CCMS support services, including Event Service.
Phase Description
1 Event Service obtains a startup sequence value from the following key in the Operating System Registry: HKEY_LOCAL_MACHINE\SYSTEM\CurrentControlSet\Services\ CCMSEventService\Startup
This value either begins the standard "warm start" synchronization process or an alternative "cold start" process used for diagnostics; the standard process is the "warm start" scenario.
2 Event Service calls a Distributed Component Object Model (DCOM) method in the Database Service to begin the synchronization startup sequence. Event Service waits for a response from Database Service that the startup sequence is complete.
3 Database Service retrieves the current record for the call center from the appropriate data call center database in Centergy. It calls a DCOM method in Event Service to indicate that it has obtained the record.
3 Database Service retrieves agent group records from the Centergy data call center database. It calls a DCOM method in Event Service to pass the data and indicate the archive status of each agent group object.
5 Database Service retrieves call type records from the Centergy data call center database. It calls a DCOM method in Event Service to pass the data and indicate the archive status of each call type object.
6 Database Service retrieves agent records from the Centergy data call center database. It calls a DCOM method in Event Service to pass the data and indicate the archive status of each agent object.
7 Database Service calls a DCOM method in Event Service to indicate that the startup sequence is complete.
8 Event Service, with all data objects for each call center in local memory, opens the OAI channel and the event stream to resume normal event processing and dynamic database synchronization.

Databases, Data Objects, and Statistics
26 EADS TELECOM North America – 2471-003
Switch Extraction Synchronization Process
The switch extraction synchronization process, also referred to as a "cold start," is available for diagnostics. It begins when a user of Centergy Manager requests an immediate synchronization of Centergy and an EADS TELECOM North America switch. See "Manage System Settings" in the Centergy Manager Administrator Guide (590-2503). This process can begin whenever Event Service starts, depending on the value of a key in the Operating System Registry.
In this process, Centergy pulls call center objects directly from an EADS TELECOM North America switch, rather than getting objects through event processing. Centergy marks as "archived" any objects that are in the data call center database but not in the switch database.
Phase Description
1 Option: • A user of Centergy Manager requests an immediate synchronization of
Centergy and an EADS TELECOM North America switch. See "Manage System Settings" in the Centergy Manager Administrator Guide (590-2503). Or:
• Event Service obtains a startup sequence value from the following key in the Operating System Registry: HKEY_LOCAL_MACHINE\SYSTEM\CurrentControlSet\Services\ CCMSEventService\Startup
This value either begins the standard "warm start" synchronization process or an alternative "cold start" process used for diagnostics; this scenario is the "cold start" scenario.
2 Event Service calls a Distributed Component Object Model (DCOM) method in the Database Service to begin the synchronization startup sequence. Event Service waits for a response from Database Service that the startup sequence is complete.
3 Database Service uses the Administrative Console EXTR_CALL_CENTER option over a dedicated Open Application Interface (OAI) database channel to extract the call center table from an EADS TELECOM North America switch.
4 Database Service purges the UserGroupToCallCenter mapping table in the Centergy database.
5 Database Service parses the extracted call center data for: • Call center names • Time zone offset and daylight savings code for each call center • The type of each call center
6 Database Service marks every object in the appropriate Centergy data call center database as "archived."
7 Database Service parses the extracted call center data and adds user groups to the UserGroupToCallCenter mapping table.

MMMMMMMM
Centergy Server Operations and Maintenance
EADS TELECOM North America – 2471-003 27
Phase Description
8 Database Service uses the Administrative Console AGENT_INFO_PROFILE option over a dedicated OAI database channel to extract agent profile data from an EADS TELECOM North America switch.
9 Database Service parses the extracted agent profile data for: • Each agent's name • Each agent's user group • Each agent's directory number (DIRN) • The pilot to which each agent is assigned (agent group) • The user group for the pilot to which each agent is assigned
10 Database Service compares agents from the switch to agents in the Centergy call center database. It marks each matching agent as "not archived." Database Service adds each agent from the switch that is not in the Centergy database as a new agent.
11 Database Service compares agent groups from the switch to agent groups in the Centergy call center database record. It marks each matching agent group as "not archived." Database Service adds each agent group from the switch that is not in the Centergy database record as a new agent group.
This phase clearly identifies all of the pilots that contain agents and creates an agent group record for each.
12 Database Service uses the Administrative Console PILOT_TITLES option over a dedicated OAI database channel to extract pilot names from an EADS TELECOM North America switch.
13 Database Service parses the pilot names. It first compares each pilot name against the agent group names in the Centergy data call center database record. For each match, it saves the pilot's name and user group with the agent group data. For each pilot name that does not match an agent group, Database Service saves a call type record with the pilot's name and user group.
14 Database Service sets the Centergy server's date and time to match those of the EADS TELECOM North America switch.
15 Database Service retrieves the current record for the call center from the appropriate data call center database in Centergy. It calls a DCOM method in Event Service to indicate that it has obtained the record.
16 Database Service retrieves agent group records from the Centergy data call center database. It calls a DCOM method in Event Service to pass the data and indicate the archive status of each agent group object.
17 Database Service retrieves call type records from the Centergy data call center database. It calls a DCOM method in Event Service to pass the data and indicate the archive status of each call type object.

Databases, Data Objects, and Statistics
28 EADS TELECOM North America – 2471-003
Phase Description
18 Database Service retrieves agent records from the Centergy data call center database. It calls a DCOM method in Event Service to pass the data and indicate the archive status of each agent object.
19 Database Service calls a DCOM method in Event Service to indicate that the startup sequence is complete.
20 Event Service, with all data objects for each call center in local memory, opens the OAI channel and the event stream to resume normal event processing and dynamic database synchronization.
During a switch extraction synchronization process, Centergy may extract objects from the switch database that are not ready to provide valid data. For example, the switch might have a pilot that that is intended for use as an agent group but does not yet have agents. Until the switch defines agents for a pilot, Centergy treats it as a call type.
Saving Statistics to Data Call Center Databases
The Event Service software (CCMSEventService) interfaces with an EADS TELECOM North America switch to obtain event data and translates the event data into statistics for agents, agent groups, and call types. Based on the Interval Statistic Time set in Centergy Manager, Event Service saves these statistics to appropriate data call center databases on the Centergy Network Management Server (CNMS) every 5, 15, 30, or 60 minutes.
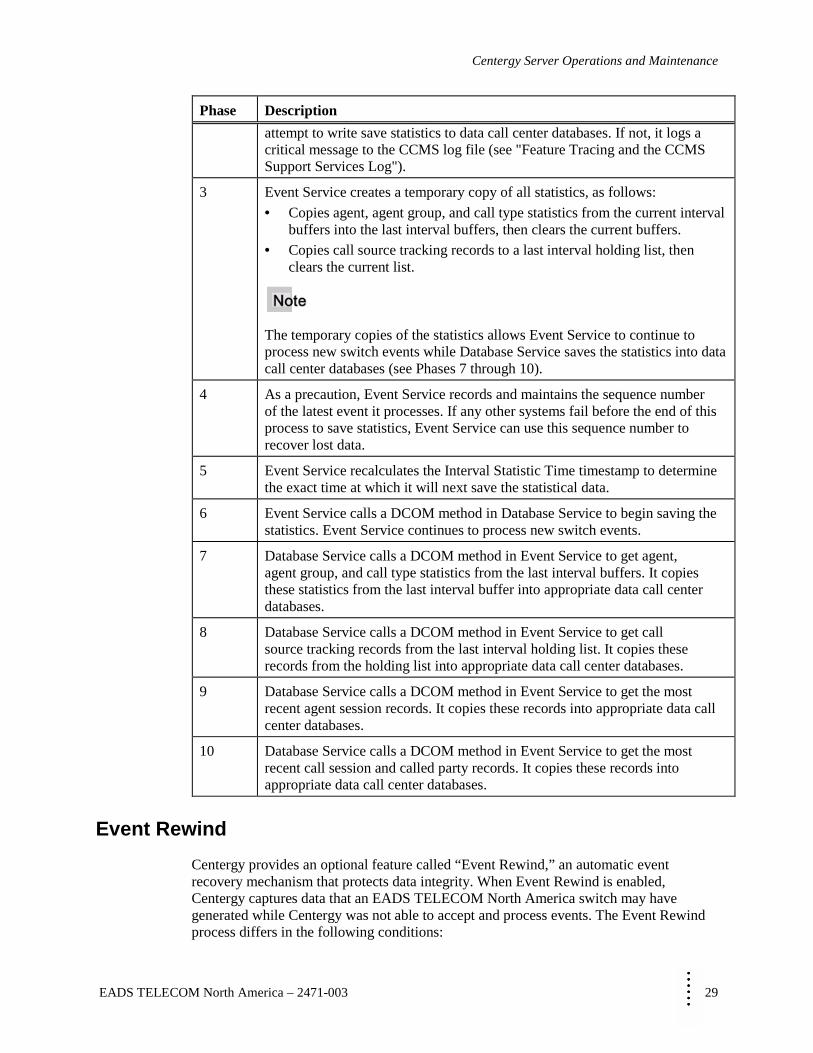
The process to save statistics to data call center databases is sometimes referred to as an "interval flush." The following table describes the process.
Phase Description
1 Event Service uses the Interval Statistic Time from Centergy Manager to calculate the exact time at which it will next save the statistical data. It maintains this time as a UTC (Coordinated Universal Time) timestamp.
Specifically, the EventProc thread compares this UTC timestamp with the timestamp of each event from an EADS TELECOM North America switch. When an event's timestamp matches or is later than the Interval Statistic Time timestamp, Event Service proceeds with saving the statistics.
Every minute, the ActiveCallMonitor thread checks the event queue. If the event queue holds an event, the ActiveCallMonitor waits another minute. If the queue is empty, the ActiveCallMonitor checks the server's current UTC timestamp. If the current time matches or is later than the Interval Statistic Time timestamp, Event Service proceeds with saving the statistics.
2 Event Service checks to ensure that the Database service successfully retrieved agent, agent group, call type, and call source tracking statistics in the last
MMMMMMMM
Centergy Server Operations and Maintenance
EADS TELECOM North America – 2471-003 29
Phase Description attempt to write save statistics to data call center databases. If not, it logs a critical message to the CCMS log file (see "Feature Tracing and the CCMS Support Services Log").
3 Event Service creates a temporary copy of all statistics, as follows: • Copies agent, agent group, and call type statistics from the current interval
buffers into the last interval buffers, then clears the current buffers. • Copies call source tracking records to a last interval holding list, then
clears the current list.
The temporary copies of the statistics allows Event Service to continue to process new switch events while Database Service saves the statistics into data call center databases (see Phases 7 through 10).
4 As a precaution, Event Service records and maintains the sequence number of the latest event it processes. If any other systems fail before the end of this process to save statistics, Event Service can use this sequence number to recover lost data.
5 Event Service recalculates the Interval Statistic Time timestamp to determine the exact time at which it will next save the statistical data.
6 Event Service calls a DCOM method in Database Service to begin saving the statistics. Event Service continues to process new switch events.
7 Database Service calls a DCOM method in Event Service to get agent, agent group, and call type statistics from the last interval buffers. It copies these statistics from the last interval buffer into appropriate data call center databases.
8 Database Service calls a DCOM method in Event Service to get call source tracking records from the last interval holding list. It copies these records from the holding list into appropriate data call center databases.
9 Database Service calls a DCOM method in Event Service to get the most recent agent session records. It copies these records into appropriate data call center databases.
10 Database Service calls a DCOM method in Event Service to get the most recent call session and called party records. It copies these records into appropriate data call center databases.
Event Rewind
Centergy provides an optional feature called “Event Rewind,” an automatic event recovery mechanism that protects data integrity. When Event Rewind is enabled, Centergy captures data that an EADS TELECOM North America switch may have generated while Centergy was not able to accept and process events. The Event Rewind process differs in the following conditions:
Databases, Data Objects, and Statistics
30 EADS TELECOM North America – 2471-003
• Event Rewind when the OAI link between Centergy and an EADS TELECOM North America switch is down
• Event Rewind when Event Service stops and starts
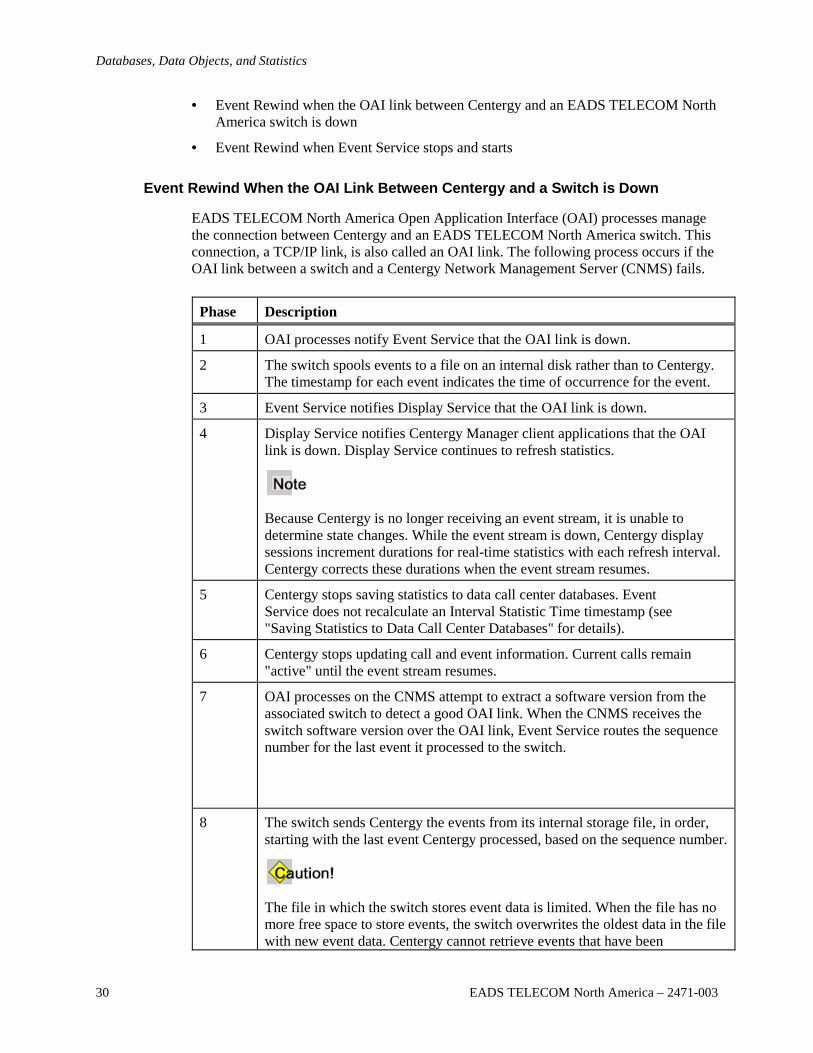
Event Rewind When the OAI Link Between Centergy and a Switch is Down
EADS TELECOM North America Open Application Interface (OAI) processes manage the connection between Centergy and an EADS TELECOM North America switch. This connection, a TCP/IP link, is also called an OAI link. The following process occurs if the OAI link between a switch and a Centergy Network Management Server (CNMS) fails.
Phase Description
1 OAI processes notify Event Service that the OAI link is down.
2 The switch spools events to a file on an internal disk rather than to Centergy. The timestamp for each event indicates the time of occurrence for the event.
3 Event Service notifies Display Service that the OAI link is down.
4 Display Service notifies Centergy Manager client applications that the OAI link is down. Display Service continues to refresh statistics.
Because Centergy is no longer receiving an event stream, it is unable to determine state changes. While the event stream is down, Centergy display sessions increment durations for real-time statistics with each refresh interval. Centergy corrects these durations when the event stream resumes.
5 Centergy stops saving statistics to data call center databases. Event Service does not recalculate an Interval Statistic Time timestamp (see "Saving Statistics to Data Call Center Databases" for details).
6 Centergy stops updating call and event information. Current calls remain "active" until the event stream resumes.
7 OAI processes on the CNMS attempt to extract a software version from the associated switch to detect a good OAI link. When the CNMS receives the switch software version over the OAI link, Event Service routes the sequence number for the last event it processed to the switch.
8 The switch sends Centergy the events from its internal storage file, in order, starting with the last event Centergy processed, based on the sequence number.
The file in which the switch stores event data is limited. When the file has no more free space to store events, the switch overwrites the oldest data in the file with new event data. Centergy cannot retrieve events that have been
MMMMMMMM
Centergy Server Operations and Maintenance
EADS TELECOM North America – 2471-003 31
Phase Description overwritten on the switch's event data file. If the OAI link is restored before the switch overwrites old event records, Centergy can retrieve all switch data. Otherwise, some data may be lost.
9 While it transmits events from its event data file to Centergy, the switch continues to spool new events into the event data file.
10 Event Service notifies Display Service that the OAI link is up.
11 Display Service notifies Centergy Manager client applications that the OAI link is restored, but that the event stream is still out-of-sequence. Display Service continues to refresh statistics.
12 Event Service recalculates the time at which it will next save statistical data to data call center databases and resumes saving statistics between events.
13 Centergy resumes updating call and event information. Calls reflect accurate current states based on event stream input.
14 After the switch transmits the last event from its event data file, it resumes transmitting new events directly to the CNMS.
15 Event Services notifies Display Service when it regains synchronization with the switch.
16 Event Service recalculates all agent state statistics for each call center.
17 Event Service resumes normal event processing.
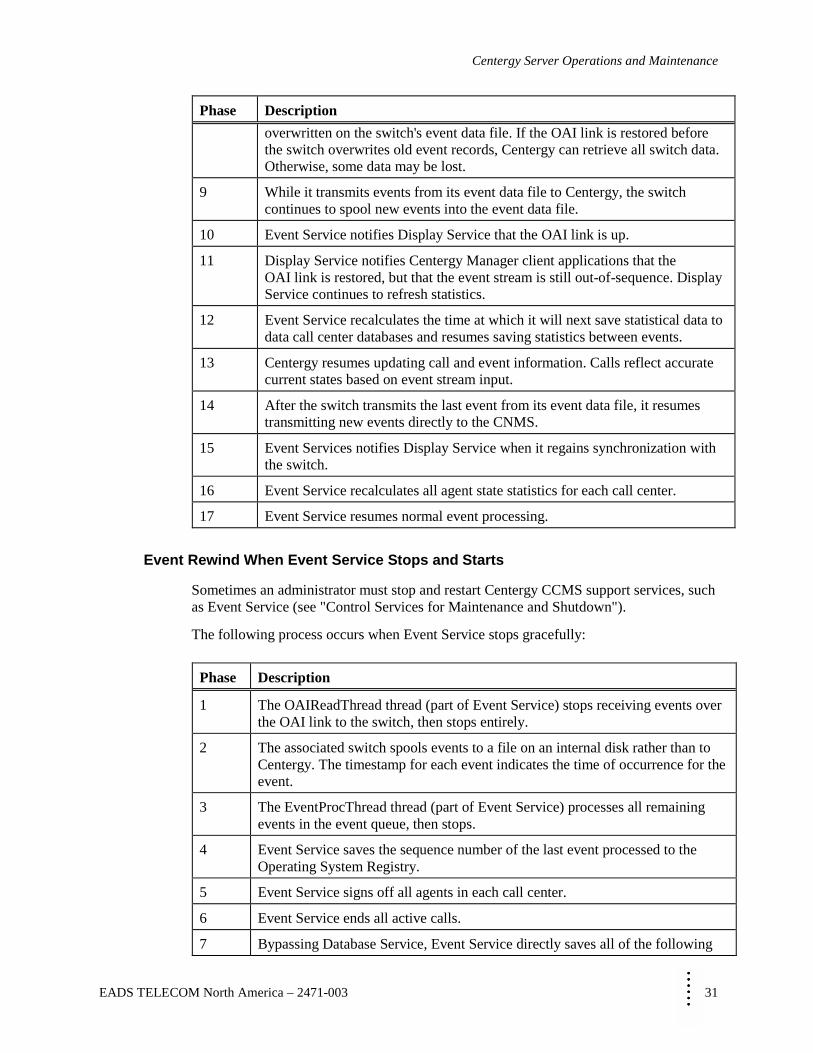
Event Rewind When Event Service Stops and Starts
Sometimes an administrator must stop and restart Centergy CCMS support services, such as Event Service (see "Control Services for Maintenance and Shutdown").
The following process occurs when Event Service stops gracefully:
Phase Description
1 The OAIReadThread thread (part of Event Service) stops receiving events over the OAI link to the switch, then stops entirely.
2 The associated switch spools events to a file on an internal disk rather than to Centergy. The timestamp for each event indicates the time of occurrence for the event.
3 The EventProcThread thread (part of Event Service) processes all remaining events in the event queue, then stops.
4 Event Service saves the sequence number of the last event processed to the Operating System Registry.
5 Event Service signs off all agents in each call center.
6 Event Service ends all active calls.
7 Bypassing Database Service, Event Service directly saves all of the following

Databases, Data Objects, and Statistics
32 EADS TELECOM North America – 2471-003
Phase Description statistics to appropriate data call center databases: • Agent, agent group, and call type statistics • Call source tracking records • Agent session records • Call session and called party records
8 Event Service saves real-time statistics for agents, agent groups, and call types to .csv files.
9 Event Service stops.
The following process occurs whenever Event Service restarts.
Phase Description
1 Event Service synchronizes the agents, agent groups, and call types in the server's SQL databases with associated EADS TELECOM North America switch databases. See "Synchronization of Centergy Data Call Center Databases with EADS TELECOM North America Switch Databases."
2 Event Service gets the last event sequence number from the Operating System Registry. If a sequence number is not available, Event Service resumes normal processing, starting with new events from the switch. Otherwise, this process continues with phase 3.
3 Event Service recovers real-time statistics for agents, agent groups, and call types from .csv files. Event Service resets agent states to the last known state, unless the agent state is a call state, for which it sets the state as "unknown." Event Service deletes the .csv files to prevent their reuse.
4 OAI processes on the CNMS attempt to extract a software version from the associated switch to detect a good OAI link. When the CNMS receives the switch software version over the OAI link, Event Service routes the sequence number for the last event it processed to the switch.
5 The switch sends Centergy the events from its internal storage file, in order, starting with the last event Centergy processed, based on the sequence number.
The file in which the switch stores event data is limited. When the file has no more free space to store events, the switch overwrites the oldest data in the file with new event data. Centergy cannot retrieve events that have been overwritten on the switch's event data file. If the OAI link is restored before the switch overwrites old event records, Centergy can retrieve all switch data. Otherwise, some data may be lost.
6 While it transmits events from its event data file to Centergy, the switch continues to spool new events into the event data file.
7 Event Service notifies Display Service that the OAI link is up.
MMMMMMMM
Centergy Server Operations and Maintenance
EADS TELECOM North America – 2471-003 33
Phase Description
8 Display Service notifies Centergy Manager client applications that the OAI link is restored, but that the event stream is still out-of-sequence. Display Service continues to refresh statistics.
9 Event Service resumes processing the event stream, starting with the event that matches the sequence number from the Operating System Registry. Event Service resets this sequence number to zero to prevent reuse of the sequence number.
10 Event Service recalculates the time at which it will next save statistical data to data call center databases and resumes saving statistics between events.
As a precaution against additional system failures, Event Service records the sequence number for the first event saved after the restoration of the OAI link.
11 Centergy resumes updating call and event information. Calls reflect accurate current states based on event stream input.
12 After the switch transmits the last event from its event data file, it resumes transmitting new events directly to the CNMS.
13 Event Services notifies Display Service when it regains synchronization with the switch.
14 Event Service recalculates all agent state statistics for each call center.
15 Event Service resumes normal event processing.
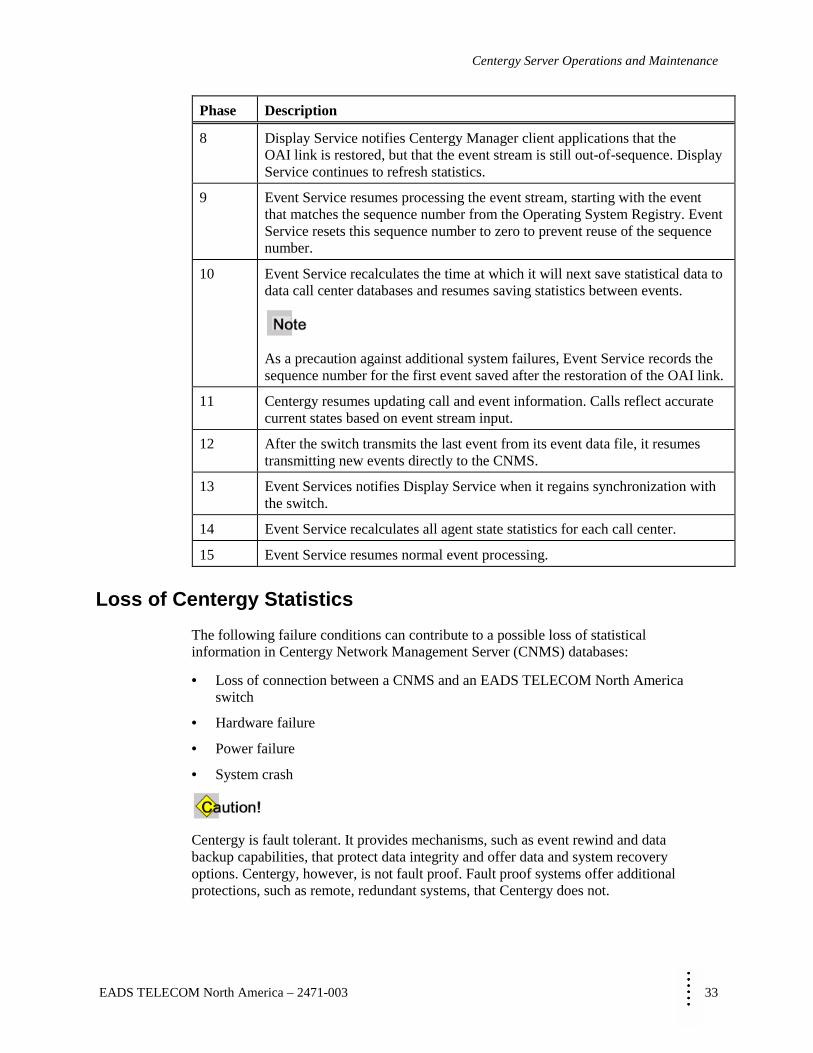
Loss of Centergy Statistics
The following failure conditions can contribute to a possible loss of statistical information in Centergy Network Management Server (CNMS) databases:
• Loss of connection between a CNMS and an EADS TELECOM North America switch
• Hardware failure
• Power failure
• System crash
Centergy is fault tolerant. It provides mechanisms, such as event rewind and data backup capabilities, that protect data integrity and offer data and system recovery options. Centergy, however, is not fault proof. Fault proof systems offer additional protections, such as remote, redundant systems, that Centergy does not.
Databases, Data Objects, and Statistics
34 EADS TELECOM North America – 2471-003
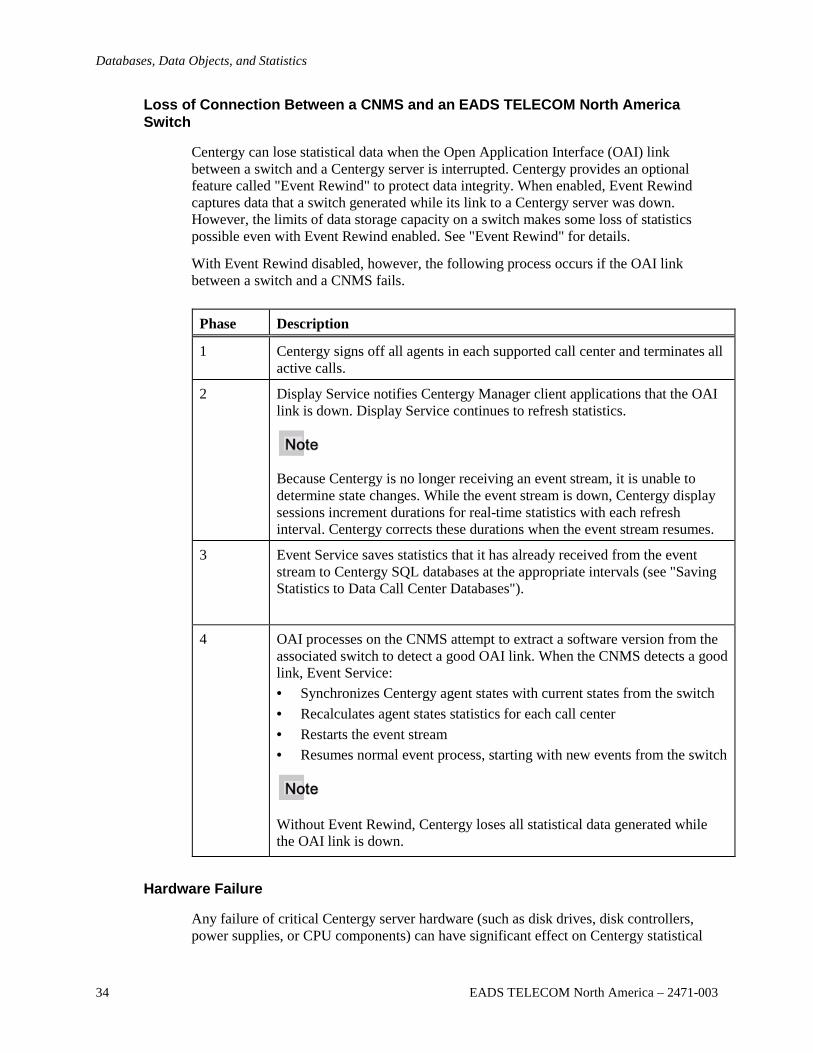
Loss of Connection Between a CNMS and an EADS TELECOM North America Switch
Centergy can lose statistical data when the Open Application Interface (OAI) link between a switch and a Centergy server is interrupted. Centergy provides an optional feature called "Event Rewind" to protect data integrity. When enabled, Event Rewind captures data that a switch generated while its link to a Centergy server was down. However, the limits of data storage capacity on a switch makes some loss of statistics possible even with Event Rewind enabled. See "Event Rewind" for details.
With Event Rewind disabled, however, the following process occurs if the OAI link between a switch and a CNMS fails.
Phase Description
1 Centergy signs off all agents in each supported call center and terminates all active calls.
2 Display Service notifies Centergy Manager client applications that the OAI link is down. Display Service continues to refresh statistics.
Because Centergy is no longer receiving an event stream, it is unable to determine state changes. While the event stream is down, Centergy display sessions increment durations for real-time statistics with each refresh interval. Centergy corrects these durations when the event stream resumes.
3 Event Service saves statistics that it has already received from the event stream to Centergy SQL databases at the appropriate intervals (see "Saving Statistics to Data Call Center Databases").
4 OAI processes on the CNMS attempt to extract a software version from the associated switch to detect a good OAI link. When the CNMS detects a good link, Event Service: • Synchronizes Centergy agent states with current states from the switch • Recalculates agent states statistics for each call center • Restarts the event stream • Resumes normal event process, starting with new events from the switch
Without Event Rewind, Centergy loses all statistical data generated while the OAI link is down.
Hardware Failure
Any failure of critical Centergy server hardware (such as disk drives, disk controllers, power supplies, or CPU components) can have significant effect on Centergy statistical
MMMMMMMM
Centergy Server Operations and Maintenance
EADS TELECOM North America – 2471-003 35
data. The extent of the data loss depends on the exact nature of the hardware failure. Recovery of data after hardware failure usually requires replacement of the hardware and restoration of statistical data through backup. See "SQL Database Backups" for more information.
Power Failure
When power to a CNMS stops abruptly, Event Service does not have time to shut down gracefully and Database Service does not have time to write all statistics to the data call center databases. A loss of power will almost certainly cause a loss of data.
A low voltage indicator can allow the CNMS services to shut down gracefully if the outage outlasts the availability of backup power.
System Crash
If for any reason the server running CNMS software crashes or Event Service software fails, Centergy will lose current real-time statistics.
The Event Rewind mechanism offers some protection for interval statistics (through the availability in the system registry of the sequence number for the last event that Event Service processed). When a CNMS is back in operation after a system crash, the sequence number in the system registry enables event processing to continue, beginning with that last event.
The registry setting with this sequence number, however, may be corrupted or damaged when a Centergy server crashes and requires a complete rebuild. Corruption or damage to this registry setting prevents Event Rewind from working. In this case, Event Service resumes processing the event stream from the latest event and Centergy loses all statistical data generated while the server was not active.
Notify EADS TELECOM North America of Statistical Data Loss
If Centergy has lost data that was not successfully recovered by Event Rewind, please notify the EADS TELECOM North America Technical Service Center (TSC) at 1-800-729-1872.
Event Scenarios
Event Service processes data from an event stream from an EADS TELECOM North America switch. Many event scenarios affect the event stream and Centergy statistics. Some events affect agent statistics. Other events affect agent group and call type statistics.
Agent Event Scenarios
The following common events affect Centergy statistics for agents:
• Agent answers call
• Calling party abandons call before agent answer
Databases, Data Objects, and Statistics
36 EADS TELECOM North America – 2471-003
• Agent places a call
• Agent puts a call on hold
• Agent makes consultation call with original caller on hold
• Agent transfers call without announcement
• Agent transfers call with announcement
• Agent initiates a conference call
• Agent parks a call
• Agent in wrap
• Agent initiates work
Call Type and Agent Group Event Scenarios
The following common events affect Centergy statistics for agent groups and call types:
• Agent does or does not answer call within answer threshold
• Agent handles call: Centergy calculates duration
• Calling party abandons call
• Calling party abandons call within short abandon threshold
• Calling party abandons call in first IVR step
• Calling party abandons call in queue
• Calling party abandons call while ringing
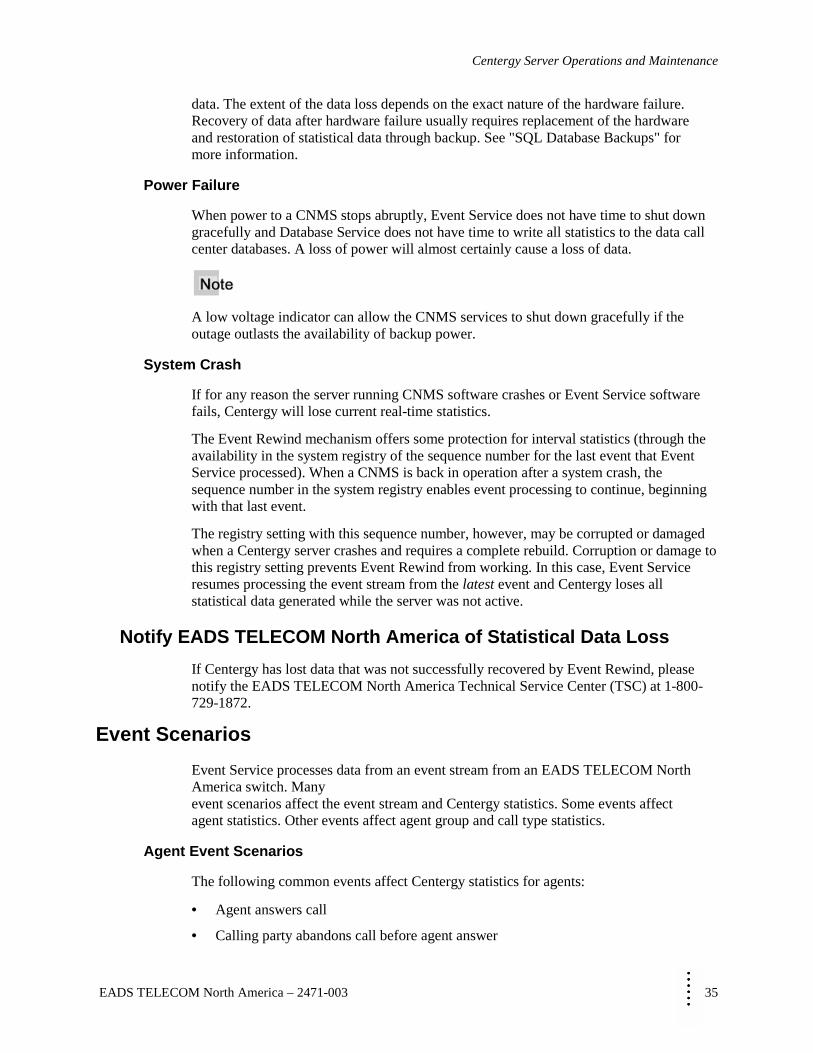
Agent Answers Call
In this event scenario, an agent in the Available state answers a call.
MMMMMMMM
Centergy Server Operations and Maintenance
EADS TELECOM North America – 2471-003 37
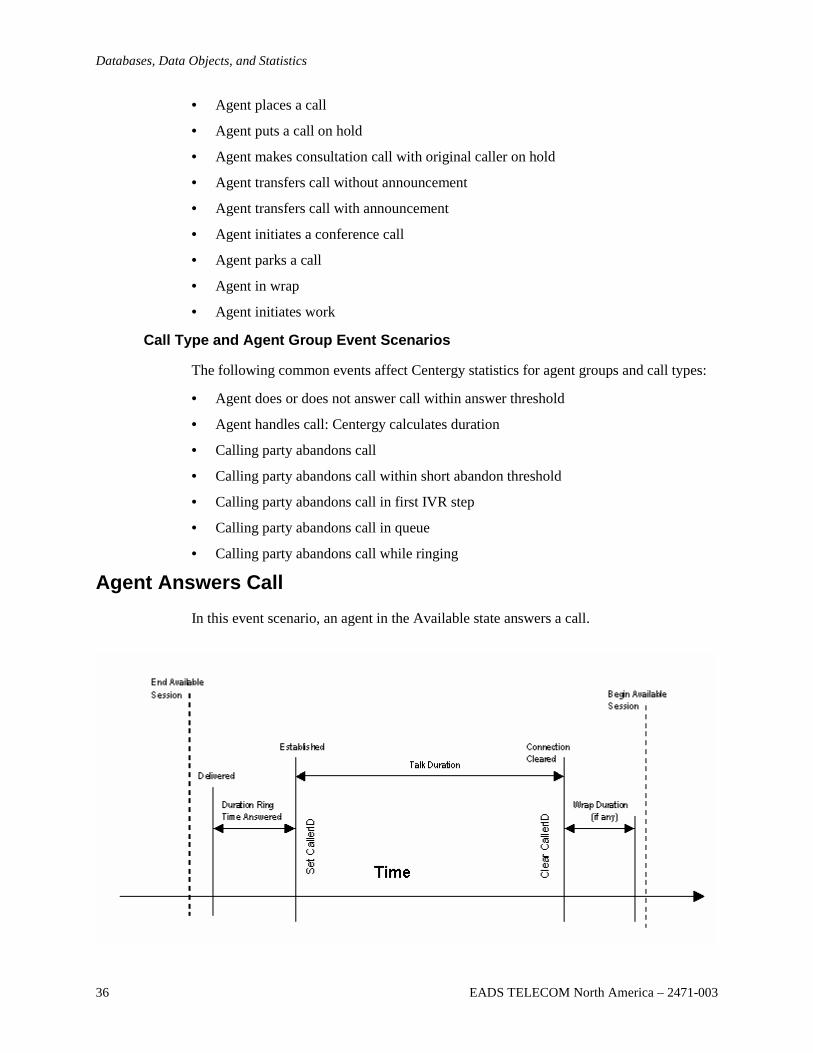
Calling Party Abandons Call Before Agent Answer
In this event scenario, an agent in the Available state receives a call, but the calling party abandons the call before the agent answers.
Databases, Data Objects, and Statistics
38 EADS TELECOM North America – 2471-003
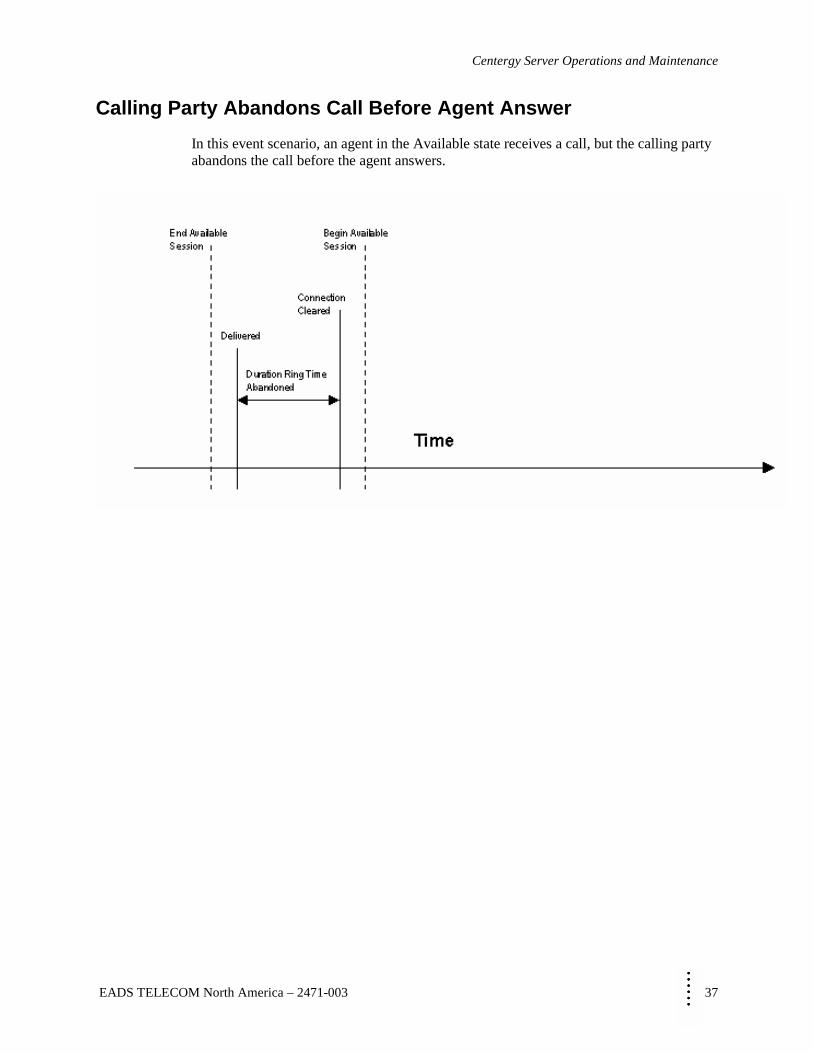
Agent Places a Call
In this event scenario, the agent goes off hook and dials a number to place a call.
MMMMMMMM
Centergy Server Operations and Maintenance
EADS TELECOM North America – 2471-003 39
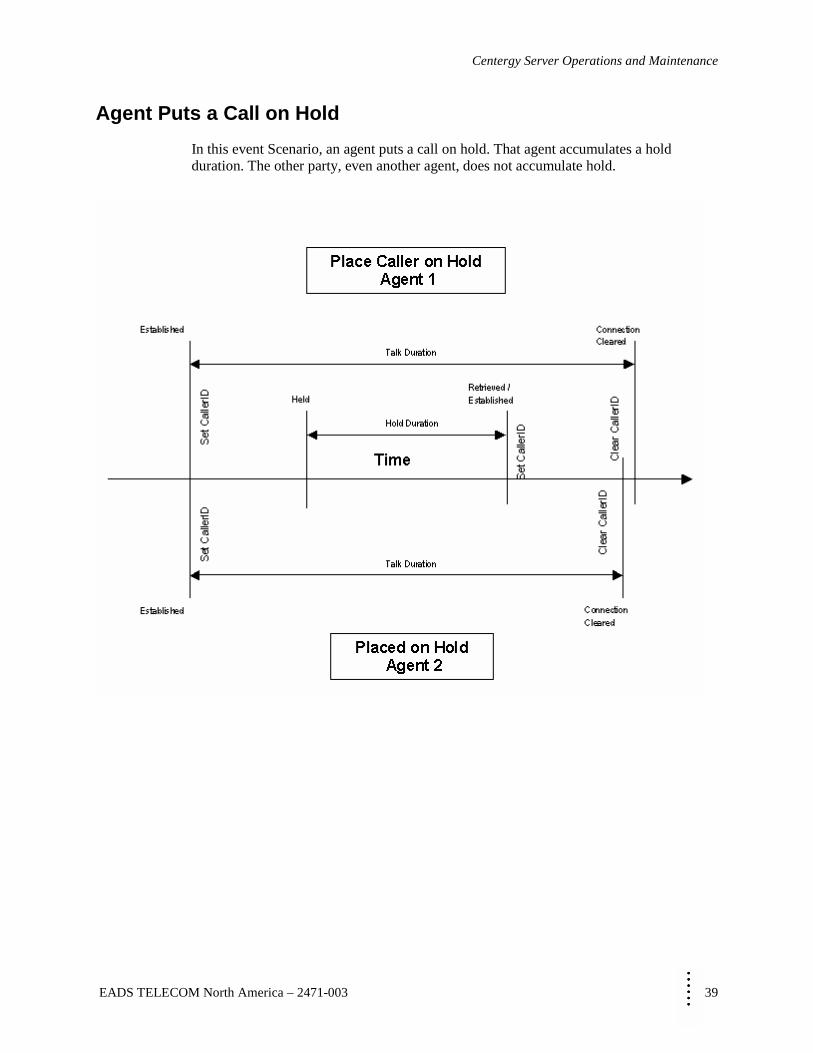
Agent Puts a Call on Hold
In this event Scenario, an agent puts a call on hold. That agent accumulates a hold duration. The other party, even another agent, does not accumulate hold.
Databases, Data Objects, and Statistics
40 EADS TELECOM North America – 2471-003
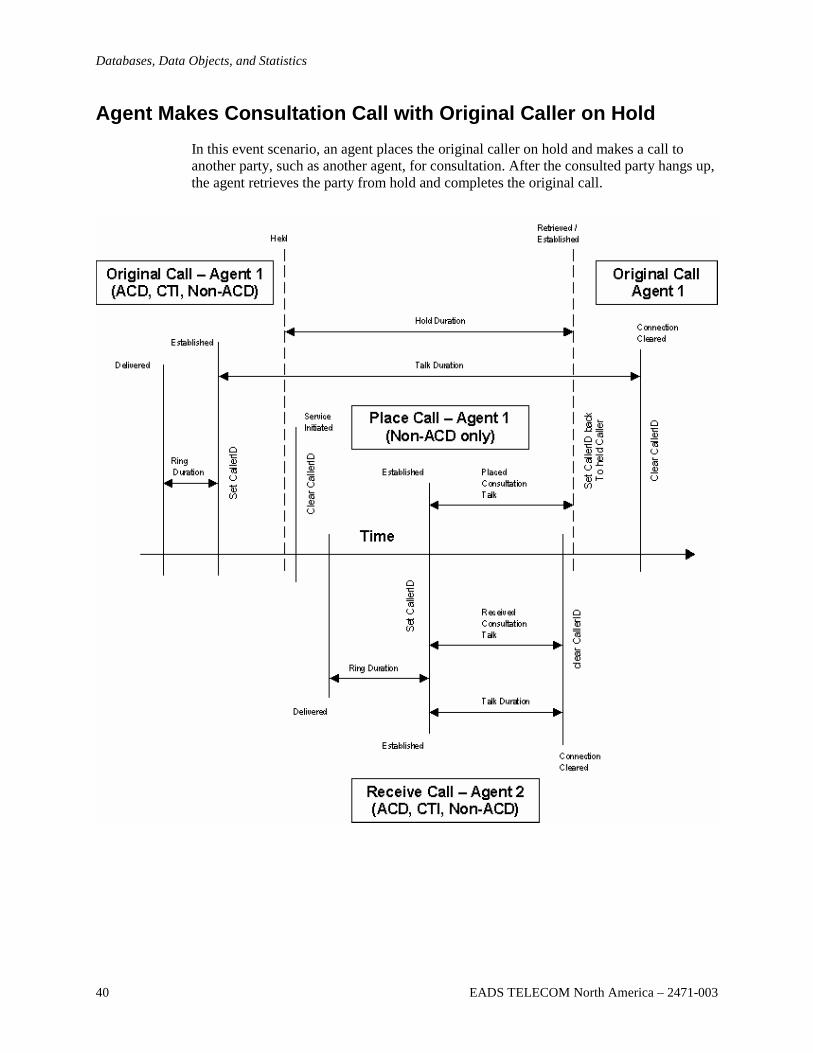
Agent Makes Consultation Call with Original Caller on Hold
In this event scenario, an agent places the original caller on hold and makes a call to another party, such as another agent, for consultation. After the consulted party hangs up, the agent retrieves the party from hold and completes the original call.

MMMMMMMM
Centergy Server Operations and Maintenance
EADS TELECOM North America – 2471-003 41
Agent Transfers Call without Announcement
In this event scenario, an agent places a call on hold, dials a number for a transfer, and hangs up before another agent answers the unannounced transfer call. An agent may dial another agent's directory number (DIRN) directly or may dial the DIRN for a call type pilot that will use an Automatic Call Distribution (ACD) call guide to complete the transfer to another agent.

Databases, Data Objects, and Statistics
42 EADS TELECOM North America – 2471-003
Agent Transfers Call with Announcement
In this event scenario, an agent places the original caller on hold and makes a call to a second party, such as another agent. After consulting with the second party, the agent then hangs up, leaving the calling party connected with the second party. An agent may dial another agent's directory number (DIRN) directly or may dial the DIRN for a call type pilot that will use an Automatic Call Distribution (ACD) call guide to complete the transfer to another agent.
MMMMMMMM
Centergy Server Operations and Maintenance
EADS TELECOM North America – 2471-003 43
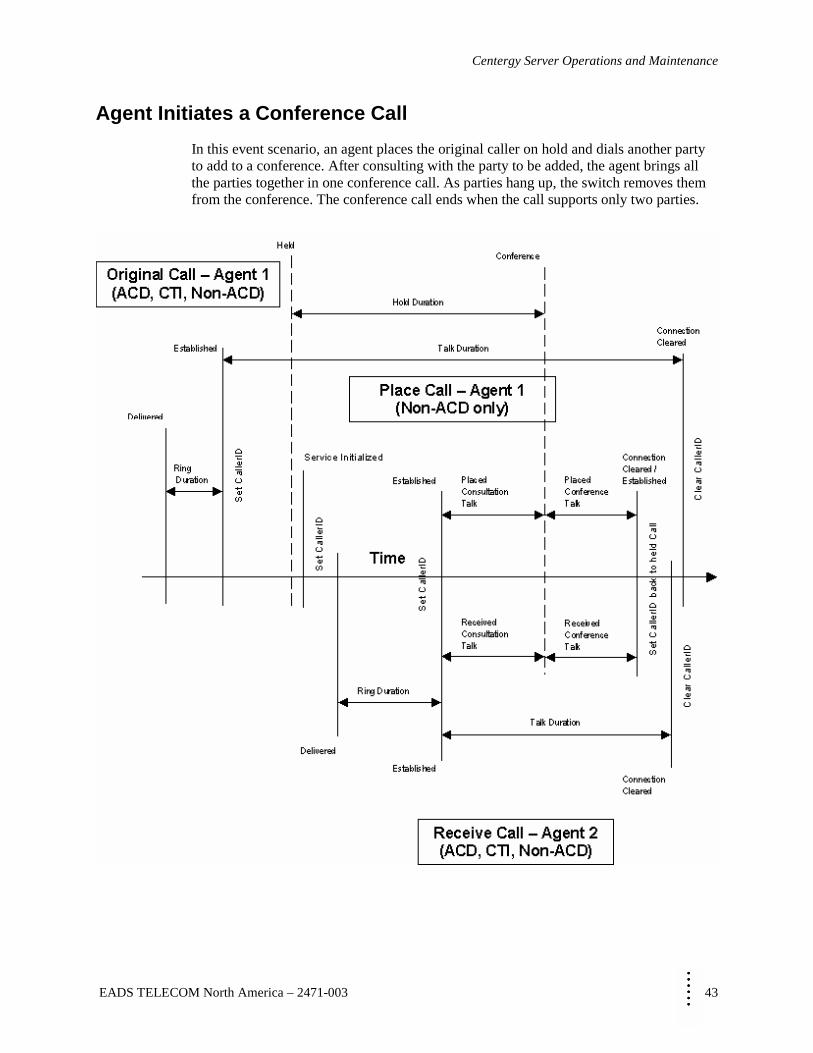
Agent Initiates a Conference Call
In this event scenario, an agent places the original caller on hold and dials another party to add to a conference. After consulting with the party to be added, the agent brings all the parties together in one conference call. As parties hang up, the switch removes them from the conference. The conference call ends when the call supports only two parties.
Databases, Data Objects, and Statistics
44 EADS TELECOM North America – 2471-003
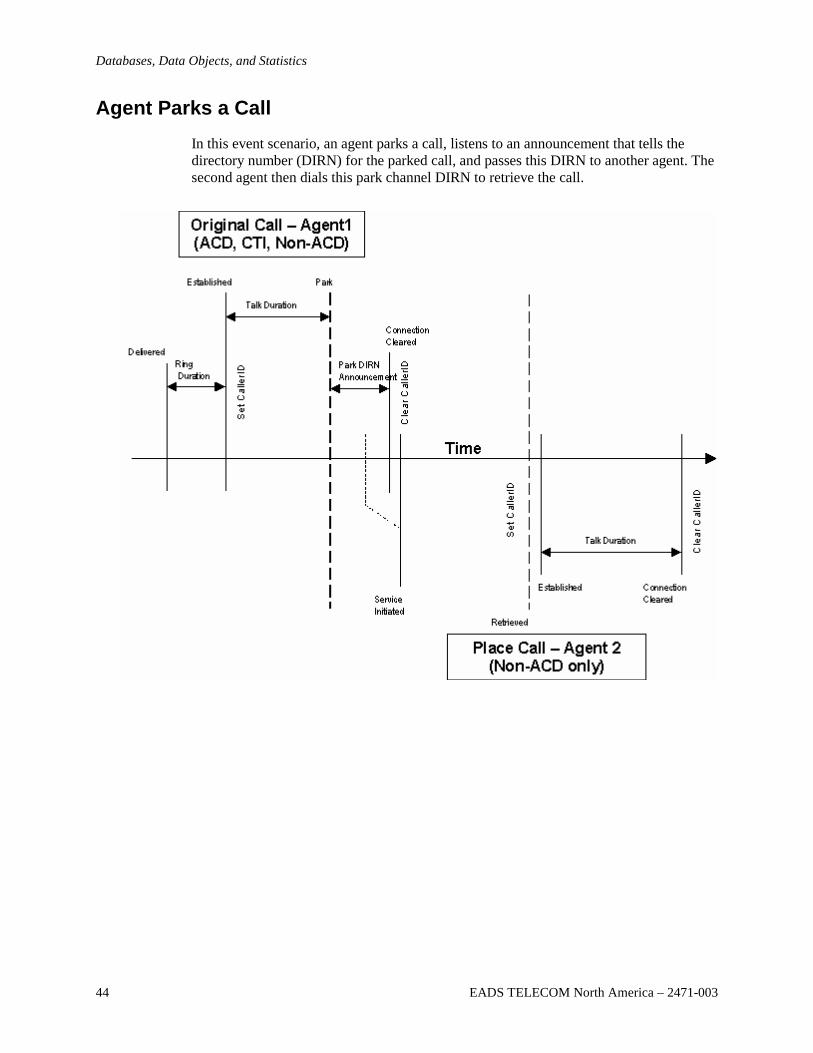
Agent Parks a Call
In this event scenario, an agent parks a call, listens to an announcement that tells the directory number (DIRN) for the parked call, and passes this DIRN to another agent. The second agent then dials this park channel DIRN to retrieve the call.
MMMMMMMM
Centergy Server Operations and Maintenance
EADS TELECOM North America – 2471-003 45
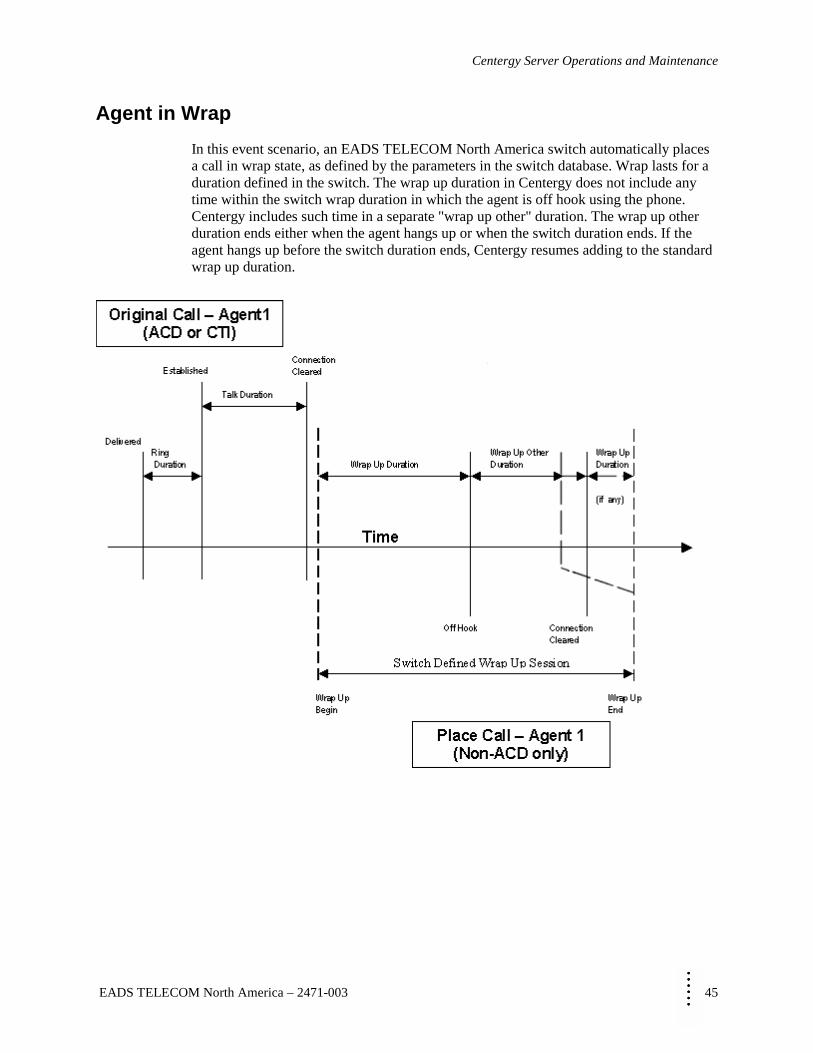
Agent in Wrap
In this event scenario, an EADS TELECOM North America switch automatically places a call in wrap state, as defined by the parameters in the switch database. Wrap lasts for a duration defined in the switch. The wrap up duration in Centergy does not include any time within the switch wrap duration in which the agent is off hook using the phone. Centergy includes such time in a separate "wrap up other" duration. The wrap up other duration ends either when the agent hangs up or when the switch duration ends. If the agent hangs up before the switch duration ends, Centergy resumes adding to the standard wrap up duration.
Databases, Data Objects, and Statistics
46 EADS TELECOM North America – 2471-003
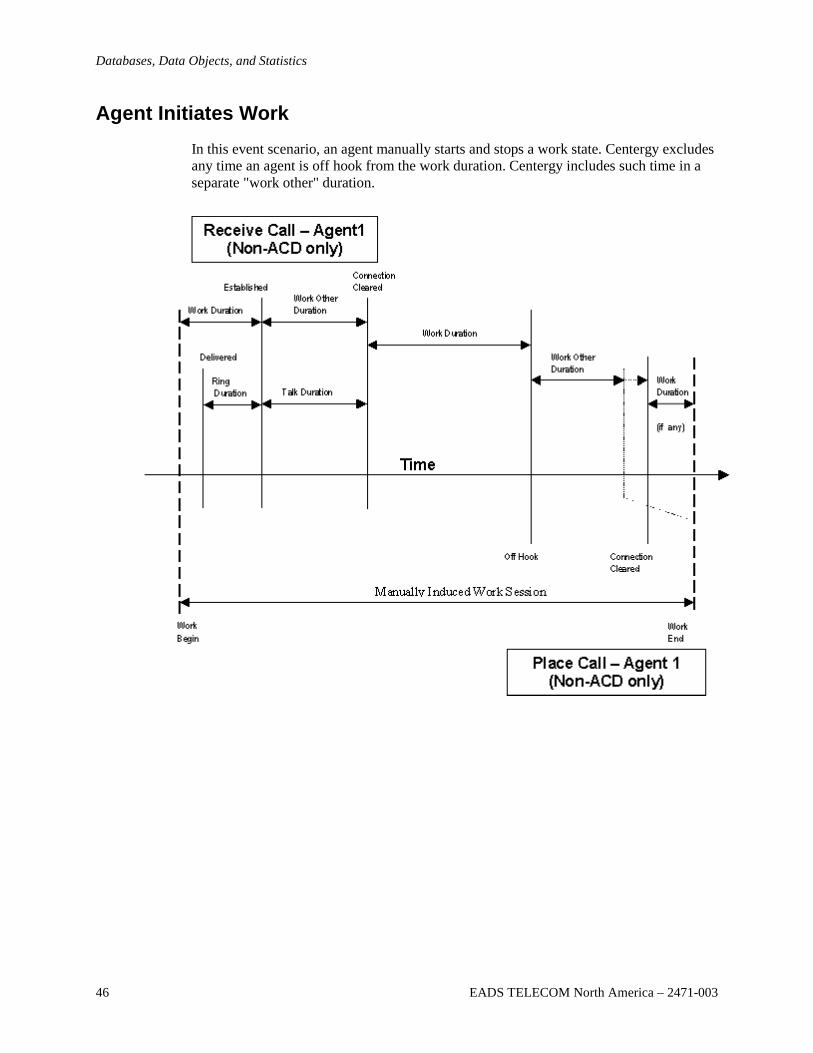
Agent Initiates Work
In this event scenario, an agent manually starts and stops a work state. Centergy excludes any time an agent is off hook from the work duration. Centergy includes such time in a separate "work other" duration.
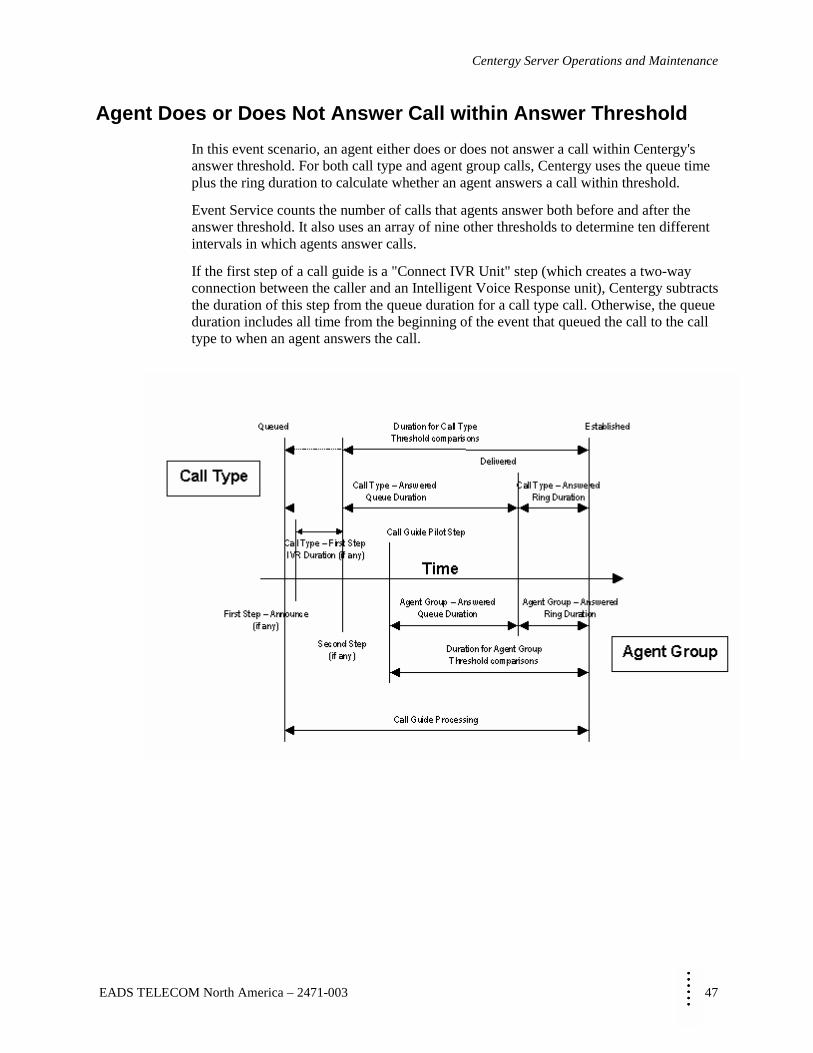
MMMMMMMM
Centergy Server Operations and Maintenance
EADS TELECOM North America – 2471-003 47
Agent Does or Does Not Answer Call within Answer Threshold
In this event scenario, an agent either does or does not answer a call within Centergy's answer threshold. For both call type and agent group calls, Centergy uses the queue time plus the ring duration to calculate whether an agent answers a call within threshold.
Event Service counts the number of calls that agents answer both before and after the answer threshold. It also uses an array of nine other thresholds to determine ten different intervals in which agents answer calls.
If the first step of a call guide is a "Connect IVR Unit" step (which creates a two-way connection between the caller and an Intelligent Voice Response unit), Centergy subtracts the duration of this step from the queue duration for a call type call. Otherwise, the queue duration includes all time from the beginning of the event that queued the call to the call type to when an agent answers the call.
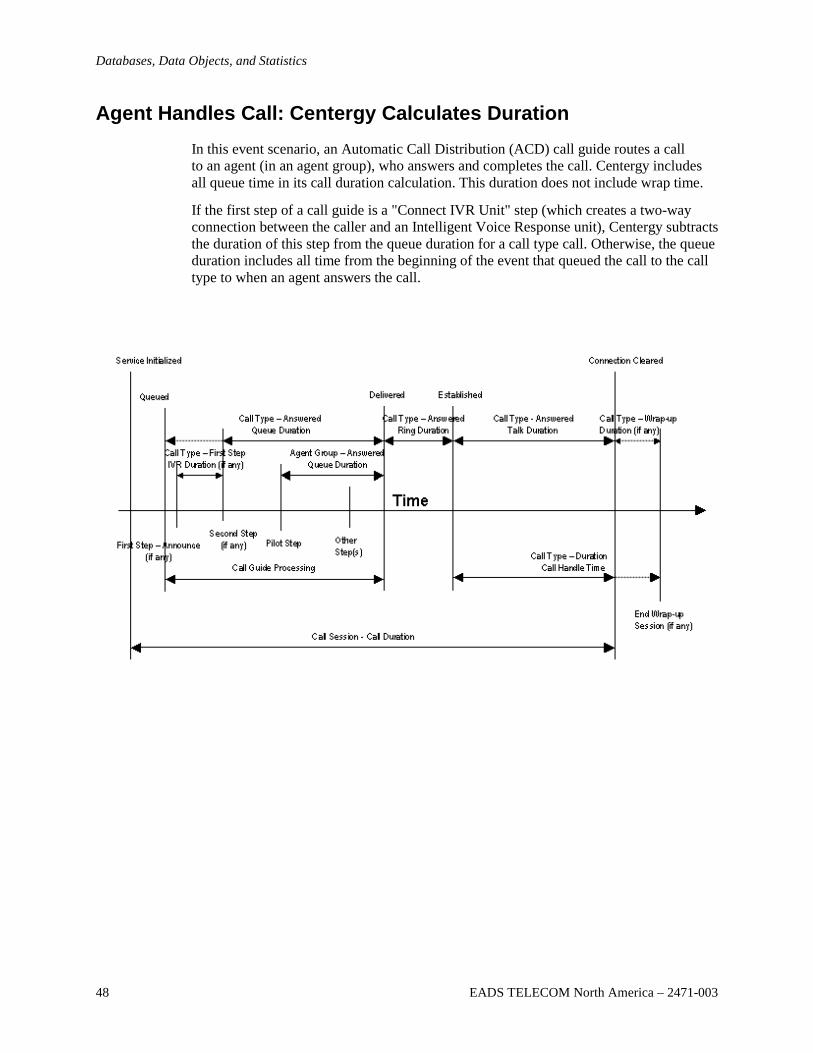
Databases, Data Objects, and Statistics
48 EADS TELECOM North America – 2471-003
Agent Handles Call: Centergy Calculates Duration
In this event scenario, an Automatic Call Distribution (ACD) call guide routes a call to an agent (in an agent group), who answers and completes the call. Centergy includes all queue time in its call duration calculation. This duration does not include wrap time.
If the first step of a call guide is a "Connect IVR Unit" step (which creates a two-way connection between the caller and an Intelligent Voice Response unit), Centergy subtracts the duration of this step from the queue duration for a call type call. Otherwise, the queue duration includes all time from the beginning of the event that queued the call to the call type to when an agent answers the call.

MMMMMMMM
Centergy Server Operations and Maintenance
EADS TELECOM North America – 2471-003 49
Calling Party Abandons Call
In this event scenario, a caller hangs up before an agent answers. Centergy first checks for short abandon (see "Calling Party Abandons Call within Short Abandon Threshold"). If it does not filter the call as being short abandoned, Centergy adds the abandoned call's queue duration and ring duration, then compares the result against the Answer Threshold.
Event Service counts the number of calls abandoned before and after the answer threshold. It also uses an array of nine other thresholds to determine ten different intervals in which callers abandon calls.
If the first step of a call guide is a "Connect IVR Unit" step (which creates a two-way connection between the caller and an Intelligent Voice Response unit), Centergy subtracts the duration of this step from the queue duration for a call type call. Otherwise, the queue duration includes all time from the beginning of the event that queued the call to the call type to when an agent answers the call.
A caller can abandon a call at any time. They can abandon a call before a pilot step in a call guide routes the call to an agent group. If they abandon a call before ACD routes it to an agent, the ring duration is zero.
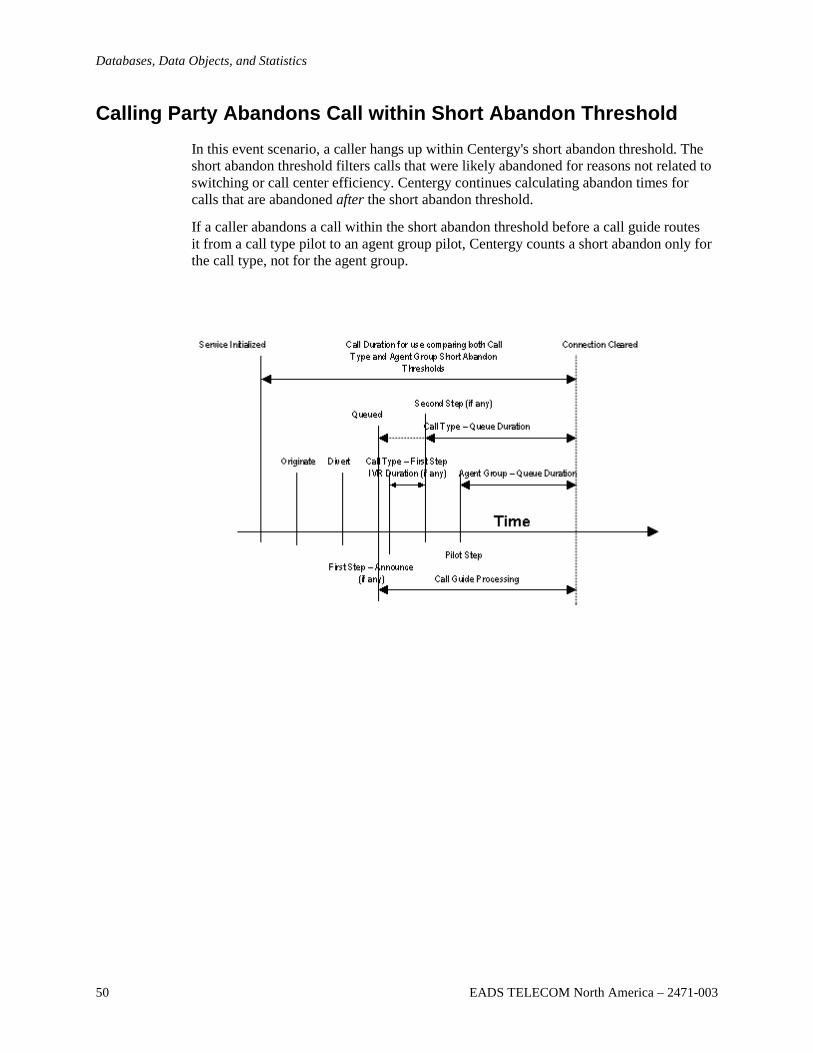
Databases, Data Objects, and Statistics
50 EADS TELECOM North America – 2471-003
Calling Party Abandons Call within Short Abandon Threshold
In this event scenario, a caller hangs up within Centergy's short abandon threshold. The short abandon threshold filters calls that were likely abandoned for reasons not related to switching or call center efficiency. Centergy continues calculating abandon times for calls that are abandoned after the short abandon threshold.
If a caller abandons a call within the short abandon threshold before a call guide routes it from a call type pilot to an agent group pilot, Centergy counts a short abandon only for the call type, not for the agent group.

MMMMMMMM
Centergy Server Operations and Maintenance
EADS TELECOM North America – 2471-003 51
Calling Party Abandons Call in First IVR Step
In this event scenario, a caller abandons a call while it is in the first step of a call guide and the step is a "Connect IVR Unit" step (which creates a two-way connection between the caller and an Intelligent Voice Response unit). Centergy subtracts the duration of any first IVR step from any queue durations for a call type call.
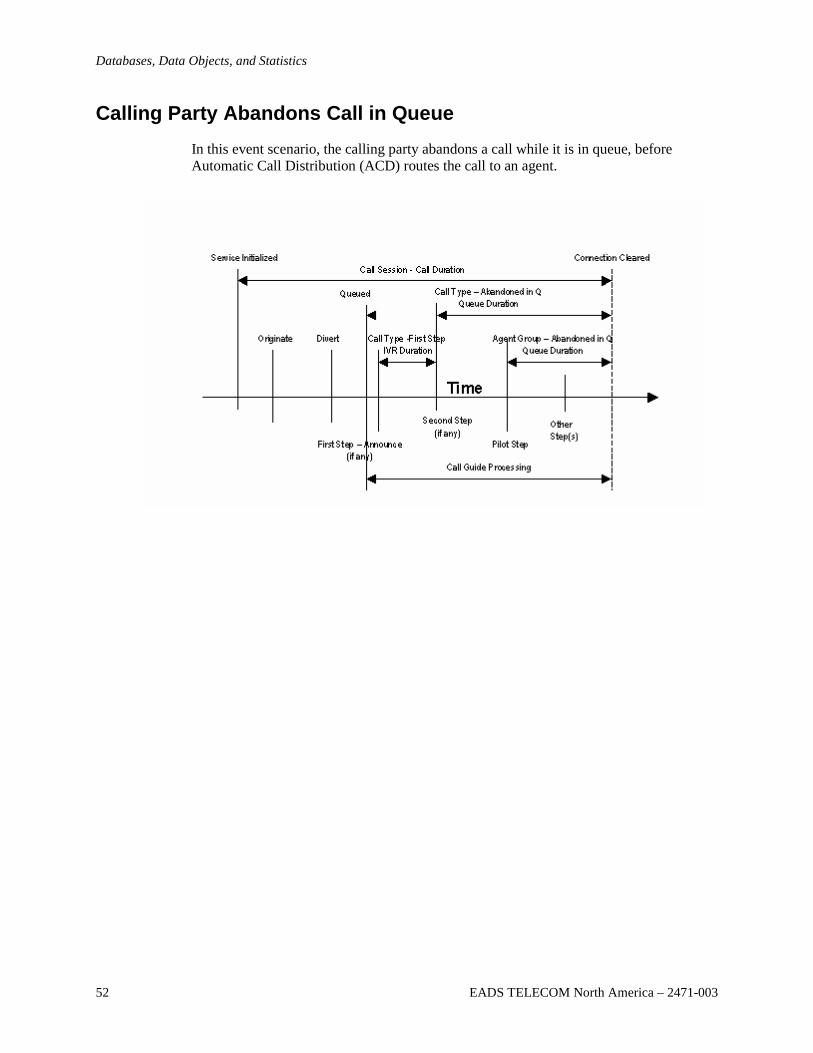
Databases, Data Objects, and Statistics
52 EADS TELECOM North America – 2471-003
Calling Party Abandons Call in Queue
In this event scenario, the calling party abandons a call while it is in queue, before Automatic Call Distribution (ACD) routes the call to an agent.

MMMMMMMM
Centergy Server Operations and Maintenance
EADS TELECOM North America – 2471-003 53
Calling Party Abandons Call While Ringing
In this event scenario, the calling party abandons a call after Automatic Call Distribution (ACD) routes it to an agent, but before the agent answers.

Databases, Data Objects, and Statistics
54 EADS TELECOM North America – 2471-003

MMMMMMMM
Centergy Server Operations and Maintenance
EADS TELECOM North America – 2471-003 55
Chapter 4
Server Configuration Options
Configuration Options
The following configuration options vary based on your organization's unique requirements and networking environment:
• Domain account
• Printer availability
• Access to data call center databases
Domain Account for Centergy Network Management Server
Some Centergy functions require a domain account for a Centergy Network Management Server (CNMS). Centergy versions 1.2 and earlier included a local account, "CCMSSystem," which services and components used by logging in as a user. For Centergy version 1.3 and later, however, the lack of a domain account may inhibit the full functions of Centergy, such as report printing and the e-mailing of report output.
The domain account for a CNMS can have any name (Centergy does not require an account named "CCMSSystem").
Printer Availability on a Centergy Network Management Server
The Centergy Manager application enables authorized users to select a printer for reports. For details, see "Printer Selection for Reports" in the Centergy Manager Administrator Guide (590-2503). However, only printers that are available to a CNMS are available to Centergy Manager. To provide a printer as an option for Centergy Manager, you must install the appropriate printer and driver on a CNMS.
Enabling Access to Data Call Center Databases
Some external (third-party) applications require direct access to Centergy’s Data Call Center databases. External applications, however, cannot access a Data Call Center database unless a server administrator makes the database available by creating an Open Database Connectivity (ODBC) data source. This procedure sets a single database to allow access by external applications; repeat this procedure for every Data Call Center database that external applications will access.
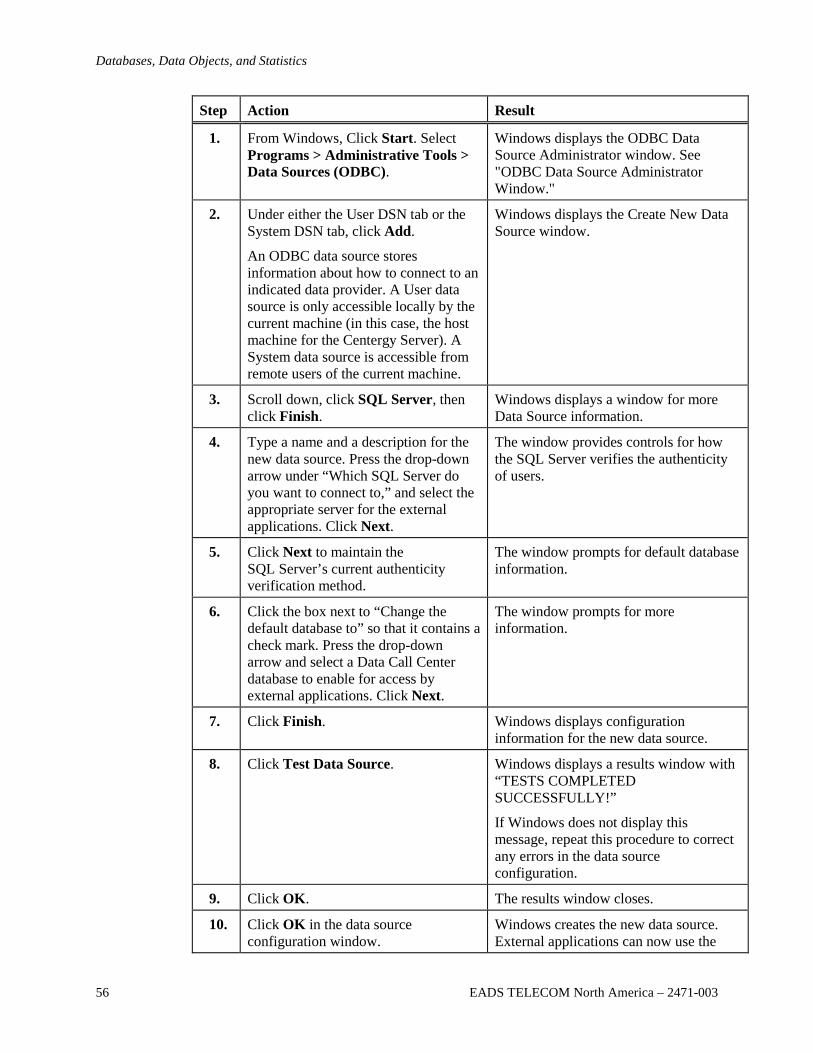
Databases, Data Objects, and Statistics
56 EADS TELECOM North America – 2471-003
Step Action Result
1. From Windows, Click Start. Select Programs > Administrative Tools > Data Sources (ODBC).
Windows displays the ODBC Data Source Administrator window. See "ODBC Data Source Administrator Window."
2. Under either the User DSN tab or the System DSN tab, click Add.
An ODBC data source stores information about how to connect to an indicated data provider. A User data source is only accessible locally by the current machine (in this case, the host machine for the Centergy Server). A System data source is accessible from remote users of the current machine.
Windows displays the Create New Data Source window.
3. Scroll down, click SQL Server, then click Finish.
Windows displays a window for more Data Source information.
4. Type a name and a description for the new data source. Press the drop-down arrow under “Which SQL Server do you want to connect to,” and select the appropriate server for the external applications. Click Next.
The window provides controls for how the SQL Server verifies the authenticity of users.
5. Click Next to maintain the SQL Server’s current authenticity verification method.
The window prompts for default database information.
6. Click the box next to “Change the default database to” so that it contains a check mark. Press the drop-down arrow and select a Data Call Center database to enable for access by external applications. Click Next.
The window prompts for more information.
7. Click Finish. Windows displays configuration information for the new data source.
8. Click Test Data Source. Windows displays a results window with “TESTS COMPLETED SUCCESSFULLY!”
If Windows does not display this message, repeat this procedure to correct any errors in the data source configuration.
9. Click OK. The results window closes.
10. Click OK in the data source configuration window.
Windows creates the new data source. External applications can now use the
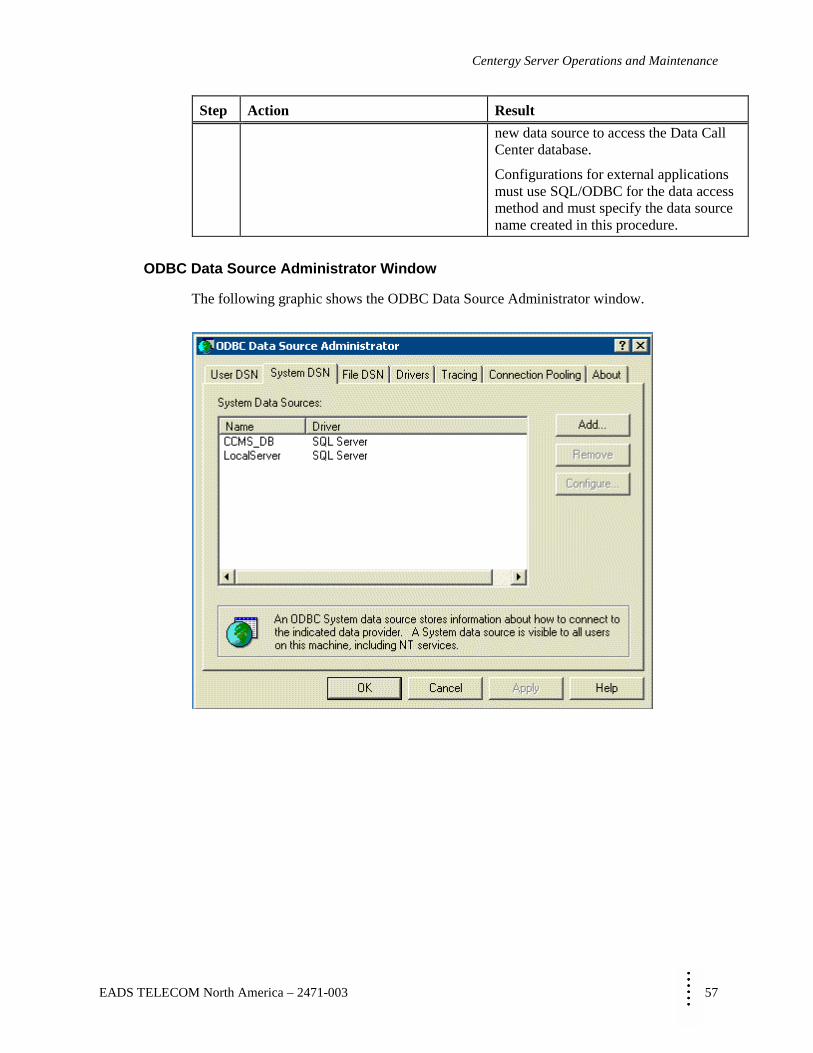
MMMMMMMM
Centergy Server Operations and Maintenance
EADS TELECOM North America – 2471-003 57
Step Action Result
new data source to access the Data Call Center database.
Configurations for external applications must use SQL/ODBC for the data access method and must specify the data source name created in this procedure.
ODBC Data Source Administrator Window
The following graphic shows the ODBC Data Source Administrator window.

Databases, Data Objects, and Statistics
58 EADS TELECOM North America – 2471-003
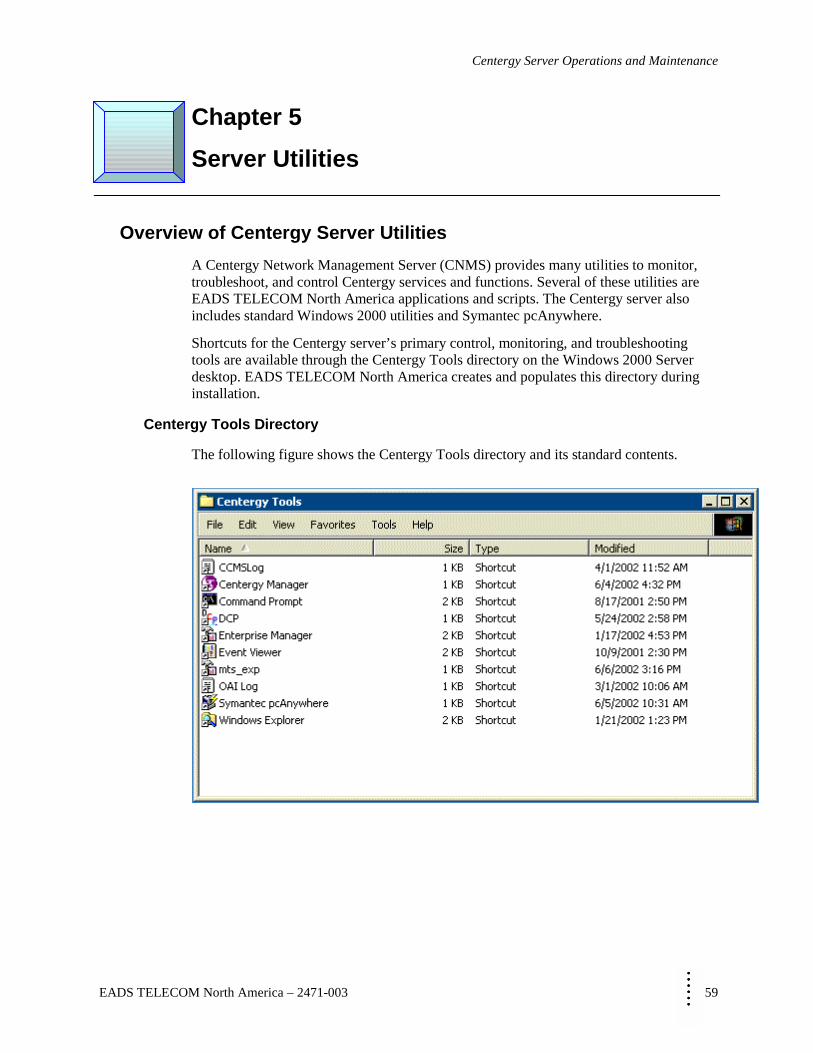
MMMMMMMM
Centergy Server Operations and Maintenance
EADS TELECOM North America – 2471-003 59
Chapter 5
Server Utilities
Overview of Centergy Server Utilities
A Centergy Network Management Server (CNMS) provides many utilities to monitor, troubleshoot, and control Centergy services and functions. Several of these utilities are EADS TELECOM North America applications and scripts. The Centergy server also includes standard Windows 2000 utilities and Symantec pcAnywhere.
Shortcuts for the Centergy server’s primary control, monitoring, and troubleshooting tools are available through the Centergy Tools directory on the Windows 2000 Server desktop. EADS TELECOM North America creates and populates this directory during installation.
Centergy Tools Directory
The following figure shows the Centergy Tools directory and its standard contents.

Server Utilities
60 EADS TELECOM North America – 2471-003
EADS TELECOM North America Utilities to Operate and Maintain Centergy
The following table identifies the EADS TELECOM North America Centergy Manager troubleshooting, monitoring, and control utilities and describes their basic functions. The Centergy Tools directory on the server desktop contains a shortcut for each of these utilities.
EADS TELECOM North America Utility
Function
CCMSLog
Opens a log of all CCMS support service activity. The feature tracing component of the Centergy diagnostic utilities controls the generation and contents of this file.
The typical single-server location of the CCMS log file is D:\CCMS\ LogFiles\ CCMSLog.log. In a dual-server configuration, the typical location of the CCMS log file is E:\CCMS\LogFiles\CCMSLog.log on the Centergy server.
See “Feature Tracing and the CCMS Support Services Log” for details and procedures.
Centergy Manager Starts the main Centergy Manager user interface; see the Centergy Manager Administrator Guide, (590-2503) for comprehensive information.
The typical location of the Centergy Manager executable is D:\Program Files\eadstelecom\CentergyManager\ CMGR.exe. In a dual-server configuration, the Centergy Manager executable is only on the Centergy server.
See “Starting Centergy Manager from a Centergy Network Management Server” for a procedure.
DCP (Driver Control Program)
This Open Application Interface (OAI) Toolkit utility configures drivers to support communications with an EADS TELECOM North America switch. It can enable the system to generate packet log files that contain messages that a switch sends to the CNMS. It also automatically generates logs to track OAI driver activity. With the DCP, a system administrator can monitor the status of OAI links and control packet logging. For assistance, see the Driver Control Program (DCP) Administrator’s User Guide (590-2352).
The typical location of the DCP utility is D:\OAIToolkit\ Dcp.exe. In a dual-server configuration, the DCP utility is only on the Centergy server.
The DCP utility is for use by EADS TELECOM North
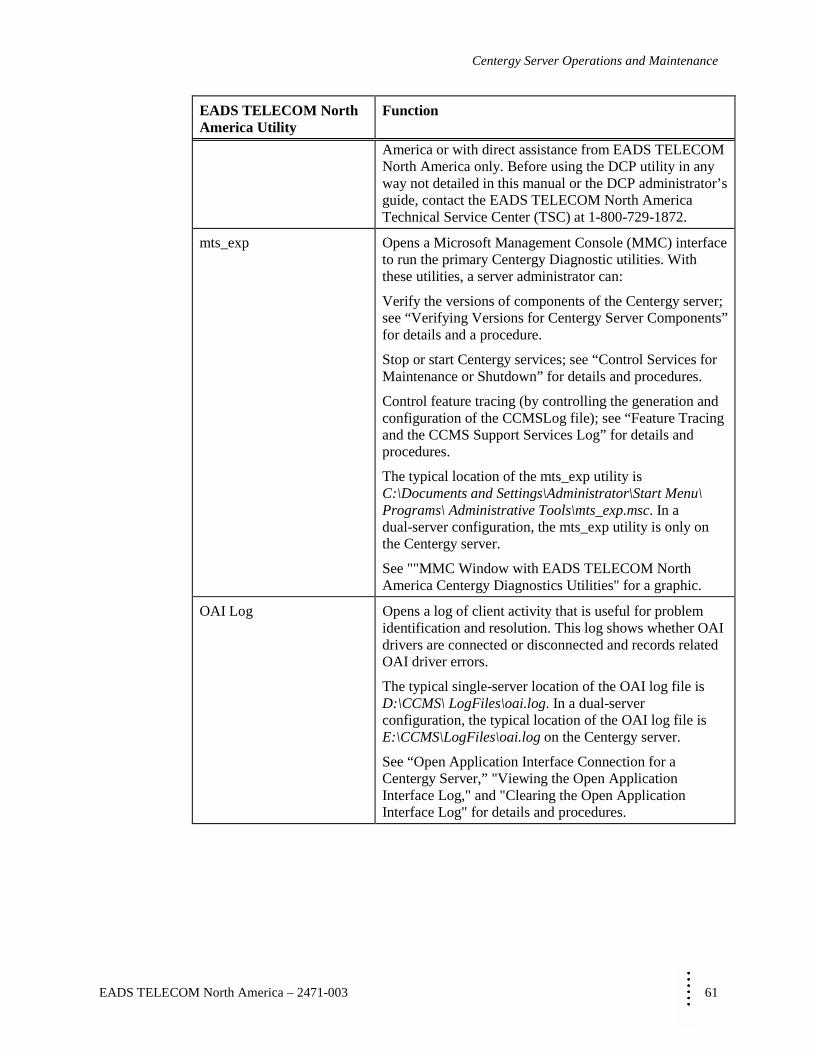
MMMMMMMM
Centergy Server Operations and Maintenance
EADS TELECOM North America – 2471-003 61
EADS TELECOM North America Utility
Function
America or with direct assistance from EADS TELECOM North America only. Before using the DCP utility in any way not detailed in this manual or the DCP administrator’s guide, contact the EADS TELECOM North America Technical Service Center (TSC) at 1-800-729-1872.
mts_exp
Opens a Microsoft Management Console (MMC) interface to run the primary Centergy Diagnostic utilities. With these utilities, a server administrator can:
Verify the versions of components of the Centergy server; see “Verifying Versions for Centergy Server Components” for details and a procedure.
Stop or start Centergy services; see “Control Services for Maintenance or Shutdown” for details and procedures.
Control feature tracing (by controlling the generation and configuration of the CCMSLog file); see “Feature Tracing and the CCMS Support Services Log” for details and procedures.
The typical location of the mts_exp utility is C:\Documents and Settings\Administrator\Start Menu\ Programs\ Administrative Tools\mts_exp.msc. In a dual-server configuration, the mts_exp utility is only on the Centergy server.
See ""MMC Window with EADS TELECOM North America Centergy Diagnostics Utilities" for a graphic.
OAI Log Opens a log of client activity that is useful for problem identification and resolution. This log shows whether OAI drivers are connected or disconnected and records related OAI driver errors.
The typical single-server location of the OAI log file is D:\CCMS\ LogFiles\oai.log. In a dual-server configuration, the typical location of the OAI log file is E:\CCMS\LogFiles\oai.log on the Centergy server.
See “Open Application Interface Connection for a Centergy Server,” "Viewing the Open Application Interface Log," and "Clearing the Open Application Interface Log" for details and procedures.
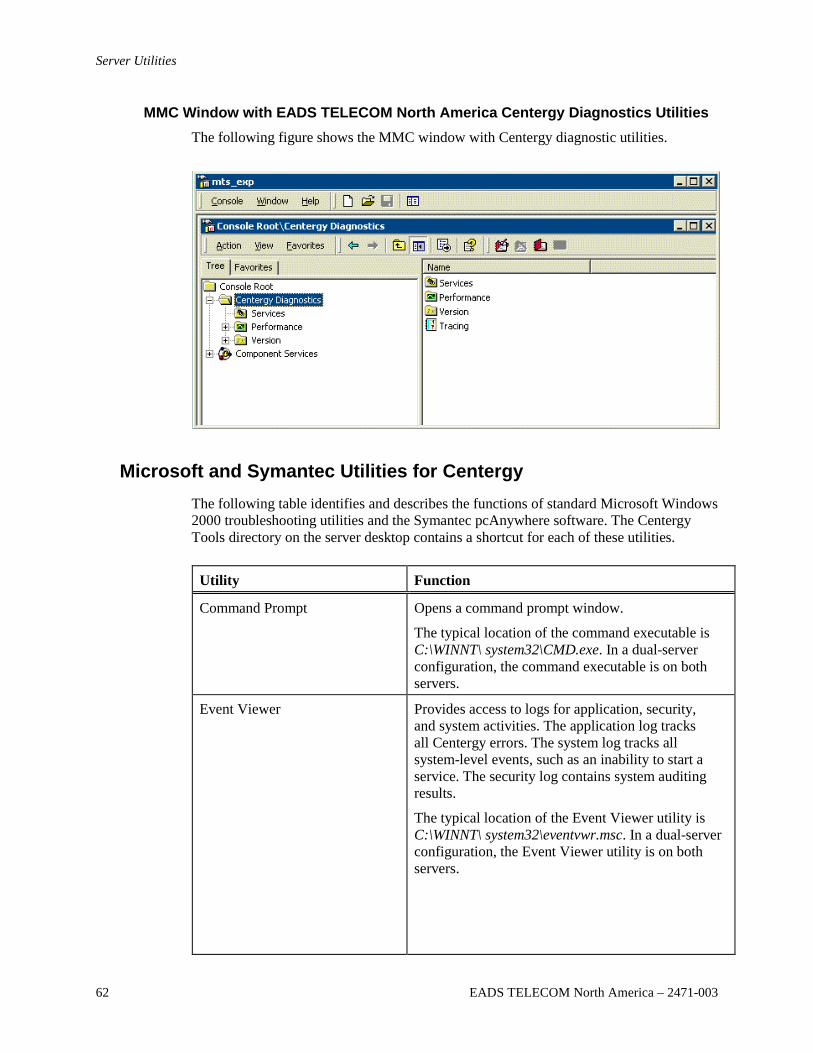
Server Utilities
62 EADS TELECOM North America – 2471-003
MMC Window with EADS TELECOM North America Centergy Diagnostics Utilities
The following figure shows the MMC window with Centergy diagnostic utilities.
Microsoft and Symantec Utilities for Centergy
The following table identifies and describes the functions of standard Microsoft Windows 2000 troubleshooting utilities and the Symantec pcAnywhere software. The Centergy Tools directory on the server desktop contains a shortcut for each of these utilities.
Utility Function
Command Prompt Opens a command prompt window.
The typical location of the command executable is C:\WINNT\ system32\CMD.exe. In a dual-server configuration, the command executable is on both servers.
Event Viewer Provides access to logs for application, security, and system activities. The application log tracks all Centergy errors. The system log tracks all system-level events, such as an inability to start a service. The security log contains system auditing results.
The typical location of the Event Viewer utility is C:\WINNT\ system32\eventvwr.msc. In a dual-server configuration, the Event Viewer utility is on both servers.
MMMMMMMM
Centergy Server Operations and Maintenance
EADS TELECOM North America – 2471-003 63
Utility Function
Enterprise Manager
Opens the SQL Server Enterprise Manager, the primary administrative tool for Microsoft SQL Server 2000. See "SQL Server Enterprise Manager" for a graphic. With this utility, a system administrator can: • Define groups of servers running SQL Server. • Register individual servers in a group. • Configure all SQL Server options for each
registered server. • Create and administer all SQL Server databases,
objects, logins, users, and permissions in each registered server.
• Define and execute SQL Server administration tasks on each registered server.
• Invoke the various wizards defined for SQL Server.
The Enterprise Manager provides detailed online help, available through the Help menu, to guide administrators in its use.
The typical single-server location of the Enterprise Manager utility is C:\WINNT\system32\mmc.exe.In a dual-server configuration, the Enterprise Manager utility is on the SQL Server only.
Symantec pcAnywhere Runs the Symantec pcAnywhere program, which: • Provides secure, fast, and easy remote access to
PCs. • Enables remote server management and helpdesk
support • Supports remote file retrieve and use of PC
applications
The typical location of the pcAnywhere executable is D:\Program Files\Symantec\pcAnywhere\ WINAW32.EXE. In a dual-server configuration, the pcAnywhere executable is on both servers.
Windows Explorer Opens Windows Explorer.
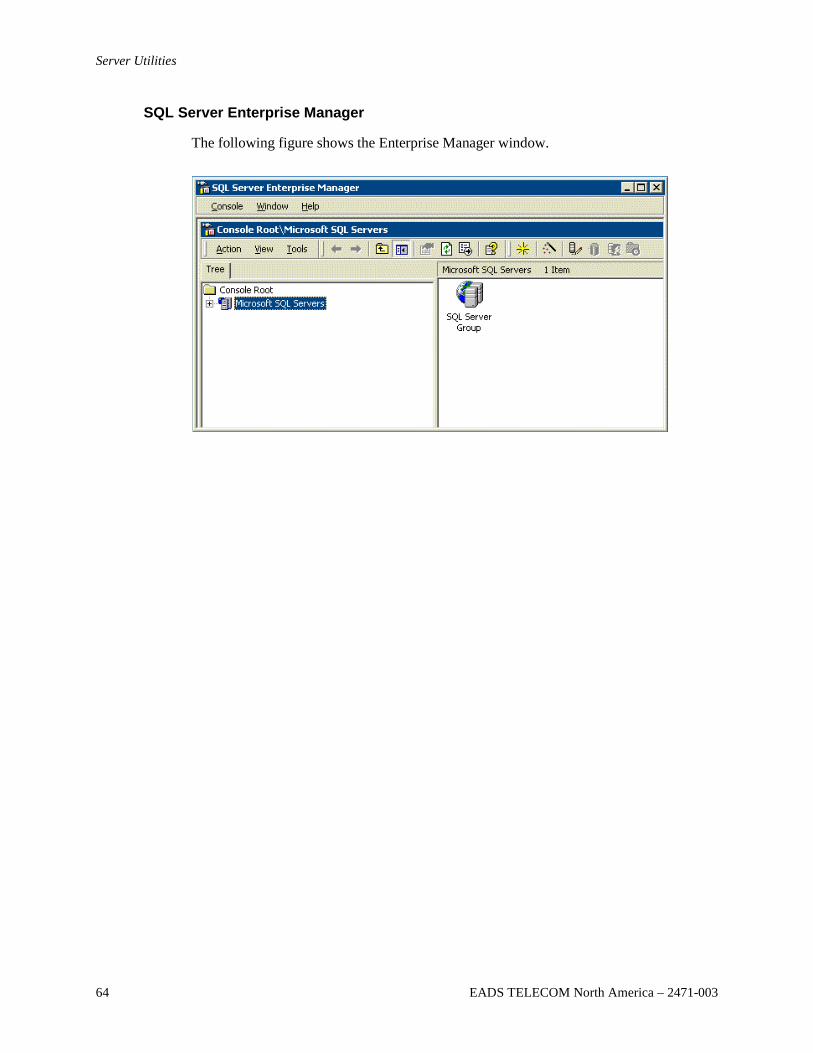
Server Utilities
64 EADS TELECOM North America – 2471-003
SQL Server Enterprise Manager
The following figure shows the Enterprise Manager window.
MMMMMMMM
Centergy Server Operations and Maintenance
EADS TELECOM North America – 2471-003 65
Chapter 6
Verify Centergy Components
Verifying Versions for Centergy Server Components
Use this procedure to ensure that all of the Centergy server’s CCMS Support Services share a common version number.
Step Action Result
1. From the Windows desktop for the Centergy server, double-click the Centergy Tools directory.
Windows opens the Centergy Tools directory.
2. Double-click mts_exp. Windows opens the MMC. See "Overview of Centergy Server Utilities" for a graphic of the open MMC with Centergy diagnostic utilities.
3. Double-click Version.
The MMC lists Centergy server components with a corresponding version level. See the figure in "List of Centergy Server Components with Version Level" for an example.
4. To resolve any discrepancies or concerns regarding the versions of the CCMS Support Services, contact the EADS TELECOM North America Technical Service Center (TSC) at 1-800-729-1872.
The EADS TELECOM North America TSC responds.
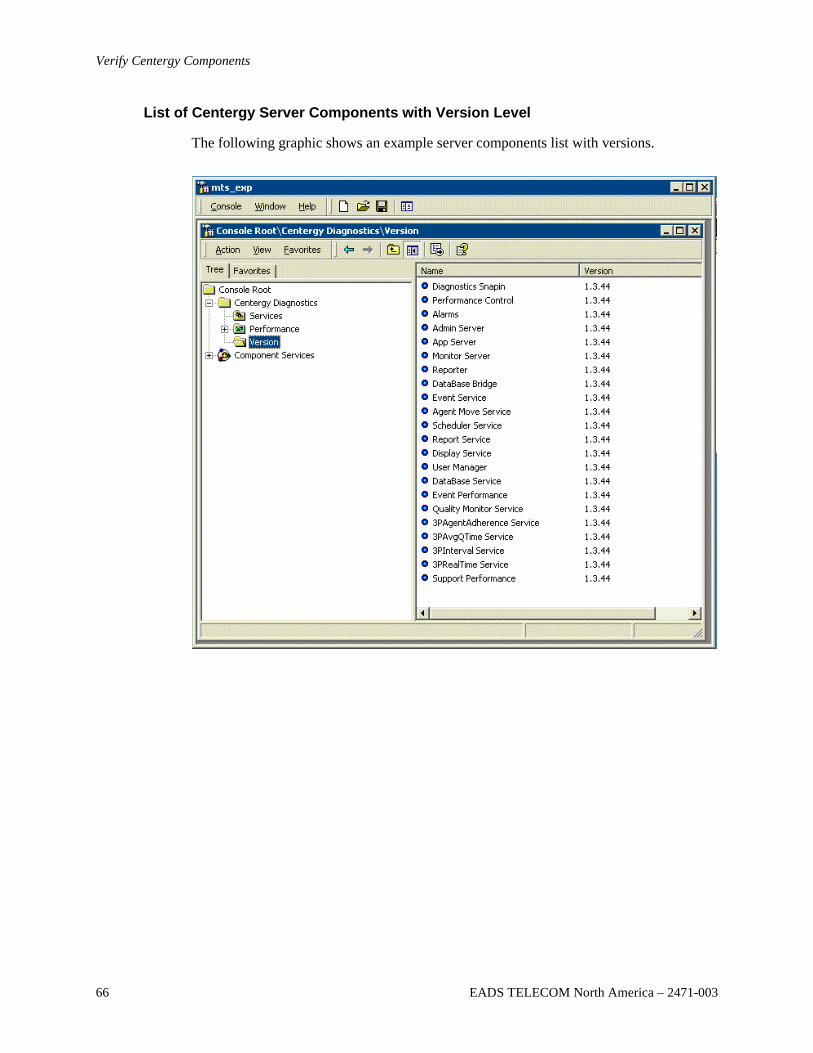
Verify Centergy Components
66 EADS TELECOM North America – 2471-003
List of Centergy Server Components with Version Level
The following graphic shows an example server components list with versions.
MMMMMMMM
Centergy Server Operations and Maintenance
EADS TELECOM North America – 2471-003 67
Chapter 7
Control Centergy Services
Control Services for Maintenance or Shutdown
At times, the Centergy server requires maintenance or must be shut down for activities such as a planned power outage or system upgrade. Activities related to controlling Centergy services include:
• Stopping or starting Centergy services
• Shutting down the Centergy server
• Verifying Centergy operations after restarting services
Stopping or Starting Centergy Services
The Services utility, available through the Microsoft Management Console (MMC), can stop and start primary CCMS support services (as described in "Primary Components of a Centergy Network Management Server"). A system administrator for Centergy may need to stop Centergy services for a scheduled power outage, routine maintenance activity, or system upgrade. When the task is complete, the server administrator will need to restart the services.
The Services utility can stop or start all Centergy services collectively. This is helpful when taking Centergy completely off line and when bringing it back on line. The Services utility can stop or start Centergy services individually. If the state of the CCMS service is “Stopped,” the Services utility will start it. If the state of the service is “Started,” the Services utility will stop it. Stopping and starting individual services, rather than all services, assists in precise troubleshooting.
Stopping Centergy services can have major implications! Before stopping any service, ensure that the change will not be detrimental to the use of the system!
Impact of Stopping Windows Before Stopping Centergy Services
When Windows stops while the Centergy services are still running, the SQL database may not record all current statistics. When Windows stops abruptly, Event Service does not have time to shut down gracefully. The Database Service does not have time to write all statistical data to the SQL database.
Control Centergy Services
68 EADS TELECOM North America – 2471-003
Impact of Power Failures and System Crashes
When power to the server stops abruptly while Centergy services are still running, the SQL database may not record all current statistics. When the server loses power, Event Service does not have time to shut down gracefully, and Database Service does not have time to write all statistical data to the SQL database.
A low voltage indicator can allow the services to shut down gracefully if the outage outlasts the availability of backup power.
Event Rewind Implications
Centergy provides an optional feature called “Event Rewind,” an automatic event recovery mechanism that protects data integrity. When Event Rewind is enabled, Centergy captures data that a switch may have generated while Centergy was not able to accept and process events, such as when Open Application Interface (OAI) communication between the switch and the Centergy server is interrupted.
Stopping and restarting Centergy services can have an impact on the Event Rewind feature and the integrity of the switch event data that Centergy captures. With Event Rewind enabled, Centergy records the sequence number of the last event it processes. When Centergy services resume operations after being stopped, Centergy requests the switch to resend events, in order, starting with the last event Centergy processed, based on the sequence number.
However, the file in which the switch stores event data is limited. When the file has no more free space to store events, the switch overwrites the oldest event data in the file with new event data. Centergy cannot retrieve events that have been overwritten on the switch’s event data file. If Centergy services resume operation before the switch overwrites old event records, Centergy can retrieve all switch data. Otherwise, some data may be lost.
The exact duration before a switch begins to overwrite old event data depends on the level of activity for that switch. This duration can vary greatly between different sites with different call center or contact center activity. To minimize possible data loss, stop Centergy services for any non-emergency only during low traffic periods. If Centergy services must be stopped during periods of heavy traffic, restart the services as soon as possible.
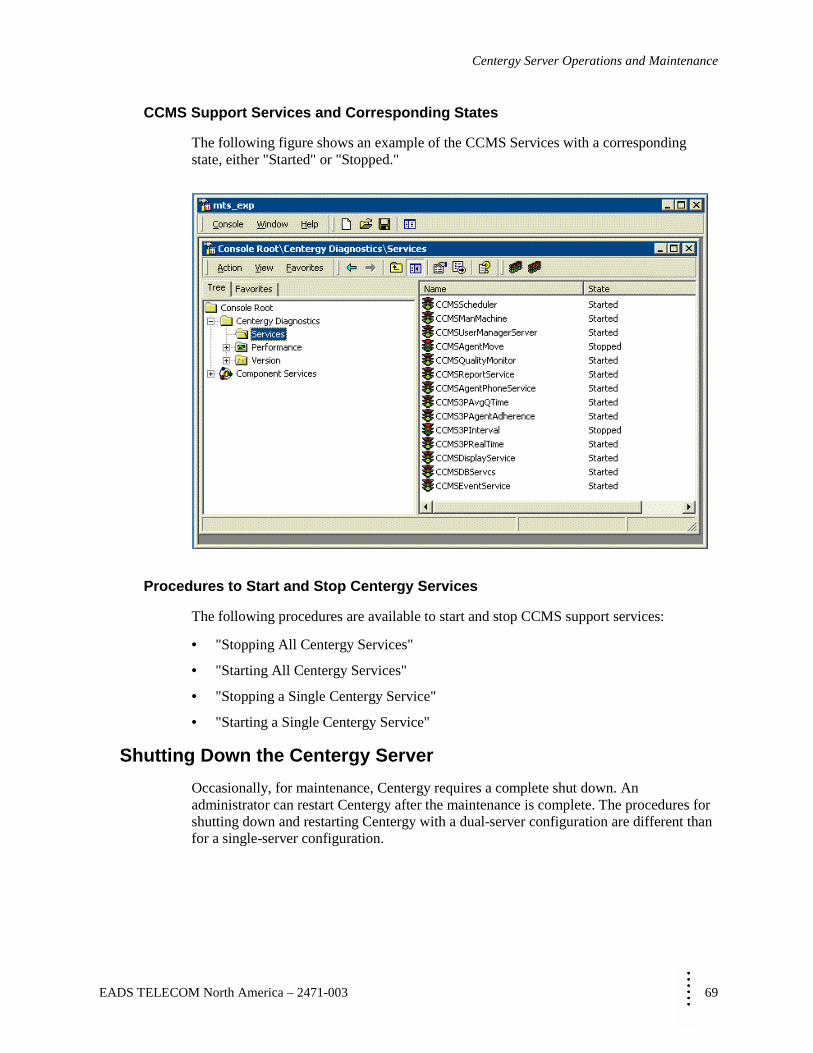
MMMMMMMM
Centergy Server Operations and Maintenance
EADS TELECOM North America – 2471-003 69
CCMS Support Services and Corresponding States
The following figure shows an example of the CCMS Services with a corresponding state, either "Started" or "Stopped."
Procedures to Start and Stop Centergy Services
The following procedures are available to start and stop CCMS support services:
• "Stopping All Centergy Services"
• "Starting All Centergy Services"
• "Stopping a Single Centergy Service"
• "Starting a Single Centergy Service"
Shutting Down the Centergy Server
Occasionally, for maintenance, Centergy requires a complete shut down. An administrator can restart Centergy after the maintenance is complete. The procedures for shutting down and restarting Centergy with a dual-server configuration are different than for a single-server configuration.

Control Centergy Services
70 EADS TELECOM North America – 2471-003
Procedures to Shut Down a Centergy Server
The following procedures are available to shut down a Centergy server:
• "Shutting Down Centergy with a Single-server Configuration"
• "Restarting Centergy with a Single-server Configuration"
• "Shutting Down Centergy with a Dual-server Configuration"
• "Restarting Centergy with a Dual-server Configuration"
Verifying Centergy Operations After Restarting Services
After stopping and starting Centergy services, you must verify that Centergy services have resumed operations.
Procedures to Verify the Operations of Centergy Services
The following procedures are available to verify Centergy operations:
• "Verifying the Operation of Centergy Services"
• "Verifying Display Session Updates in Centergy Manager"
• "Verifying the Operation of OAI Drivers"
• "Verifying the Reception of Switch Events"
Stopping All Centergy Services
Use this procedure to stop all Centergy services.
Step Action Result
1. From the Windows desktop for the Centergy server, double-click the Centergy Tools directory.
Windows opens the Centergy Tools directory.
2. Double-click mts_exp. Windows opens a Microsoft Management Console (MMC) with Centergy diagnostic utilities.
3. Double-click Console Root, then Centergy Diagnostics, then Services.
The MMC displays all of the CCMS support services (as defined in "Primary Components of the Centergy Network Management Server"). It indicates the state of each service as either “Started” or “Stopped.”
4. In the MMC window toolbar, click on the red traffic light icon ( ).
The Services utility stops all of the Centergy services.
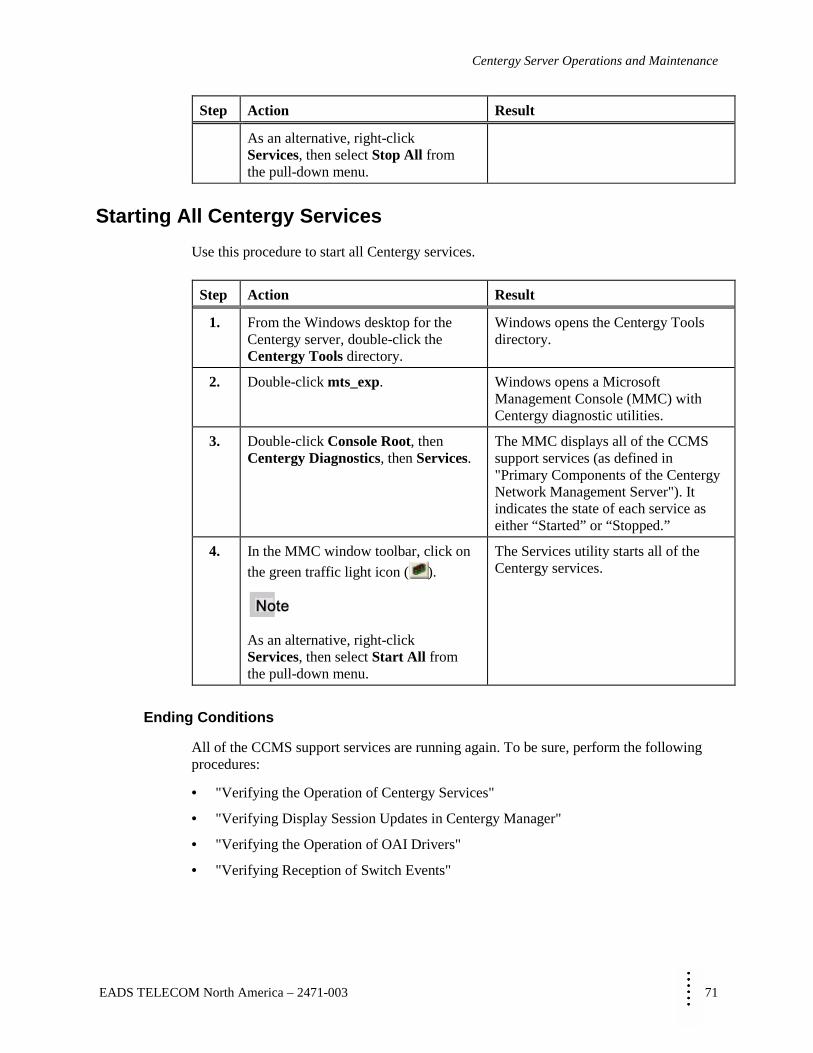
MMMMMMMM
Centergy Server Operations and Maintenance
EADS TELECOM North America – 2471-003 71
Step Action Result
As an alternative, right-click Services, then select Stop All from the pull-down menu.
Starting All Centergy Services
Use this procedure to start all Centergy services.
Step Action Result
1. From the Windows desktop for the Centergy server, double-click the Centergy Tools directory.
Windows opens the Centergy Tools directory.
2. Double-click mts_exp. Windows opens a Microsoft Management Console (MMC) with Centergy diagnostic utilities.
3. Double-click Console Root, then Centergy Diagnostics, then Services.
The MMC displays all of the CCMS support services (as defined in "Primary Components of the Centergy Network Management Server"). It indicates the state of each service as either “Started” or “Stopped.”
4. In the MMC window toolbar, click on the green traffic light icon ( ).
As an alternative, right-click Services, then select Start All from the pull-down menu.
The Services utility starts all of the Centergy services.
Ending Conditions
All of the CCMS support services are running again. To be sure, perform the following procedures:
• "Verifying the Operation of Centergy Services"
• "Verifying Display Session Updates in Centergy Manager"
• "Verifying the Operation of OAI Drivers"
• "Verifying Reception of Switch Events"
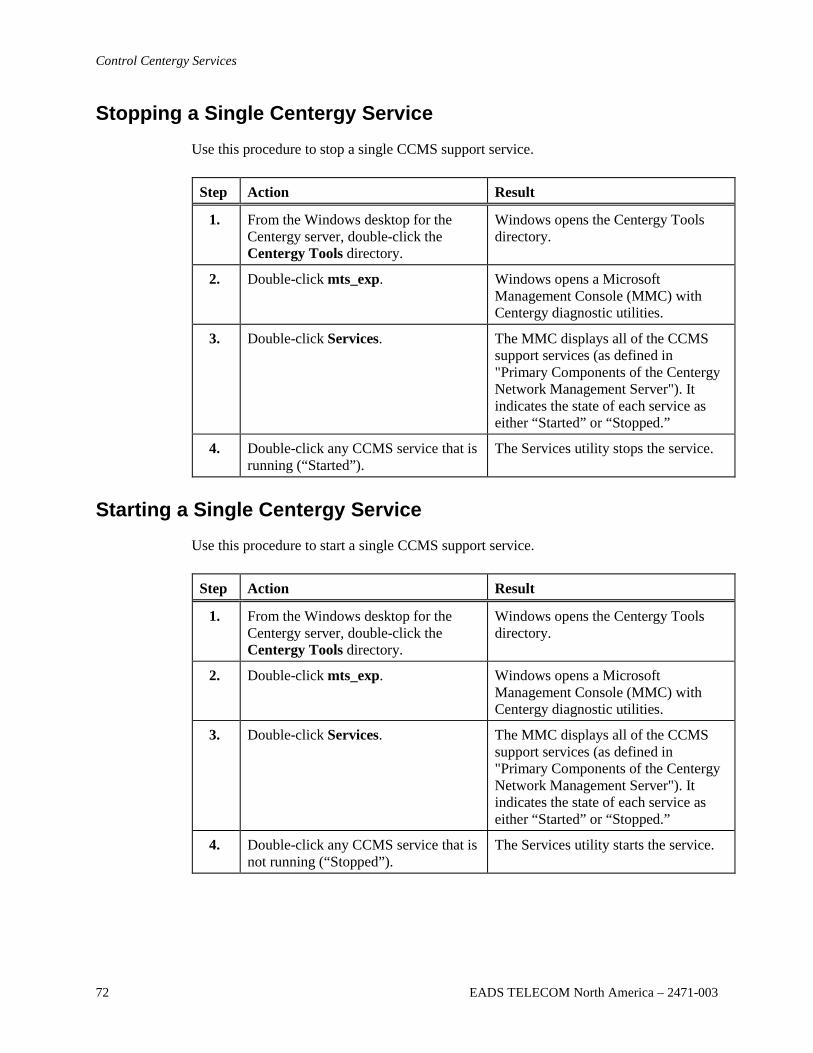
Control Centergy Services
72 EADS TELECOM North America – 2471-003
Stopping a Single Centergy Service
Use this procedure to stop a single CCMS support service.
Step Action Result
1. From the Windows desktop for the Centergy server, double-click the Centergy Tools directory.
Windows opens the Centergy Tools directory.
2. Double-click mts_exp. Windows opens a Microsoft Management Console (MMC) with Centergy diagnostic utilities.
3. Double-click Services.
The MMC displays all of the CCMS support services (as defined in "Primary Components of the Centergy Network Management Server"). It indicates the state of each service as either “Started” or “Stopped.”
4. Double-click any CCMS service that is running (“Started”).
The Services utility stops the service.
Starting a Single Centergy Service
Use this procedure to start a single CCMS support service.
Step Action Result
1. From the Windows desktop for the Centergy server, double-click the Centergy Tools directory.
Windows opens the Centergy Tools directory.
2. Double-click mts_exp. Windows opens a Microsoft Management Console (MMC) with Centergy diagnostic utilities.
3. Double-click Services.
The MMC displays all of the CCMS support services (as defined in "Primary Components of the Centergy Network Management Server"). It indicates the state of each service as either “Started” or “Stopped.”
4. Double-click any CCMS service that is not running (“Stopped”).
The Services utility starts the service.

MMMMMMMM
Centergy Server Operations and Maintenance
EADS TELECOM North America – 2471-003 73
Ending Conditions
The CCMS support service is running again. To be sure, perform the following procedures:
• "Verifying the Operation of Centergy Services"
• "Verifying Display Session Updates in Centergy Manager"
• "Verifying the Operation of OAI Drivers"
• "Verifying Reception of Switch Events"
Shutting Down Centergy with a Single-server Configuration
Use this procedure to shut down Centergy with a single-server configuration.
Initial Conditions
Centergy CCMS support services must not be running; follow the procedure to “Stop All Centergy Services.”
Shut Down Centergy with a Single-server Configuration
Do the following:
Step Action Result
1. In the Windows 2000 Server toolbar, right-click the server icon ( ), then click MSSQL Server – Stop.
Windows displays a prompt that asks, “Are you sure you want to stop MSSQL Server . ..?”
2. Click Yes.
If you get the same prompt a second time, click Yes again.
Windows stops all SQL Server operations.
3. Stop all other active applications. Windows stops all applications.
4. In the Windows toolbar, click Start, then Shut Down.
Windows displays a prompt to shut down.
5. Click the option button to “shut down the computer?” Then click Yes.
Windows shuts down.
6. Turn off power to the server. The server turns off.
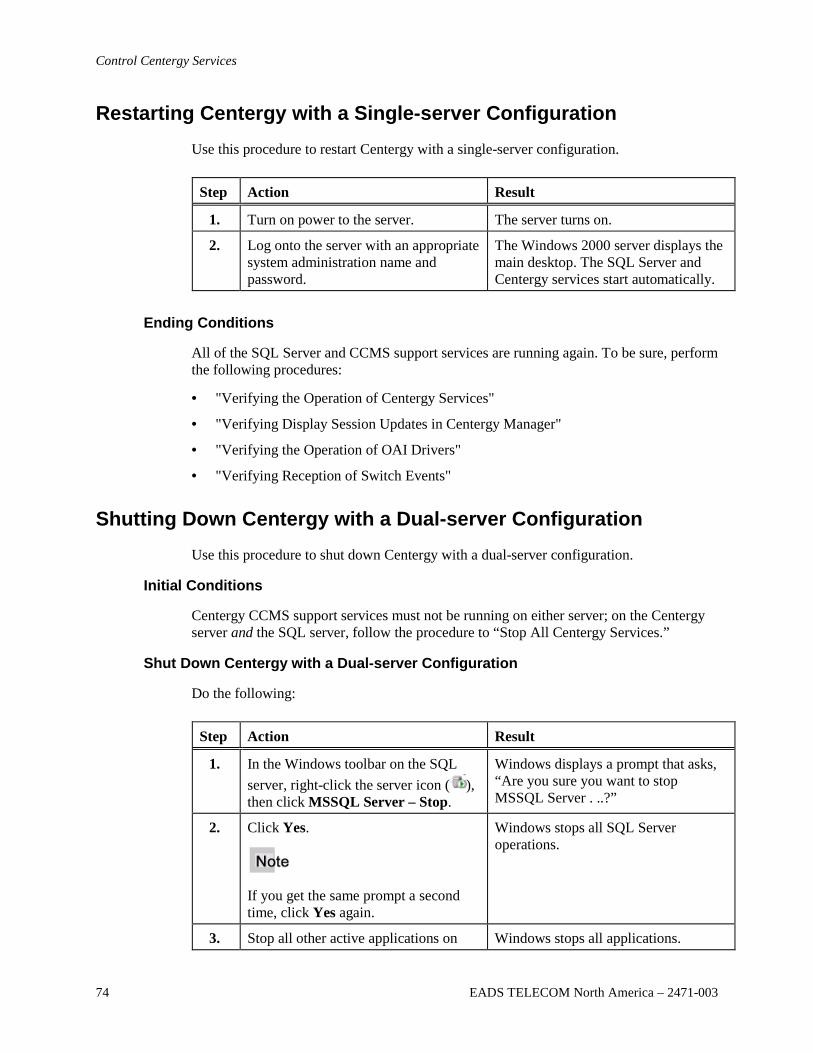
Control Centergy Services
74 EADS TELECOM North America – 2471-003
Restarting Centergy with a Single-server Configuration
Use this procedure to restart Centergy with a single-server configuration.
Step Action Result
1. Turn on power to the server. The server turns on.
2. Log onto the server with an appropriate system administration name and password.
The Windows 2000 server displays the main desktop. The SQL Server and Centergy services start automatically.
Ending Conditions
All of the SQL Server and CCMS support services are running again. To be sure, perform the following procedures:
• "Verifying the Operation of Centergy Services"
• "Verifying Display Session Updates in Centergy Manager"
• "Verifying the Operation of OAI Drivers"
• "Verifying Reception of Switch Events"
Shutting Down Centergy with a Dual-server Configuration
Use this procedure to shut down Centergy with a dual-server configuration.
Initial Conditions
Centergy CCMS support services must not be running on either server; on the Centergy server and the SQL server, follow the procedure to “Stop All Centergy Services.”
Shut Down Centergy with a Dual-server Configuration
Do the following:
Step Action Result
1. In the Windows toolbar on the SQL server, right-click the server icon ( ), then click MSSQL Server – Stop.
Windows displays a prompt that asks, “Are you sure you want to stop MSSQL Server . ..?”
2. Click Yes.
If you get the same prompt a second time, click Yes again.
Windows stops all SQL Server operations.
3. Stop all other active applications on Windows stops all applications.
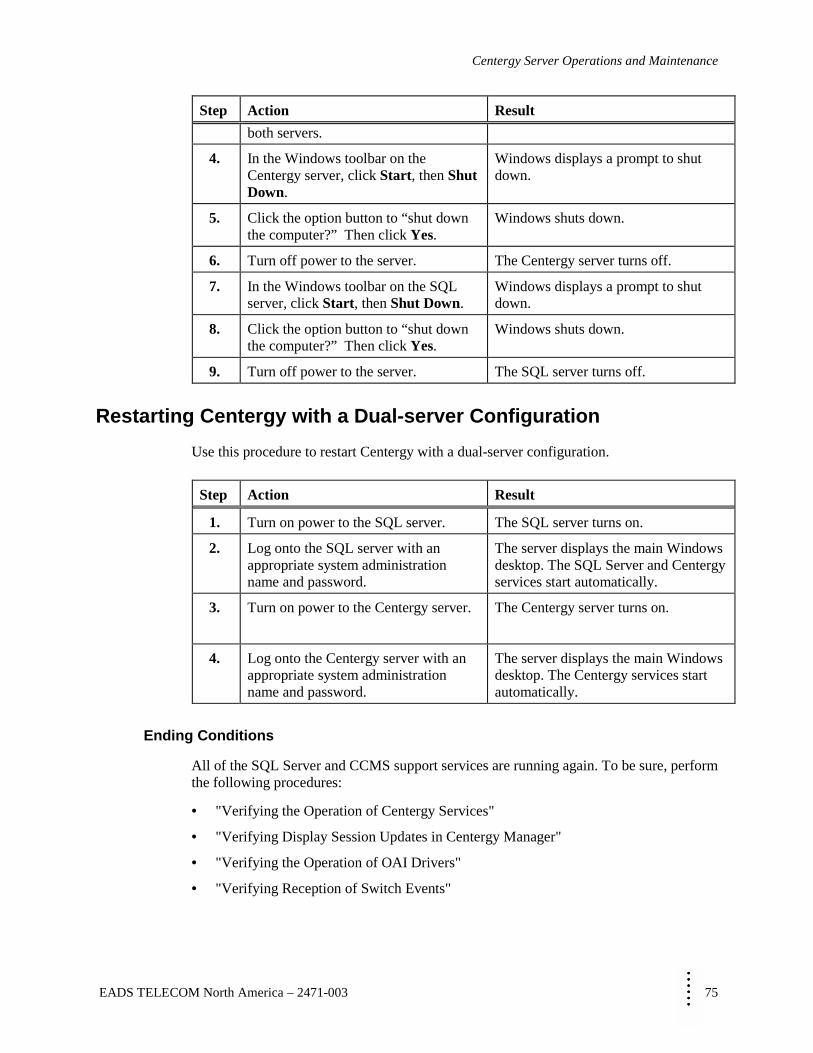
MMMMMMMM
Centergy Server Operations and Maintenance
EADS TELECOM North America – 2471-003 75
Step Action Result both servers.
4. In the Windows toolbar on the Centergy server, click Start, then Shut Down.
Windows displays a prompt to shut down.
5. Click the option button to “shut down the computer?” Then click Yes.
Windows shuts down.
6. Turn off power to the server. The Centergy server turns off.
7. In the Windows toolbar on the SQL server, click Start, then Shut Down.
Windows displays a prompt to shut down.
8. Click the option button to “shut down the computer?” Then click Yes.
Windows shuts down.
9. Turn off power to the server. The SQL server turns off.
Restarting Centergy with a Dual-server Configuration
Use this procedure to restart Centergy with a dual-server configuration.
Step Action Result
1. Turn on power to the SQL server. The SQL server turns on.
2. Log onto the SQL server with an appropriate system administration name and password.
The server displays the main Windows desktop. The SQL Server and Centergy services start automatically.
3. Turn on power to the Centergy server. The Centergy server turns on.
4. Log onto the Centergy server with an appropriate system administration name and password.
The server displays the main Windows desktop. The Centergy services start automatically.
Ending Conditions
All of the SQL Server and CCMS support services are running again. To be sure, perform the following procedures:
• "Verifying the Operation of Centergy Services"
• "Verifying Display Session Updates in Centergy Manager"
• "Verifying the Operation of OAI Drivers"
• "Verifying Reception of Switch Events"
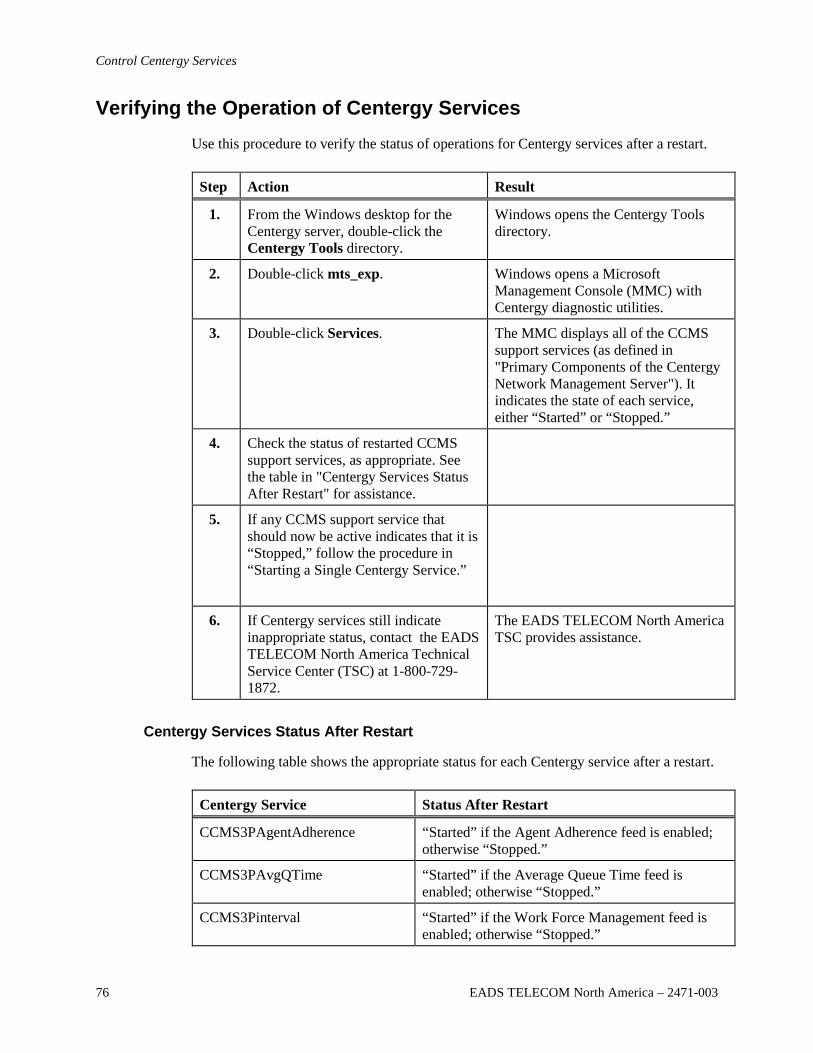
Control Centergy Services
76 EADS TELECOM North America – 2471-003
Verifying the Operation of Centergy Services
Use this procedure to verify the status of operations for Centergy services after a restart.
Step Action Result
1. From the Windows desktop for the Centergy server, double-click the Centergy Tools directory.
Windows opens the Centergy Tools directory.
2. Double-click mts_exp. Windows opens a Microsoft Management Console (MMC) with Centergy diagnostic utilities.
3. Double-click Services. The MMC displays all of the CCMS support services (as defined in "Primary Components of the Centergy Network Management Server"). It indicates the state of each service, either “Started” or “Stopped.”
4. Check the status of restarted CCMS support services, as appropriate. See the table in "Centergy Services Status After Restart" for assistance.
5. If any CCMS support service that should now be active indicates that it is “Stopped,” follow the procedure in “Starting a Single Centergy Service.”
6. If Centergy services still indicate inappropriate status, contact the EADS TELECOM North America Technical Service Center (TSC) at 1-800-729-1872.
The EADS TELECOM North America TSC provides assistance.
Centergy Services Status After Restart
The following table shows the appropriate status for each Centergy service after a restart.
Centergy Service Status After Restart
CCMS3PAgentAdherence “Started” if the Agent Adherence feed is enabled; otherwise “Stopped.”
CCMS3PAvgQTime “Started” if the Average Queue Time feed is enabled; otherwise “Stopped.”
CCMS3Pinterval “Started” if the Work Force Management feed is enabled; otherwise “Stopped.”
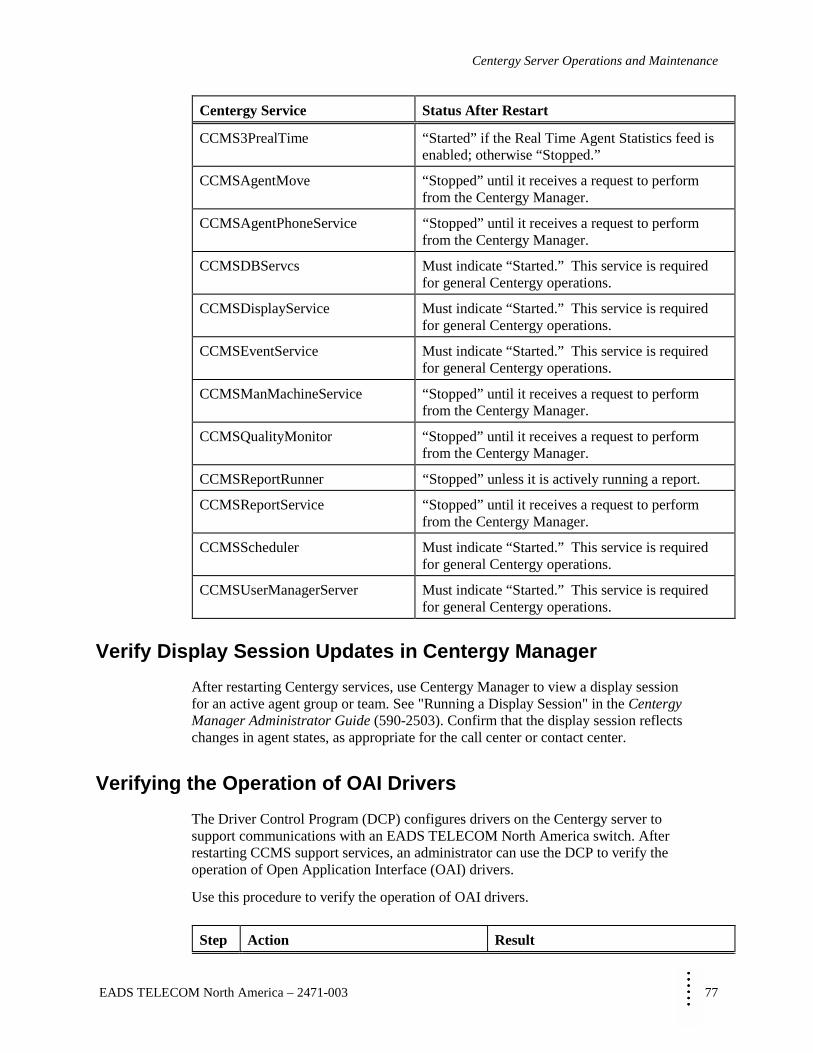
MMMMMMMM
Centergy Server Operations and Maintenance
EADS TELECOM North America – 2471-003 77
Centergy Service Status After Restart
CCMS3PrealTime “Started” if the Real Time Agent Statistics feed is enabled; otherwise “Stopped.”
CCMSAgentMove “Stopped” until it receives a request to perform from the Centergy Manager.
CCMSAgentPhoneService “Stopped” until it receives a request to perform from the Centergy Manager.
CCMSDBServcs Must indicate “Started.” This service is required for general Centergy operations.
CCMSDisplayService Must indicate “Started.” This service is required for general Centergy operations.
CCMSEventService Must indicate “Started.” This service is required for general Centergy operations.
CCMSManMachineService “Stopped” until it receives a request to perform from the Centergy Manager.
CCMSQualityMonitor “Stopped” until it receives a request to perform from the Centergy Manager.
CCMSReportRunner “Stopped” unless it is actively running a report.
CCMSReportService “Stopped” until it receives a request to perform from the Centergy Manager.
CCMSScheduler Must indicate “Started.” This service is required for general Centergy operations.
CCMSUserManagerServer Must indicate “Started.” This service is required for general Centergy operations.
Verify Display Session Updates in Centergy Manager
After restarting Centergy services, use Centergy Manager to view a display session for an active agent group or team. See "Running a Display Session" in the Centergy Manager Administrator Guide (590-2503). Confirm that the display session reflects changes in agent states, as appropriate for the call center or contact center.
Verifying the Operation of OAI Drivers
The Driver Control Program (DCP) configures drivers on the Centergy server to support communications with an EADS TELECOM North America switch. After restarting CCMS support services, an administrator can use the DCP to verify the operation of Open Application Interface (OAI) drivers.
Use this procedure to verify the operation of OAI drivers.
Step Action Result

Control Centergy Services
78 EADS TELECOM North America – 2471-003
Step Action Result
1. From the Windows desktop for the Centergy server, double-click the Centergy Tools directory.
Windows opens the Centergy Tools directory.
2. Double-click on DCP. Windows opens the DCP interface window. See "Driver Control Program Interface."
3. Under the File menu, click Open.
The DCP displays a File | Open window.
4. Double-click EVENTDRV. The File | Open window closes.
5. Under the View menu, click Statistics. The DCP displays the current statistics for the OAI Event Driver. See "OAI Event Driver Statistics Window."
6. Confirm that the OAI Event Driver statistics indicate that the link is up.
The statistics window for the Event Driver indicates “Link Up.”
7. If the Event Driver link is not up, contact the EADS TELECOM North America Technical Service Center (TSC) at 1-800-729-1872.
The EADS TELECOM North America TSC provides support.
8. Click Done. The OAI Event Driver statistics window closes.
9. Under the File menu, click Open. The DCP displays a File | Open window.
10. Double-click OTHERDRV. The File | Open window closes.
11. Under the View menu, click Statistics. The DCP displays the current statistics for the OAI Other Driver. See "OAI Other Driver Statistics Window."
12. Confirm that the OAI Other Driver statistics indicate that the link is up.
The statistics window for other drivers indicates “Link Up.”
13. If the Event Driver link is not up, contact the EADS TELECOM North America Technical Service Center (TSC) at 1-800-729-1872.
The EADS TELECOM North America TSC provides support.
14. Click Done. The OAI Other Driver statistics window closes.
Driver Control Program Interface
The following graphic shows the DCP interface.
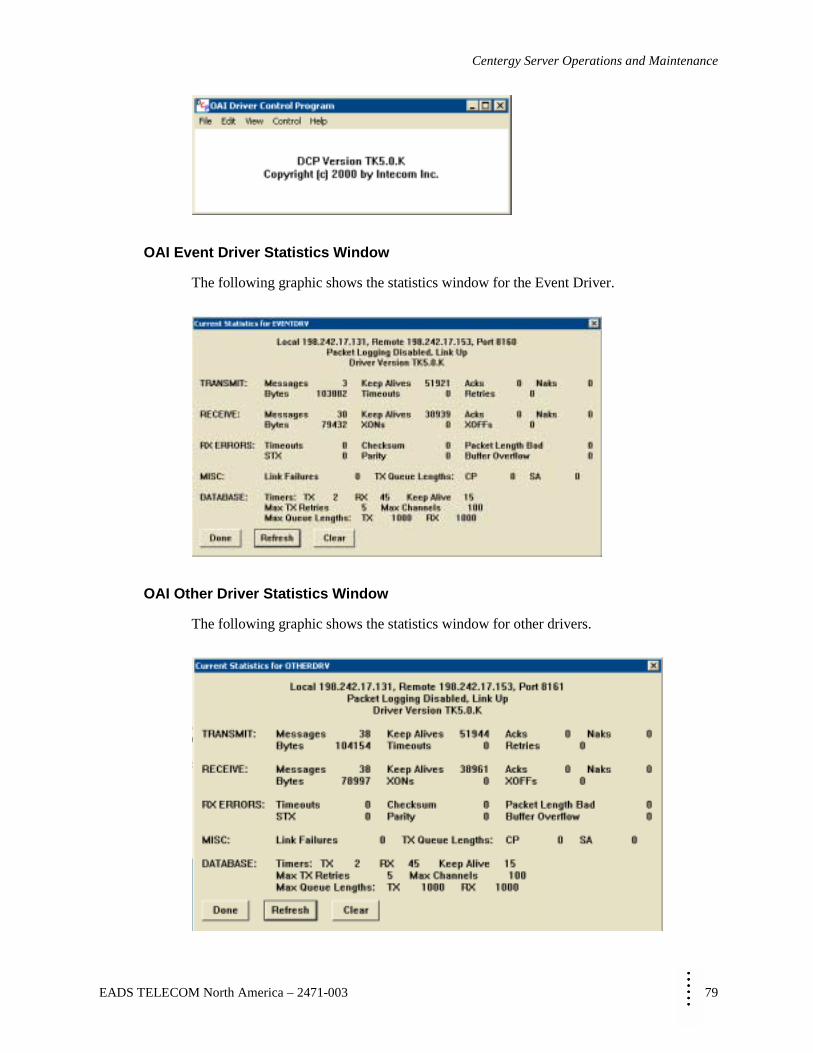
MMMMMMMM
Centergy Server Operations and Maintenance
EADS TELECOM North America – 2471-003 79
OAI Event Driver Statistics Window
The following graphic shows the statistics window for the Event Driver.
OAI Other Driver Statistics Window
The following graphic shows the statistics window for other drivers.
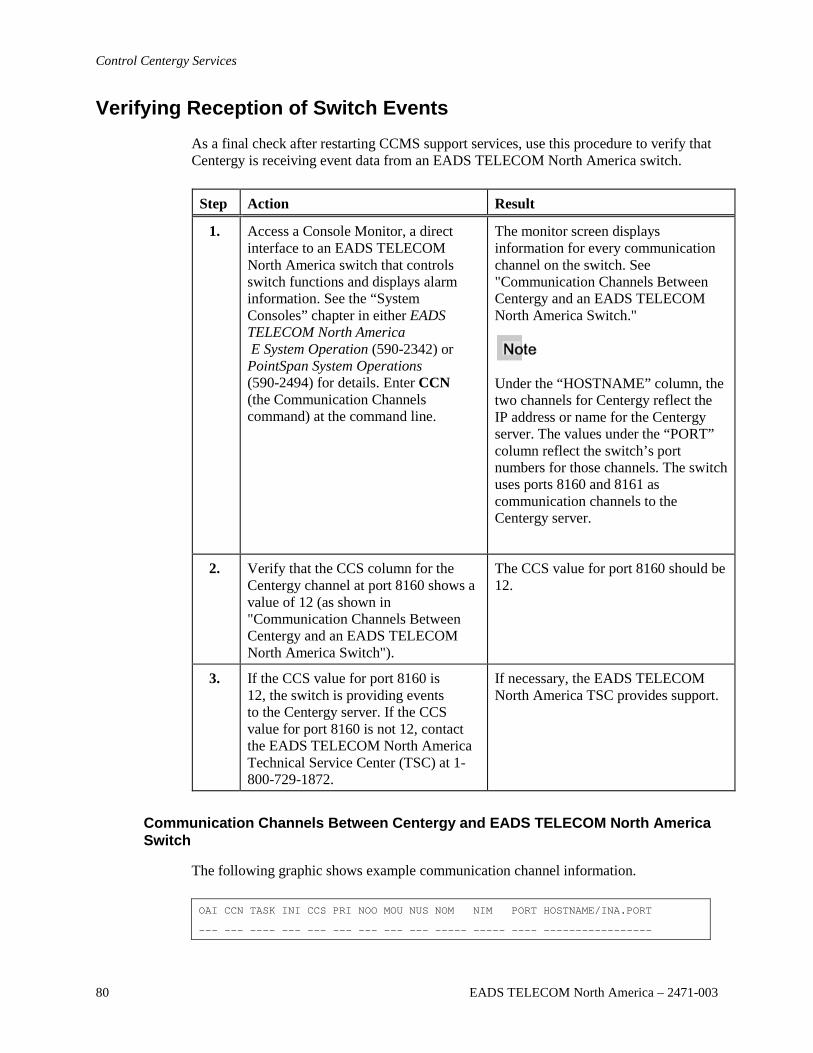
Control Centergy Services
80 EADS TELECOM North America – 2471-003
Verifying Reception of Switch Events
As a final check after restarting CCMS support services, use this procedure to verify that Centergy is receiving event data from an EADS TELECOM North America switch.
Step Action Result
1. Access a Console Monitor, a direct interface to an EADS TELECOM North America switch that controls switch functions and displays alarm information. See the “System Consoles” chapter in either EADS TELECOM North America E System Operation (590-2342) or PointSpan System Operations (590-2494) for details. Enter CCN (the Communication Channels command) at the command line.
The monitor screen displays information for every communication channel on the switch. See "Communication Channels Between Centergy and an EADS TELECOM North America Switch."
Under the “HOSTNAME” column, the two channels for Centergy reflect the IP address or name for the Centergy server. The values under the “PORT” column reflect the switch’s port numbers for those channels. The switch uses ports 8160 and 8161 as communication channels to the Centergy server.
2. Verify that the CCS column for the Centergy channel at port 8160 shows a value of 12 (as shown in "Communication Channels Between Centergy and an EADS TELECOM North America Switch").
The CCS value for port 8160 should be 12.
3. If the CCS value for port 8160 is 12, the switch is providing events to the Centergy server. If the CCS value for port 8160 is not 12, contact the EADS TELECOM North America Technical Service Center (TSC) at 1-800-729-1872.
If necessary, the EADS TELECOM North America TSC provides support.
Communication Channels Between Centergy and EADS TELECOM North America Switch
The following graphic shows example communication channel information.
OAI CCN TASK INI CCS PRI NOO MOU NUS NOM NIM PORT HOSTNAME/INA.PORT
--- --- ---- --- --- --- --- --- --- ----- ----- ---- -----------------

MMMMMMMM
Centergy Server Operations and Maintenance
EADS TELECOM North America – 2471-003 81
13 1 A01 1 2 M 0 0 0 24611 52977 8160 tscas.intecom.com.1894
14 2 A01 0 1 M 0 0 0 0 0 8160 pswc.intecom.com.0
17 5 A01 1 12 M 0 0 0 60241 15 8160 cntrgy.intecom.com
18 6 A01 2 2 M 0 0 0 226 81 8161 cntrgy.intecom.com
Control Centergy Services
82 EADS TELECOM North America – 2471-003
MMMMMMMM
Centergy Server Operations and Maintenance
EADS TELECOM North America – 2471-003 83
Chapter 8
Feature Tracing
Feature Tracing and the CCMS Support Services Log
With feature tracing, a Centergy Network Management Server (CNMS) can generate a log of all CCMS support service activity. Feature tracing is useful for identifying and troubleshooting system problems. When feature tracing is active, the system generates a CCMS support service log file (CCMSLog). The feature tracing component of the Centergy diagnostic utilities controls the generation of this file.
Managing feature logging and the CCMSLog file involves the following procedures:
• “Opening the CCMS Support Services Log File”
• “Controlling Feature Tracing”
• “Checking the Size of the CCMS Support Services Log File
• “Clearing the CCMS Support Services Log File”
Opening the CCMS Support Services Log File
Use this procedure to open the log for CCMS support services. This log contains a record of CCMS support service activity based on tracing and filtering parameters. See “Controlling Feature Tracing” for details.
Step Action Result
1. From the Windows desktop for the Centergy server, double-click the Centergy Tools directory.
Windows opens the Centergy Tools directory.
2. Double-click CCMSLog. Windows opens the CCMS support services log in a text editor.
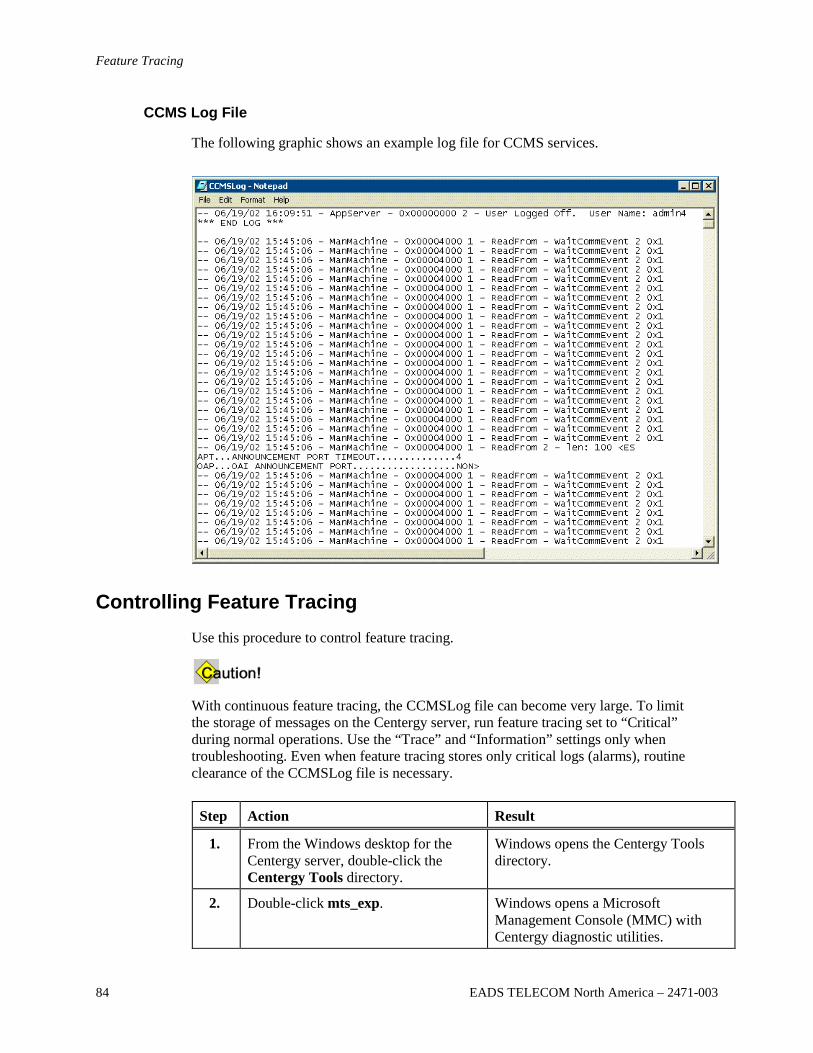
Feature Tracing
84 EADS TELECOM North America – 2471-003
CCMS Log File
The following graphic shows an example log file for CCMS services.
Controlling Feature Tracing
Use this procedure to control feature tracing.
With continuous feature tracing, the CCMSLog file can become very large. To limit the storage of messages on the Centergy server, run feature tracing set to “Critical” during normal operations. Use the “Trace” and “Information” settings only when troubleshooting. Even when feature tracing stores only critical logs (alarms), routine clearance of the CCMSLog file is necessary.
Step Action Result
1. From the Windows desktop for the Centergy server, double-click the Centergy Tools directory.
Windows opens the Centergy Tools directory.
2. Double-click mts_exp. Windows opens a Microsoft Management Console (MMC) with Centergy diagnostic utilities.
MMMMMMMM
Centergy Server Operations and Maintenance
EADS TELECOM North America – 2471-003 85
Step Action Result
3. Left-click Centergy Diagnostics, then double-click the icon in the right display area for the Tracing utility.
The MMC opens the Tracing Properties window. See "Tracing Properties Window."
4. Enable or disable feature tracing.
To enable feature tracing, click the box next to “Tracing On” so that it contains a check mark. To disable feature tracing, remove the check mark next to “Tracing On” and skip to Step 7.
The Tracing Properties window remains open. If feature tracing is on, the system generates a CCMSLog file. If feature tracing is off, the system does not generate a CCMSLog file.
5. Configure the feature tracing parameters as required. See "Filtering Options" for more detail.
To include messages of a certain type in your trace log, click the box next to that item so that it contains a check mark.
To exclude messages of a certain type in your trace log, remove the check mark from the box next to that item.
The Tracing Properties window remains open. The CCMSLog file reflects the configuration parameters.
6. Set the “Level Filter” to one of the following levels: • Trace: Passes all system messages • Information: Filters out trace
messages • Critical: Filters out trace and
information messages; passes only alarm information
With continuous feature tracing, the CCMSLog file can become very large. To limit the storage of messages on the Centergy server, run feature tracing set to “Critical” during normal operations. Use the “Trace” and “Information” settings only when troubleshooting.
The Tracing Properties window remains open. The CCMSLog file reflects the level of filtering.
7. Click OK. The MMC closes the Tracing Properties window.
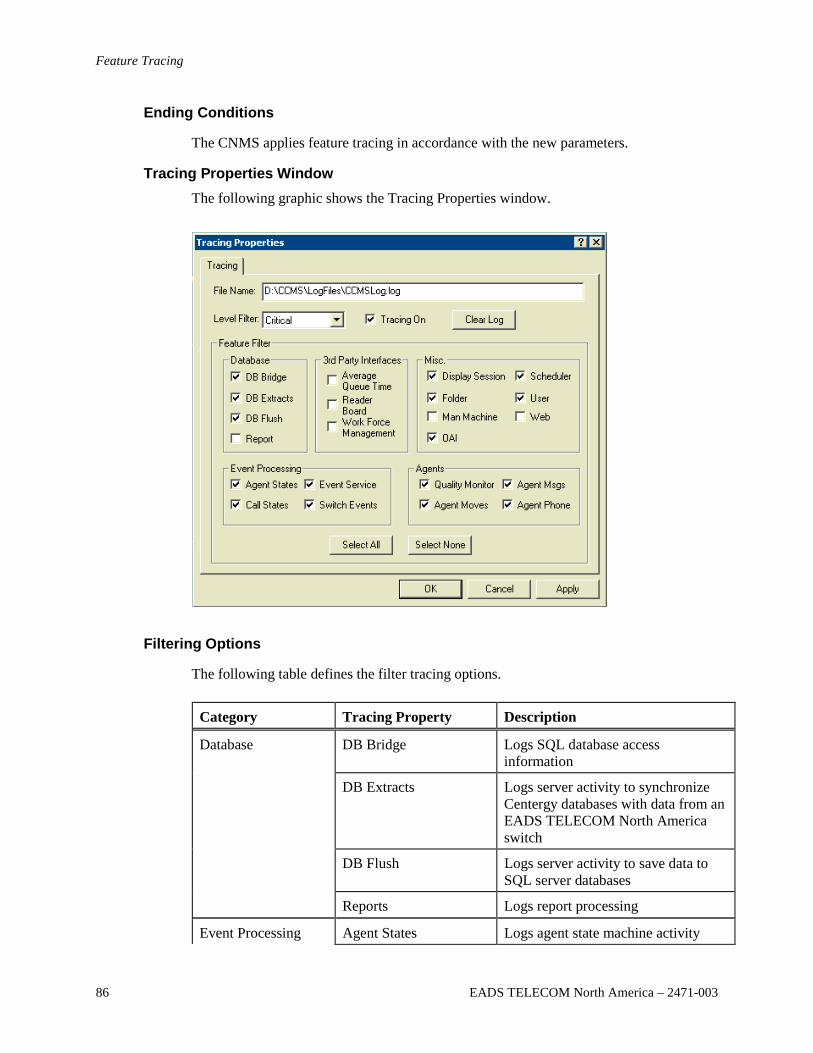
Feature Tracing
86 EADS TELECOM North America – 2471-003
Ending Conditions
The CNMS applies feature tracing in accordance with the new parameters.
Tracing Properties Window
The following graphic shows the Tracing Properties window.
Filtering Options
The following table defines the filter tracing options.
Category Tracing Property Description
Database DB Bridge Logs SQL database access information
DB Extracts Logs server activity to synchronize Centergy databases with data from an EADS TELECOM North America switch
DB Flush Logs server activity to save data to SQL server databases
Reports Logs report processing
Event Processing Agent States Logs agent state machine activity
MMMMMMMM
Centergy Server Operations and Maintenance
EADS TELECOM North America – 2471-003 87
Category Tracing Property Description
Call States Logs agent state machine activity
Event Service Logs all Event Service activity
Switch Events Logs all switch events
3rd Party Interfaces Average Queue Time Logs activity with external AQT applications
Reader Board Logs activity with external information display systems
Work Force Management
Logs activity with external workforce management systems
Agents Quality Monitor Logs silent monitoring and recording activity
Agent Moves Logs agent moves
Agent Msgs (Messages) Logs agent phone message processing
Agent Phone Logs agent transaction code processing
Misc (Miscellaneous) Display Session Logs display session activity
Folder Logs folder management activity (creation, deletion, etc.)
Man Machine Logs activity to control an EADS TELECOM North America switch database
OAI Logs OAI activity between the CNMS and an EADS TELECOM North America switch
Scheduler Logs schedule processing
User Logs user management (including log on and log off)
Web Logs web activity
Checking the Size of the CCMS Support Services Log File
Use this procedure to check the size of the CCMS Log File.
The Resource Manager of the Centergy Manager interface is also useful in monitoring the size of the CCMS Log file. For details, see "Manage Disk Capacity" in the Centergy Manager Administrator Guide (590-2503).

Feature Tracing
88 EADS TELECOM North America – 2471-003
Step Action Result
1. From the Windows desktop for the Centergy server, open the D:\CCMS\ LogFiles directory.
In a dual-server configuration, open the E:\CCMS\LogFiles directory.
Windows opens the LogFiles directory.
2. From the View menu, click Details. Windows displays details for the files in the LogFiles directory.
3. Check the file size. The directory displays the current size of the CCMSLog file.
Clearing the CCMS Support Services Log File
Use this procedure to clear the CCMS Log file.
Step Action Result
1. From the Windows desktop for the Centergy server, double-click the Centergy Tools directory.
Windows opens the Centergy Tools directory.
2. Double-click mts_exp. Windows opens a Microsoft Management Console (MMC) with Centergy diagnostic utilities.
3. Left-click Centergy Diagnostics, then double-click the icon in the right display area for the Tracing utility.
The MMC opens the Tracing Properties window.
4. Click Clear Log. The system immediately deletes all of the feature tracing information in the CCMS Log file.
MMMMMMMM
Centergy Server Operations and Maintenance
EADS TELECOM North America – 2471-003 89
Chapter 9
Open Application Interface Communications
Open Application Interface Connection for a Centergy Server
A Centergy Network Management Server (CNMS) uses an Open Application Interface (OAI) connection to synchronize the data in the database with the data from an EADS TELECOM North America switch. See "Synchronization of Centergy Data Call Center Databases with EADS TELECOM North America Switch Databases."
A CNMS generates a log of OAI communications activity that shows whether OAI drivers are connected or disconnected and records related OAI driver errors. The following procedures are available:
• "Viewing the Open Applications Interface Log"
• "Clearing the Open Applications Interface Log"
Viewing the Open Application Interface Log
Use this procedure to display the Open Application Interface (OAI) log for the Centergy Network Management Server (CNMS).
Step Action Result
1. From the Windows desktop for the Centergy server, double-click the Centergy Tools directory.
Windows opens the Centergy Tools directory.
2. Double-click OAILog. Windows opens the OAI Log file. See "OAI Log File."
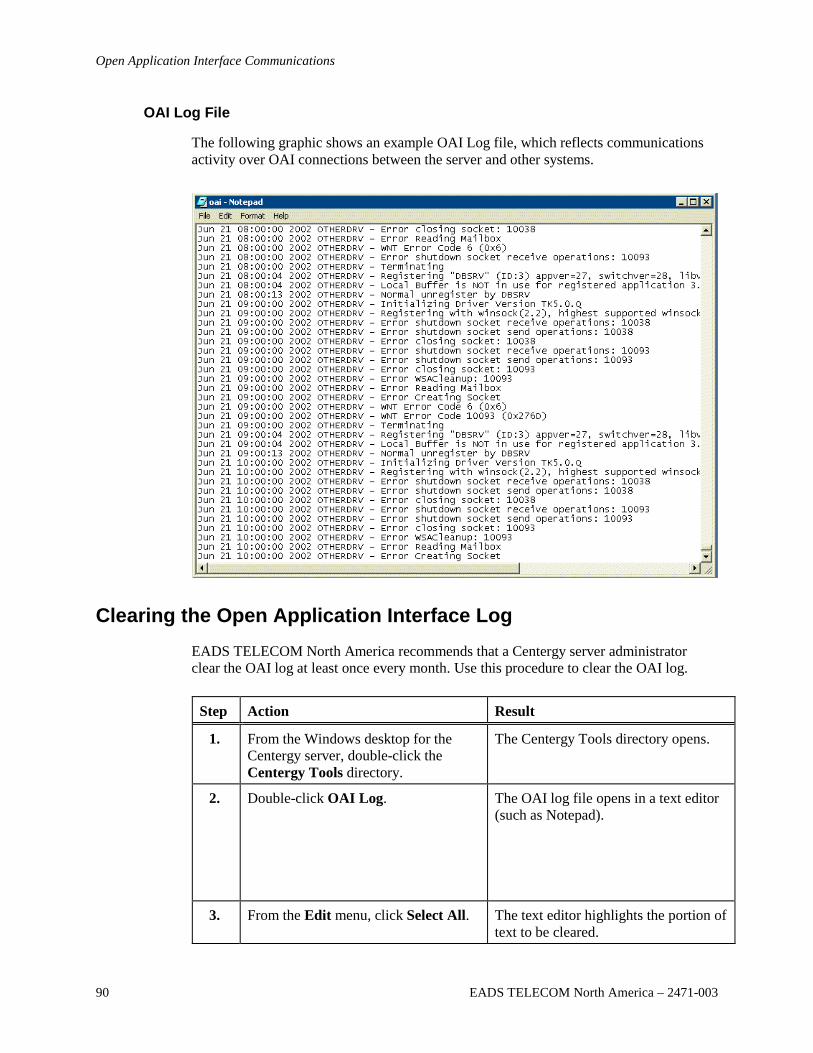
Open Application Interface Communications
90 EADS TELECOM North America – 2471-003
OAI Log File
The following graphic shows an example OAI Log file, which reflects communications activity over OAI connections between the server and other systems.
Clearing the Open Application Interface Log
EADS TELECOM North America recommends that a Centergy server administrator clear the OAI log at least once every month. Use this procedure to clear the OAI log.
Step Action Result
1. From the Windows desktop for the Centergy server, double-click the Centergy Tools directory.
The Centergy Tools directory opens.
2. Double-click OAI Log. The OAI log file opens in a text editor (such as Notepad).
3. From the Edit menu, click Select All. The text editor highlights the portion of text to be cleared.
MMMMMMMM
Centergy Server Operations and Maintenance
EADS TELECOM North America – 2471-003 91
Step Action Result
As an alternative, manually select (highlight) only the portion of text that you wish to delete.
4. From the Edit menu, click Cut. The text editor clears the selected text.
5. From the File menu, click Save. A Save As window opens.
It indicates a file named "oai" in the D:\CCMS\LogFiles directory (single server) or E:\CCMS\LogFiles directory (dual server).
6. Click Save. The following message opens: D:\CCMS\LogFiles\oai.log already exists. Do you want to replace it?
7. Click Yes. The server saves the modified OAI log file.
Open Application Interface Communications
92 EADS TELECOM North America – 2471-003
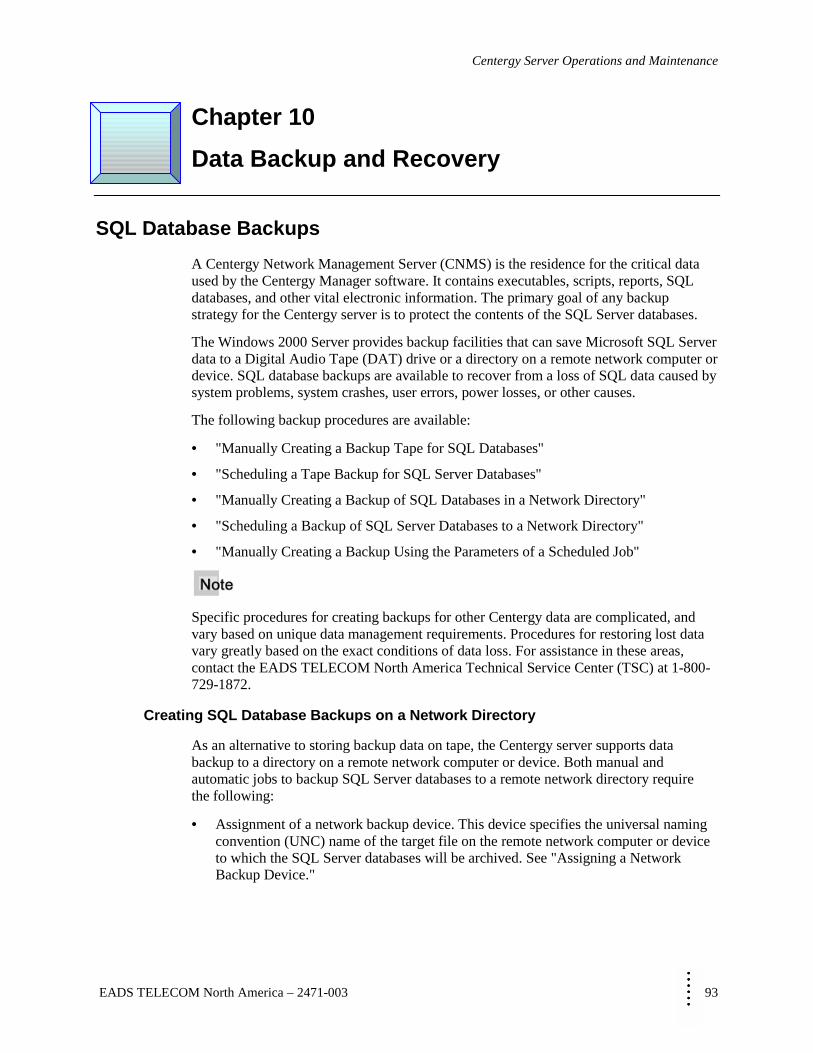
MMMMMMMM
Centergy Server Operations and Maintenance
EADS TELECOM North America – 2471-003 93
Chapter 10
Data Backup and Recovery
SQL Database Backups
A Centergy Network Management Server (CNMS) is the residence for the critical data used by the Centergy Manager software. It contains executables, scripts, reports, SQL databases, and other vital electronic information. The primary goal of any backup strategy for the Centergy server is to protect the contents of the SQL Server databases.
The Windows 2000 Server provides backup facilities that can save Microsoft SQL Server data to a Digital Audio Tape (DAT) drive or a directory on a remote network computer or device. SQL database backups are available to recover from a loss of SQL data caused by system problems, system crashes, user errors, power losses, or other causes.
The following backup procedures are available:
• "Manually Creating a Backup Tape for SQL Databases"
• "Scheduling a Tape Backup for SQL Server Databases"
• "Manually Creating a Backup of SQL Databases in a Network Directory"
• "Scheduling a Backup of SQL Server Databases to a Network Directory"
• "Manually Creating a Backup Using the Parameters of a Scheduled Job"
Specific procedures for creating backups for other Centergy data are complicated, and vary based on unique data management requirements. Procedures for restoring lost data vary greatly based on the exact conditions of data loss. For assistance in these areas, contact the EADS TELECOM North America Technical Service Center (TSC) at 1-800-729-1872.
Creating SQL Database Backups on a Network Directory
As an alternative to storing backup data on tape, the Centergy server supports data backup to a directory on a remote network computer or device. Both manual and automatic jobs to backup SQL Server databases to a remote network directory require the following:
• Assignment of a network backup device. This device specifies the universal naming convention (UNC) name of the target file on the remote network computer or device to which the SQL Server databases will be archived. See "Assigning a Network Backup Device."
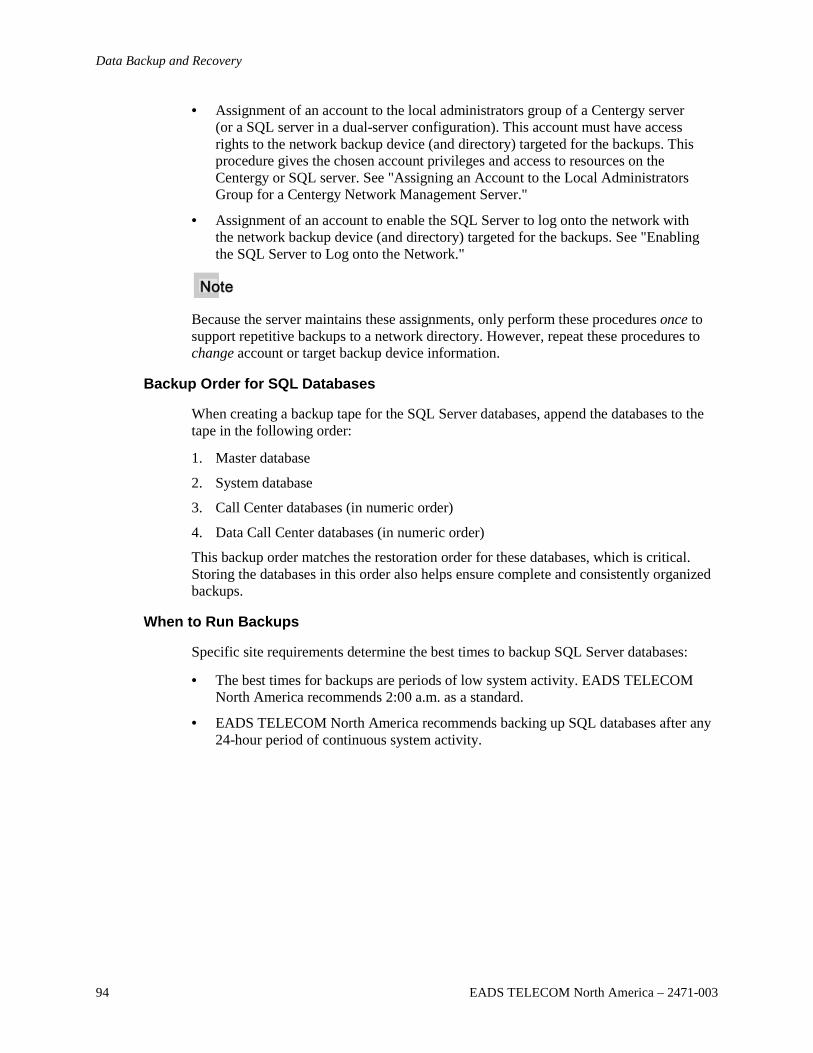
Data Backup and Recovery
94 EADS TELECOM North America – 2471-003
• Assignment of an account to the local administrators group of a Centergy server (or a SQL server in a dual-server configuration). This account must have access rights to the network backup device (and directory) targeted for the backups. This procedure gives the chosen account privileges and access to resources on the Centergy or SQL server. See "Assigning an Account to the Local Administrators Group for a Centergy Network Management Server."
• Assignment of an account to enable the SQL Server to log onto the network with the network backup device (and directory) targeted for the backups. See "Enabling the SQL Server to Log onto the Network."
Because the server maintains these assignments, only perform these procedures once to support repetitive backups to a network directory. However, repeat these procedures to change account or target backup device information.
Backup Order for SQL Databases
When creating a backup tape for the SQL Server databases, append the databases to the tape in the following order:
1. Master database
2. System database
3. Call Center databases (in numeric order)
4. Data Call Center databases (in numeric order)
This backup order matches the restoration order for these databases, which is critical. Storing the databases in this order also helps ensure complete and consistently organized backups.
When to Run Backups
Specific site requirements determine the best times to backup SQL Server databases:
• The best times for backups are periods of low system activity. EADS TELECOM North America recommends 2:00 a.m. as a standard.
• EADS TELECOM North America recommends backing up SQL databases after any 24-hour period of continuous system activity.

MMMMMMMM
Centergy Server Operations and Maintenance
EADS TELECOM North America – 2471-003 95
Backup Interfaces
Creating backups of SQL Server databases on a Centergy Network Management Server (CNMS) involves some or all of the following interfaces:
• SQL Server Enterprise Manager (with Server Highlighted)
• SQL Server Backup Window
• Backup Edit Schedule Window
• Recurring Job Schedule Window
• SQL Server Agent Jobs
• Master Backup Properties Window
• Edit Job Step Window
• Computer Management Window
• MSSQLSERVER Properties Window
SQL Server Enterprise Manager (with Server Highlighted)
The following graphic show the Enterprise Manager with a server highlighted.
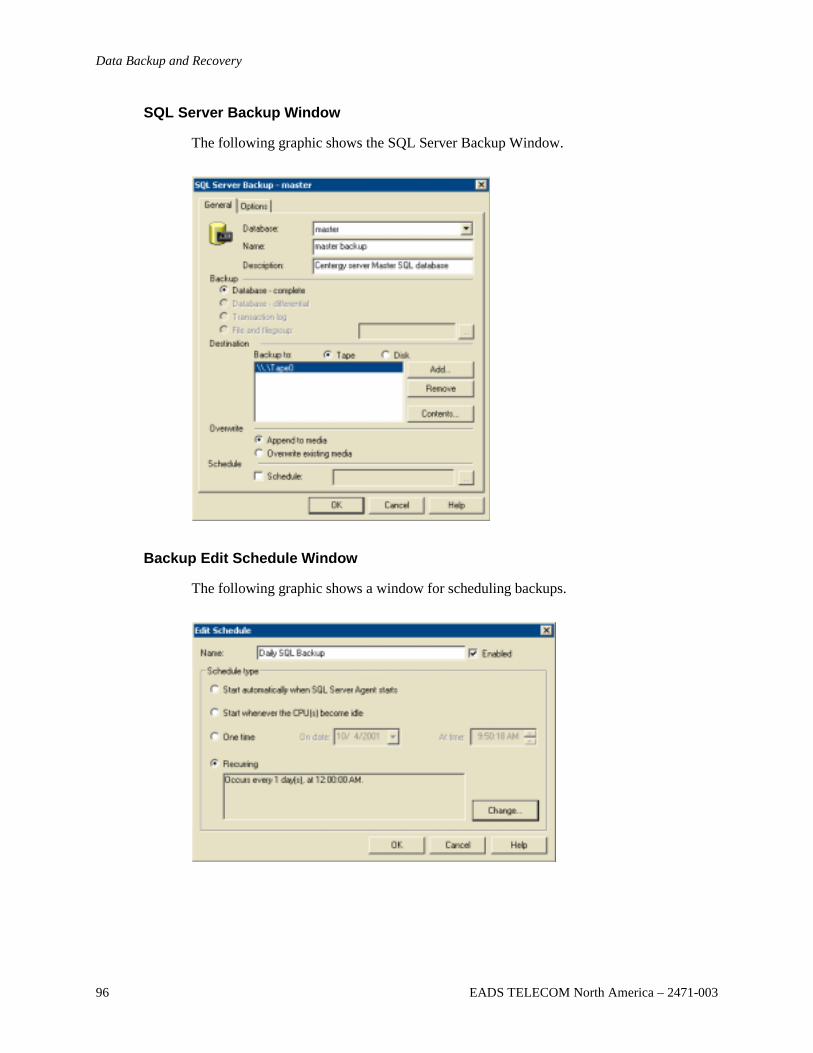
Data Backup and Recovery
96 EADS TELECOM North America – 2471-003
SQL Server Backup Window
The following graphic shows the SQL Server Backup Window.
Backup Edit Schedule Window
The following graphic shows a window for scheduling backups.
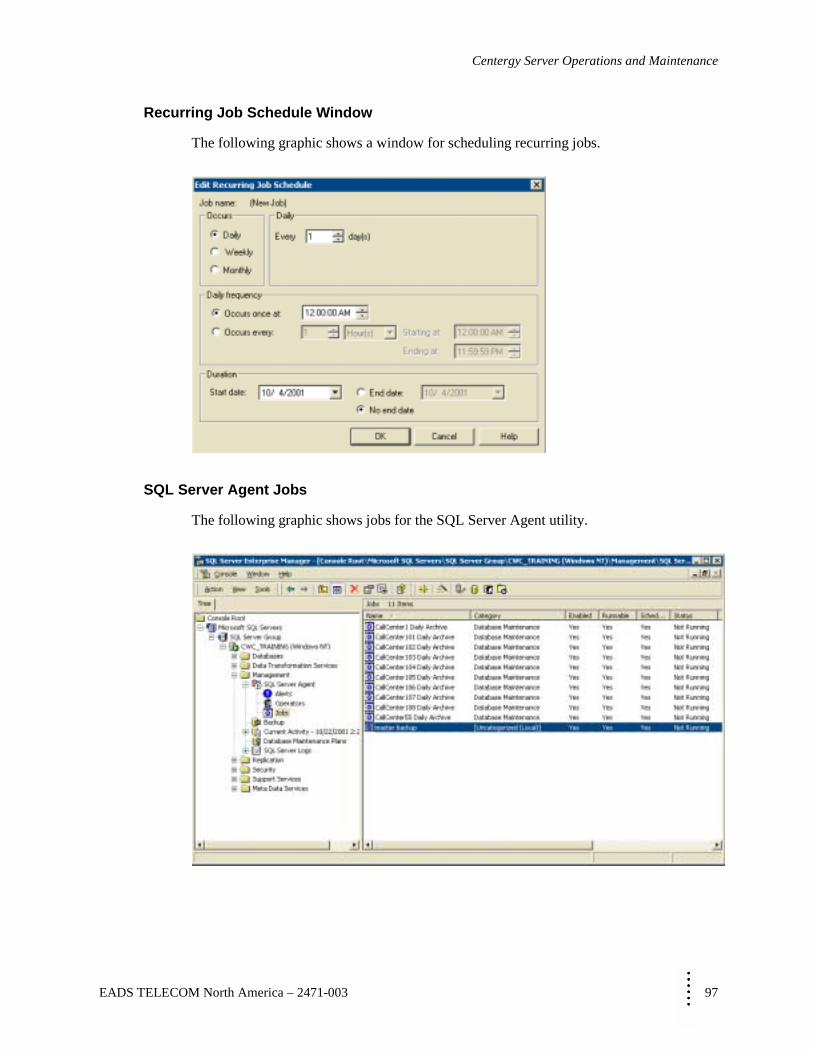
MMMMMMMM
Centergy Server Operations and Maintenance
EADS TELECOM North America – 2471-003 97
Recurring Job Schedule Window
The following graphic shows a window for scheduling recurring jobs.
SQL Server Agent Jobs
The following graphic shows jobs for the SQL Server Agent utility.
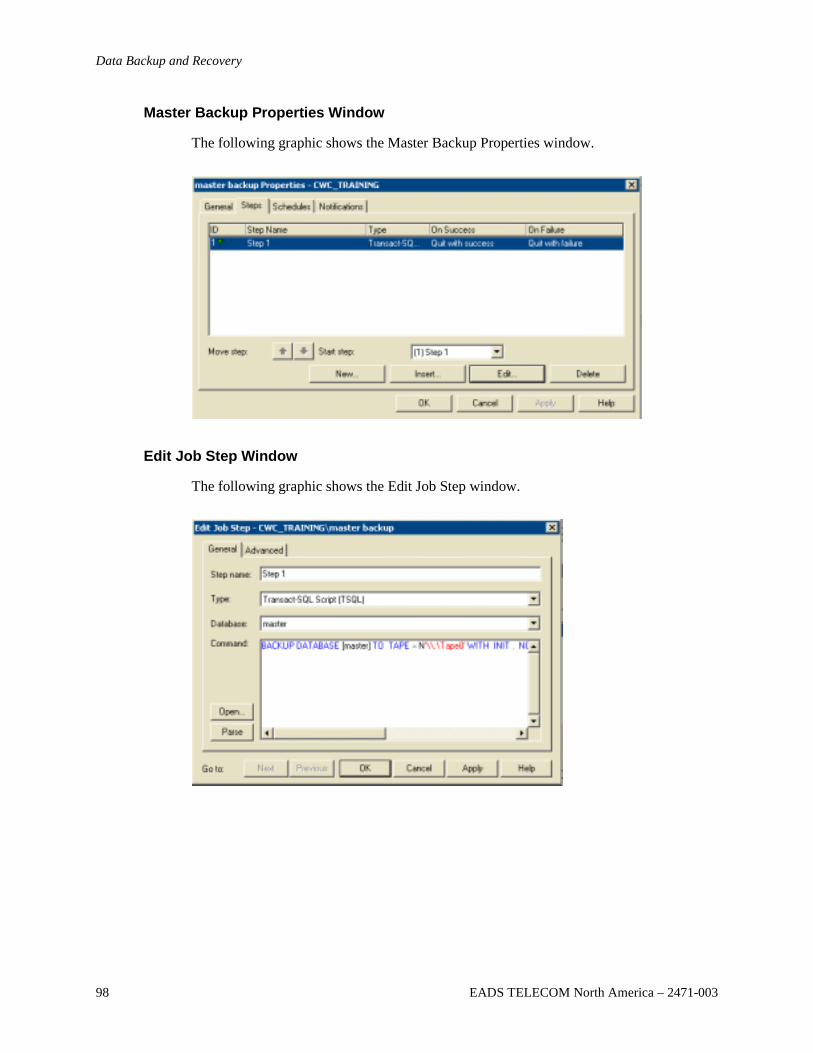
Data Backup and Recovery
98 EADS TELECOM North America – 2471-003
Master Backup Properties Window
The following graphic shows the Master Backup Properties window.
Edit Job Step Window
The following graphic shows the Edit Job Step window.
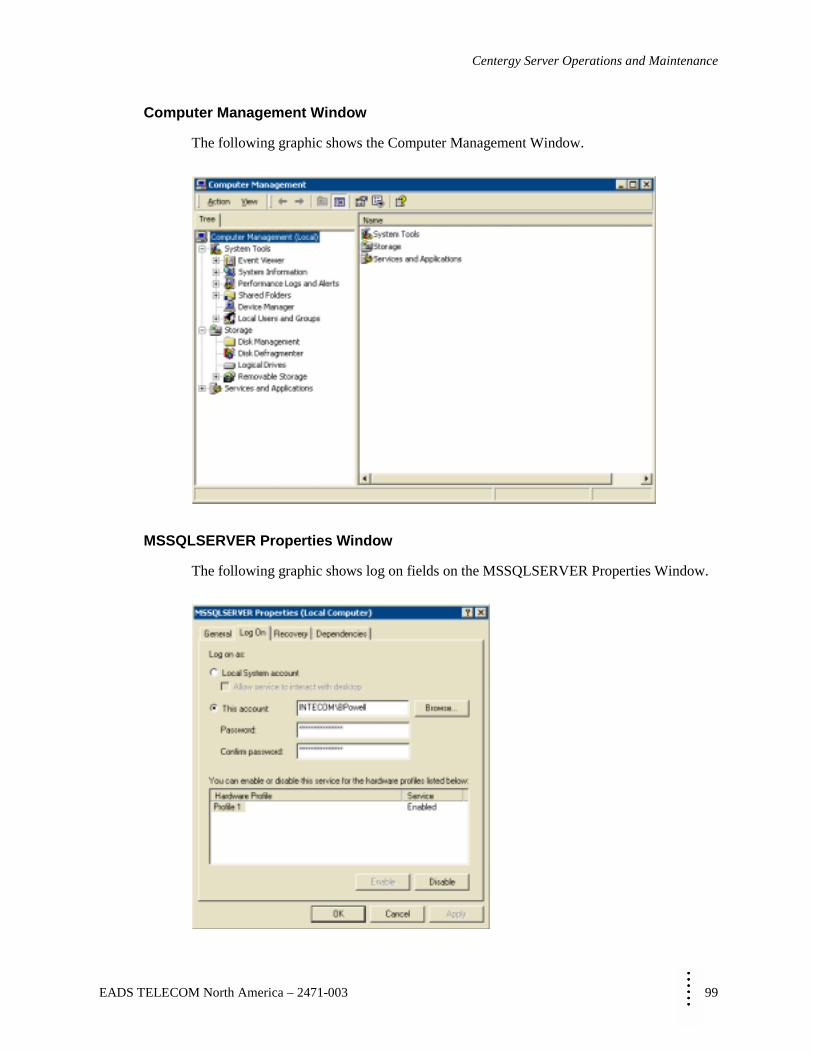
MMMMMMMM
Centergy Server Operations and Maintenance
EADS TELECOM North America – 2471-003 99
Computer Management Window
The following graphic shows the Computer Management Window.
MSSQLSERVER Properties Window
The following graphic shows log on fields on the MSSQLSERVER Properties Window.
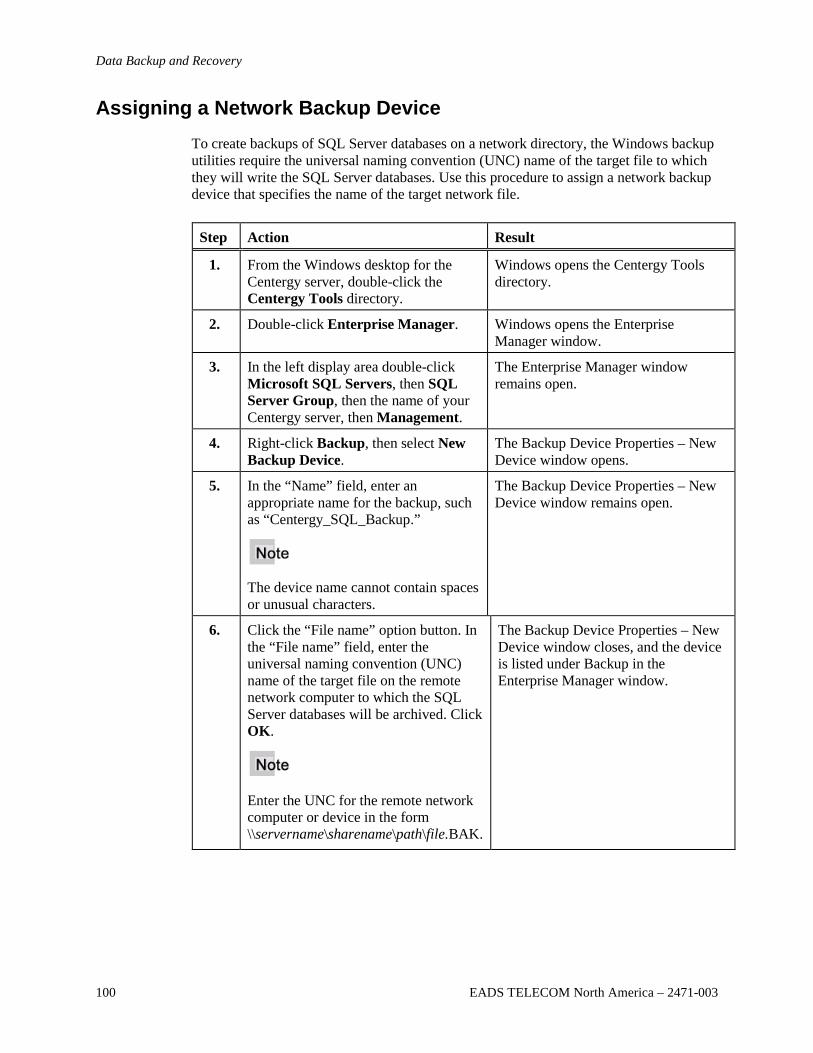
Data Backup and Recovery
100 EADS TELECOM North America – 2471-003
Assigning a Network Backup Device
To create backups of SQL Server databases on a network directory, the Windows backup utilities require the universal naming convention (UNC) name of the target file to which they will write the SQL Server databases. Use this procedure to assign a network backup device that specifies the name of the target network file.
Step Action Result
1. From the Windows desktop for the Centergy server, double-click the Centergy Tools directory.
Windows opens the Centergy Tools directory.
2. Double-click Enterprise Manager. Windows opens the Enterprise Manager window.
3. In the left display area double-click Microsoft SQL Servers, then SQL Server Group, then the name of your Centergy server, then Management.
The Enterprise Manager window remains open.
4. Right-click Backup, then select New Backup Device.
The Backup Device Properties – New Device window opens.
5. In the “Name” field, enter an appropriate name for the backup, such as “Centergy_SQL_Backup.”
The device name cannot contain spaces or unusual characters.
The Backup Device Properties – New Device window remains open.
6. Click the “File name” option button. In the “File name” field, enter the universal naming convention (UNC) name of the target file on the remote network computer to which the SQL Server databases will be archived. Click OK.
Enter the UNC for the remote network computer or device in the form \\servername\sharename\path\file.BAK.
The Backup Device Properties – New Device window closes, and the device is listed under Backup in the Enterprise Manager window.

MMMMMMMM
Centergy Server Operations and Maintenance
EADS TELECOM North America – 2471-003 101
Assigning an Account to the Local Administrators Group for a Centergy Network Management Server
Use this procedure to assign an account to the local administrators group for the Centergy server (or SQL Server in a dual-server configuration). This procedure gives the chosen account access to resources on the Centergy or SQL server.
An account that will support data backup must have access rights to the network backup device (and directory) targeted for backups (see "Assigning a Network Backup Device").
Step Action Result
1. In the Windows toolbar, click Start, then Programs, then Administrative Tools, then Computer Management.
The Computer Management window opens.
2. Double-click Local Users and Groups, then double-click Groups.
The Computer Management window displays group names in the right-hand area.
3. Right-click Administrators, then click Add to Group.
The Administrators Properties window opens.
4. Click Add. The Select Users or Groups window opens.
5. Click the arrow button next to the “Look in” field, then select the domain for the account to be assigned.
If you are already logged into this domain, skip to Step 7. If not, go to Step 6.
If you are already logged into this domain, the Select Users or Groups window displays a list of accounts in this domain.
If you are not already logged into this domain, a prompt for a network account name and password appears.
6. Enter your network account name and password to access this domain. Click OK.
The Select Users or Groups window displays a list of accounts in the domain.
7. Select an account to assign as a local administrator group on the Centergy server (or SQL server). Click Add.
An account that will support data backup must have access rights to the network backup device (and directory) targeted for backups.
The lower display area in the Select Users or Groups window displays information for the selected account.
8. Click OK. The Select Users or Groups window
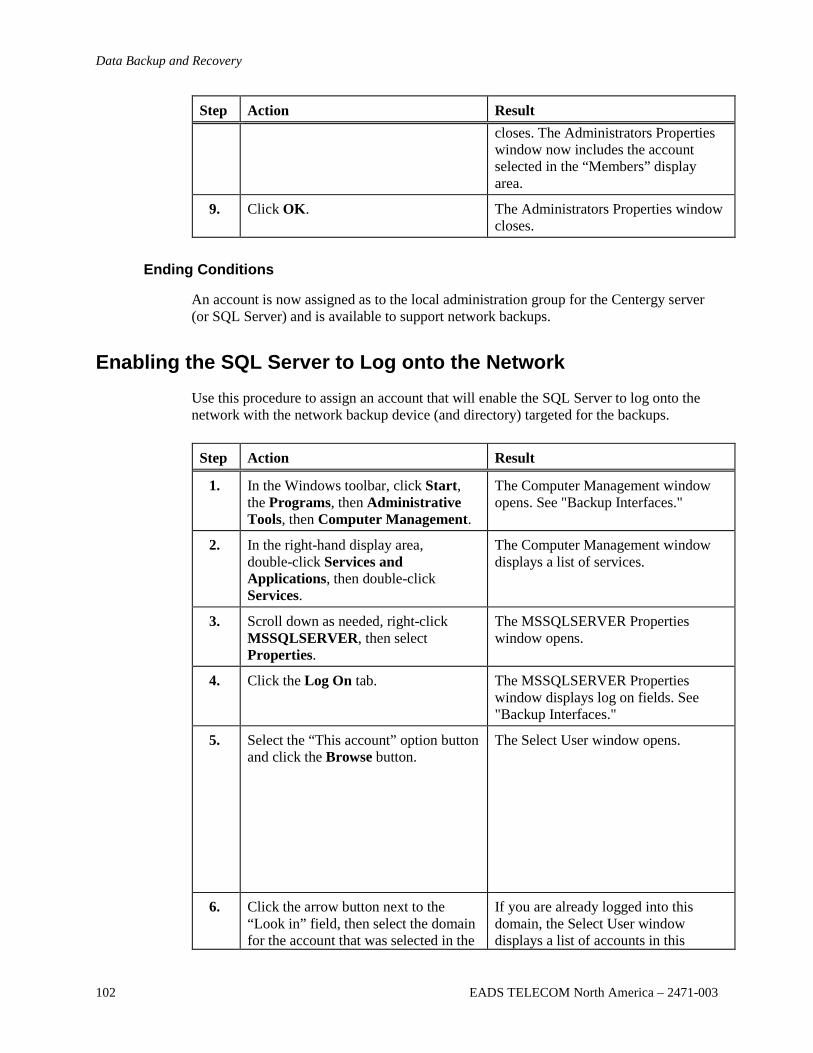
Data Backup and Recovery
102 EADS TELECOM North America – 2471-003
Step Action Result closes. The Administrators Properties window now includes the account selected in the “Members” display area.
9. Click OK. The Administrators Properties window closes.
Ending Conditions
An account is now assigned as to the local administration group for the Centergy server (or SQL Server) and is available to support network backups.
Enabling the SQL Server to Log onto the Network
Use this procedure to assign an account that will enable the SQL Server to log onto the network with the network backup device (and directory) targeted for the backups.
Step Action Result
1. In the Windows toolbar, click Start, the Programs, then Administrative Tools, then Computer Management.
The Computer Management window opens. See "Backup Interfaces."
2. In the right-hand display area, double-click Services and Applications, then double-click Services.
The Computer Management window displays a list of services.
3. Scroll down as needed, right-click MSSQLSERVER, then select Properties.
The MSSQLSERVER Properties window opens.
4. Click the Log On tab. The MSSQLSERVER Properties window displays log on fields. See "Backup Interfaces."
5. Select the “This account” option button and click the Browse button.
The Select User window opens.
6. Click the arrow button next to the “Look in” field, then select the domain for the account that was selected in the
If you are already logged into this domain, the Select User window displays a list of accounts in this
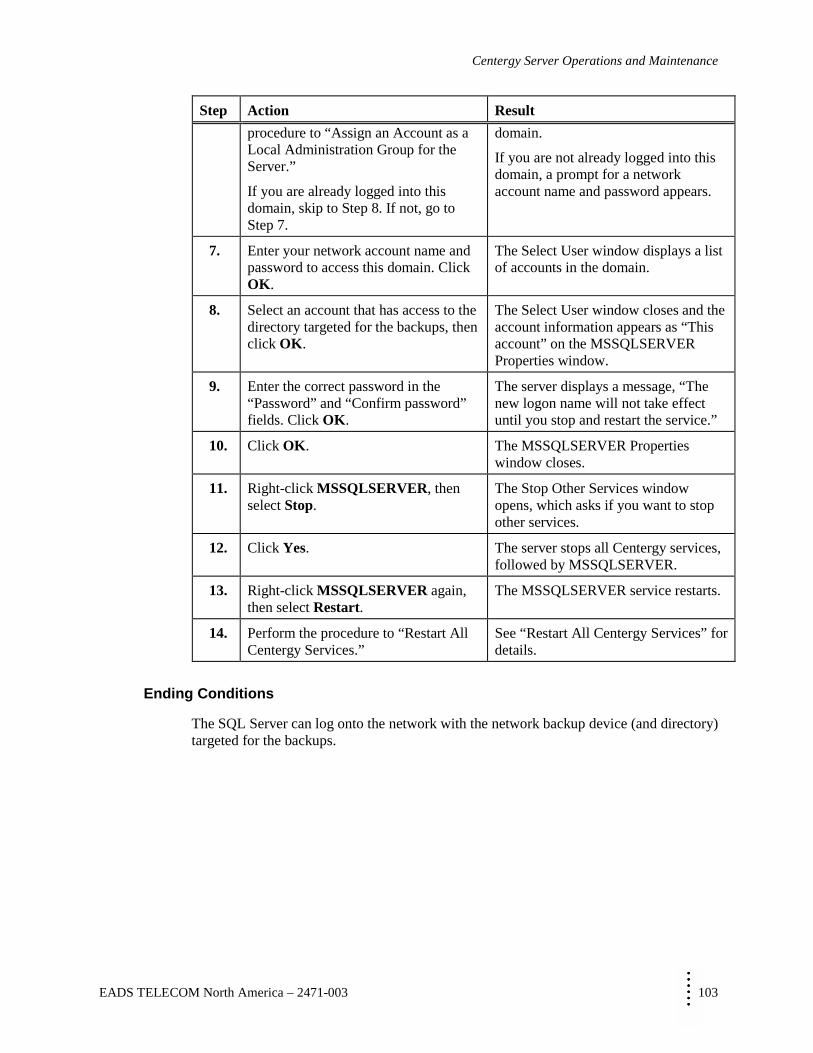
MMMMMMMM
Centergy Server Operations and Maintenance
EADS TELECOM North America – 2471-003 103
Step Action Result procedure to “Assign an Account as a Local Administration Group for the Server.”
If you are already logged into this domain, skip to Step 8. If not, go to Step 7.
domain.
If you are not already logged into this domain, a prompt for a network account name and password appears.
7. Enter your network account name and password to access this domain. Click OK.
The Select User window displays a list of accounts in the domain.
8. Select an account that has access to the directory targeted for the backups, then click OK.
The Select User window closes and the account information appears as “This account” on the MSSQLSERVER Properties window.
9. Enter the correct password in the “Password” and “Confirm password” fields. Click OK.
The server displays a message, “The new logon name will not take effect until you stop and restart the service.”
10. Click OK. The MSSQLSERVER Properties window closes.
11. Right-click MSSQLSERVER, then select Stop.
The Stop Other Services window opens, which asks if you want to stop other services.
12. Click Yes. The server stops all Centergy services, followed by MSSQLSERVER.
13. Right-click MSSQLSERVER again, then select Restart.
The MSSQLSERVER service restarts.
14. Perform the procedure to “Restart All Centergy Services.”
See “Restart All Centergy Services” for details.
Ending Conditions
The SQL Server can log onto the network with the network backup device (and directory) targeted for the backups.
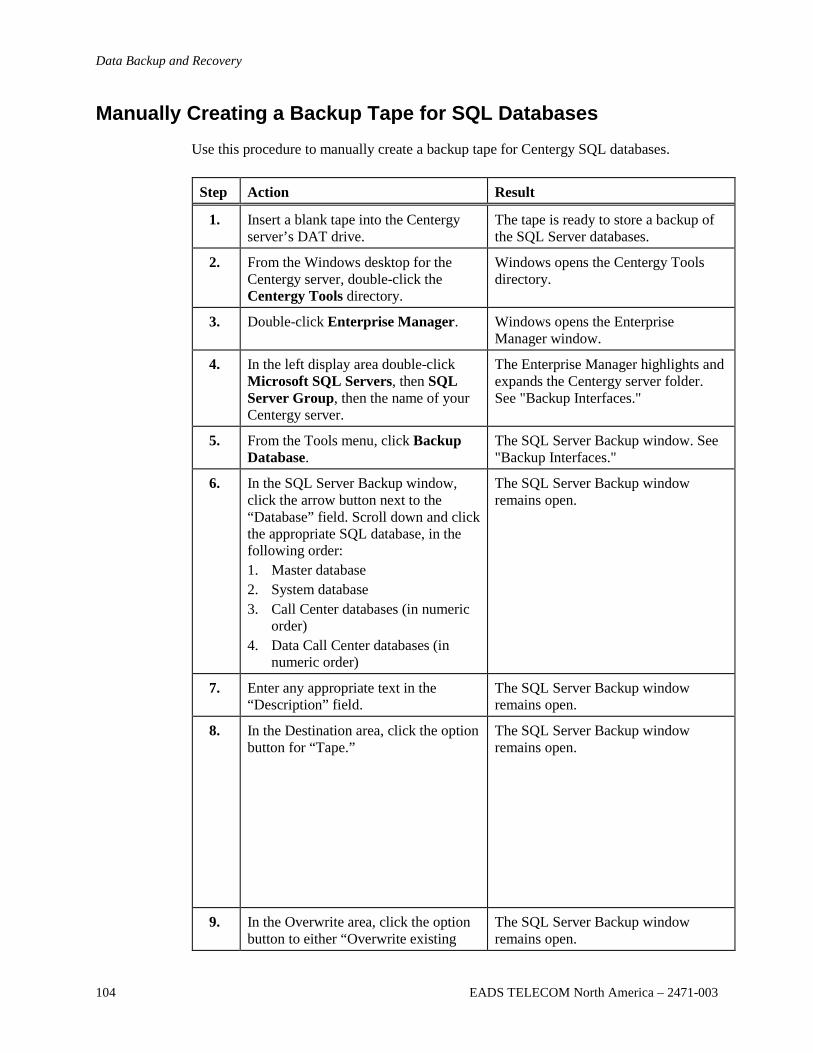
Data Backup and Recovery
104 EADS TELECOM North America – 2471-003
Manually Creating a Backup Tape for SQL Databases
Use this procedure to manually create a backup tape for Centergy SQL databases.
Step Action Result
1. Insert a blank tape into the Centergy server’s DAT drive.
The tape is ready to store a backup of the SQL Server databases.
2. From the Windows desktop for the Centergy server, double-click the Centergy Tools directory.
Windows opens the Centergy Tools directory.
3. Double-click Enterprise Manager. Windows opens the Enterprise Manager window.
4. In the left display area double-click Microsoft SQL Servers, then SQL Server Group, then the name of your Centergy server.
The Enterprise Manager highlights and expands the Centergy server folder. See "Backup Interfaces."
5. From the Tools menu, click Backup Database.
The SQL Server Backup window. See "Backup Interfaces."
6. In the SQL Server Backup window, click the arrow button next to the “Database” field. Scroll down and click the appropriate SQL database, in the following order: 1. Master database 2. System database 3. Call Center databases (in numeric
order) 4. Data Call Center databases (in
numeric order)
The SQL Server Backup window remains open.
7. Enter any appropriate text in the “Description” field.
The SQL Server Backup window remains open.
8. In the Destination area, click the option button for “Tape.”
The SQL Server Backup window remains open.
9. In the Overwrite area, click the option button to either “Overwrite existing
The SQL Server Backup window remains open.

MMMMMMMM
Centergy Server Operations and Maintenance
EADS TELECOM North America – 2471-003 105
Step Action Result media” or “Append to media.”
Select the option button to “Overwrite existing media” for the Master database. Use “Append to media” for all other SQL Server databases.
10. Do not click the box to schedule an automatic backup.
As an option, you can schedule an automatic backup of SQL Server databases to tape. See “Scheduling a Tape Backup for SQL Server Databases.”
The SQL Server Backup window remains open.
11. Click OK.
The Enterprise Manager stores the selected SQL database to the backup tape.
12. Repeat Step 6 through Step 12 until the SQL databases are appended to the tape in the order shown in Step 6.
Ending Conditions
The tape is available to recover from any SQL data loss caused by system problems, system crashes, user errors, power losses, or other causes.
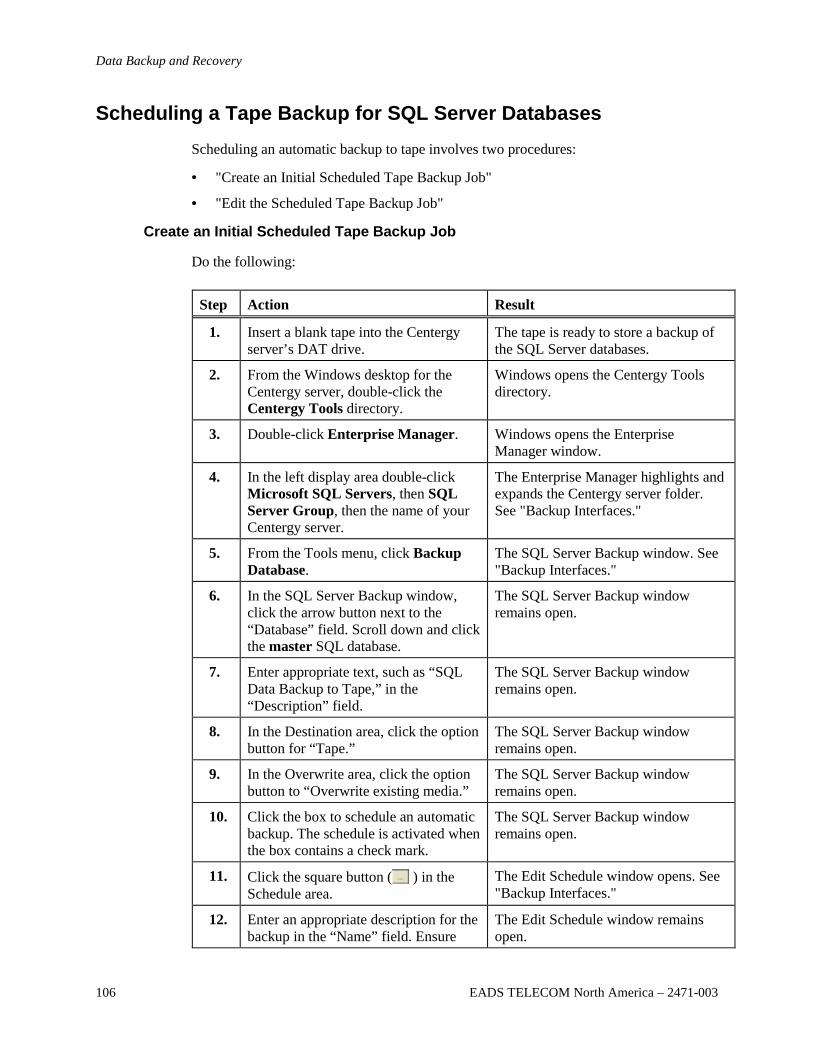
Data Backup and Recovery
106 EADS TELECOM North America – 2471-003
Scheduling a Tape Backup for SQL Server Databases
Scheduling an automatic backup to tape involves two procedures:
• "Create an Initial Scheduled Tape Backup Job"
• "Edit the Scheduled Tape Backup Job"
Create an Initial Scheduled Tape Backup Job
Do the following:
Step Action Result
1. Insert a blank tape into the Centergy server’s DAT drive.
The tape is ready to store a backup of the SQL Server databases.
2. From the Windows desktop for the Centergy server, double-click the Centergy Tools directory.
Windows opens the Centergy Tools directory.
3. Double-click Enterprise Manager. Windows opens the Enterprise Manager window.
4. In the left display area double-click Microsoft SQL Servers, then SQL Server Group, then the name of your Centergy server.
The Enterprise Manager highlights and expands the Centergy server folder. See "Backup Interfaces."
5. From the Tools menu, click Backup Database.
The SQL Server Backup window. See "Backup Interfaces."
6. In the SQL Server Backup window, click the arrow button next to the “Database” field. Scroll down and click the master SQL database.
The SQL Server Backup window remains open.
7. Enter appropriate text, such as “SQL Data Backup to Tape,” in the “Description” field.
The SQL Server Backup window remains open.
8. In the Destination area, click the option button for “Tape.”
The SQL Server Backup window remains open.
9. In the Overwrite area, click the option button to “Overwrite existing media.”
The SQL Server Backup window remains open.
10. Click the box to schedule an automatic backup. The schedule is activated when the box contains a check mark.
The SQL Server Backup window remains open.
11. Click the square button ( ) in the Schedule area.
The Edit Schedule window opens. See "Backup Interfaces."
12. Enter an appropriate description for the backup in the “Name” field. Ensure
The Edit Schedule window remains open.
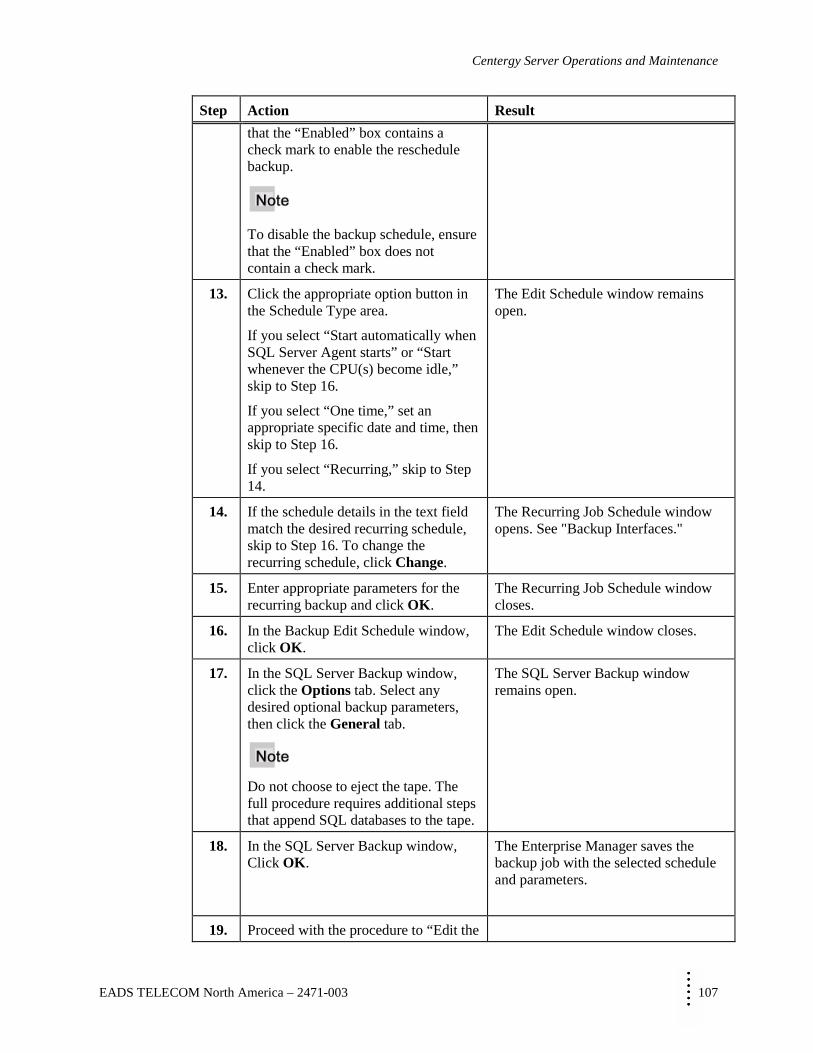
MMMMMMMM
Centergy Server Operations and Maintenance
EADS TELECOM North America – 2471-003 107
Step Action Result that the “Enabled” box contains a check mark to enable the reschedule backup.
To disable the backup schedule, ensure that the “Enabled” box does not contain a check mark.
13. Click the appropriate option button in the Schedule Type area.
If you select “Start automatically when SQL Server Agent starts” or “Start whenever the CPU(s) become idle,” skip to Step 16.
If you select “One time,” set an appropriate specific date and time, then skip to Step 16.
If you select “Recurring,” skip to Step 14.
The Edit Schedule window remains open.
14. If the schedule details in the text field match the desired recurring schedule, skip to Step 16. To change the recurring schedule, click Change.
The Recurring Job Schedule window opens. See "Backup Interfaces."
15. Enter appropriate parameters for the recurring backup and click OK.
The Recurring Job Schedule window closes.
16. In the Backup Edit Schedule window, click OK.
The Edit Schedule window closes.
17. In the SQL Server Backup window, click the Options tab. Select any desired optional backup parameters, then click the General tab.
Do not choose to eject the tape. The full procedure requires additional steps that append SQL databases to the tape.
The SQL Server Backup window remains open.
18. In the SQL Server Backup window, Click OK.
The Enterprise Manager saves the backup job with the selected schedule and parameters.
19. Proceed with the procedure to “Edit the
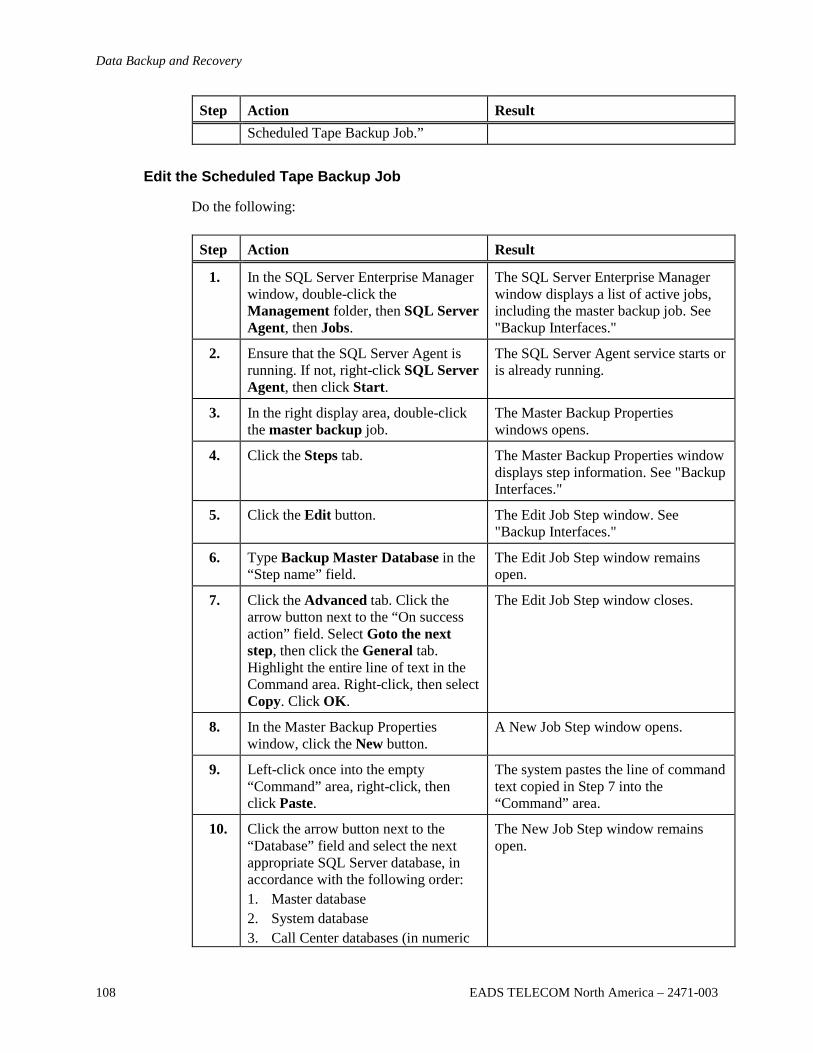
Data Backup and Recovery
108 EADS TELECOM North America – 2471-003
Step Action Result Scheduled Tape Backup Job.”
Edit the Scheduled Tape Backup Job
Do the following:
Step Action Result
1. In the SQL Server Enterprise Manager window, double-click the Management folder, then SQL Server Agent, then Jobs.
The SQL Server Enterprise Manager window displays a list of active jobs, including the master backup job. See "Backup Interfaces."
2. Ensure that the SQL Server Agent is running. If not, right-click SQL Server Agent, then click Start.
The SQL Server Agent service starts or is already running.
3. In the right display area, double-click the master backup job.
The Master Backup Properties windows opens.
4. Click the Steps tab. The Master Backup Properties window displays step information. See "Backup Interfaces."
5. Click the Edit button. The Edit Job Step window. See "Backup Interfaces."
6. Type Backup Master Database in the “Step name” field.
The Edit Job Step window remains open.
7. Click the Advanced tab. Click the arrow button next to the “On success action” field. Select Goto the next step, then click the General tab. Highlight the entire line of text in the Command area. Right-click, then select Copy. Click OK.
The Edit Job Step window closes.
8. In the Master Backup Properties window, click the New button.
A New Job Step window opens.
9. Left-click once into the empty “Command” area, right-click, then click Paste.
The system pastes the line of command text copied in Step 7 into the “Command” area.
10. Click the arrow button next to the “Database” field and select the next appropriate SQL Server database, in accordance with the following order: 1. Master database 2. System database 3. Call Center databases (in numeric
The New Job Step window remains open.

MMMMMMMM
Centergy Server Operations and Maintenance
EADS TELECOM North America – 2471-003 109
Step Action Result order)
4. Data Call Center databases (in numeric order)
11. In the “Step name” field, type an appropriate description, such as “Backup System Database.”
The New Job Step window remains open.
12. Edit the text in the “Command” field as follows: • Correct the database in the string
“BACKUP DATABASE [dbname];” for example, change “BACKUP DATABASE [master]” to “BACKUP DATABASE [system].”
• Correct the database in the string “NAME = N’dbname backup’;” for example, change “NAME = N’master backup’” to “NAME = N’system backup’.”
• As desired, change the description in the string “DESCRIPTION = N’description text’.” This text initially reflects any description entered in the procedure to “Create an Initial Scheduled Tape Backup Job.”
• Change “INIT” to “NOINIT.”
Specify “INIT” only in the command for the Master database. The INIT command causes the backup to overwrite existing data on the backup media. The NOINIT command causes the new data to append to existing data on the backup media. Use of INIT for the Master database only ensures that the media will store one, and only one, complete backup of each SQL Server database.
The New Job Step window remains open.
13. If creating a step for the last Data Call Center database, go to Step 14. If not, go to Step 15.
See Step 14 or 15, as appropriate.
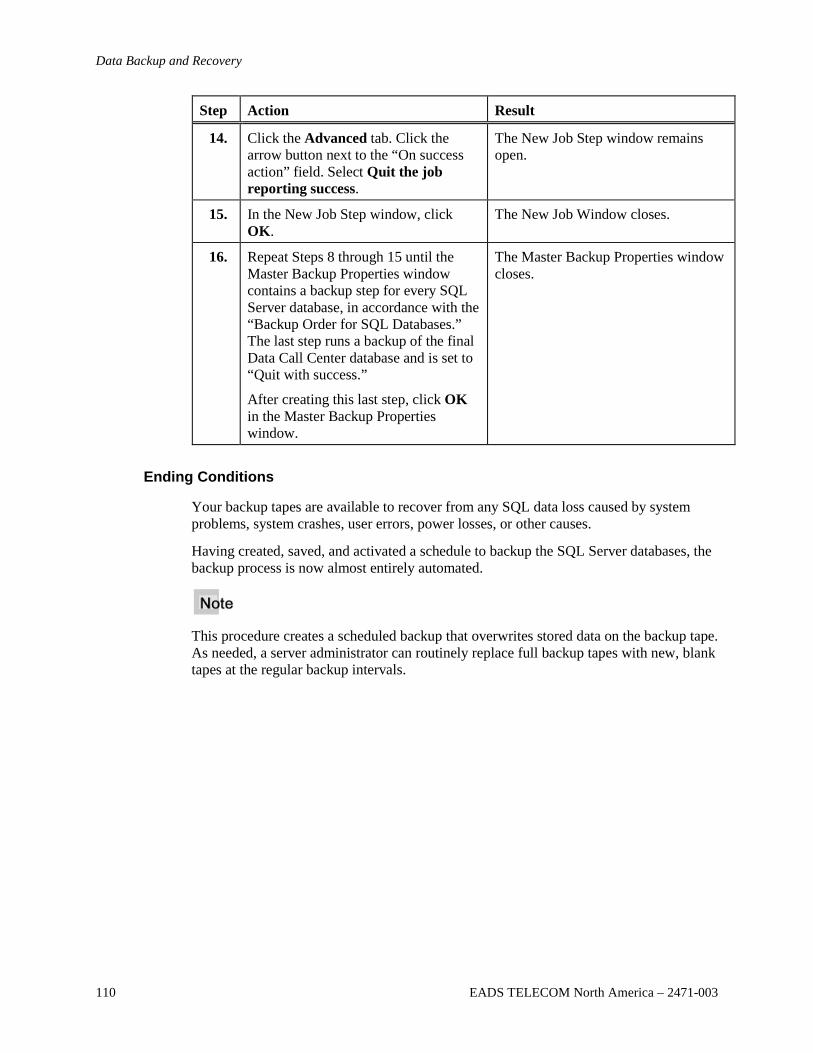
Data Backup and Recovery
110 EADS TELECOM North America – 2471-003
Step Action Result
14. Click the Advanced tab. Click the arrow button next to the “On success action” field. Select Quit the job reporting success.
The New Job Step window remains open.
15. In the New Job Step window, click OK.
The New Job Window closes.
16. Repeat Steps 8 through 15 until the Master Backup Properties window contains a backup step for every SQL Server database, in accordance with the “Backup Order for SQL Databases.” The last step runs a backup of the final Data Call Center database and is set to “Quit with success.”
After creating this last step, click OK in the Master Backup Properties window.
The Master Backup Properties window closes.
Ending Conditions
Your backup tapes are available to recover from any SQL data loss caused by system problems, system crashes, user errors, power losses, or other causes.
Having created, saved, and activated a schedule to backup the SQL Server databases, the backup process is now almost entirely automated.
This procedure creates a scheduled backup that overwrites stored data on the backup tape. As needed, a server administrator can routinely replace full backup tapes with new, blank tapes at the regular backup intervals.
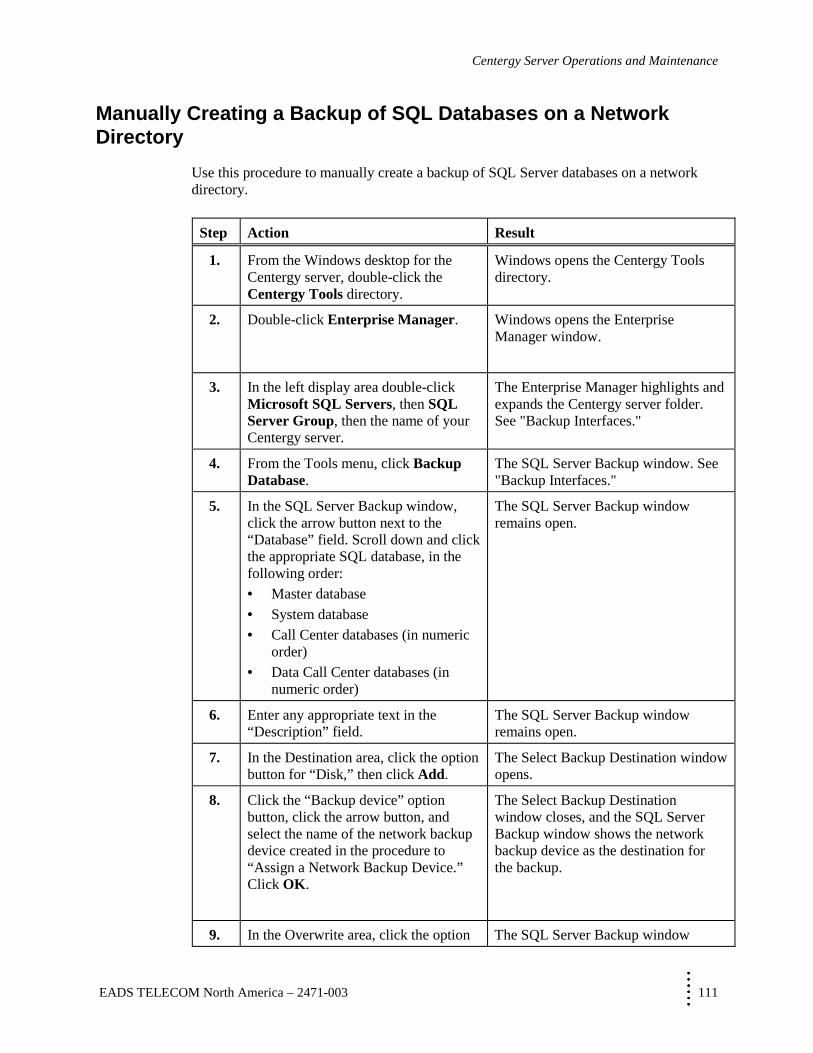
MMMMMMMM
Centergy Server Operations and Maintenance
EADS TELECOM North America – 2471-003 111
Manually Creating a Backup of SQL Databases on a Network Directory
Use this procedure to manually create a backup of SQL Server databases on a network directory.
Step Action Result
1. From the Windows desktop for the Centergy server, double-click the Centergy Tools directory.
Windows opens the Centergy Tools directory.
2. Double-click Enterprise Manager. Windows opens the Enterprise Manager window.
3. In the left display area double-click Microsoft SQL Servers, then SQL Server Group, then the name of your Centergy server.
The Enterprise Manager highlights and expands the Centergy server folder. See "Backup Interfaces."
4. From the Tools menu, click Backup Database.
The SQL Server Backup window. See "Backup Interfaces."
5. In the SQL Server Backup window, click the arrow button next to the “Database” field. Scroll down and click the appropriate SQL database, in the following order: • Master database • System database • Call Center databases (in numeric
order) • Data Call Center databases (in
numeric order)
The SQL Server Backup window remains open.
6. Enter any appropriate text in the “Description” field.
The SQL Server Backup window remains open.
7. In the Destination area, click the option button for “Disk,” then click Add.
The Select Backup Destination window opens.
8. Click the “Backup device” option button, click the arrow button, and select the name of the network backup device created in the procedure to “Assign a Network Backup Device.” Click OK.
The Select Backup Destination window closes, and the SQL Server Backup window shows the network backup device as the destination for the backup.
9. In the Overwrite area, click the option The SQL Server Backup window
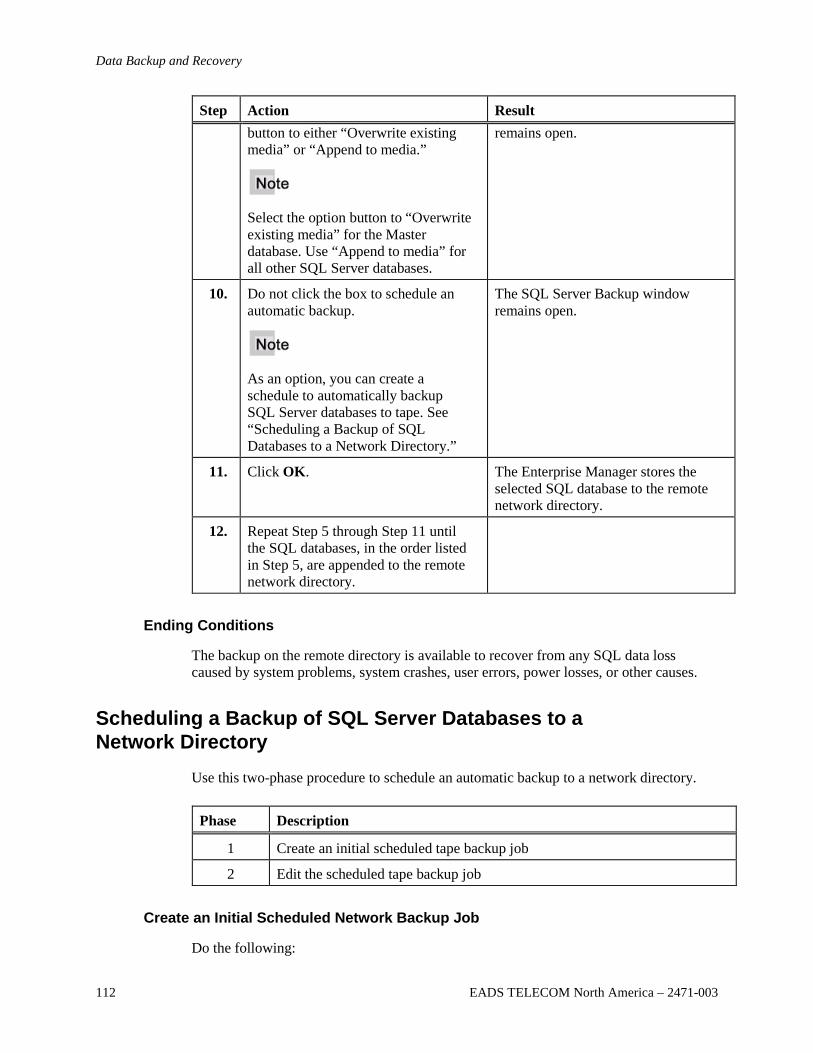
Data Backup and Recovery
112 EADS TELECOM North America – 2471-003
Step Action Result button to either “Overwrite existing media” or “Append to media.”
Select the option button to “Overwrite existing media” for the Master database. Use “Append to media” for all other SQL Server databases.
remains open.
10. Do not click the box to schedule an automatic backup.
As an option, you can create a schedule to automatically backup SQL Server databases to tape. See “Scheduling a Backup of SQL Databases to a Network Directory.”
The SQL Server Backup window remains open.
11. Click OK. The Enterprise Manager stores the selected SQL database to the remote network directory.
12. Repeat Step 5 through Step 11 until the SQL databases, in the order listed in Step 5, are appended to the remote network directory.
Ending Conditions
The backup on the remote directory is available to recover from any SQL data loss caused by system problems, system crashes, user errors, power losses, or other causes.
Scheduling a Backup of SQL Server Databases to a Network Directory
Use this two-phase procedure to schedule an automatic backup to a network directory.
Phase Description
1 Create an initial scheduled tape backup job
2 Edit the scheduled tape backup job
Create an Initial Scheduled Network Backup Job
Do the following:
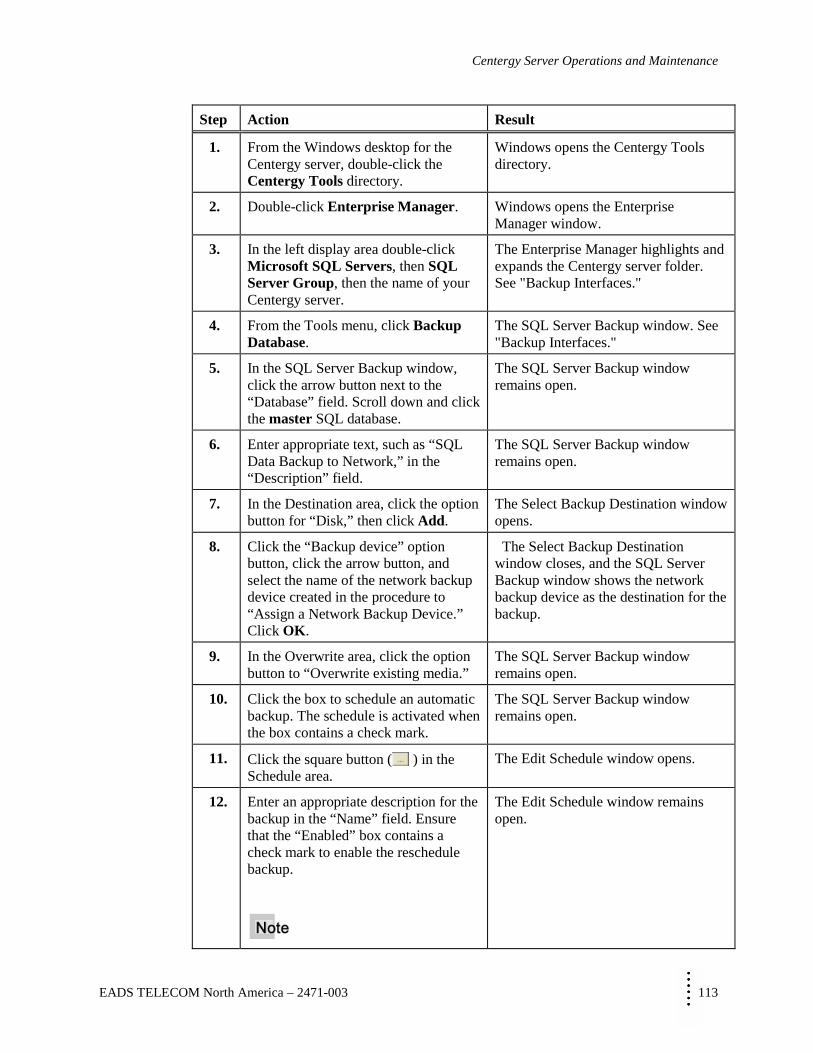
MMMMMMMM
Centergy Server Operations and Maintenance
EADS TELECOM North America – 2471-003 113
Step Action Result
1. From the Windows desktop for the Centergy server, double-click the Centergy Tools directory.
Windows opens the Centergy Tools directory.
2. Double-click Enterprise Manager. Windows opens the Enterprise Manager window.
3. In the left display area double-click Microsoft SQL Servers, then SQL Server Group, then the name of your Centergy server.
The Enterprise Manager highlights and expands the Centergy server folder. See "Backup Interfaces."
4. From the Tools menu, click Backup Database.
The SQL Server Backup window. See "Backup Interfaces."
5. In the SQL Server Backup window, click the arrow button next to the “Database” field. Scroll down and click the master SQL database.
The SQL Server Backup window remains open.
6. Enter appropriate text, such as “SQL Data Backup to Network,” in the “Description” field.
The SQL Server Backup window remains open.
7. In the Destination area, click the option button for “Disk,” then click Add.
The Select Backup Destination window opens.
8. Click the “Backup device” option button, click the arrow button, and select the name of the network backup device created in the procedure to “Assign a Network Backup Device.” Click OK.
The Select Backup Destination window closes, and the SQL Server Backup window shows the network backup device as the destination for the backup.
9. In the Overwrite area, click the option button to “Overwrite existing media.”
The SQL Server Backup window remains open.
10. Click the box to schedule an automatic backup. The schedule is activated when the box contains a check mark.
The SQL Server Backup window remains open.
11. Click the square button ( ) in the Schedule area.
The Edit Schedule window opens.
12. Enter an appropriate description for the backup in the “Name” field. Ensure that the “Enabled” box contains a check mark to enable the reschedule backup.
The Edit Schedule window remains open.
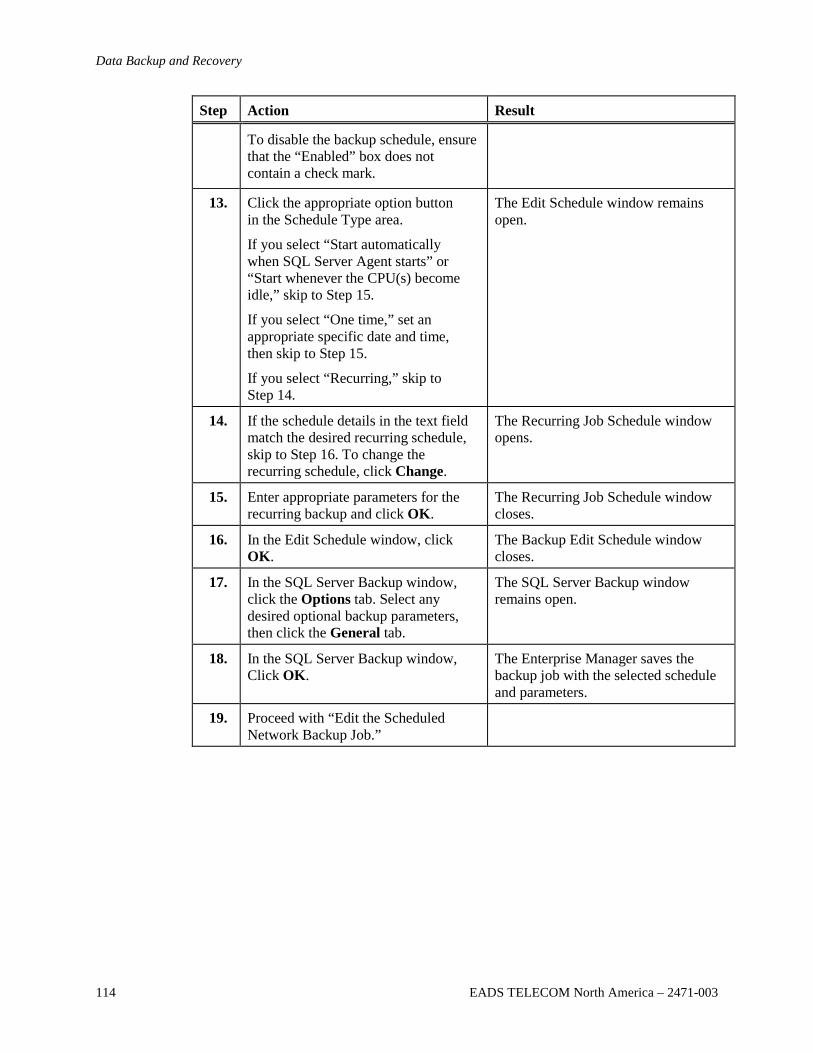
Data Backup and Recovery
114 EADS TELECOM North America – 2471-003
Step Action Result
To disable the backup schedule, ensure that the “Enabled” box does not contain a check mark.
13. Click the appropriate option button in the Schedule Type area.
If you select “Start automatically when SQL Server Agent starts” or “Start whenever the CPU(s) become idle,” skip to Step 15.
If you select “One time,” set an appropriate specific date and time, then skip to Step 15.
If you select “Recurring,” skip to Step 14.
The Edit Schedule window remains open.
14. If the schedule details in the text field match the desired recurring schedule, skip to Step 16. To change the recurring schedule, click Change.
The Recurring Job Schedule window opens.
15. Enter appropriate parameters for the recurring backup and click OK.
The Recurring Job Schedule window closes.
16. In the Edit Schedule window, click OK.
The Backup Edit Schedule window closes.
17. In the SQL Server Backup window, click the Options tab. Select any desired optional backup parameters, then click the General tab.
The SQL Server Backup window remains open.
18. In the SQL Server Backup window, Click OK.
The Enterprise Manager saves the backup job with the selected schedule and parameters.
19. Proceed with “Edit the Scheduled Network Backup Job.”
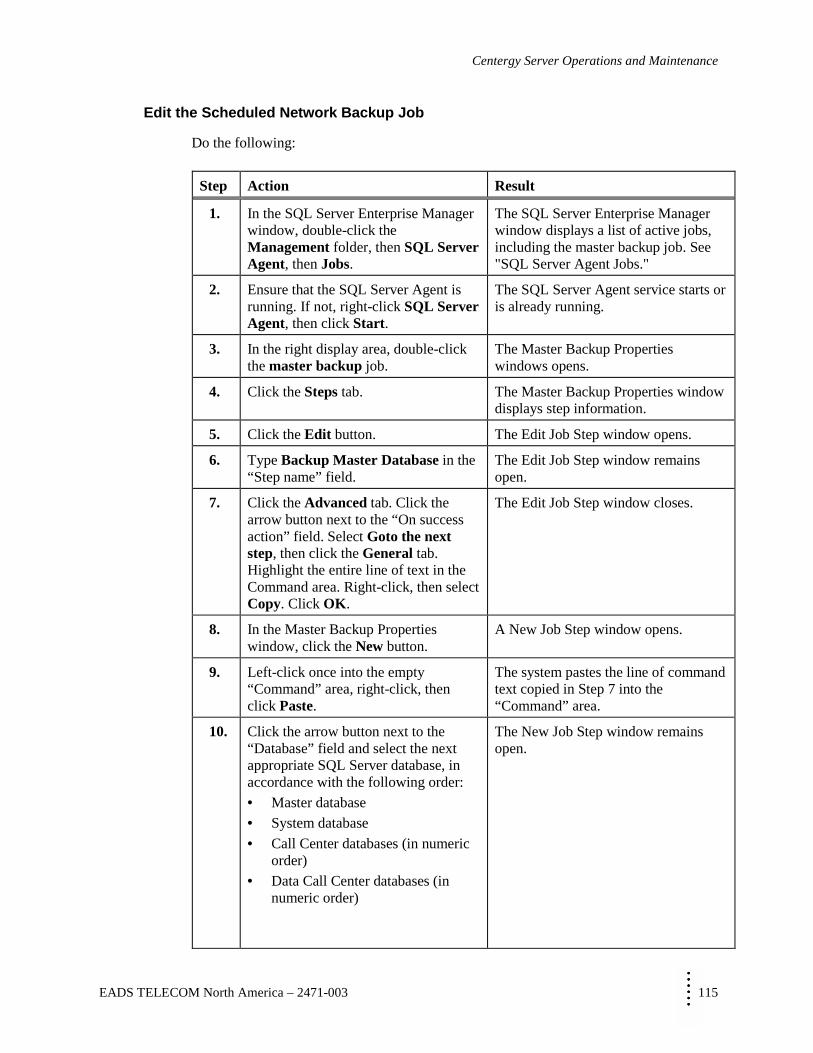
MMMMMMMM
Centergy Server Operations and Maintenance
EADS TELECOM North America – 2471-003 115
Edit the Scheduled Network Backup Job
Do the following:
Step Action Result
1. In the SQL Server Enterprise Manager window, double-click the Management folder, then SQL Server Agent, then Jobs.
The SQL Server Enterprise Manager window displays a list of active jobs, including the master backup job. See "SQL Server Agent Jobs."
2. Ensure that the SQL Server Agent is running. If not, right-click SQL Server Agent, then click Start.
The SQL Server Agent service starts or is already running.
3. In the right display area, double-click the master backup job.
The Master Backup Properties windows opens.
4. Click the Steps tab. The Master Backup Properties window displays step information.
5. Click the Edit button. The Edit Job Step window opens.
6. Type Backup Master Database in the “Step name” field.
The Edit Job Step window remains open.
7. Click the Advanced tab. Click the arrow button next to the “On success action” field. Select Goto the next step, then click the General tab. Highlight the entire line of text in the Command area. Right-click, then select Copy. Click OK.
The Edit Job Step window closes.
8. In the Master Backup Properties window, click the New button.
A New Job Step window opens.
9. Left-click once into the empty “Command” area, right-click, then click Paste.
The system pastes the line of command text copied in Step 7 into the “Command” area.
10. Click the arrow button next to the “Database” field and select the next appropriate SQL Server database, in accordance with the following order: • Master database • System database • Call Center databases (in numeric
order) • Data Call Center databases (in
numeric order)
The New Job Step window remains open.

Data Backup and Recovery
116 EADS TELECOM North America – 2471-003
Step Action Result
11. In the “Step name” field, type an appropriate description, such as “Backup System Database.”
The New Job Step window remains open.
12. Edit the text in the “Command” field as follows: • Correct the database in the string
“BACKUP DATABASE [dbname];” for example, change “BACKUP DATABASE [master]” to “BACKUP DATABASE [system].”
• Correct the database in the string “NAME = N’dbname backup’;” for example, change “NAME = N’master backup’” to “NAME = N’system backup’.”
• As desired, change the description in the string “DESCRIPTION = N’description text’.” This text initially reflects any description entered in the procedure to “Create an Initial Scheduled Network Backup Job.”
• Change “INIT” to “NOINIT.”
Specify “INIT” only in the command for the Master database. The INIT command causes the backup to overwrite existing data on the backup media. The NOINIT command causes the new data to append to existing data on the backup media. Use of INIT for the Master database only ensures that the media will store one, and only one, complete backup of each SQL Server database.
The New Job Step window remains open.
13. If creating a step for the last Data Call Center database, go to Step 14. If not, go to Step 15.
See Step 14 or 15, as appropriate.
14. Click the Advanced tab. Click the arrow button next to the “On success action” field. Select Quit the job reporting success.
The New Job Step window remains open.
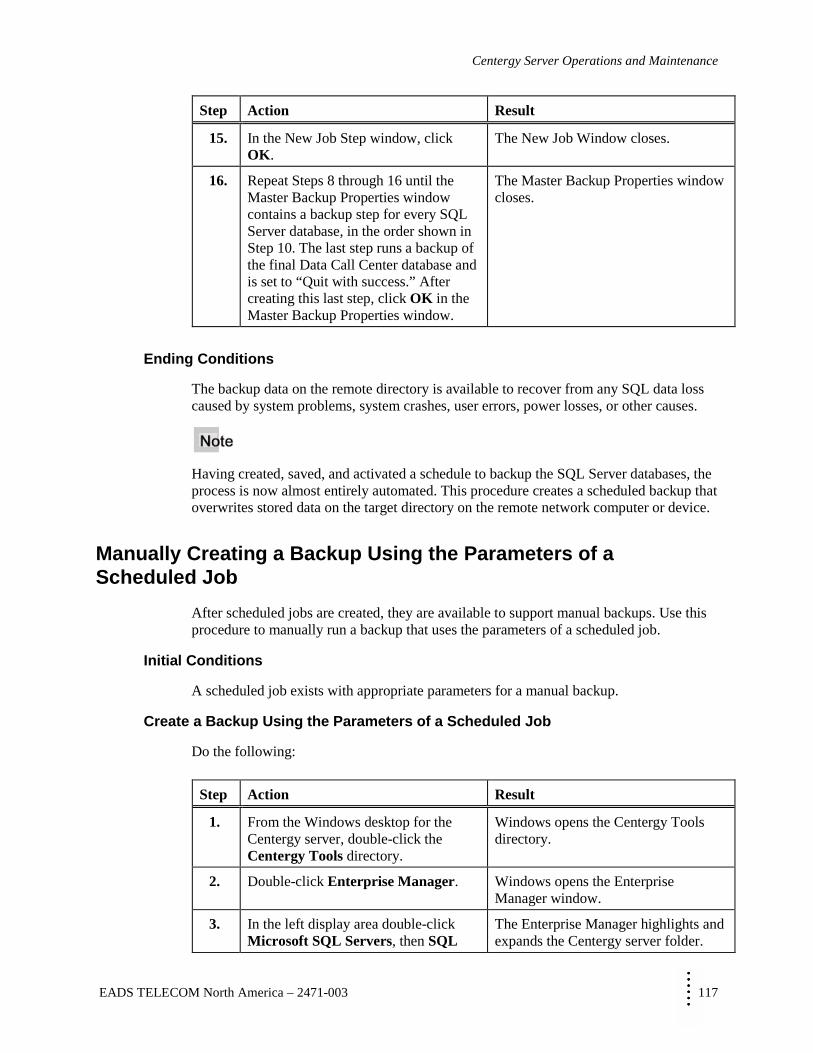
MMMMMMMM
Centergy Server Operations and Maintenance
EADS TELECOM North America – 2471-003 117
Step Action Result
15. In the New Job Step window, click OK.
The New Job Window closes.
16. Repeat Steps 8 through 16 until the Master Backup Properties window contains a backup step for every SQL Server database, in the order shown in Step 10. The last step runs a backup of the final Data Call Center database and is set to “Quit with success.” After creating this last step, click OK in the Master Backup Properties window.
The Master Backup Properties window closes.
Ending Conditions
The backup data on the remote directory is available to recover from any SQL data loss caused by system problems, system crashes, user errors, power losses, or other causes.
Having created, saved, and activated a schedule to backup the SQL Server databases, the process is now almost entirely automated. This procedure creates a scheduled backup that overwrites stored data on the target directory on the remote network computer or device.
Manually Creating a Backup Using the Parameters of a Scheduled Job
After scheduled jobs are created, they are available to support manual backups. Use this procedure to manually run a backup that uses the parameters of a scheduled job.
Initial Conditions
A scheduled job exists with appropriate parameters for a manual backup.
Create a Backup Using the Parameters of a Scheduled Job
Do the following:
Step Action Result
1. From the Windows desktop for the Centergy server, double-click the Centergy Tools directory.
Windows opens the Centergy Tools directory.
2. Double-click Enterprise Manager. Windows opens the Enterprise Manager window.
3. In the left display area double-click Microsoft SQL Servers, then SQL
The Enterprise Manager highlights and expands the Centergy server folder.
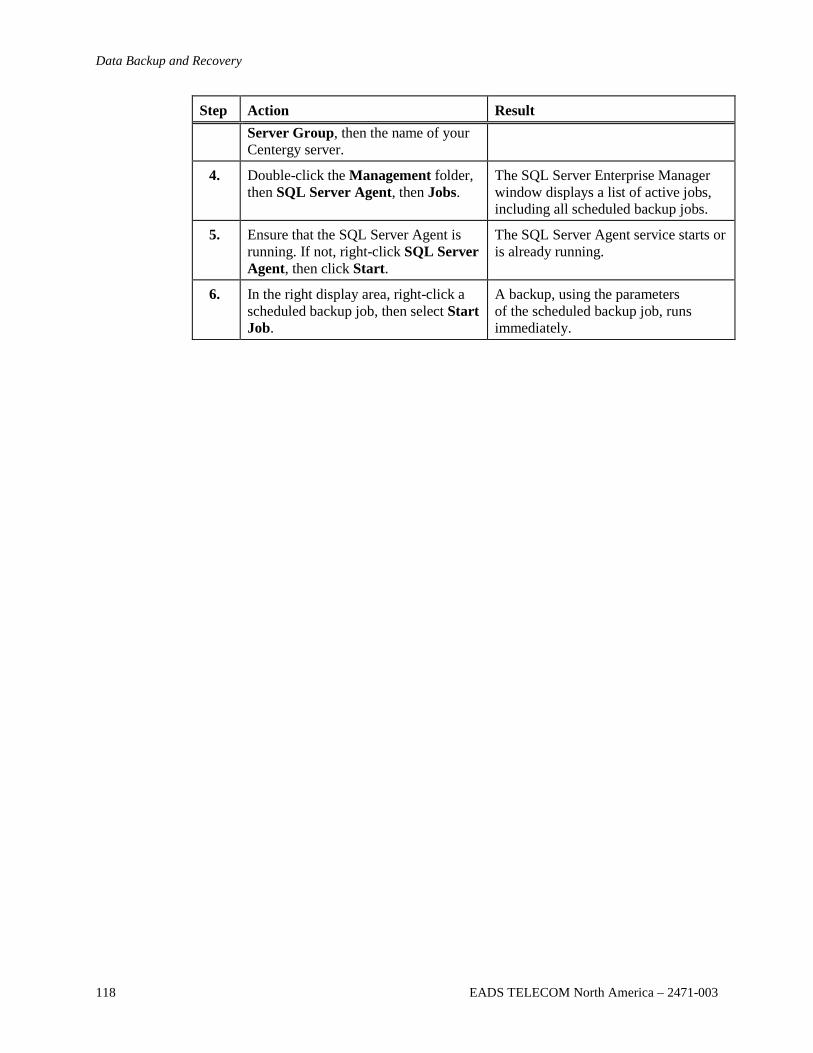
Data Backup and Recovery
118 EADS TELECOM North America – 2471-003
Step Action Result Server Group, then the name of your Centergy server.
4. Double-click the Management folder, then SQL Server Agent, then Jobs.
The SQL Server Enterprise Manager window displays a list of active jobs, including all scheduled backup jobs.
5. Ensure that the SQL Server Agent is running. If not, right-click SQL Server Agent, then click Start.
The SQL Server Agent service starts or is already running.
6. In the right display area, right-click a scheduled backup job, then select Start Job.
A backup, using the parameters of the scheduled backup job, runs immediately.

MMMMMMMM
Centergy Server Operations and Maintenance
EADS TELECOM North America – 2471-003 119
Chapter 11
Custom Reports
Implement a Custom Report for Centergy
Centergy supports the addition and use of custom reports. The following table shows the primary phases for creating a Centergy custom report and adding it for use in the Centergy Manager application.
Phase Activity
1. Define a custom report.
2. Assign the report developer's account to the SQL Readers group for a Centergy Network Management Server.
3. Enable Crystal Reports on a report development PC to access a Centergy SQL Server database.
4. Create a custom report template.
5. Add a custom report template to Centergy.
Using Centergy Manager, follow the procedure in "Adding a Custom Report Template." For more information, see the Centergy Manager Administrator Guide (590-2503).
You must log onto Centergy Manager with an account that has permission to add a custom report.
Define a Custom Report
Before creating a custom Crystal report for use in Centergy, answer all the following questions:
• What type of data (agent, agent group, or call type) will the report include?
• What level (interval, daily, or summary) will the report reflect?
• What grouping will the report use?
• What qualifier will the report include?
• What statistics or formulas will the report include?
• What name will the report have?
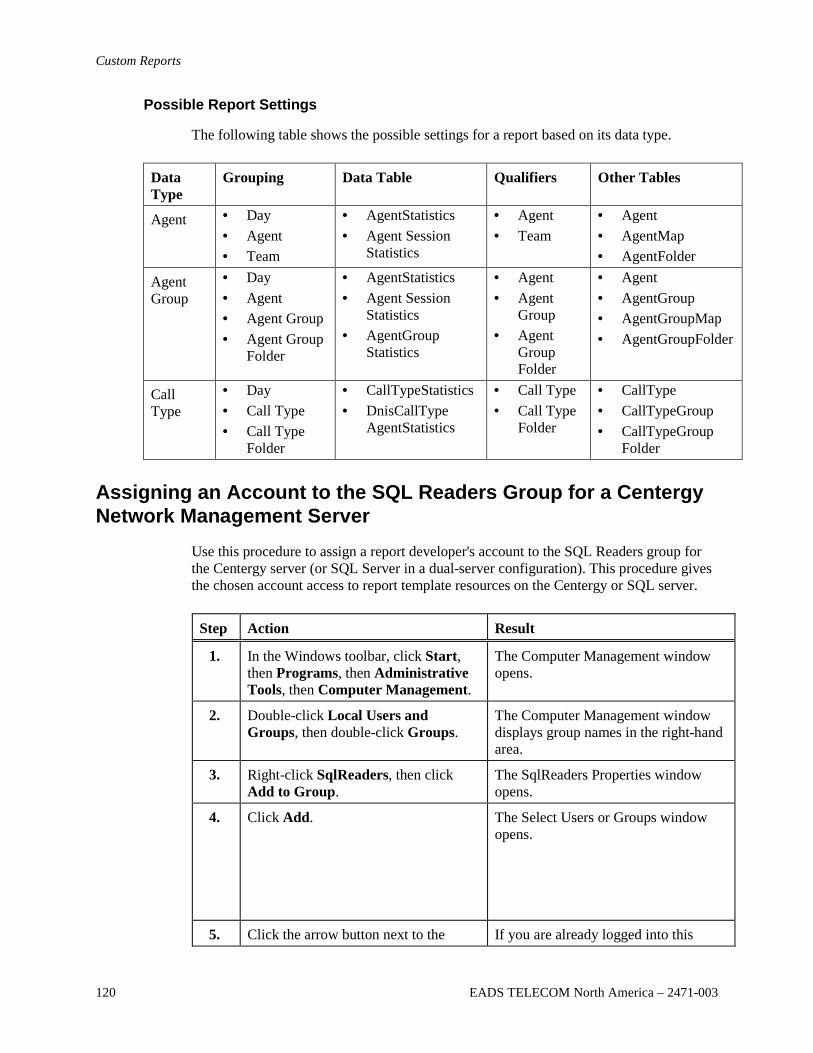
Custom Reports
120 EADS TELECOM North America – 2471-003
Possible Report Settings
The following table shows the possible settings for a report based on its data type.
Data Type
Grouping Data Table Qualifiers Other Tables
Agent • Day • Agent • Team
• AgentStatistics • Agent Session
Statistics
• Agent • Team
• Agent • AgentMap • AgentFolder
Agent Group
• Day • Agent • Agent Group • Agent Group
Folder
• AgentStatistics • Agent Session
Statistics • AgentGroup
Statistics
• Agent • Agent
Group • Agent
Group Folder
• Agent • AgentGroup • AgentGroupMap • AgentGroupFolder
Call Type
• Day • Call Type • Call Type
Folder
• CallTypeStatistics • DnisCallType
AgentStatistics
• Call Type • Call Type
Folder
• CallType • CallTypeGroup • CallTypeGroup
Folder
Assigning an Account to the SQL Readers Group for a Centergy Network Management Server
Use this procedure to assign a report developer's account to the SQL Readers group for the Centergy server (or SQL Server in a dual-server configuration). This procedure gives the chosen account access to report template resources on the Centergy or SQL server.
Step Action Result
1. In the Windows toolbar, click Start, then Programs, then Administrative Tools, then Computer Management.
The Computer Management window opens.
2. Double-click Local Users and Groups, then double-click Groups.
The Computer Management window displays group names in the right-hand area.
3. Right-click SqlReaders, then click Add to Group.
The SqlReaders Properties window opens.
4. Click Add. The Select Users or Groups window opens.
5. Click the arrow button next to the If you are already logged into this
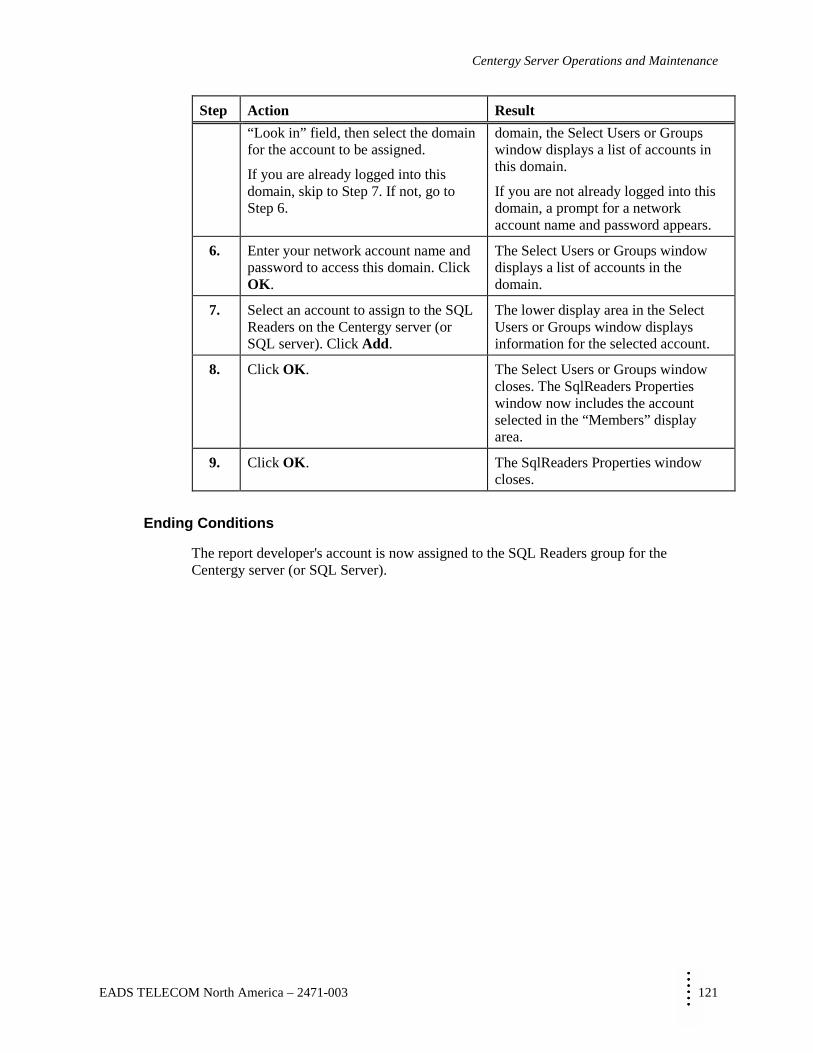
MMMMMMMM
Centergy Server Operations and Maintenance
EADS TELECOM North America – 2471-003 121
Step Action Result “Look in” field, then select the domain for the account to be assigned.
If you are already logged into this domain, skip to Step 7. If not, go to Step 6.
domain, the Select Users or Groups window displays a list of accounts in this domain.
If you are not already logged into this domain, a prompt for a network account name and password appears.
6. Enter your network account name and password to access this domain. Click OK.
The Select Users or Groups window displays a list of accounts in the domain.
7. Select an account to assign to the SQL Readers on the Centergy server (or SQL server). Click Add.
The lower display area in the Select Users or Groups window displays information for the selected account.
8. Click OK. The Select Users or Groups window closes. The SqlReaders Properties window now includes the account selected in the “Members” display area.
9. Click OK. The SqlReaders Properties window closes.
Ending Conditions
The report developer's account is now assigned to the SQL Readers group for the Centergy server (or SQL Server).

Custom Reports
122 EADS TELECOM North America – 2471-003
Enabling Crystal Reports on a Report Development PC to Access a Centergy SQL Server
To create a custom report template for Centergy, Crystal Reports must have access to a Centergy SQL Server database. Use this procedure to create an Open Database Connectivity (ODBC) data source on the PC you use to develop custom reports to enable Crystal Reports to access a Centergy SQL Server. The data source name (DSN) for the ODBC connection must be "CCMS_DB" to match the ODBC DSN defined on a CNMS.
Step Action Result
1. Open the ODBC connectivity control panel on the development computer.
This may be available under Start by selecting Programs > Administrative Tools > Data Sources (ODBC). If not, you can find it by searching for "Data Sources (ODBC)."
The ODBC Data Source Administrator window opens.
2. Under either the User DSN or System DSN tab, click Add.
An ODBC data source stores information about how to connect to an indicated data provider. A User data source is only accessible locally by the current machine. A System data source is accessible by remote users of the current machine.
The Create New Data Source window opens.
3. Scroll down, click SQL Server, then click Finish.
A window for more data source information opens.
4. Type "CCMS_DB" as the name of the new data source. Type an appropriate description, such as "SQL Connection for Custom Reports."
Type the name of an appropriate SQL Server. As an alternative, press the drop-down arrow under "Which SQL Server do you want to connect to" and select an appropriate SQL Server.
Click Next.
The window provides controls for how the SQL Server verifies the authenticity of users.

MMMMMMMM
Centergy Server Operations and Maintenance
EADS TELECOM North America – 2471-003 123
Step Action Result
5. Click the radio button for "With Windows NT authentication using the network login ID."
Click Next.
The window prompts for default database information.
6. Option:
Click Next to maintain the default database information.
Or:
If necessary, modify the database information, then click Next.
The window prompts for more information.
7. Click Finish. A server setup information window opens. It displays the configuration you have just established.
8. Click Test Data Source. Windows displays a results window with either "TESTS COMPLETED SUCCESSFULLY" or "TESTS FAILED."
9. If the tests pass, continue with Step 10.
If the tests fail, Repeat this procedure to correct any errors in the data source configuration. For assistance, contact the EADS TELECOM North America Technical Service Center (TSC) at 1-800-729-1872.
10. Click OK. Windows closes the results window and returns to the ODBC Data Source Administrator window.
11. Click OK. The ODBC Data Source Administrator window closes.
Ending Conditions
The custom report development computer can now access the SQL Server on the appropriate CNMS.
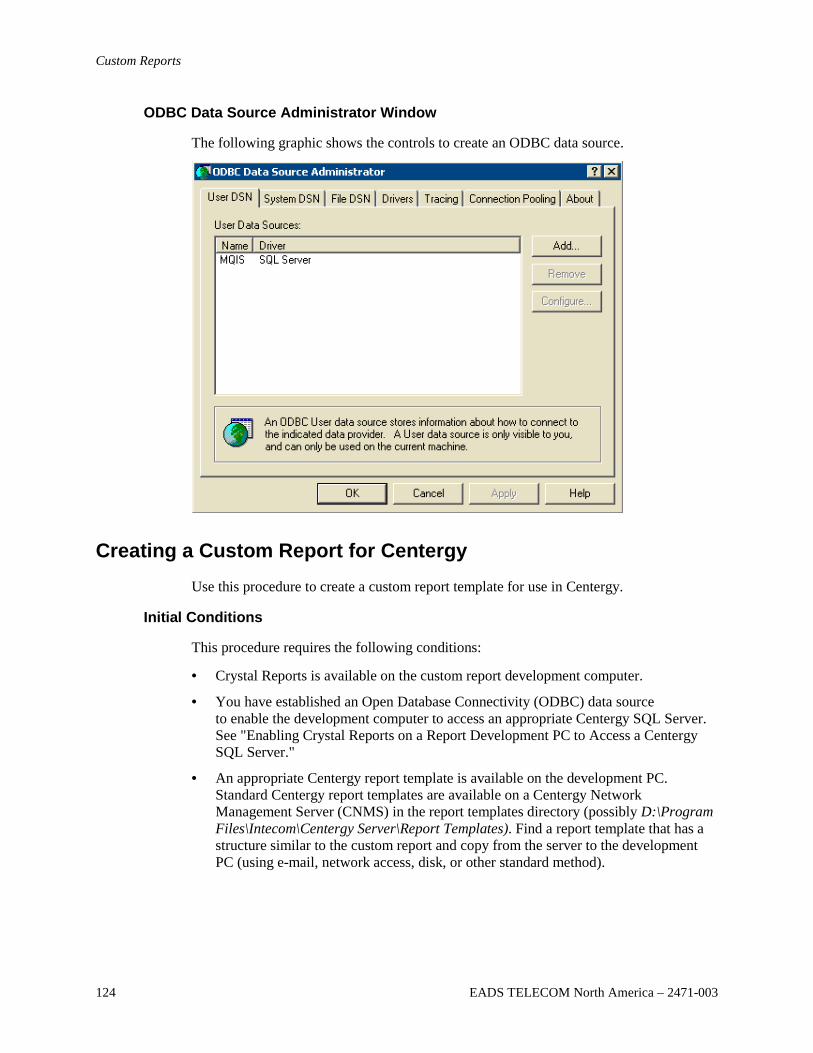
Custom Reports
124 EADS TELECOM North America – 2471-003
ODBC Data Source Administrator Window
The following graphic shows the controls to create an ODBC data source.
Creating a Custom Report for Centergy
Use this procedure to create a custom report template for use in Centergy.
Initial Conditions
This procedure requires the following conditions:
• Crystal Reports is available on the custom report development computer.
• You have established an Open Database Connectivity (ODBC) data source to enable the development computer to access an appropriate Centergy SQL Server. See "Enabling Crystal Reports on a Report Development PC to Access a Centergy SQL Server."
• An appropriate Centergy report template is available on the development PC. Standard Centergy report templates are available on a Centergy Network Management Server (CNMS) in the report templates directory (possibly D:\Program Files\Intecom\Centergy Server\Report Templates). Find a report template that has a structure similar to the custom report and copy from the server to the development PC (using e-mail, network access, disk, or other standard method).
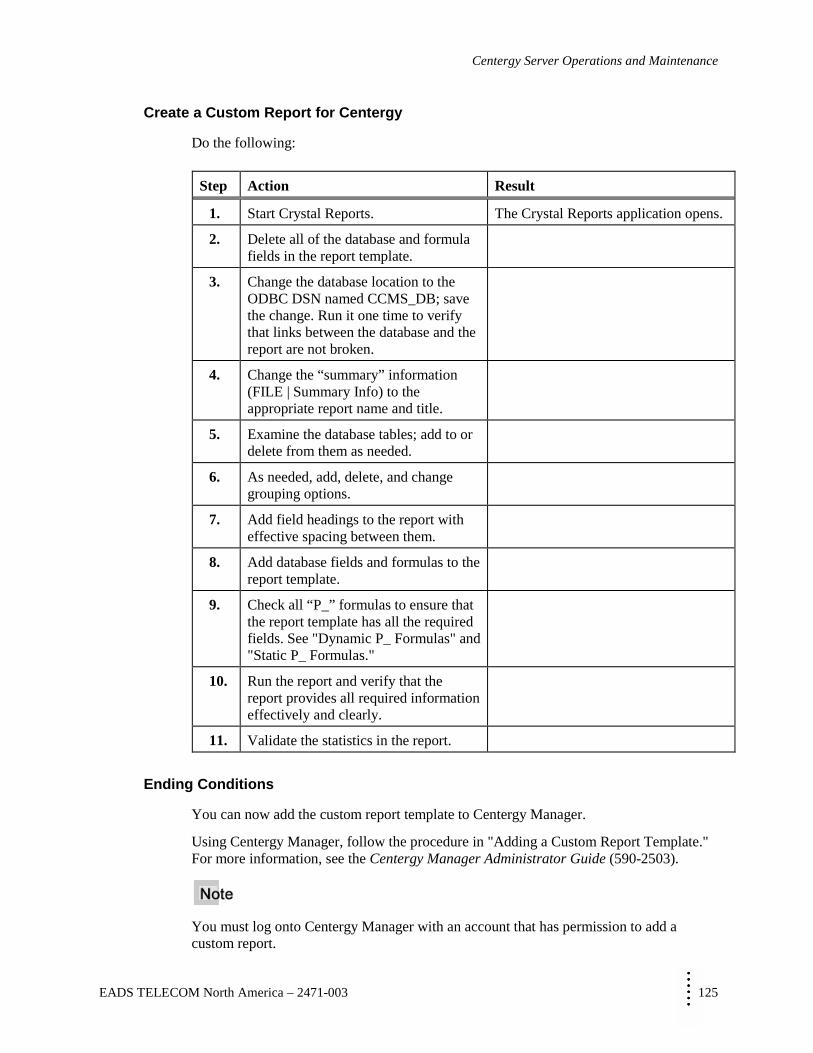
MMMMMMMM
Centergy Server Operations and Maintenance
EADS TELECOM North America – 2471-003 125
Create a Custom Report for Centergy
Do the following:
Step Action Result
1. Start Crystal Reports. The Crystal Reports application opens.
2. Delete all of the database and formula fields in the report template.
3. Change the database location to the ODBC DSN named CCMS_DB; save the change. Run it one time to verify that links between the database and the report are not broken.
4. Change the “summary” information (FILE | Summary Info) to the appropriate report name and title.
5. Examine the database tables; add to or delete from them as needed.
6. As needed, add, delete, and change grouping options.
7. Add field headings to the report with effective spacing between them.
8. Add database fields and formulas to the report template.
9. Check all “P_” formulas to ensure that the report template has all the required fields. See "Dynamic P_ Formulas" and "Static P_ Formulas."
10. Run the report and verify that the report provides all required information effectively and clearly.
11. Validate the statistics in the report.
Ending Conditions
You can now add the custom report template to Centergy Manager.
Using Centergy Manager, follow the procedure in "Adding a Custom Report Template." For more information, see the Centergy Manager Administrator Guide (590-2503).
You must log onto Centergy Manager with an account that has permission to add a custom report.
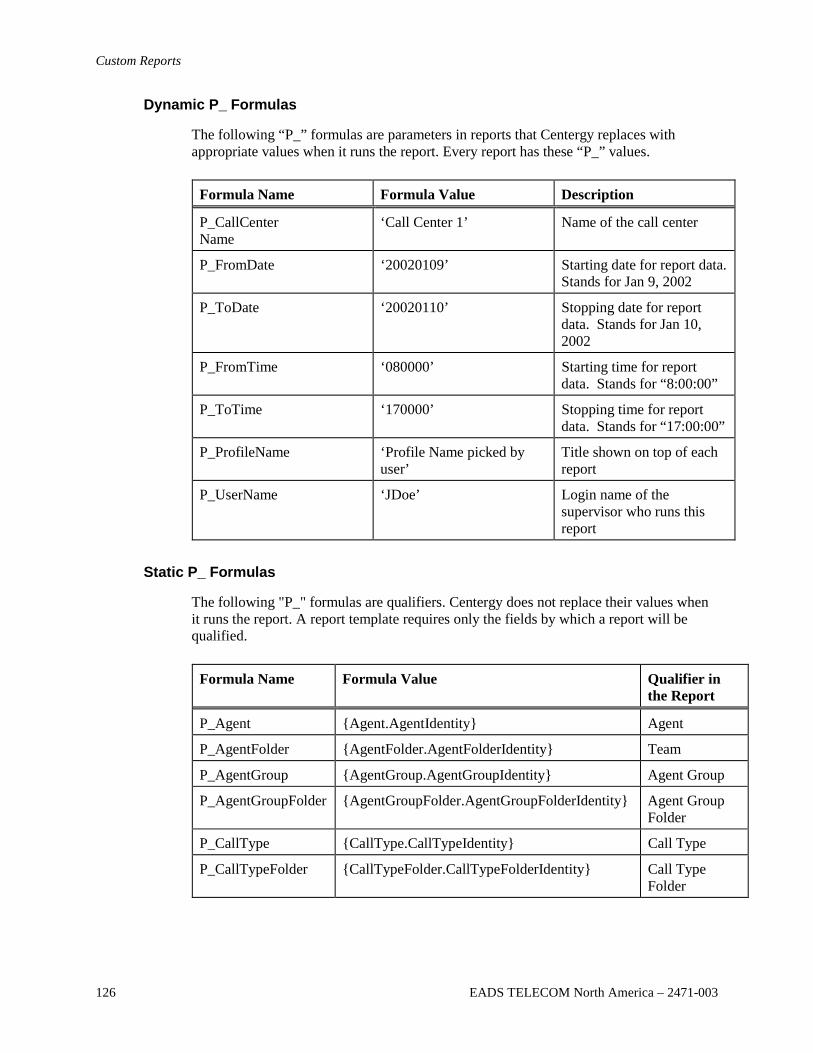
Custom Reports
126 EADS TELECOM North America – 2471-003
Dynamic P_ Formulas
The following “P_” formulas are parameters in reports that Centergy replaces with appropriate values when it runs the report. Every report has these “P_” values.
Formula Name Formula Value Description
P_CallCenter Name
‘Call Center 1’ Name of the call center
P_FromDate ‘20020109’ Starting date for report data. Stands for Jan 9, 2002
P_ToDate ‘20020110’ Stopping date for report data. Stands for Jan 10, 2002
P_FromTime ‘080000’ Starting time for report data. Stands for “8:00:00”
P_ToTime ‘170000’ Stopping time for report data. Stands for “17:00:00”
P_ProfileName ‘Profile Name picked by user’
Title shown on top of each report
P_UserName ‘JDoe’ Login name of the supervisor who runs this report
Static P_ Formulas
The following "P_" formulas are qualifiers. Centergy does not replace their values when it runs the report. A report template requires only the fields by which a report will be qualified.
Formula Name Formula Value Qualifier in the Report
P_Agent {Agent.AgentIdentity} Agent
P_AgentFolder {AgentFolder.AgentFolderIdentity} Team
P_AgentGroup {AgentGroup.AgentGroupIdentity} Agent Group
P_AgentGroupFolder {AgentGroupFolder.AgentGroupFolderIdentity} Agent Group Folder
P_CallType {CallType.CallTypeIdentity} Call Type
P_CallTypeFolder {CallTypeFolder.CallTypeFolderIdentity} Call Type Folder
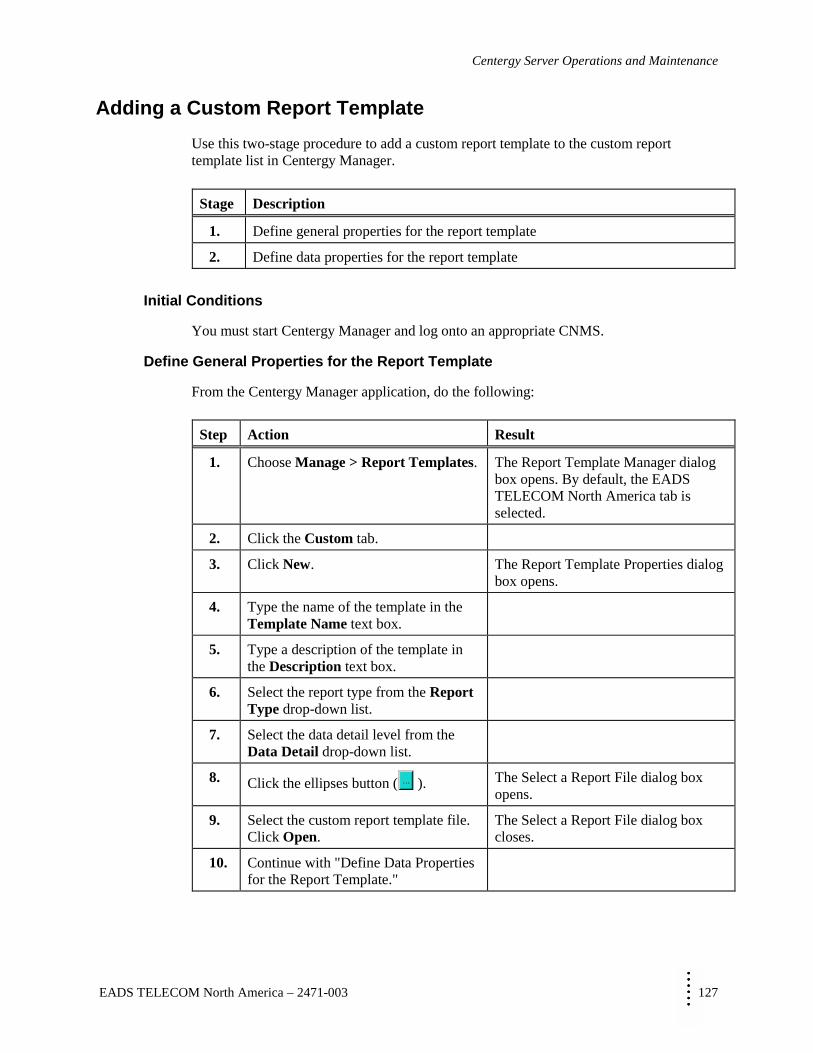
MMMMMMMM
Centergy Server Operations and Maintenance
EADS TELECOM North America – 2471-003 127
Adding a Custom Report Template
Use this two-stage procedure to add a custom report template to the custom report template list in Centergy Manager.
Stage Description
1. Define general properties for the report template
2. Define data properties for the report template
Initial Conditions
You must start Centergy Manager and log onto an appropriate CNMS.
Define General Properties for the Report Template
From the Centergy Manager application, do the following:
Step Action Result
1. Choose Manage > Report Templates. The Report Template Manager dialog box opens. By default, the EADS TELECOM North America tab is selected.
2. Click the Custom tab.
3. Click New. The Report Template Properties dialog box opens.
4. Type the name of the template in the Template Name text box.
5. Type a description of the template in the Description text box.
6. Select the report type from the Report Type drop-down list.
7. Select the data detail level from the Data Detail drop-down list.
8. Click the ellipses button ( ). The Select a Report File dialog box opens.
9. Select the custom report template file. Click Open.
The Select a Report File dialog box closes.
10. Continue with "Define Data Properties for the Report Template."

Custom Reports
128 EADS TELECOM North America – 2471-003
Define Data Properties for the Report Template
Do the following:
Step Action Result
1. Click the Data tab.
2. Highlight the Data Types from box.
3. In the Select Data Qualifier Type list, click the box next to each data type for use in the custom report. A check mark in the box next to a type includes that type for the custom report template.
4. Select a Default Data Type for the custom report template.
5. Select the database tables to be used with this report template.
Your selection for Data Detail under the General tab determine which database tables are available.
Database Selection
Interval Data Select from the Interval Data list.
Daily Table Select from the Daily Table list.
Reports Select from the Reports list.
6. Click Save. Centergy Manager to the Report Template Manager dialog box.
7. Click Close. The Report Template Manager dialog box closes.

MMMMMMMM
Centergy Server Operations and Maintenance
EADS TELECOM North America – 2471-003 129
Chapter 12
Run Centergy Manager
Starting Centergy Manager from a Centergy Network Management Server
The Centergy Tools directory on the Windows server desktop provides a shortcut to start EADS TELECOM North America Centergy Manager software. The server provides this software to assist troubleshooting and to verify connectivity with an EADS TELECOM North America switch.
Running Centergy Manager from the server limits the availability of resources that the server may need. Run Centergy Manager from the server only for brief troubleshooting.
Step Action Result
1. From the Windows desktop for the Centergy server, double-click the Centergy Tools directory.
Windows opens the Centergy Tools directory.
2. Double-click Centergy Manager. The Centergy Manager client application opens.
Ending Conditions
The Centergy Manager application is running. Follow the procedures in the Centergy Manager Administrator Guide (590-2503) to log Centergy Manager onto a CNMS and perform other tasks.
Run Centergy Manager
130 EADS TELECOM North America – 2471-003