Embed Size (px)
Citation preview
1
RUSHCLIFFE DISTRICT SCOUTS
CARE AND USE
OF
KNIVES, SAWS AND AXES
Compiled by D. Howard ©
Rushcliffe Scout Council Registered as a Charity, Number 522469
January 2016
2
Axes 11
Care of axes 14
Chopping to length 15
Felling Axe, The 15
Hand Axe, The 15
Safety rules. 13
Splitting 15
Using the Axe 15
Knives 7
Sharpening 7
Safety, General 5
Saws 8
Before you start. 9
Sawing to length. 9
When finished. 10
Sharpening Equipment 6
Tree trimming and felling 17
Felling a Tree 17
Trimming 19
WHAT IS AND ISN'T LEGAL 3
Advice from the Scout Association 3
Picture Credits
D. Howard
Pictures on pages 4, 5, 6, 7, 8, 11, 12, 18 top, 19 bottom, 20 bottom.
Pictures from ‘The Scout And His Axe’ The Patrol Books N0.26 by John Thurman. Pub. The Boy Scouts Association 1963
on pages 10, 16 bottom, 17 right, 18 right, 19top
and revised pictures on pages 14, 16 top, 17 left, 18 left.
3
WHAT IS AND ISN'T LEGAL - A BRIEF SUMMARY.
The maximum penalty for an adult carrying a knife is four years in prison and a fine of £5000.
it is illegal for any shop to sell a knife of any kind (including cutlery and kitchen knives) to
anyone under the age of 18.
it is generally an offence to carry a knife in public without good reason or lawful authority
(for example, a good reason is a chef on the way to work carrying their own knives).
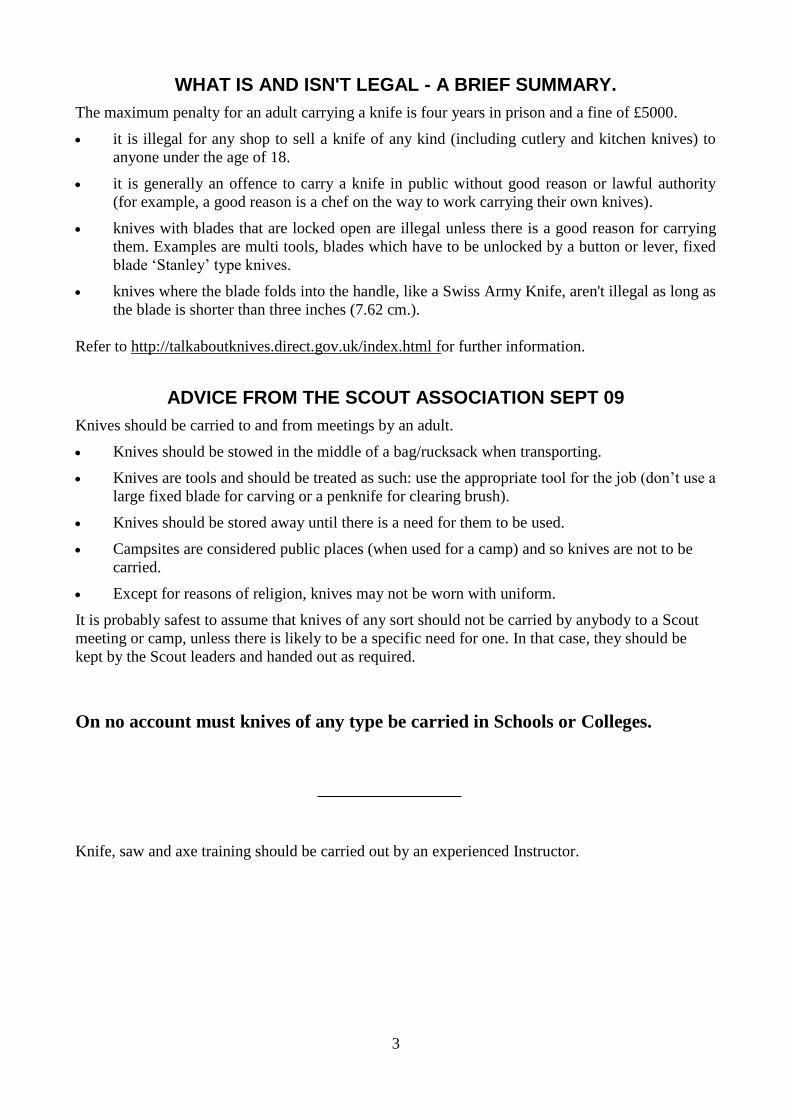
knives with blades that are locked open are illegal unless there is a good reason for carrying
them. Examples are multi tools, blades which have to be unlocked by a button or lever, fixed
blade ‘Stanley’ type knives.
knives where the blade folds into the handle, like a Swiss Army Knife, aren't illegal as long as
the blade is shorter than three inches (7.62 cm.).
Refer to http://talkaboutknives.direct.gov.uk/index.html for further information.
ADVICE FROM THE SCOUT ASSOCIATION SEPT 09
Knives should be carried to and from meetings by an adult.
Knives should be stowed in the middle of a bag/rucksack when transporting.
Knives are tools and should be treated as such: use the appropriate tool for the job (don’t use a
large fixed blade for carving or a penknife for clearing brush).
Knives should be stored away until there is a need for them to be used.
Campsites are considered public places (when used for a camp) and so knives are not to be
carried.
Except for reasons of religion, knives may not be worn with uniform.
It is probably safest to assume that knives of any sort should not be carried by anybody to a Scout
meeting or camp, unless there is likely to be a specific need for one. In that case, they should be
kept by the Scout leaders and handed out as required.
On no account must knives of any type be carried in Schools or Colleges.
Knife, saw and axe training should be carried out by an experienced Instructor.
4
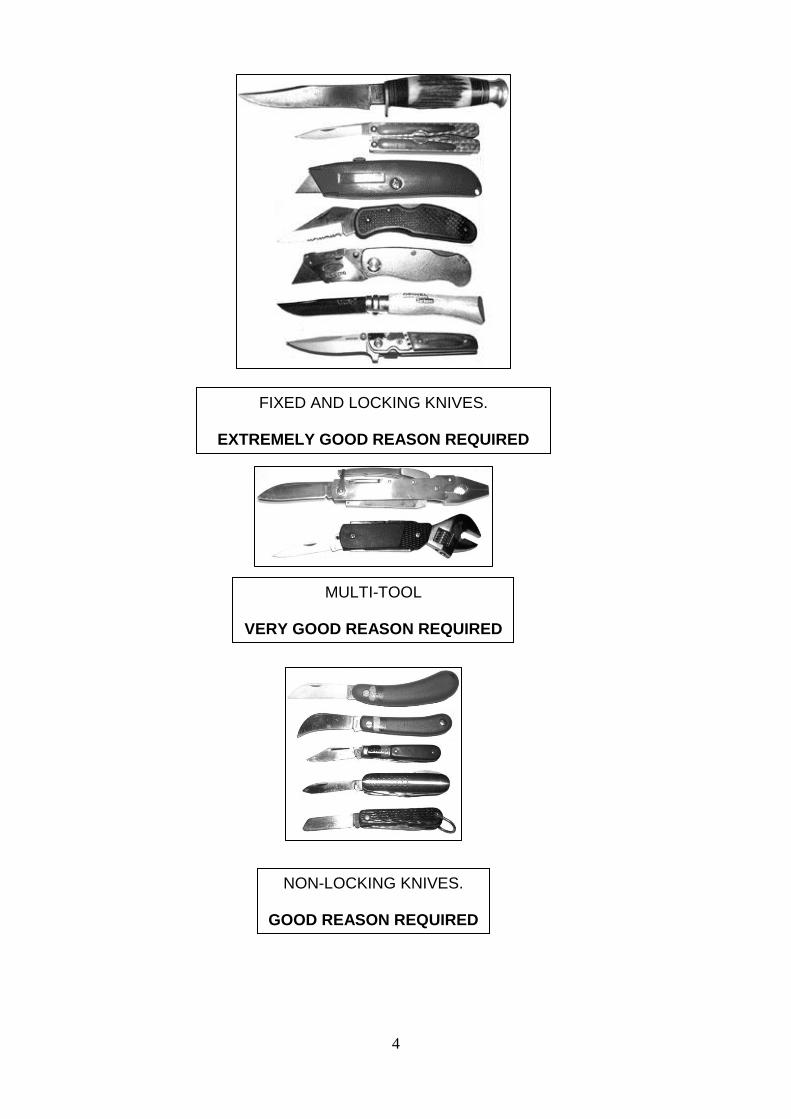
FIXED AND LOCKING KNIVES.
EXTREMELY GOOD REASON REQUIRED
NON-LOCKING KNIVES.
GOOD REASON REQUIRED
MULTI-TOOL
VERY GOOD REASON REQUIRED
5
SAFETY
Knives, Saws and Axes are all potentially dangerous. The key word when using them is
SAFETY.
They may all be classified as offensive weapons so always carry them packed away if possible.
Being a Scout does not give you any more rights to carry or use these items, indeed if you were charged with any offence related to them, you would have brought Scouting into disrepute.
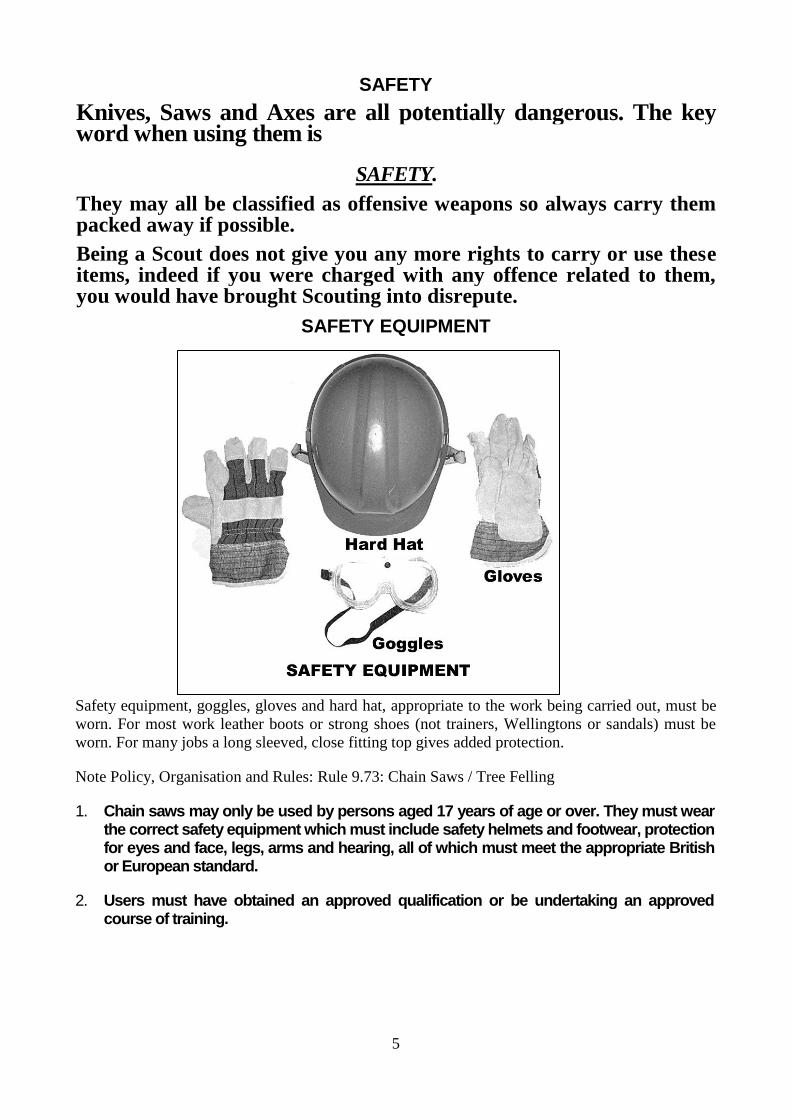
SAFETY EQUIPMENT
Safety equipment, goggles, gloves and hard hat, appropriate to the work being carried out, must be
worn. For most work leather boots or strong shoes (not trainers, Wellingtons or sandals) must be
worn. For many jobs a long sleeved, close fitting top gives added protection.
Note Policy, Organisation and Rules: Rule 9.73: Chain Saws / Tree Felling
1. Chain saws may only be used by persons aged 17 years of age or over. They must wear the correct safety equipment which must include safety helmets and footwear, protection for eyes and face, legs, arms and hearing, all of which must meet the appropriate British or European standard.
2. Users must have obtained an approved qualification or be undertaking an approved course of training.
6
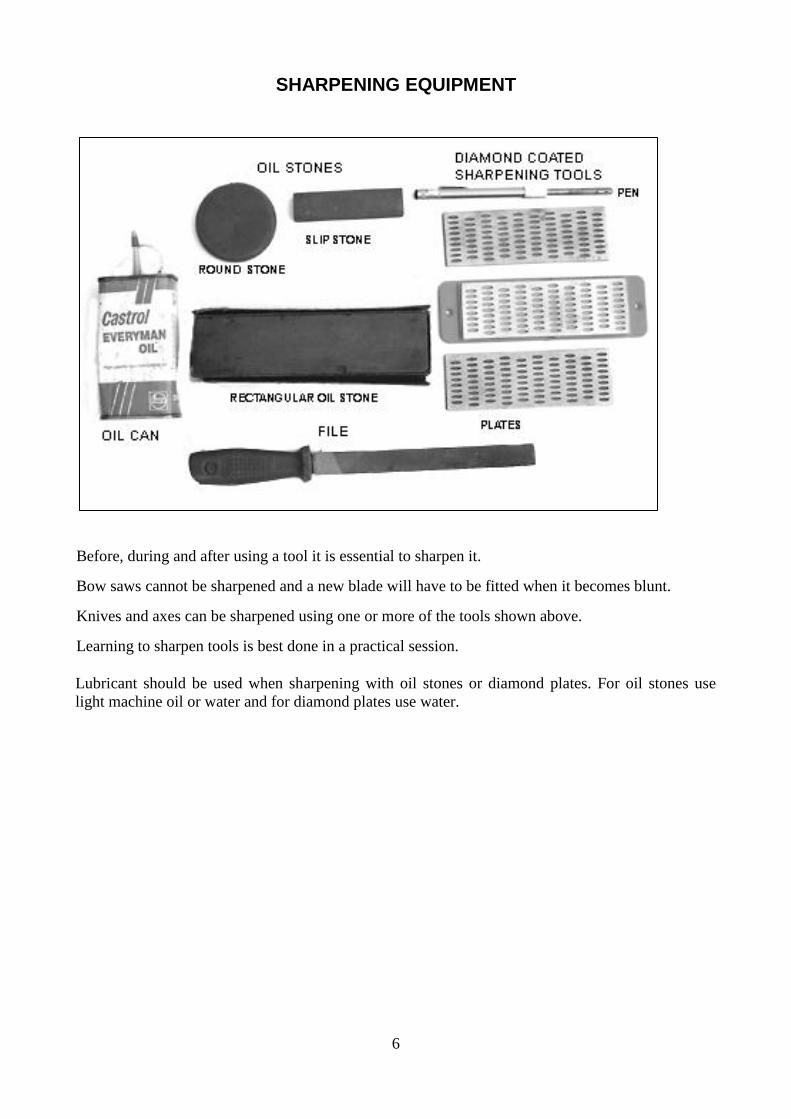
SHARPENING EQUIPMENT
Before, during and after using a tool it is essential to sharpen it.
Bow saws cannot be sharpened and a new blade will have to be fitted when it becomes blunt.
Knives and axes can be sharpened using one or more of the tools shown above.
Learning to sharpen tools is best done in a practical session.
Lubricant should be used when sharpening with oil stones or diamond plates. For oil stones use
light machine oil or water and for diamond plates use water.
7
KNIVES
For most purposes, non-locking clasp knives are preferable to sheath knives or locking knives.
They need to be sharp.
Do not allow anybody to leave knives lying about (especially open or unsheathed).
Wear a stout glove on the hand not holding the knife.
Always cut away from you, and not towards other people.
Use a wooden block to support the work whilst cutting if possible.
Do not carry knives around with the blade open.
Do not play games with them.
When washing knives do not drop them in the water and leave them, the ‘washer up’ may not
be able to see them and is liable to cut themselves. Immersing the whole knife may also
damage the handle.
Sharpen and clean the knife before putting it away.
Sharpening
An oilstone or diamond coated plate are probably the most effective sharpening aid for non-
domestic knives. An oilstone often has medium grit on one side and fine on the other. Diamond
plates are often supplied in sets of three a fine, a medium and a coarse plate. For touching up the
knife edge a fine grade is used. If there is damage to the blade a coarser grade can be used.
Do not use a high speed grinding wheel as the blade will overheat and loose its ‘temper’ making it
impossible to make and keep a sharp edge.
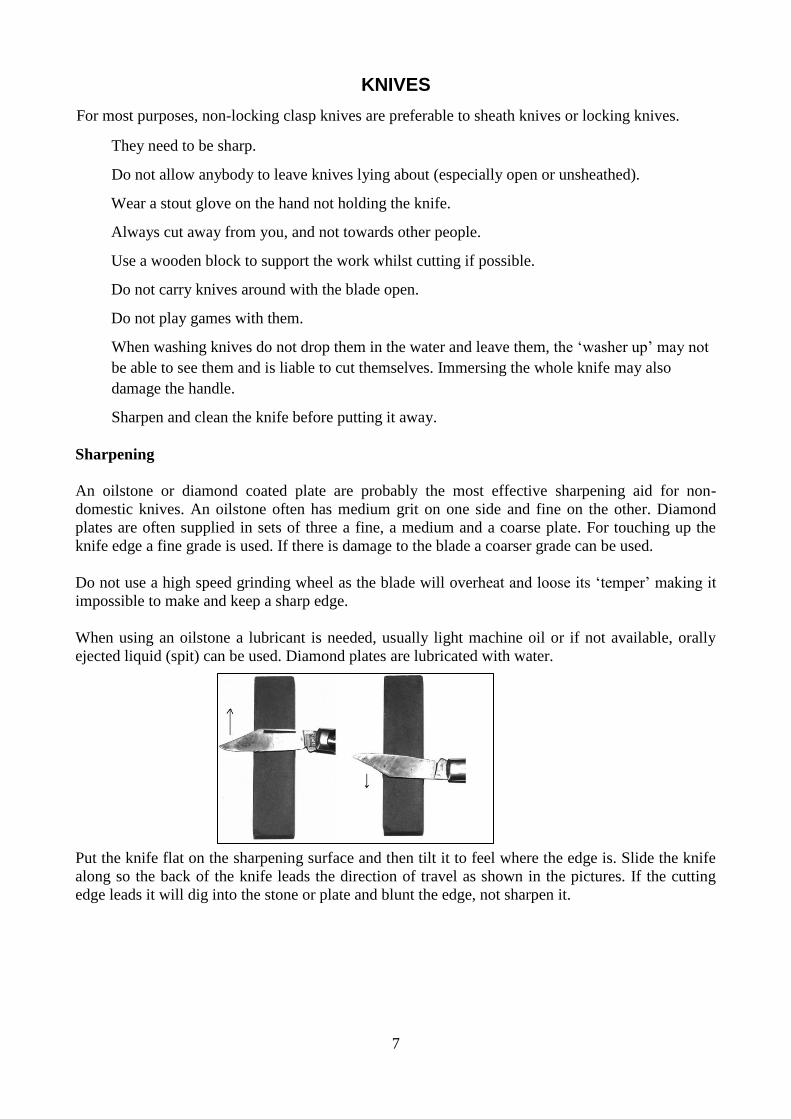
When using an oilstone a lubricant is needed, usually light machine oil or if not available, orally
ejected liquid (spit) can be used. Diamond plates are lubricated with water.
Put the knife flat on the sharpening surface and then tilt it to feel where the edge is. Slide the knife
along so the back of the knife leads the direction of travel as shown in the pictures. If the cutting
edge leads it will dig into the stone or plate and blunt the edge, not sharpen it.
8
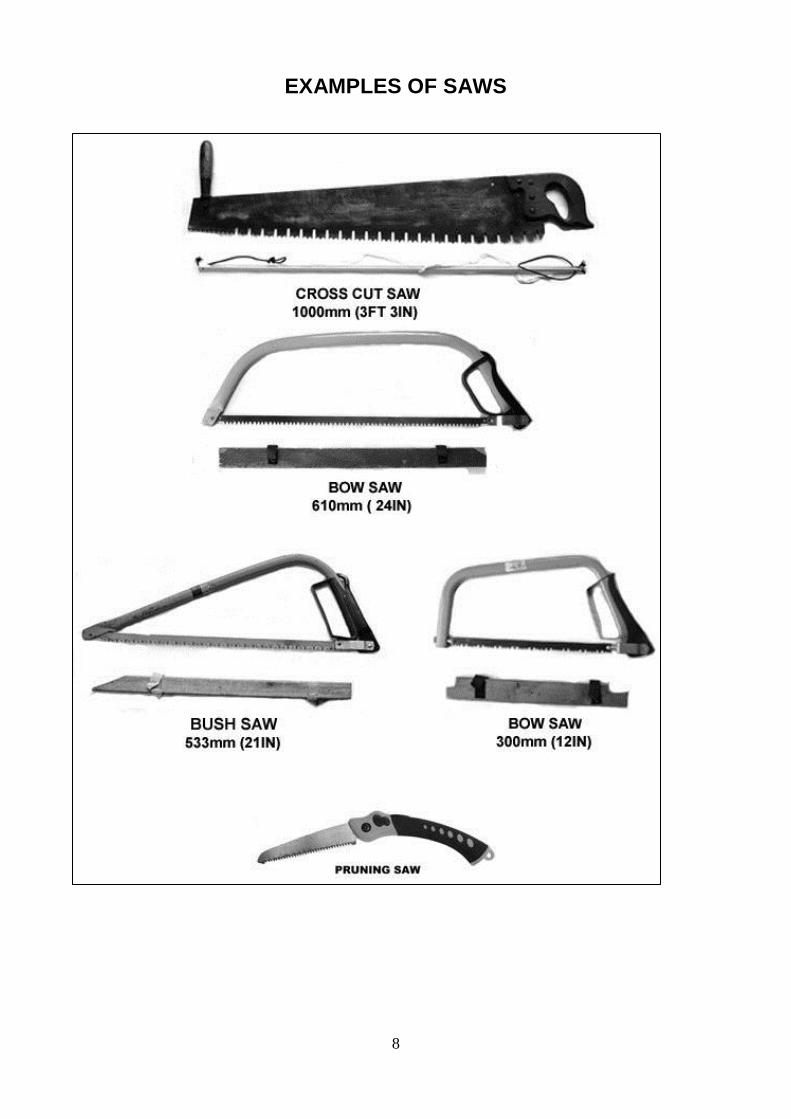
EXAMPLES OF SAWS
9
SAWS Saws are much more economical in effort and waste less wood than axes when cutting wood to
length, and usually quicker.
Be aware that although saws are less likely to cause serious injuries than axes, they can give nasty
cuts and gashes.
Most Scouts will be using bow saws, bush saws or pruning saws for outdoor activities.
Before you start.
Discard loose clothing.
Wear a stout glove on the hand not using the saw, but not on the hand using the saw.
Check the saw is clean and sharp.
Bow saws and bush saws cannot be sharpened, new blades are reasonably priced.
Pruning saws cannot be sharpened.
Crosscut saws can be sharpened, but should only be done by an experienced person with the proper
tools. It can be expensive when done professionally.
Sawing to length.
Use a block or a sawing-horse.
Make certain that there is no obstruction to a full stroke of the saw.
Ensure the timber is firmly held.
Make sure that the cut will not close up or grip the blade
Start the cut by putting the blade on the wood close to the handle and pull the saw back towards
you. Repeat a couple of times.
Do not press on the saw; if it is sharp the teeth will cut without extra pressure.
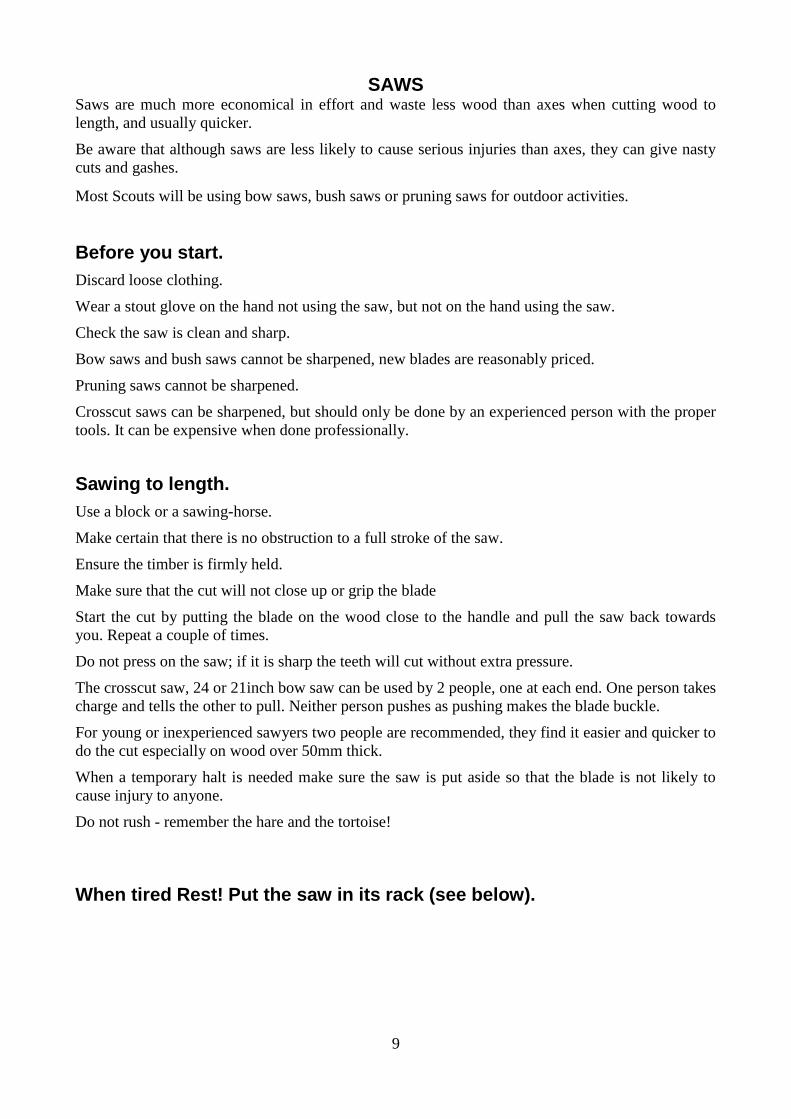
The crosscut saw, 24 or 21inch bow saw can be used by 2 people, one at each end. One person takes
charge and tells the other to pull. Neither person pushes as pushing makes the blade buckle.
For young or inexperienced sawyers two people are recommended, they find it easier and quicker to
do the cut especially on wood over 50mm thick.
When a temporary halt is needed make sure the saw is put aside so that the blade is not likely to
cause injury to anyone.
Do not rush - remember the hare and the tortoise!
When tired Rest! Put the saw in its rack (see below).
10
When finished.
Dry the saw, clean and lightly oil the blade.
Mask the blade.
Unfortunately, manufacturers do not always provide saws with a mask. Some will come with a clip
on piece of plastic, which inevitably gets lost or breaks.
In camp, make a rack for the saw from two pieces of wood secured by tent pegs so that the saw can
be stored blade down. Keep the saw off the ground to avoid getting the blade damp.
For transport and storage, make a mask of wood or plastic or wrap with cloth or sacking or place in
a box.
11
AXES
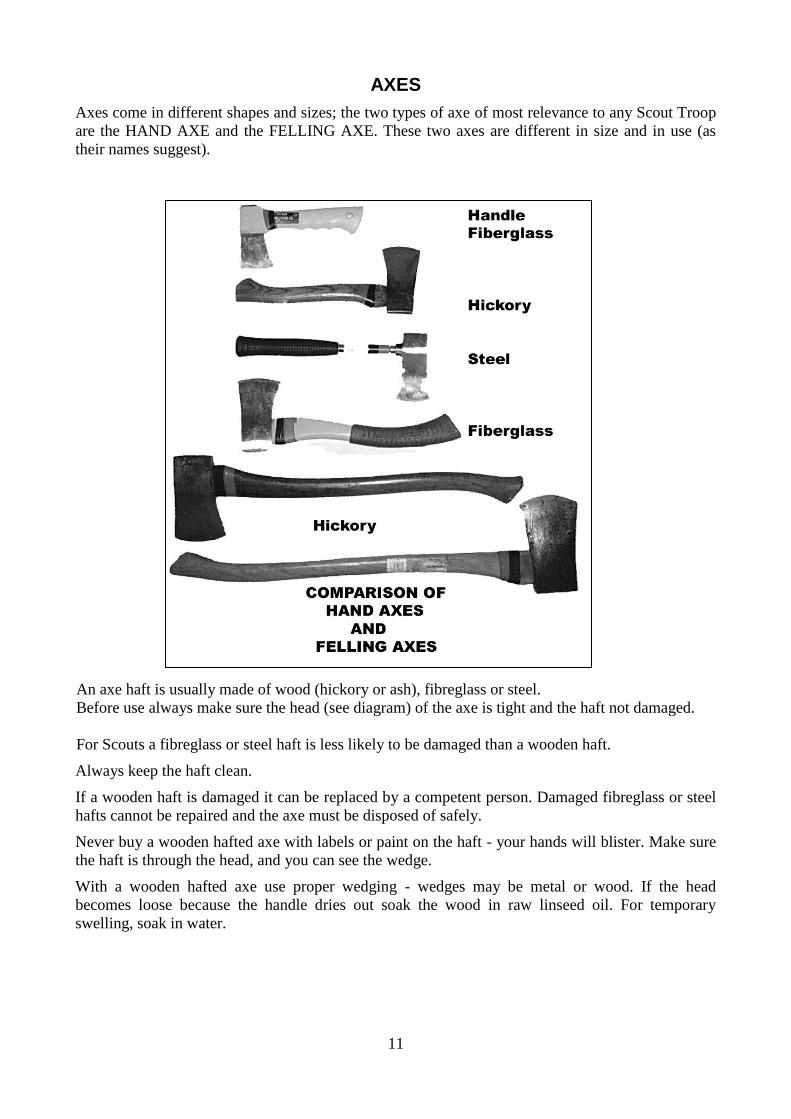
Axes come in different shapes and sizes; the two types of axe of most relevance to any Scout Troop
are the HAND AXE and the FELLING AXE. These two axes are different in size and in use (as
their names suggest).
An axe haft is usually made of wood (hickory or ash), fibreglass or steel.
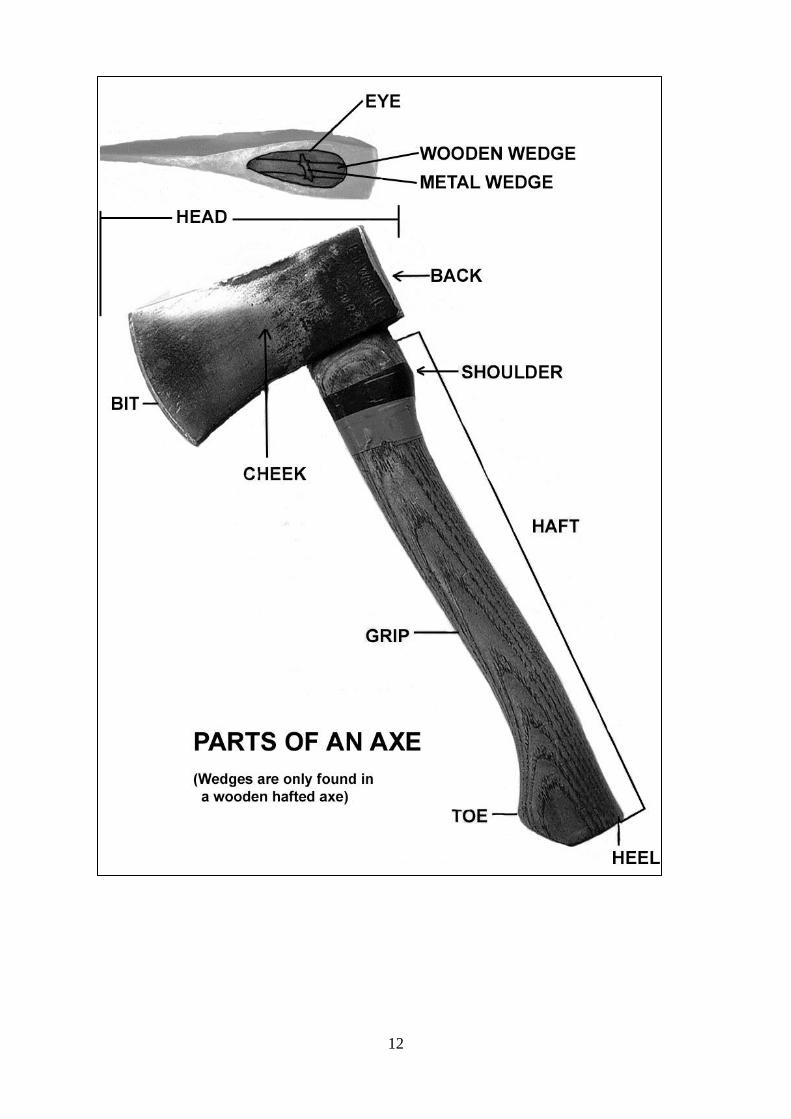
Before use always make sure the head (see diagram) of the axe is tight and the haft not damaged.
For Scouts a fibreglass or steel haft is less likely to be damaged than a wooden haft.
Always keep the haft clean.
If a wooden haft is damaged it can be replaced by a competent person. Damaged fibreglass or steel
hafts cannot be repaired and the axe must be disposed of safely.
Never buy a wooden hafted axe with labels or paint on the haft - your hands will blister. Make sure
the haft is through the head, and you can see the wedge.
With a wooden hafted axe use proper wedging - wedges may be metal or wood. If the head
becomes loose because the handle dries out soak the wood in raw linseed oil. For temporary
swelling, soak in water.
12
13
SAFETY RULES
Leather boots or strong shoes MUST be worn. Trainers, wellingtons or sandals are NOT to be
worn.
Remove loose clothing (e.g. neckerchiefs, lanyards, necklaces).
Tie back long hair.
Wear safety goggles.
When using a hand axe wear a strong glove on the hand not holding the axe.
Do not wear gloves when using a felling axe.
Make sure the cutting area is clear of obstructions (e.g. overhanging branches) and people for 2 axe
lengths. An axe length is from the shoulder to the head of the axe with the arm at full stretch.
Use a chopping block where possible to support the timber whilst cutting.
When using a hand-axe always chop downwards and away from you.
Never chop onto the ground.
Mask the axe when not in use, do not leave it lying on the ground or propped against a log or tree.
If the axe head becomes loose STOP at once.
If you become tired STOP at once.
To pass an axe to another person hold the heel end of the haft in one hand with the other hand close
to the head with the bit towards your body.
Say ‘ Take the Axe.’
The other person grasps the head firmly and says ‘ I have it.’
You can then let go.
This way of passing an axe means the heavy head is always under control and unlikely to swing
about and do damage to either person.
Although an axe is suitable for cutting live timber (trees), cutting of live trees is not permitted in
most areas that Scouts will use.
Specifically, cutting of live wood is not permitted in the Rushcliffe District Campsites unless
instructed to do so by one of the wardens.
14
CARE OF AXES
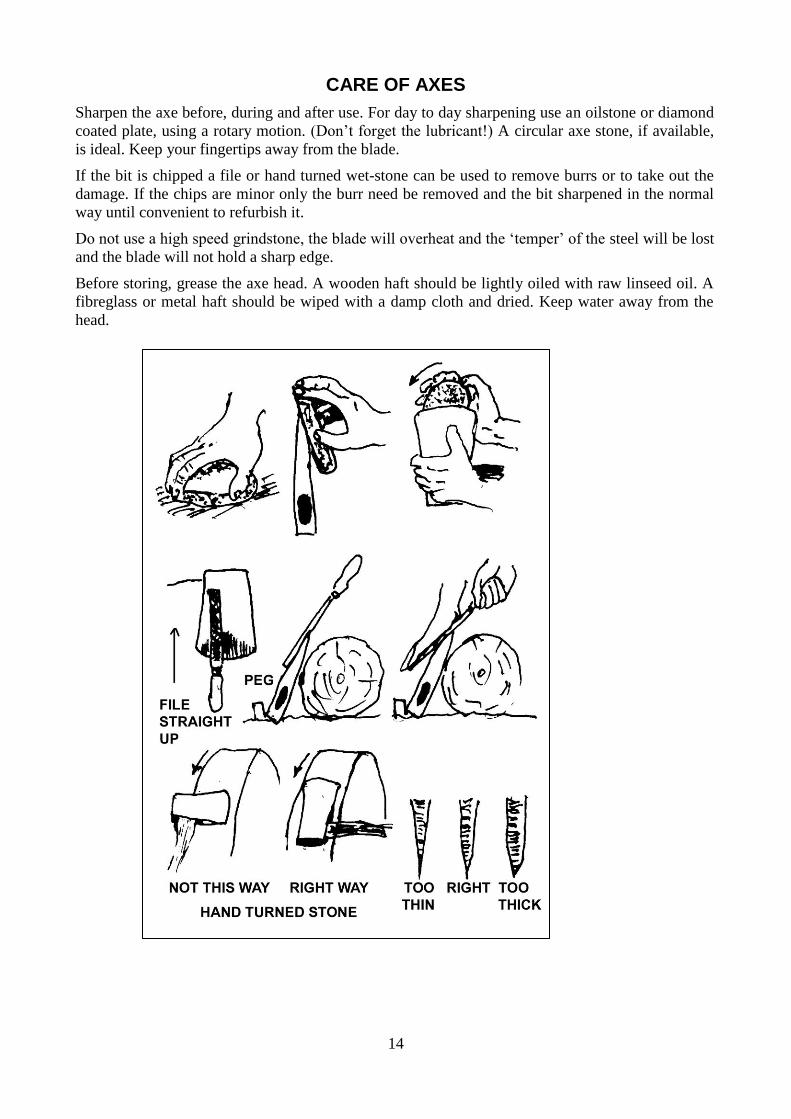
Sharpen the axe before, during and after use. For day to day sharpening use an oilstone or diamond
coated plate, using a rotary motion. (Don’t forget the lubricant!) A circular axe stone, if available,
is ideal. Keep your fingertips away from the blade.
If the bit is chipped a file or hand turned wet-stone can be used to remove burrs or to take out the
damage. If the chips are minor only the burr need be removed and the bit sharpened in the normal
way until convenient to refurbish it.
Do not use a high speed grindstone, the blade will overheat and the ‘temper’ of the steel will be lost
and the blade will not hold a sharp edge.
Before storing, grease the axe head. A wooden haft should be lightly oiled with raw linseed oil. A
fibreglass or metal haft should be wiped with a damp cloth and dried. Keep water away from the
head.

15
Using the Axe
The prime use of an axe is to split wood, for which a hand-axe or a felling axe may be used. The
secondary uses are to chop wood to length and to lop branches off fallen timber.
The felling of trees, with the tree owners permission, is another use, but it is hard work and a
suitably sized saw is easier.
Axes are made in different weights. Choose an axe which is a not too heavy for you to use
comfortably.
The Hand Axe
Hand axes are used one handed. When cutting loose timber make sure you cut over the chopping
block. If you need to hold the timber use a strong glove on the holding hand. Never on the hand
holding the axe. Angle the wood so that the holding hand is higher up the wood than the cut.
Chopping to length:
Put the wood on the block. Take a balanced stance.
Let the weight of the axe do the work.
On larger timber always cut a ‘vee’ shaped notch, never try to cut straight through.
When tired Rest! - Mask the axe in the chopping block.
Splitting:
As chopping, but rest the wood flat on the block and cut along the grain.
When tired Rest! - Mask the axe in the chopping block.
The Felling Axe
The methods described are appropriate to most people, the important thing is that you hold and
handle a felling axe in a way that is comfortable and natural to you.
A sensible process for learning how to use a felling axe is: -
Use an axe of a weight and length of haft that is suitable for you. Using an axe that is too long or
too short, too heavy or too light is unsatisfactory and can be dangerous.
Most Scouts will need an axe with a 2½ lb. head and a three-quarter length haft, but for older
Scouts a 3½ lb. head with a full length haft is very satisfactory. The things that are important about
using a felling axe, apart from the safety rules already given: -
1. Grip the axe firmly throughout the whole operation of using it.
2. Have your feet firmly planted on the ground. Movement should come from your arms and from
your trunk above the waist.
3. Keep the axe under control throughout each stroke. You can practise swinging by having an old haft
with a weight fixed firmly in place of the head. As in golf, the swing is terribly important.
4. Practise on fallen timber because it is much easier to cut a log that is resting on the ground than to
cut a standing tree.
5. Learn to aim each blow at an exact spot on the log. When you are practising, put a chalk mark on
the log and try to hit that.
16
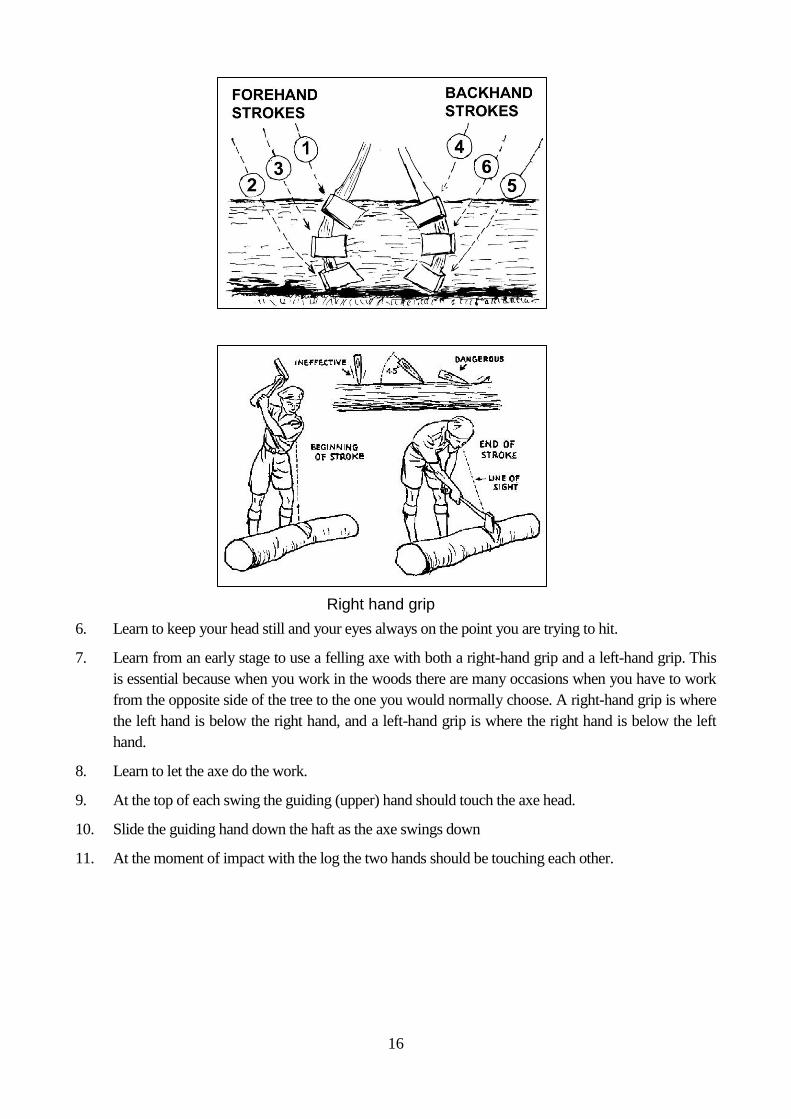
6. Learn to keep your head still and your eyes always on the point you are trying to hit.
7. Learn from an early stage to use a felling axe with both a right-hand grip and a left-hand grip. This
is essential because when you work in the woods there are many occasions when you have to work
from the opposite side of the tree to the one you would normally choose. A right-hand grip is where
the left hand is below the right hand, and a left-hand grip is where the right hand is below the left
hand.
8. Learn to let the axe do the work.
9. At the top of each swing the guiding (upper) hand should touch the axe head.
10. Slide the guiding hand down the haft as the axe swings down
11. At the moment of impact with the log the two hands should be touching each other.
Right hand grip
17
TREE TRIMMING AND FELLING Tree felling and logging-up with an axe are good exercise, tiring and exciting to do, BUT using a
saw is usually easier, less tiring and wastes less wood. On dead timber an axe tends to bounce,
therefore a saw is normally used to cut both dead and green wood.
Felling a Tree
The safety rules, already given to you, all apply, but a felling axe is a bigger tool than a hand axe
and consequently more dangerous, these other matters must also be considered.
1. Make sure that you have permission to fell the tree and that it needs to be felled.
2. Make sure you are properly dressed for the job. Felling in bare feet or in camp shoes is
highly dangerous. Socks and stout shoes or boots must be worn. Make sure that there is
nothing protruding or hanging from your dress which can get caught by the saw or axe.
3. Avoid wearing gloves if possible, but if you wear gloves then have them made of a material
that increases the strength of your grip and avoid any sort of leather material, which quickly
becomes slippery.
4. Make sure that your tools are sharp and that if using an axe the head is firmly fixed to the
haft.
5. Do not attempt to fell a tree with an axe when it is raining because the haft will get wet and
become slippery and dangerous. Similarly with the handle(s) of a saw
6. Avoid tree felling in windy conditions.
7. Decide where you want to fell the tree, i.e., in what direction you want it to fall.
8. Consider the natural lean of the tree. Very few trees are completely upright and, other things
being equal; let the tree fall in the direction in which it will tend to fall.
9. When felling deciduous trees bear in mind the weight of the head of the tree, which may
easily counteract the lean of the trunk especially when in leaf.
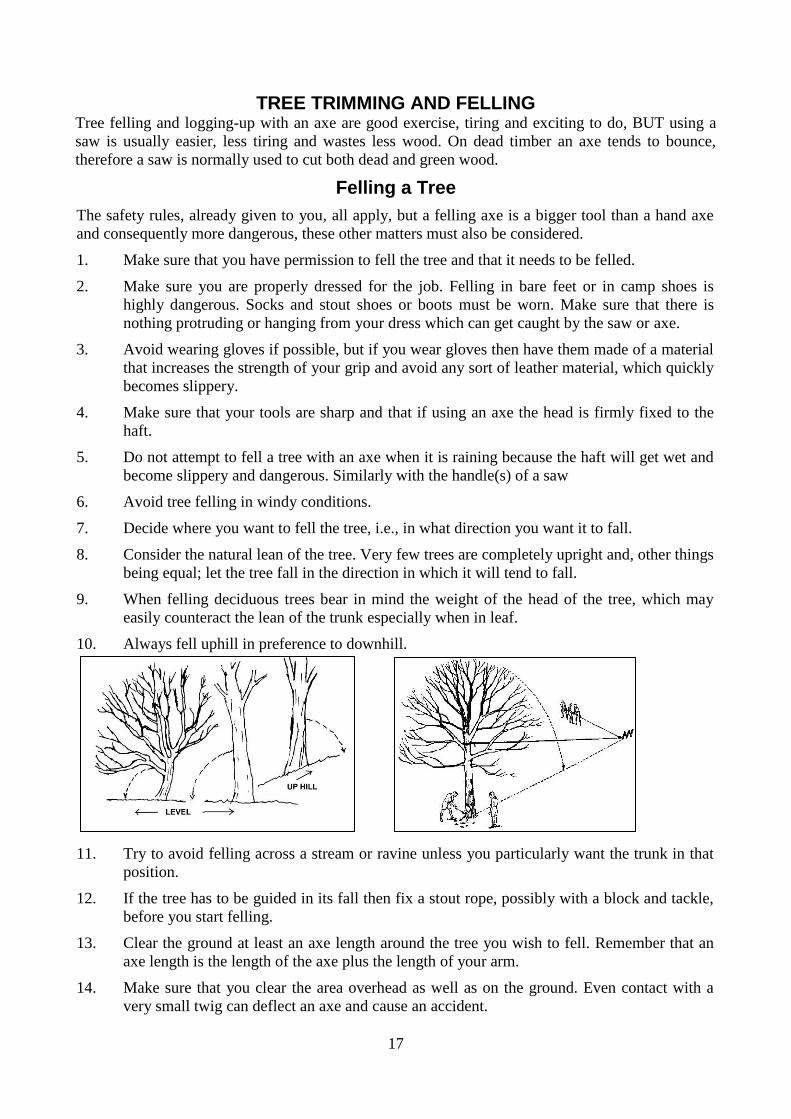
10. Always fell uphill in preference to downhill.
11. Try to avoid felling across a stream or ravine unless you particularly want the trunk in that
position.
12. If the tree has to be guided in its fall then fix a stout rope, possibly with a block and tackle,
before you start felling.
13. Clear the ground at least an axe length around the tree you wish to fell. Remember that an
axe length is the length of the axe plus the length of your arm.
14. Make sure that you clear the area overhead as well as on the ground. Even contact with a
very small twig can deflect an axe and cause an accident.
18
15. Make sure that all spectators are at least two axe lengths away and behind and to one side of
the area where you will be working, i.e., well behind the anticipated line of the fall of the
tree and that you have a clear escape route.
16. If possible, have a lookout posted some distance from the tree to warn you if there is any
movement or spectators moving into the danger area.
Felling
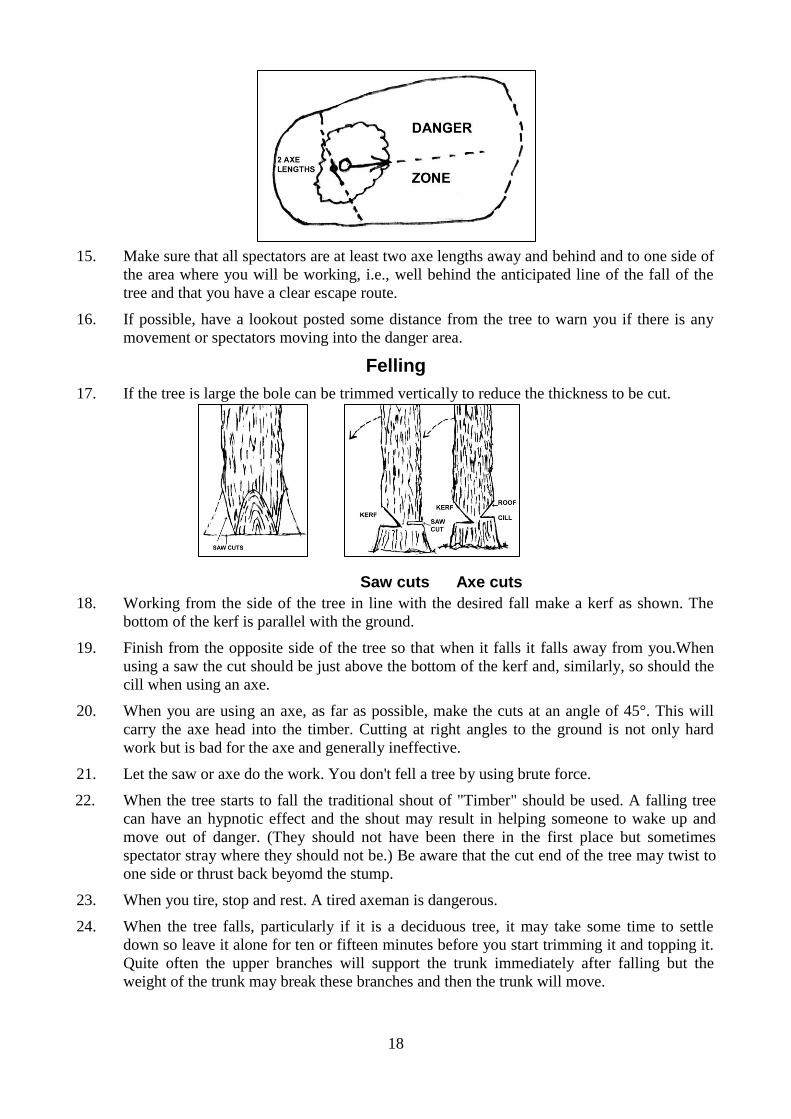
17. If the tree is large the bole can be trimmed vertically to reduce the thickness to be cut.
18. Working from the side of the tree in line with the desired fall make a kerf as shown. The
bottom of the kerf is parallel with the ground.
19. Finish from the opposite side of the tree so that when it falls it falls away from you.When
using a saw the cut should be just above the bottom of the kerf and, similarly, so should the
cill when using an axe.
20. When you are using an axe, as far as possible, make the cuts at an angle of 45°. This will
carry the axe head into the timber. Cutting at right angles to the ground is not only hard
work but is bad for the axe and generally ineffective.
21. Let the saw or axe do the work. You don't fell a tree by using brute force.
22. When the tree starts to fall the traditional shout of "Timber" should be used. A falling tree
can have an hypnotic effect and the shout may result in helping someone to wake up and
move out of danger. (They should not have been there in the first place but sometimes
spectator stray where they should not be.) Be aware that the cut end of the tree may twist to
one side or thrust back beyomd the stump.
23. When you tire, stop and rest. A tired axeman is dangerous.
24. When the tree falls, particularly if it is a deciduous tree, it may take some time to settle
down so leave it alone for ten or fifteen minutes before you start trimming it and topping it.
Quite often the upper branches will support the trunk immediately after falling but the
weight of the trunk may break these branches and then the trunk will move.
Saw cuts Axe cuts
19
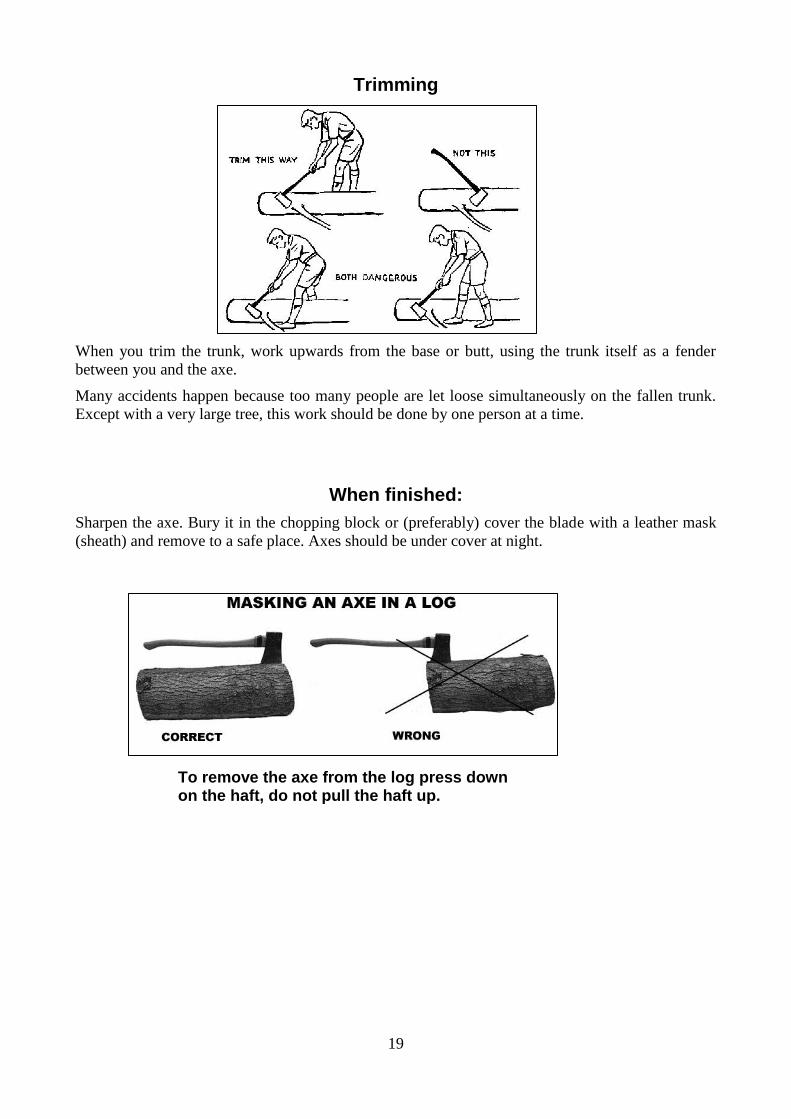
Trimming
When you trim the trunk, work upwards from the base or butt, using the trunk itself as a fender
between you and the axe.
Many accidents happen because too many people are let loose simultaneously on the fallen trunk.
Except with a very large tree, this work should be done by one person at a time.
When finished:
Sharpen the axe. Bury it in the chopping block or (preferably) cover the blade with a leather mask
(sheath) and remove to a safe place. Axes should be under cover at night.
To remove the axe from the log press down on the haft, do not pull the haft up.
20
REMEMBER
NEVER Use a blunt axe.
NEVER Chop on the ground always use a chopping block, and aim at where the wood is
supported by the block.
NEVER Allow the bit to drive into the ground.
NEVER Use the axe if you are tired, and stop using an axe if you become tired.
NEVER Use an axe with a damaged haft. Always replace a damaged wooden haft with a new
one or replace the axe.
NEVER Attempt to repair a haft however slight the damage.
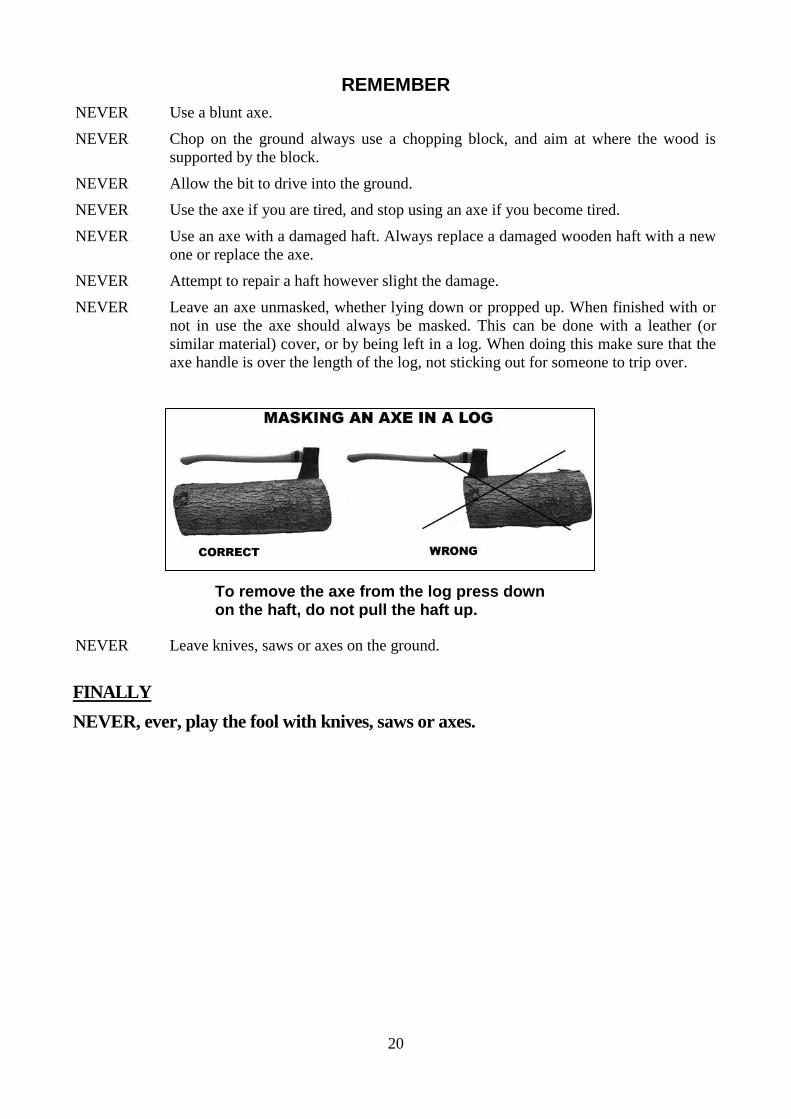
NEVER Leave an axe unmasked, whether lying down or propped up. When finished with or
not in use the axe should always be masked. This can be done with a leather (or
similar material) cover, or by being left in a log. When doing this make sure that the
axe handle is over the length of the log, not sticking out for someone to trip over.
NEVER Leave knives, saws or axes on the ground.
FINALLY
NEVER, ever, play the fool with knives, saws or axes.
To remove the axe from the log press down on the haft, do not pull the haft up.


![[XLS]careertech.k12.wv.uscareertech.k12.wv.us/OCTIWebsiteRevisions/16Clusters/... · Web viewuse knives, cleavers, meat saws, bandsaws, or other equipment to perform meat cutting](https://img.pdfslide.us/doc/110x75/5af7e69e7f8b9a190c91c35d/xlscareertechk12wvuscareertechk12wvusoctiwebsiterevisions16clustersweb.jpg)