Embed Size (px)
Citation preview

SCORPIONGROUP
www.scorpionauto.com
Car security with
built-in intelligence
S4 Security Systems (with Single Button Radio Key)
For use in all EU member statesOperating Instructions

This ManualPlease take time to familiarise yourself with the contents of this manual. Failure to do so could, in certain circumstances, prevent the vehicle’s engine from being started.
Throughout this manual you will see references to features and timing settings, these are the standard settings and may be different to those selected on your vehicle. Please ask the installing dealer for the “Installation System Requirements” sheet that you completed with the installing dealer prior to installation, to see where customisation of the security system, from its standard format may have taken place.
IMPORTANT NOTICEThis instruction manual includes references to the multi-function keypad. This keypad is included with S30 security systems, but is a cost option on other S Series security systems and therefore features associated with the
keypad will not be available unless one is installed.
Some features described in this manual may require additional parts and/or labour charges when installed to certain vehicle makes and/or models.
The warranty terms and conditions for the product and the installing dealer’s labour must be supplied to you separately. As the product is supplied by Sigma in a form
where it will not function without first being fitted to a vehicle, Sigma are not liable for any labour charges, consequential losses or damage.

3
Table of Contents
1. IntroductionAbout the Security System Page 5Parts included in your Sigma Vehicle Security System Page 6Optional Items Page 6Programmable Features Page 6
2. Basic Operation of the Security SystemArming the Security System Page 7Disarming the Security System Page 8Ultrasonic Interior Protection Page 8Arming the Security System with Ultrasonic Sensors Deleted Page 8Panic Mode/Siren Test Page 9Starting the Vehicle - S4 Models with Key Theft Protection Page 10If the Security System is Triggered Page 11
3. Operation of Programmable Features(if selected and/or installed by your dealer)Auto-Arm Page 12Auto-Arm with Door Locking Page 12Auto-Rearm Page 12Door Open, Closed Loop & Auto-Arm Warning Bleeps Page 12Extend CDL Lock Output Page 13Key Theft Protection Page 13Safety Lock/Unlock Page 13Total Closure Page 14Total Open/Boot Release Page 14
4. Radio KeysReplacing the Battery in a Radio Key Page 16Teaching New Radio Keys to the Security System Page 16
5. Using the Ignition PIN ProcedureDisarming the Security System Page 17Teaching New Radio & Touch Keys to the Security System Page 18

4
6. Using the Optional Touch Key OverrideDisarming the Security System Page 19Arming the Security System Page 19Teaching New Touch Keys to the Security System Page 19
7. Using the Optional Multi-Function KeypadDisarming the Security System Page 20Arming the Security System Page 20Changing the Security System’s PIN Page 21(Personal Identification Number) Code Teaching New Radio Keys to the Security System Page 22Teaching New Touch Keys to the Security System Page 23
8. Changing the way the Security System operates using the Optional KeypadKeypad Feature Summary Table Page 24Last Trigger Isolation Page 25Delete Arm and Disarm Indication Tone Page 25Delete Ultrasonic Sensors Page 25Safety Lock/Unlock Page 26Displaying the Vehicle’s Battery Voltage Page 26
9. Trouble ShootingTrouble Shooting Table Page 27
10. Notes Page 28

5
1. IntroductionAbout the Security SystemThe Sigma S-Series security systems build on the features of previous Sigma models and offer the highest level of security, convenience and flexibility. Operated correctly, this Sigma security system will protect your vehicle against today’s sophisticated thief, however this security system is designed as a deterrent against the theft of, or from a vehicle, and as such cannot offer any guarantee against such occurrences. Always follow the advice of the Police, lock your vehicle at all times, park in a well lit area whenever possible and never leave valuable items in a vehicle where they can be seen. Due to the advances in vehicle security, more vehicles are being stolen using the owner’s keys or in car-jacking situations. S4 models have an optional Internal Panic Button facility, sophisticated locking options and offer a Key Theft Protection feature (optional Keypad required) to prevent car-jacking and the theft of a vehicle even with the keys, however always ensure your keys are not left unattended or in a vulnerable place. Your local Police Crime Prevention Officer will be pleased to advise you about general vehicle security precautions.Many Sigma vehicle security systems comply with the Thatcham MIRRC criteria. The Thatcham MIRRC organisation was set up on behalf of the ABI (Association of British Insurers) to establish design and manufacturing quality standards for vehicle security systems. Security systems complying with the Thatcham MIRRC criteria are rigorously tested for quality, functionality, electro-magnetic interference resilience and their ability to resist physical and electronic attack from a vehicle thief.The S4 security systems are also built on the same production line and are subject to the same rigorous quality standards, functionality testing and electro-magnetic interference resilience.
The S4 systems comply with the following criteria:• European Vehicle Security Directives 95/54 EC (EMC) and 74/61 EC (Security)
• Operate on the DTI and R&TTE approved radio frequency of 433.92 MHz – For use in all EU member states. (See certification on page 31)

6
Parts included in your Sigma Vehicle Security System• Certificate of Installation. When completed correctly by your installing dealer this
certificate may entitle you to a discount on your vehicle insurance premium (applies to most major insurance companies).
• Electronic Control Unit. The security system’s ECU is concealed within the vehicle and connected to the various points, forming the “brain” of the whole system.
• Immobilisation. A single immobilisation circuit is also available on the S4 security system, which only becomes self-arming if the Key Theft Protection feature is turned on.
• Perimeter Protection. Provided by independent boot/bonnet and door circuits.• Radio Keys. Two, single button, weatherproof, high security Radio Keys which are
resistant to radio frequency code scanning/grabbing and incorporate a 66-bit random code encryption.
• Siren. Compact, high power siren unit, usually mounted under the bonnet.• LED. The dashboard mounted LED (light emitting diode) is the security system’s
status light and also acts as a visual deterrent.• Ultrasonic Sensors. Intelligent, self-adjusting, ultrasonic sensors provide interior
protection and are mounted inside the passenger compartment.• Unique PIN Code. Two self-adhesive labels show the unique PIN code and serial
number for your security system. These should be kept in a safe place.
Optional Items• Accessories. Pagers, Internal Sirens, LEDs and Window Closers etc. can be activated
from the unit’s accessory outputs (max. current 200mA).• Internal Panic Switch. A dash mounted switch that will instantly trigger the siren and
flash the indicators in the event of personal attack.• Multifunction Keypad. The dashboard mounted Keypad can be used as an
emergency override to arm/disarm the security system (refer to page 20), to change the way the system operates (page 24) and is required to operate the system’s Key Theft Protection feature (page 10 & 13).
• Touch Key Override. A dashboard mounted Receptacle and two Touch Keys provide a heavy duty emergency override to arm/disarm the security system.
• Two Button Radio Key. Allows additional control of the alarm system’s outputs when the Extended Lock Pulse, Total Closure, and Total Open/Boot Release features are required to be operated from the Radio Key in addition to Panic Mode. Also required to Remotely Delete Ultrasonic Sensors off.
Programmable Features* The security system is microprocessor controlled and this enables you to benefit from a number of enhanced user friendly convenience and security features. If you wish to have any of these enabled, consult your dealer. These include:• Auto-Arm can automatically arm the security system a timed period after the last
door is closed, if the system is accidently left disarmed. This feature can also include locking if required.
• Auto-Rearm can automatically re-arm the security system (and re-lock the doors) if a door is not opened in a timed period following the system having been disarmed.

7
• Door Open, Closed Loop & Auto-Arm Warning Bleeps will alert you, with a series of bleeps when first armed, that a door, boot or the bonnet is open, the Closed Loop Protection circuit is broken or Auto-Arm is selected.
• Extend CDL Lock Output this feature enables the CDL Lock Pulse to be extended when the Radio Key button remains held on arming (up to a maximum of 26 seconds). This feature provides an alternative method to operating Total Closure on vehicles equipped with a Total Closure circuit that can be operated in this way.
• Key Theft Protection with this feature selected, even if the vehicle’s keys and Radio Key are used to disarm the alarm system the vehicle can only be started after entering the correct 4-digit PIN into the Keypad.
• Safety Lock/Unlock can automatically lock the doors and boot when the ignition is turned on, unlocking them again when the ignition is turned off.
• Total Closure this feature can provide an output when arming the system. The output can be operated in one of 2 ways; “Timed” in which case the output always occurs upon arming for a preset period, or “Hold Down” where the output only occurs when, and for the period that, the Radio Key button remains depressed (up to a maximum of 26 seconds).
• Total Open/Boot Release this feature can provide an output when disarming the system. The output can be operated in one of 2 ways; “Timed” in which case the output always occurs upon disarming for a preset period, or “Hold Down” where the output only occurs when, and for the period that, the Radio Key button remains depressed (up to a maximum of 26 seconds).
* Some of the above features may not be available on certain vehicles or may require additional labour and/or parts, incurring extra cost. Please consult your installing dealer.
2. Basic Operation of the Security SystemArming the Security System• Vacatethevehicleclosingallwindows,doors,bootandbonnet.• Briefly press and release the Radio Key button, whilst standing near the vehicle.• The security system will acknowledge arming by illuminating the vehicle’s hazard warning
lights for a 3 second period (if the hazard lights flash twice at this point this indicates that the interior Ultrasonic Sensors have been deleted - see page 8).
• The doors will lock if this facility is included with your security system.The security system will then enter a “pre-set state”, which comprises of the Settle Time and Ultrasonic Threshold Time. This period is used by the security system’s microprocessor to monitor the vehicle’s internal environment and adjust the sensitivity of the ultrasonic sensors if necessary.If a door, boot or bonnet has been inadvertently left open or the optional Closed Loop Protection Circuit is broken the siren will continuously bleep, (if the Door Open, Closed Loop & Auto-Arm Warning Bleep feature is selected), for 15 seconds as a warning to close everything securely. If this happens, disarm the security system, close all doors etc. securely, and re-arm. Failure to do this within 15 seconds will result in a full alarm trigger.

8
Disarming the Security System• Briefly press and release the Radio Key button, whilst standing near the vehicle.• The security system will acknowledge disarming by illuminating the vehicle’s hazard
warning lights for a 1 second period.• If the alarm has been triggered during the armed period, then the siren will emit 3
Trigger Warning Bleeps.• The doors will unlock if this facility is included with your security system.
Ultrasonic Interior ProtectionThe S-Series range of alarm systems are all supplied with sophisticated microprocessor controlled Ultrasonic Sensors as the primary interior protection system. Unlike conventional ultrasonic detectors this system ensures that an actual entry has occurred rather than just air movement, air pressure fluctuation, seat belt movement, etc.
Whenever the system is armed:• Initially the dashboard LED displays a dim rapid flash for the first 15 seconds. This is
the Settle Time, during which the Ultrasonic Sensors are inactive. This allows the air movement inside the vehicle to stabilise.
• The dashboard LED then displays a long bright flash for the next 15 seconds. During this Ultrasonic Threshold Time, the Ultrasonic Sensors are now active. The alarm system’s microprocessor monitors the interior of the vehicle, and if any “background” movement is detected that would otherwise cause a false alarm, the sensitivity is reduced from that programmed by the installer. The LED will illuminate for a second, to indicate the detection of any “background” movement.
• After the first 32 seconds a short bright red flash from the dashboard LED every second indicates that the system is now fully armed and the Ultrasonic Sensors are set to their pre-programmed maximum or their automatically reduced level if some “background” movement was detected during the Threshold Time.
The detection system also employs a movement/time method where a certain amount of movement in a given time is also required to cause a trigger.This method of detection offers a high level of protection against false alarms commonly associated with other systems employing inferior methods of detection.
Arming the Security System with Ultrasonic Sensors DeletedIt may sometimes be necessary to arm the security system with the Ultrasonic interior sensors deleted - for example if you wish to leave people or animals inside the secured vehicle, although sensible safety precautions should be exercised if considering this action!

9
The Ultrasonic Sensors can be deleted in three ways:
1. Using the optional Keypad, before exiting the vehicle:• See page 25 for details.2. Using the optional Two Button Radio Key, from outside the vehicle after arming the system:• See the Two Button Radio Key operating instructions for details.3. Using the Radio Key and ignition, before exiting the vehicle:• With the vehicle’s ignition turned on, briefly press and release the Radio Key button
twice to delete the Ultrasonic Sensors.• The dashboard mounted LED will flash each time the Radio Key button is pressed.• Turn off the vehicle’s ignition.• Vacate the vehicle closing all doors, boot and bonnet.• Briefly press and release the Radio Key button, whilst standing near the vehicle.• The security system will acknowledge arming with the Ultrasonic Sensors deleted by
flashing the vehicle’s hazard warning lights twice, instead of the normal 3 second illumination.
• The doors will lock if this facility is included with your security system.In all cases the deleted sensors will be restored the next time you arm the security system in the normal way.
Panic Mode/Siren TestTo enter Panic Mode press and hold the Radio Key button down for 3 seconds, the system will change state (i.e. from armed to disarmed or disarmed to armed) and then enter Panic Mode. Whilst in Panic Mode the siren will sound and the hazard lights will flash indefinitely. To exit Panic Mode, briefly press and release the Radio Key button. This time the system will not change state, just exit Panic Mode.N.B. If any of the Extended CDL Lock Pulse, Total Close or Total Open/Boot Release features have been programmed to occur when the Radio Key button is “Held Down”, then Panic Mode will no longer be available from the Single Button Radio Key. The optional Two Button Radio Key should be used if Panic Mode is still required from the Radio Key in addition to “Hold Down” operation of these features from button 1.

10
Starting the Vehicle - S4 Models with Key Theft ProtectionWith the Key Theft Protection feature selected, only the alarm system is armed and disarmed by the Radio Keys (or Touch Keys, Keypad or Ignition PIN entries). The immobilisation circuit acts independently of the alarm, setting automatically a pre-set time (the Stall & Start Time; usually 30 seconds) after the ignition is switched off and can only be unset after disarming the alarm, by entering the security system’s unique PIN into the Keypad (or Ignition in extreme cases). This feature prevents theft of a vehicle even with the owner’s keys. The Keypad only allows three attempts to enter the correct PIN code. If a third incorrect PIN code is entered, the security system will ignore all further PIN code entries for 3 minutes. This is a security feature.
Disarming the system and starting the vehicle:Whilst the security system is fully armed the dashboard mounted LED will display a short bright flash every second.• Disarm the alarm system in the normal way (or Touch Keys, Keypad or Ignition PIN).• The dashboard mounted LED will be constantly illuminated for a pre-set time (the
Stall & Start Time; usually 30 seconds) after disarming, as a warning that Key Theft Protection is active and the vehicle is still immobilised. When this period elapses the LED returns to the usual immobilisation indication of a short bright flash every 3 seconds. (Turning the ignition on will cause the LED to extinguish, but the vehicle will remain immobilised).
• To start the vehicle (whilst the LED is now flashing, in the previous solid state or even with the ignition on) simply enter the security system’s unique PIN into the Keypad.
• If the correct PIN is entered the LED will extinguish, indicating that the vehicle can now be started (If the ignition is on when the correct PIN is entered, then the LED will already be off, so there will be no confirmation).
If the ignition is not turned on within 30 seconds of entering the correct PIN, or turning the engine off, the immobiliser re-sets, this is indicated by a short bright flash from the dashboard LED every 3 seconds.
Starting an immobilised vehicle:• To start the vehicle (whilst the LED is flashing or even with the ignition on) simply
enter the security system’s unique PIN into the Keypad.• If the correct PIN is entered the LED will extinguish, indicating that the vehicle can
now be started (If the ignition is on when the correct PIN is entered, then the LED will already be off, so there will be no confirmation).
IMPORTANT NOTE:Immobilisation only is indicated by a short bright flash from the dashboard LED
every 3 seconds. This will only occur if the Key Theft Protection feature is selected. Although the vehicle is immobilised, the alarm system is not armed in this instance and the interior, doors, boot and bonnet circuits are not protected until the security system is armed. Only when the dashboard mounted LED displays a short bright flash every
second is the security system fully armed.

11
If the Security System is TriggeredIf the security system is triggered, the hazard lights will flash and the siren will sound at full power for approximately 30 seconds, after which the hazard lights and siren will stop and the security system will immediately re-arm ready for any further attack. The security system has an anti-nuisance feature, known as the Shut Down Count which allows each protected circuit to only trigger 10 times (the Shut Down Count) in any armed period, after which the circuit causing the continual trigger will shut down, leaving all other circuits protected.
Disarming the security system whilst the siren is still sounding:Briefly press the Radio Key button to disarm the security system whenever it is sounding. If the door locking option is installed however, and the Radio Key button is pressed to disarm a sounding system, the doors will remain locked as a safety feature. To unlock the doors simply re-arm then disarm the security system again.
Disarming the security system after a trigger has occurred:Briefly press the Radio Key button to disarm the security system in the normal manner. The doors will unlock if this facility is included with your security system. The security system will acknowledge disarming by illuminating the vehicle’s hazard warning lights for a 1 second period and 3 Trigger Warning Bleeps will be heard to indicate that a trigger has occurred during the last armed period.
Trigger Identification:Should the alarm have been triggered in the last armed period, then the dashboard LED will flash to confirm the circuit triggered, when the ignition is turned on. The number of flashes corresponds with the circuits in the table below. The ignition can be turned off and back on to display the circuit as many times as necessary, however arming the security system again will re-set the memory.
TRIGGERED CIRCUIT LED FLASHES
Closed Loop Detection 2
Panic Mode Activation 6
Ignition Detection 8
Door Negative 10
Boot/Bonnet 14
Ultrasonic Sensors 16
NB 4 and 12 flashes are reserved for indication of the optional sensors and Door Positive circuits that are not available on the S4 models.

12
3. Operation of Programmable Features(if selected and/or installed by your dealer)
Auto-ArmAuto-Arm automatically arms the security system if the vehicle is accidentally left unarmed. The security system will automatically arm a pre-set time (the Auto-Arm Time; usually 60 seconds) after the ignition has been switched off, the vehicle vacated, and the last door, boot or bonnet has been closed. If a door, boot or bonnet remains open, or is opened during the Auto-Arm Time, the security system will not arm until that door, boot or bonnet is closed. As a warning that Auto-Arm is going to automatically arm the system, the siren will sound 2 warning bleeps when you open the door to exit the vehicle.Note: If the “Door Open, Closed Loop and Auto Arm Warning Bleeps” have been programmed to “off” there will be no warning bleeps to advise you that this feature is active.
Auto-Arm with Door LockingThis option operates in the same way as Auto-Arm; however the vehicle’s doors will also automatically lock at the same time the security system Auto-Arms, if this facility is included with your security system.Note: Be sure to remove your car keys when leaving the vehicle if you have chosen the Auto-Arm with Door Locking option, otherwise they may be locked in the vehicle!
Auto-RearmAuto-Rearm automatically re-arms the security system if it is accidentally disarmed. The security system will automatically re-arm and lock (if this facility has been included with your security system) a pre-set time (the Auto-Rearm Time; usually 60 seconds), from the system being disarmed by the Radio Key, provided that no door, bonnet or boot has been opened during the Auto-Rearm Time. Any sensors deleted for the previous armed period will remain deleted if the system Auto-Rearms. This feature prevents the vehicle being vulnerable if the Radio Key button is pressed by mistake – perhaps from inside your house while your car is parked close by in the driveway or street, or if children press the Radio Key button in play! This feature provides extra security with no inconvenience.
Door Open, Closed Loop & Auto-Arm Warning BleepsThe security system emits “warning bleeps” which can be turned off by your dealer if required. The “warning bleeps” take the form of 2 bleeps whenever a door, boot or bonnet is opened only if Auto-Arm is selected and as a series of repeated bleeps for 15 seconds after the security system is armed as a warning that either:a) A door, boot or bonnet is still open or ajar.b) The optional Closed Loop Protection circuit is broken.When the security system is armed and the repeated bleep is heard, if the security system is not disarmed, the open door, bonnet or boot not closed or the Closed Loop Protection circuit not completed within 15 seconds, the security system will trigger.

13
The trigger will continue for ten 30 second cycles, after this the circuit causing the trigger will be ignored by the security system (to conform with noise abatement laws) and is no longer protected.Note: One door left open in this way may affect the protection on all other doors, depending on the make and model of vehicle. With the “Door Open Warning Bleeps” programmed to “off” this facility will function in the same way but without the audible warning.
Extend CDL Lock Output*This feature is not available on all makes and models of vehicles, but provides an alternative to the Total Closure output. It is only suitable for vehicles that close the windows/sunroof when the vehicle’s key is held in the lock position. If this feature has been selected on your security system and window/sunroof closure is required then instead of giving the Radio Key button a brief press to arm the security system, press and hold down the button until the windows/sunroof are fully closed (maximum 26 seconds). Releasing the Radio Key button at anytime during window/sunroof closure stops the windows/sunroof from moving any further. Users of this facility should be particularly cautious when children or animals are inside or near the vehicle.Note: If you choose this facility then the Personal Panic/Siren Test feature will no longer be available from the Single Button Radio Key.
Key Theft Protection*With this feature selected, disarming the security system with the Radio Key (or Touch Key, Keypad or Ignition PIN) no-longer automatically deactivates the immobiliser. Before the vehicle can be started the security systems unique PIN must be entered into the Keypad once the alarm is disarmed. This prevents theft of a vehicle even with the owner’s keys.If this feature is selected on S4 models, the single immobilisation circuit becomes self arming a pre-set time (the Stall & Start Time; usually 30 seconds) after the ignition is turned off. This provides additional security, so that if a vehicle were to be stolen in a car-jacking situation (whilst the engine was still running), then 30 seconds (dependent on programming) after the ignition is next turned off, the vehicle will not re-start without entering the security systems unique PIN. Refer to Starting the Vehicle - S4 Models with Key Theft Protection on page 10 for details of operation.
Safety Lock/Unlock*Many Police forces now recommend that you lock your vehicle’s doors whilst driving, Safety Lock/Unlock prevents you from having to remember to do so and is available if the door locking facility is included with your system. If all the doors, bonnet and boot are closed and you turn on the vehicle’s ignition all the doors and boot will lock. When you turn off the ignition all the doors and boot will then unlock. To stop the doors and boot locking on a single occasion (for example if you wish to start the engine and then vacate the vehicle to scrape ice from the windows), open a door and turn on the vehicle’s ignition, after 1 second the vehicle’s hazard lights will give a single flash. It is then safe to close your door and Safety Lock/Unlock will not lock your doors until the next time you turn the vehicle’s ignition off then on again.

14
The Safety Lock/Unlock feature can also be turned on using the Keypad in the following way:• To enable Safety Lock/Unlock turn on the vehicle’s ignition, type 7 on the Keypad and
immediately turn off the ignition. Safety Lock/Unlock will now function as described.• To disable Safety Lock/Unlock turn on the vehicle’s ignition, type 7 on the Keypad
and immediately turn off the ignition. Safety Lock/Unlock is now disabled and will not operate your door locks.
Note: For occupant safety the Safety Lock/Unlock feature is configured to only activate Single Locking circuits & should never operate a vehicle’s Double or Dead Locking.
Total Closure*The Total Closure output can be programmed to operate in one of two ways:1. “Timed”:This method of operation should only be used on vehicles equipped with built-in “Anti-Trap” features. If Total Closure has been programmed to operate for a “Timed” period, then closure of the vehicle’s windows/sunroof will always occur on arming for the timed period. This timed period is adjustable up to a maximum of 99 seconds. Users of this facility should be particularly cautious when children or animals are inside or near the vehicle.Note: The Panic Mode/Siren Test feature is still available from the Single Button Radio Key when “Timed” operation is selected.2. “Hold Down”:If Total Closure has been programmed to operate on “Hold Down”, then closure of the vehicle’s windows/sunroof can be performed only when required. In such instances, instead of giving the Radio Key button a brief press to arm the security system, press and hold down the button until the windows/sunroof are fully closed (maximum 26 seconds). Releasing the Radio Key button at anytime during window/sunroof closure stops the windows/sunroof from moving any further. Users of this facility should be particularly cautious when children or animals are inside or near the vehicle.Note: If you choose this “Hold Down” operation then the Panic Mode/Siren Test feature will no longer be available from the Single Button Radio Key.
Total Open/Boot Release*The Total Open/Boot Release output can be programmed to operate in one of two ways:1. “Timed”:The “Timed” method of operation is not ideal for most applications as it always attempts to open the vehicle’s windows/sunroof or boot every time the system is disarmed. If Total Open/Boot Release has been programmed to operate for a “Timed” period, then opening of the vehicle’s windows/sunroof or boot will always occur on disarming for the timed period. This timed period is adjustable up to a maximum of 99 seconds.Note: The Panic Mode/Siren Test feature is still available from the Single Button Radio Key when “Timed” operation is selected.

15
2. “Hold Down”:If Total Open/Boot Release has been programmed to operate on “Hold Down”, then opening of the vehicle’s windows/sunroof or boot can be performed only when required. In such instances, instead of giving the Radio Key button a brief press to disarm the security system, press and hold down the button until the windows/sunroof are fully open or the boot opens (maximum 26 seconds). Releasing the Radio Key button at anytime during window/sunroof open stops the windows/sunroof from moving any further.Note: If you choose this “Hold Down” operation then the Panic Mode/Siren Test feature will no longer be available from the Single Button Radio Key.* These features may not be available on certain vehicles or may require additional labour and/or parts, incurring extra cost. Please consult your installing dealer.
16
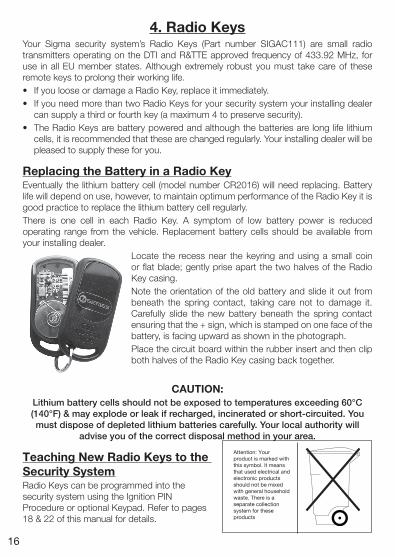
4. Radio KeysYour Sigma security system’s Radio Keys (Part number SIGAC111) are small radio transmitters operating on the DTI and R&TTE approved frequency of 433.92 MHz, for use in all EU member states. Although extremely robust you must take care of these remote keys to prolong their working life.• If you loose or damage a Radio Key, replace it immediately.• If you need more than two Radio Keys for your security system your installing dealer
can supply a third or fourth key (a maximum 4 to preserve security).• The Radio Keys are battery powered and although the batteries are long life lithium
cells, it is recommended that these are changed regularly. Your installing dealer will be pleased to supply these for you.
Replacing the Battery in a Radio KeyEventually the lithium battery cell (model number CR2016) will need replacing. Battery life will depend on use, however, to maintain optimum performance of the Radio Key it is good practice to replace the lithium battery cell regularly.There is one cell in each Radio Key. A symptom of low battery power is reduced operating range from the vehicle. Replacement battery cells should be available from your installing dealer.
Locate the recess near the keyring and using a small coin or flat blade; gently prise apart the two halves of the Radio Key casing.Note the orientation of the old battery and slide it out from beneath the spring contact, taking care not to damage it. Carefully slide the new battery beneath the spring contact ensuring that the + sign, which is stamped on one face of the battery, is facing upward as shown in the photograph.Place the circuit board within the rubber insert and then clip both halves of the Radio Key casing back together.
CAUTION:Lithium battery cells should not be exposed to temperatures exceeding 60°C (140°F) & may explode or leak if recharged, incinerated or short-circuited. You must dispose of depleted lithium batteries carefully. Your local authority will
advise you of the correct disposal method in your area.
Teaching New Radio Keys to the Security SystemRadio Keys can be programmed into the security system using the Ignition PIN Procedure or optional Keypad. Refer to pages 18 & 22 of this manual for details.
Attention: Your product is marked with this symbol. It means that used electrical and electronic products should not be mixed with general household waste. There is a separate collection system for these products

17
5. Using the Ignition PIN ProcedureIMPORTANT NOTICE:In the following sections describing the operation of the Ignition PIN Procedure, reference to a PIN code will be made. The PIN code for your security system will have been issued to you on two self-adhesive labels which must be kept in a safe place. This PIN code is unique to your security system and acts as an emergency override when entered during the Ignition PIN Procedure and/or into the optional keypad. You can change the PIN code printed on the issued labels, to one of your own choice that you can easily remember, however, failure to recall your PIN code could increase the cost of replacing or adding further Radio Keys and will prevent yourself and your installing dealer from overriding the security system in the unlikely event of Radio Key failure. If you do not know, or have forgotten your PIN code then your installing dealer can reset this for you, provided that the security system is not armed. The system’s PIN can only be changed using the keypad.
Disarming the Security SystemIf the Radio Key fails to operate the security system, due to a depleted battery in the Radio Key for example or its total loss/damage, the security system can be disarmed using the Ignition PIN Procedure (alternatively the optional keypad and Touch Key can also be used as an override, if supplied with your system. See pages 20 & 19 respectively).To disarm the security system using the Ignition PIN Procedure:• Unlock the driver’s door with the vehicle’s key and enter the vehicle (the siren will
sound).• Cycle the ignition 3 times in 7 seconds i.e. off to on, off to on, off to on (the siren will
sound, if not already doing so).• The LED will now illuminate constantly for 3 seconds, before proceeding to flash. If
the first digit of the security system’s PIN is 0, then the ignition must to turned off whist the LED is still constantly illuminated. Otherwise, allow the LED to extinguish and then count the flashes and turn the ignition off immediately after the corresponding flash i.e. If the first digit is 3, turn the ignition off after the 3rd flash.
• With the first digit selected turn the ignition back on. The LED will illuminate constantly again for 3 seconds, before proceeding to flash. Select the 2nd, 3rd and 4th digits in the same manner as the first.
• When the ignition is turned off to select the 4th digit, the security system will either a) Disarm in the normal way if the PIN code is correct. If the Key Theft Protection feature is selected, the PIN must be entered again, in the same way now, to unset the immobiliser. b) Remain armed if the PIN code is incorrect. The security system only allows 3 attempts to enter the correct PIN code.Note: If a 3rd incorrect PIN code is entered, the security system will ignore all further PIN code entries, whether by Ignition Procedure or Keypad, for 3 minutes. This “PIN lockout” is a security feature.

18
Teaching New Radio Keys & Touch Keys to the Security SystemIMPORTANT NOTICE: When teaching one or more Radio Keys into the security system all previous Radio Keys will be erased from the system, similarly teaching one or more Touch Keys into the system will erase all previous Touch Keys. Therefore, you must always teach ALL the Radio Keys required to operate the security system at the same time or, if programming Touch Keys, ALL the touch keys at the same time. Programming only Radio Keys however, does not delete the current Touch Keys and vice versa.If an additional Radio Key or Touch Key is required or an existing Radio Key or Touch Key is lost the new key can be programmed to the security system using the Ignition PIN Procedure (alternatively the optional Keypad can also be used to teach Radio Keys & Touch Keys, if supplied with your system. See page 22 & 23).To programme new Radio Keys and/or Touch Keys:• Ensure all the Radio Keys and/or Touch Keys required to work the system are at hand
and that the security system is disarmed (using an existing Radio Key, Touch Key, Keypad or previously described Ignition PIN Procedure).
• Cycle the ignition 3 times in 7 seconds i.e. off to on, off to on, off to on.• The LED will now illuminate constantly for 3 seconds, before proceeding to flash.
If the first digit of the security system’s PIN is 0, then the ignition must be turned off whilst the LED is still constantly illuminated. Otherwise, allow the LED to extinguish and then count the flashes and turn the ignition off immediately after the corresponding flash i.e. If the first digit is 3, turn the ignition off after the 3rd flash.
• With the first digit selected turn the ignition back on.• The LED will illuminate constantly again for 3 seconds, before proceeding to flash.
Select the 2nd, 3rd and 4th digits in the same manner as the first.• When the ignition is turned off to select the 4th digit, the LED will display 2 flashes
every 2 seconds to indicate the security system is ready to learn Radio Keys and/or Touch Keys in the next 15 seconds.
• If Radio Keys are to be taught press the 1st Radio Key button briefly. The dashboard LED will illuminate for 1 second and the siren will bleep as confirmation that the Radio Key has been learnt. Repeat this for the remaining Radio Keys.
• If Touch Keys are to be taught briefly press the 1st Touch Key to the receptacle and remove it. The dashboard LED will illuminate for 1 second and the siren will bleep as confirmation that the Touch Key has been learnt. Repeat this for the remaining Touch Keys.
15 seconds after the last Radio Key or Touch Key has been taught the security system will automatically exit programming mode.

19
6. Using the Optional Touch Key OverrideYour Sigma security system’s Touch Keys utilise Dallas IC technology. Although extremely robust you must take care of these Touch Keys to prolong their working life.• If you lose or damage a Touch Key, replace it immediately.• Your installing dealer can supply up to 4 Touch Keys to operate your security system
(maximum 4 to preserve security).• The Touch Keys are not battery powered and so should not be split or require any
maintenance.
Disarming the Security SystemIf the Radio Key fails to operate the security system, due to a depleted battery in the Radio Key for example or its total loss/damage, the security system can be disarmed using the Touch Key (alternatively the built-in Ignition PIN Procedure or the optional Keypad, if supplied with your system, can also be used. See pages 17 & 20). To do this, enter the vehicle (the siren will sound), briefly press the Touch Key to the receptacle and remove it, the security system will disarm in the normal way. If the Key Theft Protection feature is selected, the PIN must now be entered using the Keypad (or Ignition PIN Procedure in extreme cases) to unset the immobiliser.
Arming the Security SystemIf the Radio Key fails to operate the security system, due to a depleted battery in the Radio Key for example or its total loss/damage, the security system can be armed using the Touch Key (alternatively the optional Keypad can be used, if supplied with your system. See page 20). To do this open and leave open the vehicle’s door, briefly press the Touch Key to the receptacle and remove it, the security system will arm in the normal way (along with Door Open, Closed Loop & Auto-Arm Warning Bleeps if switched on), immediately close the door and manually lock the door with the vehicle’s door key.
Teaching New Touch Keys to the Security SystemTouch Keys can be programmed into the security system using the Ignition PIN or optional Keypad. Refer to pages 18 & 23 of this manual for details.

20
7. Using the Optional Multi-Function KeypadIMPORTANT NOTICE:In the following sections describing the operation of the Keypad, reference to a PIN code will be made. The PIN code for your security system will have been issued to you on two self-adhesive labels which must be kept in a safe place. This PIN code is unique to your security system and acts as an emergency override when entered during the Ignition PIN Procedure and/or into the optional Keypad. You can change the PIN code printed on the issued labels, to one of your own choice that you can easily remember, however, failure to recall your PIN code could increase the cost of replacing or adding further Radio Keys & Touch Keys and will prevent yourself and your installing dealer from overriding the security system in the unlikely event of Radio Key failure. If you do not know, or have forgotten your PIN code then your installing dealer can reset this for you, provided that the security system is not armed.
Note:When using the Keypad, each time a button is pressed the LED on the Keypad
will flash once as confirmation. The next button should not be pressed before this confirmation. However, you only have 2 seconds to enter the next character. If you
do not press the next character within this time period the LED on the Keypad will flash repeatedly, after which you must start the sequence again from the
beginning.
Disarming the Security SystemIf the Radio Key fails to operate the security system, due to a depleted battery in the Radio Key for example or its total loss/damage, the security system can be disarmed using the Keypad (alternatively the built-in Ignition PIN Procedure or the optional Touch Key, if supplied with your system, can also be used. See pages 17 & 19). To do this, enter the vehicle (the siren will sound), type your PIN code into the Keypad, the security system will disarm in the normal way. If the Key Theft Protection feature is selected, the PIN must be entered again, in the same way, now to unset the immobiliser. The security system only allows 3 attempts to enter the correct PIN code.Note: If a 3rd incorrect PIN code is entered, the security system will ignore all further PIN code entries, whether by Keypad or Ignition Procedure, for 3 minutes. This “PIN lockout” is a security feature.
Arming the Security SystemIf the Radio Key fails to operate the security system, due to a depleted battery in the Radio Key for example or its total loss/damage, the security system can be armed using the Keypad (alternatively the optional Touch Key can be used, if supplied with your system. See page 19). To do this open and leave open the vehicle’s door, type your PIN code into the Keypad, the security system will arm in the normal way (along with Door Open, Closed Loop & Auto-Arm Warning Bleeps if switched on), immediately close the door and manually lock the door with the vehicle’s door key.

21
Changing the Security System’s PIN (Personal Identification Number) Code
Note:The security system’s PIN is unique to each security system and is the same 4
digit number that is required to operate both the Ignition PIN Procedure and the Keypad as overrides, however, the system’s PIN can only be changed using the Keypad. When using the Keypad, each time a button is pressed the LED on the Keypad will flash once as confirmation. The next button should not be pressed before this confirmation. However, you only have 2 seconds to enter the next
character. If you do not press the next character within this time period the LED on the Keypad will flash repeatedly, after which you must start the sequence
again from the beginning.With the ignition switched off and the security system disarmed, type into the Keypad the following:
Where AAAA represents the old 4-digit PIN code and BBBB represents the newly chosen 4-digit PIN code. To confirm correct input of your PIN code the siren will bleep after entering the last digit. The number 992 is the access code/command which notifies the alarm unit to accept the new PIN code.
So for example if the existing PIN code is 1234 and you wish to change it to 6789 you would type in:
You can see that the new code needs to be typed in twice as confirmation.–– Example only ––
* * A A A A
* 9 29
* B B BB
* B B BB
#
* * 1 2 3 4
* 9 29
* 6 8 97
* 6 8 97
#
Your PIN code (siren will bleep)
Notifies security system to accept new PIN
Enter the new PIN code
Confirm new PIN code
Stores the new PIN code to the security system. This will be followed by a bleep

22
Teaching New Radio Keys to the Security SystemIMPORTANT NOTICE:When teaching one or more Radio Keys into the security system all previous Radio Keys will be erased from the system. You must always teach ALL the Radio Keys required to operate the security system at the same time.
Note:When using the Keypad, each time a button is pressed the LED on the Keypad will flash once as confirmation. The next button should not be pressed before
this confirmation. However, you only have 2 seconds to enter the next character. If you do not press the next character within this time period the LED on the
Keypad will flash repeatedly, after which you must start the sequence again from the beginning.
With the ignition switched off and the security system disarmed, type into the Keypad the following:
Where AAAA represents the 4-digit PIN code and n represents the total number of Radio Keys to be recognised by the security system (maximum 4). To confirm correct input of your PIN code the siren will bleep after entering the last digit. The number 991 is the access code/command, which notifies the security system to accept the new Radio Keys.Then immediately press the first Radio Key button briefly, the dashboard LED will illuminate for 1 second and the siren will bleep as confirmation that the Radio Key has been learnt, now press the second Radio Key button briefly, the dashboard LED will illuminate for 1 second and the siren will bleep again, continue with the third and fourth Radio Keys (if applicable). After pressing your final Radio Key wait 10 seconds. Finally test that all your Radio Keys arm and disarm the security system.ExampleSo for example if the PIN code is 1234 and you wish to programme in 2 Radio Keys you would type in:
Then press the Radio Keys briefly at the appropriate time.–– Example only ––
* * A A A A
* 9 19
* n
#
* * 1 2 3 4
* 9 19
* 2
#
Your PIN code (siren will bleep)
Notifies security system you want to programme Radio Keys
Is the number of Radio Keys that you want to programme in
Confirms you want to programme Radio Keys and will be followed by a bleep

23
Teaching New Touch Keys to the Security SystemIMPORTANT NOTICE:When teaching one or more Touch Keys into the security system all previous Touch Keys will be erased from the system. You must always teach ALL the Touch Keys required to operate the security system at the same time.
Note:When using the Keypad, each time a button is pressed the LED on the Keypad will flash once as confirmation. The next button should not be pressed before
this confirmation. However, you only have 2 seconds to enter the next character. If you do not press the next character within this time period the LED on the
Keypad will flash repeatedly, after which you must start the sequence again from the beginning.
With the ignition switched off and the security system disarmed, type into the Keypad the following:
Where AAAA represents the 4-digit PIN code and n represents the total number of Touch Keys to be recognised by the security system (maximum 4). To confirm correct input of your PIN code the siren will bleep after entering the last digit. The number 990 is the access code/command, which notifies the security system to accept the new Touch Keys.Then immediately press the first Touch Key briefly onto the receptacle and remove it, the dashboard LED will illuminate for 1 second and the siren will bleep as confirmation that the touch key has been learnt, now press the second Touch Key briefly onto the receptacle and remove it, the dashboard LED will illuminate for 1 second and the siren will bleep again, continue with the third and fourth Touch Keys (if applicable). After teaching the final Touch Key wait 10 seconds. Finally test that all the Touch Keys arm and disarm the security system.ExampleSo for example if the PIN code is 1234 and you wish to programme in 2 Touch Keys you would type in:
Then press the Touch Keys briefly to the receptacle at the appropriate time.–– Example only ––
* * A A A A
* 9 09
* n
#
* * 1 2 3 4
* 9 09
* 2
#
Your PIN code (siren will bleep)
Notifies security system you want to programme Touch Keys
Is the number of Touch Keys that you want to programme in
Confirms you want to programme Touch Keys and will be followed by a bleep

24
8. Changing the way the Security System operates using the Optional Keypad
Button Keypad Feature Summary
0‘‘Last Trigger Isolation’’ - allows the security system to be set without triggering, even if a door, boot or bonnet switch on the vehicle is not functioning correctly.
1“Delete Arm and Disarm Indication Tone”- next armed period only, if arm/disarm tones are selected.
2‘‘Delete Ultrasonic Sensors’’- next armed period only (Also possible using Radio Key – see page 8).
3‘‘Delete Dual Stage Sensor Pre-warn’’*- feature not available on S4 models without accessory sensor sockets.
4‘‘Delete Single & Dual Stage Sensor Triggers’’*- feature not available on S4 models without accessory sensor sockets.
5‘‘Delete Ultrasonic, Single & Dual Stage Sensor Triggers’’*- feature not available on S4 models without accessory sensor sockets.
6‘‘Delete Ultrasonic, Single & Dual Stage Sensor Triggers and Pre-warn”*- feature not available on S4 models without accessory sensor sockets.
7‘‘Safety Lock/Unlock’’- toggles feature on & off.
8‘‘Display the Vehicle’s Battery Voltage’’- via the dashboard LED.
9 For future use.
* (Star) For programming your security system.
# (Hash) For programming your security system.
N.B. The options marked (*) above refer to features associated with the Single and Dual Stage Accessory Sensor Sockets which are not available on the S4 system.Important: If the Arm and Disarm Indication Tones have been turned on, the security system will no-longer comply with the requirements of 74/61EC.

25
Last Trigger Isolation (Option 0 on the Keypad).If after arming the security system, the Door Open Warning Bleeps continue to sound or the alarm system repeatedly triggers for no apparent reason, yet all the doors, bonnet and boot appear to be closed correctly, this may indicate a fault on one of the switches that trigger the security system. On a normal security system this would mean the entire vehicle would have to be left unprotected. The faulty switch would result in a trigger if an attempt were made to arm the security system. To exclude the switch causing the fault – turn on the vehicle’s ignition, type 0 on the Keypad and immediately turn off the ignition. Arm the security system in the normal way. If the Door Open Warning Bleeps are active the siren will bleep as before for 15 seconds, but the security system will no longer trigger on the troublesome circuit after this period. You must repeat this process each time you arm the security system.This function means that you can leave the vehicle protected on all circuits with the exception of the faulty door, boot or bonnet switch.Note: Any fault should be rectified by your installing dealer as soon as possible. Remember the vehicle is not fully protected in this situation, and one faulty door switch may affect the protection on all other doors, depending on the make and model of vehicle.
Delete Arm and Disarm Indication Tone (Option 1 on the Keypad).This feature is not available unless the Arm and Disarm Indication Tones have been activated (for non EU member states only). Arming the security system without the arming tone and the following disarming tone may be necessary if you wish to arm or disarm the system late at night. To do this turn on the vehicle’s ignition, type 1 on the Keypad and immediately turn off the ignition. Vacate the vehicle, closing all doors, boot and bonnet.Now arm the security system in the normal way.When the system is disarmed, 3 warning bleeps will be heard as normal if the system has been triggered in the last armed period.Note: The Arm and Disarm Indication Tones will be restored next time you arm the security system in the normal way.Important: If the Arm and Disarm Indication Tones have been turned on, the security system will no-longer comply with the requirements of 74/61/EC.
Delete Ultrasonic Sensors (Option 2 on the Keypad).Arming the security system without Ultrasonic Sensor protection will be necessary if you wish to leave people or animals inside the secured vehicle (sensible safety precautions should be exercised if considering this action!). This facility may also be used to provide limited protection to the vehicle if left unattended with the windows and/or sunroof open.To do this turn on the vehicle’s ignition, type 2 on the Keypad and immediately turn off the ignition. Vacate the vehicle, closing all doors, boot and bonnet. Now arm the security system in the normal way.The security system will acknowledge arming with 2 flashes of the vehicle’s hazard warning lights, instead of the normal 3 second illumination.Note: Ultrasonic protection will be restored next time you arm the security system in the normal way.

26
Delete Dual Stage Sensor Pre-warn (Option 3 on the Keypad).Sensor sockets are not available on the S4 system and therefore feature not available on S4 models.
Delete Single & Dual Stage Sensor Triggers (Option 4 on the Keypad).Sensor sockets are not available on the S4 system and therefore feature not available on S4 models.
Delete Ultrasonic, Single & Dual Stage Sensor Triggers (Option 5 on the Keypad).Sensor sockets are not available on the S4 system and therefore feature not available on S4 models.
Delete Ultrasonic, Single & Dual Stage Sensor Triggers & Pre-warn (Option 6 on the Keypad).Sensor sockets are not available on the S4 system and therefore feature not available on S4 models.
Safety Lock/Unlock (Option 7 on the Keypad).Many Police forces now recommend that you lock your vehicle’s doors whilst driving, Safety Lock/Unlock prevents you from having to remember to do so. If all the doors, bonnet and boot are closed and you turn on the vehicle’s ignition all the doors and boot will lock. When you turn off the ignition all the doors and boot will then unlock.To stop the doors and boot locking on a single occasion, for example if you wish to start the engine and then vacate the vehicle, perhaps to scrape ice from the windows, open a door and turn on the vehicle’s ignition, after 1 second the vehicle’s hazard lights will give a single flash. It is then safe to close your door and Safety Lock/Unlock will not lock your doors until the next time you turn the vehicle’s ignition off then on again.• To enable Safety Lock/Unlock turn on the vehicle’s ignition, type 7 on the Keypad
and immediately turn off the ignition. Safety Lock/Unlock will now function as described.
• To disable Safety Lock/Unlock turn on the vehicle’s ignition, type 7 on the Keypad and immediately turn off the ignition. Safety Lock/Unlock is now disabled and will not operate your door locks.
Displaying the Vehicle’s Battery Voltage (Option 8 on the Keypad).Turn on the vehicle’s ignition, type 8 on the Keypad and immediately turn off the ignition. The dashboard LED will flash the approximate voltage of the vehicle’s battery (i.e. 12 flashes = 12 volts). A battery voltage below 9 volts can affect the security system’s correct operation and the vehicle may not start. If your security system is armed and you have power loss, the Radio Key may not operate the security system, and your emergency override Keypad may not operate. Recharge the vehicle’s battery if possible, or contact your motoring organisation.

27
9. Trouble Shooting TableIF THIS HAPPENS IT COULD BE THIS DO THIS
Radio Key fails to operate or security system will not arm/disarm from Radio Key
Are you parked near high power transmitters? This could be blocking the signal.
Enter PIN number and override system. Drive vehicle to an area with no interference.
Battery in the Radio Key is flat.
Try the second Radio Key. Charge the battery.
‘Check vehicle’s ignition is off.
Turn vehicle’s ignition off.
Vehicle’s battery is flat. Charge vehicle’s battery.
Vehicle will not start
Has the automatic immobilisation set?(only S4 models with Key Theft Protection on)
If Key Theft Protection is on enter the correct PIN.
Check vehicle’s battery is not flat.
Charge vehicle’s battery.
Security system activates with no apparent cause
‘Are any of the doors, windows, bonnet, boot or sunroof open?
Close door etc and re-arm.
Check for moving items in vehicle, i.e. air fresheners, etc. hanging from rear view mirror etc.
Remove item.
People or animals are inside the vehicle.
Following operating instructions to disable ultrasonic sensors whilst vehicle is occupied.
Check all air vents are closed.
If open, close vents.
Remember• Make sure all the security system’s Radio Keys operate.• Replace transmitter batteries annually.• If a Radio Key is lost or damaged replace it immediately.• Further problems should be referred to your installing dealer at the soonest possible
opportunity.

28
10. Notes
Arm/Disarm Indication TonesPlease note that the S4 security system is supplied with the Arm/Disarm Indication Tones turned off to comply with European legislation.If the Arm and Disarm Indication Tones are turned on the security system will no-longer comply with the requirements of 74/61EC.This feature should only be turned on in non-EU member states, where local law allows.

29
INFORMATION ON DISPOSAL FOR USERS
(Private Households)1. In the European UnionNote: If you want to dispose of this equipment, please do not use the ordinary household waste bin.Used electrical and electronic equipment must be treated separately and in accordance with legislation that requires proper treatment, recovery and recycling of used electrical and electronic equipment.Following the implementation by members states, private households within the EU states may return their used electrical and electronic equipment to designated collection facilities free of charge*.In some countries your local retailer may also take back your old product free of charge if you purchase a similar new one*.
* - Please contact your local authority for further details.
If your used electrical or electronic equipment has batteries or accumulators, please dispose of these separately according to local requirements. By disposing of this product correctly you will help ensure that the waste undergoes the necessary treatment, recovery and recycling and thus prevent potential negative effects on the environment and human health which could otherwise arise due to inappropriate waste handling.
2. In other Countries outside the EUIf you wish to discard this product, please contact your local authorities and ask for the correct method of disposal.
Attention: Your product is marked with this symbol. It means that used electrical and electronic products should not be mixed with general household waste. There is a separate collection system for these products

30

31
EU Declaration of Conformity for R&TTE Directive
The EU Directives covered by this Declaration:Radio Equipment and Telecommunications Terminal Equipment Directive 1999/5/EC.
The products covered by this Declaration:Sigma SIGAC111 for use on all Radio Key operated S Series security systems.
The basis on which Conformity is being declared:The product above complies with the essential requirements of the Radio and Telecommunications Directive 1999/5/EC on the basis of the Technical Construction File Number: Sigma AC111.
Signed:
___________________________________________Malcolm Alderson
Authority:Q&A Manager
Date:16th June 2010
ATTENTION! The attention of the specifier, purchaser, installer or user is drawn to special measures and limitations to use which must be observed when the product is taken into service to maintain compliance with the above Directives. Details of
these special methods and limitations to use are available on request.
This manual is published by Sigma without any warranty on the content. Sigma reserves the right to make improvements and changes to this manual due to typographical
errors, inaccuracies of currently available information, or improvements to software or hardware at any time without notice. Such changes will be included in future editions of
this manual.

Maintenance and Service
Your dealer will be able to assist in the event of any problem withyour alarm system. If you experience any difficulty with your alarmsystem, take your vehicle back to your dealer and ask for assistance.
All information is supplied in good faith, but from time to time certainchanges in specification/features may change without notice.
Sigma Security is part of the Scorpion Group. Othercompanies in the group are Toad & Sterling all of
which offer the same levels of quality and technologyas Sigma security.
Scorpion Automotive is a forward-thinking automotivecompany incorporating some well-known and trusted
brands. In addition to this we pride ourselves on our reliabledistribution and back up. Scorpion Automotive is growing
rapidly and wants you to be part of the success story.Scorpion Automotive has an enviable portfolio of brands,
working across many automotive market sectors, backedup by a highly experienced R&D/Technical department and
state of the art In-house SMT PCB and automatic wiringand connection systems’ manufacture.
The business not only covers three brands of security but isalso very successful with OE product development, supplying
manufacturers including Subaru, Iveco and DAF trucks.In order to satisfy the demands of today’s automotivecustomers for quality and reliability the company has
achieved accreditation to ISO/TS16949. This is a majorachievement and something that only 2% of companies
worldwide have been able to achieve.
For information about our group and companies, please visit: www.scorpionauto.com
Scorpion Automotive Ltd Drumhead Road Chorley North Business Park Chorley PR6 7DE
Tel: 01257 249 928 Fax: 01257 249 938 E-mail: [email protected]
SIG
MA
JU
NE
201
0P
/N: I
NS
T009
RE
V 0
04