Embed Size (px)
Citation preview

Captiva InputAccel 6.5 Tutorial
M. Scott Roth
February 2012
v1.0
www.armedia.com msroth.wordpress.com

Table of Contents
1 Introduction .......................................................................................................................................... 5
1.1 Process Overview .......................................................................................................................... 6
1.2 Architecture Overview .................................................................................................................. 8
2 CaptureFlow Designer ........................................................................................................................... 9
2.1 Process Design .............................................................................................................................. 9
2.2 IA Values and Custom Values ...................................................................................................... 10
2.2.1 IA Values .............................................................................................................................. 11
2.2.2 Custom Values .................................................................................................................... 12
2.2.3 My Assignments .................................................................................................................. 12
2.3 Branching .................................................................................................................................... 14
2.4 Compiling .................................................................................................................................... 15
2.5 Installing the Process .................................................................................................................. 15
2.5.1 Installation .......................................................................................................................... 15
2.5.2 Copy and Paste Settings ...................................................................................................... 16
2.6 User Roles and Security .............................................................................................................. 17
3 Module Setup ...................................................................................................................................... 21
3.1 ScanPlus ...................................................................................................................................... 22
3.1.1 Scanner................................................................................................................................ 22
3.1.2 Event Actions ...................................................................................................................... 23
3.1.3 Auto-Batch Creation............................................................................................................ 24
3.2 Image Enhancement ................................................................................................................... 25
3.3 OCR .............................................................................................................................................. 25
3.4 Indexing ....................................................................................................................................... 27
3.5 Documentum Export ................................................................................................................... 29
3.5.1 Connection Info ................................................................................................................... 29
3.5.2 Storage Structure ................................................................................................................ 30
3.5.3 Cabinet ................................................................................................................................ 30
3.5.4 Folders ................................................................................................................................. 31
3.5.5 Document Metadata Definition .......................................................................................... 33
3.5.6 Document Content Definition ............................................................................................. 34
3.6 ODBC Export ................................................................................................................................ 35
3.6.1 ODBC Connection ................................................................................................................ 35
3.6.2 ODBC Export Module Configuration ................................................................................... 36
3.6.2.1 Data Source Connection ................................................................................................. 36
3.6.2.2 Mappings ......................................................................................................................... 36
3.6.2.2.1 SQL Query ................................................................................................................. 37
3.6.2.2.2 Parameters ................................................................................................................ 37
3.7 Multi ............................................................................................................................................ 38
4 Testing and Debugging ........................................................................................................................ 39
4.1 Admin Console ............................................................................................................................ 39
4.1.1 Batch Settings - Tasks .......................................................................................................... 39
4.1.2 IA and Custom Values ......................................................................................................... 40
4.1.3 Clearing Errors and Retriggering steps................................................................................ 41
4.1.4 Logs ..................................................................................................................................... 42
4.2 The InputAccel Database ............................................................................................................ 43
4.3 InputAccel Reports ...................................................................................................................... 44
4.4 Process Developer Batch Debugging .......................................................................................... 44
4.5 ODBC Log..................................................................................................................................... 45
4.6 IA Server Debug Mode ................................................................................................................ 46
4.7 SQL Server Profiler ...................................................................................................................... 46
5 Wrap Up .............................................................................................................................................. 47
5.1 Advanced Topics ......................................................................................................................... 47
5.1.1 Logging and Reporting ........................................................................................................ 48

5.1.2 Module Scripting ................................................................................................................. 48
5.1.3 Custom Modules ................................................................................................................. 48
5.1.4 Web Services ....................................................................................................................... 48
5.2 Thanks ......................................................................................................................................... 48
5.3 About the Author ........................................................................................................................ 49

M. Scott Roth / Armedia 5
1 Introduction I recently developed and deployed a Captiva InputAccel v6.5 solution for a customer. Prior to this project, I had never had any exposure to InputAccel, but figured “how hard could it be?”. Well, it turned out to be much harder -- and simpler -- than I expected. Let me explain. Here’s why it was harder:
First, there is virtually zero information on the Internet or the EDN about how to setup and develop a solution using InputAccel. One good website I found, EMCCaptiva.net, was all about version 5.3 of InputAccel. InputAccel went through a major redesign with version 6, so not much of this website was relevant.
The documentation that comes with InputAccel can be overwhelming. Much of the documentation is contained in hyperlinked Windows help files and, at least to my mind, doesn’t provide enough context or flow to function as a tutorial.
There are at least five different ways to configure and deploy InputAccel discussed in the installation documentation. However, the discussions are all predicated upon you knowing something about InputAccel and don’t offer any best practices or rules of thumb to get you started.
The CaptureFlow Designer, the new GUI design tool that was released with InputAccel version 6.0 has no documentation, though it does have online help and some sample processes that are helpful. Because this tool is so new, no one on the Internet or EDN professed knowledge of how to use it either.
Any process built in Process Developer (the previous InputAccel process development tool) is not compatible with CaptureFlow Designer. This means there is no way to reverse-engineer an existing process into the new tool for learning purposes.
There is not a unified debugging environment. Tracking down an error or root cause of a failed process step requires checking several logs and servers.
And last, much of the “development” of an InputAccel process is configuration of the modules. However, most of this configuration is hidden and not obvious. There is also no unified development/configuration environment, so I was continually bouncing around among the various modules to get the process configured and running.
Here’s why developing, configuring and deploying an InputAccel solution was easier than I expected (the caveat being: “once I figured it out”):
First, the CaptureFlow Designer GUI tool is easy to use once you get the hang of it. You simply drag modules from a pallet onto a workspace and connect them to form your process. Hopefully future versions of the tool will continue to refine its function and expand its capabilities (e.g., better error handling, better custom variable configuration, direct access to module setup, etc.).
M. Scott Roth / Armedia 6
The InputAccel modules are really powerful, and with a few clicks, can be configured to take care of most of your needs. It is obvious that a lot of thought has gone into these modules and their capabilities.
Once I understood where a problem occurred or a tweak needed to be made, it was simple to make the necessary corrections with just a few clicks of the mouse.
Finally, I didn’t have to do any real programming per se to get my process built. I did use some built-in functions and variables though, to manipulate the data I was interested in collecting.
The purpose of this paper is to describe the simple process I designed and implemented using CaptureFlow Designer, various InputAccel modules, and the InputAccel Administration Console. I have tried to capture the “gotchas” I encountered and tips for avoiding them or remedying them, and advice given to me by seasoned InputAccel developers. My hope is that someone will benefit from this narrative. The remainder of this document is structured as follows:
The remaining subsections in this section discuss the business process I needed to implement and the architecture of my InputAccel environment.
Section 2 discusses the CaptureFlow Designer GUI tool and how I implemented the process described in section 1.1. It touches on the two major functions of the tool: process flow design and custom variables.
Section 3 discusses how to complete the implementation of the process by configuring (referred to as “setting up”) each of the InputAccel modules.
Section 4 covers how to test and debug your process once it has been compiled and installed.
Section 5 contains the conclusion of my InputAccel experience.
1.1 Process Overview The business process I needed to implement was fairly simple. A handful of users scan black and white documents (correspondence) at their desks, provide basic index information, and save the documents to a content management system (Documentum). The capture process needed to create an OCR version of the document, convert it to PDF, update an external database, and store the document in a particular folder hierarchy in the content management system. Figure 1 depicts my capture process.

M. Scott Roth / Armedia 7
Figure 1 Scanning Process
One note to make here: the users were used to scanning and indexing their own documents. This setup is a little different from how InputAccel usually works. Usually, the tasks in an InputAccel process are executed by different people in more of a pipeline paradigm. For example, scanner operators do nothing but scan documents and make sure the quality is acceptable. Once they release the document, it flows to a QA person who applies image enhancement filters and techniques to improve the quality of the documents. QA releases the document to someone who reads the document and applies the indexing metadata, etc. In my process, a single person performs both the scanning and indexing. All of the other tasks are automated. The result of this configuration is that when users apply indexing metadata to their documents, they see all the other users’ documents in the IndexPlus module’s queue. For my customer this was okay, but it is not the normal implementation of InputAccel. In addition, there is a branch in the logic I have not depicted here, but will discuss in Section 2.1. During the Indexing step, if the user fails to enter a ‘Case Number’, the ‘Update ODBC Database’ step is skipped.
M. Scott Roth / Armedia 8
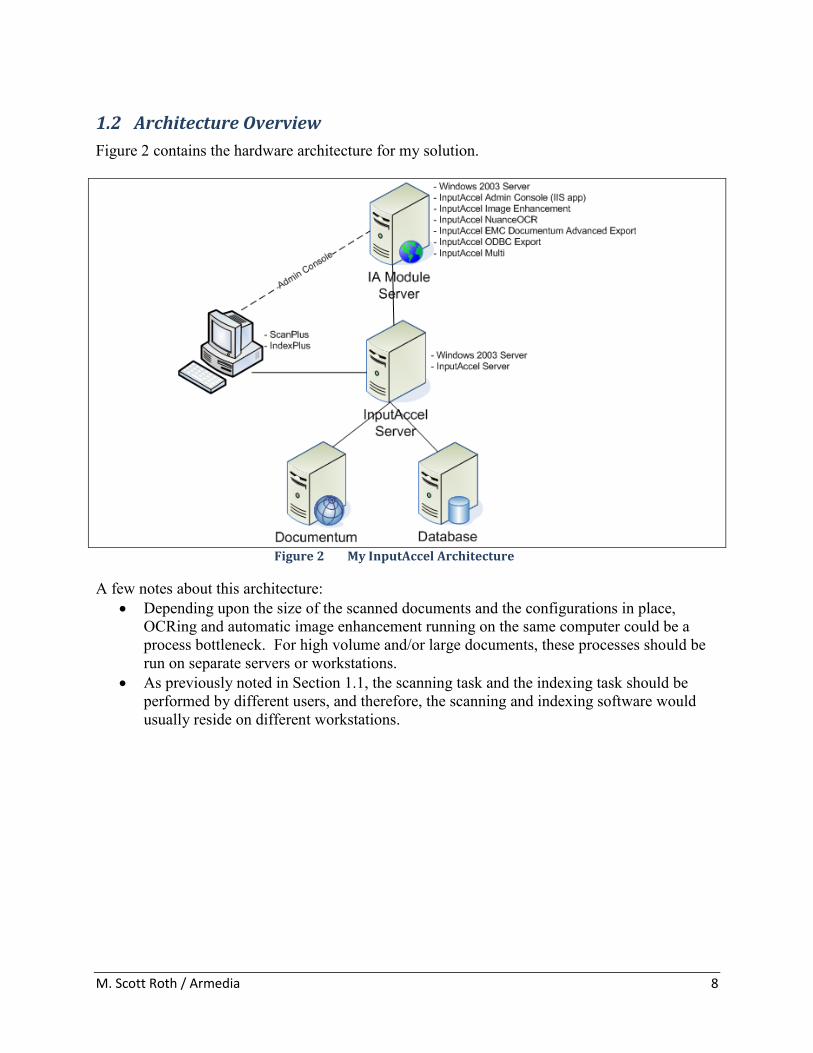
1.2 Architecture Overview Figure 2 contains the hardware architecture for my solution.
Figure 2 My InputAccel Architecture
A few notes about this architecture: Depending upon the size of the scanned documents and the configurations in place,
OCRing and automatic image enhancement running on the same computer could be a process bottleneck. For high volume and/or large documents, these processes should be run on separate servers or workstations.
As previously noted in Section 1.1, the scanning task and the indexing task should be performed by different users, and therefore, the scanning and indexing software would usually reside on different workstations.

M. Scott Roth / Armedia 9
2 CaptureFlow Designer CaptureFlow Designer is InputAccel’s (IA) new GUI-based, process development tool. It replaces the Process Builder tool, though Process Builder is still shipped with InputAccel and still works perfectly fine.
2.1 Process Design Figure 3 depicts my interpretation of the scanning process discussed Section 1.1.
Figure 3 CaptureFlow Manager

M. Scott Roth / Armedia 10
When you create a new process in CaptureFlow Designer, you are presented with a short, default process already defined. This default process consists of a Create node, a ScanPlus step, a Process node, and an End node. To build a process, you simply drag steps from the pallet on the left, onto the canvas on the right, somewhere between the Process and End nodes. CaptureFlow Designer keeps the diagram looking neat by automatically sliding steps and nodes to accommodate additions and deletions to the process. Once all the steps of your process are in place and in the right order, right-click on each one to rename them. The name you give each step here will be the name used later by the InputAccel server while processing documents. In addition to naming your steps, you must also indicate at what level each step is triggered. You do this by right-clicking each step and choosing the Level option. Your choices of trigger level vary by step, but are generally between 0 and 7. Essentially you are telling each step what level in the stack of scanned pages each operation should occur. For example, documents are scanned and released to the InputAccel server in batches. Image enhancement is applied to each page in the batch. Indexing occurs on a per-document basis. See the Captiva InputAccel document, System Overview: The Basics of InputAccel, for a good description of what these trigger levels are and what they do. For my process, I set the following levels:
IA Step Level ScanPlus Batch (Level 7) ImageEnhancement Page (Level 0) OCR Document (Level 1) Index Document (Level 1) DocumentumExport Document (Level 1) UpdateDatabase Document (Level 1) End Delete Batch
2.2 IA Values and Custom Values You probably noticed that between each of the steps and nodes there are hyperlinks named 0 Values. Clicking these hyperlinks opens the Assign Values window (see Figure 4). This is where you assign what data and content is passed from one step to the next in your process. These assignments are critical. If you don’t pass the right information from one step to the next, the succeeding step may not have enough information to execute properly, or it may not be triggered at all. When you insert steps into the CaptureFlow Designer process, some of these variables are defined for you. For example, when you inserted the ImageEnhancement step after the Process node, CaptureFlow Designer automatically assigned ImageEnhancment:0.ImageInput = ScanPlus:0.OutputImage. This assignment passes the scanned pages from the ScanPlus step to the ImageEnhancement step. Without this assignment, the ImageEnhancement step would never trigger.

M. Scott Roth / Armedia 11
Figure 4 CaptureFlow Designer with Assign Value Window
2.2.1 IA Values
InputAccel has hundreds of pre-defined variables that can contain or receive values throughout the process. These pre-defined values are called “IA Values”, and just like steps, they exist and operate at different levels. You can find descriptions of many of these variables by clicking the Help button in the CaptureFlow Designer tool bar, and searching on “IA Values”. When you click the <IA Value> link on the Assign to line in the Assign Values window, the assignment window expands and the autocomplete feature engages to display the names of all of the steps in your process. Simply select the step that contains the IA value you would like to set. Next, you will be presented with a numbered list, 0 – 7. These represent the trigger levels at which the IA values are defined. Select a level and autocomplete will display a list of all available IA values at that level. Choose a value and click OK to close the assignment window.

M. Scott Roth / Armedia 12
Next, click the <Expression> link next to the <IA Value> you just created. The assignment window will open but the autocomplete feature does not automatically engage. This is because you can assign hard coded literals to IA Values by just entering the values here. If you want to use autocomplete to assign an IA Value from another step, just start typing and it will begin displaying options. Once you have completed an assignment, you will notice a More… link on the right side of the Assign Values window for the assignment you just made. If you click on the More… link, the assignment window will expand to display some options for applying conditions to your assignment. Note that the condition must evaluate to TRUE or FALSE.
2.2.2 Custom Values
In addition to IA Values, you can create custom values (i.e., custom variables) that can be assigned to and manipulated just like IA Values. To create a custom value, click the Custom Value button in CaptureFlow Designer’s tool bar. The custom value definition window will be opened (see Figure 5).
Figure 5 Custom Value Definition Window
Simply define the variables you will need in your process. These variables will be available for assignment in the Assign Values window, the same as IA Values. Note that the Level column assigns these variables to a trigger level of the process, the same as the levels discussed in Section 2.1.
2.2.3 My Assignments
The key assignments I made in my process to pass content and data from one step to the next using the IA Values and Custom Values are:

M. Scott Roth / Armedia 13
Where Assignment Occurs
Assignment Remarks
ScanPlus – ImageEnhancement
ImageEnhancement:0.InputImage = ScanPlus:0.OutputImage
Send each page from the scanner to the image enhancement module.
ImageEnhancement – OCR
CustomValues:1.Case_Number = ImageEnhancement:0.BarText0
Assign the first barcode the image enhancement module encounters to the customer variable “Case_Number”. (More about barcode recognition in Section 3.2).
ImageEnhancement – OCR
OCR:0.Level0_InputImage = ImageEnhancement:0.OutputImage
Send each page to be OCRed. The OCR module is configured to operate at the Document level (Level 1), so it won’t trigger until all of the pages of the document have been received.
OCR – Index Index:0.InputImage = ImageEnhancement:0.OutputImage
Send each image enhanced page to the index step.
Index – DocumentumExport
DocumentumExport:1.InputFile1 = OCR:1.OutputFile1_OutputFile
Send the OCRed PDF generated in the OCR step to the Documentum Export step to be exported to Documentum.
DocumentumExport – UpdateDatabase
CustomValues:1.now = Now() Get the current date and assign it to the custom value “now”.
DocumentumExport – UpdateDatabase
CustomValues:1.y = GetDatePart(CustomValues:1.now,0)
Get the year part of the date.
DocumentumExport – UpdateDatabase
CustomValues:1.m = GetDatePart(CustomValues:1.now,1)
Get the month part of the date.
DocumentumExport – UpdateDatabase
CustomValues:1.d = GetDatePart(CustomValues:1.now,2)
Get the day of the month part of the date.
DocumentumExport – UpdateDatabase
CustomValues:1.Month = “Jan” if (CustomValues:1.m = 1) is True
If the custom value m is equal to 1, assign the value “Jan” to the custom value Month. This logic is repeated 11 more times, once for each month.
DocumentumExport – UpdateDatabase
CustomValues:1.Day = CustomValues:1.d
Set the Day custom value equal to the custom value d.
DocumentumExport – UpdateDatabase
CustomValues:1.Day = “0” & CustomValues:1.d if (CustomValues:1.d < 10)
Pad the Day custom value with a “0” if the day of the month is less than 10.
DocumentumExport – UpdateDatabase
CustomValues:1.Documentum_DocId = DocumentumExport:0. Level0_ObjectId
Capture the r_object_id from Documentum for the newly imported document.
Index Module CustomValues:1.Case_Number Case Number entered in the Index Module.
Index Module CustomValues:1.Doc_Type The type of document this scan is: letter, memo, request, response.

M. Scott Roth / Armedia 14
Note that with value assignments you can do some pseudo-programming using built-in functions. For example, you can assign the current date and time to a variable using the Now() function. See the CaptureFlow Designer Guide Programming Reference (part of online help) for a list of all the functions available. You can also write custom functions and routines in VBA that can affect these variables. To do this, you must save your process as an IPP file (see Section 2.4) and load it into InputAccel’s legacy development tool, Process Builder (not covered in this tutorial). Once you have done this, you cannot re-open your process in CaptureFlow Designer; the two editors are not compatible.
2.3 Branching Creating a branch, or an if-then decision, in your process is easy. Simply drag the Decision node from the CaptureFlow Designer Steps pallet into your process (see Figure 6). The interesting part of the branch is setting up the condition to cause the branch to execute.
Figure 6 Custom Value Definition Window
To enter the condition that will cause the branch to execute, click the Condition1 link. This will open the Condition Editor. Give the condition a name (this will appear on the process diagram)

M. Scott Roth / Armedia 15
and then enter a conditional expression that evaluates to TRUE. Whenever this condition is evaluated to TRUE, the branch is executed. Otherwise, the default path is taken.
In my example, I created a condition called “Has Case Number” with an expression: CustomValues:1.Case_Number <> “”. So, when the process gets to the branch node, the InputAccel server will look to see if the Custom Value Case_Number has a value. (This value will be entered in the indexing step discussed later in Section 3.4.) If it does, then the branch is executed. Otherwise, the branch is ignored.
2.4 Compiling When you save your process in CaptureFlow Designer, the file you create is an XPP file. To prepare the process for deployment to the InputAccel server, compile the process by selecting Compile from the CaptureFlow Designer Quick Access Toolbar. Compiling your process will create an IAP and IPP file. Either of which can be deployed to the InputAccel server (see Section 2.5). Note that IPP files can be loaded into Process Builder, InputAccel’s legacy design tool. Loading an IPP file in Process Builder will reveal all of the code CaptureFlow Designer auto-generated for you. However, any changes you make to the process in Process Builder, cannot be loaded into CaptureFlow Designer.
2.5 Installing the Process After you have designed your capture process, defined all the custom variables you need, and compiled the process, it is time to install the process on the InputAccel server.
2.5.1 Installation
Unlike the Process Builder tool which allowed you to install your compiled process directly from the development environment, CaptureFlow Designer has no such capability. To install a CaptureFlow Designer process, you need to logon to the InputAccel Administration Console and manually add the process. See the online Captiva Administration Guide for details pertaining to this procedure. Once a process is installed on the InputAccel server, you can update it by right-clicking on it and choosing Add Upgraded Process from the context menu (see Figure 7). A major caveat here is that you can only upgrade processes that have not had steps added, deleted or rearranged. Otherwise, this procedure will create a new process on the InputAccel server for you, instead of updating the selected process. Processes with changed IA Value expressions or new/deleted Custom Values upgrade with no problem;; just don’t change the steps once they are defined and installed. If the steps in your process change, you can copy the module settings from one process to another. See Section 2.5.2.

M. Scott Roth / Armedia 16
Figure 7 InputAccel Admin Console, Add Upgraded Process
2.5.2 Copy and Paste Settings
The problem with installing a process as a new process or having the InputAccel server do it for you is that you lose all of your module configurations (see Section 3). If this happens, it is possible to copy and paste your module settings from one process to another. To do this, select the old process in the InputAccel Administration Console’s Processes window, then right-click on the step in the Step window below it. Choose Copy -> Settings. Then select the new process, select the corresponding step, right-click and choose Paste -> Settings (see Figure 8). The copy/paste feature is a huge time saver. You will have a much greater appreciation for it after reading the configurations performed on each module discussed in Section 3.

M. Scott Roth / Armedia 17
Figure 8 InputAccel Admin Console, Copy Settings
2.6 User Roles and Security After installing your process on the InputAccel server, you may want to take some time to assign the users of the system to specific roles. If you don’t include users in at least a minimum set of roles, they won’t even be able to logon using the ScanPlus and IndexPlus modules.
User role assignments are made from the InputAccel Administration Console by clicking the Licensing/Security button and then selecting View Roles (see Figure 9). By default, there are six roles defined.
1. Administrators - Fixed role for Administrators which has all permissions in InputAccel. 2. System Monitor - Contains all permissions to use the Administration Console in read-only
mode. 3. Module Operator - Contains permissions common to all modules for processing batches. 4. Index Operator - Contains permissions to use all IndexPlus functionality. 5. Scan Operator - Contains permissions to use all ScanPlus and RescanPlus functionality. 6. DocumentumExport Operator - Contains permissions to read and modify protected
values.

M. Scott Roth / Armedia 18
Figure 9 InputAccel Roles
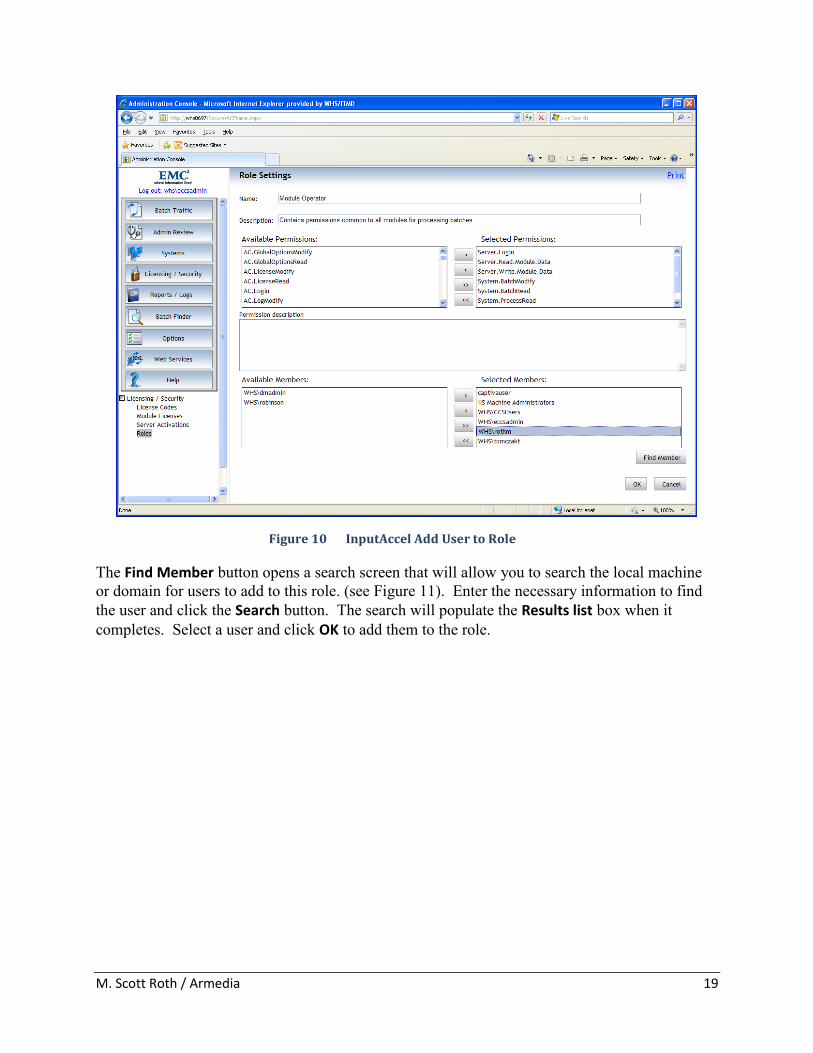
To open a role, select it and then click the Settings button (see Figure 10). To understand the role permissions available, see “Roles” in the online Captiva Administration Guide. The lower two boxes on the screen (Available Members and Selected Members) are used to add or remove users from this particular role. To add a user not already in the Available Members box, click the Find Member button.
M. Scott Roth / Armedia 19
Figure 10 InputAccel Add User to Role
The Find Member button opens a search screen that will allow you to search the local machine or domain for users to add to this role. (see Figure 11). Enter the necessary information to find the user and click the Search button. The search will populate the Results list box when it completes. Select a user and click OK to add them to the role.

M. Scott Roth / Armedia 20
Figure 11 InputAccel Find Member Search Box
Any user who launches a module must be a member of the “Module Operator” role, this includes users who will launch modules manually, as well as system users who will run unattended tasks (e.g., OCR). In addition, any user who is doing scanning should be a member of the “Scan Operator” role and any user doing indexing should be a member of the “Index Operator” role. So, in my example process, all of my users are members of “Module Operators”, “Scan Operators”, and “Index Operators”. My local system account on the IA Module server is a member of the “Module Operators” group because it will run the unattended tasks.
M. Scott Roth / Armedia 21
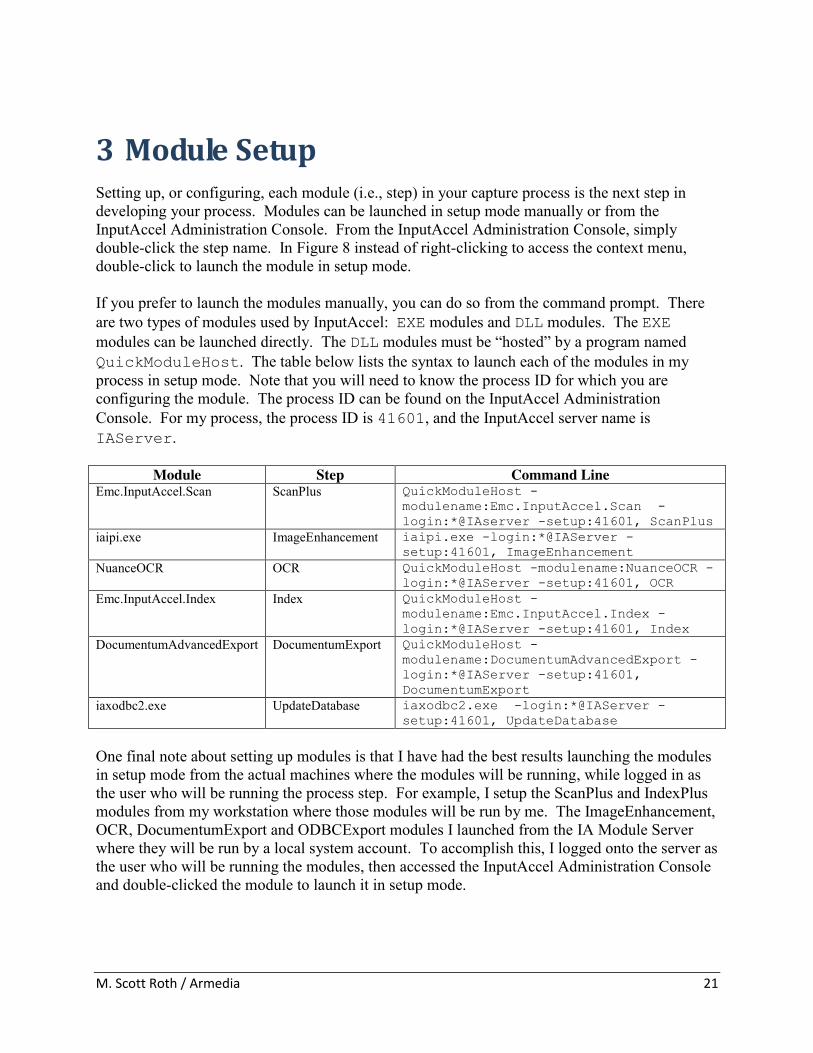
3 Module Setup Setting up, or configuring, each module (i.e., step) in your capture process is the next step in developing your process. Modules can be launched in setup mode manually or from the InputAccel Administration Console. From the InputAccel Administration Console, simply double-click the step name. In Figure 8 instead of right-clicking to access the context menu, double-click to launch the module in setup mode. If you prefer to launch the modules manually, you can do so from the command prompt. There are two types of modules used by InputAccel: EXE modules and DLL modules. The EXE modules can be launched directly. The DLL modules must be “hosted” by a program named QuickModuleHost. The table below lists the syntax to launch each of the modules in my process in setup mode. Note that you will need to know the process ID for which you are configuring the module. The process ID can be found on the InputAccel Administration Console. For my process, the process ID is 41601, and the InputAccel server name is IAServer.
Module Step Command Line Emc.InputAccel.Scan ScanPlus QuickModuleHost -
modulename:Emc.InputAccel.Scan -login:*@IAserver -setup:41601, ScanPlus
iaipi.exe ImageEnhancement iaipi.exe -login:*@IAServer -setup:41601, ImageEnhancement
NuanceOCR OCR QuickModuleHost -modulename:NuanceOCR -login:*@IAServer -setup:41601, OCR
Emc.InputAccel.Index Index QuickModuleHost -modulename:Emc.InputAccel.Index -login:*@IAServer -setup:41601, Index
DocumentumAdvancedExport DocumentumExport QuickModuleHost -modulename:DocumentumAdvancedExport -login:*@IAServer -setup:41601, DocumentumExport
iaxodbc2.exe UpdateDatabase iaxodbc2.exe -login:*@IAServer -setup:41601, UpdateDatabase
One final note about setting up modules is that I have had the best results launching the modules in setup mode from the actual machines where the modules will be running, while logged in as the user who will be running the process step. For example, I setup the ScanPlus and IndexPlus modules from my workstation where those modules will be run by me. The ImageEnhancement, OCR, DocumentumExport and ODBCExport modules I launched from the IA Module Server where they will be run by a local system account. To accomplish this, I logged onto the server as the user who will be running the modules, then accessed the InputAccel Administration Console and double-clicked the module to launch it in setup mode.

M. Scott Roth / Armedia 22
The following sections discuss the configuration of each module in more detail. As previously stated, half of the process’s functionality is contained in these configurations, not in CaptureFlow Designer.
3.1 ScanPlus I have found that there are three important areas to configure in the ScanPlus module: Scanner, Event Actions, and Auto-Batch Creation.
3.1.1 Scanner
Creating a scanner configuration and profile is straighforward. See the online help for ScanPlus for detailed information. It is important that the you create a scanner configuration profile for each scanner in your system, meaning if each user has a different model or make of scanner, create a profile for each of their scanners (see Figure 12). This will make deployment much easier.
Figure 12 Scanner Configuration

M. Scott Roth / Armedia 23
3.1.2 Event Actions
If you plan to scan multiple documents in a batch and use divider pages to separate documents, you must set up an event action so InputAccel knows how to behave when a divider page is detected. In my example, I used “Kodak 2” type dividers and want InputAccel to create a new document every time it encounters one. Figure 13 shows this configuration.
Figure 13 Event Actions

M. Scott Roth / Armedia 24
3.1.3 Auto-Batch Creation
Auto-batch creation allows you to apply a template to the name of each batch created by the user. Implementation is easy though limited to what is described on the screen. For my process, I set the Process schema to my process name, “test”, and set the Batch name schema to “@(Name)-@(Now)” (see Figure 14). This will produce batches with names like “Scott-20120213-102652”.
Figure 14 Auto-Batch Creation

M. Scott Roth / Armedia 25
3.2 Image Enhancement I have found that configuring image enhancement is largely a trial and error process. InputAccel provides some sample images you can play with (they are located in the C:\Program Files\InputAccel\Client\images folder) to get a feel for the effect of each filter. You may also need to experiment with the brightness and contrast settings on each scanner’s configuration profile to achieve optimal results. In my process, the image enhancement step applies a de-skew filter (see Figure 15) and occurs automatically with no user intervention. You can configure the specifics of each filter by right-clicking on document thumbnail in the Filter list and choosing Properties.
Figure 15 Image Enhancement – De-skew
If you are using a barcode detection filter it must be the first filter applied to the image or it won’t detect the barcodes. If you do configure a barcode filter, note that it won’t evaluate the sample image until you click on the filter thumbnail in the Filter list. I have had the best results using the “Extended Barcode Detection Filter” and setting the Decode symbols option to off (i.e., unselecting it).
M. Scott Roth / Armedia 26
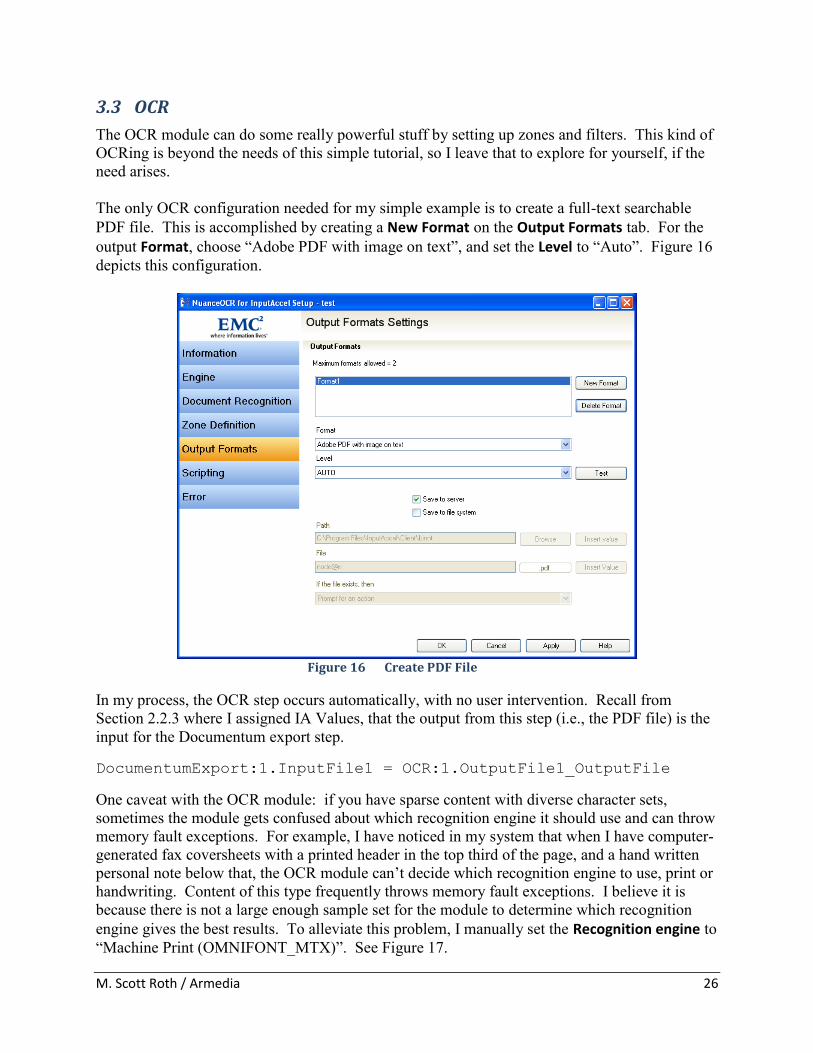
3.3 OCR The OCR module can do some really powerful stuff by setting up zones and filters. This kind of OCRing is beyond the needs of this simple tutorial, so I leave that to explore for yourself, if the need arises. The only OCR configuration needed for my simple example is to create a full-text searchable PDF file. This is accomplished by creating a New Format on the Output Formats tab. For the output Format, choose “Adobe PDF with image on text”, and set the Level to “Auto”. Figure 16 depicts this configuration.
Figure 16 Create PDF File
In my process, the OCR step occurs automatically, with no user intervention. Recall from Section 2.2.3 where I assigned IA Values, that the output from this step (i.e., the PDF file) is the input for the Documentum export step.
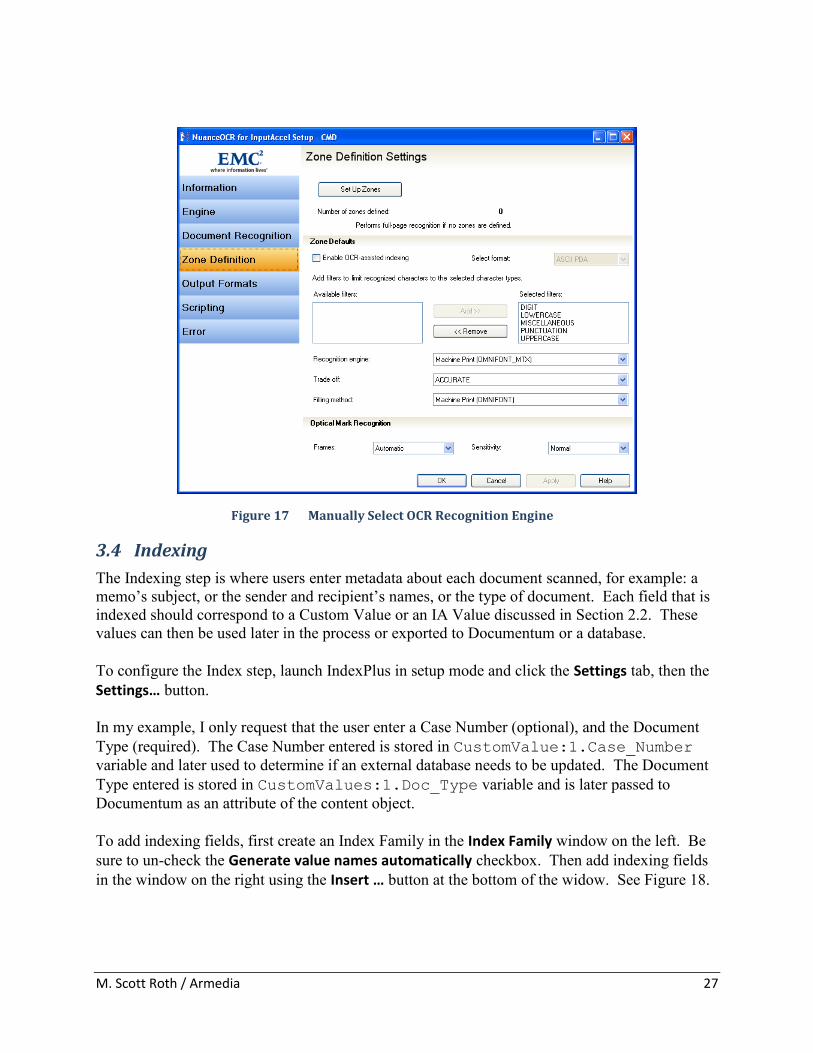
DocumentumExport:1.InputFile1 = OCR:1.OutputFile1_OutputFile One caveat with the OCR module: if you have sparse content with diverse character sets, sometimes the module gets confused about which recognition engine it should use and can throw memory fault exceptions. For example, I have noticed in my system that when I have computer-generated fax coversheets with a printed header in the top third of the page, and a hand written personal note below that, the OCR module can’t decide which recognition engine to use, print or handwriting. Content of this type frequently throws memory fault exceptions. I believe it is because there is not a large enough sample set for the module to determine which recognition engine gives the best results. To alleviate this problem, I manually set the Recognition engine to “Machine Print (OMNIFONT_MTX)”. See Figure 17.
M. Scott Roth / Armedia 27
Figure 17 Manually Select OCR Recognition Engine
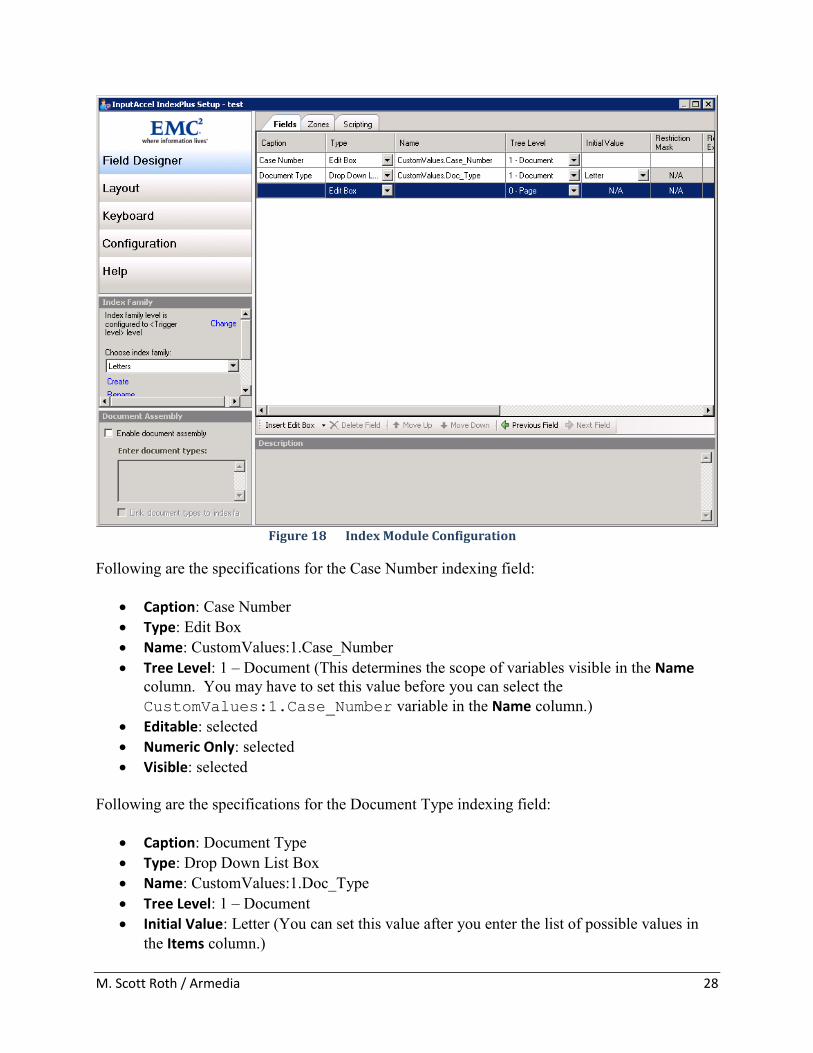
3.4 Indexing The Indexing step is where users enter metadata about each document scanned, for example: a memo’s subject, or the sender and recipient’s names, or the type of document. Each field that is indexed should correspond to a Custom Value or an IA Value discussed in Section 2.2. These values can then be used later in the process or exported to Documentum or a database. To configure the Index step, launch IndexPlus in setup mode and click the Settings tab, then the Settings… button. In my example, I only request that the user enter a Case Number (optional), and the Document Type (required). The Case Number entered is stored in CustomValue:1.Case_Number variable and later used to determine if an external database needs to be updated. The Document Type entered is stored in CustomValues:1.Doc_Type variable and is later passed to Documentum as an attribute of the content object. To add indexing fields, first create an Index Family in the Index Family window on the left. Be sure to un-check the Generate value names automatically checkbox. Then add indexing fields in the window on the right using the Insert … button at the bottom of the widow. See Figure 18.
M. Scott Roth / Armedia 28
Figure 18 Index Module Configuration
Following are the specifications for the Case Number indexing field:
Caption: Case Number Type: Edit Box Name: CustomValues:1.Case_Number Tree Level: 1 – Document (This determines the scope of variables visible in the Name
column. You may have to set this value before you can select the CustomValues:1.Case_Number variable in the Name column.)
Editable: selected Numeric Only: selected Visible: selected
Following are the specifications for the Document Type indexing field:
Caption: Document Type Type: Drop Down List Box Name: CustomValues:1.Doc_Type Tree Level: 1 – Document Initial Value: Letter (You can set this value after you enter the list of possible values in
the Items column.)
M. Scott Roth / Armedia 29
Editable: selected Items: Letter, Memo, Reply, Note Visible: selected
3.5 Documentum Export The EMC Documentum Advanced Export module allows you to automatically export content (i.e., your scanned and/or OCRed image) from InputAccel into Documentum. Of all the modules, I have found this one to be the most temperamental as to whom you login as to configure it. I recommend that you login to the server where the Documentum Export module will run, as the user who will be running it, in order to configure it. Obviously, since no configuration or logic implementation was possible for this module in CaptureFlow Designer, all of that work will be done here.
3.5.1 Connection Info
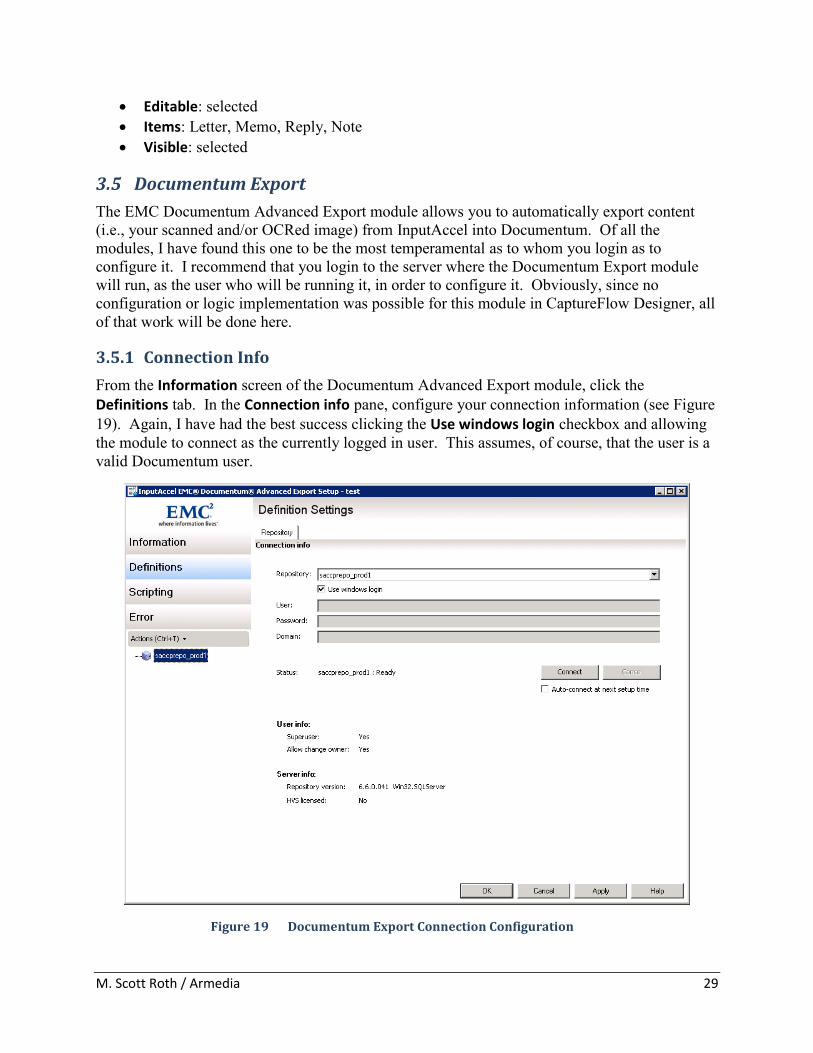
From the Information screen of the Documentum Advanced Export module, click the Definitions tab. In the Connection info pane, configure your connection information (see Figure 19). Again, I have had the best success clicking the Use windows login checkbox and allowing the module to connect as the currently logged in user. This assumes, of course, that the user is a valid Documentum user.
Figure 19 Documentum Export Connection Configuration

M. Scott Roth / Armedia 30
Also, un-check the Auto-connect at next setup time checkbox. This will require you to click the Connect button every time you run setup on this module (which shouldn’t be too often after this). However, it will also prevent the module from locking the user account by exceeding the failed login attempts should the user account or password that runs this module change.
Click the Connect button. The module will connect to the Documentum repository and extract some basic information. This process can take a minute or two depending upon all of the usual hardware and network conditions that can affect performance.
3.5.2 Storage Structure
Once the connection to the repository has completed, you should see a single node under the Actions tab menu that represents your repository.
In my process, correspondence is stored in a cabinet named /Correspondence. The Correspondence cabinet contains a folder structure into which the scanned documents will be placed. The structure of the folders is like this: /Year/Month/Day, such that each scanned document will be placed in a folder structure corresponding to the date on which it was scanned (see Figure 20). If any part of the folder structure does not exist (e.g., a new day or month), I have the Documentum Export module automatically create it.
Figure 20 Correspondence Storage Structure
3.5.3 Cabinet
The first step in the configuration task was to define the cabinet in which to build the folder structure. Right-click on the node representing the repository and choose Add definition… -> Cabinet. On the Object tab (see Figure 21), make the following settings:
Object type: Cabinet (dm_cabinet) Search for the object using its path: /Correspondence (You can click the Browse
button if you would like to browse the repository for the cabinet instead of typing its path.)
When the Exporter Cannot Find the Documentum Object: Create a new object When the Exporter Finds Multiple Documentum Objects: Use the first object found

M. Scott Roth / Armedia 31
Figure 21 Documentum Export Cabinet Configuration
3.5.4 Folders
Right-click the cabinet node (called ExistingCabinet0) and choose Add definition… -> Folder. A new folder is added to the cabinet, this will be the year portion of the storage path. Select the folder to display the definition settings for it. On the Object tab (see Figure 22), make the following settings:
Object type: Folder (dm_folder) Search for the object using its path: Create a new object (you have no choice here). When the Exporter Cannot Find the Documentum Object: Create a new object. This is
the key setting for automatically creating new folders when the day/month/year changes. When the Exporter Finds Multiple Documentum Objects: Use the first object found.

M. Scott Roth / Armedia 32
Figure 22 Documentum Export Folder Configuration
Now, click the Attribute tab to define the attributes that will be set for the new folder object (see Figure 23). Click the Populate Documentum system attributes checkbox and then click the New button. In the Attribute name column, select object_name from the drop down list. In the Value cell, enter or select @(CustomValues.y). Recall in Section 2.2.3, we defined the CustomValues:1.y value to contain the current year.
Select the NewFolder0 node and create a subfolder for the month portion of the storage path in the same manner you created the year folder. The value for its object_name attribute should be @(CustomValues.Month).
Repeat the process once more for the day folder. Give the object_name a value of @(CustomValues.Day).

M. Scott Roth / Armedia 33
Figure 23 Documentum Export Folder Attributes Configuration
3.5.5 Document Metadata Definition
Finally we get to the step where we define the content that will be exported from InputAccel into Documentum.
Select the last folder you defined, right-click and select Add definition… -> Document. On the Object tab, make sure the Object type is set to Document (dm_document). All of the other settings on this tab should default to the same settings as the folders you configured.
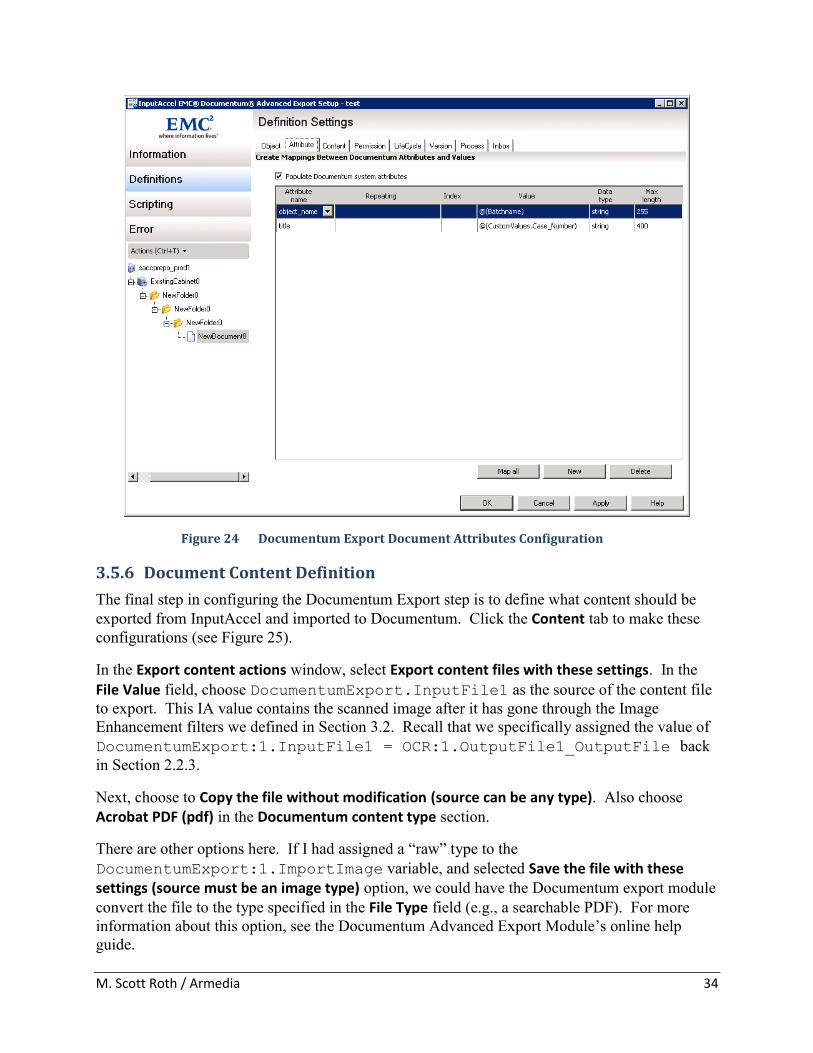
For my correspondence, I set two attributes, object_name and title, using IA and Custom Values entered or derived earlier in the process. Click the Attribute tab, make sure the Populate Documentum system attributes checkbox is checked, and click the New button. Add the object_name attribute and the title attribute. For the object_name attribute, assign it a value of @(Batchname), and for the title attribute, assign the value @(CustomValues:1.Case_Number). See Figure 24.
The @(Batchname) IA value contains the name of the scan batch which is controlled by the auto-batch creation template we defined in the scanning module (see Section 3.1.3). The @(CustomValues:1.Case_Number) contains the case number entered by the user in the Index step (see Section 3.4).
M. Scott Roth / Armedia 34
Figure 24 Documentum Export Document Attributes Configuration
3.5.6 Document Content Definition
The final step in configuring the Documentum Export step is to define what content should be exported from InputAccel and imported to Documentum. Click the Content tab to make these configurations (see Figure 25).
In the Export content actions window, select Export content files with these settings. In the File Value field, choose DocumentumExport.InputFile1 as the source of the content file to export. This IA value contains the scanned image after it has gone through the Image Enhancement filters we defined in Section 3.2. Recall that we specifically assigned the value of DocumentumExport:1.InputFile1 = OCR:1.OutputFile1_OutputFile back in Section 2.2.3.
Next, choose to Copy the file without modification (source can be any type). Also choose Acrobat PDF (pdf) in the Documentum content type section.
There are other options here. If I had assigned a “raw” type to the DocumentumExport:1.ImportImage variable, and selected Save the file with these settings (source must be an image type) option, we could have the Documentum export module convert the file to the type specified in the File Type field (e.g., a searchable PDF). For more information about this option, see the Documentum Advanced Export Module’s online help guide.

M. Scott Roth / Armedia 35
Click the Apply and OK buttons to save the configuration and close the module.
Figure 25 Documentum Export Document Content Configuration
3.6 ODBC Export The ODBC Export module allows you to send data to or extract data from a database. In my process, if a Case Number was entered in the Index step, the Case Number and the Documentum object Id need to be inserted into a table in an external database.
3.6.1 ODBC Connection
The first step in setting up the ODBC Export module is to configure an ODBC data source. Use the ODBC Data Source Administrator wizard [Start -> Programs -> Administrative Tools -> Data Sources (ODBC) on most workstations] to configure a System DSN on the computer that will be running the ODBC Export module. In defining the ODBC connection, you can specify “Windows NT Authentication” if the ODBC Export module will be run as an account that has database access, or you can specify a specific login user. Make sure you set the default database to the correct database. This will simplify your queries somewhat.

M. Scott Roth / Armedia 36
3.6.2 ODBC Export Module Configuration
Once a System DSN has been created, you can launch the ODBC Export module in setup mode using one of the methods described earlier in this section. Again, I found it best to do this from the computer that will be running the module.
3.6.2.1 Data Source Connection
Once the ODBC Export module is open, click the Connect… button in the Data Source panel to establish the ODBC connection for the module (see Figure 26). Select the System DSN you created in Section 3.6.1. If you have multiple System DSNs configured, you will see them listed here. It is possible to configure queries to run against multiple databases.
Figure 26 ODBC Export Configuration
3.6.2.2 Mappings
Click the New… button in the Mapping panel to create a new mapping (i.e., a new query). The Edit Mapping window will appear (see Figure 27).
In the Data source field, select the DSN you configured in Section 3.6.2.1. In the Export from Level field, select Document. Remember from Section 2.1 that
InputAccel maintains scan information at numerous levels (e.g., batch, document, page). We are configuring the ODBC Export module to trigger and export information on a per document basis.
In the Action panel, choose Run SQL. This is not the obvious choice since we will be writing an “Insert” query to update the database. However, I have determined that the Run SQL selection here is the easiest option. I have encountered problems using the “Insert” action that are magically resolved by selecting Run SQL.
M. Scott Roth / Armedia 37
3.6.2.2.1 SQL Query
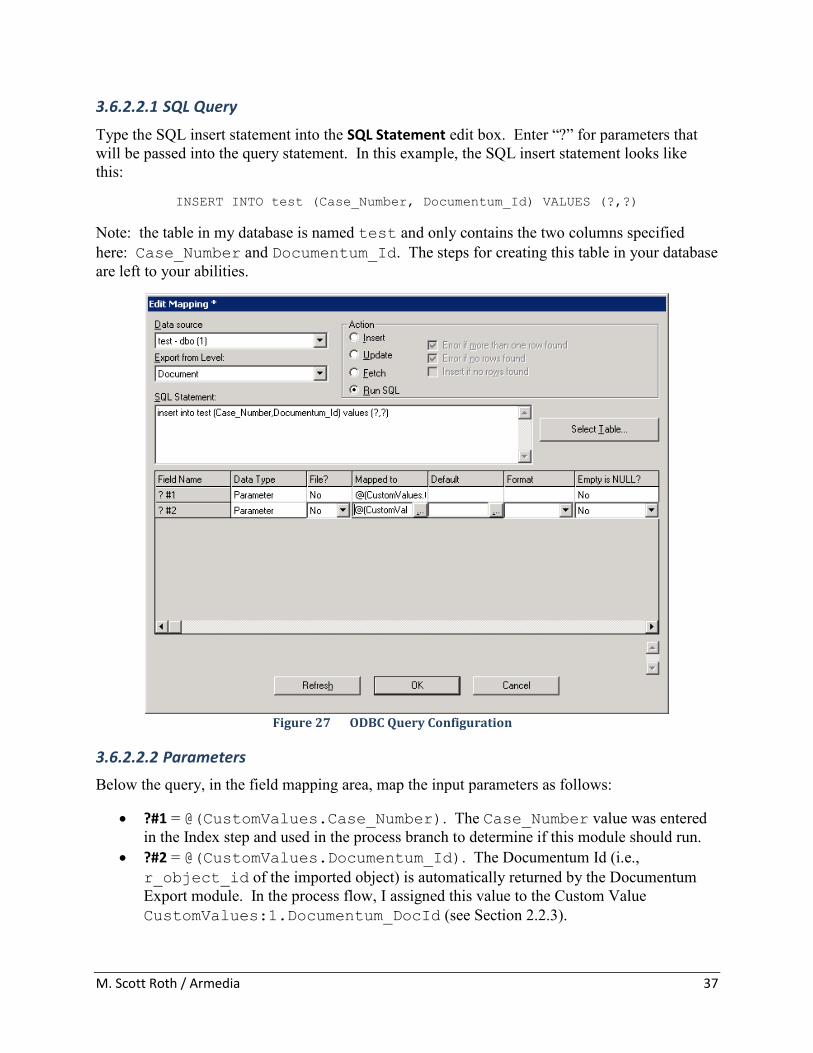
Type the SQL insert statement into the SQL Statement edit box. Enter “?” for parameters that will be passed into the query statement. In this example, the SQL insert statement looks like this:
INSERT INTO test (Case_Number, Documentum_Id) VALUES (?,?)
Note: the table in my database is named test and only contains the two columns specified here: Case_Number and Documentum_Id. The steps for creating this table in your database are left to your abilities.
Figure 27 ODBC Query Configuration
3.6.2.2.2 Parameters Below the query, in the field mapping area, map the input parameters as follows:
?#1 = @(CustomValues.Case_Number). The Case_Number value was entered in the Index step and used in the process branch to determine if this module should run.
?#2 = @(CustomValues.Documentum_Id). The Documentum Id (i.e., r_object_id of the imported object) is automatically returned by the Documentum Export module. In the process flow, I assigned this value to the Custom Value CustomValues:1.Documentum_DocId (see Section 2.2.3).

M. Scott Roth / Armedia 38
One thing to note about parameters and SQL statements: I have discovered that you need to enter them from beginning to end, with correct parameter placement and mapping. If, after you have entered the SQL, you need to add, remove, or rearrange the parameters, you should just delete the SQL and mappings completely and re-enter them. The problem is that parameter mappings seem to get assigned once and don’t adjust with changes in the SQL. For example, if I changed my query by inserting a column and parameter between Case_Number and Documentum_Id, parameter ?#1 would still map to Case_Number, and ?#2 would still map to Documentum_Id even though it is now the third parameter in the SQL statement (see Figure 28). If you aren’t careful, this can cause a great deal of confusion, and as you will see in Section 4, troubleshooting ODBC Export is not simple.
Figure 28 SQL Parameter Confusion
3.7 Multi The Multi module was not directly included in our CaptureFlow Designer process, but was indirectly included when the End node was configured to Delete Batches. Multi does not require any configuration, but needs to be running on the IA Module Server in order to delete batches as they complete.

M. Scott Roth / Armedia 39
4 Testing and Debugging This section summarizes the few tips I have gathered for debugging and testing processes in InputAccel. Unfortunately, InputAccel does not have a unified development/debugging environment. Therefore, to debug a process or problem batch, you have to jump around among several screens, tools, and servers.
4.1 Admin Console One of the most valuable tools for testing and debugging a capture process or misbehaving batch is the InputAccel Administration Console. From the Administration Console you can view batch details, to include the status of each step; view and modify IA and Custom Values; clear errors and retrigger steps; and view log files. Each of these capabilities is discussed in the following sections.
In addition, the InputAccel Administration Console provides real-time information concerning batches, modules, steps, licenses, etc. See the online EMC Captiva InputAccel Administration Guide for more information about the InputAccel Administration Console.
Remember, changes made to a process file, that is the IAP file compiled in CaptureFlow Designer, will only effect new batches. Running batches will continue to use the process file that was in place when the batch was created.
4.1.1 Batch Settings - Tasks
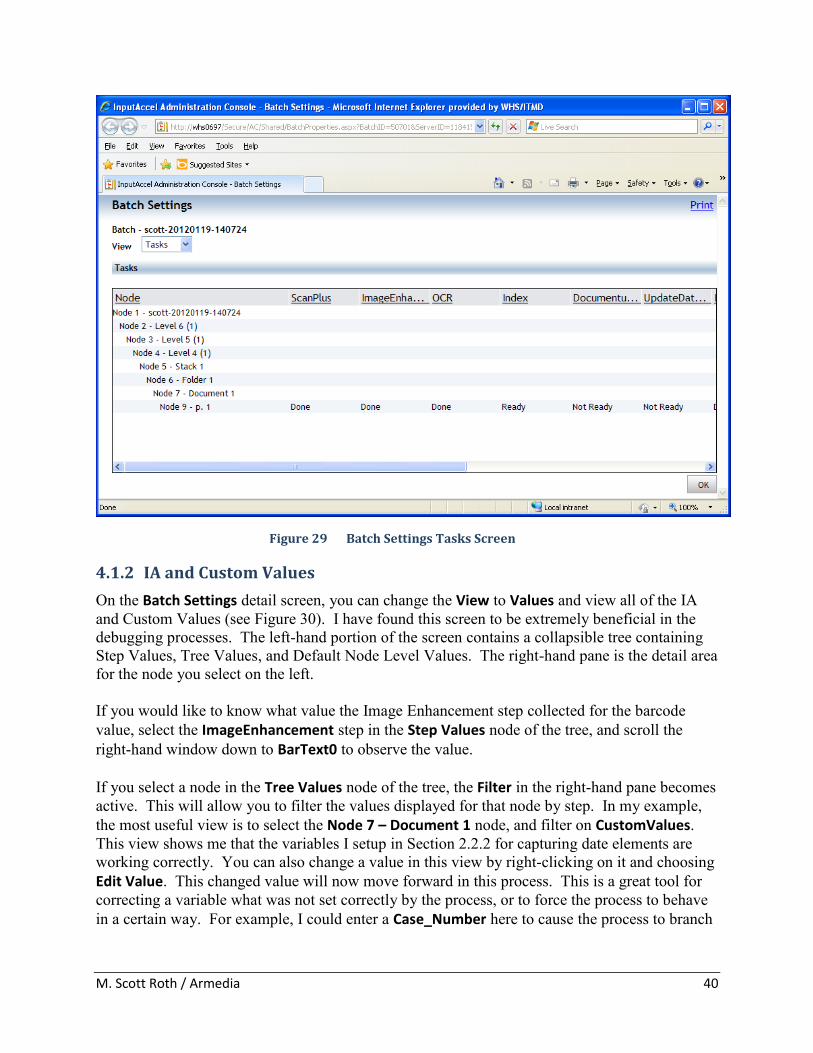
Double clicking on a batch name on the Batch Traffic screen of the Administration Console will open the Batch Settings detail screen for that batch (see Figure 29). From here, you can determine where the batch is in the process. In this example, the batch is waiting for the Index step. By right-clicking on the status (e.g., Done), you can choose Show Image and view the scanned image that a step is processing.
M. Scott Roth / Armedia 40
Figure 29 Batch Settings Tasks Screen
4.1.2 IA and Custom Values
On the Batch Settings detail screen, you can change the View to Values and view all of the IA and Custom Values (see Figure 30). I have found this screen to be extremely beneficial in the debugging processes. The left-hand portion of the screen contains a collapsible tree containing Step Values, Tree Values, and Default Node Level Values. The right-hand pane is the detail area for the node you select on the left. If you would like to know what value the Image Enhancement step collected for the barcode value, select the ImageEnhancement step in the Step Values node of the tree, and scroll the right-hand window down to BarText0 to observe the value. If you select a node in the Tree Values node of the tree, the Filter in the right-hand pane becomes active. This will allow you to filter the values displayed for that node by step. In my example, the most useful view is to select the Node 7 – Document 1 node, and filter on CustomValues. This view shows me that the variables I setup in Section 2.2.2 for capturing date elements are working correctly. You can also change a value in this view by right-clicking on it and choosing Edit Value. This changed value will now move forward in this process. This is a great tool for correcting a variable what was not set correctly by the process, or to force the process to behave in a certain way. For example, I could enter a Case_Number here to cause the process to branch

M. Scott Roth / Armedia 41
if the document did not contain a Case_Number and the process had not advanced beyond the branch. You can also view the image file, copy it from the server, or replace it with a different file by right-clicking on one of the IA Values that references the image (e.g., Node 7 – Document.OutputFile1_OutputFile). This can be useful if you want to view or manipulate an image on your workstation, outside the context of the batch or InputAccel completely.
Figure 30 Batch Settings Values Screen
4.1.3 Clearing Errors and Retriggering steps
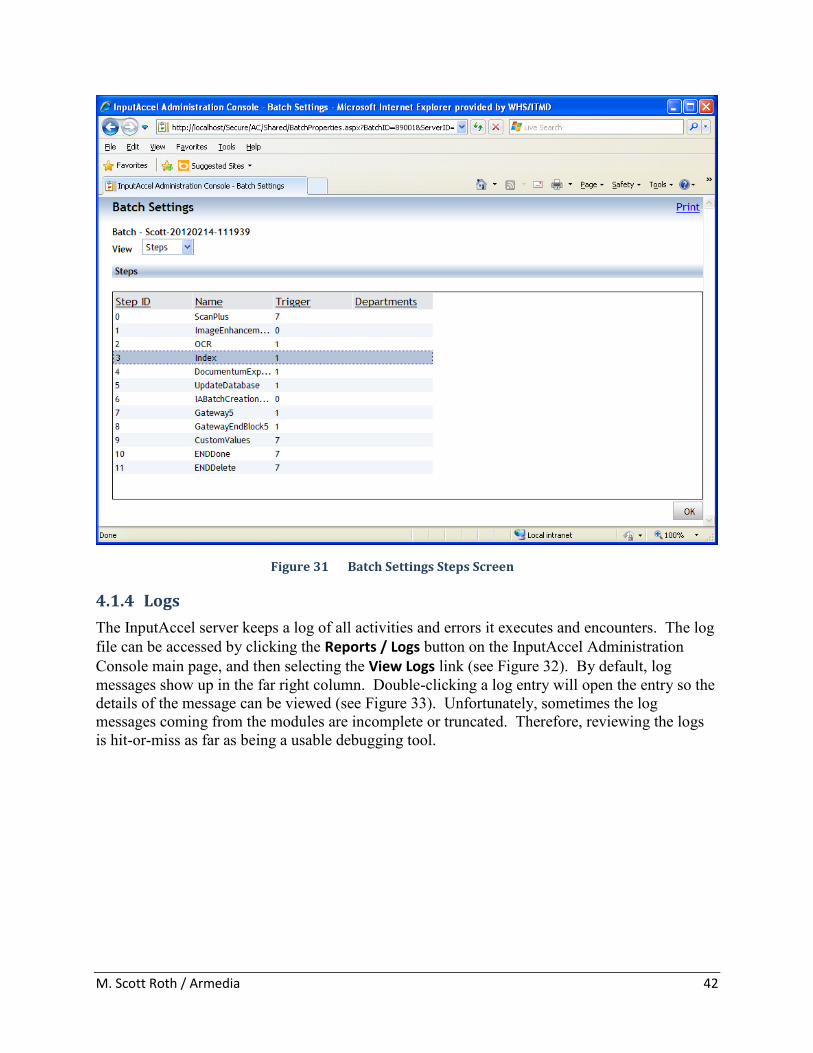
Changing the View on the Batch Settings screen to Steps lists the steps in the process (see Figure 31). I haven’t found this screen to be overly helpful except for one nice feature. If you have a task that failed a step for some reason you can clear the error and retrigger the step after making adjustments to the IA Values or Custom Values.
To clear an error and retrigger a step, right-click the step and choose Clear Task Errors and then Retrigger. This will retrigger the step. If you want to skip this step, you can set the IA Value RetriesLeft to 0 on most steps and retrigger. There can be ramifications for doing this if later steps in the process depend upon the output of the skipped step; caveat emptor.
M. Scott Roth / Armedia 42
Figure 31 Batch Settings Steps Screen
4.1.4 Logs
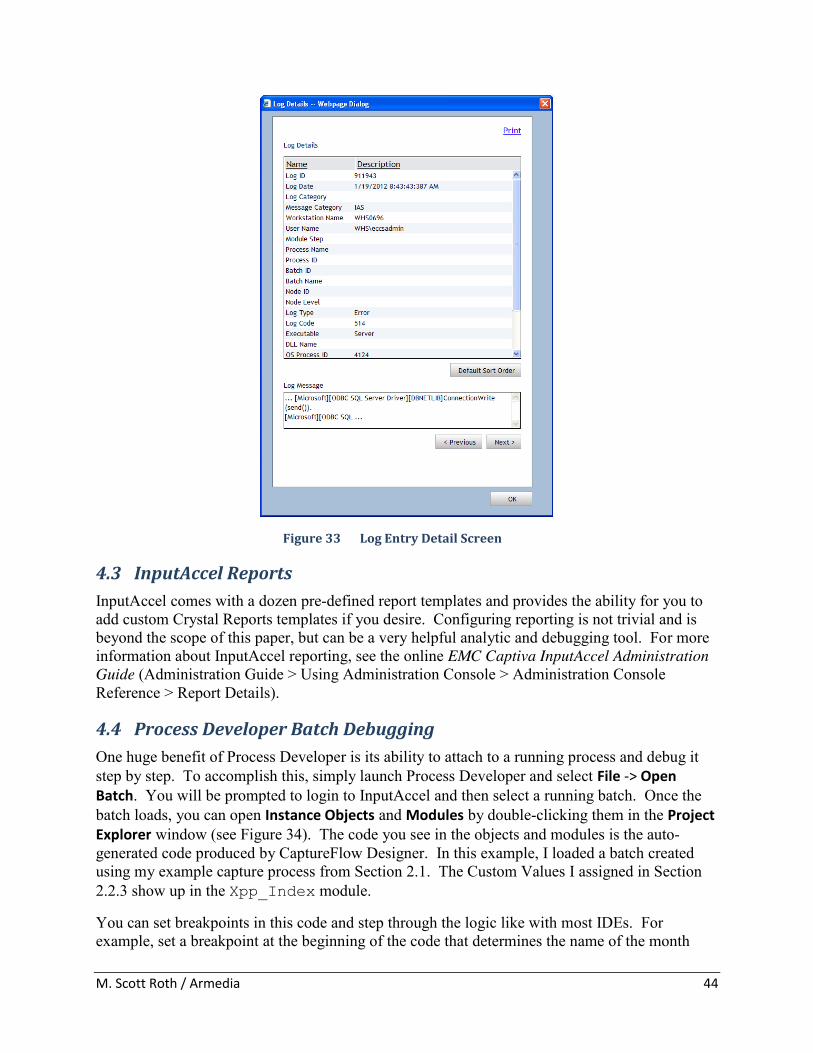
The InputAccel server keeps a log of all activities and errors it executes and encounters. The log file can be accessed by clicking the Reports / Logs button on the InputAccel Administration Console main page, and then selecting the View Logs link (see Figure 32). By default, log messages show up in the far right column. Double-clicking a log entry will open the entry so the details of the message can be viewed (see Figure 33). Unfortunately, sometimes the log messages coming from the modules are incomplete or truncated. Therefore, reviewing the logs is hit-or-miss as far as being a usable debugging tool.

M. Scott Roth / Armedia 43
Figure 32 Logs Screen
4.2 The InputAccel Database If you have access to the InputAccel database directly, it can be helpful to look at some of the underlying tables and data that power InputAccel.
The Log Screen, discussed in Section 4.1.4, gets its data from the Tbl_AuditErrorLog table. Also:
Batches are maintained in the Tbl_Batches table. Licenses are maintained in the Tbl_LicPolicy table.
There are numerous tables that deal with users, roles, and security as well as reporting. Sometimes, viewing this data directly can aid in debugging a process.
M. Scott Roth / Armedia 44
Figure 33 Log Entry Detail Screen
4.3 InputAccel Reports InputAccel comes with a dozen pre-defined report templates and provides the ability for you to add custom Crystal Reports templates if you desire. Configuring reporting is not trivial and is beyond the scope of this paper, but can be a very helpful analytic and debugging tool. For more information about InputAccel reporting, see the online EMC Captiva InputAccel Administration Guide (Administration Guide > Using Administration Console > Administration Console Reference > Report Details).
4.4 Process Developer Batch Debugging One huge benefit of Process Developer is its ability to attach to a running process and debug it step by step. To accomplish this, simply launch Process Developer and select File -> Open Batch. You will be prompted to login to InputAccel and then select a running batch. Once the batch loads, you can open Instance Objects and Modules by double-clicking them in the Project Explorer window (see Figure 34). The code you see in the objects and modules is the auto-generated code produced by CaptureFlow Designer. In this example, I loaded a batch created using my example capture process from Section 2.1. The Custom Values I assigned in Section 2.2.3 show up in the Xpp_Index module.
You can set breakpoints in this code and step through the logic like with most IDEs. For example, set a breakpoint at the beginning of the code that determines the name of the month

M. Scott Roth / Armedia 45
(i.e., If (p1.CustomValues.m = 1) Then) in the Xpp_Index module. Open the IndexPlus module on your workstation and complete the index step. As soon as the IndexPlus module calls the code to complete its processing, your breakpoint will hit and stop the process. You can then step through the code to determine if the name of the month is being properly derived.
Know that changing anything here will only affect the batch you are debugging. You are not making these changes to the process template. This is both good and bad. Good in the sense that you can’t “ruin” anything. Bad in that once you figure out a fix, you will have to return to CaptureFlow Designer to implement it.
Figure 34 Debugging in Process Builder
4.5 ODBC Log If you use the ODBC Export module, as I did in my example process, you can use ODBC Data Source tracing files to help debug interactions between the module and the database. To enable ODBC tracing, open the ODBC Data Source Administrator and click the Tracing tab. Click the Start Tracing Now button to start tracing (see Figure 35).
ODBC tracing will write numerous messages to the trace file you indicate in the Log File Path field. Unfortunately, ODBC trace files are not the easiest files to decipher. However, for gross errors, you should be able to figure out the issue from the entries in this log file.

M. Scott Roth / Armedia 46
Figure 35 ODBC Tracing
4.6 IA Server Debug Mode You can log debug information about several of the InputAccel client modules by setting IAClientDebug = 1 in the C:\Documents and Settings\All Users\ Application Data\EMC\InputAccel\settings.ini file. This setting will create a log file named c:\iaclient.log. Also, many of the InputAccel modules have the option to save a log file if they are run in client mode (as opposed to unattended mode).
4.7 SQL Server Profiler If you are using Microsoft SQL Server as your InputAccel database, you can use the SQL Server Profiler tool available from Tools menu of the Microsoft SQL Server Management Studio to capture and analyze queries InputAccel submits to the database. Though a laborious process, occasionally you can capture an errant query.

M. Scott Roth / Armedia 47
5 Wrap Up My experience with InputAccel has been strictly trial and error; I did not attend any training classes, in-person or otherwise (perhaps it shows). Outside of some email and phone calls with an EMC Captiva engineer whom I know personally, and a fellow engineer at Armedia with extensive Captiva experience, my project was successfully accomplished by me trying and testing anything and everything that seemed reasonable. In the end, I think development and deployment of my InputAccel project was relatively simple, it just took a while to get there. Having struggled with the environment, the architecture, the paradigms, and concepts encapsulated by InputAccel, I have formulated a few suggestions that I think would make developing InputAccel solutions easier and more intuitive. If CaptureFlow Designer is the central tool for development, then all activities involved with development should be brought into the tool. For example:
You should be able to install a process from CaptureFlow Designer after it has been compiled. Process Developer allows you to do this.
After a process has been installed, you should be able to launch each module for setup from CaptureFlow Designer to continue the development process.
CaptureFlow Designer should provide the same debugging facilities as Process Developer; specifically, step-by-step debugging of a batch, and the ability to load an exported batch.
CaptureFlow Designer needs a better built-in facility for creating “Scripts” for modules that is more on par with the capabilities of Process Developer.
Log rules and reporting should be more intuitive and f possible, brought into the CaptureFlow Designer tool.
Perhaps some of these capabilities will be realized in Captiva v7 expected late in 2012. This document contains the extent of my experiences and best practices (as I have come to know them). Hopefully the knowledge I have gained will be helpful to someone as green as I was when I started my project.
5.1 Advanced Topics Before wrapping this up, I’d like to briefly visit some advanced topics; there are four I think are important to mention: logging and reporting, module scripting, custom modules, and web services. All of these topics and others are covered in the online help files distributed with InputAccel.

M. Scott Roth / Armedia 48
5.1.1 Logging and Reporting
As I briefly touched on in Section 4.1.4 and Section 4.3, InputAccel has a substantial logging and reporting facility. It is possible to create custom logs and log filters to view and track information pertinent to your process. It is also possible to include some IA and Custom Values in these logs.
InputAccel also has a reporting facility that allows you to create and run canned or custom reports using Crystal Reports. These reports typically have a more sophisticated layout than log files, and usually operate on data generated between two dates, as opposed to log files which are open ended.
Creating and configuring reports and logs is not trivial, but worth the investment to understand the process.
5.1.2 Module Scripting
Most of the InputAccel modules have a Scripting tab which allows you to write custom processing code to be invoked when certain events occur within the module. This capability harkens back in some ways to the abilities provided in Process Developer for writing custom code. However, the tool for developing this code is little more than a text editor with no autocompletion built-in. Therefore, without extensive knowledge of the InputAccel class model and API, you are left virtually clueless. That said, mastery of InputAccel at this level could yield some exceptionally powerful results.
5.1.3 Custom Modules
It is possible to write your own InputAccel modules to perform specific tasks or functions. For example, automatically rotating an image 90 degrees, or exporting data to a non-ODBC-compliant database, or applying rights management to a scanned document. The best description I have found of doing this is in EMC engineering solution note ESG108510. There are also some helpful examples in the ..\InputAccel\Client\src\Scripts\ Samples\ directory.
5.1.4 Web Services
InputAccel also has the capability to provide and consume web services. This allows your scanning environment to easily traverse the globe and provide scanning capabilities over the Internet or private WAN. Web service setup and configuration is addressed in the EMC Captiva InputAccel System Overview: The Basics of InputAccel guide as well as the online Web Services Scripting API Reference guide.
5.2 Thanks I want to thank Lee Grayson (Armedia) for his longsuffering patience with me and expert help in getting me through my first InputAccel project. Much of what I learned and documented here was from Lee or based upon knowledge I gained from one of his suggestions. I also want to thank Jesse Rauch (EMC\Captiva) for all of his help, suggestions, and support with my project.

M. Scott Roth / Armedia 49
5.3 About the Author M. Scott Roth is a Director of Technology at Armedia, LLC. Mr. Roth has been in the enterprise content management business for 15 years and maintains a blog dedicated to capturing and sharing tips related to Documentum at http://msroth.wordpress.com.
<SDG><