Embed Size (px)
Citation preview
c360 Solutions
c360 Web Connect Configuration
Guide Microsoft Dynamics CRM 2011 compatible
c360 Solutions, Inc.
www.c360.com

Page 2 of 16 4/15/2011 www.c360.com
Contents____________________________________
Overview......................................................................................................... 3
Web Connect Configuration ............................................................................... 4
Implementing Web Connect ......................................................................... 4
Creating Web Forms for use with Web Connect .............................................. 4
Sample Forms ............................................................................................ 6
Form Field Input Validation .......................................................................... 6
Web Connect Configuration Tool ................................................................... 7
Global Settings ........................................................................................... 8
Capture Page Settings ................................................................................. 9
Mappings ................................................................................................. 10
Actions .................................................................................................... 11
Publishing Web Connect to your web site ..................................................... 15
Testing Web Connect ................................................................................ 16

Page 3 of 16 4/15/2011 www.c360.com
Overview _____________________________
c360 Web Connect for Microsoft CRM is a Microsoft CRM compatible component that
allows organizations using Microsoft CRM to easily integrate their web site to
Microsoft CRM for lead and web visitor activity capture. Web Connect will allow
organizations to:
- Link multiple web site forms to CRM to create Lead and Activity records.
- By form, Web Connect can be configured execute any or all of the following
actions:
o Email all web form values and actions taken to an SMTP address,
record owner, record owner’s manager or team in CRM
o Match by email address and create new Lead or Activity depending on
whether email address was matched to an existing Lead or Contact
o Create an additional CRM activity to log form field values and actions
taken (same information as sent in email)
o Send a configurable HTML or text (administrator may specify)
formatted confirmation email to visitor
o Specify a URL to which to post one or more of the form field values
(e.g. this action may be used for opting visitor into a 3rd party email
list)
o Run a manual workflow rule in CRM

Page 4 of 16 4/15/2011 www.c360.com
Web Connect Configuration _______________
Implementing Web Connect
Several steps are necessary to implement Web Connect for use in your organization.
The steps to implement Web Connect are:
1. Download Web Connect: Download Web Connect from www.c360.com
2. Install the Web Connect configuration tool: The Web Connect installation
guide includes step-by-step instructions to install Web Connect. When you
install Web Connect, you are actually installing the Web Connect configuration
tool. You will use this to configure Web Connect then you will use its
deployment feature to deploy Web Connect components to your web site.
3. Create web forms: Create your web forms from the Web Connect templates
or build your own web forms.
4. Copy web forms to your web site: Once you have created your web forms
you will copy them to the area on your site where you would like them to
reside.
5. Configure web form fields and actions: Using the Web Connect
configuration tool configure each form so that its fields correctly map to the
CRM Lead fields and the appropriate actions are taken upon form submittal.
6. Publish Web Connect to Web: In the Web Connect configuration tool you
can select the ‘Publish Web Connect to Web’ option. This will move the
necessary Web Connect components out onto your web site so Web Connect
will operate properly when forms are submitted.
7. Test Web Connect: Prior to creating links from your production site to your
new forms, test each form to ensure that the values entered are properly
flowing through to your Microsoft CRM installation.
8. Go Live: Link your new forms from your web site so that your visitors will be
directed to them and visitor data will begin to show up in CRM.
Creating Web Forms for use with Web Connect
c360 Web Connect allows for existing company web capture pages to integrate into
CRM. In order to do this, the forms you would like to integrate into CRM must follow
the format shown below. Specifically:
- Web forms must post to the WebConnect.aspx page. This page is provided
with Web Connect and is published to your web site when you publish Web
Connect.
- Web form fields that are to map to picklist field types on the Microsoft CRM
Lead records must contain the correct ID values to correspond to the CRM
field’s integer values (note: in Microsoft CRM picklists field values consist of
both a text description as well as an integer ID value)
- Web forms must require the visitor’s email address. This is what Web
Connect uses to determine if the visitor already exists in your CRM database.
- Web forms should validate the data being entered into them. Web Connect
will not attempt to validate the data that is being entered. If inappropriate
data is entered and CRM is unable to process it, the details of the error will be

Page 5 of 16 4/15/2011 www.c360.com
emailed to your Web Connect administrator. Adding Java Script into your
forms to validate input will reduce potential errors.
Below is the HTML for the SimpleInfo.htm form that is included with Web Connect.
This shows the necessary elements for a Web Connect form.
<html>
<head>
<meta http-equiv="Content-Type" content="text/html; charset=windows-1252">
<title>Caption</title>
</head>
<body>
<form method="POST" name="frmCRMLead"
action="../webconnect.aspx?OrgName=[organizationname]" id="Form1">
<table border="0" width="600" id="table1" cellspacing="0"
cellpadding="0">
<tr>
<td width="50%"><b>Contact Us</b></td>
<td width="50%"></td>
</tr>
<tr>
<td width="50%">First Name:</td>
<td width="50%"> <input type="text" name="firstname"
size="20"></td>
</tr>
<tr>
<td width="50%">Last Name:</td>
<td width="50%"> <input type="text" name="lastname"
size="20"></td>
</tr>
<tr>
<td width="50%">E-mail</td>
<td width="50%"> <input type="text"
name="emailaddress1" size="20"></td>
</tr>
<tr><td width = "50%"><input type="submit" name="btnSubmit"
value="submit" >
</table>
</form>
</body>
</html>

Page 6 of 16 4/15/2011 www.c360.com
Sample Forms
The Web Connect installation zip file includes several sample forms that may be used
as templates or guides in developing your own web site forms. The forms are
described in the table below and are all plain forms with no graphical formatting.
These forms have been created to use standard CRM Lead fields and values so
modification will be necessary if you wish to collect values for custom fields you have
added to your CRM Lead records.
Sample Form Name Form Description
AllCRMLeadFields.htm This is an example form which includes all standard Microsoft CRM Lead values. This form is useful as a template from which you can remove fields you do not wish to collect and add fields you do wish to collect
ContactUs.htm This is a simple information collection form to gather a visitor’s information and solicit their comments. The fields included are:
- First Name
- Last Name - Company Name - Business Phone Number - Email Address - Comments
SimpleInfo.htm This form asks the visitor only for first name, last name and email address. This may be appropriate for use when you are simply building a list of email addresses for marketing purposes.
Form Field Input Validation
As mentioned earlier, Web Connect will not validate the data your web visitors enter.
To validate the visitors’ data entry you may wish to add Java Script to the forms to
validate that the visitor is entering data in the format you desire. For example, when
asking for an email address you may wish to use Java Script to ensure that the
address contains at least an ‘@’ symbol and a ‘.’. Email addresses without both
these characters cannot e valid. Below is an example of a Java Script function to
validate the fields in SimpleInfo.htm.
<SCRIPT language="javascript">
function ValidateFields() {
if (frmCRMLead.firstname.value == "") {;
alert("Please enter your first name.");
return false;
}
if (frmCRMLead.lastname.value == "") {;
alert("Please enter your last name.");
return false;
}
if (frmCRMLead.emailaddress1.value == "") {;
alert("Please enter your email address.");
return false;
}
if ((frmCRMLead.emailaddress1.value.indexOf("@") == -1) &&
(frmCRMLead.emailaddress1.value.indexOf(".") == -1)) {;
alert("Please enter a valid email address.");
return false;
}
return true;

Page 7 of 16 4/15/2011 www.c360.com
}
</SCRIPT>
To add the Java Script validation function above to one of the template Web Connect
forms insert the code above into the form and change the following line in the form…
<input type="submit" name="btnSubmit" value="submit" >
…to the line below so the ‘ValidateFields’ Java Script function will be called when the
form is submitted.
<input type="submit" name="btnSubmit" value="submit" onClick="return
ValidateFields();>
Web Connect Configuration Tool
Once you have built your forms and placed them on your web site, you must use the
Web Connect configuration tool to configure how the form fields map to CRM lead
values and to indicate which actions you would like to take place when the form is
submitted.
Double-click on the c360.WebConnect.Configuration.exe to launch the Web Connect
Setup tool. Before configuring individual Capture Pages, the settings on this tab must
be completed.
Choose the Organization to install Web Connect for
Figure 1. Choose Organization screen

Page 8 of 16 4/15/2011 www.c360.com
Global Settings
The Global Settings screen, pictured below, is where you provide Web Connect the
basic information it needs to interact with your Microsoft CRM installation.
Figure 2: Configuring Web Connect global settings
The table below describes the information that should be entered into each field on
the Global Settings screen.
Setting Description Example
CRM Server The machine name of the CRM server crm.adventureworkscycle.com
Virtual Directory The virtual directory where the CRM web services reside. By default this will be mscrmservices
mscrmservices
Domain Name The domain on which CRM is installed awc
CRM User Name The CRM user that Web Connect uses to connect to CRM and create CRM Lead and Activity records
Portal.Web.Service
CRM Password The password for the CRM user mentioned above
Enter password here
Confirm CRM Password Repeat the password for the CRM user
Enter password here

Page 9 of 16 4/15/2011 www.c360.com
Capture Page Settings
To configure individual capture pages, go to the Capture Page Settings tab, pictured
in Figure 3, and click ‘Add’.
The ‘Edit’ button will allow you to modify existing pages you have already
configured.
The ‘Delete’ button will delete any configurations you no longer wish to complete.
The ‘Copy’ button will allow you to make and rename a copy of form settings that
are already configured.
Figure 3: Web capture pages

Page 10 of 16 4/15/2011 www.c360.com
Capture Page Configurations
To configure a capture page’s settings you will need to specify the pages’ field
mappings and actions to take place when a form is submitted by a web visitor.
Mappings
The Mappings tab is where you tell Web Connect how the fields on your web from
should map to the fields on the CRM Lead form. The mappings form is pictured in
figure 4.
Figure 4: Map data from your web form to the CRM Lead record
NOTE:
• If you are mapping a picklist field and setting a default value, that entry
should be the CRM picklist value, not the CRM picklist label
• Default values are supported for text boxes

Page 11 of 16 4/15/2011 www.c360.com
Actions
Click the ‘Actions’ tab is where you will tell Web Connect what you would like to
happen each time a web visitor completes the web form and clicks submit. Figure 5
shows the Actions tab.
Figure 5: Configure actions
The following table provides a description of each setting on the Actions tab.

Page 12 of 16 4/15/2011 www.c360.com
Setting Description
Create CRM lead record if visitor email address not already in CRM
When checked, will create a lead in CRM using the Capture Page mappings set on Mappings tab.
Assign new lead record owner The CRM user or team this lead record will be assigned to
Create History Activity Will create an activity on the lead or contact record with the information captured in the form. See Figure 6
Create Activity for Recall A reminder activity to follow up on this lead
Internal Notification Sends internal email notifying employee of the newly added lead. Can be a logical CRM user (Owner, Owner’s Manager, Owner’s Team) or a non CRM user using SMTP. See figure 7.
Visitor Confirmation Email Sends email to the visitor of the webpage. Configurable using form fields from the capture page. Can also be written in HTML for special formatting. See Figure 8.
Workflow Choose Lead and Contact workflow rules to run. You might have internal business rules that require workflow to run when leads or contacts are created.
Form Post Optional additional internal or 3rd party post page to process form field values.
Redirection URL The URL that is displayed to the visitor after submitting the form.
Figure 6 shows the configuration screen for the history activity that Web Connect can
create. This Activity is useful for logging the visit and capturing the values that were
entered. For example, when a visitor whose email address is already in your CRM
database visits your site and completes a form it is good to have this activity created
so you will be aware of his visit.
Figure 6: Setting for the history Activity
Page 13 of 16 4/15/2011 www.c360.com
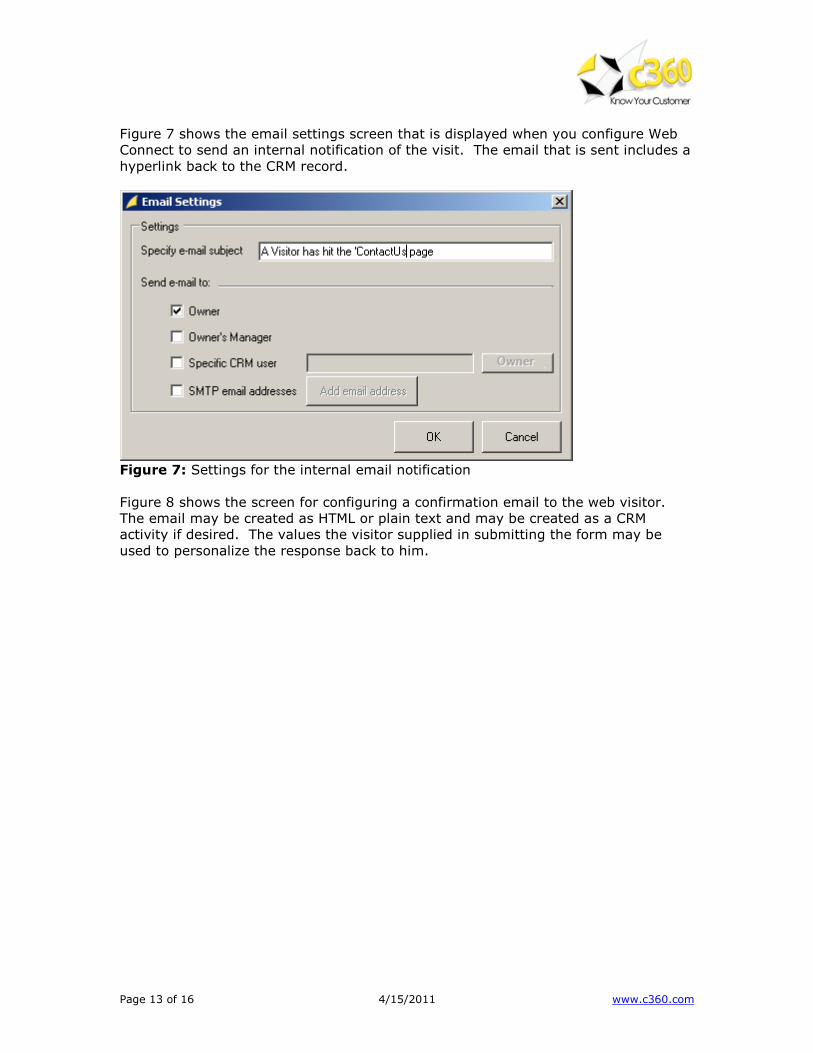
Figure 7 shows the email settings screen that is displayed when you configure Web
Connect to send an internal notification of the visit. The email that is sent includes a
hyperlink back to the CRM record.
Figure 7: Settings for the internal email notification
Figure 8 shows the screen for configuring a confirmation email to the web visitor.
The email may be created as HTML or plain text and may be created as a CRM
activity if desired. The values the visitor supplied in submitting the form may be
used to personalize the response back to him.

Page 14 of 16 4/15/2011 www.c360.com
Figure 8: Configuring the confirmation email to be sent to web visitors
If you elect to run a workflow you may select which workflow to run when the CRM
record in question is a Lead or a Contact. This is pictured in figure 9. Remember
that in some cases (when the visitor’s email is not found in CRM) Web Connect will
create a new Lead record. In other cases (when the visitor’s email is found in CRM)
Web Connect will be performing actions against an existing Lead or Contact record.
This is important to consider in case you have workflow rules firing on the ‘creation’
event of Lead records.

Page 15 of 16 4/15/2011 www.c360.com
Figure 9: Selecting a workflow rule to run when the form is submitted
Publishing Web Connect to your web site
Once you have configured all your form settings you are ready to publish the Web
Connect components to your web site. Remember, prior to doing this you must copy
your web forms to the appropriate location(s) on your web site. Publishing will put
other necessary components out onto the web site so your web forms can access
these components and these components can, in turn, access Microsoft CRM.
Click the ‘Publish Web Connect to Web’ button and the publish screen, pictured in
figure 10 will appear.
Figure 10: Publishing Web Connect components to your web site

Page 16 of 16 4/15/2011 www.c360.com
Using the selection buttons on the publish form select your web site’s virtual
directory where the main web site pages reside as well as the site’s bin directory
where any executable components of your web site reside. If you do not have a bin
directory you can simply create a directory named ‘bin’ under the root directory of
your web site.
Testing Web Connect
Now that you have published the Web Connect components open a browser and type
in the URL for one of your Web Forms. Figure 11 below shows the sample ‘Contact
Us’ form supplied with Web Connect. Complete the form and click the submit button
and, after a brief processing period, you will be redirected to the specified redirection
page.
Figure 11: The Web Connect sample ‘Contact Us’ form
Once you have been redirected to the redirection page, open CRM to verify that the
expected actions have taken place.