Embed Size (px)
Citation preview
c360 Email to Case Installation and Configuration Guide Microsoft Dynamics CRM 2011 compatible
c360 Solutions, Inc. www.c360.com [email protected]
www.c360.com Page 2 8/27/2011
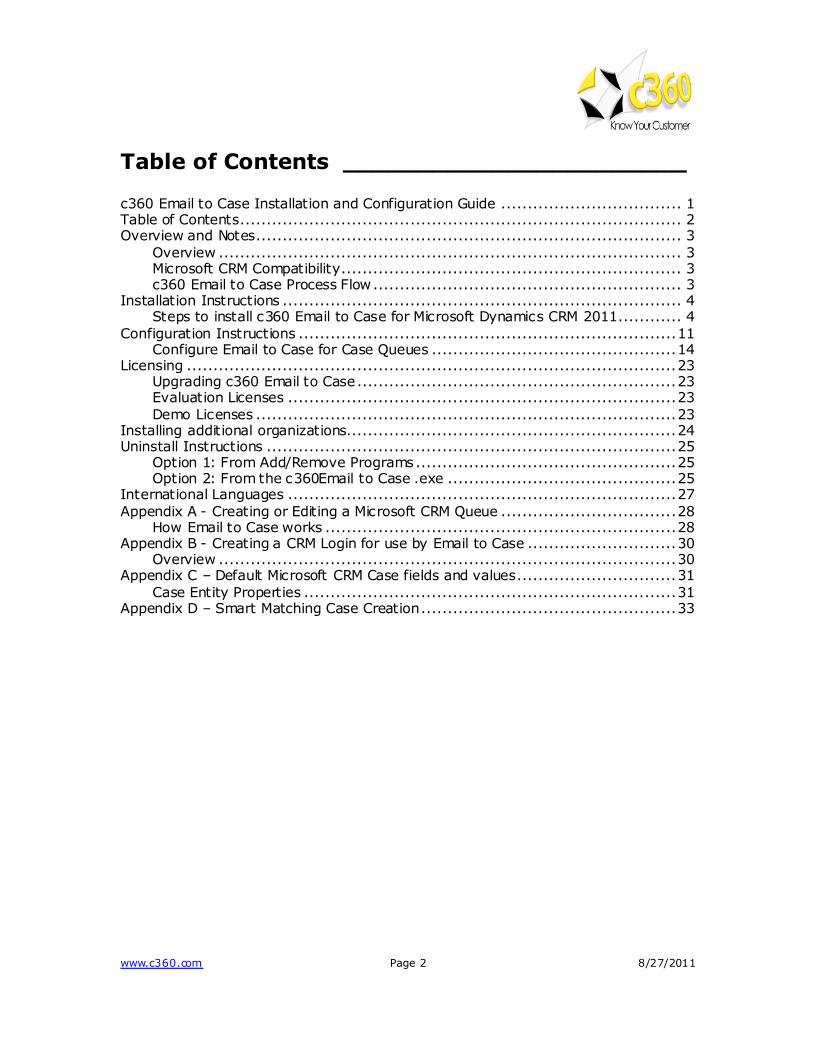
Table of Contents _______________________ c360 Email to Case Installation and Configuration Guide .................................. 1 Table of Contents ................................................................................... 2 Overview and Notes ................................................................................ 3
Overview ....................................................................................... 3 Microsoft CRM Compatibility ................................................................ 3 c360 Email to Case Process Flow .......................................................... 3
Installation Instructions ........................................................................... 4 Steps to install c360 Email to Case for Microsoft Dynamics CRM 2011 ............ 4
Configuration Instructions ....................................................................... 11 Configure Email to Case for Case Queues .............................................. 14
Licensing ............................................................................................ 23 Upgrading c360 Email to Case ............................................................ 23 Evaluation Licenses ......................................................................... 23 Demo Licenses ............................................................................... 23
Installing additional organizations.............................................................. 24 Uninstall Instructions ............................................................................. 25
Option 1: From Add/Remove Programs ................................................. 25 Option 2: From the c360Email to Case .exe ........................................... 25
International Languages ......................................................................... 27 Appendix A - Creating or Editing a Microsoft CRM Queue ................................. 28
How Email to Case works .................................................................. 28 Appendix B - Creating a CRM Login for use by Email to Case ............................ 30
Overview ...................................................................................... 30 Appendix C – Default Microsoft CRM Case fields and values .............................. 31
Case Entity Properties ...................................................................... 31 Appendix D – Smart Matching Case Creation ................................................ 33
www.c360.com Page 3 8/27/2011
Overview and Notes _____________________
Overview
c360 Solutions Email to Case component is a Windows Service that monitors one or more Microsoft CRM queues converting inbound e-mails into Service Cases. Email to Case instantly allows Microsoft CRM users to implement e-mail based service or
support without burdening service representatives with additional data entry.
Microsoft CRM Compatibility
c360 Email to Case for Microsoft Dynamics CRM 2011 is compatible with Microsoft Dynamics CRM 2011. For additional product information, please visit http://www.c360.com/emailtocase.aspx.
Please note that if this installation is on an environment in which c360 Email to Case v3 was installed, you must uninstall the product before continuing with this installation. Please contact [email protected] for more information.
c360 Email to Case Process Flow
Email to Case monitors an unlimited number of Microsoft CRM queues creating Case
records and linking the e-mail activities to those Case records. The process flow of EmailToCase is:
- Customer sends e-mail to queue alias (e.g. [email protected]) - Microsoft CRM connector receives e-mail and creates CRM e-mail activity
- CRM e-mail activity is placed in the CRM queue as a queue item - Email to Case service runs on a scheduled interval and uses administrator set
parameters to create a new Case based on the new CRM e-mail activity - Email to Case links CRM e-mail Activity to the newly created Case and deletes
the queue item o Case is linked to the e-mail sender‟s Contact and/or Account record
based on an administrator set option o Cases based on e-mails from unresolved senders are linked to a
default Contact or Account - Newly created Case is placed in the queue to which the e-mail was sent - Customer is notified by a CRM email activity that a new Case has been
created - One or more designated internal recipients are notified by e-mail that a new
Case has been created. This e-mail notification includes a link to directly open the newly created Case
www.c360.com Page 4 8/27/2011
Installation Instructions __________________ Requirements To install the product the installation application must be run on the CRM server by a
user with Local Administrator and CRM Deployment Manager privileges. The user must also be a member of the CRM System Administrator role. The installation of c360 Email to Case for Microsoft CRM 2011 requires the c360 Email to Case crm2011.exe file which can be downloaded by visiting http://www.c360.com/DownloadRegister.aspx.
Steps to install c360 Email to Case for Microsoft Dynamics CRM 2011
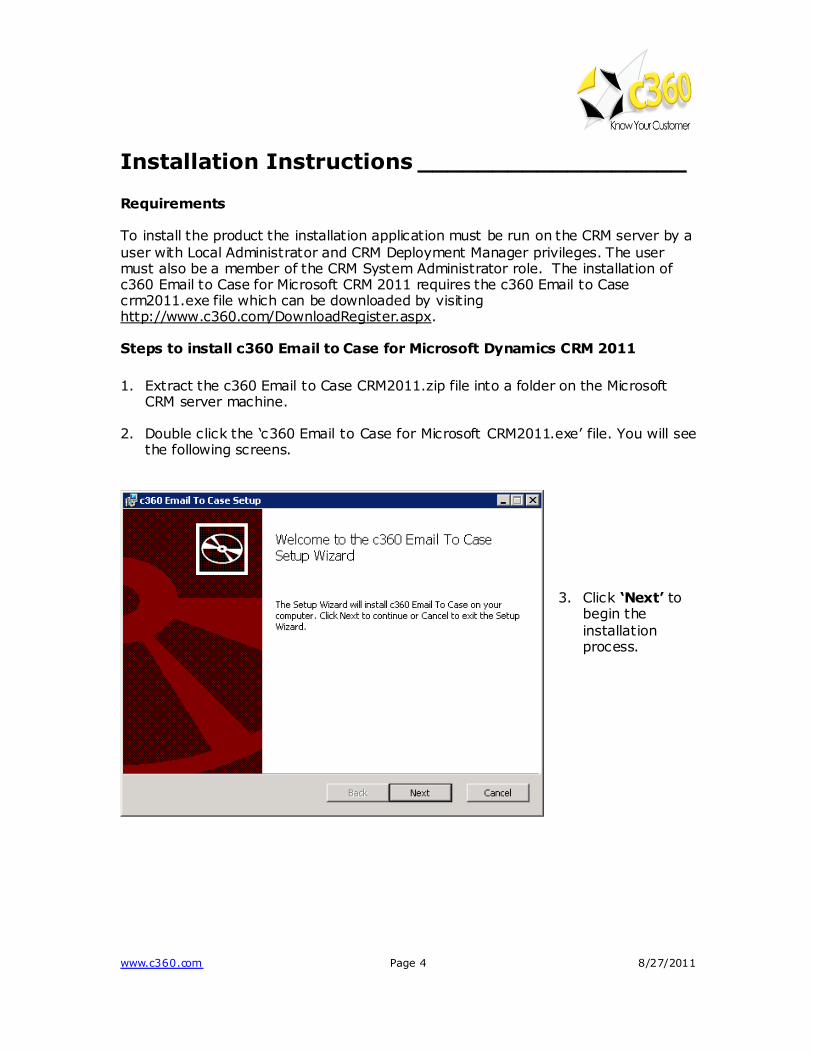
1. Extract the c360 Email to Case CRM2011.zip file into a folder on the Microsoft
CRM server machine. 2. Double click the „c360 Email to Case for Microsoft CRM2011.exe‟ file. You will see
the following screens.
3. Click ‘Next’ to
begin the
installation process.
www.c360.com Page 5 8/27/2011
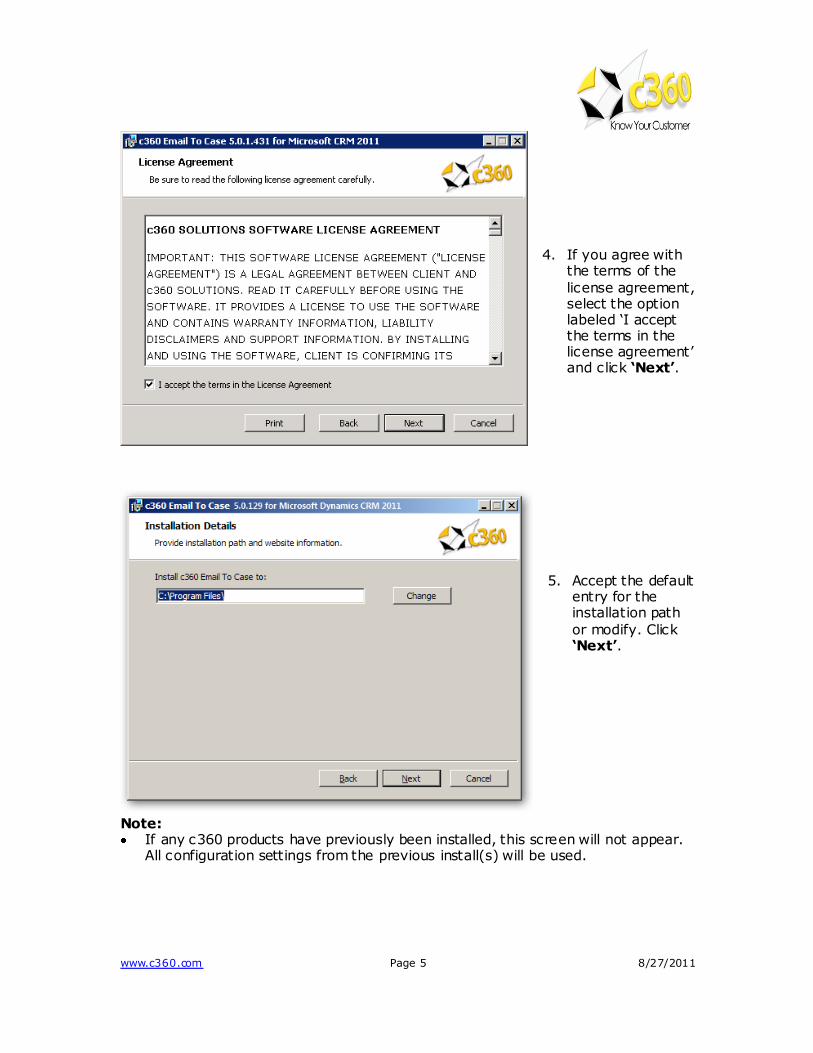
4. If you agree with
the terms of the
license agreement, select the option labeled „I accept the terms in the license agreement‟ and click ‘Next’.
5. Accept the default
entry for the installation path
or modify. Click ‘Next’.
Note: If any c360 products have previously been installed, this screen will not appear.
All configuration settings from the previous install(s) will be used.
www.c360.com Page 6 8/27/2011
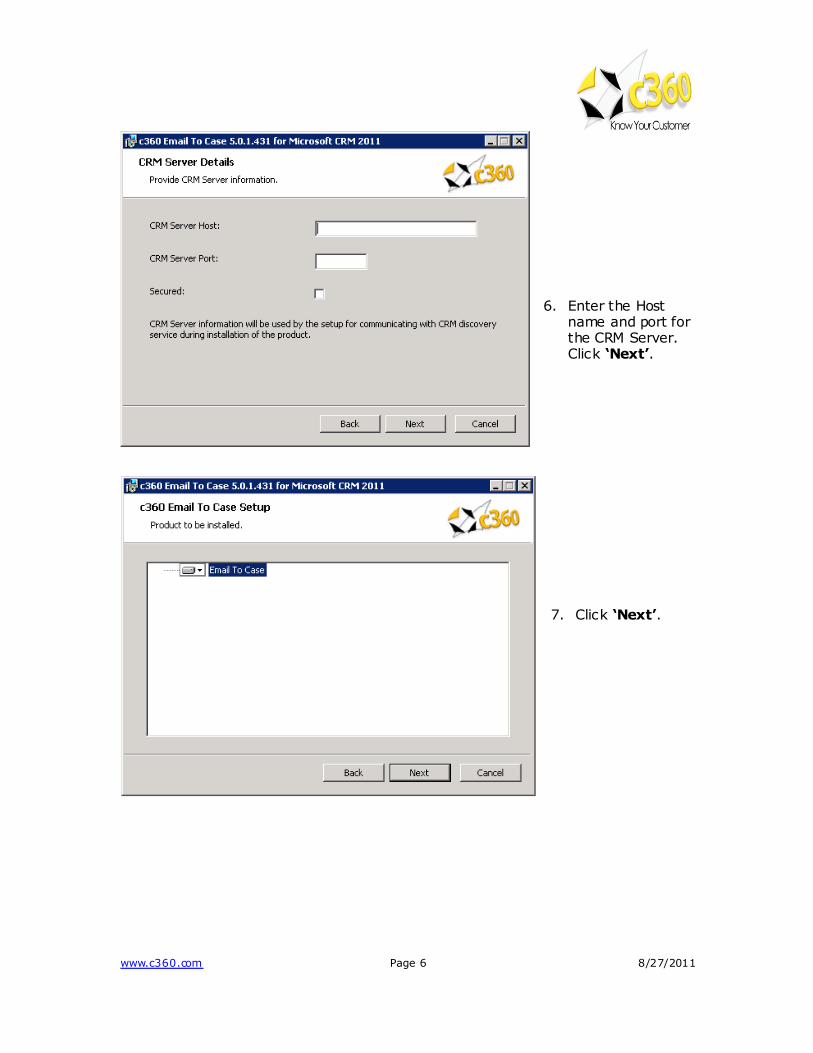
6. Enter the Host
name and port for the CRM Server. Click ‘Next’.
7. Click ‘Next’.
www.c360.com Page 7 8/27/2011
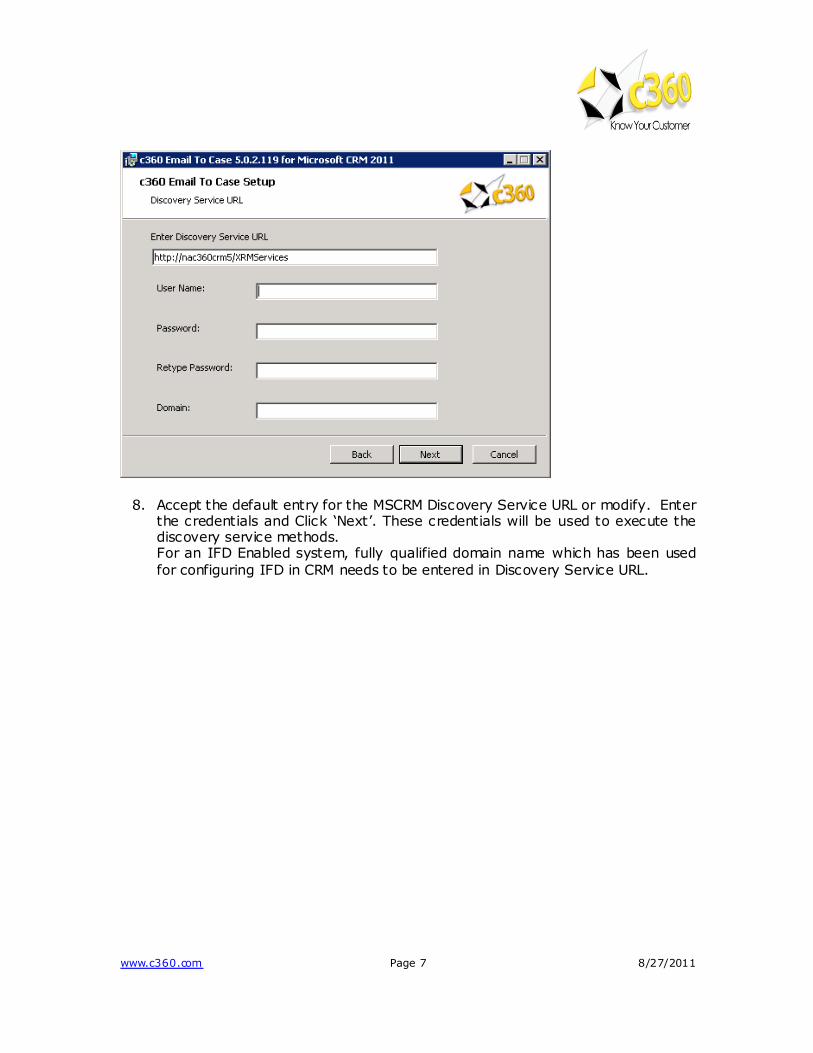
8. Accept the default entry for the MSCRM Discovery Service URL or modify. Enter the credentials and Click „Next‟. These credentials will be used to execute the discovery service methods. For an IFD Enabled system, fully qualified domain name which has been used
for configuring IFD in CRM needs to be entered in Discovery Service URL.

www.c360.com Page 8 8/27/2011
9. Select the
Organization(s)
for which the product is to be installed. Then click ‘Next’.
10. There is no extra
configuration required for specific
organizations. Click ‘Next’.
Note: To be configured: The organization has not been configured for installation. Successful: The organization has been configured and configuration settings
have been validated. The product is ready to be installed for the organization.
www.c360.com Page 9 8/27/2011
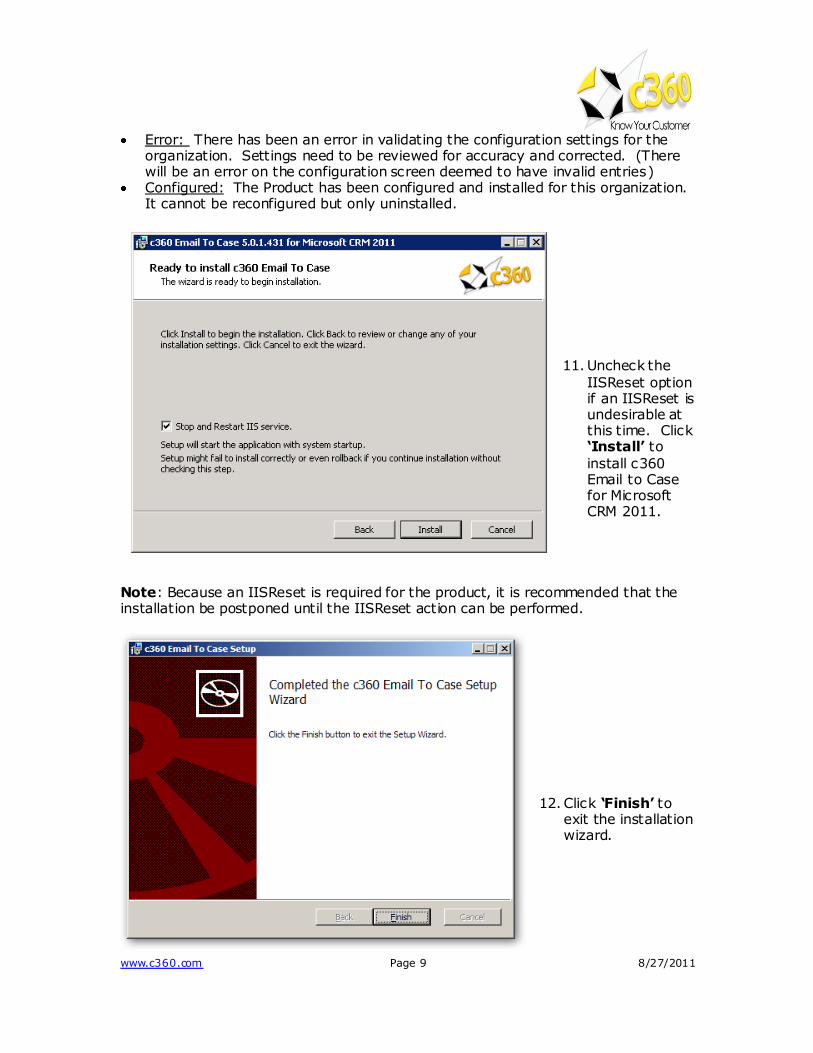
Error: There has been an error in validating the configuration settings for the organization. Settings need to be reviewed for accuracy and corrected. (There will be an error on the configuration screen deemed to have invalid entries)
Configured: The Product has been configured and installed for this organization. It cannot be reconfigured but only uninstalled.
11. Uncheck the
IISReset option if an IISReset is undesirable at this time. Click ‘Install’ to
install c360 Email to Case for Microsoft CRM 2011.
Note: Because an IISReset is required for the product, it is recommended that the installation be postponed until the IISReset action can be performed.
12. Click ‘Finish’ to exit the installation wizard.
www.c360.com Page 10 8/27/2011
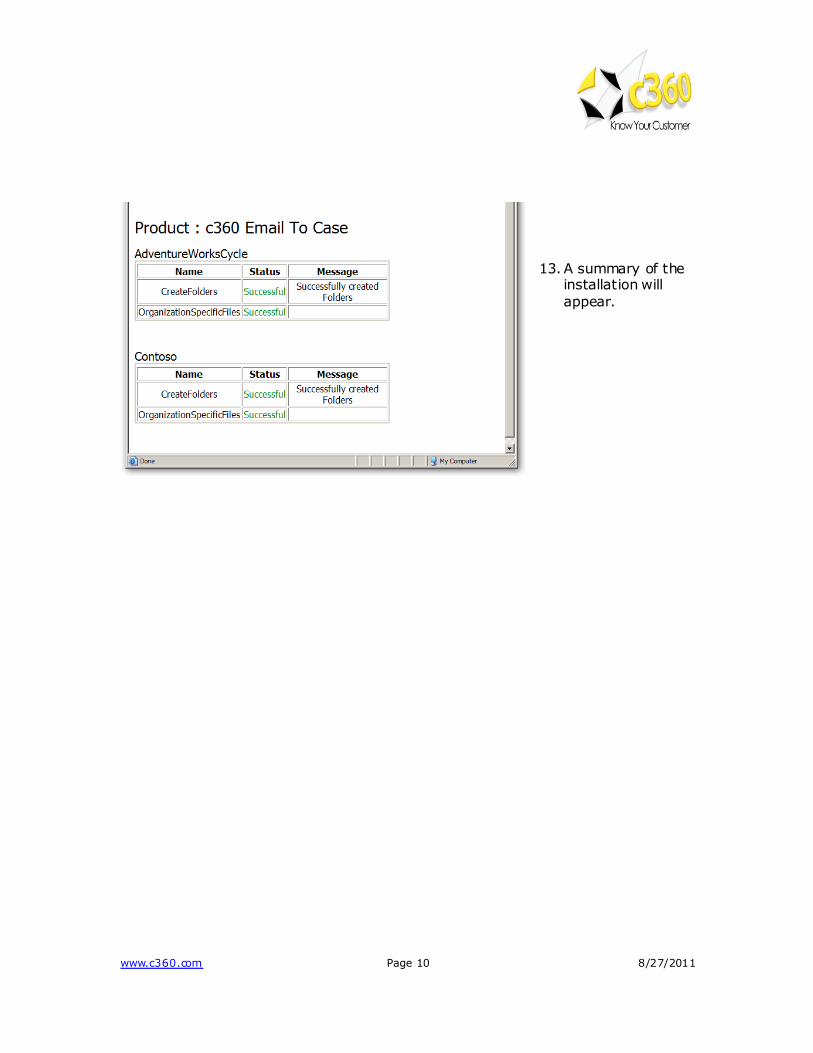
13. A summary of the
installation will
appear.

www.c360.com Page 11 8/27/2011
Configuration Instructions ________________ Configuration Preparation The configuration of Email to Case involves three steps. These are:
1. Configure one or more Microsoft CRM Queues to receive inbound email
Refer to Appendix A ‘Creating or Editing a Microsoft CRM Queue’ 2. Create a CRM login to allow Email to Case to communicate with Microsoft CRM
Refer to Appendix B ‘Creating a CRM login for use by Email to Case’ 3. Configure the Email to Case application
Once items 1 and 2 and complete proceed with the installation
instructions below Follow these steps to configure Email to Case: 1. Double click the file named c360.EmailToCase.exe. The application‟s
administrative interface will open and you can then click the „Install Service‟ button to install the Email to Case service as illustrated in figure 1 below
Note: A shortcut of the file c360.EmailToCase is placed on the desktop or you can navigate to the Email to Case installation directory and launch it from there.
Figure 1: Configuring service settings with the Email to Case Service screen
www.c360.com Page 12 8/27/2011
2. Once the Email to Case service has been installed, specify the account under which you would like the service to log on. Choose Local System account or specify another account and click the „Start‟ button to start the service.
a. Note: you may make configuration changes while the EmailToCase service
is running but your changes will not take effect until the service is stopped and restarted.
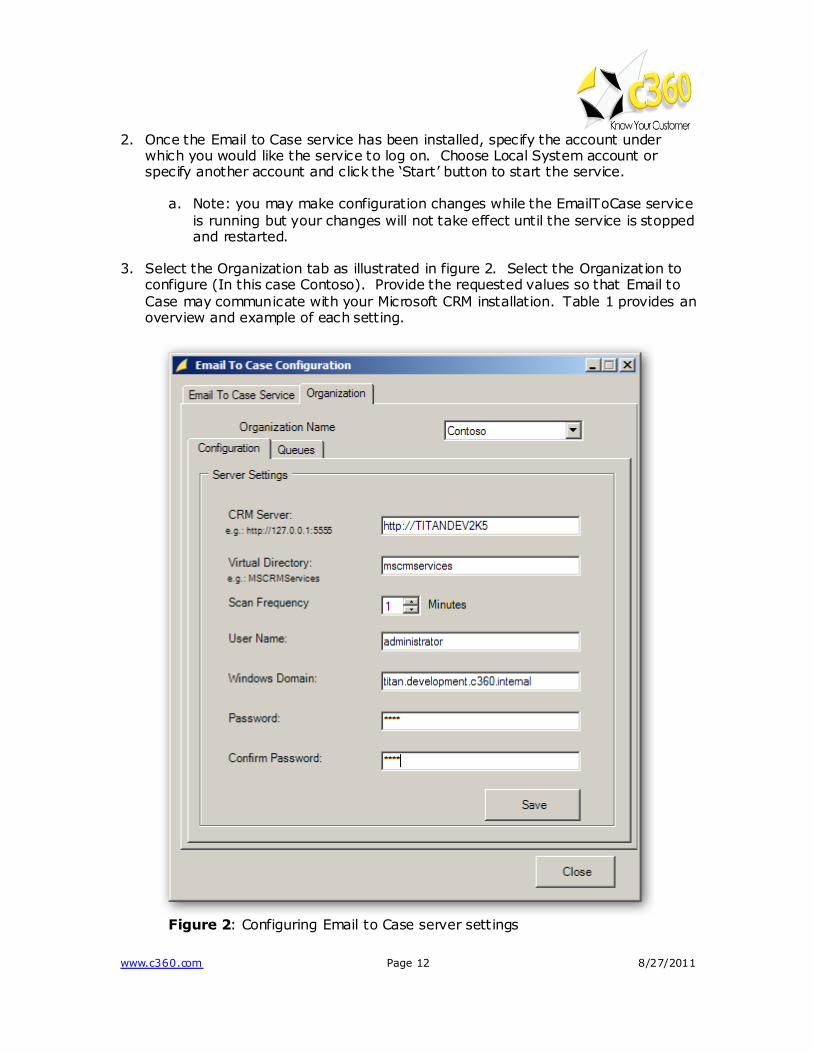
3. Select the Organization tab as illustrated in figure 2. Select the Organization to
configure (In this case Contoso). Provide the requested values so that Email to
Case may communicate with your Microsoft CRM installation. Table 1 provides an overview and example of each setting.
Figure 2: Configuring Email to Case server settings
www.c360.com Page 13 8/27/2011
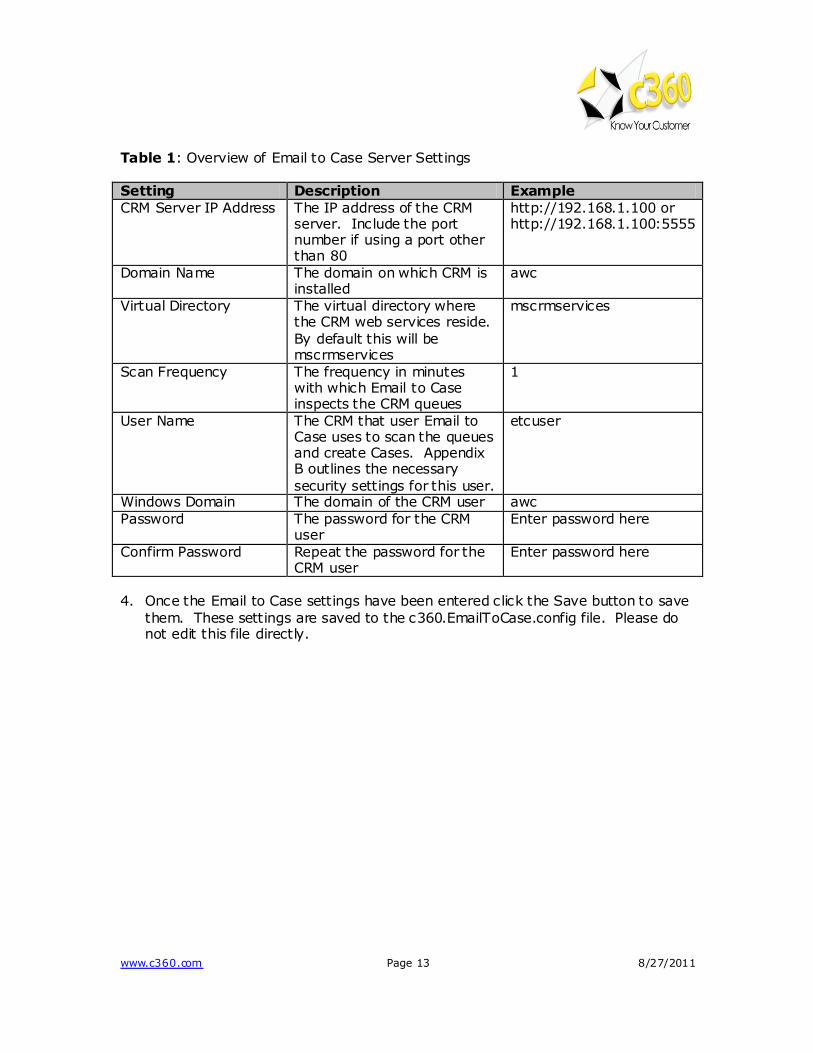
Table 1: Overview of Email to Case Server Settings
Setting Description Example
CRM Server IP Address The IP address of the CRM server. Include the port number if using a port other than 80
http://192.168.1.100 or http://192.168.1.100:5555
Domain Name The domain on which CRM is installed
awc
Virtual Directory The virtual directory where the CRM web services reside.
By default this will be mscrmservices
mscrmservices
Scan Frequency The frequency in minutes with which Email to Case inspects the CRM queues
1
User Name The CRM that user Email to Case uses to scan the queues and create Cases. Appendix B outlines the necessary
security settings for this user.
etcuser
Windows Domain The domain of the CRM user awc
Password The password for the CRM user
Enter password here
Confirm Password Repeat the password for the CRM user
Enter password here
4. Once the Email to Case settings have been entered click the Save button to save
them. These settings are saved to the c360.EmailToCase.config file. Please do not edit this file directly.
www.c360.com Page 14 8/27/2011
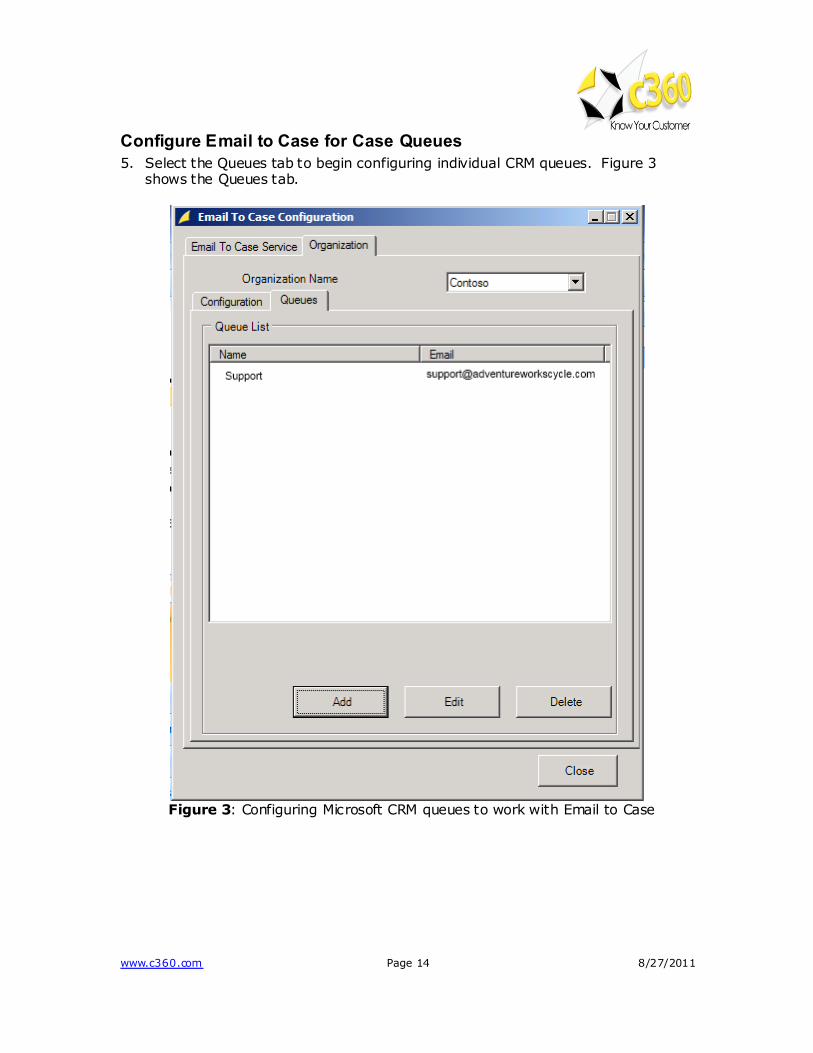
Configure Email to Case for Case Queues
5. Select the Queues tab to begin configuring individual CRM queues. Figure 3 shows the Queues tab.
Figure 3: Configuring Microsoft CRM queues to work with Email to Case
www.c360.com Page 15 8/27/2011
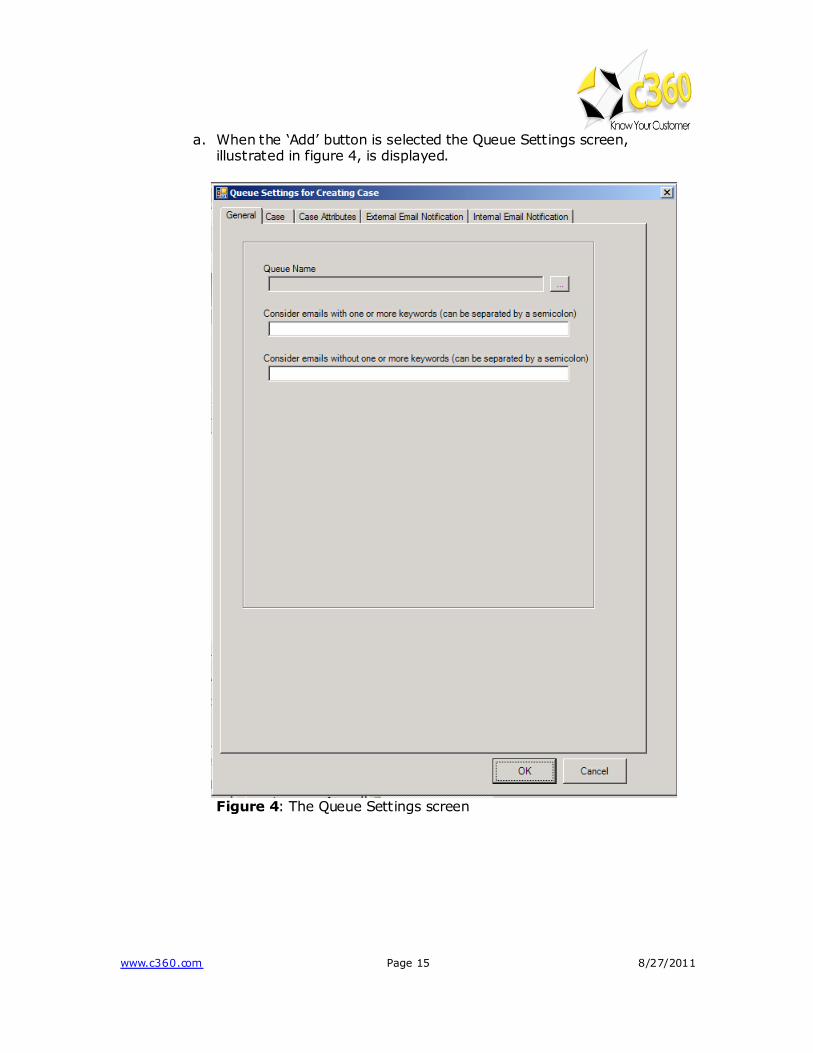
a. When the „Add‟ button is selected the Queue Settings screen, illustrated in figure 4, is displayed.
Figure 4: The Queue Settings screen
www.c360.com Page 16 8/27/2011
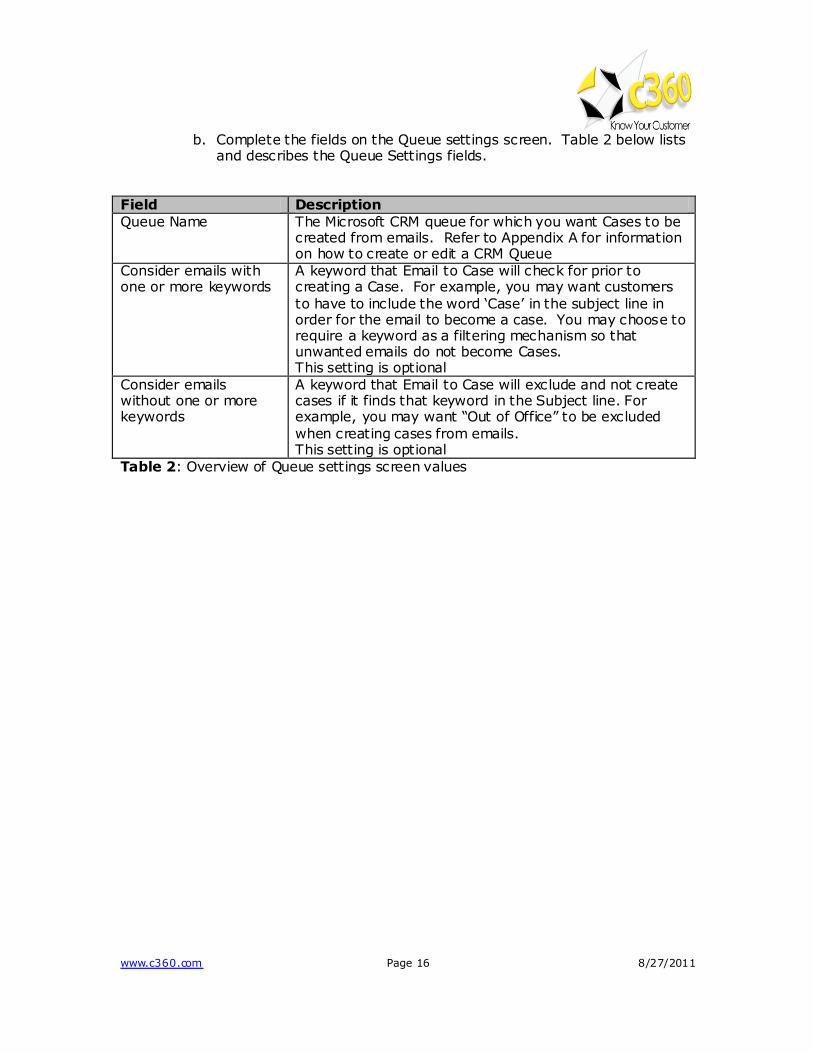
b. Complete the fields on the Queue settings screen. Table 2 below lists and describes the Queue Settings fields.
Field Description
Queue Name The Microsoft CRM queue for which you want Cases to be created from emails. Refer to Appendix A for information on how to create or edit a CRM Queue
Consider emails with one or more keywords
A keyword that Email to Case will check for prior to creating a Case. For example, you may want customers
to have to include the word „Case‟ in the subject line in order for the email to become a case. You may choose to require a keyword as a filtering mechanism so that unwanted emails do not become Cases. This setting is optional
Consider emails without one or more keywords
A keyword that Email to Case will exclude and not create cases if it finds that keyword in the Subject line. For example, you may want “Out of Office” to be excluded
when creating cases from emails. This setting is optional
Table 2: Overview of Queue settings screen values
www.c360.com Page 17 8/27/2011
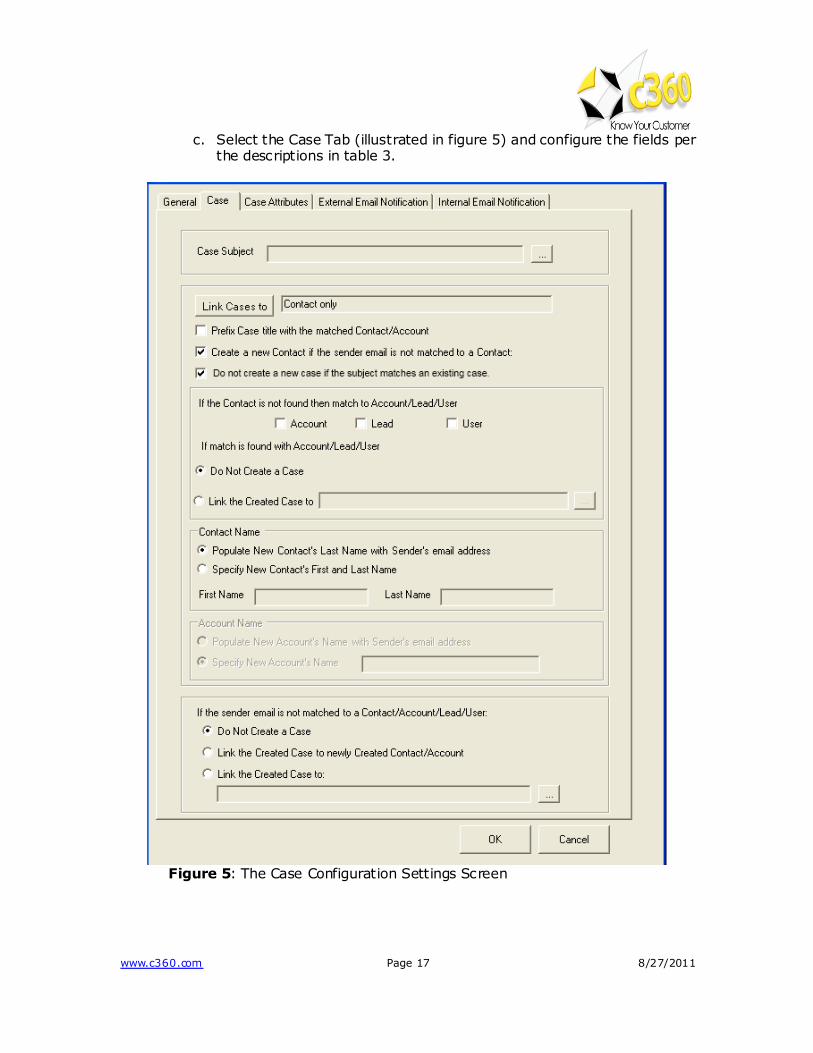
c. Select the Case Tab (illustrated in figure 5) and configure the fields per the descriptions in table 3.
Figure 5: The Case Configuration Settings Screen
www.c360.com Page 18 8/27/2011
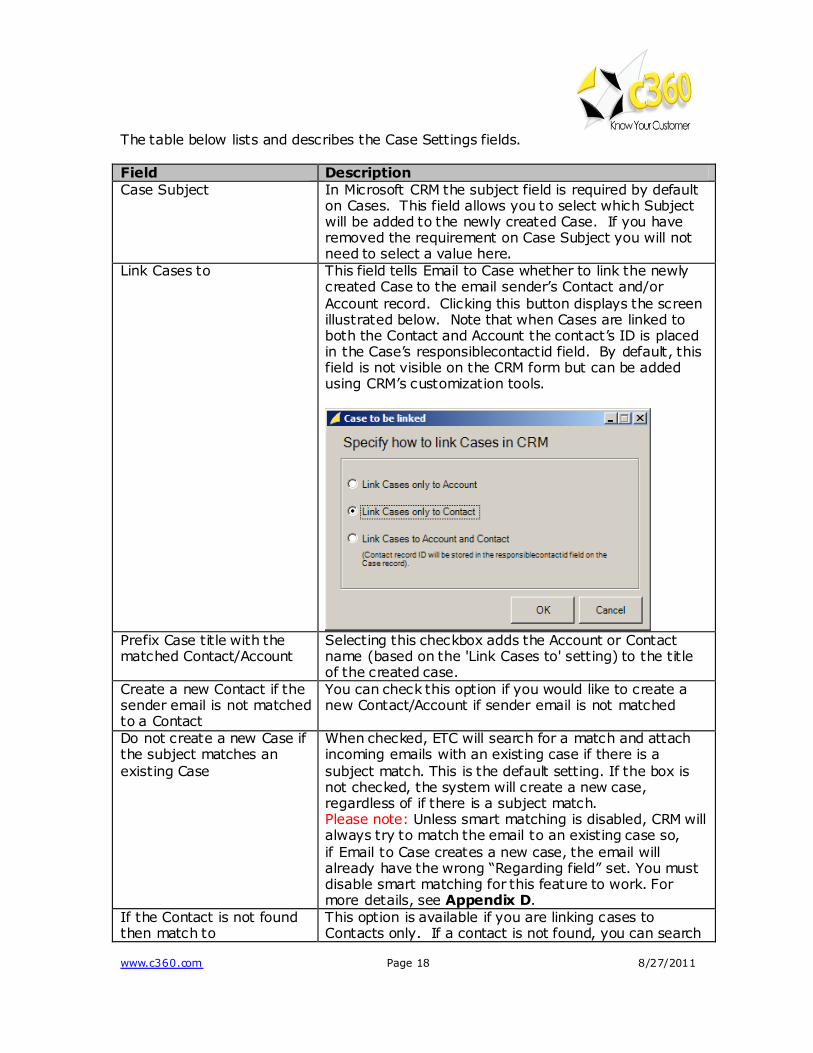
The table below lists and describes the Case Settings fields.
Field Description
Case Subject In Microsoft CRM the subject field is required by default on Cases. This field allows you to select which Subject will be added to the newly created Case. If you have removed the requirement on Case Subject you will not need to select a value here.
Link Cases to This field tells Email to Case whether to link the newly created Case to the email sender‟s Contact and/or
Account record. Clicking this button displays the screen illustrated below. Note that when Cases are linked to both the Contact and Account the contact‟s ID is placed in the Case‟s responsiblecontactid field. By default, this field is not visible on the CRM form but can be added using CRM‟s customization tools.
Prefix Case title with the matched Contact/Account
Selecting this checkbox adds the Account or Contact name (based on the 'Link Cases to' setting) to the title of the created case.
Create a new Contact if the sender email is not matched to a Contact
You can check this option if you would like to create a new Contact/Account if sender email is not matched
Do not create a new Case if the subject matches an
existing Case
When checked, ETC will search for a match and attach incoming emails with an existing case if there is a
subject match. This is the default setting. If the box is not checked, the system will create a new case, regardless of if there is a subject match. Please note: Unless smart matching is disabled, CRM will always try to match the email to an existing case so,
if Email to Case creates a new case, the email will already have the wrong “Regarding field” set. You must disable smart matching for this feature to work. For more details, see Appendix D.
If the Contact is not found then match to
This option is available if you are linking cases to Contacts only. If a contact is not found, you can search
www.c360.com Page 19 8/27/2011
Field Description
Account/Lead/User for matching leads, users and/or accounts. You then have the option to not create the case or to link to a
different record. Contact Name In situations where a new Contact is created, you can
specify that the last name field of the Contact be created with sender‟s email address. Alternatively, you may specify static firstname and lastname values to be used for the Contact to be created
Account Name In situations where a new Account is created, you can specify the Name of the Account to be created with sender email address. Alternatively, you may specify a
static name value to be used for the Account to be created
If the Sender is not matched to a Contact/Account/Lead/User:
In situations where an email is received from an email address that is not found in the Microsoft CRM Contact or Account tables, you can choose one of the following options:
- Do not create a case for the email
- Link the Case created by Email to Case to the newly created Contact or Account
- Link the Case created by Email to Case to the Contact or Account selected here.
Table 3: Overview of Case screen values
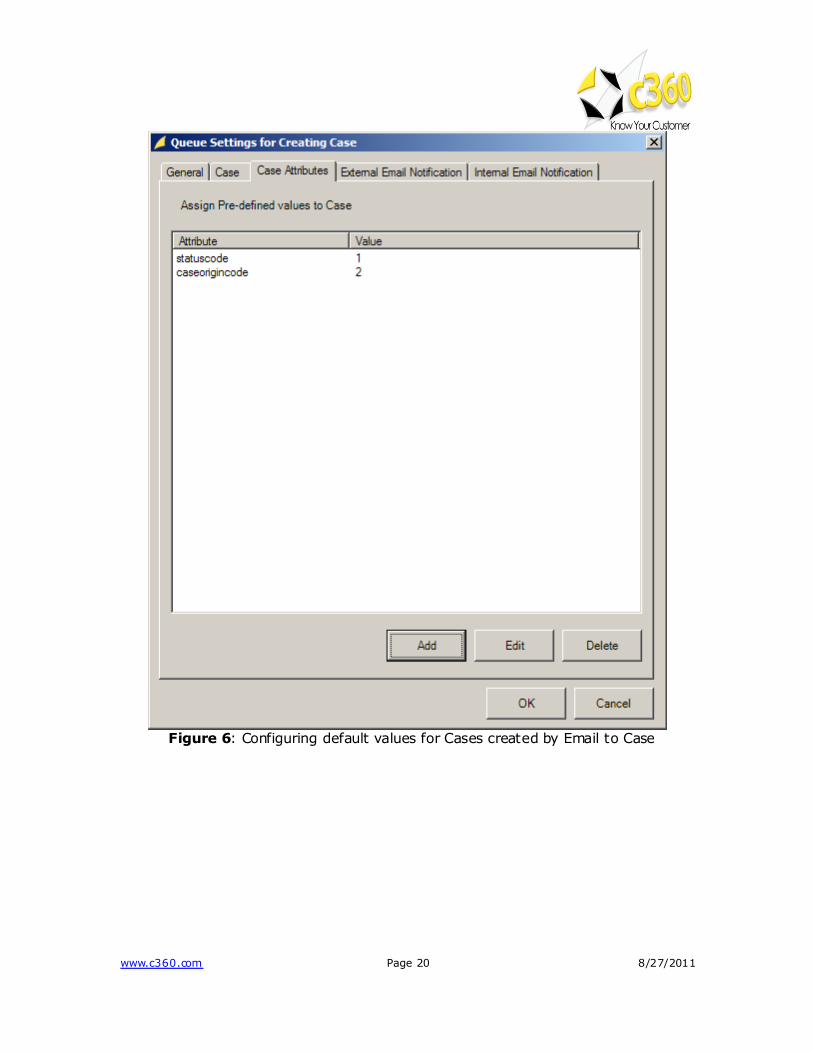
d. Select the Case Attributes tab and configure any case fields that you
would like to be completed by default. For example, you may want to default the Case Origin field to „Email‟. Similarly, you may want to default the Status Reason field to „In Progress.‟ To do this you will need to enter the field‟s schema name and picklist integer value on the Case attributes tab. Examples entries are included in the table below.
Figure 6 shows the Case Attributes screen. For reference, Appendix C contains a table of all standard Case fields including their labels (in English), values and schema names.
Field Label Attribute (this is the
Microsoft CRM Schema Name for the field)
Value (this is the actual value that will be saved to the CRM database)
Case Origin caseorigincode 2
Status Reason statuscode 1
Note:
By default, the following email attributes are mapped to the case Email subject – Case „Title‟ Email body – Case „Description‟
www.c360.com Page 20 8/27/2011
Figure 6: Configuring default values for Cases created by Email to Case
www.c360.com Page 21 8/27/2011
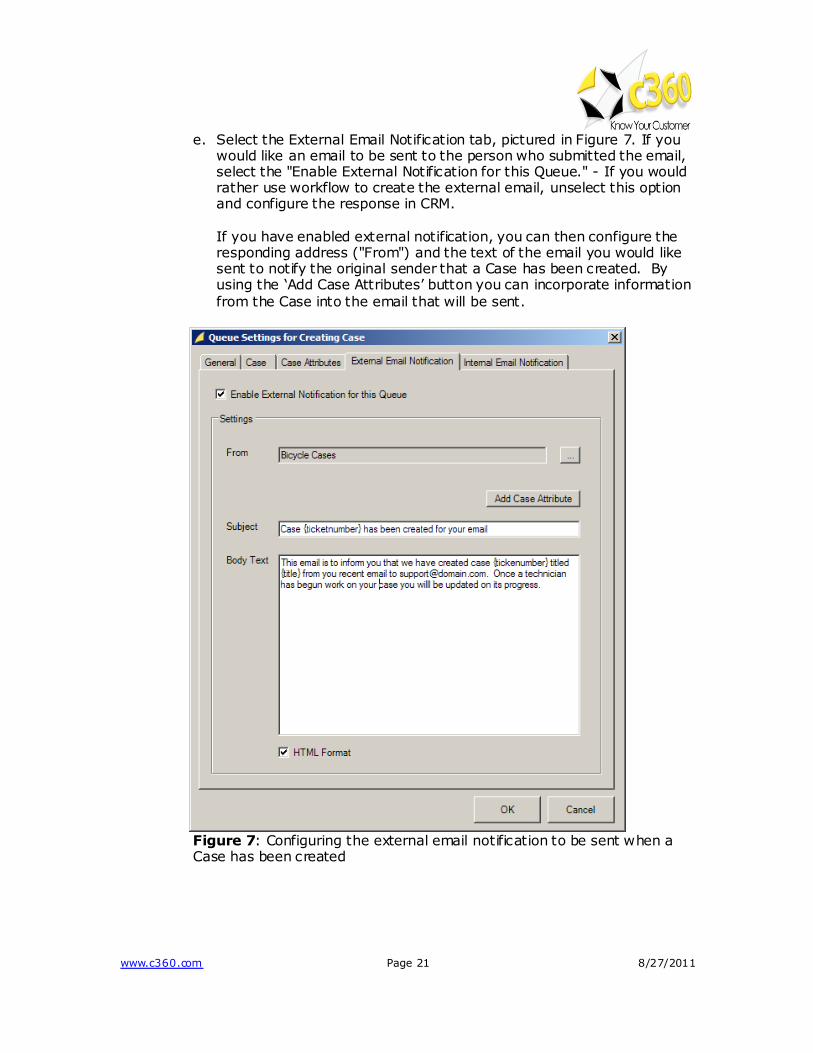
e. Select the External Email Notification tab, pictured in Figure 7. If you would like an email to be sent to the person who submitted the email, select the "Enable External Notification for this Queue." - If you would rather use workflow to create the external email, unselect this option and configure the response in CRM.
If you have enabled external notification, you can then configure the responding address ("From") and the text of the email you would like sent to notify the original sender that a Case has been created. By using the „Add Case Attributes‟ button you can incorporate information
from the Case into the email that will be sent.
Figure 7: Configuring the external email notification to be sent when a Case has been created
www.c360.com Page 22 8/27/2011
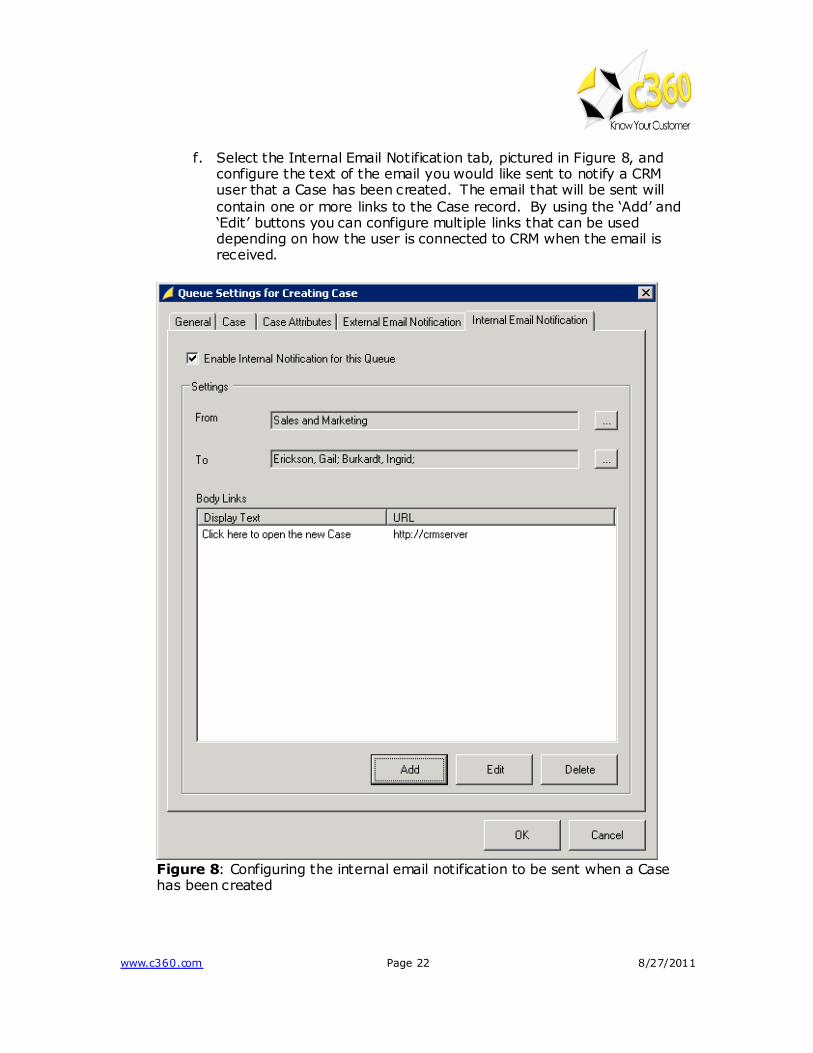
f. Select the Internal Email Notification tab, pictured in Figure 8, and
configure the text of the email you would like sent to notify a CRM user that a Case has been created. The email that will be sent will
contain one or more links to the Case record. By using the „Add‟ and „Edit‟ buttons you can configure multiple links that can be used depending on how the user is connected to CRM when the email is received.
Figure 8: Configuring the internal email notification to be sent when a Case has been created

www.c360.com Page 23 8/27/2011
Licensing ______________________________
Upgrading c360 Email to Case
It is not possible to migrate from Email to Case v3.0 to Email to Case for CRM 2011. Your system must have Email to Case v4.0 or higher in order to upgrade to c360 Email to Case for CRM 2011.
If c360 Email to Case for CRM 4.0 is already installed with valid licenses, those licenses will be valid for Email to Case for CRM 2011. If you no longer have a valid license, or if this is a fresh installation of c360 Email to Case for CRM 2011, license setup application can be obtained from c360 Solutions Inc upon request.
This application is an executable file designed to be run on the CRM server. Copy the License setup application to the CRM server and double click it to run the application. It will automatically place the license file in the appropriate directory.
Evaluation Licenses
To request a 15 day production evaluation license go to our web site at
http://www.c360.com/Evaluation.aspx. You will be emailed a licensing application that, when run, will place a valid license file in the appropriate directory.
Demo Licenses
To download “demo licenses” for one of the sample Microsoft Dynamics CRM 4.0 installations for organization names „Adventure Works Cycle Demo‟, „Adventure
Works Cycle‟, „Contoso‟ or „Microsoft CRM‟, please visit our website at http://www.c360.com/Licenses.aspx
www.c360.com Page 24 8/27/2011
Installing additional organizations __________ Steps to install additional organizations for c360 Email to Case for Microsoft Dynamics CRM 2011
1. Re-run the c360 Email to Case for Microsoft CRM crm2011.exe. Follow the process as described in Installation Instructions.
2. On step 9, note select the addition organization(s) to be installed.
3. Continue the process as described in the rest of the Installation Instructions.
www.c360.com Page 25 8/27/2011
Uninstall Instructions ____________________
Option 1: From Add/Remove Programs
1. On the CRM server where you installed the product navigate to „Control Panel‟
and open „Add or Remove Programs‟ 2. Select c360 Email to Case from the list of the currently installed programs 3. Click ‘Remove’ 4. Click ‘Yes’ in the confirmation message box to begin the uninstall process.
Note: this will uninstall for all organizations.
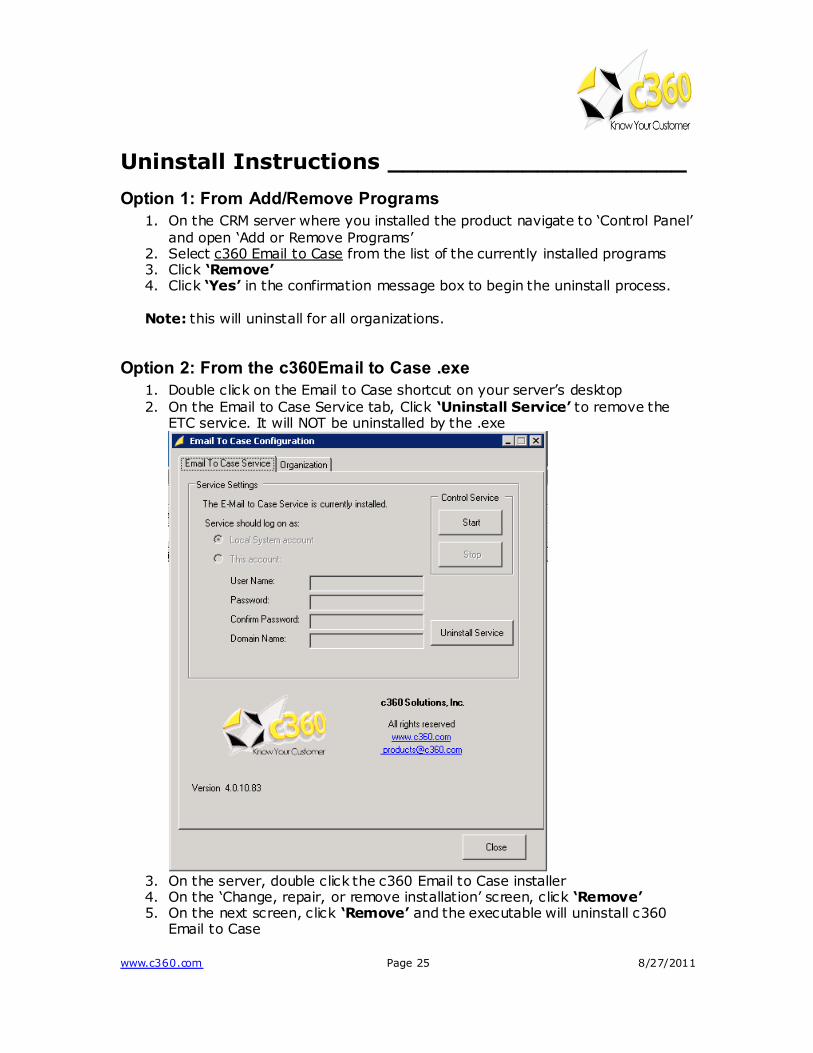
Option 2: From the c360Email to Case .exe
1. Double click on the Email to Case shortcut on your server‟s desktop
2. On the Email to Case Service tab, Click ‘Uninstall Service’ to remove the ETC service. It will NOT be uninstalled by the .exe
3. On the server, double click the c360 Email to Case installer 4. On the „Change, repair, or remove installation‟ screen, click ‘Remove’ 5. On the next screen, click ‘Remove’ and the executable will uninstall c360
Email to Case
www.c360.com Page 26 8/27/2011
Steps to uninstall an organization for c360 Email to Case for Microsoft Dynamics CRM 2011 1. Re-run the „c360 Email to Case for Microsoft CRM crm2011.exe‟ file. 2. Select the modify option.
3. De-select any configured organizations. Click ‘Next. 4. Click ‘Yes’ in the confirmation message box to begin the uninstall process. Note: multiple organizations can be uninstalled at once.
www.c360.com Page 27 8/27/2011
International Languages _________________ c360 Email to Case for Microsoft Dynamics CRM 2011 includes language translation files which allows you to select the language displayed to the user (German, French etc).
Please go to our language product page http://www.c360.com/Language.aspx to obtain instructions for installing and configuring the language translation.
www.c360.com Page 28 8/27/2011
Appendix A - Creating or Editing a Microsoft CRM Queue ____________________________
How Email to Case works
c360 EmailToCase is a Windows service that monitors CRM queues in Microsoft CRM, taking email activities from those queues and creating Case records from them. Because Email to Case is monitoring Microsoft CRM queues, those queues must
already be set up to convert inbound emails into Microsoft CRM email activities.
Queues
A queue is a holding container in Microsoft CRM for work items such as activities, cases, and knowledge base articles. In CRM 2011, any entity can be enabled to work with queues, with records moving to the owner‟s default queue when created or
assigned. Create queues to bundle customer-related activities or cases, and then assign those queues to specific users or teams such as a customer service representative (CSR) or specialized team. Customer service teams frequently use queues to share cases.
As soon as a queue is created, it is visible to users in the Queues area. For example, in the Queues area, you will see views sorted into „Available Items‟ and „Items I am Working On‟. When a user has finished working with a specific case or activity in a queue, that work item can be assigned to another user or team or added to a different queue, removing it from the original queue.
Queues can also contain knowledge base articles. In the Knowledge Base area, you can view knowledge base articles that are sorted into Draft, Unapproved, and Published folders. You can find Queues under „Queues‟ in the Workplace pane or „c360 My Workplace‟.
Create or edit a queue
You can edit an existing queue by following steps 1 and 2 to navigate to the Queue
area. Then open the record you want to edit. Use the information in this procedure to
guide you in entering data.
1. In the Navigation Pane, click Settings, click Business Management, and
then click Queues. 2. On the Actions toolbar, click New. 3. In the General section, enter or edit information or observe any noted
restrictions or requirements as needed: a. Queue Name: enter a name that describes the queue‟s purpose,
business focus, or other meaningful characteristics. b. Owner: click Lookup to select an owner c. E-mail: enter the e-mail address for the person who should receive
the email sent to the queue. E-mail addresses must be valid. For example, [email protected]. If a queue does not have an e-
mail address assigned to it in the E-mail field, the queue will not receive any e-mail activity in CRM
www.c360.com Page 29 8/27/2011
d. Under Incoming E-mail, in the Convert e-mail activities list, click the type of e-mail messages that you want to convert to e-mail activities.
e. Under E-mail Access Configuration, select how e-mail will be accessed for incoming and outgoing mail.
4. Click Save or Save and Close.

www.c360.com Page 30 8/27/2011
Appendix B - Creating a CRM Login for use by Email to Case ___________________________
Overview
Email to Case must communicate with the CRM server in order to view the contents of Queues, create Cases, link Email Activities to Cases, link cases to Contacts and/or Accounts and create/send Email Activities from Cases. To do this, Email to Case requires a CRM login/user with a minimum level of permissions. This login/user can
be a dedicated login/user solely use by Email to Case or can be a shared login used by other processes and/or individuals. The CRM login/user must have the following privileges enabled in their assigned Security Role:
- Activity – Create, Read, Write (Organization)
- Queue – Read (Organization) - Case – Create, Read, Write, Append, Append To, Assign (Organization)
www.c360.com Page 31 8/27/2011
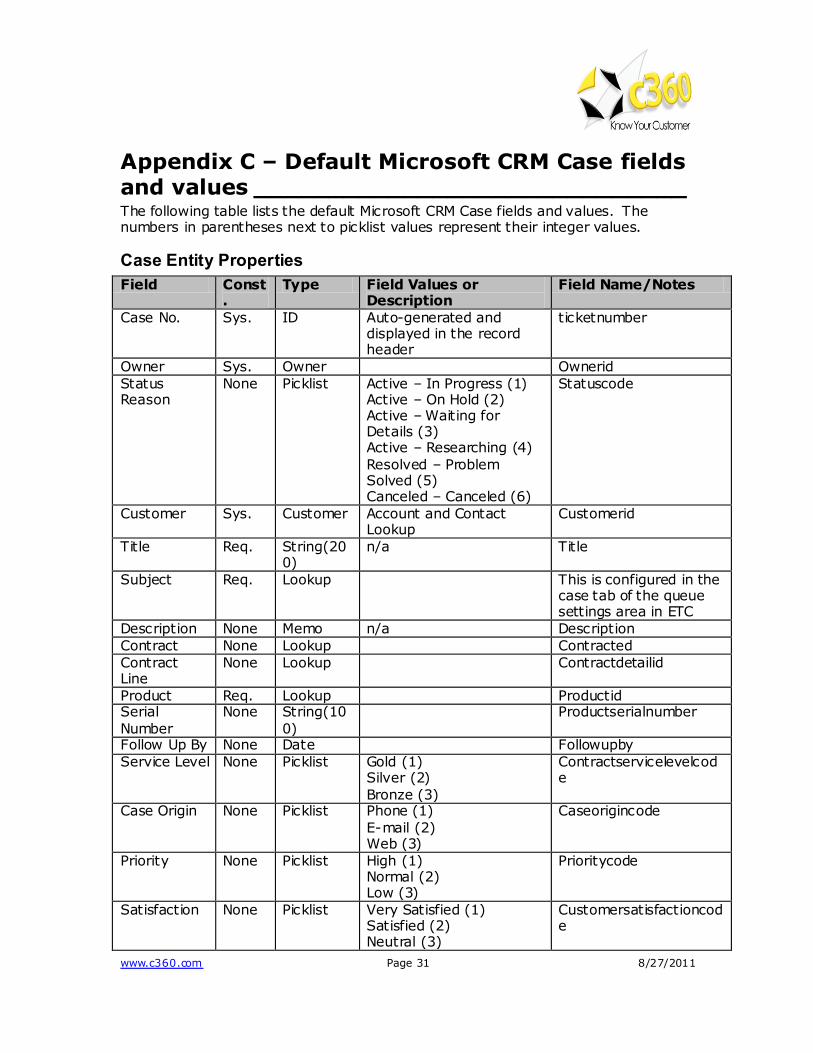
Appendix C – Default Microsoft CRM Case fields and values _____________________________ The following table lists the default Microsoft CRM Case fields and values. The numbers in parentheses next to picklist values represent their integer values.
Case Entity Properties
Field Const.
Type Field Values or Description
Field Name/Notes
Case No. Sys. ID Auto-generated and displayed in the record header
ticketnumber
Owner Sys. Owner Ownerid
Status Reason
None Picklist Active – In Progress (1) Active – On Hold (2) Active – Waiting for Details (3) Active – Researching (4)
Resolved – Problem Solved (5) Canceled – Canceled (6)
Statuscode
Customer Sys. Customer Account and Contact Lookup
Customerid
Title Req. String(200)
n/a Title
Subject Req. Lookup This is configured in the case tab of the queue settings area in ETC
Description None Memo n/a Description
Contract None Lookup Contracted
Contract Line
None Lookup Contractdetailid
Product Req. Lookup Productid Serial
Number
None String(10
0)
Productserialnumber
Follow Up By None Date Followupby
Service Level None Picklist Gold (1) Silver (2)
Bronze (3)
Contractservicelevelcode
Case Origin None Picklist Phone (1)
E-mail (2) Web (3)
Caseorigincode
Priority None Picklist High (1) Normal (2) Low (3)
Prioritycode
Satisfaction None Picklist Very Satisfied (1) Satisfied (2) Neutral (3)
Customersatisfactioncode
www.c360.com Page 32 8/27/2011
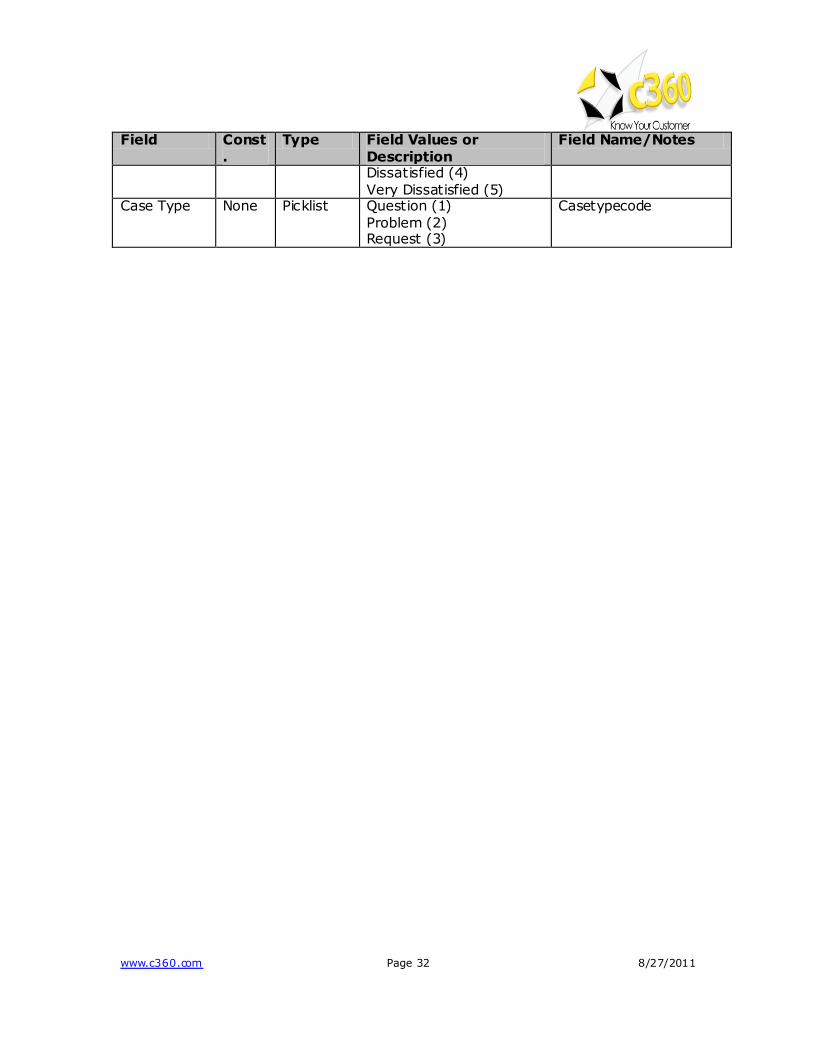
Field Const
.
Type Field Values or
Description
Field Name/Notes
Dissatisfied (4)
Very Dissatisfied (5) Case Type None Picklist Question (1)
Problem (2) Request (3)
Casetypecode
www.c360.com Page 33 8/27/2011
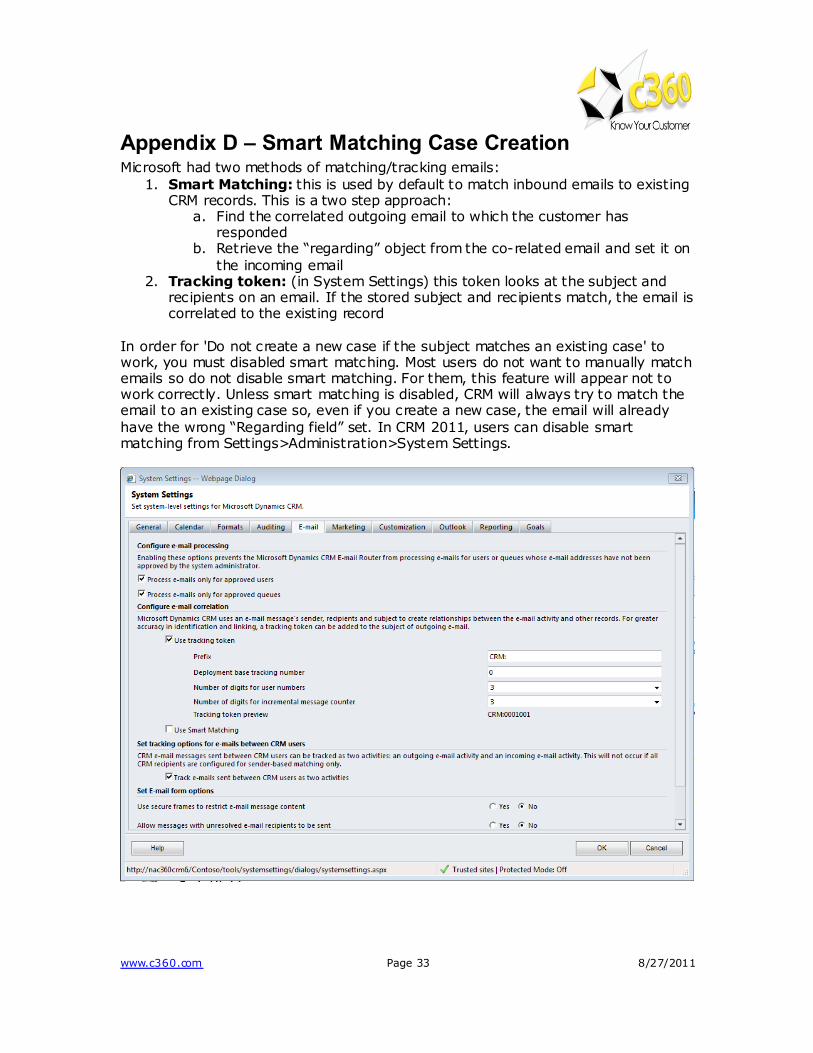
Appendix D – Smart Matching Case Creation Microsoft had two methods of matching/tracking emails:
1. Smart Matching: this is used by default to match inbound emails to existing CRM records. This is a two step approach:
a. Find the correlated outgoing email to which the customer has responded
b. Retrieve the “regarding” object from the co-related email and set it on
the incoming email 2. Tracking token: (in System Settings) this token looks at the subject and
recipients on an email. If the stored subject and recipients match, the email is correlated to the existing record
In order for 'Do not create a new case if the subject matches an existing case' to work, you must disabled smart matching. Most users do not want to manually match emails so do not disable smart matching. For them, this feature will appear not to work correctly. Unless smart matching is disabled, CRM will always try to match the email to an existing case so, even if you create a new case, the email will already
have the wrong “Regarding field” set. In CRM 2011, users can disable smart matching from Settings>Administration>System Settings.