Embed Size (px)
Citation preview

Page | 1
BT DieselWorks AutoSync – Installation guide (3rd gen, firmware v2.00 and higher ONLY!)
Supported vehicles:
2007.5-2014 Silverado/Sierra 2500-3500
2007.5-2013 Silverado/Sierra 1500
2007-2014 Tahoe/Yukon/Suburban/Escalade/Denali
Thank you for purchasing the BT DieselWorks AutoSync. The AutoSync is a patent-pending revolutionary new easy-to-install module that adds many enhanced functional and comfort features to your GMT-900 truck or SUV. Upon unpacking your AutoSync, inspect it for any broken pieces that might have been damaged in shipping.
NOTE: These instructions are only for AutoSync’s with firmware v2.00 and higher. AutoSync firmware display is shown at every vehicle startup for several seconds in the Driver Information Center. Firmware v2.00+ is significantly different than older versions so be sure to read this thoroughly!
“BT DieselWorks AutoSync v2.xx”
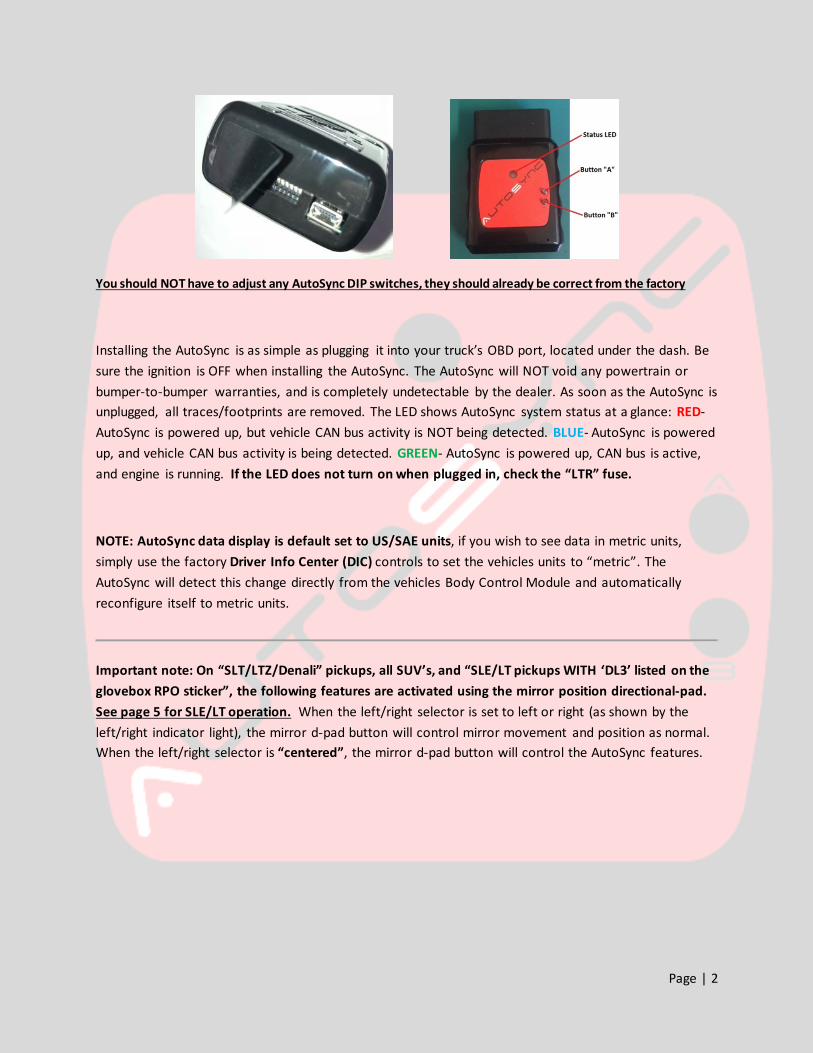
On the AutoSync, there two momentary push-buttons on the top of the module marked “A” and “B”, a row of DIP switches (normally not used, covered by sticker), and a status LED. The AutoSync must remain plugged in at all times for features to work. You can use AutoSync with an OBD port splitter (to use simultaneously with another scan tool, Edge Insight, EZ Lynk, etc), however compatibility is NOT guaranteed unless you use the BT DieselWorks OBD splitter, available at our website. AutoSync will not drain your battery when left plugged in with the vehicle off, and it will not cause any harm if you unplug/plug-in AutoSync while the vehicle is running.
Page | 2
You should NOT have to adjust any AutoSync DIP switches, they should already be correct from the factory
Installing the AutoSync is as simple as plugging it into your truck’s OBD port, located under the dash. Be sure the ignition is OFF when installing the AutoSync. The AutoSync will NOT void any powertrain or bumper-to-bumper warranties, and is completely undetectable by the dealer. As soon as the AutoSync is unplugged, all traces/footprints are removed. The LED shows AutoSync system status at a glance: RED-AutoSync is powered up, but vehicle CAN bus activity is NOT being detected. BLUE- AutoSync is powered up, and vehicle CAN bus activity is being detected. GREEN- AutoSync is powered up, CAN bus is active, and engine is running. If the LED does not turn on when plugged in, check the “LTR” fuse.
NOTE: AutoSync data display is default set to US/SAE units, if you wish to see data in metric units, simply use the factory Driver Info Center (DIC) controls to set the vehicles units to “metric”. The AutoSync will detect this change directly from the vehicles Body Control Module and automatically reconfigure itself to metric units.
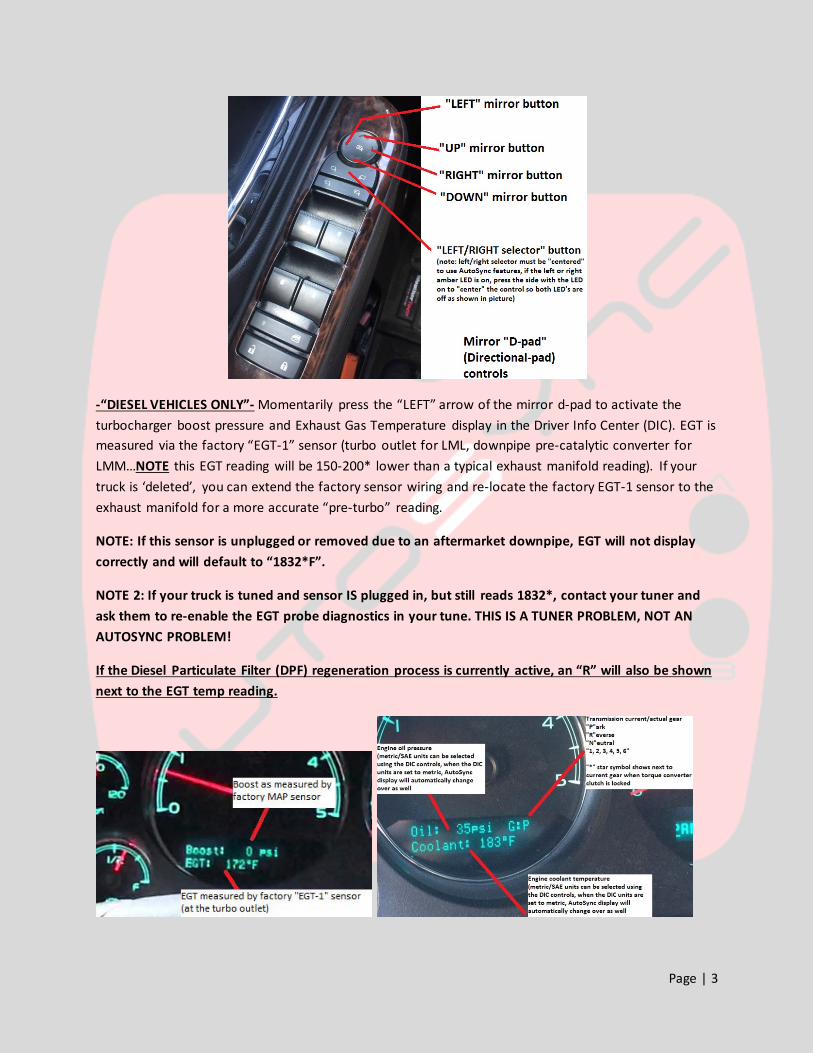
Important note: On “SLT/LTZ/Denali” pickups, all SUV’s, and “SLE/LT pickups WITH ‘DL3’ listed on the glovebox RPO sticker”, the following features are activated using the mirror position directional-pad. See page 5 for SLE/LT operation. When the left/right selector is set to left or right (as shown by the left/right indicator light), the mirror d-pad button will control mirror movement and position as normal. When the left/right selector is “centered”, the mirror d-pad button will control the AutoSync features.
Page | 3
-“DIESEL VEHICLES ONLY”- Momentarily press the “LEFT” arrow of the mirror d-pad to activate the turbocharger boost pressure and Exhaust Gas Temperature display in the Driver Info Center (DIC). EGT is measured via the factory “EGT-1” sensor (turbo outlet for LML, downpipe pre-catalytic converter for LMM…NOTE this EGT reading will be 150-200* lower than a typical exhaust manifold reading). If your truck is ‘deleted’, you can extend the factory sensor wiring and re-locate the factory EGT-1 sensor to the exhaust manifold for a more accurate “pre-turbo” reading.
NOTE: If this sensor is unplugged or removed due to an aftermarket downpipe, EGT will not display correctly and will default to “1832*F”.
NOTE 2: If your truck is tuned and sensor IS plugged in, but still reads 1832*, contact your tuner and ask them to re-enable the EGT probe diagnostics in your tune. THIS IS A TUNER PROBLEM, NOT AN AUTOSYNC PROBLEM!
If the Diesel Particulate Filter (DPF) regeneration process is currently active, an “R” will also be shown next to the EGT temp reading.
Page | 4
-Momentarily press the “RIGHT” arrow of the mirror d-pad to activate engine coolant temperature (ECT), engine oil pressure (EOP), transmission current gear, and torque converter clutch lockup status. “G:_” is the transmission current gear display, which will show P,N,R,1,2,3,4,5,6 depending on current transmission gear. If the torque converter is locked, a “*” star symbol will show next to the current gear number.
When you activate either of these data displays, you will hear a “beep” tone from the stereo, and the live data display will show up in the DIC. The info is updated/refreshed in real time several times per second.
To “lock” the data display on and prevent the ~7 second timeout, simply press and HOLD the left or right button for roughly 2 seconds. You will then hear a second “beep” tone, indicating that the DIC data display is “locked” on. To clear/unlock the data display, press the “UP” arrow of the mirror d-pad.
IMPORTANT NOTE: If you use the vehicle’s dash mounted DIC buttons to force-clear the DIC while the AutoSync live data display is active, you might find that the AutoSync data display does not work next time you select the left/right buttons. To “re-sync” the AutoSync with the DIC, momentarily press the “UP” arrow of the mirror d-pad, wait a few seconds, and then try re-selecting the desired live data display with the left/right arrow buttons.
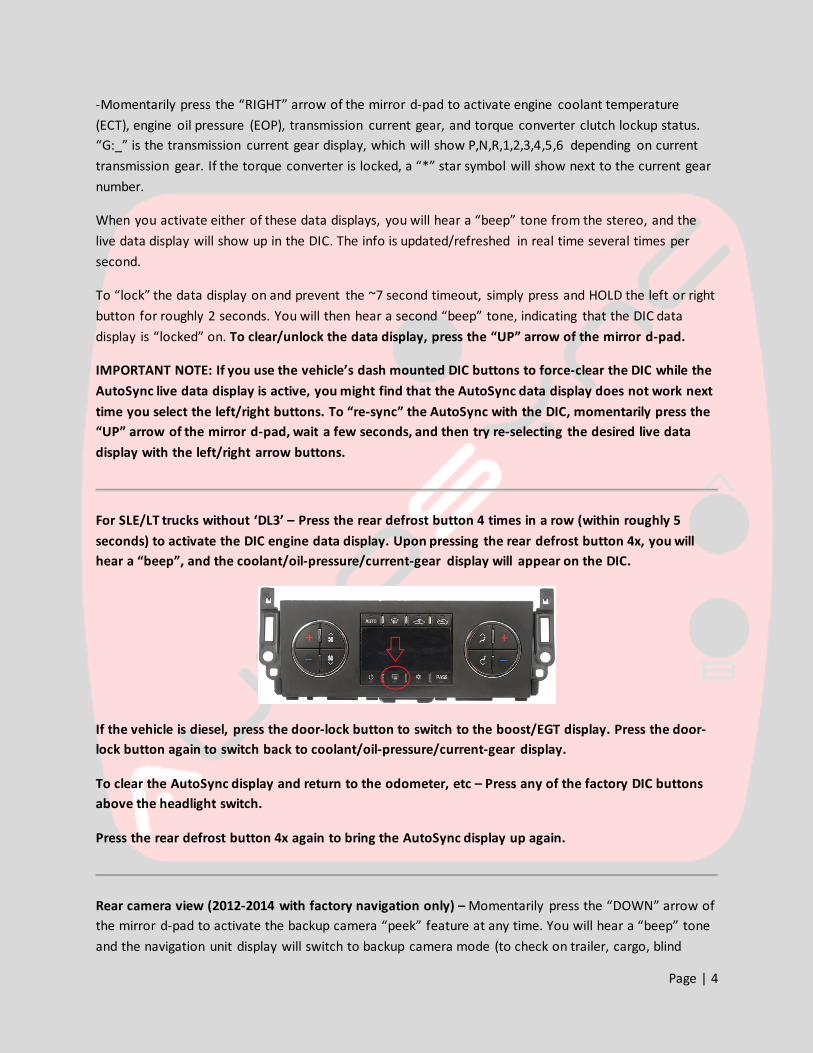
For SLE/LT trucks without ‘DL3’ – Press the rear defrost button 4 times in a row (within roughly 5 seconds) to activate the DIC engine data display. Upon pressing the rear defrost button 4x, you will hear a “beep”, and the coolant/oil-pressure/current-gear display will appear on the DIC.
If the vehicle is diesel, press the door-lock button to switch to the boost/EGT display. Press the door-lock button again to switch back to coolant/oil-pressure/current-gear display.
To clear the AutoSync display and return to the odometer, etc – Press any of the factory DIC buttons above the headlight switch.
Press the rear defrost button 4x again to bring the AutoSync display up again.
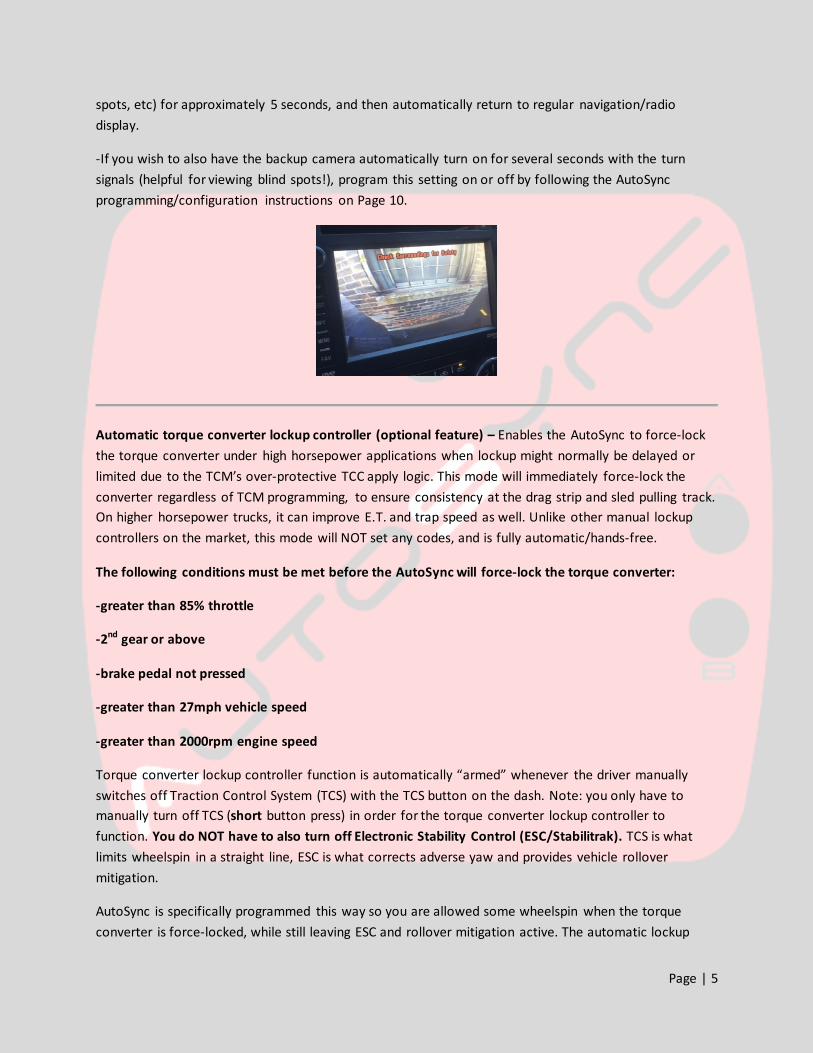
Rear camera view (2012-2014 with factory navigation only) – Momentarily press the “DOWN” arrow of the mirror d-pad to activate the backup camera “peek” feature at any time. You will hear a “beep” tone and the navigation unit display will switch to backup camera mode (to check on trailer, cargo, blind
Page | 5
spots, etc) for approximately 5 seconds, and then automatically return to regular navigation/radio display.
-If you wish to also have the backup camera automatically turn on for several seconds with the turn signals (helpful for viewing blind spots!), program this setting on or off by following the AutoSync programming/configuration instructions on Page 10.
Automatic torque converter lockup controller (optional feature) – Enables the AutoSync to force-lock the torque converter under high horsepower applications when lockup might normally be delayed or limited due to the TCM’s over-protective TCC apply logic. This mode will immediately force-lock the converter regardless of TCM programming, to ensure consistency at the drag strip and sled pulling track. On higher horsepower trucks, it can improve E.T. and trap speed as well. Unlike other manual lockup controllers on the market, this mode will NOT set any codes, and is fully automatic/hands-free.
The following conditions must be met before the AutoSync will force-lock the torque converter:
-greater than 85% throttle
-2nd gear or above
-brake pedal not pressed
-greater than 27mph vehicle speed
-greater than 2000rpm engine speed
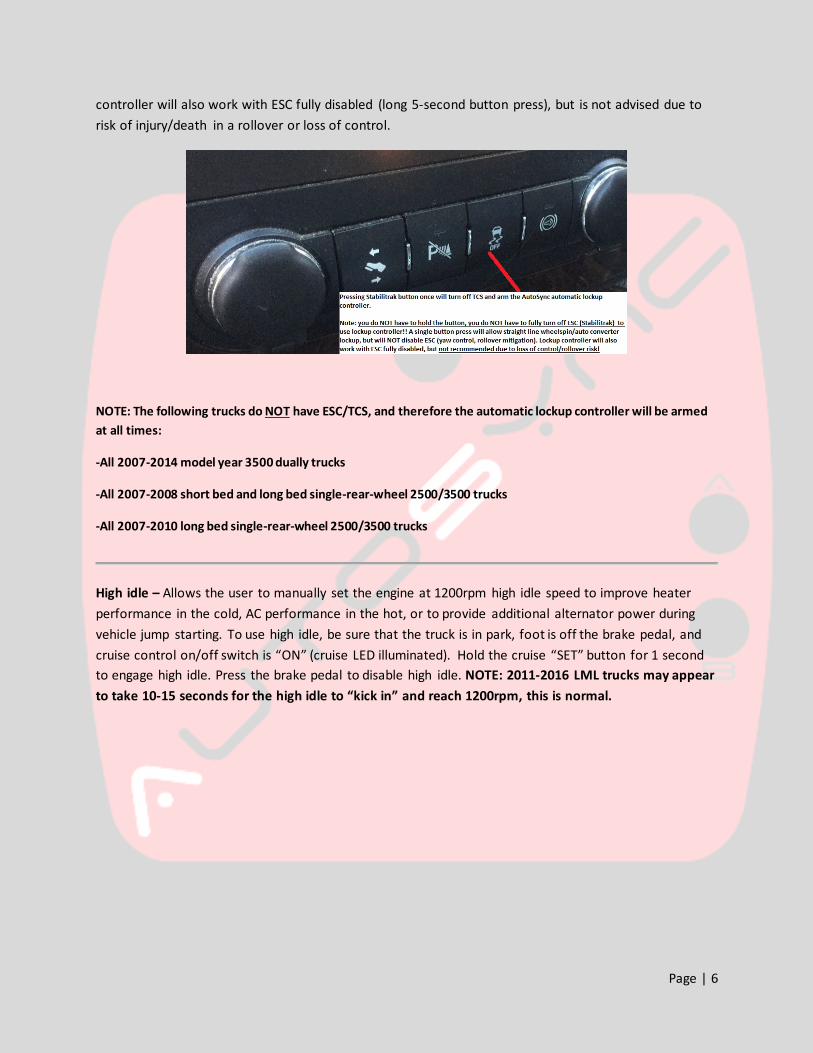
Torque converter lockup controller function is automatically “armed” whenever the driver manually switches off Traction Control System (TCS) with the TCS button on the dash. Note: you only have to manually turn off TCS (short button press) in order for the torque converter lockup controller to function. You do NOT have to also turn off Electronic Stability Control (ESC/Stabilitrak). TCS is what limits wheelspin in a straight line, ESC is what corrects adverse yaw and provides vehicle rollover mitigation.
AutoSync is specifically programmed this way so you are allowed some wheelspin when the torque converter is force-locked, while still leaving ESC and rollover mitigation active. The automatic lockup
Page | 6
controller will also work with ESC fully disabled (long 5-second button press), but is not advised due to risk of injury/death in a rollover or loss of control.
NOTE: The following trucks do NOT have ESC/TCS, and therefore the automatic lockup controller will be armed at all times:
-All 2007-2014 model year 3500 dually trucks
-All 2007-2008 short bed and long bed single-rear-wheel 2500/3500 trucks
-All 2007-2010 long bed single-rear-wheel 2500/3500 trucks
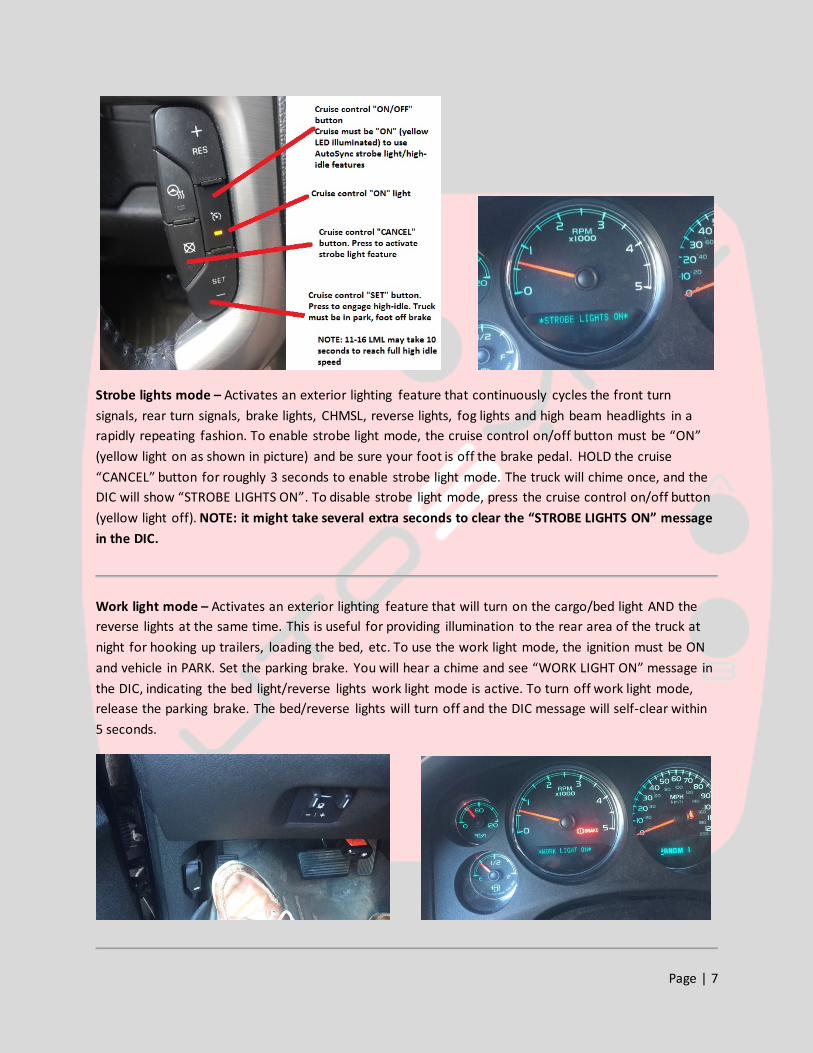
High idle – Allows the user to manually set the engine at 1200rpm high idle speed to improve heater performance in the cold, AC performance in the hot, or to provide additional alternator power during vehicle jump starting. To use high idle, be sure that the truck is in park, foot is off the brake pedal, and cruise control on/off switch is “ON” (cruise LED illuminated). Hold the cruise “SET” button for 1 second to engage high idle. Press the brake pedal to disable high idle. NOTE: 2011-2016 LML trucks may appear to take 10-15 seconds for the high idle to “kick in” and reach 1200rpm, this is normal.
Page | 7
Strobe lights mode – Activates an exterior lighting feature that continuously cycles the front turn signals, rear turn signals, brake lights, CHMSL, reverse lights, fog lights and high beam headlights in a rapidly repeating fashion. To enable strobe light mode, the cruise control on/off button must be “ON” (yellow light on as shown in picture) and be sure your foot is off the brake pedal. HOLD the cruise “CANCEL” button for roughly 3 seconds to enable strobe light mode. The truck will chime once, and the DIC will show “STROBE LIGHTS ON”. To disable strobe light mode, press the cruise control on/off button (yellow light off). NOTE: it might take several extra seconds to clear the “STROBE LIGHTS ON” message in the DIC.
Work light mode – Activates an exterior lighting feature that will turn on the cargo/bed light AND the reverse lights at the same time. This is useful for providing illumination to the rear area of the truck at night for hooking up trailers, loading the bed, etc. To use the work light mode, the ignition must be ON and vehicle in PARK. Set the parking brake. You will hear a chime and see “WORK LIGHT ON” message in the DIC, indicating the bed light/reverse lights work light mode is active. To turn off work light mode, release the parking brake. The bed/reverse lights will turn off and the DIC message will self-clear within 5 seconds.
Page | 8
AutoSync provides additional window convenience features/enhancements as well.
NOTE: these express up/down window features work on all SUV’s, all SLT/LTZ/Denali pickup trucks, and SLE/LT pickups WITH ‘DL3’ listed on the glovebox RPO sticker. If you have an SLE/LT/base pickup truck WITHOUT ‘DL3’, the express up/down windows feature will NOT work. This is not an AutoSync limitation, it is unfortunately simply due to the way GM wired/configured the lower trim vehicles
“Express up” (one-touch) for the drivers front window only – Simply “blip” the driver’s window switch up, and the window will automatically fully close. To immediately stop express-up at any time, blip the driver window switch “down”. To partially close the window (without activating express-up), holding the window switch “up” for longer than ~1 second will stop express-up from activating. In other words, a short flick of the switch activates express-up, a longer hold of the switch will not activate express-up.
“Express down” (one-touch) for both rear windows – Simply “blip” either rear window switch down, and the respective window will automatically open fully. Halting express-down operation, or only partially opening the window (without express-down activating) is accomplished in the same manner as the above-explained drivers express window operation.
-NOTE: Express-up on the rear windows, or front passenger window is NOT available due to lack of pinch-protection logic in the window motors, and risk of inadvertently trapping a front/rear passenger in the window. Be sure to exercise care and pay attention when using the AutoSync express up/down window functions, and NEVER allow any children to sit in the vehicle unattended!!!
Window control and mirror fold (if equipped) control via the remote keyfob lock/unlock buttons while the vehicle is off (and within range of the keyfob) is also available. NOTE: this feature works on all SUV’s, all SLT/LTZ/Denali pickup trucks, and SLE/LT pickups WITH ‘DL3’ listed on the glovebox RPO sticker. If you have an SLE/LT/base pickup truck WITHOUT ‘DL3’, the remote keyfob windows feature will NOT work.
-To unfold the power-fold mirrors (if equipped) while the truck is off, press the “unlock” button 3 times within ~5 seconds.
-To open the windows while the truck is off, press the “unlock” button 4 times within ~5 seconds.
-To fold the power-fold mirrors (if equipped) while the truck is off, press the “lock” button 3 times within ~5 seconds.
-To close the windows while the truck is off, press the “lock” button 4 times within ~5 seconds.
NOTE 1: If the truck has been powered down for more than an hour or so, you MAY need to press the appropriate lock/unlock button one additional time to activate the desired function. This is due to the fact that sometimes the initial lock/unlock CAN bus message can be missed because under certain conditions, the AutoSync may take an extra couple milliseconds to “wake-up”.
Page | 9
NOTE 2: these window/mirror features work on all SUV’s, SLT/LTZ/Denali pickup truck, and SLE/LT pickup truck WITH factory power-fold mirrors (check the glovebox RPO sticker for “DL3”). If you have an SLE/LT/base pickup truck WITHOUT factory power fold mirrors (DL3), the DIC engine data display will NOT work. This is not an AutoSync limitation, it is unfortunately simply due to the way GM wired/configured the lower trim vehicles…
NOTE 3: Be sure to exercise care when using the AutoSync remote open/close window functions, do NOT use below freezing/icing temps, and NEVER allow any children to sit in the vehicle unattended!!!
NOTE 4: On vehicles without BT DieselWorks BCM (body control module) tuning, the remote keyfob functions MAY only open/close the front windows. To enable rear window control via remote keyfob, you will need BCM tuning.
NOTE 5: DO NOT remotely operate the windows with the keyfob if you do not have direct line-of-sight with the vehicle! This is to ensure that the windows actually close fully, and that nothing is in danger of being pinched in the closing window. If a window happens to bind, it will obviously not close properly…we will not be held responsible if one or more of the windows fails to fully open/close (due to mechanical or electrical problem) when using the remote keyfob!!
NOTE 6: The sunroof and rear sliding window will NOT open/close via the remote keyfob. This is for windows/mirrors only!
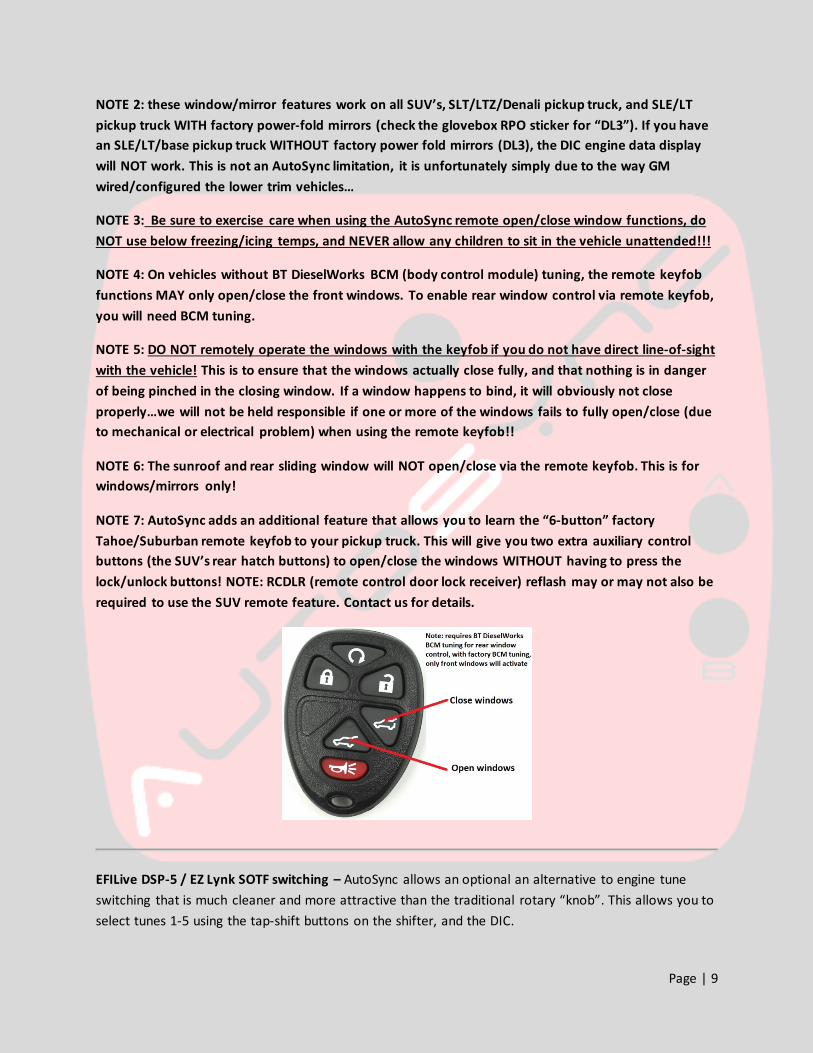
NOTE 7: AutoSync adds an additional feature that allows you to learn the “6-button” factory Tahoe/Suburban remote keyfob to your pickup truck. This will give you two extra auxiliary control buttons (the SUV’s rear hatch buttons) to open/close the windows WITHOUT having to press the lock/unlock buttons! NOTE: RCDLR (remote control door lock receiver) reflash may or may not also be required to use the SUV remote feature. Contact us for details.
EFILive DSP-5 / EZ Lynk SOTF switching – AutoSync allows an optional an alternative to engine tune switching that is much cleaner and more attractive than the traditional rotary “knob”. This allows you to select tunes 1-5 using the tap-shift buttons on the shifter, and the DIC.

Page | 10
-The “DSP/SOTF signal” wire is a required additional accessory for the AutoSync to add this feature. The wire must be inserted into pin position 8 of the OBD port. See www.btdieselworks.com to purchase.
-Unbolt the OBD port from the dash bracket, and remove the top row blue plastic retainer clip using a small screwdriver or pick. Insert the AutoSync DSP/SOTF wire into pin position 8 (top row, furthest right…confirm with the small pin location numbers printed on the OBD port connector itself).
-Cut the “SIGNAL” wire going to your existing rotary DSP/SOTF knob switch. Usually this wire color is purple or blue and goes to (LML: ECM C3 connector, pin 11) or (LMM: ECM C1 connector, pin 46). Splice the AutoSync DSP/SOTF wire to the DSP/SOTF signal wire that you just cut. The ground (usually black) wire going to the old rotary switch can be cut/taped off/removed. BE SURE TO DOUBLE CHECK WHICH WIRES YOU ARE WORKING WITH. SPLICING THE AUTOSYNC DSP/SOTF WIRE TO THE “GROUND” WIRE OF THE OLD ROTARY KNOB SWITCH WILL DESTROY THE AUTOSYNC AND VOID WARRANTIES!
-Once the wiring has been installed, the AutoSync must be reprogrammed to enable the DSP/SOTF tuning option. See “AutoSync configuration procedure” instructions on page 10.
To use the AutoSync DSP/SOTF switch:
-Be sure you are in any gear position except “M” manual (tune switching is disabled when in Manual)
-To check what tune you are currently in: tap either the “+” or “-“ button on the shifter. You will hear a “beep” and the currently selected tune will show up in the DIC for several seconds and then clear.
-To change tunes: press and hold either the “+” (increase tune) or “-“ (decrease tune) button on the shifter for ~2 seconds. The currently selected tune will show up in the DIC. Keep holding the button, you will hear a second beep, and the tune change will show in the DIC for several seconds before clearing.
Page | 11
AutoSync Reprogramming/configuration procedure The AutoSync incorporates an “on-screen” programming menu to allow the user to enable/disable various features, adjust TPMS programming, and initiate automatic firmware updates.
To access the programming menu –
- If there are any warning messages currently on the DIC, press the DIC “” button to clear them and return to the regular “odometer” display.
- Cruise control on/off switch must be ON (orange LED illuminated on the cruise control switch) - Press and hold both the cruise control “RES+” button and the tap-shift “+” button together for
~2 seconds until you hear a chime, then the AutoSync config menu will appear on the DIC. *NOTE*, if you have DSP-5 switchable tuning enabled, you might find that you have to press the cruise RES+ button slightly before you press the tap-shift “+” button, otherwise the DSP-5 switchable tuning menu might activate inadvertently.
- Release the buttons. - Use the “+” and “-“ buttons on the transmission shift lever to scroll up/down through the menus - To exit the programming menu at any time, turn the cruise control OFF (press the cruise control
on/off button so the orange light turns off). The AutoSync programming menu will then clear within 5 seconds.
- *NOTE* when selecting menu items using the cruise SET-/RES+ buttons, you might have to hold the button for a half-second (until you hear a confirmation ‘beep’), as there is some “debounce” logic in the switches.
To enable/disable the turn signal camera feature (2012-2014 trucks only) – Scroll to the “turn signal camera” page, and press/hold the cruise control RES+ button for 1 second to enable it, or the cruise control SET- button to disable it. You will hear a ‘beep’ and the menu display will change to ‘ENABLED’ or ‘DISABLED’ when you have successfully changed the setting.
To enable/disable the DSP/SOTF tune switching feature – Scroll to the “DSP/SOTF tune switch” page, and press/hold the cruise control RES+ button for 1 second to enable it, or the cruise control SET- button to disable it.
To enable/disable the “SecurIdle” feature – This feature allows you to lock the shifter in “park”, even when the brake pedal is depressed. This is useful if you want to leave your truck running but not allow anyone to easily drive it away. Press the cruise control “RES” button to enable it, or cruise control “SET-“ button to disable it. When this feature is set to “enable”, whenever the truck is locked using the remote keyfob while running (a quick-release keychain for your remote keyfob is recommended), SecurIdle is activated. If SecurIdle is activated and someone breaks into the truck, when they step on the brake pedal to try to shift out of park, the stereo will beep continuously and the shifter will remain locked. SecurIdle is automatically disarmed when the truck is unlocked with the remote keyfob. NOTE: SecurIdle
Page | 12
is only active when the AutoSync is plugged in; if SecurIdle is active, unplugging the AutoSync for ~10 seconds will unlock the shifter…but it is unlikely a smash-and-grab thief will know that.
Diagnostic trouble code read/clear – Scroll to the “Read DTCs” page to read and clear current and pending engine trouble codes. To read DTCs, press the cruise control “SET-” button. You will hear a beep, and within a few seconds, any current DTCs will show up on the DIC. The DIC can only show several codes per “page”; use the shifter +/- buttons to scroll through the DTC pages. To “back out” of the DTC display list, press the cruise control “CANCEL” button. To clear DTCs, press cruise control “RES+” button.
To enable/disable auto mirror fold – (obviously this is only available on trucks with factory power-fold mirrors) Press the cruise control “RES+” button to enable it, or cruise control “SET-“ button to disable it. When enabled, the mirrors will automatically fold when the vehicle is turned off, and drivers door is opened. The mirrors will automatically fold back out the next time the key is cycled “on”.
Lockup controller – This allows you to enable or disable the automatic torque converter lockup feature. On trucks “without” stability control, the lockup controller by default is armed all of the time. On trucks “with” stability control, the lockup controller is armed when traction control is turned “off” by the driver. If you want to disable the lockup controller so it does not automatically arm at any time, press the cruise control “SET-” button to disable it, or cruise control “RES+” button to enable it.
To access the TPMS setup menu – Vehicle must be KEY ON/ENGINE OFF to program TPMS! Scroll to the “TPMS setup” page, and press/hold the cruise control RES+ button for 1 second. You will hear a ‘beep’ and the menu will change to “TPMS set to: xx PSI”. Use the transmission shift lever +/- buttons to select your desired TPMS warning threshold setting. The allowed setting ranges from 25psi – 80psi, in 5-psi increments. To fully DISABLE the TPMS, scroll ‘up’ until the menu shows “TPMS: Disabled”. When you have selected your desired pressure setting (or disabled), press and hold the cruise SET- button for 1 second to save/program your selection. You will hear a chime and then the configuration menu will exit. Wait 5 seconds, then turn the ignition OFF. Wait 30 seconds. Now your TPMS setting has been saved. If you accidentally entered the TPMS setup menu and want to “back out” without reprogramming, just press the cruise control CANCEL button, and it will bring you back to the AutoSync main menu.
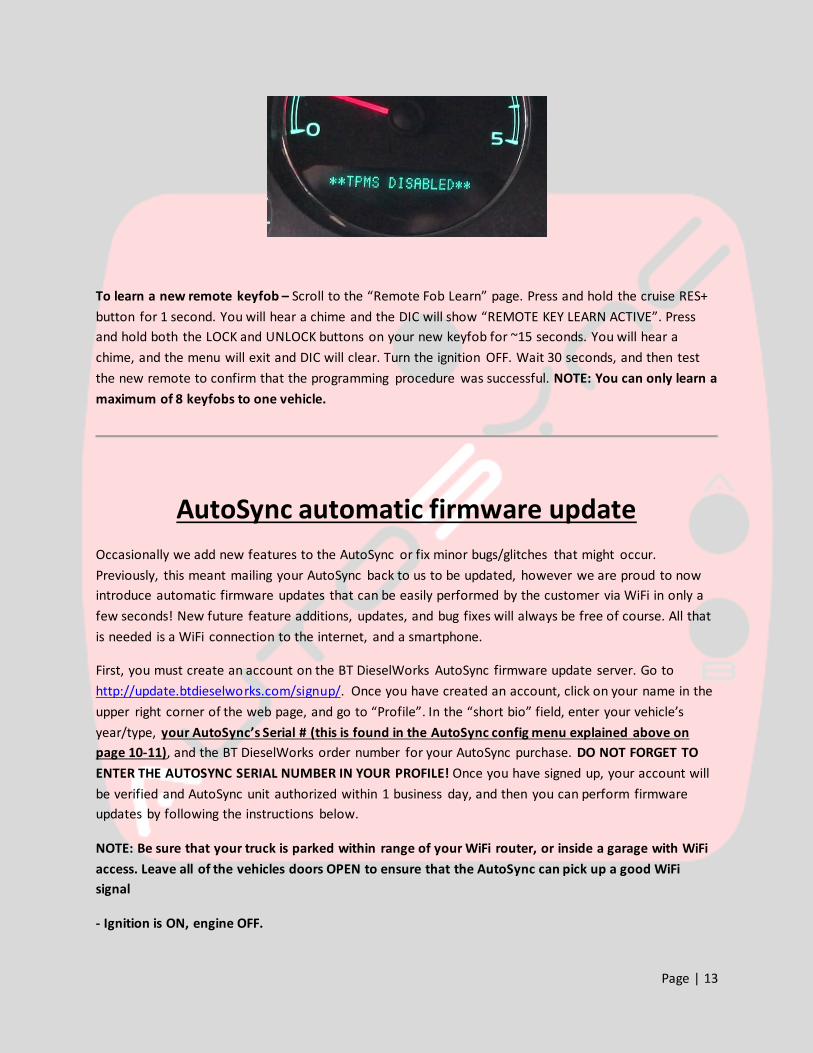
NOTE: If the AutoSync has been set to disable TPMS, it must remain plugged in for the TPMS disable feature to work.
NOTE: when the AutoSync is set to disable TPMS, the truck will still chime and display a temporary “TPMS DISABLED” message in the DIC several seconds after startup. This is simply to warn the driver that TPMS has been disabled by AutoSync. Do not press any DIC buttons, the DIC message will self-clear within 10 seconds!
Page | 13
To learn a new remote keyfob – Scroll to the “Remote Fob Learn” page. Press and hold the cruise RES+ button for 1 second. You will hear a chime and the DIC will show “REMOTE KEY LEARN ACTIVE”. Press and hold both the LOCK and UNLOCK buttons on your new keyfob for ~15 seconds. You will hear a chime, and the menu will exit and DIC will clear. Turn the ignition OFF. Wait 30 seconds, and then test the new remote to confirm that the programming procedure was successful. NOTE: You can only learn a maximum of 8 keyfobs to one vehicle.
AutoSync automatic firmware update Occasionally we add new features to the AutoSync or fix minor bugs/glitches that might occur. Previously, this meant mailing your AutoSync back to us to be updated, however we are proud to now introduce automatic firmware updates that can be easily performed by the customer via WiFi in only a few seconds! New future feature additions, updates, and bug fixes will always be free of course. All that is needed is a WiFi connection to the internet, and a smartphone.
First, you must create an account on the BT DieselWorks AutoSync firmware update server. Go to http://update.btdieselworks.com/signup/. Once you have created an account, click on your name in the upper right corner of the web page, and go to “Profile”. In the “short bio” field, enter your vehicle’s year/type, your AutoSync’s Serial # (this is found in the AutoSync config menu explained above on page 10-11), and the BT DieselWorks order number for your AutoSync purchase. DO NOT FORGET TO ENTER THE AUTOSYNC SERIAL NUMBER IN YOUR PROFILE! Once you have signed up, your account will be verified and AutoSync unit authorized within 1 business day, and then you can perform firmware updates by following the instructions below.
NOTE: Be sure that your truck is parked within range of your WiFi router, or inside a garage with WiFi access. Leave all of the vehicles doors OPEN to ensure that the AutoSync can pick up a good WiFi signal
- Ignition is ON, engine OFF.
Page | 14
- Enter the AutoSync configuration menu explained above on page 10. Scroll down to the page that says “Firmware: x.xx Serial #: xxxxxxxx”.
- NOTE: The following steps must happen within ~60 seconds, otherwise the AutoSync will time out, exit the setup menu, and you will have to start over again.
1. Press and hold the cruise control RES+ button for 1 second. You will hear a chime, and the DIC will show “Connect to AutoSync using your phone”.
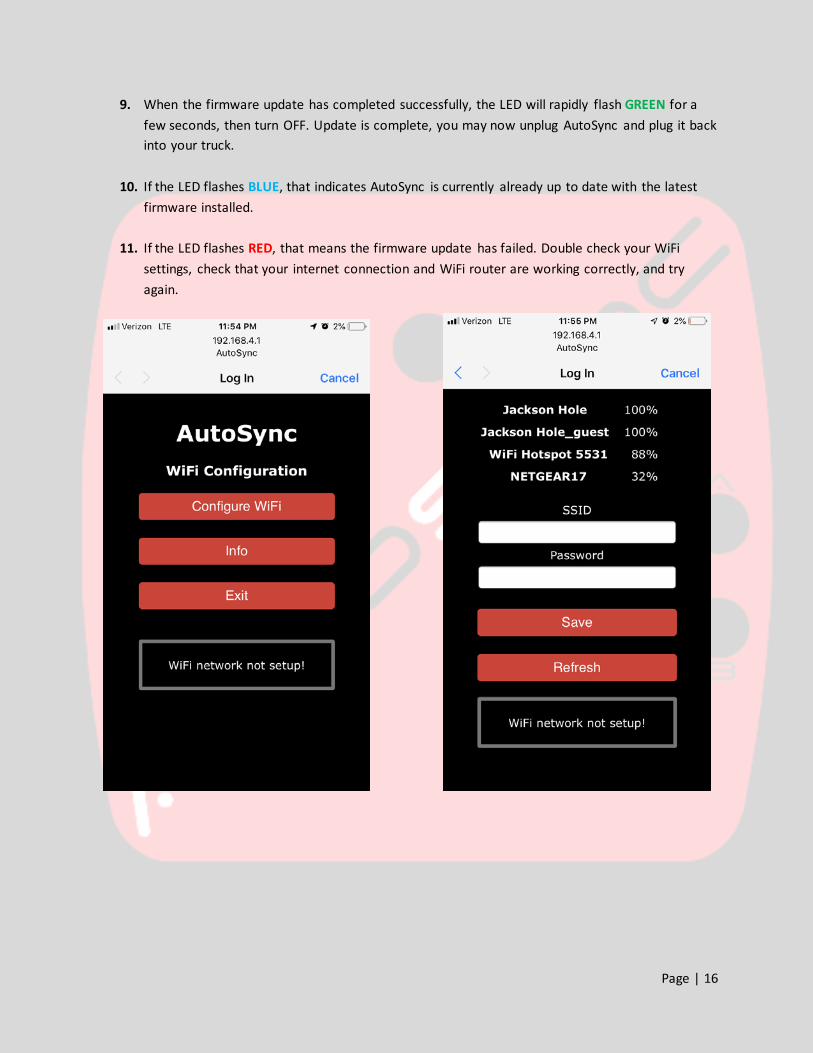
2. Using your phone, search for available WiFi networks. Within a few seconds, the WiFi network “AutoSync” should appear.
3. Connect to the AutoSync WiFi network. Once your phone is connected, the AutoSync configuration menu will appear on your phone (picture of menu on page 15).
4. Click “Configure WiFi”. The AutoSync will now search your available WiFi networks, and the signal strength of each WiFi network. If your WiFi network does not appear, wait a few seconds and click “Refesh”. If your WiFi network still does not appear within ~10 seconds, check that your WiFi router is working, and the AutoSync is within range of your router. Connection can be unreliable if signal strength is below ~25%.
5. Click on your home WiFi network, enter your WiFi router password, and click “save”. The AutoSync will now attempt to connect to your WiFi network. If the connection is successful, your phone will exit the AutoSync configuration menu, the DIC will show “Connection Success”, and the status LED on the AutoSync will also turn “purple/pinkish”. If the AutoSync does not connect within 10 seconds, double check that your WiFi password is correct, and try again.
6. Once the AutoSync has connected successfully, within a few seconds, it will show “Firmware Download – DO NOT DISTURB!”. The AutoSync is now downloading the updated firmware from the internet and reprogramming itself. Do not unplug the AutoSync or turn the ignition off. When the firmware check/download has completed (it should take less than 30 seconds), the DIC will show “Download Complete, menu will now exit” (if new firmware has been installed) or “Already up to date, menu will now exit” (if the AutoSync already has the latest firmware installed). The status LED on the AutoSync will flash GREEN after a successful update, or flash BLUE if firmware is already up to date. The DIC menu will then clear. You might see an ABS light or “Service Stabilitrak” message when the AutoSync reboots, this is normal. Re-enter the AutoSync config menu and verify that the firmware version # is “higher” than before.
7. Wait 30 seconds, turn ignition OFF.
8. Unplug the AutoSync for 10 seconds, and plug it back in.
Page | 15
9. If the DIC shows “Update Failed! Error: xx”, turn the ignition OFF, unplug the AutoSync for 10
seconds, plug it back in, and try the update procedure again. If it still fails after multiple attempts, it most likely means that your WiFi connection is weak or there is a problem with your WiFi router. Follow the “alternate method” instructions below.
10. If update procedure seems to be hanging for more than 1 minute or so (stuck on “Firmware download – do not disturb” message), turn the ignition OFF, unplug the AutoSync for 10 seconds, and try update procedure again.
Alternate method if you cannot move your truck within range of your WiFi router
1. Be sure you are sitting near your WiFi router. Locate any regular phone charger or power supply with a mini-USB connector, be sure it is capable of supplying at least 1-amp or 1000mA.
2. Press and hold the “A” button on the AutoSync.
3. While still holding the “A” button, plug the AutoSync into USB power. The LED will turn GREEN indicating that the AutoSync is on offboard programming mode.
4. When the LED turns GREEN, release the “A” button. Note: If you have already entered your home networks WiFi credentials at a previous time, the LED will only turn GREEN for a second, and then turn PINKISH/PURPLE, indicating it has already connected and is downloading the new firmware. If the LED just stays green, follow steps 5-6 below.
5. Using your phone, search for available WiFi networks. Within a few seconds, the network “AutoSync-OFFBOARD” should appear.
6. Connect to the AutoSync-OFFBOARD WiFi network. Once your phone is connected, the AutoSync configuration menu will appear on your phone.
7. Follow steps 4-5 above on page 13.
8. Once the AutoSync has successfully connected to your home WiFi network, the LED will turn PINKISH/PURPLE color, indicating it has connected and is currently downloading new firmware.
Page | 16
9. When the firmware update has completed successfully, the LED will rapidly flash GREEN for a few seconds, then turn OFF. Update is complete, you may now unplug AutoSync and plug it back into your truck.
10. If the LED flashes BLUE, that indicates AutoSync is currently already up to date with the latest firmware installed.
11. If the LED flashes RED, that means the firmware update has failed. Double check your WiFi settings, check that your internet connection and WiFi router are working correctly, and try again.