Embed Size (px)
Citation preview

OUTDOOR STRENGTH TRAINING PROGRAM
Better than
having Covid
panted on you
in a poorly
ventilated gym
INDEX
How to get strong in a pandemic
Disclaimer
Equipment
The warm up
The main movement patterns
The exercises
Horizontal pull
Horizontal push
Vertical pull
Vertical push
Hip-dominant
Quad-dominant
Anterior core
Lateral core
The program
Program A
Program B
An example fortnight
3
5
6
7
8
9
9
10
12
14
15
17
20
21
23
23
24
25
ACCESS THE COMPLETE EXERCISE VIDEO LIBRARY VIA THIS LINK

At the time of writing (November 2020), there are kettlebells on Amazon that cost more than a week’s holiday in The Maldives.
The coronavirus pandemic has made gyms inaccessible and caused a worldwide shortage of home gym equipment, hence the crazy prices! However, the good news is that when you’re strength training, your muscles don’t know if what they’re resisting against is a heavy weight, your body weight or a resistance band.
While having access to big weights in a gym is necessary if you want to develop maximum strength, it’s not essential if your goal is to get stronger and gain (or at least maintain) muscle while getting leaner.
All you need to get started with the outdoor strength training program we’ve designed for you is a pull up bar, a TRX (or equivalent suspension trainer) and some bands.
Each session in the program is a full-body workout. For optimal results you should do 3 sessions per week, with a day off (or light cardio) on the days in between. Two days training per week is ok for maintenance, but you’ll find it harder to make progress.
Everyone is very different which is why we usually tailor our programs specifically to each of our clients, taking into account their strengths, weaknesses and limitations.
But, as this program is free, that part will be down to you! To make it easy for you to get started we’ve provided you with a structure and a selection of exercises of varying degrees of difficulty for each of the main movement patterns.
We recommend that you start with the easier exercises and change up to the harder ones once they become too easy for you (for most exercises in this program, a good indicator is when you can do 15 reps with perfect technique).
HOW TO GET STRONG IN A PANDEMIC
3
Start by leaving a few reps in reserve for each exercise (if you think you can do 12 reps, just do 9). The goal is not to kill yourself in every workout. The goal is consistency. This is more likely to be achieved if you feel better at the end of the workout than you did at the beginning.
You can challenge yourself more once you’ve got the hang of the movements.Here’s a video library of all of the exercises to help you with technique.
Never work through pain (the bad kind). While it’s normal to feel some burn in your muscles during the last few reps of a set (good pain), it’s an indication that something is wrong if you feel pain in your joints during the first reps (bad pain).
Use ‘technical failure’ as a guide. When you start pushing yourself more, stop before the point where your technique breaks down. That’s where injuries happen.
Set your ego to one side. Related to the previous point: Don’t butcher your technique just to get a few more reps in. If you’re not as fit and strong as you used to be, you’ll soon get back there by being patient and consistent. Accept where you’re at now and aim to make small improvements each session.
The best workout program is 52 x 3* (Three times a week for 52 weeks). Consistency produces the best results. Don’t worry too much about the minor details.
The hardest part is getting started. Don’t feel like training today? Make a deal with yourself that at a minimum you’ll put your workout gear on and get to the park, whatever the weather. Give yourself permission to decide what you’ll do when you get there. Chances are that once you make it that far you’ll do the whole workout and feel better for it afterwards.
Good luck and let me know how you get on!
Andy Marlow360 Personal TrainingFounder & Head Trainer
*credit to Tony Gentilcore for these universal words of wisdom
SOME (OFTEN FORGOTTEN) COMMON SENSE
4

Participation in all forms of exercise involves some risk of injury.
It’s your own responsibility if you get injured following this program.
If you have pre-existing health issues, always consult with your doctor before engaging in physical exercise.
DISCLAIMER
5
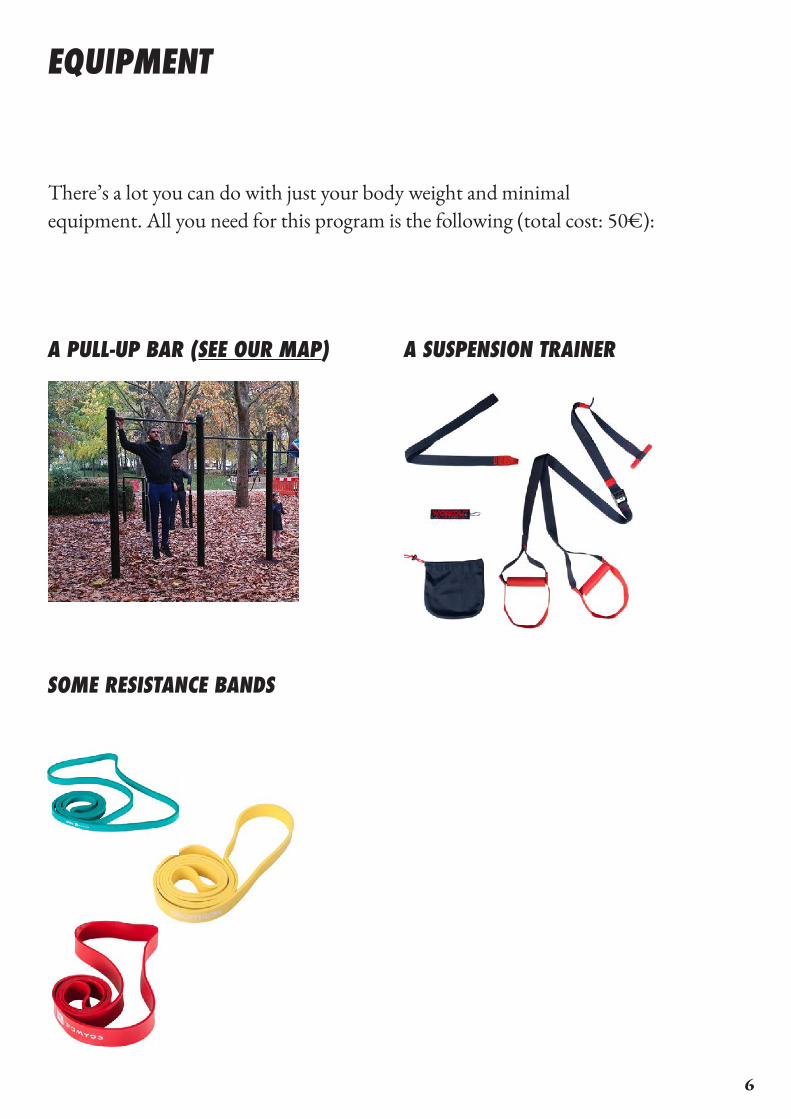
There’s a lot you can do with just your body weight and minimal equipment. All you need for this program is the following (total cost: 50€):
A PULL-UP BAR (SEE OUR MAP) A SUSPENSION TRAINER
SOME RESISTANCE BANDS
EQUIPMENT
6
During the colder months, it’s a good idea to raise your body temperature with some light cardio before you begin the dynamic warm up. A 5-10 minute jog to to the park is enough.
For the dynamic warm up you need to mobilise your shoulders and hips while activating your major muscle groups and the stabilising muscles of your ‘core’.
It’s beyond the scope of this program to provide personalised warmups for all fitness levels. However, for most people, it will be enough to do 5 to 8 reps of one exercise from each movement pattern in the program. For example, a beginner’s warm up could be composed of:
Single arm band rowPush-ups on kneesDead hang (for half as long as possible)Single arm overhead band press (with light band)Hip thrustsAir squatsSplit squatsSlow mountain climbersSide plank (for half as long as possible)
THE WARM UP
7
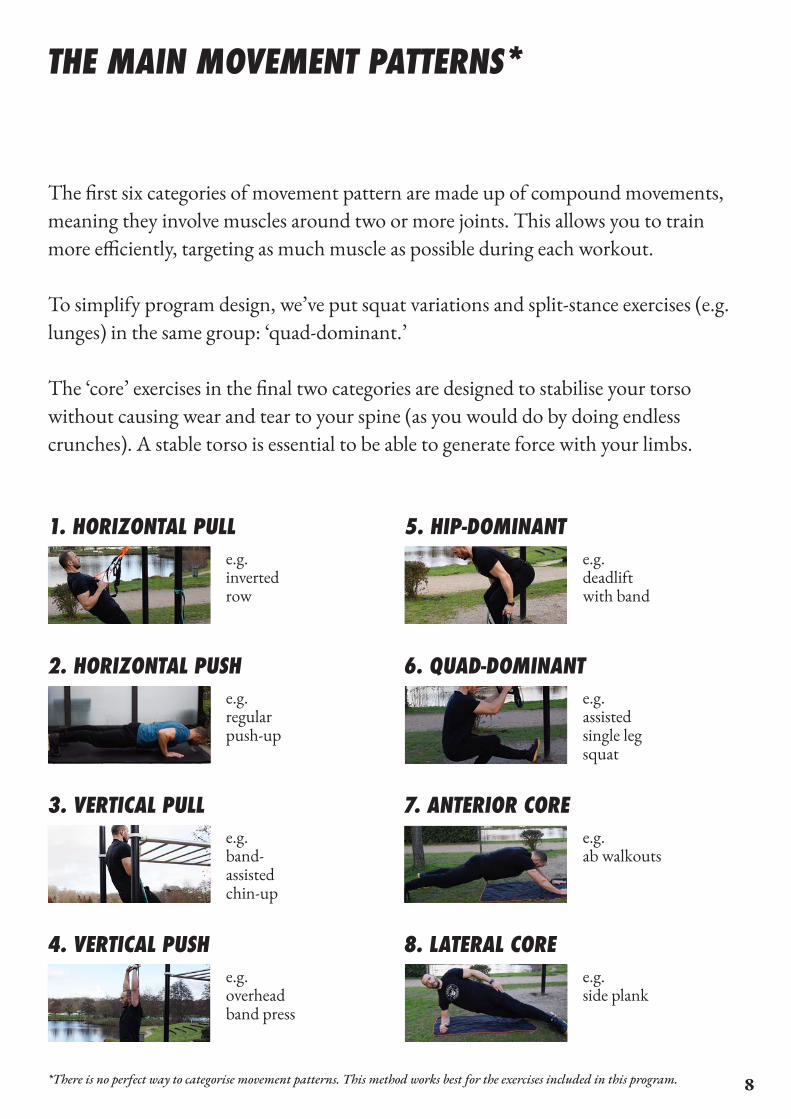
The first six categories of movement pattern are made up of compound movements, meaning they involve muscles around two or more joints. This allows you to train more efficiently, targeting as much muscle as possible during each workout.
To simplify program design, we’ve put squat variations and split-stance exercises (e.g. lunges) in the same group: ‘quad-dominant.’
The ‘core’ exercises in the final two categories are designed to stabilise your torso without causing wear and tear to your spine (as you would do by doing endless crunches). A stable torso is essential to be able to generate force with your limbs.
1. HORIZONTAL PULLe.g.inverted row
e.g.deadlift with band
e.g.regularpush-up
e.g.assisted single leg squat
e.g.band-assisted chin-up
e.g.ab walkouts
e.g.overhead band press
e.g.side plank
5. HIP-DOMINANT
3. VERTICAL PULL 7. ANTERIOR CORE
2. HORIZONTAL PUSH 6. QUAD-DOMINANT
4. VERTICAL PUSH 8. LATERAL CORE
THE MAIN MOVEMENT PATTERNS*
8*There is no perfect way to categorise movement patterns. This method works best for the exercises included in this program.
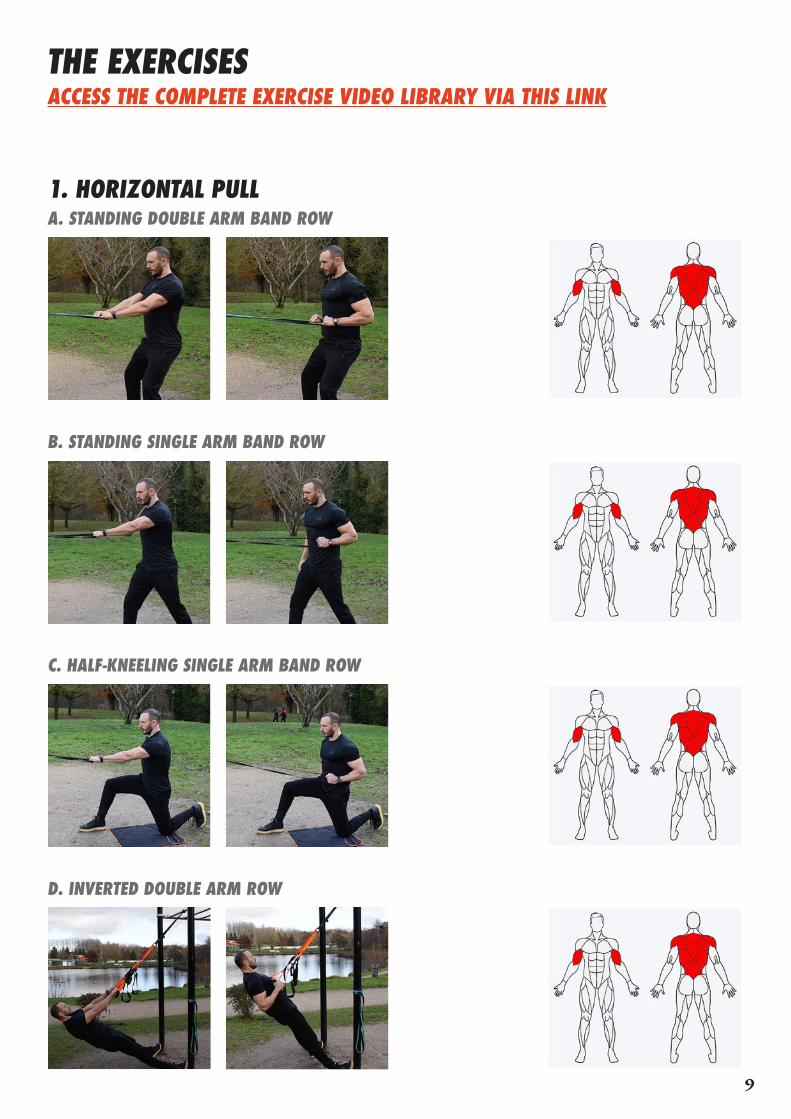
1. HORIZONTAL PULLA. STANDING DOUBLE ARM BAND ROW
B. STANDING SINGLE ARM BAND ROW
C. HALF-KNEELING SINGLE ARM BAND ROW
D. INVERTED DOUBLE ARM ROW
THE EXERCISESACCESS THE COMPLETE EXERCISE VIDEO LIBRARY VIA THIS LINK
9
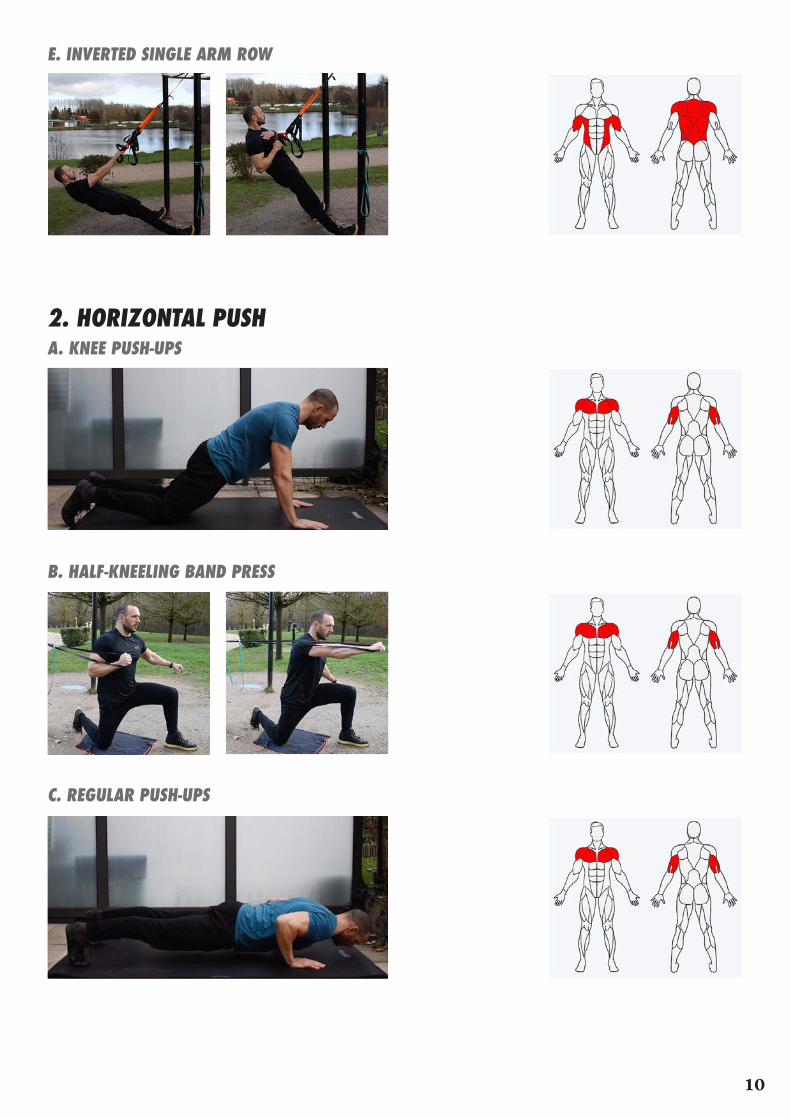
2. HORIZONTAL PUSH
E. INVERTED SINGLE ARM ROW
A. KNEE PUSH-UPS
B. HALF-KNEELING BAND PRESS
C. REGULAR PUSH-UPS
10
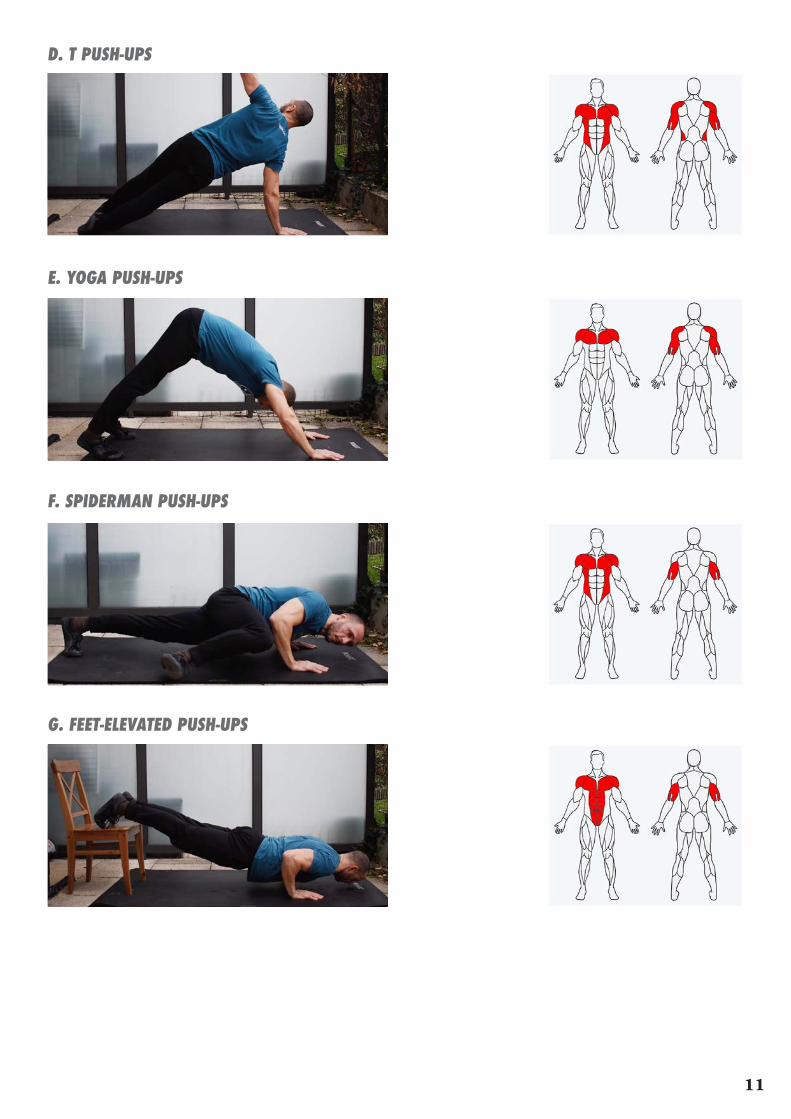
D. T PUSH-UPS
E. YOGA PUSH-UPS
F. SPIDERMAN PUSH-UPS
G. FEET-ELEVATED PUSH-UPS
11
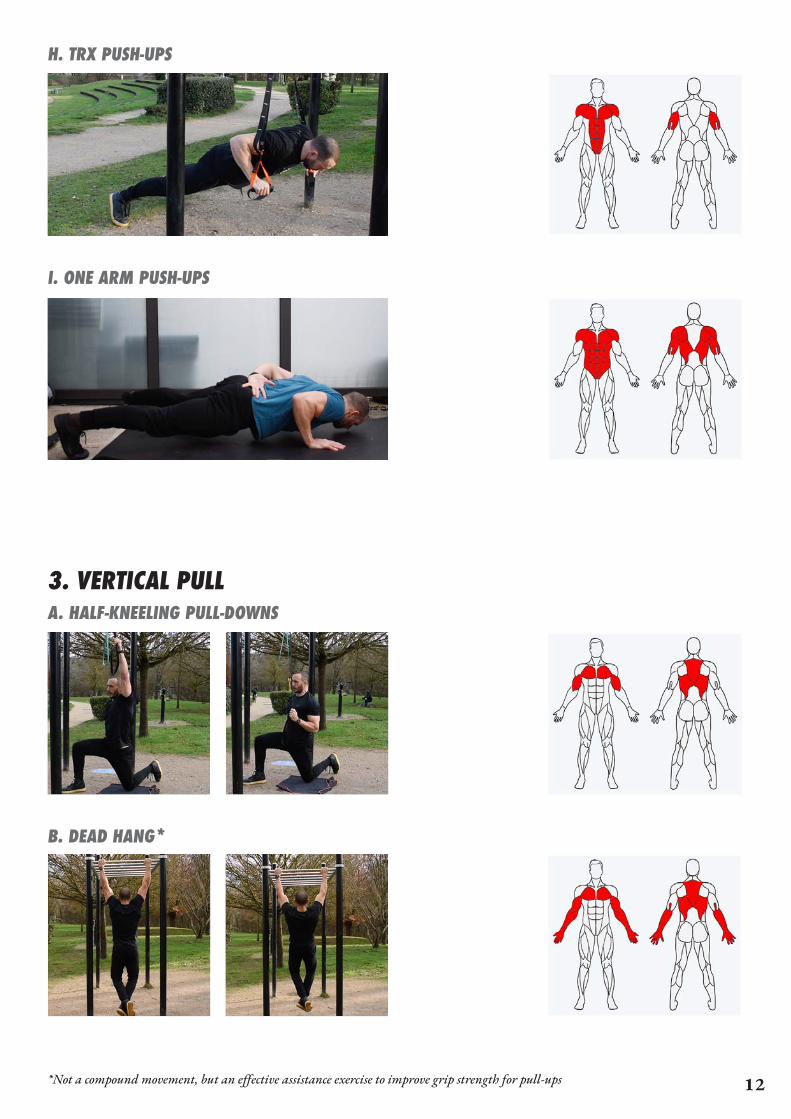
H. TRX PUSH-UPS
I. ONE ARM PUSH-UPS
A. HALF-KNEELING PULL-DOWNS
B. DEAD HANG*
12
3. VERTICAL PULL
*Not a compound movement, but an effective assistance exercise to improve grip strength for pull-ups
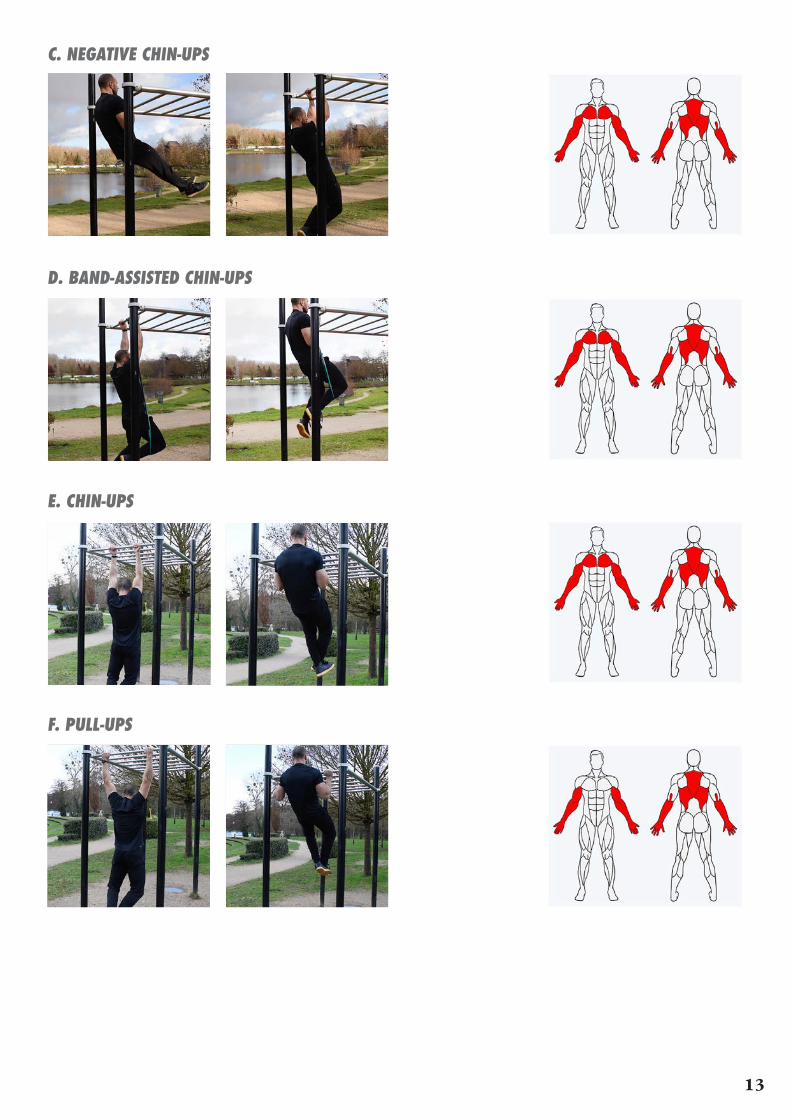
C. NEGATIVE CHIN-UPS
D. BAND-ASSISTED CHIN-UPS
E. CHIN-UPS
F. PULL-UPS
13

G. TOWEL PULL-UPS
A. DOUBLE OVERHEAD BAND PRESS
B. SINGLE OVERHEAD BAND PRESS
C. DIPS
14
4. VERTICAL PUSH
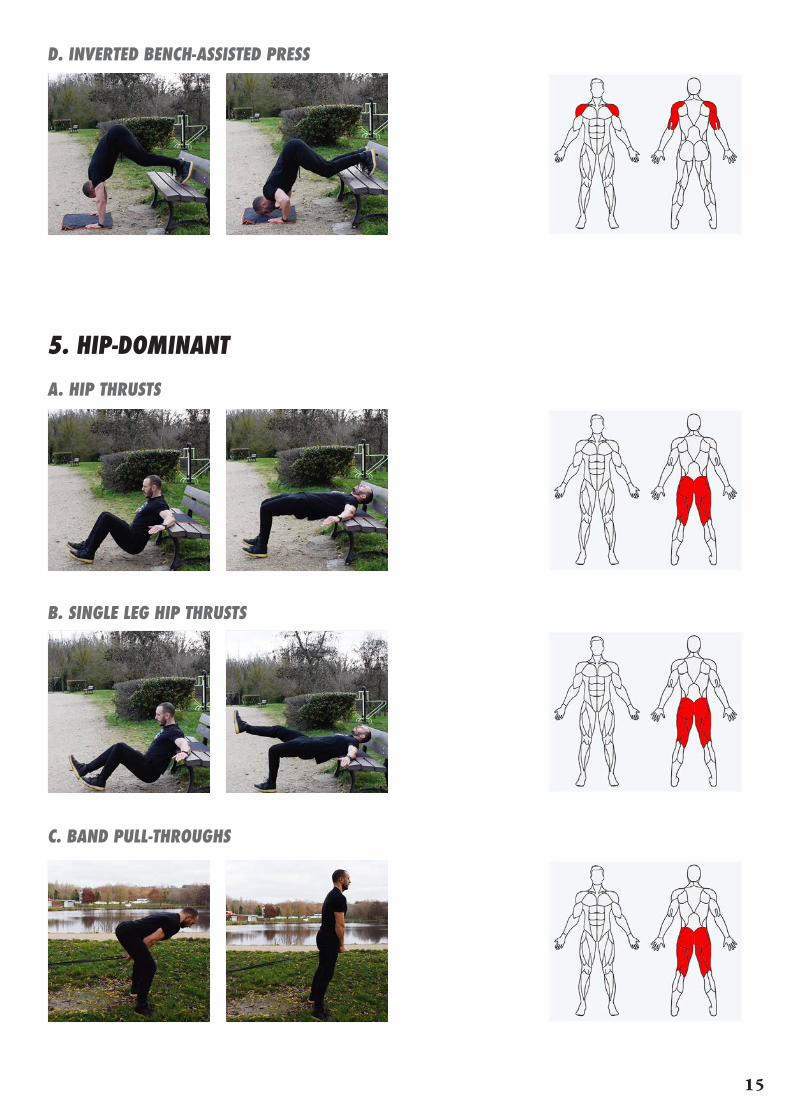
D. INVERTED BENCH-ASSISTED PRESS
A. HIP THRUSTS
B. SINGLE LEG HIP THRUSTS
C. BAND PULL-THROUGHS
15
5. HIP-DOMINANT
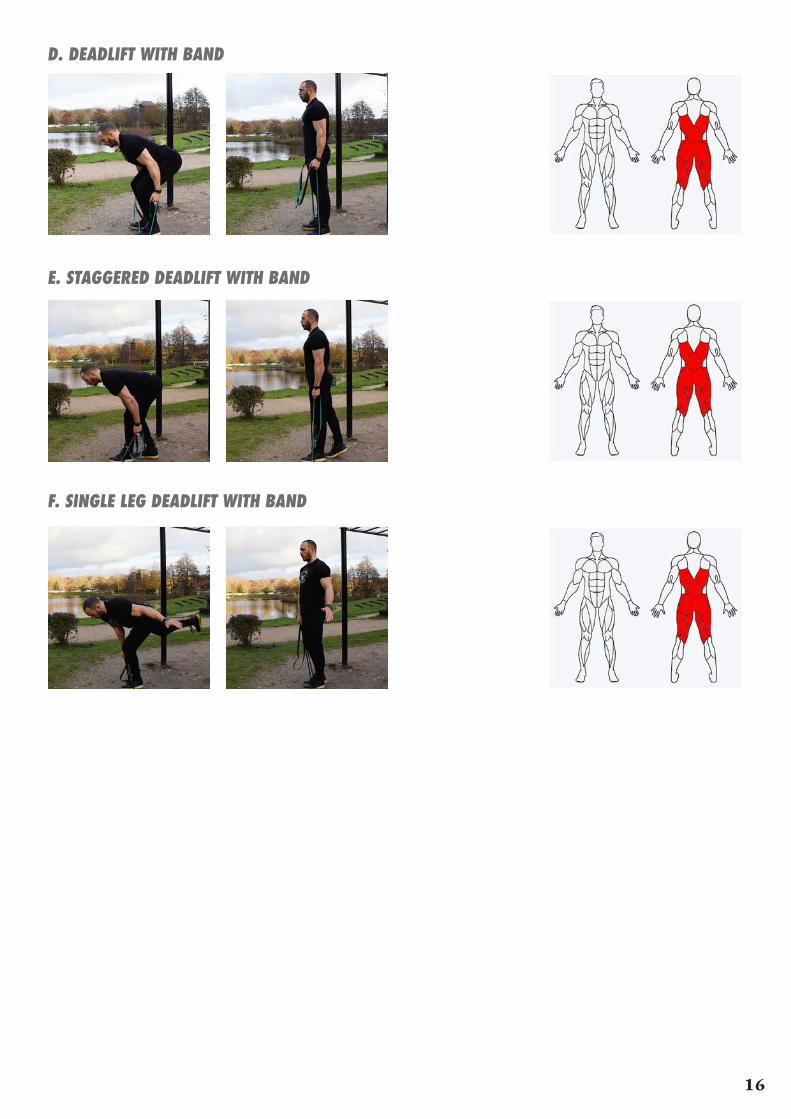
D. DEADLIFT WITH BAND
E. STAGGERED DEADLIFT WITH BAND
F. SINGLE LEG DEADLIFT WITH BAND
16
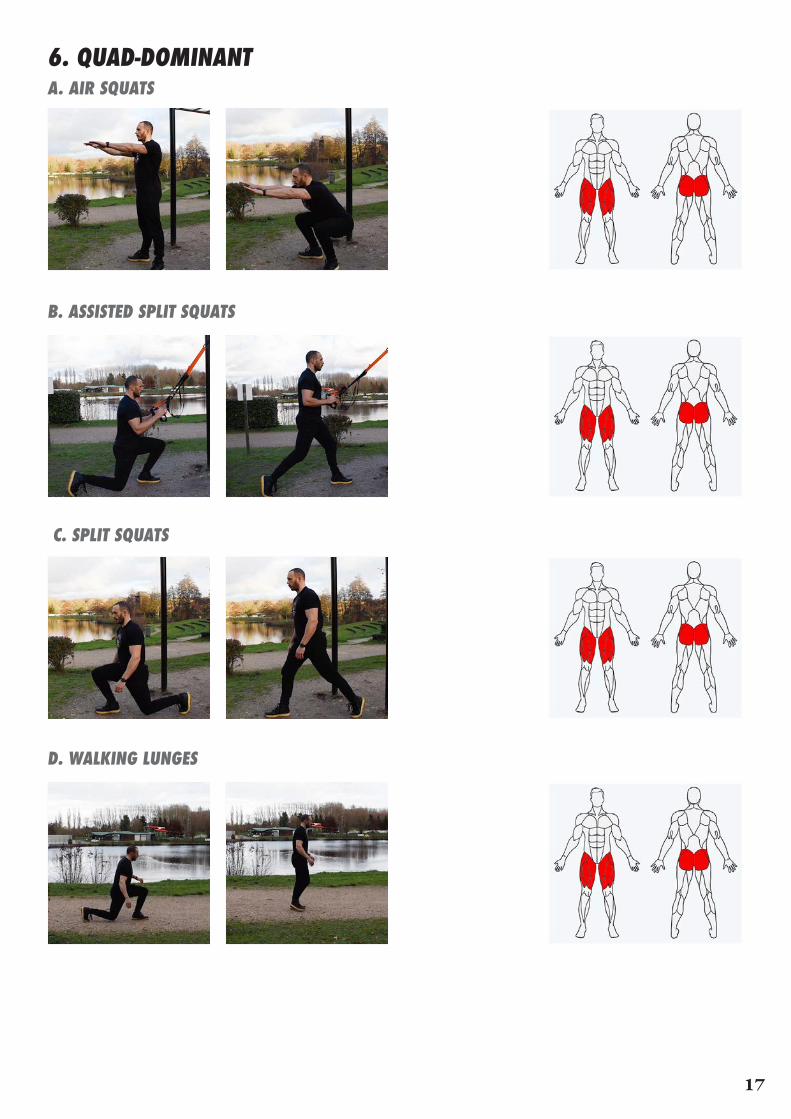
A. AIR SQUATS
B. ASSISTED SPLIT SQUATS
C. SPLIT SQUATS
D. WALKING LUNGES
17
6. QUAD-DOMINANT
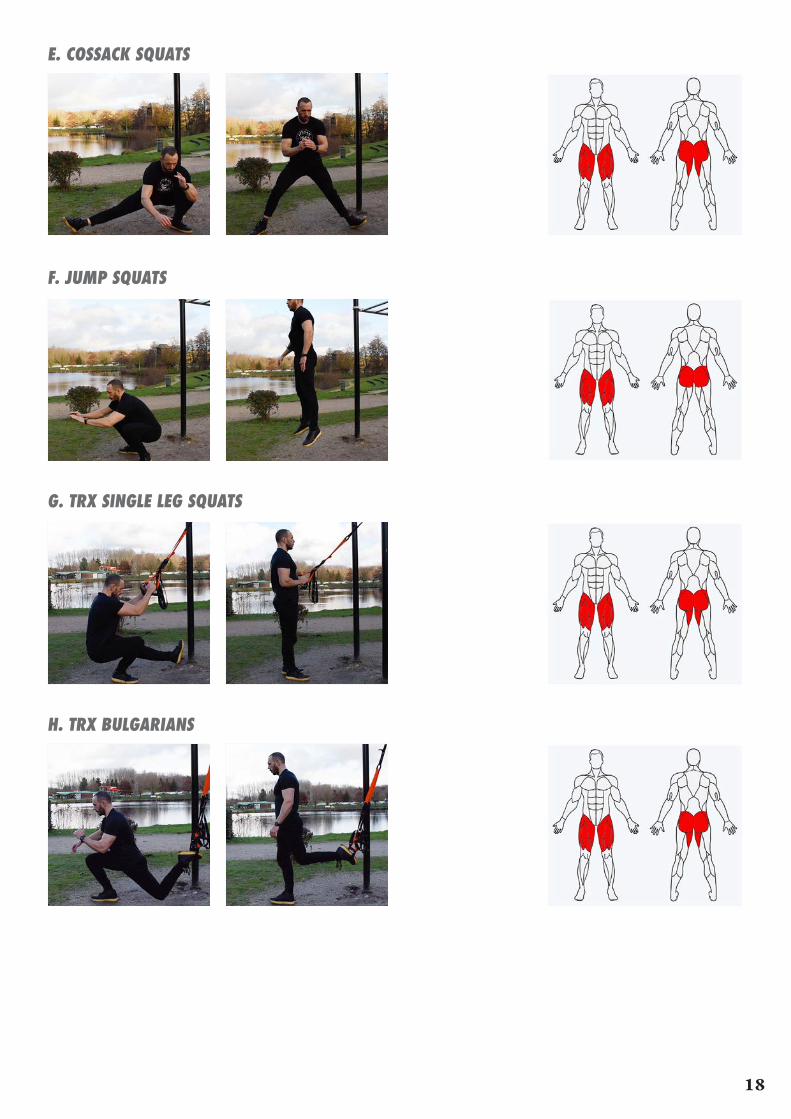
E. COSSACK SQUATS
F. JUMP SQUATS
G. TRX SINGLE LEG SQUATS
H. TRX BULGARIANS
18
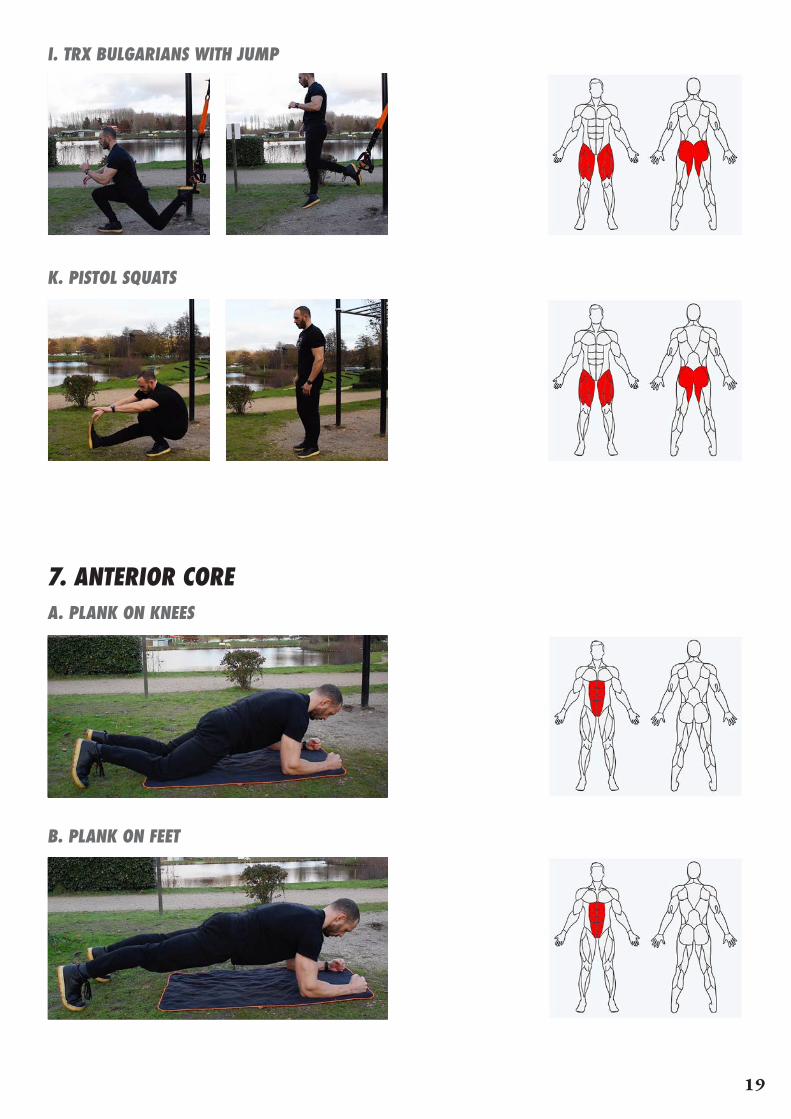
I. TRX BULGARIANS WITH JUMP
K. PISTOL SQUATS
A. PLANK ON KNEES
B. PLANK ON FEET
19
7. ANTERIOR CORE
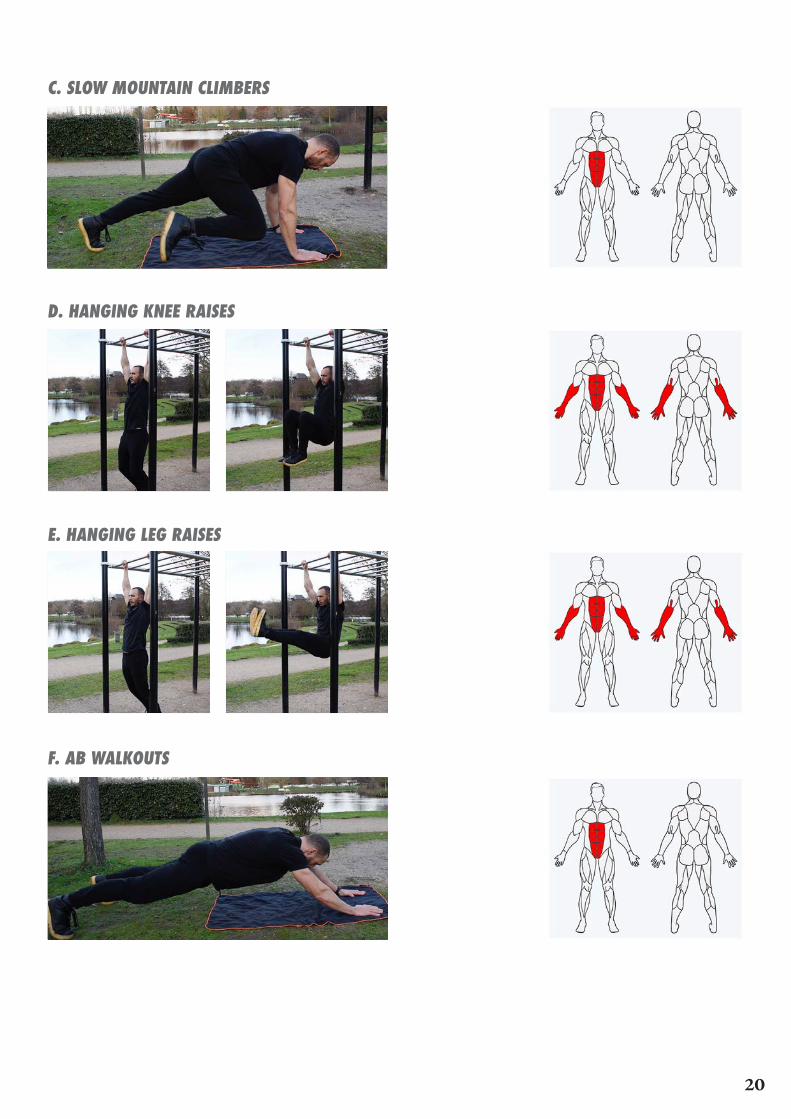
C. SLOW MOUNTAIN CLIMBERS
D. HANGING KNEE RAISES
E. HANGING LEG RAISES
F. AB WALKOUTS
20

G. TRX BODYSAW
A. SIDE PLANK ON KNEES
B. SIDE PLANK ON FEET
C. SIDE PLANK ROLL
21
8. LATERAL CORE
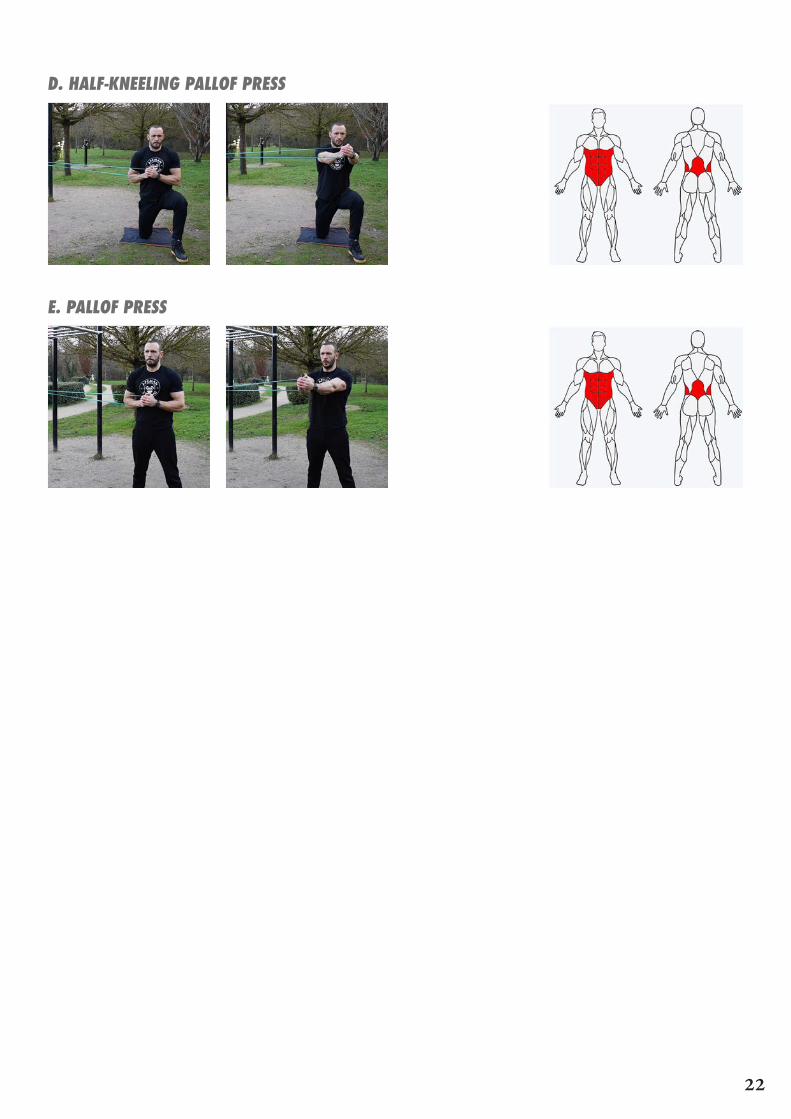
D. HALF-KNEELING PALLOF PRESS
E. PALLOF PRESS
22
23
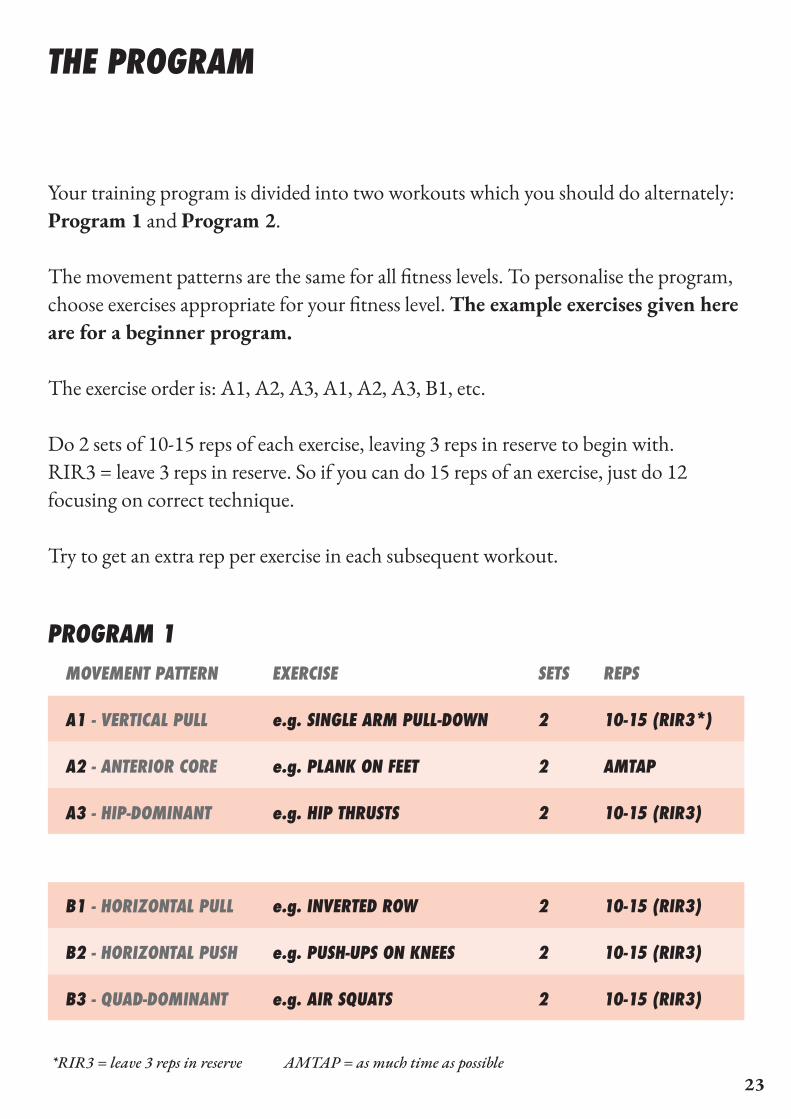
THE PROGRAM
Your training program is divided into two workouts which you should do alternately: Program 1 and Program 2.
The movement patterns are the same for all fitness levels. To personalise the program, choose exercises appropriate for your fitness level. The example exercises given here are for a beginner program.
The exercise order is: A1, A2, A3, A1, A2, A3, B1, etc.
Do 2 sets of 10-15 reps of each exercise, leaving 3 reps in reserve to begin with.RIR3 = leave 3 reps in reserve. So if you can do 15 reps of an exercise, just do 12 focusing on correct technique.
Try to get an extra rep per exercise in each subsequent workout.
MOVEMENT PATTERN
A1 - VERTICAL PULL
A2 - ANTERIOR CORE
A3 - HIP-DOMINANT
B1 - HORIZONTAL PULL
B2 - HORIZONTAL PUSH
B3 - QUAD-DOMINANT
EXERCISE
e.g. SINGLE ARM PULL-DOWN
e.g. PLANK ON FEET
e.g. HIP THRUSTS
e.g. INVERTED ROW
e.g. PUSH-UPS ON KNEES
e.g. AIR SQUATS
SETS
2
2
2
2
2
2
REPS
10-15 (RIR3*)
AMTAP
10-15 (RIR3)
10-15 (RIR3)
10-15 (RIR3)
10-15 (RIR3)
PROGRAM 1
*RIR3 = leave 3 reps in reserve AMTAP = as much time as possible
24
MOVEMENT PATTERN
A1 - HORIZONTAL PULL
A2 - VERTICAL PUSH
A3 - QUAD-DOMINANT
B1 - VERTICAL PULL
B2 - LATERAL CORE
B3 - HIP-DOMINANT
EXERCISE
e.g. HALF-KNEELING SINGLE ARM ROW
e.g. DOUBLE OVERHEAD BAND PRESS
e.g. SPLIT SQUATS
e.g. DEAD HANG
e.g. SIDE PLANK ON KNEES
e.g. BAND PULL-THROUGHS
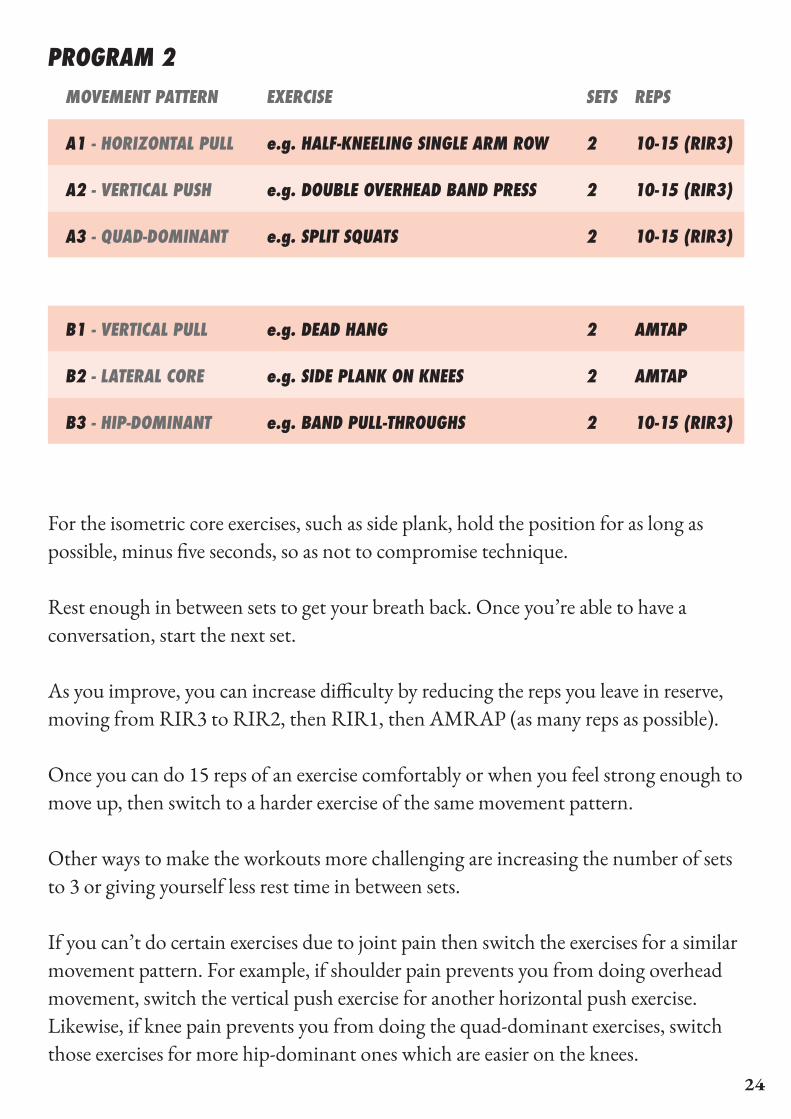
For the isometric core exercises, such as side plank, hold the position for as long as possible, minus five seconds, so as not to compromise technique.
Rest enough in between sets to get your breath back. Once you’re able to have a conversation, start the next set.
As you improve, you can increase difficulty by reducing the reps you leave in reserve, moving from RIR3 to RIR2, then RIR1, then AMRAP (as many reps as possible).
Once you can do 15 reps of an exercise comfortably or when you feel strong enough to move up, then switch to a harder exercise of the same movement pattern.
Other ways to make the workouts more challenging are increasing the number of sets to 3 or giving yourself less rest time in between sets.
If you can’t do certain exercises due to joint pain then switch the exercises for a similar movement pattern. For example, if shoulder pain prevents you from doing overhead movement, switch the vertical push exercise for another horizontal push exercise. Likewise, if knee pain prevents you from doing the quad-dominant exercises, switch those exercises for more hip-dominant ones which are easier on the knees.
PROGRAM 2SETS
2
2
2
2
2
2
REPS
10-15 (RIR3)
10-15 (RIR3)
10-15 (RIR3)
AMTAP
AMTAP
10-15 (RIR3)
25
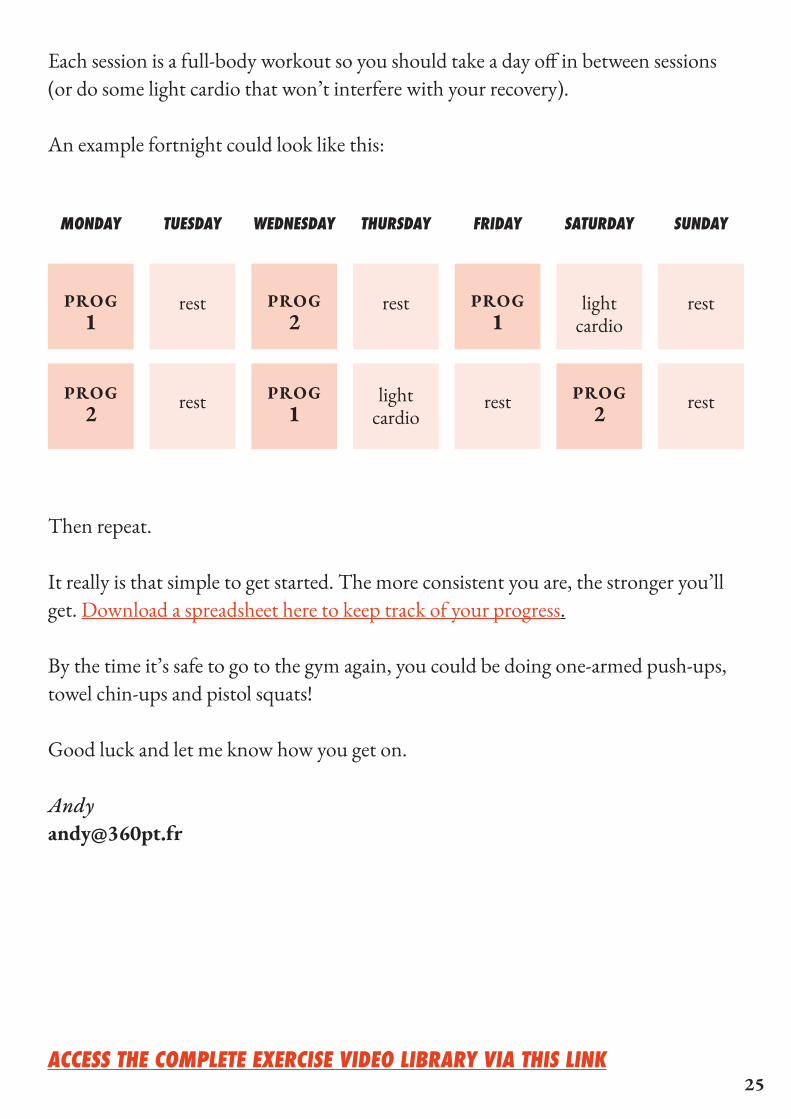
Each session is a full-body workout so you should take a day off in between sessions (or do some light cardio that won’t interfere with your recovery).
An example fortnight could look like this:
Then repeat.
It really is that simple to get started. The more consistent you are, the stronger you’ll get. Download a spreadsheet here to keep track of your progress.
By the time it’s safe to go to the gym again, you could be doing one-armed push-ups, towel chin-ups and pistol squats!
Good luck and let me know how you get on.
Andy [email protected]
MONDAY TUESDAY WEDNESDAY THURSDAY FRIDAY SATURDAY SUNDAY
PROG1
PROG2
PROG2
PROG1
PROG1
PROG2
rest rest light cardio
rest
rest light cardio
restrest
ACCESS THE COMPLETE EXERCISE VIDEO LIBRARY VIA THIS LINK