Embed Size (px)
Citation preview

BDI-2 Data Manager™ Guide to Use for the Florida Birth-to-Five
Child Outcomes Measurement System
Last Updated 06/20/2013
The Data Manager is a product of Riverside Publishing
3800 Golf Road, Suite 100 • Rolling Meadows, IL 60008 Phone: 800.323.9540 • Web: www.riversidepublishing.com
D a t a M a n a g e r G u i d e f o r t h e F l o r i d a C h i l d O u t c o m e s M e a s u r e m e n t S y s t e m
Table of Contents Introduction and Getting Started .................................................................................. 3 Adding Children ................................................................................................................ 5 Adding Assessment Data ............................................................................................... 10 Editing Assessment Data ............................................................................................... 24 Viewing Reports .............................................................................................................. 25 Exporting Data Files ....................................................................................................... 31
Riverside Publishing Customer Support:
e-mail: [email protected] phone: 800.323.9540 ext 6070
hours: Monday-Friday 8AM to 6PM CT
D a t a M a n a g e r G u i d e f o r t h e F l o r i d a C h i l d O u t c o m e s M e a s u r e m e n t S y s t e m
06.20.13 page 3
Introduction and Getting Started The Battelle Developmental Inventory™, 2nd Edition, (BDI-2™) is an early childhood assessment instrument based on the concept of developmental milestones. As a child develops, he or she typically attains critical skills and behaviors sequentially, from simple to complex. BDI-2 helps measure a child’s progress along this developmental continuum by both global domains and discrete skill sets in the following areas: Adaptive, Personal-Social, Communication, Motor, and Cognitive. This manual is intended for users of the BDI-2 Data Manager in the context of the Florida Birth-to-Five Child Outcomes Measurement System. Data collected will be used to report on Indicator 3 (Part C) and Indicator 7 (Part B) of the State Performance Plan. These indicators relate to outcomes for preschool children with disabilities. Florida is required to report on whether preschool children with disabilities are making progress in social/emotional skills, skills related to the acquisition and use of knowledge (to include communication and early literacy skills), and the use of appropriate behaviors to meet their needs (adaptive skills). The login accounts assigned to Florida Early Steps and School District Preschool Exceptional Student Education (ESE) staff for the purpose of managing data related to the Child Outcomes Measurement System will automatically log these users into the database created by the state of Florida for this purpose. Users are assigned to different levels of the hierarchy depending on the functions they need to perform and the data they are entitled to access. The different Tiers and the roles of individuals assigned to them are as follows: Tier 1: Members of the State Leadership Team for the Child Outcomes Measurement System. Tier 2: State-level administrators of the Department of Health, Early Steps and the Department of Education, Bureau of Exceptional Education and Student Services (BEESS). Tier 3: Local Early Steps Coordinators and their designees; School District Preschool ESE Directors and their designees. In addition to being able to see, edit, and enter child records, Tier 3 users can generate group reports, manage their organization, and will act as custodians for their corresponding login accounts. Tier 4: Individuals granted login privileges by either a Local Early Steps Coordinator or District Preschool ESE Director for the purpose of entering assessment data. Tier 4 users will ONLY be able to see, edit, and enter individual child records, unless given administrative privileges by the LEA or LES Administrator.
1

D a t a M a n a g e r G u i d e f o r t h e F l o r i d a C h i l d O u t c o m e s M e a s u r e m e n t S y s t e m
06.20.13 page 4
Technical support
For technical assistance regarding use of the Data Manager, please use the following contact information: e-mail: [email protected] phone: 800.323.9540 ext 6070 hours: Monday-Friday 8AM to 6PM CT Logging on to BDI-2 Data Manager
1. Enter the following link in the address box of your internet browser: https://www.bdi2datamanager.com
2. Enter your Login ID. 3. Enter your Password. 4. Click Login.
D a t a M a n a g e r G u i d e f o r t h e F l o r i d a C h i l d O u t c o m e s M e a s u r e m e n t S y s t e m
06.20.13 page 5
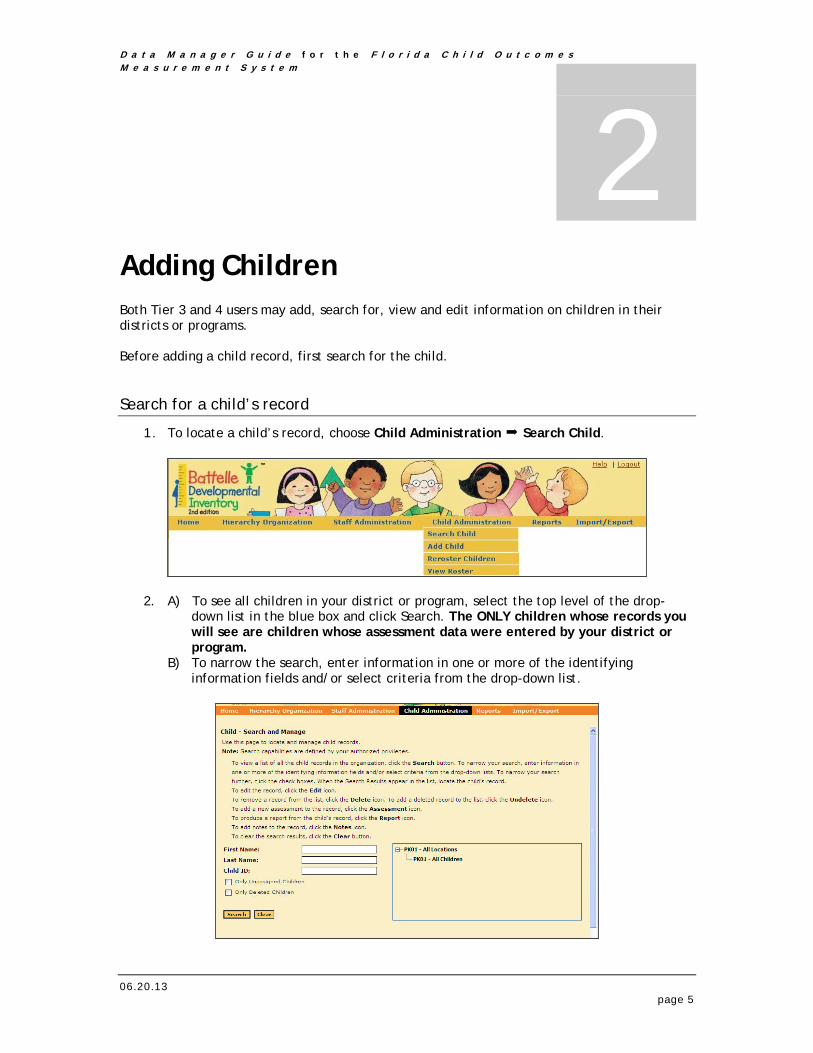
Adding Children Both Tier 3 and 4 users may add, search for, view and edit information on children in their districts or programs. Before adding a child record, first search for the child. Search for a child’s record
1. To locate a child’s record, choose Child Administration Search Child.
2. A) To see all children in your district or program, select the top level of the drop-down list in the blue box and click Search. The ONLY children whose records you will see are children whose assessment data were entered by your district or program.
B) To narrow the search, enter information in one or more of the identifying information fields and/or select criteria from the drop-down list.
2

D a t a M a n a g e r G u i d e f o r t h e F l o r i d a C h i l d O u t c o m e s M e a s u r e m e n t S y s t e m
06.20.13 page 6
Note: Click the Only Unassigned Children or Only Deleted Children check box to search for records that are not assigned or have been deleted.
3. Scroll down to view the search results.
4. If the child exists in the system, you can complete the following activities for that child:
• Edit a child’s identifying information • Delete a child’s assessment (can undelete the assessment later, if
necessary) • Enter or change assessment data • Create and view a report • Enter test item notes
Note:
(a) There may be more than one child in the system with the same first and last name. There may even be more than one child with the same first name, last name, and birthdate. These children can only be distinguished by their unique ID number (see #3, below).
(b) There can only be ONE child with a given ID number in the system. If an ID number is entered into the search criteria, the system will search for a child with that unique ID. If the ID already exists in the system, AND the record was created within your LES or school district, the Data Manager should find the record and allow the record to be viewed. The Data Manager will automatically link the new assessment data with this existing record.
(c) If the ID already exists in the system, but the record was created either within a different LES or school district, or within a different agency, the Data Manager will not find the record or allow the record to be viewed. Within the search function, then, it will appear as though the ID does not yet exist in the system. However, when you try to add the new child’s record (described below), the Data Manager will notify you that the ID already exists somewhere in the system. In this case, the ID that you enter for the child must be modified as described in #3 below.
D a t a M a n a g e r G u i d e f o r t h e F l o r i d a C h i l d O u t c o m e s M e a s u r e m e n t S y s t e m
06.20.13 page 7
Adding child records
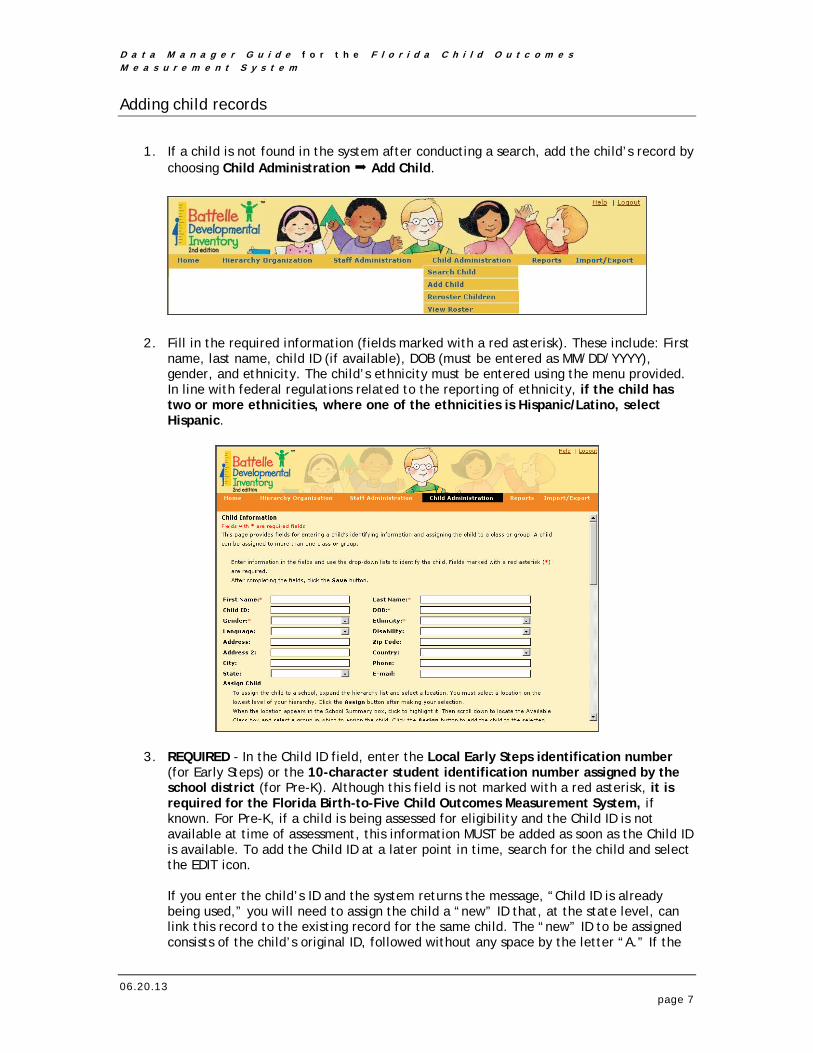
1. If a child is not found in the system after conducting a search, add the child’s record by
choosing Child Administration Add Child.
2. Fill in the required information (fields marked with a red asterisk). These include: First name, last name, child ID (if available), DOB (must be entered as MM/DD/YYYY), gender, and ethnicity. The child’s ethnicity must be entered using the menu provided. In line with federal regulations related to the reporting of ethnicity, if the child has two or more ethnicities, where one of the ethnicities is Hispanic/Latino, select Hispanic.
3. REQUIRED - In the Child ID field, enter the Local Early Steps identification number (for Early Steps) or the 10-character student identification number assigned by the school district (for Pre-K). Although this field is not marked with a red asterisk, it is required for the Florida Birth-to-Five Child Outcomes Measurement System, if known. For Pre-K, if a child is being assessed for eligibility and the Child ID is not available at time of assessment, this information MUST be added as soon as the Child ID is available. To add the Child ID at a later point in time, search for the child and select the EDIT icon.
If you enter the child’s ID and the system returns the message, “Child ID is already being used,” you will need to assign the child a “new” ID that, at the state level, can link this record to the existing record for the same child. The “new” ID to be assigned consists of the child’s original ID, followed without any space by the letter “A.” If the

D a t a M a n a g e r G u i d e f o r t h e F l o r i d a C h i l d O u t c o m e s M e a s u r e m e n t S y s t e m
06.20.13 page 8
Data Manager indicates that the “ID+A” number already exists, then use the child’s original ID followed by the letter “B.”
4. Scroll down and click on the name of the Local Early Steps Program or School District to
which the child will be assigned. The name will be highlighted.
5. Click Assign. In a couple of seconds, the name of the Program or District you selected will now show in the area entitled Tier 3 - Program/Dists Summary.
6. Scroll down. Under Tier 4 – Data Entry, click or select the name of the Tier 4 group to which you want to assign the child to highlight in blue. For some districts and programs, all children will be assigned to the “Data Entry” classroom. The situation may be different in your district or program. Administrators may have elected to organize child records into subgroups (e.g., by location and by group). Please contact your administrator on how to assign a child to a subgroup.
7. Next, click Assign. The group or class you selected will now show in the area entitled Assigned. The child is now assigned to this group or class, and a description of the group or class is shown in the area entitled Group Summary.
8. For Early Steps users only: Scroll down and in the Child User Defined Fields section
(as shown below), enter the name of the Home County of the child. For example, if a

D a t a M a n a g e r G u i d e f o r t h e F l o r i d a C h i l d O u t c o m e s M e a s u r e m e n t S y s t e m
06.20.13 page 9
child is in West Central Early Steps and is from the home county of Pasco, then enter Pasco. Next, if the assessment scores to be entered are a “shared data point” and were provided by the partnering Pre-K agency, enter the Pre-K identification number in the Preschool ID field.
9. For Pre-K users only: Scroll down to the Child User Defined Fields section (as shown above). If the assessment scores to be entered are a “shared data point” and were provided by the partnering LES agency, enter the Early Steps child identification number in the Early Steps ID field.
10. Click Save to finish or click Save & Add Another Child if you want to add another
child’s record.
D a t a M a n a g e r G u i d e f o r t h e F l o r i d a C h i l d O u t c o m e s M e a s u r e m e n t S y s t e m
06.20.13 page 10
Adding Assessment Data After a child’s record has been added, assessment data can be entered for the child. Entering complete item-level data vs. raw scores only
The Florida Child Outcomes Measurement System requires that complete raw or item-level data be entered for assessments administered as part of the accountability system (depending on the option elected by the school district or Early Steps program). There are two exceptions to this rule:
1. As described in guidance documents available on the website of the Florida Technical Assistance and Training System, http://www.tats.ucf.edu/outcomes.html, the Florida Child Outcomes Measurement System makes use of a “shared data point.” Complete, item-level data for the “shared data point” must be entered into the Data Manager. The data may be entered by either the LES or the Pre-K program, depending on local agreements as to which agency administers the assessment. However, as indicated earlier in this Data Manager guide, the partnering agency that does not enter the data will not be able to view the child’s record. To ensure that each LES and Pre-K program can view all entry and exit records for children who are part of their accountability reporting, the agency that administered the “shared data point” assessment must provide its partnering agency with the score summary form related to that assessment. The partnering agency must then add the child’s name to its program and enter the child’s assessment data. However, for this purpose, only the raw scores - not complete item-level data – are required. As of the fiscal year beginning July 1, 2012, records will no longer be matched across Early Steps and Pre-K, so raw scores for all “shared data point” assessments must be entered in order for entry and exit records to match accordingly.
2. When an LES administers an assessment for a child older than 30 months, the
assessment data will only be needed, for accountability purposes, by the Pre-K program to which the child may transition. If the LES enters the complete item-level data for this assessment, the receiving Pre-K program needs to create a record for this child and enter only the raw scores.
3
D a t a M a n a g e r G u i d e f o r t h e F l o r i d a C h i l d O u t c o m e s M e a s u r e m e n t S y s t e m
06.20.13 page 11
Enter new assessment data for a selected child
The following instructions are applicable to ALL assessment data entered for any child, including assessment data from shared data points, Screening Tests, full assessments, and full assessments administered as follow-up assessments for “failed” Screening Test domains.
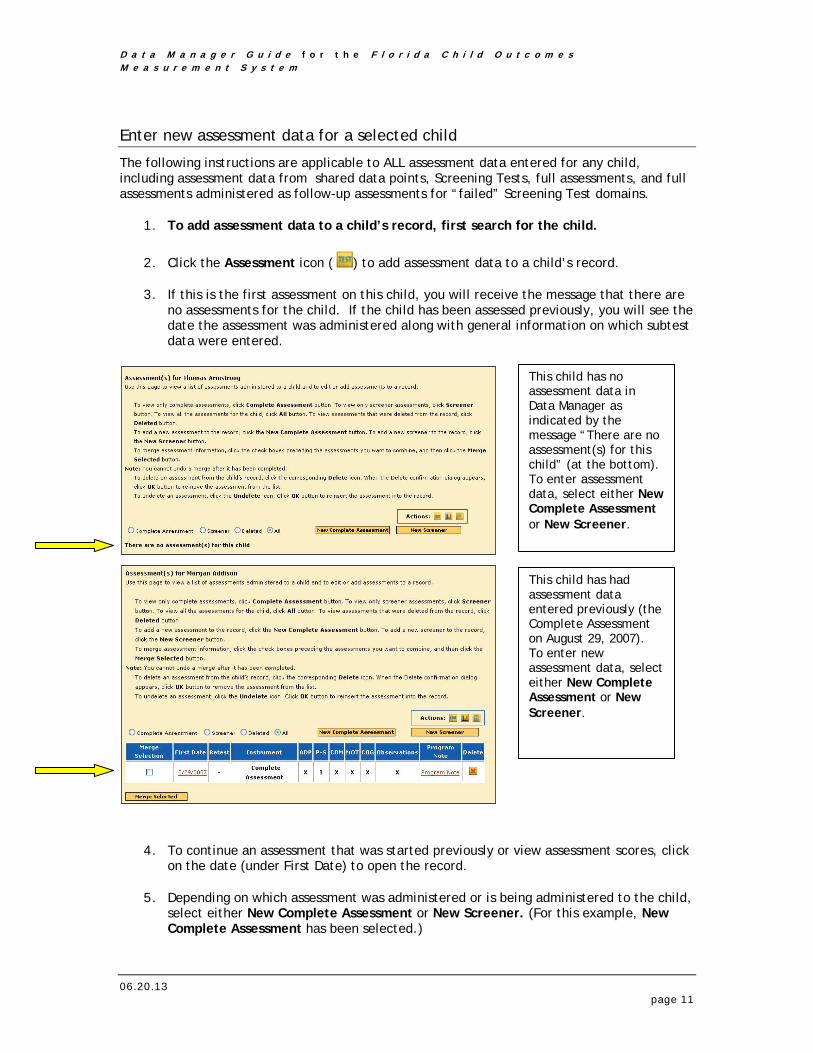
1. To add assessment data to a child’s record, first search for the child.
2. Click the Assessment icon ( ) to add assessment data to a child’s record.
3. If this is the first assessment on this child, you will receive the message that there are no assessments for the child. If the child has been assessed previously, you will see the date the assessment was administered along with general information on which subtest data were entered.
4. To continue an assessment that was started previously or view assessment scores, click on the date (under First Date) to open the record.
5. Depending on which assessment was administered or is being administered to the child,
select either New Complete Assessment or New Screener. (For this example, New Complete Assessment has been selected.)
This child has no assessment data in Data Manager as indicated by the message “There are no assessment(s) for this child” (at the bottom). To enter assessment data, select either New Complete Assessment or New Screener.
This child has had assessment data entered previously (the Complete Assessment on August 29, 2007). To enter new assessment data, select either New Complete Assessment or New Screener.
D a t a M a n a g e r G u i d e f o r t h e F l o r i d a C h i l d O u t c o m e s M e a s u r e m e n t S y s t e m
06.20.13 page 12
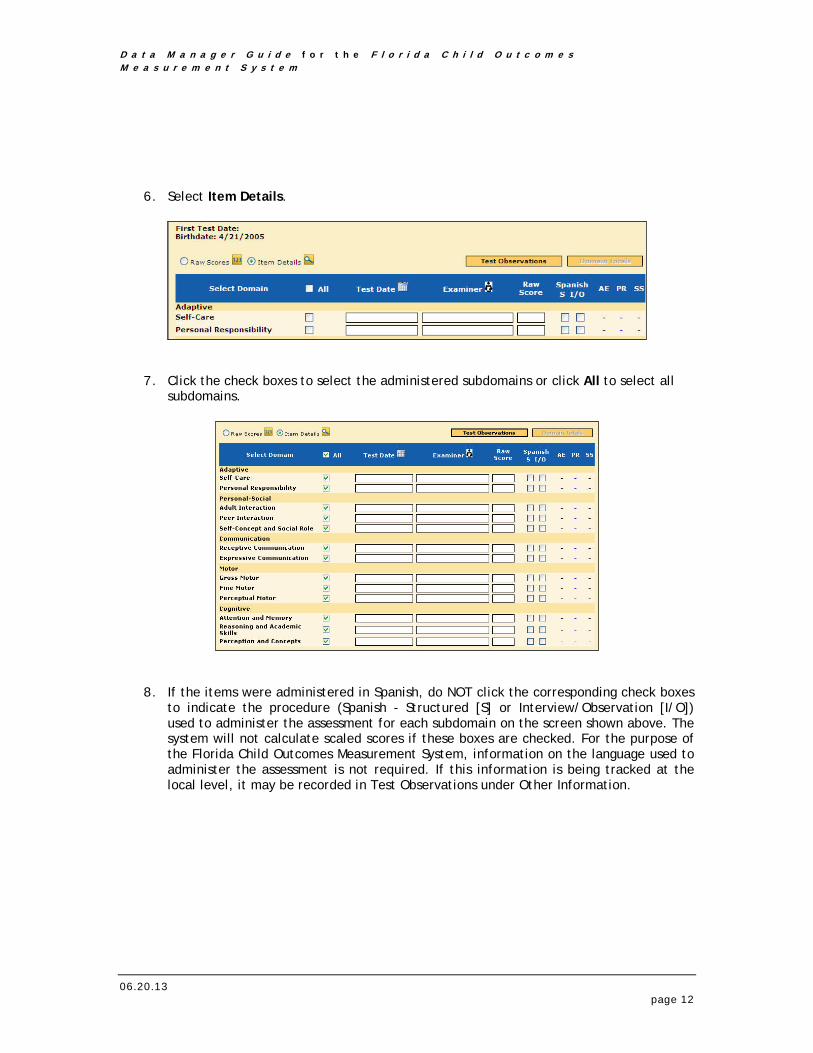
6. Select Item Details.
7. Click the check boxes to select the administered subdomains or click All to select all
subdomains.
8. If the items were administered in Spanish, do NOT click the corresponding check boxes
to indicate the procedure (Spanish - Structured [S] or Interview/Observation [I/O]) used to administer the assessment for each subdomain on the screen shown above. The system will not calculate scaled scores if these boxes are checked. For the purpose of the Florida Child Outcomes Measurement System, information on the language used to administer the assessment is not required. If this information is being tracked at the local level, it may be recorded in Test Observations under Other Information.

D a t a M a n a g e r G u i d e f o r t h e F l o r i d a C h i l d O u t c o m e s M e a s u r e m e n t S y s t e m
06.20.13 page 13
9. REQUIRED - Enter a test date (MM/DD/YYYY) for each subdomain administered, or select the Test Date calendar icon to quickly select the test administration date.
10. Enter the name of the examiner who administered the assessment to the child.
To enter the name of the examiner, select the appropriate name or login account from the dropdown menu, or type the examiner’s name in the first relevant examiner field box that corresponds with the assessed domain and copy and paste the name into all other pertinent domains. The examiner field is no longer being used to indicate data points.
If the Test Date icon is selected, a new window will open showing a calendar. Select the date of the assessment from the calendar. If the Test Date is entered by hand, use the following format: MM/DD/YYYY. If all subdomains were administered on the same selected date, click All. You may need to maximize to scroll down. Click Select and Continue. If only some subtests were administered on the selected date, check the subdomains that were administered on that date. Then scroll down and click Select and Continue.

D a t a M a n a g e r G u i d e f o r t h e F l o r i d a C h i l d O u t c o m e s M e a s u r e m e n t S y s t e m
06.20.13 page 14
11. Click Next to proceed with score entry.
12. REQUIRED - Enter the scores and procedures for each administered subdomain item by
selecting the score (2, 1, or 0) and the administration procedure (S, O, or I). Both of these are required. For each subdomain, you will not necessarily start at Item 1; the system will take you to the first item relevant to the child’s age. NOTE: If scores are being transferred into the Data Manager from a paper scoring form that does not have the administration procedure information, it is still necessary to select a procedure for each item, otherwise the Data Manager will not score the assessment. In this case, (a) select any procedure – it does not matter which one – in order to enable the Data Manager to score the assessment; (b) in Test Observations -> Other Information (see pages 17-19), enter the text “METHOD Invalid.”

D a t a M a n a g e r G u i d e f o r t h e F l o r i d a C h i l d O u t c o m e s M e a s u r e m e n t S y s t e m
06.20.13 page 15
When entering item-level scores, the first column will show B for BASAL and C for CEILING. See screen capture included with next item for example. Scroll up and click Done at the top, right-hand corner when all the scores for the subdomain have been entered. This saves the data.
13. If you selected more than one subdomain, you will automatically advance to the next
selected subdomain. Enter data for the next subdomain. • Select the score (2, 1, or 0) for each item administered. • Select the administration procedure (S, O, or I) for each item administered. The
system will not proceed to the next subdomain unless the administration procedure is selected for each completed item. Both the score and procedure used for administration are required in order to continue.
• Click Done once scores have been entered. • Then repeat as appropriate.
14. If you have not entered all scores for a subdomain and have not reached basal or ceiling, the system will provide a warning pop-up window to notify you that this is the case. You may still return within a two-week period from the first test date to complete the subdomain. Please note that basal and ceiling must be reached before the system will score the subdomain.
15. A summary of scores will be shown when data have been added to the last selected
subdomain.
D a t a M a n a g e r G u i d e f o r t h e F l o r i d a C h i l d O u t c o m e s M e a s u r e m e n t S y s t e m
06.20.13 page 16
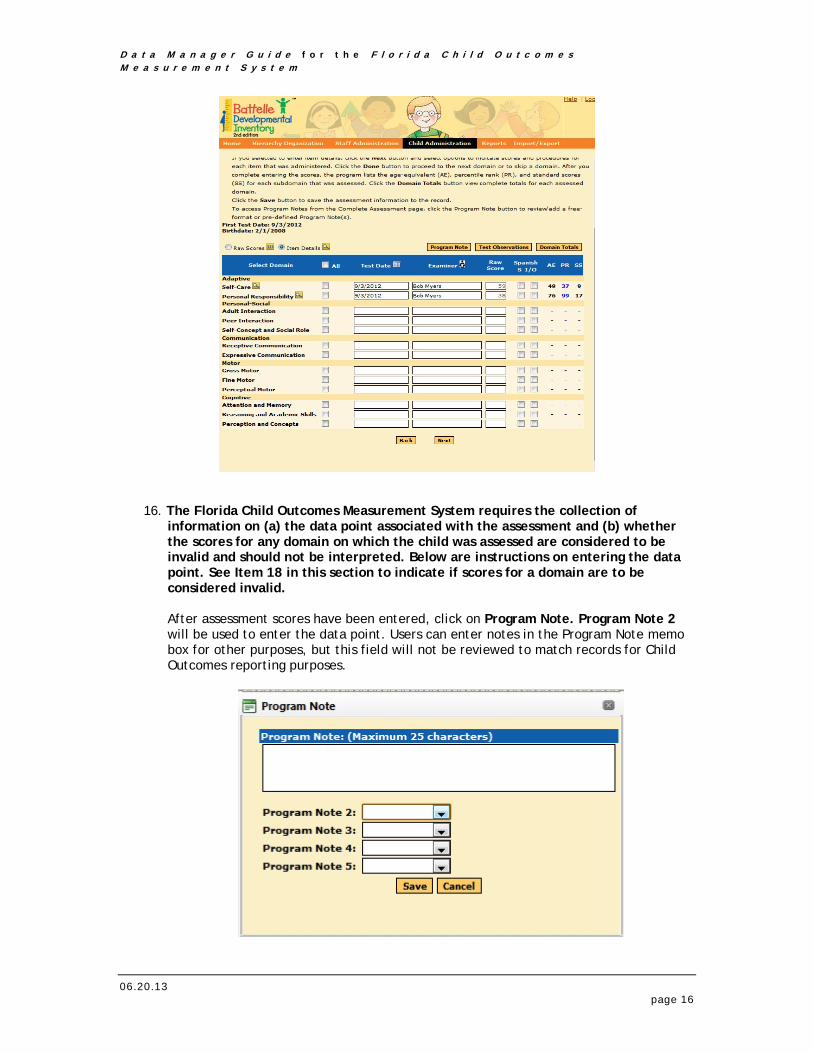
16. The Florida Child Outcomes Measurement System requires the collection of information on (a) the data point associated with the assessment and (b) whether the scores for any domain on which the child was assessed are considered to be invalid and should not be interpreted. Below are instructions on entering the data point. See Item 18 in this section to indicate if scores for a domain are to be considered invalid. After assessment scores have been entered, click on Program Note. Program Note 2 will be used to enter the data point. Users can enter notes in the Program Note memo box for other purposes, but this field will not be reviewed to match records for Child Outcomes reporting purposes.

D a t a M a n a g e r G u i d e f o r t h e F l o r i d a C h i l d O u t c o m e s M e a s u r e m e n t S y s t e m
06.20.13 page 17
Click on the drop-down arrow next to Program Note 2 and all of the available options will be listed as shown below.
Although the Data Manager lists 17 options for Program Note 2, users may only select one of the following 5 options for Early Steps or 6 options for Pre-K:
Early Steps Part C Data Point Options
Options Definitions Part C Entry The assessment represents the child’s status on ENTRY into the
Early Steps program. Part C Exit The assessment represents the child’s status on EXIT from the Early
Steps program. 0: Ineligible The child was determined ineligible for services and will not be
receiving services through the Early Steps program. 1: Other- Not for Child Outcomes
The assessment was conducted for a purpose unrelated to providing entry or exit data for the Florida Child Outcomes Measurement System. For example, the assessment was conducted as part of ongoing progress monitoring.
2: Child > 30 months - Not for Child Outcomes System
The child is greater than 30 months of age at time of assessment, and therefore the assessment should not be included in the Child Outcomes Measurement System for Part C.
D a t a M a n a g e r G u i d e f o r t h e F l o r i d a C h i l d O u t c o m e s M e a s u r e m e n t S y s t e m
06.20.13 page 18
Important Notes: • The following choices from the Program Note 2 drop-down menu are NOT VALID
DATAPOINT OPTIONS for Part C: “Transition,” “Part B Entry,” “Part B Exit,” “Entry,” “Exit,” and numbers “3” through “9.”
• Change the data point to “0” for any children found ineligible. • When follow-up full assessments are administered following a screener in any
domain(s), data points for both the screener and full assessment should match.
Examiner Field Entry: • For Part C Exits that are assessed by Part C, enter the examiner’s name,
assessment team, or other identifying information in the Examiner field. • For Part C Exits that are assessed by Part B, enter “LEA” in the Examiner field.
----------------------------------------------------------------------------------
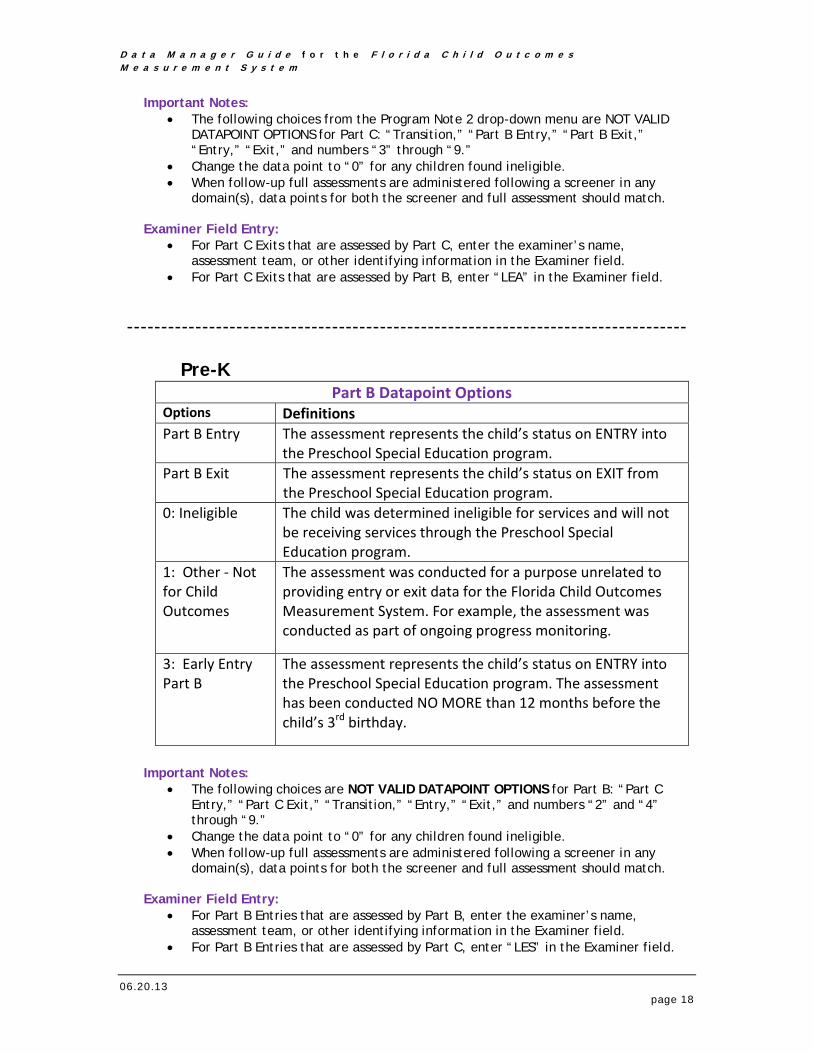
Pre-K Part B Datapoint Options
Options Definitions Part B Entry The assessment represents the child’s status on ENTRY into
the Preschool Special Education program. Part B Exit The assessment represents the child’s status on EXIT from
the Preschool Special Education program. 0: Ineligible The child was determined ineligible for services and will not
be receiving services through the Preschool Special Education program.
1: Other - Not for Child Outcomes
The assessment was conducted for a purpose unrelated to providing entry or exit data for the Florida Child Outcomes Measurement System. For example, the assessment was conducted as part of ongoing progress monitoring.
3: Early Entry Part B
The assessment represents the child’s status on ENTRY into the Preschool Special Education program. The assessment has been conducted NO MORE than 12 months before the child’s 3rd birthday.
Important Notes:
• The following choices are NOT VALID DATAPOINT OPTIONS for Part B: “Part C Entry,” “Part C Exit,” “Transition,” “Entry,” “Exit,” and numbers “2” and “4” through “9.”
• Change the data point to “0” for any children found ineligible. • When follow-up full assessments are administered following a screener in any
domain(s), data points for both the screener and full assessment should match.
Examiner Field Entry: • For Part B Entries that are assessed by Part B, enter the examiner’s name,
assessment team, or other identifying information in the Examiner field. • For Part B Entries that are assessed by Part C, enter “LES” in the Examiner field.
D a t a M a n a g e r G u i d e f o r t h e F l o r i d a C h i l d O u t c o m e s M e a s u r e m e n t S y s t e m
06.20.13 page 19
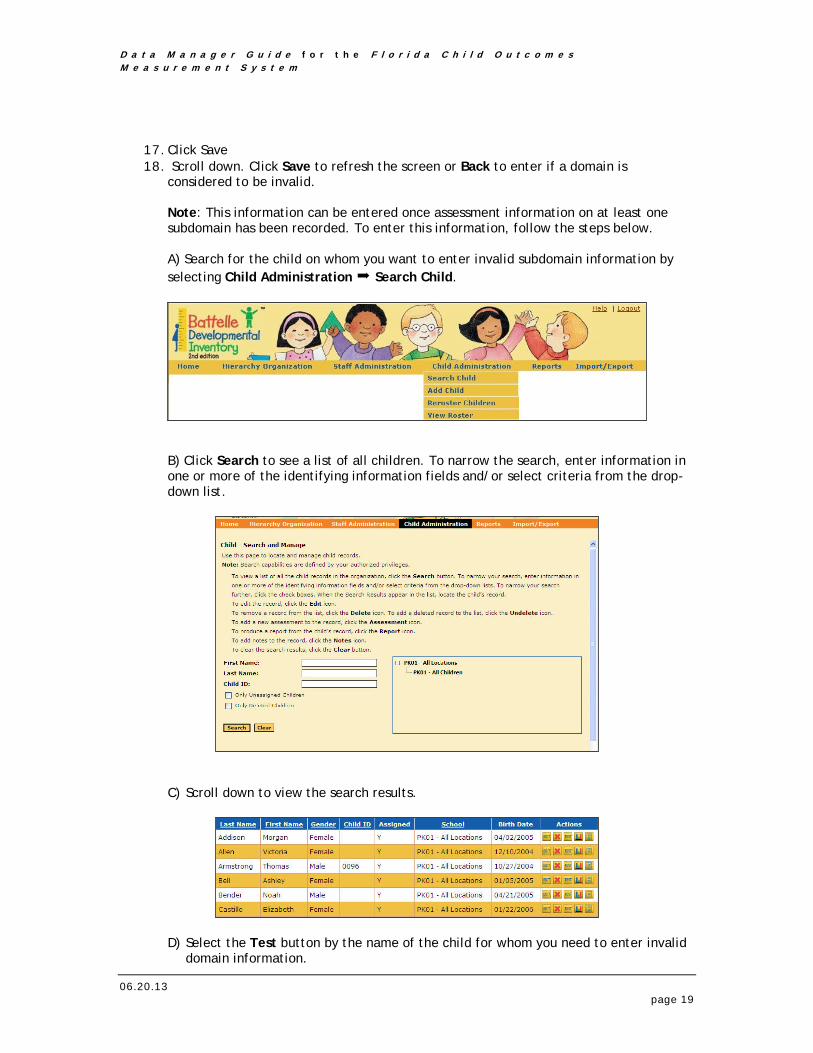
17. Click Save 18. Scroll down. Click Save to refresh the screen or Back to enter if a domain is
considered to be invalid. Note: This information can be entered once assessment information on at least one subdomain has been recorded. To enter this information, follow the steps below.
A) Search for the child on whom you want to enter invalid subdomain information by selecting Child Administration Search Child.
B) Click Search to see a list of all children. To narrow the search, enter information in one or more of the identifying information fields and/or select criteria from the drop-down list.
C) Scroll down to view the search results.
D) Select the Test button by the name of the child for whom you need to enter invalid domain information.

D a t a M a n a g e r G u i d e f o r t h e F l o r i d a C h i l d O u t c o m e s M e a s u r e m e n t S y s t e m
06.20.13 page 20
E) Click on the date listed below First Date.
F) Click on Test Observations.
G) Click on Other Information.
H) If in the judgment of the examiner, a domain score is invalid for any reason,
including language, then enter the abbreviation of the domain and the word “invalid.” This field should contain one or more of the following, with a comma in between domains:
ADP Invalid [for Adaptive Invalid] P-S Invalid [for Personal-Social Invalid] COM Invalid [for Communication Invalid] MOT Invalid [for Motor Invalid] COG Invalid [for Cognitive Invalid]
This field may also contain the text, “METHOD Invalid” in which the administration procedure for each item was selected solely for scoring purposes.

D a t a M a n a g e r G u i d e f o r t h e F l o r i d a C h i l d O u t c o m e s M e a s u r e m e n t S y s t e m
06.20.13 page 21
I) Click Save.
J) If you would like to include any additional information regarding this record (e.g., Hard of Hearing), enter this information in Background Information.

D a t a M a n a g e r G u i d e f o r t h e F l o r i d a C h i l d O u t c o m e s M e a s u r e m e n t S y s t e m
06.20.13 page 22
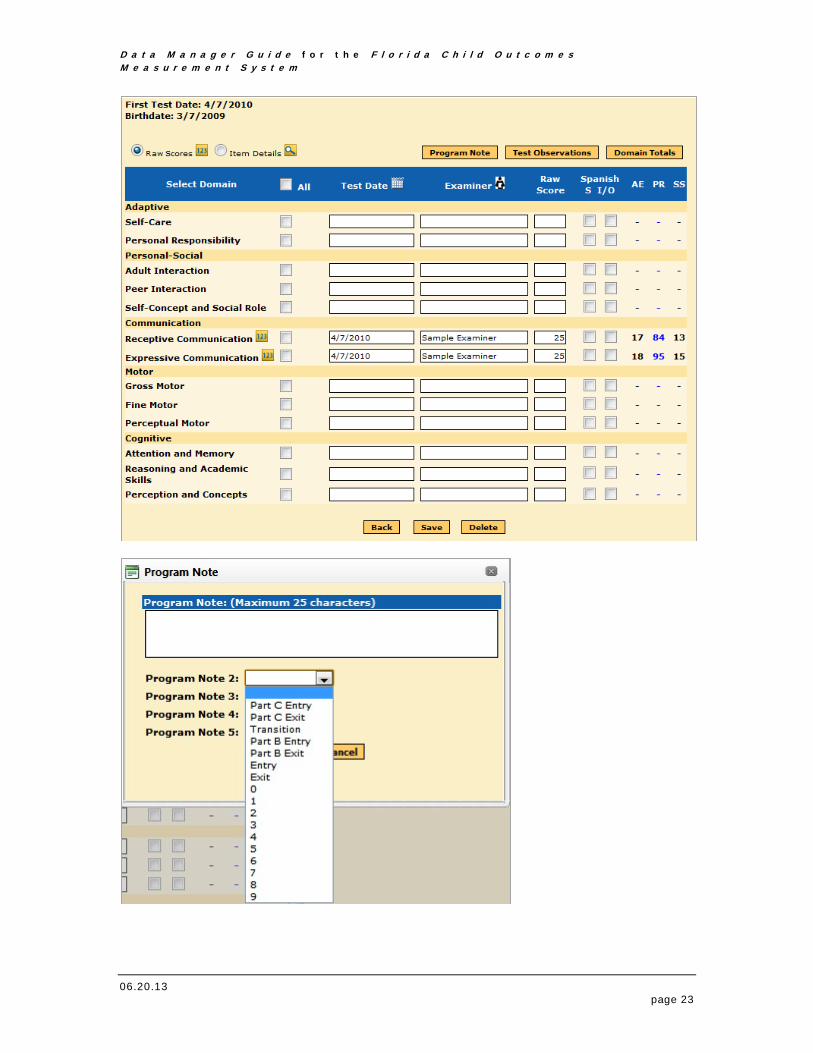
Screening Test Note: See Memo on Use of Screening Test for detailed guidance on the permissible use of the Battelle Developmental Inventory (2nd Ed.; BDI-2) Screening Test (Newborg, 2005). When entering data from domains of a full assessment that are administered as a follow-up to a “failed” Screening Test in one or more domains, it is necessary to create a new assessment record in the Data Manager. To enter the scores, first search for the child’s existing record in the Data Manager as outlined in section 3 previously, select “New Complete Assessment,” and then enter the assessment scores for whatever domains are administered. If item-level data are being entered, ALL item-level scores for a particular domain must be entered, including scores for items that were administered as part of the Screening Test and were not re-administered because the follow-up full assessment was conducted within the 2-week window permitted by the BDI-2 Examiner’s Manual. At this point, there is no way to have the Data Manager populate a new assessment record with item-level scores from a previously administered Screening Test. The data point for the full assessment should match the data point entered for the Screening Test. For example, if the Screening Test was conducted as an entry to Part C (“Part C Entry”), the data point for the follow-up full assessment, for any and all domains administered, should also be entered as “Part C Entry”. Below is an example of a Screening Test requiring a follow-up full assessment for the Communication domain.
The following image shows the follow-up full assessment for the Communication domain. The Part C Entry datapoint should be entered in Program Note 2 as shown in the second screen capture below.
D a t a M a n a g e r G u i d e f o r t h e F l o r i d a C h i l d O u t c o m e s M e a s u r e m e n t S y s t e m
06.20.13 page 23

D a t a M a n a g e r G u i d e f o r t h e F l o r i d a C h i l d O u t c o m e s M e a s u r e m e n t S y s t e m
06.20.13 page 24
Editing Assessment Data To edit raw or item-level scores after they have been entered and saved, follow the steps below. Edit existing assessment data for a selected child
1. To edit existing assessment data, first search for the child.
2. Click the Assessment icon ( ) to edit assessment data.
3. You will see the list of existing assessments for the child. Click on the date (under First Date) to open the record requiring edits.
4. Select either Raw Scores or Item Details to edit scores. If you select Raw Scores, you will be able to edit the scores on this screen. If you select Item Details, you will need to select the subdomains that require edits and then click Next.
5. If editing item-level scores, click Done when finished. Click Save when changes have been completed.
4
D a t a M a n a g e r G u i d e f o r t h e F l o r i d a C h i l d O u t c o m e s M e a s u r e m e n t S y s t e m
06.20.13 page 25
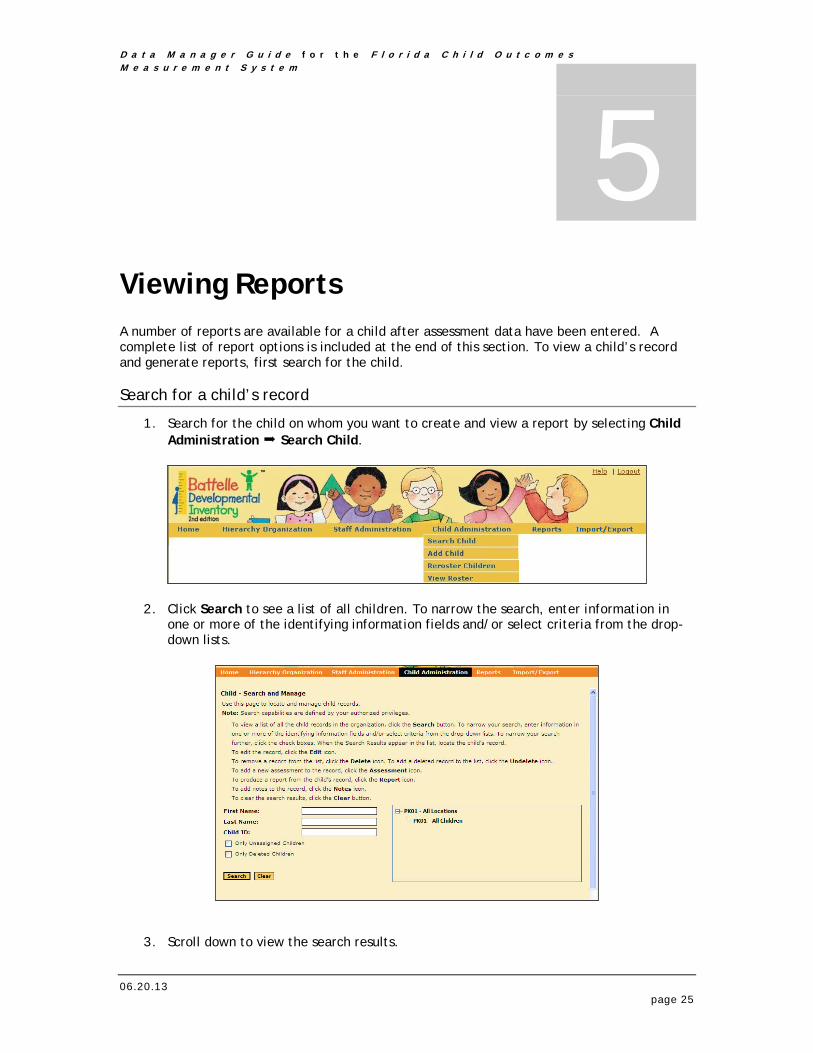
Viewing Reports A number of reports are available for a child after assessment data have been entered. A complete list of report options is included at the end of this section. To view a child’s record and generate reports, first search for the child. Search for a child’s record
1. Search for the child on whom you want to create and view a report by selecting Child Administration Search Child.
2. Click Search to see a list of all children. To narrow the search, enter information in one or more of the identifying information fields and/or select criteria from the drop-down lists.
3. Scroll down to view the search results.
5
D a t a M a n a g e r G u i d e f o r t h e F l o r i d a C h i l d O u t c o m e s M e a s u r e m e n t S y s t e m
06.20.13 page 26
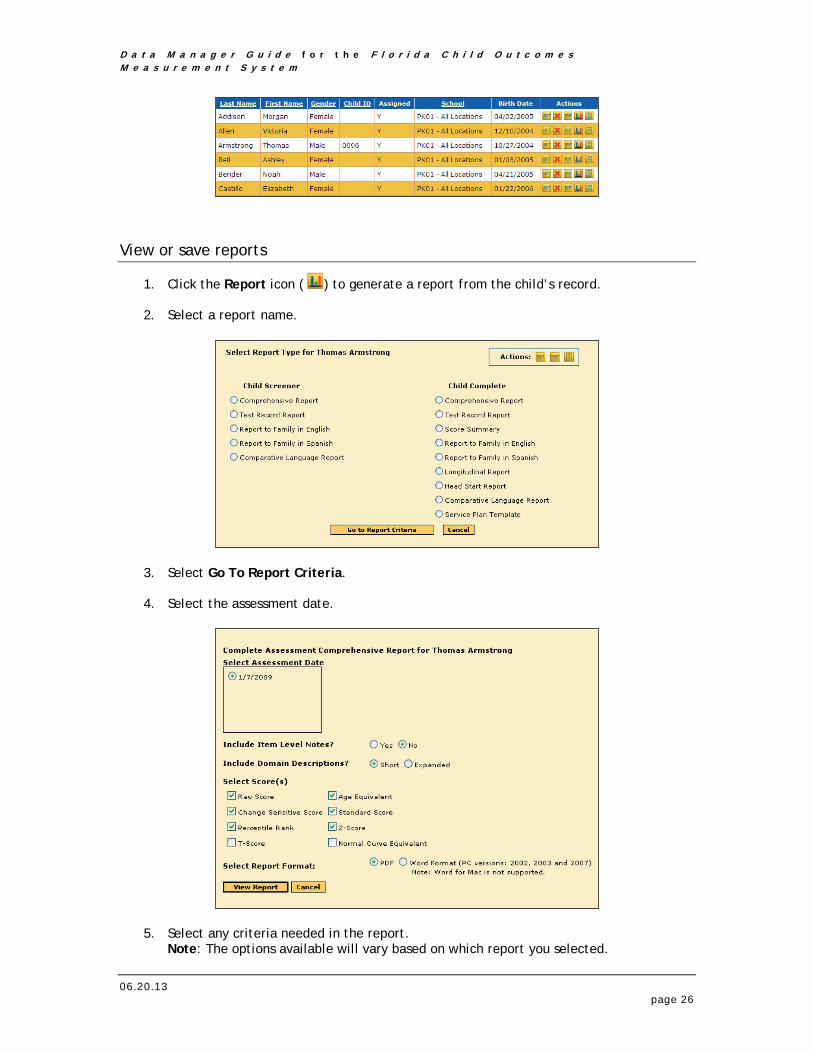
View or save reports
1. Click the Report icon ( ) to generate a report from the child’s record.
2. Select a report name.
3. Select Go To Report Criteria.
4. Select the assessment date.
5. Select any criteria needed in the report. Note: The options available will vary based on which report you selected.

D a t a M a n a g e r G u i d e f o r t h e F l o r i d a C h i l d O u t c o m e s M e a s u r e m e n t S y s t e m
06.20.13 page 27
6. Select View Report.
7. Click Open to view the report or Save. If Save is chosen, select the location to save the
report and give the file a name.
8. View, print, and/or close the report.

D a t a M a n a g e r G u i d e f o r t h e F l o r i d a C h i l d O u t c o m e s M e a s u r e m e n t S y s t e m
06.20.13 page 28
Available Report Options Child Screener Reports
Child Screener Report—Comprehensive Screener Report: Select this type to produce a report that includes a description of the test and what it measures, behavioral observations (if provided by the examiner), a table of scores listing raw scores and standard deviations (SD) (per domain and total), cut scores, pass/refer recommendations, and total age-equivalent (AE) scores. This report also includes test validity statements (if entered by the examiner) as well as item detail information with domain, item stem, number of points received, and item level notes (if entered by the examiner). The report also provides basic or extended descriptions of the assessed domains. This report can be previewed, printed, saved, or launched as a PDF file. Child Screener Report—Test Record Report: Select this type to produce a report that replicates the front page and inside front page of the paper test record. This report can be previewed, printed, or saved as a file. Child Screener Report—Report to Family in English: Select this type to produce a report in English that includes an introductory paragraph (written for a family member) explaining the purpose of the test and what it measures as well as item detail information with domain, item stem, number of points received, and item level notes (if entered by the examiner). The report also provides basic or extended descriptions of the assessed domains. While formatted slightly differently, the information in this report replicates the information in the Child Screener—Report to Family in Spanish. This report can be previewed, printed, or saved as a file. Child Screener Report—Report to Family in Spanish—Select this type to produce a report in Spanish that includes an introductory paragraph (written for a family member) explaining the purpose of the test and what it measures as well as item detail information with domain, item stem, number of points received, and item level notes (if entered by the examiner). The report also provides basic or extended descriptions of the assessed domains. While formatted slightly differently, the information in this report replicates the information in the Child Screener—Report to Family in English. This report can be previewed, printed, or saved as a file. Child Screener Report—Comparative Language Report: Select this type to produce a report that includes a brief narrative explaining the purpose of the test and what it measures and the test-retest procedure. This report also provides item detail information with domain, item stem, number of points received in English and Spanish, and item level notes (if entered by the examiner). The difference between Spanish and English raw score points is also included. This report can be previewed, printed, or saved as a file.
Child Complete Reports
Child Complete Report—Comprehensive Report: Select this type to produce a report that includes a brief narrative and table of scores. The narrative explains the purpose of the test and what it measures and includes behavioral observations (if provided by the examiner). Depending on the scoring options you select, the table of scores can report raw scores, age equivalents (AE), percentile ranks (PR), standard scores (SS), change-sensitive scores, T scores, z scores, and normal curve equivalents (NCE). Test validity statements (if entered by the examiner) and item detail information with domain/subdomain, item stem, number of points received, and item level notes (if entered by the examiner) are also

D a t a M a n a g e r G u i d e f o r t h e F l o r i d a C h i l d O u t c o m e s M e a s u r e m e n t S y s t e m
06.20.13 page 29
included. The report also provides basic or extended descriptions of the assessed domains. This report can be previewed, printed, saved, or launched as a PDF file. Child Complete Report—Test Record Report: Select this type to produce a report that replicates the front page and inside front page of the paper test record. This report can be previewed, printed, or saved as a file. Child Complete Report—Score Summary: Select this type to produce a report that includes a brief narrative and table of scores. Depending on the scoring options you select, the table of scores can report raw scores, age equivalents (AE), percentile ranks (PR), standard scores (SS), change-sensitive scores, T scores, z scores, and normal curve equivalents (NCE). The report also provides a graphical representation summarizing the child’s scores. It can be previewed, printed, or saved as a file. Child Complete Report—Report to Family in English: Select this type to produce a report in English that includes an introductory paragraph (written for a family member) explaining the purpose of the test and what it measures as well as item detail information with domain/subdomain, item stem, number of points received, and item level notes (if entered by the examiner). The report also provides basic or extended descriptions of the assessed domains. While formatted slightly differently, the information in this report replicates the information in the Child Screener Report—Report to Family in Spanish. This report can be previewed, printed, or saved as a file. Child Complete Report—Report to Family in Spanish: Select this type to produce a report in Spanish that includes an introductory paragraph (written for a family member) explaining the purpose of the test and what it measures as well as item detail information with domain/subdomain, item stem, number of points received, and item level notes (if entered by the examiner). The report also provides basic or extended descriptions of the assessed domains. While formatted slightly differently, the information in this report replicates the information in the Child Screener Report—Report to Family in English. This report can be previewed, printed, or saved as a file. Child Complete Report—Longitudinal Report: Select this type to produce a graphical description of the child’s performance on up to three subdomains in the assessments. The default setting for this report is the change-sensitive score; however, you can select any derived score. This report can be previewed, printed, or saved as a file. Child Complete Report—Head Start Report: Select this type to produce a report that includes a brief narrative and table of scores. The narrative explains the purpose of the test and what it measures; includes behavioral observations (if provided by the examiner); and describes the Head Start requirement, percentage of Head Start items mastered or emerging, future learning objectives, and the Head Start Outcomes Framework. Depending on the scoring options you select, the table of scores can report raw scores, age equivalents (AE), percentile ranks (PR), standard scores (SS), change-sensitive scores, T scores, z scores, and normal curve equivalents (NCE). Test validity statements (if entered by the examiner) are included as well as item detail information with domain/subdomain, item stem, number of points received, and item level notes (if entered by the examiner). The report also provides basic or extended descriptions of the assessed domains. This report can be previewed, printed, or saved as a file. Child Complete Report—Comparative Language Report: Select this type to produce a report that includes a brief narrative explaining the purpose of the test and what it measures; the test-retest procedure; and item detail information including domain/subdomain, item stem, number of points received in English and Spanish, item level notes (if entered by the examiner), and differences between Spanish and English raw score points.

D a t a M a n a g e r G u i d e f o r t h e F l o r i d a C h i l d O u t c o m e s M e a s u r e m e n t S y s t e m
06.20.13 page 30
Child Complete Report—Service Plan Template: Select this type to produce a template that can be used in conjunction with one of the other complete reports to create Individualized Education Program (IEP) or Individualized Family Service Plan (IFSP) goals and objectives. No scores are generated with this template. The template can be previewed, printed, saved, or launched as a PDF file.
Group Screener Reports
Group Screener Report—Screener Roster Report: Select this type to produce a report that includes raw scores, pass/refer recommendations, and total age-equivalent (AE) scores for a group of children you select. Report options include selecting a date range and standard deviation (SD) that is reported for all domains and the total.
Group Complete Reports
Group Complete Report—Roster Report: Select this type to produce a report that includes z scores, standard scores (SS) (scaled for subdomains and developmental quotients for domains and totals), age-equivalent (AE) scores, and change-sensitive scores for a group of children you select. The program provides options for selecting one or all of the available scores.
Group Complete Report—Head Start Report: Select this type to produce a Head Start Report for a group of children you select.

D a t a M a n a g e r G u i d e f o r t h e F l o r i d a C h i l d O u t c o m e s M e a s u r e m e n t S y s t e m
06.20.13 page 31
Exporting Data Files Exporting Data creates a file that includes all of the data that you select. Once the data file has been exported, it can be used with another software application, such as Microsoft Excel.
1. To export data from the BDI-2 Data Manager, choose Import/Export > Export.
2. When the Export page opens, select the option to indicate the type of data you want to export. Organization—Select this option to export information about your organization.
Staff—This file normally provides staff information. However, for the Florida Child Outcomes Measurement System, this file will only provide basic data point information.
Students—Select this option to export child demographic information. Assessment Summary—Select this option to export assessment summary information.
6

D a t a M a n a g e r G u i d e f o r t h e F l o r i d a C h i l d O u t c o m e s M e a s u r e m e n t S y s t e m
06.20.13 page 32
Assessment Domains—Select this option to export assessment domain information, including child name, test date, and subdomain scores. Assessment Details—Select this option to export details about assessments, including item-level scores.
Assessment Observations—Select this option to export test observations.
Student and Assessment Summary—Select this option to export child demographic and assessment summary information. Migration Export—This option is not applicable for most users of the Florida Child Outcomes Measurement System. Select this option to export data for import into another Data Manager Web account or to export data for analysis by a statistical program.
3. Click to expand the hierarchy list; then select a level of your organization to specify the scope of the information that is exported. 4. Select an Export Beginning Date and Export Ending Date. 5. Program Note Criteria are not applicable. 6. Specify the type of file you want to export. Tab—Select this option if you are using a plain text application, such as Microsoft Notepad, to organize the exported data. This will create a file in which the information is organized into lines and each item is separated by a tabbed space. Comma—Select this option if you are using a spreadsheet application, such as Microsoft Excel, to organize the exported data. This will create a file in which the information is organized into rows and each item is separated by a column. XML—This is the only file option available for the Migration Export. 7. Add or change your E-mail address (if applicable). 8. Click
to export the file or
to schedule an export. Please note that the following exports are scheduled and are not immediately available for viewing and downloading: Assessment Domains, Assessment Details, Student and Assessment Summary, and Migration Export.

D a t a M a n a g e r G u i d e f o r t h e F l o r i d a C h i l d O u t c o m e s M e a s u r e m e n t S y s t e m
06.20.13 page 33
For security reasons, remember to LOG OUT of the system when not in use.
Store your login information in a secure location.