Embed Size (px)
Citation preview
Baylor Secure
Messaging
For Non-Baylor Users

TABLE OF CONTENTS SECTION ONE: GETTING STARTED..................................................................4
Receiving a Secure Message for the First Time................................................4 Password Configuration ....................................................................................5 Logging into Baylor Secure Messaging .............................................................7 Secure Messaging Features .............................................................................8 An Introduction to the Inbox ..............................................................................9 Viewing Messages ..........................................................................................10
Viewing Messages in the Preview Pane ..................................................10 Viewing Messages in the Message Window............................................11 Returning to Default View (Inbox) from the Message Window ..............12
SECTION TWO: MESSAGE MANAGEMENT ....................................................13
Replying to a Message....................................................................................13 Adding Attachments ........................................................................................14 Sent Items .......................................................................................................17 Drafts...............................................................................................................18
Saving Messages to the Draft Folder .......................................................18 Editing Messages in the Draft Folder.......................................................19
Deleted Items ..................................................................................................20 SECTION THREE: FOLDERS............................................................................21
Moving an Item from the Deleted Folders to the Inbox....................................21 Permanently Deleting Items from Base Folders ..............................................22 Custom Folders ...............................................................................................23
Moving an Item to a Custom Folder .........................................................25 Deleting Custom Folders ..........................................................................26
SECTION FOUR: User Settings .........................................................................27
Modifying User Credentials .............................................................................27 Modifying User Preferences ............................................................................28
SECTION FIVE: Logging Out .............................................................................29
User Logout.....................................................................................................29 SECTION SIX: ADDITIONAL HELP ...................................................................30
Baylor Secure Messaging Page 2 of 30 Rev July 2007

INTRODUCTION Baylor Secure Messaging provides a secure, encrypted means for communicating confidential information between Baylor and external recipients (non Baylor employees). Baylor confidential information includes, but is not limited to: proprietary research, clinical, academic, administrative, and affiliate information, intellectual property, financial information, employee and student identifiable information, human subject research participants and patient protected health information. Baylor Secure Messaging is NOT an email system and is NOT intended to replace the current Microsoft Exchange email system. Confidential information is not directly sent to external recipients. Instead, a notification is sent to an external recipient that includes the subject line of the message and a hyperlink to access the contents of the message. The recipient clicks on the hyperlink within the email, which directs them to logon to the Baylor Secure Messaging website (https://bsm.bcm.edu). Once the external recipient successfully logs in, he/she is able to review the message, which is stored within the Baylor network.
Baylor Secure Messaging Page 3 of 30 Rev July 2007
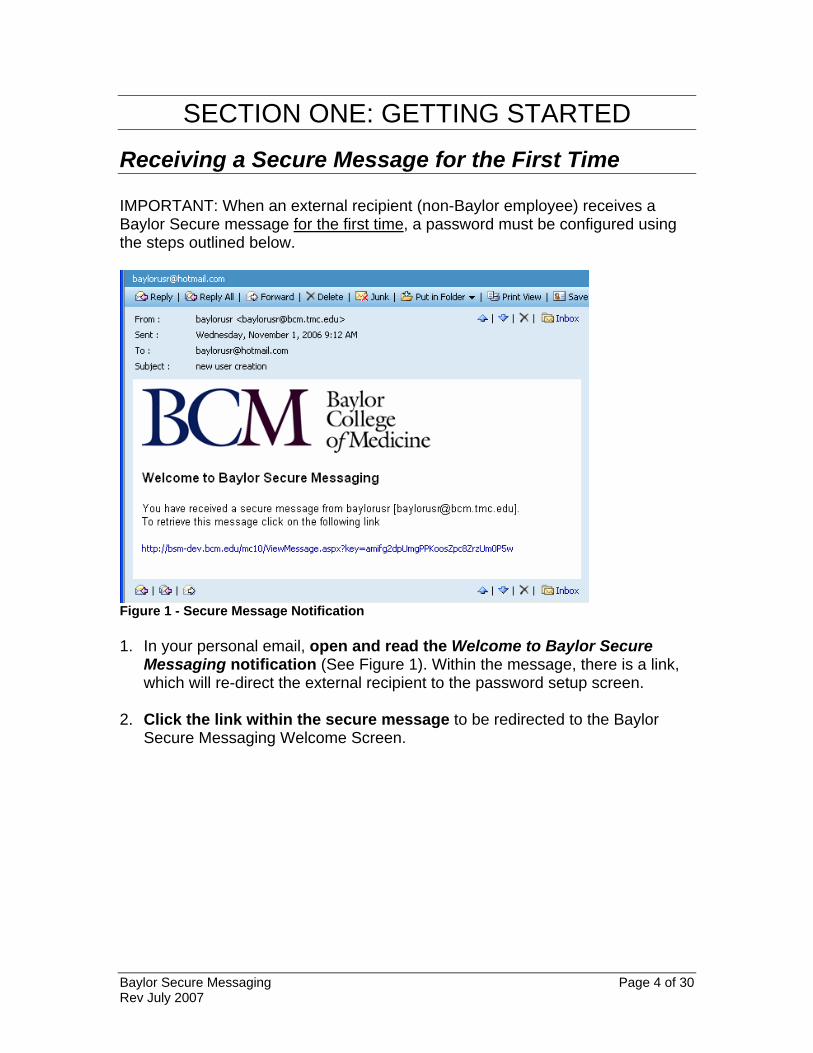
SECTION ONE: GETTING STARTED Receiving a Secure Message for the First Time IMPORTANT: When an external recipient (non-Baylor employee) receives a Baylor Secure message for the first time, a password must be configured using the steps outlined below.
Figure 1 - Secure Message Notification 1. In your personal email, open and read the Welcome to Baylor Secure
Messaging notification (See Figure 1). Within the message, there is a link, which will re-direct the external recipient to the password setup screen.
2. Click the link within the secure message to be redirected to the Baylor
Secure Messaging Welcome Screen.
Baylor Secure Messaging Page 4 of 30 Rev July 2007
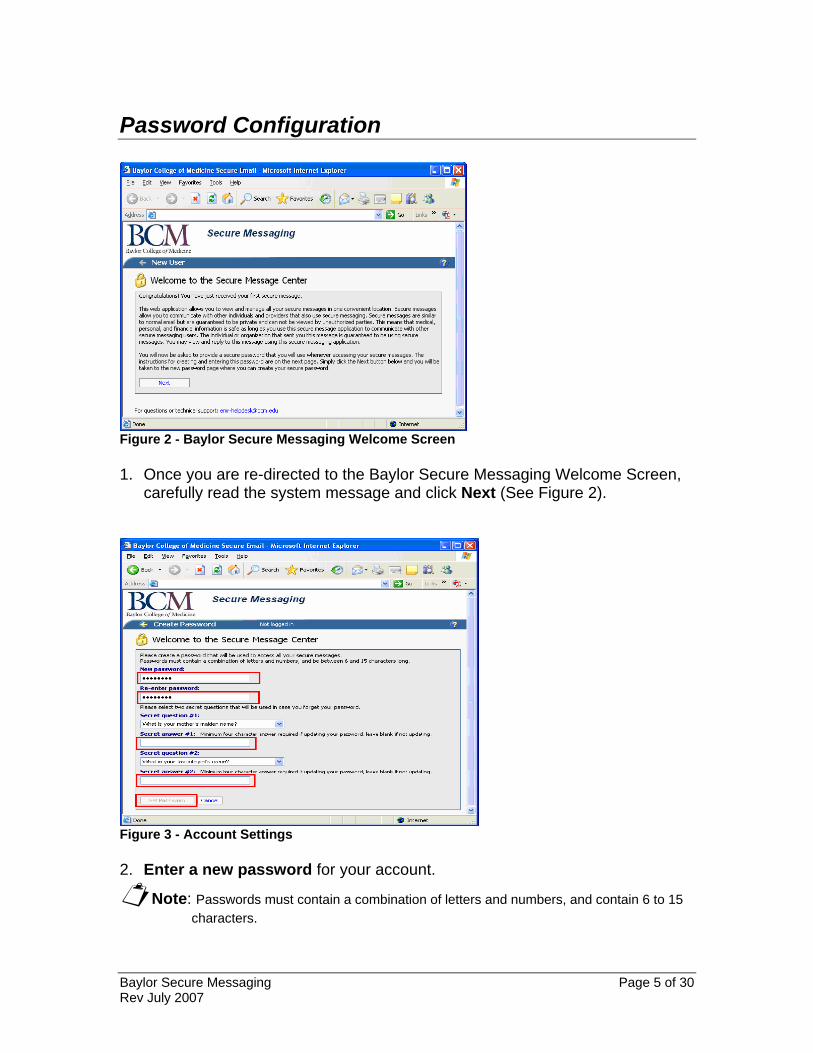
Password Configuration
Figure 2 - Baylor Secure Messaging Welcome Screen 1. Once you are re-directed to the Baylor Secure Messaging Welcome Screen,
carefully read the system message and click Next (See Figure 2).
Figure 3 - Account Settings 2. Enter a new password for your account.
Note: Passwords must contain a combination of letters and numbers, and contain 6 to 15 characters.
Baylor Secure Messaging Page 5 of 30 Rev July 2007
3. You are required to re-enter your password, as well as create two secret questions, which will be used for verification purposes should the password need to be reset in the future (See Figure 3).
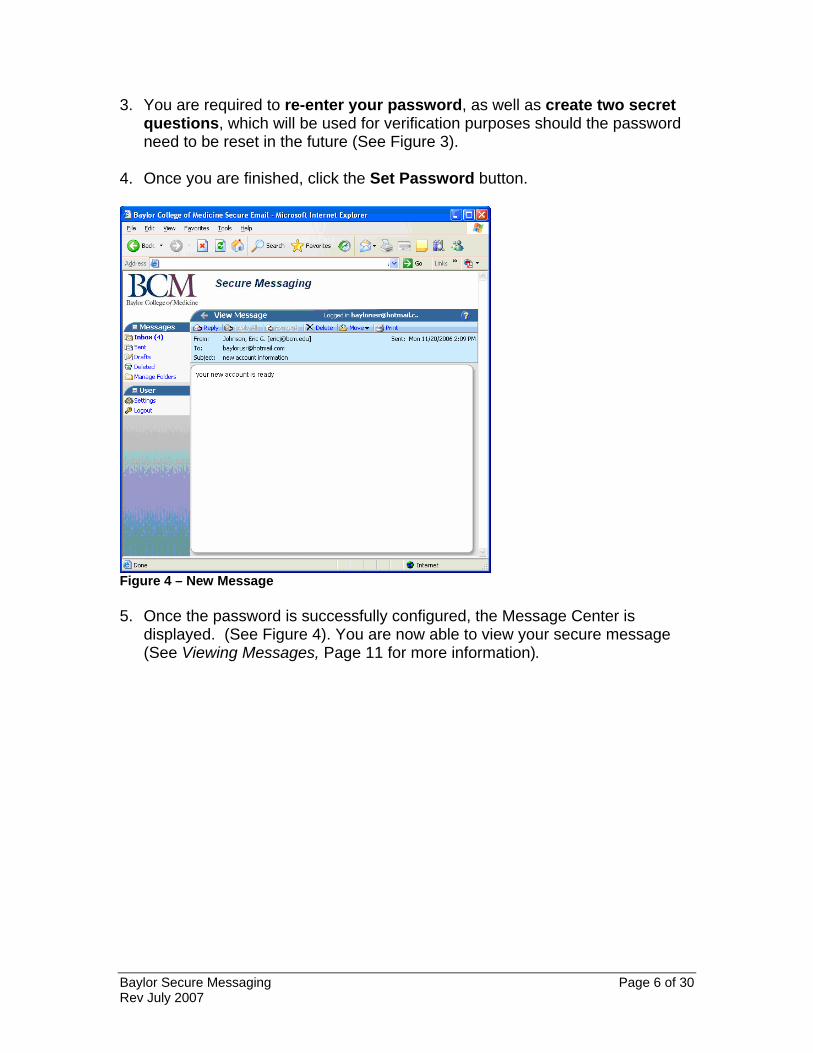
4. Once you are finished, click the Set Password button.
Figure 4 – New Message 5. Once the password is successfully configured, the Message Center is
displayed. (See Figure 4). You are now able to view your secure message (See Viewing Messages, Page 11 for more information).
Baylor Secure Messaging Page 6 of 30 Rev July 2007
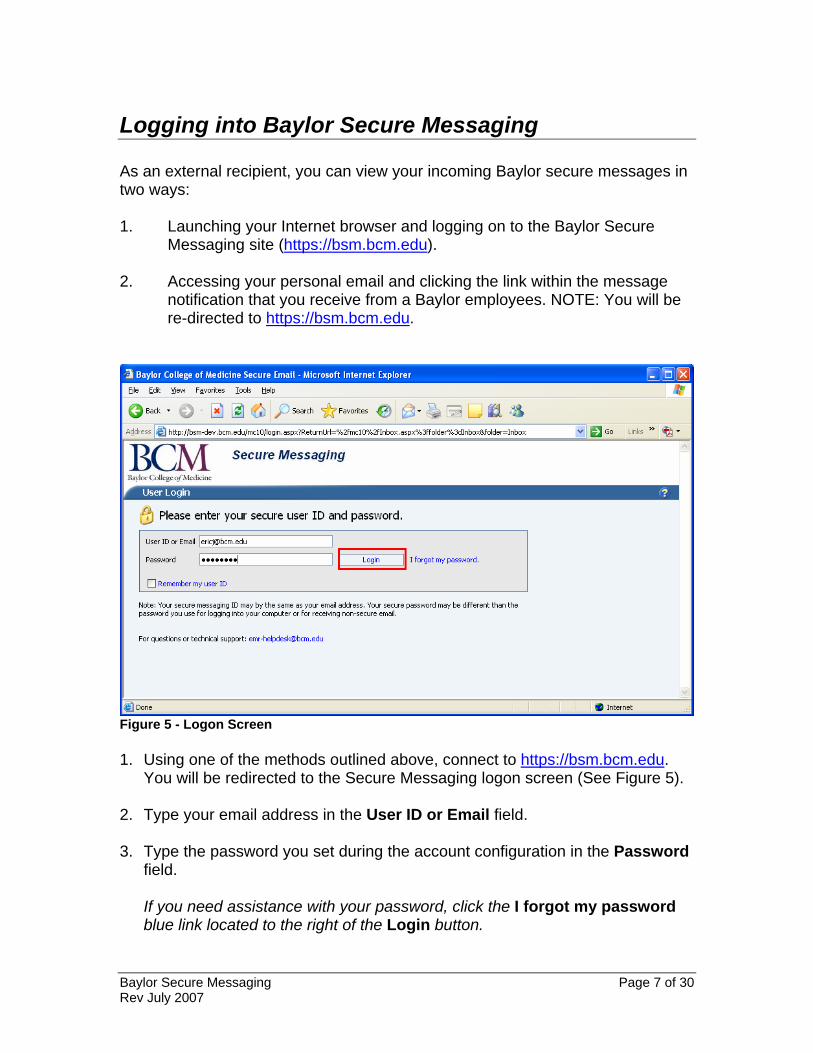
Logging into Baylor Secure Messaging As an external recipient, you can view your incoming Baylor secure messages in two ways: 1. Launching your Internet browser and logging on to the Baylor Secure
Messaging site (https://bsm.bcm.edu). 2. Accessing your personal email and clicking the link within the message
notification that you receive from a Baylor employees. NOTE: You will be re-directed to https://bsm.bcm.edu.
Figure 5 - Logon Screen 1. Using one of the methods outlined above, connect to https://bsm.bcm.edu.
You will be redirected to the Secure Messaging logon screen (See Figure 5). 2. Type your email address in the User ID or Email field.
3. Type the password you set during the account configuration in the Password
field.
If you need assistance with your password, click the I forgot my password blue link located to the right of the Login button.
Baylor Secure Messaging Page 7 of 30 Rev July 2007
4. Click Login.
Secure Messaging Features
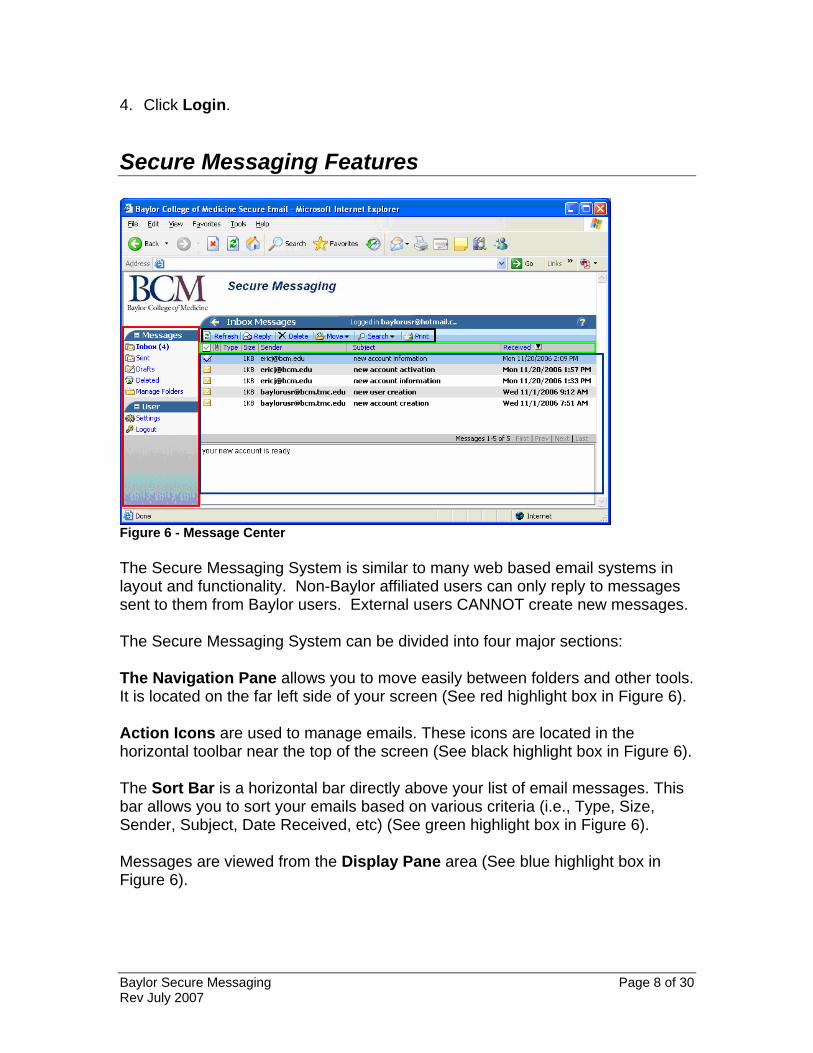
Figure 6 - Message Center The Secure Messaging System is similar to many web based email systems in layout and functionality. Non-Baylor affiliated users can only reply to messages sent to them from Baylor users. External users CANNOT create new messages. The Secure Messaging System can be divided into four major sections: The Navigation Pane allows you to move easily between folders and other tools. It is located on the far left side of your screen (See red highlight box in Figure 6). Action Icons are used to manage emails. These icons are located in the horizontal toolbar near the top of the screen (See black highlight box in Figure 6). The Sort Bar is a horizontal bar directly above your list of email messages. This bar allows you to sort your emails based on various criteria (i.e., Type, Size, Sender, Subject, Date Received, etc) (See green highlight box in Figure 6). Messages are viewed from the Display Pane area (See blue highlight box in Figure 6).
Baylor Secure Messaging Page 8 of 30 Rev July 2007
An Introduction to the Inbox
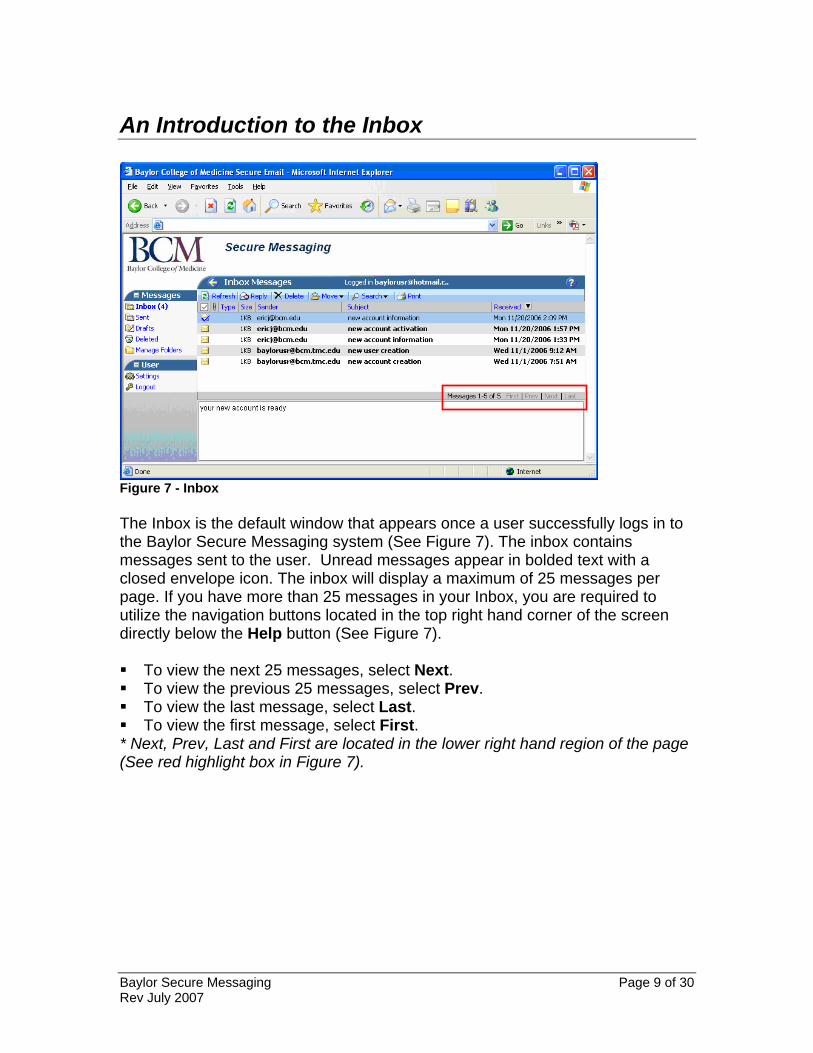
Figure 7 - Inbox The Inbox is the default window that appears once a user successfully logs in to the Baylor Secure Messaging system (See Figure 7). The inbox contains messages sent to the user. Unread messages appear in bolded text with a closed envelope icon. The inbox will display a maximum of 25 messages per page. If you have more than 25 messages in your Inbox, you are required to utilize the navigation buttons located in the top right hand corner of the screen directly below the Help button (See Figure 7). To view the next 25 messages, select Next. To view the previous 25 messages, select Prev. To view the last message, select Last. To view the first message, select First.
* Next, Prev, Last and First are located in the lower right hand region of the page (See red highlight box in Figure 7).
Baylor Secure Messaging Page 9 of 30 Rev July 2007
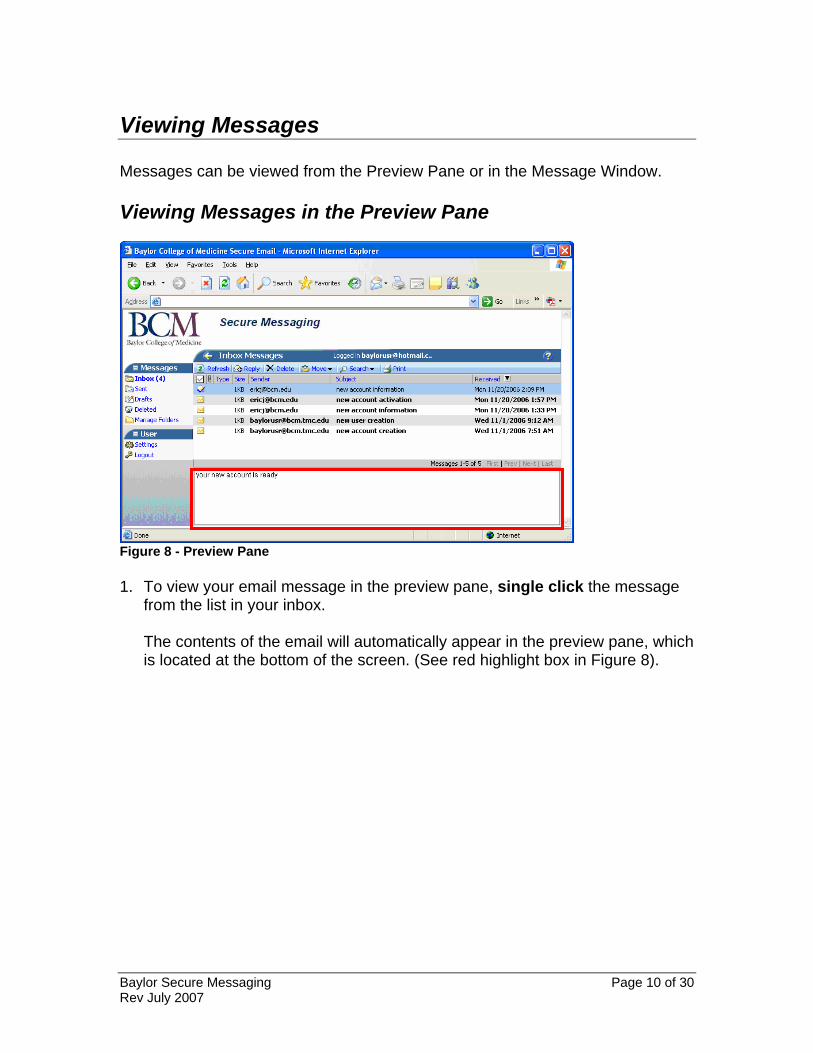
Viewing Messages Messages can be viewed from the Preview Pane or in the Message Window. Viewing Messages in the Preview Pane
Figure 8 - Preview Pane 1. To view your email message in the preview pane, single click the message
from the list in your inbox. The contents of the email will automatically appear in the preview pane, which is located at the bottom of the screen. (See red highlight box in Figure 8).
Baylor Secure Messaging Page 10 of 30 Rev July 2007
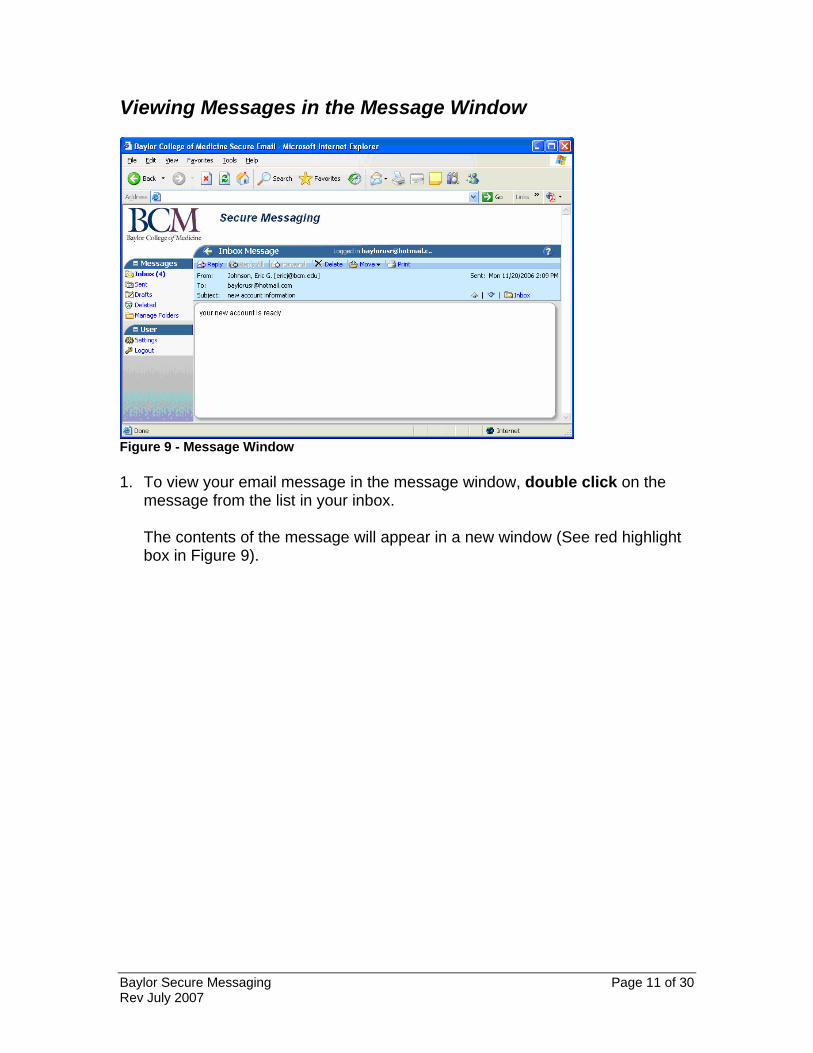
Viewing Messages in the Message Window
Figure 9 - Message Window 1. To view your email message in the message window, double click on the
message from the list in your inbox. The contents of the message will appear in a new window (See red highlight box in Figure 9).
Baylor Secure Messaging Page 11 of 30 Rev July 2007
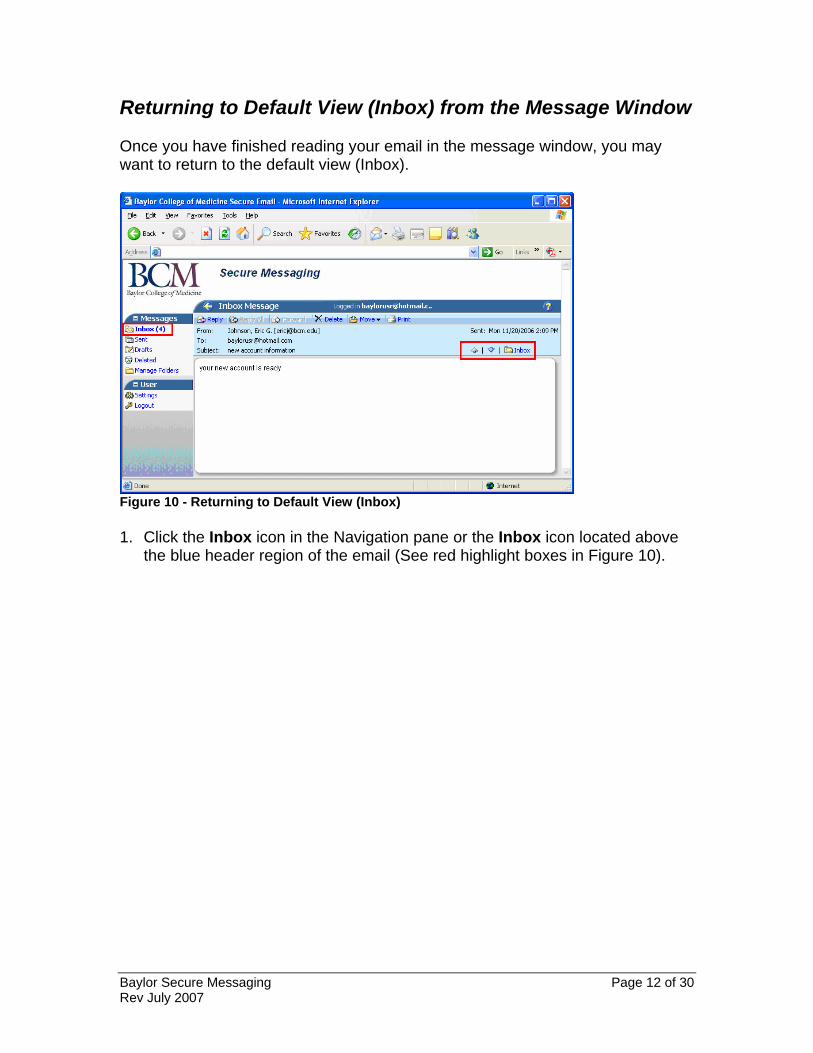
Returning to Default View (Inbox) from the Message Window Once you have finished reading your email in the message window, you may want to return to the default view (Inbox).
Figure 10 - Returning to Default View (Inbox) 1. Click the Inbox icon in the Navigation pane or the Inbox icon located above
the blue header region of the email (See red highlight boxes in Figure 10).
Baylor Secure Messaging Page 12 of 30 Rev July 2007
SECTION TWO: MESSAGE MANAGEMENT
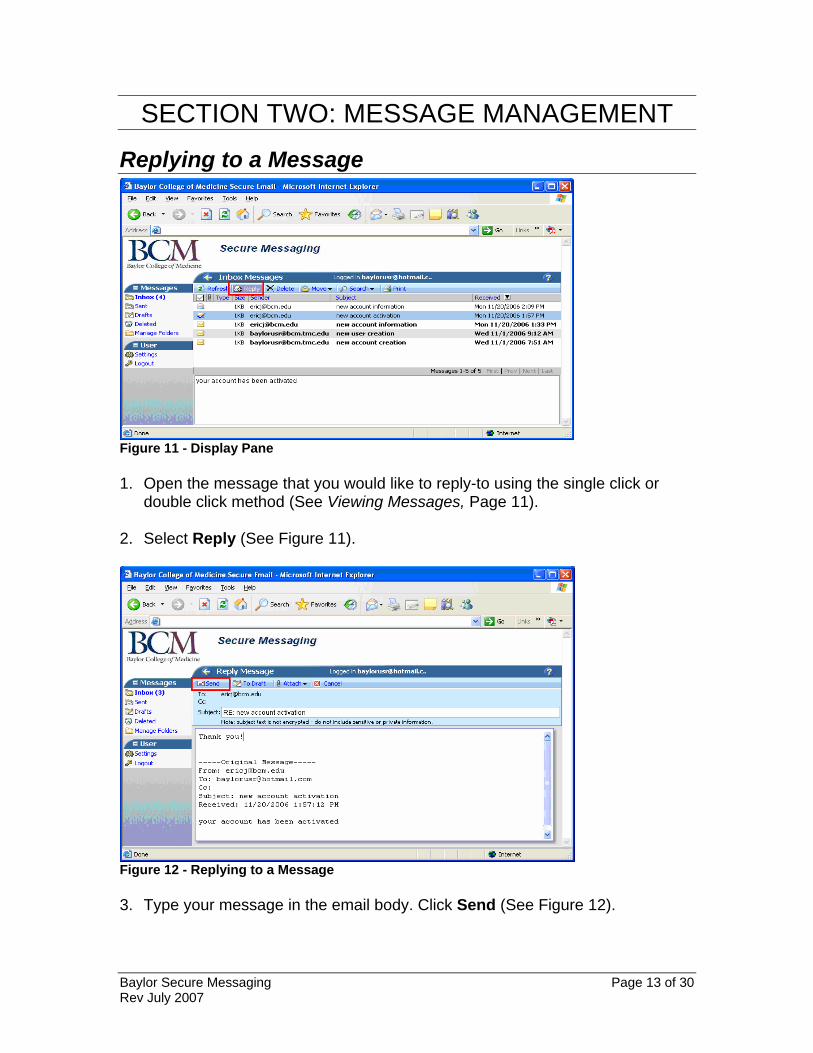
Replying to a Message
Figure 11 - Display Pane 1. Open the message that you would like to reply-to using the single click or
double click method (See Viewing Messages, Page 11). 2. Select Reply (See Figure 11).
Figure 12 - Replying to a Message 3. Type your message in the email body. Click Send (See Figure 12).
Baylor Secure Messaging Page 13 of 30 Rev July 2007
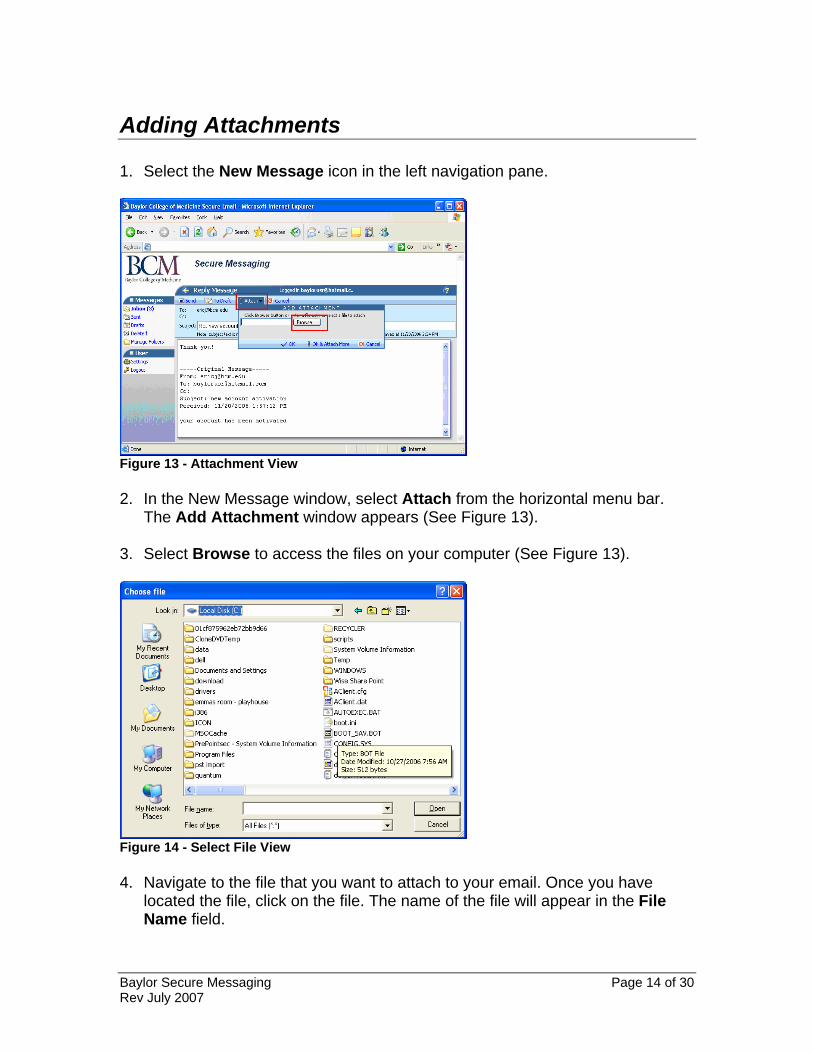
Adding Attachments 1. Select the New Message icon in the left navigation pane.
Figure 13 - Attachment View 2. In the New Message window, select Attach from the horizontal menu bar.
The Add Attachment window appears (See Figure 13). 3. Select Browse to access the files on your computer (See Figure 13).
Figure 14 - Select File View 4. Navigate to the file that you want to attach to your email. Once you have
located the file, click on the file. The name of the file will appear in the File Name field.
Baylor Secure Messaging Page 14 of 30 Rev July 2007
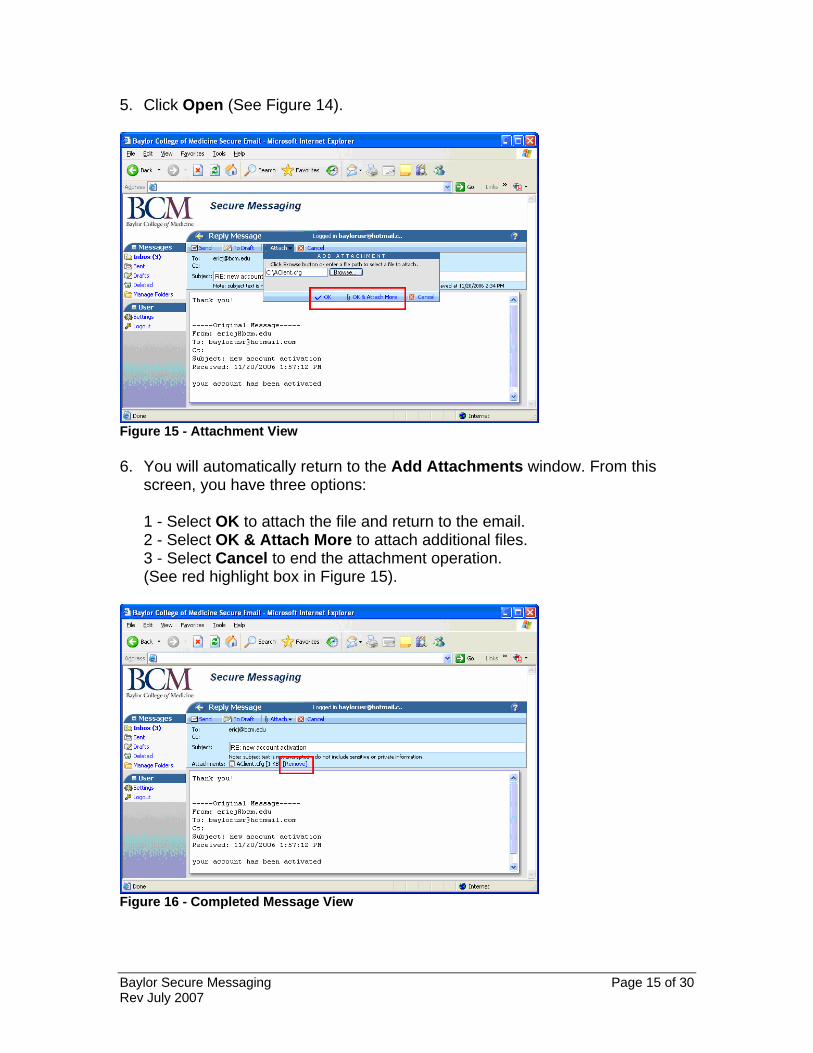
5. Click Open (See Figure 14).
Figure 15 - Attachment View 6. You will automatically return to the Add Attachments window. From this
screen, you have three options: 1 - Select OK to attach the file and return to the email. 2 - Select OK & Attach More to attach additional files. 3 - Select Cancel to end the attachment operation. (See red highlight box in Figure 15).
Figure 16 - Completed Message View
Baylor Secure Messaging Page 15 of 30 Rev July 2007
Once completed, you will see the name of the attachment below the subject line (See red highlight box in Figure 16). If you need to remove the attachment, select Remove (See red highlight box in Figure 16).
Baylor Secure Messaging Page 16 of 30 Rev July 2007
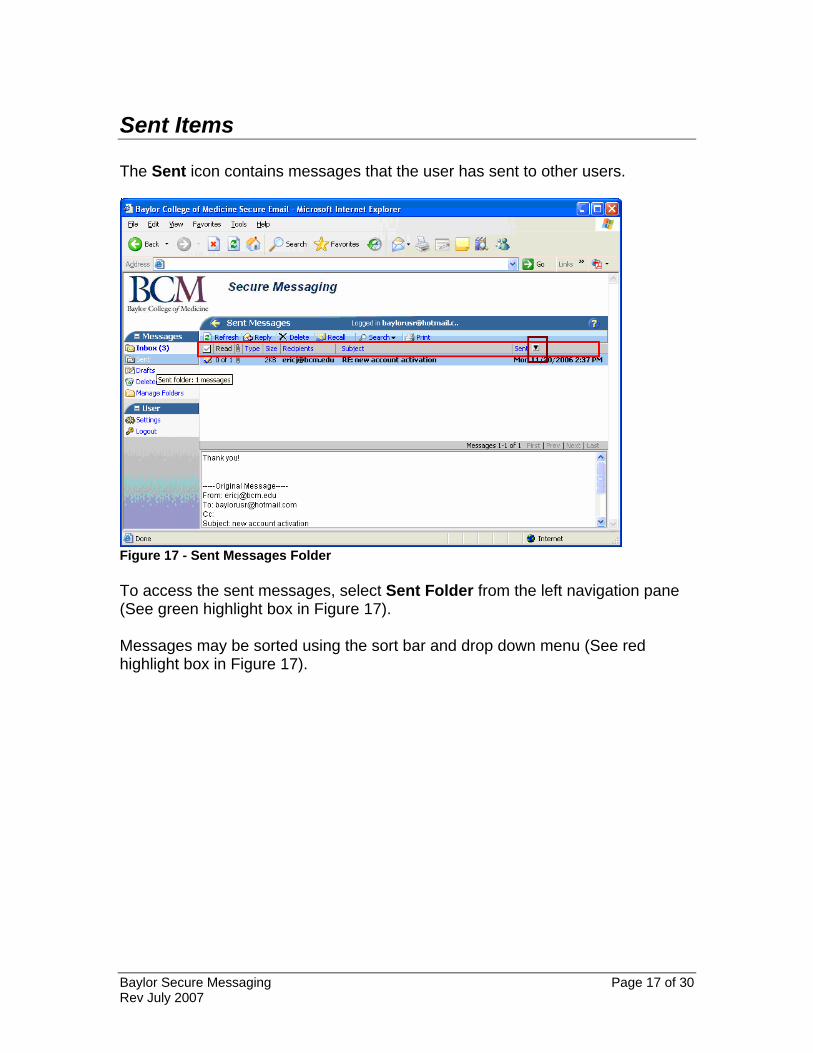
Sent Items The Sent icon contains messages that the user has sent to other users.
Figure 17 - Sent Messages Folder To access the sent messages, select Sent Folder from the left navigation pane (See green highlight box in Figure 17). Messages may be sorted using the sort bar and drop down menu (See red highlight box in Figure 17).
Baylor Secure Messaging Page 17 of 30 Rev July 2007
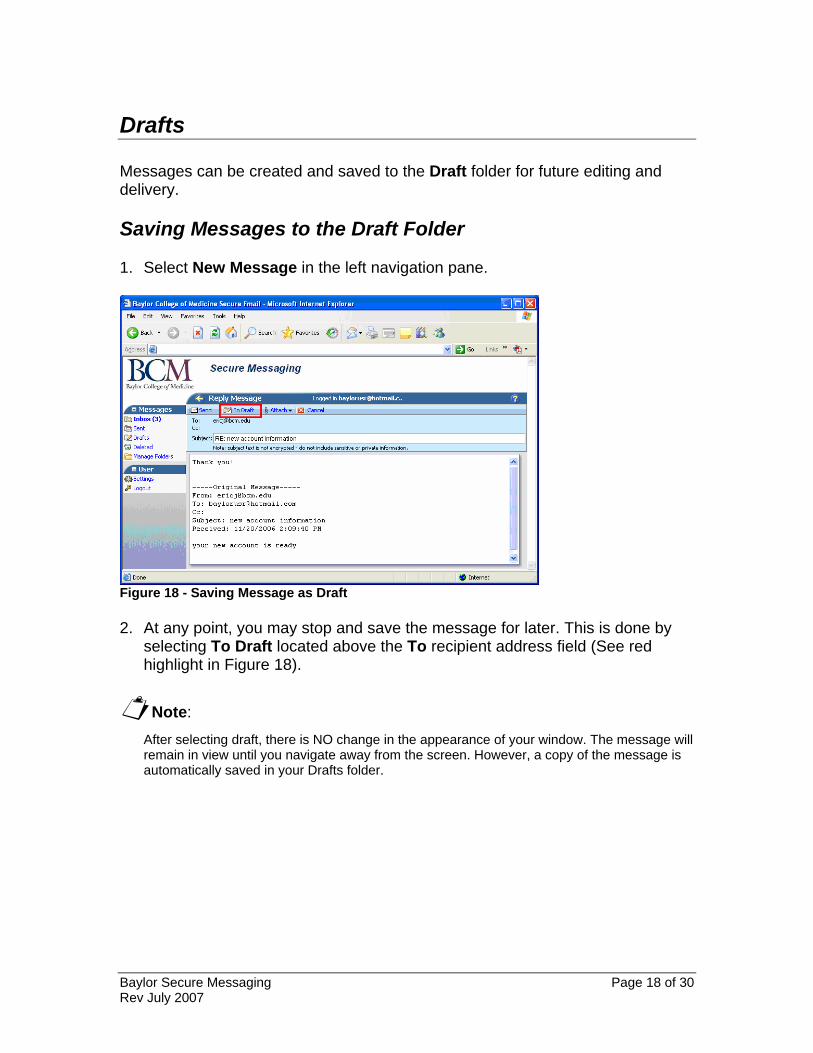
Drafts Messages can be created and saved to the Draft folder for future editing and delivery. Saving Messages to the Draft Folder 1. Select New Message in the left navigation pane.
Figure 18 - Saving Message as Draft 2. At any point, you may stop and save the message for later. This is done by
selecting To Draft located above the To recipient address field (See red highlight in Figure 18).
Note:
After selecting draft, there is NO change in the appearance of your window. The message will remain in view until you navigate away from the screen. However, a copy of the message is automatically saved in your Drafts folder.
Baylor Secure Messaging Page 18 of 30 Rev July 2007
Editing Messages in the Draft Folder
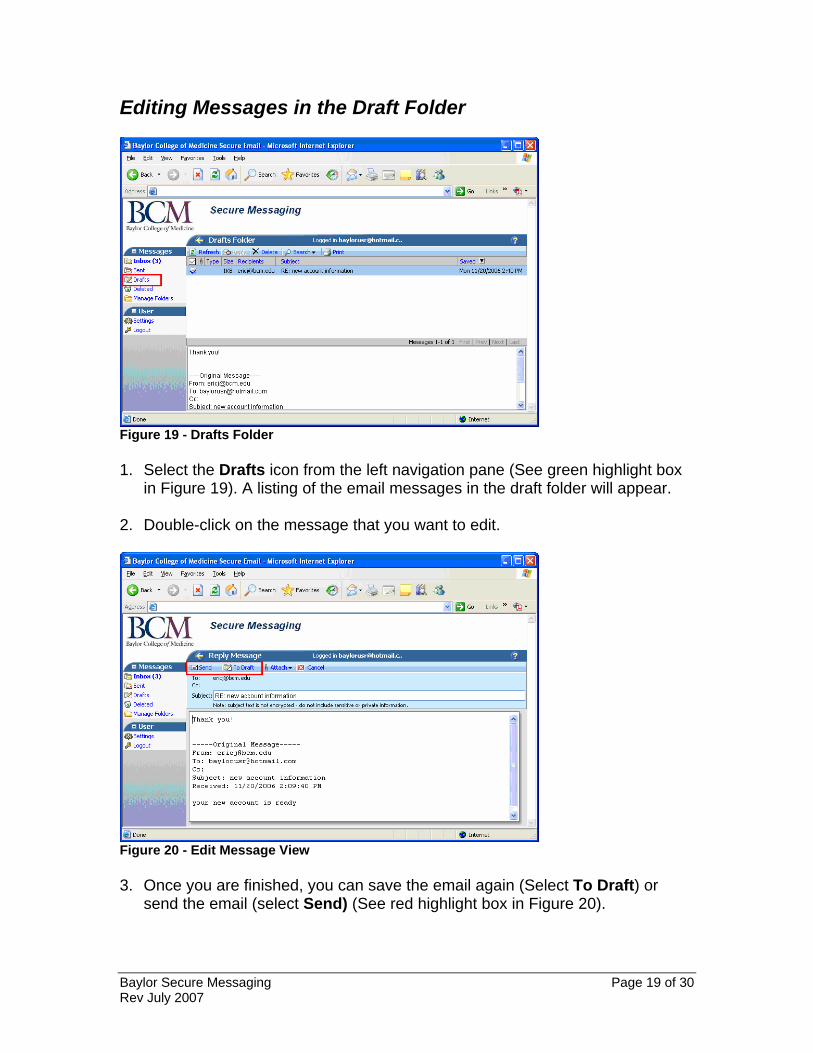
Figure 19 - Drafts Folder 1. Select the Drafts icon from the left navigation pane (See green highlight box
in Figure 19). A listing of the email messages in the draft folder will appear. 2. Double-click on the message that you want to edit.
Figure 20 - Edit Message View 3. Once you are finished, you can save the email again (Select To Draft) or
send the email (select Send) (See red highlight box in Figure 20).
Baylor Secure Messaging Page 19 of 30 Rev July 2007

Deleted Items The Deleted folder contains messages deleted from the Inbox or Drafts folder. 1. To delete a message, select the Inbox icon from the left navigation pane. 2. Select the message to be deleted.
Figure 21 - Deleting a Message from the Inbox 3. Select Delete from the horizontal toolbar (See Figure 21).
Baylor Secure Messaging Page 20 of 30 Rev July 2007
SECTION THREE: FOLDERS
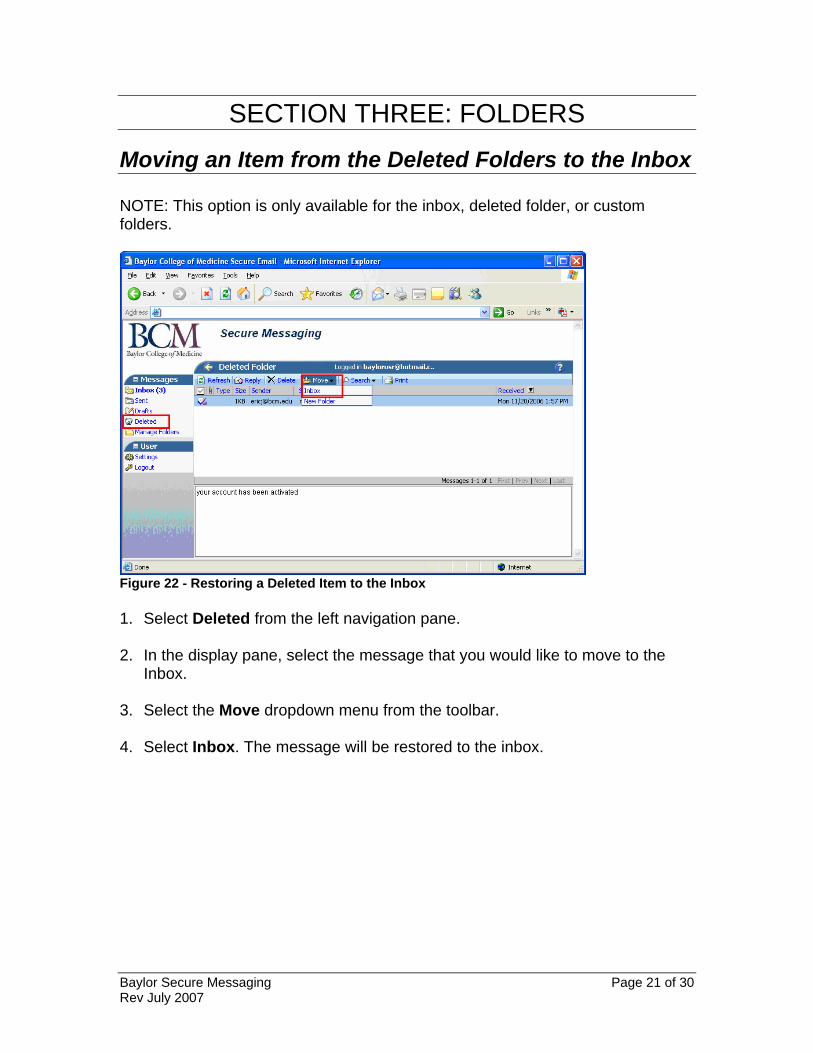
Moving an Item from the Deleted Folders to the Inbox NOTE: This option is only available for the inbox, deleted folder, or custom folders.
Figure 22 - Restoring a Deleted Item to the Inbox 1. Select Deleted from the left navigation pane. 2. In the display pane, select the message that you would like to move to the
Inbox. 3. Select the Move dropdown menu from the toolbar. 4. Select Inbox. The message will be restored to the inbox.
Baylor Secure Messaging Page 21 of 30 Rev July 2007
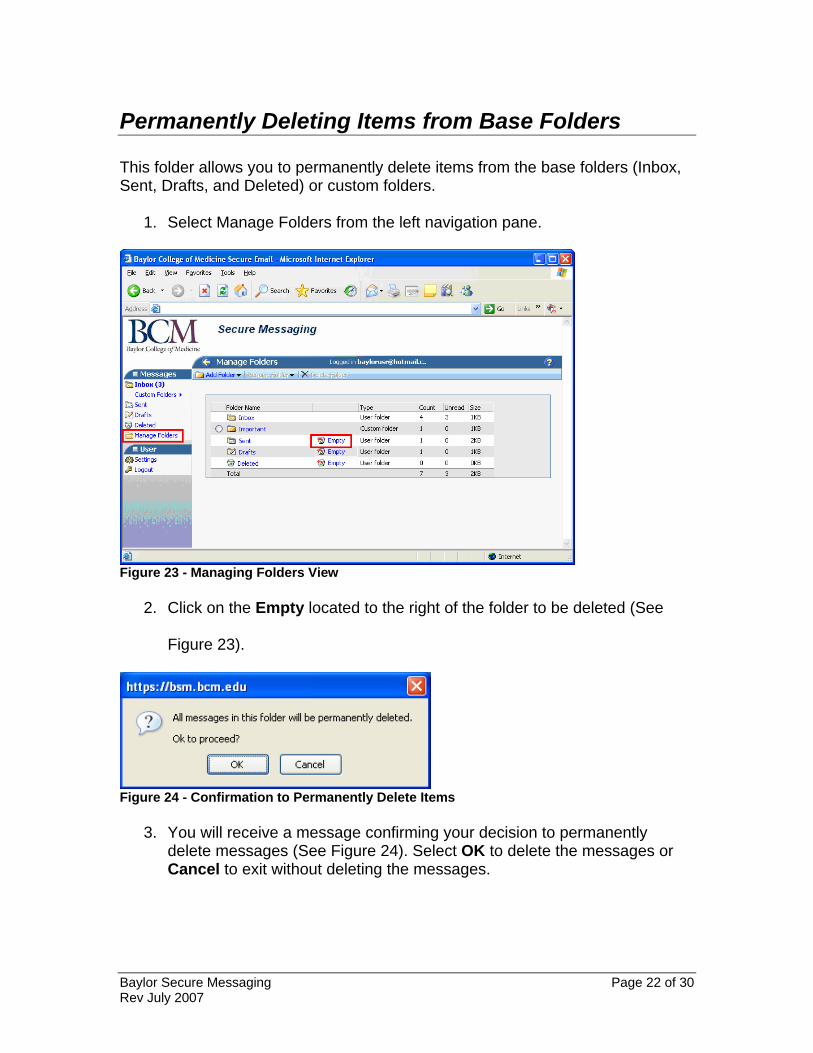
Permanently Deleting Items from Base Folders This folder allows you to permanently delete items from the base folders (Inbox, Sent, Drafts, and Deleted) or custom folders.
1. Select Manage Folders from the left navigation pane.
Figure 23 - Managing Folders View
2. Click on the Empty located to the right of the folder to be deleted (See
Figure 23).
Figure 24 - Confirmation to Permanently Delete Items
3. You will receive a message confirming your decision to permanently delete messages (See Figure 24). Select OK to delete the messages or Cancel to exit without deleting the messages.
Baylor Secure Messaging Page 22 of 30 Rev July 2007
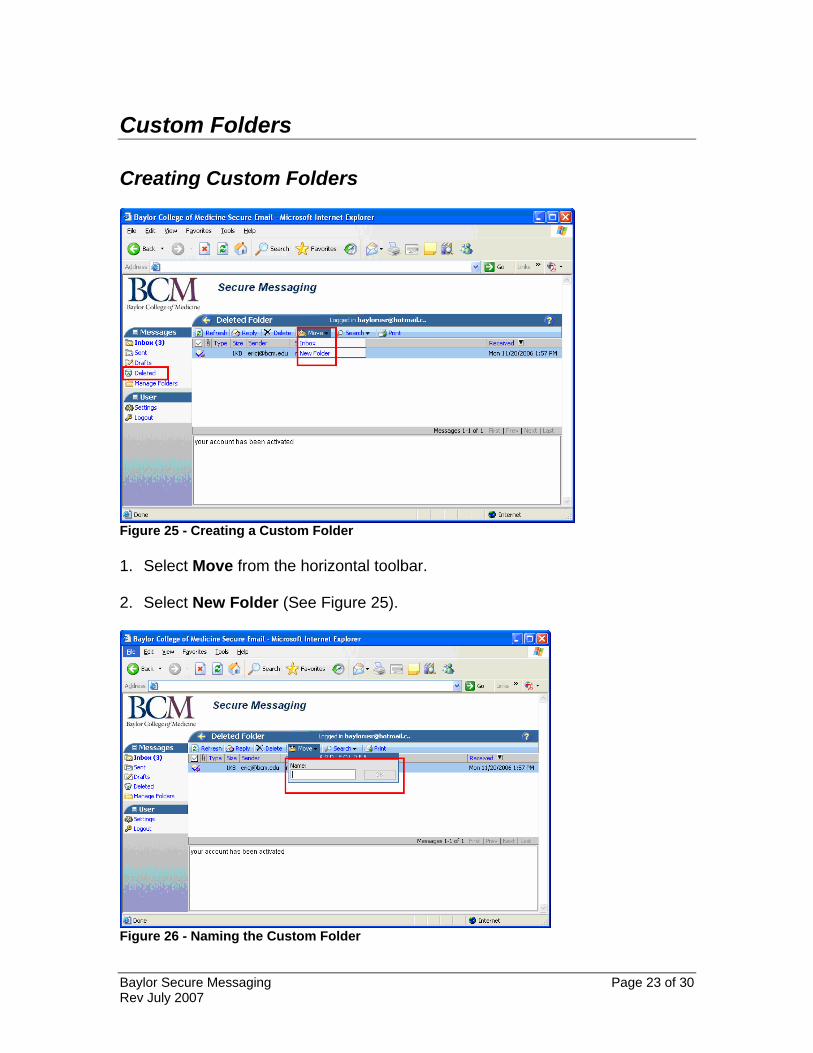
Custom Folders Creating Custom Folders
Figure 25 - Creating a Custom Folder 1. Select Move from the horizontal toolbar.
2. Select New Folder (See Figure 25).
Figure 26 - Naming the Custom Folder
Baylor Secure Messaging Page 23 of 30 Rev July 2007
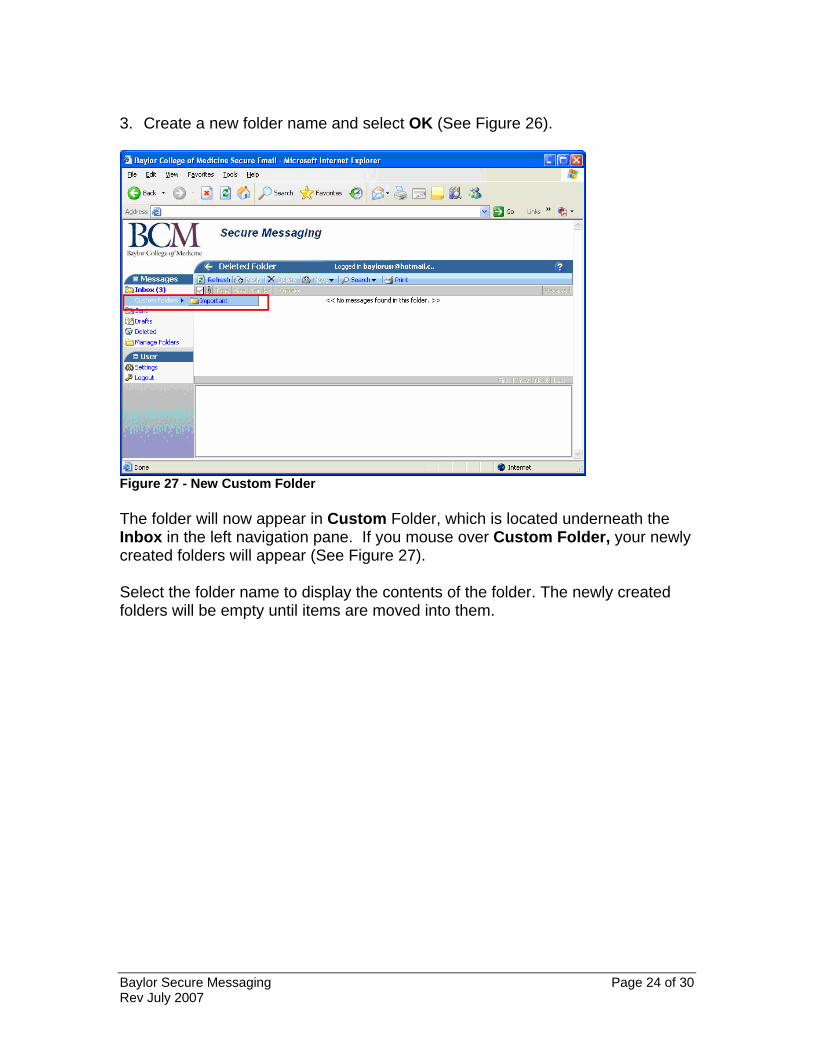
3. Create a new folder name and select OK (See Figure 26).
Figure 27 - New Custom Folder The folder will now appear in Custom Folder, which is located underneath the Inbox in the left navigation pane. If you mouse over Custom Folder, your newly created folders will appear (See Figure 27). Select the folder name to display the contents of the folder. The newly created folders will be empty until items are moved into them.
Baylor Secure Messaging Page 24 of 30 Rev July 2007

Moving an Item to a Custom Folder 1. Select the message that you want to delete from the Inbox or Deleted folder.
Figure 28 - Creating a Custom Folder 2. Select Move from the horizontal toolbar (See Figure 28).
3. Once the dropdown menu appears, select the destination folder.
Baylor Secure Messaging Page 25 of 30 Rev July 2007
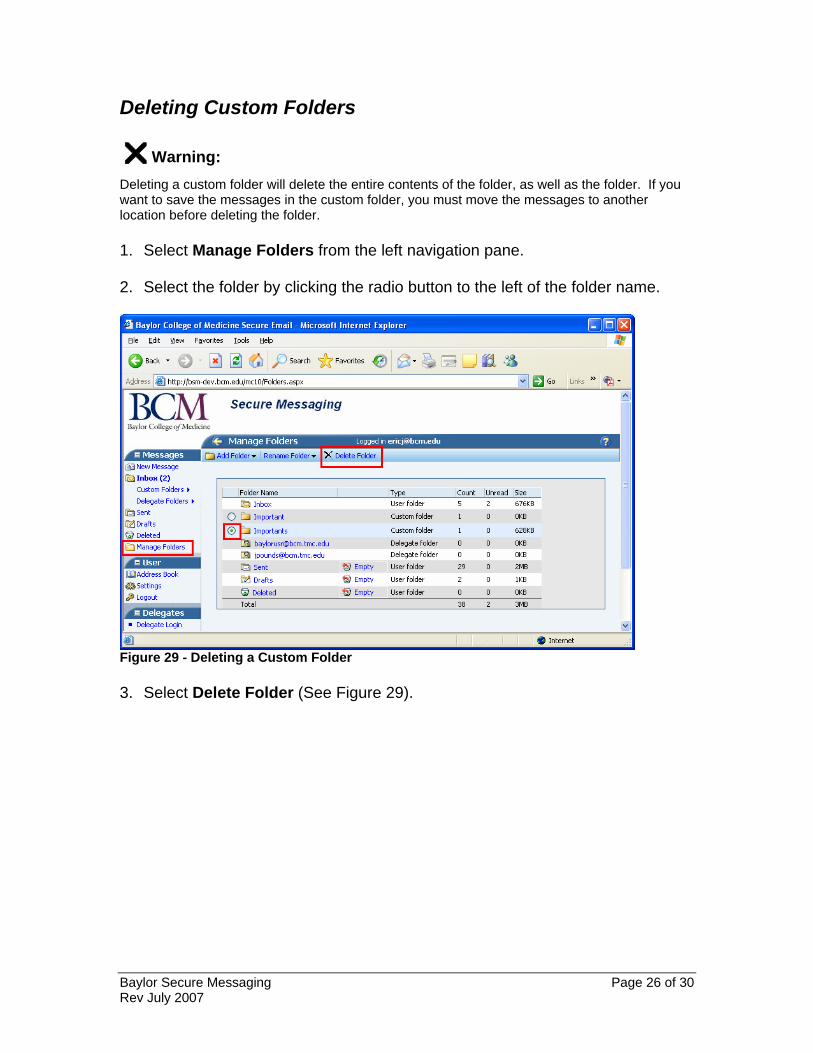
Deleting Custom Folders
Warning: Deleting a custom folder will delete the entire contents of the folder, as well as the folder. If you want to save the messages in the custom folder, you must move the messages to another location before deleting the folder. 1. Select Manage Folders from the left navigation pane.
2. Select the folder by clicking the radio button to the left of the folder name.
Figure 29 - Deleting a Custom Folder 3. Select Delete Folder (See Figure 29).
Baylor Secure Messaging Page 26 of 30 Rev July 2007
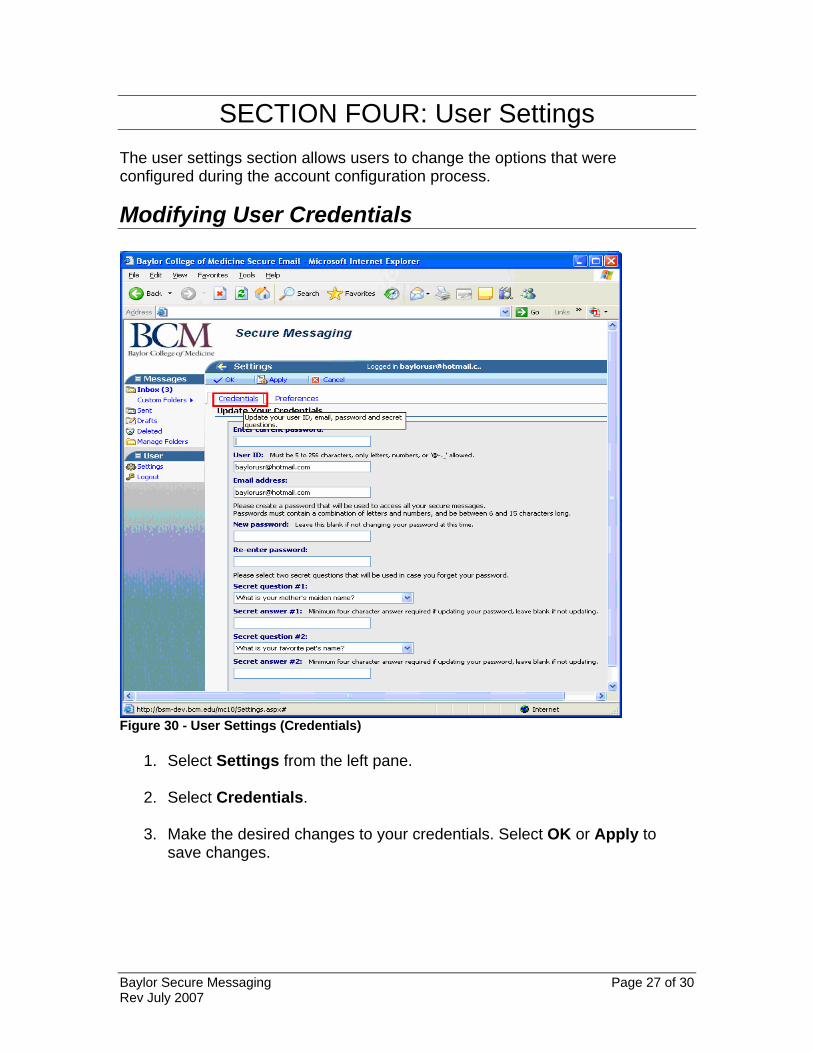
SECTION FOUR: User Settings The user settings section allows users to change the options that were configured during the account configuration process.
Modifying User Credentials
Figure 30 - User Settings (Credentials)
1. Select Settings from the left pane.
2. Select Credentials.
3. Make the desired changes to your credentials. Select OK or Apply to
save changes.
Baylor Secure Messaging Page 27 of 30 Rev July 2007
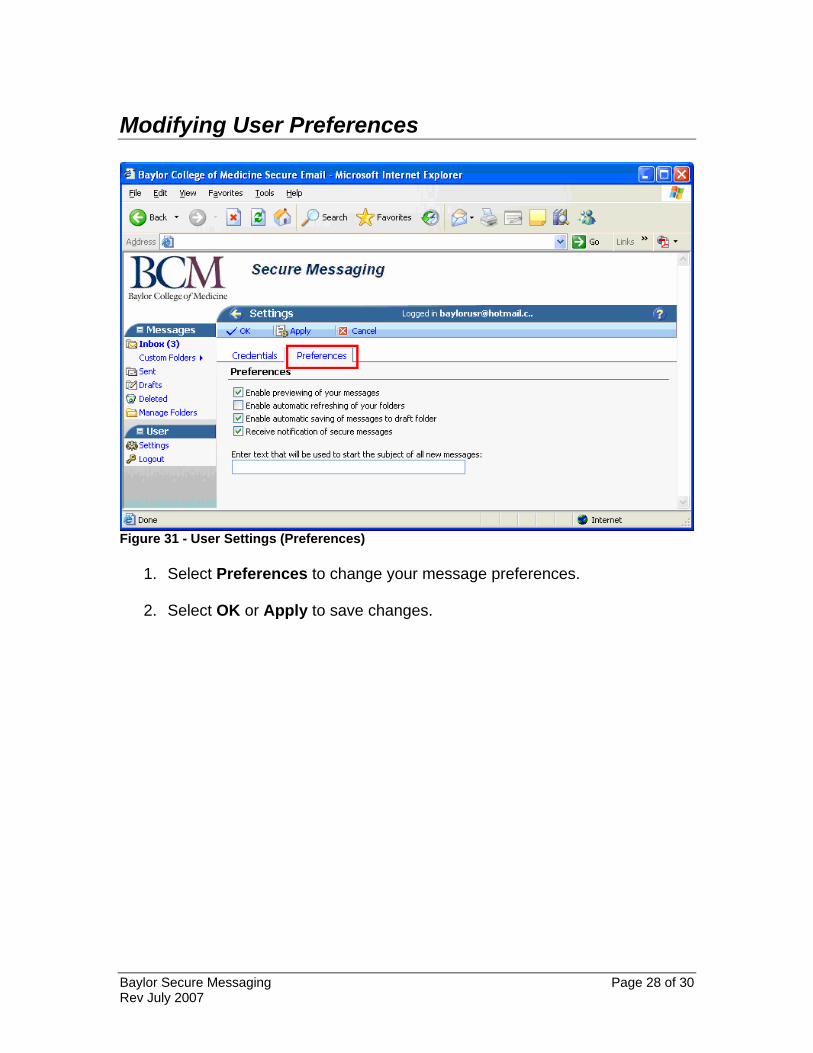
Modifying User Preferences
Figure 31 - User Settings (Preferences)
1. Select Preferences to change your message preferences. 2. Select OK or Apply to save changes.
Baylor Secure Messaging Page 28 of 30 Rev July 2007
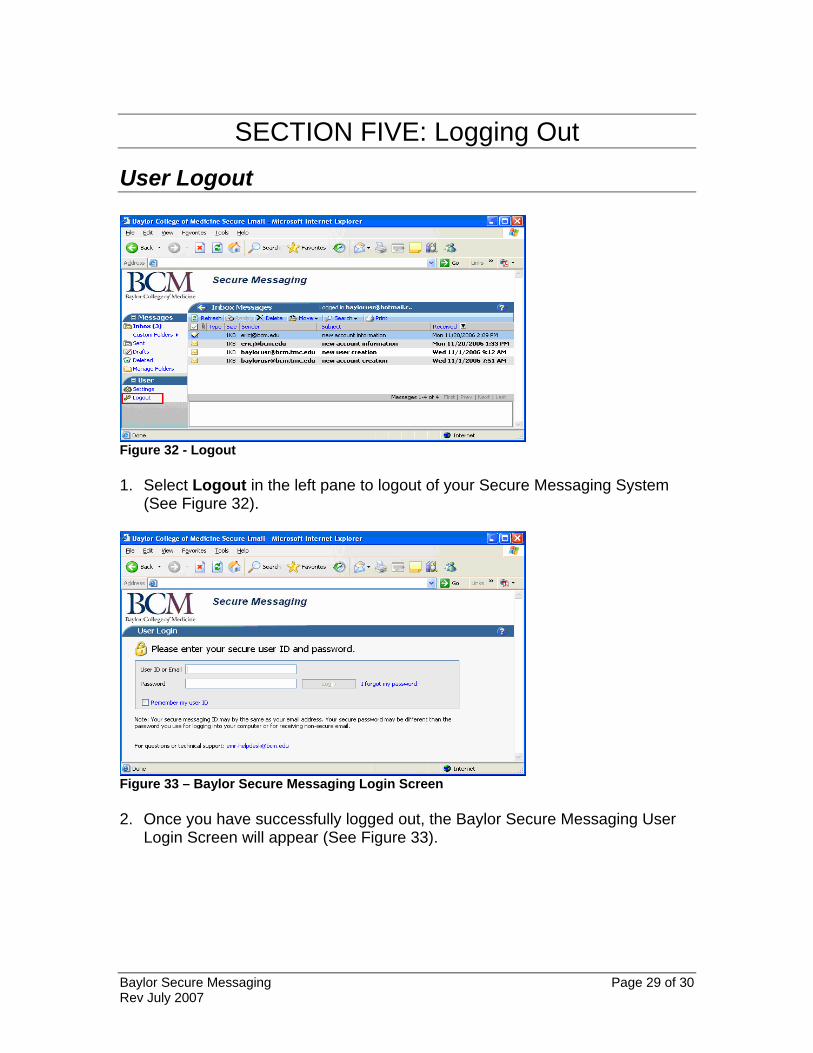
SECTION FIVE: Logging Out
User Logout
Figure 32 - Logout 1. Select Logout in the left pane to logout of your Secure Messaging System
(See Figure 32).
Figure 33 – Baylor Secure Messaging Login Screen 2. Once you have successfully logged out, the Baylor Secure Messaging User
Login Screen will appear (See Figure 33).
Baylor Secure Messaging Page 29 of 30 Rev July 2007
SECTION SIX: ADDITIONAL HELP
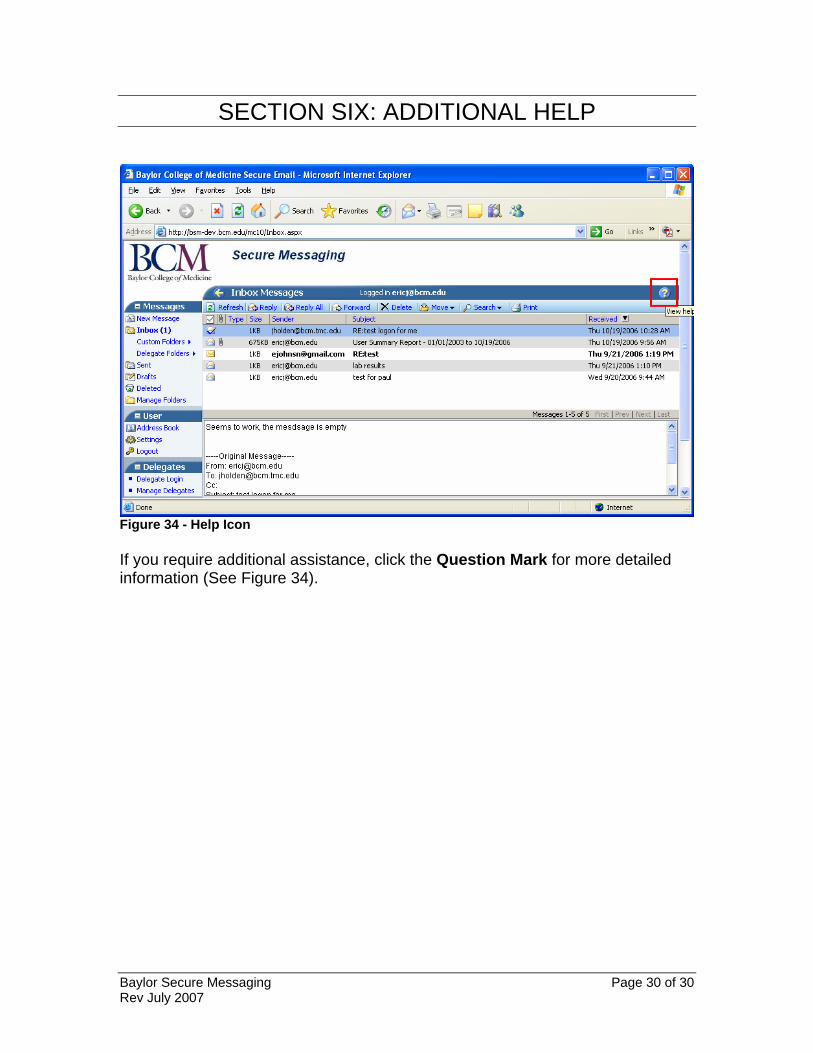
Figure 34 - Help Icon If you require additional assistance, click the Question Mark for more detailed information (See Figure 34).
Baylor Secure Messaging Page 30 of 30 Rev July 2007