Embed Size (px)
Citation preview

M-850-36
BATTERY LAWNMOWER
OPERATING INSTRUCTIONS
MODELS: LSM 3648 MA
Thank you for purchasing the Lawn Star Lawnmower which is one of the finest and most advanced lawnmowers today’s technology can produce. Before you begin using it, please read this manual carefully and familiarise yourself with the control and the proper use of this product to ensure you get the best possible performance from it. The operator or user is responsible for accidents or hazards occurring to other people or their property. SAFETY PRECAUTIONS Inspect your lawnmower before each operation. If any part is damaged or worn, repair or replace before operation. Use only genuine Lawn Star (Pty) Ltd. replacement parts when servicing or repairing the unit. These parts are available from your supplying dealer or service agent. Use only genuine Lawn Star replacement cutting blade Part No. M-256-20 or mulching blade Part No. M-255-10. WARNING : Remove the safety key from the socket whenever you leave the machine unattended. Remove safety plug(Fig.9-4) and batteries before clearing a blockage, before checking, before cleaning or working on the appliance, before changing parts such as the blades, after striking a foreign object (inspect the appliance for damage and make repairs as necessary) or if the appliance starts to vibrate abnormally (check immediately). The operator must wear protective clothing, long trousers and sturdy, non-slip footwear. Do not operate the mower when barefoot or wearing open sandals. Do not use your lawnmower for any jobs other than those for which it was intended. Do not use unless the entire grass catcher is attached or the rear guard is in place. Do not switch on mower unless all four wheels are resting squarely on the lawn being mowed. Do not tilt or lift mower while switched on. Switch off mower before pushing over surfaces other than grass. Do not force your lawnmower. If motor labours, mow in multiple passes at different height settings. Keep hands and feet well clear of rotating blades while the mower is in use. Cutting blades continue to rotate for a few seconds after switch-off. Never pick up or carry mower while the motor is running. Inspect the area to be cut and remove all debris that could be entangled in the cutting blades. Also remove any solid objects, e.g. stones, sticks, wires and bones that the unit may sling during cutting. Exercise extreme caution when mowing and changing direction. Always walk, never run. Never cut grass by pulling the mower towards yourself. Do not walk backwards while mowing, you may trip. Avoid dangerous environments. Do not use the unit in poor light or in damp or wet locations. Do not use in the rain. Do not use on steep slopes, especially if damp. Work across slope faces, not up and down. Do not over-reach. Ensure good footing and balance are maintained. Never operate the lawnmower when you are tired, ill or under the influence of alcohol or drugs. Do not allow children or people unfamiliar with these instructions to use the lawnmower. Local regulations may restrict the age of the operator. Children, pets and onlookers should be kept at least 15 meters away from the work area, unless shielded by an effective solid barrier. When not in use, remove batteries and safety plug and store the unit indoors in a dry and locked place, out of reach of children. PREPARATIONS FOR USE Remove the lawnmower, handles, grass catcher and all other contents from the packaging. Remove the spanner, bolts and nuts supplied from the bag. Assemble the handles and tighten the knobs (Fig.1).Attach the handle ends to the lawnmower chassis, insert the four bolts provided and tighten the nuts using the spanner (Fig.2 No.1). Note: ensure the nuts are on the outside. Assemble the grass catcher (Fig.3) by pressing the grass filter (Fig.3 No.3) into position and screwing the handle (Fig.3 No.2) on with the four 4.8 x 50 self-tapping screws and M5 washers provided. Fit the M6 bolt, washer and nut in the two positions shown in (Fig.3 No.5.). Fold closed the two halves of the grass catcher (Fig.3 No.1) making sure that all the clips are fully aligned and clicked into position. Fit the 2 x ST 4.8X20 screws to secure both rear halves of the grass catcher (Fig.3 No.4). Lift the rear guard flap (Fig.4 No.1) and attach the grass catcher to the mower (Fig.4 No.2) ensuring that the grass catcher is hooked onto chassis hooks. Lower the guard flap to secure grass catcher. Check that all blade bolts, screws, knobs, nuts are securely tightened. THE USE OF THIS LAWNMOWER FOR COMMERCIAL OR RENTAL PURPOSES WILL INVALIDATE THE WARRANTY.
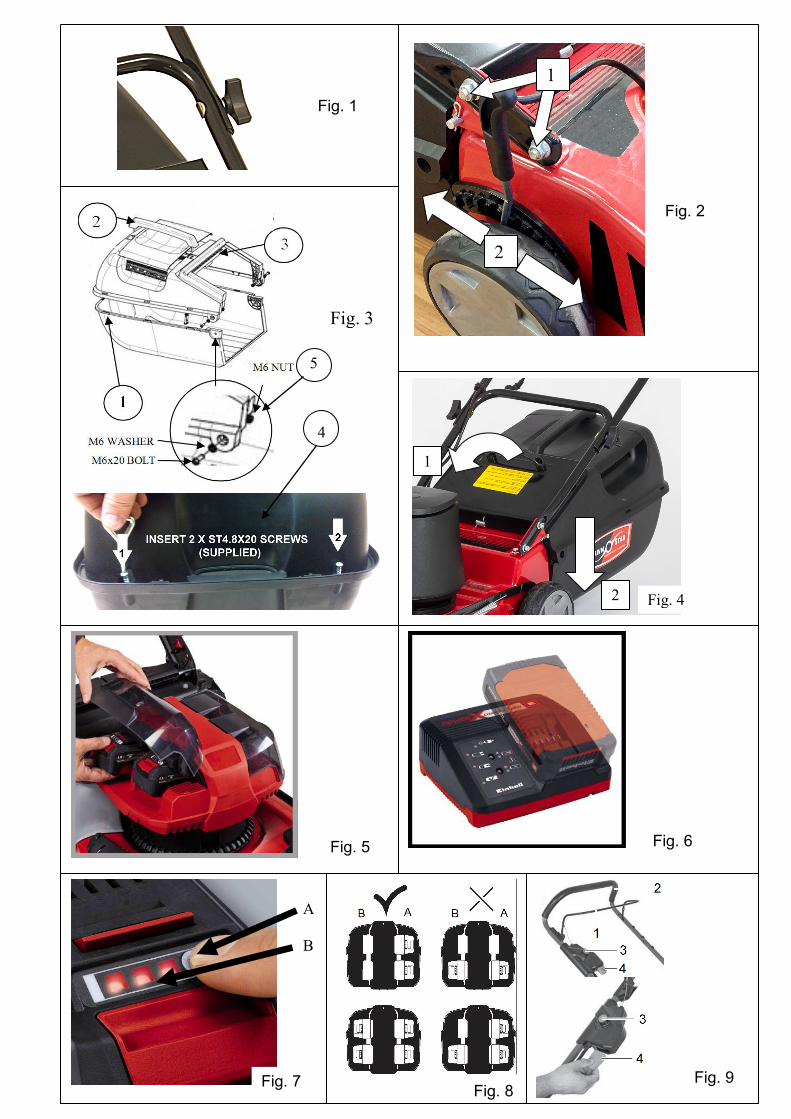
Fig. 1
Fig. 2
Fig. 6
4
Fig. 3
1
2
5
1
2 Fig. 4
Fig. 5
Fig. 7
A B
Fig. 8
Fig. 9
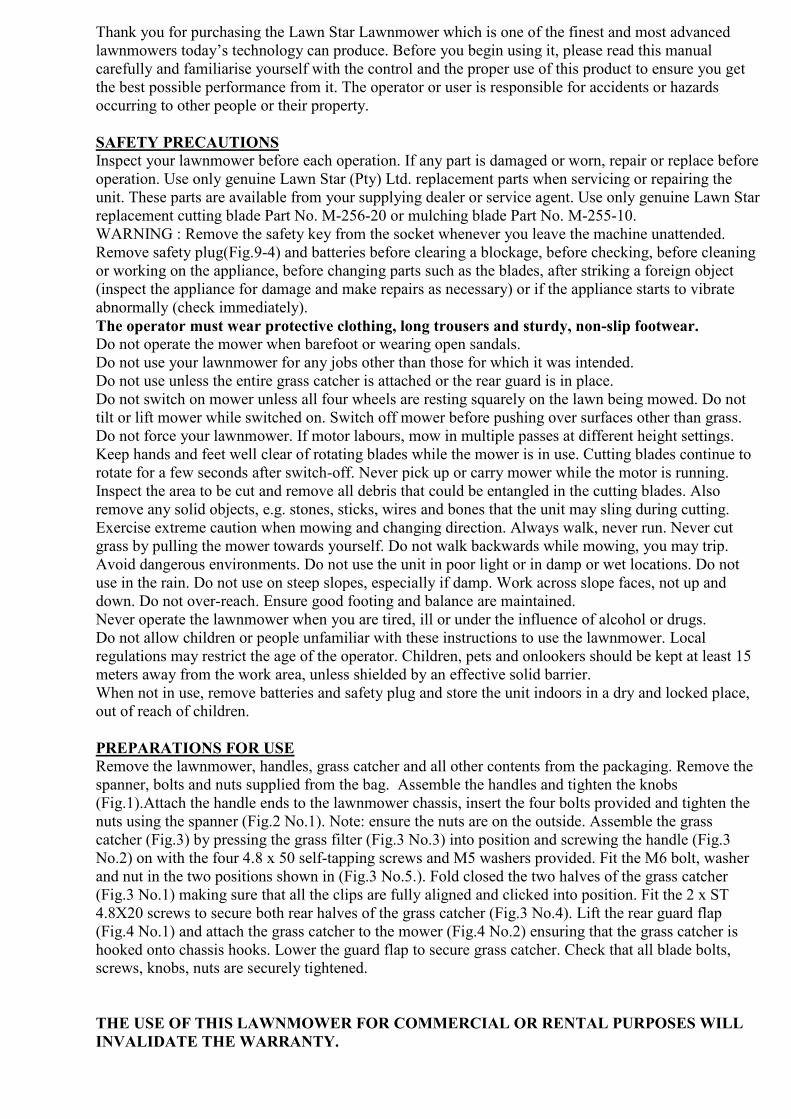
CHARGING BATTERIES 1. Take the battery pack out of the equipment. 1. Do this by pressing the push-lock button and pulling the battery out (Fig.5). 2. Check that your mains voltage is the same as that marked on the rating plate of the battery charger.
Insert the power plug of the charger into the socket outlet. The green LED will then begin to flash. 3. Insert the battery pack into the battery charger (Fig.6). 4. In the section entitled “Battery capacity indicator” you will find a table with an explanation of the
LED indicator on the batteries. 5. See Table 1 for explanation of LED indicators on charger unit. The battery pack may become a little warm during charging. This is normal. If the battery pack fails to charge, check:
• If the battery pack is warm, let it cool and try again • whether there is voltage at the socket outlet • whether the battery is correctly fitted to charger and the charging contacts are clean.
If the battery pack still fails to charge, contact our customer service centre for assistance. To ensure that the battery pack provides long service, you should take care to recharge it promptly. You must recharge the battery pack when you notice that the performance of the device drops. Always store the battery in the fully charged state. Never allow the battery pack to become fully discharged. This will cause it to develop a defect! INSTALLING THE BATTERY (Fig. 5) Open the battery cover. Then insert the batteries in the mounts as shown in (Fig. 5). For optimum mowing results and battery power performance it is always best to use batteries with the same capacity of 3.0 Ah or higher. There is also the option of using batteries with different capacities in the two battery mounts A and B (Fig.8) which are opposite each other. Always make sure, however, that you only use batteries of the same capacity in each separate battery bank (Fig. 8). For example, you could use 2 x 4.0Ah batteries in one battery bank(A) while using 2 x 3.0Ah batteries in the opposite battery bank(B). Important! Use only batteries which are charged to the same level. Never combine full and half-full batteries. Always charge the two/all batteries simultaneously. The equipment‘s operating time depends on the battery with the lower charge level. The two/all batteries must always be fully charged before use. Close the battery cover by swinging it down, and make sure that it latches in place correctly.
BATTERY CAPACITY INDICATOR (Fig. 7) Press the switch for the battery capacity indicator (Fig. 7-A) . The battery capacity indicator (Fig. 7-B) shows the charge status of the battery using 3 LEDs. All 3 LEDs are lit: The battery is fully charged. 2 or 1 LED(s) are lit: The battery has an adequate remaining charge. 1 LED blinks: The battery is empty, recharge the battery. All LEDs flash: The battery pack has undergone exhaustive di- scharge and is defective. Do not use or charge a defective battery pack! Caution! Do not park the lawn mower in the sun. Batteries which have been inserted could heat up to in-admissible levels. CARE, MAINTAINANCE, STORAGE AND TRANSPORT Hazard!
Pull out the safety plug and remove all the battery packs before transporting, storing or starting any maintenance work on the mower. Do not oil – this is unnecessary. Do not clean the lawn mower with running water, particularly with high-pressure water. We recommend cleaning the equipment immediately each time after use. Clean the equipment regularly with a damp cloth and some soft soap. Do not use cleaning agents or solvents; these may be aggressive to the plastic parts in the equipment. Ensure that no water can get into the interior of the equipment. Keep air intake vents, in plastic motor housing, free of grass cuttings and dirt to ensure unobstructed cooling air-flow through the motor. Clogged-up air intake vents cause the motor to overheat and can result in failure. Keep all nuts, bolts and screws tightened to ensure that the appliance is in a safe working condition. Replace worn or damaged parts for safety. The blade is subjected to more wear and tear than any other component. Therefore, routinely check the condition of the blade and make sure that it is tightly fastened. If the blade is worn, it must be immediately replaced with genuine Lawn Star replacement blades.
• Low energy bar blade Part No. M-256-20 • Mulching blade Part No. M-255-10.
An excessively vibrating mower means that the blade is not properly balanced or has become deformed from striking an object. In this case, the blade must be replaced. Check the grass catcher box regularly for damage and replace if necessary. Store in a cool dry place out of reach of children and unauthorised persons.
OPERATING INSTRUCTIONS Caution! The lawn mower is equipped with a safety switch to prevent unauthorized use. Directly before starting up the lawn mower insert the safety plug (Fig.9-4) and remove the safety plug again when interrupting or terminating your work. Important! For safety reasons this mower is fitted with an angle sensor. It will not be possible to start the cordless lawn mower if the pitch angle is over ~70° ± 10°. To prevent the equipment switching on accidentally, the lawn mower is equipped with a safety switch (Fig. 9-3) which must be pressed before the switching bar (Fig. 9-1) can be activated. Note: It will take a few second for the motor to start once the switching bar has been activated. To begin mowing your lawn, continue to grip the switching bar (Fig. 9-1) and release the safety switch (Fig. 9-3). The lawn mower switches itself off when the switching bar is released. After the motor starts the speed will drop after a few seconds when in idle mode and will rise again when in working mode. Repeat this process several times so that you are sure that the machine functions properly. Do not use the switch lever intermittently as this will damage it. Tilt the mower slightly over backwards when starting the mower in long grass this reduces the load on the motor during start-up. Warning! Never open the chute flap or remove the grass box when engine is still running. A rotating blade can cause serious injuries! Always remove the safety plug (Fig. 9-4) first before removing the grass box. Before you perform any repair or maintenance work on the equipment, ensure that the blade is not rotating, that the safety plug is disconnected and that the batteries have been removed. MOWING PROCEDURES The ideal time to mow your lawn is in the cooler late afternoon. The grass is dry and the sensitive new cut area is not exposed to direct sun. Cut your lawn at the same height most of the time. Adjust the cutting height (Fig.2 No.2) based on the weather. If your lawn is getting a lot of water you can cut a little closer. If the temperature is high and things are dry, allow the grass to grow a little longer so that the soil retains more moisture and the roots Tall and thick grass should be cut in multiple passes with the mower set at different heights. Best results are achieved with regular mowing. Do not let the grass grow too long between mowings and do not set the cutting height too low as this will scalp the lawn. Avoid cutting wet grass as this will overload the motor and will block the discharge chute. Ensure that the blades are sharp. A sharp blade makes a nice clean cut. A dull blade shatters the leaf and impairs the healthy growth of your lawn. To improve the appearance of your lawn, alternate your cutting pattern. CAUTION Avoid excessive intermittent switch operation during mowing as this will damage the switch. Allow the motor to run for 5 seconds before cutting grass. Starting the motor in tall grass will overload it push down on the handle to slightly lift the front of the mower out of the grass when starting the mower. Periodically clean the underside of the mower chassis with a brush. Built–up grass cuttings become corrosive when they decompose and will promote rust. Do not use water to clean. Wear gloves.
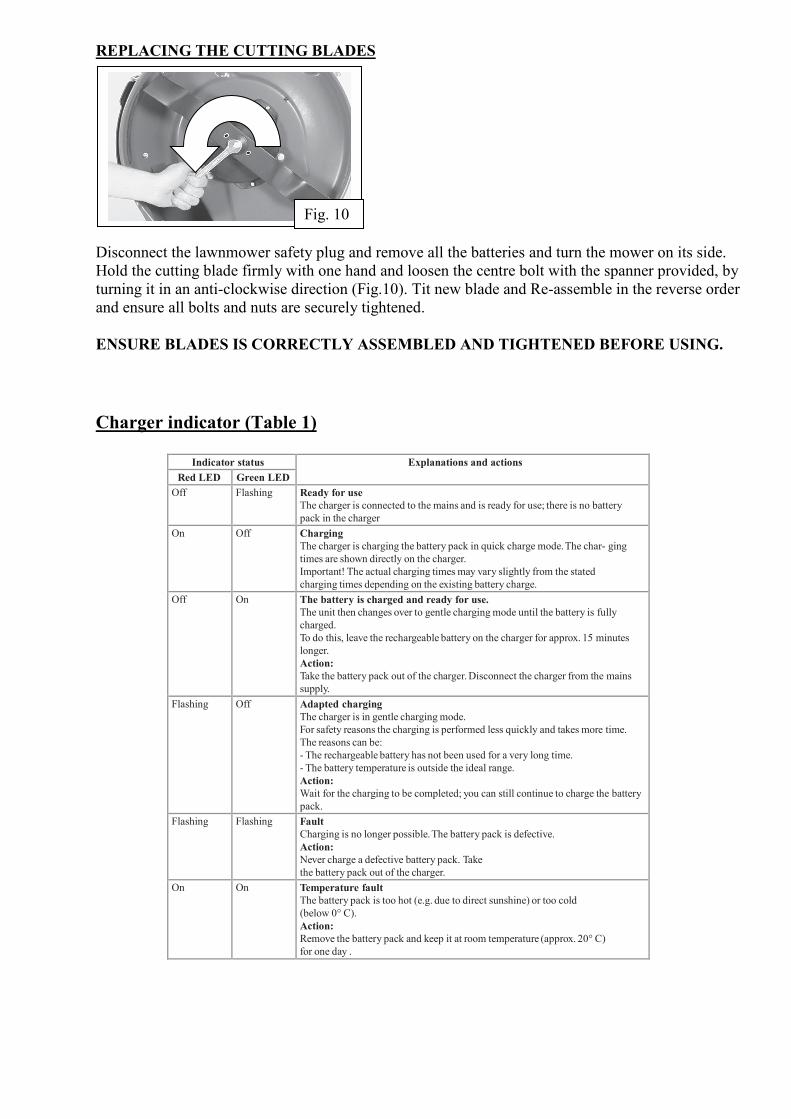
REPLACING THE CUTTING BLADES Disconnect the lawnmower safety plug and remove all the batteries and turn the mower on its side. Hold the cutting blade firmly with one hand and loosen the centre bolt with the spanner provided, by turning it in an anti-clockwise direction (Fig.10). Tit new blade and Re-assemble in the reverse order and ensure all bolts and nuts are securely tightened. ENSURE BLADES IS CORRECTLY ASSEMBLED AND TIGHTENED BEFORE USING.
Charger indicator (Table 1)
Indicator status Explanations and actions
Red LED Green LED Off Flashing Ready for use
The charger is connected to the mains and is ready for use; there is no battery pack in the charger
On Off Charging The charger is charging the battery pack in quick charge mode. The char- ging times are shown directly on the charger. Important! The actual charging times may vary slightly from the stated charging times depending on the existing battery charge.
Off On The battery is charged and ready for use. The unit then changes over to gentle charging mode until the battery is fully charged. To do this, leave the rechargeable battery on the charger for approx. 15 minutes longer. Action: Take the battery pack out of the charger. Disconnect the charger from the mains supply.
Flashing Off Adapted charging The charger is in gentle charging mode. For safety reasons the charging is performed less quickly and takes more time. The reasons can be: - The rechargeable battery has not been used for a very long time. - The battery temperature is outside the ideal range. Action: Wait for the charging to be completed; you can still continue to charge the battery pack.
Flashing Flashing Fault Charging is no longer possible. The battery pack is defective. Action: Never charge a defective battery pack. Take the battery pack out of the charger.
On On Temperature fault The battery pack is too hot (e.g. due to direct sunshine) or too cold (below 0° C). Action: Remove the battery pack and keep it at room temperature (approx. 20° C) for one day .
Fig. 10

TROUBLE SHOOTING GUIDE
PROBLEM PROBABLE CAUSE CORRECTIVE ACTION
Motor does not start Machine standing in high
grass The mower housing is clogged Safety plug is not inserted Battery is not correctly inserted
Start motor on shorter grass or al- ready mowed area; change cutting height if necessary Clean housing so that the blade can run freely Insert the safety plug Remove the battery and reinsert
Motor performance drops
Grass too tall or damp The mower housing is clogged Blade badly worn Battery performance decreasing
Correct the cutting height Clean the housing Replace the blade Check the battery performance and charge the battery if necessary
Unclean cuts Blade worn Wrong cutting height
Replace the blade Correct the cutting height
Excessive vibration Blades incorrectly
assembled Remove safety plug and batteries and check blade assembly
Blades damaged Remove safety plug and batteries and
replace with new blades Blades clogged with
dirt Remove safety plug and batteries, remove, clean and replace
Poor grass collection Blades dull or damaged Remove safety plug and batteries and
replace with new blades Mower clogged with
dirt Remove safety plug and batteries, clean underside of chassis, fan and grass collection chute
Grass catcher clogged
with dirt Remove safety plug and batteries, clean grass collection box or replace if necessary
LAWN STAR ( PTY ) LTD
WARRANTY CARD
LSM 3648 MA
Please read carefully
This card is required for warranty repair claims. Please fill in this card and keep it in a safe place, stapled to the original proof of purchase. The original proof of purchase (i.e. receipt, invoice, docket, etc.) must show the original date of purchase and clearly identify the product. WITHOUT THIS CARD AND ORIGINAL PROOF OF PURCHASE, ANY WARRANTY BECOMES NULL AND VOID. Make:………………..Serial No:……………….Date of Purchase:…………………. Model:………………. PURCHASER PURCHASED FROM NAME: NAME: ADDRESS: ADDRESS: PHONE: PHONE:
LIMITED DOMESTIC USE WARRANTY
Lawn Star (Pty) Ltd. guarantees this unit to be free from defects in material and workmanship. If any such defect should become apparent during a period of
12 MONTHS from the date of the original purchase, we undertake to repair this unit free of charge or replace this unit with a factory reconditioned unit at our discretion. This does not prejudice your rights in terms of the Consumer Protection Act. Transport costs to our service centre and back to the owner, should such costs occur, will be carried by the owner of the unit. The repaired or replaced unit will be covered by this warranty for the remainder of the original warranty period. This warranty covers only the original purchaser of this unit. This warranty becomes invalid if: - the unit has been used commercially or for rental purposes; - damage has been caused by misuse, abuse, accident or normal wear and tear; - spares and accessories other than specified by us are used with this unit; - the unit has been opened, altered or otherwise tampered with; Lawnmower blades and grass collection box and batteries are wearing parts and are not covered by Warranty. PLEASE READ AND UNDERSTAND THE INSTRUCTION MANUAL BEFORE YOU OPERATE THIS UNIT.

LAWN STAR ( PTY ) LTD. For service and warranty repairs please contact your nearest Service Agent listed below: CUSTOMER CARE : 0860-LAWNSTAR HEAD OFFICE : 98 Bofors Circle, Epping 2 South, Cape Town PO Box 496, Parow, 7499 Tel: 021-535-5249 Fax: 021-535-4624 NAMIBIA : Tel: 061- 232-475 Fax: 061- 242-139 BOTSWANA : +267-318-6851 ZIMBABWE : +263-4-486 192/646
For more information visit: www.lawnstar.co.za