Embed Size (px)
Citation preview
Revision F Issued December 2013
AvePoint Task and Calendar Sync
On-Premises 2.3
Installation and Configuration Guide
2
AvePoint Task and Calendar Sync On-Premises 2.3 Install and Config Guide
Table of Contents
About AvePoint Task & Calendar Sync .......................................................................................................... 3
Prerequisites ................................................................................................................................................. 4
System Requirements ................................................................................................................................... 5
Configuring High Trust SharePoint Apps for AvePoint Task & Calendar Sync .............................................. 6
Installation Overview ................................................................................................................................ 6
Preparing the Certificates ......................................................................................................................... 8
Creating and Configuring a Website ....................................................................................................... 14
Creating and Configuring a Database ..................................................................................................... 17
Creating and Configuring a Service ......................................................................................................... 20
Configuring SharePoint 2013 for Hosting Apps ...................................................................................... 21
Configuring SharePoint 2013 for Server-to-Server App Use ................................................................... 24
Disabling the Loopback Check ................................................................................................................ 27
Configuring SharePoint 2013 App Catalog .............................................................................................. 28
Modifying the Global.config File ............................................................................................................. 29
Modifying the Web.config File ................................................................................................................ 30
Setting Your Task & Calendar Sync Web Page as the Start Page ............................................................ 31
Uploading AvePoint Task & Calendar Sync to App Catalog .................................................................... 33
Adding AvePoint Task & Calendar Sync to Your Website ....................................................................... 34
Using AvePoint Task & Calendar Sync ......................................................................................................... 35
Applying AvePoint Task & Calendar Sync License ....................................................................................... 36
Upgrading Your AvePoint Task & Calendar Sync ........................................................................................ 38
Upgrading the AvePoint Task & Calendar Sync Website ........................................................................ 38
Upgrading the AvePoint Task & Calendar Sync ...................................................................................... 41
Updating the App on Your Website ........................................................................................................ 41
Uninstalling AvePoint Task & Calendar Sync .............................................................................................. 44
Notices and Copyright Information ............................................................................................................ 45

3
AvePoint Task and Calendar Sync On-Premises 2.3 Install and Config Guide
About AvePoint Task & Calendar Sync AvePoint Task & Calendar Sync, a SharePoint 2013 app, synchronizes all of your calendars and tasks from SharePoint and places that data for viewing in Microsoft Outlook Exchange.
4
AvePoint Task and Calendar Sync On-Premises 2.3 Install and Config Guide
Prerequisites Before you install and use AvePoint Task & Calendar Sync, make sure the following prerequisites are met:
• SharePoint 2013 is installed on a server that is in the same domain as the server that you will install this app on.
• Safari 5.1.7 (7534.57.2), Google Chrome 26.0.1414.43, Mozilla Firefox 19.0.2, or Internet Explorer 9 or above is installed on the server where this app will be installed.
• The SharePoint account used to add AvePoint Task & Calendar Sync must have Full Control permission to, at the very least, the site where you want to install AvePoint Task & Calendar Sync.
• The SharePoint site where you want to install AvePoint Task & Calendar Sync is created.
• The SSL certificate of AvePoint Task and Calendar Sync is prepared.
• The AvePoint Task & Calendar Sync app is downloaded.
• The AvePoint Task & Calendar Sync website package is downloaded.
5
AvePoint Task and Calendar Sync On-Premises 2.3 Install and Config Guide
System Requirements The system requirements are as follows:
• The AvePoint Task & Calendar Sync app must be installed in the same domain as that of the AvePoint Task & Calendar Sync website.
• The access is available among the SQL Server, the SharePoint farm, and the AvePoint Task & Calendar Sync website.
• The firewalls in the servers where SQL Server resides, SharePoint farm resides, and AvePoint Task & Calendar Sync website resides is closed.
6
AvePoint Task and Calendar Sync On-Premises 2.3 Install and Config Guide
Configuring High Trust SharePoint Apps for AvePoint Task & Calendar Sync Refer to these sections to configure high trust SharePoint apps for AvePoint Task & Calendar Sync.
Installation Overview To properly install AvePoint Task & Calendar Sync on your site, the following steps must be performed in this order. Click the link to jump to the corresponding section.
1. Preparing the Certificate
AvePoint Task & Calendar Sync requires that two certificates must be prepared; you must prepare certificates (.pfx and .cer files) and export them to the desired location for further use.
2. Creating and Configuring a Website
AvePoint Task & Calendar Sync requires that a website be created; AvePoint Task & Calendar Sync will be installed in this website.
3. Creating and Configuring a Database
AvePoint Task & Calendar Sync requires that a database be created to store data.
4. Creating and Configuring a Service AvePoint Task & Calendar Sync requires that a service be created; this service synchronizes changes between SharePoint and Microsoft Outlook Exchange.
5. Configuring SharePoint 2013 for Hosting Apps
This checks whether the SharePoint service applications meet the requirements of AvePoint Task & Calendar Sync. If the SharePoint service applications are not meet the requirements, configure the settings of service applications.
6. Configuring SharePoint 2013 for Server-to-Server App Use
This configuration is done to ensure that the certificate you created above is trusted by SharePoint sites.
7. Configuring SharePoint 2013 App Catalog
An app catalog site is used to store apps. These apps can be installed on any sites under the Web application where the app catalog site resides.
8. Modifying the Global.config File
This is to modify the Global.config file to specify a database to store data for AvePoint Task & Calendar Sync.
7
AvePoint Task and Calendar Sync On-Premises 2.3 Install and Config Guide
9. Modifying the Web.config File
This is to modify the Web.config file to make sure AvePoint Task & Calendar Sync has sufficient permission to access SharePoint sites.
10. Setting Your Task & Calendar Sync Web Page as the Start Page
This step modifies the AppManifest file in the AvePoint Task & Calendar Sync package to specify the website you created in the Creating and Configuring a Website step as the start page. When you use Task & Calendar Sync on the SharePoint 2013 site, it will access the website that you created.
11. Uploading AvePoint Task & Calendar Sync to App Catalog
Before installing AvePoint Task & Calendar Sync, you must upload AvePoint Task & Calendar Sync to the app catalog.
12. Adding AvePoint Task & Calendar Sync to Your Website
This provides steps for adding AvePoint Task & Calendar Sync to your website.
8
AvePoint Task and Calendar Sync On-Premises 2.3 Install and Config Guide
Preparing the Certificates Before creating the Task & Calendar Sync website, you have to prepare certificates (.pfx and .cer files) for AvePoint Task & Calendar Sync. This builds trust communication between SharePoint sites and the AvePoint Task & Calendar Sync website. Follow the steps below to prepare the two certificates types:
1. Log in to the server where you want to install AvePoint Task & Calendar Sync.
2. Navigate to Start > Administrative Tools > Internet Information Services (IIS) Manager to open the IIS Manager.
3. Click the local host in the left pane.
4. Double-click Server Certificates under the IIS heading.
5. If you have already prepared a third party certificate (.pfx file) for Task & Calendar Sync, follow the steps below to copy the prepared .pfx file to a .cer file:
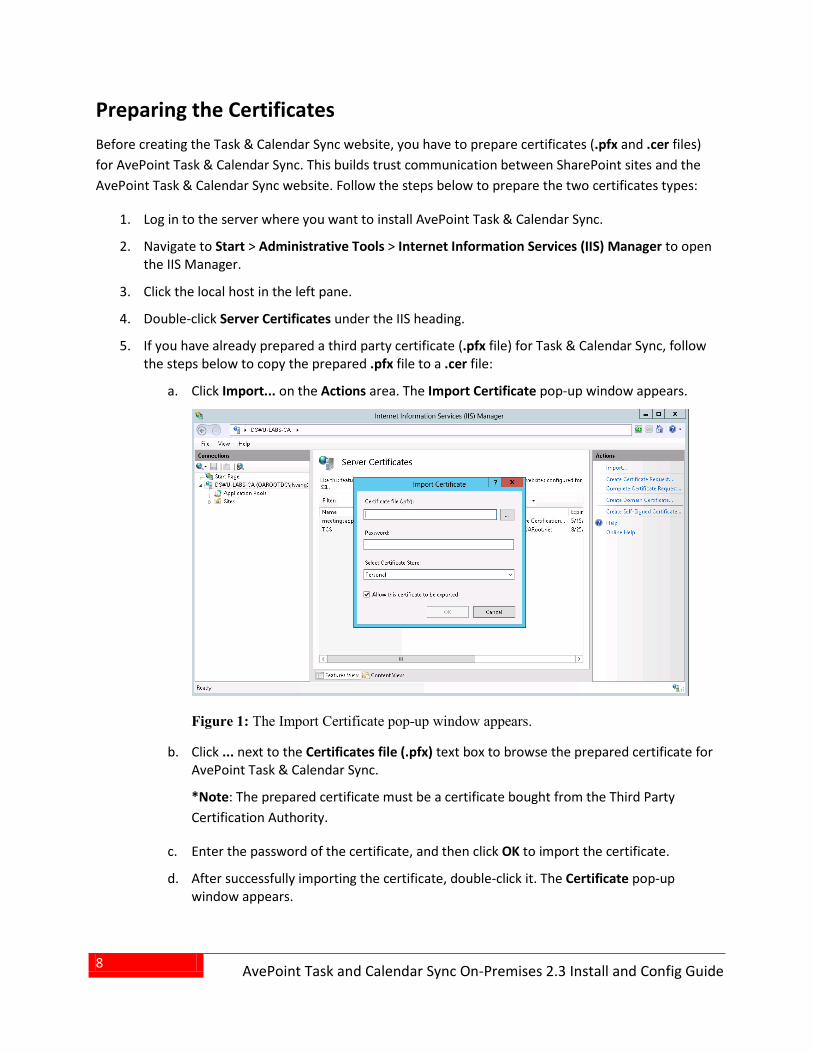
a. Click Import... on the Actions area. The Import Certificate pop-up window appears.
Figure 1: The Import Certificate pop-up window appears.
b. Click ... next to the Certificates file (.pfx) text box to browse the prepared certificate for AvePoint Task & Calendar Sync.
*Note: The prepared certificate must be a certificate bought from the Third Party Certification Authority.
c. Enter the password of the certificate, and then click OK to import the certificate.
d. After successfully importing the certificate, double-click it. The Certificate pop-up window appears.
9
AvePoint Task and Calendar Sync On-Premises 2.3 Install and Config Guide
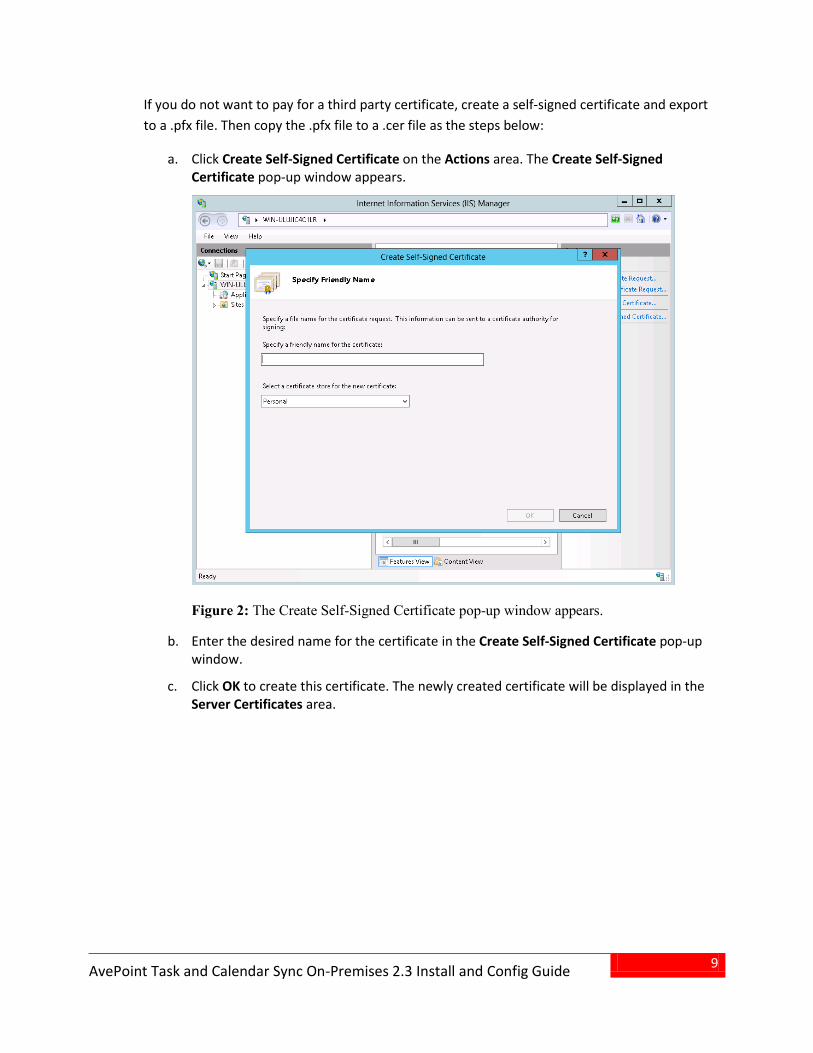
If you do not want to pay for a third party certificate, create a self-signed certificate and export to a .pfx file. Then copy the .pfx file to a .cer file as the steps below:
a. Click Create Self-Signed Certificate on the Actions area. The Create Self-Signed Certificate pop-up window appears.
Figure 2: The Create Self-Signed Certificate pop-up window appears.
b. Enter the desired name for the certificate in the Create Self-Signed Certificate pop-up window.
c. Click OK to create this certificate. The newly created certificate will be displayed in the Server Certificates area.
10
AvePoint Task and Calendar Sync On-Premises 2.3 Install and Config Guide
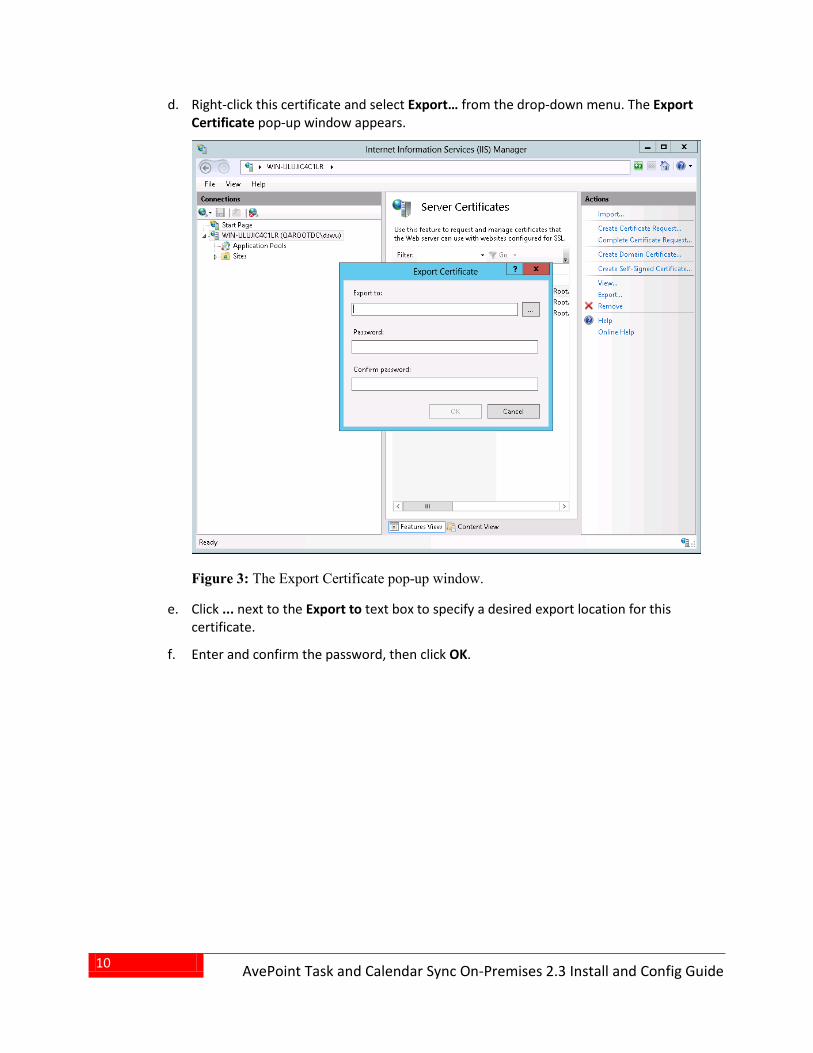
d. Right-click this certificate and select Export… from the drop-down menu. The Export Certificate pop-up window appears.
Figure 3: The Export Certificate pop-up window.
e. Click ... next to the Export to text box to specify a desired export location for this certificate.
f. Enter and confirm the password, then click OK.
11
AvePoint Task and Calendar Sync On-Premises 2.3 Install and Config Guide
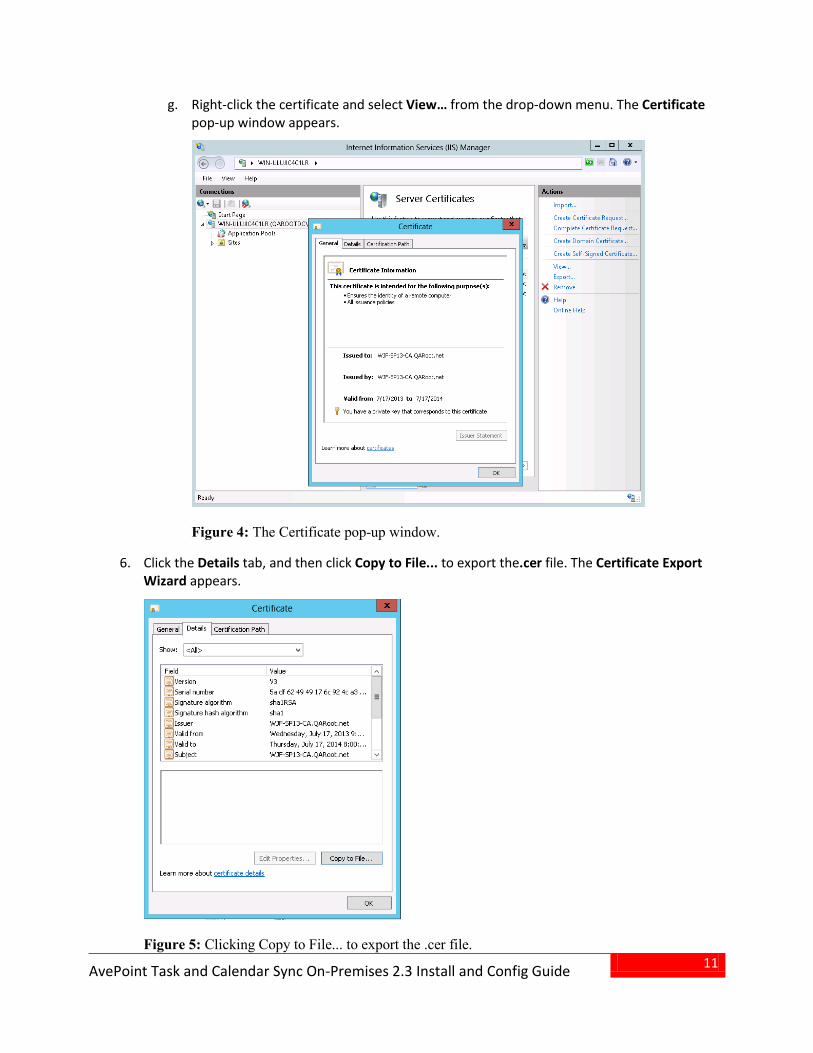
g. Right-click the certificate and select View… from the drop-down menu. The Certificate pop-up window appears.
Figure 4: The Certificate pop-up window.
6. Click the Details tab, and then click Copy to File... to export the.cer file. The Certificate Export Wizard appears.
Figure 5: Clicking Copy to File... to export the .cer file.
12
AvePoint Task and Calendar Sync On-Premises 2.3 Install and Config Guide
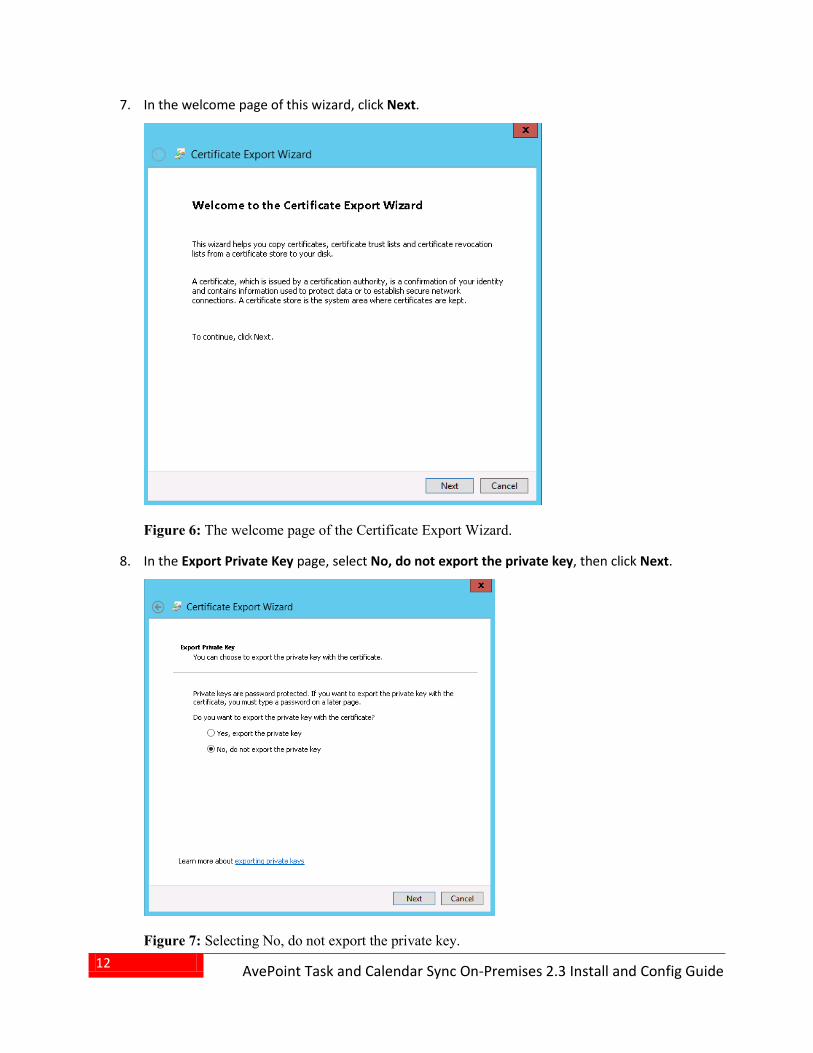
7. In the welcome page of this wizard, click Next.
Figure 6: The welcome page of the Certificate Export Wizard.
8. In the Export Private Key page, select No, do not export the private key, then click Next.
Figure 7: Selecting No, do not export the private key.
13
AvePoint Task and Calendar Sync On-Premises 2.3 Install and Config Guide
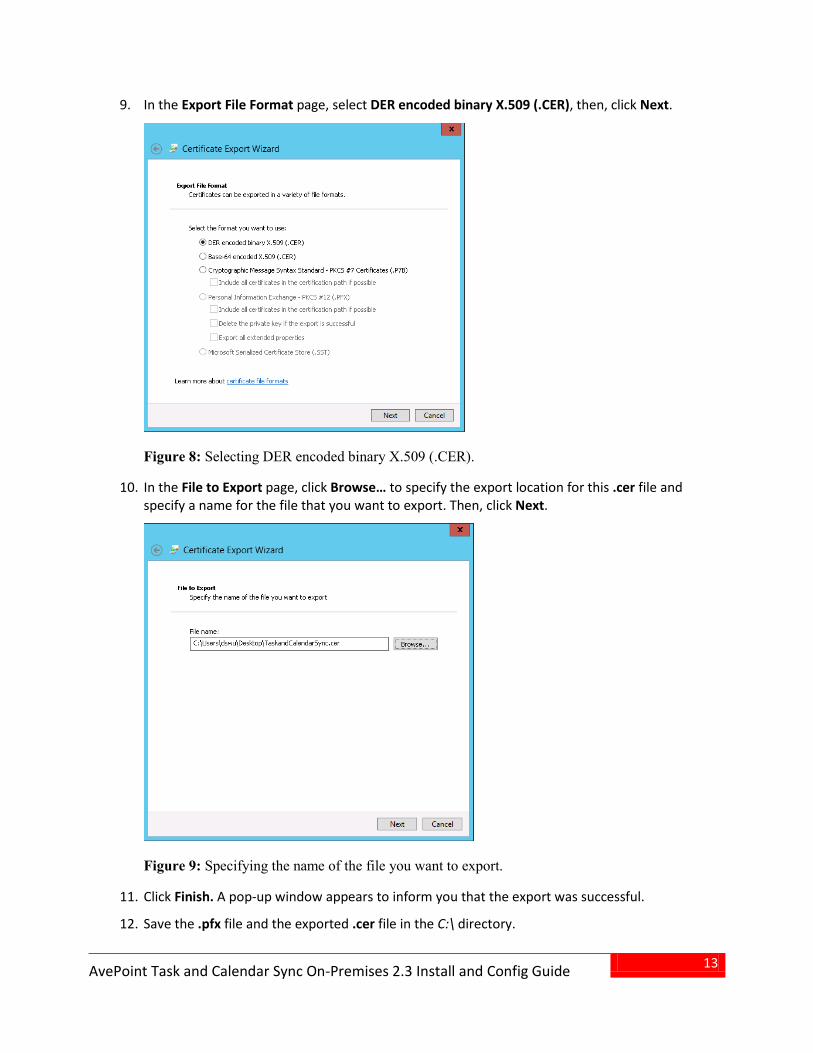
9. In the Export File Format page, select DER encoded binary X.509 (.CER), then, click Next.
Figure 8: Selecting DER encoded binary X.509 (.CER).
10. In the File to Export page, click Browse… to specify the export location for this .cer file and specify a name for the file that you want to export. Then, click Next.
Figure 9: Specifying the name of the file you want to export.
11. Click Finish. A pop-up window appears to inform you that the export was successful.
12. Save the .pfx file and the exported .cer file in the C:\ directory.
14
AvePoint Task and Calendar Sync On-Premises 2.3 Install and Config Guide
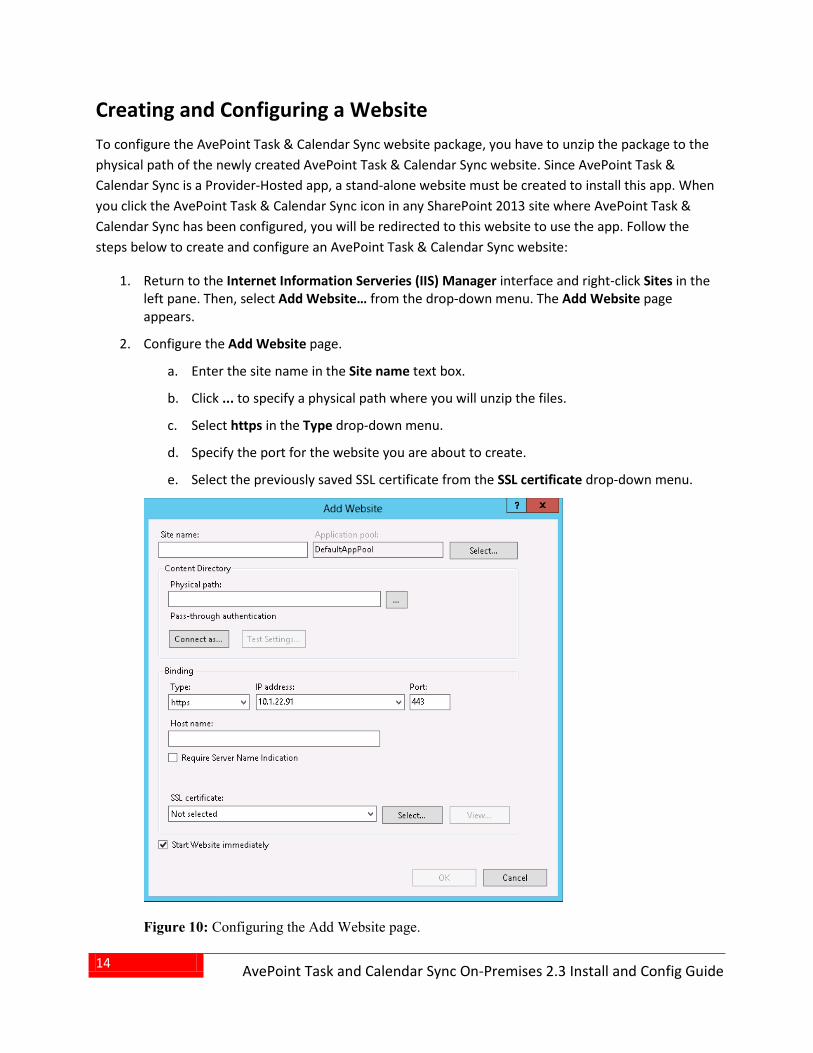
Creating and Configuring a Website To configure the AvePoint Task & Calendar Sync website package, you have to unzip the package to the physical path of the newly created AvePoint Task & Calendar Sync website. Since AvePoint Task & Calendar Sync is a Provider-Hosted app, a stand-alone website must be created to install this app. When you click the AvePoint Task & Calendar Sync icon in any SharePoint 2013 site where AvePoint Task & Calendar Sync has been configured, you will be redirected to this website to use the app. Follow the steps below to create and configure an AvePoint Task & Calendar Sync website:
1. Return to the Internet Information Serveries (IIS) Manager interface and right-click Sites in the left pane. Then, select Add Website… from the drop-down menu. The Add Website page appears.
2. Configure the Add Website page.
a. Enter the site name in the Site name text box.
b. Click ... to specify a physical path where you will unzip the files.
c. Select https in the Type drop-down menu.
d. Specify the port for the website you are about to create.
e. Select the previously saved SSL certificate from the SSL certificate drop-down menu.
Figure 10: Configuring the Add Website page.
15
AvePoint Task and Calendar Sync On-Premises 2.3 Install and Config Guide
3. Click OK to create this website.
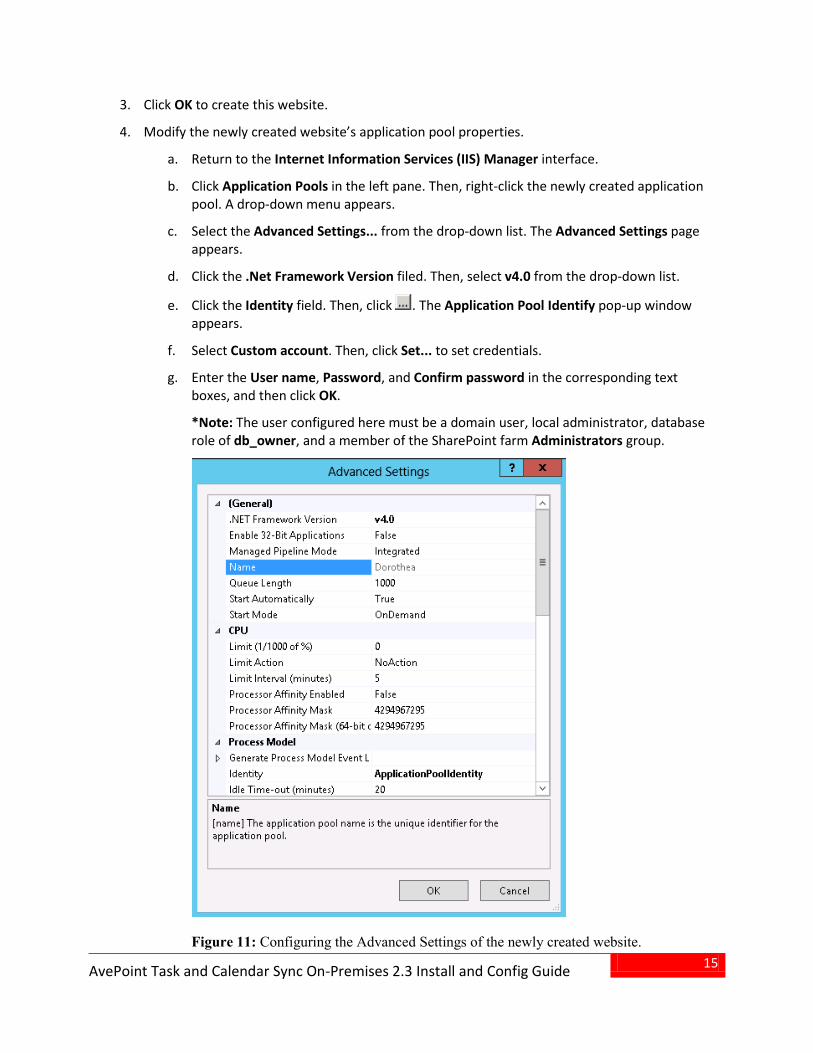
4. Modify the newly created website’s application pool properties.
a. Return to the Internet Information Services (IIS) Manager interface.
b. Click Application Pools in the left pane. Then, right-click the newly created application pool. A drop-down menu appears.
c. Select the Advanced Settings... from the drop-down list. The Advanced Settings page appears.
d. Click the .Net Framework Version filed. Then, select v4.0 from the drop-down list.
e. Click the Identity field. Then, click . The Application Pool Identify pop-up window appears.
f. Select Custom account. Then, click Set... to set credentials.
g. Enter the User name, Password, and Confirm password in the corresponding text boxes, and then click OK.
*Note: The user configured here must be a domain user, local administrator, database role of db_owner, and a member of the SharePoint farm Administrators group.
Figure 11: Configuring the Advanced Settings of the newly created website.
16
AvePoint Task and Calendar Sync On-Premises 2.3 Install and Config Guide
5. Click OK to close the Advanced Settings page.
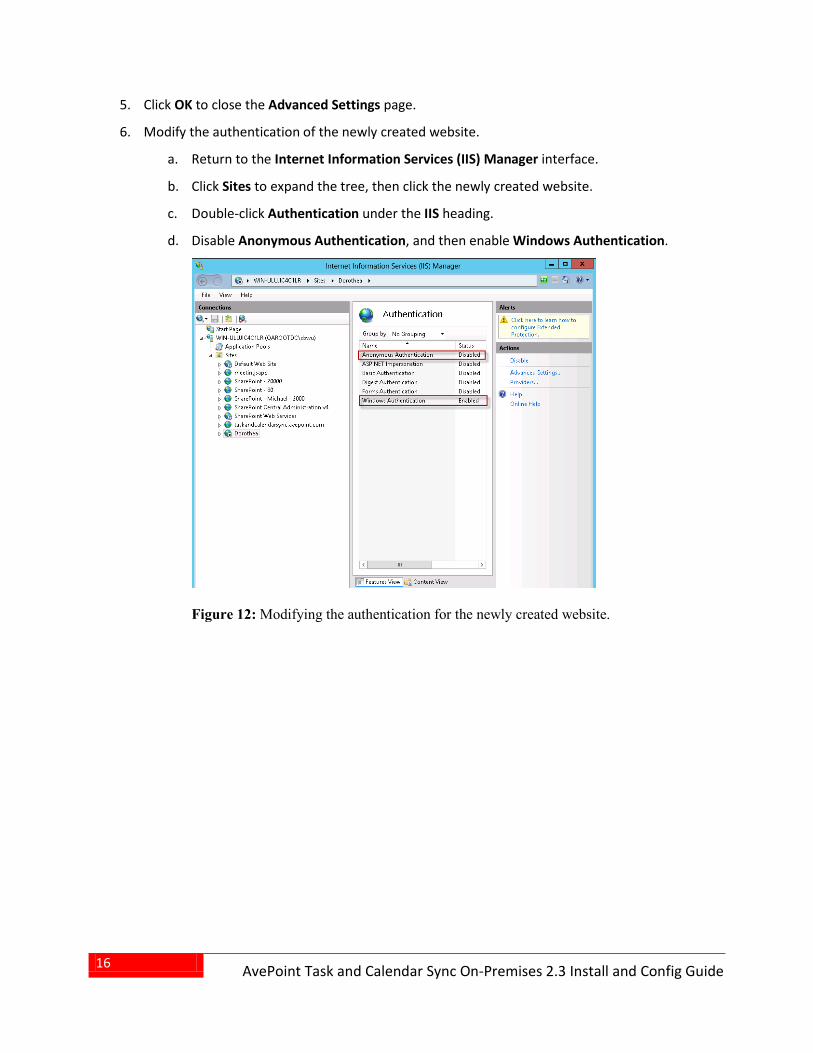
6. Modify the authentication of the newly created website.
a. Return to the Internet Information Services (IIS) Manager interface.
b. Click Sites to expand the tree, then click the newly created website.
c. Double-click Authentication under the IIS heading.
d. Disable Anonymous Authentication, and then enable Windows Authentication.
Figure 12: Modifying the authentication for the newly created website.
17
AvePoint Task and Calendar Sync On-Premises 2.3 Install and Config Guide
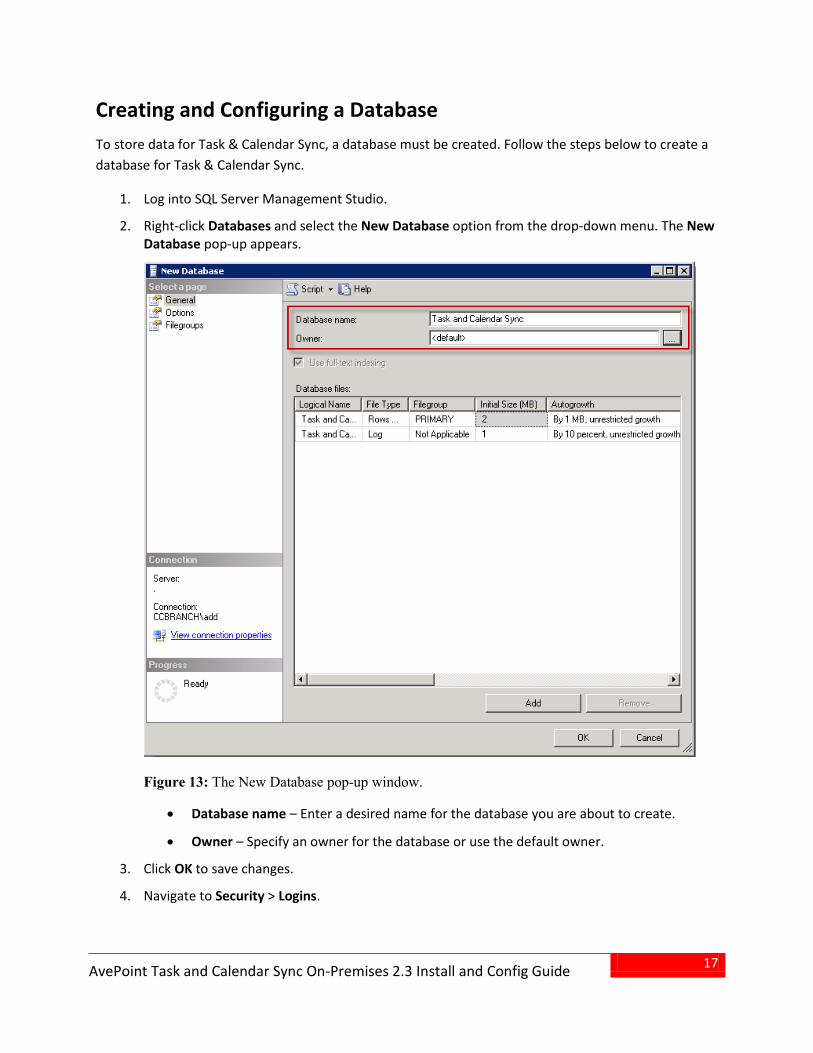
Creating and Configuring a Database To store data for Task & Calendar Sync, a database must be created. Follow the steps below to create a database for Task & Calendar Sync.
1. Log into SQL Server Management Studio.
2. Right-click Databases and select the New Database option from the drop-down menu. The New Database pop-up appears.
Figure 13: The New Database pop-up window.
• Database name – Enter a desired name for the database you are about to create.
• Owner – Specify an owner for the database or use the default owner.
3. Click OK to save changes.
4. Navigate to Security > Logins.
18
AvePoint Task and Calendar Sync On-Premises 2.3 Install and Config Guide
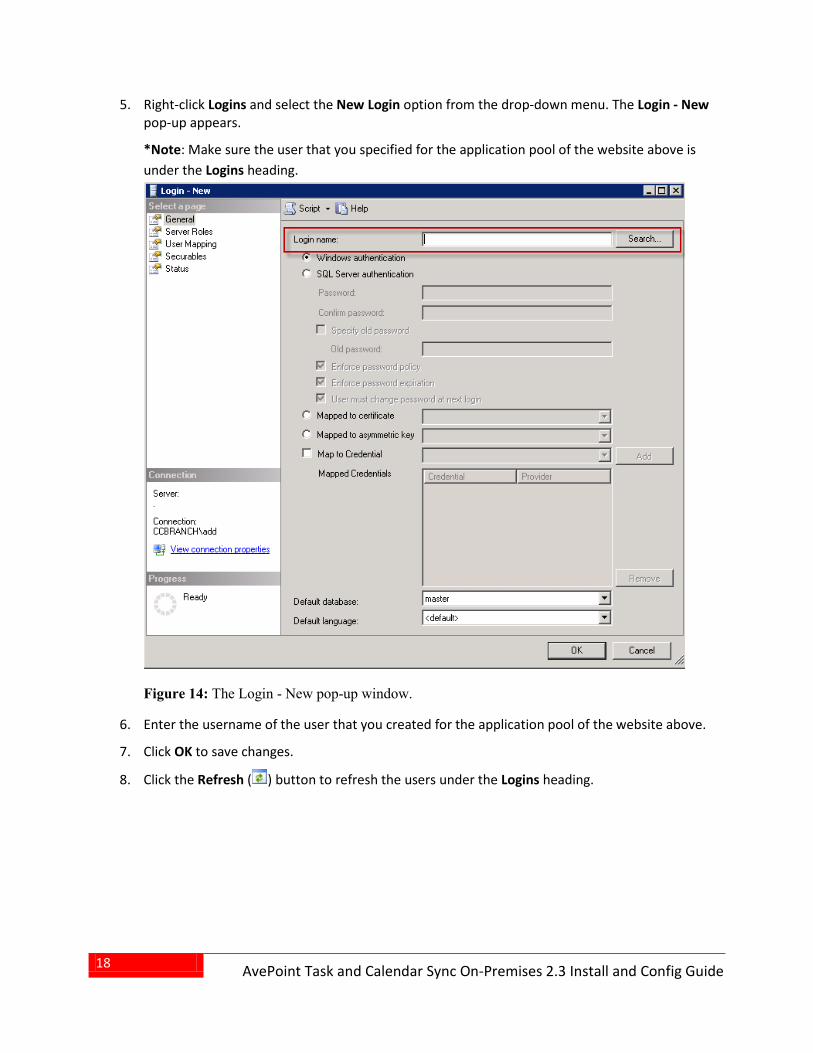
5. Right-click Logins and select the New Login option from the drop-down menu. The Login - New pop-up appears.
*Note: Make sure the user that you specified for the application pool of the website above is under the Logins heading.
Figure 14: The Login - New pop-up window.
6. Enter the username of the user that you created for the application pool of the website above.
7. Click OK to save changes.
8. Click the Refresh ( ) button to refresh the users under the Logins heading.
19
AvePoint Task and Calendar Sync On-Premises 2.3 Install and Config Guide
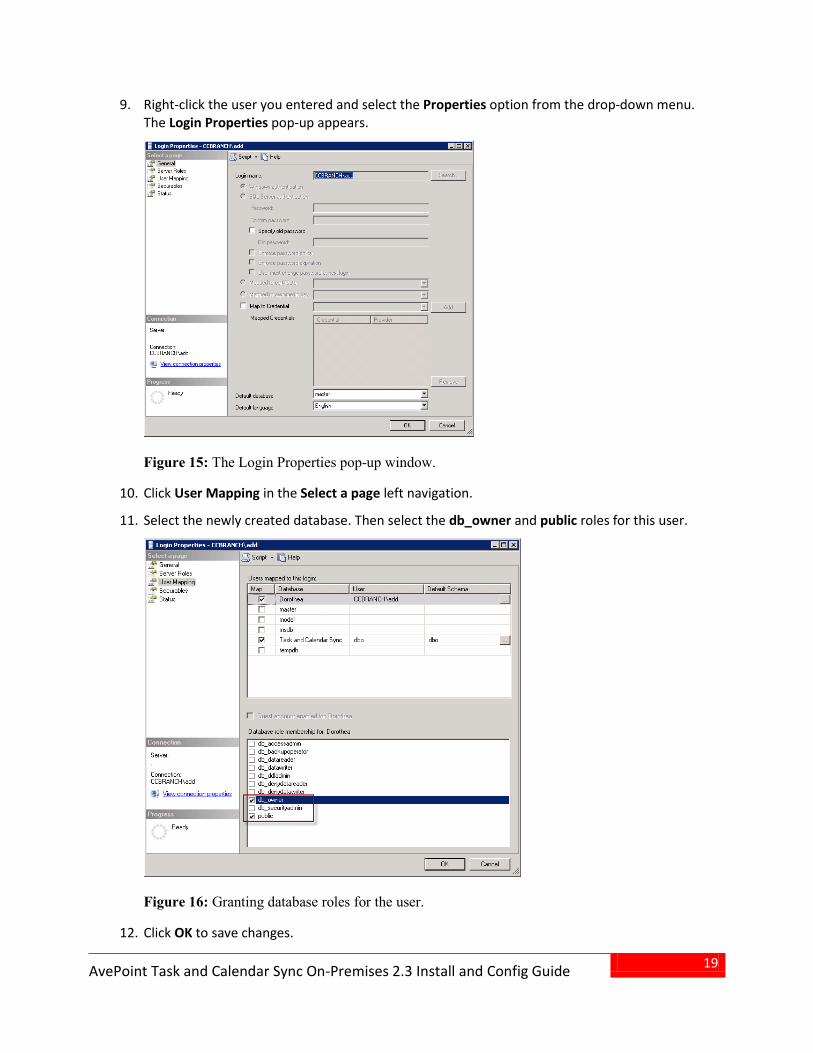
9. Right-click the user you entered and select the Properties option from the drop-down menu. The Login Properties pop-up appears.
Figure 15: The Login Properties pop-up window.
10. Click User Mapping in the Select a page left navigation.
11. Select the newly created database. Then select the db_owner and public roles for this user.
Figure 16: Granting database roles for the user.
12. Click OK to save changes.
20
AvePoint Task and Calendar Sync On-Premises 2.3 Install and Config Guide
Creating and Configuring a Service AvePoint Task & Calendar Sync requires that a service be created; this service synchronizes changes between SharePoint and Microsoft Outlook Exchange. Follow the steps below to create a service for Task & Calendar Sync.
1. Unzip the AvePoint Task & Calendar Sync website package.
2. Navigate to the bin folder, and find the register.cmd file.
3. Right-click the file and select Run as administrator from the drop-down menu. The Task & Calendar Sync service will be created.
4. Click Start > Run, then enter services.msc in the Open text box. The Services interface appears.
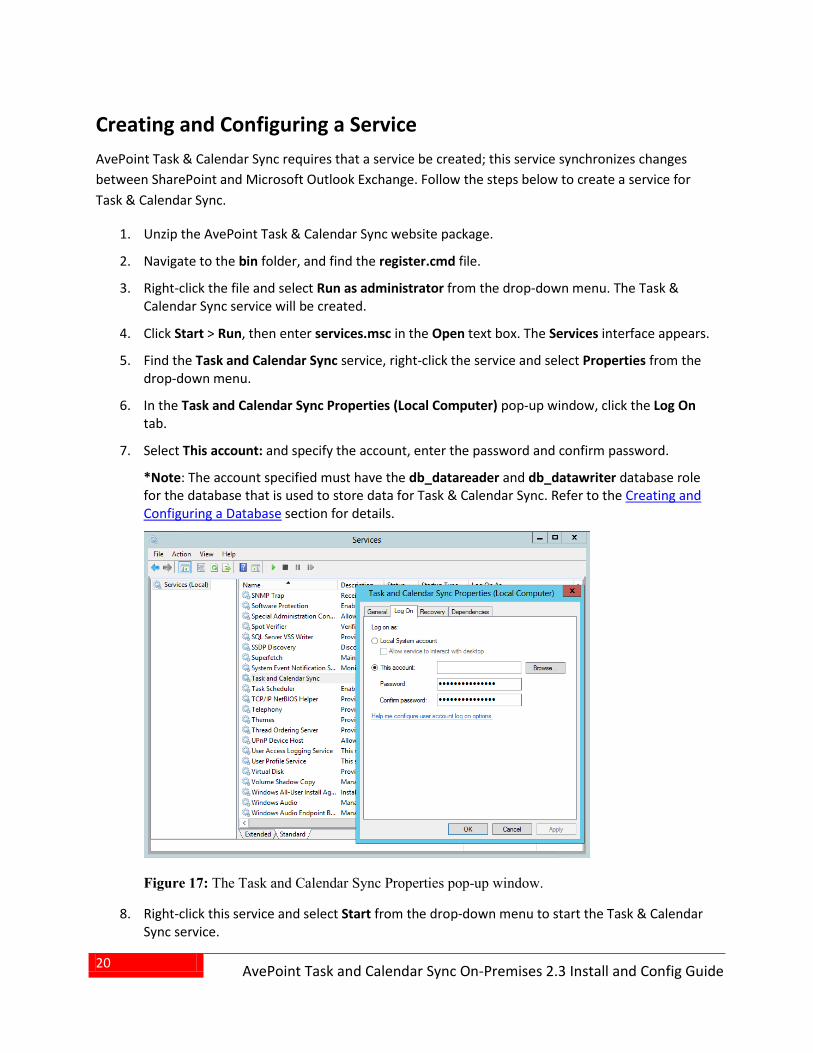
5. Find the Task and Calendar Sync service, right-click the service and select Properties from the drop-down menu.
6. In the Task and Calendar Sync Properties (Local Computer) pop-up window, click the Log On tab.
7. Select This account: and specify the account, enter the password and confirm password.
*Note: The account specified must have the db_datareader and db_datawriter database role for the database that is used to store data for Task & Calendar Sync. Refer to the Creating and Configuring a Database section for details.
Figure 17: The Task and Calendar Sync Properties pop-up window.
8. Right-click this service and select Start from the drop-down menu to start the Task & Calendar Sync service.
21
AvePoint Task and Calendar Sync On-Premises 2.3 Install and Config Guide
Configuring SharePoint 2013 for Hosting Apps If you have already used On-Premises SharePoint apps, you can skip this section.
Before you configure SharePoint 2013 for hosting apps, make sure you log in to the SharePoint server where you are about to use Task & Calendar Sync using the previously configured user.
This section is used to check whether the SharePoint service applications meet the requirements of AvePoint Task & Calendar Sync. If the SharePoint service applications do not meet the requirements, the settings of service applications need to be configured.
*Note: The following conditions must be met:
• The SharePoint server you are about to use AvePoint Task & Calendar Sync must be in the same domain where the previously created AvePoint Task & Calendar Sync website resides.
• The user used to log in the SharePoint server must be a domain user, a member of Local Administrators group, has database role of db_Owner, a member of the SharePoint Farm Administrators group, has permission to access the Site Collection where you are deploying the app and has Full Control permission to the Web application where this site collection resides.
Follow the steps below to check and configure SharePoint 2013 for hosting apps:
1. Create the necessary SharePoint App Management Service Applications and start the necessary services through Windows PowerShell.
a. Navigate to Start > All Programs > Microsoft SharePoint 2013 Products > SharePoint 2013 Management Shell.
b. Execute the following Windows PowerShell script in the SharePoint Management Shell. *Note: For best results, use the default names recommended by Microsoft in the script. The following parameters have already been provided with default values. You can also modify the parameter values, if desired.
• appHostDomain – Specify a domain for this app.
• New-SPSubscriptionSettingsServiceApplication –Name – Enter a name for the SharePoint subscription settings service application.
• New-SPAppManagementServiceApplication –Name – Enter a name for the app management service application.
• Set-SPAppSiteSubscriptionName –Name – Enter a name for the app subscription.
*Note: If more than one SharePoint subscription service exists in the farm, select one of the services and add the service to the end of the $appMgmtSvcInstance node. For example: $appMgmtSvcInstance[0].Status
22
AvePoint Task and Calendar Sync On-Premises 2.3 Install and Config Guide
If more than one app management service exists in the farm, select one of the services and add the service to the end of the $appSubSettingSvcInstance node. For example: $appSubSettingSvcInstance[0].Status Make sure the SharePoint Web Services Default application pool exists in the current environment. For best results, copy the script below into a text editor (Notepad, Notepad++) before executing in the SharePoint Management Shell. $appHostDomain = "taskandcalendarsyncapp.avepoint.com" $adminService = Get-Service -Name spadminv4 if ($adminService.Status -ne "Running") { Start-Service $adminService } $timerService = Get-Service -Name sptimerv4 if ($timerService.Status -ne "Running") { Start-Service $timerService } Set-SPAppDomain $appHostDomain $appMgmtSvcInstance = Get-SPServiceInstance | Where-Object { $_.GetType().Name -eq "AppManagementServiceInstance" } if ($appMgmtSvcInstance.Status -ne "Online") { Start-SPServiceInstance -Identity $appMgmtSvcInstance } $appSubSettingSvcInstance = Get-SPServiceInstance | Where-Object {$_.GetType().Name –eq "SPSubscriptionSettingsServiceInstance"} if ($appSubSettingSvcInstance.Status -ne "Online") {Start-SPServiceInstance -Identity $appSubSettingSvcInstance } $appPoolServiceApps = Get-SPServiceApplicationPool -Identity "SharePoint Web Services Default" $appSubSvc = Get-SPServiceApplication | Where-Object {$_.TypeName -eq "Microsoft SharePoint Foundation Subscription Settings Service Application"} if($appSubSvc -eq $null) { $appSubSvc = New-SPSubscriptionSettingsServiceApplication -ApplicationPool $appPoolServiceApps -Name "Settings Service Application" -DatabaseName SettingsServiceDB $proxySubSvc = New-SPSubscriptionSettingsServiceApplicationProxy -ServiceApplication $appSubSvc } $appAppSvc = Get-SPServiceApplication | Where-Object {$_.TypeName -eq "App Management Service Application"}
23
AvePoint Task and Calendar Sync On-Premises 2.3 Install and Config Guide
if($appAppSvc -eq $null) { $appAppSvc = New-SPAppManagementServiceApplication -ApplicationPool $appPoolServiceApps -Name "App Management Service Application" -DatabaseName AppServiceDB $proxyAppSvc = New-SPAppManagementServiceApplicationProxy -ServiceApplication $appAppSvc } Set-SPAppSiteSubscriptionName -Name "taskcalendarapp" –Confirm:$false
2. Verify the service applications and service instances created and started in SharePoint 2013 for hosting apps.
a. Navigate to Start > All Programs > Microsoft SharePoint 2013 Products > SharePoint 2013 Central Administration.
b. Click Manage service applications under the Application Management heading.
c. In the Manage Service Applications page, the following two service applications are created.
• App Management Service Application
• Settings Service Application
d. Click System Settings on the left pane.
e. Click Manage services on server under the Servers heading.
24
AvePoint Task and Calendar Sync On-Premises 2.3 Install and Config Guide
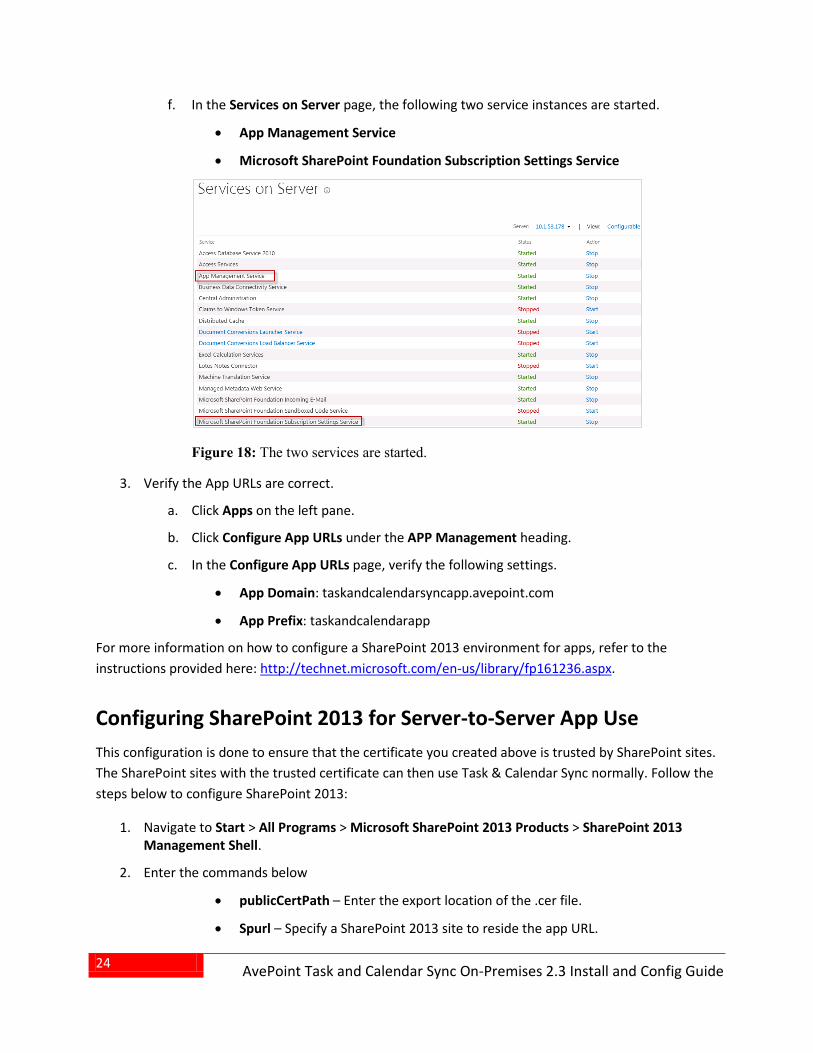
f. In the Services on Server page, the following two service instances are started.
• App Management Service
• Microsoft SharePoint Foundation Subscription Settings Service
Figure 18: The two services are started.
3. Verify the App URLs are correct.
a. Click Apps on the left pane.
b. Click Configure App URLs under the APP Management heading.
c. In the Configure App URLs page, verify the following settings.
• App Domain: taskandcalendarsyncapp.avepoint.com
• App Prefix: taskandcalendarapp
For more information on how to configure a SharePoint 2013 environment for apps, refer to the instructions provided here: http://technet.microsoft.com/en-us/library/fp161236.aspx.
Configuring SharePoint 2013 for Server-to-Server App Use This configuration is done to ensure that the certificate you created above is trusted by SharePoint sites. The SharePoint sites with the trusted certificate can then use Task & Calendar Sync normally. Follow the steps below to configure SharePoint 2013:
1. Navigate to Start > All Programs > Microsoft SharePoint 2013 Products > SharePoint 2013 Management Shell.
2. Enter the commands below
• publicCertPath – Enter the export location of the .cer file.
• Spurl – Specify a SharePoint 2013 site to reside the app URL.
25
AvePoint Task and Calendar Sync On-Premises 2.3 Install and Config Guide
• Name (the parameter after the New-SPTrustedRootAuthority command) – Enter a name for the SharePoint trusted root authority.
$publicCertPath = "ExportLocation\filename.cer" $issuerId = [System.Guid]::NewGuid().ToString() $spurl ="Website URL" $spweb = Get-SPWeb $spurl $realm = Get-SPAuthenticationRealm -ServiceContext $spweb.Site $certificate = Get-PfxCertificate $publicCertPath New-SPTrustedRootAuthority -Name "Task & Calendar Sync App" -Certificate $certificate $fullIssuerIdentifier = $issuerId + '@' + $realm New-SPTrustedSecurityTokenIssuer -Name $issuerId -Certificate $certificate -RegisteredIssuerName $fullIssuerIdentifier –IsTrustBroker *Note: The following two actions may need to be performed:
• We recommend using https type. However, if the newly created website is the http type, run the following command in the SharePoint Management Shell.
$serviceConfig = Get-SPSecurityTokenServiceConfig $serviceConfig.AllowOAuthOverHttp = $true $serviceConfig.Update()
26
AvePoint Task and Calendar Sync On-Premises 2.3 Install and Config Guide
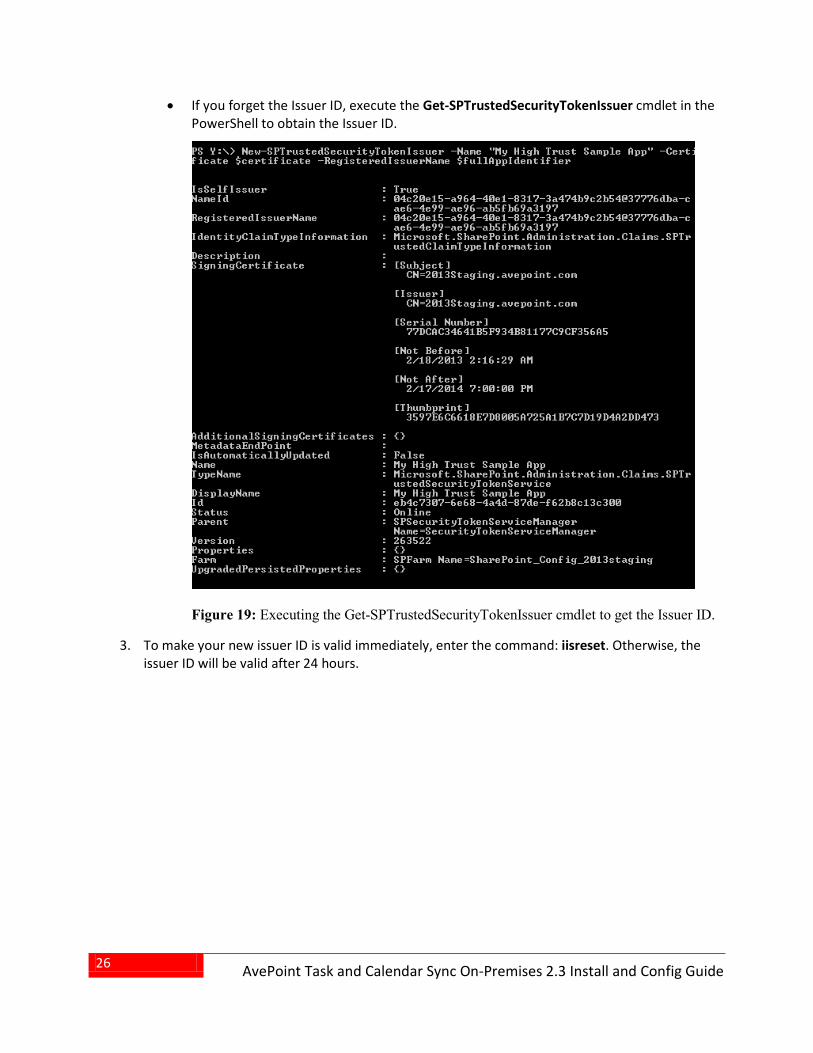
• If you forget the Issuer ID, execute the Get-SPTrustedSecurityTokenIssuer cmdlet in the PowerShell to obtain the Issuer ID.
Figure 19: Executing the Get-SPTrustedSecurityTokenIssuer cmdlet to get the Issuer ID.
3. To make your new issuer ID is valid immediately, enter the command: iisreset. Otherwise, the issuer ID will be valid after 24 hours.
27
AvePoint Task and Calendar Sync On-Premises 2.3 Install and Config Guide
Disabling the Loopback Check This method disables the loopback check so AvePoint Task & Calendar Sync can be used in the SharePoint On-Premises farm normally. Disabling the loopback prevents authentication prompts by stopping the continual OAuth prompt when hitting https://app.companyname.com/. This is only required if you are testing directly on the SharePoint server. Follow the steps below to set the DisableLoopbackCheck registry key:
1. Click Run... from the Start menu.
2. Enter regedit in the Open text box. Then, click OK. The Registry Editor page appears.
3. Navigate to HKEY_LOCAL_MACHINE > SYSTEM > CurrentControlSet > Control> Lsa. Then, right-click Lsa. A drop-down menu appears.
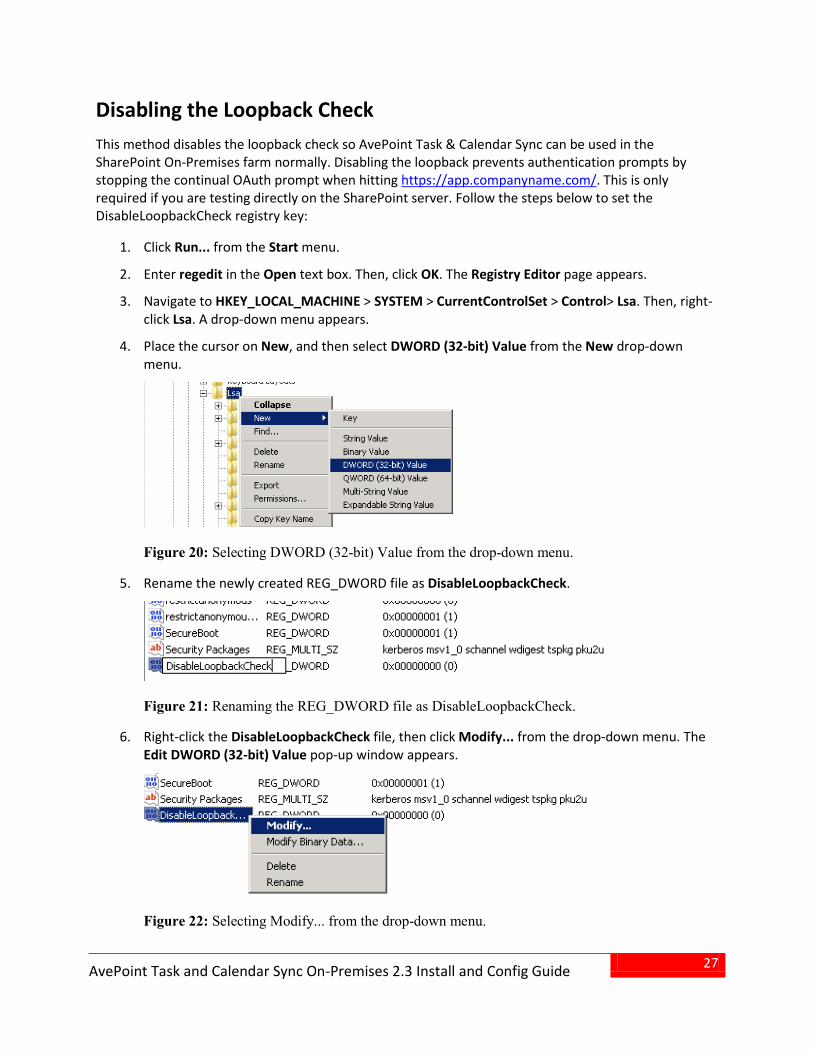
4. Place the cursor on New, and then select DWORD (32-bit) Value from the New drop-down menu.
Figure 20: Selecting DWORD (32-bit) Value from the drop-down menu.
5. Rename the newly created REG_DWORD file as DisableLoopbackCheck.
Figure 21: Renaming the REG_DWORD file as DisableLoopbackCheck.
6. Right-click the DisableLoopbackCheck file, then click Modify... from the drop-down menu. The Edit DWORD (32-bit) Value pop-up window appears.
Figure 22: Selecting Modify... from the drop-down menu.
28
AvePoint Task and Calendar Sync On-Premises 2.3 Install and Config Guide
7. Enter 1 in the Value data text box. Then, click OK.
Figure 23: Entering 1 in the Value data text box.
8. Close the Registry Editor page, and restart your computer.
Configuring SharePoint 2013 App Catalog An app catalog site is used to store the apps. These apps can be installed on any site under the Web application where the app catalog site resides. Follow the steps below to configure SharePoint 2013 App catalog:
1. Navigate to Start > All Programs > Microsoft SharePoint 2013 Products > SharePoint 2013 Central Administration.
2. Click Manage App Catalog under the Apps heading.
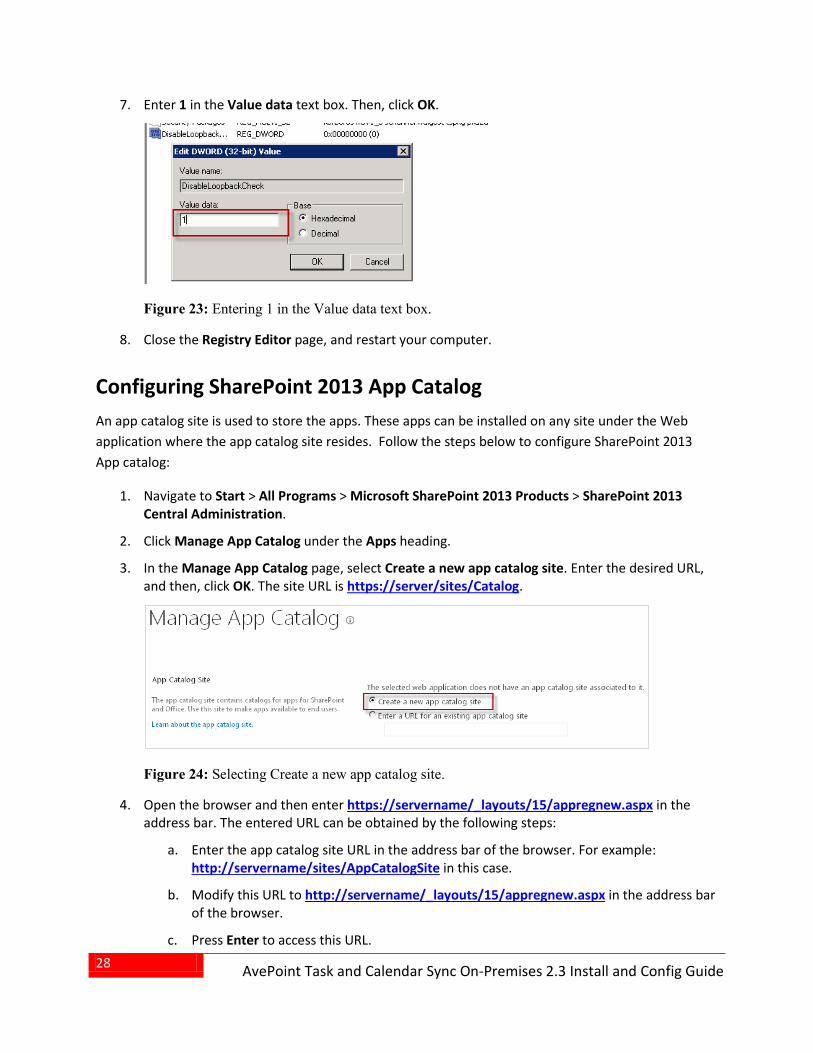
3. In the Manage App Catalog page, select Create a new app catalog site. Enter the desired URL, and then, click OK. The site URL is https://server/sites/Catalog.
Figure 24: Selecting Create a new app catalog site.
4. Open the browser and then enter https://servername/_layouts/15/appregnew.aspx in the address bar. The entered URL can be obtained by the following steps:
a. Enter the app catalog site URL in the address bar of the browser. For example: http://servername/sites/AppCatalogSite in this case.
b. Modify this URL to http://servername/_layouts/15/appregnew.aspx in the address bar of the browser.
c. Press Enter to access this URL.
29
AvePoint Task and Calendar Sync On-Premises 2.3 Install and Config Guide
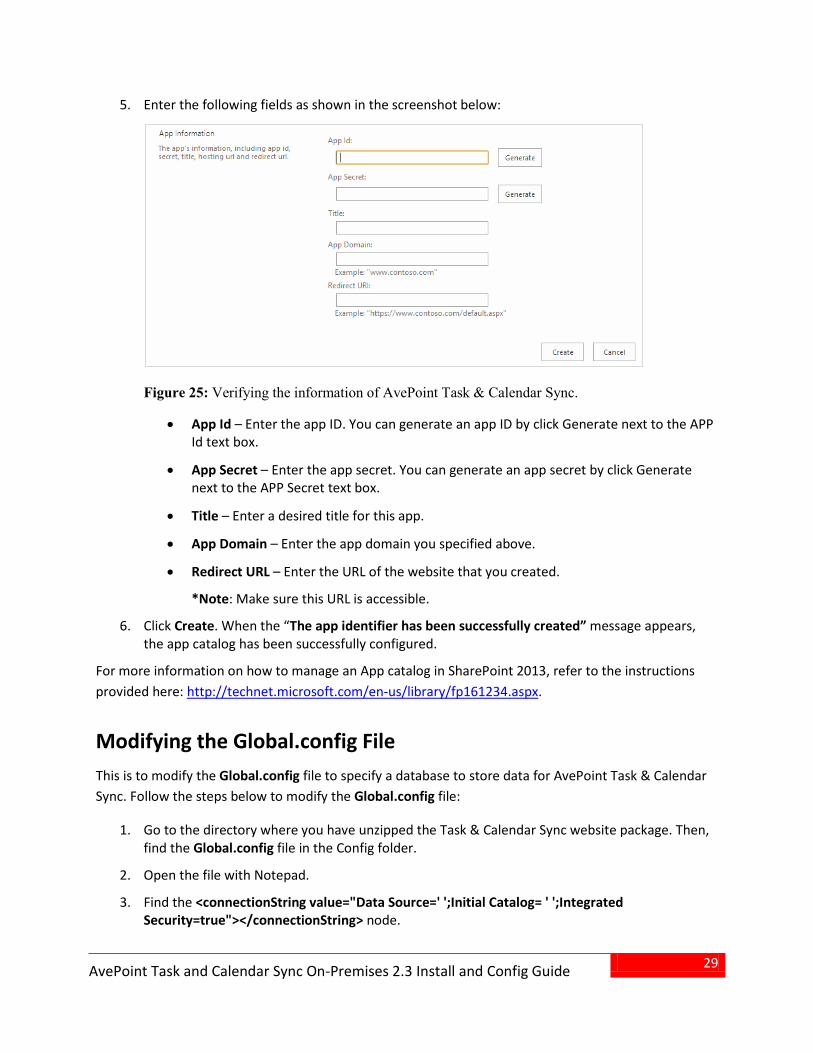
5. Enter the following fields as shown in the screenshot below:
Figure 25: Verifying the information of AvePoint Task & Calendar Sync.
• App Id – Enter the app ID. You can generate an app ID by click Generate next to the APP Id text box.
• App Secret – Enter the app secret. You can generate an app secret by click Generate next to the APP Secret text box.
• Title – Enter a desired title for this app.
• App Domain – Enter the app domain you specified above.
• Redirect URL – Enter the URL of the website that you created.
*Note: Make sure this URL is accessible.
6. Click Create. When the “The app identifier has been successfully created” message appears, the app catalog has been successfully configured.
For more information on how to manage an App catalog in SharePoint 2013, refer to the instructions provided here: http://technet.microsoft.com/en-us/library/fp161234.aspx.
Modifying the Global.config File This is to modify the Global.config file to specify a database to store data for AvePoint Task & Calendar Sync. Follow the steps below to modify the Global.config file:
1. Go to the directory where you have unzipped the Task & Calendar Sync website package. Then, find the Global.config file in the Config folder.
2. Open the file with Notepad.
3. Find the <connectionString value="Data Source=' ';Initial Catalog= ' ';Integrated Security=true"></connectionString> node.

30
AvePoint Task and Calendar Sync On-Premises 2.3 Install and Config Guide
• Data Source – Enter the SQL Server name.
4. Initial Catalog – Enter the name of the database that you created above. Save changes to this file and close it.
Modifying the Web.config File This is to modify the Web.config file to make sure AvePoint Task & Calendar Sync has sufficient permission to access SharePoint sites. Follow the steps below to modify the Web.config file:
1. Go to the directory where you have unzipped the Task & Calendar Sync website package. Then, find the Web.config file.
2. Open the Web.config file using Notepad.
3. Find the <appSettings> node in the file, then modify as shown below:
<appSettings> <add key="ClientId" value=" " /> <add key="ClientSecret" value="" /> <add key="ClientSigningCertificatePath" value="" /> <add key="ClientSigningCertificatePassword" value=" " /> <add key="IssuerId" value="" /> </appSettings>
• ClientId – Enter the app ID that you generated above.
• ClientSecret – Enter the app secret that you generated above. • ClientSigningCertificatePath – Enter the export location of the SSL certificate. • ClientSigningCertificatePassword – Enter the specified password when you export the
certificate. • IssuerId – Enter the Issuer ID you specified above.
4. Save the modifications and then close the file.
31
AvePoint Task and Calendar Sync On-Premises 2.3 Install and Config Guide
Setting Your Task & Calendar Sync Web Page as the Start Page This step modifies the AppManifest file in the AvePoint Task & Calendar Sync package to specify the website you created in the Creating and Configuring a Website step as the start page. When you use Task & Calendar Sync on the SharePoint 2013 site, it will access the website that you created. Follow the steps below to modify the AvePoint Task & Calendar Sync package:
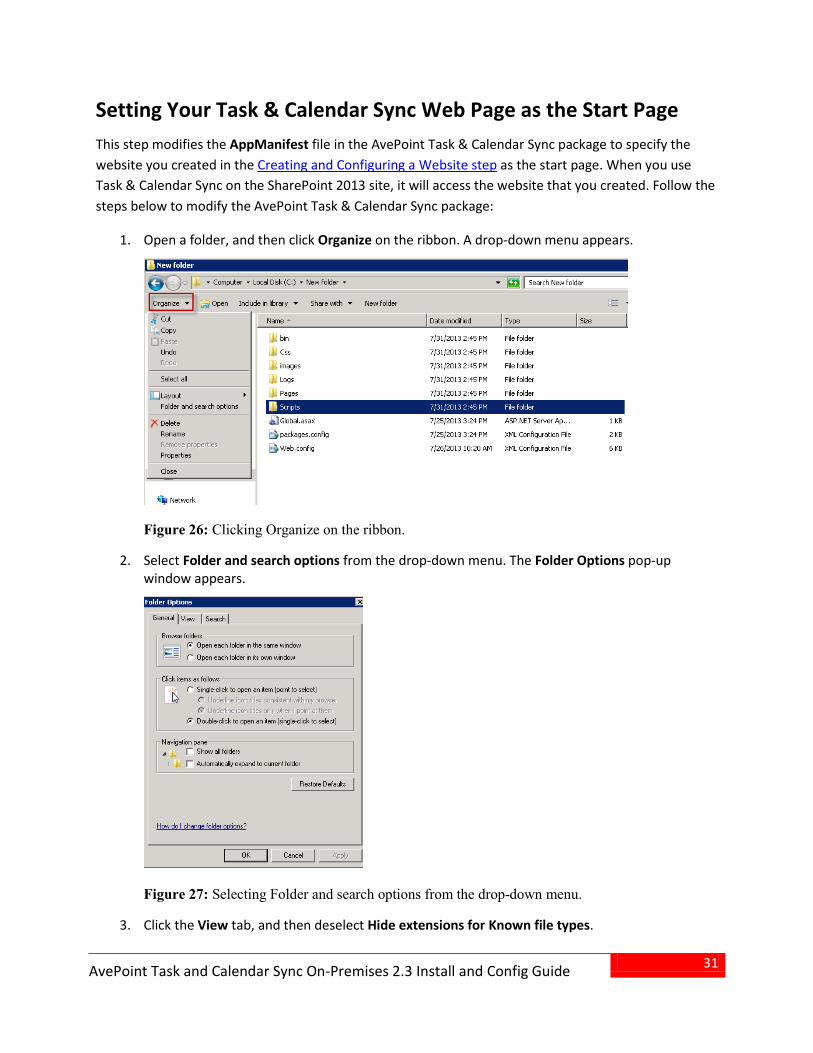
1. Open a folder, and then click Organize on the ribbon. A drop-down menu appears.
Figure 26: Clicking Organize on the ribbon.
2. Select Folder and search options from the drop-down menu. The Folder Options pop-up window appears.
Figure 27: Selecting Folder and search options from the drop-down menu.
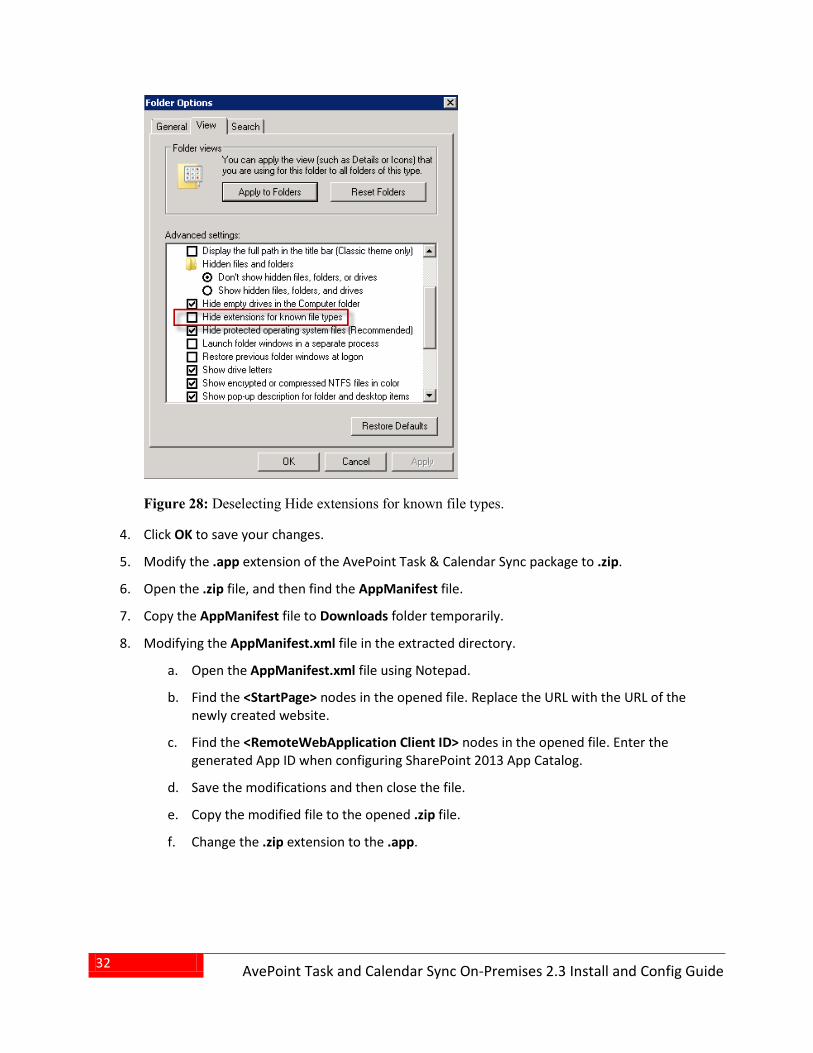
3. Click the View tab, and then deselect Hide extensions for Known file types.
32
AvePoint Task and Calendar Sync On-Premises 2.3 Install and Config Guide
Figure 28: Deselecting Hide extensions for known file types.
4. Click OK to save your changes.
5. Modify the .app extension of the AvePoint Task & Calendar Sync package to .zip.
6. Open the .zip file, and then find the AppManifest file.
7. Copy the AppManifest file to Downloads folder temporarily.
8. Modifying the AppManifest.xml file in the extracted directory.
a. Open the AppManifest.xml file using Notepad.
b. Find the <StartPage> nodes in the opened file. Replace the URL with the URL of the newly created website.
c. Find the <RemoteWebApplication Client ID> nodes in the opened file. Enter the generated App ID when configuring SharePoint 2013 App Catalog.
d. Save the modifications and then close the file.
e. Copy the modified file to the opened .zip file.
f. Change the .zip extension to the .app.
33
AvePoint Task and Calendar Sync On-Premises 2.3 Install and Config Guide
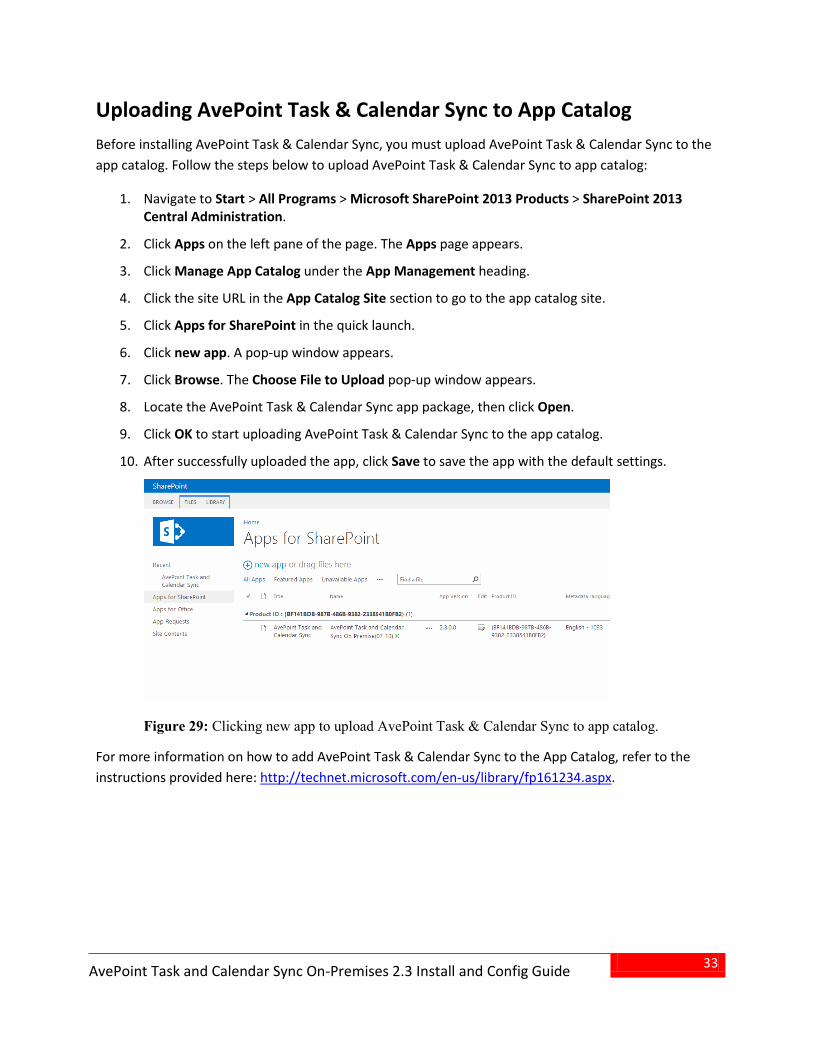
Uploading AvePoint Task & Calendar Sync to App Catalog Before installing AvePoint Task & Calendar Sync, you must upload AvePoint Task & Calendar Sync to the app catalog. Follow the steps below to upload AvePoint Task & Calendar Sync to app catalog:
1. Navigate to Start > All Programs > Microsoft SharePoint 2013 Products > SharePoint 2013 Central Administration.
2. Click Apps on the left pane of the page. The Apps page appears.
3. Click Manage App Catalog under the App Management heading.
4. Click the site URL in the App Catalog Site section to go to the app catalog site.
5. Click Apps for SharePoint in the quick launch.
6. Click new app. A pop-up window appears.
7. Click Browse. The Choose File to Upload pop-up window appears.
8. Locate the AvePoint Task & Calendar Sync app package, then click Open.
9. Click OK to start uploading AvePoint Task & Calendar Sync to the app catalog.
10. After successfully uploaded the app, click Save to save the app with the default settings.
Figure 29: Clicking new app to upload AvePoint Task & Calendar Sync to app catalog.
For more information on how to add AvePoint Task & Calendar Sync to the App Catalog, refer to the instructions provided here: http://technet.microsoft.com/en-us/library/fp161234.aspx.
34
AvePoint Task and Calendar Sync On-Premises 2.3 Install and Config Guide
Adding AvePoint Task & Calendar Sync to Your Website The user who adds AvePoint Task & Calendar to your website must be a domain user and must have Full Control to the website where you are adding the app. Users in the Farm Service Account cannot perform this action.
1. Navigate to the SharePoint site where you want to install AvePoint Task & Calendar Sync.
2. Click the Settings icon on the top right corner of your site, and then click Add an app. Or, navigate to the Site Content page and click Add an app. The Your Apps page appears.
3. In the Quick Launch, click From Your Organization to add AvePoint Task & Calendar Sync from App Catalog.
4. Enter AvePoint Task & Calendar Sync in the Find an app search text box, and then press Enter.
5. Click AvePoint Task & Calendar Sync. To learn more about AvePoint Task and Calendar Sync, click Details or Reviews.
6. Click Add it to add AvePoint Task & Calendar Sync on your site.
7. When you are asked if you want to trust AvePoint Meetings:
• Click the View Terms & Conditions from AvePoint Inc. link to view the terms and conditions.
• Click the View the Privacy Statement from AvePoint Inc. link to view the privacy statement.
• Click Trust It.
8. AvePoint Task & Calendar Sync and five automatically created lists will now appear on the Site Contents page. To view the AvePoint Task & Calendar Sync page, click AvePoint Task & Calendar Sync on the Site Contents page.
35
AvePoint Task and Calendar Sync On-Premises 2.3 Install and Config Guide
Using AvePoint Task & Calendar Sync AvePoint Task & Calendar Sync comes with a two-month free trial. Contact an AvePoint representative for assistance with purchasing an Enterprise license.
For more information on how to use AvePoint Task & Calendar Sync, refer to the AvePoint demo video site: http://www.avepoint.com/resources/etutorials/
36
AvePoint Task and Calendar Sync On-Premises 2.3 Install and Config Guide
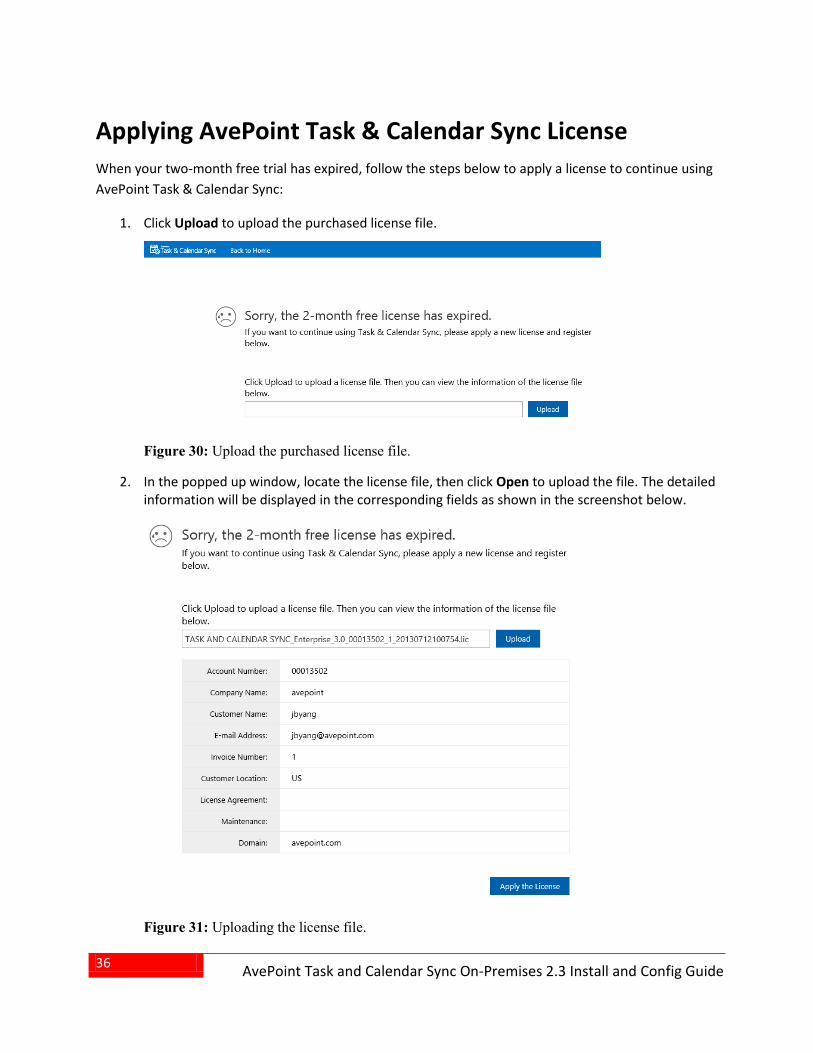
Applying AvePoint Task & Calendar Sync License When your two-month free trial has expired, follow the steps below to apply a license to continue using AvePoint Task & Calendar Sync:
1. Click Upload to upload the purchased license file.
Figure 30: Upload the purchased license file.
2. In the popped up window, locate the license file, then click Open to upload the file. The detailed information will be displayed in the corresponding fields as shown in the screenshot below.
Figure 31: Uploading the license file.
37
AvePoint Task and Calendar Sync On-Premises 2.3 Install and Config Guide
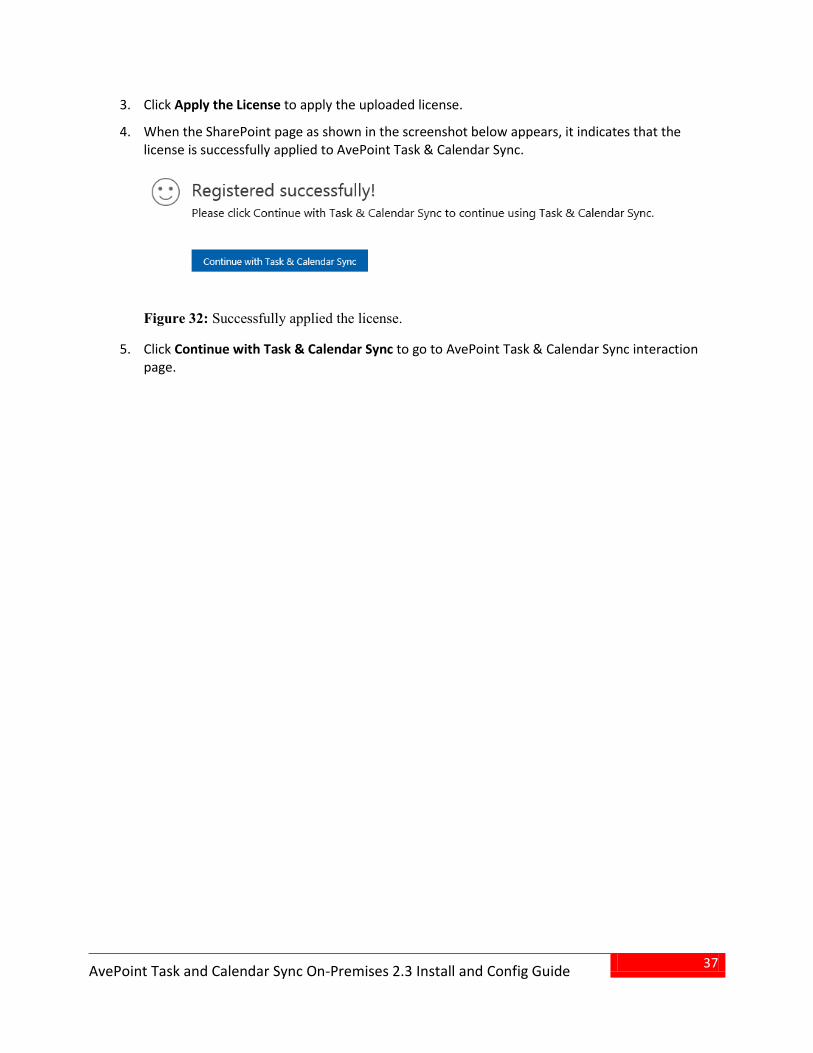
3. Click Apply the License to apply the uploaded license.
4. When the SharePoint page as shown in the screenshot below appears, it indicates that the license is successfully applied to AvePoint Task & Calendar Sync.
Figure 32: Successfully applied the license.
5. Click Continue with Task & Calendar Sync to go to AvePoint Task & Calendar Sync interaction page.
38
AvePoint Task and Calendar Sync On-Premises 2.3 Install and Config Guide
Upgrading Your AvePoint Task & Calendar Sync Before upgrading your AvePoint Task & Calendar Sync to a newer version, you need to download the latest AvePoint Task & Calendar Sync app package and AvePoint Task & Calendar Sync website package. Contact an AvePoint representative for these packages.
Refer to the sections below to upgrade your AvePoint Task & Calendar Sync.
Upgrading the AvePoint Task & Calendar Sync Website Follow the steps below to upgrade the website:
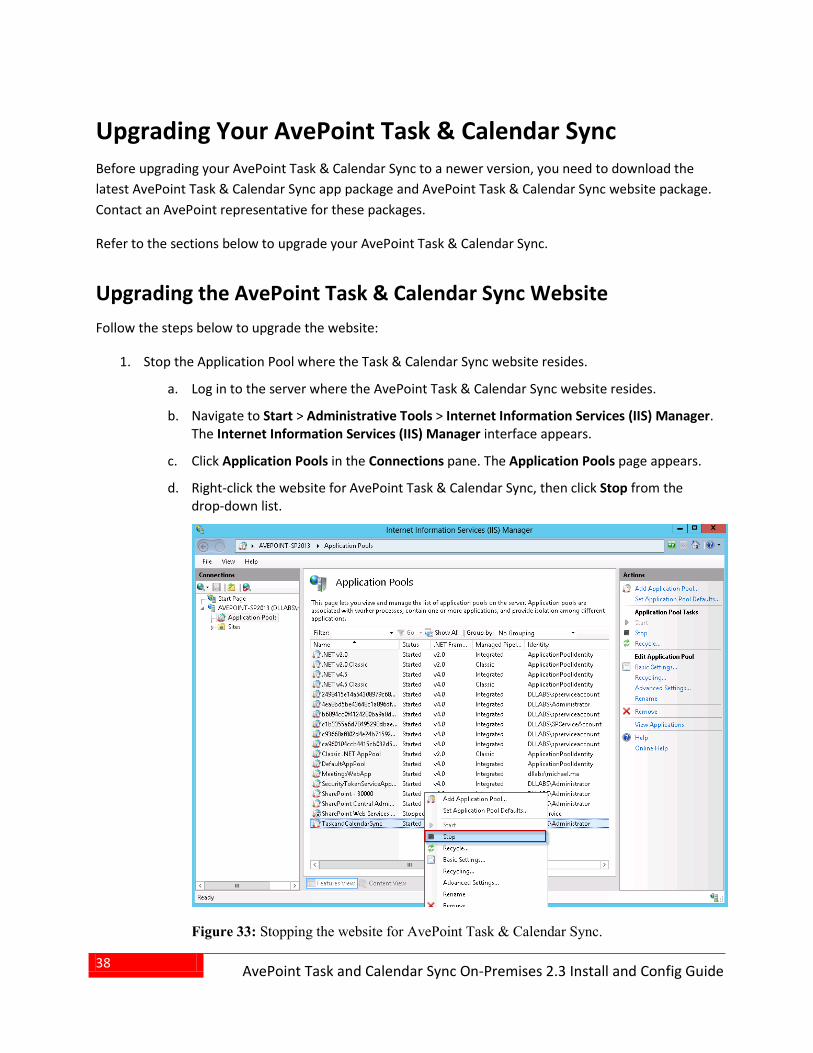
1. Stop the Application Pool where the Task & Calendar Sync website resides.
a. Log in to the server where the AvePoint Task & Calendar Sync website resides.
b. Navigate to Start > Administrative Tools > Internet Information Services (IIS) Manager. The Internet Information Services (IIS) Manager interface appears.
c. Click Application Pools in the Connections pane. The Application Pools page appears.
d. Right-click the website for AvePoint Task & Calendar Sync, then click Stop from the drop-down list.
Figure 33: Stopping the website for AvePoint Task & Calendar Sync.
39
AvePoint Task and Calendar Sync On-Premises 2.3 Install and Config Guide
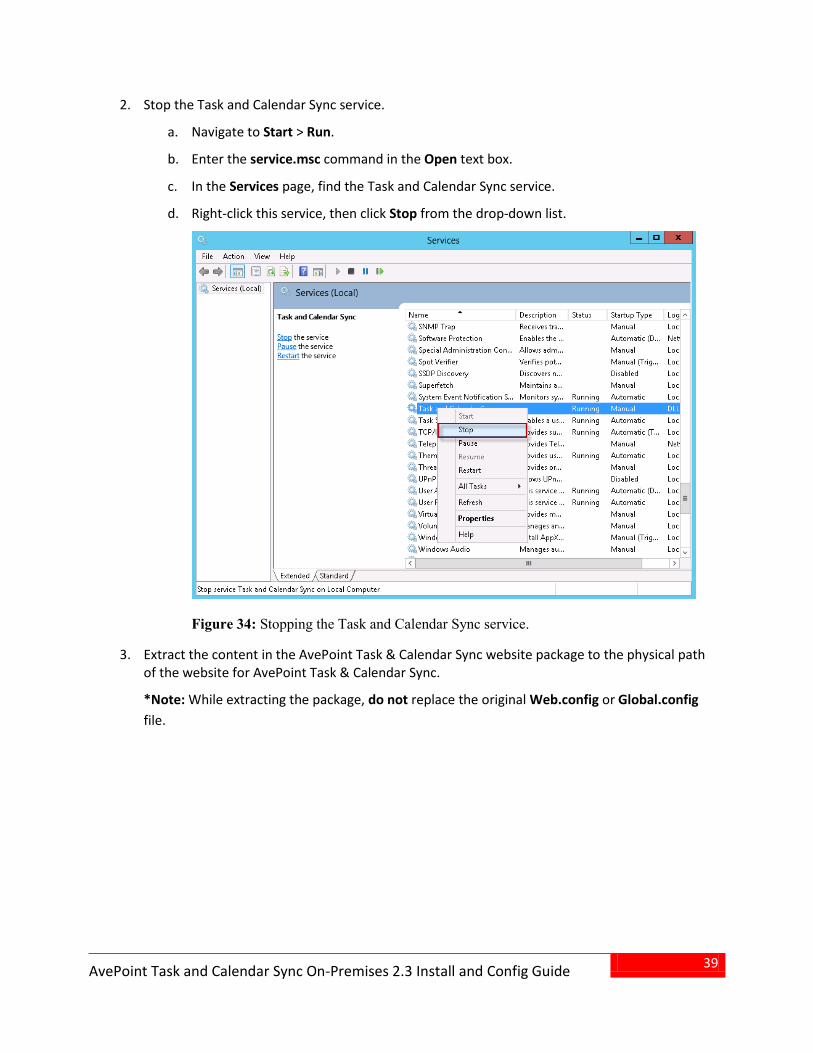
2. Stop the Task and Calendar Sync service.
a. Navigate to Start > Run.
b. Enter the service.msc command in the Open text box.
c. In the Services page, find the Task and Calendar Sync service.
d. Right-click this service, then click Stop from the drop-down list.
Figure 34: Stopping the Task and Calendar Sync service.
3. Extract the content in the AvePoint Task & Calendar Sync website package to the physical path of the website for AvePoint Task & Calendar Sync.
*Note: While extracting the package, do not replace the original Web.config or Global.config file.
40
AvePoint Task and Calendar Sync On-Premises 2.3 Install and Config Guide
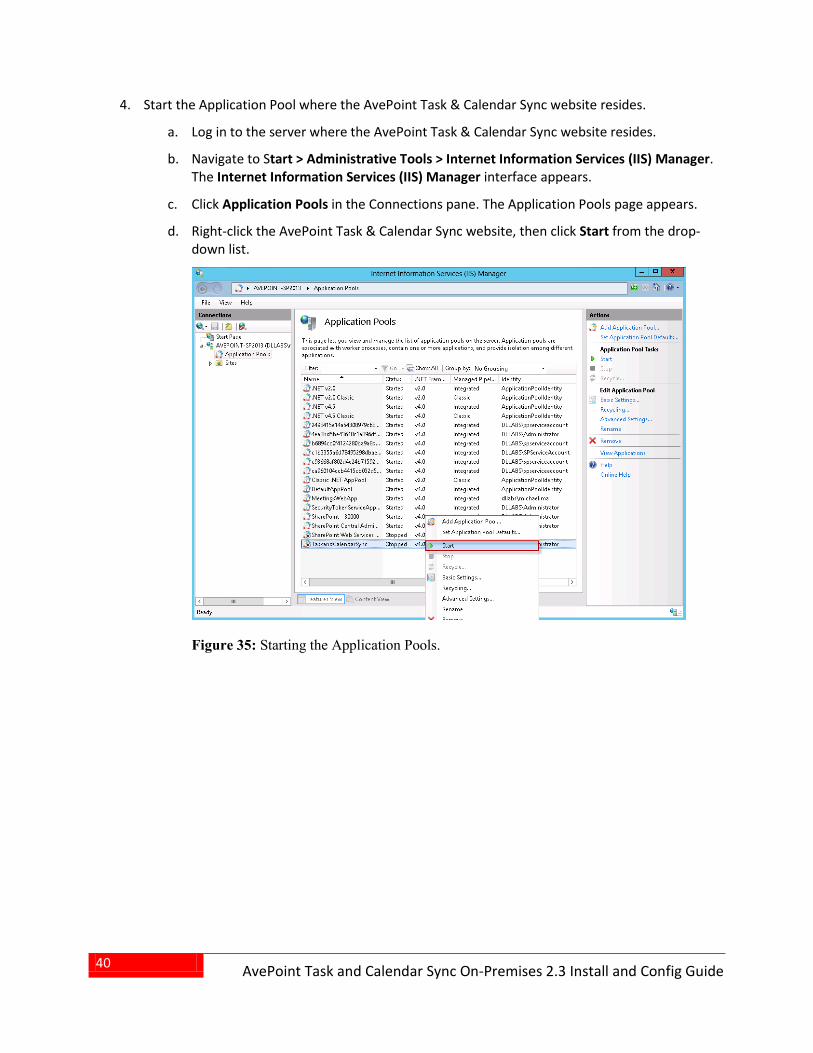
4. Start the Application Pool where the AvePoint Task & Calendar Sync website resides.
a. Log in to the server where the AvePoint Task & Calendar Sync website resides.
b. Navigate to Start > Administrative Tools > Internet Information Services (IIS) Manager. The Internet Information Services (IIS) Manager interface appears.
c. Click Application Pools in the Connections pane. The Application Pools page appears.
d. Right-click the AvePoint Task & Calendar Sync website, then click Start from the drop-down list.
Figure 35: Starting the Application Pools.
41
AvePoint Task and Calendar Sync On-Premises 2.3 Install and Config Guide
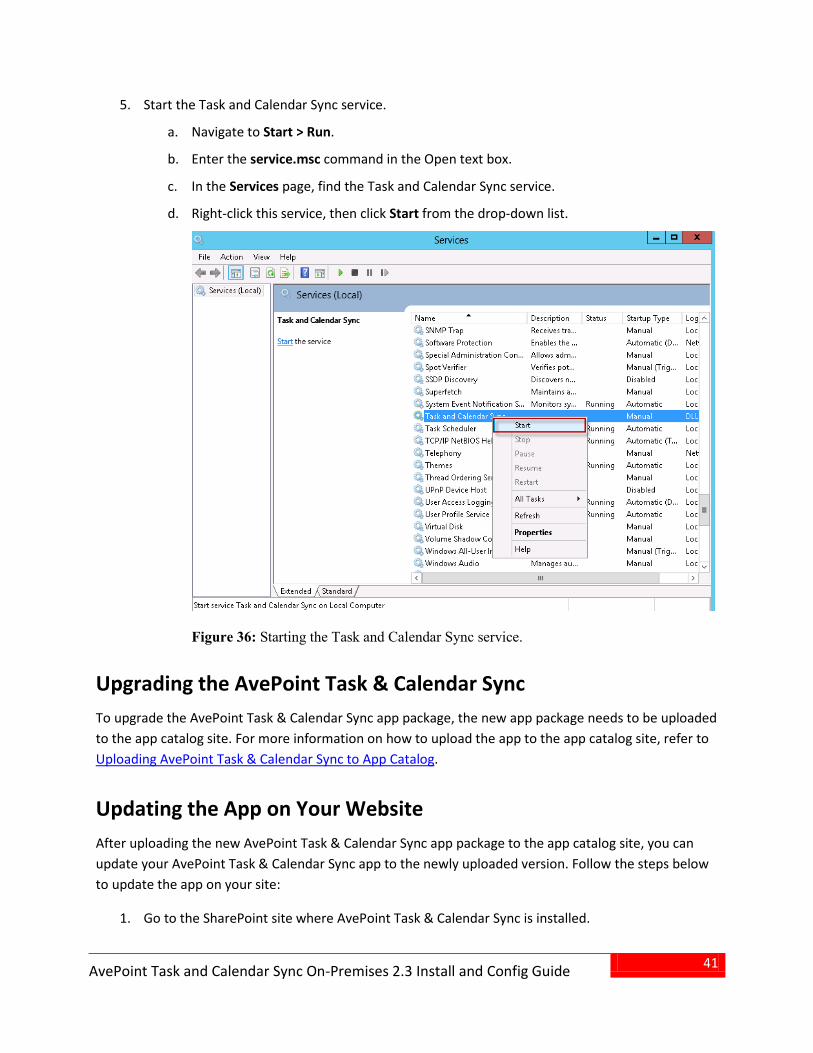
5. Start the Task and Calendar Sync service.
a. Navigate to Start > Run.
b. Enter the service.msc command in the Open text box.
c. In the Services page, find the Task and Calendar Sync service.
d. Right-click this service, then click Start from the drop-down list.
Figure 36: Starting the Task and Calendar Sync service.
Upgrading the AvePoint Task & Calendar Sync To upgrade the AvePoint Task & Calendar Sync app package, the new app package needs to be uploaded to the app catalog site. For more information on how to upload the app to the app catalog site, refer to Uploading AvePoint Task & Calendar Sync to App Catalog.
Updating the App on Your Website After uploading the new AvePoint Task & Calendar Sync app package to the app catalog site, you can update your AvePoint Task & Calendar Sync app to the newly uploaded version. Follow the steps below to update the app on your site:
1. Go to the SharePoint site where AvePoint Task & Calendar Sync is installed.
42
AvePoint Task and Calendar Sync On-Premises 2.3 Install and Config Guide
2. Click Site Contents on the navigation.
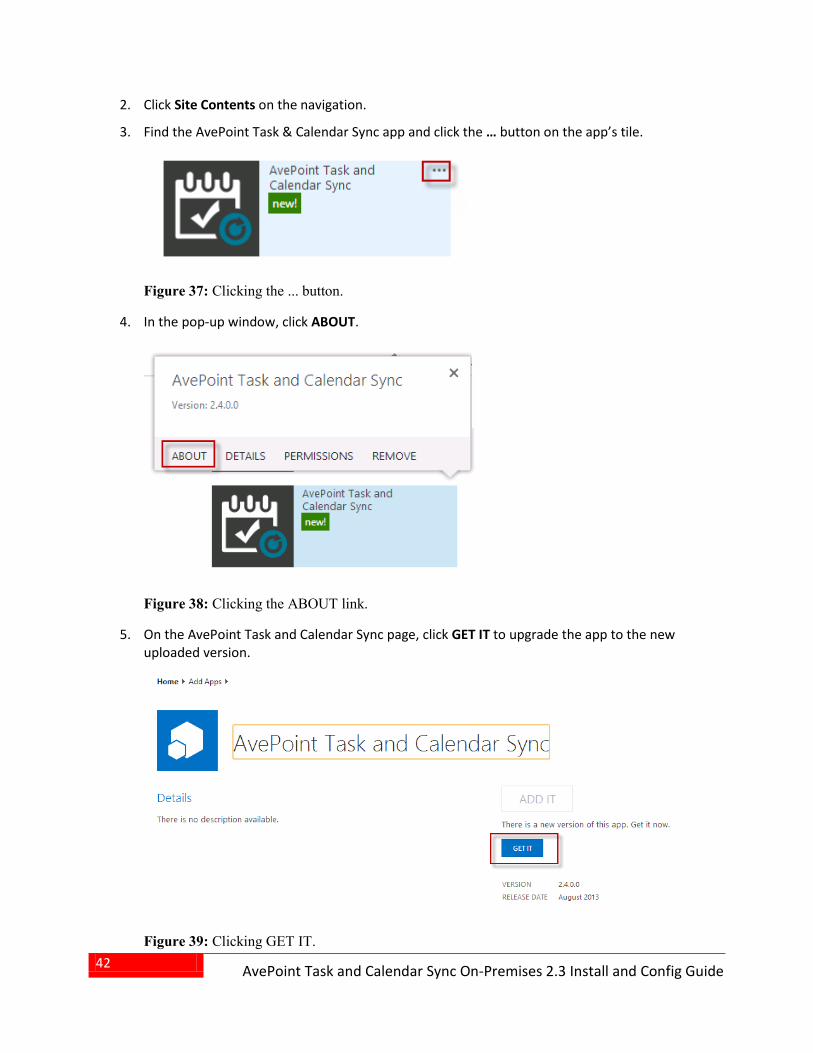
3. Find the AvePoint Task & Calendar Sync app and click the … button on the app’s tile.
Figure 37: Clicking the ... button.
4. In the pop-up window, click ABOUT.
Figure 38: Clicking the ABOUT link.
5. On the AvePoint Task and Calendar Sync page, click GET IT to upgrade the app to the new uploaded version.
Figure 39: Clicking GET IT.
43
AvePoint Task and Calendar Sync On-Premises 2.3 Install and Config Guide
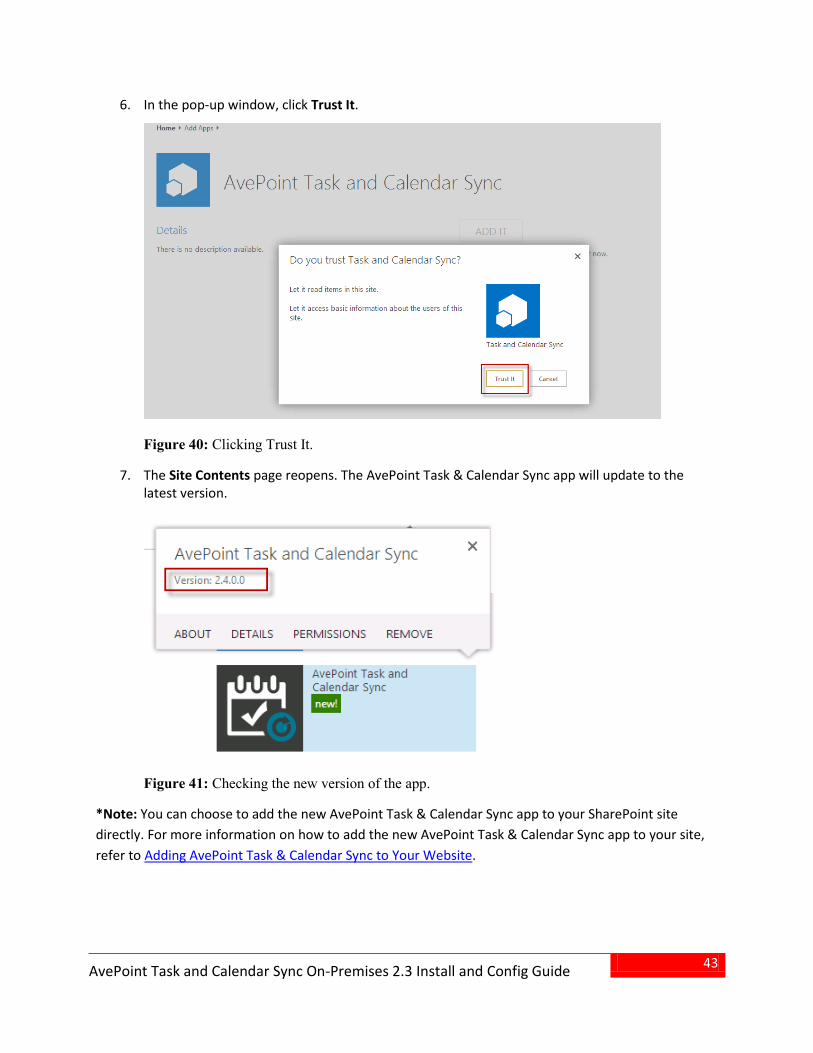
6. In the pop-up window, click Trust It.
Figure 40: Clicking Trust It.
7. The Site Contents page reopens. The AvePoint Task & Calendar Sync app will update to the latest version.
Figure 41: Checking the new version of the app.
*Note: You can choose to add the new AvePoint Task & Calendar Sync app to your SharePoint site directly. For more information on how to add the new AvePoint Task & Calendar Sync app to your site, refer to Adding AvePoint Task & Calendar Sync to Your Website.
44
AvePoint Task and Calendar Sync On-Premises 2.3 Install and Config Guide
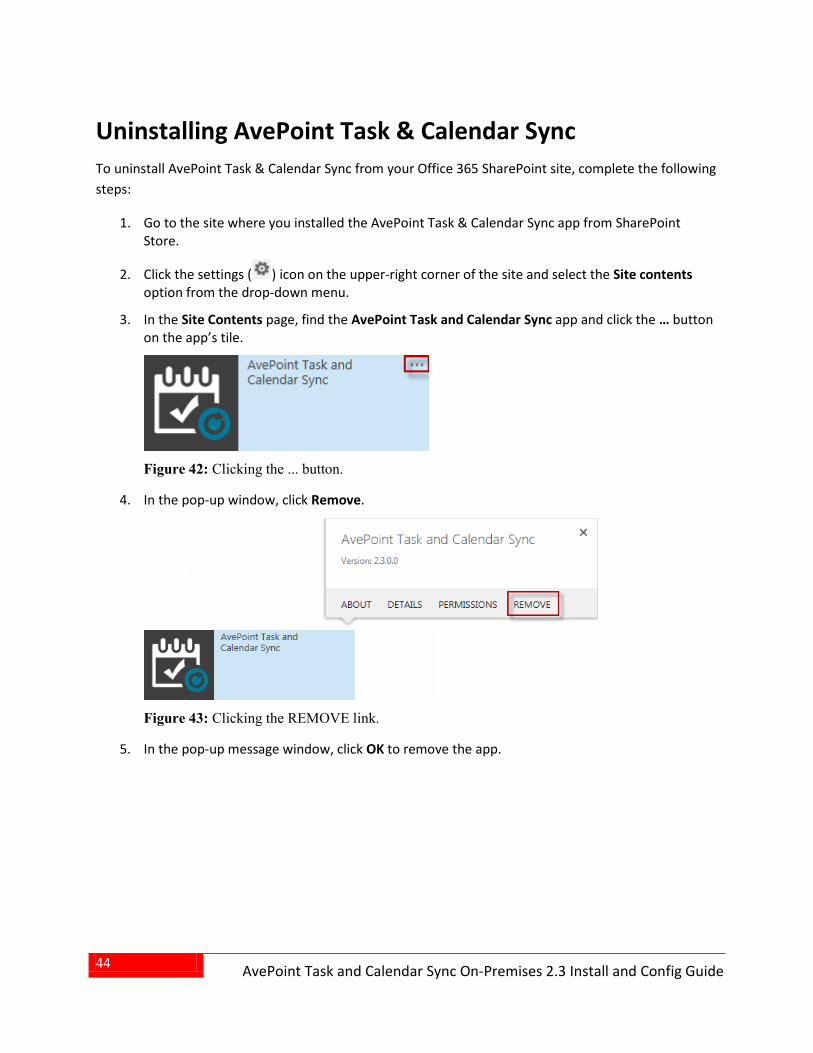
Uninstalling AvePoint Task & Calendar Sync To uninstall AvePoint Task & Calendar Sync from your Office 365 SharePoint site, complete the following steps:
1. Go to the site where you installed the AvePoint Task & Calendar Sync app from SharePoint Store.
2. Click the settings ( ) icon on the upper-right corner of the site and select the Site contents option from the drop-down menu.
3. In the Site Contents page, find the AvePoint Task and Calendar Sync app and click the … button on the app’s tile.
Figure 42: Clicking the ... button.
4. In the pop-up window, click Remove.
Figure 43: Clicking the REMOVE link.
5. In the pop-up message window, click OK to remove the app.
45
AvePoint Task and Calendar Sync On-Premises 2.3 Install and Config Guide
Notices and Copyright Information Notice The materials contained in this publication are owned or provided by AvePoint, Inc. and are the property of AvePoint or its licensors, and are protected by copyright, trademark and other intellectual property laws. No trademark or copyright notice in this publication may be removed or altered in any way.
Copyright Copyright ©2013 AvePoint, Inc. All rights reserved. All materials contained in this publication are protected by United States and international copyright laws and no part of this publication may be reproduced, modified, displayed, stored in a retrieval system, or transmitted in any form or by any means, electronic, mechanical, photocopying, recording or otherwise, without the prior written consent of AvePoint, 3 Second Street, Jersey City, NJ 07311, USA or, in the case of materials in this publication owned by third parties, without such third party’s consent. Notwithstanding the foregoing, to the extent any AvePoint material in this publication is reproduced or modified in any way (including derivative works and transformative works), by you or on your behalf, then such reproduced or modified materials shall be automatically assigned to AvePoint without any further act and you agree on behalf of yourself and your successors, assigns, heirs, beneficiaries, and executors, to promptly do all things and sign all documents to confirm the transfer of such reproduced or modified materials to AvePoint.
Trademarks AvePoint®, DocAve®, the AvePoint logo, and the AvePoint Pyramid logo are registered trademarks of AvePoint, Inc. with the United States Patent and Trademark Office. These registered trademarks, along with all other trademarks of AvePoint used in this publication are the exclusive property of AvePoint and may not be used without prior written consent.
Microsoft, MS-DOS, Internet Explorer, Microsoft Office SharePoint Servers 2007/2010/2013, SharePoint Portal Server 2003, Windows SharePoint Services, Windows SQL server, and Windows are either registered trademarks or trademarks of Microsoft Corporation.
Adobe Acrobat and Acrobat Reader are trademarks of Adobe Systems, Inc.
All other trademarks contained in this publication are the property of their respective owners and may not be used without such party’s consent.
Changes The material in this publication is for information purposes only and is subject to change without notice. While reasonable efforts have been made in the preparation of this publication to ensure its accuracy, AvePoint makes no representation or warranty, expressed or implied, as to its completeness, accuracy, or suitability, and assumes no liability resulting from errors or omissions in this publication or from the use of the information contained herein. AvePoint reserves the right to make changes in the Graphical User Interface of the AvePoint software without reservation and without notification to its users.
AvePoint, Inc. Harborside Financial Center, Plaza 10 3 Second Street, 9th Floor Jersey City, New Jersey 07311 USA