Embed Size (px)
Citation preview

PLEASE READ: The 02E 6 speed DSG transmissions are equipped in several Audi VW models. Depending on the model and year of your vehicle there will be slight differences in the battery box area. An example of this is some cars where not equipped with a plastic battery box cover but rather came with a soft black insulation cover. The instructional image references still apply.
1. With the the engine bay accessible remove the battery cover by pushing in the lock tab and pull up. (Image 1)2. Remove the front side of the battery box. Push in the two tabs on the front while pulling up. (Image 2)(Note: Some vehicles are equipped with an surrounding insulation cover not a plastic battery box. If your vehicle is equipped with an insulation cover, remove the insulation cover with the battery in step 5.)3. Disconnect the battery power cables. Both the positive and negative cable clamps are 10mm. (Image 3)
Installation Guidelines For Audi-VW 6-Speed DSG Transmission Fluid Filter Change Kit (02E - Double Clutch Transmissions)
! CAUTION !Performing work on your automobile without having proper knowledge, mechanical ability
or the proper tools and safety equipment, can cause severe injury, death or automobile mechanical problems!BLAUfergnugen! Inc. recommends you have an A.S.E. Certified Audi Vw Technician install your parts to ensure your safety.
ALWAYS WEAR SAFETY GLASSES AND OTHER SAFETY ITEMS WHEN PERFORMING THE FOLLOWING WORK !Always read the factory service manual safety instructions and guideline before installing this kit.
Check the factory manual and always verify the automatic transmission fluid supplied in this kit is recommended for your specific model and year vehicle. Failing to verify can result in transmission failure.
NOTE: It is best to use a drain pan that has measuring capacities, you will then have an accurate idea of the amount of new fluid to put back into the transmission.NOTE: Many of the steps below are to be performed on an approved automotive lift. Warning: Use safety precautions. People should never be under the car or in front of the wheels when performing this operation! Serious injury or death could result!NOTE: When performing the transmission fluid and filter service, the vehicle should be completely level on an approved automotive lift or jack stands.NOTE: When performing transmission maintenance, cleanliness is of great importance. Always use lint free rags, confirm all transmission parts are clean, and cover transmission components when removed from transmission.
Page 1 Copyright BLAUfergnügen ! Inc. 2016 Form # INS211
IMAGE 1 IMAGE 2
IMAGE 3

Page 2 Copyright BLAUfergnügen ! Inc. 2016 Form # INS211
4. Remove the battery hold down bracket. This is held in place by a 13mm bolt and located at the passenger side base of the battery between the engine cover and battery. (Image 4 and 5)
5. Remove the battery along with the battery insulation. (Image 6)
6. Remove the three 10mm bolts holding the battery tray frame in place. (Image 7 and 8)
IMAGE 4 IMAGE 5
IMAGE 6 IMAGE 7
IMAGE 8

Page 3 Copyright BLAUfergnügen ! Inc. 2016 Form # INS211
7. Pull up the battery tray frame to allow access to the rear side of the battery box. With the rear side of the battery box exposed un-clip the rear side of the battery box. (Image 9 and 10)
8. Remove the battery tray frame by first pulling the rear of the battery tray frame up and then back to the fire wall at an upward angle. The battery tray frame may have to be slightly twisted and or maneuvered in such a way to not tangle the battery and fuse box wires. (Image 11)9. Elevate the vehicle on an approved automotive lift or jack stands using the factory lift points to a level position. (See the factory owners manual for approved factory vehicle lift points.)10. Remove the lower engine protective splash pan. The small sized splash pan is held in place by several t-25 torx screws. If it is a full size splash pan there are both t-25 and t-30 torx holding the splash pan in place. (Image 12)
11. Remove the 14mm DSG transmission drain plug along with the crush washer. Allow the DSG fluid to drain from the transmission. During this step not all DSG transmission fluid will drain from the transmission. Roughly only 1.5 – 2 Liters of DSG fluid will drain. (Image 13, 14, and 15)
IMAGE 9 IMAGE 10
IMAGE 11 IMAGE 12
IMAGE 13

Page 4 Copyright BLAUfergnügen ! Inc. 2016 Form # INS211
12. Drain the remaining DSG transmission fluid by removing the transmission fluid level insert.
This is a 8mm six point allen recessed up inside the drain plug port. (Image 16, 17, 18, and 19)
IMAGE 14 IMAGE 15
IMAGE 16 IMAGE 17
IMAGE 18 IMAGE 19

Page 5 Copyright BLAUfergnügen ! Inc. 2016 Form # INS211
13. Once you have confirmed all the old DSG transmission fluid has drained from the transmission reinstall the transmission fluid level insert and tighten to 2 ft. lbs.14. Install filling tool adapter VAS 6262BL hand tight. Secure the filling hose to adapter VAS 6262 and direct the other end of the hose up in front of the transmission to the top side of the engine bay. (Image 20)15. Locate the DSG transmission filter housing at the top of the transmission. This is a black plastic housing. Using a 24mm socket loosen and remove the housing. You may want to consider placing several rags around the filter area to absorb any spillage. (Image 21)
16. Remove the DSG transmission filter by firmly pulling upward. You may want to grasp the filter using a large clean rag as this can minimize any splash that happens when the filter pops upward. (Image 22)17. Install the new DSG transmission filter in the same orientation as the old one. Confirm the filter o-ring area has popped onto the transmission. (Image 23)18. Remove and replace the sealing o-ring on the DSG transmission filter housing. It is best to mildly lubricate the new o-ring with some clean DSG fluid to minimize the chance of the o-ring scarring and not achieving a proper seal. (Image 24)
IMAGE 20 IMAGE 21
IMAGE 22
IMAGE 24IMAGE 23
Page 6 Copyright BLAUfergnügen ! Inc. 2016 Form # INS211
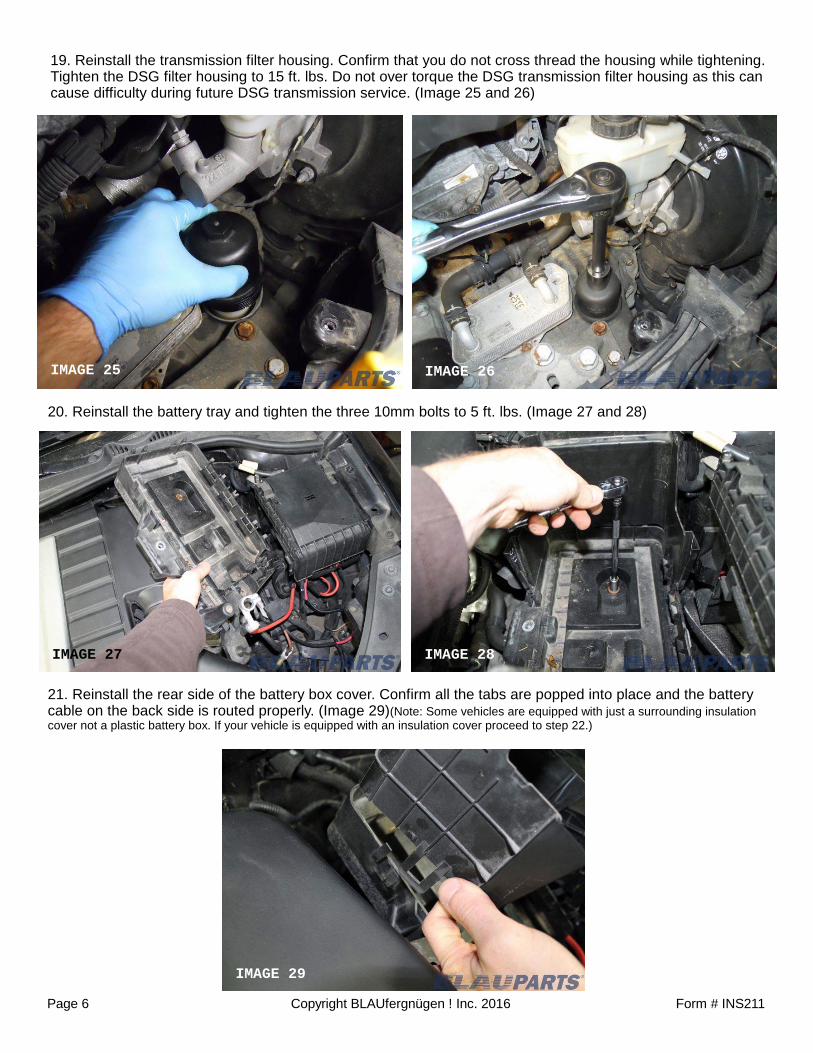
19. Reinstall the transmission filter housing. Confirm that you do not cross thread the housing while tightening. Tighten the DSG filter housing to 15 ft. lbs. Do not over torque the DSG transmission filter housing as this can cause difficulty during future DSG transmission service. (Image 25 and 26)
20. Reinstall the battery tray and tighten the three 10mm bolts to 5 ft. lbs. (Image 27 and 28)
21. Reinstall the rear side of the battery box cover. Confirm all the tabs are popped into place and the battery cable on the back side is routed properly. (Image 29)(Note: Some vehicles are equipped with just a surrounding insulation cover not a plastic battery box. If your vehicle is equipped with an insulation cover proceed to step 22.)
IMAGE 26IMAGE 25
IMAGE 27 IMAGE 28
IMAGE 29

Page 7 Copyright BLAUfergnügen ! Inc. 2016 Form # INS211
22. Reinstall the battery in the proper direction of the power and ground cables along with the battery insulation. (Image 30)23. Reinstall the 13mm battery hold down bolt and bracket located on the passenger side of the battery. This is between the engine cover and the battery. (Image 31 and 32)24. Reinstall the battery power cables and tighten 10mm nuts/bolts to 4 ft. lbs. (Image 33)
25. Reinstall the front side of the plastic battery cover. Confirm the front lock tabs and the side alignment channels are installed correctly. (Image 34 and 35)(Note: Some vehicles are not equipped with a plastic cover. Some vehicles came with a surrounding insulation cover If your vehicle is equipped with an insulation cover proceed to step 27.)
IMAGE 30 IMAGE 31
IMAGE 32 IMAGE 33
IMAGE 34 IMAGE 35

26. Install the top battery cover. Confirm the two tabs on the rear of the cover are installed and allow the front to snap down. (Image 36)
DSG Transmission Fluid Filling Procedure:27. With the filling tool adapter VAS 6262 installed, slide the fill hose on as pictured. (Image 37)
28. With the fill hose up in front of the transmission, connect the hose to the fluid bottles as described in the supplied tool and hose kit instructions. Connect the hose to the DSG fluid bottle as described in the supplied instructions. (Image 38)29. Allow around 2.5 liters of DSG fluid to flow by gravity into the transmission. As fluid is being fed into the transmission, with the vehicle elevated, and level off the ground, start the vehicle. With the brakes applied, shift/select through all the gears of the transmission while the engine is idling. Allow 5 seconds for each gear selection. While the engine is in park and idling, continue to gravity feed the DSG fluid into the transmission. This will allow several more liters to flow into the transmission. Allow all 5-6 liters to empty and flow into the transmission, remove the fill adapter, and install the drain plug with new sealing washer. (Image 39 and 40)
Page 8 Copyright BLAUfergnügen ! Inc. 2016 Form # INS211
(To allow for a quicker flow of DSG fluid into the transmission you may use pump tool number J91001 available at blauparts.com.)
IMAGE 36 IMAGE 37
IMAGE 38
IMAGE 40IMAGE 39

30. As the engine is at idle. Plug the Ross-Tech diagnostic software into the OBD2 port and begin to monitor the transmission fluid temperature.
Using the Ross-Tech, 1st Select Control Module (Image 41), 2nd 02-Auto Trans Control Module (Image 42), 3rd Measuring Blocks – 08 (Image 43),4th Group 019 (Image 44). Display group 019 in field 1 will allow for an accurate DSG fluid temperature reading.
Page 9 Copyright BLAUfergnügen ! Inc. 2016 Form # INS211
31. With the vehicle level, bring the transmission fluid temperature to warm between 35°C - 45C° (95°F – 113°F). At this temperature range, a little transmission fluid should begin to flow out from the fill port level insert. When this happens, the proper DSG fluid level has been achieved. Note: Do not allow the transmission temperature to exceed 45C° (113°F).32. Reinstall the 14mm allen drain plug and torque to 11 ft lbs.33. Once the proper transmission fluid level has been attained, turn the engine off and exit the Ross-Tech diagnostic software and disconnect the OBD2 plug port.
NOTE: If no fluid drips from the fill port, proper level has not been achieved. Reinstall the 5mm allen drain plug, turn off the engine, and allow the transmission to cool to below 30°C (86°F). Repeat the transmission fluid level process per the above recommendations. (Steps 27-33)
34. Re-install the lower engine splash pan with T-25 torx.35. Remove the vehicle from the approved automotive lift or jack stands using factory lift points and procedures.
IMAGE 41 IMAGE 42
IMAGE 43 IMAGE 44