Embed Size (px)
Citation preview
AS400 Basics Manual - Page 1 of 16 Revised. May 2006
AS400 Basics
Signing On If you cannot get a Lincoln Public Schools sign-on logo, contact the
Computing Services Help Desk at 436-1735 for assistance.
User ID’s Everyone in the district has a userid (user identification code) that is used to gain access to the AS/400. After receiving a completed and signed LPS Computer Access form, a user ID will be assigned to you by the Computing Services Department. The userid is used in setting up your AS/400 profile that determines your starting menu, printer, messages, etc. Profiles are set up by Computing Services.
Passwords In order to complete the sign-on to the AS/400, you need a password. Passwords should be secured. DO NOT write your password on a Post-it-Note and stick it on the side of your terminal or underneath your keyboard. If you attempt to sign on with either an invalid userid or password, you will receive a warning message. After three attempts, your AS/400 connection will automatically “vary off”. Your Lincoln Public Schools logo screen will disappear. This means that you do not have access to the AS/400. You need to call the Computing Services Help Desk at 436-1735, and ask them to vary you back on.
AS400 Basics Manual - Page 2 of 16 Revised. May 2006
Keyboard
Using Your Keyboard
Understanding the functions of the keys on your keyboard lets you enter data into the system in the most effective manner. While the appearance of the keyboard and the arrangement of the keys varies among keyboard models, the functions of the keys are applicable to all keyboards. If the keys on your keyboard do not correspond to the titles of the keys discussed, refer to your keyboard map to find the correct locations of the keys or to change them.
Cursor Movement Keys
Each screen in the AS400 system contains information in limited areas known as fields. A field may present information for you to review or it may present a place for you to type information. The cursor shows your location on a screen. You can use cursor movement keys to move the cursor in the direction indicated by the arrow on the key. The cursor moves ahead one space for every character you type. If a field contains a default, the default is assumed if you skip over the field and do not type anything there. A default is a value the system provides for a field. You can move the cursor into areas on the screen that are not defined fields. An error message appears if you try to type in these protected areas of a screen. To continue processing, press RESET.
Field Exit Use the FIELD EXIT key when you are entering numbers, right-justifying numeric data, or advancing to the next field. The FIELD EXIT key also erases any data in the field to the right of the cursor when the key is pressed. Use caution with this key to avoid erasing the defaults on your screen.
Tab Use the TAB key to advance to either the next field on the screen or to move back to the previous field. The TAB key does not erase information and is therefore a safer key than the FIELD EXIT key when you are moving from field to field. Some keyboards have two TAB keys, one to move from left to right, and one to move from right to left. Personal computer style keyboards often have only one TAB key, which is used with the SHIFT key, to change the direction.
AS400 Basics Manual - Page 3 of 16 Revised. May 2006
Reset Use the RESET key to respond to the error messages in the lower left corner of the screen (red X II). Press the RESET key to clear the message so that you can continue.
Function Keys A function key is a key that you can use to perform program functions from various fields within a screen.
F1 This key enables you to view online help text whenever you need information about the screen. Press <ENTER> to return to the program after you have reviewed online help.
F3 This key enables you to end a program and returns to the previous menu. You can also use the F3 function key to end a particular function.
F4
This key enables you to view a list of valid values for a field. A valid value for a field is any information that the system can accept for that field. Valid values may be letters, numbers, characters, or combinations of the three, depending on the program and field. To view a list of valid values for a field, position the cursor in the field and press the <F4> function key. The system displays a field-level index. A field-level index is a list of all valid values that you can enter into the field. Use the cursor movement keys to position the cursor on the line that has the value you want to select and press <ENTER>. The system fills the field with the value you select and advances the cursor to the next field. Use the ROLL or PAGE keys to page through a listing of additional valid values. To exit a field-level index without selecting a value, press the F3 function key. The Position To field is used in conjunction with the F4 function key. To use the Position To field, type a valid user-defined value or partial value in the Position To field and press <ENTER>. The window displays a list of values starting with the value or partial value you enter.

AS400 Basics Manual - Page 4 of 16 Revised. May 2006
F5 This key enables you to restore previously entered information to a screen. If you inadvertently add, change or delete information on a screen, you can use this key to erase the values you have added and restore the values that were present when you entered the program. The key does not discriminate between new values that you want to replace and new values that you want to save in restoring previous values, so be prepared to lose all new values before you press this key.
F12 Use the F12 function key to cancel a program or a screen without continuing processing. This function key is similar in purpose to the Cancel? field that appears on detail screens. This function key is useful if you select the wrong option on a menu or want to end data entry without recording any information in the files.
Numbers
Entry of Numbers
Numbers are entered without hyphens, commas, dashes, slashes, etc. Enter numbers only.
Social Security Numbers
Correct: 123456789 Wrong 123-45-6789
Telephone Numbers
Correct: 4361730 Wrong: 436-1730
Dates Correct: 40298 040298 04021998 Wrong: 4/2/98 Note: The current date sometimes is defaulted in to the date field. Another date maybe entered by typing over the existing date and then pressing the <FIELD EXIT> key to erase any left over numbers.

AS400 Basics Manual - Page 5 of 16 Revised. May 2006
Keyboard when using the AS400
The ESC key The function keys F1 through F12 or hold down the shift key and press the function keys to get F13 through F24.
Page Up and Page Down
Num Lock
Tab Reset Field Exit Enter
The ESC key is used to setup and use the Group Job Session Manager. Setup sessions and move between the sessions using the ESC key.
The ENTER key indicates that the data you have entered on the display is ready to be sent to the system.
The TAB key allows you to move forward field to field.
The SHIFT key + the TAB key allows you to move backward field to field.
The FIELD EXIT key allows you to move forward field to field. In addition, when you press this key, blanks are inserted from the present cursor position to the end of the field. When you press this key in a right adjust field (some dates and student numbers), the data to the left of the cursor will shift to the right. The vacated positions are filled with zeros or blanks and the cursor moves to the next field.
The SHIFT key + the FIELD EXIT key (the NEW LINE key sequence) moves you to the first character position of the next input line.
The RESET key is used to unlock the keyboard when it is locked because of an error condition.
The NUM LOCK key is a toggle key used to activate the number keypad or the functions on the lower part of the number keys on the keypad.
AS400 Basics Manual - Page 6 of 16 Revised. May 2006
Work Station Control Menu
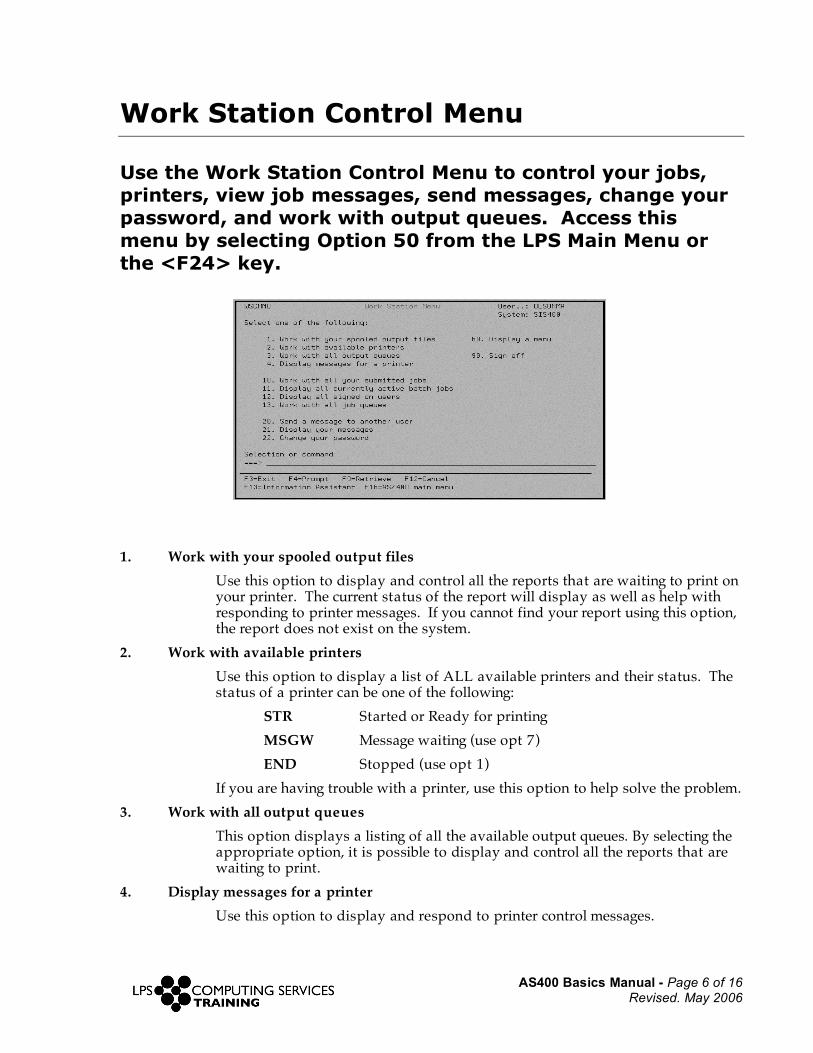
Use the Work Station Control Menu to control your jobs, printers, view job messages, send messages, change your password, and work with output queues. Access this menu by selecting Option 50 from the LPS Main Menu or the <F24> key.
1. Work with your spooled output files
Use this option to display and control all the reports that are waiting to print on your printer. The current status of the report will display as well as help with responding to printer messages. If you cannot find your report using this option, the report does not exist on the system.
2. Work with available printers Use this option to display a list of ALL available printers and their status. The status of a printer can be one of the following:
STR Started or Ready for printing MSGW Message waiting (use opt 7) END Stopped (use opt 1)
If you are having trouble with a printer, use this option to help solve the problem. 3. Work with all output queues
This option displays a listing of all the available output queues. By selecting the appropriate option, it is possible to display and control all the reports that are waiting to print.
4. Display messages for a printer Use this option to display and respond to printer control messages.

AS400 Basics Manual - Page 7 of 16 Revised. May 2006
10. Work with all your submitted jobs Use this option to determine if a report or document is ready to be printed. The jobs are listed in order. Interpret the status as follows: JOBQ The job has not yet started. It will run as soon as other jobs are
completed. ACTIVE The computer is processing your job but it is not yet finished.
MSGW There is a message related to the job. Type 7 (Display message) beside the job to view the message.
OUTQ The job has completed. 11. Display all currently active batch jobs
Use this option to determine what other batch jobs are currently using system resources.
12. Display all signed on users Use this option to list all currently signed on users. 13. Work with all job queues
If your job remains in a JOBQ status for a long period of time, use this option to help you determine the reason for the delay.
20. Send a message to another user Use this option to send a message to other users on the system based on their userid. This option is not the same as sending e-mail messages and should not be used for personal mail.
21. Display your messages Use this option to display completion messages about jobs you have submitted and e-mail messages that have not been sent as personal.
22. Change your password Use this option to change your password.
60. Display a menu Use this option to display any valid AS/400 menu that is specified. 90. Sign off Use this option to sign you completely off the system.
AS400 Basics Manual - Page 8 of 16 Revised. May 2006
Establishing Multiple Sessions
Establishing multiple sessions allows you to work in several areas of the AS400 without exiting an area to move to another. Set up a session for each area in which you typically work each day. Additional sessions, up to a maximum of 16, may be established throughout the day as needed.
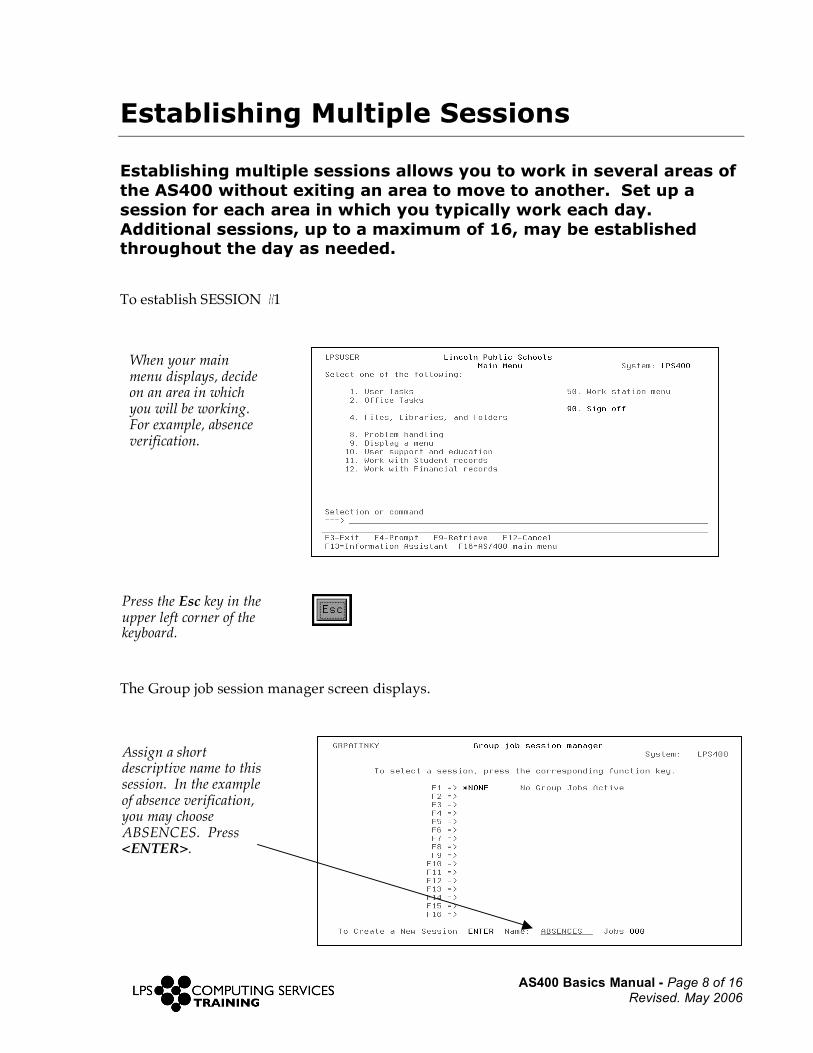
To establish SESSION #1
The Group job session manager screen displays.
When your main menu displays, decide on an area in which you will be working. For example, absence verification.
Press the Esc key in the upper left corner of the keyboard.
Assign a short descriptive name to this session. In the example of absence verification, you may choose ABSENCES. Press <ENTER>.
AS400 Basics Manual - Page 9 of 16 Revised. May 2006
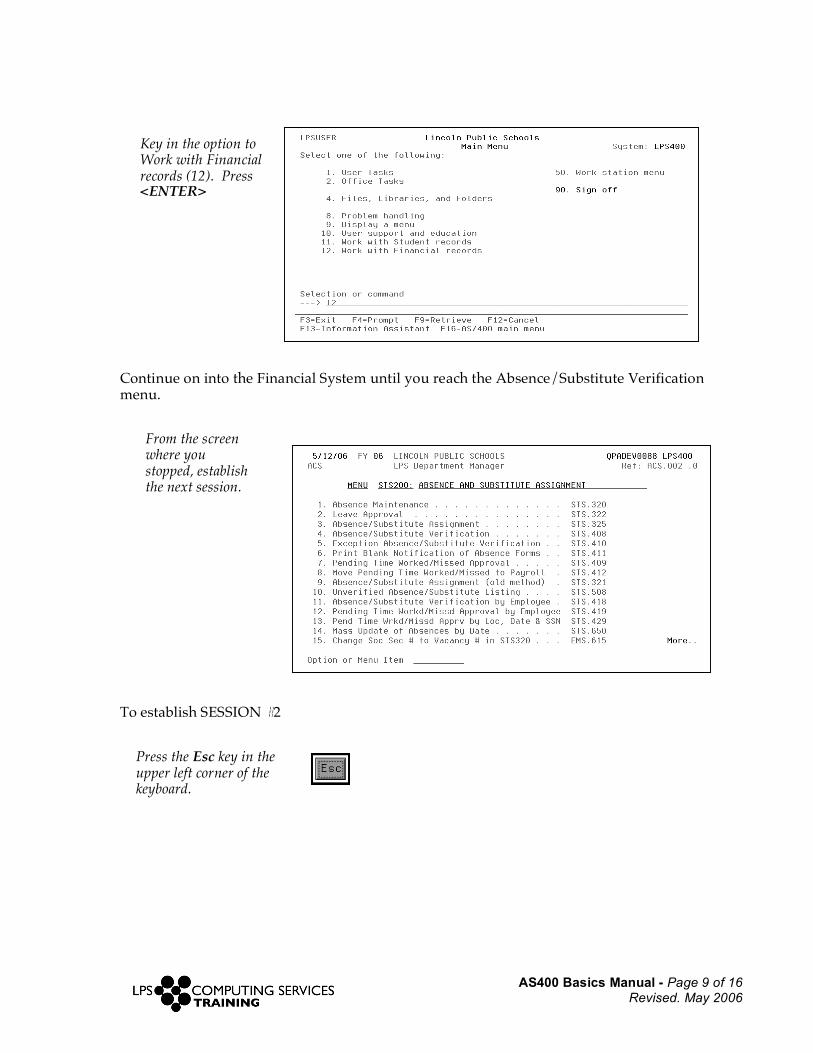
Continue on into the Financial System until you reach the Absence/Substitute Verification menu.
To establish SESSION #2
Key in the option to Work with Financial records (12). Press <ENTER>
Press the Esc key in the upper left corner of the keyboard.
From the screen where you stopped, establish the next session.
AS400 Basics Manual - Page 10 of 16 Revised. May 2006
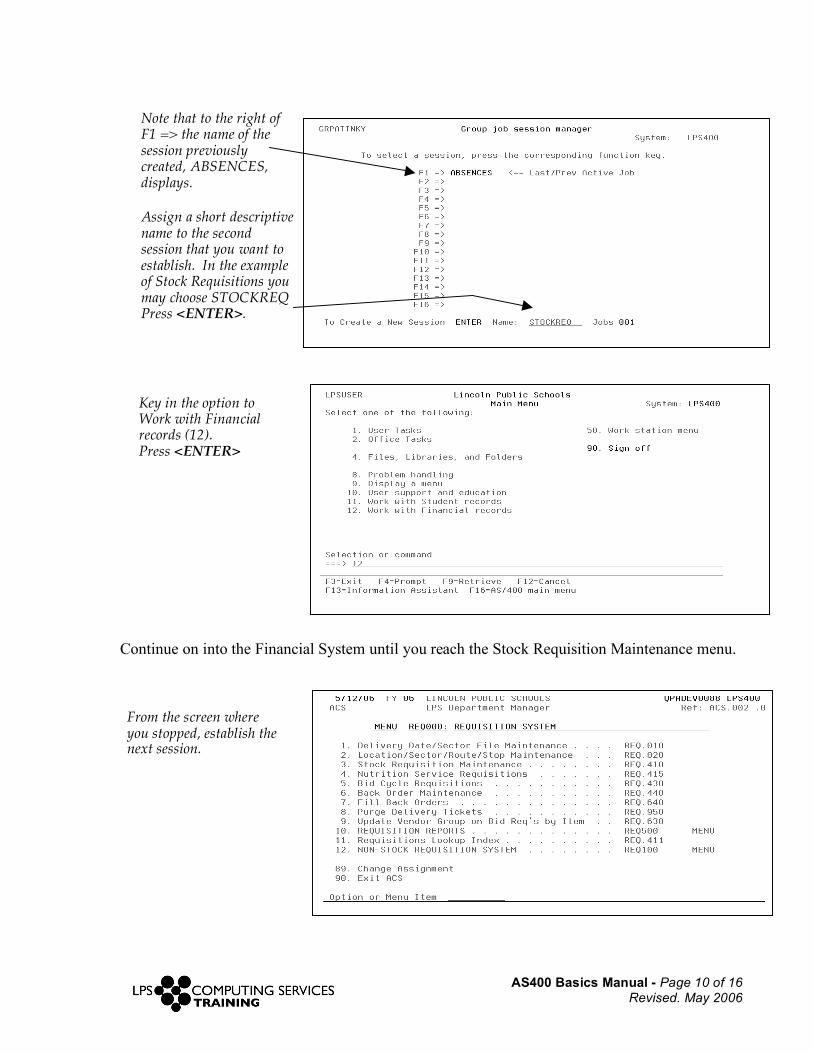
Continue on into the Financial System until you reach the Stock Requisition Maintenance menu.
Note that to the right of F1 => the name of the session previously created, ABSENCES, displays. Assign a short descriptive name to the second session that you want to establish. In the example of Stock Requisitions you may choose STOCKREQ Press <ENTER>.
Key in the option to Work with Financial records (12). Press <ENTER>
From the screen where you stopped, establish the next session.
AS400 Basics Manual - Page 11 of 16 Revised. May 2006
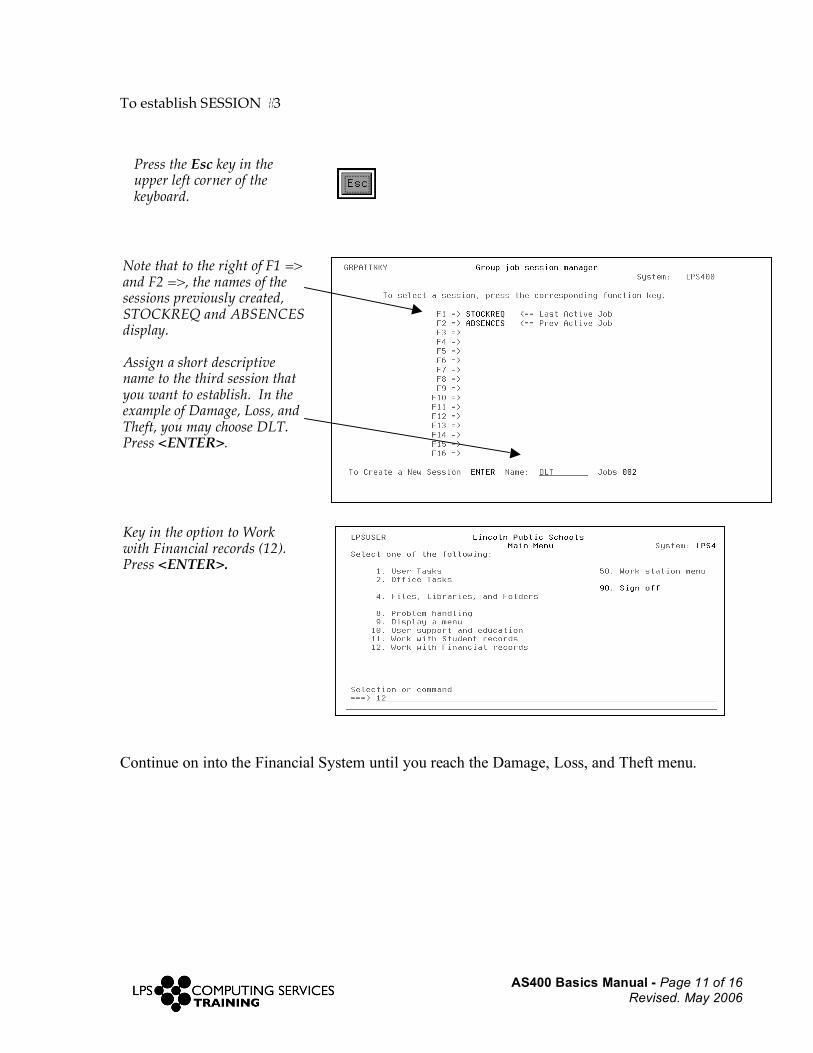
To establish SESSION #3
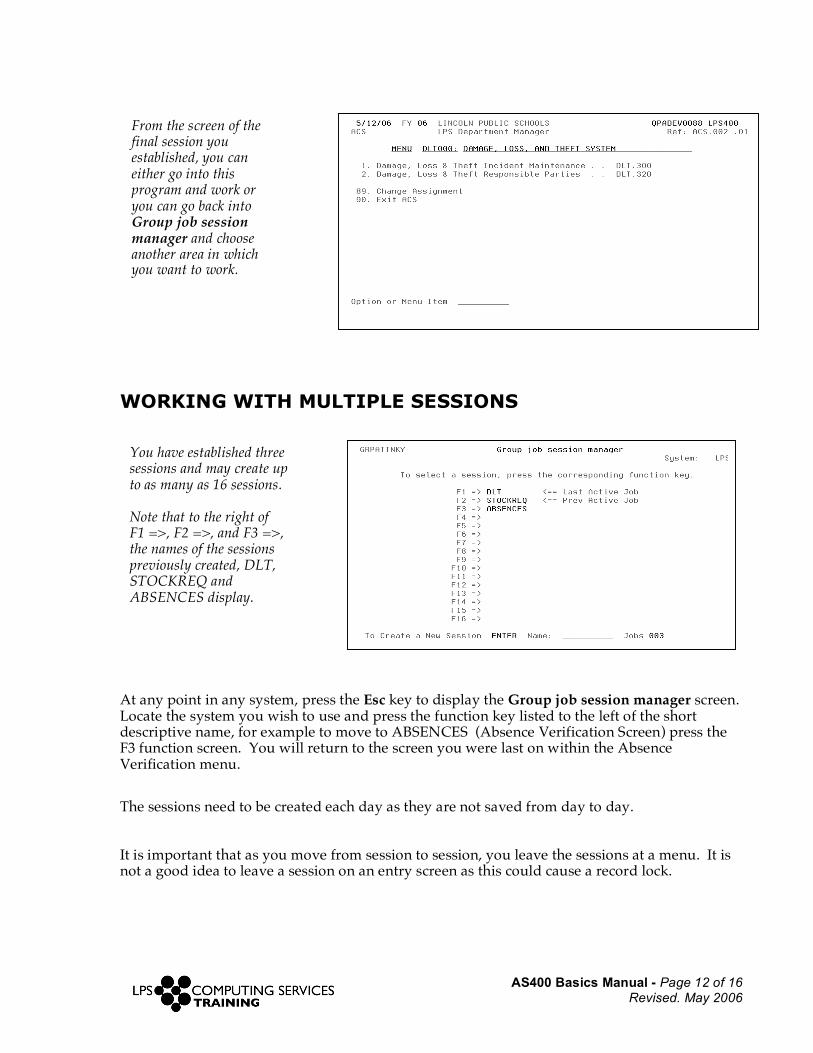
Continue on into the Financial System until you reach the Damage, Loss, and Theft menu.
Press the Esc key in the upper left corner of the keyboard.
Note that to the right of F1 => and F2 =>, the names of the sessions previously created, STOCKREQ and ABSENCES display. Assign a short descriptive name to the third session that you want to establish. In the example of Damage, Loss, and Theft, you may choose DLT. Press <ENTER>.
Key in the option to Work with Financial records (12). Press <ENTER>.
AS400 Basics Manual - Page 12 of 16 Revised. May 2006
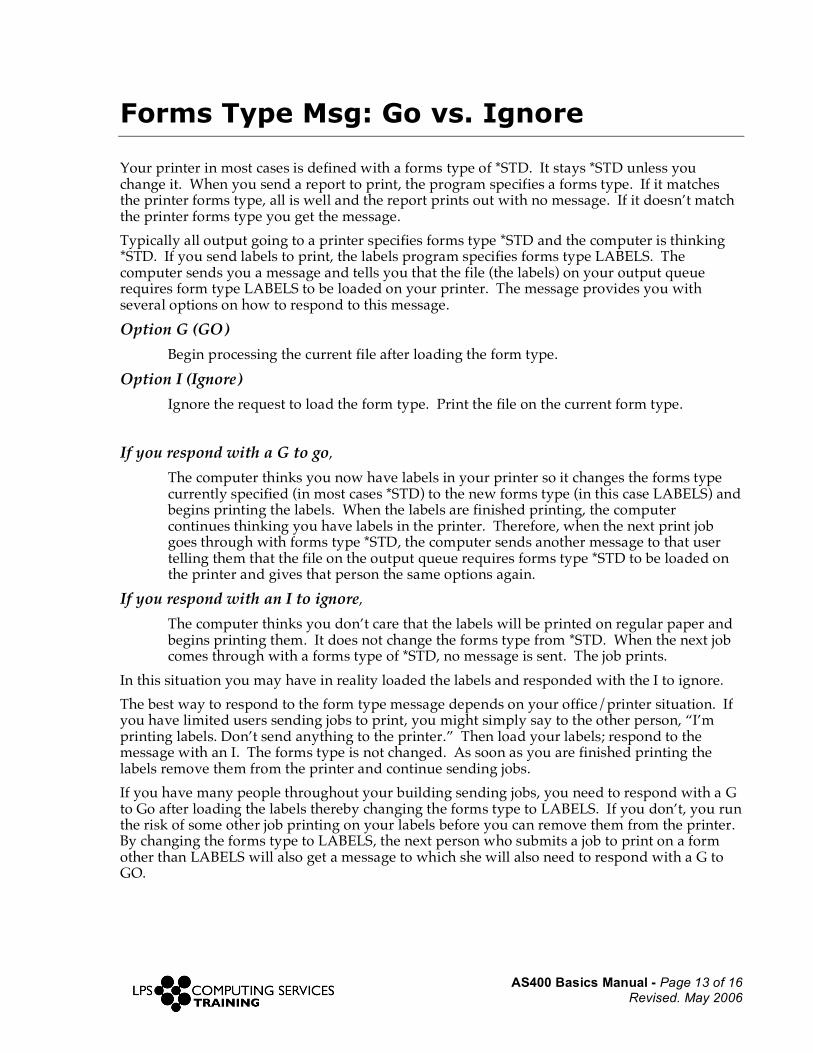
WORKING WITH MULTIPLE SESSIONS
At any point in any system, press the Esc key to display the Group job session manager screen. Locate the system you wish to use and press the function key listed to the left of the short descriptive name, for example to move to ABSENCES (Absence Verification Screen) press the F3 function screen. You will return to the screen you were last on within the Absence Verification menu.
The sessions need to be created each day as they are not saved from day to day. It is important that as you move from session to session, you leave the sessions at a menu. It is not a good idea to leave a session on an entry screen as this could cause a record lock.
You have established three sessions and may create up to as many as 16 sessions. Note that to the right of F1 =>, F2 =>, and F3 =>, the names of the sessions previously created, DLT, STOCKREQ and ABSENCES display.
From the screen of the final session you established, you can either go into this program and work or you can go back into Group job session manager and choose another area in which you want to work.
AS400 Basics Manual - Page 13 of 16 Revised. May 2006
Forms Type Msg: Go vs. Ignore
Your printer in most cases is defined with a forms type of *STD. It stays *STD unless you change it. When you send a report to print, the program specifies a forms type. If it matches the printer forms type, all is well and the report prints out with no message. If it doesn’t match the printer forms type you get the message. Typically all output going to a printer specifies forms type *STD and the computer is thinking *STD. If you send labels to print, the labels program specifies forms type LABELS. The computer sends you a message and tells you that the file (the labels) on your output queue requires form type LABELS to be loaded on your printer. The message provides you with several options on how to respond to this message. Option G (GO)
Begin processing the current file after loading the form type. Option I (Ignore)
Ignore the request to load the form type. Print the file on the current form type. If you respond with a G to go,
The computer thinks you now have labels in your printer so it changes the forms type currently specified (in most cases *STD) to the new forms type (in this case LABELS) and begins printing the labels. When the labels are finished printing, the computer continues thinking you have labels in the printer. Therefore, when the next print job goes through with forms type *STD, the computer sends another message to that user telling them that the file on the output queue requires forms type *STD to be loaded on the printer and gives that person the same options again.
If you respond with an I to ignore, The computer thinks you don’t care that the labels will be printed on regular paper and begins printing them. It does not change the forms type from *STD. When the next job comes through with a forms type of *STD, no message is sent. The job prints.
In this situation you may have in reality loaded the labels and responded with the I to ignore. The best way to respond to the form type message depends on your office/printer situation. If you have limited users sending jobs to print, you might simply say to the other person, “I’m printing labels. Don’t send anything to the printer.” Then load your labels; respond to the message with an I. The forms type is not changed. As soon as you are finished printing the labels remove them from the printer and continue sending jobs. If you have many people throughout your building sending jobs, you need to respond with a G to Go after loading the labels thereby changing the forms type to LABELS. If you don’t, you run the risk of some other job printing on your labels before you can remove them from the printer. By changing the forms type to LABELS, the next person who submits a job to print on a form other than LABELS will also get a message to which she will also need to respond with a G to GO.
AS400 Basics Manual - Page 14 of 16 Revised. May 2006
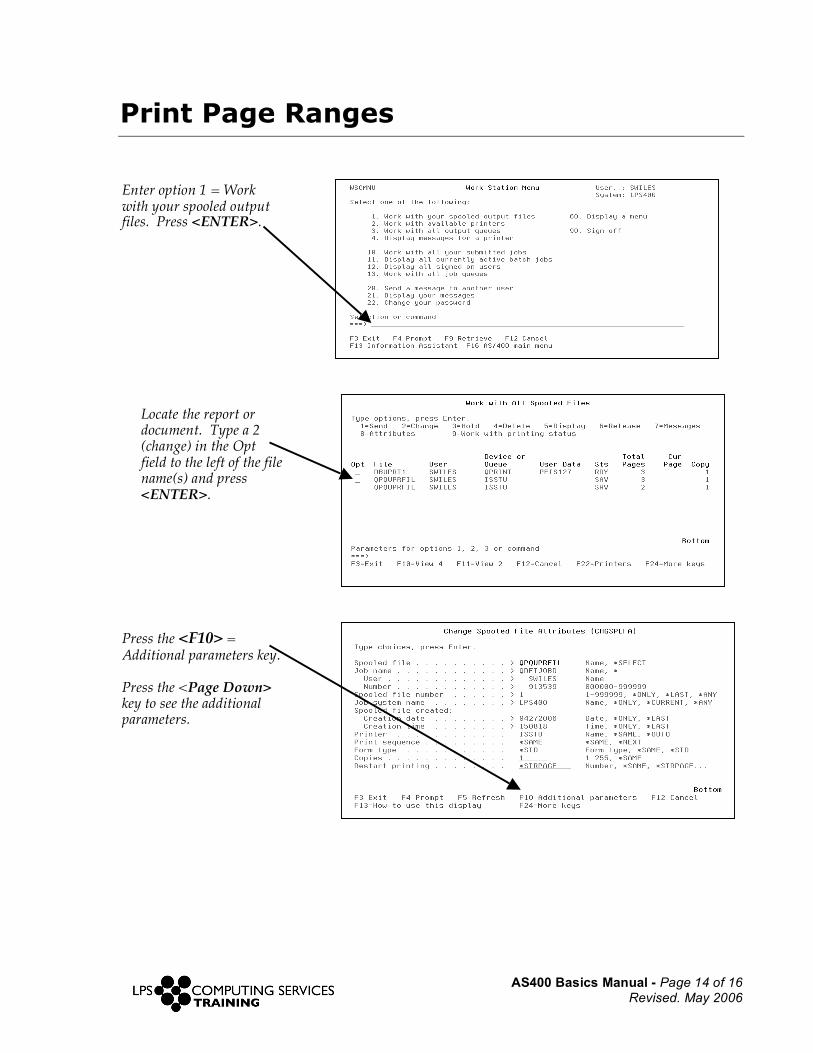
Enter option 1 = Work with your spooled output files. Press <ENTER>.
Print Page Ranges
Locate the report or document. Type a 2 (change) in the Opt field to the left of the file name(s) and press <ENTER>.
Press the <F10> = Additional parameters key. Press the <Page Down> key to see the additional parameters.
AS400 Basics Manual - Page 15 of 16 Revised. May 2006
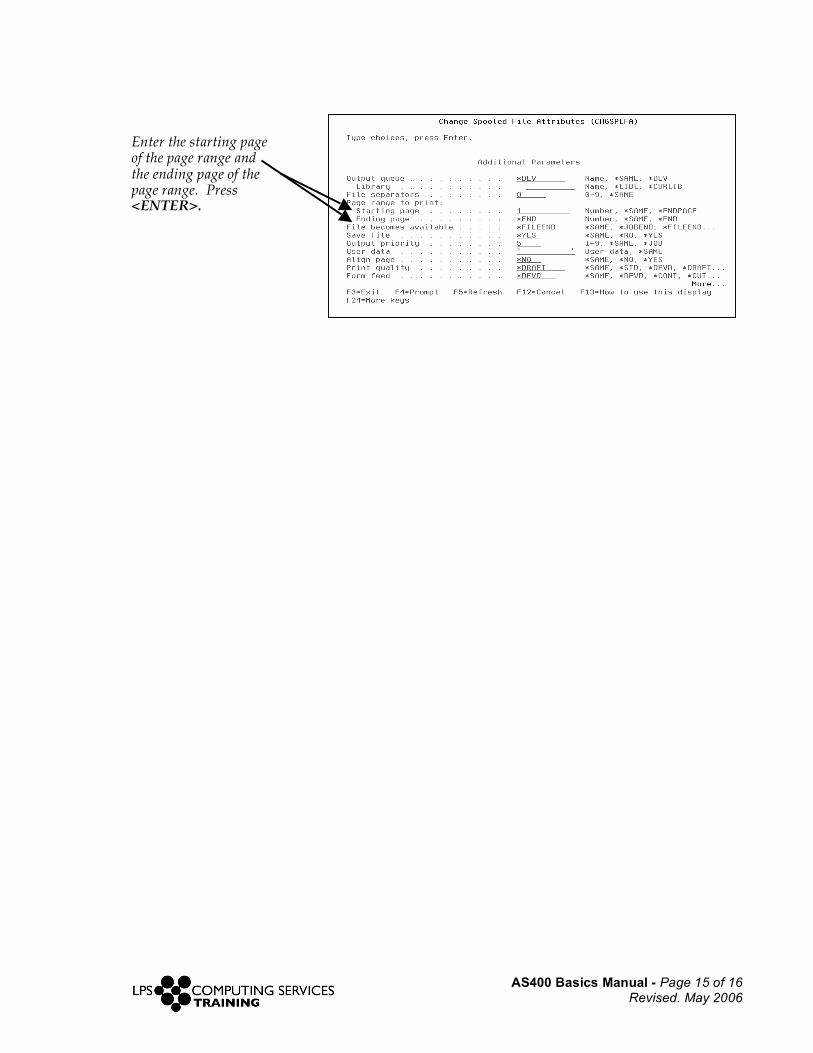
Enter the starting page of the page range and the ending page of the page range. Press <ENTER>.
AS400 Basics Manual - Page 16 of 16 Revised. May 2006
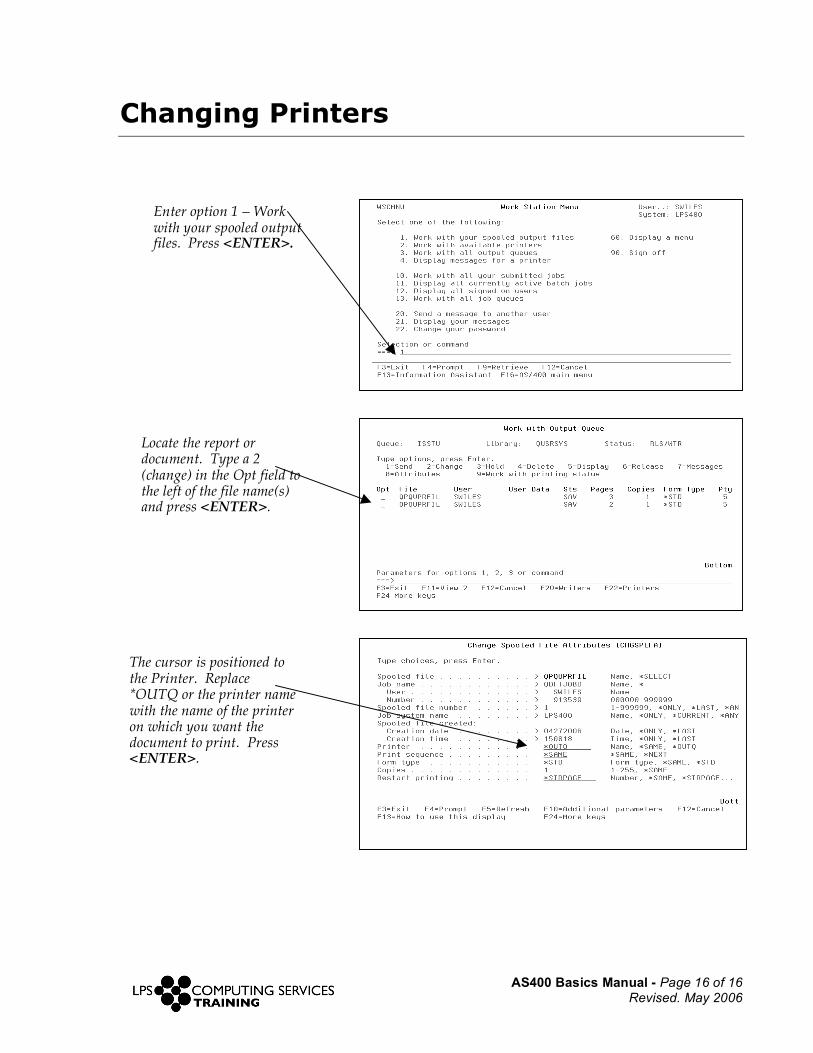
Changing Printers
Enter option 1 – Work with your spooled output files. Press <ENTER>.
Locate the report or document. Type a 2 (change) in the Opt field to the left of the file name(s) and press <ENTER>.
The cursor is positioned to the Printer. Replace *OUTQ or the printer name with the name of the printer on which you want the document to print. Press <ENTER>.