Embed Size (px)
Citation preview
Animated Skydome
P a g e | 2
3DBrushwork.com
CHAPTER 01
Making the Sky dome
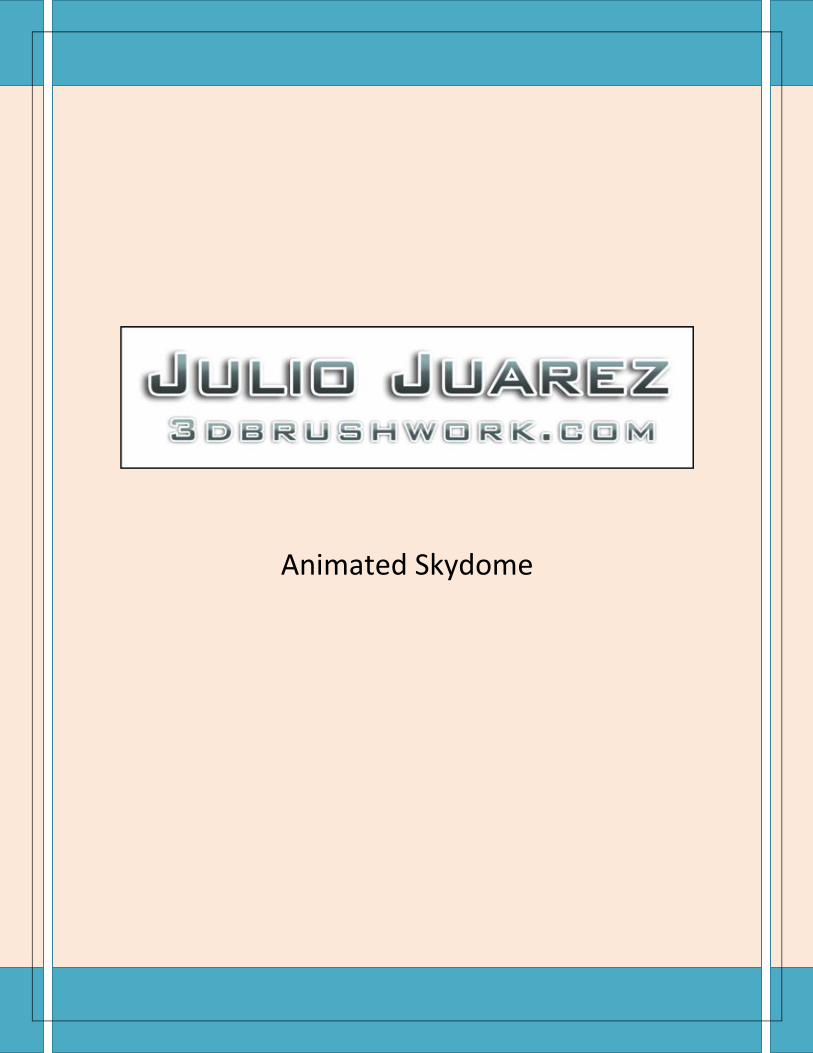
Hello everyone, my name is Julio Juarez and I will be walking you through the process of creating a
realistic animated sky dome using UDK. I will also use Photoshop and 3D studio Max. These techniques
are applicable in other 3D software.
First we will start by creating a sphere, then deleting the bottom of it. As a result we will get a dome that
we'll later use inside UDK. Then Scale it down slightly on the Z-axis.
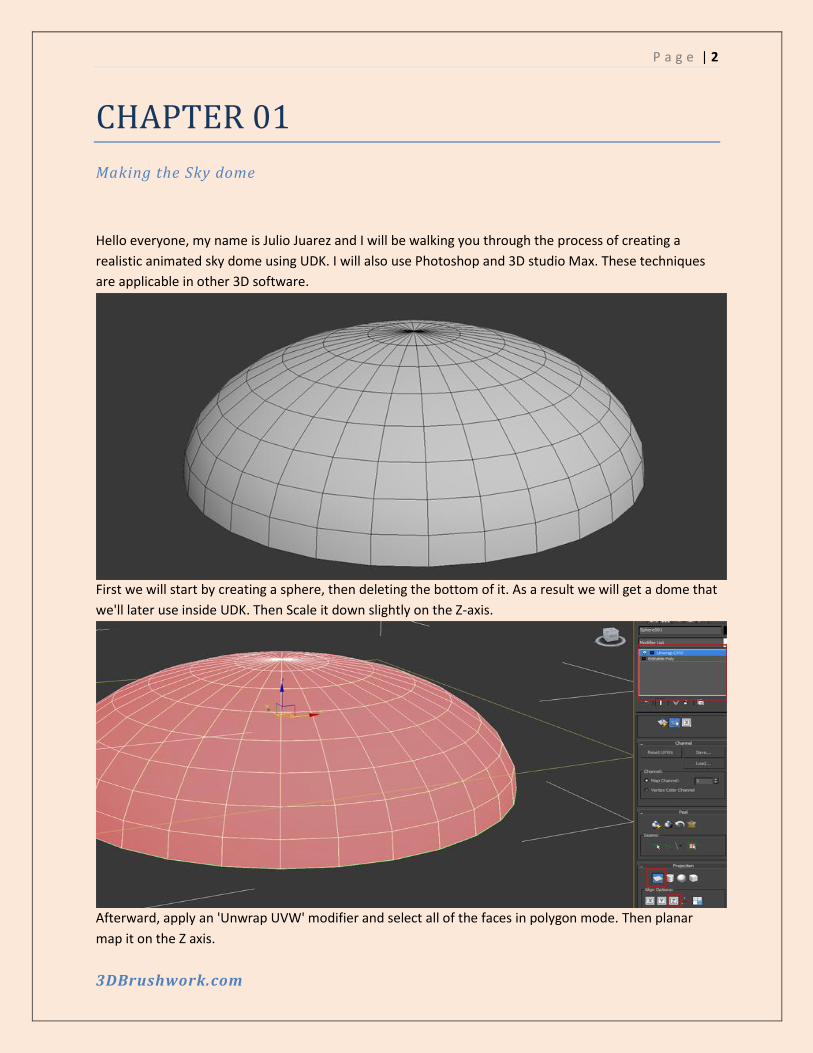
Afterward, apply an 'Unwrap UVW' modifier and select all of the faces in polygon mode. Then planar
map it on the Z axis.
P a g e | 3
3DBrushwork.com
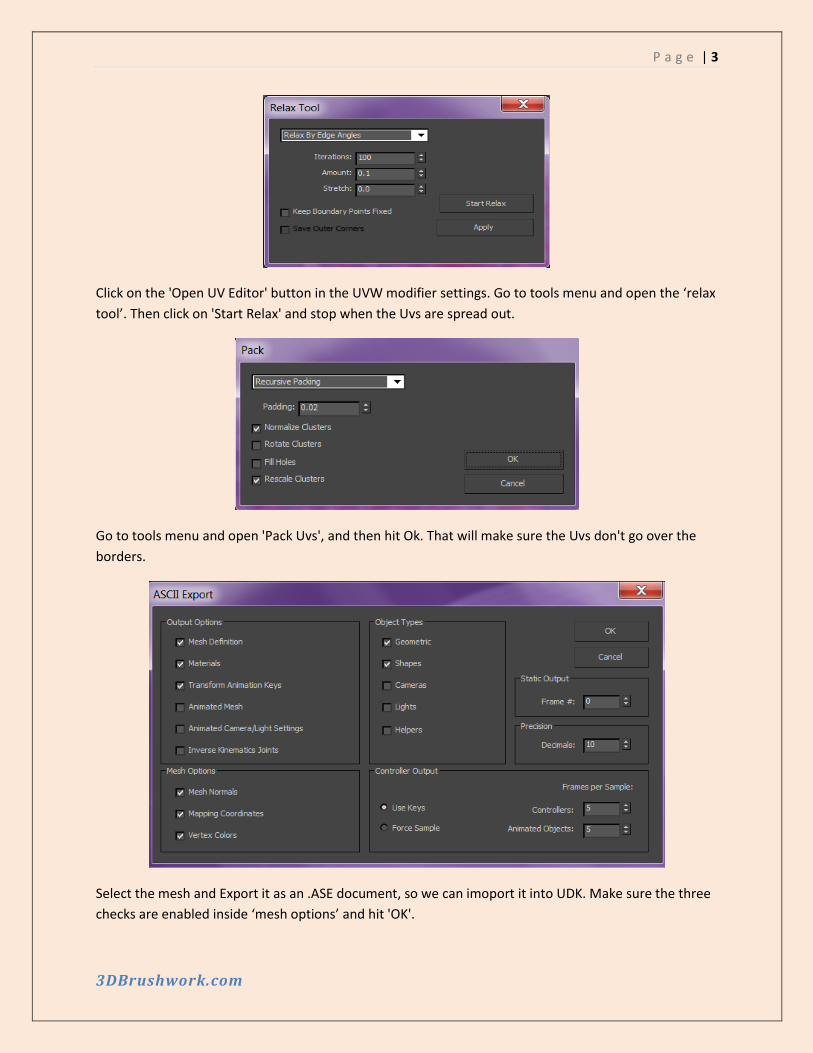
Click on the 'Open UV Editor' button in the UVW modifier settings. Go to tools menu and open the ‘relax
tool’. Then click on 'Start Relax' and stop when the Uvs are spread out.
Go to tools menu and open 'Pack Uvs', and then hit Ok. That will make sure the Uvs don't go over the
borders.
Select the mesh and Export it as an .ASE document, so we can imoport it into UDK. Make sure the three
checks are enabled inside ‘mesh options’ and hit 'OK'.
P a g e | 4
3DBrushwork.com
CHAPTER 02
Making the Sky Texture
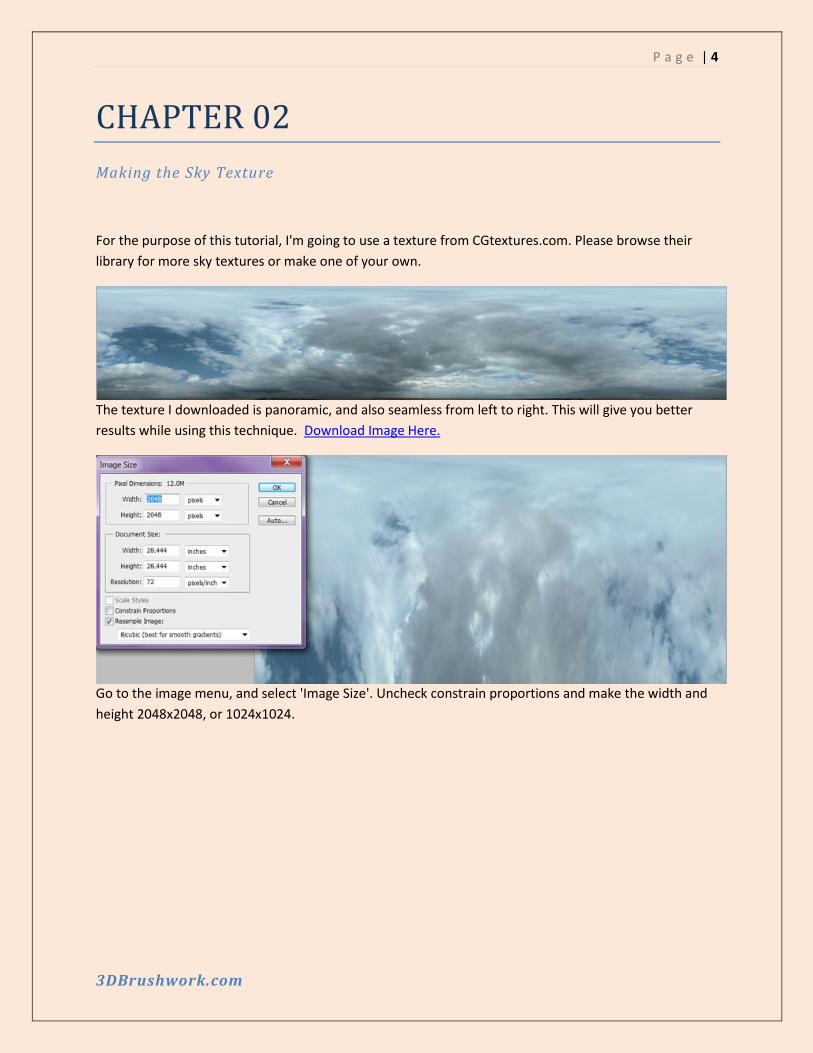
For the purpose of this tutorial, I'm going to use a texture from CGtextures.com. Please browse their
library for more sky textures or make one of your own.
The texture I downloaded is panoramic, and also seamless from left to right. This will give you better
results while using this technique. Download Image Here.
Go to the image menu, and select 'Image Size'. Uncheck constrain proportions and make the width and
height 2048x2048, or 1024x1024.
P a g e | 5
3DBrushwork.com
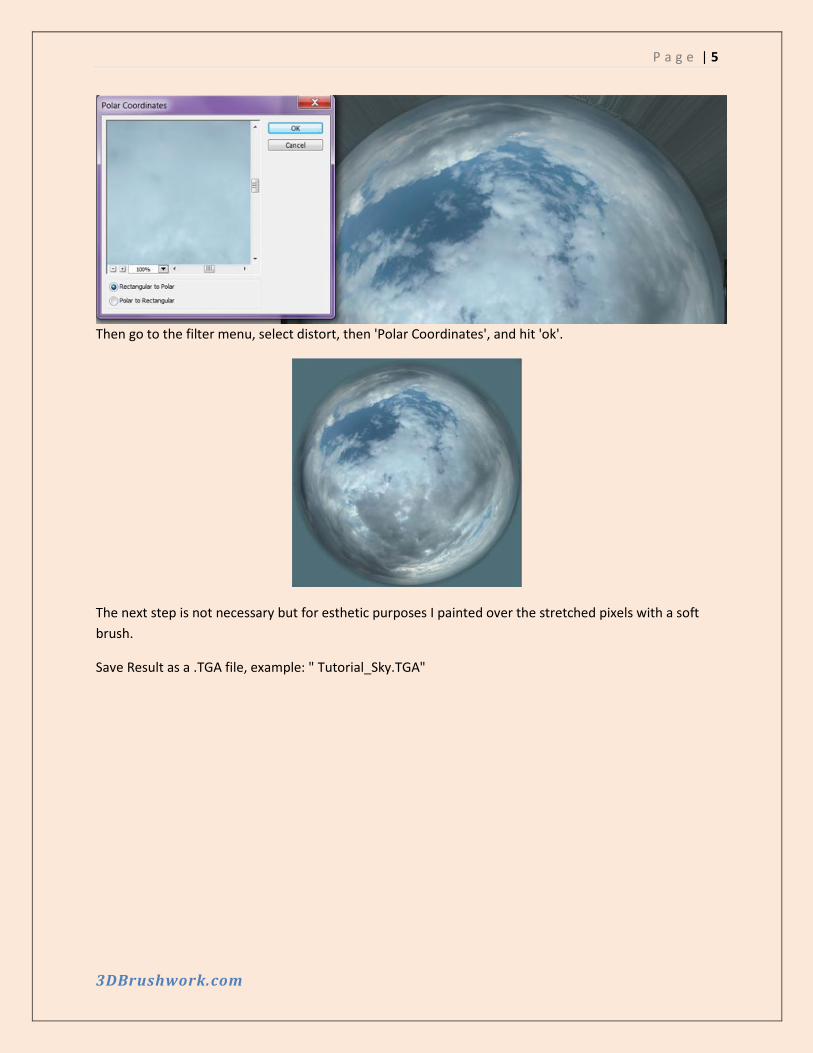
Then go to the filter menu, select distort, then 'Polar Coordinates', and hit 'ok'.
The next step is not necessary but for esthetic purposes I painted over the stretched pixels with a soft
brush.
Save Result as a .TGA file, example: " Tutorial_Sky.TGA"
P a g e | 6
3DBrushwork.com
CHAPTER 03
Creating Masks
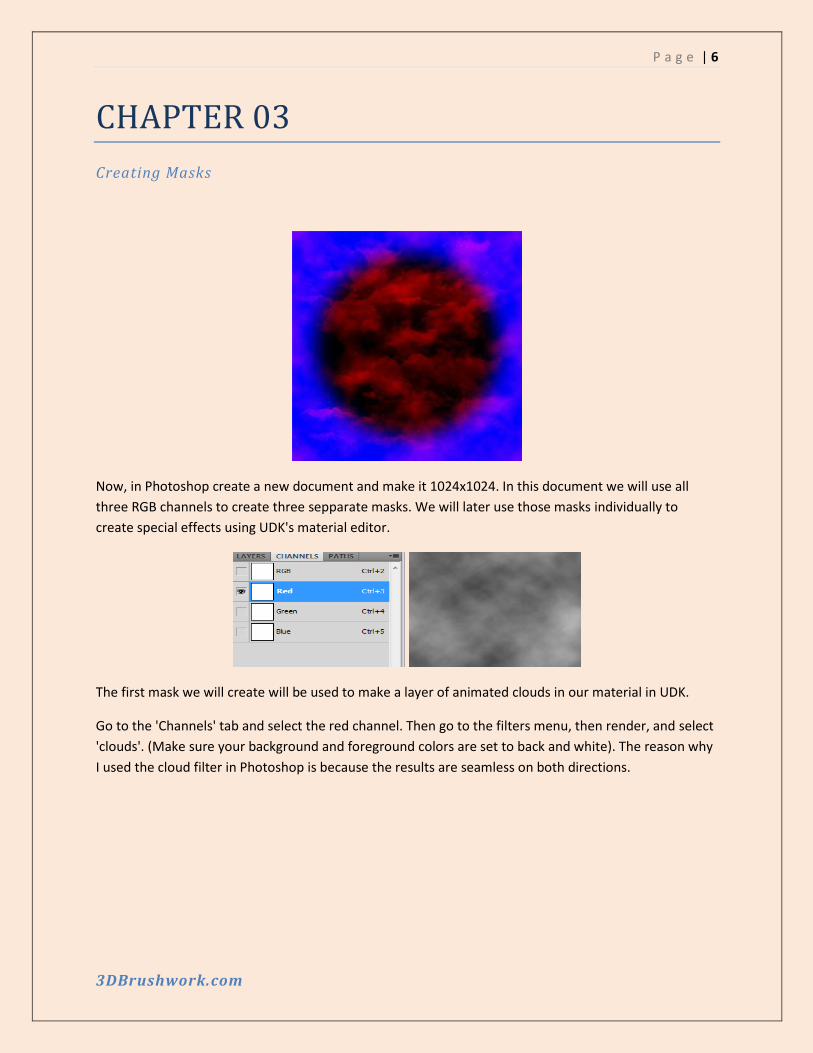
Now, in Photoshop create a new document and make it 1024x1024. In this document we will use all
three RGB channels to create three sepparate masks. We will later use those masks individually to
create special effects using UDK's material editor.
The first mask we will create will be used to make a layer of animated clouds in our material in UDK.
Go to the 'Channels' tab and select the red channel. Then go to the filters menu, then render, and select
'clouds'. (Make sure your background and foreground colors are set to back and white). The reason why
I used the cloud filter in Photoshop is because the results are seamless on both directions.
P a g e | 7
3DBrushwork.com
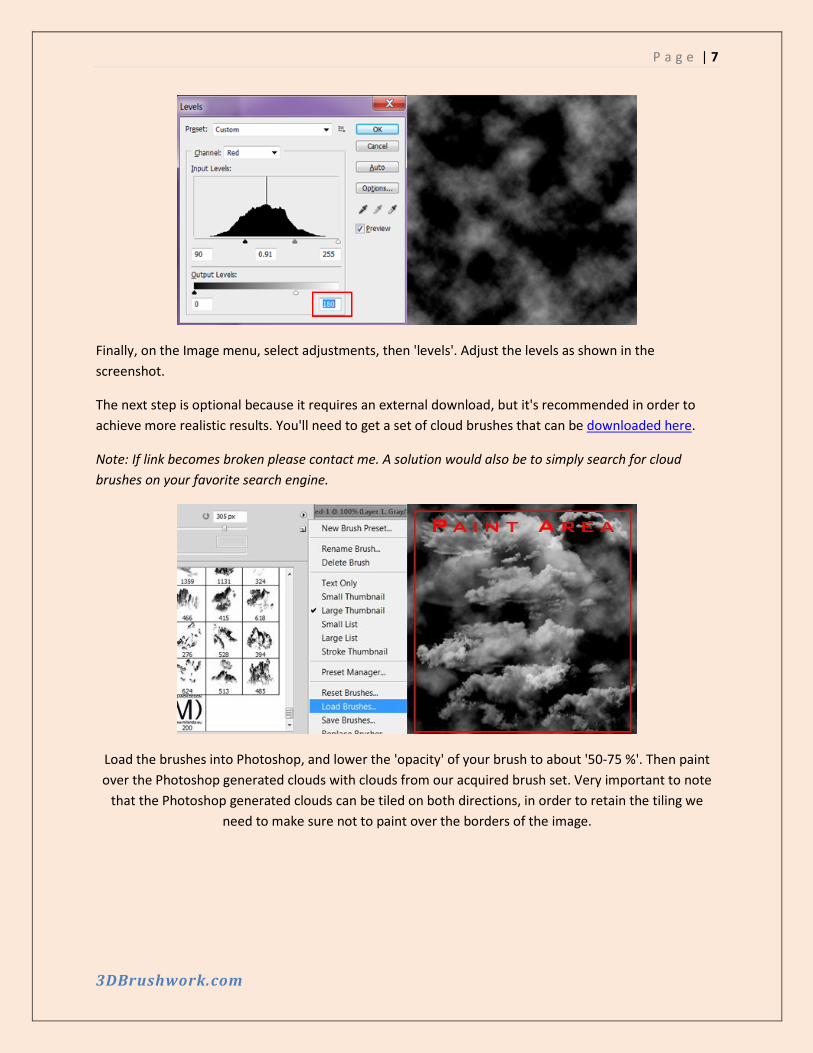
Finally, on the Image menu, select adjustments, then 'levels'. Adjust the levels as shown in the
screenshot.
The next step is optional because it requires an external download, but it's recommended in order to
achieve more realistic results. You'll need to get a set of cloud brushes that can be downloaded here.
Note: If link becomes broken please contact me. A solution would also be to simply search for cloud
brushes on your favorite search engine.
Load the brushes into Photoshop, and lower the 'opacity' of your brush to about '50-75 %'. Then paint
over the Photoshop generated clouds with clouds from our acquired brush set. Very important to note
that the Photoshop generated clouds can be tiled on both directions, in order to retain the tiling we
need to make sure not to paint over the borders of the image.
P a g e | 8
3DBrushwork.com
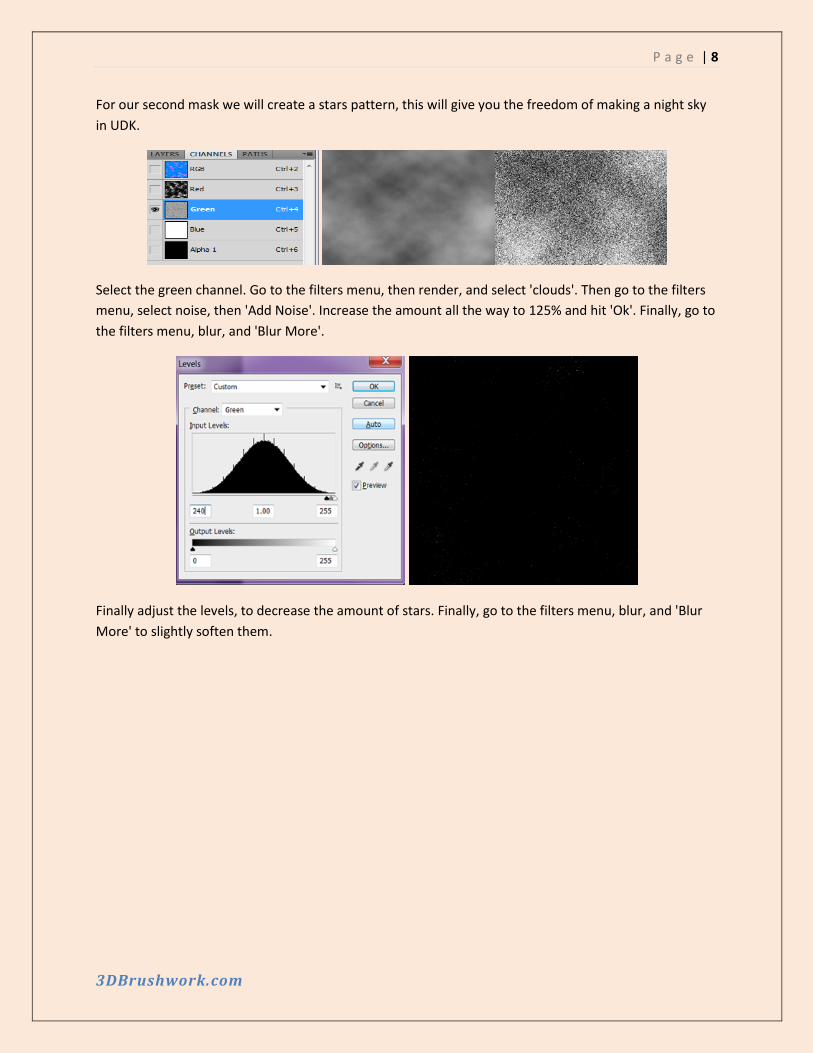
For our second mask we will create a stars pattern, this will give you the freedom of making a night sky
in UDK.
Select the green channel. Go to the filters menu, then render, and select 'clouds'. Then go to the filters
menu, select noise, then 'Add Noise'. Increase the amount all the way to 125% and hit 'Ok'. Finally, go to
the filters menu, blur, and 'Blur More'.
Finally adjust the levels, to decrease the amount of stars. Finally, go to the filters menu, blur, and 'Blur
More' to slightly soften them.
P a g e | 9
3DBrushwork.com
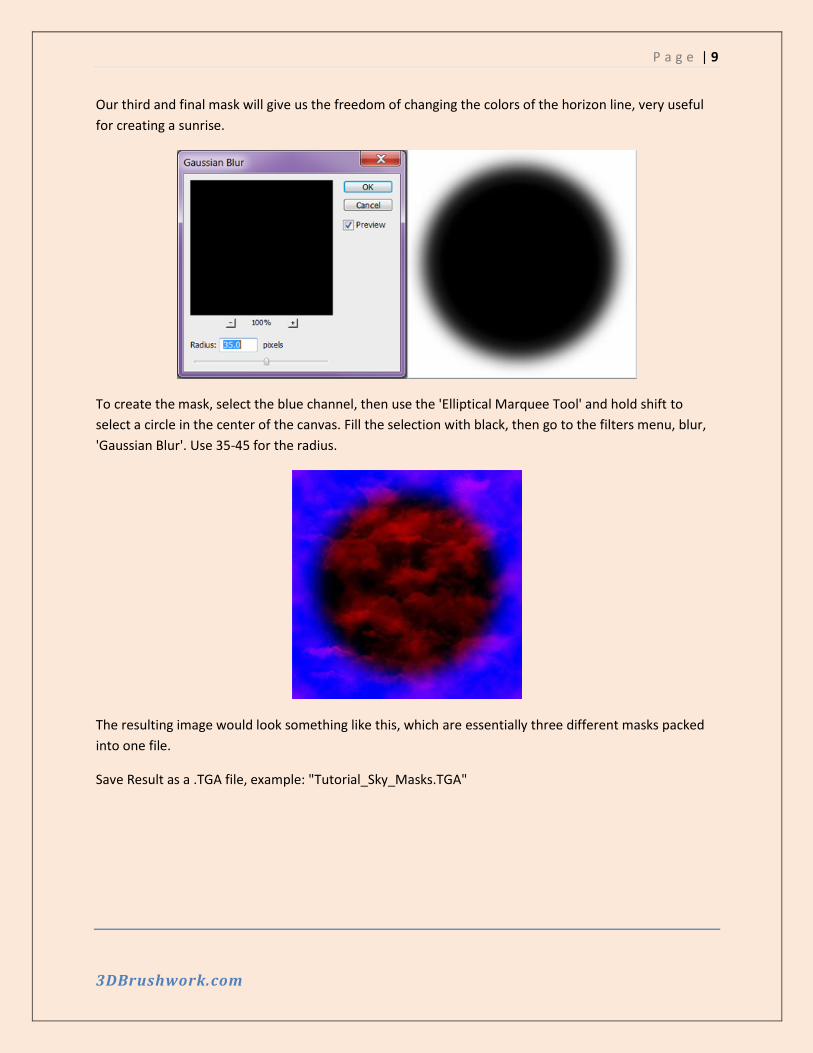
Our third and final mask will give us the freedom of changing the colors of the horizon line, very useful
for creating a sunrise.
To create the mask, select the blue channel, then use the 'Elliptical Marquee Tool' and hold shift to
select a circle in the center of the canvas. Fill the selection with black, then go to the filters menu, blur,
'Gaussian Blur'. Use 35-45 for the radius.
The resulting image would look something like this, which are essentially three different masks packed
into one file.
Save Result as a .TGA file, example: "Tutorial_Sky_Masks.TGA"
P a g e | 10
3DBrushwork.com
CHAPTER 04
Creating and Using the Material in UDK
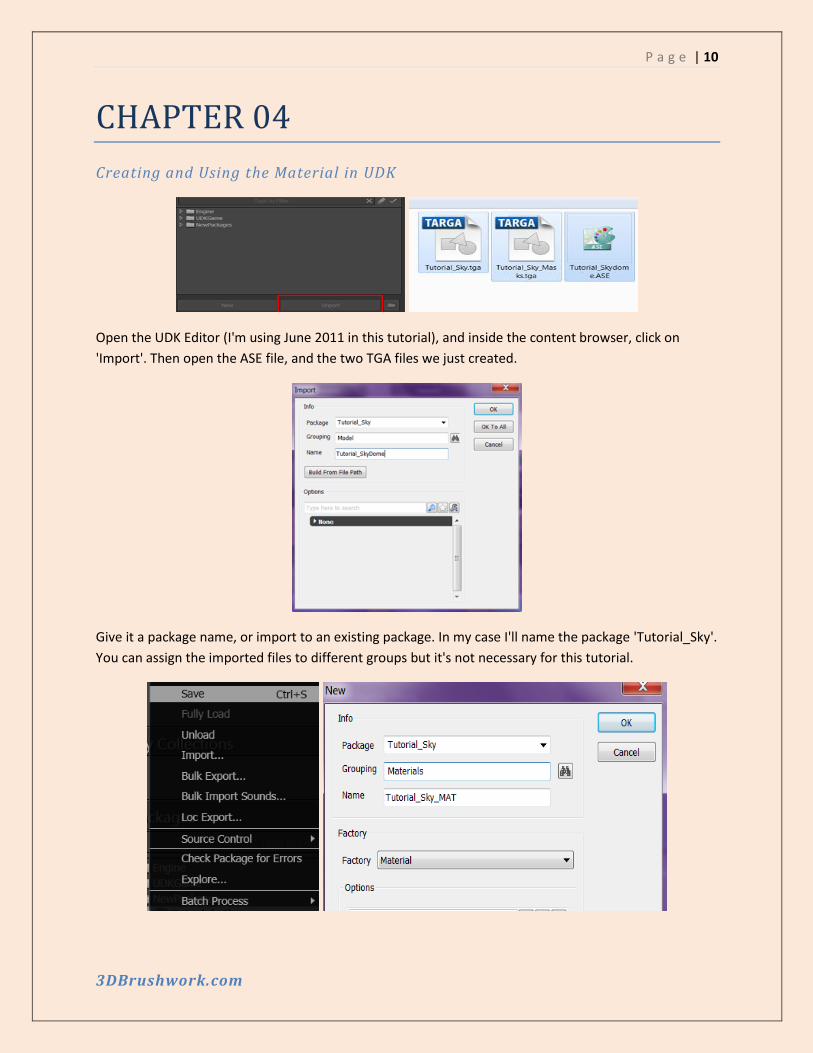
Open the UDK Editor (I'm using June 2011 in this tutorial), and inside the content browser, click on
'Import'. Then open the ASE file, and the two TGA files we just created.
Give it a package name, or import to an existing package. In my case I'll name the package 'Tutorial_Sky'.
You can assign the imported files to different groups but it's not necessary for this tutorial.

P a g e | 11
3DBrushwork.com
Make sure you save the package, and create a new material inside that same package. I named the new
material 'Tutorial_Sky_MAT', you can use any name that you prefer.
In the material editor window create two Texture Samples, the shortcut to create them is holding 'T' on
the keyboard and clicking on an empty area.
In the content browser, select the sky texture and assign it to one of the empty texture samples. Do the
same for the Masks texture.
Then select the Sky dome static mesh, and apply it to the preview window in the material editor. This is
done by using the green arrow titled 'Use Selected Static Mesh in Content Browser'. Finally, make sure
'two sided' is checked on the material properties.
P a g e | 12
3DBrushwork.com
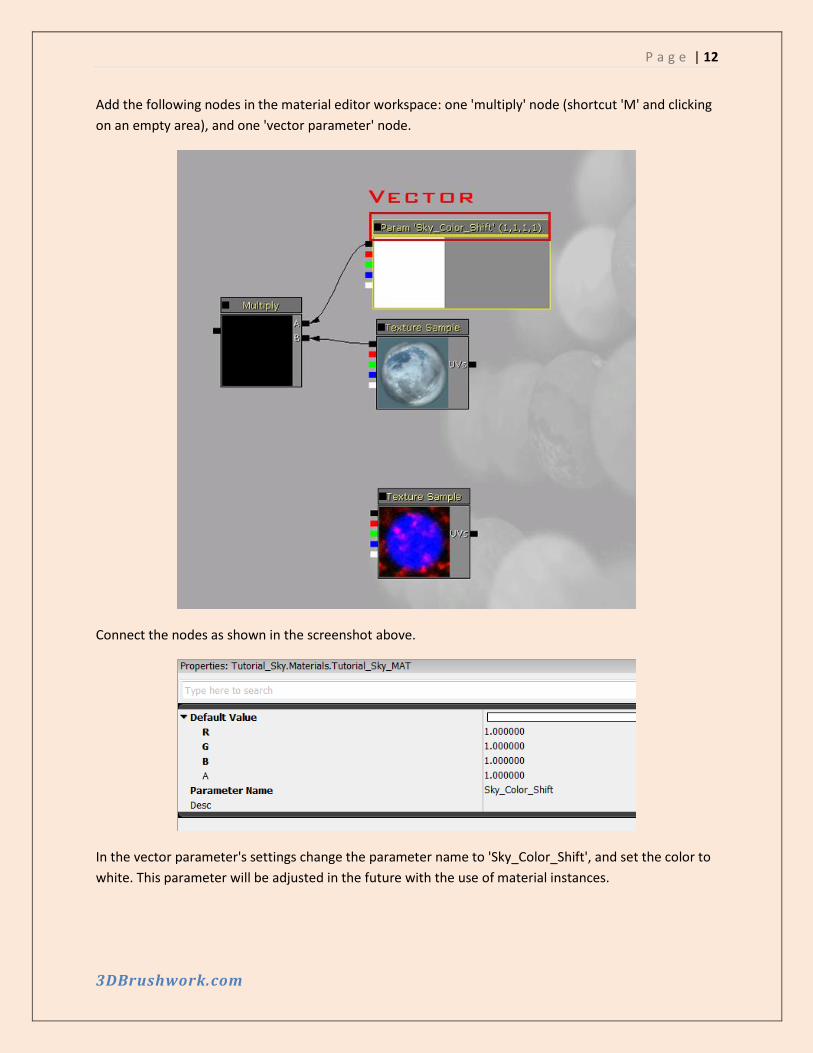
Add the following nodes in the material editor workspace: one 'multiply' node (shortcut 'M' and clicking
on an empty area), and one 'vector parameter' node.
Connect the nodes as shown in the screenshot above.
In the vector parameter's settings change the parameter name to 'Sky_Color_Shift', and set the color to
white. This parameter will be adjusted in the future with the use of material instances.
P a g e | 13
3DBrushwork.com
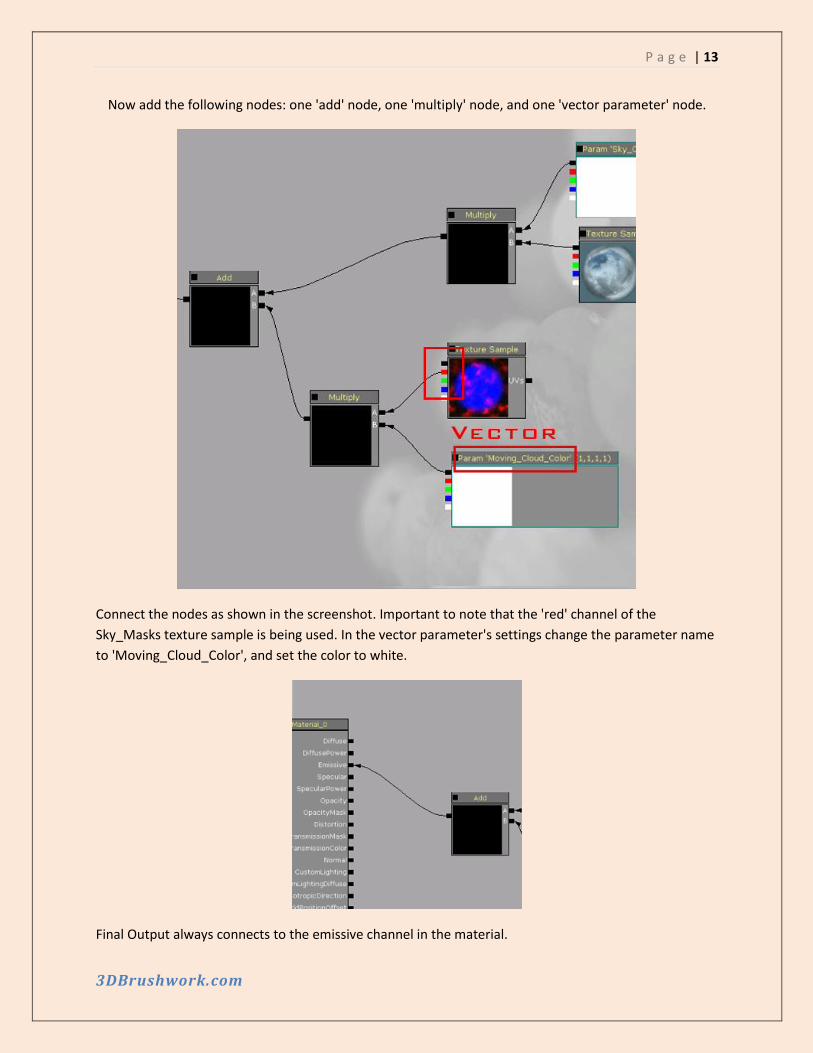
Now add the following nodes: one 'add' node, one 'multiply' node, and one 'vector parameter' node.
Connect the nodes as shown in the screenshot. Important to note that the 'red' channel of the
Sky_Masks texture sample is being used. In the vector parameter's settings change the parameter name
to 'Moving_Cloud_Color', and set the color to white.
Final Output always connects to the emissive channel in the material.
P a g e | 14
3DBrushwork.com
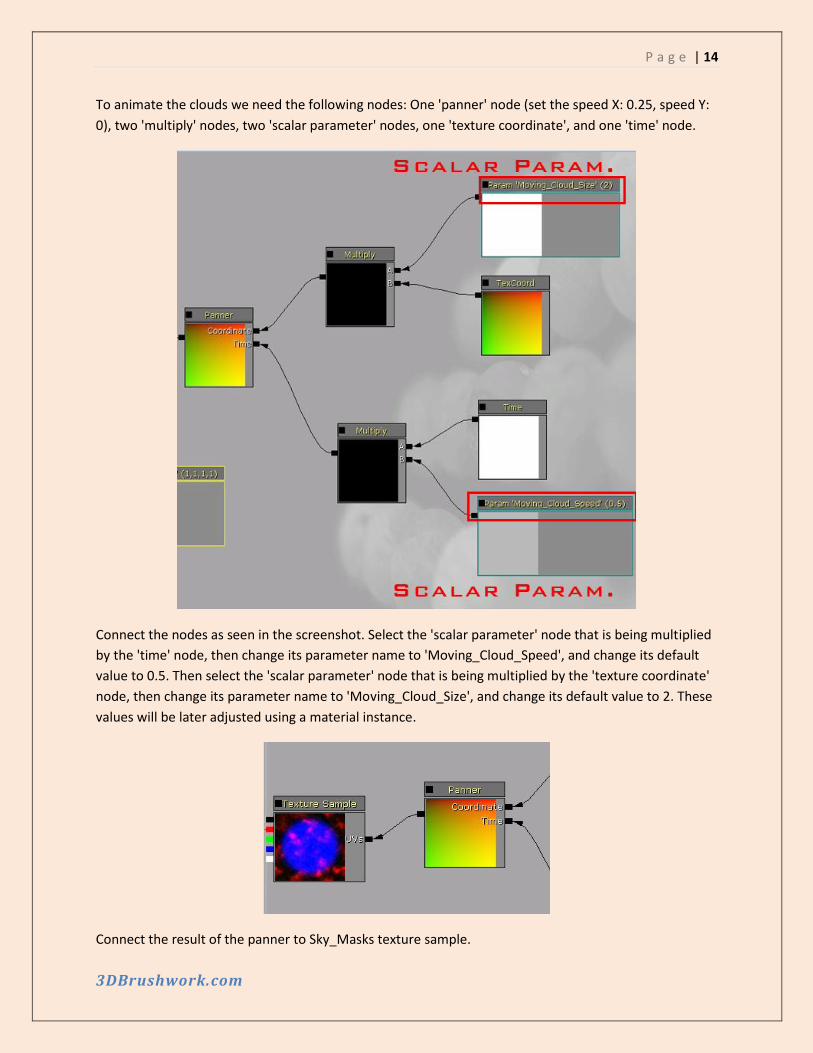
To animate the clouds we need the following nodes: One 'panner' node (set the speed X: 0.25, speed Y:
0), two 'multiply' nodes, two 'scalar parameter' nodes, one 'texture coordinate', and one 'time' node.
Connect the nodes as seen in the screenshot. Select the 'scalar parameter' node that is being multiplied
by the 'time' node, then change its parameter name to 'Moving_Cloud_Speed', and change its default
value to 0.5. Then select the 'scalar parameter' node that is being multiplied by the 'texture coordinate'
node, then change its parameter name to 'Moving_Cloud_Size', and change its default value to 2. These
values will be later adjusted using a material instance.
Connect the result of the panner to Sky_Masks texture sample.
P a g e | 15
3DBrushwork.com
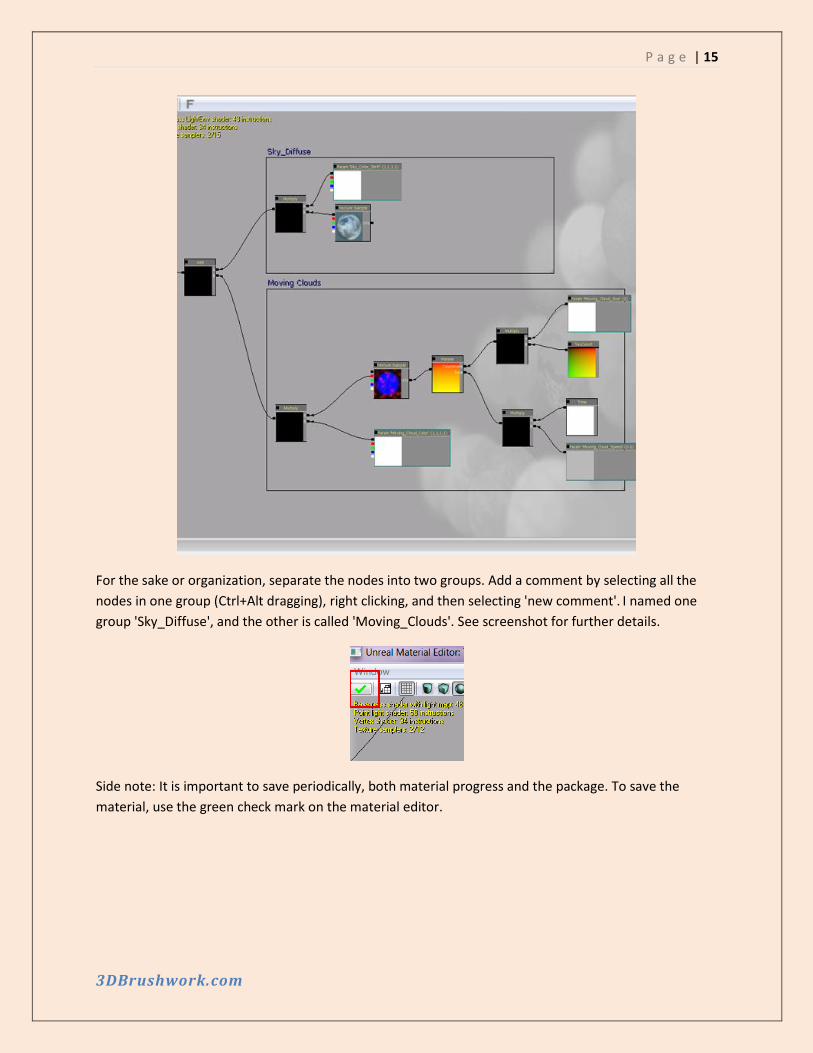
For the sake or organization, separate the nodes into two groups. Add a comment by selecting all the
nodes in one group (Ctrl+Alt dragging), right clicking, and then selecting 'new comment'. I named one
group 'Sky_Diffuse', and the other is called 'Moving_Clouds'. See screenshot for further details.
Side note: It is important to save periodically, both material progress and the package. To save the
material, use the green check mark on the material editor.
P a g e | 16
3DBrushwork.com
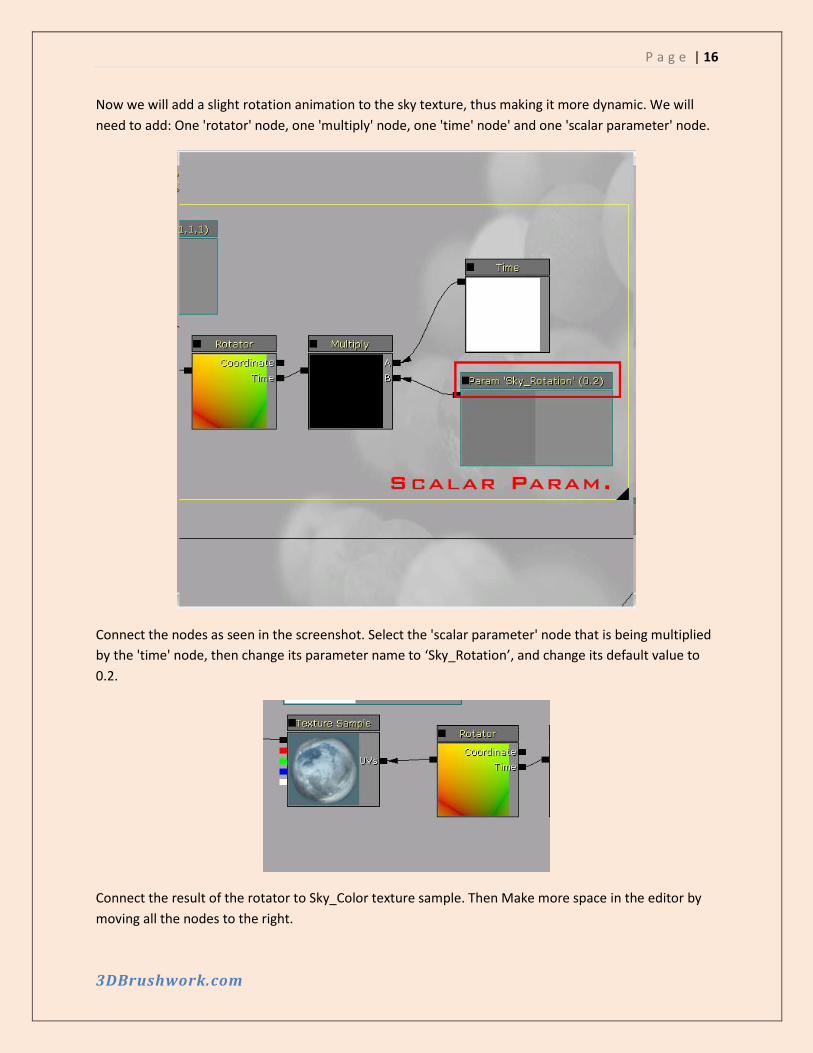
Now we will add a slight rotation animation to the sky texture, thus making it more dynamic. We will
need to add: One 'rotator' node, one 'multiply' node, one 'time' node' and one 'scalar parameter' node.
Connect the nodes as seen in the screenshot. Select the 'scalar parameter' node that is being multiplied
by the 'time' node, then change its parameter name to ‘Sky_Rotation’, and change its default value to
0.2.
Connect the result of the rotator to Sky_Color texture sample. Then Make more space in the editor by
moving all the nodes to the right.
P a g e | 17
3DBrushwork.com
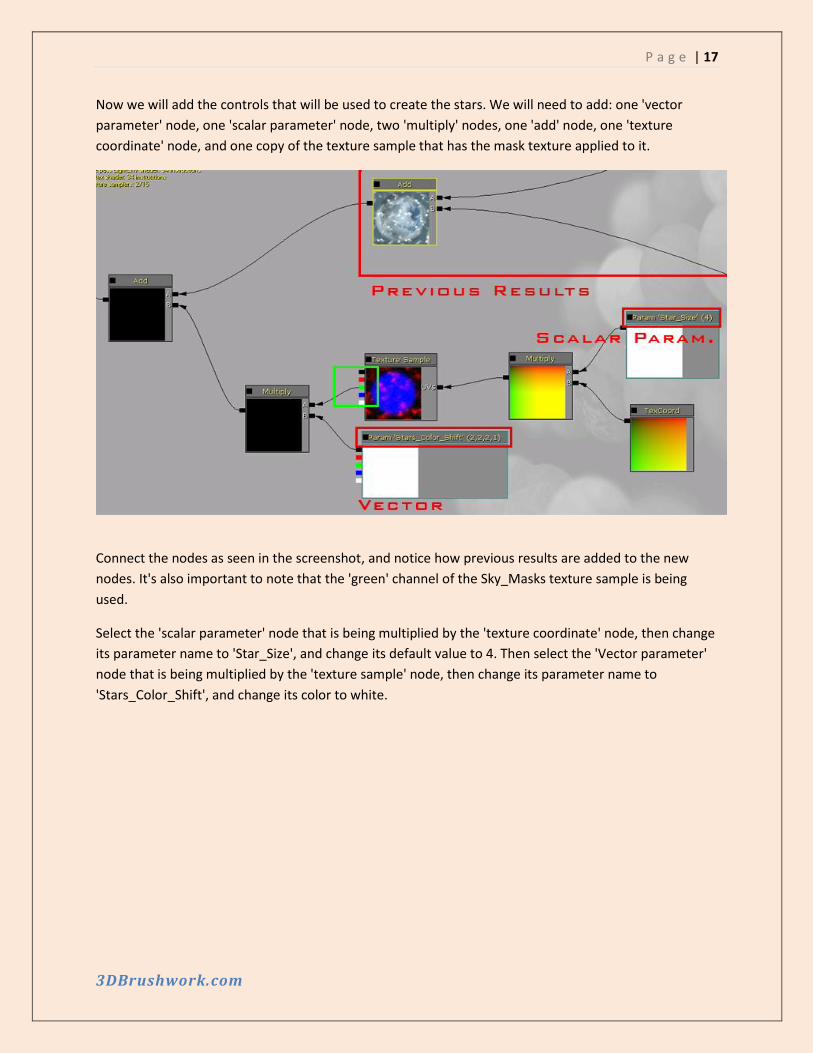
Now we will add the controls that will be used to create the stars. We will need to add: one 'vector
parameter' node, one 'scalar parameter' node, two 'multiply' nodes, one 'add' node, one 'texture
coordinate' node, and one copy of the texture sample that has the mask texture applied to it.
Connect the nodes as seen in the screenshot, and notice how previous results are added to the new
nodes. It's also important to note that the 'green' channel of the Sky_Masks texture sample is being
used.
Select the 'scalar parameter' node that is being multiplied by the 'texture coordinate' node, then change
its parameter name to 'Star_Size', and change its default value to 4. Then select the 'Vector parameter'
node that is being multiplied by the 'texture sample' node, then change its parameter name to
'Stars_Color_Shift', and change its color to white.
P a g e | 18
3DBrushwork.com
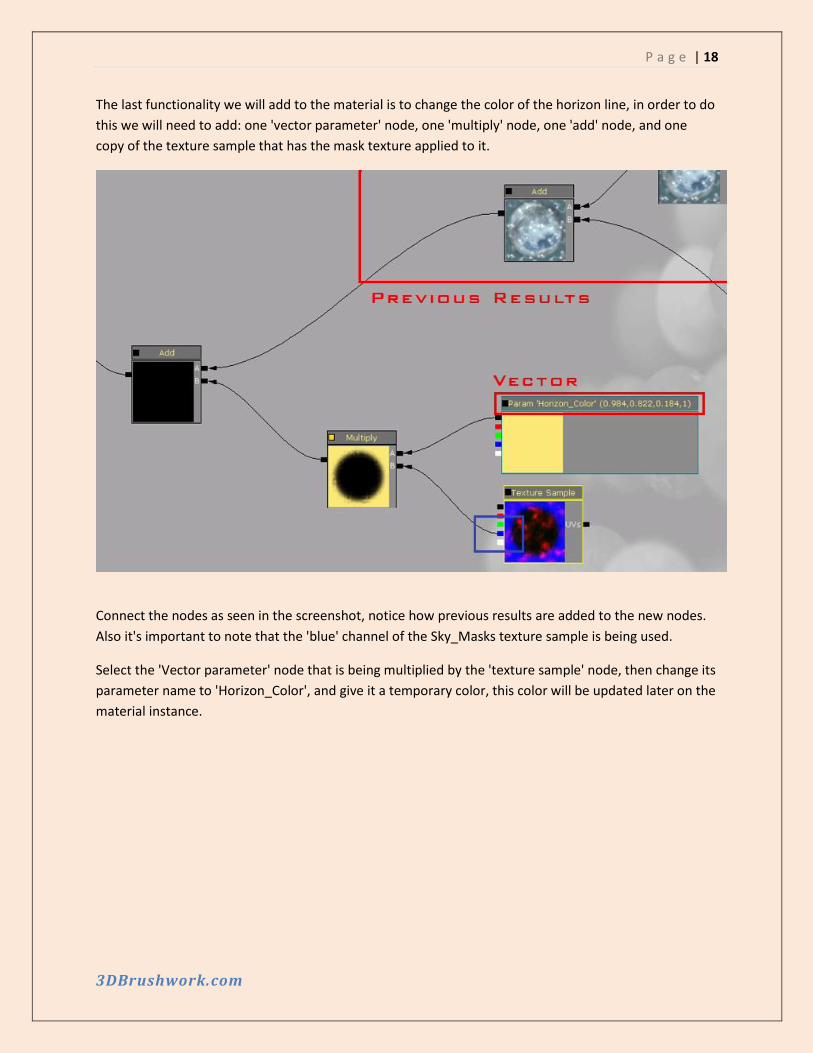
The last functionality we will add to the material is to change the color of the horizon line, in order to do
this we will need to add: one 'vector parameter' node, one 'multiply' node, one 'add' node, and one
copy of the texture sample that has the mask texture applied to it.
Connect the nodes as seen in the screenshot, notice how previous results are added to the new nodes.
Also it's important to note that the 'blue' channel of the Sky_Masks texture sample is being used.
Select the 'Vector parameter' node that is being multiplied by the 'texture sample' node, then change its
parameter name to 'Horizon_Color', and give it a temporary color, this color will be updated later on the
material instance.
P a g e | 19
3DBrushwork.com
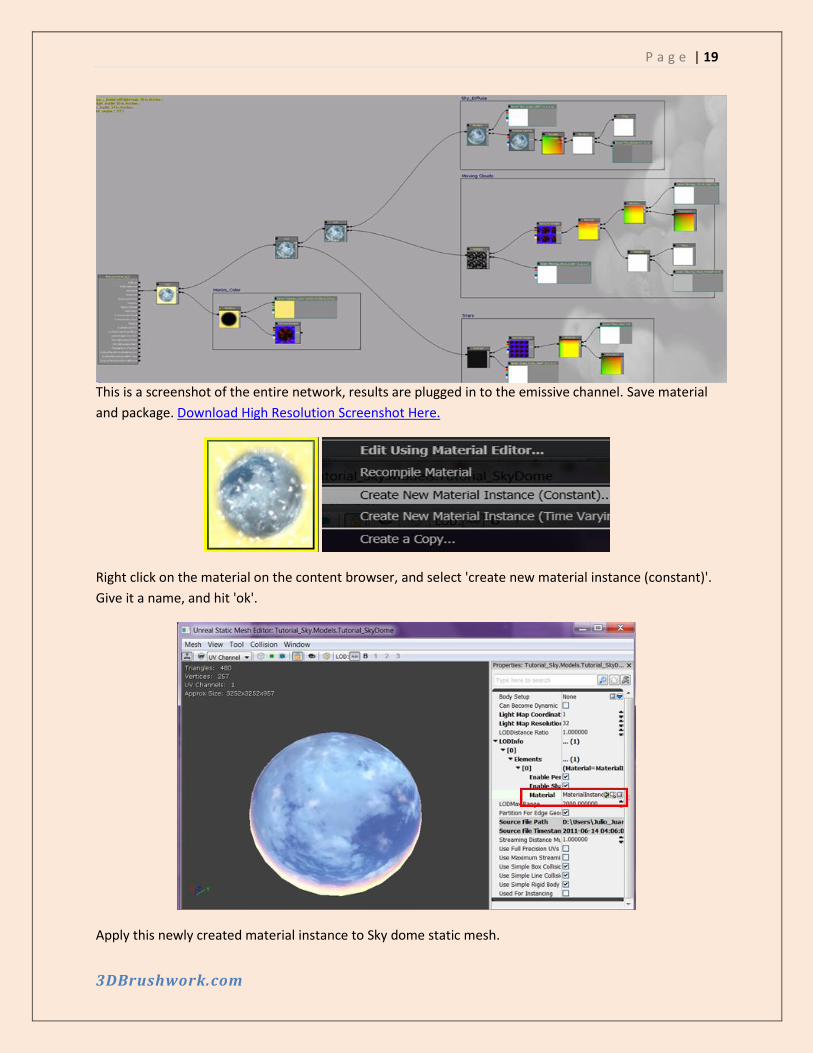
This is a screenshot of the entire network, results are plugged in to the emissive channel. Save material
and package. Download High Resolution Screenshot Here.
Right click on the material on the content browser, and select 'create new material instance (constant)'.
Give it a name, and hit 'ok'.
Apply this newly created material instance to Sky dome static mesh.
P a g e | 20
3DBrushwork.com
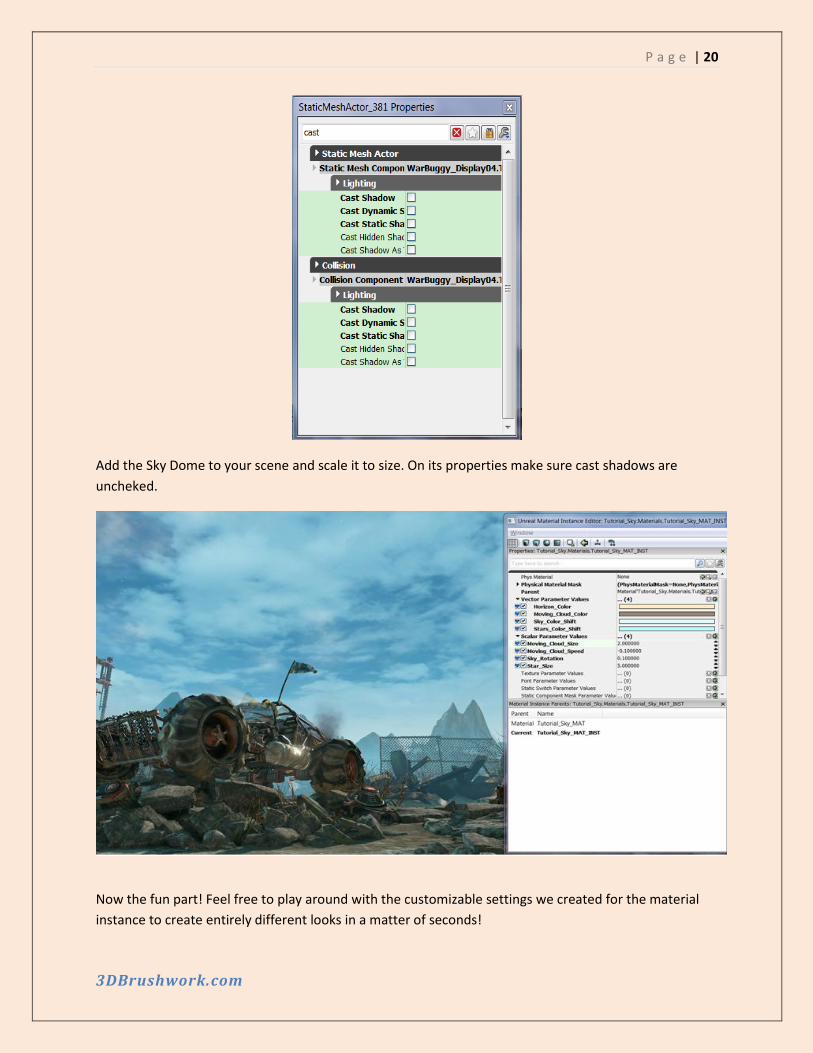
Add the Sky Dome to your scene and scale it to size. On its properties make sure cast shadows are
uncheked.
Now the fun part! Feel free to play around with the customizable settings we created for the material
instance to create entirely different looks in a matter of seconds!
P a g e | 21
3DBrushwork.com
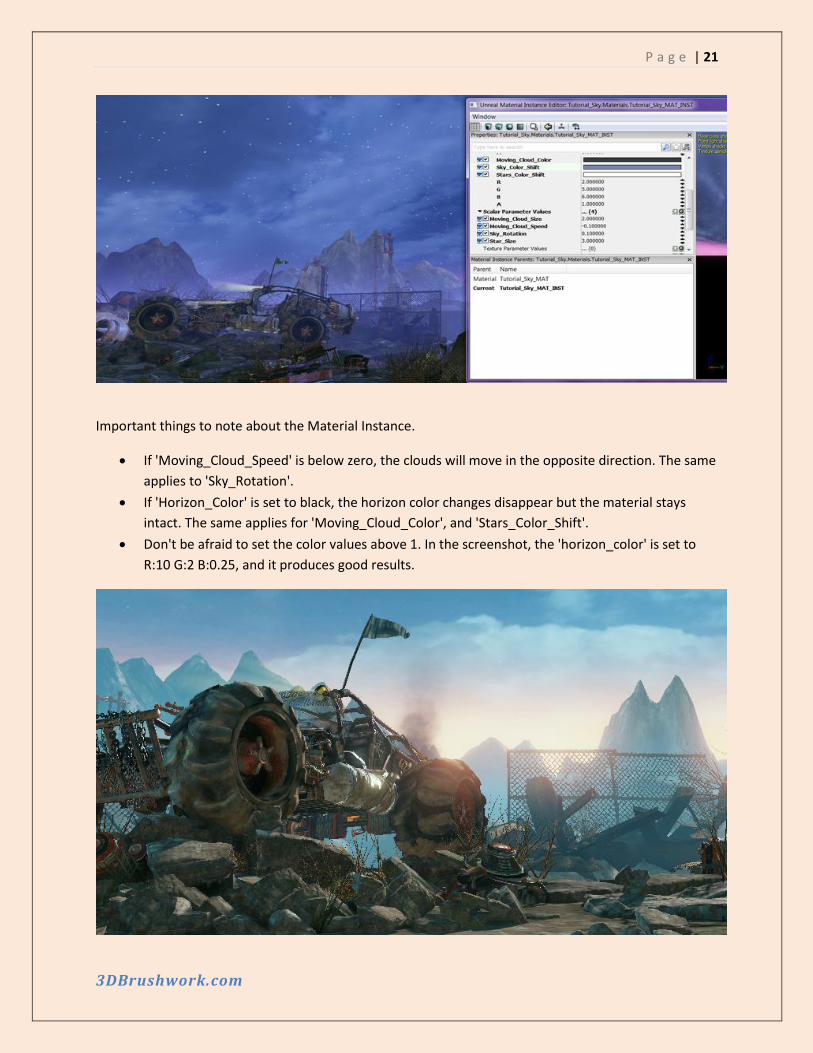
Important things to note about the Material Instance.
If 'Moving_Cloud_Speed' is below zero, the clouds will move in the opposite direction. The same
applies to 'Sky_Rotation'.
If 'Horizon_Color' is set to black, the horizon color changes disappear but the material stays
intact. The same applies for 'Moving_Cloud_Color', and 'Stars_Color_Shift'.
Don't be afraid to set the color values above 1. In the screenshot, the 'horizon_color' is set to
R:10 G:2 B:0.25, and it produces good results.