Embed Size (px)
Citation preview

Wired remote controller MWR-SH10N
Air Conditioneruser manual
imagine the possibilitiesThank you for purchasing this Samsung product.
This manual is made with 100% recycled paper.
DB68-05566A-00EN ES FR IT PT DE EL NL PL HU RU AR
ENGLISH-2
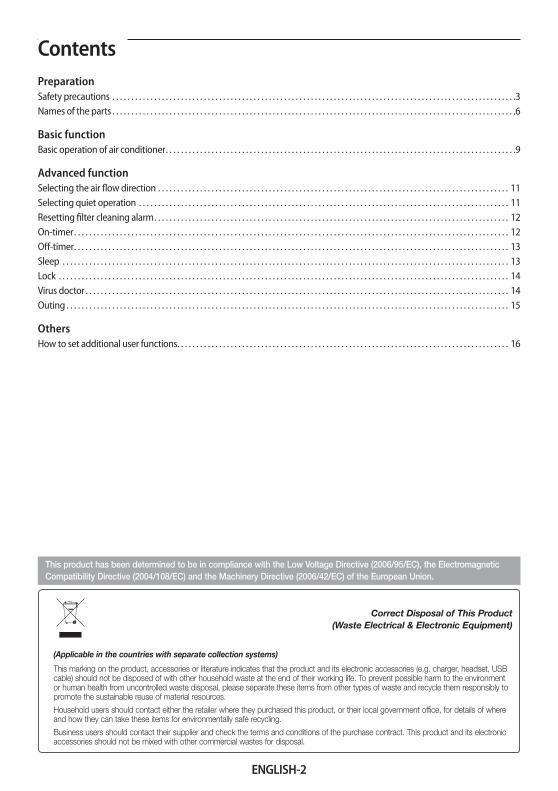
ContentsPreparationSafety precautions . . . . . . . . . . . . . . . . . . . . . . . . . . . . . . . . . . . . . . . . . . . . . . . . . . . . . . . . . . . . . . . . . . . . . . . . . . . . . . . . . . . . . . . . . . . . . . . . . . . . . . . . . .3Names of the parts . . . . . . . . . . . . . . . . . . . . . . . . . . . . . . . . . . . . . . . . . . . . . . . . . . . . . . . . . . . . . . . . . . . . . . . . . . . . . . . . . . . . . . . . . . . . . . . . . . . . . . . . . .6
Basic functionBasic operation of air conditioner. . . . . . . . . . . . . . . . . . . . . . . . . . . . . . . . . . . . . . . . . . . . . . . . . . . . . . . . . . . . . . . . . . . . . . . . . . . . . . . . . . . . . . . . . . . .9
Advanced functionSelecting the air flow direction . . . . . . . . . . . . . . . . . . . . . . . . . . . . . . . . . . . . . . . . . . . . . . . . . . . . . . . . . . . . . . . . . . . . . . . . . . . . . . . . . . . . . . . . . . . . 11Selecting quiet operation . . . . . . . . . . . . . . . . . . . . . . . . . . . . . . . . . . . . . . . . . . . . . . . . . . . . . . . . . . . . . . . . . . . . . . . . . . . . . . . . . . . . . . . . . . . . . . . . . 11Resetting filter cleaning alarm. . . . . . . . . . . . . . . . . . . . . . . . . . . . . . . . . . . . . . . . . . . . . . . . . . . . . . . . . . . . . . . . . . . . . . . . . . . . . . . . . . . . . . . . . . . . . 12On-timer. . . . . . . . . . . . . . . . . . . . . . . . . . . . . . . . . . . . . . . . . . . . . . . . . . . . . . . . . . . . . . . . . . . . . . . . . . . . . . . . . . . . . . . . . . . . . . . . . . . . . . . . . . . . . . . . . . 12Off-timer. . . . . . . . . . . . . . . . . . . . . . . . . . . . . . . . . . . . . . . . . . . . . . . . . . . . . . . . . . . . . . . . . . . . . . . . . . . . . . . . . . . . . . . . . . . . . . . . . . . . . . . . . . . . . . . . . . 13Sleep . . . . . . . . . . . . . . . . . . . . . . . . . . . . . . . . . . . . . . . . . . . . . . . . . . . . . . . . . . . . . . . . . . . . . . . . . . . . . . . . . . . . . . . . . . . . . . . . . . . . . . . . . . . . . . . . . . . . . 13Lock . . . . . . . . . . . . . . . . . . . . . . . . . . . . . . . . . . . . . . . . . . . . . . . . . . . . . . . . . . . . . . . . . . . . . . . . . . . . . . . . . . . . . . . . . . . . . . . . . . . . . . . . . . . . . . . . . . . . . . 14Virus doctor. . . . . . . . . . . . . . . . . . . . . . . . . . . . . . . . . . . . . . . . . . . . . . . . . . . . . . . . . . . . . . . . . . . . . . . . . . . . . . . . . . . . . . . . . . . . . . . . . . . . . . . . . . . . . . . 14Outing . . . . . . . . . . . . . . . . . . . . . . . . . . . . . . . . . . . . . . . . . . . . . . . . . . . . . . . . . . . . . . . . . . . . . . . . . . . . . . . . . . . . . . . . . . . . . . . . . . . . . . . . . . . . . . . . . . . . 15
OthersHow to set additional user functions. . . . . . . . . . . . . . . . . . . . . . . . . . . . . . . . . . . . . . . . . . . . . . . . . . . . . . . . . . . . . . . . . . . . . . . . . . . . . . . . . . . . . . . 16
Correct Disposal of This Product (Waste Electrical & Electronic Equipment)
(Applicable in the countries with separate collection systems)
This marking on the product, accessories or literature indicates that the product and its electronic accessories (e.g. charger, headset, USB cable) should not be disposed of with other household waste at the end of their working life. To prevent possible harm to the environment or human health from uncontrolled waste disposal, please separate these items from other types of waste and recycle them responsibly to promote the sustainable reuse of material resources.
Household users should contact either the retailer where they purchased this product, or their local government office, for details of where and how they can take these items for environmentally safe recycling.
Business users should contact their supplier and check the terms and conditions of the purchase contract. This product and its electronic accessories should not be mixed with other commercial wastes for disposal.
This product has been determined to be in compliance with the Low Voltage Directive (2006/95/EC), the Electromagnetic Compatibility Directive (2004/108/EC) and the Machinery Directive (2006/42/EC) of the European Union.
ENGLISH-3
01 PREPARATIO
N
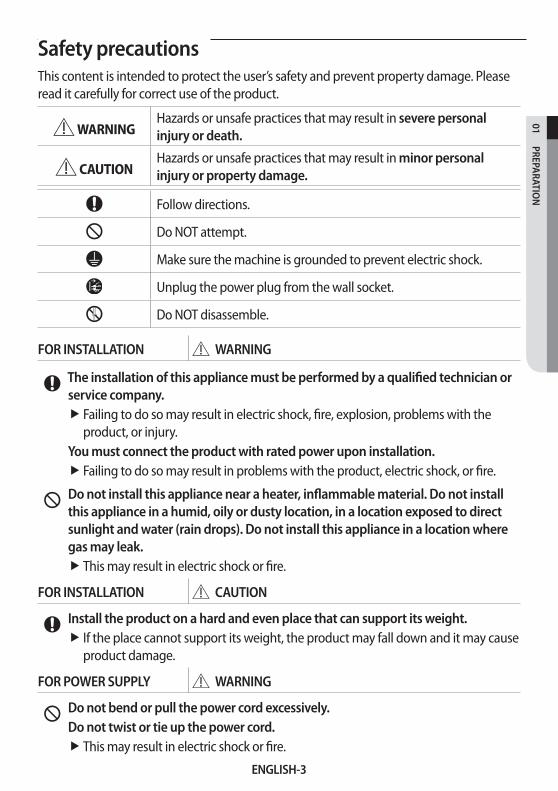
Safety precautionsThis content is intended to protect the user’s safety and prevent property damage. Please read it carefully for correct use of the product.
WARNINGHazards or unsafe practices that may result in severe personal injury or death.
CAUTIONHazards or unsafe practices that may result in minor personal injury or property damage.
Follow directions.
Do NOT attempt.
Make sure the machine is grounded to prevent electric shock.
Unplug the power plug from the wall socket.
Do NOT disassemble.
FOR INSTALLATION WARNING
The installation of this appliance must be performed by a qualified technician or service company.
Failing to do so may result in electric shock, fire, explosion, problems with the product, or injury.
You must connect the product with rated power upon installation.Failing to do so may result in problems with the product, electric shock, or fire.
Do not install this appliance near a heater, inflammable material. Do not install this appliance in a humid, oily or dusty location, in a location exposed to direct sunlight and water (rain drops). Do not install this appliance in a location where gas may leak.
This may result in electric shock or fire.
FOR INSTALLATION CAUTION
Install the product on a hard and even place that can support its weight.If the place cannot support its weight, the product may fall down and it may cause product damage.
FOR POWER SUPPLY WARNING
Do not bend or pull the power cord excessively. Do not twist or tie up the power cord.
This may result in electric shock or fire.

ENGLISH-4
Safety precautions
FOR OPERATION WARNING
If the appliance generates a strange noise, a burning smell or smoke, stop the operation immediately and contact your nearest service center.
Failing to do so may result in electric shock or fire.To reinstall the air conditioner, please contact your nearest service center.
Failing to do so may result in problems with the product, water leakage, electric shock, or fire.A delivery service for the product is not provided. If you reinstall the product in another location, additional construction expenses and an installation fee will be charged.
If the malfunction diagnosis indicator appears or abnormal operation occurs, stop operation immediately.
If you detect any burning smells from the product or abnormal operation occurs, then immediately turn off the air conditioner and power, and then contact the service center. Continuing to use the device in this state can cause electric shock, fire, or damage to the product.
Do not attempt to repair, disassemble, or modify the appliance yourself.Failing to do so may result in electric shock, fire, problems with the product, or injury.
FOR OPERATION CAUTION
Do not allow water to enter the product.This may result in fire or explosion.
Do not operate the appliance with wet hands.This may result in electric shock.
Do not spray volatile material such as insecticide onto the surface of the appliance.As well as being harmful to humans, it may also result in electric shock, fire or problems with the product.
Do not apply a strong impact to the remote controller and do not disassemble the remote controller.Do not use this product for other purposes.
This product is designed to only be used for a system air conditioner.Do not press the buttons with any sharp objects.
This may result in electric shock or part damage.
ENGLISH-5
01 PREPARATIO
N
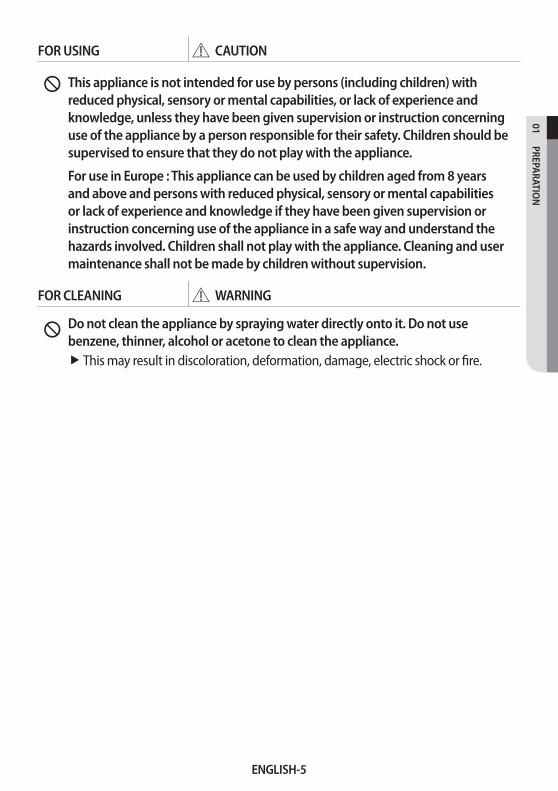
FOR USING CAUTION
This appliance is not intended for use by persons (including children) with reduced physical, sensory or mental capabilities, or lack of experience and knowledge, unless they have been given supervision or instruction concerning use of the appliance by a person responsible for their safety. Children should be supervised to ensure that they do not play with the appliance.
For use in Europe : This appliance can be used by children aged from 8 years and above and persons with reduced physical, sensory or mental capabilities or lack of experience and knowledge if they have been given supervision or instruction concerning use of the appliance in a safe way and understand the hazards involved. Children shall not play with the appliance. Cleaning and user maintenance shall not be made by children without supervision.
FOR CLEANING WARNING
Do not clean the appliance by spraying water directly onto it. Do not use benzene, thinner, alcohol or acetone to clean the appliance.
This may result in discoloration, deformation, damage, electric shock or fire.
ENGLISH-6
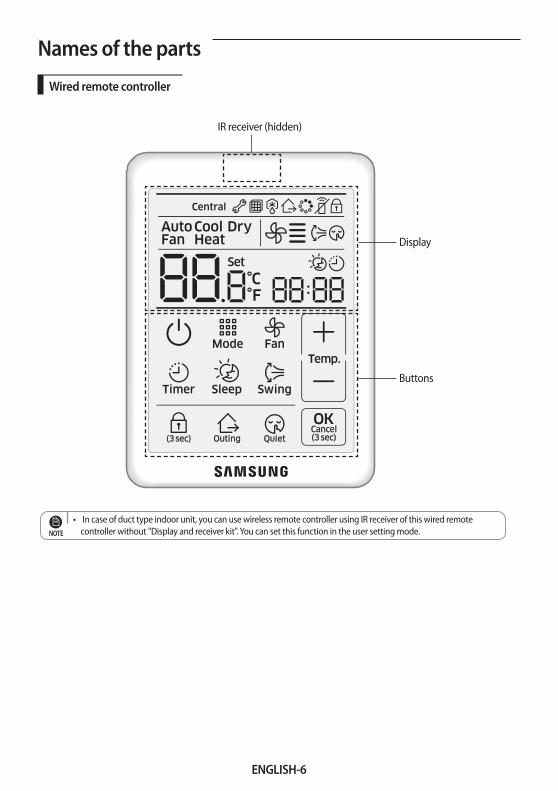
Names of the parts
Wired remote controller
IR receiver (hidden)
Display
Buttons
In case of duct type indoor unit, you can use wireless remote controller using IR receiver of this wired remote controller without "Display and receiver kit". You can set this function in the user setting mode.NOTE

ENGLISH-7
01 PREPARATIO
N
Display
①⑦
⑧
③ ④ ⑤ ②
⑥
⑪⑫
⑬⑩
⑭⑨
Classifi cation Indication Function
①
Displays air conditioner operation.
②
Displays quiet operation.
③
Displays Indoor temperature/Set temperature.
④ Displays AC fan speed.
⑤ Displays air swing (Up/Down).
⑥
Displays ON/OFF time (scheduled time).
⑦
Displays fi lter cleaning (fi lter cleaning period).
⑧
Displays check.
⑨ Displays centralized control.
⑩
Displays virus doctor.
⑪ Displays outing mode
⑫ Displays defrost operation
⑬ Displays partial locking/all locking/invaild operation.
Displays IR receiver for wireless remote controller.(Default : disuse, indication on)

ENGLISH-8
Names of the parts
Buttons
①
②
④
⑤
⑥
⑦
③
⑧
⑪
⑩ ⑨
Classifi cation Button Function
①
Operation on/off button Turn the air conditioner power on/off
②
Mode button Select a desired air conditioner operation
③
Temperature setting button
Set a desired temperature and adjust the time
④
Fan speed button Change the air conditioner's fan speed
⑤
Air swing button Select the air fl ow direction of the air conditioner
⑥
Timer button Select the timer function
⑦
OK/Cancel button Confi rm or cancel (by pressing and holding the button for 3 seconds)
⑧
Sleep button Select sleep operation for the air conditioner
⑨
Quiet button Select quiet operation for the air conditioner
⑩
Outing button Select outing operation for the air conditioner
⑪ Lock button Lock the wired remote controller.

ENGLISH-9
02 BASIC FU
NCTIO
N
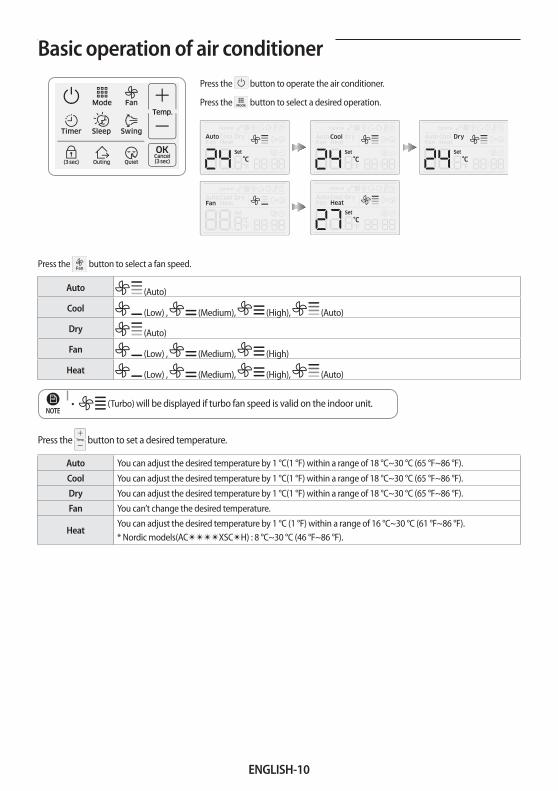
Basic operation of air conditionerBasic operations can be selected by pressing the [ Mode ] button.
AutoThis operation allows you to automatically adjust the temperature and the fan speed to maximize your comfort.
When the indoor temperature is very high, the device will produce a strong, cold breeze. When the indoor temperature cools down, then weaker breeze will be produced.
CoolThis is a frequently used operation that allows you to adjust the fan speed, temperature, and air flow direction the way you like.
If you select heating operation during cooling operation, then the cooling operation is canceled.
DryThis operation effectively removes all excess humidity so that you can feel refreshed during rainy days.
FanThis operation produces breeze, just like a powerful fan, so that you can enjoy a refreshing breeze.
HeatThis function produces warm breeze so that you can use it in the fall or winter.
Immediately after starting the heating operation, the air conditioner system may stop producing any breeze at all for a while to avoid generating cold breeze.Defrost indicator ( )
- If you start removing frost from the outdoor unit during heating operation, the indicator will turn on. When defrosting is over, the indicator will turn off. (When the frost is being removed, the indoor unit does not generate any breeze.)
If you stop the air conditioner after the heating operation, the air conditioner will produce some breeze to discharge all the heat from the indoor unit.If you select the cooling operation during heating operation, then the heating operation is canceled.
ENGLISH-10
Basic operation of air conditionerPress the button to operate the air conditioner.
Press the button to select a desired operation.
Press the button to select a fan speed.
Auto (Auto)
Cool (Low) , (Medium), (High), (Auto)
Dry (Auto)
Fan (Low) , (Medium), (High)
Heat (Low) , (Medium), (High), (Auto)
(Turbo) will be displayed if turbo fan speed is valid on the indoor unit.NOTE
Press the button to set a desired temperature.
Auto You can adjust the desired temperature by 1 °C(1 °F) within a range of 18 °C~30 °C (65 °F~86 °F).
Cool You can adjust the desired temperature by 1 °C(1 °F) within a range of 18 °C~30 °C (65 °F~86 °F).
Dry You can adjust the desired temperature by 1 °C(1 °F) within a range of 18 °C~30 °C (65 °F~86 °F).
Fan You can’t change the desired temperature.
HeatYou can adjust the desired temperature by 1 °C (1 °F) within a range of 16 °C~30 °C (61 °F~86 °F).* Nordic models(AC✴✴✴✴XSC✴H) : 8 °C~30 °C (46 °F~86 °F).

ENGLISH-11
03 AD
VANCED
FUN
CTION
Selecting the air flow directionThis function allows you to shift the air flow direction up and down.
1. Press the [ Swing ] button to tilt the blade up and down. 2. Press the [ Swing ] button one more time to set the air flow direction when the
blade reaches the desired position. The up/down tilting of the blade will stop in place.
If you press the [ Swing ] button for a duct type indoor unit, the air flow direction will not be controlled and lamp will blink.NOTE
Selecting quiet operationIn quiet operation, the noise from the air conditioner operation will be decreased.Press the [ Quiet ] button to select the quiet operation.
Auto Quiet Cancel is repeated.
Cool Quiet Cancel is repeated.
Dry Quiet Cancel is repeated.
Fan will blink.
Heat Quiet Cancel is repeated.
If you press the [ Quiet ] button for an air conditioner which does not support the quiet operation, will blink.NOTE
ENGLISH-12
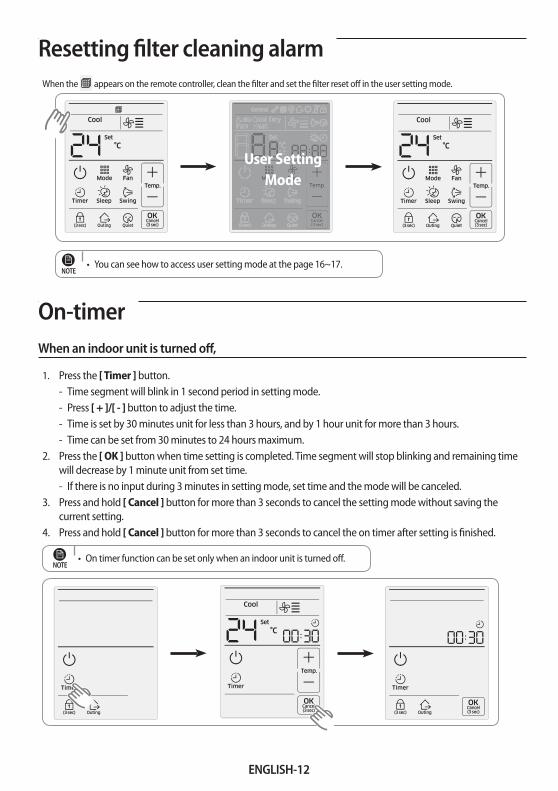
Resetting fi lter cleaning alarm When the appears on the remote controller, clean the fi lter and set the fi lter reset off in the user setting mode.
User Setting
Mode
You can see how to access user setting mode at the page 16~17.
NOTE
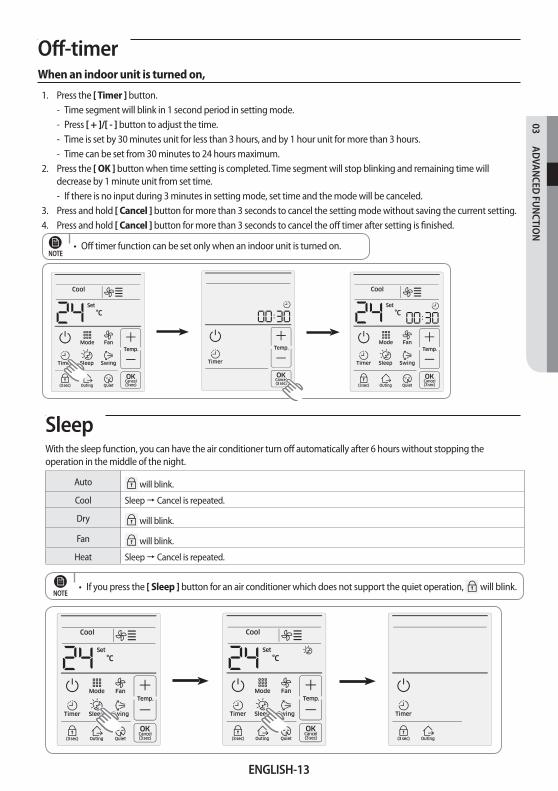
On-timer When an indoor unit is turned off ,
1. Press the [ Timer ] button. - Time segment will blink in 1 second period in setting mode. - Press [ + ]/[ - ] button to adjust the time. - Time is set by 30 minutes unit for less than 3 hours, and by 1 hour unit for more than 3 hours. - Time can be set from 30 minutes to 24 hours maximum.
2. Press the [ OK ] button when time setting is completed. Time segment will stop blinking and remaining time will decrease by 1 minute unit from set time. - If there is no input during 3 minutes in setting mode, set time and the mode will be canceled.
3. Press and hold [ Cancel ] button for more than 3 seconds to cancel the setting mode without saving the current setting.
4. Press and hold [ Cancel ] button for more than 3 seconds to cancel the on timer after setting is fi nished.
On timer function can be set only when an indoor unit is turned off .
NOTE
ENGLISH-13
03 AD
VANCED
FUN
CTION
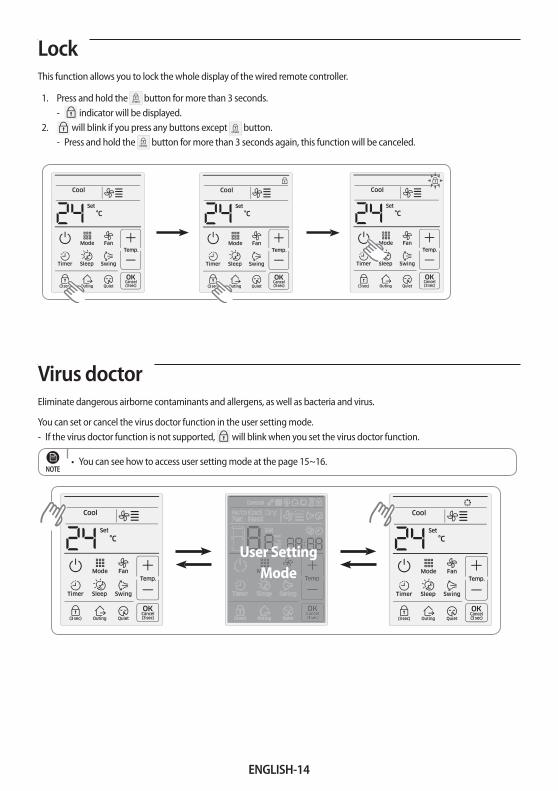
Off-timerWhen an indoor unit is turned on,
1. Press the [ Timer ] button. - Time segment will blink in 1 second period in setting mode. - Press [ + ]/[ - ] button to adjust the time. - Time is set by 30 minutes unit for less than 3 hours, and by 1 hour unit for more than 3 hours. - Time can be set from 30 minutes to 24 hours maximum.
2. Press the [ OK ] button when time setting is completed. Time segment will stop blinking and remaining time will decrease by 1 minute unit from set time. - If there is no input during 3 minutes in setting mode, set time and the mode will be canceled.
3. Press and hold [ Cancel ] button for more than 3 seconds to cancel the setting mode without saving the current setting.4. Press and hold [ Cancel ] button for more than 3 seconds to cancel the off timer after setting is finished.
Off timer function can be set only when an indoor unit is turned on.NOTE
SleepWith the sleep function, you can have the air conditioner turn off automatically after 6 hours without stopping the operation in the middle of the night.
Auto will blink.
Cool Sleep Cancel is repeated.
Dry will blink.
Fan will blink.
Heat Sleep Cancel is repeated.
If you press the [ Sleep ] button for an air conditioner which does not support the quiet operation, will blink.NOTE
ENGLISH-14
LockThis function allows you to lock the whole display of the wired remote controller.
1. Press and hold the button for more than 3 seconds. - indicator will be displayed.
2. will blink if you press any buttons except button. - Press and hold the button for more than 3 seconds again, this function will be canceled.
Virus doctorEliminate dangerous airborne contaminants and allergens, as well as bacteria and virus.
You can set or cancel the virus doctor function in the user setting mode. - If the virus doctor function is not supported, will blink when you set the virus doctor function.
You can see how to access user setting mode at the page 15~16. NOTE
User Setting
Mode

ENGLISH-15
04 O
THERS
OutingOuting function keeps minimum cooling/heating temperature of indoor on your absence.1. Press the [ Outing ] button.
- Outing indicator will be displayed.2. When an air conditioner is turned off,
- If indoor temperature has 5 °C(9 °F) difference with desired outing temperature, the air conditioner will be turned on automatically.
- If indoor temperature is same as desired outing temperature, the air conditioner will be turned off automatically. - it is repeated depending on indoor temperature within 12 hours, and then outing function is canceled.
Auto will blink.
Cool Outing Cancel is repeated.
Dry will blink.
Fan will blink.
Heat Outing Cancel is repeated.
You can use outing function in only cool/heat mode.The outing function will be active when wired remote controller is turned off.The outing function operates with low fan speed.If there is any input button on your wired remote controller, outing function will be canceled.If your indoor unit's status is changed, outing function will be canceled.You can set the desired outing temperature on the user setting mode.
<Temperature setting range> - Cool mode : 25~30 °C (77~86 °F), default : 27 °C (81 °F) - Heat mode : 16~22 °C (61~72 °F), default : 16 °C (61 °F)
You can use the outing function in the master wired remote controller. The slave wired remote controller just displays it for a outing function status of the master wired remote controller.
- Press the [ Outing ] button on the slave wired remote controller, then the will blink. The outing function operation will be canceled if you change the master/slave setting on your wired remote controller.
NOTE
5 °C difference between indoor temperature and outing setting temperature
After 12 hr

ENGLISH-16
How to set additional user functions
Main menu
Sub menu
Setting value
Page
Move menu Move page
1. If you want to use the various additional user functions for your wired remote controller, press the top left corner (hidden button) of the display for more than 3 seconds. - You will enter the additional function settings, and the main menu will be displayed.
2. Refer to the list of additional user functions for your wired remote controller on the next page, and select the desired menu. - Using the [ + ]/[ - ] buttons, select a main menu number and press the [ Mode ] button to enter the sub menu setting
screen. - Using the [ + ]/[ - ] buttons, select a sub menu number and press the [ Mode ] button to enter data setting screen. - Using the [ + ]/[ - ] buttons, select the settings. - Press the [ Fan ] button to select page. - Press the [ OK ] button to save the current settings. The [ OK ] button is invalid on the main menu or sub manu setting
screen. - Press the [ Cancel ] button for more than 3 seconds to exit to normal mode without saving settings.

ENGLISH-17
04 O
THERS
Main menu
Sub menu Function description
Setting valuePage Save location
Value Factory default
2
1Temperature Limit
Lower limit 8 ~ 30 °C(47 ~ 86 °F) 8(47) 01 Wired remote controller
2 Upper limit 8 ~ 30 °C(47 ~ 86 °F) 30(86) 01 Wired remote controller
3Set Outing
Temperature
Cooling desire temperature on outing function
25 ~ 30 °C(77 ~ 86 °F) 27(81) 01 Wired remote controller
4Heating desire temperature on
outing function16 ~ 22 °C(61 ~ 72 °F) 16(61) 01 Wired remote controller
3
1 Lock of all buttons 0-Unlock, 1-Lock 0 01 Wired remote controller
2Partial Button
Lock 1
Lock of operation ON/OFF button 0-Unlock, 1-Lock 0 01 Wired remote controller
Lock of temperature setting buttons
0-Unlock, 1-Lock 0 02 Wired remote controller
Lock of fan speed button 0-Unlock, 1-Lock 0 03 Wired remote controller
3Partial Button
Lock 2
Lock of ON/OFF timer function button
0-Unlock, 1-Lock 0 01 Wired remote controller
Lock of Swing function button 0-Unlock, 1-Lock 0 02 Wired remote controller
Lock of Sleep function button 0-Unlock, 1-Lock 0 03 Wired remote controller
Lock of Quiet function button 0-Unlock, 1-Lock 0 04 Wired remote controller
Lock of Outing function button 0-Unlock, 1-Lock 0 05 Wired remote controller
4Operation Mode
Partial Button Lock
Lock of operation mode button 0-Unlock, 1-Lock 0 01 Wired remote controller
Hide of auto mode 0-Unlock, 1-Lock 0 02 Wired remote controller
Hide of cool mode 0-Unlock, 1-Lock 0 03 Wired remote controller
Hide of dry mode 0-Unlock, 1-Lock 0 04 Wired remote controller
Hide of fan mode 0-Unlock, 1-Lock 0 05 Wired remote controller
Hide of heat mode 0-Unlock, 1-Lock 0 06 Wired remote controller
6 1 Checking/setting of backlight time out 0~30 (Disuse in 0) 5 01 Wired remote controller(1 time use)
7
1
User Setting Function
Resetting filter cleaning alarm 0-No reset, 1-Reset 0 01 Wired remote controller
2 Use of virus doctor 0-Disuse, 1-Use 0 01 Wired remote controller
3 Use display of current temperature 0-Disuse, 1-Use 1 01 Wired remote controller
4 Use of button melody 0-Disuse, 1-Use 1 01 Wired remote controller
5Use of IR receiver for wireless
remote controller 1)*0-Disuse, 1-Use 0 01 Wired remote controller
8 1 Setting/Checking Easy Tuning -2 ~ +2 0 01 Wired remote controller(1 time use)
0 1Reset to default value of user setting mode
(except current time)0-No reset, 1-Reset 0 01 Wired remote controller
(1 time use)
will blink if you select a function that is not supported by the indoor unit.NOTE
1)* In case of duct type indoor unit, you can use wireless remote controller using IR receiver of this wired remote controller without "Display and receiver kit"

ENGLISH-18
How to set additional user functionsExample of locking Power button and unlocking Mode button
1. Press the top left corner (hidden button) of display for more than 3 seconds to enter to User Setting Mode.
2. Main menu segment will display as number 2 and blink in 1 second period when accessed to User Setting Mode.
3. Set the Main menu as number 3 by pressing [ + ]/[ - ] button.
4. Select Sub menu by pressing [ Mode ] button. - Sub menu will be displayed.
5. Set the Sub menu as number 2 by pressing [ + ]/[ - ] button.
6. Select Data by pressing [ Mode ] button. - Page of current menu and data applied to the page will be displayed.
7. Set data as number 1 by pressing [ + ]/[ - ] button.
8. Select Page as number 2 by pressing [ Fan ] button.
9. Set data of page 2 as number 0 by pressing [ + ]/[ - ] button.
10. Save the current setting by pressing [ OK ] button. - Mode will be changed to normal status without saving current settings by
pressing and holding [ Cancel ] button for more than 3 seconds.

![“Bad Smells in Software Analytics Papers · “Bad smells” is a term that comes from the agile community. According to Fowler [5], bad smells (a.k.a. code smells) are “a surface](https://img.pdfslide.us/doc/110x75/5fd5b3527e6add531945185a/aoebad-smells-in-software-analytics-papers-aoebad-smellsa-is-a-term-that-comes.jpg)