Embed Size (px)
Citation preview
Advanced ColdFusion Administration
ColdFusion® 5
Macromedia® Incorporated
Copyright Notice
© 1999–2001 Macromedia Inc. All rights reserved.
This manual, as well as the software described in it, is furnished under license and may be used or copied only in accordance with the terms of such license. The content of this manual is furnished for informational use only, is subject to change without notice, and should not be construed as a commitment by Macromedia, Inc. Macromedia Inc. assumes no responsibility or liability for any errors or inaccuracies that may appear in this book.
Except as permitted by such license, no part of this publication may be reproduced, stored in a retrieval system, or transmitted in any form or by any means, electronic, mechanical, recording, or otherwise, without the prior written permission of Macromedia Inc.
ColdFusion and HomeSite are U.S. registered trademarks of Macromedia Inc.macromedia inc.Macromedia, the Macromedia logo, Macromedia Spectra, ColdFusion logo, and JRun are trademarks of Macromedia, Inc. Java is a trademark of Sun Microsystems, Inc. Microsoft, Windows, Windows NT, Windows 95, Microsoft Access, and FoxPro are registered trademarks of Microsoft Corporation. PostScript is a trademark of Adobe Systems Inc. Solaris is a trademark of Sun Microsystems Inc. UNIX is a trademark of The Open Group.All other company names, brand names, and product names are trademarks of their respective holder(s).
Part number: ZCF50MADM
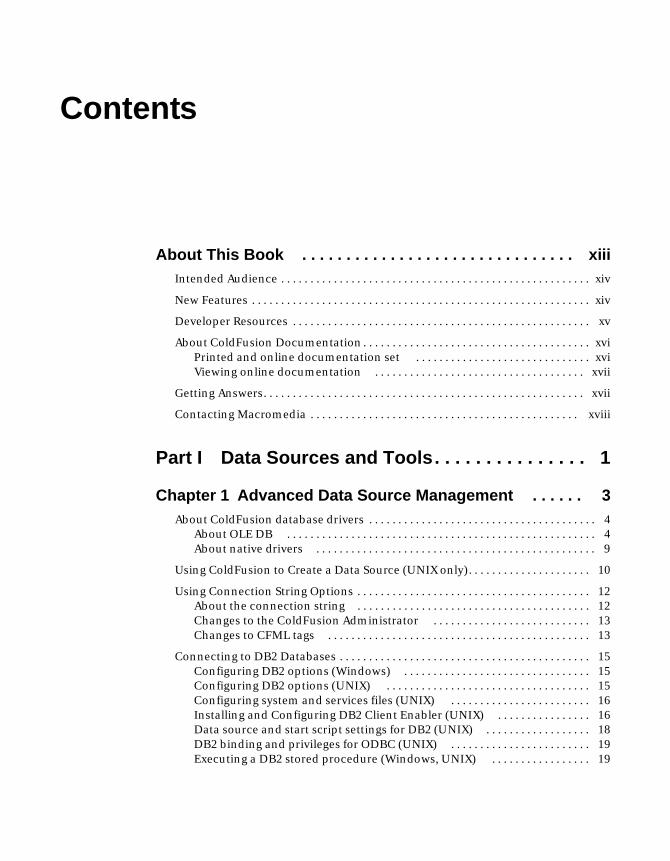
Contents
About This Book . . . . . . . . . . . . . . . . . . . . . . . . . . . . . . . xiiiIntended Audience . . . . . . . . . . . . . . . . . . . . . . . . . . . . . . . . . . . . . . . . . . . . . . . . . . . . . xiv
New Features . . . . . . . . . . . . . . . . . . . . . . . . . . . . . . . . . . . . . . . . . . . . . . . . . . . . . . . . . . xiv
Developer Resources . . . . . . . . . . . . . . . . . . . . . . . . . . . . . . . . . . . . . . . . . . . . . . . . . . . xv
About ColdFusion Documentation . . . . . . . . . . . . . . . . . . . . . . . . . . . . . . . . . . . . . . . xviPrinted and online documentation set . . . . . . . . . . . . . . . . . . . . . . . . . . . . . . xviViewing online documentation . . . . . . . . . . . . . . . . . . . . . . . . . . . . . . . . . . . . xvii
Getting Answers. . . . . . . . . . . . . . . . . . . . . . . . . . . . . . . . . . . . . . . . . . . . . . . . . . . . . . . xvii
Contacting Macromedia . . . . . . . . . . . . . . . . . . . . . . . . . . . . . . . . . . . . . . . . . . . . . . xviii
Part I Data Sources and Tools. . . . . . . . . . . . . . . 1
Chapter 1 Advanced Data Source Management . . . . . . 3About ColdFusion database drivers . . . . . . . . . . . . . . . . . . . . . . . . . . . . . . . . . . . . . . . 4
About OLE DB . . . . . . . . . . . . . . . . . . . . . . . . . . . . . . . . . . . . . . . . . . . . . . . . . . . . . 4About native drivers . . . . . . . . . . . . . . . . . . . . . . . . . . . . . . . . . . . . . . . . . . . . . . . . 9
Using ColdFusion to Create a Data Source (UNIX only). . . . . . . . . . . . . . . . . . . . . 10
Using Connection String Options . . . . . . . . . . . . . . . . . . . . . . . . . . . . . . . . . . . . . . . . 12About the connection string . . . . . . . . . . . . . . . . . . . . . . . . . . . . . . . . . . . . . . . . 12Changes to the ColdFusion Administrator . . . . . . . . . . . . . . . . . . . . . . . . . . . 13Changes to CFML tags . . . . . . . . . . . . . . . . . . . . . . . . . . . . . . . . . . . . . . . . . . . . . 13
Connecting to DB2 Databases . . . . . . . . . . . . . . . . . . . . . . . . . . . . . . . . . . . . . . . . . . . 15Configuring DB2 options (Windows) . . . . . . . . . . . . . . . . . . . . . . . . . . . . . . . . 15Configuring DB2 options (UNIX) . . . . . . . . . . . . . . . . . . . . . . . . . . . . . . . . . . . 15Configuring system and services files (UNIX) . . . . . . . . . . . . . . . . . . . . . . . . 16Installing and Configuring DB2 Client Enabler (UNIX) . . . . . . . . . . . . . . . . 16Data source and start script settings for DB2 (UNIX) . . . . . . . . . . . . . . . . . . 18DB2 binding and privileges for ODBC (UNIX) . . . . . . . . . . . . . . . . . . . . . . . . 19Executing a DB2 stored procedure (Windows, UNIX) . . . . . . . . . . . . . . . . . 19
iv Contents
Connecting to dBASE/FoxPro Databases. . . . . . . . . . . . . . . . . . . . . . . . . . . . . . . . . . 21Configuring dBASE/FoxPro options (Windows) . . . . . . . . . . . . . . . . . . . . . . 21Configuring dBASE/FoxPro Driver options (UNIX) . . . . . . . . . . . . . . . . . . . 23
Connecting to Excel Databases . . . . . . . . . . . . . . . . . . . . . . . . . . . . . . . . . . . . . . . . . . 24ODBC: Microsoft Excel Driver options . . . . . . . . . . . . . . . . . . . . . . . . . . . . . . 24ODBC: MERANT Excel Workbook Driver options . . . . . . . . . . . . . . . . . . . . . 25
Connecting to Informix Databases . . . . . . . . . . . . . . . . . . . . . . . . . . . . . . . . . . . . . . . 26Configuring Informix using ODBC . . . . . . . . . . . . . . . . . . . . . . . . . . . . . . . . . . 26Configuring Informix using the native driver . . . . . . . . . . . . . . . . . . . . . . . . . 27Connecting to Informix data sources (UNIX) . . . . . . . . . . . . . . . . . . . . . . . . . 27Connecting to Informix through ODBC/CLI (Windows, UNIX) . . . . . . . . . 29
Connecting to Sybase Databases . . . . . . . . . . . . . . . . . . . . . . . . . . . . . . . . . . . . . . . . . 32ODBC: MERANT Sybase ASE Driver options . . . . . . . . . . . . . . . . . . . . . . . . . 32Native: Sybase 11 Driver options . . . . . . . . . . . . . . . . . . . . . . . . . . . . . . . . . . . 33Tips for connecting to Sybase System 11 (UNIX) . . . . . . . . . . . . . . . . . . . . . 33
Connecting to Text Databases . . . . . . . . . . . . . . . . . . . . . . . . . . . . . . . . . . . . . . . . . . . 35ODBC: Microsoft Text Driver options (Windows) . . . . . . . . . . . . . . . . . . . . . 35ODBC: MERANT Text Driver options (UNIX) . . . . . . . . . . . . . . . . . . . . . . . . 35
Connecting to Visual FoxPro Databases. . . . . . . . . . . . . . . . . . . . . . . . . . . . . . . . . . . 37
Chapter 2 Administrator Tools . . . . . . . . . . . . . . . . . . . 39Accessing the Administrator Tools . . . . . . . . . . . . . . . . . . . . . . . . . . . . . . . . . . . . . . . 40
Features on the Tools Tab . . . . . . . . . . . . . . . . . . . . . . . . . . . . . . . . . . . . . . . . . . . . . . . 41Logs and Statistics tools . . . . . . . . . . . . . . . . . . . . . . . . . . . . . . . . . . . . . . . . . . . 41System Monitoring tools . . . . . . . . . . . . . . . . . . . . . . . . . . . . . . . . . . . . . . . . . . . 45Archive and Deploy tools . . . . . . . . . . . . . . . . . . . . . . . . . . . . . . . . . . . . . . . . . . 49
Part II ColdFusion Security . . . . . . . . . . . . . . . . 57
Chapter 3 ColdFusion Security . . . . . . . . . . . . . . . . . . 59Why Is ColdFusion Security Important?. . . . . . . . . . . . . . . . . . . . . . . . . . . . . . . . . . . 60
Types of ColdFusion Security . . . . . . . . . . . . . . . . . . . . . . . . . . . . . . . . . . . . . . 61
Choosing a Level of ColdFusion Security. . . . . . . . . . . . . . . . . . . . . . . . . . . . . . . . . . 62Developing applications . . . . . . . . . . . . . . . . . . . . . . . . . . . . . . . . . . . . . . . . . . . 63Deploying applications . . . . . . . . . . . . . . . . . . . . . . . . . . . . . . . . . . . . . . . . . . . . 64Securing the ColdFusion Administrator . . . . . . . . . . . . . . . . . . . . . . . . . . . . . 66
To Learn More About Security . . . . . . . . . . . . . . . . . . . . . . . . . . . . . . . . . . . . . . . . . . . 67
Contents v
Chapter 4 Configuring Basic Security . . . . . . . . . . . . . 71About Basic Security . . . . . . . . . . . . . . . . . . . . . . . . . . . . . . . . . . . . . . . . . . . . . . . . . . . . 72
Installation defaults . . . . . . . . . . . . . . . . . . . . . . . . . . . . . . . . . . . . . . . . . . . . . . . 72
Configuring Remote Development Security (RDS) . . . . . . . . . . . . . . . . . . . . . . . . . 73Securing data sources . . . . . . . . . . . . . . . . . . . . . . . . . . . . . . . . . . . . . . . . . . . . . 73
ColdFusion Remote Development Services (RDS) . . . . . . . . . . . . . . . . . . . . . . . . . 74Basic security limitations . . . . . . . . . . . . . . . . . . . . . . . . . . . . . . . . . . . . . . . . . . 74Securing ColdFusion file resources . . . . . . . . . . . . . . . . . . . . . . . . . . . . . . . . . 74Securing ColdFusion data sources . . . . . . . . . . . . . . . . . . . . . . . . . . . . . . . . . . 75
Using a Password to Restrict Access to RDS . . . . . . . . . . . . . . . . . . . . . . . . . . . . . . . 76ColdFusion Studio Password . . . . . . . . . . . . . . . . . . . . . . . . . . . . . . . . . . . . . . . 76Removing password-based access control: Windows . . . . . . . . . . . . . . . . . 76
Configuring Basic Runtime Security . . . . . . . . . . . . . . . . . . . . . . . . . . . . . . . . . . . . . . 77
Chapter 5 Configuring Advanced Security . . . . . . . . . 79What is Advanced Security? . . . . . . . . . . . . . . . . . . . . . . . . . . . . . . . . . . . . . . . . . . . . . 80
Advanced Security Basics . . . . . . . . . . . . . . . . . . . . . . . . . . . . . . . . . . . . . . . . . . . . . . . 81User directories . . . . . . . . . . . . . . . . . . . . . . . . . . . . . . . . . . . . . . . . . . . . . . . . . . . 81Resource types . . . . . . . . . . . . . . . . . . . . . . . . . . . . . . . . . . . . . . . . . . . . . . . . . . . 82Policies . . . . . . . . . . . . . . . . . . . . . . . . . . . . . . . . . . . . . . . . . . . . . . . . . . . . . . . . . . 82Security contexts . . . . . . . . . . . . . . . . . . . . . . . . . . . . . . . . . . . . . . . . . . . . . . . . . . 83
Advanced Security Implementations . . . . . . . . . . . . . . . . . . . . . . . . . . . . . . . . . . . . . 84Securing applications with User security . . . . . . . . . . . . . . . . . . . . . . . . . . . . 84Securing resources with RDS security . . . . . . . . . . . . . . . . . . . . . . . . . . . . . . . 85Securing applications with a security sandbox . . . . . . . . . . . . . . . . . . . . . . . 85Securing the ColdFusion Administrator . . . . . . . . . . . . . . . . . . . . . . . . . . . . . 86
Creating an Advanced Security Framework . . . . . . . . . . . . . . . . . . . . . . . . . . . . . . . 88Implementation summary . . . . . . . . . . . . . . . . . . . . . . . . . . . . . . . . . . . . . . . . . 88
Setting Up a Security Server . . . . . . . . . . . . . . . . . . . . . . . . . . . . . . . . . . . . . . . . . . . . . 89
Caching Advanced Security Information . . . . . . . . . . . . . . . . . . . . . . . . . . . . . . . . . . 91
Defining User Directories . . . . . . . . . . . . . . . . . . . . . . . . . . . . . . . . . . . . . . . . . . . . . . . 92
Defining a Security Context . . . . . . . . . . . . . . . . . . . . . . . . . . . . . . . . . . . . . . . . . . . . . 95
Specifying Resources to Protect . . . . . . . . . . . . . . . . . . . . . . . . . . . . . . . . . . . . . . . . . . 96
Implementing ColdFusion RDS Security . . . . . . . . . . . . . . . . . . . . . . . . . . . . . . . . . . 98
Implementing User Security . . . . . . . . . . . . . . . . . . . . . . . . . . . . . . . . . . . . . . . . . . . . . 99
Implementing Server Sandbox Security . . . . . . . . . . . . . . . . . . . . . . . . . . . . . . . . . . 100
Securing the ColdFusion Administrator. . . . . . . . . . . . . . . . . . . . . . . . . . . . . . . . . . 102
Viewing a Map of your Security Framework . . . . . . . . . . . . . . . . . . . . . . . . . . . . . . 103
vi Contents
An Example of ColdFusion Studio Security . . . . . . . . . . . . . . . . . . . . . . . . . . . . . . . 104Enabling Advanced Security . . . . . . . . . . . . . . . . . . . . . . . . . . . . . . . . . . . . . . 104Specifying a User Directory . . . . . . . . . . . . . . . . . . . . . . . . . . . . . . . . . . . . . . . 104Defining a security context . . . . . . . . . . . . . . . . . . . . . . . . . . . . . . . . . . . . . . . . 105Specifying resources to protect . . . . . . . . . . . . . . . . . . . . . . . . . . . . . . . . . . . . 105Adding policies . . . . . . . . . . . . . . . . . . . . . . . . . . . . . . . . . . . . . . . . . . . . . . . . . . 106Granting access privileges . . . . . . . . . . . . . . . . . . . . . . . . . . . . . . . . . . . . . . . . 106Assigning users/groups to policies . . . . . . . . . . . . . . . . . . . . . . . . . . . . . . . . . 107Enable ColdFusion Studio Security . . . . . . . . . . . . . . . . . . . . . . . . . . . . . . . . 108
Advanced Security Single Sign-On . . . . . . . . . . . . . . . . . . . . . . . . . . . . . . . . . . . . . . 109
Undocumented Tags and Functions . . . . . . . . . . . . . . . . . . . . . . . . . . . . . . . . . . . . . 110Administrative Functions . . . . . . . . . . . . . . . . . . . . . . . . . . . . . . . . . . . . . . . . . 110Administrative Tags . . . . . . . . . . . . . . . . . . . . . . . . . . . . . . . . . . . . . . . . . . . . . . 111
Part III Advanced Verity Tools . . . . . . . . . . . . . 113
Chapter 6 Configuring Verity K2 Server . . . . . . . . . . 115Overview . . . . . . . . . . . . . . . . . . . . . . . . . . . . . . . . . . . . . . . . . . . . . . . . . . . . . . . . . . . . . 116
Verity operates in two modes . . . . . . . . . . . . . . . . . . . . . . . . . . . . . . . . . . . . . . 116Quick start to K2 Server . . . . . . . . . . . . . . . . . . . . . . . . . . . . . . . . . . . . . . . . . . . 116
About K2 Server . . . . . . . . . . . . . . . . . . . . . . . . . . . . . . . . . . . . . . . . . . . . . . . . . . . . . . . 118Installation details . . . . . . . . . . . . . . . . . . . . . . . . . . . . . . . . . . . . . . . . . . . . . . . 118Two Verity modes now supported . . . . . . . . . . . . . . . . . . . . . . . . . . . . . . . . . 118How ColdFusion determines which mode to use . . . . . . . . . . . . . . . . . . . . 119Collections created with ColdFusion . . . . . . . . . . . . . . . . . . . . . . . . . . . . . . . 119
Starting K2 Server . . . . . . . . . . . . . . . . . . . . . . . . . . . . . . . . . . . . . . . . . . . . . . . . . . . . . 120Windows batch file example . . . . . . . . . . . . . . . . . . . . . . . . . . . . . . . . . . . . . . 121Linux and UNIX scripts . . . . . . . . . . . . . . . . . . . . . . . . . . . . . . . . . . . . . . . . . . . 121
Stopping K2 Server . . . . . . . . . . . . . . . . . . . . . . . . . . . . . . . . . . . . . . . . . . . . . . . . . . . . 122Stopping K2 when run as a service . . . . . . . . . . . . . . . . . . . . . . . . . . . . . . . . . 122Stopping K2 when run as an application . . . . . . . . . . . . . . . . . . . . . . . . . . . . 122Stopping K2 Server on Linux/UNIX . . . . . . . . . . . . . . . . . . . . . . . . . . . . . . . . 122
Editing the k2server.ini File. . . . . . . . . . . . . . . . . . . . . . . . . . . . . . . . . . . . . . . . . . . . . 124Edit the vdkHome parameter of k2server.ini . . . . . . . . . . . . . . . . . . . . . . . . 124Edit the Coll-n section of k2server.ini . . . . . . . . . . . . . . . . . . . . . . . . . . . . . . 124k2server.ini file listing . . . . . . . . . . . . . . . . . . . . . . . . . . . . . . . . . . . . . . . . . . . . 125
k2server.ini Parameter Reference . . . . . . . . . . . . . . . . . . . . . . . . . . . . . . . . . . . . . . . 127Server section . . . . . . . . . . . . . . . . . . . . . . . . . . . . . . . . . . . . . . . . . . . . . . . . . . . 127Search thread keywords . . . . . . . . . . . . . . . . . . . . . . . . . . . . . . . . . . . . . . . . . . 128Collection sections . . . . . . . . . . . . . . . . . . . . . . . . . . . . . . . . . . . . . . . . . . . . . . . 129
Using the rck2 Utility to Search K2 Documents . . . . . . . . . . . . . . . . . . . . . . . . . . . 131rck2 syntax . . . . . . . . . . . . . . . . . . . . . . . . . . . . . . . . . . . . . . . . . . . . . . . . . . . . . . 131rck2 command options . . . . . . . . . . . . . . . . . . . . . . . . . . . . . . . . . . . . . . . . . . . 131
Contents vii
Error Messages. . . . . . . . . . . . . . . . . . . . . . . . . . . . . . . . . . . . . . . . . . . . . . . . . . . . . . . . 132Generic error codes . . . . . . . . . . . . . . . . . . . . . . . . . . . . . . . . . . . . . . . . . . . . . . 132Usage error codes . . . . . . . . . . . . . . . . . . . . . . . . . . . . . . . . . . . . . . . . . . . . . . . . 132Runtime error codes . . . . . . . . . . . . . . . . . . . . . . . . . . . . . . . . . . . . . . . . . . . . . 132Data error codes . . . . . . . . . . . . . . . . . . . . . . . . . . . . . . . . . . . . . . . . . . . . . . . . . 133Query error codes . . . . . . . . . . . . . . . . . . . . . . . . . . . . . . . . . . . . . . . . . . . . . . . . 133Security error codes . . . . . . . . . . . . . . . . . . . . . . . . . . . . . . . . . . . . . . . . . . . . . . 133Remote Connection error codes . . . . . . . . . . . . . . . . . . . . . . . . . . . . . . . . . . . 134File Handling error codes . . . . . . . . . . . . . . . . . . . . . . . . . . . . . . . . . . . . . . . . . 134Dispatch error codes . . . . . . . . . . . . . . . . . . . . . . . . . . . . . . . . . . . . . . . . . . . . . 134Warnings . . . . . . . . . . . . . . . . . . . . . . . . . . . . . . . . . . . . . . . . . . . . . . . . . . . . . . . . 134TCP/IP error codes . . . . . . . . . . . . . . . . . . . . . . . . . . . . . . . . . . . . . . . . . . . . . . . 135
Chapter 7 Indexing XML Documents . . . . . . . . . . . . . 137Indexing Overview . . . . . . . . . . . . . . . . . . . . . . . . . . . . . . . . . . . . . . . . . . . . . . . . . . . . 138
Implementation summary . . . . . . . . . . . . . . . . . . . . . . . . . . . . . . . . . . . . . . . . 138
Style Files. . . . . . . . . . . . . . . . . . . . . . . . . . . . . . . . . . . . . . . . . . . . . . . . . . . . . . . . . . . . . 139Configuring style files . . . . . . . . . . . . . . . . . . . . . . . . . . . . . . . . . . . . . . . . . . . . 139Configuring the style.xml file . . . . . . . . . . . . . . . . . . . . . . . . . . . . . . . . . . . . . . 139style.xml command syntax . . . . . . . . . . . . . . . . . . . . . . . . . . . . . . . . . . . . . . . . 141style.ufl file . . . . . . . . . . . . . . . . . . . . . . . . . . . . . . . . . . . . . . . . . . . . . . . . . . . . . . 142style.dft file . . . . . . . . . . . . . . . . . . . . . . . . . . . . . . . . . . . . . . . . . . . . . . . . . . . . . . 142
Indexing XML Documents . . . . . . . . . . . . . . . . . . . . . . . . . . . . . . . . . . . . . . . . . . . . . 143Indexing using mkvdk . . . . . . . . . . . . . . . . . . . . . . . . . . . . . . . . . . . . . . . . . . . . 143Searching using rcvdk . . . . . . . . . . . . . . . . . . . . . . . . . . . . . . . . . . . . . . . . . . . . 143
Chapter 8 Verity Spider . . . . . . . . . . . . . . . . . . . . . . . . 145Overview . . . . . . . . . . . . . . . . . . . . . . . . . . . . . . . . . . . . . . . . . . . . . . . . . . . . . . . . . . . . . 146
Supports Web standards . . . . . . . . . . . . . . . . . . . . . . . . . . . . . . . . . . . . . . . . . . 146Restart capability . . . . . . . . . . . . . . . . . . . . . . . . . . . . . . . . . . . . . . . . . . . . . . . . 146State maintenance through a persistent store . . . . . . . . . . . . . . . . . . . . . . . 146Performance . . . . . . . . . . . . . . . . . . . . . . . . . . . . . . . . . . . . . . . . . . . . . . . . . . . . 146
Verity Spider Syntax . . . . . . . . . . . . . . . . . . . . . . . . . . . . . . . . . . . . . . . . . . . . . . . . . . . 148Overview . . . . . . . . . . . . . . . . . . . . . . . . . . . . . . . . . . . . . . . . . . . . . . . . . . . . . . . . 148The Verity Spider command . . . . . . . . . . . . . . . . . . . . . . . . . . . . . . . . . . . . . . 148Using a command file . . . . . . . . . . . . . . . . . . . . . . . . . . . . . . . . . . . . . . . . . . . . 149Command-line option reference . . . . . . . . . . . . . . . . . . . . . . . . . . . . . . . . . . 149
Core Options . . . . . . . . . . . . . . . . . . . . . . . . . . . . . . . . . . . . . . . . . . . . . . . . . . . . . . . . . 151
Processing Options . . . . . . . . . . . . . . . . . . . . . . . . . . . . . . . . . . . . . . . . . . . . . . . . . . . . 153
Networking Options . . . . . . . . . . . . . . . . . . . . . . . . . . . . . . . . . . . . . . . . . . . . . . . . . . . 159
Paths and URLs Options . . . . . . . . . . . . . . . . . . . . . . . . . . . . . . . . . . . . . . . . . . . . . . . 163
Content Options . . . . . . . . . . . . . . . . . . . . . . . . . . . . . . . . . . . . . . . . . . . . . . . . . . . . . . 168
Locale Options . . . . . . . . . . . . . . . . . . . . . . . . . . . . . . . . . . . . . . . . . . . . . . . . . . . . . . . . 176
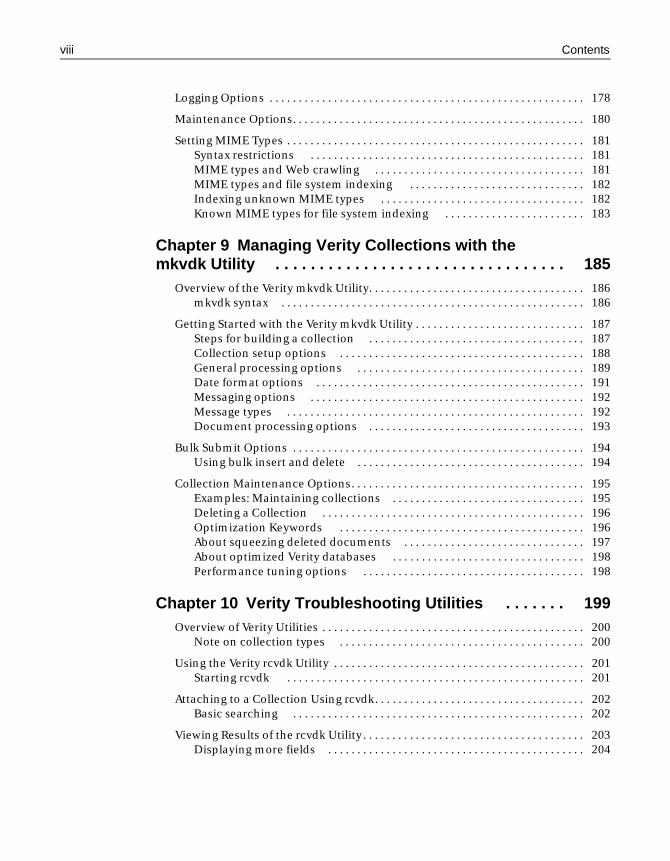
viii Contents
Logging Options . . . . . . . . . . . . . . . . . . . . . . . . . . . . . . . . . . . . . . . . . . . . . . . . . . . . . . 178
Maintenance Options. . . . . . . . . . . . . . . . . . . . . . . . . . . . . . . . . . . . . . . . . . . . . . . . . . 180
Setting MIME Types . . . . . . . . . . . . . . . . . . . . . . . . . . . . . . . . . . . . . . . . . . . . . . . . . . . 181Syntax restrictions . . . . . . . . . . . . . . . . . . . . . . . . . . . . . . . . . . . . . . . . . . . . . . . 181MIME types and Web crawling . . . . . . . . . . . . . . . . . . . . . . . . . . . . . . . . . . . . 181MIME types and file system indexing . . . . . . . . . . . . . . . . . . . . . . . . . . . . . . 182Indexing unknown MIME types . . . . . . . . . . . . . . . . . . . . . . . . . . . . . . . . . . . 182Known MIME types for file system indexing . . . . . . . . . . . . . . . . . . . . . . . . 183
Chapter 9 Managing Verity Collections with the mkvdk Utility . . . . . . . . . . . . . . . . . . . . . . . . . . . . . . . . . 185
Overview of the Verity mkvdk Utility. . . . . . . . . . . . . . . . . . . . . . . . . . . . . . . . . . . . . 186mkvdk syntax . . . . . . . . . . . . . . . . . . . . . . . . . . . . . . . . . . . . . . . . . . . . . . . . . . . . 186
Getting Started with the Verity mkvdk Utility . . . . . . . . . . . . . . . . . . . . . . . . . . . . . 187Steps for building a collection . . . . . . . . . . . . . . . . . . . . . . . . . . . . . . . . . . . . . 187Collection setup options . . . . . . . . . . . . . . . . . . . . . . . . . . . . . . . . . . . . . . . . . . 188General processing options . . . . . . . . . . . . . . . . . . . . . . . . . . . . . . . . . . . . . . . 189Date format options . . . . . . . . . . . . . . . . . . . . . . . . . . . . . . . . . . . . . . . . . . . . . . 191Messaging options . . . . . . . . . . . . . . . . . . . . . . . . . . . . . . . . . . . . . . . . . . . . . . . 192Message types . . . . . . . . . . . . . . . . . . . . . . . . . . . . . . . . . . . . . . . . . . . . . . . . . . . 192Document processing options . . . . . . . . . . . . . . . . . . . . . . . . . . . . . . . . . . . . . 193
Bulk Submit Options . . . . . . . . . . . . . . . . . . . . . . . . . . . . . . . . . . . . . . . . . . . . . . . . . . 194Using bulk insert and delete . . . . . . . . . . . . . . . . . . . . . . . . . . . . . . . . . . . . . . . 194
Collection Maintenance Options. . . . . . . . . . . . . . . . . . . . . . . . . . . . . . . . . . . . . . . . 195Examples: Maintaining collections . . . . . . . . . . . . . . . . . . . . . . . . . . . . . . . . . 195Deleting a Collection . . . . . . . . . . . . . . . . . . . . . . . . . . . . . . . . . . . . . . . . . . . . . 196Optimization Keywords . . . . . . . . . . . . . . . . . . . . . . . . . . . . . . . . . . . . . . . . . . 196About squeezing deleted documents . . . . . . . . . . . . . . . . . . . . . . . . . . . . . . . 197About optimized Verity databases . . . . . . . . . . . . . . . . . . . . . . . . . . . . . . . . . 198Performance tuning options . . . . . . . . . . . . . . . . . . . . . . . . . . . . . . . . . . . . . . 198
Chapter 10 Verity Troubleshooting Utilities . . . . . . . 199Overview of Verity Utilities . . . . . . . . . . . . . . . . . . . . . . . . . . . . . . . . . . . . . . . . . . . . . 200
Note on collection types . . . . . . . . . . . . . . . . . . . . . . . . . . . . . . . . . . . . . . . . . . 200
Using the Verity rcvdk Utility . . . . . . . . . . . . . . . . . . . . . . . . . . . . . . . . . . . . . . . . . . . 201Starting rcvdk . . . . . . . . . . . . . . . . . . . . . . . . . . . . . . . . . . . . . . . . . . . . . . . . . . . 201
Attaching to a Collection Using rcvdk. . . . . . . . . . . . . . . . . . . . . . . . . . . . . . . . . . . . 202Basic searching . . . . . . . . . . . . . . . . . . . . . . . . . . . . . . . . . . . . . . . . . . . . . . . . . . 202
Viewing Results of the rcvdk Utility. . . . . . . . . . . . . . . . . . . . . . . . . . . . . . . . . . . . . . 203Displaying more fields . . . . . . . . . . . . . . . . . . . . . . . . . . . . . . . . . . . . . . . . . . . . 204
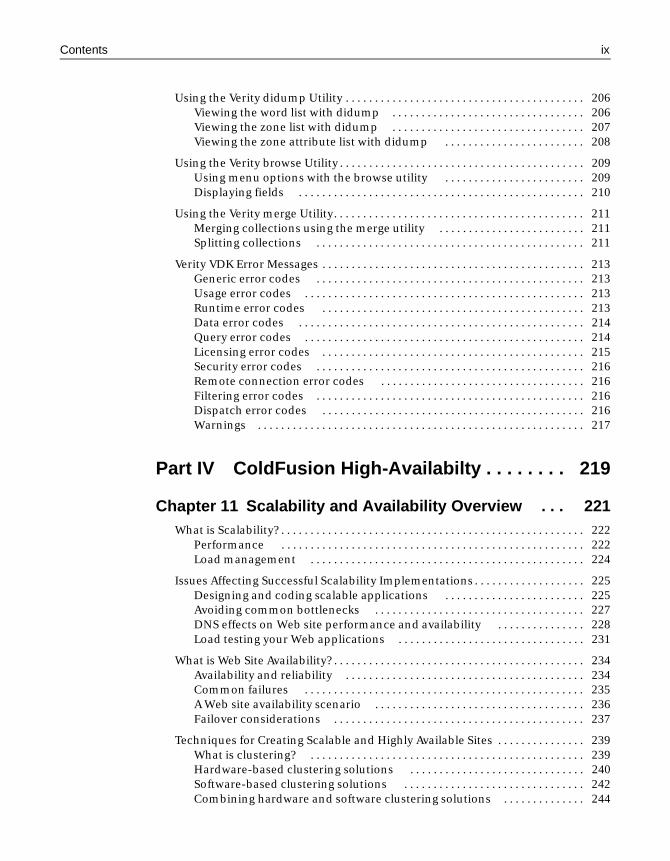
Contents ix
Using the Verity didump Utility . . . . . . . . . . . . . . . . . . . . . . . . . . . . . . . . . . . . . . . . . 206Viewing the word list with didump . . . . . . . . . . . . . . . . . . . . . . . . . . . . . . . . . 206Viewing the zone list with didump . . . . . . . . . . . . . . . . . . . . . . . . . . . . . . . . . 207Viewing the zone attribute list with didump . . . . . . . . . . . . . . . . . . . . . . . . 208
Using the Verity browse Utility . . . . . . . . . . . . . . . . . . . . . . . . . . . . . . . . . . . . . . . . . . 209Using menu options with the browse utility . . . . . . . . . . . . . . . . . . . . . . . . 209Displaying fields . . . . . . . . . . . . . . . . . . . . . . . . . . . . . . . . . . . . . . . . . . . . . . . . . 210
Using the Verity merge Utility. . . . . . . . . . . . . . . . . . . . . . . . . . . . . . . . . . . . . . . . . . . 211Merging collections using the merge utility . . . . . . . . . . . . . . . . . . . . . . . . . 211Splitting collections . . . . . . . . . . . . . . . . . . . . . . . . . . . . . . . . . . . . . . . . . . . . . . 211
Verity VDK Error Messages . . . . . . . . . . . . . . . . . . . . . . . . . . . . . . . . . . . . . . . . . . . . . 213Generic error codes . . . . . . . . . . . . . . . . . . . . . . . . . . . . . . . . . . . . . . . . . . . . . . 213Usage error codes . . . . . . . . . . . . . . . . . . . . . . . . . . . . . . . . . . . . . . . . . . . . . . . . 213Runtime error codes . . . . . . . . . . . . . . . . . . . . . . . . . . . . . . . . . . . . . . . . . . . . . 213Data error codes . . . . . . . . . . . . . . . . . . . . . . . . . . . . . . . . . . . . . . . . . . . . . . . . . 214Query error codes . . . . . . . . . . . . . . . . . . . . . . . . . . . . . . . . . . . . . . . . . . . . . . . . 214Licensing error codes . . . . . . . . . . . . . . . . . . . . . . . . . . . . . . . . . . . . . . . . . . . . . 215Security error codes . . . . . . . . . . . . . . . . . . . . . . . . . . . . . . . . . . . . . . . . . . . . . . 216Remote connection error codes . . . . . . . . . . . . . . . . . . . . . . . . . . . . . . . . . . . 216Filtering error codes . . . . . . . . . . . . . . . . . . . . . . . . . . . . . . . . . . . . . . . . . . . . . . 216Dispatch error codes . . . . . . . . . . . . . . . . . . . . . . . . . . . . . . . . . . . . . . . . . . . . . 216Warnings . . . . . . . . . . . . . . . . . . . . . . . . . . . . . . . . . . . . . . . . . . . . . . . . . . . . . . . . 217
Part IV ColdFusion High-Availabilty . . . . . . . . 219
Chapter 11 Scalability and Availability Overview . . . 221What is Scalability? . . . . . . . . . . . . . . . . . . . . . . . . . . . . . . . . . . . . . . . . . . . . . . . . . . . . 222
Performance . . . . . . . . . . . . . . . . . . . . . . . . . . . . . . . . . . . . . . . . . . . . . . . . . . . . 222Load management . . . . . . . . . . . . . . . . . . . . . . . . . . . . . . . . . . . . . . . . . . . . . . . 224
Issues Affecting Successful Scalability Implementations . . . . . . . . . . . . . . . . . . . 225Designing and coding scalable applications . . . . . . . . . . . . . . . . . . . . . . . . 225Avoiding common bottlenecks . . . . . . . . . . . . . . . . . . . . . . . . . . . . . . . . . . . . 227DNS effects on Web site performance and availability . . . . . . . . . . . . . . . 228Load testing your Web applications . . . . . . . . . . . . . . . . . . . . . . . . . . . . . . . . 231
What is Web Site Availability? . . . . . . . . . . . . . . . . . . . . . . . . . . . . . . . . . . . . . . . . . . . 234Availability and reliability . . . . . . . . . . . . . . . . . . . . . . . . . . . . . . . . . . . . . . . . . 234Common failures . . . . . . . . . . . . . . . . . . . . . . . . . . . . . . . . . . . . . . . . . . . . . . . . 235A Web site availability scenario . . . . . . . . . . . . . . . . . . . . . . . . . . . . . . . . . . . . 236Failover considerations . . . . . . . . . . . . . . . . . . . . . . . . . . . . . . . . . . . . . . . . . . . 237
Techniques for Creating Scalable and Highly Available Sites . . . . . . . . . . . . . . . 239What is clustering? . . . . . . . . . . . . . . . . . . . . . . . . . . . . . . . . . . . . . . . . . . . . . . . 239Hardware-based clustering solutions . . . . . . . . . . . . . . . . . . . . . . . . . . . . . . 240Software-based clustering solutions . . . . . . . . . . . . . . . . . . . . . . . . . . . . . . . 242Combining hardware and software clustering solutions . . . . . . . . . . . . . . 244
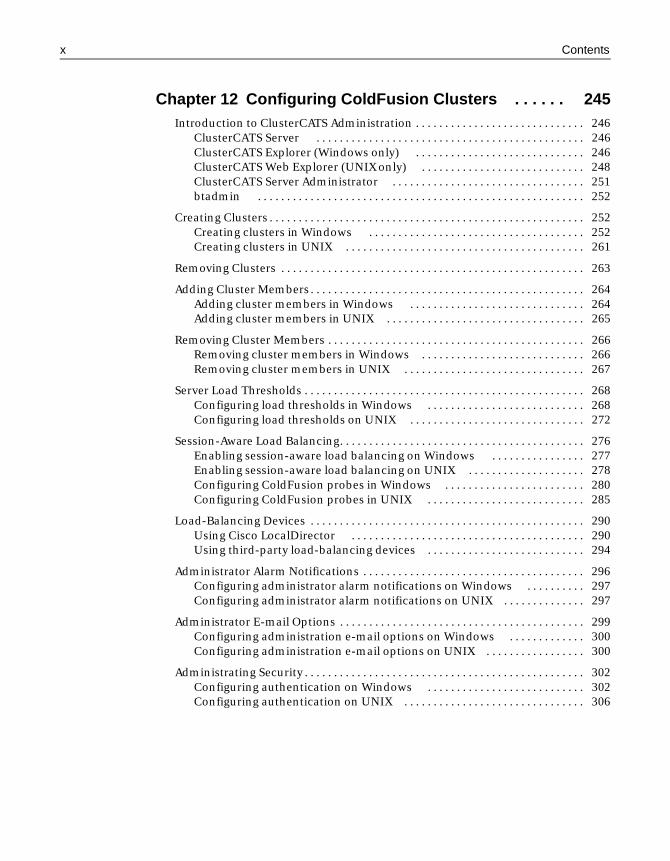
x Contents
Chapter 12 Configuring ColdFusion Clusters . . . . . . 245Introduction to ClusterCATS Administration . . . . . . . . . . . . . . . . . . . . . . . . . . . . . 246
ClusterCATS Server . . . . . . . . . . . . . . . . . . . . . . . . . . . . . . . . . . . . . . . . . . . . . . 246ClusterCATS Explorer (Windows only) . . . . . . . . . . . . . . . . . . . . . . . . . . . . . 246ClusterCATS Web Explorer (UNIX only) . . . . . . . . . . . . . . . . . . . . . . . . . . . . 248ClusterCATS Server Administrator . . . . . . . . . . . . . . . . . . . . . . . . . . . . . . . . . 251btadmin . . . . . . . . . . . . . . . . . . . . . . . . . . . . . . . . . . . . . . . . . . . . . . . . . . . . . . . . 252
Creating Clusters . . . . . . . . . . . . . . . . . . . . . . . . . . . . . . . . . . . . . . . . . . . . . . . . . . . . . . 252Creating clusters in Windows . . . . . . . . . . . . . . . . . . . . . . . . . . . . . . . . . . . . . 252Creating clusters in UNIX . . . . . . . . . . . . . . . . . . . . . . . . . . . . . . . . . . . . . . . . . 261
Removing Clusters . . . . . . . . . . . . . . . . . . . . . . . . . . . . . . . . . . . . . . . . . . . . . . . . . . . . 263
Adding Cluster Members . . . . . . . . . . . . . . . . . . . . . . . . . . . . . . . . . . . . . . . . . . . . . . . 264Adding cluster members in Windows . . . . . . . . . . . . . . . . . . . . . . . . . . . . . . 264Adding cluster members in UNIX . . . . . . . . . . . . . . . . . . . . . . . . . . . . . . . . . . 265
Removing Cluster Members . . . . . . . . . . . . . . . . . . . . . . . . . . . . . . . . . . . . . . . . . . . . 266Removing cluster members in Windows . . . . . . . . . . . . . . . . . . . . . . . . . . . . 266Removing cluster members in UNIX . . . . . . . . . . . . . . . . . . . . . . . . . . . . . . . 267
Server Load Thresholds . . . . . . . . . . . . . . . . . . . . . . . . . . . . . . . . . . . . . . . . . . . . . . . . 268Configuring load thresholds in Windows . . . . . . . . . . . . . . . . . . . . . . . . . . . 268Configuring load thresholds on UNIX . . . . . . . . . . . . . . . . . . . . . . . . . . . . . . 272
Session-Aware Load Balancing. . . . . . . . . . . . . . . . . . . . . . . . . . . . . . . . . . . . . . . . . . 276Enabling session-aware load balancing on Windows . . . . . . . . . . . . . . . . 277Enabling session-aware load balancing on UNIX . . . . . . . . . . . . . . . . . . . . 278Configuring ColdFusion probes in Windows . . . . . . . . . . . . . . . . . . . . . . . . 280Configuring ColdFusion probes in UNIX . . . . . . . . . . . . . . . . . . . . . . . . . . . 285
Load-Balancing Devices . . . . . . . . . . . . . . . . . . . . . . . . . . . . . . . . . . . . . . . . . . . . . . . 290Using Cisco LocalDirector . . . . . . . . . . . . . . . . . . . . . . . . . . . . . . . . . . . . . . . . 290Using third-party load-balancing devices . . . . . . . . . . . . . . . . . . . . . . . . . . . 294
Administrator Alarm Notifications . . . . . . . . . . . . . . . . . . . . . . . . . . . . . . . . . . . . . . 296Configuring administrator alarm notifications on Windows . . . . . . . . . . 297Configuring administrator alarm notifications on UNIX . . . . . . . . . . . . . . 297
Administrator E-mail Options . . . . . . . . . . . . . . . . . . . . . . . . . . . . . . . . . . . . . . . . . . 299Configuring administration e-mail options on Windows . . . . . . . . . . . . . 300Configuring administration e-mail options on UNIX . . . . . . . . . . . . . . . . . 300
Administrating Security . . . . . . . . . . . . . . . . . . . . . . . . . . . . . . . . . . . . . . . . . . . . . . . . 302Configuring authentication on Windows . . . . . . . . . . . . . . . . . . . . . . . . . . . 302Configuring authentication on UNIX . . . . . . . . . . . . . . . . . . . . . . . . . . . . . . . 306
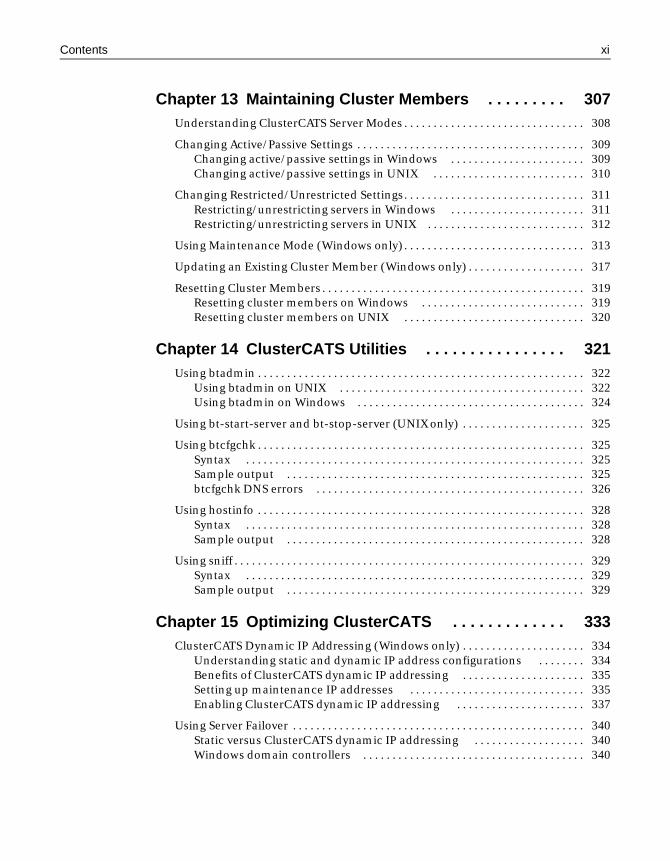
Contents xi
Chapter 13 Maintaining Cluster Members . . . . . . . . . 307Understanding ClusterCATS Server Modes . . . . . . . . . . . . . . . . . . . . . . . . . . . . . . . 308
Changing Active/Passive Settings . . . . . . . . . . . . . . . . . . . . . . . . . . . . . . . . . . . . . . . 309Changing active/passive settings in Windows . . . . . . . . . . . . . . . . . . . . . . . 309Changing active/passive settings in UNIX . . . . . . . . . . . . . . . . . . . . . . . . . . 310
Changing Restricted/Unrestricted Settings. . . . . . . . . . . . . . . . . . . . . . . . . . . . . . . 311Restricting/unrestricting servers in Windows . . . . . . . . . . . . . . . . . . . . . . . 311Restricting/unrestricting servers in UNIX . . . . . . . . . . . . . . . . . . . . . . . . . . . 312
Using Maintenance Mode (Windows only) . . . . . . . . . . . . . . . . . . . . . . . . . . . . . . . 313
Updating an Existing Cluster Member (Windows only) . . . . . . . . . . . . . . . . . . . . 317
Resetting Cluster Members . . . . . . . . . . . . . . . . . . . . . . . . . . . . . . . . . . . . . . . . . . . . . 319Resetting cluster members on Windows . . . . . . . . . . . . . . . . . . . . . . . . . . . . 319Resetting cluster members on UNIX . . . . . . . . . . . . . . . . . . . . . . . . . . . . . . . 320
Chapter 14 ClusterCATS Utilities . . . . . . . . . . . . . . . . 321Using btadmin . . . . . . . . . . . . . . . . . . . . . . . . . . . . . . . . . . . . . . . . . . . . . . . . . . . . . . . . 322
Using btadmin on UNIX . . . . . . . . . . . . . . . . . . . . . . . . . . . . . . . . . . . . . . . . . . 322Using btadmin on Windows . . . . . . . . . . . . . . . . . . . . . . . . . . . . . . . . . . . . . . . 324
Using bt-start-server and bt-stop-server (UNIX only) . . . . . . . . . . . . . . . . . . . . . 325
Using btcfgchk . . . . . . . . . . . . . . . . . . . . . . . . . . . . . . . . . . . . . . . . . . . . . . . . . . . . . . . . 325Syntax . . . . . . . . . . . . . . . . . . . . . . . . . . . . . . . . . . . . . . . . . . . . . . . . . . . . . . . . . . 325Sample output . . . . . . . . . . . . . . . . . . . . . . . . . . . . . . . . . . . . . . . . . . . . . . . . . . . 325btcfgchk DNS errors . . . . . . . . . . . . . . . . . . . . . . . . . . . . . . . . . . . . . . . . . . . . . . 326
Using hostinfo . . . . . . . . . . . . . . . . . . . . . . . . . . . . . . . . . . . . . . . . . . . . . . . . . . . . . . . . 328Syntax . . . . . . . . . . . . . . . . . . . . . . . . . . . . . . . . . . . . . . . . . . . . . . . . . . . . . . . . . . 328Sample output . . . . . . . . . . . . . . . . . . . . . . . . . . . . . . . . . . . . . . . . . . . . . . . . . . . 328
Using sniff . . . . . . . . . . . . . . . . . . . . . . . . . . . . . . . . . . . . . . . . . . . . . . . . . . . . . . . . . . . . 329Syntax . . . . . . . . . . . . . . . . . . . . . . . . . . . . . . . . . . . . . . . . . . . . . . . . . . . . . . . . . . 329Sample output . . . . . . . . . . . . . . . . . . . . . . . . . . . . . . . . . . . . . . . . . . . . . . . . . . . 329
Chapter 15 Optimizing ClusterCATS . . . . . . . . . . . . . 333ClusterCATS Dynamic IP Addressing (Windows only) . . . . . . . . . . . . . . . . . . . . . 334
Understanding static and dynamic IP address configurations . . . . . . . . 334Benefits of ClusterCATS dynamic IP addressing . . . . . . . . . . . . . . . . . . . . . 335Setting up maintenance IP addresses . . . . . . . . . . . . . . . . . . . . . . . . . . . . . . 335Enabling ClusterCATS dynamic IP addressing . . . . . . . . . . . . . . . . . . . . . . 337
Using Server Failover . . . . . . . . . . . . . . . . . . . . . . . . . . . . . . . . . . . . . . . . . . . . . . . . . . 340Static versus ClusterCATS dynamic IP addressing . . . . . . . . . . . . . . . . . . . 340Windows domain controllers . . . . . . . . . . . . . . . . . . . . . . . . . . . . . . . . . . . . . . 340

xii Contents
Configuring Load-Balancing Metrics . . . . . . . . . . . . . . . . . . . . . . . . . . . . . . . . . . . . 341Overview of metrics . . . . . . . . . . . . . . . . . . . . . . . . . . . . . . . . . . . . . . . . . . . . . . 341Load types . . . . . . . . . . . . . . . . . . . . . . . . . . . . . . . . . . . . . . . . . . . . . . . . . . . . . . 342Output variables . . . . . . . . . . . . . . . . . . . . . . . . . . . . . . . . . . . . . . . . . . . . . . . . . 342Troubleshooting the load-balancing metrics . . . . . . . . . . . . . . . . . . . . . . . . 343
Index . . . . . . . . . . . . . . . . . . . . . . . . . . . . . . . . . . . . . . . . 345
About This Book
Advanced ColdFusion Administration is intended for anyone who needs to configure databases for the ColdFusion server.
Contents
• Intended Audience................................................................................................... xiv
• New Features ............................................................................................................ xiv
• Developer Resources................................................................................................. xv
• About ColdFusion Documentation ........................................................................ xvi
• Getting Answers ...................................................................................................... xvii
• Contacting Macromedia........................................................................................ xviii
xiv About This Book
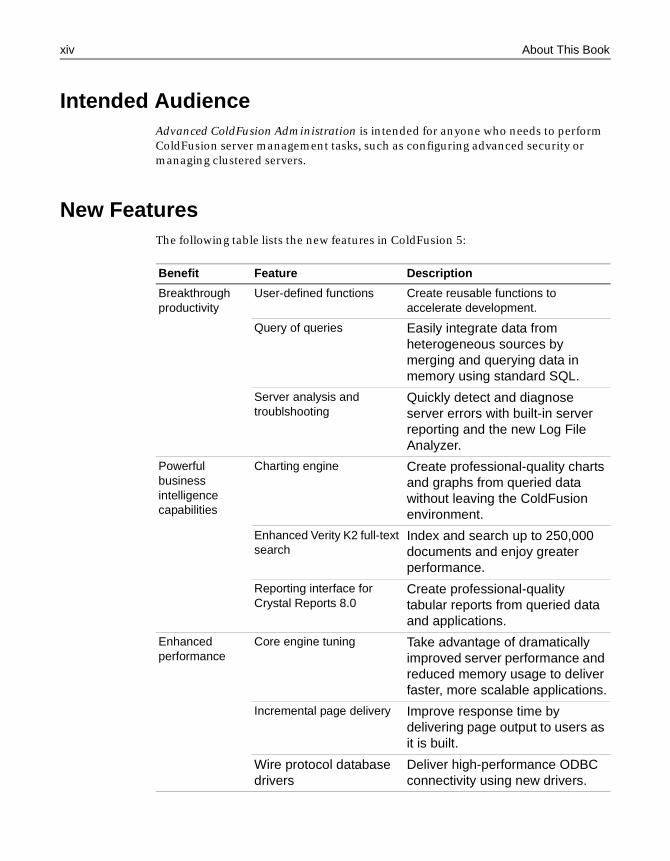
Intended AudienceAdvanced ColdFusion Administration is intended for anyone who needs to perform ColdFusion server management tasks, such as configuring advanced security or managing clustered servers.
New FeaturesThe following table lists the new features in ColdFusion 5:
Benefit Feature Description
Breakthrough productivity
User-defined functions Create reusable functions to accelerate development.
Query of queries Easily integrate data from heterogeneous sources by merging and querying data in memory using standard SQL.
Server analysis and troublshooting
Quickly detect and diagnose server errors with built-in server reporting and the new Log File Analyzer.
Powerful business intelligence capabilities
Charting engine Create professional-quality charts and graphs from queried data without leaving the ColdFusion environment.
Enhanced Verity K2 full-text search
Index and search up to 250,000 documents and enjoy greater performance.
Reporting interface for Crystal Reports 8.0
Create professional-quality tabular reports from queried data and applications.
Enhanced performance
Core engine tuning Take advantage of dramatically improved server performance and reduced memory usage to deliver faster, more scalable applications.
Incremental page delivery Improve response time by delivering page output to users as it is built.
Wire protocol database drivers
Deliver high-performance ODBC connectivity using new drivers.
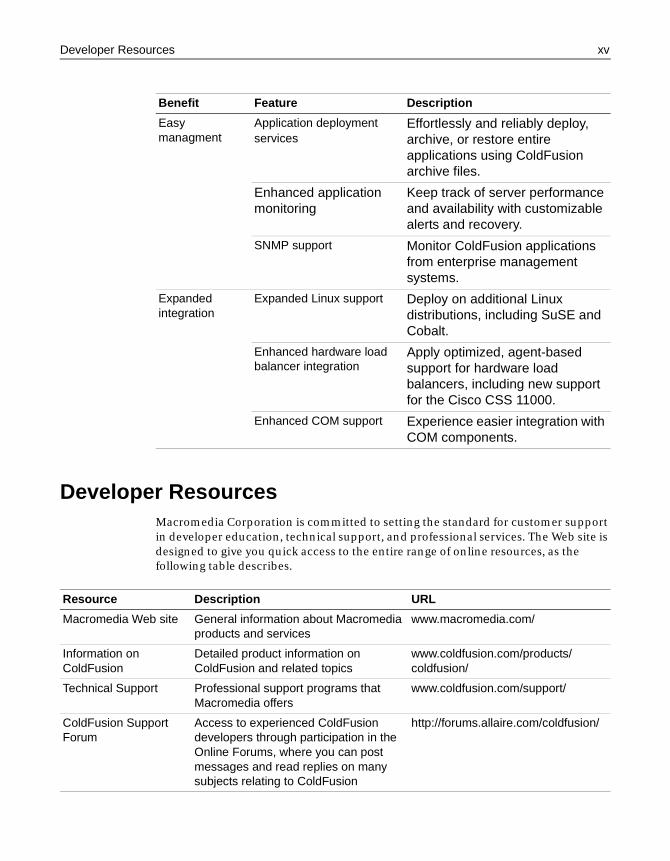
Developer Resources xv
Developer ResourcesMacromedia Corporation is committed to setting the standard for customer support in developer education, technical support, and professional services. The Web site is designed to give you quick access to the entire range of online resources, as the following table describes.
Easy managment
Application deployment services
Effortlessly and reliably deploy, archive, or restore entire applications using ColdFusion archive files.
Enhanced application monitoring
Keep track of server performance and availability with customizable alerts and recovery.
SNMP support Monitor ColdFusion applications from enterprise management systems.
Expanded integration
Expanded Linux support Deploy on additional Linux distributions, including SuSE and Cobalt.
Enhanced hardware load balancer integration
Apply optimized, agent-based support for hardware load balancers, including new support for the Cisco CSS 11000.
Enhanced COM support Experience easier integration with COM components.
Benefit Feature Description
Resource Description URL
Macromedia Web site General information about Macromedia products and services
www.macromedia.com/
Information on ColdFusion
Detailed product information on ColdFusion and related topics
www.coldfusion.com/products/coldfusion/
Technical Support Professional support programs that Macromedia offers
www.coldfusion.com/support/
ColdFusion Support Forum
Access to experienced ColdFusion developers through participation in the Online Forums, where you can post messages and read replies on many subjects relating to ColdFusion
http://forums.allaire.com/coldfusion/
xvi About This Book
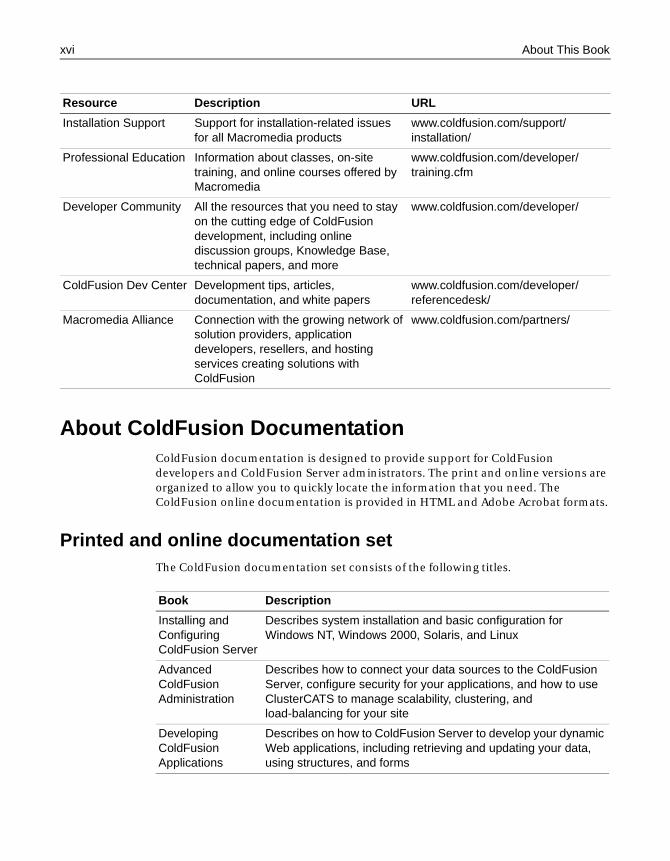
About ColdFusion DocumentationColdFusion documentation is designed to provide support for ColdFusion developers and ColdFusion Server administrators. The print and online versions are organized to allow you to quickly locate the information that you need. The ColdFusion online documentation is provided in HTML and Adobe Acrobat formats.
Printed and online documentation setThe ColdFusion documentation set consists of the following titles.
Installation Support Support for installation-related issues for all Macromedia products
www.coldfusion.com/support/installation/
Professional Education Information about classes, on-site training, and online courses offered by Macromedia
www.coldfusion.com/developer/training.cfm
Developer Community All the resources that you need to stay on the cutting edge of ColdFusion development, including online discussion groups, Knowledge Base, technical papers, and more
www.coldfusion.com/developer/
ColdFusion Dev Center Development tips, articles, documentation, and white papers
www.coldfusion.com/developer/referencedesk/
Macromedia Alliance Connection with the growing network of solution providers, application developers, resellers, and hosting services creating solutions with ColdFusion
www.coldfusion.com/partners/
Resource Description URL
Book Description
Installing and Configuring ColdFusion Server
Describes system installation and basic configuration for Windows NT, Windows 2000, Solaris, and Linux
Advanced ColdFusion Administration
Describes how to connect your data sources to the ColdFusion Server, configure security for your applications, and how to use ClusterCATS to manage scalability, clustering, and load-balancing for your site
Developing ColdFusion Applications
Describes on how to ColdFusion Server to develop your dynamic Web applications, including retrieving and updating your data, using structures, and forms
Getting Answers xvii
Viewing online documentationAll ColdFusion documentation is available online in HTML and Adobe Acrobat PDF formats. To view the HTML documentation, open the following URL on the Web server running ColdFusion: http://localhost/cfdocs/dochome.htm.
ColdFusion documentation in Acrobat format is available on the ColdFusion product CD-ROM and for download from the ColdFusion web site: http://www.coldfusion.com.
ColdFusion Studio documentation
ColdFusion Studio contains a wide range of online assistance, including a complete collection of ColdFusion documentation. To view ColdFusion online documentation from within ColdFusion Studio, click the Help resource tab. You will see an expandable list of documents about ColdFusion Server and ColdFusion Studio, as well as other information that relates to Web programming:
ColdFusion Studio online documentation is searchable and you can bookmark individual pages. For more information about using the ColdFusion Studio interface, see the ColdFusion Studio documentation set.
Getting AnswersOne of the best ways to solve particular programming problems is to tap into the vast expertise of the ColdFusion developer communities on the ColdFusion Forums. Other developers on the forum can help you figure out how to do just about anything with ColdFusion. The search facility can also help you search messages from the previous 12 months, allowing you to learn how others have solved a problem that you might be facing. The Forums is a great resource for learning ColdFusion, but it is also a great place to see the ColdFusion developer community in action.
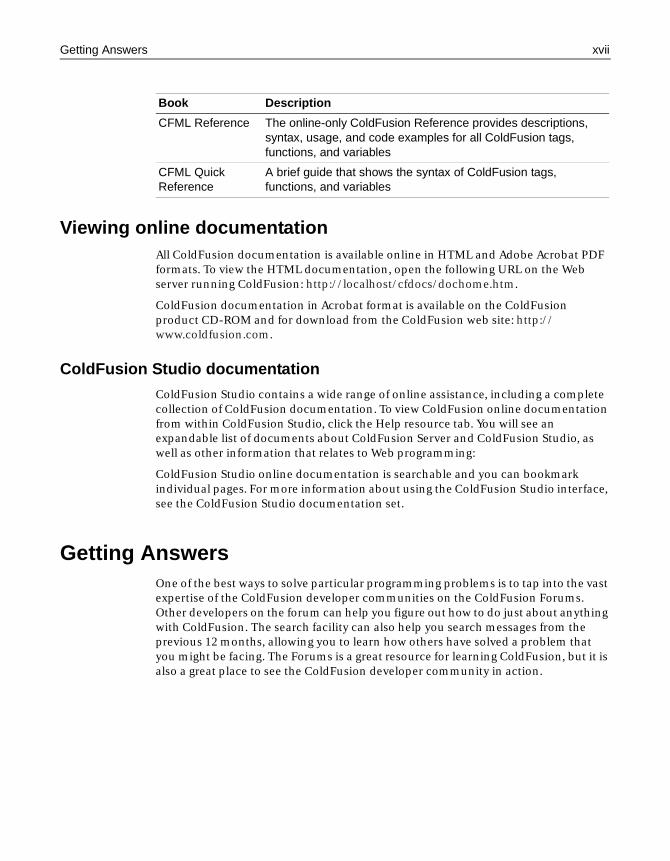
CFML Reference The online-only ColdFusion Reference provides descriptions, syntax, usage, and code examples for all ColdFusion tags, functions, and variables
CFML Quick Reference
A brief guide that shows the syntax of ColdFusion tags, functions, and variables
Book Description

xviii About This Book
Contacting Macromedia
Corporate headquarters
Macromedia, Inc.600 Townsend StreetSan Francisco, CA 94103
Tel: 415.252.2000Fax: 415.626.0554
Web: www.macromedia.com
Technical support
Macromedia offers a range of telephone and Web-based support options. Go to http://www.coldfusion.com/support/ for a complete description of technical support services.
You can make postings to the ColdFusion Support Forum (http://forums.coldfusion.com/DevConf/index.cfm) at any time.
Sales Toll Free: 888.939.2545
Tel: 617.219.2100Fax: 617.219.2101
E-mail: [email protected]
Web: http://commerce.coldfusion.com/purchase/index.cfm
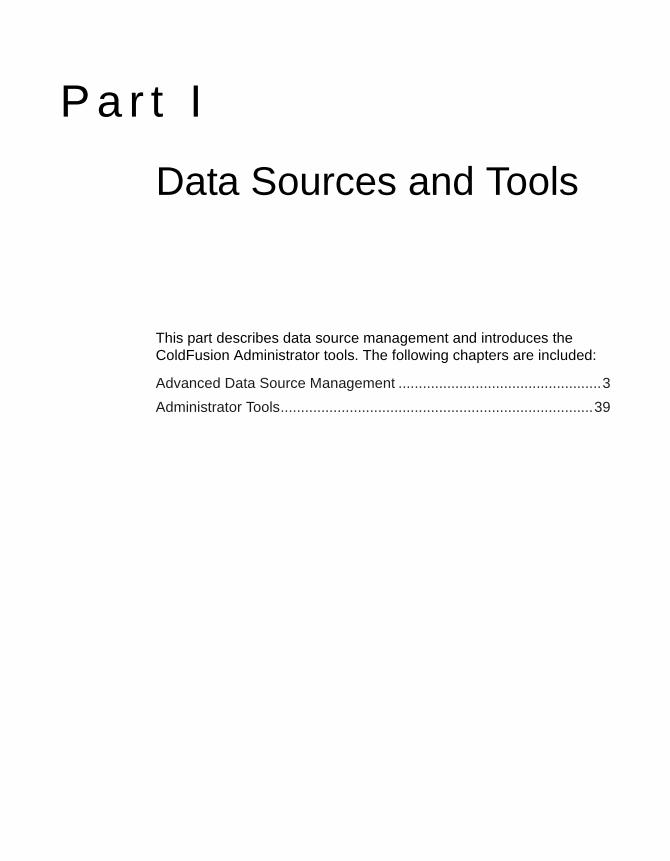
P a r t I
Data Sources and Tools
This part describes data source management and introduces the
ColdFusion Administrator tools. The following chapters are included:Advanced Data Source Management ..................................................3
Administrator Tools.............................................................................39

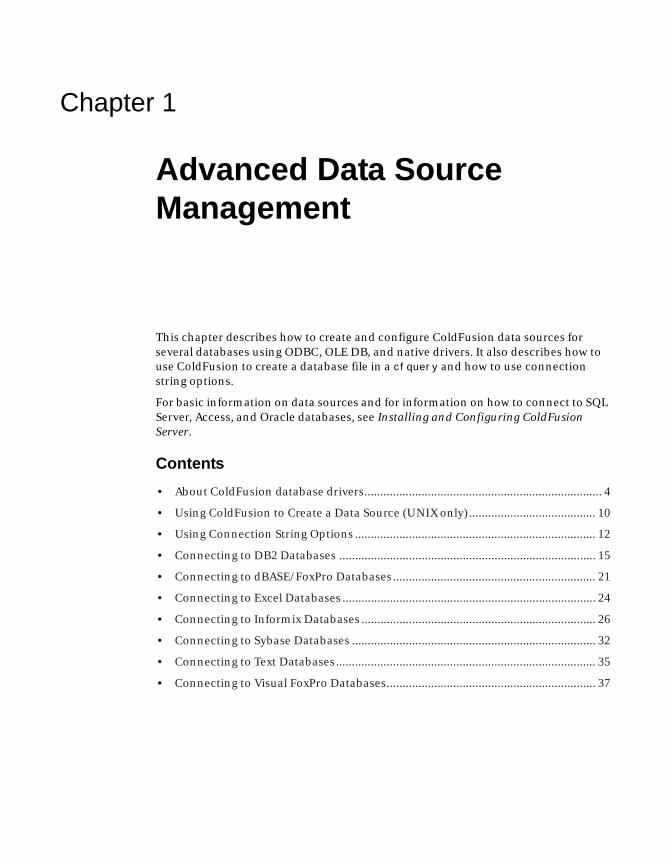
Chapter 1
Advanced Data Source Management
This chapter describes how to create and configure ColdFusion data sources for several databases using ODBC, OLE DB, and native drivers. It also describes how to use ColdFusion to create a database file in a cfquery and how to use connection string options.
For basic information on data sources and for information on how to connect to SQL Server, Access, and Oracle databases, see Installing and Configuring ColdFusion Server.
Contents
• About ColdFusion database drivers........................................................................... 4
• Using ColdFusion to Create a Data Source (UNIX only)........................................ 10
• Using Connection String Options ............................................................................ 12
• Connecting to DB2 Databases ................................................................................. 15
• Connecting to dBASE/FoxPro Databases................................................................ 21
• Connecting to Excel Databases ................................................................................ 24
• Connecting to Informix Databases .......................................................................... 26
• Connecting to Sybase Databases ............................................................................. 32
• Connecting to Text Databases.................................................................................. 35
• Connecting to Visual FoxPro Databases.................................................................. 37
4 Chapter 1 Advanced Data Source Management
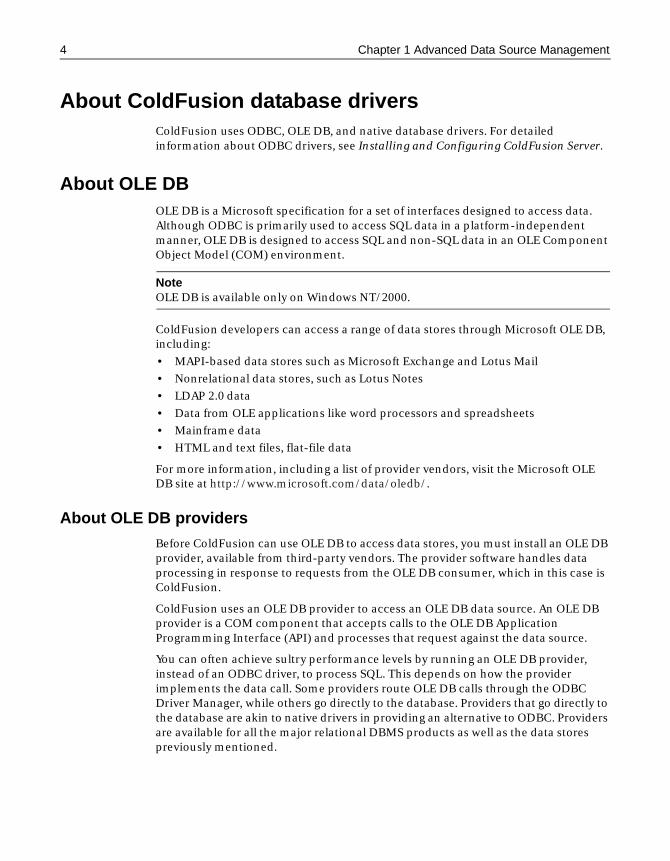
About ColdFusion database driversColdFusion uses ODBC, OLE DB, and native database drivers. For detailed information about ODBC drivers, see Installing and Configuring ColdFusion Server.
About OLE DBOLE DB is a Microsoft specification for a set of interfaces designed to access data. Although ODBC is primarily used to access SQL data in a platform-independent manner, OLE DB is designed to access SQL and non-SQL data in an OLE Component Object Model (COM) environment.
NoteOLE DB is available only on Windows NT/2000.
ColdFusion developers can access a range of data stores through Microsoft OLE DB, including:
• MAPI-based data stores such as Microsoft Exchange and Lotus Mail
• Nonrelational data stores, such as Lotus Notes
• LDAP 2.0 data
• Data from OLE applications like word processors and spreadsheets
• Mainframe data
• HTML and text files, flat-file data
For more information, including a list of provider vendors, visit the Microsoft OLE DB site at http://www.microsoft.com/data/oledb/.
About OLE DB providers
Before ColdFusion can use OLE DB to access data stores, you must install an OLE DB provider, available from third-party vendors. The provider software handles data processing in response to requests from the OLE DB consumer, which in this case is ColdFusion.
ColdFusion uses an OLE DB provider to access an OLE DB data source. An OLE DB provider is a COM component that accepts calls to the OLE DB Application Programming Interface (API) and processes that request against the data source.
You can often achieve sultry performance levels by running an OLE DB provider, instead of an ODBC driver, to process SQL. This depends on how the provider implements the data call. Some providers route OLE DB calls through the ODBC Driver Manager, while others go directly to the database. Providers that go directly to the database are akin to native drivers in providing an alternative to ODBC. Providers are available for all the major relational DBMS products as well as the data stores previously mentioned.
About ColdFusion database drivers 5
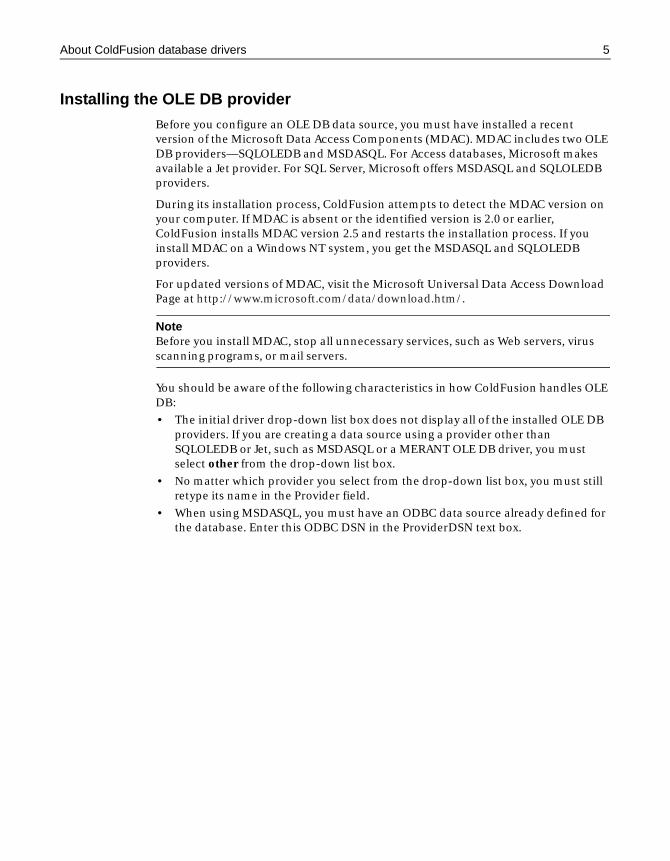
Installing the OLE DB provider
Before you configure an OLE DB data source, you must have installed a recent version of the Microsoft Data Access Components (MDAC). MDAC includes two OLE DB providers—SQLOLEDB and MSDASQL. For Access databases, Microsoft makes available a Jet provider. For SQL Server, Microsoft offers MSDASQL and SQLOLEDB providers.
During its installation process, ColdFusion attempts to detect the MDAC version on your computer. If MDAC is absent or the identified version is 2.0 or earlier, ColdFusion installs MDAC version 2.5 and restarts the installation process. If you install MDAC on a Windows NT system, you get the MSDASQL and SQLOLEDB providers.
For updated versions of MDAC, visit the Microsoft Universal Data Access Download Page at http://www.microsoft.com/data/download.htm/.
NoteBefore you install MDAC, stop all unnecessary services, such as Web servers, virus scanning programs, or mail servers.
You should be aware of the following characteristics in how ColdFusion handles OLE DB:
• The initial driver drop-down list box does not display all of the installed OLE DB providers. If you are creating a data source using a provider other than SQLOLEDB or Jet, such as MSDASQL or a MERANT OLE DB driver, you must select other from the drop-down list box.
• No matter which provider you select from the drop-down list box, you must still retype its name in the Provider field.
• When using MSDASQL, you must have an ODBC data source already defined for the database. Enter this ODBC DSN in the ProviderDSN text box.
6 Chapter 1 Advanced Data Source Management
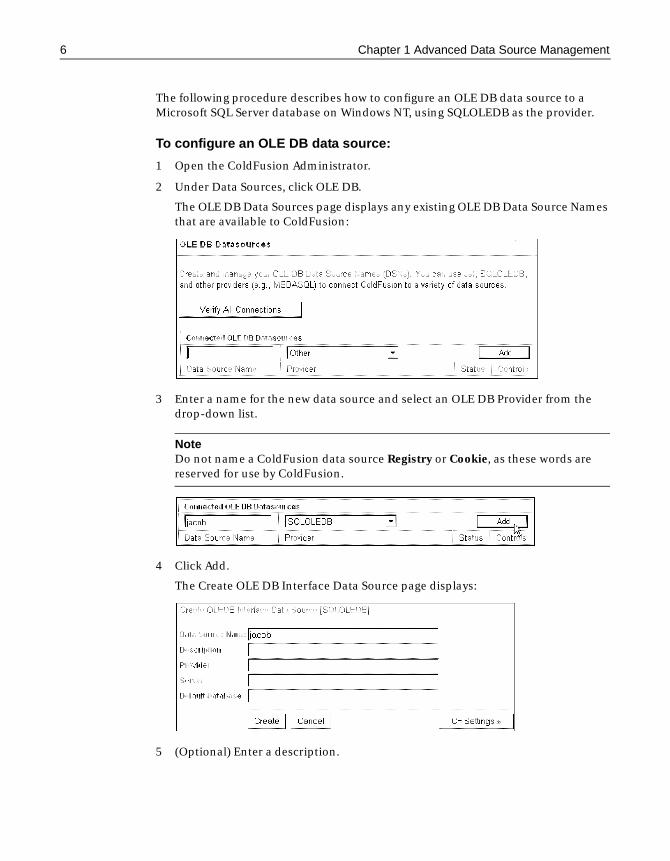
The following procedure describes how to configure an OLE DB data source to a Microsoft SQL Server database on Windows NT, using SQLOLEDB as the provider.
To configure an OLE DB data source:
1 Open the ColdFusion Administrator.
2 Under Data Sources, click OLE DB.
The OLE DB Data Sources page displays any existing OLE DB Data Source Names that are available to ColdFusion:
3 Enter a name for the new data source and select an OLE DB Provider from the drop-down list.
NoteDo not name a ColdFusion data source Registry or Cookie, as these words are reserved for use by ColdFusion.
4 Click Add.
The Create OLE DB Interface Data Source page displays:
5 (Optional) Enter a description.
About ColdFusion database drivers 7
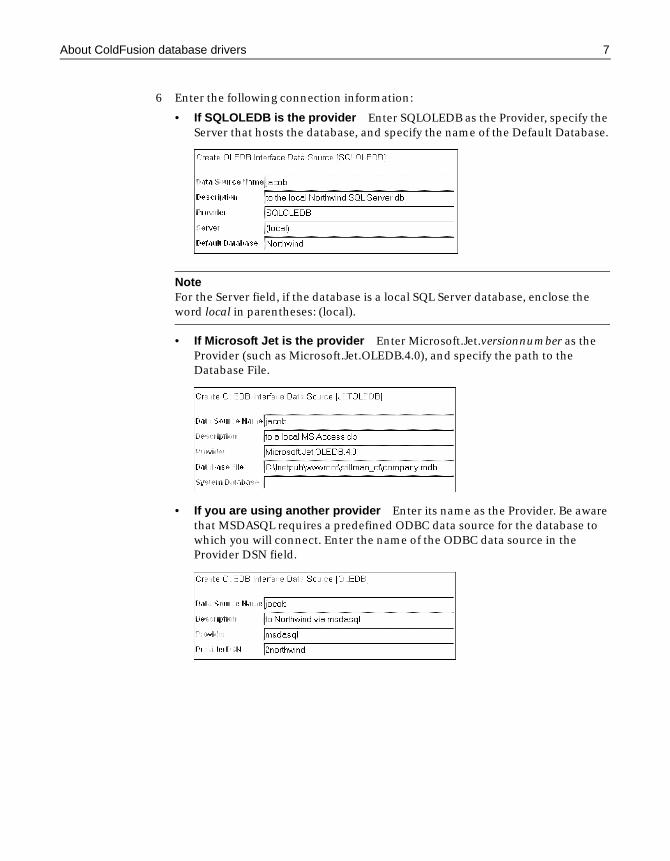
6 Enter the following connection information:
• If SQLOLEDB is the provider Enter SQLOLEDB as the Provider, specify the Server that hosts the database, and specify the name of the Default Database.
NoteFor the Server field, if the database is a local SQL Server database, enclose the word local in parentheses: (local).
• If Microsoft Jet is the provider Enter Microsoft.Jet.versionnumber as the Provider (such as Microsoft.Jet.OLEDB.4.0), and specify the path to the Database File.
• If you are using another provider Enter its name as the Provider. Be aware that MSDASQL requires a predefined ODBC data source for the database to which you will connect. Enter the name of the ODBC data source in the Provider DSN field.
8 Chapter 1 Advanced Data Source Management
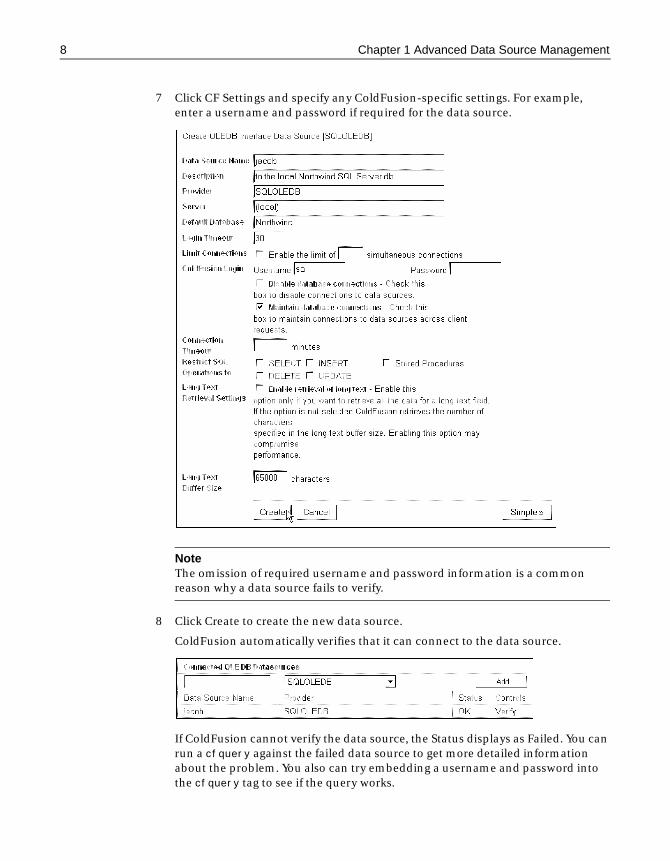
7 Click CF Settings and specify any ColdFusion-specific settings. For example, enter a username and password if required for the data source.
NoteThe omission of required username and password information is a common reason why a data source fails to verify.
8 Click Create to create the new data source.
ColdFusion automatically verifies that it can connect to the data source.
If ColdFusion cannot verify the data source, the Status displays as Failed. You can run a cfquery against the failed data source to get more detailed information about the problem. You also can try embedding a username and password into the cfquery tag to see if the query works.
About ColdFusion database drivers 9
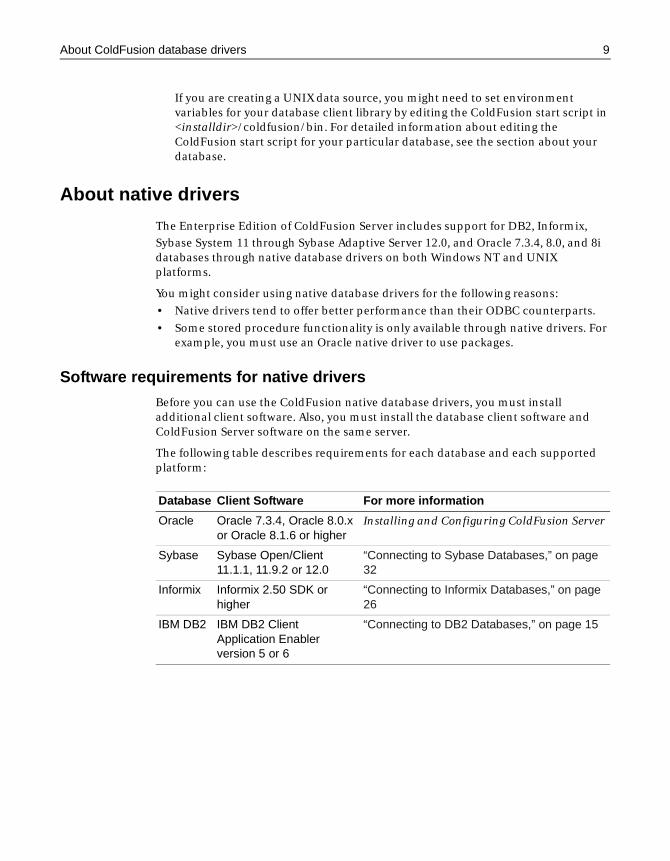
If you are creating a UNIX data source, you might need to set environment variables for your database client library by editing the ColdFusion start script in <installdir>/coldfusion/bin. For detailed information about editing the ColdFusion start script for your particular database, see the section about your database.
About native drivers
The Enterprise Edition of ColdFusion Server includes support for DB2, Informix, Sybase System 11 through Sybase Adaptive Server 12.0, and Oracle 7.3.4, 8.0, and 8i databases through native database drivers on both Windows NT and UNIX platforms.
You might consider using native database drivers for the following reasons:
• Native drivers tend to offer better performance than their ODBC counterparts.
• Some stored procedure functionality is only available through native drivers. For example, you must use an Oracle native driver to use packages.
Software requirements for native drivers
Before you can use the ColdFusion native database drivers, you must install additional client software. Also, you must install the database client software and ColdFusion Server software on the same server.
The following table describes requirements for each database and each supported platform:
Database Client Software For more information
Oracle Oracle 7.3.4, Oracle 8.0.x or Oracle 8.1.6 or higher
Installing and Configuring ColdFusion Server
Sybase Sybase Open/Client 11.1.1, 11.9.2 or 12.0
“Connecting to Sybase Databases,” on page 32
Informix Informix 2.50 SDK or higher
“Connecting to Informix Databases,” on page 26
IBM DB2 IBM DB2 Client Application Enabler version 5 or 6
“Connecting to DB2 Databases,” on page 15
10 Chapter 1 Advanced Data Source Management
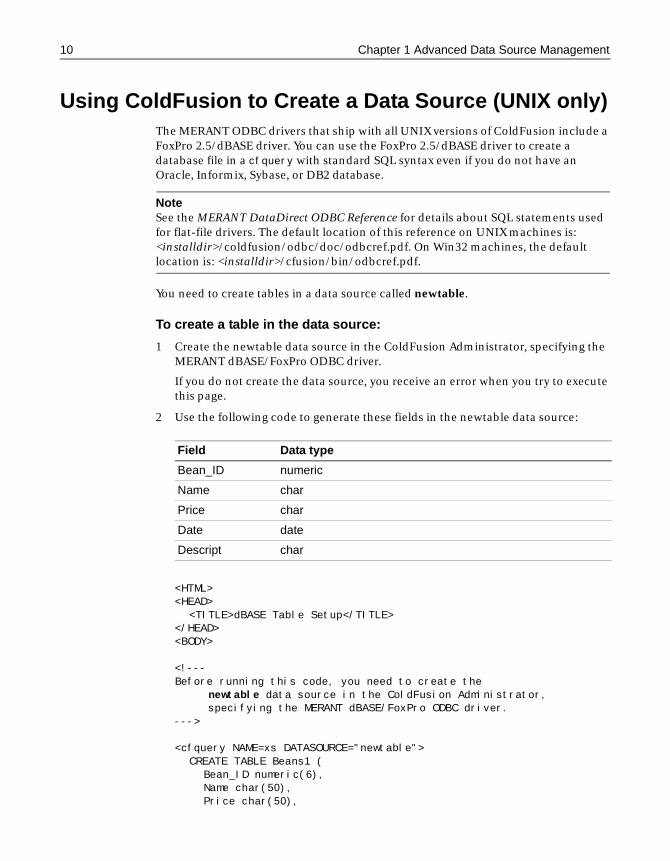
Using ColdFusion to Create a Data Source (UNIX only)The MERANT ODBC drivers that ship with all UNIX versions of ColdFusion include a FoxPro 2.5/dBASE driver. You can use the FoxPro 2.5/dBASE driver to create a database file in a cfquery with standard SQL syntax even if you do not have an Oracle, Informix, Sybase, or DB2 database.
NoteSee the MERANT DataDirect ODBC Reference for details about SQL statements used for flat-file drivers. The default location of this reference on UNIX machines is: <installdir>/coldfusion/odbc/doc/odbcref.pdf. On Win32 machines, the default location is: <installdir>/cfusion/bin/odbcref.pdf.
You need to create tables in a data source called newtable.
To create a table in the data source:
1 Create the newtable data source in the ColdFusion Administrator, specifying the MERANT dBASE/FoxPro ODBC driver.
If you do not create the data source, you receive an error when you try to execute this page.
2 Use the following code to generate these fields in the newtable data source:
<HTML><HEAD>
<TITLE>dBASE Table Setup</TITLE></HEAD><BODY>
<!---Before running this code, you need to create the
newtable data source in the ColdFusion Administrator, specifying the MERANT dBASE/FoxPro ODBC driver.
--->
<cfquery NAME=xs DATASOURCE="newtable"> CREATE TABLE Beans1 (
Bean_ID numeric(6), Name char(50), Price char(50),
Field Data type
Bean_ID numeric
Name char
Price char
Date date
Descript char
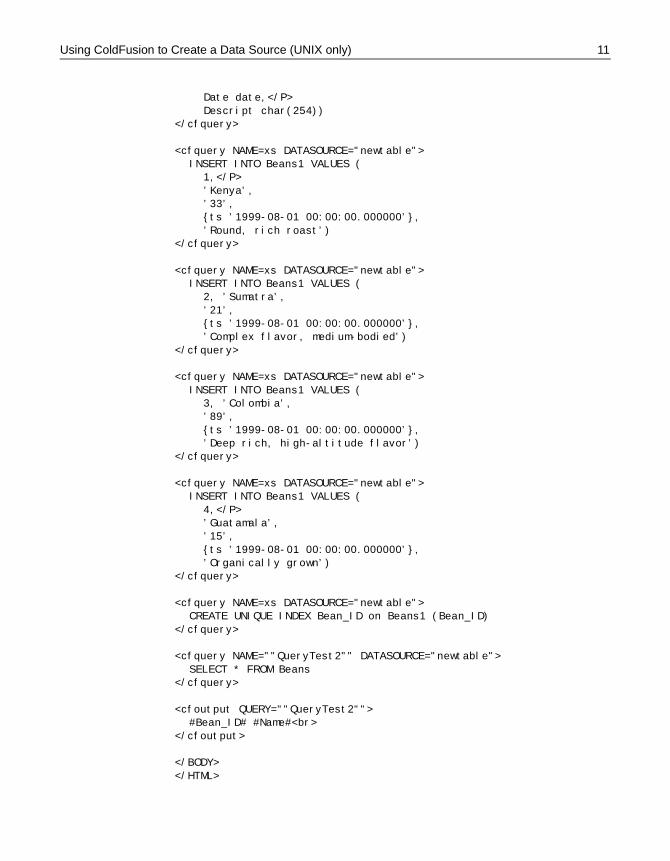
Using ColdFusion to Create a Data Source (UNIX only) 11
Date date,</P> Descript char(254))
</cfquery>
<cfquery NAME=xs DATASOURCE="newtable">INSERT INTO Beans1 VALUES (
1,</P> ’Kenya’, ’33’, {ts ’1999-08-01 00:00:00.000000’}, ’Round, rich roast’)
</cfquery>
<cfquery NAME=xs DATASOURCE="newtable"> INSERT INTO Beans1 VALUES (
2, ’Sumatra’, ’21’, {ts ’1999-08-01 00:00:00.000000’}, ’Complex flavor, medium-bodied’)
</cfquery>
<cfquery NAME=xs DATASOURCE="newtable"> INSERT INTO Beans1 VALUES (
3, ’Colombia’, ’89’, {ts ’1999-08-01 00:00:00.000000’}, ’Deep rich, high-altitude flavor’)
</cfquery>
<cfquery NAME=xs DATASOURCE="newtable"> INSERT INTO Beans1 VALUES (
4,</P> ’Guatamala’, ’15’, {ts ’1999-08-01 00:00:00.000000’}, ’Organically grown’)
</cfquery>
<cfquery NAME=xs DATASOURCE="newtable"> CREATE UNIQUE INDEX Bean_ID on Beans1 (Bean_ID)
</cfquery>
<cfquery NAME=""QueryTest2"" DATASOURCE="newtable"> SELECT * FROM Beans
</cfquery>
<cfoutput QUERY=""QueryTest2""> #Bean_ID# #Name#<br>
</cfoutput>
</BODY></HTML>

12 Chapter 1 Advanced Data Source Management
Using Connection String OptionsColdFusion 5 allows you to specify a connection string for ODBC data sources. You can do this programmatically or in the ColdFusion Administrator.
About the connection string
You can use the connection string to do the following tasks:
• Specify connection attributes that cannot be defined in the odbc.ini settings.
• Override odbc.ini settings.
• Make ODBC connections dynamically when there is no data source defined in the odbc.ini settings.
Some ODBC data sources let you pass driver-specific options. A database administrator (DBA) can use these options to see which applications are connected to the database server, and to identify who is running those applications. For example, many applications that connect to Microsoft SQL Server pass the attribue-value pairs APP="appname" and WSID="work station id" when connecting.
Consider the following cfquery, which specifies values in the connection string for the APP and WSID attributes:
<cfquery name="getInfo" datasource="2Northwind" dbtype="ODBC"connectstring="DRIVER={SQL SERVER};
SERVER=(local); UID=sa; PWD=; DATABASE=Northwind;
APP=ColdFusion5;WSID=Workstation_Moe">
SELECT *FROM shippers
</cfquery>
The APP and WSID values are readily available when you run the above query. A SQL Server DBA can use Profiler to view this information in a trace:
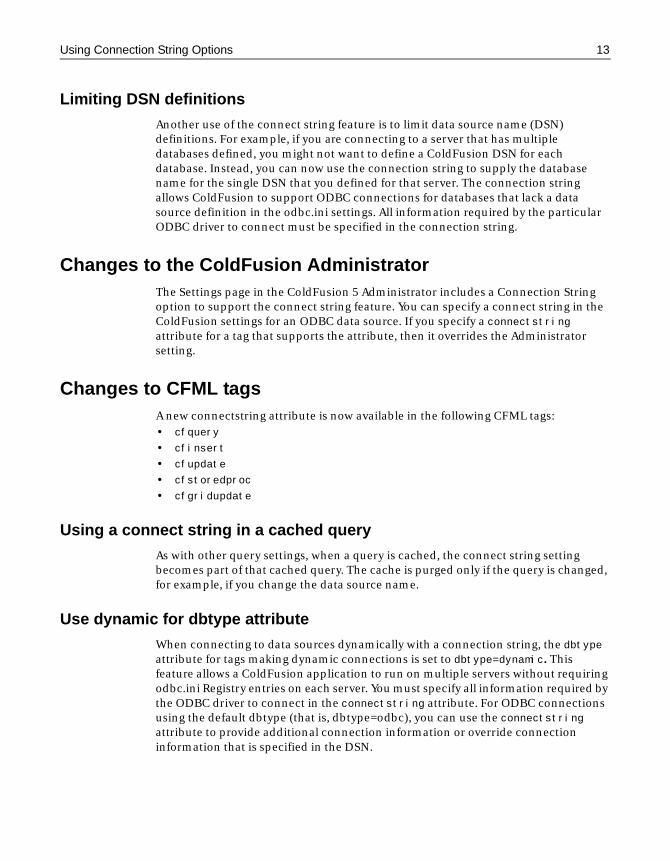
Using Connection String Options 13
Limiting DSN definitions
Another use of the connect string feature is to limit data source name (DSN) definitions. For example, if you are connecting to a server that has multiple databases defined, you might not want to define a ColdFusion DSN for each database. Instead, you can now use the connection string to supply the database name for the single DSN that you defined for that server. The connection string allows ColdFusion to support ODBC connections for databases that lack a data source definition in the odbc.ini settings. All information required by the particular ODBC driver to connect must be specified in the connection string.
Changes to the ColdFusion AdministratorThe Settings page in the ColdFusion 5 Administrator includes a Connection String option to support the connect string feature. You can specify a connect string in the ColdFusion settings for an ODBC data source. If you specify a connectstring attribute for a tag that supports the attribute, then it overrides the Administrator setting.
Changes to CFML tagsA new connectstring attribute is now available in the following CFML tags:• cfquery
• cfinsert
• cfupdate
• cfstoredproc
• cfgridupdate
Using a connect string in a cached query
As with other query settings, when a query is cached, the connect string setting becomes part of that cached query. The cache is purged only if the query is changed, for example, if you change the data source name.
Use dynamic for dbtype attribute
When connecting to data sources dynamically with a connection string, the dbtype attribute for tags making dynamic connections is set to dbtype=dynamic. This feature allows a ColdFusion application to run on multiple servers without requiring odbc.ini Registry entries on each server. You must specify all information required by the ODBC driver to connect in the connectstring attribute. For ODBC connections using the default dbtype (that is, dbtype=odbc), you can use the connectstring attribute to provide additional connection information or override connection information that is specified in the DSN.
14 Chapter 1 Advanced Data Source Management
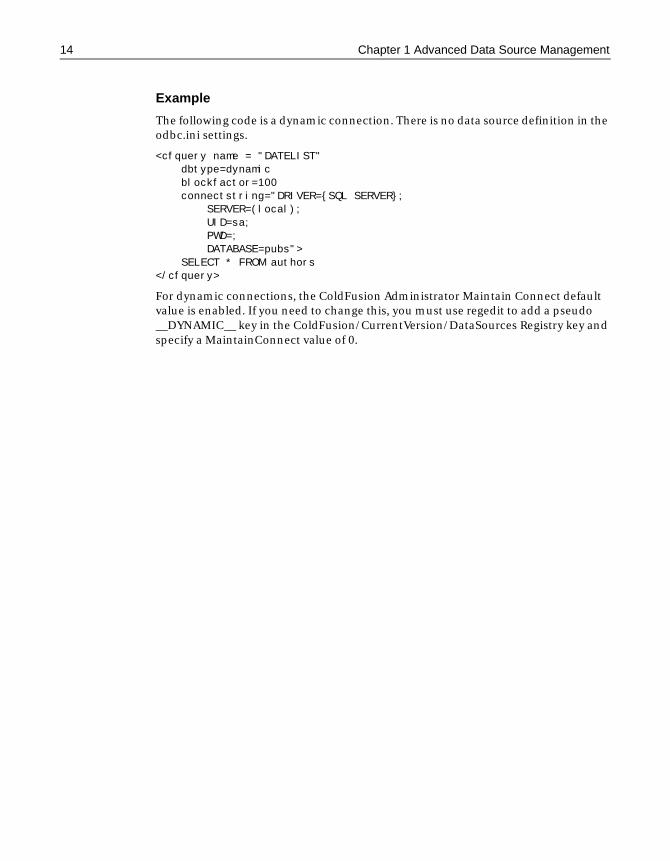
Example
The following code is a dynamic connection. There is no data source definition in the odbc.ini settings.
<cfquery name = "DATELIST" dbtype=dynamic blockfactor=100 connectstring="DRIVER={SQL SERVER}; SERVER=(local); UID=sa; PWD=; DATABASE=pubs"> SELECT * FROM authors</cfquery>
For dynamic connections, the ColdFusion Administrator Maintain Connect default value is enabled. If you need to change this, you must use regedit to add a pseudo __DYNAMIC__ key in the ColdFusion/CurrentVersion/DataSources Registry key and specify a MaintainConnect value of 0.
Connecting to DB2 Databases 15
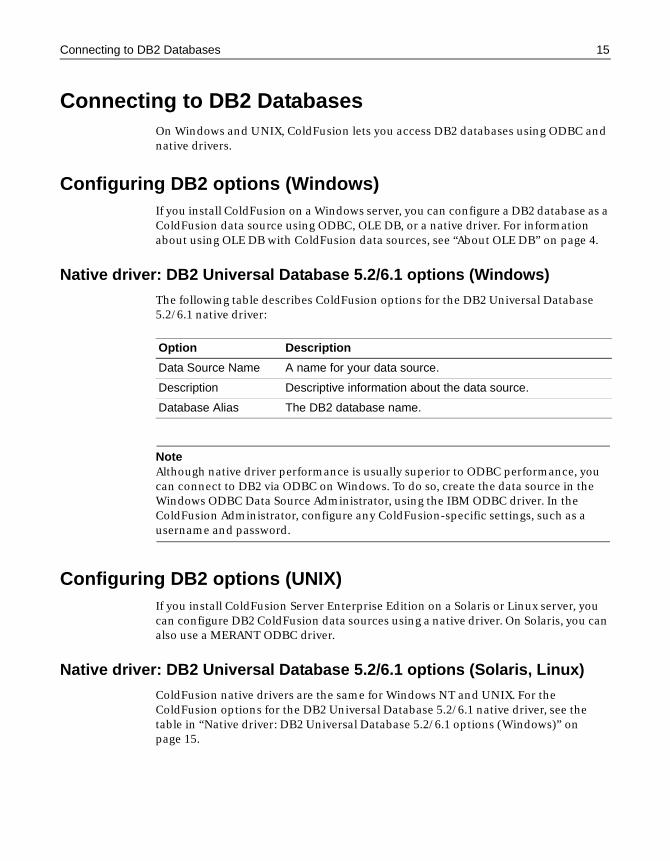
Connecting to DB2 DatabasesOn Windows and UNIX, ColdFusion lets you access DB2 databases using ODBC and native drivers.
Configuring DB2 options (Windows)If you install ColdFusion on a Windows server, you can configure a DB2 database as a ColdFusion data source using ODBC, OLE DB, or a native driver. For information about using OLE DB with ColdFusion data sources, see “About OLE DB” on page 4.
Native driver: DB2 Universal Database 5.2/6.1 options (Windows)
The following table describes ColdFusion options for the DB2 Universal Database 5.2/6.1 native driver:
NoteAlthough native driver performance is usually superior to ODBC performance, you can connect to DB2 via ODBC on Windows. To do so, create the data source in the Windows ODBC Data Source Administrator, using the IBM ODBC driver. In the ColdFusion Administrator, configure any ColdFusion-specific settings, such as a username and password.
Configuring DB2 options (UNIX)If you install ColdFusion Server Enterprise Edition on a Solaris or Linux server, you can configure DB2 ColdFusion data sources using a native driver. On Solaris, you can also use a MERANT ODBC driver.
Native driver: DB2 Universal Database 5.2/6.1 options (Solaris, Linux)
ColdFusion native drivers are the same for Windows NT and UNIX. For the ColdFusion options for the DB2 Universal Database 5.2/6.1 native driver, see the table in “Native driver: DB2 Universal Database 5.2/6.1 options (Windows)” on page 15.
Option Description
Data Source Name A name for your data source.
Description Descriptive information about the data source.
Database Alias The DB2 database name.
16 Chapter 1 Advanced Data Source Management
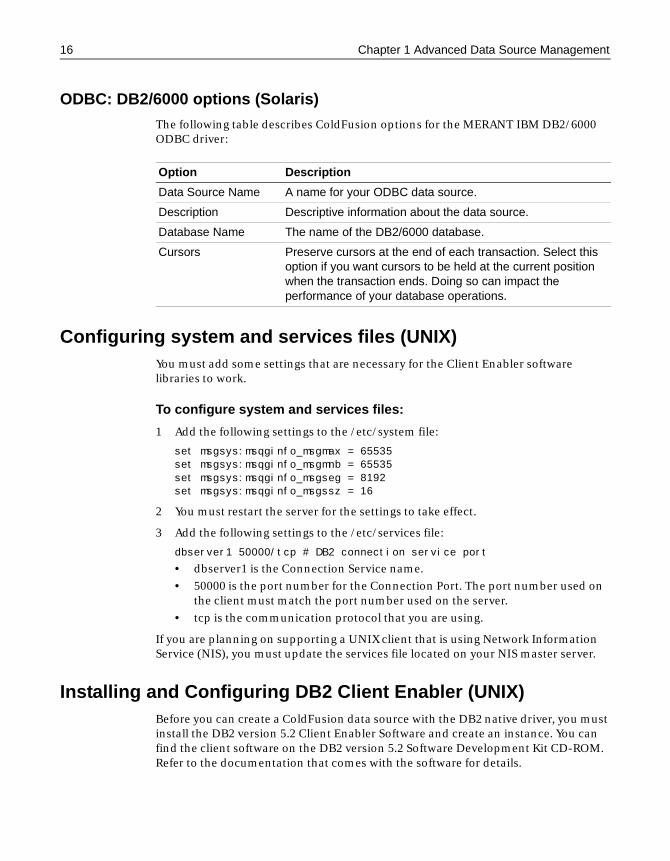
ODBC: DB2/6000 options (Solaris)
The following table describes ColdFusion options for the MERANT IBM DB2/6000 ODBC driver:
Configuring system and services files (UNIX)You must add some settings that are necessary for the Client Enabler software libraries to work.
To configure system and services files:
1 Add the following settings to the /etc/system file:
set msgsys:msqginfo_msgmax = 65535set msgsys:msqginfo_msgmnb = 65535set msgsys:msqginfo_msgseg = 8192set msgsys:msqginfo_msgssz = 16
2 You must restart the server for the settings to take effect.
3 Add the following settings to the /etc/services file:
dbserver1 50000/tcp # DB2 connection service port
• dbserver1 is the Connection Service name.
• 50000 is the port number for the Connection Port. The port number used on the client must match the port number used on the server.
• tcp is the communication protocol that you are using.
If you are planning on supporting a UNIX client that is using Network Information Service (NIS), you must update the services file located on your NIS master server.
Installing and Configuring DB2 Client Enabler (UNIX)Before you can create a ColdFusion data source with the DB2 native driver, you must install the DB2 version 5.2 Client Enabler Software and create an instance. You can find the client software on the DB2 version 5.2 Software Development Kit CD-ROM. Refer to the documentation that comes with the software for details.
Option Description
Data Source Name A name for your ODBC data source.
Description Descriptive information about the data source.
Database Name The name of the DB2/6000 database.
Cursors Preserve cursors at the end of each transaction. Select this option if you want cursors to be held at the current position when the transaction ends. Doing so can impact the performance of your database operations.
Connecting to DB2 Databases 17
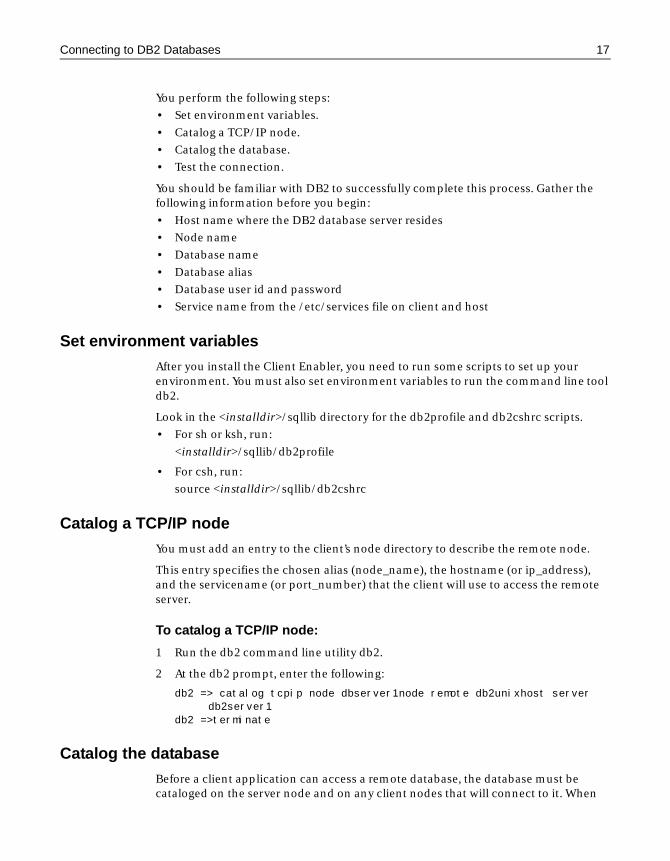
You perform the following steps:
• Set environment variables.
• Catalog a TCP/IP node.
• Catalog the database.
• Test the connection.
You should be familiar with DB2 to successfully complete this process. Gather the following information before you begin:
• Host name where the DB2 database server resides
• Node name
• Database name
• Database alias
• Database user id and password
• Service name from the /etc/services file on client and host
Set environment variables
After you install the Client Enabler, you need to run some scripts to set up your environment. You must also set environment variables to run the command line tool db2.
Look in the <installdir>/sqllib directory for the db2profile and db2cshrc scripts.
• For sh or ksh, run:
<installdir>/sqllib/db2profile
• For csh, run:
source <installdir>/sqllib/db2cshrc
Catalog a TCP/IP node
You must add an entry to the client’s node directory to describe the remote node.
This entry specifies the chosen alias (node_name), the hostname (or ip_address), and the servicename (or port_number) that the client will use to access the remote server.
To catalog a TCP/IP node:
1 Run the db2 command line utility db2.
2 At the db2 prompt, enter the following:
db2 => catalog tcpip node dbserver1node remote db2unixhost server db2server1
db2 =>terminate
Catalog the database
Before a client application can access a remote database, the database must be cataloged on the server node and on any client nodes that will connect to it. When
18 Chapter 1 Advanced Data Source Management
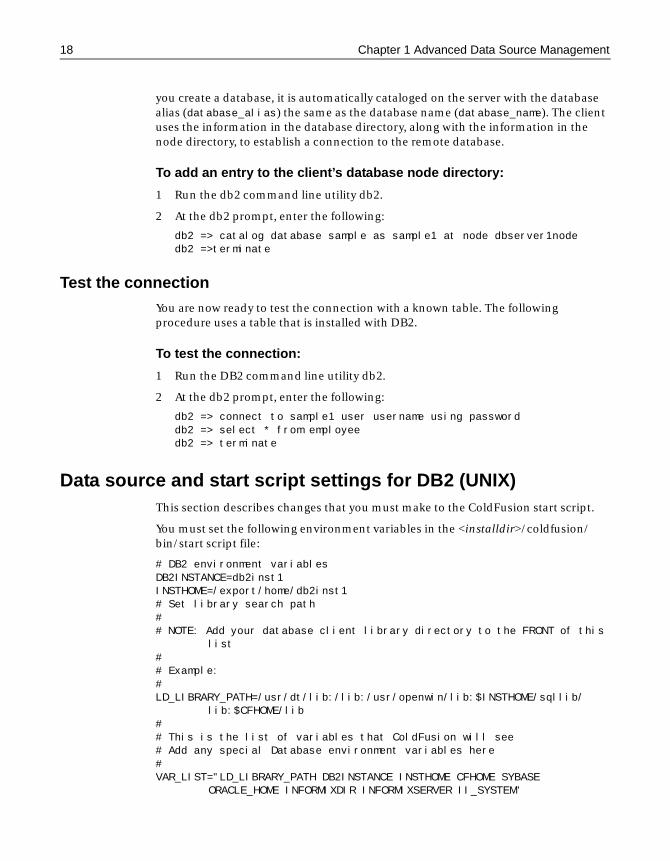
you create a database, it is automatically cataloged on the server with the database alias (database_alias) the same as the database name (database_name). The client uses the information in the database directory, along with the information in the node directory, to establish a connection to the remote database.
To add an entry to the client’s database node directory:
1 Run the db2 command line utility db2.
2 At the db2 prompt, enter the following:
db2 => catalog database sample as sample1 at node dbserver1nodedb2 =>terminate
Test the connection
You are now ready to test the connection with a known table. The following procedure uses a table that is installed with DB2.
To test the connection:
1 Run the DB2 command line utility db2.
2 At the db2 prompt, enter the following:
db2 => connect to sample1 user username using passworddb2 => select * from employeedb2 => terminate
Data source and start script settings for DB2 (UNIX)This section describes changes that you must make to the ColdFusion start script.
You must set the following environment variables in the <installdir>/coldfusion/bin/start script file:
# DB2 environment variablesDB2INSTANCE=db2inst1INSTHOME=/export/home/db2inst1# Set library search path## NOTE: Add your database client library directory to the FRONT of this
list## Example: #LD_LIBRARY_PATH=/usr/dt/lib:/lib:/usr/openwin/lib:$INSTHOME/sqllib/
lib:$CFHOME/lib## This is the list of variables that ColdFusion will see# Add any special Database environment variables here#VAR_LIST="LD_LIBRARY_PATH DB2INSTANCE INSTHOME CFHOME SYBASE
ORACLE_HOME INFORMIXDIR INFORMIXSERVER II_SYSTEM"
Connecting to DB2 Databases 19
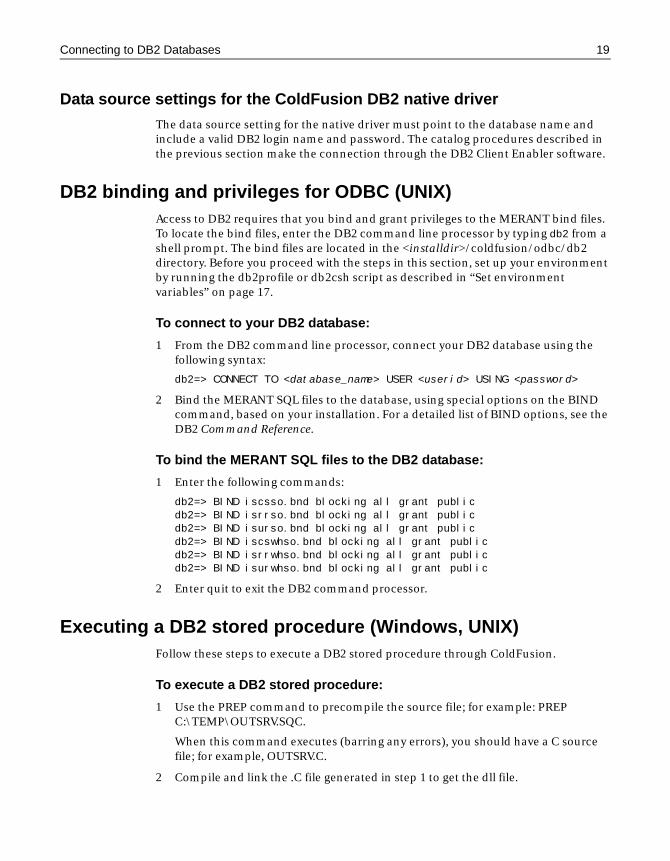
Data source settings for the ColdFusion DB2 native driver
The data source setting for the native driver must point to the database name and include a valid DB2 login name and password. The catalog procedures described in the previous section make the connection through the DB2 Client Enabler software.
DB2 binding and privileges for ODBC (UNIX)Access to DB2 requires that you bind and grant privileges to the MERANT bind files. To locate the bind files, enter the DB2 command line processor by typing db2 from a shell prompt. The bind files are located in the <installdir>/coldfusion/odbc/db2 directory. Before you proceed with the steps in this section, set up your environment by running the db2profile or db2csh script as described in “Set environment variables” on page 17.
To connect to your DB2 database:
1 From the DB2 command line processor, connect your DB2 database using the following syntax:
db2=> CONNECT TO <database_name> USER <userid> USING <password>
2 Bind the MERANT SQL files to the database, using special options on the BIND command, based on your installation. For a detailed list of BIND options, see the DB2 Command Reference.
To bind the MERANT SQL files to the DB2 database:
1 Enter the following commands:
db2=> BIND iscsso.bnd blocking all grant publicdb2=> BIND isrrso.bnd blocking all grant publicdb2=> BIND isurso.bnd blocking all grant publicdb2=> BIND iscswhso.bnd blocking all grant publicdb2=> BIND isrrwhso.bnd blocking all grant publicdb2=> BIND isurwhso.bnd blocking all grant public
2 Enter quit to exit the DB2 command processor.
Executing a DB2 stored procedure (Windows, UNIX)Follow these steps to execute a DB2 stored procedure through ColdFusion.
To execute a DB2 stored procedure:
1 Use the PREP command to precompile the source file; for example: PREP C:\TEMP\OUTSRV.SQC.
When this command executes (barring any errors), you should have a C source file; for example, OUTSRV.C.
2 Compile and link the .C file generated in step 1 to get the dll file.
20 Chapter 1 Advanced Data Source Management
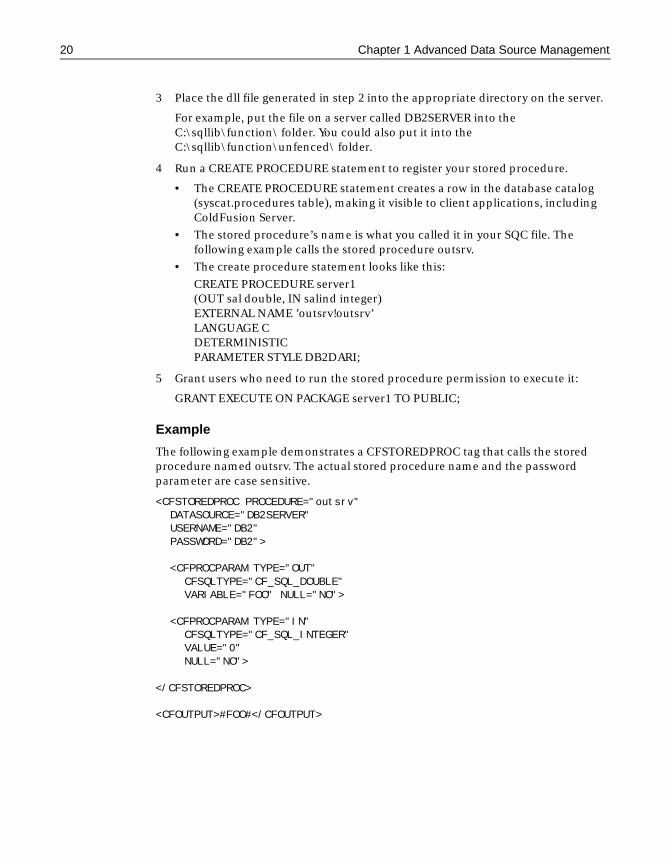
3 Place the dll file generated in step 2 into the appropriate directory on the server.
For example, put the file on a server called DB2SERVER into the C:\sqllib\function\ folder. You could also put it into the C:\sqllib\function\unfenced\ folder.
4 Run a CREATE PROCEDURE statement to register your stored procedure.
• The CREATE PROCEDURE statement creates a row in the database catalog (syscat.procedures table), making it visible to client applications, including ColdFusion Server.
• The stored procedure’s name is what you called it in your SQC file. The following example calls the stored procedure outsrv.
• The create procedure statement looks like this:
CREATE PROCEDURE server1(OUT sal double, IN salind integer)EXTERNAL NAME ’outsrv!outsrv’LANGUAGE CDETERMINISTICPARAMETER STYLE DB2DARI;
5 Grant users who need to run the stored procedure permission to execute it:
GRANT EXECUTE ON PACKAGE server1 TO PUBLIC;
Example
The following example demonstrates a CFSTOREDPROC tag that calls the stored procedure named outsrv. The actual stored procedure name and the password parameter are case sensitive.
<CFSTOREDPROC PROCEDURE="outsrv" DATASOURCE="DB2SERVER" USERNAME="DB2" PASSWORD="DB2">
<CFPROCPARAM TYPE="OUT" CFSQLTYPE="CF_SQL_DOUBLE" VARIABLE="FOO" NULL="NO">
<CFPROCPARAM TYPE="IN" CFSQLTYPE="CF_SQL_INTEGER" VALUE="0" NULL="NO">
</CFSTOREDPROC>
<CFOUTPUT>#FOO#</CFOUTPUT>
Connecting to dBASE/FoxPro Databases 21
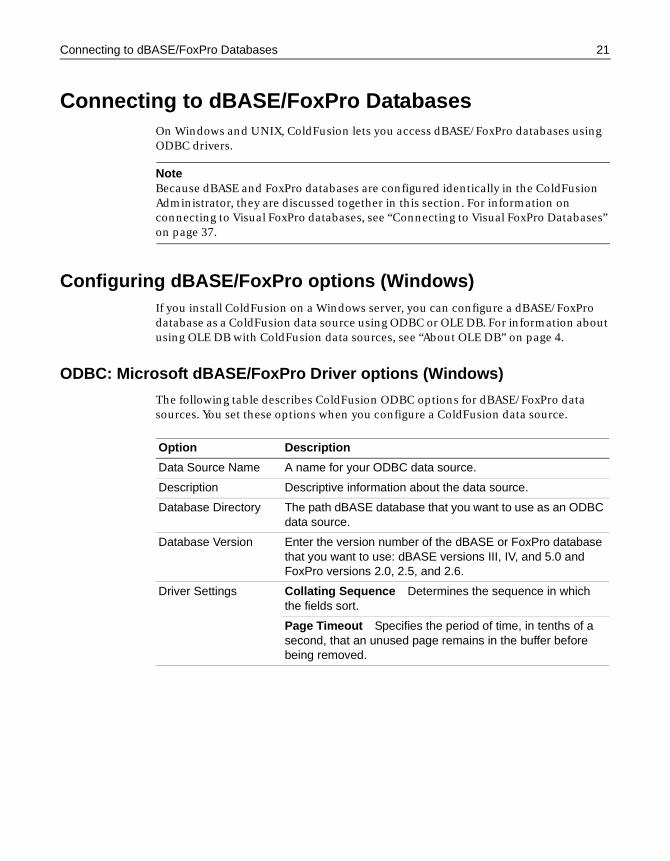
Connecting to dBASE/FoxPro DatabasesOn Windows and UNIX, ColdFusion lets you access dBASE/FoxPro databases using ODBC drivers.
NoteBecause dBASE and FoxPro databases are configured identically in the ColdFusion Administrator, they are discussed together in this section. For information on connecting to Visual FoxPro databases, see “Connecting to Visual FoxPro Databases” on page 37.
Configuring dBASE/FoxPro options (Windows)If you install ColdFusion on a Windows server, you can configure a dBASE/FoxPro database as a ColdFusion data source using ODBC or OLE DB. For information about using OLE DB with ColdFusion data sources, see “About OLE DB” on page 4.
ODBC: Microsoft dBASE/FoxPro Driver options (Windows)
The following table describes ColdFusion ODBC options for dBASE/FoxPro data sources. You set these options when you configure a ColdFusion data source.
Option Description
Data Source Name A name for your ODBC data source.
Description Descriptive information about the data source.
Database Directory The path dBASE database that you want to use as an ODBC data source.
Database Version Enter the version number of the dBASE or FoxPro database that you want to use: dBASE versions III, IV, and 5.0 and FoxPro versions 2.0, 2.5, and 2.6.
Driver Settings Collating Sequence Determines the sequence in which the fields sort.
Page Timeout Specifies the period of time, in tenths of a second, that an unused page remains in the buffer before being removed.
22 Chapter 1 Advanced Data Source Management
ODBC: MERANT dBASE/FoxPro Driver options (Windows)
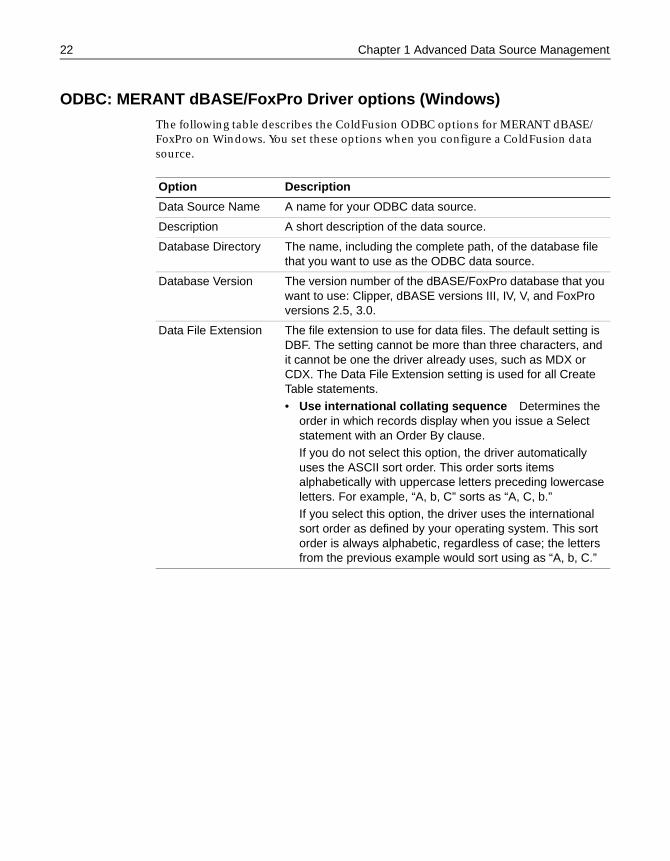
The following table describes the ColdFusion ODBC options for MERANT dBASE/FoxPro on Windows. You set these options when you configure a ColdFusion data source.
Option Description
Data Source Name A name for your ODBC data source.
Description A short description of the data source.
Database Directory The name, including the complete path, of the database file that you want to use as the ODBC data source.
Database Version The version number of the dBASE/FoxPro database that you want to use: Clipper, dBASE versions III, IV, V, and FoxPro versions 2.5, 3.0.
Data File Extension The file extension to use for data files. The default setting is DBF. The setting cannot be more than three characters, and it cannot be one the driver already uses, such as MDX or CDX. The Data File Extension setting is used for all Create Table statements.• Use international collating sequence Determines the
order in which records display when you issue a Select statement with an Order By clause. If you do not select this option, the driver automatically uses the ASCII sort order. This order sorts items alphabetically with uppercase letters preceding lowercase letters. For example, “A, b, C” sorts as “A, C, b.”If you select this option, the driver uses the international sort order as defined by your operating system. This sort order is always alphabetic, regardless of case; the letters from the previous example would sort using as “A, b, C.”
Connecting to dBASE/FoxPro Databases 23
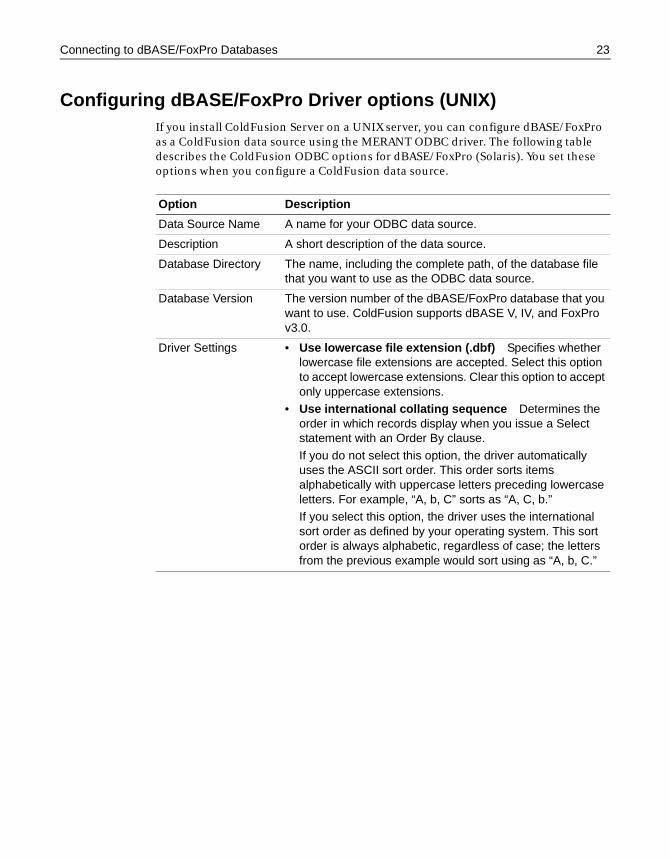
Configuring dBASE/FoxPro Driver options (UNIX)If you install ColdFusion Server on a UNIX server, you can configure dBASE/FoxPro as a ColdFusion data source using the MERANT ODBC driver. The following table describes the ColdFusion ODBC options for dBASE/FoxPro (Solaris). You set these options when you configure a ColdFusion data source.
Option Description
Data Source Name A name for your ODBC data source.
Description A short description of the data source.
Database Directory The name, including the complete path, of the database file that you want to use as the ODBC data source.
Database Version The version number of the dBASE/FoxPro database that you want to use. ColdFusion supports dBASE V, IV, and FoxPro v3.0.
Driver Settings • Use lowercase file extension (.dbf) Specifies whether lowercase file extensions are accepted. Select this option to accept lowercase extensions. Clear this option to accept only uppercase extensions.
• Use international collating sequence Determines the order in which records display when you issue a Select statement with an Order By clause.
If you do not select this option, the driver automatically uses the ASCII sort order. This order sorts items alphabetically with uppercase letters preceding lowercase letters. For example, “A, b, C” sorts as “A, C, b.”If you select this option, the driver uses the international sort order as defined by your operating system. This sort order is always alphabetic, regardless of case; the letters from the previous example would sort using as “A, b, C.”
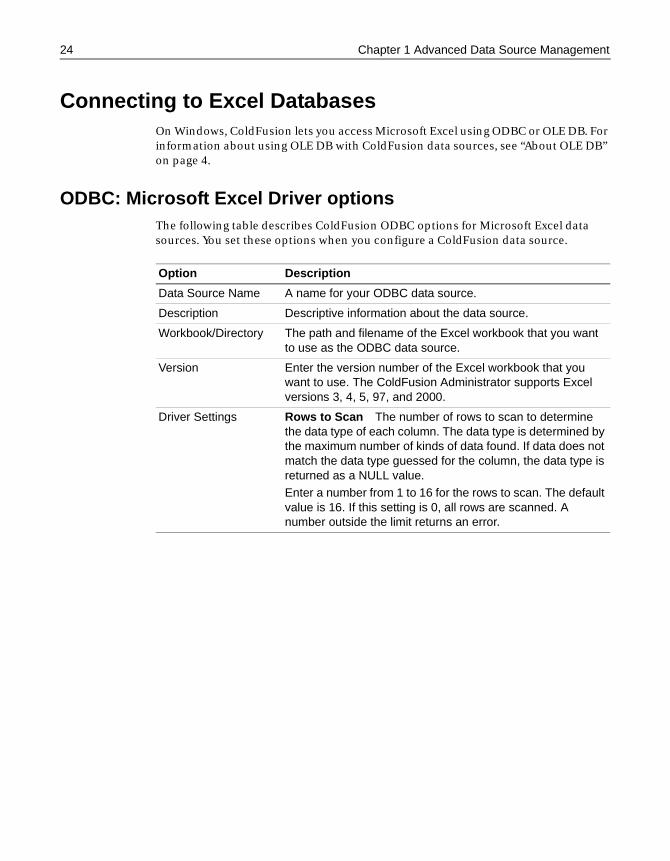
24 Chapter 1 Advanced Data Source Management
Connecting to Excel DatabasesOn Windows, ColdFusion lets you access Microsoft Excel using ODBC or OLE DB. For information about using OLE DB with ColdFusion data sources, see “About OLE DB” on page 4.
ODBC: Microsoft Excel Driver optionsThe following table describes ColdFusion ODBC options for Microsoft Excel data sources. You set these options when you configure a ColdFusion data source.
Option Description
Data Source Name A name for your ODBC data source.
Description Descriptive information about the data source.
Workbook/Directory The path and filename of the Excel workbook that you want to use as the ODBC data source.
Version Enter the version number of the Excel workbook that you want to use. The ColdFusion Administrator supports Excel versions 3, 4, 5, 97, and 2000.
Driver Settings Rows to Scan The number of rows to scan to determine the data type of each column. The data type is determined by the maximum number of kinds of data found. If data does not match the data type guessed for the column, the data type is returned as a NULL value.Enter a number from 1 to 16 for the rows to scan. The default value is 16. If this setting is 0, all rows are scanned. A number outside the limit returns an error.
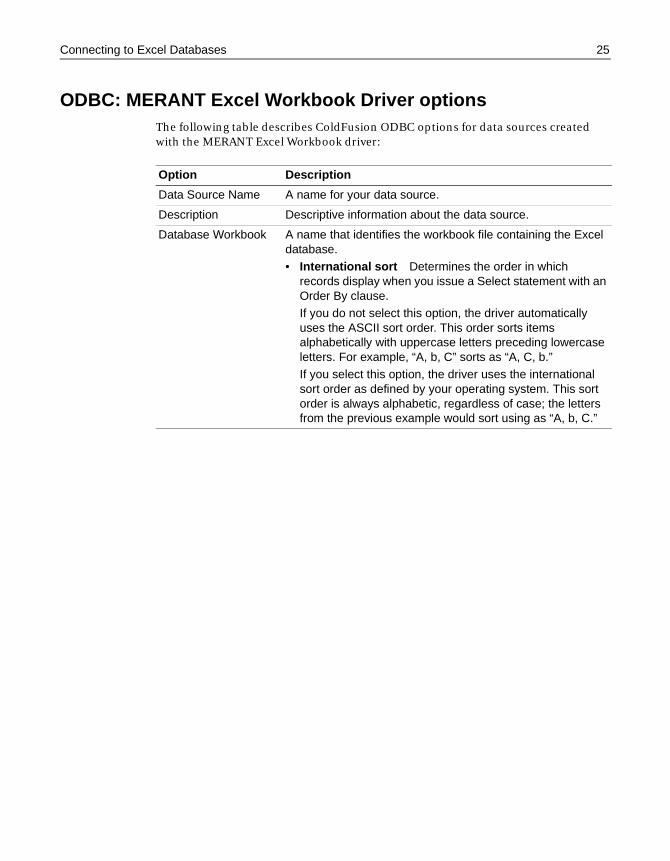
Connecting to Excel Databases 25
ODBC: MERANT Excel Workbook Driver options The following table describes ColdFusion ODBC options for data sources created with the MERANT Excel Workbook driver:
Option Description
Data Source Name A name for your data source.
Description Descriptive information about the data source.
Database Workbook A name that identifies the workbook file containing the Excel database.• International sort Determines the order in which
records display when you issue a Select statement with an Order By clause. If you do not select this option, the driver automatically uses the ASCII sort order. This order sorts items alphabetically with uppercase letters preceding lowercase letters. For example, “A, b, C” sorts as “A, C, b.”If you select this option, the driver uses the international sort order as defined by your operating system. This sort order is always alphabetic, regardless of case; the letters from the previous example would sort using as “A, b, C.”
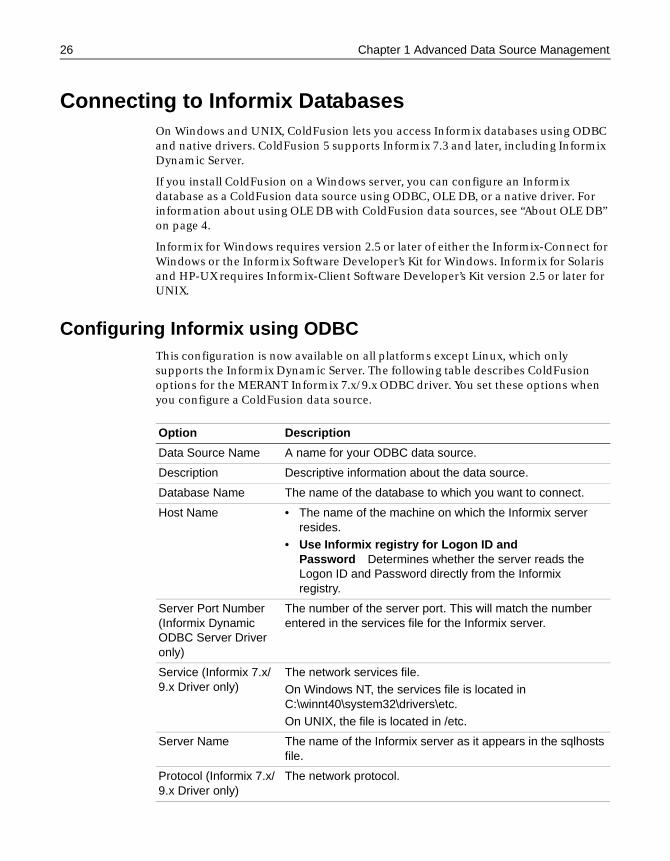
26 Chapter 1 Advanced Data Source Management
Connecting to Informix DatabasesOn Windows and UNIX, ColdFusion lets you access Informix databases using ODBC and native drivers. ColdFusion 5 supports Informix 7.3 and later, including Informix Dynamic Server.
If you install ColdFusion on a Windows server, you can configure an Informix database as a ColdFusion data source using ODBC, OLE DB, or a native driver. For information about using OLE DB with ColdFusion data sources, see “About OLE DB” on page 4.
Informix for Windows requires version 2.5 or later of either the Informix-Connect for Windows or the Informix Software Developer’s Kit for Windows. Informix for Solaris and HP-UX requires Informix-Client Software Developer’s Kit version 2.5 or later for UNIX.
Configuring Informix using ODBCThis configuration is now available on all platforms except Linux, which only supports the Informix Dynamic Server. The following table describes ColdFusion options for the MERANT Informix 7.x/9.x ODBC driver. You set these options when you configure a ColdFusion data source.
Option Description
Data Source Name A name for your ODBC data source.
Description Descriptive information about the data source.
Database Name The name of the database to which you want to connect.
Host Name • The name of the machine on which the Informix server resides.
• Use Informix registry for Logon ID and Password Determines whether the server reads the Logon ID and Password directly from the Informix registry.
Server Port Number (Informix Dynamic ODBC Server Driver only)
The number of the server port. This will match the number entered in the services file for the Informix server.
Service (Informix 7.x/9.x Driver only)
The network services file. On Windows NT, the services file is located in C:\winnt40\system32\drivers\etc. On UNIX, the file is located in /etc.
Server Name The name of the Informix server as it appears in the sqlhosts file.
Protocol (Informix 7.x/9.x Driver only)
The network protocol.
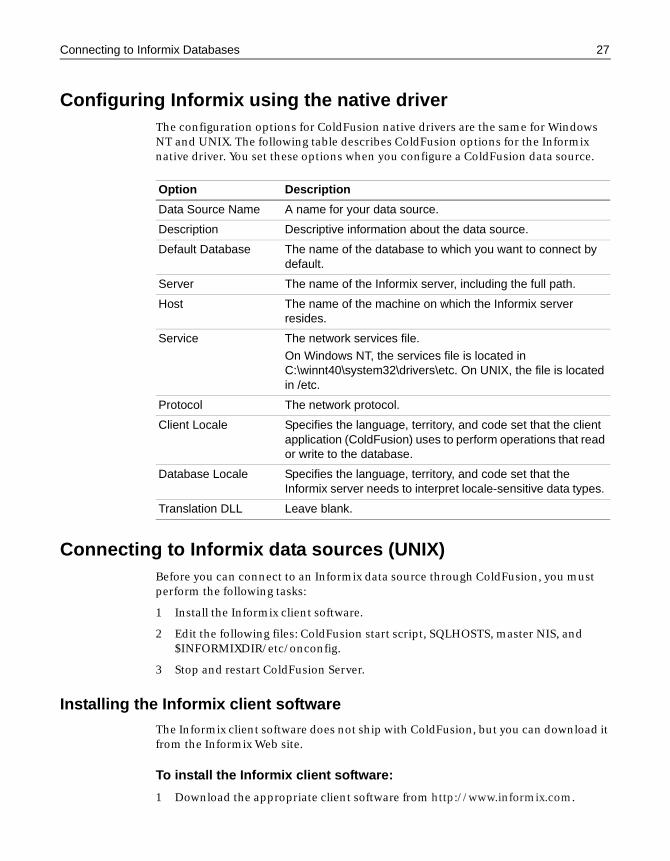
Connecting to Informix Databases 27
Configuring Informix using the native driverThe configuration options for ColdFusion native drivers are the same for Windows NT and UNIX. The following table describes ColdFusion options for the Informix native driver. You set these options when you configure a ColdFusion data source.
Connecting to Informix data sources (UNIX)Before you can connect to an Informix data source through ColdFusion, you must perform the following tasks:
1 Install the Informix client software.
2 Edit the following files: ColdFusion start script, SQLHOSTS, master NIS, and $INFORMIXDIR/etc/onconfig.
3 Stop and restart ColdFusion Server.
Installing the Informix client software
The Informix client software does not ship with ColdFusion, but you can download it from the Informix Web site.
To install the Informix client software:
1 Download the appropriate client software from http://www.informix.com.
Option Description
Data Source Name A name for your data source.
Description Descriptive information about the data source.
Default Database The name of the database to which you want to connect by default.
Server The name of the Informix server, including the full path.
Host The name of the machine on which the Informix server resides.
Service The network services file.
On Windows NT, the services file is located in C:\winnt40\system32\drivers\etc. On UNIX, the file is located in /etc.
Protocol The network protocol.
Client Locale Specifies the language, territory, and code set that the client application (ColdFusion) uses to perform operations that read or write to the database.
Database Locale Specifies the language, territory, and code set that the Informix server needs to interpret locale-sensitive data types.
Translation DLL Leave blank.
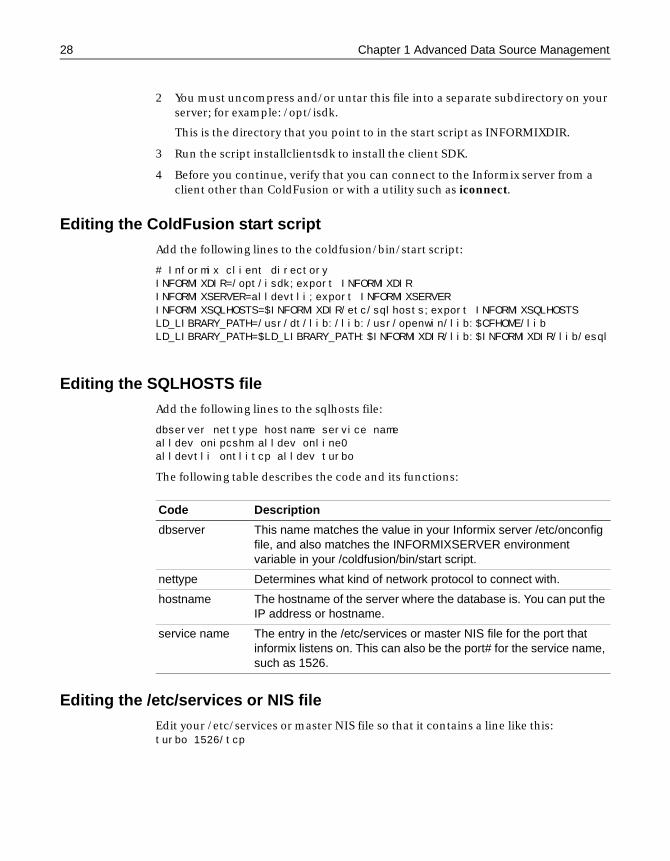
28 Chapter 1 Advanced Data Source Management
2 You must uncompress and/or untar this file into a separate subdirectory on your server; for example: /opt/isdk.
This is the directory that you point to in the start script as INFORMIXDIR.
3 Run the script installclientsdk to install the client SDK.
4 Before you continue, verify that you can connect to the Informix server from a client other than ColdFusion or with a utility such as iconnect.
Editing the ColdFusion start script
Add the following lines to the coldfusion/bin/start script:
# Informix client directoryINFORMIXDIR=/opt/isdk;export INFORMIXDIRINFORMIXSERVER=alldevtli;export INFORMIXSERVERINFORMIXSQLHOSTS=$INFORMIXDIR/etc/sqlhosts;export INFORMIXSQLHOSTSLD_LIBRARY_PATH=/usr/dt/lib:/lib:/usr/openwin/lib:$CFHOME/libLD_LIBRARY_PATH=$LD_LIBRARY_PATH:$INFORMIXDIR/lib:$INFORMIXDIR/lib/esql
Editing the SQLHOSTS file
Add the following lines to the sqlhosts file:
dbserver nettype hostname service namealldev onipcshm alldev online0alldevtli ontlitcp alldev turbo
The following table describes the code and its functions:
Editing the /etc/services or NIS file
Edit your /etc/services or master NIS file so that it contains a line like this:turbo 1526/tcp
Code Description
dbserver This name matches the value in your Informix server /etc/onconfig file, and also matches the INFORMIXSERVER environment variable in your /coldfusion/bin/start script.
nettype Determines what kind of network protocol to connect with.
hostname The hostname of the server where the database is. You can put the IP address or hostname.
service name The entry in the /etc/services or master NIS file for the port that informix listens on. This can also be the port# for the service name, such as 1526.
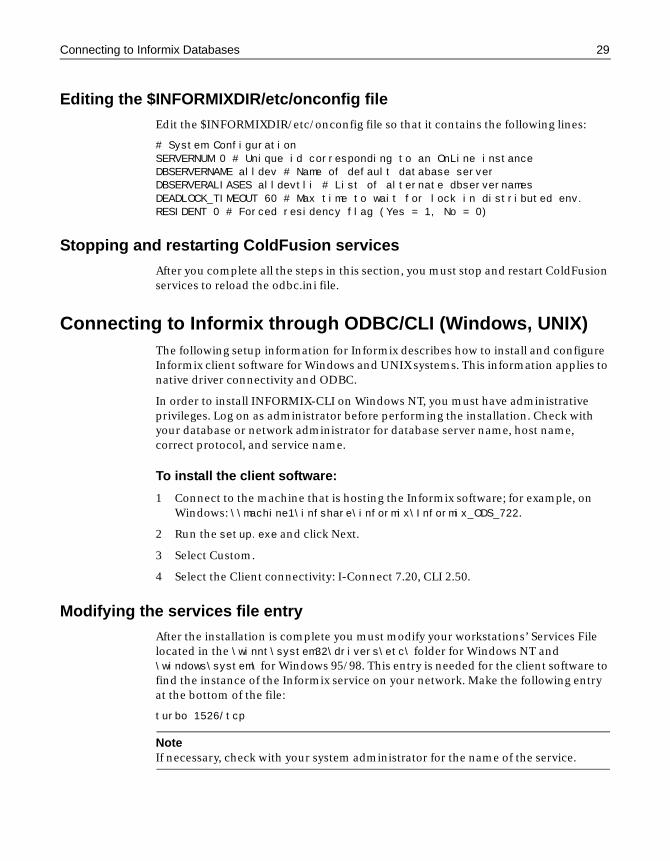
Connecting to Informix Databases 29
Editing the $INFORMIXDIR/etc/onconfig file
Edit the $INFORMIXDIR/etc/onconfig file so that it contains the following lines:
# System ConfigurationSERVERNUM 0 # Unique id corresponding to an OnLine instanceDBSERVERNAME alldev # Name of default database server DBSERVERALIASES alldevtli # List of alternate dbservernamesDEADLOCK_TIMEOUT 60 # Max time to wait for lock in distributed env.RESIDENT 0 # Forced residency flag (Yes = 1, No = 0)
Stopping and restarting ColdFusion services
After you complete all the steps in this section, you must stop and restart ColdFusion services to reload the odbc.ini file.
Connecting to Informix through ODBC/CLI (Windows, UNIX)The following setup information for Informix describes how to install and configure Informix client software for Windows and UNIX systems. This information applies to native driver connectivity and ODBC.
In order to install INFORMIX-CLI on Windows NT, you must have administrative privileges. Log on as administrator before performing the installation. Check with your database or network administrator for database server name, host name, correct protocol, and service name.
To install the client software:
1 Connect to the machine that is hosting the Informix software; for example, on Windows: \\machine1\infshare\informix\Informix_ODS_722.
2 Run the setup.exe and click Next.
3 Select Custom.
4 Select the Client connectivity: I-Connect 7.20, CLI 2.50.
Modifying the services file entry
After the installation is complete you must modify your workstations’ Services File located in the \winnt\system32\drivers\etc\ folder for Windows NT and \windows\system\ for Windows 95/98. This entry is needed for the client software to find the instance of the Informix service on your network. Make the following entry at the bottom of the file:
turbo 1526/tcp
NoteIf necessary, check with your system administrator for the name of the service.
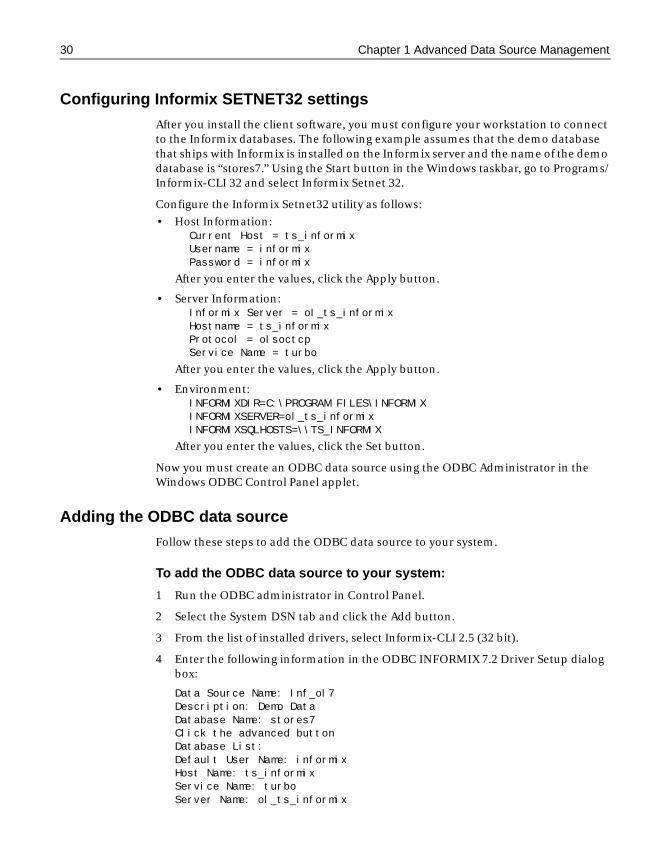
30 Chapter 1 Advanced Data Source Management
Configuring Informix SETNET32 settings
After you install the client software, you must configure your workstation to connect to the Informix databases. The following example assumes that the demo database that ships with Informix is installed on the Informix server and the name of the demo database is “stores7.” Using the Start button in the Windows taskbar, go to Programs/Informix-CLI 32 and select Informix Setnet 32.
Configure the Informix Setnet32 utility as follows:
• Host Information:Current Host = ts_informixUsername = informixPassword = informix
After you enter the values, click the Apply button.
• Server Information:Informix Server = ol_ts_informixHostname = ts_informixProtocol = olsoctcpService Name = turbo
After you enter the values, click the Apply button.
• Environment:INFORMIXDIR=C:\PROGRAM FILES\INFORMIXINFORMIXSERVER=ol_ts_informixINFORMIXSQLHOSTS=\\TS_INFORMIX
After you enter the values, click the Set button.
Now you must create an ODBC data source using the ODBC Administrator in the Windows ODBC Control Panel applet.
Adding the ODBC data source
Follow these steps to add the ODBC data source to your system.
To add the ODBC data source to your system:
1 Run the ODBC administrator in Control Panel.
2 Select the System DSN tab and click the Add button.
3 From the list of installed drivers, select Informix-CLI 2.5 (32 bit).
4 Enter the following information in the ODBC INFORMIX 7.2 Driver Setup dialog box:
Data Source Name: Inf_ol7Description: Demo DataDatabase Name: stores7Click the advanced buttonDatabase List: Default User Name: informixHost Name: ts_informixService Name: turboServer Name: ol_ts_informix
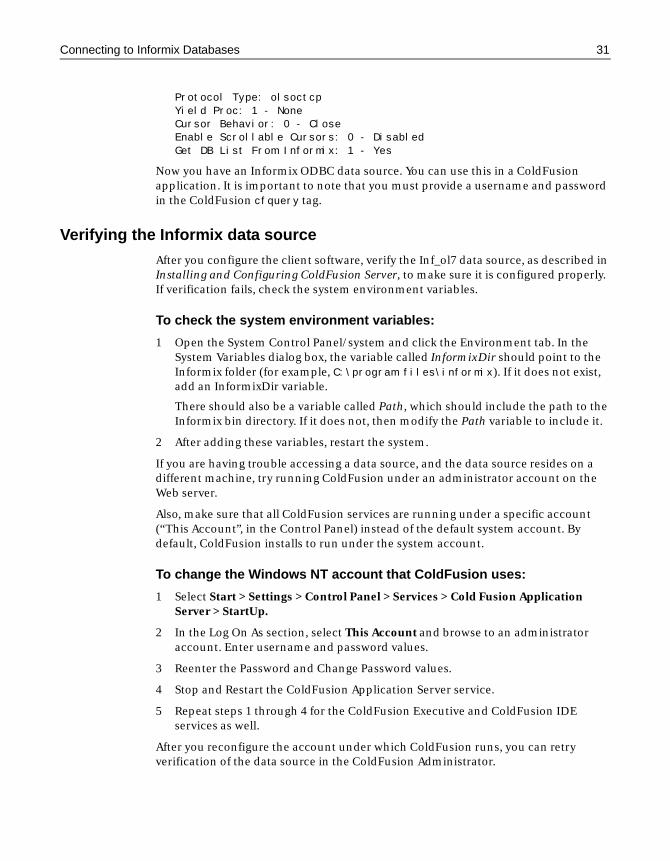
Connecting to Informix Databases 31
Protocol Type: olsoctcpYield Proc: 1 - NoneCursor Behavior: 0 - CloseEnable Scrollable Cursors: 0 - DisabledGet DB List From Informix: 1 - Yes
Now you have an Informix ODBC data source. You can use this in a ColdFusion application. It is important to note that you must provide a username and password in the ColdFusion cfquery tag.
Verifying the Informix data source
After you configure the client software, verify the Inf_ol7 data source, as described in Installing and Configuring ColdFusion Server, to make sure it is configured properly. If verification fails, check the system environment variables.
To check the system environment variables:
1 Open the System Control Panel/system and click the Environment tab. In the System Variables dialog box, the variable called InformixDir should point to the Informix folder (for example, C:\program files\informix). If it does not exist, add an InformixDir variable.
There should also be a variable called Path, which should include the path to the Informix bin directory. If it does not, then modify the Path variable to include it.
2 After adding these variables, restart the system.
If you are having trouble accessing a data source, and the data source resides on a different machine, try running ColdFusion under an administrator account on the Web server.
Also, make sure that all ColdFusion services are running under a specific account (“This Account”, in the Control Panel) instead of the default system account. By default, ColdFusion installs to run under the system account.
To change the Windows NT account that ColdFusion uses:
1 Select Start > Settings > Control Panel > Services > Cold Fusion Application Server > StartUp.
2 In the Log On As section, select This Account and browse to an administrator account. Enter username and password values.
3 Reenter the Password and Change Password values.
4 Stop and Restart the ColdFusion Application Server service.
5 Repeat steps 1 through 4 for the ColdFusion Executive and ColdFusion IDE services as well.
After you reconfigure the account under which ColdFusion runs, you can retry verification of the data source in the ColdFusion Administrator.
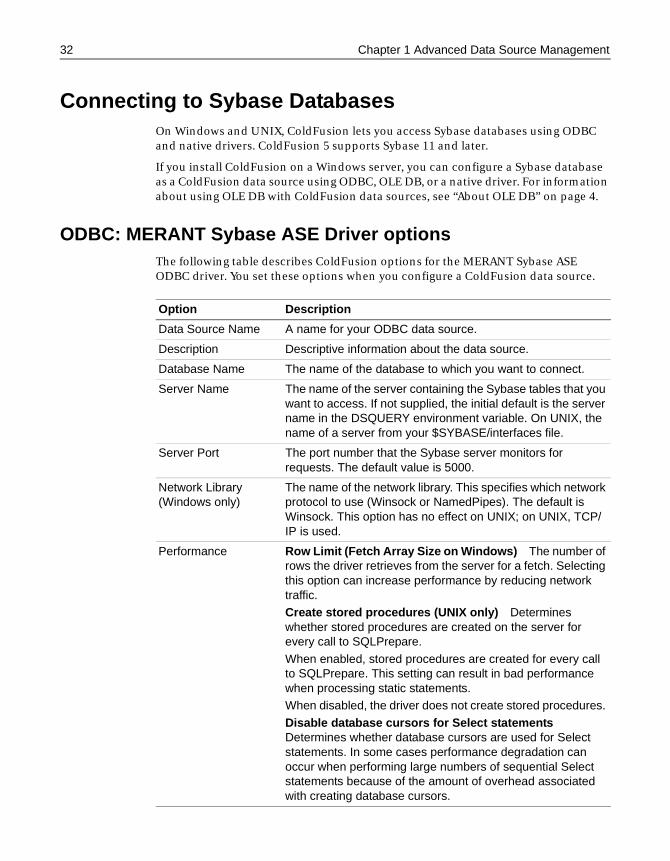
32 Chapter 1 Advanced Data Source Management
Connecting to Sybase DatabasesOn Windows and UNIX, ColdFusion lets you access Sybase databases using ODBC and native drivers. ColdFusion 5 supports Sybase 11 and later.
If you install ColdFusion on a Windows server, you can configure a Sybase database as a ColdFusion data source using ODBC, OLE DB, or a native driver. For information about using OLE DB with ColdFusion data sources, see “About OLE DB” on page 4.
ODBC: MERANT Sybase ASE Driver optionsThe following table describes ColdFusion options for the MERANT Sybase ASE ODBC driver. You set these options when you configure a ColdFusion data source.
Option Description
Data Source Name A name for your ODBC data source.
Description Descriptive information about the data source.
Database Name The name of the database to which you want to connect.
Server Name The name of the server containing the Sybase tables that you want to access. If not supplied, the initial default is the server name in the DSQUERY environment variable. On UNIX, the name of a server from your $SYBASE/interfaces file.
Server Port The port number that the Sybase server monitors for requests. The default value is 5000.
Network Library (Windows only)
The name of the network library. This specifies which network protocol to use (Winsock or NamedPipes). The default is Winsock. This option has no effect on UNIX; on UNIX, TCP/IP is used.
Performance Row Limit (Fetch Array Size on Windows) The number of rows the driver retrieves from the server for a fetch. Selecting this option can increase performance by reducing network traffic.Create stored procedures (UNIX only) Determines whether stored procedures are created on the server for every call to SQLPrepare.
When enabled, stored procedures are created for every call to SQLPrepare. This setting can result in bad performance when processing static statements.When disabled, the driver does not create stored procedures.
Disable database cursors for Select statements Determines whether database cursors are used for Select statements. In some cases performance degradation can occur when performing large numbers of sequential Select statements because of the amount of overhead associated with creating database cursors.
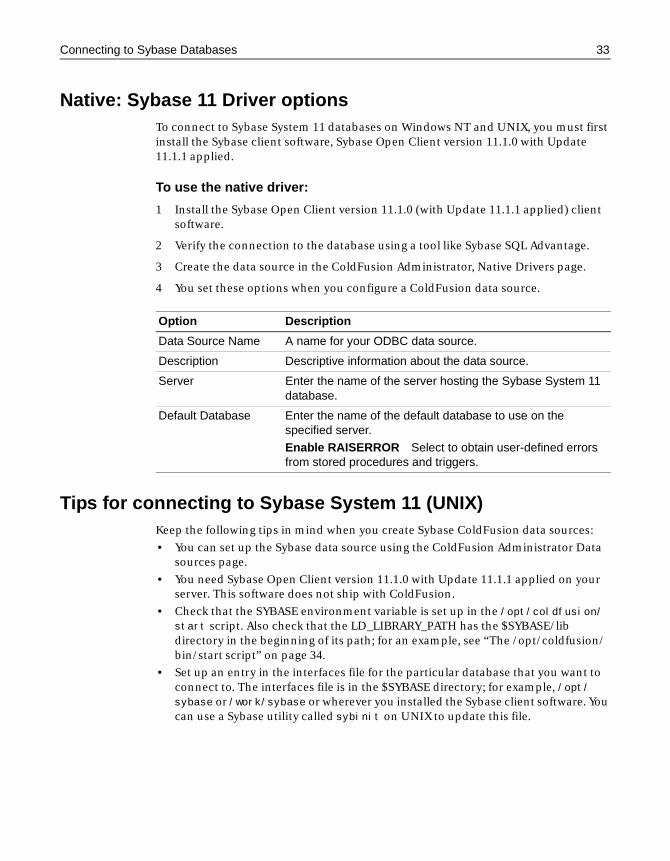
Connecting to Sybase Databases 33
Native: Sybase 11 Driver options To connect to Sybase System 11 databases on Windows NT and UNIX, you must first install the Sybase client software, Sybase Open Client version 11.1.0 with Update 11.1.1 applied.
To use the native driver:
1 Install the Sybase Open Client version 11.1.0 (with Update 11.1.1 applied) client software.
2 Verify the connection to the database using a tool like Sybase SQL Advantage.
3 Create the data source in the ColdFusion Administrator, Native Drivers page.
4 You set these options when you configure a ColdFusion data source.
Tips for connecting to Sybase System 11 (UNIX)Keep the following tips in mind when you create Sybase ColdFusion data sources:
• You can set up the Sybase data source using the ColdFusion Administrator Data sources page.
• You need Sybase Open Client version 11.1.0 with Update 11.1.1 applied on your server. This software does not ship with ColdFusion.
• Check that the SYBASE environment variable is set up in the /opt/coldfusion/start script. Also check that the LD_LIBRARY_PATH has the $SYBASE/lib directory in the beginning of its path; for an example, see “The /opt/coldfusion/bin/start script” on page 34.
• Set up an entry in the interfaces file for the particular database that you want to connect to. The interfaces file is in the $SYBASE directory; for example, /opt/sybase or /work/sybase or wherever you installed the Sybase client software. You can use a Sybase utility called sybinit on UNIX to update this file.
Option Description
Data Source Name A name for your ODBC data source.
Description Descriptive information about the data source.
Server Enter the name of the server hosting the Sybase System 11 database.
Default Database Enter the name of the default database to use on the specified server.
Enable RAISERROR Select to obtain user-defined errors from stored procedures and triggers.
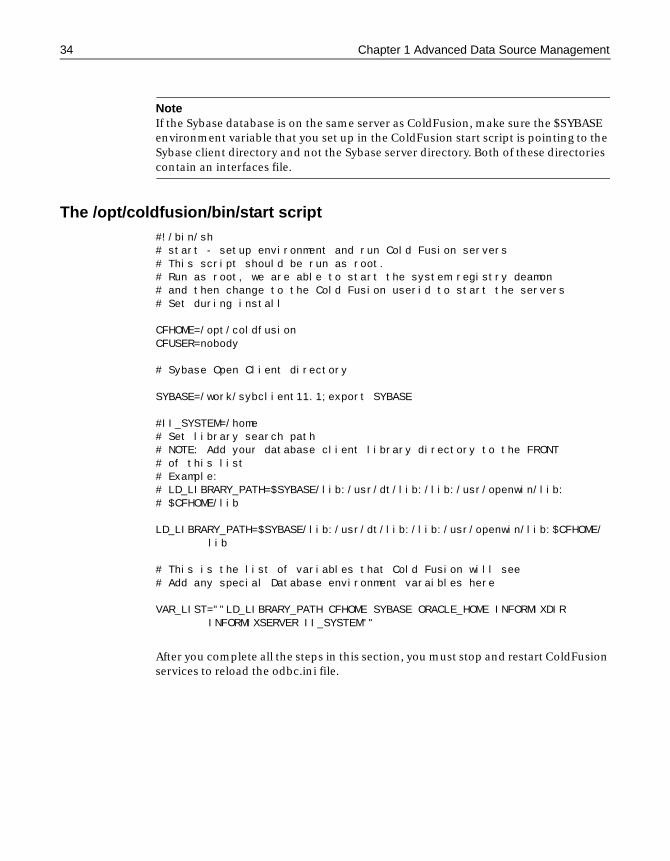
34 Chapter 1 Advanced Data Source Management
NoteIf the Sybase database is on the same server as ColdFusion, make sure the $SYBASE environment variable that you set up in the ColdFusion start script is pointing to the Sybase client directory and not the Sybase server directory. Both of these directories contain an interfaces file.
The /opt/coldfusion/bin/start script#!/bin/sh# start - setup environment and run Cold Fusion servers# This script should be run as root.# Run as root, we are able to start the system registry deamon# and then change to the Cold Fusion userid to start the servers# Set during install
CFHOME=/opt/coldfusionCFUSER=nobody
# Sybase Open Client directory
SYBASE=/work/sybclient11.1;export SYBASE
#II_SYSTEM=/home# Set library search path# NOTE: Add your database client library directory to the FRONT # of this list# Example: # LD_LIBRARY_PATH=$SYBASE/lib:/usr/dt/lib:/lib:/usr/openwin/lib:# $CFHOME/lib
LD_LIBRARY_PATH=$SYBASE/lib:/usr/dt/lib:/lib:/usr/openwin/lib:$CFHOME/lib
# This is the list of variables that Cold Fusion will see# Add any special Database environment varaibles here
VAR_LIST=""LD_LIBRARY_PATH CFHOME SYBASE ORACLE_HOME INFORMIXDIR INFORMIXSERVER II_SYSTEM""
After you complete all the steps in this section, you must stop and restart ColdFusion services to reload the odbc.ini file.
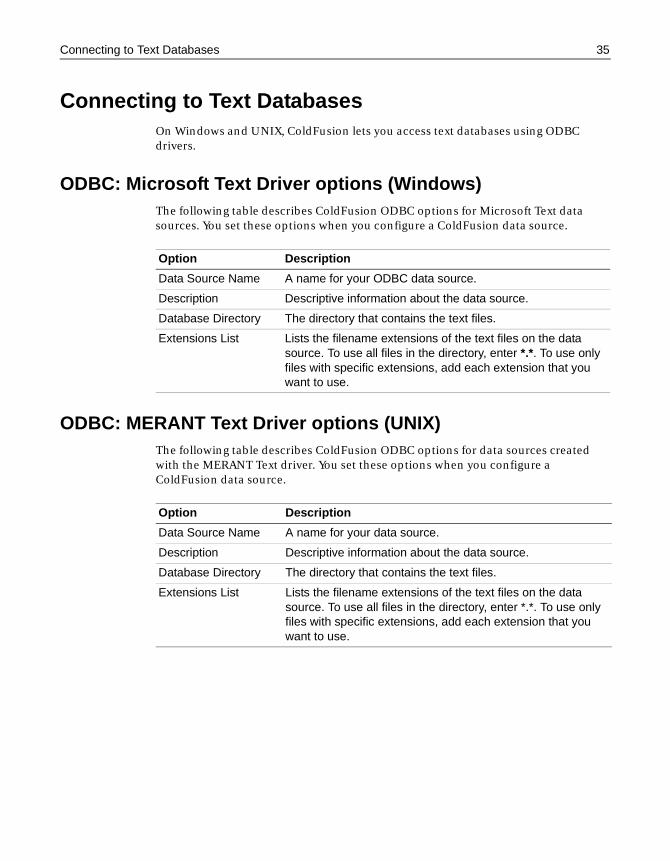
Connecting to Text Databases 35
Connecting to Text DatabasesOn Windows and UNIX, ColdFusion lets you access text databases using ODBC drivers.
ODBC: Microsoft Text Driver options (Windows)The following table describes ColdFusion ODBC options for Microsoft Text data sources. You set these options when you configure a ColdFusion data source.
ODBC: MERANT Text Driver options (UNIX)The following table describes ColdFusion ODBC options for data sources created with the MERANT Text driver. You set these options when you configure a ColdFusion data source.
Option Description
Data Source Name A name for your ODBC data source.
Description Descriptive information about the data source.
Database Directory The directory that contains the text files.
Extensions List Lists the filename extensions of the text files on the data source. To use all files in the directory, enter *.*. To use only files with specific extensions, add each extension that you want to use.
Option Description
Data Source Name A name for your data source.
Description Descriptive information about the data source.
Database Directory The directory that contains the text files.
Extensions List Lists the filename extensions of the text files on the data source. To use all files in the directory, enter *.*. To use only files with specific extensions, add each extension that you want to use.
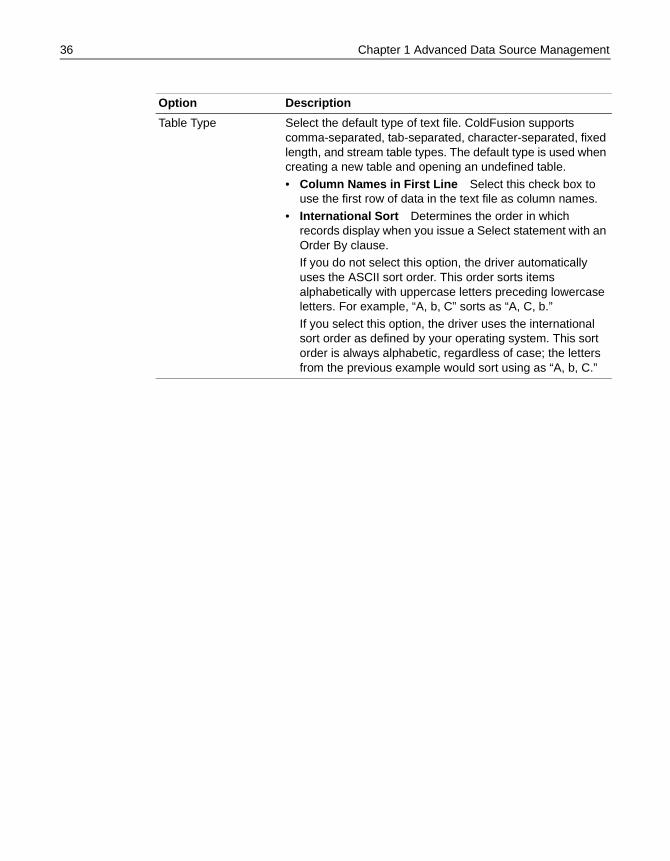
36 Chapter 1 Advanced Data Source Management
Table Type Select the default type of text file. ColdFusion supports comma-separated, tab-separated, character-separated, fixed length, and stream table types. The default type is used when creating a new table and opening an undefined table.
• Column Names in First Line Select this check box to use the first row of data in the text file as column names.
• International Sort Determines the order in which records display when you issue a Select statement with an Order By clause. If you do not select this option, the driver automatically uses the ASCII sort order. This order sorts items alphabetically with uppercase letters preceding lowercase letters. For example, “A, b, C” sorts as “A, C, b.”
If you select this option, the driver uses the international sort order as defined by your operating system. This sort order is always alphabetic, regardless of case; the letters from the previous example would sort using as “A, b, C.”
Option Description
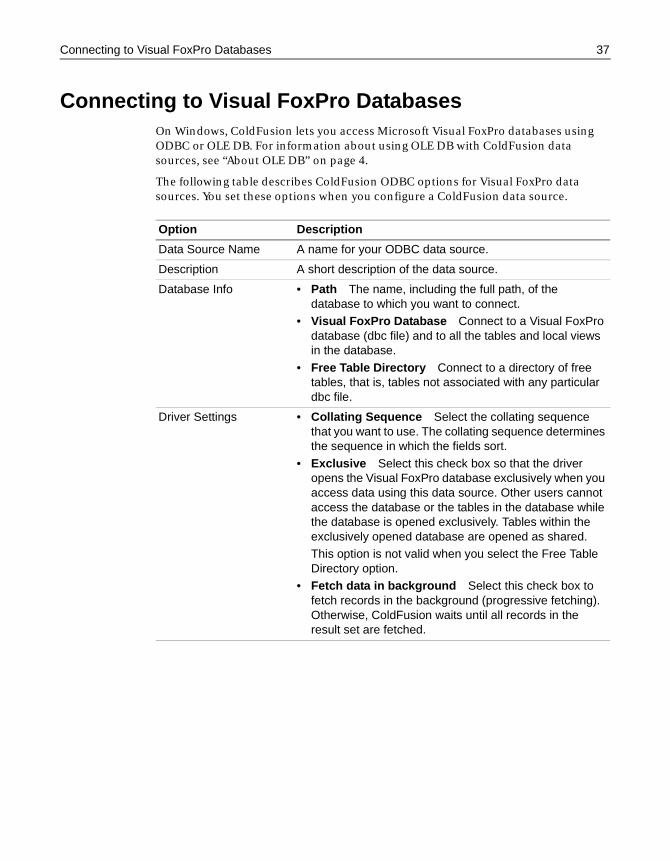
Connecting to Visual FoxPro Databases 37
Connecting to Visual FoxPro DatabasesOn Windows, ColdFusion lets you access Microsoft Visual FoxPro databases using ODBC or OLE DB. For information about using OLE DB with ColdFusion data sources, see “About OLE DB” on page 4.
The following table describes ColdFusion ODBC options for Visual FoxPro data sources. You set these options when you configure a ColdFusion data source.
Option Description
Data Source Name A name for your ODBC data source.
Description A short description of the data source.
Database Info • Path The name, including the full path, of the database to which you want to connect.
• Visual FoxPro Database Connect to a Visual FoxPro database (dbc file) and to all the tables and local views in the database.
• Free Table Directory Connect to a directory of free tables, that is, tables not associated with any particular dbc file.
Driver Settings • Collating Sequence Select the collating sequence that you want to use. The collating sequence determines the sequence in which the fields sort.
• Exclusive Select this check box so that the driver opens the Visual FoxPro database exclusively when you access data using this data source. Other users cannot access the database or the tables in the database while the database is opened exclusively. Tables within the exclusively opened database are opened as shared. This option is not valid when you select the Free Table Directory option.
• Fetch data in background Select this check box to fetch records in the background (progressive fetching). Otherwise, ColdFusion waits until all records in the result set are fetched.

38 Chapter 1 Advanced Data Source Management
Chapter 2
Administrator Tools
The tools provided with ColdFusion Administrator make it easy for you to share Web site files, analyze log files, and monitor Web site performance. This chapter introduces the Administrator Tools included with ColdFusion Server 5 and their benefits. The ColdFusion Administrator online Help provides additional information about how to use these tools.
Contents
• Accessing the Administrator Tools........................................................................... 40
• Features on the Tools Tab ......................................................................................... 41
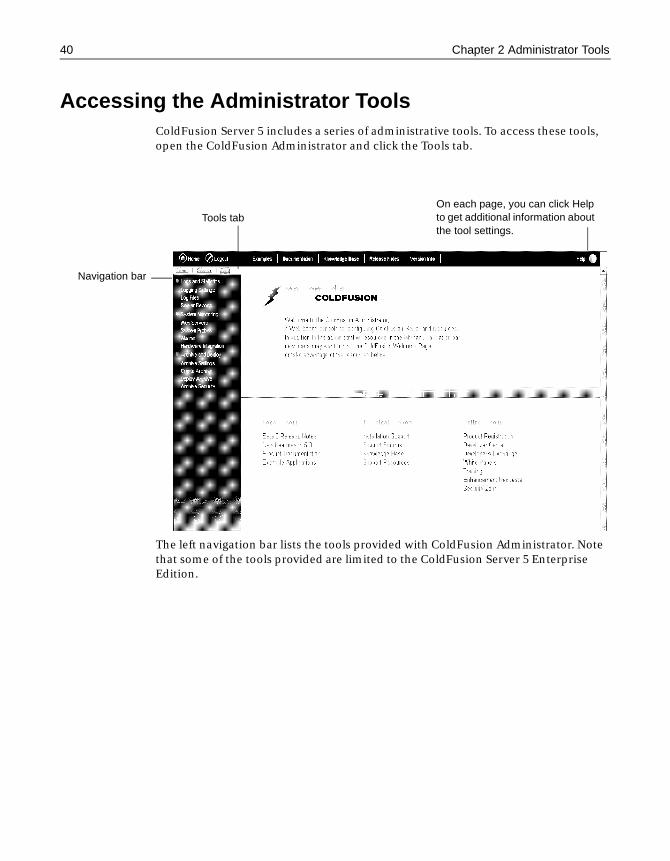
40 Chapter 2 Administrator Tools
Accessing the Administrator ToolsColdFusion Server 5 includes a series of administrative tools. To access these tools, open the ColdFusion Administrator and click the Tools tab.
The left navigation bar lists the tools provided with ColdFusion Administrator. Note that some of the tools provided are limited to the ColdFusion Server 5 Enterprise Edition.
Navigation bar
Tools tabOn each page, you can click Help to get additional information about the tool settings.
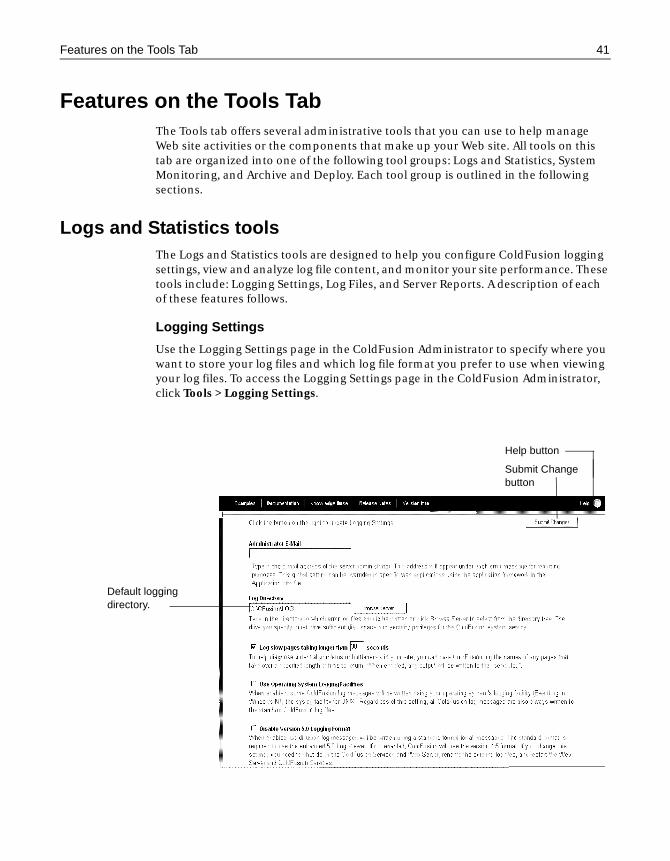
Features on the Tools Tab 41
Features on the Tools TabThe Tools tab offers several administrative tools that you can use to help manage Web site activities or the components that make up your Web site. All tools on this tab are organized into one of the following tool groups: Logs and Statistics, System Monitoring, and Archive and Deploy. Each tool group is outlined in the following sections.
Logs and Statistics toolsThe Logs and Statistics tools are designed to help you configure ColdFusion logging settings, view and analyze log file content, and monitor your site performance. These tools include: Logging Settings, Log Files, and Server Reports. A description of each of these features follows.
Logging Settings
Use the Logging Settings page in the ColdFusion Administrator to specify where you want to store your log files and which log file format you prefer to use when viewing your log files. To access the Logging Settings page in the ColdFusion Administrator, click Tools > Logging Settings.
Help button
Submit Change button
Default logging directory.
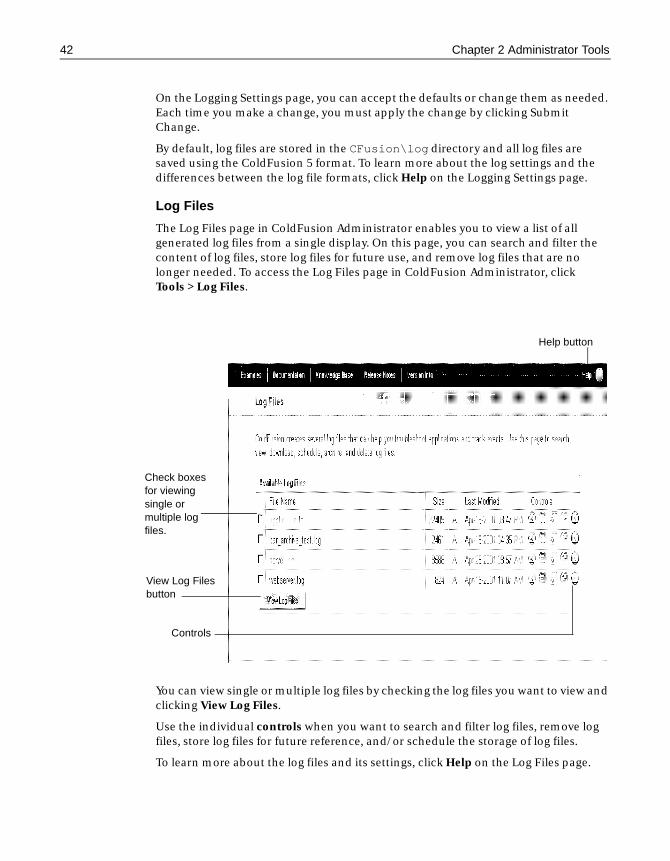
42 Chapter 2 Administrator Tools
On the Logging Settings page, you can accept the defaults or change them as needed. Each time you make a change, you must apply the change by clicking Submit Change.
By default, log files are stored in the CFusion\log directory and all log files are saved using the ColdFusion 5 format. To learn more about the log settings and the differences between the log file formats, click Help on the Logging Settings page.
Log Files
The Log Files page in ColdFusion Administrator enables you to view a list of all generated log files from a single display. On this page, you can search and filter the content of log files, store log files for future use, and remove log files that are no longer needed. To access the Log Files page in ColdFusion Administrator, clickTools > Log Files.
You can view single or multiple log files by checking the log files you want to view and clicking View Log Files.
Use the individual controls when you want to search and filter log files, remove log files, store log files for future reference, and/or schedule the storage of log files.
To learn more about the log files and its settings, click Help on the Log Files page.
Check boxes for viewing single or multiple log files.
Controls
View Log Files button
Help button

Features on the Tools Tab 43
Server Reports
The Server Reports supplied with ColdFusion Server 5 Enterprise Edition provide instantaneous statistics about the performance of your ColdFusion Server. In addition, some of these reports provide information that you can use to track server configuration changes and view current configuration settings.
To access the Server Reports in the ColdFusion Administrator, click Tools > Server Reports. The following table provides a brief overview of each report type.
Report Type Description
Server Performance Reports ColdFusion Administrator offers eight server performance reports that you can use to help measure the performance of your system. All reports offer cumulative averages of server statistics for a given time range. You can choose one of four intervals to report data: monthly, weekly, daily, or hourly. You can access any of the following eight performance reports on the Server Reports page in the ColdFusion Administrator:
• Performance Statistics Summary This report summarizes the behavior reported in all other performance reports. It specifically identifies all performance counters related to CFML requests, database operations, ColdFusion template cache pops, and other counters used for measuring throughput and internal congestion.
• Requests Report This report identifies per second the average number of CFM pages requested and the maximum average number of CFM pages requested. Other information provided in this report includes average CPU usage, ColdFusion CPU usage, ColdFusion memory usage, and ColdFusion handle and thread counts.
• Database Operations Report This report identifies per second the average number of database operations performed and the maximum average number of database operations performed. Other information provided in this report includes average CPU usage, ColdFusion CPU usage, ColdFusion memory usage, and ColdFusion handle and thread counts.
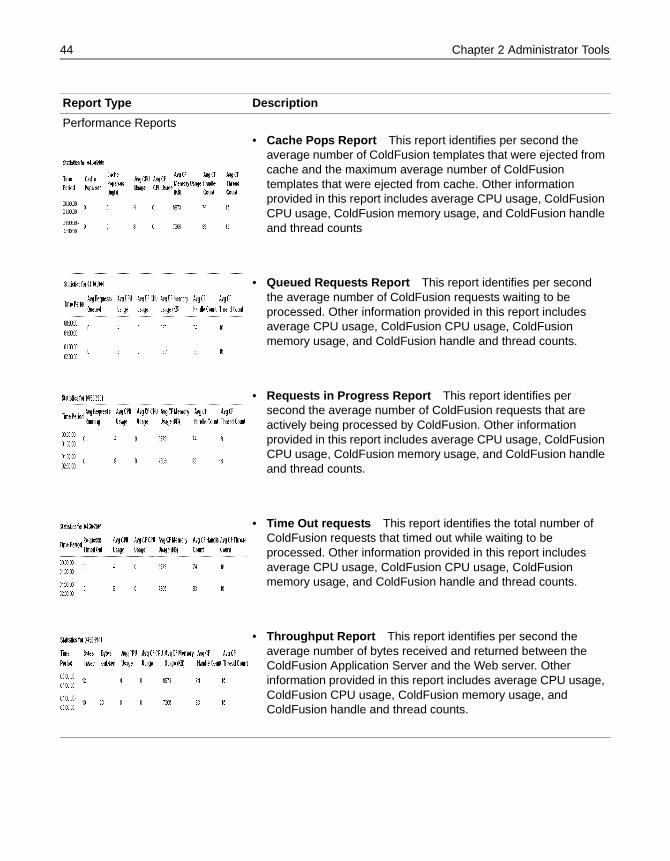
44 Chapter 2 Administrator Tools
Performance Reports
• Cache Pops Report This report identifies per second the average number of ColdFusion templates that were ejected from cache and the maximum average number of ColdFusion templates that were ejected from cache. Other information provided in this report includes average CPU usage, ColdFusion CPU usage, ColdFusion memory usage, and ColdFusion handle and thread counts
• Queued Requests Report This report identifies per second the average number of ColdFusion requests waiting to be processed. Other information provided in this report includes average CPU usage, ColdFusion CPU usage, ColdFusion memory usage, and ColdFusion handle and thread counts.
• Requests in Progress Report This report identifies per second the average number of ColdFusion requests that are actively being processed by ColdFusion. Other information provided in this report includes average CPU usage, ColdFusion CPU usage, ColdFusion memory usage, and ColdFusion handle and thread counts.
• Time Out requests This report identifies the total number of ColdFusion requests that timed out while waiting to be processed. Other information provided in this report includes average CPU usage, ColdFusion CPU usage, ColdFusion memory usage, and ColdFusion handle and thread counts.
• Throughput Report This report identifies per second the average number of bytes received and returned between the ColdFusion Application Server and the Web server. Other information provided in this report includes average CPU usage, ColdFusion CPU usage, ColdFusion memory usage, and ColdFusion handle and thread counts.
Report Type Description
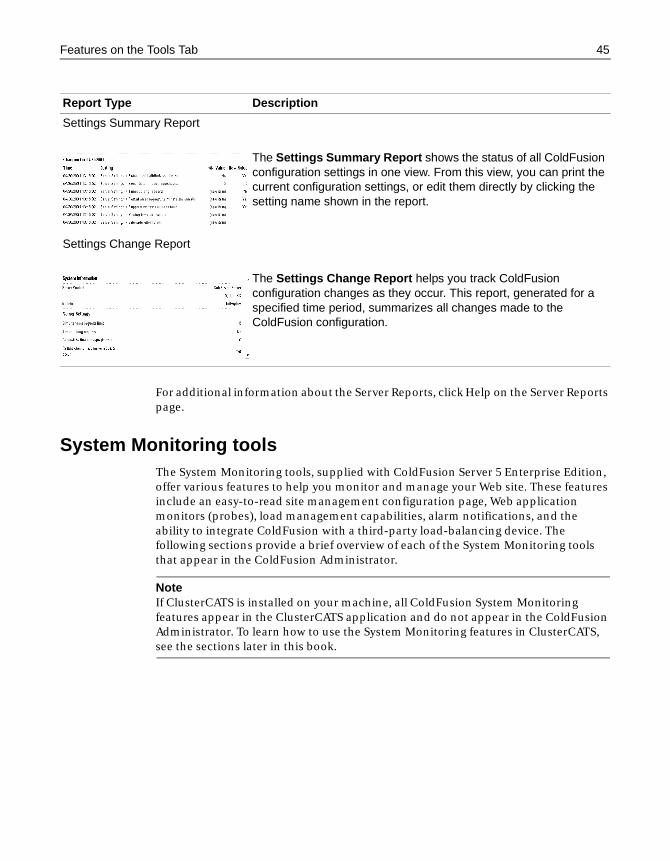
Features on the Tools Tab 45
For additional information about the Server Reports, click Help on the Server Reports page.
System Monitoring toolsThe System Monitoring tools, supplied with ColdFusion Server 5 Enterprise Edition, offer various features to help you monitor and manage your Web site. These features include an easy-to-read site management configuration page, Web application monitors (probes), load management capabilities, alarm notifications, and the ability to integrate ColdFusion with a third-party load-balancing device. The following sections provide a brief overview of each of the System Monitoring tools that appear in the ColdFusion Administrator.
NoteIf ClusterCATS is installed on your machine, all ColdFusion System Monitoring features appear in the ClusterCATS application and do not appear in the ColdFusion Administrator. To learn how to use the System Monitoring features in ClusterCATS, see the sections later in this book.
Settings Summary Report
The Settings Summary Report shows the status of all ColdFusion configuration settings in one view. From this view, you can print the current configuration settings, or edit them directly by clicking the setting name shown in the report.
Settings Change Report
The Settings Change Report helps you track ColdFusion configuration changes as they occur. This report, generated for a specified time period, summarizes all changes made to the ColdFusion configuration.
Report Type Description
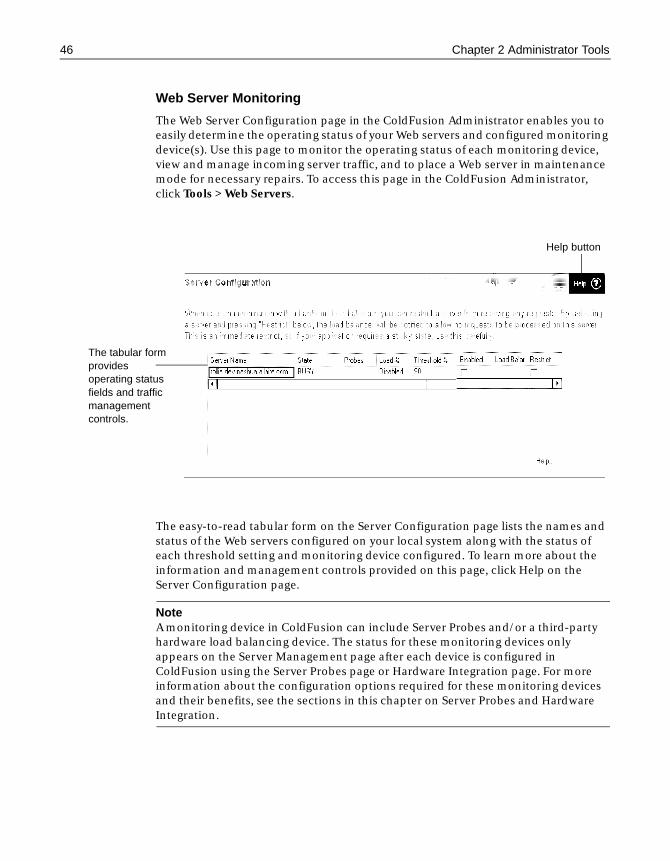
46 Chapter 2 Administrator Tools
Web Server Monitoring
The Web Server Configuration page in the ColdFusion Administrator enables you to easily determine the operating status of your Web servers and configured monitoring device(s). Use this page to monitor the operating status of each monitoring device, view and manage incoming server traffic, and to place a Web server in maintenance mode for necessary repairs. To access this page in the ColdFusion Administrator, click Tools > Web Servers.
The easy-to-read tabular form on the Server Configuration page lists the names and status of the Web servers configured on your local system along with the status of each threshold setting and monitoring device configured. To learn more about the information and management controls provided on this page, click Help on the Server Configuration page.
NoteA monitoring device in ColdFusion can include Server Probes and/or a third-party hardware load balancing device. The status for these monitoring devices only appears on the Server Management page after each device is configured in ColdFusion using the Server Probes page or Hardware Integration page. For more information about the configuration options required for these monitoring devices and their benefits, see the sections in this chapter on Server Probes and Hardware Integration.
The tabular form provides operating status fields and traffic management controls.
Help button
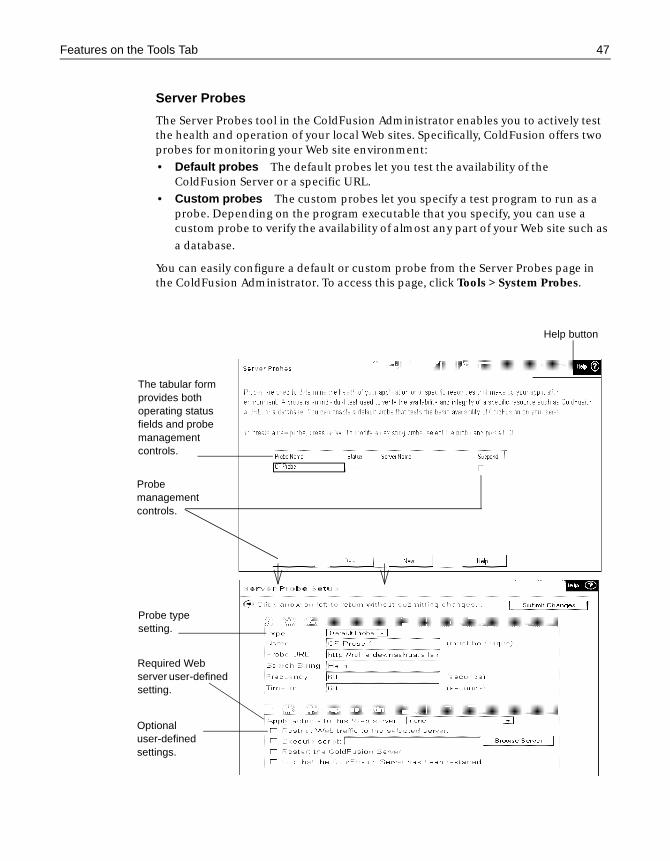
Features on the Tools Tab 47
Server Probes
The Server Probes tool in the ColdFusion Administrator enables you to actively test the health and operation of your local Web sites. Specifically, ColdFusion offers two probes for monitoring your Web site environment:
• Default probes The default probes let you test the availability of the ColdFusion Server or a specific URL.
• Custom probes The custom probes let you specify a test program to run as a probe. Depending on the program executable that you specify, you can use a custom probe to verify the availability of almost any part of your Web site such as
a database.
You can easily configure a default or custom probe from the Server Probes page in the ColdFusion Administrator. To access this page, click Tools > System Probes.
Probe management controls.
The tabular form provides both operating status fields and probe management controls.
Probe type setting.
Help button
Required Web server user-defined setting.
Optional user-defined settings.
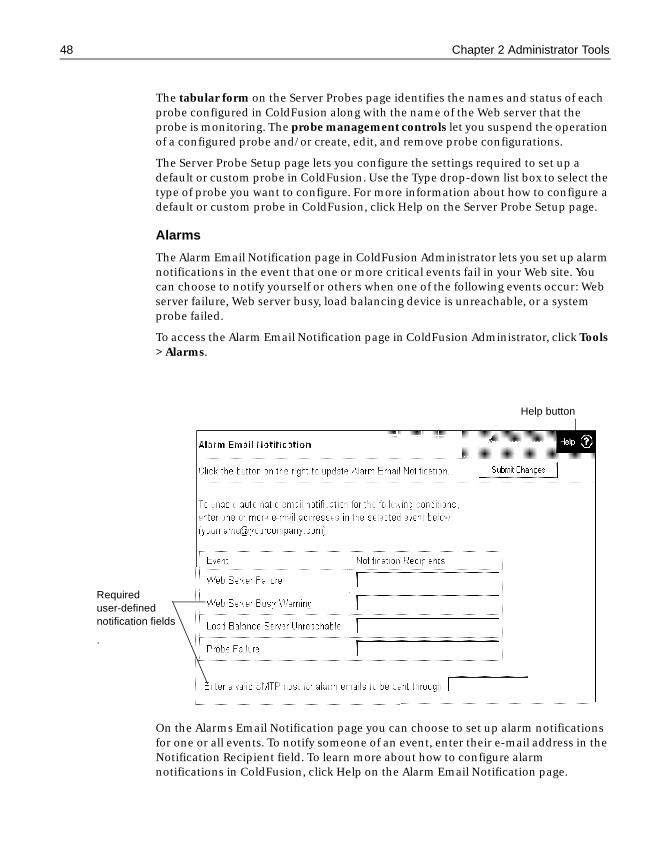
48 Chapter 2 Administrator Tools
The tabular form on the Server Probes page identifies the names and status of each probe configured in ColdFusion along with the name of the Web server that the probe is monitoring. The probe management controls let you suspend the operation of a configured probe and/or create, edit, and remove probe configurations.
The Server Probe Setup page lets you configure the settings required to set up a default or custom probe in ColdFusion. Use the Type drop-down list box to select the type of probe you want to configure. For more information about how to configure a default or custom probe in ColdFusion, click Help on the Server Probe Setup page.
Alarms
The Alarm Email Notification page in ColdFusion Administrator lets you set up alarm notifications in the event that one or more critical events fail in your Web site. You can choose to notify yourself or others when one of the following events occur: Web server failure, Web server busy, load balancing device is unreachable, or a system probe failed.
To access the Alarm Email Notification page in ColdFusion Administrator, click Tools > Alarms.
On the Alarms Email Notification page you can choose to set up alarm notifications for one or all events. To notify someone of an event, enter their e-mail address in the Notification Recipient field. To learn more about how to configure alarm notifications in ColdFusion, click Help on the Alarm Email Notification page.
Required user-defined notification fields
.
Help button
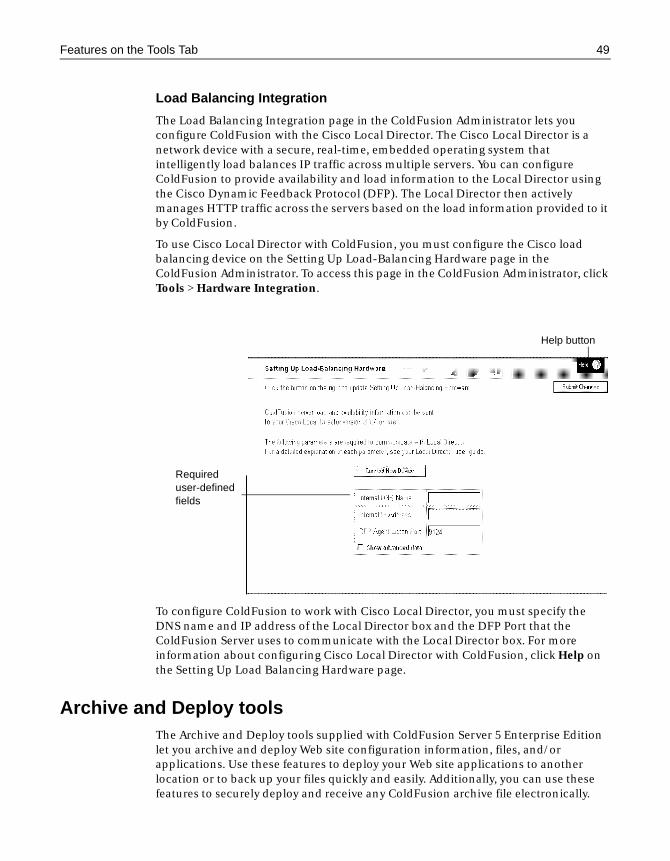
Features on the Tools Tab 49
Load Balancing Integration
The Load Balancing Integration page in the ColdFusion Administrator lets you configure ColdFusion with the Cisco Local Director. The Cisco Local Director is a network device with a secure, real-time, embedded operating system that intelligently load balances IP traffic across multiple servers. You can configure ColdFusion to provide availability and load information to the Local Director using the Cisco Dynamic Feedback Protocol (DFP). The Local Director then actively manages HTTP traffic across the servers based on the load information provided to it by ColdFusion.
To use Cisco Local Director with ColdFusion, you must configure the Cisco load balancing device on the Setting Up Load-Balancing Hardware page in the ColdFusion Administrator. To access this page in the ColdFusion Administrator, click Tools > Hardware Integration.
To configure ColdFusion to work with Cisco Local Director, you must specify the DNS name and IP address of the Local Director box and the DFP Port that the ColdFusion Server uses to communicate with the Local Director box. For more information about configuring Cisco Local Director with ColdFusion, click Help on the Setting Up Load Balancing Hardware page.
Archive and Deploy toolsThe Archive and Deploy tools supplied with ColdFusion Server 5 Enterprise Edition let you archive and deploy Web site configuration information, files, and/or applications. Use these features to deploy your Web site applications to another location or to back up your files quickly and easily. Additionally, you can use these features to securely deploy and receive any ColdFusion archive file electronically.
Help button
Required user-defined fields
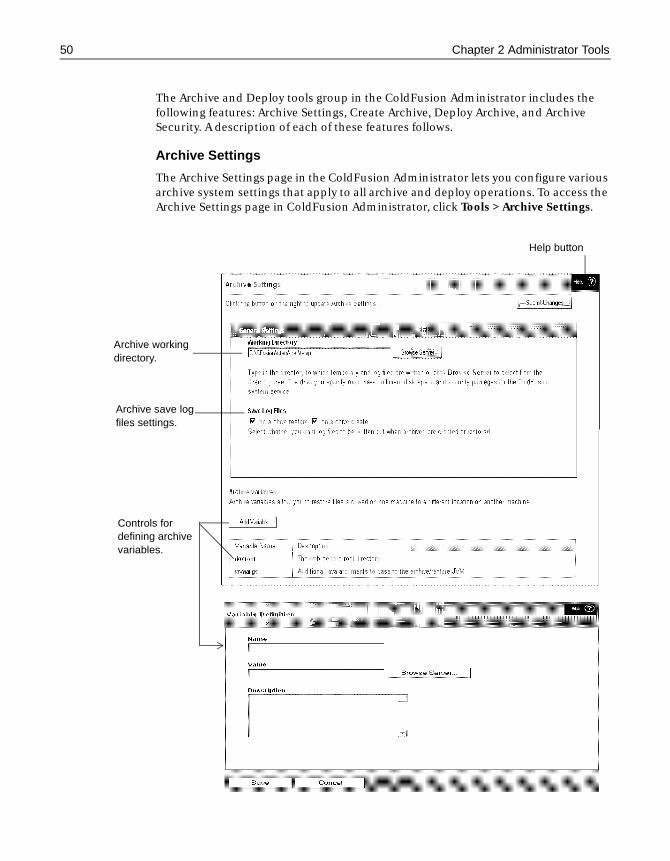
50 Chapter 2 Administrator Tools
The Archive and Deploy tools group in the ColdFusion Administrator includes the following features: Archive Settings, Create Archive, Deploy Archive, and Archive Security. A description of each of these features follows.
Archive Settings
The Archive Settings page in the ColdFusion Administrator lets you configure various archive system settings that apply to all archive and deploy operations. To access the Archive Settings page in ColdFusion Administrator, click Tools > Archive Settings.
Help button
Archive working directory.
Archive save log files settings.
Controls for defining archive variables.
Features on the Tools Tab 51
The following table provides a brief description of the features presented on the Archive Settings and Variable Definition page:
To learn more about the archive settings and archive variables in ColdFusion, click Help.
Feature Description
Archive working directory
The archive working directory text box lets you specify the directory where all archive and restore temporary files and log files are written.
By default the archive temporary files and log files are written to Cfusion\cfam\car\temp directory.
Save log files The save log file controls let you specify when ColdFusion writes archive events to a log file.ColdFusion, by default, logs events to the archive log file each time you create or restore an archive.
Controls for defining archive variables
The archive variable controls let you add, edit, and view archive variables in ColdFusion. Archive variables define locations that you commonly archive and restore on your system. The variable acts as an alias, saving you time from typing long paths to files you want to archive or restore.The tabular form on the Archive Settings page identifies all the archive variables supplied with ColdFusion plus all the user-defined archive variables. You can click Add Variables to define new variables or click a variable name shown in the tabular form to edit the definition of an existing variable. All variable definitions in the ColdFusion Administrator are defined and edited using the Variable Definition page. In the Variable Definition page you must provide a name for the variable definition and a full path to the file(s) that you often archive and restore.
Default settings You can use the default settings provided on the Archive Settings page or change them as needed. Each time you make a change on the Archive Settings page, you need to apply that change by clicking Submit Changes.
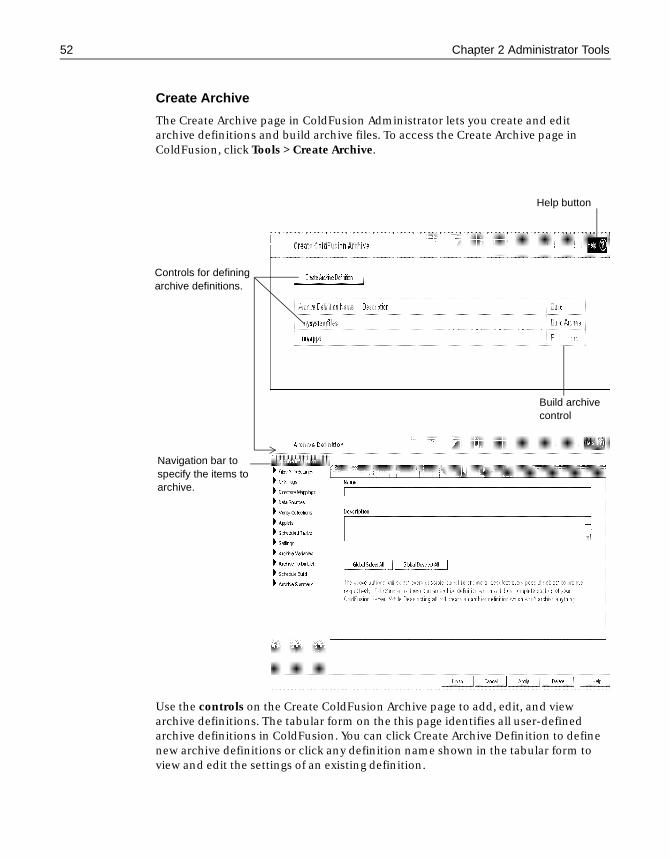
52 Chapter 2 Administrator Tools
Create Archive
The Create Archive page in ColdFusion Administrator lets you create and edit archive definitions and build archive files. To access the Create Archive page in ColdFusion, click Tools > Create Archive.
Use the controls on the Create ColdFusion Archive page to add, edit, and view archive definitions. The tabular form on the this page identifies all user-defined archive definitions in ColdFusion. You can click Create Archive Definition to define new archive definitions or click any definition name shown in the tabular form to view and edit the settings of an existing definition.
Help button
Controls for defining archive definitions.
Build archive control
Navigation bar to specify the items to archive.
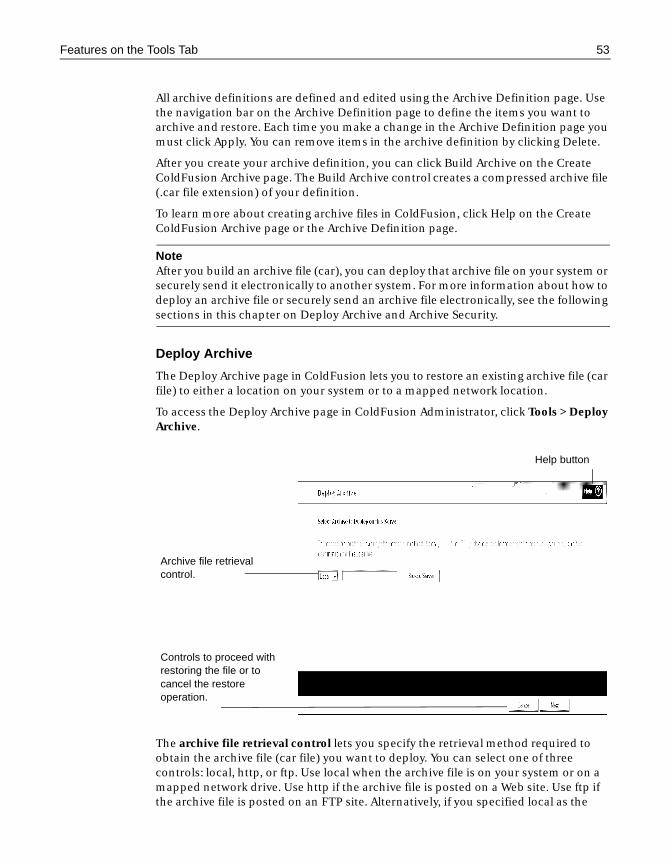
Features on the Tools Tab 53
All archive definitions are defined and edited using the Archive Definition page. Use the navigation bar on the Archive Definition page to define the items you want to archive and restore. Each time you make a change in the Archive Definition page you must click Apply. You can remove items in the archive definition by clicking Delete.
After you create your archive definition, you can click Build Archive on the Create ColdFusion Archive page. The Build Archive control creates a compressed archive file (.car file extension) of your definition.
To learn more about creating archive files in ColdFusion, click Help on the Create ColdFusion Archive page or the Archive Definition page.
NoteAfter you build an archive file (car), you can deploy that archive file on your system or securely send it electronically to another system. For more information about how to deploy an archive file or securely send an archive file electronically, see the following sections in this chapter on Deploy Archive and Archive Security.
Deploy Archive
The Deploy Archive page in ColdFusion lets you to restore an existing archive file (car file) to either a location on your system or to a mapped network location.
To access the Deploy Archive page in ColdFusion Administrator, click Tools > Deploy Archive.
The archive file retrieval control lets you specify the retrieval method required to obtain the archive file (car file) you want to deploy. You can select one of three controls: local, http, or ftp. Use local when the archive file is on your system or on a mapped network drive. Use http if the archive file is posted on a Web site. Use ftp if the archive file is posted on an FTP site. Alternatively, if you specified local as the
Help button
Archive file retrieval control.
Controls to proceed with restoring the file or to cancel the restore operation.
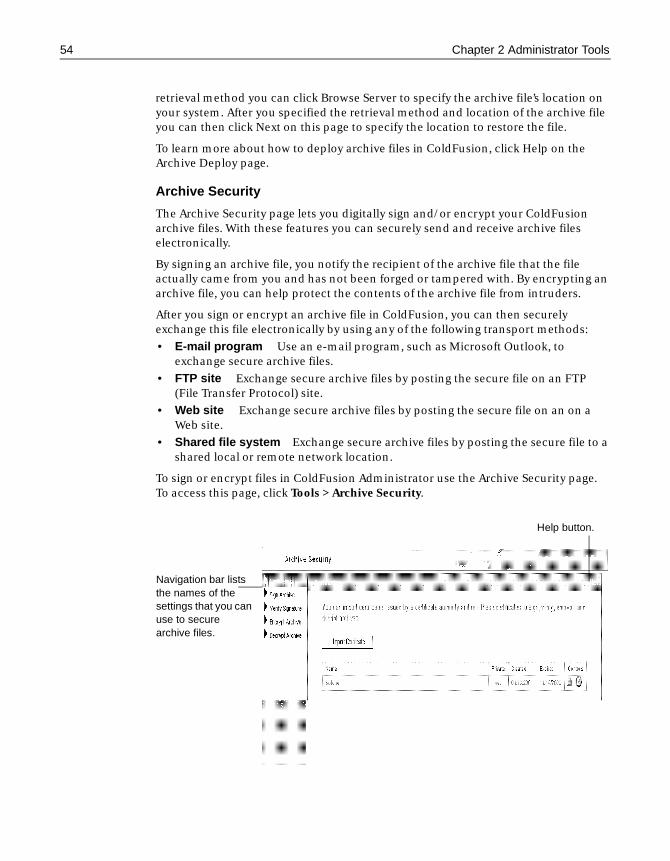
54 Chapter 2 Administrator Tools
retrieval method you can click Browse Server to specify the archive file’s location on your system. After you specified the retrieval method and location of the archive file you can then click Next on this page to specify the location to restore the file.
To learn more about how to deploy archive files in ColdFusion, click Help on the Archive Deploy page.
Archive Security
The Archive Security page lets you digitally sign and/or encrypt your ColdFusion archive files. With these features you can securely send and receive archive files electronically.
By signing an archive file, you notify the recipient of the archive file that the file actually came from you and has not been forged or tampered with. By encrypting an archive file, you can help protect the contents of the archive file from intruders.
After you sign or encrypt an archive file in ColdFusion, you can then securely exchange this file electronically by using any of the following transport methods:
• E-mail program Use an e-mail program, such as Microsoft Outlook, to exchange secure archive files.
• FTP site Exchange secure archive files by posting the secure file on an FTP (File Transfer Protocol) site.
• Web site Exchange secure archive files by posting the secure file on an on a Web site.
• Shared file system Exchange secure archive files by posting the secure file to a shared local or remote network location.
To sign or encrypt files in ColdFusion Administrator use the Archive Security page. To access this page, click Tools > Archive Security.
Help button.
Navigation bar lists the names of the settings that you can use to secure archive files.
Features on the Tools Tab 55
Click the names of the settings in the navigation bar to import a security certificate, sign an archive file, verify the signature of an archive file, encrypt an archive file, or decrypt an archive file.
NoteCertificates are required to digitally sign a ColdFusion archive file or to verify the signature of an archive file. You can obtain a certificate from a Certificate Authority such as VeriSign, Inc., or you can generate a certificate using the Key Tool utility provided with the Sun Microsystem JDK 1.3.
For details on how to import a certificate, sign an archive file, verify the signature of an archive file, or encrypt and decrypt an archive file, click Help on the Archive Security page in the ColdFusion Administrator.

56 Chapter 2 Administrator Tools
P a r t I I
ColdFusion Security
This part describes security features and configuration in ColdFusion
Server. The following chapters are included:ColdFusion Security ...........................................................................59
Configuring Basic Security .................................................................71
Configuring Advanced Security..........................................................79

Chapter 3
ColdFusion Security
This chapter introduces ColdFusion Server Basic and Advanced security features that allow you to protect a wide variety of ColdFusion resources.
Contents
• Why Is ColdFusion Security Important?.................................................................. 60
• Choosing a Level of ColdFusion Security ................................................................ 62
• To Learn More About Security.................................................................................. 67
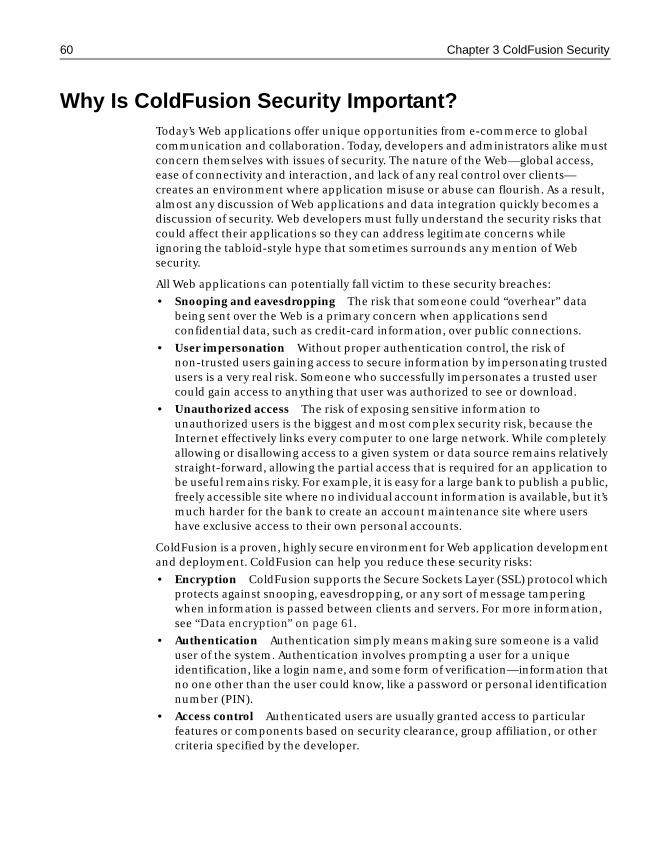
60 Chapter 3 ColdFusion Security
Why Is ColdFusion Security Important?Today’s Web applications offer unique opportunities from e-commerce to global communication and collaboration. Today, developers and administrators alike must concern themselves with issues of security. The nature of the Web—global access, ease of connectivity and interaction, and lack of any real control over clients— creates an environment where application misuse or abuse can flourish. As a result, almost any discussion of Web applications and data integration quickly becomes a discussion of security. Web developers must fully understand the security risks that could affect their applications so they can address legitimate concerns while ignoring the tabloid-style hype that sometimes surrounds any mention of Web security.
All Web applications can potentially fall victim to these security breaches:
• Snooping and eavesdropping The risk that someone could “overhear” data being sent over the Web is a primary concern when applications send confidential data, such as credit-card information, over public connections.
• User impersonation Without proper authentication control, the risk of non-trusted users gaining access to secure information by impersonating trusted users is a very real risk. Someone who successfully impersonates a trusted user could gain access to anything that user was authorized to see or download.
• Unauthorized access The risk of exposing sensitive information to unauthorized users is the biggest and most complex security risk, because the Internet effectively links every computer to one large network. While completely allowing or disallowing access to a given system or data source remains relatively straight-forward, allowing the partial access that is required for an application to be useful remains risky. For example, it is easy for a large bank to publish a public, freely accessible site where no individual account information is available, but it’s much harder for the bank to create an account maintenance site where users have exclusive access to their own personal accounts.
ColdFusion is a proven, highly secure environment for Web application development and deployment. ColdFusion can help you reduce these security risks:
• Encryption ColdFusion supports the Secure Sockets Layer (SSL) protocol which protects against snooping, eavesdropping, or any sort of message tampering when information is passed between clients and servers. For more information, see “Data encryption” on page 61.
• Authentication Authentication simply means making sure someone is a valid user of the system. Authentication involves prompting a user for a unique identification, like a login name, and some form of verification—information that no one other than the user could know, like a password or personal identification number (PIN).
• Access control Authenticated users are usually granted access to particular features or components based on security clearance, group affiliation, or other criteria specified by the developer.
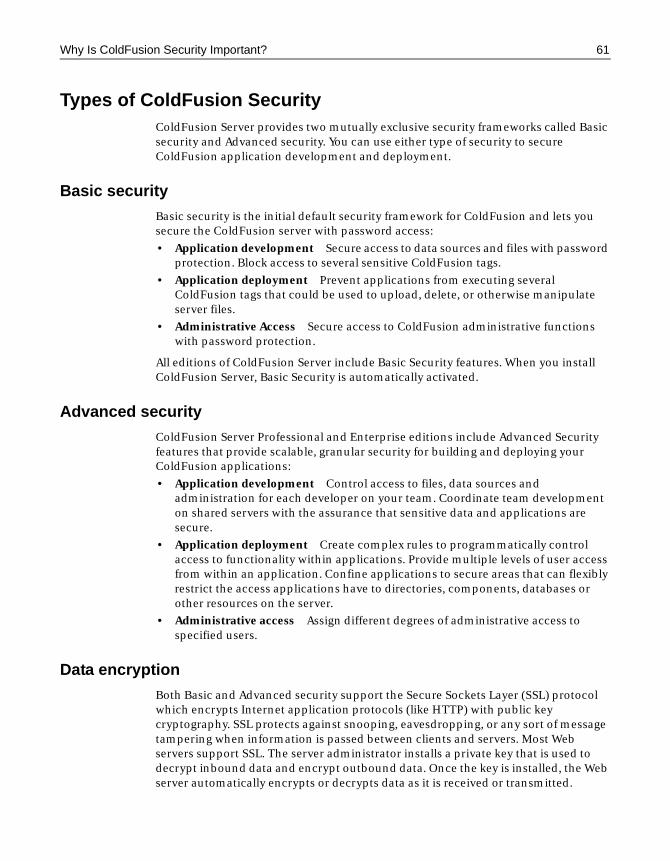
Why Is ColdFusion Security Important? 61
Types of ColdFusion SecurityColdFusion Server provides two mutually exclusive security frameworks called Basic security and Advanced security. You can use either type of security to secure ColdFusion application development and deployment.
Basic security
Basic security is the initial default security framework for ColdFusion and lets you secure the ColdFusion server with password access:
• Application development Secure access to data sources and files with password protection. Block access to several sensitive ColdFusion tags.
• Application deployment Prevent applications from executing several ColdFusion tags that could be used to upload, delete, or otherwise manipulate server files.
• Administrative Access Secure access to ColdFusion administrative functions with password protection.
All editions of ColdFusion Server include Basic Security features. When you install ColdFusion Server, Basic Security is automatically activated.
Advanced security
ColdFusion Server Professional and Enterprise editions include Advanced Security features that provide scalable, granular security for building and deploying your ColdFusion applications:
• Application development Control access to files, data sources and administration for each developer on your team. Coordinate team development on shared servers with the assurance that sensitive data and applications are secure.
• Application deployment Create complex rules to programmatically control access to functionality within applications. Provide multiple levels of user access from within an application. Confine applications to secure areas that can flexibly restrict the access applications have to directories, components, databases or other resources on the server.
• Administrative access Assign different degrees of administrative access to specified users.
Data encryption
Both Basic and Advanced security support the Secure Sockets Layer (SSL) protocol which encrypts Internet application protocols (like HTTP) with public key cryptography. SSL protects against snooping, eavesdropping, or any sort of message tampering when information is passed between clients and servers. Most Web servers support SSL. The server administrator installs a private key that is used to decrypt inbound data and encrypt outbound data. Once the key is installed, the Web server automatically encrypts or decrypts data as it is received or transmitted.
62 Chapter 3 ColdFusion Security
If your Web server connections are encrypted with SSL, all communications, including ColdFusion transmissions, are automatically encrypted. You do not have to do anything from within ColdFusion to activate data encryption.
Choosing a Level of ColdFusion SecurityThe rest of this chapter is designed to help you decide which type of ColdFusion security is right for your particular development needs. Basic and Advanced security are mutually exclusive ColdFusion features. When you install ColdFusion Server, Basic security is turned on by default. If you turn on Advanced security, it automatically overrides all your Basic security settings except one: Tags you protected with Basic security remain protected when you implement Advanced security.
NoteIf you turn off both Basic and Advanced security, all ColdFusion resources and server administration functions become available to anyone who has access to the server. When you install ColdFusion Server, leave Basic security passwords in place until you finalized your security plan and are ready to implement it.
As you begin to think about how you will secure your Web applications, keep these important points in mind:
• Security is never absolute. Technology is fast-evolving and the Web is, by nature, an environment that favors openness and access over privacy and security. You should regularly review your security plans to make sure your company hasn’t outgrown them.
• No single security model is perfect for every application or development environment. For example, an intranet deployed only to employees from a server behind your company’s firewall and an e-commerce site on the Web would have very different security plans. When they plan applications, ColdFusion developers must weigh the costs and benefits of the various security alternatives in the context of the project requirements.
• Trust is perhaps the most important concept to consider when you are planning any security strategy. When users decide whether or not to download something from the Web, it usually depends on if they trust the site. The site can engender trust in any number of ways, by providing a digital certificate, for instance. Similarly, how open you choose to make your ColdFusion environment depends on whether or not all your users are trusted. Generally speaking, the level of trust is inversely proportional to the level of security you need to implement. If trust is high—for example, if your development group consists of five people and they all access the ColdFusion server over a LAN—then you can probably manage with a less secure environment. However, if trust is lower—for example, if you're an Internet Service Provider (ISP) hosting a development site—then you will need to implement a more complex and restrictive security plan. The more public the application or development environment, the lower the level of trust.
Choosing a Level of ColdFusion Security 63
Basic security covers all phases of application development and deployment. Basic security is a good solution for trusted users because it offers them a single access level—complete control. Consider implementing Basic security if you have legacy systems or other security models in place.
Basic security also requires very little support from the ColdFusion Server administrator: You’ll want to choose a password that can’t be easily guessed and change it regularly, but aside from that, Basic security won’t require much of your time. Developers, on the other hand, will need to spend more time writing their applications; granular run-time access security is possible with Basic security, but involves custom development.
Advanced Security, on the other hand, allows you a great deal of flexibility and control, but requires more time and greater effort to set up and maintain than Basic security. Depending on how you implement it, Advanced Security can also affect performance when developers try to access resources from ColdFusion studio or when users try to run ColdFusion applications.
The following sections examine the effects of Basic and Advanced security on application development and deployment, and on administrative access to ColdFusion Server. Remember that when you select Basic or Advanced security, you’re making a global choice that affects all aspects of ColdFusion. You can’t, for instance, select Basic security for server administration and Advanced security for RDS. This section is organized by major task simply to help you prioritize your security concerns and then select the type of ColdFusion security that best meets the majority of your needs.
Developing applicationsBasic and Advanced security both restrict access to ColdFusion servers from ColdFusion Studio. You can restrict access by developers who connect to ColdFusion servers over a local area network as well as by developers who use RDS to access ColdFusion servers.
Developing applications with Basic security
Basic security for application development hinges on the protection of a single password per server. As long as you change the password frequently and your users keep it secret, you should not have to worry about unauthorized access to the directories and resources on your ColdFusion server. Before you choose Basic security, it is imperative that you understand the security liabilities of this model:
• Password vulnerability If the password is lost, hacked, or stolen, server security is compromised. See “Data encryption” on page 61 for information about protecting communications, including password transmissions, between your server and clients.
• Generalized access control Remote developers have access either to all files and data sources, or none. Basic security does not let you protect individual directories or resources.
64 Chapter 3 ColdFusion Security
Basic security is a good choice to protect ColdFusion resources if your company consists of a single development group or several small groups all physically located at the same site. Because these developers can be considered highly-trusted users, Basic security can still make sense when they are away from the office and are using RDS to develop applications remotely.
When you use Basic security to restrict access to a ColdFusion server, developers can access all files and mapped network drives on the server with a single password. This same password provides remote access to the server through RDS.
Developing applications with Advanced security
Advanced security is the ideal choice for administrators who need to meet the security challenges posed by remote or hosted ColdFusion application development. Unlike Basic security, which gives all developers the same level of access to all ColdFusion resources, Advanced security lets you customize access control for individual developers and development groups.
Using Advanced security requires more planning and configuration than using Basic security, but the benefits you’ll see in streamlined development processes are well worth the time you’ll invest. With Advanced security, you must specify the data sources and directories you want to protect, and then grant explicit access to these resources to specific groups or individual users. Protected resources can’t be accessed by anyone to whom you haven’t given permissions. Advanced security provides even further granularity by letting you explicitly specify the following on a group-by-group basis:
• The types of SQL commands that can be performed against a data source
• Read and write access to files
• The types of actions allowed by CFML tags
• Delete, optimize, purge, search, and update access to search collections
Because Advanced security uses your existing LDAP directories, NT domains, or ODBC data sources to authenticate ColdFusion developers, you never have to maintain redundant user lists. Advanced security automatically inherits any changes you make to your LDAP directories, NT domains, and ODBC data sources.
Deploying applicationsWeb applications present new security challenges for IT managers, administrators, and application developers. Basic security leaves the bulk of runtime security implementation to application developers. Advanced security makes it easier for developers to authenticate users and authorize application access, because Advanced security separates group membership and user logon maintenance from security policy specification.
Choosing a Level of ColdFusion Security 65
Deploying applications with Basic security
Basic security lets you disable execution of CFML tags that could prevent security hazards if they were used in a ColdFusion application, because they could be used to upload, delete, or otherwise manipulate files on the ColdFusion server. ColdFusion displays an error when it encounters a disabled tag in an application.
Besides the ability to restrict CFML tags, Basic security provides no runtime security for ColdFusion applications. When Basic security is implemented, the responsibility for securing applications falls mainly on the application developers. For example, developers must authenticate end-users of their applications by creating customized user directories. Developers can also integrate existing user directories, like NT domains, by using any of the custom extension mechanisms supported by ColdFusion, including CFX tags, and COM or CORBA objects. Similarly, developers must custom-build all access privileges into all their applications.
Deploying spplications with Advanced security
Advanced security lets ColdFusion developers authenticate users and match protected resources with authorized users. Advanced security builds consistent, standardized authentication right into the ColdFusion server engine, making it easier for developers to control all aspects of access to their applications.
When Advanced security is implemented, developers don’t need to create customized directories or databases to authenticate users; Advanced Security can automatically authenticate users against existing LDAP directories, NT domains, or ODBC data sources. Advanced security also makes it easier to enforce access rights for authenticated users and groups. You can expressly grant or forbid run-time access to ColdFusion Applications, CFML tags, collections, components, Data sources, Files, Directories, and Custom Tags on a user-by-user or group-by-group basis. For example, you could use Advanced security to:
• Restrict sensitive CFML tags like <CFREGISTRY> so they can be used only by members of the NT Domain Administrators group of the local domain.
• Make a sensitive search collection available only to your company’s Human Resources staff. No matter which applications use the collection, it would only ever be available to this one group.
• Make CORBA or COM objects that work with a company’s financial information available only to the departments and Web applications that require them
In the Enterprise edition of ColdFusion, Advanced security also lets you run applications in a security sandbox, which assigns security permissions to any applications running from a specified directory tree. Unlike other Advanced security features, Security sandboxes automatically enforce control over resources without additional coding to autehnticate and authorize users. Security sandboxes eliminate the risk that one application will access another application’s resources, and are most useful to hosted sites where multiple ColdFusion applications are deployed on the same server.
66 Chapter 3 ColdFusion Security
Securing the ColdFusion AdministratorThe ColdFusion Administrator is a powerful tool that lets you perform administrative tasks like managing server performance, adding and configuring ColdFusion data sources, scheduling pages, and managing log files. You can secure the Administrator with either Basic or Advanced Security. Just as with application development and deployment, the level of security that controls administrative access depends on the level of trust.
NoteYou can access the ColdFusion Administrator either locally or remotely. Because the ColdFusion Administrator is a Web-based interface, it inherits the level of encryption you set on the Web server on which ColdFusion is installed. If the Administrator is installed on a Web server that encrypts Web connections, information sent to the server during remote server administration is automatically encrypted.
Securing the Administrator with Basic security
When Basic security is implemented, you enter a password to access to the ColdFusion Administrator. (Note that the ColdFusion Administrator password is separate from the RDS security password.) Anyone who knows the administrative password can gain access to all the functionality of the ColdFusion Administrator. This situation may be desirable if you’re implementing ColdFusion in a small group where no one person is a designated administrator and everyone pitches in with administrative tasks.
The liabilities of using Basic security to protect the ColdFusion Administrator are similar to those discussed in “Developing applications with Basic security” on page 63:
• Password vulnerability If the administrative password is lost, hacked, or stolen, server security is compromised. See “Data encryption” on page 61 for information about protecting communications, including password transmissions, between your server and clients.
• Generalized access control Anyone who knows the administrative password has full access to the ColdFusion Administrator. Users who are not familiar with the Administrator could unwittingly cause problems by changing administrative settings.
Securing the sdministrator with Advanced security
When Advanced security is implemented, you have complete control over who can access the ColdFusion Administrator. Additionally, you can decentralize ColdFusion server management by assigning varying degrees of administrative access to a select number of users. If you manage ColdFusion servers for a large, diverse organization or for hosted sites, you'll likely find that the ability to delegate server management tasks helps you run your operation more efficiently. See “Securing the ColdFusion Administrator” on page 102 in Chapter 5, “Configuring Advanced Security” on page 79 for more information.
To Learn More About Security 67
To Learn More About SecuritySecurity at the speed of the Web changes more frequently and over a broader spectrum than can be covered here. Allaire is dedicated to educating its customers about new security information as it becomes available.
Visit the Allaire Security Zone (http://www.allaire.com/developer/securityzone/) to read Allaire’s latest security bulletins and technical briefs that provide information about issues Allaire believes are significant. The Security Zone also contains an extensive list of non-Allaire sites where you can go to learn about everything from security standards and protocols to the most recent security bulletins from companies like Netscape, Microsoft, and Sun.
To learn how to configure ColdFusion Server with Basic or Advanced Security, continue on to the next two chapters in this book:
• Chapter 4, “Configuring Basic Security” on page 71
• Chapter 5, “Configuring Advanced Security” on page 79

68 Chapter 3 ColdFusion Security

To Learn More About Security 69

70 Chapter 3 ColdFusion Security
Chapter 4
Configuring Basic Security
Basic ColdFusion security allows you to secure a number of ColdFusion Server resources with password access. This chapter describes configuration options for basic ColdFusion security.
Contents
• About Basic Security ................................................................................................. 72
• Configuring Remote Development Security (RDS) ................................................ 73
• ColdFusion Remote Development Services (RDS)................................................. 74
• Using a Password to Restrict Access to RDS............................................................ 76
• Configuring Basic Runtime Security........................................................................ 77
72 Chapter 4 Configuring Basic Security
About Basic SecurityColdFusion Server offers two levels of security: Basic and Advanced. Basic security allows you to impose the following types of control on the ColdFusion development environment:
• You can secure the ColdFusion Administrator with a password. Refer to “Securing the ColdFusion Administrator” on page 66 for more information.
• You can secure access from ColdFusion Studio to data sources and files with a password. See “ColdFusion Studio Password” on page 76 for more information.
• You can restrict the execution of specific ColdFusion CFML tags. See “Specifying Resources to Protect” on page 96 for more information about securing ColdFusion resources.
To access Basic security settings in the ColdFusion Administrator, open the Server, Basic Security page.
Advanced Security allows you to exercise a high degree of control over a wide range of ColdFusion resources, including CFML tags (as well as individual tag ACTION types), specific SQL operations, as well as other ColdFusion resources. For more information, see Chapter 5, “Configuring Advanced Security” on page 79.
Installation defaultsThe ColdFusion Administrator installs with secure access enabled. The password you enter as part of the setup is saved as the default, so that when you open the Administrator for the first time, you are prompted to enter the password. We recommend that you continue to use Administrator security until you complete the ColdFusion server configuration. Once you’ve determined your security requirements, you may decide to set up Advanced security. For more information, see Chapter 5, “Configuring Advanced Security” on page 79.
Disabling Administrator security
You can disable Basic security for the ColdFusion Administrator on the Server, Basic Security page. Once you’ve disabled this option, anyone can open the Administrator pages and make changes to ColdFusion Server settings.
Disabling ColdFusion Studio security
You can disable file and data source security from ColdFusion Studio on the Server, Basic Security page. With Basic security disabled, you rely on the Web server’s security to set permissions to ColdFusion application and document directories. In addition, you rely on your database settings to control access to data sources.
Configuring Remote Development Security (RDS) 73
Configuring Remote Development Security (RDS)Restricting access to your application page directories is the most important step you can take in making your site secure. You can do this using ColdFusion Basic security. However, you may find it necessary to provide broader access to these directories if, for example, you have several geographically dispersed participants in a development project. In addition, a group of widely dispersed developers may require different levels of access to files and data sources.
Securing data sourcesIn addition to your application pages, you also need to consider data source security. Using basic security measures, you can take several steps to ensure that your data sources remain secure even when your application page directories are partially accessible:
1 If you do not need to insert, update, or delete data in the data source, configure it as read-only. You can do this in the ColdFusion Administrator ODBC Data Source Advanced page.
2 Use a database system that supports security and create a user account that has access to only selected tables and operations (such as, SELECT, INSERT). You can then configure ColdFusion to use that account when interacting with the data source.
3 Using the ColdFusion ODBC or Native Drivers page, configure ColdFusion settings to allow only certain SQL operations (such as SELECT and INSERT) in interactions with the data source.
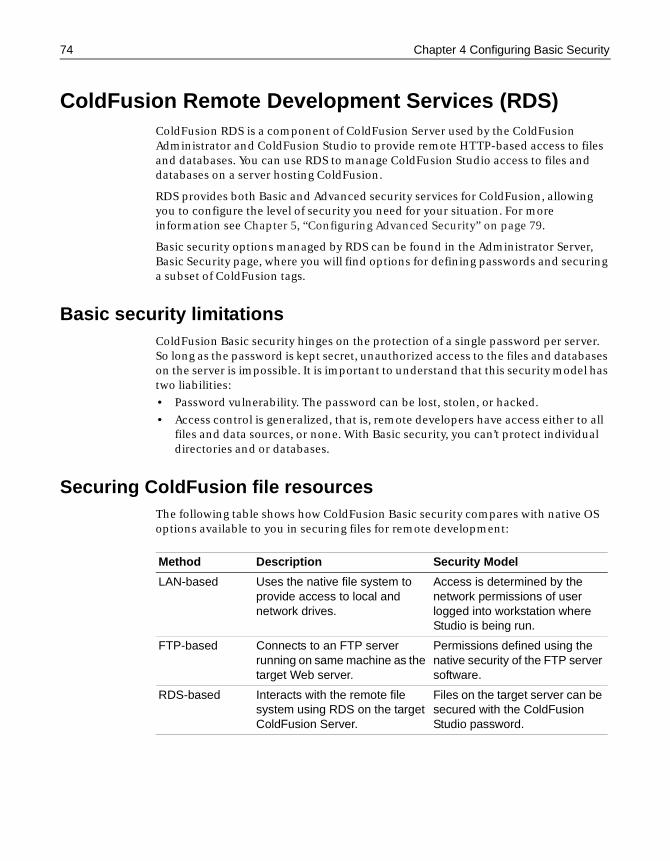
74 Chapter 4 Configuring Basic Security
ColdFusion Remote Development Services (RDS)ColdFusion RDS is a component of ColdFusion Server used by the ColdFusion Administrator and ColdFusion Studio to provide remote HTTP-based access to files and databases. You can use RDS to manage ColdFusion Studio access to files and databases on a server hosting ColdFusion.
RDS provides both Basic and Advanced security services for ColdFusion, allowing you to configure the level of security you need for your situation. For more information see Chapter 5, “Configuring Advanced Security” on page 79.
Basic security options managed by RDS can be found in the Administrator Server, Basic Security page, where you will find options for defining passwords and securing a subset of ColdFusion tags.
Basic security limitationsColdFusion Basic security hinges on the protection of a single password per server. So long as the password is kept secret, unauthorized access to the files and databases on the server is impossible. It is important to understand that this security model has two liabilities:
• Password vulnerability. The password can be lost, stolen, or hacked.
• Access control is generalized, that is, remote developers have access either to all files and data sources, or none. With Basic security, you can’t protect individual directories and or databases.
Securing ColdFusion file resourcesThe following table shows how ColdFusion Basic security compares with native OS options available to you in securing files for remote development:
Method Description Security Model
LAN-based Uses the native file system to provide access to local and network drives.
Access is determined by the network permissions of user logged into workstation where Studio is being run.
FTP-based Connects to an FTP server running on same machine as the target Web server.
Permissions defined using the native security of the FTP server software.
RDS-based Interacts with the remote file system using RDS on the target ColdFusion Server.
Files on the target server can be secured with the ColdFusion Studio password.
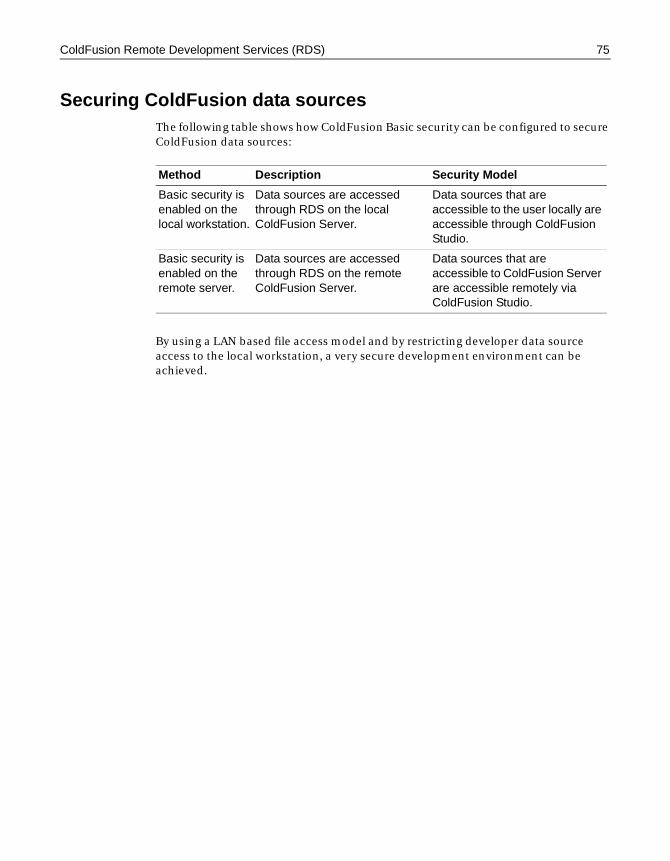
ColdFusion Remote Development Services (RDS) 75
Securing ColdFusion data sourcesThe following table shows how ColdFusion Basic security can be configured to secure ColdFusion data sources:
By using a LAN based file access model and by restricting developer data source access to the local workstation, a very secure development environment can be achieved.
Method Description Security Model
Basic security is enabled on the local workstation.
Data sources are accessed through RDS on the local ColdFusion Server.
Data sources that are accessible to the user locally are accessible through ColdFusion Studio.
Basic security is enabled on the remote server.
Data sources are accessed through RDS on the remote ColdFusion Server.
Data sources that are accessible to ColdFusion Server are accessible remotely via ColdFusion Studio.

76 Chapter 4 Configuring Basic Security
Using a Password to Restrict Access to RDSThe Server, Basic Security page of the ColdFusion Administrator is used to configure passwords for securing the Administrator and for preventing unauthorized access to ColdFusion data source and file resources through ColdFusion Studio.
NotePassword protection is enabled by default at server installation time. If you have not explicitly disabled password access, then security is already configured for your server.
ColdFusion Studio PasswordThe ColdFusion Studio password, like the Administrator password is specified during ColdFusion setup. You can specify a new password in the Administrator to control database and file access from Studio. Separate Studio and Administrator passwords allow you to separate access control to ColdFusion data sources and files, and Administrator pages.
NoteWhenever you make a change to Basic security settings, you need to stop and restart the ColdFusion RDS service using the Services Control Panel in Windows or the stop and start scripts on Solaris.
Removing password-based access control: WindowsTo allow ColdFusion Studio users access to files and databases without being prompted for a password:
1 In the Security section of the ColdFusion Administrator, click the CF Studio Password link.
2 Clear the Use a ColdFusion Studio Password checkbox.
3 Open the Services Control Panel.
4 Stop and then restart the ColdFusion RDS service. On non-Windows platforms, you run the ColdFusion Stop script, then run the ColdFusion Start script.

Configuring Basic Runtime Security 77
Configuring Basic Runtime SecurityBasic security lets you disable execution of seven CFML tags that could present security hazards. You can, however, specify a special directory, called the Unsecured Tags Directory; this is the only directory from which ColdFusion will execute tags you disable with Basic security. Tags you disable with Basic security remain disabled if you switch to Advanced security.
To restrict tag execution
1 Open the ColdFusion Administrator and click the Security link at the top of the navigation bar.
2 Click the Tag Restrictions link.
3 On the Tag Restrictions page, clear the check box that appears in front of each tag you want to disable. You can block execution of the following tags:
• cfcontent
• cfdirectory
• cffile
• cfobject
• cfregistry
• cfadminsecurity
• cfexecute
• cfftp
• cflog
• cfmail
• The cfquery dbtype = dynamic attribute
• The connectString attribute, available in the cfgridupdate, cfinsert, cfquery, cfstoredproc, and cfupdate tags.
4 Click the Submit Changes button.

78 Chapter 4 Configuring Basic Security
5 To specify a directory from which otherwise blocked tags can be executed, enter a fully qualified path (using forward slashes) in the Unsecured Tags Directory field. By default, this is the directory in which the ColdFusion Administrator is installed.
ColdFusion displays an error message when it encounters a restricted tag in an application. For more information about these tags, see to the CFML Reference.
Chapter 5
Configuring Advanced Security
This chapter describes how to set up and configure ColdFusion Server advanced security. Advanced security, which is based on Netegrity SiteMinder v. 4.11, lets you protect a wide variety of ColdFusion resources.
Contents
• What is Advanced Security?...................................................................................... 80
• Advanced Security Basics ......................................................................................... 81
• Advanced Security Implementations ...................................................................... 84
• Creating an Advanced Security Framework............................................................ 88
• Setting Up a Security Server ..................................................................................... 89
• Caching Advanced Security Information ................................................................ 91
• Defining User Directories ......................................................................................... 92
• Defining a Security Context...................................................................................... 95
• Specifying Resources to Protect ............................................................................... 96
• Implementing ColdFusion RDS Security ................................................................ 98
• Implementing User Security .................................................................................... 99
• Implementing Server Sandbox Security ................................................................ 100
• Securing the ColdFusion Administrator................................................................ 102
• Viewing a Map of your Security Framework ......................................................... 103
• An Example of ColdFusion Studio Security .......................................................... 104
• Advanced Security Single Sign-On......................................................................... 109
• Undocumented Tags and Functions ..................................................................... 110
80 Chapter 5 Configuring Advanced Security
What is Advanced Security?ColdFusion Server Professional and Enterprise editions include Advanced security features that provide scalable, granular security for building and deploying your ColdFusion applications:
• Application development Control access to files, data sources and administration for each developer on your team. Coordinate team development on shared servers with the assurance that sensitive data and applications are secure.
• Application deployment Create complex rules to programmatically control access to functionality within applications. Confine applications to secure areas that can flexibly restrict the access applications have to directories, components, databases or other resources on the server.
• Administration Secure the ColdFusion Server Administrator against unauthorized access and grant various levels of administrative access to specified users.
It is important to remember that unlike Basic security, which automatically password-protects your resources, Advanced security provides a self-enforced security framework that must be explicitly enforced by developers in the applications they write. (In the Enterprise version of ColdFusion, Advanced security does provide for security sandboxes, which automatically protect the resources they contain.)
NoteIf you have not already read Chapter 3, “ColdFusion Security” on page 59," take a few minutes now to do so. This chapter discusses the differences between Basic and Advanced security and helps you decide which type of security is best for your ColdFusion environment.
Advanced Security Basics 81
Advanced Security BasicsAll types of Advanced Security implement the following four elements:
• User directories
• Resources
• Policies
• Security contexts
This section introduces these elements and describes how they work together to build your Advanced Security framework. For detailed, hands-on instructions for actually implementing an Advanced Security framework, see “Creating an Advanced Security Framework” on page 88.
User directoriesUser directories provide a listing of user information, such as the user’s name, login password, and the names of any groups to which the user belongs. ColdFusion Advanced Security lets you incorporate any of the following industry-standard user directories:
• Lightweight Directory Access Protocol (LDAP) directory
• Windows NT domain
• ODBC data source
A user directory authenticates users by verifying that their credentials match those in the directory. It tells you if someone is a valid user of the system. When you create a security context, you select users and groups from a user directory and then individually assign them access rights to ColdFusion resources. ColdFusion developers then include code in their applications that checks if a user has rights to a resource.
Because ColdFusion uses your existing LDAP directories, NT domains, or data sources, you don’t have to create and maintain redundant user directories just to develop or deploy ColdFusion applications. Using existing NT or LDAP provides an added bonus: User groups to whom you assign security privileges automatically inherit changes to group membership; no additional maintenance is required. For example, suppose your company’s NT Domain contains a user group called BigDev. You’ve used Advanced Security to give the BigDev group access to a number of custom tags. Your company hires a new developer to work in the BigDev group. When the new developer is added to the BigDev group in your company’s NT domain, she’s automatically granted access to the custom tags because of her user group affiliation.
82 Chapter 5 Configuring Advanced Security
Resource typesA ColdFusion resource type that you want to protect is the core of Advanced security. Selecting a resource to protect doesn’t specify how to protect it or which users can access it; you’re simply telling ColdFusion the name and, if applicable, the action of the resource you intend to secure. For example, you can control:
• Write access to all the files in a specified directory
• Which actions of a specified CFML tag are restricted
• Inserts and updates for a specific ColdFusion data source
Resources are not secured until you specifically choose to protect them. You can secure the following types of resources:
• Applications
• Verity Collections
• Components
• ColdFusion Tags
• ColdFusion Functions
• Custom Tags
• Data Sources
• Files and Directories
• User Objects
• Users
PoliciesAfter you specify a resource to protect, you need to create a policy that gives a set of users access rights to that resource. A policy binds resources to users or user groups, that is, it grants a group of users access to specified resources.
For example, you can create a policy that gives members of a team complete access to three data sources that the team uses regularly. You could also create a policy that specifies the system administrator as the only user who can use the cffile tag’s write action.
If you specify a resource to protect but do not include it in any policy, the resource is fully protected within the Security Context—in other words, no users have access to those resources.
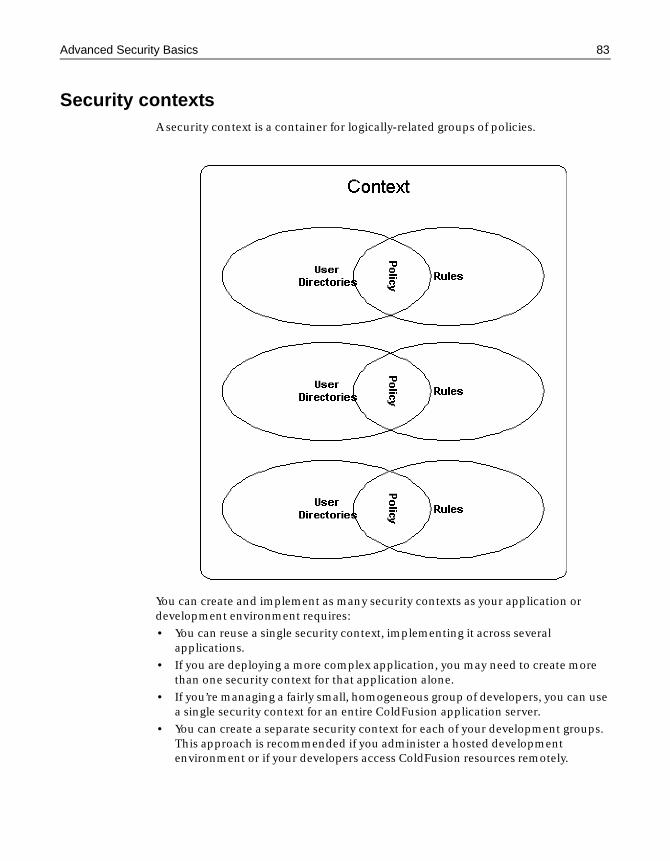
Advanced Security Basics 83
Security contextsA security context is a container for logically-related groups of policies.
You can create and implement as many security contexts as your application or development environment requires:
• You can reuse a single security context, implementing it across several applications.
• If you are deploying a more complex application, you may need to create more than one security context for that application alone.
• If you’re managing a fairly small, homogeneous group of developers, you can use a single security context for an entire ColdFusion application server.
• You can create a separate security context for each of your development groups. This approach is recommended if you administer a hosted development environment or if your developers access ColdFusion resources remotely.
84 Chapter 5 Configuring Advanced Security
Advanced Security ImplementationsThe four elements discussed in the previous section—user directories, resources, policies, and security contexts—are the building blocks of every type of security framework you’ll create. You can implement the following types of Advanced Security:
• User security Secures functionality in a ColdFusion application. User security is implemented in ColdFusion application pages by ColdFusion developers, and offers runtime user authentication and authorization.
• Remote Development Services (RDS) security Controls a ColdFusion Studio developer’s access to ColdFusion resources, including data sources, files, and directories.
• Server sandbox security Provides runtime security based on directory access at hosted sites and is controlled by the ColdFusion administrator of a hosted site.
• Administrator security Secures the ColdFusion Server Administrator against unauthorized access and lets you grant various levels of administrative access to specified users.
This section describes these types of Advanced Security and explains when you’d use each one. For step-by-step instructions for implementing Advanced Security features, see “Creating an Advanced Security Framework” on page 88 .
Securing applications with User securityUser Security authenticates users in a ColdFusion application and then assigns privileges based on the applicable ColdFusion security context.
For example, suppose you’ve used ColdFusion to build and host your company’s intranet. The Human Resources department maintains a page on the intranet where all employees can access timely information about the company, like the latest company policies, upcoming events, and job postings. You’d want everyone to be able to read the information, but you’d only want certain authorized HR employees to be able to add, update, or delete information. In addition, you might want to let employees view customized information about their salaries, job levels, and performance reviews. You certainly wouldn’t want one employee to view sensitive information about another employee, but you’d want managers to be able to see, and possibly update, information about their direct reports. User Security lets you give each employee an appropriate level of access to the HR data.
NoteThis chapter describes the steps necessary install Advanced security features and set up the security framework in the ColdFusion Administrator. Once you’ve put the security framework in place, developers must code security features into their ColdFusion applications. For information about coding secure applications, see Developing Web Applications with ColdFusion.
Advanced Security Implementations 85
Securing resources with RDS securityRemote Development Services (RDS) provides a secure connection from ColdFusion Studio to the ColdFusion Server environment and is a prerequisite to accessing data sources, using server-based browsing, and running the interactive debugger.
ColdFusion RDS security provides security services in a team-oriented ColdFusion development environment where groups of developers, working in ColdFusion Studio, require different levels of access to ColdFusion files and data sources. RDS security is a valuable tool both for companies with multiple or geographically dispersed development groups and for ISPs that host ColdFusion development environments.
Developers working in ColdFusion Studio, access these ColdFusion resources remotely, by opening CFM files or accessing data sources. RDS security authenticates users and grants them access only to the resources assigned to them by a security context. Advanced security authenticates each user against the NT domain server, ODBC data source, or LDAP directory specified in the ColdFusion Administrator as part of a security context
For example, suppose you’re a ColdFusion Server administrator at a medium-sized development company where two development groups, the Pi team and the Gamma team, are simultaneously developing separate ColdFusion Web applications. You want to limit the Pi team’s access from ColdFusion Studio; they should only be able to access the data source pi_dsn and the files in the directory c:\development\pi. The Gamma team should only be able to access the data source gamma_dsn and the files in the c:\development\gamma directory. You’d use RDS security to create two different security contexts, one for the Pi team and another for the Gamma team.
Securing applications with a security sandboxA security sandbox is similar to RDS security—it limits access to resources. The main difference is that while RDS security secures resources accessed by ColdFusion Studio developers, a security sandbox secures resources accessed by ColdFusion applications at runtime. A sandbox provides exactly what its name implies: A restricted area—an entire directory tree—where the same level of access is enforced for all users.
ColdFusion offers two types of security sandbox protection:
• You can apply the access privileges of a member of any ColdFusion security context to an entire directory tree.
• You can apply the access privileges of a member of a Windows NT Domain to an entire directory tree.
Security sandboxes are most useful to ISPs that host ColdFusion applications and development. An ISP can use sandboxes to partition application pages into individually secure areas. For example, suppose an ISP hosts two different domains, PetesApps.com and FoleysApps.com, on the same server. The owners of each domain submit their own custom tags and data sources to the ISP. In turn, the ISP gives each domain’s applications exclusive access to that domain’s tags and data sources. This ensures that a company’s resources remain secure, and are not
86 Chapter 5 Configuring Advanced Security
accessed or altered by another company’s applications. It also ensures that no applications can tamper with system resources.
The access permissions you assign to a directory tree through a security sandbox override any other access permissions users might have for the tree. For example, suppose you designate the directory c:/applications/hr_app as a security sandbox. You configure the sandbox so that nobody could write to any of the Human Resources department data sources via an application running from c:/applications/hr_app. Even the Vice President of HR, who would typically have write permissions to the HR data sources in all other contexts, would be unable to write to those sources via an application run from this sandbox.
NoteThe security sandbox feature is only available in the Enterprise edition of ColdFusion Server.
Securing the ColdFusion AdministratorIf you’ve already read earlier chapters of Administering ColdFusion Server, you know that the ColdFusion Administrator is a browser-based interface that lets you perform administrative tasks like managing server performance, adding and configuring ColdFusion data sources, scheduling pages, and managing log files. For any ColdFusion development project, some level of administration is generally necessary to set up ColdFusion Server for your application. In some cases, it’s feasible for a single person to perform all the necessary administrative tasks. Many times, though, you’ll want to be able to delegate some ColdFusion management tasks.
With ColdFusion Server, you can decentralize administrative responsibility by creating multiple administrators. Overall security is maintained because these additional administrators can control only the resources and policies for which you’ve given them explicit responsibility. You can assign the following types of administrative access to any user:
• Administrator Provides complete read and write access to all ColdFusion Administrator pages.
• Privileged Provides read and write access to all the ColdFusion pages except the Basic and Advanced Security pages; Privileged users have no access at all to the security pages.
• Restricted Provides read and write access only to the Datasources Administrator pages, the Verify Data Source page, and the Verity Collections page; Restricted users have no access to any other ColdFusion Administrator pages. You can configure Restricted access so that a user only has access to specified data sources
The ColdFusion decentralized administration model provides two important benefits:
• It helps your teams streamline the development process and work together more efficiently.
• It lightens the administrator’s load without sacrificing his control over the system.

Advanced Security Implementations 87
For example, as a ColdFusion Server administrator, you’ll probably want to assign Administrator access to one or two other users, thus ensuring you’ll have backup administrators and your company won’t have to forgo administrative support if you’re away. You might also want to create a class of Privileged access administrators who can manage all aspects of the ColdFusion environment except Basic and Advanced security. Users with Restricted administrative access can function as ColdFusion super users. You could assign Restricted access to one or two members of each development team. That way, development teams can add and configure their own data sources, but can’t access other teams’ data sources, and can’t alter the ColdFusion environment in any significant way.
For detailed instructions for securing the Administrator pages, see “Securing the ColdFusion Administrator” on page 102 .
88 Chapter 5 Configuring Advanced Security
Creating an Advanced Security FrameworkNo matter which Advanced Security feature you choose to implement—user security, RDS security, a security sandbox, or administrator security—you’ll follow the same basic steps for creating the framework:
1 Set up the security server. See “Setting Up a Security Server” on page 89 for more information.
2 Set up user directories to authenticate against an NT domain, an LDAP directory, or an ODBC data source. See “Defining User Directories” on page 92 for more information.
3 Create a security context for the application. See “Defining a Security Context” on page 95 for more information.
4 Specify rules and policies to protect resources with authorized users and groups. See “Specifying Resources to Protect” on page 96 for more information.
The rest of this chapter teaches you how to configure Advanced security on the ColdFusion server.
Implementation summaryThe details of your ColdFusion Server Advanced Security implementation depend largely on your platform and how you decide to store security policy information. Security policy information can be stored in one of three ways:
• Using the Access database file supplied by default with ColdFusion Server (Windows only)
• Using the ODBC data source of your choice
• Using an LDAP directory server. LDAP is the only option on UNIX.
Once you have decided on a method of storing security policy information, the implementation details are essentially the same regardless of platform and storage type. ColdFusion Advanced Security is implemented by defining the following elements in order:
1 A security server.
2 A user directory, in the form of an NT domain, an LDAP directory, or an ODBC data source.
3 A security context, with specific resource types to protect.
4 Specific ColdFusion rules to protect resources of a type suppported by the security context.
5 Policies that bind users and groups to rules for a security context.
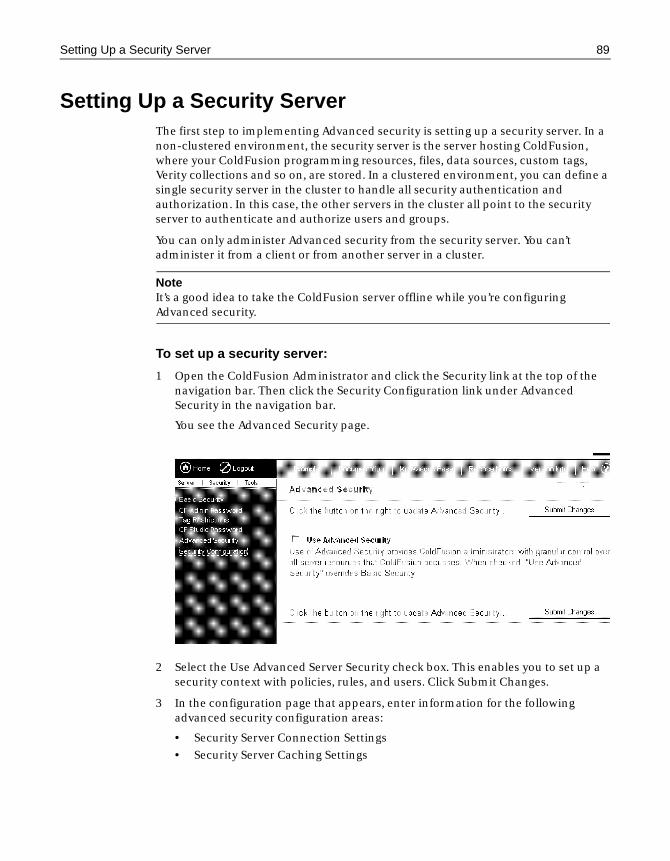
Setting Up a Security Server 89
Setting Up a Security ServerThe first step to implementing Advanced security is setting up a security server. In a non-clustered environment, the security server is the server hosting ColdFusion, where your ColdFusion programming resources, files, data sources, custom tags, Verity collections and so on, are stored. In a clustered environment, you can define a single security server in the cluster to handle all security authentication and authorization. In this case, the other servers in the cluster all point to the security server to authenticate and authorize users and groups.
You can only administer Advanced security from the security server. You can’t administer it from a client or from another server in a cluster.
NoteIt’s a good idea to take the ColdFusion server offline while you’re configuring Advanced security.
To set up a security server:
1 Open the ColdFusion Administrator and click the Security link at the top of the navigation bar. Then click the Security Configuration link under Advanced Security in the navigation bar.
You see the Advanced Security page.
2 Select the Use Advanced Server Security check box. This enables you to set up a security context with policies, rules, and users. Click Submit Changes.
3 In the configuration page that appears, enter information for the following advanced security configuration areas:
• Security Server Connection Settings
• Security Server Caching Settings
90 Chapter 5 Configuring Advanced Security
• ColdFusion Cache Settings
• The Security Server value is the physical location of the security server. By default, this is the localhost IP# 127.0.0.1. You can supply an IP address or a logical name that can be resolved to a physical address.
4 Enter a Shared Secret, which is part of the encryption key that validates Advanced security transactions. Since the default is the same for all ColdFusion Server configurations, you should change the shared secret at least once.
5 ColdFusion reserves the Authorization and Authentication ports to pass security information. Change the port number values only in the unlikely event that these ports are already in use by some other process on the server.
6 Under Security Server Caching settings, click to enable the Use Security Cache, Use Authorization Cache, or ColdFusion Server Cache if you want ColdFusion to cache security information and transactions on the security server.
See “Caching Advanced Security Information” on page 91 for a description of the Advanced security caches.
You can also change the Refresh Interval setting for any of the caches. This determines how often a cache gets flushed.
The Load Policy Store Cache at Startup option loads this cache every time you start ColdFusion services.
The Maximum Entries option in the ColdFusion Cache Settings section sets the maximum number of entries for each cache buffer. If you exceed the number, a warning is written to the server.log file.
Caching Advanced Security Information 91
Caching Advanced Security InformationCaching Advanced Security information can greatly improve performance within your ColdFusion applications. The ColdFusion Administrator provides the following Advanced security caches:
• Security Server Policy Store Cache caches Advanced security information. You can load this cache at startup. By default, it is notified of administrative changes to the policy store once every minute. The information stored in this cache is used to determine if a user is authorized for a resource. When this information is cached, ColdFusion doesn’t have to make database calls to determine this. The result is that performance is greatly improved without requiring a lot of information to be cached . Using this cache provides the most noticeable performance improvements with Advanced security.
• Security Server Authorization Cache caches each unique isAuthorized call. Since each isAuthorized call is tied to the user who made the call, the number of cached entries grows quickly in an application that has many users. Because the high overhead of this cache can dampen its performance improvements, you’re better off using the Security Server Policy Store Cache if you anticipate heavy usage of your protected applications.
• ColdFusion Server Cache caches isAuthorized and isProtected requests. The advantage of using this cache is it operates in the ColdFusion App server process space so there is no interprocess call for cached request.
To learn how to configure Advanced security caches, see “Setting Up a Security Server” on page 89.
92 Chapter 5 Configuring Advanced Security
Defining User DirectoriesUser and group authentication is carried out against either an existing Windows NT domain, an LDAP directory, or an ODBC data source. When you set up Advanced security, you must specify at least one user directory. You can add as many user directories as you like. Once you define a user directory, it is available for you to use with any security context you define for this security server.
• Windows NT Domains Authenticating against a Windows NT domain makes sense if you are already working in a Windows NT environment or will be deploying your application code to a Windows NT environment. This method is a very quick way to implement ColdFusion Advanced security, since users and groups have already been defined. ColdFusion Advanced security doesn’t provide any user/group management facilities; you must manage users and groups using the Windows NT User Manager for Domains administrative utility.
• LDAP Directories If you are running ColdFusion Server on a UNIX server, you can only use LDAP directories to store your security profile information.
You must install the LDAP Directory Server on UNIX before installing ColdFusion Server. If you have already installed ColdFusion Server and you want to use the LDAP Directory Server to store security profile information, you must reinstall ColdFusion after installing the LDAP Directory Server.
• ODBC Data Sources If your ColdFusion applications are already using a Sybase, Oracle, or any other database that supports connections through ODBC, you can use your existing database to also store your security profile tables. You must register an ODBC data source with ColdFusion before you can use it to store security profile information. See Chapter 1, “Advanced Data Source Management” on page 3” for more information about registering data sources with ColdFusion. See “Specifying Resources to Protect” on page 96 to learn how to use an ODBC data source for username and password security authentication.
To define a user directory:
1 In the Advanced Server Security page of the Administrator, click the User Directories button.
2 Enter a name for the user directory in the User Directory text box and click Add. The name you enter here is an internal name that ColdFusion uses to refer to this user directory. You can enter any name you want.
You see the New User Directory page.
3 Select Windows NT, LDAP, or ODBC in the Namespace drop-down menu.
4 Enter the appropriate information the Location field:
• If your user directory is an LDAP directory, enter the name of the LDAP server that hosts the directory.
• If your user directory is an ODBC data source, enter the fully-qualified name of the database file to use.
• If your user directory is an NT Domain, enter the domain name.
Defining User Directories 93
5 Enter a username and password if the domain, directory, or data source requires one. You can leave these fields blank if ColdFusion Server is running under Administrator access.
6 Select the Secure Connect check box to implement encrypted transmission of authentication information. Secure Connect must be enabled when accessing an LDAP server over Secure Sockets Layer (SSL).
7 Leave the Add User Directory to Existing Security Context check box selected to add users from this user directory to existing security contexts automatically. If you disable this option, you must manually associate users with each security context you create.
8 If your user directory is an NT Domain or ODBC data source, click Add to define the directory. If your user directory is an LDAP directory, complete the steps that follow to set LDAP directory options.
To define LDAP options:
1 Enter a Search Root. The Search Root must point to the branch of the LDAP tree where a user namespace logically begins. Typically, this branch represents an “organization” or an “organizational unit” and corresponds to one user directory.
2 Enter a Lookup Start. ColdFusion uses the Lookup Start to construct the non-unique beginning of the DN string, for example, uid=.
3 Enter a Lookup End. ColdFusion uses the Lookup End to construct the part of the DN string that follows user ID, for example, ou=marketing,o=widgetinc.com.
4 Enter a Search Timeout. The Search Timeout indicates the maximum amount of time (in seconds) you want ColdFusion to spend searching a directory.
5 Enter the maximum number of results you want the search to return in the Search Results field.
6 Select a Search Scope from the drop-down list. Enter the depth of your search. For example, if you want to be able to access everything under the search root, select the Subtree option. Otherwise, select the One Level option.
7 Click Add to define the user directory.
The Add User Directory to Existing Security Context box is checked by default. This setting enables you to add users to existing security contexts automatically.
Using the Sample ODBC Data Source as a User Directory
On Windows systems, you can use an ODBC data source for username/password security authentication. A sample ODBC access database, SmSampleUsers.mdb, is installed in the cfusion\database directory.
Follow these steps to use this sample database to test the ODBC username/password authentication:
1 Use the ColdFusion Administrator to create an ODBC data source using the Microsoft Access ODBC driver. Be sure to name the data source SmSampleUsers
94 Chapter 5 Configuring Advanced Security
and point at the SmSampleUsers.mdb file installed in the cfusion\database directory.
2 Use the ColdFusion Administrator Advanced Security page to add a User Directory. Select the ODBC namespace and enter SmSampleUsers in the location form field. See “Defining User Directories” on page 92 for more information.
3 Associate a user or group with a policy in your security context. Example username/passwords are admin/secret and vlander/firewall. You can browse the username/passwords in the Access database file.
The ODBC username/password requires the SmDsQuery.ini file, which is installed in the cfusion\bin directory. The file contains the SQL for the SmSampleUsers data source:[SmSampleUsers]Query_Enumerate=select Name, ’User’ as Class from SmUser Union
select Name, ’Group’ as Class from SmGroup order by Class
Query_InitUser=select Name from SmUser where Name = ’%s’
Query_AuthenticateUser=select Name from SmUser where Name = ’%s’ and Password = ’%s’
Query_GetGroups=select SmGroup.Name from SmGroup, SmUser, SmUserGroupwhere SmUser.Name = ’%s’ and SmUser.Id = SmUserGroup.UserId and SmGroup.Id = SmUserGroup.GroupId
Query_GetUserProp=select %s from SmUser where Name = ’%s’
Query_SetUserProp=update SmUser set %s = %s where Name = ’%s’
Query_GetObjInfo=select Name, ’User’ from SmUser where Name = ’%s’ Union select Name, ’Group’ from SmGroup where Name = ’%s’
Query_GetUserProps=Name, Id, FirstName, LastName, TelephoneNumber, EmailAddress
Query_IsGroupMember=select Id from SmUserGroup where UserId = (select Id from SmUser where Name = ’%s’) and GroupId = (select Id from SmGroup where Name = ’%s’)
Each ODBC data source you use for authenticating users requires a section of the same name in this INI file. The section must contain the appropriate SQL statements to authenticate users. You can use the SmSampleUsers section as an example.
Defining a Security Context 95
Defining a Security ContextThe Security Context is a logical set of resources grouped together from an administrative perspective. It does not necessarily correspond to a ColdFusion application or resource name. As its name suggests, the security context is used to establish a context in which authentication and authorization actions are carried out.
For example, you might create a security context for a particular application development effort. Within this context, you define users, groups, and rules that apply to the developers who are working on the project. Another example: You define a context for intranet users of the application you want to deploy. According to their group affiliation, different rules apply, enabling or preventing various actions based on their login.
The context establishes which types of resources you want to protect.
To define a security context:
1 Open the Advanced Server Security page and click the Security Contexts button.
2 Enter a security context name and click Add.
This is a logical name that defines the scope of the security domain. Later, in your application pages, developers use this name in the CFAUTHENTICATE tag.
3 In the New Security Context page, add a description of the security context.
4 Choose the Resource Types this context governs.
Avoid selecting ColdFusion resources that you do not intend to secure with this context, since doing so can needlessly affect performance.
The Add Existing User Directories box is checked by default to let you add users to this context automatically.
5 Click Add.
The security context is registered. Next, you define the resources and policies for this context.
96 Chapter 5 Configuring Advanced Security
Specifying Resources to ProtectWhen you define a security context, you specify the types of resources to protect, for example, files and directories. Now you must specify exactly which resources and which actions to protect. For example, you might limit write access to files at a specific pathname.
Once you’ve defined resources, you define a security policy that matches resources to users and groups. You grant access to a protected resource by adding both rules and users to a policy. The users and user groups you add to a policy (you can think of them as policy holders) are authorized to use the resources protected by the security context .
NoteColdFusion 5 introduces a new Resources View in Advanced security. This view provides and easy-to-use, graphical way to specify resources you want to protect and add them to policies. Once you’ve specified user directories and created security contexts, you can configure all Advanced security settings in the new Resource View.
To protect resources:
1 In the Advanced Server Security page, click Resources.
You see the Resource View page.
2 Select a security context from the Current Security Context drop-down box.
In the Resource Browser, any resource type you selected when you created the current security context appears next to an icon that depicts a closed lock. This icon indicates that you can protect individual resources of this type. Resource types you did not select when you created the current context appear next to an icon that depicts an open lock.
3 In the Resource Browser, select a resource type and then click the Add Resource button at the bottom of the page.
You see the Add Resource dialog. The contents of this dialog are different for each resource type. For example, if you select CFML Tags, you see a drop-down list that contains all the ColdFusion tags; if you select Files and Directories, you see a text box where you enter the name of the file or path to protect.
4 Specify the resource to protect and click OK.
You see the Resource View page again. At the bottom of the page, you see the Policy Editor for the resource you just specified.
5 Click Add Policy.
6 Enter a name for the new policy and click OK.
For example, you could create a top-level security policy, called Platinum, to grant to certain users broad access to protected resources.
7 Write a description of the policy and click OK.
Specifying Resources to Protect 97
You see the Resource View page again, showing the policy you just created. Other available policies appear in a drop-down box at the bottom of the page.
8 Select the check boxes that correspond to the actions you want to protect.
Now you can add users to the policy.
To add users and groups to a policy:
1 Click the Edit Users button at the bottom of the Resource View page to open the Users page for the current policy. Click the Add/Remove button. ColdFusion opens the Add/Remove Users page for the current policy.
2 Select from the available groups on the right side of the list control and click the left arrow to add them to the current policy. To add individual users, you enter a login name in the Enter User box and click Add.
NoteOnly groups are displayed when you add users to a policy. To enter an individual user, you must know the user login and enter it in the Enter User box. Displaying a list of all possible individual users, which could easily number in the thousands, would be a very impractical means of adding individual users to a policy.
The users you have added to the security policy are now matched to the resources that you have also defined and added to the policy.
98 Chapter 5 Configuring Advanced Security
Implementing ColdFusion RDS SecurityColdFusion RDS security provides security services to developers working in ColdFusion Studio. See “Securing resources with RDS security” on page 85 to learn about RDS security concepts.
In order to implement RDS security, you must use the ColdFusion Administrator to:
1 Set up the security server. See “Setting Up a Security Server” on page 89 for more information.
2 Set up user directories to authenticate against an NT domain, an LDAP directory, or an ODBC data source. See “Defining User Directories” on page 92 for more information.
3 Create a security context for the application. See “Defining a Security Context” on page 95 for more information.
4 Specify individual resources to protect and set up policies that match secured resources with authorized users and groups. See “Specifying Resources to Protect” on page 96 for more information.
5 Select the Use ColdFusion Studio Authentication check box in the ColdFusion Administrator’s Advanced Server Security page and select the security context you created in step 3 from the drop-down list.
Now developers working in ColdFusion Studio connect to the ColdFusion Server and access resources such as files and data sources according to the rules and policies associated with their logins.
For more information about configuring RDS in ColdFusion Studio, see Developing Web Applications with ColdFusion.
Implementing User Security 99
Implementing User SecurityThe user security feature allows ColdFusion developers to authenticate users and match protected resources with authorized users. See “Securing applications with User security” on page 84 to learn about user security concepts.
In order to implement user security you must use the ColdFusion Administrator to:
1 Set up the security server. See “Setting Up a Security Server” on page 89 for more information.
2 Set up user directories to authenticate against an NT domain, an LDAP directory, or an ODBC data source. See “Defining User Directories” on page 92 for more information.
3 Create a security context for the application. See “Defining a Security Context” on page 95 for more information.
4 Specify individual resources to protect and set up policies that match secured resources with authorized users and groups. See “Specifying Resources to Protect” on page 96 for more information.
After the security framework is in place, developers use the CFAUTHENTICATE tag in individual application pages (or the Application.cfm file) to authenticate users. The IsAuthenticated and IsAuthorized functions enable developers to offer or deny access based on the established security policies. Remember that nothing you configured in the ColdFusion Administrator takes effect until developers enforce the contexts in their applications. See the CFML Reference for more information on IsAuthenticated and IsAuthorized.
100 Chapter 5 Configuring Advanced Security
Implementing Server Sandbox SecurityColdFusion Server Enterprise edition supports server sandbox security for hosted sites. This security feature, controlled by the ColdFusion administrator of a hosted site, offers runtime security based on directory access at a hosted site. See “Securing applications with a security sandbox” on page 85 to learn about security sandbox concepts.
NoteIf both user security and server sandbox security are enabled, sandbox security takes precedence.
In order to implement server sandbox security, you must use the ColdFusion Administrator to:
1 Set up the security server. See “Setting Up a Security Server” on page 89 for more information.
2 Set up user directories to authenticate against an NT domain, an LDAP directory, or an ODBC data source. See “Defining User Directories” on page 92 for more information.
3 Create a security context for the application. See “Defining a Security Context” on page 95 for more information.
4 Specify individual resources to protect and set up policies that match secured resources with authorized users and groups. See “Specifying Resources to Protect” on page 96 for more information.
5 On the ColdFusion Administrator’s Advanced Server Security page, select the Use Security Sandbox Settings check box and then click the Security Sandboxes button at the bottom of the page.
You see the Registered Security Sandboxes page.
6 In the Security Sandbox box, enter a fully qualified path (using forward slashes) for the directory whose contents you want to protect.
7 Select the type of sandbox to create from the Type drop-down:
• Choosing Operating System protects OS-level resources based on privileges assigned through a Windows NT domain.
• Choosing Security Context protects ColdFusion resources based on privileges assigned through a security context.
8 Click Add.
You see the New Sandbox page, with the path you entered in step 6 already in the Location box.
9 Specify a Windows NT Domain or a security context:
• If you chose Operating System in step 7, enter the NT Domain to authenticate against in the NT Domain box.
Implementing Server Sandbox Security 101
• If you chose Security Context in step 7, select an existing security context from the Security Context drop-down.
10 Enter the username and password for the user whose privileges you want applied to the sandbox. This user must be a member of the security context or NT Domain you selected in step 9.
11 Click Apply to register the sandbox.
Now any ColdFusion user who tries to access the resources in the new sandbox will have the same rights to those resources as the user you specified in step 10.
102 Chapter 5 Configuring Advanced Security
Securing the ColdFusion AdministratorWith ColdFusion Server, you can decentralize administrative responsibility by creating multiple administrators. Overall security is maintained because these additional administrators can control only the resources and policies for which you’ve given them explicit responsibility. You can assign the following types of administrative access to any user:
• Administrator Provides complete read and write access to all ColdFusion Administrator pages.
• Privileged Provides read and write access to all the ColdFusion pages except the Basic and Advanced Security pages; Privileged users have no access at all to the security pages.
• Restricted Provides read and write access only to the Data sources Administrator pages, the Verify Data Source page, and the Verity Collections page; Restricted users have no access to any other ColdFusion Administrator pages. You can configure Restricted access so that a user only has access to specified data sources
You provide different levels of access to the ColdFusion Administrator with a built-in security context called “ColdFusion Admin.”
NoteBefore you can configure ColdFusion Administrator security, you must know how to create a user directory. If you don’t know how to create a user directory, see “Defining User Directories” on page 92.
To secure the ColdFusion Administrator:
1 Open the ColdFusion Administrator and click the Advanced Security link.
You see the Advanced Server Security page.
2 Make sure the Use Advanced Server Security checkbox is selected.
3 Define a user directory that contains the user to whom you want to assign Administrator privileges. (Leave the username and password fields blank when defining the user directory.)
4 Under ColdFusion Administration Security, select the Use ColdFusion Administration Authentication check box.
5 Select the user directory you created in step 3 from the drop-down box.
6 In the Administrator field, type in the name of a user who is defined in the user directory you selected in step 4. This user will have Administrator privileges for the ColdFusion Administrator.
7 Click the Apply button at the bottom of the screen.
ColdFusion Administrator security is now enabled. When you close the Administrator and try to open it again, you will be prompted for the username and password of the user you specified in step 5. If you log in as a different user, you will NOT see the Advanced Security link in the Administrator.
Viewing a Map of your Security Framework 103
Viewing a Map of your Security FrameworkColdFusion lets you display and print a map that details all the components of your Advanced security framework.
To view a map of your currently defined security framework:
1 Open the ColdFusion Administrator and click the Advanced Security link.
You see the Advanced Server Security page.
2 Make sure the Advanced Security check box is selected.
3 Click the Map button at the bottom of the page.
You see a map that lists all the Advanced security components currently defined on the server, including user directories, security sandboxes, security contexts, policies, and protected resources.
4 (Optional) Use your browser’s Print command to print a copy of the map.
104 Chapter 5 Configuring Advanced Security
An Example of ColdFusion Studio SecurityThis example shows you how to limit ColdFusion Studio access to a specific set of files and/or data sources on a remote server based on username/password authentication.
For this example, assume you are responsible for two development groups, Mars and Venus. Each group needs separate access rules for source files and data sources its current projects. To provide this access, you will:
1 Enable Advanced Security.
2 Specify a user directory for security authentication.
3 Add a security context for RDS security.
4 Specify the file and data source resources to protect.
5 Add a policy for each group of resources/users that you want to give access to the protected set of resources
6 To each Policy add the resources that can be accessed by that policy
7 To each Policy add the users or groups you want to have access to the policy resources
8 Enable ColdFusion Studio security and associate the RDS security context you created with the ColdFusion Studio security.
The following sections detail these steps.
Enabling Advanced SecurityBefore you can configure anything, you need to turn on ColdFusion Advanced security.
To enable Advanced Security:
1 Open the ColdFusion Administrator and click the Advanced Security link.
You see the Advanced Server Security page.
2 Select the Use Advanced Server Security check box.
Specifying a User DirectoryOnce you enable Advanced security, you must select a user directory to use for authenticating users when they try to access files, directories, or data sources from ColdFusion Studio.
To specify a user directory:
1 In the Advanced Server Security page click the User Directories button. You can specify either LDAP or Windows NT directory services. For an NT user directory, enter the server name in the form: domain_name/server_name.
An Example of ColdFusion Studio Security 105
2 Enter the server name or a TCP/IP address for the LDAP option. If you specify an LDAP directory you can fill out the Lookup Start field with uid= and the Lookup End field with ,ou=ou_name,o=org_name. If you leave the Lookup fields blank then the ColdFusion Studio User will have to enter their entire distinguished name rather than just their user name.
Defining a security contextThe security context is a container for the rules and policies that apply to specific users and groups.
To add a security context:
1 Open the Advanced Server Security page and click the Security Contexts button.
2 Enter RDSSecurity as the security context name and click Add.
3 In the New Security Context page, enter "Mars and Venus development teams" as the description of the security context.
4 Select the Files and Data Sources check boxes.
5 Click Add.
Specifying resources to protectWhen you add a resource to protect, no one is authorized to access that resource until you give permission by adding the resource to a policy and then adding users and groups to that policy. In this example, we want the Mars team to only have access to the mars_dsn and the Venus team to only have access to the venus_dsn. So you need to add three resources to protect.
To add data sources to the RDSService security context:
1 In the Advanced Server Security page, click Resources.
You see the Resource View page.
2 If the RDSSecurity context is not already current, select it from the Current Security Context drop-down box.
3 In the Resource Browser, select DATASOURCE and then click the Add Resource button at the bottom of the page.
You see the Add Resource dialog.
4 Enter the * (asterisk) wildcard to protect all data sources and click OK.
You see the Resource View page again. Now, you’ll specify directories to limit access to for each development group.
To add directories to the RDSService security context:
1 In the Resource Browser, select FILE and then click the Add Resource button at the bottom of the page.
106 Chapter 5 Configuring Advanced Security
You see the Add Resource dialog.
2 Enter c:\ to protect all files on the C:\ drive and click OK.
3 Repeat steps 1 and 2 to protect the following directories:
c:\development
c:\development\mars\*
c:\development\venus\*
Now that you’ve explicitly protected all the directories and sub directories and files of interest, move on to defining policies.
Adding policiesNow that you’ve selected the resources to protect, add two policies, one named MARS and one named VENUS. At the bottom of the Resource View page, you see the Policy Editor for the resource you just specified
To add policies:
1 Click Add Policy.
2 Enter MARS as the name for the new policy and click OK.
3 Write a description of the policy and click OK.
You see the Resource View page again, showing the policy you just created.
4 Select all the check boxes to protect all actions.
Now you can add users to the policy.
Granting access privilegesFor the moment, no one is authorized to access any files or data sources in the RDSService security context. All of these resources have been protected with the wildcard rule and no one has been granted permission to access them.
To allow a set of users access to these resources:
1 From the Policy page, select the MARS policy. From the MARS policy page, click the Rules button. Notice no rules are currently members of the policy.
2 Click the Add/Remove Button. The rule list is a multi select list so you can select all the rules and add them all at once. For MARS we want to add the following rules:
• MARS_DSN
• MARS_R_DIRECTORY
• MARS_W_DIRECTORY
• MARS_R_FILES
• MARS_W_FILES
An Example of ColdFusion Studio Security 107
• C_R_FILE
• C_W_FILE
• C_DEVELOPMENT_R_FILE
• C_DEVELOPMENT_W_FILE.
Now the MARS policy has access rights to the mars_dsn and all files in the c:\development\mars directory and sub directories.
3 For VENUS we want to add the following rules:
• VENUS_DSN
• VENUS_R_DIRECTORY
• VENUS_W_DIRECTORY
• VENUS_R_FILES
• VENUS_W_FILES
• C_R_FILE
• C_W_FILE
• C_DEVELOPMENT_R_FILE
• C_DEVELOPMENT_W_FILE.
Now the VENUS policy has access rights to the venus_dsn and all files in the c:\development\venus directory and sub directories.
Notice we did not add any of the wildcard rules named ALL_ , which protect all data sources and files. The policies only have access to the resources explicitly defined in their member rules. However, the policies have rules, but users still don’t have access. The next step is assigning users and groups to the policies.
Assigning users/groups to policiesThe last step in defining security for this example, is to add users and groups to the policies you created.
To add users and groups to policies:
1 From the Policy page select the MARS policy and click the Users button. The Users page indicates that no users are currently assigned to the policy. If you have defined multiple user directories, select the directory in the list box that you want to add users from, and then click the Add/Remove button.
2 Now you see a list of User Groups and a entry field. To add individual users enter the name in the entry field and click Add. To add groups select the group(s) and click Add. For our example, let's assume all the MARS developer's are in a MARS group which you add to the policy. Now all members of this group can access the resources that are members of the MARS policy.
3 Now do the same for the VENUS directory.
Okay now each group of users has access to the resources which are members of that policy. If a user is a member of both policies then she has access to the members of both policies.
108 Chapter 5 Configuring Advanced Security
Enable ColdFusion Studio SecurityThe last step is to actually enable Studio Security in the Administrator so that users trying to access ColdFusion Server resources from Studio will be properly authenticated before access is granted.
To enable ColdFusion Studio security:
1 On the Advanced Security page click the “Use ColdFusion Studio Authentication” checkbox
2 Select the RDSService security context in the list box.
3 Select the “Use Security Server Cache” check box on the Advanced Server Security page to improve the performance of the authentication process.
Now when a user authenticates from ColdFusion Studio to this RDS host the users will only see the data sources and files that they are authorized to see. If they are not a member of either group they will not see any data sources or files.
The first time Studio users open the files or data sources, performance will seem slow, depending on how many data sources and files/directories must be checked. However if security server caching is enabled, response will be much quicker the next time remote files or data sources are checked.
Advanced Security Single Sign-On 109
Advanced Security Single Sign-OnSingle sign-on is the ability to authenticate once, even when two servers are involved. For example, if the Microsoft IIS Web server authenticates a user, a ColdFusion page implementing the IsAuthenticated function would not need to re-authenticate that user.
In single sign-on, two or more agents trying to authenticate a user will share the same authentication ticket and avoid challenging the user twice for credentials. For ColdFusion, one agent is a Web server acting as an agent to Netegrity SiteMinder. The second is a ColdFusion custom agent talking to the policy server via APIs. When the Web server authenticates a user, its SiteMinder agent will append to the http header of the *.cfm file forwarded to ColdFusion, CGI parameters which include the authentication session ticket. ColdFusion uses that ticket to prove to the SiteMinder server that it has authentication, therefore preventing a second sign on.
Please refer to the release notes for information about setting up and configuring single sign-on with ColdFusion.
110 Chapter 5 Configuring Advanced Security
Undocumented Tags and FunctionsThe ColdFusion Administrator makes use of several tags and functions not currently documented in the CFML Language Reference. In the context of the ColdFusion Administrator, access to the functionality provided by these undocumented tags and functions is restricted to people with administrative privileges. While these tags and functions are currently unsupported, ColdFusion developers who have permission to create Web applications and executable ColdFusion templates on a ColdFusion server can make use of these functions and tags in their Web applications to perform certain administrative tasks. The availability of illegal de-encoding utilities that can de-encode the ColdFusion Administrator has made knowledge of the undocumented tags and functions more widely known.
The availability of the undocumented tags potentially gives developers who have permission to place applications on a ColdFusion server the ability to gain unauthorized access to registry, database, and Advanced Security settings. In most cases, this does not pose a security risk because the developers who have access to a server are trusted. However, in a hosted-application environment, such as an ISP or a corporate data center that is hosting multiple independent developer’s applications on a single server, the availability of the undocumented tags used in the ColdFusion Administrator makes it more difficult to prevent malicious actions by developers who may be using the hosting server. Currently, you can block one of the two undocumented tags, CFSECURITYADMIN, on the Basic security page of the ColdFusion Administrator. While no ColdFusion functions can be disabled with Basic security, you can protect all the undocumented functions with a security sandbox.
Administrative FunctionsIn addition to standard CFML functions, the ColdFusion 5 Administrator uses the following undocumented functions:
• CF_SETDATASOURCEUSERNAME() Sets the default user name for a ColdFusion data source
• CF_SETDATASOURCEPASSWORD() Sets the default password for the ColdFusion data source
• CF_ISCOLDFUSIONDATASOURCE() Verifies a connection to a ColdFusion data source
• CF_GETDATASOURCEUSERNAME() Gets the default user name for a ColdFusion data source
• CFUSION_VERIFYMAIL() Verifies the connection to the default ColdFusion SMTP mail server
• CFUSION_GETODBCINI() Gets ODBC data source information from the Registry
• CFUSION_SETODBCINI() Sets ODBC data source information in the Registry
• CFUSION_GETODBCDSN() Gets the ODBC data source names from the Registry
Undocumented Tags and Functions 111
• CFUSION_SETTINGS_REFRESH() Refreshes some ColdFusion settings not requiring a restart
• CFUSION_DBCONNECTIONS_FLUSH() Disconnects all currently connected ColdFusion datasources
Administrative TagsIn addition to standard CFML tags, the ColdFusion 5 Administrator uses the following undocumented tags:
• CFINTERNALDEBUG Used for internal ColdFusion debugging by product development and to PCode templates without executing them (used by the CFML Syntax Checker).
• CFSECURITYADMIN Used for updates to Advanced Security information.

112 Chapter 5 Configuring Advanced Security
P a r t I I I
Advanced Verity Tools
This part describes a number of Verity tools and utilities you can use
for configuring the Verity K2 Server search engine, as well as creating, managing, and troubleshooting Verity collections. The following chapters are included:Configuring Verity K2 Server............................................................ 115
Indexing XML Documents ................................................................137
Verity Spider .....................................................................................145
Managing Verity Collections with the mkvdk Utility ..........................185
Verity Troubleshooting Utilities .........................................................199

Chapter 6
Configuring Verity K2 Server
This section provides information about setting up and configuring the Verity K2 server, which is installed with ColdFusion Server.
Contents
• Overview .................................................................................................................. 116
• About K2 Server ....................................................................................................... 118
• Starting K2 Server .................................................................................................... 120
• Stopping K2 Server .................................................................................................. 122
• Editing the k2server.ini File .................................................................................... 124
• k2server.ini Parameter Reference .......................................................................... 127
• Using the rck2 Utility to Search K2 Documents.................................................... 131
• Error Messages ........................................................................................................ 132
116 Chapter 6 Configuring Verity K2 Server
OverviewColdFusion Server 5 includes an OEM restricted version of the Verity K2 Server, which incorporates a highly scalable search server architecture. K2 supports simultaneous indexing of distributed enterprise repositories and handles hundreds of concurrent queries and users. You will see considerable performance improvements when using K2 Server to search Verity collections.
The version of K2 Server that is part of ColdFusion 5 is restricted in the following areas:
• For ColdFusion Professional, K2 Server can search a maximum of 125,000 documents.
• For ColdFusion Enterprise, K2 Server can search a maximum of 250,000 documents.
Verity operates in two modesWith the introduction of the high-performance K2 Server engine in ColdFusion, there are now two modes of operation for Verity searching:
• VDK mode The conventional Verity search mode. Use the ColdFusion Administrator Verity Collections page to configure Verity VDK collections.
• K2 mode The high-performance K2 mode. Edit the k2server.ini file to specify unique collections for searching with K2 Server, and edit the ColdFusion Administrator Verity Server page to configure ColdFusion to use the K2 Server.
ColdFusion uses K2 mode to search collections if the following conditions are met:
1 The K2 Server is running. See “Starting K2 Server” on page 120 for more details.
2 The collection name you specify in the cfsearch tag has been specified in the k2server.ini file and is unique, that is, the collection name is not used in any Verity collections that are configured for use by ColdFusion. Check the ColdFusion Administrator Verity Collections page for possible name conflicts.
Quick start to K2 ServerTo get K2 Server up and running on your system quickly, follow these steps:
1 Edit the k2server.ini file to specify the unique collection names you want to expose to the K2 Server. See “Editing the k2server.ini File” on page 124 for details.
2 Start K2 Server by running the k2server executable. See “Starting K2 Server” on page 120 for details.
3 Enter the hostname and port number for the server where the K2 server is running. See “Specifying K2 Server parameters in the ColdFusion Adminstrator” on page 117 for details about the Administrator.
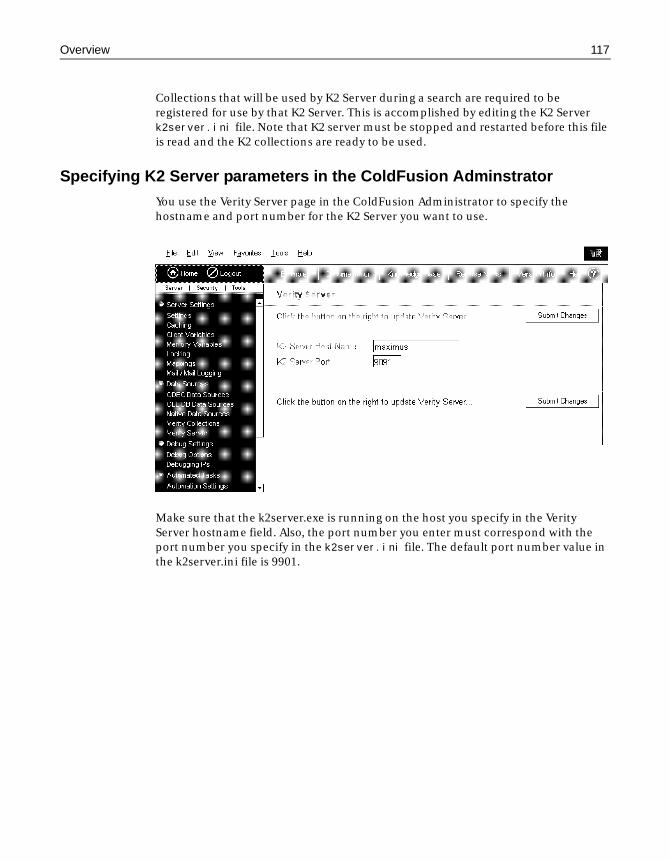
Overview 117
Collections that will be used by K2 Server during a search are required to be registered for use by that K2 Server. This is accomplished by editing the K2 Server k2server.ini file. Note that K2 server must be stopped and restarted before this file is read and the K2 collections are ready to be used.
Specifying K2 Server parameters in the ColdFusion Adminstrator
You use the Verity Server page in the ColdFusion Administrator to specify the hostname and port number for the K2 Server you want to use.
Make sure that the k2server.exe is running on the host you specify in the Verity Server hostname field. Also, the port number you enter must correspond with the port number you specify in the k2server.ini file. The default port number value in the k2server.ini file is 9901.
118 Chapter 6 Configuring Verity K2 Server
About K2 ServerK2 Server is a high-performance search engine designed to process searches quickly in a high performance, distributed system. The K2 search system has a client/server model. K2 client applications, such as ColdFusion applications, provide users access to document indexes stored in Verity collections.
K2 Server is a multi-threaded application built around the Verity search engine, providing access to Verity collections and tracking any changes made by indexing applications.
The K2 search system is designed to take advantage of the latest advances in hardware and software technology and provides the following features:
• Multi-threaded architecture
• Support for Verity knowledge retrieval features, including topics
• Continuous operation support
• Incremental squeeze
• Highly scalable
Installation detailsK2 is installed by default with ColdFusion server, but is activated manually by invoking a command file executable.
• The K2 Server installed with ColdFusion is a restricted version. ColdFusion is allowed to interact with only one K2 Server.
• If you install a fully licensed version of Verity K2 Server and configure ColdFusion to use the K2 broker, ColdFusion will not restrict document searches.
• The restricted version of K2 Server installed with ColdFusion has document search limits as follows: 125,000 documents (ColdFusion Professional) and 250,000 documents (ColdFusion Enterprise). Macromedia Spectra sites have a limit of 750,000 documents.
Two Verity modes now supportedWith the introduction of K2 Server, ColdFusion now supports two different modes of collection searching:
• VDK mode The default Verity mode, which has been supported by ColdFusion since the introduction of Verity into ColdFusion. The cfsearch tag remains functionally unchanged.
• K2 mode The restricted version of the Verity K2 Server installed with ColdFusion. The cfsearch tag remains functionally unchanged.
By default, unless you configure ColdFusion to use K2 Server, ColdFusion uses VDK mode.
About K2 Server 119
NoteTo use the K2 mode, you must edit the server registration file k2server.ini, configure ColdFusion to use K2 Server, and restart the K2 Server executable, k2server.exe.
How ColdFusion determines which mode to useColdFusion determines the Verity Search mode by comparing the collection name specified in the cfsearch tag against the local registry. If the collection name is found, then the normal VDK search will be conducted. Collection names are written to the registry by calls to the cfcollection tag and represent “ColdFusion Aware” Verity collections created or mapped to existing collections. If the collection name is not found, ColdFusion uses K2 Server to conduct the search.
Collections created with ColdFusionVerity collections created either through the ColdFusion Administrator or through the use of the cfcollection tag are structured differently from those created using native Verity tools. Collections created with tools other than ColdFusion are known as external collections. ColdFusion uses a different directory structure when creating collections, from those created using native Verity tools like mkvdk (see Chapter 9, “Managing Verity Collections with the mkvdk Utility” on page 185 for more information on mkvdk).
For example, the cfdocumentation collection created to enable searching online ColdFusion documentation files consists of two subdirectories that are not created in external Verity collections:
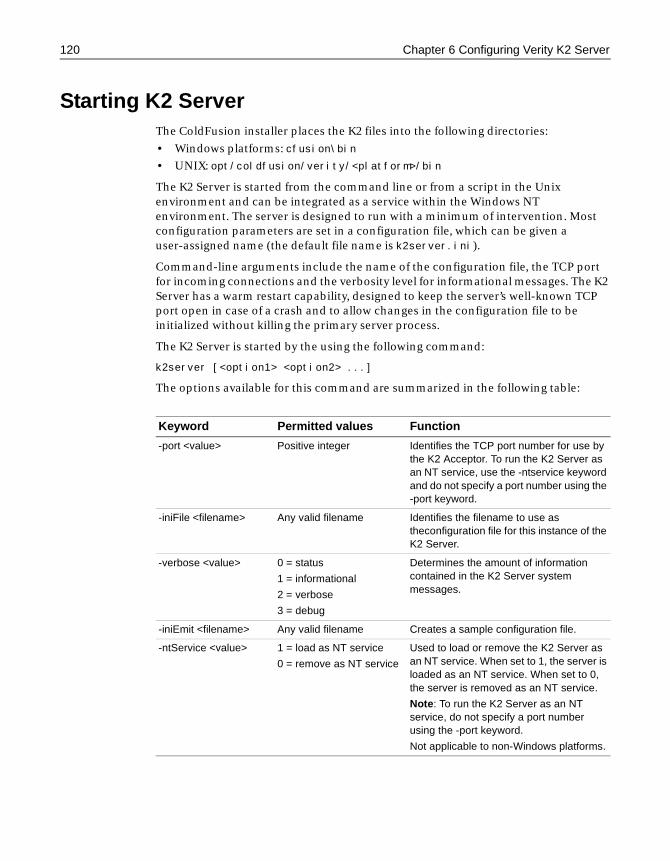
120 Chapter 6 Configuring Verity K2 Server
Starting K2 ServerThe ColdFusion installer places the K2 files into the following directories:
• Windows platforms: cfusion\bin
• UNIX: opt/coldfusion/verity/<platform>/bin
The K2 Server is started from the command line or from a script in the Unix environment and can be integrated as a service within the Windows NT environment. The server is designed to run with a minimum of intervention. Most configuration parameters are set in a configuration file, which can be given a user-assigned name (the default file name is k2server.ini).
Command-line arguments include the name of the configuration file, the TCP port for incoming connections and the verbosity level for informational messages. The K2 Server has a warm restart capability, designed to keep the server’s well-known TCP port open in case of a crash and to allow changes in the configuration file to be initialized without killing the primary server process.
The K2 Server is started by the using the following command:
k2server [<option1> <option2> ...]
The options available for this command are summarized in the following table:
Keyword Permitted values Function
-port <value> Positive integer Identifies the TCP port number for use by the K2 Acceptor. To run the K2 Server as an NT service, use the -ntservice keyword and do not specify a port number using the -port keyword.
-iniFile <filename> Any valid filename Identifies the filename to use as theconfiguration file for this instance of the K2 Server.
-verbose <value> 0 = status
1 = informational
2 = verbose
3 = debug
Determines the amount of information contained in the K2 Server system messages.
-iniEmit <filename> Any valid filename Creates a sample configuration file.
-ntService <value> 1 = load as NT service
0 = remove as NT service
Used to load or remove the K2 Server as an NT service. When set to 1, the server is loaded as an NT service. When set to 0, the server is removed as an NT service.
Note: To run the K2 Server as an NT service, do not specify a port number using the -port keyword.
Not applicable to non-Windows platforms.
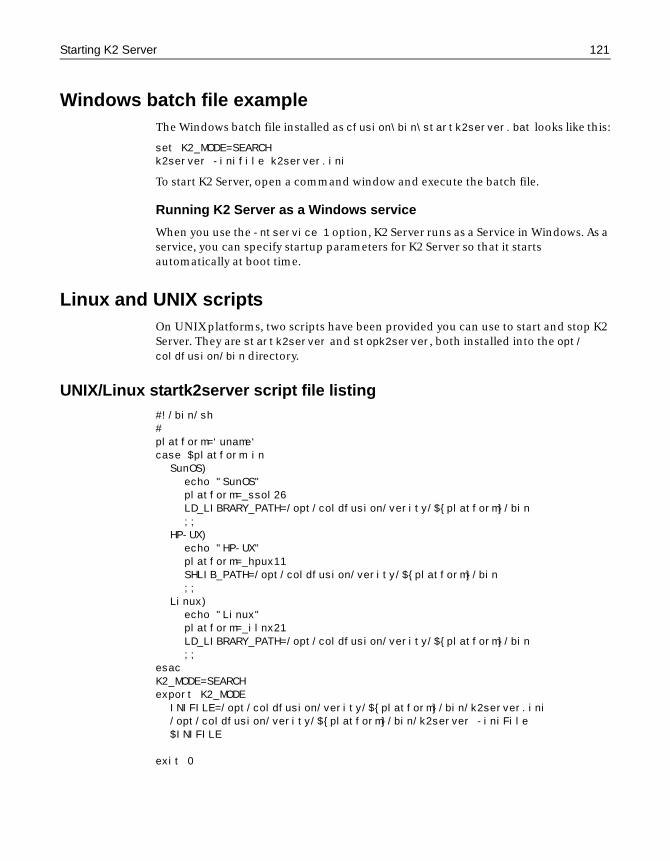
Starting K2 Server 121
Windows batch file exampleThe Windows batch file installed as cfusion\bin\startk2server.bat looks like this:
set K2_MODE=SEARCHk2server -inifile k2server.ini
To start K2 Server, open a command window and execute the batch file.
Running K2 Server as a Windows service
When you use the -ntservice 1 option, K2 Server runs as a Service in Windows. As a service, you can specify startup parameters for K2 Server so that it starts automatically at boot time.
Linux and UNIX scriptsOn UNIX platforms, two scripts have been provided you can use to start and stop K2 Server. They are startk2server and stopk2server, both installed into the opt/coldfusion/bin directory.
UNIX/Linux startk2server script file listing#!/bin/sh#platform=‘uname‘case $platform in
SunOS)echo "SunOS"platform=_ssol26LD_LIBRARY_PATH=/opt/coldfusion/verity/${platform}/bin;;
HP-UX)echo "HP-UX"platform=_hpux11SHLIB_PATH=/opt/coldfusion/verity/${platform}/bin;;
Linux)echo "Linux"platform=_ilnx21LD_LIBRARY_PATH=/opt/coldfusion/verity/${platform}/bin;;
esacK2_MODE=SEARCHexport K2_MODE
INIFILE=/opt/coldfusion/verity/${platform}/bin/k2server.ini/opt/coldfusion/verity/${platform}/bin/k2server -iniFile $INIFILE
exit 0

122 Chapter 6 Configuring Verity K2 Server
Stopping K2 ServerYou can run K2 Server either as a Windows service or in a command window, as an ordinary application. Unless you use the -ntService 1 option when starting K2 Server, K2 runs in the command window.
Stopping K2 when run as a serviceTo halt K2 Server when it is running as a Windows service, you have two options:
• Open the Services Control Panel and stop the K2 Server service.
• Open a command window and enter the command:
k2server -ntService 0
Stopping K2 when run as an applicationWhen K2 is running as an application in a command window, you stop K2 by issuing a Ctrl+C keyboard command to kill the process in the window where it is running.
Stopping K2 Server on Linux/UNIXThe ColdFusion installation includes a script for halting K2 Server. The stopk2server script can be found in /opt/coldfusion/bin by default.
UNIX/Linux stopk2server script file listing#!/bin/sh## stop k2 server - setup environment and stop k2 server### Get the pid for the process specified#pidproc(){
pid=‘ps -eo’pid,comm’ |grep $1 |sed -e ’s/^ *//’ -e ’s/ .*//’‘
}## Kill named process(es).# Try killing it nicely at first. If it won’t die willing, # then use kill -9#killproc(){
pidproc $1
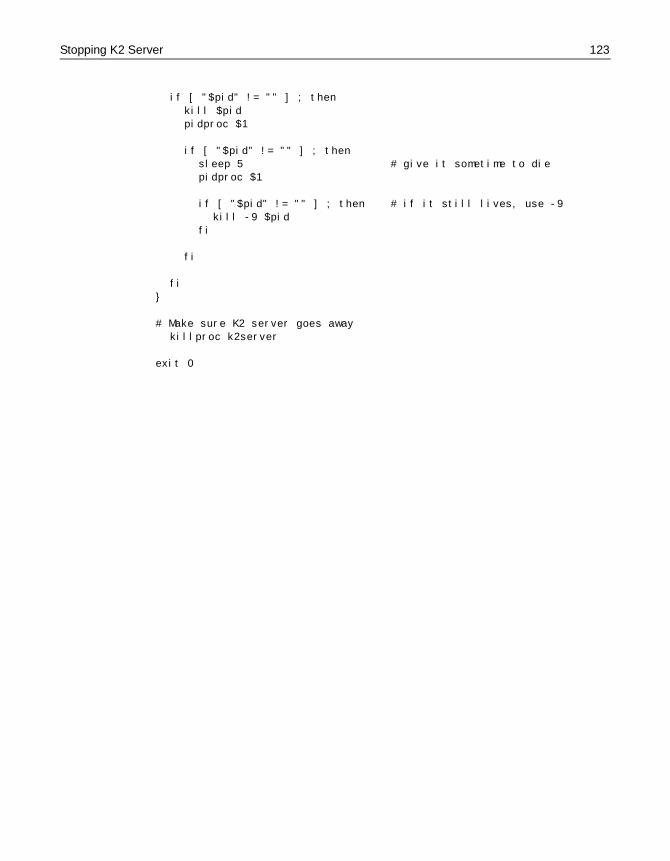
Stopping K2 Server 123
if [ "$pid" != "" ] ; then kill $pid pidproc $1
if [ "$pid" != "" ] ; thensleep 5 # give it sometime to diepidproc $1
if [ "$pid" != "" ] ; then # if it still lives, use -9kill -9 $pid
fi
fi
fi}
# Make sure K2 server goes awaykillproc k2server
exit 0
124 Chapter 6 Configuring Verity K2 Server
Editing the k2server.ini FileTo enable a collection for searching using K2 Server, you need to first set up the k2server.ini file. On Windows platforms, k2server.ini can be found in: cfusion\bin. On UNIX, k2server.ini can be found in: opt/coldfusion/verity/<platform>/bin.
The k2server.ini file consists of a large number of parameters you probably won’t need to change. To get started quickly focus on the following sections in the k2server.ini file:
• vdkHome (line 33 in the k2server.ini file listing on page 125)
• The Coll-n sections of k2server.ini: (beginning at line 66 in the k2server.ini file listing on page 125)
In the file listing for k2server.ini, the collection section can be found between lines 66-78.
For complete details on k2server.ini parameters, refer to “k2server.ini Parameter Reference” on page 127.
Edit the vdkHome parameter of k2server.iniThe value of the vdkHome parameter in k2server.ini should be the directory where your Verity files are installed.
• Windows platforms default: c:\cfusion\verity
• Non-Windows platforms default: /opt/coldfusion/verity.
Edit the Coll-n section of k2server.iniIn the Col-n section of k2server.ini, you need to specify the directory location of the collections you want K2 Server to search in the collPath parameter. This value must point to an existing Verity collection. The k2server executable can’t be used to create a collection.
For example, the collPath value points to the collection created for ColdFusion once you have first indexed the ColdFusion online documentation (this collection is not created at setup time):
[Coll-0]collPath=c:\cfusion\verity\collections\cfdocumentation\customcollAlias=cfdoc_customtopicSet=knowledgeBase=onLine=2
Create a Coll-n section for each collection you want to search with K2 server, incrementing the value n by one for each entry.
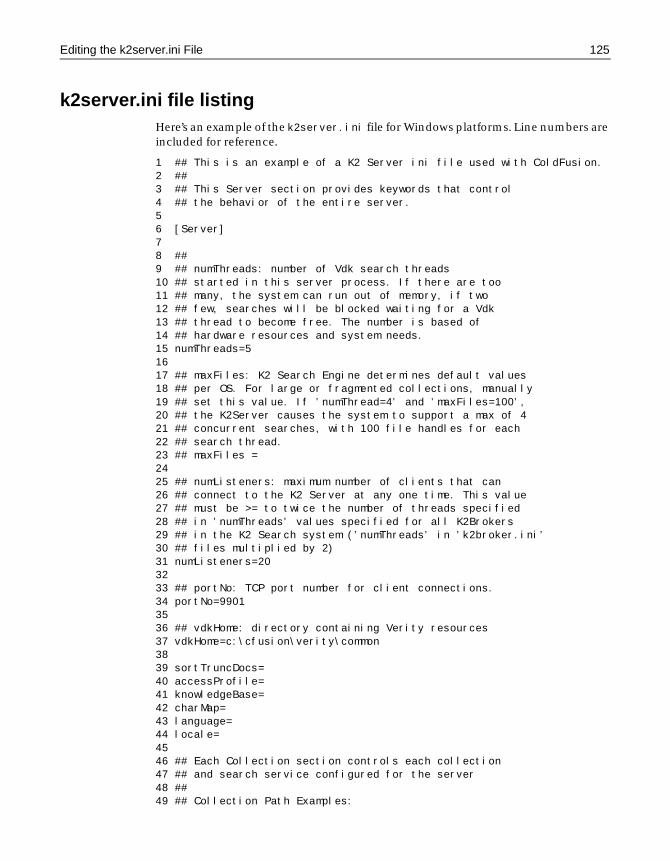
Editing the k2server.ini File 125
k2server.ini file listingHere’s an example of the k2server.ini file for Windows platforms. Line numbers are included for reference.
1 ## This is an example of a K2 Server ini file used with ColdFusion.2 ##3 ## This Server section provides keywords that control4 ## the behavior of the entire server.56 [Server]78 ##9 ## numThreads: number of Vdk search threads 10 ## started in this server process. If there are too 11 ## many, the system can run out of memory, if two 12 ## few, searches will be blocked waiting for a Vdk 13 ## thread to become free. The number is based of 14 ## hardware resources and system needs.15 numThreads=51617 ## maxFiles: K2 Search Engine determines default values18 ## per OS. For large or fragmented collections, manually19 ## set this value. If ’numThread=4’ and ’maxFiles=100’,20 ## the K2Server causes the system to support a max of 421 ## concurrent searches, with 100 file handles for each 22 ## search thread. 23 ## maxFiles =2425 ## numListeners: maximum number of clients that can 26 ## connect to the K2 Server at any one time. This value27 ## must be >= to twice the number of threads specified28 ## in ’numThreads’ values specified for all K2Brokers29 ## in the K2 Search system (’numThreads’ in ’k2broker.ini’30 ## files multiplied by 2)31 numListeners=203233 ## portNo: TCP port number for client connections.34 portNo=99013536 ## vdkHome: directory containing Verity resources37 vdkHome=c:\cfusion\verity\common3839 sortTruncDocs=40 accessProfile=41 knowledgeBase=42 charMap=43 language=44 locale=4546 ## Each Collection section controls each collection47 ## and search service configured for the server48 ##49 ## Collection Path Examples:
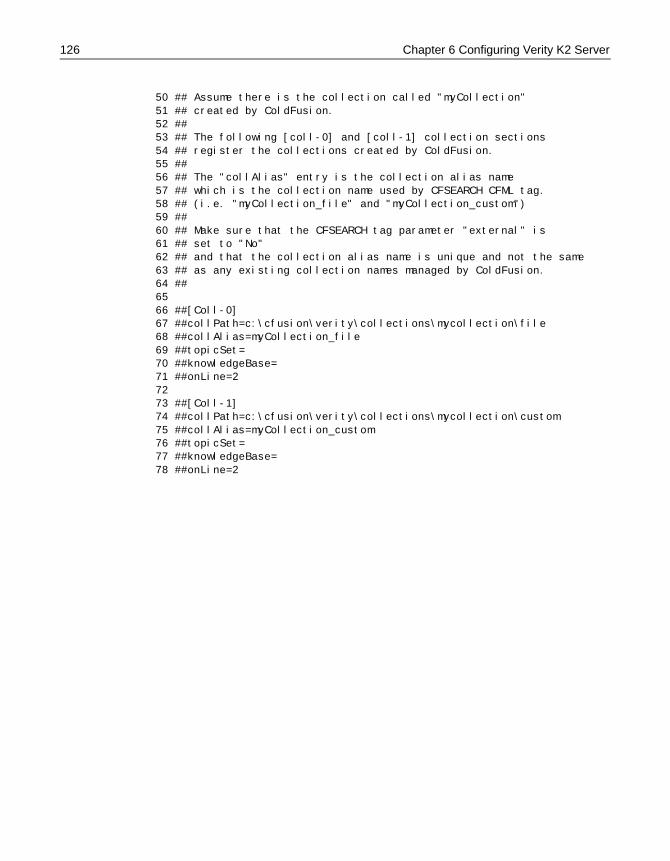
126 Chapter 6 Configuring Verity K2 Server
50 ## Assume there is the collection called "myCollection"51 ## created by ColdFusion.52 ##53 ## The following [coll-0] and [coll-1] collection sections54 ## register the collections created by ColdFusion.55 ## 56 ## The "collAlias" entry is the collection alias name57 ## which is the collection name used by CFSEARCH CFML tag.58 ## (i.e. "myCollection_file" and "myCollection_custom")59 ##60 ## Make sure that the CFSEARCH tag parameter "external" is 61 ## set to "No"62 ## and that the collection alias name is unique and not the same63 ## as any existing collection names managed by ColdFusion.64 ##6566 ##[Coll-0]67 ##collPath=c:\cfusion\verity\collections\mycollection\file68 ##collAlias=myCollection_file69 ##topicSet=70 ##knowledgeBase=71 ##onLine=27273 ##[Coll-1]74 ##collPath=c:\cfusion\verity\collections\mycollection\custom75 ##collAlias=myCollection_custom76 ##topicSet=77 ##knowledgeBase=78 ##onLine=2

k2server.ini Parameter Reference 127
k2server.ini Parameter ReferenceThe K2 Server configuration file k2server.ini is composed of a series of sections. The first section, [Server], provides keywords that control the behavior of the entire server. Each subsequent section, (in the form [Coll-1], [Coll-2], and so forth) controls each collection and search service configured for the server.
Server sectionThe following table describe the keywords that can be used in the [server] section of the server configuration file. A sample configuration file (k2server.ini) is provided with the K2 Server executable.
The server section parameters are as follows:
Parameter Description
serverAlias An arbitrary name used to identify the server.
numThreads Default number of search threads to be started in the server process. Iftoo many threads exist, the system can run out of memory; if too few threads exist, then searches will be blocked and forced to wait for a Verity engine thread to become free. The value of numThreads is based on hardware resources and system needs..
maxFiles The maximum number of file handles that can be opened by a specific search thread. The default value for maxFiles is dependent on the limits of the OS used. The maxFiles value affects how file handles are shared between the operating system and the search engine. The maxFiles and numThreads values together can be used to tune system performance.
These values can be set for a server:
[server]numThreads=4maxFiles=100
The above entries for a K2 Server cause the system to support a maximum of 4 concurrent searches, with 100 file handles allocated for each search thread. The search engine determines default values per operating system. For large or fragmented collections, it is recommended that you explicitly set a value for maxFiles.
portNo TCP port number for client connections. The value of portNo is the same value assigned to portNo in the k2broker.ini file that identifies the broker referring to this server.
numListeners Maximum number of clients that can connect to the server at one time. The numListeners value must be equal to or greater than the sum of all numThreads values specified by all K2 Brokers in the K2 search system. The numThreads value is set for a K2 Broker in the k2broker.ini file.
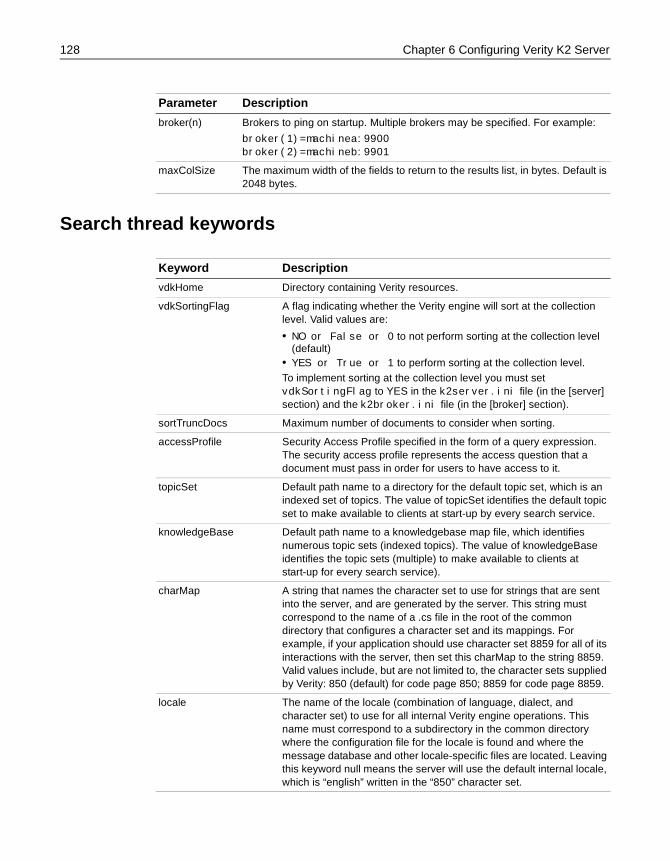
128 Chapter 6 Configuring Verity K2 Server
Search thread keywords
broker(n) Brokers to ping on startup. Multiple brokers may be specified. For example:
broker(1)=machinea:9900broker(2)=machineb:9901
maxColSize The maximum width of the fields to return to the results list, in bytes. Default is 2048 bytes.
Parameter Description
Keyword Description
vdkHome Directory containing Verity resources.
vdkSortingFlag A flag indicating whether the Verity engine will sort at the collection level. Valid values are:
• NO or False or 0 to not perform sorting at the collection level (default)
• YES or True or 1 to perform sorting at the collection level.To implement sorting at the collection level you must set vdkSortingFlag to YES in the k2server.ini file (in the [server] section) and the k2broker.ini file (in the [broker] section).
sortTruncDocs Maximum number of documents to consider when sorting.
accessProfile Security Access Profile specified in the form of a query expression. The security access profile represents the access question that a document must pass in order for users to have access to it.
topicSet Default path name to a directory for the default topic set, which is an indexed set of topics. The value of topicSet identifies the default topic set to make available to clients at start-up by every search service.
knowledgeBase Default path name to a knowledgebase map file, which identifies numerous topic sets (indexed topics). The value of knowledgeBase identifies the topic sets (multiple) to make available to clients at start-up for every search service).
charMap A string that names the character set to use for strings that are sent into the server, and are generated by the server. This string must correspond to the name of a .cs file in the root of the common directory that configures a character set and its mappings. For example, if your application should use character set 8859 for all of its interactions with the server, then set this charMap to the string 8859. Valid values include, but are not limited to, the character sets supplied by Verity: 850 (default) for code page 850; 8859 for code page 8859.
locale The name of the locale (combination of language, dialect, and character set) to use for all internal Verity engine operations. This name must correspond to a subdirectory in the common directory where the configuration file for the locale is found and where the message database and other locale-specific files are located. Leaving this keyword null means the server will use the default internal locale, which is “english” written in the “850” character set.
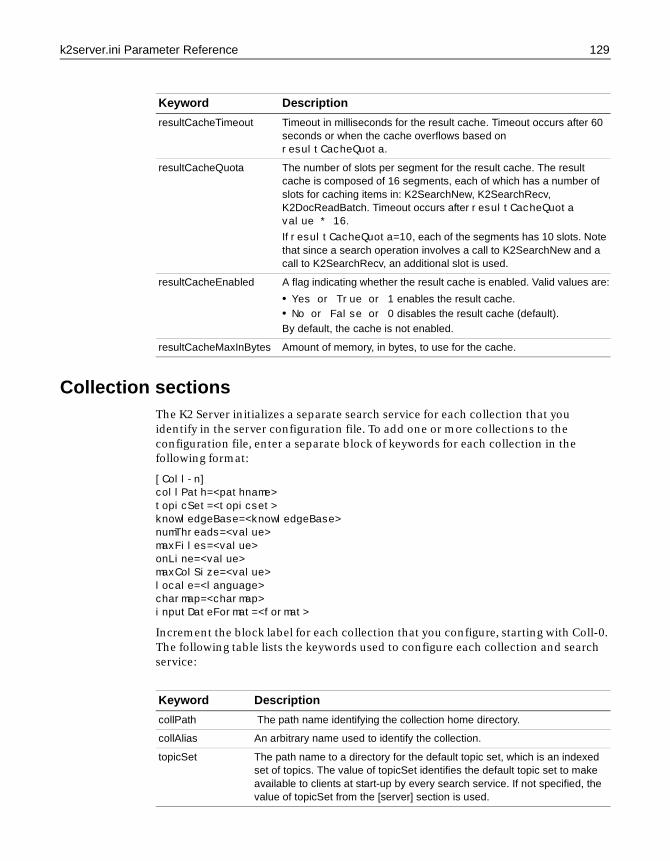
k2server.ini Parameter Reference 129
Collection sectionsThe K2 Server initializes a separate search service for each collection that you identify in the server configuration file. To add one or more collections to the configuration file, enter a separate block of keywords for each collection in the following format:
[Coll-n]collPath=<pathname>topicSet=<topicset>knowledgeBase=<knowledgeBase>numThreads=<value>maxFiles=<value>onLine=<value>maxColSize=<value>locale=<language>charmap=<charmap>inputDateFormat=<format>
Increment the block label for each collection that you configure, starting with Coll-0. The following table lists the keywords used to configure each collection and search service:
resultCacheTimeout Timeout in milliseconds for the result cache. Timeout occurs after 60 seconds or when the cache overflows based on resultCacheQuota.
resultCacheQuota The number of slots per segment for the result cache. The result cache is composed of 16 segments, each of which has a number of slots for caching items in: K2SearchNew, K2SearchRecv, K2DocReadBatch. Timeout occurs after resultCacheQuota value * 16.
If resultCacheQuota=10, each of the segments has 10 slots. Note that since a search operation involves a call to K2SearchNew and a call to K2SearchRecv, an additional slot is used.
resultCacheEnabled A flag indicating whether the result cache is enabled. Valid values are:
• Yes or True or 1 enables the result cache.• No or False or 0 disables the result cache (default).By default, the cache is not enabled.
resultCacheMaxInBytes Amount of memory, in bytes, to use for the cache.
Keyword Description
Keyword Description
collPath The path name identifying the collection home directory.
collAlias An arbitrary name used to identify the collection.
topicSet The path name to a directory for the default topic set, which is an indexed set of topics. The value of topicSet identifies the default topic set to make available to clients at start-up by every search service. If not specified, the value of topicSet from the [server] section is used.
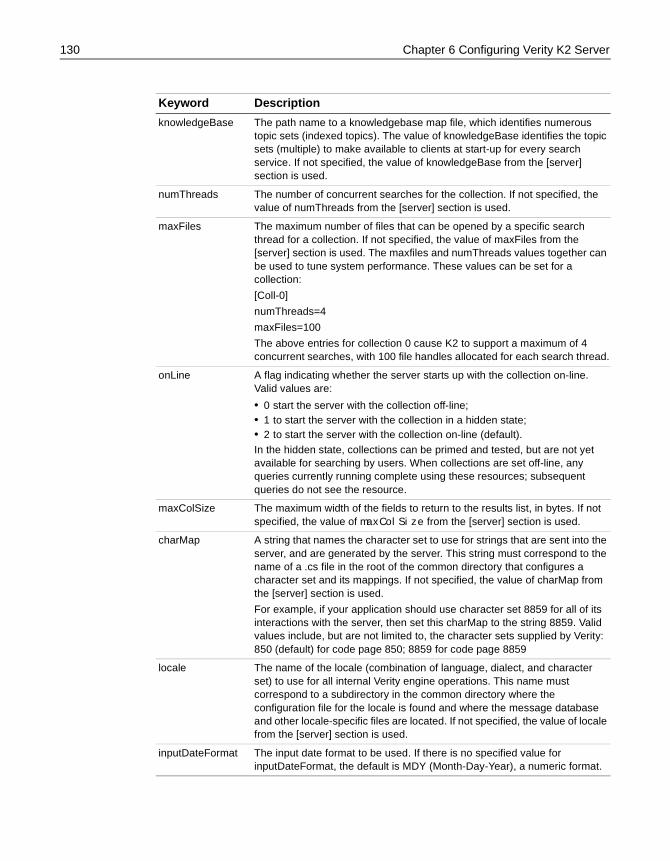
130 Chapter 6 Configuring Verity K2 Server
knowledgeBase The path name to a knowledgebase map file, which identifies numerous topic sets (indexed topics). The value of knowledgeBase identifies the topic sets (multiple) to make available to clients at start-up for every search service. If not specified, the value of knowledgeBase from the [server] section is used.
numThreads The number of concurrent searches for the collection. If not specified, the value of numThreads from the [server] section is used.
maxFiles The maximum number of files that can be opened by a specific search thread for a collection. If not specified, the value of maxFiles from the [server] section is used. The maxfiles and numThreads values together can be used to tune system performance. These values can be set for a collection:
[Coll-0]
numThreads=4
maxFiles=100
The above entries for collection 0 cause K2 to support a maximum of 4 concurrent searches, with 100 file handles allocated for each search thread.
onLine A flag indicating whether the server starts up with the collection on-line. Valid values are:
• 0 start the server with the collection off-line;• 1 to start the server with the collection in a hidden state;• 2 to start the server with the collection on-line (default).In the hidden state, collections can be primed and tested, but are not yet available for searching by users. When collections are set off-line, any queries currently running complete using these resources; subsequent queries do not see the resource.
maxColSize The maximum width of the fields to return to the results list, in bytes. If not specified, the value of maxColSize from the [server] section is used.
charMap A string that names the character set to use for strings that are sent into the server, and are generated by the server. This string must correspond to the name of a .cs file in the root of the common directory that configures a character set and its mappings. If not specified, the value of charMap from the [server] section is used.
For example, if your application should use character set 8859 for all of its interactions with the server, then set this charMap to the string 8859. Valid values include, but are not limited to, the character sets supplied by Verity: 850 (default) for code page 850; 8859 for code page 8859
locale The name of the locale (combination of language, dialect, and character set) to use for all internal Verity engine operations. This name must correspond to a subdirectory in the common directory where the configuration file for the locale is found and where the message database and other locale-specific files are located. If not specified, the value of locale from the [server] section is used.
inputDateFormat The input date format to be used. If there is no specified value for inputDateFormat, the default is MDY (Month-Day-Year), a numeric format.
Keyword Description
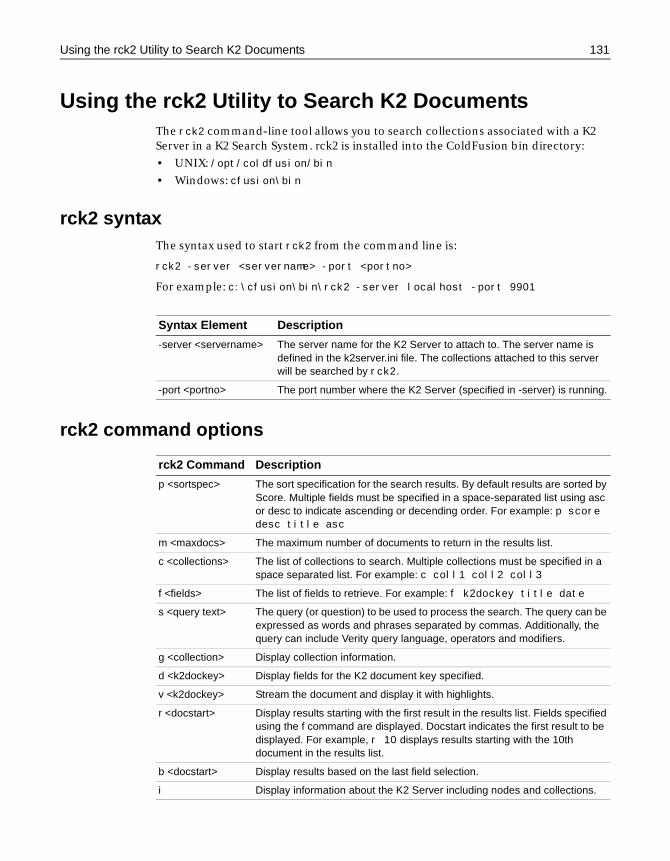
Using the rck2 Utility to Search K2 Documents 131
Using the rck2 Utility to Search K2 DocumentsThe rck2 command-line tool allows you to search collections associated with a K2 Server in a K2 Search System. rck2 is installed into the ColdFusion bin directory:
• UNIX: /opt/coldfusion/bin
• Windows: cfusion\bin
rck2 syntaxThe syntax used to start rck2 from the command line is:
rck2 -server <servername> -port <portno>
For example: c:\cfusion\bin\rck2 -server localhost -port 9901
rck2 command options
Syntax Element Description
-server <servername> The server name for the K2 Server to attach to. The server name is defined in the k2server.ini file. The collections attached to this server will be searched by rck2.
-port <portno> The port number where the K2 Server (specified in -server) is running.
rck2 Command Description
p <sortspec> The sort specification for the search results. By default results are sorted by Score. Multiple fields must be specified in a space-separated list using asc or desc to indicate ascending or decending order. For example: p score desc title asc
m <maxdocs> The maximum number of documents to return in the results list.
c <collections> The list of collections to search. Multiple collections must be specified in a space separated list. For example: c coll1 coll2 coll3
f <fields> The list of fields to retrieve. For example: f k2dockey title date
s <query text> The query (or question) to be used to process the search. The query can be expressed as words and phrases separated by commas. Additionally, the query can include Verity query language, operators and modifiers.
g <collection> Display collection information.
d <k2dockey> Display fields for the K2 document key specified.
v <k2dockey> Stream the document and display it with highlights.
r <docstart> Display results starting with the first result in the results list. Fields specified using the f command are displayed. Docstart indicates the first result to be displayed. For example, r 10 displays results starting with the 10th document in the results list.
b <docstart> Display results based on the last field selection.
i Display information about the K2 Server including nodes and collections.
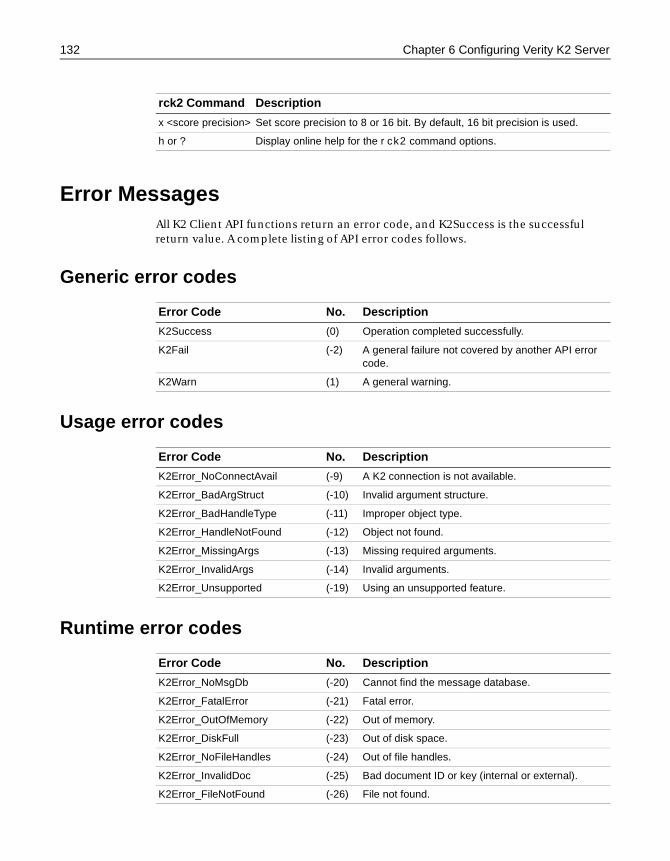
132 Chapter 6 Configuring Verity K2 Server
Error MessagesAll K2 Client API functions return an error code, and K2Success is the successful return value. A complete listing of API error codes follows.
Generic error codes
Usage error codes
Runtime error codes
x <score precision> Set score precision to 8 or 16 bit. By default, 16 bit precision is used.
h or ? Display online help for the rck2 command options.
rck2 Command Description
Error Code No. Description
K2Success (0) Operation completed successfully.
K2Fail (-2) A general failure not covered by another API error code.
K2Warn (1) A general warning.
Error Code No. Description
K2Error_NoConnectAvail (-9) A K2 connection is not available.
K2Error_BadArgStruct (-10) Invalid argument structure.
K2Error_BadHandleType (-11) Improper object type.
K2Error_HandleNotFound (-12) Object not found.
K2Error_MissingArgs (-13) Missing required arguments.
K2Error_InvalidArgs (-14) Invalid arguments.
K2Error_Unsupported (-19) Using an unsupported feature.
Error Code No. Description
K2Error_NoMsgDb (-20) Cannot find the message database.
K2Error_FatalError (-21) Fatal error.
K2Error_OutOfMemory (-22) Out of memory.
K2Error_DiskFull (-23) Out of disk space.
K2Error_NoFileHandles (-24) Out of file handles.
K2Error_InvalidDoc (-25) Bad document ID or key (internal or external).
K2Error_FileNotFound (-26) File not found.
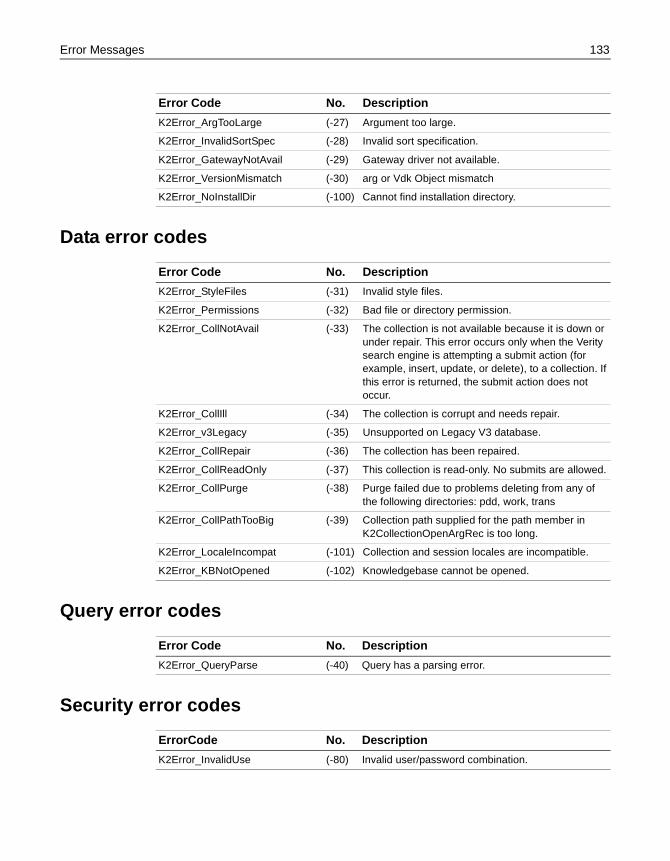
Error Messages 133
Data error codes
Query error codes
Security error codes
K2Error_ArgTooLarge (-27) Argument too large.
K2Error_InvalidSortSpec (-28) Invalid sort specification.
K2Error_GatewayNotAvail (-29) Gateway driver not available.
K2Error_VersionMismatch (-30) arg or Vdk Object mismatch
K2Error_NoInstallDir (-100) Cannot find installation directory.
Error Code No. Description
Error Code No. Description
K2Error_StyleFiles (-31) Invalid style files.
K2Error_Permissions (-32) Bad file or directory permission.
K2Error_CollNotAvail (-33) The collection is not available because it is down or under repair. This error occurs only when the Verity search engine is attempting a submit action (for example, insert, update, or delete), to a collection. If this error is returned, the submit action does not occur.
K2Error_CollIll (-34) The collection is corrupt and needs repair.
K2Error_v3Legacy (-35) Unsupported on Legacy V3 database.
K2Error_CollRepair (-36) The collection has been repaired.
K2Error_CollReadOnly (-37) This collection is read-only. No submits are allowed.
K2Error_CollPurge (-38) Purge failed due to problems deleting from any of the following directories: pdd, work, trans
K2Error_CollPathTooBig (-39) Collection path supplied for the path member in K2CollectionOpenArgRec is too long.
K2Error_LocaleIncompat (-101) Collection and session locales are incompatible.
K2Error_KBNotOpened (-102) Knowledgebase cannot be opened.
Error Code No. Description
K2Error_QueryParse (-40) Query has a parsing error.
ErrorCode No. Description
K2Error_InvalidUse (-80) Invalid user/password combination.
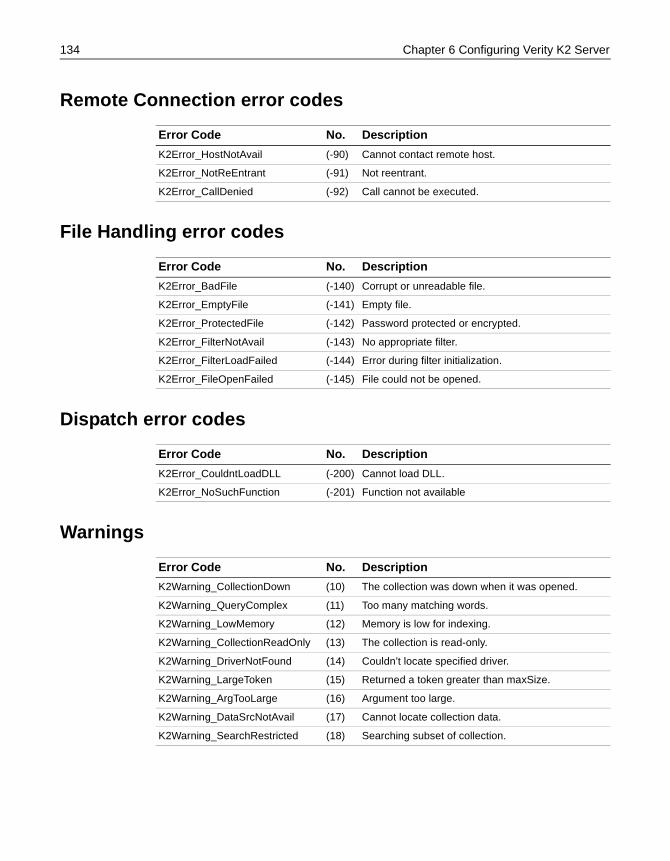
134 Chapter 6 Configuring Verity K2 Server
Remote Connection error codes
File Handling error codes
Dispatch error codes
Warnings
Error Code No. Description
K2Error_HostNotAvail (-90) Cannot contact remote host.
K2Error_NotReEntrant (-91) Not reentrant.
K2Error_CallDenied (-92) Call cannot be executed.
Error Code No. Description
K2Error_BadFile (-140) Corrupt or unreadable file.
K2Error_EmptyFile (-141) Empty file.
K2Error_ProtectedFile (-142) Password protected or encrypted.
K2Error_FilterNotAvail (-143) No appropriate filter.
K2Error_FilterLoadFailed (-144) Error during filter initialization.
K2Error_FileOpenFailed (-145) File could not be opened.
Error Code No. Description
K2Error_CouldntLoadDLL (-200) Cannot load DLL.
K2Error_NoSuchFunction (-201) Function not available
Error Code No. Description
K2Warning_CollectionDown (10) The collection was down when it was opened.
K2Warning_QueryComplex (11) Too many matching words.
K2Warning_LowMemory (12) Memory is low for indexing.
K2Warning_CollectionReadOnly (13) The collection is read-only.
K2Warning_DriverNotFound (14) Couldn’t locate specified driver.
K2Warning_LargeToken (15) Returned a token greater than maxSize.
K2Warning_ArgTooLarge (16) Argument too large.
K2Warning_DataSrcNotAvail (17) Cannot locate collection data.
K2Warning_SearchRestricted (18) Searching subset of collection.
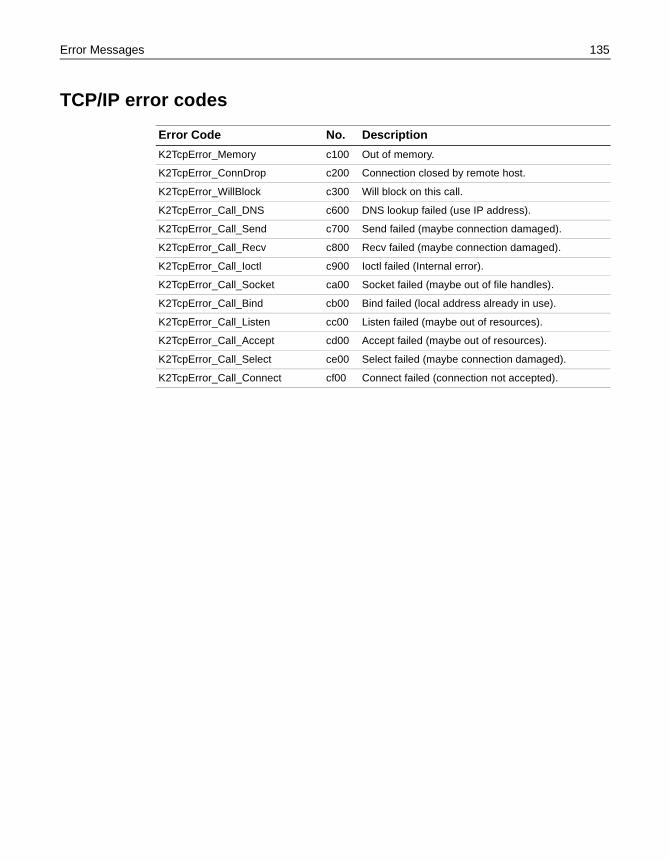
Error Messages 135
TCP/IP error codes
Error Code No. Description
K2TcpError_Memory c100 Out of memory.
K2TcpError_ConnDrop c200 Connection closed by remote host.
K2TcpError_WillBlock c300 Will block on this call.
K2TcpError_Call_DNS c600 DNS lookup failed (use IP address).
K2TcpError_Call_Send c700 Send failed (maybe connection damaged).
K2TcpError_Call_Recv c800 Recv failed (maybe connection damaged).
K2TcpError_Call_Ioctl c900 Ioctl failed (Internal error).
K2TcpError_Call_Socket ca00 Socket failed (maybe out of file handles).
K2TcpError_Call_Bind cb00 Bind failed (local address already in use).
K2TcpError_Call_Listen cc00 Listen failed (maybe out of resources).
K2TcpError_Call_Accept cd00 Accept failed (maybe out of resources).
K2TcpError_Call_Select ce00 Select failed (maybe connection damaged).
K2TcpError_Call_Connect cf00 Connect failed (connection not accepted).

136 Chapter 6 Configuring Verity K2 Server
Chapter 7
Indexing XML Documents
This chapter provides an overview of the process of configuring Verity for indexing XML files.
Contents
• Indexing Overview .................................................................................................. 138
• Style Files ................................................................................................................. 139
• Indexing XML Documents...................................................................................... 143
138 Chapter 7 Indexing XML Documents
Indexing OverviewThe addition of Verity K2 to ColdFusion 5 includes the ability to index and search XML documents. To be properly indexed, XML data files must be well-formed XML documents, as specified in the Extensible Markup Language Recommendation http://www.w3.org/TR/REC-xml.
Briefly stated, a well-formed XML document contains elements that begin with a start tag and terminate with an end tag. One element, which is called the root or document element, cannot appear in the content of another element. For all other elements, if the start tag is in the content of another element, the end tag is also in the content of the same element.
The XML data files must have a .xml extension if the universal filter is used. If documents do not have a .xml extension, you can index XML documents into an XML-only collection by specifying the XML filter in the style.dft file.
Implementation summaryVerity support for XML documents is implemented by an XML filter file and controlled using a number of style files. The style files can be found in the following locations:
• cfusion\verity\Common\style (Windows)
• opt/coldfusion/verity/common/style (UNIX)
• cfusion\verity\common\style\file (Windows)
• cfusion\verity\common\style\custom (Windows)
• opt/coldfusion/verity/common/style/file (UNIX)
• opt/coldfusion/verity/common/style/custom (UNIX)
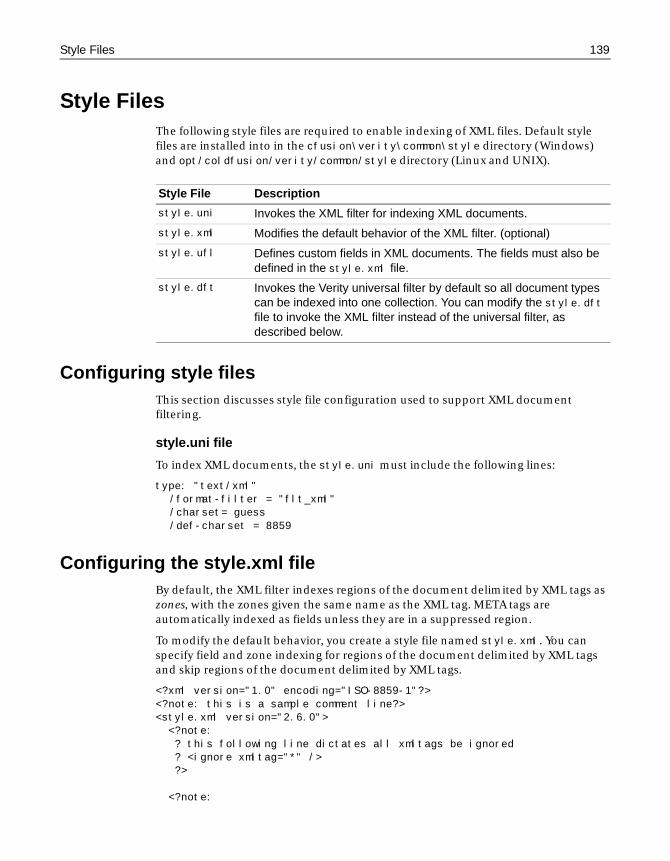
Style Files 139
Style FilesThe following style files are required to enable indexing of XML files. Default style files are installed into in the cfusion\verity\common\style directory (Windows) and opt/coldfusion/verity/common/style directory (Linux and UNIX).
Configuring style filesThis section discusses style file configuration used to support XML document filtering.
style.uni file
To index XML documents, the style.uni must include the following lines:
type: "text/xml"/format-filter = "flt_xml"/charset= guess/def-charset = 8859
Configuring the style.xml fileBy default, the XML filter indexes regions of the document delimited by XML tags as zones, with the zones given the same name as the XML tag. META tags are automatically indexed as fields unless they are in a suppressed region.
To modify the default behavior, you create a style file named style.xml. You can specify field and zone indexing for regions of the document delimited by XML tags and skip regions of the document delimited by XML tags.
<?xml version="1.0" encoding="ISO-8859-1"?><?note: this is a sample comment line?><style.xml version="2.6.0"> <?note: ? this following line dictates all xmltags be ignored ? <ignore xmltag="*" /> ?> <?note:
Style File Description
style.uni Invokes the XML filter for indexing XML documents.
style.xml Modifies the default behavior of the XML filter. (optional)
style.ufl Defines custom fields in XML documents. The fields must also be defined in the style.xml file.
style.dft Invokes the Verity universal filter by default so all document types can be indexed into one collection. You can modify the style.dft file to invoke the XML filter instead of the universal filter, as described below.
140 Chapter 7 Indexing XML Documents
? "ignore" will skip indexing xmltag, yet index contents ? between the beginning and end of this pair of xmltags ?> <?next 2 sample lines commented out: <ignore xmltag="section_1" /> <ignore xmltag="section_2" /> ?>
<?note: ? "preserve" indexes xmltag as zone with the presence of ? <ignore xmltag="*" /> ?> <?next 1 sample line commented out: <preserve xmltag="section_3" /> ?>
<?note: ? "suppress" will suppress every xmltag embedded within ?> <?next 2 sample lines commented out: <suppress xmltag="region_1" /> <suppress xmltag="region_3" /> ?>
<?note: ? "field" will further index content between the beginning ? and end of this pair of xmltags as field values ?> <?next 1 sample line commented out: <field xmltag="column_1" /> ?>
<?note: ? if attribute "fieldname" is present, above content will ? be indexed into VDK field under the value of fieldname ? instead of the field under the name of xmltag ?> <?next 1 sample line commented out: <field xmltag="column_2" fieldname="vdk_field_2" /> ?>
<?note: ? if attribute "index" is set to "override", above content ? will be indexed into VDK field overriding values read in ? from bulk insert file, if any ?> <?next 1 sample line commented out: <field xmltag="column_3" index="override" /> ?>
<?note: ? fieldname & index attributes could both exist ?></style.xml>
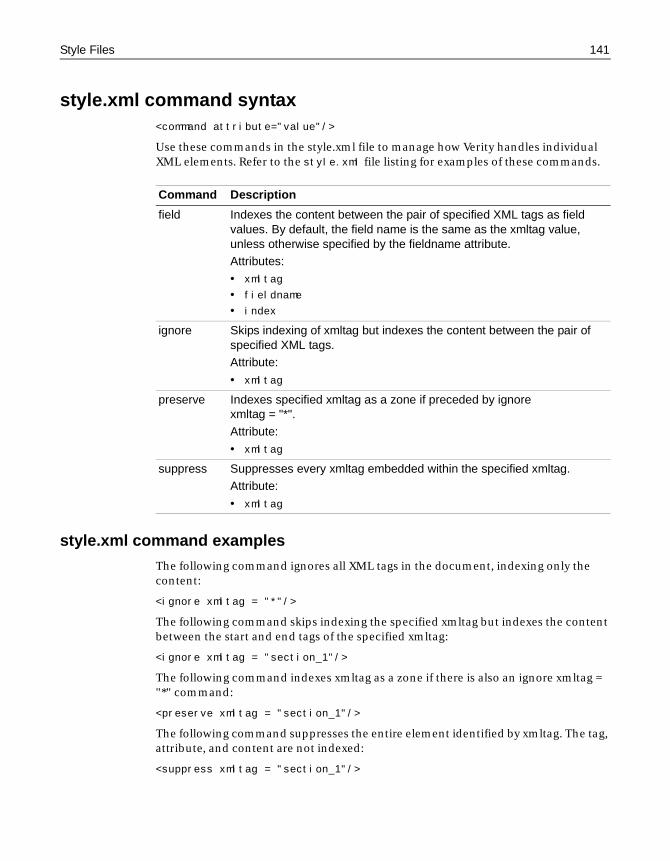
Style Files 141
style.xml command syntax<command attribute="value"/>
Use these commands in the style.xml file to manage how Verity handles individual XML elements. Refer to the style.xml file listing for examples of these commands.
style.xml command examples
The following command ignores all XML tags in the document, indexing only the content:
<ignore xmltag = "*"/>
The following command skips indexing the specified xmltag but indexes the content between the start and end tags of the specified xmltag:
<ignore xmltag = "section_1"/>
The following command indexes xmltag as a zone if there is also an ignore xmltag = "*" command:
<preserve xmltag = "section_1"/>
The following command suppresses the entire element identified by xmltag. The tag, attribute, and content are not indexed:
<suppress xmltag = "section_1"/>
Command Description
field Indexes the content between the pair of specified XML tags as field values. By default, the field name is the same as the xmltag value, unless otherwise specified by the fieldname attribute.Attributes:• xmltag
• fieldname
• index
ignore Skips indexing of xmltag but indexes the content between the pair of specified XML tags.Attribute:
• xmltag
preserve Indexes specified xmltag as a zone if preceded by ignore xmltag = "*".
Attribute:• xmltag
suppress Suppresses every xmltag embedded within the specified xmltag.Attribute:
• xmltag
142 Chapter 7 Indexing XML Documents
The following command indexes the content between the start and end tags of the specified xmltag as a field, which is given the same name as xmltag:
<field xmltag = "column_1"/>
The following command indexes the content between the start and end tags of the specified xmltag as a field, which is given the name specified in the fieldname attribute:
<field xmltag = "column_2" fieldname = "vdk_field_2"/>
The following command indexes the content between the start and end tags of the specified xmltag as a field, overriding any existing value of the field:
<field xmltag = "column_2" index = "override"/>
NoteBoth fieldname and index attributes can be used in a field command.
style.ufl fileIf administrators have defined custom fields to be populated in the style.xml file, the fields must also be defined in the style.ufl file or style.sfl file, using standard syntax.
style.dft fileTo create a collection that contains only XML documents, administrators can modify the style.dft file to invoke the XML filter directly. In this case, the XML documents do not need a .xml extension.
The style.dft must include the following lines:
$control: 1dft:{
field: DOCfilter="flt_xml"
}
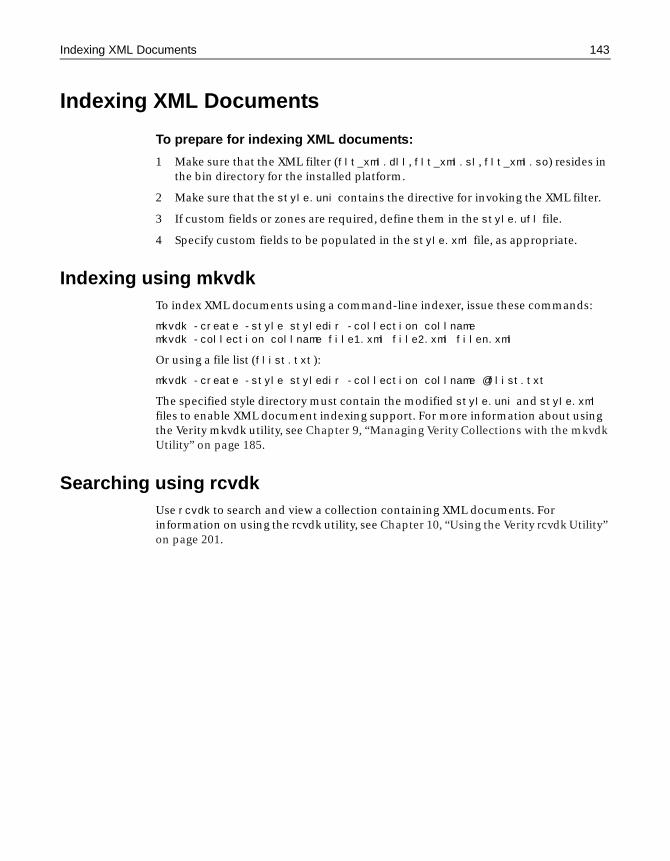
Indexing XML Documents 143
Indexing XML Documents
To prepare for indexing XML documents:
1 Make sure that the XML filter (flt_xml.dll, flt_xml.sl, flt_xml.so) resides in the bin directory for the installed platform.
2 Make sure that the style.uni contains the directive for invoking the XML filter.
3 If custom fields or zones are required, define them in the style.ufl file.
4 Specify custom fields to be populated in the style.xml file, as appropriate.
Indexing using mkvdkTo index XML documents using a command-line indexer, issue these commands:
mkvdk -create -style styledir -collection collnamemkvdk -collection collname file1.xml file2.xml filen.xml
Or using a file list (flist.txt):
mkvdk -create -style styledir -collection collname @flist.txt
The specified style directory must contain the modified style.uni and style.xml files to enable XML document indexing support. For more information about using the Verity mkvdk utility, see Chapter 9, “Managing Verity Collections with the mkvdk Utility” on page 185.
Searching using rcvdkUse rcvdk to search and view a collection containing XML documents. For information on using the rcvdk utility, see Chapter 10, “Using the Verity rcvdk Utility” on page 201.

144 Chapter 7 Indexing XML Documents
Chapter 8
Verity Spider
This chapter contains basic Verity Spider documentation, explaining how to index documents on your Web site.
Contents
• Overview .................................................................................................................. 146
• Verity Spider Syntax ................................................................................................ 148
• Core Options............................................................................................................ 151
• Processing Options ................................................................................................. 153
• Networking Options................................................................................................ 159
• Paths and URLs Options ......................................................................................... 163
• Content Options...................................................................................................... 168
• Locale Options......................................................................................................... 176
• Logging Options ...................................................................................................... 178
• Maintenance Options ............................................................................................. 180
• Setting MIME Types ................................................................................................ 181
146 Chapter 8 Verity Spider
OverviewThe Verity Spider enables you to index Web-based and file system documents throughout the enterprise. Verity Spider works in conjunction with the Verity KeyView document filtering technology so that more than two hundred of the most popular application document formats can be indexed, including Office2000 and WordPerfect, ASCII text, HTML, SGML, XML and PDF (Adobe Acrobat) documents.
Supports Web standardsVerity Spider supports key Web standards used by Internet and intranet sites today. Standard HREF links and frames pointers are recognized so that navigation through them is supported. Redirected pages are followed so that the real underlying document is indexed. Verity Spider adheres to the robots exclusion standard specified in robots.txt files, so that administrators can maintain friendly visits to remote Web sites. HTTP Basic Authentication mechanism is supported so that password-protected sites can be indexed.
Unlike other Web crawlers, Verity Spider does not need to maintain complete local copies of remote documents. When documents are viewed through Verity Information Server, documents are read from their native location with optional highlights.
Restart capabilityWhen an indexing job fails, or for some reason the Verity Spider cannot index a significant number or type of URLs, you can now restart the indexing job to update the collection. Only those URLs which were not successfully indexed previously will be processed.
State maintenance through a persistent storeVerity Spider V3.7 stores the state of gathered and indexed URLs in a persistent store, allowing it to track progress for the purposes of gracefully and efficiently restarting halted indexing jobs.
Previous versions of Verity Spider only held state information in memory, which meant that any stoppage of spidering resulted in lost work. This also meant that larger target sites required significantly more memory for spidering. The information in the persistent store can help report information such as the number of indexed pages, number of visited pages, number of rejected pages, and number of broken links.
PerformanceWith low memory requirements, flow control and the help of multithreading and efficient Domain Name System (DNS) lookups, spidering performance is greatly improved over previous versions.
Overview 147
Flow control
When indexing Web sites, Verity Spider distributes requests to Web servers in a round-robin manner. This means one URL is fetched from each Web server in turn. With flow control, it is possible that a faster Web site will finish before a slower one. Regardless, the Verity Spider optimizes indexing every Web server.
Verity Spider V3.7 adjusts the number of connections per server depending on the download bandwidth. When the download bandwidth from a Web server falls below a certain value, Verity Spider will automatically scale back the number of connections to that Web server. There will always be at least one connection to a Web server. When the download bandwidth increases to an acceptable level, Verity Spider reallocates connections (per the value of the -connections option, which is 4 by default). You can turn off flow control with the -noflowctrl option.
Multithreading
Since version 3.1, the Verity Spider has separated the gathering and indexing jobs into multiple threads for concurrence. Verity Spider V3.7 can create concurrent connections to Web servers for fetching documents, and have concurrent indexing threads for maximum utilization. This translates to an overall improvement in throughput. In previous releases, work was done in a round-robin manner, so that at any given time, only one job was running. Spider attends to the Web sites within an indexing job in a round-robin manner.
Efficient DNS lookups
Verity Spider V3.7 significantly reduces DNS lookups, which means great improvements to spidering throughput. If spidering is limited by domain or host, then no DNS lookups are made on hosts that fall outside of that range. Previously, DNS lookups were made on all candidate URLs.
Proxy handling efficiency
The use of the -noproxy option for reducing proxy checking for certain hosts, and the use of -proxyauth for authenticating on proxy servers allows for much greater flexibility when dealing with indexing jobs that involve proxy servers and firewalls. NOTE: Information Server V3.7does not support retrieving documents for viewing through secure proxy servers. Do not use -proxyauth for indexing documents which are to be viewed through Information Server V3.7.
148 Chapter 8 Verity Spider
Verity Spider SyntaxThe following section shows the syntax for several basic types of Verity Spider indexing tasks.
OverviewBefore you create an indexing task for a new collection, you should make copies of the relevant default style files to ensure that you have a set of template style files in a known, stable state.
Keep in mind that running multiple simultaneous Verity Spider jobs on the Information Server host may cause performance problems for searches. This does not mean you should never run indexing jobs when users may be searching, because your collections are available for searching even while indexing jobs are running. With an eye toward optimizing performance, you should try staggering your indexing jobs to avoid overloading your server.
The Verity Spider commandAt its most basic level, a Verity Spider command consists of the following:
vspider -initialize -collection coll [options]
Where -initialize is one of -start or -refresh (when starting points have changed), and -collection is required to provide a target for the Verity Spider, and [options] can be a near limitless combination of the options described later in this chapter.
For example:
c:\cfusion\bin\vspider -common c:\cfusion\verity\common -collection c:\new -start http://localhost -indinclude *
Note that there are of course dependencies for other options, depending on the nature of the indexing task. Some examples are:
• To build a new collection, you must use -style.
• To control how Verity Spider operates, including which documents it indexes, you should use at least some Verity Spider options.
Note that if you do not run the Verity Spider executable from its default installation directory, you must include that directory in your path. This is because the Verity Spider executable depends on other files to run properly.
The default location for the Verity Spider executable is as follows:
verity/prdname/platform/admin
Where verity/prdname is the user-definable portion of the installation directory, and platform will vary depending on your operating system.
Verity Spider Syntax 149
Using a command fileIf you want simpler reuse and archiving of your indexing commands, you should take advantage of the abstraction offered by the -cmdfile option. By using an ASCII text file to store a task’s options, you also avoid the pitfall of using special characters in an option’s parameter value.
For example, the -processbif option requires the use of "!*" and therefore any task using that option must also use the -cmdfile option.
Command-line option referenceThe following sections describe the Verity Spider V3.7 options. Note that option names are case-sensitive.
-start
A starting point for an indexing job. You can specify multiple instances, or use multiple values in a single instance.
When you execute an indexing job from a command-line and you do not use a command file (with -cmdfile), you must URL-escape any special characters in the starting point. To URL-escape a special character, use "%hex-ASCII-character-number" in place of the character. For example, you would use /time%26/ instead of /time&/. This allows the operating system to properly process the command string.
In the event an indexing task halts, you can re-run the task as-is. The persistent store for the specified collection is read and only those candidate URLs that are in the queue but not yet processed are parsed. Candidate URLs correspond to URLs of the following status as reported by vsdb:
cand, used, inse, upda, dele, fail.
NoteBy using -start with -refresh, you provide a starting point for Verity Spider and therefore do not need to use at least one of -host, -domain, -nofollow or -unlimited
For this repository type... The starting point is...
Web The URL or URLs from which the Verity Spider is to begin indexing. Use other options such as -jumps to control how far from the starting point Verity Spider goes.
File system The starting directory or directories in which the Verity Spider will start indexing. All subdirectories beneath the starting point will be indexed unless you use -pathlen, or any of the inclusion or exclusion criteria.
150 Chapter 8 Verity Spider
-refresh
Used for updating a collection, specifies that Verity Spider process only those documents which qualify as follows:
• They are new documents in the repository, and they qualify for indexing under the criteria.
• They exist in the collection and are recorded in the Verity Spider persistent store with a status of done. If Verity Spider determines that these indexed documents have been updated in the repository, then they are retrieved again to be reparsed and reindexed. Note that the document VdkVgwKey values do not change.
• They are deleted in the collection. If Verity Spider determines that documents have been deleted from the repository, then they are also deleted from the persistent store and the collection. The exception to this rule is when you use -nooptimize with -refresh. In this case, any document deleted from the repository is marked for deletion in the collection. It will be removed from the collection and the persistent store when the next indexing task is run for the collection.
When you re-run an existing indexing job, Verity Spider will automatically refresh the collection. If you add or remove any of the starting points, however, you must manually specify -refresh in order to refresh existing documents.
NoteYou can also use -start to provide a starting point for Verity Spider. If you do not use -start, then you should use at least one of -host, -domain, or -nofollow. For further control, also see -refreshtime. If you do not use any constraint criteria, Verity Spider will operate without limits and will likely index far more than you intended.
Core Options 151
Core Options
-cmdfile
Specifies that Verity Spider reads command-line syntax from a file in addition to the options passed in the command-line. This option includes the path name to the file containing the command-line syntax. The -cmdfile option circumvents command-line length limits.
The syntax for the command-file is:
option optional_parameters
For better readability, you should put each option and any parameters on a single line. Verity Spider will be able to properly parse the lines.
NoteIt is highly recommended you take advantage of the abstraction offered by this option. User error in erroneously including or omitting options in subsequent indexing jobs can be greatly reduced.
-collection
Syntax
-cmdfile path_and_filename
Specifies that Verity Spider reads command-line syntax from a file in addition to the options passed in the command-line. This option includes the path name to the file containing the command-line syntax. The -cmdfile option circumvents command-line length limits.
The syntax for the command-file is:
option optional_parameters
For better readability, you should put each option and any parameters on a single line. Verity Spider will be able to properly parse the lines.
NoteIt is highly recommended you take advantage of the abstraction offered by this option. User error in erroneously including or omitting options in subsequent indexing jobs can be greatly reduced.
-help
Displays Verity Spider syntax options.
152 Chapter 8 Verity Spider
-jobpath
Syntax
-jobpath path
Specifies the location of the Verity Spider databases and the indexing job-related files and directories.
The job-related directories and their contents are:
• log All Verity Spider log files. See -loglevel for descriptions of the log files.
• bif Bulk insert files.
• temp Web pages cached for indexing.
You can also specify the temp directory by using the -temp option.
• admin Files created by the Information Server Admin Tool.
These directories are created for you beneath the last directory specified in path.
You must make sure that path values are unique for all indexing jobs. If you do not use -jobpath, Verity Spider will create a /spider/job directory within the collection. For multiple-collection tasks, the first collection specified will be used.
WarningYou cannot use multiple job paths for multiple simultaneous indexing tasks for the same collection. Only one indexing task at a time can run for a given collection.
-style
Syntax
-style path
Details Specifies the path to the style files to use when creating a new collection.
If -style is not specified, Verity Spider uses the default style files in verity/prdname/common/style
Where verity/prdname is the user-definable portion of the installation directory.
NoteYou can safely omit -style when resubmitting an indexing job as the style information will already be part of the collection. If you are using -cmdfile, you can leave it there.
Processing Options 153
Processing Options
-abspath
Type: File system only
Generates absolute paths for files. Use this option when the document locations are not going to change, but the collection might be moved around.
When you index a Web server’s contents through the file system, you should use -prefixmap with -abspath to map the absolute filepaths to URLs.
See also -prefixmap.
-detectdupfile
Type: File system only
Details Enables checksum-based detection of duplicates when indexing file systems.
By default, a document checksum is not computed on indexed files. By using -detectdupfile, a checksum is computed based on the CRC-32 algorithm. The checksum combined with the document size is used to determine if the document is a duplicate.
-indexers
Syntax: -indexers num_indexers
Specifies the maximum number of indexing threads to run on a collection.
The default value is 2. Note that increasing the value for -indexers requires additional CPU and memory resources.
See also -maxindmem.
-license
Syntax: -license path_and_filename
Specifies the license file to use. By default, ind.lic is used, from:
verity/prdname/platform/admin/
Where verity/prdname is the user-definable portion of the installation directory, and platform represents the platform directory.
-maxindmem
Syntax: -maxindmem kilobytes
Specifies the maximum amount of memory, in kilobytes, used by each indexing thread. The number of threads is specified with -indexers.
154 Chapter 8 Verity Spider
By default, each indexing thread uses as much memory as is available from the system.
-maxnumdoc
Syntax: -maxnumdoc num_docs
Specifies the maximum number of documents to be downloaded or submitted for indexing. The value for num_docs does not necessarily correspond exactly to the number of documents indexed. The following factors affect the actual number.
Whether or not the value of num_docs falls within a block of documents dictated by -submitsize. If it does, the entire block of documents must be processed.
Whether or not documents retrieved are actually indexed because they are invalid or corrupt.
-mimemap
Syntax: -mimemap path_and_filename
Specifies a control file (simple ASCII text) that maps file extensions to MIME-types. This allows you to make custom associations and override defaults.
The format for the control file is:
#file_ext_no_dot mime-typeabc application/word
-nocache
Type: Web crawling only
Used with -noindex or -nosubmit, this option disables the caching of files during Web site indexing. This has the effect of decreasing the demands on your disk space.
Normally, Verity Spider downloads URLs and then writes them to a bulk insert file and downloads the documents themselves. When indexing occurs, once -submitsize has been reached, the cached files are indexed and then deleted. If you use -noindex, the bulk insert file is submitted but not processed by Verity Spider, and so the documents are not deleted until indexing occurs takes over. This will usually be mkvdk or collsvc, or you can subsequently use Verity Spider again with the -processbif option.
By using -nocache in conjunction with -noindex or -nosubmit, you avoid storing files locally at all. Files are downloaded only when indexing actually occurs.
See also -noindex.
-nodupdetect
Type: Web crawling only.
Disables checksum-based detection of duplicates when indexing Web sites. URL-based duplicate detection is still performed.
Processing Options 155
By default, a document checksum is computed based on the CRC-32 algorithm. The checksum combined with the document size is used to determine if the document is a duplicate.
See also -followdup.
-noindex
Specifies that the Verity Spider gathers document locations without indexing them. The document locations are stored in a bulk insert file (BIF), which is then submitted to the collection. This option is typically used in conjunction with a separate indexing process, such as mkvdk or collection servicers (collsvc). The BIF will be processed by the next indexing process run for the collection, whether it is the Verity Spider, mkvdk or collection servicers (collsvc).
Do not try to start both the Verity Spider and another process at the same time. You must allow Verity Spider enough time to generate enough work for the secondary indexing process to act upon. If you are using mkvdk, you can run it in persistent mode to ensure it will act upon work generated by Verity Spider.
NoteWhen you execute an indexing job for a collection and you use -noindex, the persistent store for the collection is not updated.
See also -nocache and -nosubmit.
For more information on mkvdk, see Chapter 9, “Managing Verity Collections with the mkvdk Utility” on page 185.
-nosubmit
Specifies that the Verity Spider gathers document locations without indexing them. The document locations are stored in a bulk insert file (BIF), which is not submitted to the collection. This option is typically used in conjunction with a separate indexing process, such as mkvdk or collection servicers (collsvc). You can also use Verity Spider again with the -processbif option. Note that with an indexing process other than Verity Spider, you must specify the name and path for the BIF because the collection has no record of it.
-persist
Syntax: -persist num_seconds
Enables the Verity Spider to run in persistent mode, checking for updates every num_seconds seconds until it is stopped.
While the Verity Spider is running in persistent mode, there is no optimization. Once the Verity Spider is taken out of persistent mode, you will need to perform optimization on the collection. For more information about using mkvdk Chapter 9, “Managing Verity Collections with the mkvdk Utility” on page 185.
156 Chapter 8 Verity Spider
NoteYou should not run more than one Verity Spider process in persistent mode. As the Verity Spider is a resource intensive process, you should only run it in persistent mode with an interval of less than one day. For time intervals greater than twelve hours, you should use some form of scheduling. Some examples are cron jobs for UNIX, and the AT command for Windows NT Server.
-preferred
Syntax: -preferred exp_1 [exp_n] ...
Type: Web crawling only
Specifies a list of hosts or domains which are to be preferred when retrieving documents for viewing. You can use wildcard expressions, where the asterisk ( * ) is for text strings and the question mark ( ? ) is for single characters. To use regular expressions, also specify the -regexp option. Use this option when you leave duplicate detection enabled and do not specify -nodupdetect.
When indexing, you may encounter a non-preferred host first. In that case, documents are parsed and followed and stored as candidates. When duplicates are encountered on another server, which is preferred, the duplicate documents from the non-preferred server are skipped. When documents are requested for viewing, they will be retrieved from the preferred server.
On Windows NT, you should include double quotes around the argument to protect the special characters such as (*). On UNIX, you should use single quotes. Note that this is only required when you run the indexing job from a command line. Quotes are not necessary within a command file (-cmdfile).
See Also -regexp
-prefixmap
Syntax: -prefixmap path_and_filename
Type: File system only
Specifies a control file (simple ASCII text) that maps file system paths to Web aliases.
In conjunction with -abspath, this option is typically used to create an URL field that is the Web equivalent of a file system path. File system indexing is faster than Web crawling over the network. If you use -prefixmap to replace the file system path with the Web URL, relative hyperlinks in the HTML pages are kept intact when viewed through Information Server.
The format for the control file is:
src_field src_prefix dest_field dest_prefix
If you use backslashes, you must double them so they are properly escaped. For example:
C:\\test\\docs\\path

Processing Options 157
For example, to map the filepath /usr/pub/docs to http://web/~verity, use the following:
vdkvgwkey /usr/pub URL http://web/~verity
See also -abspath.
-processbif
Syntax: -processbif ’command_string !*’
Due to the use of special characters, which represent the bulk insert file (BIF), you must run Verity Spider with a command file using the -cmdfile option.
Specifies a command string in which you can call a program or script which operates on BIFs generated by Verity Spider.
For example, if you want to use a script called fix_bif to add customized information to BIF files, use the following command:
vspider -cmdfile filename
Where filename is the text-only command file which contains the following (among any other necessary options):
-processbif ’fix_bif !*’
Note that your command file will include other options as well.
-regexp
Specifies the use of regular expressions rather than the default wildcard expressions for the following options: -exclude, -indexclude, -include, -indinclude, -skip, -indskip, -preferred, and -nofollow.
Wildcard expressions allow the use of the asterisk ( * ) for text strings, and the question mark ( ? ) for single characters.
Regular expressions allow for more powerful and flexible means for matching alphanumeric strings. For example, to match "ab11" or "ab34" but not "abcd" or "ab11cd," you could use the following regular expression:
^ab[0-9][0-9]$
The full extent to which regular expressions can be employed is beyond the scope of this description. For more information on regular expressions, refer to a book devoted to the subject.
This wildcard expression... Will apply to these text strings...
a*t although, attitude, audit
file?.htm files.htm, file1.htm, filer.htm
name?.* names.txt, name.doc, named.blank, names.ext
158 Chapter 8 Verity Spider
-submitsize
Syntax: -submitsize num_documents
Specifies the number of documents submitted for indexing at one time. The default value is 128. The upper limit is 64,000.
NoteAlthough larger values mean more efficient processing by the indexer, smaller values will allow more parallelism on multi-CPU systems. Furthermore, in the event of a halt during indexing, a smaller value means fewer documents will be lost.
If a halt occurs during indexing, the chunk of documents specified by -submitsize is lost because there is no transactional rollback for indexing and the documents are no longer in the queue for indexing. Remember that when you re-run the indexing task, Verity Spider can only continue with URLs and documents which are enqueued.
-temp
Syntax: -temp path
Specifies the directory for temporary files (disk cache). By default, the temp directory is contained within the job directory (optionally specified with the -jobpath option.
If you do not specify a value for this option, Verity Spider will create a /spider/temp directory within the collection. For multiple-collection tasks, the first collection specified will be used.
NoteMake sure the location you specify contains enough disk space to handle the documents which are downloaded and held before indexing. The documents are deleted from the harddisk after they are indexed.
See also -jobpath, for specifying the location of all indexing job directories and files, one of which is the temp directory.
Networking Options 159
Networking Options
-agentname
Syntax: -agentname string
Type: Web crawling only.
Specifies the value for the agent name field that is part of the HTTP request. Since Web servers can be configured to return different versions of the same page depending on the requesting agent, you can use -agentname to impersonate a browser client.
Use double-quotes if the name contains a space. Use -cmdfile if the agent name you want to use contains forbidden characters such as slashes or backslashes.
-connections
Syntax: -connections num_connections
Details Specifies the maximum number of simultaneous socket connections to make to Web sites for indexing. Each connection implies a separate thread.
The default value is 6.
NoteVerity Spider’s dynamic flow control makes the most use of all available connections when indexing Web sites. If you are indexing multiple sites, you may want to increase this number. Note that increasing the number of connections may not always help because of such dependencies as your network connection and the capabilities of the remote hosts.
-delay
Syntax: -delay num_milliseconds
Type: Web crawling only.
Details Specifies the minimum time between HTTP requests in milliseconds. The default value is 0 milliseconds for no delay.
-header
Syntax: -header string
Type: Web crawling only
Specifies an HTTP header to be added to the spidering request. For example:
-header "Referer: http://www.verity.com/"
Verity Spider sends some predefined headers, such as Accept and User-Agent among others, by default. Special headers are sometimes necessary to correctly index a site.
160 Chapter 8 Verity Spider
For example, previous versions of Verity Spider did not support the "Host" header, which is needed for Virtual Host indexing. Also, a "Proxy-authentication" header was needed to pass a username and password to a proxy server.
In Verity Spider V3.7, the "Host" header is supported by default, and the -proxyauth option is available for proxy server authentication. Therefore the -header option is maintained only for backwards compatibility and possible future enhancements.
NoteMisuse of this option will cause spider failure. In the event that this happens, re-run the indexing task with modified -header values.
-hostcache
Syntax: -hostcache num_hostnames
Specifies the number of hostnames to cache to avoid DNS lookups. Without this option, the host cache will continue to grow.
The default value is 256.
-noflowctrl
Type: Web crawling only.
Disables round-robin indexing of Web sites with network flow control.
By default, Verity Spider uses round-robin indexing of Web sites to avoid overwhelming a Web server and to improve indexing performance. Verity Spider connects to each Web server in a round-robin manner, using up to the value for -connections. This means one URL is fetched from each Web server in turn.
NoteUsing -noflowctrl may result in a significant drop in performance.
-noproxy
Syntax: -noproxy name_1 [name_n] ...
Type: Web crawling only.
Used in conjunction with -proxy, -noproxy specifies that the Verity Spider directly access the hosts whose names match those specified. By default, when -proxy is specified, the Verity Spider first tries to access every host with the proxy information. To improve performance, use -noproxy for those hosts you know can be accessed without a proxy host. For the name variable, you can use the asterisk ( * ) wildcard for text strings. For example:
’*.verity.com’
You cannot use the question mark ( ? ) wildcard, and the -regexp option does not allow you to use regular expressions.
Networking Options 161
On Windows NT, you should include double quotes around the argument to protect the special character ( * ). On UNIX, you should use single quotes. Note that this is only required when you run the indexing job from a command line. Quotes are not necessary within a command file (-cmdfile).
NoteYou must have valid Verity Spider licensing capability to use this option.
-proxy
Syntax: -proxy proxyhost:port
Type: Web crawling only.
Specifies host and port for proxy server.
Note You must have valid Verity Spider licensing capability to use this option.
See also -proxyauth for proxy servers that require authentication, and -noproxy for hosts which you know are accessible without having to go through a proxy server.
-proxyauth
Syntax: -proxyauth login:password
Type: Web crawling only.
Specifies login information for proxy server connections that require authorization to get outside the firewall. Used in conjunction with -proxy.
NoteYou must have valid Verity Spider licensing capability to use this option. Information Server V3.7 does not support retrieving documents for viewing through secure proxy servers. Do not use -proxyauth for indexing documents which are to be viewed through Information Server V3.7
-retry
Syntax: -retry num_retries
Type: Web crawling only.
Specifies the number of times the Verity Spider should attempt to access an URL. You should use -retry when it is likely that an unstable network connection will give false rejections.
The default value is 4.
-timeout
Syntax: -timeout num_seconds
Type: Web crawling only.

162 Chapter 8 Verity Spider
Specifies the time period, in seconds, that the Verity Spider should wait before timing out on a network connection and on accessing data. The data access value is automatically twice the value you specify for the network connection timeout.
The default value for the network connection timeout is 30 seconds, and therefore the value for the data access timeout is 60 seconds.
Paths and URLs Options 163
Paths and URLs Options
-auth
Syntax: -auth path_and_filename
Specifies an authorization file to support authentication for secure paths.
NoteThere must be a corresponding "Authfile=" entry in the Information Server configuration file, inetsrch.ini, so that documents can be accessed for viewing. Both -auth and Authfile= must point to the same file.
-cgiok
Type: Web crawling only.
Allows indexing of URLs containing the ? symbol. This typically means the URL leads to a CGI or other such processing program.
The return document produced by the Web server is indexed and parsed for document links which are followed and in turn indexed and parsed. However, if the Web server does not return a page, perhaps because the URL is missing parameters which are required for processing in order to produce a page, then nothing happens. There is no page to index and parse.
Example
A URL without parameters is:
http://server.com/cgi-bin/program?
If you include parameters in the URL to be indexed, as specified with the -start option, then those parameters are processed and any resulting pages are indexed and parsed.
By default, URLs with ? symbols are skipped.
-domain
Syntax: -domain name_1 [name_n] ...
Type: Web crawling only.
Limits indexing to the specified domain(s). You must use only complete text strings for domains. You may not use wildcard expressions. URLs not in the specified domain(s) will not be downloaded or parsed.
You may list multiple domains by separating each one with a single space.
NoteYou must have the appropriate Verity Spider licensing capability to use this option.
164 Chapter 8 Verity Spider
-followdup
Specifies that Verity Spider follows links within duplicate documents, although only the first instance of any duplicate documents will be indexed.
You may find this option useful if you use the same home page on multiple sites. By default, only the first instance of the document is indexed, while subsequent instances are skipped. If you have different secondary documents on the different sites, using -followdup will allow you to get to them for indexing, while still indexing the common home page only once.
-followsymlink
Type: File system only.
Specifies that Verity Spider follows symbolic links when indexing UNIX file systems.
-host
Syntax: -host name_1 [name_n] ...
Type: Web crawling only.
Limits indexing to the specified host or hosts. You must use only complete text strings for hosts. You may not use wildcard expressions.
You may list multiple hosts by separating each one with a single space. URLs not on the specified host(s) will not be downloaded or parsed.
-https
Type: Web crawling only.
Allows the indexing of SSL-enabled Web sites.
NoteYou must have the Verity SSL Option Pack installed to use -https. The Verity SSL Option Pack is a Verity Spider add-on available separately from a Verity salesperson.
-jumps
Syntax: -jumps num_jumps
Type: Web crawling only.
Specifies the maximum number of levels deep an indexing job can go from the starting URL. Specify a number between 0 and 254.
The default value is unlimited. If you see extremely large numbers of documents in a collection where you do not expect them, you should consider experimenting with this option, in conjunction with the Content options, to pare down your collection.

Paths and URLs Options 165
-nodocrobo
Specifies ROBOT META tag directives are to be ignored.
In HTML 3.0 and earlier, robot directives could only be given as the file robots.txt under the root directory of a Web site. In HTML 4.0, every document can have robot directives embedded in the META field. Use this option to ignore them. This option should, of course, be used with discretion.
See Also -norobo and http://www.w3c.org/TR/REC-html40/html40.txt.
-nofollow
Syntax: -nofollow "exp"
Type: Web crawling only.
Specifies Verity Spider cannot follow any URLs which match the expression exp. If you do not specify a exp value for -nofollow, then Verity Spider assumes a value of "*" where no documents are followed.
You can use wildcard expressions, where the asterisk ( * ) is for text strings and the question mark ( ? ) is for single characters. You should always encapsulate the exp values in double quotes to ensure they are properly interpreted.
If you use backslashes, you must double them so they are properly escaped. For example:
C:\\test\\docs\\path
To use regular expressions, also specify the -regexp option.
Previous versions of the Verity Spider did not allow the use of an expression. This meant that for each starting point URL, only the first document would be indexed. With the addition of the expression functionality, you can now selectively skip URLs even within documents.
See also -regexp
-norobo
Type: Web crawling only.
Specifies that any robots.txt files encountered are ignored. The robots.txt file is used on many Web sites to specify what parts of the site indexers should avoid. The default is to honor any robots.txt files.
If you are re-indexing a site and robots.txt has changed, the Verity Spider will delete documents that have been newly disallowed by robots.txt.
This option should, of course, be used with discretion and extreme care, especially in conjunction with -cgiok.
See Also -nodocrobo and http://info.webcrawler.com/mak/projects/robots/norobots.html.
166 Chapter 8 Verity Spider
-pathlen
Syntax: -pathlen num_pathsegments
Limits indexing to the specified number of path segments in the URL or file system path. The path length is determined as follows:
The host name and drive letter are not included. For example, neither www.spider.com:80/ nor C:\ would be included in determining the path length.
All elements following the host name are included.
The actual filename, if present, is included. For example, /world.html would be included in determining the path length.
Any directory paths between the host and the actual filename are included.
Example
For the following URL, the path length would be 4:
http://www.spider:80/comics/fun/funny/world.html<-1-> <2> <-3-> <---4--->
For the following file system path, the path length would be 3:
C:\files\docs\datasheets<-1-> <-2-> <---3--->
The default value is 100 path segments.
-refreshtime
Syntax: -refreshtime timeunits
Specifies that any documents which have been indexed since the timeunits value began are not to be refreshed.
The syntax for timeunits is:
n day n hour n min n sec
Where n is a positive integer. Note that there must be spaces, and since the first three letters of each time unit is parsed, you can use the singular or plural form.
If you specify:
-refreshtime 1 day 6 hours
Only those documents which were last indexed at least 30 hours and 1 second ago, will be refreshed.
NoteThis option is valid only with the -refresh option. When you use vsdb -recreate, the last indexed date is cleared.
Paths and URLs Options 167
-reparse
Type: Web crawling only.
Forces parsing of all HTML documents already in the collection. You must specify a starting point with the -start option when you use -reparse.
You can use -reparse when you want to include paths and documents which were previously skipped due to exclusion or inclusion criteria. Remember to change the criteria, else there will be little for the Verity Spider to do. This can be easy to overlook when you are using -cmdfile.
-unlimited
Specifies no limits to be placed on Verity Spider if neither -host nor -domain is specified. The default is to limit based on the host of the first starting point listed.
-virtualhost
Syntax: -virtualhost name_1 [name_n] ...
Specifies that DNS lookups are avoided for the hosts listed. You must use only complete text strings for hosts. You may not use wildcard expressions. This allows you to index by alias, such as when multiple Web servers are running on the same host. You can use regular expressions.
Normally, when Verity Spider resolves host names, it uses DNS lookups to convert the names to canonical names, of which there can be only one per machine. This allows for the detection of duplicate documents, to prevent results from being diluted. In the case of multiple aliased hosts, however, duplication is not a barrier as documents can be referred to by more than one alias, and yet remain distinct because of the different alias names.
Example
You may have both marketing.verity.com and sales.verity.com running on the same host. Each alias has a different document root, although document names such as index.htm may occur for both. With -virtualhost, both server aliases can be indexed as distinct sites. Without -virtualhost, they would both be resolved to the same host name and only the first document encountered from any duplicate pair would be indexed.
Warning! If you are using Netscape Enterprise Server, and you have specified only the host name as a virtual host, then Verity Spider will not be able to index the virtual host site. This is because the Verity Spider always adds the domain name to the document key.
168 Chapter 8 Verity Spider
Content Options
-casesen
Details Makes processing case-sensitive by specifying that the spider process separately keys that differ only in case. Use only for indexing UNIX servers.
-exclude
Syntax: -exclude exp_1 [exp_n] ...
Files, paths and URLs matching the specified expression(s) will not be followed. If you use backslashes, you must double them so they are properly escaped. For example:
C:\\test\\docs\\path
You can use wildcard expressions, where the asterisk ( * ) is for text strings and the question mark ( ? ) is for single characters. For example:
’/my_doc*/year199?’
On Windows NT, you should include double quotes around the argument to protect the special characters such as (*). On UNIX, you should use single quotes. Note that this is only required when you run the indexing job from a command line. Quotes are not necessary within a command file (-cmdfile).
To use regular expressions, also specify the -regexp option.
To specify a file, path or URL which you want followed but not indexed, use -indexclude. For document types, use -mimeexclude instead. For example, specify -mimeexclude application/pdf rather than -exclude *.pdf.
NoteWhen specifying an URL, you must use full, absolute paths using the same format as appears in the HTML hyperlink. If the link is relative, you must change it to absolute to use it with -exclude.
See also -regexp.
-include
Only those files, paths and URLs which match the specified expression or expressions will be followed. If you use backslashes, you must double them so they are properly escaped. For example:
C:\\test\\docs\\path
You can use wildcard expressions, where the asterisk ( * ) is for text strings and the question mark ( ? ) is for single characters. For example:
’/my_doc*/year199?’
Content Options 169
On Windows NT, you should include double quotes around the argument to protect the special characters such as (*). On UNIX, you should use single quotes. Note that this is only required when you run the indexing job from a command line. Quotes are not necessary within a command file (-cmdfile).
To use regular expressions, also specify the -regexp option.
Keep in mind that if your starting points do not contain the specified -include expressions, nothing will be indexed. The -include option prevents Verity Spider from even following anything which does not match the specified expressions. You may want to use -indinclude instead. Where -include prevents Verity Spider from even following anything which does not match the specified expressions, -indinclude allows Verity Spider to follow what matches the specified expressions, while not indexing.
For document types, use -mimeinclude instead. For example, specify -mimeinclude text/html rather than -include *.htm.
NoteWhen specifying an URL, you must use full, absolute paths using the same format as appears in the HTML hyperlink. If the link is relative, you must change it to absolute to use it with -include.
See also -regexp.
-indexclude
Syntax: -indexclude exp_1 [exp_n] ...
Specifies that the files and paths in URLs which match the expressions are not indexed. They are, however, still followed. If you use backslashes, you must double them so they are properly escaped. For example:
C:\\test\\docs\\path
You can use wildcard expressions, where the asterisk ( * ) is for text strings and the question mark ( ? ) is for single characters. For example:
’/my_doc*/year199?’
On Windows NT, you should include double quotes around the argument to protect the special characters such as (*). On UNIX, you should use single quotes. Note that this is only required when you run the indexing job from a command line. Quotes are not necessary within a command file (-cmdfile).
To use regular expressions, also specify the -regexp option.
You would use this option to gather some documents, such as HTML tables of contents, to gain access to other documents for indexing.
Where the -exclude option prevents Verity Spider from even following anything which matches the specified expressions, -indexclude allows Verity Spider to follow anything while only skipping that which matches the specified expressions.
For document types, use -indmimeexclude instead.
170 Chapter 8 Verity Spider
NoteWhen specifying an URL, you must use full, absolute paths using the same format as appears in the HTML hyperlink. If the link is relative, you must change it to absolute to use it with -indexclude.
See Also -regexp.
-indinclude
Syntax: -indinclude exp_1 [exp_n] ...
Specifies that only those files and paths in URLs which match the expressions be followed and indexed. If you use backslashes, you must double them so they are properly escaped. For example:
C:\\test\\docs\\path
You can use wildcard expressions, where the asterisk ( * ) is for text strings and the question mark ( ? ) is for single characters. For example:
’/my_doc*/year199?’
On Windows NT, you should include double quotes around the argument to protect the special characters such as (*). On UNIX, you should use single quotes. Note that this is only required when you run the indexing job from a command line. Quotes are not necessary within a command file (-cmdfile).
To use regular expressions, also specify the -regexp option.
Where the -include option prevents Verity Spider from even following anything which does not match the specified expressions, -indinclude allows Verity Spider to follow anything while only indexing that which matches the specified expressions.
Example
If you want to index all documents that include "search" in the URL at http://web.verity.com, you cannot use:
vspider -collection collname -start http://web.verity.com -include ’*search*’
This is because the starting point does not match the -include criteria. Instead, use -indinclude to follow all documents (unless, of course, you have specified any of the exclude options) and index only those documents that match your criteria. Simply replace -include with -indinclude in the above example.
NoteWhen specifying an URL, you must use full, absolute paths using the same format as appears in the HTML hyperlink. If the link is relative, you must change it to absolute to use it with -indinclude.
See Also -regexp.
Content Options 171
-indmimeexclude
Syntax: -indmimeexclude mime_1 [mime_n] ...
Specifies that only those MIME types which match the expressions be followed but not indexed.
On Windows NT, you should include double quotes around the argument to protect the special characters such as (*). On UNIX, you should use single quotes. Note that this is only required when you run the indexing job from a command line. Quotes are not necessary within a command file (-cmdfile).
Use this option to gather some documents, such as HTML tables of contents, to gain access to other documents for indexing. The -mimeexclude option, on the other hand, prevents specified documents from being followed at all. For the mime variable, you can include the asterisk ( * ) wildcard for text strings. For example:
’text/*’
You cannot use the question mark ( ? ) wildcard, and the -regexp option does not allow you to use regular expressions.
-indmimeinclude
Syntax: -indmimeinclude mime_1 [mime_n] ...
Specifies that only those MIME types which match the expressions be followed and indexed.
The -mimeinclude option would not allow you to index desired documents if the starting URL is not followed. For the mime variable, you can include the asterisk ( * ) wildcard for text strings. For example:
’text/*’
On Windows NT, you should include double quotes around the argument to protect the special character (*). On UNIX, you should use single quotes. Note that this is only required when you run the indexing job from a command line. Quotes are not necessary within a command file (-cmdfile).
You cannot use the question mark ( ? ) wildcard, and the -regexp option does not allow you to use regular expressions.
Example
If you want to index all Word documents at http://web.verity.com, you cannot use:
vspider -collection collname -style style_dir -start http://web.verity.com -mimeinclude ’application/msword’
This is because the starting point does not match the -mimeinclude criteria. Now, you can use -indmimeinclude to follow all documents (unless, of course, you have specified any of the exclude options) and index only those documents that match your criteria. Simply replace -mimeinclude with -indmimeinclude in the above example.
172 Chapter 8 Verity Spider
-indskip
Syntax: -indskip HTML_tag "exp"
Type: Web crawling only.
Specifies Verity Spider is follow and parse links, but not index, any HTML document which contains the text of exp within the given HTML_tag. For multiple HTML_tag and exp combinations, use multiple instances of the -skip option.
You can use wildcard expressions, where the asterisk ( * ) is for text strings and the question mark ( ? ) is for single characters. For example:
’/my_doc*/year199?’
On Windows NT, you should include double quotes around the argument to protect the special characters such as (*). On UNIX, you should use single quotes. Note that this is only required when you run the indexing job from a command line. Quotes are not necessary within a command file (-cmdfile).
If you use backslashes, you must double them so they are properly escaped. For example:
C:\\test\\docs\\path
To use regular expressions, also specify the -regexp option.
Example
To skip all HTML documents which contain the word "personnel" in the Title element, while still parsing those documents for links to other documents, use the following:
-indskip title "personnel"
Example
To avoid indexing directory listing pages, while still parsing the document and path links except for link up to the parent directory, use one of the following depending on the Web server being indexed:
For Netscape Web servers, use the following:
-indskip title "*Index of*"-nofollow "*parent directory*"
For Microsoft Internet Information Server, use the following:
-indskip a "*to parent directory*"-nofollow "*parent directory*"
-maxdocsize
Syntax: -maxdocsize integer
Specifies the maximum size, in kilobytes, for documents to be indexed. Any documents larger than the value specified by maxdocsize will be ignored.
The default is to index documents of any sizes.
Content Options 173
-metafile
Syntax: -metafile path_and_filename
Type: Web crawling only.
Allows you to use a text file to map custom meta tags to valid HTTP header fields. If you use backslashes, you must double them so they are properly escaped. For example: C:\\test\\docs\\path.
This means you are able to use your own meta tag, in the document, to replace what is returned by the Web server, or to insert it if nothing is returned. Currently, the only header fields of real value are "Last-Modified" and "Content-Length." Note, however, that future enhancements could allow for much greater variety.
The syntax for entries in the text file is:
name Last-Modified y|n
or
name Content-Length y|n
Where y|n is an override flag which can be either yes or no.
Example
A mapping file for -metafile might include:
Doc_Last_Touched Last-Modified nDoc_Size Content-Length y
If you use the y override flag, the value for the custom meta tag overrides the value for the valid field, even if both values are present and differ. This can be useful when the valid field value is always sent, but you want to specify your own value with a custom meta tag.
If you use the n override flag, then the value for the custom meta tag will be used only if there is no value for the valid field returned by the server. If a value for the valid field exists, then that is given precedence.
Warning! If you have several entries mapping to the same valid field, only the last entry will take effect.
-mimeexclude
Syntax: -mimeexclude mime_1 [mime_n] ...
Specifies MIME types which are neither followed nor indexed.
On Windows NT, you should include double quotes around the argument to protect the special characters such as (*). On UNIX, you should use single quotes. Note that this is only required when you run the indexing job from a command line. Quotes are not necessary within a command file (-cmdfile).
The default is to include all MIME types. For the mime variable, you can include the asterisk ( * ) wildcard for text strings. For example:
’text/*’
174 Chapter 8 Verity Spider
You cannot use the question mark ( ? ) wildcard, and the -regexp option does not allow you to use regular expressions.
Use -indmimeexclude to allow the Verity Spider to follow documents, without indexing them, to gain access to other desirable document types.
-mimeinclude
Syntax: -mimeinclude mime_1 [mime_n] ...
Specifies MIME types to be included.
On Windows NT, you should include double quotes around the argument to protect the special characters such as (*). On UNIX, you should use single quotes. Note that this is only required when you run the indexing job from a command line. Quotes are not necessary within a command file (-cmdfile).
The default is to include all MIME types. For the mime variable, you can include the asterisk ( * ) wildcard for text strings. For example:
’text/*’
You cannot use the question mark ( ? ) wildcard, and the -regexp option does not allow you to use regular expressions.
-mindocsize
Syntax: -mindocsize integer
Specifies the minimum size, in kilobytes, for documents to be indexed. Any documents smaller than the value specified by mindocsize will be ignored.
The default is to index documents of any sizes.
-skip
Syntax: -skip HTML_tag "exp"
Type: Web crawling only
Specifies Verity Spider is to not index any HTML document which contains the text of exp within the given HTML_tag. For multiple HTML_tag and exp combinations, use multiple instances of the -skip option.
You can use wildcard expressions, where the asterisk ( * ) is for text strings and the question mark ( ? ) is for single characters. For example:
’/my_doc*/year199?’
On Windows NT, you should include double quotes around the argument to protect the special characters such as (*). On UNIX, you should use single quotes. Note that this is only required when you run the indexing job from a command line. Quotes are not necessary within a command file (-cmdfile).
Content Options 175
If you use backslashes, you must double them so they are properly escaped. For example:
C:\\test\\docs\\path
To use regular expressions, also specify the -regexp option.
Example 1
To skip all HTML documents which contain the word "personnel" in the Title element, use the following:
-skip title "personnel"
Example 2
To skip all HTML documents which contain both the word "private" and the phrase "internal user" in any paragraph element, use the following:
-skip title "personnel"-skip p "*internal use*"
See also -regexp.
176 Chapter 8 Verity Spider
Locale Options
-charmap
Syntax: -charmap name
Specifies the character map to use. Valid values are 8859 or 850. The default value is 8859.
-common
Specifies path to the Verity home directory, verity/prdname/common, where verity/prdname is the user-definable portion of the installation directory.
NoteThis option is typically not needed, as long as the PATH environment variable is set correctly.
-datefmt
Syntax: -datefmt format
Specifies the Verity import date format to use. Valid values are MDY, DMY, YMD, USA and EUR. The default value is MDY.
-language
Syntax: -language name
Specifies the Verity locale to use in indexing. This option is being replaced by the semantically consistent -locale, and is still supported for backwards compatibility.
-locale
Syntax: -locale name
Specifies the Verity locale to use in indexing, such as German (deutsch) or French (francais). The default is English (english). This option is identical to -language.
-msgdb
Syntax: -msgdb path
Specifies the path to the ind.msg message database file.
If the Verity Spider was installed properly, this option should be unnecessary. By default, the ind.msg message database is read from:
verity/prdname/platform/admin

Locale Options 177
Where verity/prdname is the user-definable portion of the installation directory, and platform represents the platform directory.

178 Chapter 8 Verity Spider
Logging Options
-loglevel
Syntax: -loglevel [nostdout] argument
Specifies the types of messages to log. By default, messages are written to standard output and to various log files in the subdirectory named /log beneath the Verity Spider job directory. If you add nostdout to the loglevel argument, messages will not be written to standard output. Log files, however, will still be created.
Valid message types are described in the following table:
Message type Description
information Licensing information written to info.log. Included with all arguments.
warning Warning messages written to warning.log. Included with all arguments.
error Error messages written to error.log. Included with all arguments.
badkey Messages regarding keys which could not be indexed due to invalid documents, written to badkey.log. Included with all arguments.
progress Current state of a document key written to progress.log. Note that a key with a progress of "inserting" may wind up as a badkey and therefore skipped, rather than an indexed key. Included with all arguments.
summary Inserted, indexed and ignored messages written to summary.log. Included with all arguments except skip.
skip Skipped documents, with explanation, written to skip.log. Included with all arguments, except summary.
debug Internal Verity Spider processing messages such as enqueued, written to debug.log. Included with both debug and trace arguments.
trace Internal Verity Spider processing messages written to debug.log. Included only with the trace argument.
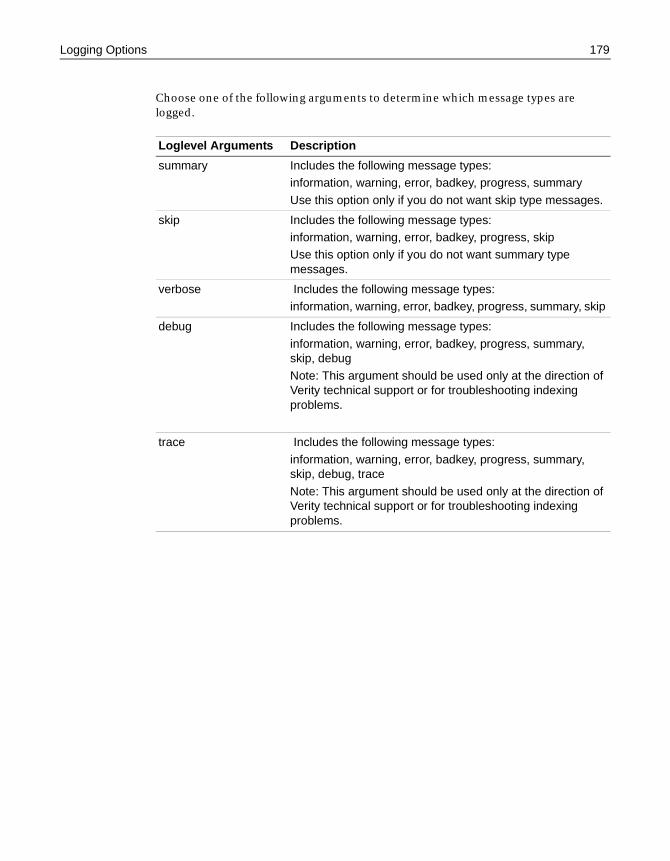
Logging Options 179
Choose one of the following arguments to determine which message types are logged.
Loglevel Arguments Description
summary Includes the following message types:information, warning, error, badkey, progress, summary
Use this option only if you do not want skip type messages.
skip Includes the following message types:information, warning, error, badkey, progress, skipUse this option only if you do not want summary type messages.
verbose Includes the following message types:information, warning, error, badkey, progress, summary, skip
debug Includes the following message types:
information, warning, error, badkey, progress, summary, skip, debug
Note: This argument should be used only at the direction of Verity technical support or for troubleshooting indexing problems.
trace Includes the following message types:
information, warning, error, badkey, progress, summary, skip, debug, trace
Note: This argument should be used only at the direction of Verity technical support or for troubleshooting indexing problems.
180 Chapter 8 Verity Spider
Maintenance Options
-nooptimize
Prevents the Verity Spider from optimizing the collection, thus reducing processing overhead during the indexing job. Use this option sparingly, as it leaves the collection in less than optimum shape. Some examples of when you might want to use this option are:
• You want to manually perform custom optimization of the collection, using mkvdk. By default the Verity Spider optimization mimics the mkvdk actions of maxmerge and vdbopt. For more information on mkvdk, see the Verity Collection Building Guide.
• You are running multiple indexing jobs against a collection, and want to wait until they are all finished to optimize.
Generally, you should not leave a collection unoptimized for too long, as search times can slow significantly.
In brief, optimizing a collection means creating a small number of large partitions, which can greatly reduce search times.
-purge
Deletes document tables and index files in the collection, and cleans up the collection’s persistent store. The collection is then "fresh" with its original style files, and is not deleted from the file system.
-repair
Specifies a failure-recovery mode for the collection, where the goal is to determine the causes of any errors, repair the errors (if possible), and bring a collection back up.
Although the Verity indexing engine always leaves the collection in a consistent, usable state, and no data can be lost or corrupted due to machine failures, it is possible for a process or event external to the Verity engine to corrupt one or more collections.
You can use -repair for constant failure-recovery operation, or you can run it selectively on collections that are "down."
Setting MIME Types 181
Setting MIME TypesYou can use the MIME type criteria options -mimeinclude, -indmimeinclude, -mimeexclude and -indmimeexclude to include or exclude MIME types.
Syntax restrictionsWhen you specify MIME type criteria, keep in mind the following restrictions.
Using the wildcard character (*)
The asterisk (*) wildcard character does not operate as a regular expression for the value of the MIME type criteria. Instead you can only use it to replace the entire MIME type or MIME sub-type.
For example, the following value is a valid substitute for text/html:
text/*
The following value is NOT a valid substitute for text/html:
text/h*
Multiple parameter values
When you specify a series of parameter values for a single instance of one of the MIME type criteria, and you use quotes, you must enclose each separate parameter value in single quotes.
For example:
-mimeinclude ’text/plain’ ’application/*’
If you enclose the entire sequence of parameter values,
-mimeinclude ’text/plain application/*’
the Verity Spider will consider the entire expression as a single value.
You can also use multiple instances of the MIME type criteria, each with a single parameter value, where quotes are necessary only if you use the wildcard character (*).
For example:
-mimeinclude text/plain-mimeinclude ’application/*’.Setting MIME Types
MIME types and Web crawlingWhen you index a Web site, the Verity Spider evaluates your MIME Type criteria against the "Content-Type" HTTP headers sent by the Web server hosting that Web site. That Web server passes along MIME Type information based on its own internal tables.
182 Chapter 8 Verity Spider
When you encounter MIME Types being dropped, make sure the Web server you are indexing has the necessary MIME Type information. See the documentation for your Web server for information about specifying MIME Types.
You can examine the indexing job’s log files for indications that files are being skipped due to MIME Types. For example, a typical ASCII file you might want indexed is a log file (filename.log). Unless the Web server understands that files with .LOG extensions are ASCII text, of MIME Type text/plain, you will see in the indexing job log file that .LOG files are skipped because of MIME Type even if you use:
-mimeinclude ’text/*’
MIME types and file system indexingWhen you index a file system, the Verity Spider reads filenames and evaluates your MIME Type criteria against an internal, compiled list of known MIME Types and associated file extensions. You cannot edit this list. However, you can use the -mimemap option to create a custom MIME Type mapping.
When you encounter MIME Types being dropped, check if the Verity Spider recognizes that particular MIME Type. See the table, “Known MIME types for file system indexing” on page 183 for more details.
You can examine the indexing job’s log files for indications that files are being skipped due to MIME types. For example, a typical ASCII file you might want indexed is a log file (filename.log). Since the Verity Spider does not understand that files with .LOG extensions are ASCII text, of MIME Type text/plain, you will see in the indexing job log file that .LOG files are skipped because of MIME Type even if you use:
-mimeinclude ’text/*’.Setting MIME Types
Indexing unknown MIME typesWhenever you find MIME Types being dropped, or you know you will be indexing files whose extensions are not known to the Verity Spider by default, use the -mimemap option to point to a file which contains your own custom mappings for file extensions and MIME Types.
You can also use the regular expression ’*/*’ for your MIME Type criteria.
For example:
-mimeinclude ’*/*’
Remember, on either platform you need to include single quotes for values which include wildcard characters.
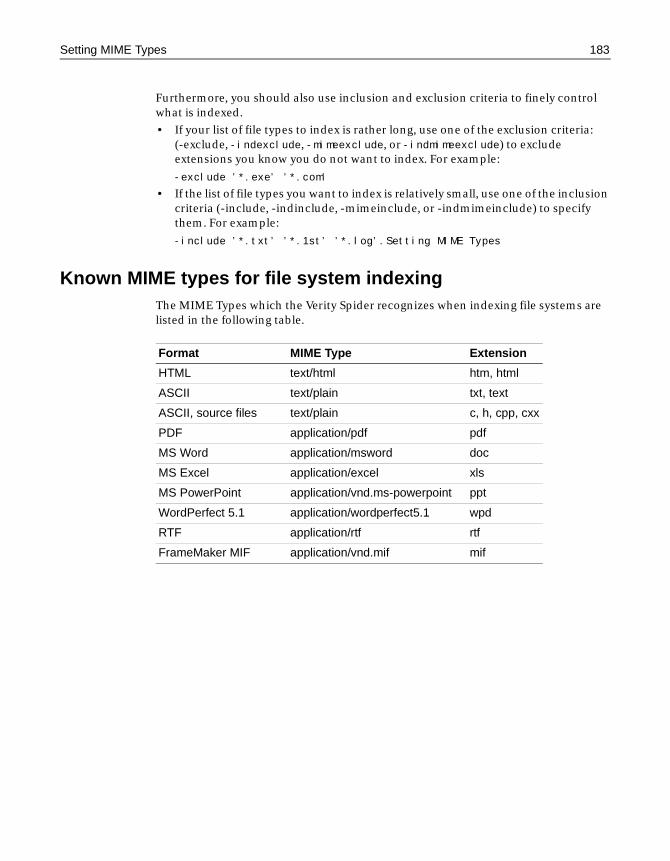
Setting MIME Types 183
Furthermore, you should also use inclusion and exclusion criteria to finely control what is indexed.
• If your list of file types to index is rather long, use one of the exclusion criteria: (-exclude, -indexclude, -mimeexclude, or -indmimeexclude) to exclude extensions you know you do not want to index. For example:
-exclude ’*.exe’ ’*.com’
• If the list of file types you want to index is relatively small, use one of the inclusion criteria (-include, -indinclude, -mimeinclude, or -indmimeinclude) to specify them. For example:
-include ’*.txt’ ’*.1st’ ’*.log’.Setting MIME Types
Known MIME types for file system indexingThe MIME Types which the Verity Spider recognizes when indexing file systems are listed in the following table.
Format MIME Type Extension
HTML text/html htm, html
ASCII text/plain txt, text
ASCII, source files text/plain c, h, cpp, cxx
PDF application/pdf pdf
MS Word application/msword doc
MS Excel application/excel xls
MS PowerPoint application/vnd.ms-powerpoint ppt
WordPerfect 5.1 application/wordperfect5.1 wpd
RTF application/rtf rtf
FrameMaker MIF application/vnd.mif mif

184 Chapter 8 Verity Spider
Chapter 9
Managing Verity Collections with the mkvdk Utility
mkvdk is a command-line utility installed with ColdFusion that you can use to perform maintenance operations on Verity collections, which are the primary data type for building searching/indexing functionality into your ColdFusion application pages.
Contents
• Overview of the Verity mkvdk Utility ..................................................................... 186
• Getting Started with the Verity mkvdk Utility ....................................................... 187
• Bulk Submit Options............................................................................................... 194
• Collection Maintenance Options........................................................................... 195
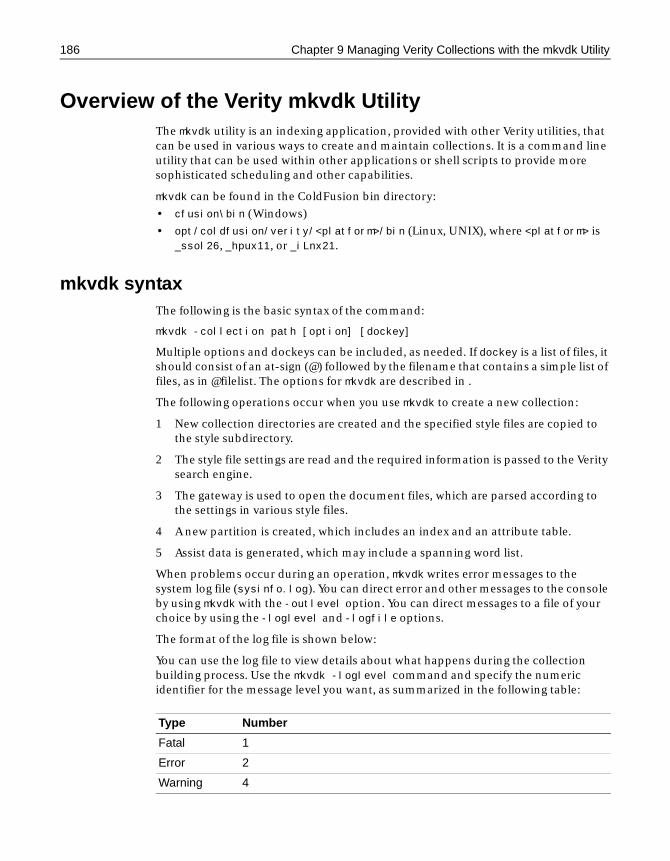
186 Chapter 9 Managing Verity Collections with the mkvdk Utility
Overview of the Verity mkvdk UtilityThe mkvdk utility is an indexing application, provided with other Verity utilities, that can be used in various ways to create and maintain collections. It is a command line utility that can be used within other applications or shell scripts to provide more sophisticated scheduling and other capabilities.
mkvdk can be found in the ColdFusion bin directory:
• cfusion\bin (Windows)
• opt/coldfusion/verity/<platform>/bin (Linux, UNIX), where <platform> is _ssol26, _hpux11, or _iLnx21.
mkvdk syntaxThe following is the basic syntax of the command:
mkvdk -collection path [option] [dockey]
Multiple options and dockeys can be included, as needed. If dockey is a list of files, it should consist of an at-sign (@) followed by the filename that contains a simple list of files, as in @filelist. The options for mkvdk are described in .
The following operations occur when you use mkvdk to create a new collection:
1 New collection directories are created and the specified style files are copied to the style subdirectory.
2 The style file settings are read and the required information is passed to the Verity search engine.
3 The gateway is used to open the document files, which are parsed according to the settings in various style files.
4 A new partition is created, which includes an index and an attribute table.
5 Assist data is generated, which may include a spanning word list.
When problems occur during an operation, mkvdk writes error messages to the system log file (sysinfo.log). You can direct error and other messages to the console by using mkvdk with the -outlevel option. You can direct messages to a file of your choice by using the -loglevel and -logfile options.
The format of the log file is shown below:
You can use the log file to view details about what happens during the collection building process. Use the mkvdk -loglevel command and specify the numeric identifier for the message level you want, as summarized in the following table:
Type Number
Fatal 1
Error 2
Warning 4

Getting Started with the Verity mkvdk Utility 187
To calculate the numeric parameter, add up the numbers for the message types you want to include. The default for both -outlevel and -loglevel is 15, which selects fatal, error, warning, and status messages (1+2+4+8).
Getting Started with the Verity mkvdk UtilityThe basic mkvdk syntax is as follows:
mkvdk -collection path [option] [...] [filespec] [...]
Where:
• Square brackets ( [] ) indicate optional items.
• An ellipsis (...) indicates repetition of the previous item. Thus, [filespec] [...] indicates an optional series of filespec items.
• filespec can be a document filename or a list of document filenames. If filespec is a list of files, it should consist of an at-sign (@) followed by the filename containing the list, as in @filelist.
• The -collection path argument is required to create or open a collection.
Numerous optional syntax options are listed below. All syntax options must precede the first filespec parameter.
Steps for building a collectionBuilding a collection with mkvdk involves setting up a collection directory structure and inserting documents into this structure. You can build a collection in two steps, using two separate mkvdk commands, as follows.
1 Set up a collection using this syntax:
mkvdk -create -collection collectionname
Where collectionname is the path to the collection directory. After running this command, a collection directory is created including style files with configuration information.
2 Insert documents using this syntax:
mkvdk -collection collectionname -bulk -insert filespec
Where filespec is the name of a bulk insert file which specifies which documents to index and insert into the collection.
Status 8
Info 16
Verbose 32
Debug 64
Type Number
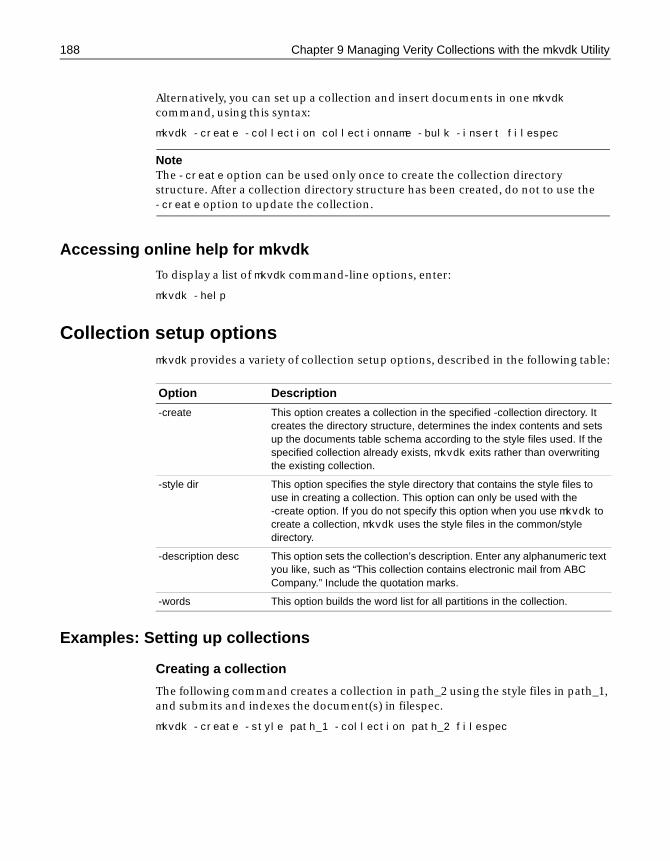
188 Chapter 9 Managing Verity Collections with the mkvdk Utility
Alternatively, you can set up a collection and insert documents in one mkvdk command, using this syntax:
mkvdk -create -collection collectionname -bulk -insert filespec
NoteThe -create option can be used only once to create the collection directory structure. After a collection directory structure has been created, do not to use the -create option to update the collection.
Accessing online help for mkvdk
To display a list of mkvdk command-line options, enter:
mkvdk -help
Collection setup optionsmkvdk provides a variety of collection setup options, described in the following table:
Examples: Setting up collections
Creating a collection
The following command creates a collection in path_2 using the style files in path_1, and submits and indexes the document(s) in filespec.
mkvdk -create -style path_1 -collection path_2 filespec
Option Description
-create This option creates a collection in the specified -collection directory. It creates the directory structure, determines the index contents and sets up the documents table schema according to the style files used. If the specified collection already exists, mkvdk exits rather than overwriting the existing collection.
-style dir This option specifies the style directory that contains the style files to use in creating a collection. This option can only be used with the -create option. If you do not specify this option when you use mkvdk to create a collection, mkvdk uses the style files in the common/style directory.
-description desc This option sets the collection’s description. Enter any alphanumeric text you like, such as “This collection contains electronic mail from ABC Company.” Include the quotation marks.
-words This option builds the word list for all partitions in the collection.
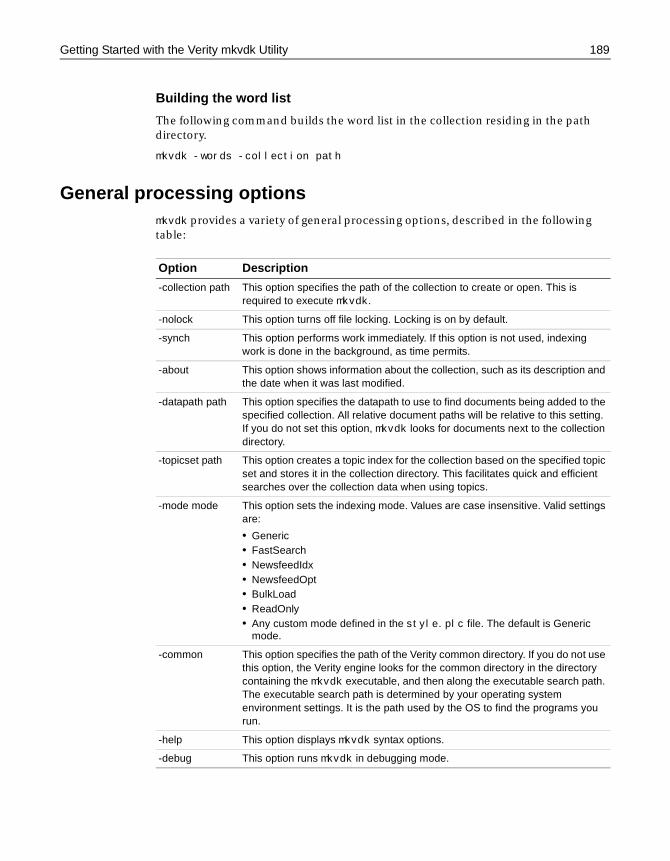
Getting Started with the Verity mkvdk Utility 189
Building the word list
The following command builds the word list in the collection residing in the path directory.
mkvdk -words -collection path
General processing optionsmkvdk provides a variety of general processing options, described in the following table:
Option Description
-collection path This option specifies the path of the collection to create or open. This is required to execute mkvdk.
-nolock This option turns off file locking. Locking is on by default.
-synch This option performs work immediately. If this option is not used, indexing work is done in the background, as time permits.
-about This option shows information about the collection, such as its description and the date when it was last modified.
-datapath path This option specifies the datapath to use to find documents being added to the specified collection. All relative document paths will be relative to this setting. If you do not set this option, mkvdk looks for documents next to the collection directory.
-topicset path This option creates a topic index for the collection based on the specified topic set and stores it in the collection directory. This facilitates quick and efficient searches over the collection data when using topics.
-mode mode This option sets the indexing mode. Values are case insensitive. Valid settings are:
• Generic• FastSearch• NewsfeedIdx• NewsfeedOpt• BulkLoad• ReadOnly• Any custom mode defined in the style.plc file. The default is Generic
mode.
-common This option specifies the path of the Verity common directory. If you do not use this option, the Verity engine looks for the common directory in the directory containing the mkvdk executable, and then along the executable search path. The executable search path is determined by your operating system environment settings. It is the path used by the OS to find the programs you run.
-help This option displays mkvdk syntax options.
-debug This option runs mkvdk in debugging mode.
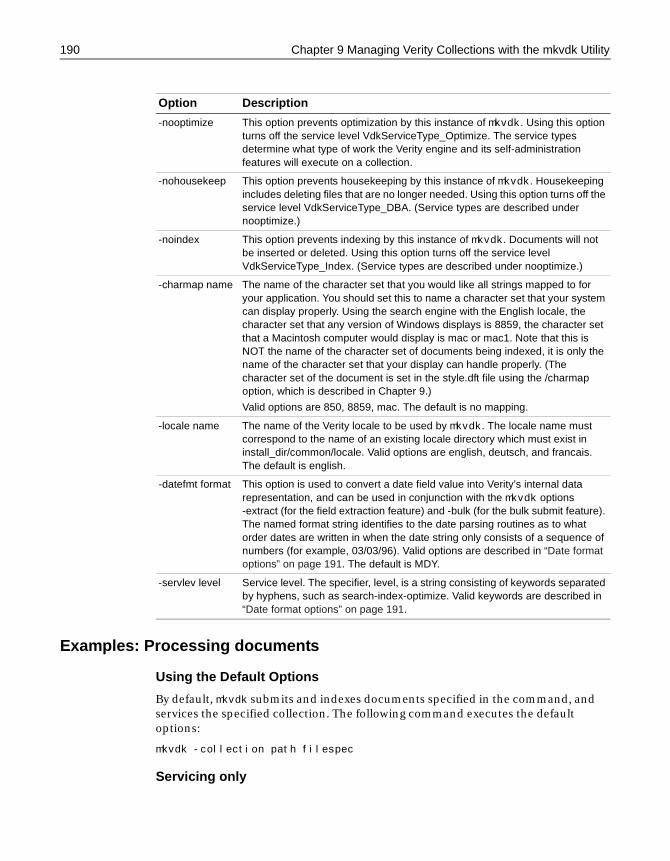
190 Chapter 9 Managing Verity Collections with the mkvdk Utility
Examples: Processing documents
Using the Default Options
By default, mkvdk submits and indexes documents specified in the command, and services the specified collection. The following command executes the default options:
mkvdk -collection path filespec
Servicing only
-nooptimize This option prevents optimization by this instance of mkvdk. Using this option turns off the service level VdkServiceType_Optimize. The service types determine what type of work the Verity engine and its self-administration features will execute on a collection.
-nohousekeep This option prevents housekeeping by this instance of mkvdk. Housekeeping includes deleting files that are no longer needed. Using this option turns off the service level VdkServiceType_DBA. (Service types are described under nooptimize.)
-noindex This option prevents indexing by this instance of mkvdk. Documents will not be inserted or deleted. Using this option turns off the service level VdkServiceType_Index. (Service types are described under nooptimize.)
-charmap name The name of the character set that you would like all strings mapped to for your application. You should set this to name a character set that your system can display properly. Using the search engine with the English locale, the character set that any version of Windows displays is 8859, the character set that a Macintosh computer would display is mac or mac1. Note that this is NOT the name of the character set of documents being indexed, it is only the name of the character set that your display can handle properly. (The character set of the document is set in the style.dft file using the /charmap option, which is described in Chapter 9.)
Valid options are 850, 8859, mac. The default is no mapping.
-locale name The name of the Verity locale to be used by mkvdk. The locale name must correspond to the name of an existing locale directory which must exist in install_dir/common/locale. Valid options are english, deutsch, and francais. The default is english.
-datefmt format This option is used to convert a date field value into Verity’s internal data representation, and can be used in conjunction with the mkvdk options -extract (for the field extraction feature) and -bulk (for the bulk submit feature). The named format string identifies to the date parsing routines as to what order dates are written in when the date string only consists of a sequence of numbers (for example, 03/03/96). Valid options are described in “Date format options” on page 191. The default is MDY.
-servlev level Service level. The specifier, level, is a string consisting of keywords separated by hyphens, such as search-index-optimize. Valid keywords are described in “Date format options” on page 191.
Option Description
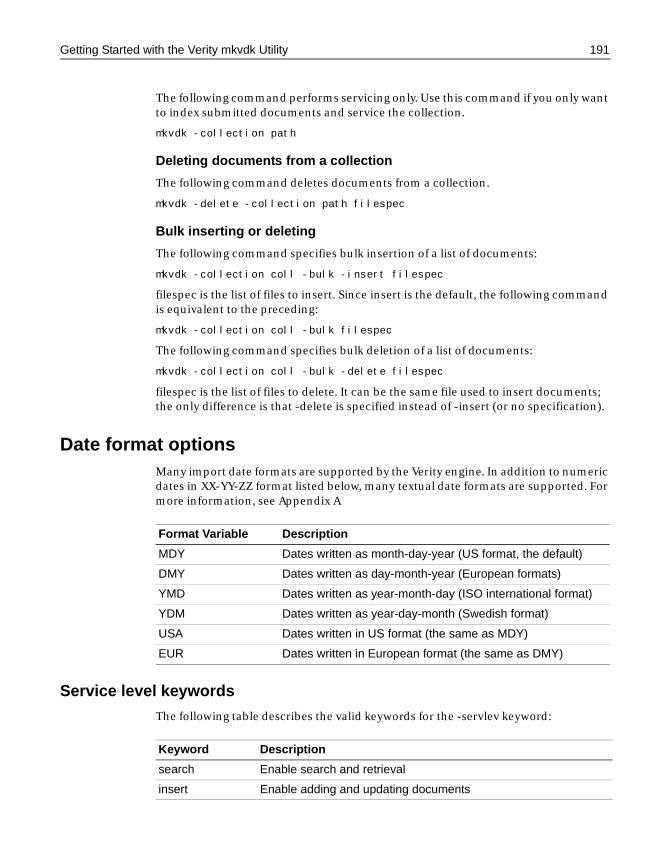
Getting Started with the Verity mkvdk Utility 191
The following command performs servicing only. Use this command if you only want to index submitted documents and service the collection.
mkvdk -collection path
Deleting documents from a collection
The following command deletes documents from a collection.
mkvdk -delete -collection path filespec
Bulk inserting or deleting
The following command specifies bulk insertion of a list of documents:
mkvdk -collection coll -bulk -insert filespec
filespec is the list of files to insert. Since insert is the default, the following command is equivalent to the preceding:
mkvdk -collection coll -bulk filespec
The following command specifies bulk deletion of a list of documents:
mkvdk -collection coll -bulk -delete filespec
filespec is the list of files to delete. It can be the same file used to insert documents; the only difference is that -delete is specified instead of -insert (or no specification).
Date format optionsMany import date formats are supported by the Verity engine. In addition to numeric dates in XX-YY-ZZ format listed below, many textual date formats are supported. For more information, see Appendix A
Service level keywords
The following table describes the valid keywords for the -servlev keyword:
Format Variable Description
MDY Dates written as month-day-year (US format, the default)
DMY Dates written as day-month-year (European formats)
YMD Dates written as year-month-day (ISO international format)
YDM Dates written as year-day-month (Swedish format)
USA Dates written in US format (the same as MDY)
EUR Dates written in European format (the same as DMY)
Keyword Description
search Enable search and retrieval
insert Enable adding and updating documents
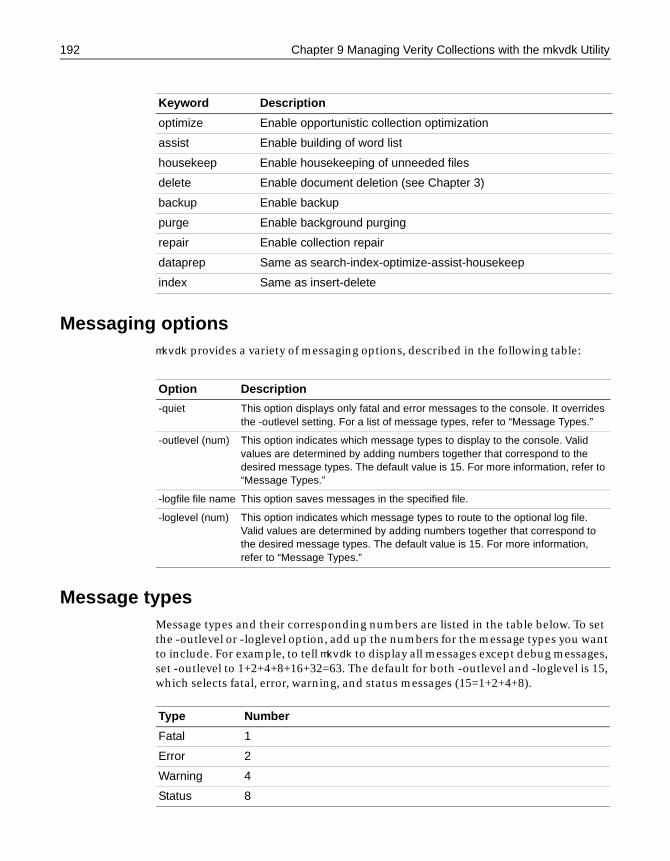
192 Chapter 9 Managing Verity Collections with the mkvdk Utility
Messaging optionsmkvdk provides a variety of messaging options, described in the following table:
Message typesMessage types and their corresponding numbers are listed in the table below. To set the -outlevel or -loglevel option, add up the numbers for the message types you want to include. For example, to tell mkvdk to display all messages except debug messages, set -outlevel to 1+2+4+8+16+32=63. The default for both -outlevel and -loglevel is 15, which selects fatal, error, warning, and status messages (15=1+2+4+8).
optimize Enable opportunistic collection optimization
assist Enable building of word list
housekeep Enable housekeeping of unneeded files
delete Enable document deletion (see Chapter 3)
backup Enable backup
purge Enable background purging
repair Enable collection repair
dataprep Same as search-index-optimize-assist-housekeep
index Same as insert-delete
Keyword Description
Option Description
-quiet This option displays only fatal and error messages to the console. It overrides the -outlevel setting. For a list of message types, refer to “Message Types.”
-outlevel (num) This option indicates which message types to display to the console. Valid values are determined by adding numbers together that correspond to the desired message types. The default value is 15. For more information, refer to “Message Types.”
-logfile file name This option saves messages in the specified file.
-loglevel (num) This option indicates which message types to route to the optional log file. Valid values are determined by adding numbers together that correspond to the desired message types. The default value is 15. For more information, refer to “Message Types.”
Type Number
Fatal 1
Error 2
Warning 4
Status 8
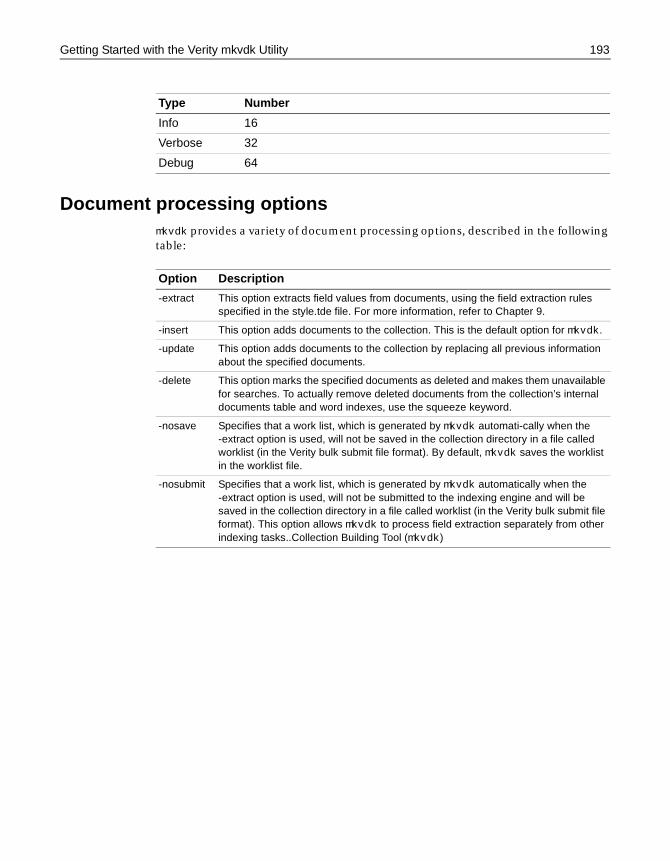
Getting Started with the Verity mkvdk Utility 193
Document processing optionsmkvdk provides a variety of document processing options, described in the following table:
Info 16
Verbose 32
Debug 64
Type Number
Option Description
-extract This option extracts field values from documents, using the field extraction rules specified in the style.tde file. For more information, refer to Chapter 9.
-insert This option adds documents to the collection. This is the default option for mkvdk.
-update This option adds documents to the collection by replacing all previous information about the specified documents.
-delete This option marks the specified documents as deleted and makes them unavailable for searches. To actually remove deleted documents from the collection’s internal documents table and word indexes, use the squeeze keyword.
-nosave Specifies that a work list, which is generated by mkvdk automati-cally when the -extract option is used, will not be saved in the collection directory in a file called worklist (in the Verity bulk submit file format). By default, mkvdk saves the worklist in the worklist file.
-nosubmit Specifies that a work list, which is generated by mkvdk automatically when the -extract option is used, will not be submitted to the indexing engine and will be saved in the collection directory in a file called worklist (in the Verity bulk submit file format). This option allows mkvdk to process field extraction separately from other indexing tasks..Collection Building Tool (mkvdk)
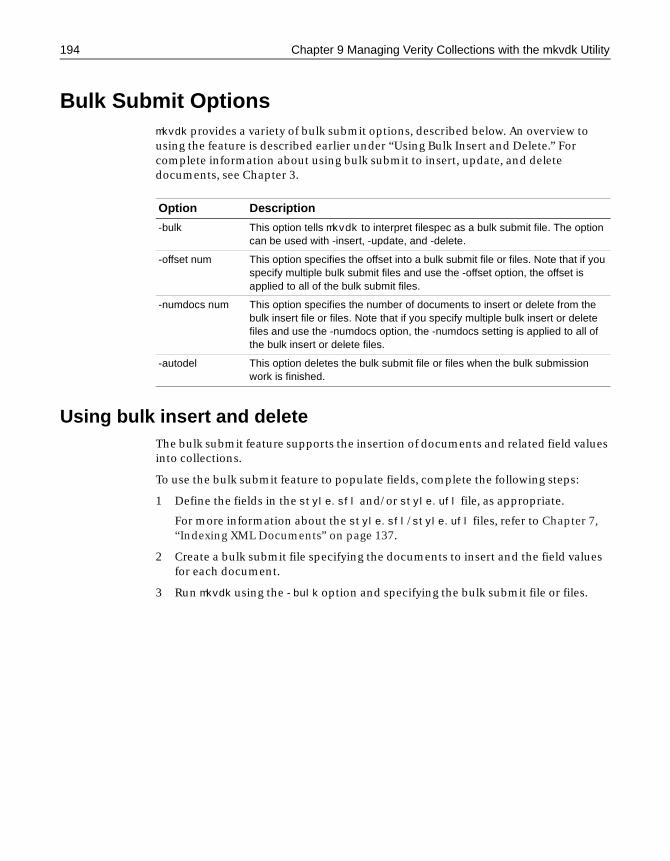
194 Chapter 9 Managing Verity Collections with the mkvdk Utility
Bulk Submit Optionsmkvdk provides a variety of bulk submit options, described below. An overview to using the feature is described earlier under “Using Bulk Insert and Delete.” For complete information about using bulk submit to insert, update, and delete documents, see Chapter 3.
Using bulk insert and deleteThe bulk submit feature supports the insertion of documents and related field values into collections.
To use the bulk submit feature to populate fields, complete the following steps:
1 Define the fields in the style.sfl and/or style.ufl file, as appropriate.
For more information about the style.sfl/style.ufl files, refer to Chapter 7, “Indexing XML Documents” on page 137.
2 Create a bulk submit file specifying the documents to insert and the field values for each document.
3 Run mkvdk using the -bulk option and specifying the bulk submit file or files.
Option Description
-bulk This option tells mkvdk to interpret filespec as a bulk submit file. The option can be used with -insert, -update, and -delete.
-offset num This option specifies the offset into a bulk submit file or files. Note that if you specify multiple bulk submit files and use the -offset option, the offset is applied to all of the bulk submit files.
-numdocs num This option specifies the number of documents to insert or delete from the bulk insert file or files. Note that if you specify multiple bulk insert or delete files and use the -numdocs option, the -numdocs setting is applied to all of the bulk insert or delete files.
-autodel This option deletes the bulk submit file or files when the bulk submission work is finished.
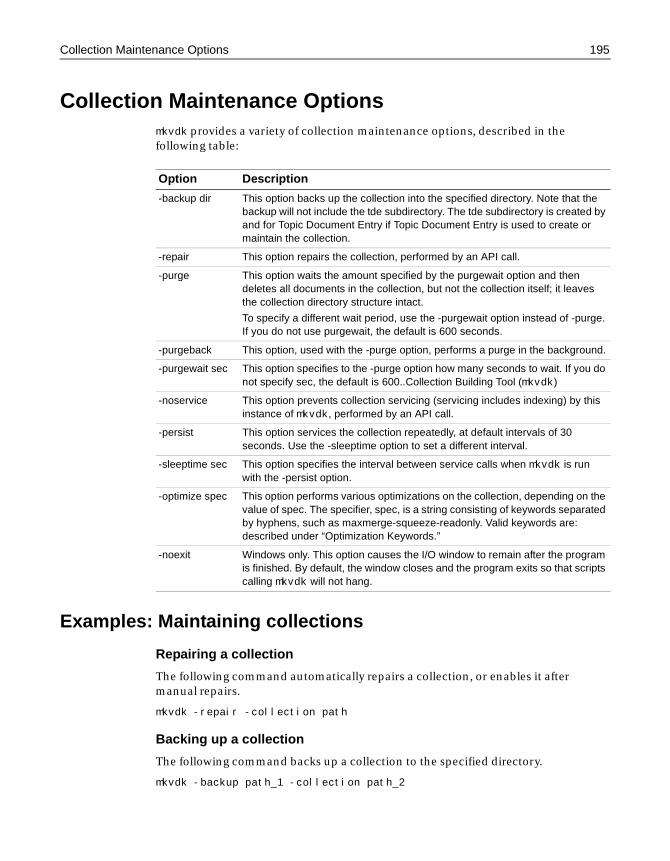
Collection Maintenance Options 195
Collection Maintenance Optionsmkvdk provides a variety of collection maintenance options, described in the following table:
Examples: Maintaining collections
Repairing a collection
The following command automatically repairs a collection, or enables it after manual repairs.
mkvdk -repair -collection path
Backing up a collection
The following command backs up a collection to the specified directory.
mkvdk -backup path_1 -collection path_2
Option Description
-backup dir This option backs up the collection into the specified directory. Note that the backup will not include the tde subdirectory. The tde subdirectory is created by and for Topic Document Entry if Topic Document Entry is used to create or maintain the collection.
-repair This option repairs the collection, performed by an API call.
-purge This option waits the amount specified by the purgewait option and then deletes all documents in the collection, but not the collection itself; it leaves the collection directory structure intact.
To specify a different wait period, use the -purgewait option instead of -purge. If you do not use purgewait, the default is 600 seconds.
-purgeback This option, used with the -purge option, performs a purge in the background.
-purgewait sec This option specifies to the -purge option how many seconds to wait. If you do not specify sec, the default is 600..Collection Building Tool (mkvdk)
-noservice This option prevents collection servicing (servicing includes indexing) by this instance of mkvdk, performed by an API call.
-persist This option services the collection repeatedly, at default intervals of 30 seconds. Use the -sleeptime option to set a different interval.
-sleeptime sec This option specifies the interval between service calls when mkvdk is run with the -persist option.
-optimize spec This option performs various optimizations on the collection, depending on the value of spec. The specifier, spec, is a string consisting of keywords separated by hyphens, such as maxmerge-squeeze-readonly. Valid keywords are: described under “Optimization Keywords.”
-noexit Windows only. This option causes the I/O window to remain after the program is finished. By default, the window closes and the program exits so that scripts calling mkvdk will not hang.
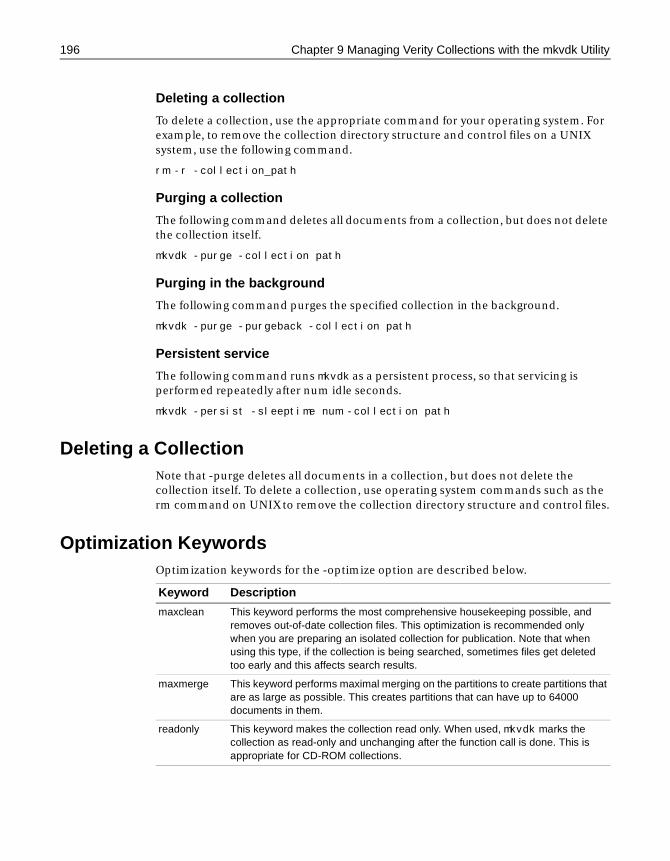
196 Chapter 9 Managing Verity Collections with the mkvdk Utility
Deleting a collection
To delete a collection, use the appropriate command for your operating system. For example, to remove the collection directory structure and control files on a UNIX system, use the following command.
rm -r -collection_path
Purging a collection
The following command deletes all documents from a collection, but does not delete the collection itself.
mkvdk -purge -collection path
Purging in the background
The following command purges the specified collection in the background.
mkvdk -purge -purgeback -collection path
Persistent service
The following command runs mkvdk as a persistent process, so that servicing is performed repeatedly after num idle seconds.
mkvdk -persist -sleeptime num -collection path
Deleting a CollectionNote that -purge deletes all documents in a collection, but does not delete the collection itself. To delete a collection, use operating system commands such as the rm command on UNIX to remove the collection directory structure and control files.
Optimization KeywordsOptimization keywords for the -optimize option are described below.
Keyword Description
maxclean This keyword performs the most comprehensive housekeeping possible, and removes out-of-date collection files. This optimization is recommended only when you are preparing an isolated collection for publication. Note that when using this type, if the collection is being searched, sometimes files get deleted too early and this affects search results.
maxmerge This keyword performs maximal merging on the partitions to create partitions that are as large as possible. This creates partitions that can have up to 64000 documents in them.
readonly This keyword makes the collection read only. When used, mkvdk marks the collection as read-only and unchanging after the function call is done. This is appropriate for CD-ROM collections.

Collection Maintenance Options 197
About squeezing deleted documentsWhen a document is deleted from a collection, its space is not recovered. It is merely marked as deleted and not available for subsequent searches. Squeezing actually removes deleted documents from the collection’s internal documents table and word indexes, thus creating a smaller collection and reducing the collection’s disk space. A smaller collection has a more efficient structure that makes searching slightly faster and uses slightly less memory.
When can you squeeze deleted documents? It is safe to squeeze deleted documents anytime for a collection because mkvdk ensures that the collection is available for searching and servicing through its self-administration features. The application does not need to temporarily disable a collection to squeeze deleted documents because when a squeeze request is made, the mkvdk assigns a new revision code to the collection. After a squeeze has occurred, the next time the application accesses the collection, the Verity engine notifies the application that dramatic changes have been made, and points the application to the new collection data.
Before squeezing deleted documents, you should be aware of some of its effects. Squeezing deleted documents out of a collection is a significant update to the collection. If users are reviewing search results at the time when squeezing occurs, the search results may be invalidated after the squeeze.
spanword This keyword creates a spanning word list across all the collection’s partitions. A collection consists of numerous smaller units called partitions each of which includes a word list. Optionally, a spanning word list can be built with an ngram index.
ngramindex This keyword builds an ngram index for the collection. An ngram index is designed to improve the search performance for queries with the <TYPO> and/or <WILDCARD> operators. An ngram index can not be built without a spanning word list. You can build a spanning word list and ngram index in the same command, for example:
mkvdk -collection collname -optimize spanword-ngramindex
squeeze This keyword squeezes deleted documents from the collection. Squeezing deleted documents recovers space in a collection, and improves search performance. Using this option invalidates the search results.
vdbopt Each collection consists of smaller units called Verity databases (VDBs). The vdbopt keyword configures the collection’s VDBs. This keyword has the effect of linearizing the data in a VDB, and making the collection metadata contained in the VDB more streamlined. It also allows the VDB to grow to a much larger size.
tuneup This keyword is a convenience keyword that includes maxmerge, vdbopt, and spanword.
publish This keyword is a convenience keyword that includes all of the optimization types. Use this keyword to optimize the collection for the best possible retrieval performance, such as for publication to a network on a server or on a CD-ROM.
Keyword Description
198 Chapter 9 Managing Verity Collections with the mkvdk Utility
About optimized Verity databasesThe Verity Database (VDB) is the fundamental storage mechanism responsible for supporting dynamic access to documents in collections. A VDB consists of simple tables with rows and columns that relate to each other by row position. VDB tables are not relational, and their architecture supports quick and efficient searching over textual data. A VDB consists of segments which are packed into a single file. One of the advantages of having one packed VDB file is optimized search performance. The fewer files that need to be opened during search processing, the faster the search performance.
The VDB optimization option optimizes the packing of a collection’s VDBs. When VDBs are built during normal indexing operations, the segments are not stored sequentially in the one-file VDB file system. As a result of VDB optimization, performance can be improved by re-serializing the packed segments in the VDBs so that all segments are contiguous, and VDBs can grow in size. Optimized VDBs can grow up to 2 gigabytes in size as opposed to the maximum 64 megabytes for an unoptimized one.
Using this option may degrade your indexing performance when certain indexing modes are set for the collection.
Performance tuning optionsmkvdk provides performance tuning options, described in the following table:
Option Description
-maxfiles num This option sets the maximum number of files that mkvdk can have open at once. The default is 50.
-diskcache num This option sets the size of the mkvdk disk cache in kbytes. The default is 128.

Chapter 10
Verity Troubleshooting Utilities
This chapter provides information about using a variety of Verity utilities for troubleshooting Verity collections.
Contents
• Overview of Verity Utilities ..................................................................................... 200
• Using the Verity rcvdk Utility.................................................................................. 201
• Attaching to a Collection Using rcvdk ................................................................... 202
• Viewing Results of the rcvdk Utility ....................................................................... 203
• Using the Verity didump Utility ............................................................................. 206
• Using the Verity browse Utility............................................................................... 209
• Using the Verity merge Utility ................................................................................ 211
• Verity VDK Error Messages ..................................................................................... 213

200 Chapter 10 Verity Troubleshooting Utilities
Overview of Verity UtilitiesThe following command line utilities are included with ColdFusion for performing a variety of operations on Verity collections:
• rcvdk Searching collections and displaying documents. See “Using the Verity rcvdk Utility” on page 201.
• didump View collection word lists. See “Using the Verity didump Utility” on page 206.
• browse Browse documents table and search results. See “Using the Verity browse Utility” on page 209.
• merge Combine collections. See “Using the Verity merge Utility” on page 211.
Refer to Chapter 9, “Managing Verity Collections with the mkvdk Utility” on page 185 for information about using mkvdk.
Refer to Chapter 6, “Configuring Verity K2 Server” on page 115 for information about the rck2 utility, the K2 Server version of the rcvdk utility described in this chapter.
Note on collection typesCollections created with ColdFusion and those created externally using native Verity tools differ in structure. Collections created using ColdFusion include two directories underneath the collection directory that are not created when using native Verity tools, file and custom. It’s important to understand that this difference may afffect the operation of these utilities. When performing operations on Verity collections created with ColdFusion, you may be required to include the full path to the collection.
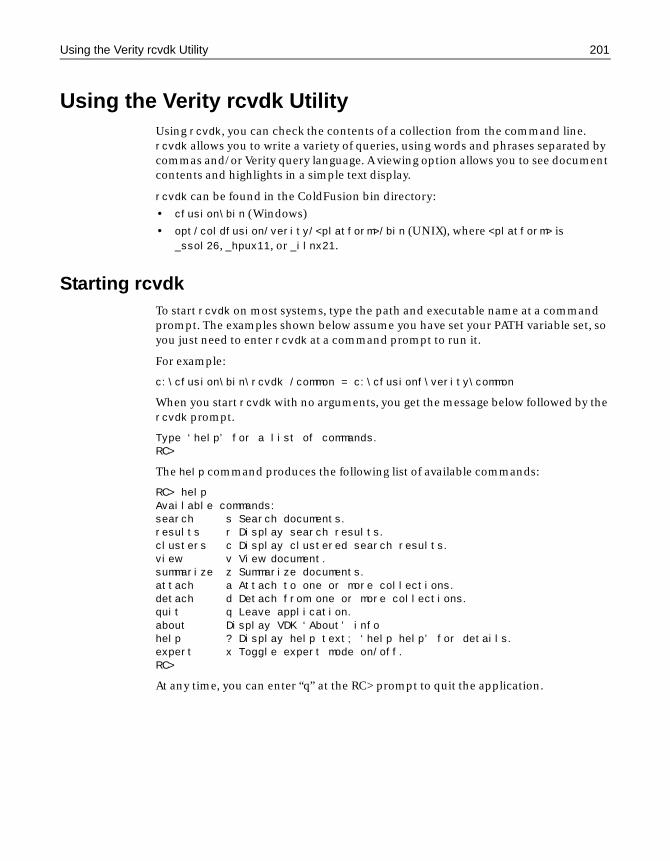
Using the Verity rcvdk Utility 201
Using the Verity rcvdk UtilityUsing rcvdk, you can check the contents of a collection from the command line. rcvdk allows you to write a variety of queries, using words and phrases separated by commas and/or Verity query language. A viewing option allows you to see document contents and highlights in a simple text display.
rcvdk can be found in the ColdFusion bin directory:
• cfusion\bin (Windows)
• opt/coldfusion/verity/<platform>/bin (UNIX), where <platform> is _ssol26, _hpux11, or _ilnx21.
Starting rcvdkTo start rcvdk on most systems, type the path and executable name at a command prompt. The examples shown below assume you have set your PATH variable set, so you just need to enter rcvdk at a command prompt to run it.
For example:
c:\cfusion\bin\rcvdk /common = c:\cfusionf\verity\common
When you start rcvdk with no arguments, you get the message below followed by the rcvdk prompt.
Type ‘help’ for a list of commands.RC>
The help command produces the following list of available commands:
RC> helpAvailable commands:search s Search documents.results r Display search results.clusters c Display clustered search results.view v View document.summarize z Summarize documents.attach a Attach to one or more collections.detach d Detach from one or more collections.quit q Leave application.about Display VDK ‘About’ infohelp ? Display help text; ‘help help’ for details.expert x Toggle expert mode on/off.RC>
At any time, you can enter “q” at the RC> prompt to quit the application.
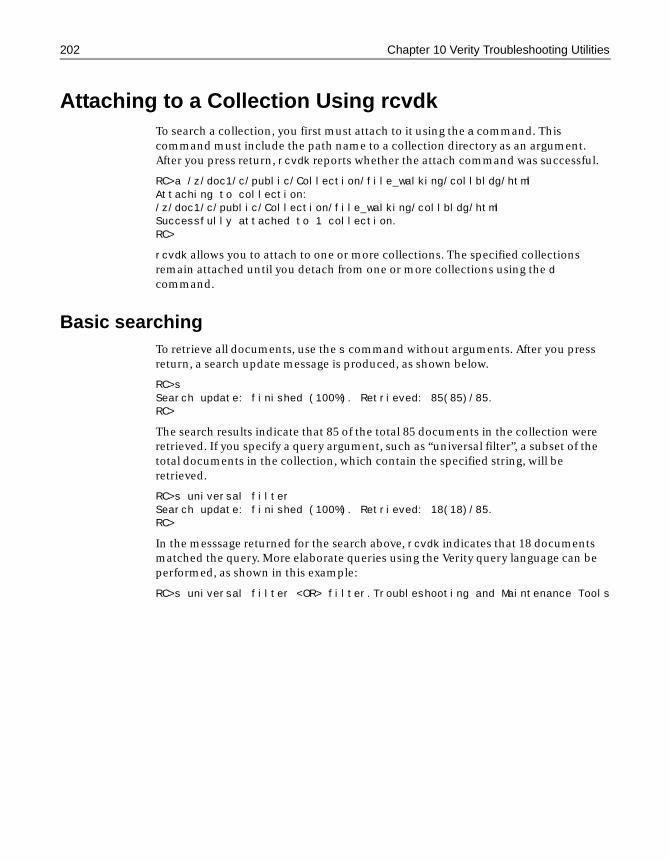
202 Chapter 10 Verity Troubleshooting Utilities
Attaching to a Collection Using rcvdkTo search a collection, you first must attach to it using the a command. This command must include the path name to a collection directory as an argument. After you press return, rcvdk reports whether the attach command was successful.
RC>a /z/doc1/c/public/Collection/file_walking/collbldg/htmlAttaching to collection:/z/doc1/c/public/Collection/file_walking/collbldg/htmlSuccessfully attached to 1 collection.RC>
rcvdk allows you to attach to one or more collections. The specified collections remain attached until you detach from one or more collections using the d command.
Basic searchingTo retrieve all documents, use the s command without arguments. After you press return, a search update message is produced, as shown below.
RC>sSearch update: finished (100%). Retrieved: 85(85)/85.RC>
The search results indicate that 85 of the total 85 documents in the collection were retrieved. If you specify a query argument, such as “universal filter”, a subset of the total documents in the collection, which contain the specified string, will be retrieved.
RC>s universal filterSearch update: finished (100%). Retrieved: 18(18)/85.RC>
In the messsage returned for the search above, rcvdk indicates that 18 documents matched the query. More elaborate queries using the Verity query language can be performed, as shown in this example:
RC>s universal filter <OR> filter.Troubleshooting and Maintenance Tools
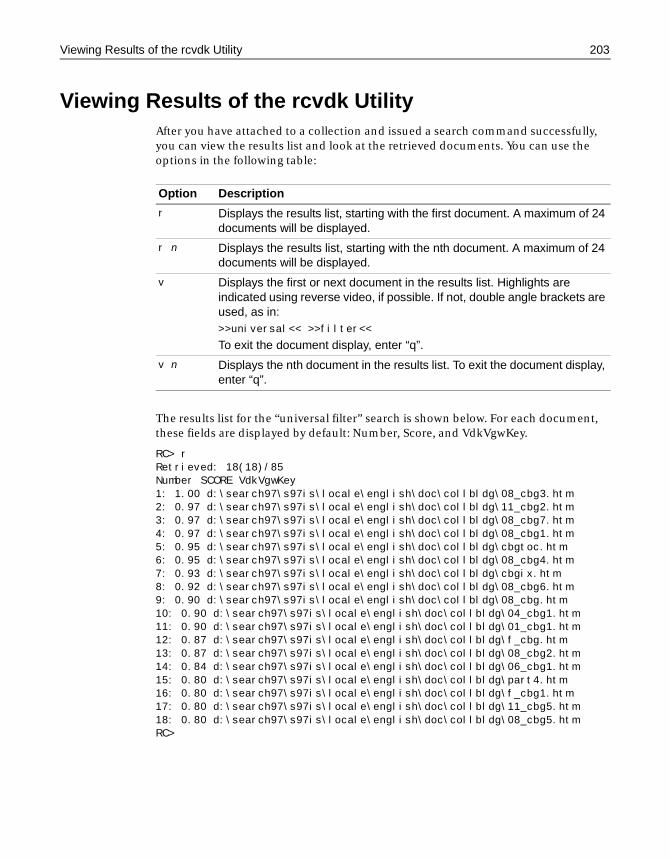
Viewing Results of the rcvdk Utility 203
Viewing Results of the rcvdk UtilityAfter you have attached to a collection and issued a search command successfully, you can view the results list and look at the retrieved documents. You can use the options in the following table:
The results list for the “universal filter” search is shown below. For each document, these fields are displayed by default: Number, Score, and VdkVgwKey.
RC> rRetrieved: 18(18)/85Number SCORE VdkVgwKey1: 1.00 d:\search97\s97is\locale\english\doc\collbldg\08_cbg3.htm2: 0.97 d:\search97\s97is\locale\english\doc\collbldg\11_cbg2.htm3: 0.97 d:\search97\s97is\locale\english\doc\collbldg\08_cbg7.htm4: 0.97 d:\search97\s97is\locale\english\doc\collbldg\08_cbg1.htm5: 0.95 d:\search97\s97is\locale\english\doc\collbldg\cbgtoc.htm6: 0.95 d:\search97\s97is\locale\english\doc\collbldg\08_cbg4.htm7: 0.93 d:\search97\s97is\locale\english\doc\collbldg\cbgix.htm8: 0.92 d:\search97\s97is\locale\english\doc\collbldg\08_cbg6.htm9: 0.90 d:\search97\s97is\locale\english\doc\collbldg\08_cbg.htm10: 0.90 d:\search97\s97is\locale\english\doc\collbldg\04_cbg1.htm11: 0.90 d:\search97\s97is\locale\english\doc\collbldg\01_cbg1.htm12: 0.87 d:\search97\s97is\locale\english\doc\collbldg\f_cbg.htm13: 0.87 d:\search97\s97is\locale\english\doc\collbldg\08_cbg2.htm14: 0.84 d:\search97\s97is\locale\english\doc\collbldg\06_cbg1.htm15: 0.80 d:\search97\s97is\locale\english\doc\collbldg\part4.htm16: 0.80 d:\search97\s97is\locale\english\doc\collbldg\f_cbg1.htm17: 0.80 d:\search97\s97is\locale\english\doc\collbldg\11_cbg5.htm18: 0.80 d:\search97\s97is\locale\english\doc\collbldg\08_cbg5.htmRC>
Option Description
r Displays the results list, starting with the first document. A maximum of 24 documents will be displayed.
r n Displays the results list, starting with the nth document. A maximum of 24 documents will be displayed.
v Displays the first or next document in the results list. Highlights are indicated using reverse video, if possible. If not, double angle brackets are used, as in:>>universal<< >>filter<<
To exit the document display, enter “q”.
v n Displays the nth document in the results list. To exit the document display, enter “q”.
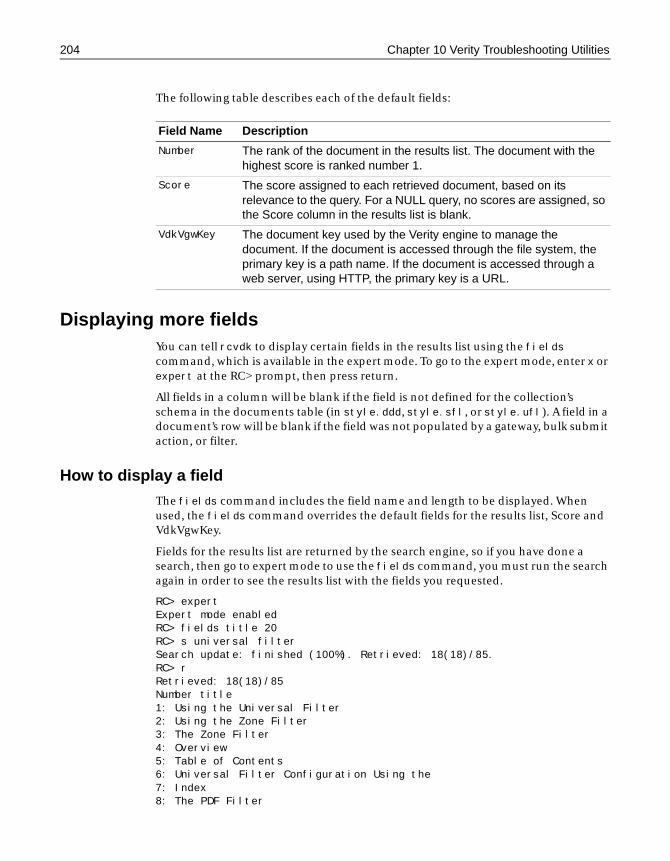
204 Chapter 10 Verity Troubleshooting Utilities
The following table describes each of the default fields:
Displaying more fieldsYou can tell rcvdk to display certain fields in the results list using the fields command, which is available in the expert mode. To go to the expert mode, enter x or expert at the RC> prompt, then press return.
All fields in a column will be blank if the field is not defined for the collection’s schema in the documents table (in style.ddd, style.sfl, or style.ufl). A field in a document’s row will be blank if the field was not populated by a gateway, bulk submit action, or filter.
How to display a field
The fields command includes the field name and length to be displayed. When used, the fields command overrides the default fields for the results list, Score and VdkVgwKey.
Fields for the results list are returned by the search engine, so if you have done a search, then go to expert mode to use the fields command, you must run the search again in order to see the results list with the fields you requested.
RC> expertExpert mode enabledRC> fields title 20RC> s universal filterSearch update: finished (100%). Retrieved: 18(18)/85.RC> rRetrieved: 18(18)/85Number title1: Using the Universal Filter2: Using the Zone Filter3: The Zone Filter4: Overview5: Table of Contents6: Universal Filter Configuration Using the7: Index8: The PDF Filter
Field Name Description
Number The rank of the document in the results list. The document with the highest score is ranked number 1.
Score The score assigned to each retrieved document, based on its relevance to the query. For a NULL query, no scores are assigned, so the Score column in the results list is blank.
VdkVgwKey The document key used by the Verity engine to manage the document. If the document is accessed through the file system, the primary key is a path name. If the document is accessed through a web server, using HTTP, the primary key is a URL.
Viewing Results of the rcvdk Utility 205
9: Document Filters and Formatting10: Collection Style Summary11: Collection Basics12: Universal Filter Document Types13: Using the style.dft File14: Supported Field Types15:16: Recognized Document Types17: Custom Zone Definitions18: The KeyView Filter KitRC>
How to display multiple fields
Multiple fields can be specified with the fields command, as shown below. The field order corresponds to the order of the columns, with the first field specified appearing in the second column. The first column is reserved for the rank order.
Remember to re-run the search before you display the results list with the fields specified.
RC> fields score 5 title 40RC> s universal filterSearch update: finished (100%). Retrieved: 18(18)/85.RC>
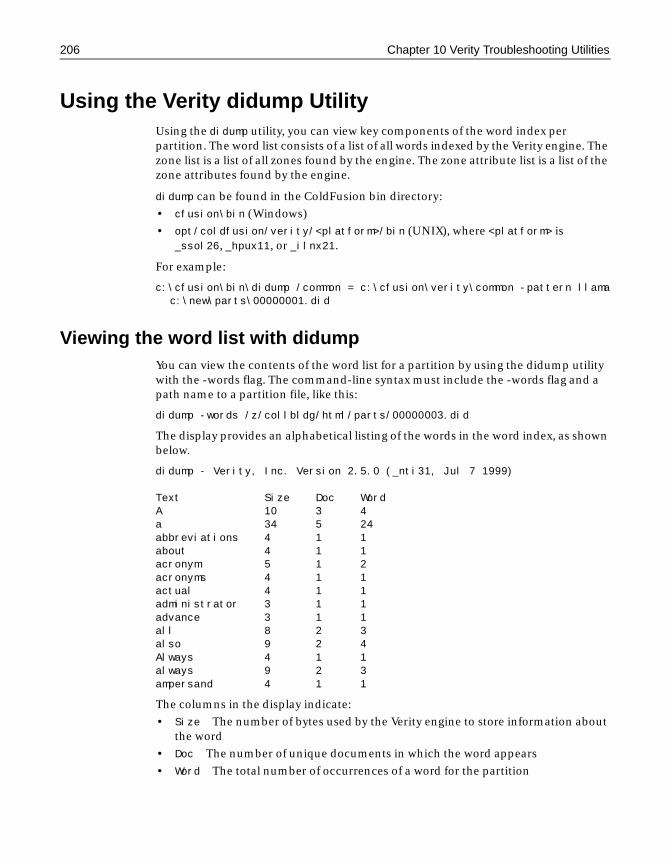
206 Chapter 10 Verity Troubleshooting Utilities
Using the Verity didump UtilityUsing the didump utility, you can view key components of the word index per partition. The word list consists of a list of all words indexed by the Verity engine. The zone list is a list of all zones found by the engine. The zone attribute list is a list of the zone attributes found by the engine.
didump can be found in the ColdFusion bin directory:
• cfusion\bin (Windows)
• opt/coldfusion/verity/<platform>/bin (UNIX), where <platform> is _ssol26, _hpux11, or _ilnx21.
For example:
c:\cfusion\bin\didump /common = c:\cfusion\verity\common -pattern llamac:\new\parts\00000001.did
Viewing the word list with didumpYou can view the contents of the word list for a partition by using the didump utility with the -words flag. The command-line syntax must include the -words flag and a path name to a partition file, like this:
didump -words /z/collbldg/html/parts/00000003.did
The display provides an alphabetical listing of the words in the word index, as shown below.
didump - Verity, Inc. Version 2.5.0 (_nti31, Jul 7 1999)
Text Size Doc WordA 10 3 4a 34 5 24abbreviations 4 1 1about 4 1 1acronym 5 1 2acronyms 4 1 1actual 4 1 1administrator 3 1 1advance 3 1 1all 8 2 3also 9 2 4Always 4 1 1always 9 2 3ampersand 4 1 1
The columns in the display indicate:
• Size The number of bytes used by the Verity engine to store information about the word
• Doc The number of unique documents in which the word appears
• Word The total number of occurrences of a word for the partition
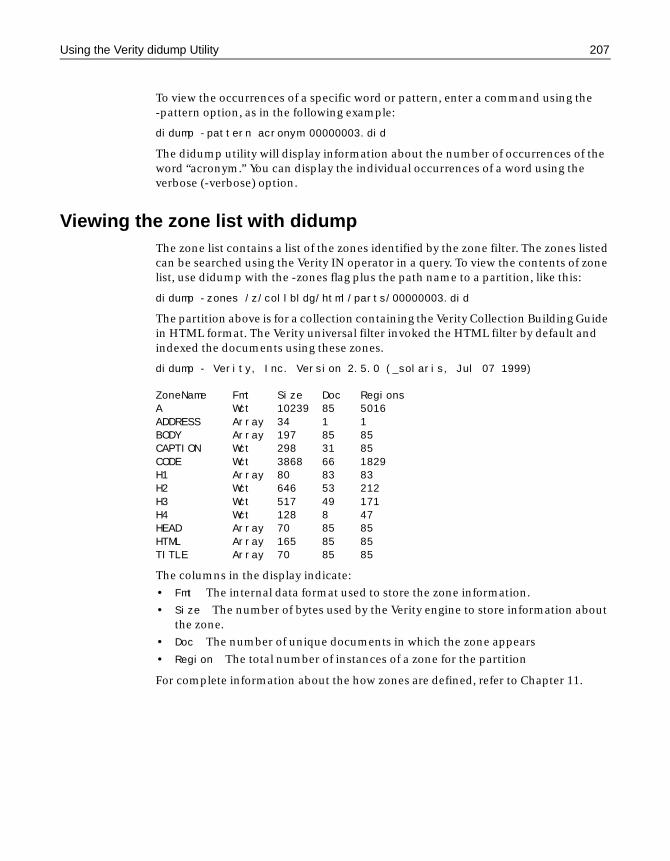
Using the Verity didump Utility 207
To view the occurrences of a specific word or pattern, enter a command using the -pattern option, as in the following example:
didump -pattern acronym 00000003.did
The didump utility will display information about the number of occurrences of the word “acronym.” You can display the individual occurrences of a word using the verbose (-verbose) option.
Viewing the zone list with didumpThe zone list contains a list of the zones identified by the zone filter. The zones listed can be searched using the Verity IN operator in a query. To view the contents of zone list, use didump with the -zones flag plus the path name to a partition, like this:
didump -zones /z/collbldg/html/parts/00000003.did
The partition above is for a collection containing the Verity Collection Building Guide in HTML format. The Verity universal filter invoked the HTML filter by default and indexed the documents using these zones.
didump - Verity, Inc. Version 2.5.0 (_solaris, Jul 07 1999)
ZoneName Fmt Size Doc RegionsA Wct 10239 85 5016ADDRESS Array 34 1 1BODY Array 197 85 85CAPTION Wct 298 31 85CODE Wct 3868 66 1829H1 Array 80 83 83H2 Wct 646 53 212H3 Wct 517 49 171H4 Wct 128 8 47HEAD Array 70 85 85HTML Array 165 85 85TITLE Array 70 85 85
The columns in the display indicate:
• Fmt The internal data format used to store the zone information.
• Size The number of bytes used by the Verity engine to store information about the zone.
• Doc The number of unique documents in which the zone appears
• Region The total number of instances of a zone for the partition
For complete information about the how zones are defined, refer to Chapter 11.
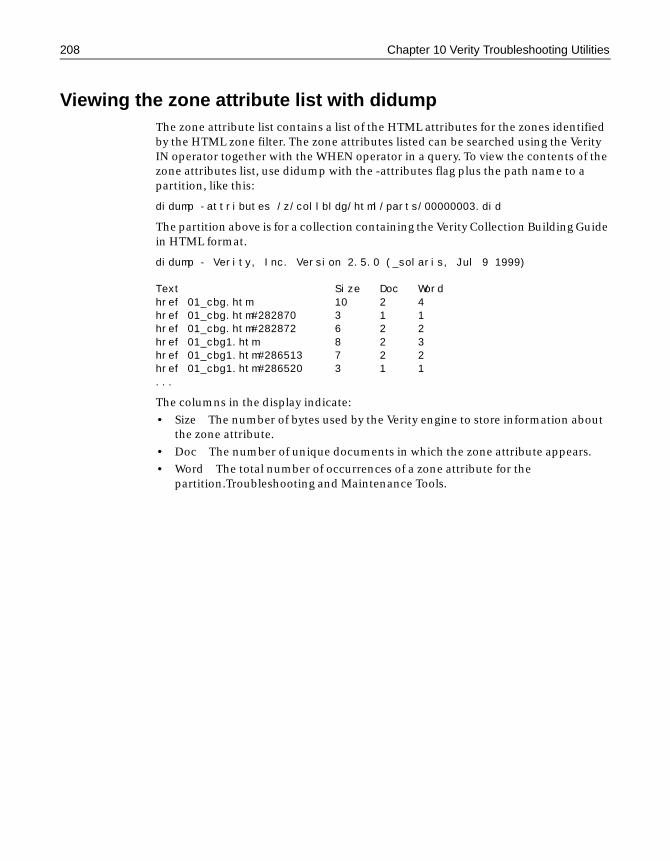
208 Chapter 10 Verity Troubleshooting Utilities
Viewing the zone attribute list with didumpThe zone attribute list contains a list of the HTML attributes for the zones identified by the HTML zone filter. The zone attributes listed can be searched using the Verity IN operator together with the WHEN operator in a query. To view the contents of the zone attributes list, use didump with the -attributes flag plus the path name to a partition, like this:
didump -attributes /z/collbldg/html/parts/00000003.did
The partition above is for a collection containing the Verity Collection Building Guide in HTML format.
didump - Verity, Inc. Version 2.5.0 (_solaris, Jul 9 1999)
Text Size Doc Wordhref 01_cbg.htm 10 2 4href 01_cbg.htm#282870 3 1 1href 01_cbg.htm#282872 6 2 2href 01_cbg1.htm 8 2 3href 01_cbg1.htm#286513 7 2 2href 01_cbg1.htm#286520 3 1 1...
The columns in the display indicate:
• Size The number of bytes used by the Verity engine to store information about the zone attribute.
• Doc The number of unique documents in which the zone attribute appears.
• Word The total number of occurrences of a zone attribute for the partition.Troubleshooting and Maintenance Tools.

Using the Verity browse Utility 209
Using the Verity browse UtilityA documents table is built for each partition in a collection. The documents table is used for field searching and for sorting search results. The fields within the documents table are defined by the following collection style files:
• style.ddd defines fields used internally by the Verity engine, identified by an initial underscore character (_)
• style.sfl defines standard fields (many of which are commented out to limit the size of the documents table)
• style.ufl defines custom fields that are not included in style.sfl
The value of each field can be filled in from source documents or can be provided explicitly. If a field is blank, it has not been populated.
browse can be found in the ColdFusion bin directory:
• cfusion\bin (Windows)
• opt/coldfusion/verity/<platform>/bin (UNIX), where <platform> is _ssol26, _hpux11, or _ilnx21
For example:
c:\cfusion\bin\browse /common = c:\cfusion\verity\commonc:\new\parts\0000001.ddd
Using menu options with the browse utilityUse the following browse command to start the utility and display a set of menu options:
browse 00000003.ddd
The system displays the following menu of options available for the browse utility.
D:\VERITY\colltest\parts>browse 00000003.dddBROWSE OPTIONS?) helpq) quitc) Number of entries in field_) Toggle viewing fields beginning with ’_’v) Toggle viewing selected fields##) Display all fields in specified record numberDispatch/Compound field options:n) No dispatchd) Dispatchs) Dispatch as streamAction (? for help):.Troubleshooting and Maintenance Tools
Using browse
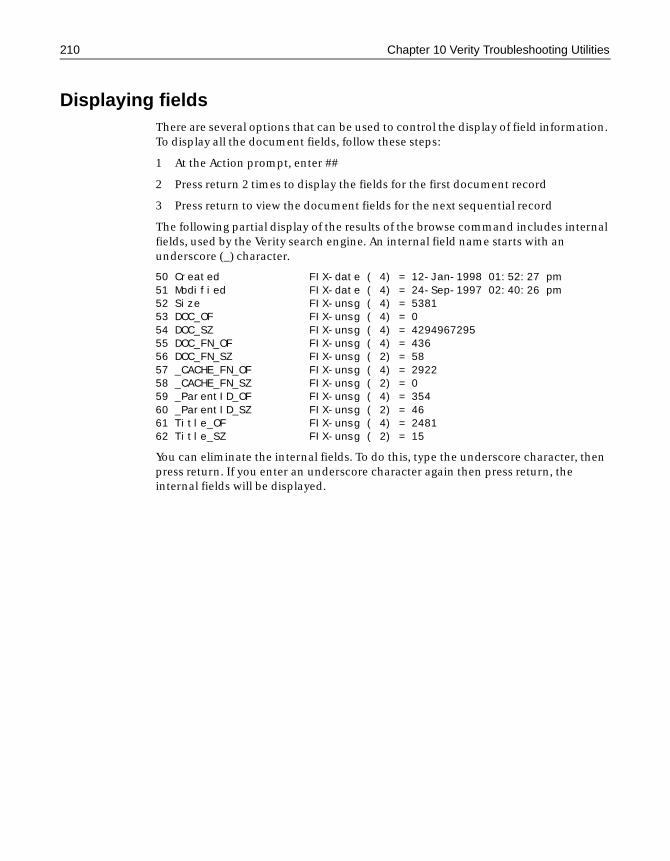
210 Chapter 10 Verity Troubleshooting Utilities
Displaying fieldsThere are several options that can be used to control the display of field information. To display all the document fields, follow these steps:
1 At the Action prompt, enter ##
2 Press return 2 times to display the fields for the first document record
3 Press return to view the document fields for the next sequential record
The following partial display of the results of the browse command includes internal fields, used by the Verity search engine. An internal field name starts with an underscore (_) character.
50 Created FIX-date ( 4) = 12-Jan-1998 01:52:27 pm51 Modified FIX-date ( 4) = 24-Sep-1997 02:40:26 pm52 Size FIX-unsg ( 4) = 538153 DOC_OF FIX-unsg ( 4) = 054 DOC_SZ FIX-unsg ( 4) = 429496729555 DOC_FN_OF FIX-unsg ( 4) = 43656 DOC_FN_SZ FIX-unsg ( 2) = 5857 _CACHE_FN_OF FIX-unsg ( 4) = 292258 _CACHE_FN_SZ FIX-unsg ( 2) = 059 _ParentID_OF FIX-unsg ( 4) = 35460 _ParentID_SZ FIX-unsg ( 2) = 4661 Title_OF FIX-unsg ( 4) = 248162 Title_SZ FIX-unsg ( 2) = 15
You can eliminate the internal fields. To do this, type the underscore character, then press return. If you enter an underscore character again then press return, the internal fields will be displayed.

Using the Verity merge Utility 211
Using the Verity merge UtilityThe merge utility lets you combine multiple collections with identical schemas. This is useful for merging smaller collections built from different sources into one, large collection. Also, you can use the merge utility to break up the collection into smaller collections of a roughly uniform size.
NoteThe Verity merge utility is available only on Windows platforms.
It is important to note that collections can be merged only if they have identical schemas. Collections can be merged if they have exactly the same set of style files (and style file entries).
Breaking up a large collection helps to optimize search performance, because it allows many applications to perform multiple concurrent search requests over the different collections. After breaking up a large collection, you can also discard older collections to reclaim limited disk storage space.
merge can be found in the ColdFusion bin directory: cfusion\bin.
To obtain help for the merge utility, enter the following command:
merge -help
NoteAfter running the merge utility, you must optimize the collection, using the mkvdk -optimize option.
For example:
c:\cfusion\bin\merge /common = c:\cfusion\verity\common
Merging collections using the merge utilityThe following is the syntax for using the merge utility to merge multiple collections into a single collection:
merge <newCollection> <srcCollection1> <srcCollection2>[srcCollectionN]
The utility reads srcCollection1, srcCollection2 and so on and merges them into a single collection with the directory name given for newCollection If the directory name given for newCollection doesn’t exist, then it is created.
Splitting collectionsThe following is the syntax for using the merge utility to split a single large collection into smaller collections.
merge -split <srcCollection> <newCollection1> <newCollection2>[-number]
212 Chapter 10 Verity Troubleshooting Utilities
The utility reads srcCollection and splits it in roughly equal-sized pieces, using the file names given for newCollection1 and so on.
If you want to split a very large collection into a large number of new collections, you can use the following option instead of explicitly naming each new collection:
merge -split -number newCollection srcCollection
The utility reads the collection identified by srcCollection and splits it into the number of segments specified by the -number option. The name of the first new collection is generated by appending the first two letters in the alphabet (aa) to the directory name given for newCollection. Each subsequent file name is generated by incrementing one of the appended letters (up to zz) for a maximum of 676 partitions. For example, if the value of -number is 3, and the value of newCollection is Collection1, the collections are named, Collection1aa, Collection1ab, and Collection1ac.
NoteThe maximum length of the directory name given for newCollection is 2 characters less than the length allowed by the file system.
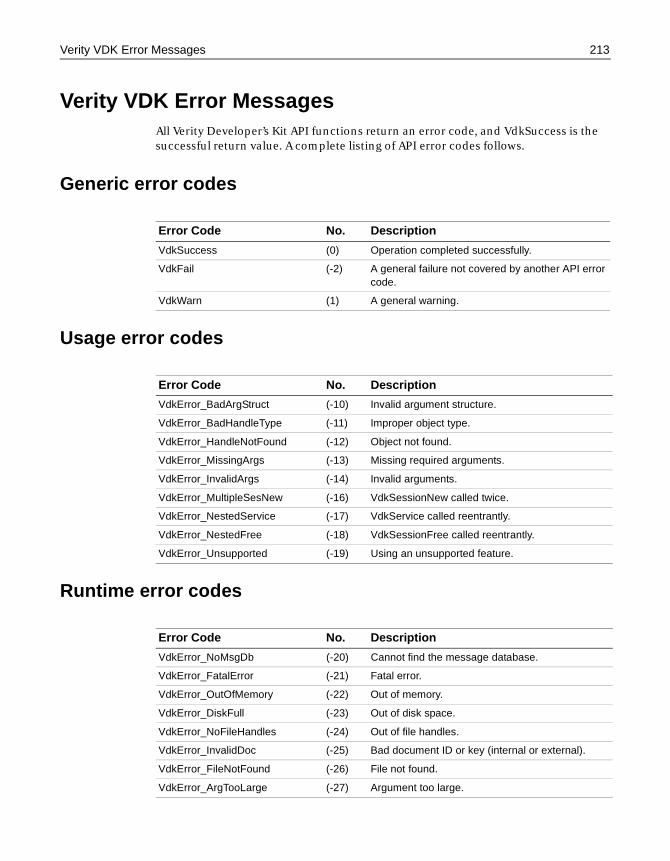
Verity VDK Error Messages 213
Verity VDK Error MessagesAll Verity Developer’s Kit API functions return an error code, and VdkSuccess is the successful return value. A complete listing of API error codes follows.
Generic error codes
Usage error codes
Runtime error codes
Error Code No. Description
VdkSuccess (0) Operation completed successfully.
VdkFail (-2) A general failure not covered by another API error code.
VdkWarn (1) A general warning.
Error Code No. Description
VdkError_BadArgStruct (-10) Invalid argument structure.
VdkError_BadHandleType (-11) Improper object type.
VdkError_HandleNotFound (-12) Object not found.
VdkError_MissingArgs (-13) Missing required arguments.
VdkError_InvalidArgs (-14) Invalid arguments.
VdkError_MultipleSesNew (-16) VdkSessionNew called twice.
VdkError_NestedService (-17) VdkService called reentrantly.
VdkError_NestedFree (-18) VdkSessionFree called reentrantly.
VdkError_Unsupported (-19) Using an unsupported feature.
Error Code No. Description
VdkError_NoMsgDb (-20) Cannot find the message database.
VdkError_FatalError (-21) Fatal error.
VdkError_OutOfMemory (-22) Out of memory.
VdkError_DiskFull (-23) Out of disk space.
VdkError_NoFileHandles (-24) Out of file handles.
VdkError_InvalidDoc (-25) Bad document ID or key (internal or external).
VdkError_FileNotFound (-26) File not found.
VdkError_ArgTooLarge (-27) Argument too large.
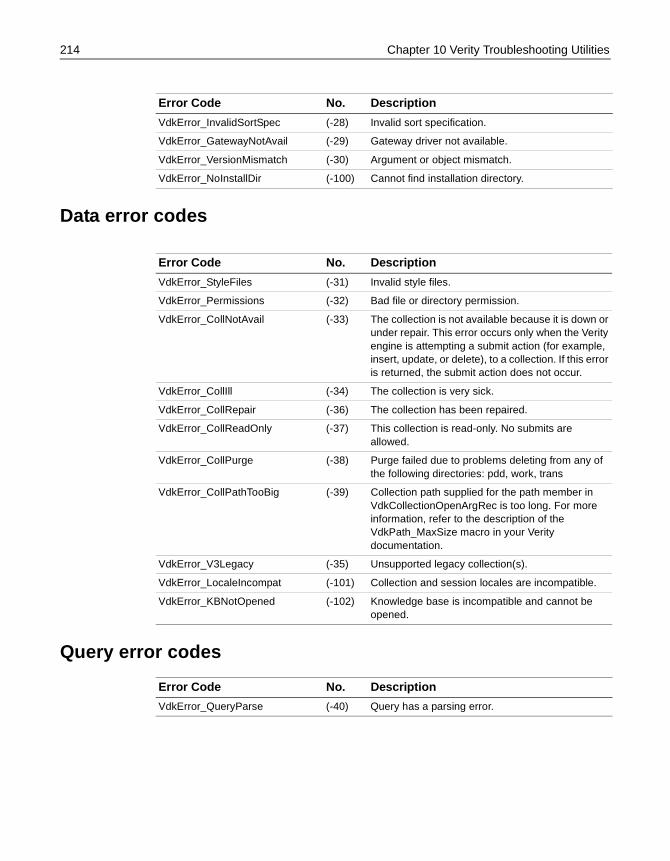
214 Chapter 10 Verity Troubleshooting Utilities
Data error codes
Query error codes
VdkError_InvalidSortSpec (-28) Invalid sort specification.
VdkError_GatewayNotAvail (-29) Gateway driver not available.
VdkError_VersionMismatch (-30) Argument or object mismatch.
VdkError_NoInstallDir (-100) Cannot find installation directory.
Error Code No. Description
Error Code No. Description
VdkError_StyleFiles (-31) Invalid style files.
VdkError_Permissions (-32) Bad file or directory permission.
VdkError_CollNotAvail (-33) The collection is not available because it is down or under repair. This error occurs only when the Verity engine is attempting a submit action (for example, insert, update, or delete), to a collection. If this error is returned, the submit action does not occur.
VdkError_CollIll (-34) The collection is very sick.
VdkError_CollRepair (-36) The collection has been repaired.
VdkError_CollReadOnly (-37) This collection is read-only. No submits are allowed.
VdkError_CollPurge (-38) Purge failed due to problems deleting from any of the following directories: pdd, work, trans
VdkError_CollPathTooBig (-39) Collection path supplied for the path member in VdkCollectionOpenArgRec is too long. For more information, refer to the description of the VdkPath_MaxSize macro in your Verity documentation.
VdkError_V3Legacy (-35) Unsupported legacy collection(s).
VdkError_LocaleIncompat (-101) Collection and session locales are incompatible.
VdkError_KBNotOpened (-102) Knowledge base is incompatible and cannot be opened.
Error Code No. Description
VdkError_QueryParse (-40) Query has a parsing error.
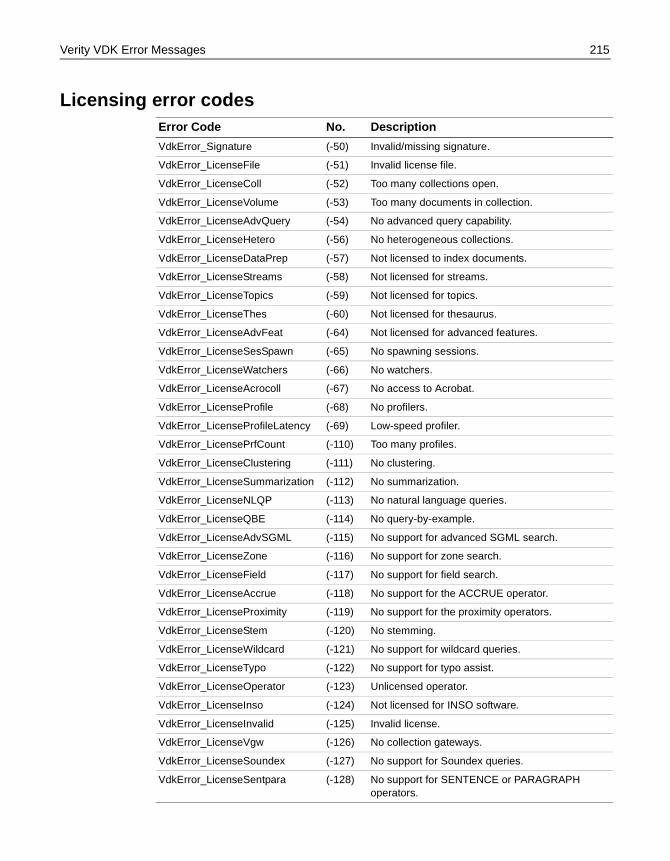
Verity VDK Error Messages 215
Licensing error codesError Code No. Description
VdkError_Signature (-50) Invalid/missing signature.
VdkError_LicenseFile (-51) Invalid license file.
VdkError_LicenseColl (-52) Too many collections open.
VdkError_LicenseVolume (-53) Too many documents in collection.
VdkError_LicenseAdvQuery (-54) No advanced query capability.
VdkError_LicenseHetero (-56) No heterogeneous collections.
VdkError_LicenseDataPrep (-57) Not licensed to index documents.
VdkError_LicenseStreams (-58) Not licensed for streams.
VdkError_LicenseTopics (-59) Not licensed for topics.
VdkError_LicenseThes (-60) Not licensed for thesaurus.
VdkError_LicenseAdvFeat (-64) Not licensed for advanced features.
VdkError_LicenseSesSpawn (-65) No spawning sessions.
VdkError_LicenseWatchers (-66) No watchers.
VdkError_LicenseAcrocoll (-67) No access to Acrobat.
VdkError_LicenseProfile (-68) No profilers.
VdkError_LicenseProfileLatency (-69) Low-speed profiler.
VdkError_LicensePrfCount (-110) Too many profiles.
VdkError_LicenseClustering (-111) No clustering.
VdkError_LicenseSummarization (-112) No summarization.
VdkError_LicenseNLQP (-113) No natural language queries.
VdkError_LicenseQBE (-114) No query-by-example.
VdkError_LicenseAdvSGML (-115) No support for advanced SGML search.
VdkError_LicenseZone (-116) No support for zone search.
VdkError_LicenseField (-117) No support for field search.
VdkError_LicenseAccrue (-118) No support for the ACCRUE operator.
VdkError_LicenseProximity (-119) No support for the proximity operators.
VdkError_LicenseStem (-120) No stemming.
VdkError_LicenseWildcard (-121) No support for wildcard queries.
VdkError_LicenseTypo (-122) No support for typo assist.
VdkError_LicenseOperator (-123) Unlicensed operator.
VdkError_LicenseInso (-124) Not licensed for INSO software.
VdkError_LicenseInvalid (-125) Invalid license.
VdkError_LicenseVgw (-126) No collection gateways.
VdkError_LicenseSoundex (-127) No support for Soundex queries.
VdkError_LicenseSentpara (-128) No support for SENTENCE or PARAGRAPH operators.
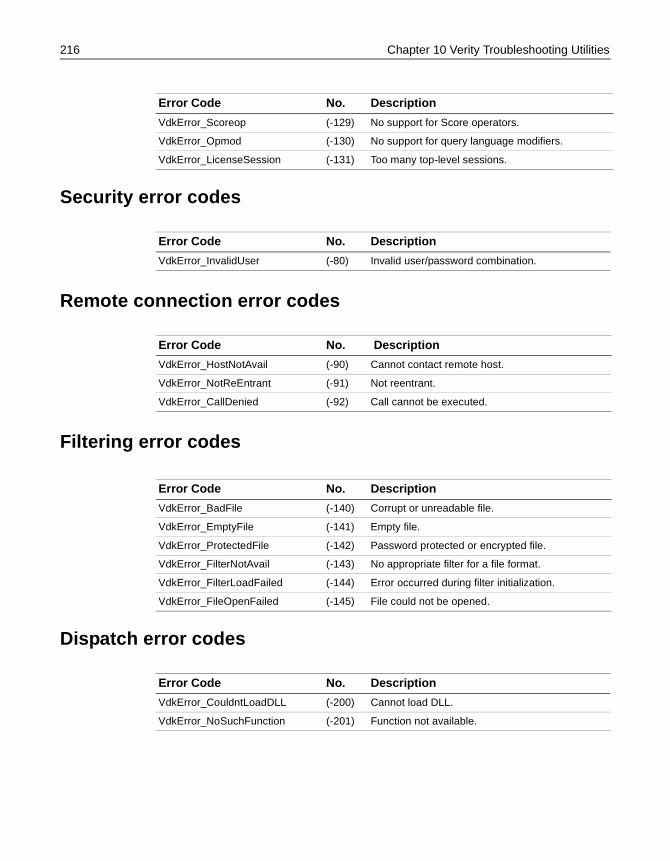
216 Chapter 10 Verity Troubleshooting Utilities
Security error codes
Remote connection error codes
Filtering error codes
Dispatch error codes
VdkError_Scoreop (-129) No support for Score operators.
VdkError_Opmod (-130) No support for query language modifiers.
VdkError_LicenseSession (-131) Too many top-level sessions.
Error Code No. Description
Error Code No. Description
VdkError_InvalidUser (-80) Invalid user/password combination.
Error Code No. Description
VdkError_HostNotAvail (-90) Cannot contact remote host.
VdkError_NotReEntrant (-91) Not reentrant.
VdkError_CallDenied (-92) Call cannot be executed.
Error Code No. Description
VdkError_BadFile (-140) Corrupt or unreadable file.
VdkError_EmptyFile (-141) Empty file.
VdkError_ProtectedFile (-142) Password protected or encrypted file.
VdkError_FilterNotAvail (-143) No appropriate filter for a file format.
VdkError_FilterLoadFailed (-144) Error occurred during filter initialization.
VdkError_FileOpenFailed (-145) File could not be opened.
Error Code No. Description
VdkError_CouldntLoadDLL (-200) Cannot load DLL.
VdkError_NoSuchFunction (-201) Function not available.
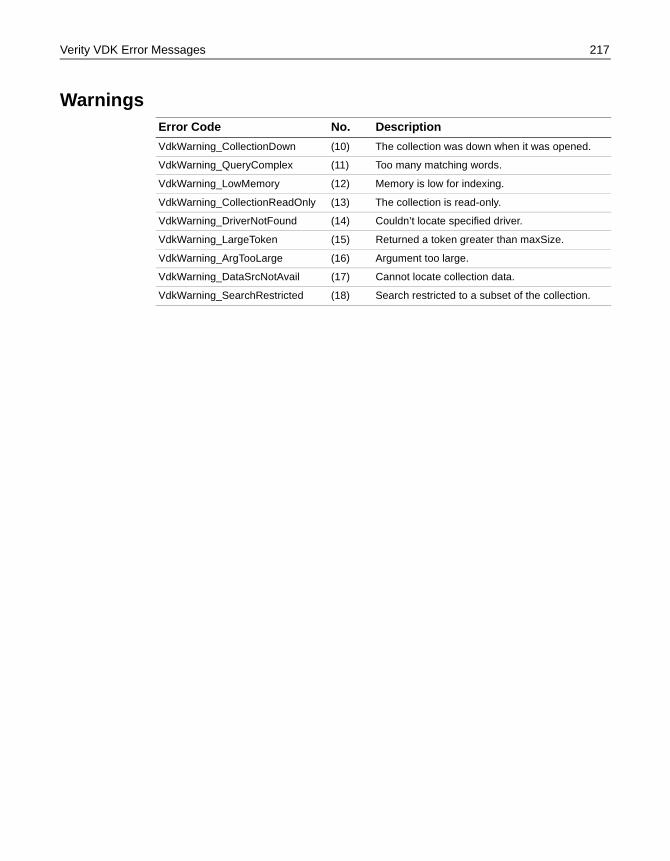
Verity VDK Error Messages 217
WarningsError Code No. Description
VdkWarning_CollectionDown (10) The collection was down when it was opened.
VdkWarning_QueryComplex (11) Too many matching words.
VdkWarning_LowMemory (12) Memory is low for indexing.
VdkWarning_CollectionReadOnly (13) The collection is read-only.
VdkWarning_DriverNotFound (14) Couldn’t locate specified driver.
VdkWarning_LargeToken (15) Returned a token greater than maxSize.
VdkWarning_ArgTooLarge (16) Argument too large.
VdkWarning_DataSrcNotAvail (17) Cannot locate collection data.
VdkWarning_SearchRestricted (18) Search restricted to a subset of the collection.

218 Chapter 10 Verity Troubleshooting Utilities
P a r t I V
ColdFusion High-Availabilty
This part explains the high-availability server clustering technology,
known as ClusterCATS, that is available with ColdFusion Server. The following chapters are included:Scalability and Availability Overview ................................................221
Configuring ColdFusion Clusters .....................................................245
Maintaining Cluster Members ..........................................................307
ClusterCATS Utilities ........................................................................321
Optimizing ClusterCATS ..................................................................333

Chapter 11
Scalability and Availability Overview
This chapter describes the concepts involved in achieving scalable and highly available Web applications.
Contents
• What is Scalability?.................................................................................................. 222
• Issues Affecting Successful Scalability Implementations .................................... 225
• What is Web Site Availability? ................................................................................. 234
• Techniques for Creating Scalable and Highly Available Sites .............................. 239
222 Chapter 11 Scalability and Availability Overview
What is Scalability?As an administrator, it’s likely that you often hear about the importance of having Web servers that scale well, but what exactly is scalability? Simply, scalability is a Web server’s ability to maintain a site’s availability, reliability, and performance as the amount of simultaneous Web traffic, or load, hitting the Web server increases.
The major issues that affect Web site scalability include:
• “Performance” on page 222
• “Load management” on page 224
PerformancePerformance refers to how efficiently a site responds to browser requests according to defined benchmarks. Application performance can be designed, tuned, and measured. It can also be affected by many complex factors, including application design and construction, database connectivity, network capacity and bandwidth, back office services (such as mail, proxy, and security services), and hardware server resources.
Web application architects and developers must design and code an application with performance in mind. Once the application is built, various administrators can tune performance by setting specific flags and options on the database, the operating system, and often the application itself to achieve peak performance. Following the construction and tuning efforts, quality assurance testers should test and measure an application’s performance prior to deployment to establish acceptable quality benchmarks. If all of these efforts are performed well, consequently you are able to better diagnose whether the Web site is operating within established operating parameters when reviewing the statistics generated by Web server monitoring and logging programs.
Depending on the size and complexity of your Web application, you may be able to handle anywhere from 10 to thousands of concurrent users. The number of concurrent connections to your Web server(s) will ultimately have a direct impact on your site’s performance. Therefore, your performance objectives must include two dimensions:
• the speed of a single user’s transaction
• the amount of performance degradation related to the increasing number of concurrent users on your Web servers
Thus, you must establish desired response benchmarks for your site and then achieve the highest number of concurrent users connected to your site at the desired response rates. By doing so, you will be able to determine a rough number of concurrent users for each Web server and then scale your Web site by adding additional servers.
Once your site runs on multiple Web servers, you will need to monitor and manage the traffic and load across the group of servers. See “Hardware planning” on page 237 and “Techniques for Creating Scalable and Highly Available Sites” on page 239 to learn about the ways you can do this.
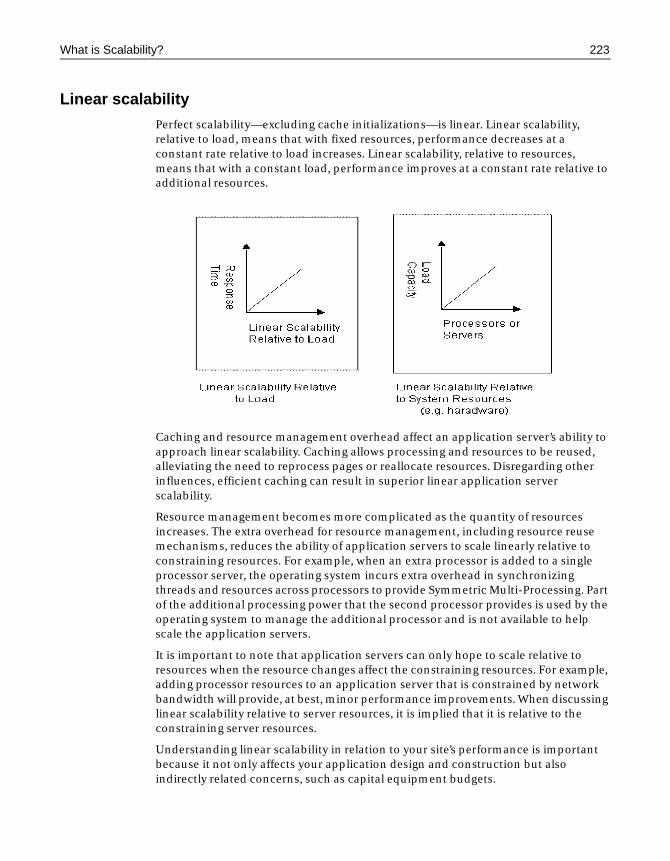
What is Scalability? 223
Linear scalability
Perfect scalability—excluding cache initializations—is linear. Linear scalability, relative to load, means that with fixed resources, performance decreases at a constant rate relative to load increases. Linear scalability, relative to resources, means that with a constant load, performance improves at a constant rate relative to additional resources.
Caching and resource management overhead affect an application server’s ability to approach linear scalability. Caching allows processing and resources to be reused, alleviating the need to reprocess pages or reallocate resources. Disregarding other influences, efficient caching can result in superior linear application server scalability.
Resource management becomes more complicated as the quantity of resources increases. The extra overhead for resource management, including resource reuse mechanisms, reduces the ability of application servers to scale linearly relative to constraining resources. For example, when an extra processor is added to a single processor server, the operating system incurs extra overhead in synchronizing threads and resources across processors to provide Symmetric Multi-Processing. Part of the additional processing power that the second processor provides is used by the operating system to manage the additional processor and is not available to help scale the application servers.
It is important to note that application servers can only hope to scale relative to resources when the resource changes affect the constraining resources. For example, adding processor resources to an application server that is constrained by network bandwidth will provide, at best, minor performance improvements. When discussing linear scalability relative to server resources, it is implied that it is relative to the constraining server resources.
Understanding linear scalability in relation to your site’s performance is important because it not only affects your application design and construction but also indirectly related concerns, such as capital equipment budgets.
224 Chapter 11 Scalability and Availability Overview
Load managementLoad management refers to the method by which simultaneous user requests are distributed and balanced among multiple servers (Web, ColdFusion, DBMS, file, and search servers). Effectively balancing load across your servers ensures that they do not become overloaded and eventually unavailable.
There are several different methods that you can use to achieve load management:
• Hardware-based solutions
• Software-based solutions, including round-robin Internet DNS or third-party clustering packages
• Hardware and software combinations
Each option has its own distinct merits.
Most load balancing solutions today manage traffic based on IP packet flow. This approach effectively handles non-application-centric sites. However, to effectively manage ColdFusion Web application traffic, it is important to implement a mechanism that monitors and balances load based on specific ColdFusion Web application load. ColdFusion relies on a leading software-based clustering technology, ClusterCATS, to ensure that the ColdFusion Web servers, the Web server, and other servers on which your ColdFusion Web applications depend remain highly available.
To learn more about different hardware and software load management solutions, see “Techniques for Creating Scalable and Highly Available Sites” on page 239.
Issues Affecting Successful Scalability Implementations 225
Issues Affecting Successful Scalability Implementations
Achieving scalable Web servers is not a trivial task. There are various solutions to pick from, setup and configuration tasks to understand and perform, and many delicate dependencies between related but heterogeneous technologies. This section describes some of the major issues affecting successful scalability implementations.
This section discusses the following topics:
• “Designing and coding scalable applications” on page 225
• “Avoiding common bottlenecks” on page 227
• “DNS effects on Web site performance and availability” on page 228
• “Load testing your Web applications” on page 231
Designing and coding scalable applicationsApplication architects must create designs that are inherently flexible by relying upon open standards that don’t restrict the application’s construction and implementation to vendor-specific interfaces and tools. Similarly, the Web developers that construct the designed application must be aware that they can significantly impact the application’s scalability in the way in which they write their code, build their SQL queries, invoke thread management, access databases, and partition the application.
This section discusses the following topics to consider when designing and building a Web application:
• “Application session and state management” on page 225
• “Database locking and concurrency issues” on page 226
Application session and state management
As you create Web applications, you will likely create specific variables that you intend to carry across multiple interactions between a user’s browser and a site’s Web server(s). Using client variables that get stored in a shared state repository or session variables that get stored in memory of a specific server are popular approaches for accomplishing this. The latter approach, however, introduces a significant challenge for a Web site that is supported by multiple servers. Once a user has begun a session and variables are stored on a specific server, the user must return to that server for the life of the session to maintain correct state information.
A good example that illustrates this concept is an e-commerce application that uses shopping carts. With this type of application, as a customer accumulates items in his or her cart, there must be a mechanism that ensures that the user can see the items as they are added. One approach is to store these items in session variables on a specific Web server. However, if you use this approach, there must also be a way to ensure that the user always returns to the same server for the life of the session. ClusterCATS for ColdFusion automatically handles this for you.
226 Chapter 11 Scalability and Availability Overview
Another approach to solving the same problem is to store client variables in a back-end common state repository. This approach enables all Web servers comprising the cluster to access variables in a common, shared back-end data store, such as a database. However, you must be aware that this approach can potentially impact your site’s performance.
Web developers must think through the various user scenarios in which application session and state are affected and engineer appropriate mechanisms for elegantly handling such situations. The three most common ways to handle session data are:
• Client-side options consisting of cookies, hidden fields, a get list, or URL parameters
• Server-side session variables
NoteStoring session data on the server requires that a simple identifier be stored on the client, such as a cookie.
• An open state repository consisting of either a common back-end database or some other shared storage device
Whatever mechanism your architects and engineers use, it’s important that they anticipate the scenarios in which maintaining an application’s state is vital to a good user experience. See “Session-Aware Load Balancing” on page 276.
Database locking and concurrency issues
Dynamic Web applications, those that allow users to modify a database, must ensure appropriate database concurrency handling. Database concurrency handling refers to how an application manages multiple concurrent user requests when accessing the same database records. If an application does not impose any database locking mechanism on multiple requests to update the same record, data integrity can be compromised in the database. In such a scenario, two users could make simultaneous modifications to a record, but only the last change would take effect.
For example, consider a Human Resources Web application on a company intranet. The HR Generalist adds two new employee records to the HR database by filling out a Web form because two new employees have just been hired. The Generalist enters most of the vital information into the records but doesn’t yet have the new employees’ phone extensions or HMO selections, and therefore leaves those fields blank. Later in the day, the HR Generalist’s boss, the HR Director, obtains this information from both new hires and decides to enter it in the database herself. However, one of the new employees, after speaking with her husband, decides to change her HMO selection from the basic selection to the PPO choice, which allows greater flexibility in choosing physicians. The employee calls the HR Generalist to tell him of the change, and the Generalist says he will take care of it immediately. Unbeknownst to the HR Director, the HR Generalist adds the information into the employee records at the same time that the HR Director is attempting to add the outdated information.
Issues Affecting Successful Scalability Implementations 227
In this scenario, if the application uses an appropriate database concurrency validation mechanism, then the HR Director would receive a message informing her that she could not access the employee record because it was in use, thereby alerting her that the HR Generalist is trying to change the record. However, if the application did not use such a validation mechanism, the HR Director would overwrite the new data that the Generalist had just entered, resulting in data integrity problems. This simple example illustrates how important it is that your dynamic Web applications handle database concurrency issues well.
Avoiding common bottlenecksIn addition to application design and construction considerations, you must also plan accordingly to avoid common bottlenecks that can negatively affect a Web application’s performance.
Following are typical bottlenecks that can affect your application’s ability to perform and scale well:
• Poorly written application logic Inefficient programming is probably the most common reason applications perform poorly. Instituting industry best practices, such as coding standards, design reviews, and code walkthroughs, can significantly help to alleviate this problem.
• Processor capacity Even a well-architected and programmed Web application can perform poorly if the Web server’s CPU is unable to provide sufficient processing power. Make sure that heavy load, mission-critical applications reside on hardware that can effectively do the job.
• Memory Insufficient Random Access Memory (RAM) limits the amount of application data that can be cached. Ensure that the amount of memory installed on the application server machine is commensurate with the needs of the Web application.
• Server congestion Server congestion refers to all type of servers, not just the Web server. Your application, proxy, search and index, and back office servers can periodically experience high volume that indirectly degrades the performance of your Web application. Therefore, when planning the physical design of the system, be sure to investigate carefully the network topology that will be implemented to ensure that existing servers are up to the task. If they are not, you may need to add new servers to the topology to ensure uninterrupted service and performance expectations.
• Firewalls Some dynamic applications that must restrict anonymous access because they present or share confidential information must pass through a corporate firewall, which can slow down requests and responses. Make sure that the correct ports are open on the firewall to ensure valid security authentication and to enable appropriate client/server communications. (You may be able to open additional secure ports to accommodate increased traffic.)
• Network connectivity and bandwidth Consider the type of network your application will run on (LAN/WAN/Internet) and how much traffic it typically receives. If traffic is consistently heavy, you may need to add additional nodes, routers, switches, or hubs to the network to handle the increased traffic.
228 Chapter 11 Scalability and Availability Overview
• Databases Database access, while vitally important to your application’s capabilities and feature set, can be costly in terms of performance and scalability if it is not engineered efficiently. When creating data sources for accessing your database, use a native database driver rather than an ODBC driver if possible because it will provide faster access. Similarly, try to reduce the number of individual SQL queries that must be repetitiously constructed and submitted by placing common database queries in stored procedures that reside on the database server. In short, tune your databases and queries for maximum efficiency.
DNS effects on Web site performance and availabilityImproper Domain Name System (DNS) setup and configuration on Web servers is one of the most common problems administrators encounter. This section addresses the following topics:
• “What is DNS?” on page 228
• “DNS effects on site performance and availability” on page 228
• “DNS core elements” on page 229
What is DNS?DNS is a set of protocols and services on a TCP/IP network that allows network users to use hierarchical natural language names rather than computer IP addresses when searching for other computer hosts (servers) on the network. DNS is used extensively on the Internet as well as on private enterprise networks, including LANs and WANs.
The primary capability contained within DNS is its ability to map host names to IP addresses, and vice-versa. For example, suppose the Web server at Allaire has an IP address of 157.55.100.1. Most people would connect to this server by entering the domain name (www.allaire.com) and not the less friendly IP address. Besides being easier to remember, the name is more reliable because the numeric address could change for a variety of reasons, but the name can always be reserved.
DNS effects on site performance and availability
Internet DNS is a powerful and successful mechanism that has enabled huge numbers of individuals and organizations to create easily locatable Web sites on the Internet. However, DNS by itself may not allow your Web site to perform and scale as it needs to, thus causing it to become unavailable and unreliable. Whether or not you use DNS by itself to load balance inbound traffic depends largely on the site’s purpose and the amount of concurrent activity you expect on it. For instance, a low volume, static site that only provides textual HTML information can likely be accommodated just fine by round-robin DNS. However, a high volume, dynamic, e-commerce site that you anticipate doing lots of volume likely won’t perform or scale well ultimately if it is only supported by round-robin DNS.
To understand why, let’s look further at the e-commerce example. Even if you have planned ahead and set up multiple servers to support this high volume site, if you rely only on DNS, it can only do two things:

Issues Affecting Successful Scalability Implementations 229
• Translate the natural language names to server IP address mappings so that users can find the site.
• If you have enabled round-robin distribution for multi-server load balancing, it can distribute the load among each server in a rote, sequential distribution manner.
However, if a spike in user activity occurs and causes servers to overload or fail, round-robin DNS will keep distributing the requests among all of the servers, even if some of them are no longer operational.
In short, Internet DNS is limited in its capabilities, and its round-robin distribution mechanism does not contain any intelligence that allows it to monitor, manage, and react to overloaded or failed servers. Consequently, DNS by itself is not a sound load balancing or failover solution for your business-critical sites. The load balancing and failover technology that ColdFusion Enterprise provides, ClusterCATS, compensates for DNS limitations and allows you to create highly available, reliable, and scalable ColdFusion Web applications.
DNS core elements
Following are core DNS elements that you must understand and be able to configure if your ColdFusion Web applications are to work well with DNS:
• “Zones and domains” on page 229
• “DNS record types, server aliases, and round-robin distribution” on page 230
Zones and domains
A Domain Name System is composed of a distributed database of names. The names in the DNS database establish a logical tree structure called the domain name space. On the Internet, the root of the DNS database is managed by the Internet Network Information Center (InterNIC). The top-level domains were originally assigned organizationally and by country. Two-letter and three-letter abbreviations are used for countries and various abbreviations are reserved for use by organizations. For example, .com, .gov, .edu for business, government, and educational organizations, respectively.
A domain is a node on a network and all of the nodes below it (subdomains) that are contained within the DNS database tree structure. Domains and subdomains can be grouped into zones to allow distributed administration of the name space. More specifically, a zone is some portion of the DNS name space whose database records exist and are managed in a particular physical file. A single DNS server may be configured to manage one or multiple zone files. Each zone is anchored at a specific domain node. Zones are used for breaking up domains across multiple segments when you need to distribute the management of the domain to multiple groups and for replicating data more efficiently.
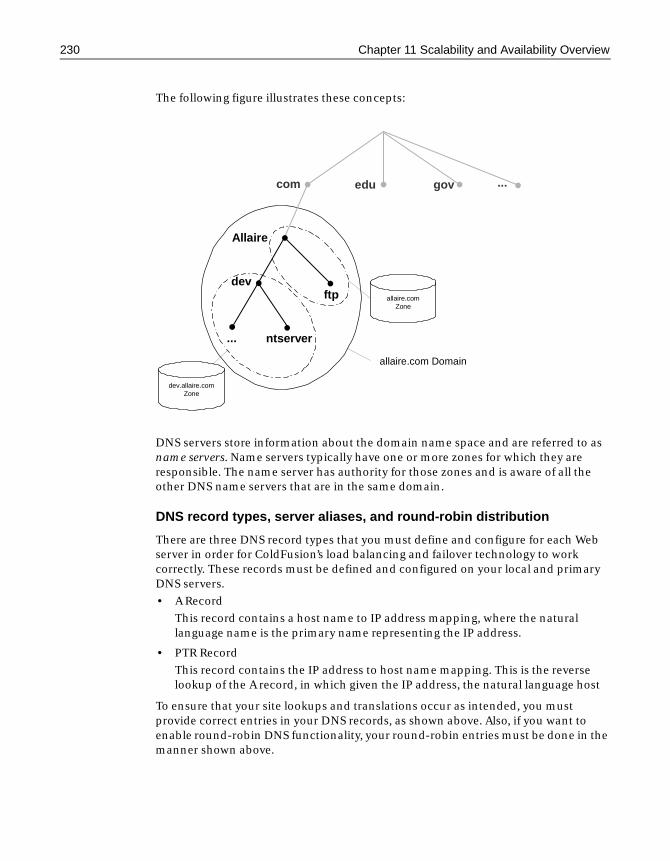
230 Chapter 11 Scalability and Availability Overview
The following figure illustrates these concepts:
DNS servers store information about the domain name space and are referred to as name servers. Name servers typically have one or more zones for which they are responsible. The name server has authority for those zones and is aware of all the other DNS name servers that are in the same domain.
DNS record types, server aliases, and round-robin distribution
There are three DNS record types that you must define and configure for each Web server in order for ColdFusion’s load balancing and failover technology to work correctly. These records must be defined and configured on your local and primary DNS servers.
• A Record
This record contains a host name to IP address mapping, where the natural language name is the primary name representing the IP address.
• PTR Record
This record contains the IP address to host name mapping. This is the reverse lookup of the A record, in which given the IP address, the natural language host
To ensure that your site lookups and translations occur as intended, you must provide correct entries in your DNS records, as shown above. Also, if you want to enable round-robin DNS functionality, your round-robin entries must be done in the manner shown above.
com edu gov ...
Allaire
ftp
allaire.com Domain
dev
ntserver...
allaire.comZone
dev.allaire.comZone
Issues Affecting Successful Scalability Implementations 231
On the Windows platform, you make DNS entries using the Domain Name Service Manager utility.
On UNIX platforms, you make these DNS entries in the name.db file, which is read by the DNS server’s Berkeley Internet Name Daemon (BIND).
Load testing your Web applicationsLoad testing is the process of defining acceptable benchmarks for your Web application’s performance and then simulating load and measuring resulting response times and throughput against those benchmarks. You perform load testing to measure the application’s ability to scale.
This section discusses the following topics:
• “Reasons to perform load testing” on page 231
• “How to load test your Web applications” on page 232
• “Load testing considerations” on page 232
Reasons to perform load testing
Load testing is important to your Web site’s success because it lets you test its capacities before you deploy it, thereby enabling you to find problems and fix them before they are exposed to your users. Determining your site’s purpose and the amount of traffic you anticipate it will receive may affect how you load test it.
Small sites that don’t expect heavy concurrent loads may be able to organize and use actual users to simultaneously access the site to perform load testing. However, this is often a difficult activity to accomplish well because it introduces many human variables. Therefore, it is typically not a practice that we advocate. In fact, for larger business-critical systems that expect heavy concurrent load, this type of testing is not feasible and will not be able to provide satisfactory nor realistic results.
A better approach to load testing is to use load simulation software. There are some excellent software load testing tools on the market that let you simulate heavy load hitting your Web server. By using the load testing software in conjunction with your defined benchmarks and formal test plans, you can confidently determine if your Web application is ready for deployment.
Another reason to load test is to verify your failover capabilities. Failover ensures that if a primary server within a cluster of servers stops functioning, then subsequent user requests are directed to another server within the cluster. Failover is addressed in more depth in “What is Web Site Availability?” on page 234. Using the load testing software of your choice, you can essentially force a server redirection by designating a machine as “unavailable” or by shutting it down.
NoteClusterCATS for ColdFusion uses the HTTP protocol to redirect packets of data from a failed server to an available server. Therefore, it is important to verify that your load testing tool can handle HTTP redirections properly before you initiate load testing.
232 Chapter 11 Scalability and Availability Overview
How to load test your Web applications
One of the first things you need to do to be able to load test is purchase a load testing software tool and learn how to use it.
There are a variety of good load testing software tools on the market, including Segue’s SilkPerformer, Mercury Interactive’s LoadRunner and RSW’s e-LOAD. Each of these packages provide substantial Web-enabled software testing solutions that will help you effectively simulate and test load.
After you purchase, install, and learn to use the load testing software, you need to determine benchmarks that you want to or must achieve for your Web site to ensure a good user experience. Following that, you must formalize your testing strategy by designing and developing written test plans against which you’ll execute your tests.
Once your test plans are written and approved, it’s time to run the tests. After you do so, you need to capture and analyze the load testing results and report the statistics to the development team. From there, you’ll need to reach consensus about what are the most serious problems you discovered, what are the necessary changes to make, and what is the best way to implement the fixes. After the changes are made and a new build of the application is available, you’ll rerun the tests to look for performance improvements. Again, you’ll reanalyze the testing results and continue this cycle until the site is operating within the established parameters that you’ve set. When your team agrees that the site scales well and is operating at peak performance under heavy stress, you’re ready to deploy the application into a production environment.
Load testing considerations
Before starting your load testing, consider the following:
• Define benchmarks early
Make sure you understand your Web site’s performance and scalability requirements before you start running tests against your site. Otherwise, you won’t know what you’re testing for and the statistics you capture won’t have significance. Also, remember that the benchmarks you define should be customized for the current application; don’t simply reuse benchmarks from an earlier site on which you may have worked. Each Web application is often distinct in terms of its design, construction, back office integration, and user experience requirements.
• Ensure the test environment mirrors the production environment
Create a test environment that is identical as much as possible to the actual production environment in which the Web site will be hosted. If you don’t simulate a similar network and bandwidth scenario, or use the same types of servers, or ensure that the same versions of software (operating system, service packs, Web server, and third-party tools) reside on both the test and production servers, you can’t anticipate problems nor determine why they occur. The number of possibilities would be too large.
Issues Affecting Successful Scalability Implementations 233
• Minimize distributed environment load testing
Load testing in a distributed environment can be problematic if the network on which you are performing your load tests becomes congested, resulting in poor response times. Additionally, if everyone else in the organization is using that network for their everyday activities, such as e-mail, source control, and file management, an increased load going over the network will likely cause significant network degradation for them. As they likely have nothing to do with the testing effort, this situation can cause great frustration.
In such a scenario, it may be more effective to physically sit in front of the server on which the application resides and perform the tests locally rather than bring the entire LAN or WAN to a slow crawl. Also, by testing locally, you are better able to rule out the network as the source of the scalability problems. Alternatively, you may be able to configure a separate subnet on the LAN or WAN that is distinct from the subnet on which everybody else in your environment uses network services.
You should now have a good overview of what scalability implies, the core elements that comprise it, some of the issues that affect successful implementations, and the tasks that must be performed to verify that your Web applications are able to achieve satisfactory scalability.
The next section describes Web site availability and reliability concepts and considerations.
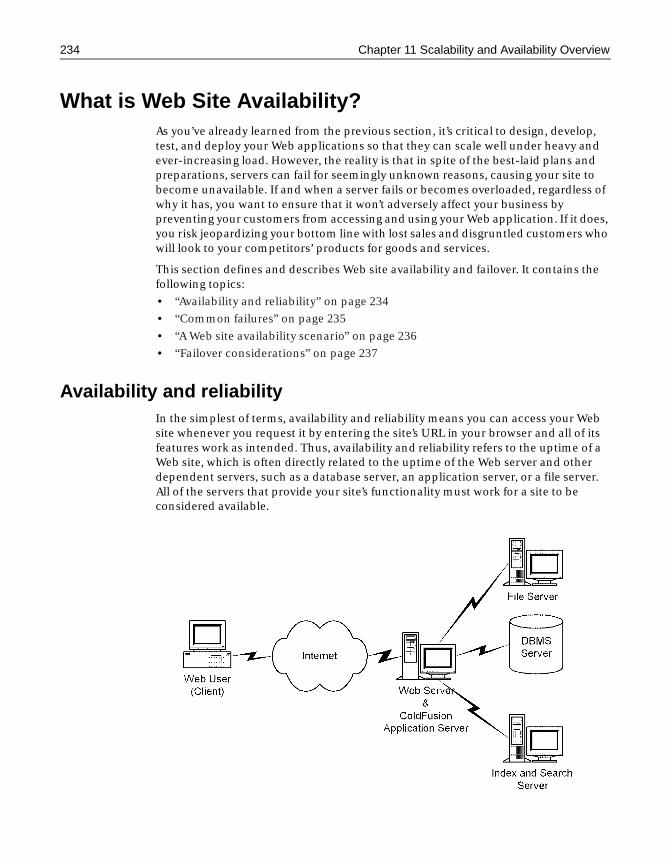
234 Chapter 11 Scalability and Availability Overview
What is Web Site Availability?As you’ve already learned from the previous section, it’s critical to design, develop, test, and deploy your Web applications so that they can scale well under heavy and ever-increasing load. However, the reality is that in spite of the best-laid plans and preparations, servers can fail for seemingly unknown reasons, causing your site to become unavailable. If and when a server fails or becomes overloaded, regardless of why it has, you want to ensure that it won’t adversely affect your business by preventing your customers from accessing and using your Web application. If it does, you risk jeopardizing your bottom line with lost sales and disgruntled customers who will look to your competitors’ products for goods and services.
This section defines and describes Web site availability and failover. It contains the following topics:
• “Availability and reliability” on page 234
• “Common failures” on page 235
• “A Web site availability scenario” on page 236
• “Failover considerations” on page 237
Availability and reliabilityIn the simplest of terms, availability and reliability means you can access your Web site whenever you request it by entering the site’s URL in your browser and all of its features work as intended. Thus, availability and reliability refers to the uptime of a Web site, which is often directly related to the uptime of the Web server and other dependent servers, such as a database server, an application server, or a file server. All of the servers that provide your site’s functionality must work for a site to be considered available.
What is Web Site Availability? 235
For ColdFusion Web applications, it is particularly important that the ColdFusion servers remain as highly available and responsive as the Web server and other dependent servers. ColdFusion processes requests that are sent to it from the Web server. Upon successfully processing the application logic, ColdFusion returns the results back to the Web server, which in turn returns an HTML response back to the browser.
Availability and reliability are concerned with keeping the relevant servers that provide services to your Web application available at all times. However, if a server on which your site depends becomes unavailable, it’s critical that a sound redundancy scheme makes certain that your site remains available. As your organization moves into an e-business paradigm, you must plan, design, and implement load balancing and failover strategies that guarantee that your servers will remain operational and serving your customers.
If servers employ a good strategy for load balancing and failover, there’s no reason why they should not provide high availability and reliability to their users. In fact, Internet Service Providers (ISPs) that host commercial Web sites and offer 24x7 technical support as a competitive service differentiator will typically specify in written service-level agreements (SLA) a percentage of time that they guarantee a Web site will be available. If the ISP has a sound scalability and failover strategy in place, this figure is usually in the range of 99% or better.
Common failuresFollowing are typical types of failures that can negatively impact your Web application’s availability and reliability:
• Hardware failures While less common than software failures, hardware failures do occur and may include crashed hard drives, blown processors, and corrupted network cards. Diagnosing and fixing these kinds of issues can be a lengthy endeavor because of time spent procuring the parts and performing the labor. If your Web application is mission-critical, you should ensure a sound hardware redundancy strategy to avoid costly downtime. A sound strategy includes a minimum of two Web servers but preferably three.
• Software failures The types of software failures that will most likely affect a Web application involve the Web server’s operating system, the Web server software itself, or the Web application software. If the operating system crashes or becomes corrupt, the Web server cannot function properly (or perhaps at all), causing your Web application’s availability, reliability, and performance to be compromised. Similarly, if the Web server software crashes or acts erratically, it will likely cause the Web server to stop running when you didn’t intend it to. It’s hard to prepare for software failures, but if you have mirrored secondary hardware systems in place to account for failures, you’ll minimize your Web application’s downtime.
• Server failures In addition to the Web server, other servers on which your Web application depends can also fail, causing either downtime or diminished capabilities on your site. For example, for distributed applications, a proxy server may go down, causing requests for your Web application’s services to go unanswered. Or, the database server can crash, making it impossible for users to

236 Chapter 11 Scalability and Availability Overview
submit or retrieve information from your database. Or, a mail server can go down, making it impossible for your users to successfully send mail to you. Ensure that your organization’s IT architecture includes network monitoring and notification software that can quickly report on the general health of your network and alert you about any failed servers.
A Web site availability scenarioImagine that you’ve just built a robust, interactive e-commerce Web site on which you plan to sell the most sought-after books and music in the world. You’ve used Java scriptlets to build the application, so of course you’ve taken advantage of it’s many built-in features, including secure database access, multi-threading, and integrated session management.
Upon finishing the development work and quality assurance testing, you deploy the Web site onto a single production Web server that is hosted within your IT department. The IT department informs you that it is able to use its existing Internet connection to make your site “live” while minimizing additional hosting support costs by going to an outside vendor. The site goes live the following day and it’s an instant success. Orders start pouring in the very first day, and huge numbers of people log on to browse and buy. Everything seems perfect. Except, on the second day of business, the load hitting the site is so high, the Web server’s performance slows to a crawl, eventually causing the server to become unavailable. Suddenly, your tech support lines are ringing off the hook with complaints that users cannot access your site, causing you to miss out on tons of sales.
Although the application may have contained many useful features and capabilities, the customers were not able to use them for very long because the site’s performance degraded to the point that the site eventually became unavailable. Because the site was deployed on only a single server, there was no way to load balance the incoming traffic. Additionally, without multiple redundant servers in place, the site was not capable of intelligently load balancing increasing traffic nor able to redirect traffic to other available servers (no failover).
This simple scenario illustrates that a critical part of any successful Web development effort must include adequate scalability, performance, and failover planning. Servers can become overloaded or fail at any time for many reasons, so make sure that your design, development, testing, and deployment strategies are sound, promote good communication between necessary departments, and include adequate disaster recovery capabilities.
What is Web Site Availability? 237
Failover considerationsThe ability to fail over servers that have become unavailable to redundant servers is a cornerstone of any mission-critical application, one that ensures an application’s continuous and reliable operation. Such disaster planning and recovery can be broken down into:
• “Hardware planning” on page 237
• “Systems monitoring” on page 238
• “Corrective actions” on page 238
Review the following considerations to ensure that you have a sound failover strategy in place—one that guarantees your Web site’s availability.
Hardware planning
As illustrated in the availability example above, it’s important to acquire all of the necessary hardware and configure it before you deploy the application. All Web sites have different requirements, feature sets, purposes, audiences, and budgets. It all translates into determining appropriate needs. However, if your site is a business-critical system that affects your company’s bottom line, you must ensure an appropriate redundancy strategy by having two or more redundant systems in place. In fact, Allaire recommends that you use a minimum of three servers to support any critical Web site so that you can take one server offline to perform update and maintenance tasks while maintaining at least two servers in production at all times. This scheme provides administrative flexibility while simultaneously protecting your site from hardware or software failures.
The two predominant redundancy models used today are:
• Primary/Backup Servers
An example of this model would be an important Web application that receives relatively little traffic. For instance, a corporate intranet. Typically, this redundancy model uses an expensive, high-capacity server for the primary server and uses an inexpensive, lower quality server for the backup server in case the primary server fails.
• Parallel Servers
This model is known as a classic load balancing/redundancy model and is used most often for business-critical applications. Unlike the primary/secondary scheme discussed above, the multiple servers used in a parallel scheme are considered peers and are grouped together as a single entity to support one or more applications.
You can use identical cloned hardware for creating your server clusters, or you can mix hardware sizes and models. Cloned, higher capacity, higher-end hardware may have greater up-front hardware costs but will help minimize administration costs down the line. Conversely, mixing hardware models and capacities may be less expensive up-front but can add administrative costs later on.
238 Chapter 11 Scalability and Availability Overview
If you plan to use a parallel model, Allaire recommends that you use many middle range servers rather than fewer high-end ones or lots of inexpensive ones. Servers that provide adequate capacity and are moderately priced can generally accommodate all your needs just as well as expensive ones at a fraction of the cost.
Systems monitoring
In addition to redundant hardware, you should ensure that your network and the mission-critical sites that reside on its servers are supported by systems monitoring software. This type of software actively and continuously monitors an application’s availability and its service levels. These monitoring programs must not only be able to detect problems, but they must also be able to route alerts to the correct administrators for immediate notification of problems.
Corrective actions
The third major failover consideration is the corrective actions that need to occur if a failure causes a server to become unavailable. Generally speaking, if a server goes down and causes your site to become unavailable, some level of human interaction is usually required to effectively diagnose and correct the problem.
However, before the analysis and repair can happen, the administrator needs to be notified. Whatever failover system you put in place, it should include an automated notification system that can route alerts via your telecommunications infrastructure (e-mail, pagers, real time web-based alerts, etc.) to the appropriate administrator for prompt attention.
Besides notifying the administrator that a problem has occurred, you also want your failover solution to automatically redirect traffic intended for the unavailable server to other available servers until the unavailable server is fixed. This crucial corrective action is what keeps your Web site up and available to your users even if one of the servers supporting it is experiencing problems.
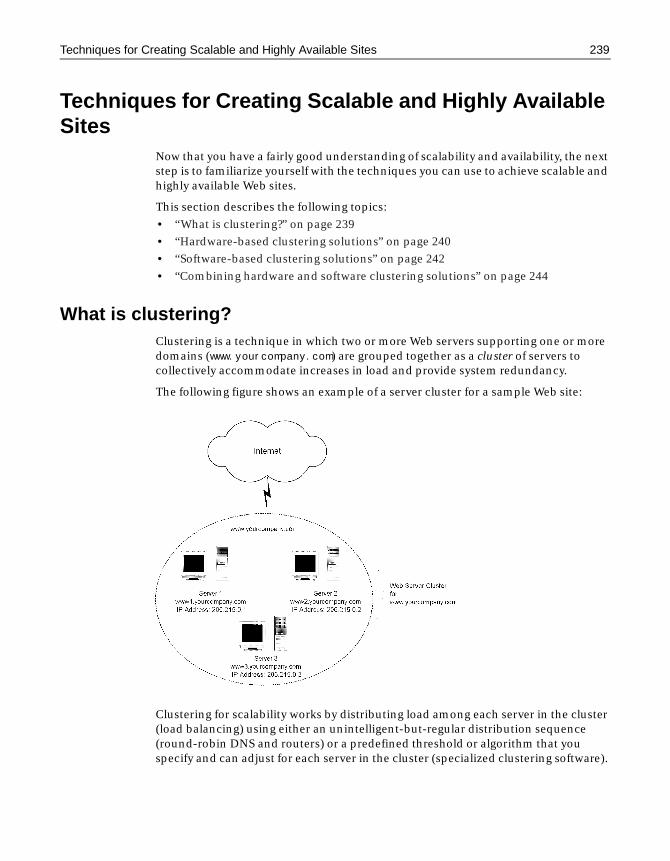
Techniques for Creating Scalable and Highly Available Sites 239
Techniques for Creating Scalable and Highly Available Sites
Now that you have a fairly good understanding of scalability and availability, the next step is to familiarize yourself with the techniques you can use to achieve scalable and highly available Web sites.
This section describes the following topics:
• “What is clustering?” on page 239
• “Hardware-based clustering solutions” on page 240
• “Software-based clustering solutions” on page 242
• “Combining hardware and software clustering solutions” on page 244
What is clustering?Clustering is a technique in which two or more Web servers supporting one or more domains (www.yourcompany.com) are grouped together as a cluster of servers to collectively accommodate increases in load and provide system redundancy.
The following figure shows an example of a server cluster for a sample Web site:
Clustering for scalability works by distributing load among each server in the cluster (load balancing) using either an unintelligent-but-regular distribution sequence (round-robin DNS and routers) or a predefined threshold or algorithm that you specify and can adjust for each server in the cluster (specialized clustering software).

240 Chapter 11 Scalability and Availability Overview
Clustering for failover relies on redundant servers to ensure that business-critical applications remain available if one of the servers in a cluster fails. Intelligent software-based failover solutions can detect when a server has failed and automatically redirect new incoming HTTP requests to the cluster members that are available. Some hardware-based failover devices that have less built-in intelligence require an administrator’s intervention once the failure is detected.
Clustering can be accomplished using software-based solutions, such as round-robin DNS by itself or together with a third-party package, a hardware-based solution, such as a packet router, or a combination of the two.
Hardware-based clustering solutionsThe most common and reliable hardware-based clustering solution is a device known as a packet router. One of the most popular routers on the market is Cisco System’s LocalDirector. A router sits in front of a cluster of Web servers and directs incoming HTTP requests to available Web servers that form the cluster. A router works by assessing the speed and volume of IP packet flow to and from the Web servers and then selecting the best server to accommodate the traffic. This process is fast and efficient. The router device in conjunction with the clustered Web servers comprise what is known as a virtual server.
Routers are considered semi-intelligent devices because they can detect a server failure and redirect requests to other servers. If a Web server fails or stops responding, the router stops sending packets to the unresponsive server. Routers are not considered fully intelligent because while they can redirect requests upon discovering a failure, they do not allow you to configure redirection thresholds for individual servers. They also do not provide for application-aware load balancing.

Techniques for Creating Scalable and Highly Available Sites 241
The following figure shows a router distributing requests in round-robin fashion to the available servers in a Web server cluster:
Advantages
A hardware-based clustering solution, such as a router, is an attractive solution for the following reasons:
• Proven technology
• Relatively low complexity
• No recurrent licensing fees
• Semi-intelligent
Routers can load balance in a round-robin fashion, detect failures, redirect traffic and remove failed servers from a cluster.
NoteNot all load-balancing devices have the same features or offer the same capabilities.

242 Chapter 11 Scalability and Availability Overview
Considerations
Carefully evaluate the following issues against a router’s attributes:
• Expense
Hardware devices can be expensive relative to some software solutions, even without yearly licensing fees.
• Single point of failure
If a problem develops on the load-balancing device itself and it fails, your load balancing and failover strategies are no longer working. Although some load-balancing devices come with secondary systems for just this reason, this additional equipment is often what inflates the overall price of a hardware solution.
• Not application-aware
The device cannot be tuned for particular types of Web applications (static vs. dynamic sites) or for the development tools used to build them (scriptlets vs. JSP vs. CGI vs. ASP and so on). Consequently, a router cannot measure the performance of a Web application server.
• Limited intelligence
The device does not allow you to configure individual load and redirection thresholds for each server in a cluster, and therefore, it is unable to effectively manage load to prevent failures.
Software-based clustering solutionsThere are several flavors of software-based clustering solutions on the market. Just like hardware-based clustering solutions, there are strengths and weaknesses associated with each. These software solutions include:
• Round-robin DNS
A very popular choice because of its relative simplicity and low implementation cost, but it does not contain any intelligence for load-balancing or failover.
• Primary/backup clustering
Two cloned systems provide redundancy for one another. This type of clustering does not provide any parallel server load balancing.
• Smart clustering
Combines the advantages of round-robin DNS and backup clustering to provide simplicity with intelligence and redundancy.
ClusterCATS, Allaire’s software clustering solution for load balancing and high availability, allows you to easily create, optimize, and maintain “smart” clusters to support your Web applications. ClusterCATS runs on NT, Solaris, and Linux platforms and works with leading mission-critical Web servers, including Microsoft IIS, Netscape Enterprise Server, and Apache. It is easily administered from remote locations and provides robust features, including:
• Configuring load and redirection thresholds per server

Techniques for Creating Scalable and Highly Available Sites 243
• Optimizing load balancing scheme with application-aware and session-aware load balancing
• Automatically detecting failures
• Automatically redirecting traffic to available servers
• Automatically notifying administrators of problems
Advantages
The following benefits make a software-based clustering solution attractive:
• Relatively low expense
Compared to the cost of hardware devices, such as routers or switches, software-based clustering solutions are relatively inexpensive. In fact, you can cheaply implement Internet DNS on UNIX and Windows platforms for initial load balancing needs and augment it with third-party clustering software.
• Flexibility
Some clustering software can augment existing hardware devices, thereby providing a more robust load balancing and failover solution. Additionally, by integrating hardware with software, you diminish, if not eliminate, losses on capital expenditures that your organization has already made. See “Combining hardware and software clustering solutions” on page 244 and “Load-Balancing Devices” on page 290 for more information about how hardware and software solutions can be integrated.
• Intelligence
Some software solutions provide a level of intelligence that enables preventive load balancing measures that actually minimize the chance of servers becoming unavailable. In the event that a server does becomes overloaded or actually fails, some software can automatically detect the problem and reroute HTTP requests to available servers in the cluster.
• No single point of failure
By distributing the load balancing and failover capabilities among multiple servers in a cluster or multiple clusters, as opposed to relying on only a single device, no individual server failure can disable your application.
Considerations
Consider the following issues when evaluating software-based solutions for your environment:
• Differences among feature sets
Not all software-based clustering solutions are the same in terms of capabilities and features. For instance, some have no automatic failure detection, notification, or IP address assumption, and others have significantly delayed detection. Some let you configure load thresholds to enable preventive measures, some don’t. Determine your scalability and failover needs in advance and pick your solution accordingly.
244 Chapter 11 Scalability and Availability Overview
• Platform constraints
Determine if the software solution you are considering will be available on your platform or operate with your preferred Web server. If reviewing data sheets and other marketing collateral from vendors, make sure that the robust features you want are available on the platform you need.
• Level of complexity
Some software-based clustering solutions have relatively low complexity. Others introduce a higher level of complexity because of the features offered, the amount of initial configuration and subsequent administration, or the amount of integration that needs to occur between other systems and devices.
Combining hardware and software clustering solutionsInstead of having to choose either a hardware solution or a software solution, another possibility is to combine both types of clustering choices. Combining hardware and software solutions will certainly provide the greatest scalability and availability capabilities for your site. Additionally, a combined solution is an attractive option if your organization has already invested in one but is looking for more comprehensive coverage. Having the flexibility to integrate hardware with software means that your organization won’t necessarily have to absorb a capital loss on a previous technology investment if you decide to purchase additional clustering technology.
However, as already discussed, not all hardware or software solutions are equal. Many have different features and capabilities, and not all hardware and software integrate well together. Be sure to investigate thoroughly when purchasing additional technology to augment your current solution.
For a visual representation of hardware and software clustering solutions working together, see “Hardware-based clustering solutions” on page 240.
Chapter 12
Configuring ColdFusion Clusters
Once you have configured your Web site and installed ClusterCATS, use the procedures in this chapter to create and configure your clusters.
Contents
• Introduction to ClusterCATS Administration ....................................................... 246
• Creating Clusters ..................................................................................................... 252
• Removing Clusters .................................................................................................. 263
• Adding Cluster Members ........................................................................................ 264
• Removing Cluster Members ................................................................................... 266
• Server Load Thresholds .......................................................................................... 268
• Session-Aware Load Balancing .............................................................................. 276
• Load-Balancing Devices ......................................................................................... 290
• Administrator Alarm Notifications ........................................................................ 296
• Administrator E-mail Options................................................................................ 299
• Administrating Security .......................................................................................... 302
246 Chapter 12 Configuring ColdFusion Clusters
Introduction to ClusterCATS AdministrationClusterCATS consists of three components:
• ClusterCATS Server
• ClusterCATS Explorer and ClusterCATS Web Explorer
• ClusterCATS Server Administrator and btadmin
The components are described in the sections that follow.
All of the components are installed on a machine when you run the ClusterCATS for ColdFusion installation program.
You must run the installation program on each server that will be part of your cluster as well as on the Windows machine (NT, 98, or 95) from which you will use the ClusterCATS Explorer to administer the cluster. Even if your clusters run on Solaris or Linux platforms, you can use a Windows machine for running the ClusterCATS Explorer (recommended). You can also use the Web-based Explorer in conjunction with included server utilities to administer your clusters.
NoteRead the description of each component that is relevant to your installation in the sections that follow. These sections contain important configuration information.
ClusterCATS ServerThe ClusterCATS Server is the heart of the clustering and load balancing of ClusterCATS. It must be installed on each server in your cluster. The server monitors the status of all other Web servers in a cluster and tracks application and transaction resource availability. ClusterCATS Server runs on Windows NT, Sun Solaris, and Linux platforms. To administer the ClusterCATS Server, use the ClusterCATS Server Administrator (Windows) or the btadmin utility (UNIX).
Each ClusterCATS Server component performs the following functions:
• Intelligently manages HTTP load across Web servers
• Proactively manages ColdFusion server load
• Provides failover support for every server in your cluster
• Proactively monitors ColdFusion servers and ColdFusion Web applications
ClusterCATS Explorer (Windows only)ClusterCATS Explorer is a Windows-based administration utility that you use to create and manage clusters from a single machine. Using a Windows Explorer-like graphical interface, you perform management tasks, such as:
• Creating and removing clusters
• Adding and removing servers from a cluster
• Configuring load balancing and high availability features
• Enabling administrator authentication privileges
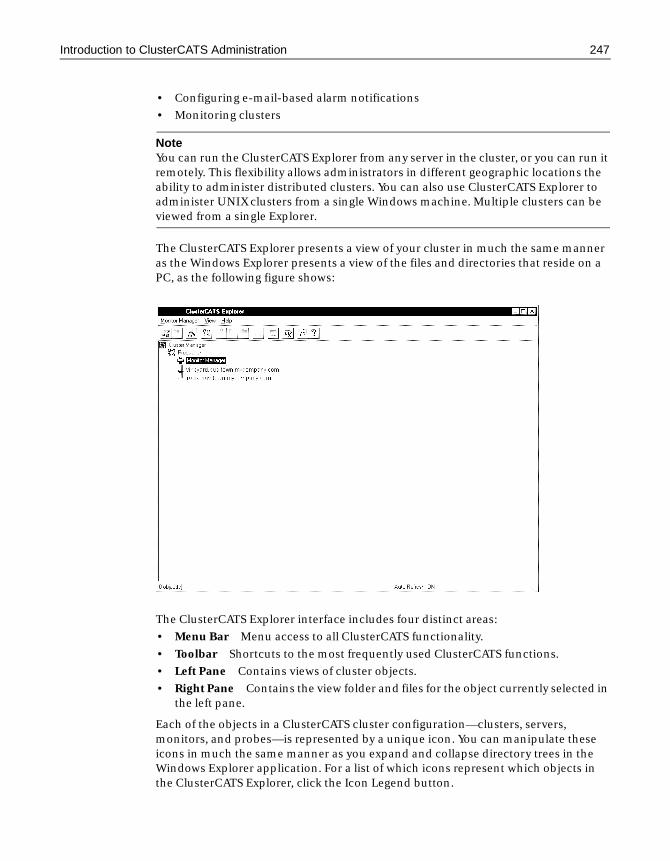
Introduction to ClusterCATS Administration 247
• Configuring e-mail-based alarm notifications
• Monitoring clusters
NoteYou can run the ClusterCATS Explorer from any server in the cluster, or you can run it remotely. This flexibility allows administrators in different geographic locations the ability to administer distributed clusters. You can also use ClusterCATS Explorer to administer UNIX clusters from a single Windows machine. Multiple clusters can be viewed from a single Explorer.
The ClusterCATS Explorer presents a view of your cluster in much the same manner as the Windows Explorer presents a view of the files and directories that reside on a PC, as the following figure shows:
The ClusterCATS Explorer interface includes four distinct areas:
• Menu Bar Menu access to all ClusterCATS functionality.
• Toolbar Shortcuts to the most frequently used ClusterCATS functions.
• Left Pane Contains views of cluster objects.
• Right Pane Contains the view folder and files for the object currently selected in the left pane.
Each of the objects in a ClusterCATS cluster configuration—clusters, servers, monitors, and probes—is represented by a unique icon. You can manipulate these icons in much the same manner as you expand and collapse directory trees in the Windows Explorer application. For a list of which icons represent which objects in the ClusterCATS Explorer, click the Icon Legend button.
248 Chapter 12 Configuring ColdFusion Clusters
ClusterCATS Web Explorer (UNIX only)ColdFusion Enterprise includes the ClusterCATS Web Explorer (btweb) for administering UNIX-only clusters. It is a graphical, cross-platform, Web-based utility used to create, configure, and administer ClusterCATS clusters.
NoteClusterCATS for ColdFusion only installs ClusterCATS Web Explorer on UNIX servers but you can access it from any computer with an Internet browser.
The Web Explorer, like its Windows counterpart, is quite robust and lets you configure and administer clusters easily. However, it does not contain the identical functionality provided by the Windows-based ClusterCATS Explorer. The Web Explorer does not let you do the following:
• Install the ClusterCATS Web Explorer on an NT server; it runs only from UNIX servers.
• Create and administer NT servers that have security enabled.
• Set or modify load thresholds via a graphical display.
• Monitor the amount of load hitting the server via a graphical display; the server’s load statistics are only displayed textually on the Cluster Member List and Server Properties pages.
If you require any of these capabilities, you should obtain a Windows machine and use the Windows-based ClusterCATS Explorer for your cluster administration.
Configuring the communications port on your Web server
Before you can open and use the ClusterCATS Web Explorer, you must ensure that a communications port is configured to listen for HTTP requests on the Netscape or Apache Web server for which you installed ClusterCATS. You can only access the ClusterCATS Web Explorer through the defined communications port on your Web server, which you configure using your Web server’s administration utilities and not the ColdFusion admin utility.
NoteFor availability and security reasons, be sure to only allow access to the ClusterCATS Web Explorer from a separate IP-based virtual host server on a port other than 80 and password protect access to it.
Netscape considerations
By default, Netscape Enterprise Server assigns your Web server a random, six-digit communication port number. You can either use this assigned number or change it to something easier to remember, like port 81.
If you are not familiar with configuring your Web server’s communications ports, see the Netscape Enterprise Server Administrator online help for instructions.
Introduction to ClusterCATS Administration 249
Apache considerations
Make the following changes to the Apache Web server’s httpd.conf file to enable the ClusterCATS Web Explorer (btweb). Replace the IP address specified in the example below (192.168.96.71) and the port (2222) with one appropriate for your system and enable authentication for the virtual directory.
###### BTWeb Administration###Listen 192.168.96.71:2222<VirtualHost 192.168.96.71:2222> ServerAdmin root@localhost DocumentRoot /usr/lib/btcats/btweb DirectoryIndex default.htm ServerName btweb ErrorLog logs/btweb_error_log CustomLog logs/btweb_access_log combined ### BTWeb stuff ### AddHandler cgi-script .exe <Directory "/usr/lib/btcats/btweb/"> Options FollowSymLinks Options ExecCGI AllowOverride None Order allow,deny Allow from all AuthName "btcats admin tools" AuthType Basic AuthUserFile /usr/local/apache/conf/users require user admin </Directory></VirtualHost>
Once you have configured your server, restart Apache. To access the Web Explorer, point your browser to the IP address you entered as the VirtualHost.
For information on using the htpasswd utility to create and manage your authentication file list, refer to the Apache documentation.
Opening the Web Explorer
The ClusterCATS Web Explorer can be used from a machine that runs either Netscape Navigator or Microsoft Internet Explorer versions 4.0 or greater.
To open the Web Explorer:
1 Open a Web browser.
2 Enter the following URL in the browser’s address field:
For Netscape Enterprise Server v3.x:
http://<server-name>:<admin-port>/admin-serv/btweb/default.html
For Netscape Enterprise Server v4.0x:
http://<server-name>:<admin-port>/https-admserv/btweb/default.html
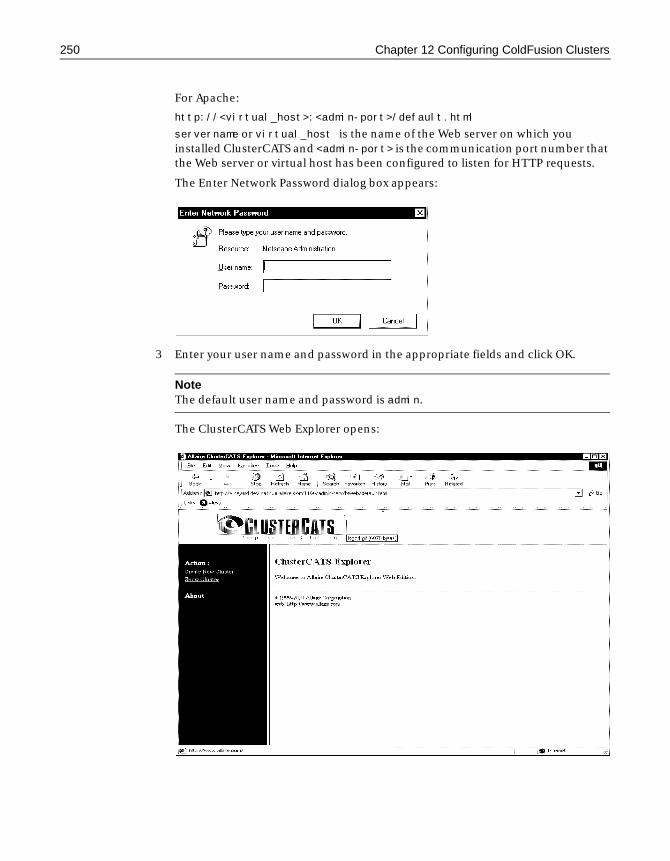
250 Chapter 12 Configuring ColdFusion Clusters
For Apache:
http://<virtual_host>:<admin-port>/default.html
servername or virtual_host is the name of the Web server on which you installed ClusterCATS and <admin-port> is the communication port number that the Web server or virtual host has been configured to listen for HTTP requests.
The Enter Network Password dialog box appears:
3 Enter your user name and password in the appropriate fields and click OK.
NoteThe default user name and password is admin.
The ClusterCATS Web Explorer opens:
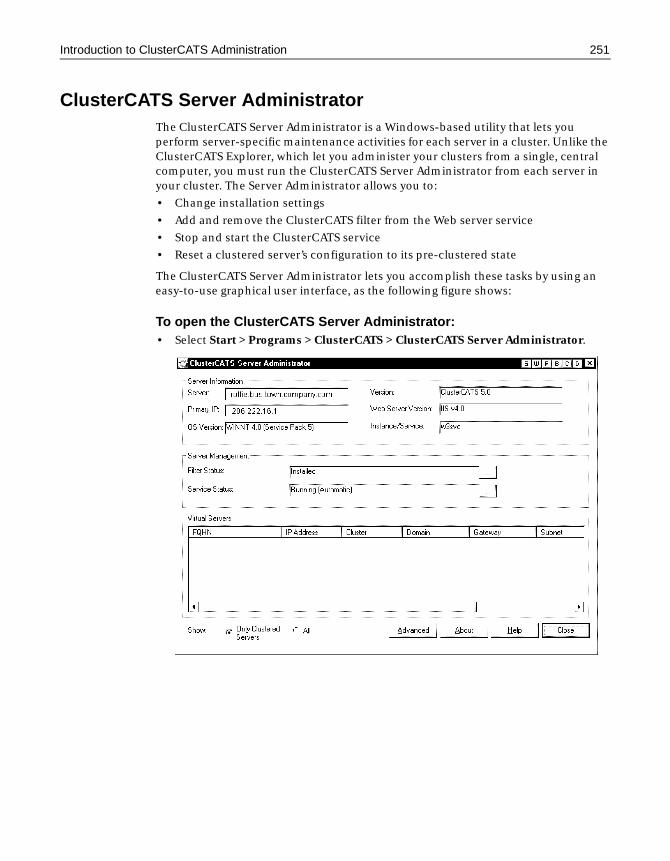
Introduction to ClusterCATS Administration 251
ClusterCATS Server AdministratorThe ClusterCATS Server Administrator is a Windows-based utility that lets you perform server-specific maintenance activities for each server in a cluster. Unlike the ClusterCATS Explorer, which let you administer your clusters from a single, central computer, you must run the ClusterCATS Server Administrator from each server in your cluster. The Server Administrator allows you to:
• Change installation settings
• Add and remove the ClusterCATS filter from the Web server service
• Stop and start the ClusterCATS service
• Reset a clustered server’s configuration to its pre-clustered state
The ClusterCATS Server Administrator lets you accomplish these tasks by using an easy-to-use graphical user interface, as the following figure shows:
To open the ClusterCATS Server Administrator:• Select Start > Programs > ClusterCATS > ClusterCATS Server Administrator.

252 Chapter 12 Configuring ColdFusion Clusters
btadminbtadmin is a scriptable utility that lets you perform server-specific maintenance activities for each server in a cluster. btadmin is available on both UNIX and Windows servers.
Unlike the ClusterCATS Web Explorer, which lets you administer your entire cluster from a single, central computer, you must use btadmin from each server in your cluster. btadmin allows you to:
• Add and remove the ClusterCATS filter from the Web server service
• Stop and start the ClusterCATS service
• Place a cluster member in maintenance mode
• Reset a clustered server’s configuration to its pre-clustered state
For more information on btadmin, refer to “Using btadmin” on page 322.
Creating ClustersIf you have successfully installed ClusterCATS, you are ready to create server clusters.
This section explains the following:
• “Creating clusters in Windows” on page 252
• “Creating clusters in UNIX” on page 261
Creating clusters in WindowsYou can create clusters using the Cluster Setup Wizard or manually using the ClusterCATS Explorer. It is easier and quicker to create and configure clusters completely using the Cluster Setup Wizard.
This section describes how to create clusters both ways:
• “Creating clusters with the Cluster Setup Wizard” on page 252
• “Manually creating clusters” on page 258
Creating clusters with the Cluster Setup Wizard
The ClusterCATS Explorer includes the Cluster Setup Wizard that makes creating and configuring clusters easy. The Wizard walks you through the required definition and configuration steps. After creating a cluster with the Wizard, you can use the ClusterCATS Explorer to make any necessary changes.
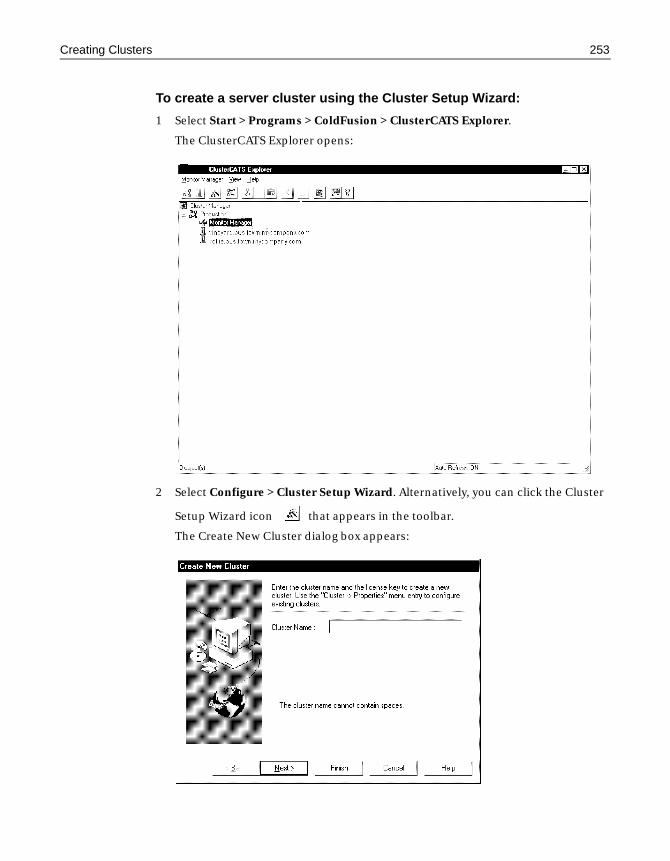
Creating Clusters 253
To create a server cluster using the Cluster Setup Wizard:
1 Select Start > Programs > ColdFusion > ClusterCATS Explorer.
The ClusterCATS Explorer opens:
2 Select Configure > Cluster Setup Wizard. Alternatively, you can click the Cluster
Setup Wizard icon that appears in the toolbar.
The Create New Cluster dialog box appears:
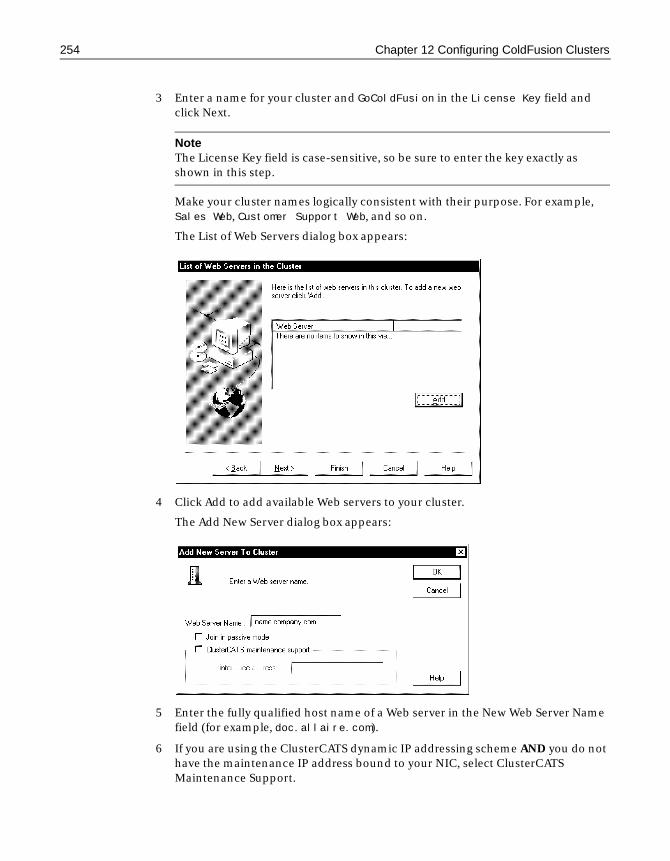
254 Chapter 12 Configuring ColdFusion Clusters
3 Enter a name for your cluster and GoColdFusion in the License Key field and click Next.
NoteThe License Key field is case-sensitive, so be sure to enter the key exactly as shown in this step.
Make your cluster names logically consistent with their purpose. For example, Sales Web, Customer Support Web, and so on.
The List of Web Servers dialog box appears:
4 Click Add to add available Web servers to your cluster.
The Add New Server dialog box appears:
5 Enter the fully qualified host name of a Web server in the New Web Server Name field (for example, doc.allaire.com).
6 If you are using the ClusterCATS dynamic IP addressing scheme AND you do not have the maintenance IP address bound to your NIC, select ClusterCATS Maintenance Support.
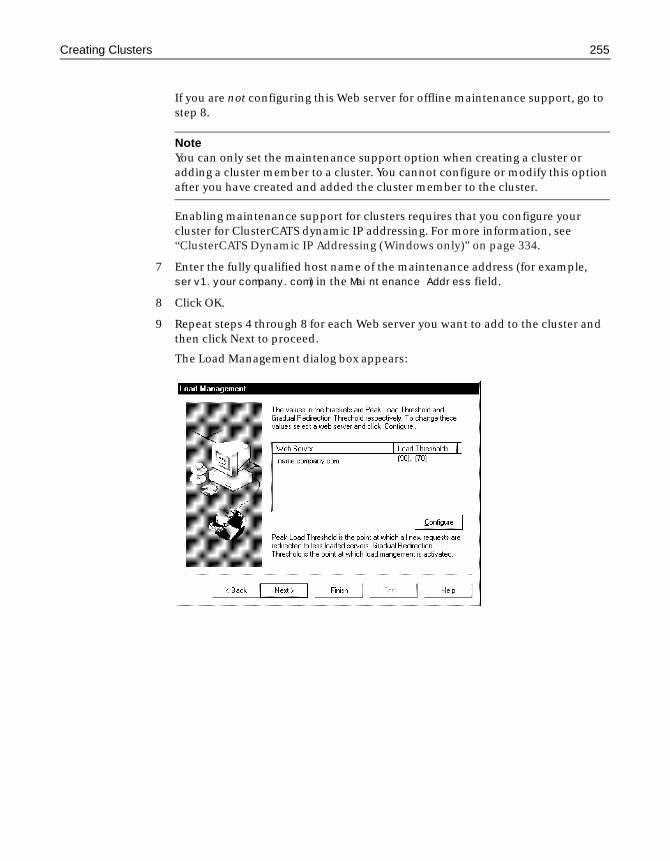
Creating Clusters 255
If you are not configuring this Web server for offline maintenance support, go to step 8.
NoteYou can only set the maintenance support option when creating a cluster or adding a cluster member to a cluster. You cannot configure or modify this option after you have created and added the cluster member to the cluster.
Enabling maintenance support for clusters requires that you configure your cluster for ClusterCATS dynamic IP addressing. For more information, see “ClusterCATS Dynamic IP Addressing (Windows only)” on page 334.
7 Enter the fully qualified host name of the maintenance address (for example, serv1.yourcompany.com) in the Maintenance Address field.
8 Click OK.
9 Repeat steps 4 through 8 for each Web server you want to add to the cluster and then click Next to proceed.
The Load Management dialog box appears:
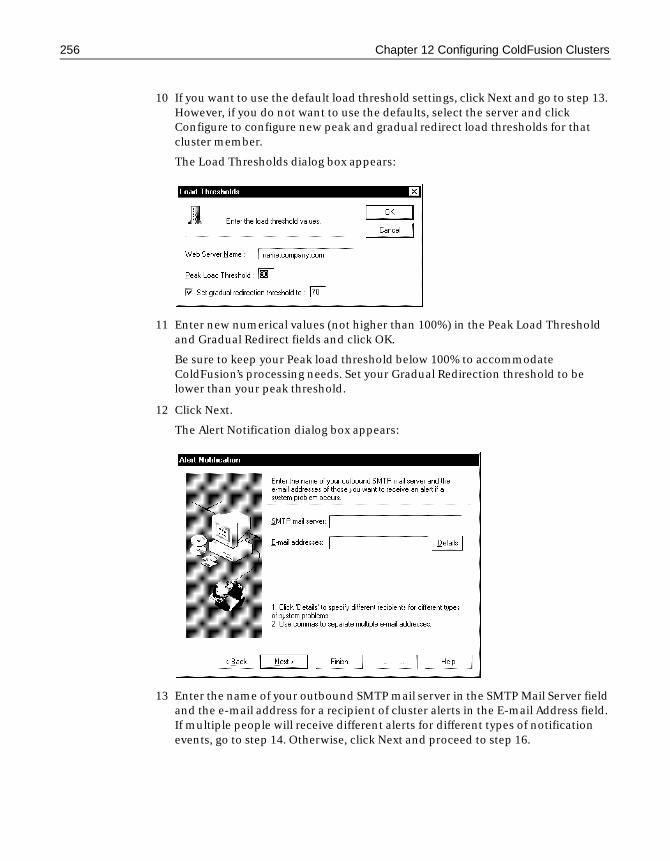
256 Chapter 12 Configuring ColdFusion Clusters
10 If you want to use the default load threshold settings, click Next and go to step 13. However, if you do not want to use the defaults, select the server and click Configure to configure new peak and gradual redirect load thresholds for that cluster member.
The Load Thresholds dialog box appears:
11 Enter new numerical values (not higher than 100%) in the Peak Load Threshold and Gradual Redirect fields and click OK.
Be sure to keep your Peak load threshold below 100% to accommodate ColdFusion’s processing needs. Set your Gradual Redirection threshold to be lower than your peak threshold.
12 Click Next.
The Alert Notification dialog box appears:
13 Enter the name of your outbound SMTP mail server in the SMTP Mail Server field and the e-mail address for a recipient of cluster alerts in the E-mail Address field. If multiple people will receive different alerts for different types of notification events, go to step 14. Otherwise, click Next and proceed to step 16.
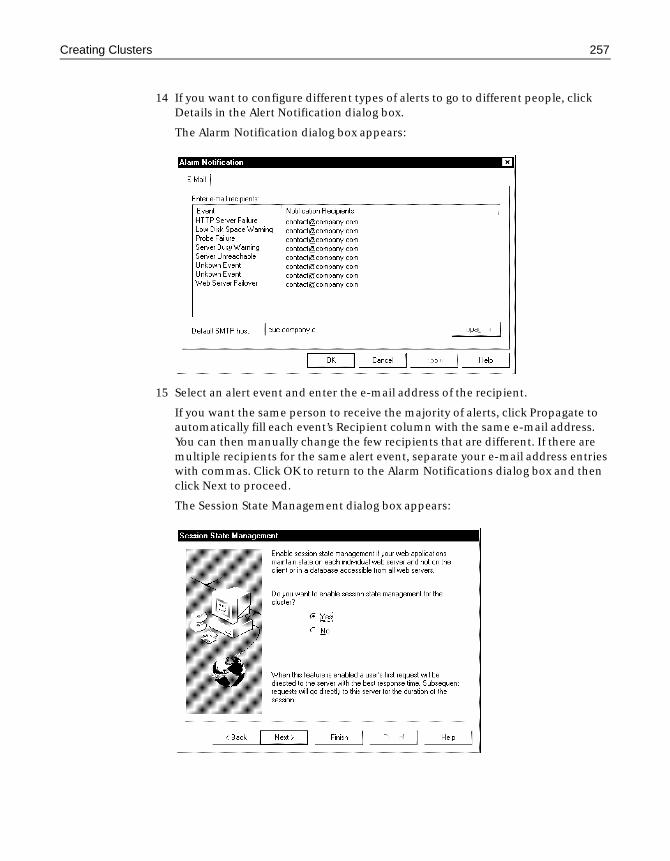
Creating Clusters 257
14 If you want to configure different types of alerts to go to different people, click Details in the Alert Notification dialog box.
The Alarm Notification dialog box appears:
15 Select an alert event and enter the e-mail address of the recipient.
If you want the same person to receive the majority of alerts, click Propagate to automatically fill each event’s Recipient column with the same e-mail address. You can then manually change the few recipients that are different. If there are multiple recipients for the same alert event, separate your e-mail address entries with commas. Click OK to return to the Alarm Notifications dialog box and then click Next to proceed.
The Session State Management dialog box appears:
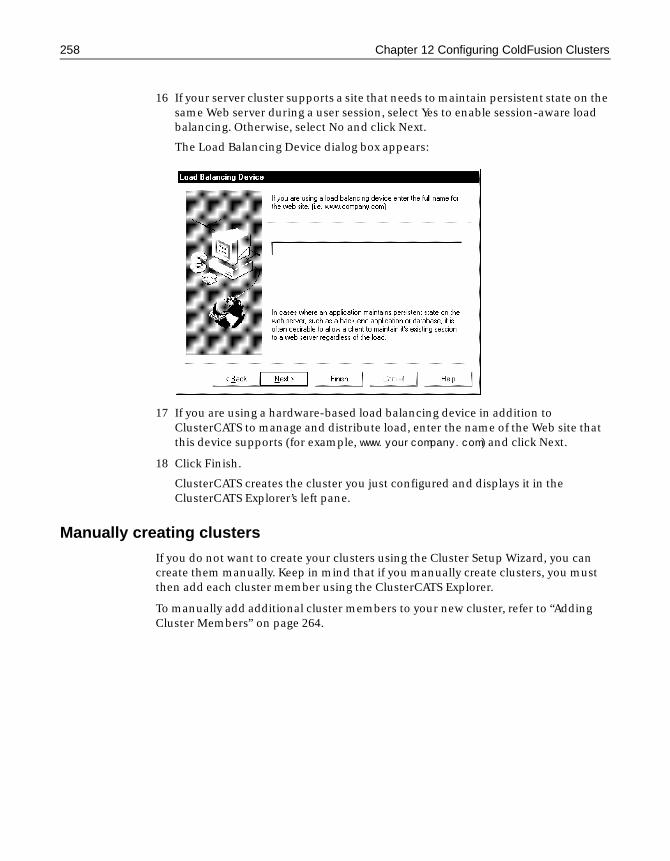
258 Chapter 12 Configuring ColdFusion Clusters
16 If your server cluster supports a site that needs to maintain persistent state on the same Web server during a user session, select Yes to enable session-aware load balancing. Otherwise, select No and click Next.
The Load Balancing Device dialog box appears:
17 If you are using a hardware-based load balancing device in addition to ClusterCATS to manage and distribute load, enter the name of the Web site that this device supports (for example, www.yourcompany.com) and click Next.
18 Click Finish.
ClusterCATS creates the cluster you just configured and displays it in the ClusterCATS Explorer’s left pane.
Manually creating clusters
If you do not want to create your clusters using the Cluster Setup Wizard, you can create them manually. Keep in mind that if you manually create clusters, you must then add each cluster member using the ClusterCATS Explorer.
To manually add additional cluster members to your new cluster, refer to “Adding Cluster Members” on page 264.
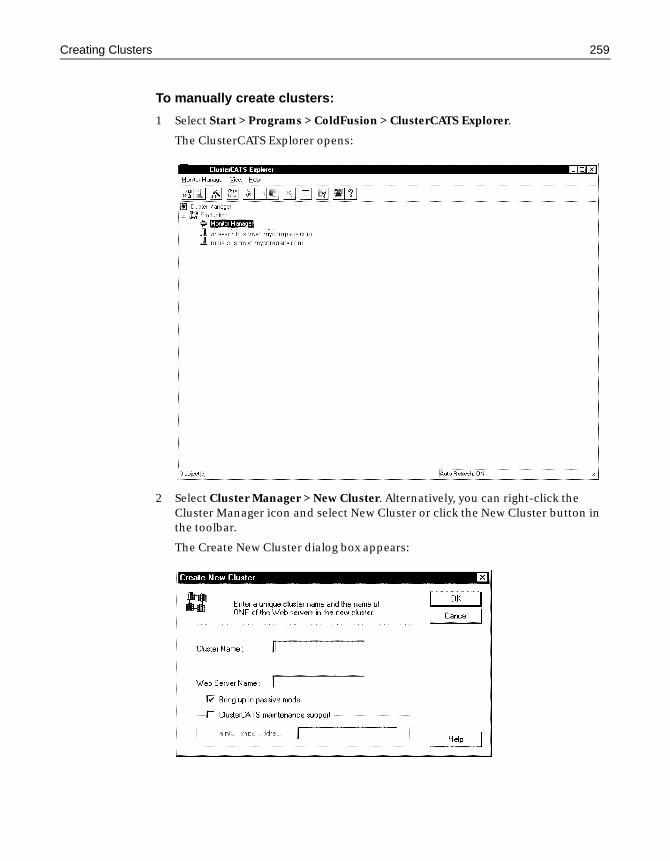
Creating Clusters 259
To manually create clusters:
1 Select Start > Programs > ColdFusion > ClusterCATS Explorer.
The ClusterCATS Explorer opens:
2 Select Cluster Manager > New Cluster. Alternatively, you can right-click the Cluster Manager icon and select New Cluster or click the New Cluster button in the toolbar.
The Create New Cluster dialog box appears:
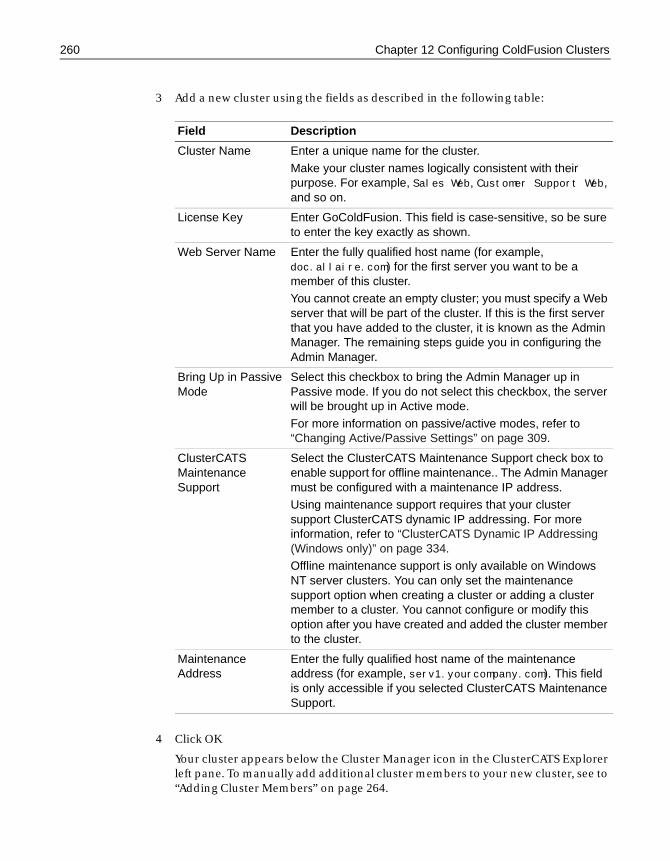
260 Chapter 12 Configuring ColdFusion Clusters
3 Add a new cluster using the fields as described in the following table:
4 Click OK
Your cluster appears below the Cluster Manager icon in the ClusterCATS Explorer left pane. To manually add additional cluster members to your new cluster, see to “Adding Cluster Members” on page 264.
Field Description
Cluster Name Enter a unique name for the cluster.
Make your cluster names logically consistent with their purpose. For example, Sales Web, Customer Support Web, and so on.
License Key Enter GoColdFusion. This field is case-sensitive, so be sure to enter the key exactly as shown.
Web Server Name Enter the fully qualified host name (for example, doc.allaire.com) for the first server you want to be a member of this cluster.You cannot create an empty cluster; you must specify a Web server that will be part of the cluster. If this is the first server that you have added to the cluster, it is known as the Admin Manager. The remaining steps guide you in configuring the Admin Manager.
Bring Up in Passive Mode
Select this checkbox to bring the Admin Manager up in Passive mode. If you do not select this checkbox, the server will be brought up in Active mode.
For more information on passive/active modes, refer to “Changing Active/Passive Settings” on page 309.
ClusterCATS Maintenance Support
Select the ClusterCATS Maintenance Support check box to enable support for offline maintenance.. The Admin Manager must be configured with a maintenance IP address. Using maintenance support requires that your cluster support ClusterCATS dynamic IP addressing. For more information, refer to “ClusterCATS Dynamic IP Addressing (Windows only)” on page 334.Offline maintenance support is only available on Windows NT server clusters. You can only set the maintenance support option when creating a cluster or adding a cluster member to a cluster. You cannot configure or modify this option after you have created and added the cluster member to the cluster.
Maintenance Address
Enter the fully qualified host name of the maintenance address (for example, serv1.yourcompany.com). This field is only accessible if you selected ClusterCATS Maintenance Support.
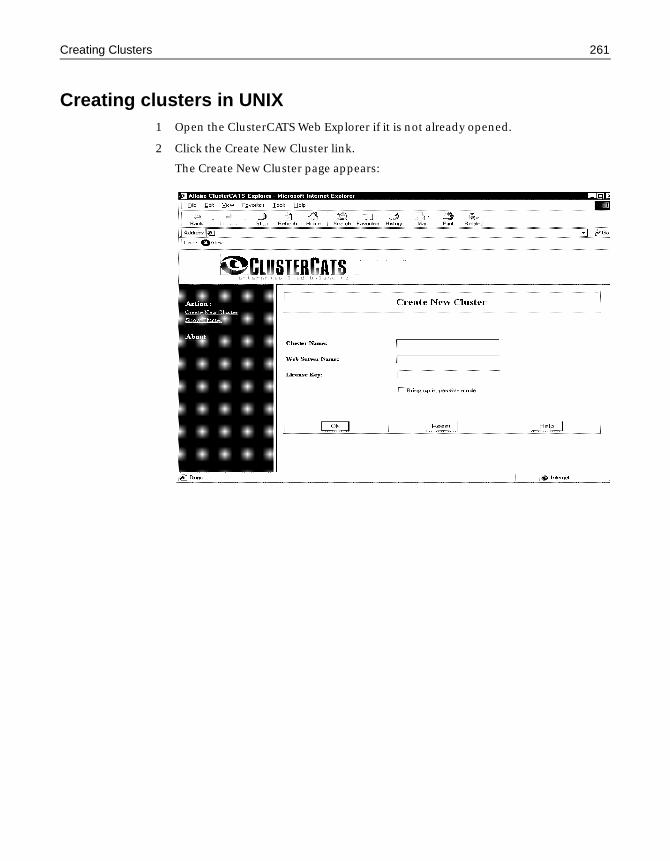
Creating Clusters 261
Creating clusters in UNIX1 Open the ClusterCATS Web Explorer if it is not already opened.
2 Click the Create New Cluster link.
The Create New Cluster page appears:
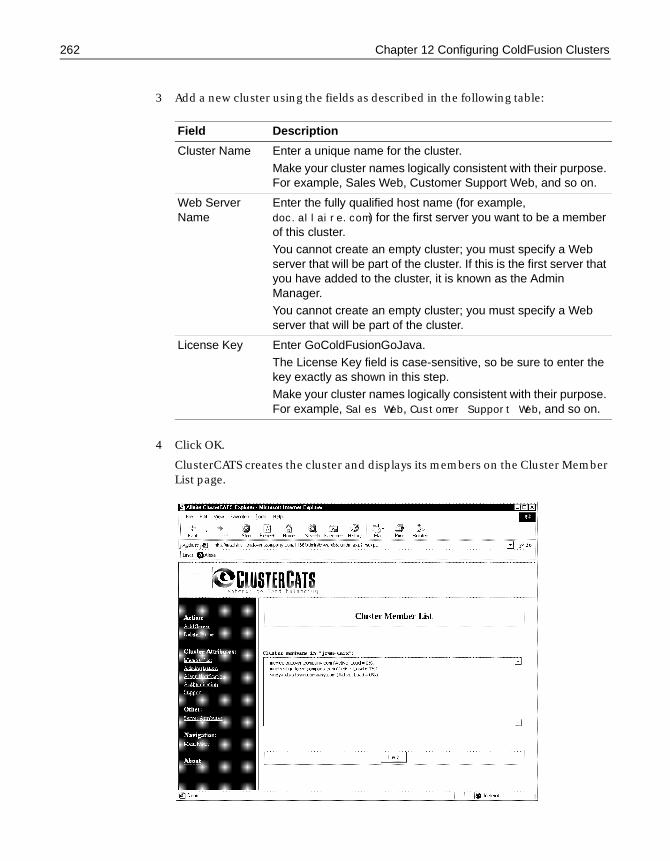
262 Chapter 12 Configuring ColdFusion Clusters
3 Add a new cluster using the fields as described in the following table:
4 Click OK.
ClusterCATS creates the cluster and displays its members on the Cluster Member List page.
Field Description
Cluster Name Enter a unique name for the cluster.
Make your cluster names logically consistent with their purpose. For example, Sales Web, Customer Support Web, and so on.
Web Server Name
Enter the fully qualified host name (for example, doc.allaire.com) for the first server you want to be a member of this cluster.You cannot create an empty cluster; you must specify a Web server that will be part of the cluster. If this is the first server that you have added to the cluster, it is known as the Admin Manager.You cannot create an empty cluster; you must specify a Web server that will be part of the cluster.
License Key Enter GoColdFusionGoJava. The License Key field is case-sensitive, so be sure to enter the key exactly as shown in this step.Make your cluster names logically consistent with their purpose. For example, Sales Web, Customer Support Web, and so on.
Removing Clusters 263
Removing ClustersTo delete an entire cluster, you must delete each cluster member from the cluster individually, using the procedure described in “Removing Cluster Members” on page 266.
NoteWhen deleting cluster members, you must delete the Admin Manager (Windows) or the Admin Agent (UNIX) last. This server is the first server you added to the cluster.
When the last cluster member has been removed, the cluster itself is deleted.
To determine which server is the Admin Manager in Windows:
1 Open the ClusterCATS Explorer.
2 Right-click on the cluster icon and choose Configure > Administration.
The cluster’s Properties dialog box appears displaying the Administration tab. The server designated as the Admin Manager will be the active entry in the drop-down list.
To determine which server is the Admin Agent in UNIX:
1 Open the ClusterCATS Web Explorer if it is not already open.
2 Click the Show Cluster link.
3 Enter the fully qualified host name of a server in the Web Server Name field.
4 Click OK.
The Cluster Member List page appears. If you get an "Error: Server <cluster_member_name> could not be found" message, make sure you used the correct, fully-qualified server name and that the server is running.
5 Click the Administration link. The Cluster Administration page appears. The Admin Agent is the currently-selected host in the Admin Agent field.
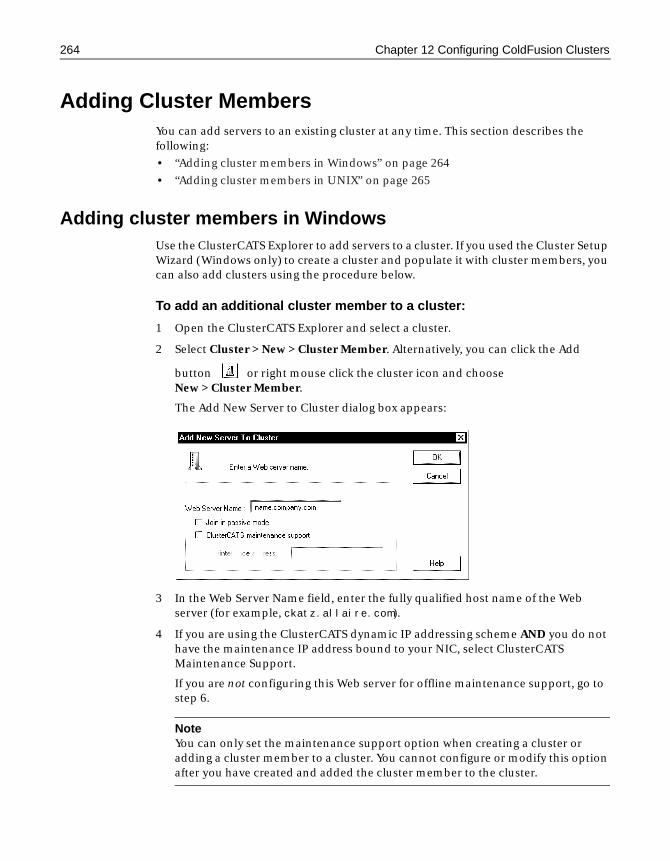
264 Chapter 12 Configuring ColdFusion Clusters
Adding Cluster MembersYou can add servers to an existing cluster at any time. This section describes the following:
• “Adding cluster members in Windows” on page 264
• “Adding cluster members in UNIX” on page 265
Adding cluster members in WindowsUse the ClusterCATS Explorer to add servers to a cluster. If you used the Cluster Setup Wizard (Windows only) to create a cluster and populate it with cluster members, you can also add clusters using the procedure below.
To add an additional cluster member to a cluster:
1 Open the ClusterCATS Explorer and select a cluster.
2 Select Cluster > New > Cluster Member. Alternatively, you can click the Add
button or right mouse click the cluster icon and choose New > Cluster Member.
The Add New Server to Cluster dialog box appears:
3 In the Web Server Name field, enter the fully qualified host name of the Web server (for example, ckatz.allaire.com).
4 If you are using the ClusterCATS dynamic IP addressing scheme AND you do not have the maintenance IP address bound to your NIC, select ClusterCATS Maintenance Support.
If you are not configuring this Web server for offline maintenance support, go to step 6.
NoteYou can only set the maintenance support option when creating a cluster or adding a cluster member to a cluster. You cannot configure or modify this option after you have created and added the cluster member to the cluster.

Adding Cluster Members 265
Enabling maintenance support for clusters requires that you configure your cluster for ClusterCATS dynamic IP addressing. For more information, see “ClusterCATS Dynamic IP Addressing (Windows only)” on page 334 .
5 Enter the fully qualified host name of the maintenance address (for example, serv1.yourcompany.com) in the Maintenance Address field.
6 Click OK.
7 Repeat steps 2 through 6 to add additional servers to the cluster manually.
Adding cluster members in UNIXUse the ClusterCATS Web Explorer to add cluster members.
To add a cluster member to a cluster:
1 Open the ClusterCATS Web Explorer if it is not already open.
2 Click the Add Server link.
The Add Server page appears:
3 Enter the fully qualified host name (for example, doc.allaire.com) in the Web Server Name field.
4 Click OK to add the cluster member to the existing cluster.
266 Chapter 12 Configuring ColdFusion Clusters
Removing Cluster MembersYou can remove servers from an existing cluster at any time. This section describes the following:
• “Removing cluster members in Windows” on page 266
• “Removing cluster members in UNIX” on page 267
Removing cluster members in WindowsUse the ClusterCATS Explorer to remove cluster members.
To remove a cluster member from a cluster:
1 Open the ClusterCATS Explorer and select a cluster member.
2 Select Server > Delete. Alternatively, you can right-click the server name and choose Delete.
The selected cluster member is deleted from the cluster you selected.
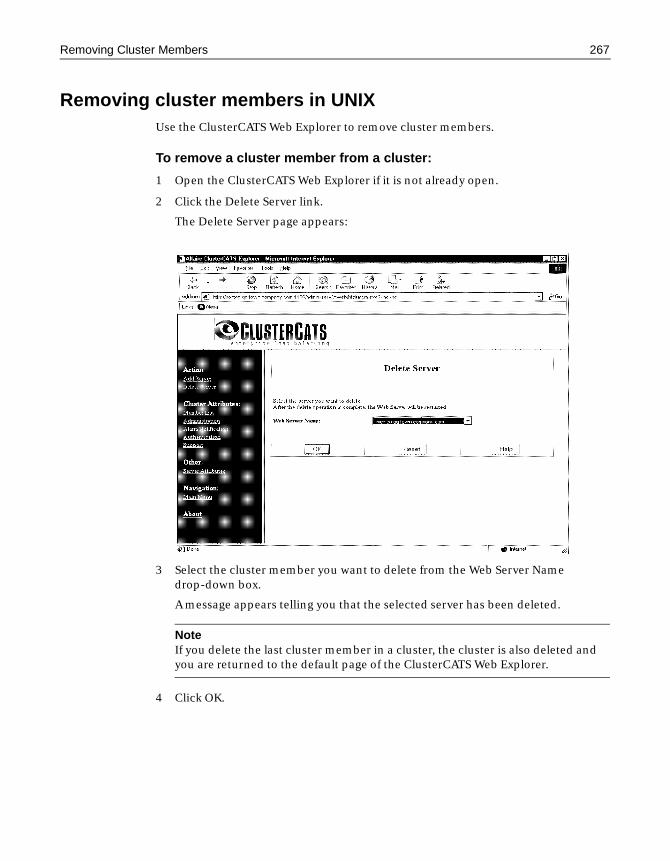
Removing Cluster Members 267
Removing cluster members in UNIXUse the ClusterCATS Web Explorer to remove cluster members.
To remove a cluster member from a cluster:
1 Open the ClusterCATS Web Explorer if it is not already open.
2 Click the Delete Server link.
The Delete Server page appears:
3 Select the cluster member you want to delete from the Web Server Name drop-down box.
A message appears telling you that the selected server has been deleted.
NoteIf you delete the last cluster member in a cluster, the cluster is also deleted and you are returned to the default page of the ClusterCATS Web Explorer.
4 Click OK.

268 Chapter 12 Configuring ColdFusion Clusters
Server Load ThresholdsClusterCATS makes certain that your Web applications remain available and running at optimum performance by intelligently managing the amount of HTTP traffic hitting your clustered servers. By setting load thresholds on each server in your cluster, you can control and manage your site’s availability and performance. Many of your threshold configuration decisions hinge on your site’s architecture and where the bulk of your processing resources need to be allocated.
During an HTTP redirection, ClusterCATS evaluates the cluster’s state according to HTTP server state first, and then ColdFusion server load. This policy is the same in both centralized and distributed ClusterCATS configurations. In a centralized ClusterCATS cluster with all Web servers at one site, ClusterCATS only redirects if the server is busy or restricted.
For each cluster member, you configure two load thresholds:
• Peak load threshold The peak load threshold represents the maximum load the server can handle before its performance degrades significantly or becomes unavailable.
• Gradual redirection threshold The gradual redirection threshold represents the point at which HTTP requests begin to be redirected to other less loaded members in a cluster so that the server’s performance does not degrade or become unavailable.
By default, the Peak load threshold is 90% and the gradual redirection threshold is 10%. These default settings adequately handle HTTP traffic going across most Web sites. However, if your Web site is particularly processing intensive, you should lower both threshold settings to better accommodate the increased load.
If you want the server to be able to handle as much load as possible, set both threshold values close to one another. However, if you want redirection to occur well in advance of the server nearing its peak threshold, set the values farther apart so that there is a differential of at least 10% between the two threshold values.
This section shows you how to set the peak and gradual redirection load thresholds for ClusterCATS servers in the following sections:
• “Configuring load thresholds in Windows” on page 268
• “Configuring load thresholds on UNIX” on page 272
Configuring load thresholds in Windows
To adjust load thresholds for a cluster member:
1 Open the ClusterCATS Explorer and select a server.
2 Select Server > Properties. Alternatively, you can right-click the server and select Properties.
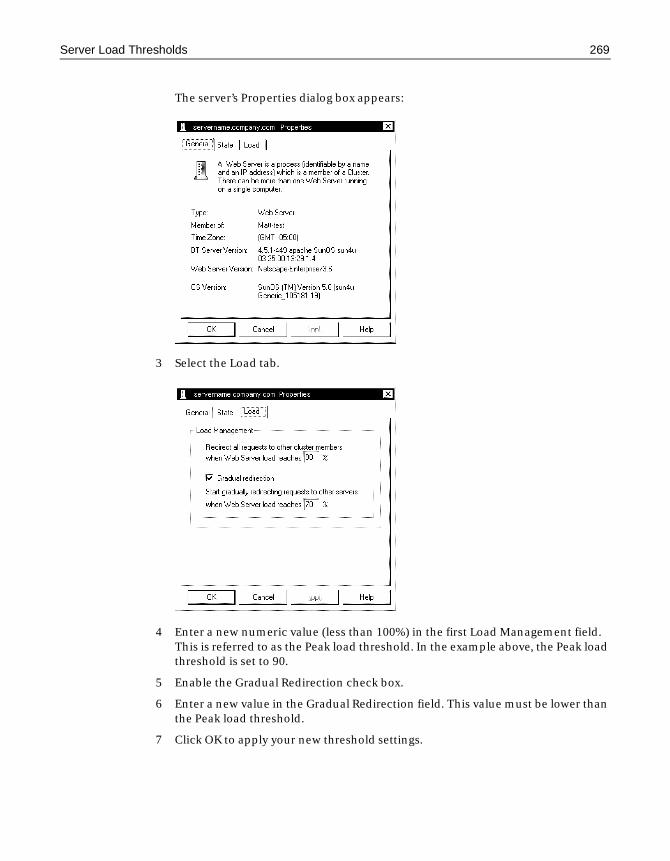
Server Load Thresholds 269
The server’s Properties dialog box appears:
3 Select the Load tab.
4 Enter a new numeric value (less than 100%) in the first Load Management field. This is referred to as the Peak load threshold. In the example above, the Peak load threshold is set to 90.
5 Enable the Gradual Redirection check box.
6 Enter a new value in the Gradual Redirection field. This value must be lower than the Peak load threshold.
7 Click OK to apply your new threshold settings.
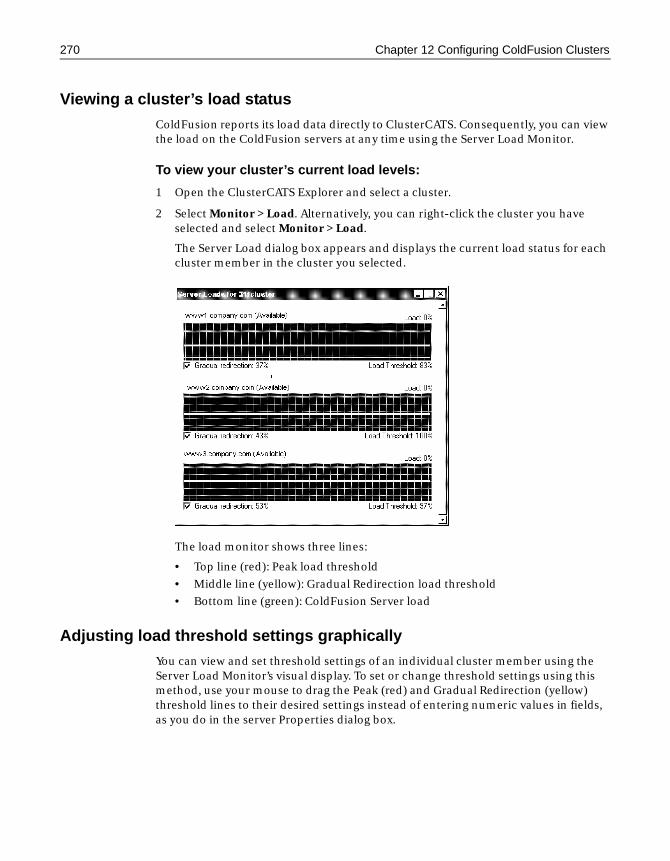
270 Chapter 12 Configuring ColdFusion Clusters
Viewing a cluster’s load status
ColdFusion reports its load data directly to ClusterCATS. Consequently, you can view the load on the ColdFusion servers at any time using the Server Load Monitor.
To view your cluster’s current load levels:
1 Open the ClusterCATS Explorer and select a cluster.
2 Select Monitor > Load. Alternatively, you can right-click the cluster you have selected and select Monitor > Load.
The Server Load dialog box appears and displays the current load status for each cluster member in the cluster you selected.
The load monitor shows three lines:
• Top line (red): Peak load threshold
• Middle line (yellow): Gradual Redirection load threshold
• Bottom line (green): ColdFusion Server load
Adjusting load threshold settings graphically
You can view and set threshold settings of an individual cluster member using the Server Load Monitor’s visual display. To set or change threshold settings using this method, use your mouse to drag the Peak (red) and Gradual Redirection (yellow) threshold lines to their desired settings instead of entering numeric values in fields, as you do in the server Properties dialog box.
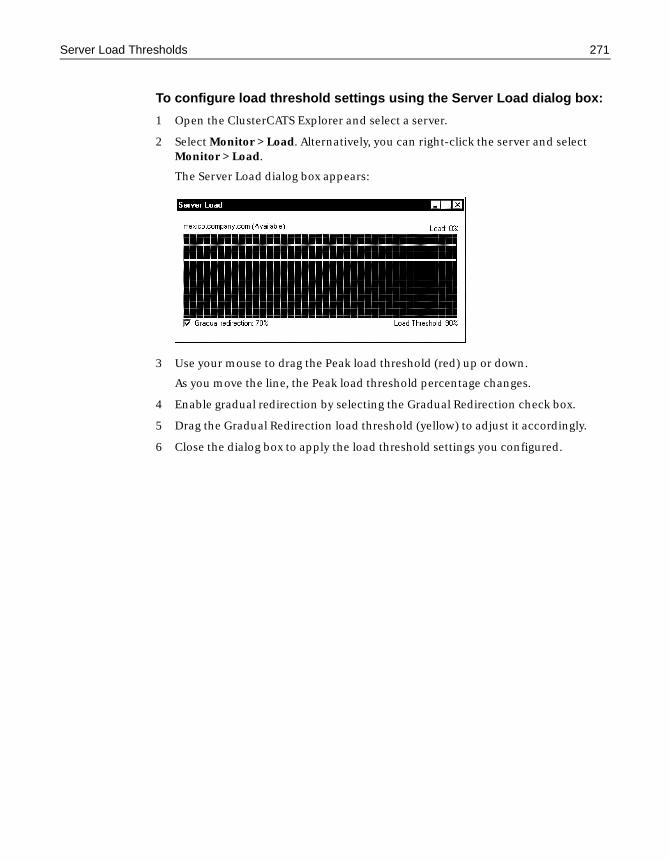
Server Load Thresholds 271
To configure load threshold settings using the Server Load dialog box:
1 Open the ClusterCATS Explorer and select a server.
2 Select Monitor > Load. Alternatively, you can right-click the server and select Monitor > Load.
The Server Load dialog box appears:
3 Use your mouse to drag the Peak load threshold (red) up or down.
As you move the line, the Peak load threshold percentage changes.
4 Enable gradual redirection by selecting the Gradual Redirection check box.
5 Drag the Gradual Redirection load threshold (yellow) to adjust it accordingly.
6 Close the dialog box to apply the load threshold settings you configured.
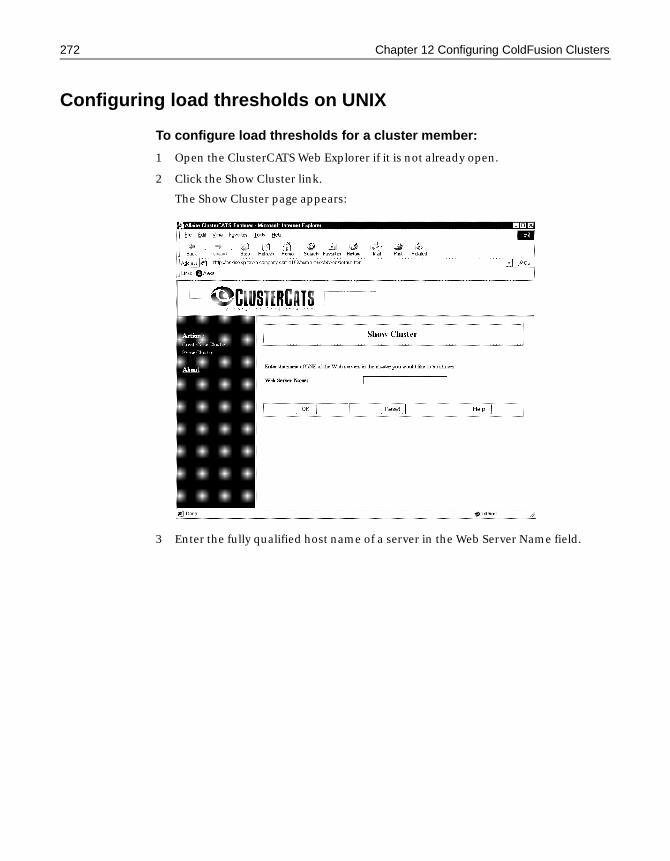
272 Chapter 12 Configuring ColdFusion Clusters
Configuring load thresholds on UNIX
To configure load thresholds for a cluster member:
1 Open the ClusterCATS Web Explorer if it is not already open.
2 Click the Show Cluster link.
The Show Cluster page appears:
3 Enter the fully qualified host name of a server in the Web Server Name field.
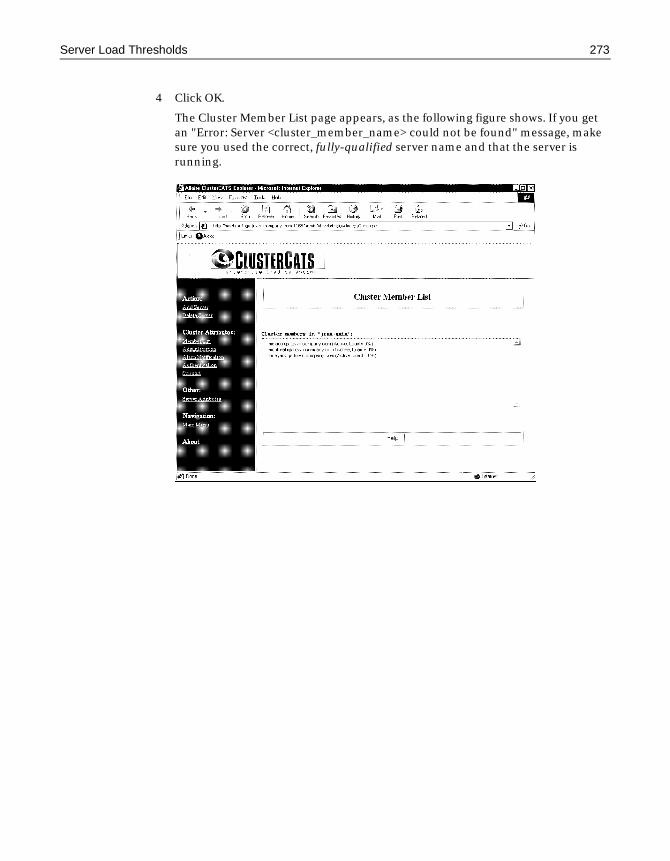
Server Load Thresholds 273
4 Click OK.
The Cluster Member List page appears, as the following figure shows. If you get an "Error: Server <cluster_member_name> could not be found" message, make sure you used the correct, fully-qualified server name and that the server is running.
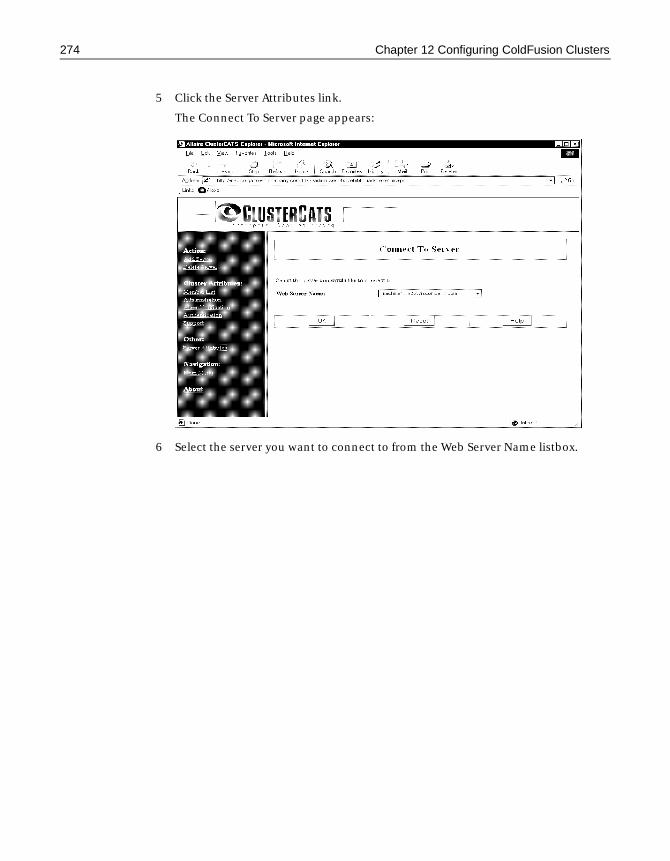
274 Chapter 12 Configuring ColdFusion Clusters
5 Click the Server Attributes link.
The Connect To Server page appears:
6 Select the server you want to connect to from the Web Server Name listbox.
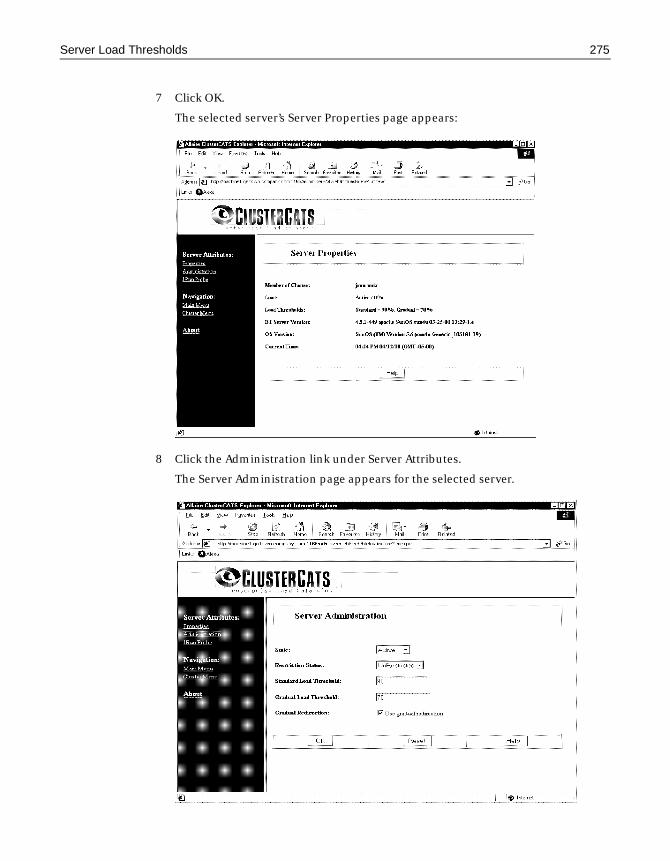
Server Load Thresholds 275
7 Click OK.
The selected server’s Server Properties page appears:
8 Click the Administration link under Server Attributes.
The Server Administration page appears for the selected server.
276 Chapter 12 Configuring ColdFusion Clusters
9 To change the Peak load threshold, enter a new numeric value (less than 100%) in the Standard Load Threshold field.
10 Enable the Gradual Redirection check box if it is not already enabled.
11 To change the Gradual Redirection load threshold, enter a new numeric value in the Gradual Load Threshold field. This value must be lower than the Standard Load Threshold.
12 Click OK to apply your new load threshold settings.
Session-Aware Load BalancingManaging your Web application’s state in a clustered environment can be challenging. By default, Web application, session, and server variables that get stored in memory or a repository during a user session are not persisted during a server redirection. Consequently, the Web server cannot maintain the application’s state correctly.
To overcome this problem, ClusterCATS provides a session-aware load balancing feature that lets you maintain application state in a clustered environment.
One method for maintaining your ColdFusion Web application’s state is to create session variables that get stored on the Web server. For an e-commerce Web site that is clustered, it is vital that users do not get redirected to another server in the middle of their session. If they did, their online transactions would be interrupted, making for an unsuccessful and frustrating user experience.
To ensure that users are not redirected from the server on which they start their session, ClusterCATS provides a built-in feature for enabling session-aware load balancing. Sometimes referred to as a “sticky” server, session-aware load balancing guarantees that users will not get bumped from the server on which they start their session until the session is complete, regardless of the load thresholds that have been defined for that server.
NoteSession-aware load balancing may not work if you use absolute hyperlinks in your Web pages. Absolute links route the HTTP request back to the cluster entry point and redirect according to the current load threshold without regard to the state of the requesting client. To avoid this inadvertent loss of state, be sure to use only relative linking in your Web pages.
This section describes the following:
• “Enabling session-aware load balancing on Windows” on page 277
• “Enabling session-aware load balancing on UNIX” on page 278
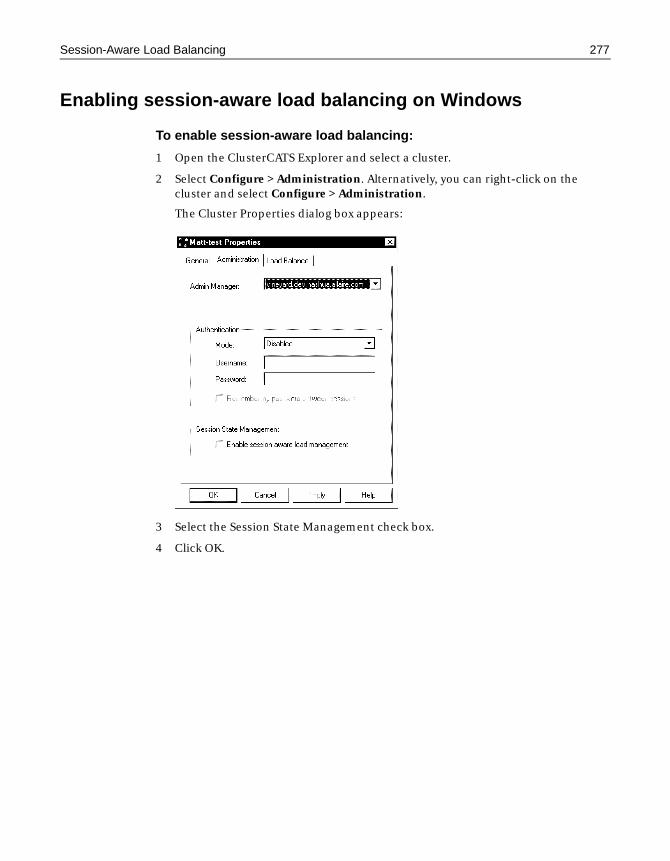
Session-Aware Load Balancing 277
Enabling session-aware load balancing on Windows
To enable session-aware load balancing:
1 Open the ClusterCATS Explorer and select a cluster.
2 Select Configure > Administration. Alternatively, you can right-click on the cluster and select Configure > Administration.
The Cluster Properties dialog box appears:
3 Select the Session State Management check box.
4 Click OK.

278 Chapter 12 Configuring ColdFusion Clusters
Enabling session-aware load balancing on UNIX
To enable session-aware load balancing:
1 Open ClusterCATS Web Explorer if it is not already open.
2 Click the Show Cluster link.
The Show Cluster page appears:
3 Enter the fully qualified host name of the server for which you want to configure session-aware load balancing in the Web Server Name field.

Session-Aware Load Balancing 279
4 Click OK.
The Cluster Member List page appears:
5 Click the Administration link under Cluster Attributes.
The Cluster Administration page appears:
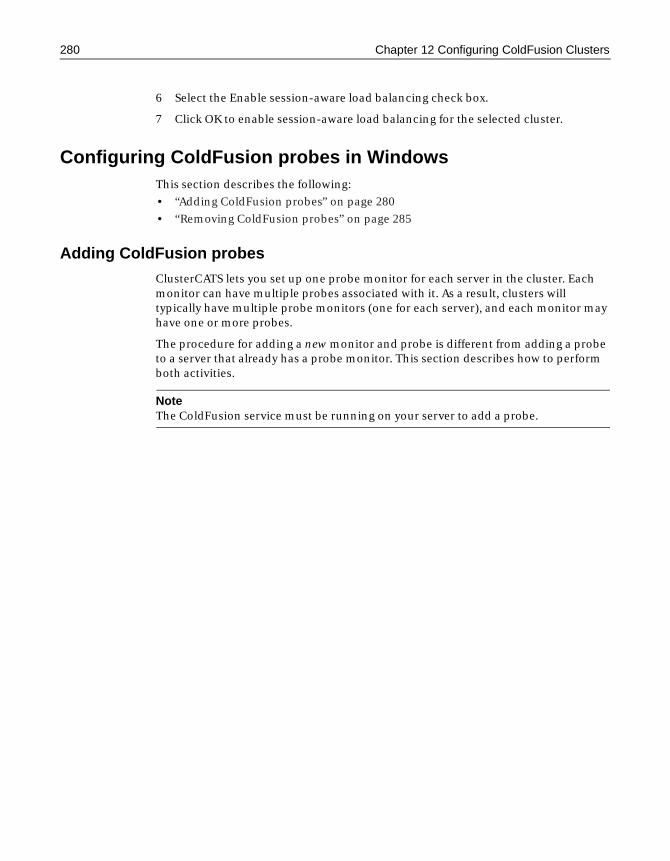
280 Chapter 12 Configuring ColdFusion Clusters
6 Select the Enable session-aware load balancing check box.
7 Click OK to enable session-aware load balancing for the selected cluster.
Configuring ColdFusion probes in WindowsThis section describes the following:
• “Adding ColdFusion probes” on page 280
• “Removing ColdFusion probes” on page 285
Adding ColdFusion probes
ClusterCATS lets you set up one probe monitor for each server in the cluster. Each monitor can have multiple probes associated with it. As a result, clusters will typically have multiple probe monitors (one for each server), and each monitor may have one or more probes.
The procedure for adding a new monitor and probe is different from adding a probe to a server that already has a probe monitor. This section describes how to perform both activities.
NoteThe ColdFusion service must be running on your server to add a probe.
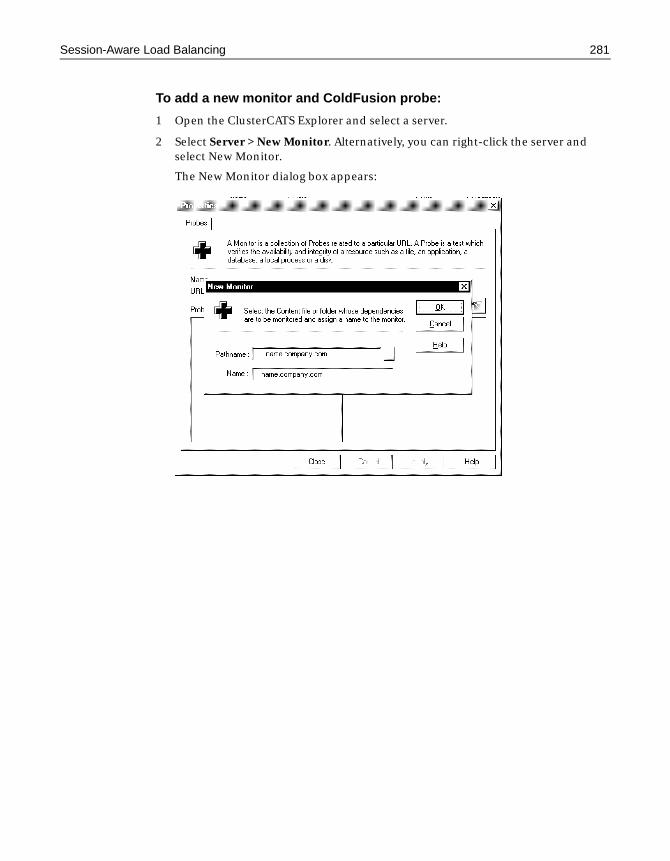
Session-Aware Load Balancing 281
To add a new monitor and ColdFusion probe:
1 Open the ClusterCATS Explorer and select a server.
2 Select Server > New Monitor. Alternatively, you can right-click the server and select New Monitor.
The New Monitor dialog box appears:
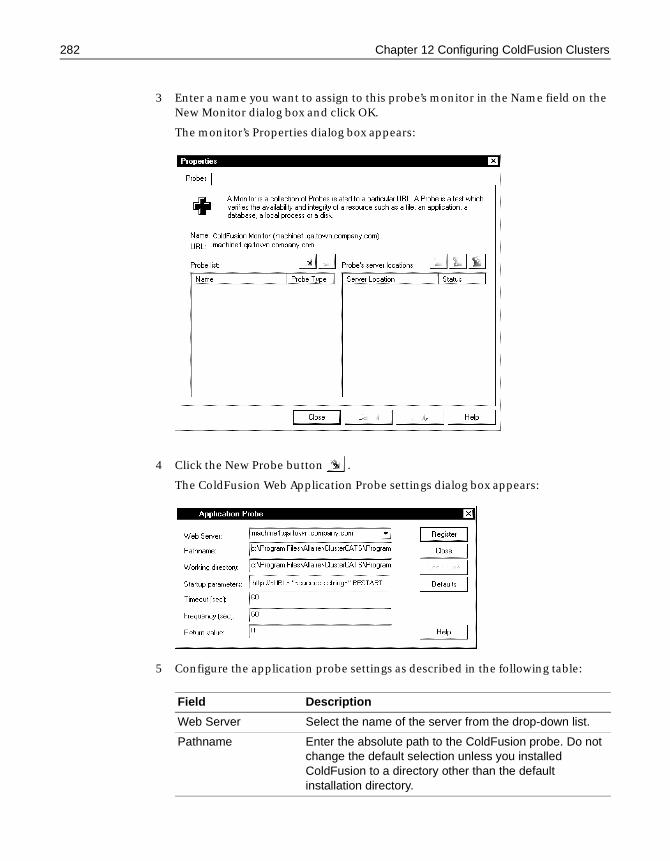
282 Chapter 12 Configuring ColdFusion Clusters
3 Enter a name you want to assign to this probe’s monitor in the Name field on the New Monitor dialog box and click OK.
The monitor’s Properties dialog box appears:
4 Click the New Probe button .
The ColdFusion Web Application Probe settings dialog box appears:
5 Configure the application probe settings as described in the following table:
Field Description
Web Server Select the name of the server from the drop-down list.
Pathname Enter the absolute path to the ColdFusion probe. Do not change the default selection unless you installed ColdFusion to a directory other than the default installation directory.
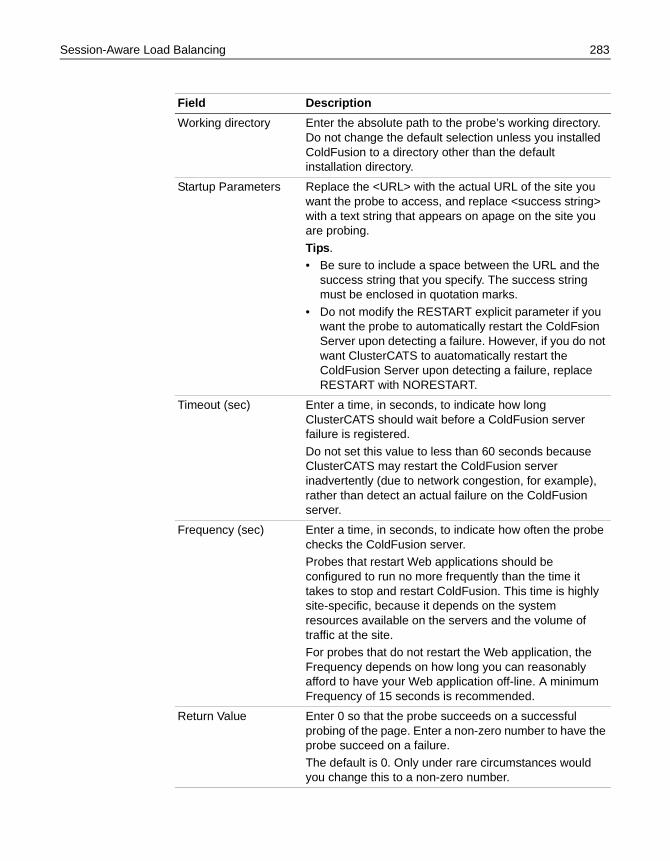
Session-Aware Load Balancing 283
Working directory Enter the absolute path to the probe’s working directory. Do not change the default selection unless you installed ColdFusion to a directory other than the default installation directory.
Startup Parameters Replace the <URL> with the actual URL of the site you want the probe to access, and replace <success string> with a text string that appears on apage on the site you are probing.
Tips. • Be sure to include a space between the URL and the
success string that you specify. The success string must be enclosed in quotation marks.
• Do not modify the RESTART explicit parameter if you want the probe to automatically restart the ColdFsion Server upon detecting a failure. However, if you do not want ClusterCATS to auatomatically restart the ColdFusion Server upon detecting a failure, replace RESTART with NORESTART.
Timeout (sec) Enter a time, in seconds, to indicate how long ClusterCATS should wait before a ColdFusion server failure is registered.
Do not set this value to less than 60 seconds because ClusterCATS may restart the ColdFusion server inadvertently (due to network congestion, for example), rather than detect an actual failure on the ColdFusion server.
Frequency (sec) Enter a time, in seconds, to indicate how often the probe checks the ColdFusion server.Probes that restart Web applications should be configured to run no more frequently than the time it takes to stop and restart ColdFusion. This time is highly site-specific, because it depends on the system resources available on the servers and the volume of traffic at the site.For probes that do not restart the Web application, the Frequency depends on how long you can reasonably afford to have your Web application off-line. A minimum Frequency of 15 seconds is recommended.
Return Value Enter 0 so that the probe succeeds on a successful probing of the page. Enter a non-zero number to have the probe succeed on a failure.
The default is 0. Only under rare circumstances would you change this to a non-zero number.
Field Description
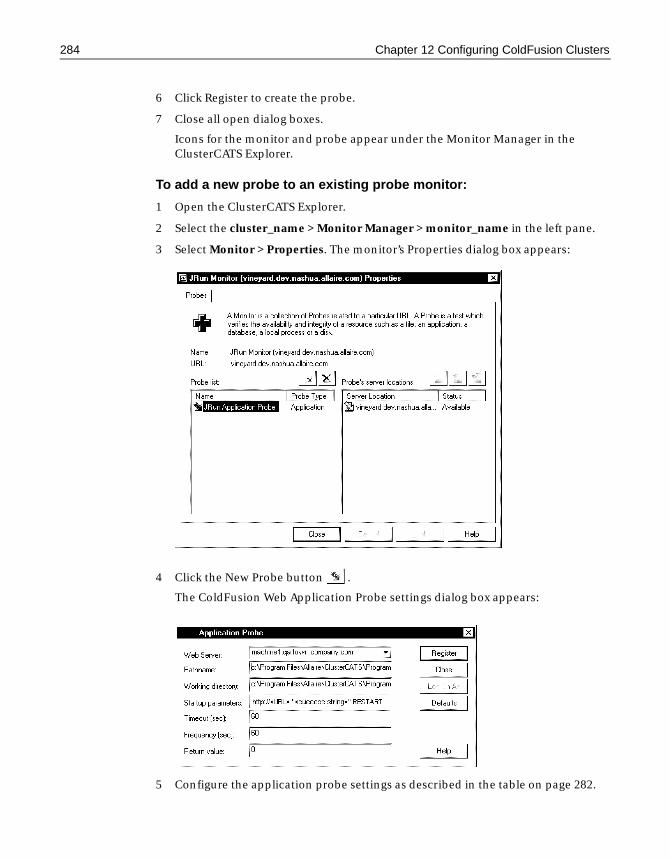
284 Chapter 12 Configuring ColdFusion Clusters
6 Click Register to create the probe.
7 Close all open dialog boxes.
Icons for the monitor and probe appear under the Monitor Manager in the ClusterCATS Explorer.
To add a new probe to an existing probe monitor:
1 Open the ClusterCATS Explorer.
2 Select the cluster_name > Monitor Manager > monitor_name in the left pane.
3 Select Monitor > Properties. The monitor’s Properties dialog box appears:
4 Click the New Probe button .
The ColdFusion Web Application Probe settings dialog box appears:
5 Configure the application probe settings as described in the table on page 282.
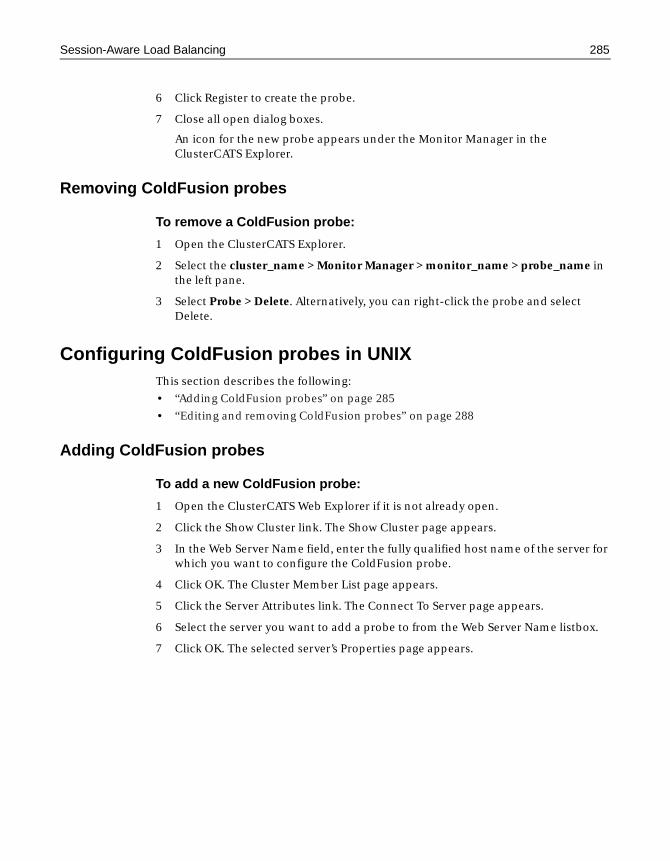
Session-Aware Load Balancing 285
6 Click Register to create the probe.
7 Close all open dialog boxes.
An icon for the new probe appears under the Monitor Manager in the ClusterCATS Explorer.
Removing ColdFusion probes
To remove a ColdFusion probe:
1 Open the ClusterCATS Explorer.
2 Select the cluster_name > Monitor Manager > monitor_name > probe_name in the left pane.
3 Select Probe > Delete. Alternatively, you can right-click the probe and select Delete.
Configuring ColdFusion probes in UNIXThis section describes the following:
• “Adding ColdFusion probes” on page 285
• “Editing and removing ColdFusion probes” on page 288
Adding ColdFusion probes
To add a new ColdFusion probe:
1 Open the ClusterCATS Web Explorer if it is not already open.
2 Click the Show Cluster link. The Show Cluster page appears.
3 In the Web Server Name field, enter the fully qualified host name of the server for which you want to configure the ColdFusion probe.
4 Click OK. The Cluster Member List page appears.
5 Click the Server Attributes link. The Connect To Server page appears.
6 Select the server you want to add a probe to from the Web Server Name listbox.
7 Click OK. The selected server’s Properties page appears.
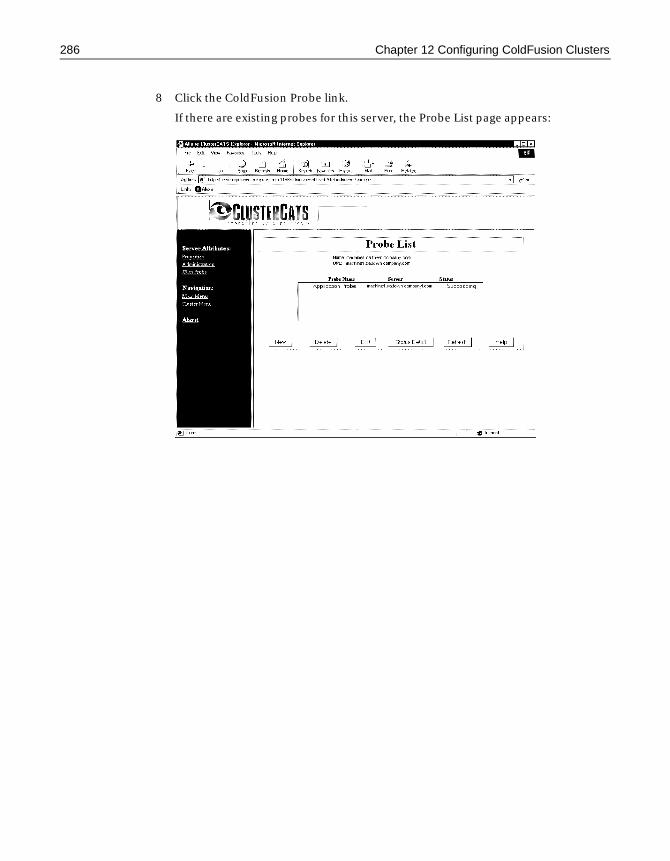
286 Chapter 12 Configuring ColdFusion Clusters
8 Click the ColdFusion Probe link.
If there are existing probes for this server, the Probe List page appears:

Session-Aware Load Balancing 287
9 To create a new probe, click New. The ColdFusion Application Probe page appears:
If this is the first probe for this server or you clicked New to add another probe, the ColdFusion Application Probe page appears:
10 Configure the application probe settings as described in the following table.
Field Description
Status This is an informational field. If the probe is not registered, the Status displays Not registered. If the probe is registered, the Status displays Succeeding.
Pathname Enter the path to the ColdFusion probe. Do not change the default selection unless you installed ClusterCATS for ColdFusion to a directory other than the default installation directory.
Working directory Enter the path to the probe’s working directory. Do not change the default selection unless you installed ClusterCATS for ColdFusion to a directory other than the default installation directory.
288 Chapter 12 Configuring ColdFusion Clusters
11 Click Register to create the probe. ClusterCATS begins to test the selected server immediately.
Editing and removing ColdFusion probes
To edit or remove a ColdFusion probe:
1 Open the ClusterCATS Web Explorer if it is not already open.
2 Click the Show Cluster link. The Show Cluster page appears.
3 Enter the fully qualified host name of the server for which you want to configure the ColdFusion probe in the Web Server Name field.
Startup Parameters
Enter the actual URL of the site you want the probe to access followed by a text string that appears on a page within the site you are probing (cfprobe.cfm in the screen shown in step 9.)Note: Do not modify the RESTART explicit parameter if you want the probe to automatically restart the ColdFusion Server upon detecting a failure. However, if you do not want ClusterCATS to automatically restart the ColdFusion Server upon detecting a failure, replace RESTART with NORESTART.
Timeout (sec) Enter a time, in seconds, to indicate how long ClusterCATS should wait before a ColdFusion server failure is registered. Do not set this value to less than 60 seconds because ClusterCATS may restart the ColdFusion server inadvertently (due to network congestion, for example), rather than detect an actual failure on the ColdFusion server.
Frequency (sec) Enter a time, in seconds, to indicate how often the probe checks the ColdFusion server.Probes that restart Web applications should be configured to run no more frequently than the time it takes to stop and restart ColdFusion. This time is highly site-specific, because it depends on the system resources available on the servers and the volume of traffic at the site.For probes that do not restart the Web application, the Frequency depends on how long you can reasonably afford to have your Web application off-line. A minimum Frequency of 15 seconds is recommended.
Return value Enter 0 so that the probe succeeds on a successful probing of the page. Enter a non-zero number to have the probe succeed on a failure.The default is 0. Only under rare circumstances would you change this to a non-zero number.
Field Description
Session-Aware Load Balancing 289
4 Click OK. The Cluster Member List page appears.
5 Click the Server Attributes link. The Connect To Server page appears.
6 Select the server that hosts the probe in the Web Server Name listbox.
7 Click OK. The selected server’s Properties page appears.
8 Click the ColdFusion Probe link. The Probe List page appears.
9 Select the probe you want to edit or remove.
10 To remove the probe, click Delete. ClusterCATS removes the ColdFusion probe.
11 To edit the probe, click Edit. A page with all the available probes appears.
12 Edit the fields corresponding to the probe you want to change and click Register.
290 Chapter 12 Configuring ColdFusion Clusters
Load-Balancing DevicesYou can configure ClusterCATS to work in conjunction with a third-party hardware load balancing device or load balancing software product to provide comprehensive load balancing and failover support for your server clusters.
This section describes the following:
• “Using Cisco LocalDirector” on page 290
• “Using third-party load balancing devices in Windows” on page 294
• “Using third-party load balancing devices in UNIX” on page 295
Using Cisco LocalDirectorCisco LocalDirector is a network appliance with a secure, real-time, embedded operating system that intelligently load balances IP traffic across multiple servers. ClusterCATS can be configured to provide ColdFusion availability and load information to the LocalDirector using Cisco’s Dynamic Feedback Protocol (DFP). The LocalDirector then actively manages HTTP traffic across the cluster, based on the load information provided to it by ClusterCATS.
You can configure the Cisco LocalDirector using the ClusterCATS Explorer on Windows only.
NoteYou must use Cisco LocalDirector Version 3.1.4 software or later.
Before configuring ClusterCATS with the LocalDirector, you must configure the LocalDirector to manage your Web servers. For more information, refer to the Cisco documentation.
LocalDirector considerations
You must be aware of the following when using ClusterCATS with Cisco LocalDirector:
• When load balancing with the LocalDirector, ClusterCATS sets the state of each cluster member to Passive mode. For more information about Passive mode, refer to “Changing Active/Passive Settings” on page 309.
• Do not use round-robin DNS.
• Turn off ClusterCATS’ Gradual Redirection load threshold. See “Server Load Thresholds” on page 268 for information on turning off gradual redirection.
• Do not use ClusterCATS’ dynamic IP addressing feature. If ClusterCATS performs dynamic IP failover, the LocalDirector will not be able to recover the failed-over IP address. For more information on ClusterCATS’ server failover features, refer to “ClusterCATS Dynamic IP Addressing (Windows only)” on page 334.

Load-Balancing Devices 291
• If two or more Web servers on the same system are in clusters using Cisco LocalDirector load balancing, then each cluster must have the same DFP Agent Listen Port number configured. The ClusterCATS DFP agent can only listen on one port.
LocalDirector dynamic-feedback command settings
Use the LocalDirector dynamic-feedback command options as described in this section to optimize your LocalDirector setup.
NoteDo not use the dynamic-feedback-pw command. ClusterCATS does not support secure DFP hosts.
dynamic-feedback -timeout
Use the dynamic-feedback -timeout option to set timeout to a value larger than the update frequency so that the LocalDirector does not prematurely terminate the connection with the cluster because of inactivity. Allaire recommends that you set the value to at least two times the update frequency.
dynamic-feedback -retry
Use the dynamic-feedback -retry option to set the retry value to zero (0) to ensure that the LocalDirector will continue connection attempts to the ClusterCATS DFP agent in the event of a lengthy period of system unavailability.
For more information on using the LocalDirector dynamic-feedback command, refer to Cisco’s LocalDirector Command Reference.
To integrate ClusterCATS with the Cisco LocalDirector:
1 Be sure to review all considerations before continuing with this procedure.
2 Complete the LocalDirector basic hardware installation and configuration. Be sure that you have defined an IP address for the LocalDirector and that the LocalDirector network interfaces are configured correctly. You can use the ping utility to test network connectivity.
3 Create a virtual server (www.yourcompany.com) in LocalDirector that corresponds to the cluster.
4 In LocalDirector, bind explicit (real) servers participating in the cluster with the virtual server.
5 Use the LocalDirector’s dynamic-feedback command to specify the IP addresses of each explicit server (cluster member) and port number each server will use to listen for DFP requests from the LocalDirector. This port number must be the same as the DFP Agent Listen Port configured in 9.
For example:
dynamic-feedback 111.168.00.22:9100 retry 0 attempts 30 timeout 60
The DFP protocol will connect to server 192.168.64.22 at port 9124. If the connection between the LocalDirector and the server is closed for any reason, the
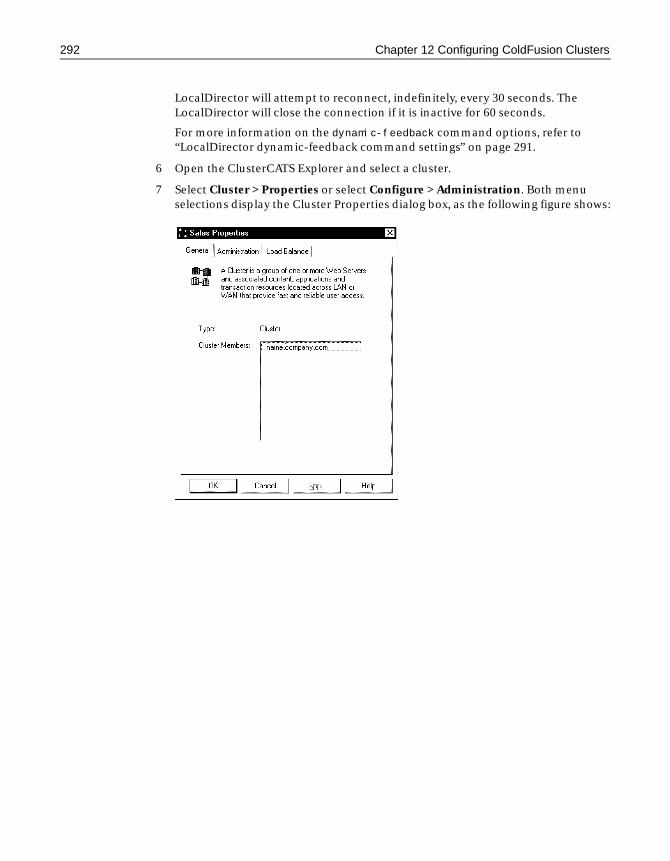
292 Chapter 12 Configuring ColdFusion Clusters
LocalDirector will attempt to reconnect, indefinitely, every 30 seconds. The LocalDirector will close the connection if it is inactive for 60 seconds.
For more information on the dynamic-feedback command options, refer to “LocalDirector dynamic-feedback command settings” on page 291.
6 Open the ClusterCATS Explorer and select a cluster.
7 Select Cluster > Properties or select Configure > Administration. Both menu selections display the Cluster Properties dialog box, as the following figure shows:
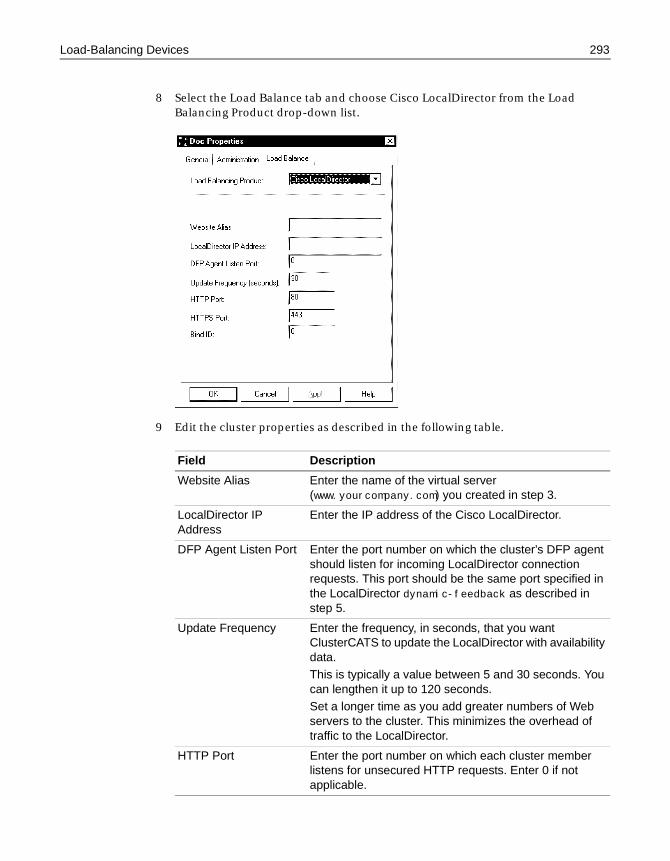
Load-Balancing Devices 293
8 Select the Load Balance tab and choose Cisco LocalDirector from the Load Balancing Product drop-down list.
9 Edit the cluster properties as described in the following table.
Field Description
Website Alias Enter the name of the virtual server (www.yourcompany.com) you created in step 3.
LocalDirector IP Address
Enter the IP address of the Cisco LocalDirector.
DFP Agent Listen Port Enter the port number on which the cluster’s DFP agent should listen for incoming LocalDirector connection requests. This port should be the same port specified in the LocalDirector dynamic-feedback as described in step 5.
Update Frequency Enter the frequency, in seconds, that you want ClusterCATS to update the LocalDirector with availability data. This is typically a value between 5 and 30 seconds. You can lengthen it up to 120 seconds.Set a longer time as you add greater numbers of Web servers to the cluster. This minimizes the overhead of traffic to the LocalDirector.
HTTP Port Enter the port number on which each cluster member listens for unsecured HTTP requests. Enter 0 if not applicable.
294 Chapter 12 Configuring ColdFusion Clusters
10 Click OK.
Once configured, ClusterCATS automatically sets the state of each cluster member to Passive and provides the load balancing and high availability data it acquires to the LocalDirector. The LocalDirector then actively manages HTTP traffic across the cluster.
Using third-party load-balancing devicesThird-party load balancing devices will actively distribute load to the Web servers based on packet flow while ClusterCATS monitors ColdFusion load and availability. If ClusterCATS detects that the ColdFusion server is becoming overloaded, it will supersede the load balancing device and redirect traffic accordingly.
This section describes how to configure a third-party load balancing device with ClusterCATS in the following sections:
• “Using third-party load balancing devices in Windows” on page 294
• “Using third-party load balancing devices in UNIX” on page 295
Using third-party load balancing devices in Windows
To integrate ClusterCATS with a third-party load balancing device:
1 Configure the load balancing device or software product as recommended by the manufacturer.
2 Open the ClusterCATS Explorer and select a cluster.
HTTPS Port Enter the port number on which each cluster member listens for secured HTTP requests. Enter 0 if not applicable.
Bind ID Enter the same Bind ID specified for the explicit (real) servers on the LocalDirector in step 4. In order for the ClusterCATS/LocalDirector integration to work as intended, the server name, port number, and bind ID combination must be the same on this ClusterCATS Load Balance tab as it is on the LocalDirector box.
Field Description
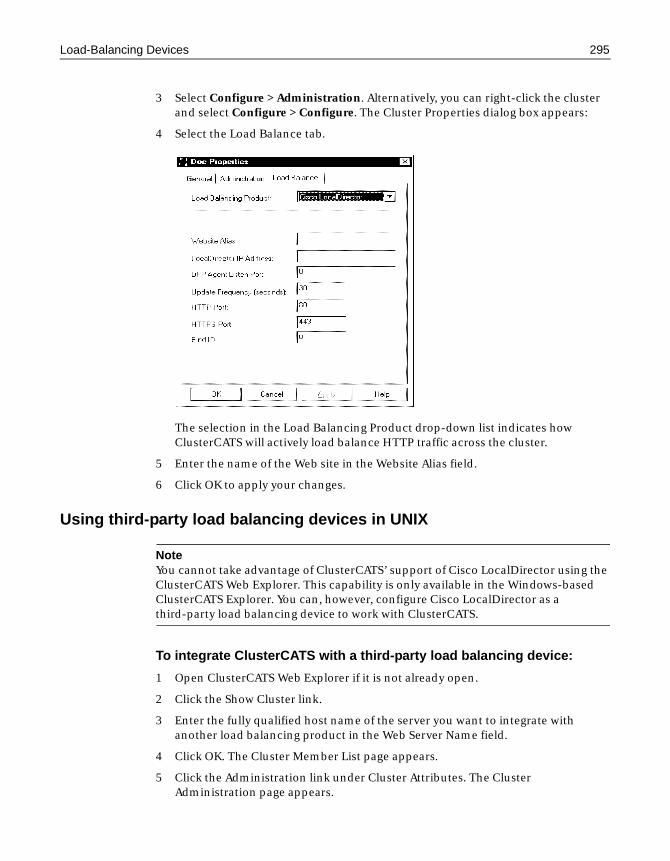
Load-Balancing Devices 295
3 Select Configure > Administration. Alternatively, you can right-click the cluster and select Configure > Configure. The Cluster Properties dialog box appears:
4 Select the Load Balance tab.
The selection in the Load Balancing Product drop-down list indicates how ClusterCATS will actively load balance HTTP traffic across the cluster.
5 Enter the name of the Web site in the Website Alias field.
6 Click OK to apply your changes.
Using third-party load balancing devices in UNIX
NoteYou cannot take advantage of ClusterCATS’ support of Cisco LocalDirector using the ClusterCATS Web Explorer. This capability is only available in the Windows-based ClusterCATS Explorer. You can, however, configure Cisco LocalDirector as a third-party load balancing device to work with ClusterCATS.
To integrate ClusterCATS with a third-party load balancing device:
1 Open ClusterCATS Web Explorer if it is not already open.
2 Click the Show Cluster link.
3 Enter the fully qualified host name of the server you want to integrate with another load balancing product in the Web Server Name field.
4 Click OK. The Cluster Member List page appears.
5 Click the Administration link under Cluster Attributes. The Cluster Administration page appears.
296 Chapter 12 Configuring ColdFusion Clusters
6 In the Load Balancing Product field, enter the URL of the Web site for which the load balancing product has been set up to manage HTTP traffic.
7 Click OK to apply your changes.
Administrator Alarm NotificationsThe ClusterCATS alarm notification feature provides instant feedback about critical events that take place within a cluster. Once an event triggers an alarm, ClusterCATS notifies one or more people by e-mail. The possible events that trigger an e-mail notification are listed below.
If an event you chose occurs, ClusterCATS sends an e-mail message to the designated person. The following table explains the notification schedule for each event.
This section describes the following:
• “Configuring administrator alarm notifications on Windows” on page 297
• “Configuring administrator alarm notifications on UNIX” on page 297
Event type Notification occurs...
HTTP Server Failure Immediately
Server Busy Warning Every 24 hours
Server Unreachable Immediately
Web Server Failover Immediately
ColdFusion Probe Failure Immediately
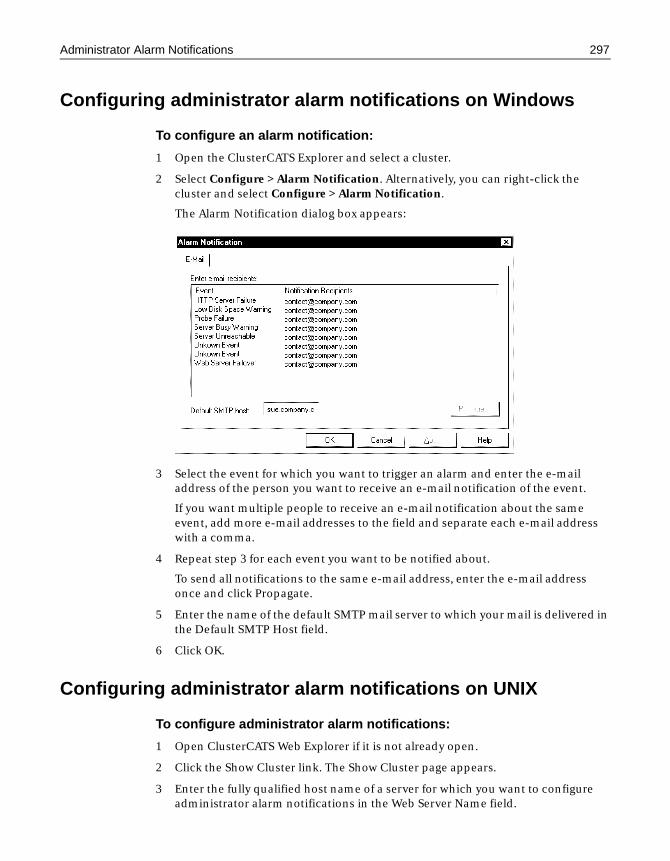
Administrator Alarm Notifications 297
Configuring administrator alarm notifications on Windows
To configure an alarm notification:
1 Open the ClusterCATS Explorer and select a cluster.
2 Select Configure > Alarm Notification. Alternatively, you can right-click the cluster and select Configure > Alarm Notification.
The Alarm Notification dialog box appears:
3 Select the event for which you want to trigger an alarm and enter the e-mail address of the person you want to receive an e-mail notification of the event.
If you want multiple people to receive an e-mail notification about the same event, add more e-mail addresses to the field and separate each e-mail address with a comma.
4 Repeat step 3 for each event you want to be notified about.
To send all notifications to the same e-mail address, enter the e-mail address once and click Propagate.
5 Enter the name of the default SMTP mail server to which your mail is delivered in the Default SMTP Host field.
6 Click OK.
Configuring administrator alarm notifications on UNIX
To configure administrator alarm notifications:
1 Open ClusterCATS Web Explorer if it is not already open.
2 Click the Show Cluster link. The Show Cluster page appears.
3 Enter the fully qualified host name of a server for which you want to configure administrator alarm notifications in the Web Server Name field.

298 Chapter 12 Configuring ColdFusion Clusters
4 Click OK. The Cluster Member List page appears.
5 Click the Alarm Notification link. The Alarm Notification page appears:
6 Enter the e-mail address of the person you want to be notified about the occurrence of an event in that event’s corresponding field.
If you want multiple people to receive an e-mail notification about the same event, add more e-mail addresses to the field and separate each e-mail address with a comma.
7 Enter the name of the default SMTP mail server to which your mail is delivered in the SMTP Host field.
8 Click OK to apply your changes.
Administrator E-mail Options 299
Administrator E-mail Options The ClusterCATS administration e-mail support feature reports vital statistics about your cluster to designated e-mail accounts in your organization. You can set up the following types of administration e-mail options:
• Report e-mail
Lets you know each day how your server clusters are functioning. Daily e-mail reports include the following information:
− Cluster name and each server’s name and IP address in the cluster
− Files Total number of files in the Web server’s root directory
− Disk space Total amount of disk space used and remaining on the system drive that contains the Web server’s root directory
− Log files Size and location of the log files
• Support e-mail
Sends an automatic e-mail nightly to Allaire’s Technical Support team that contains basic configuration information about your cluster. This information enables Allaire to provide optimal support by understanding your environment when you call a Technical Support representative. Support e-mail contains the following information:
− Cluster name and the number of servers the cluster contains
− Statistics for each server, including failover, redirection, and database statistics
You can also have one or more people of your choice receive copies of this periodic e-mail.
This section describes the following:
• “Configuring administration e-mail options on Windows” on page 300
• “Configuring administration e-mail options on UNIX” on page 300
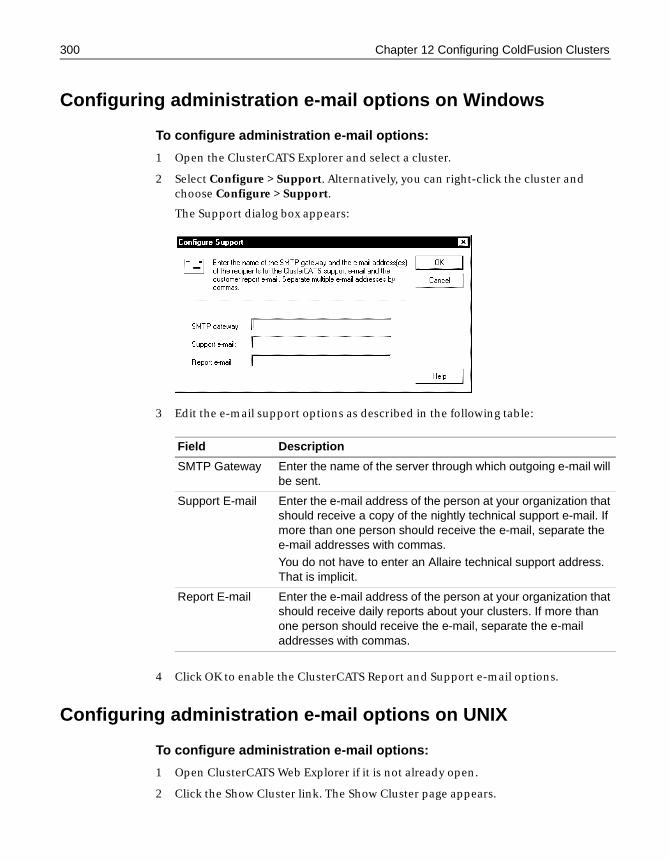
300 Chapter 12 Configuring ColdFusion Clusters
Configuring administration e-mail options on Windows
To configure administration e-mail options:
1 Open the ClusterCATS Explorer and select a cluster.
2 Select Configure > Support. Alternatively, you can right-click the cluster and choose Configure > Support.
The Support dialog box appears:
3 Edit the e-mail support options as described in the following table:
4 Click OK to enable the ClusterCATS Report and Support e-mail options.
Configuring administration e-mail options on UNIX
To configure administration e-mail options:
1 Open ClusterCATS Web Explorer if it is not already open.
2 Click the Show Cluster link. The Show Cluster page appears.
Field Description
SMTP Gateway Enter the name of the server through which outgoing e-mail will be sent.
Support E-mail Enter the e-mail address of the person at your organization that should receive a copy of the nightly technical support e-mail. If more than one person should receive the e-mail, separate the e-mail addresses with commas.You do not have to enter an Allaire technical support address. That is implicit.
Report E-mail Enter the e-mail address of the person at your organization that should receive daily reports about your clusters. If more than one person should receive the e-mail, separate the e-mail addresses with commas.
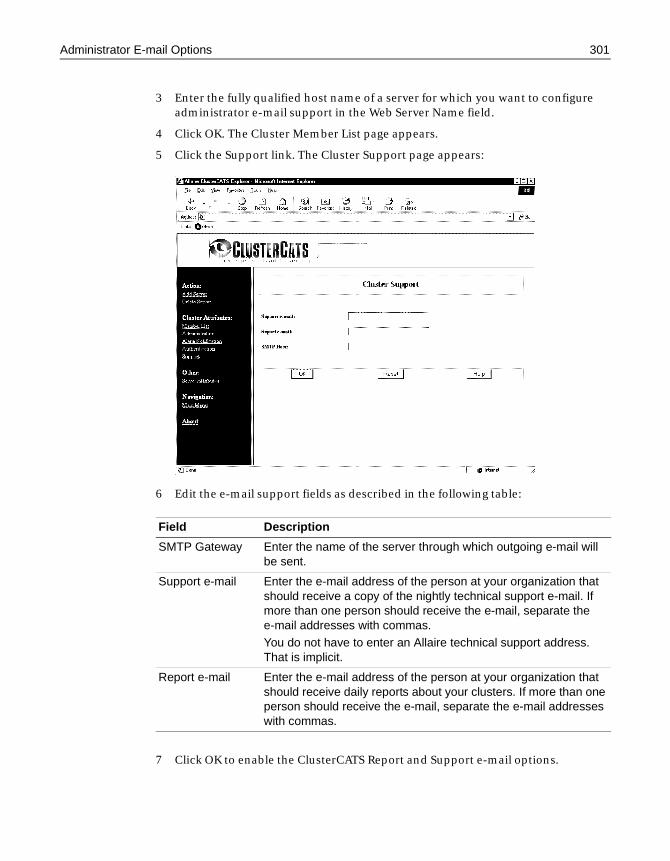
Administrator E-mail Options 301
3 Enter the fully qualified host name of a server for which you want to configure administrator e-mail support in the Web Server Name field.
4 Click OK. The Cluster Member List page appears.
5 Click the Support link. The Cluster Support page appears:
6 Edit the e-mail support fields as described in the following table:
7 Click OK to enable the ClusterCATS Report and Support e-mail options.
Field Description
SMTP Gateway Enter the name of the server through which outgoing e-mail will be sent.
Support e-mail Enter the e-mail address of the person at your organization that should receive a copy of the nightly technical support e-mail. If more than one person should receive the e-mail, separate the e-mail addresses with commas.You do not have to enter an Allaire technical support address. That is implicit.
Report e-mail Enter the e-mail address of the person at your organization that should receive daily reports about your clusters. If more than one person should receive the e-mail, separate the e-mail addresses with commas.
302 Chapter 12 Configuring ColdFusion Clusters
Administrating SecurityWhen you enable ClusterCATS administration security for a specific cluster, only authorized users are able to access and administer that cluster using their ClusterCATS Explorer (Windows) or the ClusterCATS Web Explorer (UNIX). ClusterCATS provides three administration security settings for securing your server cluster environment:
• Disabled Authentication
This is the default setting. It provides no security challenge, and therefore anyone can access the server cluster with a ClusterCATS administration tool or even a Web browser and modify your cluster environment.
• Local User Authentication
This is the recommended security setting for most clusters residing in small to mid-sized organizations that have only a few administrators. This setting provides a security challenge for anyone accessing the server. The authentication is based on administrative privileges that you define for specific users on each server in the cluster.
• Windows NT Domain Authentication (Windows NT Only)
You may want to use this security setting if your organization is fairly large and contains many distributed administrator groups that need to access your server clusters. To use this setting, you must define your global administrators’ group in the form “BT_clustername”, where clustername is the exact name of the cluster you created with the ClusterCATS Explorer. The global administrators group must exist within the same domain as the clustered servers.
This section describes the following:
• “Configuring authentication on Windows” on page 302
• “Configuring authentication on UNIX” on page 306
Configuring authentication on WindowsThe following sections describe how to enable the type of authentication most appropriate for your environment.
• “Configuring local-user authentication” on page 302
• “Configuring Windows NT domain authentication” on page 304
Configuring local-user authentication
Local-user authentication lets ClusterCATS authenticate specific users on a per-server basis. Local users of a server must have an account on the server where the Web server resides.
For example, if a cluster includes several Web servers and you only have an account on one, then you can only administer that server.
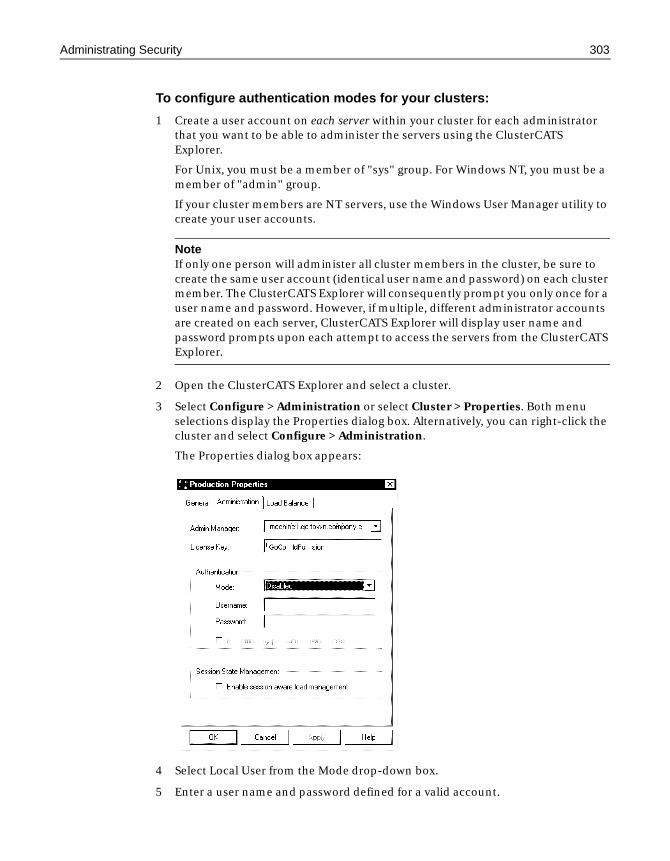
Administrating Security 303
To configure authentication modes for your clusters:
1 Create a user account on each server within your cluster for each administrator that you want to be able to administer the servers using the ClusterCATS Explorer.
For Unix, you must be a member of "sys" group. For Windows NT, you must be a member of "admin" group.
If your cluster members are NT servers, use the Windows User Manager utility to create your user accounts.
NoteIf only one person will administer all cluster members in the cluster, be sure to create the same user account (identical user name and password) on each cluster member. The ClusterCATS Explorer will consequently prompt you only once for a user name and password. However, if multiple, different administrator accounts are created on each server, ClusterCATS Explorer will display user name and password prompts upon each attempt to access the servers from the ClusterCATS Explorer.
2 Open the ClusterCATS Explorer and select a cluster.
3 Select Configure > Administration or select Cluster > Properties. Both menu selections display the Properties dialog box. Alternatively, you can right-click the cluster and select Configure > Administration.
The Properties dialog box appears:
4 Select Local User from the Mode drop-down box.
5 Enter a user name and password defined for a valid account.
304 Chapter 12 Configuring ColdFusion Clusters
NoteClusterCATS requires you to enter a valid user name and password after selecting the type of authentication you are using so that you do not inadvertently lock yourself out of the cluster.
6 Click OK to enable local user authentication for the selected cluster. Only administrators who have accounts on each secured server can access and administer those cluster members using ClusterCATS Explorer.
Configuring Windows NT domain authentication
Windows NT Domain authentication lets ClusterCATS authenticate administrators that have been added to a Windows NT domain user group.
NoteThis authentication mode can only be used on NT servers.
Before you can enable NT domain authentication on any specific cluster, you must create an NT global user group within the domain you want to secure. You can do this using the standard Windows NT User Manager for Domains utility. After you create a user group, add users to it, and enable the NT Domain authentication mode from the ClusterCATS Explorer, all users you add to that group are automatically authenticated to view and change the cluster. All servers in the cluster must reside in the same Windows NT domain unless a trusted relationship is set up between two or more domains.
A global group must exist in the domain from which the ClusterCATS Explorer is executed. Cluster members in other domains need only the trust relationship. ClusterCATS Explorer determines what servers exist in which NT domain by communicating with any Windows NT domain controller for the domain. The list of servers that exist in the Windows NT domain can be viewed by looking at the Network Neighborhood Windows NT utility. If no trust relationship exists, then cluster members must be from the same Windows NT domain.
To enable Windows NT domain authentication:
1 Select Start > Programs > Administrative Tools > User Manager for Domains to open the User Manager for Domains utility.
2 Select User > New Global Group.
The New Global Group dialog box appears.
3 Enter a name and description for the group in the applicable fields.
Your global group name must be BT_clustername, where clustername is the name of your ClusterCATS cluster.
4 Click Add to add the administrators you want to have privileges to your global group.
The Add Users and Groups dialog box appears.
Administrating Security 305
5 Select the domain from the List Names drop-down box.
6 Select the users you want to add to the group and click Add.
7 Click OK in all open dialog boxes to apply your changes and to close the User Manager for Domains utility.
8 Open the ClusterCATS Explorer and select the cluster for which you want to configure authentication.
9 Select Configure > Administration or select Cluster > Properties. Both menu selections display the Properties dialog box. Alternatively, you can right-click the cluster and select Configure > Administration.
The Properties dialog box appears.
10 Select NT Domain from the Mode drop-down box.
11 Enter a valid user name and password that participates in the domain.
NoteClusterCATS requires you to enter a valid user name and password after selecting the type of authentication you are using so that you do not inadvertently lock yourself out of the cluster.
12 Click OK to enable Windows NT Domain authentication for the selected cluster. Only users who you added to the Global User Group of the domain can use ClusterCATS Explorer to view and administer clusters using the ClusterCATS Explorer.
Disabling authentication
Disabling authentication lets any user use the ClusterCATS Explorer to create, configure, or administer clusters. Once the cluster is added, administrators have unrestricted access to the content in that cluster. Therefore, you should only choose Disabled mode if security is not a concern (for example, in a development or QA environment).
By default, ClusterCATS administrator security is disabled. However, if you have previously configured the security mode for your cluster and now want to turn if off, perform the following procedure.
To disable authentication:
1 Open the ClusterCATS Explorer and select a cluster with authentication enabled.
2 Select Configure > Authentication or select Cluster > Properties. Both menu selections display the Properties dialog box. Alternatively, you can right-click the cluster and select Configure > Administration.
3 Select Disabled from the Mode drop-down box.
4 Click OK to apply your changes.
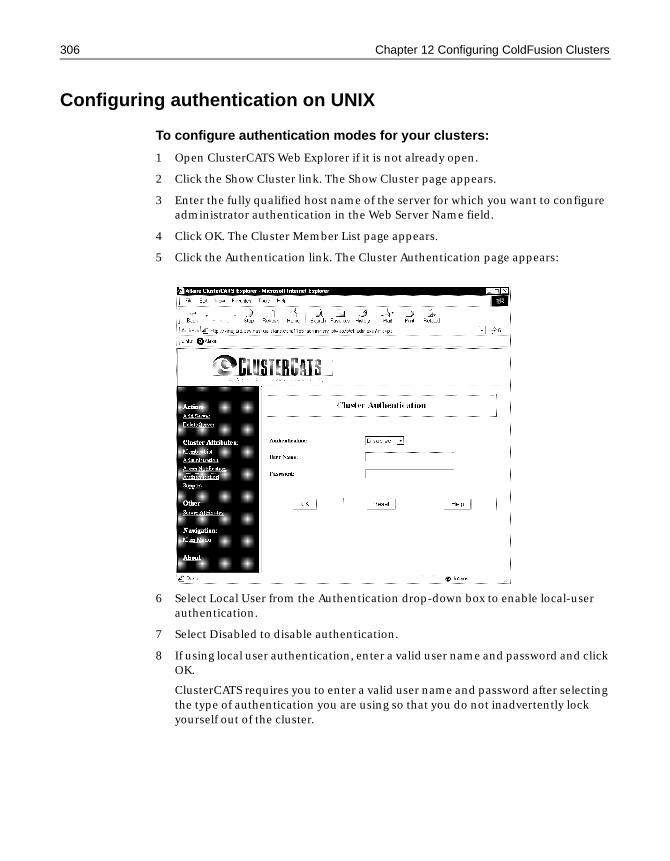
306 Chapter 12 Configuring ColdFusion Clusters
Configuring authentication on UNIX
To configure authentication modes for your clusters:
1 Open ClusterCATS Web Explorer if it is not already open.
2 Click the Show Cluster link. The Show Cluster page appears.
3 Enter the fully qualified host name of the server for which you want to configure administrator authentication in the Web Server Name field.
4 Click OK. The Cluster Member List page appears.
5 Click the Authentication link. The Cluster Authentication page appears:
6 Select Local User from the Authentication drop-down box to enable local-user authentication.
7 Select Disabled to disable authentication.
8 If using local user authentication, enter a valid user name and password and click OK.
ClusterCATS requires you to enter a valid user name and password after selecting the type of authentication you are using so that you do not inadvertently lock yourself out of the cluster.
Chapter 13
Maintaining Cluster Members
After you have created your clusters, added servers to those clusters, and configured them with load balancing and high availability features, they will likely run inconspicuously in your environment for quite some time. However, at some point you may need to update software and content or perform general maintenance tasks that are beyond the typical cluster creation and configuration activities.
Contents
• Understanding ClusterCATS Server Modes .......................................................... 308
• Changing Active/Passive Settings .......................................................................... 309
• Changing Restricted/Unrestricted Settings .......................................................... 311
• Using Maintenance Mode (Windows only) .......................................................... 313
• Updating an Existing Cluster Member (Windows only) ...................................... 317
• Resetting Cluster Members .................................................................................... 319
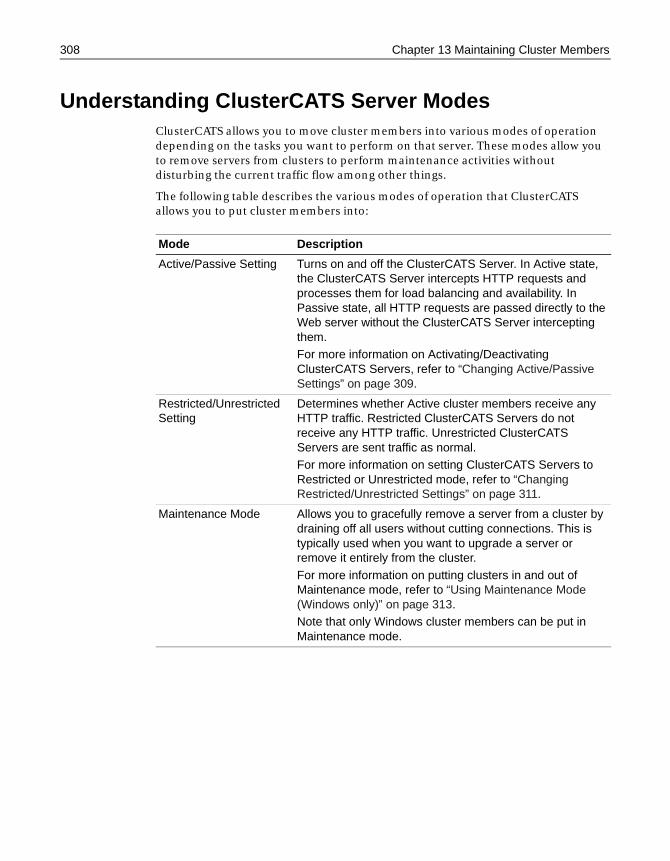
308 Chapter 13 Maintaining Cluster Members
Understanding ClusterCATS Server ModesClusterCATS allows you to move cluster members into various modes of operation depending on the tasks you want to perform on that server. These modes allow you to remove servers from clusters to perform maintenance activities without disturbing the current traffic flow among other things.
The following table describes the various modes of operation that ClusterCATS allows you to put cluster members into:
Mode Description
Active/Passive Setting Turns on and off the ClusterCATS Server. In Active state, the ClusterCATS Server intercepts HTTP requests and processes them for load balancing and availability. In Passive state, all HTTP requests are passed directly to the Web server without the ClusterCATS Server intercepting them.For more information on Activating/Deactivating ClusterCATS Servers, refer to “Changing Active/Passive Settings” on page 309.
Restricted/Unrestricted Setting
Determines whether Active cluster members receive any HTTP traffic. Restricted ClusterCATS Servers do not receive any HTTP traffic. Unrestricted ClusterCATS Servers are sent traffic as normal.For more information on setting ClusterCATS Servers to Restricted or Unrestricted mode, refer to “Changing Restricted/Unrestricted Settings” on page 311.
Maintenance Mode Allows you to gracefully remove a server from a cluster by draining off all users without cutting connections. This is typically used when you want to upgrade a server or remove it entirely from the cluster.
For more information on putting clusters in and out of Maintenance mode, refer to “Using Maintenance Mode (Windows only)” on page 313.Note that only Windows cluster members can be put in Maintenance mode.
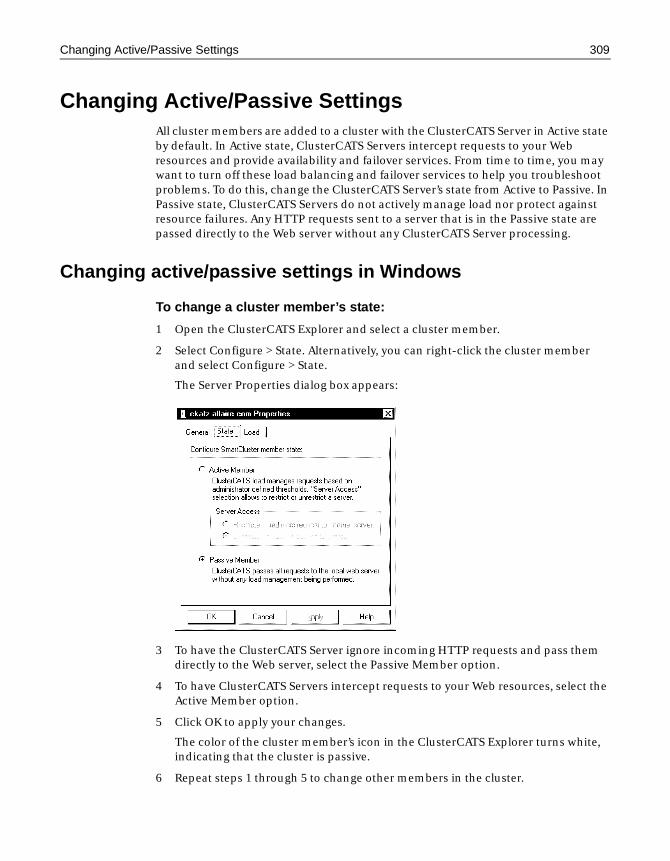
Changing Active/Passive Settings 309
Changing Active/Passive SettingsAll cluster members are added to a cluster with the ClusterCATS Server in Active state by default. In Active state, ClusterCATS Servers intercept requests to your Web resources and provide availability and failover services. From time to time, you may want to turn off these load balancing and failover services to help you troubleshoot problems. To do this, change the ClusterCATS Server’s state from Active to Passive. In Passive state, ClusterCATS Servers do not actively manage load nor protect against resource failures. Any HTTP requests sent to a server that is in the Passive state are passed directly to the Web server without any ClusterCATS Server processing.
Changing active/passive settings in Windows
To change a cluster member’s state:
1 Open the ClusterCATS Explorer and select a cluster member.
2 Select Configure > State. Alternatively, you can right-click the cluster member and select Configure > State.
The Server Properties dialog box appears:
3 To have the ClusterCATS Server ignore incoming HTTP requests and pass them directly to the Web server, select the Passive Member option.
4 To have ClusterCATS Servers intercept requests to your Web resources, select the Active Member option.
5 Click OK to apply your changes.
The color of the cluster member’s icon in the ClusterCATS Explorer turns white, indicating that the cluster is passive.
6 Repeat steps 1 through 5 to change other members in the cluster.
310 Chapter 13 Maintaining Cluster Members
Changing active/passive settings in UNIX
To change a cluster member’s state:
1 Open ClusterCATS Web Explorer if it is not already open.
2 Click the Show Cluster link.
The Show Cluster page appears.
3 Enter the fully qualified host name of the server in the Web Server Name field.
4 Click OK.
The Cluster Member List page appears.
5 Click the Server Attributes link under Other.
The Connect To Server page appears.
6 Select the server you want to connect to from the Web Server Name drop-down box.
7 Click OK.
The selected server’s Properties page appears.
8 Click the Administration link.
The Server Administration page appears for the selected server.
9 To have the ClusterCATS Server ignore incoming HTTP requests and pass them directly to the Web server, select Passive from the State drop-down box.
10 To have ClusterCATS Servers intercept requests to your Web resources, select Active from the State drop-down box.
11 Click OK.
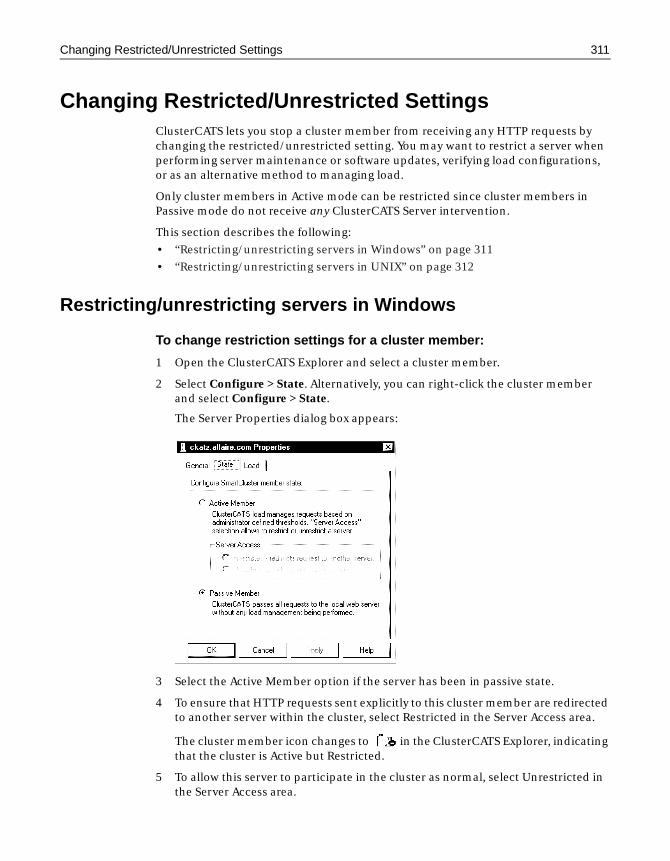
Changing Restricted/Unrestricted Settings 311
Changing Restricted/Unrestricted SettingsClusterCATS lets you stop a cluster member from receiving any HTTP requests by changing the restricted/unrestricted setting. You may want to restrict a server when performing server maintenance or software updates, verifying load configurations, or as an alternative method to managing load.
Only cluster members in Active mode can be restricted since cluster members in Passive mode do not receive any ClusterCATS Server intervention.
This section describes the following:
• “Restricting/unrestricting servers in Windows” on page 311
• “Restricting/unrestricting servers in UNIX” on page 312
Restricting/unrestricting servers in Windows
To change restriction settings for a cluster member:
1 Open the ClusterCATS Explorer and select a cluster member.
2 Select Configure > State. Alternatively, you can right-click the cluster member and select Configure > State.
The Server Properties dialog box appears:
3 Select the Active Member option if the server has been in passive state.
4 To ensure that HTTP requests sent explicitly to this cluster member are redirected to another server within the cluster, select Restricted in the Server Access area.
The cluster member icon changes to in the ClusterCATS Explorer, indicating that the cluster is Active but Restricted.
5 To allow this server to participate in the cluster as normal, select Unrestricted in the Server Access area.
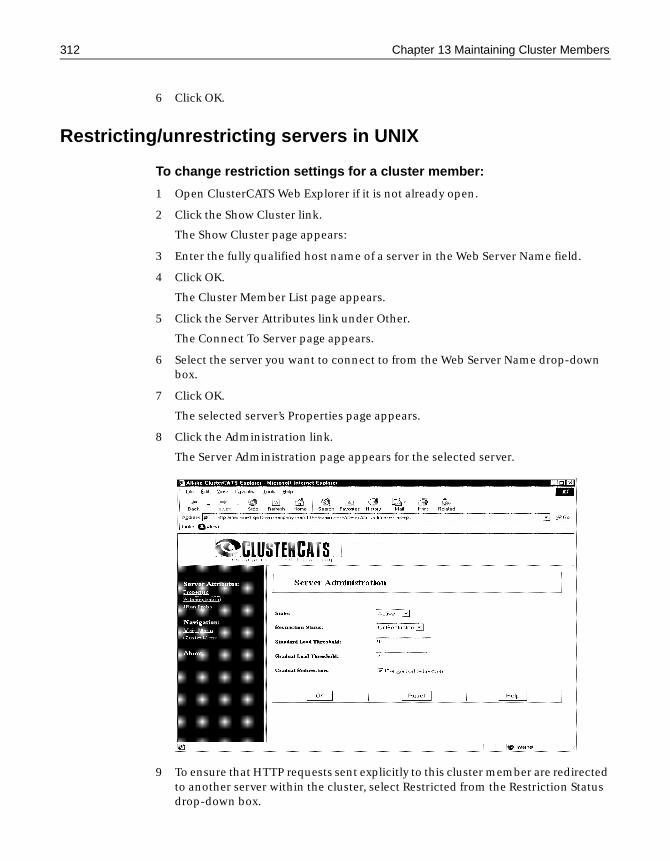
312 Chapter 13 Maintaining Cluster Members
6 Click OK.
Restricting/unrestricting servers in UNIX
To change restriction settings for a cluster member:
1 Open ClusterCATS Web Explorer if it is not already open.
2 Click the Show Cluster link.
The Show Cluster page appears:
3 Enter the fully qualified host name of a server in the Web Server Name field.
4 Click OK.
The Cluster Member List page appears.
5 Click the Server Attributes link under Other.
The Connect To Server page appears.
6 Select the server you want to connect to from the Web Server Name drop-down box.
7 Click OK.
The selected server’s Properties page appears.
8 Click the Administration link.
The Server Administration page appears for the selected server.
9 To ensure that HTTP requests sent explicitly to this cluster member are redirected to another server within the cluster, select Restricted from the Restriction Status drop-down box.
Using Maintenance Mode (Windows only) 313
10 To allow this server to participate in the cluster as normal, select Unrestricted from the Restriction Status drop-down box.
11 Click OK.
Using Maintenance Mode (Windows only)Putting a ClusterCATS Server in Maintenance mode lets you remove a server from an active cluster gracefully so that you can perform necessary updates or maintenance tasks without disrupting your users. Using the instructions in this section, you can take a server offline while allowing users to finish their current sessions.
Once in Maintenance mode, you might perform the following tasks that would normally disrupt users’ experiences:
• Upgrading server software or applications
• Change content on the Web site
• Troubleshooting problems
When a server is in maintenance mode, all inbound HTTP traffic heading for the affected server is redirected to the most available server in the cluster. After you complete your maintenance tasks and take the server out of Maintenance mode, the servers that temporarily assumed the restricted server’s IP address and HTTP traffic return the IP address back to the affected server so that it can receive and process HTTP requests.
NoteAllaire recommends that you set up your clusters with ClusterCATS dynamic IP addressing for using Maintenance mode. For more information, see “Using Server Failover” on page 340.
Once enabled, maintenance performs the following:
• Clustered Web Server on the system is set to a busy state for user specified period of time. All new traffic to the Web site will be redirect to another server in the cluster.
• If you are running session-aware load-balancing, users who have begun sessions can continue until the ClusterCATS service is shutdown.
• Once the timeout period has expired the ClusterCATS service will be shut down.
• If you are running with ClusterCATS dynamic addressing, the IP addresses associated with cluster members for this server will be failed over to another server. Thus allowing the site to continue to function, while maintenance is performed.

314 Chapter 13 Maintaining Cluster Members
To put a cluster member in Maintenance mode:
1 Open the ClusterCATS Explorer and select a cluster member that you want to update.
2 Select Configure > Load. Alternatively, you can right-click the cluster member and select Configure > Load.
The Properties dialog box appears for the selected cluster member with the Load tab active.
3 Change the Peak load threshold to 0% so that any additional HTTP requests will be redirected to other servers in the cluster.
4 OK.
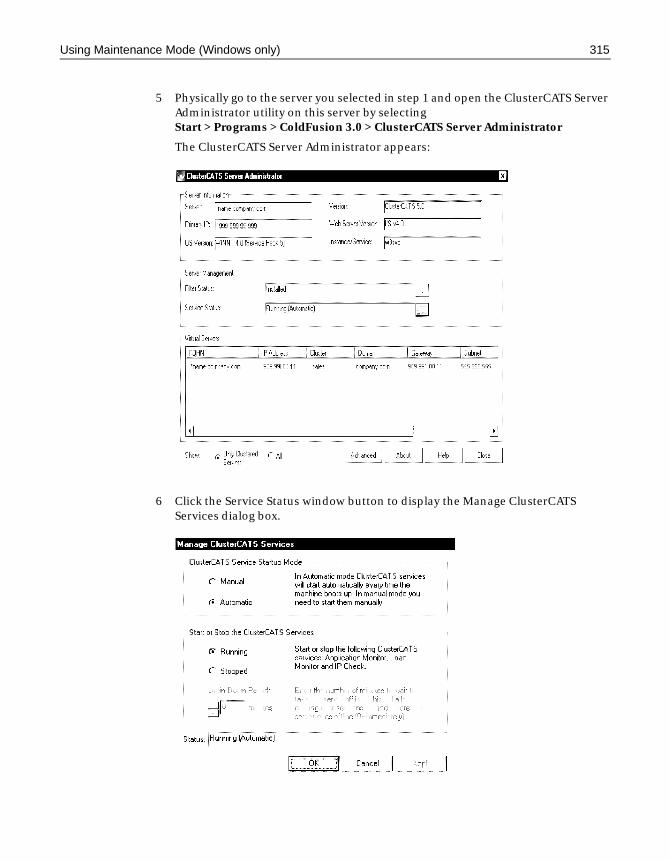
Using Maintenance Mode (Windows only) 315
5 Physically go to the server you selected in step 1 and open the ClusterCATS Server Administrator utility on this server by selecting Start > Programs > ColdFusion 3.0 > ClusterCATS Server Administrator
The ClusterCATS Server Administrator appears:
6 Click the Service Status window button to display the Manage ClusterCATS Services dialog box.
316 Chapter 13 Maintaining Cluster Members
7 Select the Stopped option to stop the ClusterCATS service and enter a value, in minutes, in the Drain Down Period field. This allows current users to conclude their sessions within the time indicated.
8 Click OK.
When the drain-down period expires, the server will fail over to another server in the cluster.
To take a cluster member out of Maintenance mode:
1 Physically go to the server and open the ClusterCATS Server Administrator utility on by selecting Start > Programs > ColdFusion 3.0 > ClusterCATS Server Administrator.
The ClusterCATS Server Administrator appears.
2 Click the BT Service Status button to display the Manage ClusterCATS Services dialog box.
3 Select the Running option.
4 Click OK.
5 Open the ClusterCATS Explorer and select the cluster member that you want to take out of Maintenance mode.
6 Select Configure > Load. Alternatively, you can right-click the cluster member and select Configure > Load.
The Properties dialog box appears for the selected cluster member with the Load tab active.
7 Change the Peak load threshold from 0 percent to an appropriate value.
8 Click OK.
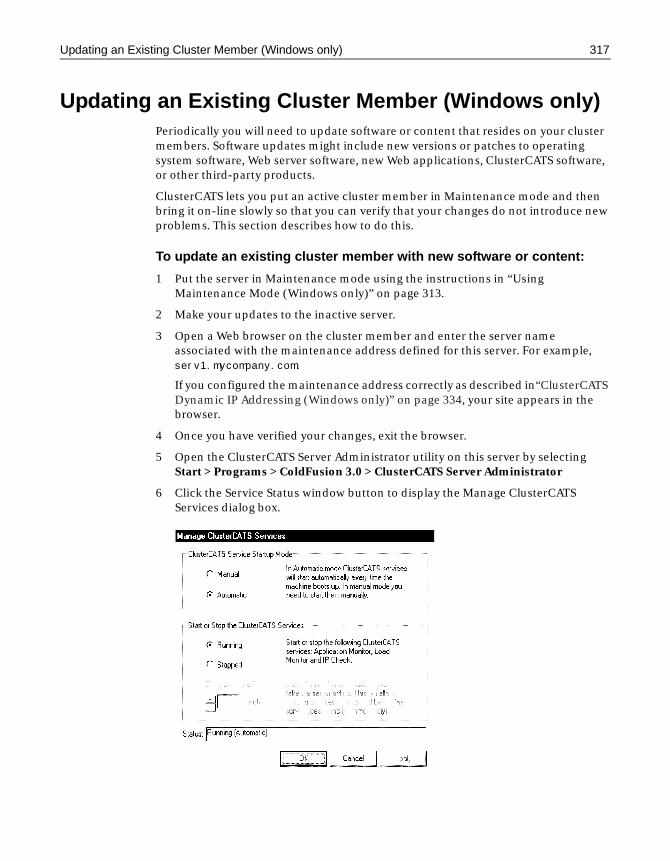
Updating an Existing Cluster Member (Windows only) 317
Updating an Existing Cluster Member (Windows only)Periodically you will need to update software or content that resides on your cluster members. Software updates might include new versions or patches to operating system software, Web server software, new Web applications, ClusterCATS software, or other third-party products.
ClusterCATS lets you put an active cluster member in Maintenance mode and then bring it on-line slowly so that you can verify that your changes do not introduce new problems. This section describes how to do this.
To update an existing cluster member with new software or content:
1 Put the server in Maintenance mode using the instructions in “Using Maintenance Mode (Windows only)” on page 313.
2 Make your updates to the inactive server.
3 Open a Web browser on the cluster member and enter the server name associated with the maintenance address defined for this server. For example, serv1.mycompany.com.
If you configured the maintenance address correctly as described in“ClusterCATS Dynamic IP Addressing (Windows only)” on page 334, your site appears in the browser.
4 Once you have verified your changes, exit the browser.
5 Open the ClusterCATS Server Administrator utility on this server by selecting Start > Programs > ColdFusion 3.0 > ClusterCATS Server Administrator
6 Click the Service Status window button to display the Manage ClusterCATS Services dialog box.
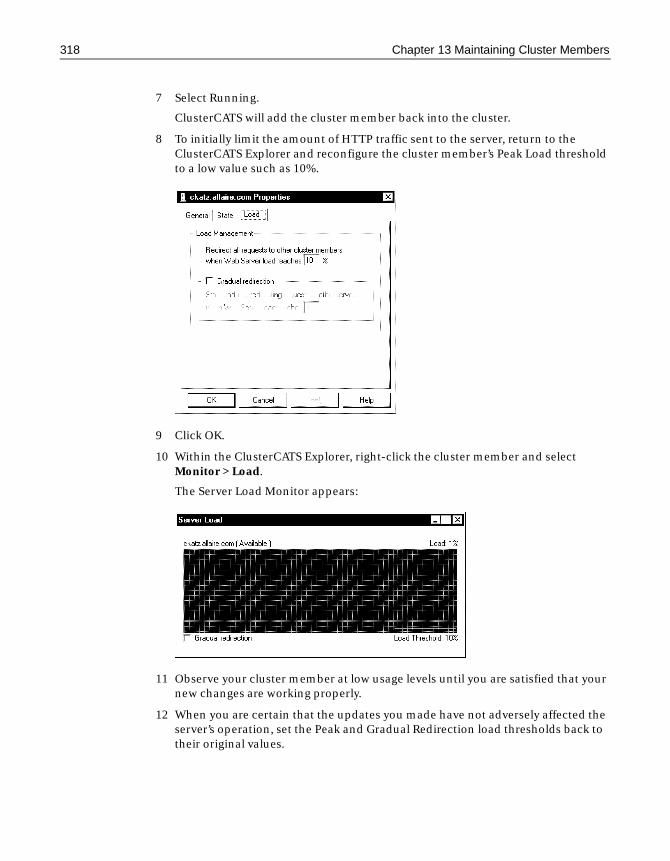
318 Chapter 13 Maintaining Cluster Members
7 Select Running.
ClusterCATS will add the cluster member back into the cluster.
8 To initially limit the amount of HTTP traffic sent to the server, return to the ClusterCATS Explorer and reconfigure the cluster member’s Peak Load threshold to a low value such as 10%.
9 Click OK.
10 Within the ClusterCATS Explorer, right-click the cluster member and select Monitor > Load.
The Server Load Monitor appears:
11 Observe your cluster member at low usage levels until you are satisfied that your new changes are working properly.
12 When you are certain that the updates you made have not adversely affected the server’s operation, set the Peak and Gradual Redirection load thresholds back to their original values.
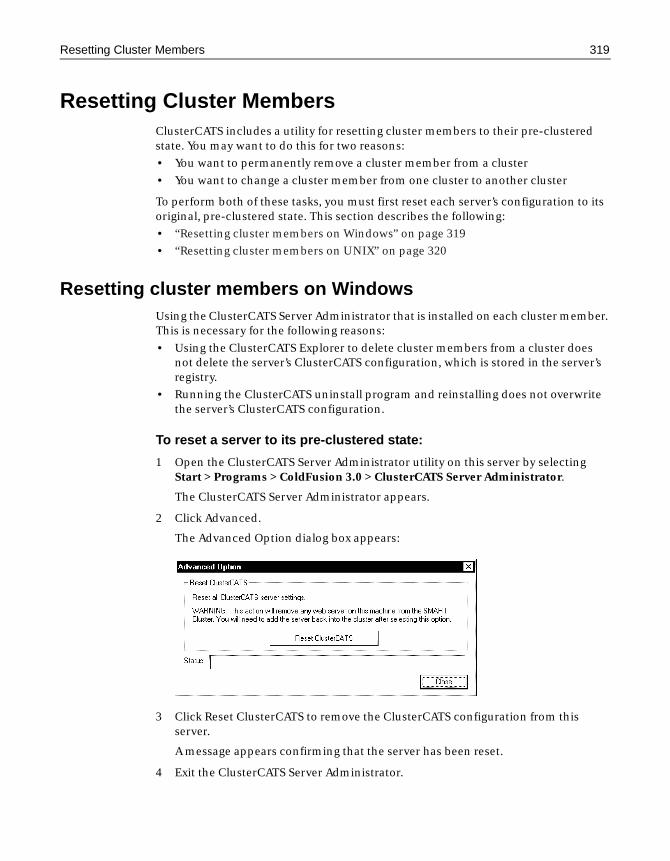
Resetting Cluster Members 319
Resetting Cluster Members ClusterCATS includes a utility for resetting cluster members to their pre-clustered state. You may want to do this for two reasons:
• You want to permanently remove a cluster member from a cluster
• You want to change a cluster member from one cluster to another cluster
To perform both of these tasks, you must first reset each server’s configuration to its original, pre-clustered state. This section describes the following:
• “Resetting cluster members on Windows” on page 319
• “Resetting cluster members on UNIX” on page 320
Resetting cluster members on WindowsUsing the ClusterCATS Server Administrator that is installed on each cluster member. This is necessary for the following reasons:
• Using the ClusterCATS Explorer to delete cluster members from a cluster does not delete the server’s ClusterCATS configuration, which is stored in the server’s registry.
• Running the ClusterCATS uninstall program and reinstalling does not overwrite the server’s ClusterCATS configuration.
To reset a server to its pre-clustered state:
1 Open the ClusterCATS Server Administrator utility on this server by selecting Start > Programs > ColdFusion 3.0 > ClusterCATS Server Administrator.
The ClusterCATS Server Administrator appears.
2 Click Advanced.
The Advanced Option dialog box appears:
3 Click Reset ClusterCATS to remove the ClusterCATS configuration from this server.
A message appears confirming that the server has been reset.
4 Exit the ClusterCATS Server Administrator.
320 Chapter 13 Maintaining Cluster Members
Resetting cluster members on UNIXEnter the following command at the server you want to reset:
btadmin -reset
Chapter 14
ClusterCATS Utilities
ColdFusion Enterprise ships with a number of scriptable command-line utilities for configuring, administering, and troubleshooting your ClusterCATS clusters. This chapter describes these utilities.
Contents
• Using btadmin ......................................................................................................... 322
• Using bt-start-server and bt-stop-server (UNIX only) ......................................... 325
• Using btcfgchk......................................................................................................... 325
• Using hostinfo ......................................................................................................... 328
• Using sniff ................................................................................................................ 329
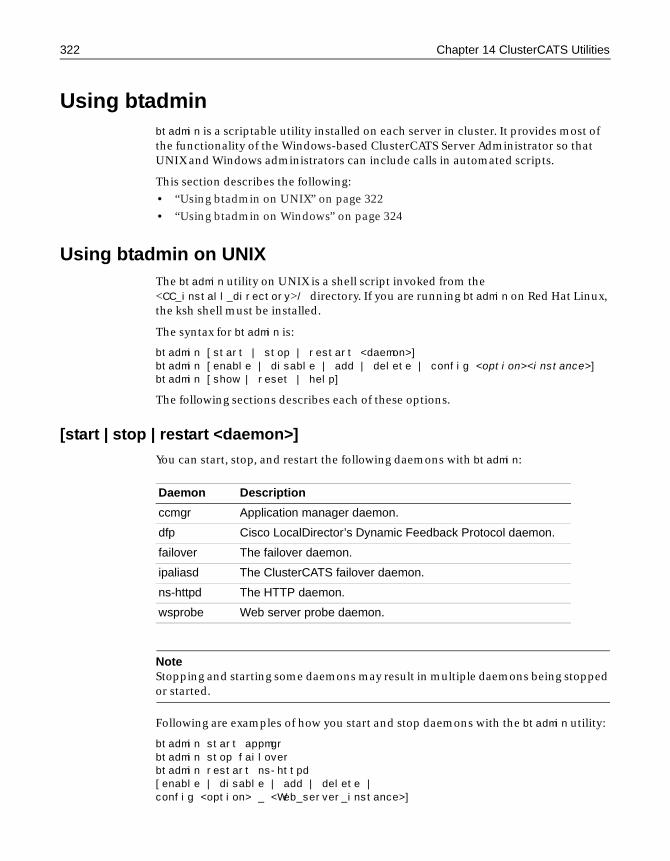
322 Chapter 14 ClusterCATS Utilities
Using btadminbtadmin is a scriptable utility installed on each server in cluster. It provides most of the functionality of the Windows-based ClusterCATS Server Administrator so that UNIX and Windows administrators can include calls in automated scripts.
This section describes the following:
• “Using btadmin on UNIX” on page 322
• “Using btadmin on Windows” on page 324
Using btadmin on UNIXThe btadmin utility on UNIX is a shell script invoked from the <CC_install_directory>/ directory. If you are running btadmin on Red Hat Linux, the ksh shell must be installed.
The syntax for btadmin is:
btadmin [start | stop | restart <daemon>]btadmin [enable | disable | add | delete | config <option><instance>] btadmin [show | reset | help]
The following sections describes each of these options.
[start | stop | restart <daemon>]
You can start, stop, and restart the following daemons with btadmin:
NoteStopping and starting some daemons may result in multiple daemons being stopped or started.
Following are examples of how you start and stop daemons with the btadmin utility:
btadmin start appmgrbtadmin stop failoverbtadmin restart ns-httpd[enable | disable | add | delete | config <option> _ <Web_server_instance>]
Daemon Description
ccmgr Application manager daemon.
dfp Cisco LocalDirector’s Dynamic Feedback Protocol daemon.
failover The failover daemon.
ipaliasd The ClusterCATS failover daemon.
ns-httpd The HTTP daemon.
wsprobe Web server probe daemon.
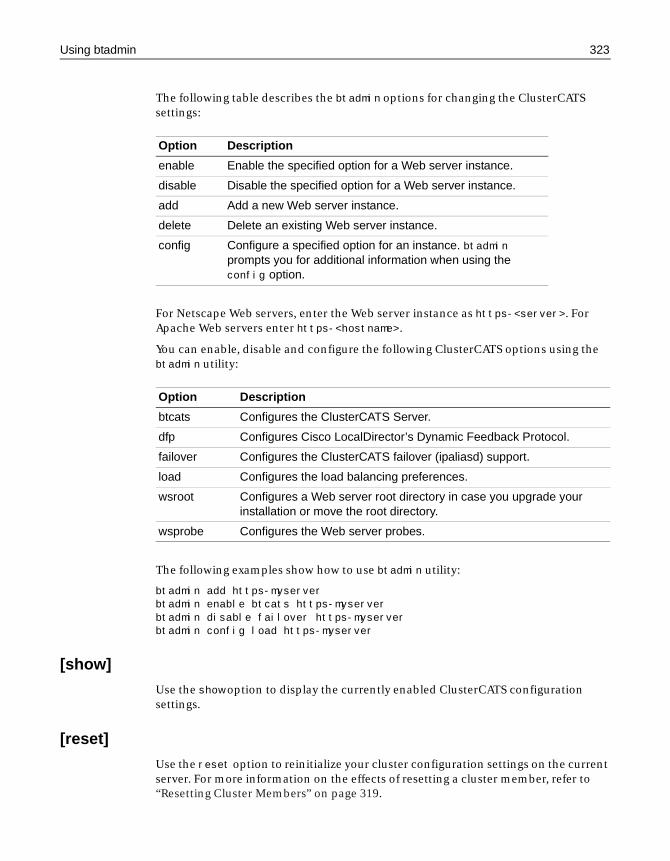
Using btadmin 323
The following table describes the btadmin options for changing the ClusterCATS settings:
For Netscape Web servers, enter the Web server instance as https-<server>. For Apache Web servers enter https-<hostname>.
You can enable, disable and configure the following ClusterCATS options using the btadmin utility:
The following examples show how to use btadmin utility:
btadmin add https-myserverbtadmin enable btcats https-myserverbtadmin disable failover https-myserverbtadmin config load https-myserver
[show]
Use the show option to display the currently enabled ClusterCATS configuration settings.
[reset]
Use the reset option to reinitialize your cluster configuration settings on the current server. For more information on the effects of resetting a cluster member, refer to “Resetting Cluster Members” on page 319.
Option Description
enable Enable the specified option for a Web server instance.
disable Disable the specified option for a Web server instance.
add Add a new Web server instance.
delete Delete an existing Web server instance.
config Configure a specified option for an instance. btadmin prompts you for additional information when using the config option.
Option Description
btcats Configures the ClusterCATS Server.
dfp Configures Cisco LocalDirector’s Dynamic Feedback Protocol.
failover Configures the ClusterCATS failover (ipaliasd) support.
load Configures the load balancing preferences.
wsroot Configures a Web server root directory in case you upgrade your installation or move the root directory.
wsprobe Configures the Web server probes.
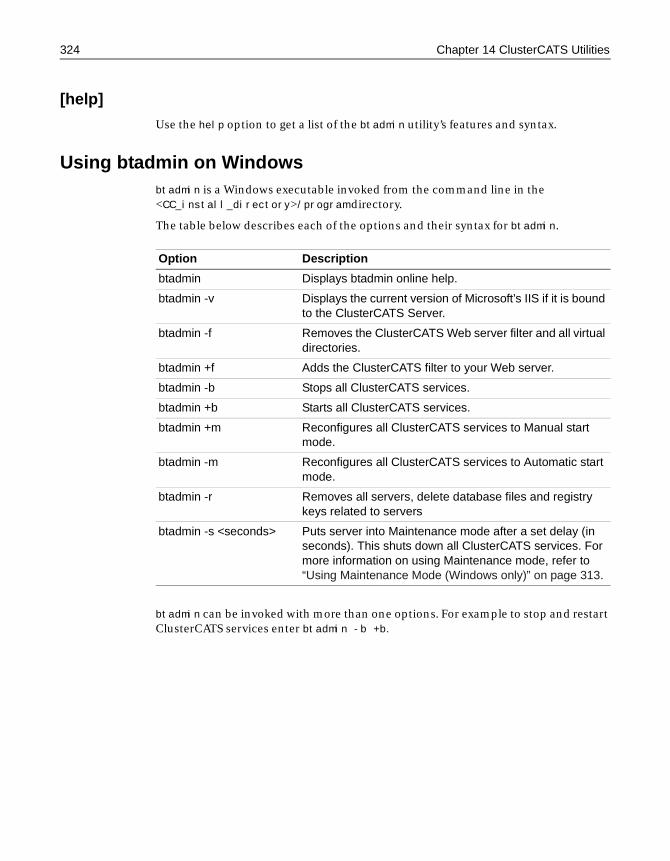
324 Chapter 14 ClusterCATS Utilities
[help]
Use the help option to get a list of the btadmin utility’s features and syntax.
Using btadmin on Windowsbtadmin is a Windows executable invoked from the command line in the <CC_install_directory>/program directory.
The table below describes each of the options and their syntax for btadmin.
btadmin can be invoked with more than one options. For example to stop and restart ClusterCATS services enter btadmin -b +b.
Option Description
btadmin Displays btadmin online help.
btadmin -v Displays the current version of Microsoft’s IIS if it is bound to the ClusterCATS Server.
btadmin -f Removes the ClusterCATS Web server filter and all virtual directories.
btadmin +f Adds the ClusterCATS filter to your Web server.
btadmin -b Stops all ClusterCATS services.
btadmin +b Starts all ClusterCATS services.
btadmin +m Reconfigures all ClusterCATS services to Manual start mode.
btadmin -m Reconfigures all ClusterCATS services to Automatic start mode.
btadmin -r Removes all servers, delete database files and registry keys related to servers
btadmin -s <seconds> Puts server into Maintenance mode after a set delay (in seconds). This shuts down all ClusterCATS services. For more information on using Maintenance mode, refer to “Using Maintenance Mode (Windows only)” on page 313.
Using bt-start-server and bt-stop-server (UNIX only) 325
Using bt-start-server and bt-stop-server (UNIX only)The bt-start-server and bt-stop-server utilities start and stop the Web server that is bound to the ClusterCATS Server. This command starts or stops either the Netscape Enterprise Server or Apache Web server.
bt-start-server and bt-stop-server are invoked from the command line in the <CC_install_directory>/ directory using the following syntax:
bt-start-serverbt-stop-server [-f]
Use the -f option to stop the Web server without being prompted for confirmation.
Using btcfgchkThe btcfgchk utility is a network management tool that displays information about your IP and DNS configurations. Use it to analyze and troubleshoot your servers and network.
SyntaxInvoke btcfgchk from the command line in the <CC_install_directory>/ program/directory using the following syntax:btcfgchk
Sample outputThe following sample output shows how btcfgchk displays configuration information for a system with one network adapter and two IP addresses:
btcfgchk FQHN is hartford.brighttiger.com El90x1 [PRIMARY]:
hartford.brighttiger.com 192.168.0.31255.255.255.0hartford.brighttiger.com
hartford1.brighttiger.com 192.168.0.32255.255.255.0hartford1.brighttiger.com
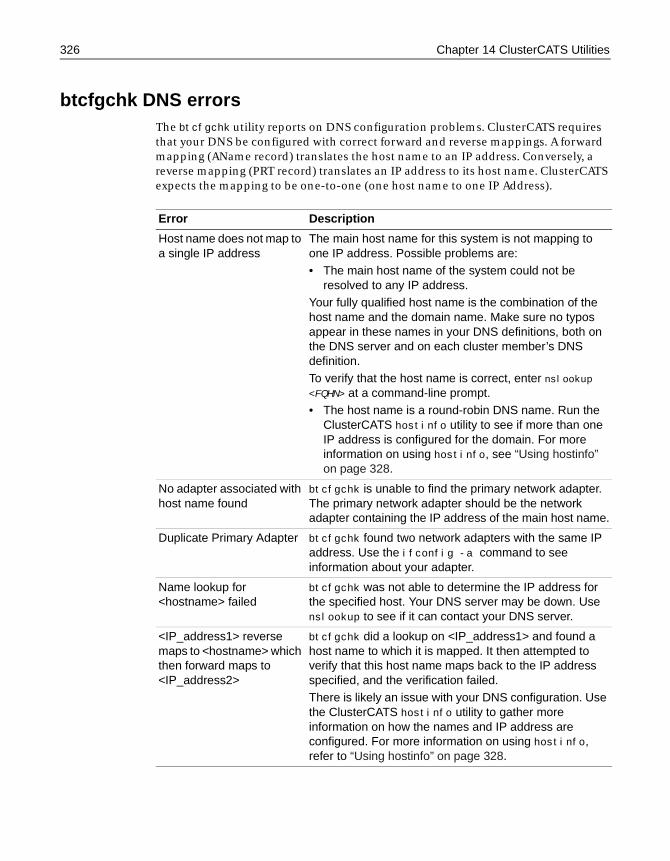
326 Chapter 14 ClusterCATS Utilities
btcfgchk DNS errorsThe btcfgchk utility reports on DNS configuration problems. ClusterCATS requires that your DNS be configured with correct forward and reverse mappings. A forward mapping (AName record) translates the host name to an IP address. Conversely, a reverse mapping (PRT record) translates an IP address to its host name. ClusterCATS expects the mapping to be one-to-one (one host name to one IP Address).
Error Description
Host name does not map to a single IP address
The main host name for this system is not mapping to one IP address. Possible problems are:• The main host name of the system could not be
resolved to any IP address. Your fully qualified host name is the combination of the host name and the domain name. Make sure no typos appear in these names in your DNS definitions, both on the DNS server and on each cluster member’s DNS definition. To verify that the host name is correct, enter nslookup <FQHN> at a command-line prompt.• The host name is a round-robin DNS name. Run the
ClusterCATS hostinfo utility to see if more than one IP address is configured for the domain. For more information on using hostinfo, see “Using hostinfo” on page 328.
No adapter associated with host name found
btcfgchk is unable to find the primary network adapter. The primary network adapter should be the network adapter containing the IP address of the main host name.
Duplicate Primary Adapter btcfgchk found two network adapters with the same IP address. Use the ifconfig -a command to see information about your adapter.
Name lookup for <hostname> failed
btcfgchk was not able to determine the IP address for the specified host. Your DNS server may be down. Use nslookup to see if it can contact your DNS server.
<IP_address1> reverse maps to <hostname> which then forward maps to <IP_address2>
btcfgchk did a lookup on <IP_address1> and found a host name to which it is mapped. It then attempted to verify that this host name maps back to the IP address specified, and the verification failed.There is likely an issue with your DNS configuration. Use the ClusterCATS hostinfo utility to gather more information on how the names and IP address are configured. For more information on using hostinfo, refer to “Using hostinfo” on page 328.
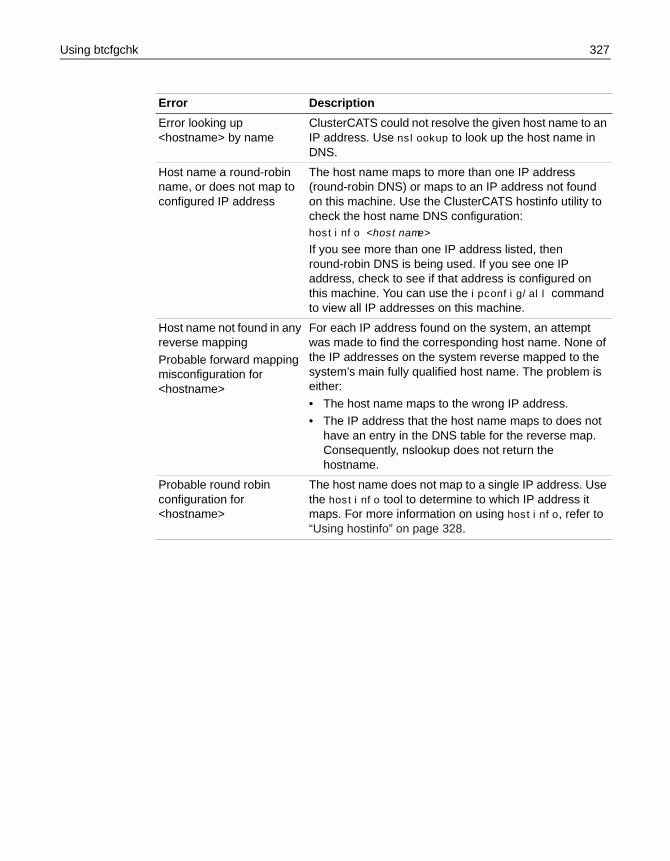
Using btcfgchk 327
Error looking up <hostname> by name
ClusterCATS could not resolve the given host name to an IP address. Use nslookup to look up the host name in DNS.
Host name a round-robin name, or does not map to configured IP address
The host name maps to more than one IP address (round-robin DNS) or maps to an IP address not found on this machine. Use the ClusterCATS hostinfo utility to check the host name DNS configuration:hostinfo <hostname>
If you see more than one IP address listed, then round-robin DNS is being used. If you see one IP address, check to see if that address is configured on this machine. You can use the ipconfig/all command to view all IP addresses on this machine.
Host name not found in any reverse mapping
Probable forward mapping misconfiguration for <hostname>
For each IP address found on the system, an attempt was made to find the corresponding host name. None of the IP addresses on the system reverse mapped to the system’s main fully qualified host name. The problem is either:
• The host name maps to the wrong IP address.• The IP address that the host name maps to does not
have an entry in the DNS table for the reverse map. Consequently, nslookup does not return the hostname.
Probable round robin configuration for <hostname>
The host name does not map to a single IP address. Use the hostinfo tool to determine to which IP address it maps. For more information on using hostinfo, refer to “Using hostinfo” on page 328.
Error Description
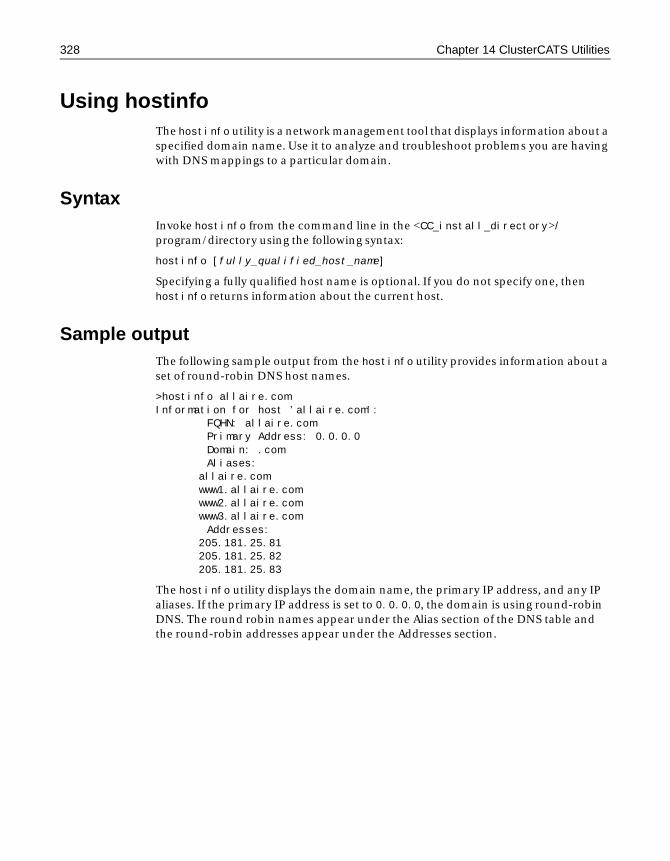
328 Chapter 14 ClusterCATS Utilities
Using hostinfoThe hostinfo utility is a network management tool that displays information about a specified domain name. Use it to analyze and troubleshoot problems you are having with DNS mappings to a particular domain.
SyntaxInvoke hostinfo from the command line in the <CC_install_directory>/ program/directory using the following syntax:
hostinfo [fully_qualified_host_name]
Specifying a fully qualified host name is optional. If you do not specify one, then hostinfo returns information about the current host.
Sample outputThe following sample output from the hostinfo utility provides information about a set of round-robin DNS host names.
>hostinfo allaire.comInformation for host ’allaire.com’: FQHN: allaire.com Primary Address: 0.0.0.0 Domain: .com Aliases:
allaire.com www1.allaire.com www2.allaire.com www3.allaire.com
Addresses: 205.181.25.81 205.181.25.82 205.181.25.83
The hostinfo utility displays the domain name, the primary IP address, and any IP aliases. If the primary IP address is set to 0.0.0.0, the domain is using round-robin DNS. The round robin names appear under the Alias section of the DNS table and the round-robin addresses appear under the Addresses section.
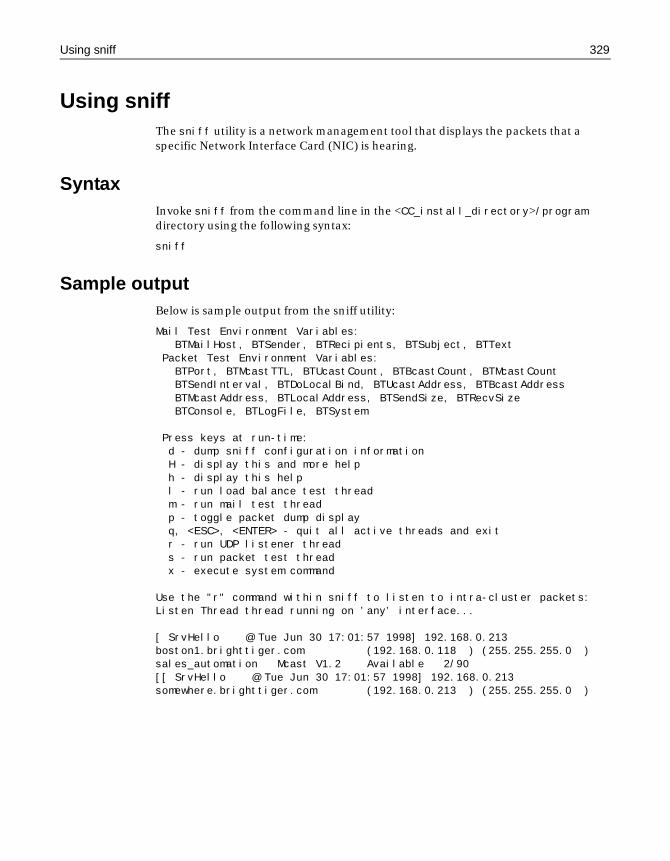
Using sniff 329
Using sniffThe sniff utility is a network management tool that displays the packets that a specific Network Interface Card (NIC) is hearing.
SyntaxInvoke sniff from the command line in the <CC_install_directory>/program directory using the following syntax:
sniff
Sample outputBelow is sample output from the sniff utility:
Mail Test Environment Variables: BTMailHost, BTSender, BTRecipients, BTSubject, BTText Packet Test Environment Variables: BTPort, BTMcastTTL, BTUcastCount, BTBcastCount, BTMcastCount BTSendInterval, BTDoLocalBind, BTUcastAddress, BTBcastAddress BTMcastAddress, BTLocalAddress, BTSendSize, BTRecvSize BTConsole, BTLogFile, BTSystem
Press keys at run-time: d - dump sniff configuration information H - display this and more help h - display this help l - run load balance test thread m - run mail test thread p - toggle packet dump display q, <ESC>, <ENTER> - quit all active threads and exit r - run UDP listener thread s - run packet test thread x - execute system command
Use the "r" command within sniff to listen to intra-cluster packets:Listen Thread thread running on ’any’ interface...
[ SrvHello @ Tue Jun 30 17:01:57 1998] 192.168.0.213boston1.brighttiger.com (192.168.0.118 ) (255.255.255.0 )sales_automation Mcast V1.2 Available 2/90[[ SrvHello @ Tue Jun 30 17:01:57 1998] 192.168.0.213somewhere.brighttiger.com (192.168.0.213 ) (255.255.255.0 )

330 Chapter 14 ClusterCATS Utilities

Using sniff 331

332 Chapter 14 ClusterCATS Utilities
Chapter 15
Optimizing ClusterCATS
ColdFusion Enterprise provides some enhanced capabilities that allow you to customize your ClusterCATS implementation. This chapter describes some of these options.
Contents
• ClusterCATS Dynamic IP Addressing (Windows only) ........................................ 334
• Using Server Failover............................................................................................... 340
• Configuring Load-Balancing Metrics .................................................................... 341
334 Chapter 15 Optimizing ClusterCATS
ClusterCATS Dynamic IP Addressing (Windows only)This section describes how to enable ClusterCATS dynamic IP addressing on your site. You do not have to configure your system on UNIX for dynamic IP addressing because it is set up by default.
If your site is already configured so that the IP address for the computer name is different from the IP address(es) for the Web sites configured on this server, you can skip “Setting up maintenance IP addresses” on page 335 and continue with “Enabling ClusterCATS dynamic IP addressing” on page 337.
Understanding static and dynamic IP address configurationsEach server that you add to a cluster must have an IP address defined for it. Because the Internet operates on a TCP/IP network protocol for sending and receiving packets of data to and from networked computers, you must correctly define your servers’ IP addresses so that they can send and receive network data as intended.
The static address must be assigned to the server itself—the physical box. You do so by making an entry in the server’s IP stack. On Windows servers, you add this IP address using the Network icon in the Control Panel.
In addition to assigning the server’s static address, you must make sure that the Web sites’ static IP addresses that reside on the Web server on this machine get removed from the IP stack (also via the Network icon in the Control Panel). Typically, you or someone else added the Web site IP addresses to the server’s IP stack before installing ClusterCATS and creating clusters. You must now manually remove those IP addresses so that ClusterCATS can dynamically create them in the IP stack according to server load and availability in the cluster.
There are generally two ways to move from static to dynamic addressing; one way is to change the IP address and FQHN of the Web site, and the other method is to change the address and FQHN of the Web server’s machine. Since most Webmasters cannot change the web site address, the instructions in this section explain how to change the computer or machine name.
NoteAll computer names associated with the ClusterCATS dynamic IP addresses must have fully qualified host names (FQHNs) in DNS and DNS forward and reverse entries.
The general process for configuring ClusterCATS with dynamic IP addressing is as follows:
1 Set up your servers with maintenance addresses. Refer to “Setting up maintenance IP addresses” on page 335.
2 Install ClusterCATS.
3 Enable ClusterCATS dynamic IP addressing. Refer to “Enabling ClusterCATS dynamic IP addressing” on page 337.
ClusterCATS Dynamic IP Addressing (Windows only) 335
4 Create your clusters. “Creating clusters in Windows” on page 252.
Benefits of ClusterCATS dynamic IP addressingThere are several benefits to using ClusterCATS dynamic IP addressing:
• Using Maintenance mode. With dynamic IP addressing, cluster members put into Maintenance mode on Windows clusters will fail over to another server and then gracefully return when brought out of Maintenance mode. For more information on Maintenance mode, refer to “Using Maintenance Mode (Windows only)” on page 313.
• Using maintenance IP addresses. If you use ClusterCATS dynamic IP addressing, you can remotely access servers in your cluster if they fail or become unavailable through the maintenance address. Maintenance addresses are statically bound to the server during the setup for ClusterCATS dynamic IP addressing. For more information on using maintenance addresses, refer to “Setting up maintenance IP addresses” on page 335.
• Optimizing Server failover. On Windows systems, when ClusterCATS is configured using static IP addresses, IP address conflicts will occur when the failed server recovers from a failover and tries to re-claim its IP address. This IP conflict is cleared when the failed server automatically reboots. ClusterCATS Dynamic IP Addressing prevents this double-reboot.
Setting up maintenance IP addressesSetting up a maintenance IP address ensures that you have one static IP address on the system that is not assigned to any Web server, virtual server, or Web site. This static address, often referred to as the system’s “maintenance address,” provides administrators with a consistent way to access the system remotely at all times. It also allows ClusterCATS to be able to communicate with the server in the event of a Web server failure.
NoteYou must have at least two IP addresses available for a machine in order to use one for a maintenance IP address.
This section shows you how to add a maintenance address that will support ClusterCATS dynamic IP addressing. If your server has only one static address that corresponds to both the computer name and the Web site, you must reconfigure it to allow for a maintenance address.
NoteThis procedure must be performed on each system in the cluster and must be done before installing ClusterCATS.
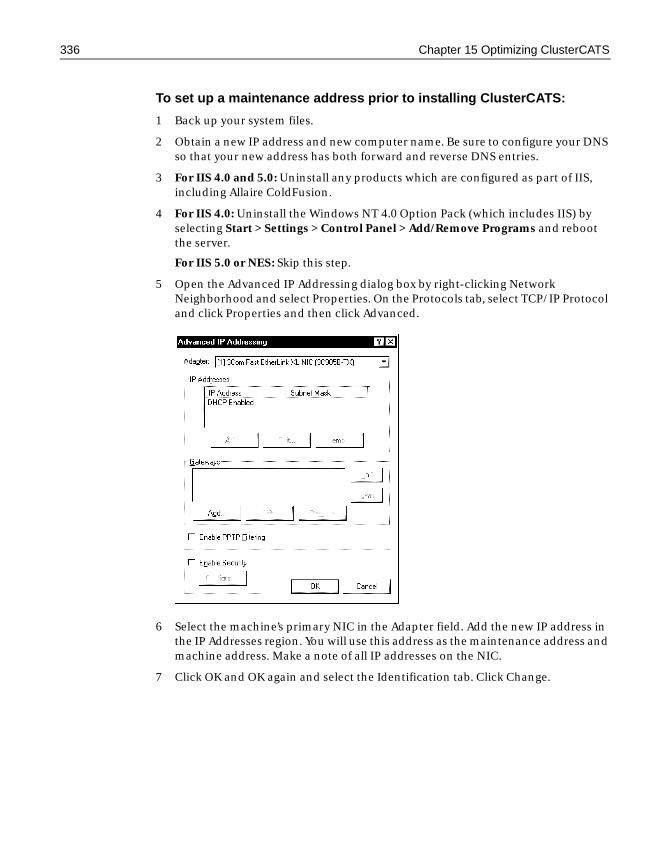
336 Chapter 15 Optimizing ClusterCATS
To set up a maintenance address prior to installing ClusterCATS:
1 Back up your system files.
2 Obtain a new IP address and new computer name. Be sure to configure your DNS so that your new address has both forward and reverse DNS entries.
3 For IIS 4.0 and 5.0: Uninstall any products which are configured as part of IIS, including Allaire ColdFusion.
4 For IIS 4.0: Uninstall the Windows NT 4.0 Option Pack (which includes IIS) by selecting Start > Settings > Control Panel > Add/Remove Programs and reboot the server.
For IIS 5.0 or NES: Skip this step.
5 Open the Advanced IP Addressing dialog box by right-clicking Network Neighborhood and select Properties. On the Protocols tab, select TCP/IP Protocol and click Properties and then click Advanced.
6 Select the machine’s primary NIC in the Adapter field. Add the new IP address in the IP Addresses region. You will use this address as the maintenance address and machine address. Make a note of all IP addresses on the NIC.
7 Click OK and OK again and select the Identification tab. Click Change.
ClusterCATS Dynamic IP Addressing (Windows only) 337
8 Enter a new name for the computer in the Computer Name field. This name corresponds to the new IP address that you just added. Do not change the Domain field on this tab.
NoteThe Computer Name on the Identification tab should only be a NetBIOS name, not a fully-qualified host name (FQHN). For example, support1.allaire.com is a possible FQHN. The first portion of this FQHN (support1) can be a NetBIOS name. support1 would also appear as the host name under the DNS tab in Protocols. The domain under the DNS tab in this case would be allaire.com. The Domain field on the Identification tab is different; it has nothing to do with DNS but only corresponds to your NT domain.
9 Close all open dialog boxes and restart the server.
10 For IIS 4.0: Reinstall the NT 4.0 Option Pack and then reboot your server.
For IIS 5.0 or NES: Skip this step.
11 For IIS 4.0: You may need to reconfigure your web sites using the Internet Service Manager.
For IIS 5.0 or NES: Skip this step.
12 Reinstall any products which are configured as part of IIS, including ColdFusion and ClusterCATS. This should include any products you uninstalled in step 3.
When you install ClusterCATS, you must select the "Server Failover" option during the installation procedure.
NoteDo not create any clusters at this time.
13 Enable the ClusterCATS dynamic IP addressing scheme using the procedure described in “Enabling ClusterCATS dynamic IP addressing” on page 337.
Enabling ClusterCATS dynamic IP addressingBefore enabling the ClusterCATS dynamic IP addressing, you must have already set up a maintenance IP address for each Web server in the cluster as described in “Setting up maintenance IP addresses” on page 335 and bound any Web sites to the appropriate IP addresses. The maintenance IP address must be different from the IP address associated with the Web site.
This section instructs you to create the cluster while the Web site is still bound to the IP address. When creating a cluster, you should not specify the maintenance address. Once you test the cluster, you can then remove the IP addresses from the Web sites and reboot. ClusterCATS then creates the address dynamically when the server boots up.
338 Chapter 15 Optimizing ClusterCATS
To enable dynamic addressing:
1 Verify that you can access your server via its maintenance address. If not, assign one to the server using the procedure described in “Setting up maintenance IP addresses” on page 335.
2 Configure your Web server to support ClusterCATS dynamic IP addressing.
For Netscape Enterprise Server: Verify that the IP addresses associated with the primary Web Server and Hardware Virtual Servers are configured on your system via the Network Control Panel. If these addresses are not configured on the system, the Netscape Enterprise Server will fail to start. In order for failover to work properly, the primary Web server can not be bound to a specific IP address. If it is, remove the binding using the Netscape Administrative Server.
For IIS: Verify that you have a unique IP address (or addresses) assigned to each Web site on the Web server in the MMC. If IP addresses are not assigned to your Web server yet, assign them now. Note that with IIS 4.0, you may have to manually enter the IP address if it does not appear in the drop down list on the Web Site properties tab.
3 Reboot your server to apply these changes.
4 Create a cluster using the Cluster Setup Wizard.
NoteDo not specify a maintenance address when adding cluster members. Since the IP addresses for the cluster members are still bound to their NICs, there is no need to do this. For more information about creating clusters, refer to “Creating clusters with the Cluster Setup Wizard” on page 252.
5 Verify that your cluster is functioning properly.
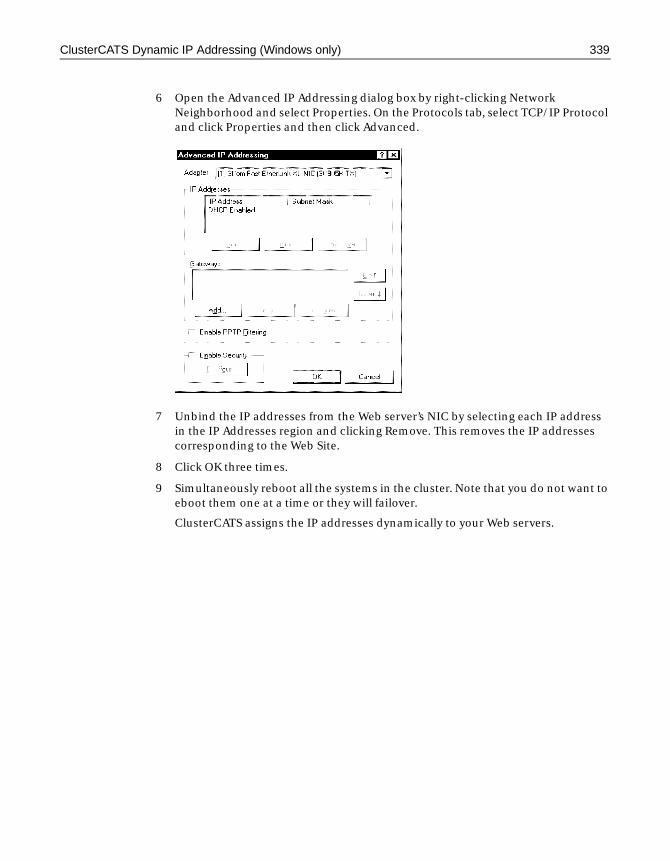
ClusterCATS Dynamic IP Addressing (Windows only) 339
6 Open the Advanced IP Addressing dialog box by right-clicking Network Neighborhood and select Properties. On the Protocols tab, select TCP/IP Protocol and click Properties and then click Advanced.
7 Unbind the IP addresses from the Web server’s NIC by selecting each IP address in the IP Addresses region and clicking Remove. This removes the IP addresses corresponding to the Web Site.
8 Click OK three times.
9 Simultaneously reboot all the systems in the cluster. Note that you do not want to eboot them one at a time or they will failover.
ClusterCATS assigns the IP addresses dynamically to your Web servers.
340 Chapter 15 Optimizing ClusterCATS
Using Server FailoverThe ability to fail over servers that have become unavailable to redundant servers is a cornerstone of any mission-critical application, one that ensures an application’s continuous and reliable operation. Server failover was an option to select during the installation process. If you did not select it during installation, you must reinstall ClusterCATS and select that option.
Static versus ClusterCATS dynamic IP addressingThere are two schemes with which you implement server failover:
• Static IP addressing. Under static IP addressing, when a machine fails, the IP address(es) that is bound to its Web server is reassigned to the most available cluster member’s Web server. When the failed over server comes back online, it must claim the IP address and then reboot again.
• Dynamic IP addressing. ClusterCATS can be configured to dynamically assign IP addresses so that when a server fails, it’s IP address(es) can be assigned to other servers. When the failed over server comes back online, ClusterCATS returns the IP addresses to it without conflict.
On Windows clusters, Allaire recommends that you use server failover with the ClusterCATS dynamic IP address scheme. In order to configure ClusterCATS dynamic IP addresses, the IP address associated with the computer name must be different from the IP addresses associated with the Web sites. ClusterCATS refers to the IP address associated with the computer name as the maintenance address. For more information on setting up your Web site with the ClusterCATS dynamic IP addressing scheme, refer to “ClusterCATS Dynamic IP Addressing (Windows only)” on page 334.
Windows domain controllersIf you are using Windows NT Domain server authentication, then each web server in a cluster must participate as a member NT Server in a domain. Do not make any server in your cluster the Primary Domain Controller (PDC). Server Fail-Over will interfere with the function of the PDC. One of the NT servers can be a Backup Domain Controller but it is not the recommended configuration.
Configuring Load-Balancing Metrics 341
Configuring Load-Balancing MetricsColdFusion Enterprise provides you the option of customizing the load balancing metrics of Web servers clustered with Allaire ClusterCATS software. This section describes how to customize the metrics to your specific Web site implementation.
Overview of metricsThe ColdFusion server records the time each JSP page and servlet request takes to be processed and can return metrics derived from this timing data upon request. These metrics are:
• Average Request Time This metric reflects the average processing time of all requests that fall within a one-minute moving window. The use of an average smooths the affects of brief spikes in request volume and in a mixture of short- and long-running requests.
• Last Request Time This metric reflects the time it took to process the last request to the server. Because it is a single, undiluted snapshot of request time, it will immediately reflect peaks and troughs in request processing time.
For these time-based metrics to be translated into a single load value for the Web server, they must be weighed against a more subjective measure of server performance—a maximum acceptable response time. This maximum reflects the upper threshold of performance at which a server should be declared "busy" for load-balancing purposes. Once a server reaches this critical busy threshold, the ClusterCATS software will redirect further service requests away from the server until it becomes more responsive to its clients.
A further enhancement in load-balancing options is provided by the ClusterCATS software. A ClusterCATS agent process performs a probe of a special JSP page —getsimpleload.jsp (every five seconds)—and records the round-trip time (RTT) for each request. From this data, it computes its own average RTT over a one-minute moving window.
This external view of request time accounts for the processing time of the JSP page request itself, but, more importantly, for other system overhead involved in reaching the Web server and receiving an acceptable response back again. By factoring in external influences on Web server responsiveness—such as network load, scheduling load, and disk I/O load—the ClusterCATS probe agent can adjust the load reported by the ColdFusion engine to create a more realistic picture overall of the Web server's performance for its clients.
For example, if the ColdFusion server is reporting a light load of requests, but the probe agent is seeing significant round-trip times to and from the Web server, then it will report a proportionally higher load for server and ColdFusion reported.
342 Chapter 15 Optimizing ClusterCATS
Load typesThe probed JSP page is located at <CC_install_directory>/btauxdir/getsimpleload.jsp. The probe agent responds to output generated by this page and uses it to calculate the overall load based on the weighting of the two available metrics set in the LOADTYPE variable:• AVG_REQ_TIME
AVG_REQ_TIME calculates load based on the average service request time. The load is derived by dividing the request time by the maximum acceptable request time. This is the default metric.
• ROUND_TRIP_TIME
ROUND_TRIP_TIME calculates load based on the round trip time for the request. This metric leaves all load calculation in the hands of the probe agent.
For servers that process database-intensive requests, ROUND_TRIP_TIME is not a good indication of load because ColdFusion processes the threads that calculate ROUND_TRIP_TIME differently than queued database connection requests. With this in mind, if you have a Web server that uses many concurrent connections to a database, either use AVG_REQ_TIME rather than ROUND_TRIP_TIME as your load type, or include a database call in getsimpleload.jsp to make this load type’s results more indicative of actual conditions.
Output variablesDuring processing, getsimpleload.jsp generates three significant output variables that are sent in response to the probe agent's HTTP query. This section describes these variables.
• CCLOADVALUE
CCLOADVALUE is the load calculated by getsimpleload.jsp using one of the available load metrics. The load value identifies how busy the server is as a percentage of its total capacity.
• CCLOADMAX
CCLOADMAX is the maximum acceptable time (in milliseconds) for a request to complete and marks the "busy threshold" for this server. In other words, this is the basis upon which a load percentage is calculated given the results of the AVG_REQ_TIME metric. The default maximum is 8 seconds (8000 ms), but this value is arbitrary and should be customized to fit the capacity and expectations of a particular Web site.
CCLOADMAX is one of two variables that you would typically change in getsimpleload.jsp to customize your server’s load metrics. If you increase the value of CCLOADMAX, then the server can take longer for each request (on average) before the server is declared busy. If you decrease CCLOADMAX, then the server's average request must be shorter before the server is declared busy.
Configuring Load-Balancing Metrics 343
• CCRTTPercent
CCRTTPercent represents the percentage of the calculated average ROUND_TRIP_TIME that the probe agent should apply to the load metric supplied by CCLOADVALUE.
CCRTTPercent is the second variable that you might change in getsimpleload.jsp to customize your server’s load metrics. It acts as a tuning knob to determine how much external influence on server performance should be calculated into the server's overall load value.
For example, increase CCRTTPercent to apply a greater weighting to the ROUND_TRIP_TIME metric in the overall load calculations. The default value of CCRTTPercent is 0 (disabled). If you change the load type to ROUND_TRIP_TIME, then the default value of CCRTTPercent is 100, which gives ROUND_TRIP_TIME the maximum weighting.
Troubleshooting the load-balancing metricsIf you make changes to the getsimpleload.jsp page while the ColdFusion server is running you must reload the page for your changes to take effect.
If ClusterCATS gets an exception every time it processes getsimpleload.jsp, you might have installed ClusterCATS before installing ColdFusion. In this case, verify that the following is true:
• ColdFusionMetricThread.class file is located in the /ColdFusion/lib/ext
• The virtual directory /btauxdir is configured on your Web server. (This was created during installation but you might have removed it.)

344 Chapter 15 Optimizing ClusterCATS
Index
A Administrator, ColdFusion authentication
A records 230absolute hyperlinks 276Access
OLE DB providers 5Active mode
described 308Active/Passive mode
changing 309changing in UNIX 310changing in Windows 309
adding cluster membersUNIX 265Windows 264
Admin Agentdefined 263
Admin Managerdefined 263
administering ClusterCATSalarm notifications 296Apache considerations 249btadmin 252ClusterCATS Explorer 246ClusterCATS Web Explorer 248e-mail support options 299introduction 246Netscape considerations 248opening the Web Explorer 249scripting 322security 302Server Administrator 251server load threshold 268using btadmin 322using bt-start-server 325using bt-stop-server 325
Administrative functions 110Administrative tags 111administrator alarm
notifications 296
about basic security 72ODBC data sources 3
Advanced security, concepts 81, 84
alarm notificationsconfiguring on UNIX 297configuring on Windows 297event schedule 296overview 296types 297
alarmsSee alarm notifications
Allaireheadquarters xviiisales xviiiWeb site xv
Allaire Spectradeveloper community xvideveloper resources xvdocumentation, about xvitraining resources xviSee also Allaire
Apacheenabling Web Explorer 249Web Explorer
considerations 249applications
database locking 226load testing 231scalability bottlenecks 227state management 225
attaching to a collection, rcvdk 202
attribute-value pairspassing via connection
string 12
configuring on UNIX 306configuring on Windows 302disabling 305domain 304local user 302NT Domain 304
availability & reliabilitycommon failures 235defined 234elements of 234failover considerations 237illustrated 235sample scenario 236
average request time 341avoiding bottlenecks 227avoiding double-reboot 335
Bbackup servers 237Basic security 72
about 72limitations 74
before you installmaintenance IP addresses 335
Binding and privilegesDB2 19
bottlenecksavoiding 227
browse utility, using menu options 209
browse, using Verity 209browse, Verity utility 209btadmin
described 252usage 322Windows syntax 324
346 Index
btcfgchkDNS Errors 326sample output 325syntax 325
bt-start-serverusage 325
bt-stop-serverusage 325
btweb 248busy state 313
Ccached query
connection string 13CCLOADMAX 342CCLOADVALUE 342CCRTTPercent 343CFAUTHENTICATE 95CFAUTHENTICATE tag 99cfcollection 119cfdocumentation 119cfquery
as diagnostic for unverified data source 8
creating a data source in 10cfsearch 119Cisco LocalDirector
and DFP Agent Listen Port 291and dynamic IP addressing 290and gradual redirection 290and Passive mode 290and round-robin DNS 290dynamic-feedback
command 291integrating with
ClusterCATS 291using 290
Client softwarerequired for native database
drivers 9cluster Maintenance mode 313cluster members
adding (UNIX) 265adding (Windows) 264adjusting load threshold 270changing from one cluster to
another 319changing state 309enabling maintenance
support 260gradual redirection
threshold 268load thresholds 268peak load threshold 268
putting in busy state 313putting in Maintenance
mode 313removing (UNIX) 267removing (Windows) 266resetting to pre-clustered
state 319restricting 311updating 317
Cluster Setup Wizard 252ClusterCATS administration
command-line 252scripting 252
ClusterCATS componentsbtadmin 252Explorer 246Server 246Server Administrator 251Web Explorer 248
ClusterCATS Exploreradministering UNIX cluster 247defined 246icon legend 247interface 247
ClusterCATS Server Administrator 251
ClusterCATS Server, defined 246ClusterCATS Web Explorer
Apache considerations 249defined 248Netscape considerations 248opening 249
clusteringdefined 239hardware considerations 242hardware solution
illustrated 241hardware-based
advantages 241hardware-based solutions 240illustrated 239intelligent vs.
non-intelligent 240software considerations 243software-based advantages 243software-based solutions 242techniques 239viewing server load 270
clustersadding members (UNIX) 265adding members
(Windows) 264adding members, overview 264alarm notifications 296
creating manually 258creating UNIX 261creating Windows 252creating with Cluster Setup
Wizard 252creating, overview 252moving cluster members
among 319removing members (UNIX) 267removing members
(Windows) 266restricting members 311
clusters membersviewing load status 270
ColdFusionmap of security framework 103RDS 74resources, protecting 95
ColdFusion Studiopassword 76
collection types, notes on 200collections
created with ColdFusion 119external 119
collections, attaching to with rcvdk 202
collections, maintaining with mkvdk 195
collections, merging with the merge utility 211
collections, splitting 211com port on Web server 248command-line
btadmin 322btcfgchk 325bt-start-server 325bt-stop-server 325hostinfo 328sniff 329
common failures 235concurrency 226Configuring
System and services files 16Configuring data source options
DB2 on UNIX 15DB2 on Windows 15dBASE/FoxPro on UNIX 23dBASE/FoxPro on Windows 21Informix and native drivers 27Informix on UNIX 27Informix on Windows 26Microsoft Text on Windows 35text on UNIX 35
Index 347
ConnectingDB2 data sources 15dBASE/FoxPro 21Excel 24Excel Workbook 25Informix 26Informix data sources 27Informix through ODBC/CLI 29Sybase 32text databases 35Visual FoxPro 37
connection stringabout 12connectstring attribute 13in cached query 13passing attribute-value pairs 12viewing information in SQL
Server 12creating clusters 252
in UNIX 261in Windows 252manually 258Windows 252with hardware solutions 240with software solutions 242
Ddata error codes 214data source creation in cfquery 10databases
concurrency issues 226locking mechanisms 226
DB2client enabler 16stored procedure 19
dBASE/FoxProODBC options 21, 22
deleting clusters 263DFP Agent Listen Port
with LocalDirector 291DFP hosts 291didump, using Verity 206didump, Verity utility 206didump, viewing the word list
with 206didump, viewing the zone attribute
list 208didump, viewing the zone list 207Disable mode 305disabling authentication 305dispatch error codes 216displaying fields 210DNS
core elements 229
defined 228domains 229name servers 230record types 230round-robin 242scalability 228server aliases 230troubleshooting with
hostinfo 328using btcfgchk 325zones 229
domain authentication for clustering 304
domainsDNS 229using hostinfo 328
double-rebootavoiding 335
dynamic connectionODBC 13
dynamic dbtype 13dynamic IP addressing
benefits 335enabling 337maintenance IP addresses 335optimizing failover,
described 335static vs. dynamic
addressing 334with LocalDirector 290with maintenance IP addresses,
described 335with Maintenance mode,
described 335dynamic-feedback command 291dynamic-feedback-pw 291
Ee-mail
alarm notifications 296reports 299support options 299
e-mail supportconfiguring on UNIX 300configuring on Windows 300
error codes Verity query 214error codes Verity runtime 213error codes, Verity data 214error codes, Verity dispatch 216error codes, Verity filtering 216error codes, Verity generic 213error codes, Verity licensing 215error codes, Verity remote
connection 216
error codes, Verity security 216error codes, Verity usage 213Error messages, Verity VDK 213events
alarm notifications 296Excel
connecting 24Excel Workbook
connecting 25
Ffailover
backup servers 237considerations 237corrective actions 238described 340domain controllers 340hardware planning for 237optimizing with dynamic IP
addressing 335parallel servers 237static vs. dynamic IP
addressing 340systems monitoring 238Web server alarm
notification 296failures
alarm notifications 296common 235HTTP server 296probes 296server busy 296server unreachable 296Web server failover 296
fields, displaying 210fields, displaying multiple 205filtering error codes 216firewalls
scalability 227funtime error codes 213
Ggeneric error codes 213getsimpleload.jsp
description 341troubleshooting 343
gradual redirectionthreshold 268with LocalDirector 290

348 Index
Hhardware planning for
failover 237hardware-based clustering
advantages 241considerations 242illustrated 241solutions 240
hostinfo 328sample output 328syntax 328
HTTP redirection 268HTTP server failure
alarm notification 296hyperlinks
relative 276
Iicon legend 247Indexing XML documents
overview 138indexing XML documents
configuring style files 139configuring style.xml 139implementation summary 138prerequisites 143searching using rcvdk 143Style Files 139style.dft 142style.ufl 142style.xml command syntax 141using mkvdk 143
Informixconnecting 26
installation, support xviintegrating ClusterCATS
with LocalDirector 291IsAuthenticated 99IsAuthorized 99
JJet
configuration information 7OLE DB providers 5
KK2 broker 118K2 Server
about 118collections, registering 117data error codes 133dispatch error codes 134error messages 132file handling error codes 134
generic error codes 132installation details 118K2 mode 118, 119K2 mode, overview 116modes of operation 116overview 116query error codes 133quick start 116remote connection error
codes 134runtime error codes 132security error codes 133specifying parameters in CF
adminstrator 117starting 120starting on Linux/UNIX 121starting with Windows batch
file 121stopping on Linux/UNIX 122stopping, when run as
application 122stopping, when run as
service 122TCP/IP error codes 135usage error codes 132vdk mode, overview 116Verity modes supported 118warnings 134
k2server.exe 117, 119k2server.ini 116, 117, 119, 124
collection sections 129editing 124editing coll-n section 124editing vdkhome
parameter 124parameter reference 127search thread keywords 128server section 127
Llast request time
described 341LDAP
user directories 92licensing error codes 215Limiting DSN definitions 13linear scalability, explained 223load balancing
combining hardware & software 291
configuring load thresholds 268
configuring metrics 341
enabling session-aware on UNIX 278
enabling session-aware on Windows 277
integrating ClusterCATS with other devices 290
issues related to scalability 224metrics, overview 341session-aware 276software-based 242using a hardware solution 241using round-robin DNS 242using third-party devices in
UNIX 295using third-party devices in
Windows 294load balancing devices 290load levels 270load metrics
output variables 342troubleshooting 343
load monitor 270load status
monitoring 270load testing
available Web tools 232considerations 232minimizing problems 232reasons to perform 231Web applications 231
load thresholdsadjusting graphically 270and LocalDirector 290configuring 268configuring in UNIX 272configuring in Windows 268peak 268status 270viewing load status 270
local user authentication 302
Mmaintenance IP addresses
described 335setting up 336
Maintenance modedescription 308upgrading cluster
members 317using 313using btadmin 324with dynamic IP
addressing 335
Index 349
maintenance support in ClusterCATS
enabling 260merge, using Verity 211merge, Verity utility 211metrics
average request time, described 341
configuring 341last request time, described 341load-balancing 341output variables 342overview 341troubleshooting 343
Microsoft Data Access Components (MDAC) 5
version detection 5mkvdk
indexing XML documents with 143
mkvdk syntax 186mkvdk, about optimized databases
(VDBs) 198mkvdk, about squeezing deleted
documents 197mkvdk, accessing online help 188mkvdk, autodel option 194mkvdk, backup option 195mkvdk, bulk option 194mkvdk, bulk submit options 194mkvdk, collection maintenance
options 195mkvdk, collection setup
options 188mkvdk, date format options 191mkvdk, deleting a collection 196mkvdk, document processing
options 193mkvdk, general processing
options 189mkvdk, getting started 187mkvdk, maintaining
collections 195mkvdk, message types 192mkvdk, messaging options 192mkvdk, noexit option 195mkvdk, noservice option 195mkvdk, numdocs option 194mkvdk, offset option 194mkvdk, optimization
keywords 196mkvdk, optimize option 195mkvdk, overview 186
mkvdk, performance tuning options 198
mkvdk, persist option 195mkvdk, processing
documents 190mkvdk, purge option 195mkvdk, purgeback option 195mkvdk, purgewaitsec option 195mkvdk, repair option 195mkvdk, sleeptime option 195modes 308
Active/Passive 308, 309Disabled 305Maintenance mode 313Restricted/Unrestricted,
described 308using Maintenance mode to
upgrade cluster members 317
monitoring load status 270monitors
adding new 281removing in Windows 285
MSDASQLconfiguration information 7predefined ODBC data source
needed 5
Nname servers 230native database drivers
about 9software requirements 9
NetscapeWeb Explorer
considerations 248NT Domain authentication 304NT domains
user directories 92
OODBC
dynamic connection 13user directories 92
ODBC data sourcesdBASE/FoxPro options 21, 22security 73
odbc.inisupport for databases without
DSNs 13OLE DB
about 4configuring an OLE DB data
source 6
providers 4OLE DB providers
Access 5installing 5Jet 5MSDASQL 5SQL Server 5SQLOLEDB 5
online help, mkvdk 188optimizing server failover 335Oracle client software 9
Pparallel servers 237Passive mode
described 308with LocalDirector 290
PasswordAdministrator security 72ColdFusion Studio 76
Passwordsremoving (Windows) 76
peak load threshold 268performance issues related to
scalability 222Policies 82probe monitors
adding 281probes
adding in UNIX 285adding in Windows 280adding to existing monitor 284alarm notification 296editing and removing in
UNIX 288failure 296removing in Windows 285startup parameters 283
PTR records 230
Qquery error codes 214
Rrck2
command options 131searching K2 documents
with 131syntax 131
rcvdksearching XML documents
with 143rcvdk utility, viewing results 203rcvdk, searching with 202
350 Index
rcvdk, starting 201rcvdk, using Verity 201rcvdk, Verity utility 201, 202, 203RDS
Basic security 98configuring basic security 73
RDS Security 85rebooting
avoiding double-reboot 335redirecting traffic 268
with Maintenance mode 313redundancy
ensuring corrective actions 238planning 237systems monitoring 238
relative hyperlinks 276relative vs. absolute
hyperlinks 276remote connection error
codes 216removing cluster members
in UNIX 267in Windows 266
removing clusters 263resetting cluster members 319
reportse-mail 299
requestsaverage request time 341last request time 341
resetting servers to pre-clustered state
btadmin -reset 323description 319in UNIX 320in Windows 319
Resource types 95Resources 82response time 341Restricted mode 308Restricted/Unrestricted
mode 308Restricted/Unrestricted state,
described 311restricting cluster members
in UNIX 312in Windows 311
Restricting tags 77round-robin DNS 242
with LocalDirector 290routers 290
Cisco LocalDirector 290for load balancing 241
third-party load balancing devices 294
Rulesdefining 96
Rules and policiescreating 96
SSandbox 65Sandbox security
implementing 100scalability
common bottlenecks 227databases 228defined 222DNS 228linear 223load management factors 224performance 222
scalable applicationsdatabase locking 226session and state 225
scripting ClusterCATS administration 252
search modedetermination by
ColdFusion 119searching, rcvdk 202Secure Sockets Layer 93securing data sources 73Securing development
resources 85Security 73
about Basic 72administrative functions 110administrative tags 111advanced concepts 81, 84advanced implementation
summary 88Basic security passwords 76choosing Basic or Advanced 62ColdFusion Administrator 66ColdFusion data sources 75ColdFusion file resources 74configuring basic RDS 73configuring basic runtime 77creating rules and policies 96defining a security context 95defining Advanced security
rules 96defining resources to protect 95Deploying applications 64Developing applications 63identifying user directories 92
implementing sandbox 100LDAP user directories 92NT domain user directories 92ODBC user directories 92policies 82RDS 85resources 82restricting tags 77Sandbox 65serverAdmin_CF_security 72setting up a security server 89user directories 81, 92
securityauthentication described 302configuring authentication on
UNIX 306configuring authentication on
Windows 302configuring domain
authentication 304disabling authentication 305local user authentication 302
Security contextdefining 95
Security Contexts 83security error codes 216Security Framework
viewing a map of 103Security framework, viewing map
of 103Server
securityAdmin_CF_security 72server busy warning
alarm notification 296server commands
btadmin 322bt-start-server 325bt-stop-server 325
server failoverdescribed 340domain controllers 340static vs. dynamic IP
addressing 340server load
adjusting 270monitoring 270
server load balancingconfiguring metrics 341
server load thresholdsconfiguring in UNIX 272configuring in Windows 268description 268
server modesdescription 308
Index 351
Server sandbox security 65server state
changing 309server unreachable
alarm notification 296Service Level Keywords 191session management 225session-aware load balancing
description 276enabling on UNIX 278enabling on Windows 277relative vs. absolute
hyperlinks 276Setting Up Collections
Examples 188Setup Wizard 252smart clusters
defined 242sniff
sample output 329syntax 329using 329
software-based clusteringadvantages 243considerations 243solutions 242
splitting collections 211SQL Server
OLE DB providers 5SQL Server trace
viewing connect string info 12SQLOLEDB
configuration information 7SSL 93Start script settings
DB2 18starting rcvdk 201state management 225static vs. dynamic addressing 334Steps for building a collection 187sticky servers 276style 39style.dft 142style.ufl 142style.xml command syntax 141support options
e-mail 299e-mail support on UNIX 300e-mail support on
Windows 300Sybase
connecting 32tips 33
352 Index
Sybase client software 9syntax, mkvdk 186System and services files 16systems monitoring for
failover 238
Ttechnical support
e-mail support 299testing Web site load 232text databases
connecting 35third-party load balancing
devices 294using in UNIX 295using in Windows 294
thresholds 268gradual redirection 268
training. See Allairetroubleshooting
e-mail support 299load-balancing metrics 343using sniff 329
troubleshooting DNStroubleshooting with
btcfgchk 325with hostinfo 328
UUnrestricted mode 308Unsecured tags directory 77updating cluster members 317upgrading servers 313usage error codes 213User directories 81
identifying 92LDAP 92NT domains 92ODBC 92
User directories, identifying 92User security
components 99implementing 99runtime 99
Using bulk insert and delete 194utilities, overview of Verity 200
VVDK error messages 213Verity browse utility, using 209Verity didump utility, using 206Verity error codes, warnings 217Verity merge utility, using 211Verity rcvdk utility, using 201
Verity rcvdk utility, viewing results of 203
Verity SpiderDNS lookups 147flow control 147multithreading 147overview 146performance 146proxy handling 147restart capability 146state maintenance via persistent
store 146Web standards support 146
Verity Spider content options-casesen 168-exclude 168-include 168-indexclude 169-indinclude 170-indmimeexclude 171-indmimeinclude 171-indskip 172-maxdocsize 172-metafile 173-mimeexclude 173-mimeinclude 174-mindocsize 174-skip 174
Verity Spider core options-cmdfile 151-collection 151-help 151-jobpath 152-style 152
Verity Spider locale options-charmap 176-common 176-datefmt 176-language 176-locale 176-msgdb 176
Verity Spider logging options-loglevel 178
Verity Spider maintenance options-nooptimize 180-purge 180-repair 180
Verity Spider networking options-agentname 159-connections 159-delay 159-header 159-hostcache 160-noflowctrl 160
-noproxy 160-proxy 161-proxyauth 161-retry 161-timeout 161
Verity Spider paths & URL options-auth 163-cgiok 163-domain 163-followdup 164-followsymlink 164-host 164-https 164-jumps 164-nodocrobo 165-nofollow 165-norobo 165-pathlen 166-refreshtime 166-reparse 167-unlimited 167-virtualhost 167
Verity Spider processing options-abspath 153-detectdupfile 153-indexers 153-license 153-maxindmem 153-maxnumdoc 154-mimemap 154-nocache 154-nodupdetect 154-noindex 155-nosubmit 155-persist 155-preferred 156-prefixmap 156-processbif 157-regexp 157-submitsize 158-temp 158
Verity Spider setting MIME typesindexing unknown MIME
types 182known MIME types for file
system indexing 183MIME types and file system
indexing 182MIME types and Web
crawling 181multiple parameter values 181syntax restrictions 181using the wildcard character
(*) 181
Index 353
Verity Spider syntaxcommand file use 149command-line options
-refresh 150-start 149
overview 148Verity Spider command 148
Verity utilities, overview 200Verity utility, browse 209Verity utility, didump 206Verity utility, merge 211Verity utility, rcvdk 201, 202Verity VDK error messages 213Verity warnings 217version detection
Microsoft Data Access Components (MDAC) 5
viewing the word list, Verity didump 206
virtual servershardware-based clustering 240
Visual FoxProconnecting 37
Wwarnings, Verity error codes 217Web applications
database locking mechanisms 226
load testing 231managing state 225scalability bottlenecks 227
Web ExplorerApache considerations 249configuring com port on Web
server 248limitations 248Netscape considerations 248opening 249
Web server failoveralarm notification 296
Web serversconfiguring com port via Web
Explorer 248determining
responsiveness 341DNS concerns 228stopping and starting 325
Web site availability & reliabilitydefined 234example 236failover considerations 237
Web site scalabilitydefined 222
implementations 225linear 223load management factors 224performance factors 222
Windows batch filestarting K2 Server with 121
wizardsCluster Setup Wizard 252
XXML documents
indexing, implementation summary 138
indexing, overview 138indexing, prerequisites 143
Zzone attribute list, viewing with
didump 208zone list, viewing with
didump 207zones
DNS 229

354 Index