Embed Size (px)
Citation preview
1
ADOBE CS2 SAFE CMYK WORKFLOWADOBE CS2 SAFE CMYK WORKFLOWADOBE CS2 SAFE CMYK WORKFLOW
INTRODUCTIONIf you’re a creative professional in the commercial printing and publishing industry, you know that maintaining consistent color throughout your workfl ow will save both time and money. The Adobe Creative Suite 2 safe CMYK workfl ow will preserve your color values from start to fi nal press, so you can work in your current workfl ow—safely. Plus, it lets you view colors accurately on your monitor and proofer.
This workfl ow described in this document is intended for the common printing conditions in North America (SWOP). You’ll learn how to use Adobe CS2 applications to achieve more accurate color in your RGB and CMYK digital print workfl ows. Walk through the steps to edit images in Photoshop, place them in Illustrator and use them to build an inDesign layout. Learn how to get an accurate preview of your artwork on your monitor, including truer blacks and spot colors. Finally, create an accurate hard proof of the document and prepare it for delivery to your print provider.
CS2 SAFE CMYK WORK-FLOW FOR A COMMERCIAL PRINT ENVIRONMENTFollow these steps to achieve more accurate color in your commercial print workfl ow.
1. Set up Photoshop.The default color settings are the same in all CS2 applications. Since it has the most color setting options, let’s look at Photoshop.
In the Color Settings, select North America General
Purpose 2. This will set the CMYK color management policy to preserve CMYK color numbers.
Since you may be working with graphics from various sources, we recommend setting the policy to Convert
to Working. All content in your layouts will be in
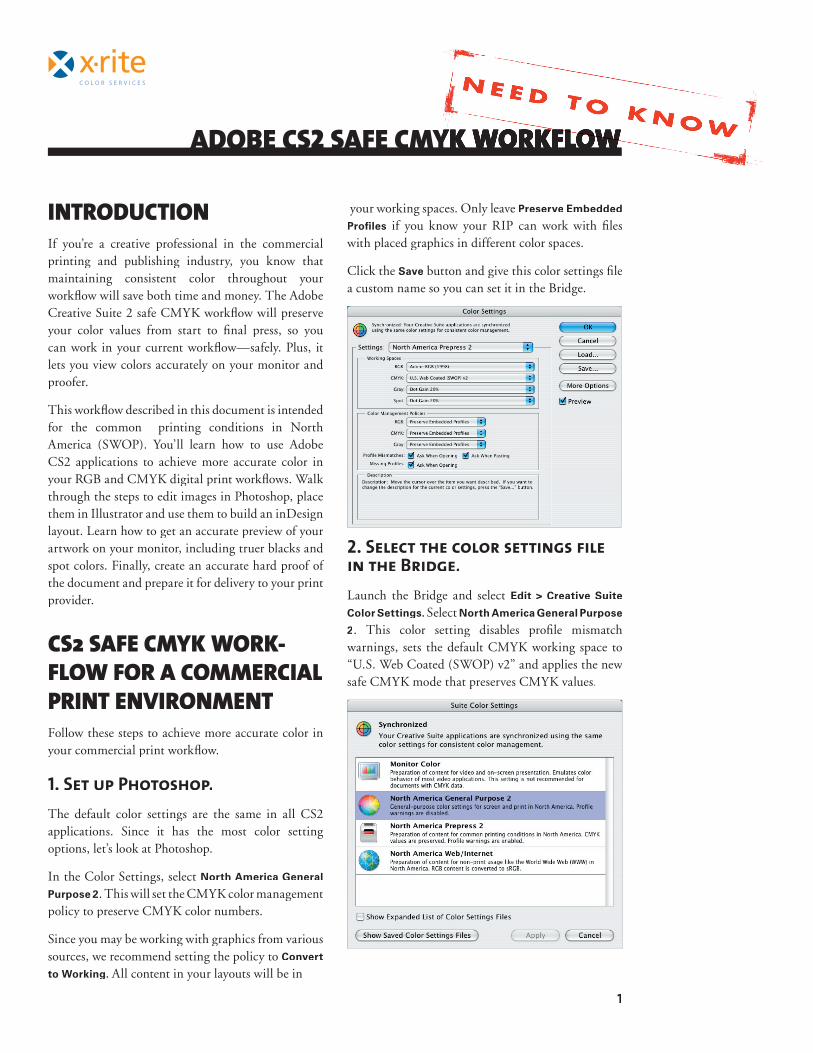
your working spaces. Only leave Preserve Embedded
Profi les if you know your RIP can work with fi les with placed graphics in different color spaces.
Click the Save button and give this color settings fi le a custom name so you can set it in the Bridge.
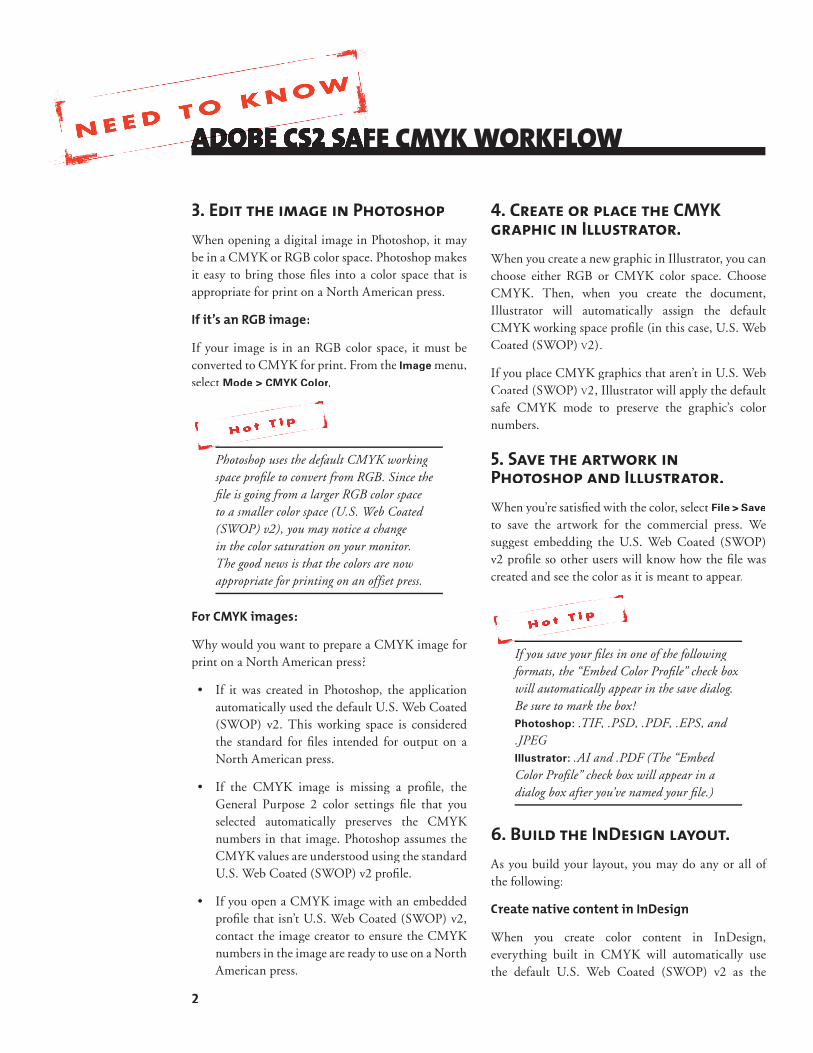
2. Select the color settings file in the Bridge.Launch the Bridge and select Edit > Creative Suite
Color Settings. Select North America General Purpose
2. This color setting disables profi le mismatch warnings, sets the default CMYK working space to “U.S. Web Coated (SWOP) v2” and applies the new safe CMYK mode that preserves CMYK values.
2
ADOBE CS2 SAFE CMYK WORKFLOW ADOBE CS2 SAFE CMYK WORKFLOW ADOBE CS2 SAFE CMYK WORKFLOW
3. Edit the image in PhotoshopWhen opening a digital image in Photoshop, it may be in a CMYK or RGB color space. Photoshop makes it easy to bring those fi les into a color space that is appropriate for print on a North American press.
If it’s an RGB image:
If your image is in an RGB color space, it must be converted to CMYK for print. From the Image menu, select Mode > CMYK Color
Photoshop uses the default CMYK working space profi le to convert from RGB. Since the fi le is going from a larger RGB color space to a smaller color space (U.S. Web Coated (SWOP) v2), you may notice a change in the color saturation on your monitor. The good news is that the colors are now appropriate for printing on an offset press.
For CMYK images:
Why would you want to prepare a CMYK image for print on a North American press?
• If it was created in Photoshop, the application automatically used the default U.S. Web Coated (SWOP) v2. This working space is considered the standard for fi les intended for output on a North American press.
• If the CMYK image is missing a profi le, the General Purpose 2 color settings fi le that you selected automatically preserves the CMYK numbers in that image. Photoshop assumes the CMYK values are understood using the standard U.S. Web Coated (SWOP) v2 profi le.
• If you open a CMYK image with an embedded profi le that isn’t U.S. Web Coated (SWOP) v2, contact the image creator to ensure the CMYK numbers in the image are ready to use on a North American press.
4. Create or place the CMYK graphic in Illustrator.When you create a new graphic in Illustrator, you can choose either RGB or CMYK color space. Choose CMYK. Then, when you create the document, Illustrator will automatically assign the default CMYK working space profi leorking space profi leorking (in this case, U.S. Web Coated (SWOP) V2).
If you place CMYK graphics that aren’t in U.S. Web Coated (SWOP) V2, Illustrator will apply the default safe CMYK mode to preserve the graphic’s color numbers.
5. Save the artwork in Photoshop and Illustrator.When you’re satisfi ed with the color, select File > Save
to save the artwork for the commercial press. We suggest embedding the U.S. Web Coated (SWOP) v2 profi le so other users will know how the fi le was created and see the color as it is meant to appear.
If you save your fi les in one of the following formats, the “Embed Color Profi le” check box will automatically appear in the save dialog. Be sure to mark the box!Photoshop: .TIF, .PSD, .PDF, .EPS, and .JPEGIllustrator: .AI and .PDF (The “Embed Color Profi le” check box will appear in a dialog box after you’ve named your fi le.)
6. Build the InDesign layout.As you build your layout, you may do any or all of the following:
Create native content in InDesign
When you create color content in InDesign, everything built in CMYK will automatically use the default U.S. Web Coated (SWOP) v2 as the
3
ADOBE CS2 SAFE CMYK WORKFLOWADOBE CS2 SAFE CMYK WORKFLOWADOBE CS2 SAFE CMYK WORKFLOW
source profi le. The key advantage is that any CMYK elements in InDesign will look the same in Photoshop and Illustrator.
Place Photoshop or Illustrator artwork
When placing CMYK artwork in a new document, inDesign will assume it is in the default U.S. Web Coated (SWOP) v2 working space. Because of the color setting we chose for this workfl ow, InDesign’s safe CMYK mode will automatically preserve the CMYK color numbers.
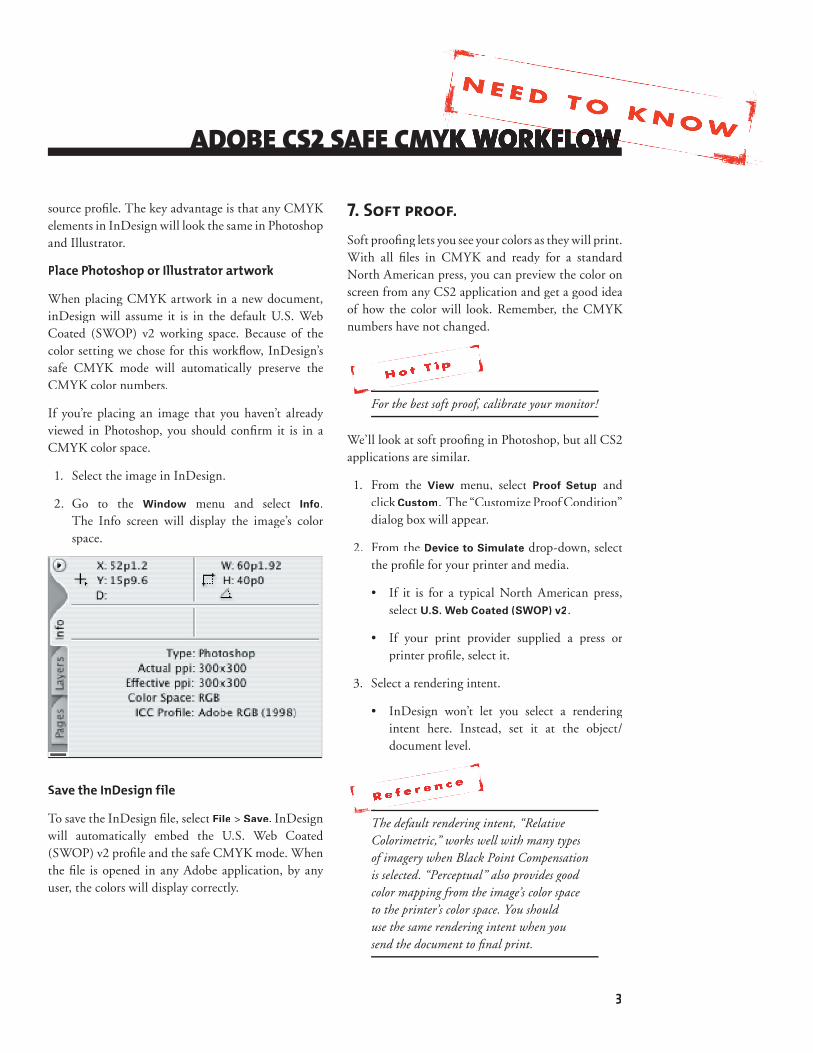
If you’re placing an image that you haven’t already viewed in Photoshop, you should confi rm it is in a CMYK color space.
1. Select the image in InDesign.
2. Go to the Window menu and select Info. The Info screen will display the image’s color space.
Save the InDesign file
To save the InDesign fi le, select File > Save. InDesign will automatically embed the U.S. Web Coated (SWOP) v2 profi le and the safe CMYK mode. When the fi le is opened in any Adobe application, by any user, the colors will display correctly.
7. Soft proof.Soft proofi ng lets you see your colors as they will print. With all fi les in CMYK and ready for a standard North American press, you can preview the color on screen from any CS2 application and get a good idea of how the color will look. Remember, the CMYK numbers have not changed.
For the best soft proof, calibrate your monitor!
We’ll look at soft proofi ng in Photoshop, but all CS2 applications are similar.
1. From the View menu, select Proof Setup and click Custom. The “Customize Proof Condition” dialog box will appear.
2. From the Device to Simulate drop-down, select the profi le for your printer and media.
• If it is for a typical North American press, select U.S. Web Coated (SWOP) v2.
• If your print provider supplied a press or printer profi le, select it.
3. Select a rendering intent.
• InDesign won’t let you select a rendering intent here. Instead, set it at the object/document level.
The default rendering intent, “Relative Colorimetric,” works well with many types of imagery when Black Point Compensation is selected. “Perceptual” also provides good color mapping from the image’s color space to the printer’s color space. You should use the same rendering intent when you send the document to fi nal print.

4
ADOBE CS2 SAFE CMYK WORKFLOW ADOBE CS2 SAFE CMYK WORKFLOW ADOBE CS2 SAFE CMYK WORKFLOW
4. To take into account the media color, check the Simulate Paper Color box.
• If you want to use these settings for future soft proofi ng, click Save. Choose a meaningful name for future identifi cation, and you’ll be able to fi nd it later in the Proof Setup menu.
5. Click OK. Your monitor now displays the document as it will appear on fi nal output (in this case, a printing press that is conforming to SWOP standards). Make any color edits.
8. If you’d like, preview blacks and control spot colors.With Adobe Creative Suite 2, you can preview blacks and handle spot colors better than ever, resulting in more predictable output color.
The improved black feature lets you choose how to view and print black objects in Illustrator and InDesign. Before, you could get accurate color previews and prints from a desktop printer with color management. But some users want to see black text as a rich black so it is easier to read. Adobe CS2 gives you the best of both worlds: use color management with InDesign and Illustrator to have the color accuracy, plus see all 100% K text and graphics as a rich black!
“Accurate Blacks” displays the difference between 100%K and rich black. If you keep the default “Consistent Blacks,” both blacks will appear the same.In Photoshop: “Display All Blacks Accurately” shows you the difference between 100% K and rich black. If you keep the default selection, “Display all blacks as Rich Black,” both blacks will appear the same.
As in the previous version, Photoshop in Adobe CS2 still displays the difference between 100% K black and rich black. To see this difference in all three applications, you must change the default setting.
To preview blacks in Illustrator:
1. From the Illustrator menu, select Preferences.
Click the drop-down menu and pick Appearance
of Black.
2. Under “On Screen Display,” select either Display
All Blacks Accurately or Display All Blacks As
Rich Black.
5
ADOBE CS2 SAFE CMYK WORKFLOWADOBE CS2 SAFE CMYK WORKFLOWADOBE CS2 SAFE CMYK WORKFLOW
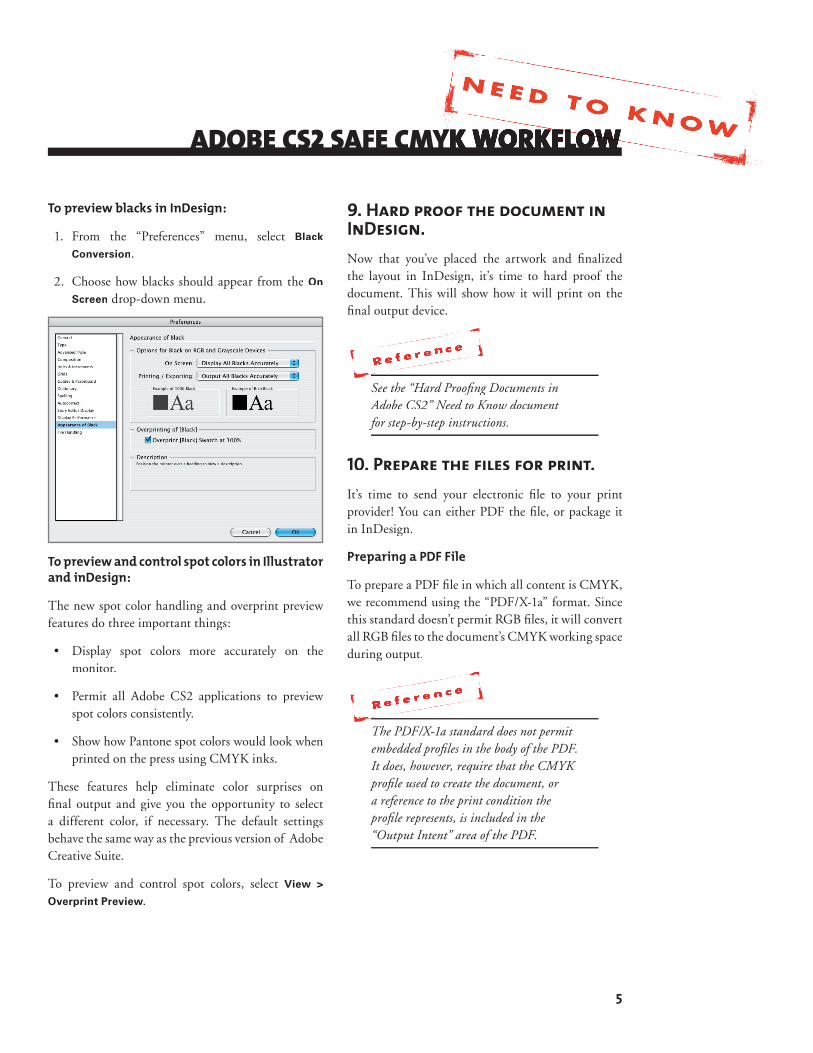
To preview blacks in InDesign:
1. From the “Preferences” menu, select Black
Conversion.
2. Choose how blacks should appear from the On
Screen drop-down menu.
To preview and control spot colors in Illustrator and inDesign:
The new spot color handling and overprint preview features do three important things:
• Display spot colors more accurately on the monitor.
• Permit all Adobe CS2 applications to preview spot colors consistently.
• Show how Pantone spot colors would look when printed on the press using CMYK inks.
These features help eliminate color surprises on fi nal output and give you the opportunity to select a different color, if necessary. The default settings behave the same way as the previous version of Adobe Creative Suite.
To preview and control spot colors, select View >
Overprint Preview.
9. Hard proof the document in InDesign.Now that you’ve placed the artwork and fi nalized the layout in InDesign, it’s time to hard proof the document. This will show how it will print on the fi nal output device.
See the “Hard Proofi ng Documents in Adobe CS2” Need to Know document for step-by-step instructions.
10. Prepare the files for print.It’s time to send your electronic fi le to your print provider! You can either PDF the fi le, or package it in InDesign.
Preparing a PDF File
To prepare a PDF fi le in which all content is CMYK, we recommend using the “PDF/X-1a” format. Since this standard doesn’t permit RGB fi les, it will convert all RGB fi les to the document’s CMYK working space during output.
The PDF/X-1a standard does not permit embedded profi les in the body of the PDF. It does, however, require that the CMYK profi le used to create the document, or a reference to the print condition the profi le represents, is included in the “Output Intent” area of the PDF.
6
ADOBE CS2 SAFE CMYK WORKFLOW ADOBE CS2 SAFE CMYK WORKFLOW ADOBE CS2 SAFE CMYK WORKFLOW
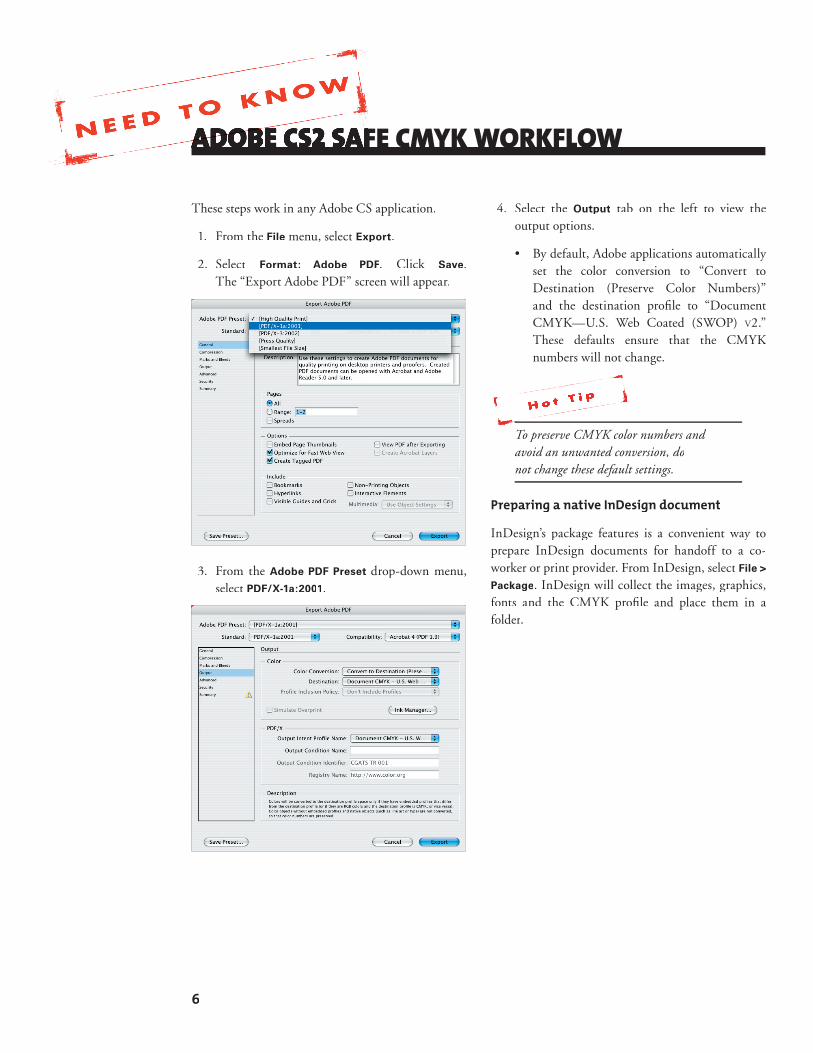
These steps work in any Adobe CS application.
1. From the File menu, select Export.
2. Select Format: Adobe PDF. Click Save.The “Export Adobe PDF” screen will appear.
3. From the Adobe PDF Preset drop-down menu, select PDF/X-1a:2001.
4. Select the Output tab on the left to view the output options.
• By default, Adobe applications automatically set the color conversion to “Convert to Destination (Preserve Color Numbers)” and the destination profi le to “Document CMYK—U.S. Web Coated (SWOP) V2.” These defaults ensure that the CMYK numbers will not change.
To preserve CMYK color numbers and avoid an unwanted conversion, do not change these default settings.
Preparing a native InDesign document
InDesign’s package features is a convenient way to InDesign’s package features is a convenient way to InDesign’s package features is aprepare InDesign documents for handoff to a co-worker or print provider. From InDesign, select File >
Package. InDesign will collect the images, graphics, fonts and the CMYK profi le and place them in a folder.