Embed Size (px)
Citation preview
ADDCOM
EHS DECT Connection Box
Operation Manual
Contents: 1. Product Description
2. Setup
3. Operation
Contents:
Addcom EHS Box Ringer Sensor Cable A – RJ45 to RJ45 (Blue) EHS Connection Cable Cable C – RJ9 to RJ9 Cable Cable D – RJ45 to RJ45 Siemens DNSG Cable Cable E – Polycom Cable Cable F – Alcatel Cable Cable G – Panasonic Cable Cable H – RJ11 Stub Cable

1. Product Description The Addcom EHS Headset Connection box is design to work in conjunction with the ADD-670 and ADD-680 Wireless Headsets and offer remote operation with a wide range of desk telephones, eliminating the need for a mechanical handset lifter. This offers the user the freedom to move around the office but still be able to monitor their telephone for incoming calls and answer the call while away from their desk. 2. SETUP The Addcom EHS Headset Connection Box is compatible with desk telephones from the following manufacturers:-
Aastra Avaya Alcatel Panasonic Polycom Siemens (DHSG) Toshiba
A full compatibility table can be found at the back of this booklet and on our website.

Connecting the EHS Box to your Desk Telephone Aastra:
1. Insert the Blue plug on cable A into the AUX port at the back of your
ADD-670/ADD-680 headset base. Insert the clear plug on cable A into the H/S EHS port on your EHS box.
2. Connect cable B (supplied with your headset) into the TEL port on the bottom of your ADD-670/ADD-680 headset base and the other end into the ‘Audio In’ port on the EHS box.
3. Connect cable D to the ‘DHSG’ port of your EHS box and the other end to the Expansion module port of your Aastra telephone
ADD‐680 Base (Rear View)
ADD‐680 Base (Underside View)
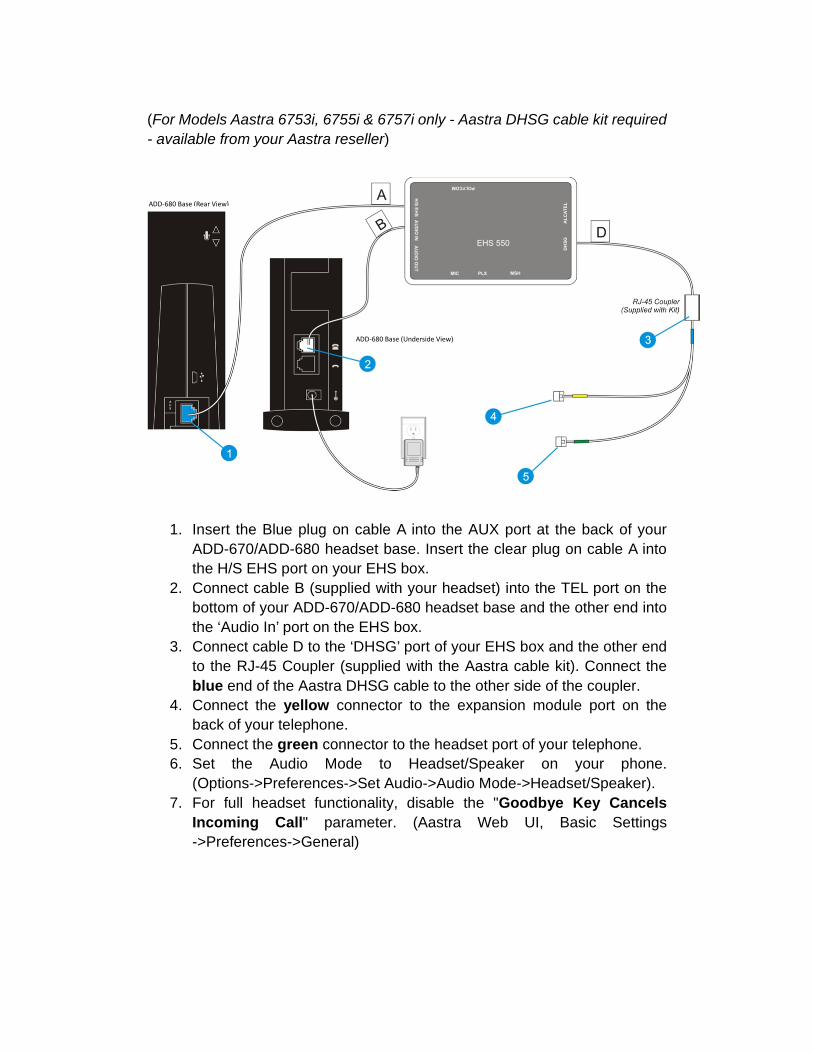
(For Models Aastra 6753i, 6755i & 6757i only - Aastra DHSG cable kit required - available from your Aastra reseller)
1. Insert the Blue plug on cable A into the AUX port at the back of your
ADD-670/ADD-680 headset base. Insert the clear plug on cable A into the H/S EHS port on your EHS box.
2. Connect cable B (supplied with your headset) into the TEL port on the bottom of your ADD-670/ADD-680 headset base and the other end into the ‘Audio In’ port on the EHS box.
3. Connect cable D to the ‘DHSG’ port of your EHS box and the other end to the RJ-45 Coupler (supplied with the Aastra cable kit). Connect the blue end of the Aastra DHSG cable to the other side of the coupler.
4. Connect the yellow connector to the expansion module port on the back of your telephone.
5. Connect the green connector to the headset port of your telephone. 6. Set the Audio Mode to Headset/Speaker on your phone.
(Options->Preferences->Set Audio->Audio Mode->Headset/Speaker). 7. For full headset functionality, disable the "Goodbye Key Cancels
Incoming Call" parameter. (Aastra Web UI, Basic Settings ->Preferences->General)
ADD‐680 Base (Rear View)
ADD‐680 Base (Underside View)
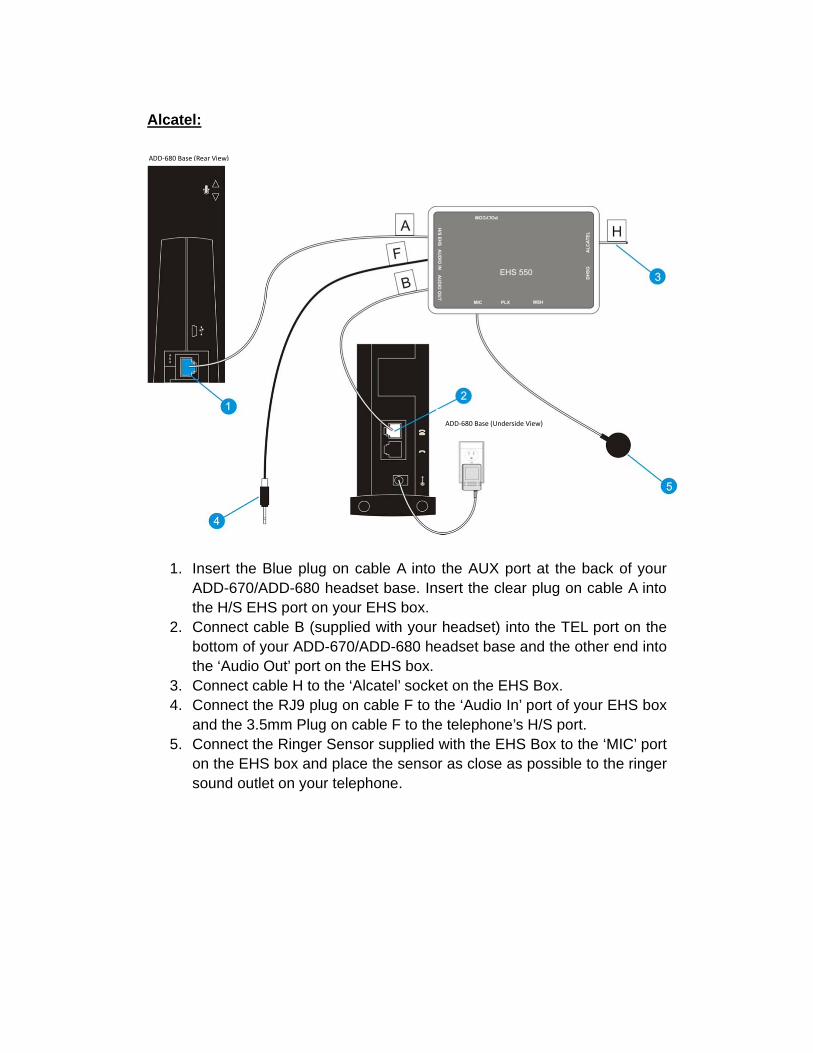
Alcatel:
1. Insert the Blue plug on cable A into the AUX port at the back of your ADD-670/ADD-680 headset base. Insert the clear plug on cable A into the H/S EHS port on your EHS box.
2. Connect cable B (supplied with your headset) into the TEL port on the bottom of your ADD-670/ADD-680 headset base and the other end into the ‘Audio Out’ port on the EHS box.
3. Connect cable H to the ‘Alcatel’ socket on the EHS Box. 4. Connect the RJ9 plug on cable F to the ‘Audio In’ port of your EHS box
and the 3.5mm Plug on cable F to the telephone’s H/S port. 5. Connect the Ringer Sensor supplied with the EHS Box to the ‘MIC’ port
on the EHS box and place the sensor as close as possible to the ringer sound outlet on your telephone.
ADD‐680 Base (Rear View)
ADD‐680 Base (Underside View)

Avaya: There are two connection methods for the Avaya range of telephones. Where the ‘reversed’ method is required, this is indicted the compatibility list. Standard
1. Insert the Blue plug on cable A into the AUX port at the back of your ADD-670/ADD-680 headset base. Insert the clear plug on cable A into the H/S EHS port on your EHS box.
2. Connect cable B (supplied with your headset) into the TEL port on the bottom of your ADD-670/ADD-680 headset base and the other end into the ‘Audio In’ port on the EHS box.
3. Connect cable C to the ‘Audio Out’ port of your EHS box and the other end to the headset port of your Avaya telephone.
4. Connect the Ringer Sensor supplied with the EHS Box to the ‘MIC’ port on the EHS box and place the sensor as close as possible to the ringer sound outlet on your telephone.
ADD‐680 Base (Rear View)
ADD‐680 Base (Underside View)

Reversed
1. Insert the Blue plug on cable A into the AUX port at the back of your ADD-670/ADD-680 headset base. Insert the clear plug on cable A into the H/S EHS port on your EHS box.
2. Connect cable B (supplied with your headset) into the TEL port on the bottom of your ADD-670/ADD-680 headset base and the other end into the ‘Audio Out’ port on the EHS box.
3. Connect cable C to the ‘Audio In’ port of your EHS box and the other end to the headset port of your Avaya telephone.
4. Connect the Ringer Sensor supplied with the EHS Box to the ‘MIC’ port on the EHS box and place the sensor as close as possible to the ringer sound outlet on your telephone.
ADD‐680 Base (Rear View)
ADD‐680 Base (Underside View)
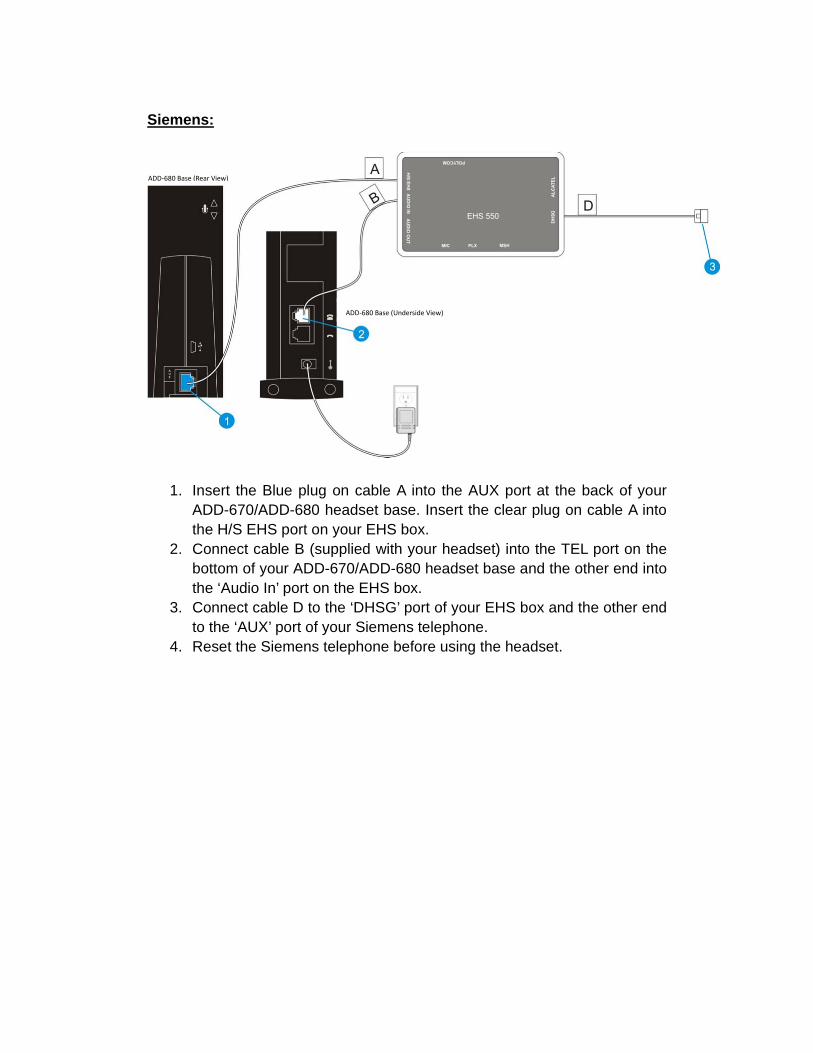
Siemens:
1. Insert the Blue plug on cable A into the AUX port at the back of your ADD-670/ADD-680 headset base. Insert the clear plug on cable A into the H/S EHS port on your EHS box.
2. Connect cable B (supplied with your headset) into the TEL port on the bottom of your ADD-670/ADD-680 headset base and the other end into the ‘Audio In’ port on the EHS box.
3. Connect cable D to the ‘DHSG’ port of your EHS box and the other end to the ‘AUX’ port of your Siemens telephone.
4. Reset the Siemens telephone before using the headset.
ADD‐680 Base (Rear View)
ADD‐680 Base (Underside View)
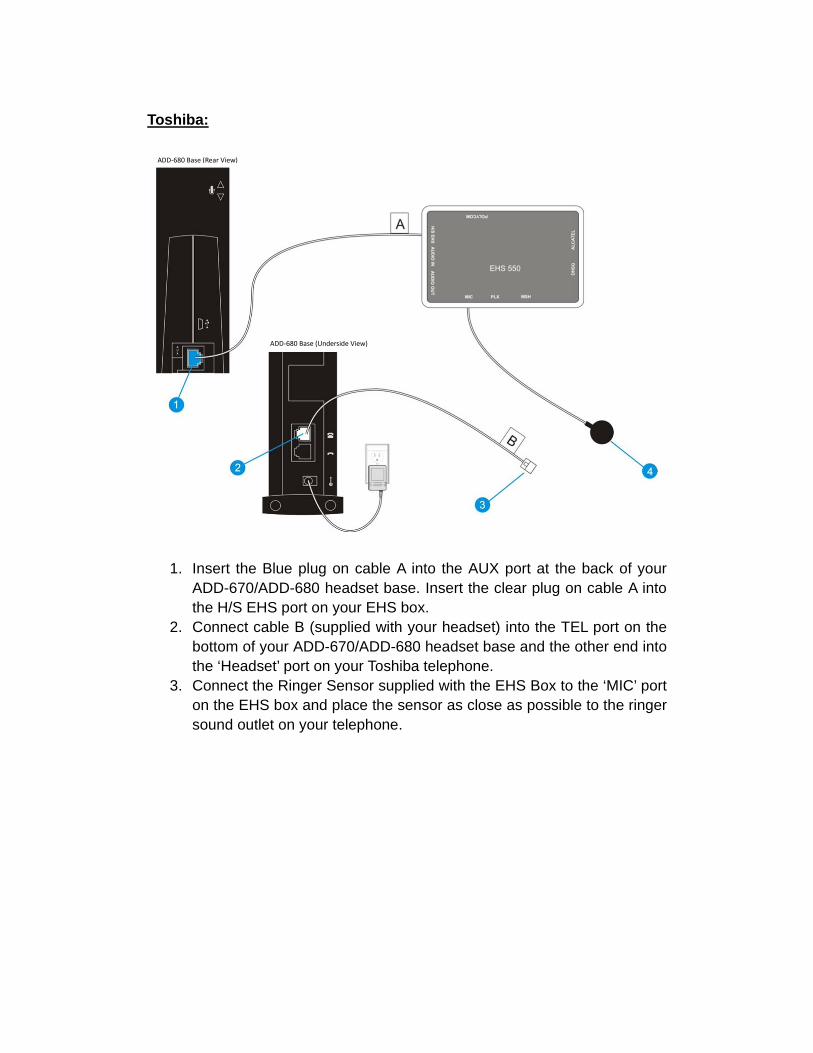
Toshiba:
1. Insert the Blue plug on cable A into the AUX port at the back of your
ADD-670/ADD-680 headset base. Insert the clear plug on cable A into the H/S EHS port on your EHS box.
2. Connect cable B (supplied with your headset) into the TEL port on the bottom of your ADD-670/ADD-680 headset base and the other end into the ‘Headset’ port on your Toshiba telephone.
3. Connect the Ringer Sensor supplied with the EHS Box to the ‘MIC’ port on the EHS box and place the sensor as close as possible to the ringer sound outlet on your telephone.
ADD‐680 Base (Rear View)
ADD‐680 Base (Underside View)
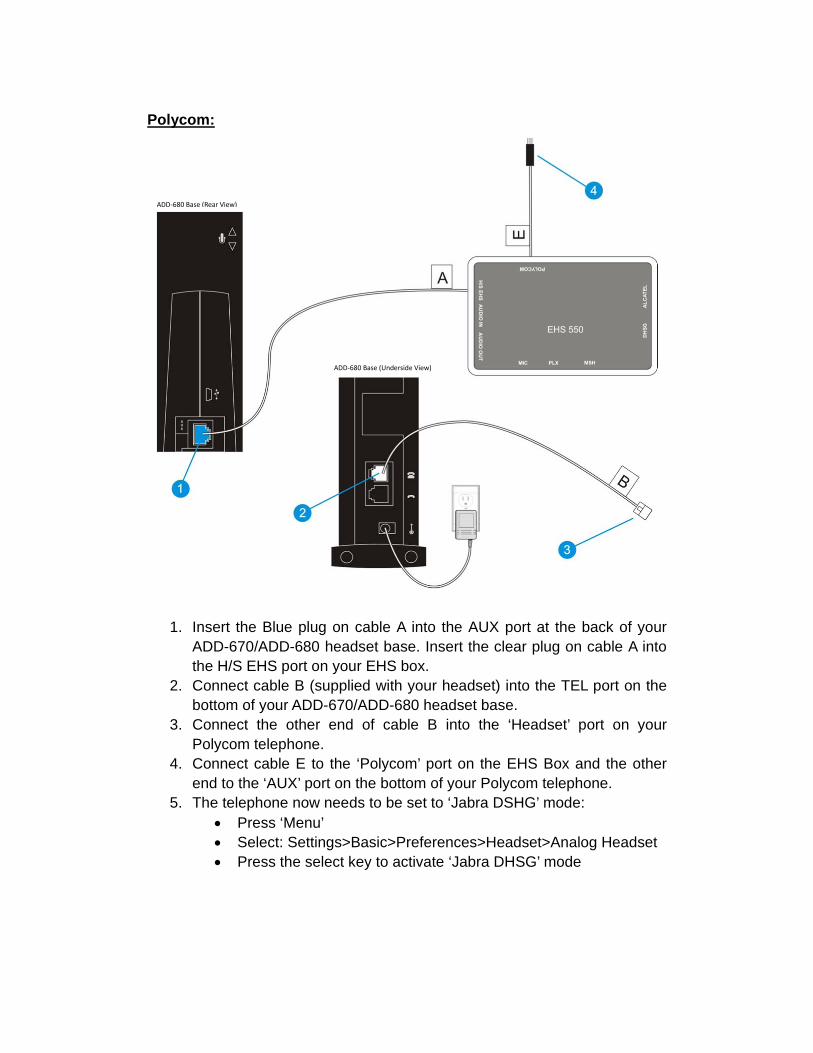
Polycom:
1. Insert the Blue plug on cable A into the AUX port at the back of your
ADD-670/ADD-680 headset base. Insert the clear plug on cable A into the H/S EHS port on your EHS box.
2. Connect cable B (supplied with your headset) into the TEL port on the bottom of your ADD-670/ADD-680 headset base.
3. Connect the other end of cable B into the ‘Headset’ port on your Polycom telephone.
4. Connect cable E to the ‘Polycom’ port on the EHS Box and the other end to the ‘AUX’ port on the bottom of your Polycom telephone.
5. The telephone now needs to be set to ‘Jabra DSHG’ mode: Press ‘Menu’ Select: Settings>Basic>Preferences>Headset>Analog Headset Press the select key to activate ‘Jabra DHSG’ mode
ADD‐680 Base (Rear View)
ADD‐680 Base (Underside View)

Panasonic:
1. Insert the Blue plug on cable A into the AUX port at the back of your ADD-670/ADD-680 headset base. Insert the clear plug on cable A into the H/S EHS port on your EHS box.
2. Connect cable B (supplied with your headset) into the TEL port on the bottom of your ADD-670/ADD-680 headset base.
3. Connect the other end of cable B into the ‘Handset’ port of the Panasonic telephone.
4. Connect cable G to the ‘PLX’ port of your EHS box and the other end to the ‘EHS’ port of your Panasonic telephone.
5. Plug the Panasonic telephone handset cable from the telephone base and plug into the ‘Handset’ port on the bottom of the ADD-670/ADD-680 base.
3. OPERATION Once your EHS box has been connected correctly to your telephone, you will be able to remotely control your telephone with the button on your ADD-670/ADD-680 headset to both answer and end calls. When you are away from your desk you will also be able to hear a signal on the headset to alert you when the telephone is ringing.
ADD‐680 Base (Rear View)
ADD‐680 Base (Underside View)