Embed Size (px)
Citation preview
Active@ LiveCD
User Guide
2 Active@ LiveCD User Guide
Copyright © 1999-2015, LSOFT TECHNOLOGIES INC. All rights reserved. No part of this documentation may be reproduced in any form or by any means or used to make any derivative work (such as translation, transformation, or adaptation) without written permission from LSOFT TECHNOLOGIES INC.
LSOFT TECHNOLOGIES INC. reserves the right to revise this documentation and to make changes in content from time to time without obligation on the part of LSOFT TECHNOLOGIES INC. to provide notification of such revision or change.
LSOFT TECHNOLOGIES INC. provides this documentation without warranty of any kind, either, implied or expressed, including, but not limited to, the implied warranties of merchantability and fitness for a particular purpose. LSOFT may make improvements or changes in the product(s) and/or the program(s) described in this documentation at any time.
All technical data and computer software is commercial in nature and developed solely at private expense. As the User, or Installer/Administrator of this software, you agree not to remove or deface any portion of any legend provided on any licensed program or documentation contained in, or delivered to you in conjunction with, this User Guide.
LSOFT.NET logo is a trademark of LSOFT TECHNOLOGIES INC.
Other brand and product names may be registered trademarks or trademarks of their respective holders.
3
Contents
1 Product Overview................................................................................................................ 4
1.1 About Active@ LiveCD .................................................................................................. 4
1.2 Requirements for Using Active@ Boot Disk .................................................................... 6
1.3 Downloading and Creating Active@ LiveCD.................................................................... 6
1.4 Booting from a CD, DVD or USB Media .......................................................................... 9
2 Navigating the Active@ LiveCD Shell .................................................................................. 12
2.1 Start button menu...................................................................................................... 12
2.2 Desktop: Shortcuts, Info panel & Configuration............................................................ 15
2.3 Quick launch icons ..................................................................................................... 16
3 Programs and utilities........................................................................................................ 18
3.1 Programs................................................................................................................... 18
3.2 Utilities ...................................................................................................................... 36
4 About Boot Priority............................................................................................................ 49
4.1 BIOS Boot ................................................................................................................. 49
4.2 UEFI Secure Boot ....................................................................................................... 50
5 Glossary ........................................................................................................................... 52
1 Product Overview
This chapter gives an overview of Active@ LiveCD.
1.1 About Active@ LiveCD Active@ LiveCD is a powerful set of tools that will help you in a number of data recovery and data security scenarios.
Active@ LiveCD combines a number of powerful tools that let you recover lost data, reset Windows passwords, make computer system backups and securely erase data. Active@ LiveCD starts when you start your computer from a bootable CD/DVD/BD Disc or USB Disk.
When you use Active@ LiveCD, you gain access to the drive's data on a physical level, and on a logical level, bypassing the resident operating system. What this allows you to do is lock selected volumes for your exclusive use. Locking a volume is important if you want to wipe data residue from unoccupied space on the drive, create a “clean” data backup or recover files or folders located on system volumes.
When you boot from the local hard drive, drive volumes cannot be locked by the resident system. The recovery operation must have exclusive access to the target location. If a service or another application gains access to the target location, it might write over the files that you are trying to recover, rendering them un-recoverable.
Here are some other functions that you can perform by booting from the CD/DVD/USB:
· Backup the system drive - If you back up the system drive with Windows or Linux OS started from the same drive, when you restore the backup, it starts as though you are recovering from a loss of power. The boot up starts with system integrity checking. If you back up the system drive with Windows\Linux started from an external drive, the restored system starts clean.
· Wipe unused data from the system records and directories, from MFT (on NTFS), from unused clusters, from file slack space (see Active@ KillDisk) - A "clean" wipe operation is not possible with Windows/Linux started from the same drive. If you wipe data with Windows/Linux started from an external drive, the wipe performs cleanly.
· Delete files - If you delete files with OS started from the same drive, Trash Can, Recycle Bin or Volume Shadow Copy service may still be active, keeping the previous version of the file or even a snapshot of the whole disk. It is possible that an uninvited intruder may retrieve this confidential data. If you delete files with operating system started from an external drive, the delete is permanent.
1.1 About Active@ LiveCD
1 Product Overview 5
· Recover Files – when you boot from an external disk, no operating system activities expected on system local disks, so you can recover your deleted files, and data on deleted\damaged volumes without of danger of data overwriting by operating system.
Active@ LiveCD contains the following products and utilities:
· Active@ Disk Backup
· Active@ Partition Recovery
· Active@ UNDELETE
· Active@ Password Changer
· Active@ Disk Editor
· Active@ KillDisk
· File Managers: Dolphin & Krusader
· Network operations utilities to help you map network drives (Network Folder Wizard), view network status, configure IP settings and firewall and to help you connect and work with a server remotely.
· Utilities to monitor the status of your hard disk, copy, move and delete files and folders create a text file, use a calculator, create a paint graphic, save display snapshots, xterm.
· System utilities to create, delete, format and resize partitions (GParted, Expert Partitioner), run command prompt commands (Terminal), check disk integrity, scan disks for viruses, display system information (System Monitor) and configure the display parameters.
· Internet tools: Internet Browser, Telnet, Remote Desktop Client
1.1.1 About the Operating System
Because the Active@ LiveCD ISO image has been created using the OpenSUSE Linux operating system and based on KDE desktop, you have access to many basic Linux features and utilities using the KDE-style user interface.
The bootable image contains a variety of plug-ins, 64-bit & 32-bit drivers, utilities and applications.
Here are some more advantages in Linux & KDE-based LiveCD:
· It does not matter 32-bit or 64-bit is your computer, as well as BIOS or UEFI boot it uses to boot up. GRUB boot manager will boot the system properly and Linux will apply either 32-bit or 64-bit drivers.
· After LiveCD booted up, you may download and install any Linux packages (RPM), for example OpenOffice, Developer Tools or Mozilla Firefox browser.
6 Active@ LiveCD User Guide
· When booted from USB disk, all user settings, as well as downloaded & installed packages stored on USB, thus saving the session. When you boot the next time, all settings are restored.
· You may use the standard dialogs, like File Open, Save As, and so on.
· Security: Networking, Firewall and support for SSL (Secure Socket Layer) is included.
· PnP (Plug and Play) support: Hardware devices can be detected and installed while LiveCD is running. This supports any in-box PnP device, including removable media and mass-storage devices. This means that you can plug in a mass-storage device to use for data recovery or data backup.
Note There are two Active@ Live packages being redistributed. One is a public evaluation FREE DEMO. This package contains 32-bit versions of all applications. These applications run in DEMO mode, not all functions are available. Another package has been supplied to clients after purchasing a registration key. This package contains 64-bit full-featured applications. Both packages can be activated with a registration key.
1.2 Requirements for Using Active@ LiveCD To use Active@ LiveCD, you must have the following:
· Intel/AMD processor
· 512MB or more RAM (1GB recommended)
· A CD/DVD drive or a USB mass storage device to boot from
In addition to the above, you must be able to turn on power to the machine and you must have access to the system board BIOS setup.
1.3 Downloading and Creating Active@ LiveCD You must perform these operations on a separate computer that has a healthy hard drive and access to the Internet.
To download Active@ LiveCD:
1. On the Internet, navigate to http://www.LiveCD.com
2. To download the freeware version, select the desired host platform (Windows or Linux) and click the DOWNLOAD link
3. To download full-featured professional version of Active@ LiveCD, click the Order link and follow the procedure for paying
4. You may save the file to a folder on your machine or you may run the file directly from the Internet folder
1.3 Downloading and Creating Active@ LiveCD
1 Product Overview 7
5. On Windows platform:
a) Run downloaded ActiveLiveCD.EXE
b) The install wizard steps you through pages to agree to the terms of the license and determine the destination folder
c) After Active@ LiveCD has been successfully installed, select the Run Active@ Boot Disk Creator check box and click Finish
6. On Linux platform:
a) Extract all files from downloaded ActiveLiveCD.TAR.gz
b) Run BootDiskCreator script
c) If authentication is required to access CD/DVD/USB media, type password for the Super User (root)
Continue with the next section to configure boot options and create a media.
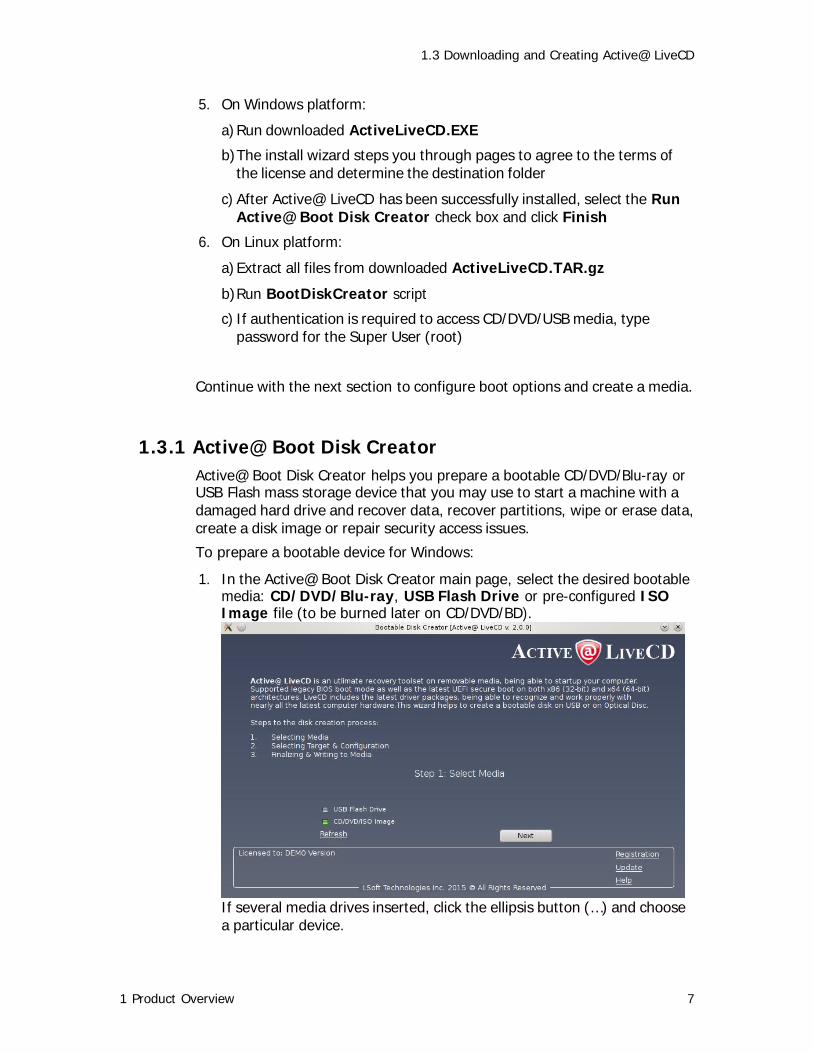
1.3.1 Active@ Boot Disk Creator
Active@ Boot Disk Creator helps you prepare a bootable CD/DVD/Blu-ray or USB Flash mass storage device that you may use to start a machine with a damaged hard drive and recover data, recover partitions, wipe or erase data, create a disk image or repair security access issues.
To prepare a bootable device for Windows:
1. In the Active@ Boot Disk Creator main page, select the desired bootable media: CD/DVD/Blu-ray, USB Flash Drive or pre-configured ISO Image file (to be burned later on CD/DVD/BD).
If several media drives inserted, click the ellipsis button (…) and choose a particular device.

8 Active@ LiveCD User Guide
2. If you have purchased commercial version of Active@ LiveCD, click Registration link to register software on your or your business name. Registration eliminates freeware version limitations and activates all professional features of commercial software.
3. Click Next.
4. Make sure that Linux OpenSUSE checkbox is selected.
At this step you can specify additional options:
a. To specify additional boot options, click System Boot Settings tab. You can change default settings to be used: Time Zone and Default Application startup mode
1.4 Booting from a CD, DVD or USB Media
1 Product Overview 9
Default Application option allows to skip launching a default application at LiveCD start up, or to launch any of Active@ software products at system boot up.
b. Network - second level tab allow you to pre-define Network Settings: network initialization, dynamic or static IP configuration
and firewall state.
c. Application Startup tab allows to configure default application to
run at boot up time with some command parameters
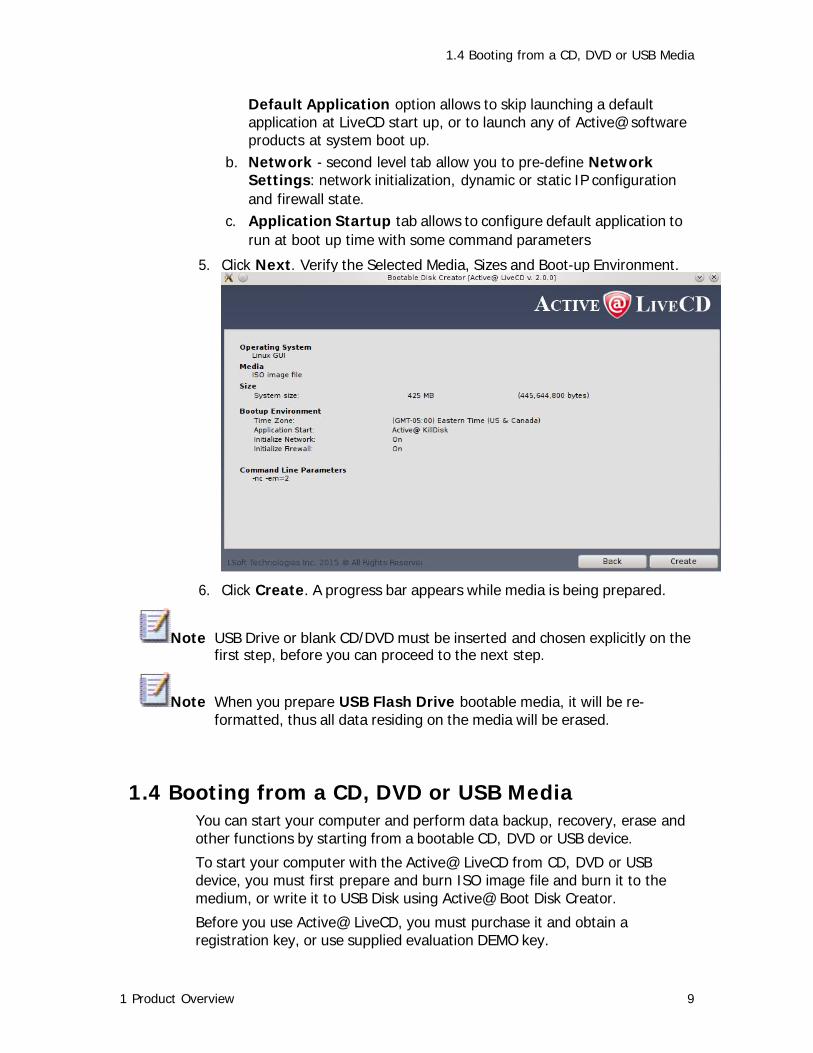
5. Click Next. Verify the Selected Media, Sizes and Boot-up Environment.
6. Click Create. A progress bar appears while media is being prepared.
Note USB Drive or blank CD/DVD must be inserted and chosen explicitly on the first step, before you can proceed to the next step.
Note When you prepare USB Flash Drive bootable media, it will be re-formatted, thus all data residing on the media will be erased.
1.4 Booting from a CD, DVD or USB Media You can start your computer and perform data backup, recovery, erase and other functions by starting from a bootable CD, DVD or USB device.
To start your computer with the Active@ LiveCD from CD, DVD or USB device, you must first prepare and burn ISO image file and burn it to the medium, or write it to USB Disk using Active@ Boot Disk Creator.
Before you use Active@ LiveCD, you must purchase it and obtain a registration key, or use supplied evaluation DEMO key.
10 Active@ LiveCD User Guide
Note For instructions on setting boot sequence priority in the system BIOS, see Chapter 3: About Boot Priority.
To boot from the configured device:
1. To boot from a CD or DVD, put the bootable Active@ LiveCD CD or DVD disk into the player.
2. To boot from a USB device, plug the bootable Active@ LiveCD USB device into a USB port.
3. Make sure that CD or USB has a boot priority over HDD in BIOS and start the power on the machine. LiveCD starts loading.
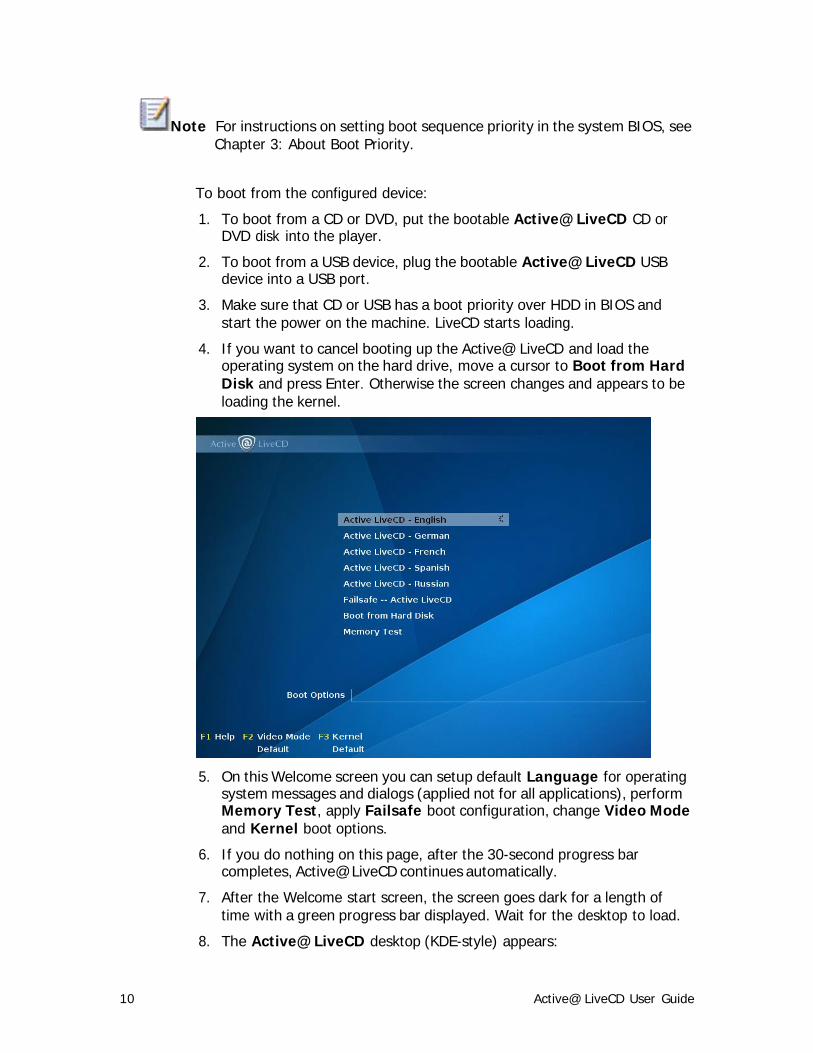
4. If you want to cancel booting up the Active@ LiveCD and load the operating system on the hard drive, move a cursor to Boot from Hard Disk and press Enter. Otherwise the screen changes and appears to be loading the kernel.
5. On this Welcome screen you can setup default Language for operating system messages and dialogs (applied not for all applications), perform Memory Test, apply Failsafe boot configuration, change Video Mode and Kernel boot options.
6. If you do nothing on this page, after the 30-second progress bar completes, Active@ LiveCD continues automatically.
7. After the Welcome start screen, the screen goes dark for a length of time with a green progress bar displayed. Wait for the desktop to load.
8. The Active@ LiveCD desktop (KDE-style) appears:

1.4 Booting from a CD, DVD or USB Media
1 Product Overview 11
You are ready to use the utilities in Active@ LiveCD.
After you start the computer this way, you have full exclusive access to the system drive. With this kind of access, you can perform tasks that are not possible when OS has been started from the hard drive.
2 Navigating the Active@ LiveCD Shell
The Active@ LiveCD shell works in a way that is similar to the KDE or Windows shell. The main interface of the shell appears as a taskbar at the bottom of the screen. Some application shortcuts located on the Desktop.
On the left is a start button with the KDE symbol on it. Several quick launch icons appear to the right of the start button.
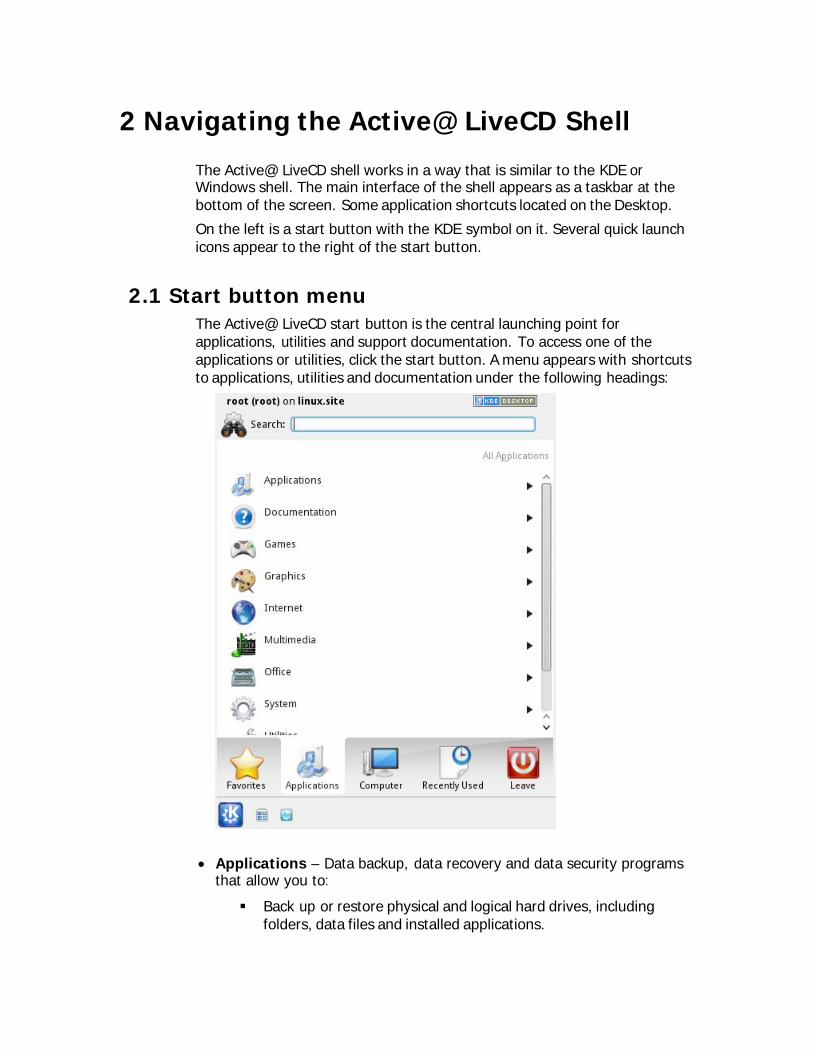
2.1 Start button menu The Active@ LiveCD start button is the central launching point for applications, utilities and support documentation. To access one of the applications or utilities, click the start button. A menu appears with shortcuts to applications, utilities and documentation under the following headings:
· Applications – Data backup, data recovery and data security programs that allow you to:
§ Back up or restore physical and logical hard drives, including folders, data files and installed applications.
13
§ Recover data from deleted or damaged partitions on attached or external drives, portable drives and memory cards.
§ Recover data from damaged or deleted files or folders.
§ Reset password and user accounts on your Windows system.
§ View and edit disk sectors content in raw format, apply colored templates for specific disk structures (MBR, boot sector, MFT,…).
§ Securely erase data from hard drives in a way that it is impossible to restore the data.
§ Wipe data from unused clusters on a regular basis to make your drive's deleted or temporary data unavailable to intruders.
§ Monitor the reliability status of your local hard drives to help prevent data loss due to hard drive failure.
· Documentation – Documents (PDF format) on all applications included with Active@ LiveCD, including the on KDE desktop and utilities.
· Games – included 3 games (KReversi, KMines, KSudoku) to spend some time while time consuming process (like large hard disk erasing) is in progress.
· Graphics – KDE Image Viewer (Gwenview), being able to preview and edit almost all picture formats (JPG, PNG, XPM, GIF, TIFF, …)
· Internet – QupZilla web browser allows to explore the Internet, read RSS, download packages and so on…
· Multimedia – K3b Disk Burning utility allows to rip, edit and burn CD/DVD ISO images, Data and Audio discs. KMix Sound Mixer manages Playback devices.
· Office – Okular Document Viewer – previews almost all document types (PDF, PS, EPS, DjVu, FB2, eBook, CHM, …). Kate Advanced Text Editor previews and edits text files stored in different code pages. Kompare Diff/Patch Frontend allows to compare any files bit-by-bit to find out differences, if any exist.
· Utilities – Ark Archiving tool to create and de-compress TAR, GZ and ZIP archives. KCalc - Scientific Calculator. KSnapshot – Screen Capture Program activated with a PrintScreen key.
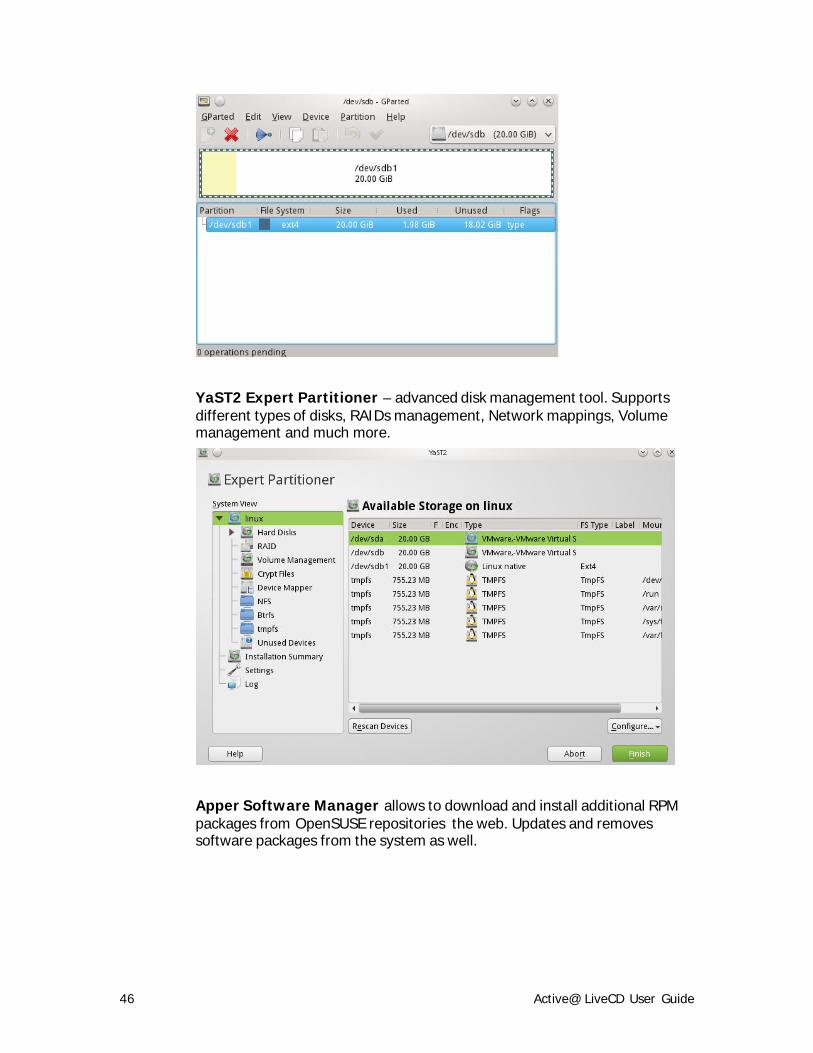
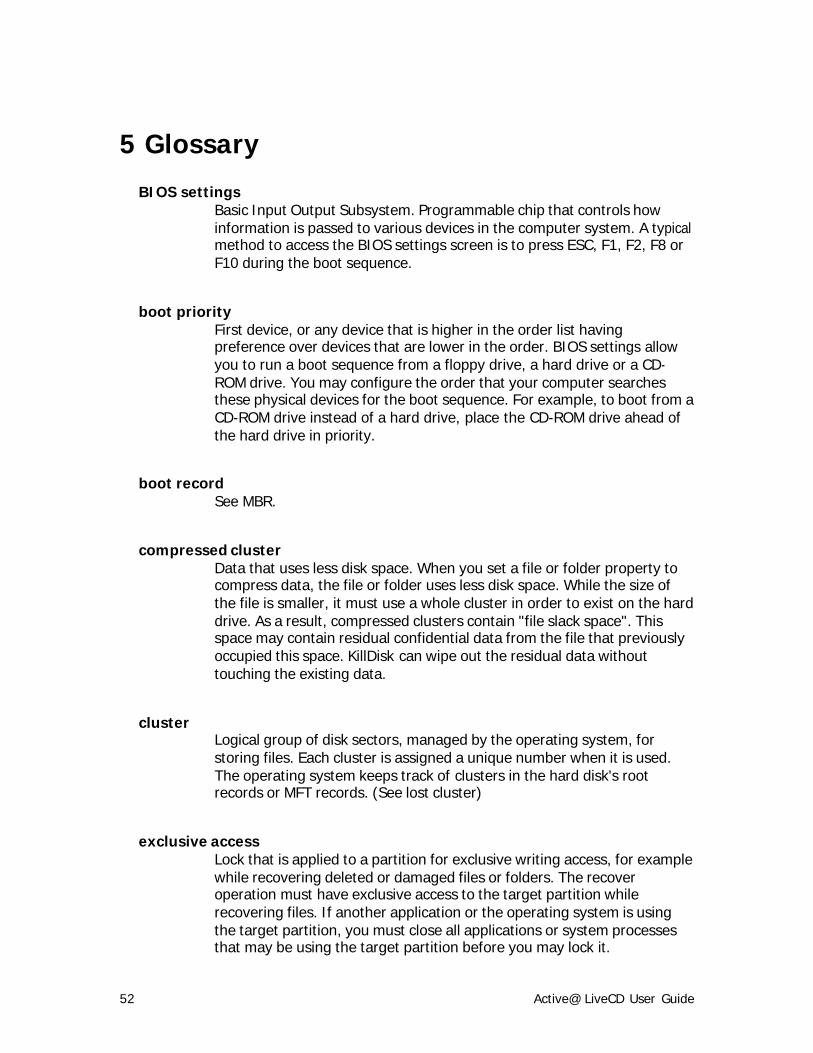
· System – Klipper Clipboard tool manages clipboard content and history. KNetAttach Network Folder Wizard – connects network folders via webadv, FTP, ssh, and Microsoft Windows Network Drive protocols. GParted Partition Editor displays, creates and edits local disks and partitions. YaST2 Expert Partitioner – advanced disk management tool. Supports different types of disks, RAIDs management, Network mappings, Volume management and much more. Apper Software Manager allows to download and install additional RPM packages from OpenSUSE repositories on the web. KSysGuard System Monitor displays and manages all local processes and the System Load.

14 Active@ LiveCD User Guide
System menu has several sub-menus:
§ Security – ClamTk Virus Scanner – downloads the latest virus database and scans your local disks for viruses. TrueCrypt GUI application attaches and manages encrypted volumes stored in files.
§ More Programs – KinfoCenter – Info Center – Operating System Summary, Memory, Hardware, Drivers & Network information.
§ Terminal – Konsole Terminal, Super User Mode Terminal and XTerm.
§ Remote Access – Remmina Remote Desktop Client allows to connect to remote hosts using different protocols (RDP, SFTP, SSH, VNC). Telnet is a simple remote console interface.
§ File Managers – Dolphin File Manager – displays, copies/moves and manages files/folders on local disks as well as network attached drives. Krusader File Manager – is a two panel file manager having many advanced features.
2.1.1 Other start button features
Start > Favorites
Displays the most important utilities and applications.
Start > Computer
Displays shortcuts to the Configure Desktop, Info Center, Run Command panel, Home folder, Root folder, Network, Trash Can and mounted CD/DVD/USB media.
Start >Recently Used
Displays the most recently used utilities and applications.
Start > Leave
Options to Log out, Lock, Switch user, Sleep, Restart & Shut down the PC.

15
2.2 Desktop: Shortcuts, Info panel & Configuration Several permanent icons appear on the Desktop after Active@ LiveCD start up. To see a “hover box” with additional information about a quick launch icon, hold your mouse pointer over the icon.
Use these icons to conveniently open the following programs:
· Active@ Disk Backup
· Active@ File Recovery
· Active@ Partition Recovery
· Active@ Password Changer
· Active@ Disk Editor
· Active@ KillDisk
· Dolphin File Manager
· Set Time Zone, Date & Time (important to verify for the first launch)
Note To add more shortcuts to the Desktop, configure existing or remove undesired ones, invoke a context menu (right mouse click) for the Desktop and execute related commands.
Configure Desktop – menu item is accessible from Application & Computer menus. Desktop configuration is same as Control Panel.
16 Active@ LiveCD User Guide
Configure Desktop (Plasma Desktop Control Panel) configures User accounts, Display & Monitor settings, Network settings, File Associations, System Notifications, Locale settings, Shortcuts & Gestures, Desktop Effects & Workspace Appearance, Accessibility, Default Applications, Window & Workspace Behavior, SSL Preferences, Device Actions, Input Devices, Power Management, Removable Devices, Multimedia, Software Manager, Date & Time Settings, Font Management, Login Screen, Permissions, Startup & Shutdown options
System Information Panel has been displayed on the right side of the screen. It monitors current status of the system - displays CPU & RAM usage, Disks & Network activity, Hardware Temperature and much more.
This information can be very useful system is damaged and data needs to be recovered (for example if motherboard or HDD is too hot).
You can remove unnecessary applets, or the whole panel.
2.3 Quick launch icons On the right part of the taskbar is a system tray with a clock showing the system time. If you hold your mouse pointer over the clock today’s date and time zone appear.
As well, several icons provide quick access to system utilities. To see a “hover box” with additional information about a system utility icon, hold the mouse pointer over one of the icons.
Use these icons to conveniently open these utilities:
· Virtual keyboard
· Clipboard
· Sound Volume & Mixer
· CD/DVD & USB attached disks
· Network connections
· Keyboard layout
· Show Hidden Icons button (Notifications & Software Updates)
· File Manager
· Web Browser
If a network is installed and activated, click on the Network Interface displays full configuration details such as operational status, IP address, DNS server address, firewall status, and so on.
The most right icon (Panel Tool Box) allows customizing task bar & quick launch icons: add more applets & widgets, remove existing ones, change height of the taskbar and so on. Click on it and explore options.

17
Note If you run Active@ LiveCD from USB disk, all customizations to the Desktop, Time Zone, Application Icons, Task Bar & Quick Launch icons will be stored to USB permanently and restored the next time you launch Active@ LiveCD.

18 Active@ LiveCD User Guide
3 Programs and utilities
This chapter provides detailed descriptions of all the programs and utilities included with Active@ LiveCD.
Applications are listed in this chapter in the order that they appear in the Active@ LiveCD start menu.
3.1 Programs · 3.1.1 Active@ Disk Backup - Create an exact image of the data stored
in selected partitions of a hard disk or an image of the entire hard disk.
· 3.1.2 Active@ Partition Recovery - Recover deleted or damaged partitions located on data volumes, attached hard drives, as well as on external USB drives and Memory Cards (SunDisk, MemoryStick, CompactFlash, etc.).
· 3.1.3 Active@ UNDELETE - - Advanced recovery tool: restores files that have been deleted, damaged or destroyed by a virus or if the file directory has been destroyed. Recovers damaged RAIDs & volumes.
· 3.1.4 Active@ Disk Editor - Edit a disk’s raw sector data to analyze and repair the MBR and other important files. Advanced search capabilities and templates for viewing MBR, Boot Sectors, LDM, MFT records are available.
· 3.1.5 Active@ Password Changer - Recover from forgotten or damaged user passwords.
· 3.1.6 Active@ KillDisk - Destroy data permanently from any computer. Also, wipe deleted data, securely removing all data in unoccupied sectors
3.1.1 Active@ Disk Backup
Active@ Disk Backup is a solution that allows you to create an exact image of the data stored in selected partitions of a hard disk or an image of the entire hard disk. You can protect your valuable data by regularly making a disk image and keeping it in a safe place. If you have trouble with data corruption, or if you want to refer to an archived version of a file, you can easily restore the data.
The application provides many tools around backing up data on your hard disk:
· Create Backup - lets you to create a regular type backup archive of an entire disk or of selected partitions in the system.
19
· Restore Backup –lets you to restore data from a disk backup archive.
· Verify Image - checks the integrity of a disk backup archive file.
Creating Backup
At the top of the main window there are three buttons corresponding to three main actions of Active@ Disk Backup. Select Create Backup to switch to creating backup mode. Alternatively you can choose Actions > Create Backup in the main menu.
Main window layout
On the left side of main application window there is a list of all disks and partitions you can backup. If some disk or partition is missing, Active@ Disk backup cannot make a backup of it (for example, because the disk is offline). To refresh the list of partitions click on Reset button.
To the right from partition list is a backup list. It shows the brief information about backup in the root (backup name, data size and number of partitions) and all partitions included into backup.
Under the backup list there are backup name field and backup options controls.
Below partition and backup lists there is property information. Its content depends on the item selected. It could be information about selected disk, partition or backup description.
The bottom part of the window occupies Create button and progress information which is not visible until backup is running.
Choosing a backup name
Click on Browse… button to open a file selection dialog and enter the required backup name and location. Backup files have .ADB extension.
Selecting partitions to backup
Drag and drop a partition you want to backup from the partition list on the left to the backup list on the right. As soon as you drop a partition its icon in the partition list changes reflecting its status as included into backup. Short backup information is also updated reflecting new backup size and number of partitions.
Setting backup options
Under backup list there are two checkboxes named Compress and Encrypt. If you want backup to be compressed (default option), select Compress checkbox.
Since data on the disk you backup may contain sensitive information you might want to encrypt the contents of your backup. To do it, select an Encrypt checkbox. You will be prompted for a password to use for

20 Active@ LiveCD User Guide
encryption. Please make sure you don’t lose your password, you will need it to restore the data back and without the password it will be impossible to restore your backup.
Adding backup description
You can optionally add a description to backup that you are creating. To do this click on the backup item in the top of the backup list.
The property panel down the window will show a text field for backup description. Enter any text description you like.
Starting disk backup creation
As soon as you entered the minimum of required information (i.e. backup name and at least one partition selected for backup) the Create button in right bottom corner of the window will be enabled giving you the ability to start making a backup. As soon as all parameters are set, click Create button to start backup creation.
While disk backup is in progress, Create button is replaced with Cancel button and to the left of it progress information is displayed. It includes the current operation, amount of data processed and time left.
You may interrupt backup creation process by clicking on Cancel button.
Restoring Backup
At the top of the main window there are three buttons corresponding to three main actions of Active@ Disk Backup. Select Restore Backup to switch to creating backup mode. Alternatively you can choose Actions > Restore Backup in the main menu.
Open existing backup
Click on Open… button and select an existing backup. Active@ Disk Backup will open file and display backup information in backup list in the right part of the main window. It will include backup name, data size and list of all partitions in backup. If you select one of the items in backup, the properties of the item will be displayed below partition and backup lists. To see a backup description, select the top item in backup list. Backup description field will appear in the bottom with text you have provided when created a backup. If backup is encrypted, you will be prompted to enter a backup password. Backup could not be restored without a valid password.
Selecting partition to restore
Drag and drop a partition you want to restore from the backup list on the right to the partition list on the left. As soon as you drop a partition its icon in the partition list changes reflecting its status as restored. You need to drop partition on existing partition of the same or bigger size or on unallocated space of the same or bigger size in partition list.

21
If you wish to make a restored partition active, click on partition in backup list to make Active checkbox enabled and then select the checkbox.
Starting disk backup restoring
As soon as you defined partition you want to restore, click Restore button to start backup restoring.
While disk backup is in progress, Restore button is replaced with Cancel button and to the left of it progress information is displayed. It includes the current operation, amount of data processed and time left.
You may interrupt backup restoring process by clicking on Cancel button.
Verifying Backup
At the top of the main window there are three buttons corresponding to three main actions of Active@ Disk Backup. Select Verify Backup to switch to backup verification mode. Alternatively you can choose Actions > Verify Backup in the main menu.
Starting disk backup verification
Click Verify button to start backup verification.
While disk backup verification is in progress, Verify button is replaced with Cancel button and to the left of it progress information is displayed. It includes the current operation, amount of data processed and time left.
You may interrupt backup verification process by clicking on Cancel button.
During backup verification Active@ Disk Backup computes the check sums of data stored in backup and compares them to the ones stored in backup. Successful comparison means data in backup file match the original and backup is valid, otherwise it is corrupted during creation or storing. The verification result is shown is dialog box in the end of verification process.
Note For more detailed instructions and support, see the Active@ Disk Backup User Guide.
3.1.2 Active@ Partition Recovery
Active@ Partition Recovery is a data recovery utility that you can use to:
· Find and recover deleted partitions and logical drives
· Create a Drive Image for backup purposes
· Fix or create a typical MBR (Master Boot Record)
This means that you can recover deleted or damaged partitions located on data volumes (D:, E:, and so on), attached hard drives, as well as on the

22 Active@ LiveCD User Guide
external USB drives and Memory Cards (SunDisk, MemoryStick, CompactFlash, etc.). On a system partition, BOOT.INI is corrected automatically (if needed) to repair an un-bootable system. As well, damaged Volume Boot Sectors are corrected to maintain integrity of the partition. This utility also enables you to fix a damaged MBR and to delete invalid partitions.
Data Recovery Tips
DO NOT WRITE ANYTHING ONTO THE DRIVE THAT CONTAINS YOUR IMPORTANT DELETED DATA!
When you install software, you write data onto the disk. This can destroy your deleted data. If you have only one logical drive, physically remove the hard drive from the computer and install it as a second logical drive on another computer where data recovery may be possible.
DO NOT SAVE RECOVERED DATA ONTO THE SAME DRIVE THAT CONTAINS THE LOST OR DAMAGED DATA!
When saving recovered data, you are writing records to the file table. If you write these records to the same drive that contains the damaged data, you are destroying the file table records that you are trying to recover. At the same time, you may be destroying the file table records for other deleted entries. It is best to save recovered data onto another logical, removable or network drive.
CREATE A RAW DISK IMAGE IF YOU HAVE AN EXTRA HARD DRIVE, OR OTHER LOGICAL DRIVES THAT ARE BIG ENOUGH!
A Raw Disk Image is a single file that stores all the data from your logical drive or physical device as a mirror image. Having a Raw Disk Image can be useful when you want to back up the contents of the whole drive, and restore it or work with it later. Before you start recovering deleted files, it may be a good idea to create a Raw Disk Image for the one drive, if you have enough space on another drive. If you do something wrong while recovering the files (for example, recovering them onto the same drive and destroying the data), you will be able to recover these deleted files and folders from the Raw Disk Image that you have wisely created.
Find and recover deleted partitions and logical drives
To find and recover deleted partitions and logical drives:
1. From the Active@ LiveCD shell, click Start > Favorites > Active@ Partition Recovery. The Active@ Partition Recovery workspace appears with all available devices listed in a tree view under Local System Devices.
2. To scan an unallocated space, select it. Known details of the selected item are displayed in the right pane.
3. To scan the unallocated space in basic mode, do the following:
23
a. Click Quick Scan. The status bar displays the progress of the scan.
b. After the scan is complete, a list of all allocated and unallocated
partitions appears in the Local System Devices list.
4. If you cannot see a logical drive, to process the whole surface of a disk, select it and click SuperScan. The Super Scan Options dialog box appears. Do the following:
a. From the Scan What drop-down list, choose the area that you want to scan.
b. To restrict the scan to a small number of sectors, indicate the From
sector and the number of sectors to scan.
c. Select the check box next to each type of partition that you want to
scan.
d. Click Start. The status bar displays the progress of the scan.
e. After the scan is complete, a new folder named SuperScan appears
in the Local System Devices list.
5. To display a smaller set of SuperScan results, do the following:
a. Right-click the SuperScan device node folder.
b. From the context menu choose Filter... The Filter Found
Partitions dialog box appears.
c. To select the types of file systems data that are displayed, in the Display File Systems area, clear the check box beside the types
that you do not want to display.
d. To display only those partitions within a specified size limit, in the Partition Size area, indicate the minimum and maximum size of
partitions in Megabytes.
e. To use basic filtering parameters, in the Filter Type area, click Use Basic Filtering.
f. To select displayed partitions based on partition status, in the Basic Filtering [Partition Status] area, clear the check box next to each
partition status number that you do not want to display.
g. To use advanced filtering parameters, in the Filter Type area, click Use Advanced Filtering.
h. To restrict displayed results for NTFS-specific parameters, in the Advanced Filtering [NTFS specific] area, select the check box
beside all the types of data that you want to display.
i. To restrict displayed results for FAT-specific parameters, in the Advanced Filtering [FAT specific] area, select the check box beside all the types of data that you want to display.
j. Click Filter. The right panel displays the filtered results.
6. You may manage other aspects of SuperScan results:
24 Active@ LiveCD User Guide
a. To resume a stopped SuperScan, right-click the folder and choose
Resume from the context menu. SuperScan resumes.
b. To save scan results, right-click the SuperScan folder and choose Save Scan Results. Similarly, you may open the saved scan results
at a different time.
c. To delete a SuperScan folder, right-click the folder and choose
Delete.
d. To display detailed properties of a SuperScan folder, right-click the
folder and choose Properties.
7. To recover deleted or damaged partition select it and click Recover. The Active@ Partition Recovery parameters dialog box appears. To specify recovery options, do the following:
a. To ensure that the Windows operating system assigns the correct letter to the disk, select a disk letter from the Assign Disk Letter
drop-down list.
b. To set the recovered partition as active and allow the system to boot
from it, select the Set Partition Active check box.
c. The recovery process checks the boot sector and fixes it if it is damaged. Select Automatic or Manual, depending on how you
want to do this.
d. If the disk has an extended partition, select the Create Extended Partition First check box and/or use ALL Unallocated area check box. If these areas are not available, these check boxes will
be disabled.
e. To save a copy of the partitioning information before recovering, select the Backup Current Partitioning Info check box and
indicate the file name to store the backup.
f. Click Recover.
The partition is recovered to the new path.
Creating a Raw Disk Image
A Raw Disk Image is a mirror copy of your entire logical drive or physical device stored as set of files. It may be a good idea to create a Raw Disk Image for a drive containing deleted files that you want to recover, if you have enough space on another drive. If you do something wrong while attempting to recover a partition, you will be able to recover these deleted files and folders from the Raw Disk Image of that partition.
Depending on disk image creation settings, a Raw Disk Image consists of a configuration file (with an extension .DIM) and a single file chunk, or set of files having extensions .000, .001, .002 ... (each file chunk has a size of 2GB in this case).

25
Important Do not save a Raw Disk Image back onto the disk that you are backing up. The target location to save the Raw Disk Image must always be another drive.
To create a Raw Disk Image:
1. In the Active@ Partition Recovery workspace, select a logical drive or a physical device.
2. Click Image. The Create Disk Image dialog box appears.
3. In the Save In drop-down list, select another physical device or another logical drive.
4. Browse to the folder where you want to save the Disk Image.
5. In File Name, give the Disk Image file a descriptive name.
6. Click Save. A progress bar appears.
Watch the progress and wait while drive's contents are copied to the new location. You may cancel the process of image creation anytime by clicking Stop.
Fixing or creating the MBR
The MBR (Master Boot Record) is created when you generate the first partition on a hard disk. It is probably the most important data structure on the disk. The location is always track (cylinder) 0, side (head) 0, and sector 1. The MBR contains the partition table for the disk and a small amount of executable code. On x86-based computers, the executable code examines the Partition Table, and identifies the system partition. The MBR then finds the system partition's starting location on the disk, and loads a copy of its Partition Boot Sector into memory. The MBR then transfers execution to executable code in the Partition Boot Sector.

26 Active@ LiveCD User Guide
To fix or create a typical MBR:
1. In the Active@ Partition Recovery workspace, in the Local System Devices list, select a disk.
2. From the Tools menu, choose Fix MBR (Create Typical MBR). A Warning message appears.
3. Click Yes.
The MBR is fixed.
Note For more detailed instructions and support, see the Active@ Partition Recovery Documentation.
3.1.3 Active@ UNDELETE
Active@ UNDELETE is a data recovery utility that you can use to restore accidentally deleted files and folders located on existing drives, and even on deleted or damaged partitions.
It is best to save recovered data onto another logical, removable, network or USB drive. Make sure that you have access to another physical or logical drive before attempting to recover a file.
To recover files using Active@ UNDELETE:
1. From the Active@ LiveCD shell, click Start > Favorites > Active@ UNDELETE. The Active@ UNDELETE workspace appears with all available disks listed in a tree view under My Computer.
2. Select a proper Local Disk under My Computer node and click Undelete Files toolbar button, or double-click it.
3. Mark Detect files by their signatures checkbox
4. Click Select All button (all signatures to be recognized), or select manually particular file types you want to detect and recover.
5. Click Scan button. Wait while local disk has been scanned.
6. Inspect found files and folders:
a) Browse folders tree to find your files and folders
b) Filter content by file type using Filter by toolbar text box
c) Click on found objects to Preview them
7. If volume is severely corrupted, file tree can be corrupted and not displayed as well. In this case try to expand Files Detected by Signatures tree, and look for your files by file type. Some file attributes, like creation time, original file name may not be recovered, however original file content can still be recovered (if not overwritten).
27
8. Place cursor on file or folder you want to recover and click Recover button.
9. The Recovery Options dialog box appears. Do the following:
g. In the Recover files to field, revise the recovery path. Make sure it
is not an original disk you are recovering data from.
h. To change file naming approach, conflict resolution modes and some advanced options, click More Recovery Options button, and change the recovery behavior.
i. Click Recover.
The file or folder is recovered to the path being supplied.
Note A device scan or a search may take a long time. To stop a device scan or a search, click Stop at any time.
Note For more detailed instructions, see the Active@ UNDELETE Documentation.
3.1.4 Active@ Disk Editor
Active@ Disk Editor is a utility to help you edit a disk's raw sector data. The editor displays information in binary and text modes at the same time. You can use this view to analyze the contents of data storage structure elements such as hard disks and partitions.
The Open Disk dialog box displays a list of available storage devices and a list of logical drives.
The Data Inspector displays whatever is currently under the cursor. It does so in ten different formats. This may help you interpret data as displayed in Hexadecimal View. If you choose to view the Data Inspector, the window always appears docked to the left panel when you are using Active@ Disk Editor.
A destructive virus may damage the MBR (Master Boot Record) and make it impossible to start the computer from the hard disk. When you start the computer, the code in the MBR executes before the operating system is started. If the MBR is corrupted, the operating system cannot start. The location of the MBR is always track (cylinder) 0, side (head) 0, and sector 1. You may use Active@ Disk Editor to repair a damaged MBR.
This section contains help with the following:
· Starting Active@ Disk Editor
· Changing the Workspace View
· Navigating to Key Sectors
28 Active@ LiveCD User Guide
· Editing Tools
Starting Active@ Disk Editor
To start Active@ Disk Editor:
1. From the Active@ LiveCD shell, click Start > Favorites > Active@ Disk Editor. The Open Disk dialog box appears.
2. Click a device or a logical drive to select it.
3. Click Open. The Active@ Disk Editor workspace appears.
4. To browse through the content of the open item:
· Click either the hexadecimal area or the text area to focus on it.
· Use the scroll bar, keyboard arrows or the mouse wheel.
5. To toggle the focus between hexadecimal and text panes, press TAB.
Changing the Workspace View
When you start Active@ Disk Editor, the default view shows the Info Pane on the left and the editing pane on the right, with a Status Pane across the bottom. You may change the default configuration of the workspace so that it opens with your custom settings each time.
To change Active@ Disk Editor default options:
1. In Active@ Disk Editor, click View toolbar button. The drop-down list of available views appears.
2. You may show or hide the Templates View, Properties View, Data Inspector View, Bookmarks View and Find Results View at the left of the workspace, for example for the Templates View:
· To hide the Templates Pane, clear the Templates check box.
To show the Templates Pane, select the Templates check box.
3. To change the default size of the font in the editing pane, select a size from the Text size drop-down list.
4. To toggle the display of the current address offset between hexadecimal and decimal, from the View menu, choose Hexadecimal Offset.
Navigating to Key Sectors
To navigate to key sectors on the open item:
1. To open a different device or logical drive:
a. Click Open Disk from File menu, or press Ctrl+O. The Open Disk
dialog box appears.
b. Click a device or a logical drive to select it. Click Open.

29
c. The Active@ Disk Editor workspace appears.
2. To jump to a named sector or offset:
a. From the Navigate menu, choose Go to Offset or Go to Sector.
The Go to Offset/Sector dialog box appears.
b. To jump to a named offset, type the offset value as Decimal. Use a
prefix 0x to use hexadecimal values.
c. To jump to a named sector, in the Sector field, type the sector number. To jump to a named cluster, in the Cluster field, type the cluster number.
d. Click Ok. The sector/offset appears in the editing panel.
3. To jump to the volume boot sector, from the Navigate menu, choose Boot Sector (0). The boot sector appears.
4. To jump to the partition table, from the Navigate menu, choose Partition Table. The partition table sector appears in the editing panel.
5. To edit the partition table:
a. From the Navigate menu, choose Partition Table. Navigation will be positioned to the sector 0, and Master Boot Record template is applied. The Signature (55 AA) at the end of zero sector marks the
end of the Partition Table.
b. Review the settings for partition table entries 1, 2, 3 and 4 in a Template View at the left side.
c. Turn on edit mode (Ctrl+Alt+E) and modify partition table
parameters.
d. To save changes, click Save.
6. From the Navigate menu, you may jump to many named sectors. These sectors are listed with the sector name and a number that is unique to your hard drive.
· To jump to the unallocated boot sector, from the Navigate menu, choose Unallocated (<your partition size>GB) > Boot Sector (<your sector number>).
· To jump to various primary NTFS locations, from the Navigate menu, choose Primary NTFS (<your partition size> GB) and do one of the following:
· To jump to the boot sector, click Boot Sector (<your sector number>). The primary boot sector appears in the editing panel.
· To jump to the boot sector copy, click Boot Sector Copy (<your sector number>). The primary boot sector copy appears in the editing panel.
· To jump to the MFT (Master File Table) sector, click $MFT (<your sector number>). The MFT sector appears in the editing panel.

30 Active@ LiveCD User Guide
· To jump to the MFT mirror, click $MFT Mirror (<your sector number>). The MFT mirror sector appears in the editing panel.
Editing tools
You may paste code or text from the Windows Clipboard. Use these tools to copy and paste selected code.
To use editing tools:
1. To toggle whether or not to allow editing in the editing pane, from the Edit menu, choose Allow Edit content.
2. To select a whole area:
a. Click anywhere in a navigation view.
b. From the Edit menu, choose Select All. The whole area is selected.
3. To select part of a sector, click and drag the cursor over some code. You may select code this way in either the HEX area or in the text area.
4. To copy HEX data, if you selected code in the HEX area, from the Edit menu, choose Copy Formatted Selected HEX data is copied to the Clipboard.
5. To copy text data, if you selected code in the text area, from the Edit menu, choose Copy. Selected text data is copied to the Clipboard.
c.
6. To paste data from the Clipboard:
a. Click the cursor in the area where you want to paste data.
b. From the Edit menu, choose Paste. The data appears.
7. To discard all changes that you have not saved yet (if any were made) and roll back settings to the way they were at the last save, from the Edit menu, click Revert Changes.
8. To save changes, click Save.
Note By default, you cannot edit content in Active@ Disk Editor. You must choose Allow Edit Content in the Edit menu in order to change the code.
Note For more detailed instructions and support, see the Active@ Disk Editor Documentation.
3.1.5 Active@ Password Changer
You can use Active@ Password Changer to recover your Windows passwords and user account attributes.
31
Active@ Password Changer is designed for resetting the local administrator password on Windows systems in case the administrator's password is forgotten or lost. You do not need to re-install and re-configure the operating system.
This utility supports multiple hard disk drives, detects several SAM databases (if multiple operating systems were installed on one volume) and provides the opportunity to pick the right SAM before starting the password recovery process. It also displays a list of all local users.
Other Windows login security restrictions can be reset, for example:
· 'Account is disabled'
· 'Password never expires'
· 'Account is locked out'
· 'User Must Change Password at Next Logon'
· 'Logon Hours'
With Active@ Password Changer you can log in as a particular user with a blank password.
To use Active@ Password Changer:
9. From the Active@ LiveCD shell, click Start > Favorites > Active@ Password Changer. The Active@ Password Changer dialog box appears.
10. To change passwords on the current drive, click Choose the Logical Drive.
11. To scan the disk and detect multiple operating systems, do the following:
a. Click Search for MS SAM Database(s).
b. Click Next. The progress bar indicates the status of scanning. A list
of SAM hives appears.
c. Select a database from the list.
12. Click Next. The list of users appears.
13. Select a user from the list and click Next. The parameters for the selected user appear.
14. Select parameter check boxes to create the situation that you want.
15. Click Save. A confirmation dialog box appears.
16. Click Yes. An information message indicates that the changes have been made.
17. Click OK.
18. For each user that you want to change, repeat steps 5 through 9.
32 Active@ LiveCD User Guide
Note For more detailed instructions and support, see the Active@ Password Changer Documentation
3.1.6 Active@ KillDisk
Active@ KillDisk is a powerful utility that will:
· Wipe confidential data from unused space on your hard drive
· Erase data from partitions or from an entire hard disk
· Destroy data permanently
Wiping the logical drive's deleted data does not delete existing files and folders. It processes all unoccupied drive space so that data recovery of previously deleted files becomes impossible. Installed applications and existing data are not touched by this process. Active@ KillDisk wipes unused data residue from file slack space, unused sectors, and unused space in MTF records or system records.
When you erase data with Active@ KillDisk, you destroy data permanently, conforming to any one of six international standards or your own custom settings.
Wiping drive space or erasing data can take a long time, so perform these operations when you are prepared to wait. For example, these operations may be run overnight.
To run Active@ KillDisk:
1. From the Active@ LiveCD shell, click Start > Favorites > Active@ KillDisk. After initializing, the Active@ KillDisk workspace appears with all available devices listed under Local System Devices.
2. Click a physical drive or a logical drive to select it. Properties of the selected device appear in the Properties tab.
3. To scan the selected logical drive, click Scan. The Progress tab appears, showing the status of the scan while Time Left counts down the remaining time.
After the scan completes, sub-folders appear in the System Local Disks list and the folders and files in the selected drive appear in the Folders and Files tab.
Available files and folders appear with a colored icon. Deleted files and folders appear with a gray icon.
4. After the scan has completed, you may do the following:
· Select existing and deleted folder and file information in the Folders and Files tab.

33
· To view sectors of data in a device or logical drive, select a device or drive and click Hex Preview. The Data Viewer appears. Scroll through the available data.
· To view sectors of data in a file:
a. Select a logical drive. Files and folders appear in the right panel.
b. In the right panel, select a file.
c. Click Hex Preview. The Data Viewer appears. Scroll through the
available data.
· To clear data residue from unused sectors:
a. Select the check box next to a device or logical drive or multiple
devices or logical drives.
b. Click Wipe. The Wipe Free Disk Space dialog box appears.
c. Choose a method from the Wipe Method drop-down list. (Method
descriptions appear below.)
d. Set other parameters for wiping. (Parameter descriptions appear below.)
e. Click Start
· The Confirm Action dialog box appears.
· Click Yes.
f. The Progress bar appears.
g. To stop the process at any time, press ESC.
· To erase data completely:
a. Select the check box next to a device or logical drive or multiple devices or multiple logical drives.
b. Click Kill. The Kill dialog box appears.
c. Choose a method from the Erase Method drop-down list. (Method
descriptions appear below.)
d. Set other parameters for erasing. (Parameter descriptions appear
below.)
e. Click Start
· If the Skip Confirmation check box is clear, the Confirm Action dialog box appears.
· This is the final step before removing data from the selected drive for ever. Type ERASE-ALL-DATA in the text box and press ENTER or click YES.
f. The Progress bar appears.
g. To stop the process at any time, press ESC.
After the Wipe or Kill operation is complete, information about the wipe or erase session is displayed in the Session Log.
34 Active@ LiveCD User Guide
Wiping or Erasing Methods
Select a wipe method or an erase method from the Method drop-down list:
One Pass Zeros or One Pass Random: The number of passes is fixed and cannot be changed. When the write head passes through a sector, it writes only zeros or a series of random characters.
US DoD 5220.22-M: The write head passes over each sector three times. The first time with zeros (0x00), second time with 0xFF and the third time with random characters. There is one final pass to verify random characters by reading.
German VSITR: The write head passes over each sector seven times.
Russian GOST p50739-95: The write head passes over each sector five times.
Gutmann most secure method: The write head passes over each sector 35 times overwriting data with different patterns.
User Defined: You indicate the number of times the write head passes over each sector. Each overwriting pass is performed with a buffer you supply separately, using ASCII or HEX values.
Read KillDisk manual for more secure erasing methods supplied.
Parameters for Wiping or Erasing
Verification: To set the amount of area the utility reads to verify the wipe method, select the Verification check box. Because verification is a long process, you may specify a percentage of the surface to be verified. To wipe or erase without verification, clear this check box.
Retry Attempts: To specify the number of retries to do when an error is encountered, enter the number in Retry Attempts.
Ignore Errors: To hide error messages while data wiping, erasing or verification is in progress, select the Ignore Errors check box. To show all error messages during wiping, erasing or verification, clear the Ignore Errors check box. All errors are written to the session log in either case.
Clear Log File before Start: To truncate the session log before erasing or wiping starts, select the Clear Log File before Start check box. To append this session’s information to the existing session log, clear the Clear Log File before Start check box.
Skip Confirmation: The confirmation dialog box is the final step before either erasing or wiping data. To bypass this dialog box, select the Skip Confirmation check box. To include this safety step, clear the Skip Confirmation check box. It is safer to run Active@ KillDisk with this check box cleared (default state).
Initialize device(s) after Kill: This check box appears only when you are erasing data from a disk. Before you can use a disk, you must initialize it. To initialize a disk as a basic disk automatically after the erasing process, select

35
this check box. To initialize a disk as a basic disk manually, clear this check box.
Write fingerprint to disk’s first sector: If fingerprint has been written to the first disk’s sector, next time you boot from this disk, you can see disk erase status (erase date/time, erase method, completion status, etc..). In case if errors occurred, or erasing stopped, status will be FAILED and displayed in red color.
Wipe unused space in MFT/Root area: This check box appears only when you are wiping data from unused space on the drive. To clear data residue from unoccupied space in the MFT (Master File Table)/Root area on the drive, select this check box. To skip this area, clear the check box.
Wipe slack space in file clusters: This check box appears only when you are wiping data from unused space on the drive. For a more thorough wiping of data residue from unused portions of clusters without touching existing data, select this check box. For a quick process, clear this check box.
Note For more detailed instructions and support, see the Active@ KillDisk Documentation.
36 Active@ LiveCD User Guide
3.2 Utilities To access one of the utilities, click the start button. A menu appears with shortcuts to utilities and groups of utilities under Applications section. Some of utilities have icons on a task bar and shortcuts on the desktop.
3.2.1 File Managers & Internet
Dolphin File Manager – displays, copies/moves and manages files/folders on local disks as well as network attached drives.
Krusader File Manager – is a two panel file manager having many advanced features.
37
Super User (Root mode) – shortcuts for Dolphin & Krusader file managers are available in menus. As long as Active@ LiveCD is a utility toolset and has no security, root user (super user) has no password.
QupZilla web browser (WebKit-based) allows to explore the Internet, read RSS, download archives and packages, inspect web pages, manage cookies and so on…

38 Active@ LiveCD User Guide
3.2.2 Remote Access
Remmina Remote Desktop Client allows to connect to and manage remote hosts using different protocols (RDP, SFTP, SSH, VNC).
Telnet is a simple remote console interface (terminal) connecting to the remote host on the specific TCP port.
3.2.3 Graphics & Multimedia
Gwenview KDE Image Viewer is able to preview and edit almost all picture formats (JPG, PNG, XPM, GIF, TIFF, …)
39
K3b Disk Burning utility to rip, edit and burn CD/DVD ISO images, Data and Audio discs.
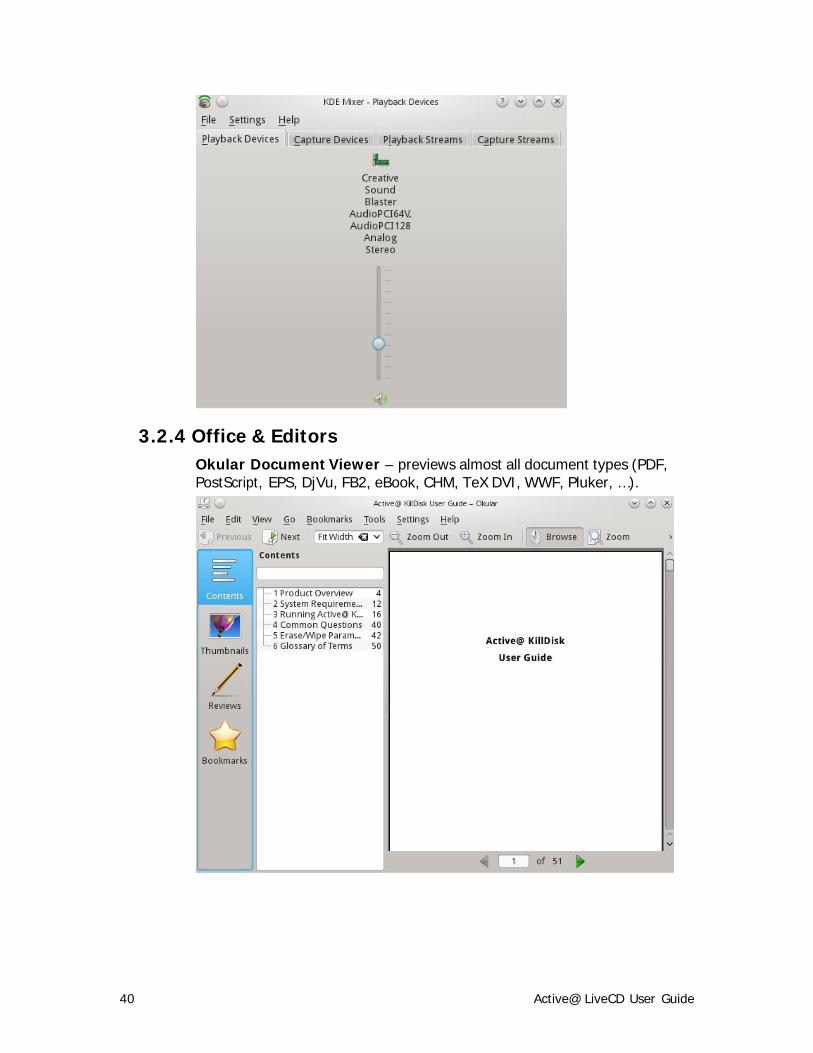
KMix Sound Mixer manages Playback devices, Capture devices, Playback streams, Capture streams, Master channel, and so on.
40 Active@ LiveCD User Guide
3.2.4 Office & Editors
Okular Document Viewer – previews almost all document types (PDF, PostScript, EPS, DjVu, FB2, eBook, CHM, TeX DVI, WWF, Pluker, …).

41
Kate Advanced Text Editor previews and edits text files stored in any code pages, in many text formats (txt, script, perl, html, xml,…), applying different coloring schemas.
Kompare Diff/Patch Frontend helps to compare any files (text and binary) and folders bit-by-bit to find out differences, if any exist.

42 Active@ LiveCD User Guide
3.2.5 Security Tools
ClamTk Virus Scanner – downloads the latest virus database, scans your local disks for viruses and sends infected files to quarantine, if needed.
TrueCrypt (RealCrypt) secure tool that creates, attaches and manages encrypted volumes stored in files, or encrypts whole partitions.
43
3.2.6 Support utilities
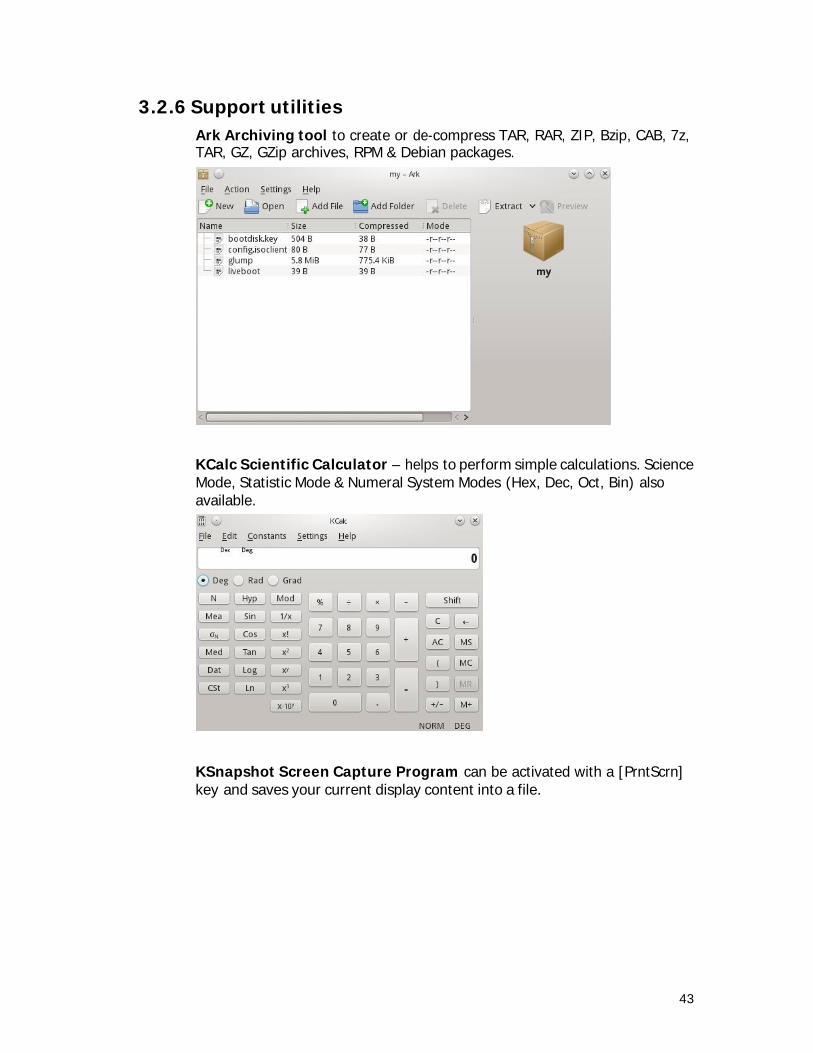
Ark Archiving tool to create or de-compress TAR, RAR, ZIP, Bzip, CAB, 7z, TAR, GZ, GZip archives, RPM & Debian packages.
KCalc Scientific Calculator – helps to perform simple calculations. Science Mode, Statistic Mode & Numeral System Modes (Hex, Dec, Oct, Bin) also available.
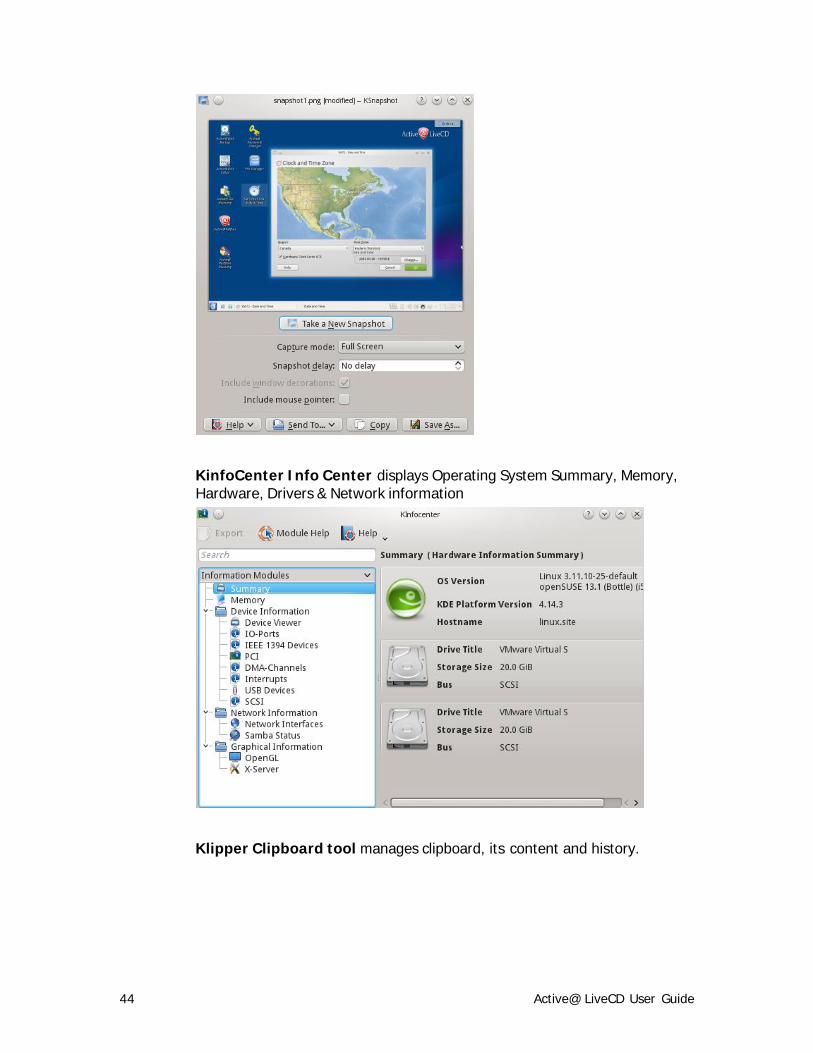
KSnapshot Screen Capture Program can be activated with a [PrntScrn] key and saves your current display content into a file.
44 Active@ LiveCD User Guide
KinfoCenter Info Center displays Operating System Summary, Memory, Hardware, Drivers & Network information
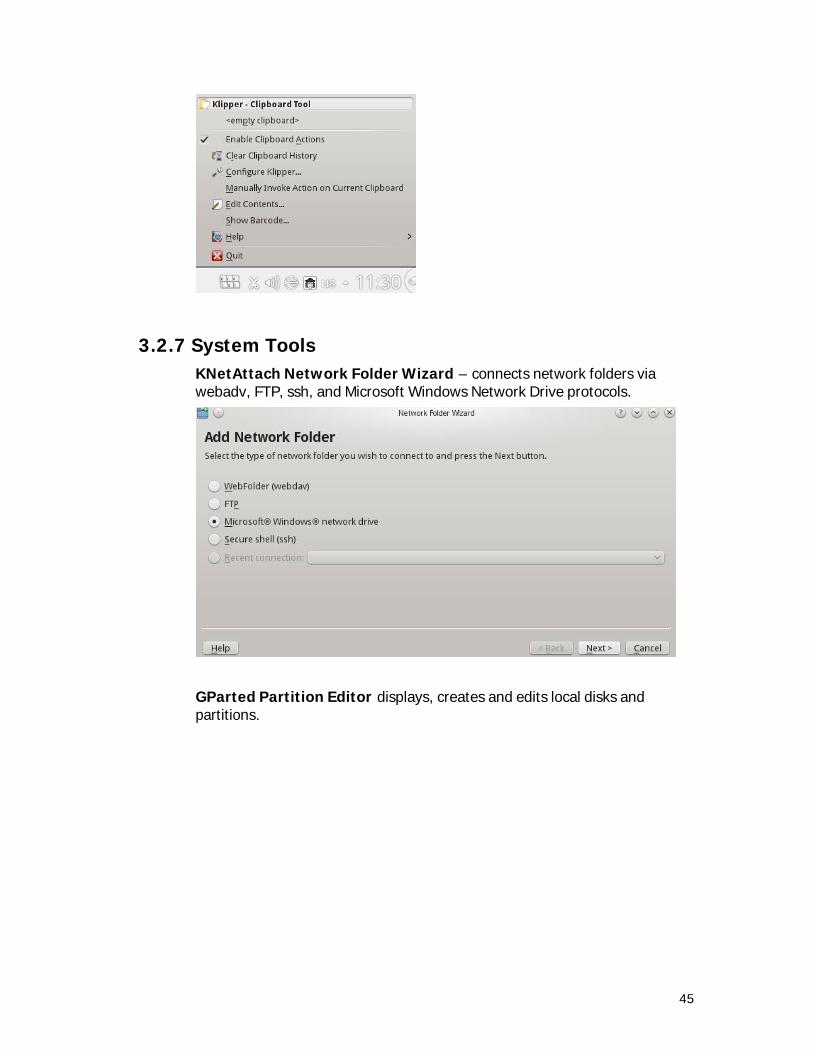
Klipper Clipboard tool manages clipboard, its content and history.
45
3.2.7 System Tools
KNetAttach Network Folder Wizard – connects network folders via webadv, FTP, ssh, and Microsoft Windows Network Drive protocols.
GParted Partition Editor displays, creates and edits local disks and partitions.
46 Active@ LiveCD User Guide
YaST2 Expert Partitioner – advanced disk management tool. Supports different types of disks, RAIDs management, Network mappings, Volume management and much more.
Apper Software Manager allows to download and install additional RPM packages from OpenSUSE repositories the web. Updates and removes software packages from the system as well.

47
Note If you launched Active@ LiveCD from bootable USB disk, all downloaded and installed software packages will be stored on USB locally and will be available when you launch Active@ LiveCD the next time.
KSysGuard System Monitor displays and manages all local processes and displays the System Load (CPU History, Memory & Swap History, Network History).

48 Active@ LiveCD User Guide
Konsole Terminal, Super User Mode Terminal and XTerm – command line tools, allowing to work with the operating system from the console.

49
4 About Boot Priority
To boot from a CD, DVD or USB device, make sure that the device has the boot sequence priority over the hard drive.
4.1 BIOS Boot BIOS (Basic Input Output Subsystem) is a programmable chip that controls how information is passed to various devices in the computer system. A typical method to access the BIOS settings screen is to press ESC, F1, F2, F8 or F10 during the boot sequence.
BIOS settings allow you to run a boot sequence from a removable disk, a hard drive, a CD-ROM drive or an external device. You may configure the order that your computer searches these physical devices for the boot sequence. The first device in the order list has the first boot priority. For example, to boot from a CD-ROM drive instead of a hard drive, place the CD-ROM drive ahead of the hard drive in priority.
While you are in the BIOS Setup Utility, you will not be able to use your mouse. Use the keyboard arrow keys to move around the screen.
Before you set boot priority for a USB device, plug the device into a USB port.
To specify the boot sequence:
1. Start the computer and press ESC, F1, F2, F8 or F10 during the initial startup screen. Depending on the BIOS manufacturer, a menu may appear.
2. Choose to enter BIOS setup. The BIOS setup utility page appears.
3. Use the arrow keys to select the BOOT tab. System devices appear in order of priority.
4. To give a CD or DVD drive boot sequence priority over the hard drive, move it to the first position in the list.
5. To give a USB device boot sequence priority over the hard drive, do the following:
· Move the hard drive device to the top of the boot sequence list.
· Expand the hard drive device to display all hard drives.
· Move the USB device to the top of the list of hard drives.

50 Active@ LiveCD User Guide
6. Save and exit the BIOS setup utility.
The computer will restart with the changed settings.
Some computer manufacturers allow you to select the device that contains the boot sequence from a special device selection menu. The example below uses a Dell system board.
To set boot priority using a device selection menu:
1. When the computer starts to boot up, after the manufacturer's ID screen, press F12 several times. The device selection menu appears.
2. Use the up and down arrows to select CD-ROM.
3. To boot from the selected device, press ENTER.
Note Using an incorrect BIOS setting can cause a system malfunction. Please follow the BIOS guide provided with your computer motherboard. If you read these instructions and you are not sure how to change a setting, it is better to leave it as the default setting.
4.2 UEFI Secure Boot
Some modern computers use new advanced UEFI x64 or x86 secure boot approach instead of the standard BIOS boot.
Active@ LiveCD fully supports UEFI secure boot on both 32-bit & 64-bit systems, and will boot up the machine automatically.
In case any malfunctions with UEFI secure boot (if your machine does not boot after you set up boot priority as it is described above), you should check that BIOS boot is enabled (Legacy mode), or UEFI is disabled.
Here is how you can check your BIOS settings.
At the moment of turning on your computer, you will see an option to enter SETUP. Depending on the manufacturer of your system, you can press the DEL key, the F2 key or another key that is listed on screen to access the system BIOS. If you are not sure, consult the User Guide that came with your computer or call the manufacturer's technical support for assistance.
Once in your system BIOS, look under the Boot menu to find an option that reads "UEFI/BIOS Boot Mode" or "UEFI Boot". In the case of "UEFI/BIOS Boot Mode" switch the mode from "UEFI" to "Legacy" mode.

51
If you see "UEFI Boot", switch the option from "Enabled" to "Disabled". Be sure to save your BIOS changes and exit to reboot your computer. You should now be able to boot up from Active@ LiveCD.
52 Active@ LiveCD User Guide
5 Glossary
BIOS settings Basic Input Output Subsystem. Programmable chip that controls how information is passed to various devices in the computer system. A typical method to access the BIOS settings screen is to press ESC, F1, F2, F8 or F10 during the boot sequence.
boot priority First device, or any device that is higher in the order list having preference over devices that are lower in the order. BIOS settings allow you to run a boot sequence from a floppy drive, a hard drive or a CD-ROM drive. You may configure the order that your computer searches these physical devices for the boot sequence. For example, to boot from a CD-ROM drive instead of a hard drive, place the CD-ROM drive ahead of the hard drive in priority.
boot record See MBR.
compressed cluster Data that uses less disk space. When you set a file or folder property to compress data, the file or folder uses less disk space. While the size of the file is smaller, it must use a whole cluster in order to exist on the hard drive. As a result, compressed clusters contain "file slack space". This space may contain residual confidential data from the file that previously occupied this space. KillDisk can wipe out the residual data without touching the existing data.
cluster Logical group of disk sectors, managed by the operating system, for storing files. Each cluster is assigned a unique number when it is used. The operating system keeps track of clusters in the hard disk's root records or MFT records. (See lost cluster)
exclusive access Lock that is applied to a partition for exclusive writing access, for example while recovering deleted or damaged files or folders. The recover operation must have exclusive access to the target partition while recovering files. If another application or the operating system is using the target partition, you must close all applications or system processes that may be using the target partition before you may lock it.
53
FAT File Allocation Table. File that contains the records of every other file and directory in a FAT-formatted hard disk drive. The operating system needs this information to access the files. There are FAT32, FAT16 and FAT versions.
free cluster A cluster that is not occupied by a file data. This space may contain residual confidential data from the file that previously occupied this space.
file slack space Unused portion of a cluster. The smallest file (and even an empty folder) takes up an entire cluster. A 10-byte file will take up 2,048 bytes if that is the cluster size. This space may contain residual confidential data from the file that previously occupied this space.
deleted boot records Damaged or erased MBR. In a damaged disk, if the location of the boot records is known, the partition table can be reconstructed.
hive Highest level of organization in the Windows registry. At this level, system and local variables are stored.
ISO Informal term for a disk image in the ISO 9660 file standard format. ISO 9660 file system is a standard, published by the International Organization for Standardization. It defines a file system for CD-ROM or DVD-ROM media that allows you to read the same CD or DVD whether you're on a PC, Mac, or other major computer platform. Making a disk image in the ISO 9660 file standard (an ISO image) is a common way to electronically store and transfer the contents of a hard drive. An ISO image often has the filename extension .ISO (although not necessarily), and is commonly referred to as an "ISO".
lost cluster Cluster with an assigned number in the file allocation table, even though it is not assigned to any file. You can free up disk space by reassigning lost clusters. In DOS and Windows, you can find lost clusters with the ScanDisk utility.

54 Active@ LiveCD User Guide
MBR Master Boot Record. All disks start with a boot sector. When you start the computer, the code in the MBR executes before the operating system is started. The location of the MBR is always track (cylinder) 0, side (head) 0, and sector 1. The MBR contains a file system identifier.
MFT records Master File Table. File that contains the records of every other file and directory in an NTFS-formatted hard disk drive. The operating system needs this information to access the files.
root records See FAT.
SAM Security Account Manager. Database stored as a registry file in Windows. It stores users' passwords in a hashed format. Since a hash function is one-way, this provides some measure of security for the storage of the passwords.
sector Smallest unit that can be accessed on a disk. Sectors are segments within each track.
track Circle of data around a disk. Tracks form concentric circles on a disk.
unallocated space Space on a hard disk where no partition exists. A partition may have been deleted or damaged or a partition may not have been created.
unused space in MFT records The performance of the computer system depends a lot on the performance of the MFT. When you delete files, the MFT entry for that file is not deleted, it is marked as deleted. This is called unused space in the MFT. If unused space is not removed from the MFT, the size of the table could grow to a point where it becomes fragmented, affecting the performance of the MFT and possibly the performance of the computer. This space may also contain residual confidential data (file names, file attributes, resident file data) from the files that previously occupied these spaces.