Embed Size (px)
Citation preview
ALL THINGSBRIGHT & BEAUTIFUL
AUTOMATIC WATERING A STEP BY STEPPlanning & Installation Guide
save water, save money, save
the
planet,
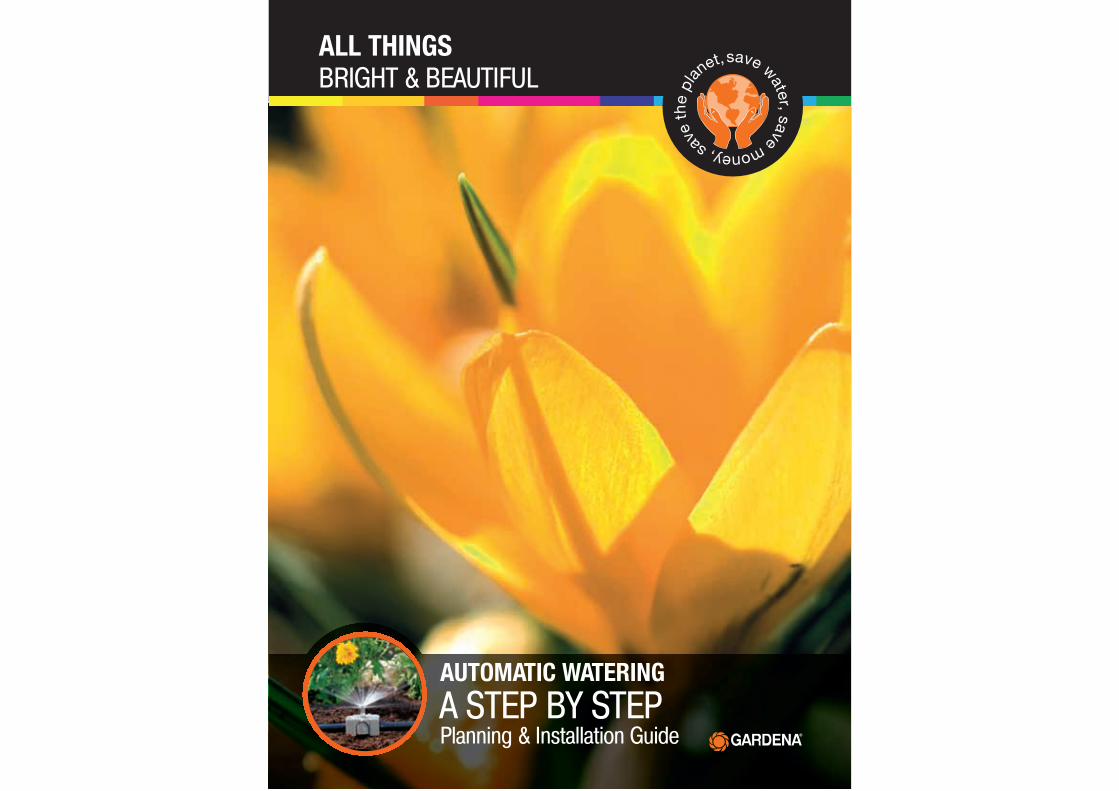
Installing a GARDENA “Quick & Easy” Micro-Drip-System around your garden will ensurethat your plants accurately receive the right amount of water for healthy growth - withoutyou having to lift a finger.Automatic watering is easy - even if you're a complete beginner, this step-by-step guidewill show you how to plan and install your own system... then let the garden take care ofitself!
QUICK & EASY Micro-Drip-System
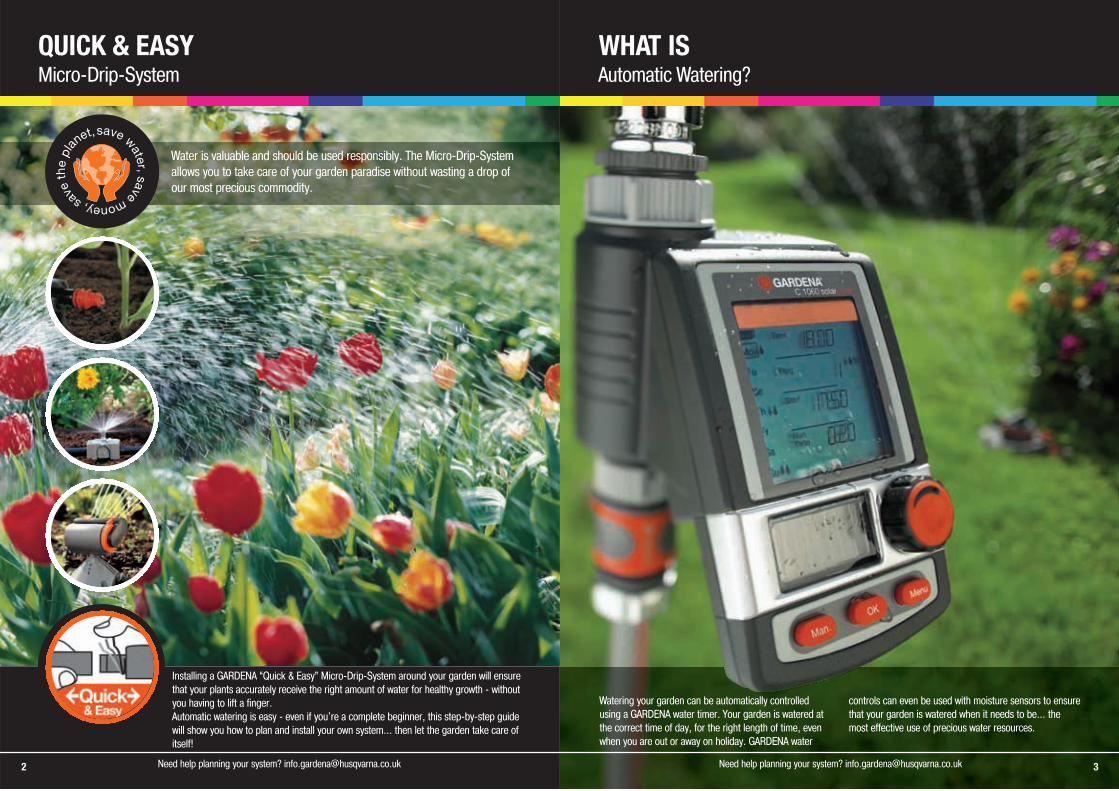
WHAT ISAutomatic Watering?
3
Watering your garden can be automatically controlledusing a GARDENA water timer. Your garden is watered atthe correct time of day, for the right length of time, evenwhen you are out or away on holiday. GARDENA water
controls can even be used with moisture sensors to ensurethat your garden is watered when it needs to be... themost effective use of precious water resources.
2 Need help planning your system? [email protected] Need help planning your system? [email protected]
save water, save money, save
the
plan
et,
Water is valuable and should be used responsibly. The Micro-Drip-Systemallows you to take care of your garden paradise without wasting a drop ofour most precious commodity.

5
HOW Automatic watering works
4 Need help planning your system? [email protected] Need help planning your system? [email protected]
GARDENA’s “Quick & Easy” Micro-Drip-System is a simplenetwork of pipes which take water around the garden, wateringplants with individual drip heads or small sprinklers.
1
Connecting to your tap Watering your garden can be automatically controlledusing a GARDENA water timer. Your garden is wateredat the correct time of day, for the right length of time,even when you are out or away on holiday. GARDENA’snew range of Water Computers and Timers hassimplified controls via detachable control panels. AllWater Computers and Timers require mains waterpressure (except Water Timer T 1030 card) and aminimum flow rate of 20 litres per hour.
3
Connecting supply pipes4.6mm (3/16”) Supply Pipe is used totake water from the Connecting Pipe toplants, containers and hanging baskets.Up to 15m of Supply Pipe can be used ina single branch from the mainConnecting Pipe. Connecting anddisconnecting pipes is "Quick & Easy'...so you can arrange and rearrange yoursystem as often as you need to.
4
Securing pipes in placeConnecting Pipes and Supply Pipes areeasily secured to the ground, walls orfences using Clips, Guides and Pegs.Pipe Guides can also be used to holdsprinklers in place.
5
Watering your plantsHowever your garden needs watering,there is a wide range of Drip Heads,Spray Nozzles and Sprinklers to choosefrom. Installation is simple and takesseconds.
2
Connecting main pipesThe first part of a GARDENA “Quick & Easy” Micro-Drip-Systemis the Master Unit, a water filter and pressure regulator whichprevents the water pressure exceeding 1.5 bar to ensure thesystem works correctly.13mm (1/2”) Connecting Pipe is used to transport water towhere it is needed. A maximum of 120m of connecting pipe canbe used from a single tap and can be routed around the backof containers, buried or covered with mulch.Connecting and disconnecting pipes is "Quick & Easy'... so youcan arrange and rearrange your system as often as you needto.
WATERING CONTAINERSContainers, troughs and hanging baskets
7
WATERING ROWSVegetables, plants and hedges
6 Need help planning your system? [email protected] Need help planning your system? [email protected]
Containers, troughs and hanging baskets are acolourful addition to any garden, but requireregular watering to maintain your beautifulflowers
Shorter rows of plants can be watered by running SupplyPipe along the row and inserting Inline Drip Heads into theSupply Pipe at the base of each plant. This method can beused up to a maximum of 15m. Up to 20 x 2 l/h Inline DripHeads can be installed in your Supply Pipe at this length.
Just starting out? You could consider a Starter Set - it hasall the equipment you need to water 10 patio containers, 5mof troughs, 20 vegetable plants or 10 shrubs or bushes,including an Electronic Water Computer.
Vegetables, hedge rows and other rows of plants can bewatered using Endline Drip Heads installed directly into yourConnecting Pipe. Route the pipe along the base of the rowand position each drip head at the base of each plant.
Route Connecting Pipe behind your containers or troughs.For hanging baskets, fix the pipe on the wall behind thebaskets.
Make branches off the Connecting Pipe with Supply Pipe toeach container, trough or hanging basket.
Install around 5 x 2 l/h Inline Drip Heads per metre in thecontainer or hanging basket.
For round containers or hanging baskets create a loop withthe Supply Pipe.
An easy way to get started is the Starter Set for HangingBaskets & Flower Boxes. This set includes enough SupplyPipe and Drip Heads to water 5m of containers, troughs orhanging baskets.
WATERING DELICATE PLANTSGreenhouses and cold frames
9
WATERING LARGER AREASBeds and borders
8 Need help planning your system? [email protected] Need help planning your system? [email protected]
When watering flower borders, beds or wholevegetable plots, it can be easier to use sprinklers orspray nozzles instead of lots of individual drip heads. A GARDENA “Quick & Easy” Micro-Drip-System
can help improve growing conditions ingreenhouses and cold frames. Delicate plantssuch as seedlings can be watered from aboveby a very fine mist, whilst drip heads can beused to water larger individual plants such astomatoes or cucumbers.
The Oscillating Sprinkler Vario 50 is ideal for square andrectangular areas. It is adjustable in both directions so thatyou need only water the area required. The length of sprayis adjustable from 2.5 to 10 metres and the width from 2 to5 metres. Add Extensions (fig 1) to lift above the plants ifrequired. Connect up to a maximum of 4 sprinklers whenspaced 10 metres apart, dependent upon the waterpressure available.
Spray Nozzles are used together in a border or bed to buildup coverage of the whole area. Add Extensions (Fig. 2) to liftabove the plants if required. Fit Control Valves if you need toreduce the spray distance.
Endline Micro Strip Sprinklers can be used with Micro StripSprinklers for watering long narrow borders or troughs.Install into Connecting Pipe. Add Extensions (Fig. 2) to liftabove the plants if required.
We recommend watering beds, borders and vegetable plots fora prolonged period at least twice a week to ensure waterreaches the lowest roots. The Oscillating Sprinkler Vario 50 andeach spray nozzle distributes approximately 5 litres per square
metre per hour. This corresponds to a seeping depth ofapproximately 5cm per hour, depending on the type of soil inyour garden.
WATERING TIP:
Micro Mist Nozzles give a very fine mist and areperfect for watering seedlings or damping down in hotweather. Run Connecting Pipe along the roof of thegreenhouse or cold frame. Install the Micro Mist Nozzlesdirectly into the Connecting Pipe, spacing themapproximately 50cm apart.
Tomatoes, cucumbers, peppers and other greenhouseplants are watered by positioning 2 litre per hour drip headsat the base of each plant.
Use a water timer to control watering in your greenhouse orcold frame. Use your timer in conjunction with the SoilMoisture Sensor for precise water management.
Fig 1
Fig 2
FEEDING TIPS:
Now you can feed your plants just as easily as you water themwith GARDENA’s Universal Liquid Fertiliser and Dispenser. TheLiquid Fertiliser has been specially developed for use with theMicro-Drip-System and is fully water soluble, so will not clogdrip heads and nozzles. It is suitable for use outside for garden
plants, balcony plants, tub plants and ornamental plants aswell as for fruit and vegetables. It can be used as a ground andleaf fertiliser, and as a fertiliser for plant and potting soil. TheDispenser ensures accurate dosage of the Fertiliser based onthe size of the area and the specific needs of your plants.
If plants are mixed apply the amount of fertiliser required for plants with the lowest fertilisation requirement. Do not start fertilisingfor two weeks after planting new plants or re-planting in pre-fertilised earth. For young plants halve the amount of fertiliser. Forroot fertilisation (drip irrigation) double the concentration and half the frequency can be selected. For leaf fertilisation (sprayirrigation and sprinklers) at least 5 minutes of irrigation time must be selected.
FERTILISER & DISPENSERSaves more time and money
11
ABOVE & BELOW GROUND WATERINGDrip irrigation for beds, borders, hedges and lawns
10 Need help planning your system? [email protected] Need help planning your system? [email protected]
The GARDENA Below and Above Ground Drip Irrigation Line isa permanently installed independent irrigation system withdrip heads installed at intervals of 30cm, which direct thewater to the root area of the plants
The Drip Irrigation Line is suitable for installation either aboveground (e.g. below hedges or in beds and borders), or forinvisible underground irrigation (e.g. of lawn areas).
The pressure-compensating drip heads enable evenwatering over a pipe length of up to 200m when the MasterUnit is fitted in the middle.
The lines are laid at a depth of approximately 20cm inplanted areas, and 10cm in lawn areas.
A water timer or computer can be used in conjunction withthe Drip Irrigation Line.
The drip heads are self-sealing so no dirt collects when thesystem is getting switched off, and has a root blocker toprevent any roots from entering inside the drip heads.
Please note:The Below and Above Ground Irrigation Line is a stand-alone
system and should be run separate to the Micro-Drip-System.
NEW FOR
2009
13
AUTOMATIC WATERING IS EASY...Installing your Micro-Drip-System
12
Automatic watering with a Micro-Drip-System saves water and time...and installation is so simple. A small system need not be planned onpaper, but we would recommend planning a larger system using our '10step' guide on page 21.
EQUIPMENT
You will find the following equipment invaluableduring installation:A GARDENA Installation ToolStrong scissorsA tape measureA hammer drill, screws and wall plugs (if fixing to hard surfaces)
CONNECTING TO THE TAP
Connect your Micro-Drip-System to an outdoortap as follows:If using a water timer, connect this to your tap asper the instructions. Connect a length ofGARDENA hose either to the water timer ordirectly to the tap. Attach the Master Unit to theHose Connector at the end of the length of hose,and connect the other end of the Master Unit toyour Connecting Pipe.
LAYING OUT THE CONNECTING PIPE
Uncoil and lay out the Connecting Pipe. Thelength of Connecting Pipe that can be useddepends on the mix of drip heads, sprinklers andspray nozzles you need. Weigh it down until itrelaxes. In cold weather place the coil in warmwater to make it more flexible and easier to workwith. Measure and cut the Connecting Pipe to fitaround your watering area.
Need help planning your system? [email protected] Need help planning your system? [email protected]
Use 4-WayCouplings, L-Jointsand Connectors,including anyT-Joints you needfor branching toSupply Pipe, whererequired to createthe network.
Fit Control Valves to shut off parts ofyour system.
Fit Plugs to close off ends of lines Secure with Pipe Guides and Pipe Clipsas required.
FITTING THE SUPPLY PIPE
Fit the Supply Pipe to the Connecting Pipe in oneof two ways:
1. Push the Supply Pipe onto the T-Jointswhich you have already installed in theConnecting Pipe.
Route the Supply Pipe to the plants andcut to length. Secure with Pipe Pegs orPipe Guides as required.
2. Take the Installation Tool and gently pierce theConnecting Pipe where you need the branch - take carenot to make the hole too large. Screw in the Connector.Route the Supply Pipe to the plants and cut to length.
WATER CONTROLSCreating more freedom
15
AUTOMATIC WATERING IS EASY...Installing your Micro-Drip-System
14 Need help planning your system? [email protected] Need help planning your system? [email protected]
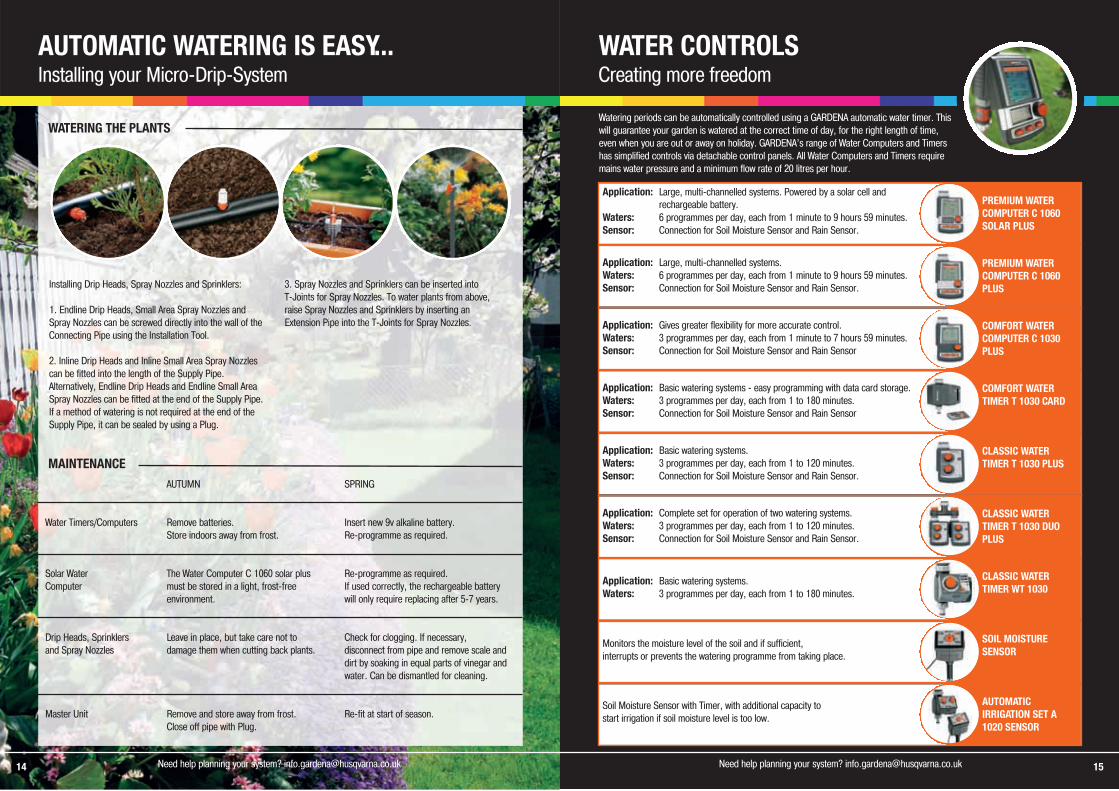
AUTUMN SPRING
Water Timers/Computers Remove batteries. Insert new 9v alkaline battery.Store indoors away from frost. Re-programme as required.
Solar Water The Water Computer C 1060 solar plus Re-programme as required.Computer must be stored in a light, frost-free If used correctly, the rechargeable battery
environment. will only require replacing after 5-7 years.
Drip Heads, Sprinklers Leave in place, but take care not to Check for clogging. If necessary,and Spray Nozzles damage them when cutting back plants. disconnect from pipe and remove scale and
dirt by soaking in equal parts of vinegar and water. Can be dismantled for cleaning.
Master Unit Remove and store away from frost. Re-fit at start of season.Close off pipe with Plug.
Watering periods can be automatically controlled using a GARDENA automatic water timer. Thiswill guarantee your garden is watered at the correct time of day, for the right length of time,even when you are out or away on holiday. GARDENA’s range of Water Computers and Timershas simplified controls via detachable control panels. All Water Computers and Timers requiremains water pressure and a minimum flow rate of 20 litres per hour.
Application: Large, multi-channelled systems. Powered by a solar cell and rechargeable battery.
Waters: 6 programmes per day, each from 1 minute to 9 hours 59 minutes.Sensor: Connection for Soil Moisture Sensor and Rain Sensor.
PREMIUM WATERCOMPUTER C 1060SOLAR PLUS
Application: Large, multi-channelled systems.Waters: 6 programmes per day, each from 1 minute to 9 hours 59 minutes.Sensor: Connection for Soil Moisture Sensor and Rain Sensor.
PREMIUM WATERCOMPUTER C 1060PLUS
Application: Gives greater flexibility for more accurate control.Waters: 3 programmes per day, each from 1 minute to 7 hours 59 minutes.Sensor: Connection for Soil Moisture Sensor and Rain Sensor
COMFORT WATERCOMPUTER C 1030PLUS
Application: Basic watering systems - easy programming with data card storage.Waters: 3 programmes per day, each from 1 to 180 minutes.Sensor: Connection for Soil Moisture Sensor and Rain Sensor
COMFORT WATERTIMER T 1030 CARD
Application: Basic watering systems.Waters: 3 programmes per day, each from 1 to 120 minutes.Sensor: Connection for Soil Moisture Sensor and Rain Sensor.
CLASSIC WATERTIMER T 1030 PLUS
Application: Complete set for operation of two watering systems.Waters: 3 programmes per day, each from 1 to 120 minutes.Sensor: Connection for Soil Moisture Sensor and Rain Sensor.
CLASSIC WATERTIMER T 1030 DUOPLUS
Application: Basic watering systems.Waters: 3 programmes per day, each from 1 to 180 minutes.
CLASSIC WATERTIMER WT 1030
Monitors the moisture level of the soil and if sufficient, interrupts or prevents the watering programme from taking place.
SOIL MOISTURESENSOR
Soil Moisture Sensor with Timer, with additional capacity to start irrigation if soil moisture level is too low.
AUTOMATICIRRIGATION SET A1020 SENSOR
WATERING THE PLANTS
Installing Drip Heads, Spray Nozzles and Sprinklers:
1. Endline Drip Heads, Small Area Spray Nozzles andSpray Nozzles can be screwed directly into the wall of theConnecting Pipe using the Installation Tool.
2. Inline Drip Heads and Inline Small Area Spray Nozzlescan be fitted into the length of the Supply Pipe.Alternatively, Endline Drip Heads and Endline Small AreaSpray Nozzles can be fitted at the end of the Supply Pipe.If a method of watering is not required at the end of theSupply Pipe, it can be sealed by using a Plug.
3. Spray Nozzles and Sprinklers can be inserted intoT-Joints for Spray Nozzles. To water plants from above,raise Spray Nozzles and Sprinklers by inserting anExtension Pipe into the T-Joints for Spray Nozzles.
MAINTENANCE
17
YOUR MICRO-DRIP-SYSTEMCalculating the size of your automatic watering system
16 Need help planning your system? [email protected] Need help planning your system? [email protected]
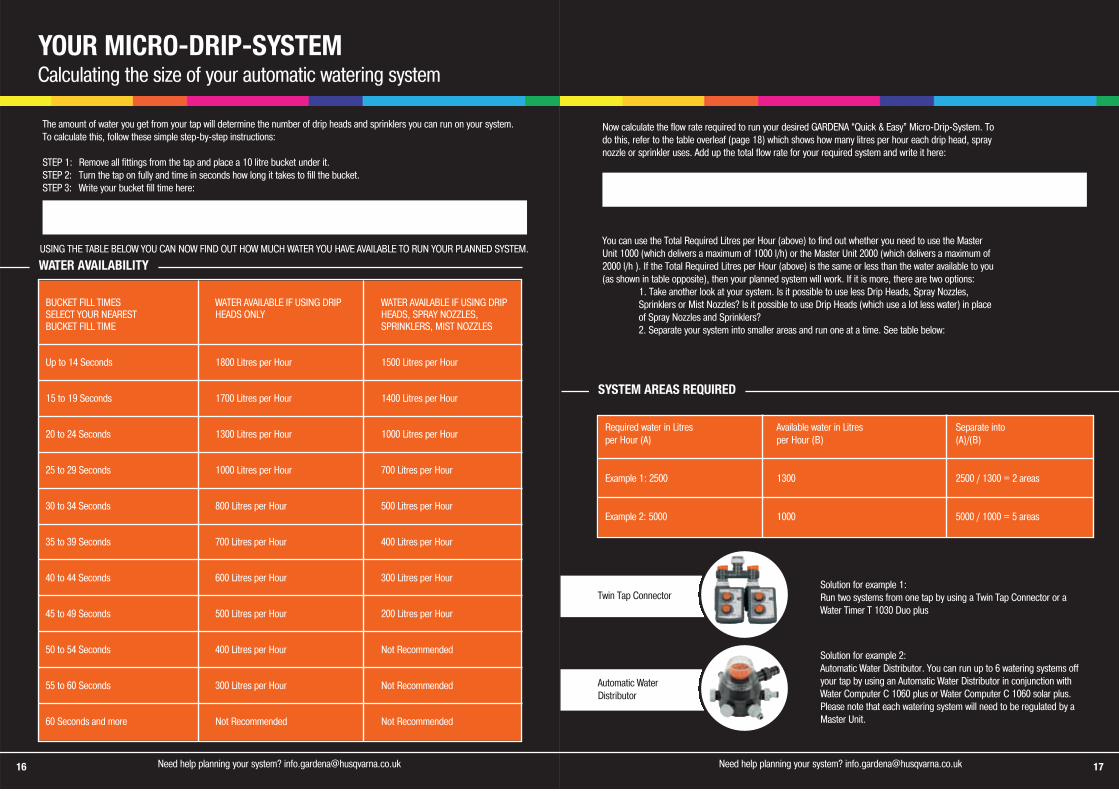
The amount of water you get from your tap will determine the number of drip heads and sprinklers you can run on your system.To calculate this, follow these simple step-by-step instructions:
STEP 1: Remove all fittings from the tap and place a 10 litre bucket under it.STEP 2: Turn the tap on fully and time in seconds how long it takes to fill the bucket.STEP 3: Write your bucket fill time here:
USING THE TABLE BELOW YOU CAN NOW FIND OUT HOW MUCH WATER YOU HAVE AVAILABLE TO RUN YOUR PLANNED SYSTEM.
BUCKET FILL TIMES WATER AVAILABLE IF USING DRIP WATER AVAILABLE IF USING DRIP SELECT YOUR NEAREST HEADS ONLY HEADS, SPRAY NOZZLES, BUCKET FILL TIME SPRINKLERS, MIST NOZZLES
Up to 14 Seconds 1800 Litres per Hour 1500 Litres per Hour
15 to 19 Seconds 1700 Litres per Hour 1400 Litres per Hour
20 to 24 Seconds 1300 Litres per Hour 1000 Litres per Hour
25 to 29 Seconds 1000 Litres per Hour 700 Litres per Hour
30 to 34 Seconds 800 Litres per Hour 500 Litres per Hour
35 to 39 Seconds 700 Litres per Hour 400 Litres per Hour
40 to 44 Seconds 600 Litres per Hour 300 Litres per Hour
45 to 49 Seconds 500 Litres per Hour 200 Litres per Hour
50 to 54 Seconds 400 Litres per Hour Not Recommended
55 to 60 Seconds 300 Litres per Hour Not Recommended
60 Seconds and more Not Recommended Not Recommended
Now calculate the flow rate required to run your desired GARDENA “Quick & Easy” Micro-Drip-System. Todo this, refer to the table overleaf (page 18) which shows how many litres per hour each drip head, spraynozzle or sprinkler uses. Add up the total flow rate for your required system and write it here:
You can use the Total Required Litres per Hour (above) to find out whether you need to use the MasterUnit 1000 (which delivers a maximum of 1000 l/h) or the Master Unit 2000 (which delivers a maximum of2000 l/h ). If the Total Required Litres per Hour (above) is the same or less than the water available to you(as shown in table opposite), then your planned system will work. If it is more, there are two options:
1. Take another look at your system. Is it possible to use less Drip Heads, Spray Nozzles, Sprinklers or Mist Nozzles? Is it possible to use Drip Heads (which use a lot less water) in place of Spray Nozzles and Sprinklers?2. Separate your system into smaller areas and run one at a time. See table below:
WATER AVAILABILITY
Required water in Litres Available water in Litres Separate intoper Hour (A) per Hour (B) (A)/(B)
Example 1: 2500 1300 2500 / 1300 = 2 areas
Example 2: 5000 1000 5000 / 1000 = 5 areas
Twin Tap Connector
Automatic Water Distributor
SYSTEM AREAS REQUIRED
Solution for example 1:Run two systems from one tap by using a Twin Tap Connector or aWater Timer T 1030 Duo plus
Solution for example 2:Automatic Water Distributor. You can run up to 6 watering systems offyour tap by using an Automatic Water Distributor in conjunction withWater Computer C 1060 plus or Water Computer C 1060 solar plus.Please note that each watering system will need to be regulated by aMaster Unit.
18 19
Nee
d he
lp p
lann
ing
your
sys
tem
? in
fo.g
arde
na@
husq
varn
a.co
.uk
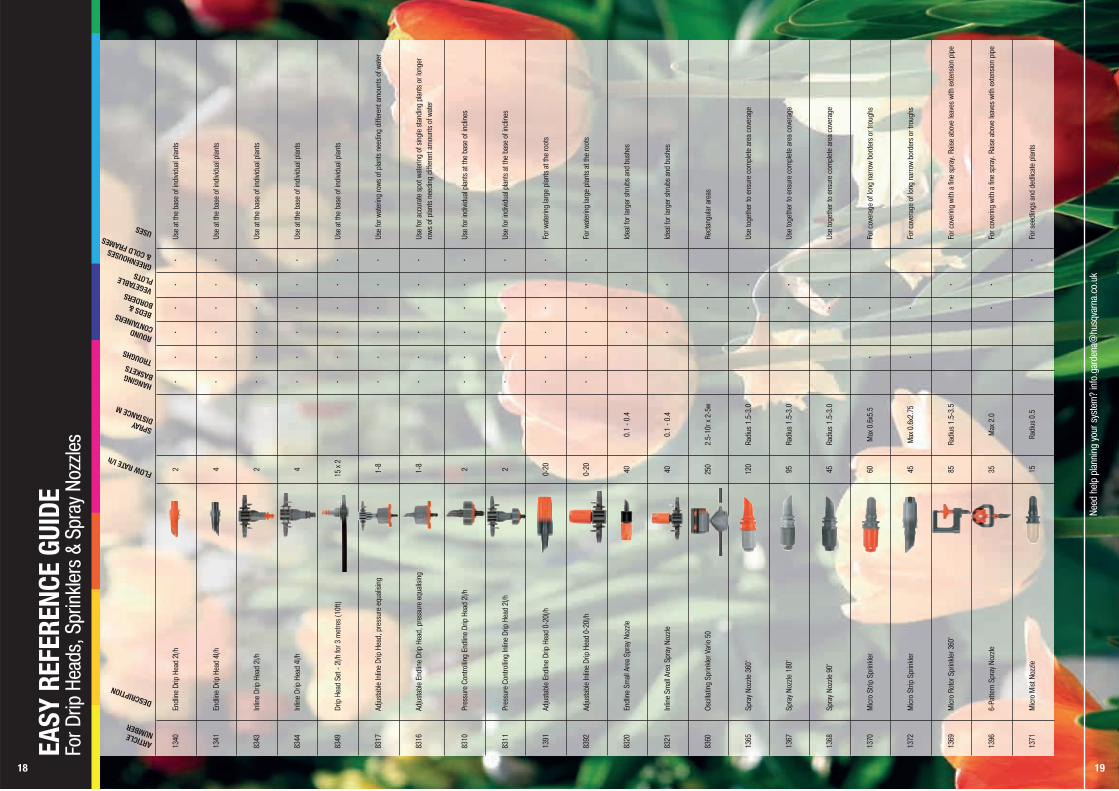
ARTICLE NUMBER
DESCRIPTION
SPRAY DISTANCE M
HANGING BASKETSTROUGHS
ROUND CONTAINERS BEDS & BORDERSVEGETABLE PLOTSGREENHOUSES & COLD FRAMESUSES
1340
Endl
ine
Drip
Hea
d 2l
/h2
••
••
••
Use
at th
e ba
se o
f ind
ividu
al p
lant
s
1341
Endl
ine
Drip
Hea
d 4l
/h4
••
••
••
Use
at th
e ba
se o
f ind
ividu
al p
lant
s
8343
Inlin
e Dr
ip H
ead
2l/h
2•
••
••
•Us
e at
the
base
of i
ndivi
dual
pla
nts
8344
Inlin
e Dr
ip H
ead
4l/h
4•
••
••
•Us
e at
the
base
of i
ndivi
dual
pla
nts
8349
Drip
Hea
d Se
t - 2
l/h fo
r 3 m
etre
s (1
0ft)
15 x
2•
••
••
•Us
e at
the
base
of i
ndivi
dual
pla
nts
8317
Adju
stab
le In
line
Drip
Hea
d, p
ress
ure
equa
lisin
g1-
8•
••
••
•Us
e fo
r wat
erin
g ro
ws o
f pla
nts
need
ing
diffe
rent
am
ount
s of
wat
er
8316
Adju
stab
le E
ndlin
e Dr
ip H
ead,
pre
ssur
e eq
ualis
ing
1-8
••
••
••
Use
for a
ccur
ate
spot
wat
erin
g of
sin
gle
stan
ding
pla
nts
or lo
nger
rows
of p
lant
s ne
edin
g di
ffere
nt a
mou
nts
of w
ater
8310
Pres
sure
Con
trollin
g En
dlin
e Dr
ip H
ead
2l/h
2•
••
••
•Us
e fo
r ind
ividu
al p
lant
s at
the
base
of i
nclin
es
8311
Pres
sure
Con
trollin
g In
line
Drip
Hea
d 2l
/h
2•
••
••
•Us
e fo
r ind
ividu
al p
lant
s at
the
base
of i
nclin
es
1391
Adju
stab
le E
ndlin
e Dr
ip H
ead
0-20
l/h0-
20•
••
••
•Fo
r wat
erin
g la
rge
plan
ts a
t the
root
s
8392
Adju
stab
le In
line
Drip
Hea
d 0-
20l/h
0-20
••
••
••
For w
ater
ing
larg
e pl
ants
at t
he ro
ots
8320
Endl
ine
Smal
l Are
a Sp
ray
Noz
zle40
0.1
- 0.4
••
•Id
eal f
or la
rger
shr
ubs
and
bush
es
8321
Inlin
e Sm
all A
rea
Spra
y N
ozzle
400.
1 - 0
.4•
••
Idea
l for
larg
er s
hrub
s an
d bu
shes
8360
Osci
llatin
g Sp
rinkl
er V
ario
50
250
2.5-
10r x
2-5
w•
•Re
ctan
gula
r are
as
1365
Spra
y N
ozzle
360
°12
0Ra
dius
1.5
-3.0
••
Use
toge
ther
to e
nsur
e co
mpl
ete
area
cov
erag
e
1367
Spra
y N
ozzle
180
°95
Radi
us 1
.5-3
.0•
•Us
e to
geth
er to
ens
ure
com
plet
e ar
ea c
over
age
1368
Spra
y N
ozzle
90°
45Ra
dius
1.5
-3.0
••
Use
toge
ther
to e
nsur
e co
mpl
ete
area
cov
erag
e
1370
Mic
ro S
trip
Sprin
kler
60M
ax 0
.6x5
.5•
•Fo
r cov
erag
e of
long
nar
row
bord
ers
or tr
ough
s
1372
Mic
ro S
trip
Sprin
kler
45M
ax 0
.6x2
.75
••
For c
over
age
of lo
ng n
arro
w bo
rder
s or
trou
ghs
1369
Mic
ro R
otor
Spr
inkl
er 3
60°
85Ra
dius
1.5
-3.5
••
For c
over
ing
with
a fi
ne s
pray
. Rai
se a
bove
leav
es w
ith e
xten
sion
pipe
1396
6-Pa
ttern
Spr
ay N
ozzle
35M
ax 2
.0•
•Fo
r cov
erin
g wi
th a
fine
spr
ay. R
aise
abo
ve le
aves
with
ext
ensio
n pi
pe
1371
Mic
ro M
ist N
ozzle
15Ra
dius
0.5
•Fo
r see
dlin
gs a
nd d
edlic
ate
plan
ts
EASY
REF
EREN
CE G
UIDE
For D
rip H
eads
, Spr
inkl
ers
& Sp
ray
Noz
zles
FLOW RATE l/h
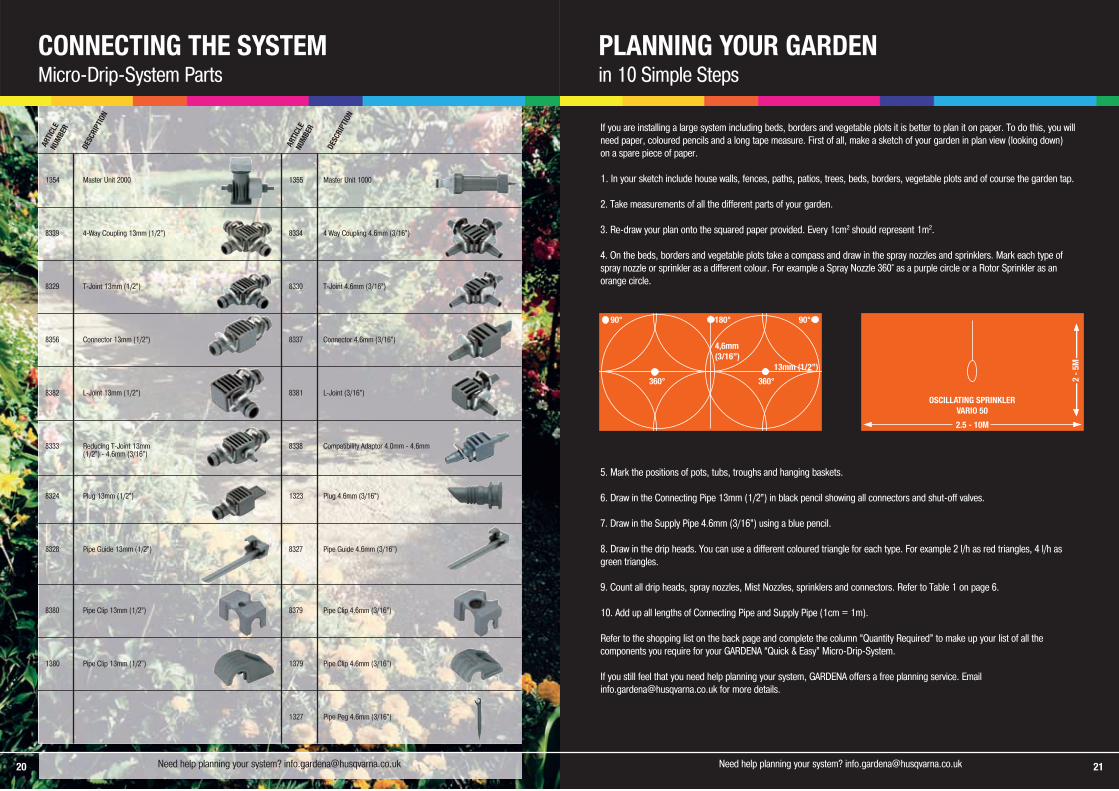
1354 Master Unit 2000 1355 Master Unit 1000
8339 4-Way Coupling 13mm (1/2”) 8334 4 Way Coupling 4.6mm (3/16”)
8329 T-Joint 13mm (1/2”) 8330 T-Joint 4.6mm (3/16”)
8356 Connector 13mm (1/2”) 8337 Connector 4.6mm (3/16”)
8382 L-Joint 13mm (1/2”) 8381 L-Joint (3/16”)
8333 Reducing T-Joint 13mm 8338 Compatibility Adaptor 4.0mm - 4.6mm(1/2”) - 4.6mm (3/16”)
8324 Plug 13mm (1/2”) 1323 Plug 4.6mm (3/16”)
8328 Pipe Guide 13mm (1/2”) 8327 Pipe Guide 4.6mm (3/16")
8380 Pipe Clip 13mm (1/2”) 8379 Pipe Clip 4.6mm (3/16”)
1380 Pipe Clip 13mm (1/2") 1379 Pipe Clip 4.6mm (3/16")
1327 Pipe Peg 4.6mm (3/16”)
ARTI
CLE
NUM
BER
DESC
RIPT
ION
ARTI
CLE
NUM
BER
DESC
RIPT
ION
CONNECTING THE SYSTEMMicro-Drip-System Parts
20
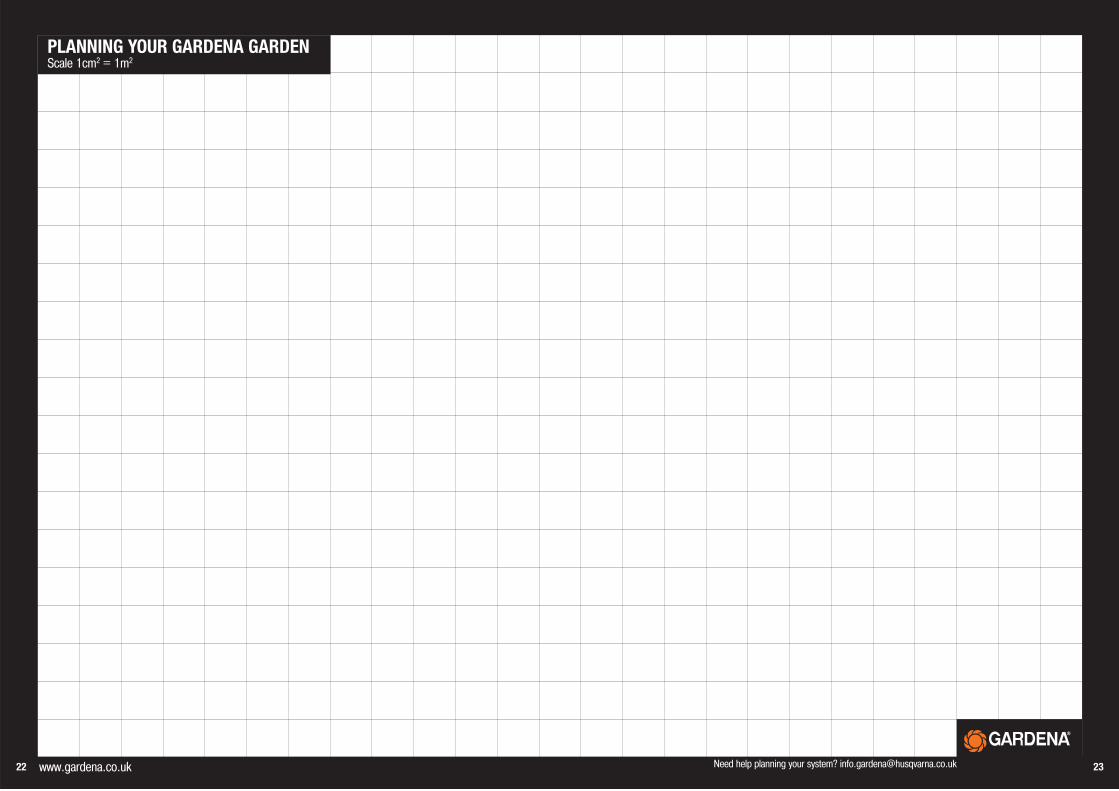
PLANNING YOUR GARDENin 10 Simple Steps
21Need help planning your system? [email protected] Need help planning your system? [email protected]
If you are installing a large system including beds, borders and vegetable plots it is better to plan it on paper. To do this, you willneed paper, coloured pencils and a long tape measure. First of all, make a sketch of your garden in plan view (looking down)on a spare piece of paper.
1. In your sketch include house walls, fences, paths, patios, trees, beds, borders, vegetable plots and of course the garden tap.
2. Take measurements of all the different parts of your garden.
3. Re-draw your plan onto the squared paper provided. Every 1cm2 should represent 1m2.
4. On the beds, borders and vegetable plots take a compass and draw in the spray nozzles and sprinklers. Mark each type ofspray nozzle or sprinkler as a different colour. For example a Spray Nozzle 360° as a purple circle or a Rotor Sprinkler as anorange circle.
5. Mark the positions of pots, tubs, troughs and hanging baskets.
6. Draw in the Connecting Pipe 13mm (1/2”) in black pencil showing all connectors and shut-off valves.
7. Draw in the Supply Pipe 4.6mm (3/16”) using a blue pencil.
8. Draw in the drip heads. You can use a different coloured triangle for each type. For example 2 l/h as red triangles, 4 l/h asgreen triangles.
9. Count all drip heads, spray nozzles, Mist Nozzles, sprinklers and connectors. Refer to Table 1 on page 6.
10. Add up all lengths of Connecting Pipe and Supply Pipe (1cm = 1m).
Refer to the shopping list on the back page and complete the column “Quantity Required” to make up your list of all thecomponents you require for your GARDENA “Quick & Easy” Micro-Drip-System.
If you still feel that you need help planning your system, GARDENA offers a free planning service. [email protected] for more details.
90° 90°180°
360°360°
4,6mm(3/16”)
13mm (1/2”)
OSCILLATING SPRINKLERVARIO 50
2.5 - 10M
2 -
5M
2322
PLANNING YOUR GARDENA GARDEN Scale 1cm2 = 1m2
www.gardena.co.uk Need help planning your system? [email protected]
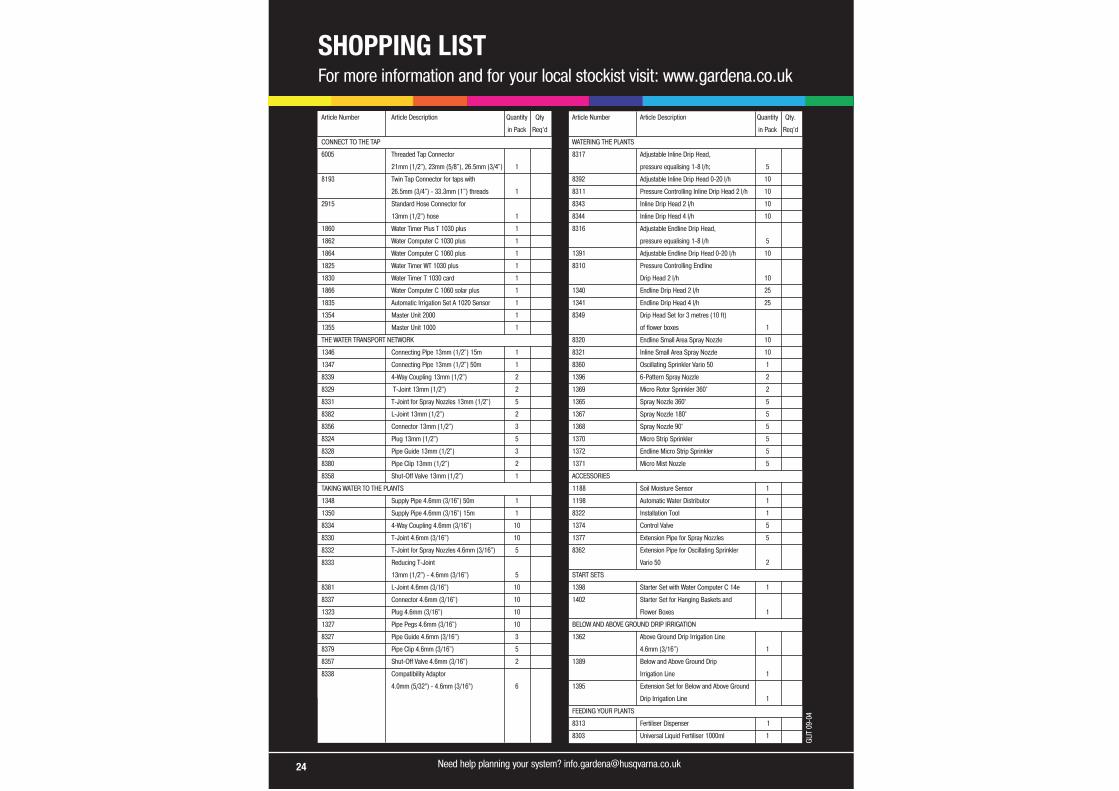
SHOPPING LISTFor more information and for your local stockist visit: www.gardena.co.uk
24 Need help planning your system? [email protected]
GLIT
09-
04
Article Number Article Description Quantity Qty.
in Pack Req’d
WATERING THE PLANTS
8317 Adjustable Inline Drip Head,
pressure equalising 1-8 l/h; 5
8392 Adjustable Inline Drip Head 0-20 l/h 10
8311 Pressure Controlling Inline Drip Head 2 l/h 10
8343 Inline Drip Head 2 l/h 10
8344 Inline Drip Head 4 l/h 10
8316 Adjustable Endline Drip Head,
pressure equalising 1-8 l/h 5
1391 Adjustable Endline Drip Head 0-20 l/h 10
8310 Pressure Controlling Endline
Drip Head 2 l/h 10
1340 Endline Drip Head 2 l/h 25
1341 Endline Drip Head 4 l/h 25
8349 Drip Head Set for 3 metres (10 ft)
of flower boxes 1
8320 Endline Small Area Spray Nozzle 10
8321 Inline Small Area Spray Nozzle 10
8360 Oscillating Sprinkler Vario 50 1
1396 6-Pattern Spray Nozzle 2
1369 Micro Rotor Sprinkler 360° 2
1365 Spray Nozzle 360° 5
1367 Spray Nozzle 180° 5
1368 Spray Nozzle 90° 5
1370 Micro Strip Sprinkler 5
1372 Endline Micro Strip Sprinkler 5
1371 Micro Mist Nozzle 5
ACCESSORIES
1188 Soil Moisture Sensor 1
1198 Automatic Water Distributor 1
8322 Installation Tool 1
1374 Control Valve 5
1377 Extension Pipe for Spray Nozzles 5
8362 Extension Pipe for Oscillating Sprinkler
Vario 50 2
START SETS
1398 Starter Set with Water Computer C 14e 1
1402 Starter Set for Hanging Baskets and
Flower Boxes 1
BELOW AND ABOVE GROUND DRIP IRRIGATION
1362 Above Ground Drip Irrigation Line
4.6mm (3/16") 1
1389 Below and Above Ground Drip
Irrigation Line 1
1395 Extension Set for Below and Above Ground
Drip Irrigation Line 1
FEEDING YOUR PLANTS
8313 Fertiliser Dispenser 1
8303 Universal Liquid Fertiliser 1000ml 1
Article Number Article Description Quantity Qty
in Pack Req’d
CONNECT TO THE TAP
6005 Threaded Tap Connector
21mm (1/2"), 23mm (5/8"), 26.5mm (3/4") 1
8193 Twin Tap Connector for taps with
26.5mm (3/4") - 33.3mm (1") threads 1
2915 Standard Hose Connector for
13mm (1/2") hose 1
1860 Water Timer Plus T 1030 plus 1
1862 Water Computer C 1030 plus 1
1864 Water Computer C 1060 plus 1
1825 Water Timer WT 1030 plus 1
1830 Water Timer T 1030 card 1
1866 Water Computer C 1060 solar plus 1
1835 Automatic Irrigation Set A 1020 Sensor 1
1354 Master Unit 2000 1
1355 Master Unit 1000 1
THE WATER TRANSPORT NETWORK
1346 Connecting Pipe 13mm (1/2") 15m 1
1347 Connecting Pipe 13mm (1/2") 50m 1
8339 4-Way Coupling 13mm (1/2") 2
8329 T-Joint 13mm (1/2") 2
8331 T-Joint for Spray Nozzles 13mm (1/2") 5
8382 L-Joint 13mm (1/2") 2
8356 Connector 13mm (1/2") 3
8324 Plug 13mm (1/2") 5
8328 Pipe Guide 13mm (1/2") 3
8380 Pipe Clip 13mm (1/2") 2
8358 Shut-Off Valve 13mm (1/2") 1
TAKING WATER TO THE PLANTS
1348 Supply Pipe 4.6mm (3/16") 50m 1
1350 Supply Pipe 4.6mm (3/16") 15m 1
8334 4-Way Coupling 4.6mm (3/16") 10
8330 T-Joint 4.6mm (3/16") 10
8332 T-Joint for Spray Nozzles 4.6mm (3/16") 5
8333 Reducing T-Joint
13mm (1/2") - 4.6mm (3/16") 5
8381 L-Joint 4.6mm (3/16") 10
8337 Connector 4.6mm (3/16") 10
1323 Plug 4.6mm (3/16") 10
1327 Pipe Pegs 4.6mm (3/16") 10
8327 Pipe Guide 4.6mm (3/16") 3
8379 Pipe Clip 4.6mm (3/16") 5
8357 Shut-Off Valve 4.6mm (3/16") 2
8338 Compatibility Adaptor
4.0mm (5/32”) - 4.6mm (3/16”) 6


![Z Z / v ] µ U E ZK ~E&Z/ · ] v µ Ç r u ] r P } À v u v } } ] } v ] v : v v v ] v v ] } v o v X , ] } Z ] E d E](https://img.pdfslide.us/doc/110x75/5f263ea58108b66f6a378e66/z-z-v-u-e-zk-ez-v-r-u-r-p-v-u-v-v-v-v-v.jpg)