Embed Size (px)
Citation preview
1
Proposal for Presentation of Doctoral Essay
“A Description and Application of Robert Aitken’s Concept
of the Physical Flute”
[This is the text for a presentation of certain salient features of the paper. The graphic examples will be projected from transparencies. Syntrillium Software was purchased by Adobe Systems Inc. As a result Cool-Edit is now Adobe Audition. All musical examples were performed by the author on a sterling silver Powell handmade flute, serial number 5586. A Radio Shack Optimus® unidirectional condenser microphone, model number 33-3017, was used to record into a Pentium 200-mmx computer with a Creative Labs Sound Blaster AWE64 Gold sound card. References are directly from the paper and are attributed there.]
A Description of the Physical Flute Technique
Robert Aitken is an internationally renowned flute virtuoso, a conductor, music director,
and a composer and vigorous proponent of New Music. He is also well known for his
pedagogical theories regarding the physicality of flute playing. Aitken has been a frequent
performer and panelist at National Flute Association conventions where literally thousands of
flute players over the years have been exposed to his theories. Mr. Aitken was awarded a lifetime
achievement award at the 2003 National Flute Association Convention.
The physical flute is the phrase that Canadian flutist Robert Aitken uses to describe the
style of flute playing that he uses for performance and teaching. There are several defining
elements of this style, some of which are in the mainstream of flute pedagogy and some of which
are less well accepted by the flute community. The development of resonance through the use of
proper support and breathing is a familiar concept. Of more significance to the ideals of the
physical flute is the principle of using body resonance through setting the body as a sort of
resonance chamber for the lowest notes, and keeping the body set for the low notes, while
playing throughout the entire flute range.
2
The ideal of using an open throat when playing the flute is another concept that is widely
accepted. However, Aitken’s lowering of the base of the tongue, which allows the larynx to
remain in the depressed inhalation state, is a technique more in line with vocal pedagogy than
flute pedagogy. Aitken also advocates placing the tip of the tongue well back on the hard palate
for the tongue stroke. This allows the tongue to rest along the floor of the mouth in the vocally
neutral position after the articulation. This position of repose for the tongue is, again, more
closely related to vocal technique than to traditional flute technique.
Another important aspect of the physical flute is the use of the embouchure to achieve the
goal of greater flexibility. Through demonstration it can be shown that a little known physical
property of air jets can aid in the development of a more or less automatic embouchure. The
author uses the term automatic embouchure to refer to the ability of the flutist to use the
downward pressure of the upper lip to allow the force of the air stream to control the forward and
backward motion of the lips. This means of controlling the lips can increase the agility of the
flutist as extremely small, nearly unconscious, lip movements can be used for wide leaps and
register changes.
Thus, the defining characteristics of the physical flute combine the sometimes vague
concepts of proper support and resonance with the use of a very facile embouchure to achieve the
goals of flexibility, homogeneity of sound, and ease of playing. It is the intention of this paper, in
the light of Aitken’s ideas, to clarify these concepts of support, resonance, and embouchure. This
paper sets out a systematic means of allowing the flutist to utilize these concepts in order to
become a better flutist, and, ultimately, to become a better musician. While this paper uses
Aitken’s ideas as a springboard for developing the concepts of the physical flute, the exercises
3
are the result of the author’s attempts to incorporate these ideas into his performance and
teaching.
This presentation will first focus on the defining elements of the physical flute technique.
Supporting materials from Chapter Two, “A Survey of Supporting Documentation” will be
discussed. Visual materials from Chapter Three, “Physical Aspects of the Physical Flute” will be
used to further clarify Aitken’s concepts. Various Exercises from Chapter Four, “The Physical
Flute and the Daily Exercise Routine,” and from Chapter Five, “The Physical Flute and the
Orchestral Excerpt Repertoire,” will be introduced to show the practical application of Aitken’s
concept of the physical flute.
Breathing and Support
Many of the techniques and concepts involved in the physical flute manner of playing are
linked to obtaining or maximizing resonance. Resonance, as it relates to flute playing, is the
“amplification of the range of audibility [of the flute sound] by various couplings of the cavities
of the mouth, nose, sinuses, larynx, pharynx, and upper thorax, and, to some extent, by the
skeletal structure of the head and upper chest.” The flutist can physically alter the amplitude of
various portions (partials) of the flute sound in either of two ways. One is through altering the
size of the resonance cavities of the vocal tract, usually by making them larger, in an effort to
somehow tune the air chambers within the body to the sound. The other means is through
changing the size and shape of the lip opening. Either of these methods can allow the flutist to
control, to a certain extent, the relative amplitude of the partials in the flute tone, effectively
altering the timbre of the sound.
As a basic tenet of the physical flute, Aitken advocates keeping the diaphragm area
expanded during the exhalation while firming the abdominal muscles inward to produce support.
4
The diaphragm area remains expanded through the continued contraction and lowering of the
diaphragm muscle itself. This means of generating support sets the lower abdominal muscles
against the diaphragm musculature, creating an isometric tension. This approach to support
allows the flutist to produce a constant stream of air at a constant pressure, in part, through the
delayed rise of the diaphragm. Another related goal is the prolongation of the expansion of the
lungs by keeping the air from escaping too rapidly, helping to preserve the quality of sound
throughout a phrase by maintaining the size of the resonance cavity. Aitken also states that while
breathing low for abdominal support, the flutist should keep the rib cage as expanded as possible
for the resultant resonance.
Essentially, Aitken is using the two different types of support that Jochen Gärtner
describes in his tome, The Vibrato, With Particular Consideration Given to the Situation of the
Flutist. The flutist’s or low support is the type of support that Aitken uses to develop control over
the air stream. As described by Gärtner, the singer’s or high support puts an emphasis on keeping
the ribs elevated while the abdominal muscles contract and the diaphragm relaxes for the
expulsion of air. Aitken uses this type of high support while maintaining the contraction of the
diaphragm during the exhalation to keep the resonance in the sound.
The Placement of the Vocal Tract
Aitken emphasizes three actions in relation to the placement of the components of the
vocal tract. First, the jaws should be very open to promote resonance. Second, the base of the
tongue should be brought straight down and gently anchored. Third, the tip of the tongue should
be placed high on the roof of the mouth and should move down and forward for the tongue
stroke.
Aitken states that “the more open you can keep the mouth to blow, the richer the sound.”

5
Aitken also stresses that the throat should be kept open at all times by anchoring the base
of the tongue in a somewhat lowered position. This anchored position of the base of the tongue
allows the larynx to remain in the lowered position of the inhalation. This lowering of the base of
the tongue, and larynx, is designed to develop and stabilize resonance characteristics and the
timbre of the sound.
Aitken advocates that the tongue lie on the floor of the mouth with the tip behind the
lower teeth after the tongue stroke. This allows the mouth to remain as open as possible without
the obstruction of the tongue. This aids in keeping the sound resonant as the mouth cavity is
unobstructed by the tongue.
The primary supporting documentation for this manner of flute playing comes from the
vocal pedagogy. Miller writes in On the Art of Singing about “Taming the Terrible Triplets of the
Vocal Tract: Tongue/Hyoid Bone/Larynx.” Richard Miller makes the point that the tongue
occupies and affects a large part of the vocal tract. He also states that the tongue is attached to
the hyoid bone, the U–shaped bone at the top of the laryngeal cartilage. A membrane from the
hyoid bone suspends the larynx. These three elements—the tongue, hyoid bone, and larynx—can
act together as a functional unit. Miller also stresses that the classically trained singer should
maintain laryngeal stability to stabilize the tone and should not allow the larynx to rise and fall
with the pitch. This concept of playing with a slightly depressed larynx is analogous to a key
component of the Italian vocal practice of copertura, or covering. Covering is the term used in
vocal pedagogy that refers to a technique of singing that balances the resonance throughout the
tessitura of the (especially male) voice.
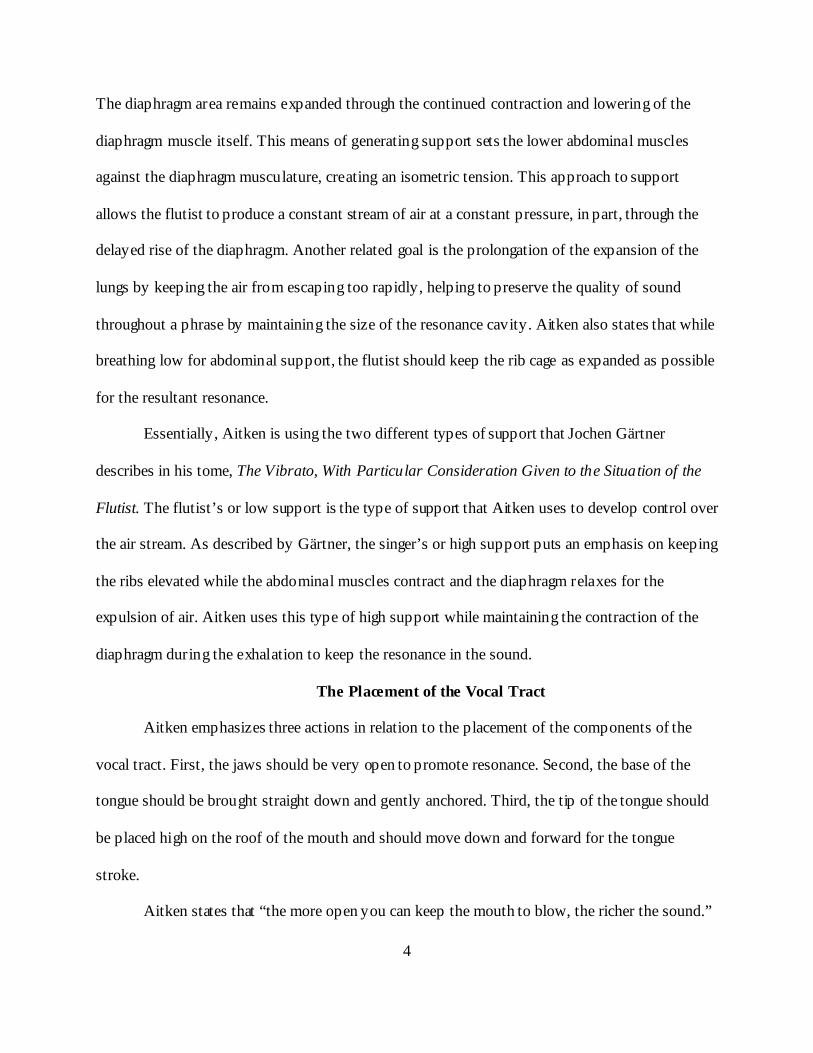
Example 1 shows the placement of the placement of lips and teeth, tongue, and hyoid
bone. The base of the tongue and hyoid bone are lowered. The attack point of the tip of the
6
tongue is high on the roof of the mouth. The tonguing action is forward and down leaving the
tongue on the floor of the mouth after the articulation.
Example 1. Flutist’s facial profile.
[All graphics will be on transparencies for projection.]
7
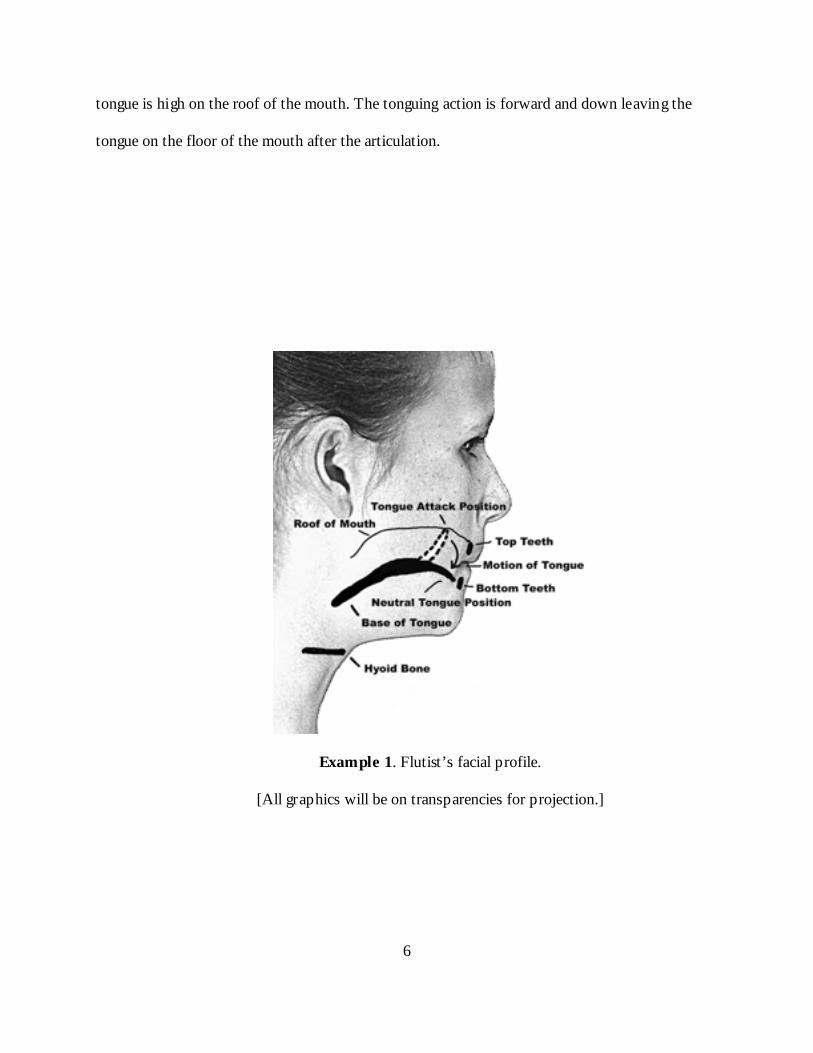
It can be demonstrated through Cool Edit frequency analysis screen shots that the
opening of the jaws and throat can result in a richer and fuller sound, as evidenced by increased
harmonic activity–greater amplitude and number of apparent partials–in the sound.
Example 2 first shows the frequency analysis screen shot of a low G performed with
relatively closed jaws and throat. The second frequency analysis screen shot is of the same low G
after the flutist opened the jaws and throat more. There is evidence of increased harmonic
activity in the low G with the jaws and throat open. The horizontal axis represents frequencies,
while the vertical axis represents the relative loudness in decibels. The vertical spikes represent
frequencies corresponding to the notes of the harmonic series.

8
Example 2. Frequency analyses of low G.
9
Frequency analysis screen shots can also be used to determine the effect that changes in
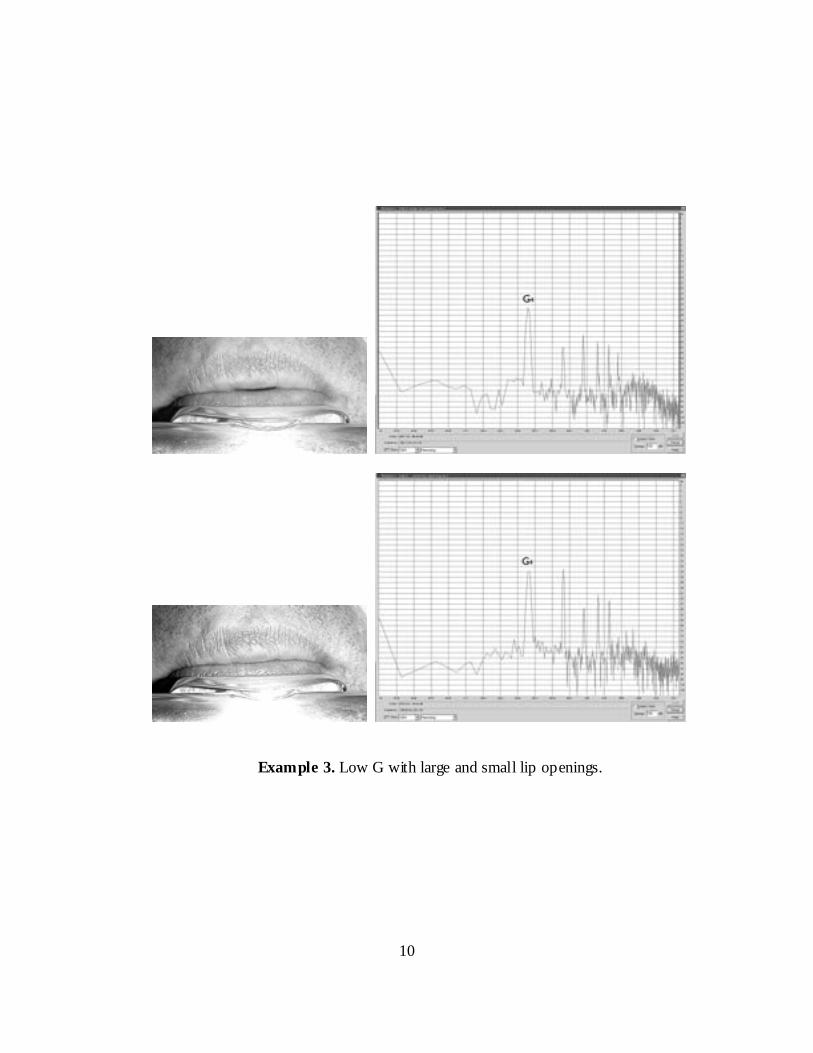
the size or shape of the lip opening will have on the resultant sound. Example 3 shows the effect
upon the sound of making the lip opening smaller. First, a low G was performed with a relatively
large lip opening. The resultant frequency analysis shows a graphic representation of the partials
in the sound. As the flutist continued blowing the low G, he lowered the upper lip into the lower
lip making the lip opening smaller. The smaller lip opening is clearly visible. The graph of the
low G with the smaller lip opening clearly indicates that the second partial is much louder. This
should result in increased brightness in the sound.
10
Example 3. Low G with large and small lip openings.
11
It is possible to ascertain through the use of Cool-Edit screen shots if using the principles
of the physical flute can aid the flutist in developing a homogenous sound. It has long been the
goal of flutists to make each note sound like the next and to minimize the differences between
the timbres of the different registers. An easy means of determining whether adjacent notes
sound nearly alike is to examine their frequency spectra or their spectral views in a program like
Cool Edit. This quantitative measure can enable the flutist/reader to discern visually components
of the sound that may be nearly indistinguishable audibly.
Example 4 shows two frequency spectra of C chromatic scales beginning on
C5 and ending on C6.

12
Example 3. Spectral analyses of C chromatic scales from C5 to C6.
13
The author recorded two C chromatic scales beginning on C5 and ending on C6. In the
first example, several clearly visible discontinuities occur between certain adjacent partials. Each
vertical group of horizontal bars represents a note of the chromatic scale, consisting of the
fundamental frequency and various partials of the harmonic series. The darker bars represent
louder partials. In order for the partials of adjacent notes to remain the same volume level, the
flutist must keep the physical parameters as consistent as possible. This means that to produce
the most homogeneous sound, the flutist must support constantly and keep the mouth and throat
cavities set optimally without adjusting—either consciously or unconsciously. The ability to
check visually for variations in the sound (representing changes in the oral cavities during sound
production) is especially useful as alterations in the oral cavities can affect the pitch as well as
the timbre of the sound. In fact, the flutist may be making unnecessary adjustments for pitch, due
to a lack of proper continuous support, which can result in discontinuities of sound.
As shown in Example 3 the author used the feedback of the visual spectral analysis to
adjust the placement of the tongue and throat to keep adjacent notes as equal as possible. In the
second example, adjacent partials appear more uniform in loudness, suggesting that, since each
note and its neighboring note are comprised of nearly identical harmonic spectra, the resultant
sound is more homogeneous than in the first example.
The homogeneity of sound of the different registers can also be measured through
frequency spectra analysis. There is a natural tendency toward greater harmonic activity in the
lowest octave and less in the highest octave. The tendency toward less harmonic activity in the
upper register can be abated somewhat through the use of physical flute technique. As Aitken
says with regard to keeping the mouth and jaws open.” … you want to have some of the low in
your highest octave. You don't want your high octave to just be a sine wave.”

14
Example 4. Spectral analyses of C chromatic scales from C4 to C5 and from C6 to C7.
15
The homogeneity of sound of the different registers can also be measured through
frequency spectra analysis. There is a natural tendency toward greater harmonic activity in the
lowest octave and less in the highest octave. The tendency toward less harmonic activity in the
upper register can be abated somewhat through the use of physical flute technique. As Aitken
says with regard to keeping the mouth and jaws open.” … you want to have some of the low in
your highest octave. You don't want your high octave to just be a sine wave.”
Example 4 shows spectral analyses of C chromatic scales from C4 to C5 and from C6 to
C7. The relative richness of the low register (C4 to C5) can be seen in the strength, uniformity,
and number of partials present in each sound. The difficulty in keeping the upper register (C6 to
C7) resplendent with harmonics in the sound can be seen as on the highest notes the higher
harmonics appear weaker.
Lip Movements for Generating Register Changes
It is important for the flutist to understand that any single note on the flute is actually a
composite of sounds. These sounds include the fundamental frequency of the note played plus
various pitches in the harmonic series of the fundamental. Example 5 demonstrates the
frequency spectrum of a low C consisting of the low C plus various partials. This particular
frequency spectrum shows a low C rich in harmonic content. It is interesting to note that in
Example 4, the second partial, C5, is actually stronger than the fundamental. Campbell and
Greated write in The Musician’s Guide to Acoustics that “this gives the instrument a rich, almost
reedy, sound in the low register.” Fletcher, in Some Acoustical Principles of Flute Technique,
mentions that for C4 played strongly, several higher partials may be stronger than the
fundamental.

16
Example 5. Frequency analysis of low C.
17
In order to develop a flexible embouchure, it is necessary to develop the ability to move
the lips the least amount possible from one register to another or indeed from one note to the
next. Using the low C fingering can result in sounding any of the partials shown in Example 5
up to the high Bb. The accurate placement of the sounding partial is made easier if the flutist
understands the underlying acoustic principles which govern the placement of the sounding
partial.
For the physical flute technique, to achieve the higher partials, the upper lip comes down
into the lower lip, the lip opening gets smaller, and the lips move forward slightly with the
resultant increase in air pressure. This motion decreases the distance from the source of the air jet
to the strike wall, thus allowing the higher partials to sound. The increased velocity of the air
stream caused by the smaller lip opening also aids in the production of higher partials. Thus, the
two main forces which allow the sounding of partials are the relative distance from the source of
the air stream to the far wall of the embouchure hole and the relative speed of the air stream.
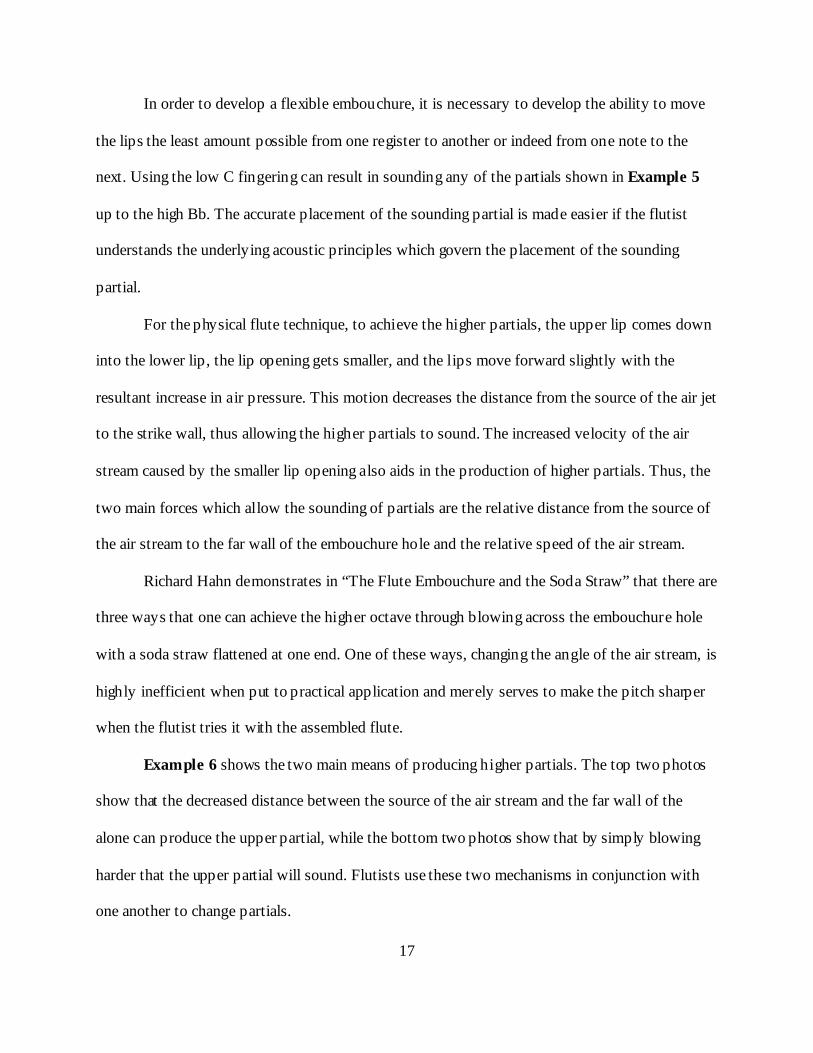
Richard Hahn demonstrates in “The Flute Embouchure and the Soda Straw” that there are
three ways that one can achieve the higher octave through blowing across the embouchure hole
with a soda straw flattened at one end. One of these ways, changing the angle of the air stream, is
highly inefficient when put to practical application and merely serves to make the pitch sharper
when the flutist tries it with the assembled flute.
Example 6 shows the two main means of producing higher partials. The top two photos
show that the decreased distance between the source of the air stream and the far wall of the
alone can produce the upper partial, while the bottom two photos show that by simply blowing
harder that the upper partial will sound. Flutists use these two mechanisms in conjunction with
one another to change partials.
18
Example 6. The Flute Embouchure and the Soda Straw.

19
Coltman writes in the "Acoustics of the Flute," that to achieve higher partials, or modes,
the flutist must vary the travel time of the jet wave across the blow hole. The two ways of
changing the travel time across the blow hole are through either changing the distance from the
lips to the far wall of the embouchure plate or by changing the speed of the air stream. These two
means are not mutually exclusive and can be used in conjunction with one another to effect a
change in the travel time across the blow hole. Coltman uses Bernoulli’s Law to explain that the
blowing pressure can be controlled through muscular tension (support), or through regulating the
size of the lip opening. There is a direct correlation between the blowing pressure and the
velocity of the jet wave, so that either greater muscular tension or a smaller lip opening will
increase the velocity of the jet wave.
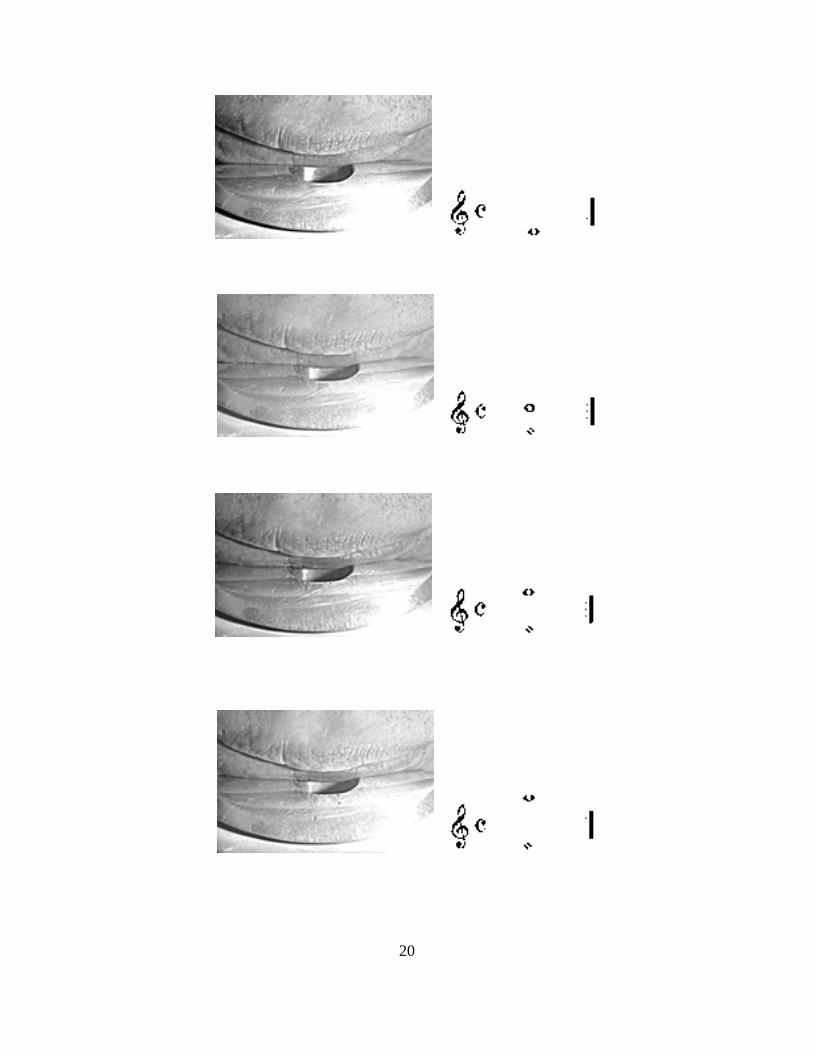
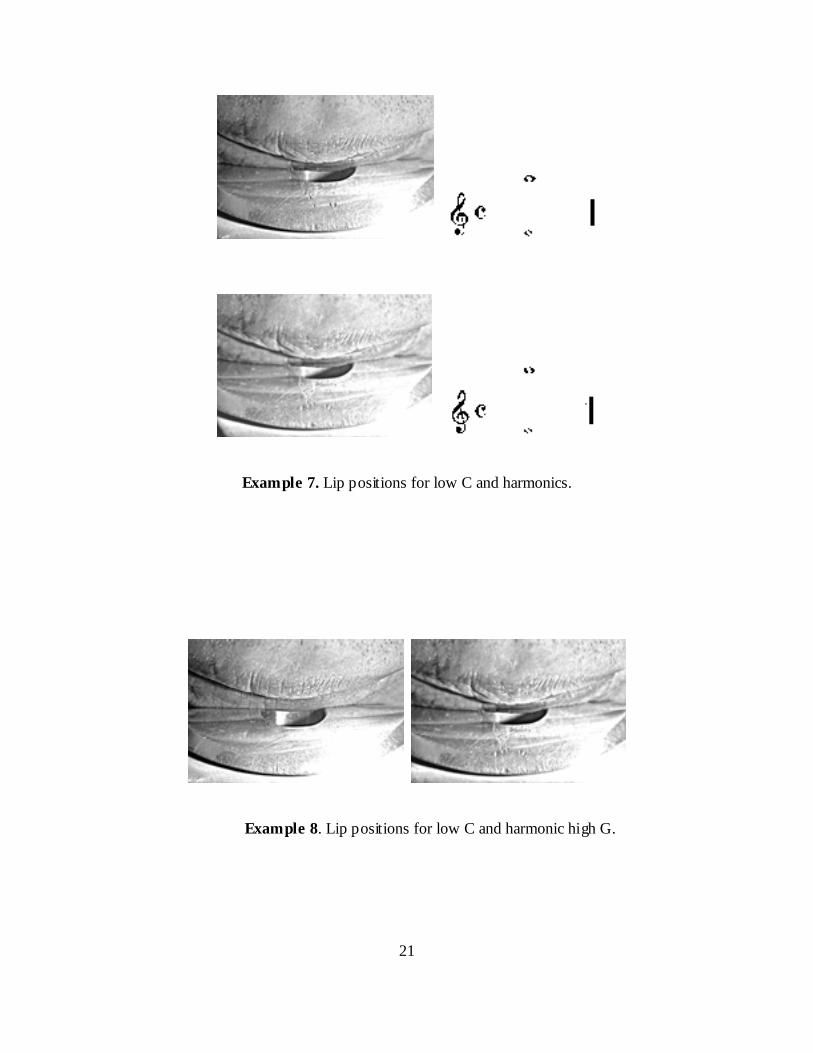
Example 7 illustrates the lip positions for playing the notes of the harmonic series on low
C, according to the concepts of the physical flute. While these changes in lip position are minute
and difficult to see from one partial to the next, Example 8 clearly shows the difference in lip
placement between the low C and the high G.
20
21
Example 7. Lip positions for low C and harmonics.
Example 8. Lip positions for low C and harmonic high G.
22
The Application of the Physical Flute Technique
The flutist through careful practice can reinforce the techniques of the physical flute
while practicing the daily exercise routine. The first area of concern while practicing should be
the development and maintenance of proper breathing and breath support. As with any type of
muscular development, the musculature of the breathing apparatus needs periodic maintenance,
reevaluation, and adjustment. This can be done during the flutist’s daily warm–up.
The most important element of support that should be practiced daily is the antagonistic
resistance of the lower abdominal muscles (the exhaling musculature) and the diaphragm (the
inhaling musculature). This, the basis of support in flute playing, is often neglected by flutists in
the daily practice routine. There is also the difficulty of providing muscular support while
keeping the jaws and throat open without allowing them to move during changes in air pressure
in the mouth and throat. Physical actions such as coughing, clearing the throat, speaking, and
singing, which couple movements of the abdomen and diaphragm with actions of the throat, tend
to emphasize the closing or narrowing of the throat or vocal chords while the principles of the
physical flute and good singing dictate that the throat and vocal tract remain as open as possible.
Example 9 shows a simple breathing exercise that the flutist can use to review the
supported breath when starting the daily practice session. For the inhalation, the lower abdominal
muscles expand outward as the diaphragm contracts, lowering, and pushing the diaphragm area
outward. The rib cage then expands outward in all directions as air fills the lungs. For the
exhalation, the lower abdominal muscles firm inward while the flutist keeps the rib cage and the
diaphragm area expanded. It is essential that the diaphragm area remains expanded throughout
the exhalation. The continued contraction of the diaphragm muscle while the lower abdominal
muscles firm inward sets up an isometric tension that allows the diaphragm area to remain

23
expanded during the exhalation. The flutist should inhale slowly for five seconds, hold for five
seconds, then exhale for five seconds. The flutist can repeat this exercise for several minutes,
each time allowing the rib cage to relax and expand further on the inhalation to achieve
maximum lung capacity.
Example 9. A simple breathing exercise.
At this point, the flutist can practicing long tones beginning with low G and working
down to the low C, using the notes of the simple resonance exercise—low G, F, E, D, and C. It is
very important that the flutist performs this and the following exercises with no vibrato to avoid
masking the sound. Aitken suggests that a goal of sixty seconds for each note be set.
Example 10 shows a simple resonance building exercise. The flutist first plays a resonant
low G. After a good breath, the flutist plays the low G while thinking of the body placement for
the low F, then slurs to the low F. The flutist then keeps the body set for the low F and begins the
next group. Each note must match the resonance of the previous note. The flutist should visualize
the body placement of each new note before performing it. Each new group beginning on low G
should start with the body set for the lowest note of the previous group until the flutist can
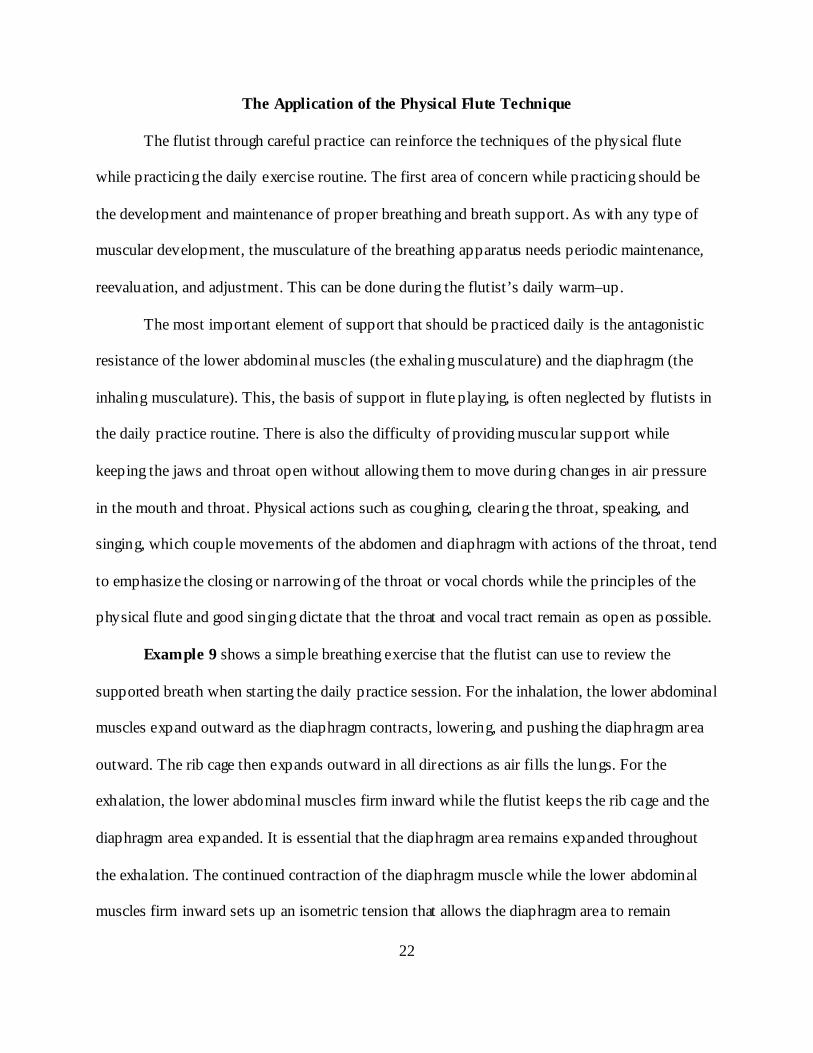
24
perform the whole exercise with the body set for the low C. The exercise should be repeated
several times playing all notes with the body set for the low C.
Example 10. A simple resonance building exercise.
The following exercises are designed to aid the flutist in developing the abdominal
muscles and the support mechanism. The exercises are flutistic adaptations of Miller’s “Onset
Exercises” and Appleman’s pulsated drills. Commas ( ) indicate breath marks. Arrows ( )
indicate the inward firming of the lower abdominal muscles. “Ta” is not to be perceived as a
syllabification, but as the front stroke of the tongue. While the exercises may appear somewhat
tedious, they allow the flutist to develop the abdominal muscles and breath support relatively
quickly.
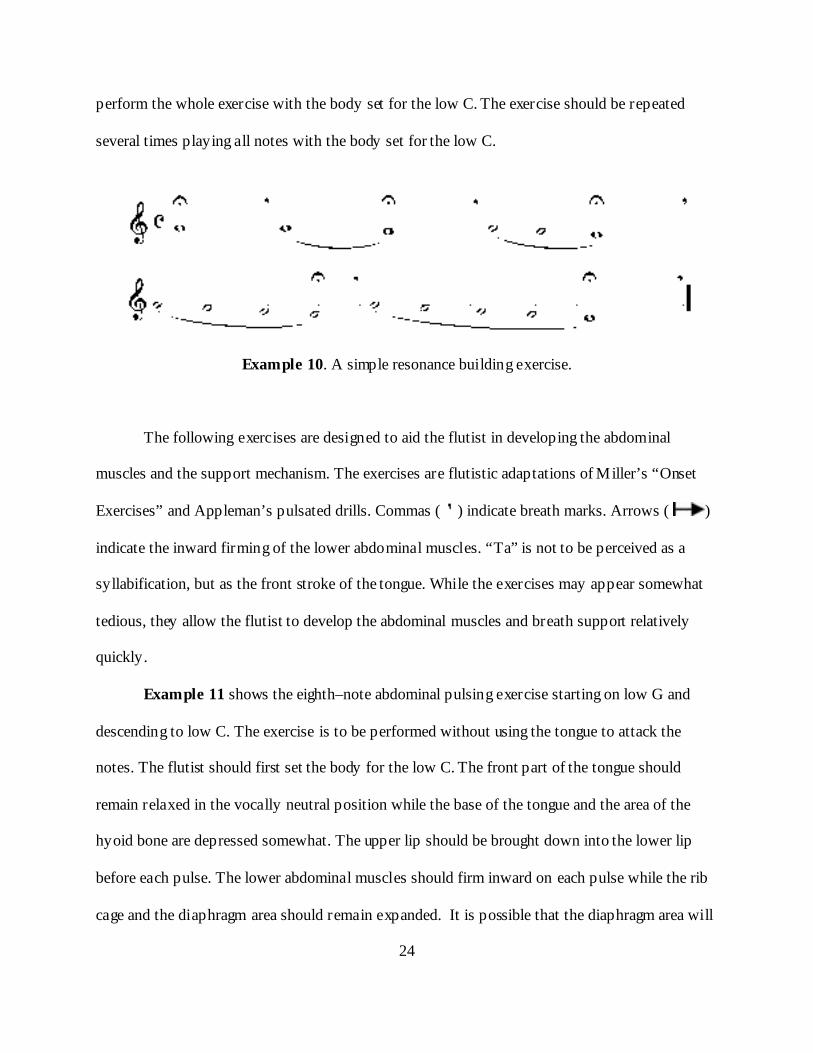
Example 11 shows the eighth–note abdominal pulsing exercise starting on low G and
descending to low C. The exercise is to be performed without using the tongue to attack the
notes. The flutist should first set the body for the low C. The front part of the tongue should
remain relaxed in the vocally neutral position while the base of the tongue and the area of the
hyoid bone are depressed somewhat. The upper lip should be brought down into the lower lip
before each pulse. The lower abdominal muscles should firm inward on each pulse while the rib
cage and the diaphragm area should remain expanded. It is possible that the diaphragm area will
25
balloon out slightly during the pulse. Gärtner calls this type of abdominal accent or thrust a
martellato or hammered attack. A point of stasis should be reached where the relaxation of the
lower abdominal muscles at the breath mark will automatically allow the downward movement
of the diaphragm, which draws air back into the lungs.
Example 11. Eighth-note abdominal pulsing exercise.
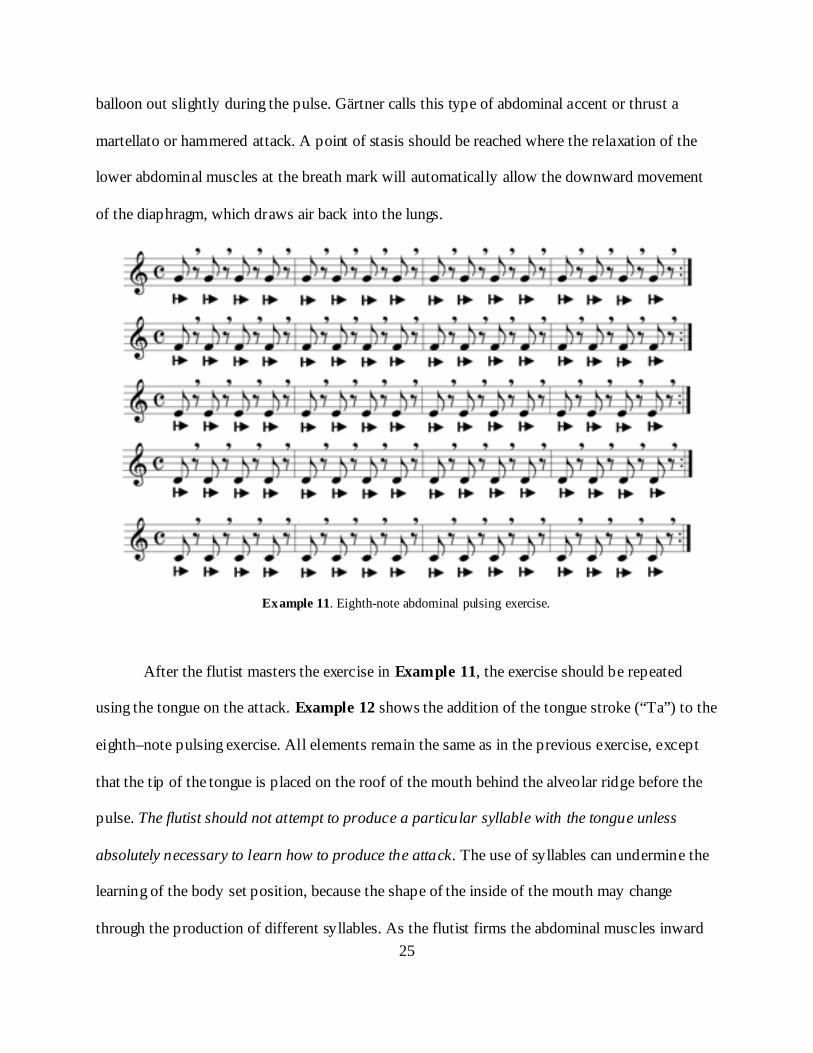
After the flutist masters the exercise in Example 11, the exercise should be repeated
using the tongue on the attack. Example 12 shows the addition of the tongue stroke (“Ta”) to the
eighth–note pulsing exercise. All elements remain the same as in the previous exercise, except
that the tip of the tongue is placed on the roof of the mouth behind the alveolar ridge before the
pulse. The flutist should not attempt to produce a particular syllable with the tongue unless
absolutely necessary to learn how to produce the attack. The use of syllables can undermine the
learning of the body set position, because the shape of the inside of the mouth may change
through the production of different syllables. As the flutist firms the abdominal muscles inward
26
to produce the air stream, the tongue is moved rapidly forward and down to the vocally neutral
position that it occupied in the previous example. It is also possible for the flutist to firm the
abdominal muscles inward before the attack in order to build the initial force of the air stream.
This should create a crisp attack with a minimal delay in the onset time of the note. Since the lips
are not affected in any way by the tongue, the sound quality should remain constant throughout
the pulsed note.
Example 12. Eighth-note pulsing exercise with tongue.
27
These exercises should be repeated using tongueless and tongued pulses on quarter, half,
and whole notes. As the duration of the note gets longer the flutist should take care to firm
inward with the lower abdominal muscles through the duration of each note.
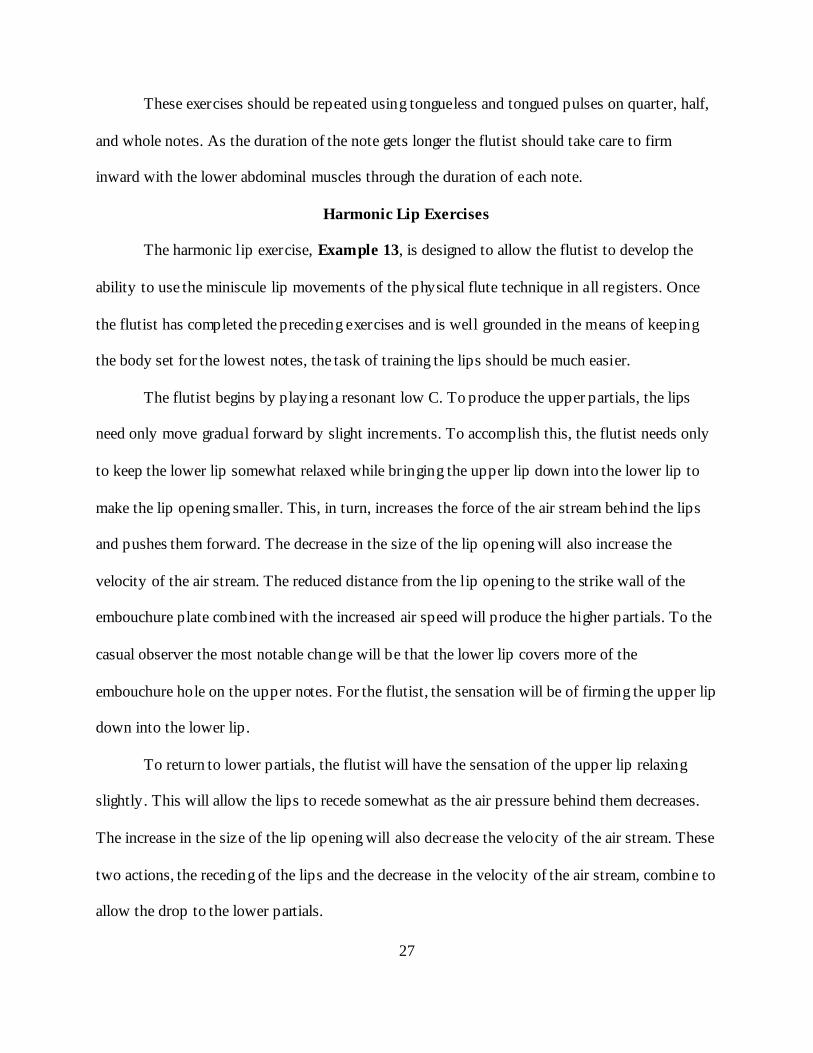
Harmonic Lip Exercises
The harmonic lip exercise, Example 13, is designed to allow the flutist to develop the
ability to use the miniscule lip movements of the physical flute technique in all registers. Once
the flutist has completed the preceding exercises and is well grounded in the means of keeping
the body set for the lowest notes, the task of training the lips should be much easier.
The flutist begins by playing a resonant low C. To produce the upper partials, the lips
need only move gradual forward by slight increments. To accomplish this, the flutist needs only
to keep the lower lip somewhat relaxed while bringing the upper lip down into the lower lip to
make the lip opening smaller. This, in turn, increases the force of the air stream behind the lips
and pushes them forward. The decrease in the size of the lip opening will also increase the
velocity of the air stream. The reduced distance from the lip opening to the strike wall of the
embouchure plate combined with the increased air speed will produce the higher partials. To the
casual observer the most notable change will be that the lower lip covers more of the
embouchure hole on the upper notes. For the flutist, the sensation will be of firming the upper lip
down into the lower lip.
To return to lower partials, the flutist will have the sensation of the upper lip relaxing
slightly. This will allow the lips to recede somewhat as the air pressure behind them decreases.
The increase in the size of the lip opening will also decrease the velocity of the air stream. These
two actions, the receding of the lips and the decrease in the velocity of the air stream, combine to
allow the drop to the lower partials.
28
Example 13. Complete six-partial harmonic lip exercise.

29
Developing the Embouchure though the Practice of Bugle Calls
The flutist can also use bugle calls to help train the lips to produce the small movements
that control register changes on the flute. Bugle calls are of necessity built upon the harmonic
series. The flutist should be capable of easily playing the first six notes, including the
fundamental, of the harmonic series based on the lowest notes of the flute, low B to low D.
Taps, perhaps the most well–known bugle call, provides a simple introduction to these
exercises. Example 14 uses the harmonic series built on low B. This example has only one
instance of the sixth partial—the high F#—so this example should be relatively easy to perform.
The flutist is reminded that there should be no movement of the throat or lower jaw while
playing these exercises. Only small motions of the lips should be used to move between partials.
Proper support should be maintained for all notes so that the flutist can concentrate solely on
developing the lips.
Example 14. Taps in B.
30
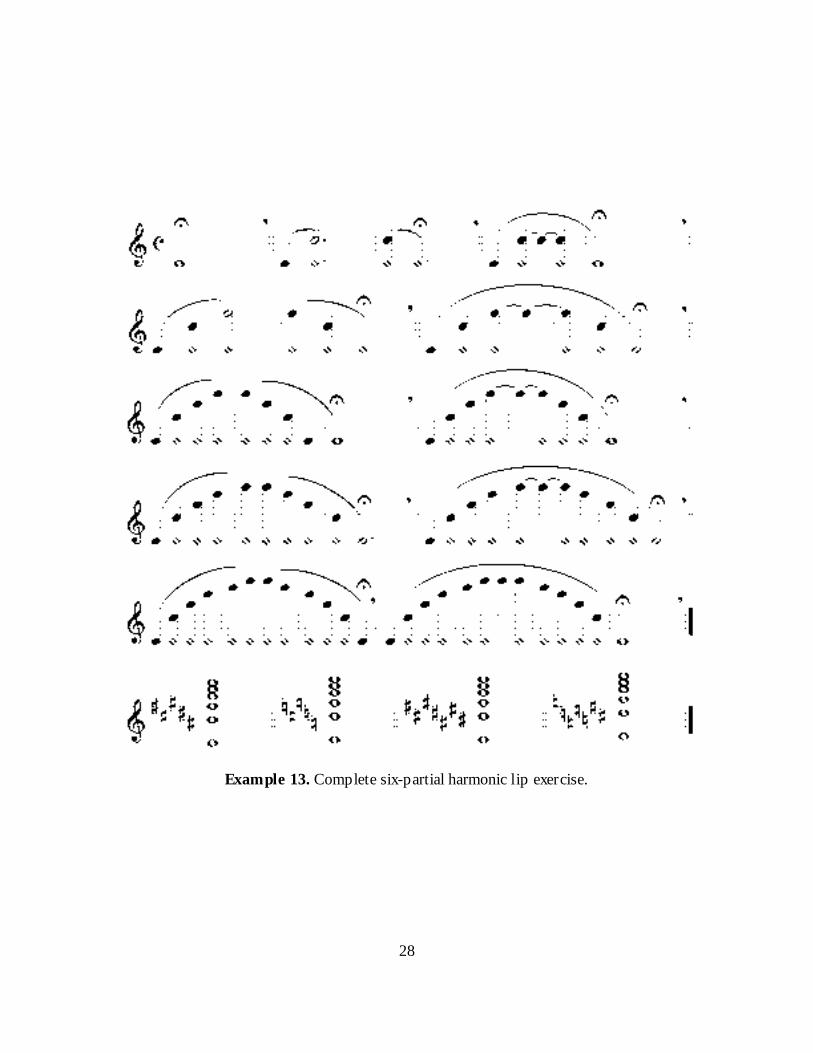
The following bugle call was used to call cadets to classes and is appropriately named
School. It can also be used as a relatively short and easy harmonic exercise. Example 15 shows
School as a harmonic exercise using low C as a fundamental note.
Example 15. School in C.
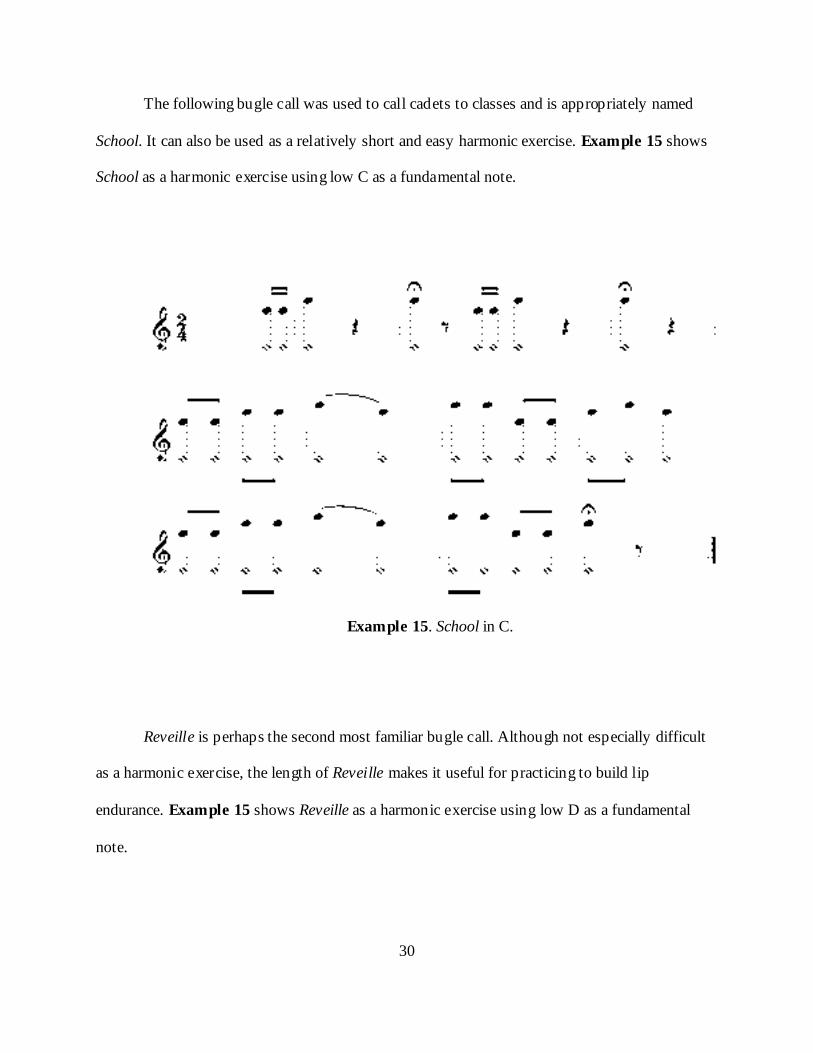
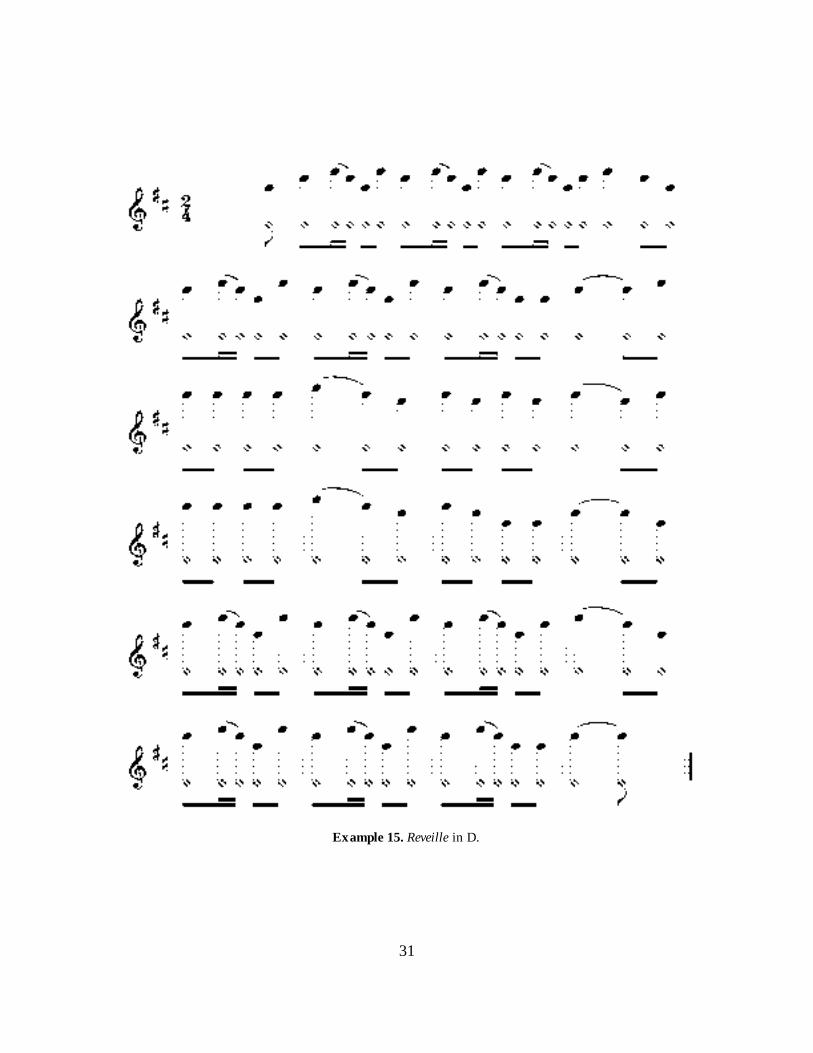
Reveille is perhaps the second most familiar bugle call. Although not especially difficult
as a harmonic exercise, the length of Reveille makes it useful for practicing to build lip
endurance. Example 15 shows Reveille as a harmonic exercise using low D as a fundamental
note.
31
Example 15. Reveille in D.
32
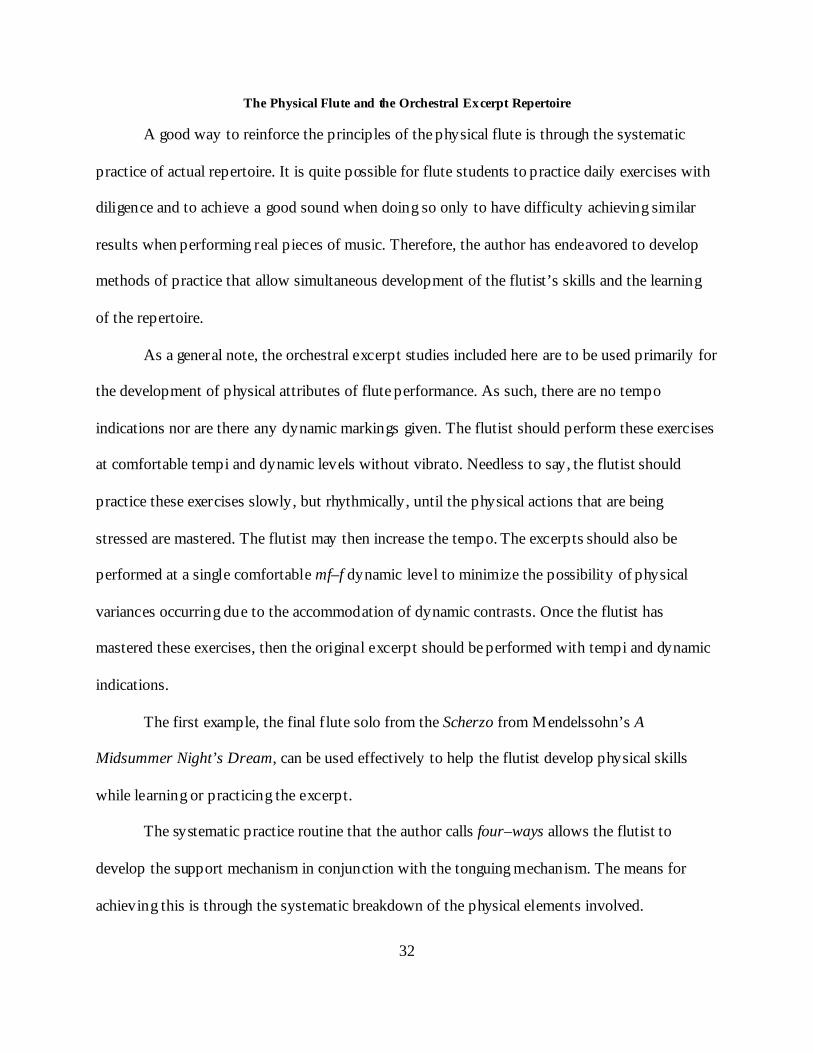
The Physical Flute and the Orchestral Excerpt Repertoire
A good way to reinforce the principles of the physical flute is through the systematic
practice of actual repertoire. It is quite possible for flute students to practice daily exercises with
diligence and to achieve a good sound when doing so only to have difficulty achieving similar
results when performing real pieces of music. Therefore, the author has endeavored to develop
methods of practice that allow simultaneous development of the flutist’s skills and the learning
of the repertoire.
As a general note, the orchestral excerpt studies included here are to be used primarily for
the development of physical attributes of flute performance. As such, there are no tempo
indications nor are there any dynamic markings given. The flutist should perform these exercises
at comfortable tempi and dynamic levels without vibrato. Needless to say, the flutist should
practice these exercises slowly, but rhythmically, until the physical actions that are being
stressed are mastered. The flutist may then increase the tempo. The excerpts should also be
performed at a single comfortable mf–f dynamic level to minimize the possibility of physical
variances occurring due to the accommodation of dynamic contrasts. Once the flutist has
mastered these exercises, then the original excerpt should be performed with tempi and dynamic
indications.
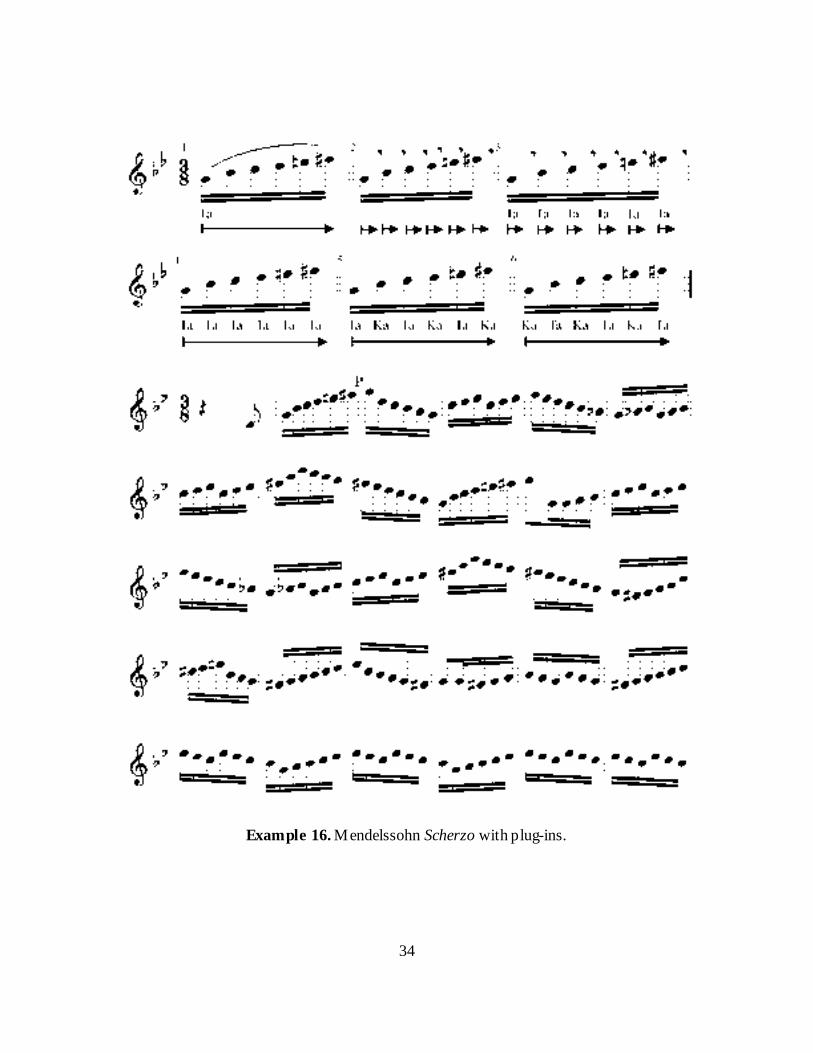
The first example, the final flute solo from the Scherzo from Mendelssohn’s A
Midsummer Night’s Dream, can be used effectively to help the flutist develop physical skills
while learning or practicing the excerpt.
The systematic practice routine that the author calls four–ways allows the flutist to
develop the support mechanism in conjunction with the tonguing mechanism. The means for
achieving this is through the systematic breakdown of the physical elements involved.

33
The four ways of practicing are:
1. The selection is slurred throughout, from breath to breath, while using constant support. 2. The selection is performed using abdominal pulses for each note without the use of the tongue. 3. The selection is performed using abdominal pulses and the tongue. 4. The selection is performed using the written articulation with constant support and regular tonguing. (In other music examples, slurs would again be performed).
The Mendelssohn Scherzo can also be used to practice double tonguing according to the
principles of the physical flute by adding two more means of practicing which aid the flutist in
developing doubled tonguing skills. The flutist is reminded that “Ta” and “Ka” indicate front and
back tongue strokes, not syllables per se.
5. The selection is performed using the double–tonguing articulation ta ka with constant support. 6. The selection is performed using the double–tonguing articulation ka ta with constant support. Example 16 shows a portion the Mendelssohn Scherzo excerpt with the plug–ins for the
six ways of practicing this example. The flutist should play the example at a comfortable tempo
in order to better control the physical processes involved. Again, the excerpt should be played at
a comfortable dynamic level to minimize the possibility of physical variance related to dynamic
contrast.
34
Example 16. Mendelssohn Scherzo with plug-ins.

35
The flute solo from Saint Saëns’s Volière also lends itself to the four–way (plus two)
method of practice. However, as the excerpt is placed over a wider tessitura, it becomes possible
to use harmonics for many of the notes in order to exercise the lips as well as the support and
tonguing mechanisms.
As with the harmonic exercises in Chapter 4, the upper partials are to be achieved
through the firming of the upper lip into the lower lip, which allows the lips to move forward
slightly. Playing lower partials after higher notes is achieved through the slight relaxation of the
upper lip, which allows the lips to move back somewhat and decreases the velocity of the air.
Example 17 shows a portion of Volière with the associated plug-ins.
Example 18. Saint Saëns’s Volière with plug-ins.
36
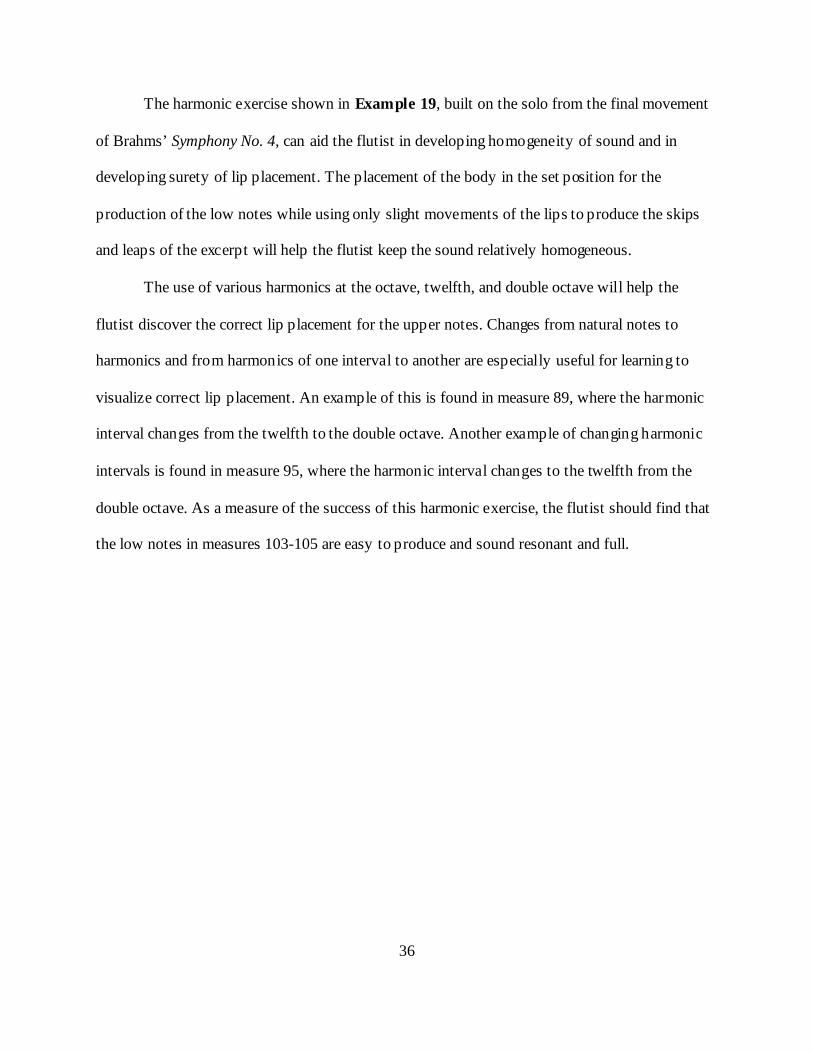
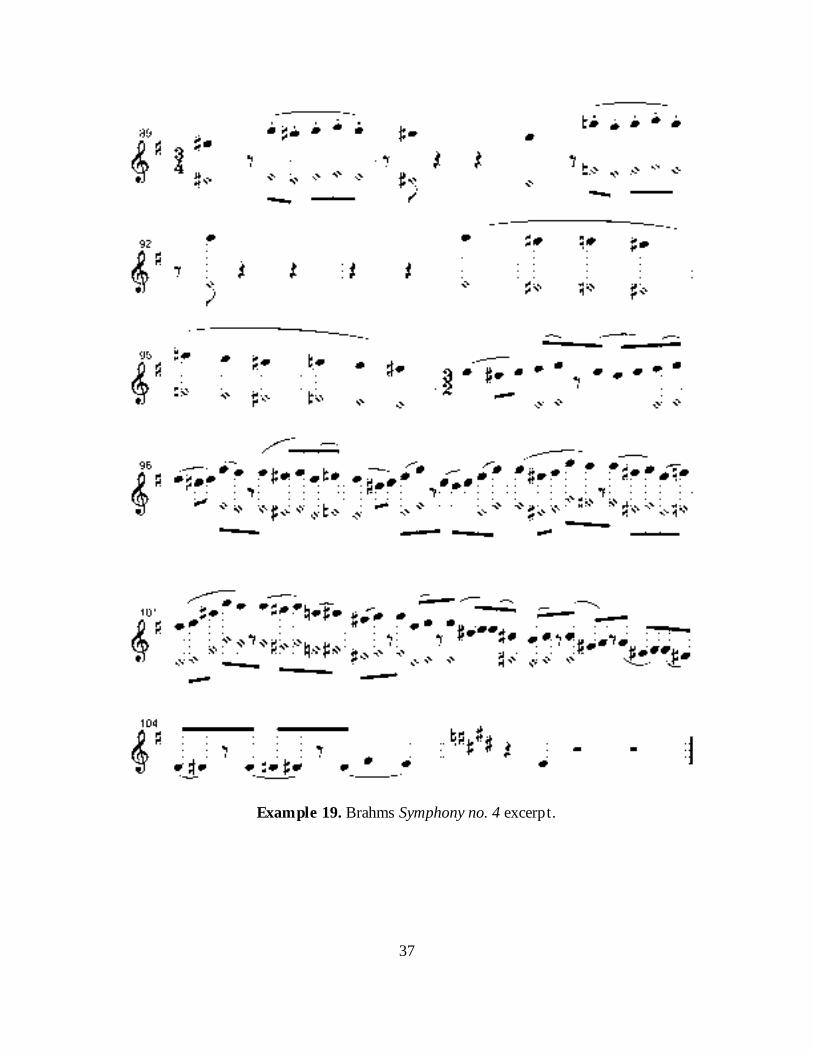
The harmonic exercise shown in Example 19, built on the solo from the final movement
of Brahms’ Symphony No. 4, can aid the flutist in developing homogeneity of sound and in
developing surety of lip placement. The placement of the body in the set position for the
production of the low notes while using only slight movements of the lips to produce the skips
and leaps of the excerpt will help the flutist keep the sound relatively homogeneous.
The use of various harmonics at the octave, twelfth, and double octave will help the
flutist discover the correct lip placement for the upper notes. Changes from natural notes to
harmonics and from harmonics of one interval to another are especially useful for learning to
visualize correct lip placement. An example of this is found in measure 89, where the harmonic
interval changes from the twelfth to the double octave. Another example of changing harmonic
intervals is found in measure 95, where the harmonic interval changes to the twelfth from the
double octave. As a measure of the success of this harmonic exercise, the flutist should find that
the low notes in measures 103-105 are easy to produce and sound resonant and full.
37
Example 19. Brahms Symphony no. 4 excerpt.
38
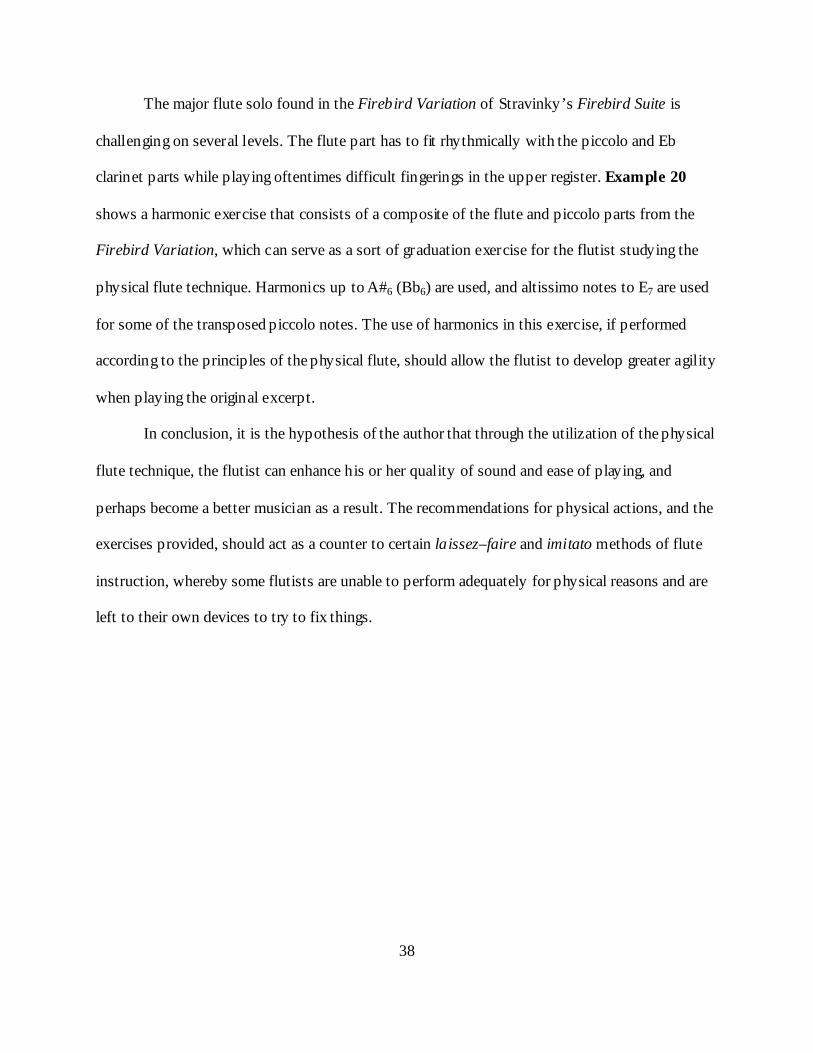
The major flute solo found in the Firebird Variation of Stravinky’s Firebird Suite is
challenging on several levels. The flute part has to fit rhythmically with the piccolo and Eb
clarinet parts while playing oftentimes difficult fingerings in the upper register. Example 20
shows a harmonic exercise that consists of a composite of the flute and piccolo parts from the
Firebird Variation, which can serve as a sort of graduation exercise for the flutist studying the
physical flute technique. Harmonics up to A#6 (Bb6) are used, and altissimo notes to E7 are used
for some of the transposed piccolo notes. The use of harmonics in this exercise, if performed
according to the principles of the physical flute, should allow the flutist to develop greater agility
when playing the original excerpt.
In conclusion, it is the hypothesis of the author that through the utilization of the physical
flute technique, the flutist can enhance his or her quality of sound and ease of playing, and
perhaps become a better musician as a result. The recommendations for physical actions, and the
exercises provided, should act as a counter to certain laissez–faire and imitato methods of flute
instruction, whereby some flutists are unable to perform adequately for physical reasons and are
left to their own devices to try to fix things.
39
Example 20. Stravinsky Firebird excerpt.


![New Iterative Methods for Interpolation, Numerical ... · and Aitken’s iterated interpolation formulas[11,12] are the most popular interpolation formulas for polynomial interpolation](https://img.pdfslide.us/doc/110x75/5ebfad147f604608c01bd287/new-iterative-methods-for-interpolation-numerical-and-aitkenas-iterated-interpolation.jpg)