Embed Size (px)
Citation preview
All rights reserved
No part of this document may be reproduced, stored in a retrieval system, or transmitted by any form or by any
means, electronic, mechanical, photocopying, recording, or otherwise, except as may be expressly permitted by the
applicable copyright statutes or in writing by the Publisher.
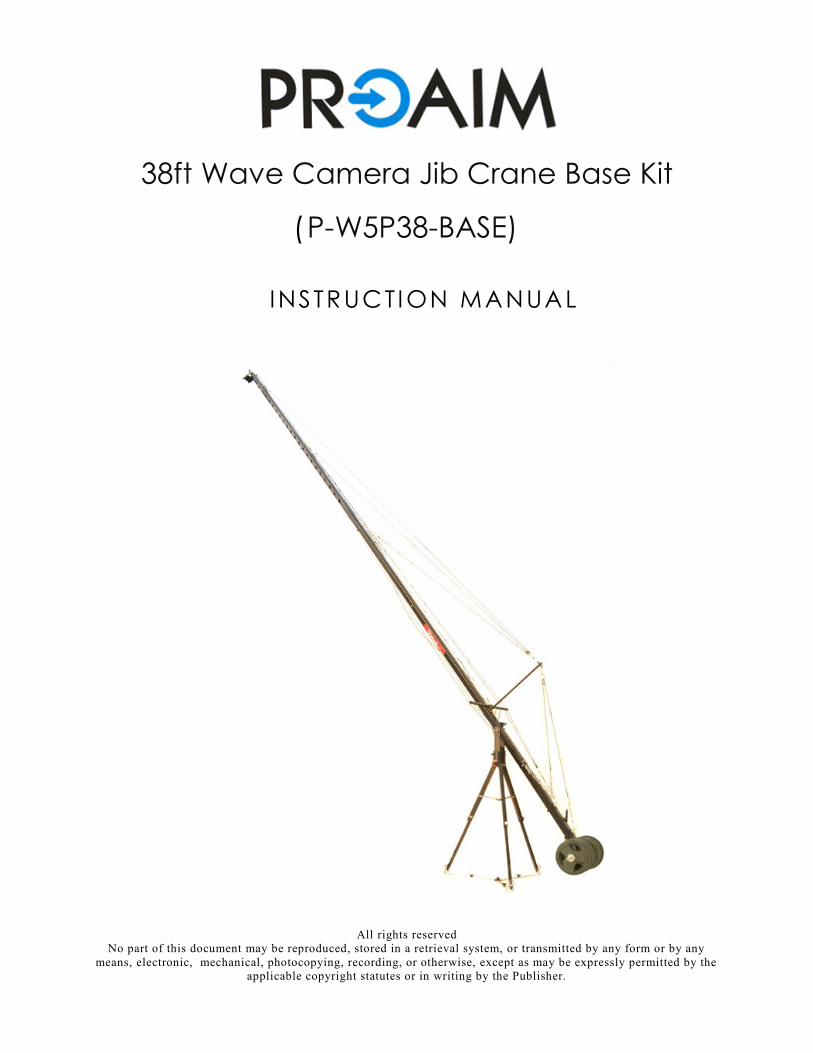
38ft Wave Camera Jib Crane Base Kit
(P-W5P38-BASE)
INSTRUCTION MANUAL
PROAIM 38ft BASE KIT 2
IT IS IMPORTANT THAT YOU READ AND UNDERSTAND THIS GUIDE BEFORE ATTEMPTING TO ASSEMBLE OR USE YOUR NEW PROAIM 38FT BASE KIT. SHOULD YOU NEED ADDITIONAL INFORMATION, TECHNICAL ASSISTANCE IS AVAILABLE ‘ON LINE' BY CONTACTING YOUR SALES REPRESENTATIVE.
INTRODUCTION From sweeping panoramas to intimate close ups in a single move, video crane shots have always added dramatic energy to enhance the field of view. Found at sporting events, music videos, TV series, Feature Films and studio productions, video crane shots turn ordinary into extraordinary.
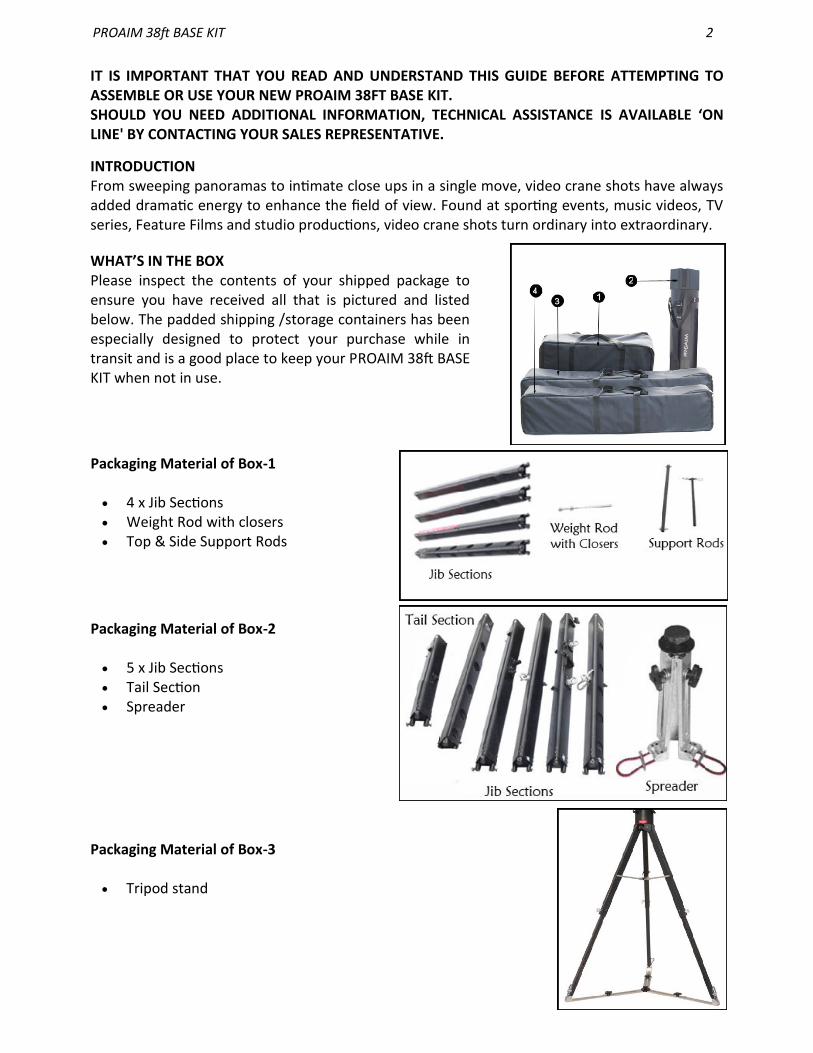
WHAT’S IN THE BOX Please inspect the contents of your shipped package to ensure you have received all that is pictured and listed below. The padded shipping /storage containers has been especially designed to protect your purchase while in transit and is a good place to keep your PROAIM 38ft BASE KIT when not in use.
Packaging Material of Box-1
4 x Jib Sections Weight Rod with closers Top & Side Support Rods
Packaging Material of Box-2
5 x Jib Sections Tail Section Spreader
Packaging Material of Box-3
Tripod stand
PROAIM 38ft BASE KIT 3
Please use following sequence of pictures and text in order they appear to set up your new PROAIM 38FT BASE KIT. Technical assistance is available by contacting our sales representa-tive.
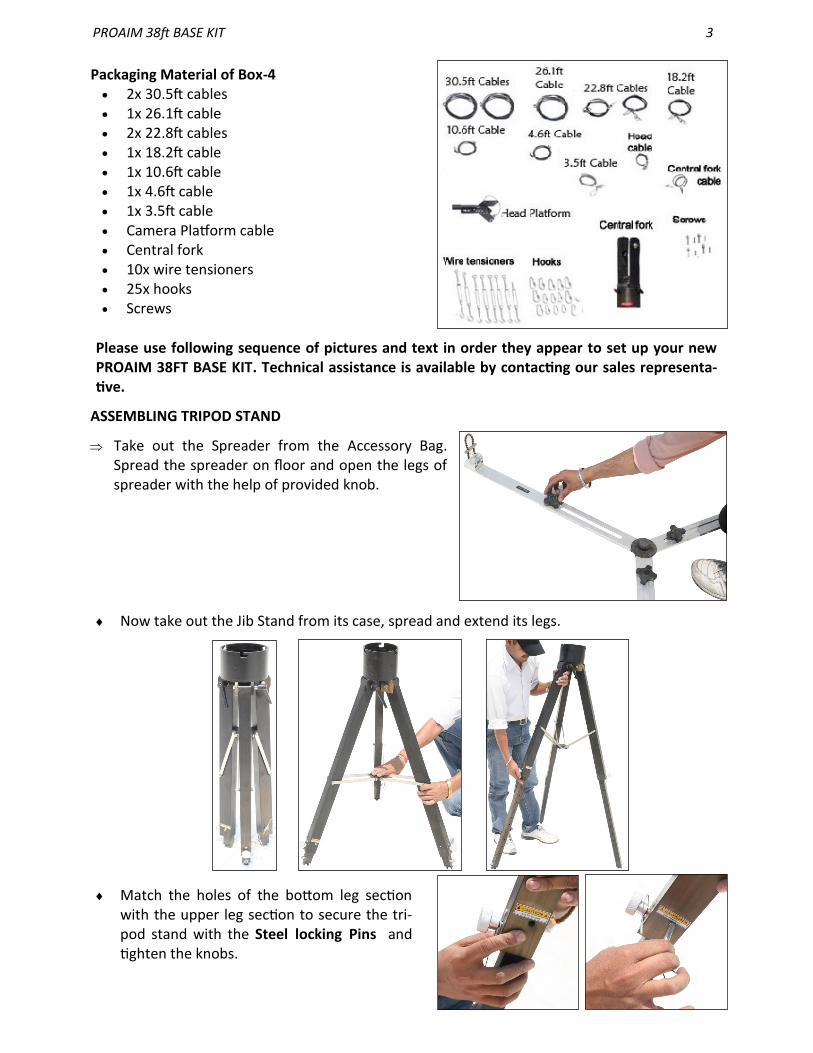
ASSEMBLING TRIPOD STAND
Take out the Spreader from the Accessory Bag. Spread the spreader on floor and open the legs of spreader with the help of provided knob.
Now take out the Jib Stand from its case, spread and extend its legs.
Match the holes of the bottom leg section with the upper leg section to secure the tri-pod stand with the Steel locking Pins and tighten the knobs.
Packaging Material of Box-4 2x 30.5ft cables 1x 26.1ft cable 2x 22.8ft cables 1x 18.2ft cable 1x 10.6ft cable 1x 4.6ft cable 1x 3.5ft cable Camera Platform cable Central fork 10x wire tensioners 25x hooks Screws
PROAIM 38ft BASE KIT 4
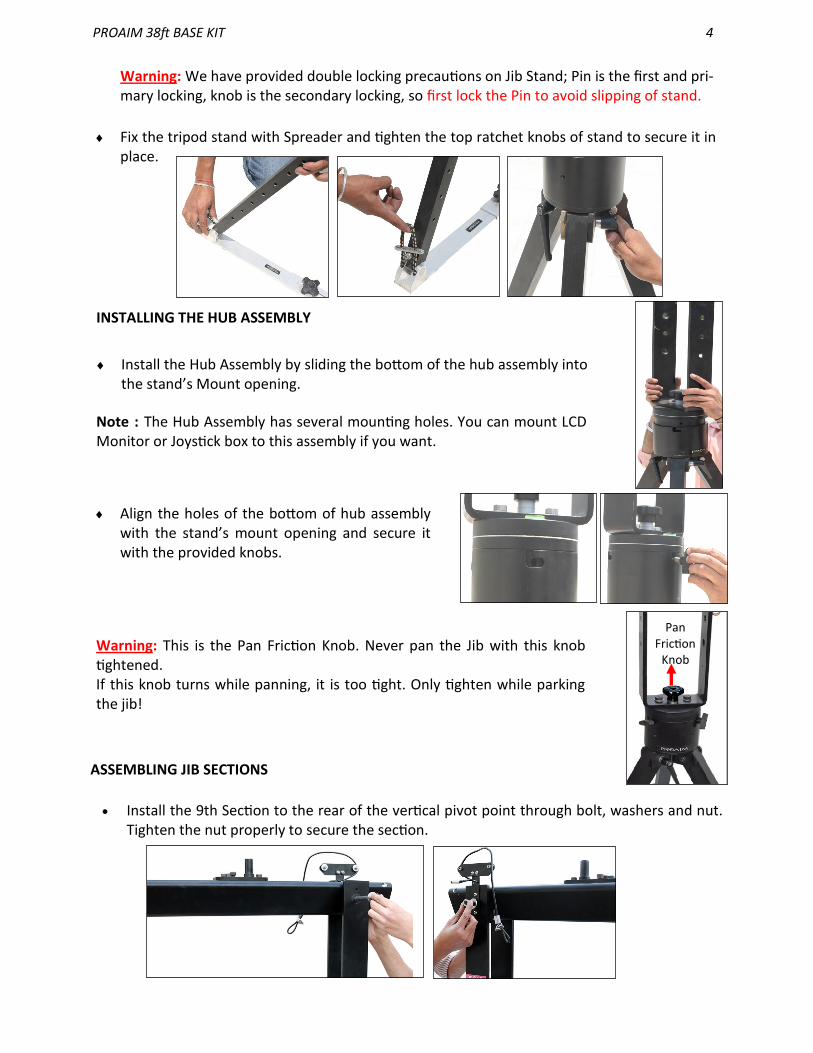
Install the 9th Section to the rear of the vertical pivot point through bolt, washers and nut. Tighten the nut properly to secure the section.
ASSEMBLING JIB SECTIONS
Warning: We have provided double locking precautions on Jib Stand; Pin is the first and pri-mary locking, knob is the secondary locking, so first lock the Pin to avoid slipping of stand.
Fix the tripod stand with Spreader and tighten the top ratchet knobs of stand to secure it in place.
Install the Hub Assembly by sliding the bottom of the hub assembly into the stand’s Mount opening.
Align the holes of the bottom of hub assembly with the stand’s mount opening and secure it with the provided knobs.
Warning: This is the Pan Friction Knob. Never pan the Jib with this knob tightened. If this knob turns while panning, it is too tight. Only tighten while parking the jib!
INSTALLING THE HUB ASSEMBLY
Pan Friction
Knob
Note : The Hub Assembly has several mounting holes. You can mount LCD Monitor or Joystick box to this assembly if you want.

PROAIM 38ft BASE KIT 5
Slide in (10th) section to the rear to join the 9th section. Install the Allen screws to the join-ing holes of both the sections and tighten.
Attach cable guide to cable guide clamp on 9th section properly. Loosen the bolts on cable guide clamp in order to attach cable guide support rod to it. Retighten the bolt.
Attach hooks to provided hook slots on all sections of the jib as shown below.
Using the same approach insert 8th, 7th and remaining sections to the joints and secure via bolts as shown below.
Cable guide Support rod
Then attach 2 hooks to the hook that you attached (as per above image) with 1st, 3rd and 1 hook to 5th section.
ASSEMBLING CABLE GUIDE AND ROD SUPPORT
PROAIM 38ft BASE KIT 6
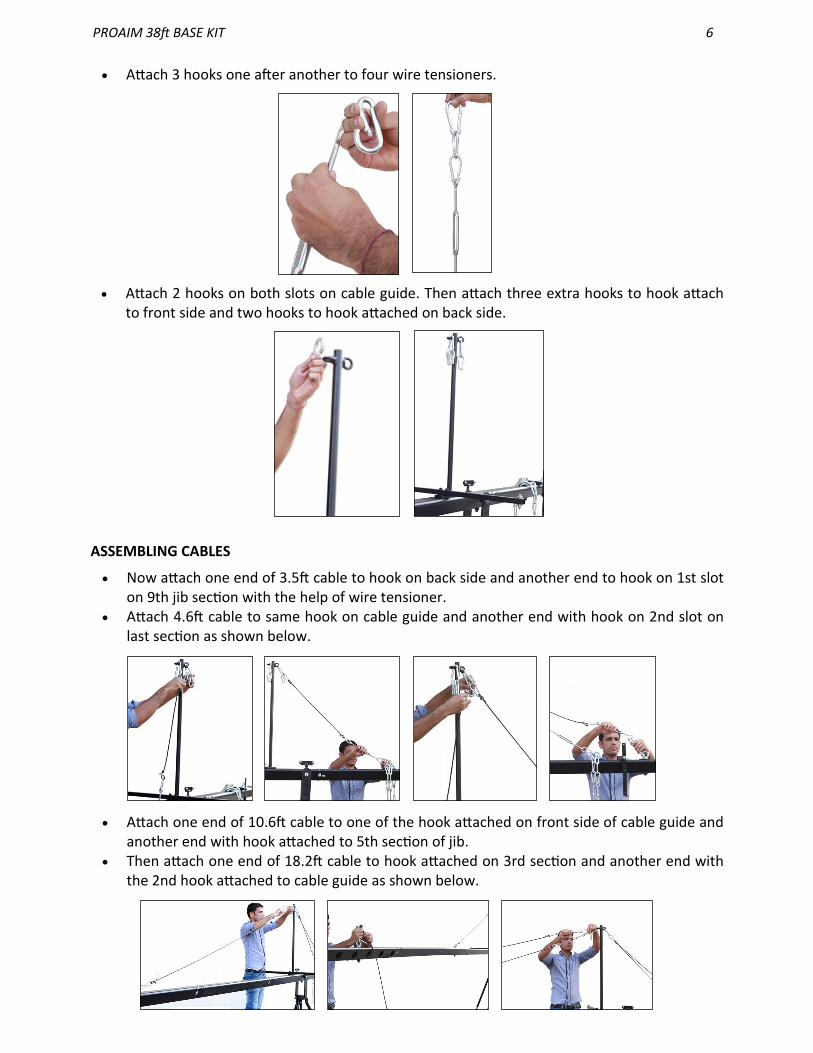
Attach 3 hooks one after another to four wire tensioners.
Attach one end of 10.6ft cable to one of the hook attached on front side of cable guide and another end with hook attached to 5th section of jib.
Then attach one end of 18.2ft cable to hook attached on 3rd section and another end with the 2nd hook attached to cable guide as shown below.
Attach 2 hooks on both slots on cable guide. Then attach three extra hooks to hook attach to front side and two hooks to hook attached on back side.
Now attach one end of 3.5ft cable to hook on back side and another end to hook on 1st slot on 9th jib section with the help of wire tensioner.
Attach 4.6ft cable to same hook on cable guide and another end with hook on 2nd slot on last section as shown below.
ASSEMBLING CABLES
PROAIM 38ft BASE KIT 7
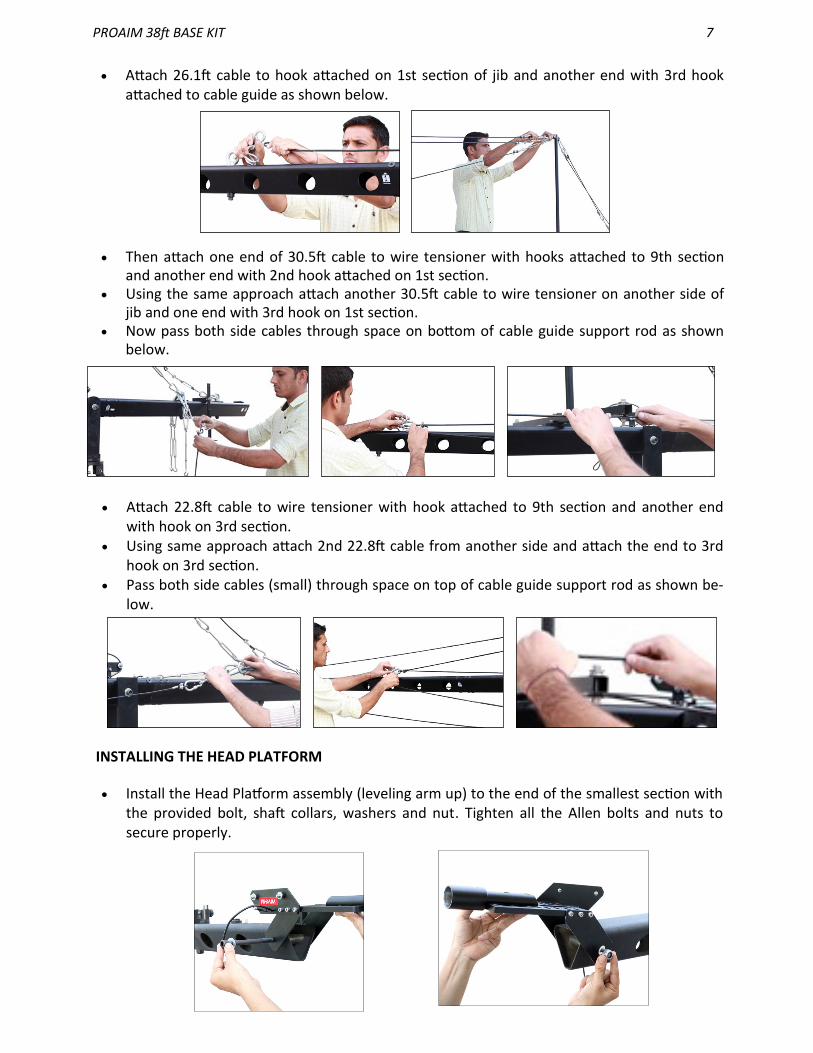
Attach 26.1ft cable to hook attached on 1st section of jib and another end with 3rd hook attached to cable guide as shown below.
Then attach one end of 30.5ft cable to wire tensioner with hooks attached to 9th section and another end with 2nd hook attached on 1st section.
Using the same approach attach another 30.5ft cable to wire tensioner on another side of jib and one end with 3rd hook on 1st section.
Now pass both side cables through space on bottom of cable guide support rod as shown below.
Attach 22.8ft cable to wire tensioner with hook attached to 9th section and another end with hook on 3rd section.
Using same approach attach 2nd 22.8ft cable from another side and attach the end to 3rd hook on 3rd section.
Pass both side cables (small) through space on top of cable guide support rod as shown be-low.
Install the Head Platform assembly (leveling arm up) to the end of the smallest section with the provided bolt, shaft collars, washers and nut. Tighten all the Allen bolts and nuts to secure properly.
INSTALLING THE HEAD PLATFORM
PROAIM 38ft BASE KIT 8
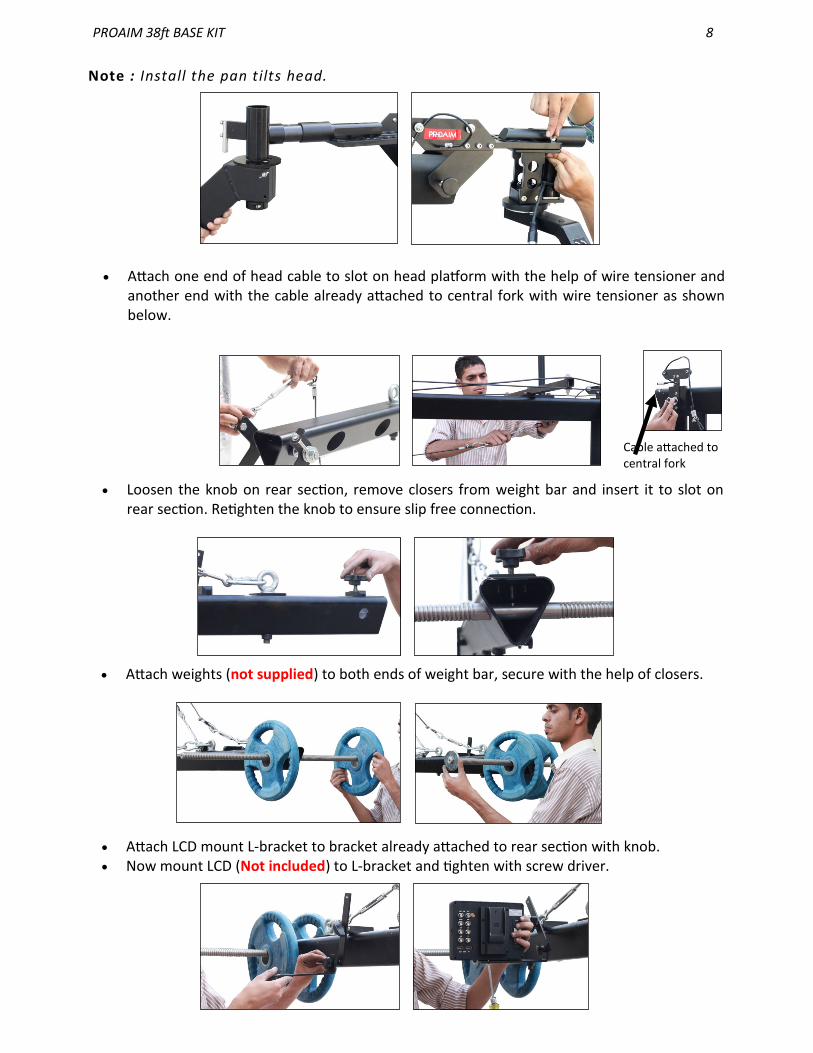
Attach one end of head cable to slot on head platform with the help of wire tensioner and another end with the cable already attached to central fork with wire tensioner as shown below.
Cable attached to central fork
Attach weights (not supplied) to both ends of weight bar, secure with the help of closers.
Attach LCD mount L-bracket to bracket already attached to rear section with knob. Now mount LCD (Not included) to L-bracket and tighten with screw driver.
Loosen the knob on rear section, remove closers from weight bar and insert it to slot on rear section. Retighten the knob to ensure slip free connection.
Note : Install the pan tilts head.

PROAIM 38ft BASE KIT 9
YOUR PROAIM 38ft BASE KIT
ALL DRESSED UP AND READY TO GO
(SHOWN WITH OTPIONAL ACCESSORIES)
WARRANTY We offer a one year warranty for our products from the date of purchase. We will repair or replace your product, free of charge, in the event of a defect in materials or craftsmanship obtained during normal use or handling based on the user manual. Please note that we will not cover any shipping costs for returning the product to us. If any VAT or import du-ties are applied to the return, we will also charge these costs to the customer.
Note: You can attach pan tilt (not included) to base of head platform through screws, bolts and nuts.

PROAIM 38ft BASE KIT 10
The warranty does not include, by the way of example, damage caused by products that we do-not supply or from mishandling in transit, accident, misuse, neglect, lack of care of the product , or service by anyone other than our company. We are not liable for incidental or consequential damages resulting from the use of the unit or occurring due to any breach of this warranty. Replacement parts of the product will be provided at nominal cost (covering the cost price of the replacement parts only) to the customers after the Warranty Period has expired. We will cover the complete cost of sending replacement parts within the warranty period. After that, Nominal cost of the product & Actual shipping cost will be charged. Do not send the unit to us without first getting a response and getting the approval to send back the item. In case of any kind of dissatisfaction, we urge you to Contact us immediately and we shall do our best to help you out. For any other assistance you can reach us via email.