Embed Size (px)
Citation preview

309637Rev. C
INSTRUCTIONS
SG3 Airless Spray Gun
– For applying architectural paints and coatings –
3600 psi (248 bar, 25 MPa) Maximum Working Pressure
246389, AReversible Tip Guard, 413 Tip
GRACO INC. P.O. BOX 1441 MINNEAPOLIS, MN 55440–1441Graco Inc. is registered to I.S. EN ISO 9001
2 309637
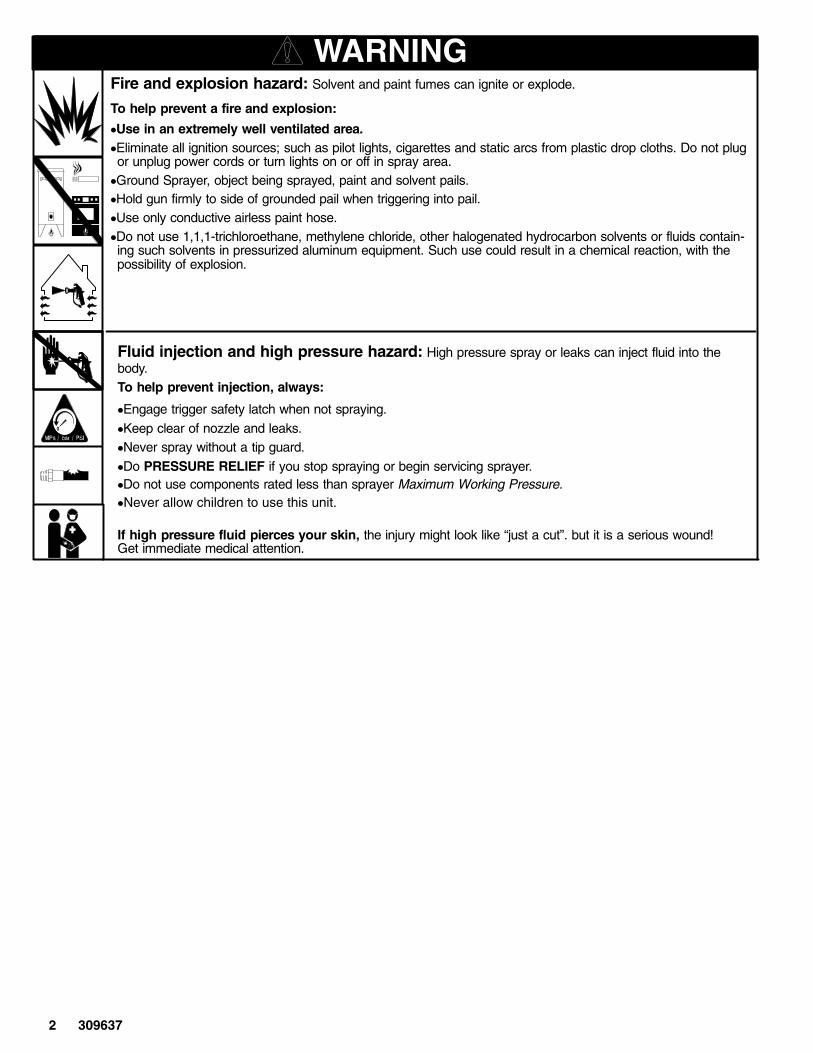
Fire and explosion hazard: Solvent and paint fumes can ignite or explode.
To help prevent a fire and explosion:
�Use in an extremely well ventilated area.�Eliminate all ignition sources; such as pilot lights, cigarettes and static arcs from plastic drop cloths. Do not plugor unplug power cords or turn lights on or off in spray area.
�Ground Sprayer, object being sprayed, paint and solvent pails.�Hold gun firmly to side of grounded pail when triggering into pail.�Use only conductive airless paint hose.�Do not use 1,1,1-trichloroethane, methylene chloride, other halogenated hydrocarbon solvents or fluids contain-ing such solvents in pressurized aluminum equipment. Such use could result in a chemical reaction, with thepossibility of explosion.
WARNING
Fluid injection and high pressure hazard: High pressure spray or leaks can inject fluid into thebody.To help prevent injection, always:
�Engage trigger safety latch when not spraying.�Keep clear of nozzle and leaks.�Never spray without a tip guard.�Do PRESSURE RELIEF if you stop spraying or begin servicing sprayer.�Do not use components rated less than sprayer Maximum Working Pressure.�Never allow children to use this unit.
If high pressure fluid pierces your skin, the injury might look like “just a cut”. but it is a serious wound!Get immediate medical attention.
WARNING
3309637
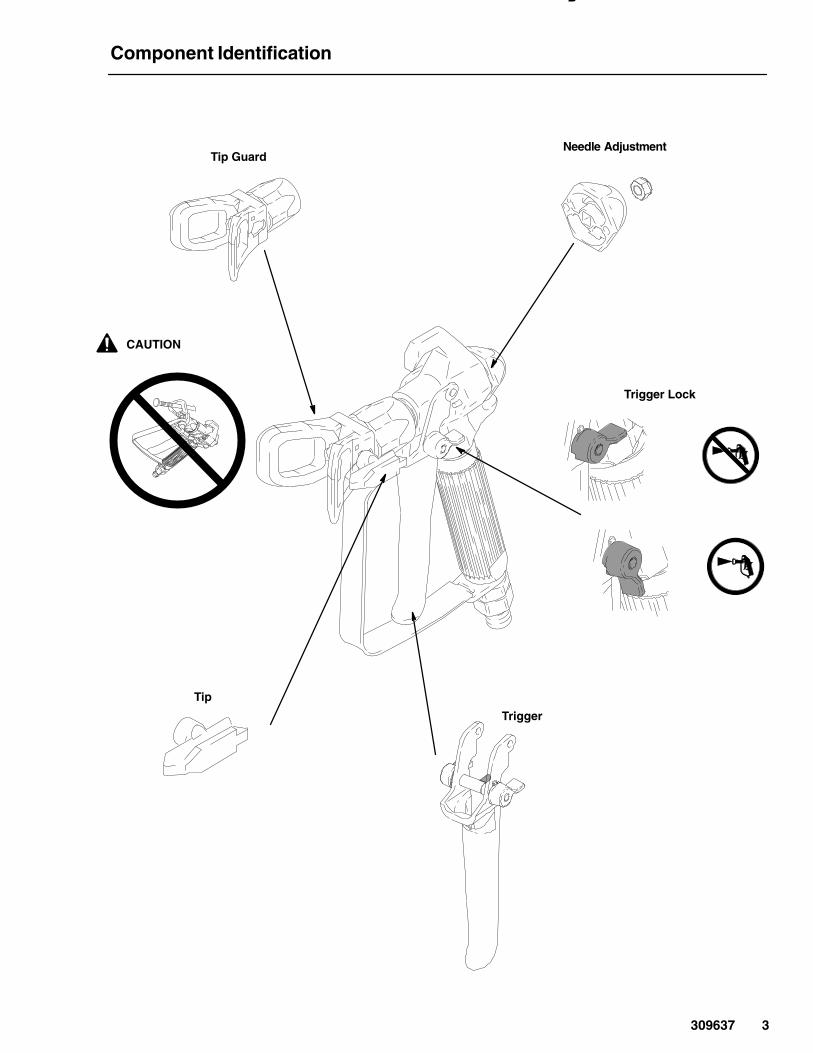
Component Identification
D
Needle Adjustment
Trigger
Tip
Trigger Lock
Tip Guard
CAUTION
4 309637
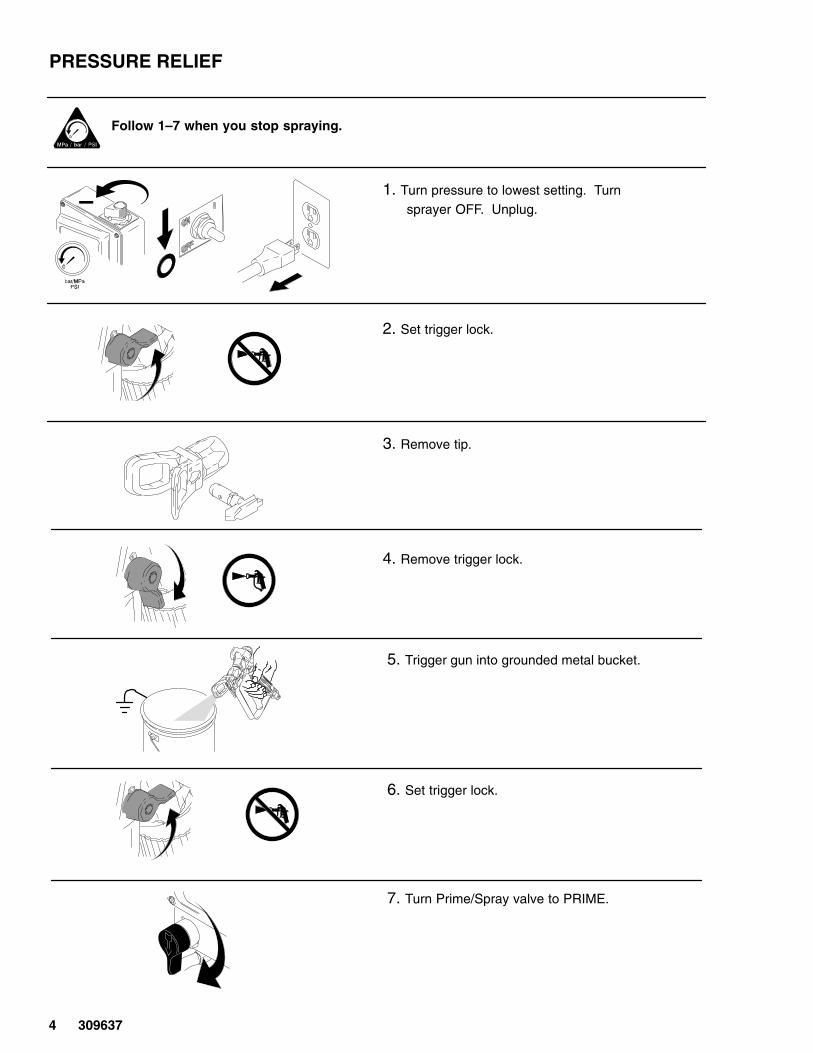
1. Turn pressure to lowest setting. Turnsprayer OFF. Unplug.
2. Set trigger lock.
PRESSURE RELIEF
3. Remove tip.
4. Remove trigger lock.
Follow 1–7 when you stop spraying.
5. Trigger gun into grounded metal bucket.
6. Set trigger lock.
7. Turn Prime/Spray valve to PRIME.
5309637
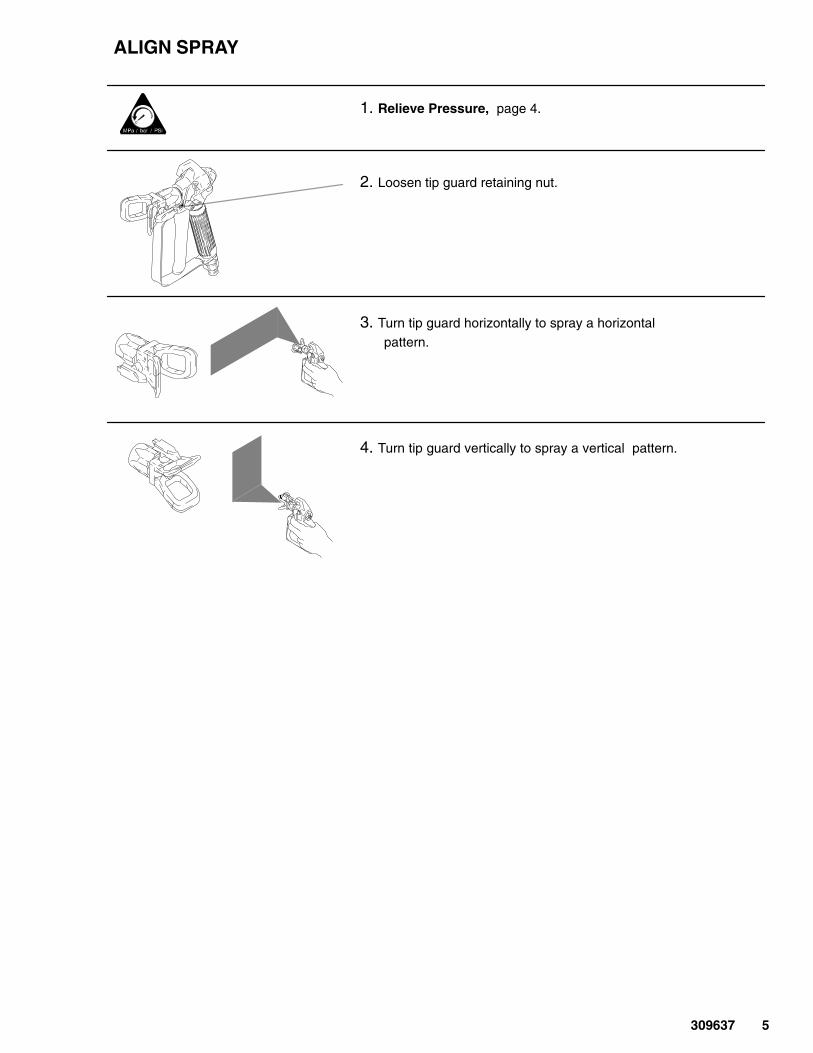
1. Relieve Pressure, page 4.
2. Loosen tip guard retaining nut.
ALIGN SPRAY
3. Turn tip guard horizontally to spray a horizontalpattern.
4. Turn tip guard vertically to spray a vertical pattern.
6 309637
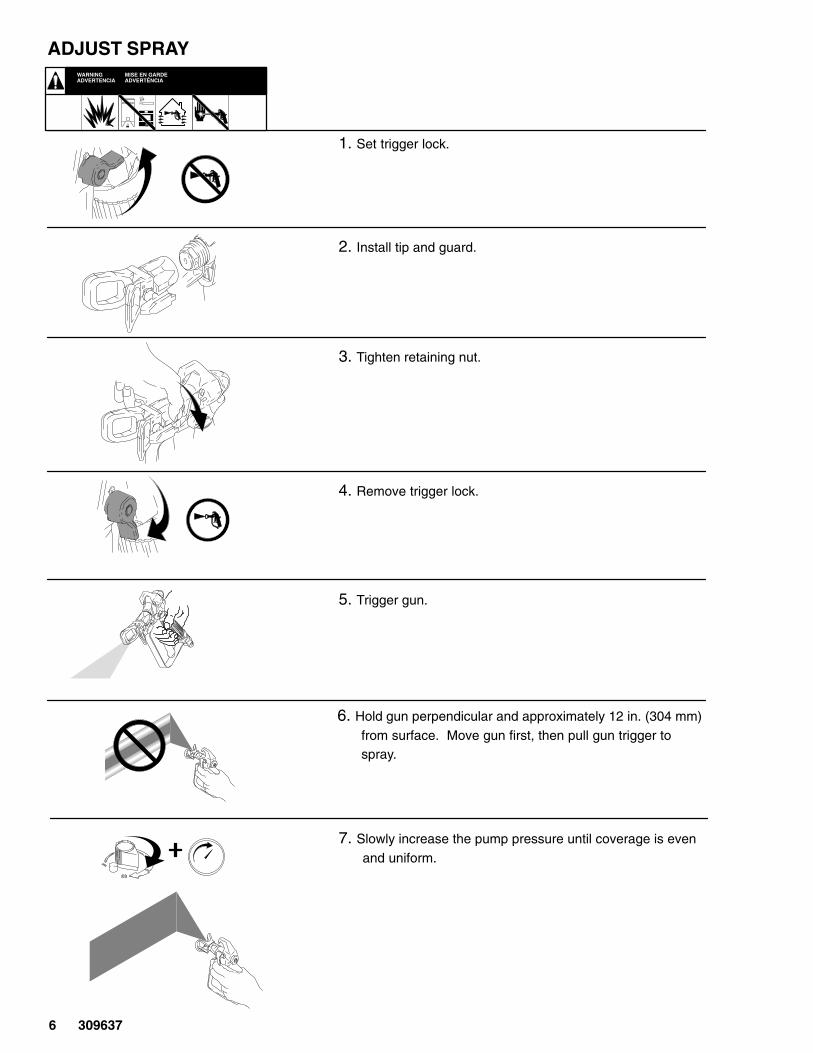
1. Set trigger lock.
2. Install tip and guard.
ADJUST SPRAYWARNING MISE EN GARDEADVERTENCIA ADVERTÊNCIA
3. Tighten retaining nut.
4. Remove trigger lock.
5. Trigger gun.
6. Hold gun perpendicular and approximately 12 in. (304 mm)from surface. Move gun first, then pull gun trigger tospray.
7. Slowly increase the pump pressure until coverage is evenand uniform.
7309637
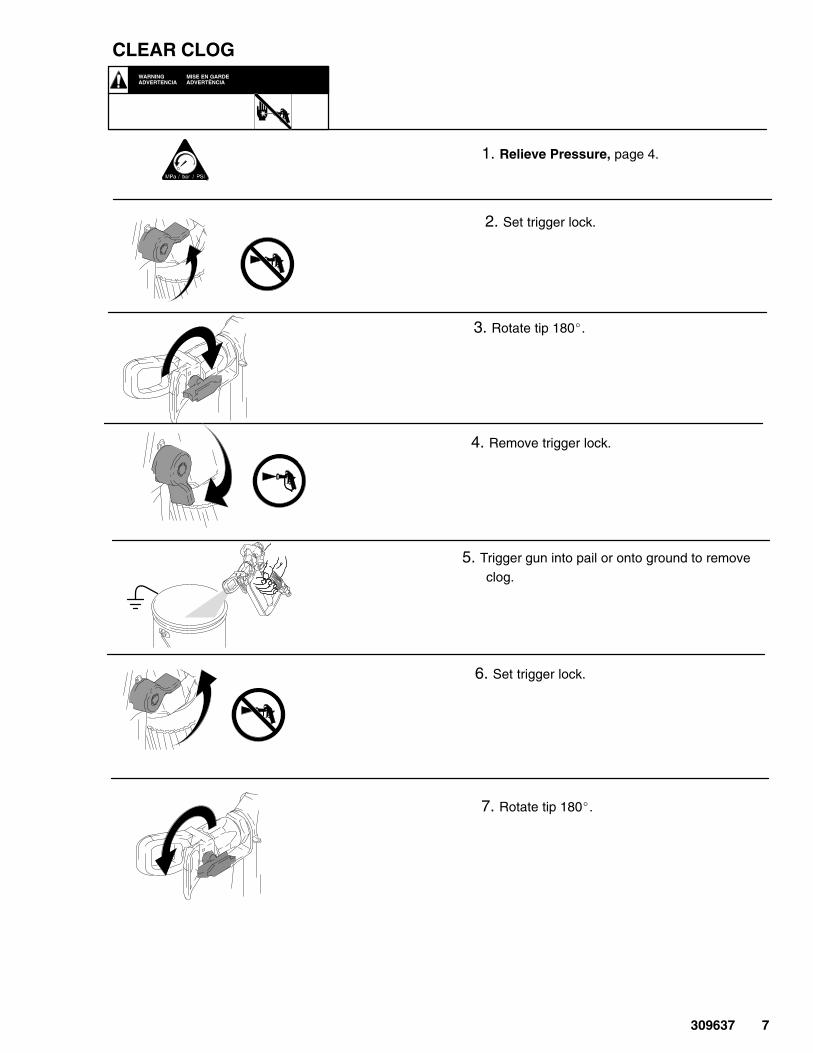
1. Relieve Pressure, page 4.
2. Set trigger lock.
3. Rotate tip 180�.
CLEAR CLOGWARNING MISE EN GARDEADVERTENCIA ADVERTÊNCIA
4. Remove trigger lock.
5. Trigger gun into pail or onto ground to removeclog.
6. Set trigger lock.
7. Rotate tip 180�.
8 309637
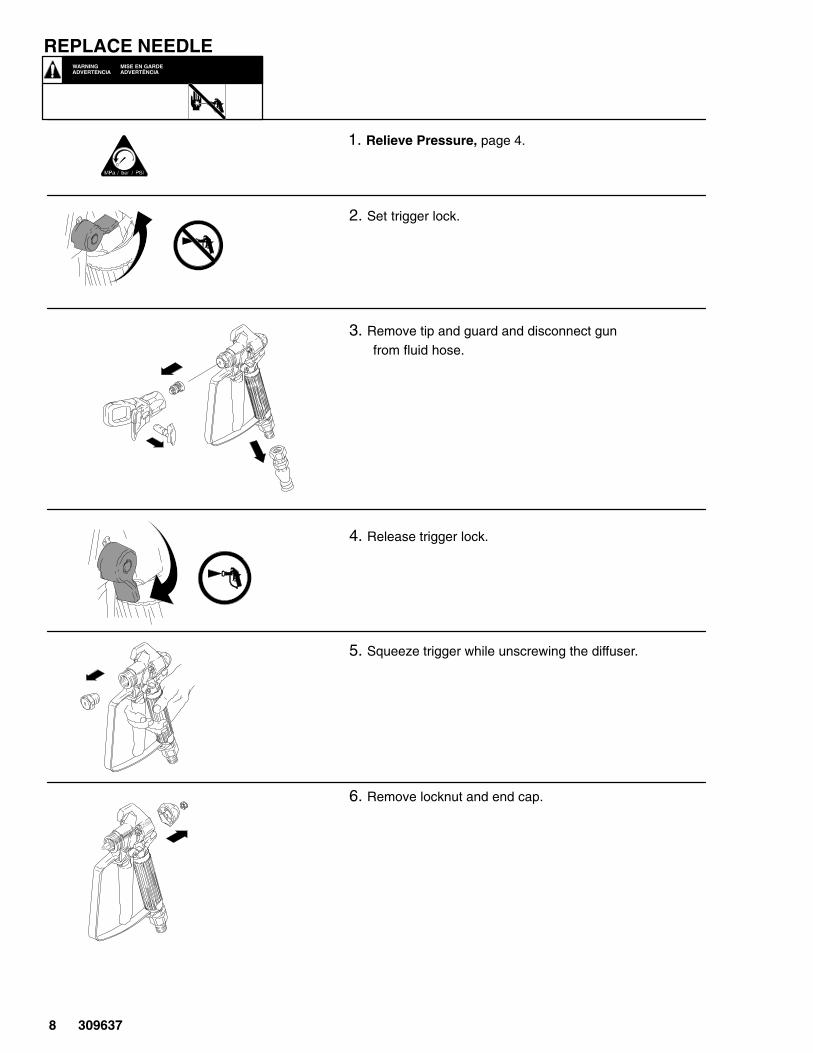
1. Relieve Pressure, page 4.
2. Set trigger lock.
3. Remove tip and guard and disconnect gunfrom fluid hose.
WARNING MISE EN GARDEADVERTENCIA ADVERTÊNCIA
4. Release trigger lock.
REPLACE NEEDLE
5. Squeeze trigger while unscrewing the diffuser.
6. Remove locknut and end cap.
9309637
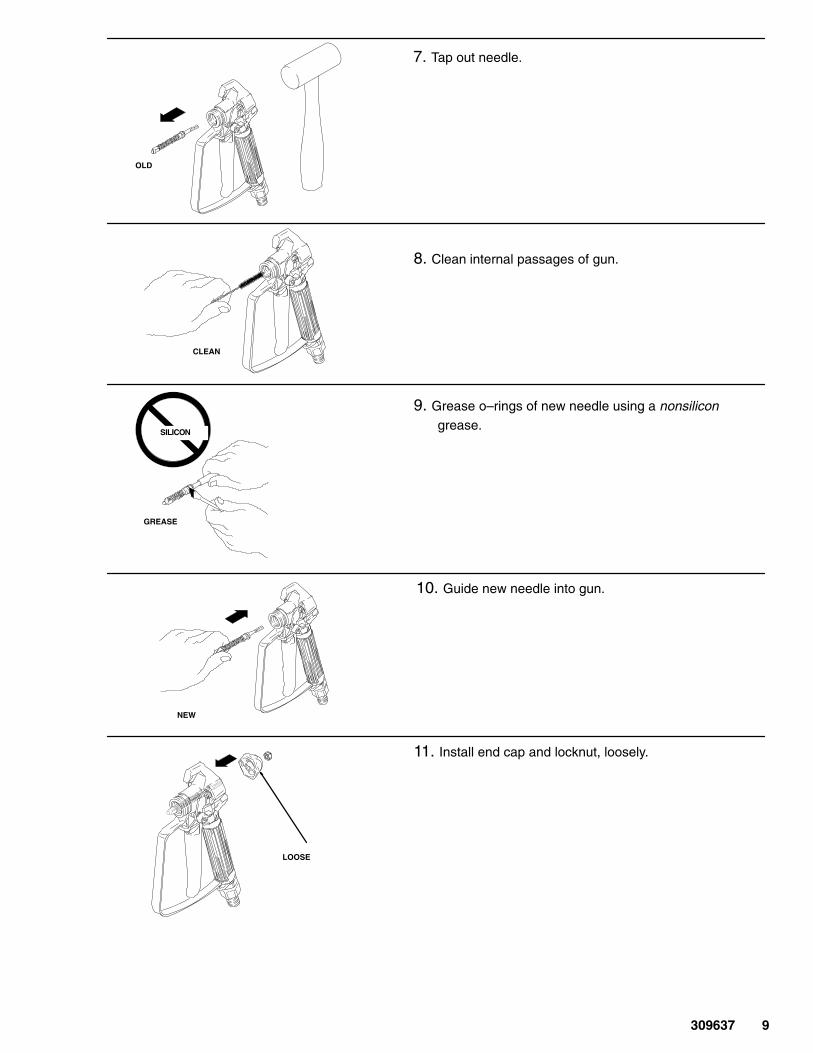
7. Tap out needle.
OLD
CLEAN
8. Clean internal passages of gun.
GREASE
SILICON
9. Grease o–rings of new needle using a nonsilicongrease.
NEW
10. Guide new needle into gun.
LOOSE
11. Install end cap and locknut, loosely.
10 309637
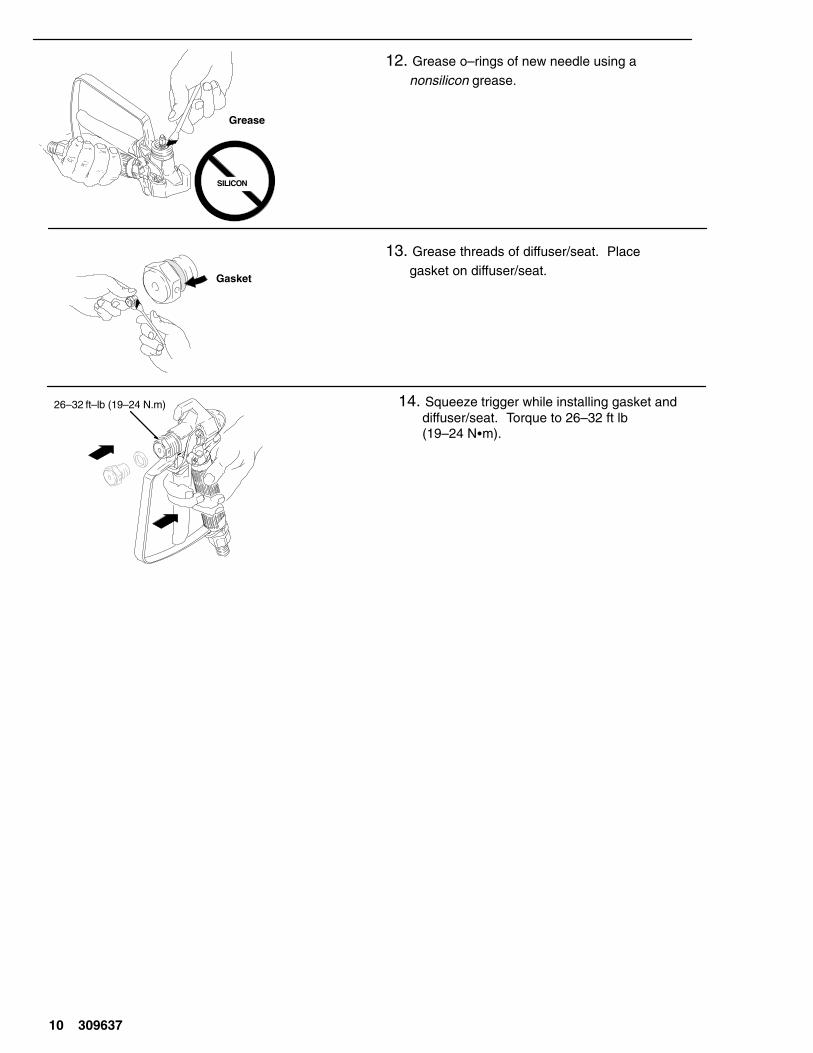
12. Grease o–rings of new needle using anonsilicon grease.
13. Grease threads of diffuser/seat. Placegasket on diffuser/seat.
Grease
Gasket
14. Squeeze trigger while installing gasket anddiffuser/seat. Torque to 26–32 ft lb(19–24 N�m).
26–32 ft–lb (19–24 N.m)
SILICON

11309637
1. Hold gun with nozzle straight up.
2. Turn locknut clockwise until you see and feel triggerraise slightly.
3. Turn locknut 3/4 turn counterclockwise.
NOTE: When needle is properly adjusted,trigger will move freely.
ADJUST NEEDLE
3/4 Turn
4. Connect fluid hose, install tip and guard.
5. Prime Sprayer, see sprayer manual.
6. Trigger gun into grounded metal bucket until fluidflows from gun.
12 309637
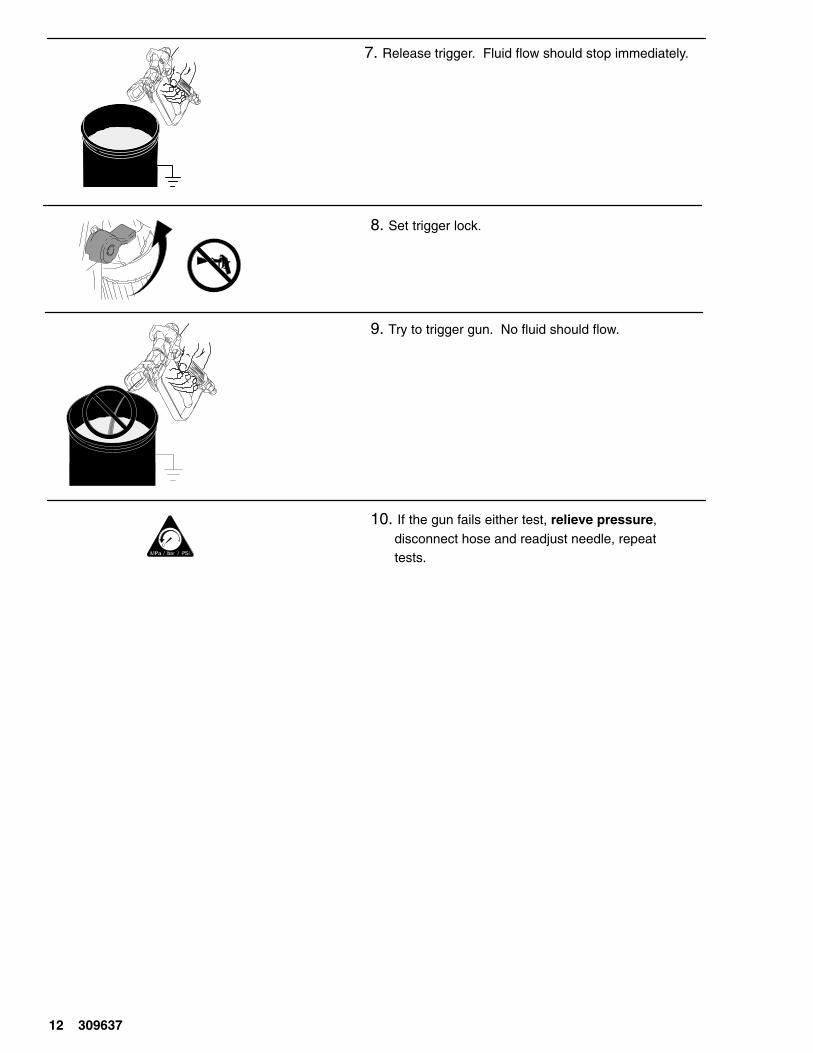
7. Release trigger. Fluid flow should stop immediately.
8. Set trigger lock.
9. Try to trigger gun. No fluid should flow.
10. If the gun fails either test, relieve pressure,disconnect hose and readjust needle, repeattests.
13309637
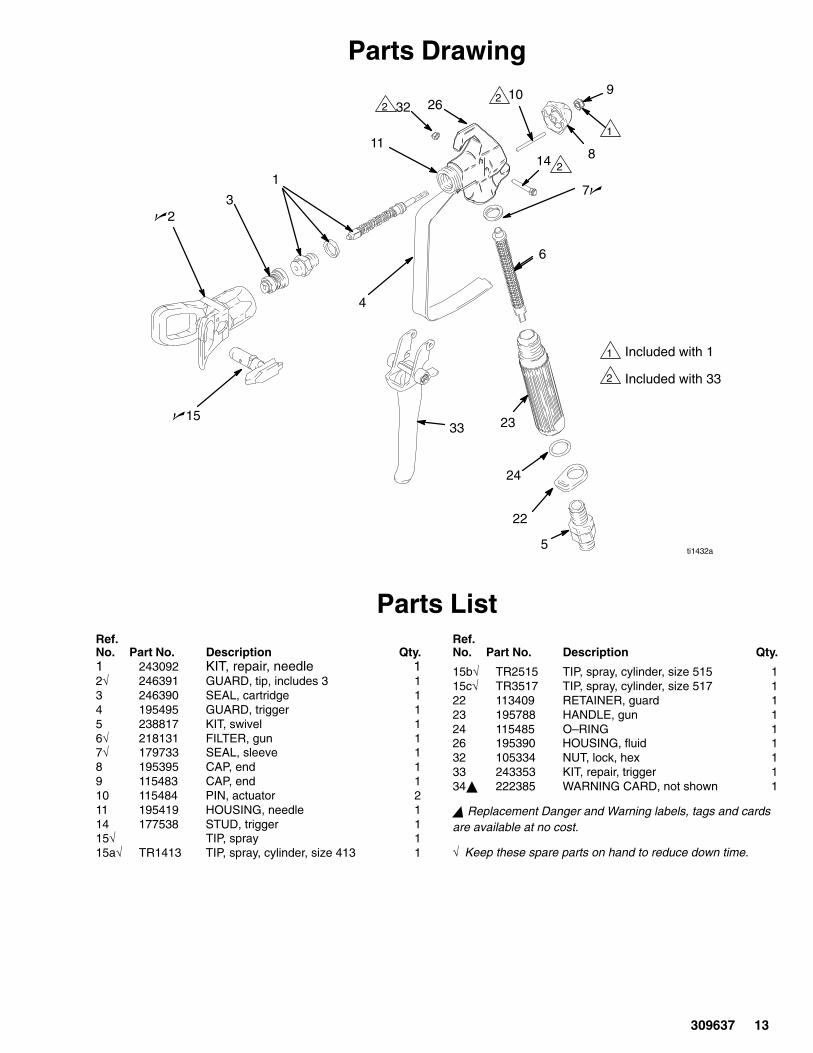
Parts Drawing
6
ti1432a
�2
�1533
22
8
7�
26
1
Included with 1
23
24
5
10
3
2
2
Included with 33
1
1
32
14
22
11
4
9
Parts ListRef.No. Part No. Description Qty.1 243092 KIT, repair, needle 12√ 246391 GUARD, tip, includes 3 13 246390 SEAL, cartridge 14 195495 GUARD, trigger 15 238817 KIT, swivel 16√ 218131 FILTER, gun 17√ 179733 SEAL, sleeve 18 195395 CAP, end 19 115483 CAP, end 110 115484 PIN, actuator 211 195419 HOUSING, needle 114 177538 STUD, trigger 115√ TIP, spray 115a√ TR1413 TIP, spray, cylinder, size 413 1
Ref.No. Part No. Description Qty.
15b√ TR2515 TIP, spray, cylinder, size 515 115c√ TR3517 TIP, spray, cylinder, size 517 122 113409 RETAINER, guard 123 195788 HANDLE, gun 124 115485 O–RING 126 195390 HOUSING, fluid 132 105334 NUT, lock, hex 133 243353 KIT, repair, trigger 134� 222385 WARNING CARD, not shown 1
� Replacement Danger and Warning labels, tags and cardsare available at no cost.
√ Keep these spare parts on hand to reduce down time.
14 309637
The Graco Warranty and DisclaimersGraco warrants all equipment referenced in this document which is manufactured by Graco and bearing its name to be free fromdefects in material and workmanship on the date of sale to the original purchaser for use. With the exception of any special, extended,or limited warranty published by Graco, Graco will, for a period of twelve months from the date of sale, repair or replace any part of theequipment determined by Graco to be defective. This warranty applies only when the equipment is installed, operated and maintainedin accordance with Graco’s written recommendations.
This warranty does not cover, and Graco shall not be liable for general wear and tear, or any malfunction, damage or wear caused byfaulty installation, misapplication, abrasion, corrosion, inadequate or improper maintenance, negligence, accident, tampering, or sub-stitution of non–Graco component parts. Nor shall Graco be liable for malfunction, damage or wear caused by the incompatibility ofGraco equipment with structures, accessories, equipment or materials not supplied by Graco, or the improper design, manufacture,installation, operation or maintenance of structures, accessories, equipment or materials not supplied by Graco.
This warranty is conditioned upon the prepaid return of the equipment claimed to be defective to an authorized Graco distributor forverification of the claimed defect. If the claimed defect is verified, Graco will repair or replace free of charge any defective parts. Theequipment will be returned to the original purchaser transportation prepaid. If inspection of the equipment does not disclose any defectin material or workmanship, repairs will be made at a reasonable charge, which charges may include the costs of parts, labor, andtransportation.
THIS WARRANTY IS EXCLUSIVE, AND IS IN LIEU OF ANY OTHER WARRANTIES, EXPRESS OR IMPLIED, INCLUDING BUTNOT LIMITED TO WARRANTY OF MERCHANTABILITY OR WARRANTY OF FITNESS FOR A PARTICULAR PURPOSE.
Graco’s sole obligation and buyer’s sole remedy for any breach of warranty shall be as set forth above. The buyer agrees that no otherremedy (including, but not limited to, incidental or consequential damages for lost profits, lost sales, injury to person or property, or anyother incidental or consequential loss) shall be available. Any action for breach of warranty must be brought within two (2) years of thedate of sale.
GRACO MAKES NO WARRANTY, AND DISCLAIMS ALL IMPLIED WARRANTIES OF MERCHANTABILITY AND FITNESS FORA PARTICULAR PURPOSE, IN CONNECTION WITH ACCESSORIES, EQUIPMENT, MATERIALS OR COMPONENTS SOLDBUT NOT MANUFACTURED BY GRACO. These items sold, but not manufactured by Graco (such as electric motors, switches,hose, etc.), are subject to the warranty, if any, of their manufacturer. Graco will provide purchaser with reasonable assistance in mak-ing any claim for breach of these warranties.
In no event will Graco be liable for indirect, incidental, special or consequential damages resulting from Graco supplying equipmenthereunder, or the furnishing, performance, or use of any products or other goods sold hereto, whether due to a breach of contract,breach of warranty, the negligence of Graco, or otherwise.
FOR GRACO CANADA CUSTOMERSThe parties acknowledge that they have required that the present document, as well as all documents, notices and legal proceedingsentered into, given or instituted pursuant hereto or relating directly or indirectly hereto, be drawn up in English. Les parties reconnais-sent avoir convenu que la rédaction du présente document sera en Anglais, ainsi que tous documents, avis et procédures judiciairesexécutés, donnés ou intentés à la suite de ou en rapport, directement ou indirectement, avec les procedures concernées.
All written and visual data contained in this document reflects the latest product information available at the time of publication.Graco reserves the right to make changes at any time without notice.
Sales Office: MinneapolisInternational Offices: Belgium, Korea, Hong Kong, Japan
GRACO INC. P.O. BOX 1441 MINNEAPOLIS, MN 55440–1441PRINTED IN U.S.A. 39637 10/2002, Revised 10/2004