Embed Size (px)
Citation preview

Market offering: Oracle package TechnologiesPackage(s): OracleAuthor: Ajay Kumar TadakamadalaDate: January 21, 2013
Whitepaper:Oracle Web ADI
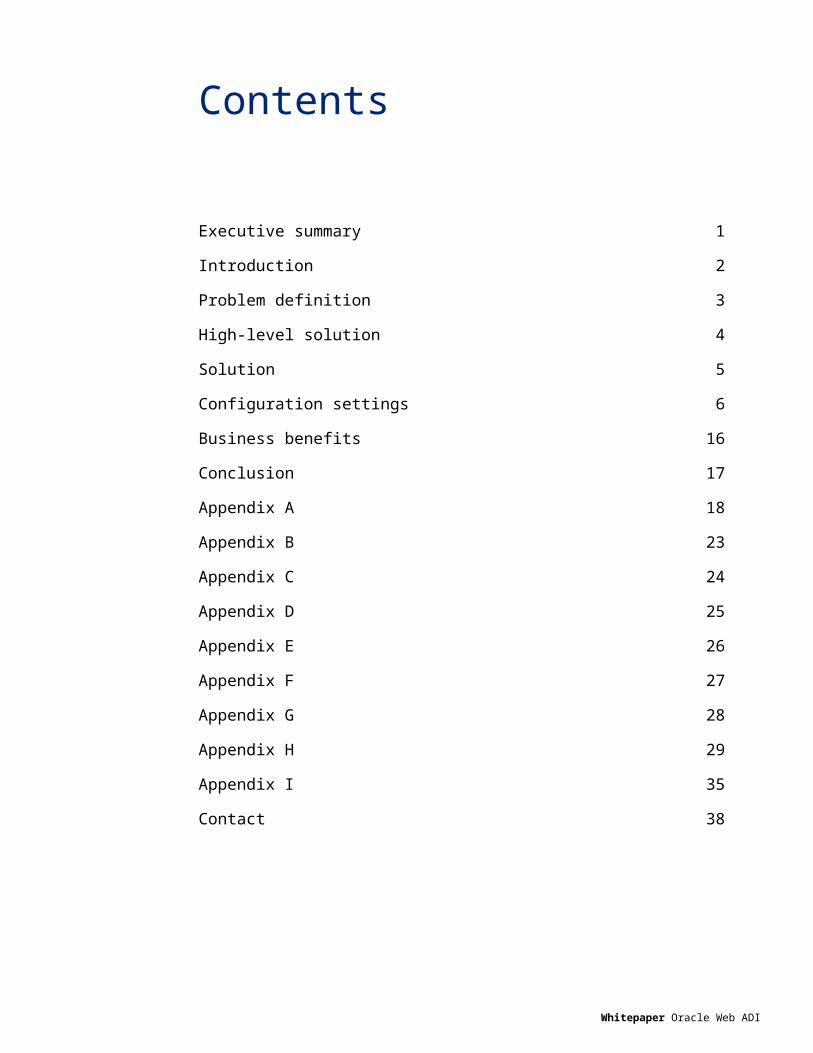
Contents
Executive summary 1
Introduction 2
Problem definition 3
High-level solution 4
Solution 5
Configuration settings 6
Business benefits 16
Conclusion 17
Appendix A 18
Appendix B 23
Appendix C 24
Appendix D 25
Appendix E 26
Appendix F 27
Appendix G 28
Appendix H 29
Appendix I 35
Contact 38
Whitepaper Oracle Web ADI
Contact
Executive summary
Oracle E-Business Suite has a powerful desktop integration tool known as Oracle Web Applications Desktop Integrator, often called as Web ADI. Oracle Web ADI is a framework that provides Oracle E-Business Suite integration with desktop utilities like Excel, Word, and Project.
Web ADI allows data to be uploaded and downloaded from Oracle E-Business Suite using desktop applications. Oracle E-Business Suite has about 150+ out-of-box Web ADIs across many modules. Users can create custom integrators to load data into interface or staging tables using Excel or Word.
This white paper includes:
1. Explain features available in Oracle Web ADI.
2. How business needs are satisfied with Oracle Web ADI.
3. Different ways to build custom Web ADI.
Whitepaper Oracle Web ADI 1
Contact
Introduction
Oracle Web ADI is a standard tool provided with Oracle E-Business Suites for integrating Oracle E-Business Suite applications with desktop applications, such as Microsoft Excel. “Integrators” encapsulate the metadata and include information such as interface tables, validations, business rules needed to integrate a particular Oracle E-Business Suite with desktop applications.
Oracle Web ADI is a design-time framework that you can use to create custom integrators and customize the existing integrator for Oracle Web ADI in Oracle E-Business Suite.
Oracle E-Business Suite applications has about 150+ seeded integrators to load data into Oracle Interface tables. You can use the Oracle Web ADI to define custom integrators for data integration.
Some key features of Oracle Web ADI are:
Wizard based User Interface (UI)
Support for embedded UI widgets in Excel
– List of Values (LOV)
– Date Pickers
– Flexfields
Development tool for custom desktop integrations
Secured as E-Business Suite application
Custom Oracle Web ADI can be developed to enable you to load data from a spreadsheet into the Oracle applications and invoke custom programs as required, e.g., the creation of invoices, upload HR data.
Whitepaper Oracle Web ADI 2
Contact
Problem definition
Business was using a legacy system for Payable invoices and wanted a tool for validating and importing invoices from business user desktops.
To ease of use and enhance productivity, business users used Oracle Web ADI.
Business requirements that led to use Oracle Web ADI:
1. Business had large amount invoices to import in Oracle E-Business Suite in every batch. They wanted a tool which can validate and import data from Excel files into Oracle E-Business Suite in cost-effective way.
2. They are mainly two categories of Accounts Payable (AP) users. First category of AP users should be able to only validate the excel data using any tool, and another category of AP users should be able to validate and import AP invoices from Excel to Oracle E-Business Suite from their desktops.
3. Tool should invoke “Payables Open Interface Import” concurrent program after entire set of data is populated into Oracle Interface tables.
4. Accounting Key Flexfield values to be displayed as part of LOV to have the user enter the valid distribution accounting segment values.
5. Currency code values to be displayed as part of LOV to have the user enter valid currency code.
Whitepaper Oracle Web ADI 3
Contact
High-level solution
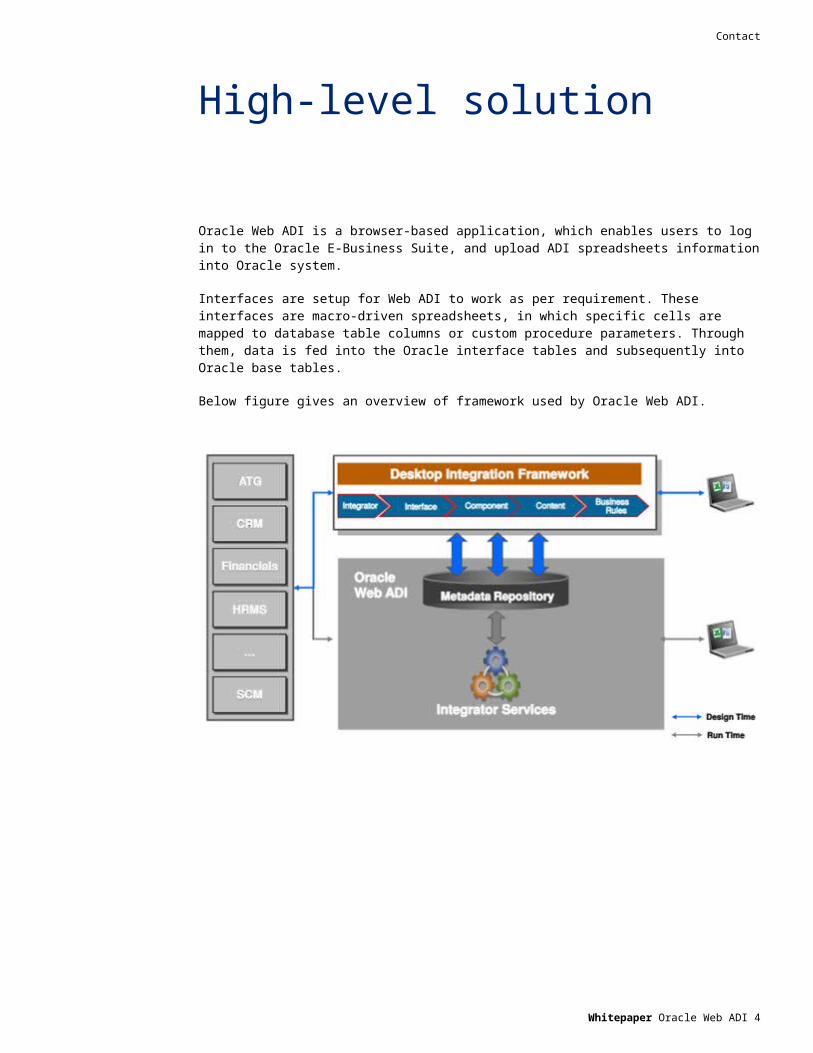
Oracle Web ADI is a browser-based application, which enables users to log in to the Oracle E-Business Suite, and upload ADI spreadsheets information into Oracle system.
Interfaces are setup for Web ADI to work as per requirement. These interfaces are macro-driven spreadsheets, in which specific cells are mapped to database table columns or custom procedure parameters. Through them, data is fed into the Oracle interface tables and subsequently into Oracle base tables.
Below figure gives an overview of framework used by Oracle Web ADI.
Whitepaper Oracle Web ADI 4
Contact
Solution
Requirement 1:To validate and import large amount invoices into Oracle E-Business Suite in each batch, Web ADI is designed. Using Web ADI, an excel document can be downloaded. Users can easily write invoices data into the downloaded excel document even off-line. Later, data is uploaded into using add-ins provided in downloaded excel. Web ADI calls a procedure which will validate the data and insert data into Oracle interface tables.
Requirement 2:
They are mainly two categories of AP users. First category of AP users should be able to only validate the excel data using any tool, and another category of AP users should be able to validate and import AP invoices from excel to Oracle E-Business Suite from their desktops.
A profile option ‘XX_AP_WEBADI_UPLOAD’ is defined at user responsibility level, which can be used to control the program from uploading data into Oracle interface tables when a particular category of users access this custom Web ADI.
Requirement 3:Tool should also invoke “Payables Open Interface Import” concurrent program only after whole excel records are inserted into Oracle interface tables.
Oracle Web ADI has a feature to invoke a concurrent program after all records are processed. While building custom Web ADI, concurrent program to be invoked and parameters should be defined in Web ADI setup.
Concurrent program to be invoked cannot be changed at run time. Instead you can call a custom concurrent program, which can decide the invoking of programs at run time.
Requirement 4:
Accounting Key Flexfield values to be displayed as part of LOV to have the user enter the valid distribution accounting segment values.
As per this requirement, Accounting Key Flex Field (KFF) LOV is embedded in General Ledger (GL) code combincation field of downloaded Web ADI excel file.
Requirement 5:Currency code values to be displayed as part of LOV to have the user enter valid currency code.
As per this requirement, currency code LOV is embedded in currency code field of downloaded Web ADI excel file.
Whitepaper Oracle Web ADI 5

Contact
Configuration settings
1. Use the Web ADI page to create spreadsheet
a. Specific to data type, which we call as integrator
b. Specific to layout for controlling purpose of the spreadsheet
2. Load data to the excel spreadsheet.
3. In spreadsheet, you need to select the Oracle upload menu option. This menu option is used from Web ADI added from Excel menu.
4. Web ADI calls the custom procedure based on which interface is created.
5. Custom procedure will validate and upload data into Oracle interface tables. Any error will be flagged and the error reason will be placed on corresponding row in the spreadsheet.
Web ADI setupA custom Web ADI consists of following components:
1. Integrator (Mandatory)
2. Interface (Mandatory)
3. Layout (Optional — Default layout is present)
4. Content (Optional — None)
5. Mappings (Optional)
6. Form function security. (Mandatory)
To build custom Web ADI,
1. Create wrapper procedure.
2. Create custom integrator
3. Define interface
4. Define layout
5. Define form function.
Create wrapper procedure
Before creating custom integrator, we have to create a wrapper procedure, which will be called from excel spreadsheet and inserts data into Oracle tables. An advantage of using wrapper procedure is we can write custom business/user logic/validations, which will validate data entered in excel before inserting into interface tables.
Error output of records failed during validation/insertion will be notified in excel spreadsheet for each line.
So that, user can correct the errors and upload the same excel spreadsheet.
Whitepaper Oracle Web ADI 6
Contact
Please refer Appendix A.
Create custom integrator
Custom integrator is created using BNE_INTEGRATOR_UTILS API package. CREATE_INTEGRATOR procedure is used to create custom integrator.
Below are the required parameters:
API Parameter name Value
p_application_id Application ID of AP
p_object_code Unique Object code
P_integrator_user_name Integrator name visible to user in integrator list drop-down
P_language Language settings
P_source_language Language settings
P_user_id User ID of user creating this integrator
p_integrator_code Output of API. By default, it returns the unique code by concatenating “_INTG” to object code passed.
Please refer Appendix B for sample code.
Create custom interface
In brief, interface is an interim layer which connects integrator and Database (DB) objects like wrapper package, API, or table.
Interface consists of DB object details like wrapper package used to upload and columns required to pass as input to wrapper package.
Parameters for API:
Parameter name Value
p_application_id Application ID of AP module
p_object_code Unique object code — it should be same as integrator object code
p_integrator_code Integrator code — output of previous API execution
p_api_package_name Wrapper package name
p_api_procedure_name Wrapper procedure
p_interface_user_name Interface name visible to user
p_param_list_name Parameter list name visible to user
p_api_type API type
p_api_return_type API return type
p_upload_type Upload type
p_language Language settings
p_source_lang Language settings
p_user_id User ID of the user creating this integrator
p_param_list_code Output of API: Returns parameter list code
p_interface_code Output of API: By default, returns the value “_INTF” concatenated at end of object code passed
Please refer Appendix C for sample code.
Whitepaper Oracle Web ADI 7
Contact
Create default layout for interface
Integrator should have at least one layout associated. We can create a default layout by using BNE_INTEGRATOR_UTILS package.
Use CREATE_DEFAULT_LAYOUT to create a default layout.
Parameters for API:
Parameter name Value
p_application_id Application ID of AP module
p_object_code Unique object code — it should be same as integrator object code
p_integrator_code Integrator code — output of integrator API execution
p_interface_code Interface code — output of interface API
p_user_id User ID of the user creating this integrator
p_force Default ‘FALSE’
p_all_columns To display all columns — value is ‘TRUE’
p_layout_code Output of API
Please refer Appendix D for sample code.
Define form function and associations
Define a form function, to associate the custom Web ADI, which is just created.
Navigation -> Application Developer -> Application -> Function
Type — SSWA servlet function
Application Developer (Responsibility) → Application →Function
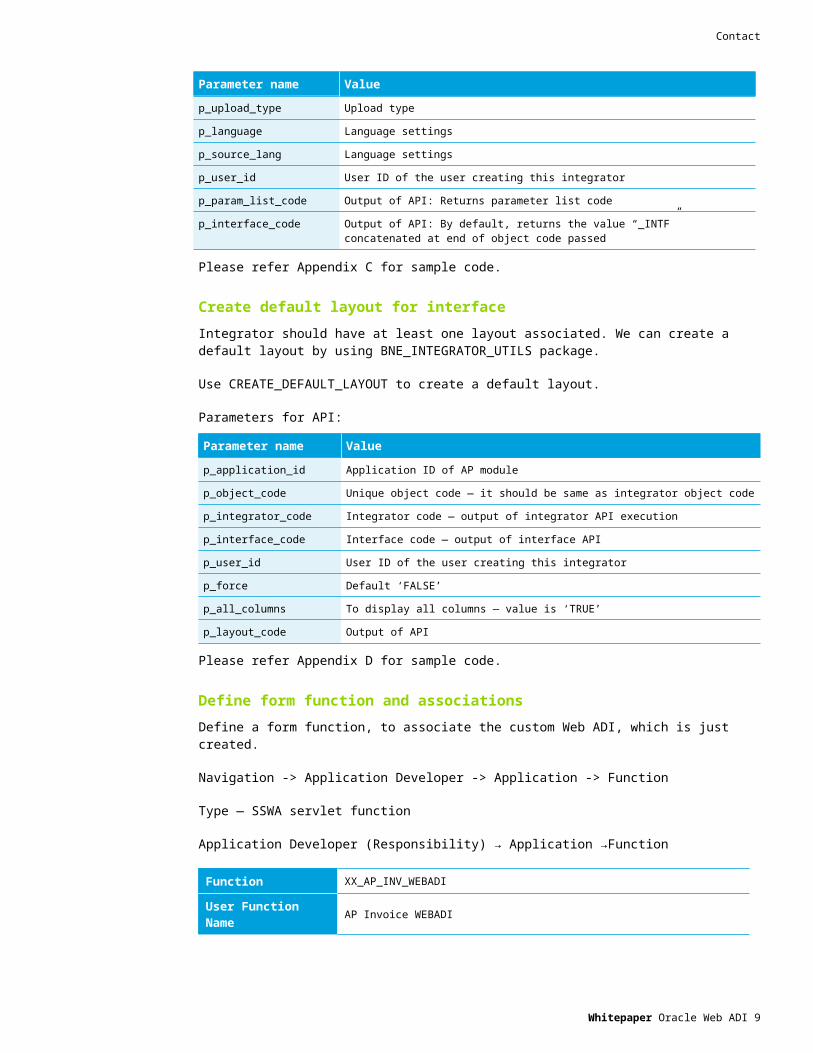
Function XX_AP_INV_WEBADI
User Function Name AP Invoice WEBADI
Associate the custom Web ADI with form function created. Using HR_INTEGRATION_UTILS package, HR_MAINT_FORM_FUNC_ASSOCIATION link custom integrator with form function.
Please refer Appendix E for sample code.
Your integrator should exist in integrator’s LOV. If your integrator does not exist then bounce the apache services.
Whitepaper Oracle Web ADI 8
Contact
Embed Accounting Flexfield KFF
As per Business requirement, we required Accounting Flexfield KFF LOV embedded in Distribution account field in downloaded Excel document.
Use BNE_INTEGRATOR_UTILS.CREATE_CCID_KFF API to create LOV and assign to distribution account field.
Parameters for API:
Parameter name Value
p_application_id Application ID of AP module
p_interface_code Interface code — output of previous API execution
p_interface_col_name Distribution field name of excel document
p_num_flex_segs No. of segments in Accounting Flexfield
p_group_name Group name
p_flex_application_id General ledger application ID
p_flex_code Accounting Flexfield code
p_flex_num Flex number
p_vrule Rule -> ‘NULL’
p_effective_date_col NULL
p_prompt_above Segment list to be prompted
p_prompt_left Segment list
p_user_hint User hints
p_user_id Application user ID
Please refer Appendix F for sample code
Embed currency code LOV
As per business requirement, we required currency code LOV embedded in currency code field in downloaded excel document.
Use BNE_INTEGRATOR_UTILS.CREATE_TABLE_LOV API to create LOV and assign to distribution account field.
Parameters for API:
Parameter name Value
p_application_id Application ID of AP module
p_interface_code Interface code — output of previous API execution
p_interface_col_name Distribution field name of excel document
p_id_col Currency code column
p_mean_col Currency name column
p_desc_col Currency description column
p_table Currency table, i.e., GL_CURRENCIES
p_addl_w_c Where clause
p_window_width Window width
p_window_height Window height
Whitepaper Oracle Web ADI 9
Contact
Parameter name Value
p_table_block_size Table block size
p_table_sort_order Sorting order
p_user_id Application user ID
Please refer Appendix G for sample code.
Setup to invoke concurrent programAfter successful upload of data into Oracle interface tables, “Payables Open Invoice Import” should be invoked. Follow below setups to invoke program after data is loaded using Web ADI.
We start with creating below required parameter lists.
1. Upload Parameter List
2. Parameter List to set calling Program parameters
3. Import Parameter List
Steps to create parameter lists
1. To create parameter lists, navigate to Desktop Integrator responsibility and click Create Document link.
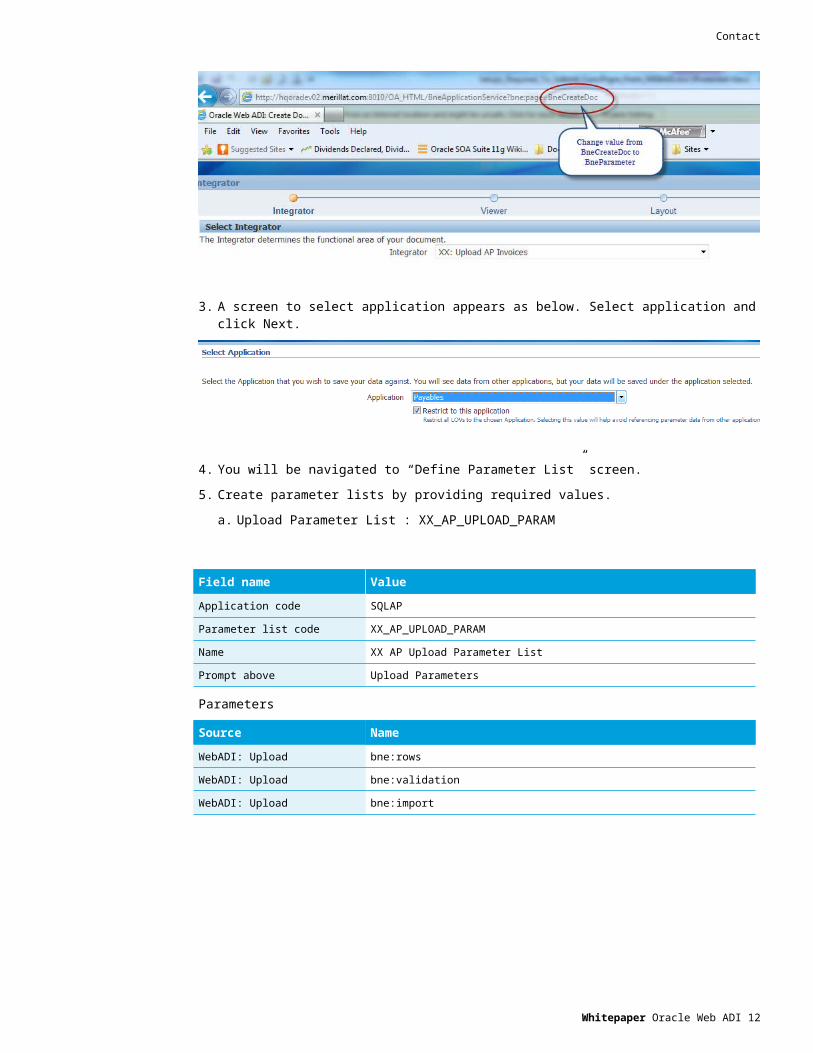
2. Modify the URL from BneCreateDoc to BneParameters as shown in below screenshot.
3. A screen to select application appears as below. Select application and click Next.
4. You will be navigated to “Define Parameter List” screen.
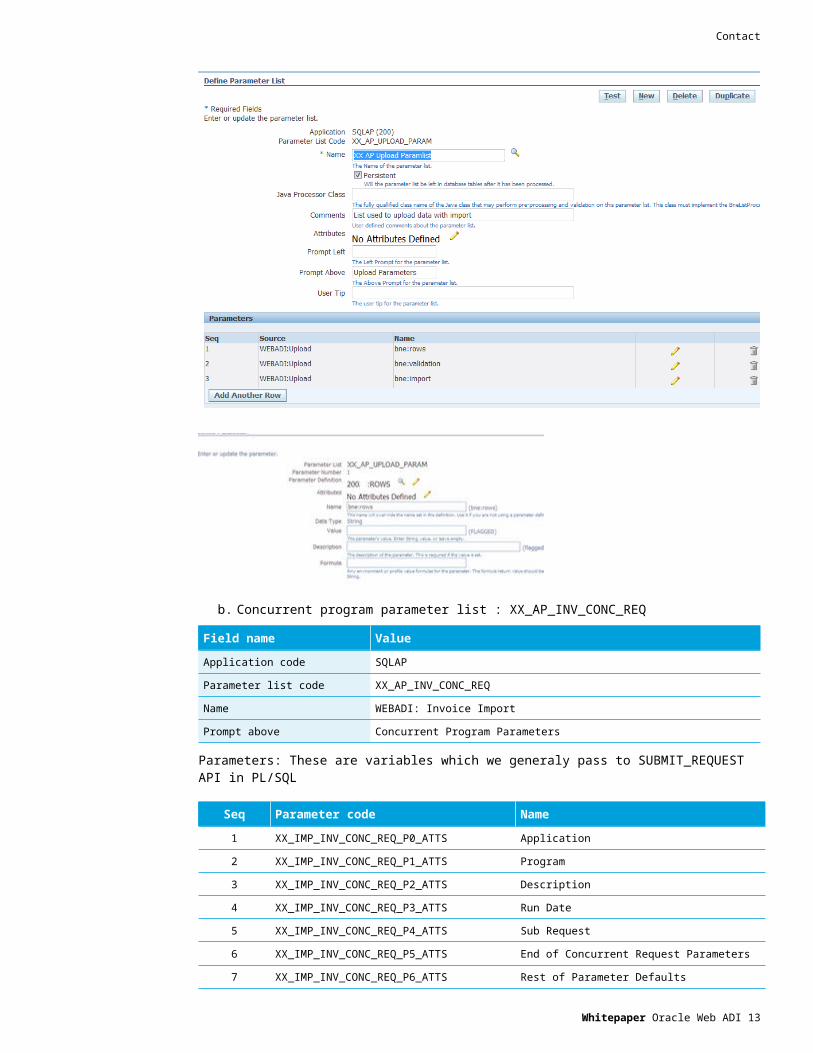
5. Create parameter lists by providing required values.
a. Upload Parameter List : XX_AP_UPLOAD_PARAM
Whitepaper Oracle Web ADI 10

Contact
Field name Value
Application code SQLAP
Parameter list code XX_AP_UPLOAD_PARAM
Name XX AP Upload Parameter List
Prompt above Upload Parameters
Parameters
Source Name
WebADI: Upload bne:rows
WebADI: Upload bne:validation
WebADI: Upload bne:import
b. Concurrent program parameter list : XX_AP_INV_CONC_REQ
Field name Value
Application code SQLAP
Parameter list code XX_AP_INV_CONC_REQ
Name WEBADI: Invoice Import
Prompt above Concurrent Program Parameters
Whitepaper Oracle Web ADI 11
Contact
Parameters: These are variables which we generaly pass to SUBMIT_REQUEST API in PL/SQL
Seq Parameter code Name
1 XX_IMP_INV_CONC_REQ_P0_ATTS Application
2 XX_IMP_INV_CONC_REQ_P1_ATTS Program
3 XX_IMP_INV_CONC_REQ_P2_ATTS Description
4 XX_IMP_INV_CONC_REQ_P3_ATTS Run Date
5 XX_IMP_INV_CONC_REQ_P4_ATTS Sub Request
6 XX_IMP_INV_CONC_REQ_P5_ATTS End of Concurrent Request Parameters
7 XX_IMP_INV_CONC_REQ_P6_ATTS Rest of Parameter Defaults
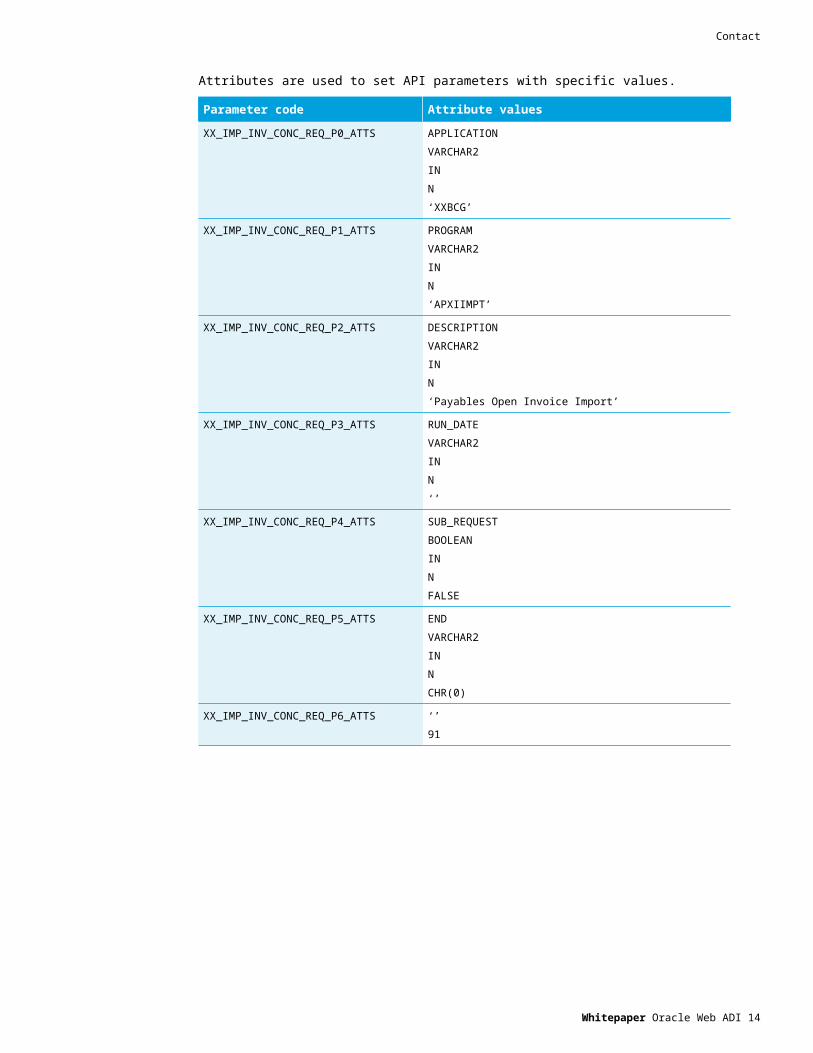
Attributes are used to set API parameters with specific values.
Parameter code Attribute values
XX_IMP_INV_CONC_REQ_P0_ATTS APPLICATIONVARCHAR2INN‘XXBCG’
XX_IMP_INV_CONC_REQ_P1_ATTS PROGRAMVARCHAR2INN‘APXIIMPT’
XX_IMP_INV_CONC_REQ_P2_ATTS DESCRIPTIONVARCHAR2INN‘Payables Open Invoice Import’
XX_IMP_INV_CONC_REQ_P3_ATTS RUN_DATEVARCHAR2INN‘’
XX_IMP_INV_CONC_REQ_P4_ATTS SUB_REQUESTBOOLEANINNFALSE
XX_IMP_INV_CONC_REQ_P5_ATTS ENDVARCHAR2INNCHR(0)
XX_IMP_INV_CONC_REQ_P6_ATTS ‘’91
Whitepaper Oracle Web ADI 12
Contact
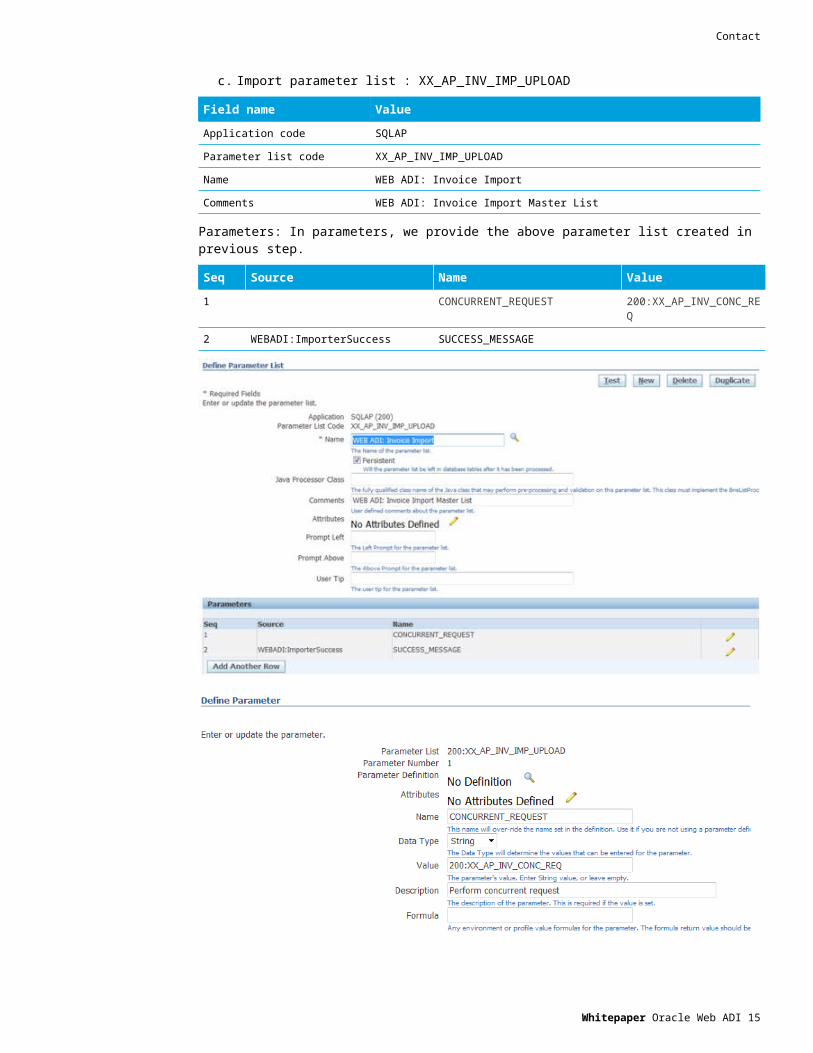
c. Import parameter list : XX_AP_INV_IMP_UPLOAD
Field name Value
Application code SQLAP
Parameter list code XX_AP_INV_IMP_UPLOAD
Name WEB ADI: Invoice Import
Comments WEB ADI: Invoice Import Master List
Parameters: In parameters, we provide the above parameter list created in previous step.
Seq Source Name Value
1 CONCURRENT_REQUEST 200:XX_AP_INV_CONC_REQ
2 WEBADI:ImporterSuccess SUCCESS_MESSAGE
Whitepaper Oracle Web ADI 13
Contact
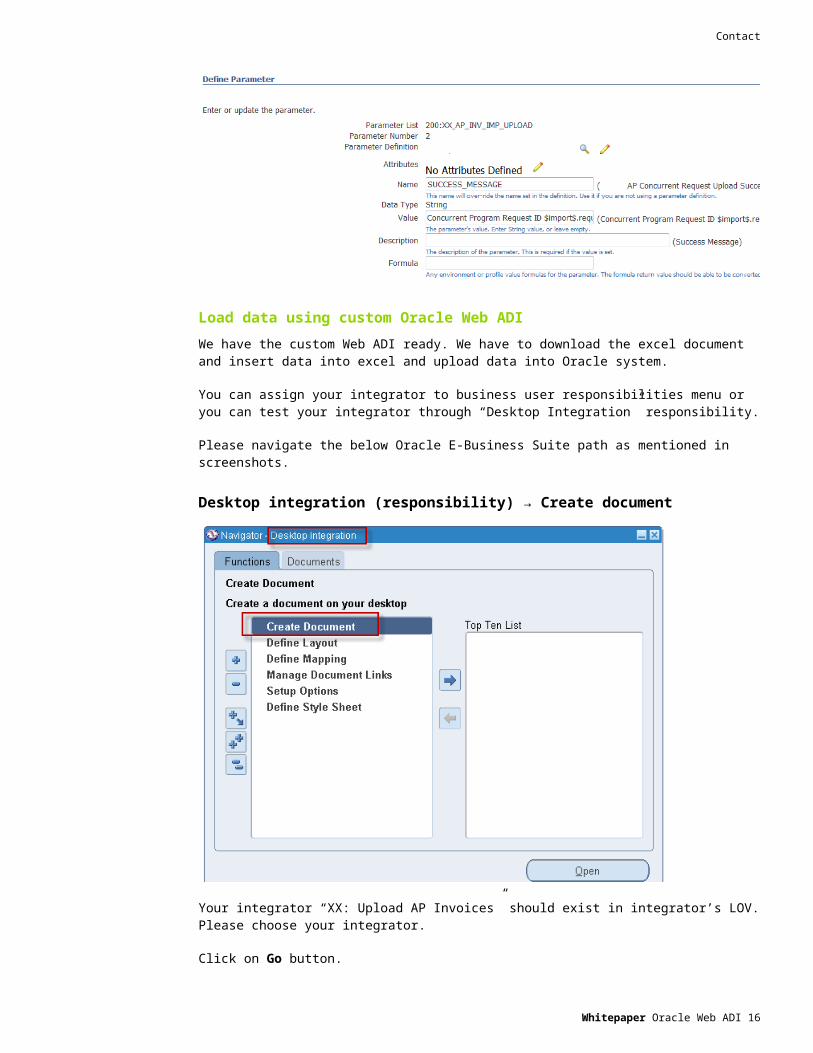
Load data using custom Oracle Web ADI
We have the custom Web ADI ready. We have to download the excel document and insert data into excel and upload data into Oracle system.
You can assign your integrator to business user responsibilities menu or you can test your integrator through “Desktop Integration” responsibility.
Please navigate the below Oracle E-Business Suite path as mentioned in screenshots.
Desktop integration (responsibility) → Create document
Your integrator “XX: Upload AP Invoices” should exist in integrator’s LOV. Please choose your integrator.
Click on Go button.
Whitepaper Oracle Web ADI 14
Contact
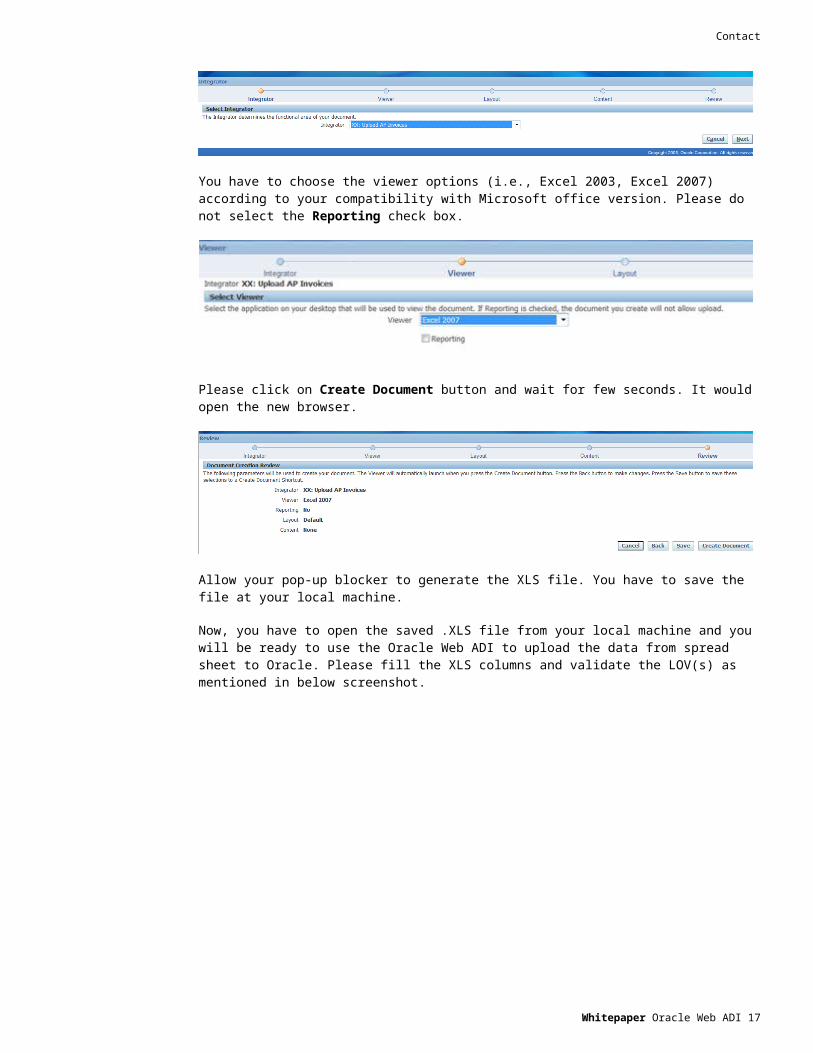
You have to choose the viewer options (i.e., Excel 2003, Excel 2007) according to your compatibility with Microsoft office version. Please do not select the Reporting check box.
Please click on Create Document button and wait for few seconds. It would open the new browser.
Allow your pop-up blocker to generate the XLS file. You have to save the file at your local machine.
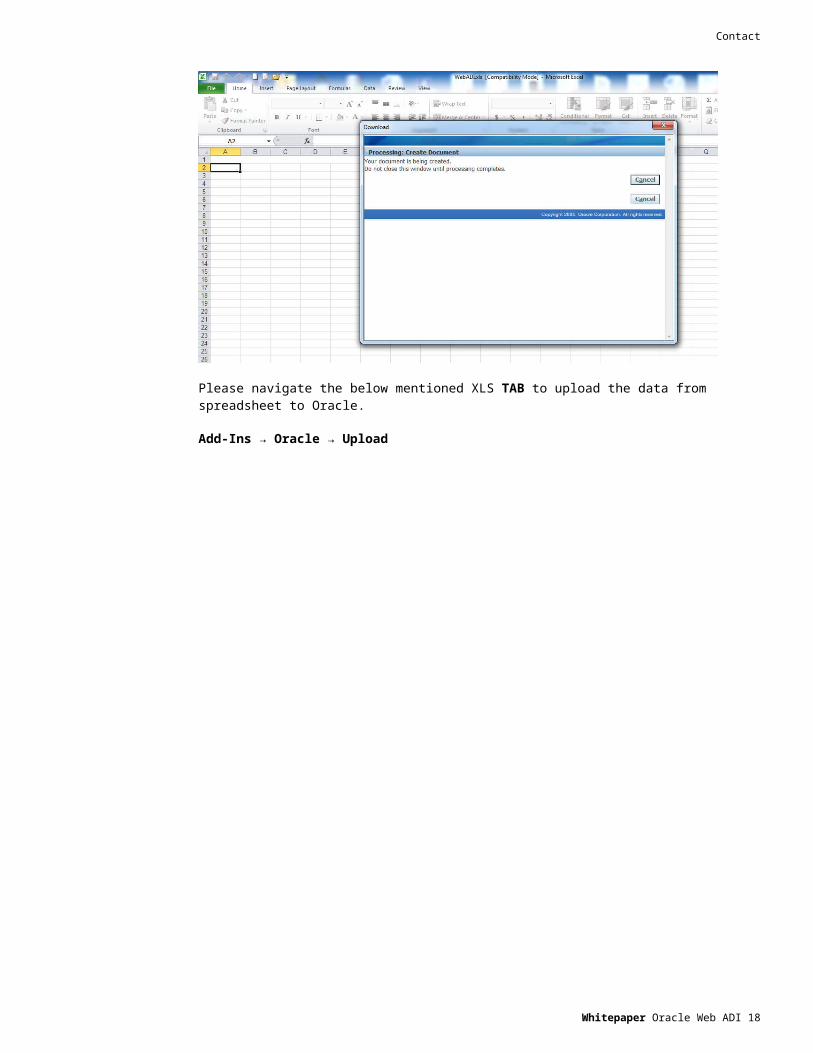
Now, you have to open the saved .XLS file from your local machine and you will be ready to use the Oracle Web ADI to upload the data from spread sheet to Oracle. Please fill the XLS columns and validate the LOV(s) as mentioned in below screenshot.
Please navigate the below mentioned XLS TAB to upload the data from spreadsheet to Oracle.
Add-Ins → Oracle → Upload
Whitepaper Oracle Web ADI 15
Contact
Business benefits
Oracle Web ADI, Web-based model also gave the client the ability to focus more on its core business and less on administrative issues. Using this desktop integration, life is much easier for data operators and accounts executives, and it will have the following benefits:
Using this tool, data can be inserted into multiple tables and import program is called. With this, manual effort is reduced.
Accomplished Clients requirements like
– Providing LOVs for Accounting KFF and Currencies
– Security amoung AP users
Users can still download the excel document and work off-line.
Users can use Oracle Web ADI, as it does not require any software to be installed. It requires few prerequites which are mentioned in Appendix I
Whitepaper Oracle Web ADI 16
Contact
Conclusion
Oracle Web ADI is a solution to integrate Desktop application such as Microsoft Excel with OracleE-Business Suite applications. Oracle Web ADI has about 150+ out-of-box integrators across modules and facilitates to create custom integrator for fulfilling Business requirements.
Oracle Web ADI hardly requires any training as it provides the templates with great flexibility of Excel-based applications.
Whitepaper Oracle Web ADI 17
Contact
Appendix A
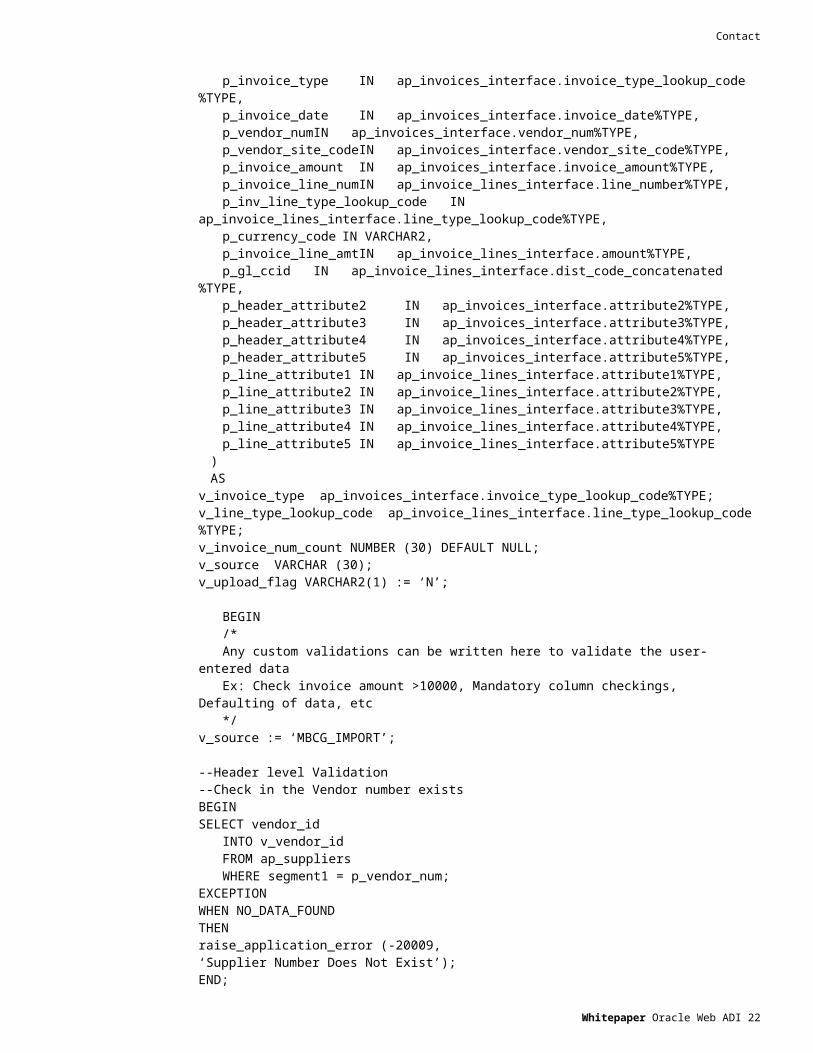
Create package to validate and insert data into tablePackage Spec:CREATE OR REPLACE PACKAGE xx_ap_inv_webadi_pkgIS
PROCEDURE upload_invoices (p_invoice_num IN ap_invoices_interface.invoice_num%TYPE,p_invoice_description IN ap_invoices_interface.description%TYPE,p_invoice_line_description IN ap_invoice_lines_interface.description%TYPE,p_invoice_type IN ap_invoices_interface.invoice_type_lookup_code%TYPE,p_invoice_date IN ap_invoices_interface.invoice_date%TYPE,p_vendor_numIN ap_invoices_interface.vendor_num%TYPE,p_vendor_site_codeIN ap_invoices_interface.vendor_site_code%TYPE,p_invoice_amount IN ap_invoices_interface.invoice_amount%TYPE,p_invoice_line_numIN ap_invoice_lines_interface.line_number%TYPE,p_inv_line_type_lookup_code IN ap_invoice_lines_interface.line_type_lookup_code%TYPE,
p_currency_code IN VARCHAR2,p_invoice_line_amtIN ap_invoice_lines_interface.amount%TYPE,p_gl_ccid IN ap_invoice_lines_interface.dist_code_concatenated%TYPE,p_header_attribute2 IN ap_invoices_interface.attribute2%TYPE,p_header_attribute3 IN ap_invoices_interface.attribute3%TYPE,p_header_attribute4 IN ap_invoices_interface.attribute4%TYPE,p_header_attribute5 IN ap_invoices_interface.attribute5%TYPE,p_line_attribute1 IN ap_invoice_lines_interface.attribute1%TYPE,p_line_attribute2 IN ap_invoice_lines_interface.attribute2%TYPE,p_line_attribute3 IN ap_invoice_lines_interface.attribute3%TYPE,p_line_attribute4 IN ap_invoice_lines_interface.attribute4%TYPE,p_line_attribute5 IN ap_invoice_lines_interface.attribute5%TYPE
);END xx_ap_inv_webadi_pkg;/
Package body:
CREATE OR REPLACE PACKAGE BODY xx_ap_inv_webadi_pkgIS
PROCEDURE upload_invoices (p_invoice_num IN ap_invoices_interface.invoice_num%TYPE,p_invoice_description IN ap_invoices_interface.description%TYPE,p_invoice_line_description IN ap_invoice_lines_interface.description%TYPE,p_invoice_type IN ap_invoices_interface.invoice_type_lookup_code%TYPE,p_invoice_date IN ap_invoices_interface.invoice_date%TYPE,p_vendor_numIN ap_invoices_interface.vendor_num%TYPE,p_vendor_site_codeIN ap_invoices_interface.vendor_site_code%TYPE,p_invoice_amount IN ap_invoices_interface.invoice_amount%TYPE,p_invoice_line_numIN ap_invoice_lines_interface.line_number%TYPE,
Whitepaper Oracle Web ADI 18
Contact
p_inv_line_type_lookup_code IN ap_invoice_lines_interface.line_type_lookup_code%TYPE,p_currency_code IN VARCHAR2,p_invoice_line_amtIN ap_invoice_lines_interface.amount%TYPE,p_gl_ccid IN ap_invoice_lines_interface.dist_code_concatenated%TYPE,p_header_attribute2 IN ap_invoices_interface.attribute2%TYPE,p_header_attribute3 IN ap_invoices_interface.attribute3%TYPE,p_header_attribute4 IN ap_invoices_interface.attribute4%TYPE,p_header_attribute5 IN ap_invoices_interface.attribute5%TYPE,p_line_attribute1 IN ap_invoice_lines_interface.attribute1%TYPE,p_line_attribute2 IN ap_invoice_lines_interface.attribute2%TYPE,p_line_attribute3 IN ap_invoice_lines_interface.attribute3%TYPE,p_line_attribute4 IN ap_invoice_lines_interface.attribute4%TYPE,p_line_attribute5 IN ap_invoice_lines_interface.attribute5%TYPE
)AS
v_invoice_type ap_invoices_interface.invoice_type_lookup_code%TYPE;v_line_type_lookup_code ap_invoice_lines_interface.line_type_lookup_code%TYPE;v_invoice_num_count NUMBER (30) DEFAULT NULL;v_source VARCHAR (30);v_upload_flag VARCHAR2(1) := ‘N’;
BEGIN/*Any custom validations can be written here to validate the user-entered dataEx: Check invoice amount >10000, Mandatory column checkings, Defaulting of data, etc*/
v_source := ‘MBCG_IMPORT’;
--Header level Validation--Check in the Vendor number existsBEGINSELECT vendor_id
INTO v_vendor_idFROM ap_suppliersWHERE segment1 = p_vendor_num;
EXCEPTIONWHEN NO_DATA_FOUNDTHENraise_application_error (-20009,‘Supplier Number Does Not Exist’);END;
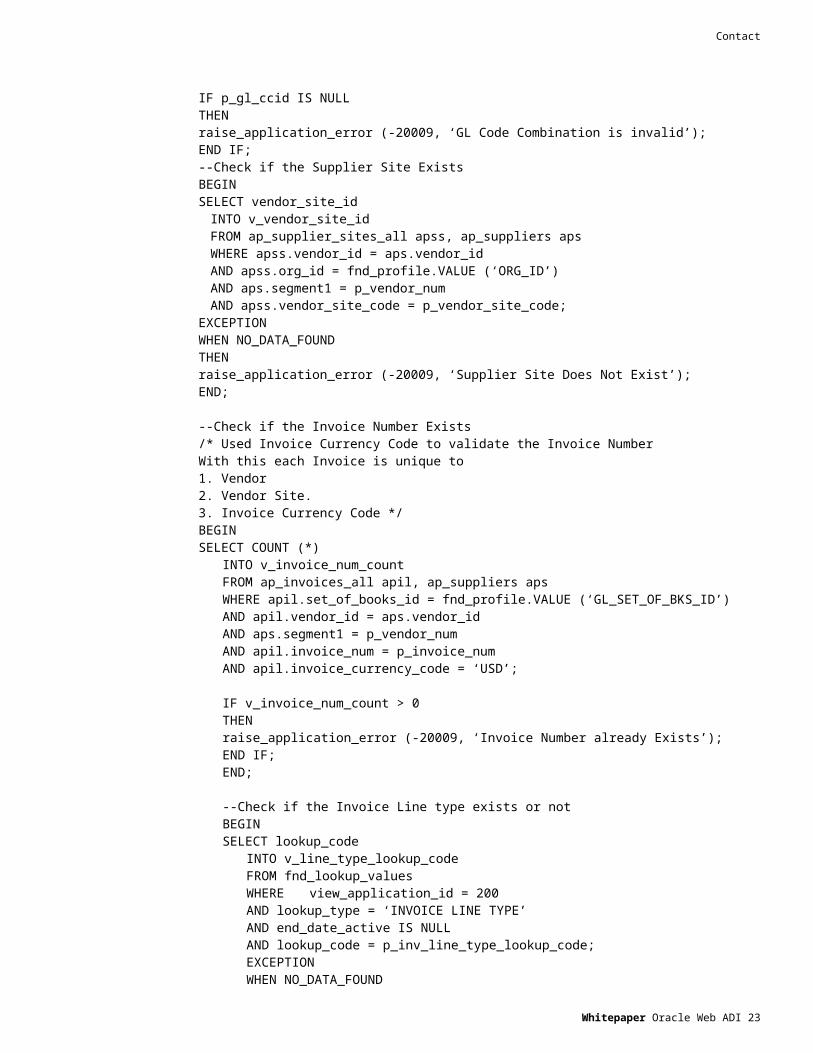
IF p_gl_ccid IS NULLTHENraise_application_error (-20009, ‘GL Code Combination is invalid’);END IF;--Check if the Supplier Site ExistsBEGINSELECT vendor_site_id
INTO v_vendor_site_idFROM ap_supplier_sites_all apss, ap_suppliers apsWHERE apss.vendor_id = aps.vendor_idAND apss.org_id = fnd_profile.VALUE (‘ORG_ID’)
Whitepaper Oracle Web ADI 19
Contact
AND aps.segment1 = p_vendor_numAND apss.vendor_site_code = p_vendor_site_code;
EXCEPTIONWHEN NO_DATA_FOUNDTHENraise_application_error (-20009, ‘Supplier Site Does Not Exist’);END;
--Check if the Invoice Number Exists/* Used Invoice Currency Code to validate the Invoice NumberWith this each Invoice is unique to1. Vendor2. Vendor Site.3. Invoice Currency Code */BEGINSELECT COUNT (*)
INTO v_invoice_num_countFROM ap_invoices_all apil, ap_suppliers apsWHERE apil.set_of_books_id = fnd_profile.VALUE (‘GL_SET_OF_BKS_ID’)AND apil.vendor_id = aps.vendor_idAND aps.segment1 = p_vendor_numAND apil.invoice_num = p_invoice_numAND apil.invoice_currency_code = ‘USD’;
IF v_invoice_num_count > 0THENraise_application_error (-20009, ‘Invoice Number already Exists’);END IF;END;
--Check if the Invoice Line type exists or notBEGINSELECT lookup_code
INTO v_line_type_lookup_codeFROM fnd_lookup_valuesWHERE view_application_id = 200AND lookup_type = ‘INVOICE LINE TYPE’AND end_date_active IS NULLAND lookup_code = p_inv_line_type_lookup_code;EXCEPTIONWHEN NO_DATA_FOUNDTHENraise_application_error (-20009,‘Invoice Line Type Does Not Exist’);END;
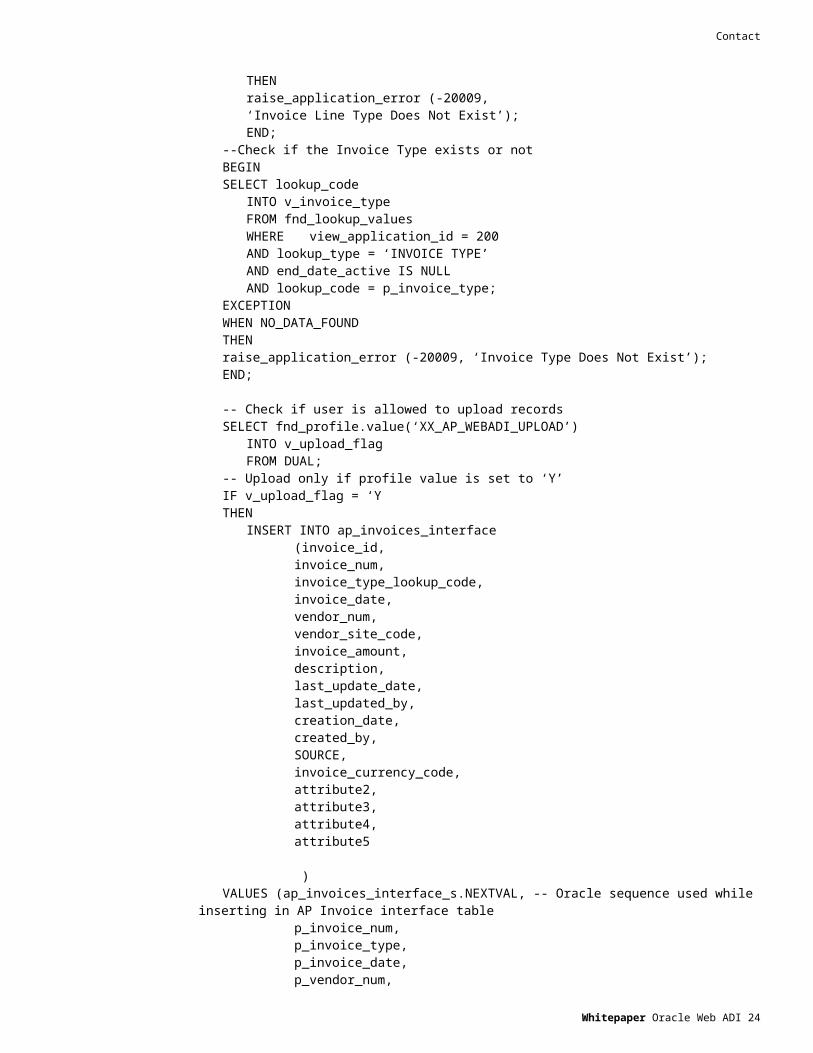
--Check if the Invoice Type exists or notBEGINSELECT lookup_code
INTO v_invoice_typeFROM fnd_lookup_valuesWHERE view_application_id = 200AND lookup_type = ‘INVOICE TYPE’AND end_date_active IS NULL
Whitepaper Oracle Web ADI 20

Contact
AND lookup_code = p_invoice_type;EXCEPTIONWHEN NO_DATA_FOUNDTHENraise_application_error (-20009, ‘Invoice Type Does Not Exist’);END;
-- Check if user is allowed to upload recordsSELECT fnd_profile.value(‘XX_AP_WEBADI_UPLOAD’)
INTO v_upload_flagFROM DUAL;
-- Upload only if profile value is set to ‘Y’IF v_upload_flag = ‘YTHEN
INSERT INTO ap_invoices_interface(invoice_id,invoice_num,invoice_type_lookup_code,invoice_date,vendor_num,vendor_site_code,invoice_amount,description,last_update_date,last_updated_by,creation_date,created_by,SOURCE,invoice_currency_code,attribute2,attribute3,attribute4,attribute5
)
VALUES (ap_invoices_interface_s.NEXTVAL, -- Oracle sequence used while inserting in AP Invoice interface table
p_invoice_num,p_invoice_type,p_invoice_date,p_vendor_num,p_vendor_site_code,p_invoice_amount,p_invoice_description,SYSDATE,-1,SYSDATE,-1,‘WEBADI’, ‘USD’,p_header_attribute2,p_header_attribute3,p_header_attribute4,
Whitepaper Oracle Web ADI 21
Contact
p_header_attribute5);
INSERT INTO ap_invoice_lines_interface(invoice_id,invoice_line_id,line_number,line_type_lookup_code,amount,dist_code_combination_id,last_updated_by,last_update_date,created_by,creation_date,description,attribute1,attribute2,attribute3,attribute4,attribute5)
VALUES (ap_invoices_interface_s.CURRVAL,ap_invoice_lines_interface_s.NEXTVAL,p_invoice_line_num,p_inv_line_type_lookup_code,p_invoice_line_amt,p_gl_ccid,-1,SYSDATE,-1,SYSDATE,p_invoice_line_description,p_line_attribute1,p_line_attribute2,p_line_attribute3,p_line_attribute4,p_line_attribute5);
END IF;
EXCEPTIONWHEN OTHERSTHENraise_Application_error(-20011, ‘Exception while uploading/validating data :’||SQLERRM);
END upload_invoices;END xx_ap_inv_webadi_pkg;/
Whitepaper Oracle Web ADI 22
Contact
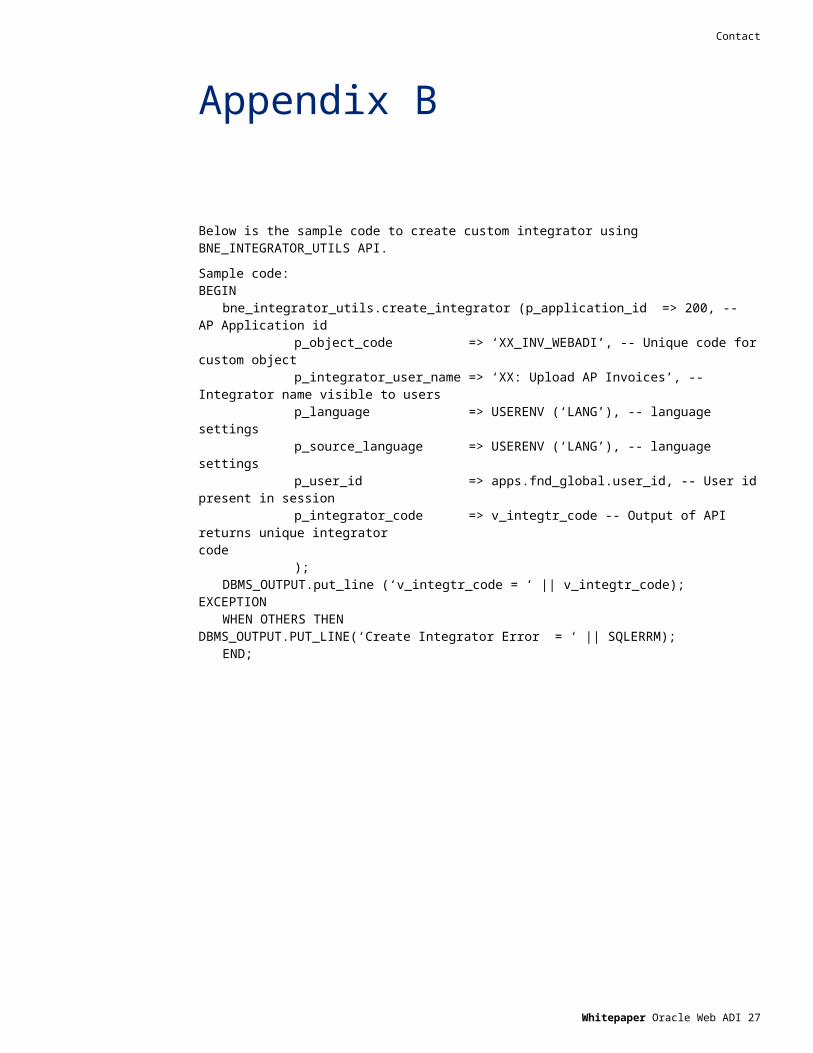
Appendix B
Below is the sample code to create custom integrator using BNE_INTEGRATOR_UTILS API.
Sample code:BEGIN
bne_integrator_utils.create_integrator (p_application_id => 200, -- AP Application idp_object_code => ‘XX_INV_WEBADI’, -- Unique code for custom objectp_integrator_user_name => ‘XX: Upload AP Invoices’, -- Integrator name visible to
usersp_language => USERENV (‘LANG’), -- language settingsp_source_language => USERENV (‘LANG’), -- language settingsp_user_id => apps.fnd_global.user_id, -- User id present in sessionp_integrator_code => v_integtr_code -- Output of API returns unique integrator
code);
DBMS_OUTPUT.put_line (‘v_integtr_code = ‘ || v_integtr_code);EXCEPTION
WHEN OTHERS THENDBMS_OUTPUT.PUT_LINE(‘Create Integrator Error = ‘ || SQLERRM);
END;
Whitepaper Oracle Web ADI 23
Contact
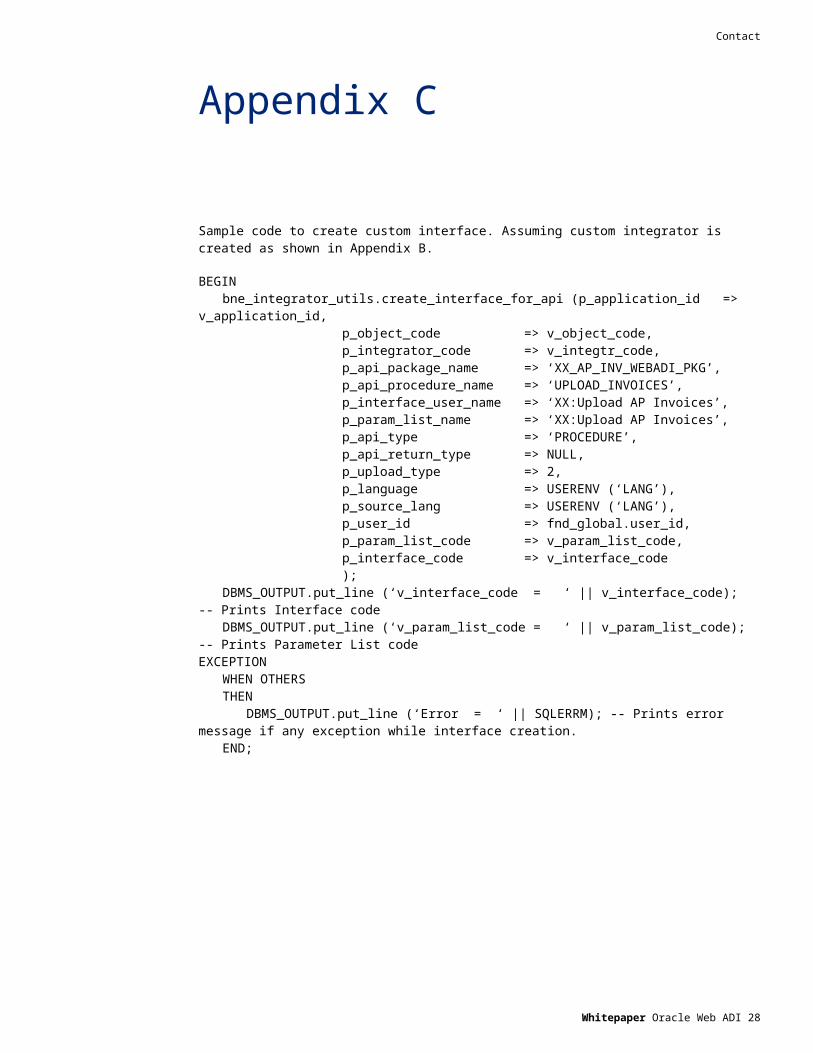
Appendix C
Sample code to create custom interface. Assuming custom integrator is created as shown in Appendix B.
BEGINbne_integrator_utils.create_interface_for_api (p_application_id => v_application_id,
p_object_code => v_object_code,p_integrator_code => v_integtr_code,p_api_package_name => ‘XX_AP_INV_WEBADI_PKG’,p_api_procedure_name => ‘UPLOAD_INVOICES’,p_interface_user_name => ‘XX:Upload AP Invoices’,p_param_list_name => ‘XX:Upload AP Invoices’,p_api_type => ‘PROCEDURE’,p_api_return_type => NULL,p_upload_type => 2,p_language => USERENV (‘LANG’),p_source_lang => USERENV (‘LANG’),p_user_id => fnd_global.user_id,p_param_list_code => v_param_list_code,p_interface_code => v_interface_code);
DBMS_OUTPUT.put_line (‘v_interface_code = ‘ || v_interface_code); -- Prints Interface codeDBMS_OUTPUT.put_line (‘v_param_list_code = ‘ || v_param_list_code); -- Prints Parameter
List codeEXCEPTION
WHEN OTHERSTHEN
DBMS_OUTPUT.put_line (‘Error = ‘ || SQLERRM); -- Prints error message if any exception while interface creation.
END;
Whitepaper Oracle Web ADI 24

Contact
Appendix D
Sample code to create default layout. Assuming custom integrator and interface are created as shown in Appendix B and C.
BEGINbne_integrator_utils.create_default_layout (p_application_id => v_application_id,
p_object_code => v_object_code ||’_LAY’,p_integrator_code => v_integtr_code,p_interface_code => v_interface_code,p_user_id => apps.fnd_global.user_id,p_force => FALSE,p_all_columns => TRUE,p_layout_code => v_layout_code);
DBMS_OUTPUT.put_line (‘v_layout_code = ‘ || v_layout_code);EXCEPTION
WHEN OTHERS THENDBMS_OUTPUT.put_line (‘Create Layout Error = ‘ || SQLERRM);
END;
Whitepaper Oracle Web ADI 25

Contact
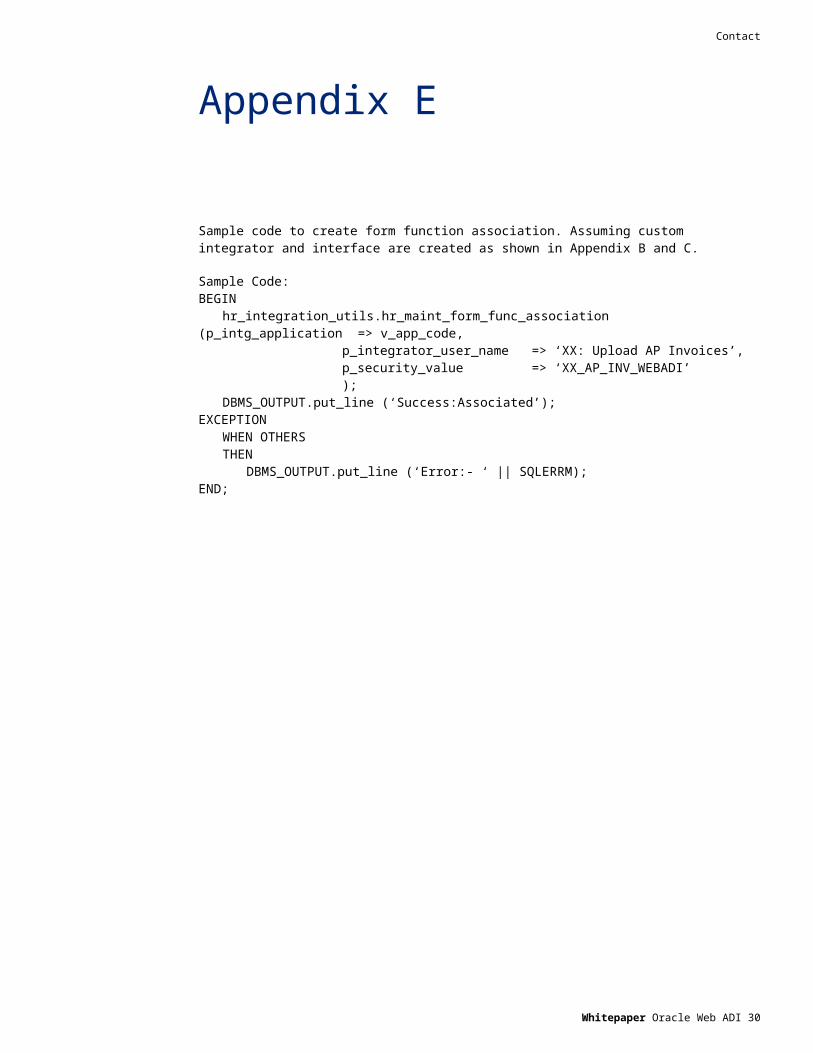
Appendix E
Sample code to create form function association. Assuming custom integrator and interface are created as shown in Appendix B and C.
Sample Code:BEGIN
hr_integration_utils.hr_maint_form_func_association (p_intg_application => v_app_code,p_integrator_user_name => ‘XX: Upload AP Invoices’,p_security_value => ‘XX_AP_INV_WEBADI’);
DBMS_OUTPUT.put_line (‘Success:Associated’);EXCEPTION
WHEN OTHERSTHEN
DBMS_OUTPUT.put_line (‘Error:- ‘ || SQLERRM);END;
Whitepaper Oracle Web ADI 26
Contact
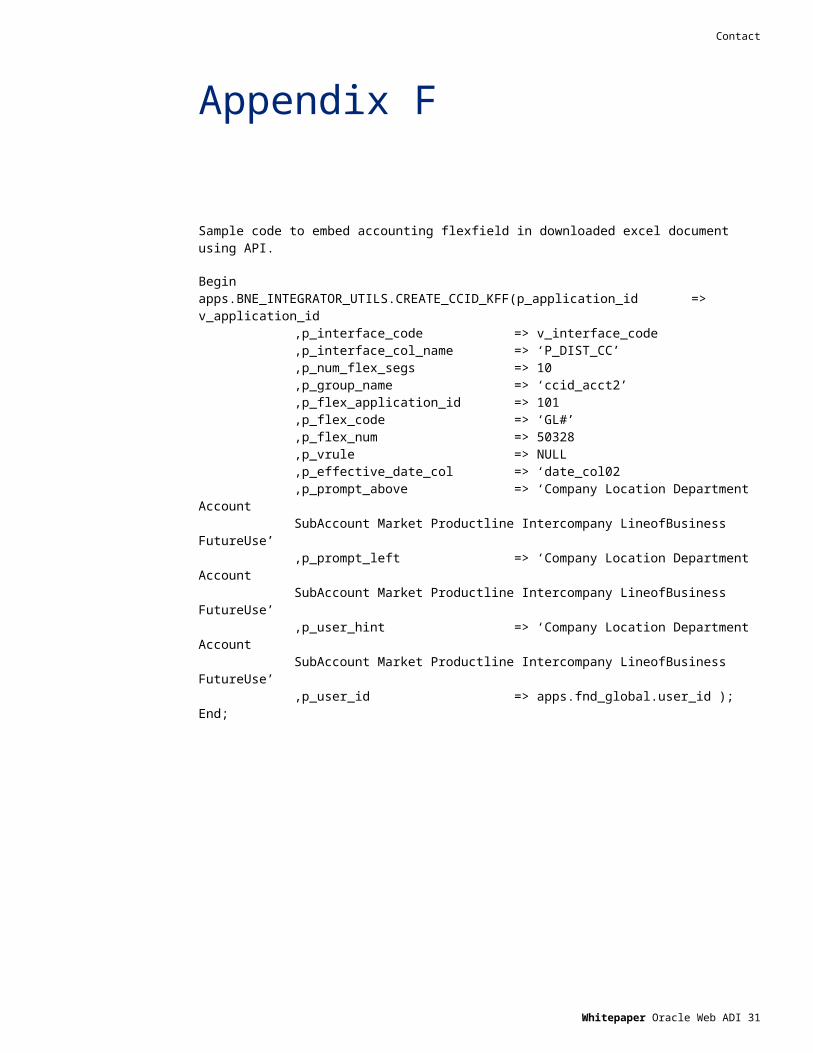
Appendix F
Sample code to embed accounting flexfield in downloaded excel document using API.
Beginapps.BNE_INTEGRATOR_UTILS.CREATE_CCID_KFF(p_application_id => v_application_id
,p_interface_code => v_interface_code ,p_interface_col_name => ‘P_DIST_CC’ ,p_num_flex_segs => 10,p_group_name => ‘ccid_acct2’ ,p_flex_application_id => 101,p_flex_code => ‘GL#’,p_flex_num => 50328,p_vrule => NULL,p_effective_date_col => ‘date_col02,p_prompt_above => ‘Company Location Department AccountSubAccount Market Productline Intercompany LineofBusiness FutureUse’,p_prompt_left => ‘Company Location Department AccountSubAccount Market Productline Intercompany LineofBusiness FutureUse’,p_user_hint => ‘Company Location Department AccountSubAccount Market Productline Intercompany LineofBusiness FutureUse’,p_user_id => apps.fnd_global.user_id );
End;
Whitepaper Oracle Web ADI 27
Contact
Appendix G
Sample code to embed currency code LOV
Beginapps.BNE_INTEGRATOR_UTILS.CREATE_TABLE_LOV (p_application_id => v_application_id,
p_interface_code => v_interface_code,p_interface_col_name => ‘p_currency_code’, p_id_col => ‘CURRENCY_CODE’,p_mean_col => NULL,p_desc_col => ‘DESCRIPTION’,p_table => ‘GL_CURRENCIES’, p_addl_w_c => ‘CURRENCY_FLAG = ‘’Y’’’,p_window_caption => ‘CURRENCY’, p_window_width => 400,p_window_height => 300,p_table_block_size => 10,p_table_sort_order => NULL,p_user_id => apps.fnd_global.user_id.user_id);
End;
Whitepaper Oracle Web ADI 28

Contact
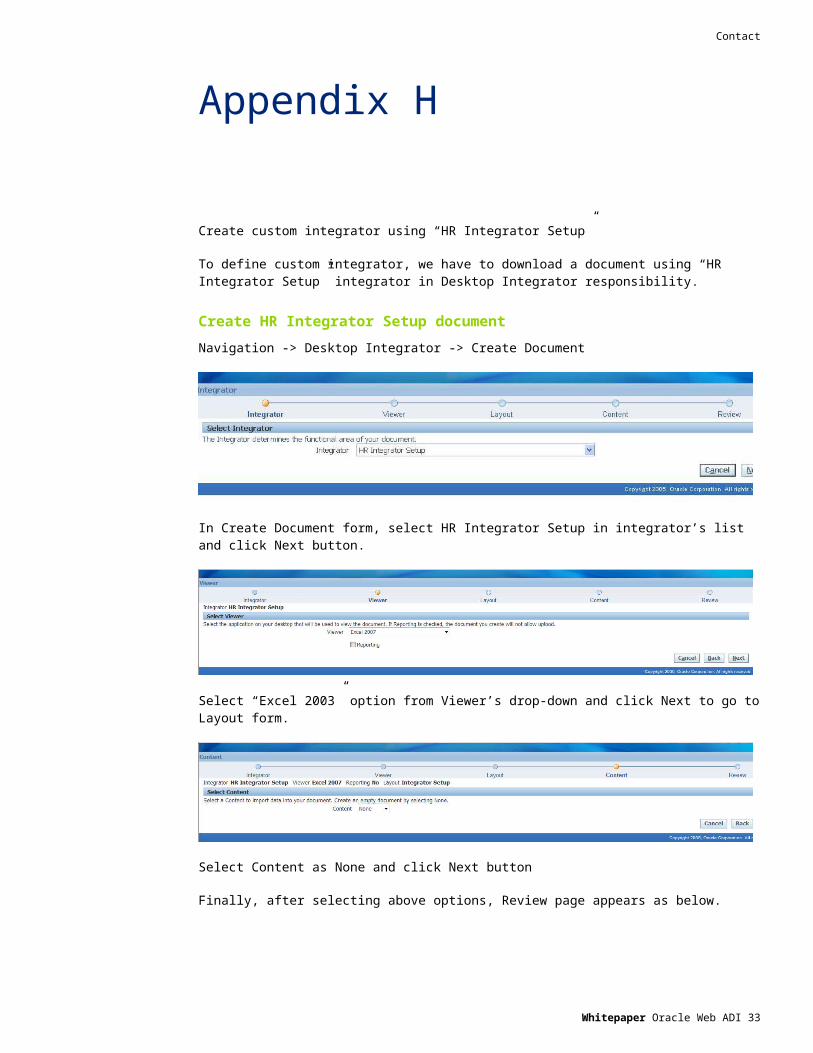
Appendix H
Create custom integrator using “HR Integrator Setup”
To define custom integrator, we have to download a document using “HR Integrator Setup” integrator in Desktop Integrator responsibility.
Create HR Integrator Setup documentNavigation -> Desktop Integrator -> Create Document
In Create Document form, select HR Integrator Setup in integrator’s list and click Next button.
Select “Excel 2003” option from Viewer’s drop-down and click Next to go to Layout form.
Select Content as None and click Next button
Finally, after selecting above options, Review page appears as below.
Whitepaper Oracle Web ADI 29
Contact
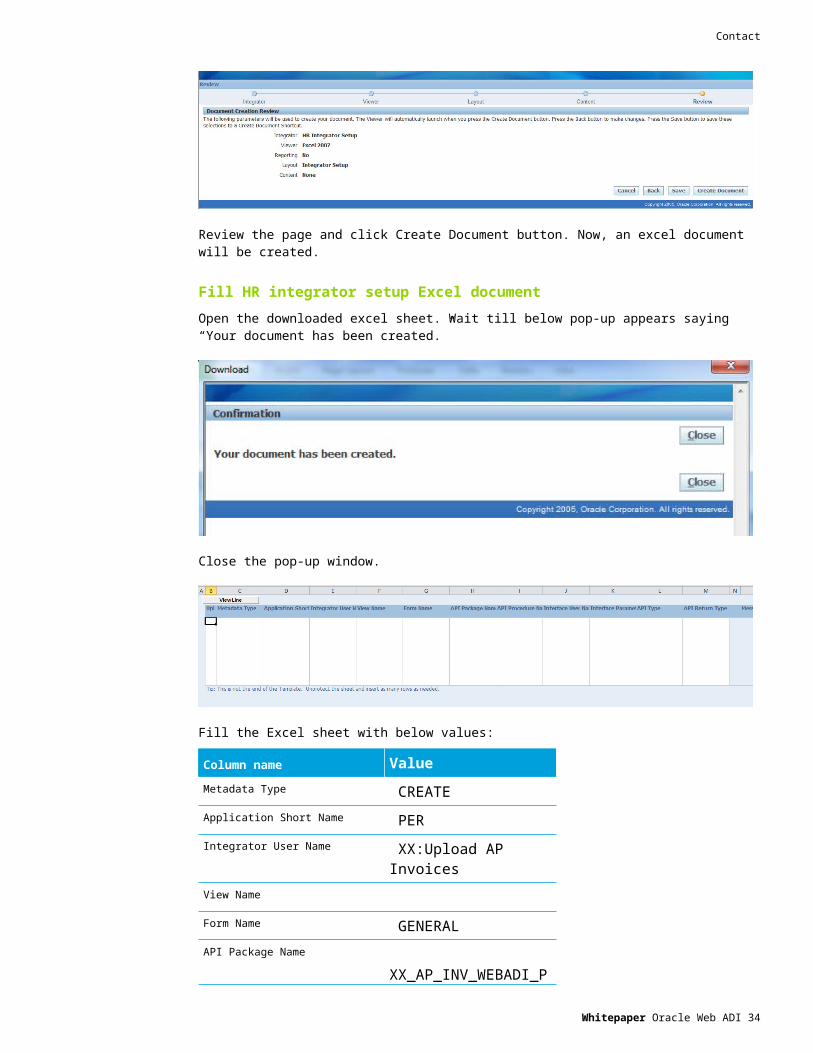
Review the page and click Create Document button. Now, an excel document will be created.
Fill HR integrator setup Excel document
Open the downloaded excel sheet. Wait till below pop-up appears saying “Your document has been created.”
Close the pop-up window.
Fill the Excel sheet with below values:
Column name ValueMetadata Type CREATEApplication Short Name PERIntegrator User Name XX:Upload AP InvoicesView Name
Form Name GENERALAPI Package Name XX_AP_INV_WEBADI_PKGAPI Procedure Name UPLOAD_INVOICESInterface User Name XX:Upload AP Invoices
Whitepaper Oracle Web ADI 30
Contact
Column name ValueInterface Parameter List Name XX:Upload AP InvoicesAPI Type PROCEDURE
Upload Excel data:
Navigate to Addins -> Oracle -> Upload.
A new pop-up window appears with Upload option. Click Upload.
Above screenshot states that custom integrator is successfully created.
Define layout
Navigation -> Desktop Integrator -> Define Layout.
Select “XX:Upload AP Invoices” integrator which is created above from integrator list. And click Go button.
Whitepaper Oracle Web ADI 31

Contact
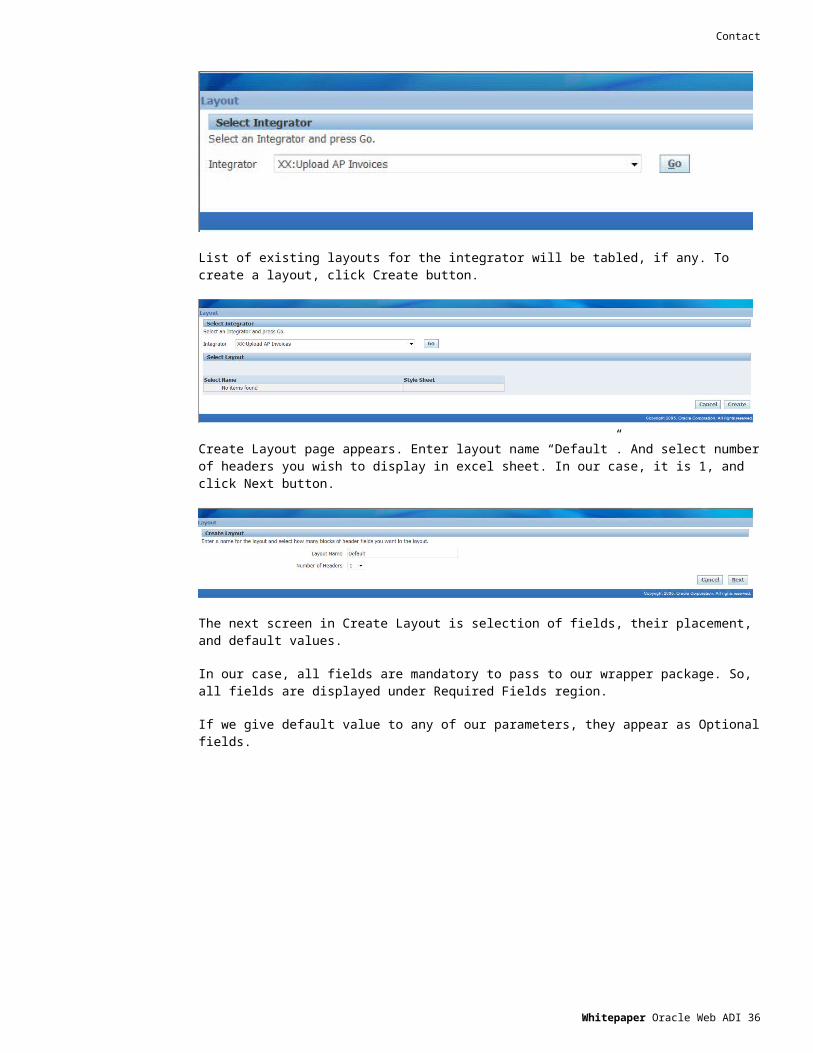
List of existing layouts for the integrator will be tabled, if any. To create a layout, click Create button.
Create Layout page appears. Enter layout name “Default”. And select number of headers you wish to display in excel sheet. In our case, it is 1, and click Next button.
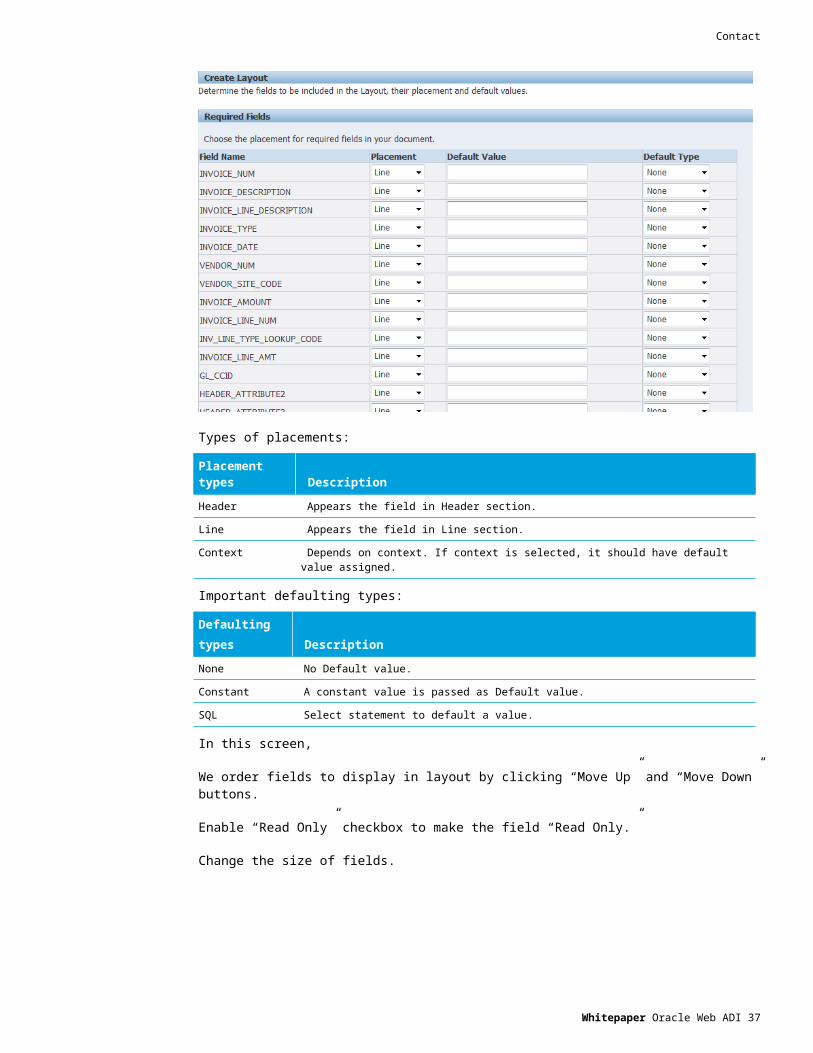
The next screen in Create Layout is selection of fields, their placement, and default values.
In our case, all fields are mandatory to pass to our wrapper package. So, all fields are displayed under Required Fields region.
If we give default value to any of our parameters, they appear as Optional fields.
Whitepaper Oracle Web ADI 32
Contact
Types of placements:
Placement types Description
Header Appears the field in Header section.
Line Appears the field in Line section.
Context Depends on context. If context is selected, it should have default value assigned.
Important defaulting types:
Defaultingtypes Description
None No Default value.
Constant A constant value is passed as Default value.
SQL Select statement to default a value.
In this screen,
We order fields to display in layout by clicking “Move Up” and “Move Down” buttons.
Enable “Read Only” checkbox to make the field “Read Only.”
Change the size of fields.
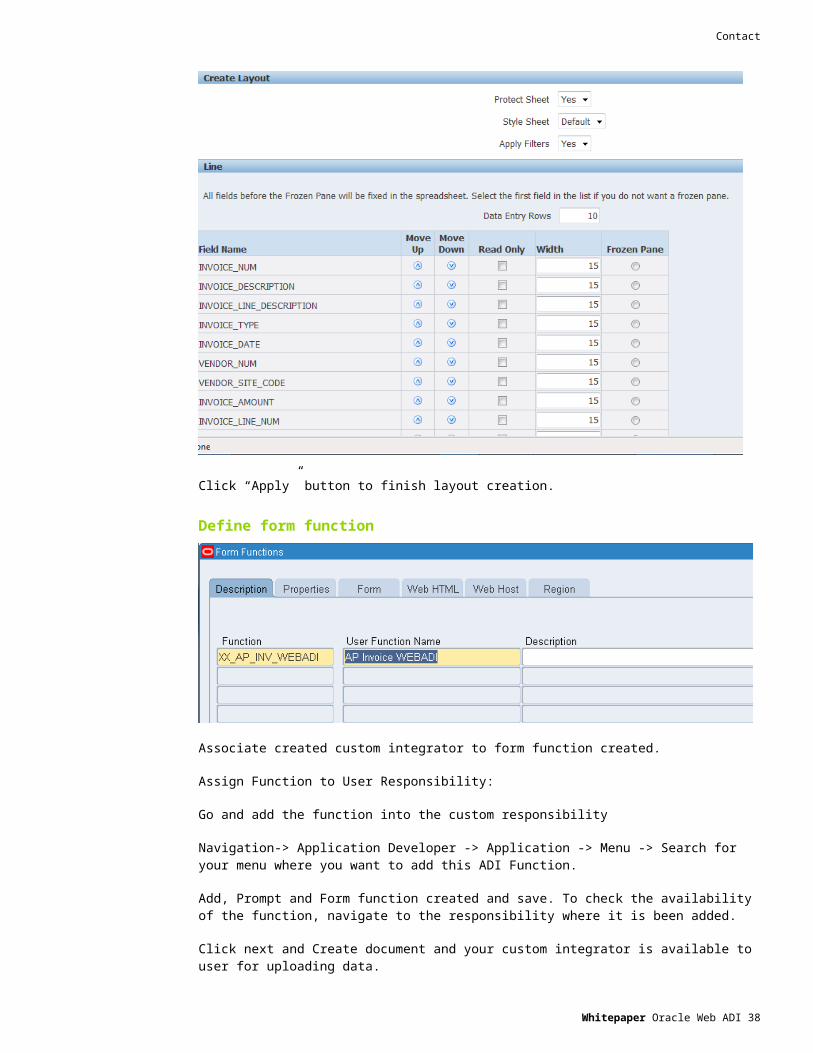
Click “Apply” button to finish layout creation.
Whitepaper Oracle Web ADI 33
Contact
Define form function
Associate created custom integrator to form function created.
Assign Function to User Responsibility:
Go and add the function into the custom responsibility
Navigation-> Application Developer -> Application -> Menu -> Search for your menu where you want to add this ADI Function.
Add, Prompt and Form function created and save. To check the availability of the function, navigate to the responsibility where it is been added.
Click next and Create document and your custom integrator is available to user for uploading data.
Whitepaper Oracle Web ADI 34

Contact
Appendix I
Prerequsites
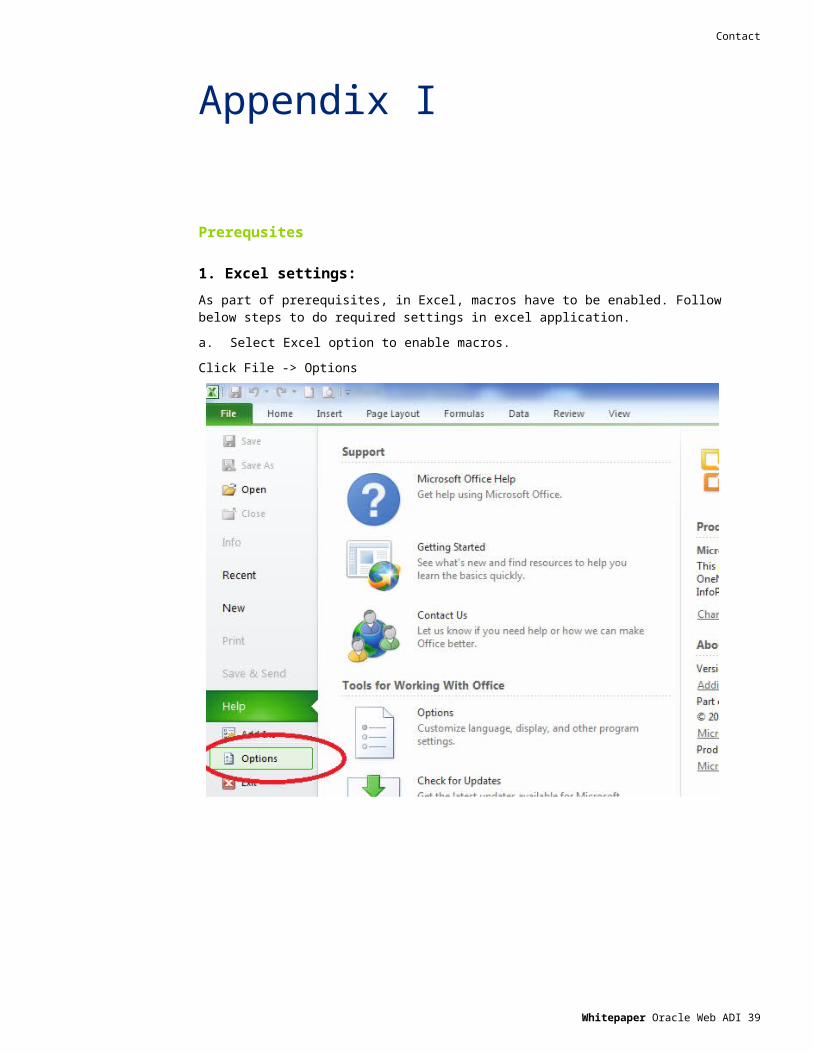
1. Excel settings:
As part of prerequisites, in Excel, macros have to be enabled. Follow below steps to do required settings in excel application.
a. Select Excel option to enable macros.
Click File -> Options
Whitepaper Oracle Web ADI 35
Contact
b. Click on Trust Center -> Trust Center Settings button in Excel Options form.
c. Select Macro Settings -> Enable all macros and check the option Trust access to the VBA Project object model in Trust Center form and save all your setting changes.
2. Browser settings:
Prior to accessing the Web ADI in user machine, below settings should be made.
1. Open Internet Explorer browser window, click on Tools menu.
2. When the Tools menu appears, click “Internet Options” at the bottom of the Tools menu.
3. Click on the security tab.
4. When the Security page appears, click the “Internet” icon in the “Select a zone” box and then click the “Custom Level” button.
5. When the “Security Settings” dialog box appears, scroll down to “Scripting” on the menu.
6. Enable “Allow status bar updates script.” Select OK.
7. You may receive a Warning. Please select “Yes.”
Whitepaper Oracle Web ADI 36
Contact
8. Finally, click “OK” to close the Internet Options dialog box.
9. Close the browser window so that new settings can be used.
3. Profile option setup in application:
Check the value for profile option named BNE: Allow No Security Rule and set the value to Yes and save the setup.
Whitepaper Oracle Web ADI 37
Contact
Contact
For more information about this paper, please contact:
Ajay Kumar Tadakamadala
DC ConsultantDeloitte U.S. India OfficesRoad No. 2, Deloitte Drive, Hitech City Layout, Madhapur, Hyderabad — [email protected]
Whitepaper Oracle Web ADI 38
This publication contains general information only and is based on the experiences and research of Deloitte practitioners. Deloitte is not, by means of this publication, rendering business, financial, investment, or other professional advice or services. This publication is not a substitute for such professional advice or services, nor should it be used as a basis for any decision or action that may affect your business. Before making any decision or taking any action that may affect your business, you should consult a qualified professional advisor. Deloitte, its affiliates, and related entities shall not be responsible for any loss sustained by any person who relies on this publication.
About DeloitteDeloitte refers to one or more of Deloitte Touche Tohmatsu Limited, a UK private company limited by guarantee, and its network of member firms, each of which is a legally separate and independent entity. Please see www.deloitte.com/about for a detailed description of the legal structure of Deloitte Touche Tohmatsu Limited and its member firms. Please see www.deloitte.com/us/about for a detailed description of the legal structure of Deloitte LLP and its subsidiaries. Certain services may not be available to attest clients under the rules and regulations of public accounting.
Copyright © 2013 Deloitte Development LLC. All rights reserved.Member of Deloitte Touche Tohmatsu Limited