Embed Size (px)
Citation preview
Access to Expense ToolTo access the tool, you would go to my.rutgers.edu and click on Log In (right corner). Once in, go to the Finance section (you may need to click on the More box in the center bottom to see more options). Click on Expense Management.
No Access to Expense Tool?Go to http://uco.rutgers.edu/forms-repository. Under Available Forms, choose the Access option. Open the Expense Management document. Complete the form, obtain necessary approvals and scan/email the form to [email protected].
Finance Approver Change?If employees require a change to the Finance Approver, the Finance Approver Form is found under http://uco.rutgers.edu/forms-repository. Under Available Forms, choose Finance Approver Forms. Open the document. Complete the form, obtain necessary approvals and scan/email the form to [email protected].
Project Approver Change?Go to the Project Request Form which is found under http://uco.rutgers.edu/forms-repository. Under Available Forms, choose Project Request Form and choose New Project Request Form. Open the document and go to the Change Existing Project tab. Complete the form, obtain necessary approvals and scan/email the form to [email protected] . Training for Expense (Employee)Web-based training is located at • Go into https://onlinelearning.rutgers.edu/canvas . • From there, click on Canvas Login• Sign in with your NetID and password• Go into Dashboard on the left• Click on Expense Management Course Pathway• Click on Modules• The section EX010 has the tutorial for Enter and Submit Expense Reports
Training for Check Request (Non Employee)Web-based training is located at • Go into https://onlinelearning.rutgers.edu/canvas . • From there, click on Canvas Login• Sign in with your NetID and password• Go into Dashboard on the left• Click on Expense Management Course Pathway• Click on Modules• The section EXS010 has the tutorial for Check Request Submittal
Questions about Original Receipts The Original Receipt Required column tells you what items need receipts. It does not stop you from submitting your expense report. It is up the department if originals need to be saved. Also, there is no need to send anything to Accounts Payable.
Requires Action (needs receipts)If an employee receives notification that their report Requires Action, they should
1. Click on the Notification Bell 2. Open the notification3. Make the necessary corrections or to upload required receipts, click on the + 4. Click Ok5. Go up to Actions in the top right corner and from the drop down, choose Submit Information
Reports Returned with Error MessagesClick on the error message, not the report number. Correct the errors or add the necessary information. Click ok then go to Actions in the top right corner and from the drop down, choose Submit Information
Withdraw and ResubmitPlease ask the user to withdraw the report and re-submit it. To withdraw, go to the home page, and click on “In Approval” in the Expense Report box. It will bring up the expense report. Click on the area to the right of the RBU where it says #of Items so that the section highlights blue. Then just above the report number they will see Actions with a down arrow. Click on the arrow and they will see the word Withdraw. Click on Withdraw and then you can go back in, make any changes and hit Submit.
Travel Order Form Go to http://procurementservices.rutgers.edu/travel/booking-travel and scroll down the page to Direct Billing Option. Choose the appropriate option and follow the instructions.
Personal Car Mileage Reimbursement prior to 9/1/16When you begin the expense, you must choose a date after 9/1/16 even if the charge is before. In the description field, note the real date of the charge and explain that you needed to use a post 9/1/16 date in order to enter it.
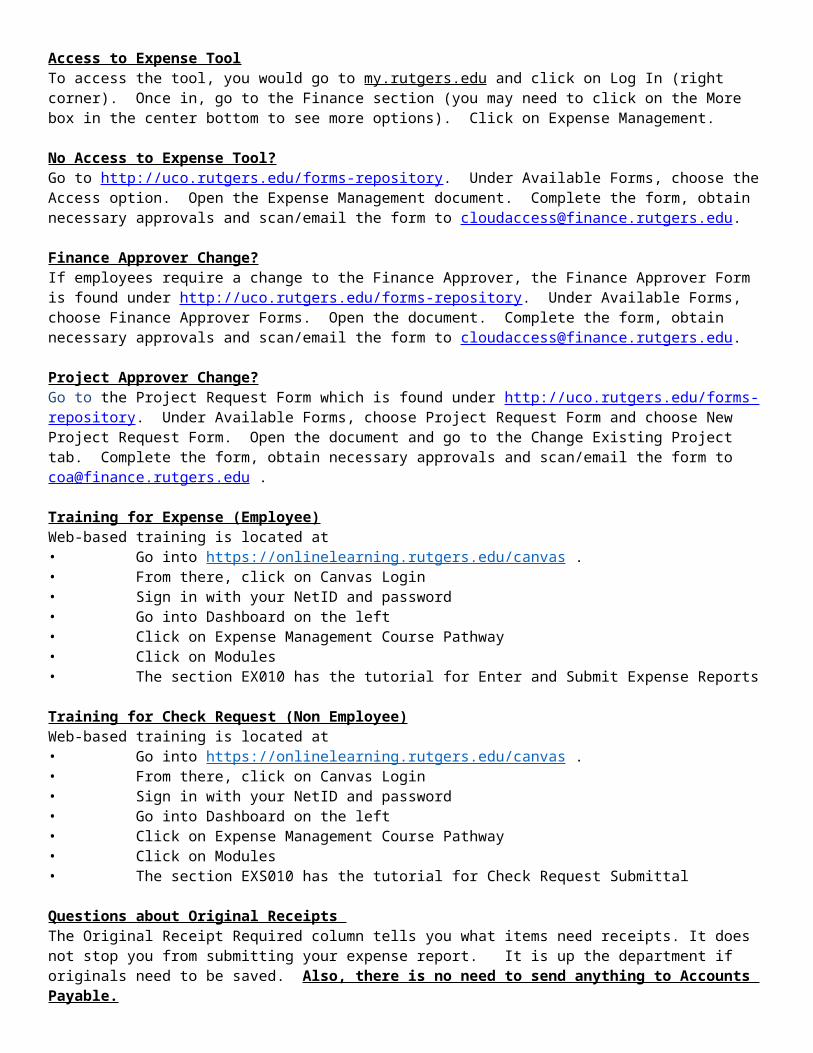
DelegateFirst, you have to be set up as the delegate for that employee. To do that, the employee will have to go under the Task icon. Choose Manage Delegates.
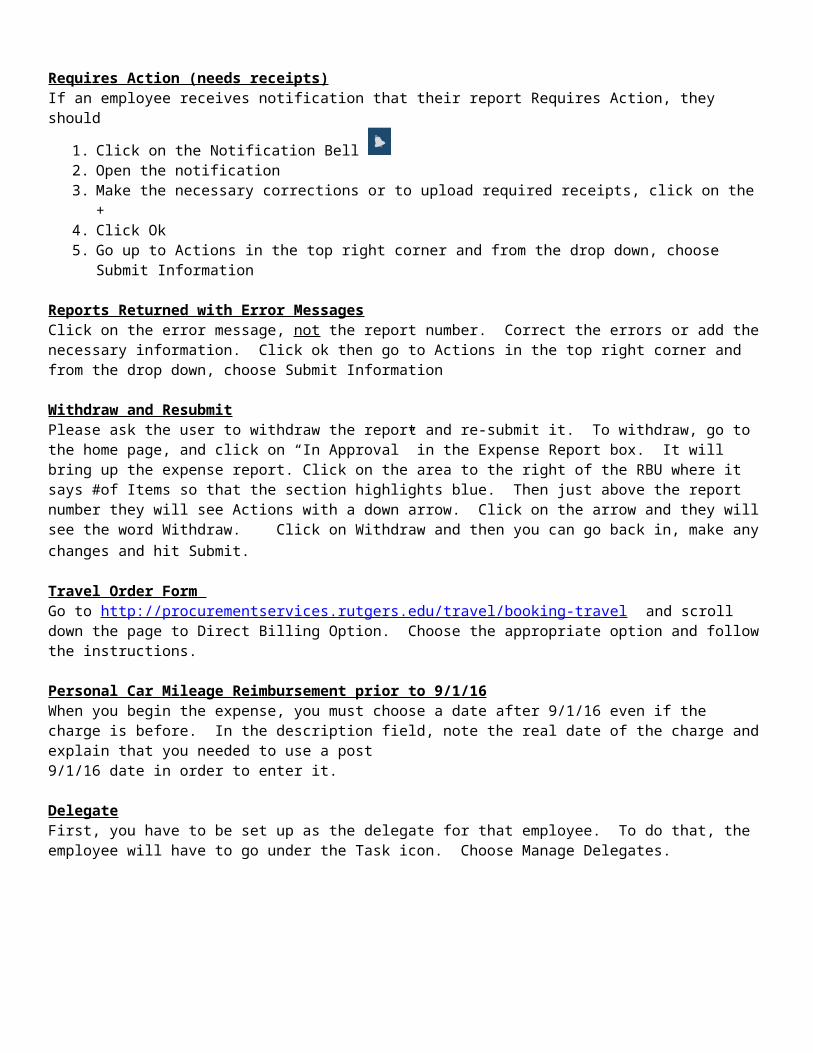
Once in Delegates and Permissions, click on the +.
Click on the magnifying glass next to Person. Search and Select: Person will come up.
Click on Advanced button.
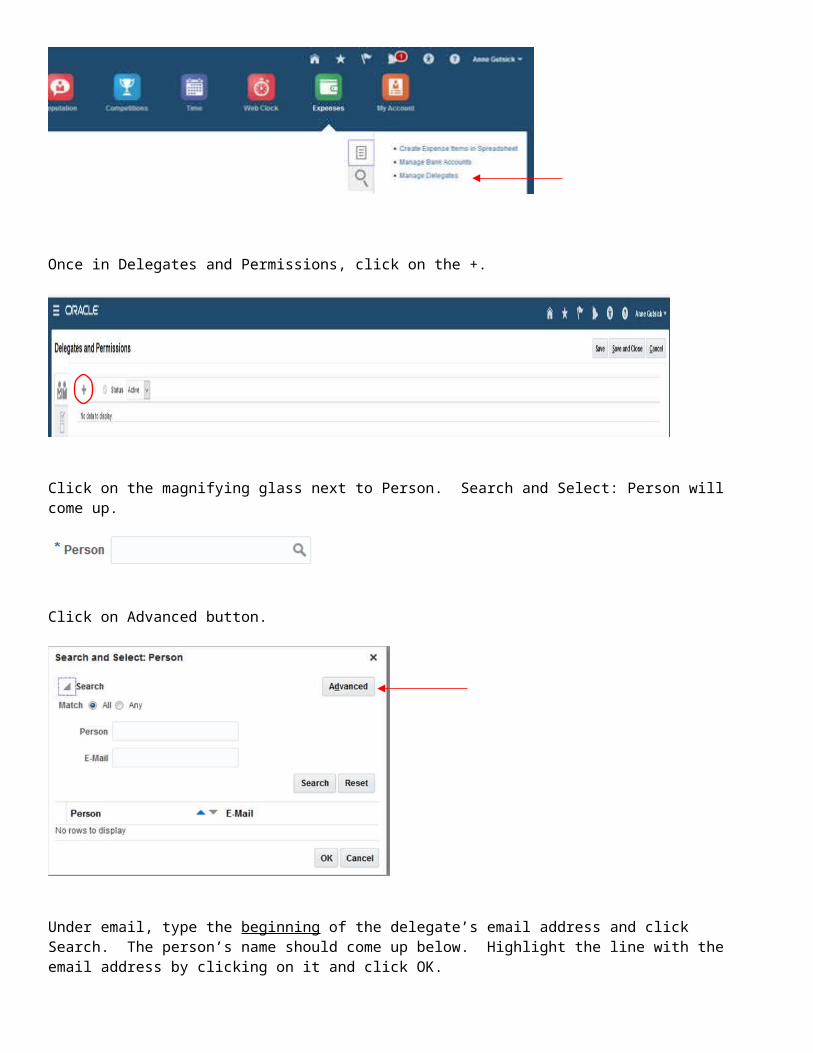
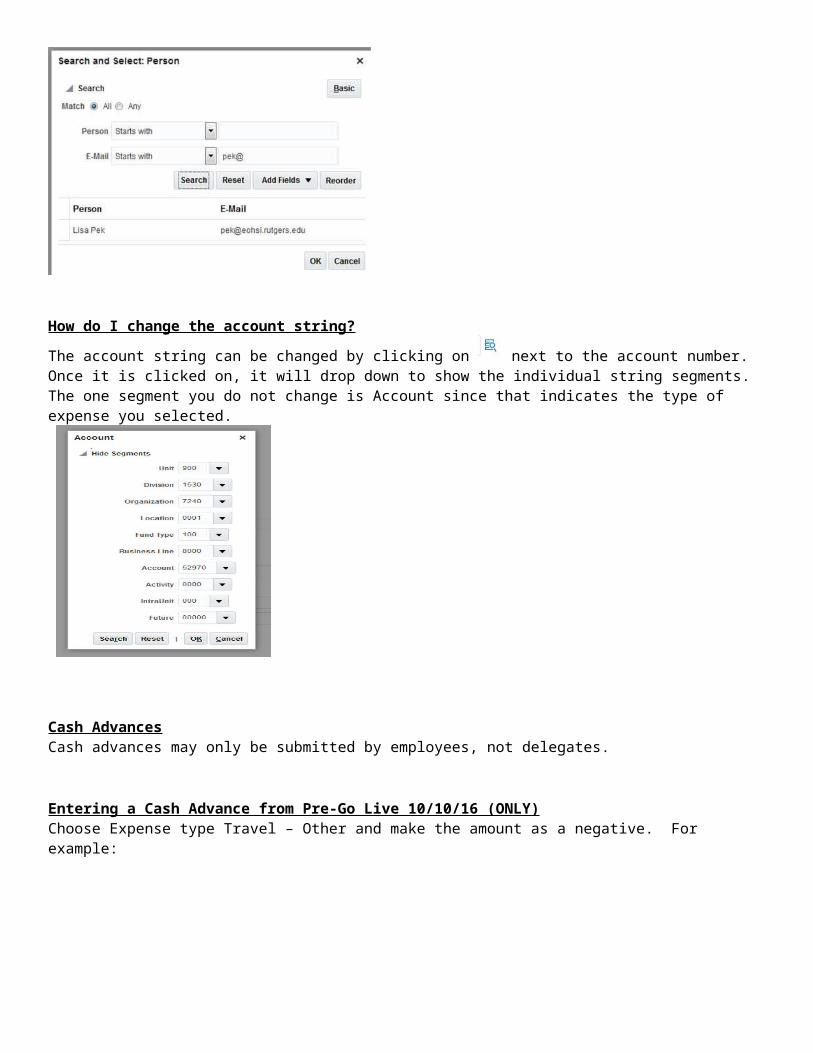
Under email, type the beginning of the delegate’s email address and click Search. The person’s name should come up below. Highlight the line with the email address by clicking on it and click OK.
How do I change the account string?
The account string can be changed by clicking on next to the account number. Once it is clicked on, it will drop down to show the individual string segments. The one segment you do not change is Account since that indicates the type of expense you selected.
Cash AdvancesCash advances may only be submitted by employees, not delegates.
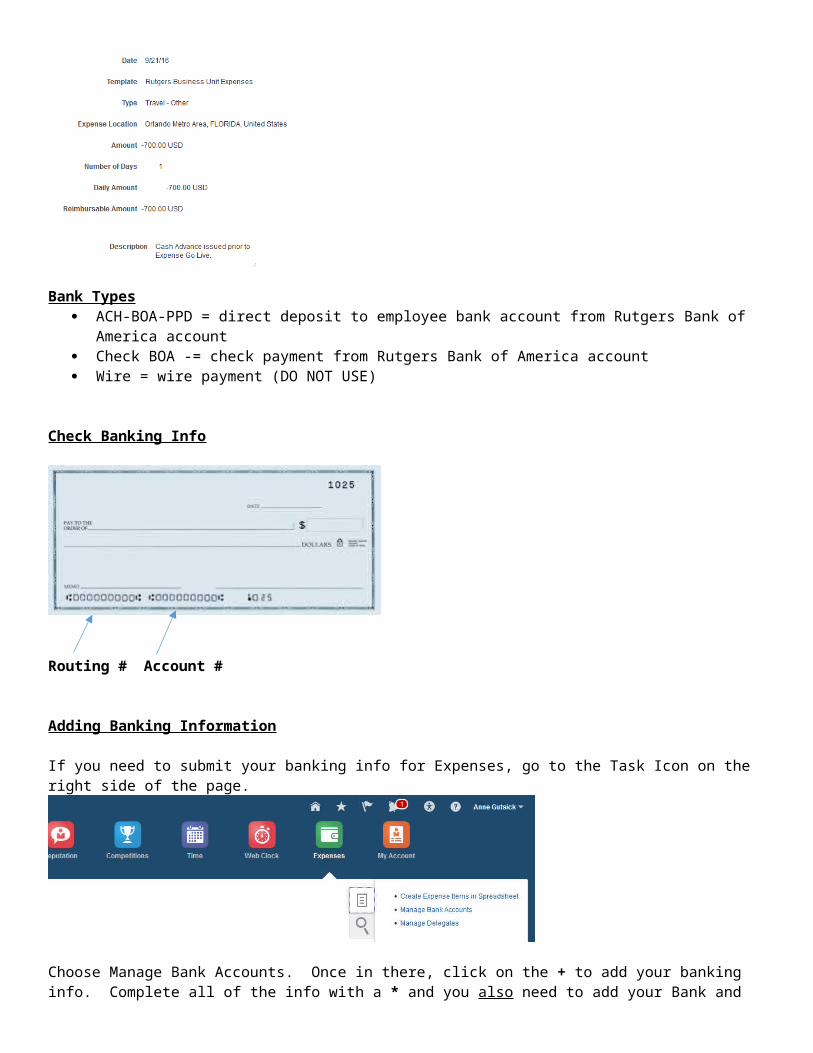
Entering a Cash Advance from Pre-Go Live 10/10/16 (ONLY)Choose Expense type Travel – Other and make the amount as a negative. For example:
Bank Types ACH-BOA-PPD = direct deposit to employee bank account from Rutgers Bank of America account Check BOA -= check payment from Rutgers Bank of America account Wire = wire payment (DO NOT USE)
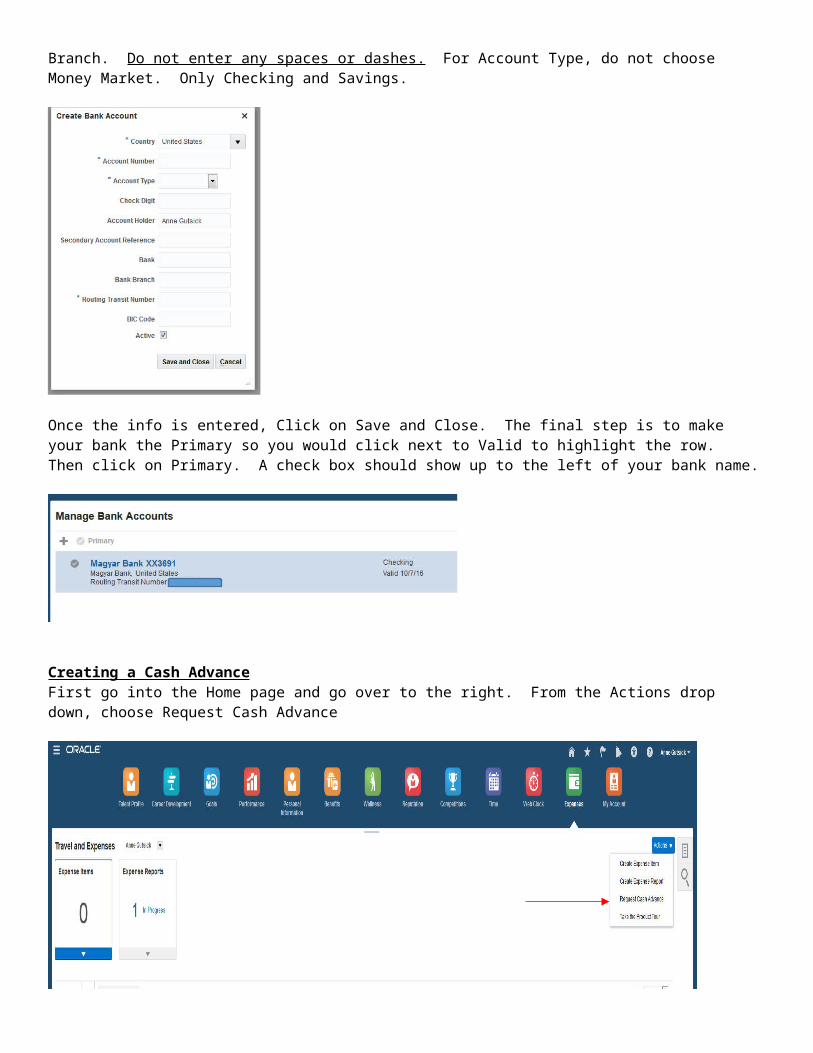
Check Banking Info
Routing # Account #
Adding Banking Information
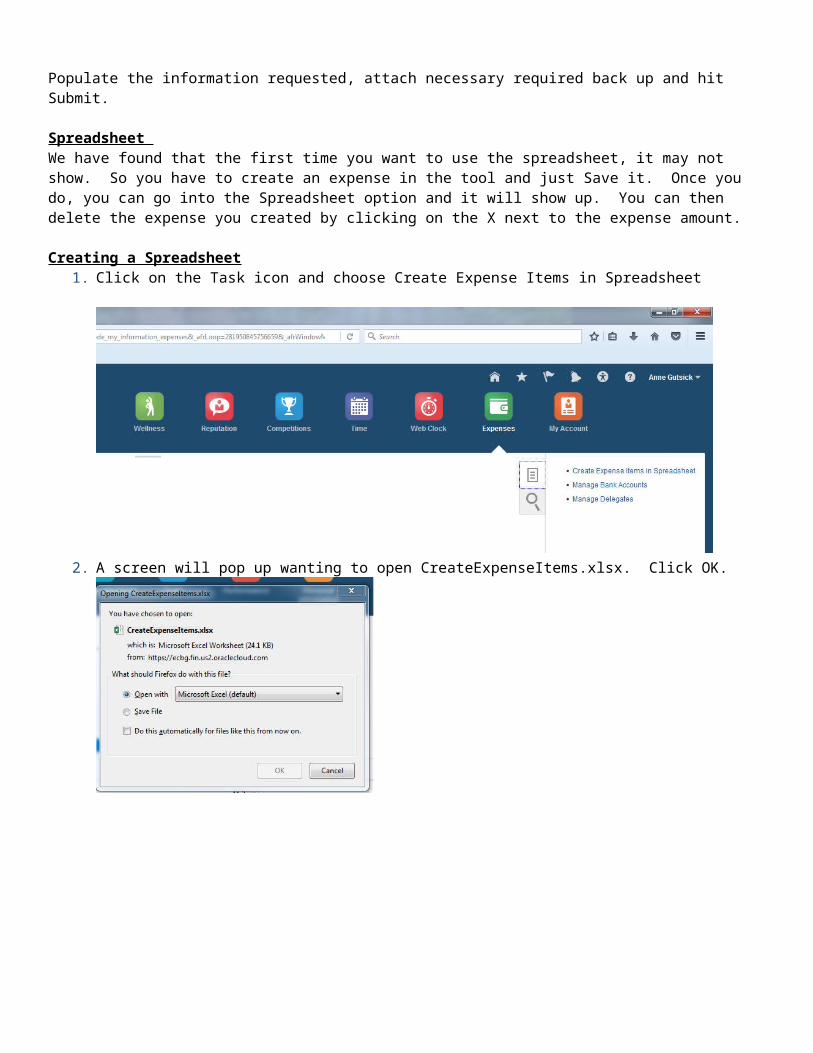
If you need to submit your banking info for Expenses, go to the Task Icon on the right side of the page.
Choose Manage Bank Accounts. Once in there, click on the + to add your banking info. Complete all of the info with a * and you also need to add your Bank and Branch. Do not enter any spaces or dashes. For Account Type, do not choose Money Market. Only Checking and Savings.
Once the info is entered, Click on Save and Close. The final step is to make your bank the Primary so you would click next to Valid to highlight the row. Then click on Primary. A check box should show up to the left of your bank name.
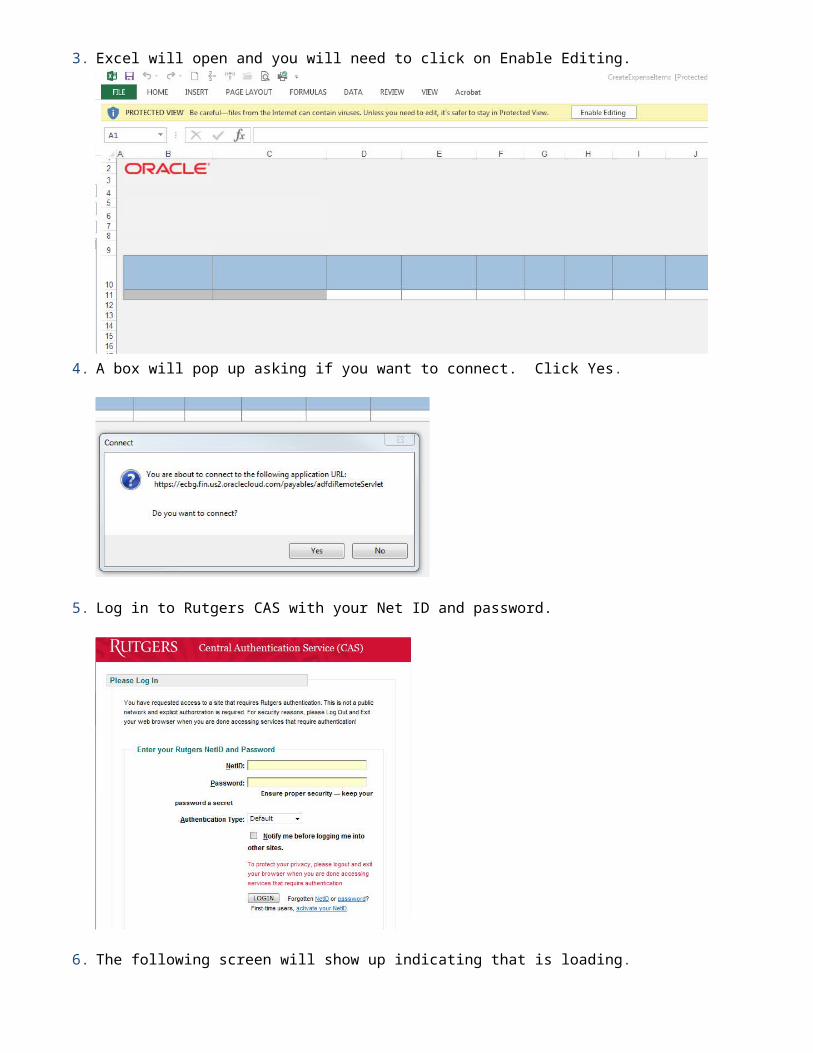
Creating a Cash AdvanceFirst go into the Home page and go over to the right. From the Actions drop down, choose Request Cash Advance
Populate the information requested, attach necessary required back up and hit Submit.
Spreadsheet We have found that the first time you want to use the spreadsheet, it may not show. So you have to create an expense in the tool and just Save it. Once you do, you can go into the Spreadsheet option and it will show up. You can then delete the expense you created by clicking on the X next to the expense amount.
Creating a Spreadsheet1. Click on the Task icon and choose Create Expense Items in Spreadsheet
2. A screen will pop up wanting to open CreateExpenseItems.xlsx. Click OK.
3. Excel will open and you will need to click on Enable Editing.
4. A box will pop up asking if you want to connect. Click Yes.
5. Log in to Rutgers CAS with your Net ID and password.
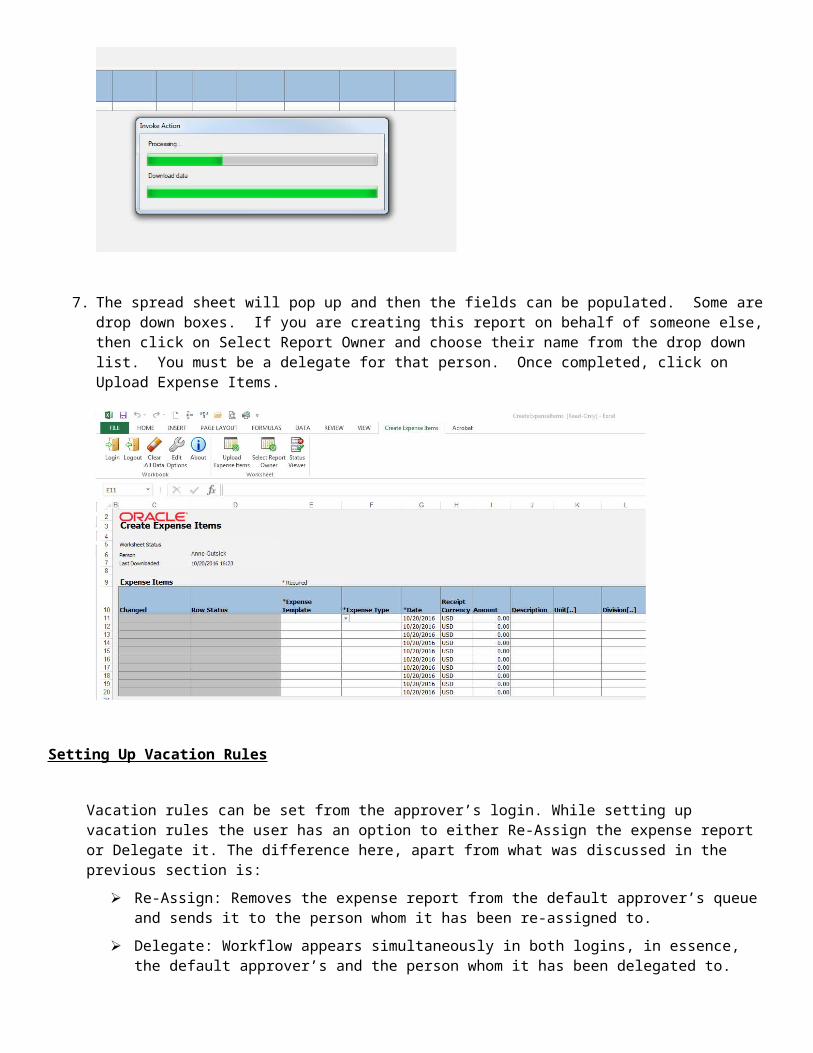
6. The following screen will show up indicating that is loading.
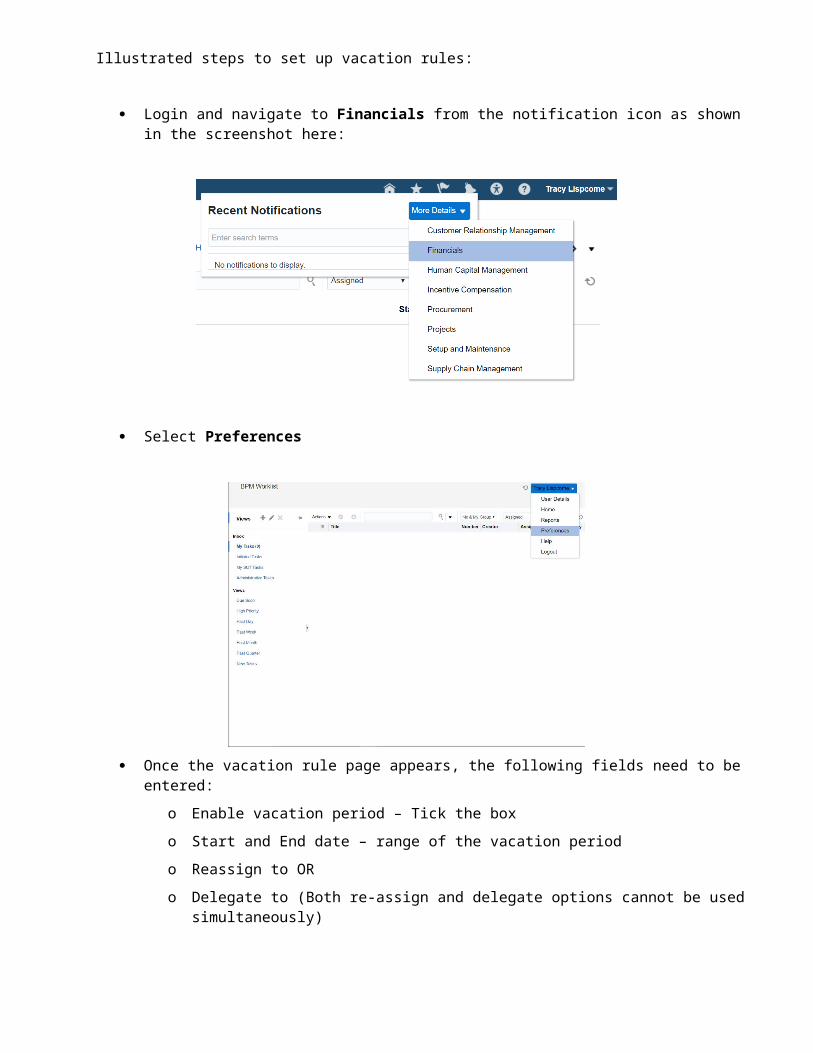
7. The spread sheet will pop up and then the fields can be populated. Some are drop down boxes. If you are creating this report on behalf of someone else, then click on Select Report Owner and choose their name from the drop down list. You must be a delegate for that person. Once completed, click on Upload Expense Items.
Setting Up Vacation Rules
Vacation rules can be set from the approver’s login. While setting up vacation rules the user has an option to either Re-Assign the expense report or Delegate it. The difference here, apart from what was discussed in the previous section is:
Re-Assign: Removes the expense report from the default approver’s queue and sends it to the person whom it has been re-assigned to.
Delegate: Workflow appears simultaneously in both logins, in essence, the default approver’s and the person whom it has been delegated to.
Illustrated steps to set up vacation rules:
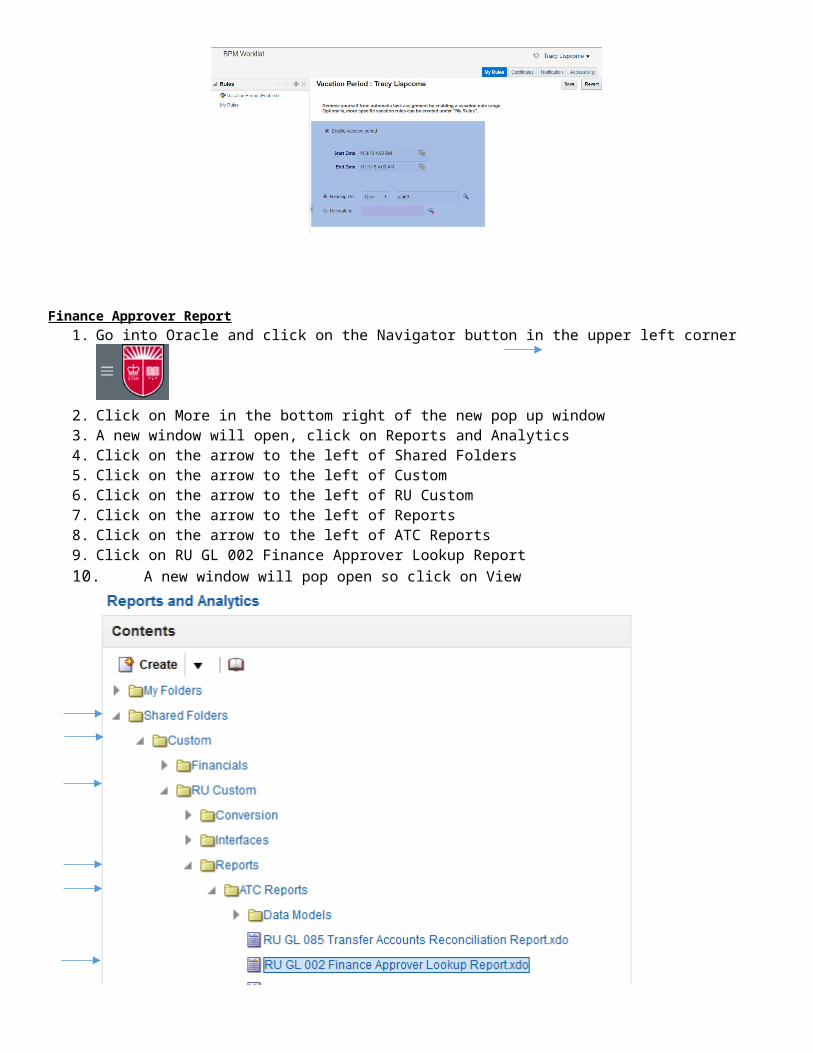
Login and navigate to Financials from the notification icon as shown in the screenshot here:
Select Preferences
Once the vacation rule page appears, the following fields need to be entered:
o Enable vacation period – Tick the box
o Start and End date – range of the vacation period
o Reassign to OR
o Delegate to (Both re-assign and delegate options cannot be used simultaneously)
Finance Approver Report
1. Go into Oracle and click on the Navigator button in the upper left corner 2. Click on More in the bottom right of the new pop up window 3. A new window will open, click on Reports and Analytics4. Click on the arrow to the left of Shared Folders5. Click on the arrow to the left of Custom6. Click on the arrow to the left of RU Custom7. Click on the arrow to the left of Reports8. Click on the arrow to the left of ATC Reports9. Click on RU GL 002 Finance Approver Lookup Report
10. A new window will pop open so click on View
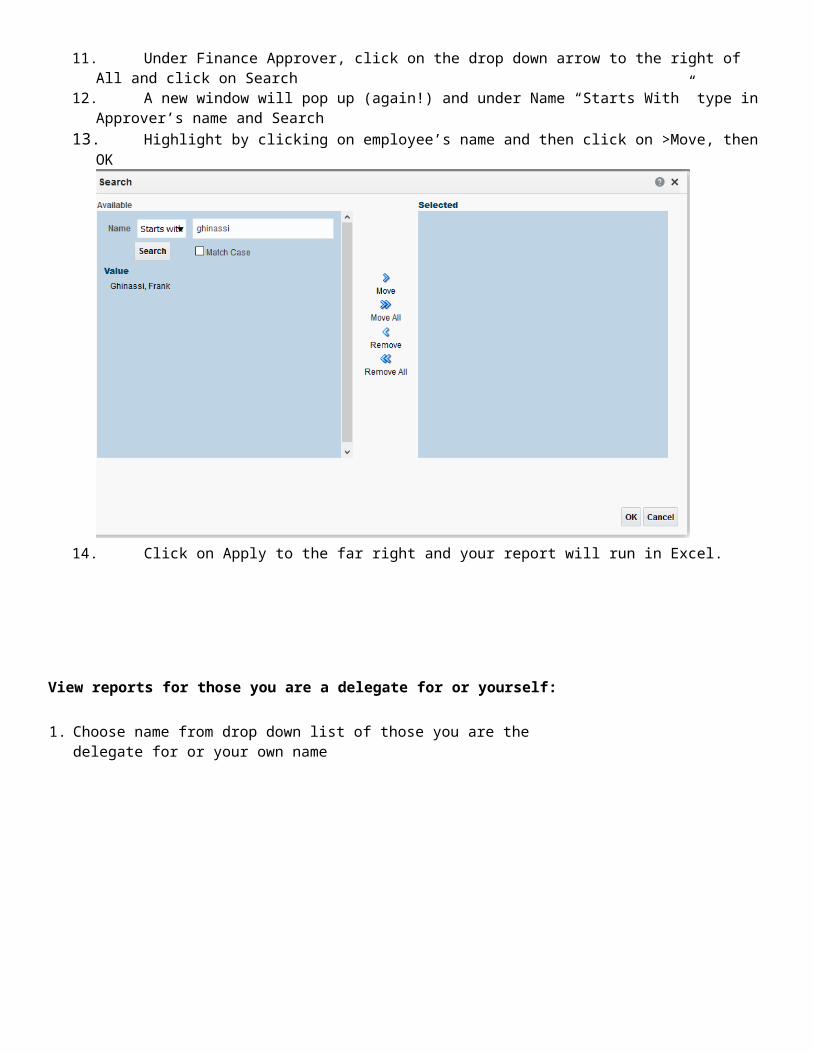
11. Under Finance Approver, click on the drop down arrow to the right of All and click on Search12. A new window will pop up (again!) and under Name “Starts With” type in Approver’s name and Search13. Highlight by clicking on employee’s name and then click on >Move, then OK
14. Click on Apply to the far right and your report will run in Excel.
View reports for those you are a delegate for or yourself:
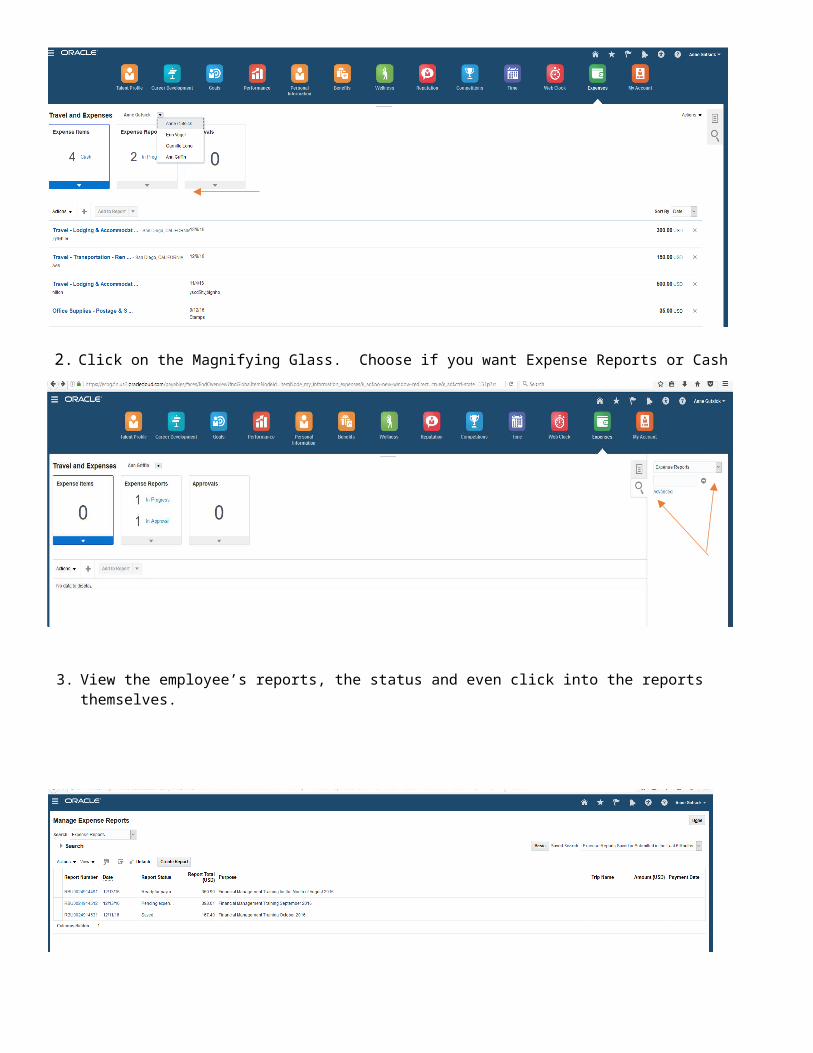
1. Choose name from drop down list of those you are the delegate for or your own name
2. Click on the Magnifying Glass. Choose if you want Expense Reports or Cash Advance and then click the right arrow.
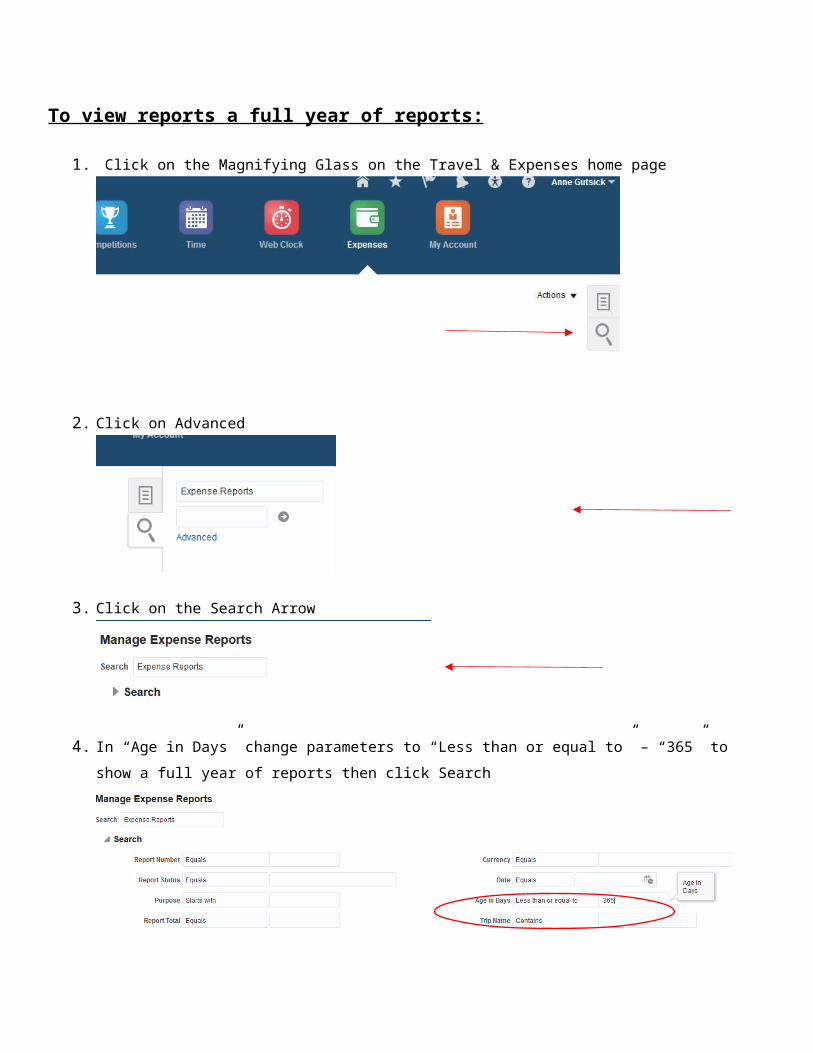
To view reports a full year of reports:
1. Click on the Magnifying Glass on the Travel & Expenses home page
2. Click on Advanced
3. Click on the Search Arrow
3. View the employee’s reports, the status and even click into the reports themselves.
4. In “Age in Days” change parameters to “Less than or equal to” – “365” to show a full year of reports then click Search
Finance Approvers – How to view reports you have approved
1. Click on the Notification Bell
2. Click on More Details
3. Click on Financials
4. Enter name of employee
5. Change Assigned to Any
6. Click on the magnifying glass to Search
Project Approver Report
Go into Oracle and click on the Navigator button (to the left of Rutgers logo).From there go to Projects – Project Financial Management
Click on the arrow to the left of Search
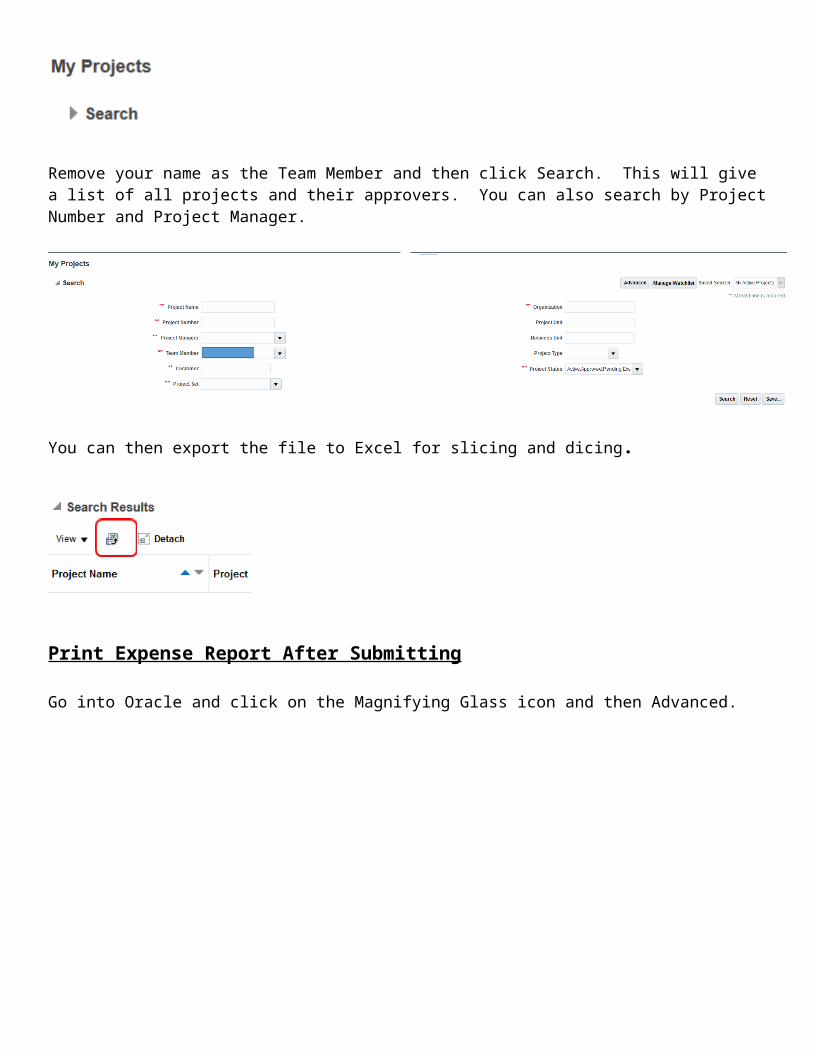
Remove your name as the Team Member and then click Search. This will give a list of all projects and their approvers. You can also search by Project Number and Project Manager.
You can then export the file to Excel for slicing and dicing.
Print Expense Report After Submitting
Go into Oracle and click on the Magnifying Glass icon and then Advanced.

Click on the arrow to the left of Search
Change the Age in Days to Less than “1”
Reports will show below. Click on the dollar amount to highlight the line. From Actions, choose Print Preview


![The Portal - Countdown · Web viewTo assign hierarchy nodes, you need to go to the persons name for the correct Sales Org, and select Countdown Supers,( bottom of page) click on “[+]”](https://img.pdfslide.us/doc/110x75/5ff45535aae07d7a266e3bf6/the-portal-countdown-web-view-to-assign-hierarchy-nodes-you-need-to-go-to-the.jpg)


![Mobile Workspaces Go Where You Go [Infographic]](https://img.pdfslide.us/doc/110x75/559e9dc01a28abcd048b46c9/mobile-workspaces-go-where-you-go-infographic.jpg)