Embed Size (px)
Citation preview

Craig GeromiJosh RumpffKirsten AdhikariAbdularahman AlzharniBloomsburg University
SMART Notebook 10:Lesson Activity Toolkit 2.0 Training
Manual
P a g e | 2
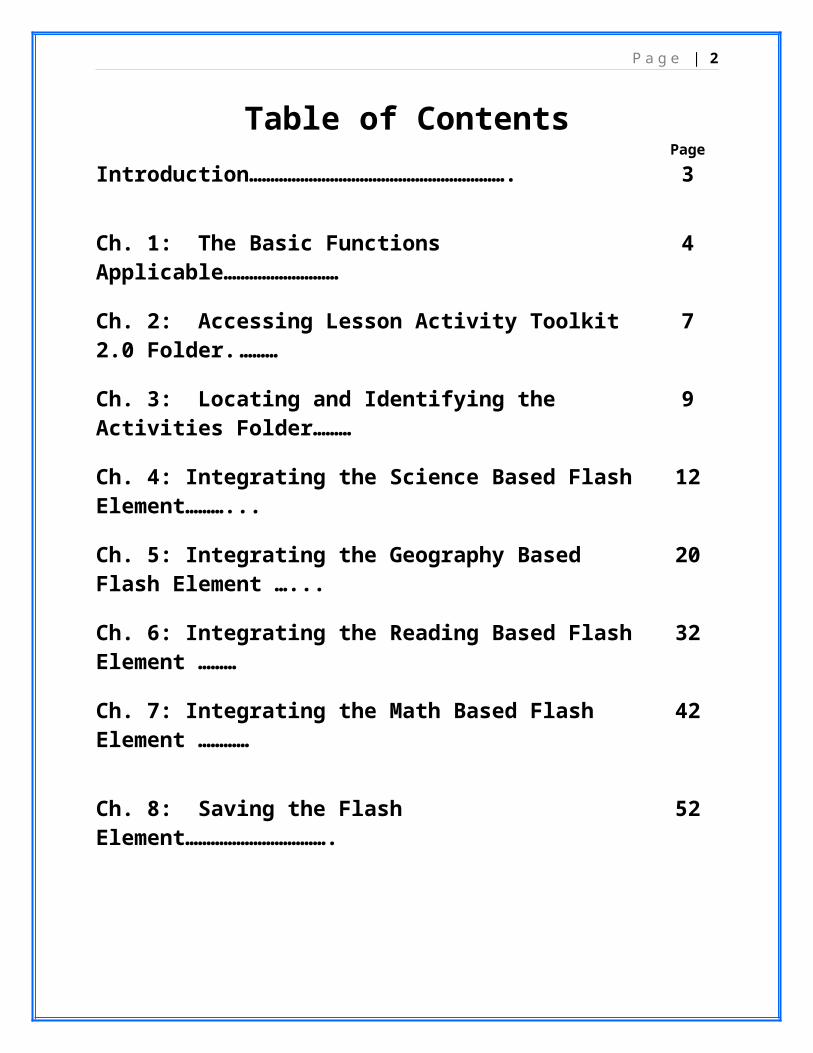
Table of ContentsPage
Introduction……………………………………………………. 3
Ch. 1: The Basic Functions Applicable……………………… 4
Ch. 2: Accessing Lesson Activity Toolkit 2.0 Folder. ……… 7
Ch. 3: Locating and Identifying the Activities Folder……… 9
Ch. 4: Integrating the Science Based Flash Element………... 12
Ch. 5: Integrating the Geography Based Flash Element …... 20
Ch. 6: Integrating the Reading Based Flash Element ……… 32
Ch. 7: Integrating the Math Based Flash Element ………… 42
Ch. 8: Saving the Flash Element……………………………. 52

P a g e | 3
WELCOME
Now that you have a basic understanding of the SMART Notebook 10 software, it’s time to take a deeper look into the possibilities when it comes to creating an interactive lesson. The Lesson Activity Toolkit 2.0 is an amazing database of customizable interactive Flash elements that can enrich any classroom. This training will walk you through step-by-step how to integrate and implement four different interactive Flash elements into your lessons. For this training, a specific subject will be utilized for each unique Flash element, but this is merely for demonstration purposes. The interactive Flash elements that are covered can be customized and used for a variety of different subjects.
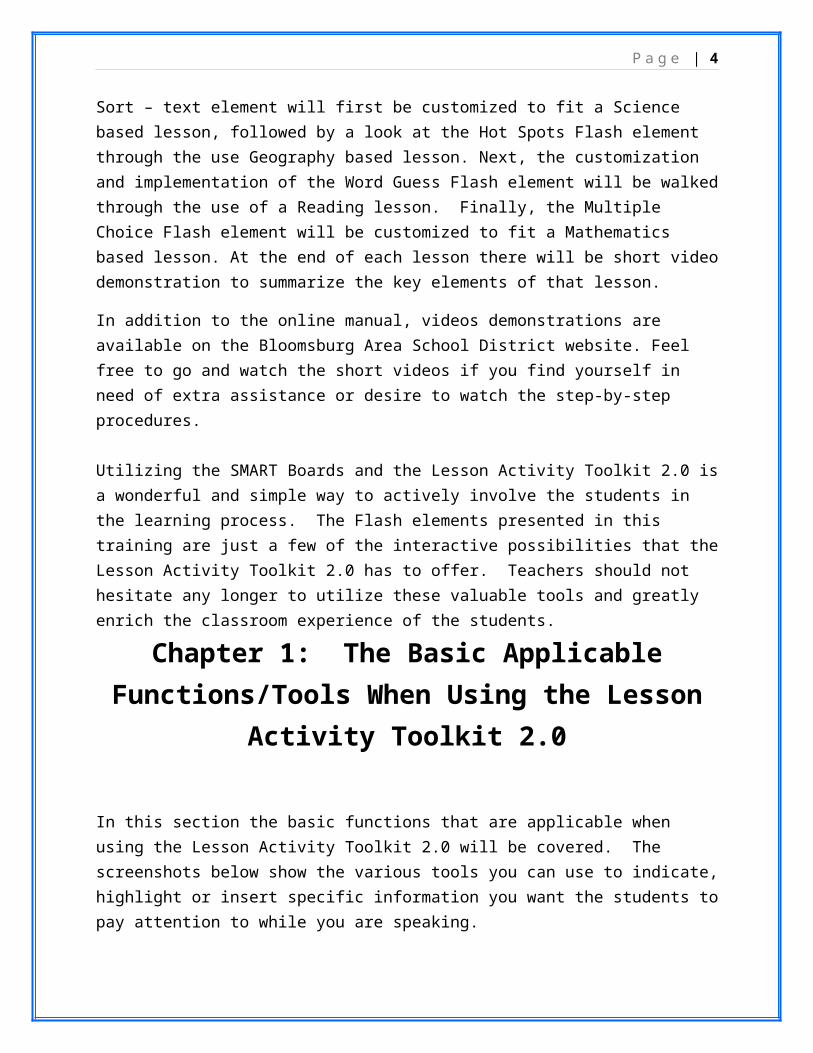
The instruction will begin by reviewing the tools that will be useful in creating and editing the interactive lessons. A brief review of the SMART Toolbar will start off the training in order to familiarize you with the tools that are available and applicable to all SMART Notebook lessons. Following this, you will be guided through the necessary procedures in order to locate the Lesson Activity Toolkit 2.0, containing the Flash elements that will be used for the rest of the training. After locating the necessary folders, you will begin your training on how to integrate and implement the Flash elements. The Category Sort – text element will first be customized to fit a Science based lesson, followed by a look at the Hot Spots Flash element through the use Geography based lesson. Next, the customization and implementation of the Word Guess Flash element will be walked through the use of a Reading lesson. Finally, the Multiple Choice Flash element will be customized to fit a Mathematics based lesson. At the end of each lesson there will be short video demonstration to summarize the key elements of that lesson.
In addition to the online manual, videos demonstrations are available on the Bloomsburg Area School District website. Feel free to go and watch the short videos if you find yourself in need of extra assistance or desire to watch the step-by-step procedures.
Utilizing the SMART Boards and the Lesson Activity Toolkit 2.0 is a wonderful and simple way to actively involve the students in the learning process. The Flash elements presented in this training are just a few of the interactive possibilities that the Lesson Activity Toolkit 2.0 has to offer. Teachers should not hesitate any longer to utilize these valuable tools and greatly enrich the classroom experience of the students.
P a g e | 4
Chapter 1: The Basic Applicable Functions/Tools When Using the Lesson
Activity Toolkit 2.0
In this section the basic functions that are applicable when using the Lesson Activity Toolkit 2.0 will be covered. The screenshots below show the various tools you can use to indicate, highlight or insert specific information you want the students to pay attention to while you are speaking.
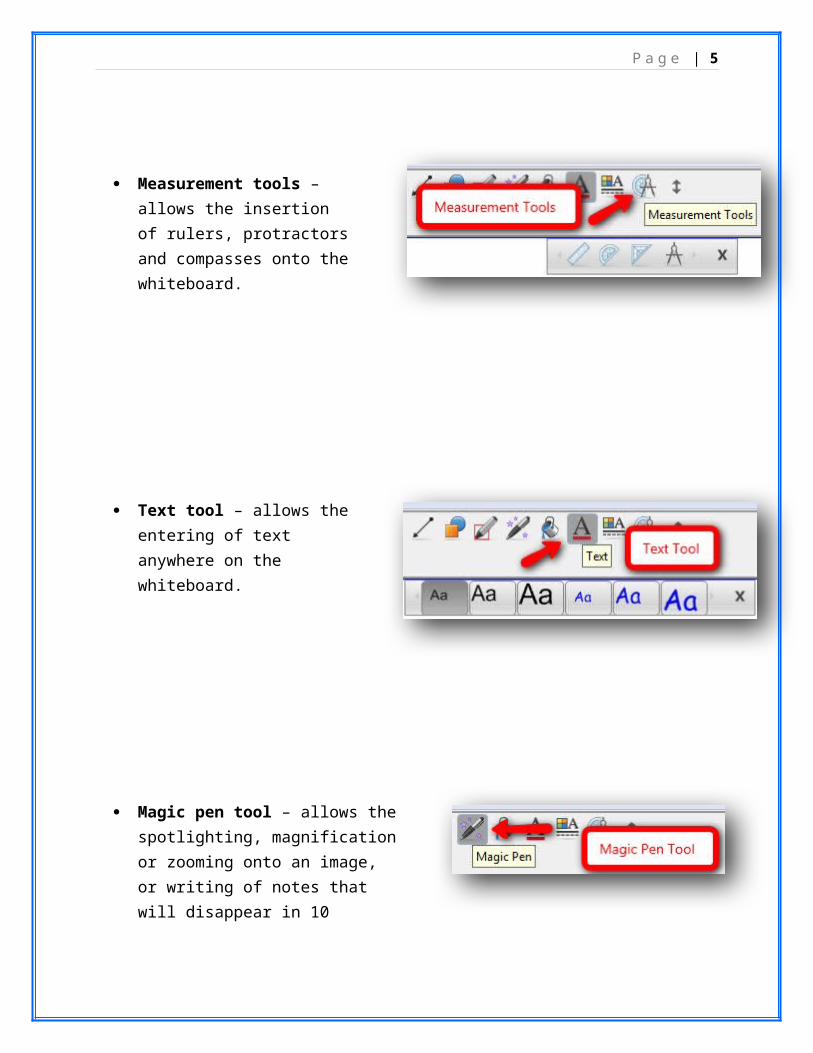
Measurement tools – allows the insertion of rulers, protractors and compasses onto the whiteboard.
Text tool – allows the entering of text anywhere on the whiteboard.
Magic pen tool – allows the spotlighting, magnification or zooming onto an image, or writing of notes that will disappear in 10 seconds. Draw a square to magnify an object or draw a circle to add a spotlight.
P a g e | 5
Shape recognition pen tool – allows the drawing of a freehand circle or other shape, and access the Shape Recognition feature in the drop-down menu to quickly perfect it.
Shape tools – allows the drawing of various shapes such as a circle, square or triangle on the whiteboard.
Line tools – allows the drawing of various lines from straight lines to dotted lines.

P a g e | 6
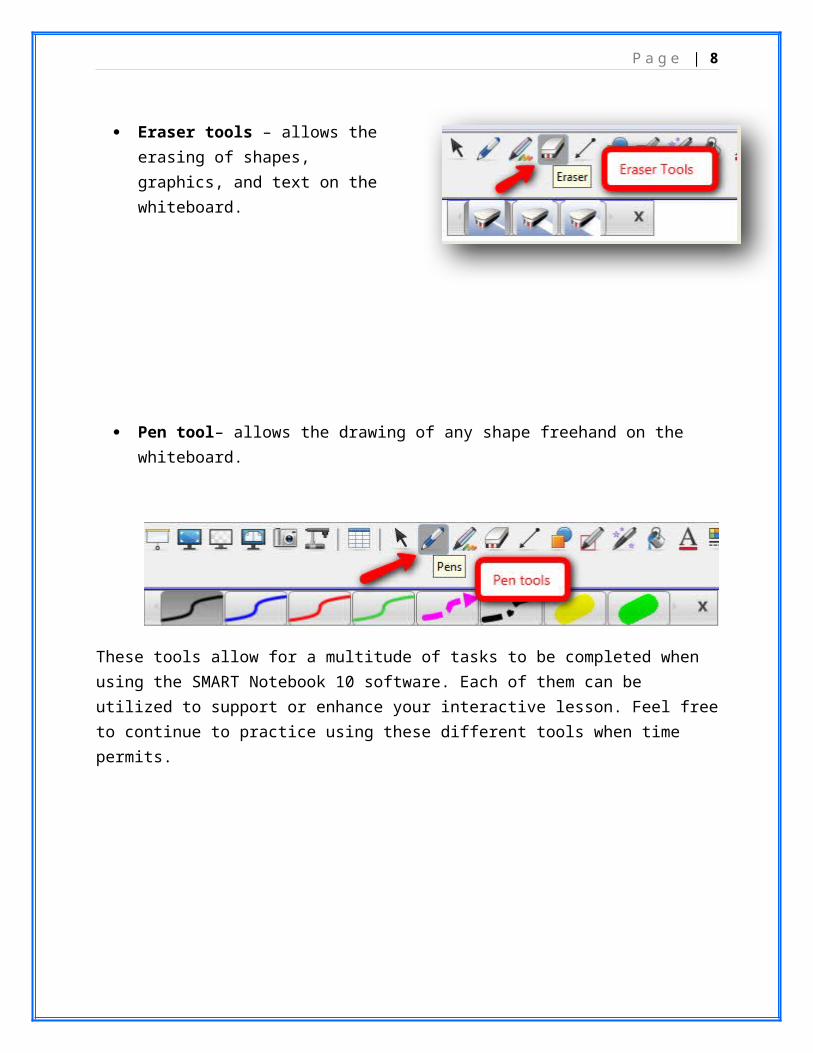
Eraser tools – allows the erasing of shapes, graphics, and text on the whiteboard.
Pen tool– allows the drawing of any shape freehand on the whiteboard.
These tools allow for a multitude of tasks to be completed when using the SMART Notebook 10 software. Each of them can be utilized to support or enhance your interactive lesson. Feel free to continue to practice using these different tools when time permits.
Copy the link below into a web browser and then click Basic Applicable Functions to watch a video simulation of this
chapter.http://bloomsburgasd.schoolwires.com/62787096141434/blank/browse.asp?
A=383&BMDRN=2000&BCOB=0&C=54762

P a g e | 7
Chapter 2: Accessing the Lesson Activity Toolkit 2.0
In this section the procedure for accessing the Lesson Activity Toolkit 2.0 will be covered. The screenshots below show the steps you must take to locate the application.
In a New Notebook File, touch or click the Gallery tab. The Gallery tab is the second tab down on the left side of the page.
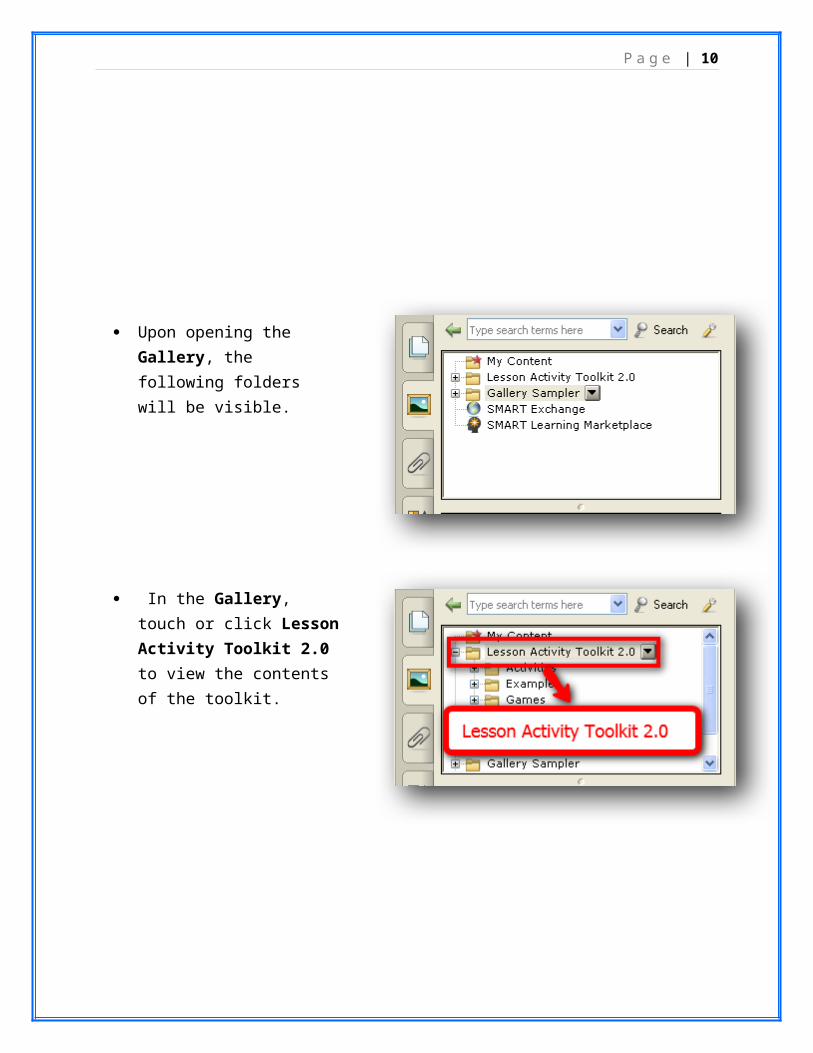
Upon opening the Gallery, the following folders will be visible.
P a g e | 8
In the Gallery, touch or click Lesson Activity Toolkit 2.0 to view the contents of the toolkit.
For a video demonstration on how to locate the Lesson Activity Toolkit 2.0, watch the following Captivate short.
Copy the link below into a web browser and then click Accessing Lesson Activity Toolkit 2.0 to watch a video
simulation of this chapter.http://bloomsburgasd.schoolwires.com/62787096141434/blank/browse.asp?
A=383&BMDRN=2000&BCOB=0&C=54762

P a g e | 9
Chapter 3: Locating and Identifying the Activities Folder
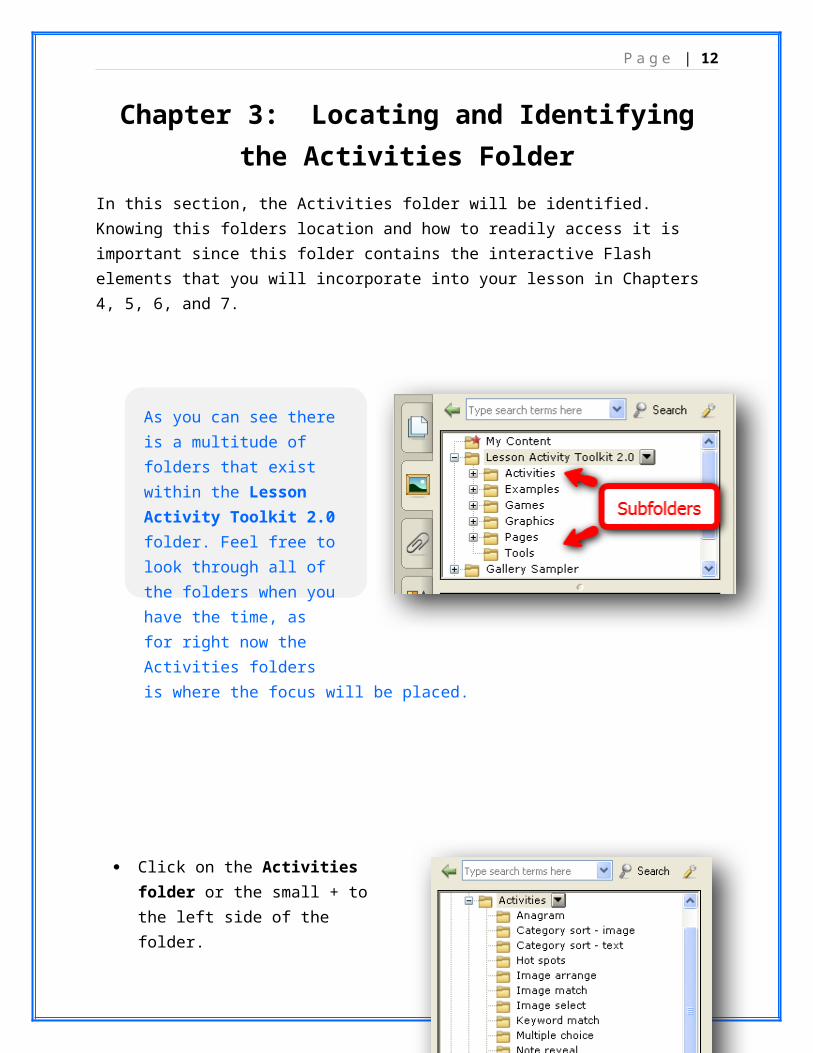
In this section, the Activities folder will be identified. Knowing this folders location and how to readily access it is important since this folder contains the interactive Flash elements that you will incorporate into your lesson in Chapters 4, 5, 6, and 7.
As you can see there is a multitude of folders that exist within the Lesson Activity Toolkit 2.0 folder. Feel free to look through all of the folders when you have the time, as for right now the Activities folders is where the focus will be placed.
Click on the Activities folder or the small + to the left side of the folder.
This will open up the many subfolders that exist within the Activities folder. Each of the flash elements to be utilized in this training will be discussed in the upcoming chapters with their specific folder also being discussed.
P a g e | 10
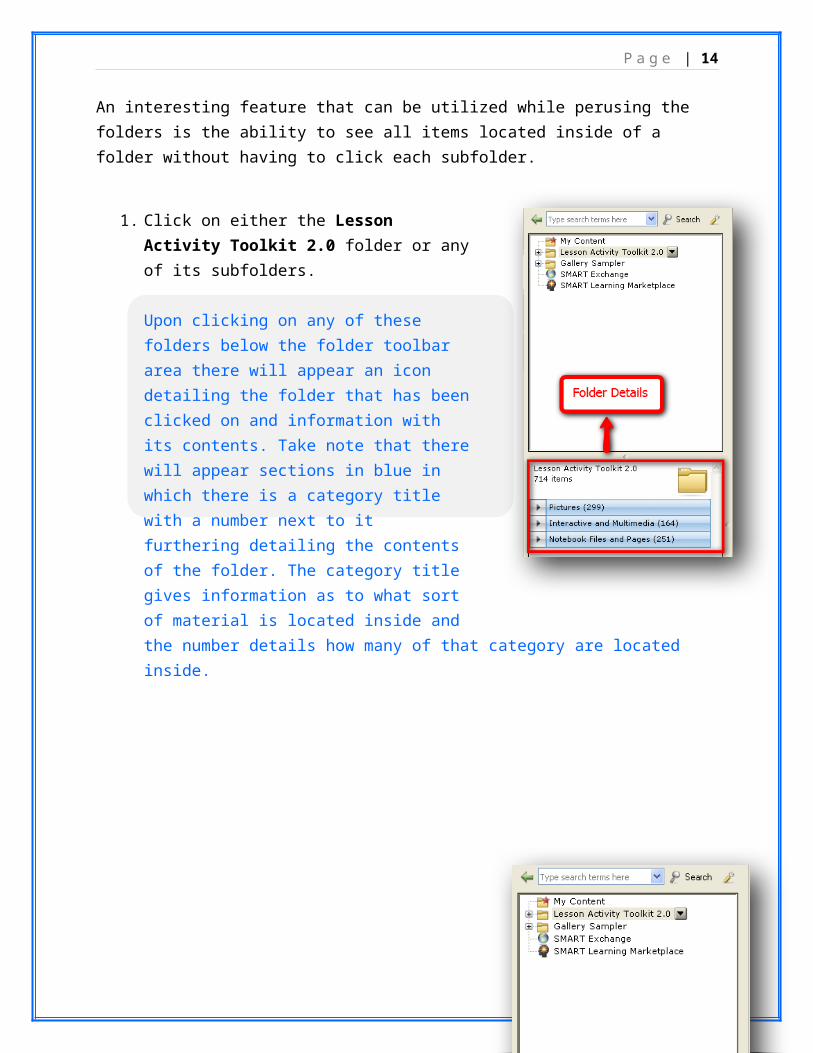
An interesting feature that can be utilized while perusing the folders is the ability to see all items located inside of a folder without having to click each subfolder.
1. Click on either the Lesson Activity Toolkit 2.0 folder or any of its subfolders.
Upon clicking on any of these folders below the folder toolbar area there will appear an icon detailing the folder that has been clicked on and information with its contents. Take note that there will appear sections in blue in which there is a category title with a number next to it furthering detailing the contents of the folder. The category title gives information as to what sort of material is located inside and the number details how many of that category are located inside.
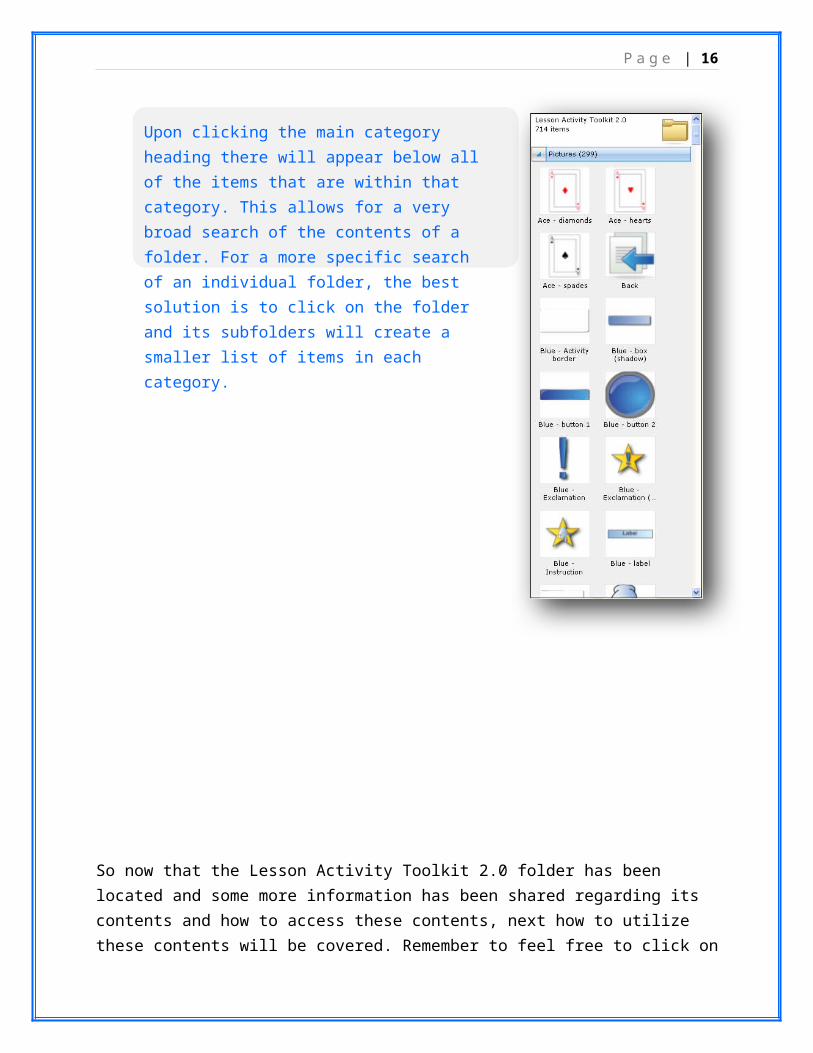
2. Click on any of these category areas, for example, the Pictures tab located inside the Lesson Activity Toolkit 2.0 folder.

P a g e | 11
Upon clicking the main category heading there will appear below all of the items that are within that category. This allows for a very broad search of the contents of a folder. For a more specific search of an individual folder, the best solution is to click on the folder and its subfolders will create a smaller list of items in each category.
So now that the Lesson Activity Toolkit 2.0 folder has been located and some more information has been shared regarding its contents and how to access these contents, next how to utilize these contents will be covered. Remember to feel free to click on and peruse any of the folders that are not covered in this material when time permits. There are many more functions that exist within the Lesson Activity Toolkit 2.0 folder and other folders that can be used to suit individual classes or lesson plans.
Copy the link below into a web browser and then click Locating and Identifying Activities to watch a video simulation of this
chapter.
P a g e | 12
http://bloomsburgasd.schoolwires.com/62787096141434/blank/browse.asp?A=383&BMDRN=2000&BCOB=0&C=54762
Chapter 4: Integrating the Science Based Flash Element
This chapter will cover the steps to be taken in order to choose, edit, and incorporate an interactive Flash element into a lesson. Science will act as the chosen topic for the example. It is important to note that these interactive Flash elements can be adapted to work with lessons of any subject.
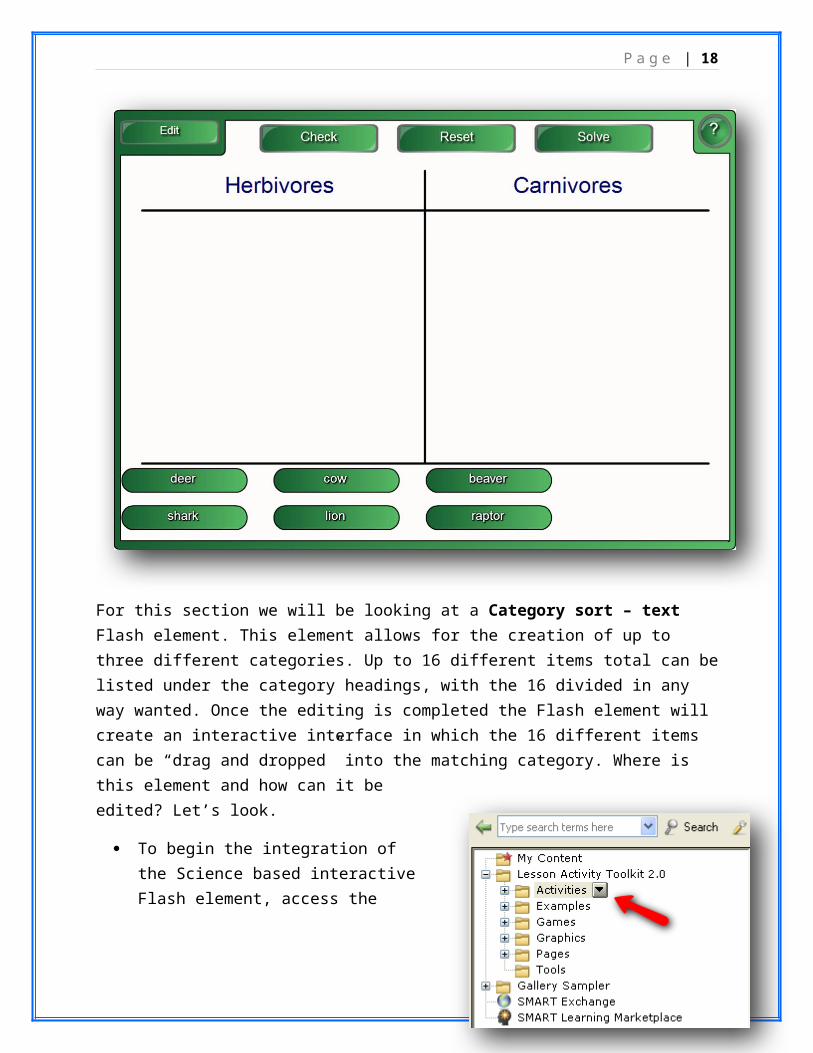
For this section we will be looking at a Category sort – text Flash element. This element allows for the creation of up to three different categories. Up to 16 different items total can be listed under the category headings, with the 16 divided in any way wanted. Once the editing is completed the Flash element will create an interactive interface in which the 16 different items can be “drag and dropped” into the matching category. Where is this element and how can it be edited? Let’s look.

P a g e | 13
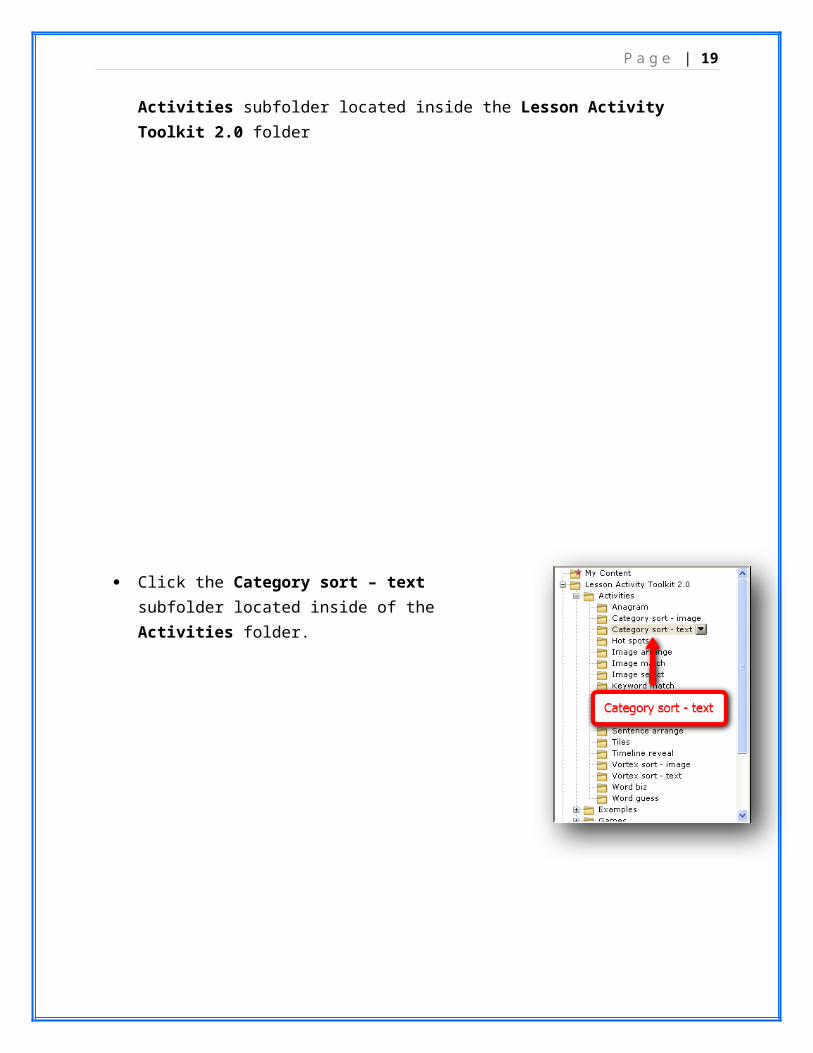
To begin the integration of the Science based interactive Flash element, access the Activities subfolder located inside the Lesson Activity Toolkit 2.0 folder
Click the Category sort – text subfolder located inside of the Activities folder.
P a g e | 14
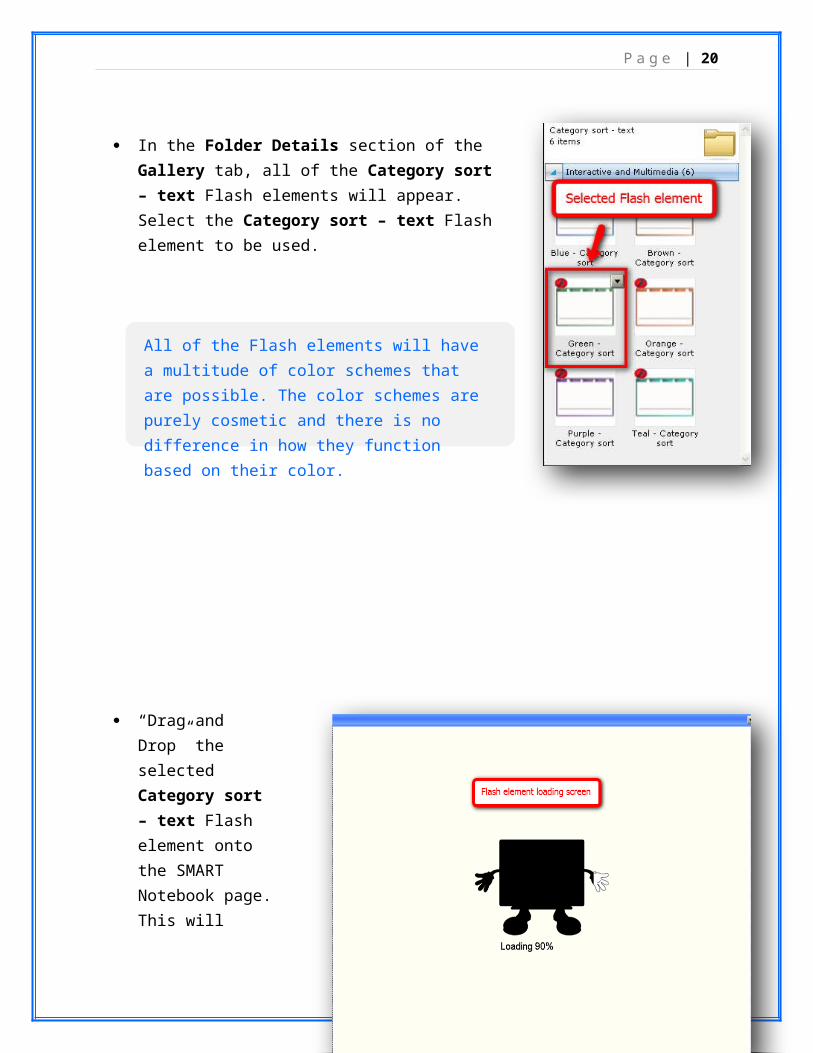
In the Folder Details section of the Gallery tab, all of the Category sort – text Flash elements will appear. Select the Category sort – text Flash element to be used.
All of the Flash elements will have a multitude of color schemes that are possible. The color schemes are purely cosmetic and there is no difference in how they function based on their color.
“Drag and Drop” the selected Category sort – text Flash element onto the SMART Notebook page. This will cause the Flash element to load into the SMART Notebook 10 page.
An alternate method to load the Flash element is to simply click the small pull-down arrow in the upper-right hand corner of the image and choose the “Insert in Notebook” option.

P a g e | 15
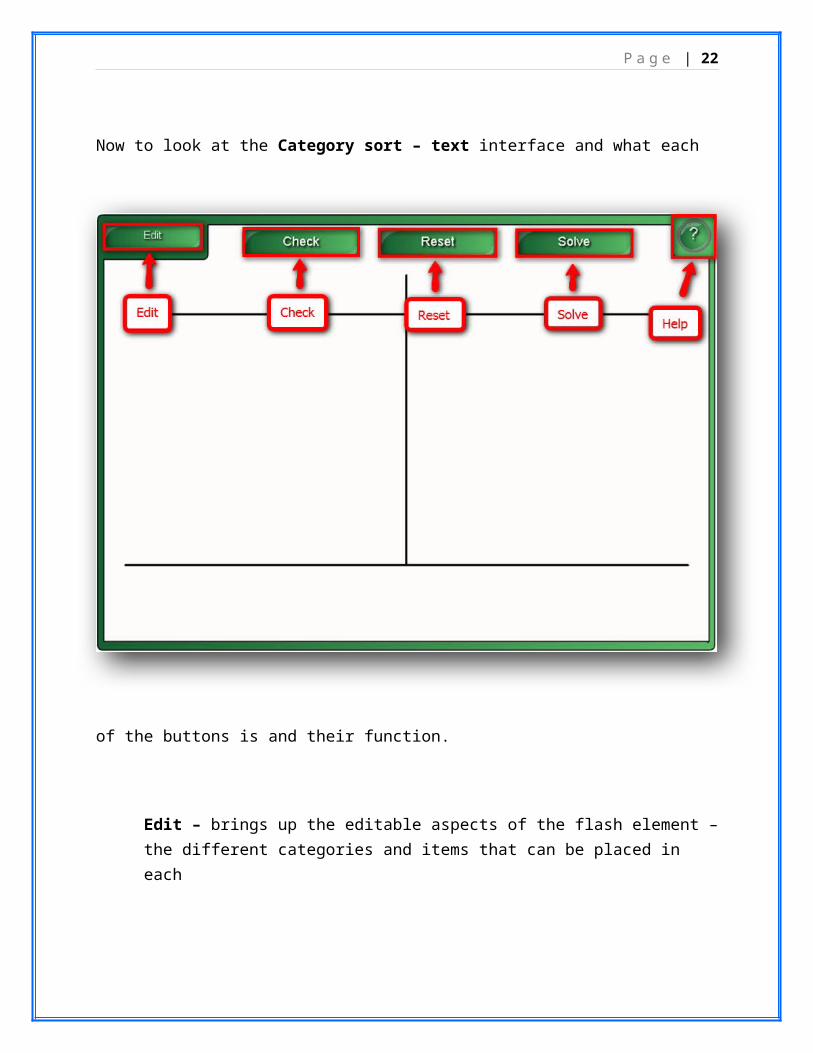
Now to look at the Category sort – text interface and what each of the buttons is and their function.
Edit – brings up the editable aspects of the flash element – the different categories and items that can be placed in each
Check – checks the answers where they are currently placed – correct answers receive a green check mark, incorrect a red x
Reset – places all of the items back in their original place
Solve – places all of the items in their correct place under the categories
P a g e | 16
Help – takes you through the steps necessary to create your own Flash element
Next is to look at how to Edit and customize the Flash element to fit the material that is being covered in the lesson.
Click the Edit button bringing up the Edit screen for the Flash element.
This may be a bit confusing upon initially looking at the interface so here is the breakdown of what each section is:
Column label – these are the main categories to be displayed on the interactive main page
Label – these are the individual data items that can be “drag and dropped” into a specific category
P a g e | 17
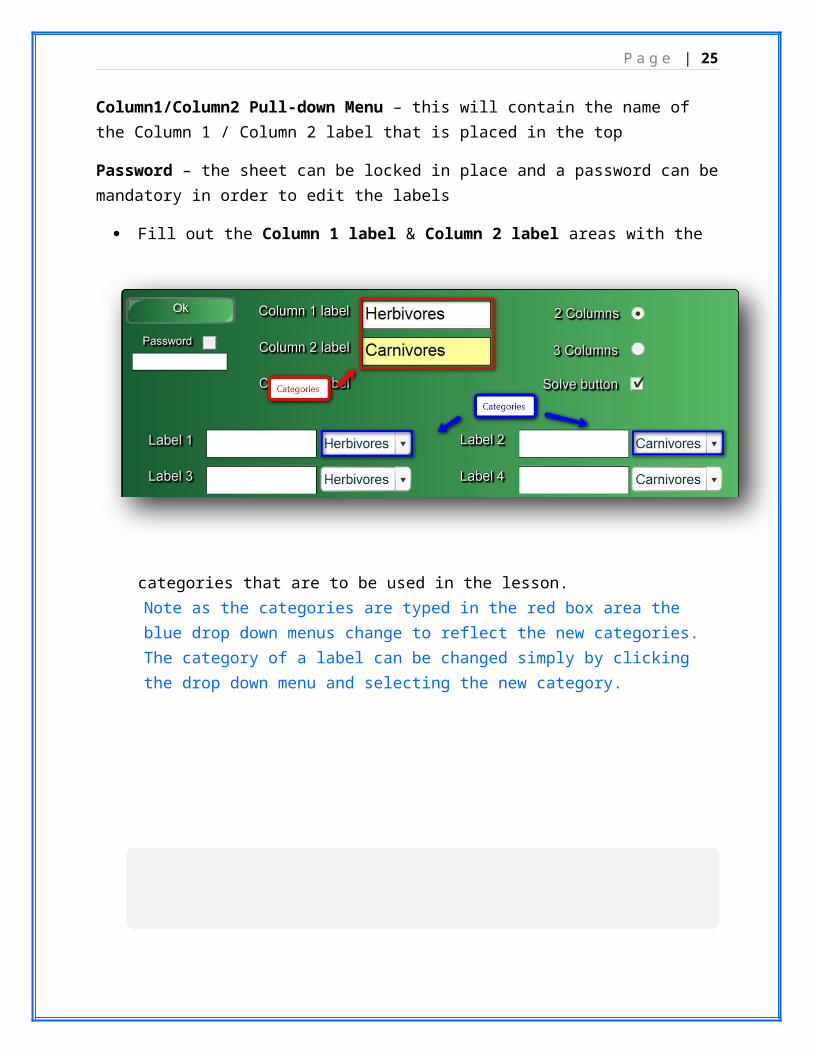
Column1/Column2 Pull-down Menu – this will contain the name of the Column 1 / Column 2 label that is placed in the top
Password – the sheet can be locked in place and a password can be mandatory in order to edit the labels
Fill out the Column 1 label & Column 2 label areas with the categories that are to be used in the lesson.
Note as the categories are typed in the red box area the blue drop down menus change to reflect the new categories. The category of a label can be changed simply by clicking the drop down menu and selecting the new category.
Fill out the Label section of the Category sort – text Flash element. This is where the items that are to be placed under a specific category are placed. As few or many as are
deemed necessary can be placed up to 16 total.
P a g e | 18
Upon completion of the categories and appropriate labels, press the Ok button in the upper left hand corner of the Category sort - text Flash element.
P a g e | 19
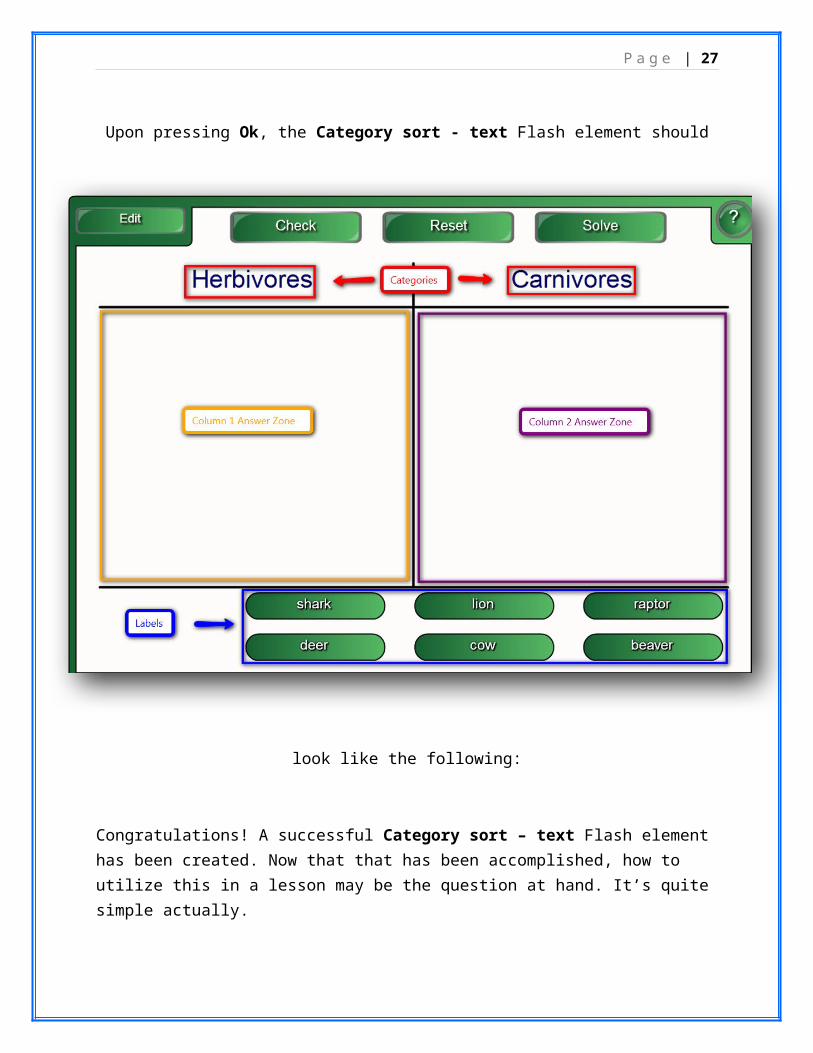
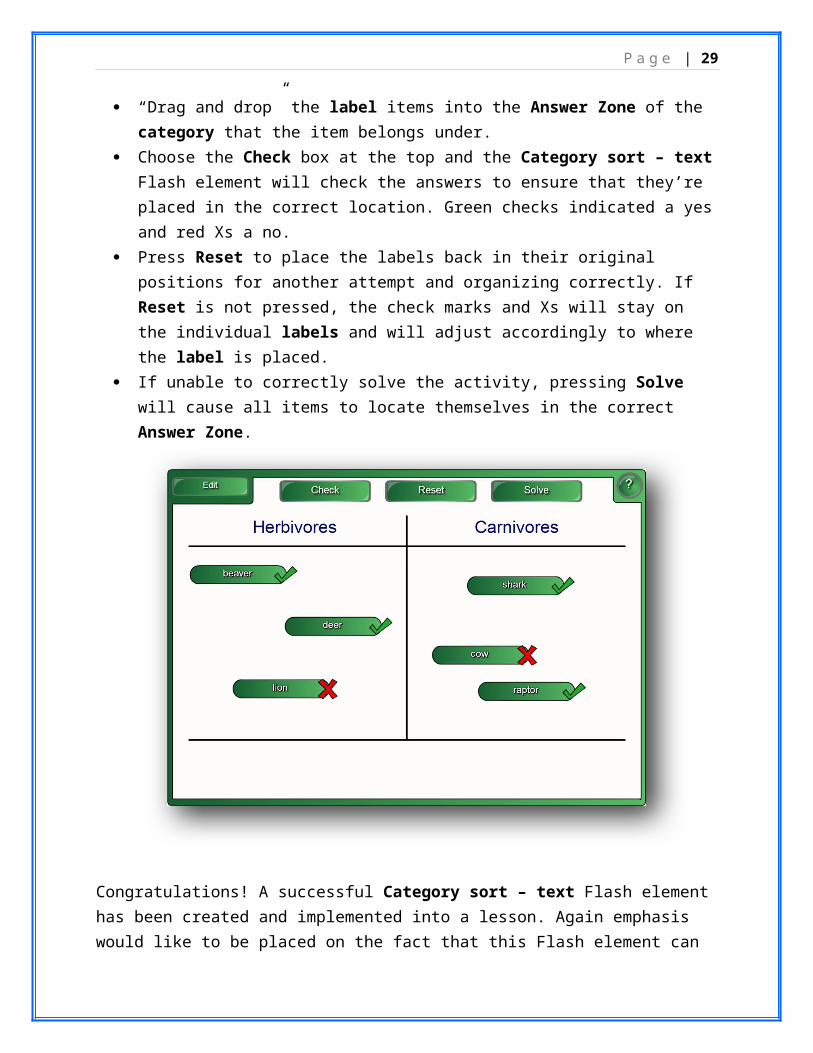
Upon pressing Ok, the Category sort - text Flash element should look like the following:
Congratulations! A successful Category sort – text Flash element has been created. Now that that has been accomplished, how to utilize this in a lesson may be the question at hand. It’s quite simple actually.
P a g e | 20
“Drag and drop” the label items into the Answer Zone of the category that the item belongs under.
Choose the Check box at the top and the Category sort – text Flash element will check the answers to ensure that they’re placed in the correct location. Green checks indicated a yes and red Xs a no.
Press Reset to place the labels back in their original positions for another attempt and organizing correctly. If Reset is not pressed, the check marks and Xs will stay on the individual labels and will adjust accordingly to where the label is placed.
If unable to correctly solve the activity, pressing Solve will cause all items to locate themselves in the correct Answer Zone.
Congratulations! A successful Category sort – text Flash element has been created and implemented into a lesson. Again emphasis would like to be placed on the fact that this Flash element can be used for a wide variety of subjects and is not limited to merely Science. So go forward and use this tool to help create a more interactive lesson for the children!
Copy the link below into a web browser and then click Sample Science Lesson to watch a video simulation of this chapter.
http://bloomsburgasd.schoolwires.com/62787096141434/blank/browse.asp?A=383&BMDRN=2000&BCOB=0&C=54762
P a g e | 21
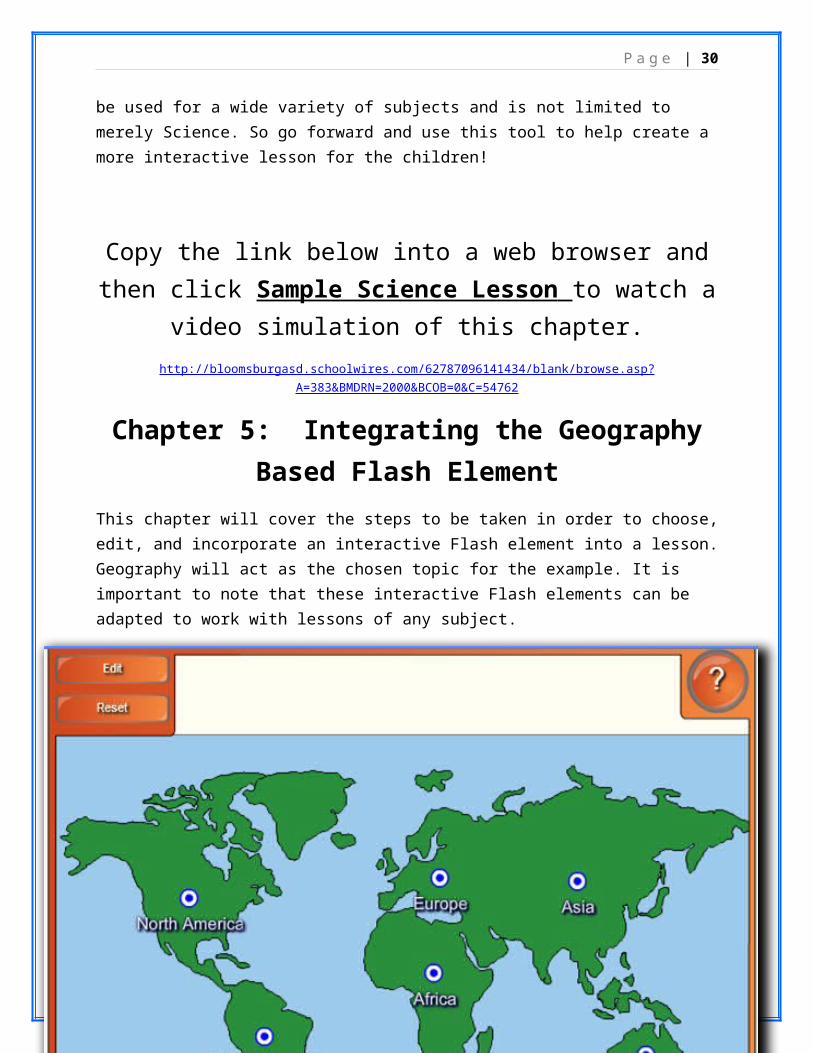
Chapter 5: Integrating the Geography Based Flash Element
This chapter will cover the steps to be taken in order to choose, edit, and incorporate an interactive Flash element into a lesson. Geography will act as the chosen topic for the example. It is important to note that these interactive Flash elements can be adapted to work with lessons of any subject.
For this section we will be looking at the Hot Spots Flash element. This element allows for the creation of a vast number of identifiable hot spots upon a background image. This background image can be one of a human body, grid, Venn diagram, world map or a custom image. For this chapter we will be utilizing the world map image to create a Geography lesson. Once the editing is completed the Flash element will create an interactive interface in which the name of a “hot
P a g e | 22
spot” will show and the user will locate this spot. There is even a scoring option allowing for a bit of friendly competition. Where is this element and how can it be edited? Let’s look.
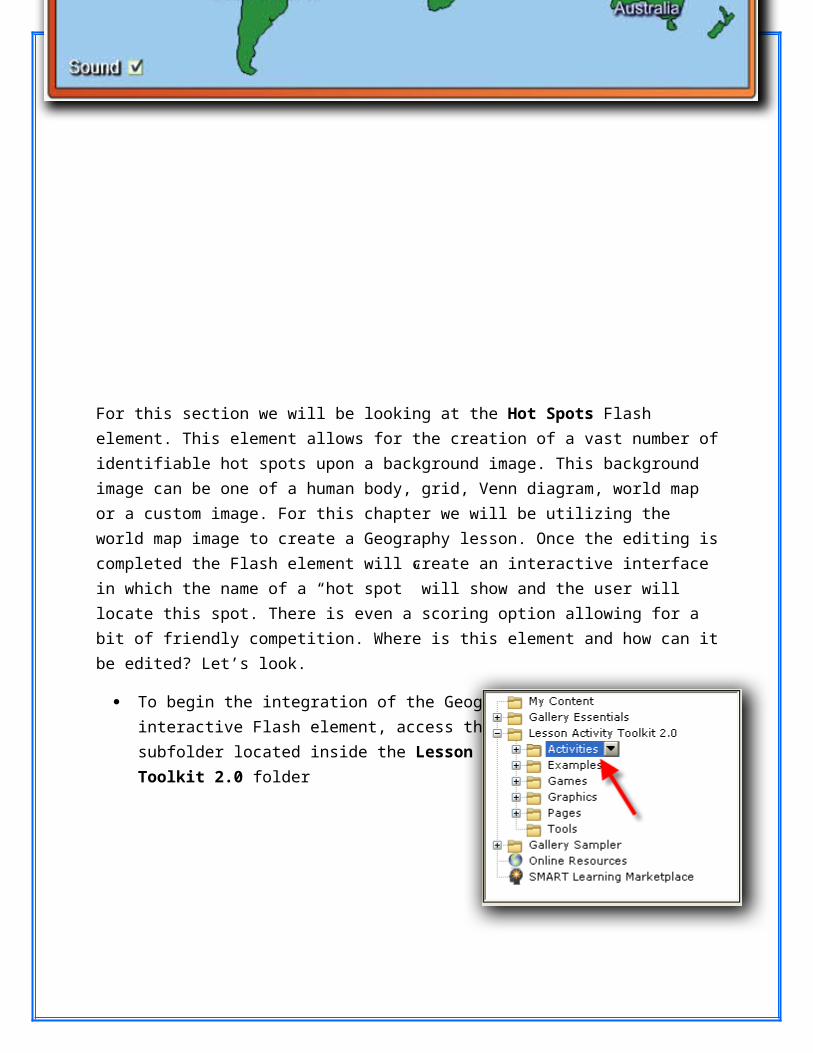
To begin the integration of the Geography basedinteractive Flash element, access the Activities subfolder located inside the Lesson Activity Toolkit 2.0 folder
Click the Hot Spots subfolder located inside the Activities folder.

P a g e | 23
In the Folder Details section of the Gallerytab, all of the Hot Spots Flash elements will appear. Select the Hot Spots Flash element to be used.
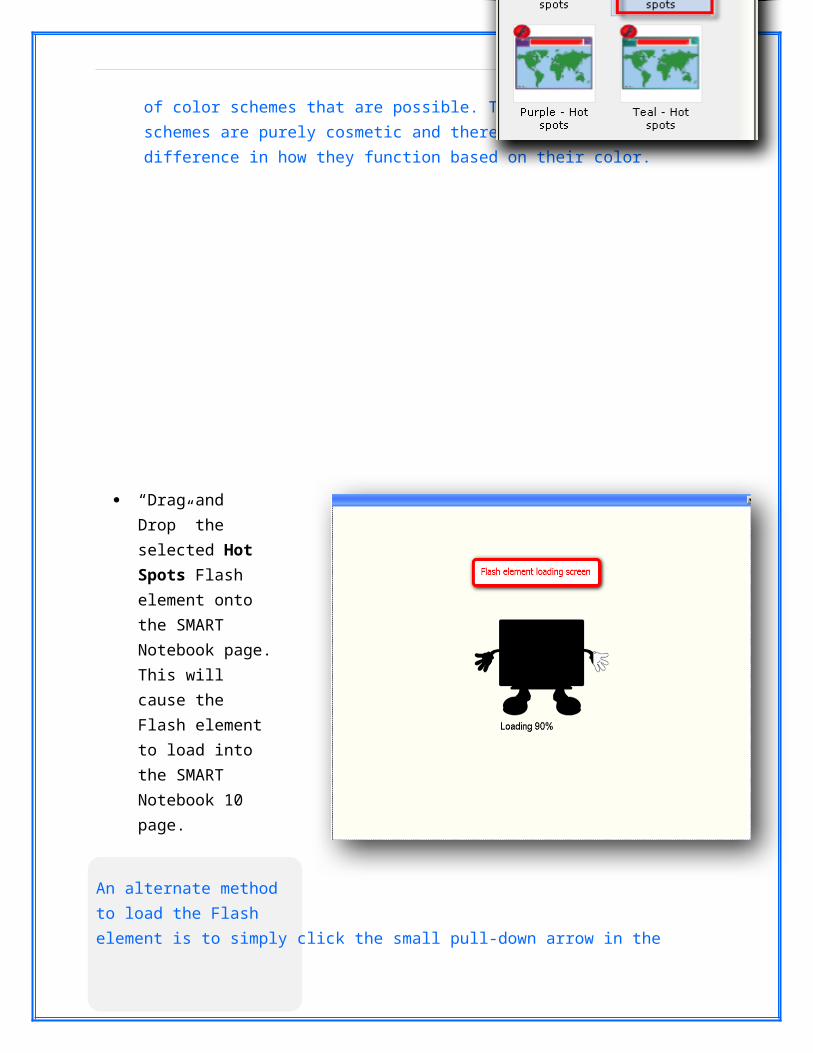
All of the Flash elements will have a multitude of color schemes that are possible. The colorschemes are purely cosmetic and there is no difference in how they function based on their color.
“Drag and Drop” the selected Hot Spots Flash element onto the SMART Notebook page. This will cause the Flash element to load into the SMART Notebook 10 page.
An alternate method to load the Flash element is to simply click the small pull-down arrow in the upper-right hand corner of the image and choose the “Insert in Notebook” option.

P a g e | 24
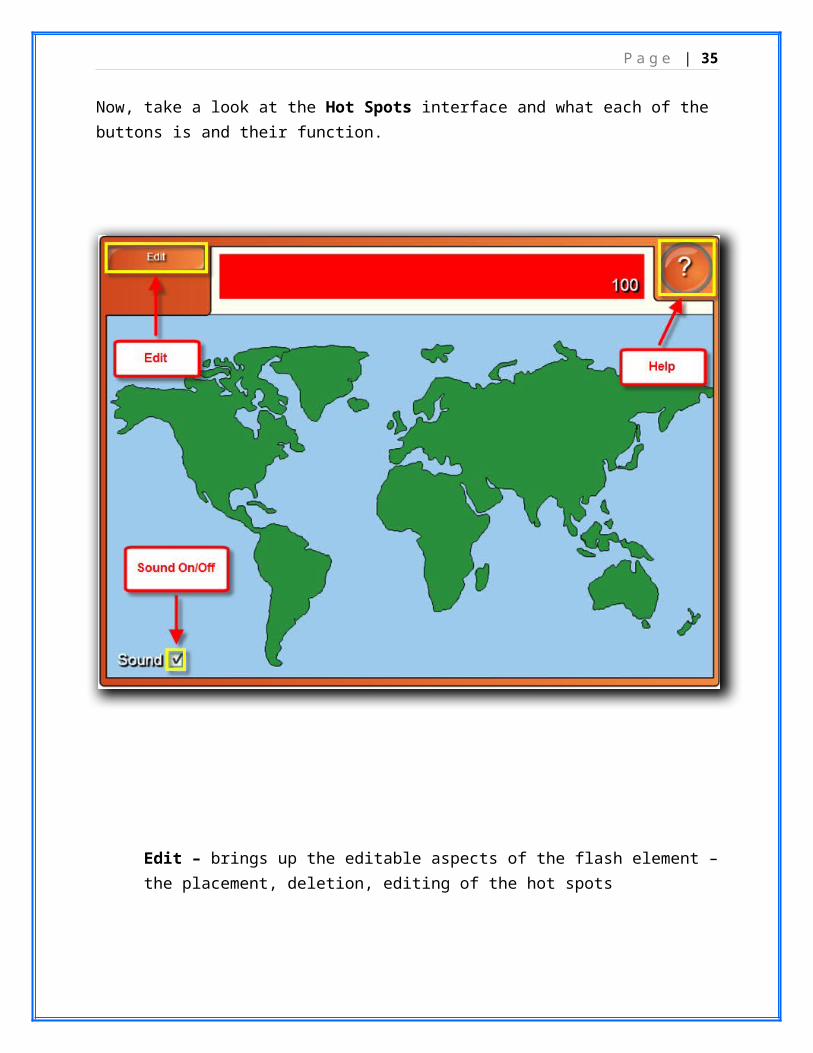
Now, take a look at the Hot Spots interface and what each of the buttons is and their function.
Edit – brings up the editable aspects of the flash element – the placement, deletion, editing of the hot spots
Help – takes you through the steps necessary to create your own Flash element
Sound On/Off – allows you to enable or disable the sound
P a g e | 25
Next is to look at how to Edit and customize the Flash element to fit the material that is being covered in the lesson.
Click the Edit button to bring up the Edit screen for the Flash element.
It may be a bit confusing upon initially looking at the interface so here is the breakdown of what each section is:
Image Setting Pull-down Menu – this contains the images that you can choose from to set as the background
Score Option Pull-down Menu– this contains the various scoring options for the Flash element.
Time On/Off – allows you to enable or disable the timer
Add – this is used to add hot spots on the background
Move – this allows you to move a “hot spot” to a different location on the background
Delete – this is used to get rid of a “hot spot”
Change labels – this allows you to change the label text to suit your needs

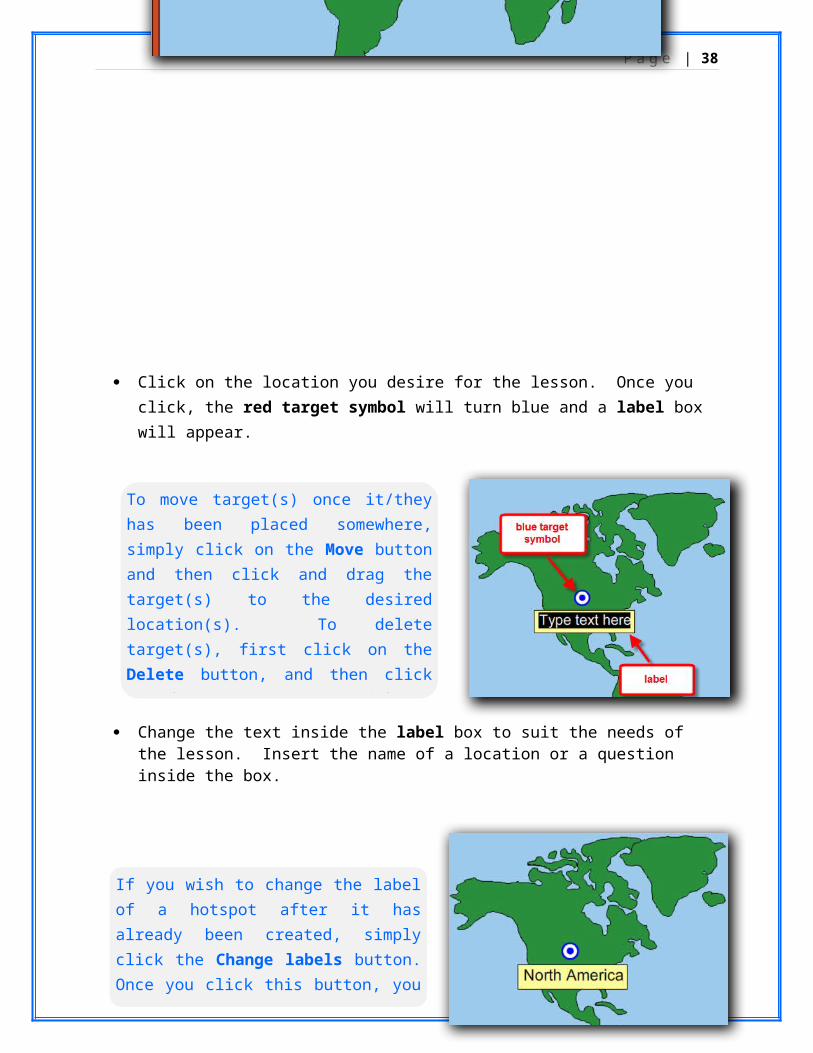
To move target(s) once it/they has been placed somewhere, simply click on the Move button and then click and drag the target(s) to the desired location(s). To delete target(s), first click on the Delete button, and then click on the target(s) you wish to delete. When you are chose delete mode, your cursor will be transformed into a red “X”.
P a g e | 26
Password –a password can be made mandatory in order to edit the flash element
Click on the Add button. A red target symbol will appear on the screen. By moving your mouse, you can move the red target around on the background.
Click on the location you desire for the lesson. Once you click, the red target symbol will turn blue and a label box will appear.
Change the text inside the label box to suit the needs of the lesson. Insert the name of a location or a question inside the box.
If you wish to change the label of a hotspot after it has already been created, simply click the Change labels button. Once you click this button, you can change the text of any of the labels on the map.
P a g e | 27
Repeat the steps necessary to create a “hot spot” to continue adding the desired hot spots to the map.
Once you have designate all of the hot spots, it is time to set the score option. This is done by selecting an option from the score option pull-down menu.
P a g e | 28
The score options that are available to you are:
“Score by distance” – calculates how far away your try is from the target as a percentage out of 100. For example, if you hit the target exactly, you score 100.
“Score by region” – allows you to set a perimeter around the target. If your attempt is within the perimeter, you score 100 points.
oOnce you select Score by region from the pull-down menu, a large, transparent gray box will appear on the right side of the map. The box will disappear if you move the cursor outside of the gray box. The box will reappear if you hover over the score option pull-down menu.
oThe region perimeter menu allows you to choose the size you desire for the region. This is a pull-down menu containing the numbers “1” through “10” (“1”
P a g e | 29
being the smallest region perimeter and “10” being the largest). The lower the number you select, the smaller the region indicator circle will appear. The higher the number you select, the larger the circle will appear.
“No Scoring” – allows you to create an interactive activity that does not include scoring
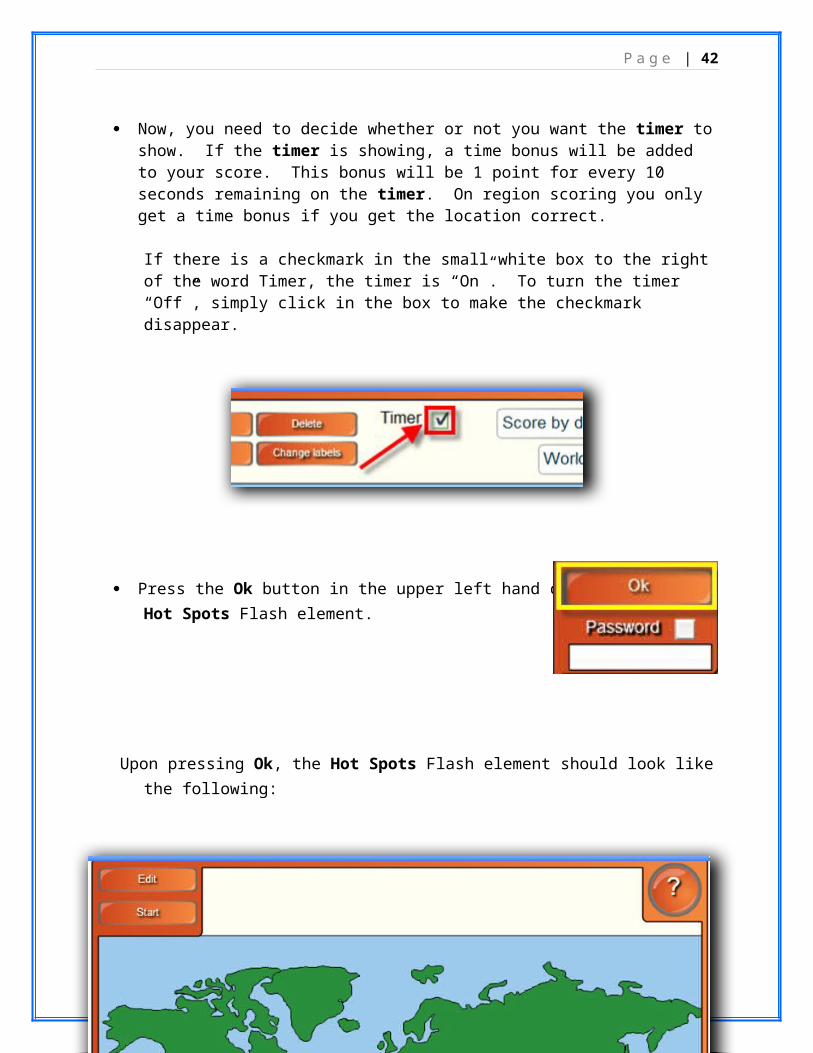
Now, you need to decide whether or not you want the timer to show. If the timer is showing, a time bonus will be added to your score. This bonus will be 1 point for every 10 seconds remaining on the timer. On region scoring you only get a time bonus if you get the location correct.
If there is a checkmark in the small white box to the right of the word Timer, the timer is “On”. To turn the timer “Off”, simply click in the box to make the checkmark disappear.
Press the Ok button in the upper left hand corner of theHot Spots Flash element.
P a g e | 30
Upon pressing Ok, the Hot Spots Flash element should look like the following:
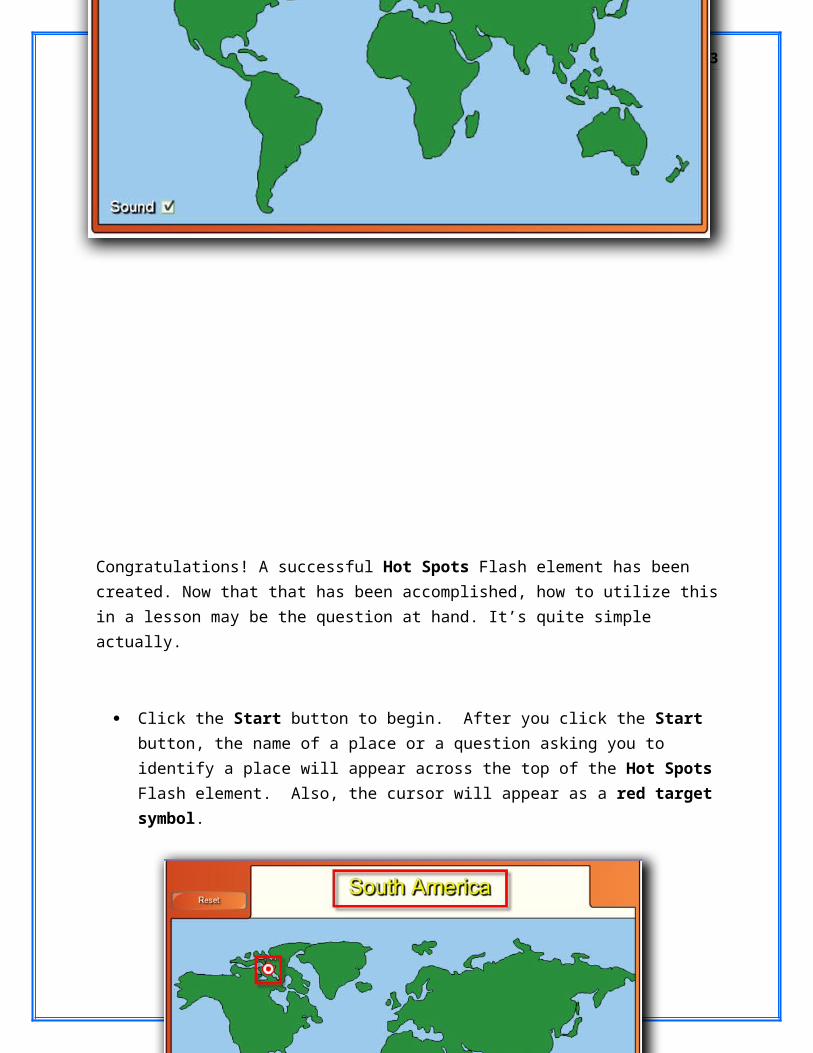
Congratulations! A successful Hot Spots Flash element has been created. Now that that has been accomplished, how to utilize this in a lesson may be the question at hand. It’s quite simple actually.
Click the Start button to begin. After you click the Start button, the name of a place or a question asking you to identify a place will appear across the top of the Hot Spots Flash element. Also, the cursor will appear as a red target symbol.
P a g e | 31
Click on the map wherever you think the place is located. Whether you guess correctly or not, a blue target symbol will appear over the correct location. Also, the name of the location will appear next to the blue target symbol.
Continue locating the places on the map. Once there are no more places to locate, your score (if a scoring option was selected from the score option pull-down menu) will be displayed on the screen. If you are finished with the Hot Spots Flash element, click the Close button. If you would like to try again, click the Reset button.

P a g e | 32
Choose the Check box at the top and the Category sort – text Flash element will check the answers to ensure that they’re placed in the correct location. Green checks indicated a yes, and red Xs a no.
Congratulations! A successful Hot Spots Flash element has been created and implemented into a lesson. Again emphasis would like to be placed on the fact that this Flash element can be used for a wide variety of subjects and is not limited to merely Geography. So go forward and use this tool to help create a more interactive lesson for the children!
Copy the link below into a web browser and then click Sample Geography Lesson to watch a video simulation of this chapter.
http://bloomsburgasd.schoolwires.com/62787096141434/blank/browse.asp?A=383&BMDRN=2000&BCOB=0&C=54762
Chapter 6: Integrating Reading Based Flash Element
P a g e | 33
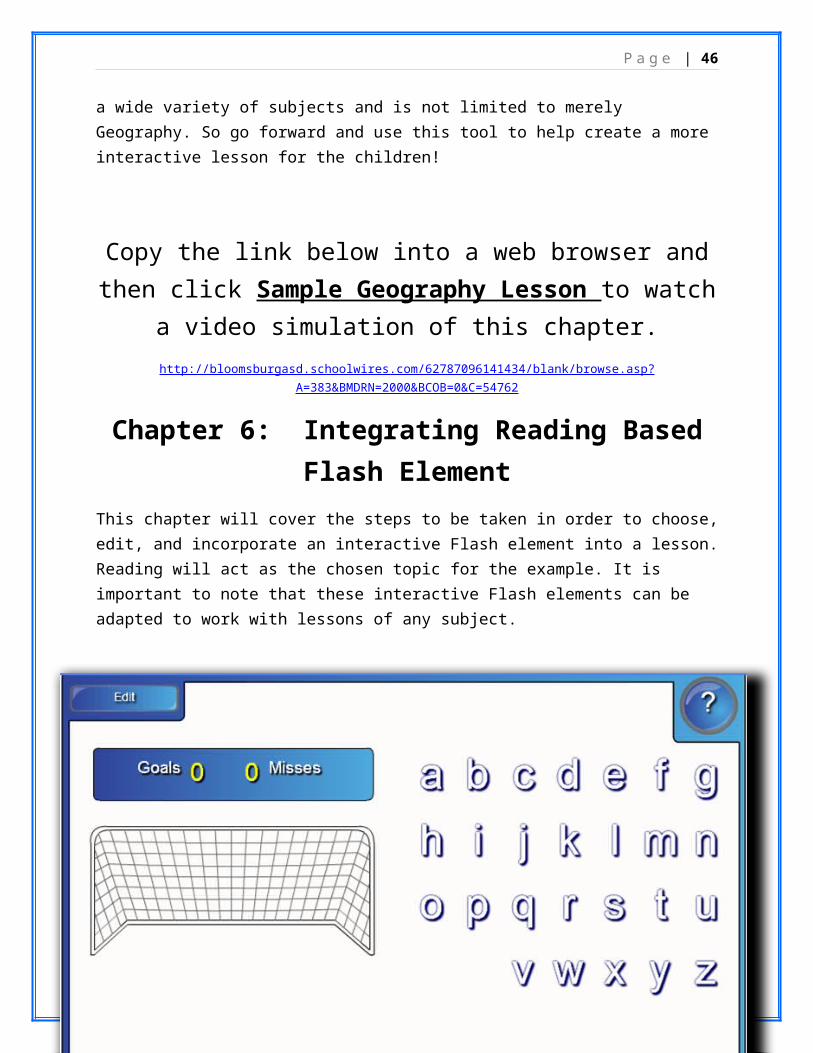
This chapter will cover the steps to be taken in order to choose, edit, and incorporate an interactive Flash element into a lesson. Reading will act as the chosen topic for the example. It is important to note that these interactive Flash elements can be adapted to work with lessons of any subject.
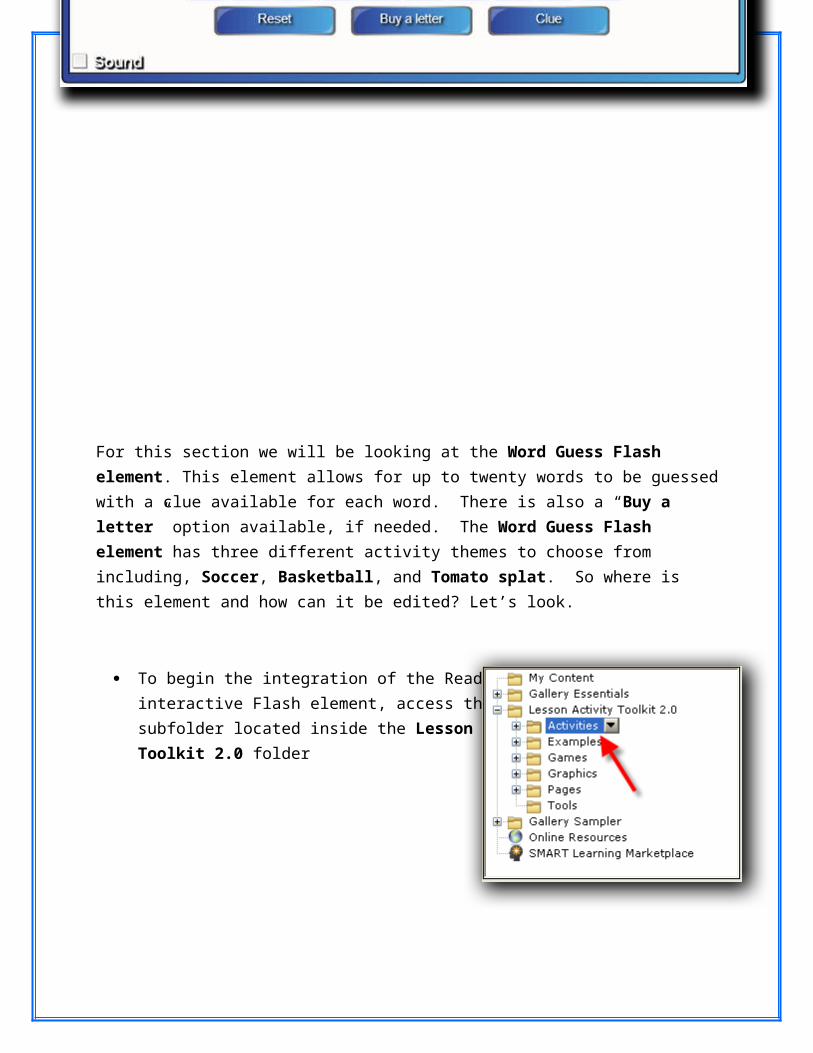
For this section we will be looking at the Word Guess Flash element. This element allows for up to twenty words to be guessed with a clue available for each word. There is also a “Buy a letter” option available, if needed. The Word Guess Flash element has three different activity themes to choose from including, Soccer, Basketball, and Tomato splat. So where is this element and how can it be edited? Let’s look.
To begin the integration of the Reading based
P a g e | 34
interactive Flash element, access the Activities subfolder located inside the Lesson Activity Toolkit 2.0 folder
Click the Word Guess subfolder located inside the Activities folder.
In the Folder Details section of the Gallery
P a g e | 35
tab, all of the Word Guess Flash elements will appear. Select the Word Guess Flash element to be used.
All of the Flash elements will have a multitude of color schemes that are possible. The colorschemes are purely cosmetic and there is no difference in how they function based on their color.
“Drag and Drop” the selected Word Guess Flash element onto the SMART Notebook page. This will cause the Flash element to load into the SMART Notebook 10 page.
An alternate method to load the Flash element is to simply click the small pull-down arrow in the upper-right hand corner of the image and choose the “Insert in Notebook” option.

P a g e | 36
Now, take a look at the Word Guess interface and what each of the buttons is and their function.
Edit – brings up the editable aspects of the flash element
Help – takes you through the steps necessary to create your own Flash element
Reset – allows you to start the activity again
Buy a letter – offers you a letter to help you solve the word guess, while at the same time costing you a miss
Clue – presents a clue to help you solve the word guess

P a g e | 37
Next is to look at how to Edit and customize the Flash element to fit the material that is being covered in the lesson.
Click the Edit button to bring up the Edit screen for the Flash element.
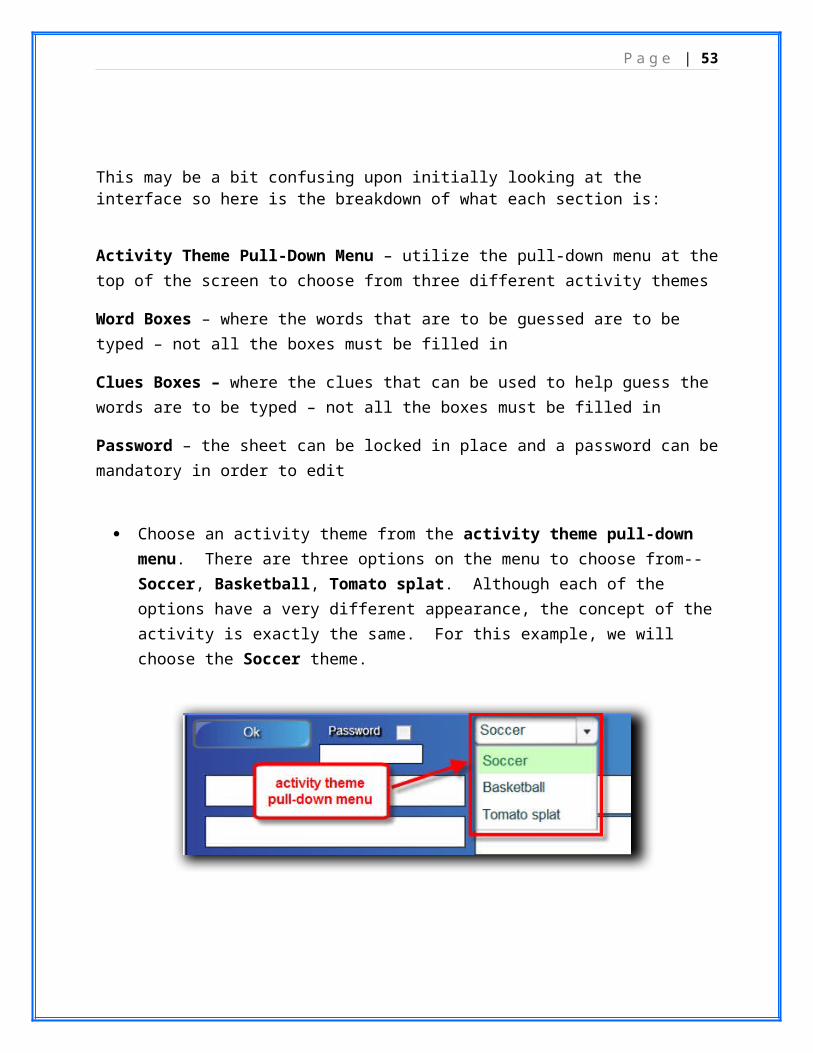
This may be a bit confusing upon initially looking at the interface so here is the breakdown of what each section is:
Activity Theme Pull-Down Menu – utilize the pull-down menu at the top of the screen to choose from three different activity themes
Word Boxes – where the words that are to be guessed are to be typed – not all the boxes must be filled in
Clues Boxes – where the clues that can be used to help guess the words are to be typed – not all the boxes must be filled in
Password – the sheet can be locked in place and a password can be mandatory in order to edit
P a g e | 38
Choose an activity theme from the activity theme pull-down menu. There are three options on the menu to choose from--Soccer, Basketball, Tomato splat. Although each of the options have a very different appearance, the concept of the activity is exactly the same. For this example, we will choose the Soccer theme.
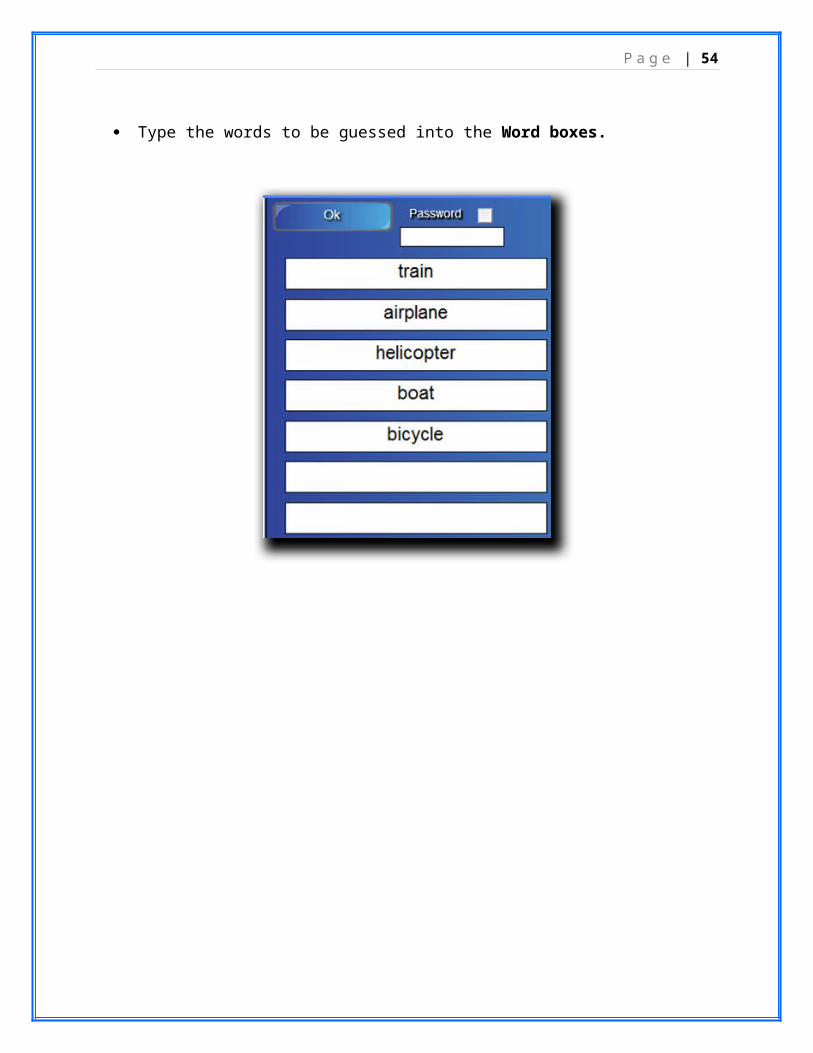
Type the words to be guessed into the Word boxes.

P a g e | 39
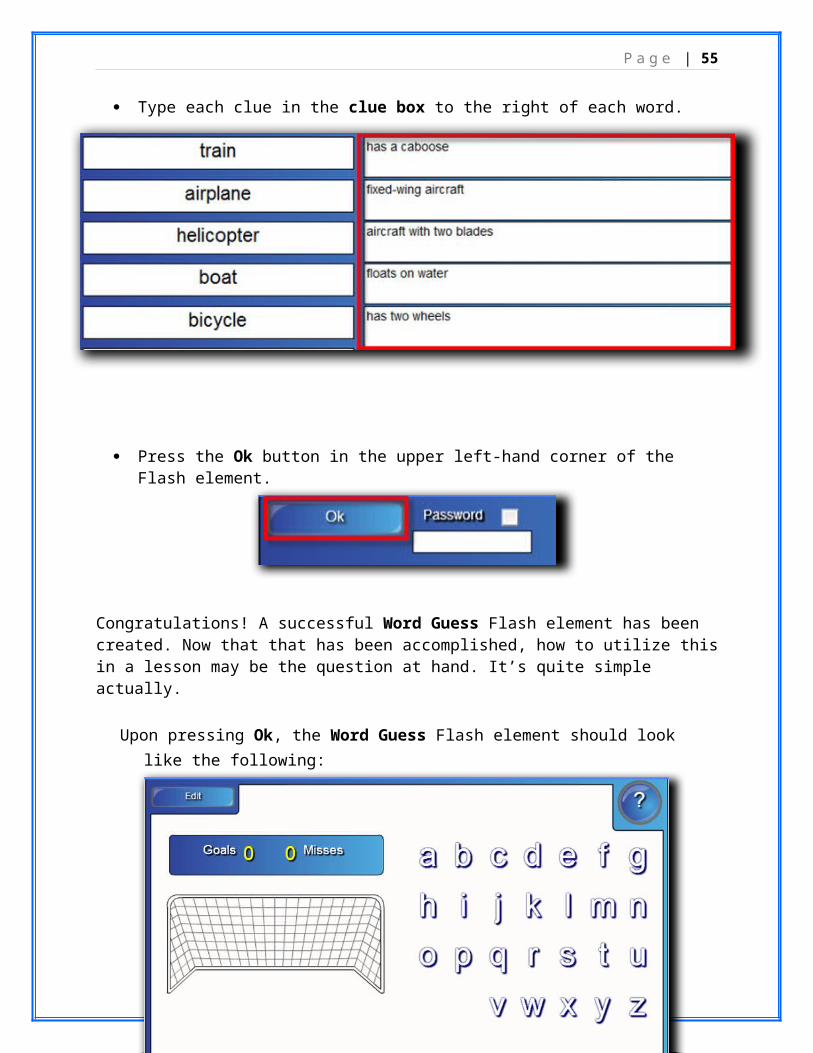
Type each clue in the clue box to the right of each word.
Press the Ok button in the upper left-hand corner of the Flash element.
Congratulations! A successful Word Guess Flash element has been created. Now that that has been accomplished, how to utilize this in a lesson may be the question at hand. It’s quite simple actually.
Upon pressing Ok, the Word Guess Flash element should look like the following:

P a g e | 40
Try to guess the word. Press Clue to receive a helpful hint.
Spell out the correct word by pressing each letter one at a time.
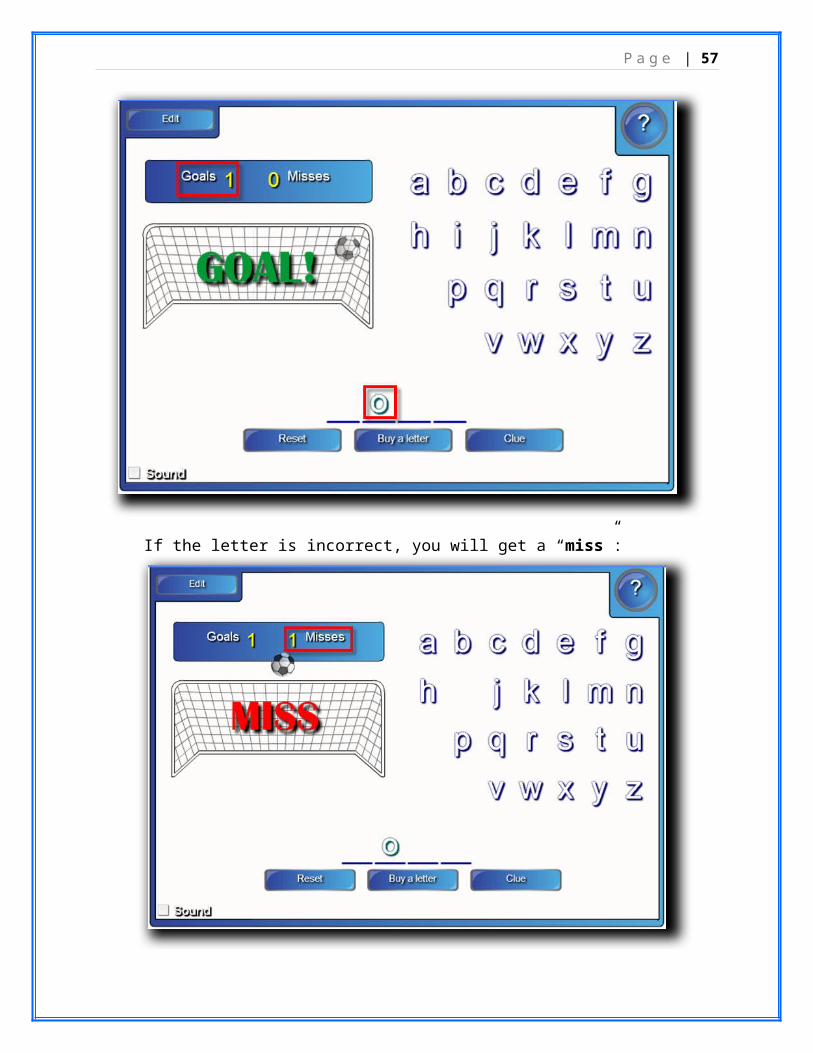
If the letter is correct, a “goal” will be scored:

P a g e | 41
If the letter is incorrect, you will get a “miss”:
You can buy a letter to help you, but each letter will cost you a miss. Press Buy aLetter to obtain a letter.
When a word is correctly spelled out, the Word Guess Flash element will look like this:
P a g e | 42
Try to complete the Word Guess activity with more hits than misses. When all of the words have been guessed, the results of the activity will be displayed. Pressing the Reset button will reset the Flash element to the beginning question.
Congratulations! A successful Word Guess Flash element has been created and implemented into a lesson. Again emphasis would like to be placed on the fact that this Flash element can be used for a wide variety of subjects and is not limited to merely reading. So go forward and use this tool to help create a more interactive lesson for the children!
Copy the link below into a web browser and then click Sample Reading Lesson to watch a video simulation of this chapter.
http://bloomsburgasd.schoolwires.com/62787096141434/blank/browse.asp?A=383&BMDRN=2000&BCOB=0&C=54762
P a g e | 43
Chapter 7: Integrating Mathematics Based Flash Element
This chapter will cover the steps to be taken in order to choose, edit, and incorporate an interactive Flash element into a lesson. Math will act as the chosen topic for the example. It is important to note that these interactive Flash elements can be adapted to work with lessons of any subject.
For this section we will be looking at the Multiple Choice Flash element. This element allows for the creation of up to ten questions with four answers for each question. After completion the answers can be clicked until correct, and all the questions can be worked through. The final result will give a percentage correct and a word of encouragement. So where is this element and how can it be edited? Let’s look.

P a g e | 44
To begin the integration of the Math basedinteractive Flash element, access the Activities subfolder located inside the Lesson Activity Toolkit 2.0 folder
Click the Multiple Choice subfolder located inside the Activities folder.

P a g e | 45
In the Folder Details section of the Gallerytab, all of the Multiple Choice Flash elements will appear. Select the Multiple Choice Flashelement to be used.
All of the Flash elements will have a multitude of color schemes that are possible. The colorschemes are purely cosmetic and there is no difference in how they function based on their color.
“Drag and Drop” the selected Multiple Choice Flash element onto the SMART Notebook page. This will cause the Flash element to load into the SMART Notebook 10 page.
An alternate method to load the Flash element is to simply click the small pull-down arrow in the upper-right hand corner of the image and choose the “Insert in Notebook” option.
P a g e | 46
Now, take a look at the Multiple Choice interface and what each of the buttons is and their function.
Edit – brings up the editable aspects of the flash element – the questions and the answers
Help – takes you through the steps necessary to create your own Flash element
P a g e | 47
Next, take a look at how to Edit and customize the Flash element to fit the material that is being covered in the lesson.
Click the Edit button to bring up the Edit screen for the Flash element.
This may be a bit confusing upon initially looking at the interface so here is the breakdown of what each section is:
Number of Questions Pull-Down Menu – choose how many questions are to be present in this Flash element – as few as one as many as ten
Question Area– this is the area where the question to appear on the final product is to be typed
Answer Boxes – where the answers to the question are to be typed – ideally one of them will be correct – not all answers must be filled in
Correct Answer Pull-Down Menu – utilize the pull-down menu to select which answer is the correct answer to the question asked
Password – the sheet can be locked in place and a password can be mandatory in order to edit

P a g e | 48
Choose the number of questions that will be asked in this Flash element from the Number of Questions Pull-Down menu. For the example three different questions will be used.
For each question there is an individual tab that will appear to edit that question
Type the question to be asked into the question area.

P a g e | 49

P a g e | 50
Type the answers to the question in the answer boxes. It does not matter which box you
put the correct answer into.

P a g e | 51
Select which answer is the correct answer from the correct answer pull-down menu. Repeat this process for all of the questions you may have. Simply click the Question Tab
to cycle between the questions.
Press the Ok button in the upper left-hand corner of the Flash element.
Congratulations! A successful Multiple Choice Flash element has been created. Now that that has been accomplished, how to utilize this in a lesson may be the question at hand. It’s quite simple actually.
Upon pressing Ok, the Multiple Choice Flash element should look like the following:

P a g e | 52
The answers may not appear in the same spot placed during the Edit phase. The Flash element will randomly assort the answers each time.
P a g e | 53
Press the answer that is thought to be correct. A green check will show if correct, a red X if incorrect. Upon choosing the correct answer a Next button will appear. Press the next button to go onto the next question slide until you reach
Upon choosing the correct answer of the final question, a Finish button will appear instead of Next at the top.
P a g e | 54
Upon pressing the Finish button the following screen will appear showing the percentage correct, some words of encouragement, and a Reset button that will reset the Flash element to the beginning question.
Congratulations! A successful Multiple Choice Flash element has been created and implemented into a lesson. Again emphasis would like to be placed on the fact that this Flash element can be used for a wide variety of subjects and is not limited to merely Math. So go forward and use this tool to help create a more interactive lesson for the children!
Copy the link below into a web browser and then click Sample Math Lesson to watch a video simulation of this chapter.
http://bloomsburgasd.schoolwires.com/62787096141434/blank/browse.asp?A=383&BMDRN=2000&BCOB=0&C=54762
Chapter 8: Saving the Flash Element
P a g e | 55
Either while you are working on the Flash element or upon completion of the interactive tool, it is wise to save the interactive Flash element so that it may be recalled at a later time. In this brief chapter you will go through the necessary steps in order to save the Flash element that you have created.
Upon choosing to Save the Flash element first click the File Pull-down menu located in the upper-left hand corner of the SMART Notebook 10 interface.
There will be two saving options located inside the File Pull-down menu. You’ll notice a Save and Save As… options. The Save and Save As… both allow for the saving of a document.

P a g e | 56
Choose the Save or Save As… option. Doing so the Save option the first time or Save As… option at any time will open up a prompt to save the material that you’ve been working on.
In the Directory area of the Save interface, navigate to the folder in which you want to save the file that you’re currently working on.
In the Name of Document section of the interface, type of name of the document.
Upon completion of both of these steps, press the Save Button saving your document to the directory that you choose with the name you typed in. At any time repeat these steps to save your document.
There you have it. Now your document is completed and saved to a location so that you can access it any time you want to use it in a lesson. Saving similar files of similar topics in organized folders can allow for easy recalling of these files at a later time. Also technology can sometimes be unpredictable and no one wants to lose their work so remember to save often.
P a g e | 57
CONCLUSION
Congratulations! You’ve successfully completed the SMART Notebook 10: Lesson Activity Toolkit 2.0 training. You’ve been shown and led through the necessary steps to integrate and implement exciting interactive Flash elements into your lessons. Remember, the Flash elements that we have shown you are merely a very small portion of the full database of Flash elements available in the Lesson Activity Toolkit 2.0 folder. Through curiosity and some sheer determination you can uncover a plethora of fun and exciting Flash elements that can enhance a lesson of any sort. We hope that you’ve enjoyed this training and that it’s motivated you to further explore and experiment with the full potential of the SMART Notebook 10 software. So best of luck and motivate those students to learn!