Embed Size (px)
Citation preview
WWW.OCTOPOT.COM
855/OCTOPOT (628-6768)
OCTOPOT®
SOIL HYDRO HYBRID
GROW SYSTEMS
- SYSTEM REQUIREMENTS
- PLANTING INSTRUCTIONS
- ASSEMBLY GUIDELINES
- WARRANTY
Congratulations!
Thank you for investing in a new way to grow. This system is a hybrid that follows a combination of soil and hydroponic growing rules. For best results, follow instructions and only plant seeds, cuttings or young clones in the Octopot Grow System. Follow system requirements for proper growing media, nutrient levels and pH ranges to ensure plant health. If you have any questions about your product or the instructions inside, please contact us. We love customer feedback!

SYSTEM REQUIREMENTS *Only plant seeds, cuttings or very young clones in Octopot Grow Systems. Octopots facilitate plant root development. Transplanting mature plants with established root systems is not recommended.
G R O W I N G M E D I A S O I L Always follow the 60/40 Rule! Specifically, use 60% high quality soilless mix with 40% perlite in Octopot Grow Systems. Perlite should be mixed throughout the growing media. Never create layers of perlite inside the Gro Sleeve®. Sunshine® Mix #4 is a professional blend that has the correct ratio of soilless mix and perlite for Octopot Grow Systems. Premier Horticulture (HP) soil needs additional perlite. Add approximately one gallon of perlite to 5 gallons of HP soil and mix well before planting.
C O C O C O I R O P T I O N Always follow the 60/40 Rule! Specifically, use 60% Coco Coir with 40% perlite in Octopot Grow
Systems. FoxFarm Coco Loco is a professional blend that has the correct ratio of coco coir and perlite. Blending coco coir with soilless mixes is another good option, just remember to include 40% perlite in the mix. Perlite should be mixed throughout the growing media. Never create layers
of perlite inside the Gro Sleeve®.
G R O W I N G M E D I A T O A V O I D Do not use hydroton, clay pebbles or rock wool. Octopot Grow Systems require a high quality
well-aerated growing media that promotes high air capacity and can wick efficiently. Using the
wrong growing media with Octopot Grow Systems will prevent them from functioning resulting
in plant damage.
S U P E R S O I L S - Super soils can be too heavy and hold too much moisture, limiting air exchange
which damages plants causing root rot. Also, nutrients in super soils tend to be used up too
early and run out too soon in the growth cycle which starves plants. Super soil may work with
Octopots if it has the correct ratio of perlite (40%) and enough controlled release nutrients to
support two root systems, not just one.
N U T R I E N T R E Q U I R E M E N T S
Add water soluble organic or conventional fertilizers and nutrients directly to the water in the Hydro Reservoir. Adding fertilizer at the time of planting can be delayed if your growing media is already infused with fertilizer. W A R N I N G : You may need to reduce fertilizer/nutrient amounts by 50% or more to avoid root burn. Why? Because Octopot Grow Systems are closed systems that never waste fertilizer and nutrients from washout or run off. The rule for Octopots is: L E S S IS M O R E . O P T I M U M P P M R A N G E EC and TDS water meters fit into the opening of the Hydro Reservoir making it simple to measure and control plant feeding schedules. Maintain nutrient levels at general range of 600 – 800 ppm (parts per million). For heavier feeding plants during maximum uptake, the range can increase to 1100 – 1200 ppm. Page 1
SYSTEM REQUIREMENTS
O P T I M U M P H R A N G E pH affects the availability of nutrients that a plant can absorb during the growth cycle. pH is a
range not an exact number. After adding nutrient solution or fertilizers to your reservoir adjust
the pH range if needed to 6.3 - 6.5. The optimal pH range for Octopot Grow Systems is between
6.3 - 6.5 however pH swings will occur as nutrients are taken in by the plant during its growing
cycle.
A I R S T O N E S N O T R E C O M M E N D E D Octopot Grow Systems are designed to oxygenate plants without air stones. Octopots do not
function like hydroponic systems. Adding air stones to Octopot Grow Systems can negatively
affect the amount of dissolved oxygen in the water causing wide pH swings.
B E N D I N G T H E R U L E S F O R O R G A N I C T E A S Suspending heavy Organic Teas in the Hydro Reservoir may require the addition of an air stone
to keep nutrients well mixed. Octopot Grow Systems are bottom feed systems and over the
top watering is not recommended however organic nutrients can be washed into the soil
approximately once a week. To mitigate pH swings, run air stones on a timer for 15 minutes per
hour.
F L U S H I N G I N D I V I D U A L O C T O P O T G R O W S Y S T E M S : To flush a plant at the end of the
growing season, simply stop adding fertilizer/nutrients to the Hydro Reservoir for the
last 7 to 10 days and add fresh water instead.
A U T O F I L L O C T O P O T GR O W S Y S T E M S : When using the Auto Fill Systems
simply shut off the water source and open the line drain to empty the system.
T H E R E I S N O R E A S O N T O D R A I N O C T O P O T GR O W S Y S T E M S D U RI N G T H E
GR O W I N G C Y C L E U N L E S S Y O U H A V E O V E R - F ER T IL I Z E D Y O U R P L A N T
F O L L O W T H E S E S T E P S T O R E C O VE R F R O M O VE R -F E R T I L I Z A T I O N :
If you notice that you have over-fertilized simply empty the Hydro Reservoir with a small pump
or siphon. Remove any dead roots inside the water. In drastic cases, it is necessary to flush the
soil and remove the leachate. Refill the Hydro Reservoir with fresh water and continue growing.
F O L L O W T H E S E S T E P S T O R E C O VE R F R O M D E H Y DR A T I O N : If you let the Hydro Reservoir go dry for an extened period, you can kill the hydrponic root system. Typically, the terrestrial roots inside the Gro Sleeve will stay alive for days after the loss of the hydroponic root system keeping your crop safe. Remove the dead roots in the Hydro Reservoir, refill with fresh water and continue growing.
Warning: HYDRO WICKS ARE NOT SOLD SEPERATELY
Don’t throw them out with your Gro Sleeve or Octo-Grid after harvest
Page 2
SYSTEM REQUIREMENTS
W A T E R I N G Octopot Grow Systems automatically water plants on demand up to 10+ days depending on the size and stage of the plant. Simply fill the Hydro Reservoir when alerted by the Depth Gauge. The optimal pH range for Octopot Grow Systems is between 6.3 - 6.5.
W A R N I N G : D O N O T W A T E R P L A N T S O V E R T H E T O P O F T H E S O I L
B E C A U S E I T W I L L P R E V E N T P L A N T R O O T S F R O M F O R M I N G I N S I D E O F
T H E H Y D R O R E S E R V O I R A N D I N H I B I T P L A N T G R O W T H . Plants sense water
down in the Hydro Reservoir and grow roots in that direction.
See www.Octopot.com/how-octopots-work for information about Hydrotropism.
GR O W I N G O U T D O O R S - Rain water will escape the system so plants are never over
watered. Excessive rain water during early stages of plant growth may prevent root growth
inside the Hydro Reservoir.
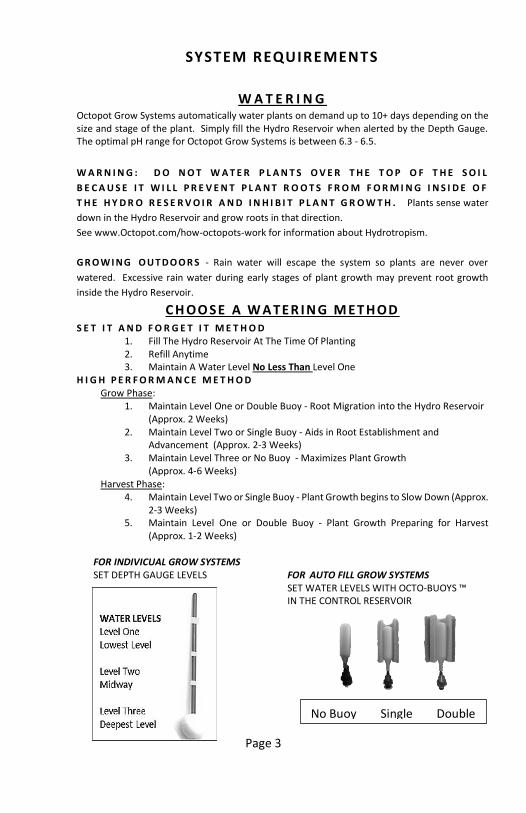
C H OO SE A W A TER I N G M ET HOD S E T I T A N D F O R G E T I T M E T H O D
1. Fill The Hydro Reservoir At The Time Of Planting 2. Refill Anytime 3. Maintain A Water Level No Less Than Level One
H I G H P E R F O R M A N C E M E T H O D Grow Phase:
1. Maintain Level One or Double Buoy - Root Migration into the Hydro Reservoir (Approx. 2 Weeks)
2. Maintain Level Two or Single Buoy - Aids in Root Establishment and Advancement (Approx. 2-3 Weeks)
3. Maintain Level Three or No Buoy - Maximizes Plant Growth (Approx. 4-6 Weeks)
Harvest Phase: 4. Maintain Level Two or Single Buoy - Plant Growth begins to Slow Down (Approx.
2-3 Weeks) 5. Maintain Level One or Double Buoy - Plant Growth Preparing for Harvest
(Approx. 1-2 Weeks) FOR INDIVICUAL GROW SYSTEMS SET DEPTH GAUGE LEVELS FOR AUTO FILL GROW SYSTEMS
SET WATER LEVELS WITH OCTO-BUOYS ™ IN THE CONTROL RESERVOIR
Page 3
No Buoy Single Double
SYSTEM REQUIREMENTS
PLANTI NG I NSTRUCTI ONS 1. Assemble your Octopot Grow System according to instructions.
2. Review System Requirements before choosing growing media and watering method.
3. Fold down the Gro Sleeve® no more than 2 inches at the top (Does not apply for Octo-Grid
Liners)
4. Moisten the growing media by adding some water to the bag before filling the Gro Sleeve®.
5. Be sure that your growing media has 40% perlite mixed well throughout – never create
layers of perlite and growing media.
6. FIRMLY press moistened growing media into the Hydro Wick® before filling the Gro
Sleeve®.
7. Pull Gro Sleeve® gently upwards while FIRMLY PACKING growing media – firmly packed
Gro Sleeves should not slouch during the growth cycle.
8. Alternative Filling Method:
a. Cut the bottom out of a standard five-gallon bucket.
b. Place Hydro Wick® inside of Gro Sleeve® with cup down, it should fit tight in the
tapered end.
c. Set Gro Sleeve® with Hydro Wick® into the Hydro Reservoir.
d. Lock Hydro Wick® into the Hydro Reservoir on the peg provided.
e. Place the bucket upside down over the Gro Sleeve.
f. Fold Gro Sleeve® edge over the bucket
g. The support of the bucket makes packing the growing media FIRMLY into the
Gro Sleeve® easier.
h. Simply remove the bucket by pulling it upward after filling the Gro Sleeve®.
i. Fold the top of the Gro Sleeve® down no more than two inches.
9. Insert seed or clone into the growing media of the Gro Sleeve® – only one plant per grow
system. Follow the directions for Octo-Dome® Cloner for plant cuttings. Transplanting
mature plants with established root systems is not recommended.
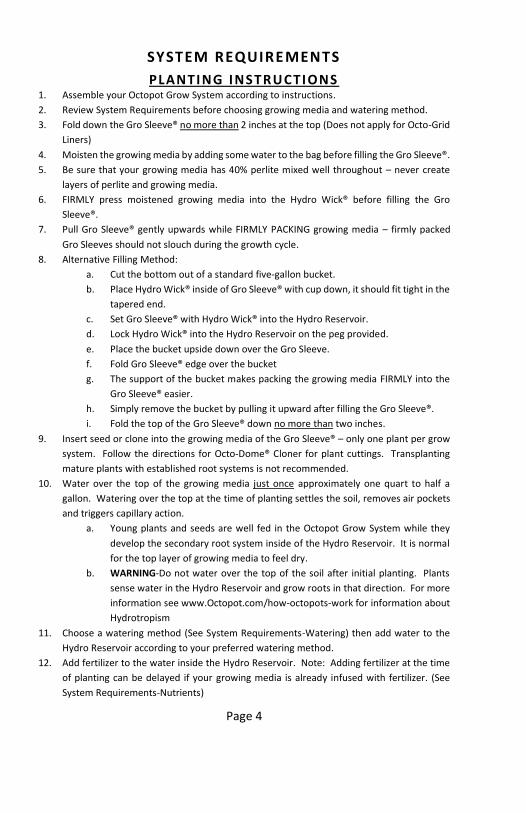
10. Water over the top of the growing media just once approximately one quart to half a
gallon. Watering over the top at the time of planting settles the soil, removes air pockets
and triggers capillary action.
a. Young plants and seeds are well fed in the Octopot Grow System while they
develop the secondary root system inside of the Hydro Reservoir. It is normal
for the top layer of growing media to feel dry.
b. WARNING-Do not water over the top of the soil after initial planting. Plants
sense water in the Hydro Reservoir and grow roots in that direction. For more
information see www.Octopot.com/how-octopots-work for information about
Hydrotropism
11. Choose a watering method (See System Requirements-Watering) then add water to the
Hydro Reservoir according to your preferred watering method.
12. Add fertilizer to the water inside the Hydro Reservoir. Note: Adding fertilizer at the time
of planting can be delayed if your growing media is already infused with fertilizer. (See
System Requirements-Nutrients)
Page 4
ASSEMBLY
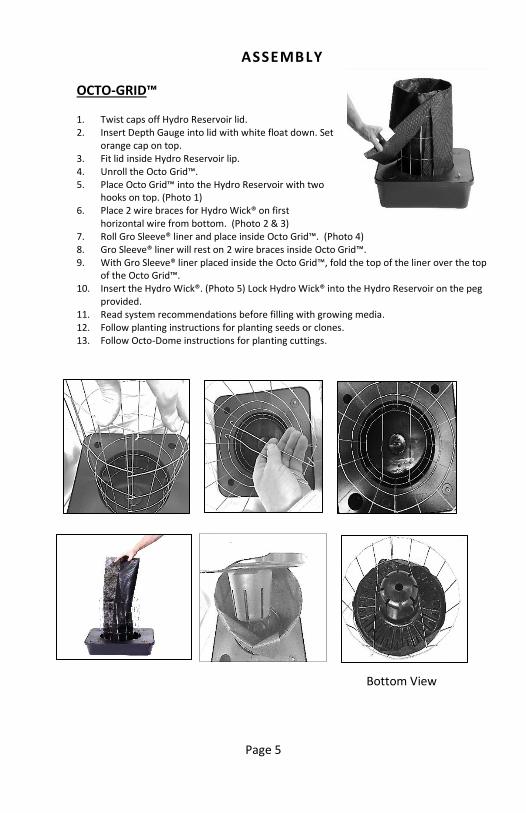
OCTO-GRID™
1. Twist caps off Hydro Reservoir lid. 2. Insert Depth Gauge into lid with white float down. Set
orange cap on top. 3. Fit lid inside Hydro Reservoir lip. 4. Unroll the Octo Grid™. 5. Place Octo Grid™ into the Hydro Reservoir with two
hooks on top. (Photo 1) 6. Place 2 wire braces for Hydro Wick® on first
horizontal wire from bottom. (Photo 2 & 3) 7. Roll Gro Sleeve® liner and place inside Octo Grid™. (Photo 4) 8. Gro Sleeve® liner will rest on 2 wire braces inside Octo Grid™. 9. With Gro Sleeve® liner placed inside the Octo Grid™, fold the top of the liner over the top
of the Octo Grid™. 10. Insert the Hydro Wick®. (Photo 5) Lock Hydro Wick® into the Hydro Reservoir on the peg
provided. 11. Read system recommendations before filling with growing media. 12. Follow planting instructions for planting seeds or clones. 13. Follow Octo-Dome instructions for planting cuttings.
Bottom View
Page 5

ASSEMBLY
6 GALLON OCTOPOT GROW SYSTEM
1. Twist caps off Hydro Reservoir lid.
2. Insert Depth Gauge into lid with white float down. Set
orange cap on top.
3. Fit lid inside Hydro Reservoir lip.
4. Place Hydro Wick® inside of Gro Sleeve® with cup down, it should fit tight in the tapered end.
5. Fold the top of the Gro Sleeve® down no more than two inches.
6. Set Gro Sleeve® with Hydro Wick® into the Hydro
Reservoir.
7. Lock Hydro Wick® into the Hydro Reservoir on the peg
provided.
8. Place caps. (optional)
9. Read System Requirements before filling with growing media.
10. Follow Planting Instructions for planting seeds and clones.
11. Follow Octo-Dome instructions for planting cuttings.
INCLUDES Hydro Reservoir Base & Lid Hydro Wick® Gro Sleeve® Depth Gauge 4 Caps
3 GALLON OCTOPOT GROW SYSTEM
1. Place Hydro Wick® inside Gro Sleeve®. 2. Insert Gro Sleeve® with Hydro Wick® into Hydro
Reservoir. 3. Insert Depth Gauge into Hydro Reservoir. 4. Read System Requirements before filling with growing
media. 5. Follow Planting Instructions for planting seeds and
clones. 6. Follow Octo-Dome instructions for planting cuttings.
INCLUDES Hydro Reservoir Hydro Wick®
Gro Sleeve® Depth Gauge
Page 6
ASSEMBLY
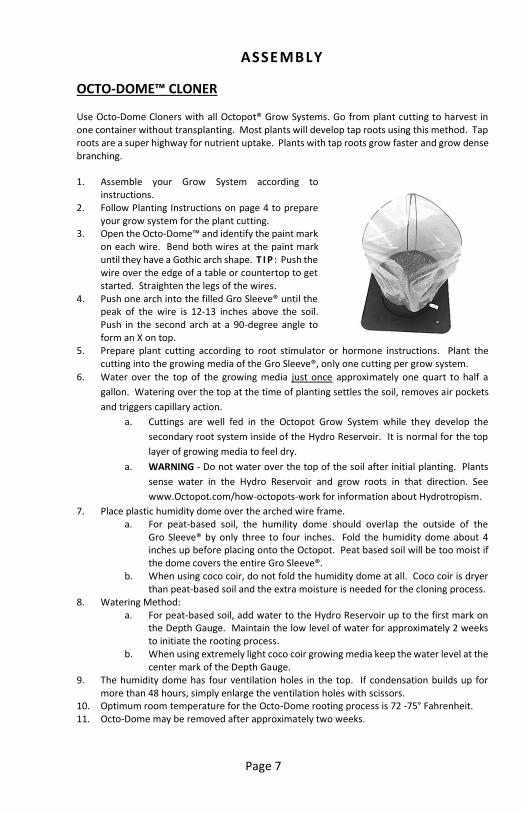
OCTO-DOME™ CLONER Use Octo-Dome Cloners with all Octopot® Grow Systems. Go from plant cutting to harvest in one container without transplanting. Most plants will develop tap roots using this method. Tap roots are a super highway for nutrient uptake. Plants with tap roots grow faster and grow dense branching.
1. Assemble your Grow System according to
instructions. 2. Follow Planting Instructions on page 4 to prepare
your grow system for the plant cutting. 3. Open the Octo-Dome™ and identify the paint mark
on each wire. Bend both wires at the paint mark until they have a Gothic arch shape. T I P : Push the wire over the edge of a table or countertop to get started. Straighten the legs of the wires.
4. Push one arch into the filled Gro Sleeve® until the peak of the wire is 12-13 inches above the soil. Push in the second arch at a 90-degree angle to form an X on top.
5. Prepare plant cutting according to root stimulator or hormone instructions. Plant the cutting into the growing media of the Gro Sleeve®, only one cutting per grow system.
6. Water over the top of the growing media just once approximately one quart to half a
gallon. Watering over the top at the time of planting settles the soil, removes air pockets
and triggers capillary action.
a. Cuttings are well fed in the Octopot Grow System while they develop the
secondary root system inside of the Hydro Reservoir. It is normal for the top
layer of growing media to feel dry.
a. WARNING - Do not water over the top of the soil after initial planting. Plants
sense water in the Hydro Reservoir and grow roots in that direction. See
www.Octopot.com/how-octopots-work for information about Hydrotropism.
7. Place plastic humidity dome over the arched wire frame. a. For peat-based soil, the humility dome should overlap the outside of the
Gro Sleeve® by only three to four inches. Fold the humidity dome about 4 inches up before placing onto the Octopot. Peat based soil will be too moist if the dome covers the entire Gro Sleeve®.
b. When using coco coir, do not fold the humidity dome at all. Coco coir is dryer than peat-based soil and the extra moisture is needed for the cloning process.
8. Watering Method: a. For peat-based soil, add water to the Hydro Reservoir up to the first mark on
the Depth Gauge. Maintain the low level of water for approximately 2 weeks to initiate the rooting process.
b. When using extremely light coco coir growing media keep the water level at the center mark of the Depth Gauge.
9. The humidity dome has four ventilation holes in the top. If condensation builds up for more than 48 hours, simply enlarge the ventilation holes with scissors.
10. Optimum room temperature for the Octo-Dome rooting process is 72 -75° Fahrenheit. 11. Octo-Dome may be removed after approximately two weeks.
Page 7
ASSEMBLY
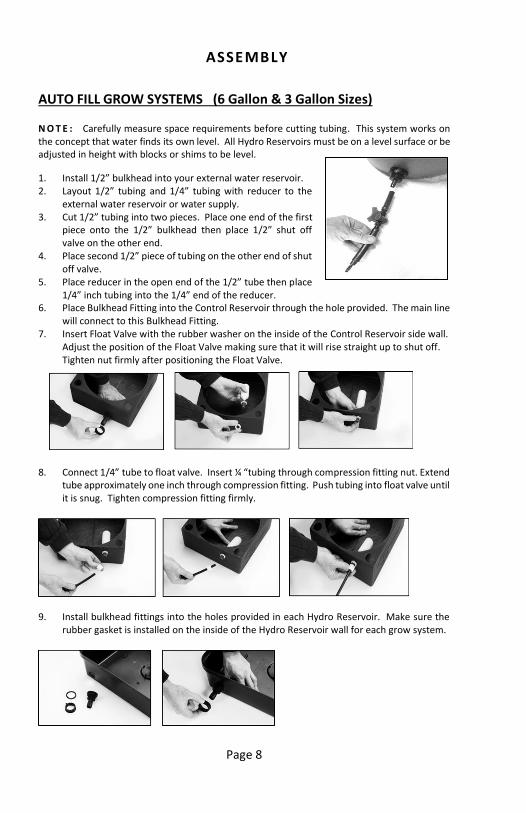
AUTO FILL GROW SYSTEMS (6 Gallon & 3 Gallon Sizes)
N O T E : Carefully measure space requirements before cutting tubing. This system works on the concept that water finds its own level. All Hydro Reservoirs must be on a level surface or be adjusted in height with blocks or shims to be level.
1. Install 1/2” bulkhead into your external water reservoir. 2. Layout 1/2” tubing and 1/4” tubing with reducer to the
external water reservoir or water supply. 3. Cut 1/2” tubing into two pieces. Place one end of the first
piece onto the 1/2” bulkhead then place 1/2” shut off valve on the other end.
4. Place second 1/2” piece of tubing on the other end of shut off valve.
5. Place reducer in the open end of the 1/2” tube then place 1/4” inch tubing into the 1/4” end of the reducer.
6. Place Bulkhead Fitting into the Control Reservoir through the hole provided. The main line will connect to this Bulkhead Fitting.
7. Insert Float Valve with the rubber washer on the inside of the Control Reservoir side wall. Adjust the position of the Float Valve making sure that it will rise straight up to shut off. Tighten nut firmly after positioning the Float Valve.
8. Connect 1/4” tube to float valve. Insert ¼ “tubing through compression fitting nut. Extend
tube approximately one inch through compression fitting. Push tubing into float valve until it is snug. Tighten compression fitting firmly.
9. Install bulkhead fittings into the holes provided in each Hydro Reservoir. Make sure the
rubber gasket is installed on the inside of the Hydro Reservoir wall for each grow system.
Page 8
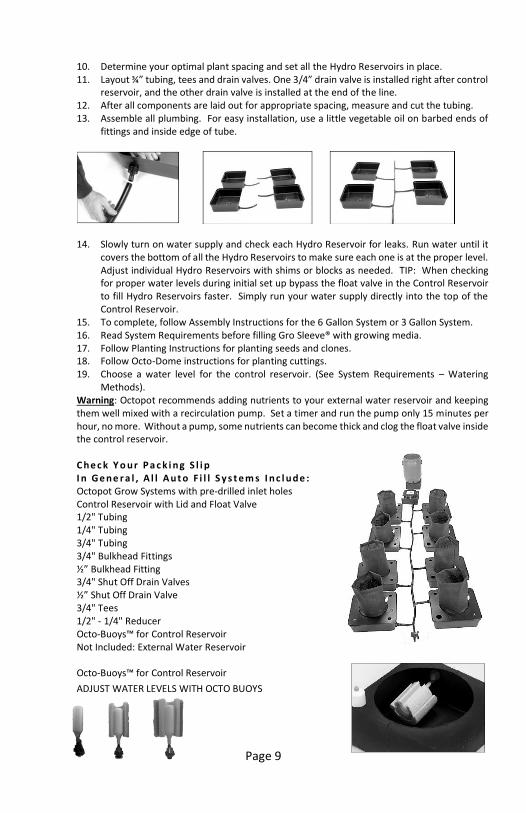
10. Determine your optimal plant spacing and set all the Hydro Reservoirs in place. 11. Layout ¾” tubing, tees and drain valves. One 3/4” drain valve is installed right after control
reservoir, and the other drain valve is installed at the end of the line. 12. After all components are laid out for appropriate spacing, measure and cut the tubing. 13. Assemble all plumbing. For easy installation, use a little vegetable oil on barbed ends of
fittings and inside edge of tube.
14. Slowly turn on water supply and check each Hydro Reservoir for leaks. Run water until it
covers the bottom of all the Hydro Reservoirs to make sure each one is at the proper level. Adjust individual Hydro Reservoirs with shims or blocks as needed. TIP: When checking for proper water levels during initial set up bypass the float valve in the Control Reservoir to fill Hydro Reservoirs faster. Simply run your water supply directly into the top of the Control Reservoir.
15. To complete, follow Assembly Instructions for the 6 Gallon System or 3 Gallon System. 16. Read System Requirements before filling Gro Sleeve® with growing media. 17. Follow Planting Instructions for planting seeds and clones. 18. Follow Octo-Dome instructions for planting cuttings. 19. Choose a water level for the control reservoir. (See System Requirements – Watering
Methods). Warning: Octopot recommends adding nutrients to your external water reservoir and keeping them well mixed with a recirculation pump. Set a timer and run the pump only 15 minutes per hour, no more. Without a pump, some nutrients can become thick and clog the float valve inside the control reservoir. C he c k Y o ur P a c k i ng S l i p I n Ge ne r a l , A l l A ut o F i l l S y s t e m s I nc l ude : Octopot Grow Systems with pre-drilled inlet holes Control Reservoir with Lid and Float Valve 1/2" Tubing 1/4" Tubing 3/4" Tubing 3/4" Bulkhead Fittings ½” Bulkhead Fitting 3/4" Shut Off Drain Valves ½” Shut Off Drain Valve 3/4" Tees 1/2" - 1/4" Reducer Octo-Buoys™ for Control Reservoir Not Included: External Water Reservoir Octo-Buoys™ for Control Reservoir
ADJUST WATER LEVELS WITH OCTO BUOYS
Page 9
ASSEMBLY
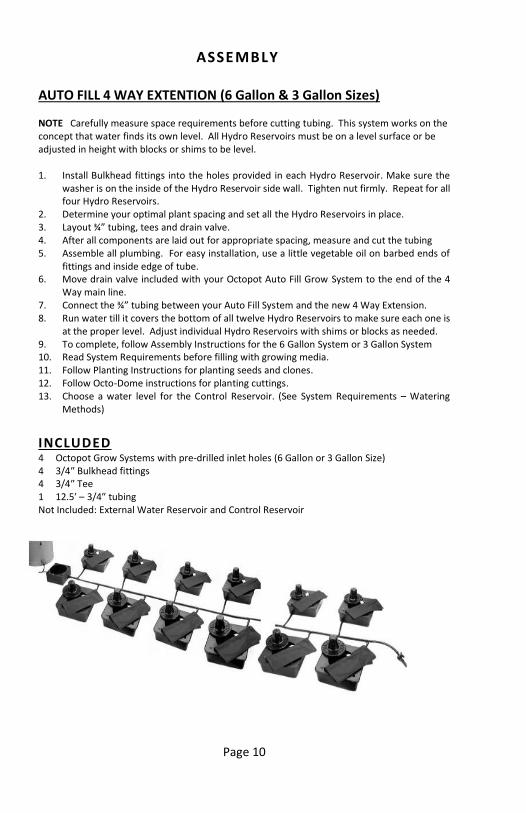
AUTO FILL 4 WAY EXTENTION (6 Gallon & 3 Gallon Sizes) NOTE Carefully measure space requirements before cutting tubing. This system works on the concept that water finds its own level. All Hydro Reservoirs must be on a level surface or be adjusted in height with blocks or shims to be level. 1. Install Bulkhead fittings into the holes provided in each Hydro Reservoir. Make sure the
washer is on the inside of the Hydro Reservoir side wall. Tighten nut firmly. Repeat for all four Hydro Reservoirs.
2. Determine your optimal plant spacing and set all the Hydro Reservoirs in place. 3. Layout ¾” tubing, tees and drain valve. 4. After all components are laid out for appropriate spacing, measure and cut the tubing 5. Assemble all plumbing. For easy installation, use a little vegetable oil on barbed ends of
fittings and inside edge of tube. 6. Move drain valve included with your Octopot Auto Fill Grow System to the end of the 4
Way main line. 7. Connect the ¾” tubing between your Auto Fill System and the new 4 Way Extension. 8. Run water till it covers the bottom of all twelve Hydro Reservoirs to make sure each one is
at the proper level. Adjust individual Hydro Reservoirs with shims or blocks as needed. 9. To complete, follow Assembly Instructions for the 6 Gallon System or 3 Gallon System 10. Read System Requirements before filling with growing media. 11. Follow Planting Instructions for planting seeds and clones. 12. Follow Octo-Dome instructions for planting cuttings. 13. Choose a water level for the Control Reservoir. (See System Requirements – Watering
Methods)
INCLUDED
4 Octopot Grow Systems with pre-drilled inlet holes (6 Gallon or 3 Gallon Size) 4 3/4″ Bulkhead fittings 4 3/4″ Tee 1 12.5′ – 3/4″ tubing Not Included: External Water Reservoir and Control Reservoir
Page 10
ASSEMBLY
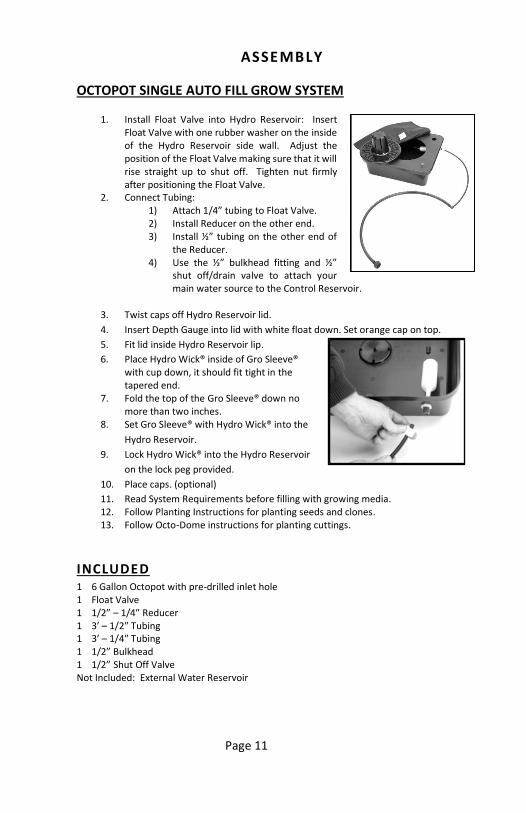
OCTOPOT SINGLE AUTO FILL GROW SYSTEM
1. Install Float Valve into Hydro Reservoir: Insert Float Valve with one rubber washer on the inside of the Hydro Reservoir side wall. Adjust the position of the Float Valve making sure that it will rise straight up to shut off. Tighten nut firmly after positioning the Float Valve.
2. Connect Tubing: 1) Attach 1/4” tubing to Float Valve. 2) Install Reducer on the other end. 3) Install ½” tubing on the other end of
the Reducer. 4) Use the ½” bulkhead fitting and ½”
shut off/drain valve to attach your main water source to the Control Reservoir.
3. Twist caps off Hydro Reservoir lid.
4. Insert Depth Gauge into lid with white float down. Set orange cap on top.
5. Fit lid inside Hydro Reservoir lip.
6. Place Hydro Wick® inside of Gro Sleeve® with cup down, it should fit tight in the tapered end.
7. Fold the top of the Gro Sleeve® down no more than two inches.
8. Set Gro Sleeve® with Hydro Wick® into the
Hydro Reservoir.
9. Lock Hydro Wick® into the Hydro Reservoir
on the lock peg provided.
10. Place caps. (optional)
11. Read System Requirements before filling with growing media. 12. Follow Planting Instructions for planting seeds and clones. 13. Follow Octo-Dome instructions for planting cuttings.
INCLUDED 1 6 Gallon Octopot with pre-drilled inlet hole 1 Float Valve 1 1/2″ – 1/4″ Reducer 1 3′ – 1/2″ Tubing 1 3′ – 1/4″ Tubing 1 1/2” Bulkhead 1 1/2” Shut Off Valve Not Included: External Water Reservoir
Page 11
ASSEMBLY
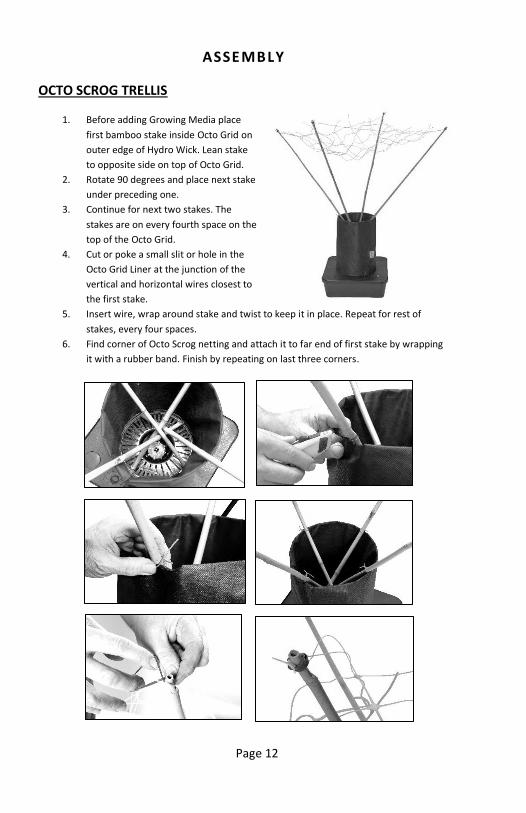
OCTO SCROG TRELLIS
1. Before adding Growing Media place
first bamboo stake inside Octo Grid on
outer edge of Hydro Wick. Lean stake
to opposite side on top of Octo Grid.
2. Rotate 90 degrees and place next stake
under preceding one.
3. Continue for next two stakes. The
stakes are on every fourth space on the
top of the Octo Grid.
4. Cut or poke a small slit or hole in the
Octo Grid Liner at the junction of the
vertical and horizontal wires closest to
the first stake.
5. Insert wire, wrap around stake and twist to keep it in place. Repeat for rest of
stakes, every four spaces.
6. Find corner of Octo Scrog netting and attach it to far end of first stake by wrapping
it with a rubber band. Finish by repeating on last three corners.
Page 12
OCTOPOT ONE YEAR 100% SATISFACTION GUARANTEE If for any reason you are not completely satisfied with your Octopot-branded product, simply
return it within one year for a full refund of your purchase price. This guaranty only applies to
Octopot-branded products purchased directly from Octopot LLC, and does not include shipping
and handling. You can return your Octopot-branded product and receive your full refund by
following the contact form at Octopot.com/warranty. If you do not have internet access, you
can call (855) 628-6768 during normal business hours (EST), Monday through Friday, 8:00 a.m.
to 5:00 p.m. A copy of your receipt or other proof of purchase is necessary for a full refund. Used
items must be cleaned before returning to avoid handling fees. If there is a problem with your
Octopot-branded product, please see Octopot Limited Warranty for warranty service.
OCTOPOT, LLC LIMITED WARRANTY PAGE 1 of 2 This product has been manufactured by Octopot, LLC ("Octopot") and this warranty is our promise to you to stand behind our product. This warranty is non-transferable and extends only to you as the original purchaser of a new product from Octopot or its authorized resellers. This warranty applies to warranty service only. If for any reason you are not satisfied with your Octopot-branded product, please see Octopot's one-year 100% satisfaction guarantee for a full refund. Nothing in this warranty is meant to limit our promise to you and your rights under our guarantee. What Does This Warranty Cover? This warranty covers any defects in materials or workmanship in the following parts ("Warranted Parts") and gauges ("Warranted Gauges"): 5 Year Warranted Parts: 30 Day Warranted Parts: 6 Gallon Hydro Reservoir GRO Sleeve 6 Gallon Base 6 Gallon Depth Gauge 6 Gallon Lid 3 Gallon Depth Gauge Hydro Wick 3 Gallon Hydro Reservoir
During the applicable warranty period, Octopot will replace any Warranted Parts or Warranted Gauges that fail under normal use as a result of a defect in material or workmanship and has been used according to Octopot’s published instructions. This remedy of replacement is the exclusive remedy to you under this warranty, and Octopot gives no other guarantee, warranty, or condition, express, statutory, or implied. No one else, including, without limitation, Octopot's agents or authorized resellers, may give you any guarantee, warranty, or condition on Octopot's behalf which is contrary to this warranty. What Does This Warranty Not Cover? This warranty does not cover: o products sold outside the United States or Canada o products that are used contrary to Octopot's published instructions o product damages as the result of extreme weather conditions (0 °F/−17.8 °C) o products subject to accident, mishandling, negligence, alteration, abuse, or misuse o scratched, dented, or other cosmetic damage o repairs made by anyone other than Octopot
OCTOPOT, LLC LIMITED WARRANTY PAGE 2 of 2
What is the Period of Coverage? This warranty begins on the date you purchased the product and extends for five years for Warranted Parts and 30-days for Warranted Gauges. If a Warranted Part or Warranted Gauge fails after its applicable warranty period expires, there is no warranty of any kind. How Do You Get Warranty Service? Warranty service can be obtained following the online process at www.octopot.com/warranty. If you do not have internet access, you can call (855) 628-6768 (EST) during normal business hours, Monday through Friday, 8:00 a.m. to 5:00 p.m. EST. To get warranty service, you will be required to ship your Warranted Part and/or Warranted Gauge to Octopot at your cost, together with a copy of your receipt or other proof of purchase. What Will Octopot Do? After you return your Warranted Part and/or Warranted Gauge to Octopot (together with a copy of your receipt or other proof of purchase), Octopot will inspect it. If Octopot determines that the Warranted Part and/or Warranted Gauge is defective in material or workmanship during the warranty period, and the defect is otherwise covered by this warranty, Octopot will replace it at no charge to you. Unless restricted by law, replacement may be with a new or refurbished part or gauge. After replacement, your replaced Warranted Part and/or Warranted Gauge will be covered by this warranty for the longer of the remainder of the original warranty period, or 90 days after Octopot ships it to you. Octopot’s sole responsibility is to replace defective Warranted Parts and Warranted Gauges. You are not entitled to a refund under this warranty under any circumstances. How Does State/Province Law Relate to This Warranty?
The law of your State or Province may give you an implied warranty, including an implied
warranty of merchantability or fitness for a particular purpose. The duration of that implied
warranty is limited to the applicable warranty period. Some States or Provinces do not allow
limitations on how long an implied warranty lasts, so this limitation may not apply to you.
Likewise, some states do not allow the exclusion or limitation of incidental or consequential
damages, so the limitation or exclusion of damages below may not apply to you.
THIS EXPRESS WARRANTY IS MADE IN LIEU OF ALL OTHER WARRANTIES, EXPRESSED OR IMPLIED,
INCLUDING, WITHOUT LIMITATION, THE IMPLIED WARRANTIES OF MERCHANTABILITY AND
FITNESS FOR A PARTICULAR PURPOSE, ALL OF WHICH ARE HEREBY DISCLAIMED, AND IS MADE
IN LIEU OF ALL OTHER OBLIGATIONS AND LIABILITIES OF OCTOPOT. OCTOPOT NEITHER
ASSUMES, NOR AUTHORIZES ANY OTHER PERSON TO ASSUME FOR OCTOPOT, ANY OTHER
LIABILITY IN CONNECTION WITH THE SALE OF THE PRODUCT. IN NO EVENT SHALL OCTOPOT,
NOR ANY OF ITS AUTHORIZED REPRESENTATIVES, BE LIABLE FOR ANY COMMERCIAL LOSS OR
SPECIAL, PUNITIVE, INDIRECT, INCIDENTAL, OR CONSEQUENTIAL DAMAGES.