Embed Size (px)
Citation preview

PLANTING GUIDE
SUCCESSFULLY TRANSPLANTING YOUR NEW PLANTS
Thank you for buying your plants from us! We’ve been growingand gardening with perennial plants in challenging soils andclimates for decades. In this booklet, we have distilled the besttechniques for successfully transplanting and growing HighCountry Gardens plants.
TABLE OF CONTENTS
RECEIVING YOUR PLANTS ............ 2 Dormant Plants Soil Preparation Planting Instructions Mulching Care and Maintenance
CACTI AND SUCCULENTS ...........10 Dormant Plants Planting Instructions Care and Maintenance
HOW TO PLANT BULBS .................13 Soil Preparation Care and Maintenance
BULB DEPTH GUIDE ........................15GLOSSARY OF TERMS .....................16
IMPORTANT!IMMEDIATELY
REMOVE PLANTS FROM PLASTIC
SHIPPING BAGS AND READ PAGE 2 OF THIS BOOKLET
For More Information, Visit HighCountryGardens.com Or Call 800-925-9387
Copyright ©2020 High Country Gardens. All rights reserved.

2
WHEN YOU RECEIVE YOUR PLANTS
DORMANT PLANTS
• Remove plants from the shipping box. Take o� the plastic shipping bags and water plants thoroughly, if dry. Your plants are well-rooted and ready to plant outside in your garden.
• For best success, plant perennials immediately after receiving them
• If you are unable to transplant them right away: place the plants outdoors in a spot receiving morning sun only; too much afternoon sun can dry out the plants. Check soil moisture daily, but water thoroughly only when needed. To keep the soil moist but not soggy. Plant no later than 7-10 days after you receive your plants.
We carefully pack your plants to arrive in excellent condition. However, even careful packaging can’t protect against damage as a result of rough, careless handling. Plants can often recover from a rough trip, as they are very resilient. However, we are committed to your gardening success and are happy to assist you with any concerns. Please report any damaged plants or problems immediately to Customer Service at 1-800-925-9387 or via highcountrygardens.com/contact-us
Most perennial plants go into a state of dormancy, or winter rest, as a result of the cold temperatures and shorter daylight hours of winter. These sleeping plants lose their stems and leaves and are dormant, not dead! They will re-grow from their roots with the arrival of spring.
We carefully inspect dormant plants before shipping to make sure their roots and crowns are healthy and ready to grow. You will have best success if you plant dormant plants in your garden right away! Don’t keep them in a pot or up pot them. Your plants will do best if they can “wake up” in the garden (their new home).
After planting, water the plants thoroughly with our recommended root stimulator combination of Saltwater Farm’s SeaCom-PGR and SuperThrive ®. Apply one or two times until new growth begins to show. Dormant plants need less frequent watering than those in active growth; water only as the soil dries.
Dormant perennials will begin to wake up and grow 2-8 weeks after planting, depending on how quickly the soil warms up.
Certain perennials wake up from dormancy much later in spring than others. These include Asclepias (Milkweed), Ceratostigma (Hardy Plumbago), Chilopsis (Desert Willow), Coreopsis (Tickseed), Echinacea (Coneflowers), Helianthus (Maximilian’s Sunflower), Liatris (Blazing Star), Oenothera (Primrose), Perovskia (Russian Sage), Phemeranthus (Fame Flower), Salvia pitcheri, Zinnia grandiflora (Gold on Blue Zinnia), woody shrubs, and many ornamental grasses.
For more information on dormant plants, visit HighCountryGardens.com andsearch: Dormant
For more information on when warm and cool season grasses are dormant, visit HighCountryGardens.com and search: Warm Season vs Cool Season

3
SOIL PREPARATIONGreat gardens start with great soil! Good soil preparation is essential to successful gardening. Healthy, living soil should have good tilth, nutrient content, and a viable population of beneficial microorganisms. We recommend using natural and organic ingredients to prepare the soil and maintain soil fertility.
It is always a good idea to have a soil test to identify your soil type (sandy, loam, silt, clay etc.) and find out your soil pH. Reach out to your local gardening extension program for soil testing resources.
SOIL AMENDMENTS
When Planting into Existing Flower Beds Use small amounts of each amendment listed below in individual planting holes.
When Preparing New Flower Beds or Digging Individual Holes into Unamended Soil The following soil amendments should be added to loosen the soil and add nutrients. Loosen and work in the amendments to a depth of 12”.
Soil Mender Mineral Boost FertilizerUse 2 lbs. per 100 sq. ft. of bed area or a small amount (a tablespoon) in each planting hole. This natural product boosts the trace mineral levels in the soil and creates healthy microbial populations in the soil. (available at highcountrygardens.com/garden-goods)
Yum Yum Mix® Use Yum Yum Mix® at the rate of 4 lbs. per 100 sq. ft. of bed area or a handful in each planting hole. This organic fertilizer adds a complete spectrum of nutrients to the soil. Organic fertilizers feed the soil micro-organisms that digest the ingredients and release available nutrients to plant roots.
Compost Add good quality, thoroughly cured compost to the soil at the rate of 1⁄2 to 1 cu. yd. per 100 sq. ft. of bed area or a generous handful to each planting hole. Some compost is more concentrated than others and should be used according to the label’s directions.
To order soil amendments, just call our toll free number (800) 925-9387 or order online at HighCountryGardens.com/garden-goods
A special note about successfully transplanting Zinnia grandiflora (Gold On Blue Zinnia) and Phemeranthus calcynium (Fame Flower): These plants won’t begin to grow until warm summer weather has arrived. The long thin string-like roots are brittle and do notlike to be disturbed when transplanting, so don’t scratch out the root ball. Continued wateringduring cold weather will rot the roots. Don’t start to water regularly until the weather warms and the plants begin to grow.

4
Planting Xeric and Very Xeric PlantsThese plants dislike oil that is rich in organic matter and water retentive. When planting use only Soil Mender MIneral Boost Fertilizer, Yum Yum Mix , and rock phosphate. Don’t use compost when planting, or fertilizing. With continued use, this will make the soil too rich and water retentive.
Xeric plants need excellent soil drainage especially in areas with 30” or more of rainfall per year (or over the winter months). Water retentive soils (clay, clay-loam or silty-clay) need to be amended with very coarse sand or gravel to improve drainage. Mix one shovel of soil (1 part) with one to three shovels of drainage material (1 to 3 parts) to fill a raised bed or build a berm (soil mounds). The more rainfall your region receives the more drainage material should be mixed into the soil.
In addition to drainage material, mix Soil Mender MIneral Boost Fertilizer, and Yum Yum Mix® into soil at recommended rates.
Plant Success Mycorrhizal Root Inoculant is a soil drench with a variety of beneficial mycorrhizal fungi, bacterial species and biostimulants. The mycorrhizal fungi and trichoderma expands within surrounding soil and increase root’s ability to absorb water and nutrients. This is essential when planting into disturbed, compacted soils (yards in subdivisions or building sites). Plant Success is very beneficial for xeric native and adapted xeric plants. For best results spread onto the soil surface after planting. (See label directions for how much to use). (A vailable at highcountrygardens.com/garden-goods)
Water Retention in Arid Climates (Regions with Hot, Dry Summer Weather)To improve water retention in arid climates, mix water holding granules into the soil at planting time. Use 1 teaspoon of dry granules per 8” x 8” hole, or 1 tablespoon of dry granules per 12” x 12” hole. These will hold extra water in the planting hole for improved transplanting success. These granules can be used with xeric and non-xeric plants.
SOIL ACIDITYIf You Live East of the Mississippi (or in the Pacific Northwest)
• These acidic soils need lime added to bring soil pH up to neutral (pH 7).
Many of our plants are native to alkaline soils and need to have soil acidity reduced (a soil test can confirm your PH levels).
A Note About Getting Xeric (Waterwise) Plants O� to a Good Start
Some gardeners prefer not to enrich the soil for xeric Penstemons and other native plants that are used to growing in poor, humus deficient soils. Instead, they simply loosen the soil with a shovel before planting to open the soil for improved water and penetration. However, we strongly suggest you improve the soil with Yum Yum Mix and Soil Mender MIneral Boost Fertilizer at the recommended rates. (See page 3 of this booklet.)

5
PLANTING INSTRUCTIONS
Roughing Out the RootsBefore placing a pot-grown plant into the ground, be sure to prepare the roots for planting. Use a sharp corner of the plastic tag or a pocket knife to make vertical cuts top to bottom, several on each side of the root ball, and several cuts across the base. Cut into the rootball about 1/4" deep. With your finger tips, lightly rough out the roots, side and bottom, so the soil ball has a fuzzy surface.
Roughing out the roots before planting will ensure that roots grow widely and vigorously into the surrounding soil and not continue to grow in the shape of the pot in which it was grown. New roots will grow from each area you cut when roughing out the roots, giving your new plant a strong foundation for years of healthy growth. (See diagram above)
Watch our planting videos at: HighCountryGardens.com/videos
TO REMOVE PLANTS FROM THEIR POTS
DO NOT lift the plants from their pots by pulling on the leaves and stems!
Instead, gently squeeze the sides of the pot to loosen the soil. Holding the plant, turn the pot upside down and push your thumb against the bottom of the pot. This should free the root ball from the sides of the pot and let the plant drop down into your hand. If roots growing through the pot are preventing removal, cut or tear them o�. This will not harm the plant.
Once the plant has been removed from the pot, the roots must be prepared for planting. Make several 1⁄4” deep cuts through the surface of the roots with the sharp corner of the plastic plant tag or the blade of a pocket knife on each side of the root ball.
If there are matted roots at the bottom, cut them 1/4" deep to loosen them

6
a b c
d
Placing the Plants in the Planting Hole Set the plant down into the hole, being careful to set the top of the root ball even with the surrounding ground. Firm the soil gently into place with your fingers. Don’t pack the soil too tightly with a tool handle. Do not water the soil as you are planting. Water the plants after they are in the ground. Water several times to settle the soil in the planting hole. Thoroughly soak the soil surrounding the planting hole. By spreading a natural material such as mulch or crushed gravel over the surface of your soil, you can slow evaporation, discourage weeds, and help your plants to thrive. (See page 7)
PLANTING DIAGRAM(cross-section)The key to beautiful perennial flower beds is to enrich the soil with plenty of compost and soil minerals. (Soil Mender Mineral Boost Fertilizer and Plant Success Mycorrhizal Root Inoculant).
a. A ridge of soil around the planting hole will hold water and allow it to soak in deeply.
b. In dry, hard-to-water areas, a shallow (1/2") “saucer” below grade of the surrounding soil will help hold water even as the ridge of soil begins to erode.
c. Add a 1” to 2” layer of mulch, being very careful not to have mulch up to the base of the plant (1 inch or more).
d. If planting individual plants outside of a prepared planting bed, prepare a hole at least a 12" deep x 12" wide for each plant.
For more info on transplanting, watering and mulching, view our videos at HighCountryGardens.com/videos
7
MULCHING
Mulching in Arid, Western ClimatesIn these regions, mulching is an essential gardening technique. Blanketing the top of the soil with mulch material will:• Improve plant growth and flowering.• Conserve valuable soil moisture by shading the soil from the sun’s heat.• Protect shallow plant roots from temperature extremes in summer and winter.• Suppress weed growth.• Add valuable organic matter to the soil as it breaks down.• Help to capture rainwater by preventing rapid run-o� from impermeable soil surfaces (gravel is particularly good for water harvesting).
Apply a 1" to 2" layer of mulch at planting time. See “Planting Diagram” on page 6 for specific techniques.
Mulching Materials for Di�erent Groups of PlantsHardy garden perennials, non-xeric groundcovers, non-xeric ornamental grasses and non-xeric shrubs: • Course, textured organic compost• Mulch• Bark or bark chips• Pine needles• Nut shells
For Xeric and very xeric plants, cacti, succulents: • Crushed gravel• Pine• Crushed nut shells• Using moisture-absorbing materials like compost or bark will cause rot
Mulching East of the Mississippi or in the Pacific NorthwestIn high rainfall regions, mulching is not usually needed to conserve water, and is not recommended in areas where slugs are a problem. Mulch can help protect your soil from extreme temperatures, add nutrients, and help reduce weeds. If you add mulch, be sure to choose a material than will not encourage rot.
Mulching is Essential Fall Planting in Dry ClimatesA 1-2" thick layer of compost or other organic material will keep plants from drying out in the dry fall weather, and will help to keep soil frozen over the spring months to prevent frost heaving of the roots.
Fall mulching is beneficial for xeric native and rock garden plants, Use a 1"-2" thick layer of gravel mulch or 1"-2" thick layer of non-packing mulch like pine needles. Using compost or bark chips, will keep the crown of xeric species too wet over the winter months and result in crown rot.

Protecting Your Perennials From Freezing TemperaturesRecently planted perennials will need to be covered with row crop cover, such as fabric or plastic, if a spring storm drops night temperatures to 25° F or lower and there is no snow cover. Just 4°-5°F of cold protection, with a protective covering, will get the plants through in good shape. Snow on top of newly planted perennials will cause no damage; it will help insulate them from cold air temperatures.
Stimulating New Root GrowthPerennial plants depend on the growth of their vigorous root systems to thrive. Get your plants o� to the best possible start by using a mixture of Sa ltwater Farms SeaCom-PGR and Superthrive (a plant growth stimulant) to soak the root zone at planting time. Mix together 1 teaspoon of SeaCom-PGR and 1⁄4 teaspoon of Super-thrive per gallon of water. Water first with clear water, wait a few minutes, then saturate the root ball and surrounding soil with the SeaCom-PGR/Superthrive mixture. Re-apply this mixture once more two weeks later for optimum results.
Did you forget your SeaCom-PGR and Superthrive? Just call our toll free order number (800) 925-9387 or order online at HighCountryGardens.com/garden-goods
WateringCarefully check newly transplanted perennials for sufficient soil moisture, especially during hot weather. There are no timetables for watering, as watering requirements vary from season to season and according to local weather. Properly planted and mulched perennials should not require daily watering. Less frequent, deep watering encourages deep root growth. For more resilient plants fill the water “saucer” around each plant twice to insure that the soil is well soaked; light overhead sprinklings are not sufficient and is generally not recommended.
Be careful not to over-water dormant plants! An initial soaking at planting time is essential. Re-water only when the soil dries out a bit. Regular watering can begin when the plants start to show vigorous new growth.
Don’t water xeric plants with the same frequency as non-xeric plants. Four to six weeks after transplanting, Plants will have begun to grow and watering frequency can be decreased for many xeric species (heat & rainfall will a�ect watering needs). Always check the soil moisture before watering, then soak thoroughly if dry.
FertilizingIt may be helpful during the first growing season to apply some fertilizer, especially in poor soil areas. Yum Yum Mix®, or another low nitrogen with phosphorous fertilizer applied one to two times during the spring and summer months will give plants a gentle boost.
For more planting info, view our growing and care videos at HighCountryGardens.com/videos
8
CARE AND MAINTENANCE

9
FALL PLANT CAREFall is a great time for planting. It’s a proven fact that fall planting gets perennial flowers, shrubs and trees o� to a faster, more vigorous start the following spring. You won’t see a lot of stem and leaf growth in the fall, because the plants are busy growing new roots! With the arrival of spring, your fall-planted garden will be ready to burst forth with vigorous new growth and a profusion of flowers. Xeric perennials will have a well-developed root system to better cope with the summer heat and dryness.
Fall Watering in Dry ClimatesIn dry climates, plants need consistent watering over the fall months. Water regularly over late-summer and into fall, decreasing frequency as the daytime temperatures cool.
Improving Cold Hardiness (Any Climate)Many perennial plants will withstand cold winters better if their stems are left standing over the winter. Zauschneria, Salvia greggii and greggii type hybrids, Gaura and Agastache are best left standing for winter and cut back in mid-spring. Leave orna-mental grasses uncut until spring for winter interest.
Fall Fertilizing (Any Climate)Most xeric plants are light feeders. October is an ideal time to fertilize. Apply organic fertilizers or high quality compost when the fall root growth cycle is in full swing. Check your mulch level and replenish as necessary.
WINTER PLANT CARE
Western GardensIn dry western climates, watering is crucial during the winter months. In regions with winter rains and/or winter-long snow cover, you only need be concerned in the case of a winter drought. Water at regular intervals through the fall until daytime tempera-tures cool in late October/November. When the soil begins to freeze, soak it once every month through the winter months, except when it’s very cold, the ground is solidly frozen or there is snow cover.
Gardens East of the Mississippi (and the Pacific Northwest)For xeric perennials, protection from excess winter moisture is critical. Wet, freezing and thawing soil conditions will rot xeric plants. Protect them by planting under a roof overhang, or placing a movable cold frame over plants in their flower bed. You may also cover your xeric plants with a crop cover fabric.

10
CACTI AND SUCCULENTSAll our cacti, agaves and succulents are seed-grown or cutting-grown here in our greenhouses. Cacti and agave plants are 2-4 years old; succulents are 1-2 years old. Please, never collect cacti from the wild unless it’s to rescue plants from construction sites. Many species are close to extinction in their native habitats due to irresponsible collectors.
DORMANT PLANTSCacti shipped early in the spring may be dormant. As the weather warms, these cacti will expand and green-up. After an initial watering to settle the soil around the roots, no further water should be applied until the weather warms up. If plants are dormant and the spring weather is rainy, protect the plants from too much moisture by cover-ing them with a gallon plastic milk container with the bottom cut out. Leave the top o� the jug so heat build up isn’t excessive in sunny weather.
SOIL PREPARATIONAll the species of hardy cacti and succulents require fast-draining soil.
Planting in the GroundPut the plants on a slope or raised area of the garden, not in a low spot which collects water. Select a bed with full sun exposure, preferably next to a south or west facing wall. These areas will provide extra winter warmth. In heavy clay soils, it is essential to replace half or more of the soil from a 10”x 10” or larger hole with coarse sand and gravel mixed thoroughly with the remaining soil to insure adequate drainage. No compost should be added, only a small handful of Soil Mender Mineral Boost Fertilizer and Yum Yum Mix®.
For cacti planting and care videos, visit HighCountryGardens.com/videos
Planting in an Outdoor Pot or PlanterUse a planting mix of 3 parts garden soil + 2 parts coarse sand + 2 parts coarse perlite (or similar material). When growing plants indoors in pots, use a good quality potting soil to mix with the sand, and expanded shale instead of garden soil.

11
PLANTING INSTRUCTIONSFor Cacti and Succulents (See planting diagram on page 12.)• Cacti, agaves, and tap-rooted succulents (Aloinopsis, Echinocereus, Nananthus) should be transplanted bare-root. Let the soil in the pot dry out for a few days. Then remove the pot and gently loosen the soil so it falls away from the roots. Trim o� any broken roots. Bare root plants should then be planted into a shallow hole. Spread out the roots evenly and sprinkle the soil into the hole until full. The base of the plant should rest on top of the soil. Mulch with a 1⁄2”-1” thick layer of pea-sized gravel around the base of the plant to protect it from contact with soggy soil over the winter months.
• Succulents with fibrous roots (Ruschia, Delosperma, Sedums and others) need not be transplanted bare-root, instead the root ball should be scored and roughed out like other perennials.
See our planting video on the product pages of our website.
Watering• Bare-root cacti and tap-rooted succulents: Do not water right away. Let plants sit dry for a day or two to allow the roots to callus over any broken or damaged areas.
• Other succulents can be watered in right away. Water thoroughly with a mixture of Saltwater Farms Sea-Com-PGR and Superthrive to stimulate strong new root growth. Water again with this mixture two weeks later.
Outdoor beds with new plants should be initially watered once every 5 to 7 days for the first month or so after transplanting. Cacti and succulents enjoy regular watering during the heat of the summer and will grow vigorously. After the first year, most cacti species need a good soaking only once every 2-4 weeks during the spring and summer if there has been no rain.
Potted plants require more frequent, regular watering, especially if the weather is hot and dry.
To prepare cacti and succulents for the approach of winter, in Fall, begin withholding water in the fall so the plants can begin to dehydrate and shrivel. Plump, well watered plants are ripe for cold damage when temperatures plunge in late fall/early winter.
Winter Protection for Cacti and SucculentsGarden Planted: Many cacti and succulents are quite cold hardy if kept dry in the cold winter and spring months. In areas that receive a lot of winter and spring moisture (especially rain), it is strongly recommended that plants be protected from cold, wet soil conditions. For example, you may cover the bed with a temporary cold frame, which can be constructed using pipe and a clean plastic sheet (to allow sunlight). Or individual plants can be covered with plastic gallon milk jugs with the bottom cut out to keep the ground around the plants dry. Leave the top o� the jug so heat build up isn’t excessive in sunny weather. Problems will occur if plants are in wet soil all winter or sit under melting snow for extended periods.
Potted Plants: Move under a roof overhang on the south or west side of the house, or place in a well ventilated cold frame. Water pots and other containers lightly a few times over the winter during warm spells.

12
FertilizingCacti and succulents are very modest in their fertilizer requirements. When planted in the ground, fertilizing in spring with SeaCom-PGR and Yum Yum Mix® will encourage plentiful flowers and good stem growth. When planted in pots, remember to feed monthly with the same mixture as above, beginning in late summer.
Plant the crown of the plants high. Gravel mulch should be used to protect the plant’s crown from excessive moisture in the winter/early spring.
a. Potted succulents should have 1⁄4 - 1⁄2” of soil scraped away from the top of the root ball, to make room for gravel mulch.
b. Cacti and agaves and tap-rooted succulents should always be transplanted to bare-root. (see page 11)
c. If summer planting, use a tall rock or board on the south side of the cacti to shade for 7-10 days. This helps the cactus to acclimate to the strong sun and avoid sunburning the stem.
d. If planting into clay, mix 3 parts coarse sand and 1 part soil from the planting hole for faster soil drainage. The planting hole needs to be at least 10” wide x 10” deep. All soil types need the addition of Planters II at recommended rates when preparing the planting hole.

13
Moisture ToleranceThe most moisture tolerant species (best adapted for growing outdoors in areas where cacti are not native plants) include: Coryphantha vivipara, Echinocereus reichenbachii varieties, Echinocereus viridiflorus, Pediocactus simpsonii, Escobaria missouriensis, and various Opuntia (pad cacti) species.
South African Succulents are very sensitive to wet soil in freezing weather. They particularly dislike being covered with snow for extended periods and will rot out. When kept dry, these plants have excellent cold tolerance. Plant them wedged between rocks, in sloped south and west facing beds where snow melts quickly and the soil is very well drained. In cold, wet winter climates these plants should be container grown so they can be moved into cold frames or under roof overhangs during the winter. Also, be on the lookout for hungry rabbits; they will occasionally nibble on these succulents. Use a chicken wire cage or spray repellent to protect the plant. If using a repellent, switch up the brand each year.
Note: Cacti will “shrink” and look dead when they go into dormancy.
Companion Plants for Cacti and SucculentsMany xeric plants can be interplanted with cacti and succulents to make colorful and interesting garden groupings.
Herbaceous perennials include various xeric Penstemons, Zinnia grandiflora, Tanace-tum densum v. amanum, Zauschneria species, Lavandula varieties, Aethionema species, Achillea ageratifolia, Hymenoxys species, Veronica bombycina, Calylophus species, and other native species.
Woody shrubs include Falugia paradoxa, Prunus besseyi, and others.
HOW TO PLANT BULBS
SOIL PREPARATION FOR BULBSA compost enriched, well-drained soil is best. Incorporate a good quality organic compost as needed. Yum Yum Mix® is recommended as an excellent source of nitrogen, phosphorus and potassium needed for strong plants and healthy roots. Mix a small amount into the bottom of the hole before planting your bulbs.
Many bulbs prefer full sun exposure. However, Muscari, Allium, Galanthus, Hyacinthoides, Scilla and many Da�odils will tolerate partial shade and bloom well. Pink Da�odils will hold their color longer if planted in dappled shade or morning sun/afternoon shade.
After planting, add a top dressing of compost or other organic material and water in thoroughly. If your winter is dry, water every three to four weeks throughout the winter and add more mulch if necessary.
14
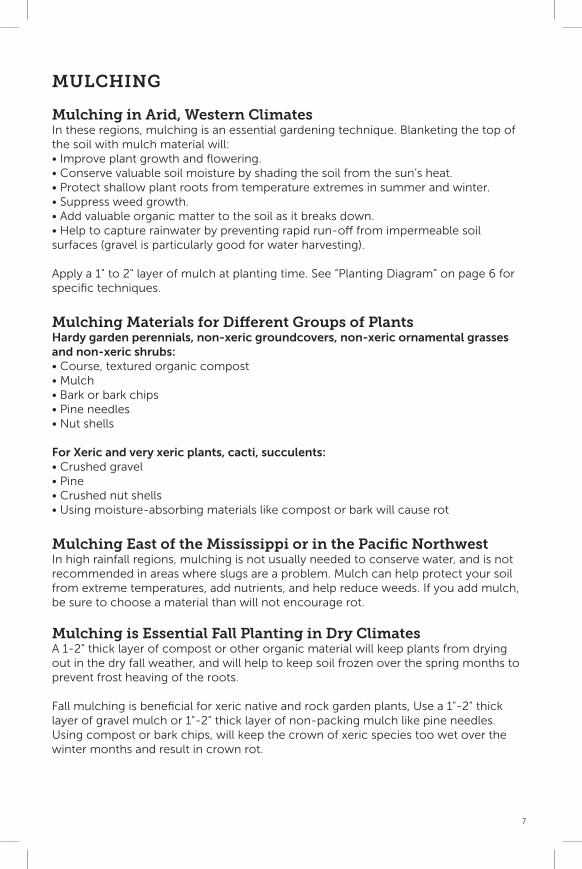
Fall-Planted Summer-Blooming BulbsWhen you receive your spring bulbs (Tulips, Da�odils, etc.) keep them in a dry, dark, cool place until ready to plant. They need air circulation so they will not collect moisture and rot. Planting times can vary from early October in the North to mid-to-late November in the southern regions. A good rule of thumb is to plant them about 6 weeks before the ground is frozen - we recommend planting as soon as you receive your bulbs.
Fall Blooming CrocusWe recommend planting these “gems” as soon as you receive them. Plant 2" apart and up to 4" deep, adding sharp gravel around the corms (bulb-like root) to deter moles or gophers (if they are a problem). Otherwise, the gravel is not needed. Because the corms can be planted so deeply, plant groundcovers such as Snow-in-Summer (Cerastium ), various creeping Speedwell (Veronica) and Soapwort (Saponaria) over them. As they poke up through the ground in the autumn, the flowers are supported by the groundcover’s foliage. Fall blooming Crocus prefer full sun to partial shade, well drained soils and dry summer soils. The grass-like foliage follows later and continues to grow after the flowers fade.
Spring-Planted Summer-Blooming BulbsSummer Blooming Bulbs, including popular varieties such as Gladiolus and Dahlias, are planted in the spring and bloom in the summer. Most of these bulbs are tropical and require warm weather to be planted. There must not be any danger of frost and your ground temperature must have reached 55 degrees Fahrenheit before planting. Many of our summer blooming bulbs can be planted as perennials in zones 9-10 (zone 8 if mulched), but should be treated as annuals in cooler climates. Or then replant next spring you can lift them and store them in the fall, or bring patio pots inside before frost.
CARE & MAINTENANCEOnce your bulbs have bloomed, allow the bulb foliage to brown and fade naturally, since the leaves are feeding the bulb in the ground. Removal of foliage weakens the bulb and leads to fewer blooms the following year. Planting your bulbs amongst your perennials is one way to conceal the dying bulb foliage. The perennials begin to grow and fill out as the bulb foliage dies back. The perennials will then provide foliage and color in the garden from late spring through the summer and into fall. Regular fertilization with balanced organic or natural fertilizer and a re-application of mulch each fall will insure more and more beautiful spring bulb blooms for many years!
Contact Us With Your Gardening Questions
HighCountryGardens.com/contact-us
800-925-9387
For the latest plants and products, please visit us at HighCountryGardens.com/new
Subscribe to our newsletter for the more planting information, new product introductions and special o�ers at HighCountryGardens.com/email.

-2”-4”
-8”
15
BULB DEPTH PLANTING GUIDES
Fall Planted BulbDepth Planting Guide
1. Crocus & Miniature Iris 2-4”
2. Grape Hyacinth 5”
3. Hyacinth: 6”
4. Wildflower &
Miniature Da�odils: 6-8”
5. Wildflower Tulips, small
Allium & wildflower bulbs: 2-4”
6. Garden Da�odils: 6-8”
7. Darwin hybrid Tulips: 6-8”
8. Large ornamental Allium: 6-8”
1. 2. 3. 4. 5. 7. 8.
1. Calla Lily: Plant so the top of bulb is exposed
2. Dahlia: 1-2”
3. Freesia: 2-3”
4. Nerine Lily: 2-3"
5. Ranunculus: 2-3"
6. Tigridia: 2-3"
7. Canna Lily: 1-2"
8. Crocosmia: 5-8"
9. Gladiolus:6-8"
10. Crinum: 4-8”
Spring Planted BulbDepth Planting Guide
1. 2. 3. 4. 5. 6. 7. 8. 9. 10.
-2”-4”
-8”
6.

16
GLOSSARY
Customer Service (800) 925-9387 HighCountryGardens.com/contact-us
HighCountryGardens.com/videos
Clay soil – Soil with a high amount of clay. This soil sticks together when compressed, lacks oxygen, and doesn’t absorb water quickly. Some plants do well in clay soils, but for others, the addition of generous amounts of sand, and other organic nutrients will improve drainage.
Dormant – Many perennials will, in cold weather, go into a period of hibernation (greatly reduced growth). The top growth of perennial may die back to the ground completely, while its roots are alive and well. See “Dormany” pg. 2 or “Fall Care” pg. 9.
Enriched garden soil – Good quality garden soil that has been enriched with com-post, organic nutrients such as Yum Yum Mix®, phosphate and Planters II.
Lean soil – Soil that is low in organic matter, drains quickly, and is low in clay. Great for xeric plants with some amendments. See details pgs. 3, 4.
Mulch – A layer of material spread over the surface of the soil to reduce evaporation, control weeds, regulate temperature, enrich soil, reduce erosion, and add beauty.
Perennial – Any plant that lives for 3 or more years when grown in conditions suitable for it. Regrows from nutrients stored in roots.
Tilth – Soil structure that facilitates air and water penetration.
Xeric – From the Greek word xeri for dry, needing little moisture. Xeric and water-wise are often used interchangeably and indicate plants or gardens needing little supple-mental watering, once established .
Xeriscape – A landscape or garden featuring xeric or water-wise plants to create a low water environment.


![Mechanical Booster Pump [PRC-A/PMB-C(M) Series] · Mechanical booster pumps (a.k.a. "Roots Blowers") can be used on the inlet of primary roughing pumps, such as oil-sealed rotary](https://img.pdfslide.us/doc/110x75/5e892f06b6398a6d1d464213/mechanical-booster-pump-prc-apmb-cm-series-mechanical-booster-pumps-aka.jpg)