Embed Size (px)
Citation preview

- Data BrochurePump Sequencer 132
D 13204/10
1 of 12 © 2010 D 132 - 04/10
The Pump Sequencer 132 is designed to provide pump control for either stand-by or 2-stage operation. In stand-by mode, the 132 automatically switches over from the lead pump to the stand-by pump during a pump failure. In 2-stage mode, the 132 turns on the second stage pump to meet additional flow requirements.
Additional functions include:• Warm Weather Shut Down (WWSD)• Exercising• Equal Run Time Rotation• Alert per Pump or Alert Levels
• Adjustable flow proof delay• Test sequence to ensure proper component operation• 120 V (ac) power supply• CSA C US certified (approved to applicable UL standards)
InputOutdoorSensorOptional
OutputPumpPump
Input120 V (ac) Power
Supply
InputPump
DemandSignal
US
Made in Canada bytekmar Control Systems Ltd.
Power:Pump Relays:Alert Relays:Demands:
120 V ± 10% 60 Hz 6 VA240 V (ac) 10 A 1/2 hp, pilot duty 720 VA240 V (ac) 10 A 1/3 hp, pilot duty 240 VA 20 to 260 V (ac) 2 VA
Signal wiringmust be rate dat least 300 V. H
1197
E
Test
1 2Pump
Demand
3 42-StageDemand
5 6FlowProof
8 9 10 11 12
1 1 2
7 17 18
OutdoorSensor
Pump2
Clear Alert
Pump 1
Pump 2
Alert A
Alert B
Flow Proof
2-Stage Demand
Pump Demand
WWSD
Power
WWSD35 Of f
70°F
100
Frequency of Rotation12 Of f
96 hours
168
not testingtestingtesting paused
offredred
13 14
Alert
15 16
AlertA A BB
Input2-StageDemand
Signal
Output
Do not apply power
OutputAlert
OutputAlert
2-Stage
Alert Levels
Pum p1 2Auto
30 second DelayExercisingAlert per Pump
Of f10 second Delay
Of fStand-by
Pump Sequencer 132Stand-by / 2-Stage
InputFlow Proof
Signal
48 144
Use supply wires suitable for120°F (50°C) above ambient
PumpN LPower
Meets Class BCanadian ICESFCC Part 15
Note: Pump demand mustbe powered with 20 to260 V (ac) before thepump will turn on.
© 2010 D 132 - 04/10 2 of 12
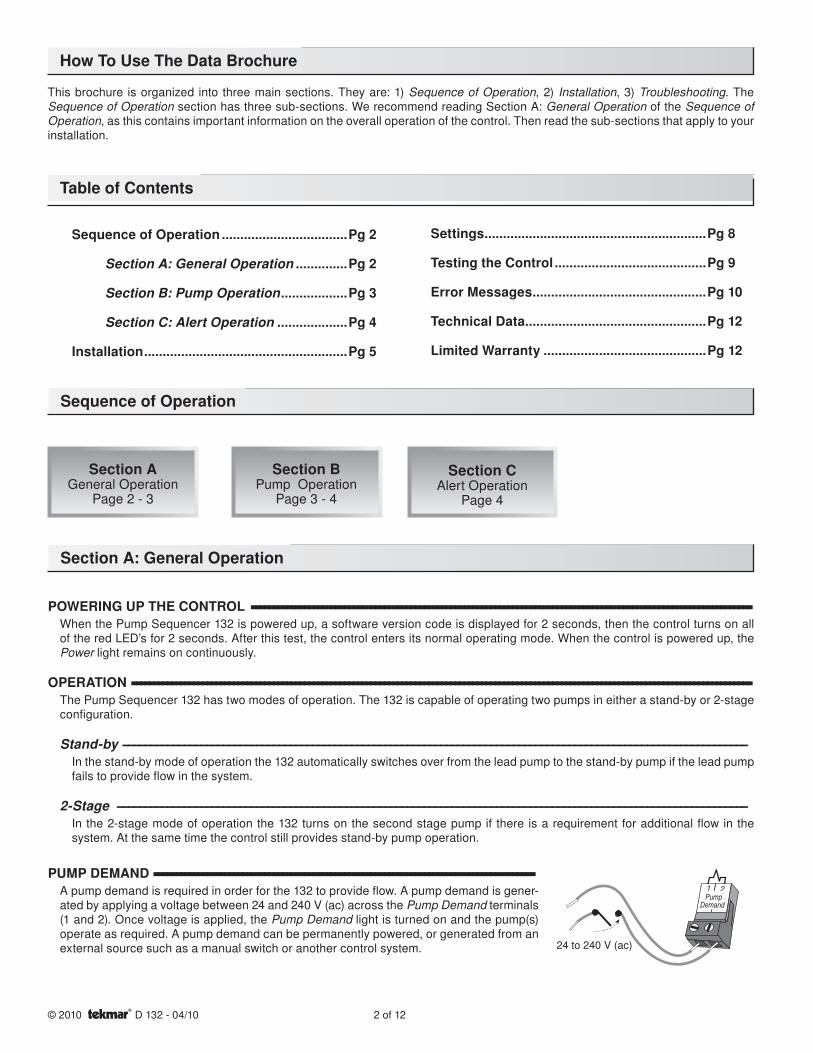
How To Use The Data Brochure
Settings ............................................................Pg 8
Testing the Control .........................................Pg 9
Error Messages ...............................................Pg 10
Technical Data .................................................Pg 12
Limited Warranty ............................................Pg 12
Sequence of Operation ..................................Pg 2
Section A: General Operation ..............Pg 2 Section B: Pump Operation ..................Pg 3 Section C: Alert Operation ...................Pg 4 Installation .......................................................Pg 5
This brochure is organized into three main sections. They are: 1) Sequence of Operation, 2) Installation, 3) Troubleshooting. The Sequence of Operation section has three sub-sections. We recommend reading Section A: General Operation of the Sequence of Operation, as this contains important information on the overall operation of the control. Then read the sub-sections that apply to your installation.
Table of Contents
Section AGeneral Operation
Page 2 - 3
Section BPump Operation
Page 3 - 4
Section CAlert Operation
Page 4
Sequence of Operation
Section A: General Operation
POWERING UP THE CONTROL ----------------------------------------------------------------------------------------------------------------- -----------------------------------------------------------------------------------------------------------------When the Pump Sequencer 132 is powered up, a software version code is displayed for 2 seconds, then the control turns on all of the red LED’s for 2 seconds. After this test, the control enters its normal operating mode. When the control is powered up, the Power light remains on continuously.
OPERATION -------------------------------------------------------------------------------------------------------------------------------------------- --------------------------------------------------------------------------------------------------------------------------------------------The Pump Sequencer 132 has two modes of operation. The 132 is capable of operating two pumps in either a stand-by or 2-stage configuration.
Stand-by ---------------------------------------------------------------------------------------------------------------- In the stand-by mode of operation the 132 automatically switches over from the lead pump to the stand-by pump if the lead pump fails to provide flow in the system.
2-Stage ----------------------------------------------------------------------------------------------------------------- In the 2-stage mode of operation the 132 turns on the second stage pump if there is a requirement for additional flow in the system. At the same time the control still provides stand-by pump operation.
PUMP DEMAND -------------------------------------------------------------------------------------- --------------------------------------------------------------------------------------A pump demand is required in order for the 132 to provide flow. A pump demand is gener-ated by applying a voltage between 24 and 240 V (ac) across the Pump Demand terminals (1 and 2). Once voltage is applied, the Pump Demand light is turned on and the pump(s) operate as required. A pump demand can be permanently powered, or generated from an external source such as a manual switch or another control system.
1 2Pump
Demand
24 to 240 V (ac)

3 of 12 © 2010 D 132 - 04/10
FLOW PROOF DELAY (30 second Delay / 10 second Delay) -------------------------------------------------------------------------- --------------------------------------------------------------------------The 132 allows a time delay for detecting a flow proof signal once a pump contact is turned on. The amount of time is adjustable from 10 to 30 seconds through a DIP switch. If a flow proof signal is not present within the selected time, the control turns off the first pump contact and turns on the second pump contact. An alert contact is activated to indicate the failure.
FLOW PROOF TEST --------------------------------------------------------------------------------------------------------------------------------- ---------------------------------------------------------------------------------------------------------------------------------The 132 has a flow proof test in order to determine if the flow proof device has failed. Once the pump contacts are turned off, a flow proof signal should not be present. If a flow proof signal is still present after 4 minutes, the control activates an alert contact and displays an error message. Refer to the Error Messages section at the back of this brochure.
ROTATION ---------------------------------------------------------------------------------------------------------------------------------------------- ----------------------------------------------------------------------------------------------------------------------------------------------The 132 has a function which automatically changes the operating sequence of the pumps based on Equal Run Time Rotation. Equal Run Time Rotation is based on pump running hours and allows for equal usage of both pumps. The 132 uses the Frequency of Rotation dial to set the rotation of the pumps.
The control rotates the operating sequence of the pumps when the pumps are off. In a constant circulation system where the lead pump runs continuously, the control waits for up to 12 hours to rotate the operating sequence of the pumps.
Note: The Equal Run Time Rotation function is reset by pressing the Clear Alert button.
EXERCISING ------------------------------------------------------------------------------------------------------------------------------------------- ------------------------------------------------------------------------------------------------------------------------------------------- The 132 has a built-in pump exercising function. This function is only operational if the Exercising / Off DIP switch is set to Exercising. If a pump has not been operated at least once every three days, the control turns on the output for 10 seconds. This minimizes the possibility of a pump seizing during a long period of inactivity.
Note: The exercising function does not work if power to the control or pumps is off.
WARM WEATHER SHUT DOWN (WWSD) ---------------------------------------------------------------------------------------------------- ---------------------------------------------------------------------------------------------------- When the 132 is used as a stand alone control, the pumps can be operated based on outdoor air temperature. The WWSD feature is only operational when an outdoor sensor is installed and the WWSD dial is not set to Off. When the outdoor air temperature rises above the WWSD setting, the 132 turns on the WWSD light. When the control is in Warm Weather Shut Down, the demand LED’s are displayed if there is a demand. However, the control does not operate the pumps to satisfy these demands. If the 132 receives a pump demand from a reset control, the outdoor sensor should not be installed and the WWSD dial must be set to Off.
PUMP OPERATION ---------------------------------------------------------------------------------------------------------------------------------- ---------------------------------------------------------------------------------------------------------------------------------- The lead pump contact closes whenever there is a pump demand and the 132 is not in WWSD. If a flow proof is not present after the flow proof delay has expired, the control turns off the lead pump contact and turns on the stand-by pump contact. An alert contact is activated to indicate the failure. The stand-by pump contact also turns off if a flow proof is not obtained once the flow proof delay has expired.
FLOW PROOF ----------------------------------------------------------------------------------------- -----------------------------------------------------------------------------------------A flow proof signal is required at all times during pump operation. A flow proof is generated by applying a voltage between 24 and 240 V (ac) across the Flow Proof terminals (5 and 6). Once voltage is applied, the Flow Proof light is turned on. Once a pump contact is turned on, a flow proof signal must be present before the flow proof delay has expired. A flow proof can come from a flow switch, pressure differential switch, current sensing switch, or power sensing switch.
Section B: Pump Operation
Section B1: Stand-by
Section B1Stand-by
Section B22-Stage
5 6Flow
Proof
24 to 240 V (ac)

© 2010 D 132 - 04/10 4 of 12
2-STAGE DEMAND ---------------------------------------------------------------------------------- ----------------------------------------------------------------------------------A 2-stage demand is required in order for the 132 to provide additional flow. A 2-stage demand is generated by applying a voltage between 24 and 240 V (ac) across the 2-Stage Demand terminals (3 and 4). Once voltage is applied, the 2-Stage Demand light is turned on. A 2-stage demand can come from an additional pressure differential switch, a tem-perature differential device, or a setpoint control based on an outdoor air temperature.
Note: The 2-stage demand device should provide an appropriate differential to prevent the second stage pump from short cycling.
Section B2: 2-Stage
PUMP OPERATION ---------------------------------------------------------------------------------------------------------------------------------- ----------------------------------------------------------------------------------------------------------------------------------
The first stage pump contact closes whenever there is a pump demand and the 132 is not in WWSD. The second stage pump con-tact closes whenever there is a pump demand, flow proof, 2-stage demand, and the 132 is not in WWSD.
If flow is not established by the first stage pump, the 132 turns off the first stage pump contact and turns on the second stage pump contact. An alert contact is activated to indicate the failure. The second stage pump contact also turns off if a flow proof is not obtained once the flow proof delay has expired.
There are two alert contacts (Alert A and Alert B) on the Pump Sequencer 132. These contacts are used to indicate either pump or control failures. The alert contacts have two modes of operation. The mode of operation for the alert contacts is selected using the Alert per Pump / Alert Levels DIP switch. When an alert contact is activated, refer to the Error Messages section of this brochure to determine the cause of the alert signal. To clear an alert, press the Clear Alert button.
When operating in the Alert Levels mode, the alert contacts are used to indicate the level of failure in the system.
ALERT A (Non-Critical) ----------------------------------------------------------------------------------------------------------------------------- ----------------------------------------------------------------------------------------------------------------------------- The Alert A contact closes when a non-critical failure occurs. Non-critical failures include: a single pump failure, a control error, an outdoor sensor failure, or short cycling of the 2-stage demand. With these failures, it is still possible to establish flow in the system.
ALERT B (Critical) ------------------------------------------------------------------------------------------------------------------------------------ ------------------------------------------------------------------------------------------------------------------------------------ The Alert B contact closes when a critical failure occurs. Critical failures include: the failure of both pumps, or a failure of the flow proof device. With these failures, the control is no longer able to operate the pumps, and it is not possible to provide flow.
When operating in Alert per Pump mode, the alert contacts are related to the pump contacts on the control. The Alert A contact closes anytime Pump 1 fails, and the Alert B contact closes anytime Pump 2 fails. The Alert A contact also closes to indicate an outdoor sensor failure, a control error, a flow proof device failure, or if the 2-stage demand is short cycling.
Section C: Alert Operation
Section C1Alert Levels
Section C2Alert per Pump
Section C1: Alert Levels
Section C2: Alert per Pump
3 42-Stage
Demand
24 to 240 V (ac)

5 of 12 © 2010 D 132 - 04/10
CAUTION Improper installation and operation of this control could result in damage to the equipment and possibly even personal injury. It is your responsibility to ensure that this control is safely installed according to all applicable codes and standards. This electronic control is not intended for use as a primary limit control. Other controls that are intended and certified as safety limits must be placed into the control circuit.
STEP ONE ------------------- ------------------- GETTING READY -------------------------------------------------------------------------------------------------- -------------------------------------------------------------------------------------------------- Check the contents of this package. If any of the contents listed are missing or damaged, please contact your wholesaler or tekmar sales representative for assistance.
Type 132 includes: One Pump Sequencer 132, Data Brochures D 132, D 001, Application Brochure A 132 Note: Carefully read the details of the Sequence of Operation to ensure that you have chosen the proper control for your application.
STEP TWO ------------------ ------------------ MOUNTING THE BASE ------------------------------------------------------------------------------------------ ------------------------------------------------------------------------------------------ Remove the control from its base by pressing down on the release clip in the wiring chamber and sliding the control away from it. The base is then mounted in accordance with the instructions in the Data Brochure D 001.
STEP THREE --------------- --------------- ROUGH-IN WIRING ---------------------------------------------------------------------------------------------- ---------------------------------------------------------------------------------------------- All electrical wiring terminates in the control base wiring chamber. The base has standard 7/8” (22 mm) knockouts which accept common wiring hardware and conduit fittings. Before removing the knockouts, check the wiring diagram and select those sections of the chamber with common voltages. Do not allow the wiring to cross between sections as the wires will interfere with safety dividers which should be installed at a later time.
Power must not be applied to any of the wires during the rough-in wiring stage.
If an Outdoor Sensor 070 is used, install the outdoor sensor according to the instructions in the Data Brochure D 070 and run the wiring back to the control.
Run wire from other system components (pumps, alerts, etc.) to the control.
Run wires from the 120 V (ac) power to the control. Use a clean power source to ensure proper operation. Multi-strand 16 AWG wire is recommended for all 120 V (ac) wiring due to its superior flexibility and ease of installation into the terminals.
STEP FOUR ----------------- ----------------- ELECTRICAL CONNECTIONS TO THE CONTROL ---------------------------------------------------- ---------------------------------------------------- The installer should test to confirm that no voltage is present at any of the wires. Push the control into the base and slide it down until it snaps firmly into place.
•
••
Powered Input Connections --------------------------------------------------
120 V (ac) Power Connect the 120 V (ac) power supply to the Power N and Power L terminals (11 and 12). This connection provides power to the microprocessor.
Pump Demand To generate a pump demand, a voltage between 24 V (ac) and 240 V (ac) must be applied across the Pump Demand terminals (1 and 2).
2-Stage Demand To generate a 2-stage demand, a voltage between 24 V (ac) and 240 V (ac) must be applied across the 2-Stage Demand terminals (3 and 4).
120 V (ac)
N LPower11 12
1 2Pum p
Demand
24 to 240 V (ac)
3 42-Sta ge
Demand
24 to 240 V (ac)
Installation

© 2010 D 132 - 04/10 6 of 12
Flow Proof To generate a flow proof, a voltage between 24 V (ac) and 240 V (ac) must be applied across the Flow Proof terminals (5 and 6).
Output Connections --------------------------------------------------------------
Pump Contacts The Pump 1 and Pump 2 terminals (7, 8 and 9, 10) are isolated outputs in the 132. There is no power available on these terminals from the control. These terminals are to be used as a switch to either make or break power to the pump circuit. Since these are isolated contacts, they may switch a voltage between 24 V (ac) and 240 V (ac).
Alert Contacts The Alert A and Alert B terminals (13, 14 and 15, 16) are isolated outputs in the 132. There is no power available on these terminals from the control. These terminals are to be used as a switch to either make or break power to the alert circuit. Since these are isolated contacts, they may switch a voltage between 24 V (ac) and 240 V (ac).
Outdoor Sensor Connection ---------------------------------------------------- Do not apply power to these terminals as this will damage the control.
Outdoor Sensor (Optional)
Connect the two wires from the Outdoor Sensor 070 to the Outdoor Sensor terminals (17 and 18). The outdoor sensor is used by the 132 to measure the outdoor air temperature.
Note: If an outdoor sensor is not installed, the WWSD dial must be set to Off.
STEP FIVE ------------------- ------------------- TESTING THE WIRING ------------------------------------------------------------------------------------------- ------------------------------------------------------------------------------------------- Each terminal block must be unplugged from its header on the control before power is applied for testing. To remove a terminal block, pull it straight down from the control.
The following tests are to be performed using standard testing practices and procedures, and should only be carried out by properly trained and experienced persons.
A good quality electrical test meter, capable of reading from at least 0 - 300 V (ac) and at least 0 - 2,000,000 Ohms, is essential to properly test the wiring and sensor.
Test The Sensor ------------------------------------------------In order to test the sensor, the actual temperature at the sensor location must be measured. A good quality digital thermometer with a surface temperature probe is recommended for ease of use and accuracy. Where a digital thermometer is not available, a spare sensor can be placed alongside the one to be tested and the read-ings compared. Test the sensor according to the instructions in the Data Brochure D 070.
5 6Flow
Pro of
24 to 240 V (ac)
7 8Pump
24 to 240 V (ac)
1 1
24 to 240 V (ac)
13 14AlertA A
17 18OutdoorSensor
Power
Ω
ΩV
17 18OutdoorSensor

7 of 12 © 2010 D 132 - 04/10
Test The Power Supply ----------------------------------------- Make sure exposed wires and bare terminals are not in contact with other wires or grounded surfaces. Turn on the power and measure the voltage between the Power N and Power L terminals (11 and 12) using an AC voltmeter. The reading should be between 108 and 132 V (ac).
Test The Powered Inputs ---------------------------------------
Pump Demand Measure the voltage between the Pump Demand terminals (1 and 2). When the pump demand device calls for flow, you should measure between 20 and 260 V (ac) at the terminals. When the pump demand device is off, you should measure less than 5 V (ac).
2-Stage Demand If a 2-stage demand is used, measure the voltage between the 2-Stage Demand terminals (3 and 4). When the 2-stage demand device calls for flow, you should measure between 20 and 260 V (ac) at the terminals. When the 2-stage demand device is off, you should measure less than 5 V (ac).
Flow Proof Measure the voltage between the Flow Proof terminals (5 and 6). When the flow proof device is energized, you should measure between 20 and 260 V (ac) at the terminals. When the flow proof device is off, you should measure less than 5 V (ac).
Test The Outputs ----------------------------------------------------------------
Pump 1 and Pump 2 Make sure power to the terminal block is off and install a jumper between Pump 1 terminals (7 and 8). When the pump circuit is powered up, the pump should start. If the pump does not turn on, check the wiring between terminal block and pump and refer to any installation or troubleshooting information supplied with the pump. If the pump operates properly, disconnect the power and remove the jumper. Repeat the above procedure for Pump 2 terminals (9 and 10).
Alert A and Alert B If an alert is connected to the Alert A terminals (13 and 14), make sure power to the alert circuit is off and install a jumper between the terminals. When the alert circuit is powered up, the alert should turn on. If the alert does not turn on, check the wiring between the terminal block and alert and refer to any installation or troubleshooting information supplied with the alert. If the alert operates properly, disconnect the power and remove the jumper. If an alert is connected to the Alert B terminals (15 and 16), repeat the above procedure for Alert B.
Ω
VV
11 12
N LPower
108 to 132 V (ac)
Ω
VV
1 2Pump
Demand20 to 260 V (ac)
Ω
VV
3 4 2-StageDemand
20 to 260 V (ac)
Ω
VV
5 6 FlowProof
20 to 260 V (ac)
7 8
11Pump
120 V (ac)
L
N

© 2010 D 132 - 04/10 8 of 12
Connecting The Control ---------------------------------------------------------
Make sure all power to the devices and terminal blocks is off, and remove any remaining jumpers from the terminals.
Reconnect the terminal blocks to the control by carefully aligning them with their respec-tive headers on the control and then pushing the terminal blocks into the headers. The terminal blocks should snap firmly into place.
Install the supplied safety dividers between the unpowered sensor input and the pow-ered 120 V (ac) or 24 V (ac) wiring chambers.
Apply power to the control. The operation of the control on power up is described in the Sequence of Operation section of this brochure.
WARM WEATHER SHUT DOWN (WWSD) --------------------------------------------------- --------------------------------------------------- The WWSD dial is only operational when an outdoor sensor is installed. The WWSD dialcan be set from 35 to 100°F or Off (2 to 38°C or Off). Refer to section A.
Note: If an outdoor sensor is not installed, the WWSD dial must be set to Off.
FREQUENCY OF ROTATION --------------------------------------------------------------------- --------------------------------------------------------------------- The Frequency of Rotation dial can be set from 12 to 168 hours or Off. Refer to section A.
30 second Delay / 10 second Delay ----------------------------------------------------------------------------------- The 30 second Delay / 10 second Delay DIP switch is used to select what time delay is required to prove flow once a pump contact is turned on. Refer to section A.
Exercising / Off --------------------------------------------------------------------------------------------------------- The Exercising / Off DIP switch is used to select exercising. If the DIP switch is set to Exercising, refer to section A.
Alert per Pump / Alert Levels ----------------------------------------------------------------------------------------- The Alert per Pump / Alert Levels DIP switch is used to select which mode of alert operation is required. Refer to section C.
Settings
13 14 1615
A AAlert Alert
B B
WWSD
35 Off
70° F
100
Frequency of Rotation12 Off
96 hours
168
48 144
2-Stage
Alert Levels
Pump1 2Auto
30 second DelayExercisingAlert per Pump
Of f10 second Delay
Of fStand-by
DIP SWITCH SETTINGS ---------------------------------------------------------------------------------------------------------------------------- ----------------------------------------------------------------------------------------------------------------------------
Pump 1 Auto / Off -----------------------------------------------------------------The Pump 1 Auto / Off DIP switch is used to select pump 1 operation. If the DIP switch is set to Pump 1 Auto, refer to section B.
Pump 2 Auto / Off ---------------------------------------------------------------- The Pump 2 Auto / Off DIP switch is used to select pump 2 operation. If the DIP switch is set to Pump 2 Auto, refer to section B.
2-Stage / Stand-by ---------------------------------------------------------------The 2-Stage / Stand-by DIP switch is used to select which mode of pump control is required. If 2-Stage is selected, refer to section B2, and if Stand-by is selected, refer to section B1.

9 of 12 © 2010 D 132 - 04/10
The Pump Sequencer 132 has a built-in test routine which is used to test the main control functions. The 132 continually monitors the outdoor sensor off not testing (if installed) and displays an error message whenever a fault is found. See red testing the following page for a list of the 132’s error messages. When the Test red testing paused button is pressed, the test light is turned on. The individual outputs and Test relays are tested in the following test sequence.
TEST SEQUENCE ------------------------------------------------------------------------------------------------------------------------------------ ------------------------------------------------------------------------------------------------------------------------------------ Each step in the test sequence lasts 10 seconds.
During the test routine, the test sequence is paused by pressing the Test button. If the Test button is not pressed again for 5 minutes while the test sequence is paused, the control exits the entire test routine. If the test sequence is paused, the Test button can be pressed again to advance to the next step. This can also be used to rapidly advance through the test sequence. To reach the desired step, repeatedly press and release the Test button until the appropriate LED is turned on.
Step 1 - Pump 1 contact is turned on for 10 seconds. After 10 seconds, the Pump 1 contact is shut off. Note: Only if there is a pump demand can the control be paused in step 1.
Step 2 - Pump 2 contact is turned on for 10 seconds. After 10 seconds, the Pump 2 contact is shut off. Note: Only if there is a pump demand can the control be paused in step 2.
Step 3 - Alert A contact is turned on for 10 seconds. After 10 seconds, the Alert A contact is shut off.
Step 4 - Alert B contact is turned on for 10 seconds. After 10 seconds, the Alert B contact is shut off.
ERROR HANDLING ---------------------------------------------------------------------------------------------------------------------------------- ---------------------------------------------------------------------------------------------------------------------------------- If an internal control fault occurs, the 132 displays an error message and turns on the Alert A contact. In this case the control continues operation. To clear the error message from the control, press the Clear Alert button. If the error message remains, the control must be returned for repair.
If an outdoor sensor fault occurs and the WWSD dial is not set to Off, the 132 displays an error message and turns on the Alert A contact. In this case the control operates the pumps based on demands. Locate and repair the problem as described in the Data Brochure D 070. To clear the error message from the control after the sensor has been repaired, press the Clear Alert button.
If a flow proof signal is present when both pump contacts have been off for more than 4 minutes, the 132 displays an error message and turns on an alert contact. In this case the control will stop operation. To clear the error message from the control after the fault is corrected, press the Clear Alert button.
If a pump fails, the appropriate error message and alert signal is displayed. To clear the error message from the control after the fault is corrected, press the Clear Alert button.
If the 2-stage demand short cycles, the 132 displays an error message and turns on the Alert A contact. In this case the control continues operation. To clear the error message from the control after the fault is corrected, press the Clear Alert button.
Testing the Control
not testingtestingtesting paused
of fredred

© 2010 D 132 - 04/10 10 of 12
Whenever a fault is detected, the indicator lights will flash in specific ways to indicate the problem. The appropriate alert contact also turns on. To clear the error message from the control after the fault is corrected, press the Clear Alert button.
Error Messages
Notes
Light on continually Light flashing Light off
Outdoor Sensor ShortControl Internal Error Outdoor Sensor Open(WWSD ≠ Off)
Flow Proof Signal
Pump 1 Failed Pump 2 Failed Pump 1 and Pump 2 Failed
Power
WWSD
2 Stage Demand
Flow Proof
Pump Demand
Power
WWSD
2 Stage Demand
Flow Proof
Pump Demand
Power
WWSD
2 Stage Demand
Flow Proof
Pump Demand
Power
WWSD
2 Stage Demand
Flow Proof
Pump Demand
Power
WWSD
2 Stage Demand
Flow Proof
Pump Demand
Power
WWSD
2 Stage Demand
Flow Proof
Pump Demand
Power
WWSD
2 Stage Demand
Flow Proof
Pump Demand
Power
WWSD
2 Stage Demand
Flow Proof
Pump Demand
2 Stage DemandShort Cycling

11 of 12 © 2010 D 132 - 04/10
Notes

Technical Data
12 of 12Product design, software and literature are Copyright © 2010 by:tekmar Control Systems Ltd. and tekmar Control Systems, Inc.
All specifications are subject to change without notice.Printed in Canada. D 132 - 04/10.
Limited Warranty The liability of tekmar under this warranty is limited. The Purchaser, by taking receipt of any tekmar product (“Product”), acknowl-edges the terms of the Limited Warranty in effect at the time of such Product sale and acknowledges that it has read and understands same.
The tekmar Limited Warranty to the Purchaser on the Products sold hereunder is a manufacturer’s pass-through warranty which the Purchaser is authorized to pass through to its customers. Under the Limited Warranty, each tekmar Product is warranted against defects in workmanship and materials if the Prod-uct is installed and used in compliance with tekmar’s instructions, ordinary wear and tear excepted. The pass-through warranty period is for a period of twenty-four (24) months from the production date if the Product is not installed during that period, or twelve (12) months from the documented date of installa-tion if installed within twenty-four (24) months from the production date.
The liability of tekmar under the Limited Warranty shall be limited to, at tekmar’s sole discretion: the cost of parts and labor provided by tekmar to repair defects in materials and/or workmanship of the defective product; or to the exchange of the defective product for a warranty replacement product; or to the granting of credit limited to the original cost of the defective product, and such repair, exchange or credit shall be the sole remedy available from tekmar, and, without limiting the foregoing in any way, tekmar is not responsible, in contract, tort or strict prod-uct liability, for any other losses, costs, expenses, inconveniences, or damages, whether direct, indirect, special, secondary, incidental or consequential, arising from ownership or use of the product, or from defects in workmanship or materials, including any liability for fundamental breach of contract.
The pass-through Limited Warranty applies only to those defective Products returned to tekmar during the warranty period. This Limited Warranty does not cover the cost of the parts or labor to remove or transport the defective Product, or to reinstall the repaired or replacement Product, all such costs and expenses being subject to Purchaser’s agreement and warranty with its customers.
Any representations or warranties about the Products made by Purchaser to its customers which are different from or in excess of the tekmar Limited Warranty are
the Purchaser’s sole responsibility and obligation. Purchaser shall indemnify and hold tekmar harmless from and against any and all claims, liabilities and damages of any kind or nature which arise out of or are related to any such representations or warranties by Purchaser to its customers.
The pass-through Limited Warranty does not apply if the returned Product has been damaged by negligence by persons other than tekmar, accident, fire, Act of God, abuse or misuse; or has been damaged by modifications, alterations or attachments made subsequent to purchase which have not been authorized by tekmar; or if the Product was not installed in compliance with tekmar’s instructions and/or the local codes and ordinances; or if due to defective installation of the Product; or if the Product was not used in compliance with tekmar’s instructions.
THIS WARRANTY IS IN LIEU OF ALL OTHER WARRANTIES, EXPRESS OR IMPLIED, WHICH THE GOVERNING LAW ALLOWS PARTIES TO CONTRACTU-ALLY EXCLUDE, INCLUDING, WITHOUT LIMITATION, IMPLIED WARRANTIES OF MERCHANTABILITY AND FITNESS FOR A PARTICULAR PURPOSE, DURA-BILITY OR DESCRIPTION OF THE PRODUCT, ITS NON-INFRINGEMENT OF ANY RELEVANT PATENTS OR TRADEMARKS, AND ITS COMPLIANCE WITH OR NON-VIOLATION OF ANY APPLICABLE ENVIRONMENTAL, HEALTH OR SAFETY LEGISLATION; THE TERM OF ANY OTHER WARRANTY NOT HEREBY CONTRACTUALLY EXCLUDED IS LIMITED SUCH THAT IT SHALL NOT EXTEND BEYOND TWENTY-FOUR (24) MONTHS FROM THE PRODUCTION DATE, TO THE EXTENT THAT SUCH LIMITATION IS ALLOWED BY THE GOVERNING LAW.
Product Warranty Return Procedure All Products that are believed to have defects in workmanship or materials must be returned, together with a written description of the defect, to the tekmar Representative assigned to the territory in which such Product is located. If tekmar receives an inquiry from someone other than a tekmar Representative, including an inquiry from Purchaser (if not a tekmar Representative) or Purchaser’s customers, regarding a potential warranty claim, tekmar’s sole obligation shall be to provide the address and other contact informa-tion regarding the appropriate Representative.
The installer must ensure that this control and its wiring are isolated and/or shielded from strong sources of electromagnetic noise. Conversely, this Class B digital apparatus complies with Part 15 of the FCC Rules and meets all requirements of the Canadian Interference-Causing Equipment Regulations. However, if this control does cause harmful interference to radio or television reception, which is determined by turning the control off and on, the user is encouraged to try to correct the interference by re-orientating or relocating the receiving antenna, relocating the receiver with respect to this control, and/or connecting the control to a different circuit from that to which the receiver is connected.
Cet appareil numérique de la classe B respecte toutes les exigences du Règlement sur le matériel brouilleur du Canada.
Caution The nonmetallic enclosure does not provide grounding between conduit connections. Use grounding type bushings and jumper wires.
Attention Un boîtier nonmétallique n´assure pas la continuité électrique des conduits. Utiliser des manchons ou des fils de accord spécialement conçus pour la mise á la terre.
Control Systems
tekmar Control Systems Ltd., Canadatekmar Control Systems, Inc., U.S.A.Head Office: 5100 Silver Star RoadVernon, B.C. Canada V1B 3K4(250) 545-7749 Fax. (250) 545-0650Web Site: www.tekmarcontrols.com
Limited Warranty and Product Return Procedure
Pump Sequencer 132 Stand-by / 2-Stage --------------------------------------------------------------------------------Literature — D 132, A 132’s, D 001.Control — Microprocessor control; This is not a safety (limit) control.Packaged weight — 2.9 lb. (1320 g), Enclosure A, blue PVC plasticDimensions — 6-5/8” H x 7-9/16” W x 2-13/16” D (170 x 193 x 72 mm)Approvals — CSA US, meets ICES & FCC regulations for EMI/RFI.Ambient conditions — Indoor use only, 32 to 120°F (0 to 50°C), < 90% RH non-condensing.Power supply — 120 V (ac) ±10% 60 Hz 6 VAPump Relays — 240 V (ac) 10 A 1/2 hp, pilot duty 720 VA Alert Relays — 240 V (ac) 10 A 1/3 hp, pilot duty 240 VA Demands — 20 to 260 V (ac) 2 VASensors — NTC thermistor, 10 k @ 77°F (25°C ±0.2°C) ß=3892 Optional — Outdoor Sensor 070
Alarm Alarm
1
1 1 2 2 N L A A B B
2 3 4 5 6 7 8 9 10 11 12 13 14 15 16 17 18
Pump Sequencer 132Stand-by / 2-Stage
Do not apply power
Use supply wires suitable for 120°F (50°C) above ambient H1
197E
off not testingred testingred testing paused
PumpDemand Demand
Pump Flow Pump PowerProof
OutdoorSensor
Power
WWSD
Pump Demand
2-Stage Demand
Pump 2
Flow Proof
Pump 1
Alert B
Alert A
Test
Made in Canada bytekmar Control Systems Ltd.
Power: 120 V ±10% 60 Hz 6 VAPump Relays: 240 V (ac) 10 A 1/2 hp, pilot duty 720 VAAlarm Relays: 240 V (ac) 10 A 1/3 hp, pilot duty 240 VADemands: 20 to 260 V (ac) 2 VA
Clear Alert
30 second delay
Alert per Pump
Alert Levels
Exercising
10 second delayOff
Pump1 2
Auto
OffStand-by
2-Stage
35 Off
100
70°F
WWSD
12
48
Off
168
144
96 hours
Frequency of Rotation
Signal wiringmust be ratedat least 300 V
Meets Class B.Canadian ICESFCC Part 15
Alert Alert 2-Stage
![PRODUCT SPECIFICATION · EIA-364-23B 1 mΩ MAXIMUM [initial] 5.1.2 Insulation Resistance Mate connectors: apply a voltage of 500 VDC between adjacent terminals and between terminals](https://img.pdfslide.us/doc/110x75/5e7080150d0dfe4480722de7/product-specification-eia-364-23b-1-m-maximum-initial-512-insulation-resistance.jpg)


![Power Quality Enhancement for Future Household System … · Dynamic voltage restorers (DVR) to address the voltage perturbation, sag or swell on the loads terminals[7,8]. The second](https://img.pdfslide.us/doc/110x75/5ed3416e154af31d6b3f8107/power-quality-enhancement-for-future-household-system-dynamic-voltage-restorers.jpg)