Embed Size (px)
Citation preview
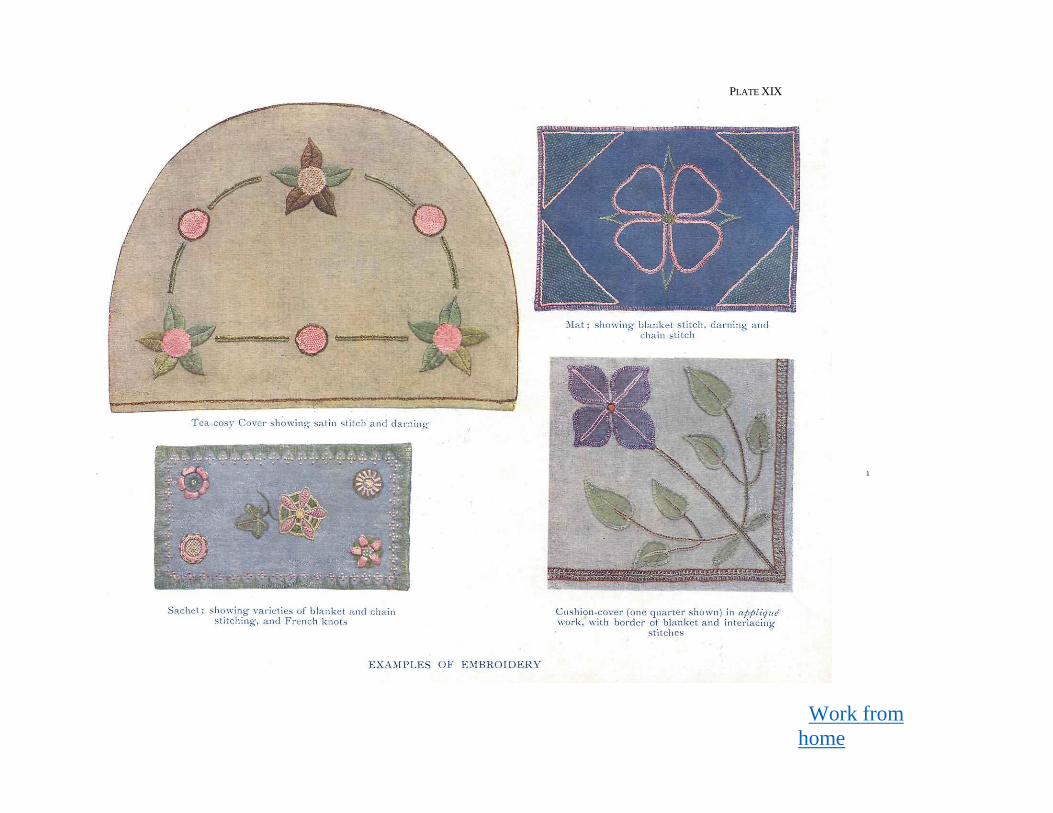
Work from home
NEEDLEWORK
PRACTICAL AND DECORATIVE
By
J. A. STRACHAN
Principal Lecturer in Needlework, Aberdeen Provincial
Committee for the Training of Teachers
THE GRESHAM PUBLISHING COMPANY, LTD. 66 CHANDOS STREET, LONDON, W.C.
1921

Work from home
PREFACE
Needlework, as a school subject, includes such varied occupations as sewing, cutting and shap-ing, and knitting. In this book, which is in-tended as a guide to teachers, these subjects are developed in so far as they may be presented to pupils in elementary or secondary schools and continuation classes. No pretence is made to deal with elaborate or intricate work such as might be required of advanced or professional workers.
The methods of work suggested are as simple and straightforward as possible, so that the pupils may be enabled to reason out what they are doing and so become prepared, if need be, to attempt intelligently much more difficult tasks.
An effort is made to connect the school needle-work lesson with the home life, and with the other subjects studied in school.
The material of the book is arranged so as to avoid laying down hard-and-fast rules with regard to non-essential things, but rather to suggest to the teacher means of accommodating her work to varying circumstances.
For the sake of clearness, Sewing, Cutting Out, Decoration, and Repairing have been dealt with in separate sections, although in practical work they cannot be separated. In each section, the possibility of gradation from the simplest elements to the most difficult is made clear.


Work from home
NEEDLEWORK
INTRODUCTION
Needlework is one of the most valuable forms of handwork practised in schools. Many other forms are taught chiefly on account of the muscular or the intellectual training they pro-vide, the actual exercises performed in school being rarely continued in after life; while needle-work, besides having considerable value as a means of education, is also of the greatest prac-tical value after school days are over.
In common with other forms of handwork, needlework makes an appeal to the understand-ing and the imagination, as well as to the hand and eye. According to the character of the worker, the intellectual or the mechanical side of the subject will appeal more strongly. The intel-lectual worker may plan and carry out ingenious ideas in work lacking perfection of stitchery or daintiness of finish, while the mechanical worker may produce beautiful work by blindly following directions, or by copying. Needlework-
(D106)
teaching in schools aims at producing workers who combine to a reasonable degree thoughtful and beautiful work. That is to say, in school, needlework should be a true handicraft, for which imagination and an appreciation of the beautiful are required, as well as understanding and prac-tical skill. Indeed, the patient, diligent work necessary for the acquisition of practical skill will be lacking if interest is not present; and interest springs from the emotions rather than from the intelligence, from the imagination of the finished work rather than from the knowledge of its details. It is beginning at the wrong end to keep children working at mere practice pieces until they have gained sufficient ability to make some article of real importance. The short time allotted to needlework in schools makes it almost impossible to reach any sort of perfection in stitchery, but more will be achieved if the pupil
is so interested that she puts her whole mind into 1

Work from home
2 Needlework
her work. The relation of the pupil to her work should be that of the craftsman of old times rather than that of the specialized workman of to-day. The workman does as he is told with his own section of the work, but the originality and beauty of the finished article is not his business. The craftsman planned his work from the begin-ning, with a vision before him of the ultimate result of all his labor. The modern method may be necessary in the economy of industrial life, but it is certainly not education.
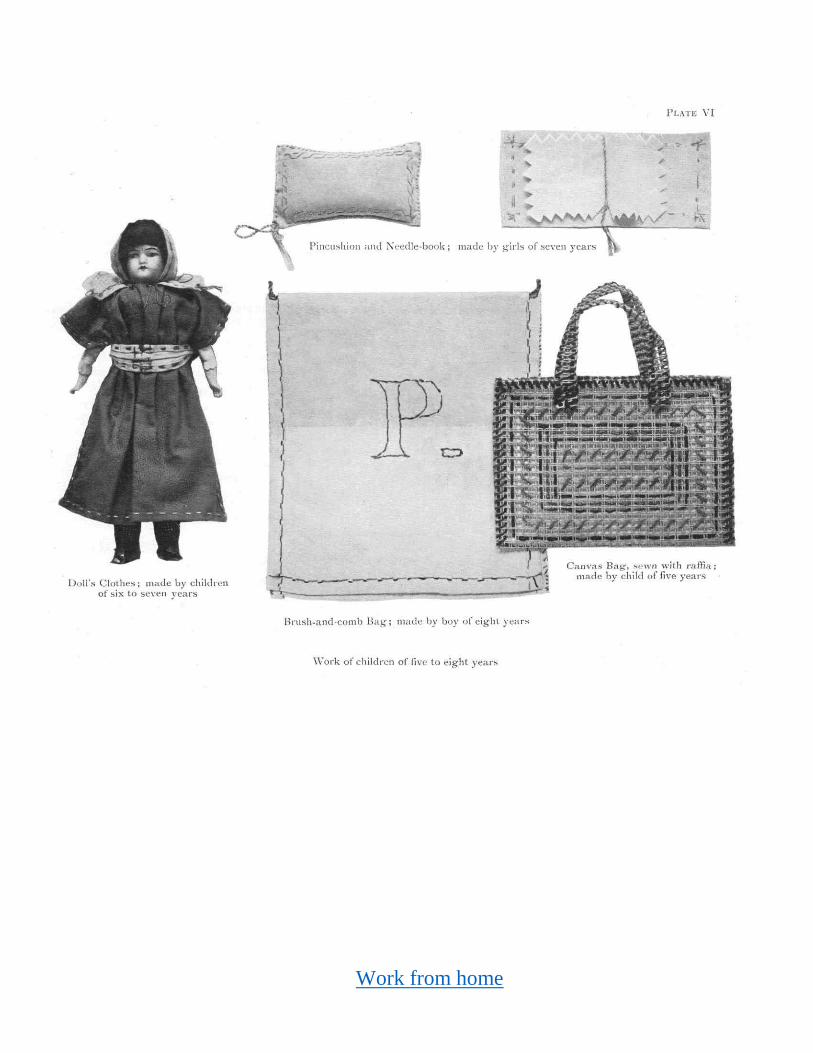
During the earliest stage, the essential thing is to form correct muscular habits, and to gain mastery over the materials and implements used; for until the mechanical difficulties are so far overcome, the mind is not wholly free to initiate or to develop new ideas. The first work must therefore be accommodated to the child's physical powers, and the introduction of fresh obstacles must be very gradual, so that mental and physical development may keep pace. But work that is too easy or monotonous ceases very soon to be interesting; so, while the simplest stitches may require long-continued practice, the plan-ning of the work as a whole, or of its details, should relieve the monotony of the steady work by which alone proficiency is gained. It is not very difficult to avoid monotony, because, while young children are bent on making " something real", their ideas of " reality" are not as ours. Handkerchiefs or table-cloths or bed-clothes for dolly, mats for mother, and bags for oneself will
give good practice, and variety can be obtained by changing the shape, color, and quality of the material. A large number of small articles will be found more satisfactory than one large piece of work, each new beginning forming an incen-tive to better work.
It is desirable that a child should pract ice various kinds of handwork before being taught to sew. A sewing-needle is a very fine imple-ment to handle, and it is characteristic of children's work that the smaller the instrument is, the more difficulty a child has in using it. Handwork in any form teaches the pupil to control the muscles and makes the hands flexible and strong; and exercises involving large and easy motions should always precede those re-quiring finer and more intricate work. Some occupations, such as paper-tearing, paper-cutting, weaving, give practice in judging or measuring distance and in handling implements, and this practice bears more directly on the needlework lessons. The apparent loss of time caused by delaying the teaching of needlework will find full compensation in the knowledge of colour, form, and proportion, and in the mechanical ability gained by the pupil from the preliminary handwork lessons. When the actual needlework lessons begin, the child is found provided with ideas of construction or decoration ready to be expressed in new ways.
Even after such a preliminary course of work, it is necessary to remember that what is to the
Work from home
Introduction 3
experienced worker the simple act of making a stitch consists, for a child, in a number of sep-arate actions, involving difficult positions of the hand and considerable muscular strain. Even the thimble is apt to prove a burden, and, until its value is felt, is very often taken off and laid away. A teacher who has been out of touch with the difficulties of young children would find it most useful to allow a class a piece of cloth, needle, and thread to experiment with for an hour unhindered by directions or advice. The teacher would watch carefully how the children work, and afterwards examine the results of their labor. This experimental work would show what things are natural for children to do, and would therefore indicate the point at which the teaching must begin.
What has been said about sewing refers equally to knitting and cutting out. C'est le premier pas qui coute, and the first process attempted, however simple in itself, implies all the difference between not being able and being able to sew or knit or cut out. Later, new ideas may succeed each other much more rapidly.
The methods of working taught to children should be as simple and direct as possible, and should be based on some real principle appli-cable to pieces of work other than the one imme-diately concerned. The best way of working will vary according to circumstances, therefore con-siderable freedom must be allowed as to choice of method, and fixed rules should be laid down only
with regard to really important matters, such as security and thoroughness of finish, even in parts of the work not noticeable at a casual glance. Thoroughness of finish will, of course, mean something quite different for the child of eight and the girl of fourteen, but the essential thing is that the child should produce the best work she is capable of. Slipshod work need never be accepted.
Although for convenience the pronoun "she" is used to represent the needlework pupil, there is no reason why boys should not share the instruction given. If boys' work is less fine than girls', it is frequently more accurate, and they enjoy the lesson quite as much. No doubt men can learn to sew well, if they must sew, after they have grown up, but they would use their ability more readily if their fingers were trained while they were young and flexible. Except in very elementary classes, boys would spend less time on the subject than girls, their stronger muscles suggesting the suitability of other forms of exer-cise; and the articles in which their ideas are expressed would be chosen to suit boyish tastes and needs. On the whole, the practical rather than the imaginative or purely decorative would be emphasized in boys' work, and the aim would be to give them some facility in handling needle and thread, rather than to induce them to make the practice of needlework a regular occupation.
A well-conducted needlework course should teach a pupil—
Work from home
4 Needlework
1. To use the smaller muscles of the hand
with accuracy, grace, and lightness; 2. To use materials carefully and with respect
to their varying qualities;
3. To be clean and tidy; 4. To develop a sense of beauty and proportion ; 5. To be thorough in small details; 6. To make useful things.
EQUIPMENT FOR NEEDLEWORK TEACHING
The Room
With very young classes the work can be carried on in an ordinary classroom, provided that dual desks are used, so that a pupil may leave her seat without disturbing others; and that the desks are flat, so that the work may be conveniently handled.
When fairly large pieces of work have to be cut out and made, the necessity for adequate accommodation begins to be felt. If work is to be practical, then the provision of furniture and implements should be that of an ordinary home or workroom.
Tables and chairs are better than desks, since they allow more freedom, and more variety in spacing. A good deal depends on whether the teaching is generally individual or simul-taneous. Where the teaching is individual, desks with one or two special cutting-out tables may serve, but each girl requires as much space as is usually allowed for two in ordinary class-work.
Tables about 20 in. wide are convenient. A wide table necessitates the pupils sitting on both sides of the table, some therefore having their backs to the teacher when an explanation is being given, and some probably being badly placed with regard to the light. A table 20 in. wide will accommodate a piece of 40-in.-wide material when folded double, as it usually is for cutting out. A wider space is not often required in school, and when it is, two tables can be moved up together for the occasion.
One of the main advantages of a special room is the possibility of greater cleanliness in the work, the ordinary classroom desks being frequently soiled by ink or paint or in some other way. One difficulty, however, is not always considered. A special room is usually provided for only one class at a time, the seats being of one height only. If chairs are used, they are suitable for grown-up persons, and children of nine or ten cannot place their feet on the ground. A pupi l whose feet are dangling has not full power over her hands.
Work from home
At least two sets of seats are required for the accommodation of the classes in a school, or some rest must be provided for the feet of the smaller pupils.
In a needlework - room there should be accommodation for the work of the pupils, not rolled up, but folded flat, and arranged in an orderly way, so that a monitor from the class can easily find it for distribution, and put it away again at the end of the lesson. A needle-work-room should contain at least one sewing-machine; water, soap, and a towel should be available; and if dressmaking, however simple, is attempted, an iron is absolutely necessary, so that the work may be pressed at intervals, to render the next stage more easily managed.
The furniture should be placed so that the pupils get the best light possible on their work. As in other work, light from the left-hand side is most desirable, and no pupil should be very far from the light. Where desks are used, with one or two cutting-out tables, these tables may well occupy the darker portion of the room.
Apparatus for Teaching
Apparatus for teaching includes all that may serve to illustrate a lesson in any way. In the needlework-class, finished examples of beautiful work may inspire the pupils to make their own work better. Pictures may serve the same purpose when real work is not available.
If simultaneous lessons can be given to a class, the teacher must use apparatus that can be clearly seen by the whole class. For lessons in cutting out, no special apparatus is necessary. The teacher uses the same articles as her pupils, and has the black-board at hand for illustration. If the class is large, and the measurements to be used are very small, it may be well for the teacher to use a measure marked on a scale of 2 in. or 4 in. to the inch. This is a very convenient piece of apparatus for showing, say, the cutting of a narrow band, or the planning out of tucks, and it may easily be made by the teacher from a strip of cardboard.
Sewing and knitting are fine and complicated processes, and the actions performed by the teacher, even when explained, are not very clearly observed by the pupils except at close range, unless the illustrative apparatus is on a very large scale, and has an arrangement of colour which makes the important points stand out clearly. It is important to enlarge the various parts of the apparatus proportionately, so as to get the right effect.
For knitting, rug or any other thick wool of bright colour, with the thickest possible knitting-pins, may be used. For sewing, any coarse, open material, or even paper, will serve for illustration. It will often be of advantage to have material or paper of two contrasting colours. With the coarse material, a large needle (double long darners are excellent)
Introduction 5
Work from home
Needlework 6
should be used, so that the pupils can see how it is handled. Wool (coarse tapestry or crewel wool or even thick knitting wool) makes a large stitch look correctly proportioned. Thick em-broidery cotton may also be found suitable, but a large stitch made with thin thread only looks like bad sewing.
What is important is that the teacher should be able to work quickly on her apparatus, showing what is necessary without waste of time. Material which is too stiff to sew makes this impossible. For the same reason, it is often advisable to have apparatus representing two or more stages of the work. The teacher cannot entirely accomplish any piece of work along with her pupils — she requires only to show the difficult points. For instance, in giv-ing a lesson on finishing an opening, the teacher would have ready a piece of work (paper or cloth) showing how to arrange the hems or false hems, and another piece showing how to manage the cutting and overlapping at the bottom. The preparation of special apparatus may seem to involve a great deal of work, but a collection of the necessary pieces is made by degrees, and once made can be used, in most cases, again and again.
The black-board is most useful to the teacher of needlework, but again, the use of it must not lead to waste of time. The most helpful drawing is no doubt one which grows while the pupil looks, and which shows exactly the changes that are made upon the work by the process being illustrated. But where an illus-tration requires a good deal of preliminary drawing, it should be prepared beforehand, and preferably in a form that will be more or less permanent. Sheets of grey or brown paper, for example, are easily stored and easily pro-duced and fixed up at the right moment. The advantage of a drawing over a piece of actual apparatus is that it can remain in view of the class during the whole of the lesson, for purposes of comparison and correction.
With regard to color, it will be found that red stands out most clearly on the white or neutral ground of a piece of coarse cloth, while yellow or orange is the color which carries best in a diagram on the black-board or on brown paper. In making diagrams, it is a good plan to reserve certain colors, say blue, for needles and pins, and others, say yellow, orange, bright green, for stitches. This helps to avoid con-fusion in the minds of the pupils.
Work from home
Section I—SEWING
CHAPTER I
PRELIMINARIES
Position of Hands and Method of Working
While most children are very eager to sew something, they do not naturally hold a needle or a piece of work in a manner likely to produce the best result. The best result may be taken as the production of good work with the least possible expenditure of time and energy. The best method of working will usually be found to be also the most graceful. The teacher, therefore, must help the pupil from the beginning to form the habit of using needle and thimble properly.
The simplest stitch, i.e. tacking, should be chosen to begin with. The needle must be grasped between the first finger and thumb, the thimble (on the middle finger) must be placed to the eye of the needle, which is then urged on its way through the material by all three fingers. The thumb and first finger are slipped along
(without any break in the motion) to the point of the needle, in order to draw it up and out, the thread meanwhile slipping between the second and third fingers, where it is held firmly and yet daintily. The needle, having now completed an elliptical motion, is ready for the next stitch. Worked in this way, the making of a stitch becomes in time a continuous motion, making for speedy work. It takes a good deal of trouble to teach all this, and many reminders are necessary before the habit is fixed, but it is worth all the trouble for the sake of the pleasure in working which it brings. Children who have not been taught how to use their thimbles properly, generally make three separate, awkward, jerky motions at every stitch, which renders work slow and dreary.
The left hand also must learn its work in order that a stitch may be well made. Considering the
7
Work from home
8 Needlework
small size of the pupil's hands, it is best to begin by holding the work over the first two fingers, holding it down with the thumb and the other two fingers. This position allows room for making a fair-sized stitch, while the last stitch is also visible as a guide so that the work may be regular. The wrist must be slightly bent so as to bring the line of work almost parallel with the worker's body.
These positions of right and left hand will, of course, have to be modified in the management of certain pieces of work, but tacking illustrates the most common way of working. The neces-sary motions and positions of the hands are often taught by means of drill lessons, which are based on a child's propensity to repeat words or actions over and over again, regardless of their useful-ness. But such lessons should be as short and as few as possible, and children who have learnt an action should not continue to drill with the others, for if a child has learned the delight of achieving some piece of work, it is disappointing (to say the least) to be in possession of needle, thread, and material, and yet to make no more progress than a horse on a treadmill. Perhaps drill lessons could be given in some way similar to action songs, in which the rhythmical performance of the action, rather than its result, is the main object.
Suitable Materials
In choosing materials for children's work, several considerations present themselves. The
chief of these are cheapness, suitability, and variety. For early lessons, the material ought to be cheap, so that the pupil may not be hindered from making frequent experiments. A material of really good durable quality is not essential at first, as the child's first efforts cannot produce anything of permanent value. Later, however, when useful articles and garments are being made, the material should be very good of its kind, so that a girl may learn the qualities of good material and how to choose it, and may experience the pleasure of handling it.
The material first used should be open in texture and rather soft, so that the efforts of the small, weak hand to push the needle through in the correct manner may not meet with resistance. It is difficult for an experienced worker to realize the lack of muscular force in children's fingers, but to anyone watching a young class struggling with an ordinary piece of firm white cotton, the reason for bad management of the needle is obvious. Unbleached calico, of open texture and without dressing, is most suitable from every point of view; it is comparatively cheap, it is sufficiently coarse in texture, and its creamy tint is restful to the eye and an excellent background for the stitches worked upon it.
This material may be varied from time to time and gradually replaced by other kinds of cotton, soft colored cottons at first, and lastly white cotton. Cotton, being the cheapest, will be the commonest material used in school, but all other
Work from home
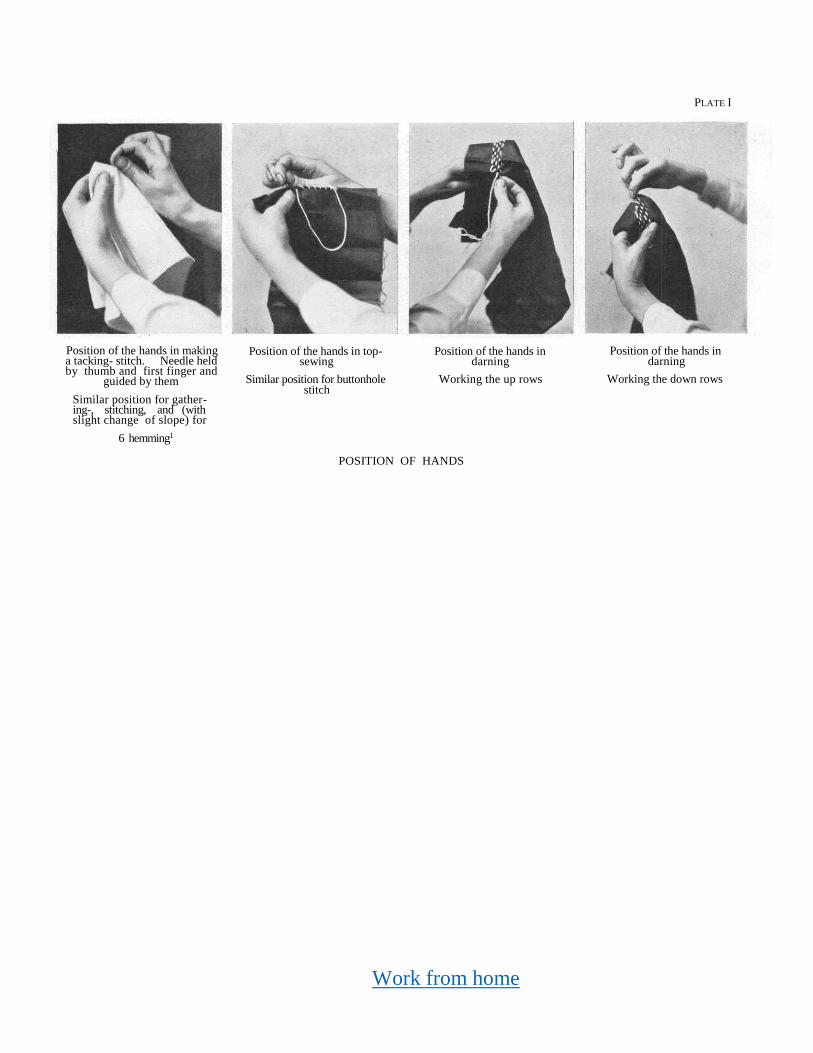
PLATE I
Position of the hands in making a tacking- stitch. Needle held by thumb and first finger and
guided by them
Similar position for gather-ing-, stitching, and (with slight change of slope) for
6 hemming1
Position of the hands in top-sewing
Similar position for buttonhole stitch
Position of the hands in darning
Working the up rows
Position of the hands in darning
Working the down rows
POSITION OF HANDS
Work from home
Sewing 9
materials in common use, linen, flannel or other woolens, dress materials, and even silk, should occasionally be used by the pupils, so that they may learn to appreciate the varying qualities and uses of materials, and the advantage of different treatment for different stuffs. In buying some of these materials, of which only small pieces are required, more variety can be obtained if very short remnants are bought. Both teacher and pupils might also be able to contribute small pieces left over after cutting out—scraps which would otherwise be thrown away as rags. This would help to destroy the idea, too preva-lent in the child's mind, that school work is a thing quite different from home work. As a rule, it is well to avoid materials which have been very specially " prepared" for school work. The thread used for sewing must always be in accordance with the material used. At first the colour should form a complete contrast with the background, so that every stitch made is easily seen. This prevents eye-strain at an age when the eye demands careful treatment, and it also permits a pupil to judge for herself whether her work is well done, and to correct her own faults in regularity. Besides being colored, the thread should also be rather thick, for the first work will consist of rather large stitches worked on rather coarse material. If embroidery thread is used, everything will then be in correct pro-portion. Clark's Embroidery Cotton No. 18 is a very useful thread, made in a large variety of
Beautiful colors which wash well. For decora-tive purposes it is suitable for all but the finest materials, and for these a finer thread, No. 30, is obtainable. Any thread heavier than No. 18 is apt to give little pupils too much trouble in needle-threading.
For later work a variety of threads should be available, all used in proportion to the fineness of the material and the stitch required, for the pupil should learn by practice that fine work on coarse stuff and coarse work on fine material are equally contrary to good taste in needlework.
For the finest white work likely to be under-taken in the elementary school, nothing finer than No. 60 white cotton thread is required, and the use of such thread will only be attained to by degrees. Appropriateness being the charac-teristic of all good work, a girl must learn to select suitable thread to sew various materials with: for example, silk thread would be used to sew silk, or to decorate valuable materials as silk, or woolens and linens of good quality; wool may be used to mend woolens and to decorate substantial woolens and sometimes linens; flax thread is best used on linen only, and cottons of every kind are most suitably sewn with cotton threads.
Needles must be chosen to suit the various threads and materials used. A needle is suit -able in size if it takes the thread through the material smoothly, yet without allowing it to slip too easily out of the needle's eye. Because
Work from home
IO Needlework
of the smallness of the child's hand, it is best to choose for most purposes short needles (known as betweens). Their length enables the pupil to grasp the needle correctly without too much strain. No. 6 is suitable for No. 40 thread, and No. 8 for No. 60 thread. For early lessons, however, the usual between needle is a little too fine for embroidery thread. A short embroidery needle is a little longer than a between needle, but has an easily-threaded eye. A suitable needle, short and with a clear eye, is the New County needle, No. 3 and No. 5. It is produced specially for children's use by W. and R. Holmes, Glasgow. When a good deal of rapid tacking has to be done, long needles (sharps) are preferable to betweens, and long needles are also required for darning. Darners No. 2 to No. 4 are suitable for woolen darning, and No. 5 to No. 7 sharps for linen darning.
Order of Work
The order in which the various stitches and processes in needlework will be taught is decided by two circumstances. First, the pupil must begin with what is easiest and proceed gradually to more difficult work, and secondly, a new kind of work should only be taught when its use is required for the construction of some article. This second consideration may tend to the omission of exercises which the teacher considers useful in themselves, and excellent as giving
practice in the management of material, but not necessary in the construction of the things commonly made in school. In such a case, the teacher would introduce an extra small article involving the desired operations. For example, the making of a kettle- or iron-holder gives opportunity for learning how to bind edges, and how to sew on a loop for hanging.
In order that pupils may learn to think about and plan their work, as much freedom of choice as possible should be permitted them. Other-wise, children tend to become machines worked by the teacher. Pupils should learn to choose colors of thread to work with, patterns to work out in the decoration of a garment, and methods of construction. How far a pupil is able to make good use of freedom depends on her environment and her experience. If from lack of training, lack of observation, or lack of beauty in her surroundings, she has apparently no appreciation of what is well and beautifully done, it will be necessary for the teacher to suggest more and to explain more fully the things to be admired and imitated in any piece of work.
In teaching methods of working, let the method chosen be as simple and direct as possible, accommodated as far as necessary to the child's immature powers, but yet based on some good principle of work. Then the pupil will not have to unlearn things taught at school when she goes to work in the world. Pupils should have a good supply at hand of all
Work from home
12 Needlework
There are many correct ways of working, but the methods indicated in the following chapters have been chosen as suitable for young learners, since they make for thorough
work, while avoiding all unnecessary intricacies. An experienced worker readily invents for herself ways of improving small details of her work.
CHAPTER II STITCHES
USED IN NEEDLEWORK
Stitches used in Needlework
In the following pages the stitches are grouped according to their similarity, but the probable order in which they would be taught is:
(i) Tacking; (2) top-sewing; (3) hemming; (4) running; (5) herring-boning; (6) darning; (7) blanket stitching; (8) chain stitching; (9) gather-ing; (10) setting in; (11) stitching; (12) button-hole stitching; (13) feather stitching, outline stitching, and varieties of chain stitching; (14) couching, knotting, and hem stitching.
The order would depend on (1) the simplicity of and (2) the necessity for the stitch.
In teaching stitches, the following points need to be emphasized:
1. The particular value or use of the stitch in question.
2. The exact form of the stitch, and the best position of the hands and the work to obtain a good result.
3. The relation of the stitch to those already known.
4. What to do with ends of thread in order to obtain neatness and security.
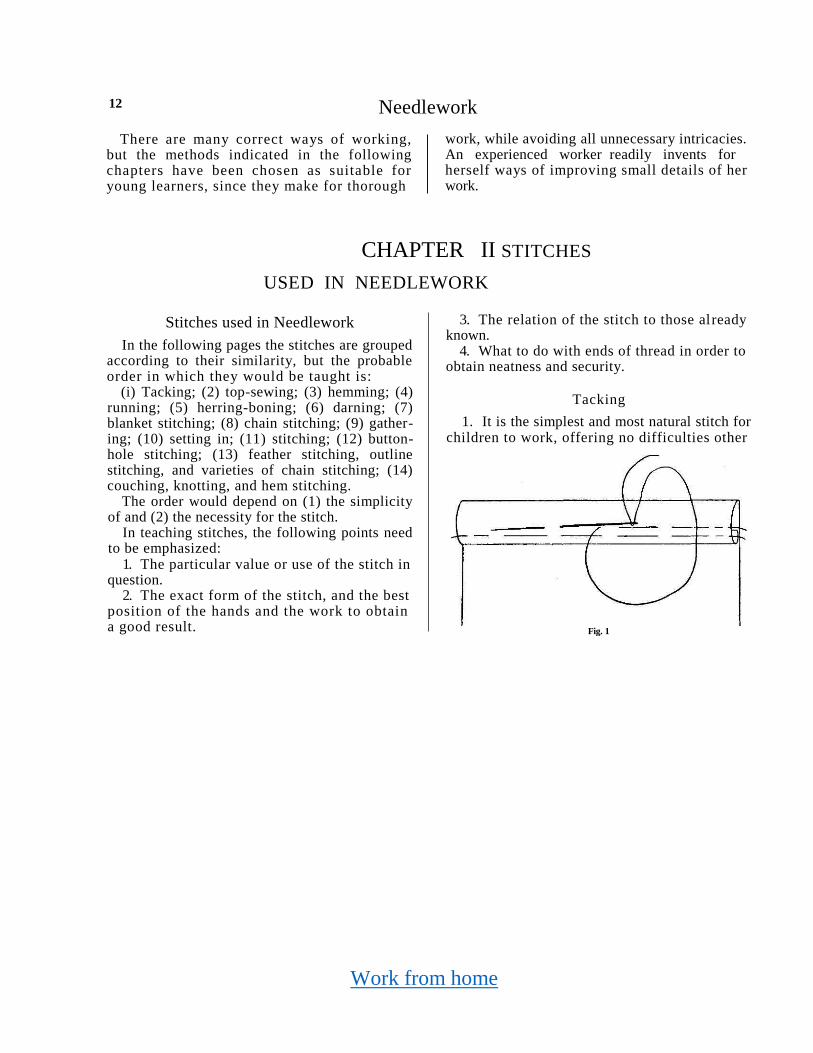
Tacking
1. It is the simplest and most natural stitch for children to work, offering no difficulties other
Fig. 1
Work from home
Sewing 13
than the management of the work and the needle. 2. Beginnings and endings may be fixed at
first by one or more back stitches, a short end of thread being left to give more security (fig. 1).
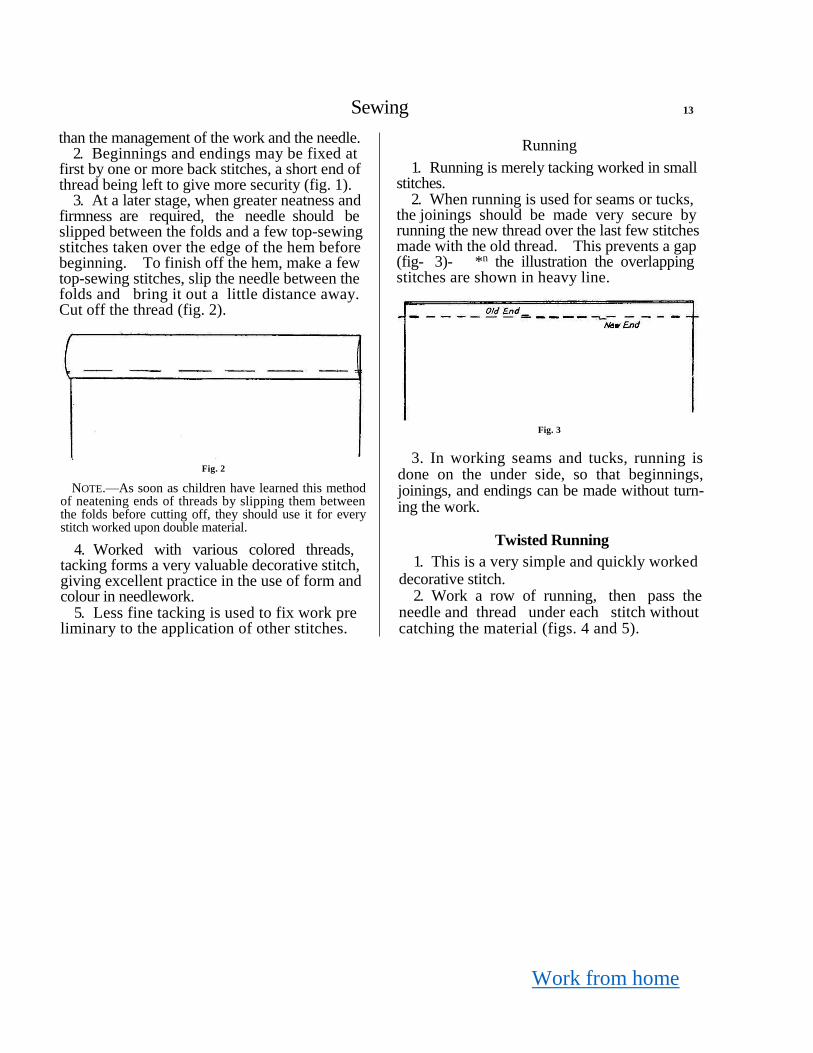
3. At a later stage, when greater neatness and firmness are required, the needle should be slipped between the folds and a few top-sewing stitches taken over the edge of the hem before beginning. To finish off the hem, make a few top-sewing stitches, slip the needle between the folds and bring it out a little distance away. Cut off the thread (fig. 2).
Fig. 2
NOTE.—As soon as children have learned this method of neatening ends of threads by slipping them between the folds before cutting off, they should use it for every stitch worked upon double material.
4. Worked with various colored threads, tacking forms a very valuable decorative stitch, giving excellent practice in the use of form and colour in needlework.
5. Less fine tacking is used to fix work pre liminary to the application of other stitches.
Running
1. Running is merely tacking worked in small stitches.
2. When running is used for seams or tucks, the joinings should be made very secure by running the new thread over the last few stitches made with the old thread. This prevents a gap (fig- 3)- *n the illustration the overlapping stitches are shown in heavy line.
Fig. 3
3. In working seams and tucks, running is done on the under side, so that beginnings, joinings, and endings can be made without turn-ing the work.
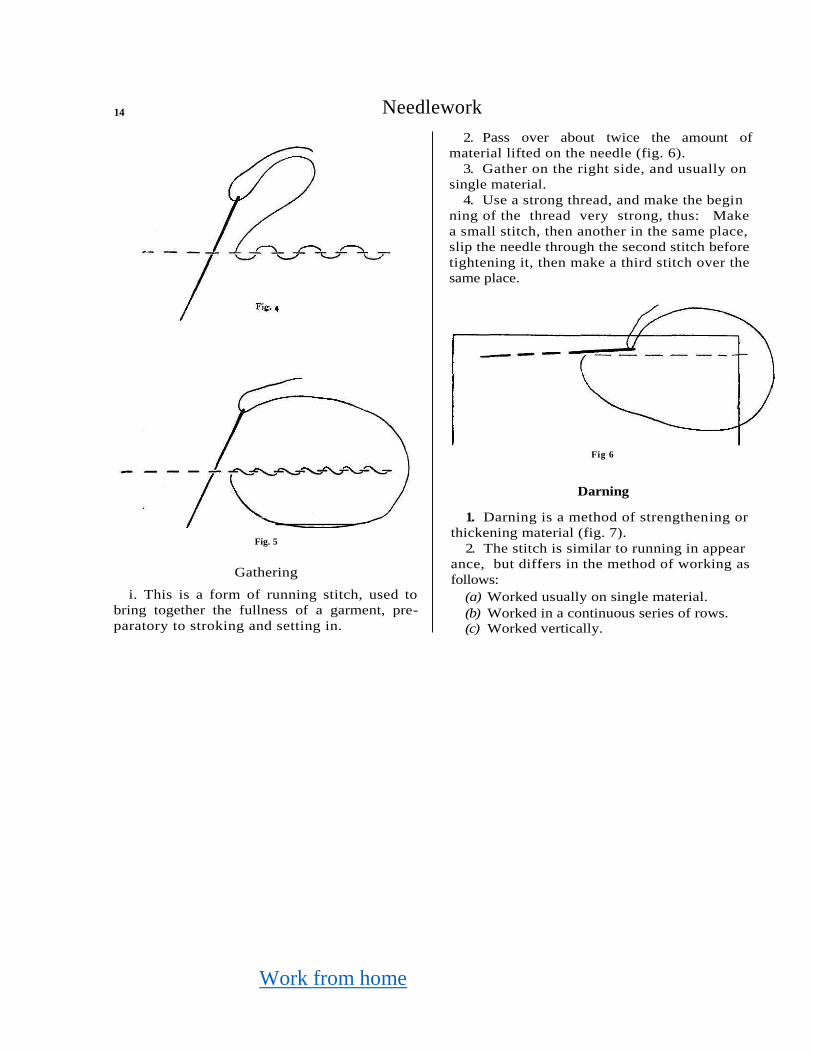
Twisted Running
1. This is a very simple and quickly worked decorative stitch.
2. Work a row of running, then pass the needle and thread under each stitch without catching the material (figs. 4 and 5).
Work from home
14 Needlework
Fig. 5
Gathering
i. This is a form of running stitch, used to
bring together the fullness of a garment, pre-
paratory to stroking and setting in.
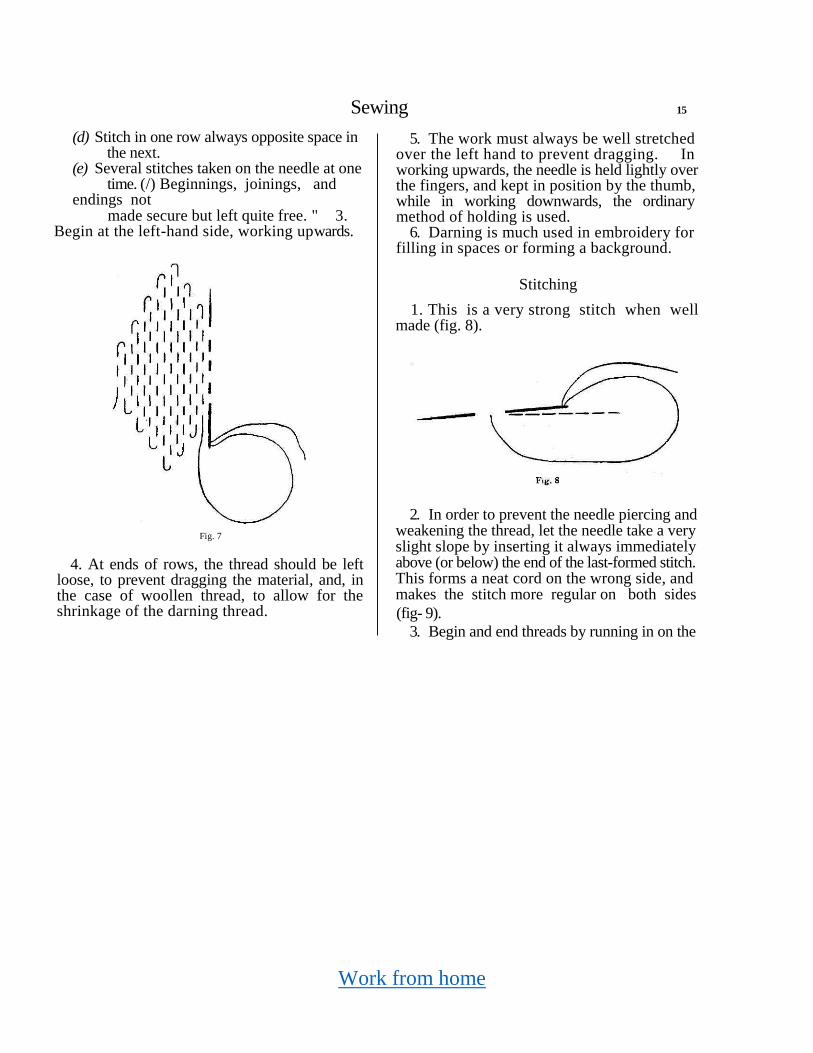
2. Pass over about twice the amount of
material lifted on the needle (fig. 6).
3. Gather on the right side, and usually on
single material.
4. Use a strong thread, and make the begin
ning of the thread very strong, thus: Make
a small stitch, then another in the same place,
slip the needle through the second stitch before
tightening it, then make a third stitch over the
same place.
Fig 6
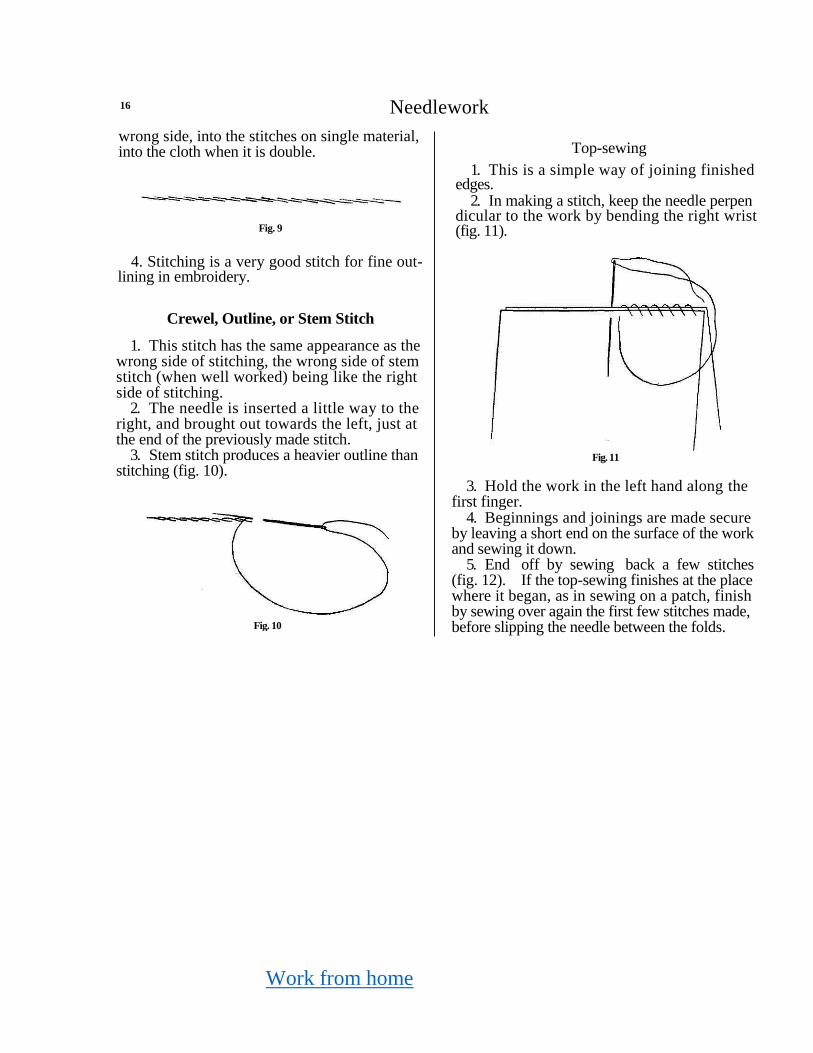
Darning
1. Darning is a method of strengthening or
thickening material (fig. 7).
2. The stitch is similar to running in appear
ance, but differs in the method of working as
follows:
(a) Worked usually on single material.
(b) Worked in a continuous series of rows.
(c) Worked vertically.
Work from home
Sewing 15
(d) Stitch in one row always opposite space in
the next. (e) Several stitches taken on the needle at one
time. (/) Beginnings, joinings, and endings not
made secure but left quite free. " 3. Begin at the left-hand side, working upwards.
Fig. 7
4. At ends of rows, the thread should be left loose, to prevent dragging the material, and, in the case of woollen thread, to allow for the shrinkage of the darning thread.
5. The work must always be well stretched over the left hand to prevent dragging. In working upwards, the needle is held lightly over the fingers, and kept in position by the thumb, while in working downwards, the ordinary method of holding is used.
6. Darning is much used in embroidery for filling in spaces or forming a background.
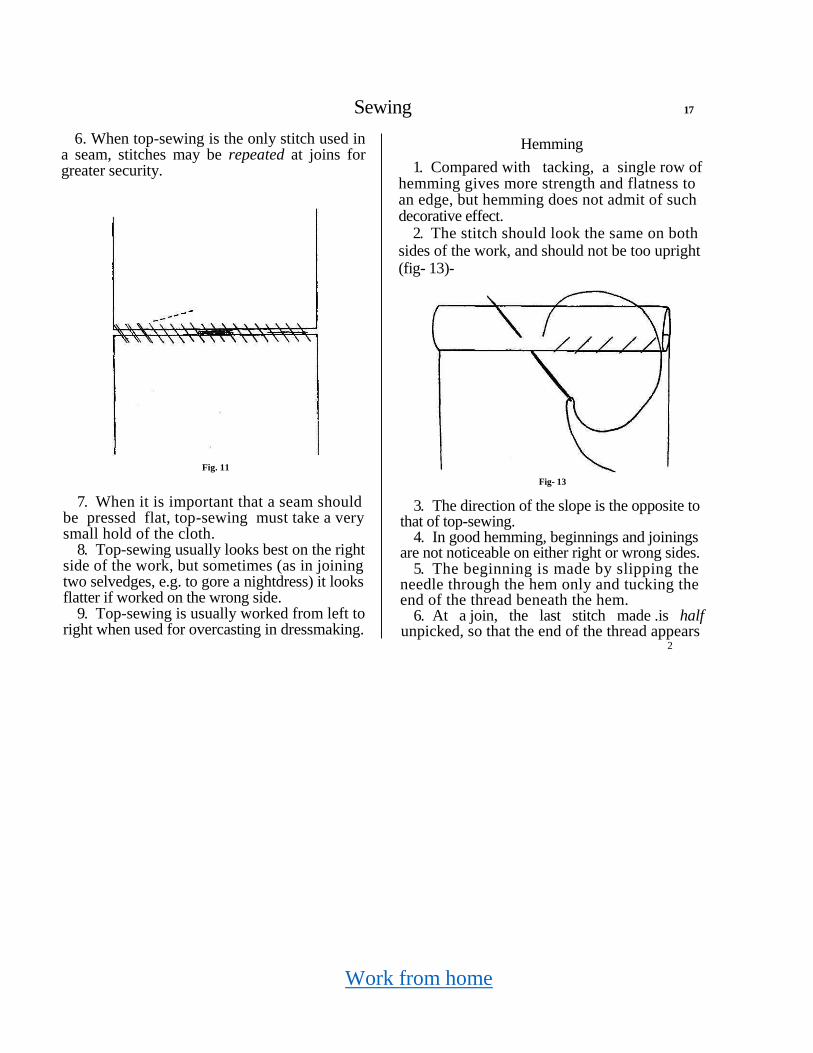
Stitching
1. This is a very strong stitch when well made (fig. 8).
2. In order to prevent the needle piercing and weakening the thread, let the needle take a very slight slope by inserting it always immediately above (or below) the end of the last-formed stitch. This forms a neat cord on the wrong side, and makes the stitch more regular on both sides
(fig- 9).
3. Begin and end threads by running in on the
Work from home
16 Needlework
wrong side, into the stitches on single material, into the cloth when it is double.
Fig. 9
4. Stitching is a very good stitch for fine out-lining in embroidery.
Crewel, Outline, or Stem Stitch
1. This stitch has the same appearance as the wrong side of stitching, the wrong side of stem stitch (when well worked) being like the right side of stitching.
2. The needle is inserted a little way to the right, and brought out towards the left, just at the end of the previously made stitch.
3. Stem stitch produces a heavier outline than stitching (fig. 10).
Top-sewing
1. This is a simple way of joining finished edges.
2. In making a stitch, keep the needle perpen dicular to the work by bending the right wrist (fig. 11).
Fig. 11
3. Hold the work in the left hand along the first finger.
4. Beginnings and joinings are made secure by leaving a short end on the surface of the work and sewing it down.
5. End off by sewing back a few stitches (fig. 12). If the top-sewing finishes at the place where it began, as in sewing on a patch, finish by sewing over again the first few stitches made, before slipping the needle between the folds.
Fig. 10
Work from home
Sewing 17
6. When top-sewing is the only stitch used in a seam, stitches may be repeated at joins for greater security.
Fig. 11
7. When it is important that a seam should be pressed flat, top-sewing must take a very small hold of the cloth.
8. Top-sewing usually looks best on the right side of the work, but sometimes (as in joining two selvedges, e.g. to gore a nightdress) it looks flatter if worked on the wrong side.
9. Top-sewing is usually worked from left to right when used for overcasting in dressmaking.
Hemming
1. Compared with tacking, a single row of hemming gives more strength and flatness to an edge, but hemming does not admit of such decorative effect.
2. The stitch should look the same on both sides of the work, and should not be too upright (fig- 13)-
Fig- 13
3. The direction of the slope is the opposite to that of top-sewing.
4. In good hemming, beginnings and joinings are not noticeable on either right or wrong sides.
5. The beginning is made by slipping the needle through the hem only and tucking the end of the thread beneath the hem.
6. At a join, the last stitch made .is half unpicked, so that the end of the thread appears
2
Work from home
18 Needlework
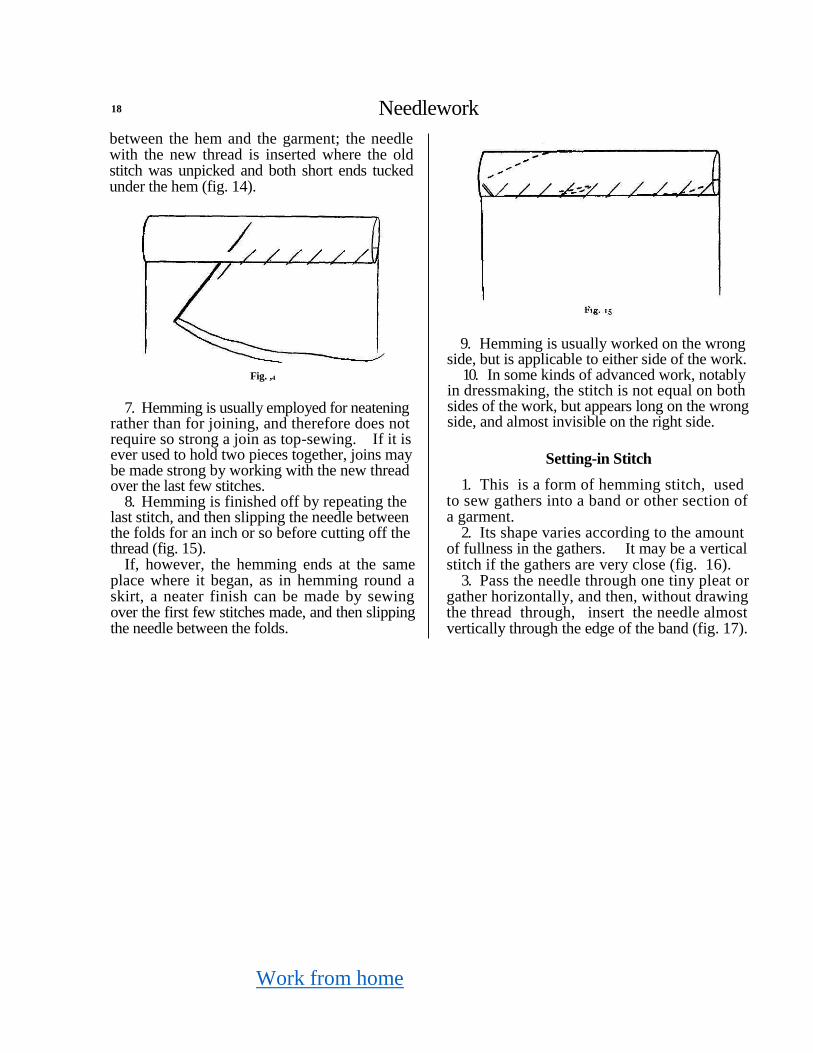
between the hem and the garment; the needle with the new thread is inserted where the old stitch was unpicked and both short ends tucked under the hem (fig. 14).
Fig. ,4
7. Hemming is usually employed for neatening rather than for joining, and therefore does not require so strong a join as top-sewing. If it is ever used to hold two pieces together, joins may be made strong by working with the new thread over the last few stitches.
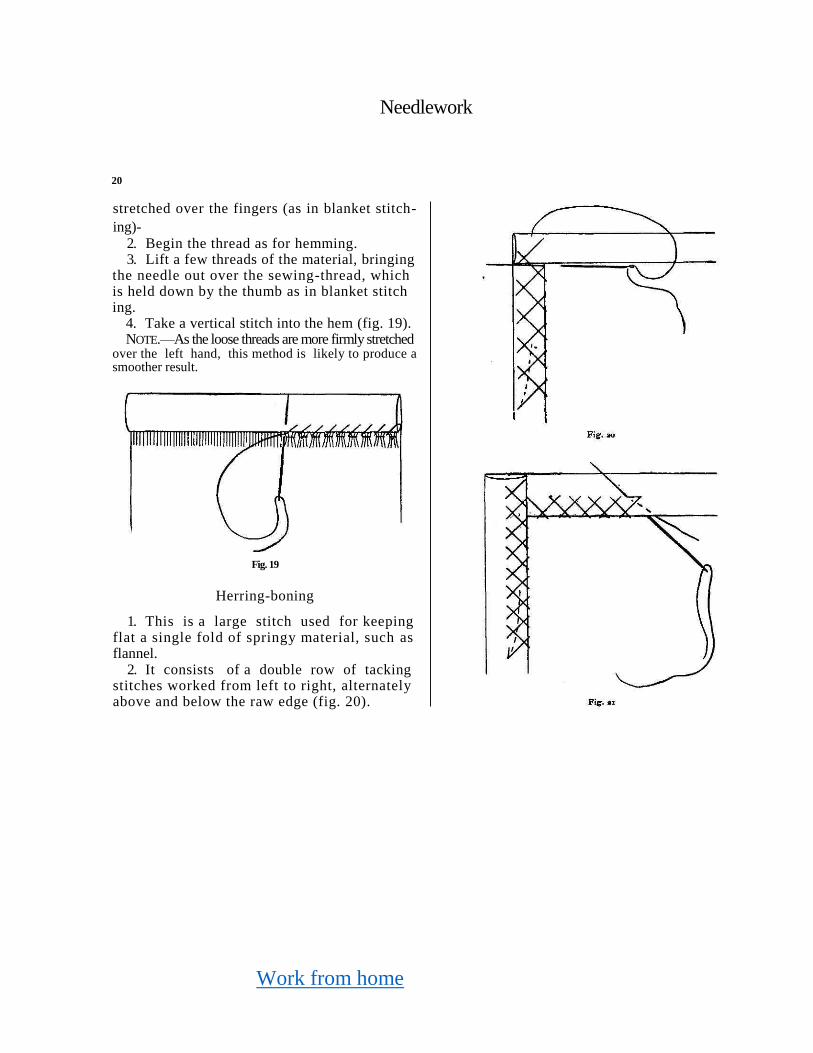
8. Hemming is finished off by repeating the last stitch, and then slipping the needle between the folds for an inch or so before cutting off the thread (fig. 15).
If, however, the hemming ends at the same place where it began, as in hemming round a skirt, a neater finish can be made by sewing over the first few stitches made, and then slipping the needle between the folds.
9. Hemming is usually worked on the wrong side, but is applicable to either side of the work.
10. In some kinds of advanced work, notably in dressmaking, the stitch is not equal on both sides of the work, but appears long on the wrong side, and almost invisible on the right side.
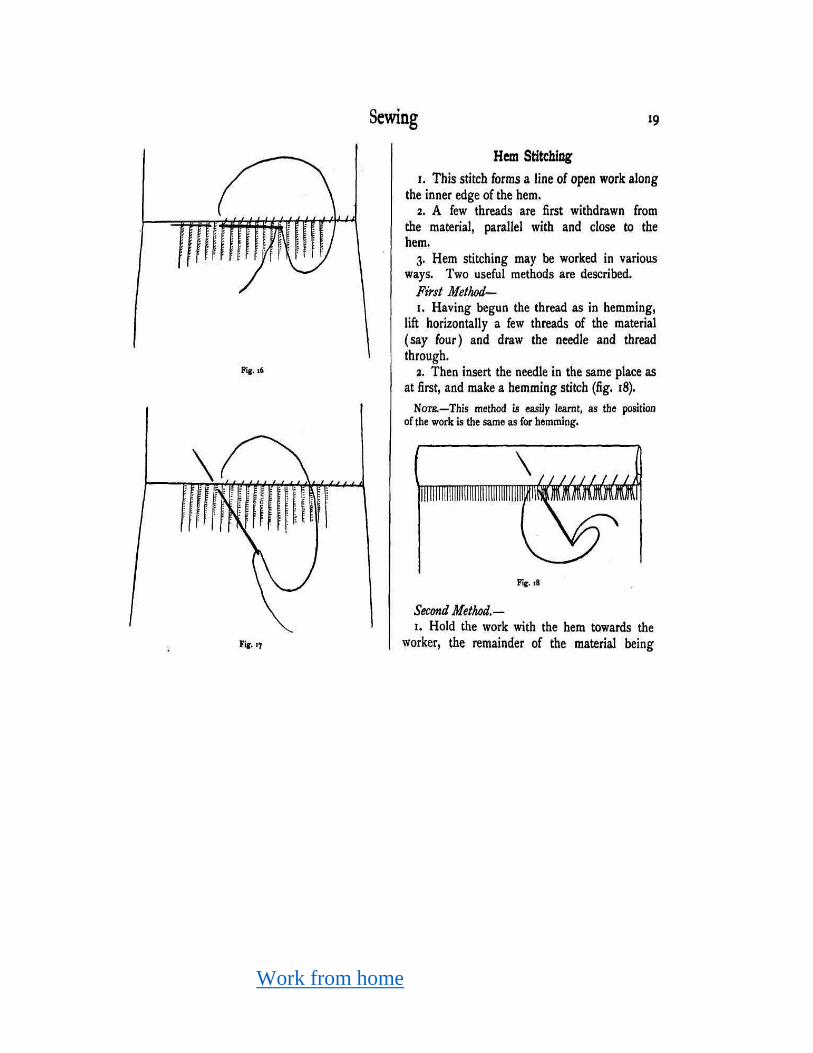
Setting-in Stitch
1. This is a form of hemming stitch, used to sew gathers into a band or other section of a garment.
2. Its shape varies according to the amount of fullness in the gathers. It may be a vertical stitch if the gathers are very close (fig. 16).
3. Pass the needle through one tiny pleat or gather horizontally, and then, without drawing the thread through, insert the needle almost vertically through the edge of the band (fig. 17).
Work from home
20
Needlework
stretched over the fingers (as in blanket stitch-
ing)- 2. Begin the thread as for hemming. 3. Lift a few threads of the material, bringing
the needle out over the sewing-thread, which is held down by the thumb as in blanket stitch ing.
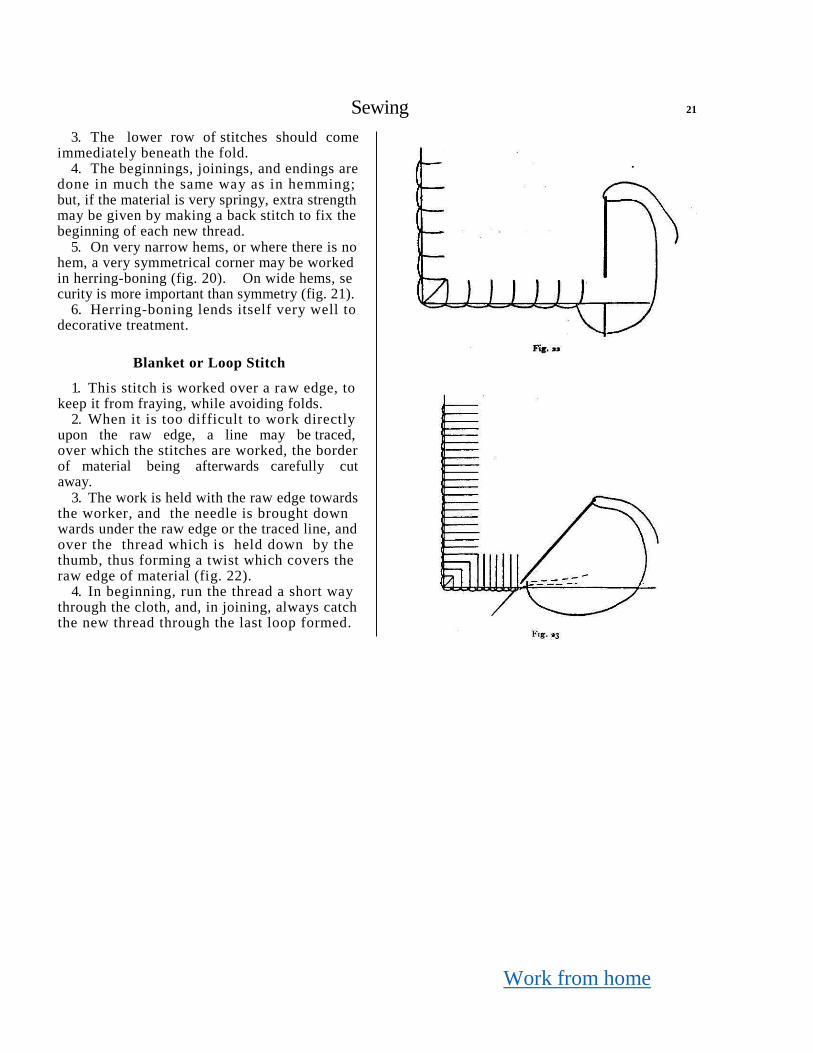
4. Take a vertical stitch into the hem (fig. 19). NOTE.—As the loose threads are more firmly stretched
over the left hand, this method is likely to produce a smoother result.
Fig. 19
Herring-boning
1. This is a large stitch used for keeping flat a single fold of springy material, such as flannel.
2. It consists of a double row of tacking stitches worked from left to right, alternately above and below the raw edge (fig. 20).
Work from home
Sewing 21
3. The lower row of stitches should come immediately beneath the fold.
4. The beginnings, joinings, and endings are done in much the same way as in hemming; but, if the material is very springy, extra strength may be given by making a back stitch to fix the beginning of each new thread.
5. On very narrow hems, or where there is no hem, a very symmetrical corner may be worked in herring-boning (fig. 20). On wide hems, se curity is more important than symmetry (fig. 21).
6. Herring-boning lends itself very well to decorative treatment.
Blanket or Loop Stitch
1. This stitch is worked over a raw edge, to keep it from fraying, while avoiding folds.
2. When it is too difficult to work directly upon the raw edge, a line may be traced, over which the stitches are worked, the border of material being afterwards carefully cut away.
3. The work is held with the raw edge towards the worker, and the needle is brought down wards under the raw edge or the traced line, and over the thread which is held down by the thumb, thus forming a twist which covers the raw edge of material (fig. 22).
4. In beginning, run the thread a short way through the cloth, and, in joining, always catch the new thread through the last loop formed.
Work from home
22 Needlework
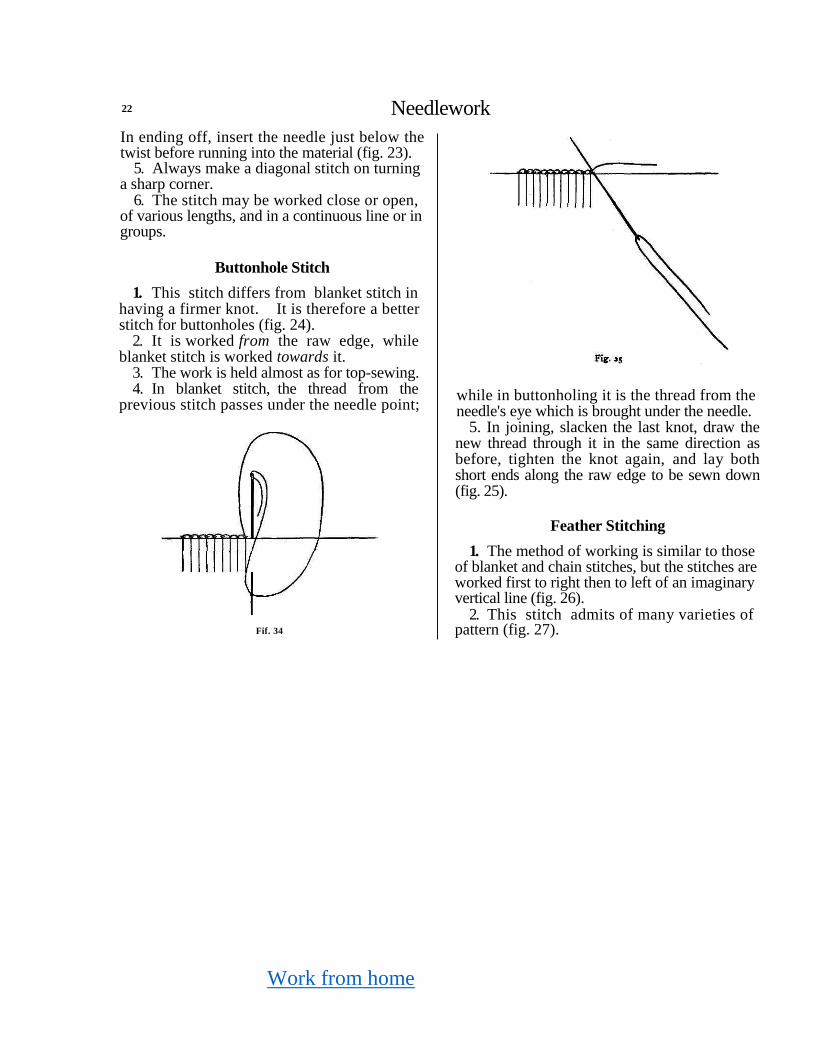
In ending off, insert the needle just below the twist before running into the material (fig. 23).
5. Always make a diagonal stitch on turning a sharp corner.
6. The stitch may be worked close or open, of various lengths, and in a continuous line or in groups.
Buttonhole Stitch
1. This stitch differs from blanket stitch in having a firmer knot. It is therefore a better stitch for buttonholes (fig. 24).
2. It is worked from the raw edge, while blanket stitch is worked towards it.
3. The work is held almost as for top-sewing. 4. In blanket stitch, the thread from the
previous stitch passes under the needle point;
while in buttonholing it is the thread from the needle's eye which is brought under the needle.
5. In joining, slacken the last knot, draw the new thread through it in the same direction as before, tighten the knot again, and lay both short ends along the raw edge to be sewn down (fig. 25).
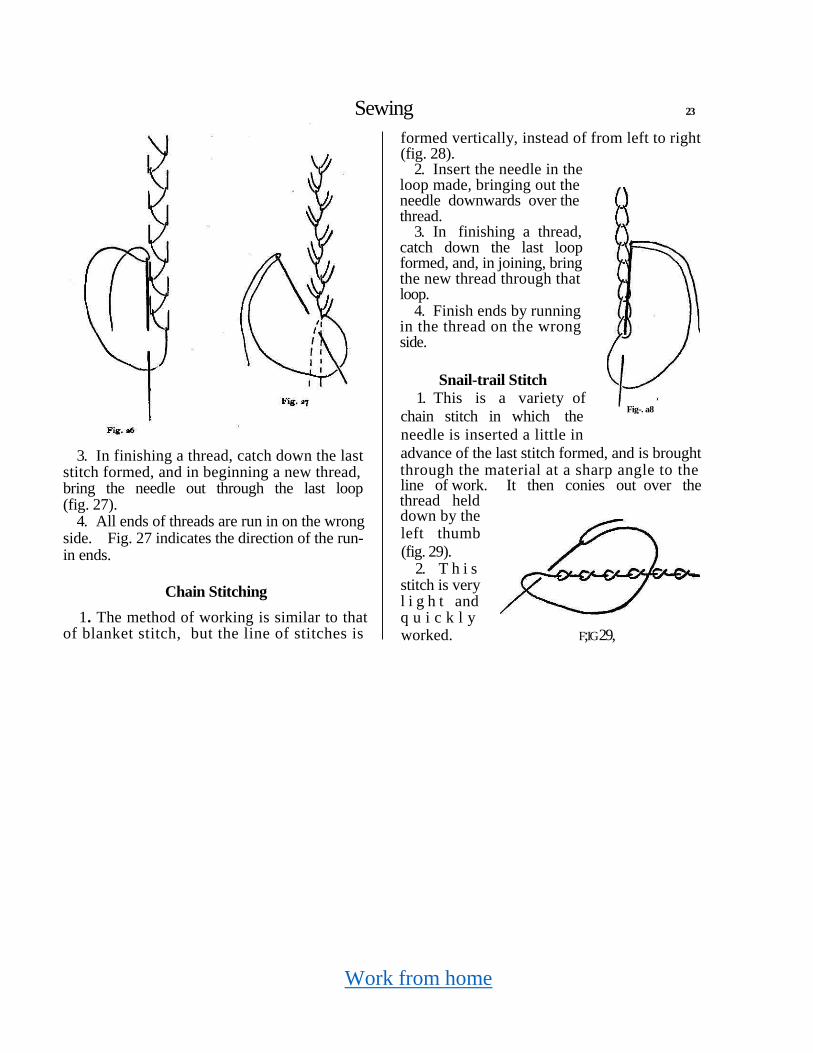
Feather Stitching
1. The method of working is similar to those of blanket and chain stitches, but the stitches are worked first to right then to left of an imaginary vertical line (fig. 26).
2. This stitch admits of many varieties of pattern (fig. 27).
Fif. 34
Work from home
Sewing 23
3. In finishing a thread, catch down the last stitch formed, and in beginning a new thread, bring the needle out through the last loop (fig. 27).
4. All ends of threads are run in on the wrong side. Fig. 27 indicates the direction of the run- in ends.
Chain Stitching
1. The method of working is similar to that of blanket stitch, but the line of stitches is
formed vertically, instead of from left to right (fig. 28).
2. Insert the needle in the loop made, bringing out the needle downwards over the thread.
3. In finishing a thread, catch down the last loop formed, and, in joining, bring the new thread through that loop.
4. Finish ends by running in the thread on the wrong side.
Snail-trail Stitch
1. This is a variety of
chain stitch in which the
needle is inserted a little in
advance of the last stitch formed, and is brought through the material at a sharp angle to the
line of work. It then conies out over the
thread held
down by the
left thumb
(fig. 29). 2. T h i s
stitch is very l i g h t and q u i c k l y
worked. F;IG 29,
Fig-. a8
Work from home
24 Needlework
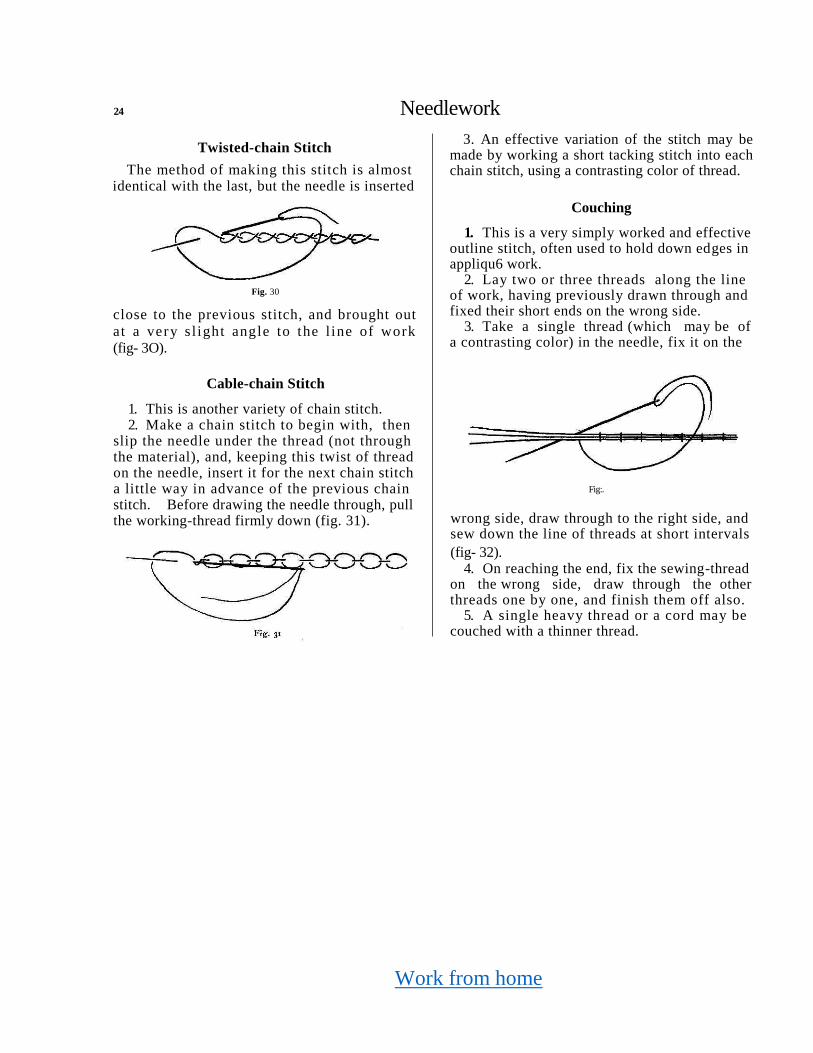
Twisted-chain Stitch
The method of making this stitch is almost identical with the last, but the needle is inserted
Fig. 30
close to the previous stitch, and brought out
at a very s l ight angle to the l ine of work
(fig- 3O).
Cable-chain Stitch
1. This is another variety of chain stitch. 2. Make a chain stitch to begin with, then
slip the needle under the thread (not through the material), and, keeping this twist of thread on the needle, insert it for the next chain stitch a little way in advance of the previous chain stitch. Before drawing the needle through, pull the working-thread firmly down (fig. 31).
3. An effective variation of the stitch may be made by working a short tacking stitch into each chain stitch, using a contrasting color of thread.
Couching
1. This is a very simply worked and effective outline stitch, often used to hold down edges in appliqu6 work.
2. Lay two or three threads along the line of work, having previously drawn through and fixed their short ends on the wrong side.
3. Take a single thread (which may be of a contrasting color) in the needle, fix it on the
Fig:.
wrong side, draw through to the right side, and sew down the line of threads at short intervals
(fig- 32). 4. On reaching the end, fix the sewing-thread
on the wrong side, draw through the other threads one by one, and finish them off also.
5. A single heavy thread or a cord may be couched with a thinner thread.
Work from home
Sewing 25
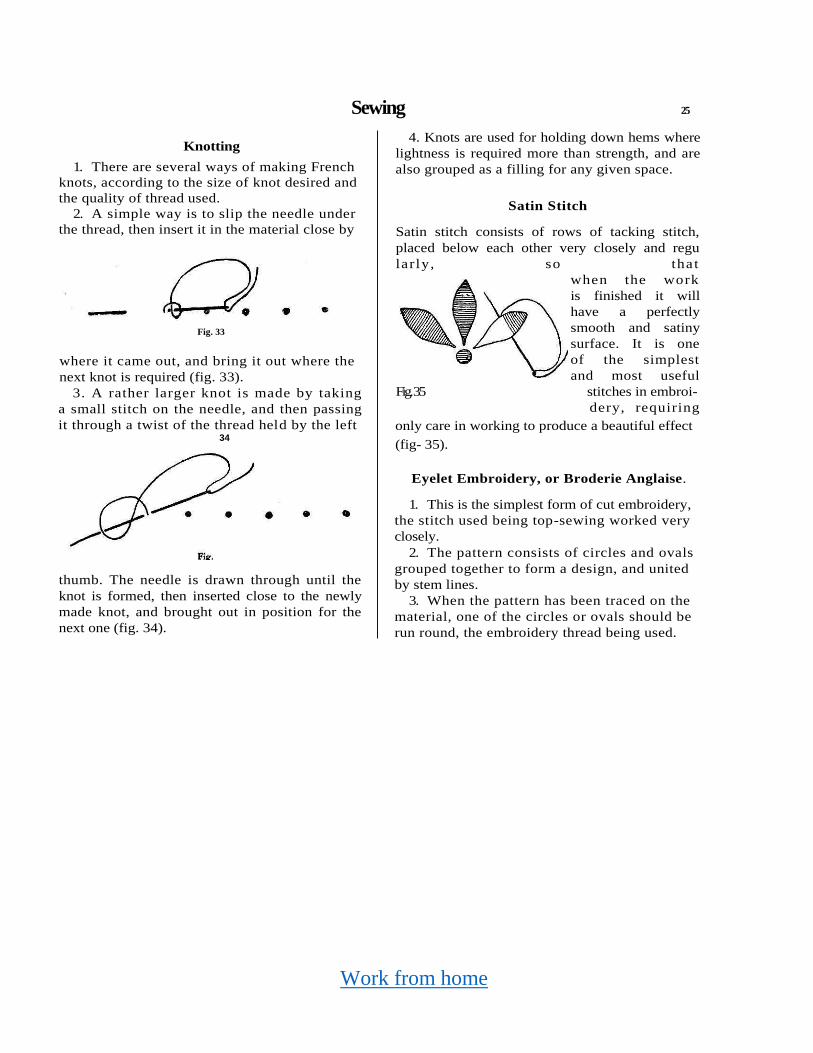
Knotting
1. There are several ways of making French
knots, according to the size of knot desired and
the quality of thread used.
2. A simple way is to slip the needle under
the thread, then insert it in the material close by
Fig. 33
where it came out, and bring it out where the
next knot is required (fig. 33).
3. A rather larger knot is made by taking
a small stitch on the needle, and then passing
it through a twist of the thread held by the left 34
thumb. The needle is drawn through until the
knot is formed, then inserted close to the newly
made knot, and brought out in position for the
next one (fig. 34).
4. Knots are used for holding down hems where
lightness is required more than strength, and are
also grouped as a filling for any given space.
Satin Stitch
Satin stitch consists of rows of tacking stitch,
placed below each other very closely and regu
larly, so tha t
when the work
is finished it will
have a perfectly
smooth and satiny
surface. It is one
of the simplest
and most useful
Fig. 35 stitches in embroi-
dery, requiring
only care in working to produce a beautiful effect
(fig- 35).
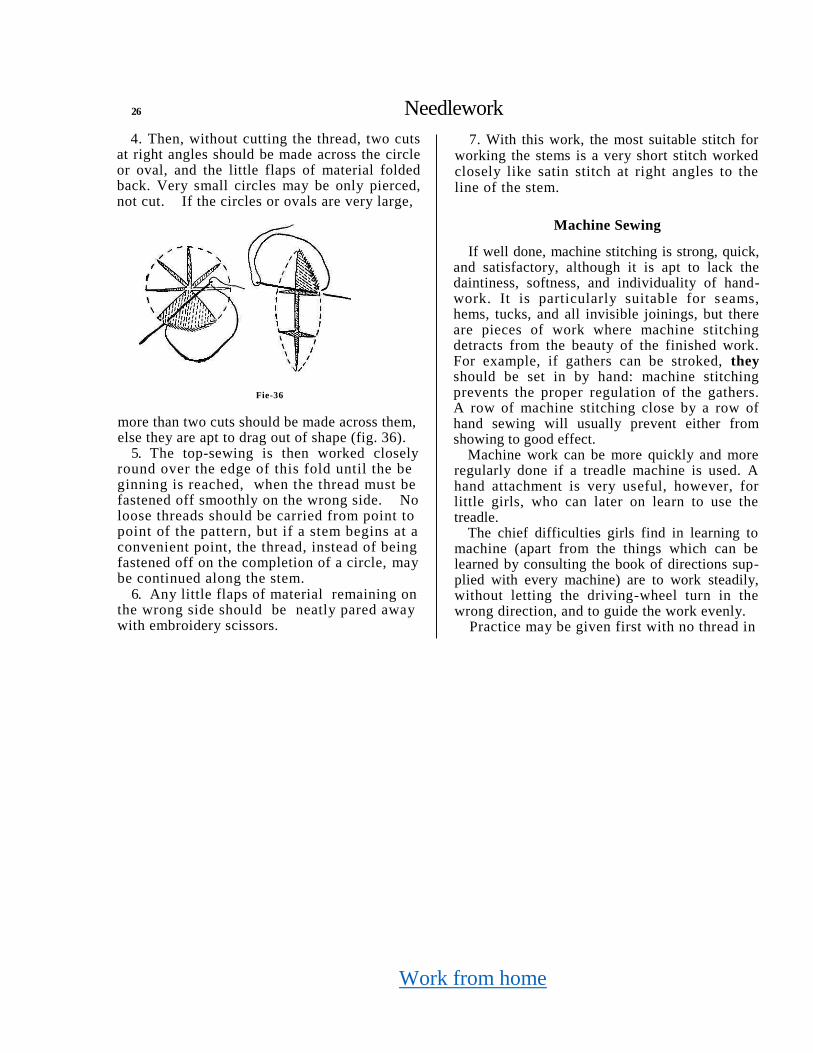
Eyelet Embroidery, or Broderie Anglaise.
1. This is the simplest form of cut embroidery,
the stitch used being top-sewing worked very
closely.
2. The pattern consists of circles and ovals
grouped together to form a design, and united
by stem lines.
3. When the pattern has been traced on the
material, one of the circles or ovals should be
run round, the embroidery thread being used.
Work from home
26 Needlework
4. Then, without cutting the thread, two cuts at right angles should be made across the circle or oval, and the little flaps of material folded back. Very small circles may be only pierced, not cut. If the circles or ovals are very large,
Fie-36
more than two cuts should be made across them, else they are apt to drag out of shape (fig. 36).
5. The top-sewing is then worked closely round over the edge of this fold until the be ginning is reached, when the thread must be fastened off smoothly on the wrong side. No loose threads should be carried from point to point of the pattern, but if a stem begins at a convenient point, the thread, instead of being fastened off on the completion of a circle, may be continued along the stem.
6. Any little flaps of material remaining on the wrong side should be neatly pared away with embroidery scissors.
7. With this work, the most suitable stitch for working the stems is a very short stitch worked closely like satin stitch at right angles to the line of the stem.
Machine Sewing
If well done, machine stitching is strong, quick, and satisfactory, although it is apt to lack the daintiness, softness, and individuality of hand-work. It is particularly suitable for seams, hems, tucks, and all invisible joinings, but there are pieces of work where machine stitching detracts from the beauty of the finished work. For example, if gathers can be stroked, they should be set in by hand: machine stitching prevents the proper regulation of the gathers. A row of machine stitching close by a row of hand sewing will usually prevent either from showing to good effect.
Machine work can be more quickly and more regularly done if a treadle machine is used. A hand attachment is very useful, however, for little girls, who can later on learn to use the treadle.
The chief difficulties girls find in learning to machine (apart from the things which can be learned by consulting the book of directions sup-plied with every machine) are to work steadily, without letting the driving-wheel turn in the wrong direction, and to guide the work evenly.
Practice may be given first with no thread in
Work from home
Sewing 27
the machine. Strips of paper may be used for practice in guiding the work. The pricking of the paper by the needle shows how far success has been attained.
As soon as some ability in working is shown, a pupil should work on something real, but at first things of little importance should be at-tempted, e.g. hems of kitchen towels or dusters, doll's clothes, &c.
As in hand sewing, beginnings, joinings, and endings require special care, so that they may be strong but invisible. The machine needle should be at its highest position when work is being placed or removed, but at its lowest when work is being turned in the machine. At a join-ing, a few stitches should be worked exactly over
the last few made, and the beginnings and end-ings may be strengthened by turning the work round and sewing a few stitches in the opposite direction over the line of sewing. All loose ends of thread must be disposed of. A quick and common, but not very neat plan, is to tie the ends together on the wrong side and cut off short. It is better to thread each end into a needle and run it into the material. The line of machine stitch-ing should lie close to the edge of the hem or seam being worked.
Apart from the actual sewing, girls must learn to place and thread the needle and the shuttle, to vary the tensions and the length of stitch, and to dust and oil the machine when necessary.
CHAPTER III
THE TREATMENT OF EDGES
Fringing
While pupils are making their very first attempts at sewing, fringing is a good way of finishing an edge, because (1) it allows the pupil to begin sewing right away, unhindered by the preliminary task of folding a hem, a delay which may cause enthusiasm to evaporate; (2) it makes sure that progress is not hindered by the diffi-
culty of pushing the needle through the folded material; (3) it helps the pupil to become acquainted with the material and with the manner in which selvedge and weft threads are woven to form cloth.
Hem Folding
1. Make first a small, and then a deeper fold,
Work from home
28 Needlework
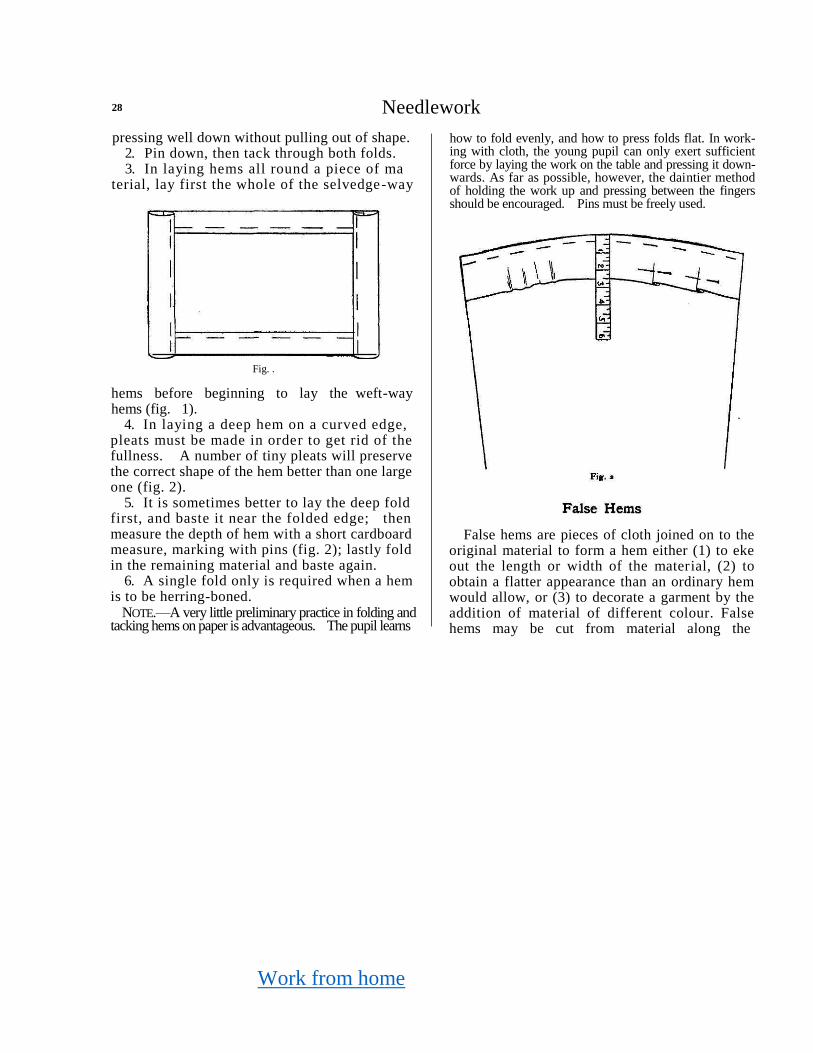
pressing well down without pulling out of shape. 2. Pin down, then tack through both folds. 3. In laying hems all round a piece of ma
terial, lay first the whole of the selvedge-way
Fig. .
hems before beginning to lay the weft-way hems (fig. 1).
4. In laying a deep hem on a curved edge, pleats must be made in order to get rid of the fullness. A number of tiny pleats will preserve the correct shape of the hem better than one large one (fig. 2).
5. It is sometimes better to lay the deep fold first, and baste it near the folded edge; then measure the depth of hem with a short cardboard measure, marking with pins (fig. 2); lastly fold in the remaining material and baste again.
6. A single fold only is required when a hem is to be herring-boned.
NOTE.—A very little preliminary practice in folding and tacking hems on paper is advantageous. The pupil learns
how to fold evenly, and how to press folds flat. In work-ing with cloth, the young pupil can only exert sufficient force by laying the work on the table and pressing it down-wards. As far as possible, however, the daintier method of holding the work up and pressing between the fingers should be encouraged. Pins must be freely used.
False hems are pieces of cloth joined on to the original material to form a hem either (1) to eke out the length or width of the material, (2) to obtain a flatter appearance than an ordinary hem would allow, or (3) to decorate a garment by the addition of material of different colour. False hems may be cut from material along the
Work from home
Sewing 29
straight thread, or on the crossway, and, accord-ing to their purpose, may be placed on the right side or on the wrong side of the garment.
A. Straight False Hem—
i. Cut the cloth for a false hem in the same direction as the material to be trimmed.
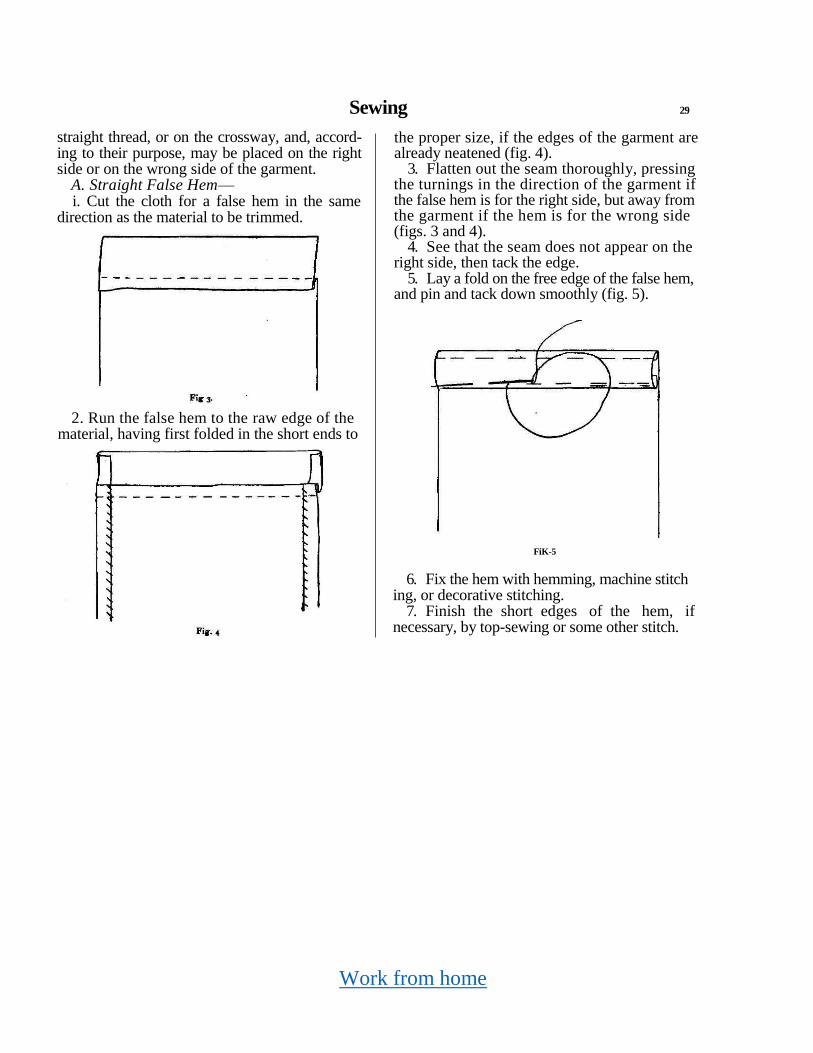
2. Run the false hem to the raw edge of the material, having first folded in the short ends to
the proper size, if the edges of the garment are already neatened (fig. 4).
3. Flatten out the seam thoroughly, pressing the turnings in the direction of the garment if the false hem is for the right side, but away from the garment if the hem is for the wrong side (figs. 3 and 4).
4. See that the seam does not appear on the right side, then tack the edge.
5. Lay a fold on the free edge of the false hem, and pin and tack down smoothly (fig. 5).
FiK-5
6. Fix the hem with hemming, machine stitch ing, or decorative stitching.
7. Finish the short edges of the hem, if necessary, by top-sewing or some other stitch.
Work from home
30 Needlework
B. Crossway False Hem— This is used on a curved edge because the crossway of material stretches.
1. Find the crossway by folding an edge of ma terial at right angles to itself, i.e. with the selvedge threads lying on the weft ones. Cut along the fold.
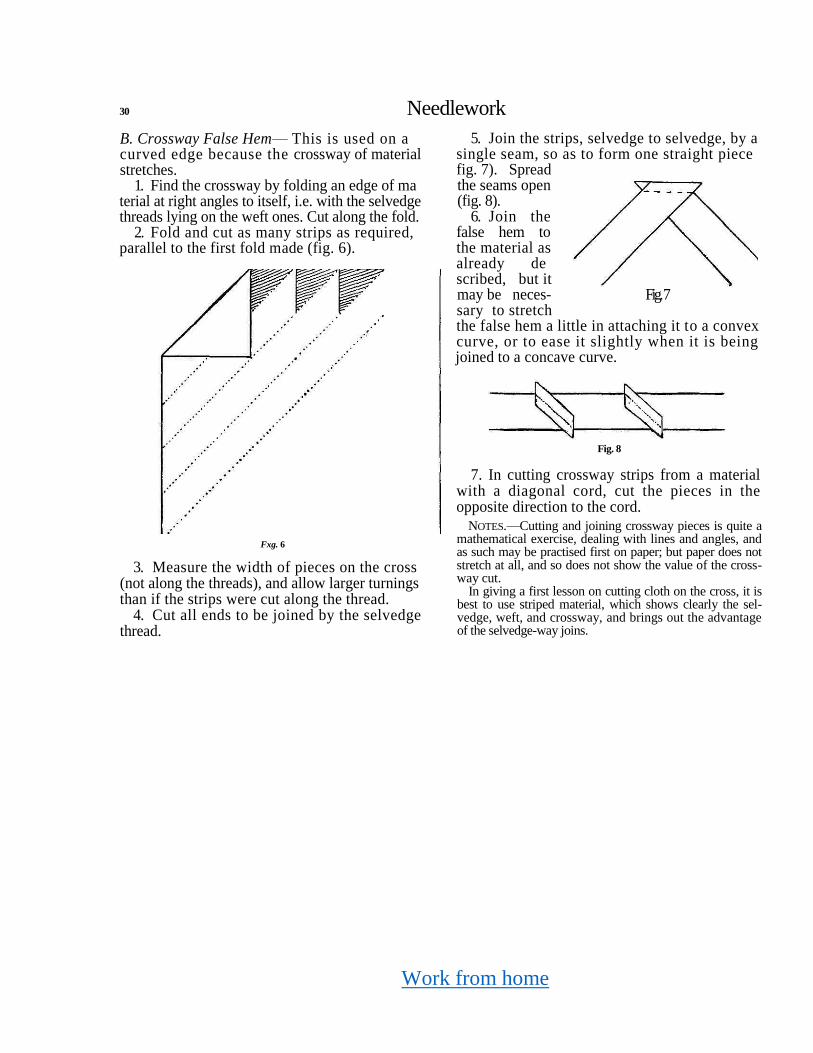
2. Fold and cut as many strips as required, parallel to the first fold made (fig. 6).
Fxg. 6
3. Measure the width of pieces on the cross (not along the threads), and allow larger turnings than if the strips were cut along the thread.
4. Cut all ends to be joined by the selvedge thread.
5. Join the strips, selvedge to selvedge, by a single seam, so as to form one straight piece fig. 7). Spread
the seams open (fig. 8).
6. Join the false hem to the material as already de scribed, but it may be neces- Fig. 7
sary to stretch
the false hem a little in attaching it to a convex
curve, or to ease it slightly when it is being
joined to a concave curve.
Fig. 8
7. In cutting crossway strips from a material with a diagonal cord, cut the pieces in the opposite direction to the cord.
NOTES.—Cutting and joining crossway pieces is quite a mathematical exercise, dealing with lines and angles, and as such may be practised first on paper; but paper does not stretch at all, and so does not show the value of the cross-way cut.
In giving a first lesson on cutting cloth on the cross, it is best to use striped material, which shows clearly the sel-vedge, weft, and crossway, and brings out the advantage of the selvedge-way joins.
Work from home
Sewing 31
In folding on the cross, it is advisable to crease the ma-terial by pressing downwards on the table, as premature stretching- ruins the value of the false hem.
However careful the worker, a slight error in folding is apt to creep in when many strips have to be cut from one piece. A good way to reduce this error is to measure off the strips not singly, but in groups (say four at a time), e.g. if 1" strips are required, cut off a width of 4", then fold and cut this piece into four.
It may be helpful to the pupils to compare a straight strip, torn selvedge-way, with a piece of tape, and a cross-way strip with a piece of braid.
Piping
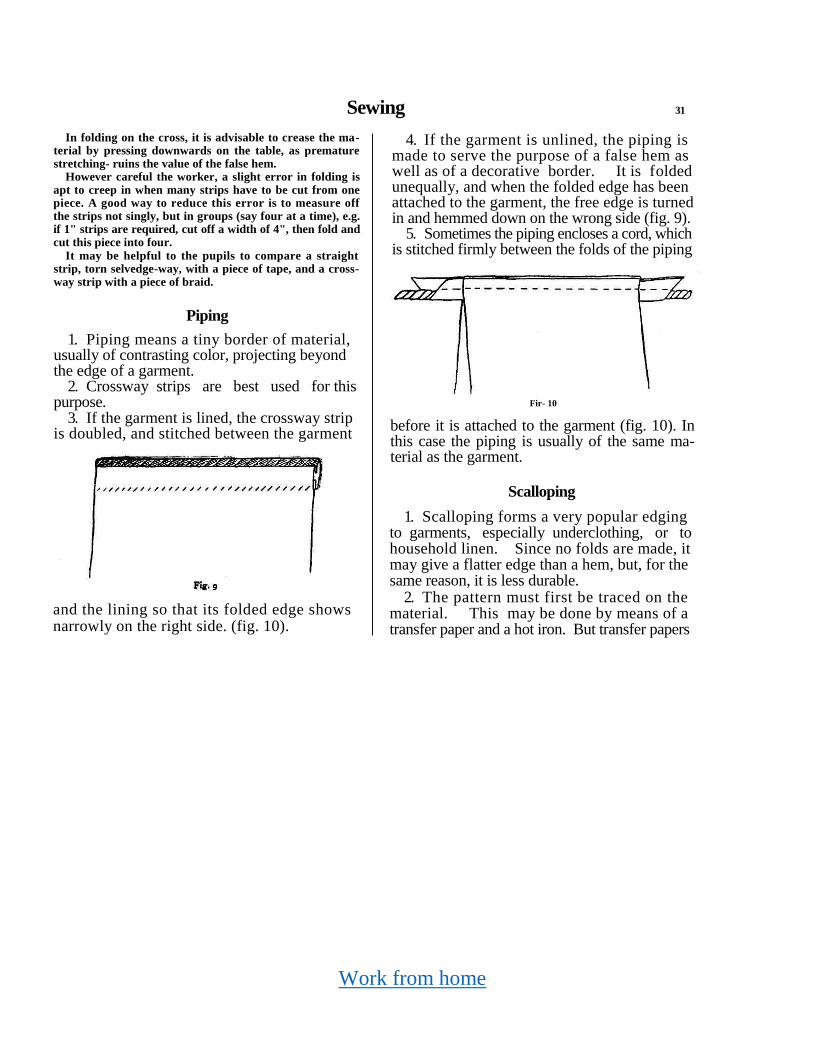
1. Piping means a tiny border of material, usually of contrasting color, projecting beyond the edge of a garment.
2. Crossway strips are best used for this purpose.
3. If the garment is lined, the crossway strip is doubled, and stitched between the garment
and the lining so that its folded edge shows narrowly on the right side. (fig. 10).
4. If the garment is unlined, the piping is made to serve the purpose of a false hem as well as of a decorative border. It is folded unequally, and when the folded edge has been attached to the garment, the free edge is turned in and hemmed down on the wrong side (fig. 9).
5. Sometimes the piping encloses a cord, which is stitched firmly between the folds of the piping
Fir- 10
before it is attached to the garment (fig. 10). In this case the piping is usually of the same ma-terial as the garment.
Scalloping
1. Scalloping forms a very popular edging to garments, especially underclothing, or to household linen. Since no folds are made, it may give a flatter edge than a hem, but, for the same reason, it is less durable.
2. The pattern must first be traced on the material. This may be done by means of a transfer paper and a hot iron. But transfer papers
Work from home
32 Needlework
are marked in straight lines of pattern, and require very careful handling and much snipping in order to make successful work on curved lines.
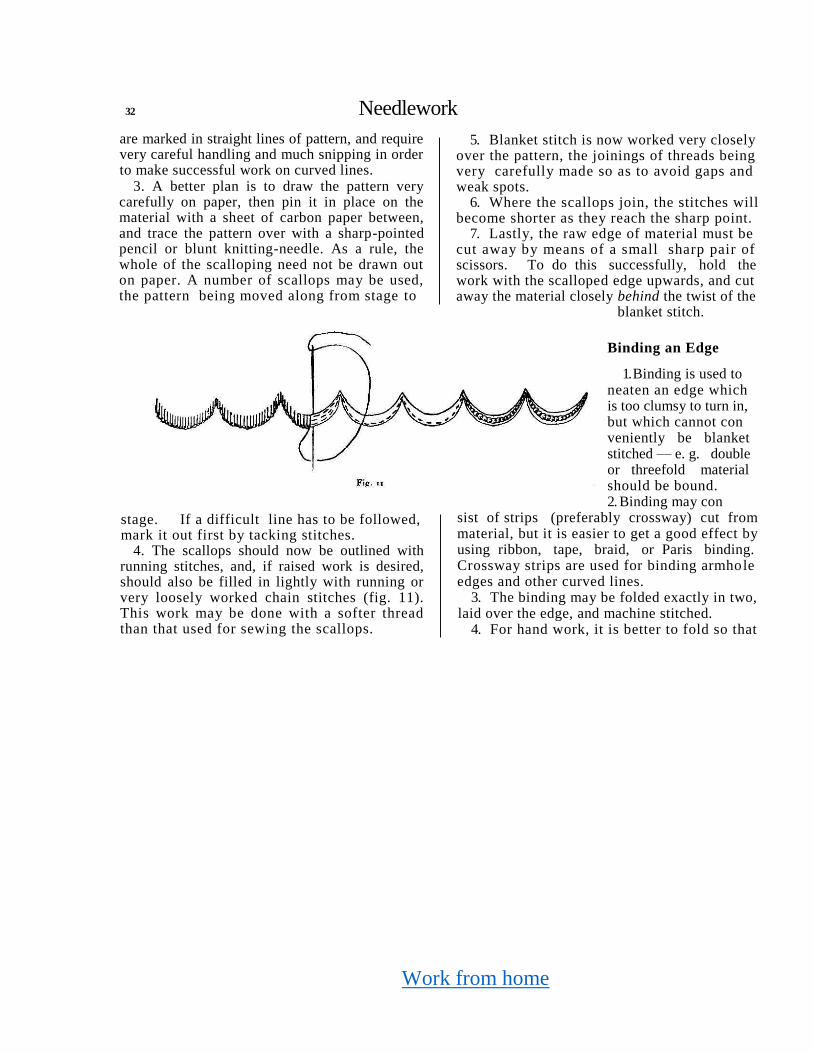
3. A better plan is to draw the pattern very carefully on paper, then pin it in place on the material with a sheet of carbon paper between, and trace the pattern over with a sharp-pointed pencil or blunt knitting-needle. As a rule, the whole of the scalloping need not be drawn out on paper. A number of scallops may be used, the pattern being moved along from stage to
stage. If a difficult line has to be followed, mark it out first by tacking stitches.
4. The scallops should now be outlined with running stitches, and, if raised work is desired, should also be filled in lightly with running or very loosely worked chain stitches (fig. 11). This work may be done with a softer thread than that used for sewing the scallops.
5. Blanket stitch is now worked very closely over the pattern, the joinings of threads being very carefully made so as to avoid gaps and weak spots.
6. Where the scallops join, the stitches will become shorter as they reach the sharp point.
7. Lastly, the raw edge of material must be cut away by means of a small sharp pair of scissors. To do this successfully, hold the work with the scalloped edge upwards, and cut away the material closely behind the twist of the
blanket stitch.
Binding an Edge
1. Binding is used to neaten an edge which is too clumsy to turn in, but which cannot con veniently be blanket stitched — e. g. double or threefold material should be bound. 2. Binding may con
sist of strips (preferably crossway) cut from material, but it is easier to get a good effect by using ribbon, tape, braid, or Paris binding. Crossway strips are used for binding armhole edges and other curved lines.
3. The binding may be folded exactly in two, laid over the edge, and machine stitched.
4. For hand work, it is better to fold so that
Work from home
Sewing 33
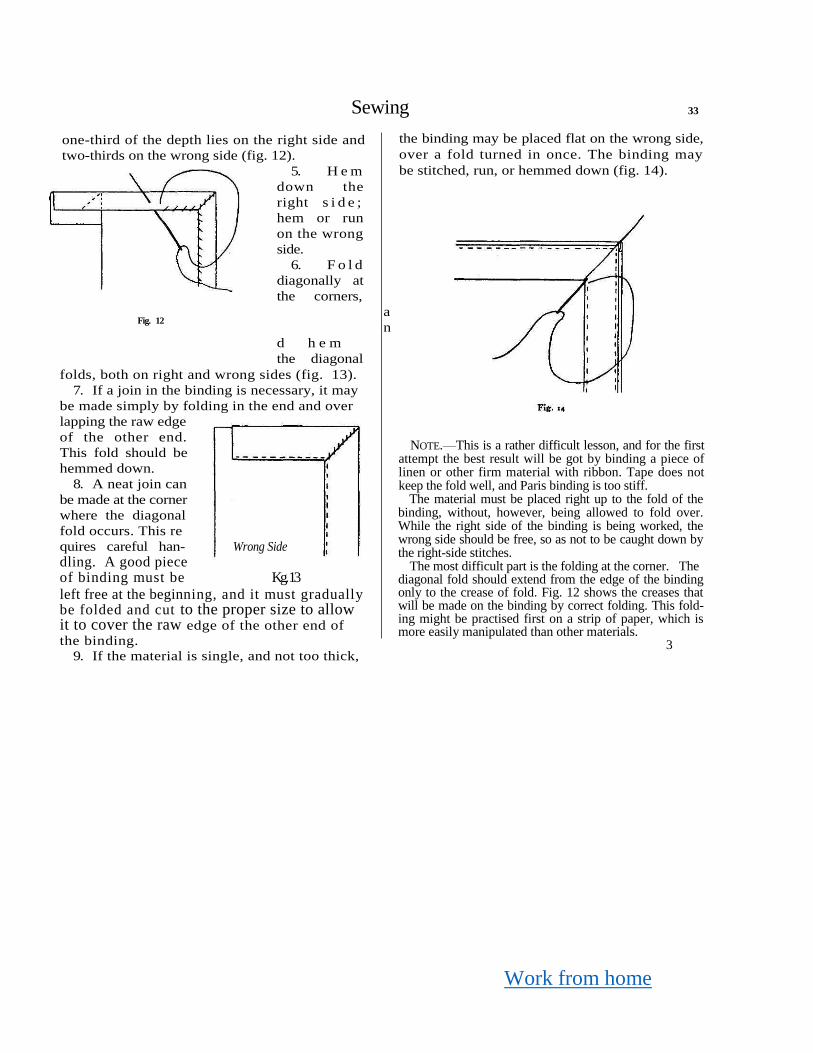
one-third of the depth lies on the right side and
two-thirds on the wrong side (fig. 12).
5. H e m
down the
right s i d e ;
hem or run
on the wrong
side.
6. F o l d
diagonally at
the corners,
a
n
d h e m
the diagonal
folds, both on right and wrong sides (fig. 13).
7. If a join in the binding is necessary, it may
be made simply by folding in the end and over
lapping the raw edge
of the other end.
This fold should be
hemmed down.
8. A neat join can
be made at the corner
where the diagonal
fold occurs. This re
quires careful han- Wrong Side
dling. A good piece
of binding must be Kg. 13
left free at the beginning, and it must gradually be folded and cut to the proper size to allow it to cover the raw edge of the other end of
the binding.
9. If the material is single, and not too thick,
the binding may be placed flat on the wrong side,
over a fold turned in once. The binding may
be stitched, run, or hemmed down (fig. 14).
NOTE.—This is a rather difficult lesson, and for the first attempt the best result will be got by binding a piece of linen or other firm material with ribbon. Tape does not keep the fold well, and Paris binding is too stiff.
The material must be placed right up to the fold of the binding, without, however, being allowed to fold over. While the right side of the binding is being worked, the wrong side should be free, so as not to be caught down by the right-side stitches.
The most difficult part is the folding at the corner. The diagonal fold should extend from the edge of the binding only to the crease of fold. Fig. 12 shows the creases that will be made on the binding by correct folding. This fold-ing might be practised first on a strip of paper, which is more easily manipulated than other materials.
3
Fig. 12
Work from home
34 Needlework
Attaching a False Hem or Decorative Band to a Square-necked Garment
1. The band of material may be cut straight or on the cross, and should be joined into one sufficiently long piece before it is put on.
2. The edges of the garment should be turned down once either to the right side or to the wrong side, the corners being snipped to make them lie flat. If the material is at all difficult, this fold should be tacked.
3. The band should be turned in singly along both its long edges and the folds tacked down.
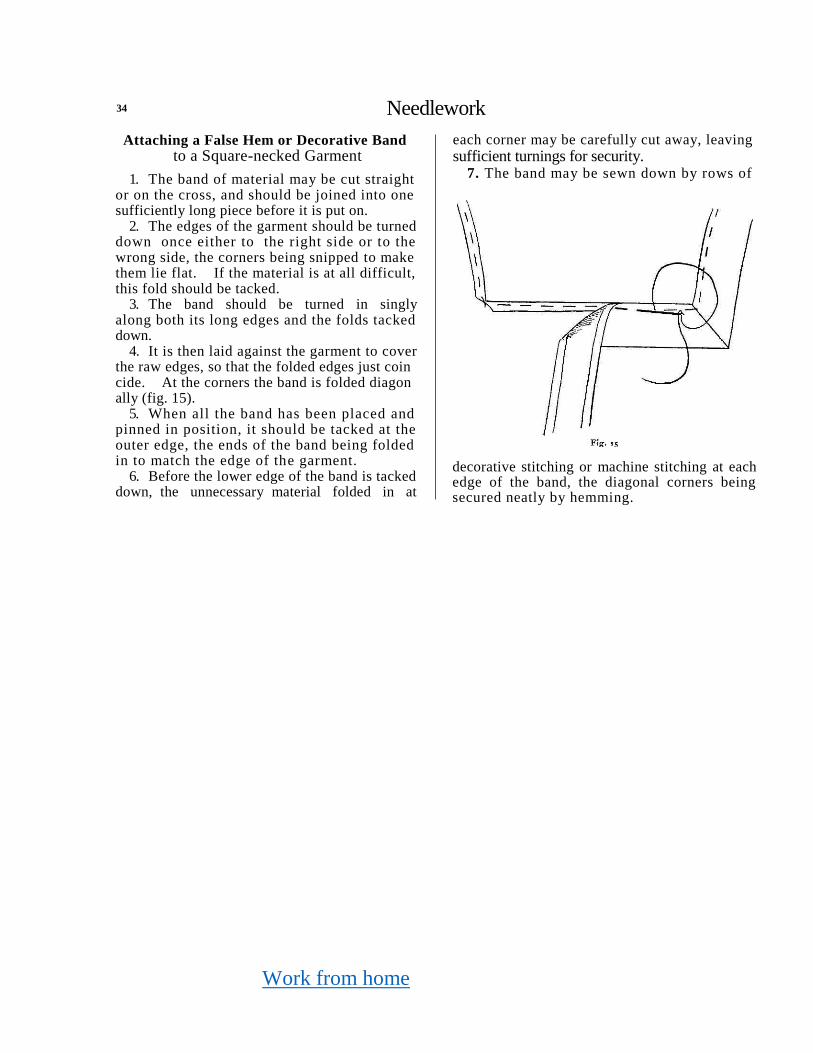
4. It is then laid against the garment to cover the raw edges, so that the folded edges just coin cide. At the corners the band is folded diagon ally (fig. 15).
5. When all the band has been placed and pinned in position, it should be tacked at the outer edge, the ends of the band being folded in to match the edge of the garment.
6. Before the lower edge of the band is tacked down, the unnecessary material folded in at
each corner may be carefully cut away, leaving
sufficient turnings for security. 7. The band may be sewn down by rows of
decorative stitching or machine stitching at each edge of the band, the diagonal corners being secured neatly by hemming.
Work from home
Sewing 35
CHAPTER IV
SEAMS
In teaching pupils to make seams, the stitch most commonly used for joining (apart from machine stitching) is running. An occasional back stitch, say at every sixth stitch, is very useful in strengthening the seam and in preventing it from dragging. Stitching is only used if great firmness is required and if machine stitching is not possible.
The most important thing to teach about seams is the necessity for flattening out the seam thoroughly after the first row of sewing has been done. This is best done by spreading out the seam and drawing the finger-nail or the end of the thimble along it firmly.
In children's work, plenty of preliminary pinning and tacking is taken for granted, although not always mentioned.
Single Seam
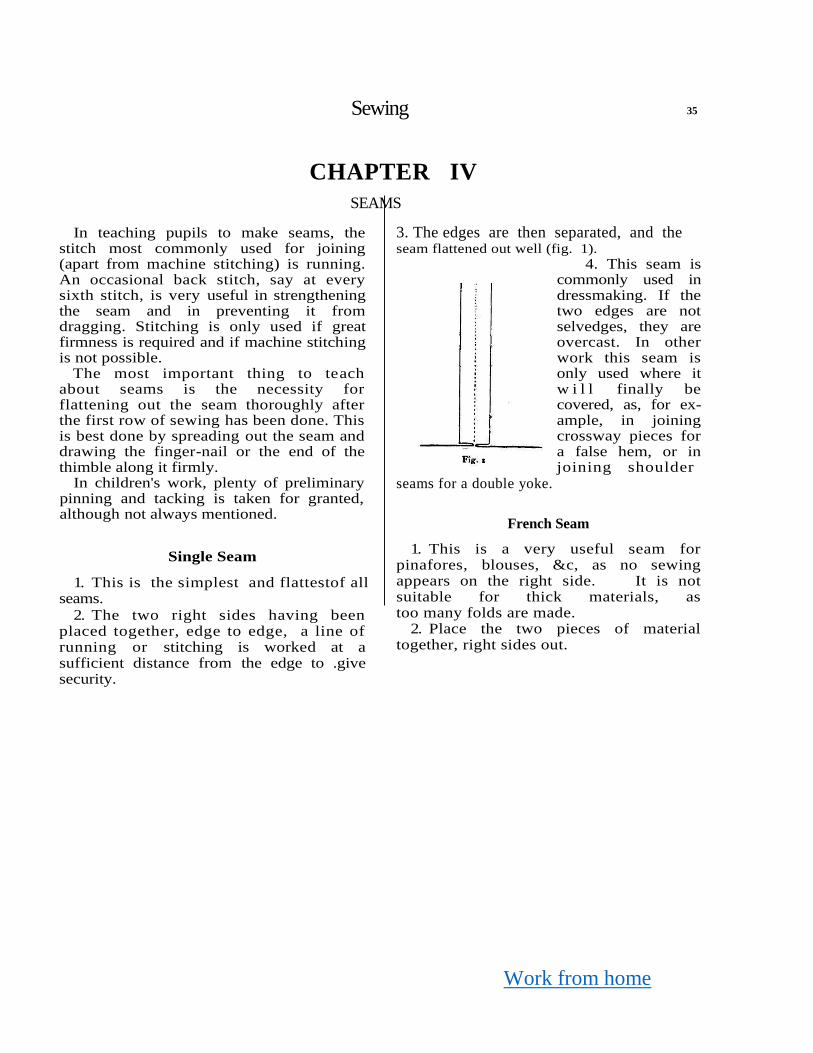
1. This is the simplest and flattestof all seams.
2. The two right sides having been placed together, edge to edge, a line of running or stitching is worked at a sufficient distance from the edge to .give security.
3. The edges are then separated, and the seam flattened out well (fig. 1).
4. This seam is commonly used in dressmaking. If the two edges are not selvedges, they are overcast. In other work this seam is only used where it w i l l finally be covered, as, for ex-ample, in joining crossway pieces for a false hem, or in joining shoulder
seams for a double yoke.
French Seam
1. This is a very useful seam for pinafores, blouses, &c, as no sewing appears on the right side. It is not suitable for thick materials, as too many folds are made.
2. Place the two pieces of material together, right sides out.
Work from home
36 Needlework
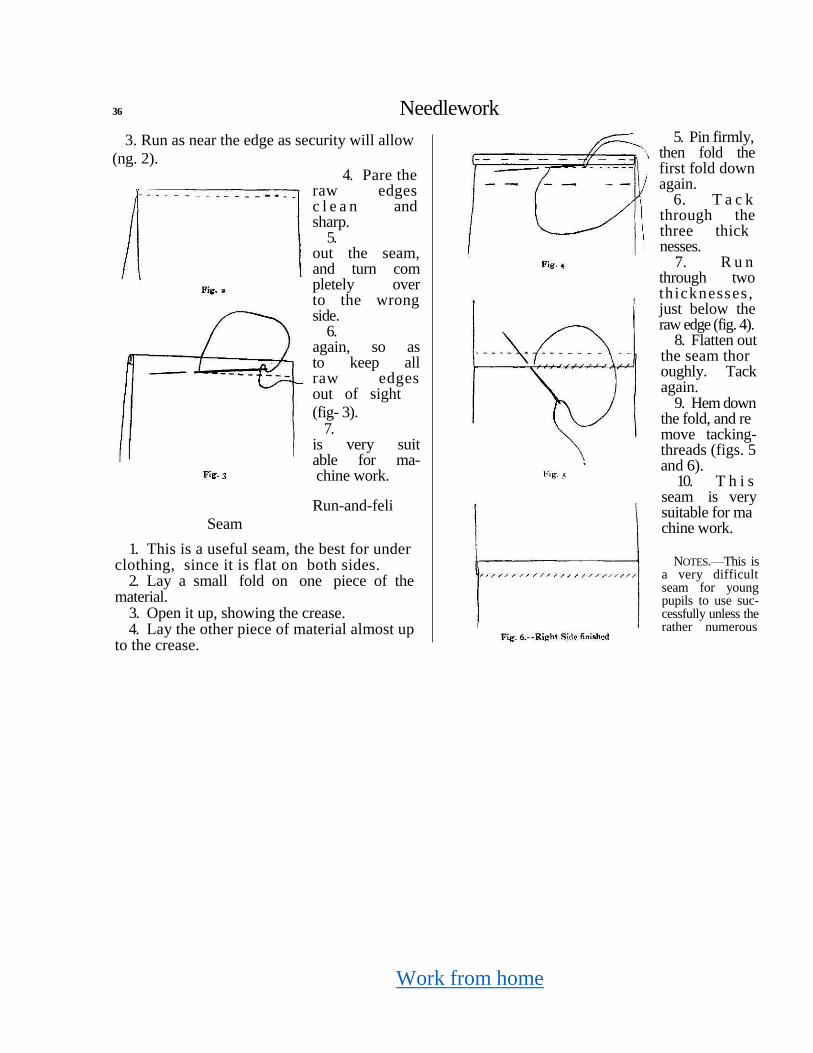
3. Run as near the edge as security will allow
(ng. 2). 4. Pare the
raw edges c l e a n and sharp.
5. Flatten out the seam, and turn com pletely over to the wrong side.
6. R u n again, so as to keep all raw edges out of sight
(fig- 3). 7. This seam
is very suit able for ma- chine work.
Run-and-feli
Seam
1. This is a useful seam, the best for under clothing, since it is flat on both sides.
2. Lay a small fold on one piece of the material.
3. Open it up, showing the crease. 4. Lay the other piece of material almost up
to the crease.
5. Pin firmly, then fold the first fold down again.
6. T a c k through the three thick nesses.
7. R u n through two thicknesses , just below the raw edge (fig. 4).
8. Flatten out the seam thor oughly. Tack again.
9. Hem down the fold, and re move tacking- threads (figs. 5 and 6).
10. T h i s seam is very suitable for ma chine work.
NOTES.—This is a very difficult seam for young pupils to use suc-cessfully unless the rather numerous
Work from home
Sewing 37
stages mentioned above are all gone through; but, as proficiency is gained, several of these stages will be omitted.
The special points of difficulty are: (i) slipping enough material under the fell to make the seam even and secure, and (2) making sure that the seam is flat before hemming.
Seams for Flannel
A. The Stronger Method.—
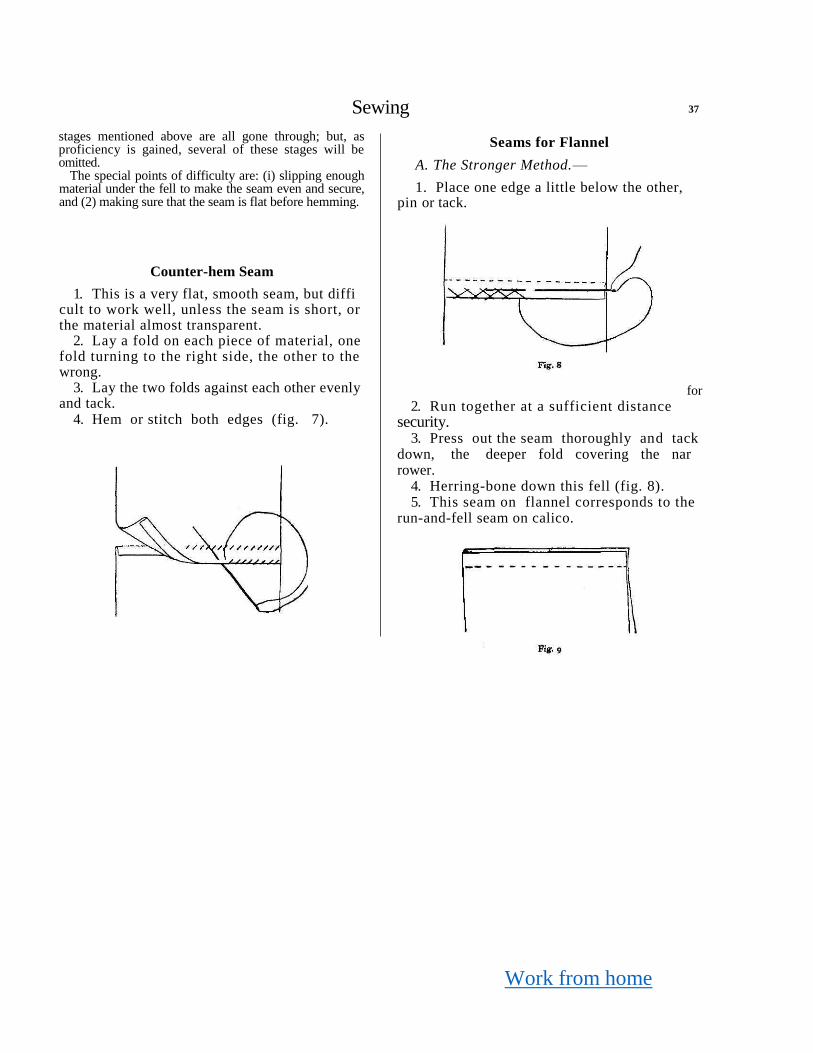
1. Place one edge a little below the other, pin or tack.
Counter-hem Seam
1. This is a very flat, smooth seam, but diffi cult to work well, unless the seam is short, or the material almost transparent.
2. Lay a fold on each piece of material, one fold turning to the right side, the other to the wrong.
3. Lay the two folds against each other evenly and tack.
4. Hem or stitch both edges (fig. 7).
for
2. Run together at a sufficient distance security.
3. Press out the seam thoroughly and tack down, the deeper fold covering the nar rower.
4. Herring-bone down this fell (fig. 8). 5. This seam on flannel corresponds to the
run-and-fell seam on calico.

Work from home
38 Needlework
B. The Flatter Method.—
1. Place the two edges together exactly. 2. Run a little way down, leaving room for
herring-bone stitches (fig. 9). 3. Press out the seam, separating the
edges. 4. Herring-bone down each side (fig. 10). The first method is usually employed for skirts
or wide garments, the second for bodices or where smoothness is essential.
CHAPTER V
TAPES AND THEIR USES
NOTE.—For the first lessons on the management of tapes it is well to use a wide, crisp tape, as the usual soft, narrow Indian tape is not easy for small fingers to deal with. Unbleached linen tape is very suitable, especially as it matches well with the unbleached cotton which pupils are probably using at an early stage.
Running in Tapes
1. The hem or runner should be rather wider than the tape.
2. Having run the tape through with a bod kin, fix it at the middle by a few stitches (fig. 1).
3. Finish the ends of the tape by a hem tacked or hemmed down.
This hem may be wide or narrow, according
to the nature of the work and the ability of the pupils.
Work from home
Sewing 39
Double Draw-strings (for a Bag)
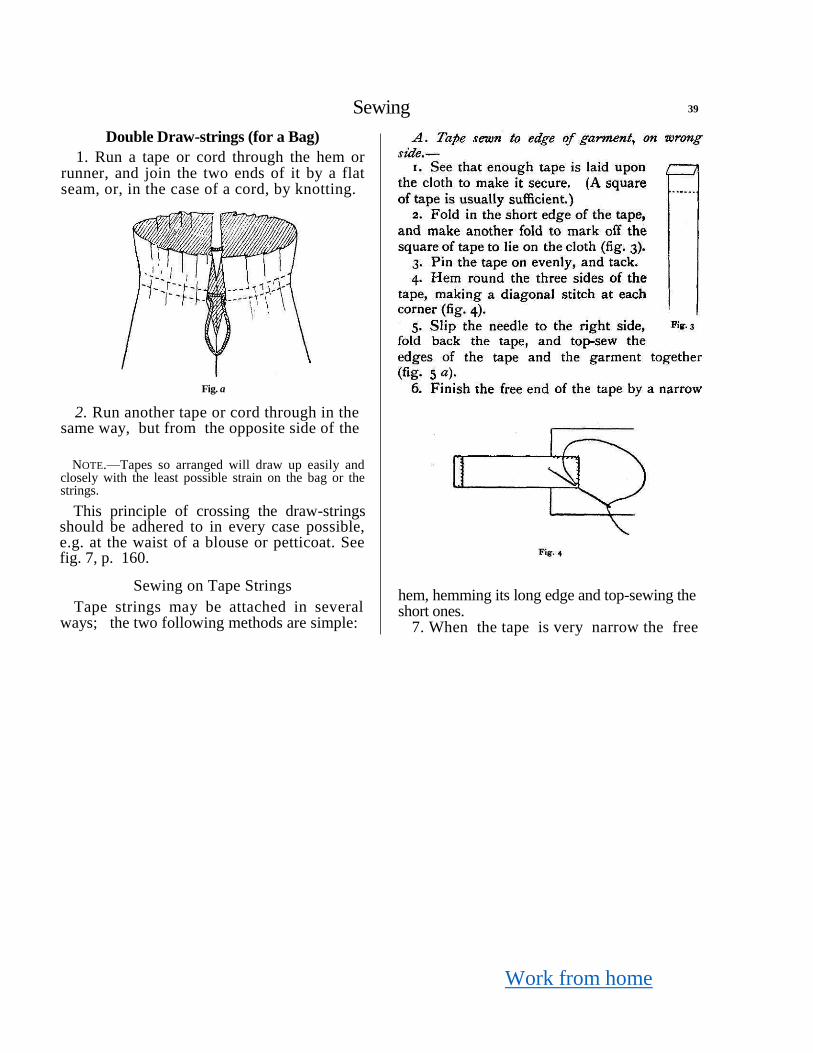
1. Run a tape or cord through the hem or runner, and join the two ends of it by a flat seam, or, in the case of a cord, by knotting.
Fig. a
2. Run another tape or cord through in the same way, but from the opposite side of the
NOTE.—Tapes so arranged will draw up easily and closely with the least possible strain on the bag or the strings.
This principle of crossing the draw-strings should be adhered to in every case possible, e.g. at the waist of a blouse or petticoat. See fig. 7, p. 160.
Sewing on Tape Strings
Tape strings may be attached in several ways; the two following methods are simple:
hem, hemming its long edge and top-sewing the short ones.
7. When the tape is very narrow the free
Work from home
Fig. 5
end is often buttonhole stitched instead of being
hemmed.
NOTE.—As the pupils advance, they would be able to omit some of the steps mentioned.
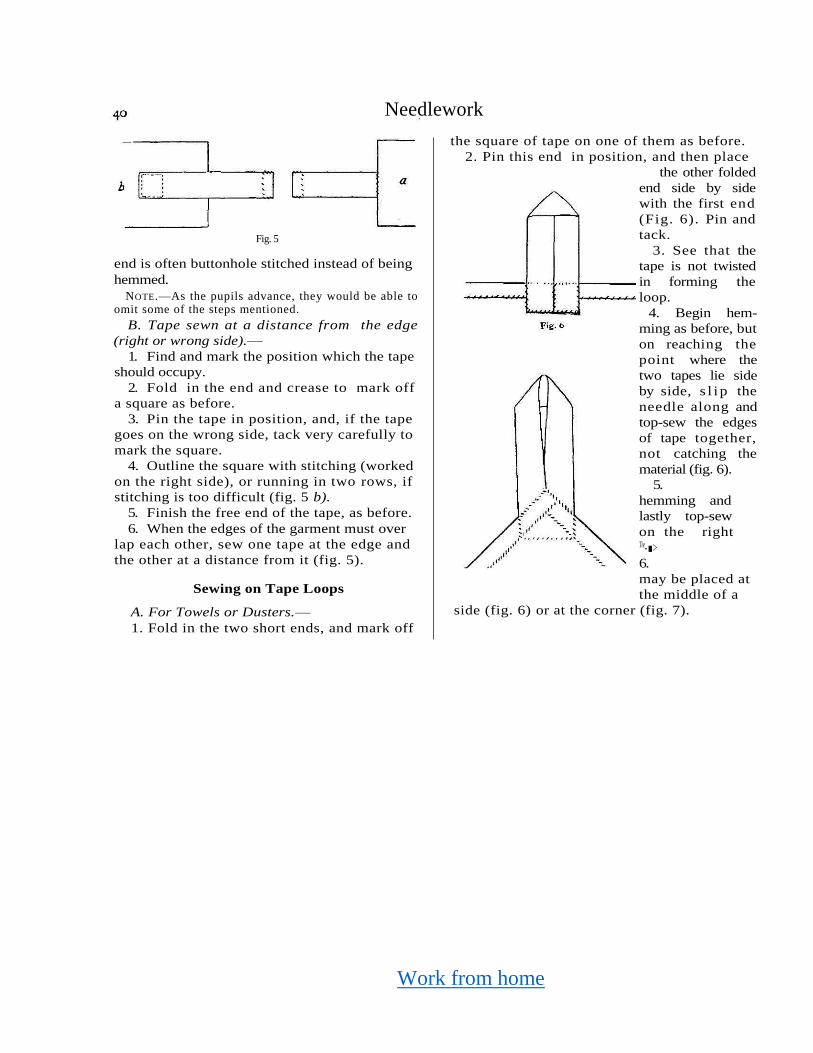
B. Tape sewn at a distance from the edge
(right or wrong side).—
1. Find and mark the position which the tape
should occupy.
2. Fold in the end and crease to mark off
a square as before.
3. Pin the tape in position, and, if the tape
goes on the wrong side, tack very carefully to
mark the square.
4. Outline the square with stitching (worked
on the right side), or running in two rows, if
stitching is too difficult (fig. 5 b).
5. Finish the free end of the tape, as before.
6. When the edges of the garment must over
lap each other, sew one tape at the edge and
the other at a distance from it (fig. 5).
Sewing on Tape Loops
A. For Towels or Dusters.—
1. Fold in the two short ends, and mark off
the square of tape on one of them as before.
2. Pin this end in position, and then place
the other folded
end side by side
with the first end
(Fig. 6). Pin and
tack.
3. See that the
tape is not twisted
in forming the
loop.
4. Begin hem-
ming as before, but
on reaching the
point where the
two tapes lie side
by side, s l i p the
needle along and
top-sew the edges
of tape together,
not catching the
material (fig. 6).
5. Finish the
hemming and
lastly top-sew
on the right Tie- ■> side.
6. The loop
may be placed at
the middle of a
side (fig. 6) or at the corner (fig. 7).
Needlework
Work from home
Sewing 41
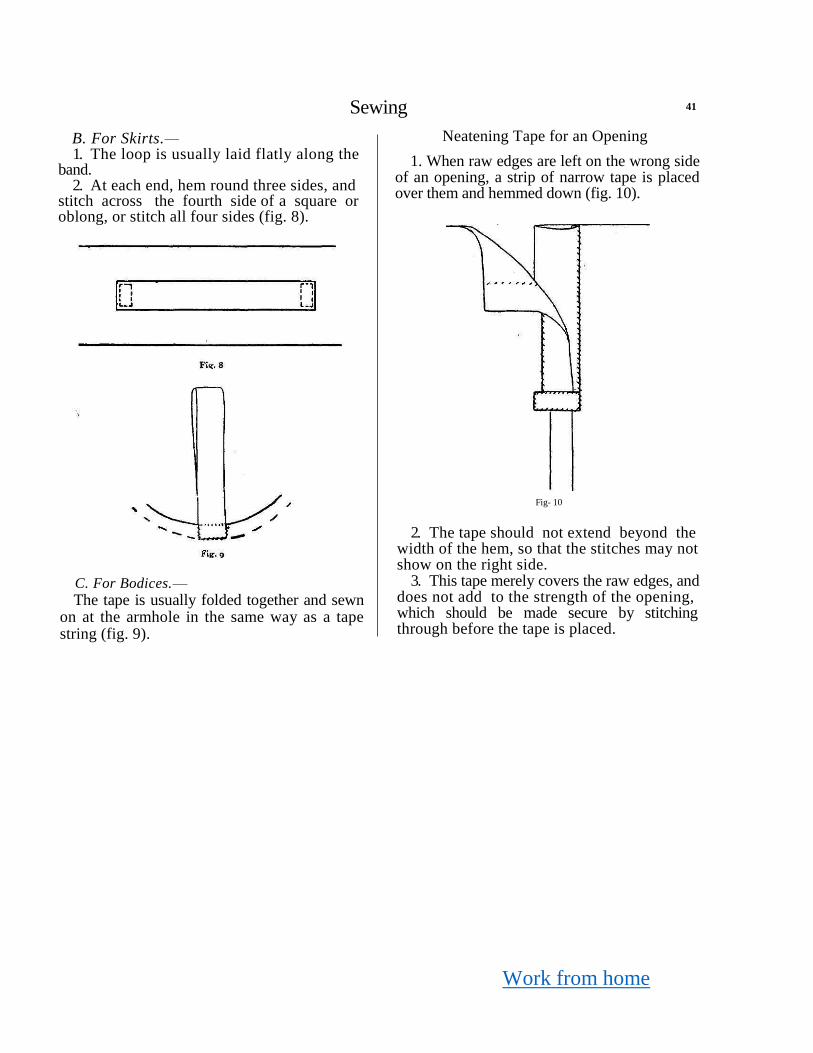
B. For Skirts.—
1. The loop is usually laid flatly along the band.
2. At each end, hem round three sides, and stitch across the fourth side of a square or oblong, or stitch all four sides (fig. 8).
C. For Bodices.—
The tape is usually folded together and sewn on at the armhole in the same way as a tape string (fig. 9).
Neatening Tape for an Opening
1. When raw edges are left on the wrong side of an opening, a strip of narrow tape is placed over them and hemmed down (fig. 10).
Fig- 10
2. The tape should not extend beyond the width of the hem, so that the stitches may not show on the right side.
3. This tape merely covers the raw edges, and does not add to the strength of the opening, which should be made secure by stitching through before the tape is placed.
Work from home
42 Needlework
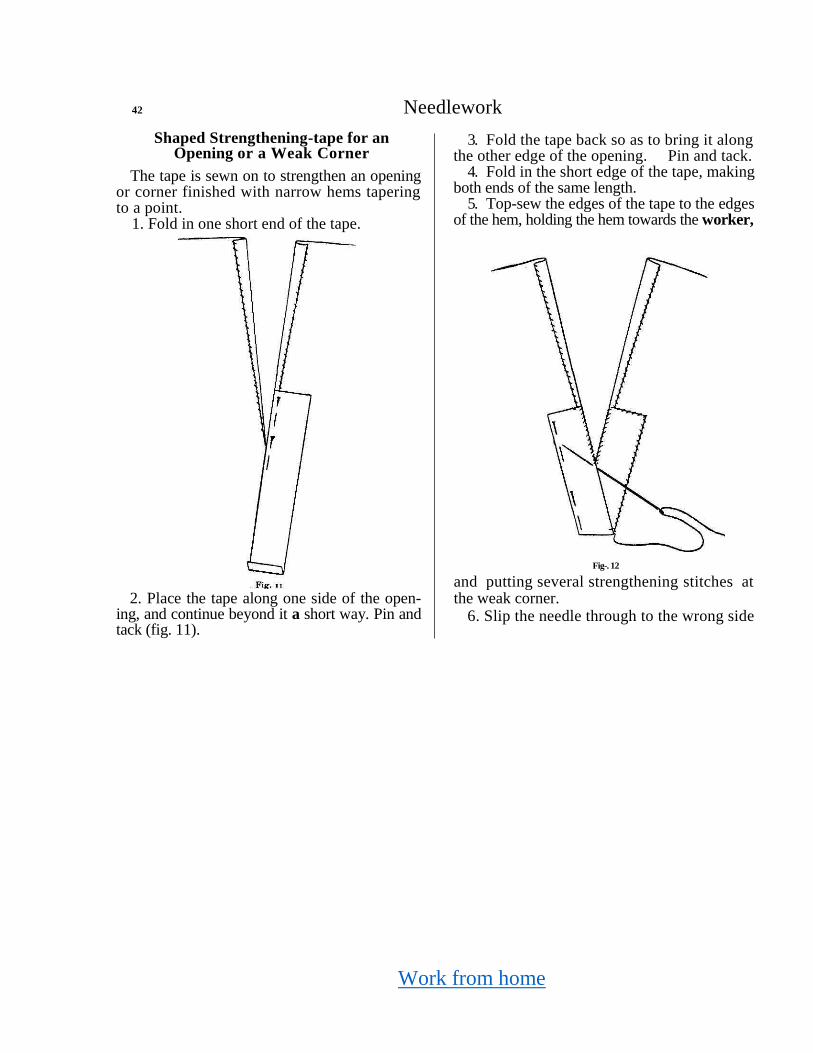
Shaped Strengthening-tape for an Opening or a Weak Corner
The tape is sewn on to strengthen an opening or corner finished with narrow hems tapering to a point.
1. Fold in one short end of the tape.
3. Fold the tape back so as to bring it along the other edge of the opening. Pin and tack.
4. Fold in the short edge of the tape, making both ends of the same length.
5. Top-sew the edges of the tape to the edges of the hem, holding the hem towards the worker,
Fig-. 12
2. Place the tape along one side of the open-ing, and continue beyond it a short way. Pin and tack (fig. 11).
and putting several strengthening stitches at the weak corner.
6. Slip the needle through to the wrong side
Work from home
Sewing 43
and hem all round the tape, making diagonal stitches at the corners.
7. On reaching the point where the tape over laps itself, slip the needle along, and hem the tape to the tape only (fig. 12).
8. Finish firmly at the point where the sewing began.
NOTE.—In sewing on tapes and other small pieces of work, it is best to arrange the working so as to avoid having to break off the thread and begin again.
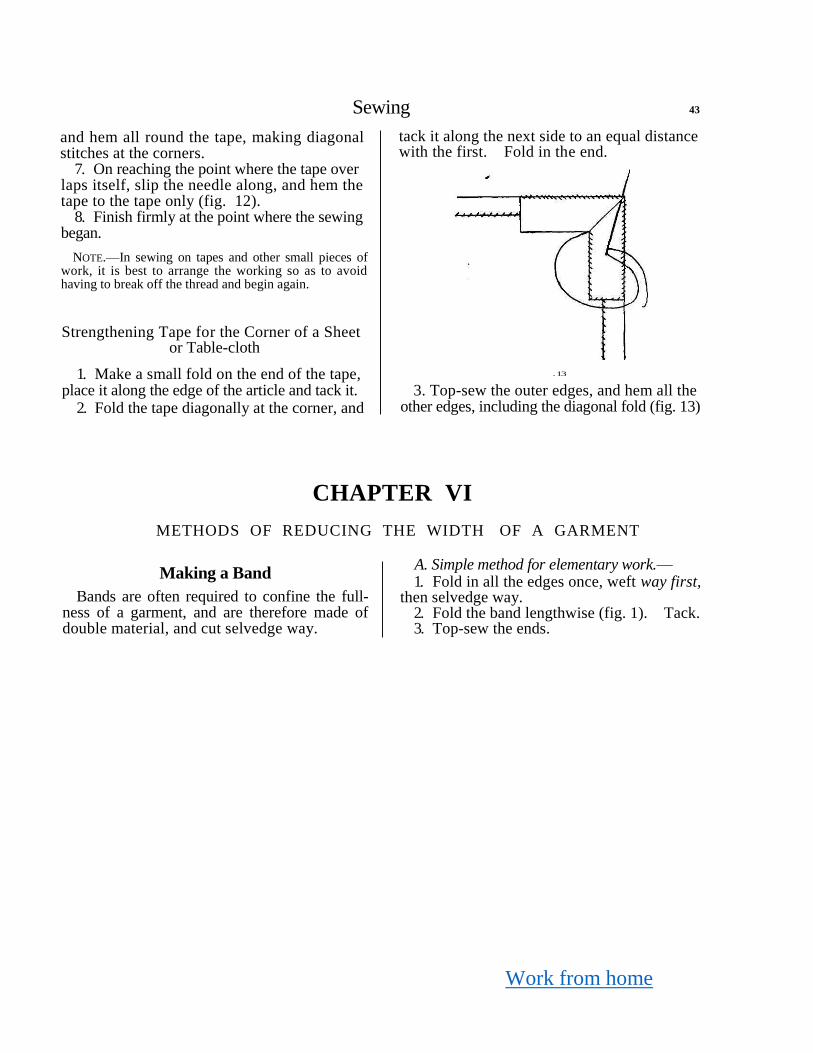
Strengthening Tape for the Corner of a Sheet or Table-cloth
1. Make a small fold on the end of the tape, place it along the edge of the article and tack it.
2. Fold the tape diagonally at the corner, and
tack it along the next side to an equal distance with the first. Fold in the end.
. 13
3. Top-sew the outer edges, and hem all the other edges, including the diagonal fold (fig. 13)
CHAPTER VI
METHODS OF REDUCING THE WIDTH OF A GARMENT
Making a Band
Bands are often required to confine the full-ness of a garment, and are therefore made of double material, and cut selvedge way.
A. Simple method for elementary work.—
1. Fold in all the edges once, weft way first, then selvedge way.
2. Fold the band lengthwise (fig. 1). Tack. 3. Top-sew the ends.
Work from home
44 Needlework
3. Pleats must not overlap each other (fig. 3). 4. Measure the amount of fullness to be got
rid of, and decide the number of pleats to be made. Since each pleat lifts material equal to twice its width, the size of pleat required will
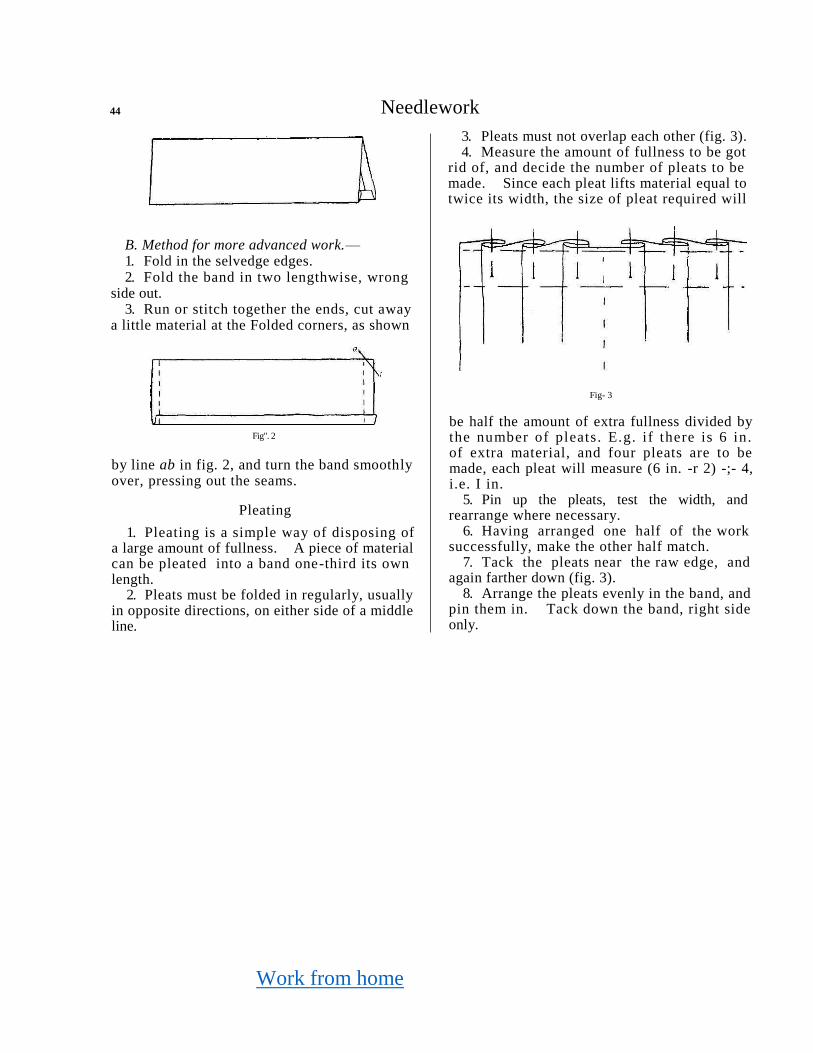
B. Method for more advanced work.—
1. Fold in the selvedge edges. 2. Fold the band in two lengthwise, wrong
side out. 3. Run or stitch together the ends, cut away
a little material at the Folded corners, as shown
Fig". 2
by line ab in fig. 2, and turn the band smoothly over, pressing out the seams.
Pleating
1. Pleating is a simple way of disposing of a large amount of fullness. A piece of material can be pleated into a band one-third its own length.
2. Pleats must be folded in regularly, usually in opposite directions, on either side of a middle line.
Fig- 3
be half the amount of extra fullness divided by the number of pleats. E.g. i f there is 6 in. of extra material, and four pleats are to be made, each pleat will measure (6 in. -r 2) -;- 4, i.e. I in.
5. Pin up the pleats, test the width, and rearrange where necessary.
6. Having arranged one half of the work successfully, make the other half match.
7. Tack the pleats near the raw edge, and again farther down (fig. 3).
8. Arrange the pleats evenly in the band, and pin them in. Tack down the band, right side only.
Work from home
Sewing 45
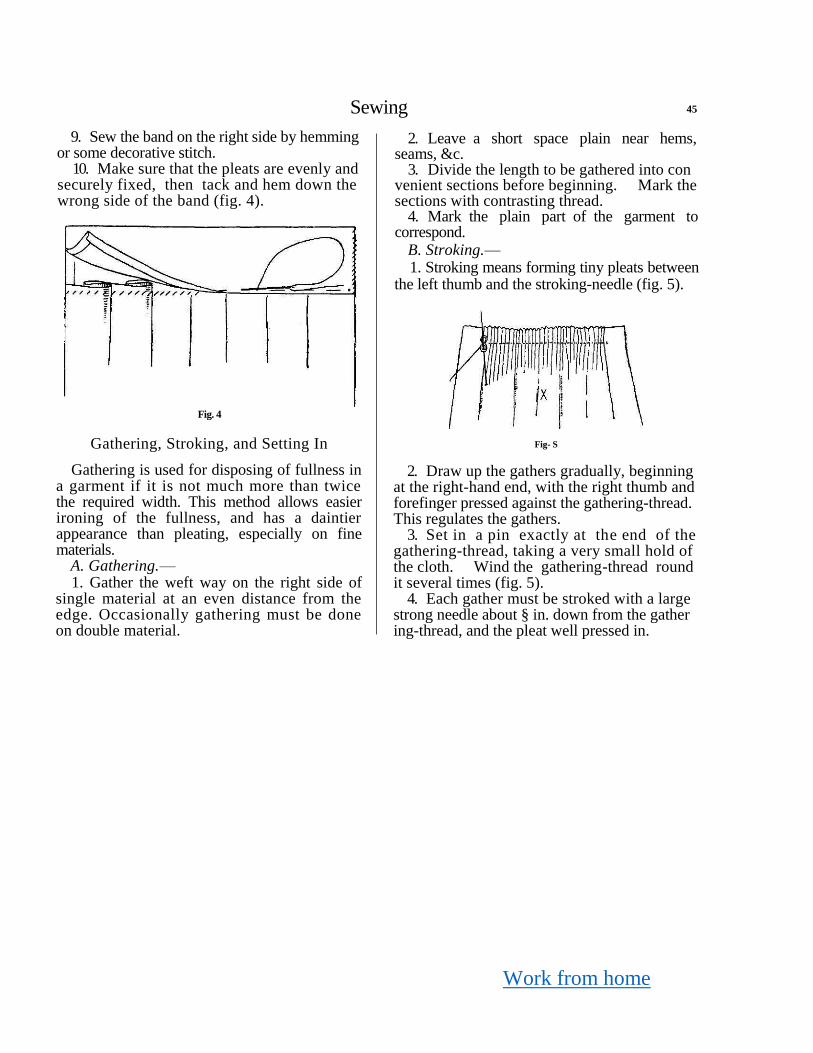
9. Sew the band on the right side by hemming or some decorative stitch.
10. Make sure that the pleats are evenly and securely fixed, then tack and hem down the wrong side of the band (fig. 4).
Fig. 4
Gathering, Stroking, and Setting In
Gathering is used for disposing of fullness in a garment if it is not much more than twice the required width. This method allows easier ironing of the fullness, and has a daintier appearance than pleating, especially on fine materials.
A. Gathering.—
1. Gather the weft way on the right side of single material at an even distance from the edge. Occasionally gathering must be done on double material.
2. Leave a short space plain near hems, seams, &c.
3. Divide the length to be gathered into con venient sections before beginning. Mark the sections with contrasting thread.
4. Mark the plain part of the garment to correspond.
B. Stroking.—
1. Stroking means forming tiny pleats between the left thumb and the stroking-needle (fig. 5).
Fig- S
2. Draw up the gathers gradually, beginning at the right-hand end, with the right thumb and forefinger pressed against the gathering-thread. This regulates the gathers.
3. Set in a pin exactly at the end of the gathering-thread, taking a very small hold of the cloth. Wind the gathering-thread round it several times (fig. 5).
4. Each gather must be stroked with a large strong needle about § in. down from the gather ing-thread, and the pleat well pressed in.
Work from home
46 Needlework
5. If the material cannot be stroked, a double line of gathering will regulate the fullness better than a single line.
NOTE.—This is rather a difficult exercise for children. A good preliminary exercise is to fold small pleats (always becoming finer) on paper with the aid of a knitting-needle or darner. There would, of course, be no gathering-thread, but pleats are easily creased in on paper. The pupil learns how to handle the stroking-needle, for if it is not correctly held the paper is torn. Cloth often suffers damage from the same cause, but children do not so readily discover and correct their fault, as cloth has more resistance.
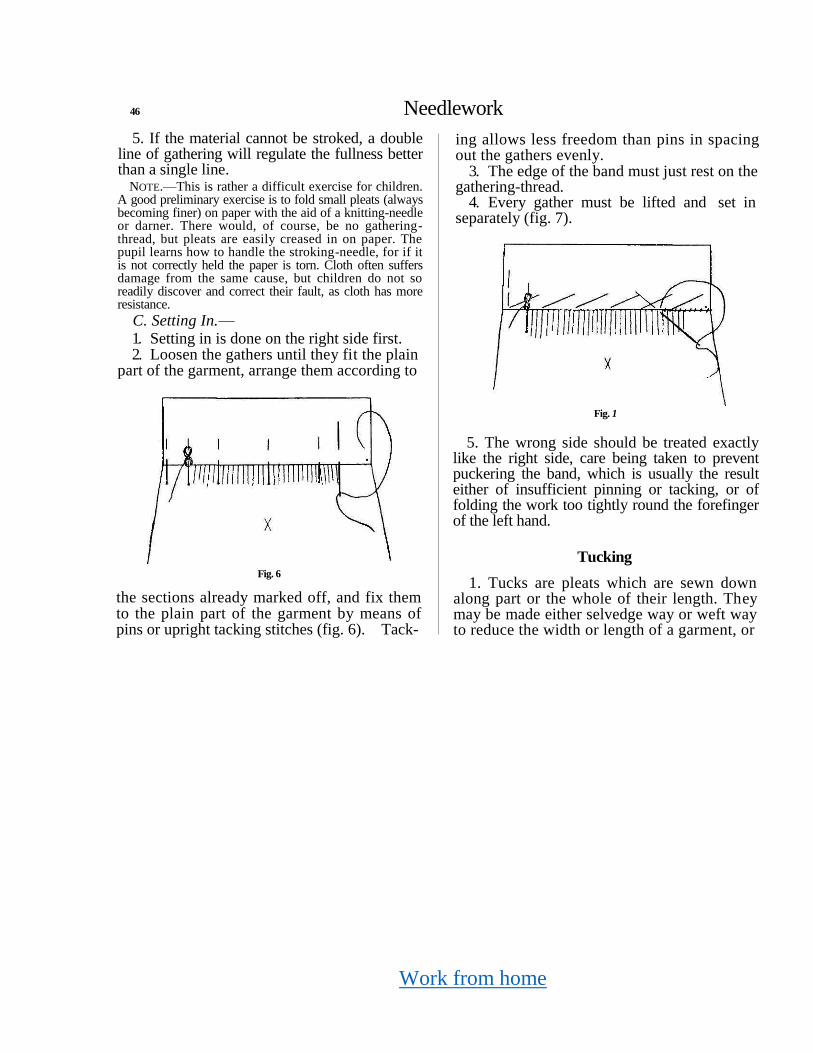
C. Setting In.—
1. Setting in is done on the right side first. 2. Loosen the gathers until they fit the plain
part of the garment, arrange them according to
Fig. 6
the sections already marked off, and fix them to the plain part of the garment by means of pins or upright tacking stitches (fig. 6). Tack-
ing allows less freedom than pins in spacing out the gathers evenly.
3. The edge of the band must just rest on the gathering-thread.
4. Every gather must be lifted and set in separately (fig. 7).
Fig. 1
5. The wrong side should be treated exactly like the right side, care being taken to prevent puckering the band, which is usually the result either of insufficient pinning or tacking, or of folding the work too tightly round the forefinger of the left hand.
Tucking
1. Tucks are pleats which are sewn down along part or the whole of their length. They may be made either selvedge way or weft way to reduce the width or length of a garment, or

Work from home
Sewing 47
merely for ornament. As ornament, they may be arranged in groups or evenly spaced, and may be of the same or of varying widths.
2. Calculate the amount of material to be dis-posed of, as in pleating, and plan out the best arrangement of tucks.
Fig. 8
The calculation is made just as for pleating. For example, if 4 in. of fullness has to be dis-posed of, and J-in. tucks are wanted, eight tucks may be made. The space between may be the same as, or less than, the width of the tuck. Having marked the edge of the first tuck, the calculation for the other tucks might be as
follows: from edge of tuck allow \ in. for depth of tuck, \ in. for tuck to lie on, \ in. for space between, \ in. for depth of second tuck. From tuck edge to tuck edge would therefore measure £ in. (fig. 8).
3. Lift the tucks very evenly; if in the selvedge direction, then fold along a thread. Tack the whole length of the tuck.
4. Lift and tack all the tucks on any section of a garment, and test the correctness of width or length before sewing any of them.
5. Run or machine stitch the tucks, working the running on the under side to avoid having to turn the work at every join. If tucks are lifted with a view to letting down the garment at a later stage, running is better than machine stitching.
6. Press out the tucks flatly after finishing the sewing.
Whipping
1. Very fine materials and muslin frills are often whipped instead of being gathered.
2. Long pieces of work should be divided into sections as in gathering.
3. The edge of the material must be cut very clean, and rolled (not folded) down to the wrong side between the thumb and forefinger of the left hand.
4. Having fixed the thread securely at the beginning, roll a little bit of the material firmly,
Work from home
48 Needlework
and bring the needle through the single material from the right side to the wrong, just beneath the roll (fig. 9).
If the whipping-stitch is worked too closely, the roll will not gather up well.
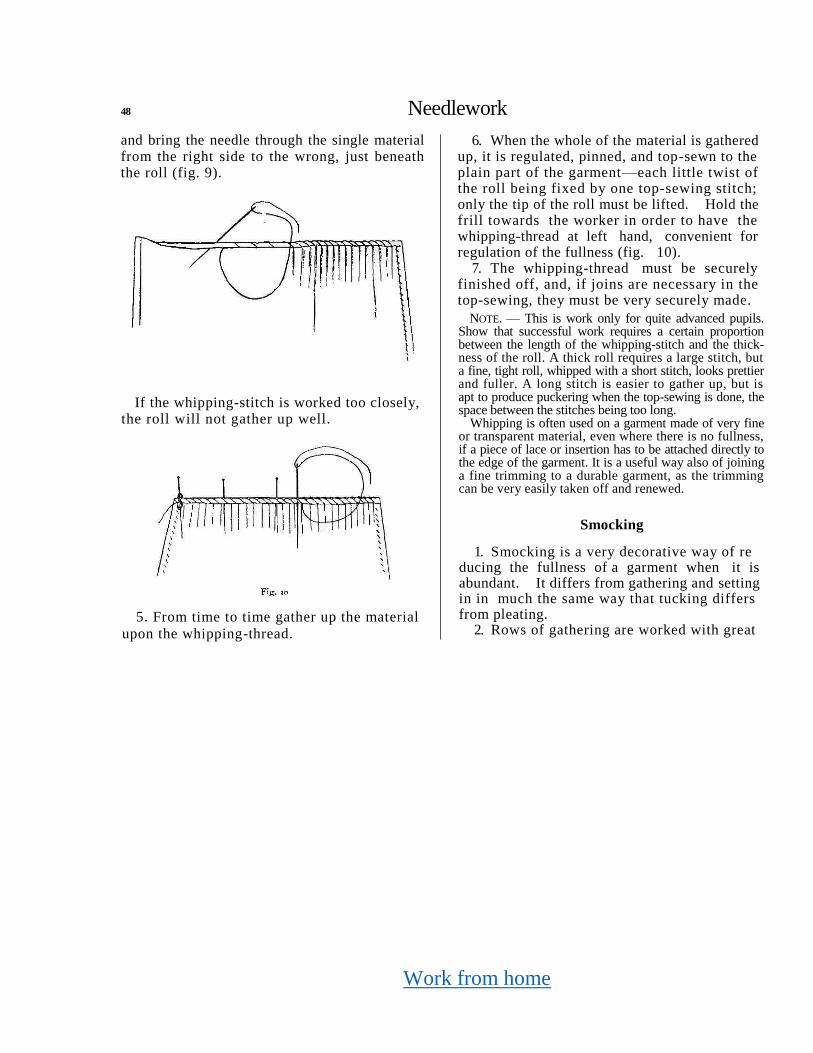
5. From time to time gather up the material
upon the whipping-thread.
6. When the whole of the material is gathered up, it is regulated, pinned, and top-sewn to the plain part of the garment—each little twist of the roll being fixed by one top-sewing stitch; only the tip of the roll must be lifted. Hold the frill towards the worker in order to have the whipping-thread at left hand, convenient for regulation of the fullness (fig. 10).
7. The whipping-thread must be securely finished off, and, if joins are necessary in the top-sewing, they must be very securely made.
NOTE. — This is work only for quite advanced pupils. Show that successful work requires a certain proportion between the length of the whipping-stitch and the thick-ness of the roll. A thick roll requires a large stitch, but a fine, tight roll, whipped with a short stitch, looks prettier and fuller. A long stitch is easier to gather up, but is apt to produce puckering when the top-sewing is done, the space between the stitches being too long.
Whipping is often used on a garment made of very fine or transparent material, even where there is no fullness, if a piece of lace or insertion has to be attached directly to the edge of the garment. It is a useful way also of joining a fine trimming to a durable garment, as the trimming can be very easily taken off and renewed.
Smocking
1. Smocking is a very decorative way of re ducing the fullness of a garment when it is abundant. It differs from gathering and setting in in much the same way that tucking differs from pleating.
2. Rows of gathering are worked with great
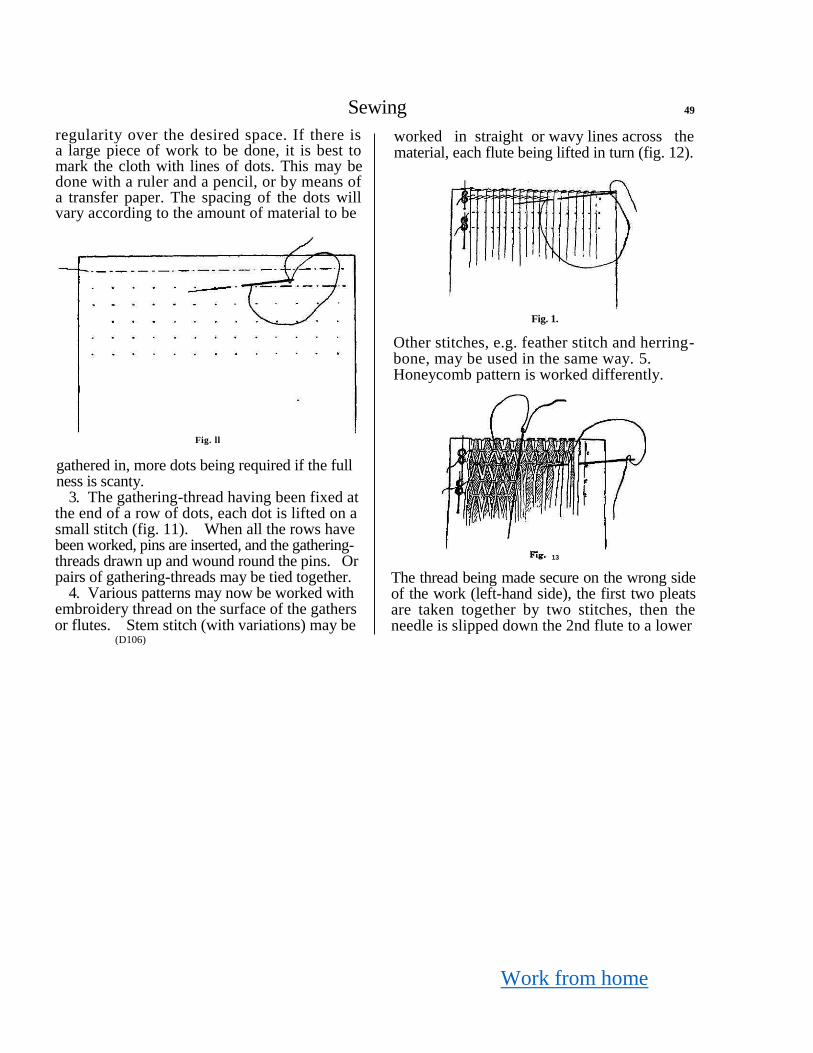
Work from home
Sewing 49
regularity over the desired space. If there is a large piece of work to be done, it is best to mark the cloth with lines of dots. This may be done with a ruler and a pencil, or by means of a transfer paper. The spacing of the dots will vary according to the amount of material to be
Fig. ll
gathered in, more dots being required if the full ness is scanty.
3. The gathering-thread having been fixed at the end of a row of dots, each dot is lifted on a small stitch (fig. 11). When all the rows have been worked, pins are inserted, and the gathering- threads drawn up and wound round the pins. Or pairs of gathering-threads may be tied together.
4. Various patterns may now be worked with embroidery thread on the surface of the gathers or flutes. Stem stitch (with variations) may be
(D106)
worked in straight or wavy lines across the material, each flute being lifted in turn (fig. 12).
Fig. 1.
Other stitches, e.g. feather stitch and herring-bone, may be used in the same way. 5. Honeycomb pattern is worked differently.
The thread being made secure on the wrong side of the work (left-hand side), the first two pleats are taken together by two stitches, then the needle is slipped down the 2nd flute to a lower
13
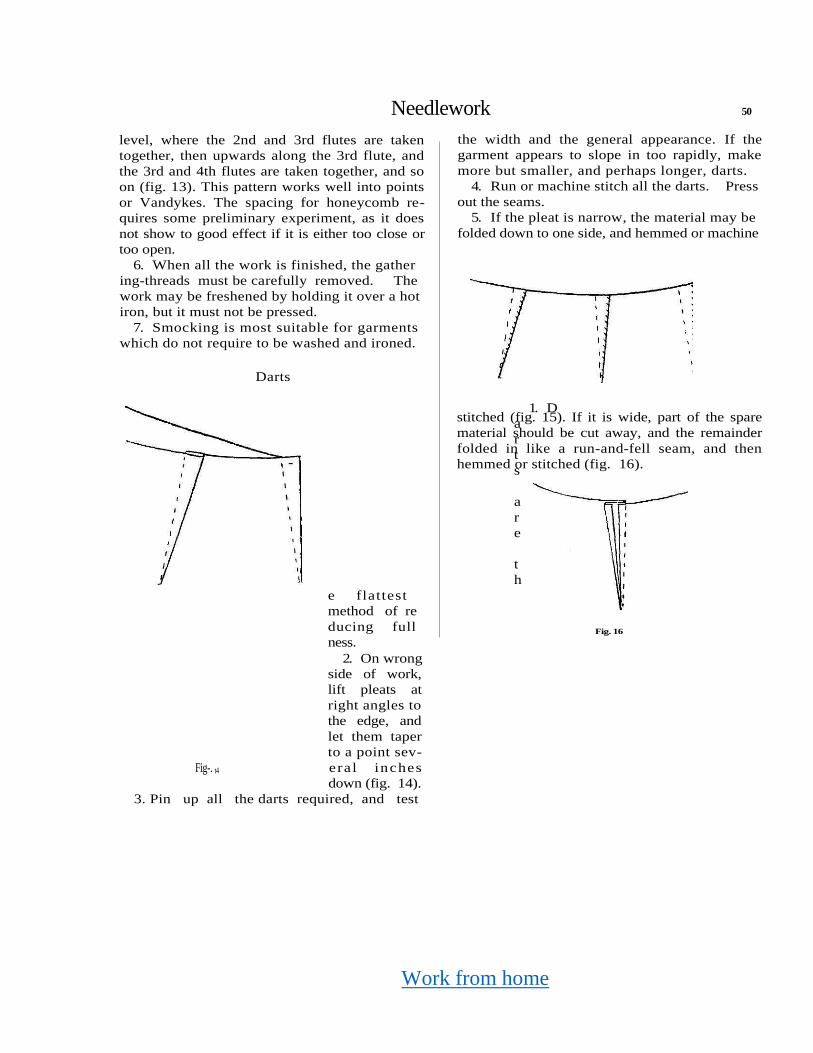
Work from home
Needlework 50
level, where the 2nd and 3rd flutes are taken
together, then upwards along the 3rd flute, and
the 3rd and 4th flutes are taken together, and so
on (fig. 13). This pattern works well into points
or Vandykes. The spacing for honeycomb re-
quires some preliminary experiment, as it does
not show to good effect if it is either too close or
too open.
6. When all the work is finished, the gather
ing-threads must be carefully removed. The
work may be freshened by holding it over a hot
iron, but it must not be pressed.
7. Smocking is most suitable for garments
which do not require to be washed and ironed.
Darts
1. D
a
r
t
s
a
r
e
t
h
e flattest
method of re
ducing full
ness.
2. On wrong
side of work,
lift pleats at
right angles to
the edge, and
let them taper
to a point sev-
Fig-. t4 eral inches
down (fig. 14).
3. Pin up all the darts required, and test
the width and the general appearance. If the
garment appears to slope in too rapidly, make
more but smaller, and perhaps longer, darts.
4. Run or machine stitch all the darts. Press
out the seams.
5. If the pleat is narrow, the material may be
folded down to one side, and hemmed or machine
stitched (fig. 15). If it is wide, part of the spare
material should be cut away, and the remainder
folded in like a run-and-fell seam, and then
hemmed or stitched (fig. 16).
Fig. 16
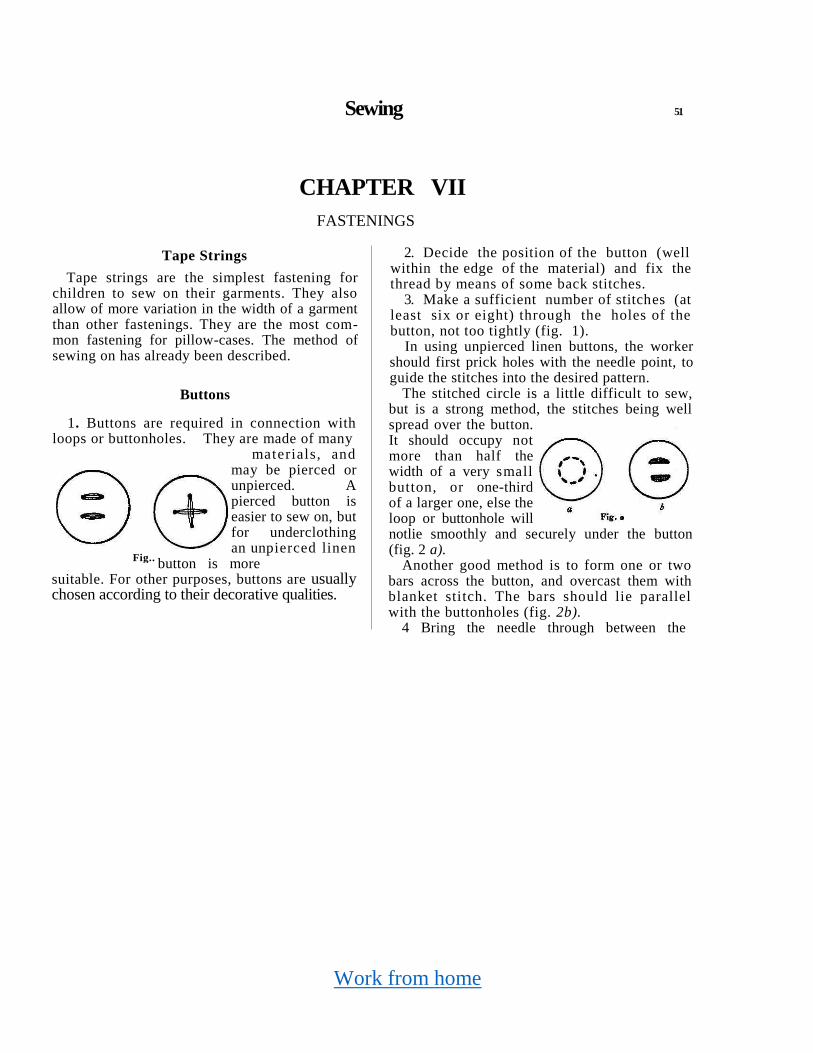
Work from home
Sewing 51
CHAPTER VII
FASTENINGS
Tape Strings
Tape strings are the simplest fastening for children to sew on their garments. They also allow of more variation in the width of a garment than other fastenings. They are the most com-mon fastening for pillow-cases. The method of sewing on has already been described.
Buttons
1. Buttons are required in connection with loops or buttonholes. They are made of many
materials, and may be pierced or unpierced. A pierced button is easier to sew on, but for underclothing an unpierced linen
button is more
suitable. For other purposes, buttons are usually chosen according to their decorative qualities.
2. Decide the position of the button (well within the edge of the material) and fix the thread by means of some back stitches.
3. Make a sufficient number of stitches (at least six or eight) through the holes of the button, not too tightly (fig. 1).
In using unpierced linen buttons, the worker should first prick holes with the needle point, to guide the stitches into the desired pattern.
The stitched circle is a little difficult to sew, but is a strong method, the stitches being well spread over the button. It should occupy not more than half the width of a very small button, or one-third of a larger one, else the loop or buttonhole will notlie smoothly and securely under the button (fig. 2 a).
Another good method is to form one or two bars across the button, and overcast them with blanket stitch. The bars should lie parallel with the buttonholes (fig. 2b).
4 Bring the needle through between the
Fig..
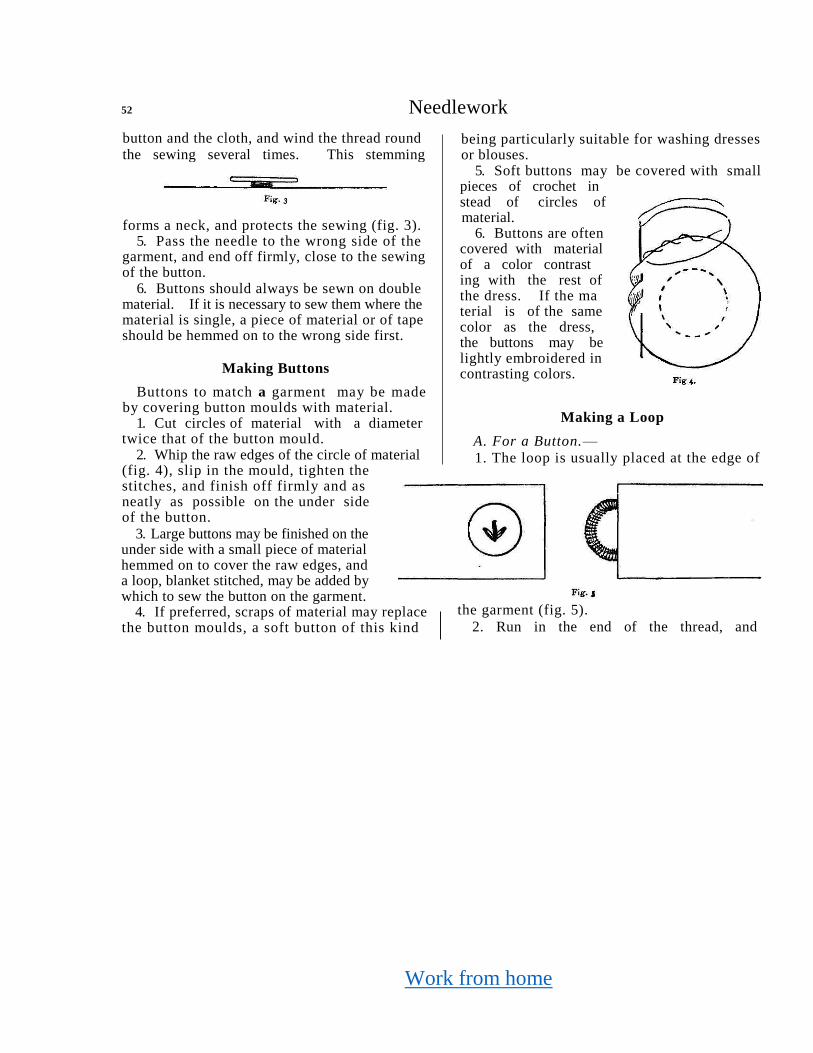
Work from home
52 Needlework
forms a neck, and protects the sewing (fig. 3). 5. Pass the needle to the wrong side of the
garment, and end off firmly, close to the sewing of the button.
6. Buttons should always be sewn on double material. If it is necessary to sew them where the material is single, a piece of material or of tape should be hemmed on to the wrong side first.
Making Buttons
Buttons to match a garment may be made by covering button moulds with material.
1. Cut circles of material with a diameter twice that of the button mould.
2. Whip the raw edges of the circle of material (fig. 4), slip in the mould, tighten the stitches, and finish off firmly and as neatly as possible on the under side of the button.
3. Large buttons may be finished on the under side with a small piece of material hemmed on to cover the raw edges, and a loop, blanket stitched, may be added by which to sew the button on the garment.
4. If preferred, scraps of material may replace the button moulds, a soft button of this kind
being particularly suitable for washing dresses or blouses.
5. Soft buttons may be covered with small pieces of crochet in stead of circles of material.
6. Buttons are often covered with material of a color contrast ing with the rest of the dress. If the ma terial is of the same color as the dress, the buttons may be lightly embroidered in contrasting colors.
Making a Loop
A. For a Button.—
1. The loop is usually placed at the edge of
button and the cloth, and wind the thread round the sewing several times. This stemming
the garment (fig. 5).
2. Run in the end of the thread, and
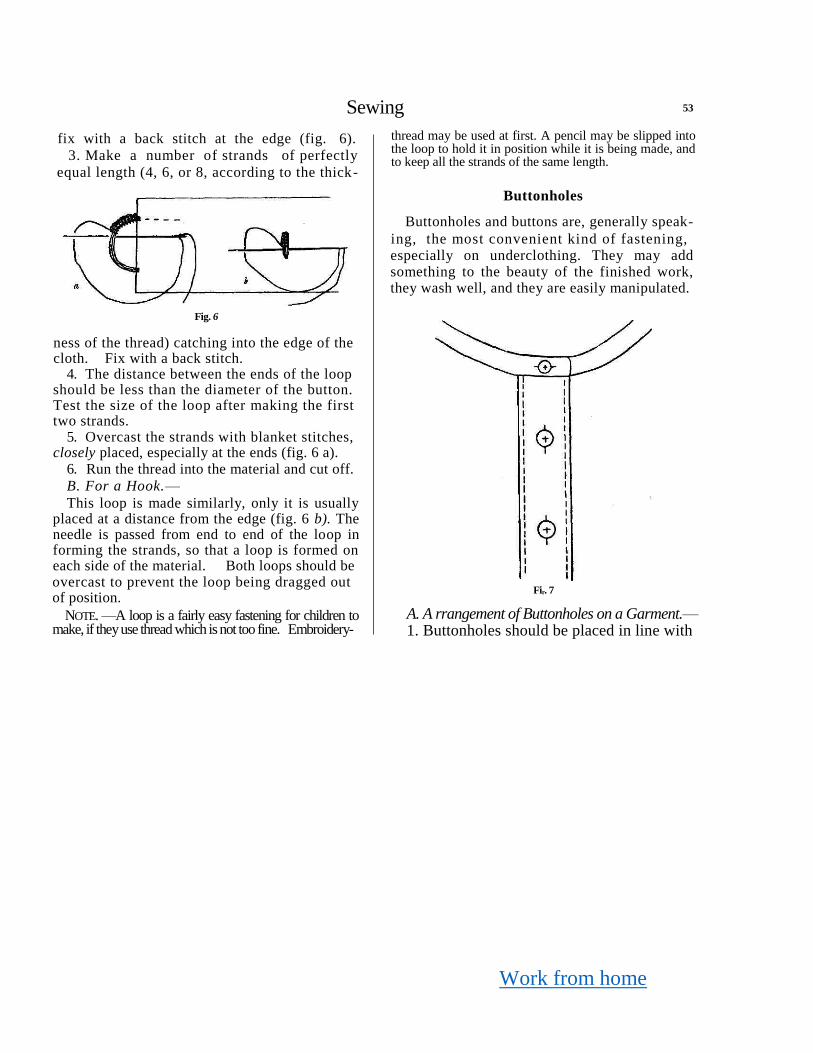
Work from home
Sewing 53
fix with a back stitch at the edge (fig. 6).
3. Make a number of strands of perfectly
equal length (4, 6, or 8, according to the thick-
thread may be used at first. A pencil may be slipped into the loop to hold it in position while it is being made, and to keep all the strands of the same length.
Buttonholes
Buttonholes and buttons are, generally speak-
ing, the most convenient kind of fastening,
especially on underclothing. They may add something to the beauty of the finished work, they wash well, and they are easily manipulated.
Fig. 6
ness of the thread) catching into the edge of the cloth. Fix with a back stitch.
4. The distance between the ends of the loop should be less than the diameter of the button. Test the size of the loop after making the first two strands.
5. Overcast the strands with blanket stitches, closely placed, especially at the ends (fig. 6 a).
6. Run the thread into the material and cut off.
B. For a Hook.—
This loop is made similarly, only it is usually placed at a distance from the edge (fig. 6 b). The needle is passed from end to end of the loop in forming the strands, so that a loop is formed on each side of the material. Both loops should be
overcast to prevent the loop being dragged out of position.
NOTE. —A loop is a fairly easy fastening for children to make, if they use thread which is not too fine. Embroidery-
Fir. 7
A. A rrangement of Buttonholes on a Garment.— 1. Buttonholes should be placed in line with
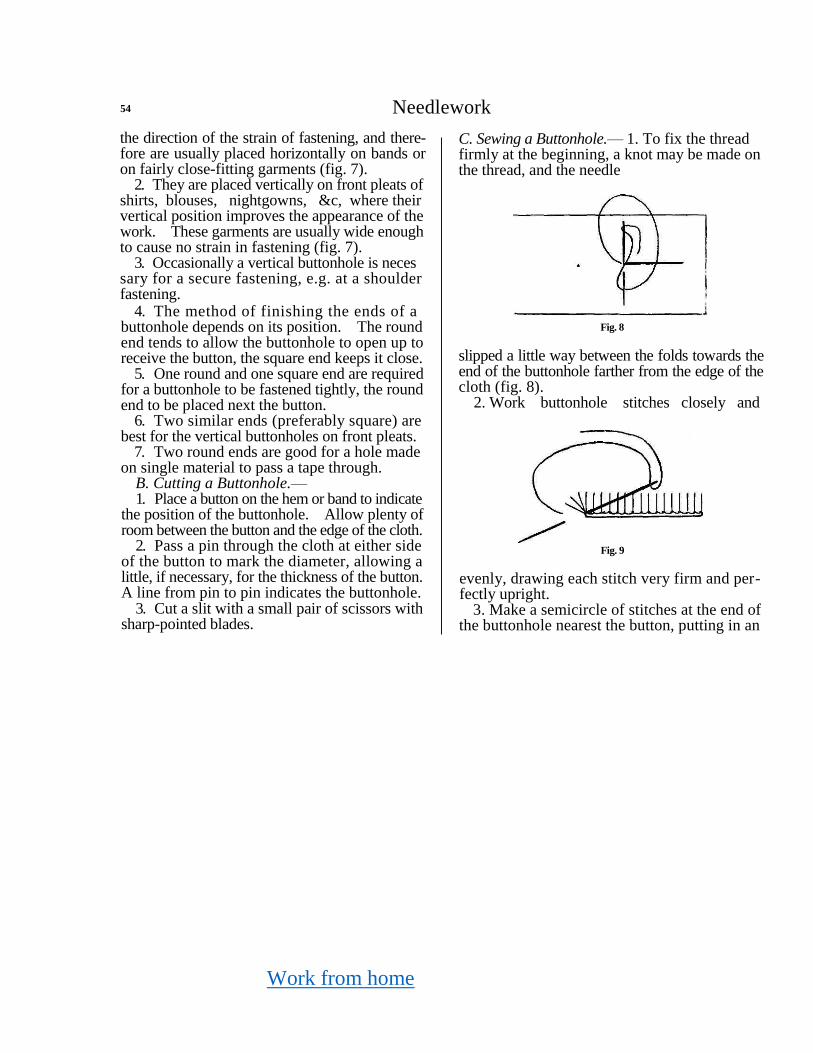
Work from home
54 Needlework
the direction of the strain of fastening, and there-fore are usually placed horizontally on bands or on fairly close-fitting garments (fig. 7).
2. They are placed vertically on front pleats of shirts, blouses, nightgowns, &c, where their vertical position improves the appearance of the work. These garments are usually wide enough to cause no strain in fastening (fig. 7).
3. Occasionally a vertical buttonhole is neces sary for a secure fastening, e.g. at a shoulder fastening.
4. The method of finishing the ends of a buttonhole depends on its position. The round end tends to allow the buttonhole to open up to receive the button, the square end keeps it close.
5. One round and one square end are required for a buttonhole to be fastened tightly, the round end to be placed next the button.
6. Two similar ends (preferably square) are best for the vertical buttonholes on front pleats.
7. Two round ends are good for a hole made on single material to pass a tape through.
B. Cutting a Buttonhole.—
1. Place a button on the hem or band to indicate the position of the buttonhole. Allow plenty of room between the button and the edge of the cloth.
2. Pass a pin through the cloth at either side of the button to mark the diameter, allowing a little, if necessary, for the thickness of the button. A line from pin to pin indicates the buttonhole.
3. Cut a slit with a small pair of scissors with sharp-pointed blades.
C. Sewing a Buttonhole.— 1. To fix the thread firmly at the beginning, a knot may be made on the thread, and the needle
Fig. 8
slipped a little way between the folds towards the end of the buttonhole farther from the edge of the cloth (fig. 8).
2. Work buttonhole stitches closely and
Fig. 9
evenly, drawing each stitch very firm and per-fectly upright.
3. Make a semicircle of stitches at the end of the buttonhole nearest the button, putting in an
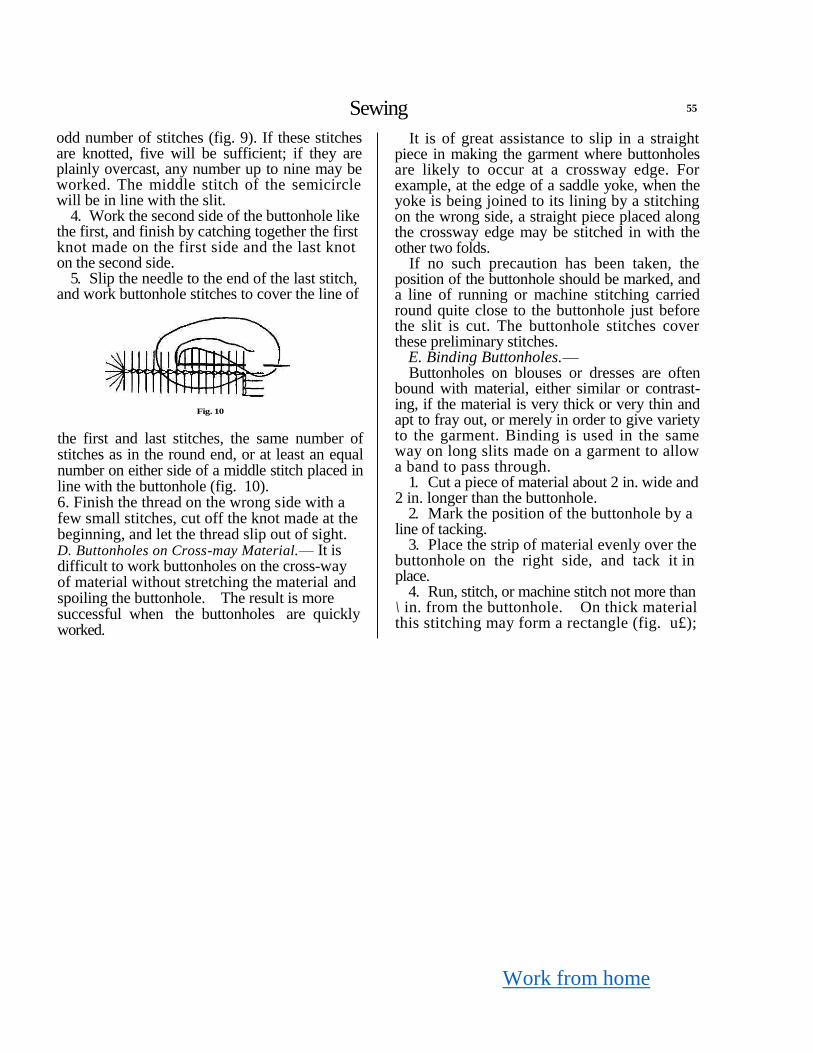
Work from home
Sewing 55
odd number of stitches (fig. 9). If these stitches are knotted, five will be sufficient; if they are plainly overcast, any number up to nine may be worked. The middle stitch of the semicircle will be in line with the slit.
4. Work the second side of the buttonhole like the first, and finish by catching together the first knot made on the first side and the last knot on the second side.
5. Slip the needle to the end of the last stitch, and work buttonhole stitches to cover the line of
Fig. 10
the first and last stitches, the same number of stitches as in the round end, or at least an equal number on either side of a middle stitch placed in line with the buttonhole (fig. 10). 6. Finish the thread on the wrong side with a few small stitches, cut off the knot made at the beginning, and let the thread slip out of sight. D. Buttonholes on Cross-may Material.— It is difficult to work buttonholes on the cross-way of material without stretching the material and spoiling the buttonhole. The result is more successful when the buttonholes are quickly worked.
It is of great assistance to slip in a straight piece in making the garment where buttonholes are likely to occur at a crossway edge. For example, at the edge of a saddle yoke, when the yoke is being joined to its lining by a stitching on the wrong side, a straight piece placed along the crossway edge may be stitched in with the other two folds.
If no such precaution has been taken, the position of the buttonhole should be marked, and a line of running or machine stitching carried round quite close to the buttonhole just before the slit is cut. The buttonhole stitches cover these preliminary stitches.
E. Binding Buttonholes.—
Buttonholes on blouses or dresses are often bound with material, either similar or contrast-ing, if the material is very thick or very thin and apt to fray out, or merely in order to give variety to the garment. Binding is used in the same way on long slits made on a garment to allow a band to pass through.
1. Cut a piece of material about 2 in. wide and 2 in. longer than the buttonhole.
2. Mark the position of the buttonhole by a line of tacking.
3. Place the strip of material evenly over the buttonhole on the right side, and tack it in place.
4. Run, stitch, or machine stitch not more than \ in. from the buttonhole. On thick material this stitching may form a rectangle (fig. u£);
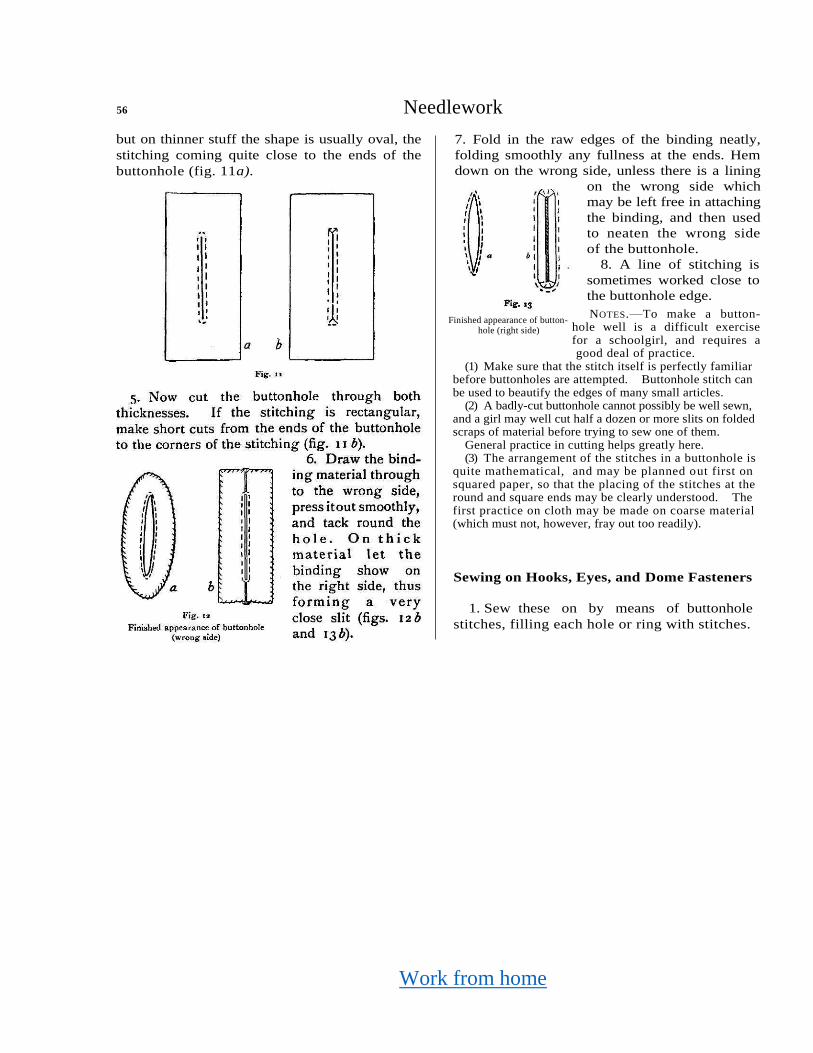
Work from home
56 Needlework
but on thinner stuff the shape is usually oval, the
stitching coming quite close to the ends of the
buttonhole (fig. 11a).
7. Fold in the raw edges of the binding neatly,
folding smoothly any fullness at the ends. Hem
down on the wrong side, unless there is a lining
on the wrong side which
may be left free in attaching
the binding, and then used
to neaten the wrong side
of the buttonhole.
8. A line of stitching is
sometimes worked close to
the buttonhole edge.
NOTES.—To make a button-hole well is a difficult exercise for a schoolgirl, and requires a good deal of practice.
(1) Make sure that the stitch itself is perfectly familiar before buttonholes are attempted. Buttonhole stitch can be used to beautify the edges of many small articles.
(2) A badly-cut buttonhole cannot possibly be well sewn, and a girl may well cut half a dozen or more slits on folded scraps of material before trying to sew one of them.
General practice in cutting helps greatly here. (3) The arrangement of the stitches in a buttonhole is
quite mathematical, and may be planned out first on squared paper, so that the placing of the stitches at the round and square ends may be clearly understood. The first practice on cloth may be made on coarse material (which must not, however, fray out too readily).
Sewing on Hooks, Eyes, and Dome Fasteners
1. Sew these on by means of buttonhole
stitches, filling each hole or ring with stitches.
Finished appearance of button-hole (right side)
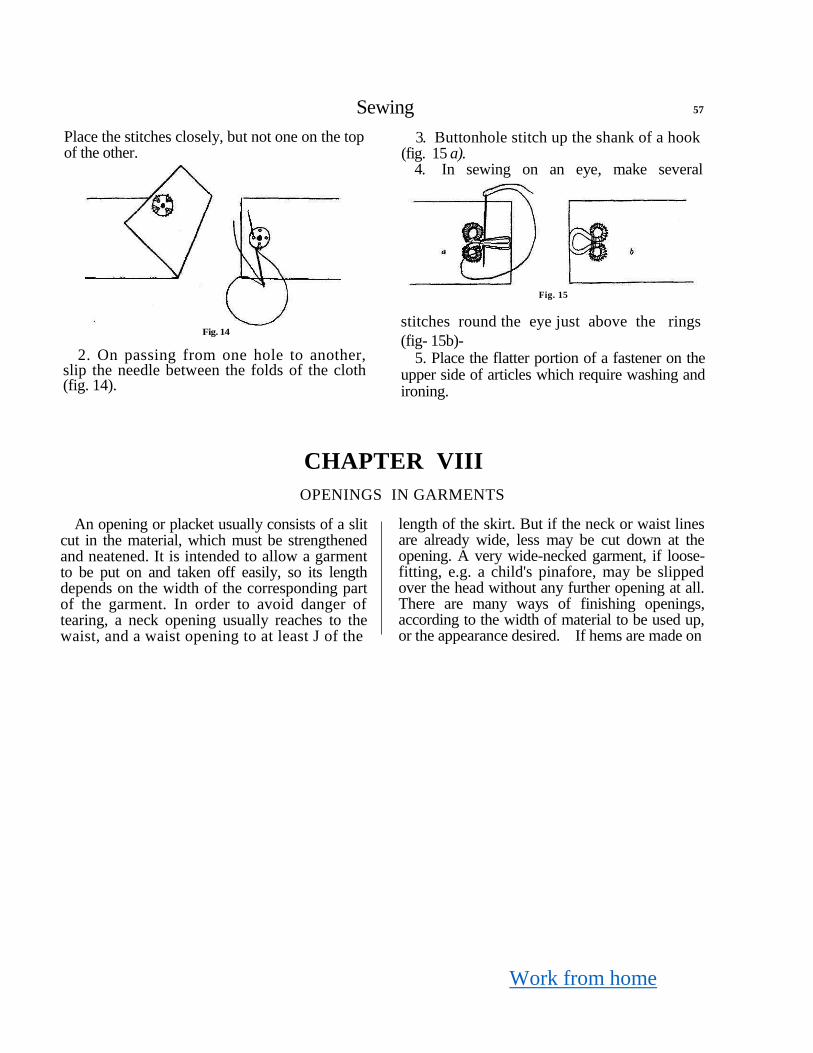
Work from home
Sewing 57
Place the stitches closely, but not one on the top of the other.
Fig. 14
2. On passing from one hole to another, slip the needle between the folds of the cloth (fig. 14).
3. Buttonhole stitch up the shank of a hook (fig. 15 a).
4. In sewing on an eye, make several
Fig. 15
stitches round the eye just above the rings
(fig- 15b)- 5. Place the flatter portion of a fastener on the
upper side of articles which require washing and ironing.
CHAPTER VIII
OPENINGS IN GARMENTS
An opening or placket usually consists of a slit cut in the material, which must be strengthened and neatened. It is intended to allow a garment to be put on and taken off easily, so its length depends on the width of the corresponding part of the garment. In order to avoid danger of tearing, a neck opening usually reaches to the waist, and a waist opening to at least J of the
length of the skirt. But if the neck or waist lines are already wide, less may be cut down at the opening. A very wide-necked garment, if loose-fitting, e.g. a child's pinafore, may be slipped over the head without any further opening at all. There are many ways of finishing openings, according to the width of material to be used up, or the appearance desired. If hems are made on
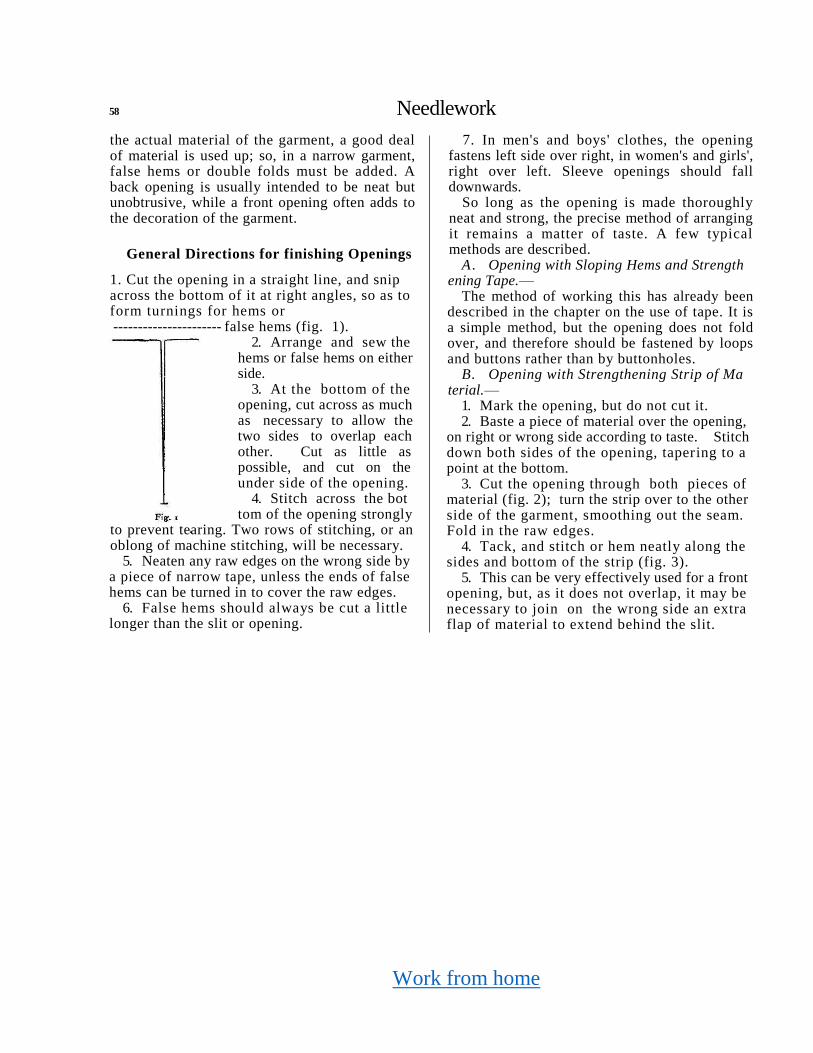
Work from home
58 Needlework
the actual material of the garment, a good deal of material is used up; so, in a narrow garment, false hems or double folds must be added. A back opening is usually intended to be neat but unobtrusive, while a front opening often adds to the decoration of the garment.
General Directions for finishing Openings
1. Cut the opening in a straight line, and snip across the bottom of it at right angles, so as to form turnings for hems or ---------------------- false hems (fig. 1).
2. Arrange and sew the hems or false hems on either side.
3. At the bottom of the opening, cut across as much as necessary to allow the two sides to overlap each other. Cut as little as possible, and cut on the under side of the opening.
4. Stitch across the bot tom of the opening strongly
to prevent tearing. Two rows of stitching, or an oblong of machine stitching, will be necessary.
5. Neaten any raw edges on the wrong side by a piece of narrow tape, unless the ends of false hems can be turned in to cover the raw edges.
6. False hems should always be cut a little longer than the slit or opening.
7. In men's and boys' clothes, the opening fastens left side over right, in women's and girls', right over left. Sleeve openings should fall downwards.
So long as the opening is made thoroughly neat and strong, the precise method of arranging it remains a matter of taste. A few typical methods are described.
A. Opening with Sloping Hems and Strength ening Tape.—
The method of working this has already been described in the chapter on the use of tape. It is a simple method, but the opening does not fold over, and therefore should be fastened by loops and buttons rather than by buttonholes.
B. Opening with Strengthening Strip of Ma terial.—
1. Mark the opening, but do not cut it. 2. Baste a piece of material over the opening,
on right or wrong side according to taste. Stitch down both sides of the opening, tapering to a point at the bottom.
3. Cut the opening through both pieces of material (fig. 2); turn the strip over to the other side of the garment, smoothing out the seam. Fold in the raw edges.
4. Tack, and stitch or hem neatly along the sides and bottom of the strip (fig. 3).
5. This can be very effectively used for a front opening, but, as it does not overlap, it may be necessary to join on the wrong side an extra flap of material to extend behind the slit.

Work from home
Sewing
C. Simple Opening for Flannel.—
1. Fold on the upper side a straight hem, and herring-bone.
2. Fold a sloping hem on the under side, not more than half the width of the straight hem, and tapering to a point. Herring-bone.
Fig. 4
3. Fold the one hem over the other; stitch together at the bottom (fig. 4).
N.B.—No snipping across is required, as only single folds are laid.
D. Opening with Simple Hems.—
1. Fold and stitch equal hems on either side of the opening.
2. Cut across the wrong side of the under hem, and fold the one hem over the other.
59
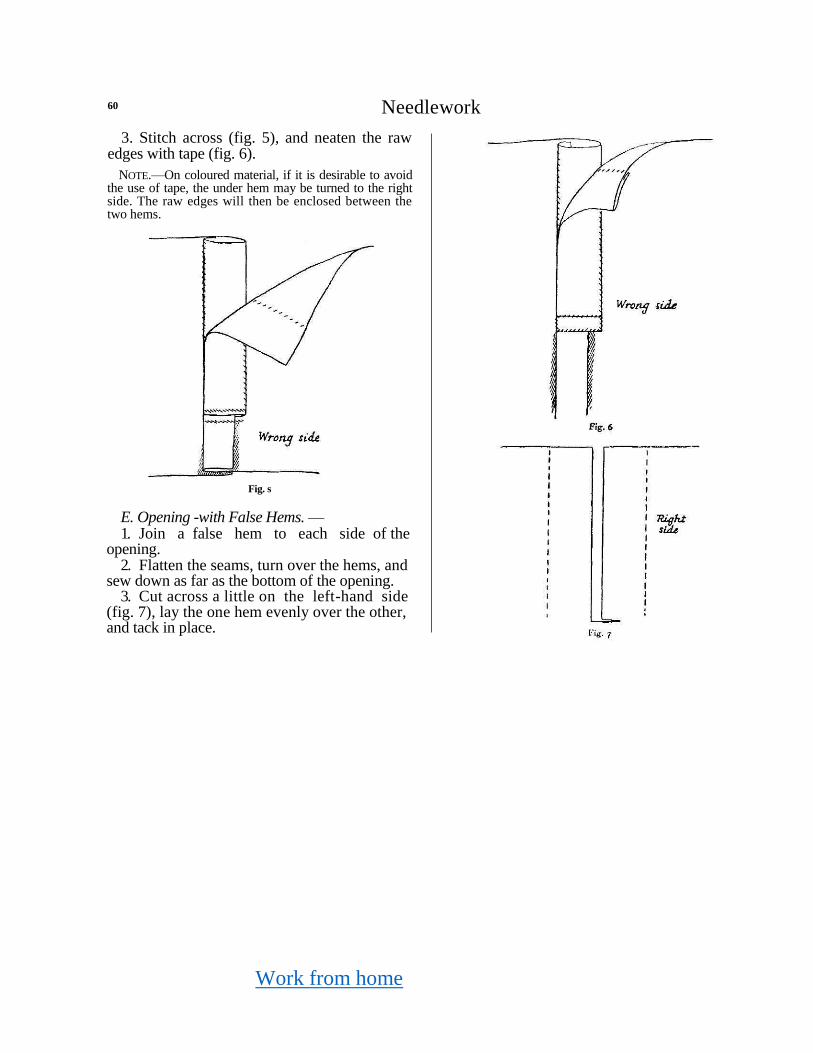
Work from home
60 Needlework
3. Stitch across (fig. 5), and neaten the raw edges with tape (fig. 6).
NOTE.—On coloured material, if it is desirable to avoid the use of tape, the under hem may be turned to the right side. The raw edges will then be enclosed between the two hems.
Fig. s
E. Opening -with False Hems. —
1. Join a false hem to each side of the opening.
2. Flatten the seams, turn over the hems, and sew down as far as the bottom of the opening.
3. Cut across a little on the left-hand side (fig. 7), lay the one hem evenly over the other, and tack in place.
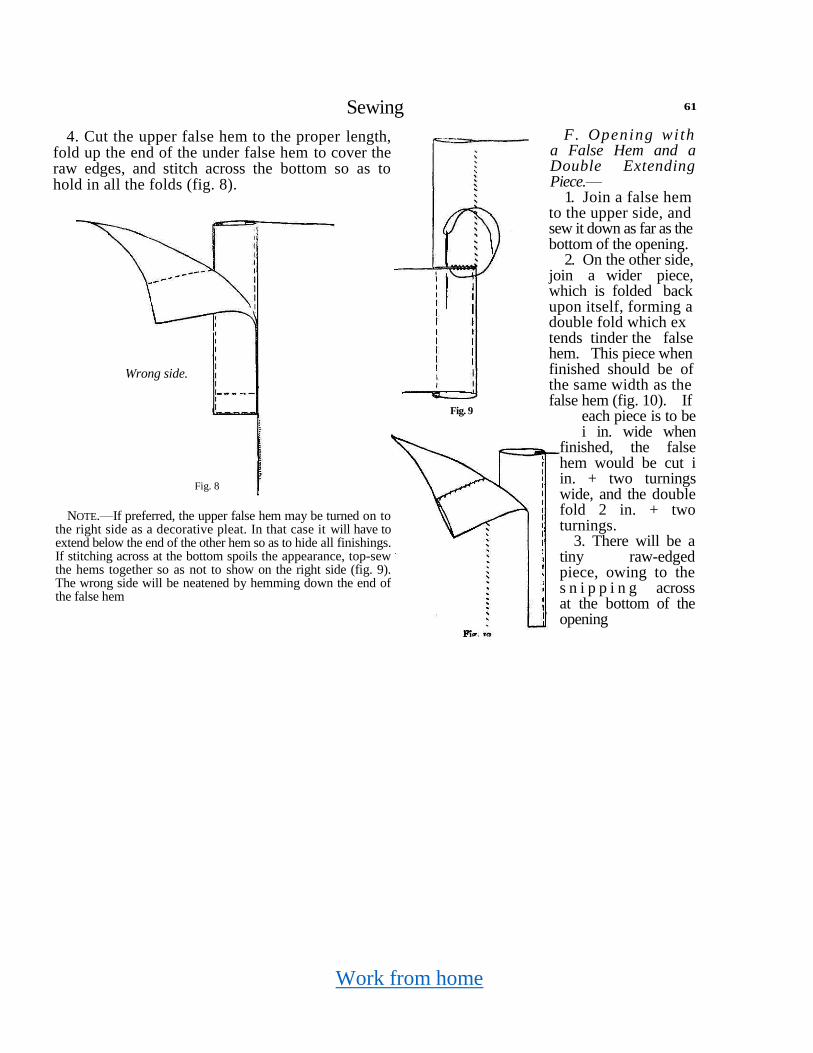
Work from home
Sewing
4. Cut the upper false hem to the proper length, fold up the end of the under false hem to cover the raw edges, and stitch across the bottom so as to hold in all the folds (fig. 8).
NOTE.—If preferred, the upper false hem may be turned on to
the right side as a decorative pleat. In that case it will have to extend below the end of the other hem so as to hide all finishings. If stitching across at the bottom spoils the appearance, top-sew the hems together so as not to show on the right side (fig. 9). The wrong side will be neatened by hemming down the end of the false hem
Fig. 9
61
F. Opening wi th a False Hem and a Double Extending Piece.—
1. Join a false hem to the upper side, and sew it down as far as the bottom of the opening.
2. On the other side, join a wider piece, which is folded back upon itself, forming a double fold which ex tends tinder the false hem. This piece when finished should be of the same width as the false hem (fig. 10). If
each piece is to be i in. wide when
finished, the false hem would be cut i in. + two turnings wide, and the double fold 2 in. + two turnings.
3. There will be a tiny raw-edged piece, owing to the s n i p p i n g across at the bottom of the opening
Wrong side.
Fig. 8
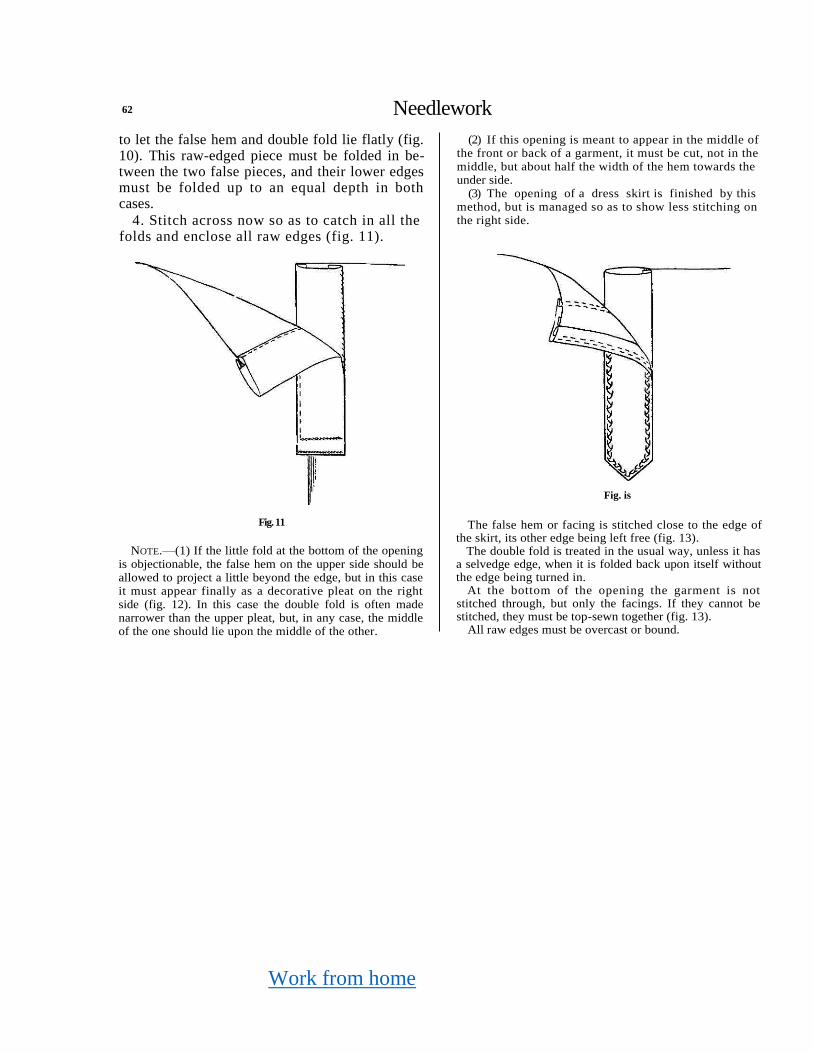
Work from home
62 Needlework
to let the false hem and double fold lie flatly (fig. 10). This raw-edged piece must be folded in be-tween the two false pieces, and their lower edges must be folded up to an equal depth in both cases.
4. Stitch across now so as to catch in all the folds and enclose all raw edges (fig. 11).
(2) If this opening is meant to appear in the middle of the front or back of a garment, it must be cut, not in the middle, but about half the width of the hem towards the under side.
(3) The opening of a dress skirt is finished by this method, but is managed so as to show less stitching on the right side.
Fig. 11
NOTE.—(1) If the little fold at the bottom of the opening is objectionable, the false hem on the upper side should be allowed to project a little beyond the edge, but in this case it must appear finally as a decorative pleat on the right side (fig. 12). In this case the double fold is often made narrower than the upper pleat, but, in any case, the middle of the one should lie upon the middle of the other.
Fig. is
The false hem or facing is stitched close to the edge of the skirt, its other edge being left free (fig. 13).
The double fold is treated in the usual way, unless it has a selvedge edge, when it is folded back upon itself without the edge being turned in.
At the bottom of the opening the garment is not stitched through, but only the facings. If they cannot be stitched, they must be top-sewn together (fig. 13).
All raw edges must be overcast or bound.
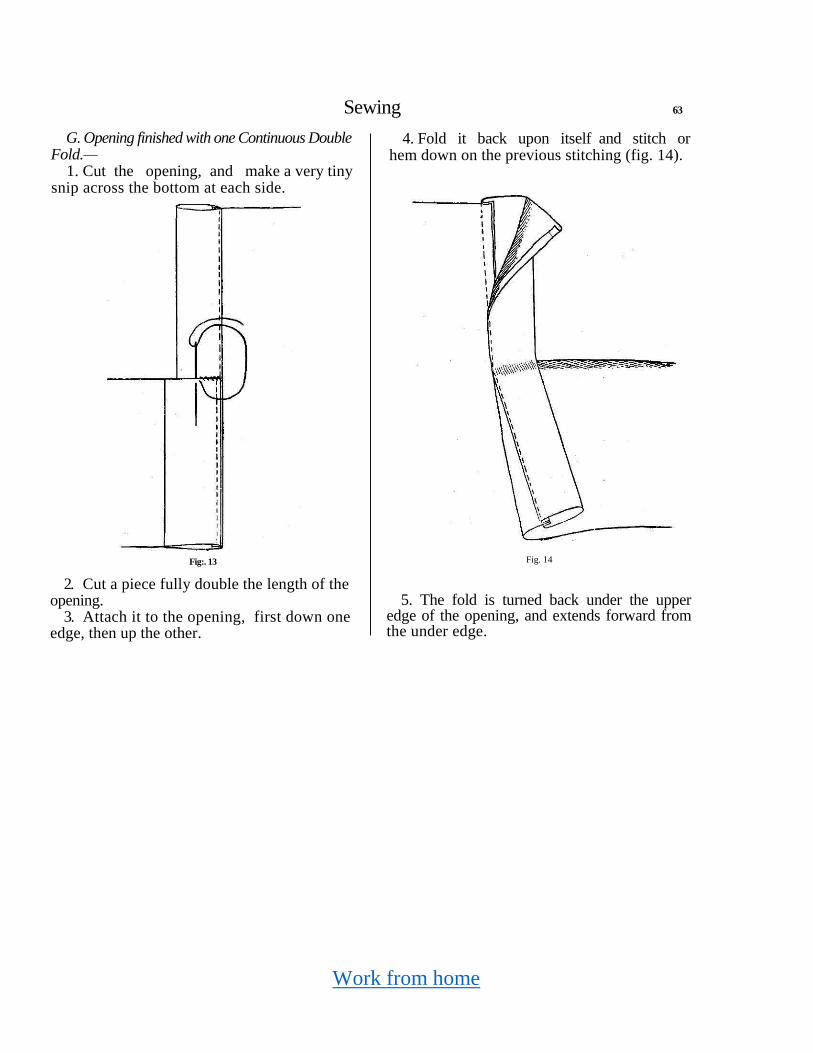
Work from home
Sewing 63
G. Opening finished with one Continuous Double Fold.—
1. Cut the opening, and make a very tiny snip across the bottom at each side.
4. Fold it back upon itself and stitch or hem down on the previous stitching (fig. 14).
Fig:. 13
2. Cut a piece fully double the length of the opening.
3. Attach it to the opening, first down one edge, then up the other.
Fig. 14
5. The fold is turned back under the upper edge of the opening, and extends forward from the under edge.
Work from home
64 Needlework
CHAPTER IX
SEWING ON TRIMMING
The method employed in attaching trimming to a garment depends on the nature of the trimming, and its probable durability as com-pared with the garment.
Lace is usually top-sewn to the edge of a gar-ment after all the rest of the work is completed. This makes it easy to pick off the lace when it becomes torn, and sew on a fresh piece, without disturbing the rest of the work.
When the lace is to be set on full, it is best to gather it first. Whipping stitch is better than gathering stitch for this purpose. Crochet and knitted laces are usually sewn on plain.
Lace insertions or motifs should be secured in an equally light fashion, since they can rarely be expected to outlast the garment. Where there is a reasonable chance that the motif will be durable, it should be closely blanket stitched to the right side. The material is then cut away on the wrong side, leaving a small turning to be folded back and hemmed down lightly.
Swiss embroidery edgings and insertions, if worked on good long cloth, are very durable, and may be sewn on in a more permanent fashion than lace. Embroidery worked on muslin should
only be used with muslin or very fine materials, and the lightest way to attach it is by rolling the edge, and whipping and top-sewing it.
A good method of attaching a long cloth em-broidery insertion or edging without fullness is to turn in a single fold on the right side of the plain border, turn in on the garment a corre-sponding fold on the wrong side, and place the two together as a counter-hem seam, which may be machine-stitched twice, or feather - stitched so as to fill this narrow seam with stitchery.
When long cloth embroidery is to be put on full, it may be gathered, stroked, and set in between the folds of the plain portion of the garment.
When the garment is single, or when the gathers are being set into an embroidery inser-tion, the cloth, or the long cloth border of the insertion, should be turned up to the wrong side, making a deep fold. When the gathered material has been set into this folded edge, the same fold of material should be turned down over the gathers on the wrong side, thus forming a neat binding.
Sometimes the gathers are not suitable for setting in by hand. The neatest plan then is to
Work from home
Sewing 65
place the gathered edge to the raw edge of the garment, right sides together, and place also with them the raw edge of a strip of material for binding, either straight or on the cross, as may be necessary. The three edges are all run or machine stitched together on the wrong side, then the binding is folded up and attached to the garment in some suitable way.
If a beading or insertion is used instead of the binding, then only the gathered edge and the edge of the garment should be stitched together, with right sides out. The seam being smoothed out, the beading is placed in position on the right side and machine stitched or otherwise attached to cover all raw edges.
( D lOfl ) 5

Work from home
Section II—CUTTING OUT
CHAPTER I
LESSONS IN CUTTING OUT
Cutting out is, for most children, a fascinating occupation. Good cutting is as essential as good sewing to the finished appearance of a garment, for a badly-cut garment can never be well made; but for good cutting out a pupil must be gradually prepared by knowledge and practice of various kinds.
Without considering the imagination and ingenuity which are necessary for the planning of beautiful and uncommon garments, the mere correct and intelligent cutting of garments to be made in school involves:—
1. Practice in handling scissors and material. 2. Ability to measure accurately. 3. A sense of proportion. 1. Two kinds of scissors are required for
needlework—a pair with long blades for cutting out garments, and a small pair of embroidery scissors, with short, narrow, pointed blades which
cut well at the points. The latter pair is useful for cutting buttonholes, embroidery, and other fine pieces of work. A girl should learn that to cut out garments well the scissors should be opened to their full width, so that a clean cut may be made with the whole length of the blade. Quicker and smoother work can be done with a large pair of scissors than with a small pair, but the weight must be accommodated to the pupils' capacity. A pair of scissors that would be too small for a teacher to use con-veniently may be quite large enough for a little girl.
Much depends also on the material to be cut. Paper is much easier to cut than cloth of any kind, but different cloths vary greatly in their resistance. A single fold of cloth may be easily cut, but a pupil may find it impossible to cut through two or four folds of material, as one
67
Work from home
68 Needlework
usually does in cutting quickly from a paper pattern.
2. To measure accurately is essential to really good cutting, and, if measurements can be judged by the eye, there is a considerable saving of time and work. This, however, is a matter of experience and of careful attention, and can only follow a long period of careful calculation.
Children not yet familiar with inch measure-ments may use tape or string. A knot may be tied on the string, or a pin fixed in the tape to represent the distance to be measured on paper or cloth. The latter is the better plan.
Later, a ruler is useful for measuring com-paratively short distances. A very useful article is a small cardboard measure, marked in inches, half-inches, and quarter-inches. This is shorter and more flexible than a ruler, and therefore more manageable for measuring the depth of hems, tucks, &c. If possible, pupils should make such a measure for themselves, marking off the correct measurements from a ruler. This is, on the whole, a better appliance than a card or stiff paper merely notched at the desired depth of hems, &c. While the use of the notched card develops the habit of accuracy in measurement, the graduated card trains the eye at the same time to recognize the common measurements. When speed is a considera-tion, the notched card would probably be more useful.
Last of all, the pupil must learn to use an inch-tape. This is necessary for long measures, or for measuring on the round—on the human figure, for example. This is the most difficult exercise of all. Measures must be taken easily, especially measures of width, and allowance must be made at many points for motion or expansion.
3. The lack of a sense of proportion will spoil any kind of work. What is required in garment-cutting is correspondence between the garment and the figure of the intended wearer. The pupil should learn something of the general proportions of the human body, and constantly compare the pattern being cut with the lines of the human figure. That is why it is better for girls in school to make garments for themselves rather than for an unknown, or at least unseen, wearer. This is the most difficult thing to learn in cutting out, and ability comes only with much practice. A well-arranged course of cutting-out lessons would ensure the pupil's freedom from mere mechanical difficulties when she arrives at this more intellectual stage of the work.
The early cutting-out lessons may sometimes be given merely so as to obtain accuracy and skill, but, as a rule, they should be arranged so as to lead to the making of some real article, however childish.
The following list of lessons indicates the stages by which cutting out might be taught in schools:—
Work from home
Cutting Out 69
1. Cutting up small scraps of paper or cloth, which may be used to stuff dolls' cushions, pillows, or beds, and also dolls or animals, as suggested in stage 3.
This lesson gives practice in mere cutting. 2. Cutting to measure paper, then cloth.
Geometrical figures may be cut merely for practice, or squares and oblongs may be made into dolls' clothes, or furnishings for a doll's bed, or pincushion, or any other little unim portant articles which could be sewed by the children.
This lesson gives practice in measuring and cutting accurately.
3. Cutting paper, then cloth, into shapes, e.g. dolls or animals, or balls for babies' toys. These would be sewn up, and stuffed with the cuttings from stage 1.
This lesson gives practice in cutting curves, and
introduces some ideas of shape and proportion. 4. Cutting, in paper and cloth, bands, collars,
or other simple portions of garments to fit the pupils themselves.
With this lesson, the pupil begins to get the idea of proportion in the human body.
5. Cutting paper patterns of garments, then the garments in material.
The previous exercises have prepared the pupil's hand, eye, and mind for this difficult piece of work.
To encourage habits of economy in the use of material, newspapers may be used for making paper patterns whenever possible. For cutting a new pattern they are not very useful, because the folds and lines are not clearly marked on them. But, after a pattern is once made, news-paper can be used for taking off copies of it, or for making adaptations of it.
CHAPTER II
TYPES OF GARMENTS
The books dealing with clothing which are published weekly or monthly give the impres-sion of hundreds of garments, each quite different from the other. As a matter of fact, the differ-ences are chiefly in detail. So far as essentials are concerned, garments belong to one or more
of four, or at most five different types—magyar, bodice, sleeve, skirt, and drawers. It is doubt-ful whether the magyar type ought to be mentioned as a separate type, but it is the best form of garment with which to begin learn-ing to cut out, since it is the most elementary
Work from home
70 Needlework
way of turning a piece of cloth into a garment. All the other types mentioned can be adapted
and combined in many ways, according to the varying fashions of the day.
If time permitted, the best way to learn cut-ting out thoroughly would be to choose each type in turn, working it into a garment, first in its simplest form, then with various typical adaptations, then in combination with other types. As a rule, one garment belonging to each type is all that can be attempted.
There is no reason why a girl should not sometimes cut out a garment from a pattern obtained from a book or given by the teacher, provided she is shown the meaning of all the lines and parts of the pattern, and also shown how to find out whether it will fit correctly or not.
The method of drafting patterns by propor-tion depends on the fact that a very definite scale of proportions may be found in the build of the human body. It is noticeable that the same proportion of parts does not hold in a child's body and in an adult's, nor in a man's and a woman's . I t i s a lso obvious that a l l do not conform exactly to the usual scale, since we readily observe that one person is very long-waisted, while another has particularly long legs. It is worth while for the teacher to know as much as possible about the usual relation of width to height, and the various differences between the usual measurements for men and women, boys and girls.
But, for the learner, most difficulties will be avoided if the various types already mentioned are worked out separately, and, if necessary, combined in a straightforward fashion, and if, in every case, at least one measure of length and one measure of width are taken from the intended wearer of the garment. Of two per-sons of equal height, one may be very stout and the other very thin, but the probability is that, though within very different limits, the parts of the width retain the same proportion with relation to each other. The same is true of the length. It must be allowed that a certain degree of chest development brings difficulties in fitting, but it is hoped that by the time a girl has this difficulty to contend with she will have gained a knowledge of principles that will help her to cope with it.
Cutting out by proportion is certainly the simplest and most reasonable method for school work. The memory is not burdened with many figures, but only, at first, with the recollection of a few principles; and there is also this ad-vantage that a whole class, having once made a beginning by measuring off the necessary length and width of these various patterns, can go through the remainder of the lessons to-gether, following the same instructions, while producing patterns of different dimensions.
The patterns which follow are nearly all based upon two measurements actually taken from the body—the most important measure of length and
Work from home
Cutting Out
the most important measure of width. These are not necessarily the greatest length and width. Many other measures may be taken so as to check the pattern, and no pattern should be cut in material until it has been tried as well as possible on the figure, and corrected where necessary.
Garments which require no Shaping
There are few garments which can be made entirely without being shaped by cutting, and
those which are made so are apt to be rather bulky. Pinafores, aprons, children's petticoats, and skirts are practically the only garments made in this way, the extra fullness being gathered or pleated into bands.
While such garments are apparently very simple, they are not always as economical as shaped garments. Frequently the bands have to be cut out of fresh material, as there are no cuttings over. A gathered or pleated garment may also give more trouble in ironing than a shaped one.
CHAPTER III TAKING MEASURES
To a certain extent, one can measure oneself, but measuring is more easily and more accurately done by another. In school, girls should work in pairs at taking measures. The girl to be measured should stand erect and steadily, and must refrain from trying to give help in measur-ing, as movement on her part may change the apparent length of a line, and make the measure-ments "come wrong". If measurements to or from the waist are involved, it is best to begin by pinning a piece of tape tightly round the waist, pressing it well down into position.
The most important measurements are taken as follows:—
Shoulder to waist {front). — Measure from the neck point of the shoulder line to near the middle of front waist.
Neck to waist {back). — Measure from the nape of the neck to the middle of back waist.
Waist to knee.—Usually measured from front waist, but for the drawers pattern it is best to measure from the middle of the back waist to behind the knee, the hip joint being well bent. The foot may be rested on a chair or bench.
Neck.—Measure round the base of the neck easily.
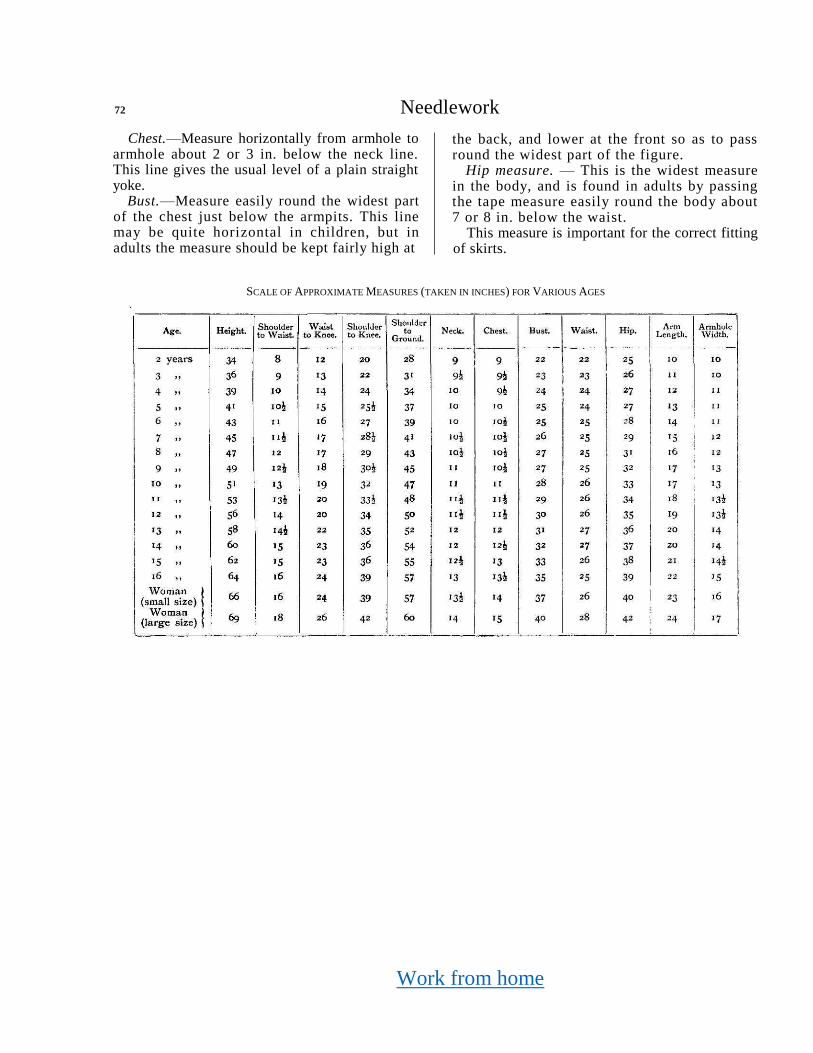
Work from home
72 Needlework
Chest.—Measure horizontally from armhole to armhole about 2 or 3 in. below the neck line. This line gives the usual level of a plain straight yoke.
Bust.—Measure easily round the widest part of the chest just below the armpits. This line may be quite horizontal in children, but in adults the measure should be kept fairly high at
the back, and lower at the front so as to pass round the widest part of the figure.
Hip measure. — This is the widest measure in the body, and is found in adults by passing the tape measure easily round the body about 7 or 8 in. below the waist.
This measure is important for the correct fitting of skirts.
SCALE OF APPROXIMATE MEASURES (TAKEN IN INCHES) FOR VARIOUS AGES
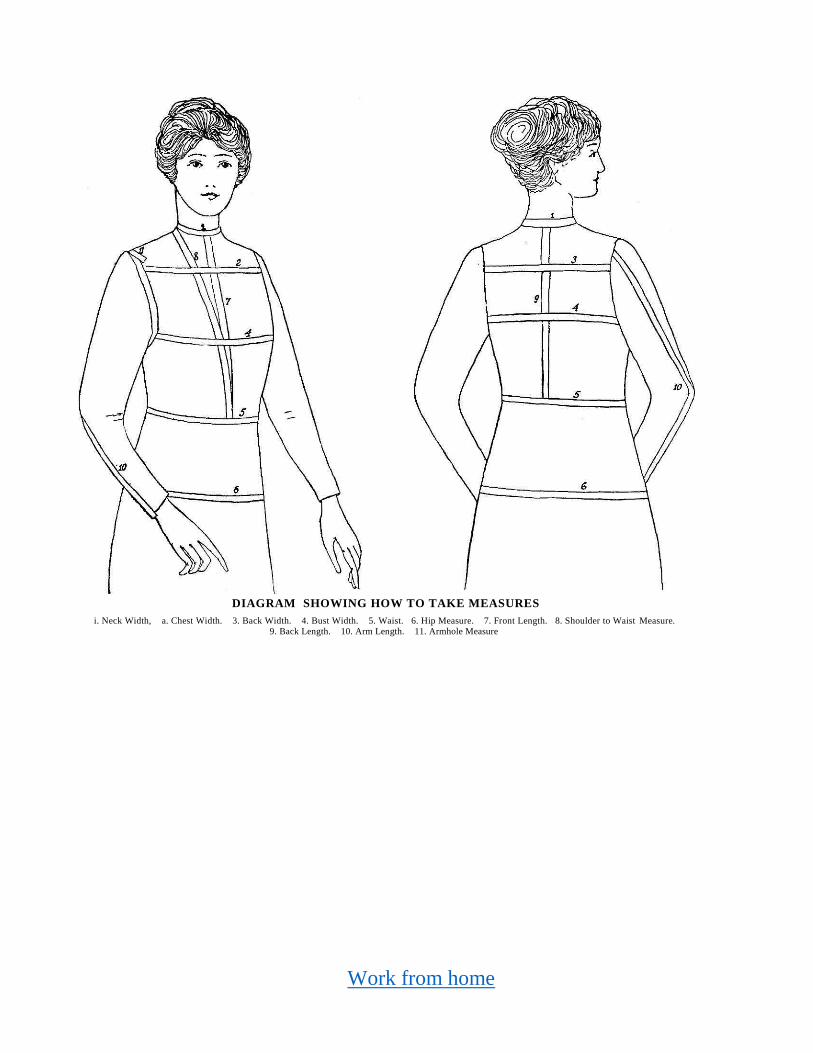
Work from home
DIAGRAM SHOWING HOW TO TAKE MEASURES
i. Neck Width, a. Chest Width. 3. Back Width. 4. Bust Width. 5. Waist. 6. Hip Measure. 7. Front Length. 8. Shoulder to Waist Measure. 9. Back Length. 10. Arm Length. 11. Armhole Measure
Work from home
74 Needlework
In children, the distance below the waist would be much less, and the measure is useful for calculating the length of a band to be placed low on the dress.
Arm length.—Measure from just behind the top of the shoulder joint to the wrist, passing the measure round the bent elbow.
Armhole.—Pass the measure under the armpit and upwards over the shoulder joint. This measure may be taken pretty closely.
In measuring children for garments to be made
in school, it must be remembered that they take a long time to make a garment, and are expected to grow a little even while wearing it.
A child's average yearly growth being 2 in., any garment made 1 or 2 in. longer than the present measure ought to fit for a considerable time. With regard to measures of width, as progress is much slower in this direction, and as children are usually measured in school above their ordinary clothes, an easy measure of width is probably sufficient to last for some time.
CHAPTER IV
MAGYAR GARMENTS
Magyar garments are very suitable for chil-dren's wear, being simple in appearance, easy to make, easy-fitting, and simple to iron after being washed. For grown-up persons, the magyar type is most suitable for blouses and very loosely-fitting garments such as dressing-jackets or gowns, night-dresses or overalls.
A pinafore (fig. 1) is shown as the simplest type of a magyar garment, for all its four quarters may be of the same shape, if the neck is cut low enough.
Simple as the pattern is, a girl learns in cutting it some very useful lessons which will have to be applied again and again in cutting out garments.
1. A pattern, as cut in paper, consists of the smallest amount that will show the whole design.
2. In a magyar pattern, the most important lines are those which mark off the quarter bust measure, and the depth of the armhole. All lines and curves bounding the sides and sleeves must keep on the outside of these two lines.
3. Plenty of room must always be allowed for motion, even if it is only the motion of breathing, or the motion of putting clothes on. For this reason we add something to the actual measure ment of the quarter bust.
4. In finding the measurements of small parts of a pattern, compare them with the nearest
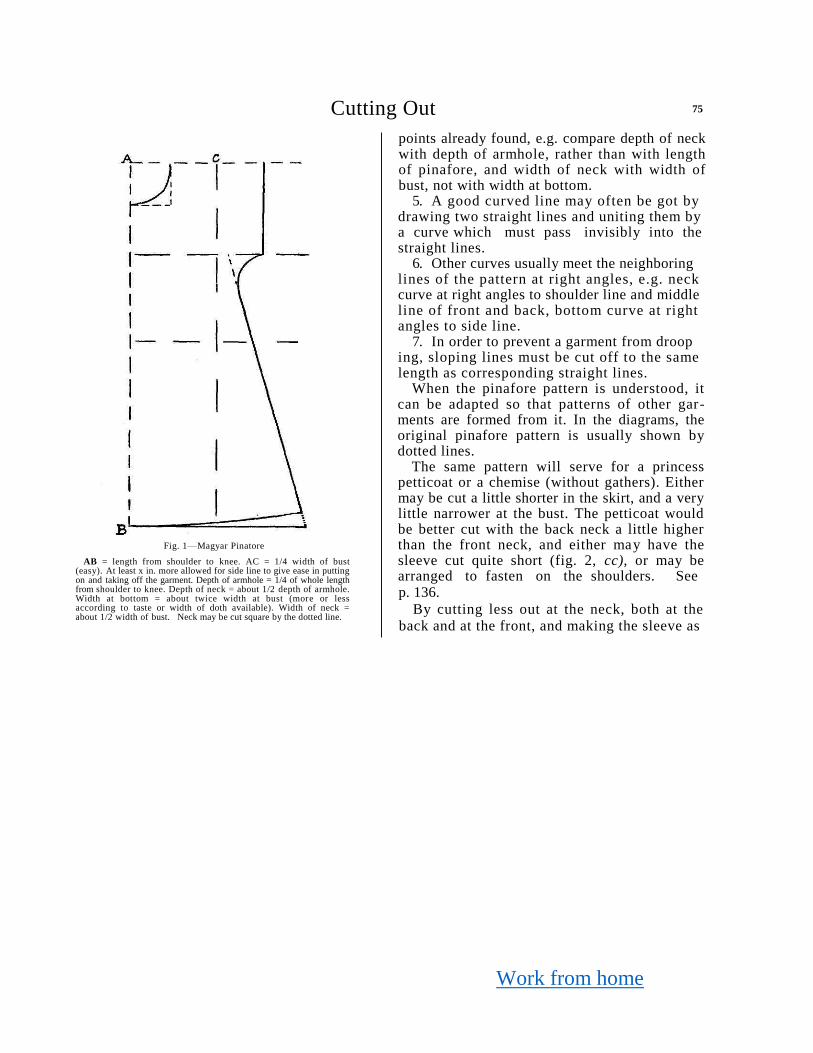
Work from home
Cutting Out 75
Fig. 1—Magyar Pinatore
AB = length from shoulder to knee. AC = 1/4 width of bust (easy). At least x in. more allowed for side line to give ease in putting on and taking off the garment. Depth of armhole = 1/4 of whole length from shoulder to knee. Depth of neck = about 1/2 depth of armhole. Width at bottom = about twice width at bust (more or less according to taste or width of doth available). Width of neck = about 1/2 width of bust. Neck may be cut square by the dotted line.
points already found, e.g. compare depth of neck with depth of armhole, rather than with length of pinafore, and width of neck with width of bust, not with width at bottom.
5. A good curved line may often be got by drawing two straight lines and uniting them by a curve which must pass invisibly into the straight lines.
6. Other curves usually meet the neighboring lines of the pattern at right angles, e.g. neck curve at right angles to shoulder line and middle line of front and back, bottom curve at right angles to side line.
7. In order to prevent a garment from droop ing, sloping lines must be cut off to the same length as corresponding straight lines.
When the pinafore pattern is understood, it can be adapted so that patterns of other gar-ments are formed from it. In the diagrams, the original pinafore pattern is usually shown by dotted lines.
The same pattern will serve for a princess petticoat or a chemise (without gathers). Either may be cut a little shorter in the skirt, and a very little narrower at the bust. The petticoat would be better cut with the back neck a little higher than the front neck, and either may have the sleeve cut quite short (fig. 2, cc), or may be arranged to fasten on the shoulders. See
p. 136.
By cutting less out at the neck, both at the
back and at the front, and making the sleeve as
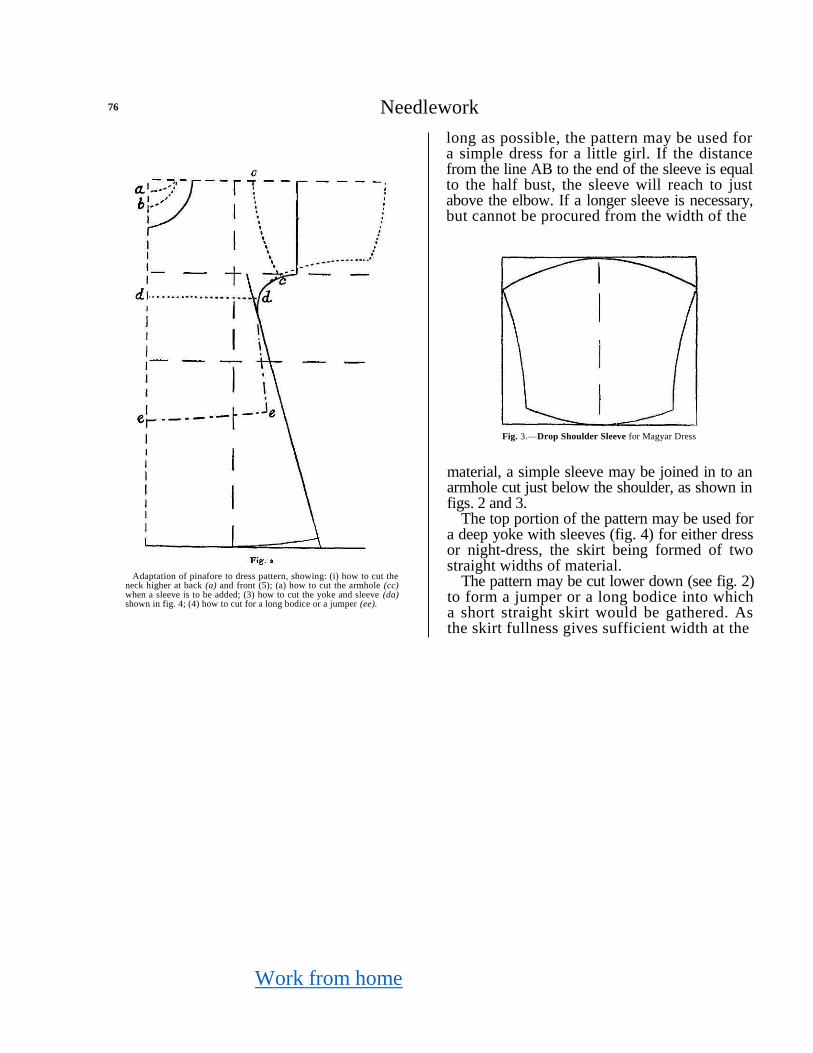
Work from home
76 Needlework
Adaptation of pinafore to dress pattern, showing: (i) how to cut the
neck higher at back (a) and front (5); (a) how to cut the armhole (cc) when a sleeve is to be added; (3) how to cut the yoke and sleeve (da) shown in fig. 4; (4) how to cut for a long bodice or a jumper (ee).
long as possible, the pattern may be used for a simple dress for a little girl. If the distance from the line AB to the end of the sleeve is equal to the half bust, the sleeve will reach to just above the elbow. If a longer sleeve is necessary, but cannot be procured from the width of the
Fig. 3.—Drop Shoulder Sleeve for Magyar Dress
material, a simple sleeve may be joined in to an armhole cut just below the shoulder, as shown in figs. 2 and 3.
The top portion of the pattern may be used for a deep yoke with sleeves (fig. 4) for either dress or night-dress, the skirt being formed of two straight widths of material.
The pattern may be cut lower down (see fig. 2) to form a jumper or a long bodice into which a short straight skirt would be gathered. As the skirt fullness gives sufficient width at the

Work from home
Cutting Out 77
Fig:. 4.—Yoke and Sleeve for Magyar Dress or Nig-ht-dress
knees, this pattern may be cut a little narrower at the sides.
Fig. 5 shows how to cut a little magyar dress to be gathered into a small square yoke. Gathers for a chemise would be allowed in a similar way, only the neck is round instead of square, since the gathers are confined by a straight band. When gathers are allowed at the middle of back and front, the side seams are often cut straighter to permit the garment to be cut out of a limited width of material, or to avoid the tendency to stretch which a sloping seam always has.
In using the pinafore pattern to develop the pattern of a night-dress or a dressing-gown
Fig. 5.—Magyar Dress with fullness to be fitted into Square Yoke
(a) Back neck line of yoke. (6) Front neck line of yoke. (?) Back neck line of dress, (d) Front neck line of dress. —
.. — .. — .. Optional line, to reduce the side slope.
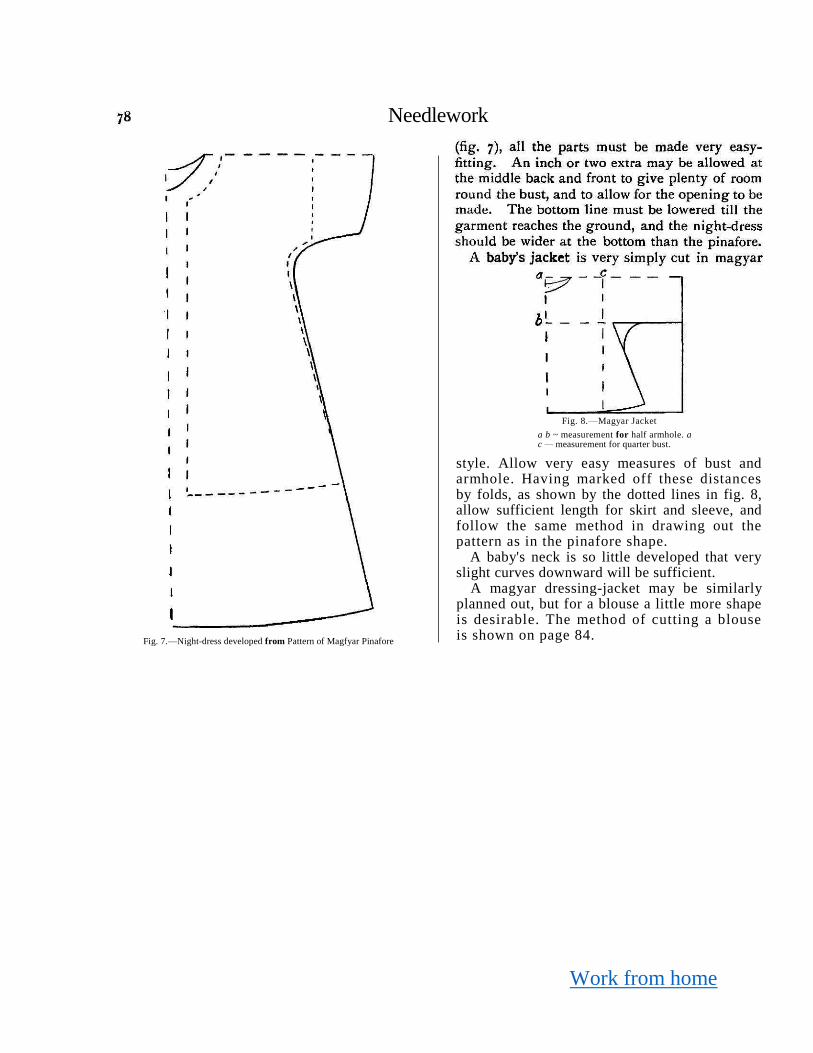
Work from home
Fig. 8.—Magyar Jacket a b ~ measurement for half armhole. a c — measurement for quarter bust.
style. Allow very easy measures of bust and armhole. Having marked off these distances by folds, as shown by the dotted lines in fig. 8, allow sufficient length for skirt and sleeve, and follow the same method in drawing out the pattern as in the pinafore shape.
A baby's neck is so little developed that very slight curves downward will be sufficient.
A magyar dressing-jacket may be similarly planned out, but for a blouse a little more shape is desirable. The method of cutting a blouse is shown on page 84.
Needlework
Fig. 7.—Night-dress developed from Pattern of Magfyar Pinafore
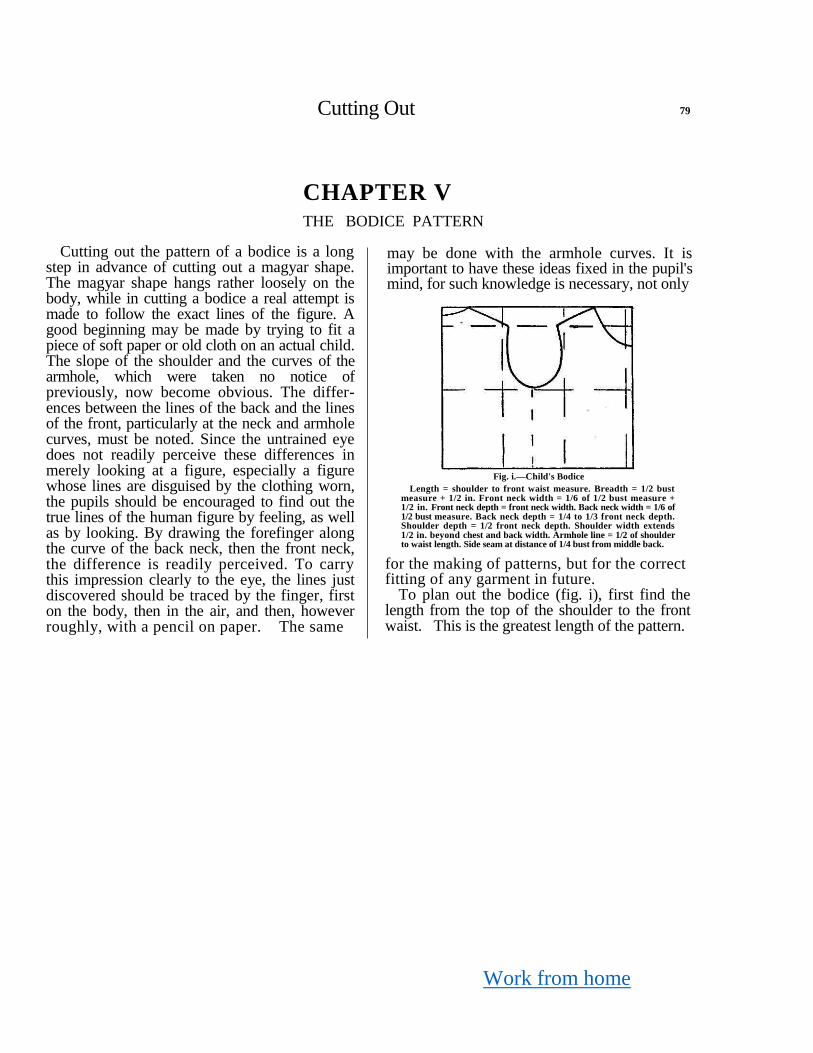
Work from home
Cutting Out 79
CHAPTER V THE BODICE PATTERN
Cutting out the pattern of a bodice is a long step in advance of cutting out a magyar shape. The magyar shape hangs rather loosely on the body, while in cutting a bodice a real attempt is made to follow the exact lines of the figure. A good beginning may be made by trying to fit a piece of soft paper or old cloth on an actual child. The slope of the shoulder and the curves of the armhole, which were taken no notice of previously, now become obvious. The differ-ences between the lines of the back and the lines of the front, particularly at the neck and armhole curves, must be noted. Since the untrained eye does not readily perceive these differences in merely looking at a figure, especially a figure whose lines are disguised by the clothing worn, the pupils should be encouraged to find out the true lines of the human figure by feeling, as well as by looking. By drawing the forefinger along the curve of the back neck, then the front neck, the difference is readily perceived. To carry this impression clearly to the eye, the lines just discovered should be traced by the finger, first on the body, then in the air, and then, however roughly, with a pencil on paper. The same
may be done with the armhole curves. It is important to have these ideas fixed in the pupil's mind, for such knowledge is necessary, not only
Fig. i.—Child's Bodice
Length = shoulder to front waist measure. Breadth = 1/2 bust measure + 1/2 in. Front neck width = 1/6 of 1/2 bust measure + 1/2 in. Front neck depth = front neck width. Back neck width = 1/6 of 1/2 bust measure. Back neck depth = 1/4 to 1/3 front neck depth. Shoulder depth = 1/2 front neck depth. Shoulder width extends 1/2 in. beyond chest and back width. Armhole line = 1/2 of shoulder to waist length. Side seam at distance of 1/4 bust from middle back.
for the making of patterns, but for the correct fitting of any garment in future.
To plan out the bodice (fig. i), first find the length from the top of the shoulder to the front waist. This is the greatest length of the pattern.
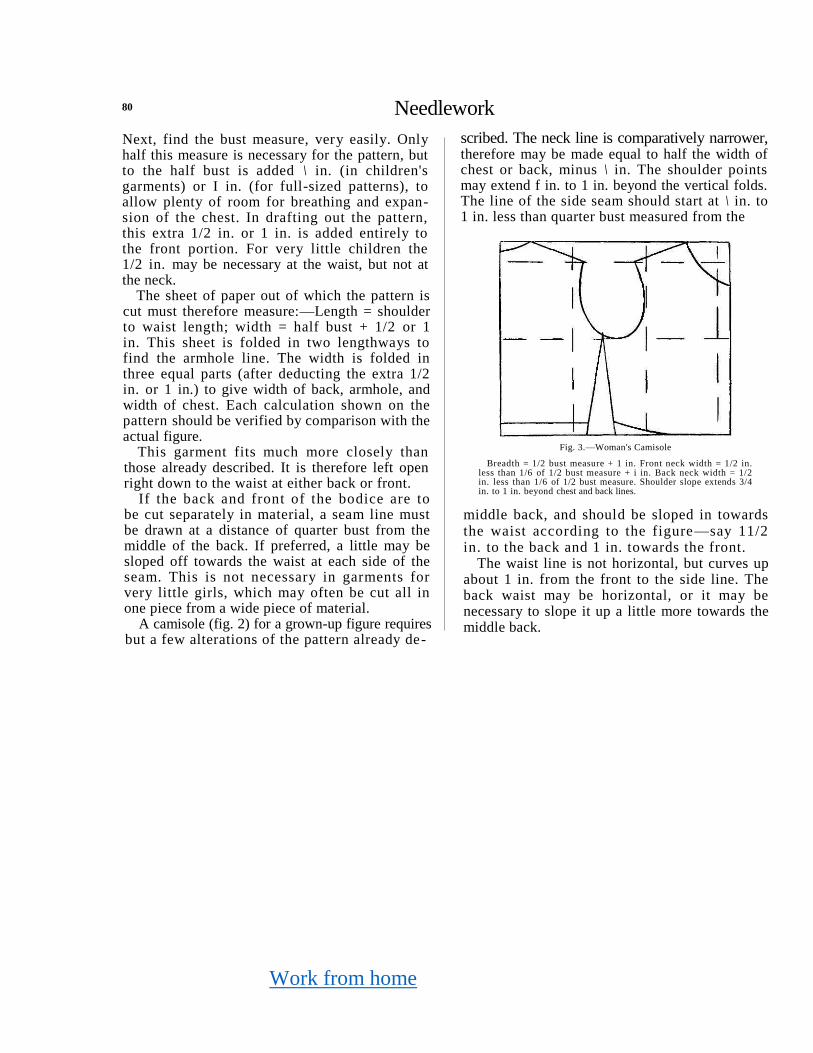
Work from home
80 Needlework
Next, find the bust measure, very easily. Only half this measure is necessary for the pattern, but to the half bust is added \ in. (in children's garments) or I in. (for full-sized patterns), to allow plenty of room for breathing and expan-sion of the chest. In drafting out the pattern, this extra 1/2 in. or 1 in. is added entirely to the front portion. For very little children the 1/2 in. may be necessary at the waist, but not at the neck.
The sheet of paper out of which the pattern is cut must therefore measure:—Length = shoulder to waist length; width = half bust + 1/2 or 1 in. This sheet is folded in two lengthways to find the armhole line. The width is folded in three equal parts (after deducting the extra 1/2 in. or 1 in.) to give width of back, armhole, and width of chest. Each calculation shown on the pattern should be verified by comparison with the actual figure.
This garment fits much more closely than those already described. It is therefore left open right down to the waist at either back or front.
If the back and front of the bodice are to be cut separately in material, a seam line must be drawn at a distance of quarter bust from the middle of the back. If preferred, a little may be sloped off towards the waist at each side of the seam. This is not necessary in garments for very little girls, which may often be cut all in one piece from a wide piece of material.
A camisole (fig. 2) for a grown-up figure requires but a few alterations of the pattern already de-
scribed. The neck line is comparatively narrower, therefore may be made equal to half the width of chest or back, minus \ in. The shoulder points may extend f in. to 1 in. beyond the vertical folds. The line of the side seam should start at \ in. to 1 in. less than quarter bust measured from the
Fig. 3.—Woman's Camisole
Breadth = 1/2 bust measure + 1 in. Front neck width = 1/2 in. less than 1/6 of 1/2 bust measure + i in. Back neck width = 1/2 in. less than 1/6 of 1/2 bust measure. Shoulder slope extends 3/4 in. to 1 in. beyond chest and back lines.
middle back, and should be sloped in towards the waist according to the figure—say 11/2 in. to the back and 1 in. towards the front.
The waist line is not horizontal, but curves up about 1 in. from the front to the side line. The back waist may be horizontal, or it may be necessary to slope it up a little more towards the middle back.
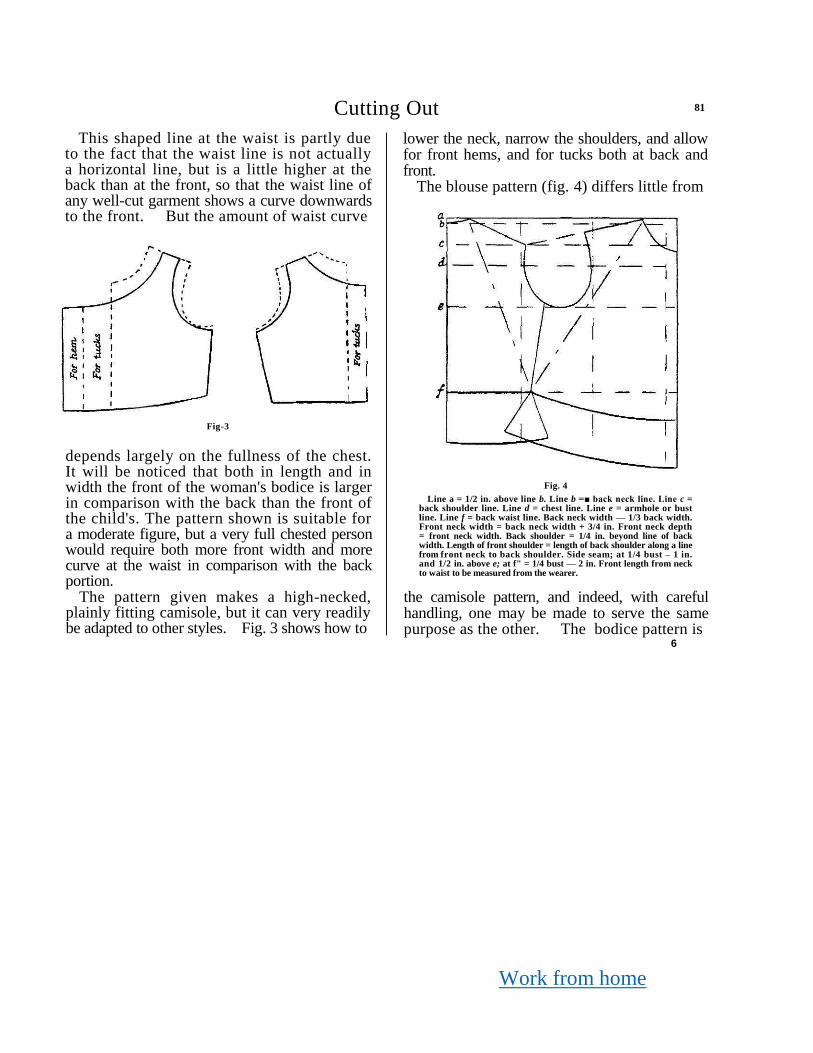
Work from home
Cutting Out 81
This shaped line at the waist is partly due to the fact that the waist line is not actually a horizontal line, but is a little higher at the back than at the front, so that the waist line of any well-cut garment shows a curve downwards to the front. But the amount of waist curve
Fig-3
depends largely on the fullness of the chest. It will be noticed that both in length and in width the front of the woman's bodice is larger in comparison with the back than the front of the child's. The pattern shown is suitable for a moderate figure, but a very full chested person would require both more front width and more curve at the waist in comparison with the back portion.
The pattern given makes a high-necked, plainly fitting camisole, but it can very readily be adapted to other styles. Fig. 3 shows how to
lower the neck, narrow the shoulders, and allow for front hems, and for tucks both at back and front.
The blouse pattern (fig. 4) differs little from
Fig. 4 Line a = 1/2 in. above line b. Line b =■ back neck line. Line c =
back shoulder line. Line d = chest line. Line e = armhole or bust line. Line f = back waist line. Back neck width — 1/3 back width. Front neck width = back neck width + 3/4 in. Front neck depth = front neck width. Back shoulder = 1/4 in. beyond line of back width. Length of front shoulder = length of back shoulder along a line from front neck to back shoulder. Side seam; at 1/4 bust – 1 in. and 1/2 in. above e; at f" = 1/4 bust — 2 in. Front length from neck to waist to be measured from the wearer.
the camisole pattern, and indeed, with careful handling, one may be made to serve the same purpose as the other. The bodice pattern is
6
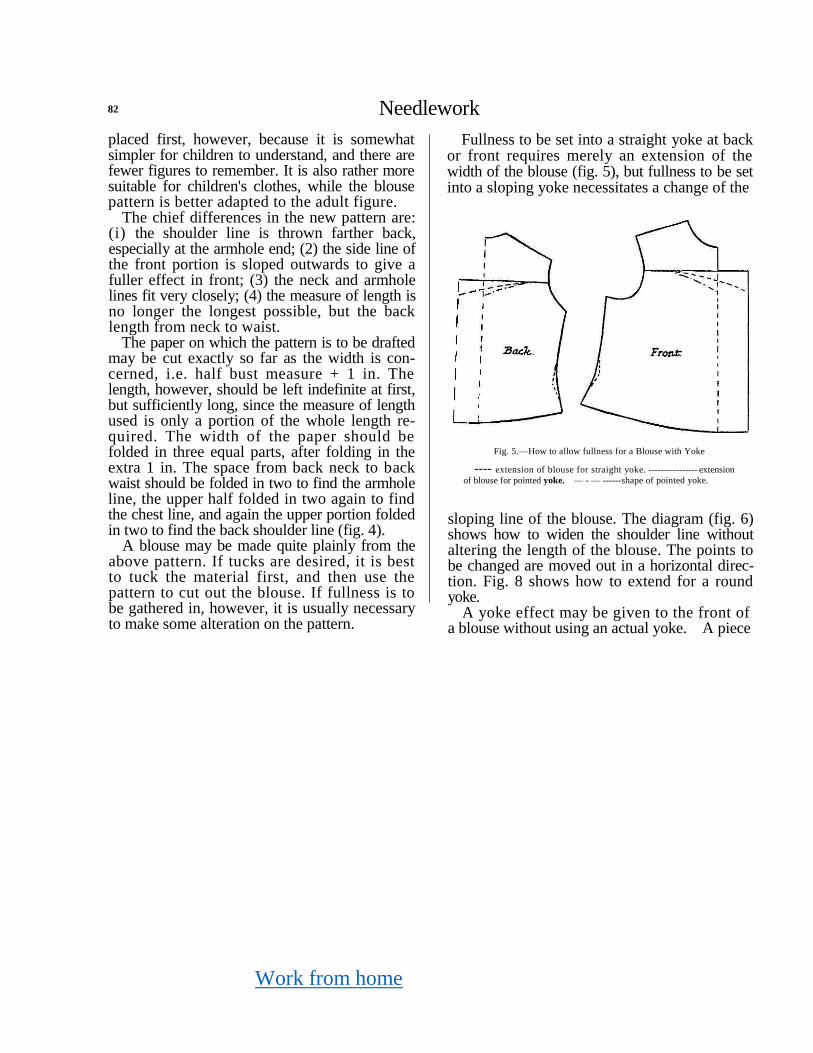
Work from home
82 Needlework
placed first, however, because it is somewhat simpler for children to understand, and there are fewer figures to remember. It is also rather more suitable for children's clothes, while the blouse pattern is better adapted to the adult figure.
The chief differences in the new pattern are: (i) the shoulder line is thrown farther back, especially at the armhole end; (2) the side line of the front portion is sloped outwards to give a fuller effect in front; (3) the neck and armhole lines fit very closely; (4) the measure of length is no longer the longest possible, but the back length from neck to waist.
The paper on which the pattern is to be drafted may be cut exactly so far as the width is con-cerned, i.e. half bust measure + 1 in. The length, however, should be left indefinite at first, but sufficiently long, since the measure of length used is only a portion of the whole length re-quired. The width of the paper should be folded in three equal parts, after folding in the extra 1 in. The space from back neck to back waist should be folded in two to find the armhole line, the upper half folded in two again to find the chest line, and again the upper portion folded in two to find the back shoulder line (fig. 4).
A blouse may be made quite plainly from the above pattern. If tucks are desired, it is best to tuck the material first, and then use the pattern to cut out the blouse. If fullness is to be gathered in, however, it is usually necessary to make some alteration on the pattern.
Fullness to be set into a straight yoke at back or front requires merely an extension of the width of the blouse (fig. 5), but fullness to be set into a sloping yoke necessitates a change of the
Fig. 5.—How to allow fullness for a Blouse with Yoke
---- extension of blouse for straight yoke. ---------------- extension of blouse for pointed yoke. — - — ------ shape of pointed yoke.
sloping line of the blouse. The diagram (fig. 6) shows how to widen the shoulder line without altering the length of the blouse. The points to be changed are moved out in a horizontal direc-tion. Fig. 8 shows how to extend for a round yoke.
A yoke effect may be given to the front of a blouse without using an actual yoke. A piece
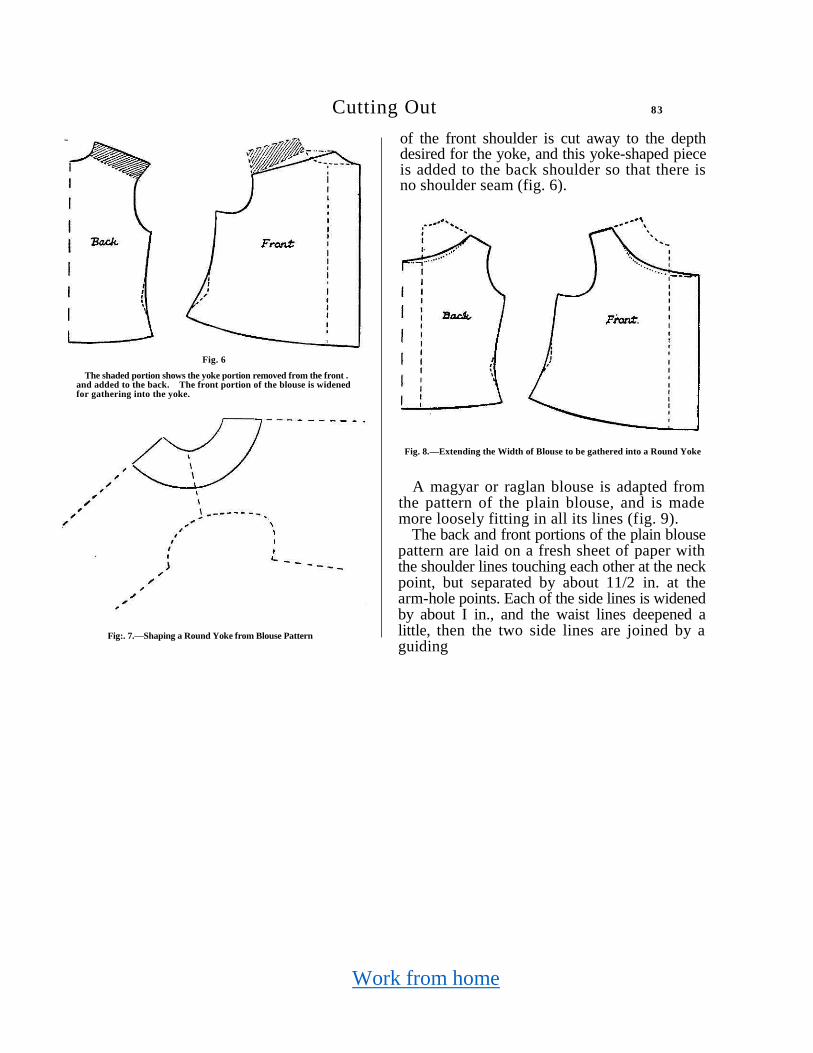
Work from home
Cutting Out 83
Fig. 6
The shaded portion shows the yoke portion removed from the front . and added to the back. The front portion of the blouse is widened for gathering into the yoke.
Fig:. 7.—Shaping a Round Yoke from Blouse Pattern
of the front shoulder is cut away to the depth desired for the yoke, and this yoke-shaped piece is added to the back shoulder so that there is no shoulder seam (fig. 6).
Fig. 8.—Extending the Width of Blouse to be gathered into a Round Yoke
A magyar or raglan blouse is adapted from the pattern of the plain blouse, and is made more loosely fitting in all its lines (fig. 9).
The back and front portions of the plain blouse pattern are laid on a fresh sheet of paper with the shoulder lines touching each other at the neck point, but separated by about 11/2 in. at the arm-hole points. Each of the side lines is widened by about I in., and the waist lines deepened a little, then the two side lines are joined by a guiding
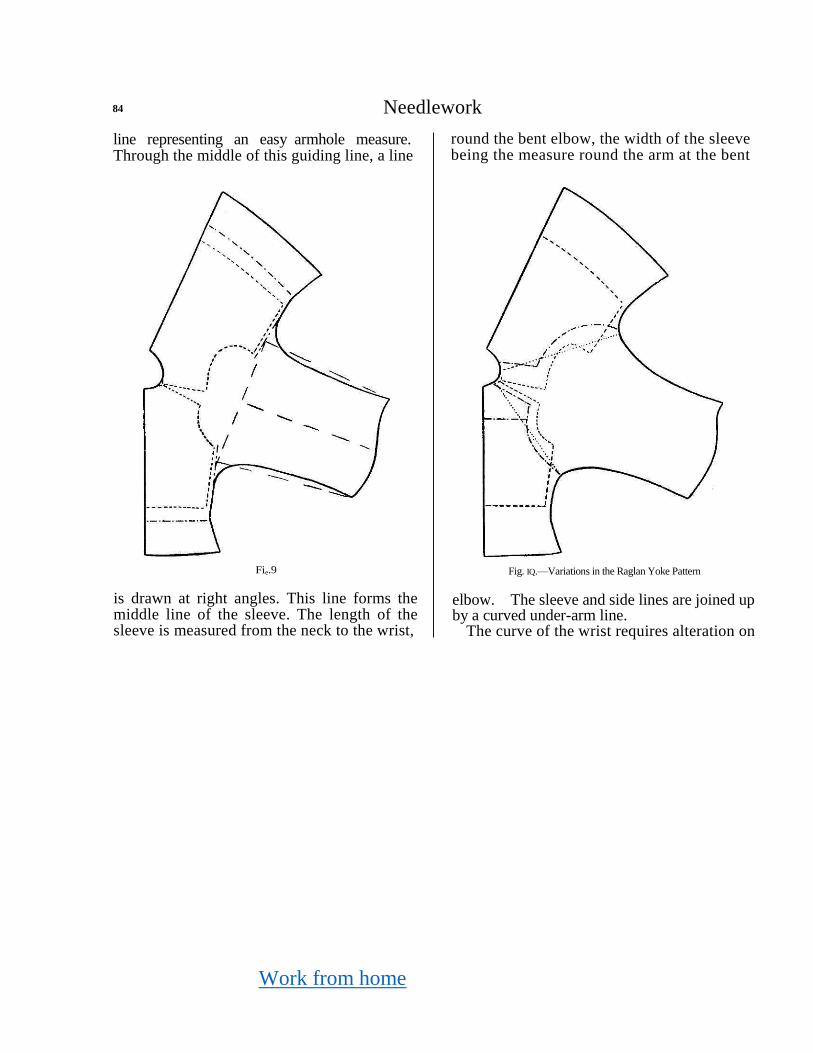
Work from home
84 Needlework
line representing an easy armhole measure. Through the middle of this guiding line, a line
round the bent elbow, the width of the sleeve being the measure round the arm at the bent
Fie.9
is drawn at right angles. This line forms the middle line of the sleeve. The length of the sleeve is measured from the neck to the wrist,
Fig. IQ.—Variations in the Raglan Yoke Pattern
elbow. The sleeve and side lines are joined up by a curved under-arm line.
The curve of the wrist requires alteration on

Work from home
Cutting Out
account of the change of position of the sleeve seam. In an ordinary sleeve, this seam is brought well round to the front of the arm, but a magyar sleeve seam is placed under the armpit. Accordingly, the most hollow part of the wrist curve is brought round towards the front.
These arrangements complete a magyar blouse, that is, a blouse in one piece. To give the pattern known as raglan, a line is drawn from the curve
of the under arm to the neck both at back and front, so that the sleeve and shoulder form one portion cut separately from the back and front.
This line may be placed in different positions according to taste, forming various yoke patterns (fig. 10). The front of the blouse is usually cut a little full, and gathered into the yoke or the shoulder portion of the sleeve. The fullness is allowed for as already described.
CHAPTER VI
THE SLEEVE PATTERN
The Sleeve Pattern
The simplest and most useful form of sleeve to begin with is the plain sleeve with one seam as usually cut for a blouse or night-dress. A sleeve with two seams is seldom now required except for coats. A very simple sleeve may already have been used to lengthen the magyar patterns, a style that also suits quite well for infants' garments, but an ordinary sleeve fits from the top of the shoulder to the wrist.
The measures required are: 1. Longest length measure = from back of
shoulder to wrist, measured round the bent elbow.
2. Widest part of sleeve = armhole measure (measured exactly).
The evolution of a sleeve pattern can easily be shown by pinning an oblong of paper into a cylinder, and slipping it on the arm. It becomes obvious that something must be cut away under the arm, in order that the paper may reach comfortably to the top of the shoulder. It is also seen that the wrist line must be narrower than the armhole line, but a blouse sleeve usually has some fullness gathered into a band. The experiment shows the two main portions of a sleeve—a long arm portion with little shaping, and a much smaller shoulder portion, which is much shaped.
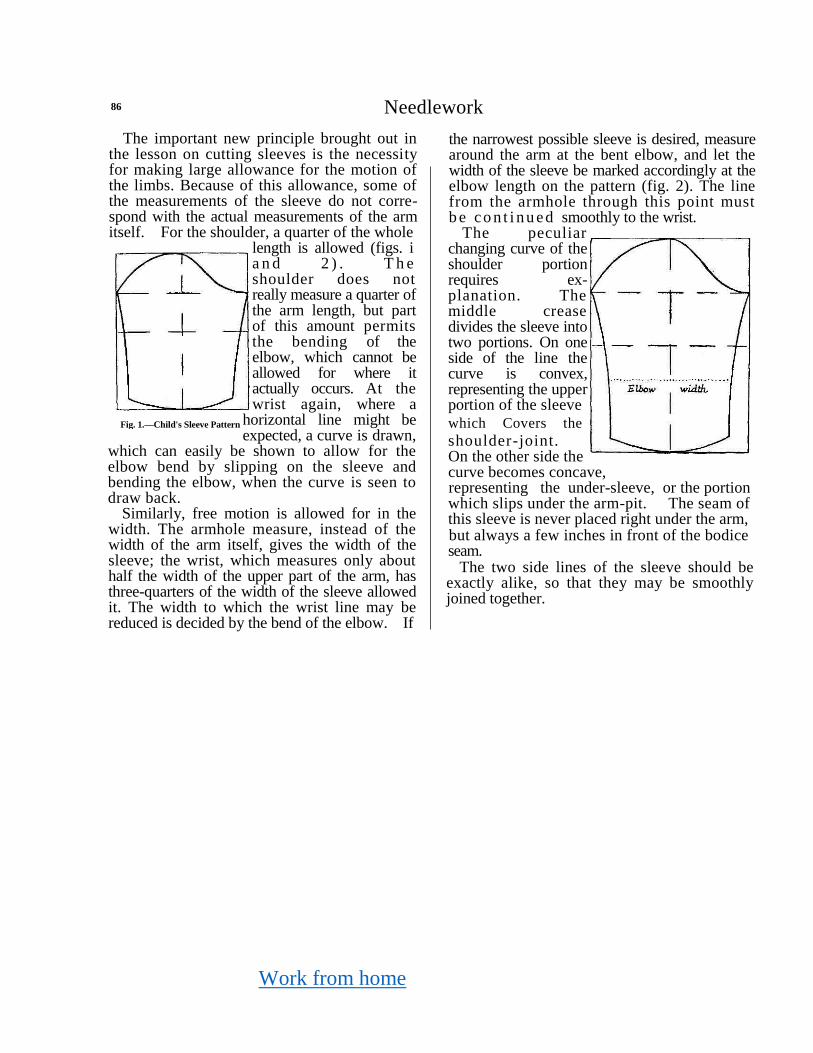
Work from home
86 Needlework
The important new principle brought out in the lesson on cutting sleeves is the necessity for making large allowance for the motion of the limbs. Because of this allowance, some of the measurements of the sleeve do not corre-spond with the actual measurements of the arm itself. For the shoulder, a quarter of the whole
length is allowed (figs. i a n d 2 ) . T h e shoulder does not really measure a quarter of the arm length, but part of this amount permits the bending of the elbow, which cannot be allowed for where it actually occurs. At the wrist again, where a
horizontal line might be expected, a curve is drawn,
which can easily be shown to allow for the elbow bend by slipping on the sleeve and bending the elbow, when the curve is seen to draw back.
Similarly, free motion is allowed for in the width. The armhole measure, instead of the width of the arm itself, gives the width of the sleeve; the wrist, which measures only about half the width of the upper part of the arm, has three-quarters of the width of the sleeve allowed it. The width to which the wrist line may be reduced is decided by the bend of the elbow. If
the narrowest possible sleeve is desired, measure around the arm at the bent elbow, and let the width of the sleeve be marked accordingly at the elbow length on the pattern (fig. 2). The line from the armhole through this point must b e co n t i nu ed smoothly to the wrist.
The peculiar changing curve of the shoulder portion requires ex-planation. The middle crease divides the sleeve into two portions. On one side of the line the curve is convex, representing the upper portion of the sleeve
which Covers the F;K- 2.—Woman's Sleeve Pattern
shoulder-joint.
On the other side the curve becomes concave, representing the under-sleeve, or the portion
which slips under the arm-pit. The seam of
this sleeve is never placed right under the arm, but always a few inches in front of the bodice
seam. The two side lines of the sleeve should be
exactly alike, so that they may be smoothly joined together.
Fig. 1.—Child's Sleeve Pattern
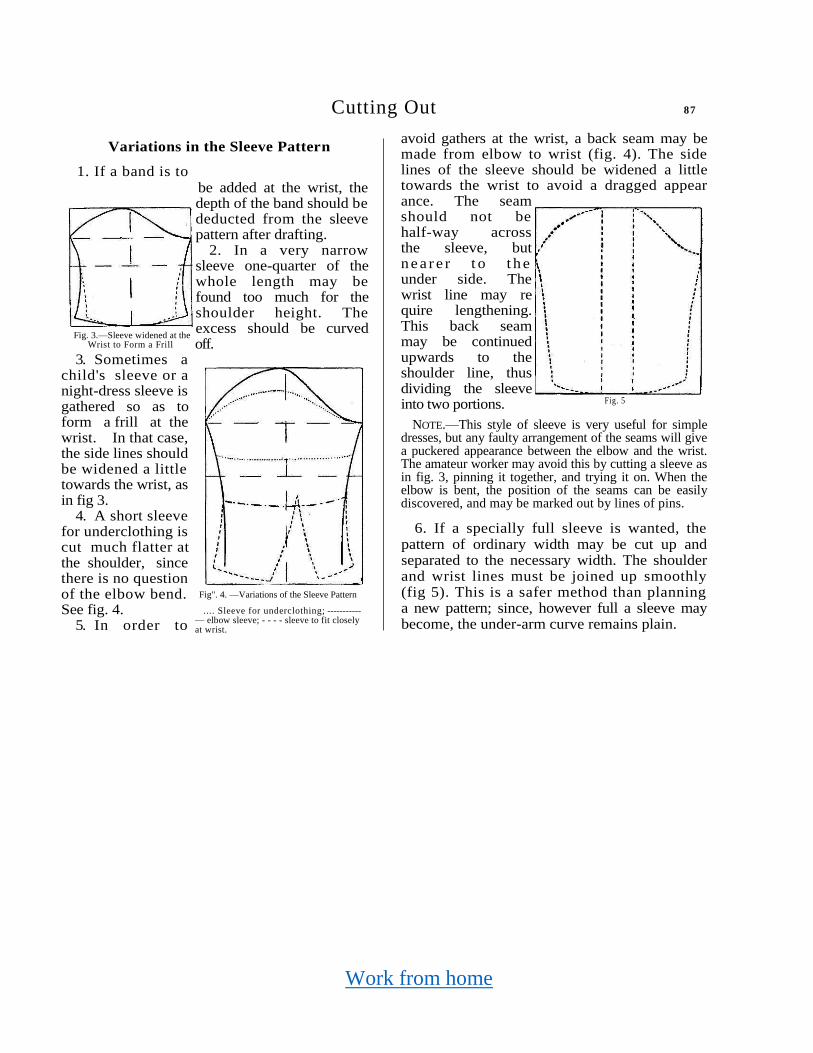
Work from home
Cutting Out 87
Variations in the Sleeve Pattern
1. If a band is to
be added at the wrist, the depth of the band should be deducted from the sleeve pattern after drafting.
2. In a very narrow sleeve one-quarter of the whole length may be found too much for the shoulder height. The excess should be curved off.
3. Sometimes a child's sleeve or a night-dress sleeve is gathered so as to form a frill at the wrist. In that case, the side lines should be widened a little towards the wrist, as in fig 3.
4. A short sleeve for underclothing is cut much flatter at the shoulder, since there is no question of the elbow bend. See fig. 4.
5. In order to
avoid gathers at the wrist, a back seam may be made from elbow to wrist (fig. 4). The side lines of the sleeve should be widened a little towards the wrist to avoid a dragged appear ance. The seam should not be half-way across the sleeve, but n e a r e r t o t h e under side. The wrist line may re quire lengthening. This back seam may be continued upwards to the shoulder line, thus dividing the sleeve into two portions. Fig. 5
NOTE.—This style of sleeve is very useful for simple dresses, but any faulty arrangement of the seams will give a puckered appearance between the elbow and the wrist. The amateur worker may avoid this by cutting a sleeve as in fig. 3, pinning it together, and trying it on. When the elbow is bent, the position of the seams can be easily discovered, and may be marked out by lines of pins.
6. If a specially full sleeve is wanted, the pattern of ordinary width may be cut up and separated to the necessary width. The shoulder and wrist lines must be joined up smoothly (fig 5). This is a safer method than planning a new pattern; since, however full a sleeve may become, the under-arm curve remains plain.
Fig. 3.—Sleeve widened at the
Wrist to Form a Frill
Fig". 4. —Variations of the Sleeve Pattern
.... Sleeve for underclothing; ----------- — elbow sleeve; - - - - sleeve to fit closely at wrist.
Work from home
88 Needlework
CHAPTER VII
THE SKIRT PATTERN
The Skirt Pattern
The essential principle in cutting a skirt is to make the seams at right angles to the waist and bottom lines, so that they will appear verti-cal when the skirt is worn. As a rule, the skirt should be at an equal distance from the ground all the way round, and the seams ought to be at fairly equal distances apart, but these matters are largely regulated by fashion.
The skirt of a child's dress or petticoat is usually made of one or two straight widths of material, merely gathered or pleated to fit a band or bodice. A woman's skirt is some-times made in the same way, if the material is very thin, and if the prevailing fashion admits of so much fullness. As a rule, however, women's skirts and underskirts are shaped or gored, and the point to be noted here is that the hip measure is the important measure in a closely fitting skirt. It is here that allowance must be made for freedom of motion, and the waist and bottom edges must be accommodated to the correct hip measure. The wider the skirt
is at the bottom, the narrower the waist line tends to be, and the narrower the bottom edge, the wider (before darts are made) will be the waist l ine. Also, the more the lines of the skirt pattern slope out, the deeper will be the curve of the waist and bottom lines. This must be so to preserve the correct angle at the junc-tion of the seam lines with the waist and bottom lines. (Compare figs. 3 and 4.)
In cutting an underskirt, especially for school work, economy of the material often takes pre-cedence of style. The first pattern shown, there-fore, while giving correct lines, aims also at getting the best value out of a piece of material. It makes a skirt rather full at the waist, but that is easily regulated by the use of darts, pleats, and draw-strings (fig. 1).
There is no need to use a paper pattern for such a simple garment, although girls may be justified in experimenting first on a piece of paper. For a more experienced worker it is sufficient to fold the cloth right away, so as to develop the pattern. In cutting an underskirt or a child's skirt, it is usually quite satis-
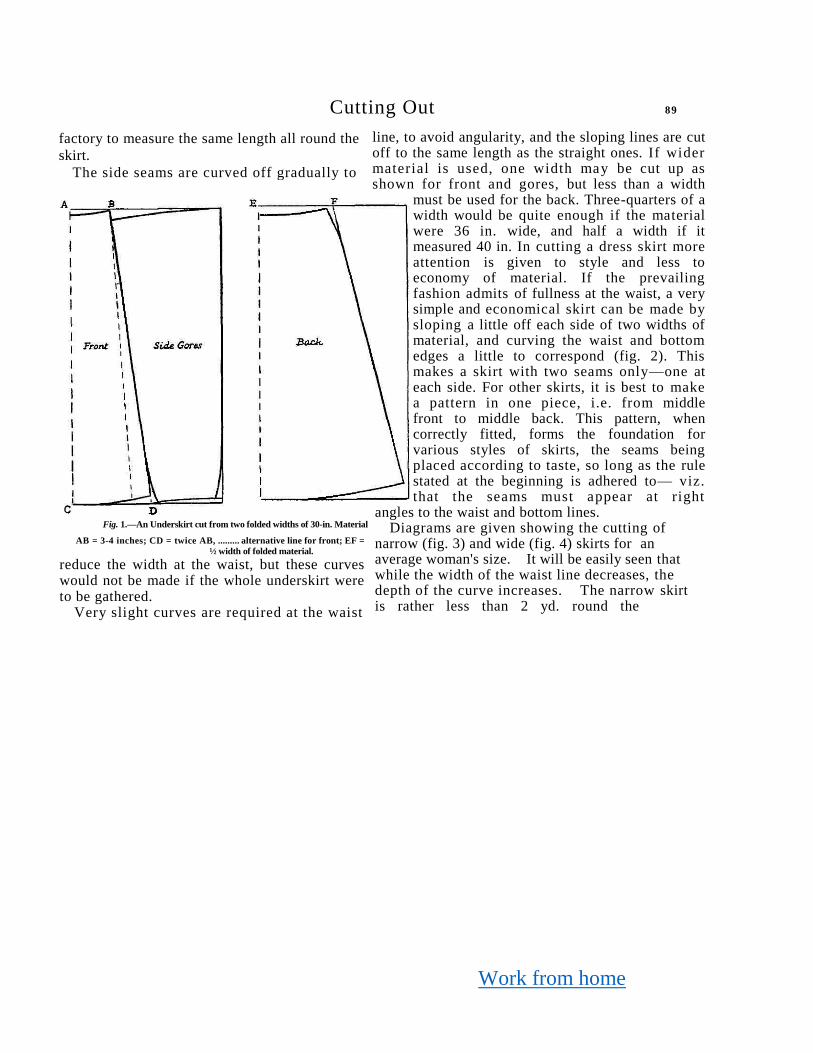
Work from home
Cutting Out 89
line, to avoid angularity, and the sloping lines are cut off to the same length as the straight ones. If wider material is used, one width may be cut up as shown for front and gores, but less than a width
must be used for the back. Three-quarters of a width would be quite enough if the material were 36 in. wide, and half a width if it measured 40 in. In cutting a dress skirt more attention is given to style and less to economy of material. If the prevailing fashion admits of fullness at the waist, a very simple and economical skirt can be made by sloping a little off each side of two widths of material, and curving the waist and bottom edges a little to correspond (fig. 2). This makes a skirt with two seams only—one at each side. For other skirts, it is best to make a pattern in one piece, i.e. from middle front to middle back. This pattern, when correctly fitted, forms the foundation for various styles of skirts, the seams being placed according to taste, so long as the rule stated at the beginning is adhered to— viz. that the seams must appear at right
angles to the waist and bottom lines. Diagrams are given showing the cutting of
narrow (fig. 3) and wide (fig. 4) skirts for an average woman's size. It will be easily seen that while the width of the waist line decreases, the depth of the curve increases. The narrow skirt is rather less than 2 yd. round the
factory to measure the same length all round the
skirt.
The side seams are curved off gradually to
Fig. 1.—An Underskirt cut from two folded widths of 30-in. Material
AB = 3-4 inches; CD = twice AB, ......... alternative line for front; EF = ½ width of folded material.
reduce the width at the waist, but these curves would not be made if the whole underskirt were to be gathered.
Very slight curves are required at the waist
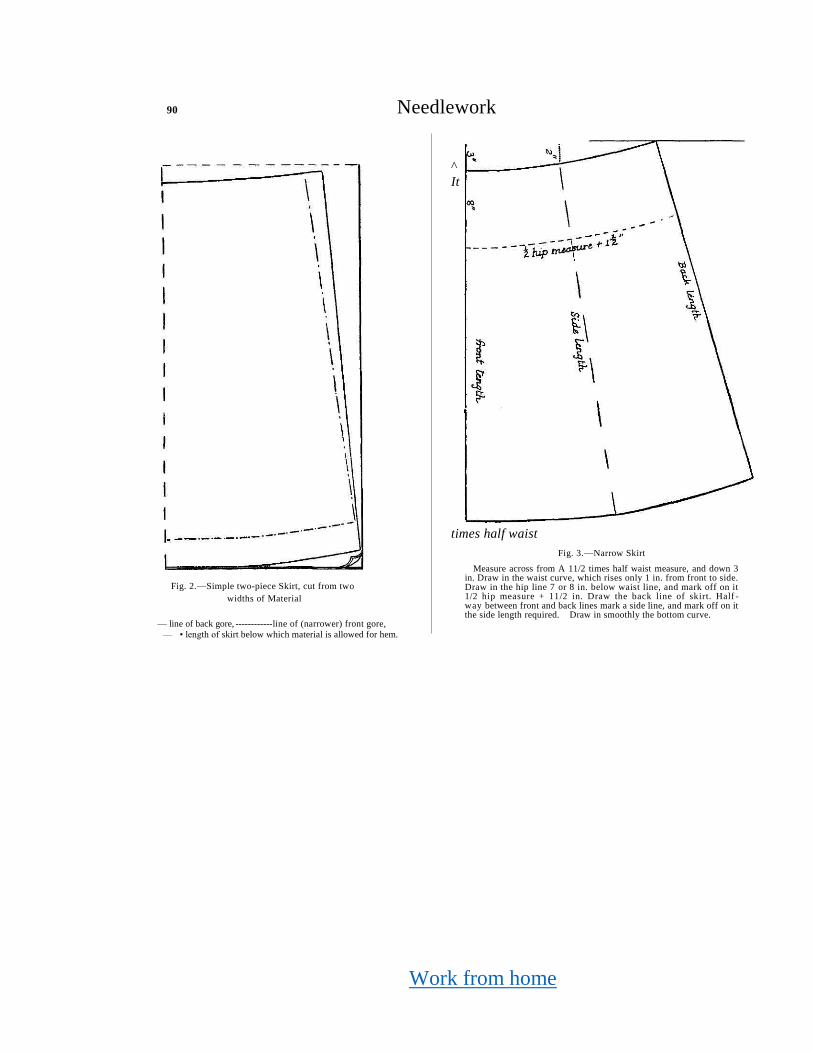
Work from home
90 Needlework
Fig. 2.—Simple two-piece Skirt, cut from two
widths of Material
— line of back gore, ------------ line of (narrower) front gore, — • length of skirt below which material is allowed for hem.
^
It
times half waist
Fig. 3.—Narrow Skirt
Measure across from A 11/2 times half waist measure, and down 3 in. Draw in the waist curve, which rises only 1 in. from front to side. Draw in the hip line 7 or 8 in. below waist line, and mark off on it 1/2 hip measure + 11/2 in. Draw the back line of skirt. Half -way between front and back lines mark a side line, and mark off on it the side length required. Draw in smoothly the bottom curve.
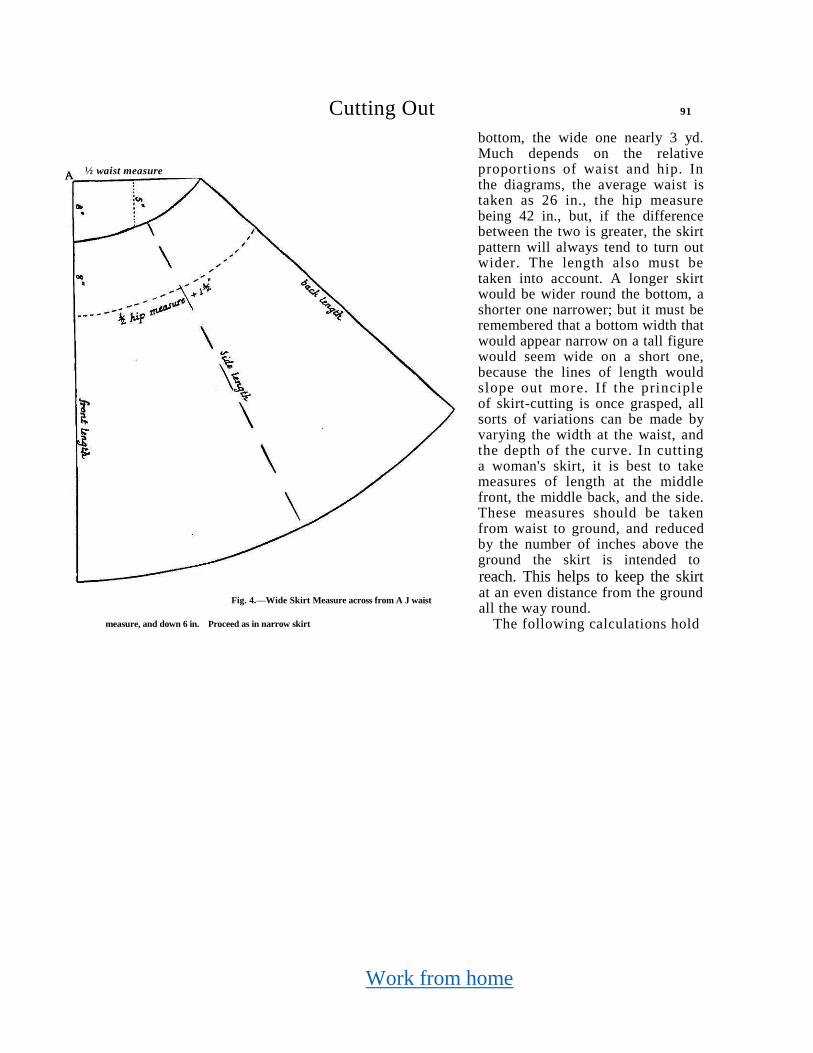
Work from home
Cutting Out 91
Fig. 4.—Wide Skirt Measure across from A J waist
measure, and down 6 in. Proceed as in narrow skirt
bottom, the wide one nearly 3 yd. Much depends on the relative proportions of waist and hip. In the diagrams, the average waist is taken as 26 in., the hip measure being 42 in., but, if the difference between the two is greater, the skirt pattern will always tend to turn out wider. The length also must be taken into account. A longer skirt would be wider round the bottom, a shorter one narrower; but it must be remembered that a bottom width that would appear narrow on a tall figure would seem wide on a short one, because the lines of length would slope out more. If the principle of skirt-cutting is once grasped, all sorts of variations can be made by varying the width at the waist, and the depth of the curve. In cutting a woman's skirt, it is best to take measures of length at the middle front, the middle back, and the side. These measures should be taken from waist to ground, and reduced by the number of inches above the ground the skirt is intended to
reach. This helps to keep the skirt at an even distance from the ground all the way round.
The following calculations hold
½ waist measure
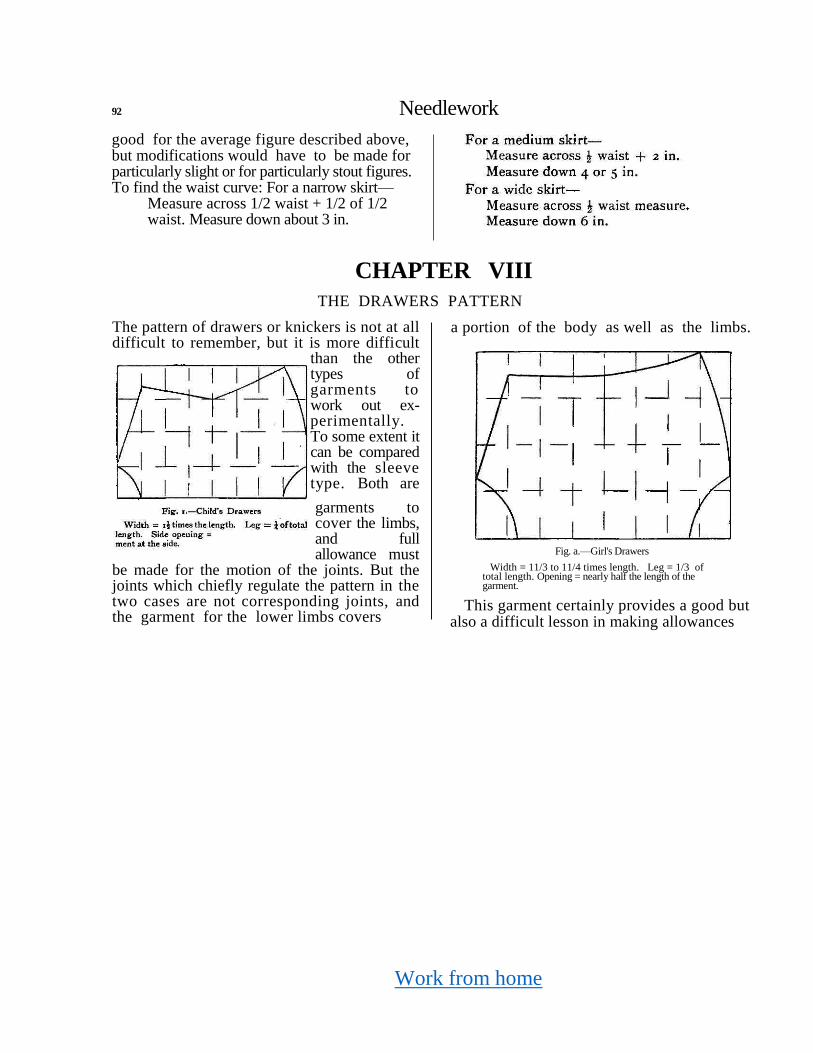
Work from home
92 Needlework
good for the average figure described above, but modifications would have to be made for particularly slight or for particularly stout figures. To find the waist curve: For a narrow skirt—
Measure across 1/2 waist + 1/2 of 1/2 waist. Measure down about 3 in.
CHAPTER VIII
THE DRAWERS PATTERN
The pattern of drawers or knickers is not at all difficult to remember, but it is more difficult
than the other types of garments to work out ex-perimentally. To some extent it can be compared with the sleeve type. Both are
garments to cover the limbs, and full allowance must
be made for the motion of the joints. But the joints which chiefly regulate the pattern in the two cases are not corresponding joints, and the garment for the lower limbs covers
a portion of the body as well as the limbs.
Fig. a.—Girl's Drawers
Width = 11/3 to 11/4 times length. Leg = 1/3 of total length. Opening = nearly half the length of the garment.
This garment certainly provides a good but also a difficult lesson in making allowances
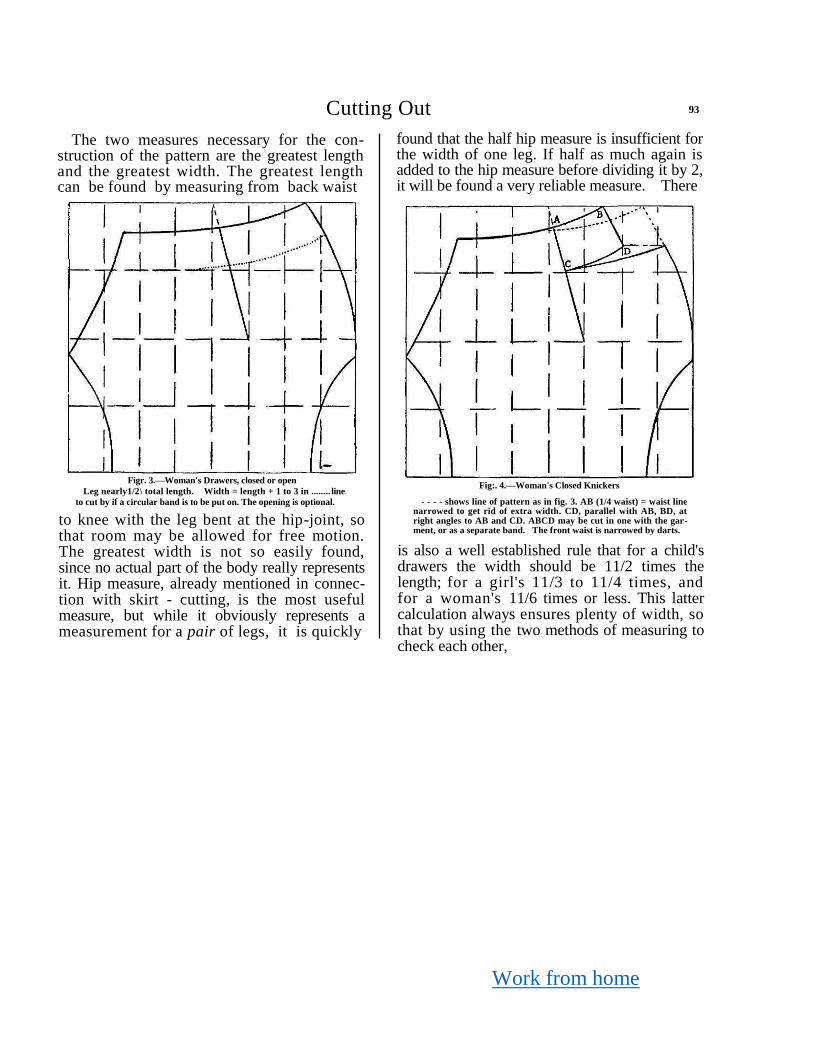
Work from home
Cutting Out 93
The two measures necessary for the con-struction of the pattern are the greatest length and the greatest width. The greatest length can be found by measuring from back waist
found that the half hip measure is insufficient for the width of one leg. If half as much again is added to the hip measure before dividing it by 2, it will be found a very reliable measure. There
Figr. 3.—Woman's Drawers, closed or open
Leg nearly1/2\ total length. Width = length + 1 to 3 in ........ line to cut by if a circular band is to be put on. The opening is optional.
to knee with the leg bent at the hip-joint, so that room may be allowed for free motion. The greatest width is not so easily found, since no actual part of the body really represents it. Hip measure, already mentioned in connec-tion with skirt - cutting, is the most useful measure, but while it obviously represents a measurement for a pair of legs, it is quickly
Fig:. 4.—Woman's Closed Knickers
- - - - shows line of pattern as in fig. 3. AB (1/4 waist) = waist line narrowed to get rid of extra width. CD, parallel with AB, BD, at right angles to AB and CD. ABCD may be cut in one with the gar-ment, or as a separate band. The front waist is narrowed by darts.
is also a well established rule that for a child's drawers the width should be 11/2 times the length; for a girl's 11/3 to 11/4 times, and for a woman's 11/6 times or less. This latter calculation always ensures plenty of width, so that by using the two methods of measuring to check each other,
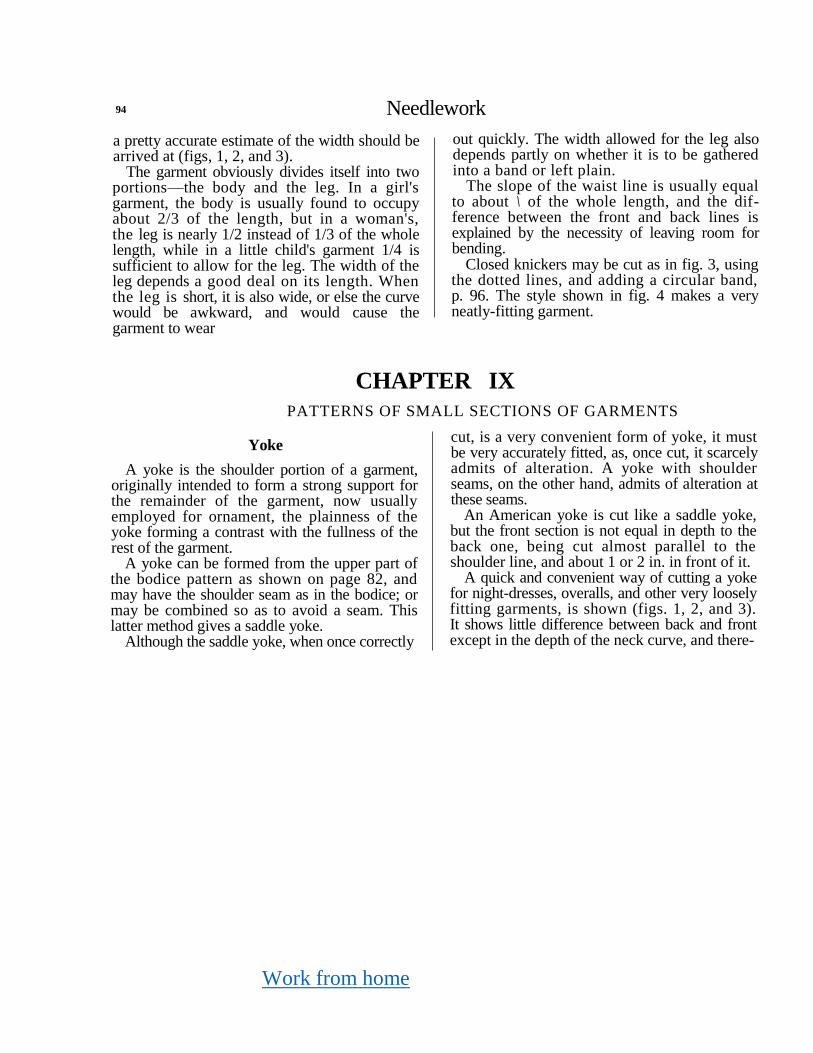
Work from home
94 Needlework
a pretty accurate estimate of the width should be arrived at (figs, 1, 2, and 3).
The garment obviously divides itself into two portions—the body and the leg. In a girl's garment, the body is usually found to occupy about 2/3 of the length, but in a woman's, the leg is nearly 1/2 instead of 1/3 of the whole length, while in a little child's garment 1/4 is sufficient to allow for the leg. The width of the leg depends a good deal on its length. When the leg is short, it is also wide, or else the curve would be awkward, and would cause the garment to wear
out quickly. The width allowed for the leg also depends partly on whether it is to be gathered into a band or left plain.
The slope of the waist line is usually equal to about \ of the whole length, and the dif-ference between the front and back lines is explained by the necessity of leaving room for bending.
Closed knickers may be cut as in fig. 3, using the dotted lines, and adding a circular band, p. 96. The style shown in fig. 4 makes a very neatly-fitting garment.
CHAPTER IX
PATTERNS OF SMALL SECTIONS OF GARMENTS
Yoke
A yoke is the shoulder portion of a garment, originally intended to form a strong support for the remainder of the garment, now usually employed for ornament, the plainness of the yoke forming a contrast with the fullness of the rest of the garment.
A yoke can be formed from the upper part of the bodice pattern as shown on page 82, and may have the shoulder seam as in the bodice; or may be combined so as to avoid a seam. This latter method gives a saddle yoke.
Although the saddle yoke, when once correctly
cut, is a very convenient form of yoke, it must be very accurately fitted, as, once cut, it scarcely admits of alteration. A yoke with shoulder seams, on the other hand, admits of alteration at these seams.
An American yoke is cut like a saddle yoke, but the front section is not equal in depth to the back one, being cut almost parallel to the shoulder line, and about 1 or 2 in. in front of it.
A quick and convenient way of cutting a yoke for night-dresses, overalls, and other very loosely fitting garments, is shown (figs. 1, 2, and 3). It shows little difference between back and front except in the depth of the neck curve, and there-
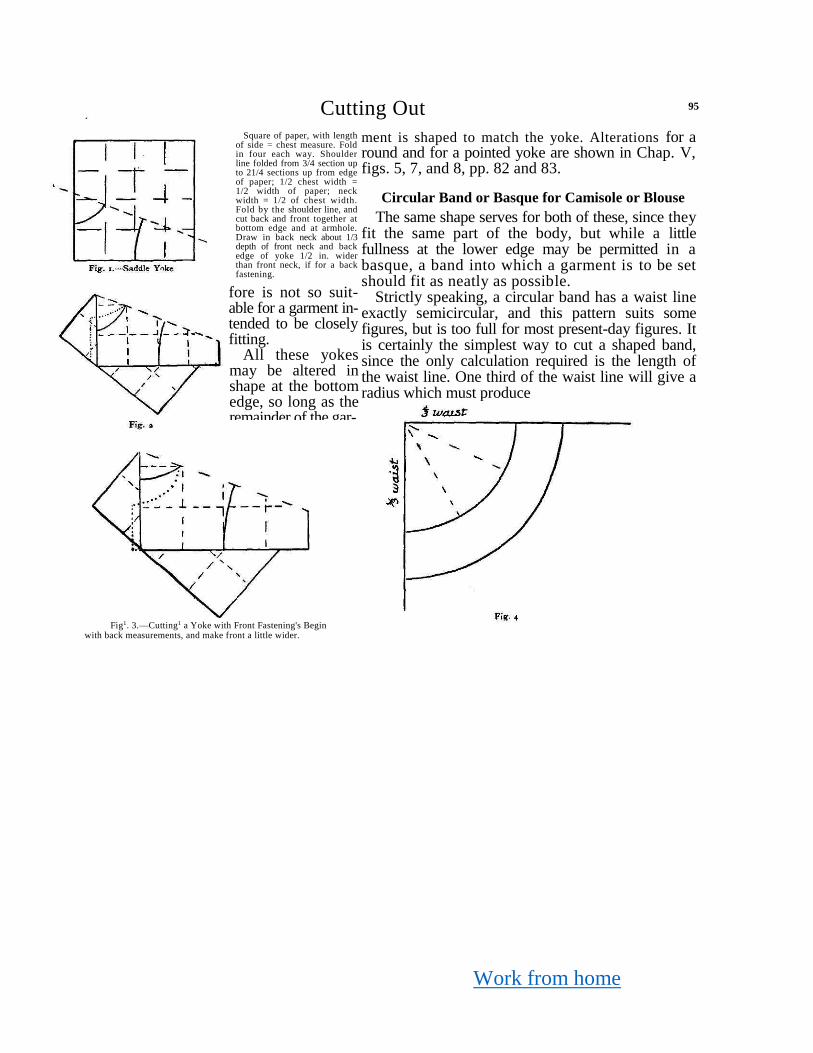
Work from home
Cutting Out
ment is shaped to match the yoke. Alterations for a round and for a pointed yoke are shown in Chap. V, figs. 5, 7, and 8, pp. 82 and 83.
Circular Band or Basque for Camisole or Blouse
The same shape serves for both of these, since they fit the same part of the body, but while a little fullness at the lower edge may be permitted in a basque, a band into which a garment is to be set should fit as neatly as possible.
Strictly speaking, a circular band has a waist line exactly semicircular, and this pattern suits some figures, but is too full for most present-day figures. It is certainly the simplest way to cut a shaped band, since the only calculation required is the length of the waist line. One third of the waist line will give a radius which must produce
95
Square of paper, with length of side = chest measure. Fold in four each way. Shoulder line folded from 3/4 section up to 21/4 sections up from edge of paper; 1/2 chest width = 1/2 width of paper; neck width = 1/2 of chest width. Fold by the shoulder line, and cut back and front together at bottom edge and at armhole. Draw in back neck about 1/3 depth of front neck and back edge of yoke 1/2 in. wider than front neck, if for a back fastening.
fore is not so suit-able for a garment in-tended to be closely fitting.
All these yokes may be altered in shape at the bottom edge, so long as the remainder of the gar-
Fig1. 3.—Cutting1 a Yoke with Front Fastening's Begin with back measurements, and make front a little wider.
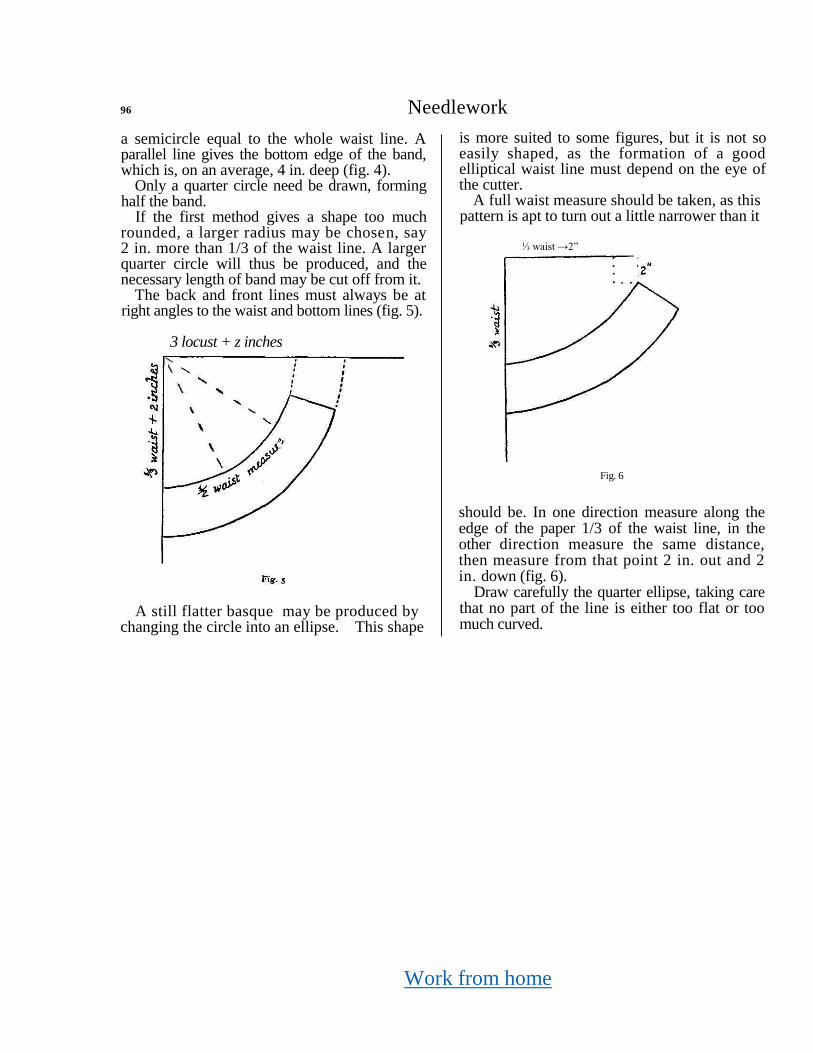
Work from home
96 Needlework
a semicircle equal to the whole waist line. A parallel line gives the bottom edge of the band, which is, on an average, 4 in. deep (fig. 4).
Only a quarter circle need be drawn, forming half the band.
If the first method gives a shape too much rounded, a larger radius may be chosen, say 2 in. more than 1/3 of the waist line. A larger quarter circle will thus be produced, and the necessary length of band may be cut off from it.
The back and front lines must always be at right angles to the waist and bottom lines (fig. 5).
3 locust + z inches
A still flatter basque may be produced by changing the circle into an ellipse. This shape
is more suited to some figures, but it is not so easily shaped, as the formation of a good elliptical waist line must depend on the eye of the cutter.
A full waist measure should be taken, as this pattern is apt to turn out a little narrower than it
Fig. 6
should be. In one direction measure along the edge of the paper 1/3 of the waist line, in the other direction measure the same distance, then measure from that point 2 in. out and 2 in. down (fig. 6).
Draw carefully the quarter ellipse, taking care that no part of the line is either too flat or too much curved.
⅓ waist →2”
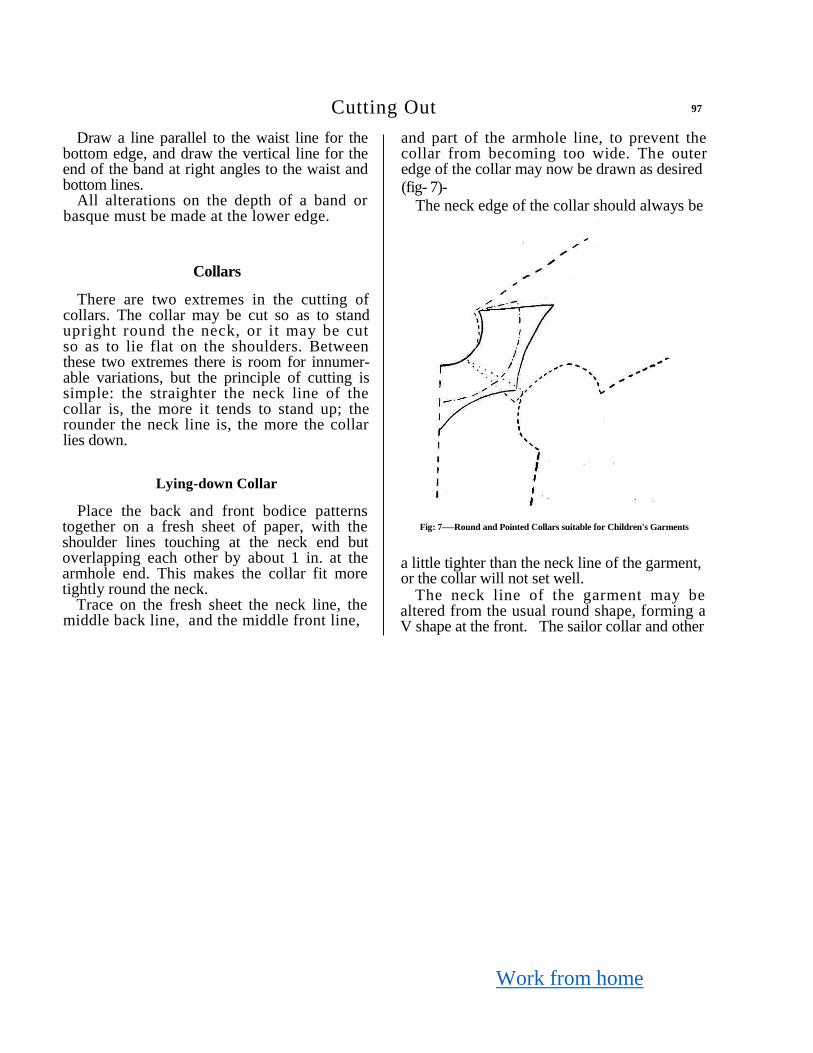
Work from home
Cutting Out 97
Draw a line parallel to the waist line for the bottom edge, and draw the vertical line for the end of the band at right angles to the waist and bottom lines.
All alterations on the depth of a band or basque must be made at the lower edge.
Collars
There are two extremes in the cutting of collars. The collar may be cut so as to stand upright round the neck, or it may be cut so as to lie flat on the shoulders. Between these two extremes there is room for innumer-able variations, but the principle of cutting is simple: the straighter the neck line of the collar is, the more it tends to stand up; the rounder the neck line is, the more the collar lies down.
Lying-down Collar
Place the back and front bodice patterns together on a fresh sheet of paper, with the shoulder lines touching at the neck end but overlapping each other by about 1 in. at the armhole end. This makes the collar fit more tightly round the neck.
Trace on the fresh sheet the neck line, the middle back line, and the middle front line,
and part of the armhole line, to prevent the collar from becoming too wide. The outer edge of the collar may now be drawn as desired
(fig- 7)-
The neck edge of the collar should always be
Fig: 7-—Round and Pointed Collars suitable for Children's Garments
a little tighter than the neck line of the garment, or the collar will not set well.
The neck line of the garment may be altered from the usual round shape, forming a V shape at the front. The sailor collar and other
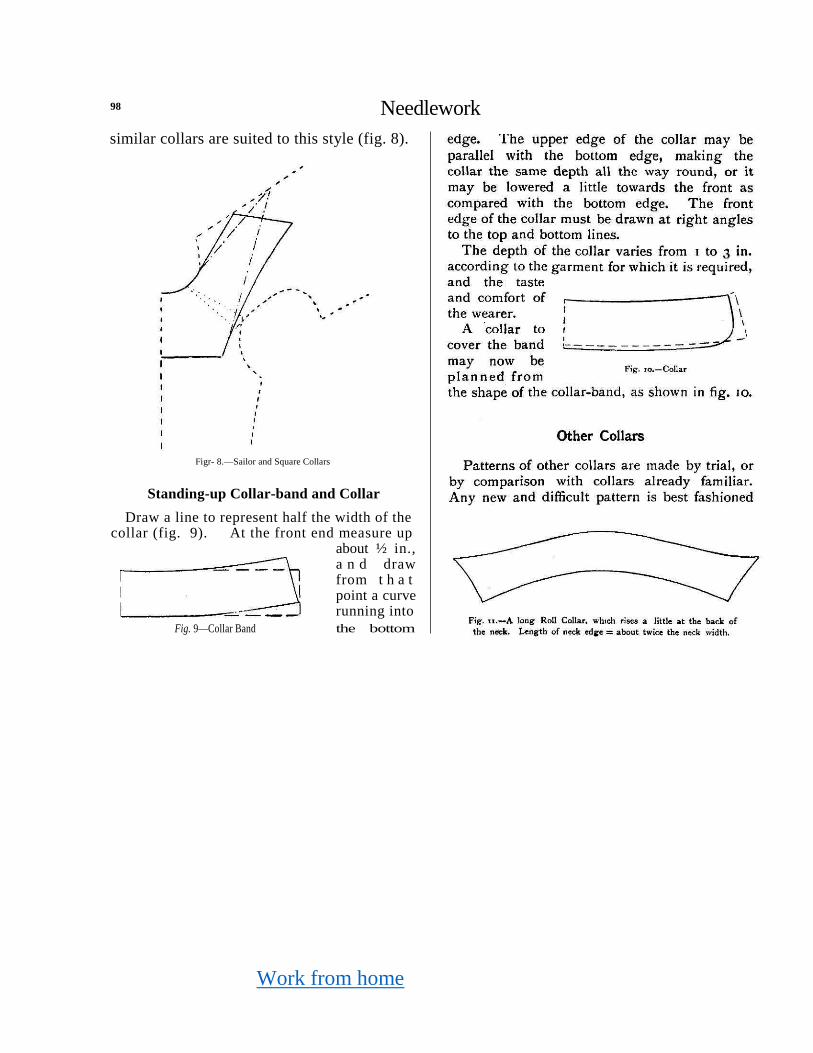
Work from home
98 Needlework
similar collars are suited to this style (fig. 8).
Figr- 8.—Sailor and Square Collars
Standing-up Collar-band and Collar
Draw a line to represent half the width of the collar (fig. 9). At the front end measure up
about ½ in., a n d draw from t h a t point a curve running into
Fig. 9—Collar Band the bottom
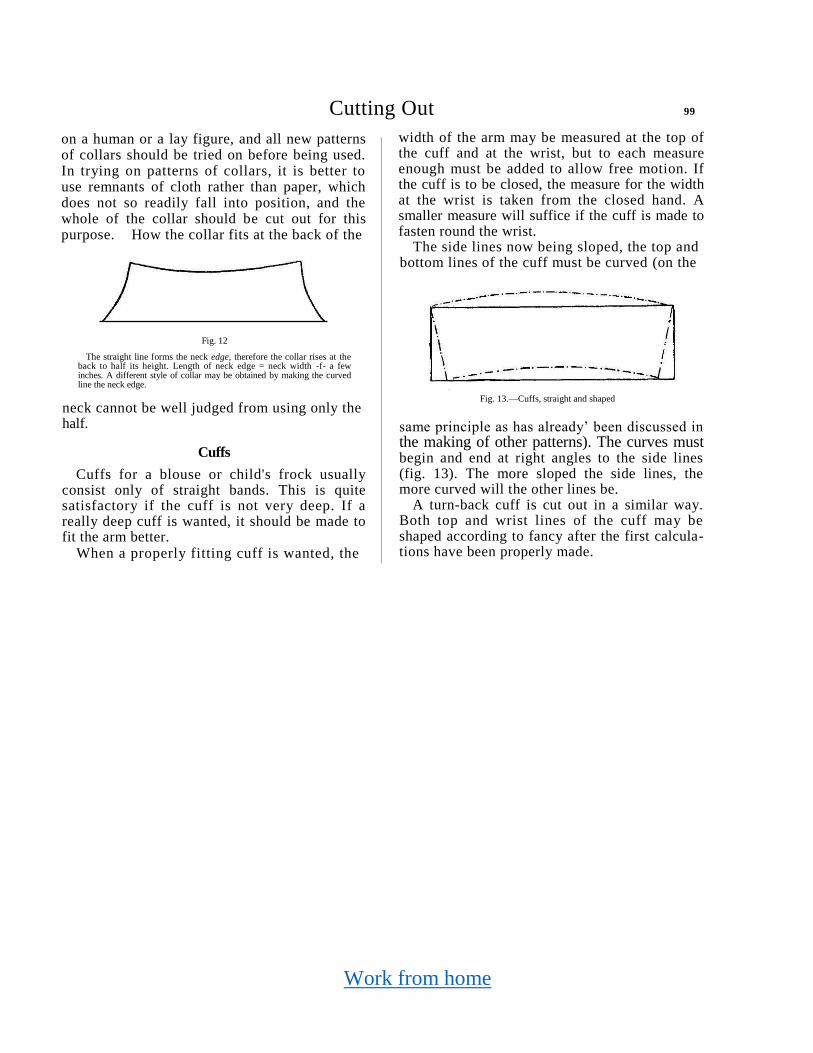
Work from home
Cutting Out 99
on a human or a lay figure, and all new patterns of collars should be tried on before being used. In trying on patterns of collars, it is better to use remnants of cloth rather than paper, which does not so readily fall into position, and the whole of the collar should be cut out for this purpose. How the collar fits at the back of the
Fig. 12
The straight line forms the neck edge, therefore the collar rises at the back to half its height. Length of neck edge = neck width -f- a few inches. A different style of collar may be obtained by making the curved line the neck edge.
neck cannot be well judged from using only the half.
Cuffs
Cuffs for a blouse or child's frock usually consist only of straight bands. This is quite satisfactory if the cuff is not very deep. If a really deep cuff is wanted, it should be made to fit the arm better.
When a properly fitting cuff is wanted, the
width of the arm may be measured at the top of the cuff and at the wrist, but to each measure enough must be added to allow free motion. If the cuff is to be closed, the measure for the width at the wrist is taken from the closed hand. A smaller measure will suffice if the cuff is made to fasten round the wrist.
The side lines now being sloped, the top and bottom lines of the cuff must be curved (on the
Fig. 13.—Cuffs, straight and shaped
same principle as has already’ been discussed in the making of other patterns). The curves must begin and end at right angles to the side lines (fig. 13). The more sloped the side lines, the more curved will the other lines be.
A turn-back cuff is cut out in a similar way. Both top and wrist lines of the cuff may be shaped according to fancy after the first calcula-tions have been properly made.
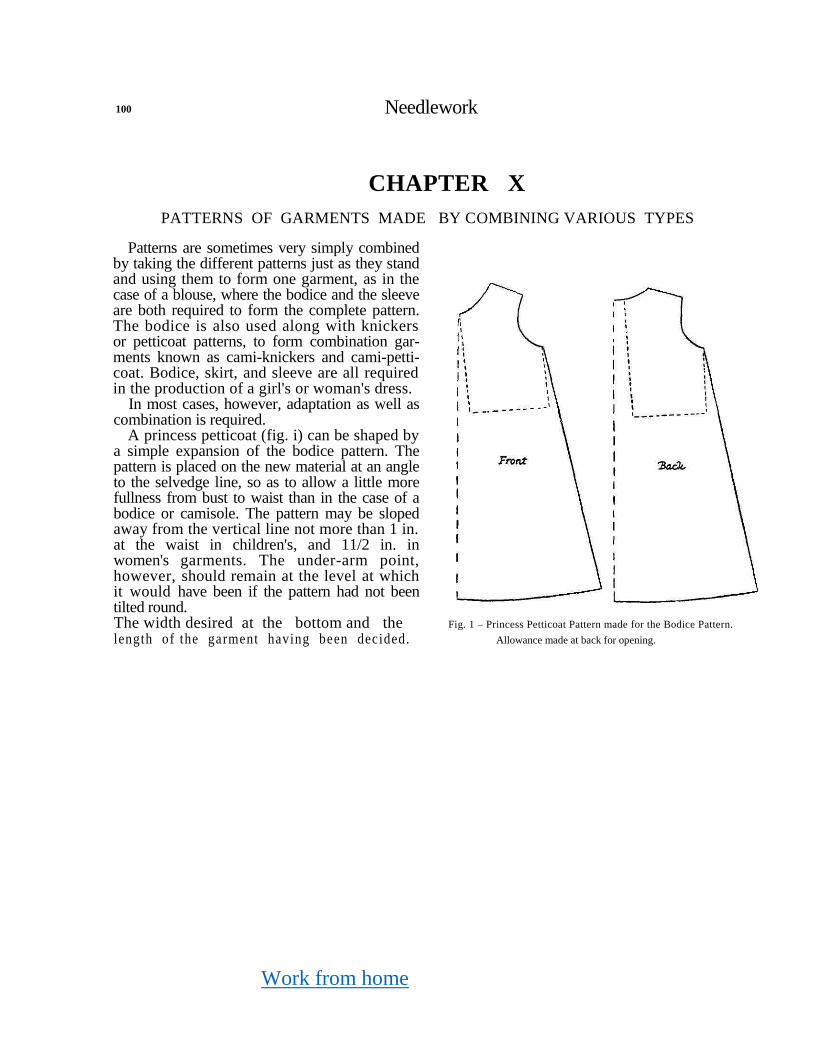
Work from home
100 Needlework
CHAPTER X
PATTERNS OF GARMENTS MADE BY COMBINING VARIOUS TYPES
Patterns are sometimes very simply combined by taking the different patterns just as they stand and using them to form one garment, as in the case of a blouse, where the bodice and the sleeve are both required to form the complete pattern. The bodice is also used along with knickers or petticoat patterns, to form combination gar-ments known as cami-knickers and cami-petti-coat. Bodice, skirt, and sleeve are all required in the production of a girl's or woman's dress.
In most cases, however, adaptation as well as combination is required.
A princess petticoat (fig. i) can be shaped by a simple expansion of the bodice pattern. The pattern is placed on the new material at an angle to the selvedge line, so as to allow a little more fullness from bust to waist than in the case of a bodice or camisole. The pattern may be sloped away from the vertical line not more than 1 in. at the waist in children's, and 11/2 in. in women's garments. The under-arm point, however, should remain at the level at which it would have been if the pattern had not been tilted round. The width desired at the bottom and the Fig. 1 – Princess Petticoat Pattern made for the Bodice Pattern.
length of the garment having been decided. Allowance made at back for opening.
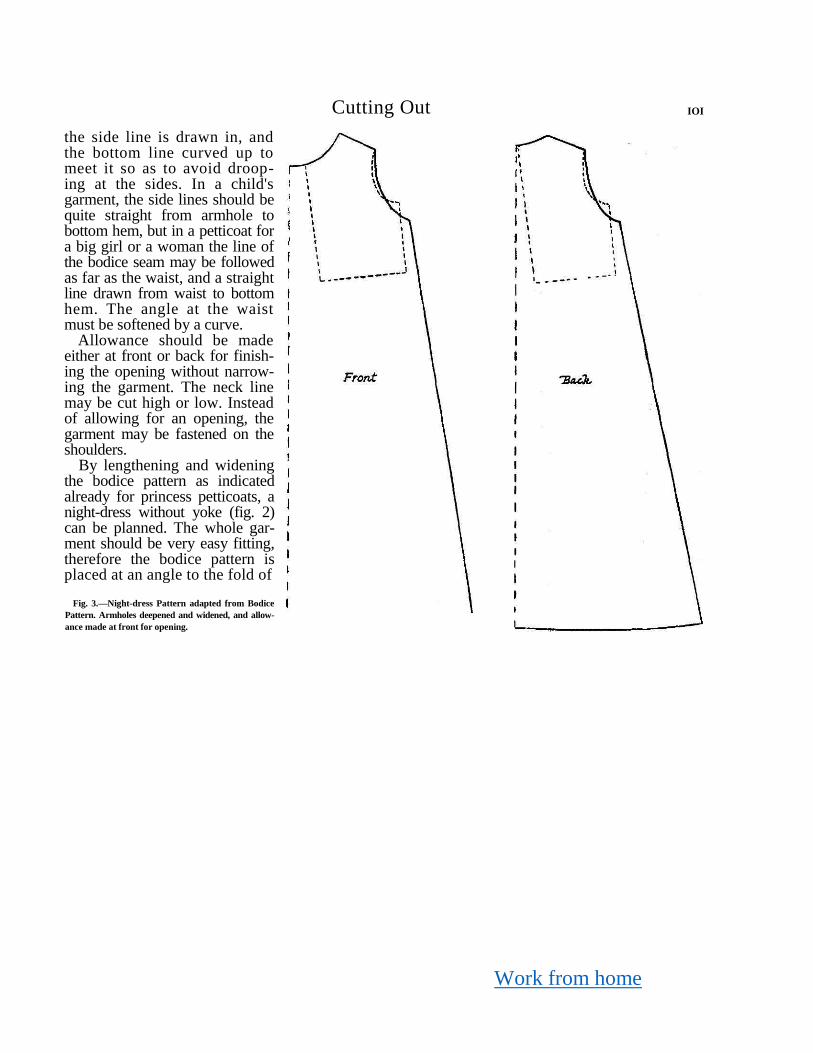
Work from home
Cutting Out IOI
the side line is drawn in, and the bottom line curved up to meet it so as to avoid droop-ing at the sides. In a child's garment, the side lines should be quite straight from armhole to bottom hem, but in a petticoat for a big girl or a woman the line of the bodice seam may be followed as far as the waist, and a straight line drawn from waist to bottom hem. The angle at the waist must be softened by a curve.
Allowance should be made either at front or back for finish-ing the opening without narrow-ing the garment. The neck line may be cut high or low. Instead of allowing for an opening, the garment may be fastened on the shoulders.
By lengthening and widening the bodice pattern as indicated already for princess petticoats, a night-dress without yoke (fig. 2) can be planned. The whole gar-ment should be very easy fitting, therefore the bodice pattern is placed at an angle to the fold of
Fig. 3.—Night-dress Pattern adapted from Bodice
Pattern. Armholes deepened and widened, and allow-
ance made at front for opening.
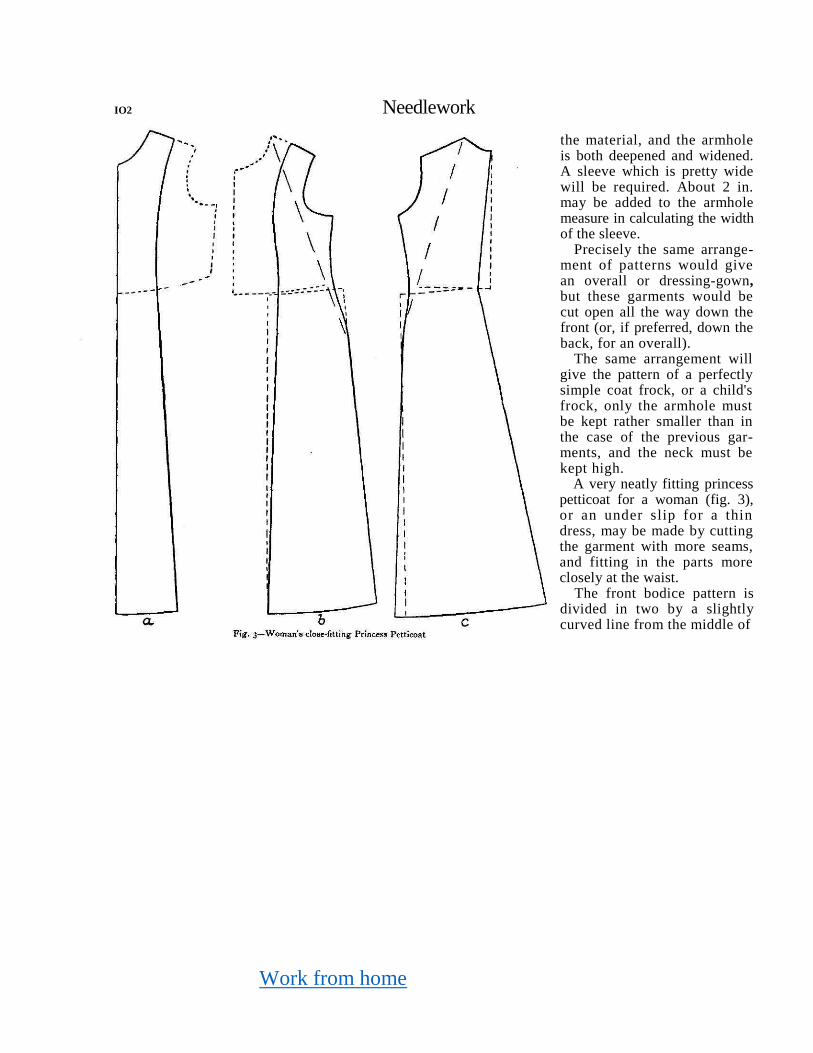
Work from home
IO2 Needlework
the material, and the armhole is both deepened and widened. A sleeve which is pretty wide will be required. About 2 in. may be added to the armhole measure in calculating the width of the sleeve.
Precisely the same arrange-ment of patterns would give an overall or dressing-gown, but these garments would be cut open all the way down the front (or, if preferred, down the back, for an overall).
The same arrangement will give the pattern of a perfectly simple coat frock, or a child's frock, only the armhole must be kept rather smaller than in the case of the previous gar-ments, and the neck must be kept high.
A very neatly fitting princess petticoat for a woman (fig. 3), or an under slip for a thin dress, may be made by cutting the garment with more seams, and fitting in the parts more closely at the waist.
The front bodice pattern is divided in two by a slightly curved line from the middle of
Work from home
Cutting Out 103
the shoulder to within 3 or 4 in. of the middle line at the waist. This section is continued by the front section of the petticoat pattern (fig. 3 a).
The other front section is narrowed so that it really fits the waist, and is completed by the side gore of the petticoat (fig. 3d).
The back bodic e i s a l so nea t ened un t i l it measures about £ waist, and to it is joined the back section of the petticoat, the sloped edge being placed at the middle of the back so as to distribute the fullness of the garment (fig. 3 c).
In planning the side and back port ions, care is required in drawing the necessary curves below the waist. The hip measure must be tested before the pattern is cut out, lest the curves may not be full enough.
This method of cutting may be used to make the pattern of a paneled dress for a gi rl or a woman. In a dress, the back may be paneled as well as the front. The dividing line for the back would be cut from the middle of the shoulder to within 2 or 3 in. of the middle line at back waist. The side pieces of a dress need not (especially in a girl's dress) be fitted in so closely at the waist, and the lines forming the side seam would be carried straight from the armhole to the bottom edge of the skirt.
Yoked Garments
The saddle yoke already shown on page 95 may be used for night-dresses, overalls, and dressing-gowns.
If a very neatly fitting yoke is required, it is safer to form it from the upper portion of the bodice pattern, fitting it well at the shoulder seams.
For the remainder of the garment, a more or less straight skirt is sufficient, the armhole curves being completed in this portion of the garment. This skirt is gathered, pleated, or smocked into the yoke.
For a child's overall, use two straight widths of material. Cut out the under-arm curve so as to give a good appearance, and sufficient width at the armhole.
For instance, if an armhole of 14 in. is required, and 7 in. is already supplied by the yoke, then the curve at each side of the skirt must measure about 31/2 in. The breadth of this curve is seldom more, but may be less, than 2 in. in a child's garment, therefore its depth would be about 21/2 in.
In a woman's garment, the width of the under-arm curve may be from 21/2 to 3 in., and the depth would, of course, depend on the depth of the yoke.
Whenever the bottom width of a garment is so great as to make it awkward to arrange the fullness in the yoke, the side lines are sloped off a little before the under-arm curve is cut (fig. 4).
Suppose half the width of the yoke measures 7 in., and half the width of material 18 in. There would be a plain piece of about 1 \ in. at either end of the yoke, and the armhole curve would
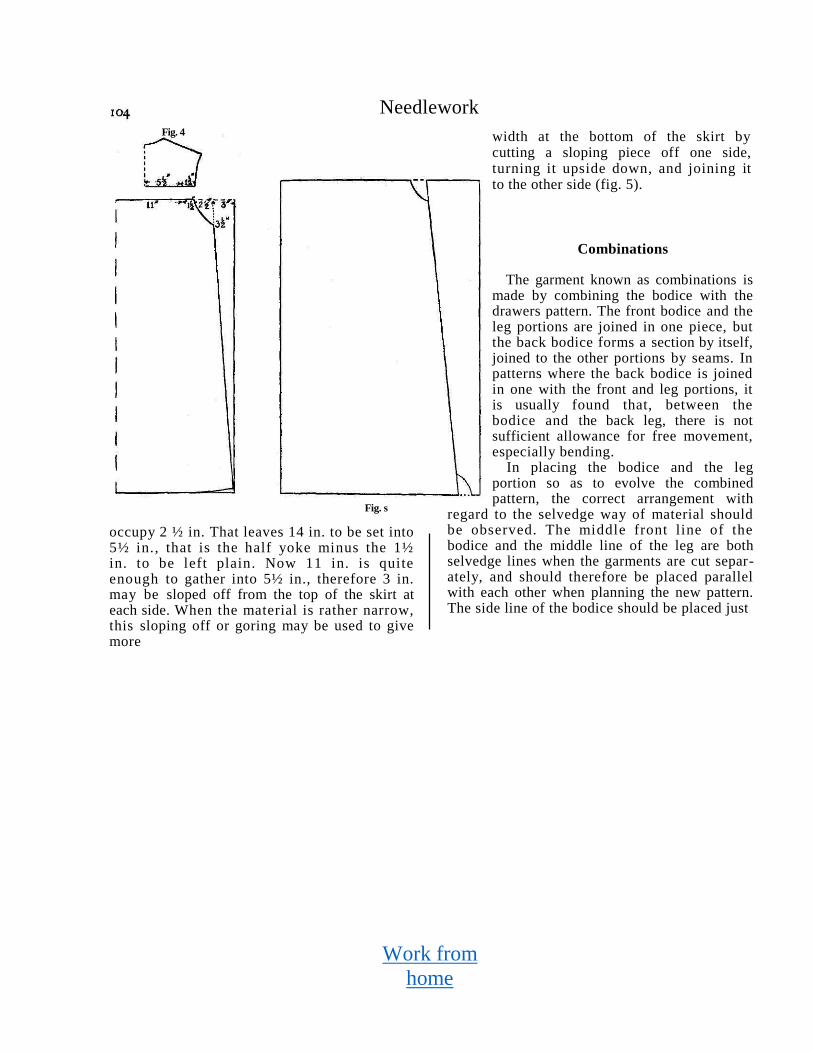
Work from
home
Needlework
Fig. s
occupy 2 ½ in. That leaves 14 in. to be set into 5½ in., that is the half yoke minus the 1½ in. to be left plain. Now 11 in. is quite enough to gather into 5½ in., therefore 3 in. may be sloped off from the top of the skirt at each side. When the material is rather narrow, this sloping off or goring may be used to give more
width at the bottom of the skirt by cutting a sloping piece off one side, turning it upside down, and joining it to the other side (fig. 5).
Combinations
The garment known as combinations is made by combining the bodice with the drawers pattern. The front bodice and the leg portions are joined in one piece, but the back bodice forms a section by itself, joined to the other portions by seams. In patterns where the back bodice is joined in one with the front and leg portions, it is usually found that, between the bodice and the back leg, there is not sufficient allowance for free movement, especially bending.
In placing the bodice and the leg portion so as to evolve the combined pattern, the correct arrangement with
regard to the selvedge way of material should be observed. The middle front line of the bodice and the middle line of the leg are both selvedge lines when the garments are cut separ-ately, and should therefore be placed parallel with each other when planning the new pattern. The side line of the bodice should be placed just
Fig. 4
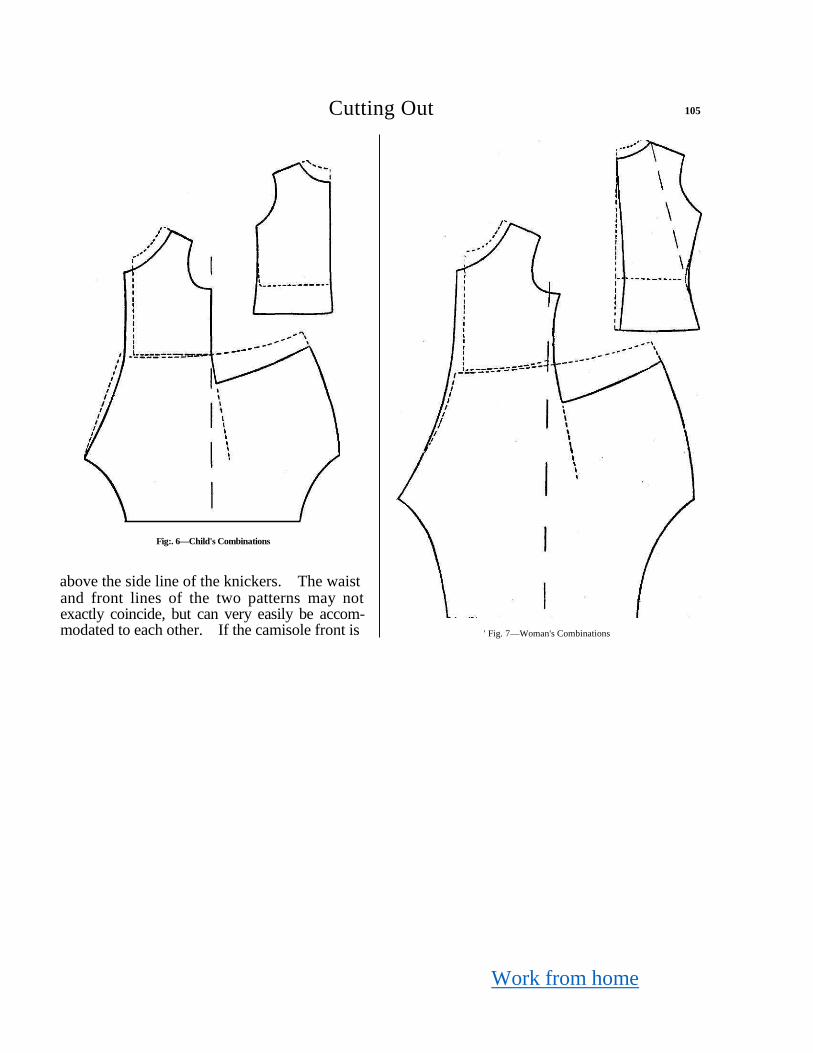
Work from home
Cutting Out 105
Fig:. 6—Child's Combinations
above the side line of the knickers. The waist and front lines of the two patterns may not exactly coincide, but can very easily be accom-modated to each other. If the camisole front is ' Fig. 7—Woman's Combinations
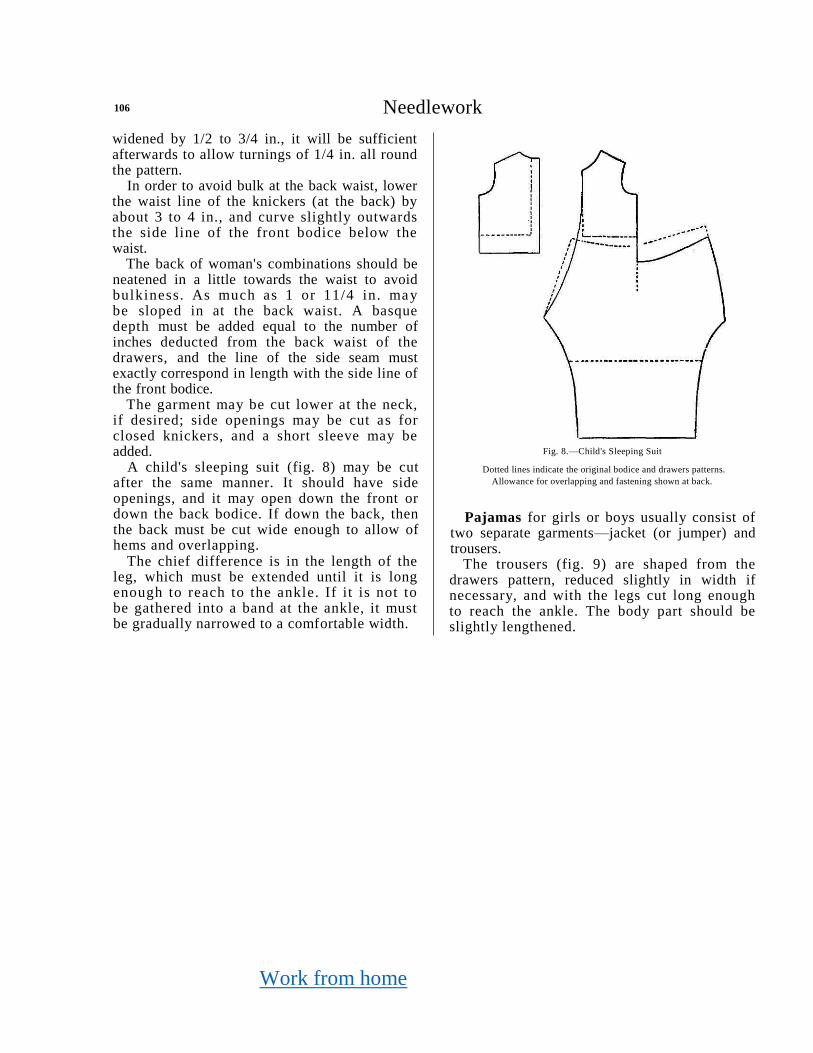
Work from home
106 Needlework
widened by 1/2 to 3/4 in., it will be sufficient afterwards to allow turnings of 1/4 in. all round the pattern.
In order to avoid bulk at the back waist, lower the waist line of the knickers (at the back) by about 3 to 4 in., and curve slightly outwards the side line of the front bodice below the waist.
The back of woman's combinations should be neatened in a little towards the waist to avoid bulkiness. As much as 1 or 11/4 in. may be sloped in at the back waist. A basque depth must be added equal to the number of inches deducted from the back waist of the drawers, and the line of the side seam must exactly correspond in length with the side line of the front bodice.
The garment may be cut lower at the neck, if desired; side openings may be cut as for closed knickers, and a short sleeve may be added.
A child's sleeping suit (fig. 8) may be cut after the same manner. It should have side openings, and it may open down the front or down the back bodice. If down the back, then the back must be cut wide enough to allow of hems and overlapping.
The chief difference is in the length of the leg, which must be extended until it is long enough to reach to the ankle. If it is not to be gathered into a band at the ankle, it must be gradually narrowed to a comfortable width.
Fig. 8.—Child's Sleeping Suit
Dotted lines indicate the original bodice and drawers patterns.
Allowance for overlapping and fastening shown at back.
Pajamas for girls or boys usually consist of two separate garments—jacket (or jumper) and trousers.
The trousers (fig. 9) are shaped from the drawers pattern, reduced slightly in width if necessary, and with the legs cut long enough to reach the ankle. The body part should be slightly lengthened.
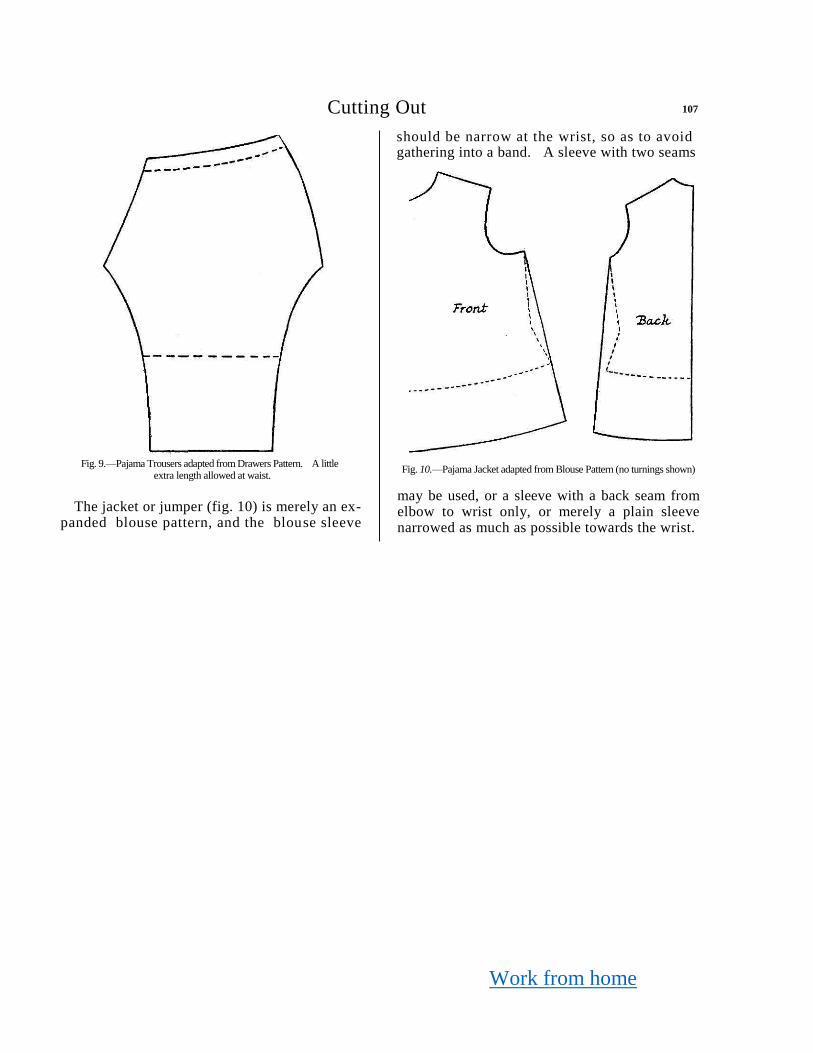
Work from home
Cutting Out 107
should be narrow at the wrist, so as to avoid gathering into a band. A sleeve with two seams
Fig. 9.—Pajama Trousers adapted from Drawers Pattern. A little extra length allowed at waist.
The jacket or jumper (fig. 10) is merely an ex-panded blouse pattern, and the blouse sleeve
Fig. 10.—Pajama Jacket adapted from Blouse Pattern (no turnings shown)
may be used, or a sleeve with a back seam from elbow to wrist only, or merely a plain sleeve narrowed as much as possible towards the wrist.
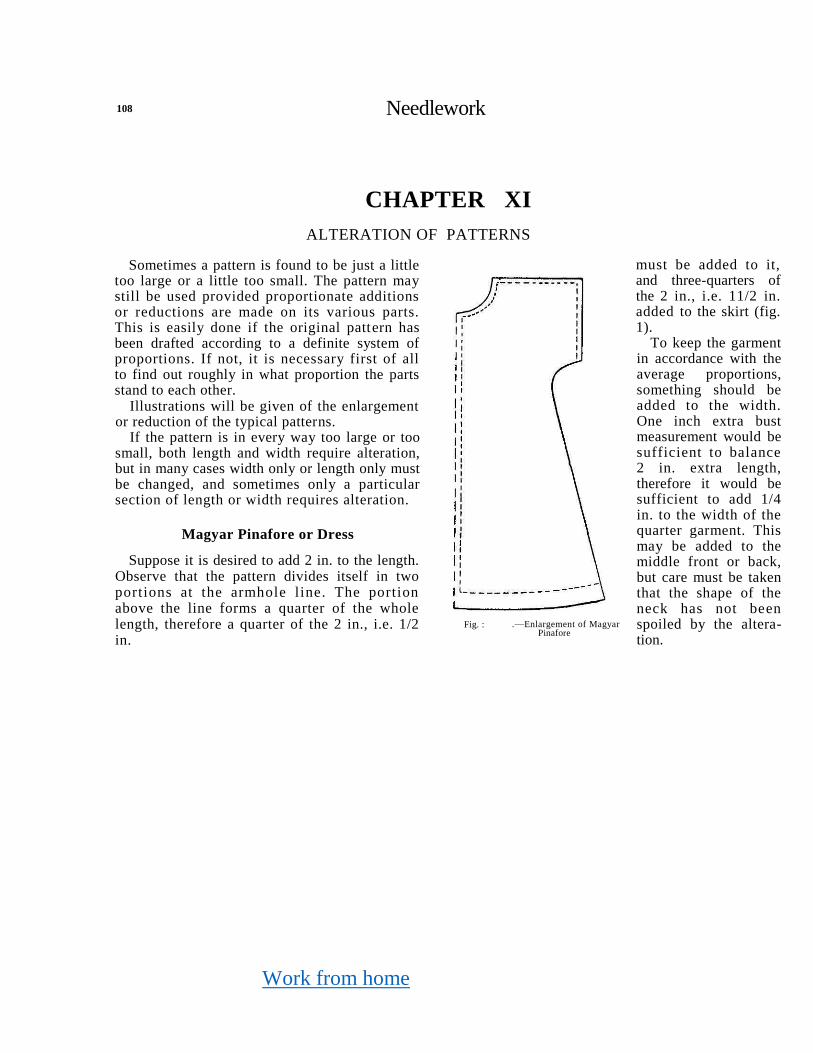
Work from home
108 Needlework
CHAPTER XI
ALTERATION OF PATTERNS
Sometimes a pattern is found to be just a little too large or a little too small. The pattern may still be used provided proportionate additions or reductions are made on its various parts. This is easily done if the original pattern has been drafted according to a definite system of proportions. If not, it is necessary first of all to find out roughly in what proportion the parts stand to each other.
Illustrations will be given of the enlargement or reduction of the typical patterns.
If the pattern is in every way too large or too small, both length and width require alteration, but in many cases width only or length only must be changed, and sometimes only a particular section of length or width requires alteration.
Magyar Pinafore or Dress
Suppose it is desired to add 2 in. to the length. Observe that the pattern divides itself in two portions at the armhole line. The portion above the line forms a quarter of the whole length, therefore a quarter of the 2 in., i.e. 1/2 in.
Fig. : .—Enlargement of Magyar Pinafore
must be added to it, and three-quarters of the 2 in., i.e. 11/2 in. added to the skirt (fig. 1).
To keep the garment in accordance with the average proportions, something should be added to the width. One inch extra bust measurement would be sufficient to balance 2 in. extra length, therefore it would be sufficient to add 1/4 in. to the width of the quarter garment. This may be added to the middle front or back, but care must be taken that the shape of the neck has not been spoiled by the altera-tion.

Work from home
Cutting Out 109
After these changes have been arranged, hems and seams must be allowed for as usual.
To reduce the pattern, simply reverse this process. Fold up tucks or turn in the edges
so as to reduce the upper portion by a quarter and the skirt by three-quarters of the difference required (fig. 2).
As the magyar pattern is very loose fitting, it may be sufficient to shorten or lengthen the skirt without changing the other lines.
Bodice Pattern
As the bodice length divides into two equal portions at the arm-hole line, an equal amount should be added to or deducted from the
pattern at neck and waist, unless the garment is intended for a particularly long-wasted or short-wasted person, when the alteration would be made at the waist only.
Of the difference required on the bust measure,
rather more than half would be made on the front portions of the bodice. The alteration
Fig- 3-—Proportionate Enlargement of the Bodice Pattern
may be made partly at the middle front or back, and partly at the side seam, provided the
Fig. 4.—How to reduce the Bodice Pattern
shoulder seam is lengthened or shortened a little at either end to preserve its correct relation to the rest of the bodice (fig. 3).
Fig. 3.—How to reduce the Magyar
Pinafore. Dotted lines indicate the turn-'ngs required in cutting the material.
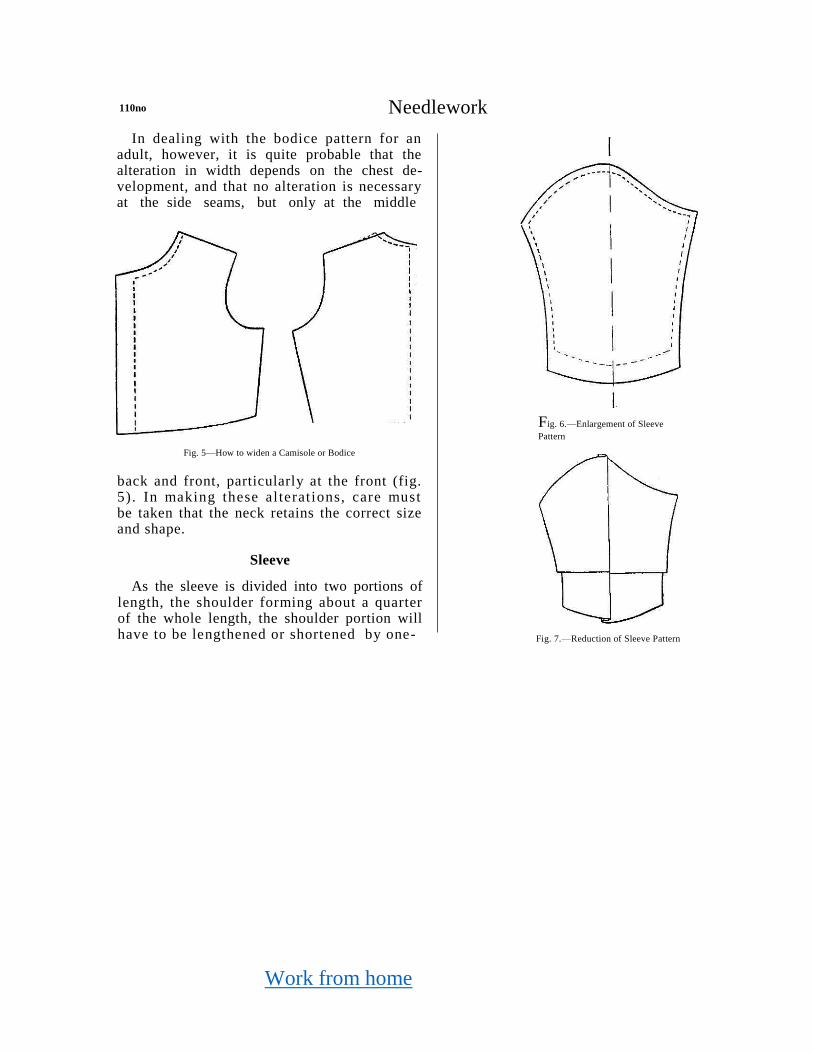
Work from home
110no Needlework
In dealing with the bodice pattern for an adult, however, it is quite probable that the alteration in width depends on the chest de-velopment, and that no alteration is necessary at the side seams, but only at the middle
Fig. 6.—Enlargement of Sleeve
Pattern
Fig. 5—How to widen a Camisole or Bodice
back and front, particularly at the front (fig. 5) . In making these al terat ions, care must be taken that the neck retains the correct size and shape.
Sleeve
As the sleeve is divided into two portions of length, the shoulder forming about a quarter of the whole length, the shoulder portion will have to be lengthened or shortened by one-
Fig. 7.—Reduction of Sleeve Pattern
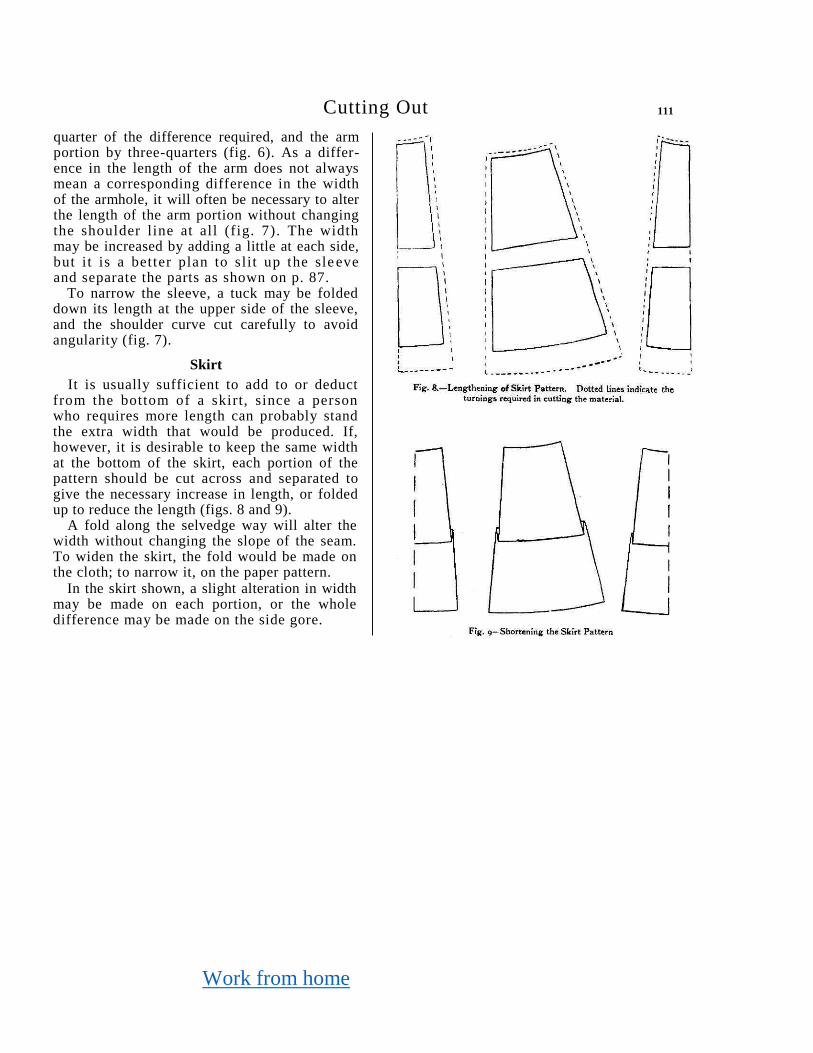
Work from home
Cutting Out
quarter of the difference required, and the arm portion by three-quarters (fig. 6). As a differ-ence in the length of the arm does not always mean a corresponding difference in the width of the armhole, it will often be necessary to alter the length of the arm portion without changing the shoulder line at all (fig. 7). The width may be increased by adding a little at each side, but it is a better plan to slit up the sle eve and separate the parts as shown on p. 87.
To narrow the sleeve, a tuck may be folded down its length at the upper side of the sleeve, and the shoulder curve cut carefully to avoid angularity (fig. 7).
Skirt
It is usually sufficient to add to or deduct from the bottom of a skirt, since a person who requires more length can probably stand the extra width that would be produced. If, however, it is desirable to keep the same width at the bottom of the skirt, each portion of the pattern should be cut across and separated to give the necessary increase in length, or folded up to reduce the length (figs. 8 and 9).
A fold along the selvedge way will alter the width without changing the slope of the seam. To widen the skirt, the fold would be made on the cloth; to narrow it, on the paper pattern.
In the skirt shown, a slight alteration in width may be made on each portion, or the whole difference may be made on the side gore.
111
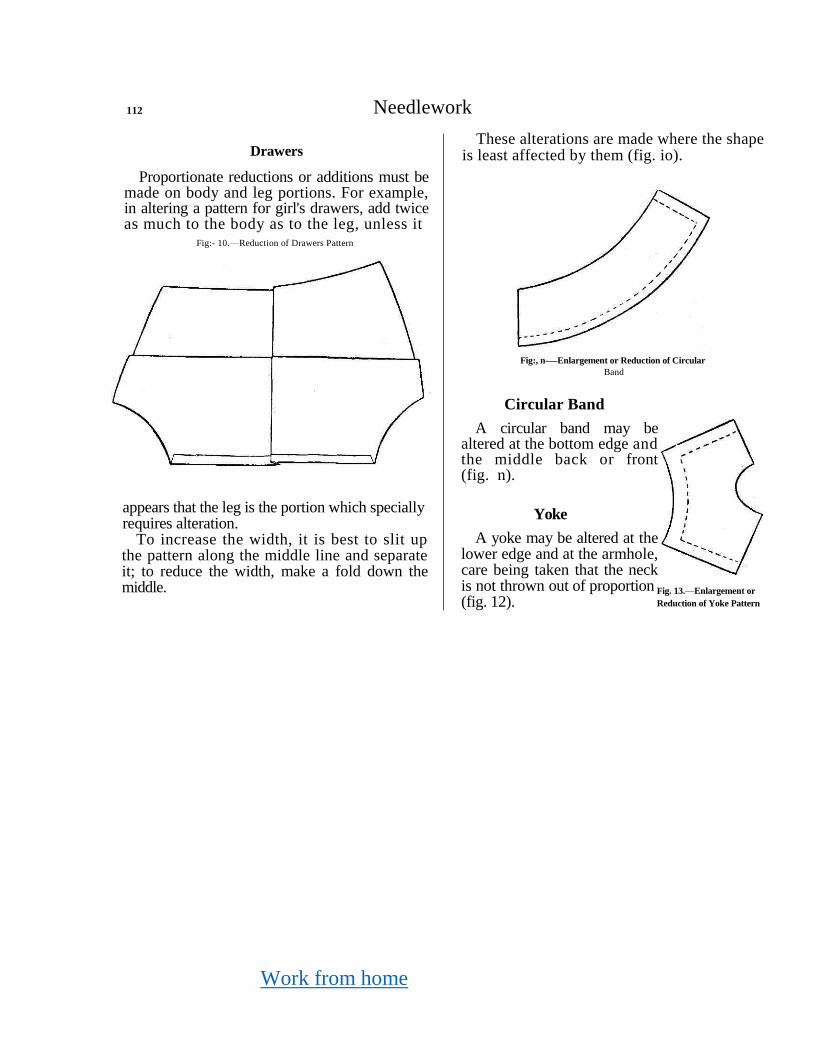
Work from home
112 Needlework
Drawers
Proportionate reductions or additions must be made on body and leg portions. For example, in altering a pattern for girl's drawers, add twice as much to the body as to the leg, unless it
Fig:- 10.—Reduction of Drawers Pattern
appears that the leg is the portion which specially requires alteration.
To increase the width, it is best to slit up the pattern along the middle line and separate it; to reduce the width, make a fold down the middle.
These alterations are made where the shape is least affected by them (fig. io).
Fig:, n-—Enlargement or Reduction of Circular
Band
Circular Band
A circular band may be altered at the bottom edge and the middle back or front (fig. n).
Yoke
A yoke may be altered at the lower edge and at the armhole, care being taken that the neck is not thrown out of proportion (fig. 12).
Fig. 13.—Enlargement or
Reduction of Yoke Pattern
Work from home
Section III—CONSTRUCTION
CHAPTER I
INFANT WORK
It is a good plan to allow children occasionally to make something entirely on their own initia-tive. The effort is valuable to the pupils, and the result instructive to the teacher, although the articles produced may be valueless from a practical point of view. In work produced by children who have had no instruction what-ever in Needlework, an ambitious effort at construction is noticeable, and such folds and stitches as are used are solely for the purpose of construction, and are not used for any neat-ness or beauty that they may add to the work. At this stage, children will attempt to make all sorts of things, e.g. bags, purses, hats, skirts, pinafores.
A little later, the articles chosen are simpler in construction, and some attempt is made to neaten and decorate them. The pupils usually confine their efforts to things they have seen made in school or at home, e.g. handkerchiefs, lap bags, mats.
( D 106 )
All the articles made show a tendency on the part of the worker to lay in no folds, or, at most, a single fold, and the stitches used are either tacking or top-sewing, even though they may not be known by name to the workers. The pupils discover for themselves that a good deal can be achieved by the help of these two stitches.
The samples shown in Plate III, worked by children over eight years of age, show a great advance, both in construction and in stitchery.
The pictures (Plate IV) were also sewn en-tirely without instruction or direction from the teacher. They were made by children of seven years of age, who had already been accustomed to drawing pictures on the blackboard and to making pictures and designs by paper-tearing. The pictures were sewn without preliminary drawing on the material.
Much simpler pictures would form appro- 8
113
Work from home
114 Needlework
priate decoration for articles made by the pupils. The remainder of the work illustrated was
done under supervision. Sewing rug canvas with raffia or any other
coarse thread available may make a good pre-liminary exercise for infants before actual sewing of cloth is attempted.
Rug canvas is so wide meshed and so neutral in tint that it cannot be objected to on account of eye-strain. (The white canvas sometimes used for later experiments is open to this objection on account of its dazzling appearance.) The pupils become accustomed to the use of needle and thread, and can learn to regulate the length of their stitches—a very important matter later on. The really objectionable features of this work are the length of the needle which must be used for so coarse a thread, and the rather unbending nature of the canvas. The pupils are prevented from learning from the beginning the correct position of the hands in managing the needle and the work. Besides the ubiquitous mat, a very substantial hand-bag may be made in this material, or strips of it may become napkin rings or curtain bands.
The use of canvas should not be long con-tinued.
In making a mat in calico the pupils first fold the selvedge-way hems and tack them, then the weft hems. When tacking has been learnt, the teacher shows a few simple patterns made by it, the children draw them, and copy them in
sewing. Then they try to invent new patterns of their own, first drawing, then sewing them.
In making a bag, the children proceed exactly as in making a mat. Then the strip of cloth is folded in two, and the sides top-sewn firmly together, except over the end hems.
Draw-strings take the form of cords made of the embroidery cotton used for sewing.
Two or more threads are twisted firmly to-gether. The twist is then caught by the middle and the two halves folded together, when the threads, endeavoring to undo the twist, become folded round each other, forming a cord. The free end is then knotted to prevent untwisting.
A cord can be most easily and quickly made by children if two work together. The required number of threads are laid together smoothly, and the ends knotted. Each child slips a pencil or a knitting-needle into the knotted end, and, holding the thread lightly with the left hand, twists the pencil quickly round with the right hand, occasionally stopping to pass the fingers along the twist to smooth it.
A cord of two colours can be prettily made by knotting the threads together, and then sepa-rating the colours to opposite ends of the line before beginning to twist.
If a cord proves too thick to pass through a bodkin, i t may be run in by means of a hairpin passed through the twist and then run through the hem points foremost.
Making dolls' clothes is always an attractive
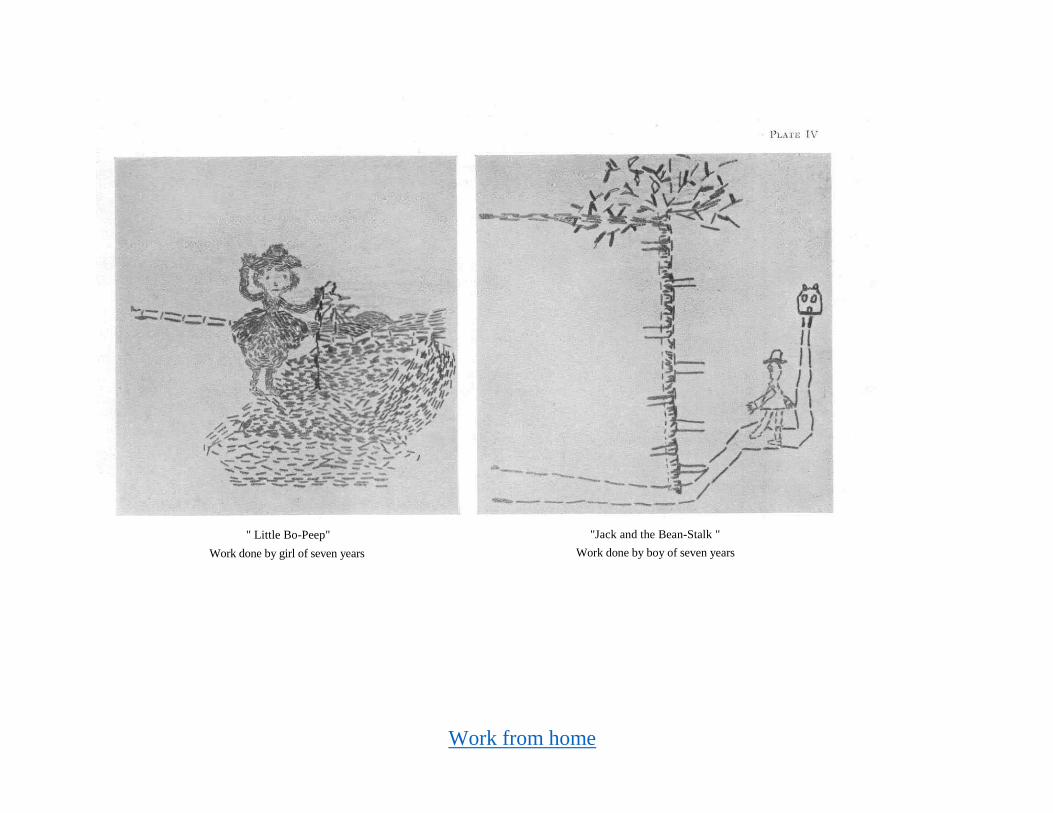
Work from home
" Little Bo-Peep"
Work done by girl of seven years
"Jack and the Bean-Stalk "
Work done by boy of seven years
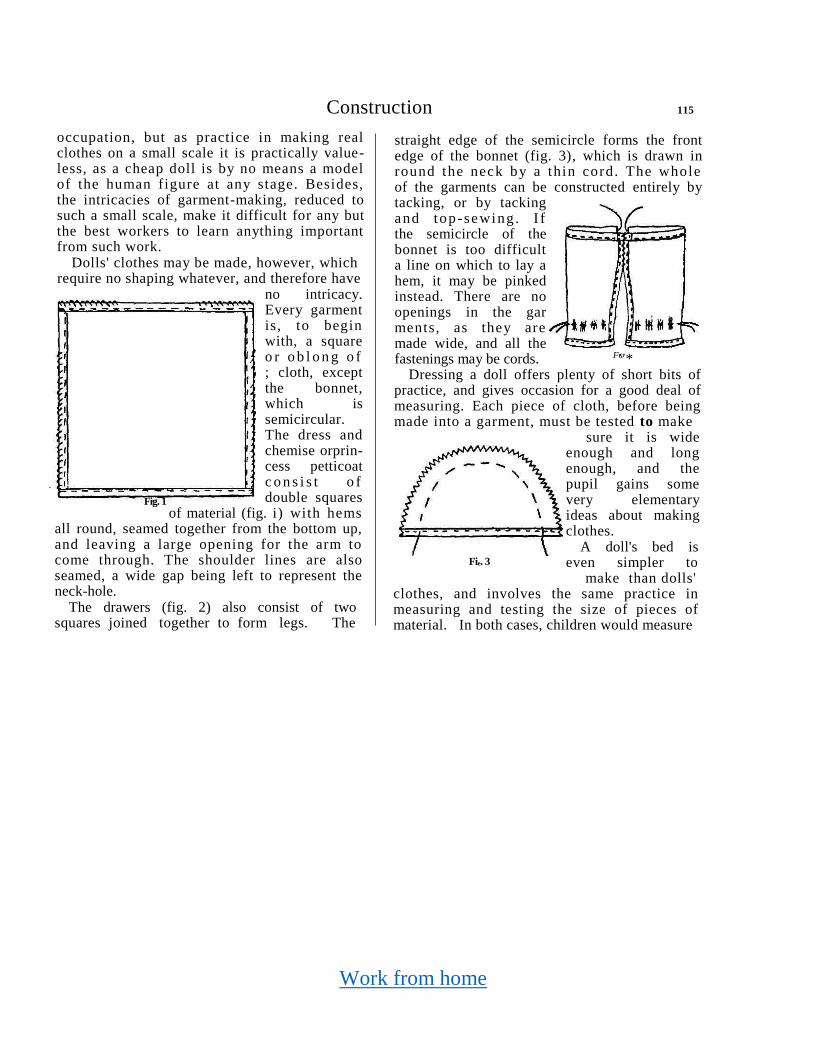
Work from home
Construction 115
occupation, but as practice in making real clothes on a small scale it is practically value-less, as a cheap doll is by no means a model of the human figure at any stage. Besides, the intricacies of garment-making, reduced to such a small scale, make it difficult for any but the best workers to learn anything important from such work.
Dolls' clothes may be made, however, which require no shaping whatever, and therefore have
no intricacy. Every garment is, to begin with, a square o r o b l o n g o f ; cloth, except the bonnet, which is semicircular. The dress and chemise orprin-cess petticoat c o n s i s t o f double squares
of material (fig. i) with hems all round, seamed together from the bottom up, and leaving a large opening for the arm to come through. The shoulder lines are also seamed, a wide gap being left to represent the neck-hole.
The drawers (fig. 2) also consist of two squares joined together to form legs. The
straight edge of the semicircle forms the front edge of the bonnet (fig. 3), which is drawn in round the neck by a thin cord. The whole of the garments can be constructed entirely by tacking, or by tacking and top-sewing. I f the semicircle of the bonnet is too difficult a line on which to lay a hem, it may be pinked instead. There are no openings in the gar ments, as they are made wide, and all the fastenings may be cords. F's' *
Dressing a doll offers plenty of short bits of practice, and gives occasion for a good deal of measuring. Each piece of cloth, before being made into a garment, must be tested to make
sure it is wide enough and long enough, and the pupil gains some very elementary ideas about making clothes.
A doll's bed is even simpler to
make than dolls' clothes, and involves the same practice in measuring and testing the size of pieces of material. In both cases, children would measure
Fig. 1
Fie. 3
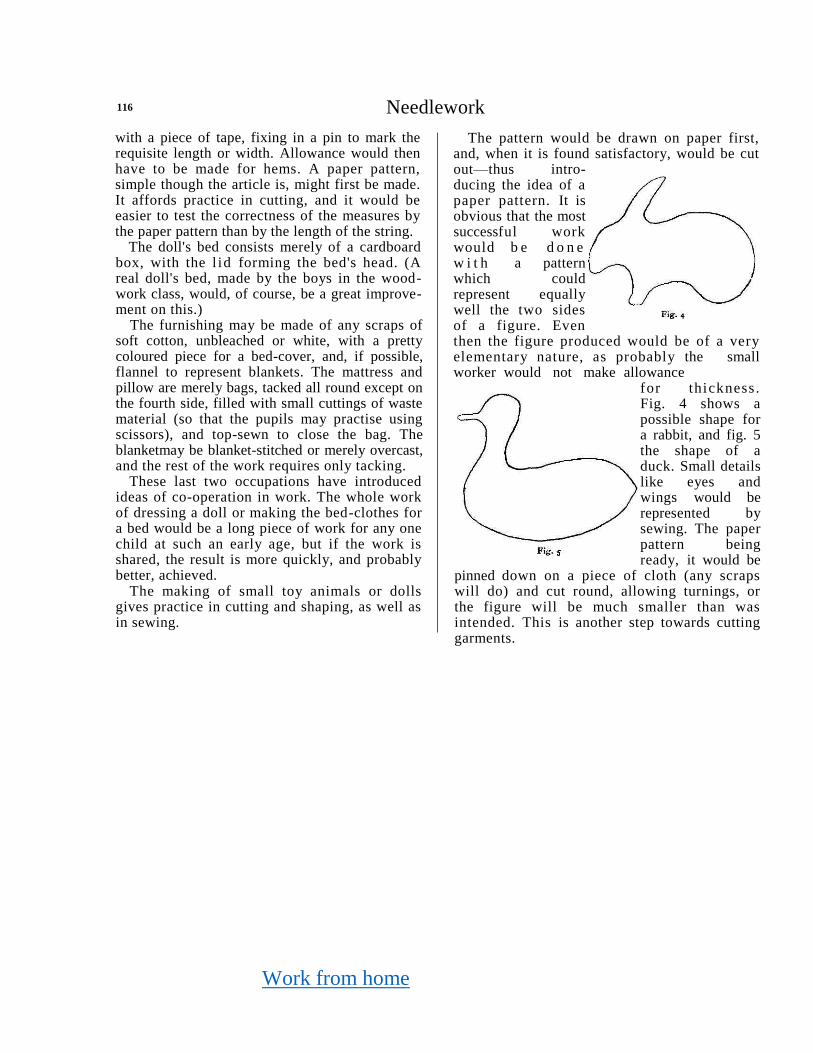
Work from home
116 Needlework
with a piece of tape, fixing in a pin to mark the requisite length or width. Allowance would then have to be made for hems. A paper pattern, simple though the article is, might first be made. It affords practice in cutting, and it would be easier to test the correctness of the measures by the paper pattern than by the length of the string.
The doll's bed consists merely of a cardboard box, with the l id forming the bed's head. (A real doll's bed, made by the boys in the wood-work class, would, of course, be a great improve-ment on this.)
The furnishing may be made of any scraps of soft cotton, unbleached or white, with a pretty coloured piece for a bed-cover, and, if possible, flannel to represent blankets. The mattress and pillow are merely bags, tacked all round except on the fourth side, filled with small cuttings of waste material (so that the pupils may practise using scissors), and top-sewn to close the bag. The blanketmay be blanket-stitched or merely overcast, and the rest of the work requires only tacking.
These last two occupations have introduced ideas of co-operation in work. The whole work of dressing a doll or making the bed-clothes for a bed would be a long piece of work for any one child at such an early age, but if the work is shared, the result is more quickly, and probably better, achieved.
The making of small toy animals or dolls gives practice in cutting and shaping, as well as in sewing.
The pattern would be drawn on paper first, and, when it is found satisfactory, would be cut out—thus intro-ducing the idea of a paper pattern. It is obvious that the most successful work would b e d o n e w i t h a pattern which could represent equally well the two sides of a figure. Even then the figure produced would be of a very elementary nature, as probably the small worker would not make allowance
for thickness . Fig. 4 shows a possible shape for a rabbit, and fig. 5 the shape of a duck. Small details like eyes and wings would be represented by sewing. The paper pattern being ready, it would be
pinned down on a piece of cloth (any scraps will do) and cut round, allowing turnings, or the figure will be much smaller than was intended. This is another step towards cutting garments.
Work from home
Construction 117
Two pieces having been cut, they would be run together most of the way round, and then turned outside in, stuffed with cuttings, and sewn up by top-sewing.
The beginning of pattern-making, apart from the patterns made by stitchery, may be attempted by outlining leaves in tacking stitch. An actual leaf is laid upon paper, traced round with a pencil and cut out, and the design is trans-ferred to the material. An arrangement of leaf forms or other natural forms could very easily be used in this way as a decoration. Besides natural forms, geometrical forms may be used in designing simple patterns. If a piece of paper is folded, and then torn or cut in any shape, a sym-
metrical design will be found on opening it up. This may be used as a pattern to be outlined, or may be cut out in colored cloth and sewn on to the original by any stitch the pupil is capable of making.
All these exercises are short, and therefore not tedious; require only small pieces of cloth, and are therefore not expensive; and, as their intrin-sic value is not great, any material which suits the worker best may be used, regardless of its value as a durable or washable material. These qualities must be considered when garments are being made, but just at first the important thing is to use material that will not demand too much muscular effort.
CHAPTER II
USEFUL THINGS FOR THE NEEDLEWORK CLASS
The following articles can be made very inex-pensively by the pupils in the younger classes. They give occasion for the practice of useful stitches and processes, and, besides being useful in themselves, they encourage the idea that, since needlework is a dainty and practical art, it is worth while having the right implements at hand, and ensuring the possibility of keeping the work clean and fresh.
Most of the articles can be made from un-bleached calico, but any other soft and neutral-tinted material would be suitable.
Needlebook
A needlebook can be made from a scrap of material about 8 in. x 4 in., or even less. Hems are folded all round, and sewn with tacking stitch. A little piece of flannel will be required
Work from home
118 Needlework
to hold the needles (and pins). This may be pinked and tacked into the book. Initials may be sewn on the cover.
Pinking offers very good practice in cutting.
Pincushion
A small pincushion is even more useful than a needlebook. A girl should always have pins close at hand, if she is to set about her work in a business-like manner.
The pincushion need not be more than 3 or 4 in. long when finished, and may be square or oblong.
Two small pieces of cotton may be used. Turn in single folds all round, and fix and decorate these with tacking.
The making of two oblongs exactly alike gives good practice in measuring.
The two oblongs are then placed together, and top-sewn round closely until less than one side is left open. The pincushion may be stuffed with bran, saw-dust, emery powder, or ravel-lings of old wool. The two unfinished edges are then pinned together, and the top-sewing finished.
If the top-sewing is scarcely close enough to keep the stuffing from oozing out, a second row of top-sewing, worked in the opposite direction and in another color, will improve the appear-ance of the edge and strengthen it.
Work-bag
A work-bag is quite essential, but, as a good-sized bag is wanted, to last for some years, it is rather a large piece of work for mere beginners. It can usually be made, however, during the second year's work.
A piece of cotton 1 yd. long, and half the width of the material, will make quite a large bag. It is important to have the selvedge way in the right direction (the selvedge way is always in the direction in which there is any strain) so that pupils may from the first get correct impres-sions of well-arranged work.
The long edges of the bag are first attended to. Hems are laid and hemmed, since good hem-ming looks equally well on either side of the work.
The top and bottom hems are then made, on opposite sides of the work, since one-third is turned up to form a bag. The waist hem should be wide enough to hold a rather wide tape flatly.
The lowest third is then folded up smoothly, and top-sewn firmly at each side. This part may be divided into two sections to hold work and implements. The implement section may be a narrow one.
The pupil's name or initials should be sewn (twisted running is a good stitch) where they can be easily seen when the bag is folded.
If the pocket of this bag is not divided into sections, a small bag with draw-strings can be made to hold a thimble, pincushion, &c.

Work from home
Construction 119
Sleeves
A pair of short sleeves, to cover the dress sleeves up to the elbow, is useful in helping to keep the work clean.
They give occasion for the easy introduction of a flat seam, such as run-and-fell . Each seam is short and straight, and the repetition of the seam in the second sleeve makes for improvement.
Each sleeve would be about 10 or 11 in. s qu a re t o b eg i n w i t h . A s hap ed s l e ev e might be more useful, but certainly more diffi-cult. The seam is first made, then hems are turned in and sewn a t e i ther end of the sleeve.
If the sleeve is not very wide, it may be drawn on comfortably without any fastening. If it is wide, a cord may be run in to tie it in to the proper size.
The cord may consist of two or more strands of embroidery thread, twisted firmly together, then folded, and the free end knotted; this, if well twisted, makes a quite durable and very effective draw-string.
Strictly speaking, eyelet holes should be made for the draw-string to pass through. This would, of course, be much too difficult a piece of work for a young class. If the cotton is some-what open, a thin cord can be drawn through the meshes, and, if the end is then knotted, it will not slip out again.
Work-apron
As a girl tackles larger and more delicate pieces of work, she needs greater protection for it. An apron and sleeves are as necessary for needlework as for cookery and laundry work.
A simple and pretty apron can be made by pleating a narrow width of material into a yoke band and adding long straps, which pass over the shoulders, cross at the back, and fasten round the waist in front. These bands may be of the same or of contrasting material. If of contrast-ing material, the addition of a contrasting false hem at the bottom of the apron is an improve-ment. Gathering could be used instead of pleating, but is more difficult; besides, this garment lends itself very well to pleating. A good deal depends on the age of the pupils.
If contrasting material is used for the bands and the hem, 3/4 yd. of material would be suffi-cient for the apron itself, i.e. for a girl's apron; a woman's size would require about 1 yd. If the same material were used all through, it would be better to allow an extra 1/4 yd., so that the shoulder straps may be long enough.
This apron does not readily become too small for a growing girl, if the straps are made long at first. The position of the fastenings may be altered as required.
Since the yoke band would measure from 10 to 12 in. across the chest, the apron need not be more than 30 in. wide. Two girls' aprons, with-
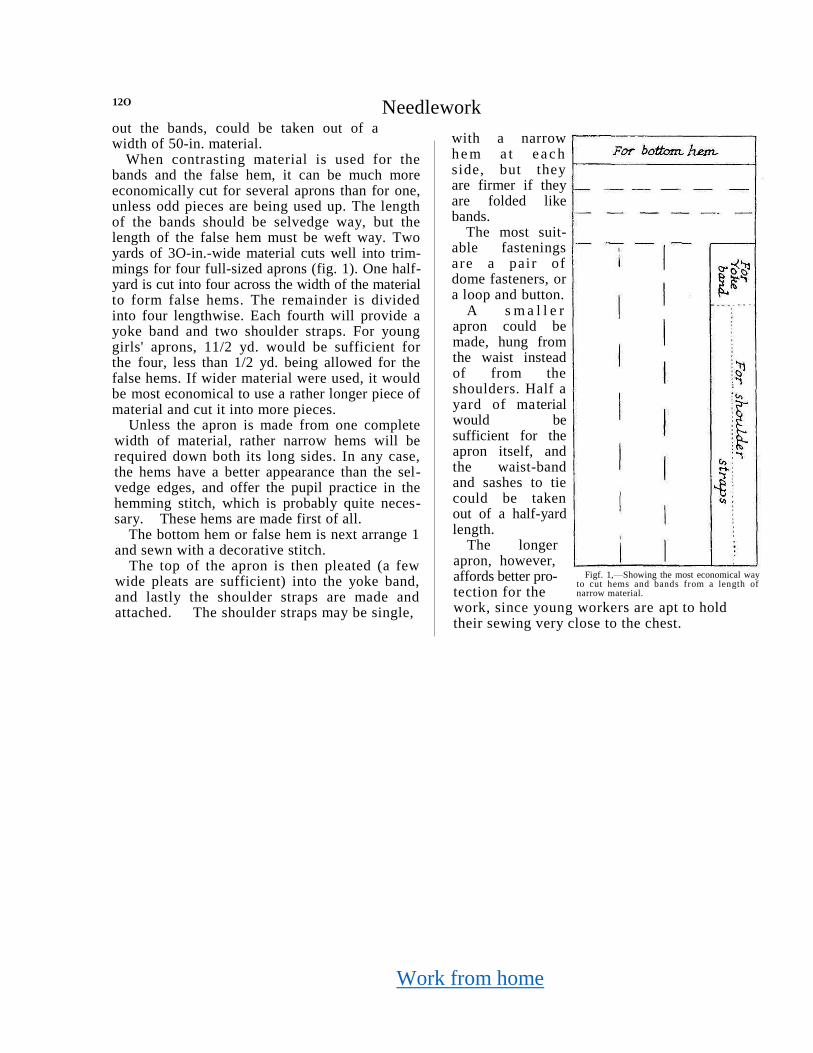
Work from home
12O
out the bands, could be taken out of a width of 50-in. material.
When contrasting material is used for the bands and the false hem, it can be much more economically cut for several aprons than for one, unless odd pieces are being used up. The length of the bands should be selvedge way, but the length of the false hem must be weft way. Two yards of 3O-in.-wide material cuts well into trim-mings for four full-sized aprons (fig. 1). One half-yard is cut into four across the width of the material to form false hems. The remainder is divided into four lengthwise. Each fourth will provide a yoke band and two shoulder straps. For young girls' aprons, 11/2 yd. would be sufficient for the four, less than 1/2 yd. being allowed for the false hems. If wider material were used, it would be most economical to use a rather longer piece of material and cut it into more pieces.
Unless the apron is made from one complete width of material, rather narrow hems will be required down both its long sides. In any case, the hems have a better appearance than the sel-vedge edges, and offer the pupil practice in the hemming stitch, which is probably quite neces-sary. These hems are made first of all.
The bottom hem or false hem is next arrange 1 and sewn with a decorative stitch.
The top of the apron is then pleated (a few wide pleats are sufficient) into the yoke band, and lastly the shoulder straps are made and attached. The shoulder straps may be single,
with a narrow h e m a t e a c h side, but they are firmer if they are folded like bands.
The most suit-able fastenings are a pai r of dome fasteners, or a loop and button.
A s m a l l e r apron could be made, hung from the waist instead of from the shoulders. Half a yard of material would be sufficient for the apron itself, and the waist-band and sashes to tie could be taken out of a half-yard length.
The longer apron, however, affords better pro-tection for the work, since young workers are apt to hold their sewing very close to the chest.
Needlework
Figf. 1,—Showing the most economical way to cut hems and bands from a length of narrow material.
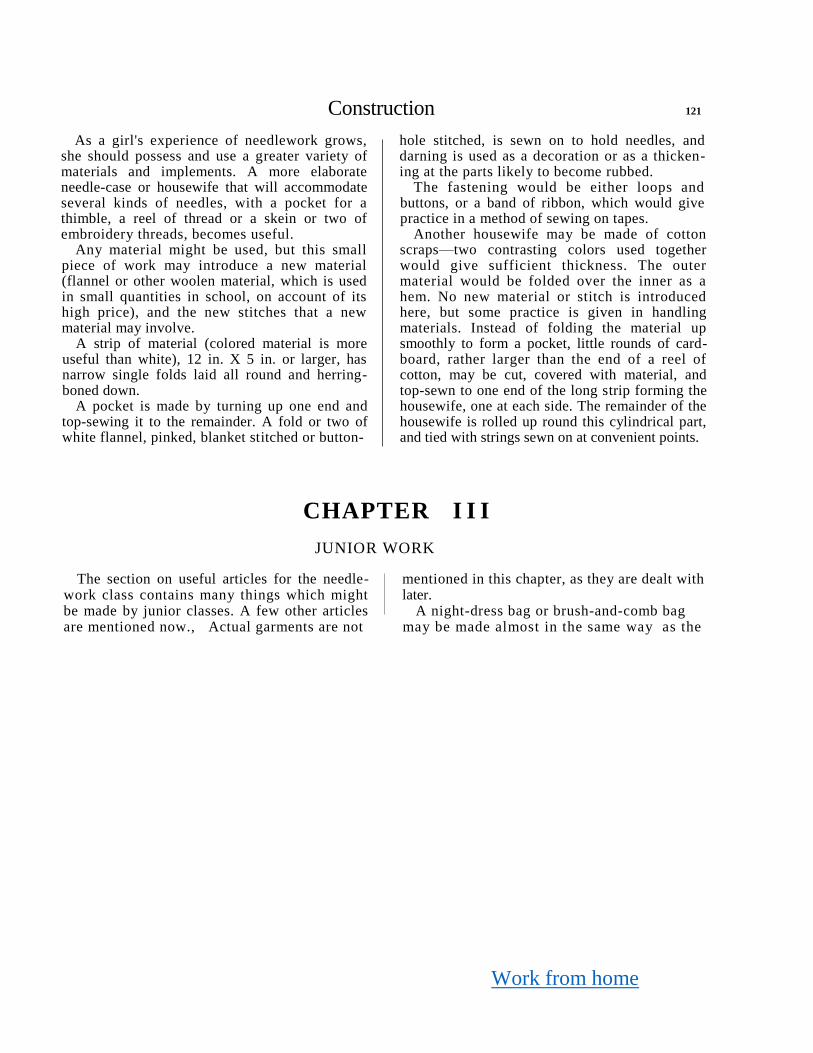
Work from home
Construction 121
As a girl's experience of needlework grows, she should possess and use a greater variety of materials and implements. A more elaborate needle-case or housewife that will accommodate several kinds of needles, with a pocket for a thimble, a reel of thread or a skein or two of embroidery threads, becomes useful.
Any material might be used, but this small piece of work may introduce a new material (flannel or other woolen material, which is used in small quantities in school, on account of its high price), and the new stitches that a new material may involve.
A strip of material (colored material is more useful than white), 12 in. X 5 in. or larger, has narrow single folds laid all round and herring-boned down.
A pocket is made by turning up one end and top-sewing it to the remainder. A fold or two of white flannel, pinked, blanket stitched or button-
hole stitched, is sewn on to hold needles, and darning is used as a decoration or as a thicken-ing at the parts likely to become rubbed.
The fastening would be either loops and buttons, or a band of ribbon, which would give practice in a method of sewing on tapes.
Another housewife may be made of cotton scraps—two contrasting colors used together would give sufficient thickness. The outer material would be folded over the inner as a hem. No new material or stitch is introduced here, but some practice is given in handling materials. Instead of folding the material up smoothly to form a pocket, little rounds of card-board, rather larger than the end of a reel of cotton, may be cut, covered with material, and top-sewn to one end of the long strip forming the housewife, one at each side. The remainder of the housewife is rolled up round this cylindrical part, and tied with strings sewn on at convenient points.
CHAPTER I I I
JUNIOR WORK
The section on useful articles for the needle-work class contains many things which might be made by junior classes. A few other articles are mentioned now., Actual garments are not
mentioned in this chapter, as they are dealt with later.
A night-dress bag or brush-and-comb bag may be made almost in the same way as the
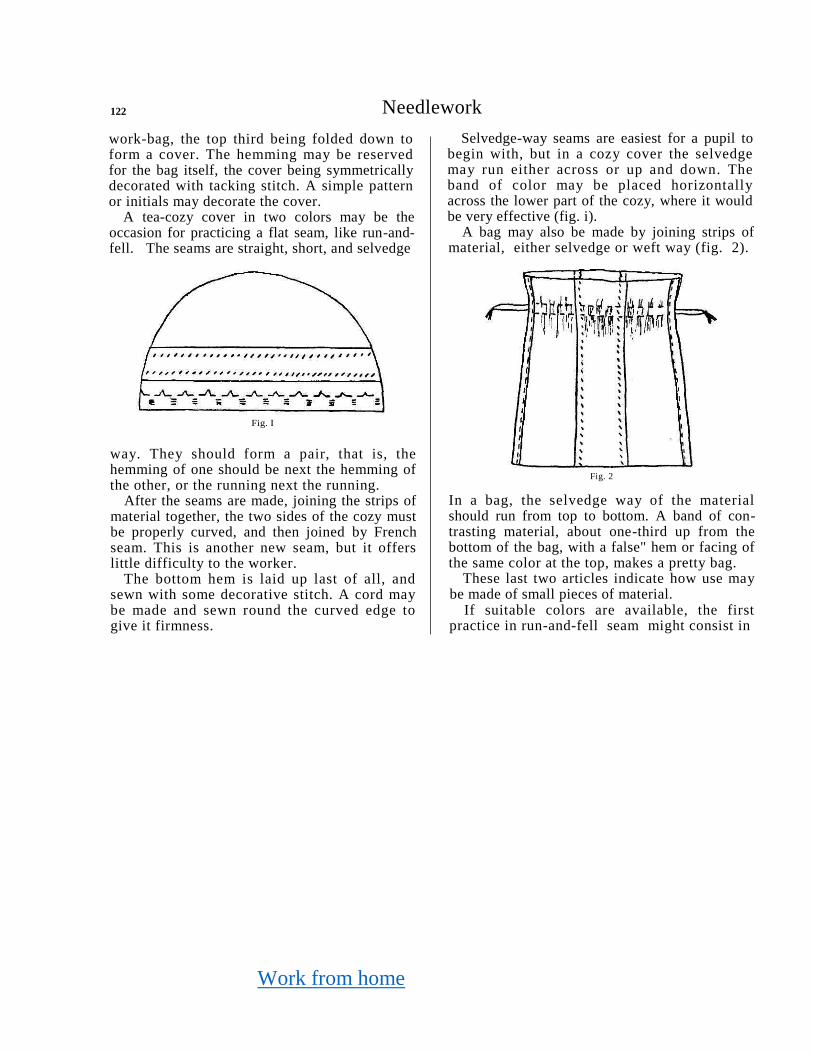
Work from home
122 Needlework
work-bag, the top third being folded down to form a cover. The hemming may be reserved for the bag itself, the cover being symmetrically decorated with tacking stitch. A simple pattern or initials may decorate the cover.
A tea-cozy cover in two colors may be the occasion for practicing a flat seam, like run-and-fell. The seams are straight, short, and selvedge
Selvedge-way seams are easiest for a pupil to begin with, but in a cozy cover the selvedge may run either across or up and down. The band of color may be placed horizontally across the lower part of the cozy, where it would be very effective (fig. i).
A bag may also be made by joining strips of material, either selvedge or weft way (fig. 2).
Fig. I
way. They should form a pair, that is, the hemming of one should be next the hemming of the other, or the running next the running.
After the seams are made, joining the strips of material together, the two sides of the cozy must be properly curved, and then joined by French seam. This is another new seam, but it offers little difficulty to the worker.
The bottom hem is laid up last of all, and sewn with some decorative stitch. A cord may be made and sewn round the curved edge to give it firmness.
Fig. 2
In a bag, the selvedge way of the material should run from top to bottom. A band of con-trasting material, about one-third up from the bottom of the bag, with a false" hem or facing of the same color at the top, makes a pretty bag.
These last two articles indicate how use may be made of small pieces of material.
If suitable colors are available, the first practice in run-and-fell seam might consist in

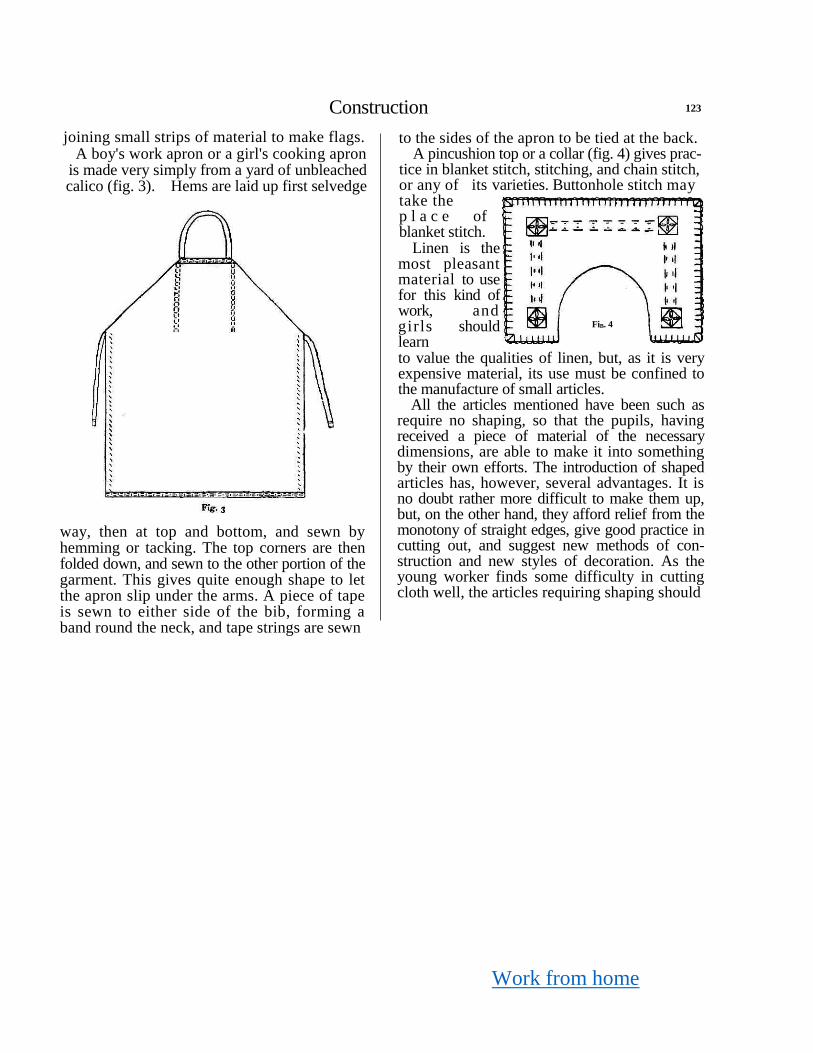
Work from home
Construction 123
joining small strips of material to make flags. A boy's work apron or a girl's cooking apron
is made very simply from a yard of unbleached
calico (fig. 3). Hems are laid up first selvedge
way, then at top and bottom, and sewn by hemming or tacking. The top corners are then folded down, and sewn to the other portion of the garment. This gives quite enough shape to let the apron slip under the arms. A piece of tape is sewn to either side of the bib, forming a band round the neck, and tape strings are sewn
to the sides of the apron to be tied at the back.
A pincushion top or a collar (fig. 4) gives prac-tice in blanket stitch, stitching, and chain stitch, or any of its varieties. Buttonhole stitch may take the p l a c e of blanket stitch.
Linen is the most pleasant material to use for this kind of work, and girls should learn
to value the qualities of linen, but, as it is very expensive material, its use must be confined to the manufacture of small articles.
All the articles mentioned have been such as require no shaping, so that the pupils, having received a piece of material of the necessary dimensions, are able to make it into something by their own efforts. The introduction of shaped articles has, however, several advantages. It is no doubt rather more difficult to make them up, but, on the other hand, they afford relief from the monotony of straight edges, give good practice in cutting out, and suggest new methods of con-struction and new styles of decoration. As the young worker finds some difficulty in cutting cloth well, the articles requiring shaping should
FiB. 4

Work from home
I24 Needlework
these things, but to get a good effect in the finished work the measuring of distances must be accurate. The construction offers some diffi-
Fig. 7
culties where the material is cut on the cross. The crossway lines are apt to stretch and the folds are not so easily pressed in. The hems should not be made very narrow, or this difficulty will be increased. There is also occasion for
Fig. 6

Work from home
Construction
ful decoration. The side hems (fairly narrow) should first be made. The bottom hem would be a deep one; or, if the material were scanty, the bottom might be blanket stitched a little way from the edge and then fringed. The neck hem would next be laid, and here it would be discovered that a curved hem must be quite narrow if it is to lie flat.
Lastly, the straight edges of the top would be folded down, and would neaten the awkward points at the ends of the curve. The narrower hems might be finished with hemming, the bottom hem with tacking or any other decorative stitch known to the pupil. Narrow tapes must be sewn on at each side of the neck curve.
A knitting-bag1 (fig. 10) is an attractive little article, which may be cut out of scraps left over from a garment. It is meant to hang on the arm and hold the ball of wool while knitting is being done.
If the material is easily cut, one-quarter of the bag may form the paper pattern, but children do not easily cut through four folds of cloth, and the appearance cannot be so readily judged from the quarter pattern.
The portion forming the bag is joined together by a French seam round the curved bottom edge. If a sufficiently long piece of
125
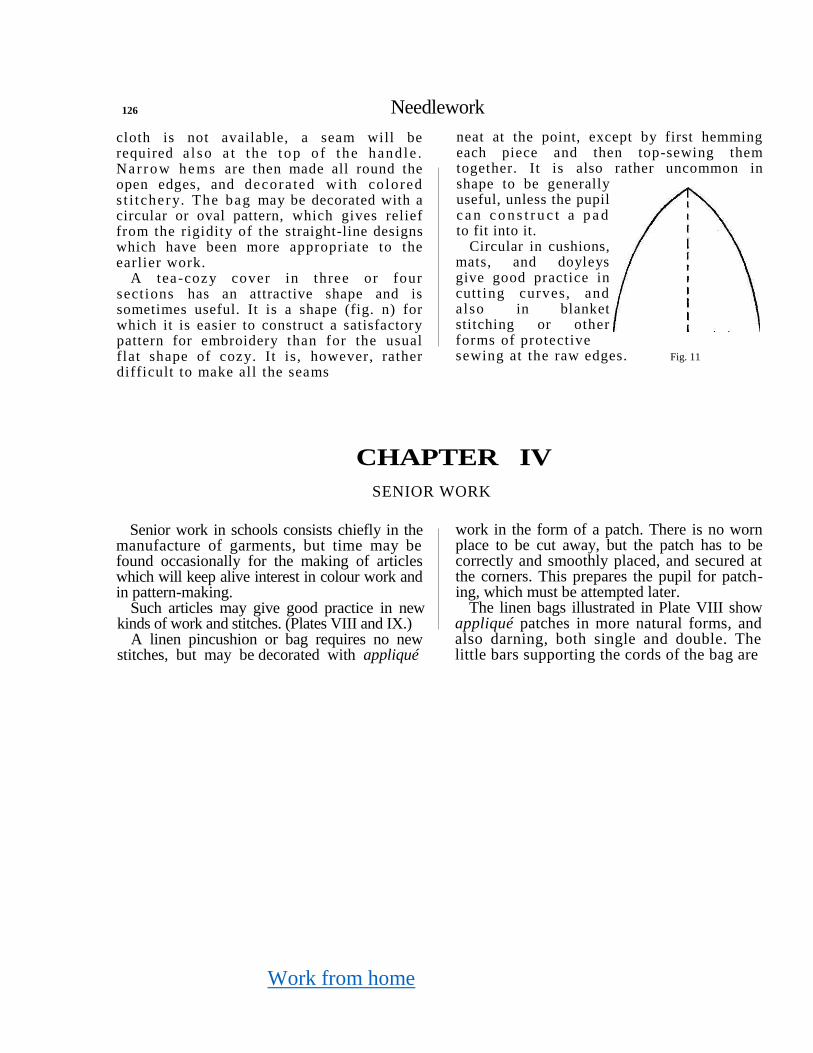
Work from home
126 Needlework
cloth is not available, a seam will be required a l so a t the t op o f t he hand le . Nar row he ms are then made all round the open edges, and decora ted wi th colored s t i t chery. The bag may be decorated with a circular or oval pattern, which gives relief from the rigidity of the straight-line designs which have been more appropriate to the earlier work.
A tea-cozy cover in three or four sections has an attractive shape and is sometimes useful. It is a shape (fig. n) for which it is easier to construct a satisfactory pattern for embroidery than for the usual flat shape of cozy. It is, however, rather difficult to make all the seams
neat at the point, except by first hemming each piece and then top-sewing them together. It is also rather uncommon in shape to be generally useful, unless the pupil c a n c o n s t r u c t a p a d to fit into it.
Circular in cushions, mats, and doyleys give good practice in cutt ing curves, and also in blanket stitching or other forms of protective sewing at the raw edges. Fig. 11
CHAPTER IV
SENIOR WORK
Senior work in schools consists chiefly in the manufacture of garments, but time may be found occasionally for the making of articles which will keep alive interest in colour work and in pattern-making.
Such articles may give good practice in new kinds of work and stitches. (Plates VIII and IX.)
A linen pincushion or bag requires no new stitches, but may be decorated with appliqué
work in the form of a patch. There is no worn place to be cut away, but the patch has to be correctly and smoothly placed, and secured at the corners. This prepares the pupil for patch-ing, which must be attempted later.
The linen bags illustrated in Plate VIII show appliqué patches in more natural forms, and also darning, both single and double. The little bars supporting the cords of the bag are
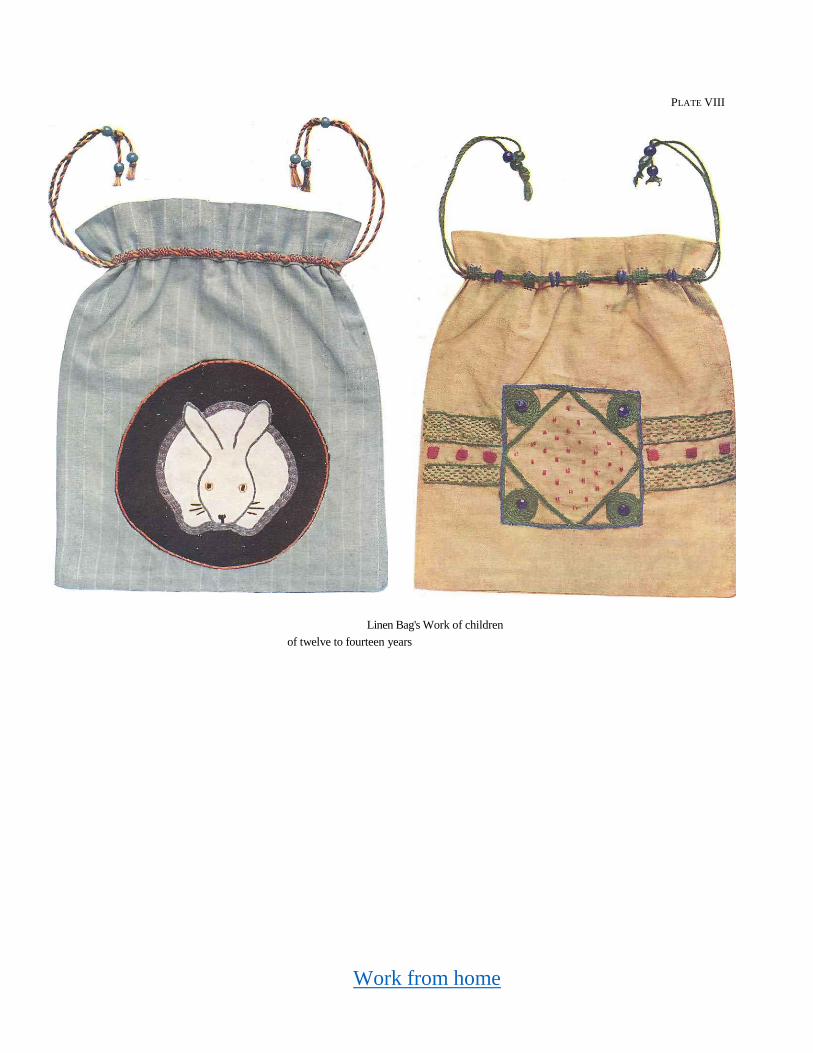
Work from home
PLATE VIII
Linen Bag's Work of children
of twelve to fourteen years


Work from home
Construction 127
made by darning closely over foundation threads. This leads up to the actual darning of holes.
Kettle-holders give a reason for binding the edge of the material and for sewing on a loop to hang up by—two useful pieces of work for which, however, there is little occasion in or-dinary garment-making.
The kettle-holder must be made of something woolen, because a bad conductor of heat is re-quired, and if two or more thicknesses are used, binding makes a much neater finish than any other method.
If old, perhaps discolored, woolen material is used, it may be enclosed between two folds of
linen or cotton, which will give the kettle-holder a prettier appearance, and at the same time enable it to throw off dust longer. The same article may be used for the practice of machine stitching. The rows of stitching form a pattern, and hold the various thicknesses of material together before the binding is put on.
Without the loop to hang up by, this would be a suitable mat for a teapot or hot-water
A linen collar shows practice in close button-holing, and a muslin collar may give practice in designing and sewing of a pattern suitable for white work.
CHAPTER V
SIMPLE GARMENTS FOR LITTLE GIRLS
When the making up of garments comes to be considered, the difficulty is to decide which of many possible methods it is best to employ. For school work, at least, the best rule is: choose the most simple and direct method possible, one which is good in principle and makes for thoroughness, while avoiding all unnecessary intricacy. Occasionally a teacher selects a particular method because it gives opportunity for the teaching of some useful detail—gathering and setting in, for instance. This is quite
reasonable, provided there is no practical ob-jection to the method chosen.
There is no reason why each girl in a class should produce a garment exactly like her neighbor’s, so that the school work looks as if turned out of a clothing factory.
Though the general type of work in a class may be the same, differences in detail should be permitted, and anything in the way of original suggestion by the pupil should be encouraged.
In deciding on the method of making a wash-
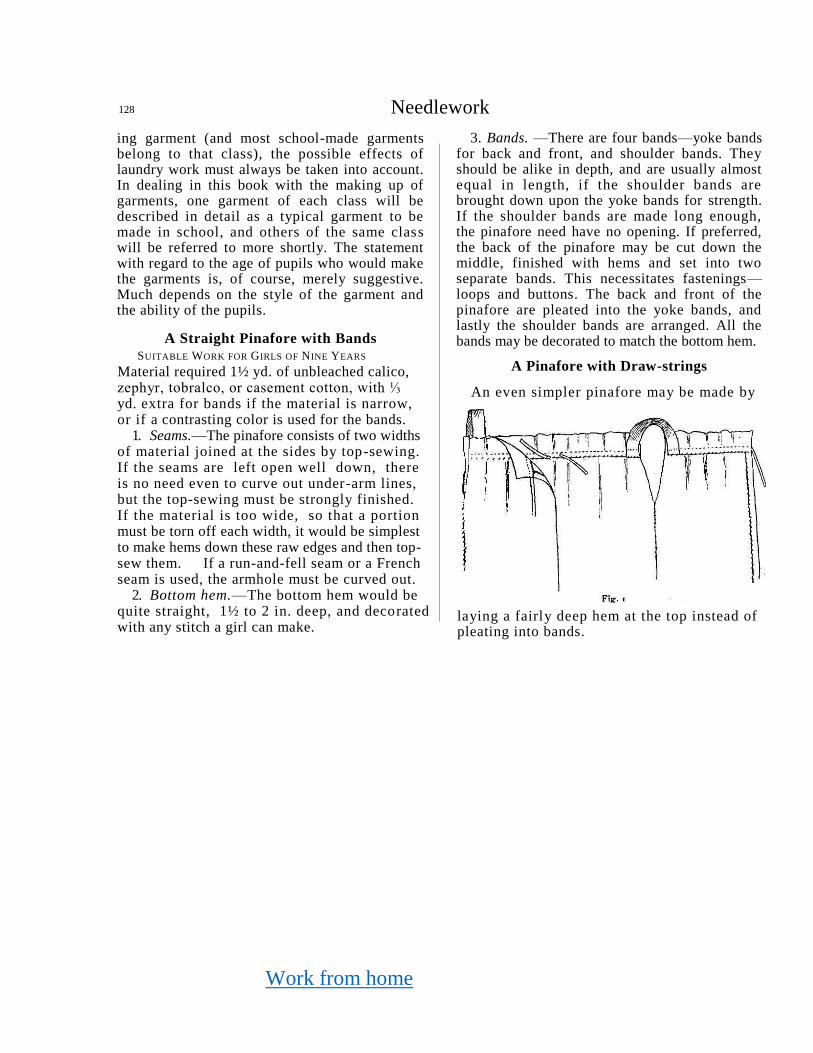
Work from home
128 Needlework
ing garment (and most school-made garments belong to that class), the possible effects of laundry work must always be taken into account. In dealing in this book with the making up of garments, one garment of each class will be described in detail as a typical garment to be made in school, and others of the same class will be referred to more shortly. The statement with regard to the age of pupils who would make the garments is, of course, merely suggestive. Much depends on the style of the garment and the ability of the pupils.
A Straight Pinafore with Bands
SUITABLE WORK FOR GIRLS OF NINE YEARS
Material required 1½ yd. of unbleached calico, zephyr, tobralco, or casement cotton, with ⅓ yd. extra for bands if the material is narrow, or if a contrasting color is used for the bands.
1. Seams.—The pinafore consists of two widths of material joined at the sides by top-sewing. If the seams are left open well down, there is no need even to curve out under-arm lines, but the top-sewing must be strongly finished. If the material is too wide, so that a portion must be torn off each width, it would be simplest to make hems down these raw edges and then top- sew them. If a run-and-fell seam or a French seam is used, the armhole must be curved out.
2. Bottom hem.—The bottom hem would be quite straight, 1½ to 2 in. deep, and decorated with any stitch a girl can make.
3. Bands. —There are four bands—yoke bands for back and front, and shoulder bands. They should be alike in depth, and are usually almost equal in length, if the shoulder bands are brought down upon the yoke bands for strength. If the shoulder bands are made long enough, the pinafore need have no opening. If preferred, the back of the pinafore may be cut down the middle, finished with hems and set into two separate bands. This necessitates fastenings— loops and buttons. The back and front of the pinafore are pleated into the yoke bands, and lastly the shoulder bands are arranged. All the bands may be decorated to match the bottom hem.
A Pinafore with Draw-strings
An even simpler pinafore may be made by
laying a fairly deep hem at the top instead of pleating into bands.

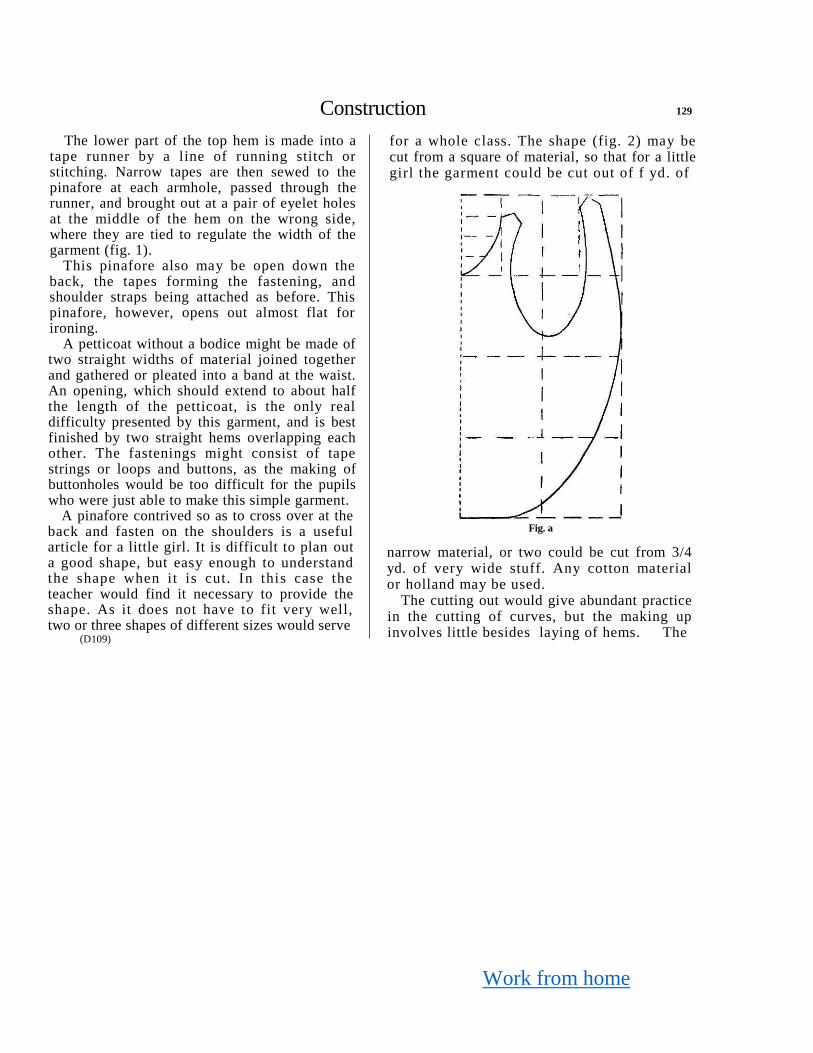
Work from home
Construction 129
The lower part of the top hem is made into a tape runner by a line of running stitch or stitching. Narrow tapes are then sewed to the pinafore at each armhole, passed through the runner, and brought out at a pair of eyelet holes at the middle of the hem on the wrong side, where they are tied to regulate the width of the garment (fig. 1).
This pinafore also may be open down the back, the tapes forming the fastening, and shoulder straps being attached as before. This pinafore, however, opens out almost flat for ironing.
A petticoat without a bodice might be made of two straight widths of material joined together and gathered or pleated into a band at the waist. An opening, which should extend to about half the length of the petticoat, is the only real difficulty presented by this garment, and is best finished by two straight hems overlapping each other. The fastenings might consist of tape strings or loops and buttons, as the making of buttonholes would be too difficult for the pupils who were just able to make this simple garment.
A pinafore contrived so as to cross over at the back and fasten on the shoulders is a useful article for a little girl. It is difficult to plan out a good shape, but easy enough to understand the shape when it is cut. In this case the teacher would find it necessary to provide the shape. As it does not have to fit very well, two or three shapes of different sizes would serve
(D109)
for a whole class. The shape (fig. 2) may be cut from a square of material, so that for a little girl the garment could be cut out of f yd. of
Fig. a
narrow material, or two could be cut from 3/4 yd. of very wide stuff. Any cotton material or holland may be used.
The cutting out would give abundant practice in the cutting of curves, but the making up involves little besides laying of hems. The
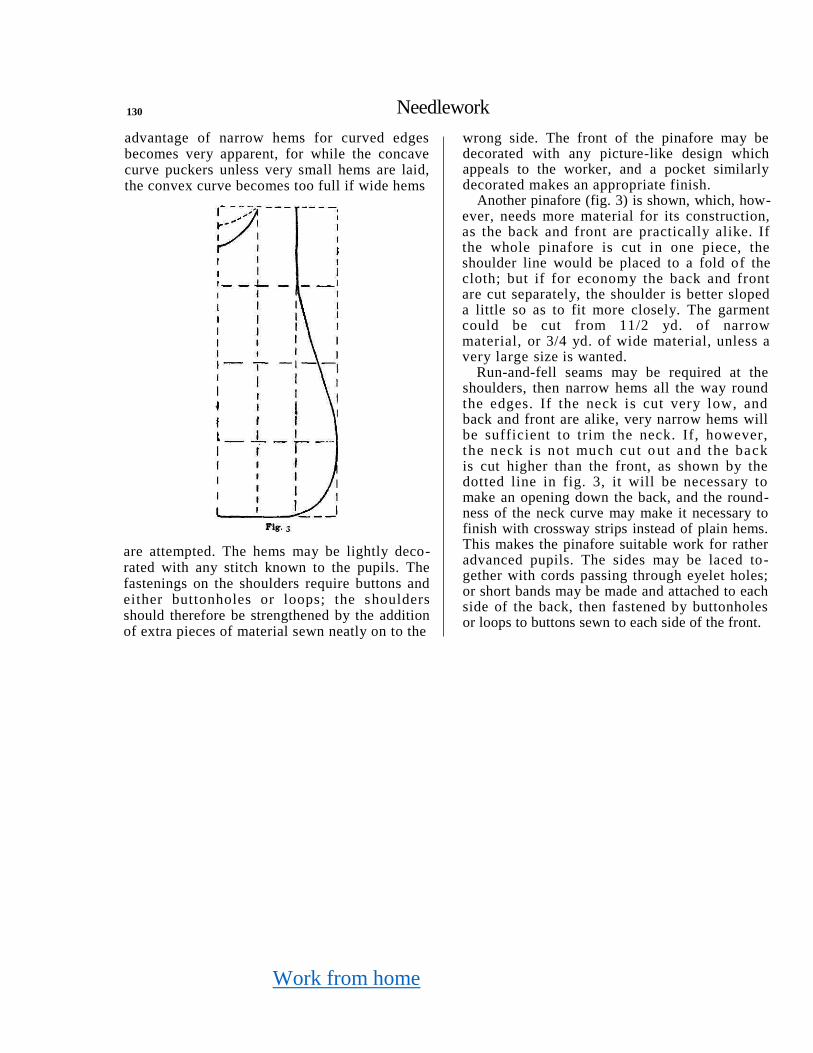
Work from home
130 Needlework
advantage of narrow hems for curved edges becomes very apparent, for while the concave curve puckers unless very small hems are laid, the convex curve becomes too full if wide hems
are attempted. The hems may be lightly deco-rated with any stitch known to the pupils. The fastenings on the shoulders require buttons and either buttonholes or loops; the shoulders should therefore be strengthened by the addition of extra pieces of material sewn neatly on to the
wrong side. The front of the pinafore may be decorated with any picture-like design which appeals to the worker, and a pocket similarly decorated makes an appropriate finish.
Another pinafore (fig. 3) is shown, which, how-ever, needs more material for its construction, as the back and front are practically alike. If the whole pinafore is cut in one piece, the shoulder line would be placed to a fold of the cloth; but if for economy the back and front are cut separately, the shoulder is better sloped a little so as to fit more closely. The garment could be cut from 11/2 yd. of narrow material, or 3/4 yd. of wide material, unless a very large size is wanted.
Run-and-fell seams may be required at the shoulders, then narrow hems all the way round the edges. If the neck is cut very low, and back and front are alike, very narrow hems will be sufficient to trim the neck. If, however, the neck is not much cut o ut and the back is cut higher than the front, as shown by the dotted line in fig. 3, it will be necessary to make an opening down the back, and the round-ness of the neck curve may make it necessary to finish with crossway strips instead of plain hems. This makes the pinafore suitable work for rather advanced pupils. The sides may be laced to-gether with cords passing through eyelet holes; or short bands may be made and attached to each side of the back, then fastened by buttonholes or loops to buttons sewn to each side of the front.
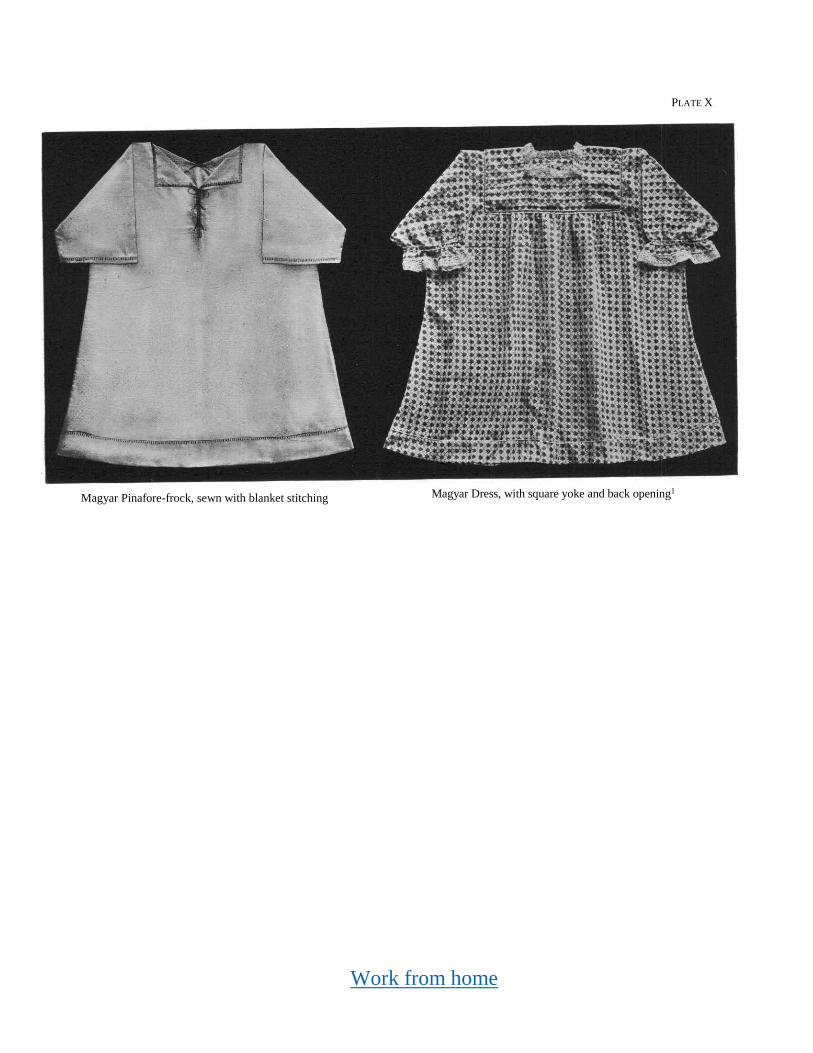
Work from home
PLATE X
Magyar Pinafore-frock, sewn with blanket stitching Magyar Dress, with square yoke and back opening1

Work from home
Construction
CHAPTER VI
MAGYAR GARMENTS
Magyar Pinafore
SUITABLE WORK FOR A GIRL OF TEN YEARS
Material required: 13/4 to 2 yd. of casement cotton, zephyr, or tobralco, 30 in. wide.
At this stage a girl had better make a paper pattern representing half the garment instead of a quarter (fig. 1), as she would not be able to cut through more than two thicknesses of material.
1. Seams.—French seam would be easy and neat, and could be sewn with No. 30 cotton of contrasting color. (Advanced workers would, of course, machine stitch the seams in a color to match the garment.) Round the curved portion the seams should be rather narrow, to avoid puckering.
2. Bottom hem — About 11/2 or 2 in. deep. It will have to be eased or pleated in, as it is curved. Before beginning to fold the hem, fold the bottom of the garment with the side seams together, and examine the bottom curve. If it has a bad shape, owing to stretching of the seams, round it off smoothly, having first pinned the two sides together.
3. Sleeves.—Make hems about 1/2 in. deep, and decorate them to match the other hems.
4. Neck.—Lay a hem about 1/4 in. deep, or join on a crossway false hem 3/4 to 1 in. deep.
All the hems may be decorated with a pattern in tacking stitch, or with some variety of chain or blanket stitch. To give variety of color, or to add to the length of the garment, all the hems might be finished with crossway false hems in the same or a contrasting color. In that case, all the hems would appear on the right side of the garment.
5. Opening.—If the pinafore is cut rather wide at the neck, it can be made without any opening.
If an opening must be made, it should be cut down almost to the waist.
The simplest method of finishing an opening at this stage is by narrow tapering hems with a shaped strengthening tape and a loop and button fastening. This is most suitable for a back opening. For a front opening, Method B, described on pp. 58 and 59, may be used.
Magyar Dress
The pinafore pattern is suitable also for a
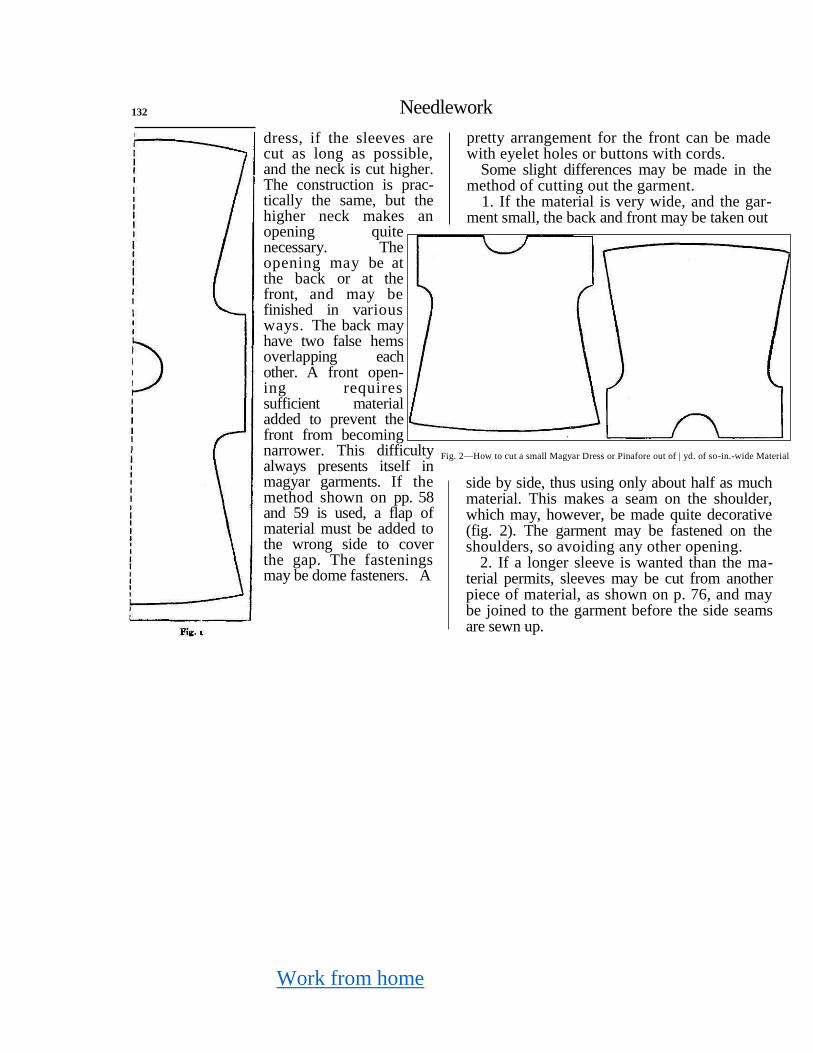
Work from home
132 Needlework
dress, if the sleeves are cut as long as possible, and the neck is cut higher. The construction is prac-tically the same, but the higher neck makes an opening quite necessary. The opening may be at the back or at the front, and may be finished in various ways. The back may have two false hems overlapping each other. A front open-ing requires sufficient material added to prevent the front from becoming narrower. This difficulty always presents itself in magyar garments. If the method shown on pp. 58 and 59 is used, a flap of material must be added to the wrong side to cover the gap. The fastenings may be dome fasteners. A
pretty arrangement for the front can be made with eyelet holes or buttons with cords.
Some slight differences may be made in the method of cutting out the garment.
1. If the material is very wide, and the gar-ment small, the back and front may be taken out
side by side, thus using only about half as much material. This makes a seam on the shoulder, which may, however, be made quite decorative (fig. 2). The garment may be fastened on the shoulders, so avoiding any other opening.
2. If a longer sleeve is wanted than the ma-terial permits, sleeves may be cut from another piece of material, as shown on p. 76, and may be joined to the garment before the side seams are sewn up.
Fig. 2—How to cut a small Magyar Dress or Pinafore out of | yd. of so-in.-wide Material
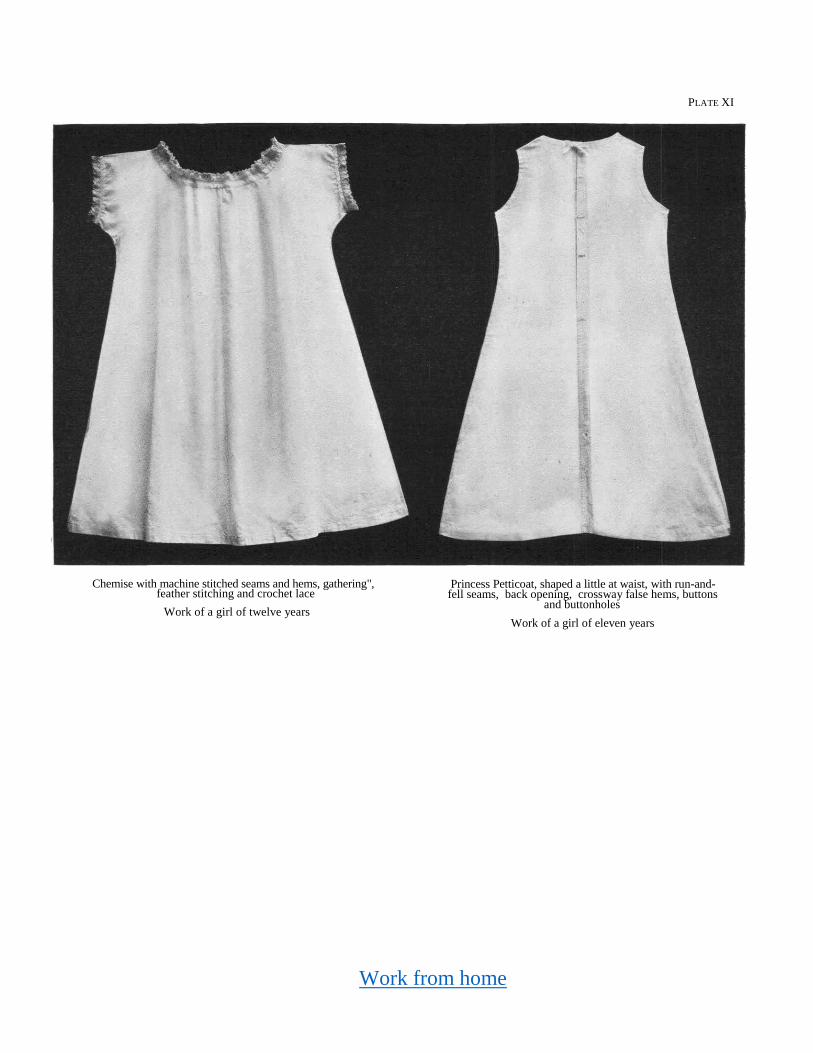
Work from home
PLATE XI
Chemise with machine stitched seams and hems, gathering", feather stitching and crochet lace
Work of a girl of twelve years
Princess Petticoat, shaped a little at waist, with run-and- fell seams, back opening, crossway false hems, buttons
and buttonholes
Work of a girl of eleven years

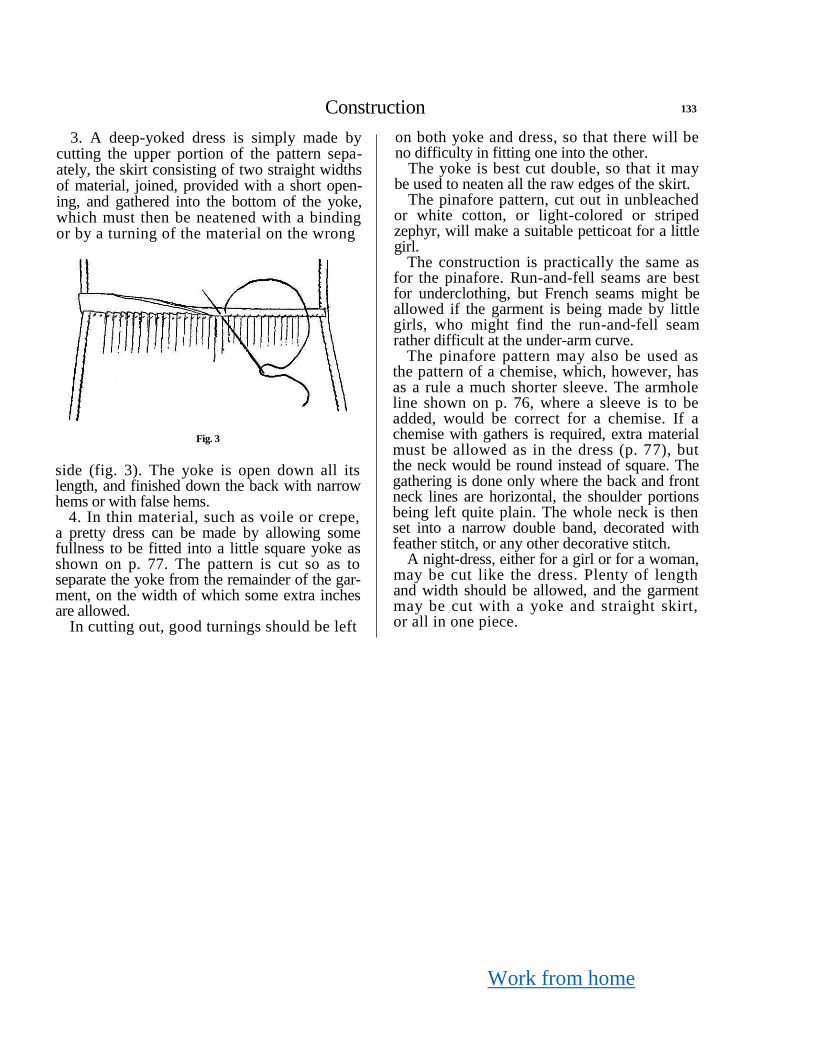
Work from home
Construction 133
3. A deep-yoked dress is simply made by cutting the upper portion of the pattern sepa-ately, the skirt consisting of two straight widths of material, joined, provided with a short open-ing, and gathered into the bottom of the yoke, which must then be neatened with a binding or by a turning of the material on the wrong
Fig. 3
side (fig. 3). The yoke is open down all its length, and finished down the back with narrow hems or with false hems.
4. In thin material, such as voile or crepe, a pretty dress can be made by allowing some fullness to be fitted into a little square yoke as shown on p. 77. The pattern is cut so as to separate the yoke from the remainder of the gar-ment, on the width of which some extra inches are allowed.
In cutting out, good turnings should be left
on both yoke and dress, so that there will be no difficulty in fitting one into the other.
The yoke is best cut double, so that it may be used to neaten all the raw edges of the skirt.
The pinafore pattern, cut out in unbleached or white cotton, or light-colored or striped zephyr, will make a suitable petticoat for a little girl.
The construction is practically the same as for the pinafore. Run-and-fell seams are best for underclothing, but French seams might be allowed if the garment is being made by little girls, who might find the run-and-fell seam rather difficult at the under-arm curve.
The pinafore pattern may also be used as the pattern of a chemise, which, however, has as a rule a much shorter sleeve. The armhole line shown on p. 76, where a sleeve is to be added, would be correct for a chemise. If a chemise with gathers is required, extra material must be allowed as in the dress (p. 77), but the neck would be round instead of square. The gathering is done only where the back and front neck lines are horizontal, the shoulder portions being left quite plain. The whole neck is then set into a narrow double band, decorated with feather stitch, or any other decorative stitch.
A night-dress, either for a girl or for a woman, may be cut like the dress. Plenty of length and width should be allowed, and the garment may be cut with a yoke and straight skirt, or all in one piece.
Work from home
134 Needlework
As a night-dress opens down the front, care must be taken to arrange the opening so as to avoid narrowing the front, which should really be slightly wider than the back. A few small tucks would use up any extra material in the back, if it seems too wide after the front opening is made.
Garments like dressing-gowns or jackets present the same difficulty, but, as they are open all the way down the front, an extra fold of the same or contrasting material can be added to fill out and decorate the front edges.
Girls enjoy making things for baby. The garments are small, but they may be very simple, and give scope for very dainty work in respect both of color and of stitchery.
A baby's jacket (p. 78, fig. 8) can be made from f yd. of narrow material, either woolen or
cotton. If made of woolen material, it gives practice in seams and hems finished by herring-boning.
After the seams have been made, hems are laid down the front edges, then at the neck, wrists, and bottom edge. These hems are finished with any suitable decorative stitch known to the pupils.
The fastening may consist of ribbon strings sewn on at the neck, or of loops and buttons.
The jacket could be elaborated by the addition of a small collar and cuffs, and a deep false hem round the bottom.
If there should be material left over, it could be made into a bonnet to match the jacket. The pattern would be the same as for the knitted bonnet shown on p. 240.
CHAPTER VII
PRINCESS PETTICOATS
Girl's Petticoat
SUITABLE WORK FOR GIRLS OF ELEVEN YEARS
Material required: Cotton or zephyr would be suitable, and about 2 yd. would be required unless the material is quite wide, when ¼ to ½ yd.
may be saved by cutting the back in two por-tions, as shown in fig. 1.
Lace edging, if desired, 2½ yd. for neck and armholes.
1. Seams. — Run-and-fell seams are most suitable for this garment. The side seams

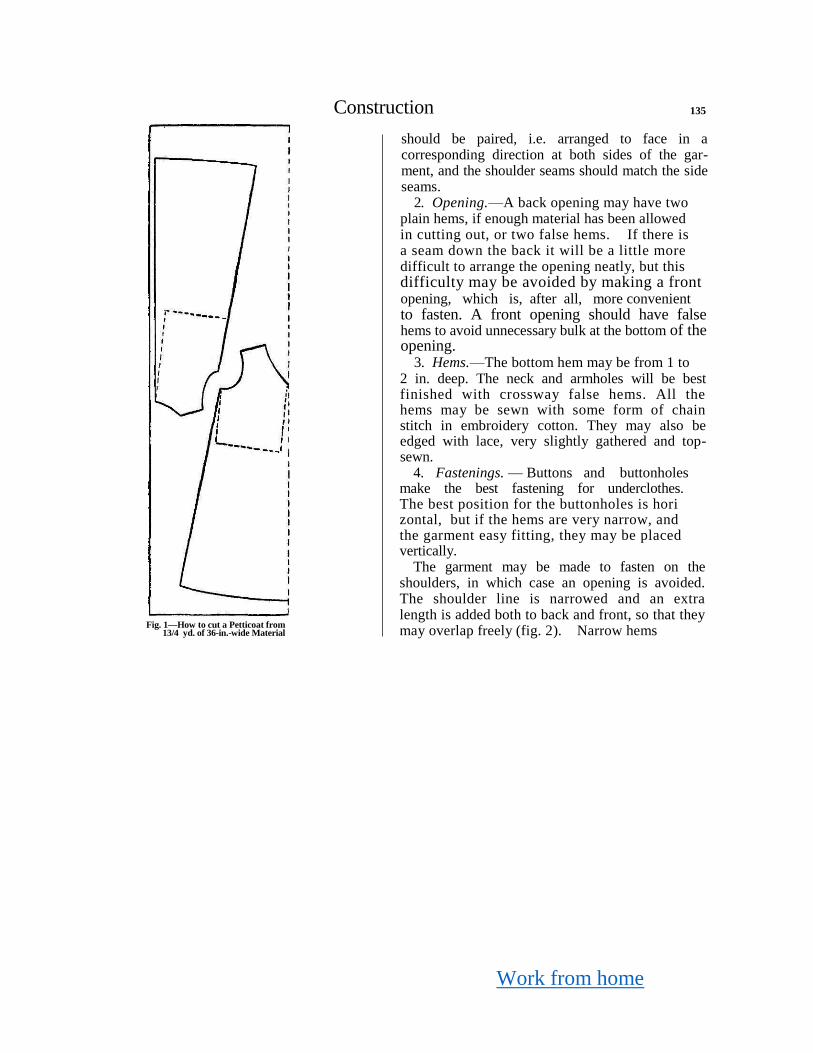
Work from home
Construction 135
Fig. 1—How to cut a Petticoat from
13/4 yd. of 36-in.-wide Material
should be paired, i.e. arranged to face in a corresponding direction at both sides of the gar-ment, and the shoulder seams should match the side seams.
2. Opening.—A back opening may have two plain hems, if enough material has been allowed in cutting out, or two false hems. If there is a seam down the back it will be a little more difficult to arrange the opening neatly, but this difficulty may be avoided by making a front
opening, which is, after all, more convenient to fasten. A front opening should have false hems to avoid unnecessary bulk at the bottom of the opening.
3. Hems.—The bottom hem may be from 1 to
2 in. deep. The neck and armholes will be best finished with crossway false hems. All the hems may be sewn with some form of chain stitch in embroidery cotton. They may also be edged with lace, very slightly gathered and top-sewn.
4. Fastenings. — Buttons and buttonholes make the best fastening for underclothes. The best position for the buttonholes is hori zontal, but if the hems are very narrow, and the garment easy fitting, they may be placed vertically.
The garment may be made to fasten on the shoulders, in which case an opening is avoided. The shoulder line is narrowed and an extra length is added both to back and front, so that they may overlap freely (fig. 2). Narrow hems
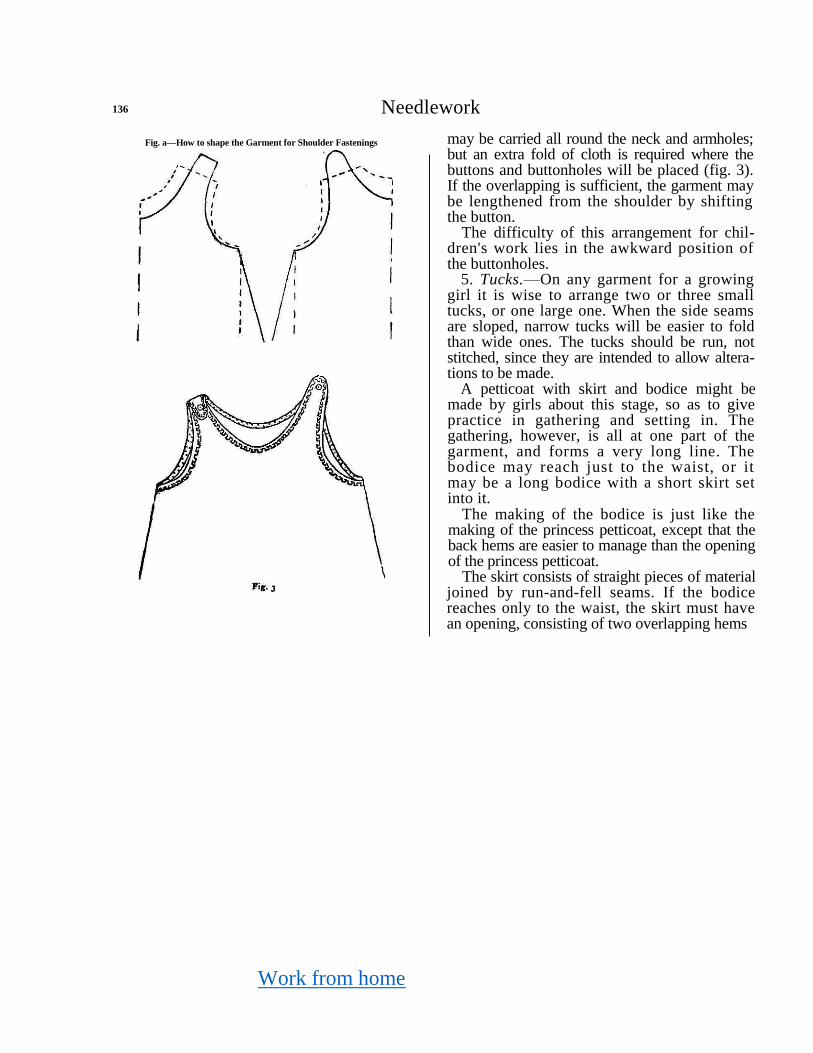
Work from home
136 Needlework
Fig. a—How to shape the Garment for Shoulder Fastenings
may be carried all round the neck and armholes; but an extra fold of cloth is required where the buttons and buttonholes will be placed (fig. 3). If the overlapping is sufficient, the garment may be lengthened from the shoulder by shifting the button.
The difficulty of this arrangement for chil-dren's work lies in the awkward position of the buttonholes.
5. Tucks.—On any garment for a growing girl it is wise to arrange two or three small tucks, or one large one. When the side seams are sloped, narrow tucks will be easier to fold than wide ones. The tucks should be run, not stitched, since they are intended to allow altera-tions to be made.
A petticoat with skirt and bodice might be made by girls about this stage, so as to give practice in gathering and setting in. The gathering, however, is all at one part of the garment, and forms a very long line. The bodice may reach just to the waist, or it may be a long bodice with a short skirt set into it.
The making of the bodice is just like the making of the princess petticoat, except that the back hems are easier to manage than the opening of the princess petticoat.
The skirt consists of straight pieces of material joined by run-and-fell seams. If the bodice reaches only to the waist, the skirt must have an opening, consisting of two overlapping hems
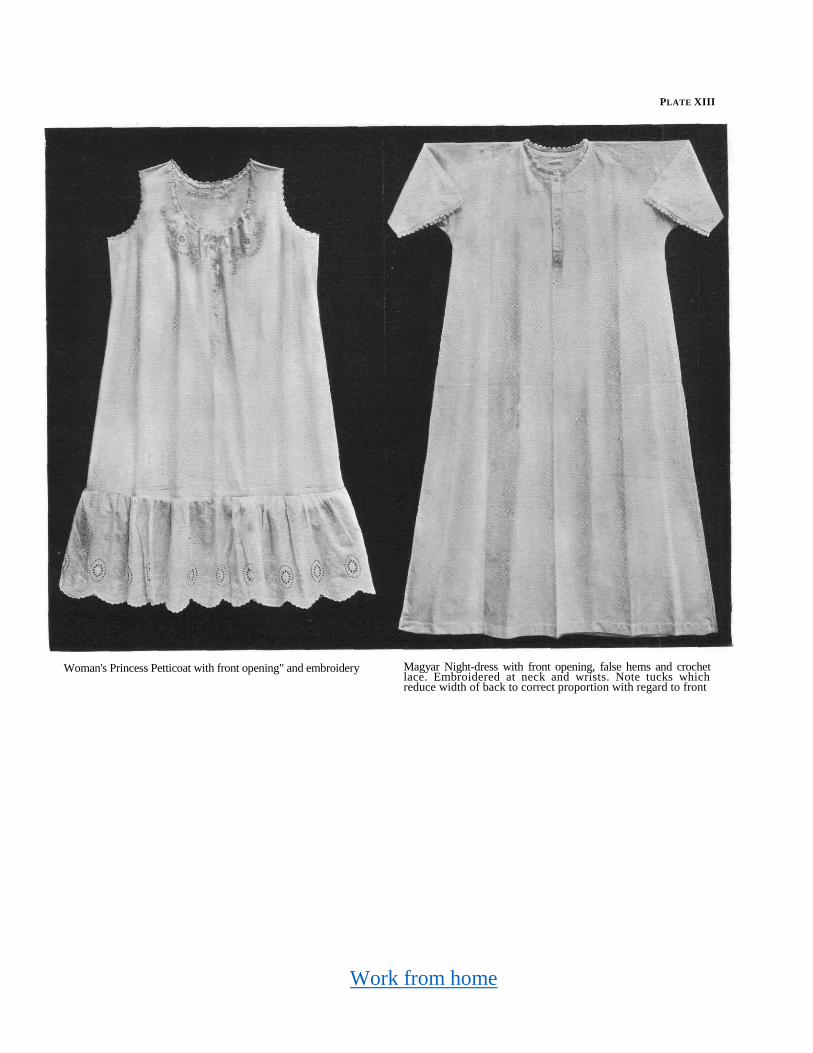
Work from home
PLATE XIII
Woman's Princess Petticoat with front opening" and embroidery Magyar Night-dress with front opening, false hems and crochet lace. Embroidered at neck and wrists. Note tucks which reduce width of back to correct proportion with regard to front

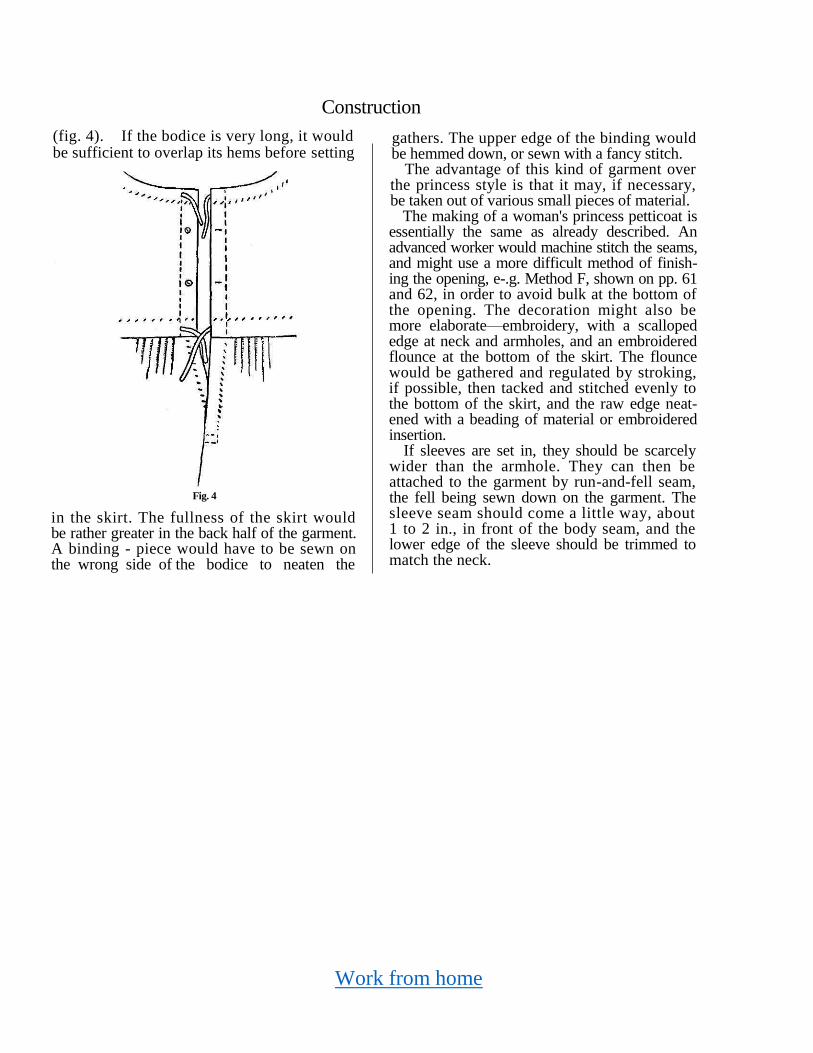
Work from home
Construction
(fig. 4). If the bodice is very long, it would be sufficient to overlap its hems before setting
Fig. 4
in the skirt. The fullness of the skirt would be rather greater in the back half of the garment. A binding - piece would have to be sewn on the wrong side of the bodice to neaten the
gathers. The upper edge of the binding would be hemmed down, or sewn with a fancy stitch.
The advantage of this kind of garment over the princess style is that it may, if necessary, be taken out of various small pieces of material.
The making of a woman's princess petticoat is essentially the same as already described. An advanced worker would machine stitch the seams, and might use a more difficult method of finish-ing the opening, e-.g. Method F, shown on pp. 61 and 62, in order to avoid bulk at the bottom of the opening. The decoration might also be more elaborate—embroidery, with a scalloped edge at neck and armholes, and an embroidered flounce at the bottom of the skirt. The flounce would be gathered and regulated by stroking, if possible, then tacked and stitched evenly to the bottom of the skirt, and the raw edge neat-ened with a beading of material or embroidered insertion.
If sleeves are set in, they should be scarcely wider than the armhole. They can then be attached to the garment by run-and-fell seam, the fell being sewn down on the garment. The sleeve seam should come a little way, about 1 to 2 in., in front of the body seam, and the lower edge of the sleeve should be trimmed to match the neck.
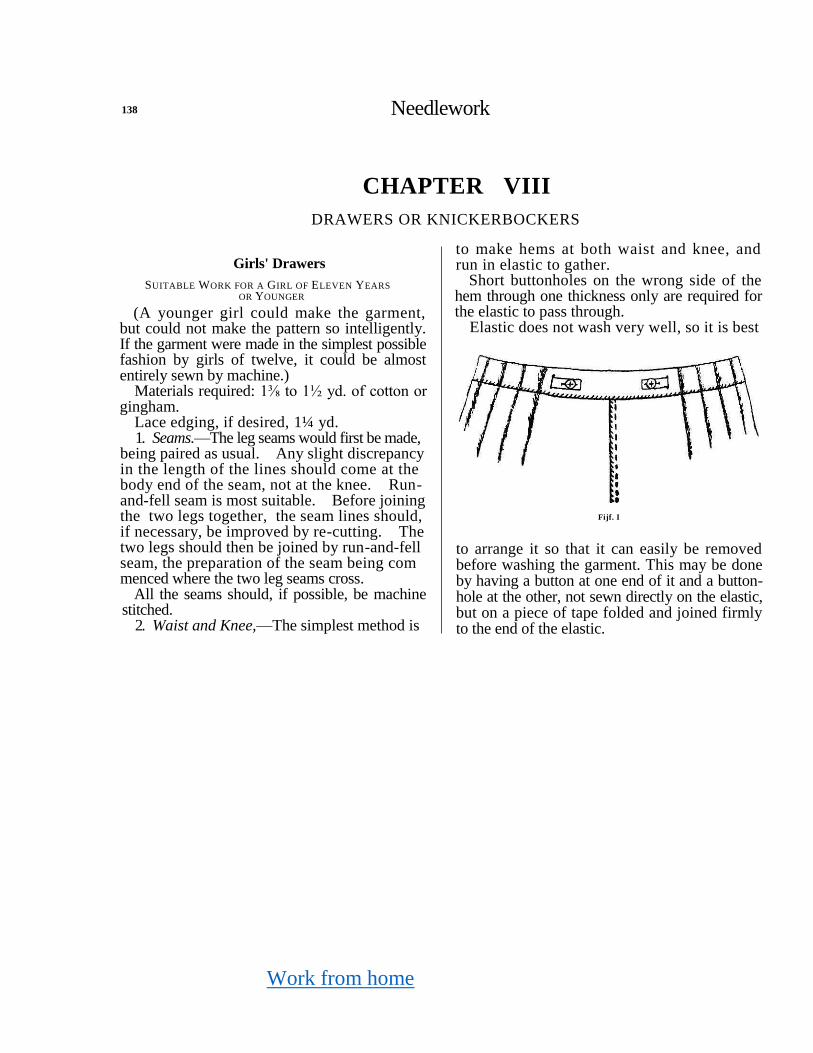
Work from home
138 Needlework
CHAPTER VIII
DRAWERS OR KNICKERBOCKERS
Girls' Drawers
SUITABLE WORK FOR A GIRL OF ELEVEN YEARS
OR YOUNGER
(A younger girl could make the garment, but could not make the pattern so intelligently. If the garment were made in the simplest possible fashion by girls of twelve, it could be almost entirely sewn by machine.)
Materials required: 1⅜ to 1½ yd. of cotton or gingham.
Lace edging, if desired, 1¼ yd. 1. Seams.—The leg seams would first be made,
being paired as usual. Any slight discrepancy in the length of the lines should come at the body end of the seam, not at the knee. Run- and-fell seam is most suitable. Before joining the two legs together, the seam lines should, if necessary, be improved by re-cutting. The two legs should then be joined by run-and-fell seam, the preparation of the seam being com menced where the two leg seams cross.
All the seams should, if possible, be machine stitched.
2. Waist and Knee,—The simplest method is
to make hems at both waist and knee, and run in elastic to gather.
Short buttonholes on the wrong side of the hem through one thickness only are required for the elastic to pass through.
Elastic does not wash very well, so it is best
Fijf. I
to arrange it so that it can easily be removed before washing the garment. This may be done by having a button at one end of it and a button-hole at the other, not sewn directly on the elastic, but on a piece of tape folded and joined firmly to the end of the elastic.
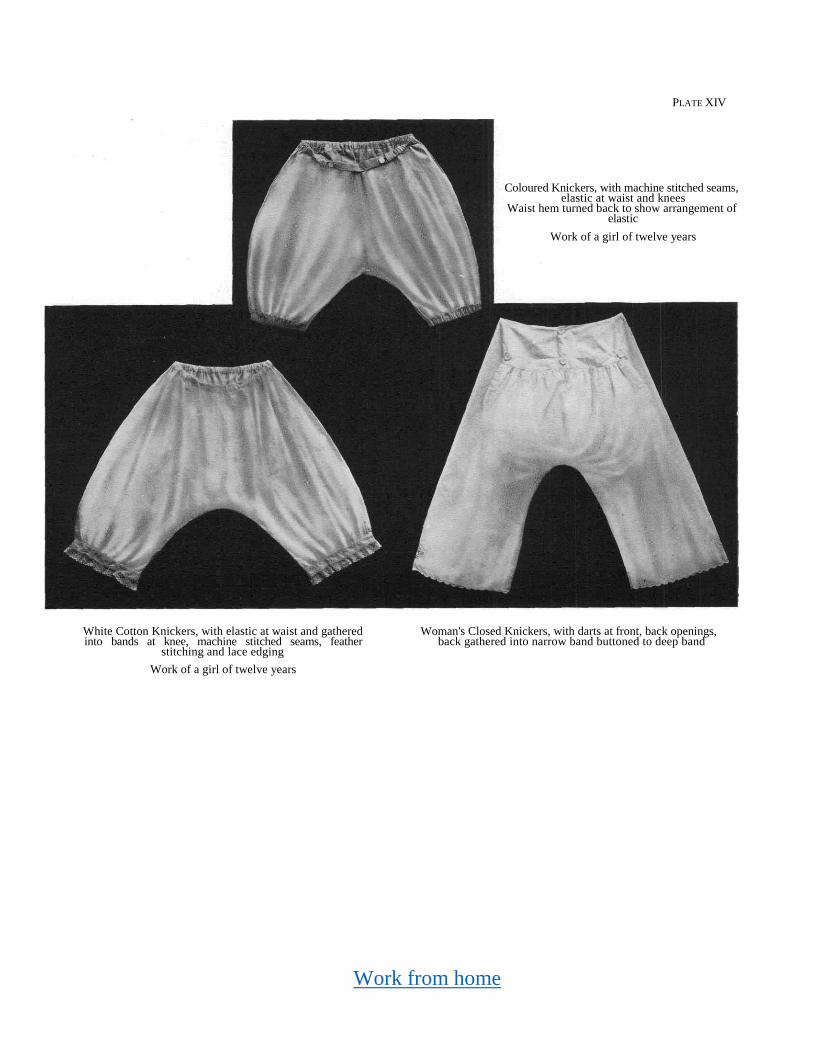
Work from home
PLATE XIV
White Cotton Knickers, with elastic at waist and gathered into bands at knee, machine stitched seams, feather
stitching and lace edging
Work of a girl of twelve years
Woman's Closed Knickers, with darts at front, back openings, back gathered into narrow band buttoned to deep band
Coloured Knickers, with machine stitched seams, elastic at waist and knees
Waist hem turned back to show arrangement of elastic
Work of a girl of twelve years

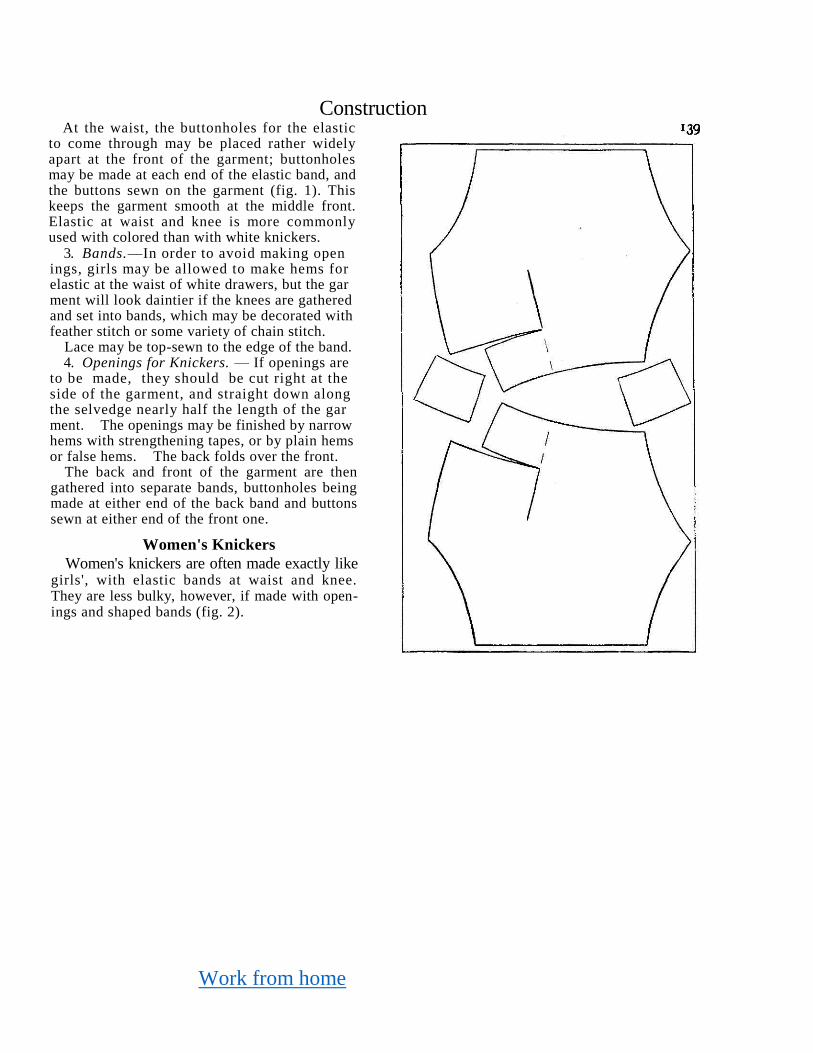
Work from home
Construction
At the waist, the buttonholes for the elastic to come through may be placed rather widely apart at the front of the garment; buttonholes may be made at each end of the elastic band, and the buttons sewn on the garment (fig. 1). This keeps the garment smooth at the middle front. Elastic at waist and knee is more commonly used with colored than with white knickers.
3. Bands.—In order to avoid making open ings, girls may be allowed to make hems for elastic at the waist of white drawers, but the gar ment will look daintier if the knees are gathered and set into bands, which may be decorated with feather stitch or some variety of chain stitch.
Lace may be top-sewn to the edge of the band. 4. Openings for Knickers. — If openings are
to be made, they should be cut right at the side of the garment, and straight down along the selvedge nearly half the length of the gar ment. The openings may be finished by narrow hems with strengthening tapes, or by plain hems or false hems. The back folds over the front.
The back and front of the garment are then gathered into separate bands, buttonholes being made at either end of the back band and buttons sewn at either end of the front one.
Women's Knickers
Women's knickers are often made exactly like girls', with elastic bands at waist and knee. They are less bulky, however, if made with open-ings and shaped bands (fig. 2).
Fig. a—How to cut closed Knickers from iJ yd. of 36-in.-wide Material
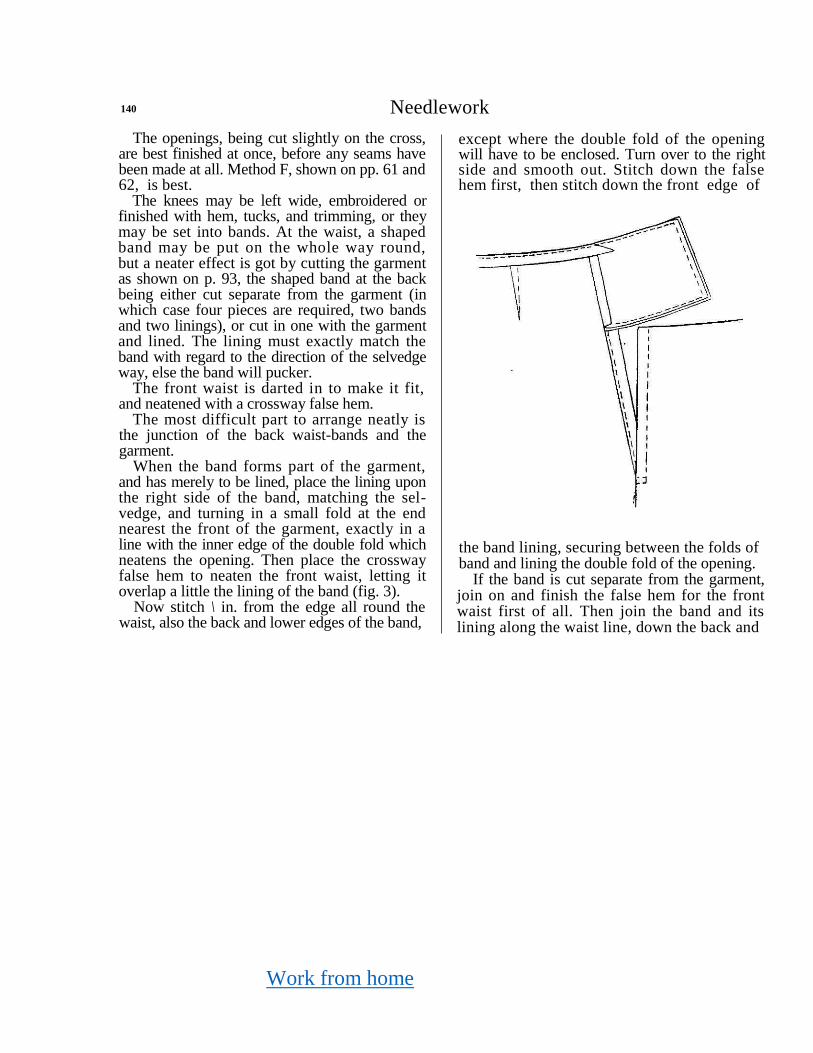
Work from home
140 Needlework
The openings, being cut slightly on the cross, are best finished at once, before any seams have been made at all. Method F, shown on pp. 61 and 62, is best.
The knees may be left wide, embroidered or finished with hem, tucks, and trimming, or they may be set into bands. At the waist, a shaped band may be put on the whole way round, but a neater effect is got by cutting the garment as shown on p. 93, the shaped band at the back being either cut separate from the garment (in which case four pieces are required, two bands and two linings), or cut in one with the garment and lined. The lining must exactly match the band with regard to the direction of the selvedge way, else the band will pucker.
The front waist is darted in to make it fit, and neatened with a crossway false hem.
The most difficult part to arrange neatly is the junction of the back waist-bands and the garment.
When the band forms part of the garment, and has merely to be lined, place the lining upon the right side of the band, matching the sel-vedge, and turning in a small fold at the end nearest the front of the garment, exactly in a line with the inner edge of the double fold which neatens the opening. Then place the crossway false hem to neaten the front waist, letting it overlap a little the lining of the band (fig. 3).
Now stitch \ in. from the edge all round the waist, also the back and lower edges of the band,
except where the double fold of the opening will have to be enclosed. Turn over to the right side and smooth out. Stitch down the false hem first, then stitch down the front edge of
the band lining, securing between the folds of band and lining the double fold of the opening.
If the band is cut separate from the garment, join on and finish the false hem for the front waist first of all. Then join the band and its lining along the waist line, down the back and
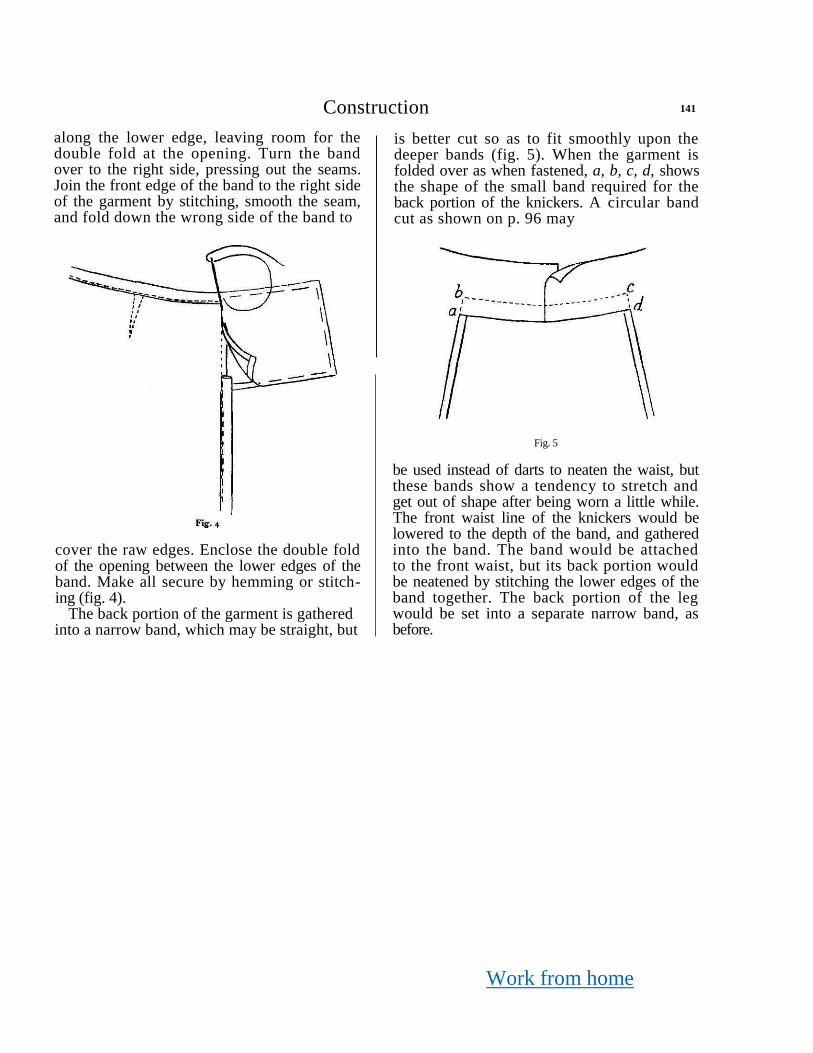
Work from home
Construction 141
along the lower edge, leaving room for the double fold at the opening. Turn the band over to the right side, pressing out the seams. Join the front edge of the band to the right side of the garment by stitching, smooth the seam, and fold down the wrong side of the band to
is better cut so as to fit smoothly upon the deeper bands (fig. 5). When the garment is folded over as when fastened, a, b, c, d, shows the shape of the small band required for the back portion of the knickers. A circular band cut as shown on p. 96 may
cover the raw edges. Enclose the double fold of the opening between the lower edges of the band. Make all secure by hemming or stitch-ing (fig. 4).
The back portion of the garment is gathered into a narrow band, which may be straight, but
Fig. 5
be used instead of darts to neaten the waist, but these bands show a tendency to stretch and get out of shape after being worn a little while. The front waist line of the knickers would be lowered to the depth of the band, and gathered into the band. The band would be attached to the front waist, but its back portion would be neatened by stitching the lower edges of the band together. The back portion of the leg would be set into a separate narrow band, as before.
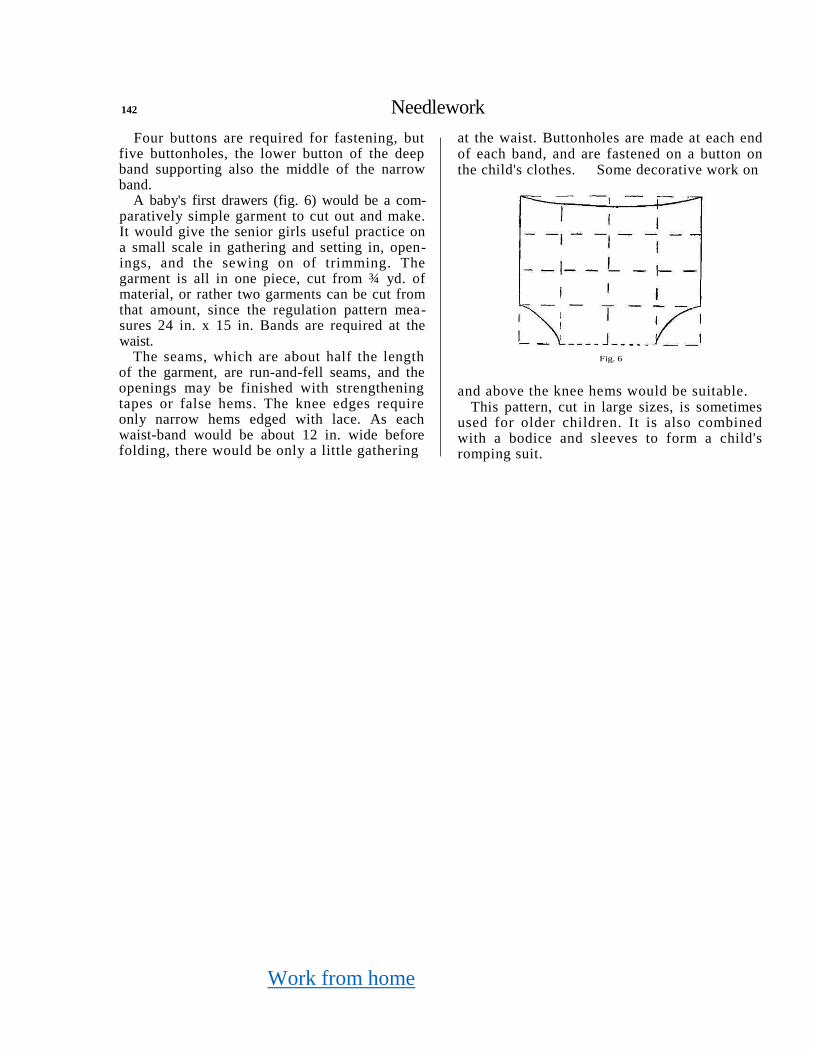
Work from home
142 Needlework
Four buttons are required for fastening, but five buttonholes, the lower button of the deep band supporting also the middle of the narrow band.
A baby's first drawers (fig. 6) would be a com-paratively simple garment to cut out and make. It would give the senior girls useful practice on a small scale in gathering and setting in, open-ings, and the sewing on of trimming. The garment is all in one piece, cut from ¾ yd. of material, or rather two garments can be cut from that amount, since the regulation pattern mea-sures 24 in. x 15 in. Bands are required at the waist.
The seams, which are about half the length of the garment, are run-and-fell seams, and the openings may be finished with strengthening tapes or false hems. The knee edges require only narrow hems edged with lace. As each waist-band would be about 12 in. wide before folding, there would be only a little gathering
at the waist. Buttonholes are made at each end of each band, and are fastened on a button on the child's clothes. Some decorative work on
Fig. 6
and above the knee hems would be suitable. This pattern, cut in large sizes, is sometimes
used for older children. It is also combined with a bodice and sleeves to form a child's romping suit.
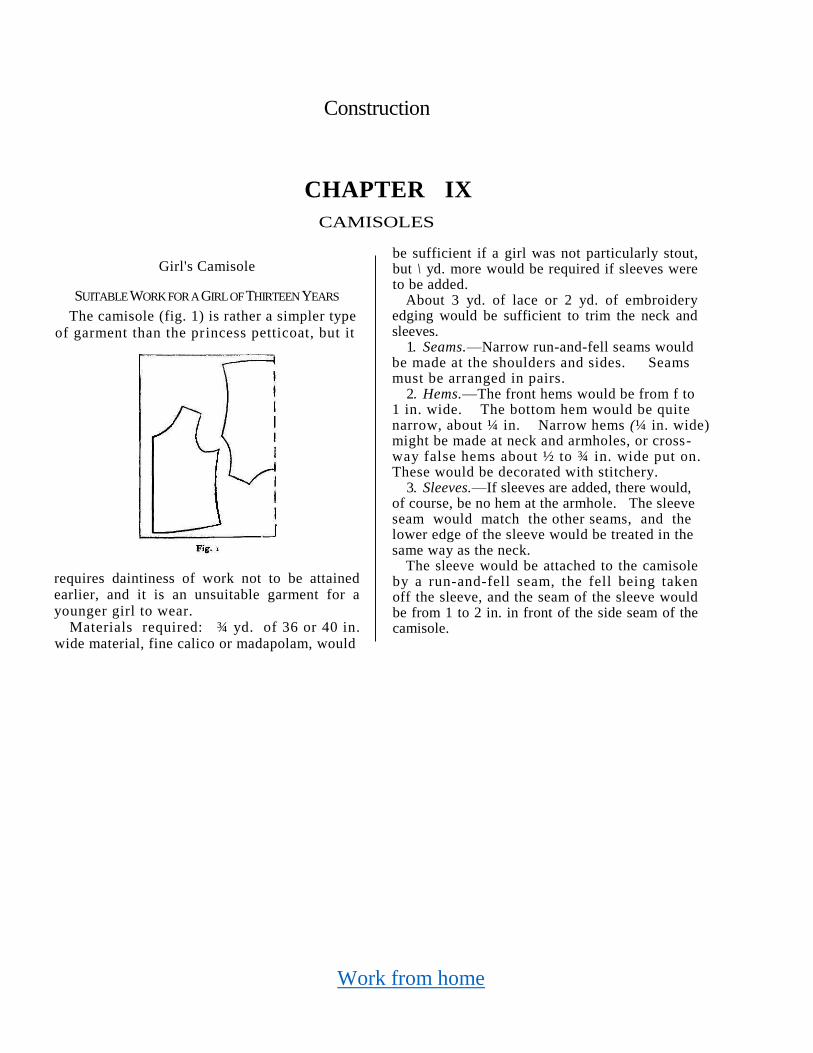
Work from home
Construction
CHAPTER IX
CAMISOLES
Girl's Camisole
SUITABLE WORK FOR A GIRL OF THIRTEEN YEARS
The camisole (fig. 1) is rather a simpler type
of garment than the princess petticoat, but it
requires daintiness of work not to be attained earlier, and it is an unsuitable garment for a younger girl to wear.
Materials required: ¾ yd. of 36 or 40 in. wide material, fine calico or madapolam, would
be sufficient if a girl was not particularly stout, but \ yd. more would be required if sleeves were to be added.
About 3 yd. of lace or 2 yd. of embroidery edging would be sufficient to trim the neck and sleeves.
1. Seams.—Narrow run-and-fell seams would be made at the shoulders and sides. Seams must be arranged in pairs.
2. Hems.—The front hems would be from f to 1 in. wide. The bottom hem would be quite narrow, about ¼ in. Narrow hems (¼ in. wide) might be made at neck and armholes, or cross- way false hems about ½ to ¾ in. wide put on. These would be decorated with stitchery.
3. Sleeves.—If sleeves are added, there would, of course, be no hem at the armhole. The sleeve seam would match the other seams, and the lower edge of the sleeve would be treated in the same way as the neck.
The sleeve would be attached to the camisole by a run-and-fell seam, the fell being taken off the sleeve, and the seam of the sleeve would be from 1 to 2 in. in front of the side seam of the camisole.
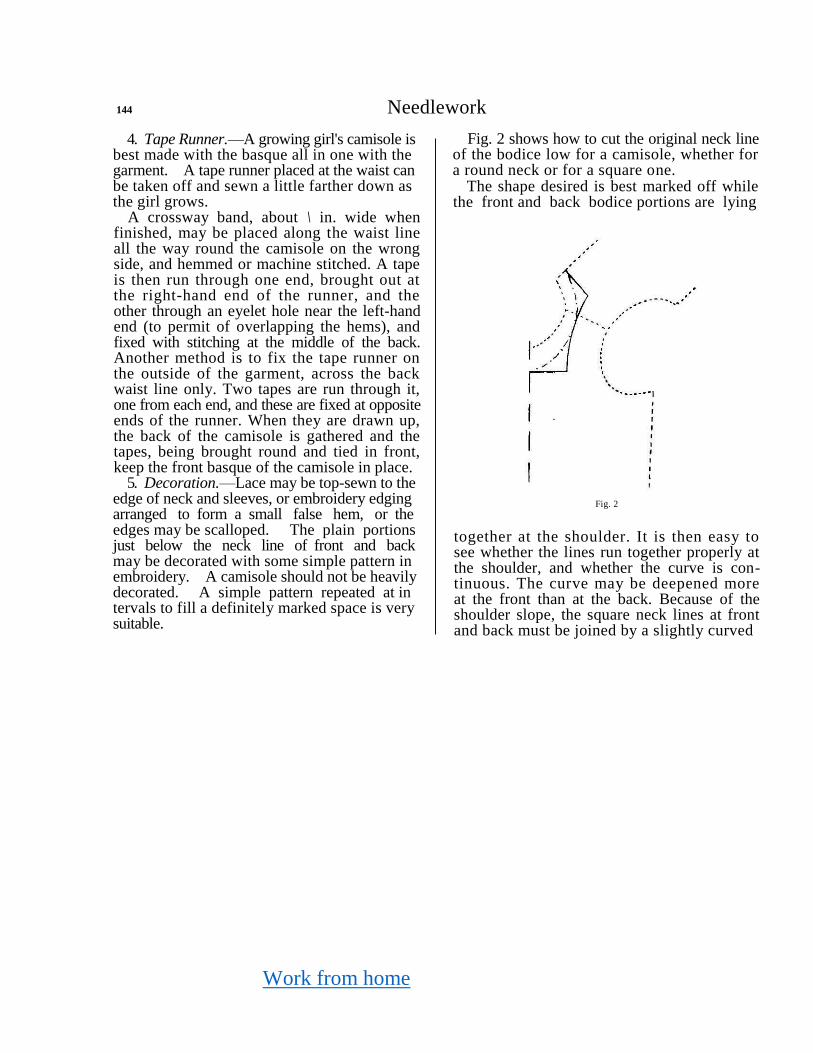
Work from home
144 Needlework
4. Tape Runner.—A growing girl's camisole is best made with the basque all in one with the garment. A tape runner placed at the waist can be taken off and sewn a little farther down as the girl grows.
A crossway band, about \ in. wide when finished, may be placed along the waist line all the way round the camisole on the wrong side, and hemmed or machine stitched. A tape is then run through one end, brought out at the right-hand end of the runner, and the other through an eyelet hole near the left-hand end (to permit of overlapping the hems), and fixed with stitching at the middle of the back. Another method is to fix the tape runner on the outside of the garment, across the back waist line only. Two tapes are run through it, one from each end, and these are fixed at opposite ends of the runner. When they are drawn up, the back of the camisole is gathered and the tapes, being brought round and tied in front, keep the front basque of the camisole in place.
5. Decoration.—Lace may be top-sewn to the edge of neck and sleeves, or embroidery edging arranged to form a small false hem, or the edges may be scalloped. The plain portions just below the neck line of front and back may be decorated with some simple pattern in embroidery. A camisole should not be heavily decorated. A simple pattern repeated at in tervals to fill a definitely marked space is very suitable.
Fig. 2 shows how to cut the original neck line of the bodice low for a camisole, whether for a round neck or for a square one.
The shape desired is best marked off while the front and back bodice portions are lying
Fig. 2
together at the shoulder. It is then easy to see whether the lines run together properly at the shoulder, and whether the curve is con-tinuous. The curve may be deepened more at the front than at the back. Because of the shoulder slope, the square neck lines at front and back must be joined by a slightly curved
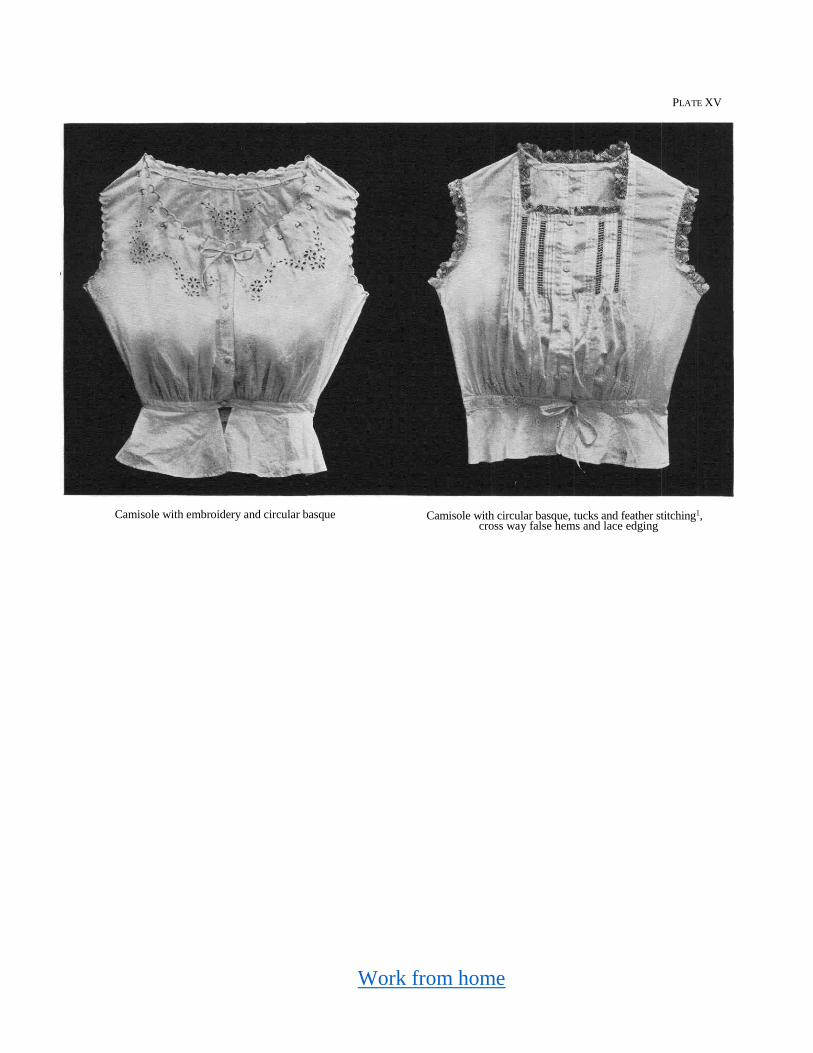
Work from home
PLATE XV
Camisole with embroidery and circular basque Camisole with circular basque, tucks and feather stitching1, cross way false hems and lace edging

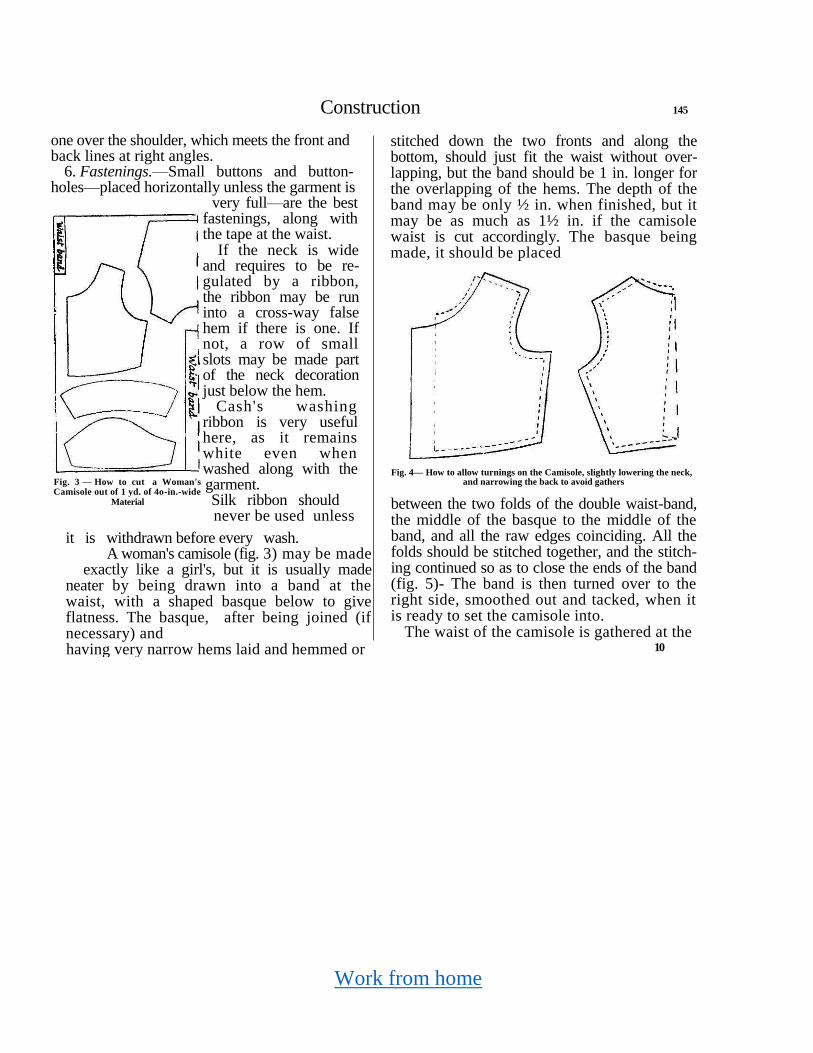
Work from home
Construction 145
one over the shoulder, which meets the front and back lines at right angles.
6. Fastenings.—Small buttons and button-holes—placed horizontally unless the garment is
very full—are the best fastenings, along with the tape at the waist.
If the neck is wide and requires to be re-gulated by a ribbon, the ribbon may be run into a cross-way false hem if there is one. If not, a row of small slots may be made part of the neck decoration just below the hem.
Cash's washing ribbon is very useful here, as it remains white even when washed along with the garment. Silk ribbon should never be used unless
stitched down the two fronts and along the bottom, should just fit the waist without over-lapping, but the band should be 1 in. longer for the overlapping of the hems. The depth of the band may be only ½ in. when finished, but it may be as much as 1½ in. if the camisole waist is cut accordingly. The basque being made, it should be placed
Fig. 4— How to allow turnings on the Camisole, slightly lowering the neck,
and narrowing the back to avoid gathers
between the two folds of the double waist-band, the middle of the basque to the middle of the band, and all the raw edges coinciding. All the folds should be stitched together, and the stitch-ing continued so as to close the ends of the band (fig. 5)- The band is then turned over to the right side, smoothed out and tacked, when it is ready to set the camisole into.
The waist of the camisole is gathered at the 10
Fig. 3 — How to cut a Woman's Camisole out of 1 yd. of 4o-in.-wide
Material
it is withdrawn before every wash. A woman's camisole (fig. 3) may be made
exactly like a girl's, but it is usually made neater by being drawn into a band at the waist, with a shaped basque below to give flatness. The basque, after being joined (if necessary) and
having very narrow hems laid and hemmed or (D106)
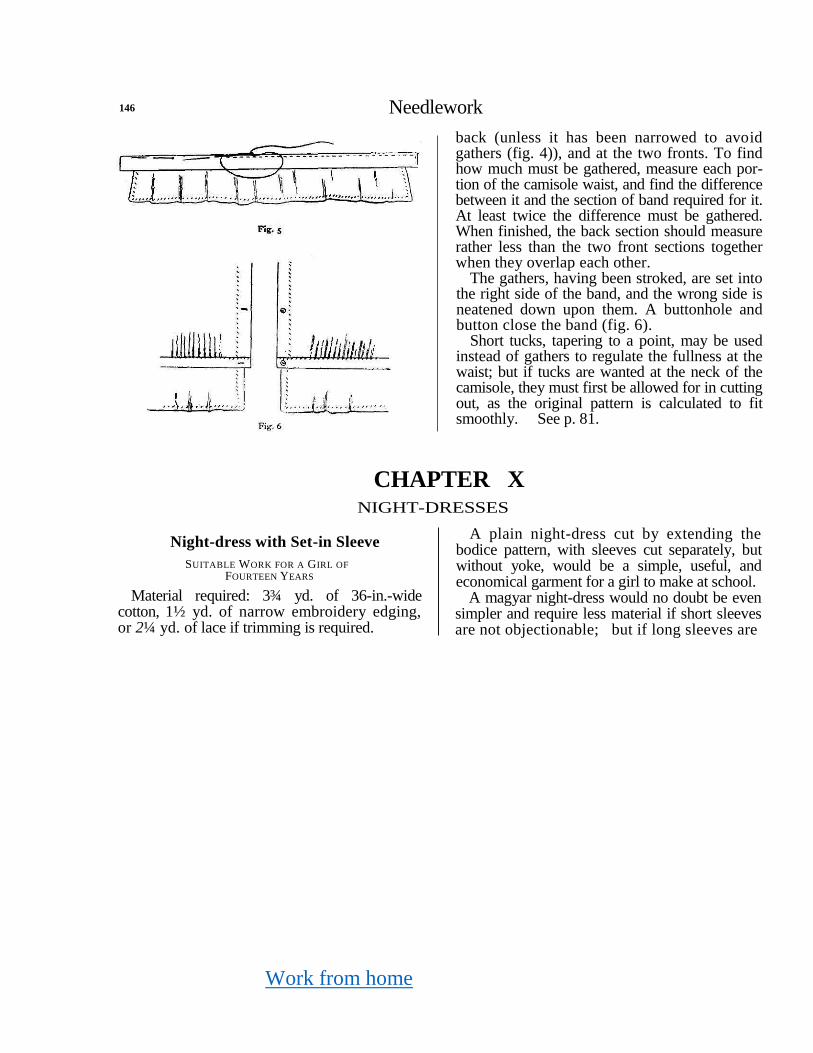
Work from home
146 Needlework
back (unless it has been narrowed to avoid gathers (fig. 4)), and at the two fronts. To find how much must be gathered, measure each por-tion of the camisole waist, and find the difference between it and the section of band required for it. At least twice the difference must be gathered. When finished, the back section should measure rather less than the two front sections together when they overlap each other.
The gathers, having been stroked, are set into the right side of the band, and the wrong side is neatened down upon them. A buttonhole and button close the band (fig. 6).
Short tucks, tapering to a point, may be used instead of gathers to regulate the fullness at the waist; but if tucks are wanted at the neck of the camisole, they must first be allowed for in cutting out, as the original pattern is calculated to fit smoothly. See p. 81.
CHAPTER X NIGHT-DRESSES
Night-dress with Set-in Sleeve
SUITABLE WORK FOR A GIRL OF
FOURTEEN YEARS
Material required: 3¾ yd. of 36-in.-wide cotton, 1½ yd. of narrow embroidery edging, or 2¼ yd. of lace if trimming is required.
A plain night-dress cut by extending the bodice pattern, with sleeves cut separately, but without yoke, would be a simple, useful, and economical garment for a girl to make at school.
A magyar night-dress would no doubt be even simpler and require less material if short sleeves are not objectionable; but if long sleeves are
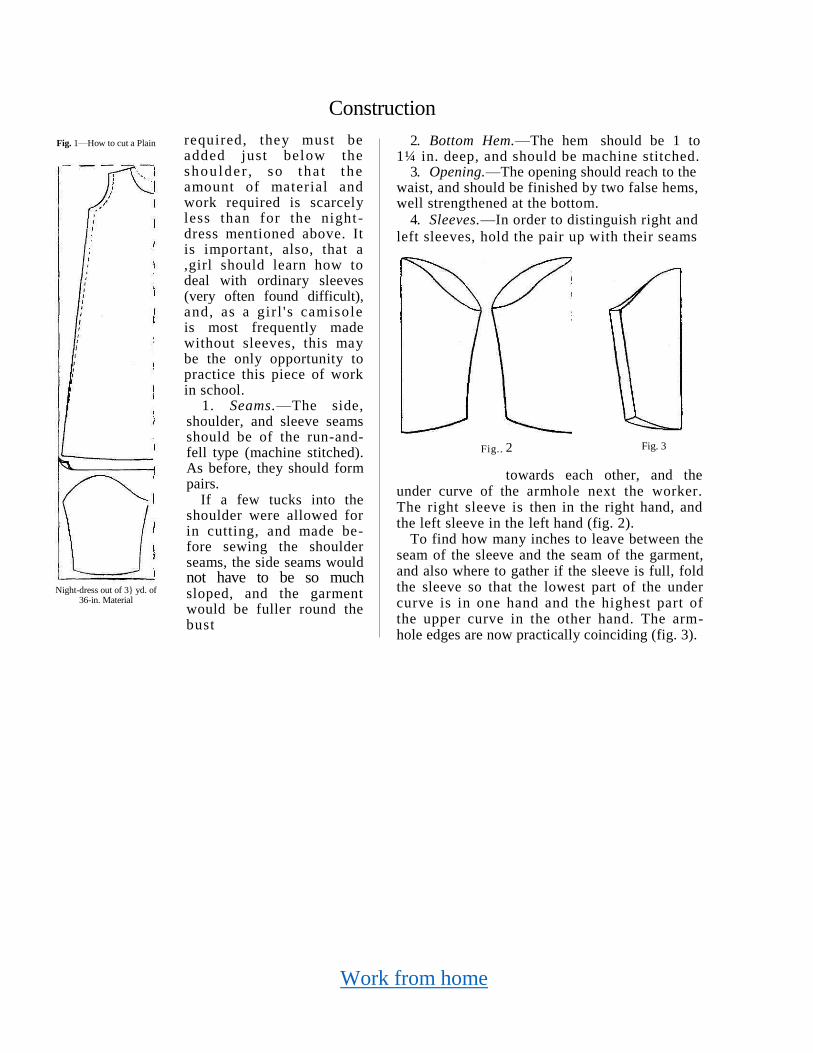
Work from home
Construction
Fig. 1—How to cut a Plain
Night-dress out of 3} yd. of 36-in. Material
required, they must be added just below the shou lde r , so t ha t t he amount of material and work required is scarcely less than for the night -dress mentioned above. It is important, also, that a ,girl should learn how to deal with ordinary sleeves (very often found difficult), and, as a gir l ' s camisole is most frequently made without sleeves, this may be the only opportunity to practice this piece of work in school.
1. Seams.—The side, shoulder, and sleeve seams should be of the run-and-fell type (machine stitched). As before, they should form pairs.
If a few tucks into the shoulder were allowed for in cutting, and made be-fore sewing the shoulder seams, the side seams would not have to be so much sloped, and the garment would be fuller round the bust
2. Bottom Hem.—The hem should be 1 to 1¼ in. deep, and should be machine stitched.
3. Opening.—The opening should reach to the waist, and should be finished by two false hems, well strengthened at the bottom.
4. Sleeves.—In order to distinguish right and
left sleeves, hold the pair up with their seams
2
towards each other, and the under curve of the armhole next the worker. The right sleeve is then in the right hand, and the left sleeve in the left hand (fig. 2).
To find how many inches to leave between the seam of the sleeve and the seam of the garment, and also where to gather if the sleeve is full, fold the sleeve so that the lowest part of the under curve is in one hand and the highest part of the upper curve in the other hand. The arm-hole edges are now practically coinciding (fig. 3).
Fig.. Fig. 3
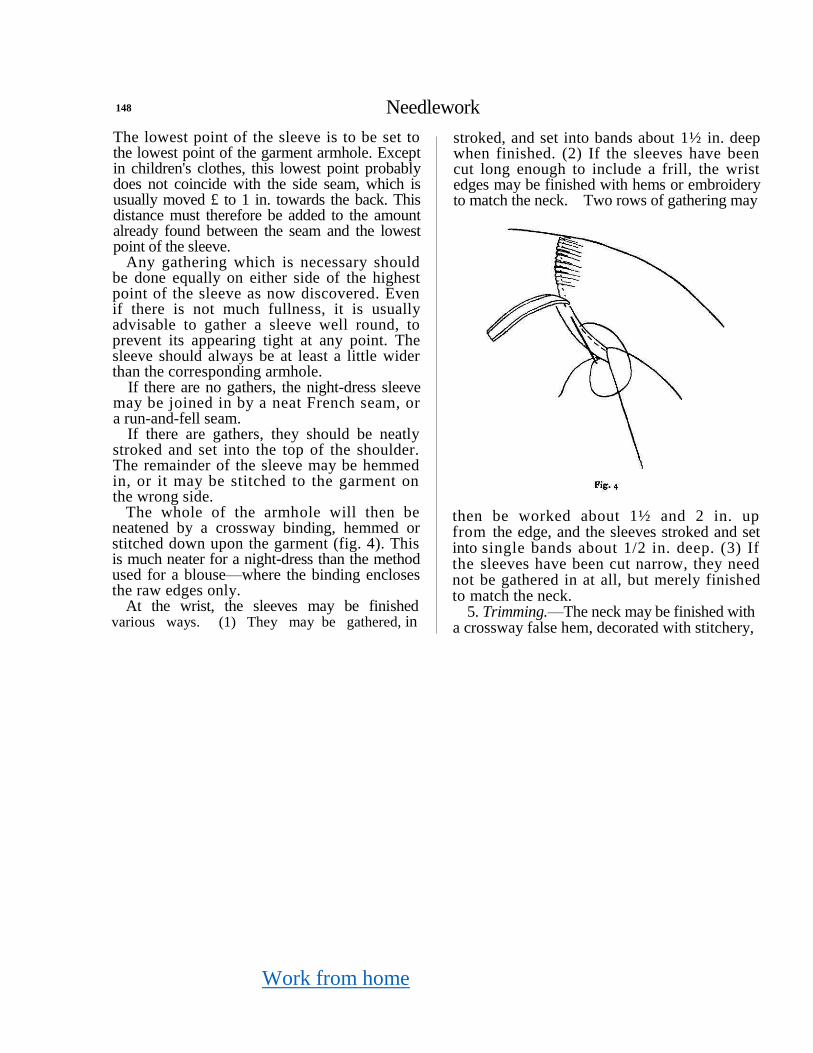
Work from home
148 Needlework The lowest point of the sleeve is to be set to the lowest point of the garment armhole. Except in children's clothes, this lowest point probably does not coincide with the side seam, which is usually moved £ to 1 in. towards the back. This distance must therefore be added to the amount already found between the seam and the lowest point of the sleeve.
Any gathering which is necessary should be done equally on either side of the highest point of the sleeve as now discovered. Even if there is not much fullness, it is usually advisable to gather a sleeve well round, to prevent its appearing tight at any point. The sleeve should always be at least a little wider than the corresponding armhole.
If there are no gathers, the night-dress sleeve may be joined in by a neat French seam, or a run-and-fell seam.
If there are gathers, they should be neatly stroked and set into the top of the shoulder. The remainder of the sleeve may be hemmed in, or it may be stitched to the garment on the wrong side.
The whole of the armhole will then be neatened by a crossway binding, hemmed or stitched down upon the garment (fig. 4). This is much neater for a night-dress than the method used for a blouse—where the binding encloses the raw edges only.
At the wrist, the sleeves may be finished various ways. (1) They may be gathered, in
stroked, and set into bands about 1½ in. deep when finished. (2) If the sleeves have been cut long enough to include a frill, the wrist edges may be finished with hems or embroidery to match the neck. Two rows of gathering may
then be worked about 1½ and 2 in. up from the edge, and the sleeves stroked and set into single bands about 1/2 in. deep. (3) If the sleeves have been cut narrow, they need not be gathered in at all, but merely finished to match the neck.
5. Trimming.—The neck may be finished with a crossway false hem, decorated with stitchery,
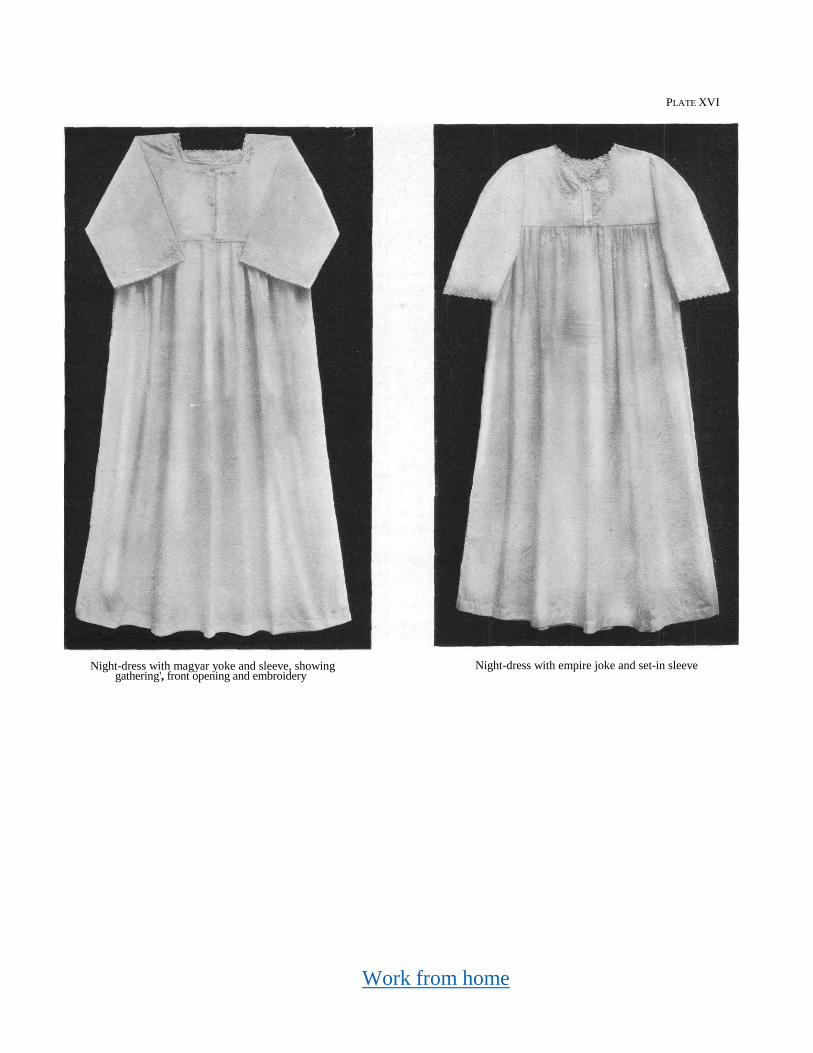
Work from home
PLATE XVI
Night-dress with magyar yoke and sleeve, showing gathering', front opening and embroidery
Night-dress with empire joke and set-in sleeve

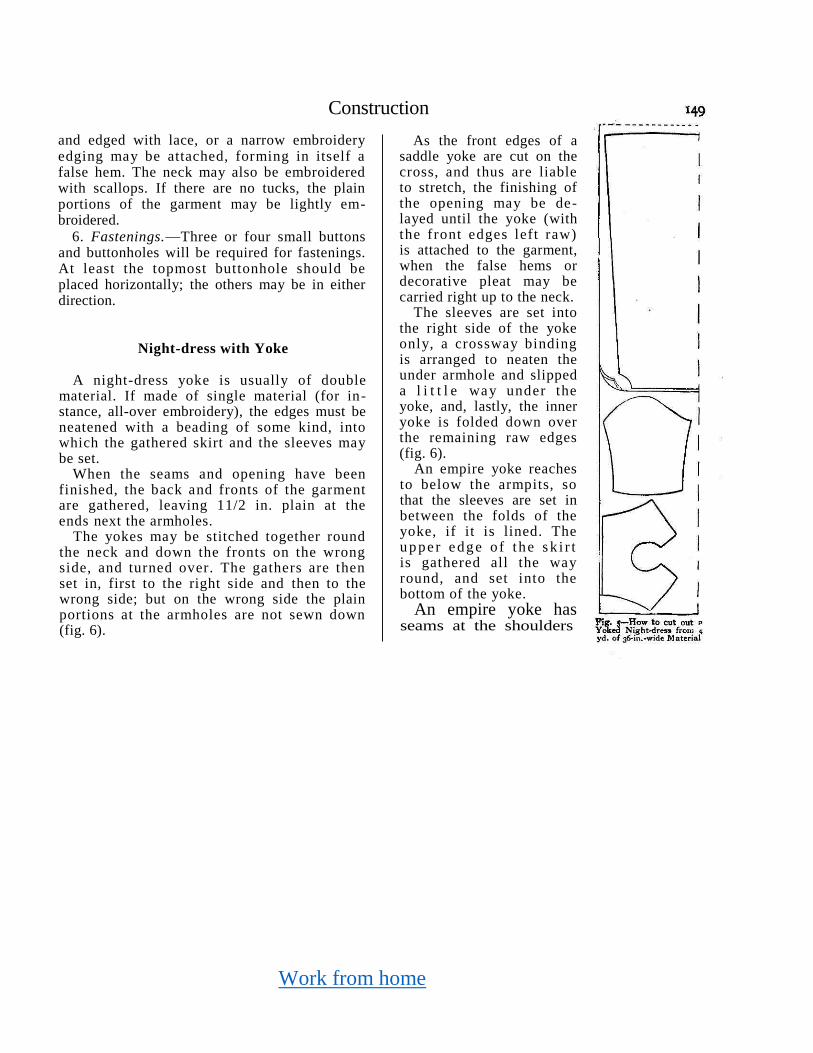
Work from home
and edged with lace, or a narrow embroidery edging may be attached, forming in itself a false hem. The neck may also be embroidered with scallops. If there are no tucks, the plain portions of the garment may be lightly em-broidered.
6. Fastenings.—Three or four small buttons and buttonholes will be required for fastenings. At least the topmost buttonhole should be placed horizontally; the others may be in either direction.
Night-dress with Yoke
A night-dress yoke is usually of double material. If made of single material (for in-stance, all-over embroidery), the edges must be neatened with a beading of some kind, into which the gathered skirt and the sleeves may be set.
When the seams and opening have been finished, the back and fronts of the garment are gathered, leaving 11/2 in. plain at the ends next the armholes.
The yokes may be stitched together round the neck and down the fronts on the wrong side, and turned over. The gathers are then set in, first to the right side and then to the wrong side; but on the wrong side the plain portions at the armholes are not sewn down (fig. 6).
As the front edges of a saddle yoke are cut on the cross, and thus are liable to stretch, the finishing of the opening may be de-layed until the yoke (with the front edges left raw) is attached to the garment, when the false hems or decorative pleat may be carried right up to the neck.
The sleeves are set into the right side of the yoke only, a crossway binding is arranged to neaten the under armhole and slipped a l i t t l e way under the yoke, and, lastly, the inner yoke is folded down over the remaining raw edges (fig. 6).
An empire yoke reaches to below the armpits, so that the sleeves are set in between the folds of the yoke, if it is lined. The u p pe r e dg e o f t he s k i r t is gathered all the way round, and set into the bottom of the yoke.
An empire yoke has seams at the shoulders
Construction
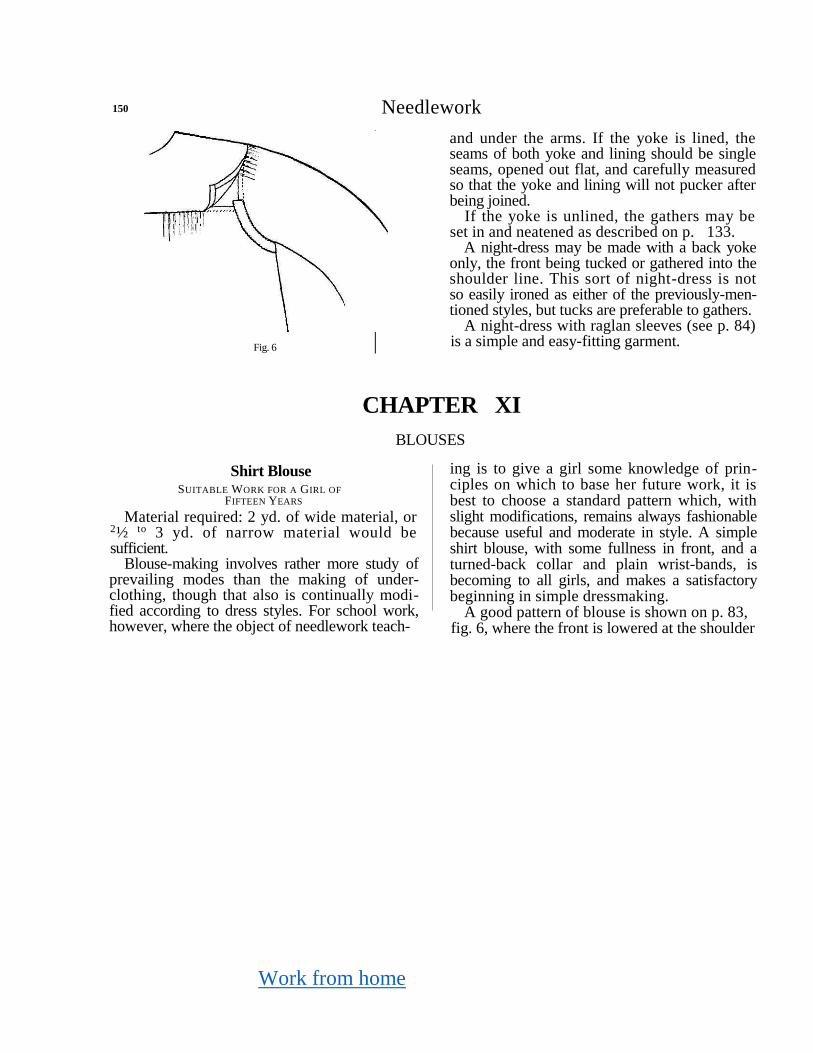
Work from home
150 Needlework
Fig. 6
and under the arms. If the yoke is lined, the seams of both yoke and lining should be single seams, opened out flat, and carefully measured so that the yoke and lining will not pucker after being joined.
If the yoke is unlined, the gathers may be set in and neatened as described on p. 133.
A night-dress may be made with a back yoke only, the front being tucked or gathered into the shoulder line. This sort of night-dress is not so easily ironed as either of the previously-men-tioned styles, but tucks are preferable to gathers.
A night-dress with raglan sleeves (see p. 84) is a simple and easy-fitting garment.
CHAPTER XI
BLOUSES
Shirt Blouse
SUITABLE WORK FOR A GIRL OF
FIFTEEN YEARS
Material required: 2 yd. of wide material, or 2½ to 3 yd. of narrow material would be sufficient.
Blouse-making involves rather more study of prevailing modes than the making of under-clothing, though that also is continually modi-fied according to dress styles. For school work, however, where the object of needlework teach-
ing is to give a girl some knowledge of prin-ciples on which to base her future work, it is best to choose a standard pattern which, with slight modifications, remains always fashionable because useful and moderate in style. A simple shirt blouse, with some fullness in front, and a turned-back collar and plain wrist-bands, is becoming to all girls, and makes a satisfactory beginning in simple dressmaking.
A good pattern of blouse is shown on p. 83, fig. 6, where the front is lowered at the shoulder
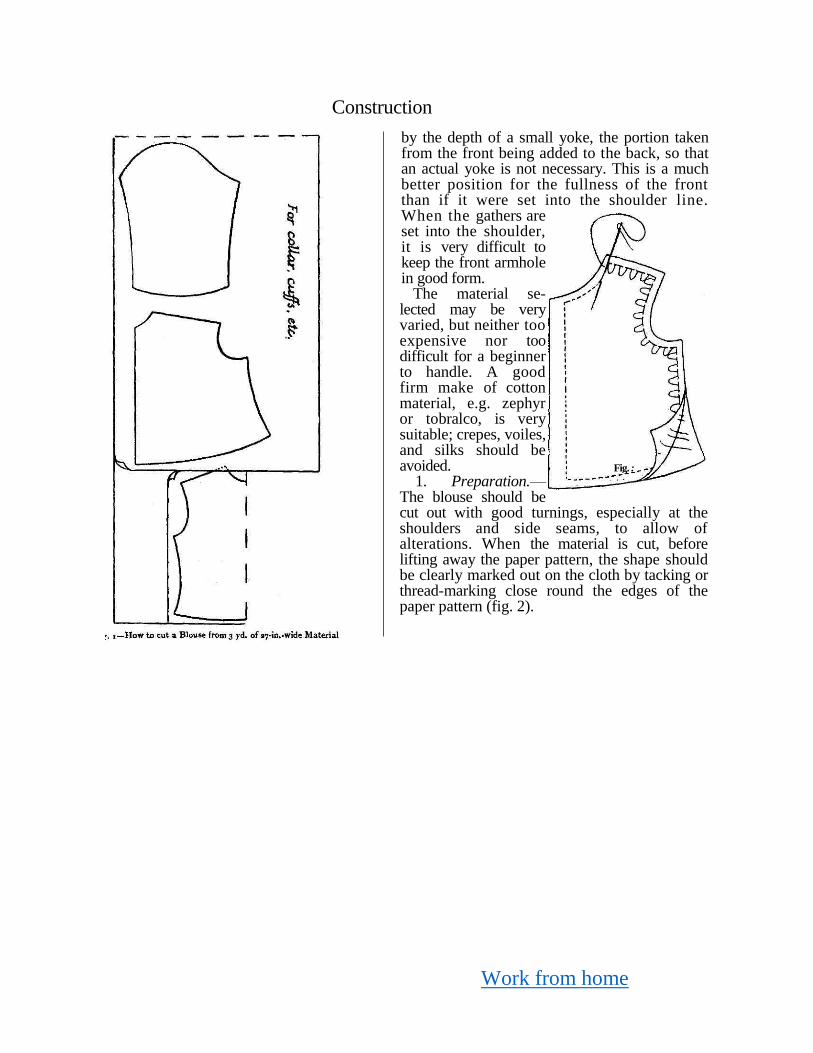
Work from home
Construction
by the depth of a small yoke, the portion taken from the front being added to the back, so that an actual yoke is not necessary. This is a much better position for the fullness of the front than if it were set into the shoulder line. When the gathers are set into the shoulder, it is very difficult to keep the front armhole in good form.
The material se-lected may be very varied, but neither too expensive nor too difficult for a beginner to handle. A good firm make of cotton material, e.g. zephyr or tobralco, is very suitable; crepes, voiles, and silks should be avoided.
1. Preparation.—The blouse should be cut out with good turnings, especially at the shoulders and side seams, to allow of alterations. When the material is cut, before lifting away the paper pattern, the shape should be clearly marked out on the cloth by tacking or thread-marking close round the edges of the paper pattern (fig. 2).
Fig. :
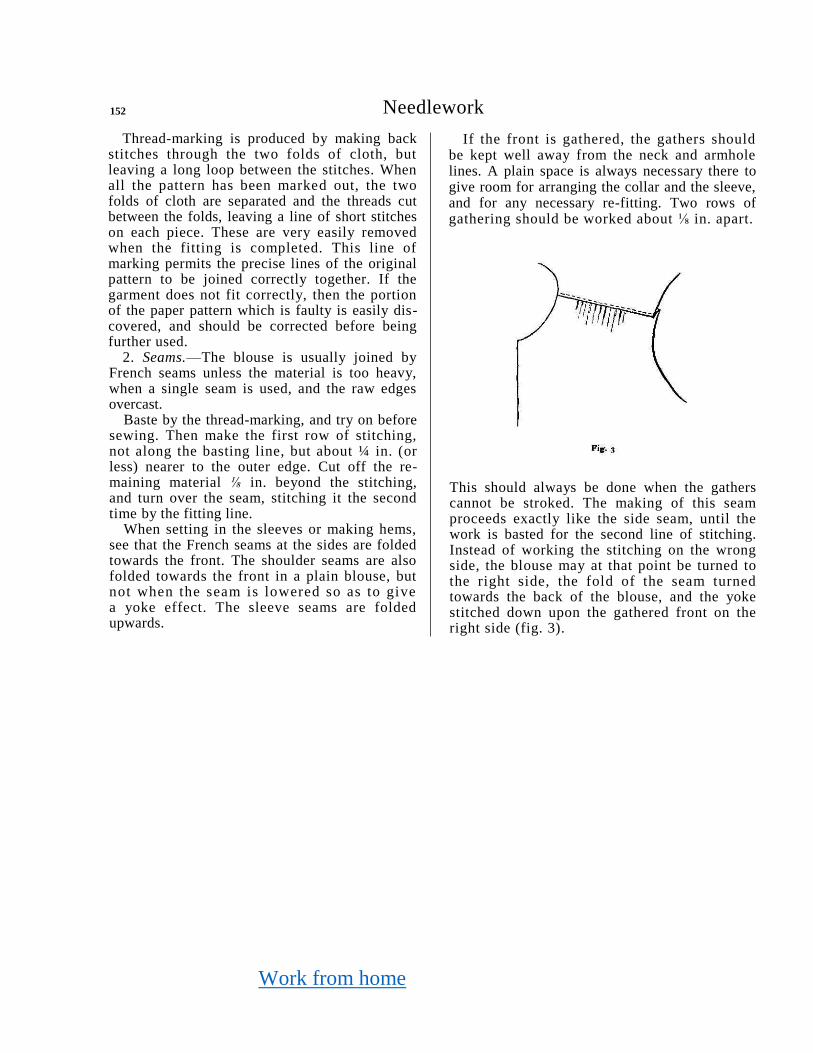
Work from home
152 Needlework
Thread-marking is produced by making back stitches through the two folds of cloth, but leaving a long loop between the stitches. When all the pattern has been marked out, the two folds of cloth are separated and the threads cut between the folds, leaving a line of short stitches on each piece. These are very easily removed when the fitting is completed. This line of marking permits the precise lines of the original pattern to be joined correctly together. If the garment does not fit correctly, then the portion of the paper pattern which is faulty is easily dis-covered, and should be corrected before being further used.
2. Seams.—The blouse is usually joined by French seams unless the material is too heavy, when a single seam is used, and the raw edges overcast.
Baste by the thread-marking, and try on before sewing. Then make the first row of stitching, not along the basting line, but about ¼ in. (or less) nearer to the outer edge. Cut off the re-maining material ⅛ in. beyond the stitching, and turn over the seam, stitching it the second time by the fitting line.
When setting in the sleeves or making hems, see that the French seams at the sides are folded towards the front. The shoulder seams are also folded towards the front in a plain blouse, but not when the seam is lowered so as to give a yoke effect. The sleeve seams are folded upwards.
If the front is gathered, the gathers should be kept well away from the neck and armhole lines. A plain space is always necessary there to give room for arranging the collar and the sleeve, and for any necessary re-fitting. Two rows of gathering should be worked about ⅛ in. apart.
This should always be done when the gathers cannot be stroked. The making of this seam proceeds exactly like the side seam, until the work is basted for the second line of stitching. Instead of working the stitching on the wrong side, the blouse may at that point be turned to the right side, the fold of the seam turned towards the back of the blouse, and the yoke stitched down upon the gathered front on the right side (fig. 3).
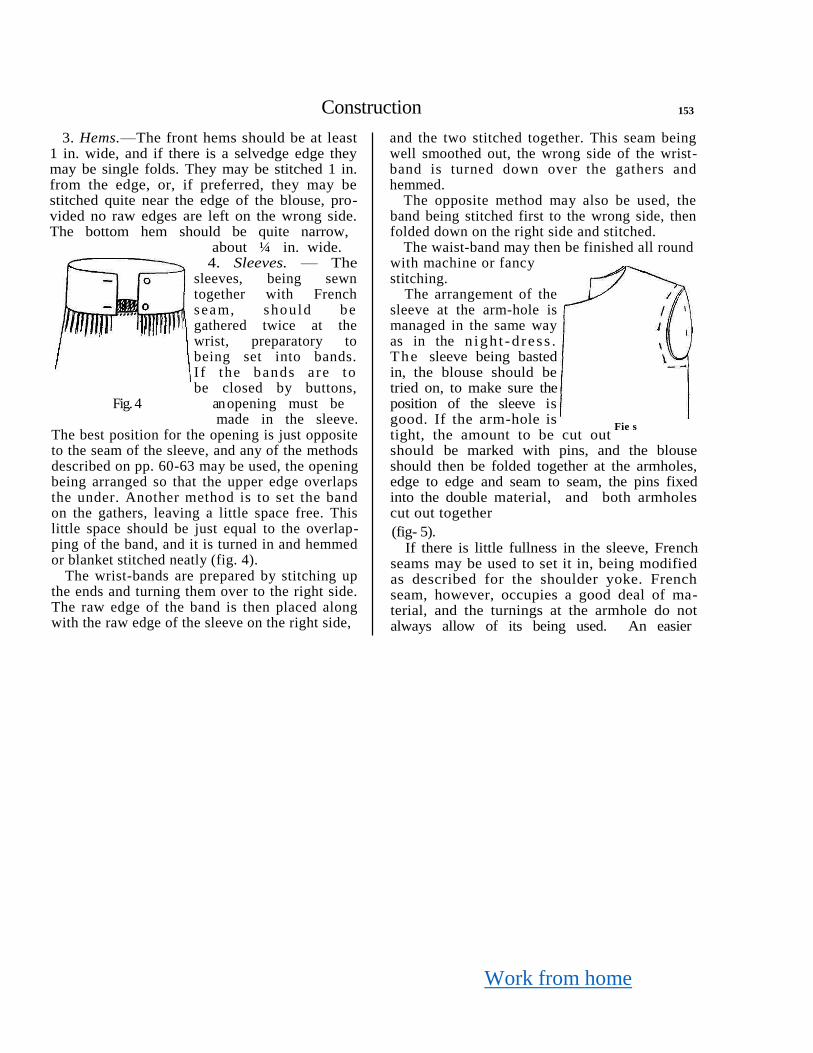
Work from home
Construction 153
3. Hems.—The front hems should be at least 1 in. wide, and if there is a selvedge edge they may be single folds. They may be stitched 1 in. from the edge, or, if preferred, they may be stitched quite near the edge of the blouse, pro-vided no raw edges are left on the wrong side. The bottom hem should be quite narrow,
about ¼ in. wide. 4. Sleeves. — The
sleeves, being sewn together with French seam, should be gathered twice at the wrist, preparatory to being set into bands. I f the bands a re to be closed by buttons,
Fig. 4 an opening must be
made in the sleeve. The best position for the opening is just opposite to the seam of the sleeve, and any of the methods described on pp. 60-63 may be used, the opening being arranged so that the upper edge overlaps the under. Another method is to set the band on the gathers, leaving a little space free. This little space should be just equal to the overlap-ping of the band, and it is turned in and hemmed or blanket stitched neatly (fig. 4).
The wrist-bands are prepared by stitching up the ends and turning them over to the right side. The raw edge of the band is then placed along with the raw edge of the sleeve on the right side,
and the two stitched together. This seam being well smoothed out, the wrong side of the wrist-band is turned down over the gathers and hemmed.
The opposite method may also be used, the band being stitched first to the wrong side, then folded down on the right side and stitched.
The waist-band may then be finished all round with machine or fancy stitching.
The arrangement of the sleeve at the arm-hole is managed in the same way as in the n ight -d ress . The sleeve being basted in, the blouse should be tried on, to make sure the position of the sleeve is good. If the arm-hole is tight, the amount to be cut out should be marked with pins, and the blouse should then be folded together at the armholes, edge to edge and seam to seam, the pins fixed into the double material, and both armholes cut out together
(fig- 5). If there is little fullness in the sleeve, French
seams may be used to set it in, being modified as described for the shoulder yoke. French seam, however, occupies a good deal of ma-terial, and the turnings at the armhole do not always allow of its being used. An easier
Fie s
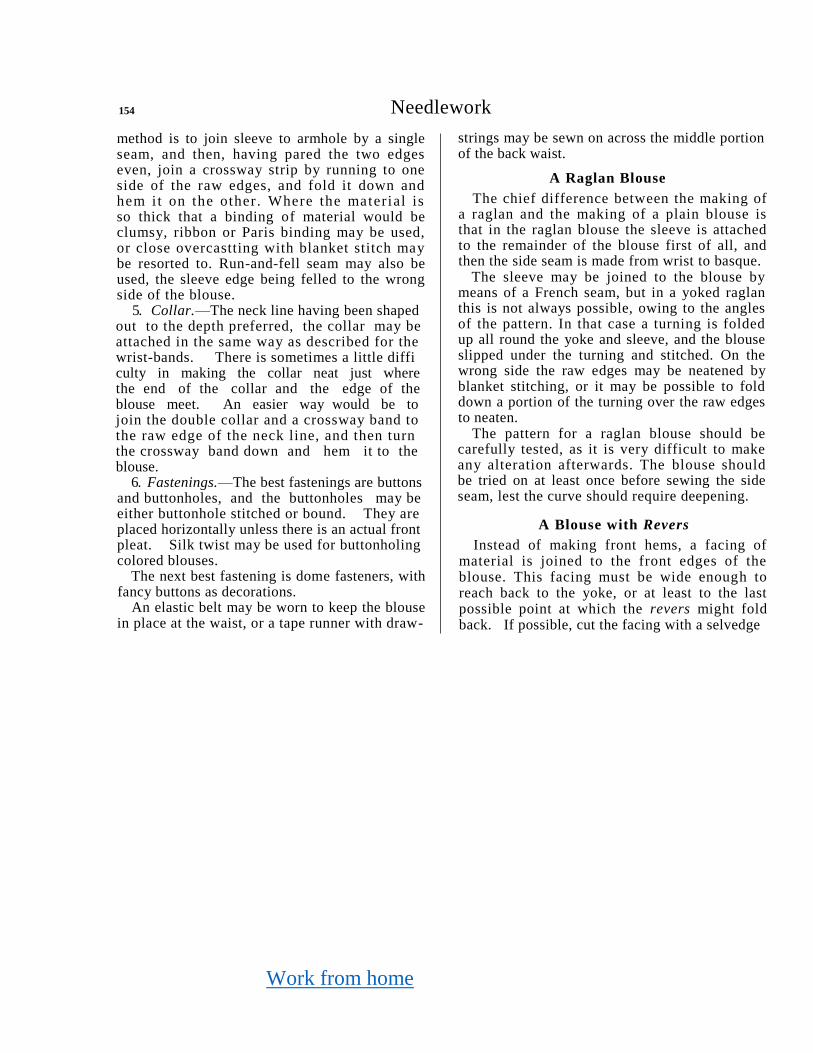
Work from home
154 Needlework
method is to join sleeve to armhole by a single seam, and then, having pared the two edges even, join a crossway strip by running to one side of the raw edges, and fold it down and hem i t on the other. Where the material is so thick that a binding of material would be clumsy, ribbon or Paris binding may be used, or close overcastting with blanket stitch may be resorted to. Run-and-fell seam may also be used, the sleeve edge being felled to the wrong side of the blouse.
5. Collar.—The neck line having been shaped out to the depth preferred, the collar may be attached in the same way as described for the wrist-bands. There is sometimes a little diffi culty in making the collar neat just where the end of the collar and the edge of the blouse meet. An easier way would be to join the double collar and a crossway band to the raw edge of the neck line, and then turn the crossway band down and hem it to the blouse.
6. Fastenings.—The best fastenings are buttons and buttonholes, and the buttonholes may be either buttonhole stitched or bound. They are placed horizontally unless there is an actual front pleat. Silk twist may be used for buttonholing colored blouses.
The next best fastening is dome fasteners, with fancy buttons as decorations.
An elastic belt may be worn to keep the blouse in place at the waist, or a tape runner with draw-
strings may be sewn on across the middle portion of the back waist.
A Raglan Blouse
The chief difference between the making of a raglan and the making of a plain blouse is that in the raglan blouse the sleeve is attached to the remainder of the blouse first of all, and then the side seam is made from wrist to basque.
The sleeve may be joined to the blouse by means of a French seam, but in a yoked raglan this is not always possible, owing to the angles of the pattern. In that case a turning is folded up all round the yoke and sleeve, and the blouse slipped under the turning and stitched. On the wrong side the raw edges may be neatened by blanket stitching, or it may be possible to fold down a portion of the turning over the raw edges to neaten.
The pattern for a raglan blouse should be carefully tested, as it is very difficult to make any alteration afterwards. The blouse should be tried on at least once before sewing the side seam, lest the curve should require deepening.
A Blouse with Revers
Instead of making front hems, a facing of material is joined to the front edges of the blouse. This facing must be wide enough to reach back to the yoke, or at least to the last possible point at which the revers might fold back. If possible, cut the facing with a selvedge
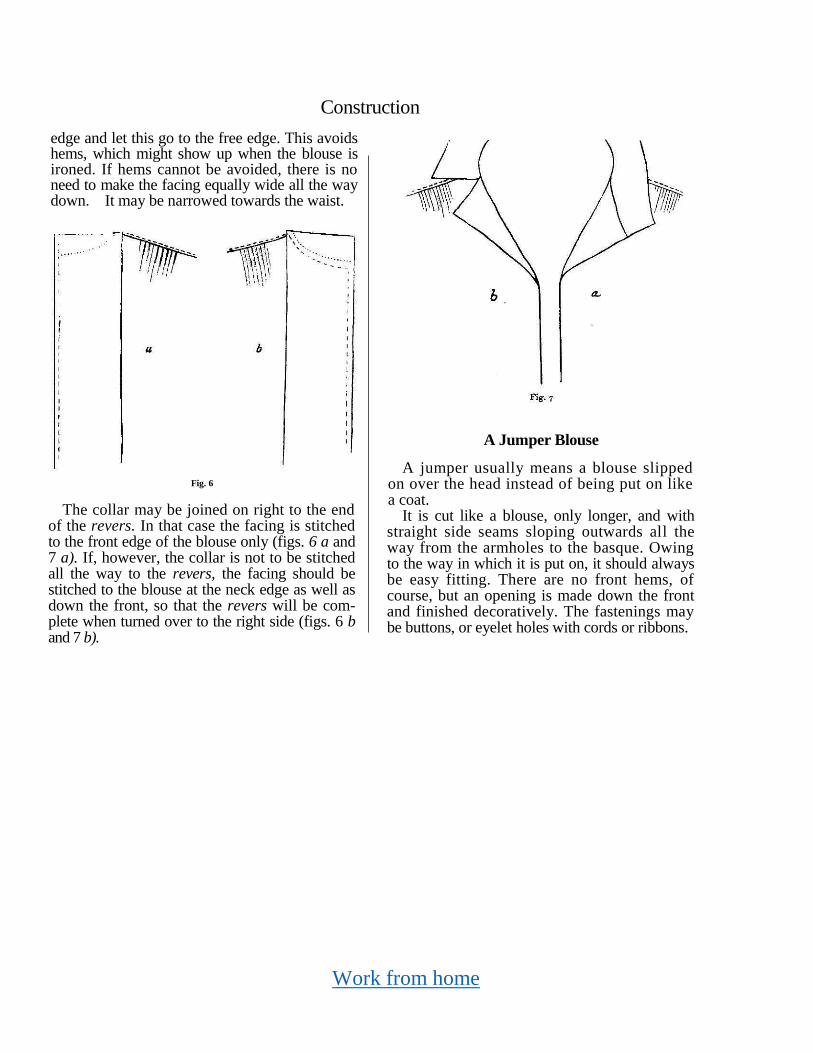
Work from home
Construction
edge and let this go to the free edge. This avoids hems, which might show up when the blouse is ironed. If hems cannot be avoided, there is no need to make the facing equally wide all the way down. It may be narrowed towards the waist.
Fig. 6
The collar may be joined on right to the end of the revers. In that case the facing is stitched to the front edge of the blouse only (figs. 6 a and 7 a). If, however, the collar is not to be stitched all the way to the revers, the facing should be stitched to the blouse at the neck edge as well as down the front, so that the revers will be com-plete when turned over to the right side (figs. 6 b and 7 b).
A Jumper Blouse
A jumper usually means a blouse slipped on over the head instead of being put on like a coat.
It is cut like a blouse, only longer, and with straight side seams sloping outwards all the way from the armholes to the basque. Owing to the way in which it is put on, it should always be easy fitting. There are no front hems, of course, but an opening is made down the front and finished decoratively. The fastenings may be buttons, or eyelet holes with cords or ribbons.
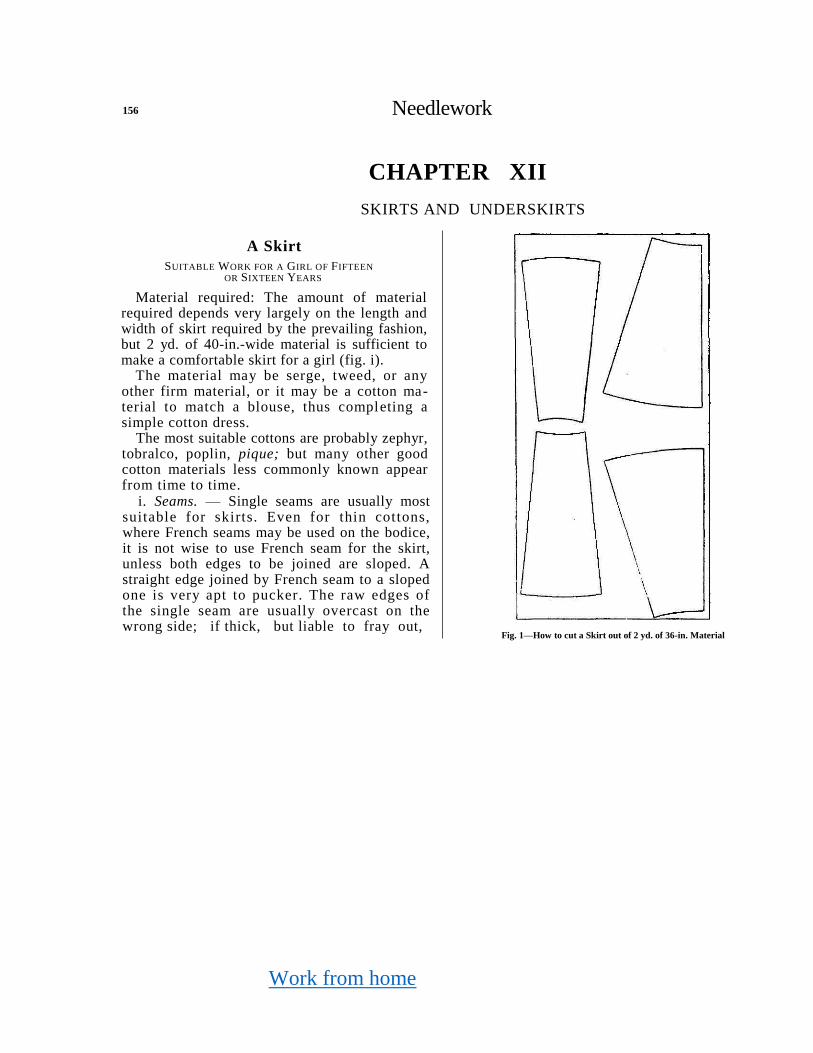
Work from home
156 Needlework
CHAPTER XII
SKIRTS AND UNDERSKIRTS
A Skirt
SUITABLE WORK FOR A GIRL OF FIFTEEN
OR SIXTEEN YEARS
Material required: The amount of material required depends very largely on the length and width of skirt required by the prevailing fashion, but 2 yd. of 40-in.-wide material is sufficient to make a comfortable skirt for a girl (fig. i).
The material may be serge, tweed, or any other firm material, or it may be a cotton ma-terial to match a blouse, thus completing a simple cotton dress.
The most suitable cottons are probably zephyr, tobralco, poplin, pique; but many other good cotton materials less commonly known appear from time to time.
i. Seams. — Single seams are usually most suitable for skirts. Even for thin cottons, where French seams may be used on the bodice, it is not wise to use French seam for the skirt, unless both edges to be joined are sloped. A straight edge joined by French seam to a sloped one is very apt to pucker. The raw edges of the single seam are usually overcast on the wrong side; if thick, but liable to fray out,
Fig. 1—How to cut a Skirt out of 2 yd. of 36-in. Material
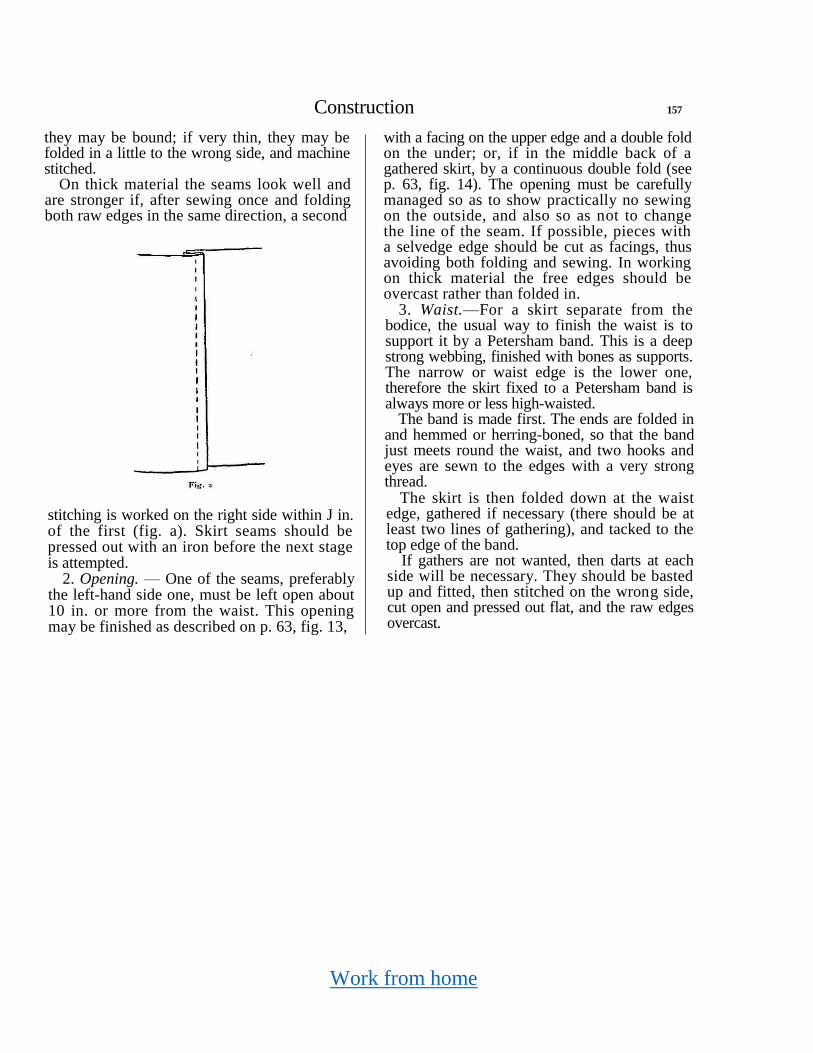
Work from home
Construction 157
they may be bound; if very thin, they may be folded in a little to the wrong side, and machine stitched.
On thick material the seams look well and are stronger if, after sewing once and folding both raw edges in the same direction, a second
stitching is worked on the right side within J in. of the first (fig. a). Skirt seams should be pressed out with an iron before the next stage is attempted.
2. Opening. — One of the seams, preferably the left-hand side one, must be left open about 10 in. or more from the waist. This opening may be finished as described on p. 63, fig. 13,
with a facing on the upper edge and a double fold on the under; or, if in the middle back of a gathered skirt, by a continuous double fold (see p. 63, fig. 14). The opening must be carefully managed so as to show practically no sewing on the outside, and also so as not to change the line of the seam. If possible, pieces with a selvedge edge should be cut as facings, thus avoiding both folding and sewing. In working on thick material the free edges should be overcast rather than folded in.
3. Waist.—For a skirt separate from the bodice, the usual way to finish the waist is to support it by a Petersham band. This is a deep strong webbing, finished with bones as supports. The narrow or waist edge is the lower one, therefore the skirt fixed to a Petersham band is always more or less high-waisted.
The band is made first. The ends are folded in and hemmed or herring-boned, so that the band just meets round the waist, and two hooks and eyes are sewn to the edges with a very strong thread.
The skirt is then folded down at the waist edge, gathered if necessary (there should be at least two lines of gathering), and tacked to the top edge of the band.
If gathers are not wanted, then darts at each side will be necessary. They should be basted up and fitted, then stitched on the wrong side, cut open and pressed out flat, and the raw edges overcast.
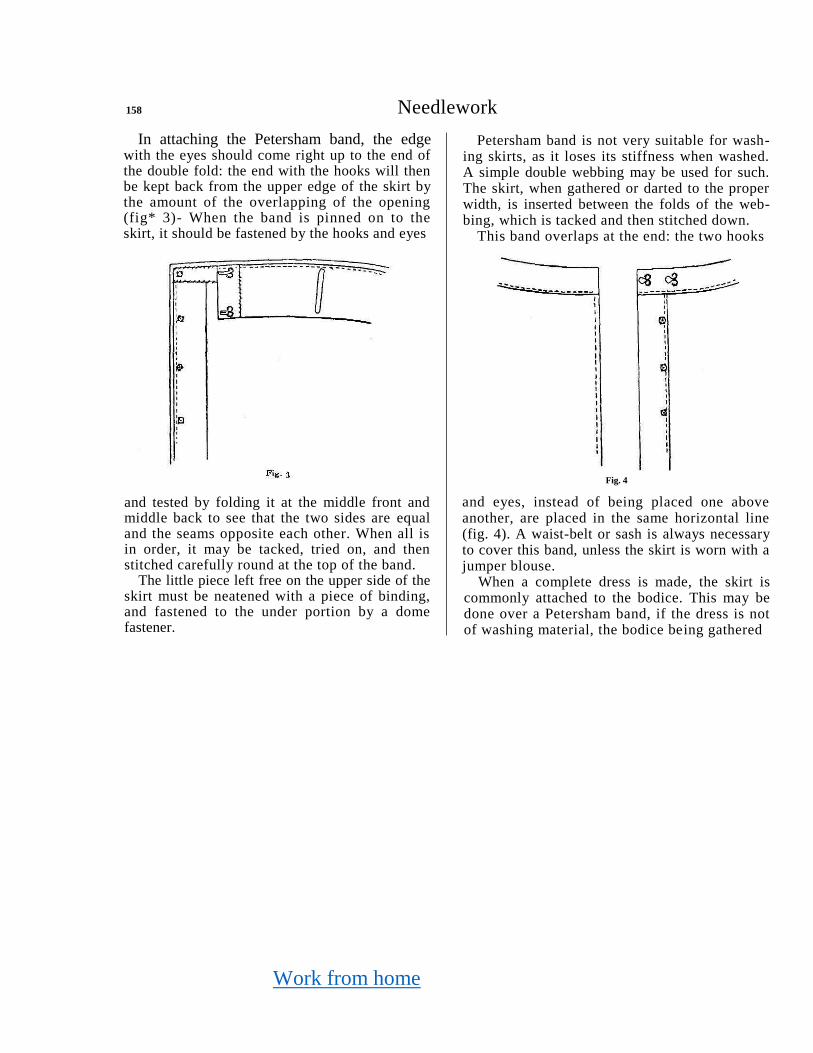
Work from home
158 Needlework
In attaching the Petersham band, the edge with the eyes should come right up to the end of the double fold: the end with the hooks will then be kept back from the upper edge of the skirt by the amount of the overlapping of the opening (fig* 3)- When the band is pinned on to the skirt, it should be fastened by the hooks and eyes
and tested by folding it at the middle front and middle back to see that the two sides are equal and the seams opposite each other. When all is in order, it may be tacked, tried on, and then stitched carefully round at the top of the band.
The little piece left free on the upper side of the skirt must be neatened with a piece of binding, and fastened to the under portion by a dome fastener.
Petersham band is not very suitable for wash-ing skirts, as it loses its stiffness when washed. A simple double webbing may be used for such. The skirt, when gathered or darted to the proper width, is inserted between the folds of the web-bing, which is tacked and then stitched down.
This band overlaps at the end: the two hooks
Fig. 4
and eyes, instead of being placed one above another, are placed in the same horizontal line (fig. 4). A waist-belt or sash is always necessary to cover this band, unless the skirt is worn with a jumper blouse.
When a complete dress is made, the skirt is commonly attached to the bodice. This may be done over a Petersham band, if the dress is not of washing material, the bodice being gathered
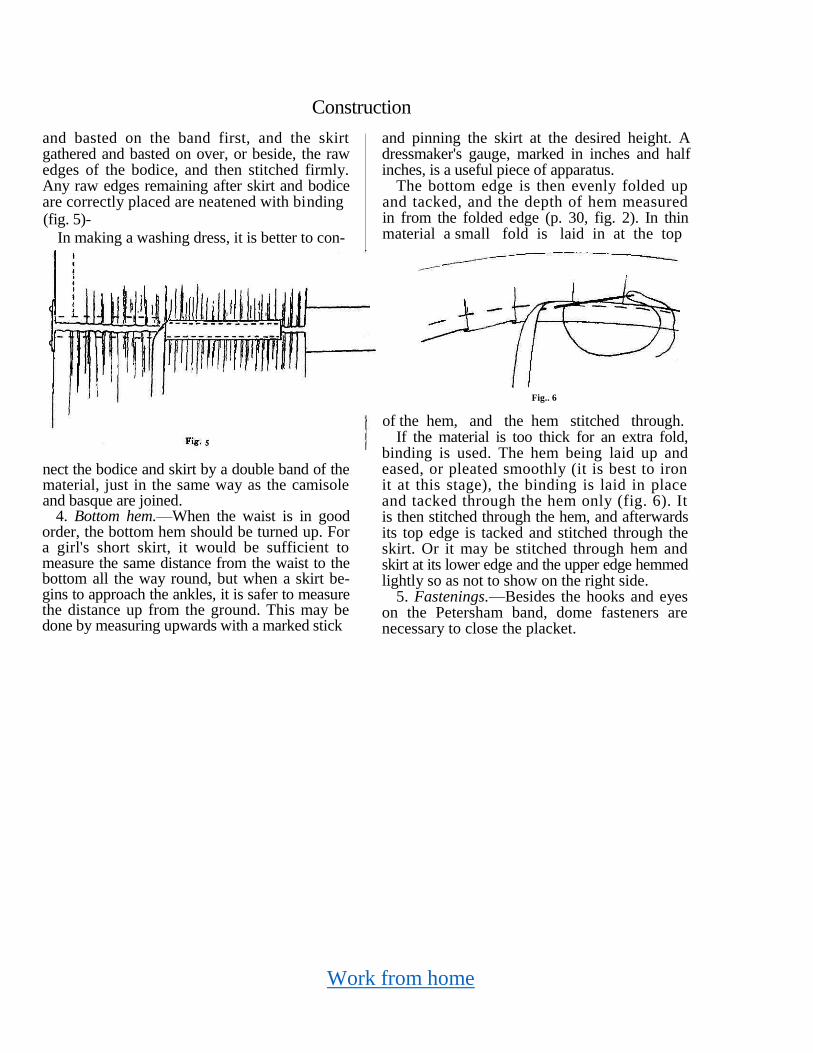
Work from home
Construction
and basted on the band first, and the skirt gathered and basted on over, or beside, the raw edges of the bodice, and then stitched firmly. Any raw edges remaining after skirt and bodice are correctly placed are neatened with binding
(fig. 5)-
In making a washing dress, it is better to con-
and pinning the skirt at the desired height. A dressmaker's gauge, marked in inches and half inches, is a useful piece of apparatus.
The bottom edge is then evenly folded up and tacked, and the depth of hem measured in from the folded edge (p. 30, fig. 2). In thin material a small fold is laid in at the top
nect the bodice and skirt by a double band of the material, just in the same way as the camisole and basque are joined.
4. Bottom hem.—When the waist is in good order, the bottom hem should be turned up. For a girl's short skirt, it would be sufficient to measure the same distance from the waist to the bottom all the way round, but when a skirt be-gins to approach the ankles, it is safer to measure the distance up from the ground. This may be done by measuring upwards with a marked stick
Fig.. 6
of the hem, and the hem stitched through. If the material is too thick for an extra fold,
binding is used. The hem being laid up and eased, or pleated smoothly (it is best to iron it at this stage), the binding is laid in place and tacked through the hem only (fig. 6). It is then stitched through the hem, and afterwards its top edge is tacked and stitched through the skirt. Or it may be stitched through hem and skirt at its lower edge and the upper edge hemmed lightly so as not to show on the right side.
5. Fastenings.—Besides the hooks and eyes on the Petersham band, dome fasteners are necessary to close the placket.
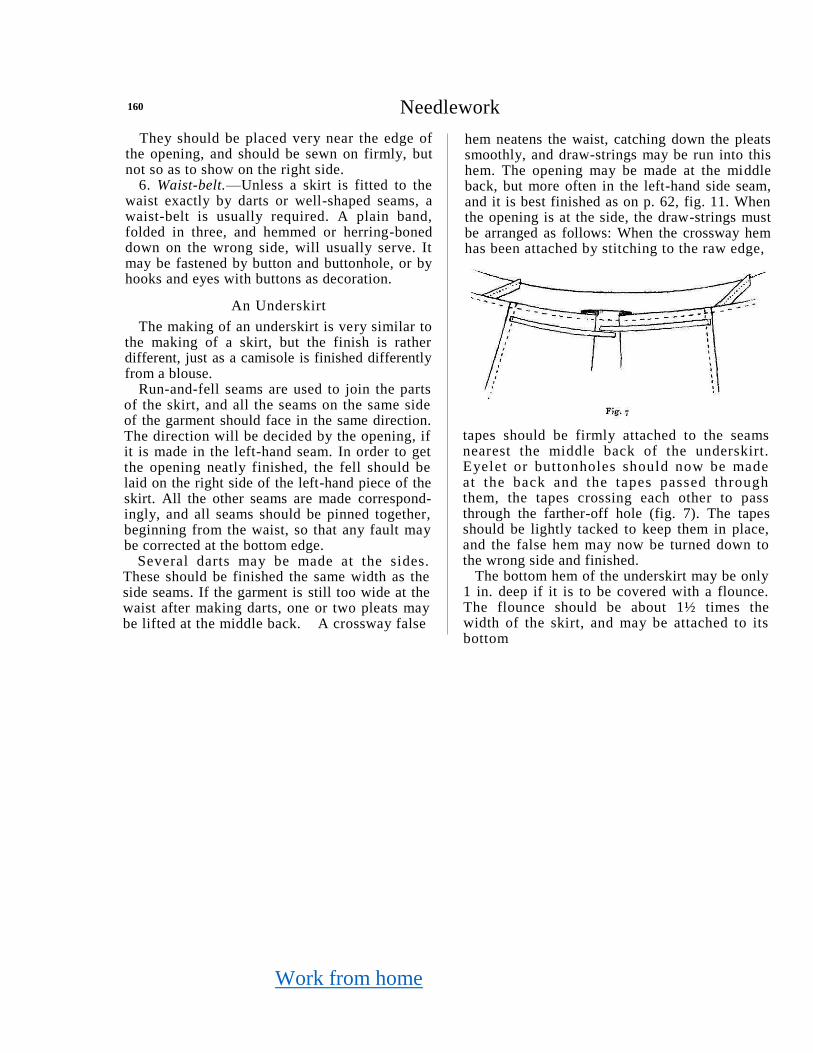
Work from home
160 Needlework
They should be placed very near the edge of the opening, and should be sewn on firmly, but not so as to show on the right side.
6. Waist-belt.—Unless a skirt is fitted to the waist exactly by darts or well-shaped seams, a waist-belt is usually required. A plain band, folded in three, and hemmed or herring-boned down on the wrong side, will usually serve. It may be fastened by button and buttonhole, or by hooks and eyes with buttons as decoration.
An Underskirt
The making of an underskirt is very similar to the making of a skirt, but the finish is rather different, just as a camisole is finished differently from a blouse.
Run-and-fell seams are used to join the parts of the skirt, and all the seams on the same side of the garment should face in the same direction. The direction will be decided by the opening, if it is made in the left-hand seam. In order to get the opening neatly finished, the fell should be laid on the right side of the left-hand piece of the skirt. All the other seams are made correspond-ingly, and all seams should be pinned together, beginning from the waist, so that any fault may be corrected at the bottom edge.
Several darts may be made at the sides. These should be finished the same width as the side seams. If the garment is still too wide at the waist after making darts, one or two pleats may be lifted at the middle back. A crossway false
hem neatens the waist, catching down the pleats smoothly, and draw-strings may be run into this hem. The opening may be made at the middle back, but more often in the left-hand side seam, and it is best finished as on p. 62, fig. 11. When the opening is at the side, the draw-strings must be arranged as follows: When the crossway hem has been attached by stitching to the raw edge,
tapes should be firmly attached to the seams nearest the middle back of the underskirt. Eyelet or buttonholes should now be made at the back and the tapes passed through them, the tapes crossing each other to pass through the farther-off hole (fig. 7). The tapes should be lightly tacked to keep them in place, and the false hem may now be turned down to the wrong side and finished.
The bottom hem of the underskirt may be only 1 in. deep if it is to be covered with a flounce. The flounce should be about 1½ times the width of the skirt, and may be attached to its bottom
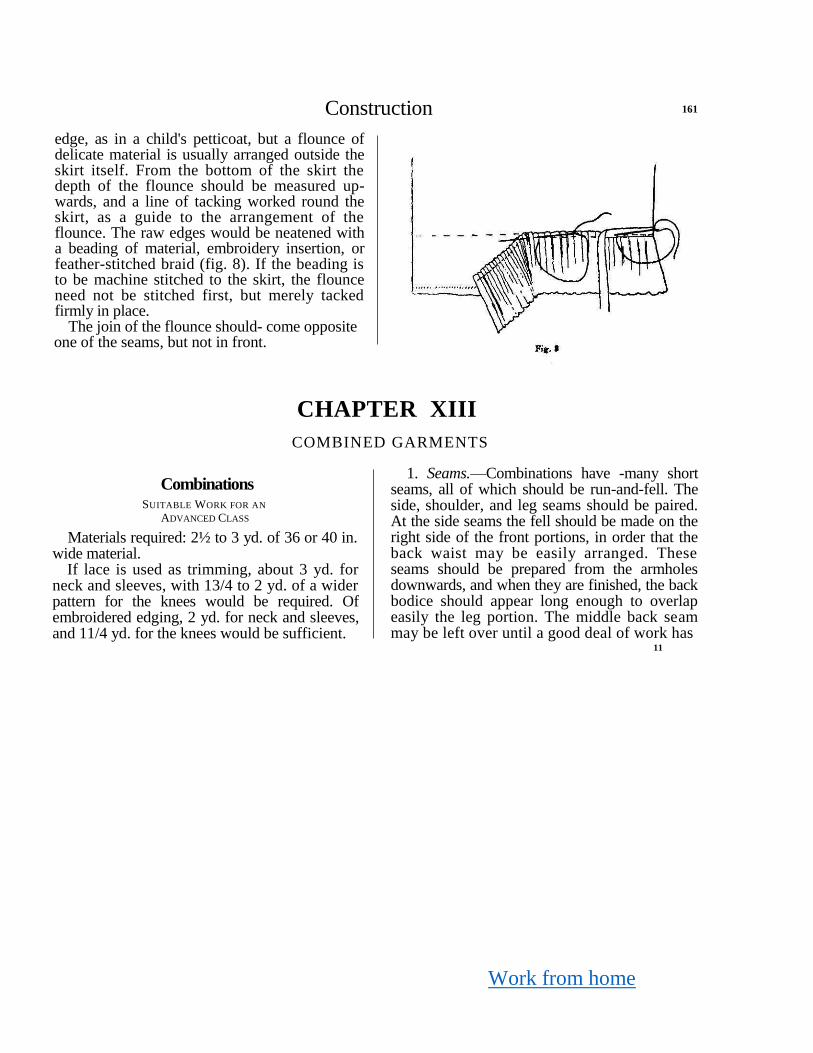
Work from home
Construction 161
edge, as in a child's petticoat, but a flounce of delicate material is usually arranged outside the skirt itself. From the bottom of the skirt the depth of the flounce should be measured up-wards, and a line of tacking worked round the skirt, as a guide to the arrangement of the flounce. The raw edges would be neatened with a beading of material, embroidery insertion, or feather-stitched braid (fig. 8). If the beading is to be machine stitched to the skirt, the flounce need not be stitched first, but merely tacked firmly in place.
The join of the flounce should- come opposite one of the seams, but not in front.
CHAPTER XIII
COMBINED GARMENTS
Combinations
SUITABLE WORK FOR AN
ADVANCED CLASS
Materials required: 2½ to 3 yd. of 36 or 40 in. wide material.
If lace is used as trimming, about 3 yd. for neck and sleeves, with 13/4 to 2 yd. of a wider pattern for the knees would be required. Of embroidered edging, 2 yd. for neck and sleeves, and 11/4 yd. for the knees would be sufficient.
1. Seams.—Combinations have -many short seams, all of which should be run-and-fell. The side, shoulder, and leg seams should be paired. At the side seams the fell should be made on the right side of the front portions, in order that the back waist may be easily arranged. These seams should be prepared from the armholes downwards, and when they are finished, the back bodice should appear long enough to overlap easily the leg portion. The middle back seam may be left over until a good deal of work has
11
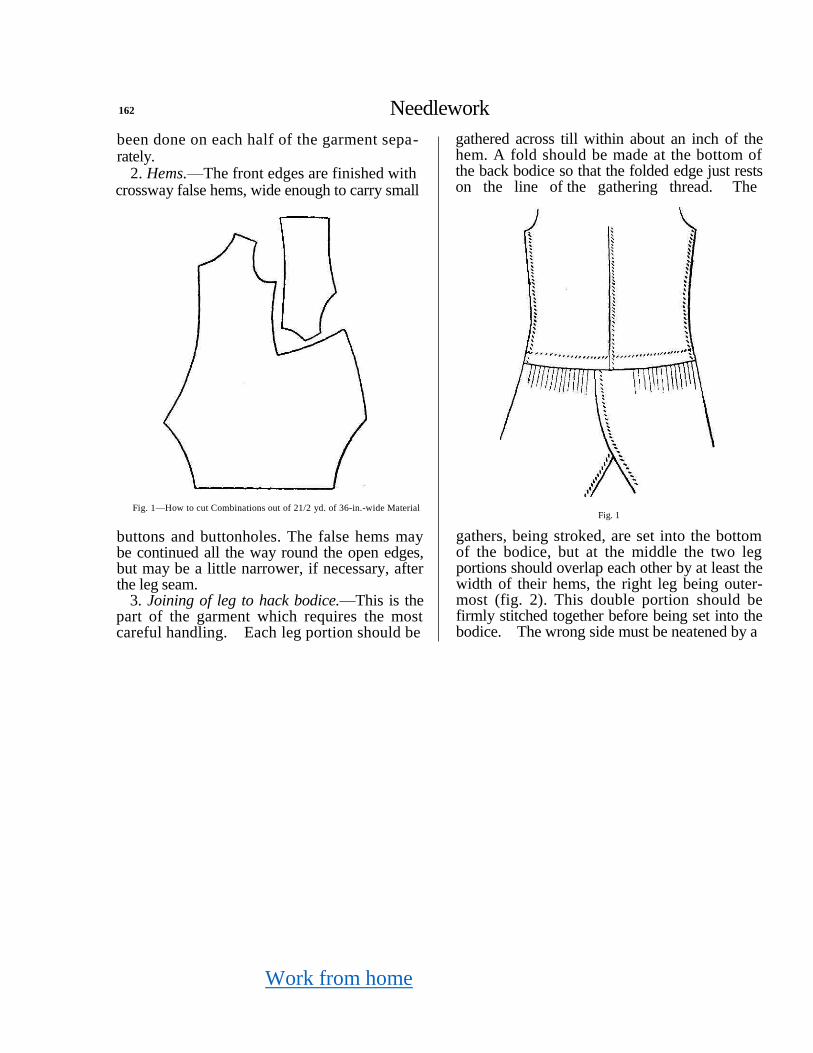
Work from home
162 Needlework
been done on each half of the garment sepa-rately.
2. Hems.—The front edges are finished with crossway false hems, wide enough to carry small
gathered across till within about an inch of the hem. A fold should be made at the bottom of the back bodice so that the folded edge just rests on the line of the gathering thread. The
Fig. 1—How to cut Combinations out of 21/2 yd. of 36-in.-wide Material
buttons and buttonholes. The false hems may be continued all the way round the open edges, but may be a little narrower, if necessary, after the leg seam.
3. Joining of leg to hack bodice.—This is the part of the garment which requires the most careful handling. Each leg portion should be
Fig. 1
gathers, being stroked, are set into the bottom of the bodice, but at the middle the two leg portions should overlap each other by at least the width of their hems, the right leg being outer-most (fig. 2). This double portion should be firmly stitched together before being set into the bodice. The wrong side must be neatened by a
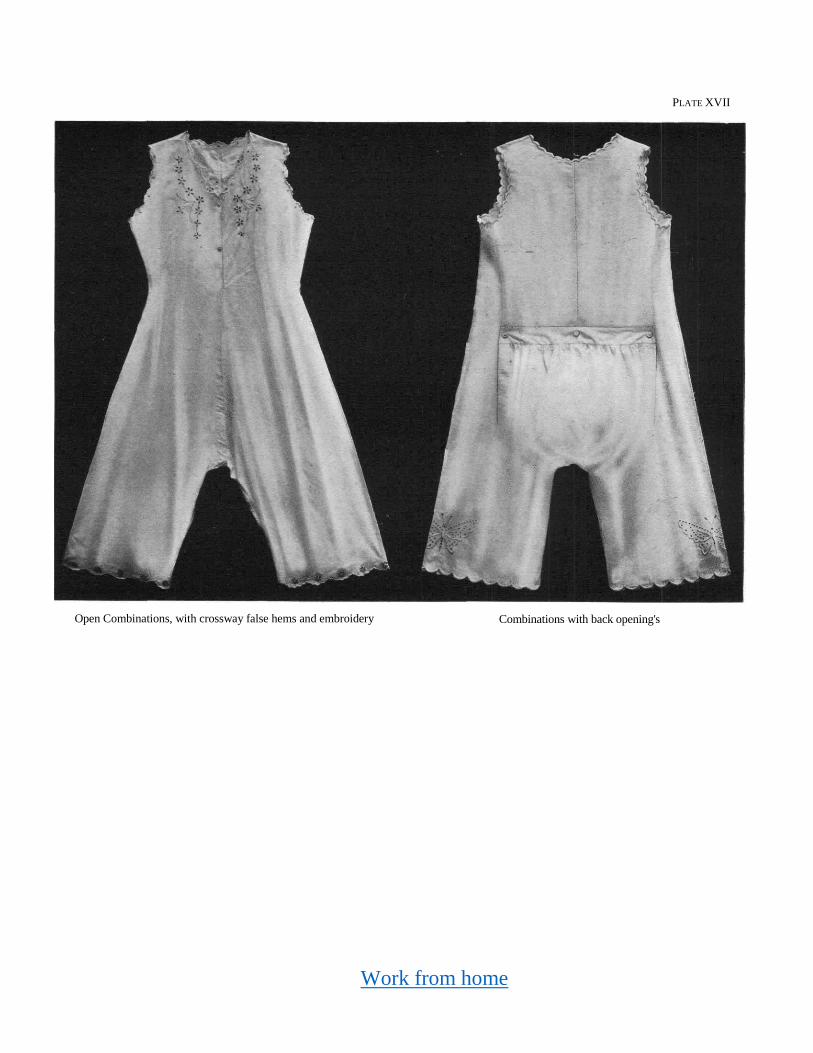
Work from home
PLATE XVII
Open Combinations, with crossway false hems and embroidery Combinations with back opening's

Wor
k
from
home

Work from home
Construction 163
crossway strip sewn to the back bodice, into which the gathers are set on the wrong side.
4. Trimming.—If lace is to be the trimming, the neck and sleeves may be finished with cross- way false hems or very narrow hems, the knees with hems and, if possible, a few small tucks. Embroidery edging may also be used, being arranged so as to form a little false hem of itself; or the edges may be embroidered and a little embroidery used to decorate the plainer parts of the garment.
5. Fastenings.—Four or five small buttons and buttonholes will be required down the front, the buttonholes being arranged horizontally, unless the garment has been made very wide and its front hem arranged decoratively. If a draw string is required at the neck, a narrow tape may be run through a false hem, being brought out through an eyelet hole at the left side, or a ribbon may be passed through slots worked with embroidery stitch.
Fullness at the neck may also be reduced by groups of small tucks.
Sleeves may be added, if desired, as in making a camisole.
Closed Combinations
Combinations may be made with side open-ings, like those of closed knickers. These open-ings may be finished first of all. The seams would next be made, and the two legs joined together by run-and-fell seam from the back
waist to a little way above the leg seam in front. As the garment is narrow, a very long front opening should be left. The fell of the run-and-fell seam should be laid on the left leg in order that the opening may be easily managed. The opening is most easily finished by two crossway false hems (as for open combinations). These are brought to a neat triangular finish at the bottom, where the right-hand hem is folded gradually over the left one (without pleating) and secured.
The lower edge of the back bodice must be neatened with a false hem which will enclose the double folds attached to the side openings. The back knickers portion will be gathered at the waist into a band, which will button up on the false hem at the bottom of the bodice. At least three buttons and buttonholes will be required to keep this band in place. The buttons may be larger than those in front.
A child's sleeping-suit is made in almost the same way as closed combinations. Occasionally it is buttoned down the back instead of down the front, the front being entirely closed with a seam. The legs are long, and gathered into bands at the ankles. Sleeves are required, gathered into bands at the wrists, and set into the armholes by run-and-fell seam, or by gathering into the arm-holes and neatening with a crossway binding, if there is fullness.
A collar may be added, if desired, attached in the same way as a blouse collar.
Work from home
164 Needlework
A pajama suit consists of two separate gar-ments, the upper one cut like a rather long and very plain blouse, the other a development of the knickers pattern, cut to fit as closely as possible without being actually tight. The whole garment is usually made as plainly as possible.
All the seams are run-and-fell seams, and no opening is required for the trousers. The jacket may have front hems turned to the wrong side, and a plain turn-down collar added to the neck; or a wide crossway false hem may be joined on round the neck and down both fronts, then turned to the right side, and stitched a long both its edges for decoration. The sleeves are narrowed towards the wrist by a seam from elbow to wrist, and finished by plain hems. The sleeves should just fit the armholes, and be set in by run-and-fell seam. The front fastening may consist of buttons and buttonholes or of fancy braid fastenings.
The trousers have plain hems at the ankles, and a wide crossway false hem at the waist, where a wide tape or pajama girdle is run in through buttonholes on the right side of the hem.
This garment requires rather more material than a night-dress, but is very simply made.
Other combined garments are those known as cami-knickers and cami-petticoat. These are, as their names suggest, merely camisoles joined by bands to knickers or a petticoat, cut separately.
Each garment is made up as usual, except at the waist, where each is gathered and set into the band which joins the two. Gathers may there-fore take the place of the darts which might otherwise be made on knickers and petticoat. These garments should have an opening down the middle front, continuing the line of the front hems of the camisole. The knickers must also have side openings, the back portion between the openings being gathered into a straight band buttoning up on the camisole band.
The making of an overall is a very good pre-liminary to elementary dressmaking, since many of the details of cutting out and construction correspond with those required in the making of skirts, blouses, and sleeves. The possession of a prettily-made overall encourages a girl in tidy habits.
There are two common ways of making an overall, but much variety can be obtained in the decoration and finishing of it.
The first way that may be chosen is to cut bodice and skirt separately and join them by a waist -band. In this case the method of cutting is much the same as for the making of a blouse and skirt or of a camisole and petti-coat, already described; but this style of overall is usually open down the back instead of down the front. The open edges of the skirt, as well as of the bodice, should be placed to a selvedge edge. The neck edges are usually cut quite low, and the fastenings required for an overall
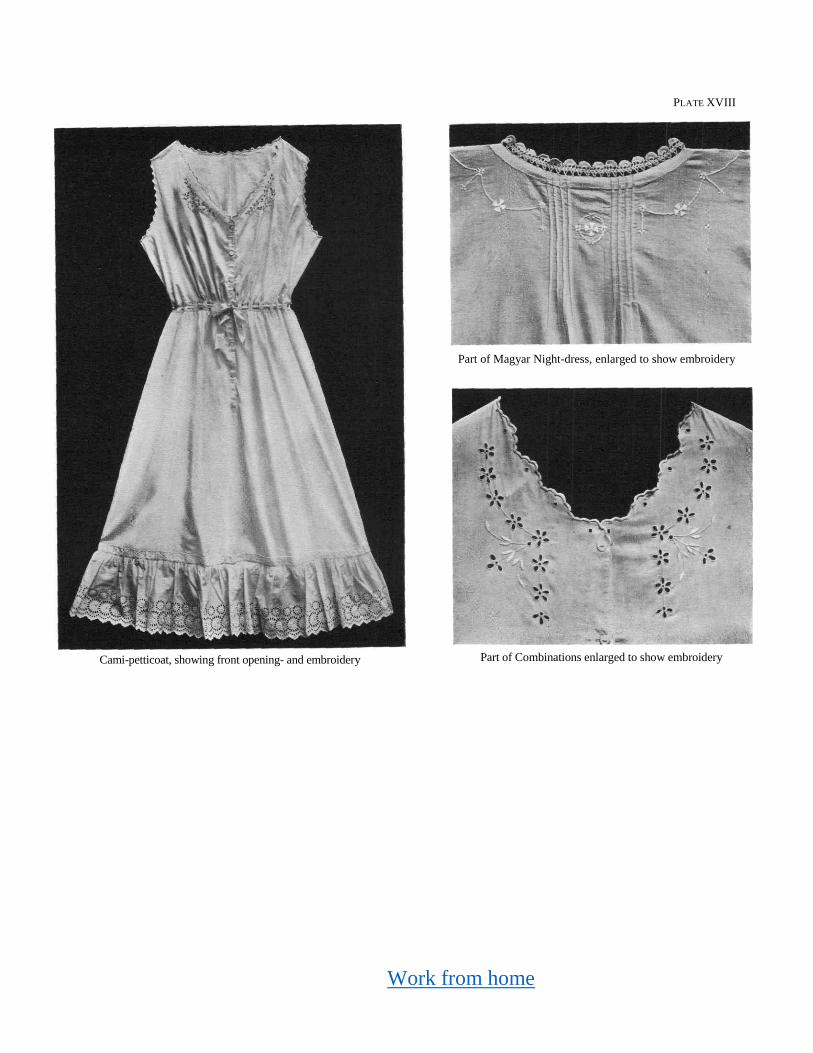
Work from home
PLATE XVIII
Part of Magyar Night-dress, enlarged to show embroidery
Cami-petticoat, showing front opening- and embroidery Part of Combinations enlarged to show embroidery
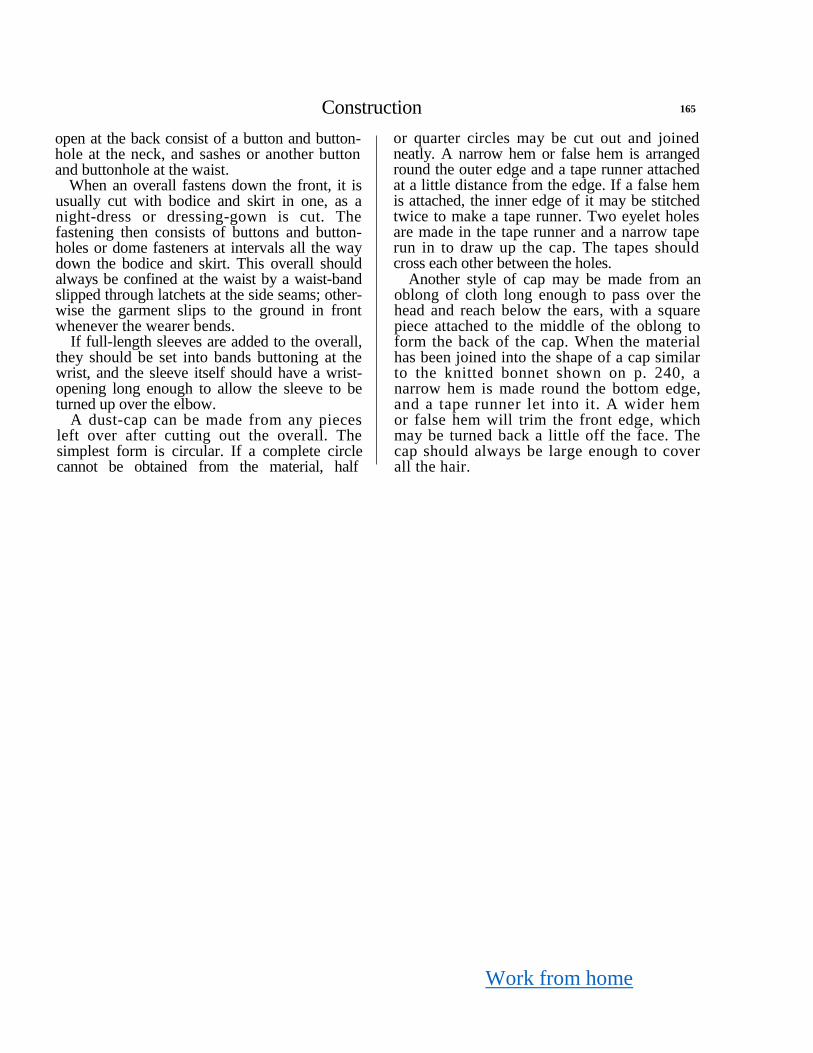
Work from home
Construction 165
open at the back consist of a button and button-hole at the neck, and sashes or another button and buttonhole at the waist.
When an overall fastens down the front, it is usually cut with bodice and skirt in one, as a night-dress or dressing-gown is cut. The fastening then consists of buttons and button-holes or dome fasteners at intervals all the way down the bodice and skirt. This overall should always be confined at the waist by a waist-band slipped through latchets at the side seams; other-wise the garment slips to the ground in front whenever the wearer bends.
If full-length sleeves are added to the overall, they should be set into bands buttoning at the wrist, and the sleeve itself should have a wrist-opening long enough to allow the sleeve to be turned up over the elbow.
A dust-cap can be made from any pieces left over after cutting out the overall. The simplest form is circular. If a complete circle cannot be obtained from the material, half
or quarter circles may be cut out and joined neatly. A narrow hem or false hem is arranged round the outer edge and a tape runner attached at a little distance from the edge. If a false hem is attached, the inner edge of it may be stitched twice to make a tape runner. Two eyelet holes are made in the tape runner and a narrow tape run in to draw up the cap. The tapes should cross each other between the holes.
Another style of cap may be made from an oblong of cloth long enough to pass over the head and reach below the ears, with a square piece attached to the middle of the oblong to form the back of the cap. When the material has been joined into the shape of a cap similar to the knitted bonnet shown on p. 240, a narrow hem is made round the bottom edge, and a tape runner let into it. A wider hem or false hem will trim the front edge, which may be turned back a little off the face. The cap should always be large enough to cover all the hair.

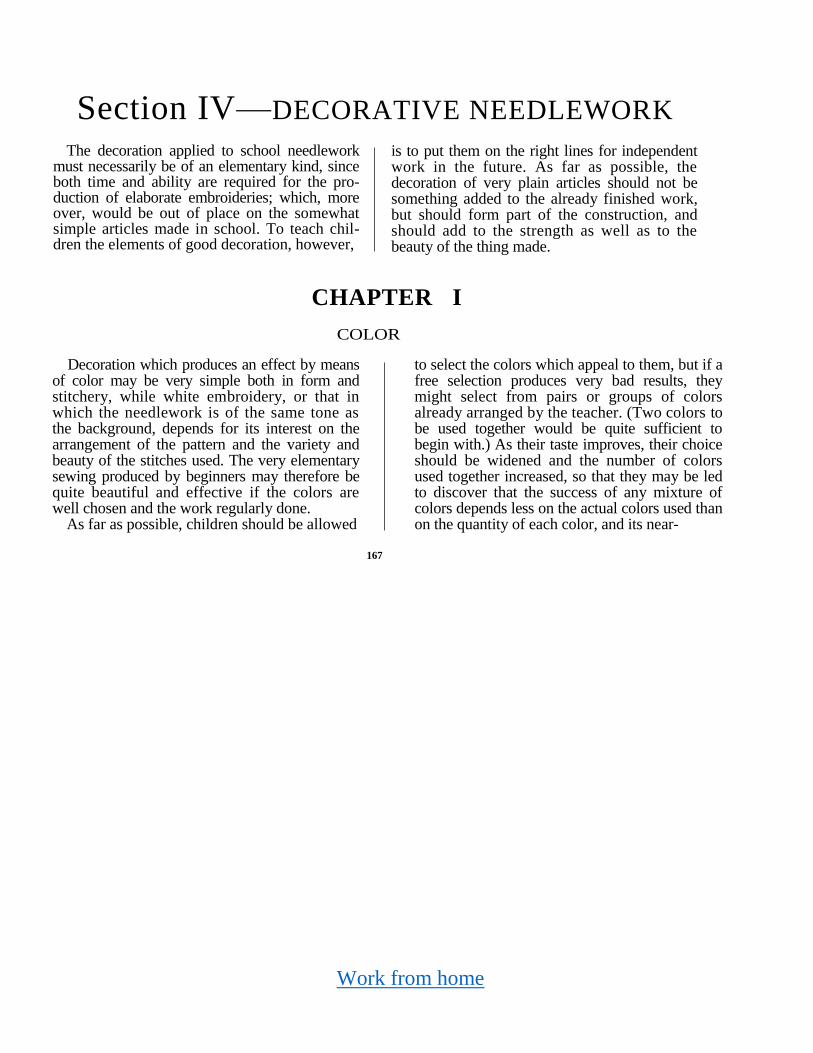
Work from home
Section IV—DECORATIVE NEEDLEWORK
The decoration applied to school needlework must necessarily be of an elementary kind, since both time and ability are required for the pro-duction of elaborate embroideries; which, more over, would be out of place on the somewhat simple articles made in school. To teach chil-dren the elements of good decoration, however,
is to put them on the right lines for independent work in the future. As far as possible, the decoration of very plain articles should not be something added to the already finished work, but should form part of the construction, and should add to the strength as well as to the beauty of the thing made.
CHAPTER I
COLOR
Decoration which produces an effect by means of color may be very simple both in form and stitchery, while white embroidery, or that in which the needlework is of the same tone as the background, depends for its interest on the arrangement of the pattern and the variety and beauty of the stitches used. The very elementary sewing produced by beginners may therefore be quite beautiful and effective if the colors are well chosen and the work regularly done.
As far as possible, children should be allowed
167
to select the colors which appeal to them, but if a free selection produces very bad results, they might select from pairs or groups of colors already arranged by the teacher. (Two colors to be used together would be quite sufficient to begin with.) As their taste improves, their choice should be widened and the number of colors used together increased, so that they may be led to discover that the success of any mixture of colors depends less on the actual colors used than on the quantity of each color, and its near-
Work from home
168 Needlework
ness to some other color. The rainbow is the example of perfect color blending, and although we cannot produce rainbows on cloth with a needle and thread, even if this were desirable, still a study of the rainbow helps to explain some of the possibilities of the use of color.
Tacking, the first stitch learned, lends itself admirably to experiments in color effects. For example, the pupil will discover the difference in effectiveness between two colors placed widely apart, and the same two colors sewn so closely that they blend together; and also the varying values of any one color according to the shades with which it is surrounded. It is usually best to lay the foundation line of tacking in a strong, dark, or quiet color, such as green, brown, or dark blue, building up the pattern with- the lighter or more vivid colors—say violet, yellow, orange, or pink. If a color is very brilliant, very small quantities of it will suffice, while a pale color may be used in large quantity lest it become lost in the background. The eye should be guided along the pattern by the strong colors.
It is more difficult to arrange color on a colored background than on a neutral one, so unbleached cotton, which is the chief, though not the sole, material used by children at first, is an excellent medium for first attempts at color blending. The advanced worker, on seeing a certain background to be worked upon, sees also
in imagination the colors which will be effective on it. Grey suggests pink, green suggests yellow or purple, and so on. Even the precise shades necessary can be imagined. The inexperienced child, or anyone with an undeveloped color sense, needs to see the actual colors spread on the background. It is a good plan to spread out not only the colors likely to suit, but a mass of miscellaneous colors, on the cloth to be sewn, and then proceed to lift away those that are not pleasing. Unexpected harmonies of color will often be discovered among those that remain, and a delightful departure made from the ordi-narily accepted associations and blends of color.
It is to be expected that the choice of children will fall upon those colors which are bright and gay, while a worker of longer experience is more likely to choose from the softer and quieter tints, which can be enlivened with spots of brilliance. Some children, however, will always prefer the quieter colors. To guide the worker in the choice of color, reference should be made to the color schemes of good pieces of work or of pictures, but especially to nature's color schemes, the various greens and yellows of the daffodil, crocus, and primrose; the green, pink, and blue, with a touch of yellow, of the forget-me-not; the dark green and purple of the clematis, &c.
The colors of birds and animals should also be studied, and may be suggested, though they cannot be reproduced, in needlework.

Work from home
Decorative Needlework 169
CHAPTER II
QUALITY OF MATERIALS
The effectiveness of a piece of work may be greatly enhanced or lowered according to the thread selected for use on the material chosen. In this, as in other matters, there must be a true sense of proportion. For a rich material, a rich thread is desirable, else the work looks poor. On the other hand, a rich thread is out of place on a coarse material, and has the effect merely of cheapening the material itself.
The plainest materials will serve very well for school work, and pupils may never really need to use any but cotton threads; but, that they may learn the values of materials and threads, it is well that they should have some variety. The threads they have to choose among are silk, flax, cotton, wool, and artificial silk (i.e. wood-pulp). Silk threads should be used only on silk or materials of very superior make.
Cotton materials of every kind are best sewn with cotton threads, of which there are many varieties, heavy and light, bright and dull. It is possible, therefore, to get any desired effect with-out the use of any other make of thread.
On linen, flax thread is appropriate, but other
threads may also be used effectively, the choice depending on the weight and quality of the linen and the use to which the finished article is to be put.
If the work will have to undergo frequent washing, cotton or flax thread would be the best choice. Silk would only be used on superior qualities of linen, while on coarser linens (where a brilliant effect is desirable) artificial silk may be used instead of silk. Wool is sometimes em-ployed on linens of a rather open, coarse make.
Woolen materials may be sewn with a variety of threads, cotton for the thinner and poorer qualities, silk, for the better makes, while silk, wool, and artificial silk are all used on dress materials, according to their quality.
Much depends on the use to be made of the finished work. A fine thread means close work and many stitches, and is therefore appropriate to work that will be viewed at close range and made of fine materials, for example, handkerchiefs, doyleys, tray cloths. Other pieces of work, such as cushions, curtains, &c, should be sewn with heavy thread, so that the work may prove
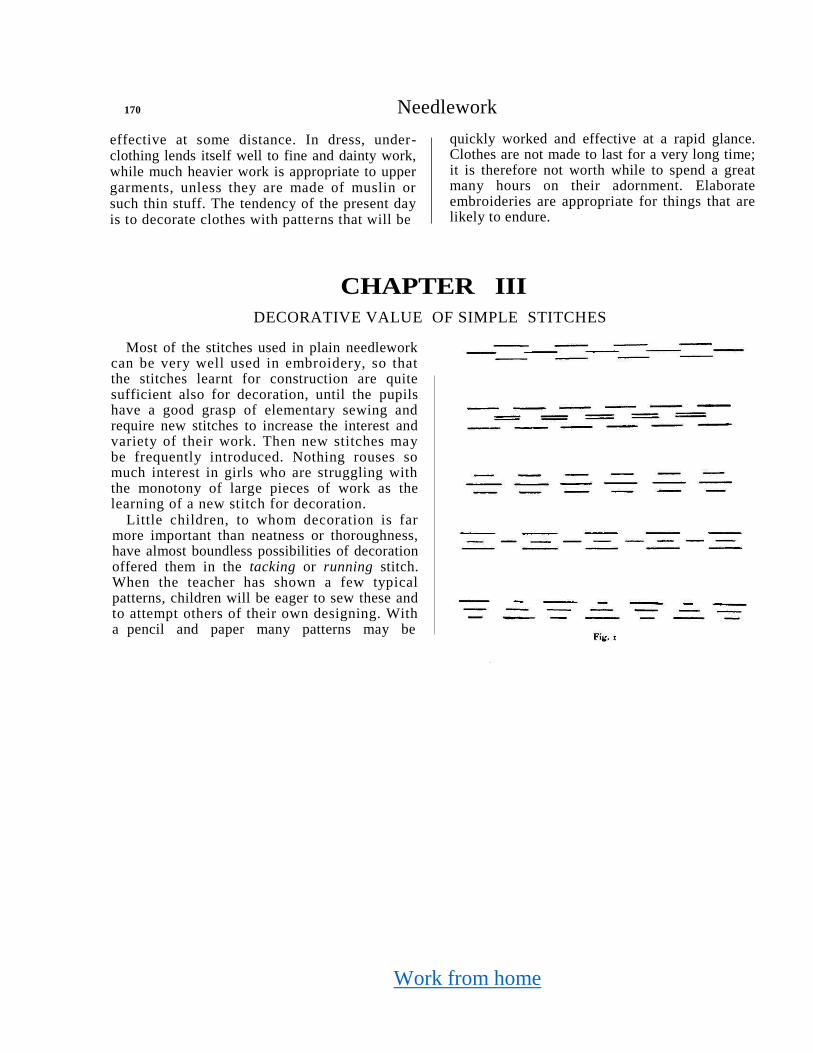
Work from home
170 Needlework
effective at some distance. In dress, under-clothing lends itself well to fine and dainty work, while much heavier work is appropriate to upper garments, unless they are made of muslin or such thin stuff. The tendency of the present day is to decorate clothes with patterns that will be
quickly worked and effective at a rapid glance. Clothes are not made to last for a very long time; it is therefore not worth while to spend a great many hours on their adornment. Elaborate embroideries are appropriate for things that are likely to endure.
CHAPTER III
DECORATIVE VALUE OF SIMPLE STITCHES
Most of the stitches used in plain needlework can be very well used in embroidery, so that the stitches learnt for construction are quite sufficient also for decoration, until the pupils have a good grasp of elementary sewing and require new stitches to increase the interest and variety of their work. Then new stitches may be frequently introduced. Nothing rouses so much interest in girls who are struggling with the monotony of large pieces of work as the learning of a new stitch for decoration.
Little children, to whom decoration is far more important than neatness or thoroughness, have almost boundless possibilities of decoration offered them in the tacking or running stitch. When the teacher has shown a few typical patterns, children will be eager to sew these and to attempt others of their own designing. With a pencil and paper many patterns may be
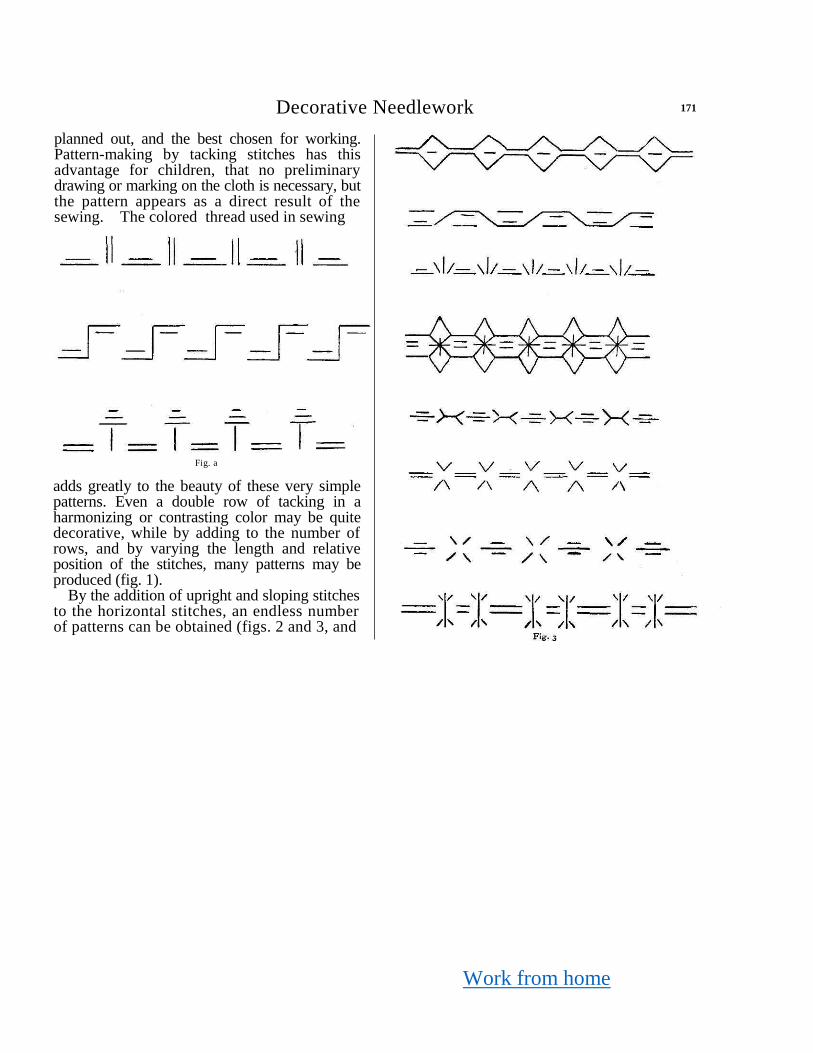
Work from home
Decorative Needlework 171
planned out, and the best chosen for working. Pattern-making by tacking stitches has this advantage for children, that no preliminary drawing or marking on the cloth is necessary, but the pattern appears as a direct result of the sewing. The colored thread used in sewing
Fig. a
adds greatly to the beauty of these very simple patterns. Even a double row of tacking in a harmonizing or contrasting color may be quite decorative, while by adding to the number of rows, and by varying the length and relative position of the stitches, many patterns may be produced (fig. 1).
By the addition of upright and sloping stitches to the horizontal stitches, an endless number of patterns can be obtained (figs. 2 and 3, and

Work from home
172 Needlework
Plate II). Strictly speaking, however, many of these patterns are not produced merely by tacking stitches, but need new and sometimes awkward positions of the hand in working. Such designs are quite acceptable if they spring
(with a little trouble) in the same form on both sides of the cloth, if a horizontal position of the needle at every stitch is not insisted on.
The next pattern (fig. 5) requires a sloping stitch to be made, but it has practically the same
from the inventive faculty of the pupil, but the teacher would suggest to the beginner only such variations as are typical and capable of being executed in a straightforward manner. For example, the four designs in fig. 4 can all be sewn by mere tacking stitches, although they contain upright and sloping lines.
It is true that (a) and (c) may be produced
Fig. 5
slope as a hemming stitch, and it is therefore useful for accustoming the pupil's hand to this new and difficult stitch before it is to be worked upon a hem. The same pattern with the slope reversed is no doubt equally pretty, but the slope of the needle required in order to make the stitch is more awkward and much less necessary in sewing. The patterns (a), (b), and (d) in fig. 4 may also be worked so as to give practice in the hemming position, but the slope of the needle is more variable in (b) and (d).
It may also be necessary to take into account the appearance of the work on both sides. Long threads dragging from point to point on the wrong side are unsightly and insecure, and such stitches are probably too long for a child's small hand to work well. In advanced work, when very
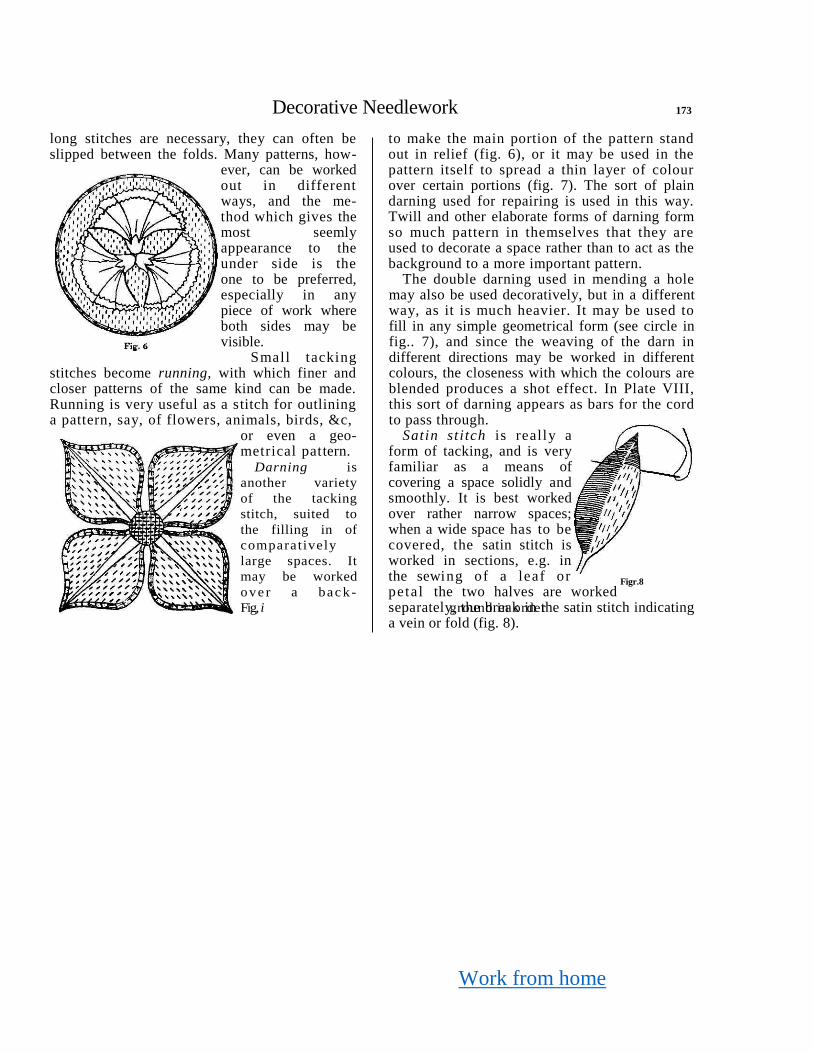
Work from home
Decorative Needlework 173
long stitches are necessary, they can often be slipped between the folds. Many patterns, how-
ever, can be worked out in different ways, and the me-thod which gives the most seemly appearance to the under side is the one to be preferred, especially in any piece of work where both sides may be visible.
Small tacking
stitches become running, with which finer and closer patterns of the same kind can be made. Running is very useful as a stitch for outlining a pattern, say, of flowers, animals, birds, &c,
or even a geo-metrical pattern.
Darning is
another variety
of the tacking
stitch, suited to
the filling in of
comparatively
large spaces. It
may be worked
ove r a bac k -
Fig, i ground in order
to make the main portion of the pattern stand out in relief (fig. 6), or it may be used in the pattern itself to spread a thin layer of colour over certain portions (fig. 7). The sort of plain darning used for repairing is used in this way. Twill and other elaborate forms of darning form so much pattern in themselves that they are used to decorate a space rather than to act as the background to a more important pattern.
The double darning used in mending a hole may also be used decoratively, but in a different way, as it is much heavier. It may be used to fill in any simple geometrical form (see circle in fig.. 7), and since the weaving of the darn in different directions may be worked in different colours, the closeness with which the colours are blended produces a shot effect. In Plate VIII, this sort of darning appears as bars for the cord to pass through.
Satin st itch is really a form of tacking, and is very familiar as a means of covering a space solidly and smoothly. It is best worked over rather narrow spaces; when a wide space has to be covered, the satin stitch is worked in sections, e.g. in the sewing of a leaf or petal the two halves are worked separately, the break in the satin stitch indicating a vein or fold (fig. 8).
Figr.8
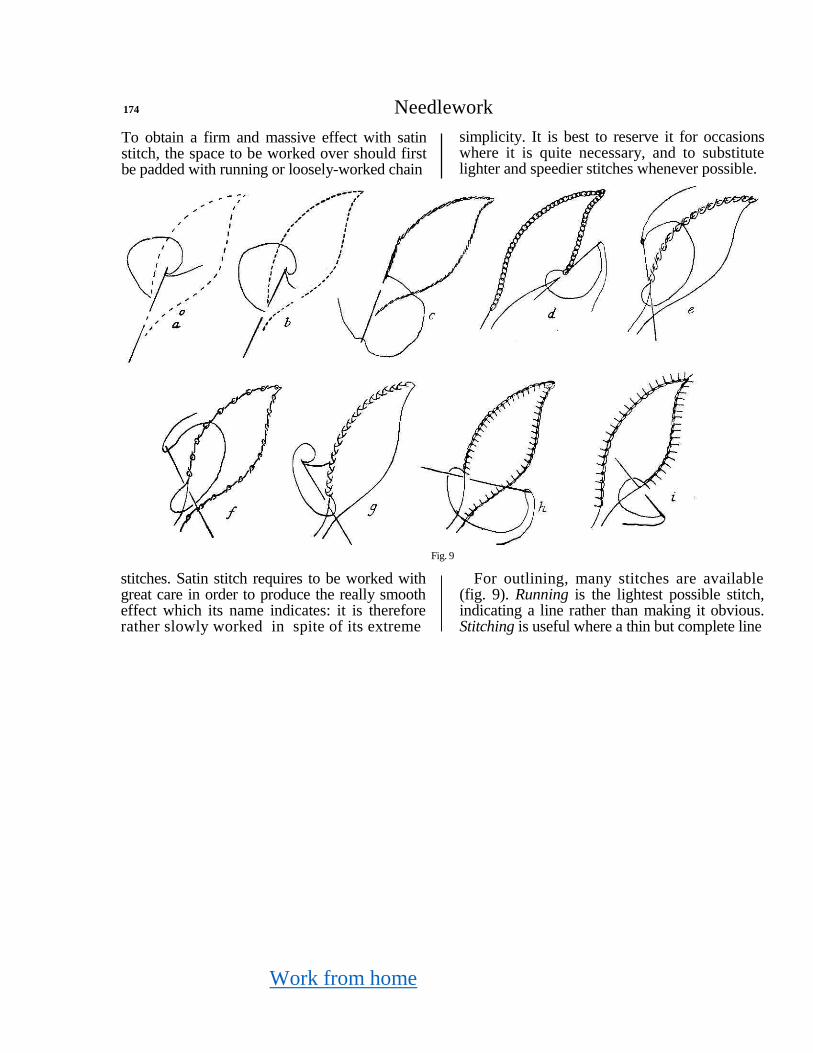
Work from home
174 Needlework
To obtain a firm and massive effect with satin stitch, the space to be worked over should first be padded with running or loosely-worked chain
simplicity. It is best to reserve it for occasions where it is quite necessary, and to substitute lighter and speedier stitches whenever possible.
Fig. 9
stitches. Satin stitch requires to be worked with great care in order to produce the really smooth effect which its name indicates: it is therefore rather slowly worked in spite of its extreme
For outlining, many stitches are available (fig. 9). Running is the lightest possible stitch, indicating a line rather than making it obvious. Stitching is useful where a thin but complete line
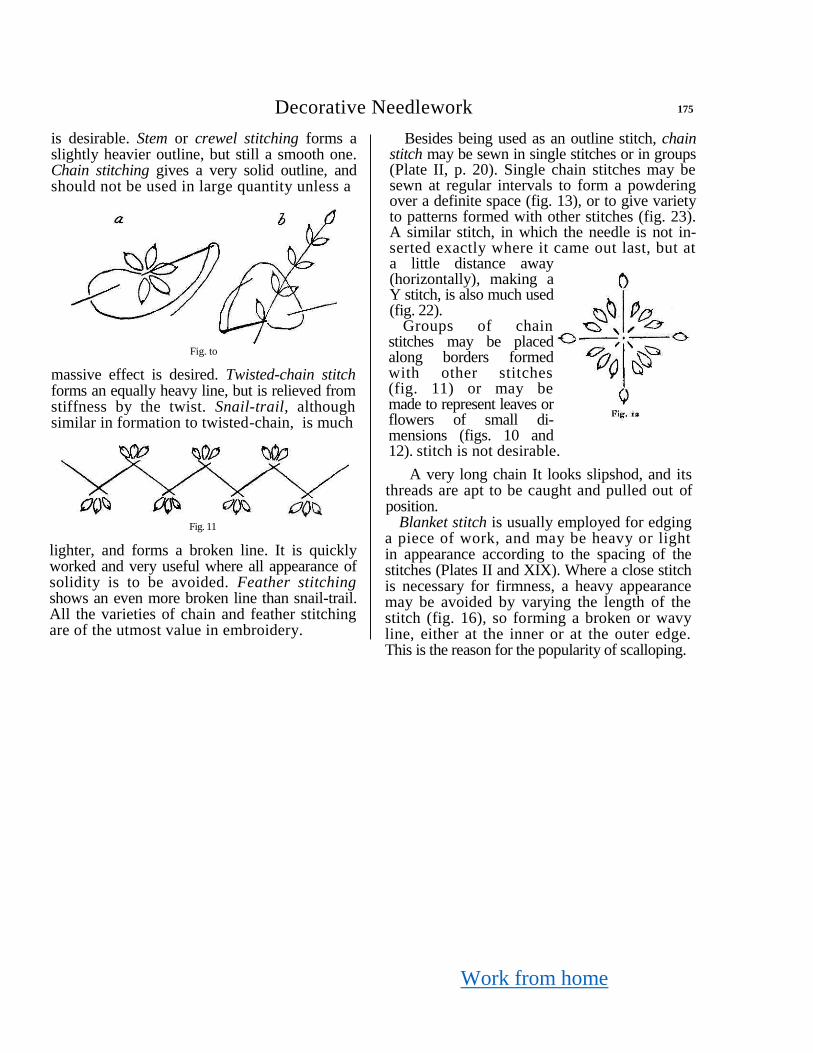
Work from home
Decorative Needlework 175
is desirable. Stem or crewel stitching forms a slightly heavier outline, but still a smooth one. Chain stitching gives a very solid outline, and should not be used in large quantity unless a
Fig. to
massive effect is desired. Twisted-chain stitch forms an equally heavy line, but is relieved from stiffness by the twist. Snail-trail, although similar in formation to twisted-chain, is much
Fig. 11
lighter, and forms a broken line. It is quickly worked and very useful where all appearance of solidity is to be avoided. Feather stitching shows an even more broken line than snail-trail. All the varieties of chain and feather stitching are of the utmost value in embroidery.
Besides being used as an outline stitch, chain stitch may be sewn in single stitches or in groups (Plate II, p. 20). Single chain stitches may be sewn at regular intervals to form a powdering over a definite space (fig. 13), or to give variety to patterns formed with other stitches (fig. 23). A similar stitch, in which the needle is not in-serted exactly where it came out last, but at a little distance away (horizontally), making a Y stitch, is also much used (fig. 22).
Groups of chain stitches may be placed along borders formed with other stitches (fig. 11) or may be made to represent leaves or flowers of small di-mensions (figs. 10 and 12). stitch is not desirable.
A very long chain It looks slipshod, and its threads are apt to be caught and pulled out of position.
Blanket stitch is usually employed for edging a piece of work, and may be heavy or light in appearance according to the spacing of the stitches (Plates II and XIX). Where a close stitch is necessary for firmness, a heavy appearance may be avoided by varying the length of the stitch (fig. 16), so forming a broken or wavy line, either at the inner or at the outer edge. This is the reason for the popularity of scalloping.
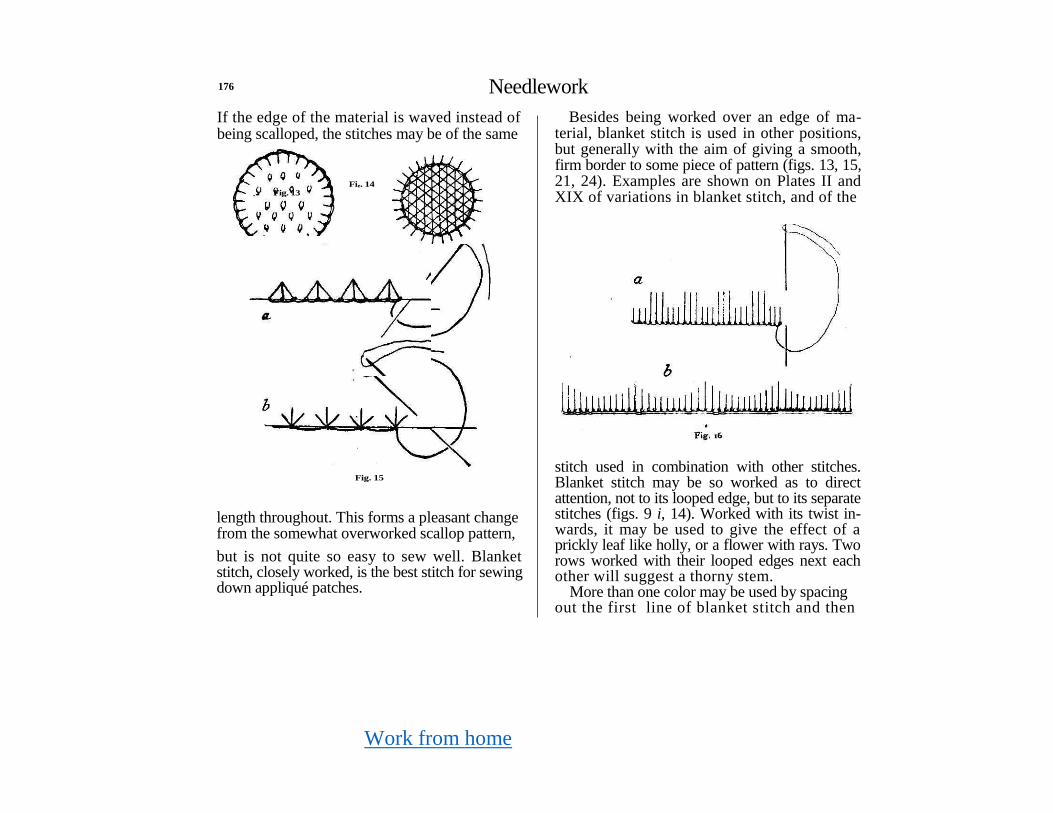
Work from home
176 Needlework
If the edge of the material is waved instead of being scalloped, the stitches may be of the same
Fie. 14
Fig. 15
length throughout. This forms a pleasant change from the somewhat overworked scallop pattern,
but is not quite so easy to sew well. Blanket stitch, closely worked, is the best stitch for sewing down appliqué patches.
Besides being worked over an edge of ma-terial, blanket stitch is used in other positions, but generally with the aim of giving a smooth, firm border to some piece of pattern (figs. 13, 15, 21, 24). Examples are shown on Plates II and XIX of variations in blanket stitch, and of the
stitch used in combination with other stitches. Blanket stitch may be so worked as to direct attention, not to its looped edge, but to its separate stitches (figs. 9 i, 14). Worked with its twist in-wards, it may be used to give the effect of a prickly leaf like holly, or a flower with rays. Two rows worked with their looped edges next each other will suggest a thorny stem.
More than one color may be used by spacing out the first line of blanket stitch and then
Fig. 13
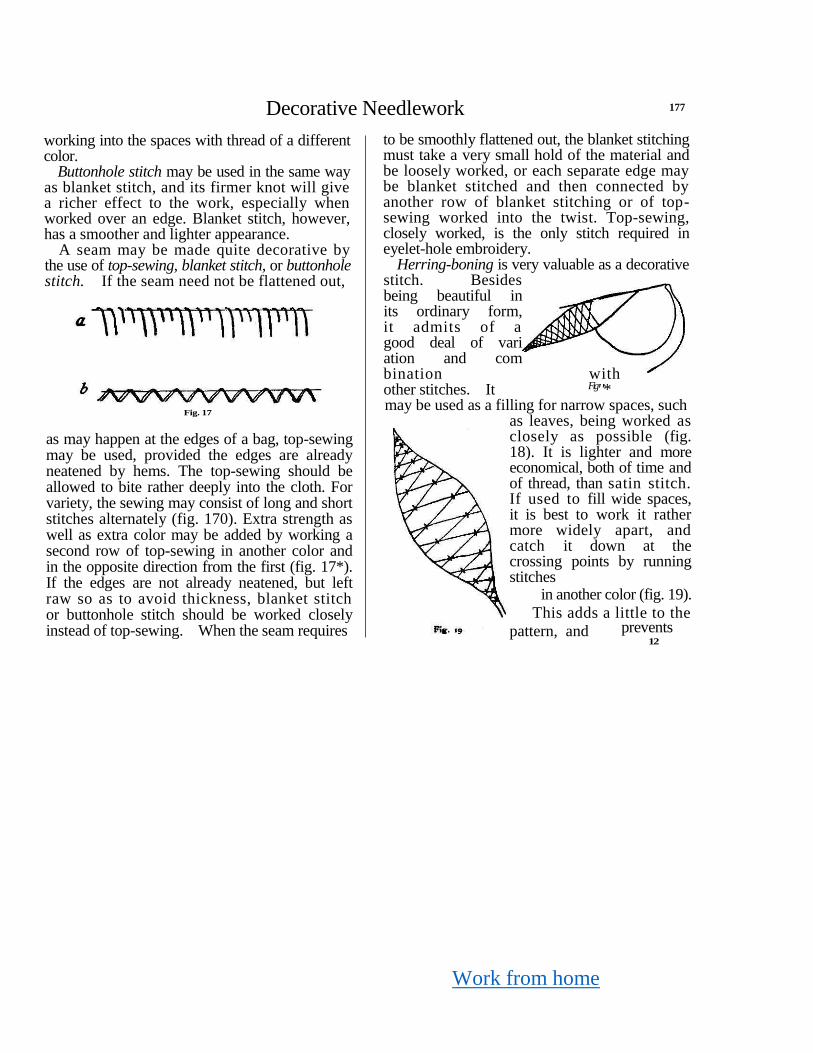
Work from home
Decorative Needlework 177
working into the spaces with thread of a different color.
Buttonhole stitch may be used in the same way as blanket stitch, and its firmer knot will give a richer effect to the work, especially when worked over an edge. Blanket stitch, however, has a smoother and lighter appearance.
A seam may be made quite decorative by the use of top-sewing, blanket stitch, or buttonhole stitch. If the seam need not be flattened out,
Fig. 17
as may happen at the edges of a bag, top-sewing may be used, provided the edges are already neatened by hems. The top-sewing should be allowed to bite rather deeply into the cloth. For variety, the sewing may consist of long and short stitches alternately (fig. 170). Extra strength as well as extra color may be added by working a second row of top-sewing in another color and in the opposite direction from the first (fig. 17*). If the edges are not already neatened, but left raw so as to avoid thickness, blanket stitch or buttonhole stitch should be worked closely instead of top-sewing. When the seam requires
to be smoothly flattened out, the blanket stitching must take a very small hold of the material and be loosely worked, or each separate edge may be blanket stitched and then connected by another row of blanket stitching or of top-sewing worked into the twist. Top-sewing, closely worked, is the only stitch required in eyelet-hole embroidery.
Herring-boning is very valuable as a decorative stitch. Besides being beautiful in its ordinary form, it admits of a good deal of vari ation and com bination with other stitches. It Fig' '*
may be used as a filling for narrow spaces, such
as leaves, being worked as closely as possible (fig. 18). It is lighter and more economical, both of time and of thread, than satin stitch. If used to fill wide spaces, it is best to work it rather more widely apart, and catch it down at the crossing points by running stitches
in another color (fig. 19).
This adds a little to the
pattern, and
prevents 12
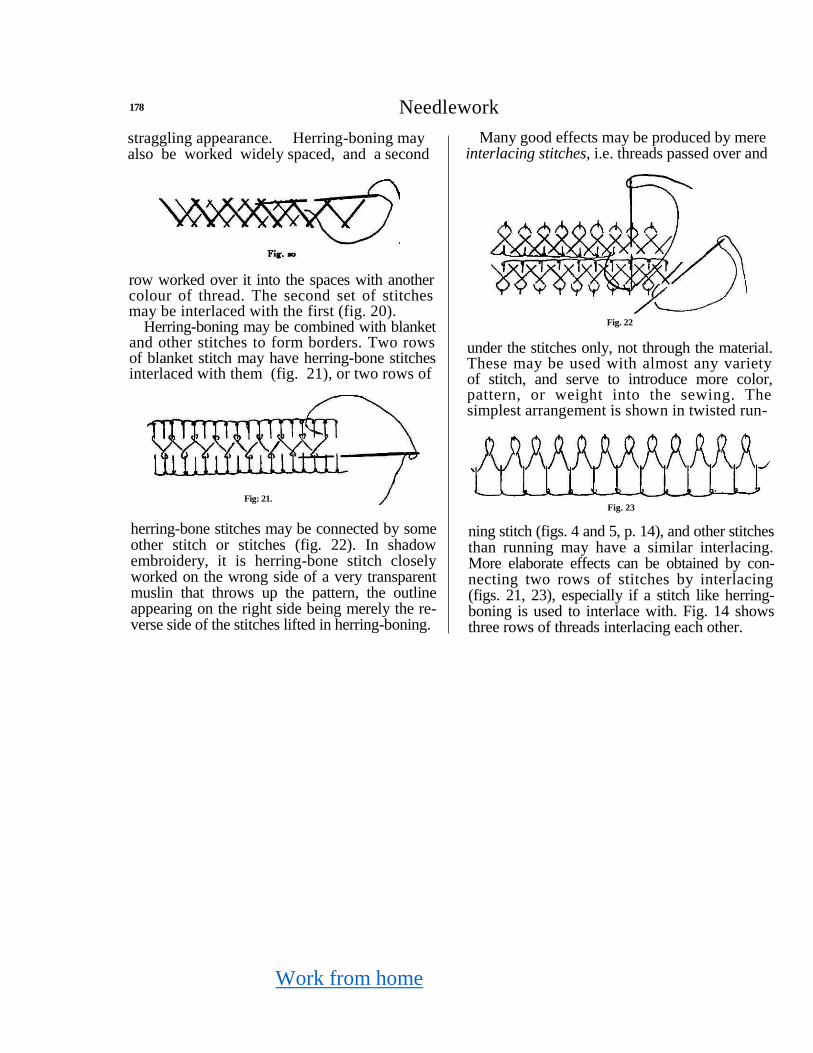
Work from home
178 Needlework
straggling appearance. Herring-boning may also be worked widely spaced, and a second
Many good effects may be produced by mere interlacing stitches, i.e. threads passed over and
row worked over it into the spaces with another colour of thread. The second set of stitches may be interlaced with the first (fig. 20).
Herring-boning may be combined with blanket and other stitches to form borders. Two rows of blanket stitch may have herring-bone stitches interlaced with them (fig. 21), or two rows of
herring-bone stitches may be connected by some other stitch or stitches (fig. 22). In shadow embroidery, it is herring-bone stitch closely worked on the wrong side of a very transparent muslin that throws up the pattern, the outline appearing on the right side being merely the re-verse side of the stitches lifted in herring-boning.
Fig. 22
under the stitches only, not through the material. These may be used with almost any variety of stitch, and serve to introduce more color, pattern, or weight into the sewing. The simplest arrangement is shown in twisted run-
Fig. 23
ning stitch (figs. 4 and 5, p. 14), and other stitches than running may have a similar interlacing. More elaborate effects can be obtained by con-necting two rows of stitches by interlacing (figs. 21, 23), especially if a stitch like herring-boning is used to interlace with. Fig. 14 shows three rows of threads interlacing each other.
Fig: 21.
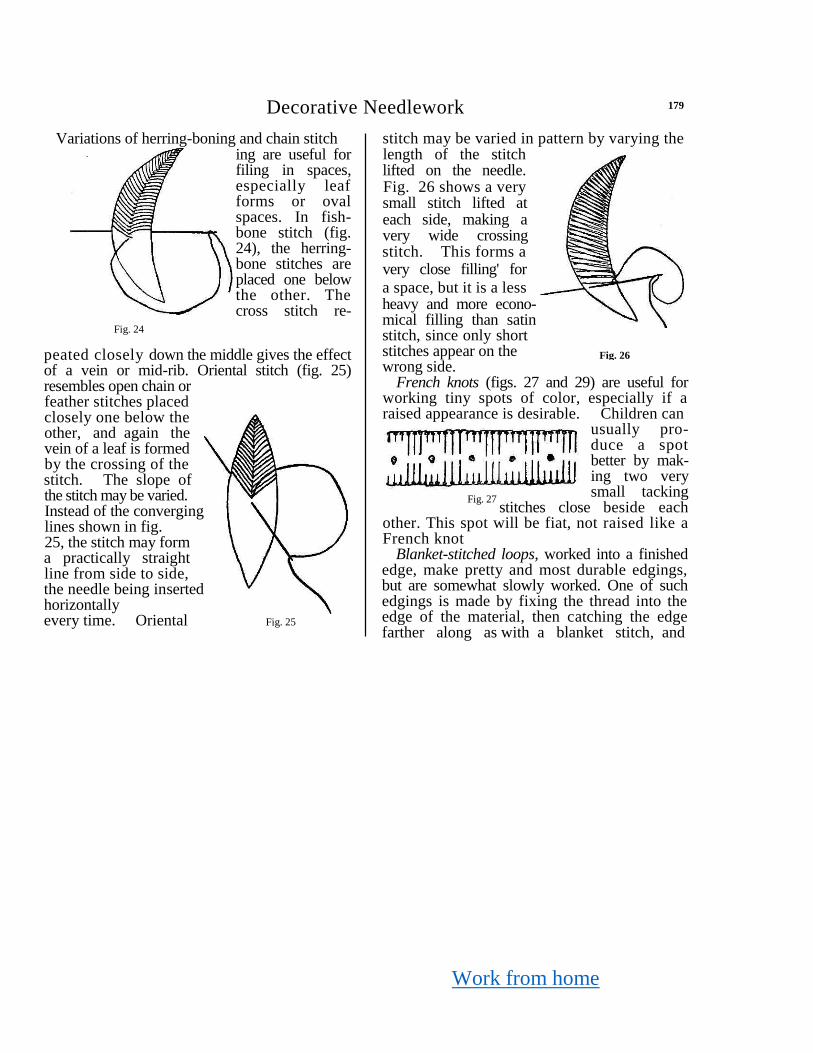
Work from home
Decorative Needlework 179
Variations of herring-boning and chain stitch ing are useful for filing in spaces, especially leaf forms or oval spaces. In fish-bone stitch (fig. 24), the herring-bone stitches are placed one below the other. The cross stitch re-
peated closely down the middle gives the effect of a vein or mid-rib. Oriental stitch (fig. 25) resembles open chain or feather stitches placed
closely one below the
other, and again the
vein of a leaf is formed
by the crossing of the
stitch. The slope of
the stitch may be varied. Instead of the converging lines shown in fig. 25, the stitch may form
a practically straight line from side to side, the needle being inserted horizontally
every time. Oriental Fig. 25
stitch may be varied in pattern by varying the
length of the stitch
lifted on the needle. Fig. 26 shows a very
small stitch lifted at each side, making a
very wide crossing
stitch. This forms a
very close filling' for
a space, but it is a less
heavy and more econo-mical filling than satin stitch, since only short stitches appear on the wrong side.
French knots (figs. 27 and 29) are useful for working tiny spots of color, especially if a raised appearance is desirable. Children can
usually pro-duce a spot better by mak-ing two very small tacking
stitches close beside each other. This spot will be fiat, not raised like a French knot
Blanket-stitched loops, worked into a finished edge, make pretty and most durable edgings, but are somewhat slowly worked. One of such edgings is made by fixing the thread into the edge of the material, then catching the edge farther along as with a blanket stitch, and
Fig. 24
Fig. 26
Fig. 27
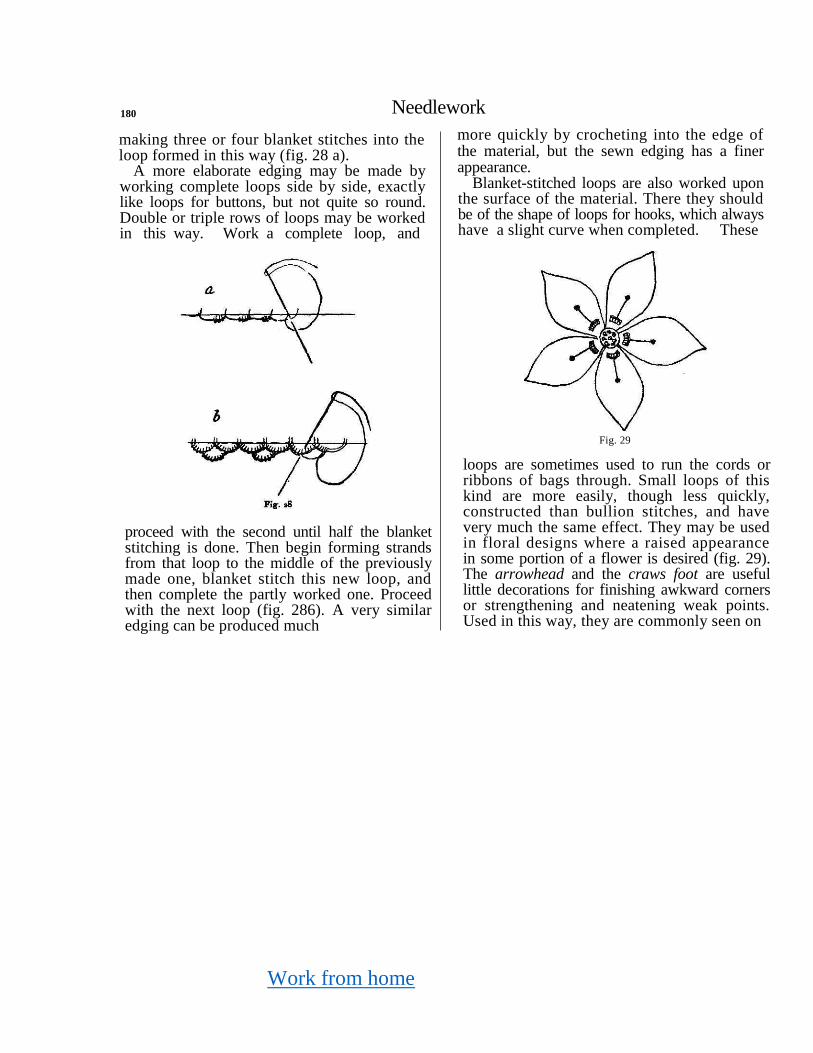
Work from home
180 Needlework
making three or four blanket stitches into the loop formed in this way (fig. 28 a).
A more elaborate edging may be made by working complete loops side by side, exactly like loops for buttons, but not quite so round. Double or triple rows of loops may be worked in this way. Work a complete loop, and
more quickly by crocheting into the edge of the material, but the sewn edging has a finer appearance.
Blanket-stitched loops are also worked upon the surface of the material. There they should be of the shape of loops for hooks, which always have a slight curve when completed. These
proceed with the second until half the blanket stitching is done. Then begin forming strands from that loop to the middle of the previously made one, blanket stitch this new loop, and then complete the partly worked one. Proceed with the next loop (fig. 286). A very similar edging can be produced much
Fig. 29
loops are sometimes used to run the cords or ribbons of bags through. Small loops of this kind are more easily, though less quickly, constructed than bullion stitches, and have very much the same effect. They may be used in floral designs where a raised appearance in some portion of a flower is desired (fig. 29). The arrowhead and the craws foot are useful little decorations for finishing awkward corners or strengthening and neatening weak points. Used in this way, they are commonly seen on
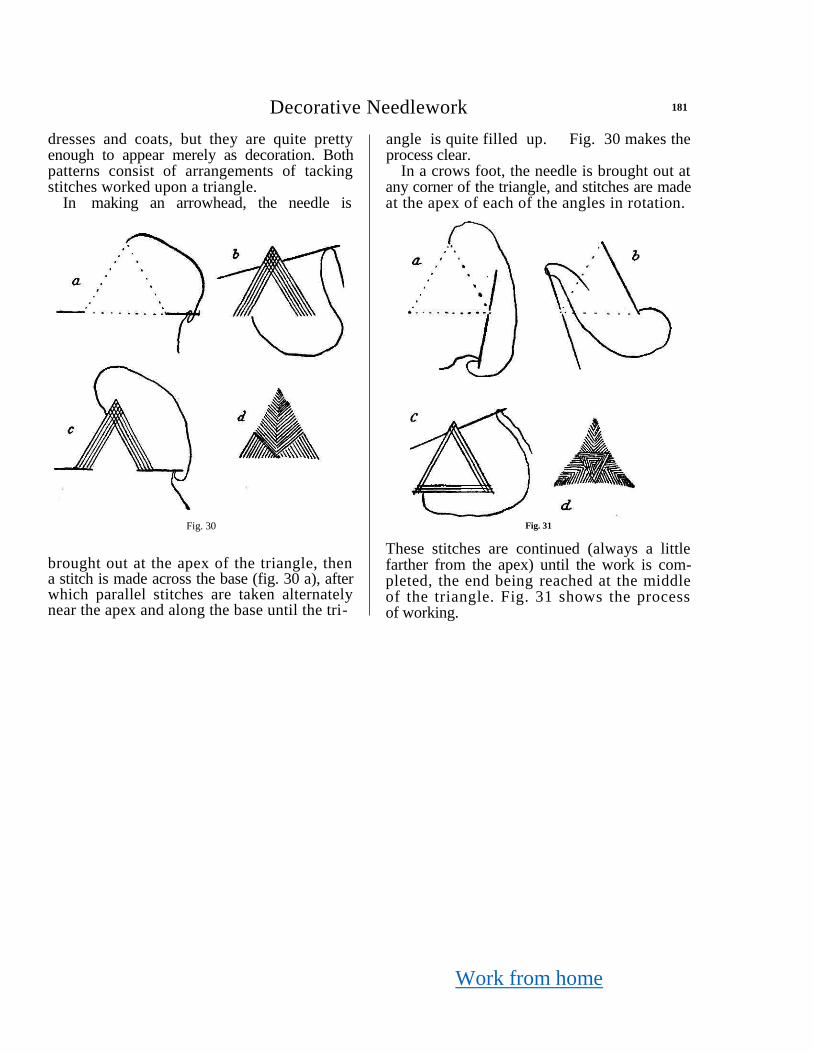
Work from home
Decorative Needlework 181
dresses and coats, but they are quite pretty enough to appear merely as decoration. Both patterns consist of arrangements of tacking stitches worked upon a triangle.
In making an arrowhead, the needle is
angle is quite filled up. Fig. 30 makes the process clear.
In a crows foot, the needle is brought out at any corner of the triangle, and stitches are made at the apex of each of the angles in rotation.
Fig. 30
brought out at the apex of the triangle, then a stitch is made across the base (fig. 30 a), after which parallel stitches are taken alternately near the apex and along the base until the tri-
Fig. 31
These stitches are continued (always a little farther from the apex) until the work is com-pleted, the end being reached at the middle of the triangle. Fig. 31 shows the process of working.
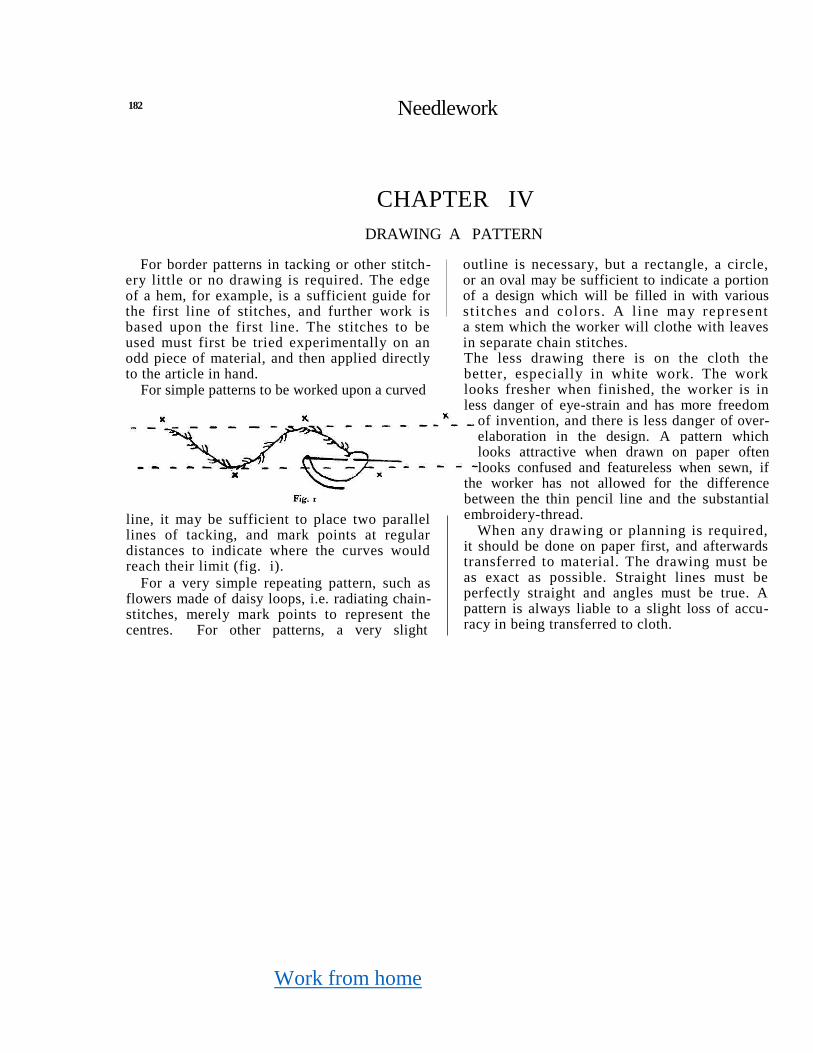
Work from home
182 Needlework
CHAPTER IV
DRAWING A PATTERN
For border patterns in tacking or other stitch-ery little or no drawing is required. The edge of a hem, for example, is a sufficient guide for the first line of stitches, and further work is based upon the first line. The stitches to be used must first be tried experimentally on an odd piece of material, and then applied directly to the article in hand.
For simple patterns to be worked upon a curved
line, it may be sufficient to place two parallel lines of tacking, and mark points at regular distances to indicate where the curves would reach their limit (fig. i).
For a very simple repeating pattern, such as flowers made of daisy loops, i.e. radiating chain-stitches, merely mark points to represent the centres. For other patterns, a very slight
outline is necessary, but a rectangle, a circle, or an oval may be sufficient to indicate a portion of a design which will be filled in with various st i tches and colors. A l ine may represent a stem which the worker will clothe with leaves in separate chain stitches. The less drawing there is on the cloth the better, especially in white work. The work looks fresher when finished, the worker is in less danger of eye-strain and has more freedom
of invention, and there is less danger of over-elaboration in the design. A pattern which looks attractive when drawn on paper often looks confused and featureless when sewn, if
the worker has not allowed for the difference between the thin pencil line and the substantial embroidery-thread.
When any drawing or planning is required, it should be done on paper first, and afterwards transferred to material. The drawing must be as exact as possible. Straight lines must be perfectly straight and angles must be true. A pattern is always liable to a slight loss of accu-racy in being transferred to cloth.
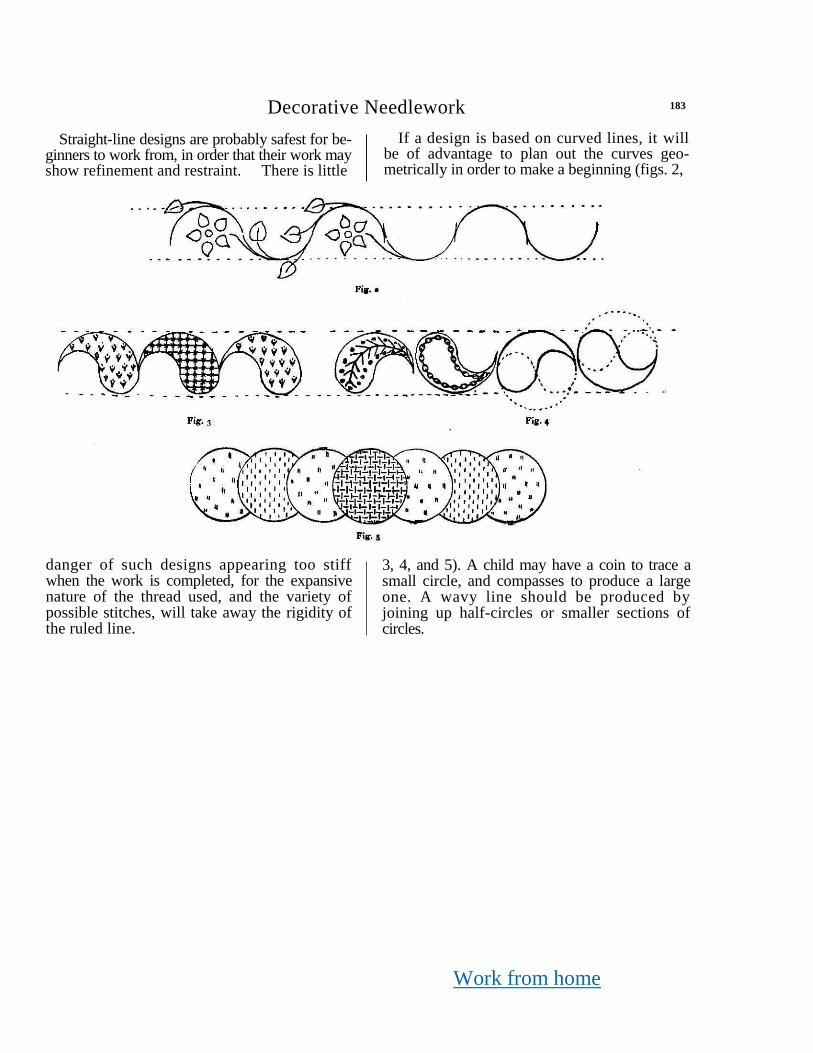
Work from home
Decorative Needlework 183
Straight-line designs are probably safest for be-ginners to work from, in order that their work may show refinement and restraint. There is little
If a design is based on curved lines, it will be of advantage to plan out the curves geo-metrically in order to make a beginning (figs. 2,
danger of such designs appearing too stiff when the work is completed, for the expansive nature of the thread used, and the variety of possible stitches, will take away the rigidity of the ruled line.
3, 4, and 5). A child may have a coin to trace a small circle, and compasses to produce a large one. A wavy line should be produced by joining up half-circles or smaller sections of circles.
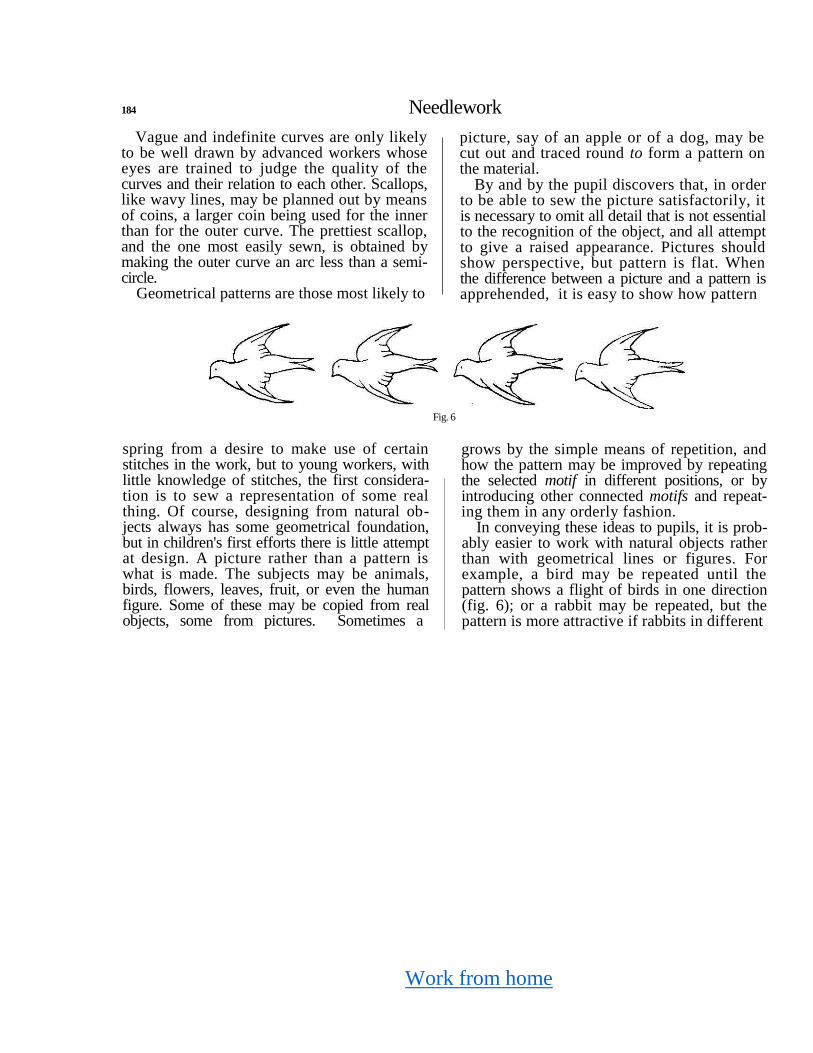
Work from home
184 Needlework
Vague and indefinite curves are only likely to be well drawn by advanced workers whose eyes are trained to judge the quality of the curves and their relation to each other. Scallops, like wavy lines, may be planned out by means of coins, a larger coin being used for the inner than for the outer curve. The prettiest scallop, and the one most easily sewn, is obtained by making the outer curve an arc less than a semi-circle.
Geometrical patterns are those most likely to
picture, say of an apple or of a dog, may be cut out and traced round to form a pattern on the material.
By and by the pupil discovers that, in order to be able to sew the picture satisfactorily, it is necessary to omit all detail that is not essential to the recognition of the object, and all attempt to give a raised appearance. Pictures should show perspective, but pattern is flat. When the difference between a picture and a pattern is apprehended, it is easy to show how pattern
Fig. 6
spring from a desire to make use of certain stitches in the work, but to young workers, with little knowledge of stitches, the first considera-tion is to sew a representation of some real thing. Of course, designing from natural ob-jects always has some geometrical foundation, but in children's first efforts there is little attempt at design. A picture rather than a pattern is what is made. The subjects may be animals, birds, flowers, leaves, fruit, or even the human figure. Some of these may be copied from real objects, some from pictures. Sometimes a
grows by the simple means of repetition, and how the pattern may be improved by repeating the selected motif in different positions, or by introducing other connected motifs and repeat-ing them in any orderly fashion.
In conveying these ideas to pupils, it is prob-ably easier to work with natural objects rather than with geometrical lines or figures. For example, a bird may be repeated until the pattern shows a flight of birds in one direction (fig. 6); or a rabbit may be repeated, but the pattern is more attractive if rabbits in different
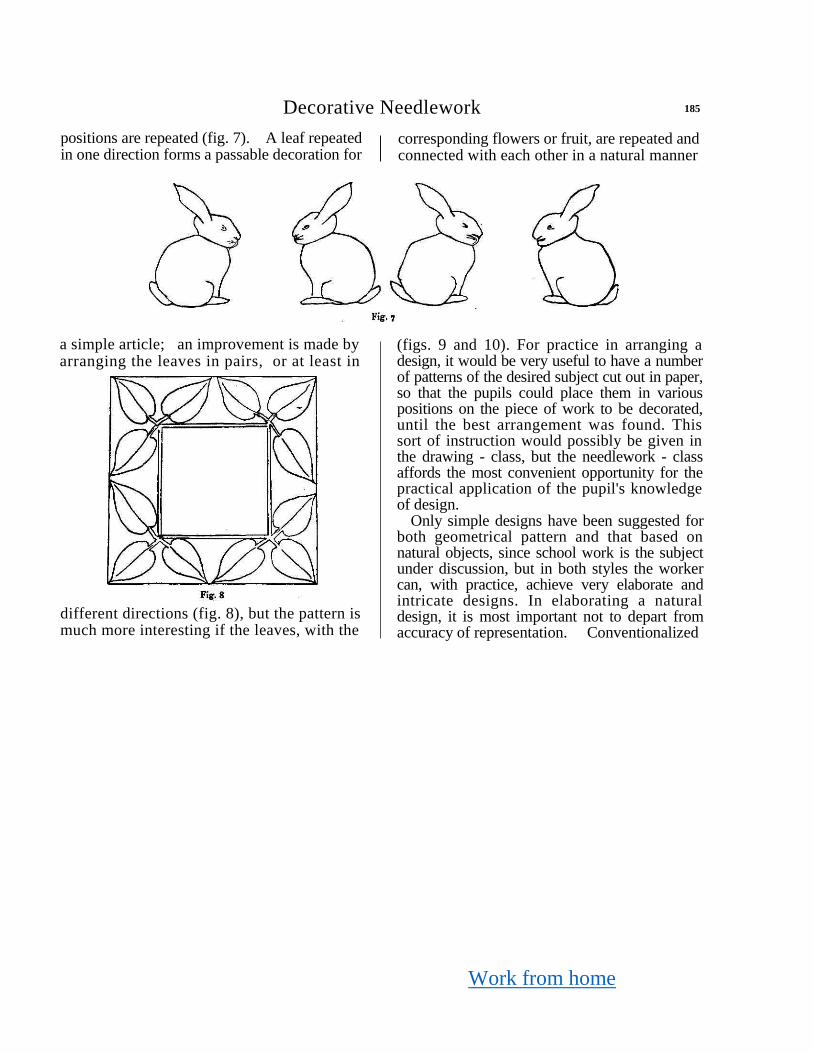
Work from home
Decorative Needlework 185
positions are repeated (fig. 7). A leaf repeated in one direction forms a passable decoration for
corresponding flowers or fruit, are repeated and connected with each other in a natural manner
a simple article; an improvement is made by arranging the leaves in pairs, or at least in
different directions (fig. 8), but the pattern is much more interesting if the leaves, with the
(figs. 9 and 10). For practice in arranging a design, it would be very useful to have a number of patterns of the desired subject cut out in paper, so that the pupils could place them in various positions on the piece of work to be decorated, until the best arrangement was found. This sort of instruction would possibly be given in the drawing - class, but the needlework - class affords the most convenient opportunity for the practical application of the pupil's knowledge of design.
Only simple designs have been suggested for both geometrical pattern and that based on natural objects, since school work is the subject under discussion, but in both styles the worker can, with practice, achieve very elaborate and intricate designs. In elaborating a natural design, it is most important not to depart from accuracy of representation. Conventionalized
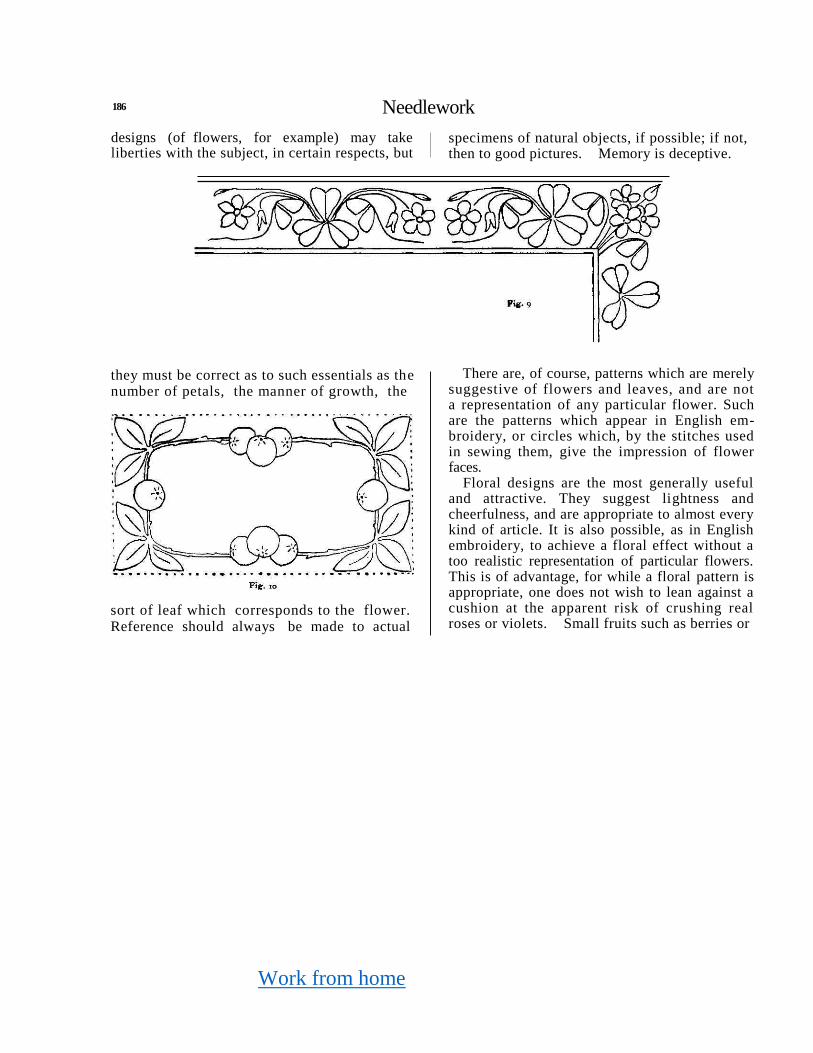
Work from home
186 Needlework
designs (of flowers, for example) may take liberties with the subject, in certain respects, but
specimens of natural objects, if possible; if not, then to good pictures. Memory is deceptive.
they must be correct as to such essentials as the number of petals, the manner of growth, the
sort of leaf which corresponds to the flower. Reference should always be made to actual
There are, of course, patterns which are merely suggestive of flowers and leaves, and are not a representation of any particular flower. Such are the patterns which appear in English em-broidery, or circles which, by the stitches used in sewing them, give the impression of flower faces.
Floral designs are the most generally useful and attractive. They suggest lightness and cheerfulness, and are appropriate to almost every kind of article. It is also possible, as in English embroidery, to achieve a floral effect without a too realistic representation of particular flowers. This is of advantage, for while a floral pattern is appropriate, one does not wish to lean against a cushion at the apparent risk of crushing real roses or violets. Small fruits such as berries or
Work from home
Decorative Needlework 187
acorns also form light and useful decoration, while bunches of grapes, apples, &c, are only suitable for some kinds of work. They are obviously most appropriately used on articles connected with the table.
Butterflies are always very popular in decora-tion, being very light in effect, and in these, too, an uncomfortably realistic appearance can be avoided. Birds may also be used very decoratively, but most animal forms are apt to make pictures rather than patterns, so that their use in decorative work is limited. They are suitable for furnishings rather than for clothes, and are usually confined to things for the use of children, who can more readily enjoy a picture than a piece of good designing.
Although it is easy to buy a pattern ready to be traced, it is far more educative to practise making a pattern as well as sewing it. The patterns made by pupils will probably be much simpler than those sold at needlework shops, but they will probably show more originality. By practice of this kind the pupils may be taught in a simple manner the elements of good pattern making, and so will become more capable of judging later in life which patterns are worth copying. Patterns produced by the worker are likely to be not only simpler, but also more intelligently worked out, since the same line of thought that produced the pattern suggested also the manner of working. The finished ap-pearance should always be present to the mind
while the design is being drawn, else the worker may draw a pattern which she finds she cannot sew with good effect. Precisely the same dia-gram might represent a floral pattern to be worked in chain stitches, English embroidery, or solid work, but the method would be decided largely by the dimensions of the pattern. For example, the pattern in fig. 10 on p. 175 must be small, if chain stitch is to be used, else the work will be poor and untidy. A small or medium-sized pattern might be worked in English em-broidery, whereas if the leaves and flower petals are very large, satin stitch, herring-boning, or outlining would be used.
To be effective, decoration must be propor-tionate. A fine piece of work of small dimen-sions is suitable for a small article likely to be looked at closely, e.g. a handkerchief or fine collar, while for cushions, curtains, &c, a bold design is much more appropriate. For such designs, applique work is very useful, saving many laborious stitches wherever a large mass of one colour has to be represented. The animals and birds already suggested as subjects may very appropriately be cut out in material and sewn on to the background. Leaves and flowers, if large and simple, lend themselves to the same treatment. The outlines of appliqué patches must be quite simple, and small details, such as eyes of animals, veins of leaves, and thin stems must be filled in by sewing in con-trasting color.
Work from home
188 Needlework
CHAPTER V
POSITION AND ARRANGEMENT OF PATTERN
This is another point on which pupils require instruction. The deciding factors in the placing of pattern are the shape of the article, its use< and especially the sense of satisfaction which a proper apportionment of parts gives to the eye.
So far as decoration and construction are one, the position of the decorative work is decided by necessity, and is likely to be natural and effective. If the construction lines are good, it is well that they should be emphasized and made effective by the addition of decoration. Hems, for example, form part of the construction of most articles, and a border of pattern along the hem will often be quite sufficient decoration for a small article. The hem may be a perfectly straight one, but the decoration may show curves or lines breaking away from the main line, and so avoiding an appearance of severity. Whether the pattern should be close to the edge of the article or some distance from it must be decided by taste. A small article may have its border close to the edge, but in a larger article the pattern is usually rendered more effective by contrast with a plain border of some depth.
A dress, for example, should have a hem of two or three inches round the bottom, the pat-tern occurring at the upper edge of the hem. A square article, such as a table-cover, should have hems of the same width all the way round; but an oblong one may have narrow hems along its length, and much wider ones at the ends, especially if those ends are likely to droop, as in a sideboard-cloth or chair back. The decoration of the narrow hems should be very slight, while that of the deep hems should be much heavier. The arrangement of hems is, of course, part of the construction, but good construction is a real part of the decoration of any article.
Apart from decoration based directly on con-struction, embroidery aims at enrichment of the material, and at lending some interest to ex-tensive empty spaces. The position of such decoration depends largely on the use of the article. A fire-screen, for example, is suitably decorated all over, since its main object is to be decorative, a sort of needlework picture. A table-cover or tea-cloth may be effectively deco-rated at the corners, and as these will droop when
Work from home
Decorative Needlework 189
the cloth is in use, any pattern showing growth must spring from the corners, not towards them. A table-centre is of the same shape as a tea-cloth, but of smaller dimensions. It may be decorated in the same fashion, but this time it is admissible to have the growth of the pat -tern springing from the corners or from the centre. The immediate centre, however, should be left plain, as something is usually placed upon it.
A cushion, on the other hand, may be deco-rated at the edges, or in the centre, or may have a pattern entirely covering it, while a pincushion should have a fair amount of plain space allowed for the pins, so that they need not be stuck into the embroidery.
Bags should usually be decorated at the lower edge. The suggestion of weight and strength lent by the addition of pattern then occurs where strength is most desirable, and there is no danger of the effectiveness of the pattern being spoiled by the gathering of the bag. In the same way, curtains and hangings usually have the pattern placed near the lower edge (unless an all-over pattern is worked); and horizontal rather than vertical lines of pattern should be planned for them, vertical lines being more likely to get lost in the drapery.
The decoration of clothes consists chiefly in the beautifying of hems and edges, and the breaking up of extensive plain spaces by pattern, while avoiding the neighbourhood of gathers.
Exactly as in the case of other articles the lines of the pattern should be consistent with the shape of the garment. A piece of embroidery that might equally well have been placed on a camisole, a table-cloth, or a cushion is not very valuable, while one that appears to have been specially planned for the place where it occurs adds greatly to the interest and beauty of the finished work.
A camisole or bodice or night-dress is suitably decorated round the neck and on the plain portion covering the chest. The decoration of the back below the neck line need not be so elaborate, but should not be omitted. The pattern should be well spaced, not crowded up to the neck edge so as to leave the remainder of the garment looking very blank. If such a crowded effect has been produced by mistake, it may often be remedied somewhat by sprinkling the sur-rounding space with small patterns, even if they only consist of groups of French knots or small daisy stitches.
The armholes of a camisole and the wrist portions of sleeves are decorated to match the neck, but with less fullness of detail, while the skirt edge of a petticoat or the knees of knickers will stand a larger or heavier pattern than neck and sleeves. If a garment is made with a yoke, the yoke really decides the direction and extent of the decoration. Garments which have no actual yoke may be easily and suitably deco-rated by repeating patterns over a space enclosed
Work from home
190 Needlework
by stitchery, so as to simulate a yoke. The yoke in this case may be curved or pointed, although an actual yoke cut in this style might be too difficult for the worker to join to the garment.
The decoration of dresses follows the same general rules as that of underclothing, but the greater variety of styles possible in the con-struction makes a much greater variety of decoration possible. Neck and wrists and skirt hems may always be decorated; so also may pockets, belts, and vests. Good effects are achieved in dresses by force of contrast. For example, if a dress is largely decorated or made of patterned material, the belt and vest and other additions would be left quite plain; while, if the dress is plain, the accessories would be
decorated. A belt with hanging ends is usually plain except at the ends, where the decoration gives an appropriate appearance of weight.
Children's dresses, being small, should never be overloaded with decoration. A woman's dress, owing to its extent, will bear larger pattern, but excess is always to be avoided. It should be noted that in decorating a dress, it is not sufficient to make a pretty garment without reference to the wearer. The same arrangement of pattern does not agree with two very different figures. Broad bands of pattern placed horizontally will reduce the apparent height of the figure, while vertical lines will increase it.
CHAPTER VI
TRANSFERRING A DESIGN TO MATERIAL
The transference of the design from the paper on which it has been planned to the material on which it is to be worked must be carefully done, lest the whole effect be spoiled by in-accuracy. Yet, for children's work, the method must be very simple, and, if possible, speedy.
For simple patterns, tacking would be a simple and cleanly method of working. The
design, traced on very thin paper, would be pinned on to the material and the pattern followed by small tacking stitches, the paper being afterwards torn away. For an intricate design, this method is not very suitable, since it would be very laborious, and there would be danger of inaccuracy due to slight movements of the paper.
Work from home
Decorative Needlework 191
For simple patterns to be frequently repeated, it is a good plan to make on stiff paper one exact copy of the repeat. If this pattern is carefully cut out, the paper may be used as a stencil, or, if large enough, the cut-out pattern may itself be used for tracing, being moved from point to point as required. A sharp-pointed pencil should be used to trace the pattern, a colored pencil being preferable to a black lead one, which is apt to leave a dingy trace on the embroidery-thread, especially in white work. Scallops may be traced on cloth in this way, by first planning a few scallops on firm paper, cutting out the outer edge, and then tracing round this edge on the material. The paper would be moved along the required line until the complete series is traced out. When the outer edge has been completed in this way, the paper may be cut by the inner scalloped edge, and the process repeated to finish the scallops.
More elaborate designs may be traced over carbon paper, which can be had in various colours, so that it may be accommodated to
light or dark materials. The design must first be very accurately drawn on paper, and then pinned into position on the material. A piece of carbon paper, of color contrasting with the background, is slipped under the design but not pinned. A sharp-pointed pencil or a blunt knitting-needle are quite good instruments to use for tracing over the lines of the pattern. The line produced should be thin, but clear, and the instrument used should not be sharp enough to tear the paper, which will often have to be used a second time if two similar portions are required, as in a sleeve design. The worker must not lean upon the carbon paper, lest the color be transferred in a mass to the cloth. If the work is extensive, a portion only should be transferred at a time, as this kind of tracing is not perfectly durable.
There are other more elaborate and more lasting ways of tracing designs on to material, but they demand much more time for execution, and are not necessary for simple work. Those described will be found sufficient for such work as can be produced by ordinary pupils.

Work from home
Section V—REPAIRING
CHAPTER I
REPAIRING
Repairing is essentially practical. work. It is as important that a girl should learn how to keep clothes in good order as that she should be able to make them. The work is naturally less attractive than making, as it lacks the flavor of adventure imparted by a piece of fresh new material. Worn garments, also, are less easy and pleasant to handle.
Yet there is pleasure in the freshened ap-pearance of a well-repaired garment, and a good deal of interest may be aroused by the endeavor to make the repair as little noticeable as possible. Theoretical lessons on the methods of darning and patching, in which the pupil works on material obviously new, are necessary before actual garments are darned and patched, but they will not cause a girl to form the habit of keeping her clothes in good order, a habit which tends so largely to create self-respect. It is necessary to show how actual articles can be repaired.
(D108)
This is the lesson, however, which it is most difficult to arrange. A regular monthly lesson in practical mending would be an excellent plan if one could ensure a suitable and sufficient supply of clean articles requiring the sort of mending the pupils are capable of doing. The disadvantage of this plan is the long period of time between lessons, so that if a piece of work proves too long to be overtaken in one lesson, it cannot be held over to the next. As the chief thing to be learned in practical mending is that each article must be treated on its own merits, it is not of great importance that a class should have sim-ultaneous practice, so long as each girl learns to mend real things when convenient. The problem must be solved in different ways in different schools.
In the first place, it is important to expect a girl who has learned to sew to make some attempt to keep her clothes in order. A poor
193 ♦ 13
Work from home
194 Needlework
repair is better than no repair at all. School needlework is not practical if a girl is learning to scallop the edges of a camisole while her dress is fastened by pins, or her pinafore has the hem torn off and not replaced. The garments worn in school may therefore offer occasional opportunity for the practice of repairing, even if one girl should sew a button on another's dress.
If possible, however, garments or other articles should be brought to school for mending. This involves a co-operation between school and home which is to the advantage of each. The teacher might sometimes be able to supply things, but the advantages of mending come home more emphatically to the pupils' minds if they are themselves benefited by their work.
Mending includes far more than darning and patching, which are really rather difficult work, suitable for pupils in senior or supplementary classes. Patching, in particular, need only be attempted when a girl can handle her needle pretty freely, for the easiest patch on a real gar-ment is more difficult than a more exacting piece of work on a small piece of cloth. The follow-ing list of lessons shows how practically every stitch and process learned may be used in repair-ing as well as in making, and the practice of mending encouraged even among quite young pupils.
NOTE. — Some of the lessons suggested below may appear needless, as there is practically no difference between sewing tape strings, for example, on to an old
garment or on to a new one. But there are good reasons for including them. First, every satisfactory repair helps to strengthen the habit of keeping things in good order. Second, there is usually a remnant of old material or previous sewing to be removed before the repair is begun. A careless worker is apt to neglect this fact. Third, repeated practice is necessary to make a girl expert even in such an easy exercise as sewing on a button. Suppose a girl has made a garment re-quiring three buttons. In a practice lesson she learns how to sew on buttons. Then she sews buttons on the garment she has made. But it would take her a long time to make another garment so that she might sew buttons on it. Meanwhile there are probably several garments at home deprived of buttons by rough handling at the laundry and in other ways. These would give the necessary exercise before the details learnt in the practice lesson are forgotten.
1. Large handkerchiefs with hem-stitched borders torn away may be freshly hemmed as small handkerchiefs for children.
2. New hems may be made and hemmed or decorated on pinafores or other simple garments.
3. Fresh tape strings may be run through bags or garments.
4. Petticoats, pinafores, &c., may be lengthened or repaired by false hems.
5. Tapes or buttons may be sewn on afresh. 6. Articles worn thin may be darned. Darn
ing of stockings (especially black stockings) should follow darning of easier materials, e.g. woolen underclothing, bed- or table-linen, &c.
7. Trimmings may be removed, and fresh trimmings sewn on.
Work from home
Repairing 195
8. Old garments may be turned into dusters by cutting up and machine stitching the best pieces. This gives excellent machine-stitching practice.
9. Buttonholes may be repaired by fresh stitch ing (over a new piece of material if necessary).
10. Practice lessons would be given in darning tears, before attempting darning of actual tears on garments.
11. Similarly, lessons would be given in darn ing holes in linen, woolen, and lastly in knitted materials, after which real articles may be mended.
12. Special lessons would be required on the typical methods of patching, after which easy patching may be done on real garments.
13. Garments worn at seams, gathers, and other awkward places may be patched. This necessitates much unpicking and manipulation of material, and is quite advanced work.
14. Collars, bands, cuffs, &c, which wear out more quickly than the rest of the garment, may be taken off and renewed, or replaced by some other method of finishing. 15- Small garments may be cut and made from the best parts of old ones. This last is scarcely a lesson in repairing, but
it is a very good and interesting lesson in making the best of things. The resulting article may be a surprise to the worker herself, since, although she must form a general plan to begin with, she must afterwards accommodate her design to the exigencies of the material. If a supply of partially used garments were available, this sort of renovation might provide occasion for teaching economy in very poor schools, where garments fit to mend are not procurable, and money for new material is scarce.
Mending must never be done just for the sake of mending, but only to render an article once more usable and respectable.
It is generally easier to mend home-made garments than ready-made ones, partly because they are of better quality and workmanship, and partly because similar mending materials are available. When an article is brought to school for mending, the appropriate mending material should, if possible, be brought along with it. If not, recourse must be had to the school supply of odds and ends, which, it has already been suggested, teacher and pupils might gradually contribute, with a view to giving variety and practical value to the work of making as well as mending.
Work from home
196 Needlework
CHAPTER II
GENERAL PRINCIPLES OF REPAIRING
Before beginning to mend an article, three things require consideration, viz. ( i ) the value of the article, (2) the material and thread re-quired, (3) the kind of repair necessary.
1. An article may not be worth mending at all, but only fit to cut up for towels or dusters. It may be worth only a slight repair to make it "serve another turn". If it is really in good condition, except for a slight damage, it is worth a good deal of trouble in repairing.
2. Both material and thread should match the article to be mended as nearly as possible in color and texture.
For articles worn thin, slightly used material is better than new. Similar, but rather finer, material may also be used.
For washed articles, washed patching material should be used. Washed material is not so aggressive in color, does not contain dressing, and is already shrunk, if shrinkage is a con-sideration.
If material to match can by no means be procured, it may be worth while to have recourse to contrast. If the damage is in a conspicuous
place, an added decoration may serve, e.g. an embroidered or lace motif on underclothing, a band of trimming on a dress or a coat.
Thread also must be carefully matched in order to produce a really good effect. It is most important that the color of the material should be matched exactly, but, if possible, the nature of the material should also be matched.
For darning-threads this is not always easy. Sewing-threads should be well twisted and firm, but for darning, a soft, loosely-twisted thread fills in the worn or empty space more satisfac-torily. For darning cotton materials, a soft embroidery-cotton is best; for linen, a flax thread; and for silk, a silk thread must be used to give the proper brilliance. Mending-wools may be used on dress material with coarse threads. But for flannel or other woven woolens, it is nearly impossible to find a worsted thread that will not drag in darning, so recourse is usually had to either cotton or silk, according to the quality and appearance of the material. But while woolen material may be successfully darned with cotton, it is obvious that cotton may not
Work from home
Repairing
be darned with wool, even for the sake of correct color, as the treatment which cotton undergoes in the laundry would turn a woolen darn into a piece of felt. For dress materials, where the chief aim is the invisibility of the repair, nothing is more suitable than a few threads drawn out of another piece of the same material. The selvedge threads will usually be found most satisfactory, but even they do not usually last long in the needle. With frequent changes, however, a very successful result can be obtained.
The same care should be taken in choosing threads with which to sew on a patch.
3. In choosing the method of repairing, select the one which produces the best result in the shortest time. It is often much more satisfactory to replace a small portion of a garment by a new piece rather than spend time on laborious darn-ing or patching. A great deal depends on how long an article is likely to outlast repairing.
The following are general rules for darning and patching:—
Woolen, linen, and dress materials are darned, whenever possible, but all may be patched if the damage is too extensive for darning.
Cottons, especially underclothing, are usually patched, but cotton sheets, pillow-cases, &c., are often darned at first.
Articles of a more decorative nature, e.g. table-cloths, tea- or tray-cloths, doyleys, should either be darned, or, if worth while, have some decoration added to cover the damage. Crochet motifs are often useful in this way.
Knitted stuffs are always darned, but very fine stockinet underclothing, where large worn places or holes occur, may be more successfully patched with similar material.
These principles and rules will not be taught to pupils all at once or in any formal lesson, but will be the outcome of a number of practical lessons in which the best treatment of different kinds of goods has been discussed. Girls are always keenly interested in the practical side of the matter.
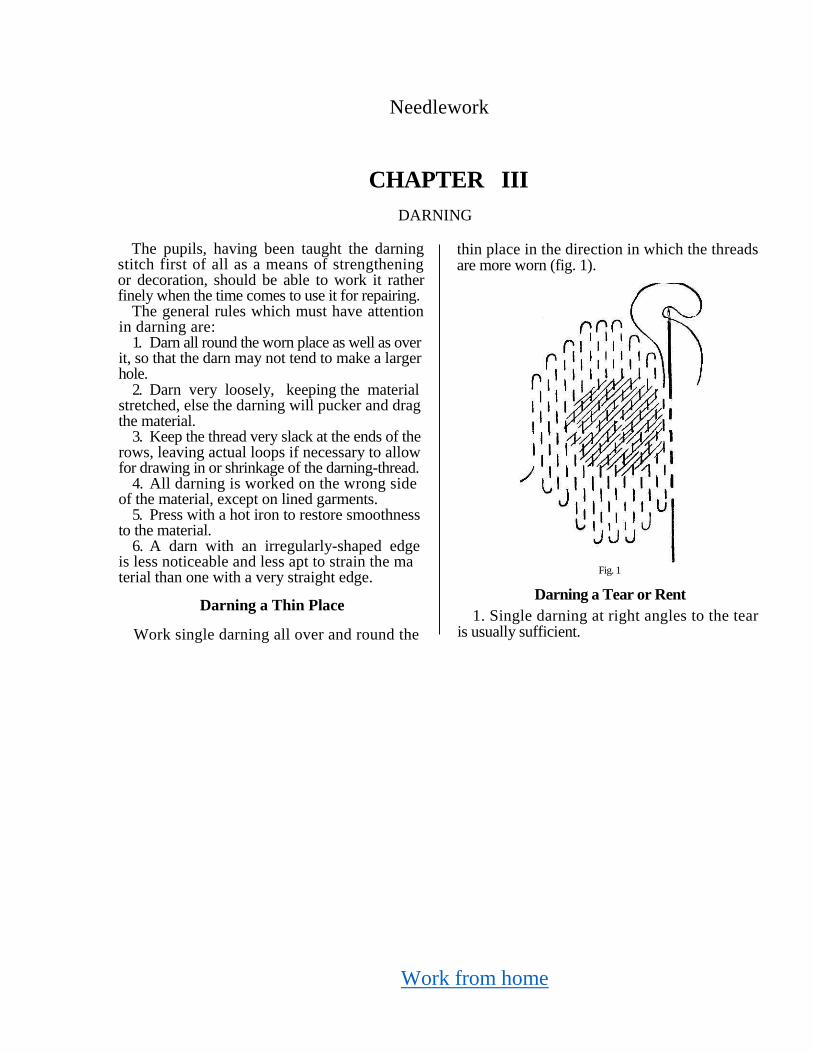
Work from home
Needlework
CHAPTER III
DARNING
The pupils, having been taught the darning stitch first of all as a means of strengthening or decoration, should be able to work it rather finely when the time comes to use it for repairing.
The general rules which must have attention in darning are:
1. Darn all round the worn place as well as over it, so that the darn may not tend to make a larger hole.
2. Darn very loosely, keeping the material stretched, else the darning will pucker and drag the material.
3. Keep the thread very slack at the ends of the rows, leaving actual loops if necessary to allow for drawing in or shrinkage of the darning-thread.
4. All darning is worked on the wrong side of the material, except on lined garments.
5. Press with a hot iron to restore smoothness to the material.
6. A darn with an irregularly-shaped edge is less noticeable and less apt to strain the ma terial than one with a very straight edge.
Darning a Thin Place
Work single darning all over and round the
thin place in the direction in which the threads are more worn (fig. 1).
Fig. 1
Darning a Tear or Rent
1. Single darning at right angles to the tear is usually sufficient.
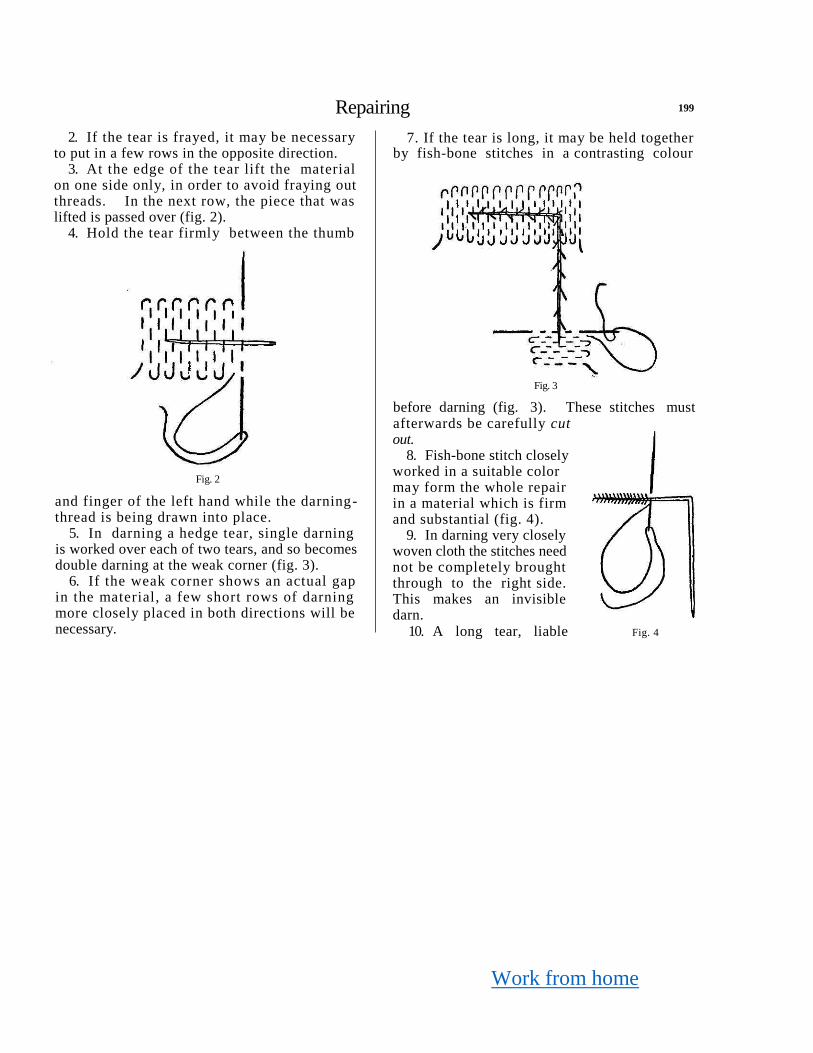
Work from home
Repairing 199
2. If the tear is frayed, it may be necessary to put in a few rows in the opposite direction.
3. At the edge of the tear lift the material on one side only, in order to avoid fraying out threads. In the next row, the piece that was lifted is passed over (fig. 2).
4. Hold the tear firmly between the thumb
Fig. 2
and finger of the left hand while the darning-thread is being drawn into place.
5. In darning a hedge tear, single darning is worked over each of two tears, and so becomes double darning at the weak corner (fig. 3).
6. If the weak corner shows an actual gap in the material, a few short rows of darning more closely placed in both directions will be necessary.
7. If the tear is long, it may be held together by fish-bone stitches in a contrasting colour
Fig. 3
before darning (fig. 3). These stitches must afterwards be carefully cut out.
8. Fish-bone stitch closely worked in a suitable color may form the whole repair in a material which is firm and substantial (fig. 4).
9. In darning very closely woven cloth the stitches need not be completely brought through to the right side. This makes an invisible darn.
10. A long tear, liable Fig. 4
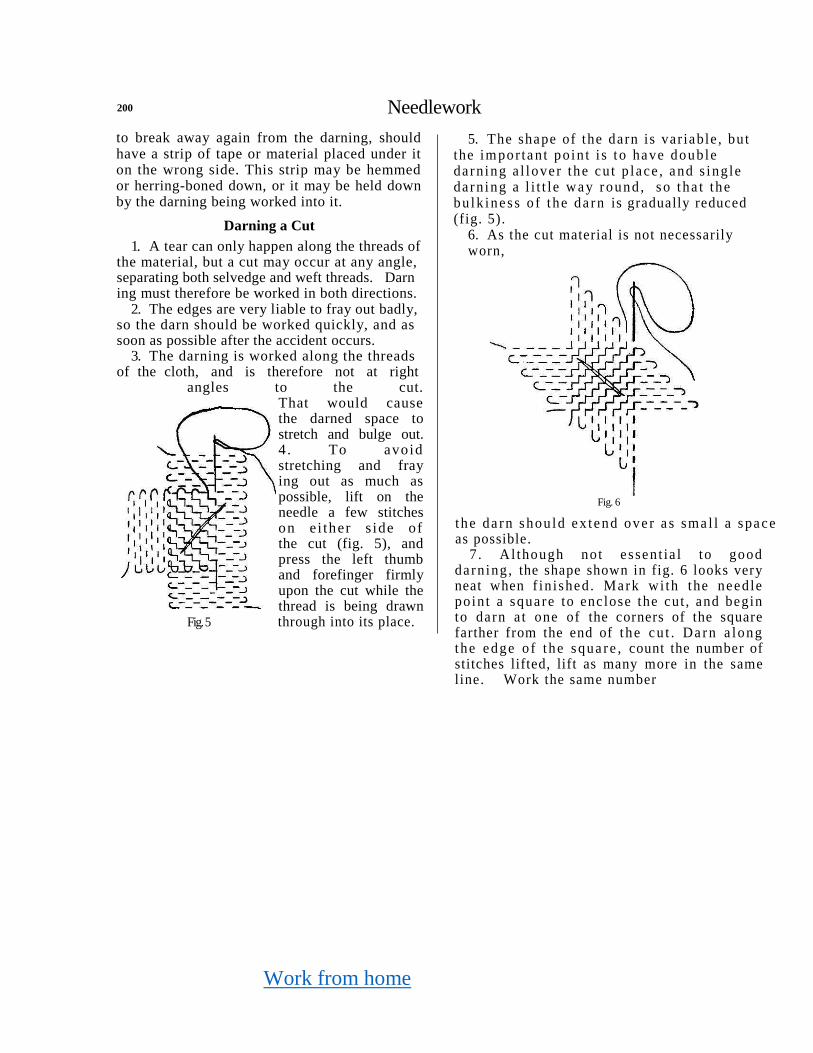
Work from home
200 Needlework
to break away again from the darning, should have a strip of tape or material placed under it on the wrong side. This strip may be hemmed or herring-boned down, or it may be held down by the darning being worked into it.
Darning a Cut
1. A tear can only happen along the threads of the material, but a cut may occur at any angle, separating both selvedge and weft threads. Darn ing must therefore be worked in both directions.
2. The edges are very liable to fray out badly, so the darn should be worked quickly, and as soon as possible after the accident occurs.
3. The darning is worked along the threads of the cloth, and is therefore not at right
angles to the cut. That would cause the darned space to stretch and bulge out. 4 . To avoid stretching and fray ing out as much as possible, lift on the needle a few stitches on ei ther s ide of the cut (fig. 5), and press the left thumb and forefinger firmly upon the cut while the thread is being drawn
Fig. 5 through into its place.
5. The shape of the darn is var iable , bu t the im por ta n t poin t i s t o have double da rn ing a l lover the cu t p lace , a nd s ingle da rn ing a l i t t l e wa y round , so t ha t the bu lk ine s s o f t he da rn is gradually reduced (fig. 5).
6. As the cut material is not necessarily worn,
Fig. 6
t he da rn shou ld e x t e nd ove r a s sma l l a spa ce as possible.
7 . Al though not e ssent ia l to good da rn ing , the shape shown in fig. 6 looks very neat when f in i shed . Mark wi th the needle poin t a square to enclose the cut , and begin to darn a t one of the corners of the square farther from the end of t he c u t . Da rn a long the e dge o f t he squa re , count the number of stitches lifted, lift as many more in the same line. Work the same number
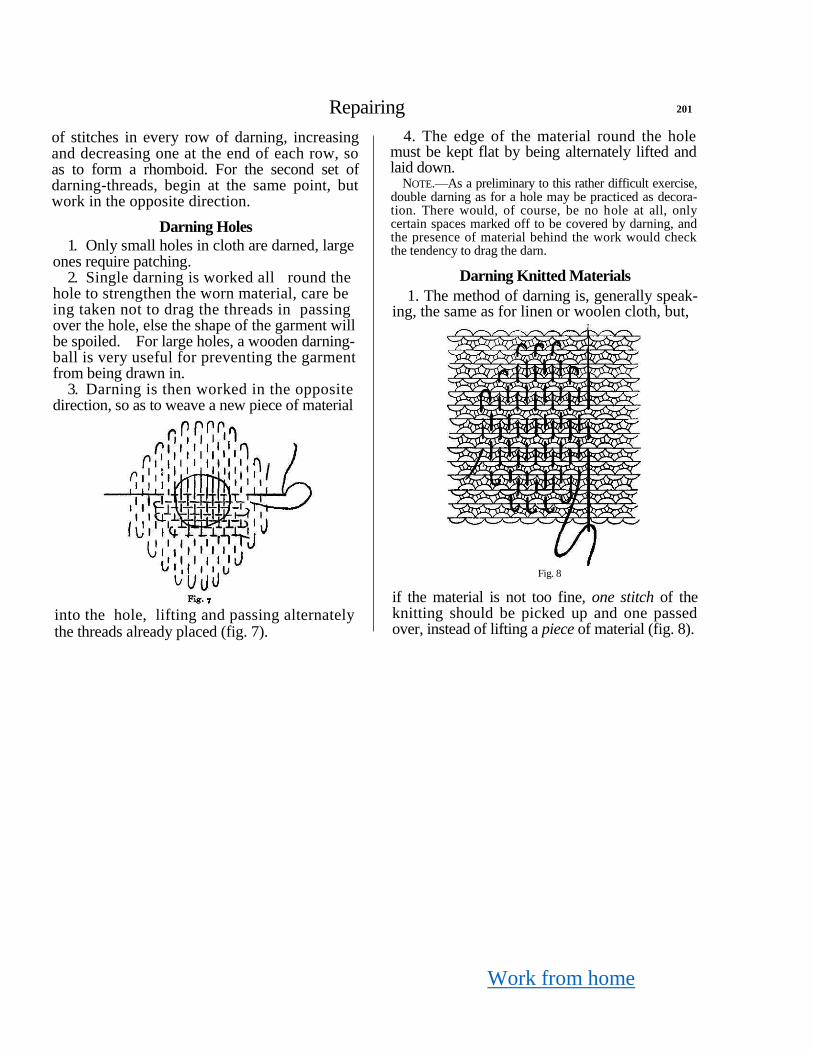
Work from home
Repairing 201
of stitches in every row of darning, increasing and decreasing one at the end of each row, so as to form a rhomboid. For the second set of darning-threads, begin at the same point, but work in the opposite direction.
Darning Holes
1. Only small holes in cloth are darned, large ones require patching.
2. Single darning is worked all round the hole to strengthen the worn material, care be ing taken not to drag the threads in passing over the hole, else the shape of the garment will be spoiled. For large holes, a wooden darning- ball is very useful for preventing the garment from being drawn in.
3. Darning is then worked in the opposite direction, so as to weave a new piece of material
into the hole, lifting and passing alternately the threads already placed (fig. 7).
4. The edge of the material round the hole must be kept flat by being alternately lifted and laid down.
NOTE.—As a preliminary to this rather difficult exercise, double darning as for a hole may be practiced as decora-tion. There would, of course, be no hole at all, only certain spaces marked off to be covered by darning, and the presence of material behind the work would check the tendency to drag the darn.
Darning Knitted Materials
1. The method of darning is, generally speak-ing, the same as for linen or woolen cloth, but,
Fig. 8
if the material is not too fine, one stitch of the knitting should be picked up and one passed over, instead of lifting a piece of material (fig. 8).
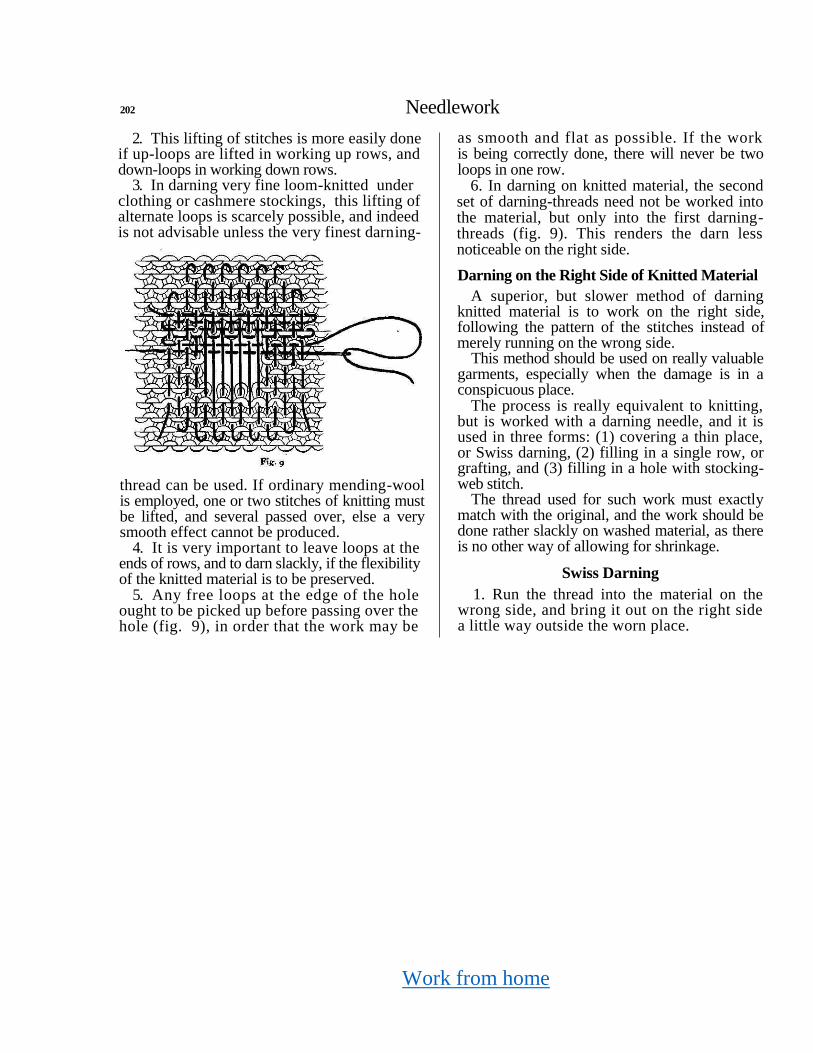
Work from home
202 Needlework
2. This lifting of stitches is more easily done if up-loops are lifted in working up rows, and down-loops in working down rows.
3. In darning very fine loom-knitted under clothing or cashmere stockings, this lifting of alternate loops is scarcely possible, and indeed is not advisable unless the very finest darning-
thread can be used. If ordinary mending-wool is employed, one or two stitches of knitting must be lifted, and several passed over, else a very smooth effect cannot be produced.
4. It is very important to leave loops at the ends of rows, and to darn slackly, if the flexibility of the knitted material is to be preserved.
5. Any free loops at the edge of the hole ought to be picked up before passing over the hole (fig. 9), in order that the work may be
as smooth and flat as possible. If the work is being correctly done, there will never be two loops in one row.
6. In darning on knitted material, the second set of darning-threads need not be worked into the material, but only into the first darning-threads (fig. 9). This renders the darn less noticeable on the right side.
Darning on the Right Side of Knitted Material
A superior, but slower method of darning knitted material is to work on the right side, following the pattern of the stitches instead of merely running on the wrong side.
This method should be used on really valuable garments, especially when the damage is in a conspicuous place.
The process is really equivalent to knitting, but is worked with a darning needle, and it is used in three forms: (1) covering a thin place, or Swiss darning, (2) filling in a single row, or grafting, and (3) filling in a hole with stocking-web stitch.
The thread used for such work must exactly match with the original, and the work should be done rather slackly on washed material, as there is no other way of allowing for shrinkage.
Swiss Darning
1. Run the thread into the material on the wrong side, and bring it out on the right side a little way outside the worn place.

Work from home
Repairing 203
2. The work is done from right to left. 3. From where the needle comes out, it will
be seen that two threads of the original knitting come, one sloping to the right, one to the left.
other horizontal stitch, and proceed in the same fashion, the needle being put in always a little to the right of where it came out, and on a higher or lower level.
Fig. 10
They may slope either upwards or downwards (fig. 10).
4. Follow the thread sloping towards the right, and take a stitch horizontally, bringing out the needle where the original thread comes out.
5. Follow it back again to the place where the needle was first brought through, take an-
6. Make quite sure that each row of darning contains a number of complete stitches. A complete stitch has two slopes— ٧ or ٨.
7. To pass to the next row (without increasing the number of stitches) slip the needle one bar upwards or downwards instead of making a horizontal stitch. This brings the needle out
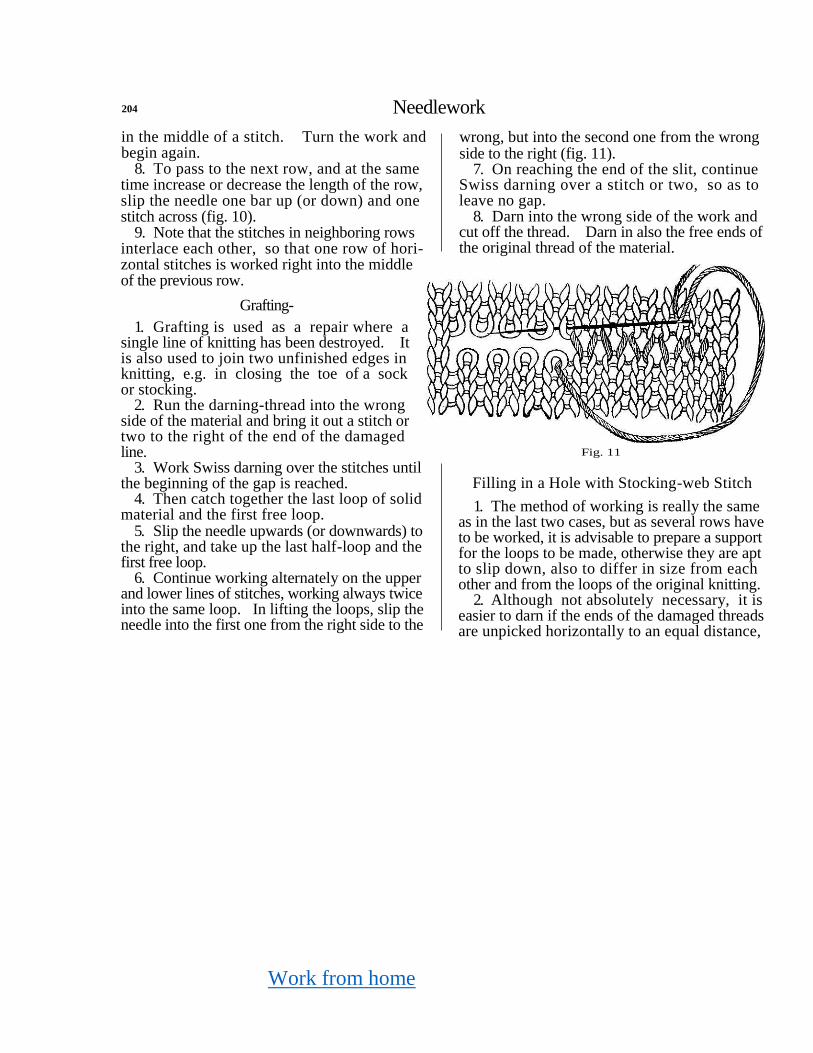
Work from home
204 Needlework
in the middle of a stitch. Turn the work and begin again.
8. To pass to the next row, and at the same time increase or decrease the length of the row, slip the needle one bar up (or down) and one stitch across (fig. 10).
9. Note that the stitches in neighboring rows interlace each other, so that one row of hori- zontal stitches is worked right into the middle of the previous row.
Grafting-
1. Grafting is used as a repair where a single line of knitting has been destroyed. It is also used to join two unfinished edges in knitting, e.g. in closing the toe of a sock or stocking.
2. Run the darning-thread into the wrong side of the material and bring it out a stitch or two to the right of the end of the damaged line.
3. Work Swiss darning over the stitches until the beginning of the gap is reached.
4. Then catch together the last loop of solid material and the first free loop.
5. Slip the needle upwards (or downwards) to the right, and take up the last half-loop and the first free loop.
6. Continue working alternately on the upper and lower lines of stitches, working always twice into the same loop. In lifting the loops, slip the needle into the first one from the right side to the
wrong, but into the second one from the wrong
side to the right (fig. 11). 7. On reaching the end of the slit, continue
Swiss darning over a stitch or two, so as to leave no gap.
8. Darn into the wrong side of the work and cut off the thread. Darn in also the free ends of the original thread of the material.
Fig. 11
Filling in a Hole with Stocking-web Stitch
1. The method of working is really the same as in the last two cases, but as several rows have to be worked, it is advisable to prepare a support for the loops to be made, otherwise they are apt to slip down, also to differ in size from each other and from the loops of the original knitting.
2. Although not absolutely necessary, it is easier to darn if the ends of the damaged threads are unpicked horizontally to an equal distance,
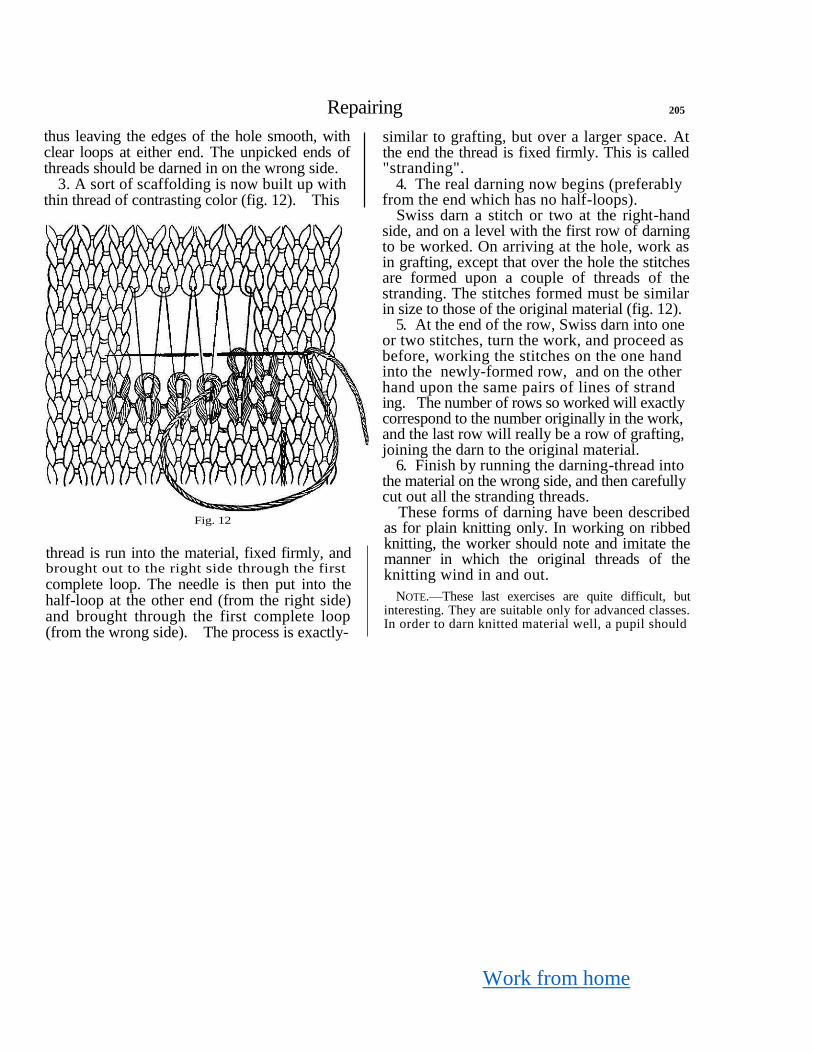
Work from home
Repairing 205
thus leaving the edges of the hole smooth, with clear loops at either end. The unpicked ends of threads should be darned in on the wrong side.
3. A sort of scaffolding is now built up with thin thread of contrasting color (fig. 12). This
Fig. 12
thread is run into the material, fixed firmly, and brought out to the right side through the first
complete loop. The needle is then put into the half-loop at the other end (from the right side) and brought through the first complete loop (from the wrong side). The process is exactly-
similar to grafting, but over a larger space. At the end the thread is fixed firmly. This is called "stranding".
4. The real darning now begins (preferably from the end which has no half-loops).
Swiss darn a stitch or two at the right-hand side, and on a level with the first row of darning to be worked. On arriving at the hole, work as in grafting, except that over the hole the stitches are formed upon a couple of threads of the stranding. The stitches formed must be similar in size to those of the original material (fig. 12).
5. At the end of the row, Swiss darn into one or two stitches, turn the work, and proceed as before, working the stitches on the one hand into the newly-formed row, and on the other hand upon the same pairs of lines of strand ing. The number of rows so worked will exactly correspond to the number originally in the work, and the last row will really be a row of grafting, joining the darn to the original material.
6. Finish by running the darning-thread into the material on the wrong side, and then carefully cut out all the stranding threads.
These forms of darning have been described as for plain knitting only. In working on ribbed knitting, the worker should note and imitate the manner in which the original threads of the knitting wind in and out.
NOTE.—These last exercises are quite difficult, but interesting. They are suitable only for advanced classes. In order to darn knitted material well, a pupil should

Work from home
2O6 Needlework
understand the construction of the material. This is best learned by undoing slowly a little piece of old knit-ting, observing how the threads travel from side to side. The unpicked thread retains the twist. It is even more instructive to unpick a thread from the middle of a piece than from the free edge. For practice in darning, before
real things can be worked upon, woollen stocking web, manufactured by E. J. Arnold & Son, is much superior to the ordinary cotton make. Any old light-coloured knitted material, however, would serve the purpose equally well.
CHAPTER IV
PATCHING
The precise method of arranging a patch must depend on the use of the article being repaired and the material of which it is made. While a merely tidy patch is quite sufficient for under-clothing, a good deal of trouble may be neces-sary to produce a satisfactory repair on dresses or ornamental articles.
There are a few general rules which should be obeyed, and there are a few typical methods of working which should be mastered first of all, but all methods admit of variation in order that a better effect may be obtained in any special piece of work.
General Rules in Patching
1. The patch must always be cut large enough to cover the hole, the worn part around it, and a space around that. A patch is usually fixed with two rows of sewing, and both must rest on
a firm piece of material, else the patch will only cause a larger hole.
NOTE.—Girls should have practice in finding and cutting the necessary patch. Even in theoretical lessons they may have such practice if a fairly large piece of cloth is handed out, the hole being cut so as to leave sufficient whole ma-terial to cut the patch from (fig. i).
Another way would be to hand out two pieces of ma-terial, one with a hole, and another, which may be of any shape, from which to cut the patch. If the class possesses a selection of odd pieces of material, these may be used to make the theoretical lesson as practical as may be. Each girl, having a piece of cloth with a hole in it (not neces-sarily exactly like her neighbor’s), may seek among the odd pieces the kind of material she requires to mend with. While choosing pieces to represent garments, the teacher would, of course, make sure that enough similar material was left to serve as patches.
It is always difficult for girls to realize the size of the patch required as compared with the size of the hole. They usually cut too small a
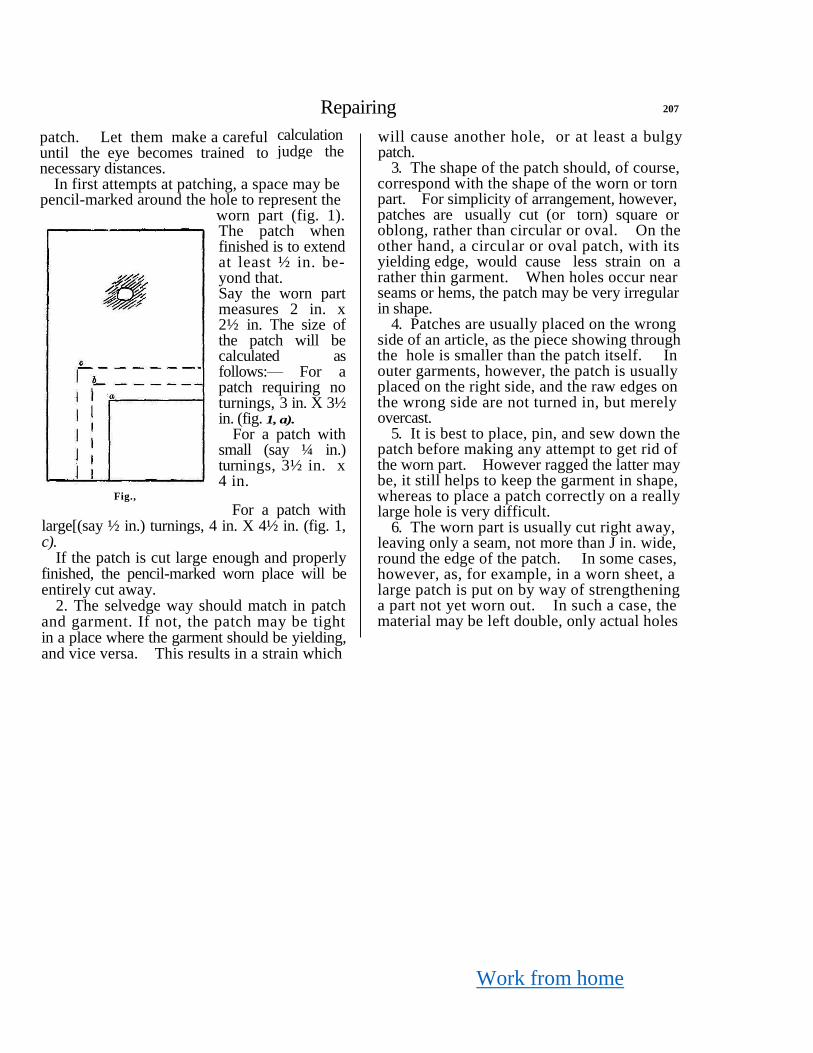
Work from home
Repairing 207
patch. Let them make a careful until the eye becomes trained to
necessary distances. In first attempts at patching, a space may be
pencil-marked around the hole to represent the
worn part (fig. 1). The patch when finished is to extend at least ½ in. be-yond that. Say the worn part measures 2 in. x 2½ in. The size of the patch will be calculated as follows:— For a patch requiring no turnings, 3 in. X 3½ in. (fig. 1, a).
For a patch with small (say ¼ in.) turnings, 3½ in. x 4 in.
Fig.,
For a patch with large[(say ½ in.) turnings, 4 in. X 4½ in. (fig. 1, c).
If the patch is cut large enough and properly finished, the pencil-marked worn place will be entirely cut away.
2. The selvedge way should match in patch and garment. If not, the patch may be tight in a place where the garment should be yielding, and vice versa. This results in a strain which
will cause another hole, or at least a bulgy patch.
3. The shape of the patch should, of course, correspond with the shape of the worn or torn part. For simplicity of arrangement, however, patches are usually cut (or torn) square or oblong, rather than circular or oval. On the other hand, a circular or oval patch, with its yielding edge, would cause less strain on a rather thin garment. When holes occur near seams or hems, the patch may be very irregular in shape.
4. Patches are usually placed on the wrong side of an article, as the piece showing through the hole is smaller than the patch itself. In outer garments, however, the patch is usually placed on the right side, and the raw edges on the wrong side are not turned in, but merely overcast.
5. It is best to place, pin, and sew down the patch before making any attempt to get rid of the worn part. However ragged the latter may be, it still helps to keep the garment in shape, whereas to place a patch correctly on a really large hole is very difficult.
6. The worn part is usually cut right away, leaving only a seam, not more than J in. wide, round the edge of the patch. In some cases, however, as, for example, in a worn sheet, a large patch is put on by way of strengthening a part not yet worn out. In such a case, the material may be left double, only actual holes
calculation judge the
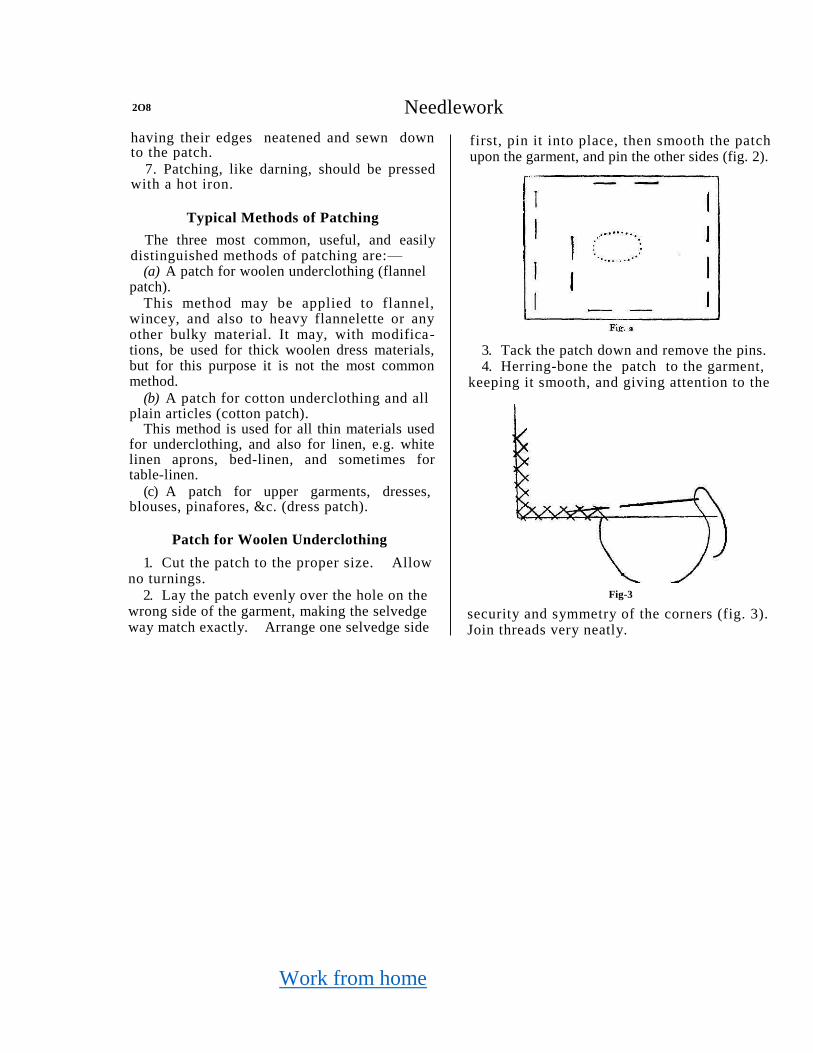
Work from home
2O8 Needlework
having their edges neatened and sewn down to the patch.
7. Patching, like darning, should be pressed with a hot iron.
Typical Methods of Patching
The three most common, useful, and easily distinguished methods of patching are:—
(a) A patch for woolen underclothing (flannel patch).
This method may be applied to flannel, wincey, and also to heavy flannelette or any other bulky material. It may, with modifica-tions, be used for thick woolen dress materials, but for this purpose it is not the most common method.
(b) A patch for cotton underclothing and all plain articles (cotton patch).
This method is used for all thin materials used for underclothing, and also for linen, e.g. white linen aprons, bed-linen, and sometimes for table-linen.
(c) A patch for upper garments, dresses, blouses, pinafores, &c. (dress patch).
Patch for Woolen Underclothing
1. Cut the patch to the proper size. Allow no turnings.
2. Lay the patch evenly over the hole on the wrong side of the garment, making the selvedge way match exactly. Arrange one selvedge side
first, pin it into place, then smooth the patch upon the garment, and pin the other sides (fig. 2).
3. Tack the patch down and remove the pins. 4. Herring-bone the patch to the garment,
keeping it smooth, and giving attention to the
Fig-3
security and symmetry of the corners (fig. 3). Join threads very neatly.
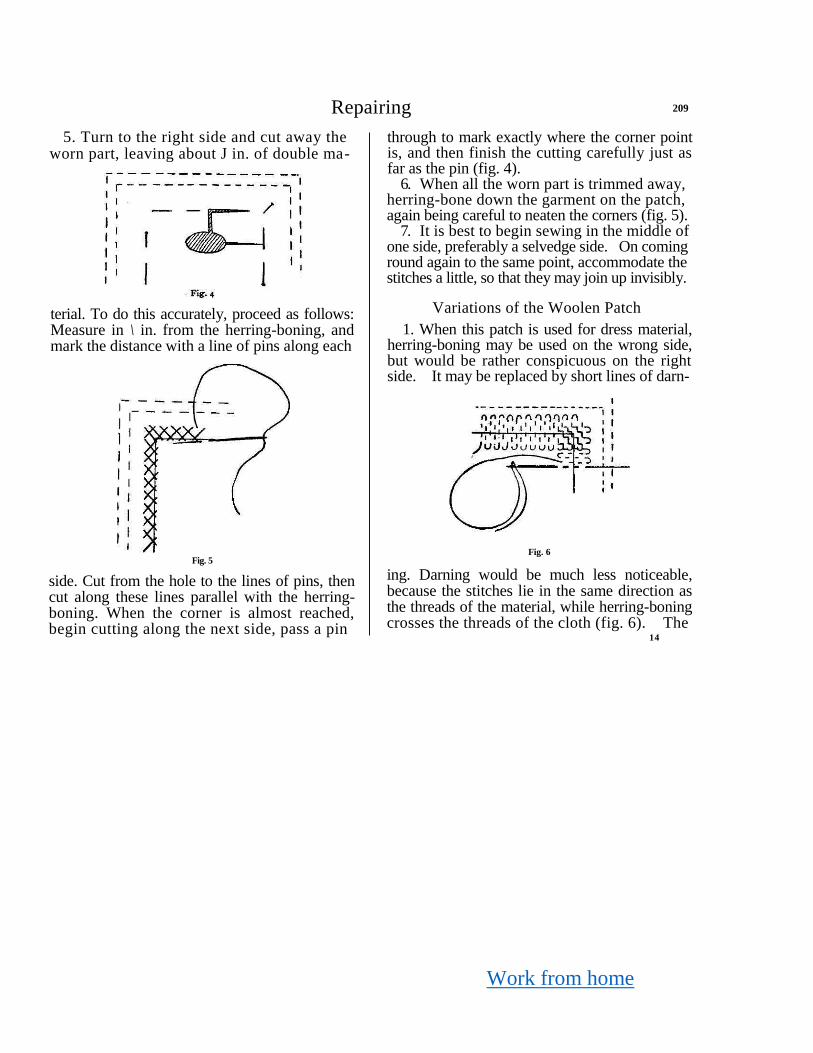
Work from home
Repairing 209
5. Turn to the right side and cut away the worn part, leaving about J in. of double ma-
terial. To do this accurately, proceed as follows: Measure in \ in. from the herring-boning, and mark the distance with a line of pins along each
Fig. 5
side. Cut from the hole to the lines of pins, then cut along these lines parallel with the herring-boning. When the corner is almost reached, begin cutting along the next side, pass a pin
through to mark exactly where the corner point is, and then finish the cutting carefully just as far as the pin (fig. 4).
6. When all the worn part is trimmed away, herring-bone down the garment on the patch, again being careful to neaten the corners (fig. 5).
7. It is best to begin sewing in the middle of one side, preferably a selvedge side. On coming round again to the same point, accommodate the stitches a little, so that they may join up invisibly.
Variations of the Woolen Patch
1. When this patch is used for dress material, herring-boning may be used on the wrong side, but would be rather conspicuous on the right side. It may be replaced by short lines of darn-
Fig. 6
ing. Darning would be much less noticeable, because the stitches lie in the same direction as the threads of the material, while herring-boning crosses the threads of the cloth (fig. 6). The
14
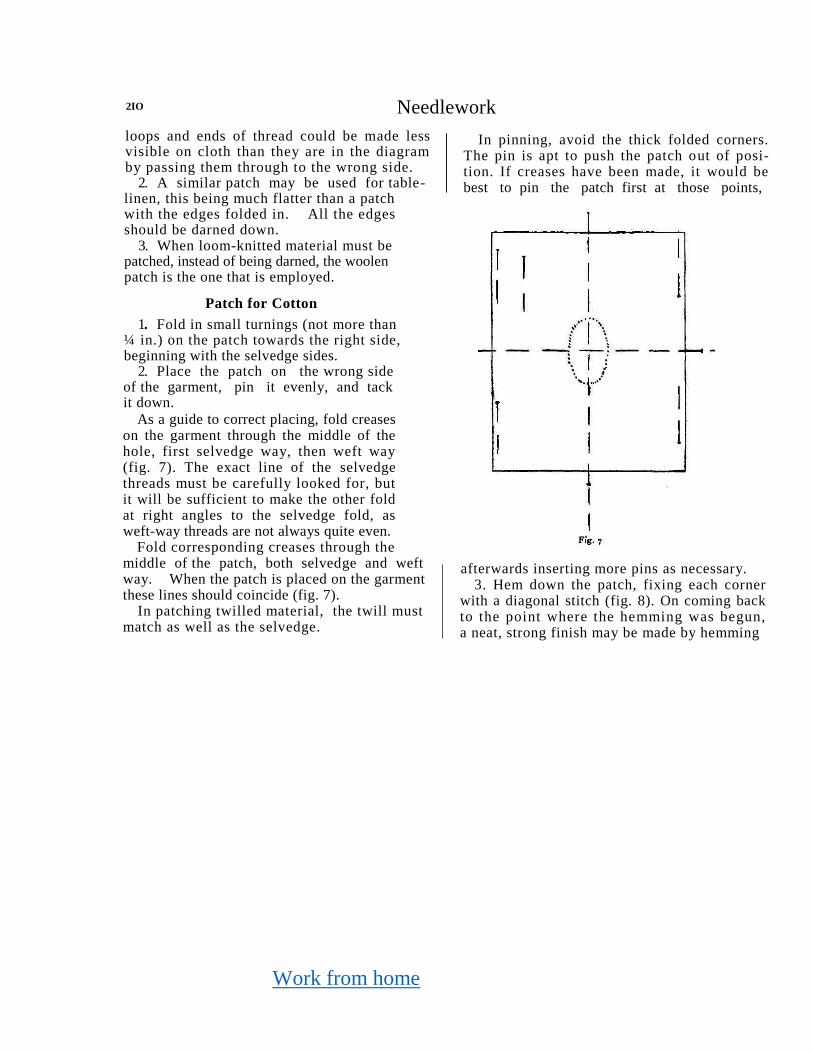
Work from home
2IO Needlework
loops and ends of thread could be made less visible on cloth than they are in the diagram by passing them through to the wrong side.
2. A similar patch may be used for table- linen, this being much flatter than a patch with the edges folded in. All the edges should be darned down.
3. When loom-knitted material must be patched, instead of being darned, the woolen patch is the one that is employed.
Patch for Cotton
1. Fold in small turnings (not more than
¼ in.) on the patch towards the right side, beginning with the selvedge sides.
2. Place the patch on the wrong side of the garment, pin it evenly, and tack it down.
As a guide to correct placing, fold creases on the garment through the middle of the hole, first selvedge way, then weft way (fig. 7). The exact line of the selvedge threads must be carefully looked for, but it will be sufficient to make the other fold at right angles to the selvedge fold, as weft-way threads are not always quite even.
Fold corresponding creases through the middle of the patch, both selvedge and weft way. When the patch is placed on the garment these lines should coincide (fig. 7).
In patching twilled material, the twill must match as well as the selvedge.
In pinning, avoid the thick folded corners. The pin is apt to push the patch out of posi-tion. If creases have been made, it would be best to pin the patch first at those points,
afterwards inserting more pins as necessary.
3. Hem down the patch, fixing each corner with a diagonal stitch (fig. 8). On coming back to the point where the hemming was begun, a neat, strong finish may be made by hemming
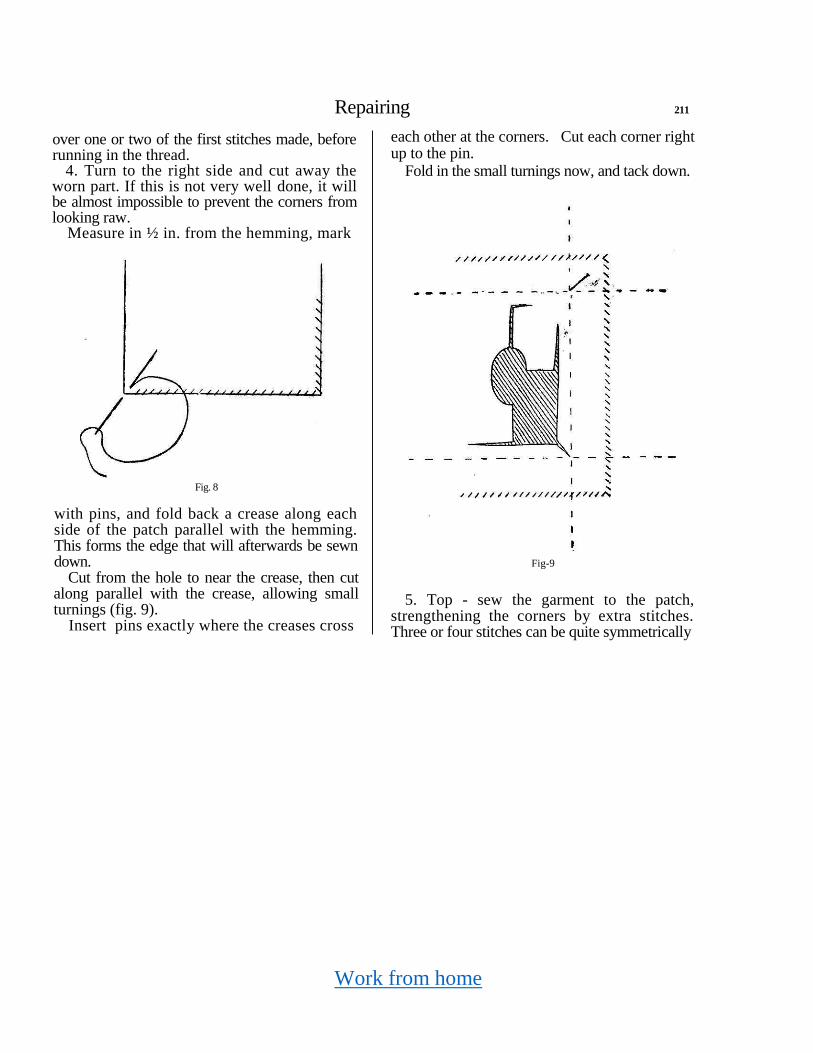
Work from home
Repairing 211
over one or two of the first stitches made, before running in the thread.
4. Turn to the right side and cut away the worn part. If this is not very well done, it will be almost impossible to prevent the corners from looking raw.
Measure in ½ in. from the hemming, mark
Fig. 8
with pins, and fold back a crease along each side of the patch parallel with the hemming. This forms the edge that will afterwards be sewn down.
Cut from the hole to near the crease, then cut along parallel with the crease, allowing small turnings (fig. 9).
Insert pins exactly where the creases cross
each other at the corners. Cut each corner right up to the pin.
Fold in the small turnings now, and tack down.
Fig-9
5. Top - sew the garment to the patch, strengthening the corners by extra stitches. Three or four stitches can be quite symmetrically

Work from home
212 Needlework
worked into the corner (fig. 10). Finish off by top-sewing over the first few stitches made.
Fig. 10
Variations of the Cotton Patch
1. When the material is very thin, or very much worn, hemming is preferable to top- sewing for the sewing of the right side. Top- sewing is better whenever possible, because it is easier to strengthen the weak corners with top- sewing, and because top-sewing appears to draw the two pieces of cloth to the same level, while hemming leaves one above the level of the other.
2. In patching coarse linen, the difficulty of managing the corners on the right side is in creased by the tendency of the cloth to fray out. In order to avoid this difficulty, the patch may be so arranged that the top-sewing is done before any material is cut away. Proceed as follows:
Begin by folding in small turnings on the
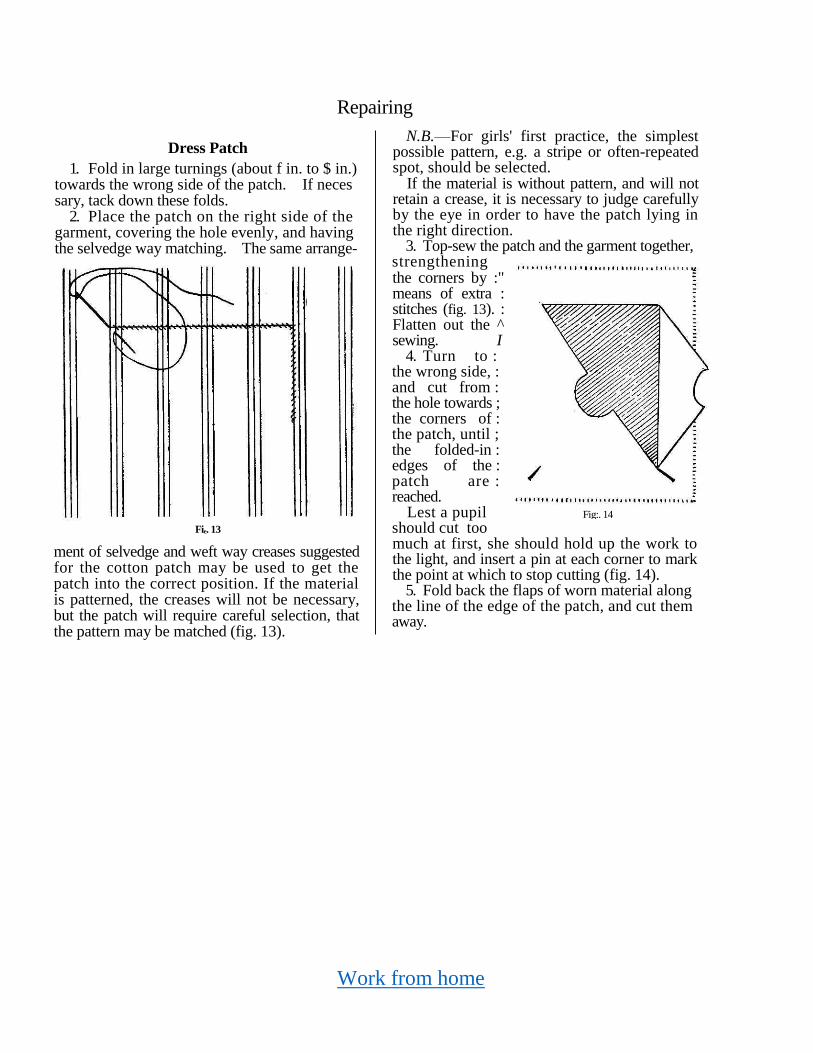
Work from home
Repairing
Dress Patch
1. Fold in large turnings (about f in. to $ in.) towards the wrong side of the patch. If neces sary, tack down these folds.
2. Place the patch on the right side of the garment, covering the hole evenly, and having the selvedge way matching. The same arrange-
Fie. 13
ment of selvedge and weft way creases suggested for the cotton patch may be used to get the patch into the correct position. If the material is patterned, the creases will not be necessary, but the patch will require careful selection, that the pattern may be matched (fig. 13).
N.B.—For girls' first practice, the simplest possible pattern, e.g. a stripe or often-repeated spot, should be selected.
If the material is without pattern, and will not retain a crease, it is necessary to judge carefully by the eye in order to have the patch lying in the right direction.
3. Top-sew the patch and the garment together, strengthening
the corners by :" means of extra : stitches (fig. 13). : Flatten out the ^ sewing. I
4. Turn to : the wrong side, : and cut from : the hole towards ; the corners of : the patch, until ; the folded-in : edges of the : patch are : reached.
Lest a pupil should cut too
much at first, she should hold up the work to the light, and insert a pin at each corner to mark the point at which to stop cutting (fig. 14).
5. Fold back the flaps of worn material along the line of the edge of the patch, and cut them away.
Fig:. 14
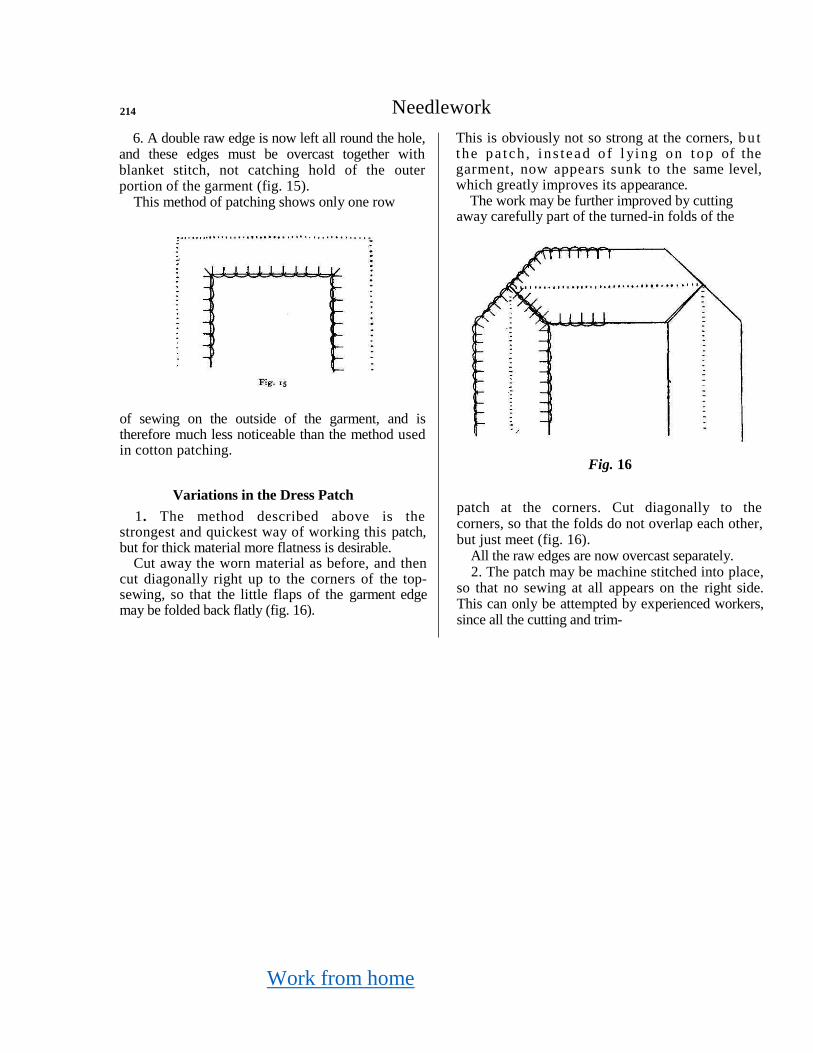
Work from home
214 Needlework
6. A double raw edge is now left all round the hole, and these edges must be overcast together with blanket stitch, not catching hold of the outer portion of the garment (fig. 15).
This method of patching shows only one row
of sewing on the outside of the garment, and is therefore much less noticeable than the method used in cotton patching.
Variations in the Dress Patch
1. The method described above is the strongest and quickest way of working this patch, but for thick material more flatness is desirable.
Cut away the worn material as before, and then cut diagonally right up to the corners of the top-sewing, so that the little flaps of the garment edge may be folded back flatly (fig. 16).
This is obviously not so strong at the corners, bu t t he pa t ch , i ns tead o f l ying on top of the garment, now appears sunk to the same level, which greatly improves its appearance.
The work may be further improved by cutting away carefully part of the turned-in folds of the
Fig. 16
patch at the corners. Cut diagonally to the corners, so that the folds do not overlap each other, but just meet (fig. 16).
All the raw edges are now overcast separately. 2. The patch may be machine stitched into place,
so that no sewing at all appears on the right side. This can only be attempted by experienced workers, since all the cutting and trim-
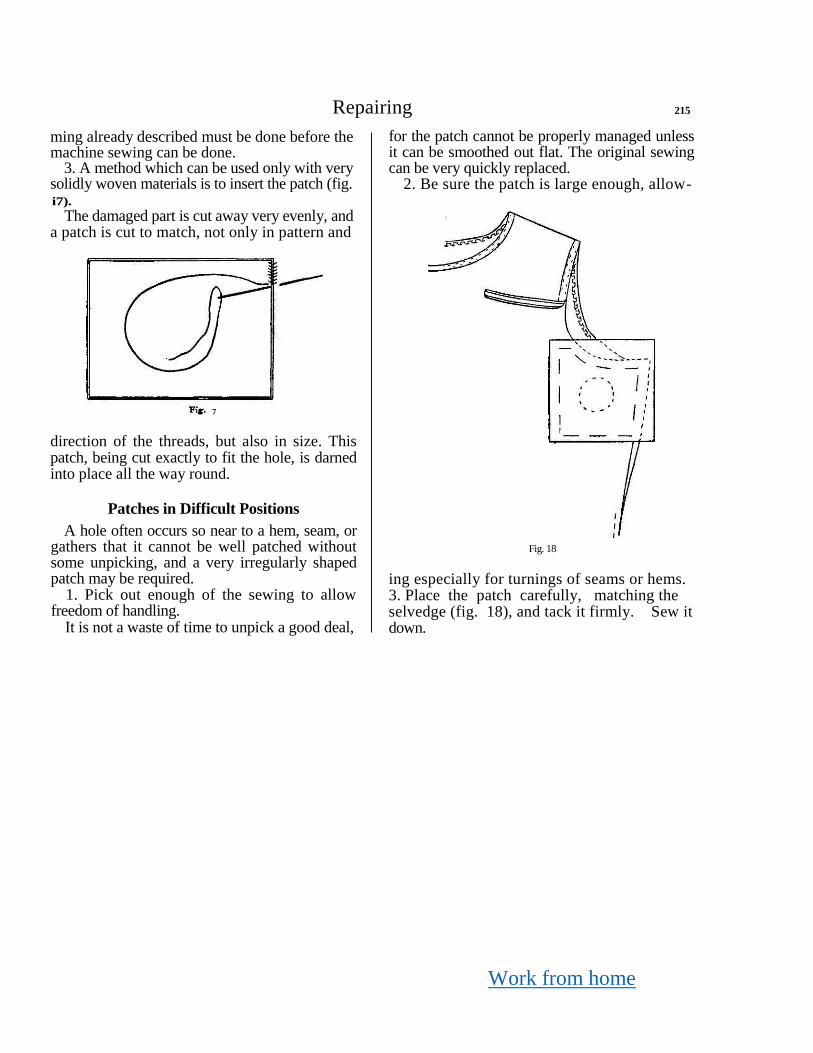
Work from home
Repairing 215
ming already described must be done before the machine sewing can be done.
3. A method which can be used only with very solidly woven materials is to insert the patch (fig. i7).
The damaged part is cut away very evenly, and a patch is cut to match, not only in pattern and
direction of the threads, but also in size. This patch, being cut exactly to fit the hole, is darned into place all the way round.
Patches in Difficult Positions
A hole often occurs so near to a hem, seam, or gathers that it cannot be well patched without some unpicking, and a very irregularly shaped patch may be required.
1. Pick out enough of the sewing to allow freedom of handling.
It is not a waste of time to unpick a good deal,
for the patch cannot be properly managed unless it can be smoothed out flat. The original sewing can be very quickly replaced.
2. Be sure the patch is large enough, allow-
Fig. 18
ing especially for turnings of seams or hems. 3. Place the patch carefully, matching the selvedge (fig. 18), and tack it firmly. Sew it down.
7
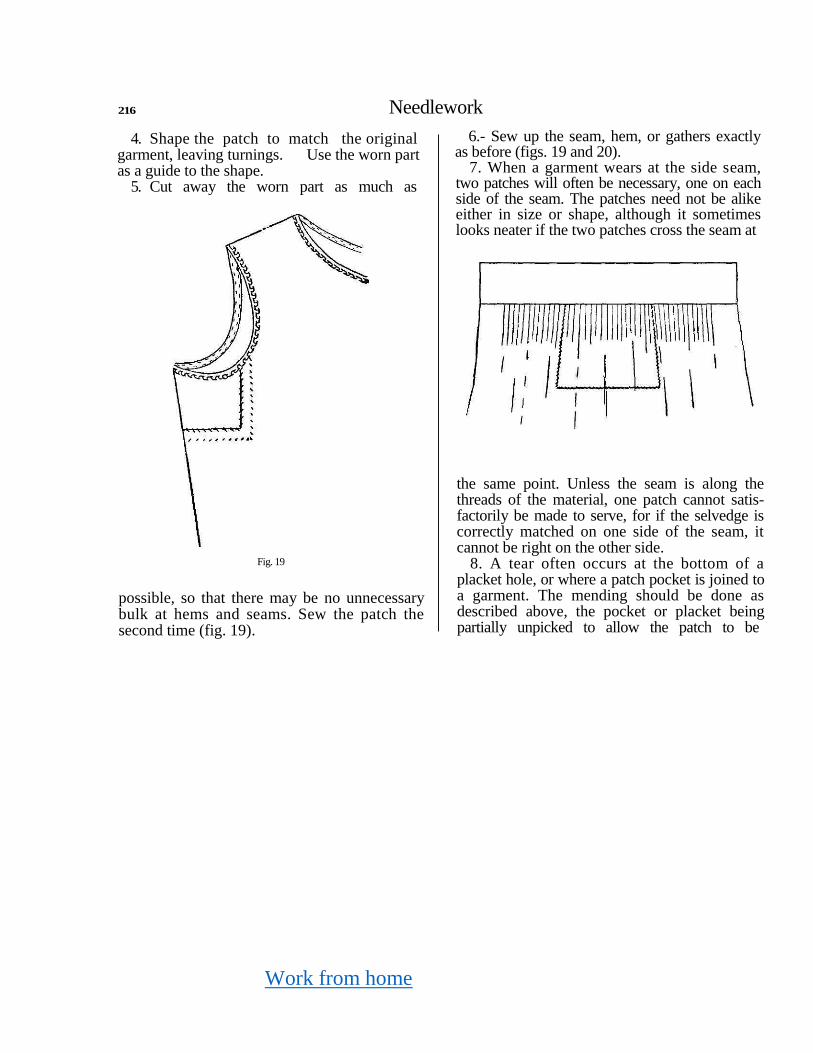
Work from home
216 Needlework
4. Shape the patch to match the original garment, leaving turnings. Use the worn part as a guide to the shape.
5. Cut away the worn part as much as
Fig. 19
possible, so that there may be no unnecessary bulk at hems and seams. Sew the patch the second time (fig. 19).
6.- Sew up the seam, hem, or gathers exactly as before (figs. 19 and 20).
7. When a garment wears at the side seam, two patches will often be necessary, one on each side of the seam. The patches need not be alike either in size or shape, although it sometimes looks neater if the two patches cross the seam at
the same point. Unless the seam is along the threads of the material, one patch cannot satis-factorily be made to serve, for if the selvedge is correctly matched on one side of the seam, it cannot be right on the other side.
8. A tear often occurs at the bottom of a placket hole, or where a patch pocket is joined to a garment. The mending should be done as described above, the pocket or placket being partially unpicked to allow the patch to be
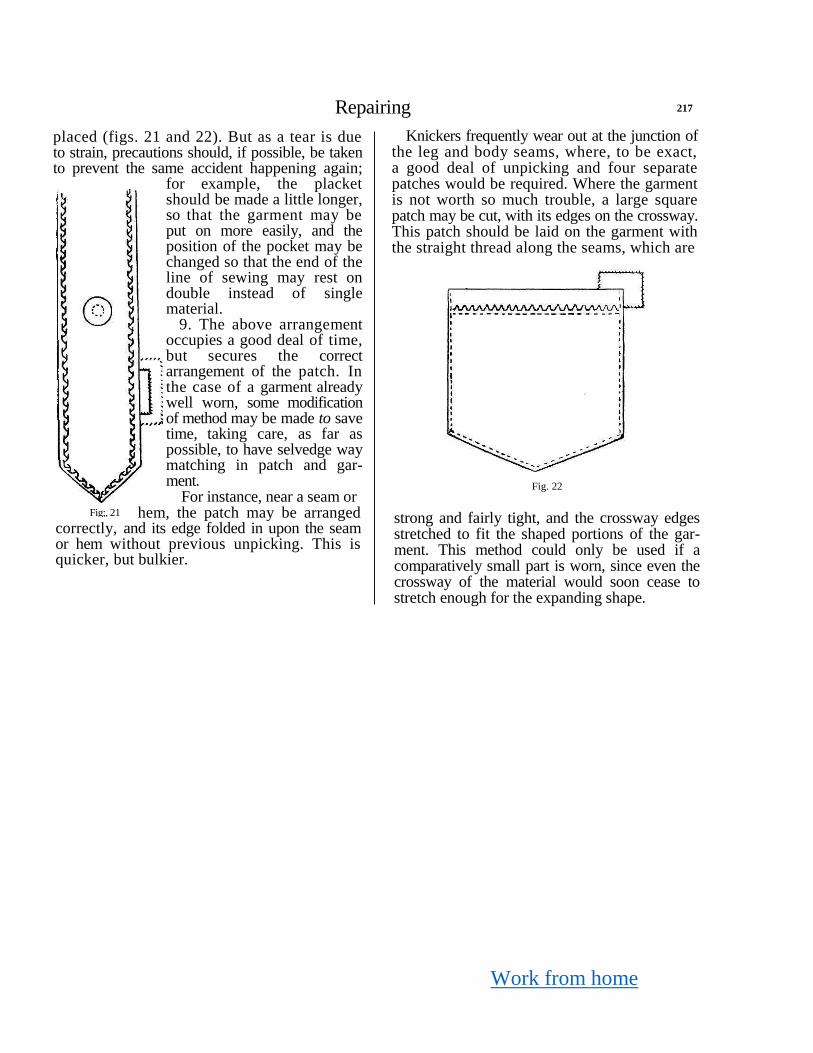
Work from home
Repairing 217
placed (figs. 21 and 22). But as a tear is due to strain, precautions should, if possible, be taken to prevent the same accident happening again;
for example, the placket should be made a little longer, so that the garment may be put on more easily, and the position of the pocket may be changed so that the end of the line of sewing may rest on double instead of single material.
9. The above arrangement occupies a good deal of time, but secures the correct arrangement of the patch. In the case of a garment already well worn, some modification of method may be made to save time, taking care, as far as possible, to have selvedge way matching in patch and gar-ment.
For instance, near a seam or hem, the patch may be arranged
correctly, and its edge folded in upon the seam or hem without previous unpicking. This is quicker, but bulkier.
Knickers frequently wear out at the junction of the leg and body seams, where, to be exact, a good deal of unpicking and four separate patches would be required. Where the garment is not worth so much trouble, a large square patch may be cut, with its edges on the crossway. This patch should be laid on the garment with the straight thread along the seams, which are
Fig. 22
strong and fairly tight, and the crossway edges stretched to fit the shaped portions of the gar-ment. This method could only be used if a comparatively small part is worn, since even the crossway of the material would soon cease to stretch enough for the expanding shape.
Fig;, 21
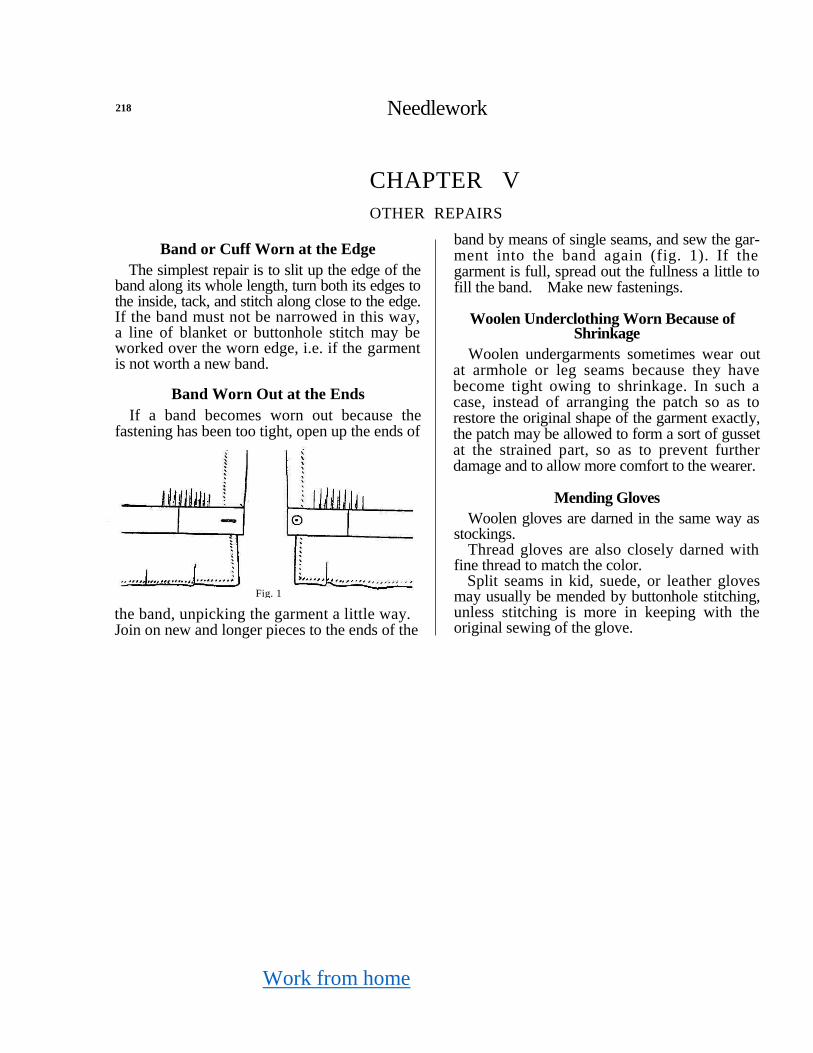
Work from home
218 Needlework
CHAPTER V
OTHER REPAIRS
Band or Cuff Worn at the Edge
The simplest repair is to slit up the edge of the band along its whole length, turn both its edges to the inside, tack, and stitch along close to the edge. If the band must not be narrowed in this way, a line of blanket or buttonhole stitch may be worked over the worn edge, i.e. if the garment is not worth a new band.
Band Worn Out at the Ends
If a band becomes worn out because the fastening has been too tight, open up the ends of
the band, unpicking the garment a little way. Join on new and longer pieces to the ends of the
band by means of single seams, and sew the gar-ment into the band again (fig. 1). If the garment is full, spread out the fullness a little to fill the band. Make new fastenings.
Woolen Underclothing Worn Because of Shrinkage
Woolen undergarments sometimes wear out at armhole or leg seams because they have become tight owing to shrinkage. In such a case, instead of arranging the patch so as to restore the original shape of the garment exactly, the patch may be allowed to form a sort of gusset at the strained part, so as to prevent further damage and to allow more comfort to the wearer.
Mending Gloves
Woolen gloves are darned in the same way as stockings.
Thread gloves are also closely darned with fine thread to match the color.
Split seams in kid, suede, or leather gloves may usually be mended by buttonhole stitching, unless stitching is more in keeping with the original sewing of the glove.
Fig. 1
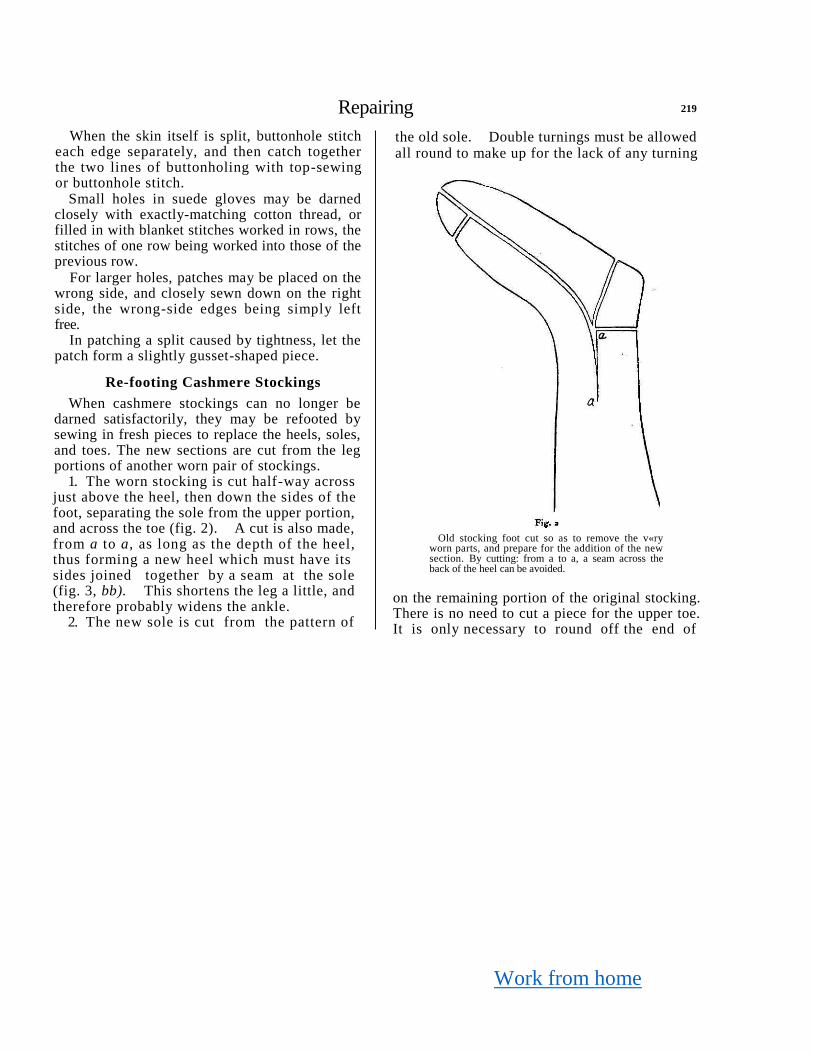
Work from home
Repairing 219
When the skin itself is split, buttonhole stitch each edge separately, and then catch together the two lines of buttonholing with top-sewing or buttonhole stitch.
Small holes in suede gloves may be darned closely with exactly-matching cotton thread, or filled in with blanket stitches worked in rows, the stitches of one row being worked into those of the previous row.
For larger holes, patches may be placed on the wrong side, and closely sewn down on the right side, the wrong-side edges being simply left free.
In patching a split caused by tightness, let the patch form a slightly gusset-shaped piece.
Re-footing Cashmere Stockings
When cashmere stockings can no longer be darned satisfactorily, they may be refooted by sewing in fresh pieces to replace the heels, soles, and toes. The new sections are cut from the leg portions of another worn pair of stockings.
1. The worn stocking is cut half-way across just above the heel, then down the sides of the foot, separating the sole from the upper portion, and across the toe (fig. 2). A cut is also made, from a to a, as long as the depth of the heel, thus forming a new heel which must have its sides joined together by a seam at the sole (fig. 3, bb). This shortens the leg a little, and therefore probably widens the ankle.
2. The new sole is cut from the pattern of
the old sole. Double turnings must be allowed all round to make up for the lack of any turning
Old stocking foot cut so as to remove the v«ry
worn parts, and prepare for the addition of the new section. By cutting: from a to a, a seam across the back of the heel can be avoided.
on the remaining portion of the original stocking. There is no need to cut a piece for the upper toe. It is only necessary to round off the end of
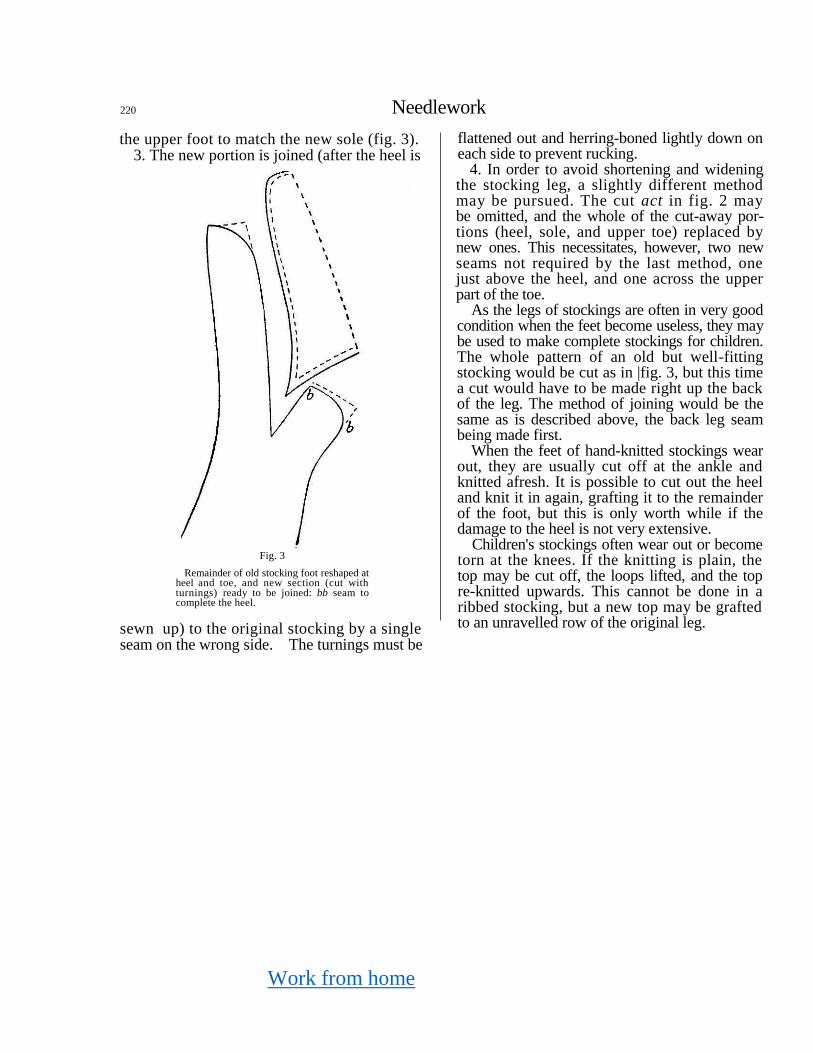
Work from home
220 Needlework
the upper foot to match the new sole (fig. 3). 3. The new portion is joined (after the heel is
Fig. 3
Remainder of old stocking foot reshaped at heel and toe, and new section (cut with turnings) ready to be joined: bb seam to complete the heel.
sewn up) to the original stocking by a single seam on the wrong side. The turnings must be
flattened out and herring-boned lightly down on each side to prevent rucking.
4. In order to avoid shortening and widening the stocking leg, a slightly different method may be pursued. The cut act in fig. 2 may be omitted, and the whole of the cut-away por-tions (heel, sole, and upper toe) replaced by new ones. This necessitates, however, two new seams not required by the last method, one just above the heel, and one across the upper part of the toe.
As the legs of stockings are often in very good condition when the feet become useless, they may be used to make complete stockings for children. The whole pattern of an old but well-fitting stocking would be cut as in |fig. 3, but this time a cut would have to be made right up the back of the leg. The method of joining would be the same as is described above, the back leg seam being made first.
When the feet of hand-knitted stockings wear out, they are usually cut off at the ankle and knitted afresh. It is possible to cut out the heel and knit it in again, grafting it to the remainder of the foot, but this is only worth while if the damage to the heel is not very extensive.
Children's stockings often wear out or become torn at the knees. If the knitting is plain, the top may be cut off, the loops lifted, and the top re-knitted upwards. This cannot be done in a ribbed stocking, but a new top may be grafted to an unravelled row of the original leg.
Work from home
Section VI—KNITTING
CHAPTER I
KNITTING
The same principles apply to the teaching of knitting as to the teaching of sewing. The pupils, in learning the first and simplest stitch, are learning the whole process of knitting, and therefore plenty of time must be allowed for the hands to accustom themselves to the new kind of work before fresh difficulties are introduced.
Many children learn to knit well much more quickly than they learn to sew well, in spite of the fact that the making of a stitch in knitting is a much more elaborate process than the making of a tacking stitch. This is probably because the knitting-needle is a much larger instrument than a sewing-needle, and because regularity in the work is dependent on the increasing power and steadiness of the hands rather than on guidance by the eye.
The teaching of knitting has this advantage over the teaching of sewing, that there is prac-tically but one position of the hands to be
221
learned, and that when the first stitch has been learned, all others are found to be the direct outcome of the first.
Materials
Just as in sewing, the first work in knitting may be comparatively coarse, finer work being attempted by degrees. In a loosely woven piece of work, the method of working is much more clearly distinguishable, so that the pupil can more easily avoid or correct mistakes; fine knitting makes very slow progress, and tight knitting is tiring to the hands and to the mind. Inexperienced knitters often allow their work to become very tight on the needles.
Short wooden or bone pins are better to start with than steel needles. That they should be short is essential to good work on the part of young pupils. Long pins are heavier, and apt to lead to awkward ways of working. A child is
Work from home
222 Needlework
apt to take a long hold of the knitting-needle, and so to lift the right hand completely away from the work in putting the wool round the needle. Using a short needle compels a pupil to take a short hold, and therefore helps to promote a more rapid and graceful manner of working.
Wooden and bone needles make looser work than steel needles of the same thickness, are less heavy to hold, and are more comfortable to work with, since they do not so readily become sticky with perspiration from small hands struggling with the difficulties of knitting. Wooden pins are cheaper than bone, but are less smooth, and more liable to break or to split at the points. No. 8 or No. 10 would be a suitable size for early work.
Either wool or cotton may be used for knitting, according to the article being made. Wool is much more flexible and pleasant to handle, cotton much cheaper and less liable to splitting. Young pupils often find cotton too stiff to work with, but older pupils can use it quite success-fully. Such a thread as Peri-lusta can often replace wool in making simple articles, but the work progresses rather more slowly. For first lessons, the wool should be of moderate thickness and of light color, so that the work may be clearly seen.
Owing to the high price of wool, children occasionally bring to school wool unraveled from a previously made article. Unless the
Work from home
Knitting 223
Garter or Plain Stitch
The pupil has two distinct lessons to learn
here: (1) the management of the needles and the wool, and (2) the making of the stitch. When the pupil begins to sew, using tacking stitch, the
management of the work is practically the only
difficulty, the stitch being so natural and easy to
comprehend. Making a stitch in knitting, on the other hand, is quite an elaborate performance.
Class lessons, which are practically drill les-sons, may be given, the teacher showing step by step how to work, using very thick knitting-pins and rug wool or other very thick wool, and the children imitating the teacher's movements. This would give the more observant pupils a good start. But individual teaching is usually necessary. A child often finds herself unable to imitate the teacher's movements, but compre-hends quickly when she feels her hands put into the correct position by the teacher.
1. Holding the Work.—The left-hand needle is held lightly from above by all the fingers, the first finger resting on the stitches so as to regu-late their passage along the needle.
The right hand holds the needle like a pen. This is the usual position. Only, when very long rows are being worked, it is necessary to change, and then the right-hand needle is held like the left-hand one.
The wool passes over the first finger of the right hand, under the next two, and round the
little finger, in order that its tension may be even. This even tension of the wool is what makes regular knitting. To hold the wool over the fingers of the right hand is the usual way, but a less common method is to keep the wool in the left hand, as in crochet. As children's difficulty in knitting lies largely in the lifting
of the wool round the point of the needle, the
teaching of this latter method would probably mean easier and quicker work.
2. Making the Stitch.—This consists of four motions: (1) slipping the right-hand needle into the first loop on the left-hand needle; (2) lifting the thread round the point of the right-hand needle; (3) drawing the needle and thread through the loop; (4) lifting the loop off the left-hand needle.
It may seem needless to analyse in this way the process of knitting, since every teacher knows quite well how to knit; but it is useful to observe how many things a child has to learn all at once in order to make any progress whatever.
Only practice will combine these actions into one continuous motion, and in the meantime the child readily confuses the order of the actions. At the beginning of a lesson, a short drill may be helpful, the teacher describing the motions, and the pupils performing them, so that the partially forgotten lesson is re-learnt.
The directions may then be reduced to single words, e.g. "In, round, through, off". These words form a mnemonic which helps a pupil to
Work from home
224 Needlework
remind herself of the correct order of the actions, and so to avoid or correct mistakes. Most children have a remarkable faculty for learning by heart any series of unconnected words, and while the teacher would not take unreasonable advantage of this power, yet anything that helps a pupil to judge and correct her own work is useful.
When the method of working has been mastered, the next thing to be aimed at is regu-larity in working, and this can only be achieved by continued practice.
Garter stitch is the name given to plain knitting backwards and forwards on two needles, and as a large number of articles, both useful and interest-ing, can be made in garter stitch, there is no need to give it up for more advanced methods until a child is perfectly familiar with the work. Only comparatively quickly - made articles need be attempted.
While garter stitch is still being practiced, the pupil should be taught to slip off the first stitch in every row without knitting it. This is necessary whenever work is knitted on both sides, else the edges become too long for the rest of the work.
Making a chain edge, casting on, casting off, and joining a thread can all be taught while garter stitch remains the method of construction.
Even after a child knows how to knit, the two most common faults are letting down loops and making loops. In order that the work may not be spoiled, the pupil must simply count the stitches after each row, so that mistakes may be
rectified at the earliest possible moment. For this reason, the rows should be short at first, or the calculation will be too difficult. The counting naturally retards the already slow progress of the work, but carefulness and accuracy are at first more important than speed.
The teacher should also discover whether the trouble is due to the materials provided. If very thin wool is knitted with thick needles, it is very difficult not to drop loops. Loops are also dropped frequently when the work is extremely tight.
Making loops is sometimes due to splitting threads, and, if the thread being worked is very liable to split, the substitution of a better-twisted thread will help. Making loops, however, is more frequently due to the worker's putting the thread over the needle at the wrong moment, or forgetting to draw the thread through before slipping the loop off the needle, and consequently having an extra loop in the next row. In this case, the pupil had better recommence knitting while re-peating the directions, "In, round, through, off".
Chain Edge
This gives a much more regular and beautiful edge to a piece of garter stitch. (See Nos. 1,2, and 3 in Plate XXII, p. 236.) When it is neces-sary to join two pieces of knitting together, the junction is much more neatly and accurately made when chain edge has been worked.
This edge may be produced by two methods.
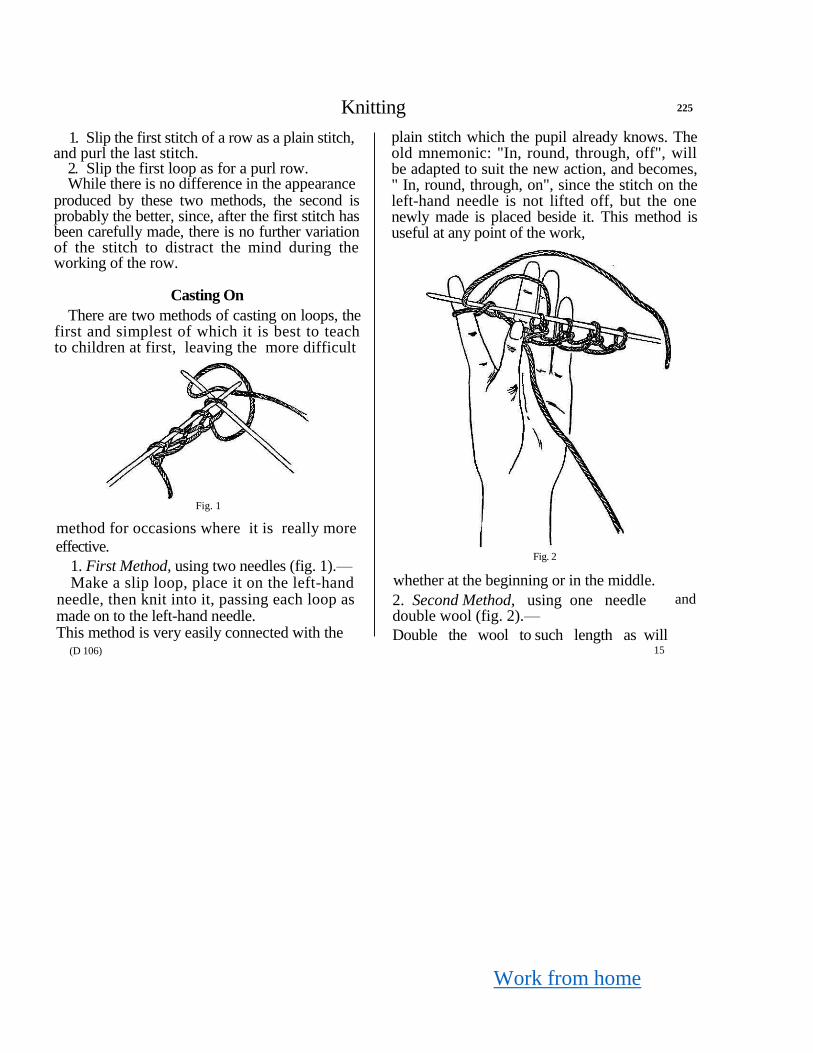
Work from home
Knitting 225
1. Slip the first stitch of a row as a plain stitch, and purl the last stitch.
2. Slip the first loop as for a purl row. While there is no difference in the appearance
produced by these two methods, the second is probably the better, since, after the first stitch has been carefully made, there is no further variation of the stitch to distract the mind during the working of the row.
Casting On
There are two methods of casting on loops, the first and simplest of which it is best to teach to children at first, leaving the more difficult
Fig. 1
method for occasions where it is really more
effective.
1. First Method, using two needles (fig. 1).— Make a slip loop, place it on the left-hand
needle, then knit into it, passing each loop as
made on to the left-hand needle. This method is very easily connected with the (D 106)
plain stitch which the pupil already knows. The old mnemonic: "In, round, through, off", will be adapted to suit the new action, and becomes, " In, round, through, on", since the stitch on the left-hand needle is not lifted off, but the one newly made is placed beside it. This method is useful at any point of the work,
Fig. 2
whether at the beginning or in the middle.
2. Second Method, using one needle double wool (fig. 2).—
Double the wool to such length as will 15
and
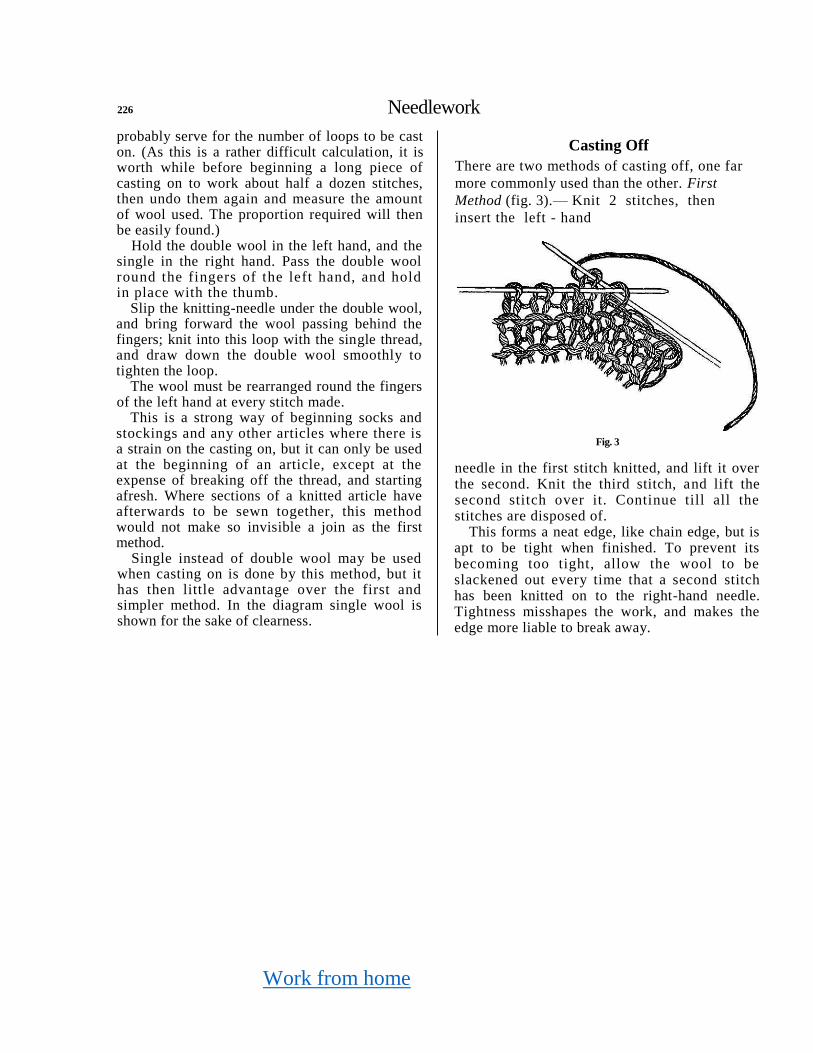
Work from home
226 Needlework
probably serve for the number of loops to be cast on. (As this is a rather difficult calculation, it is worth while before beginning a long piece of casting on to work about half a dozen stitches, then undo them again and measure the amount of wool used. The proportion required will then be easily found.)
Hold the double wool in the left hand, and the single in the right hand. Pass the double wool round the fingers of the left hand, and hold in place with the thumb.
Slip the knitting-needle under the double wool, and bring forward the wool passing behind the fingers; knit into this loop with the single thread, and draw down the double wool smoothly to tighten the loop.
The wool must be rearranged round the fingers of the left hand at every stitch made.
This is a strong way of beginning socks and stockings and any other articles where there is a strain on the casting on, but it can only be used at the beginning of an article, except at the expense of breaking off the thread, and starting afresh. Where sections of a knitted article have afterwards to be sewn together, this method would not make so invisible a join as the first method.
Single instead of double wool may be used when casting on is done by this method, but it has then little advantage over the first and simpler method. In the diagram single wool is shown for the sake of clearness.
Casting Off
There are two methods of casting off, one far
more commonly used than the other. First
Method (fig. 3).— Knit 2 stitches, then
insert the left - hand
Fig. 3
needle in the first stitch knitted, and lift it over the second. Knit the third stitch, and lift the second stitch over it. Continue till all the stitches are disposed of.
This forms a neat edge, like chain edge, but is apt to be tight when finished. To prevent its becoming too tight, allow the wool to be slackened out every time that a second stitch has been knitted on to the right-hand needle. Tightness misshapes the work, and makes the edge more liable to break away.
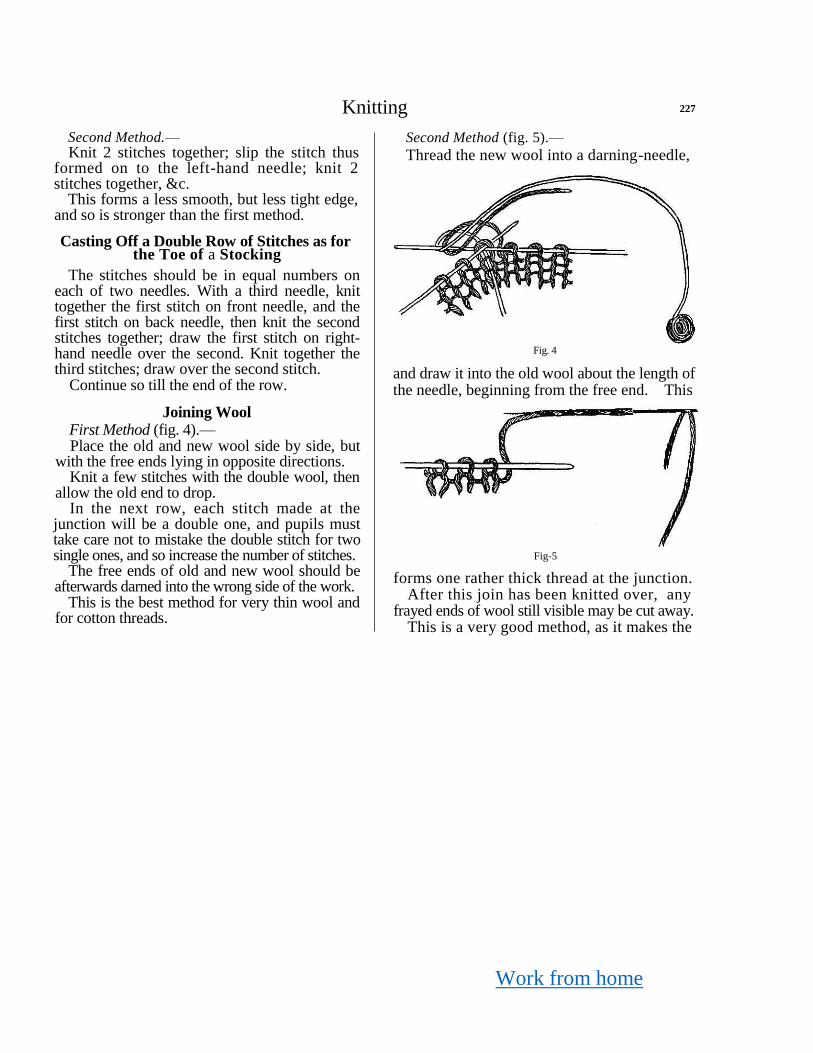
Work from home
Knitting 227
Second Method.—
Knit 2 stitches together; slip the stitch thus formed on to the left-hand needle; knit 2 stitches together, &c.
This forms a less smooth, but less tight edge, and so is stronger than the first method.
Casting Off a Double Row of Stitches as for the Toe of a Stocking
The stitches should be in equal numbers on each of two needles. With a third needle, knit together the first stitch on front needle, and the first stitch on back needle, then knit the second stitches together; draw the first stitch on right-hand needle over the second. Knit together the third stitches; draw over the second stitch.
Continue so till the end of the row.
Joining Wool First Method (fig. 4).—
Place the old and new wool side by side, but with the free ends lying in opposite directions.
Knit a few stitches with the double wool, then allow the old end to drop.
In the next row, each stitch made at the junction will be a double one, and pupils must take care not to mistake the double stitch for two single ones, and so increase the number of stitches.
The free ends of old and new wool should be afterwards darned into the wrong side of the work.
This is the best method for very thin wool and for cotton threads.
Second Method (fig. 5).—
Thread the new wool into a darning-needle,
Fig. 4
and draw it into the old wool about the length of the needle, beginning from the free end. This
Fig-5
forms one rather thick thread at the junction. After this join has been knitted over, any
frayed ends of wool still visible may be cut away. This is a very good method, as it makes the

Work from home
228 Needlework
neatest possible join, but it is scarcely possible to use it except on a fairly thick and well-twisted wool.
Purl Stitch and Rib
The first thing- a pupil has to learn about purl stitch is that it is merely the other side of plain stitch.
In making plain stitch the knitting is done from the side of the work next the worker, the needle being inserted away from the worker.
In purl stitch the process is reversed, the knitting being done on the side of the work
Fig. 6
farther from the worker, while the needle is in-serted towards the worker (fig. 6).
In plain stitch the working thread is always kept on the farther side of the work, but in purl stitch on the side nearer the worker.
In beginning to work purl, then, the thread is first thrown over the point of the needle, so as to bring it to the front, and i t remains in that
position until plain stitch is to be worked again. The stitch itself follows exactly the same course
as plain stitch, only the first and third actions are in the opposite direction to that of plain stitch.
Using the old formula to connect the new stitch with the old, the commands now become, "In (from the back), round, through (to the back), off".
Although the position of the hands in purl stitch is a little more difficult than in plain, a little steady practice will soon accustom the pupils to the new motion. What they find difficult is to change frequently from plain to purl, and from purl to plain. The first attempt at purl knitting, therefore, should consist of complete rows of purl stitch.
By knitting alternately two plain rows and two purl rows, a ribbed appearance is produced, which can be worked very suitably into cuffs, knitted vests or semmets, and other articles.
Later, the pupils can practice what is more commonly known as ribbed knitting, working alternately plain and purl stitches, instead of plain and purl rows.
The advantage of ribbed knitting over plain may be pointed out. i. It fits more closely to the figure without being stretched tightly. For this reason, a ribbed piece is always knitted at the top of plain socks and stockings, at the wrists of gloves, at the neck, wrists, and bottom edge of jerseys, &c. 2. Because of its forma-tion, it encloses more air-space (unless stretched to its limits), and therefore is warmer. The
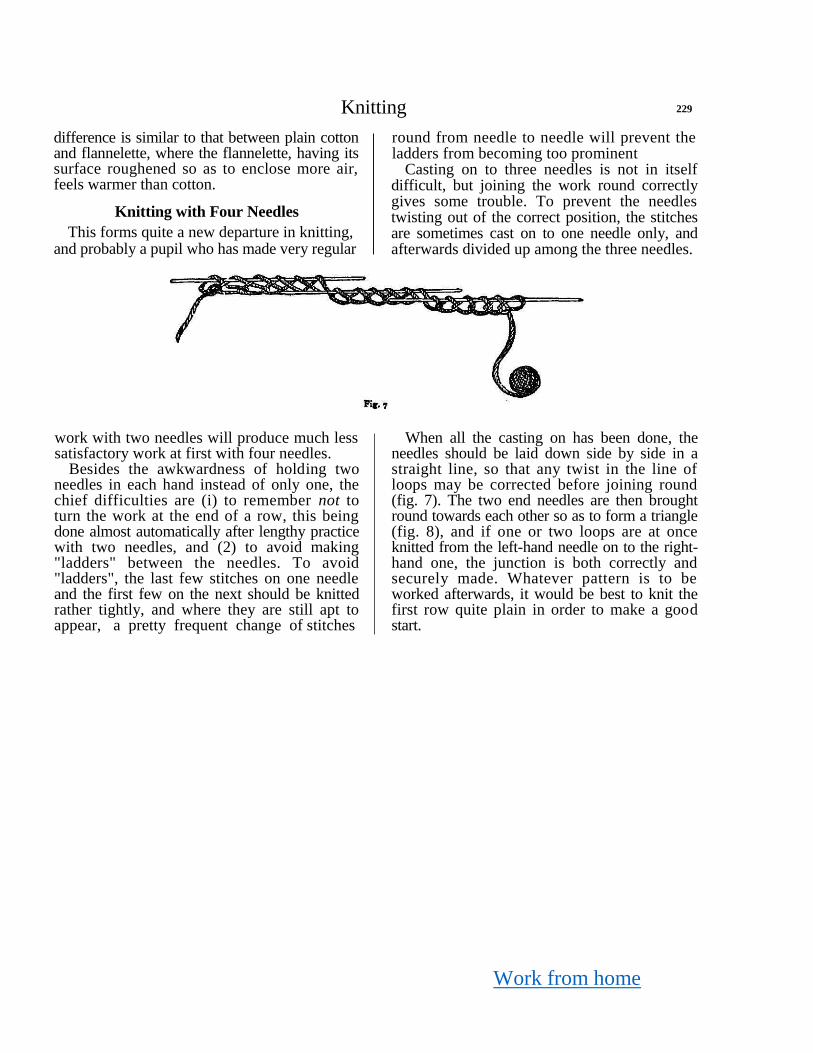
Work from home
Knitting 229
difference is similar to that between plain cotton and flannelette, where the flannelette, having its surface roughened so as to enclose more air, feels warmer than cotton.
Knitting with Four Needles
This forms quite a new departure in knitting, and probably a pupil who has made very regular
round from needle to needle will prevent the ladders from becoming too prominent
Casting on to three needles is not in itself difficult, but joining the work round correctly gives some trouble. To prevent the needles twisting out of the correct position, the stitches are sometimes cast on to one needle only, and afterwards divided up among the three needles.
work with two needles will produce much less satisfactory work at first with four needles.
Besides the awkwardness of holding two needles in each hand instead of only one, the chief difficulties are (i) to remember not to turn the work at the end of a row, this being done almost automatically after lengthy practice with two needles, and (2) to avoid making "ladders" between the needles. To avoid "ladders", the last few stitches on one needle and the first few on the next should be knitted rather tightly, and where they are still apt to appear, a pretty frequent change of stitches
When all the casting on has been done, the needles should be laid down side by side in a straight line, so that any twist in the line of loops may be corrected before joining round (fig. 7). The two end needles are then brought round towards each other so as to form a triangle (fig. 8), and if one or two loops are at once knitted from the left-hand needle on to the right-hand one, the junction is both correctly and securely made. Whatever pattern is to be worked afterwards, it would be best to knit the first row quite plain in order to make a good start.
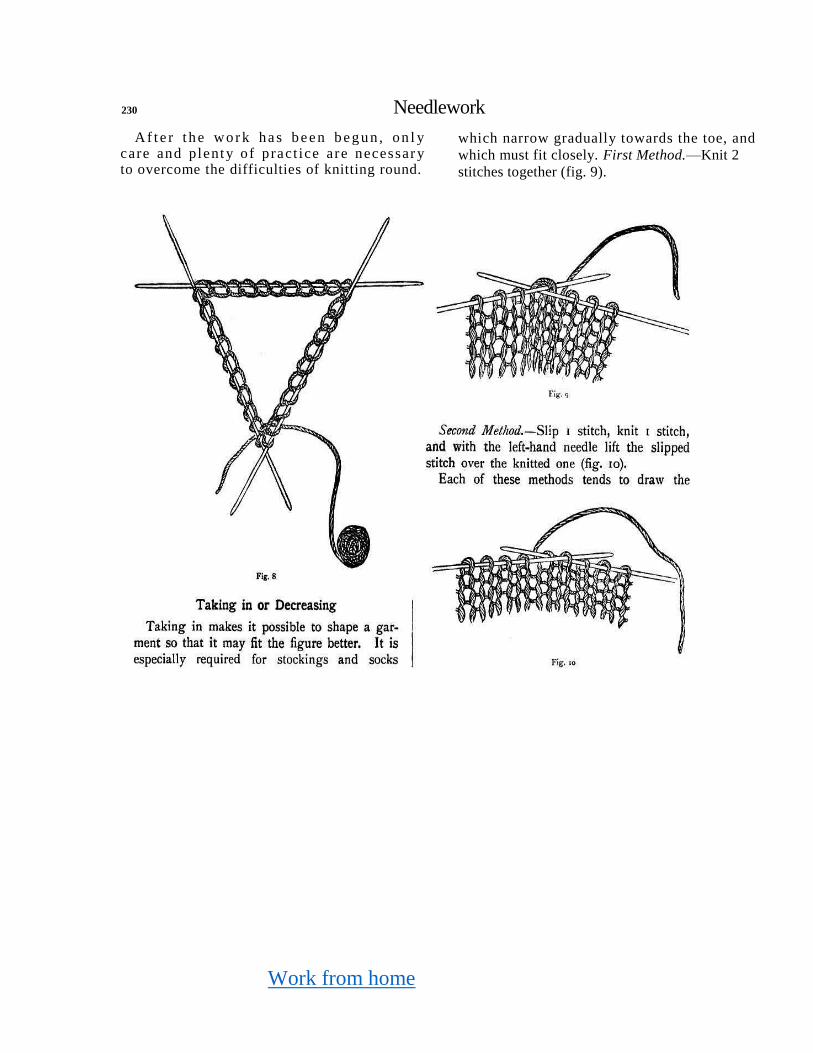
Work from home
230 Needlework
Af t e r t h e wo r k ha s b e e n b e g u n , on l y care and plenty of pract ice are necessar y to overcome the difficulties of knitting round.
which narrow gradually towards the toe, and
which must fit closely. First Method.—Knit 2
stitches together (fig. 9).
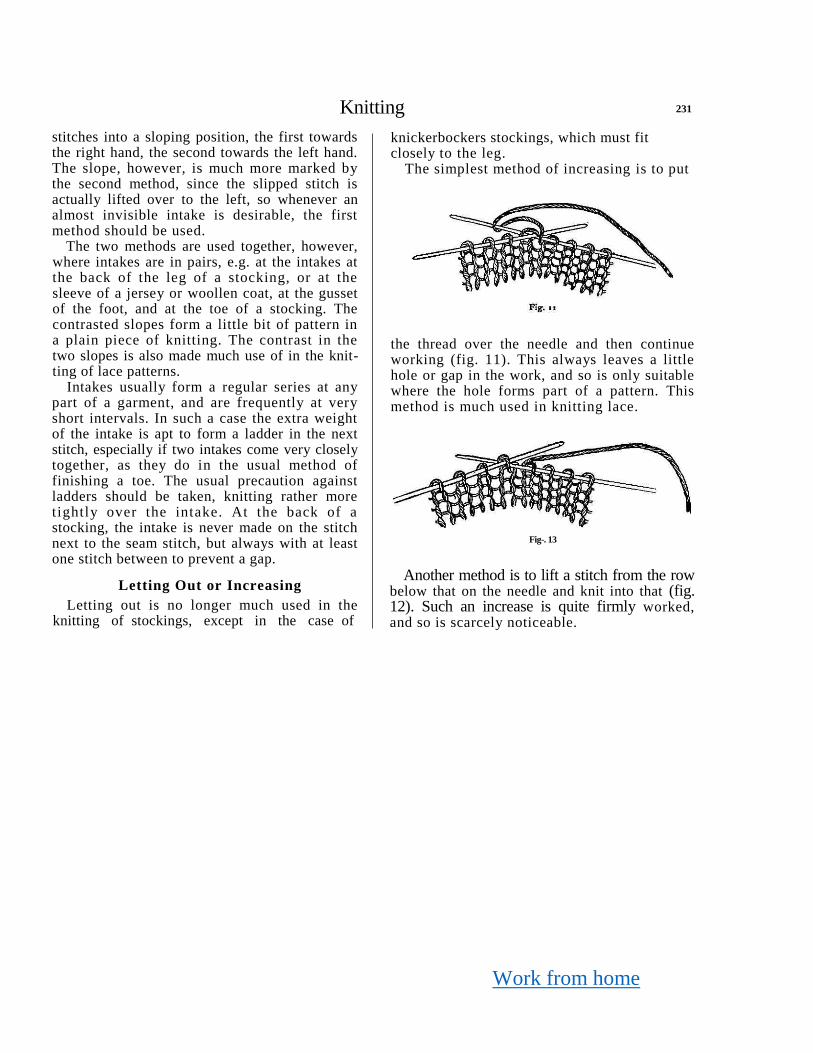
Work from home
Knitting 231
stitches into a sloping position, the first towards the right hand, the second towards the left hand. The slope, however, is much more marked by the second method, since the slipped stitch is actually lifted over to the left, so whenever an almost invisible intake is desirable, the first method should be used.
The two methods are used together, however, where intakes are in pairs, e.g. at the intakes at the back of the leg of a stocking, or at the sleeve of a jersey or woollen coat, at the gusset of the foot, and at the toe of a stocking. The contrasted slopes form a little bit of pattern in a plain piece of knitting. The contrast in the two slopes is also made much use of in the knit-ting of lace patterns.
Intakes usually form a regular series at any part of a garment, and are frequently at very short intervals. In such a case the extra weight of the intake is apt to form a ladder in the next stitch, especially if two intakes come very closely together, as they do in the usual method of finishing a toe. The usual precaution against ladders should be taken, knitting rather more tightly over the intake. At the back of a stocking, the intake is never made on the stitch next to the seam stitch, but always with at least one stitch between to prevent a gap.
Letting Out or Increasing
Letting out is no longer much used in the knitting of stockings, except in the case of
knickerbockers stockings, which must fit closely to the leg.
The simplest method of increasing is to put
the thread over the needle and then continue working (fig. 11). This always leaves a little hole or gap in the work, and so is only suitable where the hole forms part of a pattern. This method is much used in knitting lace.
Fig-. 13
Another method is to lift a stitch from the row below that on the needle and knit into that (fig. 12). Such an increase is quite firmly worked, and so is scarcely noticeable.
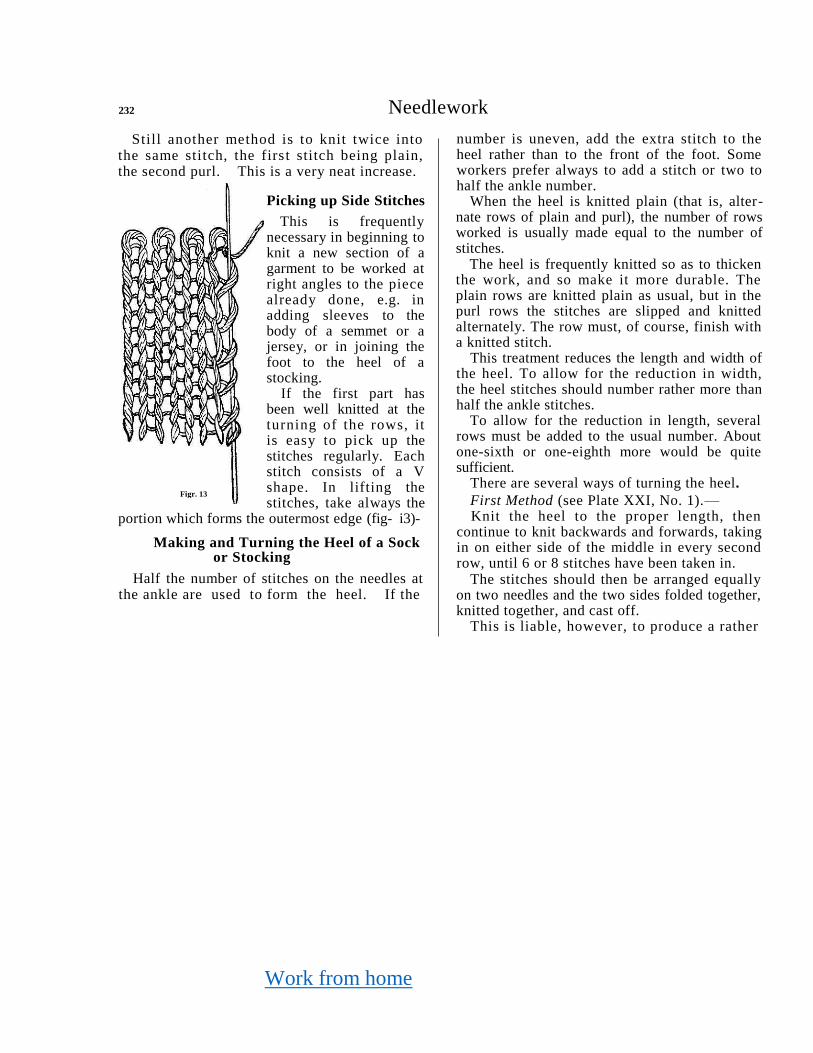
Work from home
232 Needlework
Still another method is to knit twice into the same stitch, the firs t stitch being plain, the second purl. This is a very neat increase.
Picking up Side Stitches
This is frequently necessary in beginning to knit a new section of a garment to be worked at right angles to the piece already done, e.g. in adding sleeves to the body of a semmet or a jersey, or in joining the foot to the heel of a stocking.
If the first part has been well knitted at the turning of the rows, it is easy to pick up the stitches regularly. Each stitch consists of a V shape. In lifting the stitches, take always the
portion which forms the outermost edge (fig- i3)-
Making and Turning the Heel of a Sock or Stocking
Half the number of stitches on the needles at the ankle are used to form the heel. If the
number is uneven, add the extra stitch to the heel rather than to the front of the foot. Some workers prefer always to add a stitch or two to half the ankle number.
When the heel is knitted plain (that is, alter-nate rows of plain and purl), the number of rows worked is usually made equal to the number of stitches.
The heel is frequently knitted so as to thicken the work, and so make it more durable. The plain rows are knitted plain as usual, but in the purl rows the stitches are slipped and knitted alternately. The row must, of course, finish with a knitted stitch.
This treatment reduces the length and width of the heel. To allow for the reduction in width, the heel stitches should number rather more than half the ankle stitches.
To allow for the reduction in length, several rows must be added to the usual number. About one-sixth or one-eighth more would be quite sufficient.
There are several ways of turning the heel.
First Method (see Plate XXI, No. 1).—
Knit the heel to the proper length, then continue to knit backwards and forwards, taking in on either side of the middle in every second row, until 6 or 8 stitches have been taken in.
The stitches should then be arranged equally on two needles and the two sides folded together, knitted together, and cast off.
This is liable, however, to produce a rather
Figr. 13

Work from home
Knitting 233
hard ridge under the heel, so the stitches may be grafted together with a darning-needle instead of being knitted off.
Pick up the side stitches at the left-hand side and knit them; knit the front row of the foot; pick up the right-hand side stitches and knit them.
Second Method—Gusset Heel (see Plate XXI, No. 2).—
This method takes its name from the triangular shape of the under portion of the heel, as formed by the intakes.
The necessary number of rows (as many as the number of stitches on the heel) being knitted, this portion of the work may finish at the end of a plain row.
Knit purl as far as the middle or seam stitch, then purl 1 stitch, purl 2 together, purl 1 stitch, and turn. Slip 1, knit to the seam stitch, then knit 1 stitch; take in by slipping 1, knitting 1, and taking the slipped stitch over. Knit 1 stitch, and turn. (This turning makes a gap between the central portion of the heel and the remainder of the stitches.)
In every succeeding row, knit purl or plain to the stitch before the gap, take in the two stitches over the gap, and knit another stitch. Continue until all the stitches are used up.
It is the knitting of another stitch after the intake in every row which causes the triangular shape of the heel. This pattern of heel is quite smooth when finished, and accommodates itself easily to any size of foot.
Third Method—Dutch Heel (see Plate XXI, No. 3).-
In this method the part of the heel enclosed by the intakes is oblong, not triangular. For this reason it is said to be more easily darned than the gusset heel. The oblong part enclosing the intakes should be about one-third of the width of the heel, the last stitch on either side of this middle third being knitted on to the stitches of the remainder until they are all used up.
For example, if there are 37 stitches on the heel, beginning with the purl row, purl up to the middle or seam stitch, knit the seam stitch, then purl 5 more, then 2 together, and turn. Slip the first stitch, knit 5, purl the seam stitch, then knit other 5, and take in. Turn, slip 1, purl 5, knit the seam stitch, purl 5, take in, turn. Slip 1, knit 5, purl the seam stitch, knit 5, take in, turn. Continue in this way till all the side stitches are knitted off.
Knitting the Instep Gusset of a Sock or Stocking
(See Plate XXI)
After the heel has been turned and the side stitches lifted, the front or instep needle should contain half, or rather less than half, the stitches that formed the ankle. Each of the two back needles should contain half the stitches remaining (if any remained) after the heel was turned, and the stitches picked up from one side of the heel. The stitches on these two back
Work from home
234 Needlework
needles must be reduced in number until the two together contain the same number as the front needle. This reduction is made on the heel needles at the end nearest to the front.
The counting of stitches and rows is reckoned from the seam stitch (which now disappears), and the first row is knitted plainly round to that point again.
Then knit the heel needle until 3 stitches are left. Take 2 together, knit 1.
Knit the front row. On the heel needle, knit 1, slip 1, knit 1,
draw the slipped stitch over, knit to the end of the needle. Knit a whole plain round.
In every alternate row, take in as described, noting that different methods of taking in are used on the right and left sides of the front needle, in order to form a little pattern. If these methods are reversed, the effect is not so satisfactory.
When the total number of stitches on the foot is equal to or rather less than those forming the ankle, the decreasing are discontinued, and the remainder of the foot knitted plain.
Taking In and Closing the Toe of a Stocking
The toe of a stocking or sock usually forms about a quarter of the whole length of the foot.
There are two common ways of shaping it. In the first, the decreasings are all made at the sides of the stocking foot, and follow each other
in close succession, so that the strain of repeated intakes seems sometimes to be too great for fine wool. In the other method, the intakes are worked at intervals round the foot, and, after a row with decreasing, a considerable plain-knitted space follows.
First Method (see Plate XXI, No. 3).—
The stitches are arranged just as they were for the gusset at the instep—half the number being on the front needle, the other half divided equally between the back needles. Begin count-ing at the same place as in knitting the instep gusset.
Knit the back needle until only 3 stitches are left. Knit 2 together, knit 1.
On the front needle, knit 1, slip 1, knit 1, draw the slipped stitch over, knit plain until 3 stitches remain, then knit 2 together, knit 1.
On the back needle, knit 1, slip 1, knit 1, draw the slipped stitch over, continue knitting plain to the end.
Knit 1 plain round, and then in alternate rows repeat the decreasing as above until only about 16 stitches altogether remain.
Observe once again the little bit of pattern formed by the alteration in the method of decreasing.
Second Method (see Plate XXI, No. 2).—
Suppose about 70 stitches on the needles when
the toe is reached.
Knit 6 stitches, take 2 together. Repeat
Work from home
Knitting 235
this all round, and knit any remaining stitches. Knit 6 rows plain. Knit 5 stitches, take 2 together. Repeat as before. Knit 5 rows plain. Continue in this way, reducing the number of
stitches and rows by 1 each time until only about 16 stitches remain.
This method looks well when finished, and gives a good shape to the toe.
It is not easy, however, to calculate the proper number of stitches and rows with which to begin. Taking the above calculation, for a foot containing 70 stitches the length of the toe is the same by whichever method it is worked; but for a foot containing fewer stitches, the length of the toe is much greater in proportion to the foot by the second method than by the first; while for a foot containing more stitches, the length of the toe is proportionately shorter.
A variation in the number of stitches may be made as follows:—
Beginning with about 50 stitches, knit 4 stitches between the intakes and knit 4 rows.
Beginning with about 60 stitches, knit 5 stitches and 5 rows.
Beginning with about 70 stitches, knit 6 stitches and 6 rows.
Beginning with about 80 or 90 stitches, knit 7 stitches and 7 rows.
Beginning with about 100 stitches, knit 8 stitches and 8 rows.
Closing the Toe
(See Plate XXI, Nos. 2 and 3)
The remaining 16 to 20 stitches should be arranged equally on two knitting-needles, taking care that one needle represents the upper, and the other the under part of the toe.
The two may then be knitted together and cast off, the two processes being worked together in one row. If worked in two separate rows, the ridge formed would be uncomfortable.
A smoother way of finishing is to graft the two rows together, as already described in the chapter on darning. The only difference is that the knitting-needles remain in the work to prevent the stitches from running down, and this sometimes causes a little confusion.
It may be found easier to graft the toe if the needles are replaced by a strong thread of contrasting color.
With the needles in place, the directions would be as follows:—
Hold the work so that the knitting-thread is at the right-hand side. Break off enough thread to graft with, and thread it into a darning-needle.
Bring the needle through the first stitch of front wire from wrong side to right. Leave the stitch on the wire. Draw the darning-needle through the first stitch of back wire from right side to wrong, and take off the stitch; then through second stitch from wrong side to right, and leave the stitch on.
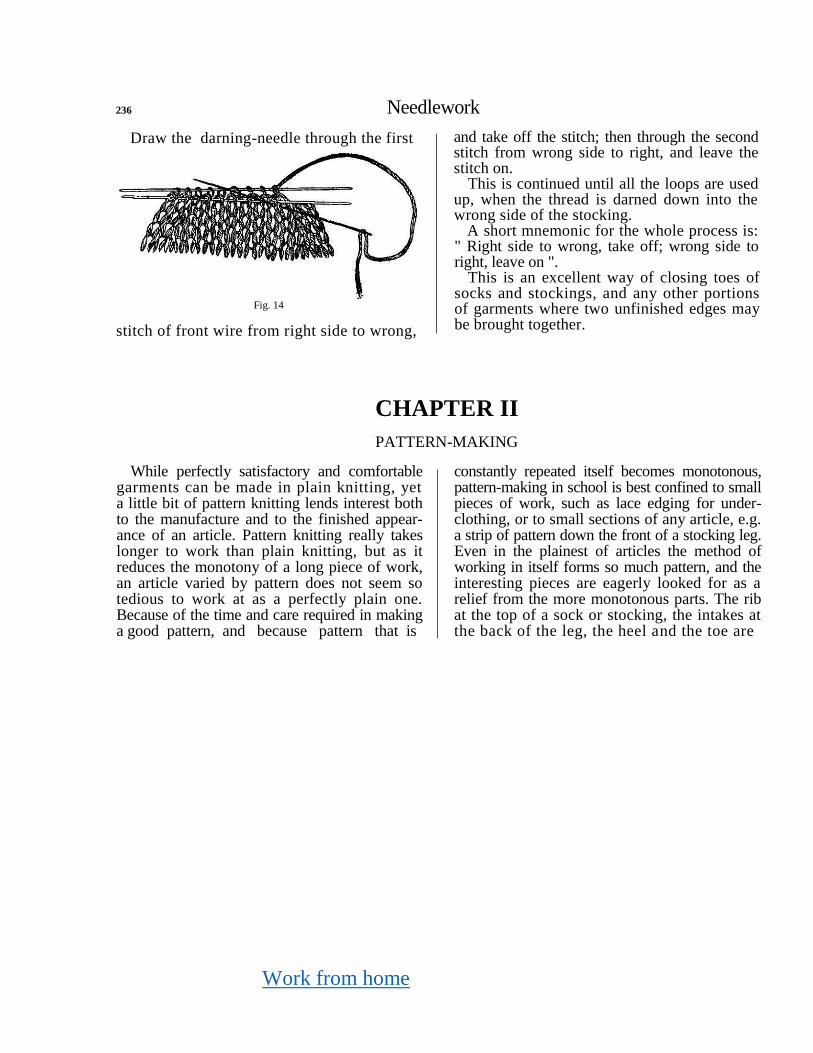
Work from home
236 Needlework
Draw the darning-needle through the first
Fig. 14
stitch of front wire from right side to wrong,
and take off the stitch; then through the second stitch from wrong side to right, and leave the stitch on.
This is continued until all the loops are used up, when the thread is darned down into the wrong side of the stocking.
A short mnemonic for the whole process is: " Right side to wrong, take off; wrong side to right, leave on ".
This is an excellent way of closing toes of socks and stockings, and any other portions of garments where two unfinished edges may be brought together.
CHAPTER II
PATTERN-MAKING
While perfectly satisfactory and comfortable garments can be made in plain knitting, yet a little bit of pattern knitting lends interest both to the manufacture and to the finished appear-ance of an article. Pattern knitting really takes longer to work than plain knitting, but as it reduces the monotony of a long piece of work, an article varied by pattern does not seem so tedious to work at as a perfectly plain one. Because of the time and care required in making a good pattern, and because pattern that is
constantly repeated itself becomes monotonous, pattern-making in school is best confined to small pieces of work, such as lace edging for under-clothing, or to small sections of any article, e.g. a strip of pattern down the front of a stocking leg. Even in the plainest of articles the method of working in itself forms so much pattern, and the interesting pieces are eagerly looked for as a relief from the more monotonous parts. The rib at the top of a sock or stocking, the intakes at the back of the leg, the heel and the toe are
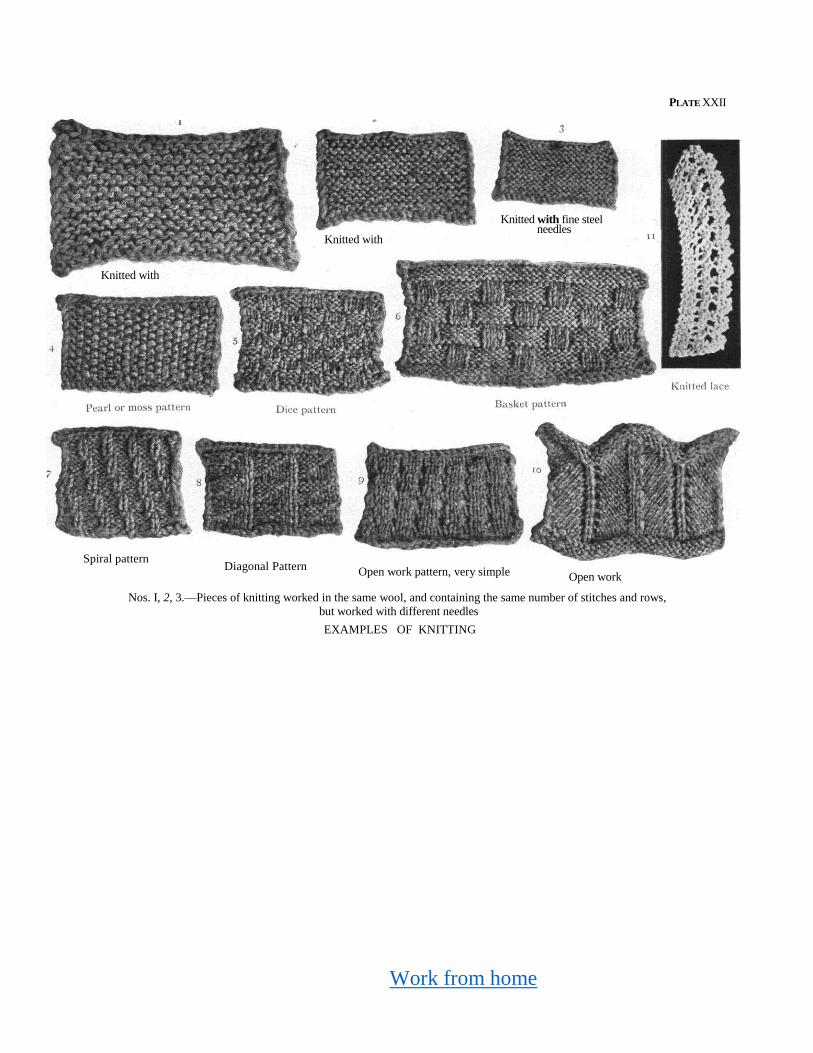
Work from home
PLATE XXII
Diagonal Pattern Open work pattern, very simple
Nos. I, 2, 3.—Pieces of knitting worked in the same wool, and containing the same number of stitches and rows, but worked with different needles
EXAMPLES OF KNITTING
Knitted with fine steel needles
Knitted with
thick steel
needles Knitted with
thick wooden
pins
Spiral pattern
Open work
(wave) pattern

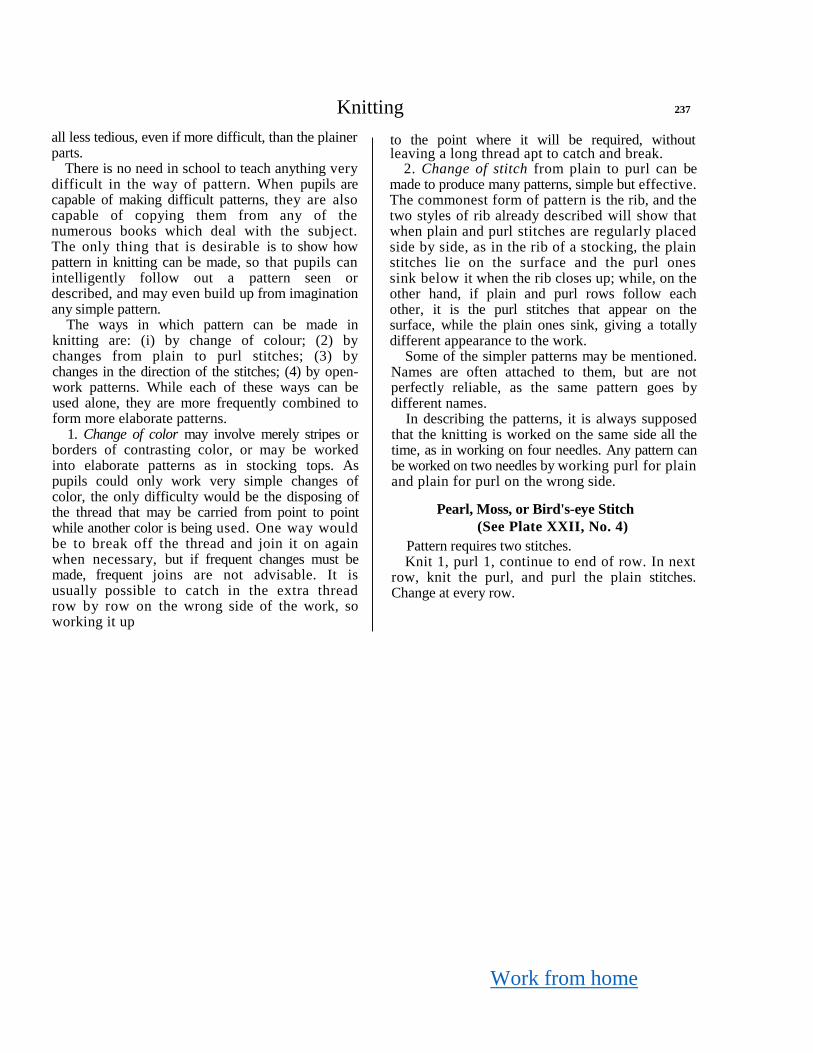
Work from home
Knitting 237
all less tedious, even if more difficult, than the plainer parts.
There is no need in school to teach anything very difficult in the way of pattern. When pupils are capable of making difficult patterns, they are also capable of copying them from any of the numerous books which deal with the subject. The only thing that is desirable is to show how pattern in knitting can be made, so that pupils can intelligently follow out a pattern seen or described, and may even build up from imagination any simple pattern.
The ways in which pattern can be made in knitting are: (i) by change of colour; (2) by changes from plain to purl stitches; (3) by changes in the direction of the stitches; (4) by open-work patterns. While each of these ways can be used alone, they are more frequently combined to form more elaborate patterns.
1. Change of color may involve merely stripes or borders of contrasting color, or may be worked into elaborate patterns as in stocking tops. As pupils could only work very simple changes of color, the only difficulty would be the disposing of the thread that may be carried from point to point while another color is being used. One way would be to break off the thread and join it on again when necessary, but if frequent changes must be made, frequent joins are not advisable. It is usually possible to catch in the extra thread row by row on the wrong side of the work, so working it up
to the point where it will be required, without leaving a long thread apt to catch and break.
2. Change of stitch from plain to purl can be made to produce many patterns, simple but effective. The commonest form of pattern is the rib, and the two styles of rib already described will show that when plain and purl stitches are regularly placed side by side, as in the rib of a stocking, the plain stitches lie on the surface and the purl ones sink below it when the rib closes up; while, on the other hand, if plain and purl rows follow each other, it is the purl stitches that appear on the surface, while the plain ones sink, giving a totally different appearance to the work.
Some of the simpler patterns may be mentioned. Names are often attached to them, but are not perfectly reliable, as the same pattern goes by different names.
In describing the patterns, it is always supposed that the knitting is worked on the same side all the time, as in working on four needles. Any pattern can be worked on two needles by working purl for plain and plain for purl on the wrong side.
Pearl, Moss, or Bird's-eye Stitch
(See Plate XXII, No. 4)
Pattern requires two stitches. Knit 1, purl 1, continue to end of row. In next
row, knit the purl, and purl the plain stitches. Change at every row.
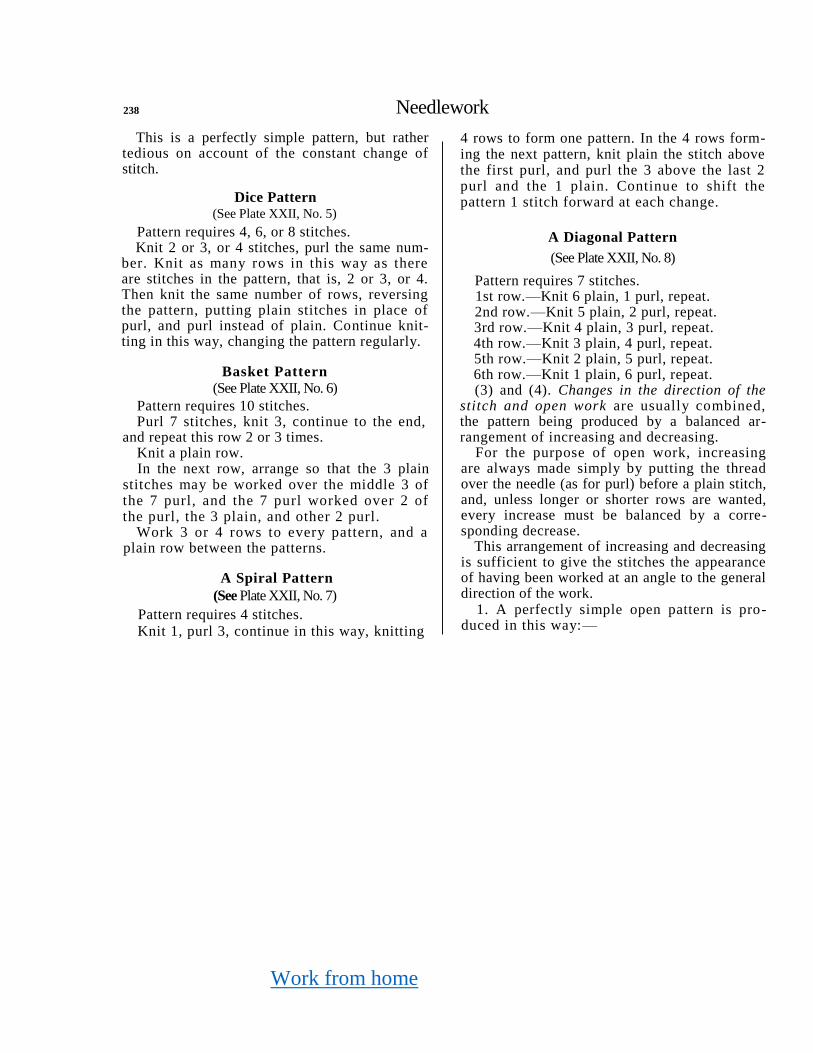
Work from home
238 Needlework
This is a perfectly simple pattern, but rather tedious on account of the constant change of stitch.
Dice Pattern
(See Plate XXII, No. 5)
Pattern requires 4, 6, or 8 stitches. Knit 2 or 3, or 4 stitches, purl the same num-
ber. Knit as many rows in this way as there are stitches in the pattern, that is, 2 or 3, or 4. Then knit the same number of rows, reversing the pattern, putting plain stitches in place of purl, and purl instead of plain. Continue knit-ting in this way, changing the pattern regularly.
Basket Pattern
(See Plate XXII, No. 6)
Pattern requires 10 stitches. Purl 7 stitches, knit 3, continue to the end,
and repeat this row 2 or 3 times. Knit a plain row. In the next row, arrange so that the 3 plain
stitches may be worked over the middle 3 of the 7 purl, and the 7 purl worked over 2 of the purl, the 3 plain, and other 2 purl.
Work 3 or 4 rows to every pattern, and a plain row between the patterns.
A Spiral Pattern
(See Plate XXII, No. 7)
Pattern requires 4 stitches.
Knit 1, purl 3, continue in this way, knitting
4 rows to form one pattern. In the 4 rows form-ing the next pattern, knit plain the stitch above the first purl, and purl the 3 above the last 2 purl and the 1 plain. Continue to shift the pattern 1 stitch forward at each change.
A Diagonal Pattern
(See Plate XXII, No. 8)
Pattern requires 7 stitches. 1st row.—Knit 6 plain, 1 purl, repeat. 2nd row.—Knit 5 plain, 2 purl, repeat. 3rd row.—Knit 4 plain, 3 purl, repeat. 4th row.—Knit 3 plain, 4 purl, repeat. 5th row.—Knit 2 plain, 5 purl, repeat. 6th row.—Knit 1 plain, 6 purl, repeat. (3) and (4). Changes in the direction of the
stitch and open work are usually combined, the pattern being produced by a balanced ar-rangement of increasing and decreasing.
For the purpose of open work, increasing are always made simply by putting the thread over the needle (as for purl) before a plain stitch, and, unless longer or shorter rows are wanted, every increase must be balanced by a corre-sponding decrease.
This arrangement of increasing and decreasing is sufficient to give the stitches the appearance of having been worked at an angle to the general direction of the work.
1. A perfectly simple open pattern is pro-duced in this way:—
Work from home
Knitting 239
Knit 1 thread over needle, knit 2 together, and so on.
Knit the next row, or several rows, plain, then repeat the pattern. (See Plate XXII, No. 9.)
2. A rather more difficult pattern, forming a wave, is worked as follows:—
Pattern requires 15 stitches. Take in (slip 1, knit 1, take slipped stitch
over), knit 5, make 1 (wool over needle), knit 1, make 1, knit 5, knit 2 together.
The next row is plain, and pattern and plain rows are then alternated. (See Plate XXII, No. 10.)
CHAPTER III
SHAPING KNITTED GARMENTS
Except for stockings, socks, and gloves, knitted garments do not require to be fitted so exactly as those made of material. The extreme flexi-bility of knitted work causes the garment to fit itself easily to the body, and the warmth and comfort of a woolen garment is dependent on its being loose rather than strained tightly.
The lines of a woolen garment are generally much simpler than those of a cloth one. For example, the shoulders often show no sloping line, and the armhole lines are much less curved.
For very easy garments it is usually sufficient
to measure the main lines of length and width and adhere to them in knitting the garment. For more difficult articles, a paper pattern, as simple as possible, may be cut in stiff paper, and the various portions of the garment measured by it, and increased or decreased accordingly. Patterns might be drafted in a similar way for stockings, socks, and gloves, but in making these it must be remembered that the perfect fitting of the article depends on its being just a little narrower than the limb itself, the knitted fabric being so easily stretched.

Work from home
240 Needlework
In working to a paper pattern, it must be noted that any ribbed appearance must be smoothed out before measuring. For instance, a piece of work in garter stitch will be very much longer after being worn, and especially after being washed, than it is at first.
It is safer to apply a measure taken in inches than a measure according to number of stitches, or rows of knitting, as the work of different workers varies so much, and also the work varies according to the thickness of the knitting-needles used (see Plate XXII). In beginning a new piece of work it is well to knit a small piece of plain knitting first of all, so that the number of stitches and the number of rows to the inch may be found for purposes of comparison. It is then easy to keep the article to the correct shape, no matter how much variation in stitch or rib occurs during the construction of the garment.
A few patterns are given of articles that may be made in school, but many other suitable patterns are to be found in publications dealing with knitting. Only those of simple outline should be selected for children's work. In the patterns given, the dimensions of a suitable size of article are stated, but the diagrams show how easy it would be to make a larger or smaller size.
Baby's Bonnet
(See Plate XXIII)
Use, if possible, double-knitting wool and
rather fine knitting-pins. The work should be close and firm.
Cast on enough stitches to occupy about 41/2 in. Knit a square in garter stitch with chain edge. At each end of the line of knitting cast on
4½ in. more, making a piece of work 131/2 in. wide.
Knit about 9 in. of this, and cast off. Join together the short edges which are at
Fig. 1.—Join a to a and b to b
right angles to each other (fig. 1). The square of 41/2 in. forms the back of the bonnet.
The front portion of the bonnet is rolled back from the face.
Ribbons to tie must be sewn on, or a crochet cord made and run through the lower edge of the bonnet.
Baby's
Bootees
(See Plate XXIII)
Cast on sufficient stitches to make a length of about 13 in.
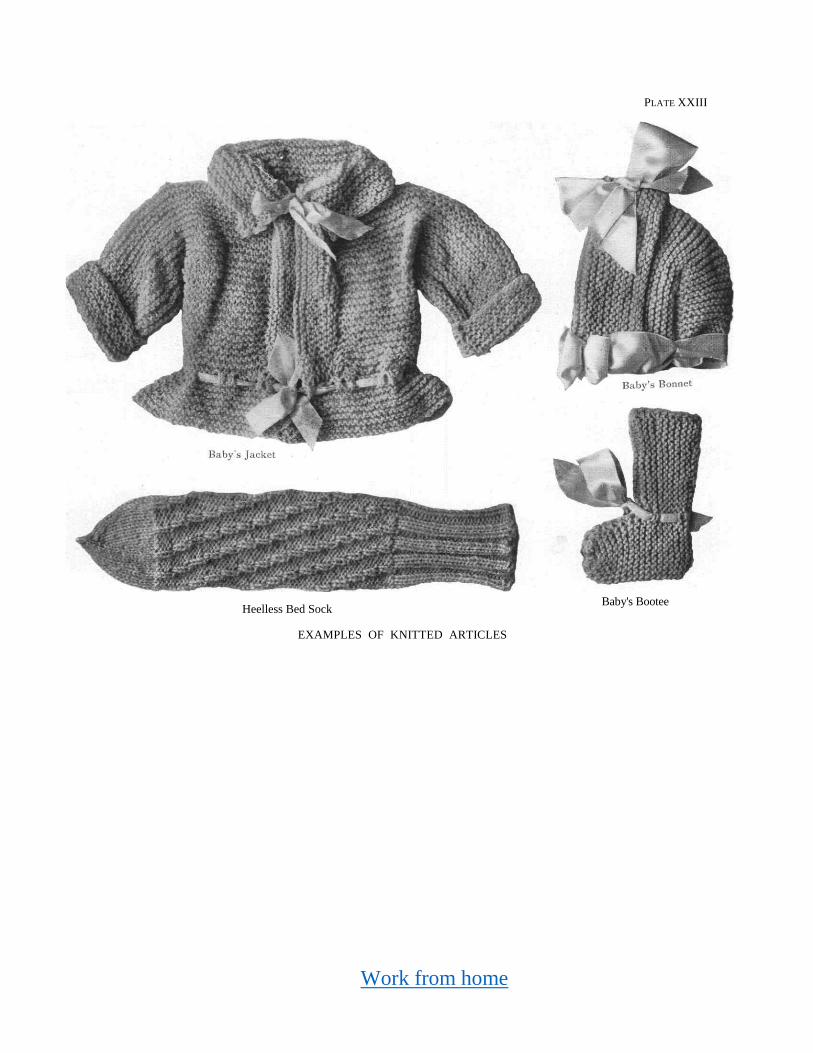
Work from home
PLATE XXIII
Heelless Bed Sock
EXAMPLES OF KNITTED ARTICLES
Baby's Bootee

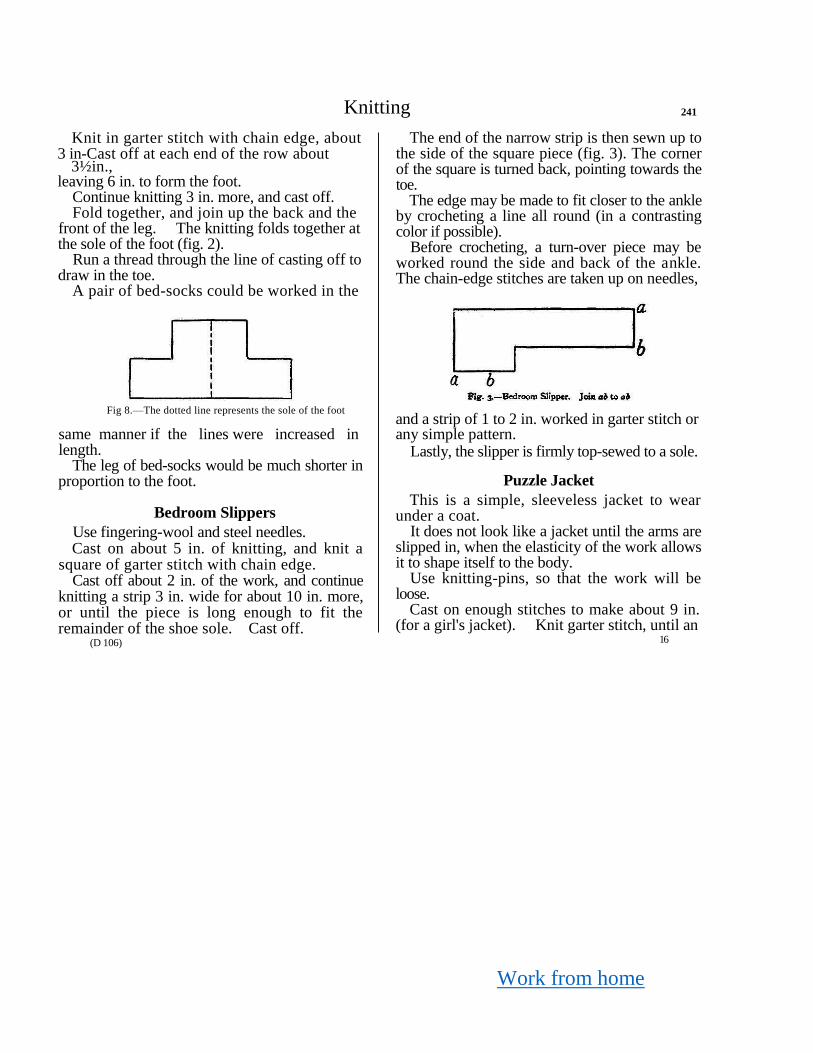
Work from home
Knitting 241
Knit in garter stitch with chain edge, about
3 in-Cast off at each end of the row about 3½in.,
leaving 6 in. to form the foot. Continue knitting 3 in. more, and cast off. Fold together, and join up the back and the
front of the leg. The knitting folds together at the sole of the foot (fig. 2).
Run a thread through the line of casting off to
draw in the toe. A pair of bed-socks could be worked in the
Fig 8.—The dotted line represents the sole of the foot
same manner if the lines were increased in length.
The leg of bed-socks would be much shorter in proportion to the foot.
Bedroom Slippers
Use fingering-wool and steel needles. Cast on about 5 in. of knitting, and knit a
square of garter stitch with chain edge. Cast off about 2 in. of the work, and continue
knitting a strip 3 in. wide for about 10 in. more, or until the piece is long enough to fit the remainder of the shoe sole. Cast off.
(D 106)
The end of the narrow strip is then sewn up to the side of the square piece (fig. 3). The corner of the square is turned back, pointing towards the toe.
The edge may be made to fit closer to the ankle by crocheting a line all round (in a contrasting color if possible).
Before crocheting, a turn-over piece may be worked round the side and back of the ankle. The chain-edge stitches are taken up on needles,
and a strip of 1 to 2 in. worked in garter stitch or any simple pattern.
Lastly, the slipper is firmly top-sewed to a sole.
Puzzle Jacket
This is a simple, sleeveless jacket to wear under a coat.
It does not look like a jacket until the arms are slipped in, when the elasticity of the work allows it to shape itself to the body.
Use knitting-pins, so that the work will be loose.
Cast on enough stitches to make about 9 in. (for a girl's jacket). Knit garter stitch, until an
16
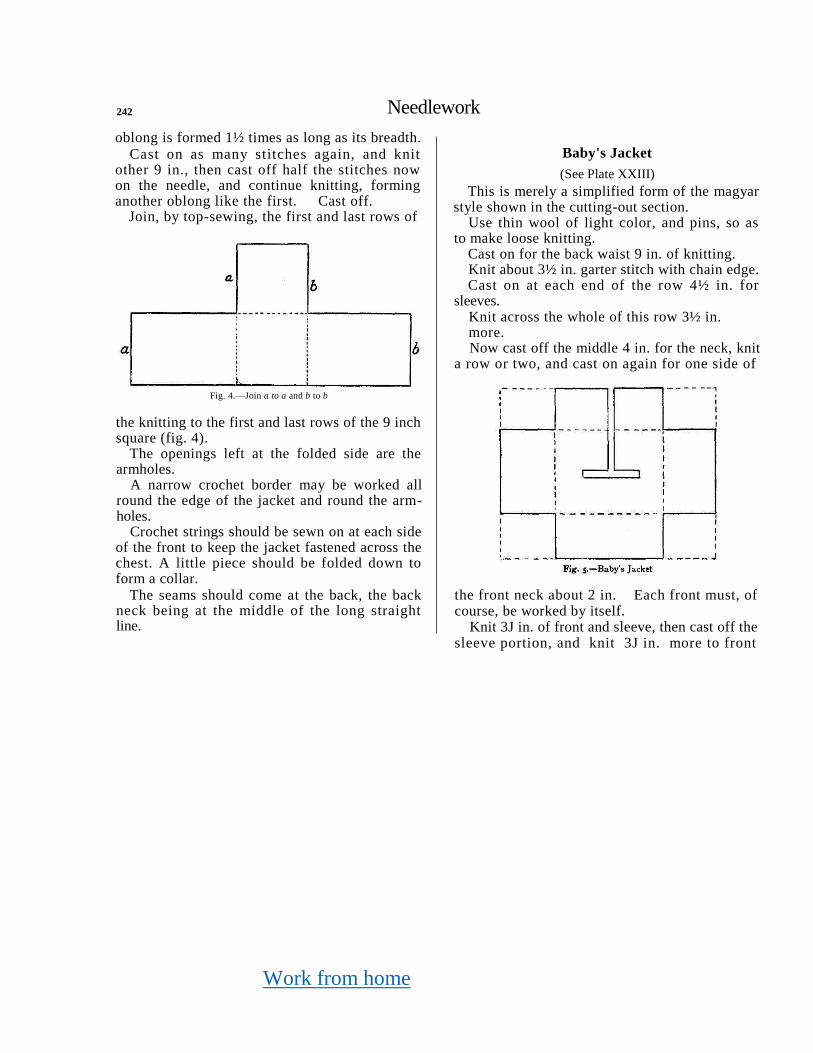
Work from home
242 Needlework
oblong is formed 1½ times as long as its breadth.
Cast on as many stitches again, and knit other 9 in., then cast off half the stitches now on the needle, and continue knitting, forming another oblong like the first. Cast off.
Join, by top-sewing, the first and last rows of
Fig. 4.—Join a to a and b to b
the knitting to the first and last rows of the 9 inch square (fig. 4).
The openings left at the folded side are the armholes.
A narrow crochet border may be worked all round the edge of the jacket and round the arm-holes.
Crochet strings should be sewn on at each side of the front to keep the jacket fastened across the chest. A little piece should be folded down to form a collar.
The seams should come at the back, the back neck being at the middle of the long straight line.
Baby's Jacket
(See Plate XXIII)
This is merely a simplified form of the magyar style shown in the cutting-out section.
Use thin wool of light color, and pins, so as to make loose knitting.
Cast on for the back waist 9 in. of knitting. Knit about 3½ in. garter stitch with chain edge. Cast on at each end of the row 4½ in. for
sleeves. Knit across the whole of this row 3½ in. more. Now cast off the middle 4 in. for the neck, knit
a row or two, and cast on again for one side of
the front neck about 2 in. Each front must, of course, be worked by itself.
Knit 3J in. of front and sleeve, then cast off the sleeve portion, and knit 3J in. more to front
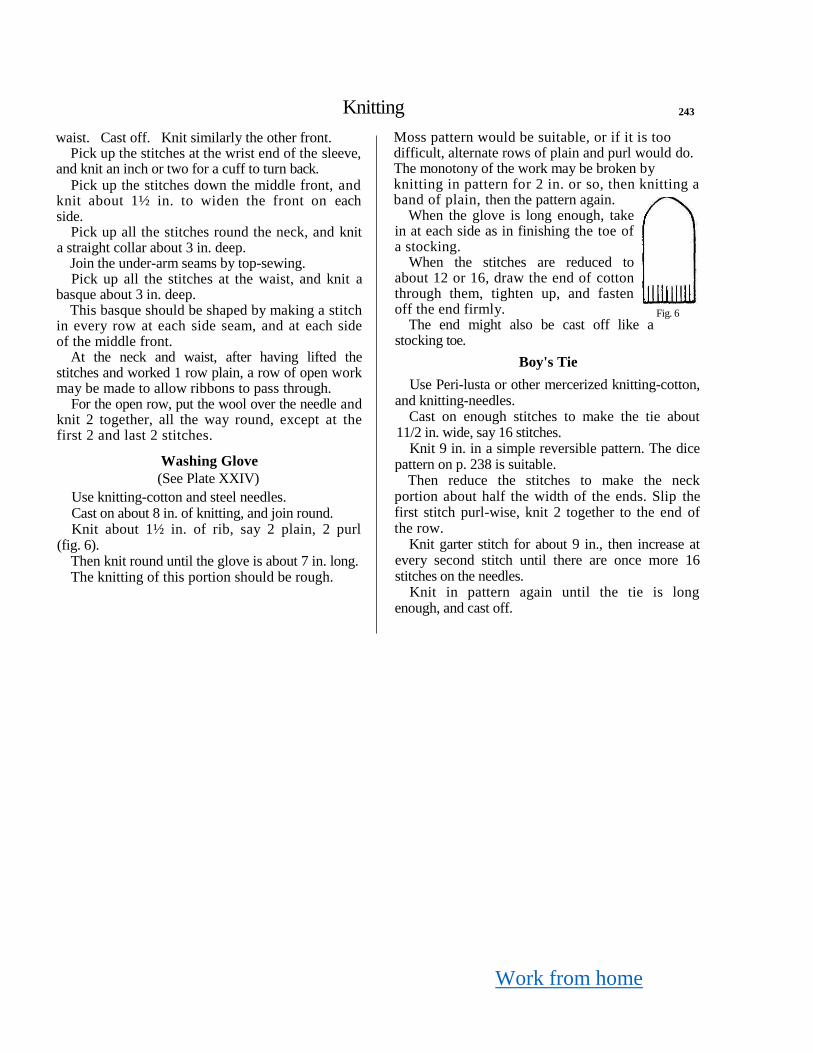
Work from home
Knitting 243
waist. Cast off. Knit similarly the other front. Pick up the stitches at the wrist end of the sleeve,
and knit an inch or two for a cuff to turn back. Pick up the stitches down the middle front, and
knit about 1½ in. to widen the front on each side.
Pick up all the stitches round the neck, and knit a straight collar about 3 in. deep.
Join the under-arm seams by top-sewing. Pick up all the stitches at the waist, and knit a
basque about 3 in. deep. This basque should be shaped by making a stitch
in every row at each side seam, and at each side of the middle front.
At the neck and waist, after having lifted the stitches and worked 1 row plain, a row of open work may be made to allow ribbons to pass through.
For the open row, put the wool over the needle and knit 2 together, all the way round, except at the first 2 and last 2 stitches.
Washing Glove
(See Plate XXIV)
Use knitting-cotton and steel needles. Cast on about 8 in. of knitting, and join round. Knit about 1½ in. of rib, say 2 plain, 2 purl
(fig. 6). Then knit round until the glove is about 7 in. long. The knitting of this portion should be rough.
Moss pattern would be suitable, or if it is too difficult, alternate rows of plain and purl would do. The monotony of the work may be broken by knitting in pattern for 2 in. or so, then knitting a band of plain, then the pattern again.
When the glove is long enough, take in at each side as in finishing the toe of a stocking.
When the stitches are reduced to about 12 or 16, draw the end of cotton through them, tighten up, and fasten off the end firmly.
The end might also be cast off like a stocking toe.
Boy's Tie
Use Peri-lusta or other mercerized knitting-cotton, and knitting-needles.
Cast on enough stitches to make the tie about 11/2 in. wide, say 16 stitches.
Knit 9 in. in a simple reversible pattern. The dice pattern on p. 238 is suitable.
Then reduce the stitches to make the neck portion about half the width of the ends. Slip the first stitch purl-wise, knit 2 together to the end of the row.
Knit garter stitch for about 9 in., then increase at every second stitch until there are once more 16 stitches on the needles.
Knit in pattern again until the tie is long enough, and cast off.
Fig. 6
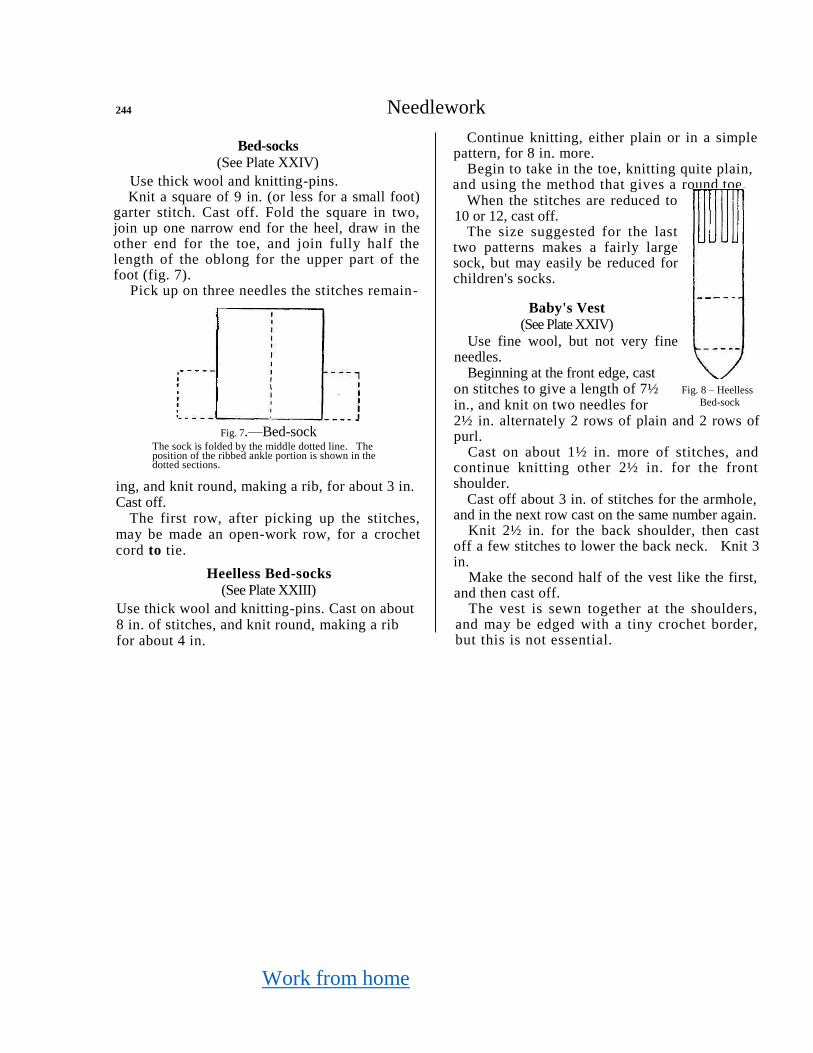
Work from home
244 Needlework
Bed-socks
(See Plate XXIV)
Use thick wool and knitting-pins. Knit a square of 9 in. (or less for a small foot)
garter stitch. Cast off. Fold the square in two, join up one narrow end for the heel, draw in the other end for the toe, and join fully half the length of the oblong for the upper part of the foot (fig. 7).
Pick up on three needles the stitches remain-
Fig. 7.—Bed-sock
The sock is folded by the middle dotted line. The position of the ribbed ankle portion is shown in the dotted sections.
ing, and knit round, making a rib, for about 3 in. Cast off.
The first row, after picking up the stitches, may be made an open-work row, for a crochet cord to tie.
Heelless Bed-socks (See Plate XXIII)
Use thick wool and knitting-pins. Cast on about 8 in. of stitches, and knit round, making a rib for about 4 in.
Continue knitting, either plain or in a simple pattern, for 8 in. more.
Begin to take in the toe, knitting quite plain, and using the method that gives a round toe.
When the stitches are reduced to 10 or 12, cast off.
The size suggested for the last two patterns makes a fairly large sock, but may easily be reduced for children's socks.
Baby's Vest (See Plate XXIV)
Use fine wool, but not very fine needles.
Beginning at the front edge, cast on stitches to give a length of 7½ in., and knit on two needles for 2½ in. alternately 2 rows of plain and 2 rows of purl.
Cast on about 1½ in. more of stitches, and continue knitting other 2½ in. for the front shoulder.
Cast off about 3 in. of stitches for the armhole, and in the next row cast on the same number again.
Knit 2½ in. for the back shoulder, then cast off a few stitches to lower the back neck. Knit 3 in.
Make the second half of the vest like the first, and then cast off.
The vest is sewn together at the shoulders, and may be edged with a tiny crochet border, but this is not essential.
Fig. 8 – Heelless
Bed-sock
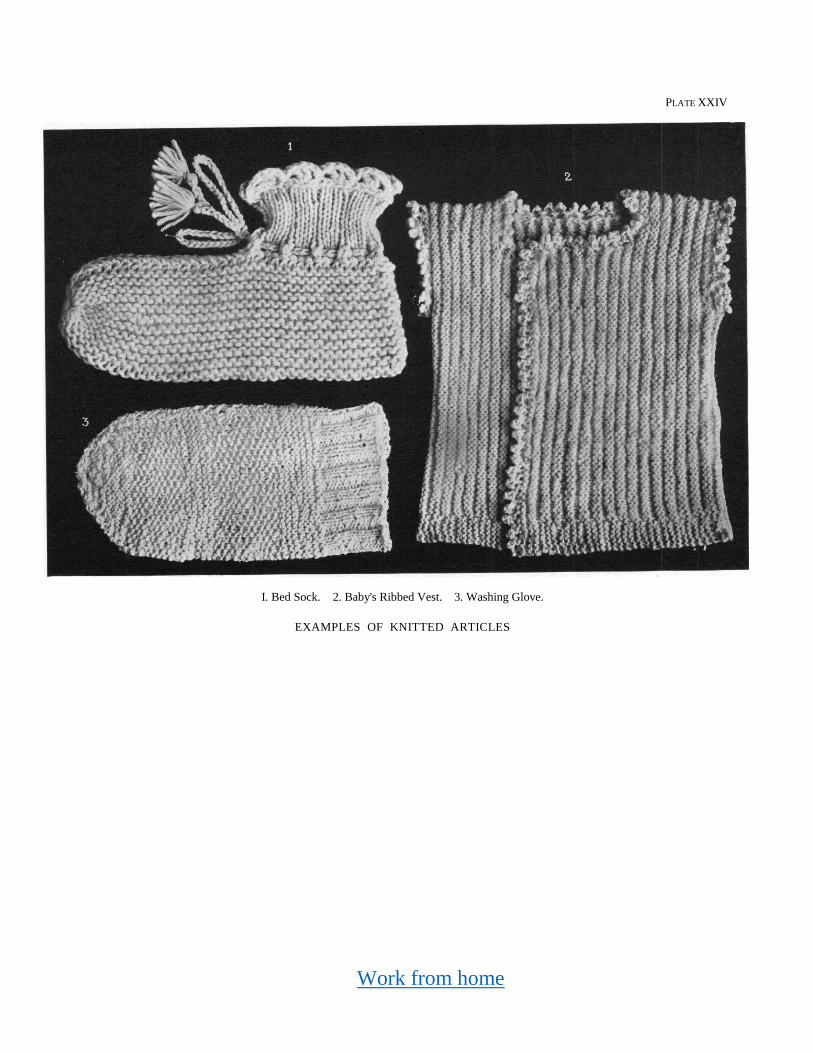
Work from home
PLATE XXIV
I. Bed Sock. 2. Baby's Ribbed Vest. 3. Washing Glove.
EXAMPLES OF KNITTED ARTICLES
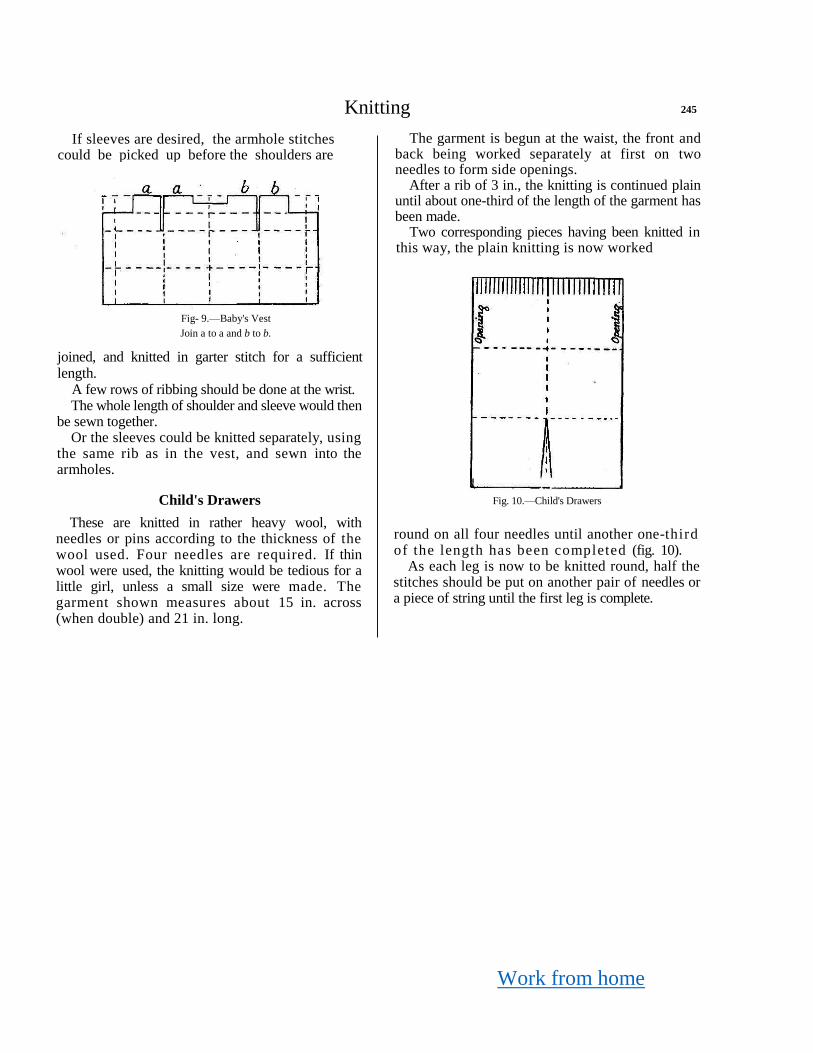
Work from home
Knitting 245
Fig- 9.—Baby's Vest
Join a to a and b to b.
joined, and knitted in garter stitch for a sufficient length.
A few rows of ribbing should be done at the wrist. The whole length of shoulder and sleeve would then
be sewn together. Or the sleeves could be knitted separately, using
the same rib as in the vest, and sewn into the armholes.
Child's Drawers
These are knitted in rather heavy wool, with needles or pins according to the thickness of the wool used. Four needles are required. If thin wool were used, the knitting would be tedious for a little girl, unless a small size were made. The garment shown measures about 15 in. across (when double) and 21 in. long.
The garment is begun at the waist, the front and back being worked separately at first on two needles to form side openings.
After a rib of 3 in., the knitting is continued plain until about one-third of the length of the garment has been made.
Two corresponding pieces having been knitted in this way, the plain knitting is now worked
Fig. 10.—Child's Drawers
round on all four needles until another one-third of the length has been completed (fig. 10).
As each leg is now to be knitted round, half the stitches should be put on another pair of needles or a piece of string until the first leg is complete.
If sleeves are desired, the armhole stitches could be picked up before the shoulders are
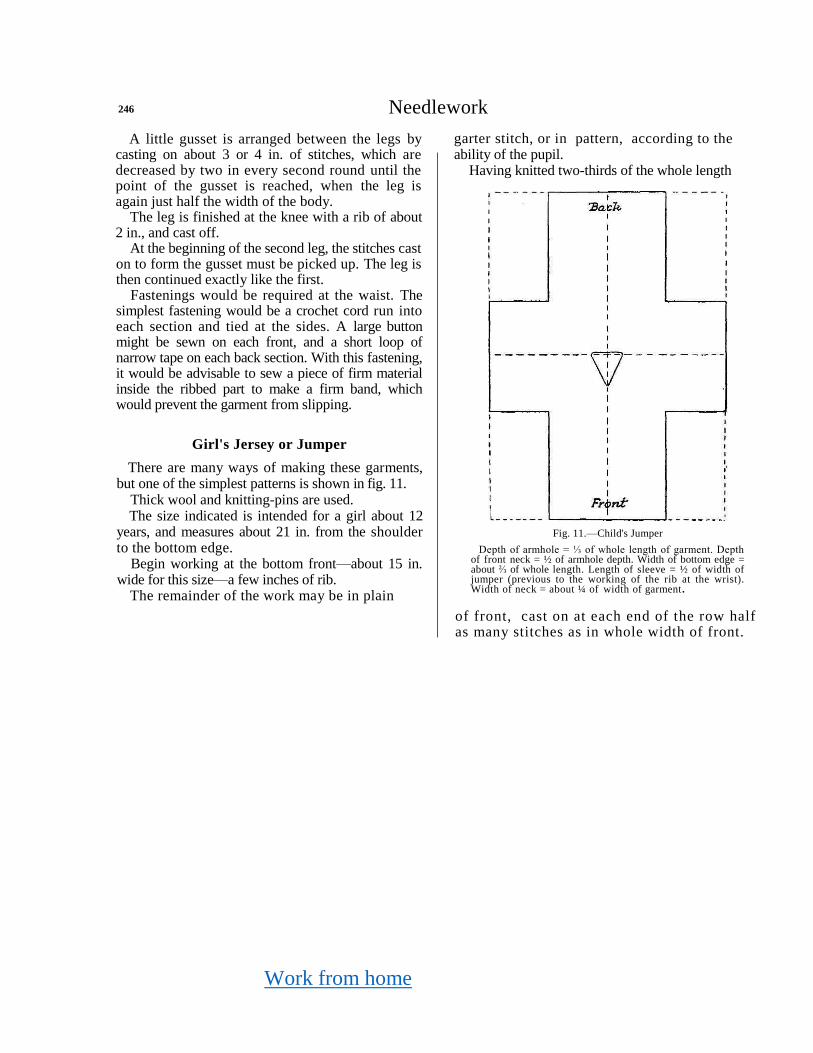
Work from home
246 Needlework
A little gusset is arranged between the legs by casting on about 3 or 4 in. of stitches, which are decreased by two in every second round until the point of the gusset is reached, when the leg is again just half the width of the body.
The leg is finished at the knee with a rib of about 2 in., and cast off.
At the beginning of the second leg, the stitches cast on to form the gusset must be picked up. The leg is then continued exactly like the first.
Fastenings would be required at the waist. The simplest fastening would be a crochet cord run into each section and tied at the sides. A large button might be sewn on each front, and a short loop of narrow tape on each back section. With this fastening, it would be advisable to sew a piece of firm material inside the ribbed part to make a firm band, which would prevent the garment from slipping.
Girl's Jersey or Jumper
There are many ways of making these garments, but one of the simplest patterns is shown in fig. 11.
Thick wool and knitting-pins are used. The size indicated is intended for a girl about 12
years, and measures about 21 in. from the shoulder to the bottom edge.
Begin working at the bottom front—about 15 in. wide for this size—a few inches of rib.
The remainder of the work may be in plain
garter stitch, or in pattern, according to the ability of the pupil.
Having knitted two-thirds of the whole length
Fig. 11.—Child's Jumper
Depth of armhole = ⅓ of whole length of garment. Depth of front neck = ½ of armhole depth. Width of bottom edge = about ⅔ of whole length. Length of sleeve = ½ of width of jumper (previous to the working of the rib at the wrist). Width of neck = about ¼ of width of garment.
of front, cast on at each end of the row half as many stitches as in whole width of front.
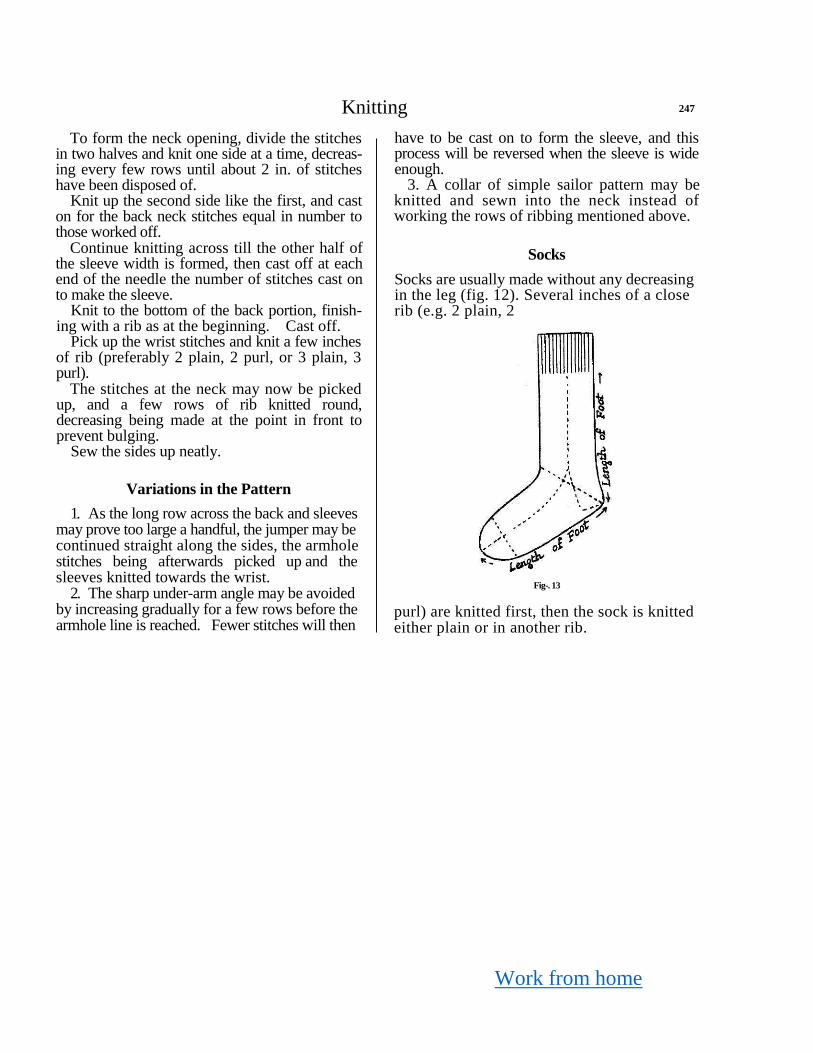
Work from home
Knitting 247
To form the neck opening, divide the stitches in two halves and knit one side at a time, decreas-ing every few rows until about 2 in. of stitches have been disposed of.
Knit up the second side like the first, and cast on for the back neck stitches equal in number to those worked off.
Continue knitting across till the other half of the sleeve width is formed, then cast off at each end of the needle the number of stitches cast on to make the sleeve.
Knit to the bottom of the back portion, finish-ing with a rib as at the beginning. Cast off.
Pick up the wrist stitches and knit a few inches of rib (preferably 2 plain, 2 purl, or 3 plain, 3 purl).
The stitches at the neck may now be picked up, and a few rows of rib knitted round, decreasing being made at the point in front to prevent bulging.
Sew the sides up neatly.
Variations in the Pattern
1. As the long row across the back and sleeves may prove too large a handful, the jumper may be continued straight along the sides, the armhole stitches being afterwards picked up and the sleeves knitted towards the wrist.
2. The sharp under-arm angle may be avoided by increasing gradually for a few rows before the armhole line is reached. Fewer stitches will then
have to be cast on to form the sleeve, and this process will be reversed when the sleeve is wide enough.
3. A collar of simple sailor pattern may be knitted and sewn into the neck instead of working the rows of ribbing mentioned above.
Socks
Socks are usually made without any decreasing in the leg (fig. 12). Several inches of a close rib (e.g. 2 plain, 2
Fig-. 13
purl) are knitted first, then the sock is knitted either plain or in another rib.
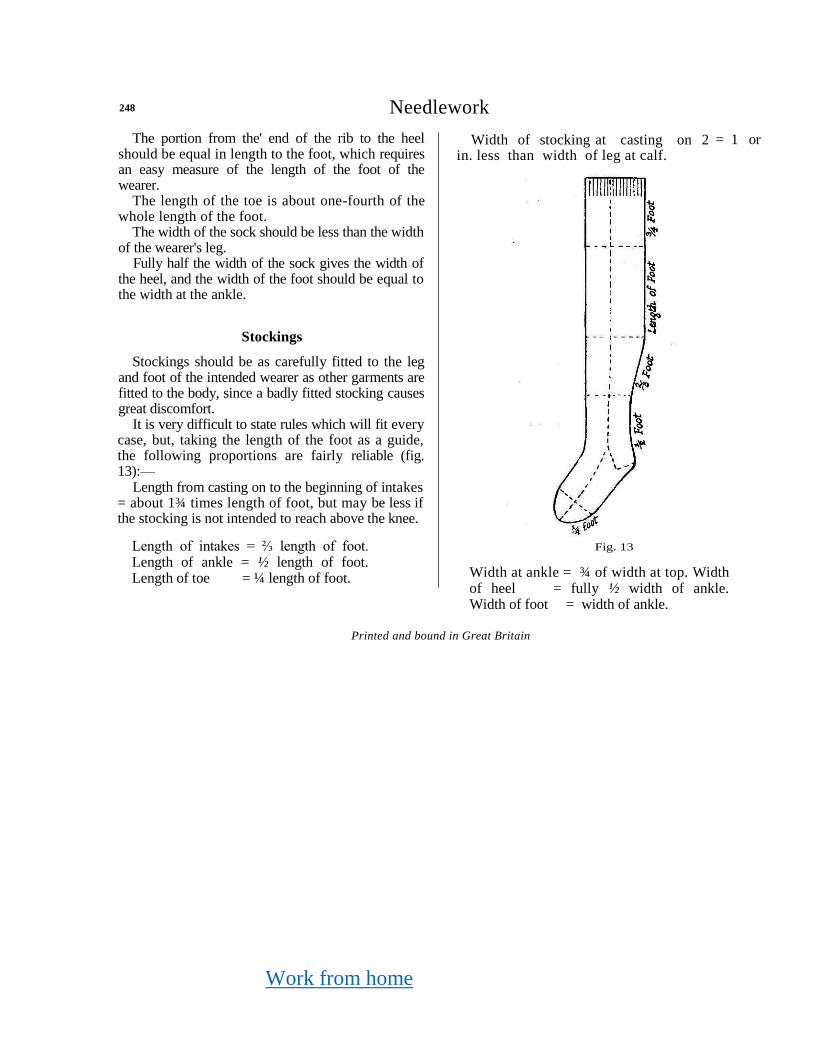
Work from home
248 Needlework
The portion from the' end of the rib to the heel should be equal in length to the foot, which requires an easy measure of the length of the foot of the wearer.
The length of the toe is about one-fourth of the whole length of the foot.
The width of the sock should be less than the width of the wearer's leg.
Fully half the width of the sock gives the width of the heel, and the width of the foot should be equal to the width at the ankle.
Stockings
Stockings should be as carefully fitted to the leg and foot of the intended wearer as other garments are fitted to the body, since a badly fitted stocking causes great discomfort.
It is very difficult to state rules which will fit every case, but, taking the length of the foot as a guide, the following proportions are fairly reliable (fig. 13):—
Length from casting on to the beginning of intakes = about 1¾ times length of foot, but may be less if the stocking is not intended to reach above the knee.
Length of intakes = ⅔ length of foot. Length of ankle = ½ length of foot. Length of toe = ¼ length of foot.
Width of stocking at casting on 2 in. less than width of leg at calf.
Fig. 13
Width at ankle = ¾ of width at top. Width of heel = fully ½ width of ankle. Width of foot = width of ankle.
Printed and bound in Great Britain
= 1 or