Embed Size (px)
Citation preview

Liferay 6.x Portal Enterprise Intranets Cookbook
Piotr FilipowiczKatarzyna Ziółkowska
Liferay 6.x Portal Enterprise Intranets Cookbook
What this book will do for you...
Build a corporate knowledge base for all employees in your organization
Confi gure site and page templates for departments in your company
Design and implement roles and permissions to fi t your organization
Defi ne effi cient business processes using XML representation
Integrate with LDAP, CAS SSO, and Solr search engine
Improve your portal with caching, clustering, indexing, searching, and more
Use effective taxonomy and folksonomy to organize documents and articles
$ 49.99 US£ 32.99 UK
Prices do not include local sales tax or VAT where applicable
Inside the Cookbook... A straightforward and easy-to-follow format
A selection of the most important tasks and problems
Carefully organized instructions for solving problems effi ciently
Clear explanations of what you did
Apply solutions to other situations
Quick answers to common problems
Packed with easy-to-follow recipes, this practical guide will show you how to unleash the full power of the Liferay Portal. Starting with performing a basic installation and running Liferay, the book will take you all the way through to building intranet structures, managing users, setting permissions, defi ning workfl ows, and creating sites that will act as the main communication tool for employees in your company. Furthermore, many recipes will show ready-to-use solutions from real-world case studies. At the end of the book, we will show you how to optimize Liferay's performance and how to use its advanced built-in tools.
After reading this book you will be ready to install, run, and use Liferay as a powerful intranet solution.
Piotr Filipowicz
Katarzyna Ziółkow
skaLiferay 6.x Portal Enterprise Intranets C
ookbook
Over 60 hands-on recipes to help you effi ciently create complex and highly personalized enterprise intranet solutions with Liferay Portal 6.x CE
P U B L I S H I N GP U B L I S H I N G
community experience dist i l ledP
UB
LIS
HIN
GP
UB
LIS
HIN
G
Visit www.PacktPub.com for books, eBooks, code, downloads, and PacktLib.
Free Sample

In this package, you will find: The authors biography
A preview chapter from the book, Chapter 9 'Liferay Workflow Capability'
A synopsis of the book’s content
More information on Liferay 6.x Portal Enterprise Intranets Cookbook
About the Authors Piotr Filipowicz is a Liferay architect and senior developer at eo Networks S.A., Poland.
He is an expert in content management systems (CMS). Piotr currently holds the position
of team leader in a group involved in developing Liferay-based software. His
accomplishments in enhancing and creating various Liferay components are evident from
his various successful implementations. His experience and knowledge are supported by
certificates such as Liferay Portal Administrator, Sun Certified Web Component
Developer for the Java Platform, and Sun Certified Programmer for the Java 2 platform.
Piotr is also one of the founders of the , which
contains a lot of information on Liferay and the CMS world.
Since 2002, he has created various kinds of IT systems, ranging from desktop
applications to CMS applications, supporting large banking and financial systems. His
main area of interest is web applications. Piotr uses Java and J2EE technologies on a
daily basis, but he is open to learning other technologies and solutions. He holds a
master's degree in software systems from Bialystok University of Technology, Poland.

Katarzyna Ziółkowska is employed at eo Networks S.A., Poland, as an IT analyst. She
is designated as the head of the analysis section. Her work focuses on government
websites and intranets, corporate business applications and websites. Katarzyna is a
specialist in content management systems. She has been working with Liferay Portal
since 2010 and has designed various products based on this technology using not only its
default functionalities, but also expanding them and designing entirely new modules.
Since 2003, her main areas of interest revolved around business process modeling,
managing business requirements, understanding user's needs, and designing usable
systems. She is also one of the authors who writes on , where
she shares her experience and knowledge on Liferay Portal CMS.
Katarzyna is certified in Prince 2 Foundation, Agile Project Management Foundation,
and is a Professional Scrum Master. She is also a member of International Institute of
Business Analysis. She holds a master's degree in arts in Russian philology from the
University of Warsaw, Faculty of Applied Linguistics, Poland.
Liferay 6.x Portal Enterprise Intranets Cookbook Liferay Portal is one of the most popular portal frameworks on the market, offering many
out-of-the-box features to build, install, configure, and customize portal or intranet
solutions. The main purpose of this book is to help you successfully build the intranet
system by providing step-by-step recipes. You will be taken on a tour that covers the
most common issues when dealing with Liferay. In every recipe, you will find solutions
to real-life problems with many explanations. The chapters are organized and ordered in
such a way that they will help you go through the intranet configuration step by step.
What This Book Covers Chapter 1, Installation and Basic Configuration, provides you with a basic knowledge on
how to install and run Liferay on Apache Tomcat. It also teaches you how to create a new
basic portlet.
Chapter 2, Authentication and Registration Process, describes several useful ways to
correctly configure authentication. It helps you learn about integration with a popular
single sign-on mechanism: CAS and communicate it with LDAP.
Chapter 3, Working with a Liferay User / User Group / Organization, introduces you to
the concept of user, user group, and organization management in Liferay. It also explains
how to use them together.
Chapter 4, Liferay Site Configuration, offers many useful recipes connected with site
configuration, such as creating sites, their templates, and enabling staging and versioning.
Chapter 5, Roles and Permissions, discusses roles and permissions and the possibility to
build a scalable grid of roles depending on the user's position in the company.
Chapter 6, Documents and Media in Liferay, introduces you to portlet, which provides
media and document fi le storage. This chapter also offers you advice on how to correctly
configure it. You will also learn how to integrate documents and media portlet with
Amazon S3 storage.
Chapter 7, Working with Content, talks about the most common CMS feature, that is,
web content management.
Chapter 8, Search and Content Presentation Tools, introduces various functionalities
connected with the searching and content presentation tool. This chapter also talks about
tagging and categorizing assets.
Chapter 9, Liferay Workflow Capability, teaches you how to apply workflow on assets
and deploy the Kaleo Web portlet.

Chapter 10, Collaboration Tools, provides recipes in collaboration with Wiki, blogs,
message boards, calendars, and so on.
Chapter 11, Quick Tricks and Advanced Knowledge, contains a set of various recipes,
which help you to perform specific tasks for your intranet sites. There are many subjects,
for example, enabling SMTP, configuring clustered environment, or using the Liferay
service bus.
Chapter 12, Basic Performance Tuning, offers information on scalable infrastructure and
discusses most common problems associated with performance.
185
9Liferay Workfl ow
Capability
In this chapter, we will cover the following topics:
The Kaleo Web installation
The Single Approver workfl ow for the user creation process
The web content creation and the fork-join workfl ow
Kaleo conditions in a message board example
Kaleo timers
IntroductionA workfl ow is a series of activities necessary to complete a task. In other words, a workfl ow consists of a sequence of states connected by transition. Each state has a specifi c step before it and a specifi c step after it. In general, it's a linear-defi ned process, which describes the fl ow between states. The term workfl ow indicates how people do their work and how they handle information. To understand workfl ow defi nitions, let's defi ne its specifi c vocabulary:
State: This term describes a unique state that will execute a specifi c action (or many actions) on a work item. For instance, new, approved, commit, done, remove, and so on.
Task: This defi nes an activity to be done on a work item between states.
Transition: This defi nes how a transition rules from one state to another. It means that transition describes a list of tasks, which have to be done to transform items from one state to another.
Liferay Workfl ow Capability
186
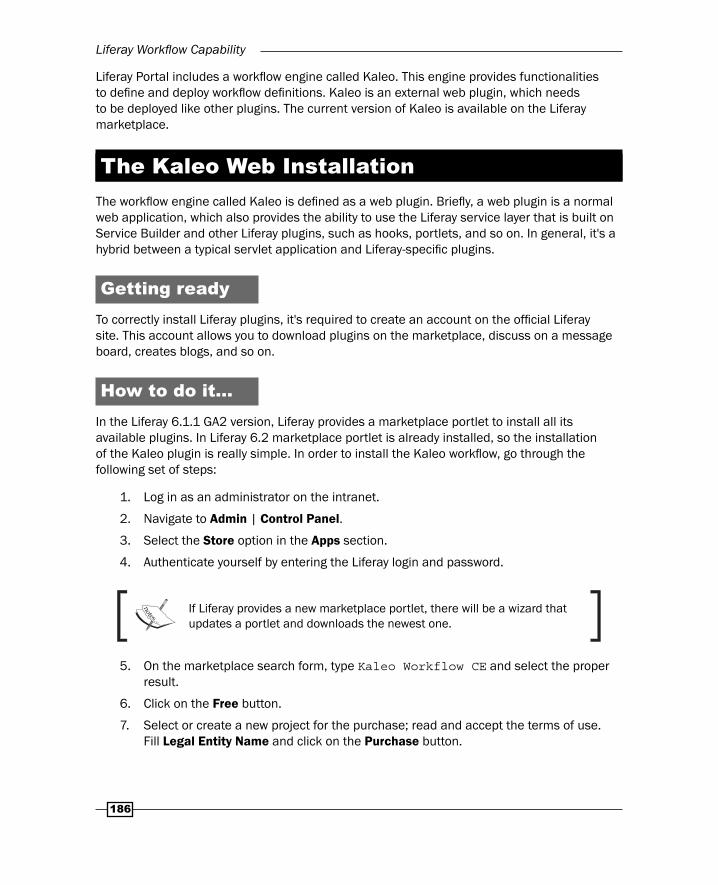
Liferay Portal includes a workfl ow engine called Kaleo. This engine provides functionalities to defi ne and deploy workfl ow defi nitions. Kaleo is an external web plugin, which needs to be deployed like other plugins. The current version of Kaleo is available on the Liferay marketplace.
The Kaleo Web InstallationThe workfl ow engine called Kaleo is defi ned as a web plugin. Briefl y, a web plugin is a normal web application, which also provides the ability to use the Liferay service layer that is built on Service Builder and other Liferay plugins, such as hooks, portlets, and so on. In general, it's a hybrid between a typical servlet application and Liferay-specifi c plugins.
Getting readyTo correctly install Liferay plugins, it's required to create an account on the offi cial Liferay site. This account allows you to download plugins on the marketplace, discuss on a message board, creates blogs, and so on.
How to do it...In the Liferay 6.1.1 GA2 version, Liferay provides a marketplace portlet to install all its available plugins. In Liferay 6.2 marketplace portlet is already installed, so the installation of the Kaleo plugin is really simple. In order to install the Kaleo workfl ow, go through the following set of steps:
1. Log in as an administrator on the intranet.
2. Navigate to Admin | Control Panel.
3. Select the Store option in the Apps section.
4. Authenticate yourself by entering the Liferay login and password.
If Liferay provides a new marketplace portlet, there will be a wizard that updates a portlet and downloads the newest one.
5. On the marketplace search form, type Kaleo Workflow CE and select the proper result.
6. Click on the Free button.
7. Select or create a new project for the purchase; read and accept the terms of use. Fill Legal Entity Name and click on the Purchase button.

Chapter 9
187
8. The system should display the following message:
Thank You!
Your receipt ID number is <RECEIPT_ID>
A confi rmation email for this order was sent to your inbox.
Click on "See Purchased" to view and manage your purchases online, or you may go to the Marketplace through your Liferay Portal instance and manage your purchases from there.
9. Navigate to See Purchased Apps and click on the Install button.
10. Verify that a Workfl ow tab is in the Control Panel | Confi guration section.
How it works…Liferay uses its own product for the workfl ow implementation. All Kaleo entities are generated by the service-builder mechanism.
It means that service.xml defi nes a set of entities: Kaleo Action, Kaleo Condition, Kaleo Defi nition, Kaleo Instance, Kaleo Instance Token, Kaleo Log, Kaleo Node, Kaleo Notifi cation, Kaleo Notifi cation Recipient, Kaleo Task, Kaleo Task Assignment, KaleoTask Assignment Instance, Kaleo Task Instance Token, Kaleo Timer, Kaleo Timer Instance Token, and Kaleo Transition. It's not necessary to know the meaning of all these entities and their relations.
After successful installation, there are a couple of new options in the Liferay environment:
The Workfl ow option in the Control Panel | Confi guration section: This is a global workfl ow confi guration, which allows you to defi ne newer workfl ow defi nitions and manage default workfl ows between assets (for instance, web content articles, users, blogs, and so on)
Workfl ow confi guration in the Admin | Site Administration | Confi guration: This defi nes workfl ows for the current site
The My Workfl ow tasks tab in the {USERNAME} | My account section: This functionality lists all pending and complete workfl ows tasks assigned to a specifi c user
My Submission in the {USERNAME} | My account section: This provides the list of assets submitted for the review process
Furthermore, Kaleo added specifi c roles, which can be used in workfl ow defi nitions:
The organization content reviewer
The portal content reviewer
The site content reviewer

Liferay Workfl ow Capability
188
See alsoFor more information on how to manage fi les or web contents, refer to
Managing fi les in Liferay using Documents and Media portlet recipe in Chapter 6, Documents and Media in Liferay
The Managing and displaying web contents recipe in Chapter 7, Working with Content
The Single Approver workfl ow for the user creation process
By default, Kaleo Workfl ow provides a Single Approver defi nition. This workfl ow requires one approval state before any asset is published.
We will show you how to use this workfl ow for the user creation process.
How to do it…Enabling the Single Approver defi nition is an easy process. To activate workfl ow for the user creation, perform these steps:
1. Navigate to the Admin | Control Panel | Confi guration | Workfl ow tab.
2. Select the Default Confi guration tab
3. Find the User resource and select the Single Approver (version 1) defi nition.
4. Click on the Save button.
To check how Single Approver works, try to create a new account in the Sign In portlet.
5. Open the Sign In portlet page. By default, it is on the main page.
6. Select the Create Account option and fi ll in the form.
7. After submitting the form, the system should display the following message:
Thank you for creating an account. You will be notifi ed via email at [email protected] when your account has been approved.

Chapter 9
189
The last thing in this process is to approve a new user. In order to achieve this, run through the following steps:
1. Log in as an administrator.
2. Navigate to My Account | My Workfl ow tasks.
3. Find a pending task with the review status and edit it by clicking on the hyperlink in the table.
4. Select the Assigned to Me option next to Assign to fi eld.
5. Approve the user (in the dialog box, it's possible to write a comment).
6. Go to the Completed tab and check the result. The approved user should be on the list.
Only a user with an assigned task can transfer it to the next task or state.

Liferay Workfl ow Capability
190
How it works…To understand this process, let's examine the Single Approver defi nition (single-approver-definition.xml located in webapps/kaleo-web/WEB-INF/classes/META-INF/definitions). This defi nition can be drawn as follows:
created
review
update
approved
reject
resubmit
review approve
StateThe starting point of this fl ow is a state called created. The defi nition of this state is present at the beginning of the single-approver-definition.xml fi le:
<state> <name>created</name> [..] <initial>true</initial> <transitions> <transition> <name>review</name> <target>review</target> </transition> </transitions></state>
The state node contains:
name: This is the name of a state
initial: This fl ag represents the initial state
List of transitions: In this example, there is only one transition called review
The transition node can defi ne:
name: This is the name of a transition
target: This is the name of the target state or task
default: This is a fl ag which marks transition as default

Chapter 9
191
TaskThe next step of our fl ow is a review task, which is defi ned by a transition called review. Tasks are the most complex structures in a fl ow defi nition. The task review is the place where users can decide whether to approve an asset or reject it. The defi nition of this task is as follows:
<task> <name>review</name> <actions> <notification> <name>Review Notification</name> <template>${userName} sent you a ${entryType} for review in the workflow.</template> <template-language>freemarker</template-language> <notification-type>email</notification-type> <notification-type>user-notification</notification-type> <execution-type>onAssignment</execution-type> </notification> [...] </actions> <assignments> <roles> [...] </roles> </assignments> <transitions> [...] </transitions></task>
The main attributes of task are:
name: This is the name of the task, for instance, review.
actions: This specifi es the list of action elements or notifi cation elements. In this example, actions contain only e-mail notifi cations.
assignments: This specifi es the list of roles or users to whom the specifi c task is assigned.
transitions: This specifi es the list of transition elements, which describe all possible ways to change the state or task. In this example, it's approved or rejected.
Liferay Workfl ow Capability
192
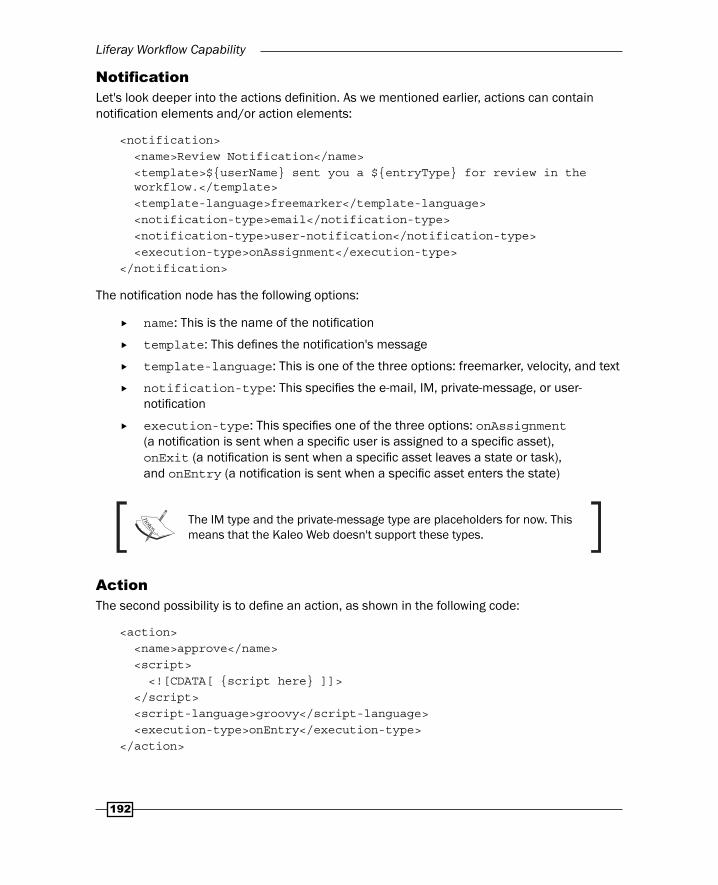
Notifi cationLet's look deeper into the actions defi nition. As we mentioned earlier, actions can contain notifi cation elements and/or action elements:
<notification> <name>Review Notification</name> <template>${userName} sent you a ${entryType} for review in the workflow.</template> <template-language>freemarker</template-language> <notification-type>email</notification-type> <notification-type>user-notification</notification-type> <execution-type>onAssignment</execution-type></notification>
The notifi cation node has the following options:
name: This is the name of the notifi cation
template: This defi nes the notifi cation's message
template-language: This is one of the three options: freemarker, velocity, and text
notification-type: This specifi es the e-mail, IM, private-message, or user-notifi cation
execution-type: This specifi es one of the three options: onAssignment (a notifi cation is sent when a specifi c user is assigned to a specifi c asset), onExit (a notifi cation is sent when a specifi c asset leaves a state or task), and onEntry (a notifi cation is sent when a specifi c asset enters the state)
The IM type and the private-message type are placeholders for now. This means that the Kaleo Web doesn't support these types.
ActionThe second possibility is to defi ne an action, as shown in the following code:
<action> <name>approve</name> <script> <![CDATA[ {script here} ]]> </script> <script-language>groovy</script-language> <execution-type>onEntry</execution-type></action>
Chapter 9
193
An action element has a simple structure, but it's a powerful tool to invoke every piece of code from Liferay. Action contains:
name: This specifi es the name of the action.
script: This specifi es the script defi nition. In this section, it's possible to write a code, which will be invoked on defi ning the execution type.
script-language: This defi nes the language which will be used in the script, for instance, Groovy, BeanShell, DRL, JavaScript, Python, Ruby. The most commonly used is the BeanShell one.
execution-type: This specifi es one of the three options: onAssignment (a notifi cation is sent when a specifi c user is assigned to a specifi c asset), onExit (a notifi cation is sent when a specifi c asset leaves a state or task), and onEntry (a notifi cation is sent when a specifi c asset enters some state).
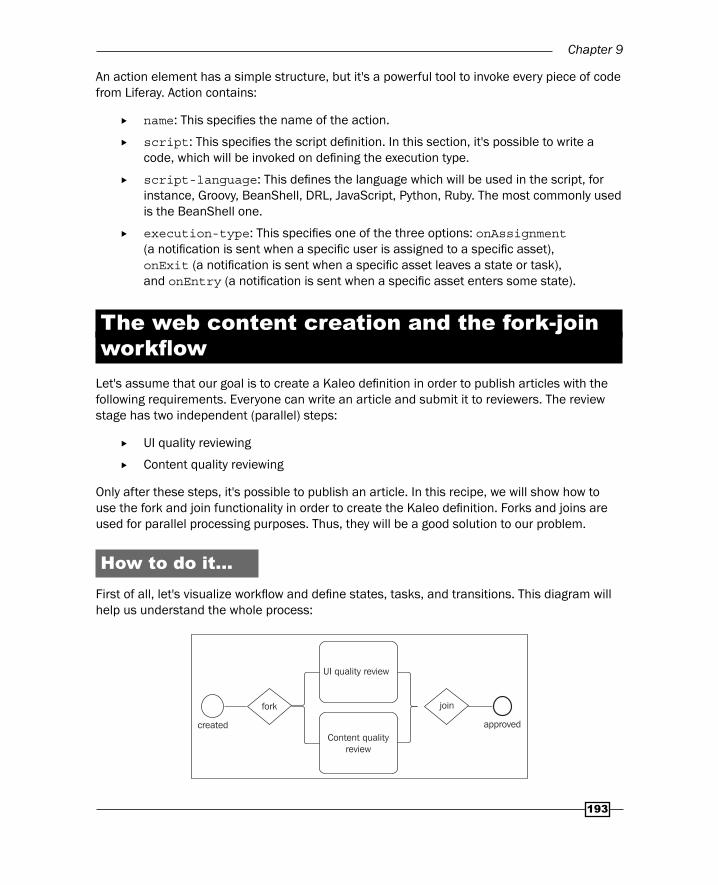
The web content creation and the fork-join workfl ow
Let's assume that our goal is to create a Kaleo defi nition in order to publish articles with the following requirements. Everyone can write an article and submit it to reviewers. The review stage has two independent (parallel) steps:
UI quality reviewing
Content quality reviewing
Only after these steps, it's possible to publish an article. In this recipe, we will show how to use the fork and join functionality in order to create the Kaleo defi nition. Forks and joins are used for parallel processing purposes. Thus, they will be a good solution to our problem.
How to do it…First of all, let's visualize workfl ow and defi ne states, tasks, and transitions. This diagram will help us understand the whole process:
created
UI quality review
approvedContent quality
review
fork join

Liferay Workfl ow Capability
194
As shown in the preceding diagram, in our workfl ow there are following components:
The created and approved state
The UI quality review and content quality review tasks
The fork and join functionality.
The second step is to write a prototype, which defi nes states, tasks, and transitions listed previously:
This is only a draft of the real defi nition. You will fi nd the working defi nition in the code fi les for this chapter along with this book.
<?xml version="1.0"?><workflow-definition> <name>Fork-Join Example</name> <state> <name>created</name> <transitions> <transition> <name>review-process</name> <target>review-process</target> </transition> </transitions> </state> <fork> <name>review-process</name> <transitions> <transition> <name>UI Quality Review</name> </transition> <transition> <name>Content Quality Review</name> </transition> </transitions> </fork> <task> <name>UI Quality Review</name> <transitions> <transition> <name>Submit</name> <target>join-tasks</target>

Chapter 9
195
</transition> </transitions> </task> <task> <name>Content Quality Review</name> <transitions> <transition> <name>Submit</name> <target>join-tasks</target> </transition> </transitions> </task> <join> <name>join-tasks</name> <transitions> <transition><name>approved</name></transition> </transitions></join> <state><name>approved</name></state></workflow-definition>
The third step is to complete the preceding defi nition by specifying each node. It can be done by copying parts from the Single Approver defi nition.
The next step is to upload this defi nition in the Kaleo workfl ow confi guration, which is placed in the Admin | Control Panel | Confi guration | Workfl ow section. After uploading the Kaleo defi nition, there should be a successful message. Now, the new defi nition will be visible in the Defi nitions tab.
The fi nal step is to enable a new workfl ow defi nition for the web content article. This step was described in the previous recipe.
How it works…This defi nition uses the fork and join functionality for web content articles. In general, when the author adds a new web content and submits it for publication, Kaleo workfl ow creates two tasks: UI Quality Review and Content Quality Review. Only after acceptance of these two tasks, the article status changes to approved. When the reviewing process is in progress, an article has a pending status.
Let's look deeply into fork and join defi nitions.

Liferay Workfl ow Capability
196
The fork elementFork has a similar structure as a state element. The main function of fork is to create a list of tasks in a parallel way. The main elements are:
name: This specifi es the name of the fork used in a transition defi nition
transitions: This specifi es the list of transitions (tasks or states)to be created
The fork element has many other functionalities and elements, such as scripts, timers, actions, and so on. It can have a really complex structure with a huge number of functionalities. In this recipe, we described only the basic function of this element.
The join elementJoin is an eternal partner of fork. This pair is always together. The main responsibility of this element is waiting unless all parallel tasks are performed and accepted. The join element has the following structure:
name: This specifi es the name of the join, which is used in a transition defi nition
transitions: This specifi es the list of transitions. It's usually one transition, which describes a state or task after the joining process.
Join has exactly the same structure as fork. It can have a very complex structure with a whole bunch of functionalities.
There's more…Instead of the join element, it's possible to use the join-xor element. The main difference between join and join-xor is that join waits for the completion of all parallel tasks, but join-xor waits only for the fi rst complete task.
Join-xor elementThe join-xor element has the same defi nition as join:
name: This specifi es the name of the join used in a transition defi nition.
transitions: This specifi es the list of transitions. It's usually one transition, which describes a state or task after the joining process.
See alsoFor more information on managing the web content, refer to Managing and displaying web contents recipe in Chapter 7, Working with Content.

Chapter 9
197
Kaleo conditions in a message board example
Kaleo workfl ow contains conditions. It's possible to use conditions to branch workfl ows and execute different tasks. Let's assume that we are message board moderators. In our company, there is a user who must accept new threads and many users who accept replies in threads. It's possible to achieve this functionality that allows message boards to work this way using Kaleo workfl ow conditions.
How to do it…This defi nition is similar to the fork and join workfl ow, but there is a great difference. There is no parallel workfl ow task. Instead, there is a condition, which moves an entity to a different state. Obviously, workfl ow is the same: the user creates a new entity and the moderator accepts it. There is little difference seen between roles, which are defi ned for a particular task.
As shown in the previous example, let's visualize workfl ow and defi ne states, tasks, and transitions. The following diagram will help you understand the whole process in a better way:
created
Normal Review
approved
Main Thread Review
Determinebranch Submit
Normal Review
Main Thread Review
The preceding diagram contains following components:
The created and approved state
Normal Review and Main Thread Review tasks
The condition statement.
Let's defi ne these defi nitions:
<?xml version="1.0"?><workflow-definition> <name>Condition Example</name> <state>

Liferay Workfl ow Capability
198
<name>created</name> <transitions> <transition> <name>determine-branch</name> <target>determine-branch</target> </transition> </transitions> </state> <condition> <name>determine-branch</name> <script> <![CDATA[SCRIPT DEFINITION]]> </script> <script-language>groovy</script-language> <transitions> <transition> <name>Normal Review</name> <target>Normal Review</target> <default>false</default> </transition> <transition> <name>Main Thread Review</name> <target>Main Thread Review</target> <default>false</default> </transition> </transitions> </condition>
<task> <name>Normal Review</name> <transitions> <transition> <name>Submit</name> <target>approved</target> </transition> </transitions> </task> <task> <name>Main Thread Review</name> <transitions> <transition> <name>Submit</name> <target>approved</target>

Chapter 9
199
</transition> </transitions> </task>
<state><name>approved</name></state></workflow-definition>
After defi ning Kaleo , let's write a conditional script which represents our Kaleo condition. In this example, we will use the Groovy script, which will be placed in the <script> tag in the <condition> defi nition. So, let's defi ne it:
import com.liferay.portal.kernel.util.GetterUtil;import com.liferay.portal.kernel.workflow.WorkflowConstants;import com.liferay.portlet.messageboards.service.MBMessageLocalServiceUtil;import com.liferay.portlet.messageboards.model.MBMessage;
String className = (String)workflowContext.get(WorkflowConstants.CONTEXT_ENTRY_CLASS_NAME);boolean isMBMessage = false;if (className.equals(MBMessage.class.getName())) { isMBMessage = true;}returnValue = "Answers Review";long classPK = GetterUtil.getLong((String)workflowContext.get(WorkflowConstants.CONTEXT_ENTRY_CLASS_PK));if (isMBMessage) { MBMessage mbMessage = MBMessageLocalServiceUtil.getMBMessage(classPK); if (mbMessage.isRoot()) { returnValue = "Main Thread Review"; }}
How it works…In the preceding example, we explained the workfl ow defi nition, which can be applied for all types of asset (for instance, user, web content article, message board, and so on). In every type, there is a typical fl ow: Created | Normal Review Task | Approved. However, if we apply this workfl ow for a message board entity, it will have a different fl ow: Created | Main Thread Review | Approved.
Why does this happen? Groovy script defi nes a condition and determines the complete fl ow.

Liferay Workfl ow Capability
200
The fi rst line gets a className defi nition. Next, the if statement checks whether this is a MBMessage entity.
The next couple of lines get the specifi c mbMessage object and check whether this object is a root of MBMessage. It's worth noting that there are predefi ned values:
returnValue: This contains the transition's target
workflowContext: This object implements the WorflowContext interface
Condition statementThe <condition> tag has the following structure:
name: This is the name of the condition.
script: This defi nes a condition.
script-language: This defi nes the language which will be used in the script, for instance: Groovy, BeanShell, DRL, JavaScript, Python, Ruby. The most common use is the BeanShell one.
transitions: This specifi es the list of transitions.
Kaleo timersThis last recipe concerns timers. This functionality allows users to defi ne specifi c actions, which should be performed after a certain period of time. Let's modify our previous recipe a little with the condition example and add a timer defi nition. Our assumption is that the task called Main Thread Review shouldn't wait more than one hour for assignment to any user. After one hour, this task should be assigned to a user with the [email protected] e-mail.
How to do it…First of all, open the previous defi nition and fi nd the Main Thread Review task. Between the assignments tag and the transitions tag, enter the following code:
<?xml version="1.0" encoding="UTF-8"?><task-timers> <task-timer> <name>default-assignment</name> <delay> <duration>1</duration> <scale>hour</scale> </delay> <blocking>true</blocking> <timer-actions>

Chapter 9
201
<timer-notification> <name /> <template /> <template-language>text</template-language> <notification-type>im</notification-type> </timer-notification> <reassignments> <user> <email-address>[email protected]</email-address> </user> </reassignments> </timer-actions> </task-timer></task-timers>
How it works…The Kaleo web plugin gives users the possibility to react to the user's action after a specifi c time period. It allows you to assign tasks to specifi c users, send notifi cations, and so on.
The <task-timers> tag has the following structure:
task-timer: This specifi es complex type with the timer's defi nition.
name: This specifi es the timer's name.
delay: This specifi es the delay defi nition and defi nes how much time the timer will wait until its actions are executed. For instance 1 hour, 5 minutes, and so on.
recurrence (not used in this example): This triggers the action several times depending on the argument specifi ed. For instance, for every 1 hour, defi nition invokes a specifi c action.
blocking: If this is true, stop the workfl ow engine execution until the timer is executed.
timer actions: This specifi es the list of actions to be done after the delay defi nition.

Where to buy this book You can buy Liferay 6.x Portal Enterprise Intranets Cookbook from the
Packt Publishing website.
Alternatively, you can buy the book from Amazon, BN.com, Computer Manuals and most internet
book retailers.
Click here for ordering and shipping details.
www.PacktPub.com
Stay Connected:
Get more information Liferay 6.x Portal Enterprise Intranets Cookbook