Embed Size (px)
Citation preview
iPad®
Cart
iPad Charge & Sync CartModel MCC2
430-MCC2-User Manual-00iPad® Is a Registered Trademark of Apple Inc.
Slot-in Sliding Doorfor security and space saving
Laser Numbered SlotsNumbering System helps you keepiPad organized.
Extra outlet3 outlet for convenience. Power allyour peripheries from one standardwall outlet.
Handleeasy manoeuvring.
LED lightson the top of the cart indicate the charging status for each iPad.
Fan (Option)air circulation.
1. iPad Cart Specifications
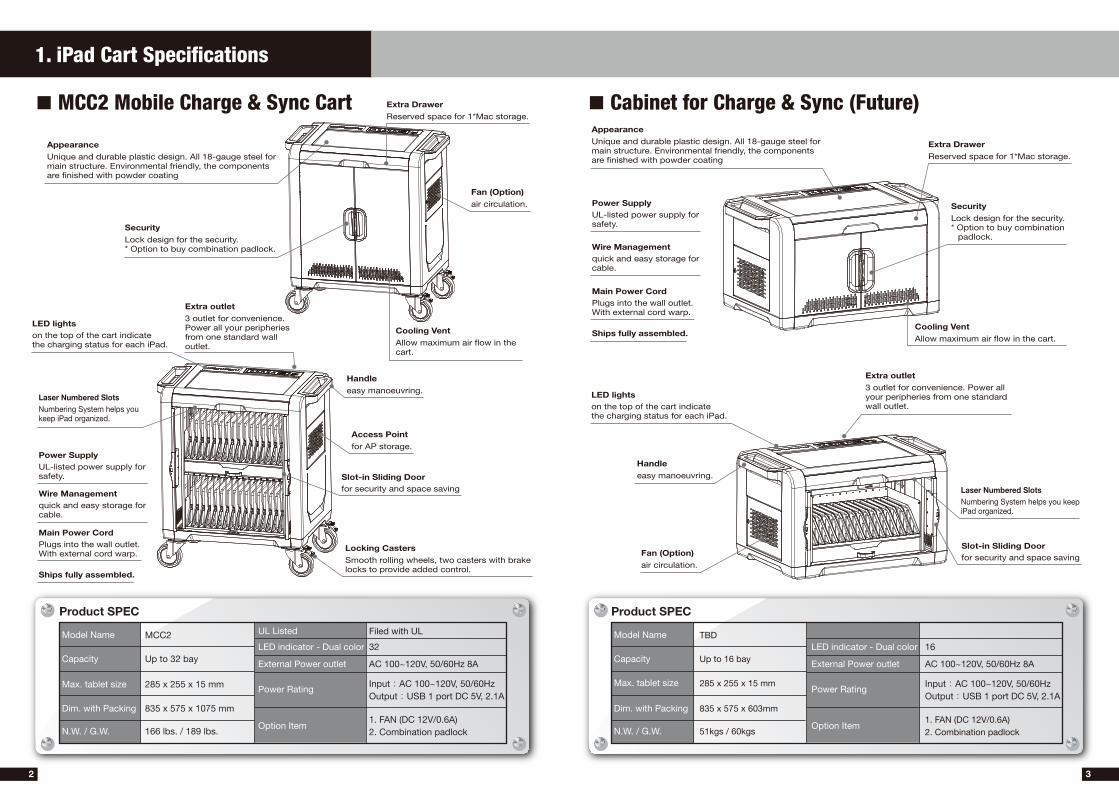
MCC2 Mobile Charge & Sync Cart Cabinet for Charge & Sync (Future)
Product SPEC
Model Name
Capacity
Max. tablet size
Dim. with Packing
N.W. / G.W.
UL Listed
LED indicator - Dual color
External Power outlet AC 100~120V, 50/60Hz 8A
32
Filed with UL
166 lbs. / 189 lbs.
835 x 575 x 1075 mm
285 x 255 x 15 mm
Up to 32 bay
MCC2
Power RatingInput:AC 100~120V, 50/60HzOutput:USB 1 port DC 5V, 2.1A
1. FAN (DC 12V/0.6A)2. Combination padlock
Option Item
Product SPEC
Model Name
Capacity
Max. tablet size
Dim. with Packing
N.W. / G.W.
LED indicator - Dual color
External Power outlet AC 100~120V, 50/60Hz 8A
16
51kgs / 60kgs
835 x 575 x 603mm
285 x 255 x 15 mm
Up to 16 bay
TBD
Power RatingInput:AC 100~120V, 50/60HzOutput:USB 1 port DC 5V, 2.1A
1. FAN (DC 12V/0.6A)2. Combination padlock
Option Item
2 3
LED lightson the top of the cart indicate the charging status for each iPad.
Slot-in Sliding Doorfor security and space saving
Laser Numbered SlotsNumbering System helps youkeep iPad organized.
Power SupplyUL-listed power supply forsafety.
Wire Managementquick and easy storage forcable.
Main Power CordPlugs into the wall outlet.With external cord warp.
Ships fully assembled.
Locking Casters
Smooth rolling wheels, two casters with brakelocks to provide added control.
Access Point for AP storage.
Extra outlet3 outlet for convenience.Power all your peripheriesfrom one standard walloutlet.
Power SupplyUL-listed power supply forsafety.
Wire Managementquick and easy storage forcable.
Main Power CordPlugs into the wall outlet.With external cord warp.
Ships fully assembled.
Handleeasy manoeuvring.
Fan (Option)air circulation.
AppearanceUnique and durable plastic design. All 18-gauge steel formain structure. Environmental friendly, the components are finished with powder coating
Cooling VentAllow maximum air flow in thecart.
Cooling VentAllow maximum air flow in the cart.
SecurityLock design for the security. * Option to buy combination padlock.
SecurityLock design for the security. * Option to buy combination padlock.
Extra DrawerReserved space for 1*Mac storage.
AppearanceUnique and durable plastic design. All 18-gauge steel formain structure. Environmental friendly, the components are finished with powder coating
Extra DrawerReserved space for 1*Mac storage.
2. Tablet Cable Set-up For Charging and Syncing Charging
4 5
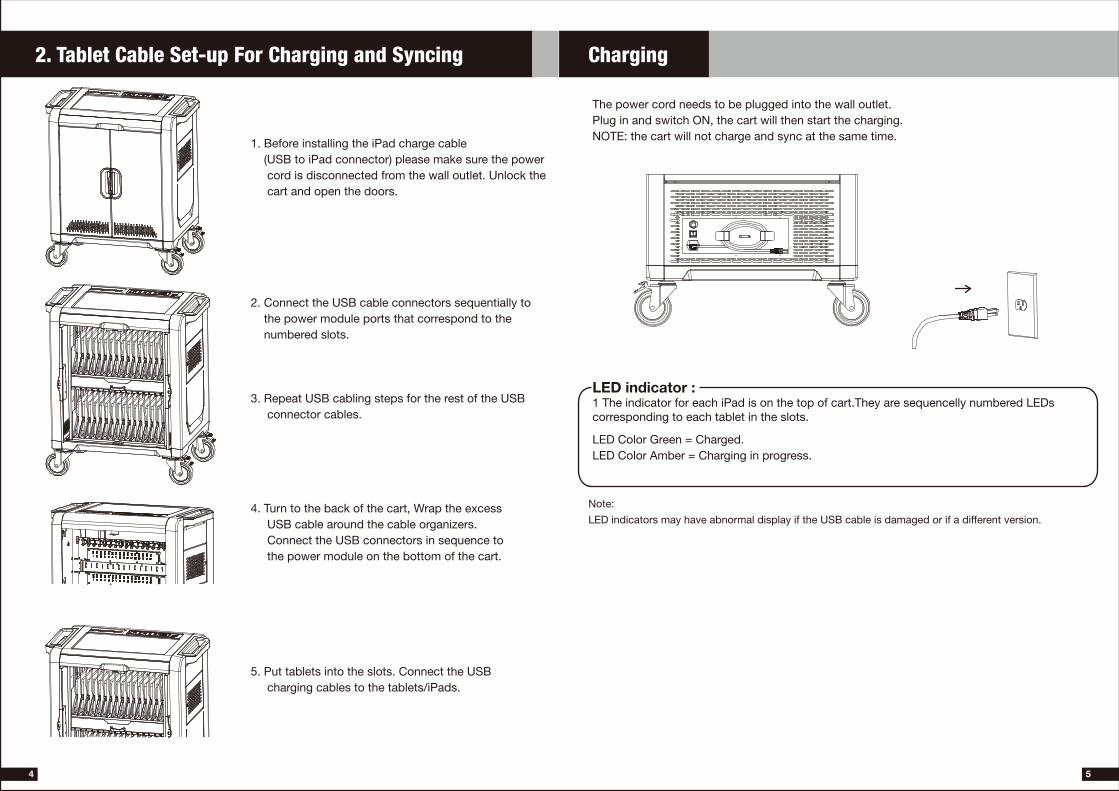
1. Before installing the iPad charge cable (USB to iPad connector) please make sure the power cord is disconnected from the wall outlet. Unlock the cart and open the doors.
The power cord needs to be plugged into the wall outlet. Plug in and switch ON, the cart will then start the charging. NOTE: the cart will not charge and sync at the same time.
2. Connect the USB cable connectors sequentially to the power module ports that correspond to the numbered slots.
3. Repeat USB cabling steps for the rest of the USB connector cables.
4. Turn to the back of the cart, Wrap the excess USB cable around the cable organizers. Connect the USB connectors in sequence to the power module on the bottom of the cart.
5. Put tablets into the slots. Connect the USB charging cables to the tablets/iPads.
LED indicator :1 The indicator for each iPad is on the top of cart.They are sequencelly numbered LEDs corresponding to each tablet in the slots.
LED Color Green = Charged.LED Color Amber = Charging in progress.
Note:
LED indicators may have abnormal display if the USB cable is damaged or if a different version.
4. Tablet Sync set-up
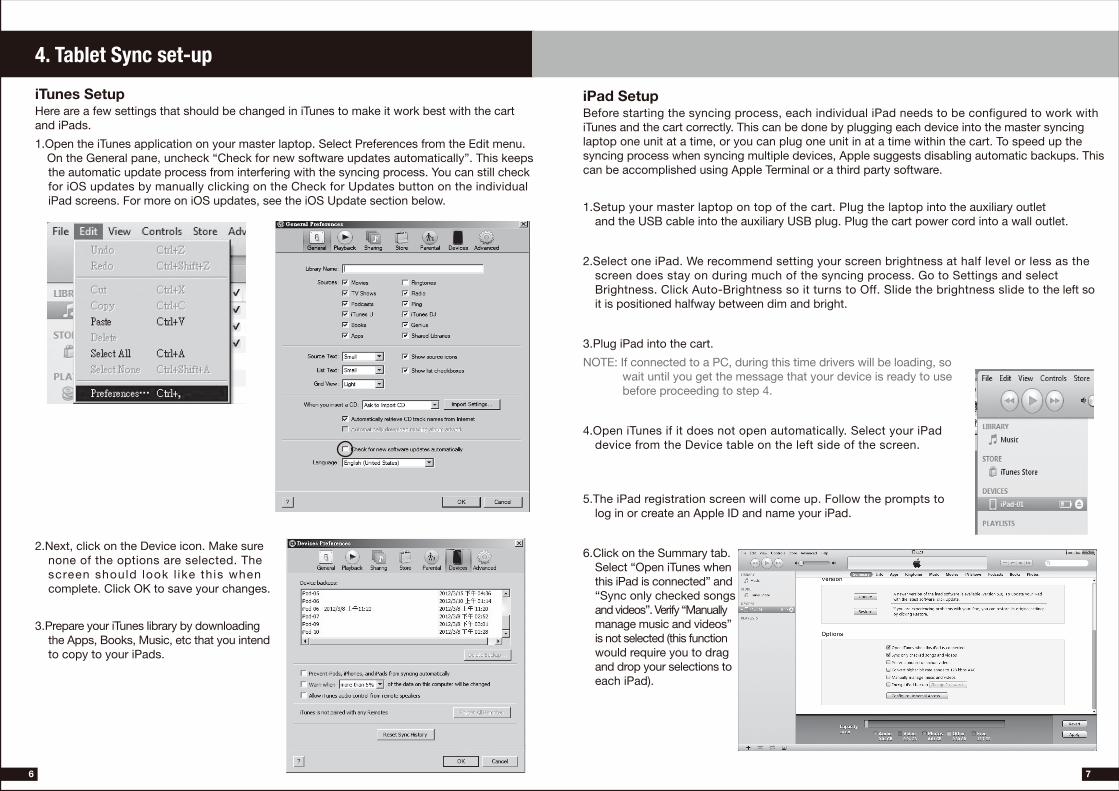
iTunes Setup Here are a few settings that should be changed in iTunes to make it work best with the cartand iPads.
1.Open the iTunes application on your master laptop. Select Preferences from the Edit menu. On the General pane, uncheck “Check for new software updates automatically”. This keeps the automatic update process from interfering with the syncing process. You can still check for iOS updates by manually clicking on the Check for Updates button on the individual iPad screens. For more on iOS updates, see the iOS Update section below.
2.Next, click on the Device icon. Make sure none of the options are selected. The screen should look l ike this when complete. Click OK to save your changes.
3.Prepare your iTunes library by downloading the Apps, Books, Music, etc that you intend to copy to your iPads.
iPad Setup Before starting the syncing process, each individual iPad needs to be configured to work withiTunes and the cart correctly. This can be done by plugging each device into the master syncing laptop one unit at a time, or you can plug one unit in at a time within the cart. To speed up thesyncing process when syncing multiple devices, Apple suggests disabling automatic backups. Thiscan be accomplished using Apple Terminal or a third party software.
1.Setup your master laptop on top of the cart. Plug the laptop into the auxiliary outlet and the USB cable into the auxiliary USB plug. Plug the cart power cord into a wall outlet.
2.Select one iPad. We recommend setting your screen brightness at half level or less as the screen does stay on during much of the syncing process. Go to Settings and select Brightness. Click Auto-Brightness so it turns to Off. Slide the brightness slide to the left so it is positioned halfway between dim and bright.
3.Plug iPad into the cart.
NOTE: If connected to a PC, during this time drivers will be loading, so wait until you get the message that your device is ready to use before proceeding to step 4.
4.Open iTunes if it does not open automatically. Select your iPad device from the Device table on the left side of the screen.
5.The iPad registration screen will come up. Follow the prompts to log in or create an Apple ID and name your iPad.
6.Click on the Summary tab. Select “Open iTunes when this iPad is connected” and “Sync only checked songs and videos”. Verify “Manually manage music and videos” is not selected (this function would require you to drag and drop your selections to each iPad).
6 7
7..Click on each of the tabs at the top (Apps, Music, Movies, TV shows, Books, Photos) and select which type of files you will want to sync on this device. Click the Sync or Apply button.
8..Repeat Steps 2 – 7 with each iPad that will be used in this cart.
Ready to Sync 1..When all the iPad devices have been configured, you are ready to charge and sync your tablets. Place each iPad in a slot in the cart. Plug each device in using the 30-pin Apple connector connectors. Plug the cart into a wall outlet.
2..If the iPad devices are new, they should be fully charged before attempting to sync.
3..When ready to sync, connect one end of the USB cable into the USB port near the auxiliary outlet and the other into a USB 2.0 port on your Mac or PC.
4. .iTunes will open and syncing will start automatically. Each iPad will be listed in iTunes under the Device list on the left hand side of the screen. You could review the sync status from master PC.
NOTE: Please keep in mind that identifying the devices and syncing will take time, so please be patient. The time is dependent on the number of iPads being synced and the amount of data being transferred. It can range from a few minutes to hours on 32 devices depends on different content. Please do not stop the process once it has been started.
5..When syncing is complete, the Eject symbol will appear next to each device. At this time it is safe to eject the device by clicking on the Eject symbol or closing iTunes.
6..When syncing is complete, unplug the USB Cable from your PC so charging can begin. Charging will not occur while the USB Cable is plugged into the master laptop.
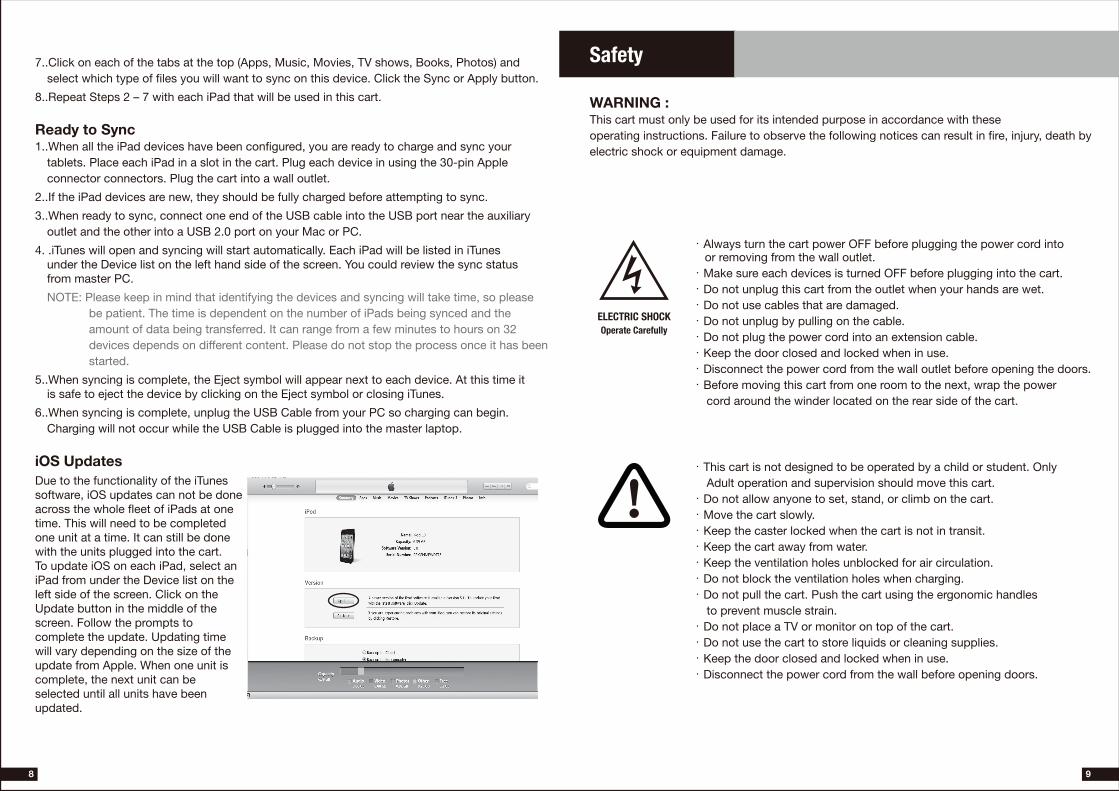
iOS Updates Due to the functionality of the iTunessoftware, iOS updates can not be doneacross the whole fleet of iPads at onetime. This will need to be completedone unit at a time. It can still be donewith the units plugged into the cart.To update iOS on each iPad, select aniPad from under the Device list on theleft side of the screen. Click on theUpdate button in the middle of thescreen. Follow the prompts tocomplete the update. Updating timewill vary depending on the size of theupdate from Apple. When one unit iscomplete, the next unit can beselected until all units have beenupdated.
WARNING :This cart must only be used for its intended purpose in accordance with theseoperating instructions. Failure to observe the following notices can result in fire, injury, death byelectric shock or equipment damage.
8
Safety
ELECTRIC SHOCKOperate Carefully
.Always turn the cart power OFF before plugging the power cord into or removing from the wall outlet..Make sure each devices is turned OFF before plugging into the cart..Do not unplug this cart from the outlet when your hands are wet..Do not use cables that are damaged..Do not unplug by pulling on the cable..Do not plug the power cord into an extension cable..Keep the door closed and locked when in use..Disconnect the power cord from the wall outlet before opening the doors..Before moving this cart from one room to the next, wrap the power cord around the winder located on the rear side of the cart.
.This cart is not designed to be operated by a child or student. Only Adult operation and supervision should move this cart..Do not allow anyone to set, stand, or climb on the cart..Move the cart slowly..Keep the caster locked when the cart is not in transit..Keep the cart away from water..Keep the ventilation holes unblocked for air circulation..Do not block the ventilation holes when charging..Do not pull the cart. Push the cart using the ergonomic handles to prevent muscle strain..Do not place a TV or monitor on top of the cart..Do not use the cart to store liquids or cleaning supplies..Keep the door closed and locked when in use..Disconnect the power cord from the wall before opening doors.
9
DUKANE CORP AV SERVICE DEPT2900 Dukane Drive
St Charles, IL 60174800-676-2487
http://www.dukane.com/av/service/
Toll-free Support During Business Hours800-676-2487
Emergency Technical Support After hours 800-265-6176 or 800-676-2485
DUKANE CORPORATION
ONE-YEAR LIMITED WARRANTY
This Dukane product is warranted to the original purchaser for a period of one (1) year from the original purchase date – in normal operating conditions – against defects in material and workmanship. DUKANE CORPORATION EXPRESSLY DISCLAIMS ALL OTHER WARRANTIES OF MERCHANTABILITY AND FITNESS FOR A PARTICULAR PURPOSE.
DURING THE WARRANTY PERIOD, DUKANE CORPORATION’S LIABILITY FOR ANY DEFECTIVE PRODUCT IS LIMITED TO THE REPAIR OR REPLACEMENT OF PRODUCT AT DUKANE CORPORATION’S OPTION. REPLACEMENT PRODUCTS MAY BE NEW OR USED. The following are not covered by the limited warranty and Dukane Corporation shall not be liable for:
1. Any product which is not distributed in the U.S.A. or Canada by Dukane Corporation or an authorized dealer.2. Damage, deterioration or malfunction resulting from: • Mispackaging, accident, misuse, abuse, neglect, improper ventilation, fire, dust, smoke, water, lightning or other acts of nature, unauthorized product modification, or failure to follow instructions supplied with the product. • Repair or attempted repair by anyone other than a Dukane Corporation authorized service center. • Any shipment of product (claims must be presented to the carrier). • Removal or installation of the product. • Any other causes which do not relate to a product defect.3. Cartons, carry cases, shipping cases, batteries, or any accessories used in connection with the product.4. Service required as a result of third party components.5. Product used as commercial rental units
Dukane corporation will pay labor and material expenses for covered items, but Dukane Corporation will not pay for the following:
1. Cost of technical adjustment, set-up, maintenance, or adjustment of user controls.2. Payment of shipping and related charges incurred in returning the product for warranty repair.
Dukane Corporation disclaims all liability for incidental or consequential damage of any kind, including all damages arising out of any interruptions in operation of the product and all damages to software.
No person, firm, or representative is authorized to assume any obligation or to make any warranty on behalf of the Dukane Corporation other than as stated above.
403-MCC2 User Manual-00