Embed Size (px)
Citation preview
Integrated Lights-Out 3 Virtual Serial Port configuration and operation
HOWTO, 6th Edition
Introduction ......................................................................................................................................... 2
Conceptual overview ............................................................................................................................ 2
Security ............................................................................................................................................... 3
Configuration ...................................................................................................................................... 4 Configuring VSP in the host system RBSU ............................................................................................. 4
HP ProLiant server models with standard Universal Asynchronous Receiver/Transmitter (UART) mode ...... 4 Configuration for Windows Server 2003 and 2008 operating systems ................................................... 8 Configuration for Linux operating systems ............................................................................................ 8
Turn off the splash image ............................................................................................................... 8 Configure the GRUB to redirect messages to the serial port ................................................................ 8 Redirect the login console to the serial port ...................................................................................... 9
Linux SysRq command support ........................................................................................................... 9
Operation ......................................................................................................................................... 10 Windows Emergency Management Services (EMS) Console ................................................................ 10 Windows Server 2003 and 2008 EMS commands ............................................................................ 10 BIOS serial console redirection (for Windows and Linux) ..................................................................... 12
Enabling serial console redirection ................................................................................................ 12 How to use VSP from a Secure Shell client ......................................................................................... 15 How to enter VSP from the command line protocol (CLP) ..................................................................... 15
Command line interface key sequences for iLO ............................................................................... 16 Command line interface keymap for iLO ........................................................................................ 17
Known issues ..................................................................................................................................... 18
For more information .......................................................................................................................... 19
Call to action ..................................................................................................................................... 19
2
Introduction HP Integrated Lights-Out 3 (iLO 3) consists of an intelligent processor and firmware that lets you manage servers remotely. The iLO Virtual Serial Port (VSP) is one iLO method of accessing a remote server. The VSP gives you a bi-directional data flow with a server serial port. Using the remote console, you can operate as if a physical serial connection exists on the remote server serial port.
This HOWTO describes VSP configuration and operation. You should be familiar with Lights-Out technology before reading this document.
NOTE Unless otherwise specified, all references to iLO in this document refer to iLO 3.
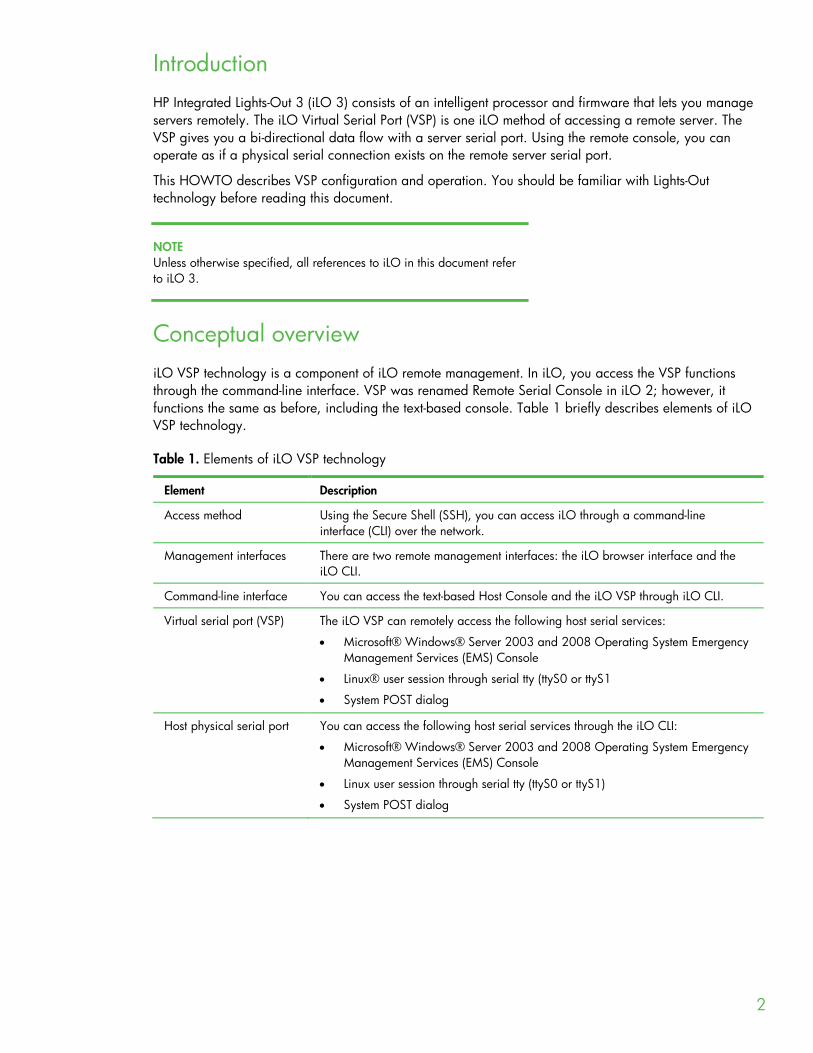
Conceptual overview iLO VSP technology is a component of iLO remote management. In iLO, you access the VSP functions through the command-line interface. VSP was renamed Remote Serial Console in iLO 2; however, it functions the same as before, including the text-based console. Table 1 briefly describes elements of iLO VSP technology.
Table 1. Elements of iLO VSP technology
Element Description
Access method Using the Secure Shell (SSH), you can access iLO through a command-line interface (CLI) over the network.
Management interfaces There are two remote management interfaces: the iLO browser interface and the iLO CLI.
Command-line interface You can access the text-based Host Console and the iLO VSP through iLO CLI.
Virtual serial port (VSP) The iLO VSP can remotely access the following host serial services:
• Microsoft® Windows® Server 2003 and 2008 Operating System Emergency Management Services (EMS) Console
• Linux® user session through serial tty (ttyS0 or ttyS1
• System POST dialog
Host physical serial port You can access the following host serial services through the iLO CLI:
• Microsoft® Windows® Server 2003 and 2008 Operating System Emergency Management Services (EMS) Console
• Linux user session through serial tty (ttyS0 or ttyS1)
• System POST dialog
3
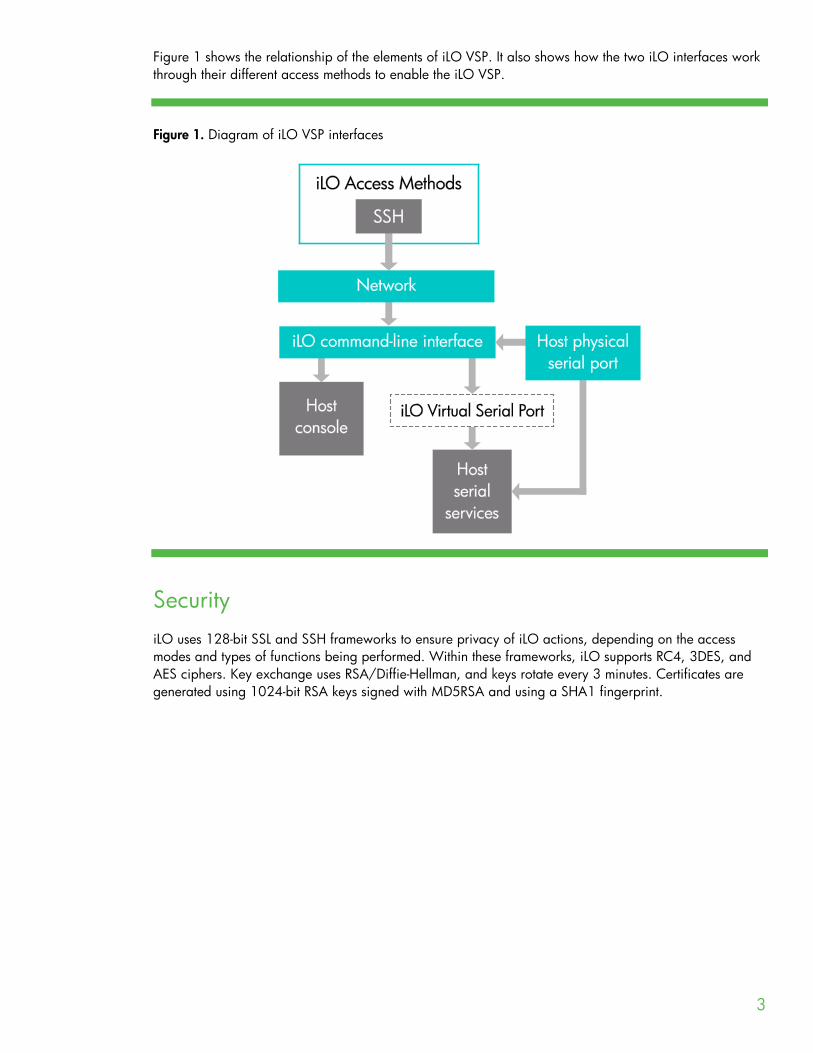
Figure 1 shows the relationship of the elements of iLO VSP. It also shows how the two iLO interfaces work through their different access methods to enable the iLO VSP.
Figure 1. Diagram of iLO VSP interfaces
Security iLO uses 128-bit SSL and SSH frameworks to ensure privacy of iLO actions, depending on the access modes and types of functions being performed. Within these frameworks, iLO supports RC4, 3DES, and AES ciphers. Key exchange uses RSA/Diffie-Hellman, and keys rotate every 3 minutes. Certificates are generated using 1024-bit RSA keys signed with MD5RSA and using a SHA1 fingerprint.
4
Configuration You must enable and configure the VSP in several places:
• Host system RBSU • Windows Server 2003 and Windows Server 2008 operating systems • Linux operating system
Configuring VSP in the host system RBSU You must configure some parameters in the ROM Based Setup Utility (RBSU) before you enable VSP. The following steps apply to both Windows and Linux.
HP ProLiant server models with standard Universal Asynchronous Receiver/Transmitter (UART) mode 1. Start RBSU.
2. Highlight the System Options option in RBSU, and then press the Enter key.
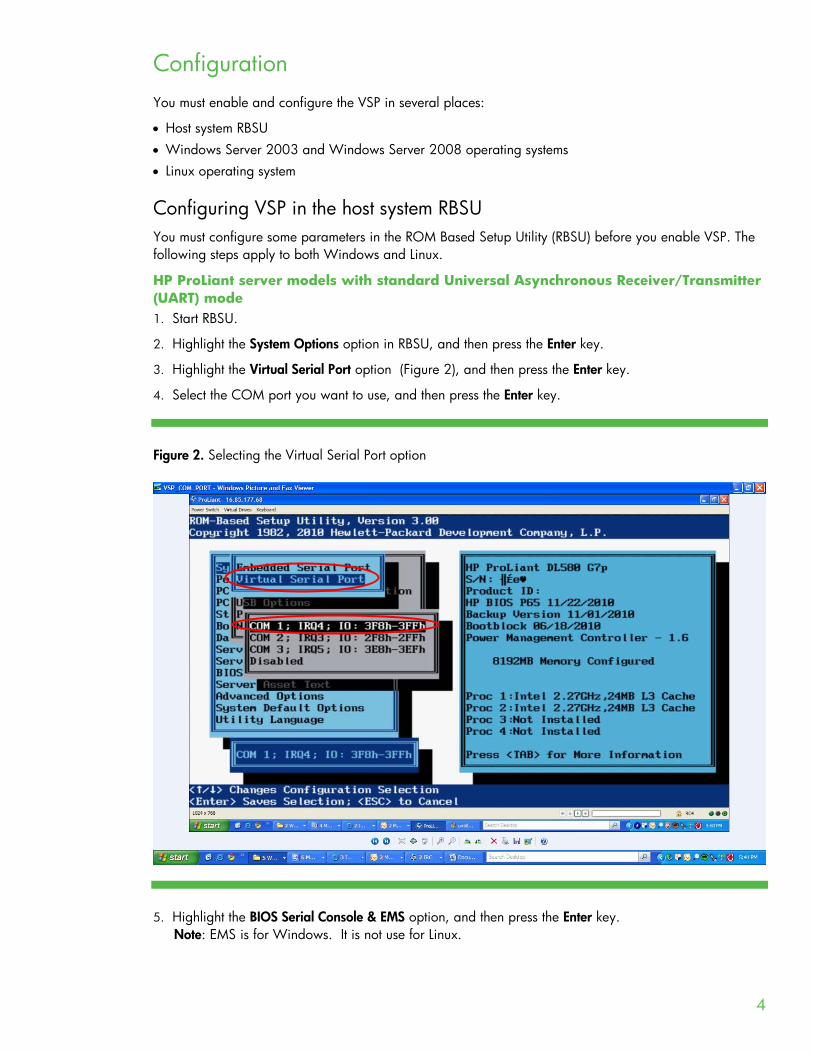
3. Highlight the Virtual Serial Port option (Figure 2), and then press the Enter key.
4. Select the COM port you want to use, and then press the Enter key.
Figure 2. Selecting the Virtual Serial Port option
5. Highlight the BIOS Serial Console & EMS option, and then press the Enter key.
Note: EMS is for Windows. It is not use for Linux.
5
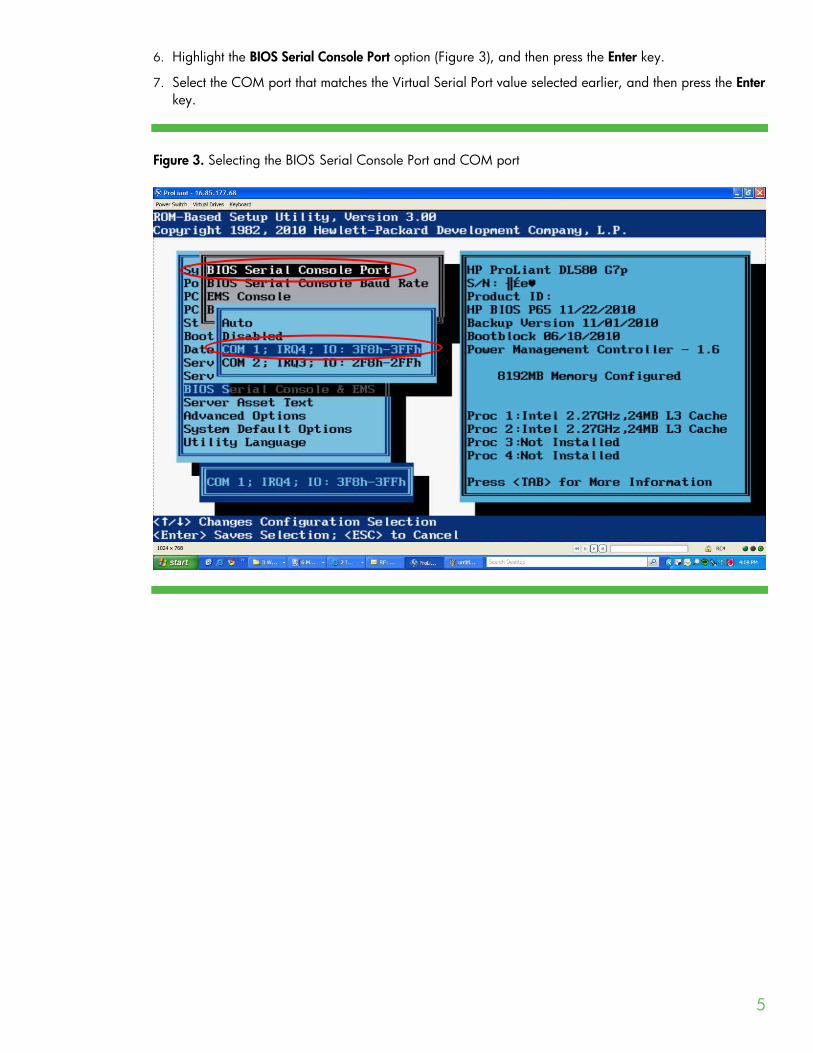
6. Highlight the BIOS Serial Console Port option (Figure 3), and then press the Enter key.
7. Select the COM port that matches the Virtual Serial Port value selected earlier, and then press the Enter key.
Figure 3. Selecting the BIOS Serial Console Port and COM port
6
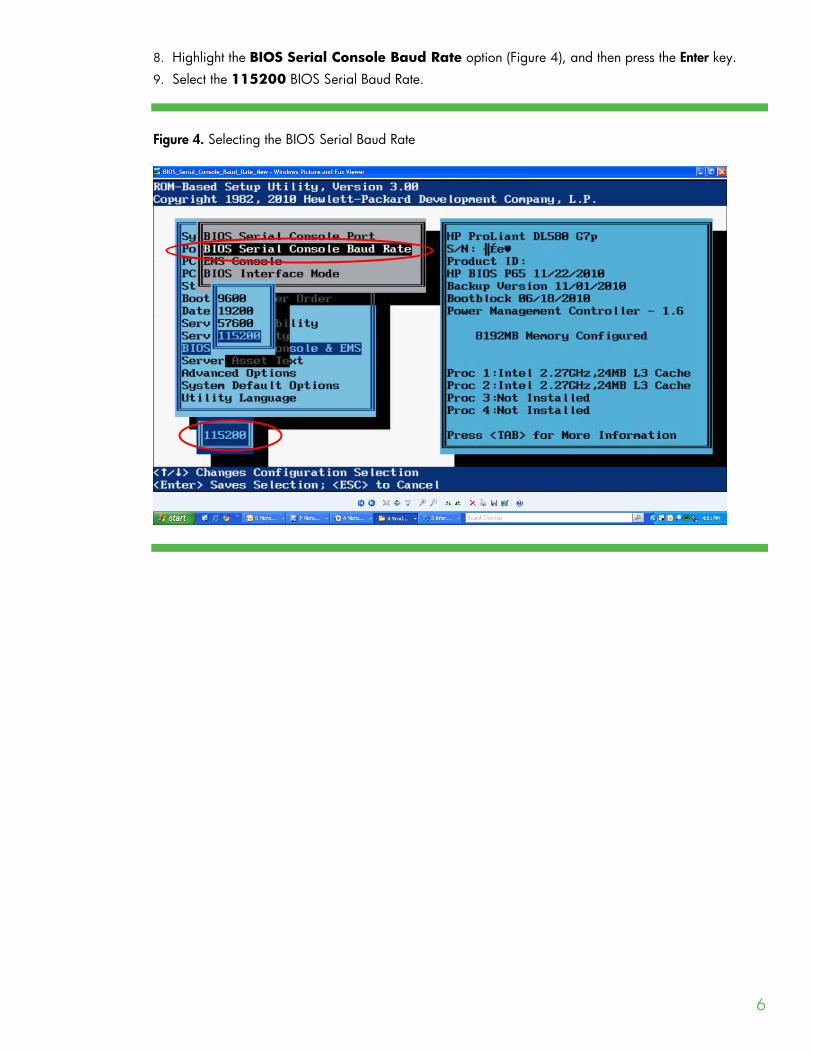
8. Highlight the BIOS Serial Console Baud Rate option (Figure 4), and then press the Enter key.
9. Select the 115200 BIOS Serial Baud Rate.
Figure 4. Selecting the BIOS Serial Baud Rate
7
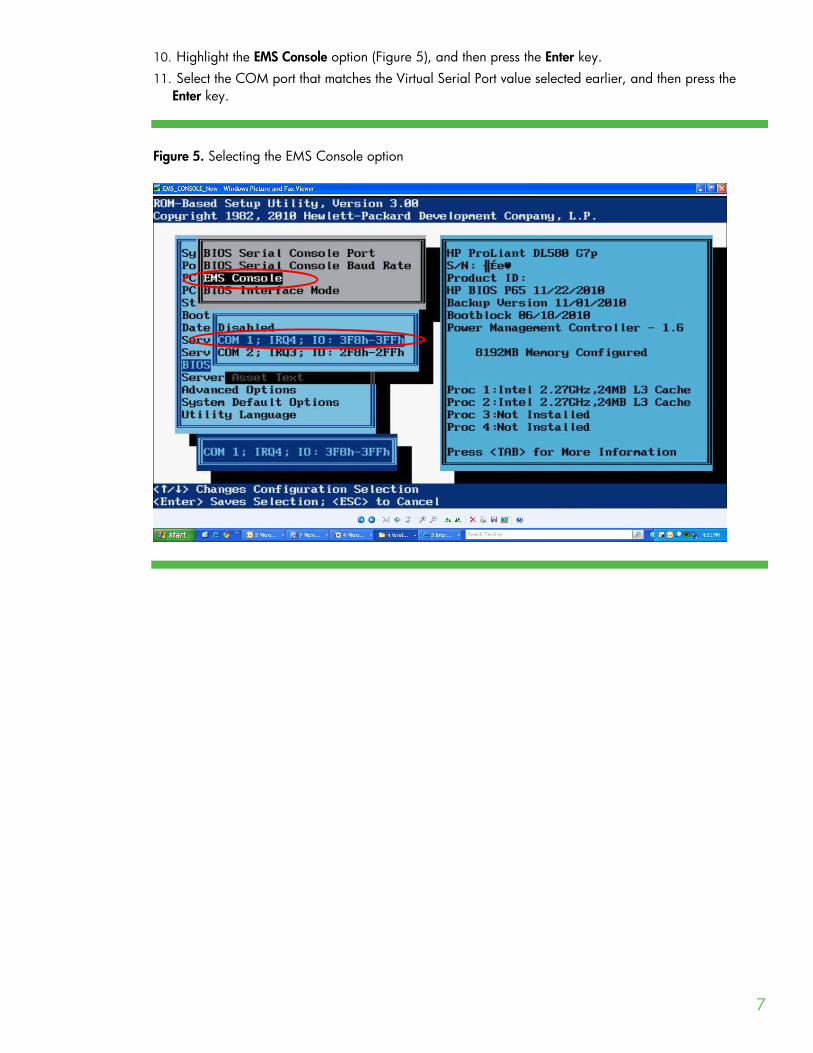
10. Highlight the EMS Console option (Figure 5), and then press the Enter key. 11. Select the COM port that matches the Virtual Serial Port value selected earlier, and then press the
Enter key.
Figure 5. Selecting the EMS Console option
8
Configuration for Windows Server 2003 and 2008 operating systems The Windows EMS Console is available in the Windows Server 2003 and 2008 operating systems. You must configure the EMS console within the operating system before you can use VSP. Refer to your operating system documentation for information about how to enable the EMS console. iLO displays an error message when you open VSP through the Internet browser, if you have not enabled the EMS console.
Configuration for Linux operating systems You can manage Linux servers remotely using console redirection. To configure Linux to use console redirection, you must implement the following changes in the Linux boot loader (GRUB):
• Turn off the splash image. • Configure the GRUB to redirect messages to the serial port to display messages while Linux starts. • Configure the GRUB to enable the Linux kernel to redirect messages to the serial port to display Linux
console messages.
Sample GRUB configuration file for Red Hat Linux: default=0
timeout=10
splashimage=(hd0,2)/grub/splash.xpm.gz
title Red Hat Enterprise Linux Server(2.6.18-164.e15)
root (hd0,2)
kernel /vmlinuz-2.6.18-164.e15 ro root=/dev/VolGroup00/LogVol00 rhgb quiet
initrd /initrd-2.6.18-164.e15.img
Turn off the splash image Since the VSP is non-graphical, you must turn off the splash image. To do that, comment out that line by inserting the pound (#) character at the beginning of the line, as follows: default=0
timeout=10
#splashimage=(hd0,2)/grub/splash.xpm.gz
title Red Hat Linux (2.6.18-164.e15)
root (hd0,2)
kernel /vmlinuz-2.6.18-164.e15 ro root=/dev/VolGroup00/LogVol00 rhgb quiet
initrd /initrd-2.6,18-164,e15.img
Configure the GRUB to redirect messages to the serial port Define the serial interface (ttyS0) as the default interface so that if no input arrives from the local keyboard within 10 seconds (the default timeout value), the system will redirect output to the serial interface (VSP). You must insert the serial command as shown below to define the serial interface as the default interface: serial -unit=0 -speed=115200
terminal -timeout=10 serial console
default=0
timeout=10
#splashimage=(hd0,2)/grub/splash.xpm.gz
title Red Hat Linux (2. 6.18-164.e15)
root (hd0,2)
9
kernel /vmlinuz-2. 6.18-164.e15 ro root=/dev/sda9 console=tty0, 115200,
initrd /initrd-2. 6.18-164.e15.img
Redirect the login console to the serial port After Linux is fully booted, you can redirect a login console to the serial port. If you configure the /dev/ttyS0 and /dev/ttyS1 devices, you can obtain serial tty sessions through the VSP console. Here are the general configuration guidelines for Linux systems:
1. To begin a shell session on a configured serial port, you can start the Linux process from the system administrator shell, but it is usually configured in the /etc/inittab to start automatically during system boot:
sx:2345:respawn:/sbin/agetty 115200 ttySx vt100
2. Paste the following into /etc/init/ttyS0.conf for com1.
# ttyS0 - getty # # This service maintains a getty on ttyS0 from the point the system is # started until it is shut down again. start on stopped rc RUNLEVEL=[2345] stop on runlevel [!2345] respawn exec /sbin/agetty -L 115200 ttyS0 vt102
NOTE RHEL6 is moving to the newer upstart init daemon, which replaces the older inittab style daemon. You now configure the serial port in the /etc/init/ttyxx.conf files. Refer to RHEL6 documentation for the details of the new configuration method for serial ports.
3. Linux requires listing the terminal in the /etc/security file to logon as root. Depending on the server model, add one of the following lines at the end of this file: ttyS0 or ttyS1.
4. You must reboot the server before Linux will recognize the changes made in these files.
NOTE You can find a sample Perl script (vspconfig.pl) that automatically performs changes to the /etc/inittab file and the /etc/security file. It is in the RIBCL sample scripts package located here: http://h20000.www2.hp.com/bizsupport/TechSupport/SoftwareDescription.jsp?lang=en&cc=us&prodTypeId=18964&prodSeriesId=1146658&prodNameId=1135772&swEnvOID=2025&swLang=8&mode=2&taskId=135&swItem=MTX-3b426a21bf8d40df88f91ea960.
Linux SysRq command support iLO firmware version 1.1x supports Linux SysRq commands using the VSP. For this feature to work, you must do on of the following on the Linux server:
• echo 1 > /proc/sys/kernel/sysrq • edit the /etc/sysctl.conf to insert “kernel.sysrq = 1”
10
Operation Virtual Serial Port operation depends upon the application you are using.
Windows Emergency Management Services (EMS) Console If enabled, the Windows EMS Console allows emergency management services in cases where video, device drivers, or other operating system features have prevented normal operation and normal corrective actions. The EMS Console lets you display running processes, change the priority of processes, and halt processes. The EMS Console is available in the Windows Server 2003 and 2008 operating systems through the physical serial port on the back of the server.
The iLO VSP lets you use the EMS Console over the network. You can use The EMS Console and the iLO Remote Console at the same time. You must enable the Windows EMS serial port through the host system RBSU.
After you connect to the EMS through the VSP, the EMS System Administration Console (SAC) opens, and the SAC> prompt displays. You may need to press the Enter key to get the prompt. At the prompt, several commands are available. Refer to Microsoft EMS documentation for a complete description of the available commands.
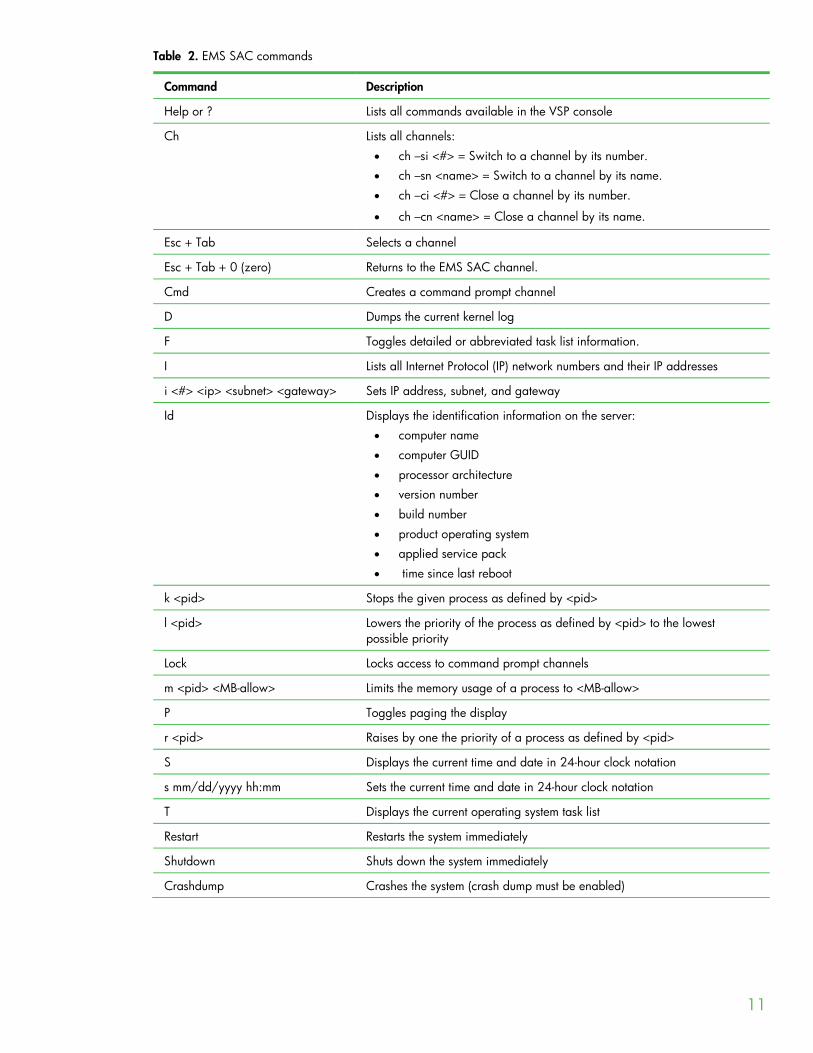
Windows Server 2003 and 2008 EMS commands Consult Microsoft documentation for full details of EMS operation. This section presents a command overview only.
After you enter each command at the EMS SAC prompt, press the Enter key to execute the command. Table 2 lists the EMS SAC commands.
11
Table 2. EMS SAC commands
Command Description
Help or ? Lists all commands available in the VSP console
Ch Lists all channels:
• ch –si <#> = Switch to a channel by its number. • ch –sn <name> = Switch to a channel by its name.
• ch –ci <#> = Close a channel by its number.
• ch –cn <name> = Close a channel by its name.
Esc + Tab Selects a channel
Esc + Tab + 0 (zero) Returns to the EMS SAC channel.
Cmd Creates a command prompt channel
D Dumps the current kernel log
F Toggles detailed or abbreviated task list information.
I Lists all Internet Protocol (IP) network numbers and their IP addresses
i <#> <ip> <subnet> <gateway> Sets IP address, subnet, and gateway
Id Displays the identification information on the server: • computer name
• computer GUID
• processor architecture • version number
• build number
• product operating system • applied service pack
• time since last reboot
k <pid> Stops the given process as defined by <pid>
l <pid> Lowers the priority of the process as defined by <pid> to the lowest possible priority
Lock Locks access to command prompt channels
m <pid> <MB-allow> Limits the memory usage of a process to <MB-allow>
P Toggles paging the display
r <pid> Raises by one the priority of a process as defined by <pid>
S Displays the current time and date in 24-hour clock notation
s mm/dd/yyyy hh:mm Sets the current time and date in 24-hour clock notation
T Displays the current operating system task list
Restart Restarts the system immediately
Shutdown Shuts down the system immediately
Crashdump Crashes the system (crash dump must be enabled)

12
BIOS serial console redirection (for Windows and Linux) If you configured the server to use BIOS serial console redirection, the system presents POST messages through the VSP during system boot. To enable this feature, go to the tab called BIOS Serial Console/EMS Support in RBSU. Select this tab and set BIOS Serial Console Port to COM1:.
Enabling serial console redirection 1. Start RBSU. 2. Highlight the System Options option in RBSU, and then press the Enter key. 3. Highlight the Virtual Serial Port option (Figure 6), and then press the Enter key. 4. Select the COM port you want to use, and then press the Enter key.
Figure 6. Setting the Virtual Serial Port
5. Highlight the BIOS Serial Console & EMS option, and then press the Enter key.
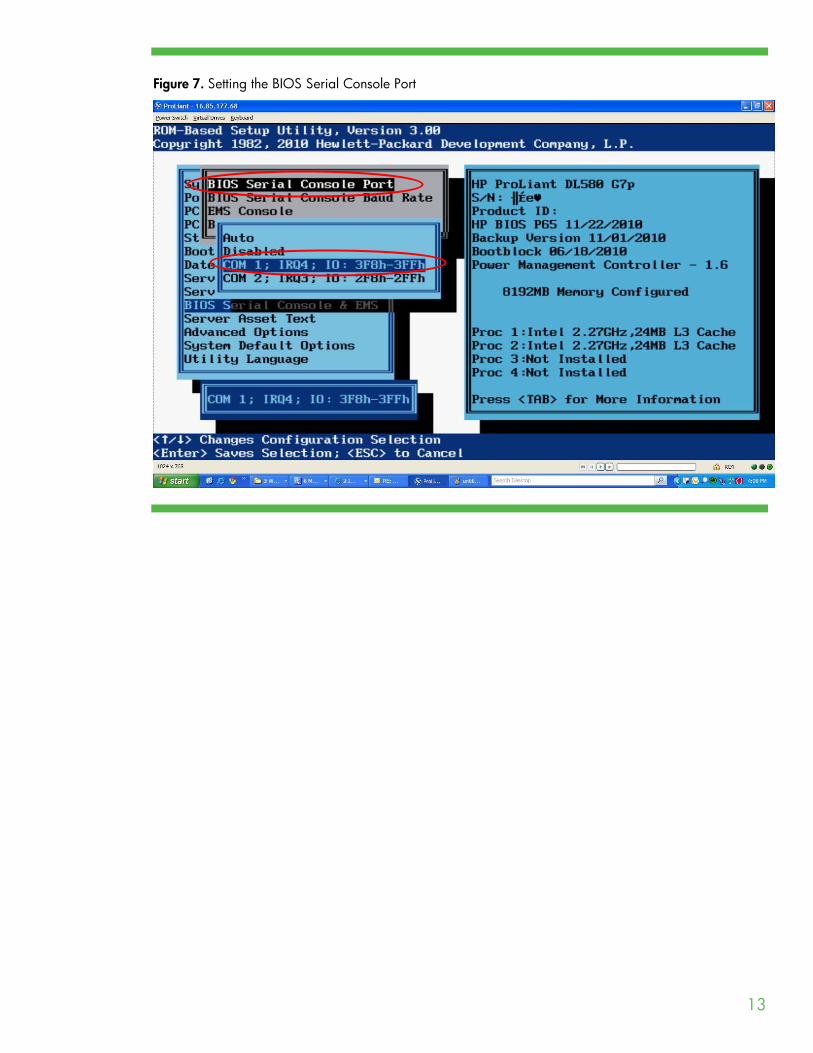
6. Highlight the BIOS Serial Console Port option (Figure 7), and then press the Enter key. 7. Select the COM port that matches the Virtual Serial Port value selected earlier, and then press the Enter
key.
13
Figure 7. Setting the BIOS Serial Console Port
14
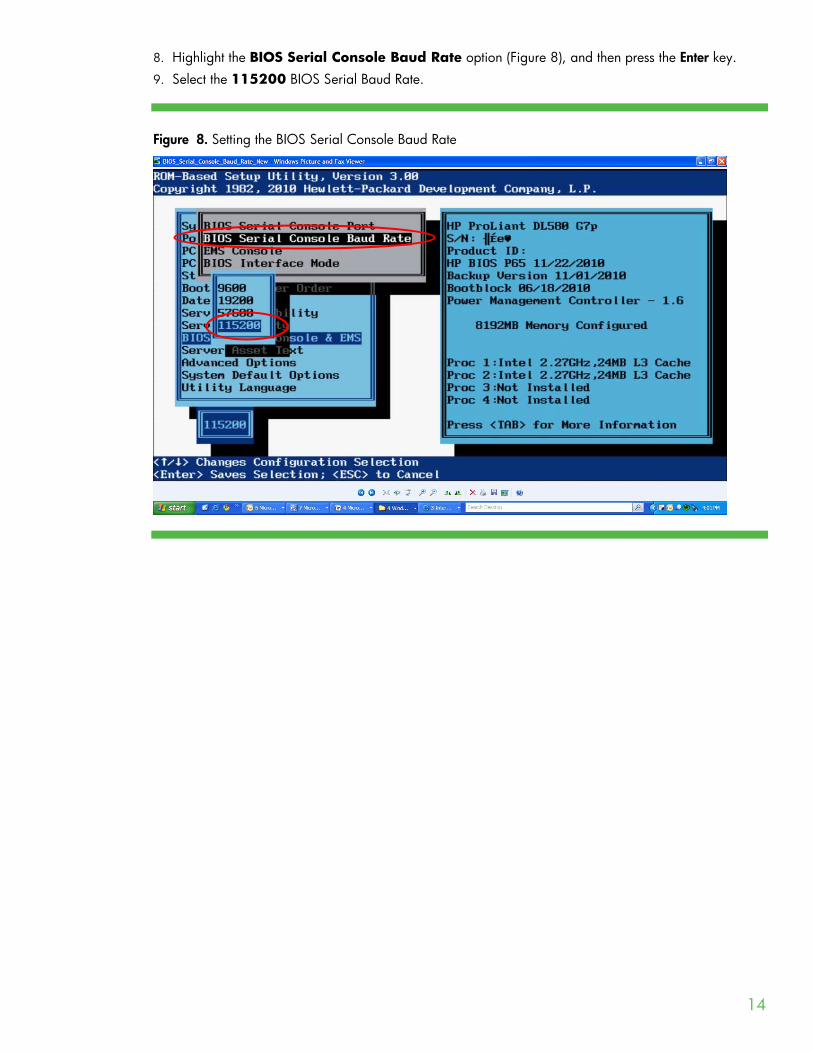
8. Highlight the BIOS Serial Console Baud Rate option (Figure 8), and then press the Enter key.
9. Select the 115200 BIOS Serial Baud Rate.
Figure 8. Setting the BIOS Serial Console Baud Rate

15
10. Highlight the EMS Console option (Figure 9), and then press the Enter key. 11. Select the COM port that matches the Virtual Serial Port value selected earlier, and then press the Enter
key.
Figure 9. Setting the EMS Console
How to use VSP from a Secure Shell client You must use an SSH client to provide secure, non-browser access to the VSP. Make sure you set the connection type to be a secure shell. You can use various SSH clients to connect to iLO. Specific instructions for their use are application dependent.
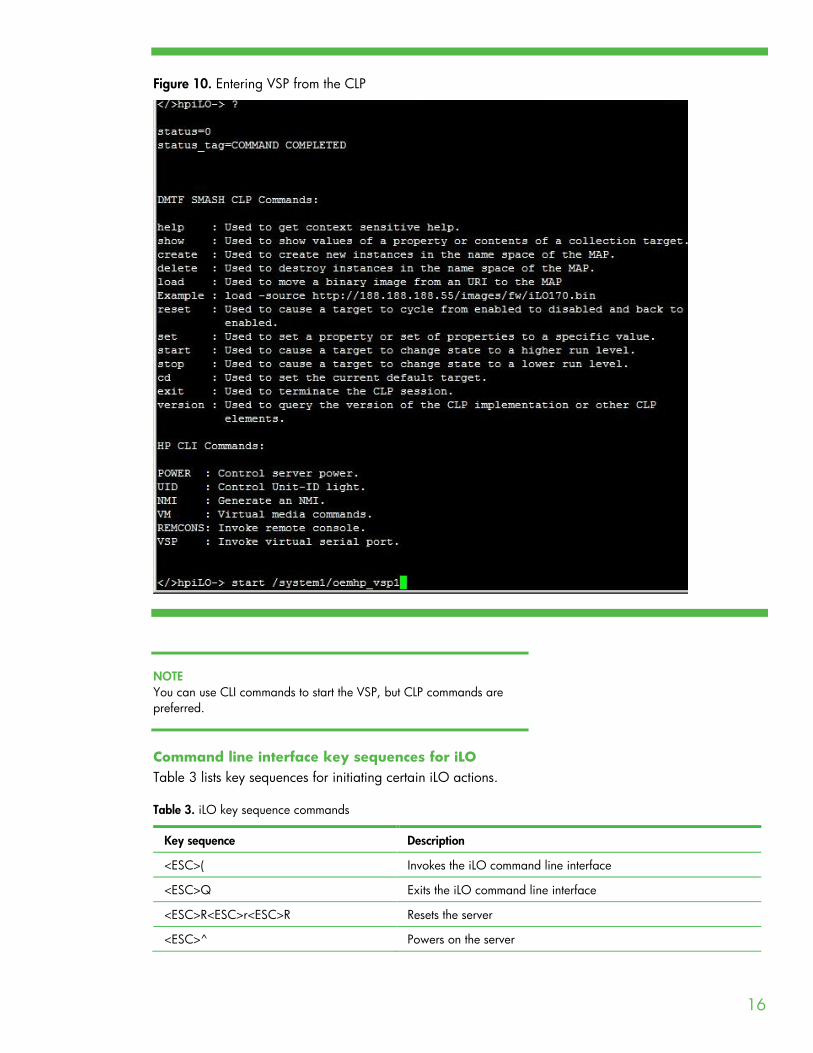
How to enter VSP from the command line protocol (CLP) After you log into iLO through an SSH session, iLO displays the CLP prompt. Use the CLP to enter VSP (see Figure 10).
16
Figure 10. Entering VSP from the CLP
NOTE You can use CLI commands to start the VSP, but CLP commands are preferred.
Command line interface key sequences for iLO Table 3 lists key sequences for initiating certain iLO actions.
Table 3. iLO key sequence commands
Key sequence Description
<ESC>( Invokes the iLO command line interface
<ESC>Q Exits the iLO command line interface
<ESC>R<ESC>r<ESC>R Resets the server
<ESC>^ Powers on the server
17
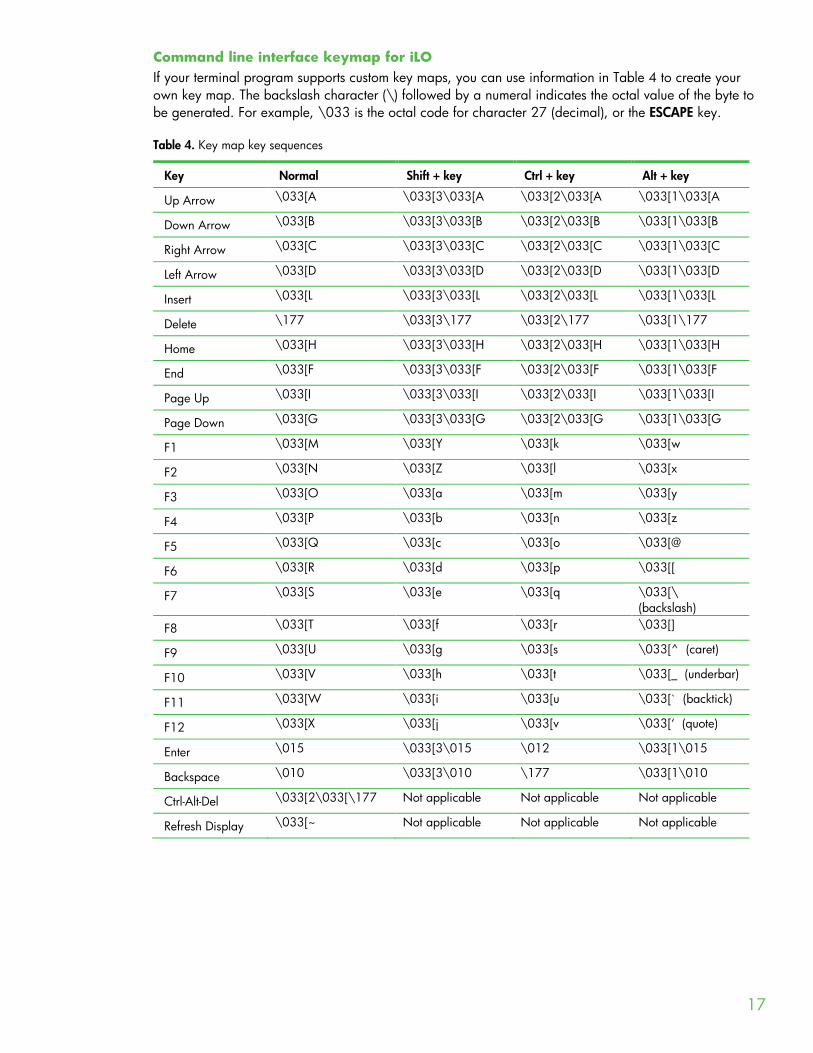
Command line interface keymap for iLO If your terminal program supports custom key maps, you can use information in Table 4 to create your own key map. The backslash character (\) followed by a numeral indicates the octal value of the byte to be generated. For example, \033 is the octal code for character 27 (decimal), or the ESCAPE key.
Table 4. Key map key sequences
Key Normal Shift + key Ctrl + key Alt + key
Up Arrow \033[A \033[3\033[A \033[2\033[A \033[1\033[A
Down Arrow \033[B \033[3\033[B \033[2\033[B \033[1\033[B
Right Arrow \033[C \033[3\033[C \033[2\033[C \033[1\033[C
Left Arrow \033[D \033[3\033[D \033[2\033[D \033[1\033[D
Insert \033[L \033[3\033[L \033[2\033[L \033[1\033[L
Delete \177 \033[3\177 \033[2\177 \033[1\177
Home \033[H \033[3\033[H \033[2\033[H \033[1\033[H
End \033[F \033[3\033[F \033[2\033[F \033[1\033[F
Page Up \033[I \033[3\033[I \033[2\033[I \033[1\033[I
Page Down \033[G \033[3\033[G \033[2\033[G \033[1\033[G
F1 \033[M \033[Y \033[k \033[w
F2 \033[N \033[Z \033[l \033[x
F3 \033[O \033[a \033[m \033[y
F4 \033[P \033[b \033[n \033[z
F5 \033[Q \033[c \033[o \033[@
F6 \033[R \033[d \033[p \033[[
F7 \033[S \033[e \033[q \033[\ (backslash)
F8 \033[T \033[f \033[r \033[]
F9 \033[U \033[g \033[s \033[^ (caret)
F10 \033[V \033[h \033[t \033[_ (underbar)
F11 \033[W \033[i \033[u \033[` (backtick)
F12 \033[X \033[j \033[v \033[‘ (quote)
Enter \015 \033[3\015 \012 \033[1\015
Backspace \010 \033[3\010 \177 \033[1\010
Ctrl-Alt-Del \033[2\033[\177 Not applicable Not applicable Not applicable
Refresh Display \033[~ Not applicable Not applicable Not applicable
18
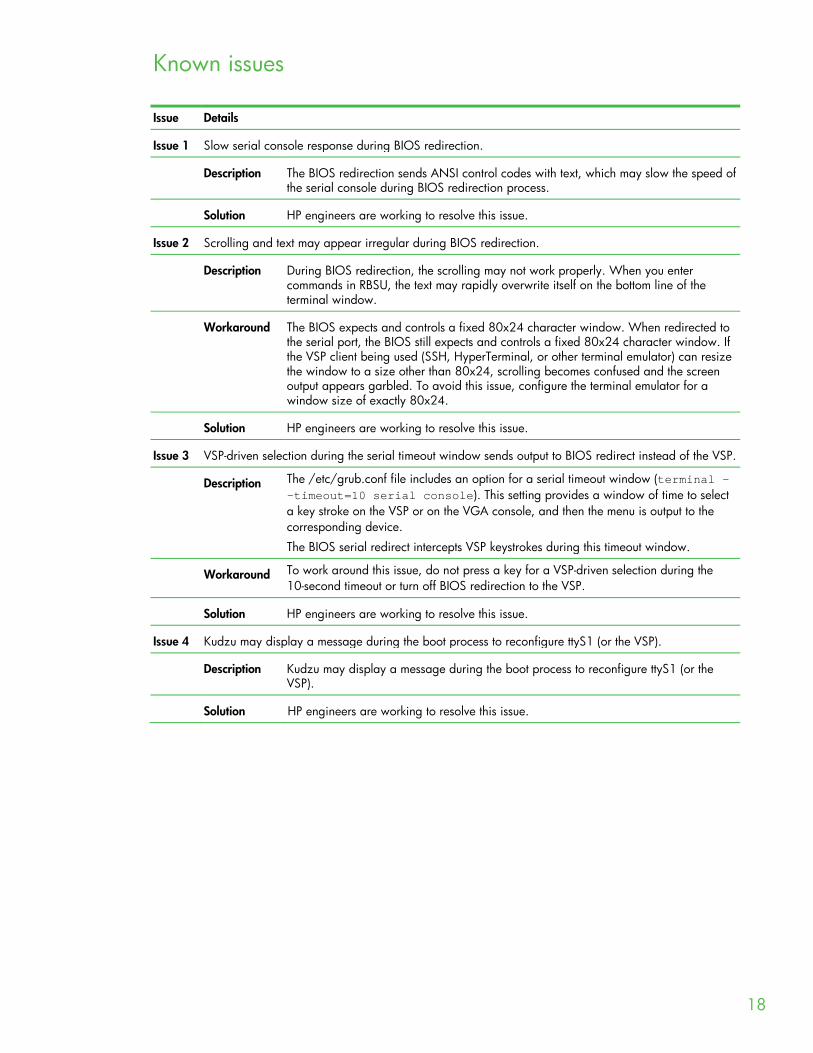
Known issues
Issue Details
Issue 1 Slow serial console response during BIOS redirection.
Description The BIOS redirection sends ANSI control codes with text, which may slow the speed of the serial console during BIOS redirection process.
Solution HP engineers are working to resolve this issue.
Issue 2 Scrolling and text may appear irregular during BIOS redirection.
Description During BIOS redirection, the scrolling may not work properly. When you enter commands in RBSU, the text may rapidly overwrite itself on the bottom line of the terminal window.
Workaround The BIOS expects and controls a fixed 80x24 character window. When redirected to the serial port, the BIOS still expects and controls a fixed 80x24 character window. If the VSP client being used (SSH, HyperTerminal, or other terminal emulator) can resize the window to a size other than 80x24, scrolling becomes confused and the screen output appears garbled. To avoid this issue, configure the terminal emulator for a window size of exactly 80x24.
Solution HP engineers are working to resolve this issue.
Issue 3 VSP-driven selection during the serial timeout window sends output to BIOS redirect instead of the VSP.
Description The /etc/grub.conf file includes an option for a serial timeout window (terminal --timeout=10 serial console). This setting provides a window of time to select a key stroke on the VSP or on the VGA console, and then the menu is output to the corresponding device.
The BIOS serial redirect intercepts VSP keystrokes during this timeout window.
Workaround To work around this issue, do not press a key for a VSP-driven selection during the 10-second timeout or turn off BIOS redirection to the VSP.
Solution HP engineers are working to resolve this issue.
Issue 4 Kudzu may display a message during the boot process to reconfigure ttyS1 (or the VSP).
Description Kudzu may display a message during the boot process to reconfigure ttyS1 (or the VSP).
Solution HP engineers are working to resolve this issue.
© Copyright 2010, 2011 Hewlett-Packard Development Company, L.P. The information contained herein is subject to change without notice. The only warranties for HP products and services are set forth in the express warranty statements accompanying such products and services. Nothing herein should be construed as constituting an additional warranty. HP shall not be liable for technical or editorial errors or omissions contained herein. Microsoft and Windows are U.S. registered trademarks of Microsoft Corporation. Linux is a registered trademark of Linus Torvalds. TC110302HT March 2011
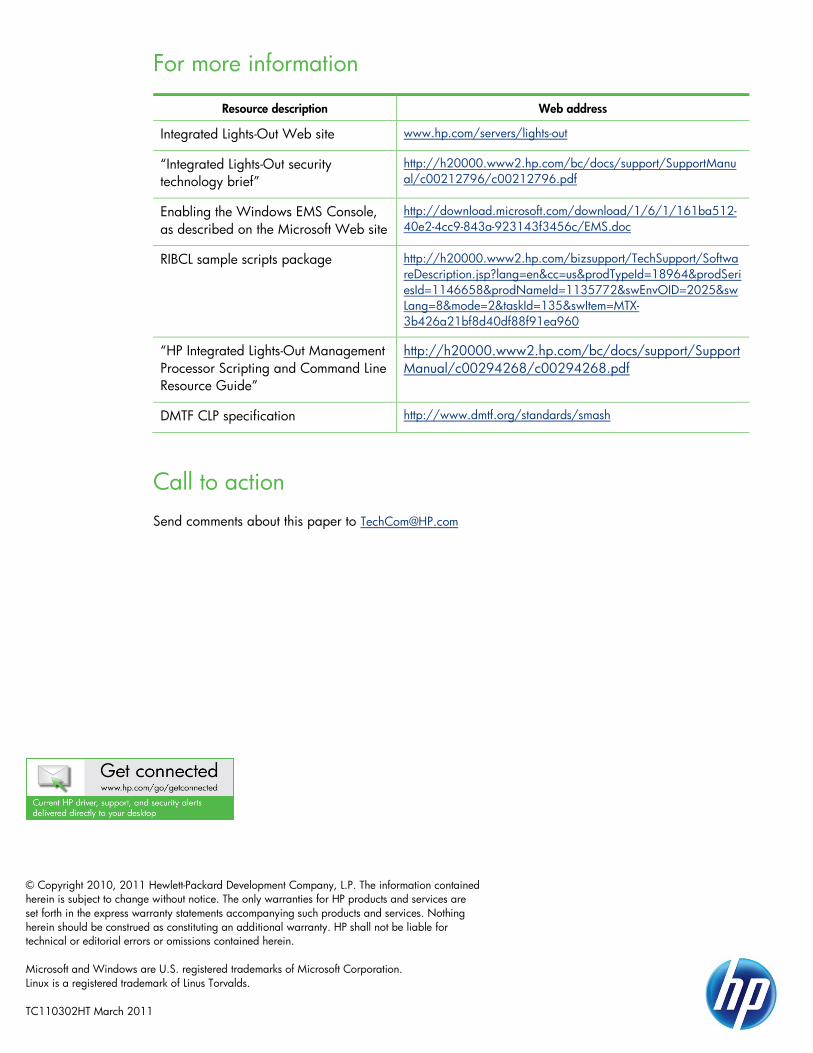
For more information
Resource description Web address
Integrated Lights-Out Web site
“Integrated Lights-Out security technology brief”
www.hp.com/servers/lights-out
Enabling the Windows EMS Console, as described on the Microsoft Web site
http://h20000.www2.hp.com/bc/docs/support/SupportManual/c00212796/c00212796.pdf
http://download.microsoft.com/download/1/6/1/161ba512-40e2-4cc9-843a-923143f3456c/EMS.doc
RIBCL sample scripts package
“HP Integrated Lights-Out Management Processor Scripting and Command Line Resource Guide”
http://h20000.www2.hp.com/bizsupport/TechSupport/SoftwareDescription.jsp?lang=en&cc=us&prodTypeId=18964&prodSeriesId=1146658&prodNameId=1135772&swEnvOID=2025&swLang=8&mode=2&taskId=135&swItem=MTX-3b426a21bf8d40df88f91ea960
DMTF CLP specification
http://h20000.www2.hp.com/bc/docs/support/SupportManual/c00294268/c00294268.pdf
http://www.dmtf.org/standards/smash
Call to action Send comments about this paper to [email protected]


![LO BELLO Y LO EFÍMERO COMO CONFIGURACIONES DE … · Revista inteRnacional de Pensamiento Político - i ÉPoca - vol. 9 - 2014 - [131-138] - issn 1885-589X 131 LO BELLO Y LO EFÍMERO](https://img.pdfslide.us/doc/110x75/5e94bec0b15892729b05ca9a/lo-bello-y-lo-efmero-como-configuraciones-de-revista-internacional-de-pensamiento.jpg)