Embed Size (px)
Citation preview
WH
ITE PA
PER
: TECH
NIC
AL
How to set up Symantec Storage Foundation for Oracle RAC in Oracle VM Server for SPARC environments using N-port ID virtualization
By Novonil Choudhuri & Syed Sadat Ali
December 2014
2
Contents
About this document .................................................................................................................................... 3
Intended audience ........................................................................................................................................ 3
Overview ....................................................................................................................................................... 3
Supported deployment scenarios ................................................................................................................. 4
Scenario 1 .................................................................................................................................................. 4
Scenario 2 .................................................................................................................................................. 5
Supported software ...................................................................................................................................... 5
Network configuration .................................................................................................................................. 5
Storage configuration ................................................................................................................................... 7
Steps to set up Symantec Storage Foundation for Oracle RAC in Oracle VM Server for SPARC
environments ................................................................................................................................................ 9
Step 1: Create Oracle VM servers. ............................................................................................................ 9
Step 2: Create and enable NPIV .............................................................................................................. 10
Step 3: Create SAN configuration ........................................................................................................... 14
Step 4: Allocate storage to Oracle VM servers from the storage array .................................................. 15
Note: Repeat the above steps 1 – 4 on the other primary control domain or the same domain to
create additional common storage as needed. ...................................................................................... 18
Step 5: Install and configure SF Oracle RAC. ........................................................................................... 18
References: ................................................................................................................................................. 19
3
About this document
This document discusses various deployment scenarios and best practices for optimized SF Oracle RAC deployment in Oracle VM Server for SPARC environments using N-port ID virtualization (NPIV) technology. NPIV provides multiple paths to Oracle VM servers (formerly Oracle VM servers) with the advantage of I/O fencing and Veritas Dynamic Multipathing (DMP), thus leveraging SFHA solutions capabilities in a cost-effective manner within virtualized environments. This configuration also helps to make the SF Oracle RAC database instance highly available in virtualized environments.
Intended audience
This document is intended for Symantec Systems Engineers (SE), Technical Support Engineers (TSE), and System Administrators for understanding, evaluating, or setting up virtualized Oracle VM Server for SPARC environments for deploying SF Oracle RAC solutions. The document assumes that the reader is proficient with installing and configuring SF Oracle RAC.
Overview
Virtualized environments offer a cost-effective alternative by leveraging existing system resources with greater efficiency. As a result, many businesses today choose to run non-critical and even mission critical applications and databases in virtualized environments. However, it is observed that applications and databases configured for high-availability are not equipped to take advantage of virtualization technologies and is often not a commonly supported configuration. SF Oracle RAC in Oracle VM Server for SPARC provides robust paths to the Oracle database and enables its deployment in production and non-production environments. It can also be used for testing purposes or to demonstrate product features and capabilities. This solution helps Oracle Real Application Clusters (RAC) databases to leverage Storage Foundation for High Availability features like high availability, I/O fencing, DMP and migration in single physical server and multiple physical servers without compromising on performance. The procedures in this document enable you to configure Oracle 10g Release 2/ 11g Release 2 / Oracle 12c RAC databases with DMP and I/O fencing capabilities on the single physical server “Oracle T5-2” containing four Oracle VM servers as well as on two different physical servers. The benefits of this solution are as follows:
The application running on SF Oracle RAC in Oracle VM servers can be migrated to another physical system Note: The migration may involve application downtime.
4
Oracle VM servers that require additional resources can be migrated to another physical system, having the requisite resources
Oracle VM servers allow for planned hardware maintenance, such as firmware upgrade of the physical system
Install, configure, and manage Oracle RAC databases using SF Oracle RAC with NPIV technology leading to reduced costs and better manageability of RAC databases in virtualized environment
Reduce the physical footprint in the data center
Reduce planned and unplanned downtimes using SF Oracle RAC
Provide high-availability to Oracle VM servers with better management of the virtualized environment
Utilize resources with greater efficiency and cost-effectiveness
Manage Oracle VM servers that require raw mapping (direct LUNs) and multiple paths with I/O fencing
Reduce I/O bottlenecks
Configure easy-to-scale Oracle RAC environments on single or multiple physical servers
Provide easy mapping between LUNs through multiple paths to Oracle VM servers without disrupting other Oracle VM servers
Provide direct LUN access to the database resulting in increased performance
Provide database integrity and eliminate the risk of data corruption in Oracle VM environments through the use of I/O fencing and VxDMP
Supported deployment scenarios
The following deployment scenarios are supported:
Scenario 1
SF Oracle RAC is configured on a single physical server.
All guest-domains are contained in a single control domain.
No I/O domain is configured.
NPIV is configured in the control domain.
5
Scenario 2 SF Oracle RAC is configured on multiple physical servers.
Guest-domains are resident on multiple control domains.
I/O domains are configured.
NPIV is configured in the control domain.
Supported software
Oracle VM 3.1 or later
Oracle Solaris SPARC 11.1
Symantec Storage Foundation for Oracle RAC 6.1 and later
Symantec regularly tests Oracle VM features with SF Oracle RAC. For supported Oracle VM versions, see the SFHA Oracle support matrix:
http://www.symantec.com/business/support/index?page=content&id=DOC5081
For information on the supported virtualization environments for Oracle RAC databases, see: http://www.oracle.com/technetwork/database/virtualizationmatrix-172995.html
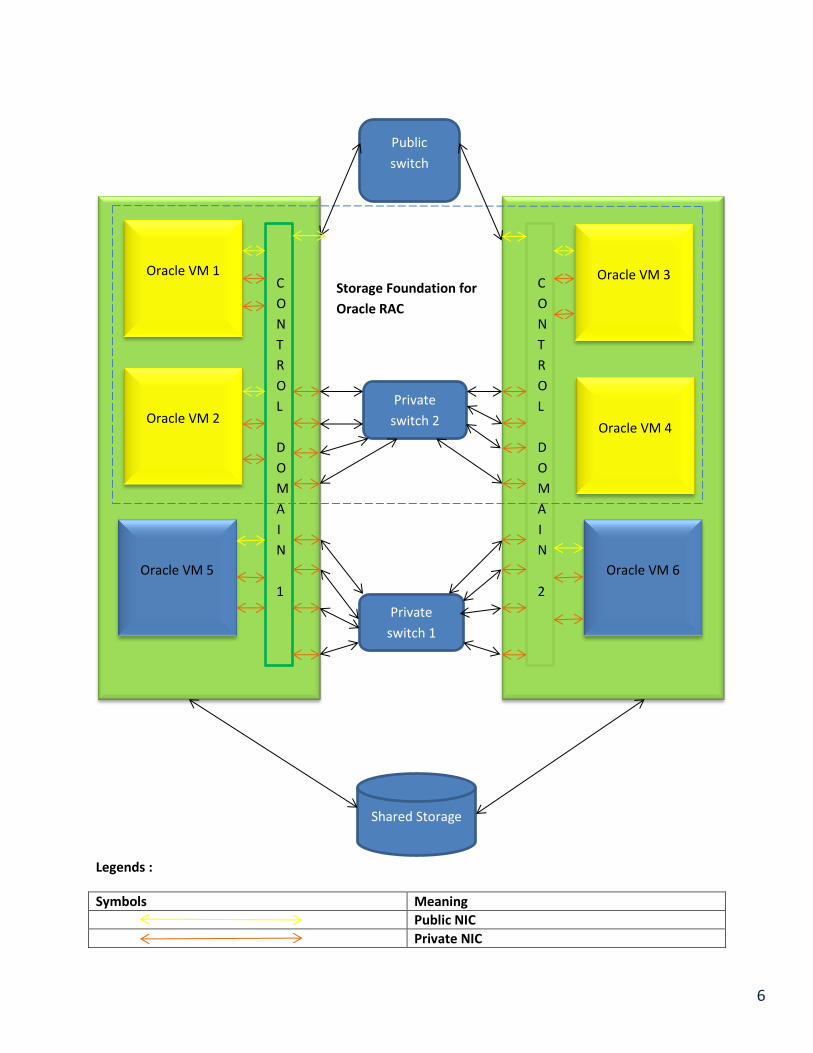
Network configuration
The required network configuration is as follows: Figure 1-1 illustrates the network configuration.
6
Legends :
Symbols Meaning
Public NIC
Private NIC
Oracle VM 1
Oracle VM 2
Oracle VM 5
Oracle VM 3
Oracle VM 6
Storage Foundation for
Oracle RAC
Shared Storage
Private
switch 1
Private
switch 2
C
O
N
T
R
O
L
D
O
M
A
I
N
1
C
O
N
T
R
O
L
D
O
M
A
I
N
2
Public
switch
Oracle VM 4
7
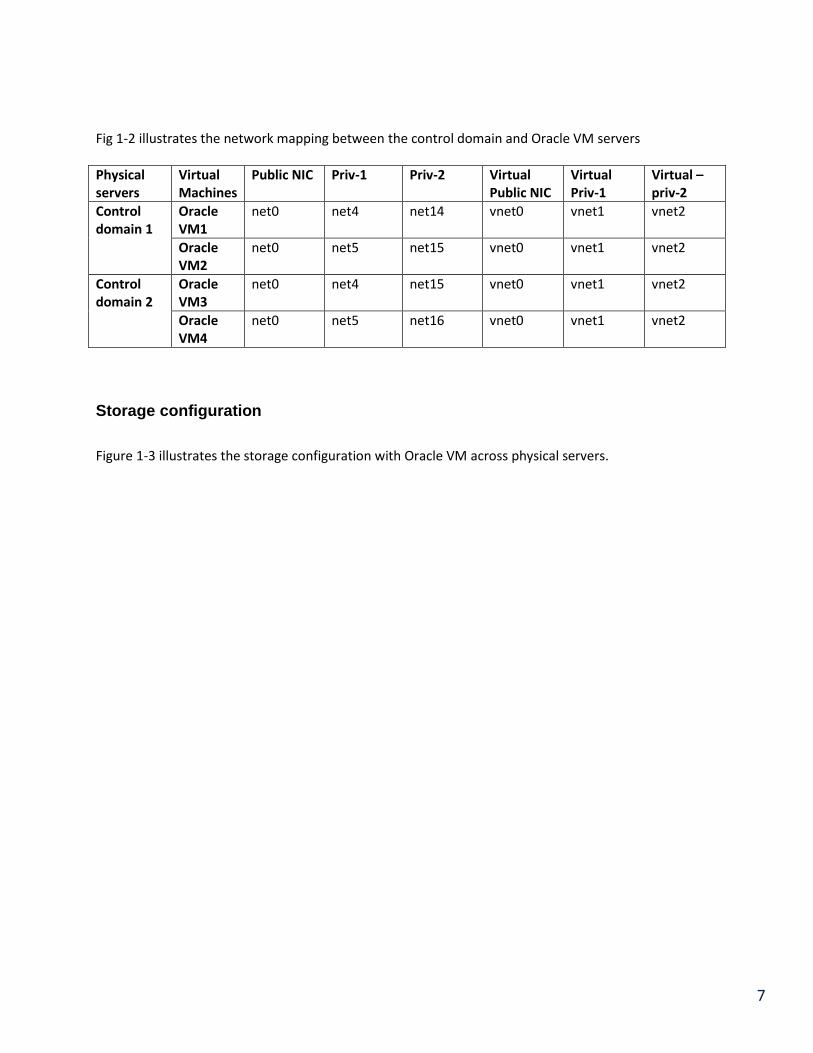
Fig 1-2 illustrates the network mapping between the control domain and Oracle VM servers
Physical servers
Virtual Machines
Public NIC Priv-1 Priv-2 Virtual Public NIC
Virtual Priv-1
Virtual – priv-2
Control domain 1
Oracle VM1
net0 net4 net14 vnet0 vnet1 vnet2
Oracle VM2
net0 net5 net15 vnet0 vnet1 vnet2
Control domain 2
Oracle VM3
net0 net4 net15 vnet0 vnet1 vnet2
Oracle VM4
net0 net5 net16 vnet0 vnet1 vnet2
Storage configuration
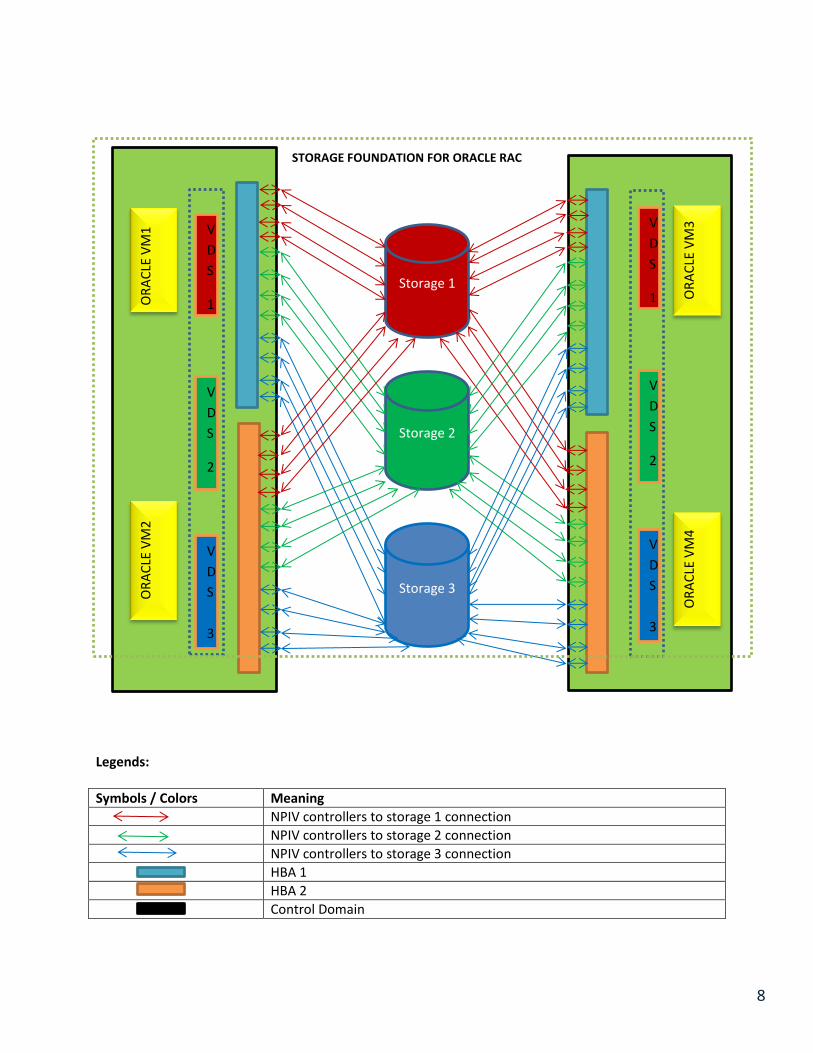
Figure 1-3 illustrates the storage configuration with Oracle VM across physical servers.
8
H
B
A
1
STORAGE FOUNDATION FOR ORACLE RAC
Legends:
Symbols / Colors Meaning
NPIV controllers to storage 1 connection
NPIV controllers to storage 2 connection
NPIV controllers to storage 3 connection
HBA 1
HBA 2
Control Domain
V
D
S
1 OR
AC
LE V
M1
O
RA
CLE
VM
2
V
D
S
2
V
D
S
3
OR
AC
LE V
M3
O
RA
CLE
VM
4
Storage 1
Storage 2
Storage 3
V
D
S
1
V
D
S
2
V
D
S
3
9
Steps to set up Symantec Storage Foundation for Oracle RAC in Oracle VM
Server for SPARC environments
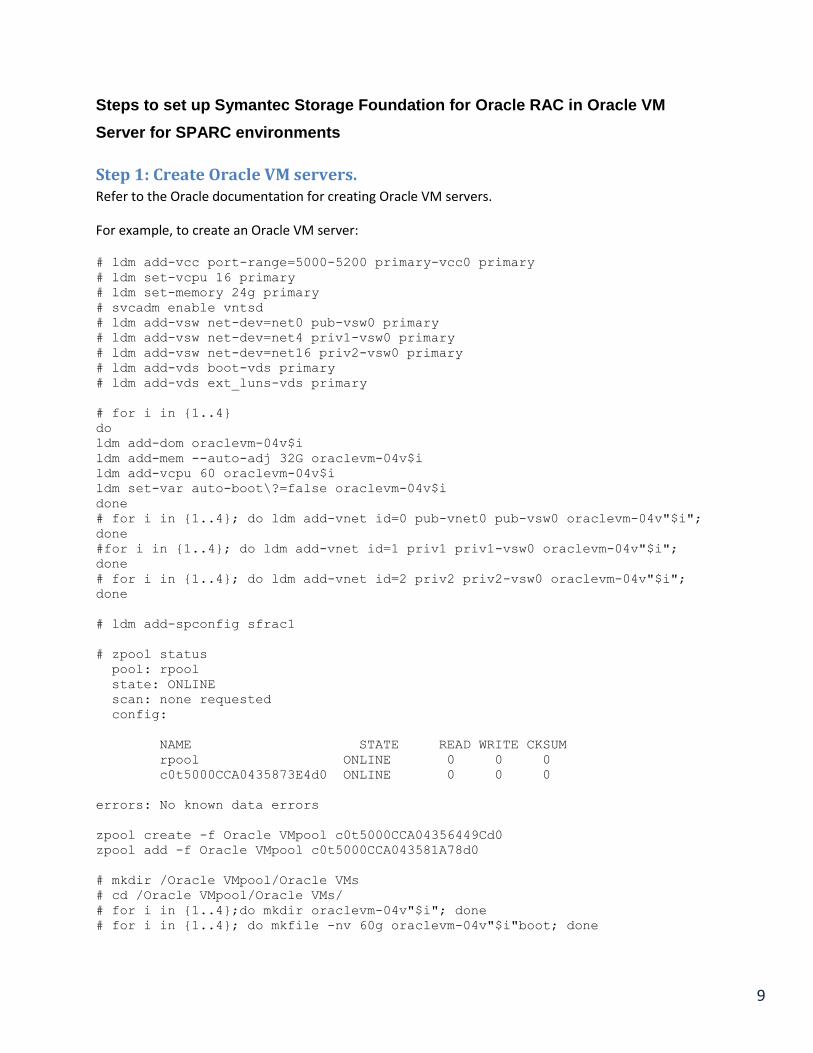
Step 1: Create Oracle VM servers. Refer to the Oracle documentation for creating Oracle VM servers.
For example, to create an Oracle VM server:
# ldm add-vcc port-range=5000-5200 primary-vcc0 primary
# ldm set-vcpu 16 primary
# ldm set-memory 24g primary
# svcadm enable vntsd
# ldm add-vsw net-dev=net0 pub-vsw0 primary
# ldm add-vsw net-dev=net4 priv1-vsw0 primary
# ldm add-vsw net-dev=net16 priv2-vsw0 primary
# ldm add-vds boot-vds primary
# ldm add-vds ext_luns-vds primary
# for i in {1..4}
do
ldm add-dom oraclevm-04v$i
ldm add-mem --auto-adj 32G oraclevm-04v$i
ldm add-vcpu 60 oraclevm-04v$i
ldm set-var auto-boot\?=false oraclevm-04v$i
done
# for i in {1..4}; do ldm add-vnet id=0 pub-vnet0 pub-vsw0 oraclevm-04v"$i";
done
#for i in {1..4}; do ldm add-vnet id=1 priv1 priv1-vsw0 oraclevm-04v"$i";
done
# for i in {1..4}; do ldm add-vnet id=2 priv2 priv2-vsw0 oraclevm-04v"$i";
done
# ldm add-spconfig sfrac1
# zpool status
pool: rpool
state: ONLINE
scan: none requested
config:
NAME STATE READ WRITE CKSUM
rpool ONLINE 0 0 0
c0t5000CCA0435873E4d0 ONLINE 0 0 0
errors: No known data errors
zpool create -f Oracle VMpool c0t5000CCA04356449Cd0
zpool add -f Oracle VMpool c0t5000CCA043581A78d0
# mkdir /Oracle VMpool/Oracle VMs
# cd /Oracle VMpool/Oracle VMs/
# for i in {1..4};do mkdir oraclevm-04v"$i"; done
# for i in {1..4}; do mkfile -nv 60g oraclevm-04v"$i"boot; done
10
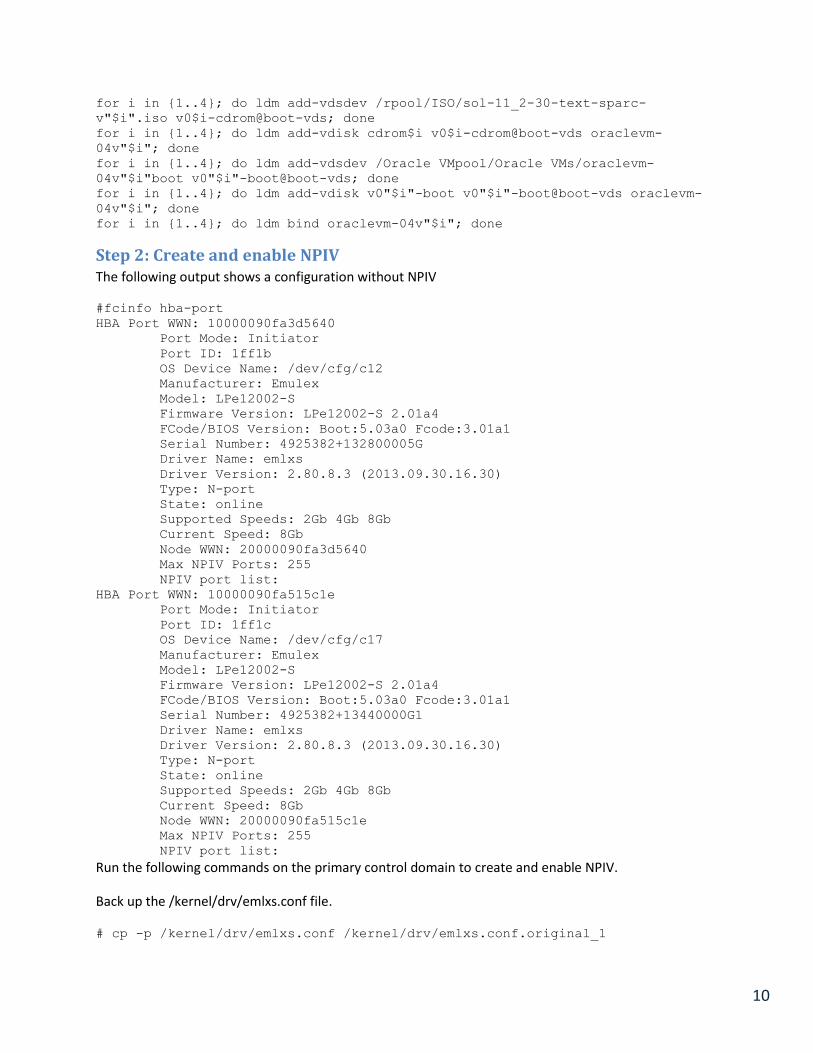
for i in {1..4}; do ldm add-vdsdev /rpool/ISO/sol-11_2-30-text-sparc-
v"$i".iso v0$i-cdrom@boot-vds; done
for i in {1..4}; do ldm add-vdisk cdrom$i v0$i-cdrom@boot-vds oraclevm-
04v"$i"; done
for i in {1..4}; do ldm add-vdsdev /Oracle VMpool/Oracle VMs/oraclevm-
04v"$i"boot v0"$i"-boot@boot-vds; done
for i in {1..4}; do ldm add-vdisk v0"$i"-boot v0"$i"-boot@boot-vds oraclevm-
04v"$i"; done
for i in {1..4}; do ldm bind oraclevm-04v"$i"; done
Step 2: Create and enable NPIV The following output shows a configuration without NPIV
#fcinfo hba-port
HBA Port WWN: 10000090fa3d5640
Port Mode: Initiator
Port ID: 1ff1b
OS Device Name: /dev/cfg/c12
Manufacturer: Emulex
Model: LPe12002-S
Firmware Version: LPe12002-S 2.01a4
FCode/BIOS Version: Boot:5.03a0 Fcode:3.01a1
Serial Number: 4925382+132800005G
Driver Name: emlxs
Driver Version: 2.80.8.3 (2013.09.30.16.30)
Type: N-port
State: online
Supported Speeds: 2Gb 4Gb 8Gb
Current Speed: 8Gb
Node WWN: 20000090fa3d5640
Max NPIV Ports: 255
NPIV port list:
HBA Port WWN: 10000090fa515c1e
Port Mode: Initiator
Port ID: 1ff1c
OS Device Name: /dev/cfg/c17
Manufacturer: Emulex
Model: LPe12002-S
Firmware Version: LPe12002-S 2.01a4
FCode/BIOS Version: Boot:5.03a0 Fcode:3.01a1
Serial Number: 4925382+13440000G1
Driver Name: emlxs
Driver Version: 2.80.8.3 (2013.09.30.16.30)
Type: N-port
State: online
Supported Speeds: 2Gb 4Gb 8Gb
Current Speed: 8Gb
Node WWN: 20000090fa515c1e
Max NPIV Ports: 255
NPIV port list:
Run the following commands on the primary control domain to create and enable NPIV.
Back up the /kernel/drv/emlxs.conf file.
# cp -p /kernel/drv/emlxs.conf /kernel/drv/emlxs.conf.original_1
11
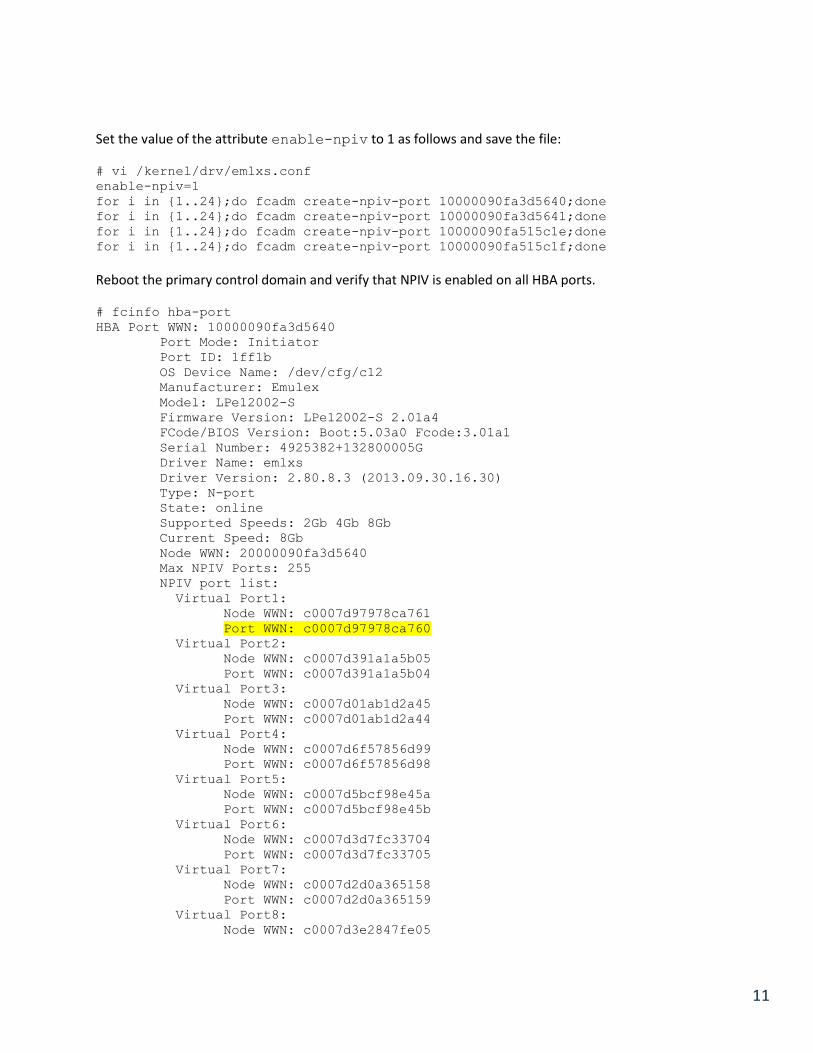
Set the value of the attribute enable-npiv to 1 as follows and save the file:
# vi /kernel/drv/emlxs.conf
enable-npiv=1
for i in {1..24};do fcadm create-npiv-port 10000090fa3d5640;done
for i in {1..24};do fcadm create-npiv-port 10000090fa3d5641;done
for i in {1..24};do fcadm create-npiv-port 10000090fa515c1e;done
for i in {1..24};do fcadm create-npiv-port 10000090fa515c1f;done
Reboot the primary control domain and verify that NPIV is enabled on all HBA ports.
# fcinfo hba-port
HBA Port WWN: 10000090fa3d5640
Port Mode: Initiator
Port ID: 1ff1b
OS Device Name: /dev/cfg/c12
Manufacturer: Emulex
Model: LPe12002-S
Firmware Version: LPe12002-S 2.01a4
FCode/BIOS Version: Boot:5.03a0 Fcode:3.01a1
Serial Number: 4925382+132800005G
Driver Name: emlxs
Driver Version: 2.80.8.3 (2013.09.30.16.30)
Type: N-port
State: online
Supported Speeds: 2Gb 4Gb 8Gb
Current Speed: 8Gb
Node WWN: 20000090fa3d5640
Max NPIV Ports: 255
NPIV port list:
Virtual Port1:
Node WWN: c0007d97978ca761
Port WWN: c0007d97978ca760
Virtual Port2:
Node WWN: c0007d391a1a5b05
Port WWN: c0007d391a1a5b04
Virtual Port3:
Node WWN: c0007d01ab1d2a45
Port WWN: c0007d01ab1d2a44
Virtual Port4:
Node WWN: c0007d6f57856d99
Port WWN: c0007d6f57856d98
Virtual Port5:
Node WWN: c0007d5bcf98e45a
Port WWN: c0007d5bcf98e45b
Virtual Port6:
Node WWN: c0007d3d7fc33704
Port WWN: c0007d3d7fc33705
Virtual Port7:
Node WWN: c0007d2d0a365158
Port WWN: c0007d2d0a365159
Virtual Port8:
Node WWN: c0007d3e2847fe05
12
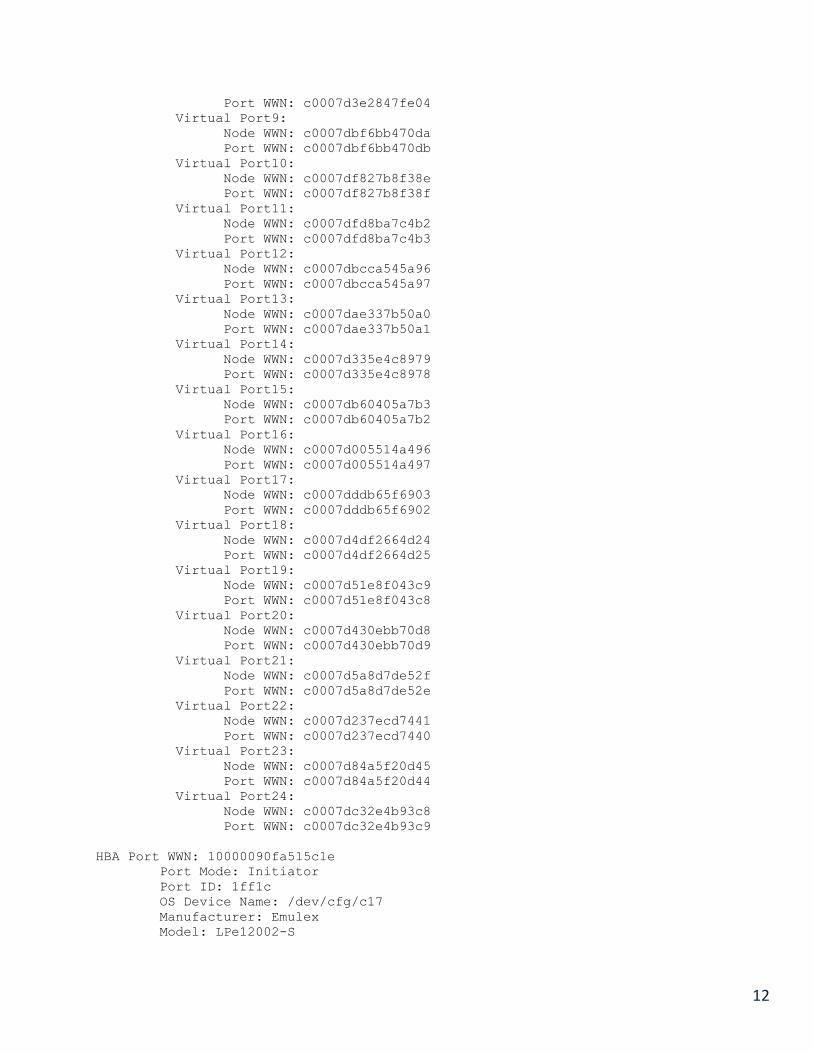
Port WWN: c0007d3e2847fe04
Virtual Port9:
Node WWN: c0007dbf6bb470da
Port WWN: c0007dbf6bb470db
Virtual Port10:
Node WWN: c0007df827b8f38e
Port WWN: c0007df827b8f38f
Virtual Port11:
Node WWN: c0007dfd8ba7c4b2
Port WWN: c0007dfd8ba7c4b3
Virtual Port12:
Node WWN: c0007dbcca545a96
Port WWN: c0007dbcca545a97
Virtual Port13:
Node WWN: c0007dae337b50a0
Port WWN: c0007dae337b50a1
Virtual Port14:
Node WWN: c0007d335e4c8979
Port WWN: c0007d335e4c8978
Virtual Port15:
Node WWN: c0007db60405a7b3
Port WWN: c0007db60405a7b2
Virtual Port16:
Node WWN: c0007d005514a496
Port WWN: c0007d005514a497
Virtual Port17:
Node WWN: c0007dddb65f6903
Port WWN: c0007dddb65f6902
Virtual Port18:
Node WWN: c0007d4df2664d24
Port WWN: c0007d4df2664d25
Virtual Port19:
Node WWN: c0007d51e8f043c9
Port WWN: c0007d51e8f043c8
Virtual Port20:
Node WWN: c0007d430ebb70d8
Port WWN: c0007d430ebb70d9
Virtual Port21:
Node WWN: c0007d5a8d7de52f
Port WWN: c0007d5a8d7de52e
Virtual Port22:
Node WWN: c0007d237ecd7441
Port WWN: c0007d237ecd7440
Virtual Port23:
Node WWN: c0007d84a5f20d45
Port WWN: c0007d84a5f20d44
Virtual Port24:
Node WWN: c0007dc32e4b93c8
Port WWN: c0007dc32e4b93c9
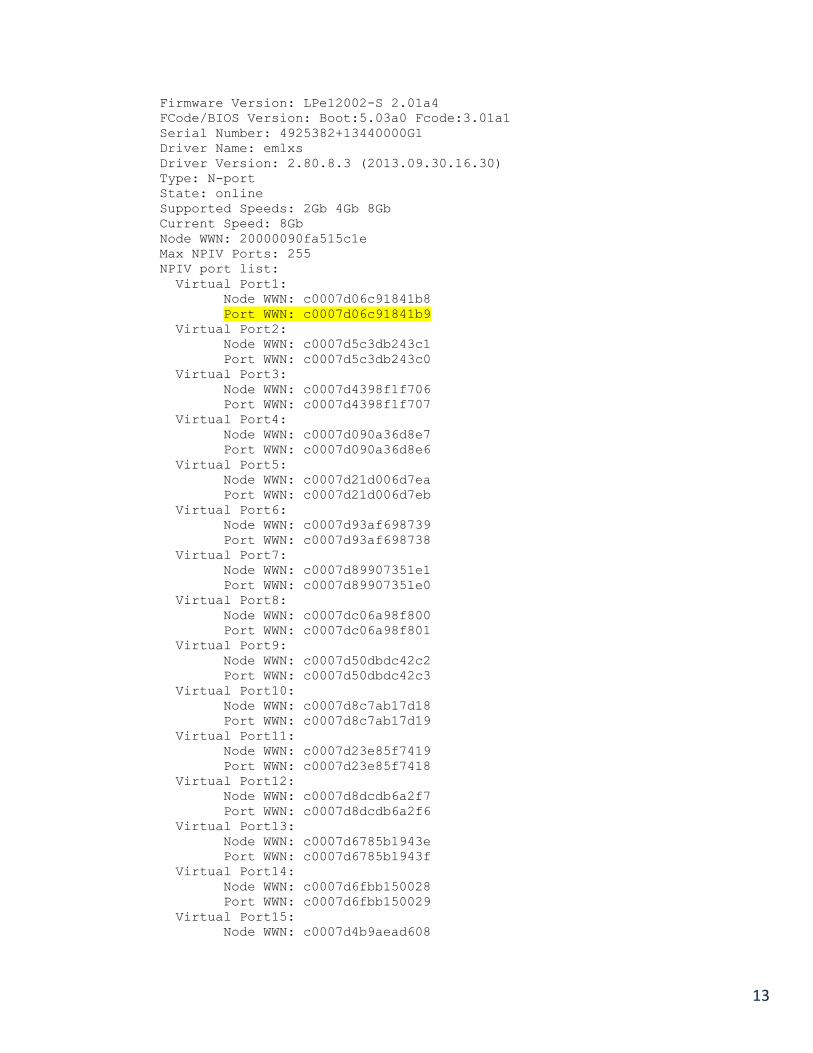
HBA Port WWN: 10000090fa515c1e
Port Mode: Initiator
Port ID: 1ff1c
OS Device Name: /dev/cfg/c17
Manufacturer: Emulex
Model: LPe12002-S
13
Firmware Version: LPe12002-S 2.01a4
FCode/BIOS Version: Boot:5.03a0 Fcode:3.01a1
Serial Number: 4925382+13440000G1
Driver Name: emlxs
Driver Version: 2.80.8.3 (2013.09.30.16.30)
Type: N-port
State: online
Supported Speeds: 2Gb 4Gb 8Gb
Current Speed: 8Gb
Node WWN: 20000090fa515c1e
Max NPIV Ports: 255
NPIV port list:
Virtual Port1:
Node WWN: c0007d06c91841b8
Port WWN: c0007d06c91841b9
Virtual Port2:
Node WWN: c0007d5c3db243c1
Port WWN: c0007d5c3db243c0
Virtual Port3:
Node WWN: c0007d4398f1f706
Port WWN: c0007d4398f1f707
Virtual Port4:
Node WWN: c0007d090a36d8e7
Port WWN: c0007d090a36d8e6
Virtual Port5:
Node WWN: c0007d21d006d7ea
Port WWN: c0007d21d006d7eb
Virtual Port6:
Node WWN: c0007d93af698739
Port WWN: c0007d93af698738
Virtual Port7:
Node WWN: c0007d89907351e1
Port WWN: c0007d89907351e0
Virtual Port8:
Node WWN: c0007dc06a98f800
Port WWN: c0007dc06a98f801
Virtual Port9:
Node WWN: c0007d50dbdc42c2
Port WWN: c0007d50dbdc42c3
Virtual Port10:
Node WWN: c0007d8c7ab17d18
Port WWN: c0007d8c7ab17d19
Virtual Port11:
Node WWN: c0007d23e85f7419
Port WWN: c0007d23e85f7418
Virtual Port12:
Node WWN: c0007d8dcdb6a2f7
Port WWN: c0007d8dcdb6a2f6
Virtual Port13:
Node WWN: c0007d6785b1943e
Port WWN: c0007d6785b1943f
Virtual Port14:
Node WWN: c0007d6fbb150028
Port WWN: c0007d6fbb150029
Virtual Port15:
Node WWN: c0007d4b9aead608
14
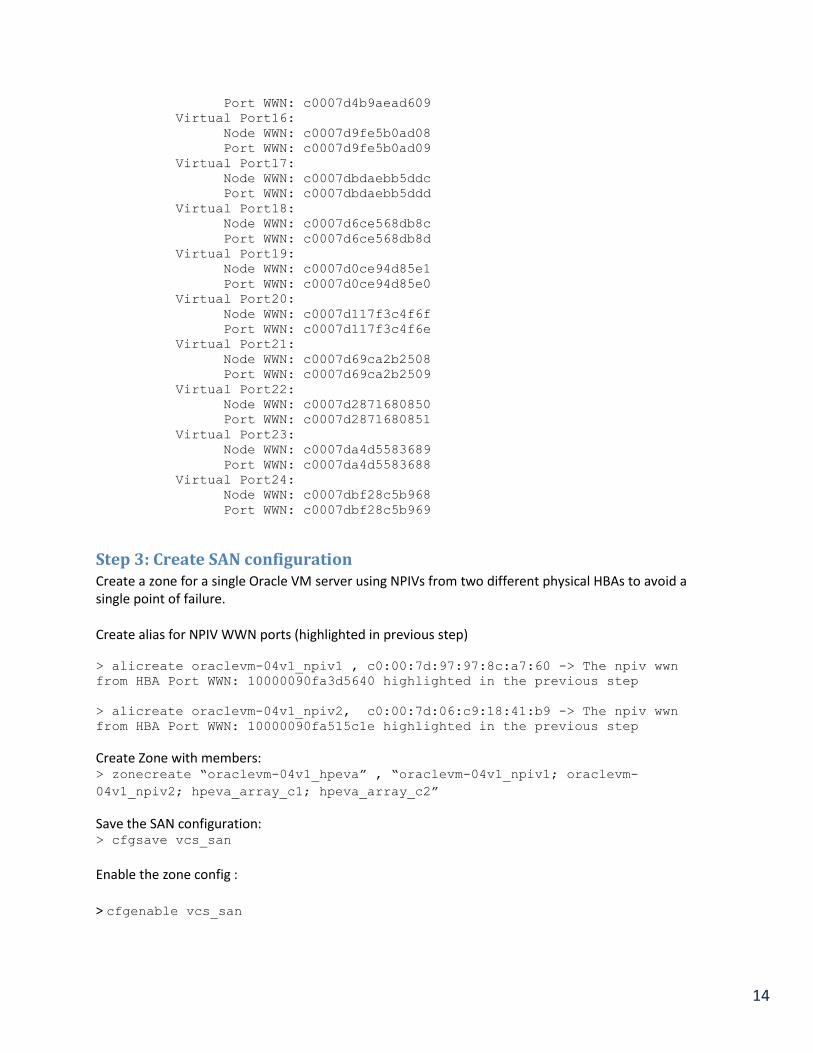
Port WWN: c0007d4b9aead609
Virtual Port16:
Node WWN: c0007d9fe5b0ad08
Port WWN: c0007d9fe5b0ad09
Virtual Port17:
Node WWN: c0007dbdaebb5ddc
Port WWN: c0007dbdaebb5ddd
Virtual Port18:
Node WWN: c0007d6ce568db8c
Port WWN: c0007d6ce568db8d
Virtual Port19:
Node WWN: c0007d0ce94d85e1
Port WWN: c0007d0ce94d85e0
Virtual Port20:
Node WWN: c0007d117f3c4f6f
Port WWN: c0007d117f3c4f6e
Virtual Port21:
Node WWN: c0007d69ca2b2508
Port WWN: c0007d69ca2b2509
Virtual Port22:
Node WWN: c0007d2871680850
Port WWN: c0007d2871680851
Virtual Port23:
Node WWN: c0007da4d5583689
Port WWN: c0007da4d5583688
Virtual Port24:
Node WWN: c0007dbf28c5b968
Port WWN: c0007dbf28c5b969
Step 3: Create SAN configuration Create a zone for a single Oracle VM server using NPIVs from two different physical HBAs to avoid a single point of failure. Create alias for NPIV WWN ports (highlighted in previous step)
> alicreate oraclevm-04v1_npiv1 , c0:00:7d:97:97:8c:a7:60 -> The npiv wwn
from HBA Port WWN: 10000090fa3d5640 highlighted in the previous step
> alicreate oraclevm-04v1_npiv2, c0:00:7d:06:c9:18:41:b9 -> The npiv wwn
from HBA Port WWN: 10000090fa515c1e highlighted in the previous step
Create Zone with members: > zonecreate “oraclevm-04v1_hpeva” , “oraclevm-04v1_npiv1; oraclevm-
04v1_npiv2; hpeva_array_c1; hpeva_array_c2”
Save the SAN configuration: > cfgsave vcs_san
Enable the zone config : > cfgenable vcs_san

15
For detailed steps, see the SAN documentation.
Step 4: Allocate storage to Oracle VM servers from the storage array # ldm add-vds hpeva6350clust1-vds primary
# echo | format | grep -i HP
44. c44t50014380244862F8d1 <HP-HSV340-1100 cyl 12798 alt 2 hd 128 sec
128>
45. c44t50014380244862F8d2 <HP-HSV340-1100 cyl 12798 alt 2 hd 128 sec
128>
46. c44t50014380244862F8d3 <HP-HSV340-1100 cyl 12798 alt 2 hd 128 sec
128>
47. c44t50014380244862F8d4 <HP-HSV340-1100 cyl 12798 alt 2 hd 128 sec
128>
48. c44t50014380244862FCd1 <HP-HSV340-1100 cyl 12798 alt 2 hd 128 sec
128>
49. c44t50014380244862FCd2 <HP-HSV340-1100 cyl 12798 alt 2 hd 128 sec
128>
50. c44t50014380244862FCd3 <HP-HSV340-1100 cyl 12798 alt 2 hd 128 sec
128>
51. c44t50014380244862FCd4 <HP-HSV340-1100 cyl 12798 alt 2 hd 128 sec
128>
54. c45t50014380244862F8d1 <HP-HSV340-1100 cyl 12798 alt 2 hd 128 sec
128>
55. c45t50014380244862F8d2 <HP-HSV340-1100 cyl 12798 alt 2 hd 128 sec
128>
56. c45t50014380244862F8d3 <HP-HSV340-1100 cyl 12798 alt 2 hd 128 sec
128>
57. c45t50014380244862F8d4 <HP-HSV340-1100 cyl 12798 alt 2 hd 128 sec
128>
58. c45t50014380244862FCd1 <HP-HSV340-1100 cyl 12798 alt 2 hd 128 sec
128>
59. c45t50014380244862FCd2 <HP-HSV340-1100 cyl 12798 alt 2 hd 128 sec
128>
60. c45t50014380244862FCd3 <HP-HSV340-1100 cyl 12798 alt 2 hd 128 sec
128>
61. c45t50014380244862FCd4 <HP-HSV340-1100 cyl 12798 alt 2 hd 128 sec
128>
122. c68t50014380244862F8d1 <HP-HSV340-1100 cyl 12798 alt 2 hd 128 sec
128>
123. c68t50014380244862F8d2 <HP-HSV340-1100 cyl 12798 alt 2 hd 128 sec
128>
124. c68t50014380244862F8d3 <HP-HSV340-1100 cyl 12798 alt 2 hd 128 sec
128>
125. c68t50014380244862F8d4 <HP-HSV340-1100 cyl 12798 alt 2 hd 128 sec
128>
126. c68t50014380244862FCd1 <HP-HSV340-1100 cyl 12798 alt 2 hd 128 sec
128>
127. c68t50014380244862FCd2 <HP-HSV340-1100 cyl 12798 alt 2 hd 128 sec
128>
128. c68t50014380244862FCd3 <HP-HSV340-1100 cyl 12798 alt 2 hd 128 sec
128>

16
129. c68t50014380244862FCd4 <HP-HSV340-1100 cyl 12798 alt 2 hd 128 sec
128>
132. c69t50014380244862F8d1 <HP-HSV340-1100 cyl 12798 alt 2 hd 128 sec
128>
133. c69t50014380244862F8d2 <HP-HSV340-1100 cyl 12798 alt 2 hd 128 sec
128>
134. c69t50014380244862F8d3 <HP-HSV340-1100 cyl 12798 alt 2 hd 128 sec
128>
135. c69t50014380244862F8d4 <HP-HSV340-1100 cyl 12798 alt 2 hd 128 sec
128>
136. c69t50014380244862FCd1 <HP-HSV340-1100 cyl 12798 alt 2 hd 128 sec
128>
137. c69t50014380244862FCd2 <HP-HSV340-1100 cyl 12798 alt 2 hd 128 sec
128>
138. c69t50014380244862FCd3 <HP-HSV340-1100 cyl 12798 alt 2 hd 128 sec
128>
139. c69t50014380244862FCd4 <HP-HSV340-1100 cyl 12798 alt 2 hd 128 sec
128>
184. c92t50014380244862F8d1 <HP-HSV340-1100 cyl 12798 alt 2 hd 128 sec
128>
185. c92t50014380244862F8d2 <HP-HSV340-1100 cyl 12798 alt 2 hd 128 sec
128>
186. c92t50014380244862F8d3 <HP-HSV340-1100 cyl 12798 alt 2 hd 128 sec
128>
187. c92t50014380244862F8d4 <HP-HSV340-1100 cyl 12798 alt 2 hd 128 sec
128>
188. c92t50014380244862FCd1 <HP-HSV340-1100 cyl 12798 alt 2 hd 128 sec
128>
189. c92t50014380244862FCd2 <HP-HSV340-1100 cyl 12798 alt 2 hd 128 sec
128>
190. c92t50014380244862FCd3 <HP-HSV340-1100 cyl 12798 alt 2 hd 128 sec
128>
191. c92t50014380244862FCd4 <HP-HSV340-1100 cyl 12798 alt 2 hd 128 sec
128>
194. c93t50014380244862F8d1 <HP-HSV340-1100 cyl 12798 alt 2 hd 128 sec
128>
195. c93t50014380244862F8d2 <HP-HSV340-1100 cyl 12798 alt 2 hd 128 sec
128>
196. c93t50014380244862F8d3 <HP-HSV340-1100 cyl 12798 alt 2 hd 128 sec
128>
197. c93t50014380244862F8d4 <HP-HSV340-1100 cyl 12798 alt 2 hd 128 sec
128>
198. c93t50014380244862FCd1 <HP-HSV340-1100 cyl 12798 alt 2 hd 128 sec
128>
199. c93t50014380244862FCd2 <HP-HSV340-1100 cyl 12798 alt 2 hd 128 sec
128>

17
200. c93t50014380244862FCd3 <HP-HSV340-1100 cyl 12798 alt 2 hd 128 sec
128>
201. c93t50014380244862FCd4 <HP-HSV340-1100 cyl 12798 alt 2 hd 128 sec
128>
262. c116t50014380244862F8d1 <HP-HSV340-1100 cyl 12798 alt 2 hd 128 sec
128>
263. c116t50014380244862F8d2 <HP-HSV340-1100 cyl 12798 alt 2 hd 128 sec
128>
264. c116t50014380244862F8d3 <HP-HSV340-1100 cyl 12798 alt 2 hd 128 sec
128>
265. c116t50014380244862F8d4 <HP-HSV340-1100 cyl 12798 alt 2 hd 128 sec
128>
266. c116t50014380244862FCd1 <HP-HSV340-1100 cyl 12798 alt 2 hd 128 sec
128>
267. c116t50014380244862FCd2 <HP-HSV340-1100 cyl 12798 alt 2 hd 128 sec
128>
268. c116t50014380244862FCd3 <HP-HSV340-1100 cyl 12798 alt 2 hd 128 sec
128>
269. c116t50014380244862FCd4 <HP-HSV340-1100 cyl 12798 alt 2 hd 128 sec
128>
272. c117t50014380244862F8d1 <HP-HSV340-1100 cyl 12798 alt 2 hd 128 sec
128>
273. c117t50014380244862F8d2 <HP-HSV340-1100 cyl 12798 alt 2 hd 128 sec
128>
274. c117t50014380244862F8d3 <HP-HSV340-1100 cyl 12798 alt 2 hd 128 sec
128>
275. c117t50014380244862F8d4 <HP-HSV340-1100 cyl 12798 alt 2 hd 128 sec
128>
276. c117t50014380244862FCd1 <HP-HSV340-1100 cyl 12798 alt 2 hd 128 sec
128>
277. c117t50014380244862FCd2 <HP-HSV340-1100 cyl 12798 alt 2 hd 128 sec
128>
278. c117t50014380244862FCd3 <HP-HSV340-1100 cyl 12798 alt 2 hd 128 sec
128>
279. c117t50014380244862FCd4 <HP-HSV340-1100 cyl 12798 alt 2 hd 128 sec
128>
# for i in {1..4}
do
ldm add-vdsdev /dev/dsk/c44t50014380244862F8d"$i"s2
c44_lun"$i"@hpeva6350clust1-vds
ldm add-vdsdev /dev/dsk/c45t50014380244862F8d"$i"s2
c45_lun"$i"@hpeva6350clust1-vds
ldm add-vdsdev /dev/dsk/c92t50014380244862F8d"$i"s2
c92_lun"$i"@hpeva6350clust1-vds
ldm add-vdsdev /dev/dsk/c93t50014380244862F8d"$i"s2
c93_lun"$i"@hpeva6350clust1-vds
ldm add-vdisk c44_lun"$i" c44_lun"$i"@hpeva6350clust1-vds oraclevm-04v1
ldm add-vdisk c92_lun"$i" c92_lun"$i"@hpeva6350clust1-vds oraclevm-04v1
ldm add-vdisk c45_lun"$i" c45_lun"$i"@hpeva6350clust1-vds oraclevm-04v2
ldm add-vdisk c93_lun"$i" c93_lun"$i"@hpeva6350clust1-vds oraclevm-04v2
done
18
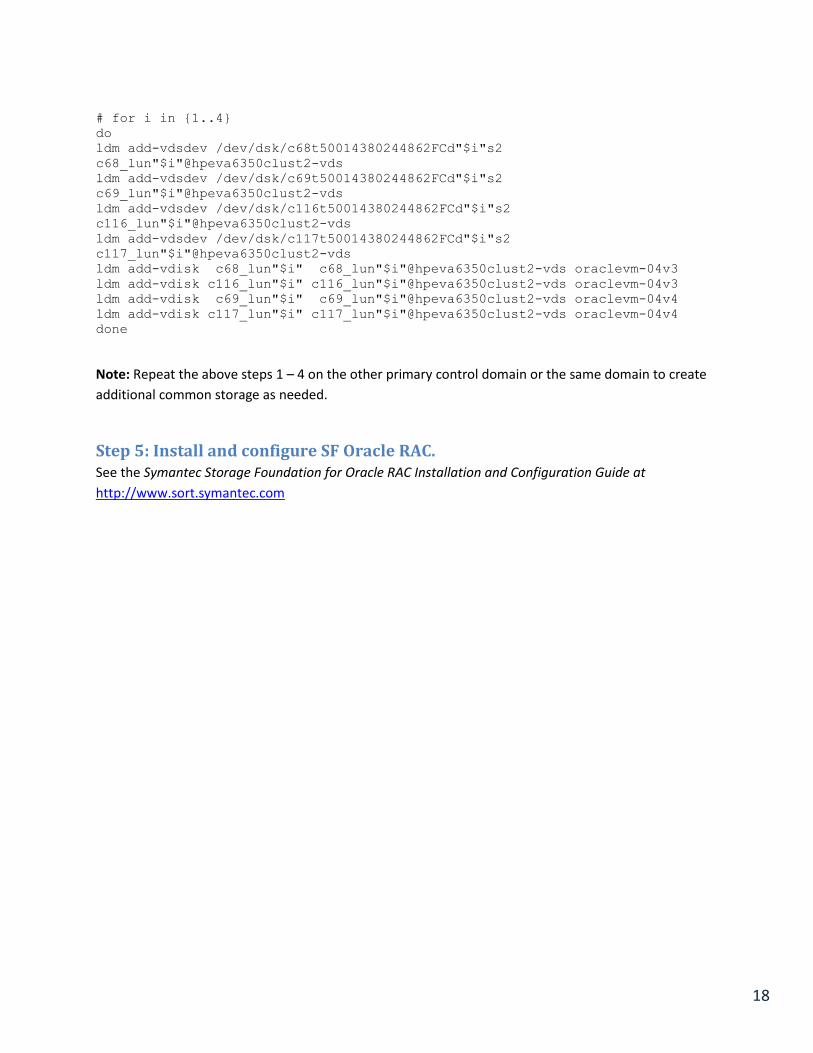
# for i in {1..4}
do
ldm add-vdsdev /dev/dsk/c68t50014380244862FCd"$i"s2
c68_lun"$i"@hpeva6350clust2-vds
ldm add-vdsdev /dev/dsk/c69t50014380244862FCd"$i"s2
c69_lun"$i"@hpeva6350clust2-vds
ldm add-vdsdev /dev/dsk/c116t50014380244862FCd"$i"s2
c116_lun"$i"@hpeva6350clust2-vds
ldm add-vdsdev /dev/dsk/c117t50014380244862FCd"$i"s2
c117_lun"$i"@hpeva6350clust2-vds
ldm add-vdisk c68_lun"$i" c68_lun"$i"@hpeva6350clust2-vds oraclevm-04v3
ldm add-vdisk c116_lun"$i" c116_lun"$i"@hpeva6350clust2-vds oraclevm-04v3
ldm add-vdisk c69_lun"$i" c69_lun"$i"@hpeva6350clust2-vds oraclevm-04v4
ldm add-vdisk c117_lun"$i" c117_lun"$i"@hpeva6350clust2-vds oraclevm-04v4
done
Note: Repeat the above steps 1 – 4 on the other primary control domain or the same domain to create
additional common storage as needed.
Step 5: Install and configure SF Oracle RAC. See the Symantec Storage Foundation for Oracle RAC Installation and Configuration Guide at
http://www.sort.symantec.com

Copyright © 2014 Symantec Corporation. All rights reserved. Symantec, the Symantec Logo, and the Checkmark Logo are trademarks or registered trademarks of Symantec Corporation or its affiliates in the U.S. and other countries. Other names may be trademarks of their respective owners.
References
Oracle VM documentation http://docs.oracle.com/cd/E37707_01/index.html What is NPIV? http://docs.oracle.com/cd/E23824_01/html/E23097/ggonk.html Using NPIV with Oracle VM Server for SPARC https://blogs.oracle.com/vmserver/entry/using_npiv_with_oracle_vm Symantec documentation https://sort.symantec.com


![LI*ZO-A* · f300 3 on on on 300 sw1sw2 sw3 sw4 [hz] 100 sw on on 270on on 230 on on 200( ) 160 on 130 on on on 380 on on on on 500 on on on 470 on on on 430 200hz atos 7 b1:](https://img.pdfslide.us/doc/110x75/5c5bde4b09d3f23b368c7bcd/lizo-a-f300-3-on-on-on-300-sw1sw2-sw3-sw4-hz-100-sw-on-on-270on-on-230-on.jpg)