Embed Size (px)
Citation preview

[Product Name]
[Version X.X]
[Platform and Minimum Version Details]
I
Salary Amount (R1)
Page 1
VTIGER CRM 6 MAGENTO BIDIRECTIONAL CONNECTOR
Version 2.1.0
Platform: VTiger 6, Magento 1.7.0.2
Vtiger CRM 6 Magento bidirectional connector allows to transfer data from Vtiger to Magento and vice versa. This document consist of description, feature, installation procedure and change log of our plugin.
Page 2
Description
VTiger Magento Multi Store Bidirectional Connector is another powerful Extension by Smackcoders to sync your Magento multi stores data, sales and customers with VTiger CRM to enhance with extended customer relationship. VTiger Magento Multi Store Bidirectional Connector allows to sync and transfer data automatically in bidirectional way from Magento stores into VTiger CRM and vise versa. Our Extension sync 6 primary data set of Magento to VTiger to make all the tasks simple to have an efficient CRM capability.CRM plays a critical role in managing customers, and this extension syncs CRM with e Commerce store to add value of a CRM to a e Commerce store.
VTiger Magento Multi Store Bidirectional Connector allows to sync and transfer data automatically in bidirectional way from Magento stores into VTiger CRM and vise versa. Our Extension sync 6 primary data set of Magento to VTiger to make all the tasks simple to have an efficient CRM capability.
• Customer Information
• Product Categories
• Product Information, specially transmit Product Gallery Images to VTiger
system
• Order Information
• Invoice Information
• Currency Support
• Discounts and Tax Information
• Stores Information
• Product Attributes
Page 3
Plugin Details****************
Author : SmackcodersAuthor URL : Smackcoders Siteversion : 2.1.0
Product URL
Vtiger6 Mage bidirectional Connector
Wiki Page Link
VTcrm 6 Magento
Blog Link
Magento connector
Vtiger crm 6 Magento
CHANGE LOG
2.1.0– Fixed: Attribute sync– Compatibility added for VtigerCRM6.1.0
2.0.0
- Synced up magento cart module with vtiger quotes module.
1.9.0
- Added Vtmultistoreconnector logs module to log transactions in vtiger .
1.8.6
- Added options to map currencies.
1.8.5
- Added MultiCurrency Support.
1.7.0
- Effective scheduling method.
- Options to kill sync.
- Product Attribute mapping.
- Auto map for custom attributes.
1.6.0
- Added scheduling method of transfer from Magento to VtigerCRM which transfers data more efficiently.
1.0.0 - This is the Pro version official release with more improvements.
1.0.0 Beta - This is the Pro version initial release for testing.
Features
• Bidirectional Connector.
• Can Sync Stores, Category, Products, Product Attributes, Customers, Cart
data, SalesOrder and Invoice.
• Update SalesOrder in magento from vtiger.
• Multi Currency Support.
• Map magento attributes with vtiger custom fields.
• Three modes of sync, On The Go Transfer, Prompt Transfer and
Scheduled Transfer.
• Auto map attribute.
• Can delete record in vtiger once it is deleted in magento.
• Sync back needed unsync item from vtiger to magento.
• Logs module in vtiger
Page 4
4 | P a g e
Video Link
Vt6 Mage bidirectional connector
UPGRADE NOTICE
Our Premium Products***********************
WP Ultimate CSV Importer Pro
Vtigercrm 6 Quickbooks Integration
Xero vtigercrm 6 Integration
Vtigercrm 6 Magento Bidirectional Connector
Vtiger 6 Google Calendar Sync
HR Payroll Management System
Smart Vtiger Duplicate Merging Module
Our Free Products*******************
Free WP Ultimate Email Marketer
Free Magento Smart Multi Backup
Free WP Google SEO Author Snippet
Free Sugar Themes
Free Orange HRM Themes
Free Vtiger CRM Themes
For More Products click here
SUPPORT
Mail Us: [email protected]
Installation
1.1. In Magento
Ensure proper backups before installation.
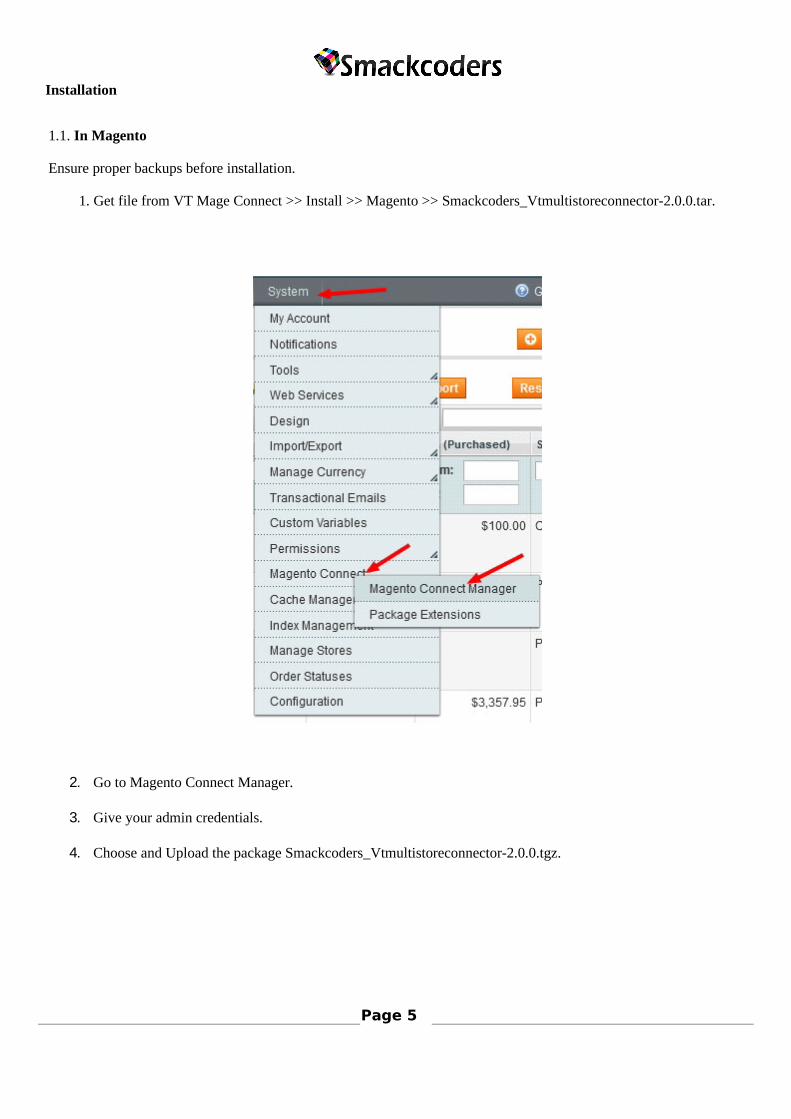
1. Get file from VT Mage Connect >> Install >> Magento >> Smackcoders_Vtmultistoreconnector-2.0.0.tar.
2. Go to Magento Connect Manager.
3. Give your admin credentials.
4. Choose and Upload the package Smackcoders_Vtmultistoreconnector-2.0.0.tgz.
Page 5
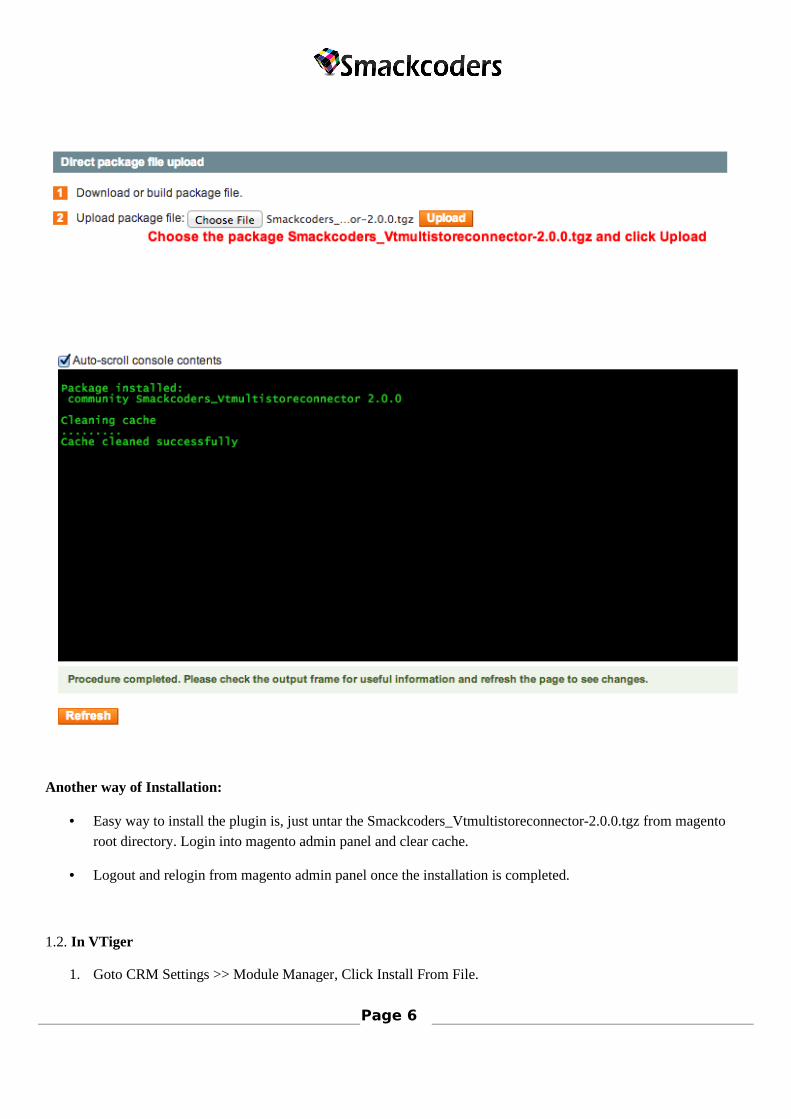
Another way of Installation:
• Easy way to install the plugin is, just untar the Smackcoders_Vtmultistoreconnector-2.0.0.tgz from magento
root directory. Login into magento admin panel and clear cache.
• Logout and relogin from magento admin panel once the installation is completed.
1.2. In VTiger
1. Goto CRM Settings >> Module Manager, Click Install From File.
Page 6
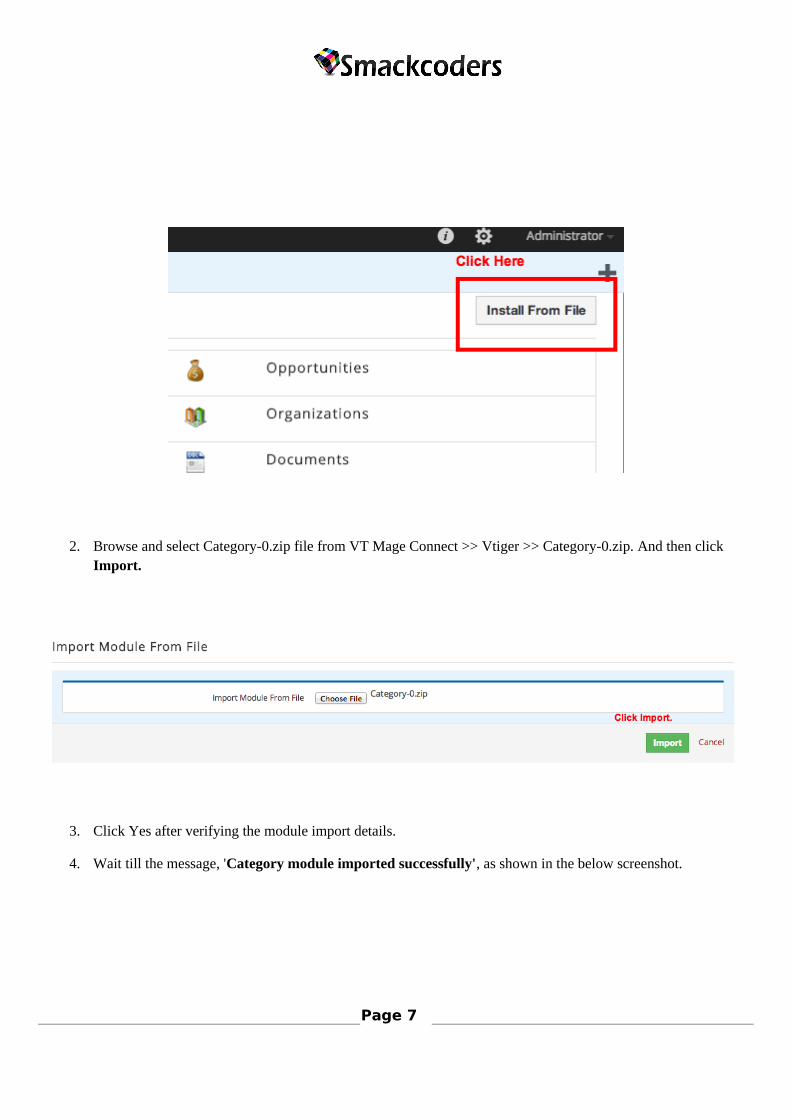
2. Browse and select Category-0.zip file from VT Mage Connect >> Vtiger >> Category-0.zip. And then click Import.
3. Click Yes after verifying the module import details.
4. Wait till the message, 'Category module imported successfully', as shown in the below screenshot.
Page 7
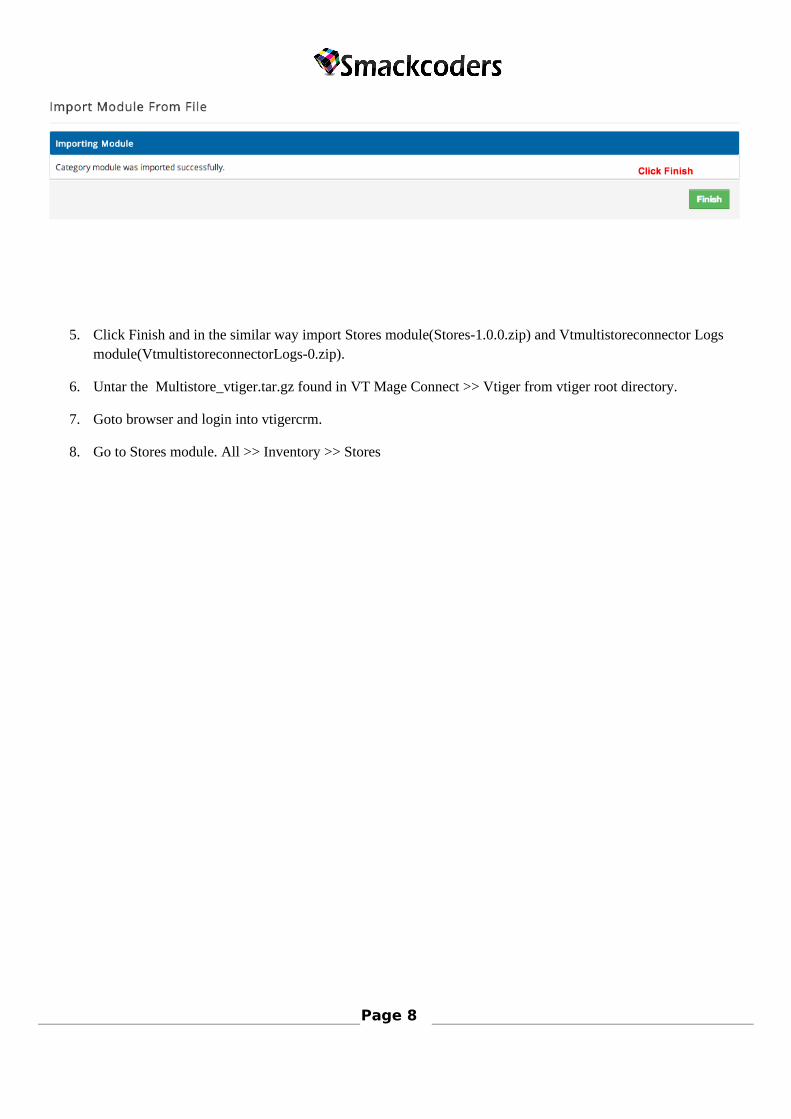
5. Click Finish and in the similar way import Stores module(Stores-1.0.0.zip) and Vtmultistoreconnector Logs module(VtmultistoreconnectorLogs-0.zip).
6. Untar the Multistore_vtiger.tar.gz found in VT Mage Connect >> Vtiger from vtiger root directory.
7. Goto browser and login into vtigercrm.
8. Go to Stores module. All >> Inventory >> Stores
Page 8
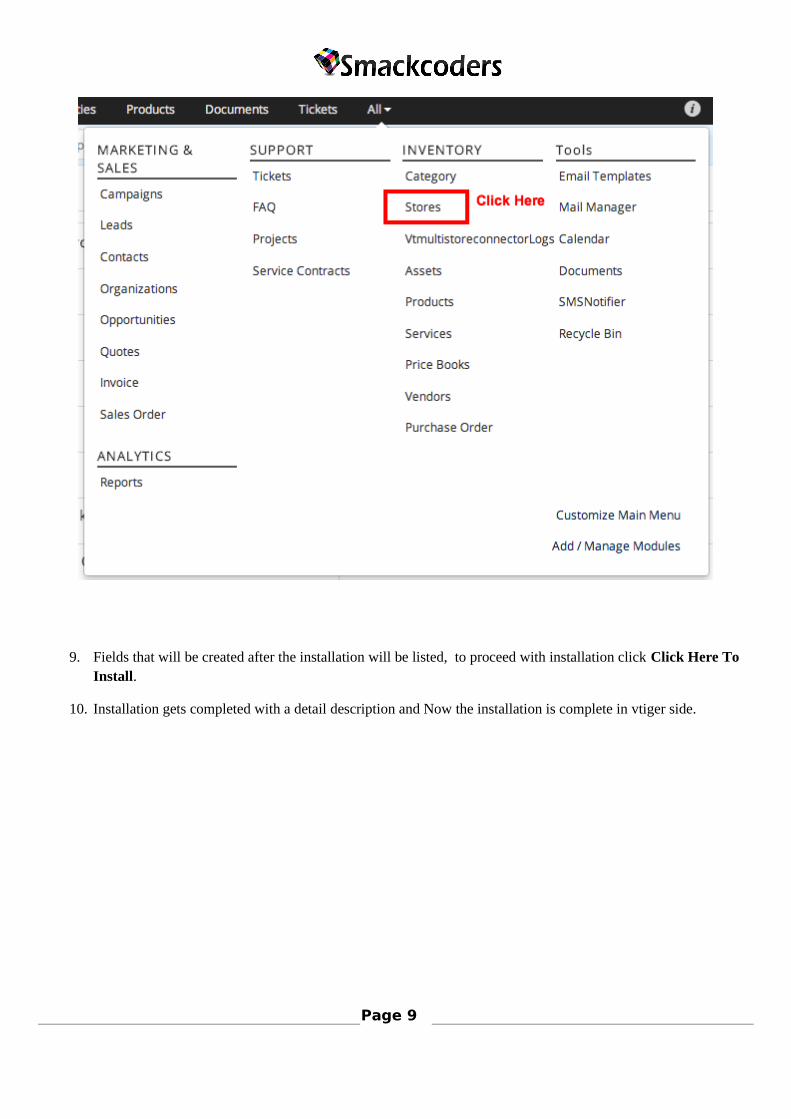
9. Fields that will be created after the installation will be listed, to proceed with installation click Click Here To Install.
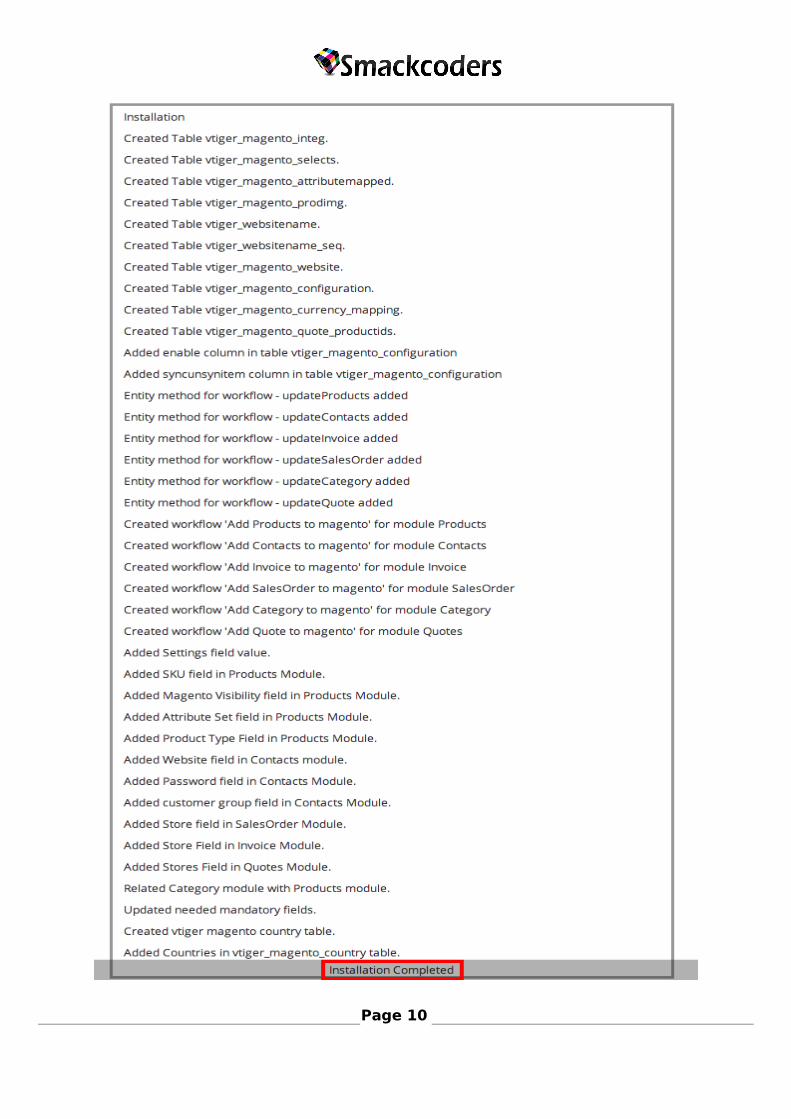
10. Installation gets completed with a detail description and Now the installation is complete in vtiger side.
Page 9
Page 10
Configuration
In Magento
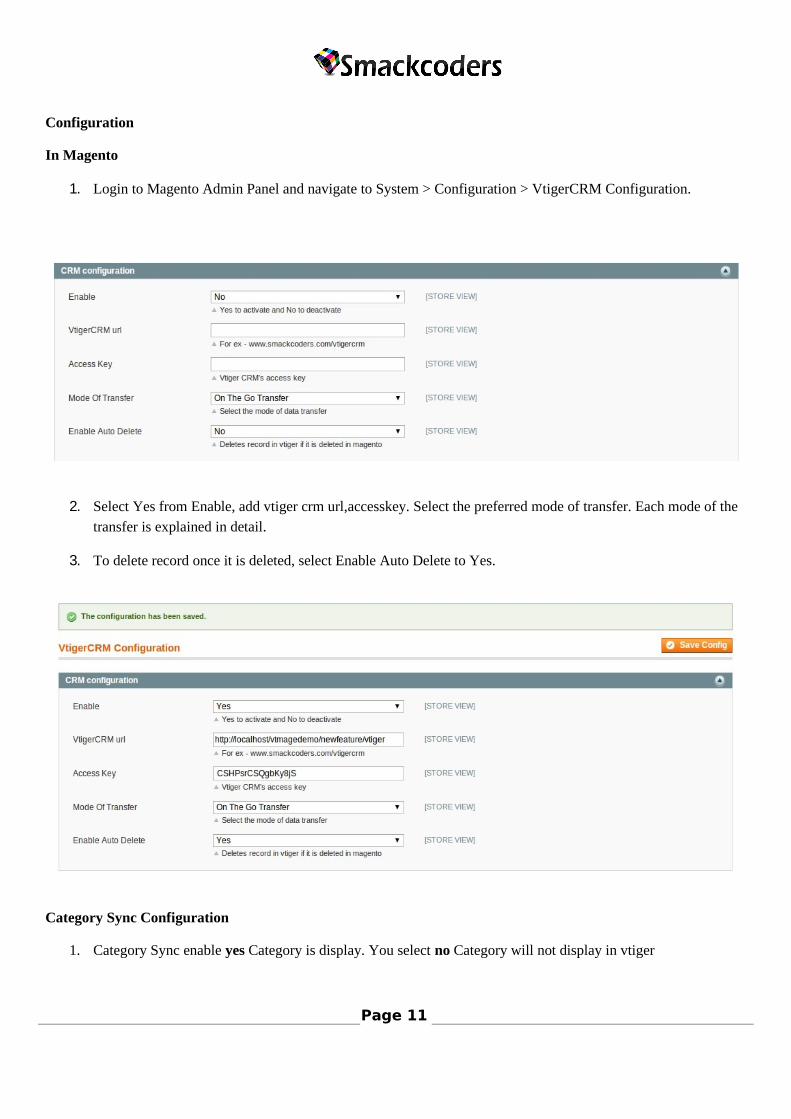
1. Login to Magento Admin Panel and navigate to System > Configuration > VtigerCRM Configuration.
2. Select Yes from Enable, add vtiger crm url,accesskey. Select the preferred mode of transfer. Each mode of the
transfer is explained in detail.
3. To delete record once it is deleted, select Enable Auto Delete to Yes.
Category Sync Configuration
1. Category Sync enable yes Category is display. You select no Category will not display in vtiger
Page 11
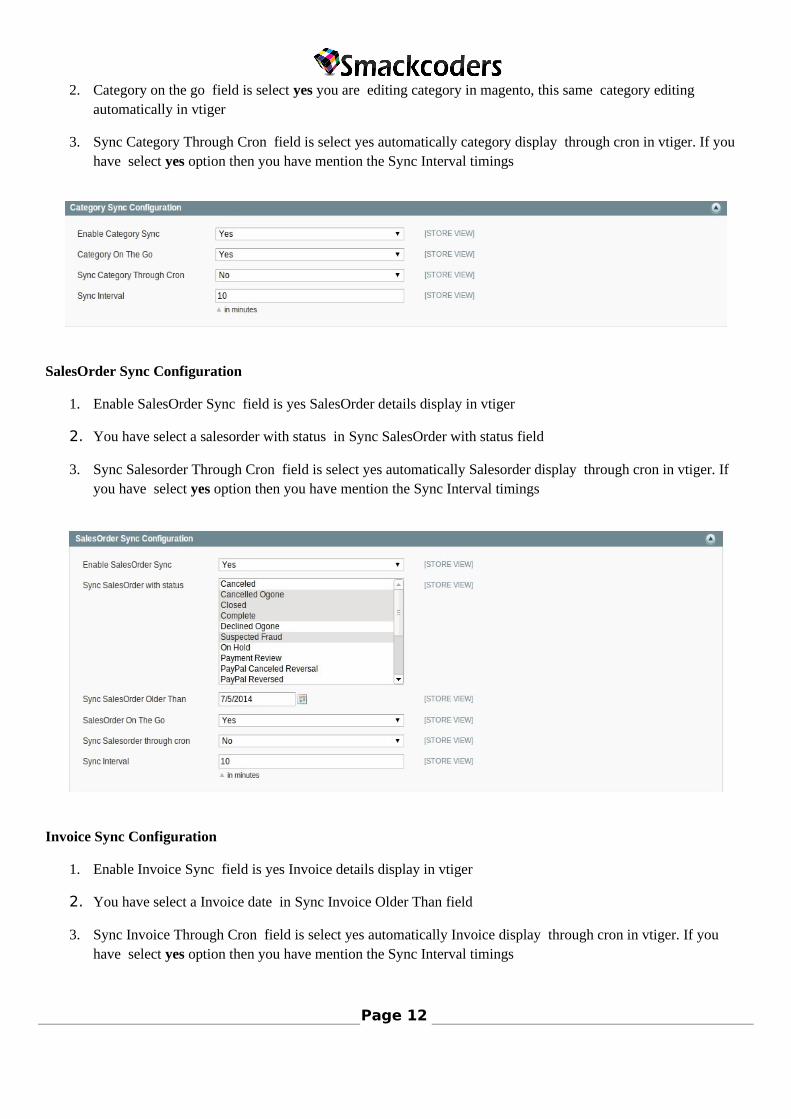
2. Category on the go field is select yes you are editing category in magento, this same category editing automatically in vtiger
3. Sync Category Through Cron field is select yes automatically category display through cron in vtiger. If you have select yes option then you have mention the Sync Interval timings
SalesOrder Sync Configuration
1. Enable SalesOrder Sync field is yes SalesOrder details display in vtiger
2. You have select a salesorder with status in Sync SalesOrder with status field
3. Sync Salesorder Through Cron field is select yes automatically Salesorder display through cron in vtiger. If you have select yes option then you have mention the Sync Interval timings
Invoice Sync Configuration
1. Enable Invoice Sync field is yes Invoice details display in vtiger
2. You have select a Invoice date in Sync Invoice Older Than field
3. Sync Invoice Through Cron field is select yes automatically Invoice display through cron in vtiger. If you have select yes option then you have mention the Sync Interval timings
Page 12
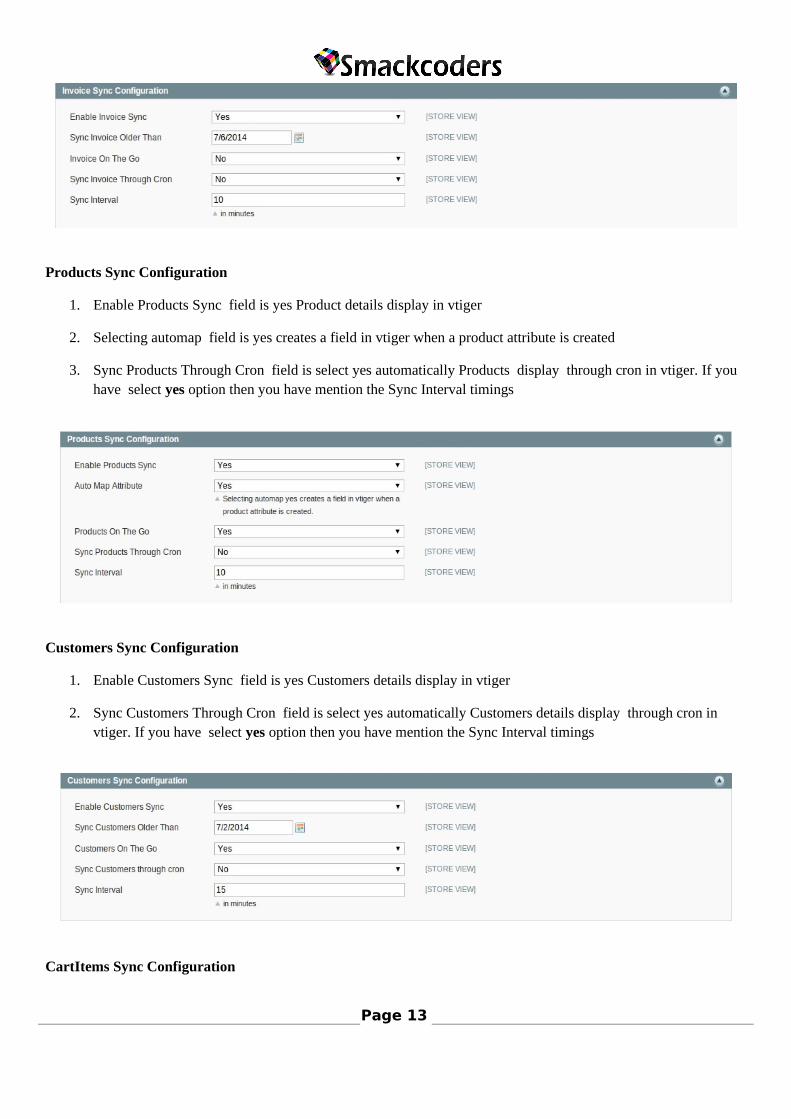
Products Sync Configuration
1. Enable Products Sync field is yes Product details display in vtiger
2. Selecting automap field is yes creates a field in vtiger when a product attribute is created
3. Sync Products Through Cron field is select yes automatically Products display through cron in vtiger. If you have select yes option then you have mention the Sync Interval timings
Customers Sync Configuration
1. Enable Customers Sync field is yes Customers details display in vtiger
2. Sync Customers Through Cron field is select yes automatically Customers details display through cron in vtiger. If you have select yes option then you have mention the Sync Interval timings
CartItems Sync Configuration
Page 13
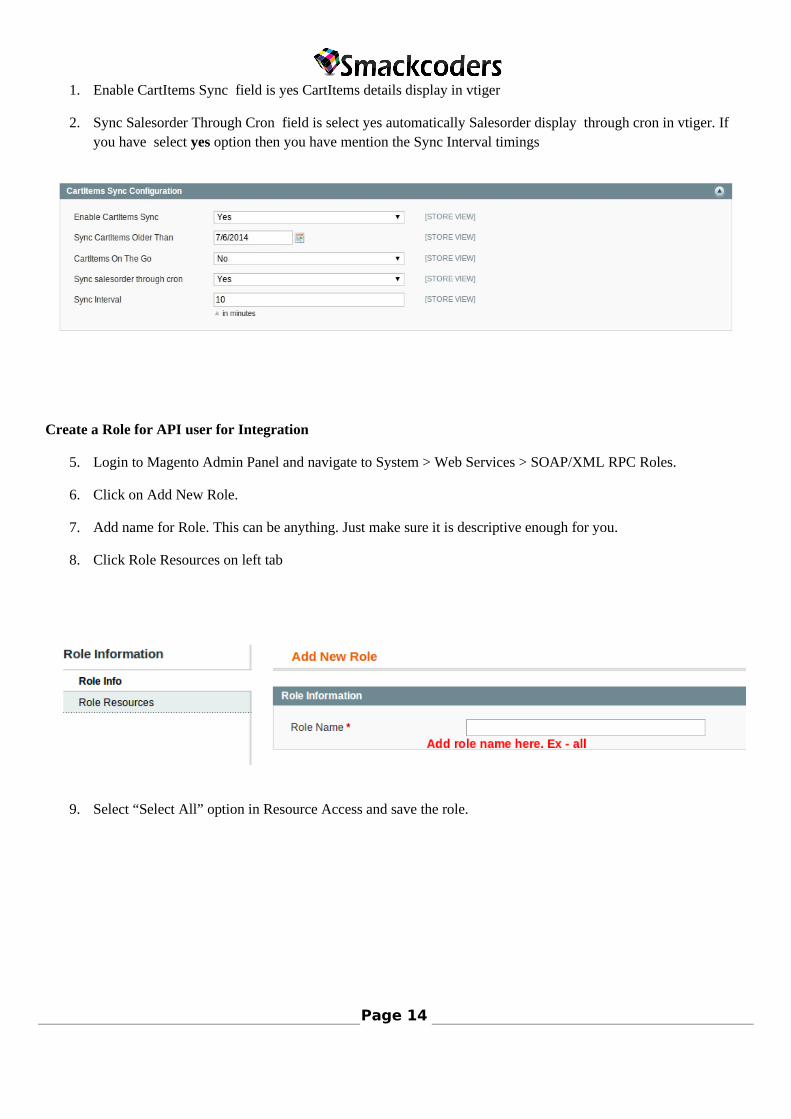
1. Enable CartItems Sync field is yes CartItems details display in vtiger
2. Sync Salesorder Through Cron field is select yes automatically Salesorder display through cron in vtiger. If you have select yes option then you have mention the Sync Interval timings
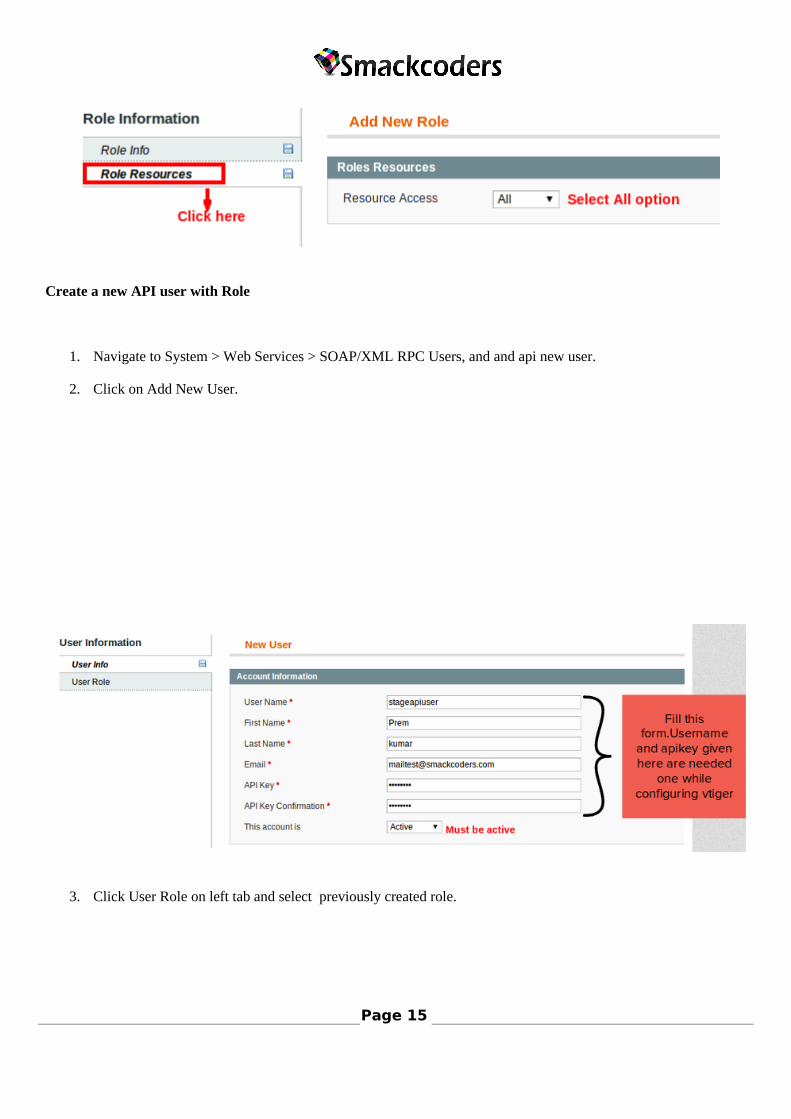
Create a Role for API user for Integration
5. Login to Magento Admin Panel and navigate to System > Web Services > SOAP/XML RPC Roles.
6. Click on Add New Role.
7. Add name for Role. This can be anything. Just make sure it is descriptive enough for you.
8. Click Role Resources on left tab
9. Select “Select All” option in Resource Access and save the role.
Page 14
Create a new API user with Role
1. Navigate to System > Web Services > SOAP/XML RPC Users, and and api new user.
2. Click on Add New User.
3. Click User Role on left tab and select previously created role.
Page 15
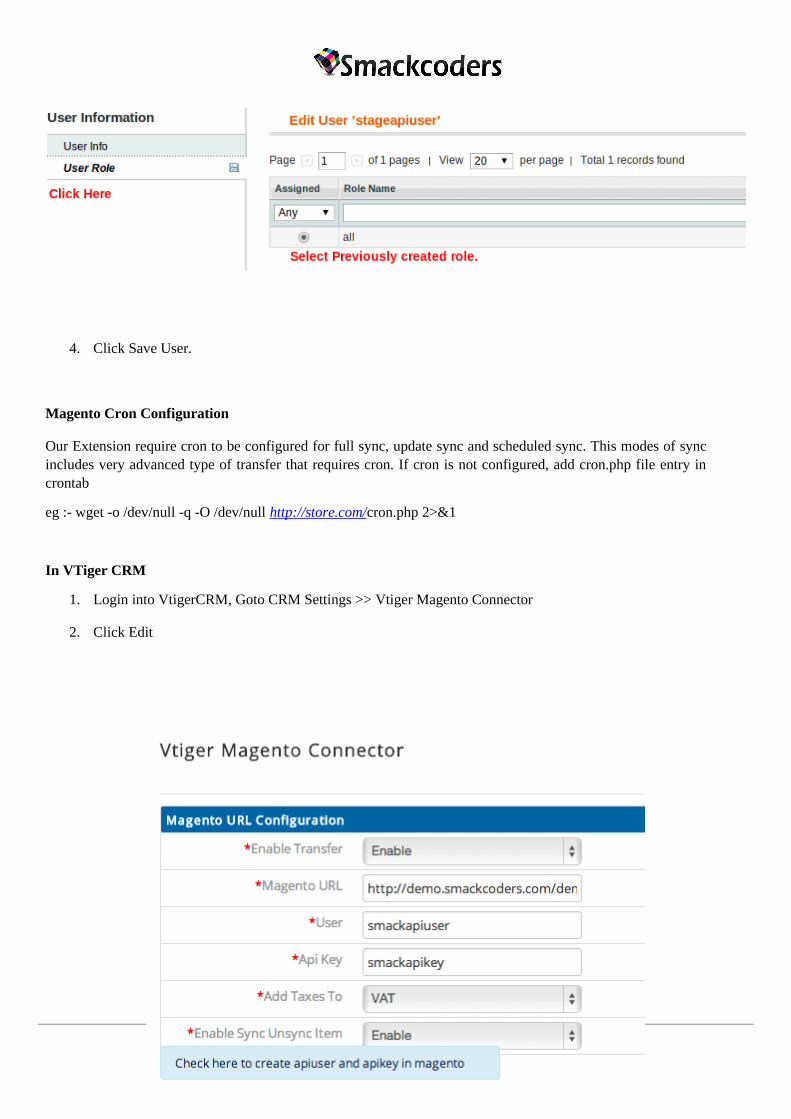
4. Click Save User.
Magento Cron Configuration
Our Extension require cron to be configured for full sync, update sync and scheduled sync. This modes of sync includes very advanced type of transfer that requires cron. If cron is not configured, add cron.php file entry in crontab
eg :- wget -o /dev/null -q -O /dev/null http://store.com/cron.php 2>&1
In VTiger CRM
1. Login into VtigerCRM, Goto CRM Settings >> Vtiger Magento Connector
2. Click Edit
Page 16
3. Click Save.
Configure MultiCurrency
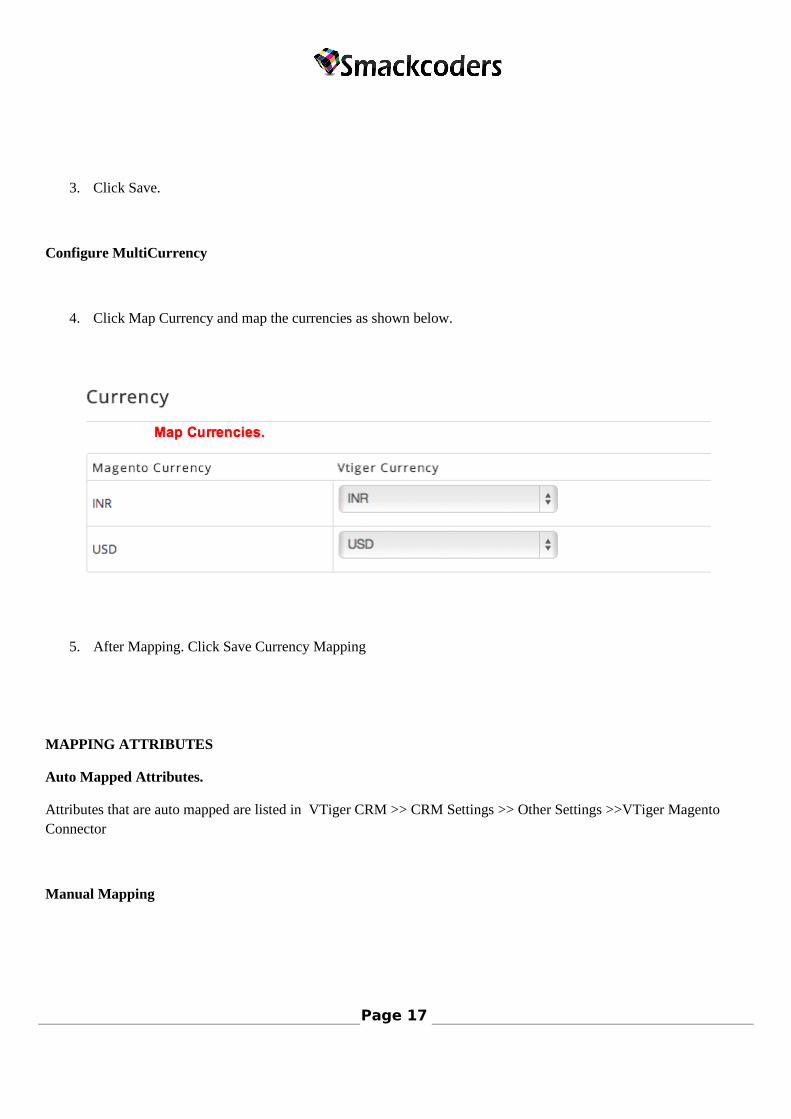
4. Click Map Currency and map the currencies as shown below.
5. After Mapping. Click Save Currency Mapping
MAPPING ATTRIBUTES
Auto Mapped Attributes.
Attributes that are auto mapped are listed in VTiger CRM >> CRM Settings >> Other Settings >>VTiger Magento Connector
Manual Mapping
Page 17
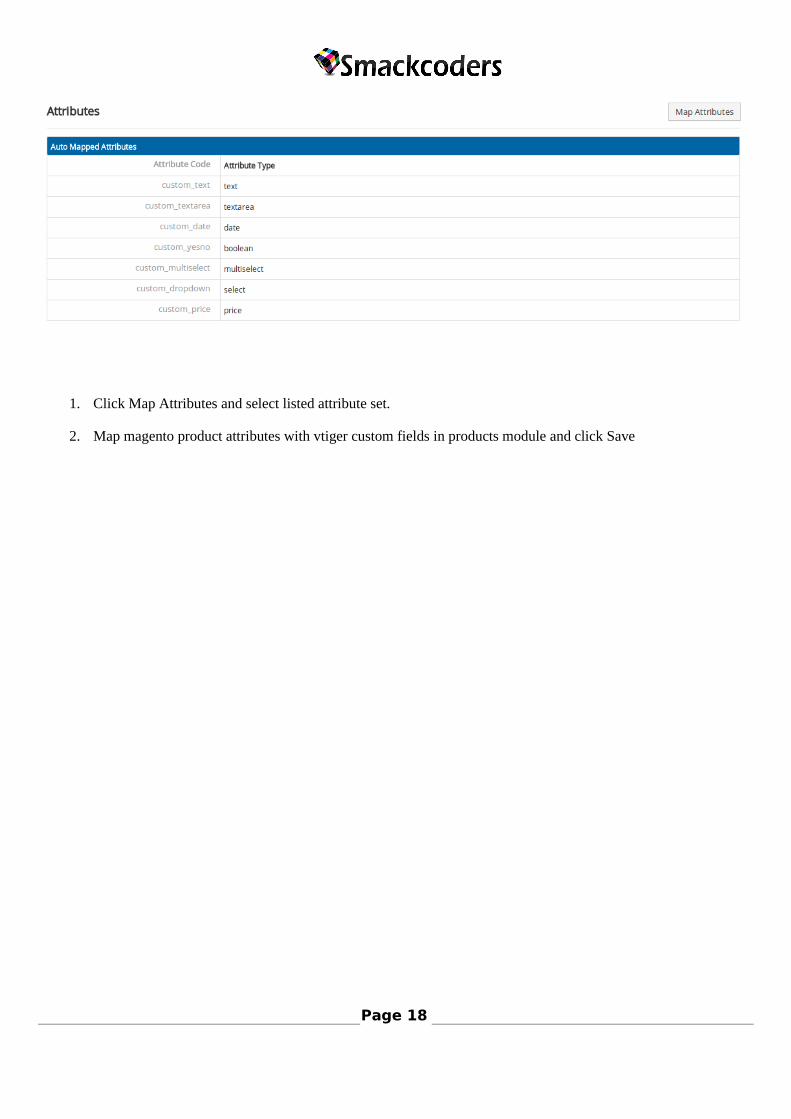
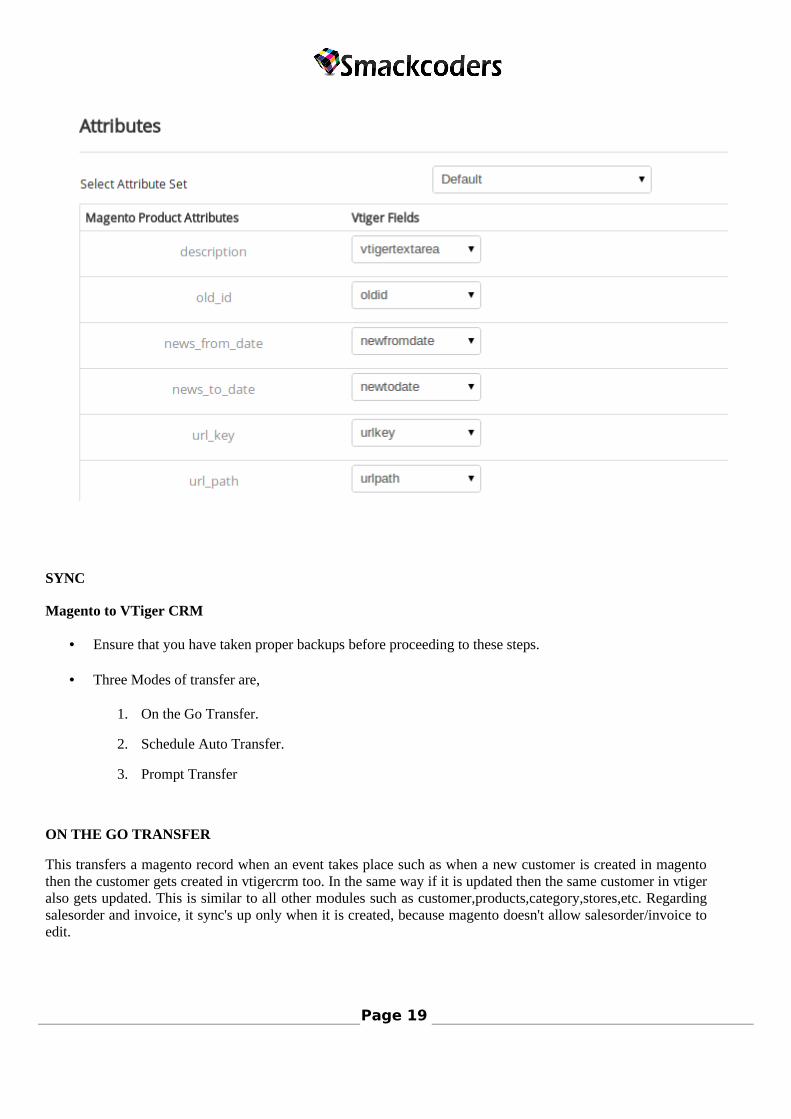
1. Click Map Attributes and select listed attribute set.
2. Map magento product attributes with vtiger custom fields in products module and click Save
Page 18
SYNC
Magento to VTiger CRM
• Ensure that you have taken proper backups before proceeding to these steps.
• Three Modes of transfer are,
1. On the Go Transfer.
2. Schedule Auto Transfer.
3. Prompt Transfer
ON THE GO TRANSFER
This transfers a magento record when an event takes place such as when a new customer is created in magento then the customer gets created in vtigercrm too. In the same way if it is updated then the same customer in vtiger also gets updated. This is similar to all other modules such as customer,products,category,stores,etc. Regarding salesorder and invoice, it sync's up only when it is created, because magento doesn't allow salesorder/invoice to edit.
Page 19
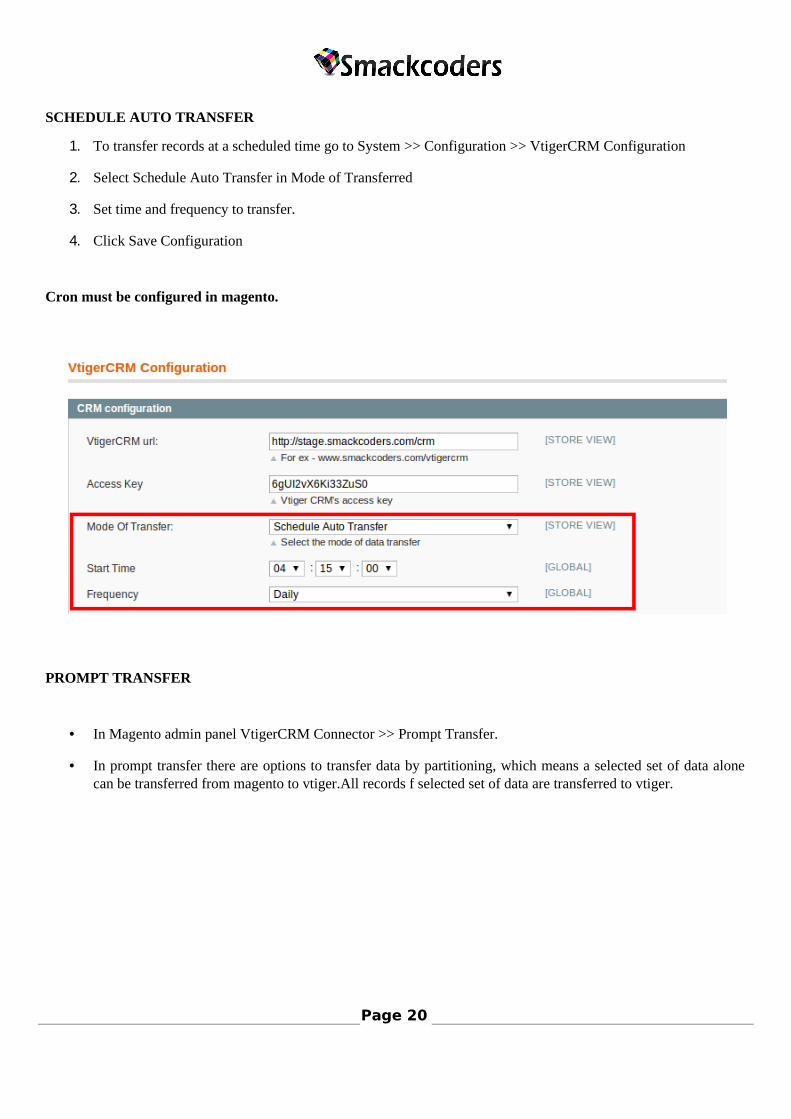
SCHEDULE AUTO TRANSFER
1. To transfer records at a scheduled time go to System >> Configuration >> VtigerCRM Configuration
2. Select Schedule Auto Transfer in Mode of Transferred
3. Set time and frequency to transfer.
4. Click Save Configuration
Cron must be configured in magento.
PROMPT TRANSFER
• In Magento admin panel VtigerCRM Connector >> Prompt Transfer.
• In prompt transfer there are options to transfer data by partitioning, which means a selected set of data alone can be transferred from magento to vtiger.All records f selected set of data are transferred to vtiger.
Page 20
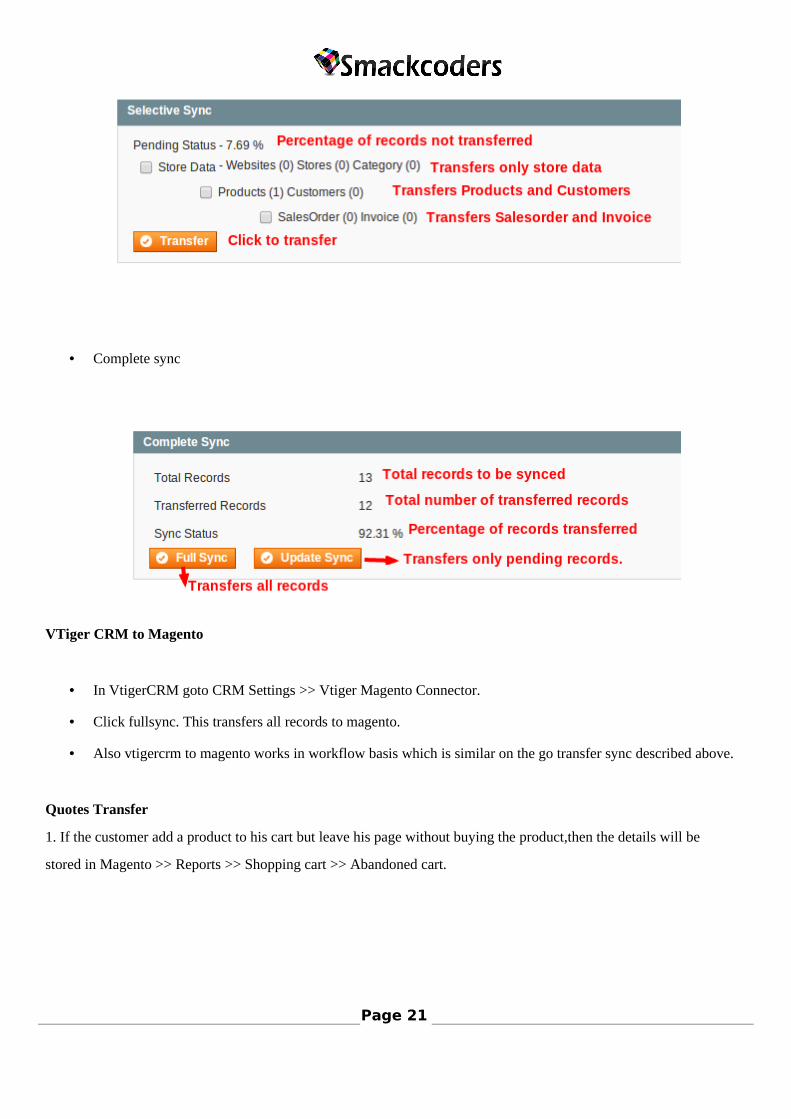
• Complete sync
VTiger CRM to Magento
• In VtigerCRM goto CRM Settings >> Vtiger Magento Connector.
• Click fullsync. This transfers all records to magento.
• Also vtigercrm to magento works in workflow basis which is similar on the go transfer sync described above.
Quotes Transfer
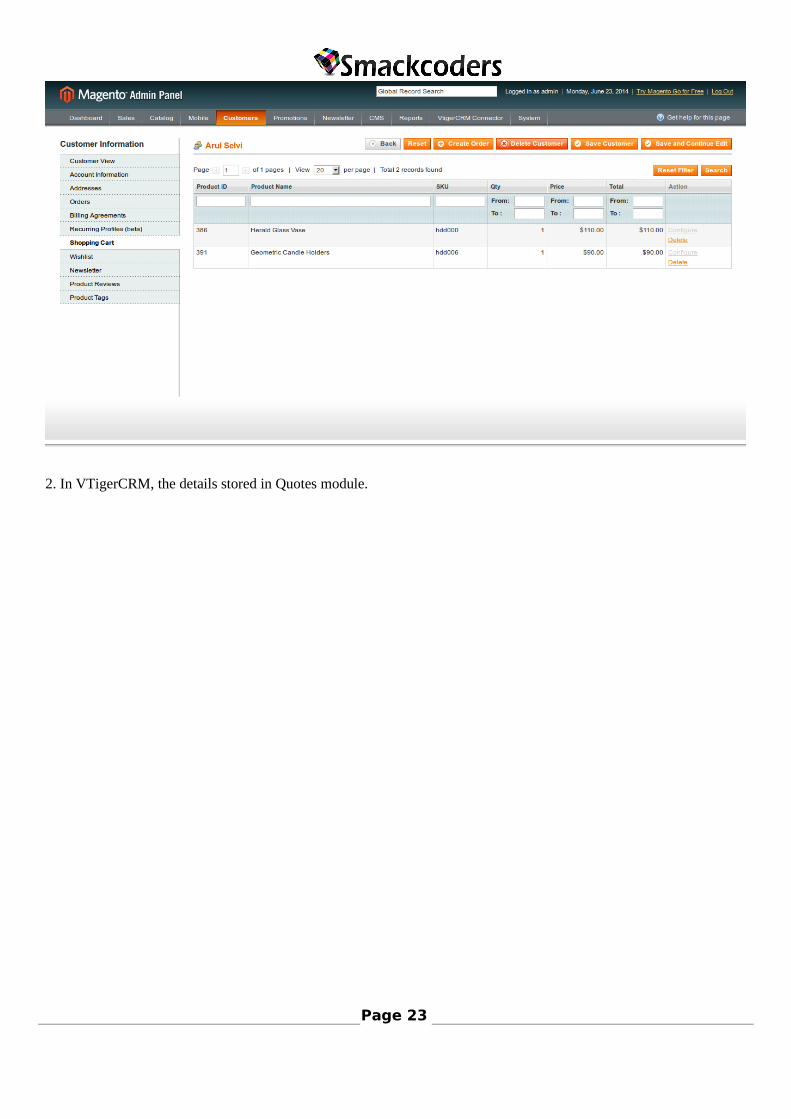
1. If the customer add a product to his cart but leave his page without buying the product,then the details will be
stored in Magento >> Reports >> Shopping cart >> Abandoned cart.
Page 21
Page 22
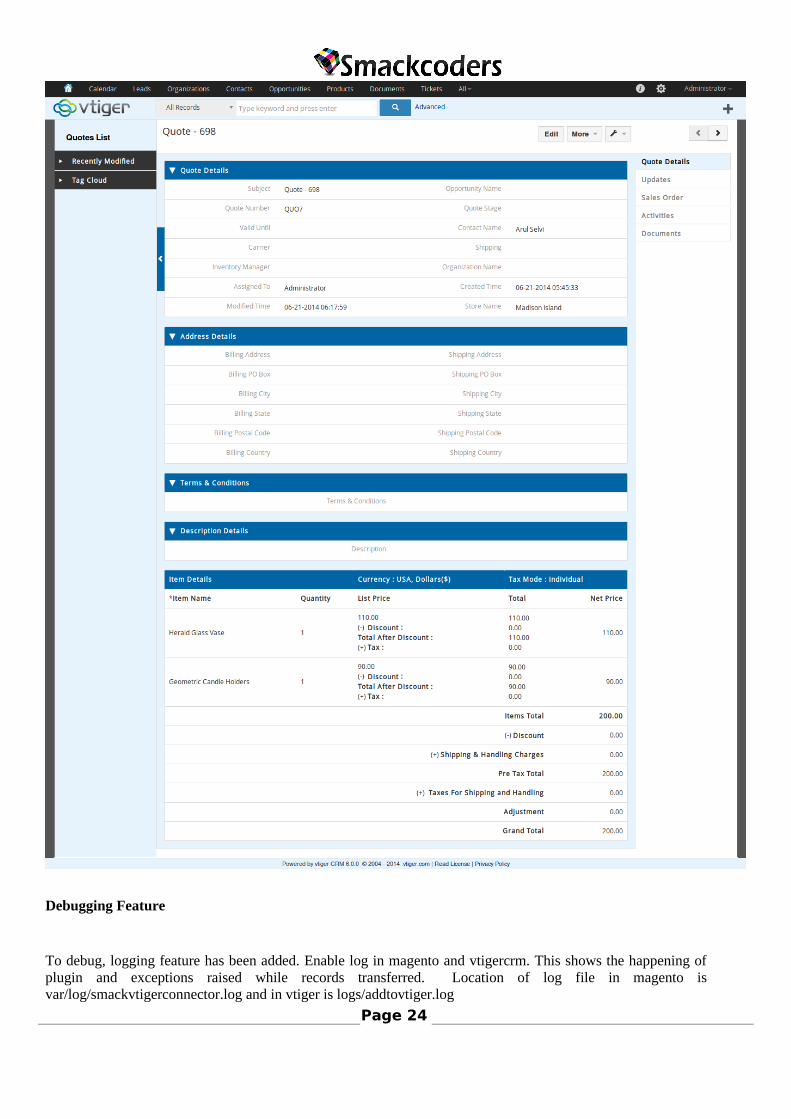
2. In VTigerCRM, the details stored in Quotes module.
Page 23
Debugging Feature
To debug, logging feature has been added. Enable log in magento and vtigercrm. This shows the happening of plugin and exceptions raised while records transferred. Location of log file in magento is var/log/smackvtigerconnector.log and in vtiger is logs/addtovtiger.log
Page 24
FIELD LIST
Contacts Module:
Two Way Sync Fields in VTMage
↔ First Name
↔ Last Name
↔ Website
↔ Date Of Birth
↔ Billing Address
↔ Shipping Address
From Vtiger to Magento alone
→ Password
Products Module:
↔ Product Name
↔ Product Active
↔ Magento Visibility
↔ Product Type
↔ Price
↔ Quantity of product
↔ Description
↔ Product Image
From Magento To Vtiger
← Sku
and other manually mapped and automapped attributes.
Due to magento api restrictions editing sku in vtiger creates a new product in Magento.
Category Module:
↔ Category Name
↔ Parent Category
Stores Module:
→ Store Name
Page 25
→ Website Name
→ Store View Name
Quotes Module
Customer Name
Store Name
Product Name
Quantity
Price
Currency
Product Tax
Discount
Shipping Amount
SalesOrder Module
• SalesOrder Number
• Customer Name
• Store Name
• Billing Address
• Shipping Address
• Product Details
• Tax
• Shipping Amount
• Discount
• Total
Invoice is similar as like salesOrder. If a salesorder is selected, while creating an invoice, products in salesorder will be created as invoice in magento. If no salesorder is selected, then it creates salesorder in magento before creating invoice because its mandatory to create salesorder before creating invoice.
UPGRADE
Upgrade from Version 1.6 to 1.7
In Vtiger
Page 26
1. Import category and stores module.
• Check and provide write permissions to modules/Category and modules/Stores directory.
• Goto CRM Settings >> Module Manager >> Install From File
• Select module zip (Category.zip/Stores.zip)
• Click Import.
• Select I would like to update now check box.
• Click Finish
2. Untar Multistore_vtiger.tar.gz from vtiger root directory.
3. Run vtmageinstall.php by http://vtigercrmurl/vtmageinstall.php.
In Magento
1. Untar the file Smackcoders_Vtmultistoreconnector-1.7.0.tgz from magento root directory.
2. Login into magento admin panel and clear cache.
3. Logout and then relogin, it is done.
UNINSTALL MODULES
How to remove Modules in Vtiger
1. Login into vtiger.
2. Goto CRM Settings >> Vtiger Magento Connector.
3. Click Click Here To Uninstall VtMageConnector.
4. Select Category and Stores to remove modules.
5. Select Delete Tables Too option to remove all tables.
6. Select Delete Created Fields Too to remove all fields
Page 27
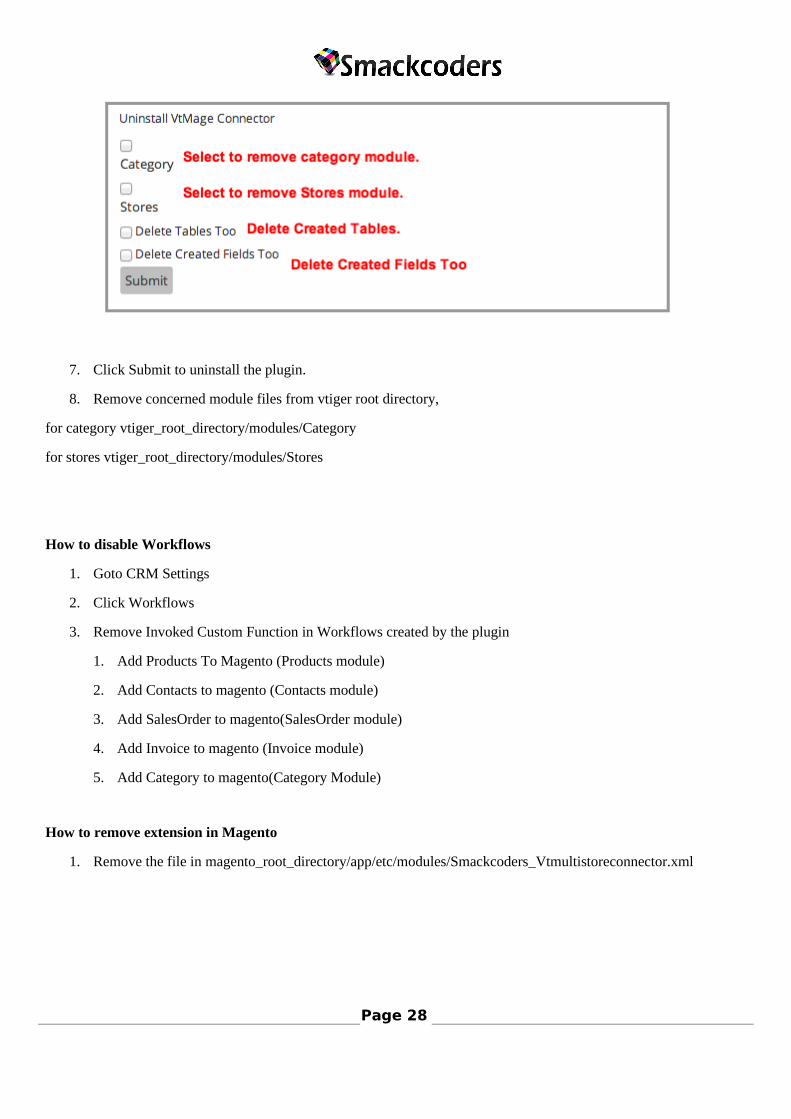
7. Click Submit to uninstall the plugin.
8. Remove concerned module files from vtiger root directory,
for category vtiger_root_directory/modules/Category
for stores vtiger_root_directory/modules/Stores
How to disable Workflows
1. Goto CRM Settings
2. Click Workflows
3. Remove Invoked Custom Function in Workflows created by the plugin
1. Add Products To Magento (Products module)
2. Add Contacts to magento (Contacts module)
3. Add SalesOrder to magento(SalesOrder module)
4. Add Invoice to magento (Invoice module)
5. Add Category to magento(Category Module)
How to remove extension in Magento
1. Remove the file in magento_root_directory/app/etc/modules/Smackcoders_Vtmultistoreconnector.xml
Page 28