Embed Size (px)
Citation preview

Bluemix Hands-On Workshop
Hello World with Ruby Sinatra
Version : 6.00
Last modification date : 08/05/2014
Owner : IBM Ecosystem Development


Copyright IBM Corporation 2013-2014. All rights reserved. 3
Table of Contents
Introduction ................................................................................................................................................ 5
Step 1 Login to Bluemix and select Ruby Sinatra ..................................................................................... 5
Step 2 We download our Sinatra app to our local drive .......................................................................... 10
Step 3 Push the app to BlueMix .............................................................................................................. 13
Step 4 The updated app runs on BlueMix ............................................................................................... 15
Step 5: Adding auto-scaling..................................................................................................................... 15
In conclusion: ........................................................................................................................................... 17


Copyright IBM Corporation 2013-2014. All rights reserved. 5
Lab Objectives: This lab shows how we can create a Ruby Sinatra app in Bluemix.
We will start by quickly launching and executing a Ruby runtime in Bluemix. For more information on runtime
systems, see http://en.wikipedia.org/wiki/Runtime_system and
https://www.ng.bluemix.net/docs/#starters/index.html
We will then download the source code to our local disk.
There we will modify the source code, and deploy the updated version back to Bluemix.
The purpose of the lab is to illustrate how one works in the Bluemix environment and how one creates, and
modifies a simple app in one of the runtimes supported by Bluemix.
The next lab will then build on this lab by introducing DevOps services, IBM’s cloud-based team
development environment
Let’s get started.
Lab Duration : 20 minutes
Introduction
In this lab we will use Sinatra http://www.sinatrarb.com/, a popular, small and easy-to-
use Domain-specific language or DSL, http://en.wikipedia.org/wiki/Domain-
specific_language, written in Ruby by Blake Mizerany with a first release in September
2007.
We do not need in-depth Ruby or Sinatra skills to complete this or the other labs in this
class. The most important thing we will be learning is not language syntax but how to work
in Bluemix.
Regardless of language, the pattern of use is very similar.
So let’s get started.
Step 1 Login to Bluemix and select Ruby Sinatra

Copyright IBM Corporation 2013-2014. All rights reserved. 6
Figure 1 Bluemix login screen
Step 1 Go to https://ace.ng.bluemix.net
Step 2 Log into Bluemix
Step 3 After Logging in, click on Catalog and select Ruby Sinatra which is a pre-
configured runtime with a simple Hello World app. When we create an app in Bluemix, we begin with a runtime or a Boilerplate. A Boilerplate consists of a runtime and an integrated backend. In this case we will select a Ruby Sinatra runtime.
Figure 2 Catalog view
Step 4 We click on the Ruby Sinatra tile.
Step 5 A pop-up for Ruby Sinatra will appear.

Copyright IBM Corporation 2013-2014. All rights reserved. 7
Figure 3 Ruby Sinatra runtime dialog
Step 6 We select a unique name for our application. The Host field is filled in from the
Name field. Hint: the host name defaults to the application name.
Step 7 We use defaults for the other values and click create.
Step 8 As our app is being created we can click on the blue compass-like icon in the upper
right-hand corner of the screen to see a list of events that take place as our app is
being created. After a short time we will see that our app is running. See the
picture below.

Copyright IBM Corporation 2013-2014. All rights reserved. 8
Step 9 The above picture shows the blue compass-like icon in the upper right-hand corner
of the screen and the messages pertaining to your new app. The messages are read from the
bottom and up.
Step 10 If we now click on the Bluemix Dashboard, we will see our new runtime
Step 11 Click anywhere on the Sinatra tile shown above to open up a more detailed view.
Figure 4 Wider view of the Sinatra runtime
Step 12 In the upper left hand corner we will see a Route, which is the URL to our new
app.
Step 13 Let’s click on this route to see our app running in Bluemix.

Copyright IBM Corporation 2013-2014. All rights reserved. 9
Figure 5 Our Sinatra app running in Bluemix
Step 14 We can see the output from our Sinatra app.
With our app now running in Bluemix, we will want to look at the files that make up the app.
Figure 6 Files and Logs allow us to look at the files of the app
Step 15 Let’s click on Files and Logs and then expand this section, to look at individual
files.

Copyright IBM Corporation 2013-2014. All rights reserved. 10
Figure 7 Looking at the source code files of our new app
Step 16 We can go through the source files to familiarize ourselves with our new app.
But we don’t want to edit the files here. To edit, we will download the files to our
local disk and do the editing there.
Step 2 We download our Sinatra app to our local drive
Figure 8 Navigate to the Quick Start link
Step 1 Let’s start by moving up from the Files to the Overview section, highlighted in
green on the left. That will make the View Quick Start link on the upper right
visible. (Within the red oval)
Step 2 The Quick Start document is a customized wizard that we just can follow along, to
learn how to proceed to download our app to our local computer. So we just follow
the instructions.
Copyright IBM Corporation 2013-2014. All rights reserved. 11
Step 3 Click on Install the command-line tool. We will use this tool
to connect to Bluemix from our local computer.
https://www.ng.bluemix.net/docs/#starters/BuildingWeb.html#
building_web
Step 4 Click on Download the starter application package. This is
the code that is generated by Bluemix. It contains the source
code for the full app that we have launched.
Step 5 Please note: the starter application package is in zip format.
Unzip the file but leave the zip-file handy, we will be using it
later to import into Jazzhub.
Step 6 Click on Download the starter application package. This is
the code that is generated by Bluemix. It contains the source
code for the full app that we have launched.
Step 7 Please note: the starter application package is in zip format.
Unzip the file but leave the zip-file handy, we will be using it
later to import into Jazzhub.
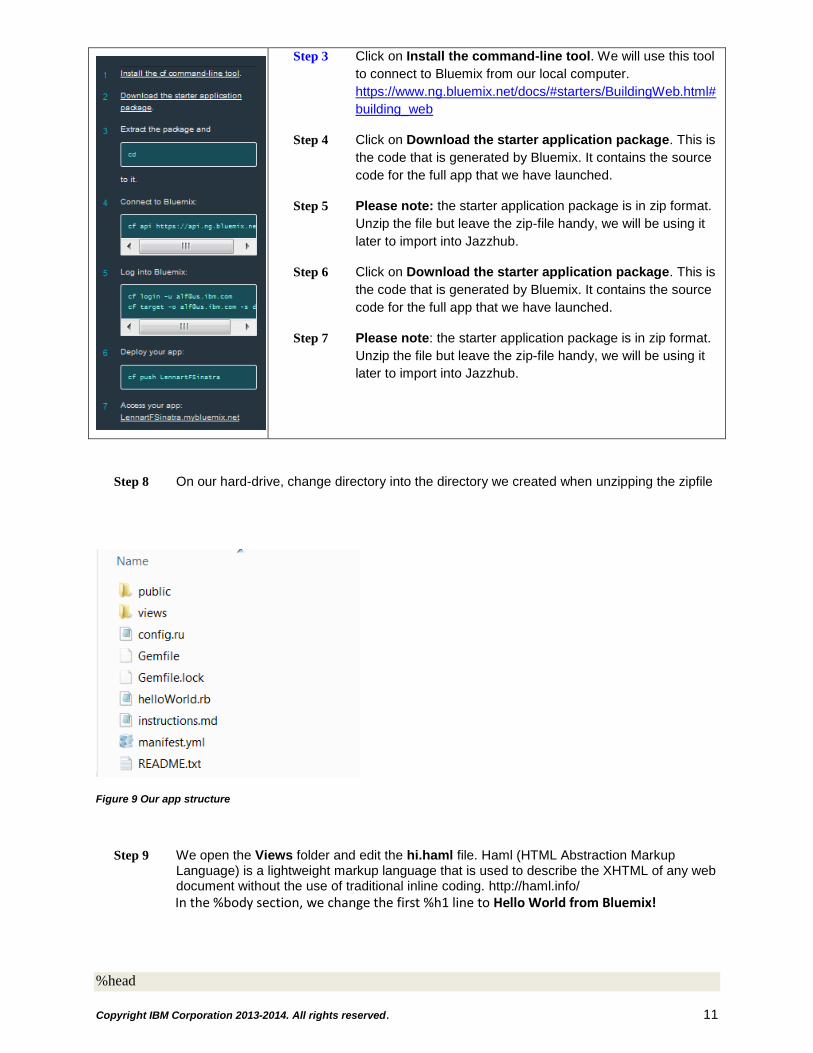
Step 8 On our hard-drive, change directory into the directory we created when unzipping the zipfile
Figure 9 Our app structure
Step 9 We open the Views folder and edit the hi.haml file. Haml (HTML Abstraction Markup Language) is a lightweight markup language that is used to describe the XHTML of any web document without the use of traditional inline coding. http://haml.info/
In the %body section, we change the first %h1 line to Hello World from Bluemix!
%head

Copyright IBM Corporation 2013-2014. All rights reserved. 12
%title Ruby Sinatra Starter Application
%meta(http-equiv="Content-Type" content="text/html; charset=utf-8")
%link(rel="stylesheet" href="/stylesheets/style.css")
%body
%table
%tr
%td{ :style => "width:30%;" }
%img(src="/images/newapp-icon.png")
%td
%h1 Hello World from Bluemix!
%p{:class => "description"}
Thanks for creating <span class = "blue">Ruby Sinatra Starter Application</span>. Get started by
reading our <a href =
"https://www.ng.bluemix.net/docs/#starters/rubysinatra/index.html#rubyhelloworld">documentation</a>
or use the quick start guide under your app in your dashboard.
-# .leftHalf
-# %img(src="/images/newapp-icon.png")
-# %h1 Hi there!
-# %p{:class => "description"}
-# Thanks for creating <span class = "blue">Ruby Sinatra Starter Application</span>. Get started by
reading our <a href =
"https://www.ng.bluemix.net/docs/#starters/rubysinatra/index.html#rubyhelloworld">documentation</a>
or use the quick start guide under your app in your dashboard.
-# .rightHalf
-# %h2 This application is powered by Ruby(version #{@version}) Sinatra on #{@os} platform.
-# %table(border="0" cellspacing="0" cellpadding="0")
-# %thead
-# %tr
-# %th.env-var Name

Copyright IBM Corporation 2013-2014. All rights reserved. 13
-# %th Value
-# %tbody
-# - @env.each do |key, value|
-# - if key == 'VCAP_SERVICES' then value = '**hidden**' end
-# %tr
-# %td.env-var=key
-# %td
-# %pre=(value.is_a? Hash)? JSON.pretty_generate(value): value
Figure 10 We make a small change to the source Step 10 If we want to, we can also remove the -# symbols from the left margin of the rest of the file
to see the output from the VCAP file that contains the major runtime parameters for the Sinatra app.
Step 11 With our change completed, the time has now come to push the app we have downloaded back to Bluemix.
Step 3 Push the app to BlueMix
Step 1 We now go to the DOS Box in Windows and change to the directory that we
downloaded the code from BlueMix to. We then enter the following commands.
Step 2 Connect to BlueMix: cf api https://api.ng.bluemix.net
Step 3 cf login –u YOUR BLUEMIX USERID and enter our password
Step 4 cf push LennartFSinatra, or the name you of your app. Step 5 We willl see the following messages in the DOS box: (abbreviated) We will see how our
code is uploaded to Bluemix, how the current app is stopped, how the new version of the app is installed and finally started.
C:\test\LennartSinatra21>cf push
Using manifest file C:\test\LennartSinatra21\manifest.yml
Updating app LennartSinatra21 in org [email protected] / space dev as [email protected]...
OK
Uploading LennartSinatra21...
Uploading from: C:\test\LennartSinatra21
20.3K, 10 files
OK
Stopping app LennartSinatra21 in org [email protected] / space dev as [email protected]...
OK
Starting app LennartSinatra21 in org [email protected] / space dev as [email protected]...

Copyright IBM Corporation 2013-2014. All rights reserved. 14
-----> Downloaded app package (20K)
OK
-----> Downloaded app buildpack cache (3.4M)
-----> Using Ruby version: ruby-1.9.3
-----> Installing dependencies using Bundler version 1.3.2
Running: bundle install --without development:test --path vendor/bundle --binstubs vendor/bundle/bin --deployment
Using tilt (1.4.1)
Using haml (4.0.5)
Using json (1.8.0)
Using rack (1.5.2)
Using rack-protection (1.5.0)
Using sinatra (1.4.3)
Using bundler (1.3.2)
Your bundle is complete! It was installed into ./vendor/bundle
Cleaning up the bundler cache.
-----> WARNINGS:
You have not declared a Ruby version in your Gemfile.
To set your Ruby version add this line to your Gemfile:"
ruby '1.9.3'"
# See https://devcenter.heroku.com/articles/ruby-versions for more information."
-----> Uploading droplet (23M)
1 of 1 instances running
App started
Showing health and status for app LennartSinatra21 in org [email protected] / space dev as [email protected]...
OK
requested state: started
instances: 1/1
usage: 128M x 1 instances
urls: LennartSinatra21.mybluemix.net
state since cpu memory disk
#0 running 2014-07-26 02:32:40 PM 0.0% 74.2M of 128M 54.7M of 1G

Copyright IBM Corporation 2013-2014. All rights reserved. 15
Step 4 The updated app runs on BlueMix
Step 1 In BlueMix, click on the Route or URL to your app to re-run it:
Figure 11 Updated output from our app
Step 5: Adding auto-scaling

Copyright IBM Corporation 2013-2014. All rights reserved. 16
Figure 12 Adding Auto_Scaling to our Sinatra app
Step 2 Adding other services to our app is easy.
Step 3 Let us open the Bluemix catalog, select Auto-Scaling and add it to our Hello World app.This will allow us to set auto-scaling parameters for the time when we will get lots of Internet traffic.
Figure 13 Adding Auto-Scaling to our app
Step 4 We enter the name of our app and then click Create.

Copyright IBM Corporation 2013-2014. All rights reserved. 17
Figure 14 Auto-scaling
Step 5 We can now define our auto-scaling policies for our app so that we deploy more instances if our memory utilization increases, and also decrease the number of instances if our network traffic decreases. This is how we will manage our app when it is ready to go into production.
In conclusion:
Using this development methodology it is easy to do development with Bluemix from our laptop.
We can use our own development tools, and even run Sinatra on our own laptop for debugging
and local testing.
Then whenever we want to update the code running on Bluemix, we can do another CF push and
update the code.
However, sooner or later we will want to do team development, and for that we will need a team
development tool, like IBM’s DevOps tools.
And that is the subject of the next lab.

Copyright IBM Corporation 2013-2014. All rights reserved. 18