Embed Size (px)
Citation preview

Bluemix Hands-On Workshop
Sinatra and RabbitMQ Version : 4.00 Last modification date : 08/8/2014 Owner : IBM Ecosystem Development


Copyright IBM Corporation 2013-2014. All rights reserved. 3
Table of Contents
Lab: Ruby Sinatra and RabbitMQ ................................................................................................................. 5
Introduction ................................................................................................................................................ 5
Part 1: Instantiating the CloudAMQP service in Bluemix ......................................................................... 5
Part 2: Importing and deploying the application from DevOps ................................................................ 7
Part 3: A walkthrough of the application ................................................................................................... 9
1. config.ru ........................................................................................................................................ 9
2. Gemfile .......................................................................................................................................... 9
3. Rabbit.rb ....................................................................................................................................... 9
4. Rabbid1.rb ..................................................................................................................................... 9
5. The Views directory with the index.rb and index1.rb................................................................... 9
6. The manifest.yml .......................................................................................................................... 9
Part 4: Deploy the Application in BlueMix ............................................................................................... 10
Part 5: Modify the application .................................................................................................................. 12
Part 6: Modify the application .................................................................................................................. 14


Copyright IBM Corporation 2013-2014. All rights reserved. 5
Lab: Ruby Sinatra and RabbitMQ Lab Objectives:
We are now ready to expand our app to include a service. We will use the Rabbit MQ service, which will
allow us to put and receive messages on a persistent queue.
We will start by creating the RabbitMQ Service
We will then fork an existing DevOps project which contains the pre-written code to access the
message queue..
We will then manually deploy our application to BlueMix
We will then generate a number of messages and look at them in the service console
We will finally update our application and redeploy it from DevOps
Lab Duration : 30 minutes
Introduction RabbitMQ is open source message broker software (sometimes called message-oriented middleware) that implements the Advanced Message Queuing Protocol (AMQP). The RabbitMQ server is written in the Erlang programming language and is built on the Open Telecom Platform framework for clustering and failover. Client libraries to interface with the broker are available for all major programming languages. Rabbit Technologies Ltd., develops and provides support for RabbitMQ. Rabbit Technologies started as a joint venture between LShift and CohesiveFT in 2007,[and was acquired in April 2010 by SpringSource, a division of VMware. The project became part of GoPivotal in May 2013. http://en.wikipedia.org/wiki/RabbitMQ There are currently three Message queuing services in Bluemix: http://www.cloudamqp.com/docs/index.html https://www.ng.bluemix.net/docs/#services/MQLight/index.html#mqlight010 for Java and https://www.ng.bluemix.net/docs/#services/RabbitMQ/index.html#RabbitMQ The RabbitMQ service does not come with a console, but the CloudAMQP instance does. So we will use CloudAMQP. AMQP stands for the Advanced Message Queueing Protocol: http://www.amqp.org/
Part 1: Instantiating the CloudAMQP service in Bluemix We will begin by creating the CloudAMQP service. It is usually best practice to start by creating the services in Bluemix and then attach a runtime to the existing service.

Copyright IBM Corporation 2013-2014. All rights reserved. 6
Figure 1 Selecting the CloudAMQP service
Step 1 In the catalog we select CloudAMQP service in the Bluemix catalog and launch it.
Figure 2 Launching RabbitMQ
Step 2 We leave the App name as unbound since we have not yet launched it. We enter the Name of the CloudAMQP service as CloudAMQP or whatever we prefer. This can be any unique name, but we have to use the same name in the manifest.yml file. We leave the Plan as Little Lemur and we then click Create.
Figure 3 The CloudAMQP service is now up and running in Bluemix

Copyright IBM Corporation 2013-2014. All rights reserved. 7
With the CloudAMQP up and running in Bluemix we wait to launch the Dashboard and head over to DevOps Services.
Part 2: Importing and deploying the application from DevOps With the RabbitMQ service up and running we are now ready to switch to DevOps services and work with
a pre-written Sinatra application hosted at
https://hub.jazz.net/project/lennartf/BMLabCloudAMQP/overview , fork it to our own repository and then
deploy it to BlueMix
Step 1 We’ll start our browser and go to the https://hub.jazz.net/project/lennartf/BMLabCloudAMQP/overview
Step 2 We’ll will be asked to sign in to DevOps Services
Step 3 We will sign in to DevOps Services
Figure 4 Edit Code tab
Step 4 After we have signed in, we click on the Edit Code tab to prepare to fork the project's files to
Copyright IBM Corporation 2013-2014. All rights reserved. 8
our own repository.
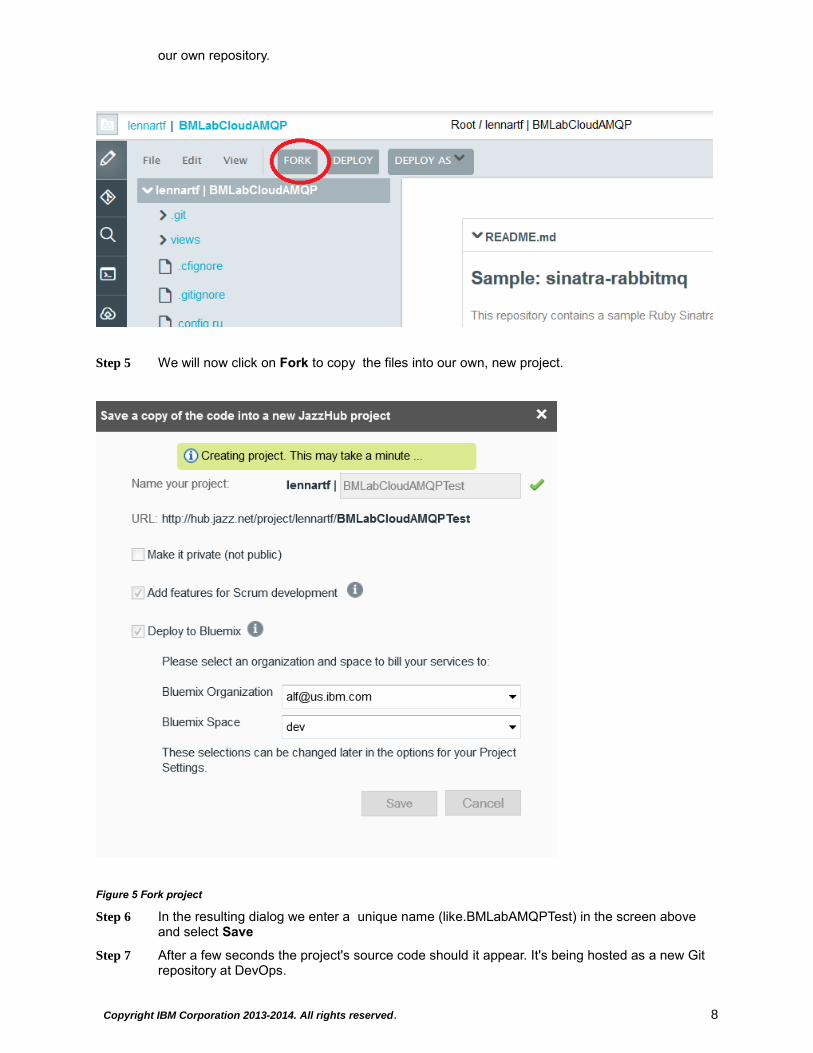
Step 5 We will now click on Fork to copy the files into our own, new project.
Figure 5 Fork project
Step 6 In the resulting dialog we enter a unique name (like.BMLabAMQPTest) in the screen above and select Save
Step 7 After a few seconds the project's source code should it appear. It's being hosted as a new Git repository at DevOps.

Copyright IBM Corporation 2013-2014. All rights reserved. 9
Part 3: A walkthrough of the application
Figure 6 The Sinatra Rabbit MQ Project in our own workspace
1. config.ru This file contains instructions for the Ruby runtime
2. Gemfile This file lists the Ruby gems to be included in the app. A Ruby gem is a Ruby module.
3. Rabbit.rb This file contains the Ruby code that interacts with Rabbit MQ
4. Rabbid1.rb This file contains updates to the rabbit.rb file that we will use in the second half of the lab.
5. The Views directory with the index.rb and index1.rb This file contains the Ruby client code that the user interacts with. The index1.rb fine contains updates to the index.rb file that we will use in the second half of the lab. This view files use the Ruby ERB templates. http://www.stuartellis.eu/articles/erb/
6. The manifest.yml This file contains deployment instructions to Bluemix. We will modify this file. First by removing the lines below buildpack. We will do this because we will add the services to the app after we have deployed the app. This is actually easier than specifying the service in the YML file. Also, we will chage the host and name parameters by providing our own names. The host

Copyright IBM Corporation 2013-2014. All rights reserved. 10
and name fields can contain the same names.
Part 4: Deploy the Application in BlueMix In this section you’ll deploy the app you just imported and run it in BlueMix. In CloudFoundry
environments such as BlueMix, deployment of an application translates into several steps to bundle up
project artifacts, creating an application at the BlueMix execution environment, transferring the bundled
application artifacts to BlueMix, and starting the application.
Figure 7 Manifest.yml file
Step 3 We will begin by making the necessary changes to the manifest.yml file. And please note that we have to use the same name for the CloudAMQP service that we are using in Bluemix. We change the host and name parameters to unique names and we are ready to go.
From the top of the DevOps page we click on the Deploy menu item and the application will be deployed to BlueMix.
Figure 8 Deplopying app
Copyright IBM Corporation 2013-2014. All rights reserved. 11
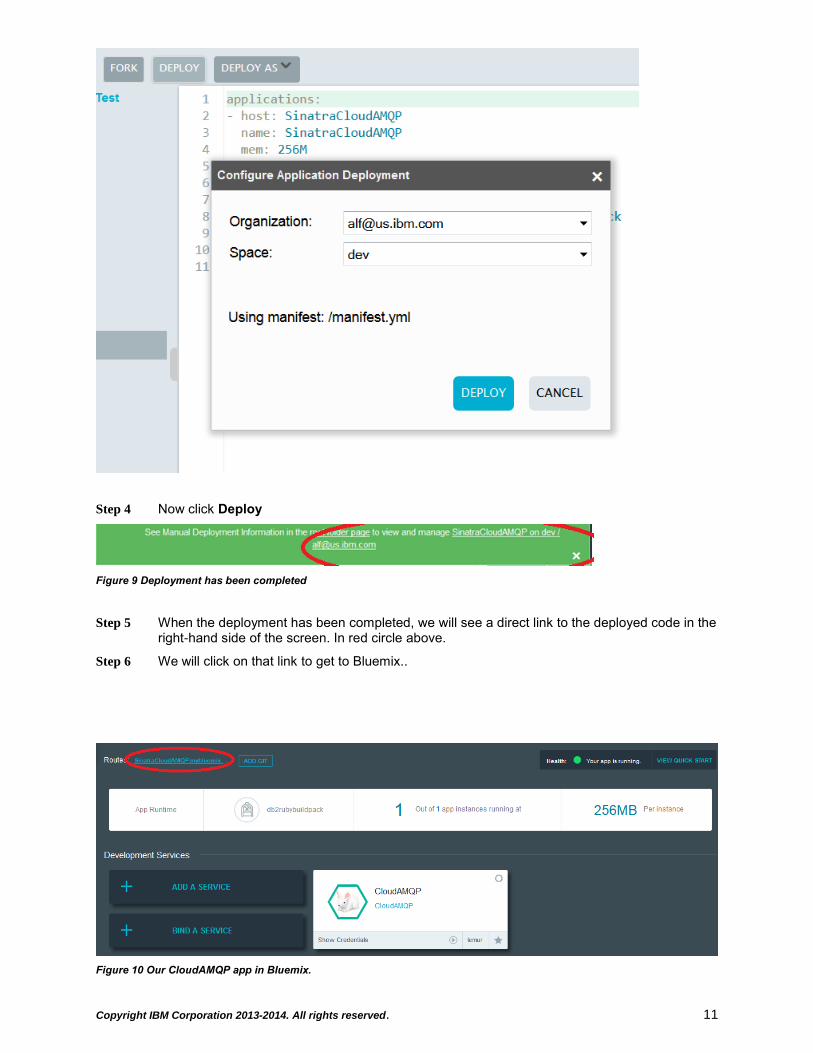
Step 4 Now click Deploy
Figure 9 Deployment has been completed
Step 5 When the deployment has been completed, we will see a direct link to the deployed code in the right-hand side of the screen. In red circle above.
Step 6 We will click on that link to get to Bluemix..
Figure 10 Our CloudAMQP app in Bluemix.

Copyright IBM Corporation 2013-2014. All rights reserved. 12
Step 7 We are now ready to run out app. We have a runtime and an accompanying service.
Step 8 Above the runtime, circled in red above, is a link to the app as it runs in Bluemix. We click on it.
Figure 11 Application's initial page
Step 9 We can now put and get messages from Rabbit MQ.
Step 10 This is a good first step, but how do we modify the code to expand on our app? That is the subject of the next section.
Part 5: Bring up the Console to look at the messages
Step 1 The time has now come to click on the CloudAMQP service in Bluemix and bring up the message console
Figure 12 Bringing up the CloudAMQP console

Copyright IBM Corporation 2013-2014. All rights reserved. 13
Figure 13 The CloudAMQP console
Step 2 We now click on the RabbitMQ management interface
Figure 14 The CloudAMQP Overview

Copyright IBM Corporation 2013-2014. All rights reserved. 14
Step 3 By clicking on the Overview tab we can see the message traffic
Figure 15 Looking at queues
Step 4 By clicking on the Queues tab we can see details of the flow in the messages queue. This queue is defined in the rabbit.rb file in our DevOps Services project.
Step 5 The console has a number of other features that we should familiarize ourselves with.
Part 6: Modify the application The time has now come to make a simple change to our app that will allow us to put multiple messages on the queue, and then retrieve all of them with one mouse-click. For that we go back to our Project in DevOps services. Step 1 Let’s start by changing the ruby code.
Figure 16 Switching the rabbit.rb and rabbit1.rb files
Step 2 In order to save on typing, we will simply switch the rabbit.rb and rabbit1.rb files to run with the new updated code. So the rabbit.rb file becomes the rabbitOLD.rb file, and the rabbit1.rb file becomes the rabbit.rb file.
Step 3 We then do a similar switch in the view folder, changing the index.erb to indexOLD.rb and index1.rb to index.rb.
Step 4 Please take some time to compare the files to see what changes we have made.
Step 5 After modifying the source code we once again click on Deploy.
Step 6 Upon successful deployment we will see the URL in the right hand side of the green message. The fact that the app has re-deployed does not necessarily mean that the app is without errors or even runs. But in this case everything works fine and the output can be seen below:

Copyright IBM Corporation 2013-2014. All rights reserved. 15
Figure 17 Updated app
Step 7 We can now enter a number of messages, one after the other, and then retrieve all of them by clicking on the Get all button.
Step 8 This concludes this lab, where we have seen how to connect the CloudAMQP queueing service to a Sinatra app.