Embed Size (px)
DESCRIPTION
Introduction: Introduction to UNIX, Linux, GNU and Linux distributions Duties of the System Administrator, The Linux System Administrator, Installing and Configuring Servers, Installing and Configuring Application Software, Creating and Maintaining User Accounts, Backing Up and Restoring Files, Monitoring and Tuning Performance, Configuring a Secure System, Using Tools to Monitor Security Booting and shutting down: Boot loaders-GRUB, LILO, Bootstrapping, Init process, rc scripts, Enabling and disabling services. The File System: Understanding the File System Structure, Working with Linux- Supported File Systems, Memory and Virtual System Configuration Files: System wide Shell Configuration Scripts, System Environmental Settings, Network Configuration Files, Managing the init Scripts, Configuration Tool, Editing Your Network Configuration TCP/IP Networking: Understanding Network Classes, Setting Up a Network nterface Card (NIC), Understanding Subnetting, Working with Gateways and Routers, Configuring Dynamic Host Configuration Protocol, Configuring the Network Using the Network The Network File System: NFS Overview, Planning an NFS Installation, Configuring an NFS Server, Configuring an NFS Client, Using Automount Services, Examining NFS Security Connecting to Microsoft Networks: Installing Samba, Configuring the Samba Server, Creating Samba Users 3, Starting the Samba Server, Connecting to a Samba Client, Connecting from a Windows PC to the Samba Server Additional Network Services: Configuring a Time Server, Providing a Caching Proxy Server Internet Services: Secure Services, SSH, scp, sftp Less Secure Services (Telnet ,FTP, sync,rsh ,rlogin,finger,talk and ntalk, Linux Machine as a Server, Configuring the xinetd Server, Comparing xinetd and Standalone, Configuring Linux Firewall Packages, Domain Name System: Understanding DNS, Understanding Types of Domain Servers, Examining Server Configuration Files, Configuring a Caching DNS Server, Configuring a Secondary Master DNS Server, Configuring a Primary Master Server, Checking Configuration Configuring Mail Services: Tracing the Email Delivery Process, Mail User Agent (MUA), Introducing SMTP, Configuring Sendmail, Using the Postfix Mail Server, Serving Email with POP3 and IMAP, Maintaining Email Security Configuring FTP Services: Introducing vsftpd, Configuring vsftpd, Advanced FTP Server Configuration, Using SFTP Configuring a Web Server: Introducing Apache, Configuring Apache, Implementing SSI, Enabling CGI, Enabling PHP, Creating a Secure Server with SSL System Administration: Administering Users and Groups Installing and Upgrading Software Packages
Citation preview
LINUX ADMINISTRATION
TYBSC(IT) SEM 5
COMPILED BY : SIDDHESH ZELE
302 PARANJPE UDYOG BHAVAN, NEAR KHANDELWAL SWEETS, NEAR THANE
STATION , THANE (WEST)
PHONE NO: 8097071144 / 8097071155 / 8655081002
UNIT TOPICS PAGE NO
Unit-I Introduction: Introduction to UNIX, Linux, GNU and Linux distributions
Duties of the System Administrator, The Linux System Administrator, Installing
and Configuring Servers, Installing and Configuring Application Software,
Creating and Maintaining User Accounts, Backing Up and Restoring Files,
Monitoring and Tuning Performance, Configuring a Secure System, Using Tools
to Monitor Security
Booting and shutting down: Boot loaders-GRUB, LILO, Bootstrapping, Init
process, rc scripts, Enabling and disabling services.
The File System: Understanding the File System Structure, Working with Linux-
Supported File Systems, Memory and Virtual
1
Unit-II System Configuration Files: System wide Shell Configuration Scripts, System
Environmental Settings, Network Configuration Files, Managing the init Scripts,
Configuration Tool, Editing Your Network Configuration
TCP/IP Networking: Understanding Network Classes, Setting Up a Network
Interface Card (NIC), Understanding Subnetting, Working with Gateways and
Routers, Configuring Dynamic Host Configuration Protocol, Configuring the
Network Using the Network
The Network File System: NFS Overview, Planning an NFS Installation,
Configuring an NFS Server, Configuring an NFS Client, Using Automount
Services, Examining NFS Security
44
Unit-III Connecting to Microsoft Networks: Installing Samba, Configuring the Samba
Server, Creating Samba Users 3, Starting the Samba Server, Connecting to a
Samba
Client, Connecting from a Windows PC to the Samba Server
Additional Network Services: Configuring a Time Server, Providing a Caching
Proxy Server
83
Unit-IV Internet Services: Secure Services, SSH, scp, sftp Less Secure Services (Telnet
,FTP, sync,rsh ,rlogin,finger,talk and ntalk, Linux Machine as a Server,
Configuring
the xinetd Server, Comparing xinetd and Standalone, Configuring Linux Firewall
Packages,
Domain Name System: Understanding DNS, Understanding Types of Domain
Servers, Examining Server Configuration Files, Configuring a Caching DNS
Server, Configuring a Secondary Master DNS Server, Configuring a Primary
Master Server, Checking Configuration
97
Unit-V Configuring Mail Services: Tracing the Email Delivery Process, Mail User Agent
(MUA), Introducing SMTP, Configuring Sendmail, Using the Postfix Mail Server,
Serving Email with POP3 and IMAP, Maintaining Email Security
Configuring FTP Services: Introducing vsftpd, Configuring vsftpd, Advanced
FTP
Server Configuration, Using SFTP
122
Unit-VI Configuring a Web Server: Introducing Apache, Configuring Apache,
Implementing SSI, Enabling CGI, Enabling PHP, Creating a Secure Server with
SSL
System Administration: Administering Users and Groups Installing and
Upgrading Software Packages
144

ADDRESS:302 PARANJPE UDYOG BHAVAN,OPP SHIVSAGAR RESTAURANT,THANE [W].PH 8097071144/55
1
Prof: siddhesh zele’s
We-IT Tutorials
TYBSC-IT Linux Administration
UNIT 1
CHAPTER 1 : UNIX Introduction
What is UNIX?
UNIX built in late '60s, early '70s by Ken Thompson and Dennis Ritchie. Originally written in
assembler, later rewritten in C (allowing greater portability), a language invented by Ritchie.
UNIX is an operating system which was first developed in the 1960s, and has been under
constant development ever since. By operating system, we mean the suite of programs which
make the computer work. It is a stable, multi-user, multi-tasking system for servers, desktops and
laptops.
UNIX systems also have a graphical user interface (GUI) similar to Microsoft Windows which
provides an easy to use environment. However, knowledge of UNIX is required for operations
which aren't covered by a graphical program, or for when there is no windows interface available
Types of UNIX
There are many different versions of UNIX, although they share common similarities. The most
popular varieties of UNIX are Sun Solaris, GNU/Linux, and MacOS X.
The UNIX operating system
Interacts with:
Applications
Users, through a command language interpreter
OS offers services:
Scheduling of multiple programs
Memory management
Access to hardware
Reports errors to applications
ADDRESS:302 PARANJPE UDYOG BHAVAN,OPP SHIVSAGAR RESTAURANT,THANE [W].PH 8097071144/55
2
Prof: siddhesh zele’s
We-IT Tutorials
TYBSC-IT Linux Administration
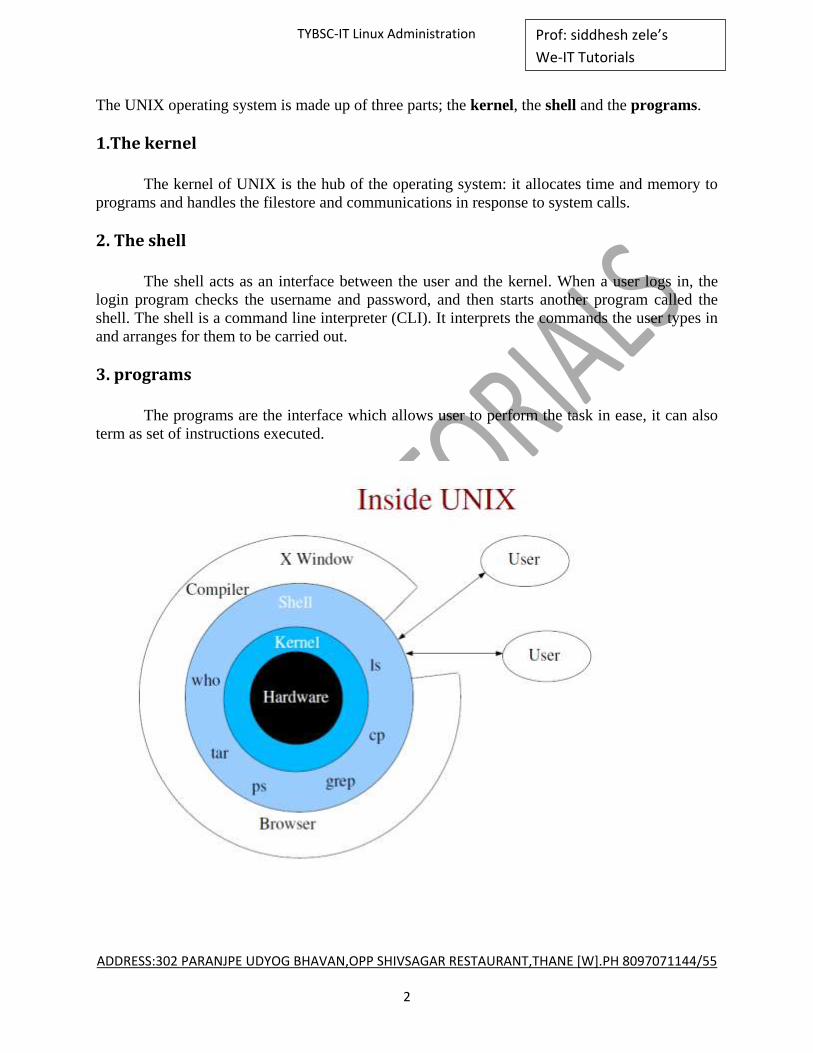
The UNIX operating system is made up of three parts; the kernel, the shell and the programs.
1.The kernel
The kernel of UNIX is the hub of the operating system: it allocates time and memory to
programs and handles the filestore and communications in response to system calls.
2. The shell
The shell acts as an interface between the user and the kernel. When a user logs in, the
login program checks the username and password, and then starts another program called the
shell. The shell is a command line interpreter (CLI). It interprets the commands the user types in
and arranges for them to be carried out.
3. programs
The programs are the interface which allows user to perform the task in ease, it can also
term as set of instructions executed.
ADDRESS:302 PARANJPE UDYOG BHAVAN,OPP SHIVSAGAR RESTAURANT,THANE [W].PH 8097071144/55
3
Prof: siddhesh zele’s
We-IT Tutorials
TYBSC-IT Linux Administration
What Is Linux?
LINUX IS A MULTIUSER, multitasking operating system from the ground up, and in this regard the
system administrator has flexibility and responsibility far beyond those of other operating
systems. The operating system (OS) relays instructions from an application to, for instance, the
computer's processor. The processor performs the instructed task, then sends the results back to
the application via the operating system.
Linux is very similar to other operating systems, such as Windows and OS X. Linux is developed
collaboratively, meaning no one company is solely responsible for its development or ongoing
support. Linux began its existence as a server OS and Has become useful as a desktop OS, can
also be used on all devices. ―From Wristwatches to Supercomputers,Mobile Phones,etc‖
Linux is being installed on the system BIOS of laptop and notebook computers, which will
enable users to turn their devices on in a matter of seconds, bringing up a streamlined Linux
environment. This environment will have Internet connectivity tools such as a web browser and
an e-mail client, allowing users to work on the Internet without having to boot all the way into
their device's primary operating system--even if that operating system is Windows.
Linux provides powerful tools with which to write their applications: developer environments,
editors, and compilers are designed to take a developer's code and convert it to something that
can access the kernel and get tasks done. Like the kernel, the Linux operating system is also
modular. Developers can pick and choose the operating tools to provide users and developers
with a new flavor of Linux designed to meet specific tasks.
There are four main parts that make up a Linux system: ■ The Linux kernel
■ The GNU utilities
■ A graphical desktop environment
■ Application software
ADDRESS:302 PARANJPE UDYOG BHAVAN,OPP SHIVSAGAR RESTAURANT,THANE [W].PH 8097071144/55
4
Prof: siddhesh zele’s
We-IT Tutorials
TYBSC-IT Linux Administration
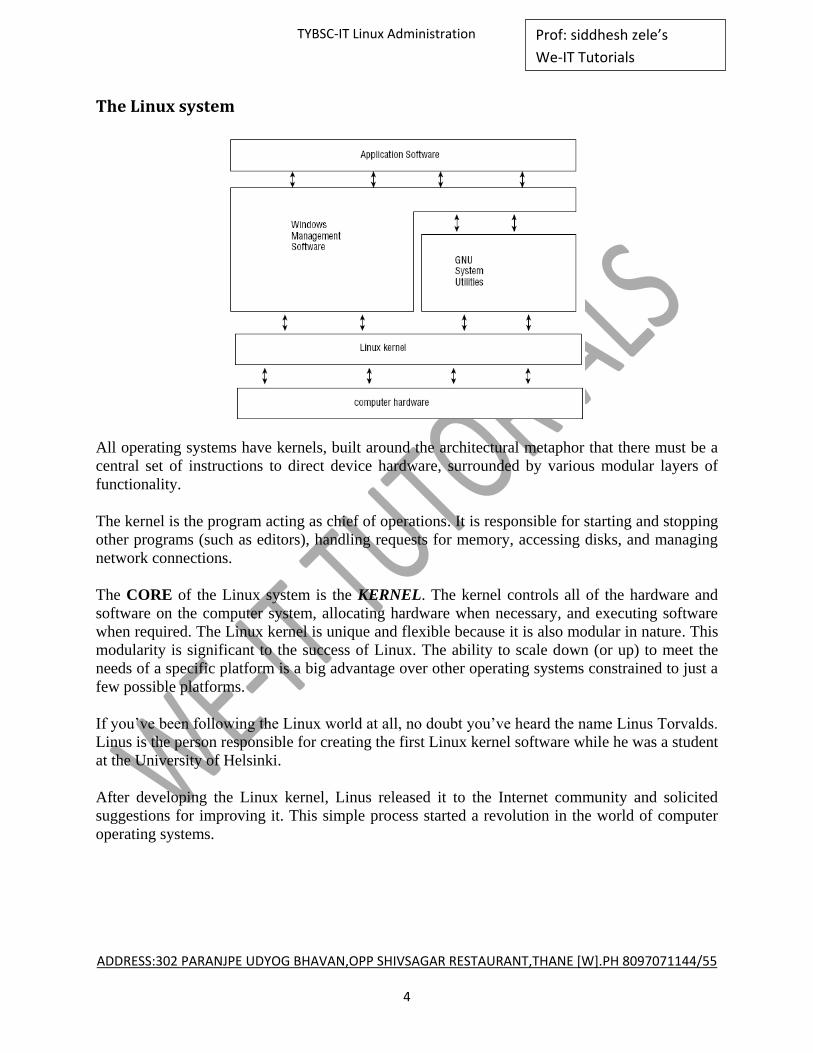
The Linux system
All operating systems have kernels, built around the architectural metaphor that there must be a
central set of instructions to direct device hardware, surrounded by various modular layers of
functionality.
The kernel is the program acting as chief of operations. It is responsible for starting and stopping
other programs (such as editors), handling requests for memory, accessing disks, and managing
network connections.
The CORE of the Linux system is the KERNEL. The kernel controls all of the hardware and
software on the computer system, allocating hardware when necessary, and executing software
when required. The Linux kernel is unique and flexible because it is also modular in nature. This
modularity is significant to the success of Linux. The ability to scale down (or up) to meet the
needs of a specific platform is a big advantage over other operating systems constrained to just a
few possible platforms.
If you‘ve been following the Linux world at all, no doubt you‘ve heard the name Linus Torvalds.
Linus is the person responsible for creating the first Linux kernel software while he was a student
at the University of Helsinki.
After developing the Linux kernel, Linus released it to the Internet community and solicited
suggestions for improving it. This simple process started a revolution in the world of computer
operating systems.

ADDRESS:302 PARANJPE UDYOG BHAVAN,OPP SHIVSAGAR RESTAURANT,THANE [W].PH 8097071144/55
5
Prof: siddhesh zele’s
We-IT Tutorials
TYBSC-IT Linux Administration
The kernel is primarily responsible for four main functions: ■ System memory management
■ Software program management
■ Hardware management
■ File system management
System memory management
One of the primary functions of the operating system kernel is memory management. Not only
does the kernel manage the physical memory available on the server, it can also create and
manage virtual memory, or memory that does not actually exist.
It does this by using space on the hard disk, called the swap space. The kernel swaps the contents
of virtual memory locations back and forth from the swap space to the actual physical memory.
The Linux system memory map
The memory locations are grouped into blocks called pages. The kernel locates each page of
memory either in the physical memory or the swap space. The kernel then maintains a table of
the memory pages that indicates which pages are in physical memory, and which pages are
swapped out to disk.
You can see the current status of the virtual memory on your Linux system by viewing the
special /proc/meminfo
ADDRESS:302 PARANJPE UDYOG BHAVAN,OPP SHIVSAGAR RESTAURANT,THANE [W].PH 8097071144/55
6
Prof: siddhesh zele’s
We-IT Tutorials
TYBSC-IT Linux Administration
Software program management
The Linux operating system calls a running program a process. A process can run in the
foreground, displaying output on a display, or it can run in background, behind the scenes. The
kernel controls how the Linux system manages all the processes running on the system.
Hardware management
Still another responsibility for the kernel is hardware management. Any device that the Linux
system must communicate with needs driver code inserted inside the kernel code. The driver
code allows the kernel to pass data back and forth to the device, acting as a middle man between
applications and the hardware.
There are two methods used for inserting device driver code in the Linux
kernel:
■ Drivers compiled in the kernel
only way to insert device driver code was to recompile the kernel. Each time you added a
new device to the system, you had to recompile the kernel code.
■ Driver modules added to the kernel
Programmers developed the concept of kernel modules to allow you to insert driver code
into a running kernel without having to recompile the kernel.
File system management
Unlike some other operating systems, the Linux kernel can support different types of file
systems to read and write data to and from hard drives.
Linux can read and write to and from file systems used by other operating systems, such
as Microsoft Windows.
The Linux kernel interfaces with each file system using the Virtual File System (VFS).
This provides a standard interface for the kernel to communicate with any type of file system.
VFS caches information in memory as each file system is mounted and used.

ADDRESS:302 PARANJPE UDYOG BHAVAN,OPP SHIVSAGAR RESTAURANT,THANE [W].PH 8097071144/55
7
Prof: siddhesh zele’s
We-IT Tutorials
TYBSC-IT Linux Administration
File
system Description
ext Linux Extended file system — the original Linux file
system
ext2 Second extended file system, provided advanced
features over ext
ext3 Third extended file system, supports journaling
hpfs OS/2 high-performance file system
jfs IBM‘s journaling file system
iso9660 ISO 9660 file system (CD-ROMs)
minix MINIX file system
msdos Microsoft FAT16
ncp Netware file system
nfs Network File System
ntfs Support for Microsoft NT file system
proc Access to system information
ReiserFS Advanced Linux file system for better performance
and disk recovery
smb Samba SMB file system for network access
sysv Older Unix file system
ufs BSD file system
umsdos Unix-like file system that resides on top of MSDOS
vfat Windows 95 file system (FAT32)
XFS High-performance 64-bit journaling file system
The GNU utilities
GNU stands for GNU’s Not UNIX—recursive acronyms are part of hacker humor. GNU
software package that might seem useless at first, but exists for good reasons. Most GNU
software conforms to a standard method of compiling and installing, and the hello package tries
to conform to this standard and so makes an excellent example.
Besides having a kernel to control hardware devices, a computer operating system needs utilities
to perform standard functions, such as controlling files and programs. While Linus created the
Linux system kernel, he had no system utilities to run on it.
The GNU organization developed a complete set of Unix utilities, but had no kernel system to
run them on. GNU utilities available for Linux called VxTools can read VxFS versions 2 and 4.
The tools included in the VxTools package are vxmount, vxumount, vxls, vxcat, vxidump, vxcd,
and vxpwd. Currently there is only read support in Linux for VxFS file systems
ADDRESS:302 PARANJPE UDYOG BHAVAN,OPP SHIVSAGAR RESTAURANT,THANE [W].PH 8097071144/55
8
Prof: siddhesh zele’s
We-IT Tutorials
TYBSC-IT Linux Administration
The shell
The GNU/Linux shell is a special interactive utility. It provides a way for users to start programs,
manage files on the file system, and manage processes running on the Linux system. The core of
the shell is the command prompt. The command prompt is the interactive part of the shell. It
allows you to enter text commands, interprets the commands, then executes the commands in the
kernel.
The shell contains a set of internal commands that you use to control things such as copying
files, moving files, renaming files, displaying the programs currently running on the system, and
stopping programs running on the system. Besides the internal commands, the shell also allows
you to enter the name of a program at the command prompt. The shell passes the program name
off to the kernel to start it.
Linux Distributions
Linux is actually just a kernel. You can obtain the sources for the kernel to compile and install it
on a machine and then obtain and install many other freely distributed software programs to
make a complete Linux installation. These installations are usually referred to as Linux systems,
because they consist of much more than just the kernel- Most of the utilities come from the GNU
Project of the Free Software Foundation.
Many people have put together ready-to-install distributions (often called flavors), usually
downloadable or on CD-ROMs or DVDs, that contain not just the kernel but also many other
programming tools and utilities. These often include an implementation of the X Window
System, a graphical environment common on many UNIX systems.
The distributions usually come with a setup program and additional documentation (normally all
on the CD[s]) to help you install your own Linux system. Some well-known distributions,
particularly on the Intel x86 family of processors, are Red Hat Enterprise Linux and its
community-developed cousin Fedora, Novell SUSE Linux and the free open SUSE variant,
Ubuntu Linux, Slackware, Gentoo, and Debian GNU/Linux.
Linux distributions can be broadly categorized into two groups. The first category includes the
purely commercial distros, and the second includes the noncommercial distros, or spins. The
commercial distros generally offer support for their distribution—at a cost. The commercial
distros also tend to have a longer release life cycle. Examples of commercial flavors of Linux-
based distros are RHEL, SuSE Linux Enterprise (SLE), etc.
The noncommercial distros, on the other hand, are free. The noncommercial distros try to adhere
to the original spirit of the open source software. They are mostly community supported and
maintained—the community consists of the users and developers. The community support and
enthusiasm can sometimes supersede that provided by the commercial offerings.
ADDRESS:302 PARANJPE UDYOG BHAVAN,OPP SHIVSAGAR RESTAURANT,THANE [W].PH 8097071144/55
9
Prof: siddhesh zele’s
We-IT Tutorials
TYBSC-IT Linux Administration
The different Linux distributions are often divided into three parts: ■ Full core Linux distributions
■ Specialized distributions
■ LiveCD test distributions
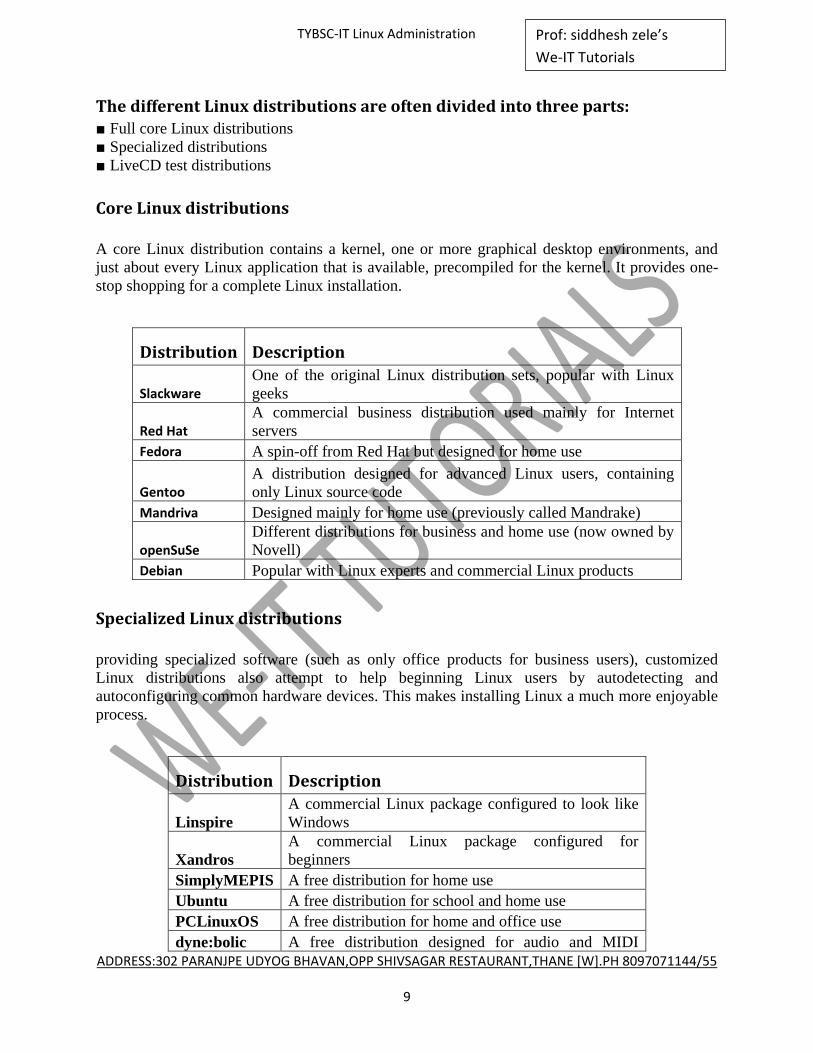
Core Linux distributions
A core Linux distribution contains a kernel, one or more graphical desktop environments, and
just about every Linux application that is available, precompiled for the kernel. It provides one-
stop shopping for a complete Linux installation.
Distribution Description
Slackware One of the original Linux distribution sets, popular with Linux
geeks
Red Hat A commercial business distribution used mainly for Internet
servers
Fedora A spin-off from Red Hat but designed for home use
Gentoo A distribution designed for advanced Linux users, containing
only Linux source code
Mandriva Designed mainly for home use (previously called Mandrake)
openSuSe Different distributions for business and home use (now owned by
Novell)
Debian Popular with Linux experts and commercial Linux products
Specialized Linux distributions
providing specialized software (such as only office products for business users), customized
Linux distributions also attempt to help beginning Linux users by autodetecting and
autoconfiguring common hardware devices. This makes installing Linux a much more enjoyable
process.
Distribution Description
Linspire
A commercial Linux package configured to look like
Windows
Xandros
A commercial Linux package configured for
beginners
SimplyMEPIS A free distribution for home use
Ubuntu A free distribution for school and home use
PCLinuxOS A free distribution for home and office use
dyne:bolic A free distribution designed for audio and MIDI

ADDRESS:302 PARANJPE UDYOG BHAVAN,OPP SHIVSAGAR RESTAURANT,THANE [W].PH 8097071144/55
10
Prof: siddhesh zele’s
We-IT Tutorials
TYBSC-IT Linux Administration
applications
Puppy Linux A free small distribution that runs well on older PCs
The Linux LiveCD
A relatively new phenomenon in the Linux world is the bootable Linux CD distribution. This lets
you see what a Linux system is like without actually installing it. Most modern PCs can boot
from a CD instead of the standard hard drive.
ADDRESS:302 PARANJPE UDYOG BHAVAN,OPP SHIVSAGAR RESTAURANT,THANE [W].PH 8097071144/55
11
Prof: siddhesh zele’s
We-IT Tutorials
TYBSC-IT Linux Administration
CHAPTER 2 : Duties of the System
Administrator
The Linux system administrator
Installing and configuring servers
Installing and configuring application software
Creating and maintaining user accounts
Backing up and restoring files
Monitoring and tuning performance
Configuring a secure system
Using tools to monitor security
The Linux System Administrator
Every computer in the world has a system administrator. It may be — and probably is — that the
majority of system administrators are probably those who decided what software and peripherals
were bundled with the machine when it was shipped.
Linux involves much more than merely sitting down and turning on the machine. Linux is quite
different from the most popular commercial operating systems in a number of ways, and while it
is no more difficult to learn than other operating systems, it is likely to seem very strange even to
the experienced administrator of some other system. By its very nature as a modern, multiuser
operating system, Linux requires a degree of administration greater than that of less robust home
market systems. This means that even if you are using a single machine connected to the Internet
by a dial-up modem — or not even connected at all — you have the benefits of the same system
employed by some of the largest businesses in the world, and will do many of the things that the
IT professionals employed by those companies are paid to do. Administering your system does
involve a degree of learning, but it also means that in setting up and configuring your own
system you gain skills and understanding that raise you above mere ―computer user‖ status. The
Linux system administrator does not achieve that mantle by having purchased a computer but
instead by having taken full control of what his or her computer does and how it does it.
The Linux system administrator is more likely to understand the necessity of active system
administration than are those who run whatever came on the computer, assuming that things
came from the factory properly configured. The user or enterprise that decides on Linux has
decided, too, to assume the control that Linux offers, and the responsibilities that this entails. The
Linux system administrator is the person who has ―root‖ access, which is to say the one who is
the system‘s ―super user‖ (or root user). A standard Linux user is limited as to the things he or
she can do with the underlying engine of the system. The nature of system administration in
Linux is surprisingly constant, no matter how large or small your installation. It merely involves
enabling and configuring features you already have available.

ADDRESS:302 PARANJPE UDYOG BHAVAN,OPP SHIVSAGAR RESTAURANT,THANE [W].PH 8097071144/55
12
Prof: siddhesh zele’s
We-IT Tutorials
TYBSC-IT Linux Administration
The word ―duties‖ implies a degree of drudgery; in fact, they‘re a manifestation of the
tremendous flexibility of the system measured against responsibility to run a tight installation.
Installing and Configuring Servers
The standard Red Hat Linux graphical user interface (GUI) requires a graphical layer called
XFree86. This is a server. It runs even on a standalone machine with one user account. It must be
configured. (Fortunately, Red Hat Linux has made this a simple and painless part of installation
on all but the most obscure combinations of video card and monitor.
In certain areas the client-server nomenclature can be confusing, though. While you cannot have
a graphical desktop without a server, you can have World Wide Web access without a Web
server, file transfer protocol (FTP) access without running an FTP server, and Internet e-mail
capabilities without ever starting a mail server. You may well want to use these servers, all of
which are included in Red Hat Linux, but then again you may not. And whenever a server is
connected to other machines outside your physical control, there are security implications — you
want users to have easy access to the things they need, but you don‘t want to open up the system
you‘re administering to the whole wide world.
Whenever a server is connected to other machines outside your physical control, there are
security implications — you want users to have easy access to the things they need, but you
don‘t want to open up the system you‘re administering to the whole wide world.
Linux distributions used to be shipped with all imaginable servers turned on by default.
You need to know what servers you need and how to employ them, and to be aware that it is bad
practice and a potential security nightmare to enable services that the system isn‘t using and
doesn‘t need.
Installing and Configuring Application Software
Linux system administrator understand two characteristics that set Linux apart from popular
commercial operating systems: The first is the idea of the root or super user, and the second is
that Linux is a multiuser operating system. Each user has (or shares) an account on the system,
be it on a separate machine or on a single machine with multiple accounts.
One reason that these concepts are crucial is found in the administration of application software
— productivity programs. While it is possible for individual users to install some applications in
their home directories — drive space set aside for their own files and customizations — these
applications are not available to other users without the intervention of the system administrator.
Besides, if an application is to be used by more than one user, it probably needs to be installed
higher up in the Linux file hierarchy, which is a job that can be performed by the system
administrator only. (The administrator can even decide which users may use which applications
by creating a ―group‖ for that application and enrolling individual users into that group.)

ADDRESS:302 PARANJPE UDYOG BHAVAN,OPP SHIVSAGAR RESTAURANT,THANE [W].PH 8097071144/55
13
Prof: siddhesh zele’s
We-IT Tutorials
TYBSC-IT Linux Administration
New software packages might be installed in /opt, if they are likely to be upgraded separately
from the Red Hat Linux distribution itself; by so doing, it‘s simple to retain the old version until
you are certain the new version works and meets expectations.
The location of the installation usually matters only if you compile the application from source
code; if you use a Red Hat Package Manager (RPM) application package, it automatically goes
where it should.
Creating and Maintaining User Accounts
Not just anyone can show up and log on to a Linux machine. An account must be created for
each user and — you guessed it — no one but the system administrator may do this. That‘s
simple enough.
But there‘s more, and it involves decisions that either you or your company must make. You
might want to let users select their own passwords, which would no doubt make them easier to
remember, but which probably would be easier for a malefactor to crack. You might want to
assign passwords, which is more secure in theory but which increases the likelihood that users
will write them down on a conveniently located scrap of paper — a risk if many people have
access to the area where the machine(s) is located. You might decide that users must change their
passwords periodically, and you can configure Red Hat Linux to prompt users to do so.
To what may specific users have access? It might be that there are aspects of your business that
make World Wide Web access desirable, but you don‘t want everyone spending their working
hours surfing the Web. If your system is at home, you may wish to limit your children‘s access to
the Web, which contains sites to which few if any parents would want their children exposed.
Backing Up and Restoring Files
Until equipment becomes absolutely infallible, and until people lose their desire to harm the
property of others (and, truth be known, until system administrators become perfect), there is a
need to back up important files so that in the event of a failure of hardware, security, or
administration, the system can be up and running again with minimal disruption. Only the system
administrator may do this. (Because of its built-in security features, Linux may not allow users to
be able even to back up their own files to floppy disks.)
Again, knowing that file backup is your job is not enough. You need to formulate a strategy for
making sure your system is not vulnerable to catastrophic disruption. And it‘s not always
obvious. If you have a high-capacity tape drive and several good sets of restore diskettes, you
might make a full system backup every few days.
Once you‘ve decided what to back up, you need to decide how frequently you want to perform
backups and whether you wish to maintain a series of incremental backups — adding only the
files that have changed since the last backup — or multiple full backups. A redundant array of
independent disks, or RAID, which is to say multiple hard drives all containing the same data as

ADDRESS:302 PARANJPE UDYOG BHAVAN,OPP SHIVSAGAR RESTAURANT,THANE [W].PH 8097071144/55
14
Prof: siddhesh zele’s
We-IT Tutorials
TYBSC-IT Linux Administration
insurance against the failure of any one of them, in addition to other backup systems. (A RAID is
not enough, because hard drive failure is not the only means by which a system can be brought to
a halt.)
NOTE : Backing up is only half the story. You need to formulate a plan for bringing the system
back up in the event of a failure.
Monitoring and Tuning Performance
System tuning is an ongoing process aided by a variety of diagnostic and monitoring tools. Some
performance decisions are made at installation time, while others are added or tweaked later.
A good example is the use of the hdparm utility, which can increase throughput in IDE drives
considerably — but for some high speed modes a check of system logs will show that faulty or
inexpensive cables can, in combination with hdparm, produce an enormity of nondestructive but
system slowing errors
Proper monitoring allows you to detect a misbehaving application that might be consuming more
resources than it should or failing to exit completely on close. Through the use of system
performance tools you can determine when hardware — such as memory, added storage, or even
something as elaborate as a hardware RAID — should be upgraded for more cost-effective use
of a machine in the enterprise or for complicated computational tasks such as three-dimensional
rendering. Possibly most important, careful system monitoring and diagnostic practices give you
an early heads-up when a system component is showing early signs of failure, so that any
potential downtime can be minimized. Combined with the resources for determining which
components are best supported by Red Hat Linux, performance monitoring can result in
replacement components which are far more robust and efficient in some cases. And in any case,
careful system monitoring plus wise use of the built-in configurability of Linux allows you to
squeeze the best possible performance from your existing equipment, from customizing video
drivers to applying special kernel patches to simply turning off unneeded services to free
memory and processor cycles.
NOTE : To squeeze the best performance from your equipment, monitor your system carefully
and use Linux‘s built-in configurability wisely.
Configuring a Secure System
If there is a common thread in Linux system administration, something that is a constant
presence in everything you do, it is the security of the computer and data integrity.
The system administrator‘s task, first and foremost, is to make certain that no data on the
machine or network are likely to become corrupted, whether by hardware or power failure, by
misconfiguration or user error (to the extent that the latter can be avoided), or by malicious or
inadvertent intrusion from elsewhere. It means doing all the tasks described throughout this
chapter well and with a full understanding of their implication, and it means much more.
ADDRESS:302 PARANJPE UDYOG BHAVAN,OPP SHIVSAGAR RESTAURANT,THANE [W].PH 8097071144/55
15
Prof: siddhesh zele’s
We-IT Tutorials
TYBSC-IT Linux Administration
No one involved in computing can have failed to hear of the succession of increasingly serious
attacks upon machines connected to the Internet. Linux systems have been entirely immune,
either to direct attack or to the effects of attacks on machines running other operating systems. In
one Distributed Denial of Service (DDoS) attack aimed at several major online companies, many
of the ―zombie‖ machines — those which had been exploited so that the vandals could employ
thousands of machines instead of just a few — were running Linux that had not been patched to
guard against a well-known security flaw. ―Code Red‖ attacks of the summer of 2001, Linux
machines themselves were invulnerable, but the huge amount of traffic generated by this ―worm‖
infection.
Depending on how and to what a Linux machine is connected, the sensitivity of the data it
contains and the uses to which it is put, security can be as simple as turning off unneeded
services, monitoring the Red Hat Linux security mailing list to make sure that all security
advisories are followed, and otherwise engaging in good computing practices to make sure the
system runs robustly. Or it can be an almost full-time job involving levels of security
permissions within the system and systems to which it is connected, elaborate firewalling to
protect not just Linux machines but machines that, through their use of non-Linux software, are
far more vulnerable, and physical security — making sure no one steals the machine itself!
For any machine that is connected to any other machine, security means hardening against attack and making certain that no one is using your machine as a platform for launching attacks against others. If you are running Web, ftp, or mail servers, it means giving access to those who are entitled to it while
locking out everyone else. It means making sure that passwords are not easily guessed and not made
available to unauthorized persons,that disgruntled former employees no longer have access to the
system, and that no unauthorized person may copy files from your machine or machines.
Using Tools to Monitor Security
Crackers — people who, for purposes of larceny or to amuse themselves, like to break into other
people‘s computers — are a clever bunch.
If there is a vulnerability in a system, they will find it. Fortunately, the Linux development
community is quick to find potential exploits and to find ways of slamming shut the door before
crackers can enter.
Fortunately, too, Red Hat is diligent in making available new, patched versions of packages in
which potential exploits have been found. So your first and best security tool is making sure that
whenever a security advisory is issued, you download and install the repaired package. This line
of defense can be annoying, but it is nothing compared to rebuilding a compromised system.
ompared to rebuilding a compromised system.

ADDRESS:302 PARANJPE UDYOG BHAVAN,OPP SHIVSAGAR RESTAURANT,THANE [W].PH 8097071144/55
16
Prof: siddhesh zele’s
We-IT Tutorials
TYBSC-IT Linux Administration
Chapter 3 : Booting and Shutting Down
A Bootloader is a program that helps load and install the operating system. As operating
systems have become more complex, the process of starting up and shutting down has become
more comprehensive. Anyone who has undergone the transition from a straight DOS-based
system to a Windows 2003/XP–based system has experienced this transition firsthand. Not only
is the core operating system brought up and shut down, but also an impressive list of services
must be started and stopped. Like Windows, Linux comprises an impressive list of services that
are turned on as part of the boot procedure
BOOT LOADERS
For any operating system to boot on standard PC hardware, you need what is called a boot loader. If you have only dealt with Windows on a PC, you have probably never needed to
interact directly with a boot loader. The boot loader is the first software program that runs when
a computer starts. It is responsible for handing over control of the system to the operating
system. Typically, the boot loader will reside in the Master Boot Record (MBR) of the disk, and
it knows how to get the operating system up and running. The main choices that come with
Linux distributions are GRUB (the Grand Unified Bootloader) and LILO (LinuxLoader). We
will mostly cover GRUB, because it is the most common boot loader that ships with the newer
distributions of Linux and because it also has a lot more features than LILO. A brief mention of
LILO is made for historical reasons only. Both LILO and GRUB can be configured to boot other
non-native operating systems.
LILO:---
LILO (LInux LOader) is a boot loader for Linux. LILO does not depend on a specific file system,
and can boot an operating system (e.g., Linux kernel images) from floppy disks and hard disks.
One of up to sixteen different images can be selected at boot time. Various parameters, such as
the root device, can be set independently for each kernel. LILO can be placed either in the master
boot record (MBR) or the boot sector of a partition. In the latter case something else must be
placed in the MBR to load LILO.
At system start, only the BIOS drivers are available for LILO to access hard disks. For this
reason, with very old BIOS, the accessible area is limited to cylinders 0 to 1023 of the first two
hard disks. For later BIOS, LILO can use 32-bit "logical block addressing" (LBA) to access
practically the entire storage of all the hard disks that the BIOS allows access to.
LILO was the default boot loader for most Linux distributions in the years after the popularity
of loading. Today, most distributions use GRUB as the default boot loader.

ADDRESS:302 PARANJPE UDYOG BHAVAN,OPP SHIVSAGAR RESTAURANT,THANE [W].PH 8097071144/55
17
Prof: siddhesh zele’s
We-IT Tutorials
TYBSC-IT Linux Administration
LILO Files :
/etc/lilo.conf :
The lilo.conf file is typically located at /etc/lilo.conf. Within lilo.conf there are typically two
section types. The first section, which defines the global options, contains parameters which
specify boot location attributes. The second section(s) contain parameters associated with the
operating system images to be loaded. The section type can be repeated for up to 16 different
boot selections.
/boot/
LILO stores a number of files in the /boot/
Master Boot Record :
LILO can write a Master Boot Record on a device
Output :
When LILO loads itself it displays the word ―LILO‖. Each letter is printed before or after some
specific action. If LILO fails at some point, the letters printed so far can be used to identify the
problem.
(nothing)
No part of LILO has been loaded. LILO either isn't installed or the partition on which its
boot sector is located isn't active. The boot media is incorrect or faulty.
L :
The first stage boot loader has been loaded and started, but it can't load the second stage boot
loader. The two-digit error codes indicate the type of problem. This condition usually indicates a
media failure or bad disk parameters in the BIOS.
LI :
The first stage boot loader was able to load the second stage boot loader, but has failed to
execute it. This can be caused by bad disk parameters in the BIOS.

ADDRESS:302 PARANJPE UDYOG BHAVAN,OPP SHIVSAGAR RESTAURANT,THANE [W].PH 8097071144/55
18
Prof: siddhesh zele’s
We-IT Tutorials
TYBSC-IT Linux Administration
LIL
The second stage boot loader has been started, but it can't load the descriptor table from the map
file. This is typically caused by a media failure or by bad disk parameters in the BIOS.
LIL?
The second stage boot loader has been loaded at an incorrect address. This is typically caused by
bad disk parameters in the BIOS.
LIL-
The descriptor table is corrupt. This can be caused by bad disk parameters in the BIOS.
LILO
All parts of LILO have been successfully loaded.
GRUB
GNU GRUB (short for GNU GRand Unified Bootloader) is a boot loader package from the GNU
Project. GRUB is the reference implementation of the Multiboot Specification, which provides a
user the choice to boot one of multiple operating systems installed on a computer or select a
specific kernel configuration available on a particular operating system's partitions.
GNU GRUB was developed from a package called the Grand Unified Bootloader.
Features:
GRUB is dynamically configurable. It loads its configuration at startup, allowing boot-
time changes, such as selecting different kernelsor initial RAM disks. To this end, GRUB
provides a simple, bash-like, command line interface, which lets users write new boot
sequences on the fly, in addition to the normal menu lists.
GRUB is highly portable. It supports multiple executable formats and is geometry
translation independent. GRUB supports all commonly used Unix file systems, the
Windows file systems VFAT and NTFS, and logical block addressing (LBA). GRUB
allows users to view the contents of files on any supported file system.
GRUB can be used with a variety of different user interfaces. Most Linux distributions take
advantage of GRUB's support for a graphical interface to provide a customized boot menu with a
background image. GRUB's text interface can be modified to use a serial link so that a remote
terminal can have access to the boot loader.

ADDRESS:302 PARANJPE UDYOG BHAVAN,OPP SHIVSAGAR RESTAURANT,THANE [W].PH 8097071144/55
19
Prof: siddhesh zele’s
We-IT Tutorials
TYBSC-IT Linux Administration
GRUB can download operating system images from a network, and thus can support diskless
systems. GRUB supports automatic decompression of OS images prior to booting from them.
GRUB uses a scrollable screen for operating system boot selection. This means 150 or more boot
choices can be easily controlled by GRUB by adding them to the "menu.lst" configuration file.
The arrow keys are used to select which operating system to boot.
GRUB supports operating systems that do not multiboot, by using chain loading. GRUB uses the
same two or three lines of command sequences to boot
any DOS, Windows, Linux, BSD or Solaris system, making it very easy to work with it.
The chain loaders for the supported Unix-like OSes are built into GRUB.
In addition to the normal menu interface, GRUB can provide a bash-like terminal command
prompt that provides a rich set of commands to allow a user to view or alter any part of the boot
process. With these tools it is possible, without prior knowledge of what is installed on a
computer, to use GRUB from an external device such as a floppy disk, USB device or a CD-
ROM to boot up an installed operating system.
A GRUB installation for any supported OS can be installed from any of the usual Unix-
like operating systems, as well as using specific GRUB implementations for DOS and Windows.
GRUB version 1
The MBR usually contains GRUB stage 1, but can contain another boot loader which can chain
boot GRUB stage 1 from another boot sector such as a partition's Volume boot record.
Given the small size of a boot sector, Stage 1 can do little more than load the next stage of
GRUB by loading a few disk sectors from a fixed location near the start of the disk (within 1024
cylinders).
Stage 1 can load Stage 2 directly, but it is normally set up to load Stage 1.5. GRUB Stage 1.5 is
located in the first 30 kilobytes of hard disk immediately following the MBR and before the first
partition. If this space is not available the install of Stage 1.5 will fail.
The stage 1.5 image contains file system specific drivers. This enables stage 1.5 to directly load
stage 2 from a known location in the file system, for example from /boot/grub. Stage 2 will then
load the default configuration file and any other modules needed.
GRUB version 2
This is very similar to Grub version 1: boot.img is stored in the MBR or Volume boot record like
Stage 1; however, it can load one sector from any LBA48 address.
This loads the first sector of core.img (generated from diskboot.img) which is then used to load
the rest of the generated core.img file. The core.img file will normally be stored in the same

ADDRESS:302 PARANJPE UDYOG BHAVAN,OPP SHIVSAGAR RESTAURANT,THANE [W].PH 8097071144/55
20
Prof: siddhesh zele’s
We-IT Tutorials
TYBSC-IT Linux Administration
location as Stage 1.5 with the same problems; however, it can be moved to a file system or bare
partition with fewer problems than moving or omitting Stage 1.5.
Once loaded, the core.img file will then load the default configuration file and any other modules
needed.
After loading GRUB, but before the operating system starts
Once GRUB has loaded, it presents an interface where the user can select which operating
system to boot. This normally takes the form of a graphical menu. If this is not available, or the
user wishes direct control, GRUB has its own command prompt. The user can then manually
specify the boot parameters. GRUB can be set to automatically load a specified kernel after a
user defined timeout.
Perhaps the most important commands that GRUB accepts in the operating system selection
(kernel selection) menu are the following two commands.
By pressing 'e', it is possible to edit parameters for the selected operating system before the
operating system is started. Typically, this is used for changing kernel parameters for a Linux
system.
By pressing 'c', the user enters the GRUB command line. This is not a regular Linux shell. It
accepts certain GRUB-specific commands.
Once boot options have been selected, GRUB loads the selected kernel into memory and passes
control to the kernel. Alternatively, GRUB can pass control of the boot process to another loader,
using chain loading. This is the method used to load operating systems such as Windows that do
not support the Multiboot standard or are not supported directly by GRUB.
Installing GRUB
Most Linux distributions will give you a choice to install and configure the boot loader during
the initial operating system installation. Thus, you wouldn‘t normally need to manually install
GRUB during normal system use.
grub-install utility or using GRUB‘s native command-line interface. You can get to this
interface using what is called a GRUB boot floppy, using a GRUB boot CD, or from a system
that has the GRUB software installed.
Backing Up the MBR
make a backup of your current ―known good‖ MBR. It is easy to do this using the dd command.
[root@localhost tmp]# dd if=/dev/sda of=/tmp/COPY_OF_MBR bs=512 count=1
ADDRESS:302 PARANJPE UDYOG BHAVAN,OPP SHIVSAGAR RESTAURANT,THANE [W].PH 8097071144/55
21
Prof: siddhesh zele’s
We-IT Tutorials
TYBSC-IT Linux Administration
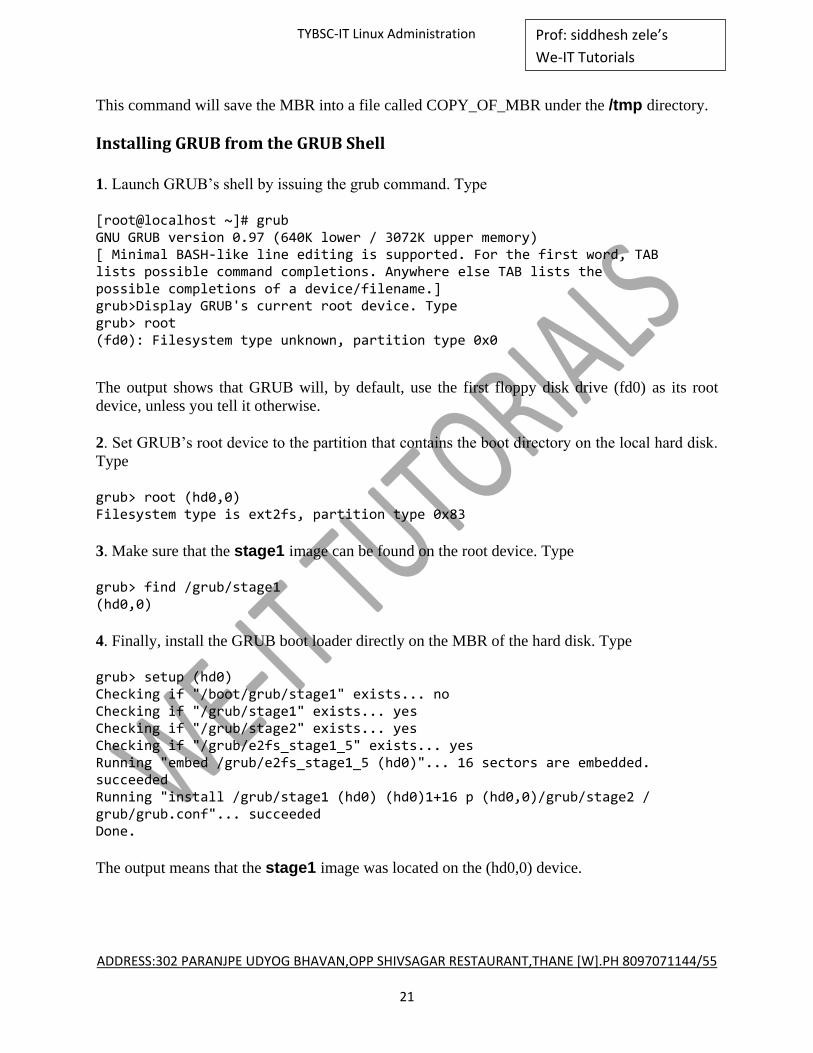
This command will save the MBR into a file called COPY_OF_MBR under the /tmp directory.
Installing GRUB from the GRUB Shell
1. Launch GRUB‘s shell by issuing the grub command. Type
[root@localhost ~]# grub GNU GRUB version 0.97 (640K lower / 3072K upper memory) [ Minimal BASH-like line editing is supported. For the first word, TAB lists possible command completions. Anywhere else TAB lists the possible completions of a device/filename.] grub>Display GRUB's current root device. Type grub> root (fd0): Filesystem type unknown, partition type 0x0
The output shows that GRUB will, by default, use the first floppy disk drive (fd0) as its root
device, unless you tell it otherwise.
2. Set GRUB‘s root device to the partition that contains the boot directory on the local hard disk.
Type
grub> root (hd0,0) Filesystem type is ext2fs, partition type 0x83
3. Make sure that the stage1 image can be found on the root device. Type
grub> find /grub/stage1 (hd0,0)
4. Finally, install the GRUB boot loader directly on the MBR of the hard disk. Type
grub> setup (hd0) Checking if "/boot/grub/stage1" exists... no Checking if "/grub/stage1" exists... yes Checking if "/grub/stage2" exists... yes Checking if "/grub/e2fs_stage1_5" exists... yes Running "embed /grub/e2fs_stage1_5 (hd0)"... 16 sectors are embedded. succeeded Running "install /grub/stage1 (hd0) (hd0)1+16 p (hd0,0)/grub/stage2 / grub/grub.conf"... succeeded Done.
The output means that the stage1 image was located on the (hd0,0) device.
ADDRESS:302 PARANJPE UDYOG BHAVAN,OPP SHIVSAGAR RESTAURANT,THANE [W].PH 8097071144/55
22
Prof: siddhesh zele’s
We-IT Tutorials
TYBSC-IT Linux Administration
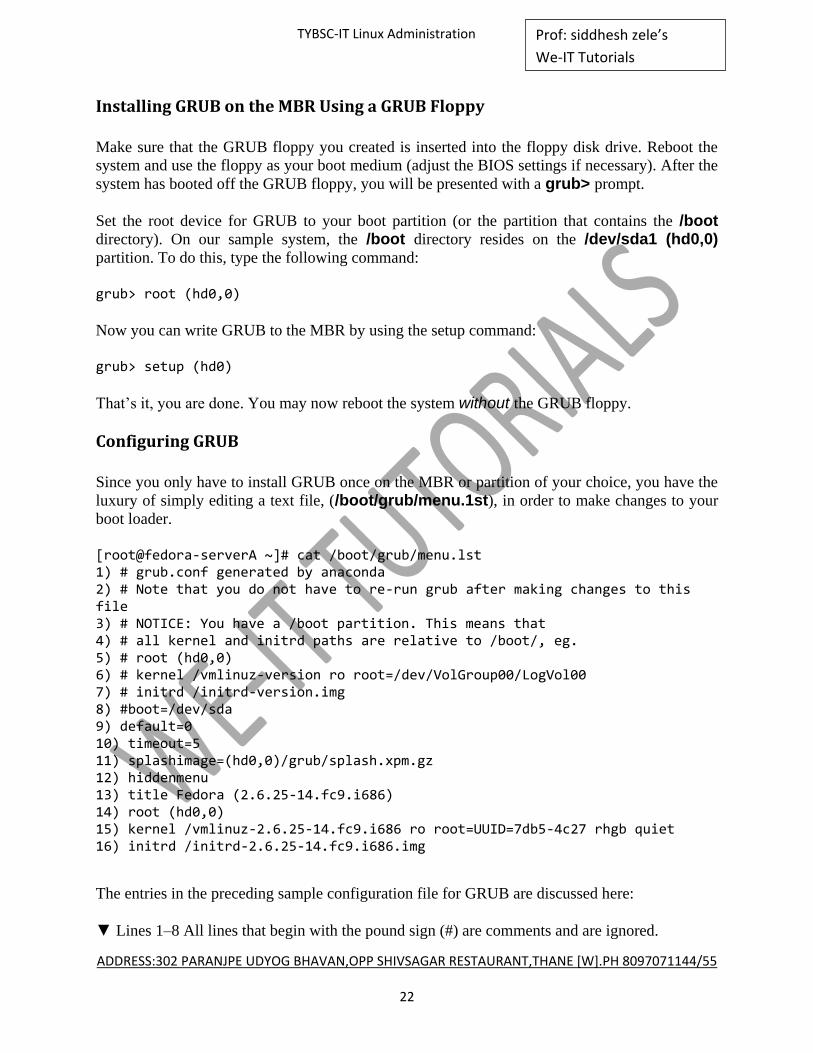
Installing GRUB on the MBR Using a GRUB Floppy
Make sure that the GRUB floppy you created is inserted into the floppy disk drive. Reboot the
system and use the floppy as your boot medium (adjust the BIOS settings if necessary). After the
system has booted off the GRUB floppy, you will be presented with a grub> prompt.
Set the root device for GRUB to your boot partition (or the partition that contains the /boot directory). On our sample system, the /boot directory resides on the /dev/sda1 (hd0,0) partition. To do this, type the following command:
grub> root (hd0,0)
Now you can write GRUB to the MBR by using the setup command:
grub> setup (hd0)
That‘s it, you are done. You may now reboot the system without the GRUB floppy.
Configuring GRUB
Since you only have to install GRUB once on the MBR or partition of your choice, you have the
luxury of simply editing a text file, (/boot/grub/menu.1st), in order to make changes to your
boot loader.
[root@fedora-serverA ~]# cat /boot/grub/menu.lst 1) # grub.conf generated by anaconda 2) # Note that you do not have to re-run grub after making changes to this file 3) # NOTICE: You have a /boot partition. This means that 4) # all kernel and initrd paths are relative to /boot/, eg. 5) # root (hd0,0) 6) # kernel /vmlinuz-version ro root=/dev/VolGroup00/LogVol00 7) # initrd /initrd-version.img 8) #boot=/dev/sda 9) default=0 10) timeout=5 11) splashimage=(hd0,0)/grub/splash.xpm.gz 12) hiddenmenu 13) title Fedora (2.6.25-14.fc9.i686) 14) root (hd0,0) 15) kernel /vmlinuz-2.6.25-14.fc9.i686 ro root=UUID=7db5-4c27 rhgb quiet 16) initrd /initrd-2.6.25-14.fc9.i686.img
The entries in the preceding sample configuration file for GRUB are discussed here:
▼ Lines 1–8 All lines that begin with the pound sign (#) are comments and are ignored.

ADDRESS:302 PARANJPE UDYOG BHAVAN,OPP SHIVSAGAR RESTAURANT,THANE [W].PH 8097071144/55
23
Prof: siddhesh zele’s
We-IT Tutorials
TYBSC-IT Linux Administration
■ Line 9, default This directive tells GRUB which entry to automatically boot. The numbering
starts from zero. The preceding sample file contains only one entry—the entry titled Fedora (2.6.25-14.fc9.i686).
■ Line 10, timeout This means that GRUB will automatically boot the default entry after five
seconds. This can be interrupted by pressing any key on the keyboard before the counter runs
out.
■ Line 11, splashimage This line specifies the name and location of an image file to be
displayed at the boot menu. This is optional and can be any custom image that fits GRUB‘s
specifications.
■ Line 12, hiddenmenu This entry hides the usual GRUB menu. It is an optional entry.
■ Line 13, title This is used to display a short title or description for the following entry it
defines. The title field marks the beginning of a new boot entry in GRUB.
■ Line 14, root You should notice from the preceding listing that GRUB still maintains its
device-naming convention (e.g., (hd0,0) instead of the usual Linux /dev/sda1).
■ Line 15, kernel Used for specifying the path to a kernel image. The first argument is the path
to the kernel image in a partition. Any other arguments are passed to the kernel as boot
parameters. Note that the path names are relative to the /boot directory, so, for example, instead
of specifying the path to the kernel to be ―/boot/vmlinuz-2.6.25-14.fc9. i686,‖ GRUB‘s
configuration file references this path as ―/vmlinuz-2.6.25-14. fc9.i686.‖
▲ Line 16, initrd The initrd option allows you to load kernel modules from an image, not the
modules from /lib/modules. See the GRUB info pages, available through the info command,
for more information on the configuration options.
Bootstrapping
When a computer is turned on, the computer's BIOS finds the primary bootable device (usually
the computer's hard disk) and loads the initial bootstrap program from the master boot
record (MBR), the first 512 bytes of the hard disk, then transfers control to this code.
Kernel Loading
Once GRUB has started and you have selected Linux as the operating system to boot, the first
thing to get loaded is the kernel. Keep in mind that no operating system exists in memory at this
point, and PCs (by their unfortunate design) have no easy way to access all of their memory.
Thus, the kernel must load completely into the first megabyte of available random access
memory (RAM). In order to accomplish this, the kernel is compressed.
ADDRESS:302 PARANJPE UDYOG BHAVAN,OPP SHIVSAGAR RESTAURANT,THANE [W].PH 8097071144/55
24
Prof: siddhesh zele’s
We-IT Tutorials
TYBSC-IT Linux Administration
The head of the file contains the code necessary to bring the CPU into protected mode (thereby
removing the memory restriction) and decompress the remainder of the kernel.
Kernel Execution
With the kernel in memory, it can begin executing.
At the very minimum, the kernel must have enough code to set up its virtual memory subsystem
and root file system (usually, the ext3 file system).
Once the kernel has started, a hardware probe determines what device drivers should be
initialized.
From here, the kernel can mount the root file system.
starts a program called init
THE INIT PROCESS
Once kernel and drivers are loaded, Linux starts loading the rest of the system. This starts with
the First Process, known as init and it has the process id of ―1‖ (the kernel itself has the process
id of 0, which cannot be displayed by using the "ps" command).
The init process takes control of the boot operation. The init process in turn runs
/etc/rc.d/rc.sysinit, which performs a number of tasks, including network configuration, SELinux
status, keyboard maps, system clock, partition mounts, and host names.
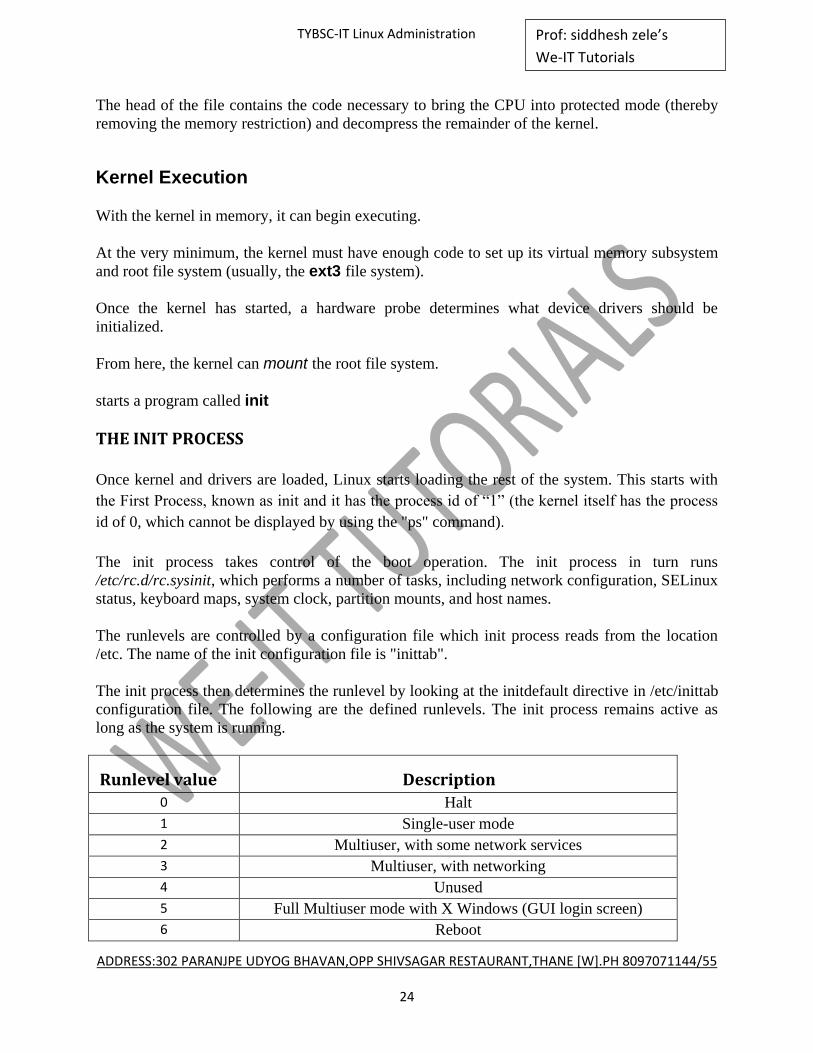
The runlevels are controlled by a configuration file which init process reads from the location
/etc. The name of the init configuration file is "inittab".
The init process then determines the runlevel by looking at the initdefault directive in /etc/inittab
configuration file. The following are the defined runlevels. The init process remains active as
long as the system is running.
Runlevel value Description 0 Halt
1 Single-user mode
2 Multiuser, with some network services
3 Multiuser, with networking
4 Unused
5 Full Multiuser mode with X Windows (GUI login screen)
6 Reboot

ADDRESS:302 PARANJPE UDYOG BHAVAN,OPP SHIVSAGAR RESTAURANT,THANE [W].PH 8097071144/55
25
Prof: siddhesh zele’s
We-IT Tutorials
TYBSC-IT Linux Administration
The Linux operating system calls a running program a process. A process can run in the
foreground, displaying output on a display, or it can run in background, behind the scenes. The
kernel controls how the Linux system manages all the processes running on the system.
The kernel creates the first process, called the init process, to start all other processes on the
system. When the kernel starts, it loads the init process into virtual memory. As the kernel starts
each additional process, it gives it a unique area in virtual memory to store the data and code that
the process uses.
Some Linux implementations contain a table of processes to start automatically on bootup. On
Linux systems this table is usually located in the special file /etc/ inittabs.
The Linux operating system uses an init system that utilizes run levels. A run level can be used
to direct the init process to run only certain types of processes, as defined in the /etc/inittabs file.
There are five init run levels in the Linux operating system.
At run level 1, only the basic system processes are started, along with one console terminal
process. This is called single user mode. Single user mode is most often used for emergency file
system maintenance when something is broken. Obviously, in this mode only one person
(usually the administrator) can log in to the system to manipulate data.
The standard init run level is 3. At this run level most application software such as network
support software is started. Another popular run level in Linux is run level 5. This is the run level
where the system starts the graphical X Window software, and allows you to log in using a
graphical desktop window.
The Linux system can control the overall system functionality by controlling the init run
level.
By changing the run level from 3 to 5, the system can change from a console-based
system to an advanced, graphical X Window system
rc scripts:
A Linux service is an application (or set of applications) that runs in the background waiting to
be used, or carrying out essential tasks.
Linux init Run Levels:
The Linux boot process has six states of operation of which "0" is the shutdown state and "3" and
above are fully operational with all essential processes running for user interaction. One of these
process started by init is /sbin/rc. This script runs a series of scripts in the directories
/etc/rc.d/rc0.d/, /etc/rc.d/rc1.d/, /etc/rc.d/rc2.d/, and so on.
ADDRESS:302 PARANJPE UDYOG BHAVAN,OPP SHIVSAGAR RESTAURANT,THANE [W].PH 8097071144/55
26
Prof: siddhesh zele’s
We-IT Tutorials
TYBSC-IT Linux Administration
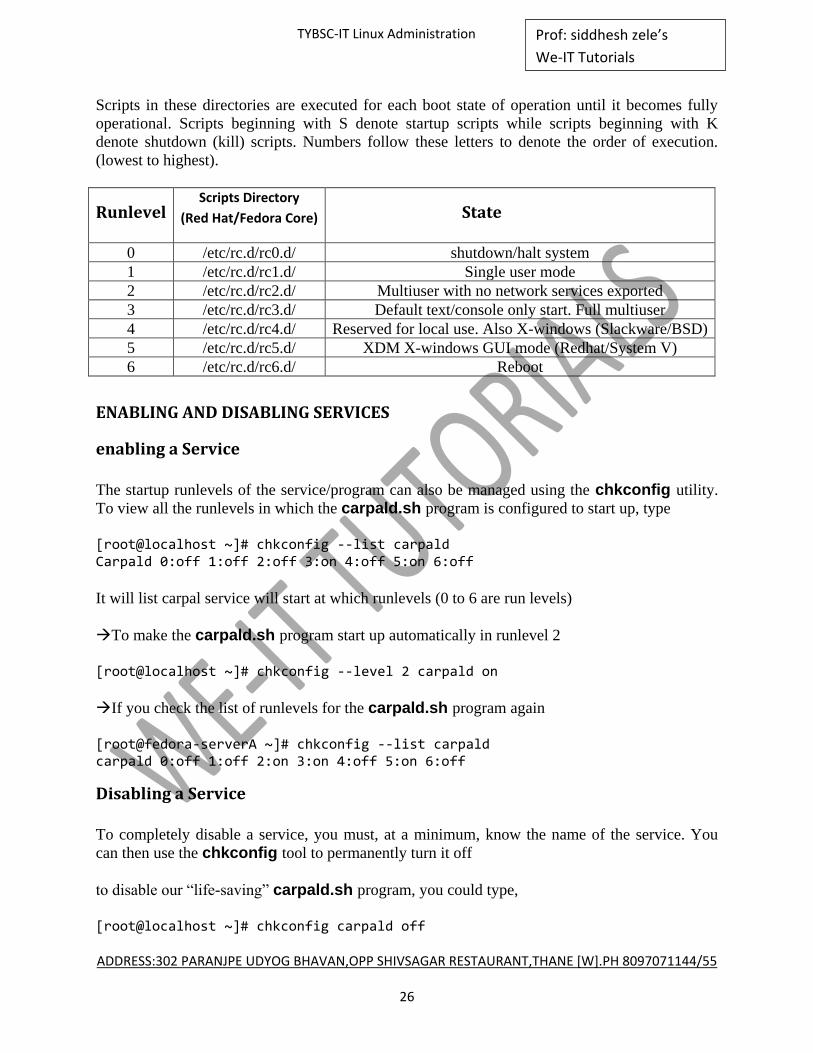
Scripts in these directories are executed for each boot state of operation until it becomes fully
operational. Scripts beginning with S denote startup scripts while scripts beginning with K
denote shutdown (kill) scripts. Numbers follow these letters to denote the order of execution.
(lowest to highest).
Runlevel Scripts Directory
(Red Hat/Fedora Core) State
0 /etc/rc.d/rc0.d/ shutdown/halt system
1 /etc/rc.d/rc1.d/ Single user mode
2 /etc/rc.d/rc2.d/ Multiuser with no network services exported
3 /etc/rc.d/rc3.d/ Default text/console only start. Full multiuser
4 /etc/rc.d/rc4.d/ Reserved for local use. Also X-windows (Slackware/BSD)
5 /etc/rc.d/rc5.d/ XDM X-windows GUI mode (Redhat/System V)
6 /etc/rc.d/rc6.d/ Reboot
ENABLING AND DISABLING SERVICES
enabling a Service
The startup runlevels of the service/program can also be managed using the chkconfig utility.
To view all the runlevels in which the carpald.sh program is configured to start up, type
[root@localhost ~]# chkconfig --list carpald Carpald 0:off 1:off 2:off 3:on 4:off 5:on 6:off
It will list carpal service will start at which runlevels (0 to 6 are run levels)
To make the carpald.sh program start up automatically in runlevel 2
[root@localhost ~]# chkconfig --level 2 carpald on
If you check the list of runlevels for the carpald.sh program again
[root@fedora-serverA ~]# chkconfig --list carpald carpald 0:off 1:off 2:on 3:on 4:off 5:on 6:off
Disabling a Service
To completely disable a service, you must, at a minimum, know the name of the service. You
can then use the chkconfig tool to permanently turn it off
to disable our ―life-saving‖ carpald.sh program, you could type,
[root@localhost ~]# chkconfig carpald off
ADDRESS:302 PARANJPE UDYOG BHAVAN,OPP SHIVSAGAR RESTAURANT,THANE [W].PH 8097071144/55
27
Prof: siddhesh zele’s
We-IT Tutorials
TYBSC-IT Linux Administration
that it has been turned off for all runlevels
fsck
Making sure that data on a system‘s hard disk is in a consistent state is an important function.
This function is partly controlled by a runlevel script and another file called the /etc/fstab file.
The File System Check (fsck) tool is automatically run as necessary on every boot, as specified
by the presence or absence of a file named /.autofsck, and also as specified by the /etc/fstab file.
ADDRESS:302 PARANJPE UDYOG BHAVAN,OPP SHIVSAGAR RESTAURANT,THANE [W].PH 8097071144/55
28
Prof: siddhesh zele’s
We-IT Tutorials
TYBSC-IT Linux Administration
Chapter 4 : File Systems
The file system is one of the most important aspects of system administration. For
administrators, programmers, users, and installed software, knowing how and where the files are
stored on the system is critical for proper system operation.
A standard should be in place that specifies locations for specific types of data. Red Hat has
chosen to follow the standards outlined in the File system Hierarchy Standard (FHS). The FHS
provides specific requirements for the placement of files in the directory structure.
Placement is based on the type of information contained in the file. Two categories of file
information exist:
a) shareable
b) unshareable, and variable or static.
Shareable files are files that can be accessed by other hosts, and unshareable files can be
accessed only by the local system.
Variable files contain information that can change at any time on their own, without
anyone actually changing the file.
A log file is an example of such a file.
A static file contains information that does not change unless a user changes it. Program
documentation and binary files are examples of static files.
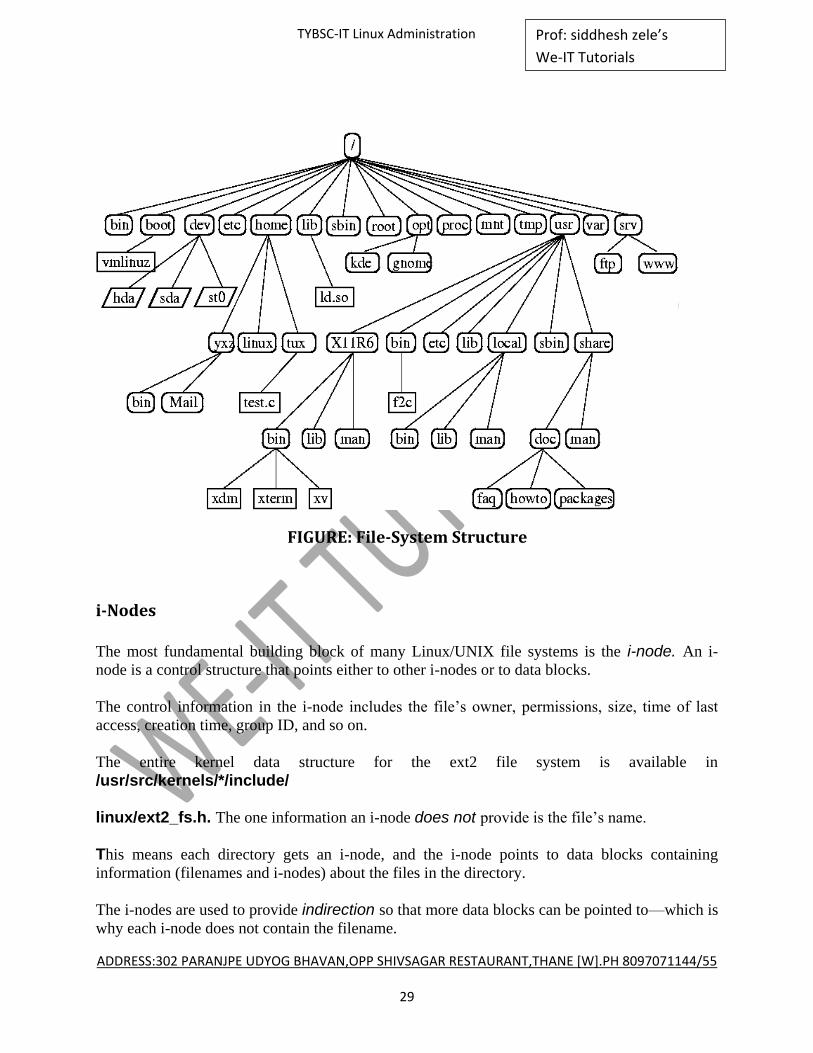
The file system is organized in a flat, hierarchical file system. Linux‘s method of mounting its
file systems in a flat, logical, hierarchical method has advantages over the file system mounting
method used by Windows. Linux references everything relative to the root file system point /.
If you have a / partition that fills up in Linux, you can create another file system called /usr/local
and move your data from /usr/local in the original file system to the new file system definition.
This practice frees up space on the / partition, and is an easy way to bring your system back up to
a fully functional state.
ADDRESS:302 PARANJPE UDYOG BHAVAN,OPP SHIVSAGAR RESTAURANT,THANE [W].PH 8097071144/55
29
Prof: siddhesh zele’s
We-IT Tutorials
TYBSC-IT Linux Administration
FIGURE: File-System Structure
i-Nodes
The most fundamental building block of many Linux/UNIX file systems is the i-node. An i-
node is a control structure that points either to other i-nodes or to data blocks.
The control information in the i-node includes the file‘s owner, permissions, size, time of last
access, creation time, group ID, and so on.
The entire kernel data structure for the ext2 file system is available in
/usr/src/kernels/*/include/
linux/ext2_fs.h. The one information an i-node does not provide is the file‘s name.
This means each directory gets an i-node, and the i-node points to data blocks containing
information (filenames and i-nodes) about the files in the directory.
The i-nodes are used to provide indirection so that more data blocks can be pointed to—which is
why each i-node does not contain the filename.
ADDRESS:302 PARANJPE UDYOG BHAVAN,OPP SHIVSAGAR RESTAURANT,THANE [W].PH 8097071144/55
30
Prof: siddhesh zele’s
We-IT Tutorials
TYBSC-IT Linux Administration
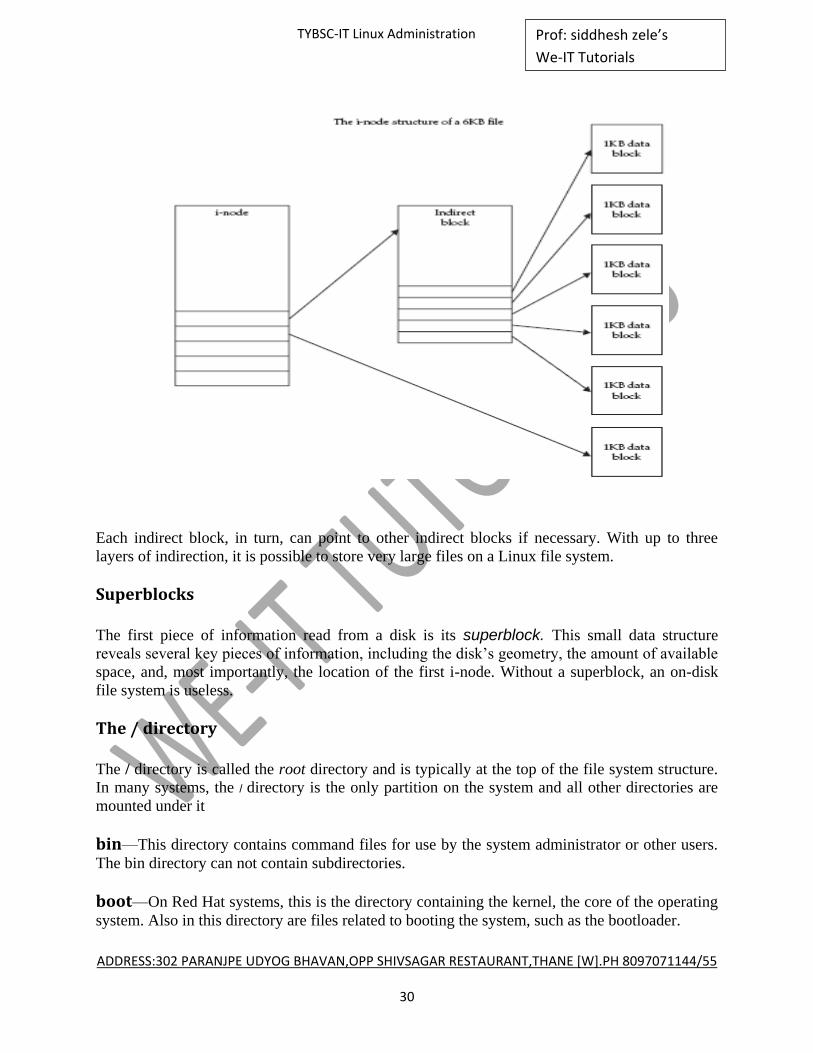
Each indirect block, in turn, can point to other indirect blocks if necessary. With up to three
layers of indirection, it is possible to store very large files on a Linux file system.
Superblocks
The first piece of information read from a disk is its superblock. This small data structure
reveals several key pieces of information, including the disk‘s geometry, the amount of available
space, and, most importantly, the location of the first i-node. Without a superblock, an on-disk
file system is useless.
The / directory
The / directory is called the root directory and is typically at the top of the file system structure.
In many systems, the / directory is the only partition on the system and all other directories are
mounted under it
bin—This directory contains command files for use by the system administrator or other users.
The bin directory can not contain subdirectories.
boot—On Red Hat systems, this is the directory containing the kernel, the core of the operating
system. Also in this directory are files related to booting the system, such as the bootloader.

ADDRESS:302 PARANJPE UDYOG BHAVAN,OPP SHIVSAGAR RESTAURANT,THANE [W].PH 8097071144/55
31
Prof: siddhesh zele’s
We-IT Tutorials
TYBSC-IT Linux Administration
dev—This directory contains files with information about devices, either hardware or software
devices, on the system.
etc—This directory and its subdirectories contain most of the system configuration files. If you
have the X Window System installed on your system, the X11 subdirectory is located here.
Networking related files are in the subdirectory sysconfig. Another subdirectory of etc is the skel
directory, which is used to create files in users‘ home directories when the users are created.
home —This directory contains the directories of users on the system. Subdirectories of home
will be named for the user to whom they belong.
lib—The shared system files and kernel modules are contained in this directory and its
subdirectories.
mnt—This directory is the location of the mount point for temporary file systems, such as a
floppy or CD.
opt—This directory and its subdirectories are often used to hold applications installed on the
system.
proc—Information about system processes is included in this directory.
root—This is the home directory of the root user. Don‘t confuse this with the / directory, which
has the same name.
sbin—Contained in this directory are system binaries used by the system administrator or the
root user.
tmp—This directory contains temporary files used by the system.
usr—This directory is often mounted on its own partition. It contains shareable, read-only data.
Subdirectories can be used for applications, typically under /usr/local.
var—Subdirectories and files under var contain variable information, such as system logs and
print queues.
Note: Never remove the /initrd/ directory. The system will not boot and you will see a
kernel panic error message

ADDRESS:302 PARANJPE UDYOG BHAVAN,OPP SHIVSAGAR RESTAURANT,THANE [W].PH 8097071144/55
32
Prof: siddhesh zele’s
We-IT Tutorials
TYBSC-IT Linux Administration
Using File System Commands
Most of the commands a Unix user needs to know are related to manipulating
files on the system.
ls
ls is probably the most commonly used Unix command. It lists information about files on the
system.
cp
cp is Unix‘s copy command.
rm
rm is Unix‘s remove command. To remove a file,
mv
mv is the move command. If moving files within a file system, mv operates more like a rename
than a move
chown
chown changes the user or group ownership of a file or directory.
chgrp
chgrp changes only the group ownership of a file or directory. To set the group ownership of a
file to group admin
chmod
This command changes file access permissions, handy when you want to limit who can and
cannot read, write or execute your files. Permissions that can be modified with this command are
write access, read access, and executable access for the user owner, the group owner, and all
users on the system
chattr
chattr enables you to set special access attributes on files. You can set files to repress updating
the access time, or set files to be append-only, immutable, or undeletable.

ADDRESS:302 PARANJPE UDYOG BHAVAN,OPP SHIVSAGAR RESTAURANT,THANE [W].PH 8097071144/55
33
Prof: siddhesh zele’s
We-IT Tutorials
TYBSC-IT Linux Administration
ln
ln creates hard or symbolic links between files. These links are useful in many different
situations where you don‘t want to copy a file to many different locations.
symlinks
This is a symbolic link maintenance utility. It checks for things like symlink sanity and dead
symbolic links.
stat
This command tells you the status of a specified file or file system. In order to run this command
you don‘t need to have access rights to the file, but you do need to be able to search all the
directories in the path leading up to the file location.
stat gives you lots of detailed information about a file, such as device number, inode number,
access rights, number of hard links, owner user ID and name, owner group ID and name, device
type, total file size, number of allocated blocks for the file, IO block size, last access time, last
modification time, and — last but not least — last changed time.
Eg: stat filename.
lsof
lsof is a very handy tool that lists what files are open on your system, and what active process
is holding them open. This command lists all files held open both by local system processes and
network services.
lsof can list open files by user or by process. You can give lsof a filename or a directory name,
and it tells you what process is holding it open.
knod
This command enables you to create block and character device files and named pipes.
macutil
This is a Linux to Mac file system conversion suite that contains the packages listed next.
MACUNPACK
macunpack extracts files from a Macintosh MacBinary archive, usually a .bin file.

ADDRESS:302 PARANJPE UDYOG BHAVAN,OPP SHIVSAGAR RESTAURANT,THANE [W].PH 8097071144/55
34
Prof: siddhesh zele’s
We-IT Tutorials
TYBSC-IT Linux Administration
HEXBIN
hexbin takes in Macintosh binhex files and converts them to a Unix readable format.
MACSAVE
This utility reads Macintosh MacBinary files from standard input, and writes them to a file.
MACSTREAM
This utility takes in a series of files and combines them into a MacBinary stream and outputs
them to standard out.
BINHEX
binhex takes in files and outputs them in BinHex 4.0 format to standard out. By default this
utility takes in MacBinary format files.
TOMAC
tomac reads in files and sends them to a Macintosh computer using the XMODEM protocol.
FROMMAC
From mac receives files from a Macintosh computer and stores them in the current directory in
MacBinary format.
Supported File Systems
Linux is a very flexible operating system that has a long history of interoperability with other
systems on a number of different hardware platforms. A consequence of this friendliness to other
operating systems is that Linux can read and write to several different file systems that originated
with other operating systems much different from Linux.
One reason that Linux supports so many file systems is because of the design of its Virtual File
Systems (VFS) layer. The VFS layer is a data abstraction layer between the kernel and the
programs in userspace that issues file system commands. Programs that run inside the kernel are
in kernel space. Programs that don‘t run inside the kernel are in user space.
The VFS layer avoids duplication of common code between all file systems. It provides a fairly
universal backward compatible method for programs to access all of the different forms of file
support. Only one common, small API set accesses each of the file system types, to simplify
programming file system support.

ADDRESS:302 PARANJPE UDYOG BHAVAN,OPP SHIVSAGAR RESTAURANT,THANE [W].PH 8097071144/55
35
Prof: siddhesh zele’s
We-IT Tutorials
TYBSC-IT Linux Administration
Standard disk file systems
If for some reason your kernel does not currently support these file systems, a kernel recompile
with the proper options turned on should enable you to access all these file systems.
MINIX
minix holds an important spot in Linux history, since Torvalds was trying to make a better minix
than minix. He wanted to improve upon the 16-bit minix kernel by making a better 32-bit kernel
that did everything that minix did and more. This historical connection is the main reason why
minix file system support is available in Linux.
One reason to run a minix file system is that it has less metadata overhead than ext2, and so it is
a preferable choice for boot and rescue disks. Rescue disks made with older versions of Red Hat
Linux use a minix file system.
EXT2
ext2 has become the standard file system for Linux. It is the next generation of the ext file
system. The ext2 implementation has not changed much since it was introduced with the 1.0
kernel back in 1993.
ext2 is flexible, can handle file systems up to 4TB large, and supports long filenames up to 1,012
characters long. In case user processes fill up a file system, ext2 normally reserves about 5
percent of disk blocks for exclusive use by root so that root can easily recover from that
situation.
EXT3 :
The extended 3 file system is a new file system introduced in Red Hat 7.2. ext3 provides all the
features of ext 2, and also features journaling and backward compatibility with ext2. The
backward compatibility enables you to still run kernels that are only ext2-aware with ext3
partitions. You can also use all of the ext2 file system tuning, repair, and recovery tools with ext
3. On an ext3 system, the system keeps a record of uncommitted file transactions and applies
only those transactions when the system is brought back up. So, a complete file system check is
not required, and the system will come back up much faster. ext3‘s journaling feature speeds up
the amount of time it takes to bring the file system back to a sane state if it‘s not been cleanly
unmounted.
REISERFS
The Reiser file system is a journaling file system designed for fast server performance, especially
in directories containing thousands of files. It is more space efficient than most other file
systems, because it does not take up a minimum of one block per file. If you write a bunch of
really small files to disk, reiserfs squeezes them all into one block instead of writing one small
ADDRESS:302 PARANJPE UDYOG BHAVAN,OPP SHIVSAGAR RESTAURANT,THANE [W].PH 8097071144/55
36
Prof: siddhesh zele’s
We-IT Tutorials
TYBSC-IT Linux Administration
file to one block like other file systems do. reiserfs also does not have fixed space allocation for
inodes, which saves about 6 percent of your disk space.
SYSTEMV
Linux currently provides read support for SystemV partitions, and write support is experimental.
The SystemV file system driver currently supports AFS/EAFS/EFS, Coherent FS, SystemV/386
FS, Version 7 FS, and Xenix file systems.
UFS
ufs is used in Solaris and early BSD operating systems. Linux provides read support, and write
support is experimental.
FAT
FAT is one of a few different file systems used with Windows over the years. Almost every
computer user has used FAT at one time or another, since it was the sparse base operating system
at the heart of all Windows operating systems.
FAT was originally created for QDOS and used on 360K (double density, double-sided) floppy
disks. Its address space has since been extended from 12 bit to 32 bit, so it can handle very large
file systems. There have been four versions of FAT since its beginnings: FAT12, FAT16, VFAT,
and FAT32.
NTFS
NTFS is the next generation of HPFS. It comes with all business versions of Microsoft operating
systems beginning with Windows NT. Unlike FAT, it is a b-tree file system, meaning it has a
performance and reliability advantage over FAT.
HPFS
The High Performance File System first came with OS/2 Version 1 created by Microsoft. It‘s the
standard OS/2 file system. Since OS/2 usage has dropped off significantly, HPFS has become a
relatively uncommon file system.
HFS
The Hierarchical File System is used with older versions of Mac OS. Macintosh formatted files
have two parts to them: a data fork and a resource fork. The resource fork contains Macintosh
operating system-specific information such as dialog boxes and menu items. The data fork
contains the meat of the file data. The data fork is readable by Unix

ADDRESS:302 PARANJPE UDYOG BHAVAN,OPP SHIVSAGAR RESTAURANT,THANE [W].PH 8097071144/55
37
Prof: siddhesh zele’s
We-IT Tutorials
TYBSC-IT Linux Administration
Nonstandard Linux file systems
IBM JFS
IBM JFS is an easy-to-use journaling file system created by IBM. It is designed for high-
throughput server environments. This is the same file system that will be provided in AIX
version 5.1. Linux support for IFS was written by IBM.
SGI XFS
SGI‘s Extended File System (XFS) is SGI‘s newest file system for all Silicon Graphics systems,
from workstations to its supercomputer line. XFS is designed for high performance. It rapidly
recovers from system crashes and can support extremely large disk farms. Its other features
include access control lists, volume management, guaranteed rate I/O, and journaling for faster
recovery. XFS can be backed up while still in use, which comes in handy since it reduces system
administration time. This is a fast file system, and now you can read and write to and from it
with your Red Hat Linux machine..
FREEVXFS
VxFS is the Veritas file system developed by the Veritas Corporation. It is used in SCO
UnixWare, HP-UX, Solaris, and other systems. Some of its features include access control lists,
journaling, online backup, and support for files up to 2TB large.
GFS
GFS is Sistina‘s Global File System. It is a clustered journaling file system for SANs that
enables multiple servers to have read/write access to a single file system on shared SAN devices.
GFS is scalable, since storage devices and servers can be added without taking the system down
or taking the disks offline. It also makes a single image of all the data in the SAN, so that if a
server fails it can be removed and replaced while the load is rebalanced amongst the remaining
servers.
In a proper cluster setup, all nodes in the cluster share the same storage devices through a fiber
channel, SCSI hookup, or network block device. Each node sees the file system as being local to
their machine, and GFS synchronizes files across the cluster. GFS is fully symmetric, so no
server is a bottleneck or single point of failure. GFS uses regular UNIX-style file semantics.
Memory file systems and virtual file systems
These file systems do not exist on disk in the same way that traditional file systems do. They
either exist entirely in system memory, or they are virtual because they are an interface to system
devices,
ADDRESS:302 PARANJPE UDYOG BHAVAN,OPP SHIVSAGAR RESTAURANT,THANE [W].PH 8097071144/55
38
Prof: siddhesh zele’s
We-IT Tutorials
TYBSC-IT Linux Administration
CRAMFS
cramfs is designed to cram a file system onto a small flash memory device, so it is small, simple,
and able to compress things well. The largest file size is 16 MB, and the largest file system size
is 256 MB.
Since cramfs is so compressed, it isn‘t instantly updateable. The mkcramf s tool needs to be run
to create or update a cramfs disk image. The image is created by compressing files one page at a
time, so this enables random page access. The metadata is not compressed, but it has been
optimized to take up much less space than other file systems. For example, only the low 8 bits of
the GID are stored. This saves space but also presents a potential security issue.
TMPFS
tmpfs is structured around the idea that whatever is put in the /tmp file system is accessed again
shortly. tmpfs exists solely in memory, so what you put in /tmp doesn‘t persist between reboots.
Mounting a special-purpose file system on / trap as an in-memory file system is a performance
boost but is rarely done in Linux because of the performance available from the traditional Linux
file system. But for those who feel that they need the performance gains from storing /tmp in
memory, this option is now available in Linux.
RAMFS
ramfs is basically cramfs without the compression.
ROMFS
This is a read-only file system that is mostly used for the initial ramdisks of installation disks. It
was designed to take up very little space, so you could fit a kernel and some useful code into a
small boot disk, without having the file system overhead taking up too much precious space in
memory or on the disk.
The kernel on the disk has only this file system linked into it, and it can load any modules it
needs later, after bootup. After the kernel is loaded, it can call other programs to help determine
what SCSI drivers are needed, if any, or what IDE or floppy drives should be accessed after
bootup. This method is perfect for rescue diskettes or installation diskettes, where only a very
bare minimum kernel needs to be loaded into memory so after the initial boot it can then load
from a CD-ROM whatever ext2 modules or other drivers are necessary to mount the system‘s
regular drives.
The romfs file system is created with a program called genromfs.

ADDRESS:302 PARANJPE UDYOG BHAVAN,OPP SHIVSAGAR RESTAURANT,THANE [W].PH 8097071144/55
39
Prof: siddhesh zele’s
We-IT Tutorials
TYBSC-IT Linux Administration
PROC
proc is a virtual file system that acts as an interface to the kernel‘s internal data structures. proc
can be used to get detailed information about a system‘s hardwareand to change kernel
parameters at run time. Even the process listing command, ps, gets its information from the proc
file system. The kernel parameters can be changed with the sysctl command.
PROC SOFTWARE INFORMATION
The /proc directory contains a great deal of information about your currently running system
software. If you look at the /proc directory on Linux, you see one subdirectory for each process
running on the system. The subdirectories are named after the process‘s ID (PD) number. Each
of those subdirectories has several standard files, and each of them gives you a different set of
information.
The status file in those proc directories contains process status in human- readable format. So, if
you want to see the status of your ssh server, you first need to know the ssh server’s PID
number.
The status file in those proc directories contains process status in human readable format.
Other useful files in the /proc/PID directory and their contents are:
cmdline — Contains the process‘s command line arguments
cpu — Contains the current and last CPU on which the process was executed
cwd — Contains a link to the process‘s current working directory
environ — Contains values of the process‘s environmental variables
exe — Contains a link to the process‘s executable
fd — A directory that contains all the process‘s file descriptors
maps — Contains memory maps to the process‘s executables and library files
mem — Contains the memory held by this process
root — Contains a link to the root directory of the process
stat — Contains the process status
statm — Contains the process memory status information
status — Contains the process status in human-readable format

ADDRESS:302 PARANJPE UDYOG BHAVAN,OPP SHIVSAGAR RESTAURANT,THANE [W].PH 8097071144/55
40
Prof: siddhesh zele’s
We-IT Tutorials
TYBSC-IT Linux Administration
Proc Hardware Information
The /proc directory also contains some useful hardware information. This information comes in
handy when you compile a new kernel, if you‘ve forgotten the specific details about your
hardware, you can look through the files in the /proc directory to get information about what‘s
installed and running on your Linux machine.
If you suspect that you‘re having hardware problems due to an interrupt request (IRQ) conflict,
you can also see your hardware‘s interrupts by looking at the /proc/interrupts file.
Some important /proc files are:
/proc/cpuinfo — Contains info about the CPU
/proc/interrupts — Tells you what interrupts are in use
/proc/scsi — A directory that contains information about SCSI devices
/proc/parport — Contains info about the parallel ports on your system
/proc/tty — A directory that contains info about ttys that are available and in use
/proc/acpi — Contains power management information
/proc/bus — A directory that contains bus-specific information
/proc/devices — Lists available character and block devices
/proc/dma — Lists used DMS channels
/proc/filesystems — Lists supported file systems
/proc/fs — A directory that contains file system parameters
/proc/ide — A directory that contains information about the IDE subsystem
/proc/ioports — Contains information about system I/O port usage
/proc/modules — Contains a list of currently loaded modules
/proc/net — Contains networking information
/proc/uptime — Contains the system uptime
/proc/version — Contains the system version
ADDRESS:302 PARANJPE UDYOG BHAVAN,OPP SHIVSAGAR RESTAURANT,THANE [W].PH 8097071144/55
41
Prof: siddhesh zele’s
We-IT Tutorials
TYBSC-IT Linux Administration
/DEV/PTS
/dev/pts is a lightweight version of devfs. Instead of having all the device files supported in the
virtual file system, it provides support for only virtual pseudo terminal device files.
DEVFS
The Device File System (devfs) is another way to access ―real‖ character and block special
devices on your root file system. The old way used major and minor numbers to register devices.
devfs enables device drivers to register devices by name instead. devfs is deprecated in the 2.6
kernel in favor of udev.
sysfs
sysfs is a virtual file system that acts as an interface to the kernel‘s internal data structures.
Information is stored in the /sys directory and can be used to get details about a system‘s
hardware and to change kernel parameters at runtime. Information in the /sys directory is similar
to the information provided in the /proc directory and can be accessed in a similar fashion.
Linux Disk Management
This section explains some basics about disk partitioning and disk management under Linux. To
see how your Linux disks are currently partitioned and what file systems are on them, look at the
/etc/fstab file.
/etc/fstab
LABEL=/ / ext3 defaults 1 1
LABEL=/boot /boot ext3 defaults 1 2
/dev/sda1 /dos auto noauto,owner 0 0
LABEL=/home /home ext3 defaults 1 2
/dev/fd0 /mnt/floppy auto noauto,owner 0 0
LABEL=/tmp /tmp ext3 defaults 1 2
LABEL=/usr /usr ext3 defaults 1 2
LABEL=/var /var ext3 defaults 1 2
Disk Partitioning on an x86 Machine
When disk partitioning on an x86 PC, you need to be mindful of the limitations present in the
x86 architecture. You are allowed to create four primary partitions. Primary partitions are the
only partitions that are bootable. You can create more partitions if you make extended partitions.
Extended partitions are set into a primary partition. So, if you choose to make extended
partitions, you are allowed to make only three primary partitions for operating system use, and
the fourth partition is dedicated to hosting the extended partitions.
ADDRESS:302 PARANJPE UDYOG BHAVAN,OPP SHIVSAGAR RESTAURANT,THANE [W].PH 8097071144/55
42
Prof: siddhesh zele’s
We-IT Tutorials
TYBSC-IT Linux Administration
Mounting Other OS Partitions/Slices
Not only can Linux read other operating systems‘ file systems; it can mount disk drives from
other systems and work with their partition tables. However, it is necessary to compile two
options into the kernel to do this. You must have the file system support and the file partitioning
support turned on in the kernel. Usually file system support is compiled as a module by default,
but disk partition support usually has to be explicitly compiled.
Some common partitioning schemes that Linux supports are x86 partitions, BSD disklabel,
Solaris x86, Unixware, Alpha, OSF, SGI, and Sun.
If you need to copy a large amount of raw disk data across a network, you can use the Network
Block Device, which enables other machines to mount a disk on your machine as if it were on
their machine. When running the Network Block Device make sure that you have the appropriate
partition support compiled into the kernel.
Metadevices
Metadevices are virtual block devices that are made up of other block devices. An example of a
metadevice is a disk array that makes many disks look like one large disk.
LOGICAL VOLUMES
Logical Volume Manager (LVM) enables you to be much more flexible with your disk usage
than you can be with conventional old-style file partitions. Normally if you create a partition,
you have to keep the partition at that size indefinitely.
With LVM in place, you could add another disk, create a physical volume, and then add the
physical volume to the volume group that contains the /var partition. Then you‘d use the LVM
file system resizing tool to increase the file system size to match the new partition size.
When you use LVMs, you need a new way of thinking about disk space. First, you have to
understand that space on any disk can be used by any file system. A Volume Group is the term
used to describe various disk spaces (either whole disks or parts of disks) that have been grouped
together into one volume.
The way it works is like this. First you need to have a physical volume which is then divided into
Volume groups that are then combined to form logical volumes. Logical volumes are akin to the
historic idea of partitions. You can then use a file system creation tool such as fdisk to create a
file system on the logical volume. The Linux kernel sees a logical volume in the same way it
sees a regular partition.
When the system is installed, LVM is enabled by default and you will need to use the LVM tools
described here to make changes to your logical volumes.

ADDRESS:302 PARANJPE UDYOG BHAVAN,OPP SHIVSAGAR RESTAURANT,THANE [W].PH 8097071144/55
43
Prof: siddhesh zele’s
We-IT Tutorials
TYBSC-IT Linux Administration
RAID
RAID is an acronym for Redundant Array of Inexpensive/Independent Disks. There are two
types of RAID that can be used on computer systems. These types are hardware RAID and
software RAID. In addition, there are six different RAID levels commonly used regardless of
whether hardware or software RAID is used. A brief explanation of hardware and software
RAID is in order.
RAID 1 IN SOFTWARE RAID stands for Redundant Array of Independent Disks. RAID 1, known as disk mirroring, is a
redundant RAID disk mode. A mirror of the first disk is kept on the other disks. If all disks crash
but one, all data can still be recovered. To work properly, RAID1 needs two or more disks, and
zero or more spare disks.
RAID 5 IN SOFTWARE
RAID 5 combines the ability to use a large number of disks while still maintaining some
redundancy. It uses three or more disks, and spare disks are optional. The final RAID 5 array
contains the combined file size of all disks except one. The equivalent of one disk‘s worth of
space is taken up by the parity information, which is written evenly across all the disks.
A RAID 5 array can survive one disk loss, but if more than one disk fails, all data is lost.
RAID IN HARDWARE
The principles of the software RAID levels also apply to hardware RAID setups. The main
difference is that in hardware RAID the disks have their own RAID controller with built-in
software that handles the RAID disk setup, and I/O. To Linux, the hard RAID interface is
transparent, so the hardware RAID disk array looks like one giant disk.
STORAGE AREA NETWORKS
A Storage Area Network (SAN) is a high availability, high performance disk storage structure
that enables several systems to store their partitions on the same large disk array.
This system provides reliable storage and fast access, since the servers are connected to the disk
array through a SCSI link or through a fiber channel.
ADDRESS:302 PARANJPE UDYOG BHAVAN,OPP SHIVSAGAR RESTAURANT,THANE [W].PH 8097071144/55
44
Prof: siddhesh zele’s
We-IT Tutorials
TYBSC-IT Linux Administration
UNIT 2
CHAPTER 1 : Red Hat System
Configuration Files
The system configuration files in the /etc directory are the first places a system administrator
goes after installing a system to set it up. The /etc directory is probably the most often visited
directory by a system administrator after their own home directory and /var/log.
it is important to keep the file permissions set properly on everything in /etc. Almost all files
should be owned by root, and nothing should be world writable.
notable exceptions are files such as /etc/shadow, where users‘ hashed passwords are stored, and
/etc/wvdial.conf, which stores dial-up account names and passwords.
The /etc/sysconfig directory contains configuration scripts written and configured by Red Hat
and Red Hat administration tools. /etc/sysconfig contains both system and networking
configuration files
Examining the System Configuration Files.
Systemwide shell configuration scripts
These files determine the default environment settings of system shells and what functions are
started every time a user launches a new shell. The files discussed next are located in /etc. These
configuration files affect all shells used on the system. An individual user can also set up a
default configuration file in his or her home directory that affects only his or her shells. This
ability is useful in case the user wants to add some extra directories to his or her path or some
aliases that only he or she can use.
When used in the home directory the names are the same, except they have in front of them. So
/etc/bashrc affects bash shells system wide, but home/kelly/.bashrc affects only the shells that
the user kelly starts.
/etc/bashrc affects bash shells systemwide, but /home/siddhu/
.bashrc effects only the shells started by user siddhu.
SHELL CONFIG SCRIPTS: BASHRC, CSH.CSHRC, ZSHRC
Bashrc is read by bash, csh.cshrc is read by tcsh, and zshrc is read by zsh. These files are read
every time a shell is launched, not just upon login, and they determine the settings and behaviors
of the shells on the system. These are places to put functions and aliases.

ADDRESS:302 PARANJPE UDYOG BHAVAN,OPP SHIVSAGAR RESTAURANT,THANE [W].PH 8097071144/55
45
Prof: siddhesh zele’s
We-IT Tutorials
TYBSC-IT Linux Administration
PROFILE This file is read by all shells except tcsh and csh upon login. Bash falls back to
reading it if there is no bash-->profile. Zsh looks for zprofile, but if there is none, it reads profile
as well.
/etc/profile # System wide environment and startup programs # Functions and aliases go in /etc/bashrc
profile is a good place to set paths because it is where you set environmental variables that are
passed on to child processes in the shell.
Another useful variable to change in the system profile is the number of user commands saved in
the .history file in their home directory. This command history is especially useful, since you can
scroll up through your previous commands by using the up and down arrows. To change the
number of commands saved in the .history file, modify this line:
HISTSIZE=1000
BASH, TCSH, ZSH AND THEIR CONFIG FILE READ ORDERS
The shells read a couple different configuration files when starting up. It is good to know which
files are read in what order, so that you know where to set variables that will only apply to
certain users.
BASH bash reads the following files on startup: /etc/profile, ~/.bash-->profile, ~/.bash-->login,
and ~/.profile. Upon logout, bash reads ~/.bash-->logout.
TCSH tcsh reads the following files when starting up: /etc/csh.cshrc, and then /etc/csh.login.
After these come the config files in the user‘s home directory: ~/.tcshrc (or if not present, then
~/.cshrc), ~/.history, ~/.login, ~/.cshdirs.
ZSH zsh reads the following when starting up: /etc/zshenv, ~/.zshenv, /etc/zprofile, ~/.zprofile,
/etc/zshrc, ~/.zshrc, and /etc/zlogin. Nonlogin shells also read ~/.bashrc. Upon logout, zsh reads
the ~/.zlogout and /etc zlogout files.
System environmental settings
/etc/motd
This file contains the message that users see every time they log in. It‘s a good place to
communicate messages about system downtime and other things that users should be aware of.
On the other hand, you can put amusing quotes here to entertain your users. Usually, the motd
contains a message like:

ADDRESS:302 PARANJPE UDYOG BHAVAN,OPP SHIVSAGAR RESTAURANT,THANE [W].PH 8097071144/55
46
Prof: siddhesh zele’s
We-IT Tutorials
TYBSC-IT Linux Administration
Welcome to Generic University‘s UNIX mail system. This system is monitored. Unauthorized
use prohibited. System downtime scheduled this Sunday night from 10 pm to 1 pm.
NOTE: motd is a plain-text file, which you can edit with any text editor. You can use it to
display any message you want users to see when they login. If you don‘t have this file in your
/etc directory you can easily create it.
DIR-->COLORS
Red Hat Linux enables you to view file listings in color, as long as you are using a terminal
program that supports colors. This file specifies which colors should be used to display what
kinds of files. By default, executable files are green, directories are dark blue, symlinks are light
blue, and regular files are white.
issue
Whatever is in this file shows up as a pre-login banner on your console. By default, this file tells
which version of Red Hat is running on the system and the kernel version.
The default file looks like this:
Red Hat Linux release 7.2 (Enigma)
Kernel \r on an \m
So when you log in, you see this message:
Fedora Core release 3 (Heidelberg)
Kernel 2.6.10-1.770_FC3 on an i686
ISSUE.NET
This file generally contains the same thing as /etc/issue. It shows up when you attempt to telnet
into the system. Because it shows up to people who are connecting to your system over the
Internet, you should change this message to include a warning such as ―Access is being
monitored. Unauthorized access is prohibited.‖ Displaying this warning is a good practice
because if you want to prosecute intruders, it helps your case to show that you warned them that
unauthorized access was prohibited.
ALIASES
The file /etc/mail/aliases is the e-mail aliases file for the sendmail program. By default it
contains many system account aliases. The aliases file sends mail for all the basic system
accounts such as bin, daemon, and operator, to root‘s mailbox.
ADDRESS:302 PARANJPE UDYOG BHAVAN,OPP SHIVSAGAR RESTAURANT,THANE [W].PH 8097071144/55
47
Prof: siddhesh zele’s
We-IT Tutorials
TYBSC-IT Linux Administration
root: siddhu all mails will be send to user siddhu
Whenever you make changes to this file, you need to run the newaliasescommand to have the
changes take effect in Sendmail.
DUMPDATES
If you do backups with dump, this file is important to you. dumpdates stores information about
the last system backup that was done. This data helps determine what kind of backup should be
done next time dump runs. It stores the name of the last file system that was backed up, the
backup increment level, and the time and date it was last run.
FSTAB
fstab contains important information about your file systems, such as what file system type the
partitions are, where they are located on the hard drive, and what mount point is used to access
them.
This information is read by vital programs such as mount, umount, and fsck.mount runs at start
time and mounts all the file systems mentioned in the fstab file, except for those with noauto in
their line. If a partition you want to access is not listed in this file, you have to mount it
manually. This can get tedious, so it‘s better to list all of your file systems in fstab.
When fsck is run at bootup, it also checks all the file systems listed in fstab for consistency. It
then fixes corrupted file systems, usually because they were not unmounted properly when the
system crashed or suddenly lost power. File systems with an fs_passno value of 0 (the number in
the last column) are not checked at boot time.
The fstab line has six fields, and each field represents a different configuration value. The first
field describes the file system, which can be a partition name, the label of a disk partition, a
logical volume, or a remote file system. The second field is the mount point used to access the
file system. The third field describes the file system type. The fourth field is the place for any
mount options you may need. The fifth field is 0 or 1 to determine whether dump backs up this
file system. The final field sets the order in which fsck checks these file systems.
LILO.CONF
LILO is the boot time LInux LOader. At boot time it gives you the option of booting into
different operating systems and even into different kernel versions of the Linux operating
system.
The information on where operating systems should be loaded from, and which one is started by
default is stored in lilo.conf. Whenever this file is changed, lilo must be run again in order for
changes to take effect. If there is anything wrong with the syntax of lilo.conf, lilo alerts you to
that problem when you run it again.
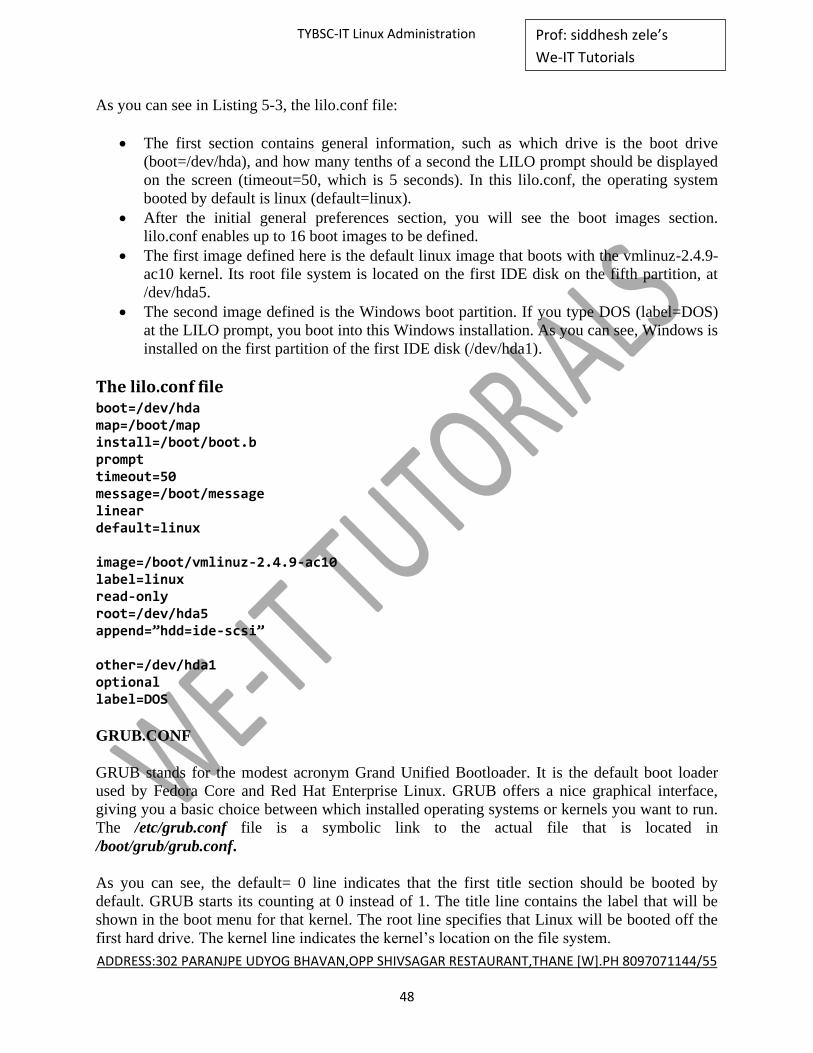
ADDRESS:302 PARANJPE UDYOG BHAVAN,OPP SHIVSAGAR RESTAURANT,THANE [W].PH 8097071144/55
48
Prof: siddhesh zele’s
We-IT Tutorials
TYBSC-IT Linux Administration
As you can see in Listing 5-3, the lilo.conf file:
The first section contains general information, such as which drive is the boot drive
(boot=/dev/hda), and how many tenths of a second the LILO prompt should be displayed
on the screen (timeout=50, which is 5 seconds). In this lilo.conf, the operating system
booted by default is linux (default=linux).
After the initial general preferences section, you will see the boot images section.
lilo.conf enables up to 16 boot images to be defined.
The first image defined here is the default linux image that boots with the vmlinuz-2.4.9-
ac10 kernel. Its root file system is located on the first IDE disk on the fifth partition, at
/dev/hda5.
The second image defined is the Windows boot partition. If you type DOS (label=DOS)
at the LILO prompt, you boot into this Windows installation. As you can see, Windows is
installed on the first partition of the first IDE disk (/dev/hda1).
The lilo.conf file boot=/dev/hda map=/boot/map install=/boot/boot.b prompt timeout=50 message=/boot/message linear default=linux image=/boot/vmlinuz-2.4.9-ac10 label=linux read-only root=/dev/hda5 append=‛hdd=ide-scsi‛ other=/dev/hda1 optional label=DOS
GRUB.CONF
GRUB stands for the modest acronym Grand Unified Bootloader. It is the default boot loader
used by Fedora Core and Red Hat Enterprise Linux. GRUB offers a nice graphical interface,
giving you a basic choice between which installed operating systems or kernels you want to run.
The /etc/grub.conf file is a symbolic link to the actual file that is located in
/boot/grub/grub.conf.
As you can see, the default= 0 line indicates that the first title section should be booted by
default. GRUB starts its counting at 0 instead of 1. The title line contains the label that will be
shown in the boot menu for that kernel. The root line specifies that Linux will be booted off the
first hard drive. The kernel line indicates the kernel‘s location on the file system.
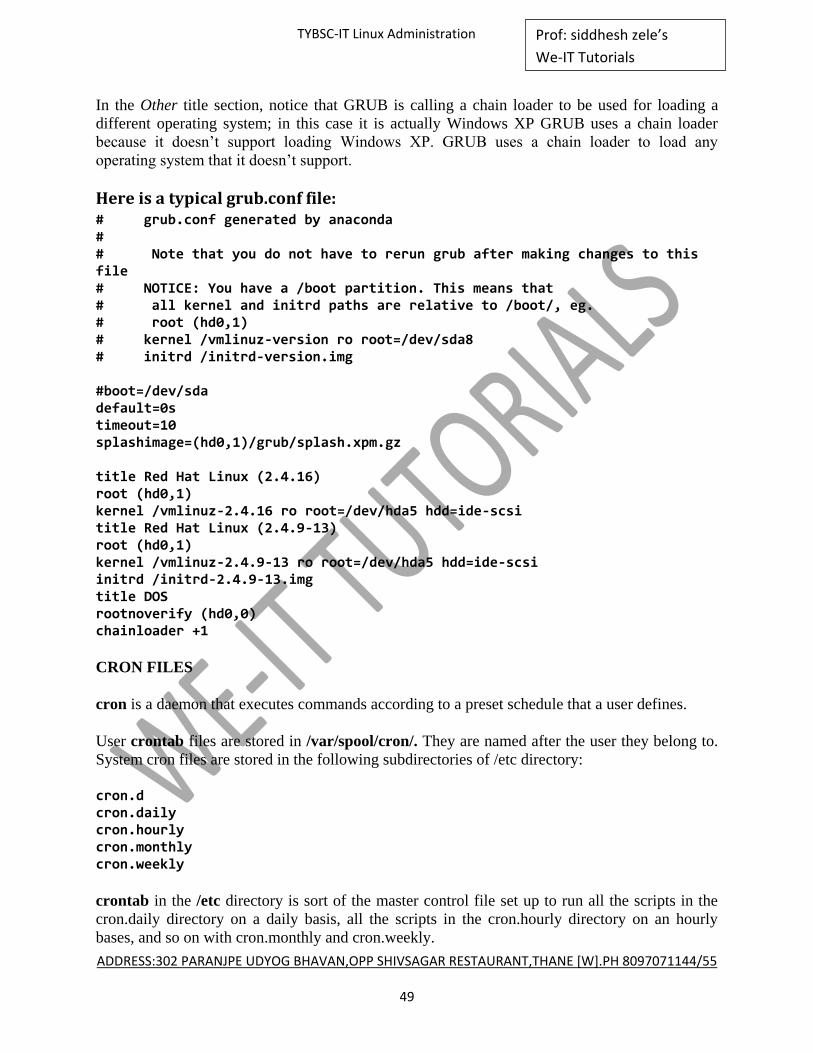
ADDRESS:302 PARANJPE UDYOG BHAVAN,OPP SHIVSAGAR RESTAURANT,THANE [W].PH 8097071144/55
49
Prof: siddhesh zele’s
We-IT Tutorials
TYBSC-IT Linux Administration
In the Other title section, notice that GRUB is calling a chain loader to be used for loading a
different operating system; in this case it is actually Windows XP GRUB uses a chain loader
because it doesn‘t support loading Windows XP. GRUB uses a chain loader to load any
operating system that it doesn‘t support.
Here is a typical grub.conf file: # grub.conf generated by anaconda # # Note that you do not have to rerun grub after making changes to this file # NOTICE: You have a /boot partition. This means that # all kernel and initrd paths are relative to /boot/, eg. # root (hd0,1) # kernel /vmlinuz-version ro root=/dev/sda8 # initrd /initrd-version.img #boot=/dev/sda default=0s timeout=10 splashimage=(hd0,1)/grub/splash.xpm.gz title Red Hat Linux (2.4.16) root (hd0,1) kernel /vmlinuz-2.4.16 ro root=/dev/hda5 hdd=ide-scsi title Red Hat Linux (2.4.9-13) root (hd0,1) kernel /vmlinuz-2.4.9-13 ro root=/dev/hda5 hdd=ide-scsi initrd /initrd-2.4.9-13.img title DOS rootnoverify (hd0,0) chainloader +1
CRON FILES
cron is a daemon that executes commands according to a preset schedule that a user defines.
User crontab files are stored in /var/spool/cron/. They are named after the user they belong to.
System cron files are stored in the following subdirectories of /etc directory:
cron.d cron.daily cron.hourly cron.monthly cron.weekly
crontab in the /etc directory is sort of the master control file set up to run all the scripts in the
cron.daily directory on a daily basis, all the scripts in the cron.hourly directory on an hourly
bases, and so on with cron.monthly and cron.weekly.

ADDRESS:302 PARANJPE UDYOG BHAVAN,OPP SHIVSAGAR RESTAURANT,THANE [W].PH 8097071144/55
50
Prof: siddhesh zele’s
We-IT Tutorials
TYBSC-IT Linux Administration
By default, a file in cron.d called sysstat runs a system activity accounting tool every 10
minutes, 24 x 7.
SYSLOG.CONF
The syslog daemon logs any notable events on your local system. It can store these logs in a
local file or send them to a remote log host for added security. It can also accept logs from other
machines when acting as a remote log host- These options and more, such as how detailed the
logging should be, are set in the syslog.conf file.
LD.SO.CONF
This configuration file is used by ldconfig, which configures dynamic linker runtime bindings. It
contains a listing of directories that hold shared libraries. Shared library files typically end with
.so, whereas static library files typically end with -a, indicating they are an archive of objects.
You may need to edit this file if you‘ve installed a program that has installed a shared library to a
different library directory that is not listed in the id.so.conf file. In this case, you get an error at
runtime that the library does not exist.
LOGROTATE.CONF
logrotate.conf and the files within the logrotated directory determine how often your log files
are rotated by the logrotate program. Log rotation refers to the process of deleting older log files
and replacing them with more recent ones. logrotate can automatically rotate, compress, remove,
and mail your log files. Log files can be rotated based on size or on time, such as daily, weekly,
or monthly.
For every program that has a separate log rotation configuration file in logrotate.d, and uses
syslogd for logging, there should be a logrotconfig file for all log entries in /etc/syslog.conf, as
well as log files produced by external applications, such as Apache. This is because syslog needs
to save log entries for these programs in separate files so that their log files can be rotated
independently of one another.
System configuration files in the /etc/sysconfig directory
APMD
apmd contains configuration information for the advanced power management daemon to follow.
This is most useful for laptops rather than servers, since it contains lots of settings to suspend
your linux machine, and restore it again.
CLOCK
This file contains information on which time zone the machine is set to, and whether or not it is
using Greenwich Mean Time for its system clock time.

ADDRESS:302 PARANJPE UDYOG BHAVAN,OPP SHIVSAGAR RESTAURANT,THANE [W].PH 8097071144/55
51
Prof: siddhesh zele’s
We-IT Tutorials
TYBSC-IT Linux Administration
AMD
amd is the file system automounter daemon. It automatically mounts an unmounted file system
whenever a file or directory within that file system is accessed.
UPS
This file contains information on what UPS is attached to your system. You can specify your
UPS model, to make it easier for the Linux system to communicate with your UPS when the
UPS needs to shut down the system.
Examining the Network Configuration Files
Files to change when setting up a system or moving the system
Starting up network services from xinetd
Starting up network services from the rc scripts
Other important network configuration files in the /etc/sysconfig Directory
Files to change when setting up a system or moving the system
Whenever you set up a system to work on a new network, either because you‘ve just installed
Red Hat or you‘re moving the machine from one location to another, a set of files need to be
modified to get it working on the new network. You need to:
Set up the IP addresses of your network interfaces. Make changes to:
/etc/sysconfig/network-scripts/ifcfg-eth0 /etc/sysconfig/network-scripts/ifcfg-eth1
Set up the hostname of your machine. Make changes to:
/etc/sysconfig/network /etc/hosts
Set up a default gateway. Make changes to:
/etc/default-route
Set up the DNS servers to reference. Make changes to:
/etc/resolv.conf
Make a local file of hostname to IP address mappings. Make changes to:
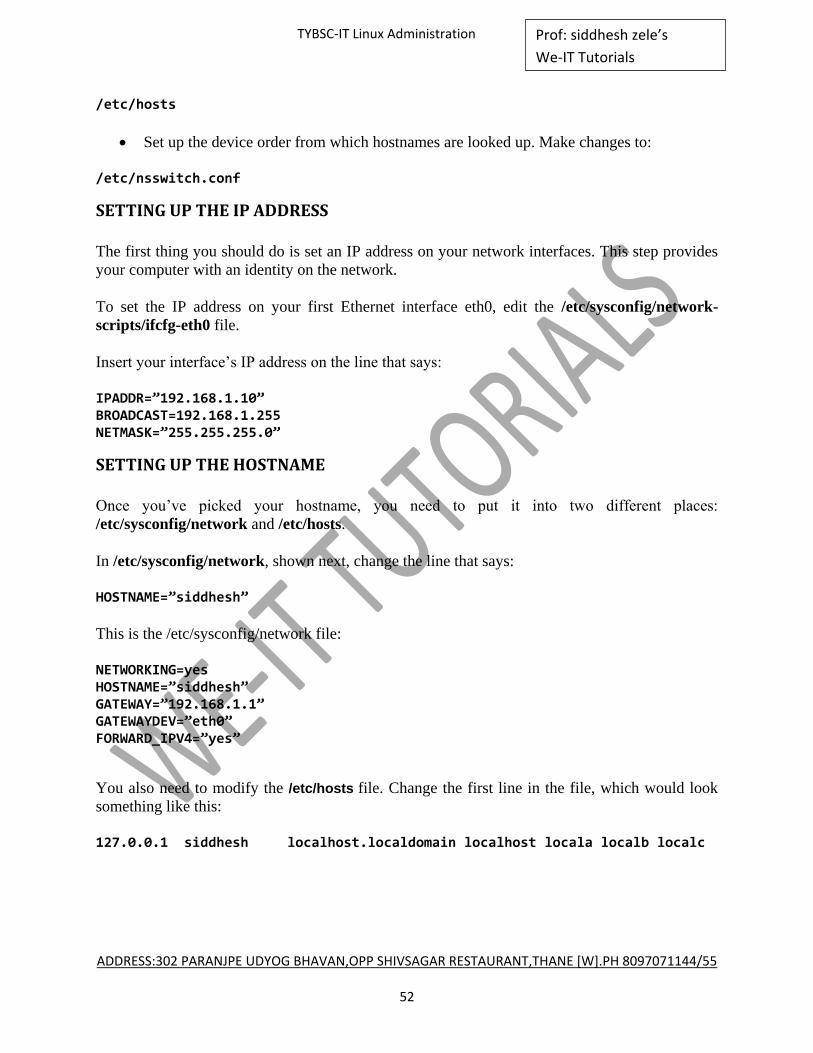
ADDRESS:302 PARANJPE UDYOG BHAVAN,OPP SHIVSAGAR RESTAURANT,THANE [W].PH 8097071144/55
52
Prof: siddhesh zele’s
We-IT Tutorials
TYBSC-IT Linux Administration
/etc/hosts
Set up the device order from which hostnames are looked up. Make changes to:
/etc/nsswitch.conf
SETTING UP THE IP ADDRESS
The first thing you should do is set an IP address on your network interfaces. This step provides
your computer with an identity on the network.
To set the IP address on your first Ethernet interface eth0, edit the /etc/sysconfig/network-
scripts/ifcfg-eth0 file.
Insert your interface‘s IP address on the line that says:
IPADDR=‛192.168.1.10‛ BROADCAST=192.168.1.255 NETMASK=‛255.255.255.0‛
SETTING UP THE HOSTNAME
Once you‘ve picked your hostname, you need to put it into two different places:
/etc/sysconfig/network and /etc/hosts.
In /etc/sysconfig/network, shown next, change the line that says:
HOSTNAME=‛siddhesh‛
This is the /etc/sysconfig/network file:
NETWORKING=yes HOSTNAME=‛siddhesh‛ GATEWAY=‛192.168.1.1‛ GATEWAYDEV=‛eth0‛ FORWARD_IPV4=‛yes‛
You also need to modify the /etc/hosts file. Change the first line in the file, which would look
something like this:
127.0.0.1 siddhesh localhost.localdomain localhost locala localb localc
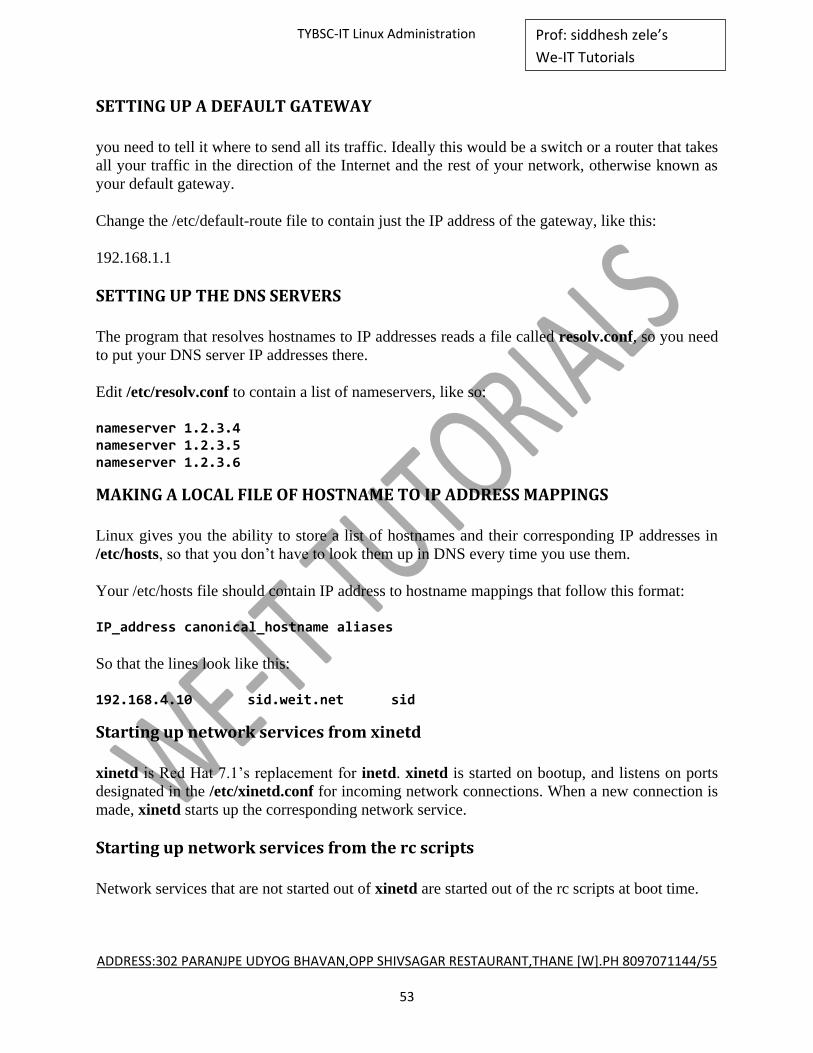
ADDRESS:302 PARANJPE UDYOG BHAVAN,OPP SHIVSAGAR RESTAURANT,THANE [W].PH 8097071144/55
53
Prof: siddhesh zele’s
We-IT Tutorials
TYBSC-IT Linux Administration
SETTING UP A DEFAULT GATEWAY
you need to tell it where to send all its traffic. Ideally this would be a switch or a router that takes
all your traffic in the direction of the Internet and the rest of your network, otherwise known as
your default gateway.
Change the /etc/default-route file to contain just the IP address of the gateway, like this:
192.168.1.1
SETTING UP THE DNS SERVERS
The program that resolves hostnames to IP addresses reads a file called resolv.conf, so you need
to put your DNS server IP addresses there.
Edit /etc/resolv.conf to contain a list of nameservers, like so:
nameserver 1.2.3.4 nameserver 1.2.3.5 nameserver 1.2.3.6
MAKING A LOCAL FILE OF HOSTNAME TO IP ADDRESS MAPPINGS
Linux gives you the ability to store a list of hostnames and their corresponding IP addresses in
/etc/hosts, so that you don‘t have to look them up in DNS every time you use them.
Your /etc/hosts file should contain IP address to hostname mappings that follow this format:
IP_address canonical_hostname aliases
So that the lines look like this:
192.168.4.10 sid.weit.net sid
Starting up network services from xinetd
xinetd is Red Hat 7.1‘s replacement for inetd. xinetd is started on bootup, and listens on ports
designated in the /etc/xinetd.conf for incoming network connections. When a new connection is
made, xinetd starts up the corresponding network service.
Starting up network services from the rc scripts
Network services that are not started out of xinetd are started out of the rc scripts at boot time.
ADDRESS:302 PARANJPE UDYOG BHAVAN,OPP SHIVSAGAR RESTAURANT,THANE [W].PH 8097071144/55
54
Prof: siddhesh zele’s
We-IT Tutorials
TYBSC-IT Linux Administration
network configuration files in the /etc/sysconfig directory
You also can use these files to set up firewall rules for your network to either allow or disallow
connections to your network.
STATIC-ROUTES
If you want to set up some static routes on your machine, you can do so in the static-routes file.
This config file has lines that follow the format of:
network-interface net network netmask netmask gw gateway
IPTABLES
iptables is the next generation Linux firewall. It supercedes the ipchains firewall. It can use
ipchains rules as a component of its firewall filtering, but iptables and ipchains cannot be run at
the same time. This is the file where the iptables rules are stored. iptables syntax is very similar
to the ipchains syntax, which is briefly explained by the following example.
When you install Red Hat, it asks if you would like to set up a host-based firewall. If you select a
medium or heavy security host-based firewall, a default set of ipchains rules installs according to
your preferences.
The following is a simplified configuration file. The gist of this configuration is that all incoming
traffic to privileged ports (those below 1024) is dropped except for ssh traffic. The first line
accepts all traffic from the loopback interface. The second line accepts all incoming TCP traffic
to the ssh port. The third line drops all incoming TCP traffic to ports between 1 and 1024. The
last line drops all incoming UDP traffic to ports between 1 and 1024.
-A INPUT -i lo -j ACCEPT -A INPUT -p tcp --dport 22 -p tcp -j ACCEPT -A INPUT -p tcp -s ! 192.168.1.0/24 --dport 1:1024 -j DROP -A INPUT -p udp -s ! 192.168.1.0/24 --dport 1:1024 -j DROP
IPCHAINS
ipchains is a Linux firewall that is now being superceded by iptables. The GUI interface that
configures the ipchains firewall rules is firewall-config. The ipchains rules are stored in the
ipchains file.
The following is a simplified configuration file. The gist of this configuration is that all incoming
traffic to privileged ports (those below 1024) is dropped except for ssh traffic. The first line
accepts all traffic from the loopback interface. The second line accepts all incoming TCP traffic
to the ssh port. The third line drops all incoming TCP traffic to ports between 1 and 1024. The
last line drops all incoming UDP traffic to ports between 1 and 1024.
ADDRESS:302 PARANJPE UDYOG BHAVAN,OPP SHIVSAGAR RESTAURANT,THANE [W].PH 8097071144/55
55
Prof: siddhesh zele’s
We-IT Tutorials
TYBSC-IT Linux Administration
-A INPUT -i lo -j ACCEPT -A INPUT -p tcp --dport 22 -p tcp -j ACCEPT -A INPUT -p tcp -s ! 192.168.1.0/24 --dport 1:1024 -j DROP -A INPUT -p udp -s ! 192.168.1.0/24 --dport 1:1024 -j DROP
Network configuration files in /etc/sysconfig/network-scripts
You can use the files in this directory to set the parameters for the hardware and software used
for networking. The scripts contained here are used to enable network interfaces and set other
network related parameters.
IFCFG-NETWORK INTERFACE NAME
Red Hat specifies a separate configuration file for each network interface.
ifcfg-eth0 for your first Ethernet interface
ifcfg-irlan0 for your infrared network port
ifcfg-lo for the network loop-back interface
ifcfg-ppp0 for your PPP network interface
IFUP AND IFDOWN
These files are symlinks to /sbin/ifup and /sbin/ifdown. In future releases, these symlinks might
be phased out. But for now, these scripts call any other necessary scripts from within the
network-scripts directory. These should be the only scripts you call from this directory.
You call these scripts with the name of the interface that you want to bring up or down. If these
scripts are called at boot time, then ―boot‖ is used as the second argument. For instance, to bring
your Ethernet interface down and then up again after boot, you would type:
ifup eth0 ifdown eth0
Managing the init Scripts
Init scripts determine which programs start up at boot time. Red Hat and other Unix distributions
have different runlevels, so there are a different set of programs that are started at each runlevel.
Usually Red Hat Linux starts up in multiuser mode with networking fumed on. These are some
of the other runlevels available:
0 - Halt
1 - Single-user mode
2 - Multiuser mode, without networking
3 - Full multiuser mode

ADDRESS:302 PARANJPE UDYOG BHAVAN,OPP SHIVSAGAR RESTAURANT,THANE [W].PH 8097071144/55
56
Prof: siddhesh zele’s
We-IT Tutorials
TYBSC-IT Linux Administration
4 - Not used
5 - Full multiuser mode (with an X-based login screen)
6 - Reboot
The system boots into the default runlevel set in /etc/inittab.
Managing rc Scripts by Hand
If you want to configure which services are started at boot time, you need to edit the rc
scripts for the appropriate runlevel. The default runlevel is 3, which is full multiuser
mode without a graphical interface and runlevel 5 with a graphical interface. So, to
change the services that are started in the default runlevel, you should edit the scripts
found in /etc/rc3.d, or /etc/rc5.d depending on your system.
When you look at a directory listing of the rc directories, notice that the files either start
with S or K. The files that start with S are startup files, and the files that start with K are
kill files. The S scripts are nm in the numerical order listed in their filenames. It should
be mentioned that if a startup script is set to S15. the K script should be K85 (or in
general, SN becomes SM with M = 100-n; the idea being the last started service is the
first killed).
Scripts that do not start with a capital S do not run upon startup. One good way to keep
scripts from starting up at boot time without deleting them is to rename the file with a
small s at the beginning instead of a capital S. This way you can always put the script
back into the startup configuration by capitalizing the initial letter.
When the system starts up, it runs through the scripts in the rc directory of the runlevel
it‘s starting up in. So when the system starts up in runlevel 3, it runs the scripts in the
/etc/rc3.d directory.
Managing rc Scripts Using chkconfig
Fedora Core and Red Hat Enterprise Linux come with a useful tool called chkconfig. It
helps the system administrator manage rc scripts and xinetd configuration files without
having to manipulate them directly. It is inspired by the chkconfig command included in the
IRIX operating system.
Type chkconfig --list to see all the services chkconfig knows about, and whether they are
stopped or started in each runlevel. The first in the chkconfig column is the name of the
installed service. The next seven columns each represent a runlevel, and tell you whether
that service is turned on or off in that runlevel.
To turn a service off or on using chkconfig, use this syntax: chkconfig -level[0—6]( you must choose the runlevel) servicename
(off|on|reset)
So, to turn off the gpm daemon turned on previously, type: chkconfig --level 2 gpm off
ADDRESS:302 PARANJPE UDYOG BHAVAN,OPP SHIVSAGAR RESTAURANT,THANE [W].PH 8097071144/55
57
Prof: siddhesh zele’s
We-IT Tutorials
TYBSC-IT Linux Administration
To turn on xinetd, type:
chkconfig xinetd on
Run chkconfig --list again to see if the service you changed has been set to the state you desire.
Changes you make with chkconfig take place the next time you boot up the system. You can
always start, stop, or restart a service by running service (service name) from a terminal prompt
.chkconfig servicename off|on|reset
ADDRESS:302 PARANJPE UDYOG BHAVAN,OPP SHIVSAGAR RESTAURANT,THANE [W].PH 8097071144/55
58
Prof: siddhesh zele’s
We-IT Tutorials
TYBSC-IT Linux Administration
CHAPTER 2 : TCP/IP Networking
TCP/IP Explained
TCP/IP is an acronym for Transmission Control Protocol/Internet Protocol, and refers to a family
of protocols used for computer communications.
To be able to send and receive information on the network, each device connected to it must
have an address. The address of any device on the network must be unique and have a standard,
defined format by which it is known to any other device on the network.
Address consists of two parts:
the address of the network to which the device is connected
the address of the device itself — its node or host address
Understanding Network Classes
All addresses must have two parts: the network part and the node, or host, part. Ipv4
addresses used in TCP/IP networks are 4 bytes long, called IP addresses, and are written in
standard dot notation, which means that a decimal number separated by dots (for example,
192.168.1.2). The decimal numbers must be within the numeric range of 0 to 255 to
conform to the 1-byte requirement.
IP addresses are divided into classes with the most significant being classes A, B, and C,
depending on the value of the first byte of the address. Table below shows valid numbers for
these classes.
The reason for the class division is to enable efficient use of the address numbers. If the
division were the first 2 bytes to the network part, as shown in Table below, and the last 2
bytes to the host part, then no network could have more than 216 hosts. This would be
impractical for large networks and wasteful for small networks.
There are a few ways to assign IP addresses to the devices, depending on the purpose of the
network. If the network is internal, an intranet, not connected to an outside network, any
class A, B, or C network number can be used.
Network Classes and Their IP Number Range :
CLASS FIRST BYTE
Class A 0—127
Class B 128—191
Class C 192—233
ADDRESS:302 PARANJPE UDYOG BHAVAN,OPP SHIVSAGAR RESTAURANT,THANE [W].PH 8097071144/55
59
Prof: siddhesh zele’s
We-IT Tutorials
TYBSC-IT Linux Administration
The MAC address was defined as the lowest level at which communication occurs. On an
Ethernet network, this address is also called the Ethernet address. This is the address that
is ultimately necessary for transmission of data. For transfer to happen, the IP address
must be mapped to the Ethernet address of the device. The mechanism that makes this
possible is Address Resolution Protocol, or ARP.
To determine the Ethernet address of a node on the same network, the sending device
sends an ARP request to the Ethernet broadcast address. The Ethernet broadcast address
is a special address to which all Ethernet cards are configured to ―listen‖. The ARP
request, containing the sender‘s IP and Ethernet addresses, as well as the IP address it is
looking for, asks each device for the Ethernet address that corresponds to a particular IP
address. The device whose address matches the request sends a reply to the sender‘s
Ethernet address. The sender is then able to send its data to the specific address it
received in response to its ARP request.
Routers enable networks not physically connected to each other to communicate. A
router must be connected physically to each network that wants to communicate. The
sending node must be able to send its request to a router on its own network, and the
receiving node must also be on a network connected to a router. The sending node sends
its request to the router on its network. This router is typically called the default gateway,
and its address must be configured in the sending node‘s configuration files.
The router receives the request from the sending node and determines the best route for it
to use to transmit the data. The router has an internal program, called a routing table,
which it uses to send the data, either to another router if the other network is not directly
connected, or directly to the other network. If the destination network cannot be found in
the routing table, then the packet is considered undeliverable and is dropped. Typically, if
the packet is dropped, the router sends an ICMP Destination Unreachable message to the
sender.
Routing tables can be manually configured or acquired dynamically. Manual
configuration means that it is necessary for whoever is setting up the router to provide all
the information about other networks and how to reach them.
Dynamic acquisition means that the router sends a message using the Routing Information
Protocol (RIP) or Open Shortest Path First (OSPF) protocol. These dynamic protocols enable
routers to share details with other routers concerning networks and their locations.
Setting Up a Network Interface Card (NIC)
Even if the computer is not connected to outside networks, internal network functionality is
required for some applications. This address is known as the loopback device, and its IP address
is 127.0.0.1. If you type ifconfig at a console prompt, you will be shown your current network
interface configuration.
If your loopback is configured, the ifconfig shows a device called lo with the address 127.0.0.1.
If this device and address are not shown, you can add the device by using the ifconfig command
as follows:
ifconfig lo 127.0.0.1
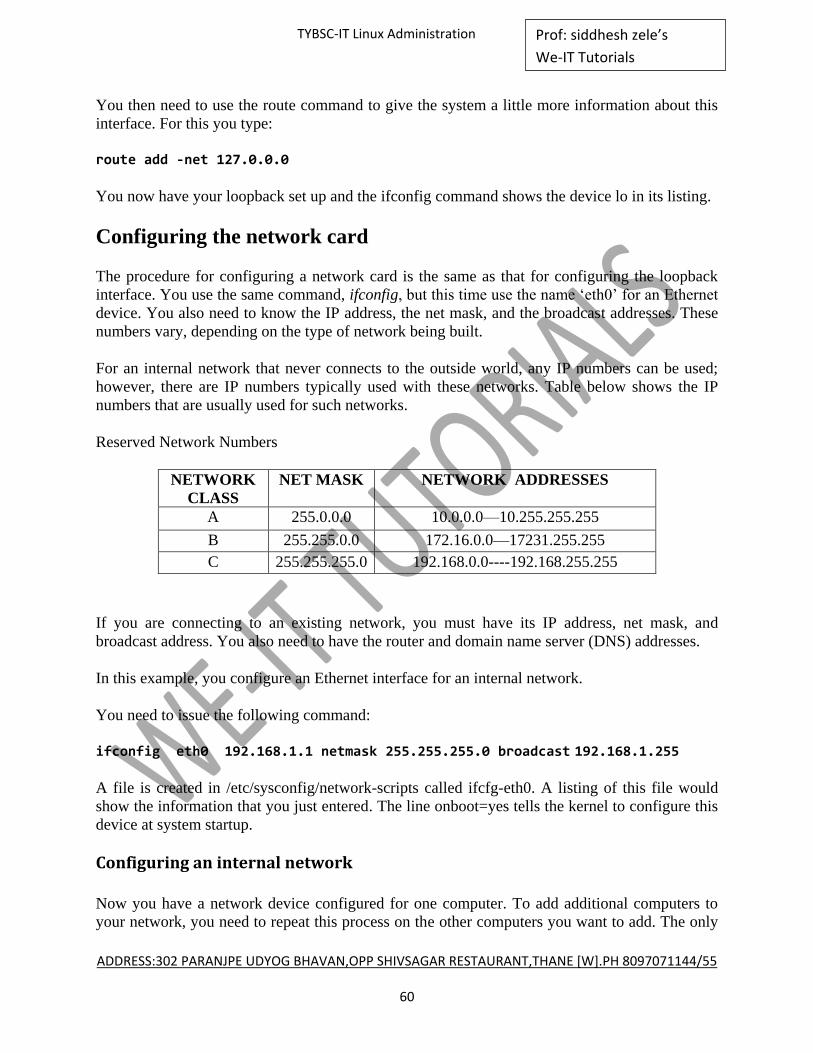
ADDRESS:302 PARANJPE UDYOG BHAVAN,OPP SHIVSAGAR RESTAURANT,THANE [W].PH 8097071144/55
60
Prof: siddhesh zele’s
We-IT Tutorials
TYBSC-IT Linux Administration
You then need to use the route command to give the system a little more information about this
interface. For this you type:
route add -net 127.0.0.0
You now have your loopback set up and the ifconfig command shows the device lo in its listing.
Configuring the network card
The procedure for configuring a network card is the same as that for configuring the loopback
interface. You use the same command, ifconfig, but this time use the name ‗eth0‘ for an Ethernet
device. You also need to know the IP address, the net mask, and the broadcast addresses. These
numbers vary, depending on the type of network being built.
For an internal network that never connects to the outside world, any IP numbers can be used;
however, there are IP numbers typically used with these networks. Table below shows the IP
numbers that are usually used for such networks.
Reserved Network Numbers
NETWORK
CLASS
NET MASK NETWORK ADDRESSES
A 255.0.0.0 10.0.0.0—10.255.255.255
B 255.255.0.0 172.16.0.0—17231.255.255
C 255.255.255.0 192.168.0.0----192.168.255.255
If you are connecting to an existing network, you must have its IP address, net mask, and
broadcast address. You also need to have the router and domain name server (DNS) addresses.
In this example, you configure an Ethernet interface for an internal network.
You need to issue the following command:
ifconfig eth0 192.168.1.1 netmask 255.255.255.0 broadcast 192.168.1.255
A file is created in /etc/sysconfig/network-scripts called ifcfg-eth0. A listing of this file would
show the information that you just entered. The line onboot=yes tells the kernel to configure this
device at system startup.
Configuring an internal network
Now you have a network device configured for one computer. To add additional computers to
your network, you need to repeat this process on the other computers you want to add. The only
ADDRESS:302 PARANJPE UDYOG BHAVAN,OPP SHIVSAGAR RESTAURANT,THANE [W].PH 8097071144/55
61
Prof: siddhesh zele’s
We-IT Tutorials
TYBSC-IT Linux Administration
change is that you need to assign a different IP address. For example, the second computer on
your network could have the address 192.168.2.6, the third could have 192.168.2.7, and so on.
In addition to configuring the network cards on each of the computers in the network,
three files on each computer need to be modified. These files are all located in the /etc directory:
/etc/nsswitch.conf /etc/hosts /etc/resolv.conf /etc/sysconfig/network
The /etc/nsswitch.conf file contains configuration information for the name resolver and
should contain the following line:
hosts: files dns
To add additional computers to your network you need to repeat network device configuration on
the other computers you want to add. three files need to be modified.
/etc/hosts.conf /etc/hosts /etc/resolv.conf
The /etc/hosts.conf file contains configuration information for the name Resolver
Ipaddress hostnames
The /etc/resolv.conf. file provides information about nameservers employed to resolve host
names
Servername ipaddress
This configuration tells the name resolver to check the /etc/hosts file before attempting to query
a name server and to return all valid addresses for a host found in the /etc/hosts file instead of
just the first.
The /etc/hosts file could contain the names of all the computers on the local network, or an
outside network. For a small network, maintaining this file is not difficult, but for a large
network, like the Internet, keeping the file up to date is often impractical.
The /etc/resolv.conf file provides information about name servers employed to resolve host
names.
The /etc/sysconfig/network file contains two lines, as follows:
NETWORKING=yes

ADDRESS:302 PARANJPE UDYOG BHAVAN,OPP SHIVSAGAR RESTAURANT,THANE [W].PH 8097071144/55
62
Prof: siddhesh zele’s
We-IT Tutorials
TYBSC-IT Linux Administration
HOSTNAME (host and domain name of your system)
The first line enables networking for your system. The second line displays the hostname of your
system and the name of the domain to which it belongs.
Understanding Subnetting
A sub-network or subnet is a logically visible division of an IP network.
IP numbers are not assigned to hosts; they are assigned to network interfaces on hosts.
Even though many computers on an IP network have a single network interface and a
single IP number, a single computer can have more than one network interface. In this
case, each interface would have its own IP number.
Advantages to subnetting:
i) enables you to use one IP address and split it up so that it can be used on several
physically connected local networks.
ii) different network topologies can exist on different network segments within the
same organization
iii) overall network traffic is reduced.
iv) enables increased security by separating traffic into local networks.
There is a limit to the number of sub-nets that can be created based on the number of times a
given number can be divided.
In the current (IPv4) implementation, IP numbers consist of 4 (8-bit) bytes for a total of 32
bits of available information. This system results in large numbers, even when they are
represented in decimal notation. To make them easier to read and organize, they are written
in what is called dotted quad format. For example, in the IP address 192.168.1.1 each of the
four groups of numbers can range from 0 to 255.
The following shows the IP number in binary notation with its decimal equivalent. If the bit
is set to 1 it is counted, and if set to zero it is not counted. 1+1 + 1+1 + 1 + 1 + 1 + 1 128 + 64 +32 + 16 + 8 + 4 +2 + 1 =255
The binary notation for 192.168.1.1 is:
11000000.10101000. 00000001 .00000001
The dotted quad notation from this binary is:
ADDRESS:302 PARANJPE UDYOG BHAVAN,OPP SHIVSAGAR RESTAURANT,THANE [W].PH 8097071144/55
63
Prof: siddhesh zele’s
We-IT Tutorials
TYBSC-IT Linux Administration
(128+64) . (128+32+8) . (1) . (1) = 192.168.1.1
The leftmost bits of the IP number of a host identify the network on which the host
resides; the remaining bits of the IP number identify the network interface. Exactly how
many bits are used by the network ID and how many are available to identify interfaces
on that network is determined by the network class.
Class A IP network numbers use the left quad to identify the network, leaving three
quads to identify host interfaces on that network. Class A addresses always have the
farthest left bit of the farthest left byte a zero, so there is a maximum of 128 class A
network numbers available, with each one containing up to 33,554,430 possible
interfaces.
The network numbers 0.0.0.0, known as the default route, and 127.0.0.0, the loopback
network, have special meanings and cannot be used to identify networks. So if you take
these two network numbers out, there are only 126 available class A network numbers.
Class B IP network numbers use the two left dotted quads to identify the network,
leaving two dotted quads to identify host interfaces. Class B addresses always have the
farthest left bits of the left byte set to 10. This leaves 14 bits left to specify the network
address giving 32,767 available B class networks. Class B networks have a range of 128
to 191 for the first of the dotted quads, with each network containing up to 32,766
possible interfaces.
Class C IP network numbers use the left three quads to identify the network, leaving the
right quad to identify host interfaces. Class C addresses always start with the farthest left
three bits set to 1 1 0 or a range of 192 to 255 for the farthest left dotted quad. This means
that there are 4,194,303 available Class C network numbers, each containing 254
interfaces.
Interpreting IP numbers
IP numbers can have three possible meanings. The first of these is an address of a
network, which is the number representing all the devices that are physically connected to
each other. The second is the broadcast address of the network, which is the address that
enables all devices on the network to be contacted. Finally, the last meaning is an actual
interface address.
For a Class C network:
192.168.3.0 is a Class C network number
192.168.3.42 is a host address on this network.
192.168.3.255 is the network broadcast address.
ADDRESS:302 PARANJPE UDYOG BHAVAN,OPP SHIVSAGAR RESTAURANT,THANE [W].PH 8097071144/55
64
Prof: siddhesh zele’s
We-IT Tutorials
TYBSC-IT Linux Administration
When you set up your Ethernet device, eth0, you used the ifconfig utility to pass some
information that was written to the ifcg-eth0 file. One of these parameters was the
network mask. The network mask is more properly called the subnetwork mask.
However, it is generally referred to as the network mask, or subnet mask. The determining factor
in sub-netting is the network mask and how it is understood on a local network segment. In
setting up your network card, you used a net mask of 255.255.255.0. In this case, all the network
bits were set to one and the host bits were set to zero. This is the standard format for all network
masks
Before You Subnet Your Network
Before you can subnet your network, you need to make some choices and gather some
information.
First, you need to decide the number of hosts on each of your subnets so that you can
determine how many IP addresses you need.
For each sub-net you create, two addresses are unusable, the subnet‘s network IP address
and its broadcast address. Every time you subnet you are creating these two unusable
addresses, so the more subnets you have, the more IP addresses you lose. The point is
that you don‘t subnet your network more than necessary. Don‘t subnet your network
more than necessary.
Next, you need to determine the sub-network mask and network numbers. The network
mask for an IP network without subnets is simply a dotted quad that has all the network
bits of the network number set to 1 and all the host bits set to 0.
Sub-networking takes one or more of the available host bits and makes them appear as
network bits to the local interfaces. If you wanted to divide your Class C network into
two sub-networks, you would change the first host bit to one, and you would get a net
mask of 11111111.11111111.11111111.10000000, or 255.255.255.128. This would give
you 126 possible IP numbers for each of your subnets.
Remember that you lose two IP addresses for each subnet. If you want to have four sub-
networks, you need to change the first two host bits to ones, and this would give you a net
mask of 255.255.255.192.
You would have 62 IP addresses available on each sub-network.
Classless Inter-Domain Routing (CIDR)
Classless Inter Domain Routing (CIDR) was invented several years ago to keep the
Internet from running out of IP addresses. The class system of allocating IP addresses can
be very wasteful. Anyone who could reasonably show a need for more than 254 host
addresses was given a Class B address block of 65,533 host addresses.
Even more wasteful was allocating companies and organizations Class A address blocks,
which contain over 16 million host addresses! Only a tiny percentage of the allocated
Class A and Class B address space has ever been actually assigned to a host computer on
the Internet.

ADDRESS:302 PARANJPE UDYOG BHAVAN,OPP SHIVSAGAR RESTAURANT,THANE [W].PH 8097071144/55
65
Prof: siddhesh zele’s
We-IT Tutorials
TYBSC-IT Linux Administration
It was realized that addresses could be conserved if the class system was eliminated. By
accurately allocating only the amount of address space that was actually needed, the
address space crisis could be avoided for many years. This solution was first proposed in
1992 as a scheme called supernetting.
Under supernetting, the class subnet masks are extended so that a network address and subnet
mask could, for example, specify multiple Class C subnets with one address.
192.60.128.0 (11000000.00111100.10000000.00000000) Class C subnet address
192.60.129.0 (11000000.00111100.10000001.00000000) Class C subnet address
192.60.130.0 (11000000.00111100.10000010.00000000) Class C subnet address
192.60.131.0 (11000000.00111100.10000011.00000000) Class C subnet address
Supernetted Subnet address:
192.60.128.0 (11000000.00111100.10000000.00000000)
Subnet Mask:
255.255.252.0 (11111111.11111111.11111100.00000000)
Broadcast Address:
192.60.131.255 (11000000.00111100.100000011.11111111)
In this example, the subnet 192.60.128.0 includes all the addresses from 192.60.128.0 to
192.60.131.255. As you can see in the binary representation of the subnet mask, the network
portion of the address is 22 bits long, and the host portion is 10 bits long.
Under CIDR, the subnet mask notation is reduced to simplified shorthand. Instead of spelling out
the bits of the subnet mask, the number of 1s bits that start the mask are simply listed. In the
example, instead of writing the address and subnet mask as
192.60.128.0, Subnet Mask 255.255.252.0
the network address is written simply as:
192.60.128.0/22
Class addresses can easily be written in CIDR notation (Class A = /8, Class B = /16, and Class C
= /24).
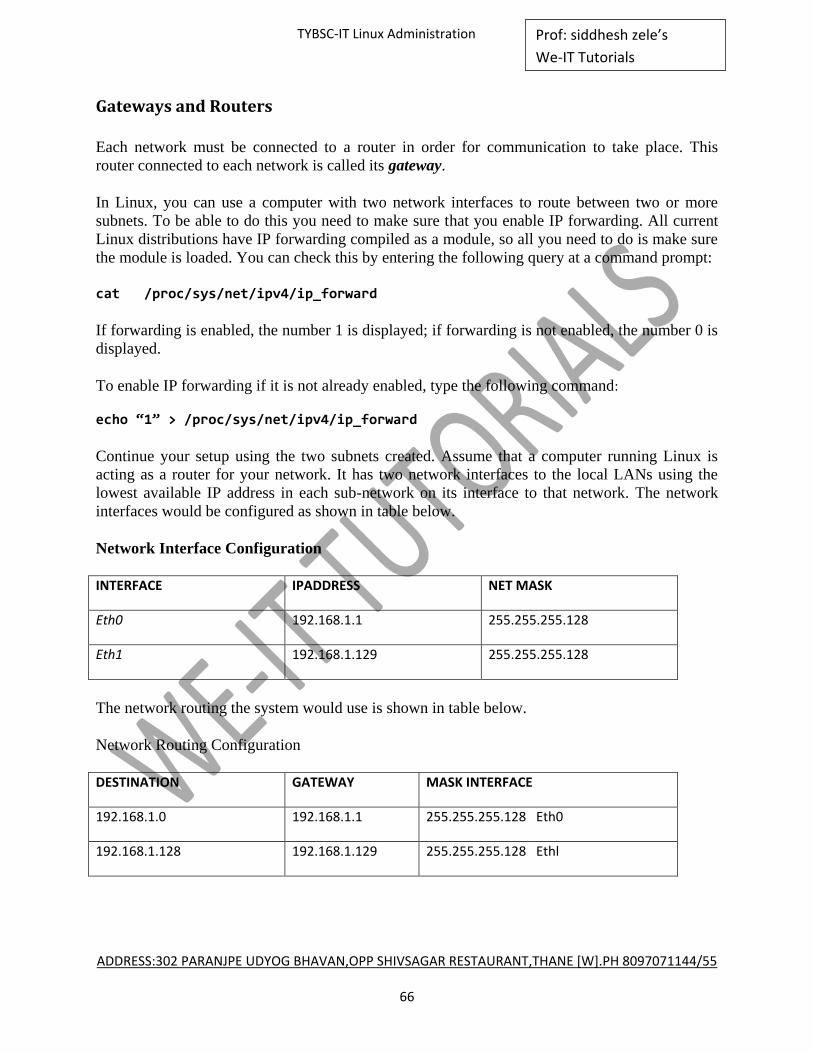
ADDRESS:302 PARANJPE UDYOG BHAVAN,OPP SHIVSAGAR RESTAURANT,THANE [W].PH 8097071144/55
66
Prof: siddhesh zele’s
We-IT Tutorials
TYBSC-IT Linux Administration
Gateways and Routers
Each network must be connected to a router in order for communication to take place. This
router connected to each network is called its gateway.
In Linux, you can use a computer with two network interfaces to route between two or more
subnets. To be able to do this you need to make sure that you enable IP forwarding. All current
Linux distributions have IP forwarding compiled as a module, so all you need to do is make sure
the module is loaded. You can check this by entering the following query at a command prompt:
cat /proc/sys/net/ipv4/ip_forward
If forwarding is enabled, the number 1 is displayed; if forwarding is not enabled, the number 0 is
displayed.
To enable IP forwarding if it is not already enabled, type the following command:
echo ‚1‛ > /proc/sys/net/ipv4/ip_forward
Continue your setup using the two subnets created. Assume that a computer running Linux is
acting as a router for your network. It has two network interfaces to the local LANs using the
lowest available IP address in each sub-network on its interface to that network. The network
interfaces would be configured as shown in table below.
Network Interface Configuration
INTERFACE IPADDRESS NET MASK
Eth0 192.168.1.1 255.255.255.128
Eth1 192.168.1.129 255.255.255.128
The network routing the system would use is shown in table below.
Network Routing Configuration
DESTINATION GATEWAY MASK INTERFACE
192.168.1.0 192.168.1.1 255.255.255.128 Eth0
192.168.1.128 192.168.1.129 255.255.255.128 Ethl
ADDRESS:302 PARANJPE UDYOG BHAVAN,OPP SHIVSAGAR RESTAURANT,THANE [W].PH 8097071144/55
67
Prof: siddhesh zele’s
We-IT Tutorials
TYBSC-IT Linux Administration
Next step is the last. Each computer on the sub- net has to show the IP address for the interface
that is its gateway to the other network. The computers on the first subnet, the 192.168.1.0
network, would have the gateway 192.168.1.1. The computers on the second subnet,
192.168.1.128, would use 192.168.1.129 as the gateway address. You can add this information
using the route command as follows:
route ad -net 192.168.1.0
and then type
route add default gw 192 .169.1.129
This command sets up the route for local (internal) routing and the external mute for your first
subnet.
Configuring Dynamic Host Configuration Protocol (DHCP)
Using Dynamic Host Configuration Protocol (DHCP), you can have an IP address and the other
information automatically assigned to the hosts connected to your network. This method is quite
efficient and convenient for large networks with many hosts, because the process of manually
configuring each host is quite time- consuming. By using DHCP, you can ensure that every host
on your network has a valid IP address, subnet mask, broadcast address, and gateway, with
minimum effort on your part.
Setting up the server
The program that runs on the server is dhcpd and is included as an RPM on the Fedora Core and
Red Hat Enterprise Linux installation CDs. You can install it using the Package Management
tool by following these instructions:
1. On Enterprise Linux choose Applications System Settings Add/Remove Applications
from the top panel. On Fedora Core 4 choose Desktop System Settings
Add/Remove Applications.
2. Scroll down the list until you see a listing for Network Servers.
3. Click the Details link for Network Servers.
4. Click Close; then click Update, and finally click Continue.
5. Insert the requested numbered installation CD when prompted and click OK.
6. After the package is installed, click Close to exit the Package Management tool.
In Fedora Core and Red Hat Enterprise Linux the DHCP server is controlled by the text
file /etc/dhcpd.conf.
ADDRESS:302 PARANJPE UDYOG BHAVAN,OPP SHIVSAGAR RESTAURANT,THANE [W].PH 8097071144/55
68
Prof: siddhesh zele’s
We-IT Tutorials
TYBSC-IT Linux Administration
A sample file is created when you install the dhcpd package that you can use as a guide.
You can modify it using a text editor. Be sure to use the proper addresses for your
network.
NOTE: You need to restart the DHCP server whenever you make changes to the
/etc/dhcpd.conf file.
To start the server, run the command service dhcpd start. To ensure that the dhcpd
program runs whenever the system is booted, you should run the command chkconfig --
level 35 dhcpd on.
Configuring the DHCP Client
First, you need to be sure that your NIC is properly configured and recognized by your system.
After that, it is easy to tell your system to use DHCP to obtain its IP information. Follow these
steps.
1. Usin25g a text editor, open the /etc/sysconfig/networkscripts/ifcfg-eth0 file.
2. Find the line bootproto=static.
3. Change static to dhcp
4. Save your changes.
5. Restart the network by issuing the command service network restart, and your system
will receive its IP information from the DHCP server.
Configuring the Network Using the Network Configuration Tool
Fedora Core and Red Hat Enterprise Linux provide a graphical network configuration tool that
you can use to configure network interface devices installed in your system.
You can access the Network Configuration tool by using the Applications menu from the
GNOME desktop. To start the Network Configuration tool in Enterprise Linux, choose
Applications System Settings Network. In Fedora Core 4 choose Desktop System
Settings Network.
The main Network Configuration tool window has five tabbed pages and opens to the Devices
tab by default.
Device: This tab shows the network devices that are installed and configured on your PC.
Network devices are associated with the actual physical hardware in the PC.
Hardware: This tab shows the actual physical hardware installed in your PC.
ADDRESS:302 PARANJPE UDYOG BHAVAN,OPP SHIVSAGAR RESTAURANT,THANE [W].PH 8097071144/55
69
Prof: siddhesh zele’s
We-IT Tutorials
TYBSC-IT Linux Administration
IPSec: This tab is where you can configure IPSec tunnels used for secure
communications.
DNS: This tab shows the system hostname, domain, and name servers used for DNS
lookups. You can configure this information here.
Hosts: This tab shows the PC hostname to static II‘ address mapping.
Adding an Ethernet Device
With the Network Configuration tool, you can easily add and configure your ethernet device. To
add an Ethernet device, do the following:
1. Click the New button from the toolbar of the Network Configuration tool main window.
The Select Device Type window appears.
2. Choose Ethernet Connection from the Device Type list, and then click Forward to go to
the Select Ethernet Device list.
3. If your NIC is shown in the Select Ethernet Device list, select it and then click Forward to
go to the Configure Network Settings window.
4. If your NIC is not listed, choose Other Ethernet Card and then click Forward to open the
Select Ethernet Adapter window.
5. Select your card from the Adapter drop-down list.
6. Choose the device name from the Device drop-down list.
You should choose eth0 for the first device, eth1 for the second, eth2 for the third, and so
on. You can also enter the system resources that the adapter will use, if desired. Usually,
this is not necessary because the OS automatically assigns resources to devices. But in
the event that you need to control the resource assignments manually because of other
hardware that you are using, you are able to do so.
7. Click Forward to continue to the Configure Network Settings window.
8. Choose whether you want to use DHCP to obtain your IP address automatically or
whether you want to enter a static IP address.
Make your choice by selecting the appropriate radio button. If you choose to set your
address statically, you must enter the IF address, the network mask, and the address of the
default gateway. You can also enter a hostname for your PC, if you desire.

ADDRESS:302 PARANJPE UDYOG BHAVAN,OPP SHIVSAGAR RESTAURANT,THANE [W].PH 8097071144/55
70
Prof: siddhesh zele’s
We-IT Tutorials
TYBSC-IT Linux Administration
9. Click Forward.
You see a listing of your selected information.
10. (Optional) If you want to make changes, click Back to return to the desired window and
make changes. If you are satisfied with your choices, click Apply to create the device.
After clicking Apply, the device is created and appears in the device list. Although the device has
been configured and added to the list of devices, it is inactive, as you can see from the device
listing. By default the device will start at boot time, but you can activate it immediately by
highlighting it and then clicking the Activate button from the menu bar at the top of the window.
11. Choose File Save from the menu to save your changes.
Adding a Wireless NIC
With the Network Configuration tool, you can easily add and configure your wireless NIC.
To add a wireless NIC, do the following:
1. Click the New button from the toolbar of the Network Configuration tool main window.
The Select Device Type window appears.
2. Choose Wireless Connection from the Device Type list and then click Forward to go to
the Select Wireless Device list.
3. If your NIC is shown in the Select Wireless Device list, select it and click Forward to go
to the Configure Wireless Connection dialog box. If your NIC is not listed, go to Step 6.
4. In the Configure Wireless Connection dialog box, enter the appropriate information for
your wireless connection as follows:
Mode:
From the dropdown list, choose from—
Auto to have the system automatically determine the connection type
Manage to set your configuration to connect to a wireless access point
Ad-hoc if you will be connecting directly to other wireless NICs
Network Name (SSID):
Either select the Specified radio button and enter the name of your network here, or select
the Auto radio button to have the system determine the name.
ADDRESS:302 PARANJPE UDYOG BHAVAN,OPP SHIVSAGAR RESTAURANT,THANE [W].PH 8097071144/55
71
Prof: siddhesh zele’s
We-IT Tutorials
TYBSC-IT Linux Administration
Channel:
Enter the channel that your wireless network uses.
Transmit Rate:
Choose Auto or a specific transmission rate for your network.
Key:
If your network uses Wired Equivalent Privacy (WEP), enter the appropriate encryption
key here.
5. After you enter your network information, click Forward to go to the Configure Network
Settings dialog box and continue with Step 10.
6. If your NIC is not listed, choose Other Wireless Card and then click Forward to open the
Select Ethernet Adapter window.
7. Select your card from the drop-down list in the Adapter field.
8. After choosing your card, choose the device name from the drop-down list in the Device
field. You should choose eth0 for the first device, eth1 for the second, eth2 for the third,
and so on. You can also enter the system resources that the adapter will use, if desired.
9. Click Forward to continue to the Configure Wireless Connection dialog box. After
entering your information, click Forward to go to the Configure Network Settings
window.
10. In the Configure Network Settings window, you can choose whether you want to use
DHCP to obtain your IP address automatically or whether you want to enter a static IP
address.
11. After you make the appropriate entries, click Forward. You see a listing of your selected
information.
12. If you want to make changes, click Back to return to the desired window and make
changes. If you are satisfied with your choices, click Apply to create the device. After
clicking Apply, the device is created and appears in the Device list.
Although the device has been configured and added to the list of devices, it is inactive, as
you can see from the device listing. By default, the device starts at boot time, but you can
activate it immediately by highlighting it and then clicking the Activate button from the
menu bar at the top of the window.
13. Choose File Save from the menu to save your changes.
ADDRESS:302 PARANJPE UDYOG BHAVAN,OPP SHIVSAGAR RESTAURANT,THANE [W].PH 8097071144/55
72
Prof: siddhesh zele’s
We-IT Tutorials
TYBSC-IT Linux Administration
Adding a Modem Connection
With the Network Configuration tool, you can easily add and configure your modem. To add a
modem, do the following:
1. Click the New button on the toolbar.
2. Choose Modem Connection from the Device Type list, and then click Forward. The
Configuration tool searches your system to try to detect a modem.
If you have a modem in your hardware list, the Configuration tool uses that modem and
opens the Select Modem window with values appropriate for the modem. If no modem is
found, a message appears, stating that no modem was found and prompting you to click
OK. After you click OK, the Select Modem dialog box appears, but the values might not
be correct for the modem that you have installed.
2. If your modem was successfully found, you can accept the default values for modem
device, baud rate, flow control, and modem volume; otherwise, enter the values
appropriate for your modem.
3. When you are satisfied with the settings, click Forward to go to the Select Provider
window.
4. Here you need to enter the name of your ISP and the telephone number that you dial to
connect. Enter the login name and password that were given to you by your ISP. Unless
you live in any of the countries listed, you can ignore the country list on the left.
5. Click Forward to go to the IP Settings window. You can probably accept the default
setting here to obtain IP addressing information automatically.
6. Choose File Save to write your configuration changes to a file
7. Click Forward to continue.
You see a listing of your selected information. If you want to make changes, click Back
to return to the desired window and make changes. If you are satisfied with your choices,
click Apply to create the device.
The device is created and appears in the Device list. Although the device has been
configured and added to the list of devices, it is inactive, as you can see from the device
listing. By default, the device starts at boot time, but you can activate it immediately by
highlighting it and then clicking the Activate button from the menu bar at the top of the
window.
ADDRESS:302 PARANJPE UDYOG BHAVAN,OPP SHIVSAGAR RESTAURANT,THANE [W].PH 8097071144/55
73
Prof: siddhesh zele’s
We-IT Tutorials
TYBSC-IT Linux Administration
8. Choose File Save from the menu to save your changes.
Editing Your Network Configuration After you add and configure your network connection device, whether it is a wired NJC, wireless
NIC, or modem, you usually don‘t need to change the configuration. You might need to modify
the configuration, though, if you change to a different NIC.
Removing a NIC Using the Network Configuration tool, you can easily make the necessary changes. Start the
Network Configuration tool as follows:
1. In Enterprise Linux choose Applications System Settings Network. In Fedora Core 4
choose Desktop System Settings Network.
2. Click the Hardware tab.
3. Highlight the device that you want to remove, and then click Delete.
4. When finished, choose File Save to save your changes.
Changing the NIC Configuration Using the Network Configuration tool, you can easily make the necessary changes. Start the
Network Configuration tool as follows:
1. In Enterprise Linux choose Applications System Settings Network. In Fedora
Core4 choose Desktop System Settings Network.
2. Highlight the device that you want to modify, and then click Edit (on the toolbar).
The Ethernet Device properties dialog box for the device you selected appears.
3. The three tabs available from this dialog box are used for the following:
General: Here you can enter a nickname for the device and choose whether the device is activated
when the system starts. You can also choose to allow other users to be able to enable and
disable the device. You can choose to obtain IP information automatically by using
DHCP, or you can manually enter the IP information for the device.
Route: Here you can enter static routes to other networks. You need to enter the network IP
number as well as the gateway IP number. In most cases, you don‘t need to enter any
information here if you are using DHCP.
ADDRESS:302 PARANJPE UDYOG BHAVAN,OPP SHIVSAGAR RESTAURANT,THANE [W].PH 8097071144/55
74
Prof: siddhesh zele’s
We-IT Tutorials
TYBSC-IT Linux Administration
Hardware Device: This tab contains information about the hardware associated with the Ethernet device.
You can assign device aliases here if you desire.
If you have configured a device, such as eth0:
a. Click the Add button in the Network Administration tool to create an alias for the
device,
b. Select the network device and configure the network settings.
1. After you make the changes you desire, click OK to return to the Network
Configuration dialog box.
The DNS tab of the Network Configuration tool is where you configure the system‘s hostname,
domain, name sewers, and search domain. Name servers are used to look up other hosts on the
network.
To enter or change these settings, do the following:
1. In Enterprise Linux choose Applications System Settings Network. In Fedora Core
4 choose Desktop System Settings Network.
2. Click the DNS tab from the Network Configuration dialog box.
3. On the DNS tab, enter the appropriate information for your system.
4. After you finish, choose File Save to save your changes.
Managing Hosts
On the Hosts tab of the Network Configuration tool, you can add, edit, or remove hosts to or
from the /etc/hosts file. This file contains IP addresses and their corresponding hostnames. When
your system tries to resolve a hostname to an IP address or determine the hostname for an IP
address, it refers to the /etc/hosts file before using the name servers. If the IP address is listed in
the /etc/hosts file, the name servers are not used. If your network contains computers whose IP
addresses are not listed in DNS, it is recommended that you add them to the /etc/hosts file.
1. In Enterprise Linux choose Applications System Settings Network.
In Fedora Core 4 choose Desktop System Settings Network.
2. Click the Hosts tab from the Network Configuration dialog box. The Hosts tab that
appears shows the hostname to static IP address mappings, if any.
3. Click New from the toolbar to open the Add/Edit Hosts Entry dialog box.
4. Enter the hostname and its IP address. If there is an alias for the hostname, enter it as
well.
5. Click OK to add the entry to the list.
6. Choose File Save to save your changes.
ADDRESS:302 PARANJPE UDYOG BHAVAN,OPP SHIVSAGAR RESTAURANT,THANE [W].PH 8097071144/55
75
Prof: siddhesh zele’s
We-IT Tutorials
TYBSC-IT Linux Administration
Working with Profiles
Multiple logical network devices can be created for each physical hardware device. For example,
if you have one Ethernet card in your system (eth0), you can create logical network devices with
different nicknames and different configuration options, all associated with eth0. These logical
network devices are different from device aliases.
Logical network devices associated with the same physical device must exist in different profiles
and cannot be activated simultaneously. Device aliases are also associated with the same
physical hardware device, but device aliases associated with the same physical hardware can be
activated at the same time.
Profiles can be used to create multiple configuration sets for different networks. A configuration
set can include logical devices as well as hosts and DNS settings. After configuring the profiles,
you can use the Network Administration tool to switch back and forth between them.
By default, there is one profile called Common. To create a new profile, do the following:
1. In Enterprise Linux choose Applications System Settings Network. In Fedora Core
4 choose Desktop System Settings Network.
2. Choose Profile New from the menu.
3. Enter a unique name for the profile.
4. After creating a new profile, if all the devices are not listed for all the profiles, add them
by clicking the Add button. If a device already exists for the physical device, use the
Copy button to copy the existing device.
Configuring IP Masquerading If you made the connection to the Internet through your router, you need to make only a few
configuration changes to make every computer on your network connect to the Internet through
your one connection. This type of connection provides a service known as Network Address
Translation or NAT. To use a single Internet connection for multiple computers, you need to use
IP masquerading. IP masquerading enables you to connect a TCP/IP network to the outside
world using a single server and a single IP address.
There exists a utility called iptables which gives you enough protection for now. To set up
masquerading, type the following commands:
iptables -P forward DENY iptables -A forward -s 192.168.0.0/24 -j MASQ -d 0.0.0.0/0
Those commands are all you need to enable the firewall rules and to start masquerading.
ADDRESS:302 PARANJPE UDYOG BHAVAN,OPP SHIVSAGAR RESTAURANT,THANE [W].PH 8097071144/55
76
Prof: siddhesh zele’s
We-IT Tutorials
TYBSC-IT Linux Administration
CHAPTER 3 : The Network File System
NFS Overview
NFS is most common method used to share files across Linux and UNIX networks. It is a
distributed file system that enables local access to remote disks and file systems. In a properly
designed and carefully implemented NFS installation, NFS‘s operation is totally transparent to
clients using remote file.
Understanding NFS
NFS follows standard client/server architectural principles.
The server component of NFS consists of the physical disks that contain the file systems want to
share and several daemons that make these shared file systems visible to and available for use by
client systems on the network. When an NFS server is sharing a file system in this manner, it is
said to be exporting a file system. Similarly, the shared file system is referred to as an NFS
export. The NFS server daemons provide remote access to the exported file systems, enable file
locking over the network and, optionally, allow the sewer administrator to set a enforce disk
quotas on the NFS exports.
On the client side of the equation, an NFS client simply mounts the export file systems locally,
just as local disks would be mounted. The mounted file system is known colloquially as an NFS
mount.
Uses of NFS:
NFS is often used to provide diskless clients, such as X terminals or the slave nodes in a
cluster, with their entire file system, including the kernel image and other boot files.
To export shared data or project-specific directories from an NFS server and to enable
clients to mount these remote file systems anywhere they see fit on the local system.
To provide centralized storage for users‘ home directories. Many sites store users‘ home
directories on a central server and use NFS to mount the home directory when users log
in or boot their systems.
NFS can be used in almost any situation requiring transparent local access to remote file
systems.
ADDRESS:302 PARANJPE UDYOG BHAVAN,OPP SHIVSAGAR RESTAURANT,THANE [W].PH 8097071144/55
77
Prof: siddhesh zele’s
We-IT Tutorials
TYBSC-IT Linux Administration
Advantages of NFS: NFS provides is centralized control, maintenance, and administration.
It is much easier, for example, to back up a file system stored on a single server than it is
to back up directories scattered across a network, on systems that are geographically
dispersed, and that might or might not be accessible when the backup is made.
NFS makes it trivial to provide access to shared disk space, or limit access to sensitive
data.
When NFS and NIS are used together, changes to system wide configuration files, such
as authentication files or network configuration information, can be quickly and
automatically propagated across the network without requiring system administrators to
physically visit each machine or requiring users to take any special action.
NFS can also conserve disk space and prevent duplication of resources. Read-only file
systems and file systems that change infrequently, such as /usr, can be exported as read-
only NFS mounts. Upgrading applications employed by users throughout a network is a
matter of installing the new application and changing the exported file system to point at
the new application.
End users also benefit from NFS. When NFS is combined with NIS, users can log in from
any system, even remotely, and still have access to their home directories and see a
uniform view of shared data. Users can protect important or sensitive data or information
that would be impossible or time-consuming to re-create by storing it on an NFS mounted
file system that is regularly backed up.
Disadvantages of NFS: As a distributed, network-based file system, NFS is sensitive to network congestion.
Heavy network traffic slows down NFS performance. Heavy disk activity on the NFS
server adversely affects NFS‘s performance. In the face of network congestion or
extreme disk activity, NFS clients run more slowly because file I/O takes longer.
If an exported file system is not available when a client attempts to mount it, the client
system can hang.
An exported file system represents a single point of failure. If the disk or system
exporting vital data or application becomes unavailable for any reason, such as a disk
crash or server failure, no one can access that resource.
NFS suffers from potential security problems because its design assumes a trusted
network, not a hostile environment in which systems are constantly being probed and
attacked. The primary weakness of most NFS implementations based on protocol
versions 1, 2, and 3 is that they are based on standard (unencrypted) remote procedure
calls (RPC). RPC is one of the most common targets of exploit attempts. As a result,
sensitive information should never be exported from or mounted on systems directly
exposed to the Internet.
Providing all users access to all files might pose greater risks than user convenience and
administrative simplicity justify. Care must be taken when configuring NFS exports to
limit access to the appropriate users and also to limit what those users are permitted to do
with the data.

ADDRESS:302 PARANJPE UDYOG BHAVAN,OPP SHIVSAGAR RESTAURANT,THANE [W].PH 8097071144/55
78
Prof: siddhesh zele’s
We-IT Tutorials
TYBSC-IT Linux Administration
Configuring an NFS Server
Key files, commands, and daemons
This subsection discusses the key files, commands, and daemons that make up an NFS server.
On most Linux systems these files and programs include the following:
Configuration and status files /etc/exports /var/lib/nfs/rmtab /var/lib/nfs/xtab /etc/hosts.allow /etc/hosts.deny
Daemons rpc.portmap rpc.mountd rpc.nfsd rpc.statd rpc.lockd rpc.rquotad
Scripts and commands /etc/rc.d/init.d/nfs nfsstat showmount rpcinfo exportfs
NFS Server Configuration and Status Files
The server configuration file is /etc/exports, which contains a list of file systems to export, the
clients permitted to mount them, and the export options that apply to client mounts. Each line in
/etc / exports has the following format:
dir [host] (options) […]
dir specifies a directory or file system to export, host specifies one or more hosts permitted to
mountdir, and options specifies one or more mount options. If you omit host, the listed options
apply to every possible client system, likely not something you want to do.
The export options, listed in parentheses after the host specification, determine the characteristics
of the exported file system. Table below lists valid values for options.
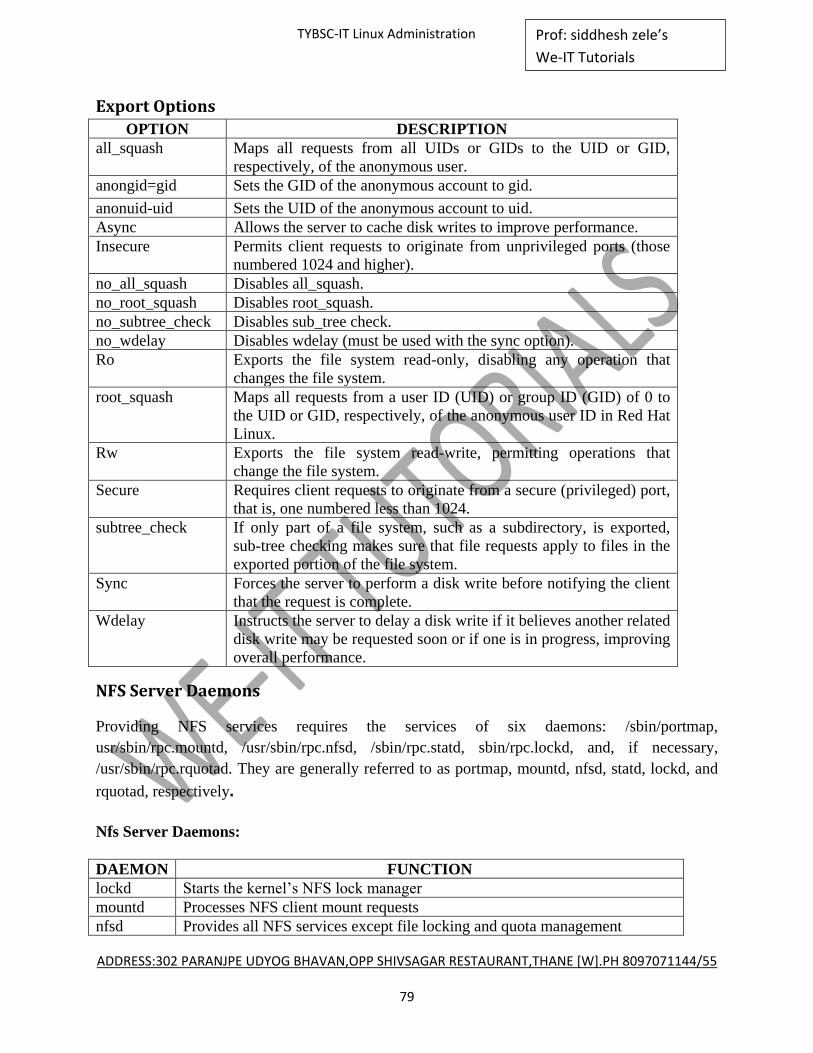
ADDRESS:302 PARANJPE UDYOG BHAVAN,OPP SHIVSAGAR RESTAURANT,THANE [W].PH 8097071144/55
79
Prof: siddhesh zele’s
We-IT Tutorials
TYBSC-IT Linux Administration
Export Options
OPTION DESCRIPTION
all_squash Maps all requests from all UIDs or GIDs to the UID or GID,
respectively, of the anonymous user.
anongid=gid Sets the GID of the anonymous account to gid.
anonuid-uid Sets the UID of the anonymous account to uid.
Async Allows the server to cache disk writes to improve performance.
Insecure Permits client requests to originate from unprivileged ports (those
numbered 1024 and higher).
no_all_squash Disables all_squash.
no_root_squash Disables root_squash.
no_subtree_check Disables sub_tree check.
no_wdelay Disables wdelay (must be used with the sync option).
Ro Exports the file system read-only, disabling any operation that
changes the file system.
root_squash Maps all requests from a user ID (UID) or group ID (GID) of 0 to
the UID or GID, respectively, of the anonymous user ID in Red Hat
Linux.
Rw Exports the file system read-write, permitting operations that
change the file system.
Secure Requires client requests to originate from a secure (privileged) port,
that is, one numbered less than 1024.
subtree_check If only part of a file system, such as a subdirectory, is exported,
sub-tree checking makes sure that file requests apply to files in the
exported portion of the file system.
Sync Forces the server to perform a disk write before notifying the client
that the request is complete.
Wdelay Instructs the server to delay a disk write if it believes another related
disk write may be requested soon or if one is in progress, improving
overall performance.
NFS Server Daemons
Providing NFS services requires the services of six daemons: /sbin/portmap,
usr/sbin/rpc.mountd, /usr/sbin/rpc.nfsd, /sbin/rpc.statd, sbin/rpc.lockd, and, if necessary,
/usr/sbin/rpc.rquotad. They are generally referred to as portmap, mountd, nfsd, statd, lockd, and
rquotad, respectively.
Nfs Server Daemons:
DAEMON FUNCTION
lockd Starts the kernel‘s NFS lock manager
mountd Processes NFS client mount requests
nfsd Provides all NFS services except file locking and quota management
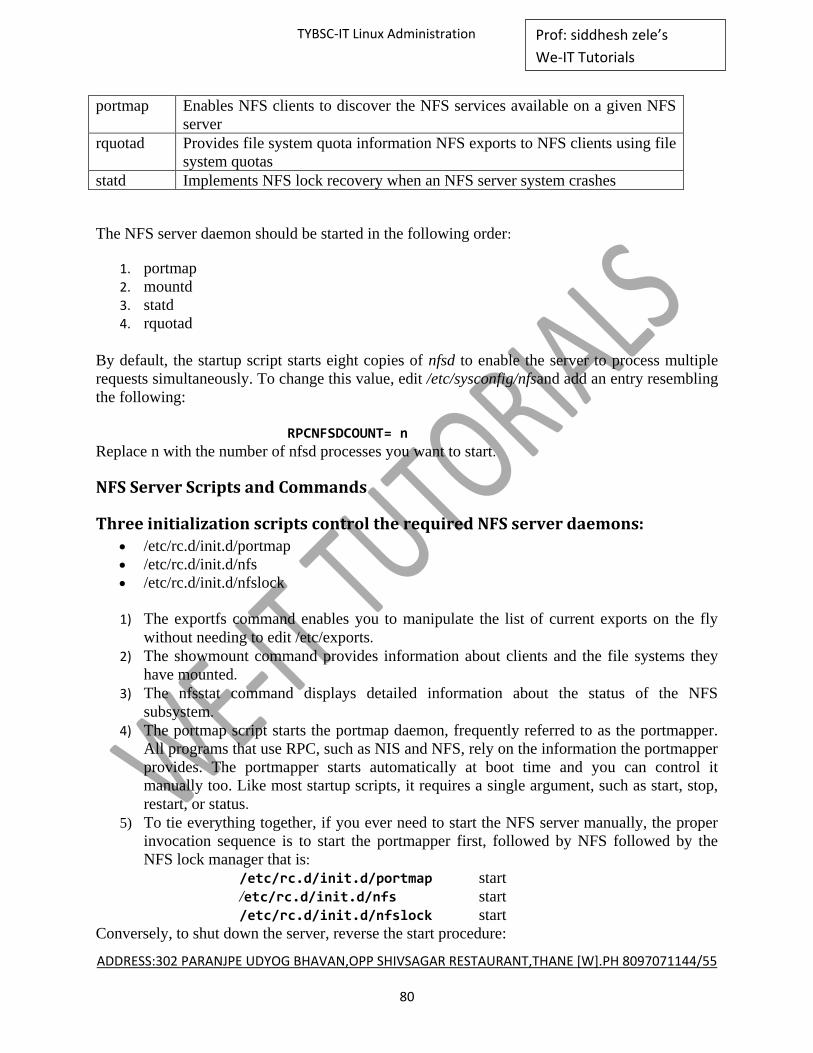
ADDRESS:302 PARANJPE UDYOG BHAVAN,OPP SHIVSAGAR RESTAURANT,THANE [W].PH 8097071144/55
80
Prof: siddhesh zele’s
We-IT Tutorials
TYBSC-IT Linux Administration
portmap Enables NFS clients to discover the NFS services available on a given NFS
server
rquotad Provides file system quota information NFS exports to NFS clients using file
system quotas
statd Implements NFS lock recovery when an NFS server system crashes
The NFS server daemon should be started in the following order:
1. portmap
2. mountd
3. statd
4. rquotad
By default, the startup script starts eight copies of nfsd to enable the server to process multiple
requests simultaneously. To change this value, edit /etc/sysconfig/nfsand add an entry resembling
the following:
RPCNFSDCOUNT= n
Replace n with the number of nfsd processes you want to start.
NFS Server Scripts and Commands
Three initialization scripts control the required NFS server daemons: /etc/rc.d/init.d/portmap
/etc/rc.d/init.d/nfs
/etc/rc.d/init.d/nfslock
1) The exportfs command enables you to manipulate the list of current exports on the fly
without needing to edit /etc/exports.
2) The showmount command provides information about clients and the file systems they
have mounted.
3) The nfsstat command displays detailed information about the status of the NFS
subsystem.
4) The portmap script starts the portmap daemon, frequently referred to as the portmapper.
All programs that use RPC, such as NIS and NFS, rely on the information the portmapper
provides. The portmapper starts automatically at boot time and you can control it
manually too. Like most startup scripts, it requires a single argument, such as start, stop,
restart, or status.
5) To tie everything together, if you ever need to start the NFS server manually, the proper
invocation sequence is to start the portmapper first, followed by NFS followed by the
NFS lock manager that is:
/etc/rc.d/init.d/portmap start
/etc/rc.d/init.d/nfs start
/etc/rc.d/init.d/nfslock start
Conversely, to shut down the server, reverse the start procedure:

ADDRESS:302 PARANJPE UDYOG BHAVAN,OPP SHIVSAGAR RESTAURANT,THANE [W].PH 8097071144/55
81
Prof: siddhesh zele’s
We-IT Tutorials
TYBSC-IT Linux Administration
/etc/rc.d/init.d/nfslock stop
/etc/rc.d/init.d/nfs stop
/etc/rc.d/init.d/portmap stop
Designing an NFS server
Selecting the file systems to export
Choosing which users (or hosts) are permitted to mount the exported file systems
Selecting a naming convention and mounting scheme that maintains network
transparency and ease of use
Configuring the server and client systems to follow the convention
Configuring an NFS Server And client Server side configuration
Sample of /etc/exports file
/home/redhat 192.168.1.0/255.255.255.0(rw) Service nfs restart
Client side configuration
Mount –t nfs siddhesh:/home/redhat/ /root/Desktop/sharingTest Cd /root/Desktop/sharingTest
Nfs files
NFS Server Configuration and Status Files NFS Server Daemons NFS Server Scripts and Commands
/etc/exports rpc.portmap /etc/rc.d/init.d/nfs
/var/lib/nfs/rmtab rpc.mountd nfstat
/var/lib/nfs/xtab rpc.nfsd showmount
/etc/hosts.allow rpd.statd rpcinfo
/etc/hosts.deny rpc.lockd exportfs
rpc.rquotad
rpcinfo’s output shows the RPC program‘s ID number, version number, the network protocol it
is using, the port number it is using, and an alias name for the program number.
The exportfs command enables you to manipulate the list of available exports, in some cases
without editing /etc/exports. It also maintains the list of currently exported file systems in
/var/lib/nfs/xtab and the kernel‘s internal table of exported file systems.

ADDRESS:302 PARANJPE UDYOG BHAVAN,OPP SHIVSAGAR RESTAURANT,THANE [W].PH 8097071144/55
82
Prof: siddhesh zele’s
We-IT Tutorials
TYBSC-IT Linux Administration
The showmount command queries the mount daemon, mountd, about the status of the NFS
server. showmount displays a list of all clients that have mounted file systems from the current
host.
rpcinfo -p to make sure the necessary daemons are running, then finish up with showmount –a.
nfsstat command which prints the kernel‘s NFS statistics.
Using Automount Services The easiest way for client systems to mount NFS exports is to use autofs, which
automatically mounts file systems not already mounted when the file system is first accessed.
autofs uses the automount daemon to mount and unmount file systems that automount has
been configured to control.
autofs uses a set of map files to control automounting. A master map file, /etc/auto.master,
associates mount points with secondary map files. The secondary map files, in turn, control
the file systems mounted under the corresponding mount points.
For example, consider the following /etc/auto.master autofs configuration file: /home /etc/auto.home /var /etc/auto.var --timeout 600
This file associates the secondary map file /etc/auto.home with mount point /home and the
map file /etc/auto.var with the /var mount point. Thus, /etc/auto.home defines the file systems
mounted under /home, and /etc/auto.var defines the file systems mounted under /var.
Each entry in /etc/auto.master, i.e. the master map, consists of at least two and possibly three
fields. The first field is the mount point; the second field identifies the full path to the
secondary map file controls the map point; the third field, which is optional, consists of
options that control the behavior of the automount daemon.
Examining NFS Security
NFS protocol versions 3 and older have some inherent security problems that make it
unsuitable for use across the internet and potentially unsafe for use even in a trusted network.
This section identifies key security issues of NFS in general and the security risks specific to
an NFS server and to NFS clients and suggests remedies that minimize your network‘s
exposure to these security risks.
General NFS Security Issues
Server Security Considerations
Client Security Considerations
ADDRESS:302 PARANJPE UDYOG BHAVAN,OPP SHIVSAGAR RESTAURANT,THANE [W].PH 8097071144/55
83
Prof: siddhesh zele’s
We-IT Tutorials
TYBSC-IT Linux Administration
UNIT 3
CHAPTER 1 : Connecting to Microsoft
Networks:
Using a program called Samba, you can emulate the Windows file-sharing protocol and connect
your Fedora Core and Red Hat Enterprise network to a windows network to share files and
printers.
Installing Samba
Configuring the Samba Server
Creating Samba Users
Starting the Samba Server
Connecting to a Samba Client
Connecting from a Windows PC to the Samba Server
Installing Samba
Computers running Windows 95 or greater use a protocol called Server Message Block (SMB) to
communicate with each other and to share services such as file and print sharing. With Samba,
the Linux PC icon appears in the Windows Network Places window and the files on the Linux
PC can be browsed using Windows Explorer. The Windows file system can be mounted on your
Linux system, and you can browse the Windows files from your Linux PC.
Before you can use Samba to connect to the Windows computers, it must first be installed on the
Linux PC. All current distributions of Fedora Core and Red Hat Enterprise Linux include three
Samba packages: Samba, Samba-client and Samba-common. They may not have been installed
during the system installation.
To see whether Samba is installed on your system, type the following at a terminal window:
rpm -q samba
If Samba is not installed, the command returns ―not installed‖
If Samba is installed, the RPM query returns the version number
Samba RPM file, install it as follows
rpm -i samba(name of file)
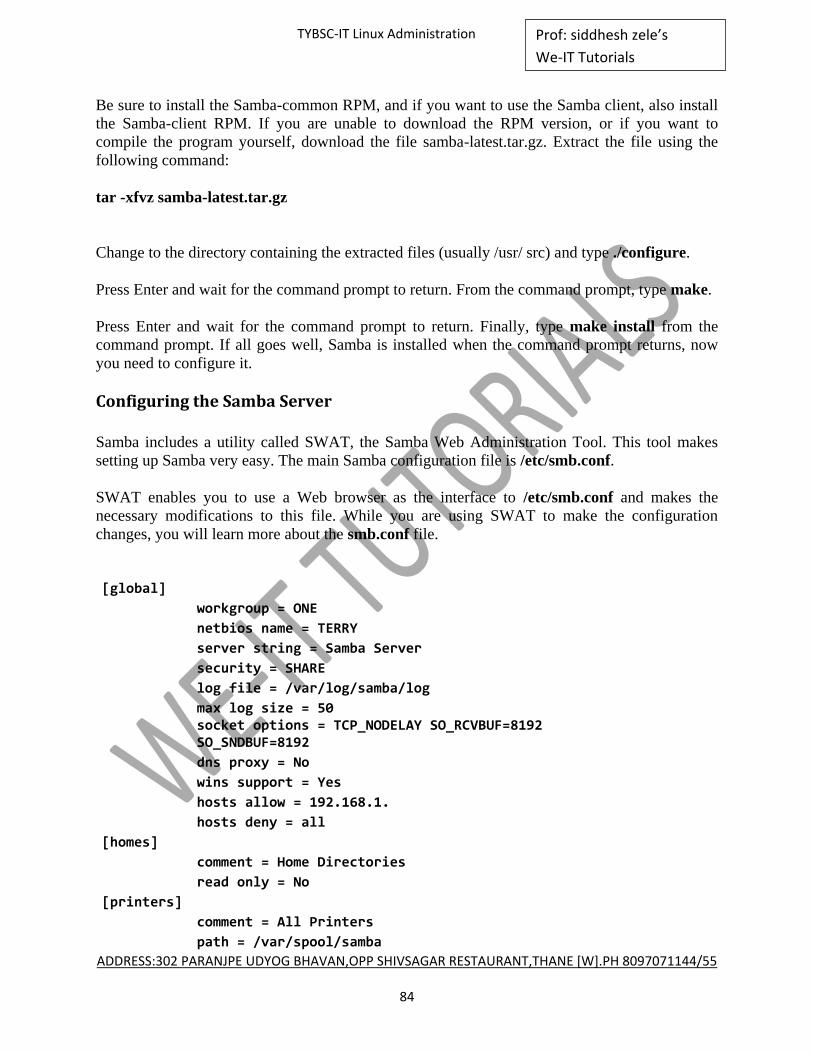
ADDRESS:302 PARANJPE UDYOG BHAVAN,OPP SHIVSAGAR RESTAURANT,THANE [W].PH 8097071144/55
84
Prof: siddhesh zele’s
We-IT Tutorials
TYBSC-IT Linux Administration
Be sure to install the Samba-common RPM, and if you want to use the Samba client, also install
the Samba-client RPM. If you are unable to download the RPM version, or if you want to
compile the program yourself, download the file samba-latest.tar.gz. Extract the file using the
following command:
tar -xfvz samba-latest.tar.gz
Change to the directory containing the extracted files (usually /usr/ src) and type ./configure.
Press Enter and wait for the command prompt to return. From the command prompt, type make.
Press Enter and wait for the command prompt to return. Finally, type make install from the
command prompt. If all goes well, Samba is installed when the command prompt returns, now
you need to configure it.
Configuring the Samba Server
Samba includes a utility called SWAT, the Samba Web Administration Tool. This tool makes
setting up Samba very easy. The main Samba configuration file is /etc/smb.conf.
SWAT enables you to use a Web browser as the interface to /etc/smb.conf and makes the
necessary modifications to this file. While you are using SWAT to make the configuration
changes, you will learn more about the smb.conf file.
[global]
workgroup = ONE
netbios name = TERRY
server string = Samba Server
security = SHARE
log file = /var/log/samba/log
max log size = 50
socket options = TCP_NODELAY SO_RCVBUF=8192 SO_SNDBUF=8192
dns proxy = No
wins support = Yes
hosts allow = 192.168.1.
hosts deny = all
[homes]
comment = Home Directories
read only = No
[printers]
comment = All Printers
path = /var/spool/samba
ADDRESS:302 PARANJPE UDYOG BHAVAN,OPP SHIVSAGAR RESTAURANT,THANE [W].PH 8097071144/55
85
Prof: siddhesh zele’s
We-IT Tutorials
TYBSC-IT Linux Administration
guest ok = Yes
print ok = Yes
browseable = Yes
[global]
The first section of the smb.conf file is the [global] section. Each section contains a list of options
and values in the format:
option = value
You have hundreds of options and values at your disposal, and you look at the most common
ones here. For a complete listing of options refer to the smb.conf man page.
workgroup = ONE is the name of the workgroup shown in the identification tab of the network
properties box on the Windows computer.
netbios name = TERRY is the name by which the Samba server is known to the Windows
computer.
server string = Samba Server is the name of the Samba server.
security = SHARE is the level of security applied to server access. Other possible options are
user, the default setting; domain; and server. Using share makes it easier to create anonymous
shares that do not require authentication, and it is useful when the netbios names of the Windows
computers are different from other names on the Linux computer. Server is used if the password
file is on another server in the network. Domain is used if the clients are added to a Windows NT
domain using smbpasswd, and login requests are by a Windows NT primary or backup domain
controller.
log file = /var/log/samba/log is the location of the log file.
max log size = 50 is the maximum size in kilobytes that the file can grow to.
socket options = TCP_NODELAY SO_RCVBUF=8192 SO_SNDBUF=8192
enables the server to be tuned for better performance. TCP_NODELAY is a default value, the
BUF values set send and receive buffers.
dns proxy = No indicates that the netbios name will not be treated like a DNS name and there
is no DNS lookup.
wins support = Yes is used to tell the Samba server to act as a WINS server.
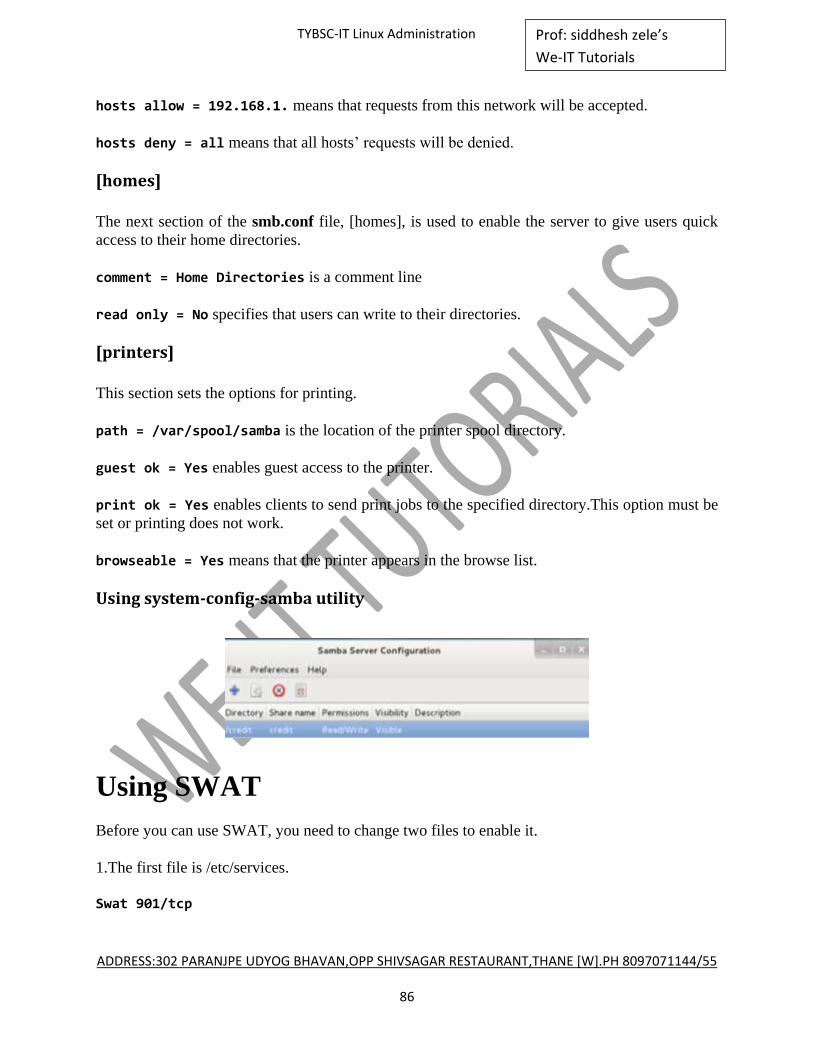
ADDRESS:302 PARANJPE UDYOG BHAVAN,OPP SHIVSAGAR RESTAURANT,THANE [W].PH 8097071144/55
86
Prof: siddhesh zele’s
We-IT Tutorials
TYBSC-IT Linux Administration
hosts allow = 192.168.1. means that requests from this network will be accepted.
hosts deny = all means that all hosts‘ requests will be denied.
[homes]
The next section of the smb.conf file, [homes], is used to enable the server to give users quick
access to their home directories.
comment = Home Directories is a comment line
read only = No specifies that users can write to their directories.
[printers]
This section sets the options for printing.
path = /var/spool/samba is the location of the printer spool directory.
guest ok = Yes enables guest access to the printer.
print ok = Yes enables clients to send print jobs to the specified directory.This option must be
set or printing does not work.
browseable = Yes means that the printer appears in the browse list.
Using system-config-samba utility
Using SWAT
Before you can use SWAT, you need to change two files to enable it.
1.The first file is /etc/services.
Swat 901/tcp

ADDRESS:302 PARANJPE UDYOG BHAVAN,OPP SHIVSAGAR RESTAURANT,THANE [W].PH 8097071144/55
87
Prof: siddhesh zele’s
We-IT Tutorials
TYBSC-IT Linux Administration
2. Next you need to add a line to /etc/inetd.conf. The inetd daemon runs at system startup
and listens for connections at specific ports.
Swat stream tcp nowait.400 root /usr/sbin/swat swat
1.need to restart the inetd daemon so it reads the changes you made to inetd.conf.
killall -HUP inetd
2.open web browser and in the location box, enter the address for localhost and the port number
for SWAT as http://localhost:901.
3.After starting Samba you can run smbclient on your localhost to get some configuration
information
smbclient -L localhost
Adding users to samba
At this point you should be able to see the samba server from any windows system in the same
workgroup but you won't be able to access the share; not until you add the user(s).
Samba authenticates its users through its local database. Once you have saved the changes to
smb.conf , you need to add the users.
Since you enabled the encrypted password option in your smb.conf, you need to add the users
with encrypted password.
Add your existing users to samba or create new users and then add them to samba.
[root@server2 root]# smbpasswd –a siddhesh New SMB password: ******** Retype new SMB password:********
Samba passwords are stored in /etc/samba/smbpasswd
Starting the Samba Server
Start /etc/init.d/samba start Stop /etc/init.d/samba stop Restart /etc/init.d/samba restart
Connecting to a Samba Client
smbclient
ADDRESS:302 PARANJPE UDYOG BHAVAN,OPP SHIVSAGAR RESTAURANT,THANE [W].PH 8097071144/55
88
Prof: siddhesh zele’s
We-IT Tutorials
TYBSC-IT Linux Administration
If you just need to grab a file, or put a file on the server, but don't need a constant connection, it
is best to either browse to the share using Gnome/KDE's built in Samba browser, or to use the
command line client smbclient.
Using smbclient is very similar to using a command-line FTP client. Here are a few useful
commands:
smbclient -L //hostname
Where hostname is the NetBIOS name of the machine you wish to connect to. After being
prompted for a password (enter no password for anonymous login) this command will give you a
list of available shares on the machine, plus some other information.
To connect to a share, you must specify the share name, in the format //hostname/sharename
where sharename could be the name of a file share, or a printer, or anything else Samba can
handle.
smbclient //we-it/siddhu
After entering siddhu's password, you are given an smb: \> prompt where you may enter
commands much like an FTP client
Connecting from a Windows PC to the Samba Server
On the Windows computer, double-click the My Network Places icon from the desktop. In the
Network Places window, you should now see a listing for the Red Hat computer, which in this
example would be rhl10. Double-click the rhl10 PC icon, and you will see the shares you made
available.
When you double-click the directory share from the rhl10 PC, you are prompted for a username
and password to enter the directories. That‘s all there is to it. Now you can share files between
your Linux and Windows computers.
On a Managed Desktop machine, to connect to a "Samba share" (also often referred to as a
"Shared drive" or "Shared space") called "UUN" (where UUN is your username) on one of the
School's file servers, put:
\\192.168.1.3\siddhu
Testing the Samba Server
use the smbclient utility to access the directories on the Windows computer as follows:
Smbclient //systemname/directory name
ADDRESS:302 PARANJPE UDYOG BHAVAN,OPP SHIVSAGAR RESTAURANT,THANE [W].PH 8097071144/55
89
Prof: siddhesh zele’s
We-IT Tutorials
TYBSC-IT Linux Administration
Why use Samba instead of NFS?
Earlier you set up the Network File System to enable file sharing across your network. Why
didn‘t you just use NFS to share the Windows files? Well, you could have, but it makes more
sense to use Samba to communicate with Windows computers. The Server Message Block
(SMB) protocol is how Windows computers communicate with each other. It is the Windows
native protocol for sharing files and printers. By using the same protocol, you are ensuring that
file and printer sharing operate with a minimum of difficulty.
ADDRESS:302 PARANJPE UDYOG BHAVAN,OPP SHIVSAGAR RESTAURANT,THANE [W].PH 8097071144/55
90
Prof: siddhesh zele’s
We-IT Tutorials
TYBSC-IT Linux Administration
CHAPTER 2 : Additional Network Services
One commonly requested network service is a time server, a service that provides the
authoritative clock against which all other systems on the LAN sync their clocks. The non-
essential services can be NTP-based time server and a caching proxy server.
Configuring a Time Server
A time server is a daemon that runs on one machine and to which other systems synchronize
their system clocks.
The Network Time Protocol (NTP) is a protocol used to help synchronize your Linux system's
clock with an accurate time source. There are that allow the general public to synchronize with
them. They are divided into two types:
Stratum 1: NTP sites using an atomic clock for timing.
Stratum 2: NTP sites with slightly less accurate time sources.
It is good practice to have at least one server on your network be the local time server for all your
other devices. This makes the correlation of system events on different systems much easier. It
also reduces Internet bandwidth usage due to NTP traffic and reduces the need to manage
firewall rules for each NTP client on your network. Sometimes, not all your servers will have
Internet access; in such cases you'll need a central server that all can access.
Configuring the Time Server
Setting up your time sewer requires a small amount of preparation, implementation, and
verification. Perform the following tasks:
1. Install the NTP software.
2. Locate suitable time servers to serve as reference clocks.
3. Configure your local time server.
4. Start the NTP daemon on the local time server.
5. Make sure that the NTP daemon responds to requests.
Installing the NIP software is simple. Use the rpmquery command to make sure that the ntp
package is installed:
$ rpmquery ntp
Download and Install The NTP Package
Download ntp-4.1.2-5.i386.rpm and install rpm

ADDRESS:302 PARANJPE UDYOG BHAVAN,OPP SHIVSAGAR RESTAURANT,THANE [W].PH 8097071144/55
91
Prof: siddhesh zele’s
We-IT Tutorials
TYBSC-IT Linux Administration
The /etc/ntp.conf File
The /etc/ntp.conf file is the main configuration file for Linux NTP in which you place the IP
addresses of the stratum 1 and stratum 2 servers you want to use. Here are the steps to create a
configuration file using a pair of sample Internet-based NTP servers:
1) First we specify the servers you're interested in:
server otherntp.server.org # A stratum 1 server at server.org server ntp.research.gov # A stratum 2 server at research.gov
2) Restrict the type of access you allow these servers. In this example the servers are not allowed
to modify the run-time configuration or query your Linux NTP server.
restrict otherntp.server.org mask 255.255.255.255 nomodify notrap noquery restrict ntp.research.gov mask 255.255.255.255 nomodify notrap noquery
The mask 255.255.255.255 statement is really a subnet mask limiting access to the single IP
address of the remote NTP servers.
3) If this server is also going to provide time for other computers, such as PCs, other Linux
servers and networking devices, then you'll have to define the networks from which this server
will accept NTP synchronization requests. You do so with a modified restrict statement
removing the noquery keyword to allow the network to query your NTP server. The syntax is:
restrict 192.168.1.0 mask 255.255.255.0 nomodify notrap
In this case the mask statement has been expanded to include all 255 possible IP addresses on the
local network.
4) We also want to make sure that localhost (the universal IP address used to refer to a Linux
server itself) has full access without any restricting keywords:
restrict 127.0.0.1
5) Save the file and restart NTP for these settings to take effect. You can now configure other
Linux hosts on your network to synchronize with this new master NTP server in a similar
fashion.
How To Get NTP Started
You have to restart the NTP process every time you make a change to the configuration file for
the changes to take effect on the running process.
ADDRESS:302 PARANJPE UDYOG BHAVAN,OPP SHIVSAGAR RESTAURANT,THANE [W].PH 8097071144/55
92
Prof: siddhesh zele’s
We-IT Tutorials
TYBSC-IT Linux Administration
To get NTP configured to start at boot, use the line:
[root@bigboy tmp]# chkconfig ntpd on
To start, stop and restart NTP after booting, follow these examples:
[root@bigboy tmp]# service ntpd start [root@bigboy tmp]# service ntpd stop [root@bigboy tmp]# service ntpd restart
Doing An Initial Synchronization
The ntpdate command is run three times to synchronize smallfry's clock to server 192.168.1.100,
but it must be run while the ntpd process is stopped. So you'll have to stop ntpd, run ntpdate and
then start ntpd again.
[root@smallfry tmp]# ntpdate -u 192.168.1.100
Providing a Caching Proxy Server
In computer networks, a proxy server is a server (a computer system or an application) that acts
as an intermediary for requests from clients seeking resources from other servers. A client
connects to the proxy server, requesting some service, such as a file, connection, web page, or
other resource available from a different server. The proxy server evaluates the request as a way
to simplify and control their complexity. Today, most proxies are web proxies, facilitating access
to content on the World Wide Web.
Uses
A proxy server has a variety of potential purposes, including:
To keep machines behind it anonymous, mainly for security.
To speed up access to resources (using caching). Web proxies are commonly used to
cache web pages from a web server.
To apply access policy to network services or content, e.g. to block undesired sites.
To access sites prohibited or filtered by your ISP or institution.
To log / audit usage, i.e. to provide company employee Internet usage reporting.
To bypass security / parental controls.
To circumvent Internet filtering to access content otherwise blocked by governments.
To scan transmitted content for malware before delivery.
To scan outbound content, e.g., for data loss prevention.
To allow a web site to make web requests to externally hosted resources (e.g. images,
music files, etc.) when cross-domain restrictions prohibit the web site from linking
directly to the outside domains.
ADDRESS:302 PARANJPE UDYOG BHAVAN,OPP SHIVSAGAR RESTAURANT,THANE [W].PH 8097071144/55
93
Prof: siddhesh zele’s
We-IT Tutorials
TYBSC-IT Linux Administration
The Web proxy is called Squid.
Squid features:
Squid provides the basic caching and proxy functions.
It also caches DNS lookups, to speed up subsequent DNS queries, performs non-blocking
DNS queries, and implements negative caching, which means that Squid remembers
when a request was made for an object (or for a DNS resource) that doesn‘t exist and
doesn‘t try to retrieve it or find the nonexistent object in its cache.
Squid also has full SSL support, includes extensive access control, and features a rich
logging system that you can use to fine-tune the caching behavior.
Squid can work as a transparent proxy. An ―ordinary‖ proxy requires Web clients to
specify the hostname and port of the proxy, which then forwards requests to the requested
server. This has obvious disadvantages, the biggest one being that you have to configure
all the Web clients to use the proxy. With transparent proxying, Web clients think they
are communicating with the requested sewer when in fact they are communicating with
the proxy. A transparent proxy still intercepts requests, but Web clients neither notice nor
care.
Squid is included in both Fedora Core and RHEL, but depending on the type of
installation you performed, it might not be installed.
The following rpmquery command will show you if Squid is installed (you only need the Squid
package): $ rpmquery squid
Types of proxy
Forward proxy
A forward proxy is the most common form of a proxy server and is generally used to pass
requests from an isolated, private network to the Internet through a firewall. Using a forward
proxy, requests from an isolated network, or intranet, can be rejected or allowed to pass through
a firewall. Requests may also be fulfilled by serving from cache rather than passing through the
Internet. This allows a level of network security and lessens network traffic.
A forward proxy server will first check to make sure a request is valid. If a request is not valid,
or not allowed (blocked by the proxy), it will reject the request resulting in the client receiving an
error or a redirect. If a request is valid, a forward proxy may check if the requested information is
cached. If it is, the forward proxy serves the cached information. If it is not, the request is sent
through a firewall to an actual content server which serves the information to the forward proxy.
The proxy, in turn, relays this information to the client and may also cache it, for future requests.
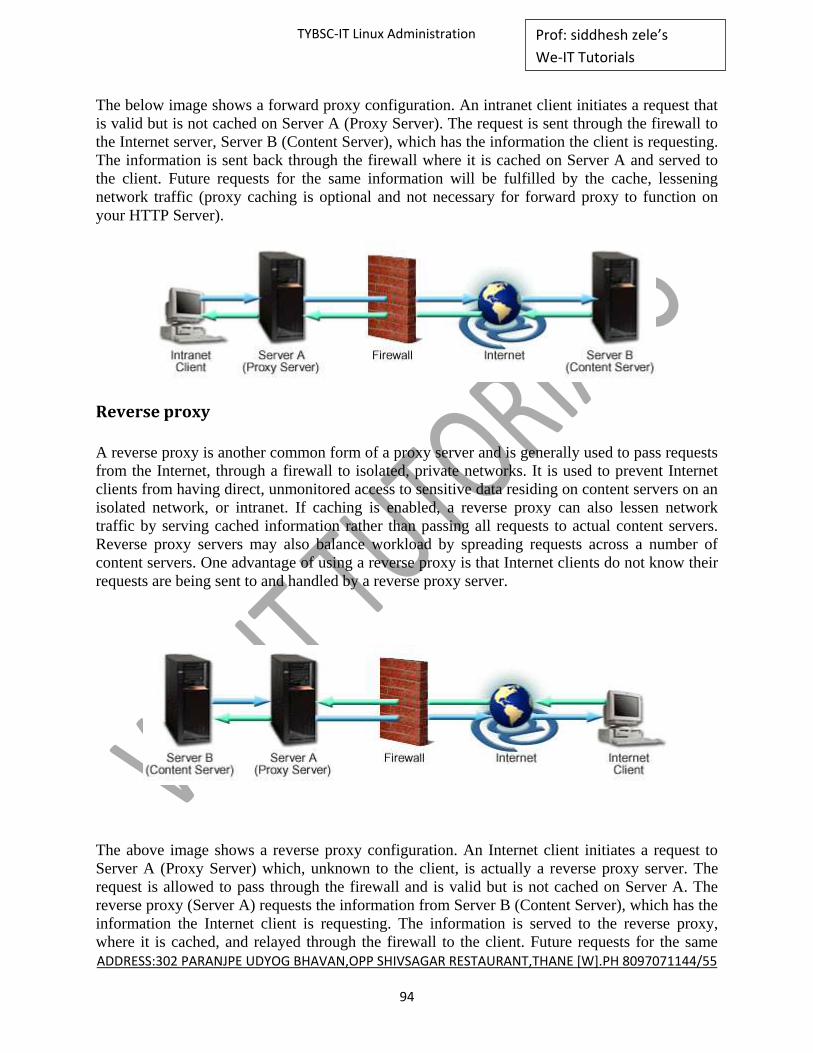
ADDRESS:302 PARANJPE UDYOG BHAVAN,OPP SHIVSAGAR RESTAURANT,THANE [W].PH 8097071144/55
94
Prof: siddhesh zele’s
We-IT Tutorials
TYBSC-IT Linux Administration
The below image shows a forward proxy configuration. An intranet client initiates a request that
is valid but is not cached on Server A (Proxy Server). The request is sent through the firewall to
the Internet server, Server B (Content Server), which has the information the client is requesting.
The information is sent back through the firewall where it is cached on Server A and served to
the client. Future requests for the same information will be fulfilled by the cache, lessening
network traffic (proxy caching is optional and not necessary for forward proxy to function on
your HTTP Server).
Reverse proxy
A reverse proxy is another common form of a proxy server and is generally used to pass requests
from the Internet, through a firewall to isolated, private networks. It is used to prevent Internet
clients from having direct, unmonitored access to sensitive data residing on content servers on an
isolated network, or intranet. If caching is enabled, a reverse proxy can also lessen network
traffic by serving cached information rather than passing all requests to actual content servers.
Reverse proxy servers may also balance workload by spreading requests across a number of
content servers. One advantage of using a reverse proxy is that Internet clients do not know their
requests are being sent to and handled by a reverse proxy server.
The above image shows a reverse proxy configuration. An Internet client initiates a request to
Server A (Proxy Server) which, unknown to the client, is actually a reverse proxy server. The
request is allowed to pass through the firewall and is valid but is not cached on Server A. The
reverse proxy (Server A) requests the information from Server B (Content Server), which has the
information the Internet client is requesting. The information is served to the reverse proxy,
where it is cached, and relayed through the firewall to the client. Future requests for the same
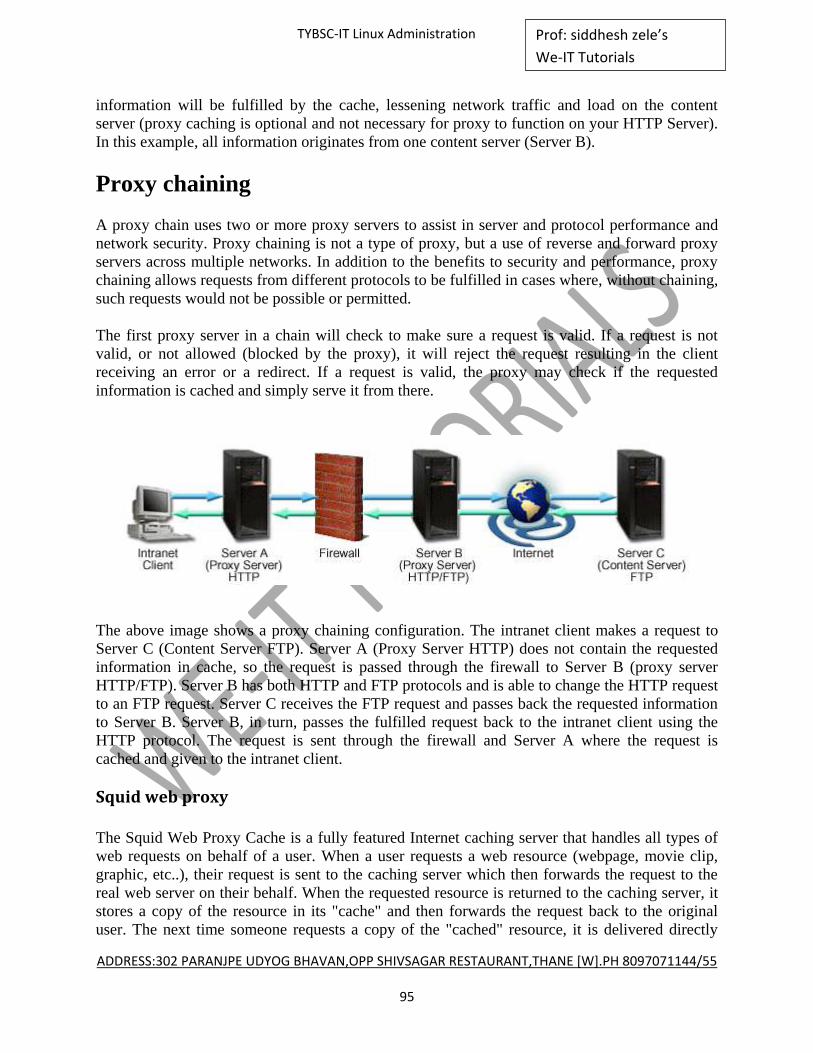
ADDRESS:302 PARANJPE UDYOG BHAVAN,OPP SHIVSAGAR RESTAURANT,THANE [W].PH 8097071144/55
95
Prof: siddhesh zele’s
We-IT Tutorials
TYBSC-IT Linux Administration
information will be fulfilled by the cache, lessening network traffic and load on the content
server (proxy caching is optional and not necessary for proxy to function on your HTTP Server).
In this example, all information originates from one content server (Server B).
Proxy chaining
A proxy chain uses two or more proxy servers to assist in server and protocol performance and
network security. Proxy chaining is not a type of proxy, but a use of reverse and forward proxy
servers across multiple networks. In addition to the benefits to security and performance, proxy
chaining allows requests from different protocols to be fulfilled in cases where, without chaining,
such requests would not be possible or permitted.
The first proxy server in a chain will check to make sure a request is valid. If a request is not
valid, or not allowed (blocked by the proxy), it will reject the request resulting in the client
receiving an error or a redirect. If a request is valid, the proxy may check if the requested
information is cached and simply serve it from there.
The above image shows a proxy chaining configuration. The intranet client makes a request to
Server C (Content Server FTP). Server A (Proxy Server HTTP) does not contain the requested
information in cache, so the request is passed through the firewall to Server B (proxy server
HTTP/FTP). Server B has both HTTP and FTP protocols and is able to change the HTTP request
to an FTP request. Server C receives the FTP request and passes back the requested information
to Server B. Server B, in turn, passes the fulfilled request back to the intranet client using the
HTTP protocol. The request is sent through the firewall and Server A where the request is
cached and given to the intranet client.
Squid web proxy
The Squid Web Proxy Cache is a fully featured Internet caching server that handles all types of
web requests on behalf of a user. When a user requests a web resource (webpage, movie clip,
graphic, etc..), their request is sent to the caching server which then forwards the request to the
real web server on their behalf. When the requested resource is returned to the caching server, it
stores a copy of the resource in its "cache" and then forwards the request back to the original
user. The next time someone requests a copy of the "cached" resource, it is delivered directly

ADDRESS:302 PARANJPE UDYOG BHAVAN,OPP SHIVSAGAR RESTAURANT,THANE [W].PH 8097071144/55
96
Prof: siddhesh zele’s
We-IT Tutorials
TYBSC-IT Linux Administration
from the local proxy server and not from the distant web server (depending on age of resource
etc..).
Using a proxy server can greatly reduce web browsing speed if frequently visited sites and
resources are stored locally in the cache. There are also financial savings to be gained if you're a
large organization with many Internet users or even a small home user that has a quota allowance
for downloads. There are many ways a proxy can be beneficial to all networks.
ADDRESS:302 PARANJPE UDYOG BHAVAN,OPP SHIVSAGAR RESTAURANT,THANE [W].PH 8097071144/55
97
Prof: siddhesh zele’s
We-IT Tutorials
TYBSC-IT Linux Administration
UNIT 4
Chapter 1: INTERNET SERVICES
An Internet Service can be defined as any service that can be accessed through TCP/IP-based
networks, whether an internal network (intranet) or external network (Internet). Actually, TCP
and IP are two of the protocols that are included in a group of protocols sometimes known as the
Internet protocols. Internet services can be provided through either secure or non-secure TCP/IP
connections. Common services are Telnet, FTP, SMTP, HTPP, ICMP, ARP, DNS, SSH, scp,
sftp, and others.
The significance of TCP/IP as the basis for these services cannot be overlooked. TCP/IP
provides a platform- and operating-system-independent protocol for these services. Any
computer, running any operating system, can communicate with any other computer on the
network if they both use TCP/IP protocols for establishing and maintaining the connection and
formatting and transmitting the data.
The availability of a wide range of Internet services makes Linux machines versatile workhorses
that can fulfill many different functions in a company‘s network.
Secure Services
Common services, such as Telnet and FTP, were written in the days when everyone trusted
everybody else on the Internet. These services send all their traffic in plain text, including
passwords. Plain-text traffic is extremely easy to eavesdrop on by anyone between the traffic‘s
source and destination. Since the Internet has exploded in popularity, running insecure services
such as these is not a good idea.
Some Secure Services are listed below:
SSH
Secure Shell, also known as SSH, is a secure Telnet replacement that encrypts all traffic,
including passwords, using a public/private encryption key exchange protocol. It provides
the same functionality of Telnet, plus other useful functions, such as traffic tunneling.
SSH asks you if you want to accept and trust the host key being sent to you as being the
real key. This question is asked only once when you log in to a machine for the first time.
After this first login, SSH behaves exactly like Telnet --you start SSH, it asks for your
password, and then you see a regular terminal screen.

ADDRESS:302 PARANJPE UDYOG BHAVAN,OPP SHIVSAGAR RESTAURANT,THANE [W].PH 8097071144/55
98
Prof: siddhesh zele’s
We-IT Tutorials
TYBSC-IT Linux Administration
In addition to providing terminal access, SSH tunnels almost any other protocol through
it. So, it is possible to tunnel POP, RCP, and other protocols through SSH to turn them
into encrypted, more secure protocols.
Example of how to tunnel your mail through SSH to keep your password and mail
encrypted and secure during transit:
In this example, you use POP3 to retrieve your mail from the remote machine
buffy.xena .edu. Normally you would tell your POP3 software to connect from your
local host to port 110 (the POP port) of buffy.xena.edu.
The first step is to configure your POP mailer to connect to port 16510 of your own
machine, and put in the password for your account on buffy.xena.edu.
The second step is to set up the SSH tunnel, which encrypts and forwards the traffic
over the network to terry.muhlenberg.edu’s POP port.
To set up the SSH tunnel, type the following at the command line:
ssh -N -L 16510:127.0.0.1:110 [email protected]
And you are now sending and receiving your mail through an encrypted SSH tunnel.
scp
Secure Copy, also known as scp, is part of the SSH package. It is a secure alternative to
RCP and FTP, because, like SSH, the password is not sent over the network in plain text.
You can scp files to any machine that has an ssh daemon running.
The syntax of scp is
scp user@host:file1 user@host:file2
If you have KDE installed on your system, you can use the Konqueror browser and the
fish protocol to establish an SSH connection to a remote PC. Then you can drag and drop
the files or directories you want to copy between the remote and local machine. Follow
the steps here:
1. Open the Konqueror browser, enter fish://<name or IP address of remote
PC> into the browser location field and press Enter. If this is the first time
you are connecting to the remote host, you will be prompted about the
connection. Click Enter to accept the information.
2. When prompted, enter the username and password and click OK to
connect.
3. To copy or move files or directories from the remote PC to the local PC,
select the files or directories you want to copy or move, right-click the
ADDRESS:302 PARANJPE UDYOG BHAVAN,OPP SHIVSAGAR RESTAURANT,THANE [W].PH 8097071144/55
99
Prof: siddhesh zele’s
We-IT Tutorials
TYBSC-IT Linux Administration
selected items and either copy to or move the selected items from the pop-
up menu, and browse to where you want to place them.
sftp
Secure File Transfer Program, also known as sftp, is an FTP client that performs all its
functions over SSH.
The syntax for sftp is:
sftp user@host:file file
Less Secure Services
These are non-secure services that should not be used, since they trust that the network is
absolutely secure. Their secure equivalents should be used instead. Using these services should
be discouraged, because all their traffic is sent over the network in plain text. This means that
anyone with a common sniffer such as tcpdump can see every keystroke that is typed in the
session, including your users‘ passwords.
Telnet
Telnet is a protocol and application that enables someone to have access to a virtual
terminal on a remote host. It resembles text-based console access on a UNIX machine.
Telnet is an application that‘s available almost everywhere. Because of this distribution,
most beginning UNIX users use Telnet exclusively to communicate with other UNIX and
NT machines. Since all Telnet traffic, including passwords, is sent in plain text, the
Secure Shell (ssh) command should be used instead, if at all possible. SSH provides an
equivalent interface to Telnet, with increased features, and most importantly, encrypted
traffic and passwords.
FTP
FTP is a ubiquitous file transfer protocol that runs over ports 20 and 21. For transferring
software packages from anonymous FTP repositories, such as ftp.redhat.com, FTP is still
the standard application to use. However, for personal file transfers, you should use scp.
scp encrypts the traffic, including passwords. Once you have successfully logged on to an
FTP server, you can type help for a list of available commands.
The important commands to remember are:
o put to move a file from your machine to the remote machine
o get to pull a file from the remote server to your machine.
ADDRESS:302 PARANJPE UDYOG BHAVAN,OPP SHIVSAGAR RESTAURANT,THANE [W].PH 8097071144/55
100
Prof: siddhesh zele’s
We-IT Tutorials
TYBSC-IT Linux Administration
o mput to send multiple files
o mget.ls to retrieve multiple files
o dir gives you a listing of files available for downloading from the remote site.
rsync
rsync is an unencrypted file transfer program that is similar to RCP It includes the added
feature of allowing just the differences between two sets of files on two machines to be
transferred across the network. Because it sends traffic unencrypted, it should be tunneled
through SSH. Otherwise, it should not be used. The rsync server listens on port 873.
rsh
rsh is an unencrypted mechanism for executing commands on remote hosts. Normally
you specify a command to be run on the remote host on rsh‘s command line, but if no
command is given, you are logged into the remote host using rlogin.
rsh‘s syntax:
rsh remotehostname remotecommand
rlogin
rlogin is a remote login program that connects your terminal to a remote machine‘s
terminal. rlogin is an non-secure protocol, because it sends all information, including
passwords, in plain text. It also enables an implicit trust relationship to exist between
machines, so that you can use rlogin without a password.
finger
finger enables users on remote systems to look up information about users on another
system. Generally finger displays a user‘s login name, real name, terminal name, idle
time, login time, office location, and phone number. You should disable finger outside of
your local network, because user information gathered from it could be used to
compromise your system. The finger daemon listens on port 79.
talk and ntalk
talk and ntalk are real-time that protocols. The talk server runs on port 517 and the ntalk
server runs on port 518. To send someone else a talk request, type
talk or ntalk username@hostname
ADDRESS:302 PARANJPE UDYOG BHAVAN,OPP SHIVSAGAR RESTAURANT,THANE [W].PH 8097071144/55
101
Prof: siddhesh zele’s
We-IT Tutorials
TYBSC-IT Linux Administration
If that person‘s server is running a talk or ntalk daemon and the person is logged in, he or
she will see an invitation to chat with you.
Linux Machine as a Server
The following sections give you an overview of what common server protocols are available on
Linux.
HTTP
The most common Web server used on Linux is Apache. Apache is started out of a
system‘s rc scripts. Apache is easily configurable, and its configuration files live in
/etc/httpd/conf/. While Apache can be set to listen to many different network ports, the
most common port it listens on is port 80.
sshd
The secure shell daemon (sshd) is started out of the system‘s rc scripts. Its global system
configuration files are in /etc/ssh, and users‘ SSH configuration files are in $HOME/.ssh/.
The SSH server listens on port 22.
ftpd
The FTP daemon uses ports 20 and 21 to listen for and initiate FTP requests. Its
configuration files ftpaccess, ftpconversions, ftpgroups, ftphosts, and ftpusers, are located
in the /etc directory.
DNS
The Domain Name Service (DNS), which maps IP addresses to hostnames, is served by
the named program on port 53. Its configuration file is named.conf in the /etc directory.
Configuring the xinetd Server
xinetd is a replacement for inetd that adds more security and functionality inetd is the old
workhorse of the Linux networking world, and xinetd is an improvement on an important
program. It incorporates new features that have been desired by system administrators for
a few years now.
xinetd features are listed below:
1. xinetd starts at system boot time, and waits and listens for connections to come in on the
ports to which they are assigned in their conf files. After a connection request is
made, if the service requested requires that a new server be spawned, then xinetd

ADDRESS:302 PARANJPE UDYOG BHAVAN,OPP SHIVSAGAR RESTAURANT,THANE [W].PH 8097071144/55
102
Prof: siddhesh zele’s
We-IT Tutorials
TYBSC-IT Linux Administration
spawns a new server and keeps listening for new connection requests on the service
port.
2. One of the most notable improvements of xinetd over inetd is that anyone can start
network services. With inetd, only root can start a network service, and that
restriction leads to a host of security problems.
3. xinetd supports encrypting plain-text services such as the ftp command channel by
wrapping them in stunnel.
4. xinetd also enables you to do access control on all services based on different criteria,
such as remote host address, access time, remote hostname, and remote host domain.
5. xinetd also takes the extra security step of killing servers that aren‘t in the configuration
file and those that violate the configuration‘s access criteria. It can help prevent denial
of service (DOS) attacks by limiting normal functions that can cripple the machine if
there are too many of them occurring at the same time.
6. xinetd can limit the number of incoming connections to the whole machine or from a
single host to prevent network overflow attacks.
7. It can limit the number of processes that are forked by a network service.
8. To prevent the machine from being slowed to a crawl because of the incoming network
traffic, xinetd can also stop a service if it is driving the machine‘s load up too high.
9. Log capabilities have also been improved in xinetd. For each service it runs, it can log the
remote user and host address, the length of time the service has been running, and
failed access control attempts.
10. xinetd is flexible enough to enable you to utilize increased security measures such as
chrooted environments.
11. The xinetd.conf file is much shorter than inetd.conf, making it easier to read through and
customize. The last line says that all the files in the /etc/xinetd.d directory are read
into the xinetd.conf file as well. Each service started by xinetd gets its own dedicated
file in the /etc/xinetd.d directory. This way you can tell, with a glance at the xinetd.d
file listing, what services are being started by it. You can easily enable or disable a
service by setting the value of disable = to either yes or no.
12. If you use a Telnet server on your system, you should be aware that by default telnetd
does not start up with xinetd. To start a Telnet daemon in xinetd, you should use the
groups = yes option within the xinetd.conf file and change the disabled = line from
yes to no.
ADDRESS:302 PARANJPE UDYOG BHAVAN,OPP SHIVSAGAR RESTAURANT,THANE [W].PH 8097071144/55
103
Prof: siddhesh zele’s
We-IT Tutorials
TYBSC-IT Linux Administration
Comparing xinetd and Standalone
To control a service, you need to know what spawns it. Here is a general listing of what
services are spawned from superservers, such as xinetd, and which are started on their
own from rc scripts or root.
The key differences between things that run standalone and those started by the xinetd
server is the amount of config information required and availability - that is, whether the
associated service needs to be constantly available and instantly responsive, or whether
that service only needs to be available in response to occasional incoming requests.
Services like a Web server could certainly be run by xinetd, but the overhead of starting
and stopping it repeatedly would make your system incredibly slow and perhaps even
crash it.
xinetd-Started Services
The following services are started from xinetd. Each of these services should ideally have its
own file in the /etc/xinetd.d directory. You should look in that directory to find the appropriate
file and open the file to change whether it is enabled or disabled.
chargen: Random character generator that sends its traffic over TCP
daytime-udp: Gives you the time over IJDP
finger: User information lookup program
kshell: Restricts user access to the shell
rlogin: Service similar to Telnet, but enables trust relationships between machines
swat: Samba Web Administration tool
time: Gives you the time
chargen-udp: Random character generator that sends its traffic over udp
echo: Echoes back all characters sent to it over TCP
gssftp: Kerberized FTP server
rsh: Remote shell
talk: A talk (real-time chat) server
time-udp: Gives you the time over UDP
comsat: Notifies users if they have new mail
echo-udp: Echoes back all characters sent to it over UDP
klogin: Kerberos‘s answer to rlogin
ntalk: A talk (real-time chat) server
rsync: Remote file transfer protocol
telnet: Telnet server
wu-ftpd: An FTP server
daytime: Gives you the time over TCP
eklogin: Encrypting kerberized rlogin server
krb5-telnet: Kerberized Telnet server
rexec: Provides remote execution facilities
sgi_fam: File-monitoring daemon
tftp: Trivial File Transfer Program
ADDRESS:302 PARANJPE UDYOG BHAVAN,OPP SHIVSAGAR RESTAURANT,THANE [W].PH 8097071144/55
104
Prof: siddhesh zele’s
We-IT Tutorials
TYBSC-IT Linux Administration
Standalone Services
These services are started from the rc scripts specifically written for them in the rc directories.
You can enable or disable these services from those directories.
apache: Web server
sshd: SSH server
sendmail: Mail server
qmail: Mail server
postfix: Mail server
thttpd: Semi lightweight Web server
boa: Lightweight Web server
named: DNS server
xfs: X font server
xdm: X display manager
portmap: Maps RPC services to ports
rpc.quotad: Serves quota information
knfsd: User space portion of the NFS daemon
rpc.mountd: NFS mount sewer
rpc.ypbind: NIS sewer
squid: Web proxy server
nessuad: Penetration-testing server
postgresql: Database server
mysql: Database sewer
oracle: Database server
Configuring Linux Firewall Packages
Linux provides a few different mechanisms for system security. One of these mechanisms is
Linux‘s firewall package. The primary firewall package available is iptables.iptables is a packet
filtering firewall.
iptables is Fedora‘s and Red Hat‘s built-in IP firewall administration tool. Using iptables enables
you to run a personal firewall to protect your Linux machine. If the Linux machine is a routing
gateway for other machines on your network, it can act as a packet-filtering network firewall if
more than one network interface is installed.
Two of the firewalling packages available are tcp-wrappers and ipchains. tcp-wrappers is a
minimalistic packet filtering application to protect certain network ports, and ipchains is a packet
filtering firewall.
TCP wrappers works only on programs that are started from inetd. So services such as sshd,
apache, and sendmail cannot be ―wrapped‖ with tcp-wrappers. tcp-wrappers also cannot be used
ADDRESS:302 PARANJPE UDYOG BHAVAN,OPP SHIVSAGAR RESTAURANT,THANE [W].PH 8097071144/55
105
Prof: siddhesh zele’s
We-IT Tutorials
TYBSC-IT Linux Administration
with udp or rcp services, because these services wait for a short time after a connection is closed
to see whether another connections will be initiated soon.
An inetd.conf without tcp-wrappers would look like this: telnet stream tcp nowait root /usr/sbin/in.telnetd in.telnetd
An inetd.conf with tcp-wrappers looks like this:
telnet stream tcp nowait root /usr/sbin/tcpd in.telnetd
When inetd starts up, it looks through /etc/inetd.conf to see what network service connections it
should start listening for.
tcpd is then called and reads the /etc/hosts.allow file to see if the hostname of the computer
that‘s trying to connect is listed there. If allowed
If the hostname is in /etc/hosts.deny, the connection is closed.
The syntax of an allow or deny rule follows this format:
service: hostname : options
So to enable all services from your own machine (localhost), use a rule like this in your
hosts.allow file:
ALL: [email protected] : ALLOW
To enable only machines from the xena.edu domain to telnet into your machine, use this rule in
your hosts.allow file:
in.telnetd: .xena.edu : ALLOW
ipchains
ipchains is Linux‘s built-in IP firewall administration tool. Using ipchains enables you to run a
personal firewall to protect your Linux machine. If the Linux machine is a routing gateway for
other machines on your network, it can act as a packet filtering network firewall if more than one
network interface is installed.

ADDRESS:302 PARANJPE UDYOG BHAVAN,OPP SHIVSAGAR RESTAURANT,THANE [W].PH 8097071144/55
106
Prof: siddhesh zele’s
We-IT Tutorials
TYBSC-IT Linux Administration
Chapter 2: DOMAIN NAME SYSTEM
The Domain Name System works for finding hosts on TCP/IP networks.
Understanding DNS
Name address resolution is, simply stated, the conversion of people friendly names into
computer friendly numbers. Each interface on the network has an IP address. This
address is expressed as a group of numbers referred to as a dotted quad group.
These groups of numbers present no problem to the computers in the network, but it is
difficult for humans to remember many groups of numbers. So, you need to be able to
enter names and then have these names converted into numbers.
Each time you type a Web site‘s address into your browser, the Domain Name System
(DNS) goes to work. You enter names that are easy for you to remember, and the names
are resolved into numbers that computers find easy to understand.
Enabling efficient human / machine interaction is the function of name address resolution
provided by DNS.
First, take a look at domain names and their organization using the domain name
tactechnology.com. The first part of this domain name, tactechnology, is the name of the
company, institution, or organization. The next part, after the period (dot in today‘s
vernacular) is called the top-level domain (TED).
Table below shows other top-level domains in the United States. TOP LEVEL DOMAIN MEANING
com A TLD typically used to register a business
edu A TLD assigned to an educational institution
gov A TLD given to a U.S. government agency
mil A TLD used by a branch of the U.S. military
net A TLD used by a network affiliated organization
org A TLD used by a noncommercial organization
info A TLD that can be used for any type of organization
Large domains may be further broken down into sub-domains. For example, the
tactechnology site is www.tactechnoloqy.com. Perhaps the accounting department runs
their own Web server. To find their Web server, tactechnology contains the sub-domain
acct. tactechnology.com. An individual computer in the accounting department also has a
hostname, for example, payables. The complete name for this computer is then
payables.acct.tactechnology.com, and you can find its IP address by using the DNS to
look it up.

ADDRESS:302 PARANJPE UDYOG BHAVAN,OPP SHIVSAGAR RESTAURANT,THANE [W].PH 8097071144/55
107
Prof: siddhesh zele’s
We-IT Tutorials
TYBSC-IT Linux Administration
When you type in a hostname, your system uses its resources to resolve names into IP
addresses. One of these files is /etc/nsswitch.conf (nsswitch means name service switch),
which contains a line telling the system where to look for host information.
The hosts file contains IP addresses and hostnames that you used on your sample
network. After the system looks in the hosts file and fails to find the address, the next file
checked is /etc/resolv.conf. This file contains the IP addresses of computers that are
known as domain name servers, and these are listed in /etc/resolv.conf as just name
servers.
Installing the Software
The most common DNS server used in current Fedora Core and Red Hat Enterprise Linux
distributions is BIND, or the Berkeley Internet Name Daemon. The latest release of BIND can be
obtained from the Internet Software Consortium at www.isc.org. A very convenient and easy
way to install the latest version of BIND is to look for the distribution specific package. Check
the Web site for your distribution to locate the RPM for BIND.
The RPM version of BIND is included with the Red Hat installation CD-ROMs. The RPM file
can be installed at the command line by using the rpm command.
Understanding Types of Domain Servers
A top-level domain server is one that provides information about the domains is typically
referred to as a root name server.
A search for www.muhlenberg.edu looks to the root name server for .edu for information.
The root name server then directs the search to a lower-level domain name server until
the information is found. You can see this by using the dig command to search for the
root name server for edu.
You can continue the search for the second-level domain by adding the name of the
domain you are looking for.
After you have found the domain you are looking for, information about that domain is
provided by its local domain name servers.
The three types of local domain name servers are master, or primary, slave, or secondary
and caching-only servers.
1. Master:
The master contains all the information about the domain and supplies this information
when requested. A master server is listed as -an authoritative server when it contains the
information you are seeking and it can provide that information.
ADDRESS:302 PARANJPE UDYOG BHAVAN,OPP SHIVSAGAR RESTAURANT,THANE [W].PH 8097071144/55
108
Prof: siddhesh zele’s
We-IT Tutorials
TYBSC-IT Linux Administration
2. Slave:
The slave is intended as a backup in case the master server goes down or is not available.
This server contains the same information as the master and provides it when requested if
the master server cannot be contacted.
3. Caching:
A caching server does not provide information to outside sources; it is used to provide
domain information to other servers and workstations on the local network. The caching
server remembers the domains that have been accessed. Use of a caching server speeds up
searches since the domain information is already stored in memory and the server knows
exactly where to go rather than having to send out a request for domain information.
The information that the master and slave servers provide is provided by configuring it.
Examining Server Configuration Files
Before you begin to configure your servers, you need to take a closer look at the files you need to
configure. The number of files you will use depends on the type of BIND server you want to use.
You need five files to set up the named server. Three files are required regardless of the
configuration as a master, slave, or caching-only server, and two additional configuration files
are used on the master server. There is also the script that is used to start the servers after they
are configured, for a total of six possible files.
The three required files are: named.conf: Found in the /etc directory, this file contains global properties and sources of
configuration files.
named.ca: Found in /var/named, this file contains the names and addresses of root servers.
named.local: Found in /var/named, this file provides information for resolving the loopback address
for the local host.
The two additional files required for the master domain server are: zone: This file contains the names and addresses of servers and workstations in the local domain and
maps names to IP addresses.
reverse zone: This file provides information to map IP addresses to names.
The following script is used to start the BIND server:
/etc/rc.d/init.d/named:
ADDRESS:302 PARANJPE UDYOG BHAVAN,OPP SHIVSAGAR RESTAURANT,THANE [W].PH 8097071144/55
109
Prof: siddhesh zele’s
We-IT Tutorials
TYBSC-IT Linux Administration
This is the BIND server initialization file used to start BIND. A sample file is installed with the
RPM from the Installation CDs.
The named.conf file
Look at this file in more detail beginning with the lines starling with //. These are comment lines,
and anything following them is ignored. Commands are passed to the file in the form of
statements. Several of these statements are shown in the sample file, but you actually can use
seven configuration statements.
These are listed here with a brief explanation of their function. options: Lists global configurations and defaults
include: Gets information from another file and includes it
acl: Specifies IP addresses used in an access control list
logging: Specifies log file locations and contents
server: Specifies properties of remote servers
zone: Specifies information about zones
key: Specifies security keys used for authentication
Information about the statement is contained within curly braces and terminated by a semicolon:
{information about server}.
1) Options
The options statement is typically the first section of named.conf and it contains information
about the location of the files used by named. You can use only one options statement, but you
can have more than one value for that statement.
You can specify the directory where additional configuration files used by named are located are
located to make it unnecessary to list the entire path to the file; you just list the name of the file
for any files shown in the remainder of named.conf.
Options statements use the following syntax:
options { value property; }
The list of values that can be used in the options statement is quite long.
ADDRESS:302 PARANJPE UDYOG BHAVAN,OPP SHIVSAGAR RESTAURANT,THANE [W].PH 8097071144/55
110
Prof: siddhesh zele’s
We-IT Tutorials
TYBSC-IT Linux Administration
Options Values and Their Meanings: VALUE MEANING
allow-query Accepts queries only from hosts in the address list (by default
queries are accepted from any host). Usage: allow-query {―
address-1ist 3‖};.
allow-transfer Zone transfers are accepted only by hosts in the address list
(by default transfers are allowed to all hosts). Usage: allow-
transfer{―address list‖};
auth-nxdomain The server responds as an authoritative server (defaults to
yes). Usage: auth-nxdomain ―yes or no‖; (choose one).
check-names Hostnames are checked for compliance with the RFC. Usage:
check-names ―master or slave or response warn or fail or
ignore‖; (choose one from each group).
cleaning-interval Specifies the time period before expired resource records are
removed by the server (defaults to 60 minutes) Usage:
cleaning-interval ―number‖; (specify number in minutes).
coresize Specifies largest size for core dump files. Usage: coresize
―size‖; (specify size in bytes).
datasize Limits server memory usage.Usage: datasize ―size‖; (specify
size in bytes).
deallocate-on-exit
Detects memory leaks (default is no). Usage: deallocate-on-
exit ―yes or no‖; (choose one)
directory Path of the directory where server configuration files are
located.Usage: directory ―path to directory‖; (specify path)
dump-file If named receives a SIGINT signal, it dumps the database to
the file specified here (defaults to named_dump.db)
fake- iquery If set to yes, the server sends a fake reply to inverse queries
rather than an error (default is no). Usage: fake-iquery ―yes or
no‖; (choose one)
fetch-glue If set to yes, the server obtains the glue records for a response
(default is yes).Usage: fetch-glue ―yes or no‖; (choose one)
files Limits number of concurrently open files (default is
unlimited).Usage: files ―number‖; (specify number)
forward If set to first, the servers listed in the forwarders option are
queried first and then the server tries to find the answer itself.
If set to only, just the servers in the forwarders list are
queried.Usage: forward ―first or only‖; (choose one)
forwarders Shows IP addresses of servers to forward queries (default is
none).Usage: forwarders ―IP addresses of servers―;(specify IP
addresses).
host-statistics If set to yes the server keeps statistics on hosts (default is
no).Usage: host-statistics ―yes or no‖; (choose one).
interface Specifies interval for searching the network for new or
ADDRESS:302 PARANJPE UDYOG BHAVAN,OPP SHIVSAGAR RESTAURANT,THANE [W].PH 8097071144/55
111
Prof: siddhesh zele’s
We-IT Tutorials
TYBSC-IT Linux Administration
interval removed interfaces (default is 60 minutes).Usage:
interface-interval ―time‖ (specify time in minutes).
listen-on Specifies port and interfaces on which server listens for
queries (default is port 53).Usage: listen-on ―port {address
list}‖; (specify port number and address list).
max-transfer- time-in
Specifies time server waits for completion of inbound transfer
(default is 120 minutes).Usage: max-transfer-time-in ―time‖;
(specify time in minutes)
memstatistics- file When deallocate-on-exit is set, specifies the file where
memory statistics are written (defaults to
named.memstats).Usage: memstatistics-file ―path to file‖;
(specify path and filename)
2) include
The include statement lists the path and name of any files that you want to be included with the
named.conf file. Use the same syntax as used in the options statement to specify the path.
3) Acl
This option lets you specify a list of IP addresses in an access control list. Only hosts on this list
have access to the server.
4) Logging
The logging statement is where you specify your server‘s logging options. The logging statement
contains two additional items, the channel and the category. The channel is where you specify
the location of the logged information. Logged information can be written to a file, sent to the
syslog, or thrown away by specifying the appropriate command. Choosing to send the
information to a file gives you several additional choices for handling the information. You can
set the number of versions to keep, the size of the files, and whether the severity of the
information and the time and category are included with the other information in the file.
The syntax for the logging statement is similar to the syntax for the option statement. The
following commands send the information to a file. Items in italics indicate information you need
to enter.
logging { channel channel_name file path to file versions specify number or unlimited size specify size in bytes } If you want to send the information to the syslog, the syntax is: logging { channel channel_name
ADDRESS:302 PARANJPE UDYOG BHAVAN,OPP SHIVSAGAR RESTAURANT,THANE [W].PH 8097071144/55
112
Prof: siddhesh zele’s
We-IT Tutorials
TYBSC-IT Linux Administration
{ syslog (choose where to send from following choices) (kern,user,mail,daemon,auth,syslog,lpr,news,uucp,cron,\ authpriv,ftp,local0 thru local7) To discard the information, choose null as the destination. logging { channel channel_name null; }
Next you can set the severity level for the information written to the file or syslog. This section
follows the sections shown previously for file or syslog. You also indicate here if you want the
time, category, and severity included. If you are discarding the information, you don‘t need to set
these parameters.
severity choose from critical,error,warning,notice,info,debug\ level,dynamic print-time choose yes or no print-severity choose yes or no print-category choose yes or no }; The category is where you specify the type of information to log. This value follows the severity and print parameters and takes the following syntax: category categoryname { channel name; channel name; };
You can choose from over 20 logging categories. These are shown, alphabetically, in
Table.
CATEGORY TYPE OF INFORMATION LOGGED
cname Information about CNAME references
config Information about configuration files
db Information about databases
default The default if nothing is selected
eventlib Information about event system debugging
insist Details about failures from internal consistency checking
lame-servers Information about lame servers
load Information about zone loading
maintenance Information about maintenance
ncache Information about negative caching
ADDRESS:302 PARANJPE UDYOG BHAVAN,OPP SHIVSAGAR RESTAURANT,THANE [W].PH 8097071144/55
113
Prof: siddhesh zele’s
We-IT Tutorials
TYBSC-IT Linux Administration
notify Information about tracing the NOTIFY protocol
os Information about operating system problems
packet Dumps of all sent and received packets
panic Information about faults that shut down the server
parser Information about processing configuration commands
queries Information about all received DNS queries
response-checks Information about response-checking results
security Information about security status of server
statistics Information about server statistics
update Information about dynamic updates
xfer-in Information about inbound zone transfers
xfer-out Information about outbound zone transfers
Using the categories from the logging statement, you can obtain a large quantity of information
about your server. This information can be useful if you are having problems with your DNS.
You can enable logging for the area that you think is causing your problem and then read the
appropriate log to find any messages that might indicate an error with your configuration.
5) Server
In the server statement you can set the properties of a remote server. You can specify whether to
send queries to the remote server from the local server, and you can set the method used for
transferring information. The syntax for this statement is the same as for other statements.
The following are valid values:
bogus: Specify yes or no (No is the default and indicates that queries are sent to the remote
server.) Yes means that the remote server is not queried.
transfer: Specify the number of transfers you want to allow.
transfer-format: Specify whether you want one-answer or many answers.
keys: Specify key ID (currently not implemented).
6) Zones
The listings in /etc/named.conf also contain zone statements. These zone statements refer
to files that are called zone files. Each zone statement begins with the word zone
followed by the domain name and the data class. The four data classes are in, hs, hesiod,
and chaos. If no type is specified, the default is in, for Internet.
Next follows the type option which specifies whether the server is a master, a slave/stub,
or is the hints file. A stub server loads only NS records, not the entire domain. The hints
file is used to initialize the root cache and contains a list of root servers.
ADDRESS:302 PARANJPE UDYOG BHAVAN,OPP SHIVSAGAR RESTAURANT,THANE [W].PH 8097071144/55
114
Prof: siddhesh zele’s
We-IT Tutorials
TYBSC-IT Linux Administration
Next is the name of the zone file for the specified zone. This is a pointer to the file
containing the data about the zone.
The other options for the zone statements are listed here, along with an explanation of their
function:
allow-query:
Accepts queries only from hosts in the address list (by default queries are accepted from any
host).
allow-transfer:
Zone transfers are accepted only by hosts in the address list (by default transfers are allowed to
all hosts).
allow-update:
Hosts in the address list are allowed to update the database.
also-notify:
Servers in the address list are sent a notify message when the zone is updated.
check-names:
Host names are checked for compliance with the RFC.
max-transfer-time-in:
Specifies the time the slave waits for a zone transfer.
notify:
When zone files are updated, this option, when set to yes, sends DNS NOTIFY messages
(default is yes).
These options are the same as those shown in the options statement section and have the same
function here. When listed in the options section, they apply to all zones, but if listed with a
specific zone, they apply only to that zone. Settings listed in a specific zone section override
those globally set in the options statement.

ADDRESS:302 PARANJPE UDYOG BHAVAN,OPP SHIVSAGAR RESTAURANT,THANE [W].PH 8097071144/55
115
Prof: siddhesh zele’s
We-IT Tutorials
TYBSC-IT Linux Administration
The named.ca file
The first zone file is known as the cache file, and it references a file called named.ca, which
contains information about the world‘s root name servers. This information changes and needs to
be updated periodically.
The named.local file
The next zone file contains information about the local host. The file referenced here is
named.local and contains information about the local domain. The next zone file provides name
lookup information about the domain tactechnology.com, and the final zone provides reverse
lookup. Reverse lookup enables you to enter the IP number and obtain the name.
Zone Files
A zone file can contain many types of RRs, which are listed in the order in which they generally
appear in the zone files
SOA — Start of Authority
The start of authority (SOA) is the first line in the zone file. The SOA identifies the name server
as the authoritative source for information about that domain.
Each zone file has only one SOA, and it contains the following data:
@ IN SOA main.tactechnology.com. mail.tactechnology.com. (/ 2000052101 ; Serial 8h ;Refresh 2h ;Retry 1w ;Expire 1d) ;Minimum TTL
The first character in the SOA line is a special symbol that means ―to look at this domain.‖ IN
means Internet. SOA means Start of authority. The authoritative server for this domain is
main.tactechnology.com., and mail.tactechnology.com. is the e-mail address of the administrator.
There is trailing period after the domain names. If these are not included, the domain name is
appended to the entry.
The opening parenthesis enables the first line to be extended so that anything between the
opening and closing parenthesis is considered one line.
The line containing 2000052101: Serial is the serial number of the file.
Refresh is the amount of time the server should wait before refreshing its data.
ADDRESS:302 PARANJPE UDYOG BHAVAN,OPP SHIVSAGAR RESTAURANT,THANE [W].PH 8097071144/55
116
Prof: siddhesh zele’s
We-IT Tutorials
TYBSC-IT Linux Administration
Retry is the amount of time the server should wait before attempting to contact the primary
server if the previous attempt failed.
Expire means that if the secondary master is unable to contact a primary master during the
specified period, the data expires and should be purged.
TTL specifies the Time to Live for the data. This parameter is intended for caching name servers
and tells them how long to hold the data in their cache.
All of the information contained by the SOA may be placed on one line, but it is usually written
as shown previously. The order of the items is significant in the SOA header.
1. NS — NAME SERVERS IN THIS DOMAIN
Shows the names of the name servers.
2. A — THE IP ADDRESS FOR THE NAME
Shows the IP address for the name servers.
3. PTR — POINTER FOR ADDRESS NAME MAPPING
Used to point to the name servers.
4. CNAME — CANONICAL NAME
Shows the real name of the host.
5. MX RECORD — MAIL EXCHANGE RECORD
The MX record specifies the mail servers for the domain.
6. TXT — TEXT INFORMATION
Enables entry of descriptive information.
7. WKS — WELL-KNOWN SERVICE
Enables entry of descriptive information.
8. HINFO — HOST INFORMATION
Usually shows type of hardware and software.
The reverse zone file
The last zone file shown in the named.conf file is called tac.rev. This file is used to provide
information for reverse lookups. Searching for tactechnology.com by using the domain name is
called forward address resolution since it uses a name to find an IP number and is the most
common use of name resolution. You can also find a name from an IP number and this is called
reverse address resolution. All you need to do is enter the IP address, and the server returns the
domain name.
Configuring a Caching DNS Server
In this section you set up a caching server for the domain tactechnology.com. Three files are
used in all three types of server configurations. In a caching-only server, these three files make
up the entire configuration.
ADDRESS:302 PARANJPE UDYOG BHAVAN,OPP SHIVSAGAR RESTAURANT,THANE [W].PH 8097071144/55
117
Prof: siddhesh zele’s
We-IT Tutorials
TYBSC-IT Linux Administration
1. Begin by verifying the zone information in /etc/named.conf. When you installed the
BIND package, the /etc/named.conf file was created and it contained zone
information for your localhost, but you need to check it to be sure. You are looking
for two zone lines: one indicated by a ―.‖, referencing the file named.ca, and one
shown as ― 0.0.127.in.addr.arpa‖, referencing named.local.
2. Next, you need to check the configuration of the /var/named/named.local file.
This file contains the domain information for the local host, and is typically created when
BIND is installed. You usually don‘t have to make any changes to
/var/named/named.local. This domain is a reverse domain in that it is used to map the
loopback address 127.0.0.1 to the local host name.
3. You need to check the /etc/nsswitch file to be sure it contains the following line. hosts: files nisplus dns
4. You need to check the /etc/resolv.conf file to make sure that the IP address (127.0.0.1) of
your localhost is listed as a name server.
5. Finally, you need to check that your /etc/host.conf contains the word bind.
6. After you have completed all of the previous steps, it is time to start the named daemon
and check your work. Type rndc start at a command prompt, wait for the prompt to
return, and then type dig.
Configuring a Secondary Master DNS Server (Slave)
You already have three of the files in place and only need to slightly modify the /etc/named.conf
file and add two more files to complete the slave configuration. On the server you want to be the
slave, go to the /etc/named.conf file and add two more zones, one for the forward lookup of your
server, and one for the
reverse lookup.
For the forward lookup, you need to add the following. (For this example, the master server is
called main.tactechnology.com, and the slave is p200. tactechnology.com. Be sure to use your
own domain name and IP address instead of the examples shown.)
zone ‚tactechnology.com‛ { notify no; type slave; file ‚tactech.com‛; masters { 192.168.1.1; }; }; For the reverse lookup you add this section: zone ‚1.168.192.in-addr.arpa‛
ADDRESS:302 PARANJPE UDYOG BHAVAN,OPP SHIVSAGAR RESTAURANT,THANE [W].PH 8097071144/55
118
Prof: siddhesh zele’s
We-IT Tutorials
TYBSC-IT Linux Administration
{ notify no; type slave; file ‚tac.rev‛; masters { 192.168.1.1; }; };
Configuring a Primary Master Server (Master)
The /etc/named.conf file on the master server also needs to be modified.
1. Assuming that you already set up this server as a caching-only server, you just need to
add the following lines to /etc/named.conf.
zone ‚tactechnology.com‛ { notify no; type master; file ‚tactech.com‛; }; For the reverse lookup you add this section: zone ‚1.168.192.in-addr.arpa‛ { notify no; type master; file ‚tac.rev‛; };
Notice that you used the same names for the files on the master (primary) server as the
slave (secondary) server. This is because these files are downloaded by the slave in a
zone file transfer and stored on the slave in the files shown by the file option. You did not
create the files on the slave but created them on the master server.
2. You now need to create the zone files that are referenced by the /etc/named.conf file.
First you create the file /var/named/tactech.com by beginning with the Start of
Authority section (SOA).
@ IN SOA main.tactechnology.com.mail.tactechnology.com. ( / 200005203 ; Serial/ 8h ; Refresh/ 2h ; Retry/ 1w ; Expire/ 1d) ; Minimum TTL/ Next you add name server and mail exchange information.
ADDRESS:302 PARANJPE UDYOG BHAVAN,OPP SHIVSAGAR RESTAURANT,THANE [W].PH 8097071144/55
119
Prof: siddhesh zele’s
We-IT Tutorials
TYBSC-IT Linux Administration
NS main.tactechnology.com./ NS terry.tactechnology.com./ MX 10 main; Primary Mail Exchanger/ MX 20 p200; Secondary Mail Exchanger/
3. Finally, you add information about your local host, mail, FTP and Web server. You can
also add information about every workstation on your network.
4. Next you set up the reverse lookup zone file which is called tac.rev. Again, you need to
start with the SOA header as shown:
@ IN SOA main.tactechnology.com. mail.tactechnology.com.( 200005203;Serial 8h ; Refresh 2h ; Retry 1w ; Expire 1d) ; Minimum TTL Next you add the information about your name servers and their IP addresses. NS main.tactechnology.com. 1 PTR main.tactechnology.com. 2 PTR p200.tactechnology.com.
Checking Your Configuration
The three very useful tools available for troubleshooting DNS problems that are included with
BIND are
nslookup
host
dig
nslookup
nslookup is one of several programs that can be used to obtain information about your name
servers. This information helps you to fix problems that may have occurred. nslookup is a
program that can be used either interactively, or non-interactively, to look up name servers.

ADDRESS:302 PARANJPE UDYOG BHAVAN,OPP SHIVSAGAR RESTAURANT,THANE [W].PH 8097071144/55
120
Prof: siddhesh zele’s
We-IT Tutorials
TYBSC-IT Linux Administration
Entering nslookup at a command prompt starts the search for a name server by looking in the
/etc/resolv.conf file.
If you are running a name server on your system, your localhost (127.0.0.1) is searched, as this is
the first listing for a name server in /etc/resolv.conf. You can also tell nslookup to search for a
specific server by entering a hyphen and the name of the desired server after the command. After
nslookup starts, the DNS server used for searches is shown and a prompt is presented for
entering commands.
The most common commands available for use with nslookup are:
ls — used to list information about the domain in question
set — used to change search information for lookups
host
Host enables you to find an IP address for the specified domain name. All that is required is the
domain name of the remote host as shown in the following:
host tactechnology.com
You can also search for resource record types by using the –t option and the type of resource
record you want to search.
dig
Dig can be used for debugging and obtaining other useful information. The basic syntax is:
dig (@server) domain name (type)
Items in parenthesis are optional. Dig can also be used to do reverse lookups by using the –x
switch and specifying the IP address:
dig –x 127.0.0.1
This command returns the domain name of the local host
You made some changes to the /etc/named.conf file, so before you can check what you did, you
need to restart the named daemon. The named daemon must be restarted whenever you make
changes to /etc/named.conf. To restart named, you need to type:
rndc restart

ADDRESS:302 PARANJPE UDYOG BHAVAN,OPP SHIVSAGAR RESTAURANT,THANE [W].PH 8097071144/55
121
Prof: siddhesh zele’s
We-IT Tutorials
TYBSC-IT Linux Administration
Now you can run nslookup to see if you can find your name server. After nslookup starts, it
returns the name of your local host. Now you need to look for your name server by using the set
command to change the query type to look for name servers.
The last thing you need to check is the reverse lookup. Start nslookup in the default mode by
typing nslookup at the command prompt. Then you can enter the IP address of the server.
ADDRESS:302 PARANJPE UDYOG BHAVAN,OPP SHIVSAGAR RESTAURANT,THANE [W].PH 8097071144/55
122
Prof: siddhesh zele’s
We-IT Tutorials
TYBSC-IT Linux Administration
UNIT 5
Chapter 1: CONFIGURING MAIL
SERVICES
Using electronic mail, you can send messages to and receive messages from other computer
users anywhere in the world.
Before configuring an e-mail client or server, you need to understand how e-mail works and the
programs to use or make available to your users. Several key components are essential for e-mail
to work properly, and as a system administrator it is your responsibility to configure the
following items.
Programs:
A Mail User Agent (MUA) for users to be able to read and write e-mail
A Mail Transfer Agent (MTA) to deliver the e-mail messages between computers across
a network
A Mail Delivery Agent (MDA) to deliver messages to users‘ mailbox files
An mail notification program to tell users that they have new mail
The TCP/IP protocols for storing e-mail messages and transferring e-mail between MTAs
Other communication and mail storage components:
Ports
Mail queues
Mailbox files
Tracing the E-Mail Delivery Process
The usual email delivery process involves three components:
1. Mail User Agent
2. Mail Transfer Agent
3. Mail Delivery Agent
Mail User Agent (MUA)
To be able to send mail, you, or your users, need a program called a Mail User Agent (MUA).
The MUA, also called a mail client, enables users to write and read mail messages.

ADDRESS:302 PARANJPE UDYOG BHAVAN,OPP SHIVSAGAR RESTAURANT,THANE [W].PH 8097071144/55
123
Prof: siddhesh zele’s
We-IT Tutorials
TYBSC-IT Linux Administration
Two types of MUAs are available:
1. graphical user interface (GUI), such as Netscape Messenger
2. command-line interface, such as Pine.
Whether your MUA is a GUI or command-line interface, after the message is composed, the
MUA sends it to the mail transfer agent (MTA). The MTA is the program that sends the message
out across the network and does its work without any intervention by the user. In fact, most users
are unaware of the MTA, they just see their mail client.
Mail Transfer Agent (MTA)
Now that the MTA has received the message from the MUA, it can do its job. The MTA
installed by default on your Red Hat system is called Sendmail. The MTA reads the information
in the ‗To‘ section of the e-mail message and determines the IP address of the recipient‘s mail
server. Then the MTA tries to open a connection to the recipient‘s server through a
communication port, typically port 25. If the MTA on the sending machine can establish a
connection, it sends the message to the MTA on the recipient‘s server using the Simple Message
Transfer Protocol (SMTP).
The MTA on the receiving server adds header information to the message. The header contains
information that is used for tracking the message and ensuring that it is delivered. Next the
receiving MTA passes the message to another program to inform the receiver that new mail has
arrived.
Mail Delivery Agent (MDA)
After the MDA receives the message from the MTA, it places the message in the receiver‘s
mailbox file that is identified by the username. On your Red Hat system this is a program called
procmail. The location of the user‘s mailbox file is
/usr/spool/mail/<user’s name>.
The final step in the process happens when the user who is the intended receiver of the message
reads the message. The user does this using the MUA on his or her PC. An optional program is a
mail notifier that periodically checks your mailbox file for new mail. If you have such a program
installed, it notifies you of the new mail.
The Red Hat Linux shell has a built-in mail notifier that looks at your mailbox file once a
minute. If new mail has arrived, the shell displays a message just before it displays the next
system prompt. It won‘t interrupt a program you‘re running. You can adjust how frequently the
mail notifier checks and even which mailbox files to watch. If you are using a GUI, there are
mail notifiers available that play sounds or display pictures to let you know that new mail has
arrived.
ADDRESS:302 PARANJPE UDYOG BHAVAN,OPP SHIVSAGAR RESTAURANT,THANE [W].PH 8097071144/55
124
Prof: siddhesh zele’s
We-IT Tutorials
TYBSC-IT Linux Administration
Introducing SMTP
SMTP is the TCP/IP protocol for transferring e-mail messages between computers on a network.
SMTP specifies message movement between MTAs, by the path the message takes. Messages
may go directly from the sending to the receiving MTA or through other MTAs on other network
computers. These other computers briefly store the message before they forward it to another
MTA, if it is local to the MTA, or to a gateway that sends it to an MTA on another network.
The SMTP protocol can transfer only ASCII text. It can‘t handle fonts, colors, graphics, or
attachments. If you want to be able to send these items, you need to add another protocol to
SMTP. The protocol you need is called Multipurpose Internet Mail Extensions, or MIME. MIME
enables you to add colors, sounds, and graphics to your messages while still enabling them to be
delivered by SMTP. In order for MIME to work, you must have a MIME-compliant MUA.
1. POP3
POP3 is the Post Office Protocol version 3. This protocol runs on a server that is
connected to a network and continuously sends and receives mail. The POP3
server stores any messages it receives. POP3 was developed to solve the problem
of what happens to messages when the recipient is not connected to the network.
Without POP3, the message could not be sent to the recipient if the recipient were
offline. But with POP3, when you want to check your e-mail, you connect to the
POP3 server to retrieve your messages that were stored by the server. After you
retrieve your messages, you can use the MUA on your PC to read them. Of
course, your MUA has to understand the POP3 to be able to communicate with
the POP3 server. The messages you retrieve to your PC are then typically
removed from the server. This means that they are no longer available to you if
you want to retrieve them to another PC.
2. IMAP4
The Internet Message Access Protocol version 4 (IMAP4) provides sophisticated
client/server functionality for handling e-mail. IMAP4 has more features than
POP3. IMAP4 enables you to store your e-mail on a networked mail server, just
as POP3 does. The difference is that POP3 requires you to download your e-mail
before your MUA reads it, whereas IMAP4 enables your e-mail to reside
permanently on a remote server, from which you can access your mail. And you
can do so from your office, your home, or anywhere else. Your MUA must
understand IMAP4 to retrieve messages from an IMAP4 server.
ADDRESS:302 PARANJPE UDYOG BHAVAN,OPP SHIVSAGAR RESTAURANT,THANE [W].PH 8097071144/55
125
Prof: siddhesh zele’s
We-IT Tutorials
TYBSC-IT Linux Administration
Configuring Sendmail
A number of mail transport agents are available for Red Hat Linux, including Qmail, smail and
Sendmail. The most widely used MTA is Sendmail, which is the default MTA for Red Hat
Linux.
Checking that Sendmail is installed and running
Before you start to configure Sendmail, be sure that it‘s installed on your computer.
The following example shows how to check, using the rpmquery command. The output shows
not only that Sendmail is installed, but which version of Sendmail is installed.
# rpmquery -a grep sendmail
If Sendmail is installed, make sure that it starts at boot time. You can use the following
chkconfig command to verify this:
# chkconfig --list sendmail
Finally, ensure that Sendmail is running and start it if it isn‘t. You have several ways to check
whether Sendmail is running.The following command uses ps and pidof to query the process
table for running Sendmail instances:
# ps wu -p $(pidof sendmail)
The TTY fields with ‗?‘ indicate that the sendmail processes are not associated with a terminal.
This usually means that the process is running as daemon, which is the case with Sendmail. If
you don‘t see output indicating that Sendmail is running, execute the following command to start
Sendmail:
# service sendmail start
Another technique you can use is to telnet to localhost, port 25.
# telnet localhost 25
Type QUIT to exit the session.
Configuring Sendmail
Fedora Core and RHEL install a default Send- mail configuration file that works for most sites.If
you need to edit the configuration file at all, you may need to make only a couple of minor
changes. Here are the key lines a Red Hat system administrator might want to edit in

ADDRESS:302 PARANJPE UDYOG BHAVAN,OPP SHIVSAGAR RESTAURANT,THANE [W].PH 8097071144/55
126
Prof: siddhesh zele’s
We-IT Tutorials
TYBSC-IT Linux Administration
/etc/mail/sendmail.cf. The line in question begins with the uppercase letters DS and occurs near
line 100. The following example specifies the host named
mailbeast.example.com as a mail relay host.
# ‚Smart‛ relay host (may be null)
DS
Change the line to define the name of the mail relay host. The mail relay host is the name of the
computer that sends and receives mail on your network. There should not be any space between
DS and the hostname.
# ‚Smart‛ relay host (may be null)
DSmailbeast.example.com
You need a copy of the predefined configuration files in /etc/mail/sendmail.mc. The basic
procedure is to modify sendmail.mc for your own needs, regenerate /etc/mail/sendmail.cf using
the m4 macro processor and then test your configuration. This method enables you to make
incremental changes, minimizing the risk of major problems.
The m4 Macro Processor
A macro is a symbolic name for a long string of characters, much like a keyboard macro is a
shorthand way to type a long series of key-strokes. Sendmail rules are generated from the macms
in Sendmail macro files. The location of the generic Sendmail macro file for Red Hat is
/etc/mail/sendmail.mc. In addition, Sendmail‘s own macro files are stored in a set of
subdirectories in /usr/share/sendmail-cf. The rules in the Sendmail macro file generate the
default Sendmail configuration file, /etc/mail /sendmail.cf. The m4 utility is a macro processor
that reads the macro file and generates the configuration file. An example of a macro in
/etc/mail/sendmail.mc is the OSTYPE macro that identifies the operating system.
Sendmail runs on many different operating systems, not just UNIX and Linux. On a Linux
system, if you look at Sendmail‘s macro file, you see the following line, which tells Send- mail
which operating system it‘s running on so that Sendmail runs properly:
OSTYPE (‘linux’) dnl
Understanding and Managing Mail Queues
Sometimes email messages don‘t go out immediately and instead remain in one of the
originating MTA‘s outgoing mail queues. The reasons for the delay can be:
ADDRESS:302 PARANJPE UDYOG BHAVAN,OPP SHIVSAGAR RESTAURANT,THANE [W].PH 8097071144/55
127
Prof: siddhesh zele’s
We-IT Tutorials
TYBSC-IT Linux Administration
1. Perhaps your network is down.
2. Your intranet‘s connection to the Internet is sporadic.
3. The recipient‘s MTA might be unavailable.
When they send their messages, Sendmail puts the message into the mail queue and keeps trying
to send the message at intervals defined in the Sendmail configuration file or passed as a
command-line parameter to the Sendmail daemon when it starts. You can find out what these
intervals are by checking the initialization script that starts Sendmail.
The following listing shows the file /etc/sysconfig/sendmail:
DAEMON=yes QUEUE=1h
The line beginning with QUEUE defines the refry interval to refry as one hour (lh). You can
specify the interval in h (hours), m (minutes), or s (seconds).
Setting Up Aliases
Mail aliases are useful for creating distribution lists and for making access to users more
convenient. For example, if people have trouble spelling one‘s name, create an alias with
alternate spellings, so if someone misspells the name, the mail still reaches the intended
recipient.
You can an alias a nonexistent user to a real user. For example, you could set up an alias, bubba,
which redirects all mail intended for bubba to the real user kurt. The aliases file is usually
/etc/aliases.
To create an entry in the aliases file, use your favorite editor. Each entry consists of the
username, followed by a colon, followed by some sort of white space, followed by the alias.
Multiple usernames can be specified on the left side of the colon to create a primitive distribution
list. After you save the file, you must run the newaliases command to make the changes take
effect. This step is necessary because Sendmail looks at the binary file /etc/aliases.db to read
alias information. The newaliases command reads your aliases text file and updates the binary
file.
Using Other Sendmail Files and Commands
Glancing through your Sendmail configuration file shows that Sendmail uses several files and
directories. The following list describes some of them.
/usr/sbin/sendmail: The sendmail daemon executable image
mailq: Shows the contents of the mail queue:
ADDRESS:302 PARANJPE UDYOG BHAVAN,OPP SHIVSAGAR RESTAURANT,THANE [W].PH 8097071144/55
128
Prof: siddhesh zele’s
We-IT Tutorials
TYBSC-IT Linux Administration
# mailq
/var/spool/mqueue: The directory that holds the mail queue
/var/spool/mail: The directory that holds users’ mail spools (the mailbox file)
/etc/mail/access: Lists usernames, email addresses, domain names, and IP addresses not
permitted to send mail to your system
/etc/mail/relay-domains: Lists hosts (by name, partial names, or IP addresses) that are permitted
to relay email through your system
/etc/mail/local-host-names: Lists other names for your system
/etc/mail/virtusertable: Maps email addresses to usernames on the system
Using the Postfix Mail Server
Following are the features of Postfix Mail Server:
1. Postfix is fully compatible with Sendmail at the command level
2. The primary Postfix daemon is named sendmail, just like Sendmail.
3. Postfix was designed to be a high-performance, easier-to-use replacement for Sendmail
4. Postfix is easier to configure and use
5. Postfix does not need a meta-configuration-language (the m4 macros) to generate or
modify configuration files
6. Postfix‘s syntax is:
7. relayhost relay.example.com
Switching to Postfix
By default, Fedora Core and RHEL use Sendmail. Before switching to Postfix stop Sendmail:
# service sendmail stop
You want to stop Sendmaii before changing anything so that no incoming mail gets stuck in
Sendmail‘s queues before it is delivered. You should make sure that Postfix is installed:
$ rpmquery postfix
To make Postfix your MTA, click Main Menu Preferences More Preferences Mail
Transport Agent Switcher or execute the command system-switch-mail at a command prompt.
Click the Post fix radio button and then click OK to save your change and close the dialog box.
Click OK in the information message box to proceed.
ADDRESS:302 PARANJPE UDYOG BHAVAN,OPP SHIVSAGAR RESTAURANT,THANE [W].PH 8097071144/55
129
Prof: siddhesh zele’s
We-IT Tutorials
TYBSC-IT Linux Administration
Configuring Postfix
Postfix‘s primary configuration file is /etc/postfix/main.cf. You will need to check or edit at least
the following variables:
1. The mydomain variable specifies your domain name:
mydomain = example.com
2. The myhostname variable identifies the local machine‘s fully qualified domain name:
myhostname = coondog.èxample.com
3. The myorigin variable identifies the domain name appended to unqualified addresses
(that is, usernames without the @example.com goober attached):
myorigin = $mydomain
This causes all mail going out to have your domain name appended. Thus, if the value of
mydomain is possum_holler.com and your username is bubba, then your outgoing mail
will appear to come from bubba@possum_holler.com.
4. The mydestination variable tells Postfix what addresses it should deliver locally.
For a standalone workstation, which is a system that is connected directly to the Internet
and that has some sort of domain name resolution running, you want mail to that machine
and to localhost (and/or localhost.$mydomain and/or localhost.locadomain) delivered
locally, so the following entry should suffice:
mydestination = $myhostname, locaihost, localhost.$mydomain
Postfix supports a larger number of configuration variables than the four just listed, but these are
the mandatory changes you have to make.
Create or modify /etc/aliases. At the very least, you need aliases for Postfix, postmaster, and root
in order for mail sent to those addresses to get to a real person. Here are the contents of my initial
/etc/aliases file:
postfix: root
postmaster: root
root: bubba
ADDRESS:302 PARANJPE UDYOG BHAVAN,OPP SHIVSAGAR RESTAURANT,THANE [W].PH 8097071144/55
130
Prof: siddhesh zele’s
We-IT Tutorials
TYBSC-IT Linux Administration
After creating or modifying the aliases file, regenerate the alias database using Postfix‘s
newaliases command:
# /user/sbin/newaliases
You are finally ready to start Postfix:
# service postfix start
Make sure that Postfix will start when you boot the system. You can use the chkconfig
commands shown in the following example:
# chkconfig --levels 0123456 sendmail off # chkconfig --levels 2345 postfix on
Finally, modify your syslog configuration to handle Postfix log messages appropriately.
You have to restart syslogd syslogd to cause these changes to take effect:
# service syslog restart
Running Postfix behind a Firewall or Gateway
If the system on which you run Postfix is behind a firewall, uses a mail host, or otherwise lacks a
direct or constant Internet connection, you probably want to define a relay host that handles your
system‘s outbound email. In this case, Postfix will simply hand off locally generated email to the
relay host, which must be configured to relay for you. For a system that sits on an internal
network and that doesn‘t have a direct connection to the Internet, add the following entries to
/etc/postfix/main.cf:
relayhost = mailhost.$mydomain disable_dns_lookups = yes
mailhost.$mydomain (replace mailhost with the actual name of the relay host) handles actual
mail delivery. If you don‘t run DNS on your internal network, the second line prevents Postfix‘s
SMTP client from performing DNS lookups and instead causes Postfix to retrieve the IP address
for the relay host from /etc/hosts, so make sure that /etc/hosts contains the fully qualified domain
name, IP address, and alias (if one exists) for the relay host you specify.
You can also specify the relay host‘s IP address in /etc/postfix/main.cf using the syntax:
relayhost = [192.168.0.1]
ADDRESS:302 PARANJPE UDYOG BHAVAN,OPP SHIVSAGAR RESTAURANT,THANE [W].PH 8097071144/55
131
Prof: siddhesh zele’s
We-IT Tutorials
TYBSC-IT Linux Administration
Notice that the IP address is enclosed in square brackets. The square brackets implicitly disable
DNS lookups. That is, the square brackets imply disable_dns_lookups = yes.
If you make these (or other) changes to the Postfix configuration file, you have to tell Postfix
about them. Use the following command to do so:
# service postfix reload
Running Postfix on a Mail Host
At the end of the previous section, you configured Postfix to use a mail host, sometimes called a
smart host, mail hub, or mail relay, for delivering outbound mail. This configuration assumes
that the relay host, named mailbeast (just an example), is the sole point of entry and exit for all
email traffic entering the network from the Internet and exiting the network from client systems.
You need to set the following configuration variables on mailbeast:
$myhostname
$mydomain
$myorigin
$mydestination
In addition, mailbeast needs to be told for which systems it can relay mail. Doing so involves
setting two additional configuration variables, $mynetworks and $relay_domains. $mynetworks
defines a list of trusted SMTP clients, that is, the list of clients that Postfix will allow to relay
mail. $relay_domains defines the destinations to which Postfix will relay mail.
Define $mynetworks using an explicit list of network/netmask patterns. Consider the following
$mynetworks setting:
mynetworks = 192.168,0.0/24, 127.0.0.0/8
This directive states that any system with an IP address in the range 192.168.0.1 to
192.168.0.254 or in the loopback network can relay mail through the Postfix server.
Where $mynetworks defines who is permitted to relay using the Postfix server, $relay_domains
identifies to where email can be relayed. By default, Postfix relays mail to any address that
matches $mynetworks and $mydestination (the default value of $relay_domains is
$mydestination). To add relay destinations, specify a comma- or space-delimited list of
hostnames or domains.
relay_domains = $mydestination, example.com, mailbeast.otherexample.com
After making these changes, use the reload command
ADDRESS:302 PARANJPE UDYOG BHAVAN,OPP SHIVSAGAR RESTAURANT,THANE [W].PH 8097071144/55
132
Prof: siddhesh zele’s
We-IT Tutorials
TYBSC-IT Linux Administration
# service postfix reload
Serving Email with POP3 and IMAP
The systems used as desktop network clients ordinarily do not have an MTA of their own. Such
systems require email access using IMAP or POP3. This section shows you how to configure
IMAP and POP3 servers. POP3 imposes a significantly higher disk space penalty on the server,
especially if users decide to store all of their email on the server. Heavy POP3 usage can
dramatically bring down a mail server due to the overhead involved in clients polling the server
for new mail.
Setting up an IMAP Server
The IMAP implementation configured in this section is the Dovecot IMAP server.
We‘ve selected Dovecot for several reasons:
1. It supports POP3 and IMAP, simplifying initial setup and ongoing maintenance.So, if
you configure the IMAP server, you get a POP3 server for free unless you specifically
disable POP3 services.
2. Dovecot also supports POP3S and IMAPS (Secure POP3 and Secure IMAP ),which wrap
the authentication and data exchange processes in SSL-based encryption (using
OpenSSL).
3. Dovecot is also ready to run after the necessary packages have been installed, modulo the
steps described below.
First, make sure that the dovecot package is installed. The following rpmquery command shows
you whether this package is installed. If not, install the dovecot package before proceeding:
# rpmquery dovecot
Configuring Dovecot
If the necessary packages are installed, configure the dovecot service to start when the system
boots. If you don‘t intend to provide an IMAP server, you can disable the IMAP services as
described shortly. Use the following commands to start dovecot at boot time:
# chkconfig --levels 0123456 dovecot off # chkconfig --levels 345 dovecot on
ADDRESS:302 PARANJPE UDYOG BHAVAN,OPP SHIVSAGAR RESTAURANT,THANE [W].PH 8097071144/55
133
Prof: siddhesh zele’s
We-IT Tutorials
TYBSC-IT Linux Administration
Testing Cyrus
To test the server, connect to the POP3 server as a mortal user using telnet:
$ telnet localhost pop3 quit
To close the connection, type quit (or QUIT) and press Enter. This example used telnet to
connect to the POP3 port (port 110). If you see anything other than +0K mumble displayed,
check your configuration. If you can connect to the POP3 server, you will be able to retrieve
messages using the POP3 protocol.
Next up, connect to the IMAP server, again using telnet:
$ telnet localhost imap .logout
To close the connection, type .logout (or .LOGOUT) and press Enter.
Maintaining Email Security
Using S/MIME (secure MIME) for security is only one of many steps to take to protect the
integrity of your own and your users‘ email.
Protecting against Eavesdropping
Your mail message goes through more computers than just yours and your recipient‘s
because of store-and-forward techniques. All a cracker has to do to snoop through your
mail is use a packet sniffer program to intercept passing mail messages.
A packet sniffer is intended to be a tool that a network administrator uses to record and
analyze network traffic, but the bad guys use them too.
Using Encryption
Many email products enable your messages to be encrypted (coded in a secret pattern) so
that only you and your recipient can read them.
One method is to sign your messages using digital signatures, which makes it possible for
people to confirm that a message appearing to come from you did in fact come from you.
Another method is to encrypt email itself. Combining digital signatures with encryption
protects both the confidentiality of your email and its authenticity.
Fedora Core and RHEL ship with GNU Privacy Guard, or GPG, which provides a full
suite of digital signature and encryption services.

ADDRESS:302 PARANJPE UDYOG BHAVAN,OPP SHIVSAGAR RESTAURANT,THANE [W].PH 8097071144/55
134
Prof: siddhesh zele’s
We-IT Tutorials
TYBSC-IT Linux Administration
Using a Firewall
If you receive mail from people outside your network, you should set up a firewall to
protect your network.
The firewall is a computer that prevents unauthorized data from reaching your network.
If you work on one computer dialed in to an ISP, you can still install a firewall.
Bombing, Spamming, or Spoofing
Bombing happens when someone continually sends the same message to an email address
either accidentally or maliciously.
Spamming is a variation of bombing. A spammer sends unsolicited email to many users.
You easily can be an accidental spammer.
Spoofing happens when someone sends you email from a fake address. Spoofing is
possible because plain SMTP does not have authentication capabilities. Without
authentication features, SMTP can‘t be sure that incoming mail is really from the address
it says it is. If your mail server enables connections to the SMTP port, anyone with a little
knowledge of the internal workings of SMTP can connect to that port and send you email
from a spoofed address. Besides connecting to the SMTP port of a site, a user can send
spoofed email by modifying his or her Web browser interfaces.
ADDRESS:302 PARANJPE UDYOG BHAVAN,OPP SHIVSAGAR RESTAURANT,THANE [W].PH 8097071144/55
135
Prof: siddhesh zele’s
We-IT Tutorials
TYBSC-IT Linux Administration
Chapter 2 : CONFIGURING FILE
TRANSFER PROTOCOLS
Introducing vsftpd
The default FTP server daemon on Fedora Core and RHEL systems is vsftpd, the Very Secure
FTP Daemon, which has a project Web site at http://vsftpd.beasts.org/.
vsftpd offers the additional security features and usability enhancements listed here:
1. Support for virtual IF configurations
2. Support for so-called virtual users
3. Can run as a standalone daemon or from inetd or xinetd
4. Configurable on a per-user or per-IP basis
5. Bandwidth throttling
6. IPv6-ready
You do not have to install a special RPM to provide anonymous FTP services. A couple of
tweaks to the vsftpd configuration file is enough.
Configuring vsftpd
Depending on the type of installation you selected, the installer, might or might not have
installed vsftpd. To find out, execute the command rpmquery vsftpd.
# rpmquery vsftpd
If vsftpd is installed, configure it to start at boot time using the chkconfig command:
# chkconfig --levels 0123456 vsttpd off # chkconfig --levels 345 vsftpd on
Alternatively, you can use the graphical Service Configuration tool; to do so, type system-config-
services at a command prompt or select Main Menu System Settings Server Setting
Services. When you see the screen, scroll down to the vsftpd entry near the bottom of the
services scroll box.
Click the check box next to vsftpd to enable it and then click Save to save your changes. Select
File Exit to close the Service Configuration Tool after saving your changes.
The stock vsftpd installation creates a basic functioning FTP server that works for users with
their own login accounts on the system and for anonymous FTP using either the anonymous or
ADDRESS:302 PARANJPE UDYOG BHAVAN,OPP SHIVSAGAR RESTAURANT,THANE [W].PH 8097071144/55
136
Prof: siddhesh zele’s
We-IT Tutorials
TYBSC-IT Linux Administration
ftp login names. If not already present (it should be), add the following line to the bottom of
/etc/vsftpd/vsftpd.conf, the vsftpd configuration file:
listen = YES
This entry configures vsftpd to run as a standalone daemon.
Start vsftpd: #service vsftpd start
Finally, try to log in as an anonymous user. You can use a login name of ftp or anonymous:
$ ftp localhost
In its default configuration, vsftpd uses /var/ftp/pub as the download directory, so if you want to
add content to your FTP server with no server reconfiguration, populate /var/ftp/pub.
The first step in FTP server configuration is to become familiar with the configuration files that
control the server‘s behavior. Table below lists and briefly describes vsftpd‘s configuration files:
FILE NAME DESCRIPTION
/etc/vsftpd/vsftpd.conf Controls the operation of FTP daemon, vsftpd
/etc/vsftpd/ftpusers Lists the users not allowed to login via FTP
/etc/vsftpd/user_list By default, defines user permitted access vis FTP
Configuring User Level FTP Access
The /etc/vsftpd/ftpusers file is the simplest to understand. It contains a list of user or account
names, one per line, that are not allowed to log in using FTP. This file is used to increase
security. /etc/vsftpd/ftpusers is used to prevent privileged user accounts, such as root, from using
FTP to obtain access to the system.
The difference between the files /etc/vsftp/ftpusers and /etc/vsftpd/user_list is that
/etc/vsftp/ftpusers unconditionally denies access to the system via FTP; /etc/vsftpd/user_list can
be used to deny or permit access, depending on the value of the userlist_ deny directive in
/etc/vsftpd/vsftpd.conf.
ADDRESS:302 PARANJPE UDYOG BHAVAN,OPP SHIVSAGAR RESTAURANT,THANE [W].PH 8097071144/55
137
Prof: siddhesh zele’s
We-IT Tutorials
TYBSC-IT Linux Administration
If userlist_deny is set to NO (that is, userlist_deny=No), then vsftpd allows FTP access only to
the users listed in /etc/vsftpd.user_list. If userlist denyis set to YES (that is, userlist_deny=YES),
no user listed in /etc/vsftpd/user_list will be permitted to login via FTP. Such users will not even
be prompted for a password.
Configuring vsftpd Features
The most important (and potentially the longest) vsftpd configuration file is
/etc/vsftpd/vsftpd.conf. The configuration directives in this file enable you to exercise finely
grained control over vsftpd‘s behavior.
Each line is either a comment, which begins with #, or a directive. Directives have the form
option=value. Most of the configuration options are Boolean, so they are either on or off, or,
rather, YES or NO.
A second group of configuration options take numeric values, and a third, considerably smaller
set of configuration options accept string values.
Disabling Anonymous FTP
On the off chance you decided to disable anonymous FTP entirely, this is easily accomplished.
Method 1:
The easiest way is to remove the ftp user from /etc/passwd and /etc/group: # cp -p /etc/passwd /etc/passwd.ftp # cp -p /etc/group /etc/group.ftp # userdel -r ftp # find / -user 50 | xargs rm –r
Ordinarily, userdel‘s -r option removes files in ftp‘s home directory (/var/ftp), but it
doesn‘t work in this case because the ftp user doesn‘t own Ivan ftp, root does. userdel
also removes the ftp user from /etc/group, so you needn‘t execute the groupdel command.
The find command locates all the files owned by the ftp user and deletes them. You have
to use the numeric UID (50) instead of the username (ftp) because the username no
longer exists.
The problem with this method is that if you later decide to permit anonymous FTP, you
have to recreate the ftp user and group because, as configured, vsftpd doesn‘t allow any
FTP login if the user ftp is not present in the password file.
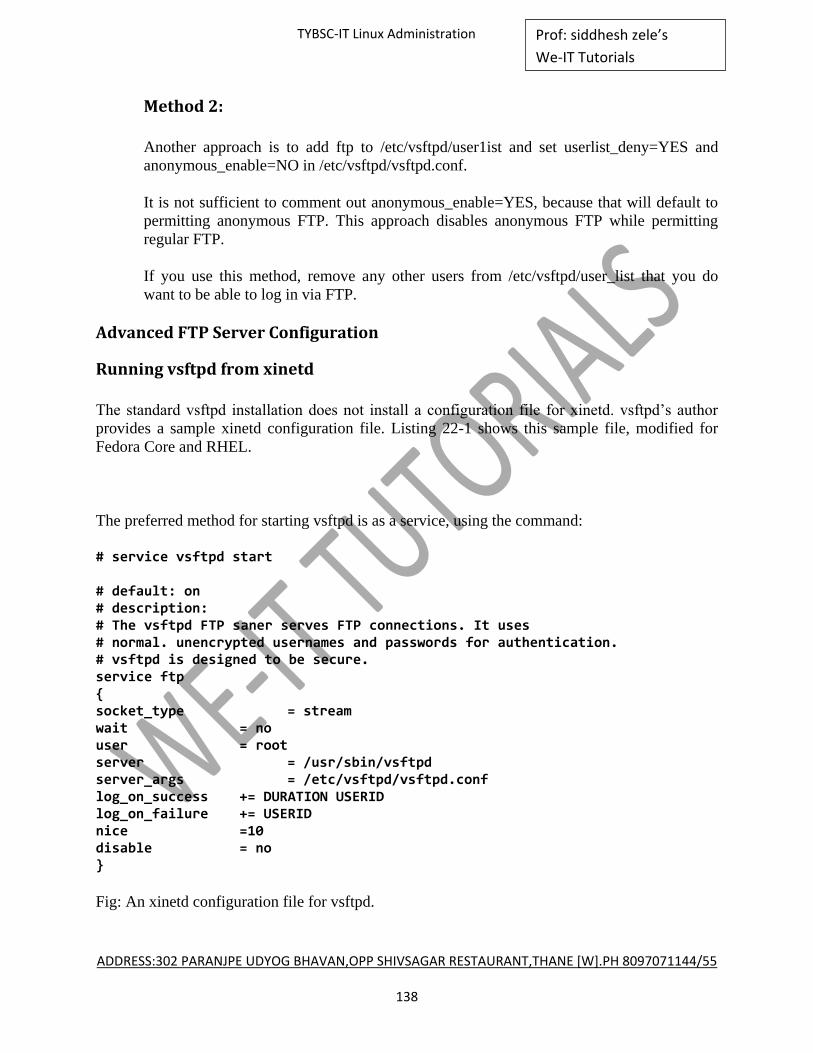
ADDRESS:302 PARANJPE UDYOG BHAVAN,OPP SHIVSAGAR RESTAURANT,THANE [W].PH 8097071144/55
138
Prof: siddhesh zele’s
We-IT Tutorials
TYBSC-IT Linux Administration
Method 2:
Another approach is to add ftp to /etc/vsftpd/user1ist and set userlist_deny=YES and
anonymous_enable=NO in /etc/vsftpd/vsftpd.conf.
It is not sufficient to comment out anonymous_enable=YES, because that will default to
permitting anonymous FTP. This approach disables anonymous FTP while permitting
regular FTP.
If you use this method, remove any other users from /etc/vsftpd/user_list that you do
want to be able to log in via FTP.
Advanced FTP Server Configuration
Running vsftpd from xinetd
The standard vsftpd installation does not install a configuration file for xinetd. vsftpd‘s author
provides a sample xinetd configuration file. Listing 22-1 shows this sample file, modified for
Fedora Core and RHEL.
The preferred method for starting vsftpd is as a service, using the command:
# service vsftpd start # default: on # description: # The vsftpd FTP saner serves FTP connections. It uses # normal. unencrypted usernames and passwords for authentication. # vsftpd is designed to be secure. service ftp { socket_type = stream wait = no user = root server = /usr/sbin/vsftpd server_args = /etc/vsftpd/vsftpd.conf log_on_success += DURATION USERID log_on_failure += USERID nice =10 disable = no }
Fig: An xinetd configuration file for vsftpd.
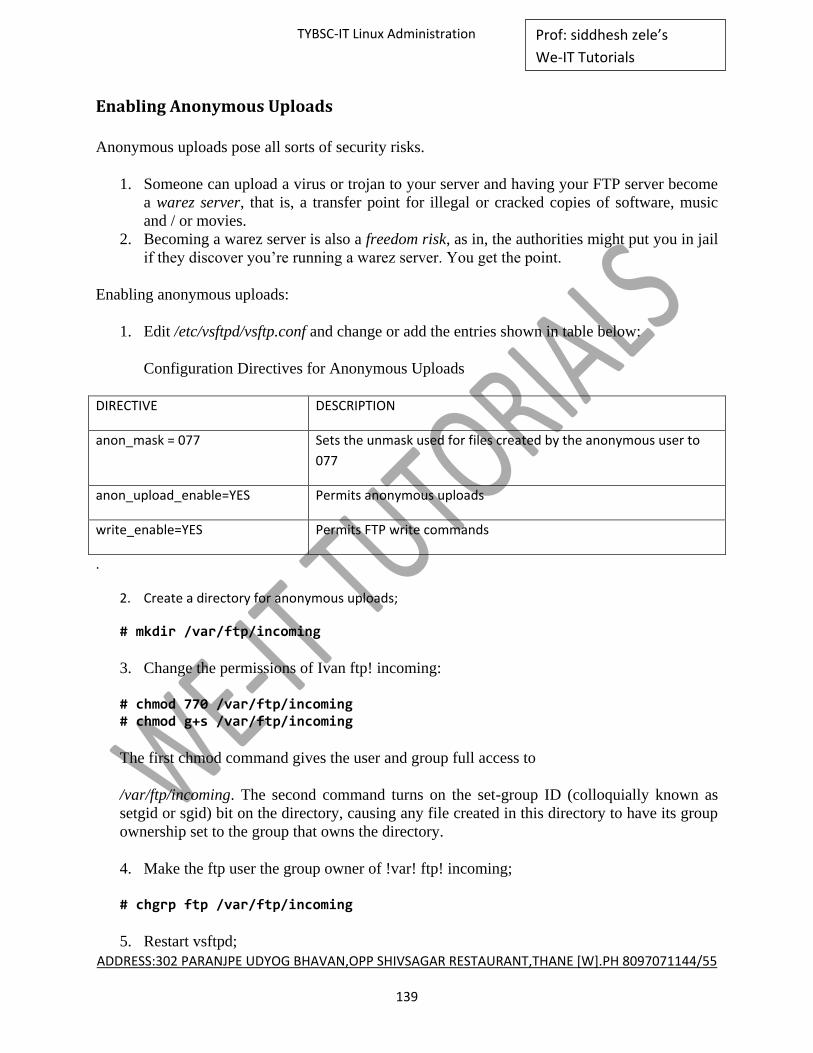
ADDRESS:302 PARANJPE UDYOG BHAVAN,OPP SHIVSAGAR RESTAURANT,THANE [W].PH 8097071144/55
139
Prof: siddhesh zele’s
We-IT Tutorials
TYBSC-IT Linux Administration
Enabling Anonymous Uploads
Anonymous uploads pose all sorts of security risks.
1. Someone can upload a virus or trojan to your server and having your FTP server become
a warez server, that is, a transfer point for illegal or cracked copies of software, music
and / or movies.
2. Becoming a warez server is also a freedom risk, as in, the authorities might put you in jail
if they discover you‘re running a warez server. You get the point.
Enabling anonymous uploads:
1. Edit /etc/vsftpd/vsftp.conf and change or add the entries shown in table below:
Configuration Directives for Anonymous Uploads
DIRECTIVE DESCRIPTION
anon_mask = 077 Sets the unmask used for files created by the anonymous user to
077
anon_upload_enable=YES Permits anonymous uploads
write_enable=YES Permits FTP write commands
.
2. Create a directory for anonymous uploads;
# mkdir /var/ftp/incoming
3. Change the permissions of Ivan ftp! incoming:
# chmod 770 /var/ftp/incoming # chmod g+s /var/ftp/incoming
The first chmod command gives the user and group full access to
/var/ftp/incoming. The second command turns on the set-group ID (colloquially known as
setgid or sgid) bit on the directory, causing any file created in this directory to have its group
ownership set to the group that owns the directory.
4. Make the ftp user the group owner of !var! ftp! incoming;
# chgrp ftp /var/ftp/incoming
5. Restart vsftpd;
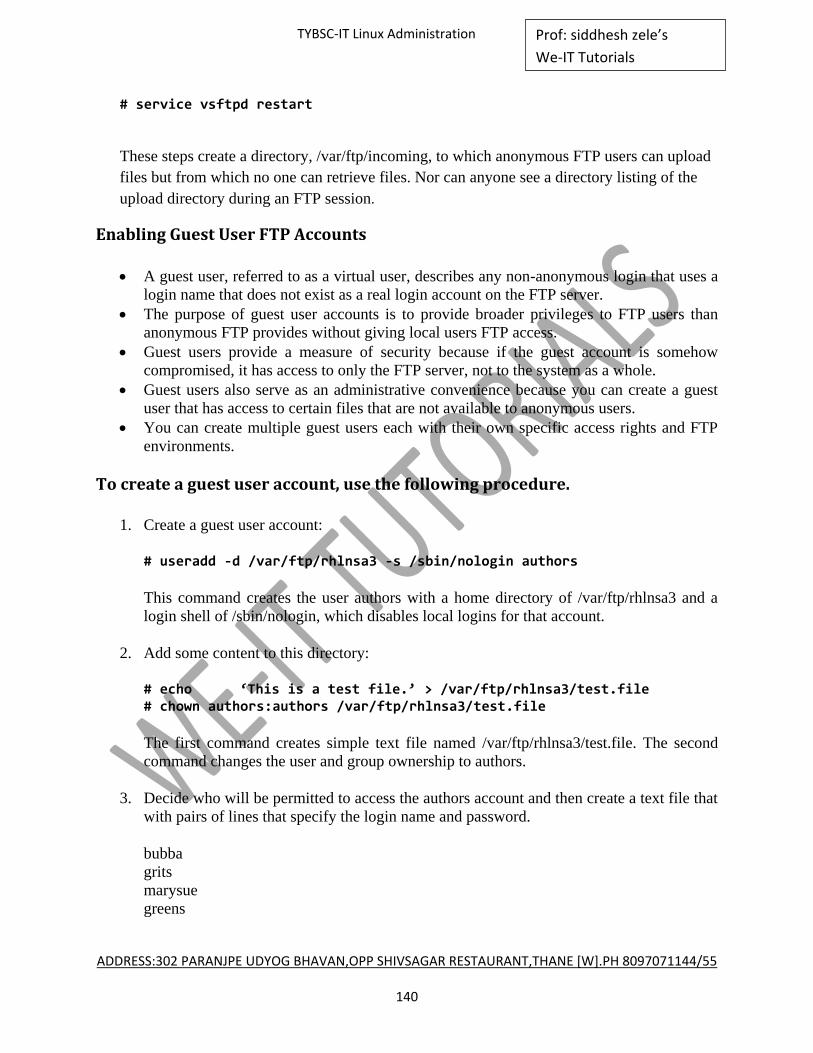
ADDRESS:302 PARANJPE UDYOG BHAVAN,OPP SHIVSAGAR RESTAURANT,THANE [W].PH 8097071144/55
140
Prof: siddhesh zele’s
We-IT Tutorials
TYBSC-IT Linux Administration
# service vsftpd restart
These steps create a directory, /var/ftp/incoming, to which anonymous FTP users can upload
files but from which no one can retrieve files. Nor can anyone see a directory listing of the
upload directory during an FTP session.
Enabling Guest User FTP Accounts
A guest user, referred to as a virtual user, describes any non-anonymous login that uses a
login name that does not exist as a real login account on the FTP server.
The purpose of guest user accounts is to provide broader privileges to FTP users than
anonymous FTP provides without giving local users FTP access.
Guest users provide a measure of security because if the guest account is somehow
compromised, it has access to only the FTP server, not to the system as a whole.
Guest users also serve as an administrative convenience because you can create a guest
user that has access to certain files that are not available to anonymous users.
You can create multiple guest users each with their own specific access rights and FTP
environments.
To create a guest user account, use the following procedure.
1. Create a guest user account:
# useradd -d /var/ftp/rhlnsa3 -s /sbin/nologin authors
This command creates the user authors with a home directory of /var/ftp/rhlnsa3 and a
login shell of /sbin/nologin, which disables local logins for that account.
2. Add some content to this directory:
# echo ‘This is a test file.’ > /var/ftp/rhlnsa3/test.file # chown authors:authors /var/ftp/rhlnsa3/test.file
The first command creates simple text file named /var/ftp/rhlnsa3/test.file. The second
command changes the user and group ownership to authors.
3. Decide who will be permitted to access the authors account and then create a text file that
with pairs of lines that specify the login name and password.
bubba
grits
marysue
greens
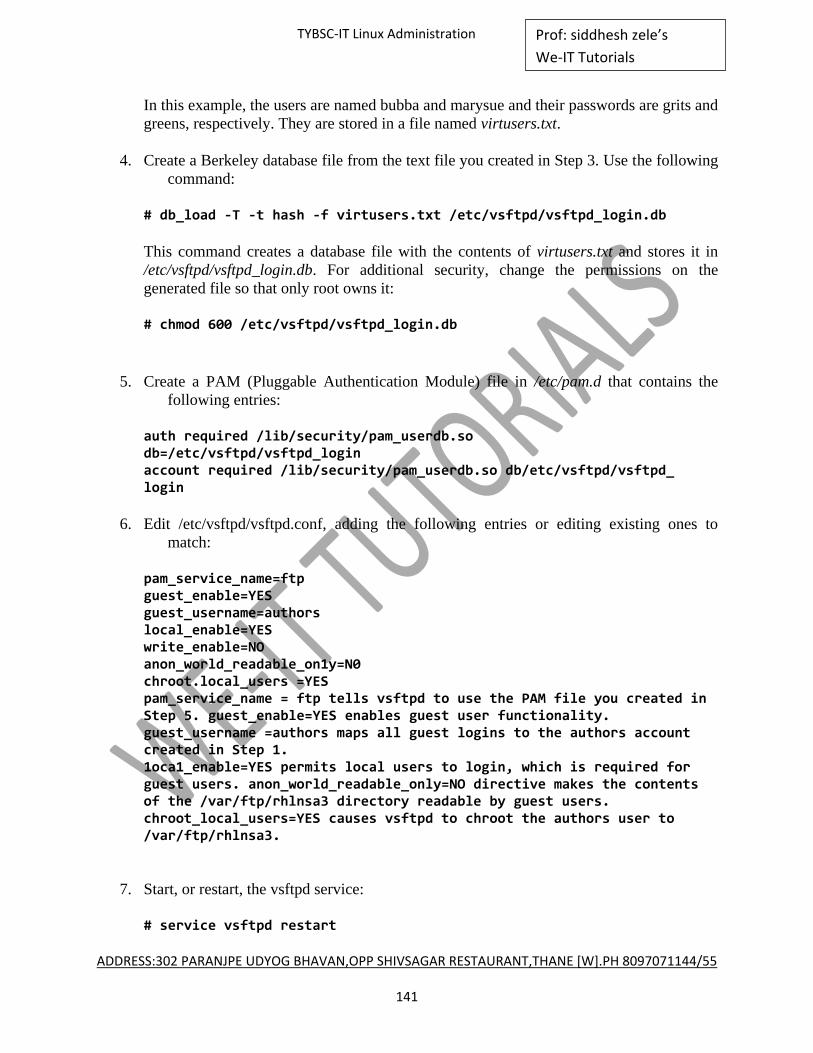
ADDRESS:302 PARANJPE UDYOG BHAVAN,OPP SHIVSAGAR RESTAURANT,THANE [W].PH 8097071144/55
141
Prof: siddhesh zele’s
We-IT Tutorials
TYBSC-IT Linux Administration
In this example, the users are named bubba and marysue and their passwords are grits and
greens, respectively. They are stored in a file named virtusers.txt.
4. Create a Berkeley database file from the text file you created in Step 3. Use the following
command:
# db_load -T -t hash -f virtusers.txt /etc/vsftpd/vsftpd_login.db
This command creates a database file with the contents of virtusers.txt and stores it in
/etc/vsftpd/vsftpd_login.db. For additional security, change the permissions on the
generated file so that only root owns it:
# chmod 600 /etc/vsftpd/vsftpd_login.db
5. Create a PAM (Pluggable Authentication Module) file in /etc/pam.d that contains the
following entries:
auth required /lib/security/pam_userdb.so db=/etc/vsftpd/vsftpd_login account required /lib/security/pam_userdb.so db/etc/vsftpd/vsftpd_ login
6. Edit /etc/vsftpd/vsftpd.conf, adding the following entries or editing existing ones to
match:
pam_service_name=ftp guest_enable=YES guest_username=authors local_enable=YES write_enable=NO anon_world_readable_on1y=N0 chroot.local_users =YES pam_service_name = ftp tells vsftpd to use the PAM file you created in Step 5. guest_enable=YES enables guest user functionality. guest_username =authors maps all guest logins to the authors account created in Step 1. 1oca1_enable=YES permits local users to login, which is required for guest users. anon_world_readable_only=NO directive makes the contents of the /var/ftp/rhlnsa3 directory readable by guest users. chroot_local_users=YES causes vsftpd to chroot the authors user to /var/ftp/rhlnsa3.
7. Start, or restart, the vsftpd service:
# service vsftpd restart
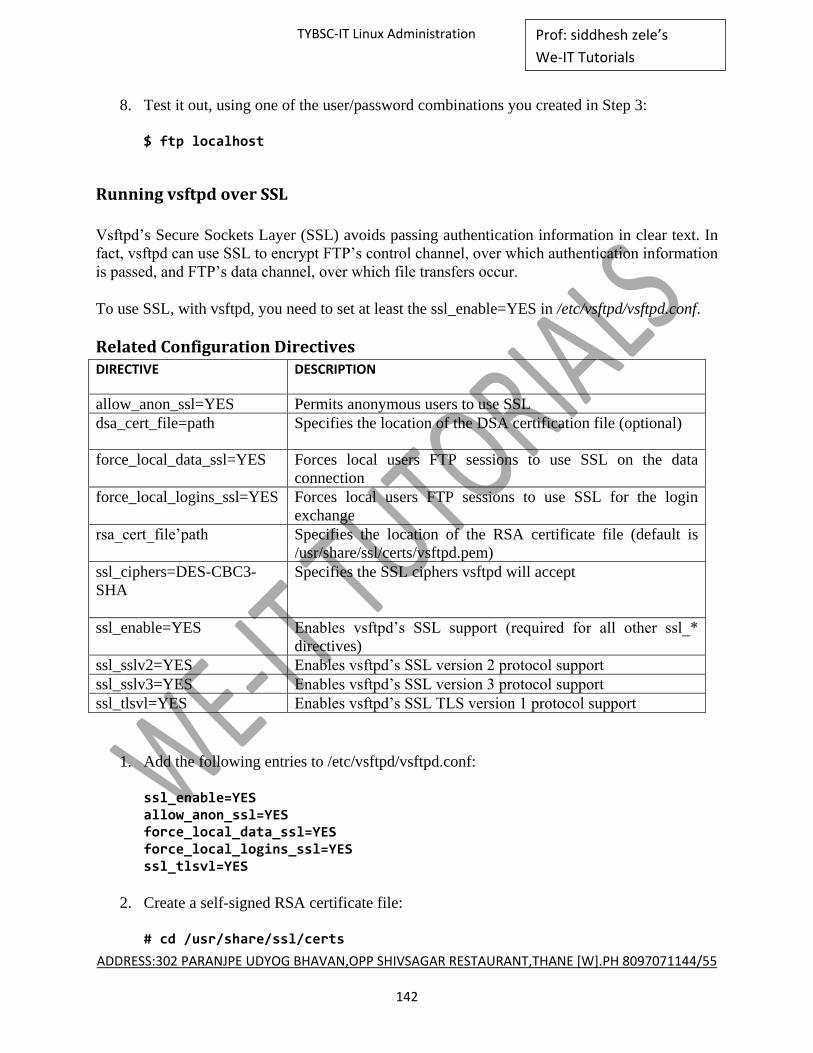
ADDRESS:302 PARANJPE UDYOG BHAVAN,OPP SHIVSAGAR RESTAURANT,THANE [W].PH 8097071144/55
142
Prof: siddhesh zele’s
We-IT Tutorials
TYBSC-IT Linux Administration
8. Test it out, using one of the user/password combinations you created in Step 3:
$ ftp localhost
Running vsftpd over SSL
Vsftpd‘s Secure Sockets Layer (SSL) avoids passing authentication information in clear text. In
fact, vsftpd can use SSL to encrypt FTP‘s control channel, over which authentication information
is passed, and FTP‘s data channel, over which file transfers occur.
To use SSL, with vsftpd, you need to set at least the ssl_enable=YES in /etc/vsftpd/vsftpd.conf.
Related Configuration Directives DIRECTIVE DESCRIPTION
allow_anon_ssl=YES Permits anonymous users to use SSL
dsa_cert_file=path Specifies the location of the DSA certification file (optional)
force_local_data_ssl=YES Forces local users FTP sessions to use SSL on the data
connection
force_local_logins_ssl=YES Forces local users FTP sessions to use SSL for the login
exchange
rsa_cert_file‘path Specifies the location of the RSA certificate file (default is
/usr/share/ssl/certs/vsftpd.pem)
ssl_ciphers=DES-CBC3-
SHA
Specifies the SSL ciphers vsftpd will accept
ssl_enable=YES Enables vsftpd‘s SSL support (required for all other ssl_*
directives)
ssl_sslv2=YES Enables vsftpd‘s SSL version 2 protocol support
ssl_sslv3=YES Enables vsftpd‘s SSL version 3 protocol support
ssl_tlsvl=YES Enables vsftpd‘s SSL TLS version 1 protocol support
1. Add the following entries to /etc/vsftpd/vsftpd.conf:
ssl_enable=YES allow_anon_ssl=YES force_local_data_ssl=YES force_local_logins_ssl=YES ssl_tlsvl=YES
2. Create a self-signed RSA certificate file:
# cd /usr/share/ssl/certs
ADDRESS:302 PARANJPE UDYOG BHAVAN,OPP SHIVSAGAR RESTAURANT,THANE [W].PH 8097071144/55
143
Prof: siddhesh zele’s
We-IT Tutorials
TYBSC-IT Linux Administration
# make vsftpd.pem
3. Start or restart the vsftpd service:
# service vsftpd start
Using SFTP
As an alternative to configuring vsftpd with SSL, you can use sftp-server, a program that is part
of the OpenSSH (Secure Shell) suite of secure client and server programs.
sftp-server implements the server-side portion of the FTP protocol. You do not invoke it directly;
the SSH daemon, $ sshd, does so when it receives an incoming FTP request.
You need to have the OpenSSH-related packages installed, but they are part of the standard
Fedora Core 3 and RHEL installation. The following is a rpmquery command:
# rpmquery openssh{, -{clients,askpass,server}}
If the packages are not installed, install them before proceeding. If they are installed, make sure
the following line appears in /etc/ssh/sshd_config:
Subsystem sftp /usr/libexec/openssh/sftp-server
This directive tells sshd to execute the program /usr/libexec/openssh/sftp-server to service the
SFTP subsystem. Again, this entry should be part of the stock installation, but if it isn‘t, add it to
the configuration file and then restart the SSH daemon using the following command:
# service sshd restart
From the client‘s perspective, very little changes. The client command to execute is sftp
rather than ftp, and the set of supported commands is more limited than it is standard FTP
commands.
One important difference that between clear-text FTP and secure FTP is that sftp does not
support anonymous FTP; users will always be prompted to provide a password unless
they have set up SSH keys.
However, you can configure vsftpd to provide anonymous FTP and then use OpenSSH to
provide secure, authenticated FTP service for users that have valid accounts on the
system.
The two services FTP and SFTP can exist side by side because sftp uses port 115 and
FTP uses port 25.
ADDRESS:302 PARANJPE UDYOG BHAVAN,OPP SHIVSAGAR RESTAURANT,THANE [W].PH 8097071144/55
144
Prof: siddhesh zele’s
We-IT Tutorials
TYBSC-IT Linux Administration
UNIT 6
Chapter 1 : CONFIGURING A WEB
SERVER
Introducing Apache
The Apache Web server‘s origins are the National Center for Supercomputing Applications
(NCSA) HTTP server (referred to as httpd). NCSA‘s httpd was the most popular of the early
HTTP servers, and its source code was in the public domain. After NCSA‘s active development
of their httpd effectively stopped (late 1994 and early 1995), a small group of Web
administrators who had modified the source code to address their own site- specific needs or to
patch various bugs gathered together to coordinate their activities and merge their code changes
into a single code free.
Apache Features
Apache is an open-source software project, so anyone can contribute code for inclusion in the
server, although whether such code is accepted is up to members of the core Apache team. User
feedback drives Apache‘s development and defines its feature set.
Features include:
Apache is easily extensible using Dynamic Shared Objects (DSOs), more commonly
known as modules. Modules extend Apache‘s capabilities and new features without
requiring recompilation because they can be loaded and unloaded at runtime, just as
shared program libraries can be dynamically loaded and unloaded at runtime.
Apache has a rich set of access controls and gives Web site administrators considerable
flexibility in choosing authentication mechanisms. You can use a simple text file; a
binary database format that supports very large numbers of users without becoming
bogged down executing authentication requests; third-party databases such as MySQL,
PostgreSQL, or Oracle; and even site-wide authentication methods such as LDAP.
Apache supports virtual hosts, also known as multi-homed servers, which enables a
single machine to provide Web services for multiple domains or IP addresses (or host-
names).
Apache enables administrators to define multiple directory index files, the default page to
display when a Web client requests a directory URL. So, for example, the server can
return index.html, index.htm, index.php, or execute a script named index.cgi when a

ADDRESS:302 PARANJPE UDYOG BHAVAN,OPP SHIVSAGAR RESTAURANT,THANE [W].PH 8097071144/55
145
Prof: siddhesh zele’s
We-IT Tutorials
TYBSC-IT Linux Administration
client requests a directory URL, depending on what Apache finds in the requested
directory.
Apache is a rich supporter for server logging. You can define custom log file formats and
control the level of detail contained in each log entry. Apache can send log file output to
named pipes (FIFOs) on systems that support named pipes, primarily Linux, UNIX, and
similarly designed operating systems. This feature enables any arbitrary log manipulation
that can be accomplished using a named pipe. In fact, Apache can be configured to
generate a unique identifier that distinguishes one hit from every other hit, although there
are some restrictions that apply.
Apache automatically adjusts to the capabilities of connected Web clients, one instance
of a more general process called content negotiation. Content negotiation refers to the
technique Web clients and servers use to select how to present a resource, such as a
document that is available in several different formats. If a Web client incompletely or
improperly implements HTTP standards, is broken in a way that Apache can determine,
or does not support a given HTML specification, Apache sends Web pages modified to
give the best representation of the requested information based on what the client can
process.
How Web Servers Work
The Web client (a browser) first performs a DNS lookup on the server name specified in
the URL, obtains the IP address of the server, and then connects to port 80 at that IP
address. If you specify an IP address directly, the DNS lookup doesn‘t occur.
When the connection is established, the client sends an HTTP GET request for the
document in the URL, which could be, among other possibilities, a specific HTML
document, an image, or a script.
After the server receives the request, it translates the document URL into a filename on
the local system. For example, the document URL http://www.example.com/news.html
might become /var/www/html/news.html.
Next, Apache evaluates whether the requested document is subject to some sort of access
control. If no access control is required, Apache satisfies the request as described in the
next paragraph. If access control is in effect, Apache requests a username and password
from the client or rejects the request outright, depending on the type of access control in
place.
If the requested URL specifies a directory (that is, the URL ends in /) rather than a
specific document, Apache looks for the directory index page, index.html by default, and
returns that document to the client.
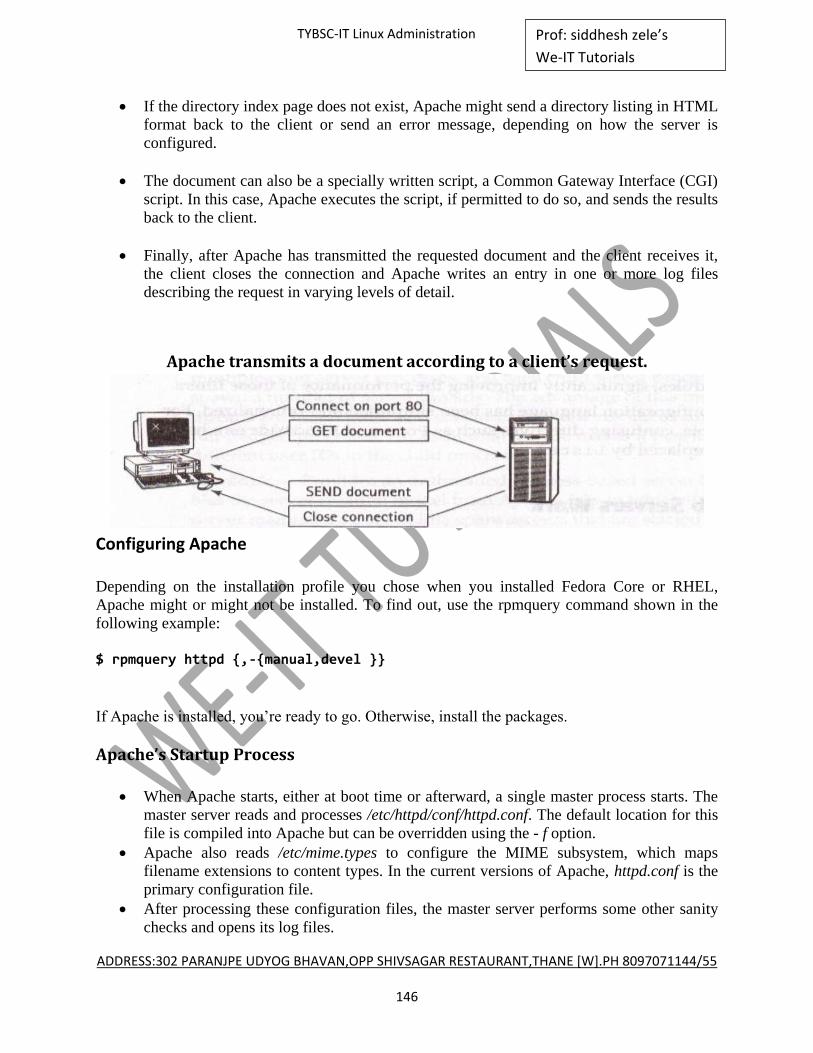
ADDRESS:302 PARANJPE UDYOG BHAVAN,OPP SHIVSAGAR RESTAURANT,THANE [W].PH 8097071144/55
146
Prof: siddhesh zele’s
We-IT Tutorials
TYBSC-IT Linux Administration
If the directory index page does not exist, Apache might send a directory listing in HTML
format back to the client or send an error message, depending on how the server is
configured.
The document can also be a specially written script, a Common Gateway Interface (CGI)
script. In this case, Apache executes the script, if permitted to do so, and sends the results
back to the client.
Finally, after Apache has transmitted the requested document and the client receives it,
the client closes the connection and Apache writes an entry in one or more log files
describing the request in varying levels of detail.
Apache transmits a document according to a client’s request.
Configuring Apache
Depending on the installation profile you chose when you installed Fedora Core or RHEL,
Apache might or might not be installed. To find out, use the rpmquery command shown in the
following example:
$ rpmquery httpd {,-{manual,devel }}
If Apache is installed, you‘re ready to go. Otherwise, install the packages.
Apache’s Startup Process
When Apache starts, either at boot time or afterward, a single master process starts. The
master server reads and processes /etc/httpd/conf/httpd.conf. The default location for this
file is compiled into Apache but can be overridden using the - f option.
Apache also reads /etc/mime.types to configure the MIME subsystem, which maps
filename extensions to content types. In the current versions of Apache, httpd.conf is the
primary configuration file.
After processing these configuration files, the master server performs some other sanity
checks and opens its log files.
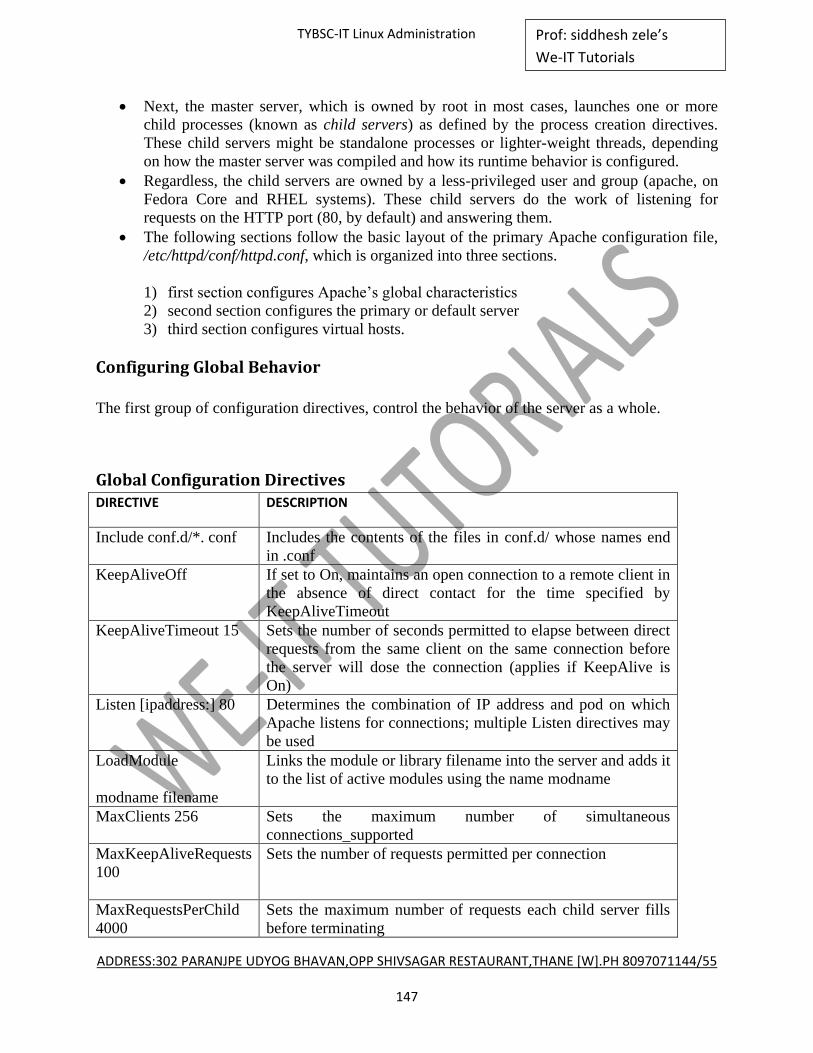
ADDRESS:302 PARANJPE UDYOG BHAVAN,OPP SHIVSAGAR RESTAURANT,THANE [W].PH 8097071144/55
147
Prof: siddhesh zele’s
We-IT Tutorials
TYBSC-IT Linux Administration
Next, the master server, which is owned by root in most cases, launches one or more
child processes (known as child servers) as defined by the process creation directives.
These child servers might be standalone processes or lighter-weight threads, depending
on how the master server was compiled and how its runtime behavior is configured.
Regardless, the child servers are owned by a less-privileged user and group (apache, on
Fedora Core and RHEL systems). These child servers do the work of listening for
requests on the HTTP port (80, by default) and answering them.
The following sections follow the basic layout of the primary Apache configuration file,
/etc/httpd/conf/httpd.conf, which is organized into three sections.
1) first section configures Apache‘s global characteristics
2) second section configures the primary or default server
3) third section configures virtual hosts.
Configuring Global Behavior
The first group of configuration directives, control the behavior of the server as a whole.
Global Configuration Directives DIRECTIVE DESCRIPTION
Include conf.d/*. conf Includes the contents of the files in conf.d/ whose names end
in .conf
KeepAliveOff If set to On, maintains an open connection to a remote client in
the absence of direct contact for the time specified by
KeepAliveTimeout
KeepAliveTimeout 15 Sets the number of seconds permitted to elapse between direct
requests from the same client on the same connection before
the server will dose the connection (applies if KeepAlive is
On)
Listen [ipaddress:] 80
Determines the combination of IP address and pod on which
Apache listens for connections; multiple Listen directives may
be used
LoadModule
modname filename
Links the module or library filename into the server and adds it
to the list of active modules using the name modname
MaxClients 256 Sets the maximum number of simultaneous
connections_supported
MaxKeepAliveRequests
100
Sets the number of requests permitted per connection
MaxRequestsPerChild
4000
Sets the maximum number of requests each child server fills
before terminating
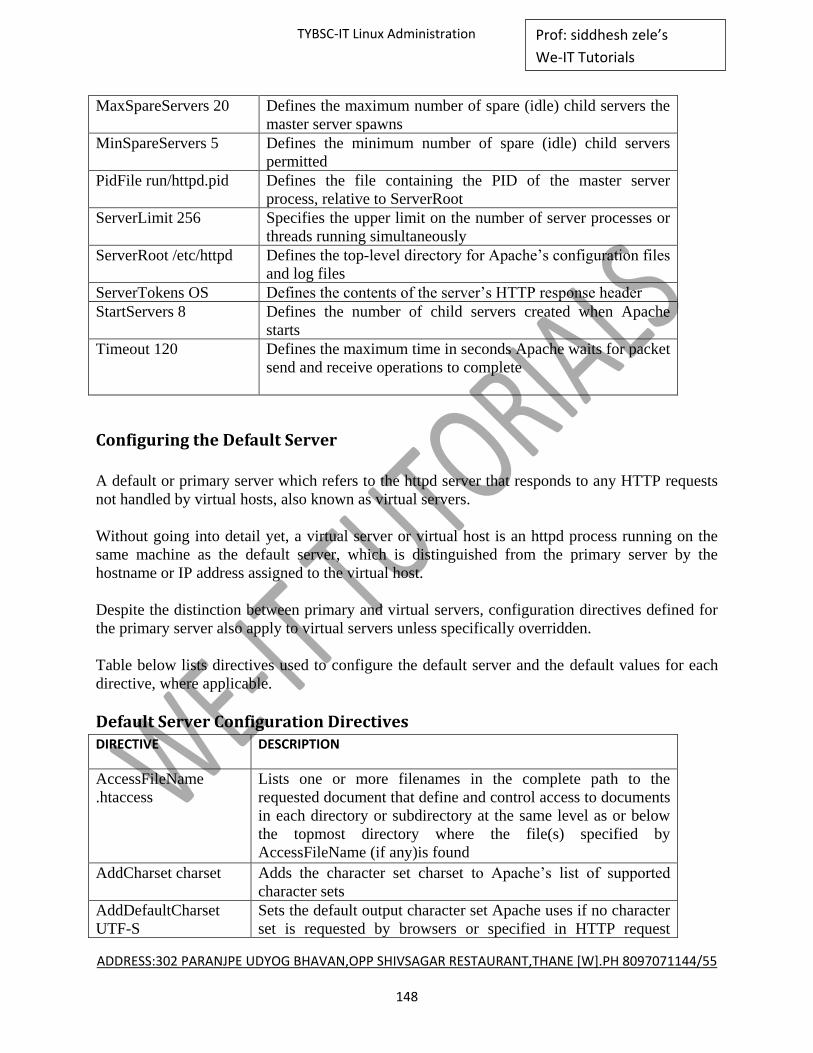
ADDRESS:302 PARANJPE UDYOG BHAVAN,OPP SHIVSAGAR RESTAURANT,THANE [W].PH 8097071144/55
148
Prof: siddhesh zele’s
We-IT Tutorials
TYBSC-IT Linux Administration
MaxSpareServers 20 Defines the maximum number of spare (idle) child servers the
master server spawns
MinSpareServers 5 Defines the minimum number of spare (idle) child servers
permitted
PidFile run/httpd.pid Defines the file containing the PID of the master server
process, relative to ServerRoot
ServerLimit 256 Specifies the upper limit on the number of server processes or
threads running simultaneously
ServerRoot /etc/httpd Defines the top-level directory for Apache‘s configuration files
and log files
ServerTokens OS Defines the contents of the server‘s HTTP response header
StartServers 8 Defines the number of child servers created when Apache
starts
Timeout 120
Defines the maximum time in seconds Apache waits for packet
send and receive operations to complete
Configuring the Default Server
A default or primary server which refers to the httpd server that responds to any HTTP requests
not handled by virtual hosts, also known as virtual servers.
Without going into detail yet, a virtual server or virtual host is an httpd process running on the
same machine as the default server, which is distinguished from the primary server by the
hostname or IP address assigned to the virtual host.
Despite the distinction between primary and virtual servers, configuration directives defined for
the primary server also apply to virtual servers unless specifically overridden.
Table below lists directives used to configure the default server and the default values for each
directive, where applicable.
Default Server Configuration Directives DIRECTIVE DESCRIPTION
AccessFileName
.htaccess
Lists one or more filenames in the complete path to the
requested document that define and control access to documents
in each directory or subdirectory at the same level as or below
the topmost directory where the file(s) specified by
AccessFileName (if any)is found
AddCharset charset Adds the character set charset to Apache‘s list of supported
character sets
AddDefaultCharset
UTF-S
Sets the default output character set Apache uses if no character
set is requested by browsers or specified in HTTP request

ADDRESS:302 PARANJPE UDYOG BHAVAN,OPP SHIVSAGAR RESTAURANT,THANE [W].PH 8097071144/55
149
Prof: siddhesh zele’s
We-IT Tutorials
TYBSC-IT Linux Administration
headers
AddHandler handler
mimetype
Associates handler with the MIME type mimetype
AddIcon icon name
Maps icon as the icon to display next to files ending with name;
used with the Fancylndexing directive
AddlconByEncoding
icon mimeencoding
Associates icon with files whose MIME encoding is
mimeencoding; used with the Fancylndexing directive
AddIconByType icon
mimetype
Sets icon as the icon to display next to files with the MIME type
of mimetype; used with the Fancylndexing directive
AddLanguage
mimelang name
Maps the filename extension specified by name to the MIME
language mimelang, overriding previous mappings for name
AddOutputFilter
output mimetype
Associates an output filter for server output of type output with
the MIME type mimetype
AddType mimetype
name
Adds the specified rnimetype for files ending in name to the list
of MIME types read from the Typeconfig file
Alias urlpath dirpath
Maps the directory urlpath, specified relative to DocumentRoot,
to the file system directory dirpath enabling Apache to access a
directory otherwise inaccessible because all content must be
under DocumentRoot
CustomLog logs/
access_log combined
Defines the name of Apache‘s access log and the log format
used when logging requests to the server
Defaultlcon /icons/
unknown.gif
Sets the default icon displayed next to files whose MIME or
content type cannot be determined; used with the
Fancylndexing directive
DefaultType text/plain
Defines the default MIME type when a requested document‘s
MIME type cannot be determined using the Typesconfig or
AddType directives
<Directory dirname>
directives
</Directory>
Delimits a set of configuration directives that apply to dirname
and its subdirectories, if any
DirectoryIndex
filename
Specifies one or more filenames that can serve as a directory
index when a request does not specify a particular file or
document
DocumentRoot ―/var
/www/html‖
Sets the base directory from which all requested documents will
be sewed; document URLS (filenames) are interpreted relative
to DocumentRoot
ErrorLog
logs/error_log
Defines the name of Apache‘s error log, relative to ServerRoot
if the filename does not begin with /
ForceLanguagePriority Uses the values specified in LanguagePriority to return a valid
result Fallback returns a valid choice from those listed in
LanguagePriority; Prefer returns the first matching value from

ADDRESS:302 PARANJPE UDYOG BHAVAN,OPP SHIVSAGAR RESTAURANT,THANE [W].PH 8097071144/55
150
Prof: siddhesh zele’s
We-IT Tutorials
TYBSC-IT Linux Administration
acceptable languages specified by the client
Group [#] apache Specifies the group name or, if prefixed with 4, the GID under
which the child servers execute
HeaderName
HEADER. html
Defines HEADER.html as the file whose contents will be
inserted at the top of a directory listing
HostnameLookups off Controls whether Apache performs DNS lookups on connecting
hosts in order to log hostnames
IndexIgnore filespec Defines one more filename patterns filespec that the directory
indexer will ignore
IndexOptions opts Sets the options controlling the behavior of Apache‘s directory
indexing feature
LanguagePriority spec Specifies a list of language codes in spec that indicates the order
in which languages codes will be applied during content
negotiation
LogFormat str name Defines a log file format str named name which Apache uses for
messages it logs in the access log
LogLevel warn Controls the amount and detail of information Apache records
in its error log
ReadmeName
README.html
Defines README html as the file whose contents will be
appended to the end of a directory listing
ScriptAlias urlpath
dirpath
Functions exactly like the Alias directive and also indicates that
dirpath contains executable CGI scripts
ServerAdmin
root@localhost
Defines the email address included in error messages displayed
to client connections
ServerName Specifies an alternative name for the server, such as
www.mydornain.com, that is different than the host‘s actual
name (webbeast.mydomain.com)
ServerSignature On Directs Apache to append the ServerName and version number
as a footer to generated documents, such as error message, FTP
file listings, and so forth
TypesConfig
/etc/mime.types
Sets the filename of the MIME types configuration file (relative
to ServerRoot if the filename does not begin with m), which
maps filename extensions to content types User
[#] apache Specifies the user name or, if prefixed with #, the UID under
which the child servers execute
UserDir public_html Defines the subdirectory in a user‘s home directory that is used
when clients request documents belonging to a specific user
Configuring Virtual Servers
Virtual servers (also referred to as virtual hosts) are primarily used to run Web servers for
multiple domains on a single physical system. Virtual servers can also be used to allow multiple
workgroups or departments that share the same network or subnet to maintain independent Web
pages without requiring individual dedicated departmental servers.
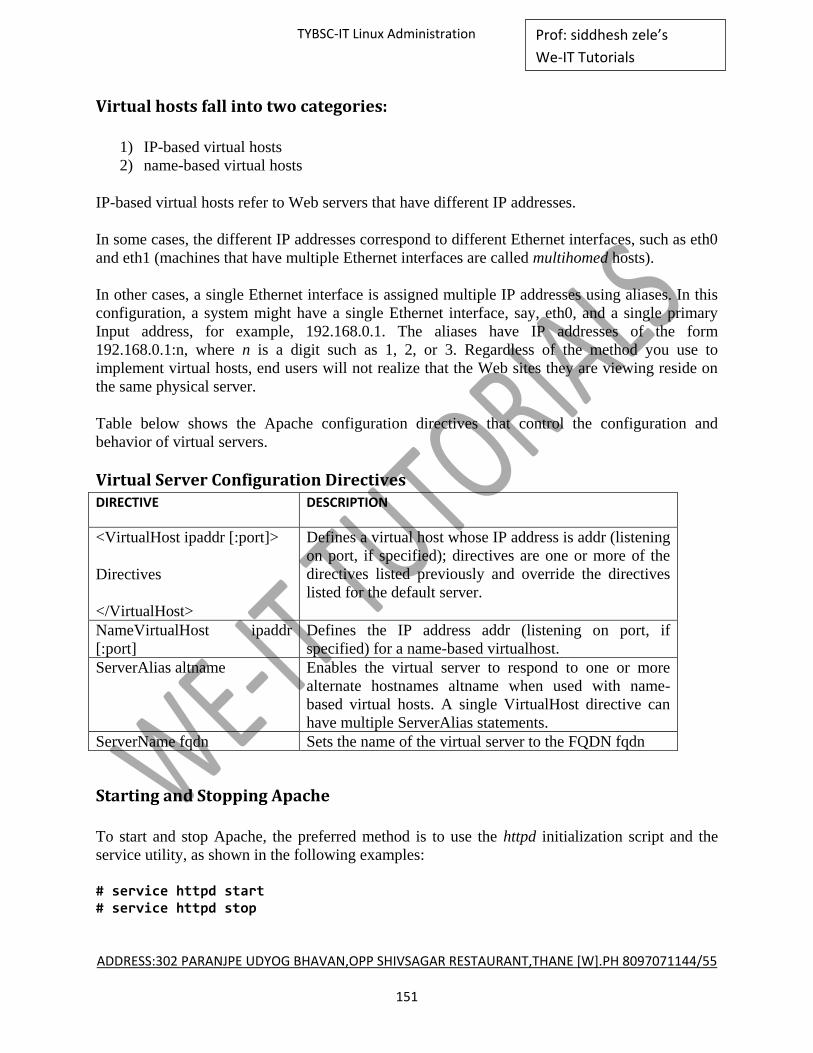
ADDRESS:302 PARANJPE UDYOG BHAVAN,OPP SHIVSAGAR RESTAURANT,THANE [W].PH 8097071144/55
151
Prof: siddhesh zele’s
We-IT Tutorials
TYBSC-IT Linux Administration
Virtual hosts fall into two categories:
1) IP-based virtual hosts
2) name-based virtual hosts
IP-based virtual hosts refer to Web servers that have different IP addresses.
In some cases, the different IP addresses correspond to different Ethernet interfaces, such as eth0
and eth1 (machines that have multiple Ethernet interfaces are called multihomed hosts).
In other cases, a single Ethernet interface is assigned multiple IP addresses using aliases. In this
configuration, a system might have a single Ethernet interface, say, eth0, and a single primary
Input address, for example, 192.168.0.1. The aliases have IP addresses of the form
192.168.0.1:n, where n is a digit such as 1, 2, or 3. Regardless of the method you use to
implement virtual hosts, end users will not realize that the Web sites they are viewing reside on
the same physical server.
Table below shows the Apache configuration directives that control the configuration and
behavior of virtual servers.
Virtual Server Configuration Directives DIRECTIVE DESCRIPTION
<VirtualHost ipaddr [:port]>
Directives
</VirtualHost>
Defines a virtual host whose IP address is addr (listening
on port, if specified); directives are one or more of the
directives listed previously and override the directives
listed for the default server.
NameVirtualHost ipaddr
[:port]
Defines the IP address addr (listening on port, if
specified) for a name-based virtualhost.
ServerAlias altname Enables the virtual server to respond to one or more
alternate hostnames altname when used with name-
based virtual hosts. A single VirtualHost directive can
have multiple ServerAlias statements.
ServerName fqdn Sets the name of the virtual server to the FQDN fqdn
Starting and Stopping Apache
To start and stop Apache, the preferred method is to use the httpd initialization script and the
service utility, as shown in the following examples:
# service httpd start # service httpd stop
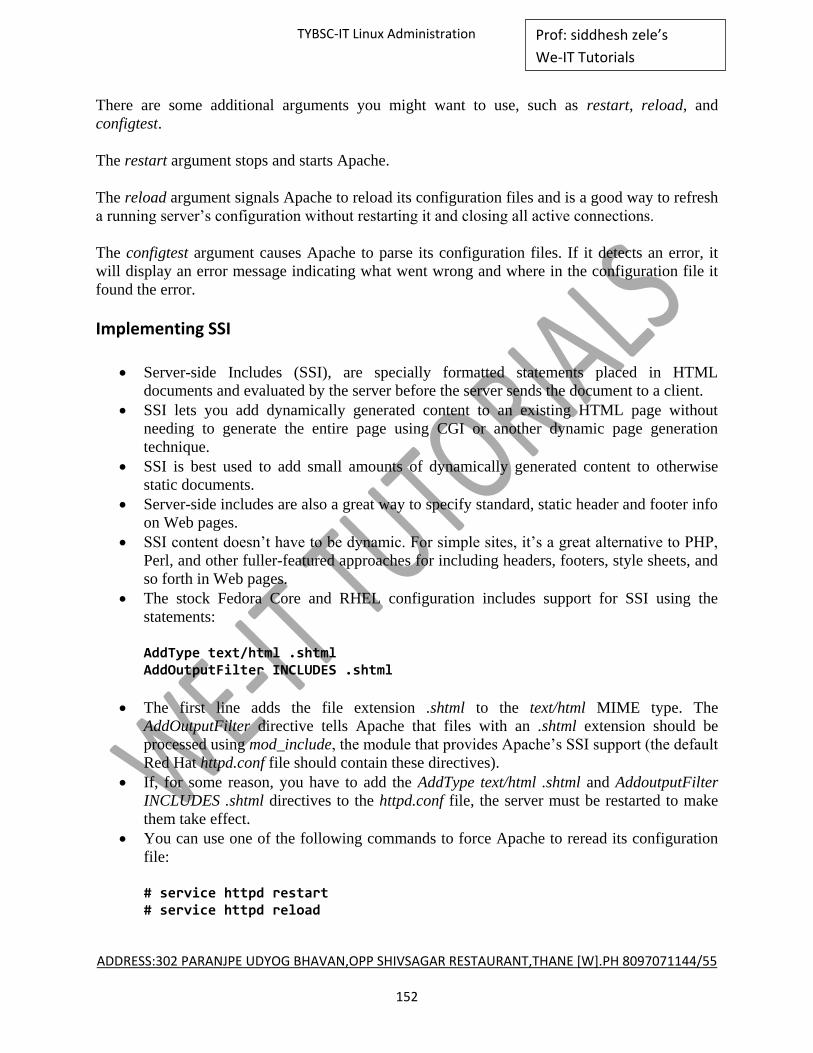
ADDRESS:302 PARANJPE UDYOG BHAVAN,OPP SHIVSAGAR RESTAURANT,THANE [W].PH 8097071144/55
152
Prof: siddhesh zele’s
We-IT Tutorials
TYBSC-IT Linux Administration
There are some additional arguments you might want to use, such as restart, reload, and
configtest.
The restart argument stops and starts Apache.
The reload argument signals Apache to reload its configuration files and is a good way to refresh
a running server‘s configuration without restarting it and closing all active connections.
The configtest argument causes Apache to parse its configuration files. If it detects an error, it
will display an error message indicating what went wrong and where in the configuration file it
found the error.
Implementing SSI
Server-side Includes (SSI), are specially formatted statements placed in HTML
documents and evaluated by the server before the server sends the document to a client.
SSI lets you add dynamically generated content to an existing HTML page without
needing to generate the entire page using CGI or another dynamic page generation
technique.
SSI is best used to add small amounts of dynamically generated content to otherwise
static documents.
Server-side includes are also a great way to specify standard, static header and footer info
on Web pages.
SSI content doesn‘t have to be dynamic. For simple sites, it‘s a great alternative to PHP,
Perl, and other fuller-featured approaches for including headers, footers, style sheets, and
so forth in Web pages.
The stock Fedora Core and RHEL configuration includes support for SSI using the
statements:
AddType text/html .shtml AddOutputFilter INCLUDES .shtml
The first line adds the file extension .shtml to the text/html MIME type. The
AddOutputFilter directive tells Apache that files with an .shtml extension should be
processed using mod_include, the module that provides Apache‘s SSI support (the default
Red Hat httpd.conf file should contain these directives).
If, for some reason, you have to add the AddType text/html .shtml and AddoutputFilter
INCLUDES .shtml directives to the httpd.conf file, the server must be restarted to make
them take effect.
You can use one of the following commands to force Apache to reread its configuration
file:
# service httpd restart # service httpd reload
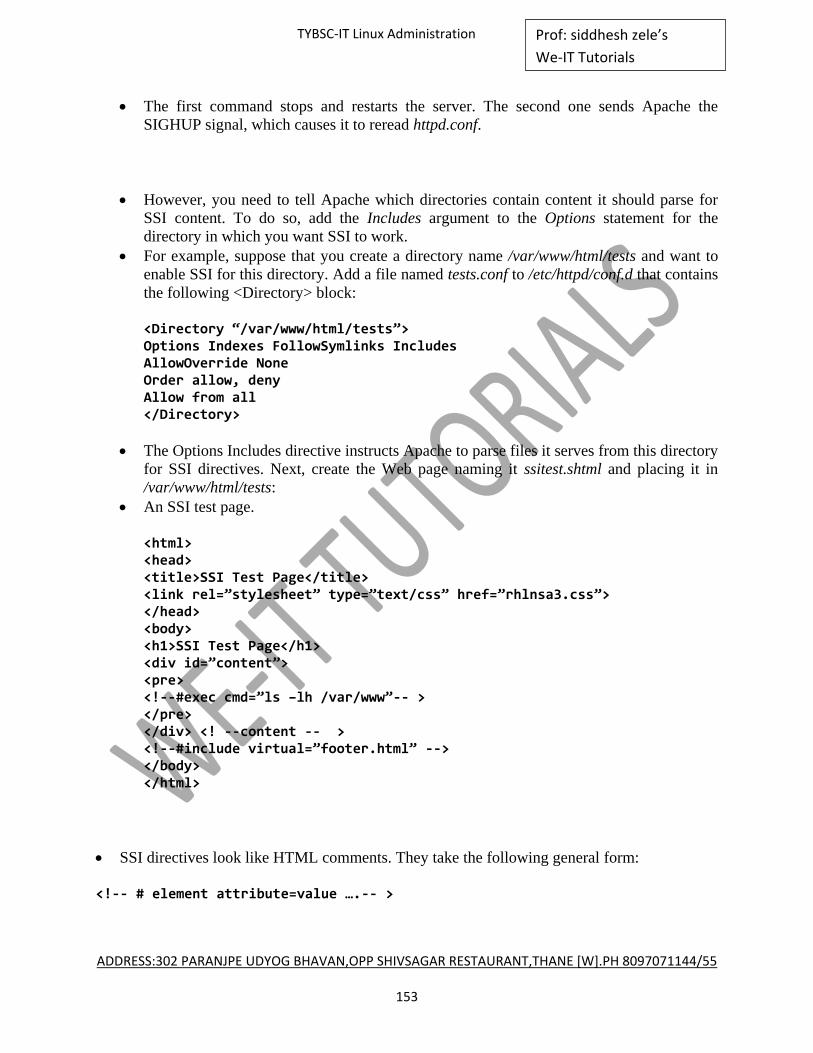
ADDRESS:302 PARANJPE UDYOG BHAVAN,OPP SHIVSAGAR RESTAURANT,THANE [W].PH 8097071144/55
153
Prof: siddhesh zele’s
We-IT Tutorials
TYBSC-IT Linux Administration
The first command stops and restarts the server. The second one sends Apache the
SIGHUP signal, which causes it to reread httpd.conf.
However, you need to tell Apache which directories contain content it should parse for
SSI content. To do so, add the Includes argument to the Options statement for the
directory in which you want SSI to work.
For example, suppose that you create a directory name /var/www/html/tests and want to
enable SSI for this directory. Add a file named tests.conf to /etc/httpd/conf.d that contains
the following <Directory> block:
<Directory ‚/var/www/html/tests‛> Options Indexes FollowSymlinks Includes AllowOverride None Order allow, deny Allow from all </Directory>
The Options Includes directive instructs Apache to parse files it serves from this directory
for SSI directives. Next, create the Web page naming it ssitest.shtml and placing it in
/var/www/html/tests:
An SSI test page.
<html> <head> <title>SSI Test Page</title> <link rel=‛stylesheet‛ type=‛text/css‛ href=‛rhlnsa3.css‛> </head> <body> <h1>SSI Test Page</h1> <div id=‛content‛> <pre> <!--#exec cmd=‛ls –lh /var/www‛-- > </pre> </div> <! --content -- > <!--#include virtual=‛footer.html‛ --> </body> </html>
SSI directives look like HTML comments. They take the following general form:
<!-- # element attribute=value ….-- >
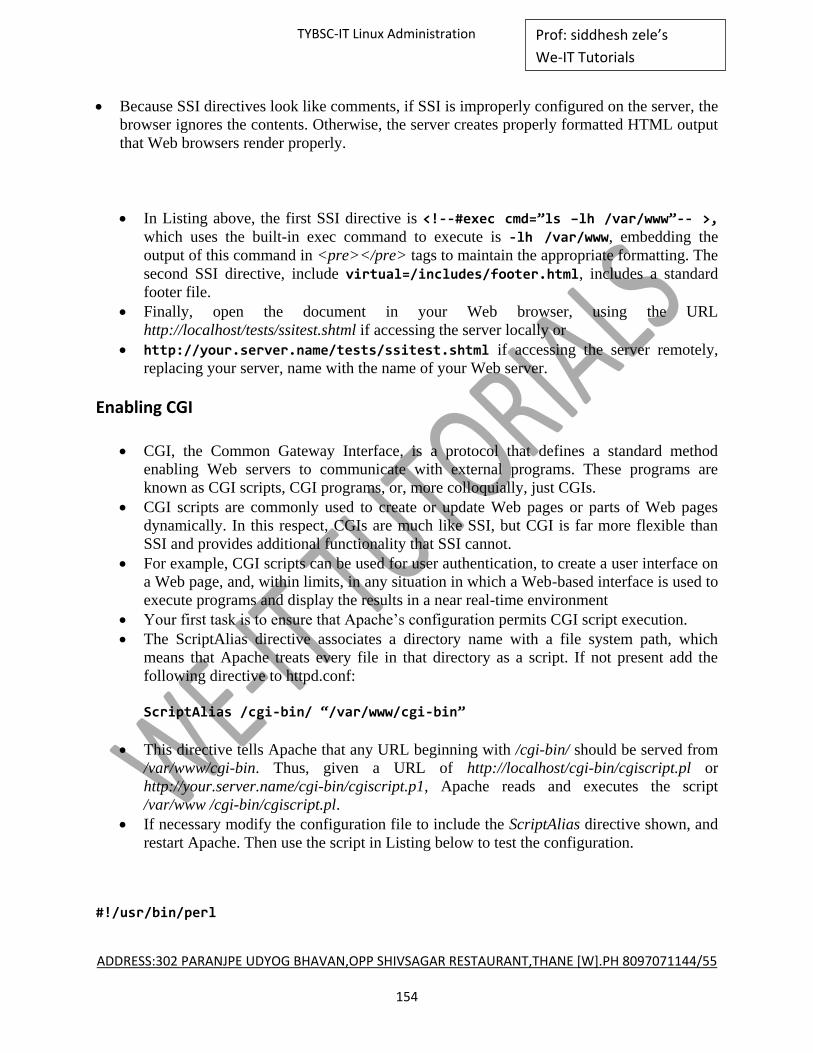
ADDRESS:302 PARANJPE UDYOG BHAVAN,OPP SHIVSAGAR RESTAURANT,THANE [W].PH 8097071144/55
154
Prof: siddhesh zele’s
We-IT Tutorials
TYBSC-IT Linux Administration
Because SSI directives look like comments, if SSI is improperly configured on the server, the
browser ignores the contents. Otherwise, the server creates properly formatted HTML output
that Web browsers render properly.
In Listing above, the first SSI directive is <!--#exec cmd=‛ls –lh /var/www‛-- >,
which uses the built-in exec command to execute is -lh /var/www, embedding the
output of this command in <pre></pre> tags to maintain the appropriate formatting. The
second SSI directive, include virtual=/includes/footer.html, includes a standard
footer file.
Finally, open the document in your Web browser, using the URL
http://localhost/tests/ssitest.shtml if accessing the server locally or
http://your.server.name/tests/ssitest.shtml if accessing the server remotely,
replacing your server, name with the name of your Web server.
Enabling CGI
CGI, the Common Gateway Interface, is a protocol that defines a standard method
enabling Web servers to communicate with external programs. These programs are
known as CGI scripts, CGI programs, or, more colloquially, just CGIs.
CGI scripts are commonly used to create or update Web pages or parts of Web pages
dynamically. In this respect, CGIs are much like SSI, but CGI is far more flexible than
SSI and provides additional functionality that SSI cannot.
For example, CGI scripts can be used for user authentication, to create a user interface on
a Web page, and, within limits, in any situation in which a Web-based interface is used to
execute programs and display the results in a near real-time environment
Your first task is to ensure that Apache‘s configuration permits CGI script execution.
The ScriptAlias directive associates a directory name with a file system path, which
means that Apache treats every file in that directory as a script. If not present add the
following directive to httpd.conf:
ScriptAlias /cgi-bin/ ‚/var/www/cgi-bin‛
This directive tells Apache that any URL beginning with /cgi-bin/ should be served from
/var/www/cgi-bin. Thus, given a URL of http://localhost/cgi-bin/cgiscript.pl or
http://your.server.name/cgi-bin/cgiscript.p1, Apache reads and executes the script
/var/www /cgi-bin/cgiscript.pl.
If necessary modify the configuration file to include the ScriptAlias directive shown, and
restart Apache. Then use the script in Listing below to test the configuration.
#!/usr/bin/perl
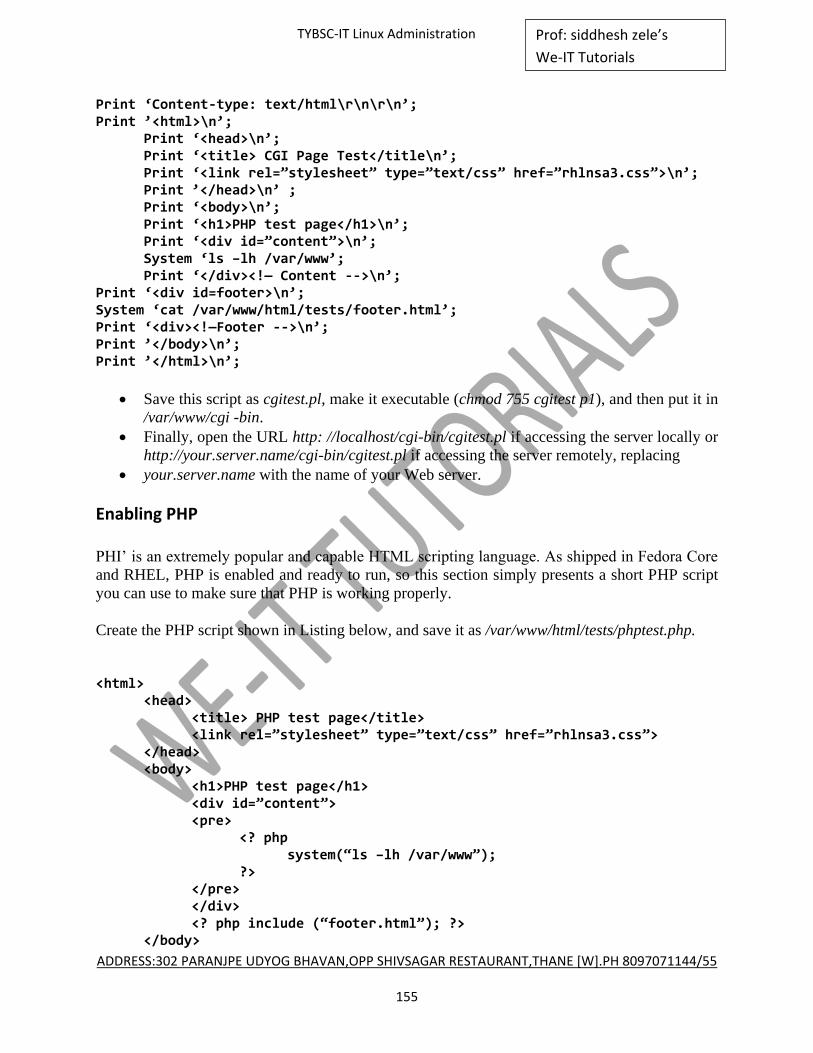
ADDRESS:302 PARANJPE UDYOG BHAVAN,OPP SHIVSAGAR RESTAURANT,THANE [W].PH 8097071144/55
155
Prof: siddhesh zele’s
We-IT Tutorials
TYBSC-IT Linux Administration
Print ‘Content-type: text/html\r\n\r\n’; Print ’<html>\n’; Print ‘<head>\n’; Print ‘<title> CGI Page Test</title\n’; Print ‘<link rel=‛stylesheet‛ type=‛text/css‛ href=‛rhlnsa3.css‛>\n’; Print ’</head>\n’ ; Print ‘<body>\n’; Print ‘<h1>PHP test page</h1>\n’; Print ‘<div id=‛content‛>\n’; System ‘ls –lh /var/www’; Print ‘</div><!— Content -->\n’; Print ‘<div id=footer>\n’; System ‘cat /var/www/html/tests/footer.html’; Print ‘<div><!—Footer -->\n’; Print ’</body>\n’; Print ’</html>\n’;
Save this script as cgitest.pl, make it executable (chmod 755 cgitest p1), and then put it in
/var/www/cgi -bin.
Finally, open the URL http: //localhost/cgi-bin/cgitest.pl if accessing the server locally or
http://your.server.name/cgi-bin/cgitest.pl if accessing the server remotely, replacing
your.server.name with the name of your Web server.
Enabling PHP
PHI‘ is an extremely popular and capable HTML scripting language. As shipped in Fedora Core
and RHEL, PHP is enabled and ready to run, so this section simply presents a short PHP script
you can use to make sure that PHP is working properly.
Create the PHP script shown in Listing below, and save it as /var/www/html/tests/phptest.php.
<html> <head> <title> PHP test page</title> <link rel=‛stylesheet‛ type=‛text/css‛ href=‛rhlnsa3.css‛> </head> <body> <h1>PHP test page</h1> <div id=‛content‛> <pre> <? php system(‚ls –lh /var/www‛); ?> </pre> </div> <? php include (‚footer.html‛); ?> </body>
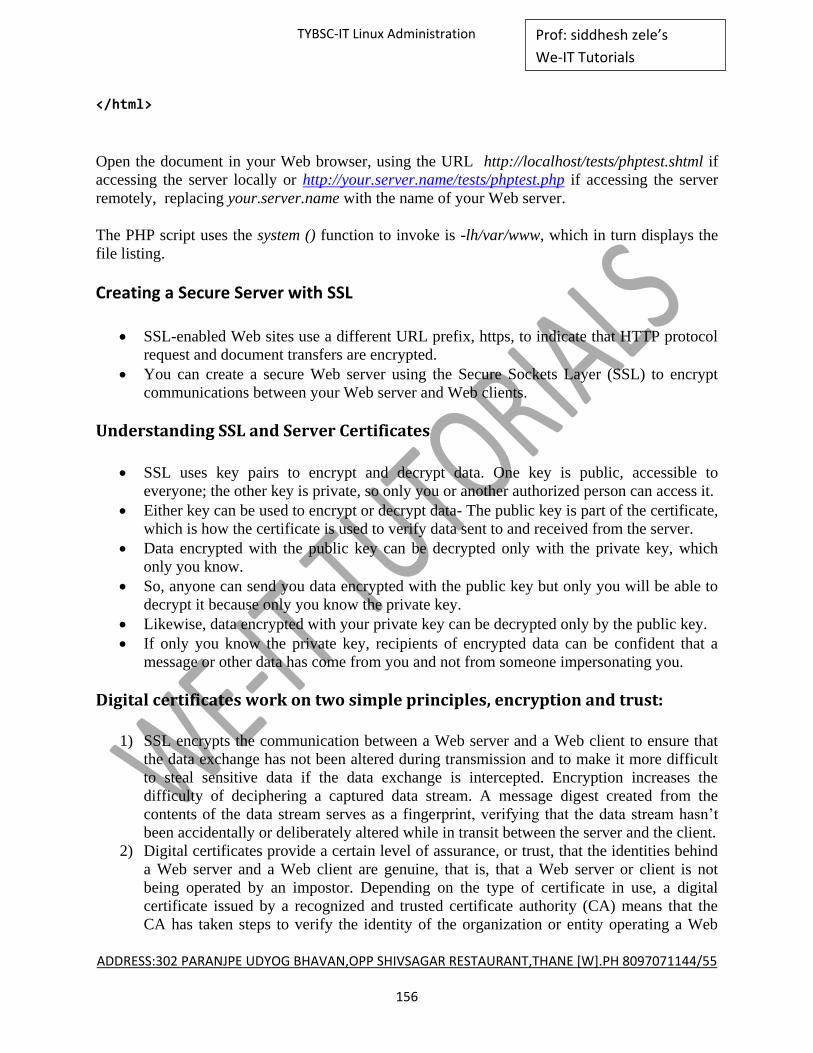
ADDRESS:302 PARANJPE UDYOG BHAVAN,OPP SHIVSAGAR RESTAURANT,THANE [W].PH 8097071144/55
156
Prof: siddhesh zele’s
We-IT Tutorials
TYBSC-IT Linux Administration
</html>
Open the document in your Web browser, using the URL http://localhost/tests/phptest.shtml if
accessing the server locally or http://your.server.name/tests/phptest.php if accessing the server
remotely, replacing your.server.name with the name of your Web server.
The PHP script uses the system () function to invoke is -lh/var/www, which in turn displays the
file listing.
Creating a Secure Server with SSL
SSL-enabled Web sites use a different URL prefix, https, to indicate that HTTP protocol
request and document transfers are encrypted.
You can create a secure Web server using the Secure Sockets Layer (SSL) to encrypt
communications between your Web server and Web clients.
Understanding SSL and Server Certificates
SSL uses key pairs to encrypt and decrypt data. One key is public, accessible to
everyone; the other key is private, so only you or another authorized person can access it.
Either key can be used to encrypt or decrypt data- The public key is part of the certificate,
which is how the certificate is used to verify data sent to and received from the server.
Data encrypted with the public key can be decrypted only with the private key, which
only you know.
So, anyone can send you data encrypted with the public key but only you will be able to
decrypt it because only you know the private key.
Likewise, data encrypted with your private key can be decrypted only by the public key.
If only you know the private key, recipients of encrypted data can be confident that a
message or other data has come from you and not from someone impersonating you.
Digital certificates work on two simple principles, encryption and trust:
1) SSL encrypts the communication between a Web server and a Web client to ensure that
the data exchange has not been altered during transmission and to make it more difficult
to steal sensitive data if the data exchange is intercepted. Encryption increases the
difficulty of deciphering a captured data stream. A message digest created from the
contents of the data stream serves as a fingerprint, verifying that the data stream hasn‘t
been accidentally or deliberately altered while in transit between the server and the client.
2) Digital certificates provide a certain level of assurance, or trust, that the identities behind
a Web server and a Web client are genuine, that is, that a Web server or client is not
being operated by an impostor. Depending on the type of certificate in use, a digital
certificate issued by a recognized and trusted certificate authority (CA) means that the
CA has taken steps to verify the identity of the organization or entity operating a Web

ADDRESS:302 PARANJPE UDYOG BHAVAN,OPP SHIVSAGAR RESTAURANT,THANE [W].PH 8097071144/55
157
Prof: siddhesh zele’s
We-IT Tutorials
TYBSC-IT Linux Administration
site. As a result, a digital certificate provides a reasonable degree of certainty that a Web
site is in fact operated by the organization or entity that claims to operate it.
A certificate contains information about the certificate owner, including the
following:
1) The owner‘s email address
2) The owner‘s name
3) How the certificate can be used
4) How long the certificate is valid
5) The address of the Web site for which the certificate has been issued
6) The public key associated with the certificate
7) A message digest (also known as hash) to use to confirm that the certificate has not been
altered since it was issued
The certificate also contains the certificate ID of the person or entity that issued the
certificate and that certified (signed) the information provided in the certificate.
Accordingly, you have to trust the issuer of the certificate, the certificate authority (CA).
A CA‘s certificate is referred to as a root certificate because it forms the basis, or root, of
a tree of trust if you trust the CA‘s root certificate, you trust the certificates issued and
signed by that CA.
Most browsers come preloaded with the root certificates of several recognized CAs.
To view the root certificates preloaded in Firefox, start Firefox and select Edit
Preferences Advanced, click the Manage Certificates button, and then click the
Authorities tab.
Digital certificates come in two flavors:
1) signed by CA
2) self-signed certificates.
A self-signed certificate is one that has been signed using the certificate itself. The
primary use of self-signed certificates is to create secure servers that do not participate in
the larger trust trees provided by formal CAs. For example, you might use a self-signed
certificate on an intranet Web server that handles payroll processing or sensitive
personnel information.
Creating a Self-Signed Certificate
1. To create a self-signed digital certificate on Fedora Core and RHEL systems use the
following procedure (as the root user):
Change directories to /etc/pki/tls/certs:
ADDRESS:302 PARANJPE UDYOG BHAVAN,OPP SHIVSAGAR RESTAURANT,THANE [W].PH 8097071144/55
158
Prof: siddhesh zele’s
We-IT Tutorials
TYBSC-IT Linux Administration
# cd /etc/pki/tls/certs
2. Create a key pair:
# make genkey
3. This step creates public and private keys that will be used to encrypt and decrypt data
streams sent to and from the server. Use a pass phrase that will be easy to remember but
difficult for others to guess. The generated key file will be
/etc/pki/tls/private/localhost.key.
If you are going to obtain a digital certification from a CA, you need to create a
certificate signing request (this step is optional for self-signed certificates):
# make certreq
The resulting file will be created in /etc/pki/tls/certs/localhost.csr. A certificate signing
request (CSR) is used to send a request to a CA to generate a CA-signed certificate for
you to install on your Web server. Its contents include the locality domain name
information you entered, server administrator‘s email address, and the public key you
created in Step 2. Again, this step is unnecessary if you will only be using a self- signed
certificate.
4. Create the self-signed certificate:
# make testcert
You can find the newly created certificate in /etc/pki/tls/certs/localhost.crt. The Apache
configuration looks for the certificate in this location, so there is no need to install the
certificate.
At this point, the secure server has been configured, and you are ready to test it. First,
restart Apache so it will load the certificate:
# service httpd restart
After restarting the server, point your Web browser at https://localhost if you are running
the server locally or https: //www.example.com if you are accessing a remote server.
The only significant difference between the standard and secure home page is that most
browsers usually provide some sort of visual indication that you are connected to a secure
page.

ADDRESS:302 PARANJPE UDYOG BHAVAN,OPP SHIVSAGAR RESTAURANT,THANE [W].PH 8097071144/55
159
Prof: siddhesh zele’s
We-IT Tutorials
TYBSC-IT Linux Administration
Obtaining a Certificate from a Certification Authority
To obtain a digital certificate from a recognized CA, you must create a CSR and submit it to a
CA. You also have to pay for the certificate.
ADDRESS:302 PARANJPE UDYOG BHAVAN,OPP SHIVSAGAR RESTAURANT,THANE [W].PH 8097071144/55
160
Prof: siddhesh zele’s
We-IT Tutorials
TYBSC-IT Linux Administration
Chapter 2 : ADMINISTERING USER AND
GROUPS
Administering User Accounts
Administering users and groups, or, more precisely, administering user and group accounts, is a
fundamental Linux system administration activity.
Fedora Core or RHEL systems also have logical user accounts, user accounts that exist for
particular applications, such as MySQL, or system functions, such as the mail and bin user
accounts.
Other than this distinction between real and logical user accounts, there are few substantive
differences between actual and logical users. In particular, both actual and logical have user
identification numbers (UIDs), numeric values that the kernel and many applications use instead
of the account name. Ordinarily, each user account has a unique UID (on a given system), but
this is not strictly required.
Working with User Accounts
You use the following commands most often:
useradd — Create user login accounts
userdel — Delete user login accounts
usermod — Modify user login accounts
passwd — Set or change account passwords
chsh — Set or change a user‘s default shell
chage — Modify password expiration information
The User Database Files
To understand the following discussion, you need to know the format of the user database fifes,
/etc/passwd and /etc/shadow. Each line in both files consists of colon-separated fields, one line
per user. The format of the password file, /etc/passwd, is:
username:password:uid:gid:gecos:directory:shell
Fields in the Password File
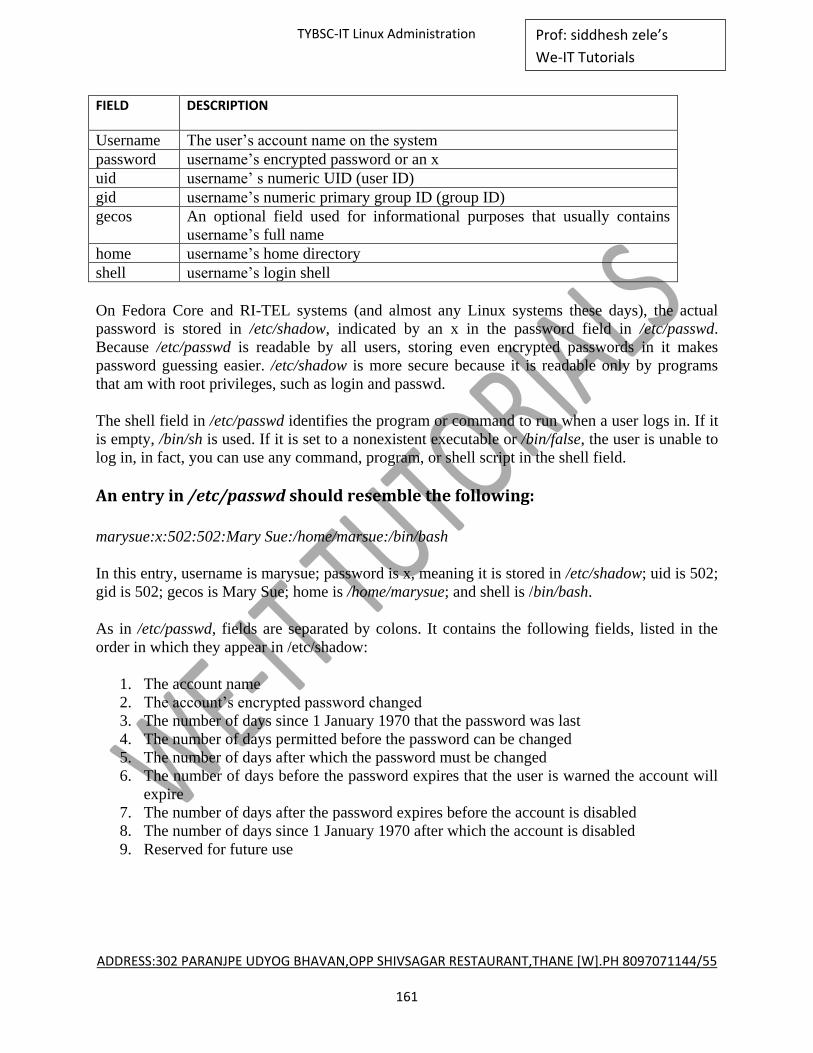
ADDRESS:302 PARANJPE UDYOG BHAVAN,OPP SHIVSAGAR RESTAURANT,THANE [W].PH 8097071144/55
161
Prof: siddhesh zele’s
We-IT Tutorials
TYBSC-IT Linux Administration
FIELD DESCRIPTION
Username The user‘s account name on the system
password username‘s encrypted password or an x
uid username‘ s numeric UID (user ID)
gid username‘s numeric primary group ID (group ID)
gecos An optional field used for informational purposes that usually contains
username‘s full name
home username‘s home directory
shell username‘s login shell
On Fedora Core and RI-TEL systems (and almost any Linux systems these days), the actual
password is stored in /etc/shadow, indicated by an x in the password field in /etc/passwd.
Because /etc/passwd is readable by all users, storing even encrypted passwords in it makes
password guessing easier. /etc/shadow is more secure because it is readable only by programs
that am with root privileges, such as login and passwd.
The shell field in /etc/passwd identifies the program or command to run when a user logs in. If it
is empty, /bin/sh is used. If it is set to a nonexistent executable or /bin/false, the user is unable to
log in, in fact, you can use any command, program, or shell script in the shell field.
An entry in /etc/passwd should resemble the following:
marysue:x:502:502:Mary Sue:/home/marsue:/bin/bash
In this entry, username is marysue; password is x, meaning it is stored in /etc/shadow; uid is 502;
gid is 502; gecos is Mary Sue; home is /home/marysue; and shell is /bin/bash.
As in /etc/passwd, fields are separated by colons. It contains the following fields, listed in the
order in which they appear in /etc/shadow:
1. The account name
2. The account‘s encrypted password changed
3. The number of days since 1 January 1970 that the password was last
4. The number of days permitted before the password can be changed
5. The number of days after which the password must be changed
6. The number of days before the password expires that the user is warned the account will
expire
7. The number of days after the password expires before the account is disabled
8. The number of days since 1 January 1970 after which the account is disabled
9. Reserved for future use
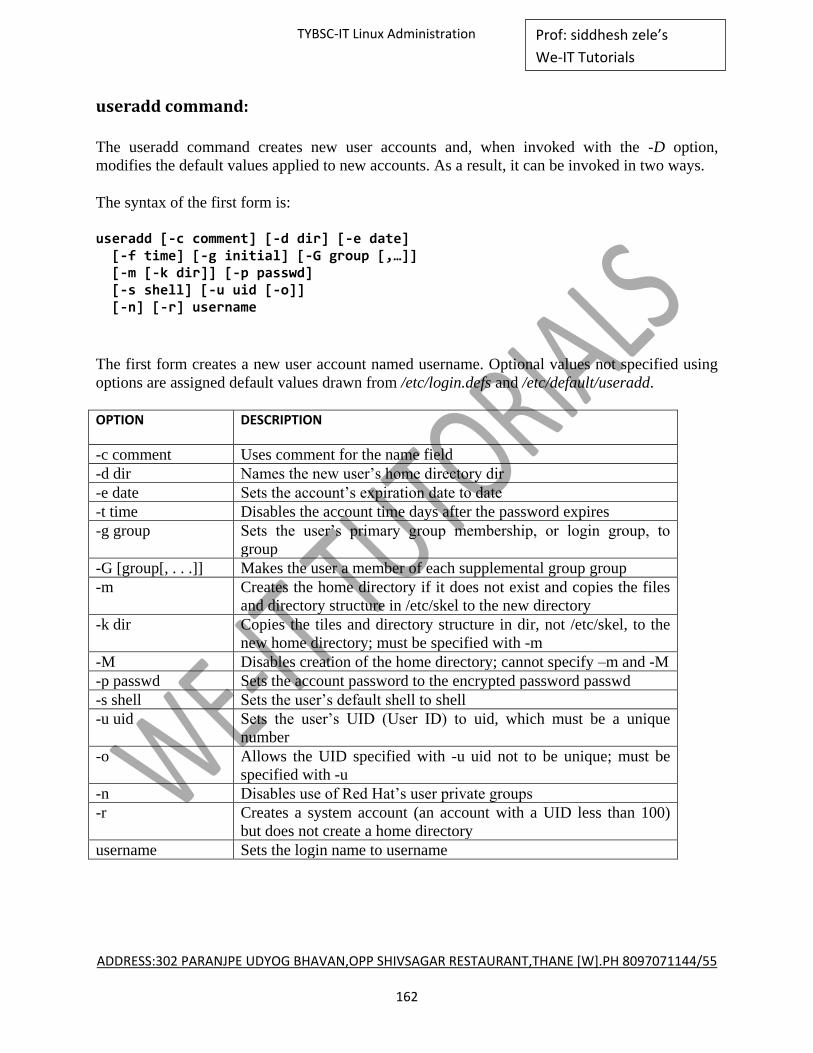
ADDRESS:302 PARANJPE UDYOG BHAVAN,OPP SHIVSAGAR RESTAURANT,THANE [W].PH 8097071144/55
162
Prof: siddhesh zele’s
We-IT Tutorials
TYBSC-IT Linux Administration
useradd command:
The useradd command creates new user accounts and, when invoked with the -D option,
modifies the default values applied to new accounts. As a result, it can be invoked in two ways.
The syntax of the first form is:
useradd [-c comment] [-d dir] [-e date] [-f time] [-g initial] [-G group [,…]] [-m [-k dir]] [-p passwd] [-s shell] [-u uid [-o]] [-n] [-r] username
The first form creates a new user account named username. Optional values not specified using
options are assigned default values drawn from /etc/login.defs and /etc/default/useradd.
OPTION DESCRIPTION
-c comment Uses comment for the name field
-d dir Names the new user‘s home directory dir
-e date Sets the account‘s expiration date to date
-t time Disables the account time days after the password expires
-g group Sets the user‘s primary group membership, or login group, to
group
-G [group[, . . .]] Makes the user a member of each supplemental group group
-m Creates the home directory if it does not exist and copies the files
and directory structure in /etc/skel to the new directory
-k dir Copies the tiles and directory structure in dir, not /etc/skel, to the
new home directory; must be specified with -m
-M Disables creation of the home directory; cannot specify –m and -M
-p passwd Sets the account password to the encrypted password passwd
-s shell Sets the user‘s default shell to shell
-u uid Sets the user‘s UID (User ID) to uid, which must be a unique
number
-o Allows the UID specified with -u uid not to be unique; must be
specified with -u
-n Disables use of Red Hat‘s user private groups
-r Creates a system account (an account with a UID less than 100)
but does not create a home directory
username Sets the login name to username

ADDRESS:302 PARANJPE UDYOG BHAVAN,OPP SHIVSAGAR RESTAURANT,THANE [W].PH 8097071144/55
163
Prof: siddhesh zele’s
We-IT Tutorials
TYBSC-IT Linux Administration
The second way to invoke useradd uses the -D option. Invoked with only -D, useradd displays
its current default settings. Using -D with any of the options listed in Table below modifies the
default value for the corresponding field.
Here is the syntax for the second form: useradd – D [-g group][-b home_dir ] [-f inactive_time] [-e expire_date] [-s shell]
Options for Changing useradd Defaults
OPTION DESCRIPTION
-g group Sets the default group to group
-b dir Sets the default home directory to dir
-f time Sets the default account disable time to time days
-e date Sets the default account expiration date to date
-s shell Sets the default login shell to shell
userdel command:
The userdel command deletes a user account and, optionally, related files.
Its syntax is:
userdel [-r] username
username identifies the user account to delete. Using -r deletes the corresponding home directory
and mail spool. Without - r, userde1 removes only the account references in the user and group
database files. You cannot delete the account of a logged in user, so userdel fails if usemame is
logged in.
usermod command:
The usermod command modifies an existing user account.
Its syntax is:
useradd [-c comment] [-d dir[-m]] [-e date] [-f inactive] [-g group] [-G group[,…]] [-l user_name] [-p passwd] [-s shell] [-u uid [-o]] [-L | -U] username
ADDRESS:302 PARANJPE UDYOG BHAVAN,OPP SHIVSAGAR RESTAURANT,THANE [W].PH 8097071144/55
164
Prof: siddhesh zele’s
We-IT Tutorials
TYBSC-IT Linux Administration
-l new_username changes the account name from username to new_username. -L disables
(locks) username‘s account by placing a ! in front of the user‘s encrypted password in
/etc/shadow. -U enables (unlocks) the account by removing the !.
At least one option must be specified, but –p, -U, and -L may not be used together in any
combination. If username is logged in, usermod fails because you cannot change the login name
of a logged-in user.
passwd command:
The passwd command, generally regarded as ―the password changing utility‖ actually has more
capabilities than merely changing passwords. In general, it updates all of a user‘s authentication
tokens, of which the login password is only one.
Its syntax is:
passwd [-dkluf] [-S] username
-d removes the password for username, disabling the account. -k causes passwd to update only
expired authentication tokens (passwords, in this case).
The -s option displays a short status message about username, indicating whether the account is
locked or unlocked, the kind of encryption used, and so forth.
Another very handy method to set or change a password, especially from a script, is to use the
passwd command‘s --stdin option, which allows you to pipe a new, plain-text password in.
For example, the following command changes the user bubba‘s password to sekritword, using
the --stdin option to passwd:
# echo ‘sekritword’ | passwd --stdin bubba
This command pipes the password through the passwd command. When used with the
--stdin option, passwd reads its input from stdin rather than interactively at the keyboard. Notice
that the echo command embeds the password in single quotes because the password contains
shell meta-characters that must be protected from expansion.
chsh command:
The chsh command changes a user‘s login shell.
Its syntax is:
chsh [-s shell ] [-1] [username]
ADDRESS:302 PARANJPE UDYOG BHAVAN,OPP SHIVSAGAR RESTAURANT,THANE [W].PH 8097071144/55
165
Prof: siddhesh zele’s
We-IT Tutorials
TYBSC-IT Linux Administration
-s shell sets username‘s login shell to shell Unless configured otherwise, shell can be the full
pathname of any executable file on the system. Using the -l option displays the shells listed in
/etc/shells.
chage command:
The chage command changes the expiration policy for a user‘s password.
Its syntax is:
chage [-l] [-m mindays] [-M maxdays] [-d lastday] [-I inactive] [-E expiredate) [-W warndays] username
OPTION DESCRIPTION
username Specifies username as the account name to query or modify.
-1 Displays expiration information for username.
-m mindays Sets mindays days as the minimum amount of time permitted
between password changes.
-M maxdays Sets maxdays days as the maximum number of days a password is
valid.
-d lastday Sets lastday as the date on which the password was last changed,
expressed as the number of days elapsed since 1 January 1970.
lastday can be set using a more convenient date format, such as
June 21, 2003, or 2003-0621.
-I inactive Sets inactive days as the number of days username‘s account may
be inactive after the password has expired before the account is
locked.
-E expiredate Sets expiredate as the date on which username‘s account expires.
-w warndays Sets warndays as the number of days before the password expires
that a warning message is issued
If no options are used, chage executes in interactive mode, prompting the user for each item of
information. The chage command‘s -1 option to obtain a friendlier display:
# chage -1 marysue
chage does not display the fields in the order in which they appear in /etc/shadow.
Modifying Multiple Accounts Simultaneously
The shadow password suite includes the newusers utility which can be used to create and update
multi- pie user accounts.

ADDRESS:302 PARANJPE UDYOG BHAVAN,OPP SHIVSAGAR RESTAURANT,THANE [W].PH 8097071144/55
166
Prof: siddhesh zele’s
We-IT Tutorials
TYBSC-IT Linux Administration
One of the advantages of command line tools is that they can be used to perform hulk or mass
changes.
Two commands, chpasswd and newusers, make multiple changes to the user password database
in a single operation.
The syntax is:
newusers userfile
userfile is the name of a text file consisting of lines in the same format as the standard password
file, subject to the following exceptions:
1. The password field appears as clear text — newusers encrypts it before adding the
account.
2. The pw_age field is ignored for shadow passwords if the user already
3. The GID can be the name of an existing group or a nonexistent GID. If the GID is the
name of an existing group, the named user is added to that group, but if it is a nonexistent
numeric value, a new group with the specified GID is created.
4. If the specified home directory refers to a nonexistent directory, newusers creates it. If the
directory already exists, ownership of the directory is set to that of the named user.
The chpasswd command updates existing user passwords. It reads a file consisting of colon-
separated username:password pairs. password must be plain text, which will be encrypted at
runtime, unless chpasswd is invoked with the -e option, in which case password must already be
encrypted.
Viewing Login and Process Information
To view current and past login information and to determine what processes users are running,
you can use one of the following commands:
last — Displays historical login information
who — Displays information about currently logged in users
w — Displays a user‘s currently running process
1) last:
For all logins, last prints the user name, TTY, date, time, lapsed time, and the host name or IP
address of the remote host, if applicable, from which the login originated of all user logins,
starting with the most recent login.
Its syntax is:
last [-R | [-ai]] [-num |-n num] [username] [tty]

ADDRESS:302 PARANJPE UDYOG BHAVAN,OPP SHIVSAGAR RESTAURANT,THANE [W].PH 8097071144/55
167
Prof: siddhesh zele’s
We-IT Tutorials
TYBSC-IT Linux Administration
By default, last lists all the entries in /var/log/wtmp, so you can use -num and -n num to specify
the number of output lines to display. Ordinarily, last displays the hostname in the third column,
but using -a places the hostname in the rightmost column, -i shows the hostname‘s IP address,
and -R completely suppresses display of the hostname. To view the login activity of a specific
user, use the username argument. tty enables you to view logins per TTY. Multiple usernames
and ttys can be listed.
2) who
The who command displays information about currently logged-in users. Its default output
includes the user name, login TTY and the date and time each user logged in. The syntax is:
who [-Hil] | [-q]
Using the -H option adds column headings to who‘s output. Specifying -i adds each user‘s idle
time to the display. Use -1 to force who to show fully qualified domain names (FQDNs). To
obtain the total number of logged-in users, use the -q option by itself.
3) w
The w command is very similar to who, except that it also displays the command line of each
user‘s currently running process and a summary of each user‘s CPU usage. The syntax is:
w [-husf] [username]
By default, w prints header information when it starts; -h disables the header.
- s generates a short output format that omits the login time and the CPU usage. - f disables
displaying the host from which users are logged in. Specifying username lists only username‘s
login session and process information.
Working with Group Accounts
Unlike user accounts, group accounts always represent some sort of logical organization of users.
Like user accounts, groups have group identification numbers, or GIDs, and it is common for
users to be members of several groups. Groups are used to tie one or more users together to
simplify administrative tasks.
The group file used in LINUX is /etc /group. It has one entry per line, and each line has the
format:
groupname : password : gid : userlist
gid is the numeric group ID number

ADDRESS:302 PARANJPE UDYOG BHAVAN,OPP SHIVSAGAR RESTAURANT,THANE [W].PH 8097071144/55
168
Prof: siddhesh zele’s
We-IT Tutorials
TYBSC-IT Linux Administration
groupname is the name of the group
password is an optional field containing the encrypted group password
userlist is a comma-separated list of the user account names that compose the group
Group Account Administrative Commands COMMAND DESCRIPTION
gpasswd Sets group passwords and modifies group accounts
groupadd Creates a new group account
groupdel Deletes an existing group account
groupmod Modifies existing group accounts
If x appears in the password field, nonmembers of the group cannot join it using the newgrp
command. A typical entry in the group file might resemble the following:
admins:x:507:joebob,marysue,bubba
groupname is admins; password is empty, meaning no group password has been set; gid is 503;
and userlist is joebob, marysue, bubba.
Creating Groups
To create a new group, use the groupadd command. Its syntax is:
groupadd [-g gid [-o]] | [-r] [-f] groupname
groupname is the only required argument and must be the name of a nonexistent group. When
invoked with only the name of the new group, groupadd creates the group and assigns it the first
unused GID that is both greater than 500 and not already in use. Specify -f to force groupadd to
accept an existing groupname. Use the -g gid option if you want to specify the new group‘s GID,
replacing gid with a unique GID (use the -o option to force groupadd to accept a nonunique
GID).
To create system group, one that has special privileges, use the -r option.
The following command creates a new group named admins:
# groupadd admin
ADDRESS:302 PARANJPE UDYOG BHAVAN,OPP SHIVSAGAR RESTAURANT,THANE [W].PH 8097071144/55
169
Prof: siddhesh zele’s
We-IT Tutorials
TYBSC-IT Linux Administration
Modifying and Deleting Groups
groupmod enables you to change a group‘s GID or name, and gpasswd enables you to set and
modify a group‘s authentication and membership information.
From root‘s perspective, gpasswd syntax is:
gpasswd [-A username] [-M username] groupname
Root can use -A username to assign username as groupname‘s group administrator. -M username
adds username to groupname‘s membership roster. Assigning a group administrator using -A
does not make the administrator a member of the group; you have to use -M to add the
administrator as a member of the group. Multiple username‘s can be specified with -A and -M.
The following command shows how to add marysue and joebob to the admins group:
# gpasswd -M marysue, joebob admins
For group administrators, gpasswd‘s syntax is:
gpasswd [-R] [-r] [-a username] [-d username] groupname
Using a Shadowed Group File
Much of the behavior described in the previous subsection does not apply if the shadow group
file, /etc/gshadow, is present. In particular, if the shadow group file is in use:
1. Adding a group creates an entry for that group in the shadow group file.
2. Adding a user to a group adds that user to both the standard group file and the shadow
group file
3. The third field in the shadow group file holds the name of the group administrator, not
the GID, if an administrator is added using gpasswd‘s -A username option
4. A group administrator cannot join the group unless the administrator‘s account is also a
member of the group. Similarly, a group administrator can add and delete her user
account from the group without affecting her administrative function.
5. Only group members can use newgrp to join the group. To put it another way,
nonmembers of a group cannot use newgrp to join groups of which they are not members,
even if they know the group password. In fact passwords are irrelevant because they do
not work for non- members and members do not need to use them.
Using User Private Groups
UPGs are intended to make Linux groups easier to use. The UPG scheme has the following
salient characteristics:

ADDRESS:302 PARANJPE UDYOG BHAVAN,OPP SHIVSAGAR RESTAURANT,THANE [W].PH 8097071144/55
170
Prof: siddhesh zele’s
We-IT Tutorials
TYBSC-IT Linux Administration
Each user has a primary group with the same name as the user account. For example, the
user named bubba has a primary or initial group of bubba.
Each user is the only member of her primary group. Thus, the user bubba is the only
member of the group bubba.
Each user‘s umask defaults to 002; because every user has her own private group in the
UPG scheme, the group protection afforded by the normal Linux umask of 022 is
unnecessary.
Group-specific directories, such as project directories, have the set-GID (set group ID) bit
enabled. If you set the set-GID bit on a directory, all files created in that directory have
their group set to the directory‘s group.
The default umask is set in /etc/profile.
Administering Users and Groups with User Manager
User Manager is a graphical tool for administering user and group accounts.
To use it, you must be logged in as root or otherwise have root access.
To start User Manager, click Main Menu System Settings Users and Groups.
You can start from a command line using the command system-config-user in a terminal
window.
From this screen you can view, modify, and delete existing user and group accounts or
create new ones.
To reduce the list of displayed accounts or to search for a specific account, type the first
few letters of an account name in the Filter by text box and click the Apply filter button.
You can update most windows by clicking the Refresh button on the toolbar.
To get context-sensitive help, click the toolbar‘s Help button or, to view the entire User
Manager manual, select Help Manual from the toolbar.
Creating User Accounts
To add a new user:
1. Click the Add User button. The Create New User dialog box appears
2. Type the new account name in the User Name text box
3. Type the user‘s full name in the Full Name text box.
4. Type the user‘s password in the Password and Confirm Password fields, The password
must be at least six characters
5. Select a login shell. If you choose not to accept the default shell, select an alternative
shell from the Login Shell drop-down box
6. The default home directory is /home/username. You can change the home directory by
editing the Home Directory text box or not create a home directory at all by clearing the
Create home directory check box
7. To prevent creation of a user private group, remove the check from the Create new group
for the user check box.
8. Click OK to create the user.

ADDRESS:302 PARANJPE UDYOG BHAVAN,OPP SHIVSAGAR RESTAURANT,THANE [W].PH 8097071144/55
171
Prof: siddhesh zele’s
We-IT Tutorials
TYBSC-IT Linux Administration
Modifying and Deleting User Accounts
After you have created a user account, you can configure additional properties by
clicking User Manager‘s User tab, selecting the user, and clicking the Properties button to
open the User Properties dialog box.
To add the user to additional groups, click the Groups tab. Click the check box next to the
groups of which the user should be a member, then click the Apply button.
Other account data you can modify from the User Properties window includes the basic
user information you supplied when you created the user (the User Data tab), account
information (the Account Info tab), and password expiration information (the Password
Mo tab).
On the Password Info tab, click the Enable account expiration check box to set the user
account‘s expiration date if you want the account to expire on a certain date. To prevent
this user account from logging in, place a check mark in the User account is locked check
box.
Click the Password Info tab to view and change the account password expiration
information. The date that the user last changed her password appears across the top of
the tab.
Click Enable password expiration to force a password change after a certain number of
days, and then enter the number of days between required password changes in the Days
before change required text box.
You can also set the number of days before the user can change her password, the
number of days before the user is warned to change her password, and the number of
days before the account becomes inactive.
When you have finished modifying the user account properties, click OK to apply the
changes and close the User Properties dialog box.
Finally, to delete a user account, click the account to delete on User Manager‘s Users tab,
and then click the Delete button.
Creating Group Accounts
To add a new user group, click the Add Group button. In the Create New Group dialog box type
the name of the new group, and then click OK to create the group.
Modifying and Deleting Group Accounts
To view or modify the properties of an existing group, select the group to modify from
the group list on the Groups tab and click the Properties button. The Group Properties
dialog box appears.
The Group Users tab displays the users that are members of the group. To add other users
to the group, place a check mark next to the user account names in the list, and deselect
account names to remove them from the group. Click OK to apply the changes and close
the Group Properties box
After you have finished adding or modifying user and group accounts, click File Quit
or press Ctrl +Q to save your changes and close User Manager.
ADDRESS:302 PARANJPE UDYOG BHAVAN,OPP SHIVSAGAR RESTAURANT,THANE [W].PH 8097071144/55
172
Prof: siddhesh zele’s
We-IT Tutorials
TYBSC-IT Linux Administration
Understanding the Root Account
The root account or root can access any file and modify any process. Indeed, it is for this
reason that root is often called the superuser. The exceptions to root‘s capabilities are
few.
Root on an NFS client (that is, a system mounting an NFS exported file system from an
NFS server) typically cannot exercise root privileges on the exported file system because
the NFS server exports the file system using the root_squash option. The root_squash
option maps root‘s UID and GID to the UID and GID of the anonymous user on the
client system. Keep in mind that this is the default behavior of the NFS server daemon
(exportfs) and can be overridden using no_root_squash on the NFS server.
On the local system and for local resources, root always has unlimited power and control;
it is only in the case of remote or networked resources where root‘s power is subject to
special considerations and restrictions on root‘s power emerge.
The ext2 and ext3 file systems also restrict root‘s power. The ext2 and ext3 file systems
support a number of special file attributes, including immutability. Using the chattr
utility, root can set a file‘s immutable attribute, which prevents all users, including root,
from modifying the file; it cannot be deleted, renamed, or written to, and hard links
cannot be created to it until the immutable attribute is cleared. Only root can set or clear a
file‘s immutable attribute.
Linux capabilities and Linux access control lists (ACLs) are being developed that enable
root‘s power with respect to process management and file access to be subdivided into
more finely grained capabilities. Capabilities work by splitting root‘s traditional
privileges into smaller sets of more specific privileges that you can enable and disable.
A capability bounding set defines a list of capabilities any process running on a Linux
system can hold. If a capability does not appear in the bounding set, no process,
regardless of how privileged it is, can exercise it.
Implementing Sudo
Sudo enables you to give specific users or groups of users the ability to run some (or all)
commands requiring root privileges.
Sudo also logs all commands executed, which allows you to maintain an audit trail of the
commands executed, by whom they were executed, when they were executed, and so on.
Sudo‘s ―basic philosophy is to give as few privileges as possible but still allow people to get
their work done.‖
Sudo’s features include:
1. Enabling the ability to restrict the commands a given user may run on a per-host basis.
2. Maintaining a clear audit trail of who did what. The audit trail can use the system logger
or Sudo‘s own log file. In fact, you can use Sudo in lieu of a root shell to take advantage
of this logging.
ADDRESS:302 PARANJPE UDYOG BHAVAN,OPP SHIVSAGAR RESTAURANT,THANE [W].PH 8097071144/55
173
Prof: siddhesh zele’s
We-IT Tutorials
TYBSC-IT Linux Administration
3. Limiting root-equivalent activity to a short period of time using time- stamp based
―tickets,‖ thus avoiding the potential of leaving an active root shell open in environments
where others can physically get to your keyboard.
4. Allowing a single configuration file, /etc/sudoers, to be used on multiple machines,
permitting both centralized Sudo administration and the flexibility to define a user‘s
privileges on a per host basis
5. By default, sudo logs to /var/1og/mesages using the system logger (syslogd), but you can
configure the system logger to log sudo-related messages to a different file.
6. Sudo can even bypass the system logger completely and maintain its own log file.
7. If Sudo is invoked by an invalid user, is invoked with an invalid command, or if other
abnormal situations arise, Sudo notifies the root user (by default) via email.
8. Sudo‘s configuration file is /etc/sudoers, which must be edited using visudo, part of the
Sudo distribution.
9. Using visudo is vital because it locks the /etc/sudoers to prevent simultaneous edits and
validates the grammar and syntax in the configuration file, refusing to save changes if it
believes it has detected an error.
After the configuration file has been created, a typical Sudo session proceeds as
follows:
1. An authorized user prefixes the root command she wants to execute with sudo followed
by a space, for example:
$ sudo shutdown -h +5 ‚System shutting down for disk replacement‛
2. Sudo prompts the user for her personal password (not the root password) and then checks
the configuration file (/etc/sudoers) to make sure she has permission to run the given
command on a given machine.
3. The password prompt can be overridden by specifying the NOPASSWD flag in
/etc/sudoers, but this poses as security risk.
4. If the user is permitted to use that command, Sudo runs the command as root (or another
user if specified), logs the details, and timestamps the Sudo session ticket.
5. If the user is not permitted to use that command, Sudo logs the attempt and exits. Sudo
also logs problems and other invalid sudo uses.
6. After executing the first command, the user can use multiple sudo commands without
being prompted for her password again. The session ticket expires five minutes (the
default expiration period) after the last sudo command is issued, after which the user is
again prompted for a password.
ADDRESS:302 PARANJPE UDYOG BHAVAN,OPP SHIVSAGAR RESTAURANT,THANE [W].PH 8097071144/55
174
Prof: siddhesh zele’s
We-IT Tutorials
TYBSC-IT Linux Administration
INSTALLING AND UPGRADING SOFTWARE PACKAGES
Linux users can download and install new or updated software with little or no difficulty using
RPM, the Red Hat Package Manager.
Using the Red Hat Package Manager
RPM is a powerful software configuration manager and the preferred tool for installing,
removing, verifying, and updating software packages on Fedora Core and RHEL systems.
RPM consists of two components:
i) set of databases that store information about installed software
ii) the programs that interface with the databases.
RPM can work with binary and source packages.
Binary packages, referred to simply as RPMs, contain compiled software ready for
installation. They use the file extension .rpm.
Source packages, more often called source RPMs or SRPMs, are uncompiled packages
containing source code, patches, and build instructions, all of which are used to create
binary RPMs. SRPMs have a .src.rpm file extension.
The different operation modes of RPM are:
General options
Querying
Package maintenance
Administrative options
Miscellaneous options
General Options
At the command line, the primary RPM command is rpm. In addition to the mode-specific
command line options discussed in the following sections, rpm accepts the general command line
options listed in Table below:
OPTION DESCRIPTION
ADDRESS:302 PARANJPE UDYOG BHAVAN,OPP SHIVSAGAR RESTAURANT,THANE [W].PH 8097071144/55
175
Prof: siddhesh zele’s
We-IT Tutorials
TYBSC-IT Linux Administration
-v Displays basic information about the RPM operation‘s status
-vv Displays debugging information. Most useful to software packagers and RPM
developers
--quiet Displays only error information
--help Shows a usage summary
--test Performs a ―dry run‖ of the requested operation without actually modifying the file
system or the RPM database
--
version
Shows the RPM version number
--justdb Updates only the database, not the file system
For example, the following command uses --test to delete the whois package from RPM‘s
database without actually deleting the files:
# rpm --test -e jwhois # rpmquery jwhois
The first command deletes the jwhois package but, because the - - test was specified, the package
wasn‘t actually deleted. The second command uses the rpmquery command to see if the jwho is
RPM is installed. The package is still installed.
Query Mode
RPM‘s query mode is one of its most powerful and useful features. The general form of an RPM
query is:
rpmquery [query_opts]
rpmquery specifies a query operation and query_opt specifies what to query, the type of query,
how the query should run, or the format of its output. Most commonly, queries use the following
general syntax:
rpmquery [query_opts] package [...]
package names the RPM to query. Query multiple RPMs using a space-separated list of package
names. Query mode‘s power comes at the cost of a long list of options for the query_opts
argument.
The options fall into two broad categories:
1. package selection options, controls which package or packages to query
2. output selection options, defines what information to display.
ADDRESS:302 PARANJPE UDYOG BHAVAN,OPP SHIVSAGAR RESTAURANT,THANE [W].PH 8097071144/55
176
Prof: siddhesh zele’s
We-IT Tutorials
TYBSC-IT Linux Administration
Table below lists many of the options available in query mode. The Type column uses S to mark
a package selection option and I to mark an information selection option. Unless mentioned
otherwise, all options require at least one package name as an argument.
OPTION TYPE DESCRIPTION
-a S Queries all installed RPMs. Does not require a package
specification.
-c I Lists only the configuration files stored in the queried RPM(s).
--changelog I Displays change information about the queried RPM(S).
-d I Lists only the documentation tiles stored in the RPM.
--dump I For each tile stored in the queried RPM(s), displays its path,
size, modification time, MD5 checksum, permissions, owner,
group, and whether it is a configuration tile, documentation
tile, a device, or a symlink (must be used with -I, -c, or -d).
-f file S Lists the packages in the RPM that file. Does not require a
package specification.
-g group S Lists the packages in the RPM group named group. Does not
require a package specification.
-i I Displays complete information about the queried RPM(s).
-l I Lists all of the files stored in the RPM.
--last I Displays the installation date and time of each RPM queried,
starting with the most recently installed RPM.
-p package[….] S Queries the uninstalled RPM named package.
--provides I Lists all of the capabilities the queried RPM(s) provides.
--requires I Lists all RPMs on which the package depends.
--whatprovides
capability
S Queries all RPMs that provide capability
--whatrequires
capability
S Queries all RPMs that provide capability in order to function
properly
Querying Package Dependencies
The --provides, --requires, --whatrequires, and --whatprovides options allow you to identify
dependencies between packages. The capability argument represents the dependency itself,
which is often the name of another RPM or the name of a particular file. RPM uses dependencies
to maintain system integrity, so, for example, if one RPM requires something a second RPM
provides, you cannot, in normal usage, delete the second RPM. To illustrate, to determine on
what capabilities the RPM package depends, use the --requires option as shown in the following
command:
$ rpmquery --requires rpm
ADDRESS:302 PARANJPE UDYOG BHAVAN,OPP SHIVSAGAR RESTAURANT,THANE [W].PH 8097071144/55
177
Prof: siddhesh zele’s
We-IT Tutorials
TYBSC-IT Linux Administration
To identify what capabilities a package provides, use the --provides option:
$ rpmquery --provides rpm
To determine which RPMs depend on a given capability, use --whatrequires capability to list all
packages requiring capability. For example, the following command shows all the packages that
require the RPM capability the RPM package provides.
$ rpmquery --whatrequires rpm
Formatting Query Output
The --qf option allows custom formatting of RPM query output. On the downside, --qf might not
work with all query options, and RPMs rarely contain au the information that can potentially be
displayed.
The general form of a query using query format strings is:
rpmquery --qf ‘format_str’ [query_opts]
A format_str must contain at least one tag; all other components are optional. Optional elements
include literal text, directives to control the output‘s width and justification, control character
sequences, output modifiers and array iterators.
A tag is a predefined token or symbol representing a piece of information. Examples include
SUMMARY, DESCRIPTION, NAME and VERSION. Each tag must be embedded in a % { }
construct, for example: % (SUMMARY} or % {NAME).
Type rpm --querytags to view the entire list of tags RPM understands.
Note:
1. First, fortmat_str should be delimited by single quotes (‗), also called apostrophes or
strong quotes, or by regular double quotation marks (1), often called weak quotes.
2. Format strings used in shell scripts should be embedded between strong quotes to protect
them from effects of shell expansion.
3. Make sure to type --qf (notice the double hyphen); -qf means something else entirely, as
described in the previous section. To avoid confusion or the possibility of a typing error,
consider using the long option --queryformat, a synonym of –qf.
To specify the width of a field, place a number between a tag‘s percent sign and its opening
brace; for example, %20 {NAME}
By default, output is right-justified, so to force left justification, prefix the field width with -; for
example, % -20 {NAME}
ADDRESS:302 PARANJPE UDYOG BHAVAN,OPP SHIVSAGAR RESTAURANT,THANE [W].PH 8097071144/55
178
Prof: siddhesh zele’s
We-IT Tutorials
TYBSC-IT Linux Administration
The escape sequences are \n for a newline and \ t for a tab.
The next command uses two tags, NAME and VERSION, to specify the output fields:
$ rpmquery –qf ‘%{NAME}%{VERSION}’ setup bc hdparm root
Package Installation and Removal 1) Installing RPMs
The basic syntax for installing an RPM is:
rpm -i [options] package [….]
package is the complete name of the RPM to install and options the installation process. Table
below lists commonly used options values.
OPTION DESCRIPTION
--force Install the package even if it is already installed, install an older
package version, and replace files already installed. –force also
ignores dependencies.
-h Print up to 50 hash marks (#) to illustrate the progress of the
installation
--nodeps Do not perform a dependency check before installing or upgrading a
package.
--test Do not install the package or update the database, just identify and
display possible conflicts or dependency errors.
-v Be slightly verbose and show some useful information during the
installation.
The following command demonstrates installing an RPM:
# rpm –ivh fortune-mod-1.2.1-1.i386.rpm
2) Upgrading RPMs
The options for upgrading existing RPMs come in two flavors, -U, for upgrade, and -F, for
freshen.
Upgrading a package, using -U, installs it even if an earlier version is not currently installed, but
freshening a package, using –F, installs it only if an earlier version is currently installed.

ADDRESS:302 PARANJPE UDYOG BHAVAN,OPP SHIVSAGAR RESTAURANT,THANE [W].PH 8097071144/55
179
Prof: siddhesh zele’s
We-IT Tutorials
TYBSC-IT Linux Administration
The upgrade (-U) option is almost always the method to use because it simply does the right
thing. The only exception is when installing multiple versions of the kernel, in which case you do
want to have several versions of the same package(s) installed.
3) Removing RPMS
Removing or deleting RPMs and their contents is easy.
The general form of the command is:
rpm -e package [….]
The -e option is a mnemonic for expunge (literal meaning is wipe out). package is the name,
only, of the RPM to remove. Multiple packages can be removed simultaneously by listing each
package on the command line.
For example, the following command removes the fortune-mod and whois RPMs:
# rpm -e fortuna-mod ,whois
Notice that successful removal generates no additional output.
4) Verifying RPMs
Verifying an RPM compares the current status of files installed by an RPM to the file
information recorded at the time the RPM was installed, such as file sizes and MD5 checksum
values, and reports any discrepancies.
The general form of the verify command is:
rpm -v package […]
The -v option requests RPM to verify the status of files in package, the name of the RPM to
verify. As with many other RPM operations, multiple packages can be verified simultaneously.
Table below explains the file characteristics that RPM evaluates when verifying an RPM.
CHARACTERISTIC DESCRIPTION
MD5 Checksum The file‘s MD5 checksum (calculated using the md5sum command)
File size The file‘s size, in bytes
Modification time The date and time the file was last modified
Device The device file or files in the case of drivers and hardware devices
User The file‘s owner, such as root or bin
Group The file‘s group
Mode The file‘s permissions and type