Embed Size (px)
Citation preview

Applications & Tools
Answers for industry.
Cover
Easy and Reliable Detection of Objects by Means of Optical Proximity Switches
LOGO! Set 18 LOGO! 0BA6 and 0BA7
Compact Documentation March 2013

Warranty and Liability
2 LOGO! Set 18
Version 2.0, Entry ID: 23588559
Cop
yrig
ht
Sie
men
s A
G 2
013
All
right
s re
serv
ed
Warranty and Liability
Note The Application Examples are not binding and do not claim to be complete regarding the circuits shown, equipping and any eventuality. The Application Examples do not represent customer-specific solutions. They are only intended to provide support for typical applications. You are responsible for ensuring that the described products are used correctly. These application examples do not relieve you of the responsibility to use safe practices in application, installation, operation and maintenance. When using these Application Examples, you recognize that we cannot be made liable for any damage/claims beyond the liability clause described. We reserve the right to make changes to these Application Examples at any time without prior notice. If there are any deviations between the recommendations provided in these application examples and other Siemens publications – e.g. Catalogs – the contents of the other documents have priority.
We do not accept any liability for the information contained in this document.
Any claims against us – based on whatever legal reason – resulting from the use of the examples, information, programs, engineering and performance data etc., described in this Application Example shall be excluded. Such an exclusion shall not apply in the case of mandatory liability, e.g. under the German Product Liability Act (“Produkthaftungsgesetz”), in case of intent, gross negligence, or injury of life, body or health, guarantee for the quality of a product, fraudulent concealment of a deficiency or breach of a condition which goes to the root of the contract (“wesentliche Vertragspflichten”). The damages for a breach of a substantial contractual obligation are, however, limited to the foreseeable damage, typical for the type of contract, except in the event of intent or gross negligence or injury to life, body or health. The above provisions do not imply a change of the burden of proof to your detriment. Any form of duplication or distribution of these Application Examples or excerpts hereof is prohibited without the expressed consent of Siemens Industry Sector.
Caution The functions and solutions described in this article confine themselves to the realization of the automation task predominantly. Please take into account furthermore that corresponding protective measures have to be taken up in the context of Industrial Security when connecting your equipment to other parts of the plant, the enterprise network or the Internet. Further information can be found under the Item-ID 50203404. http://support.automation.siemens.com/WW/view/en/50203404

Table of Contents
LOGO! Set 18 Version 2.0, Entry ID: 23588559 3
Cop
yrig
ht
Sie
men
s A
G 2
013
All
right
s re
serv
ed
Table of Contents Warranty and Liability .............................................................................................. 2 1 Task................................................................................................................. 4 2 Solution........................................................................................................... 5
2.1 Overview of the overall solution ......................................................... 5 2.2 Hardware and software components used ......................................... 6
3 Function Mechanisms of this Application ..................................................... 8 3.1 Retro-reflective sensor ....................................................................... 8 3.2 Anti-crushing device .......................................................................... 8 3.3 LOGO! logic module .......................................................................... 9
4 Installation .................................................................................................... 11 4.1 Connection to a 400V three-phase mains......................................... 11 4.2 Connection to a 230V mains ............................................................ 12 4.3 Installing, wiring and parameterizing the hardware ........................... 13 4.4 Parameterizing LOGO! .................................................................... 13 4.5 Configuring the SIRIUS circuit breaker ............................................. 13 4.6 Configuring the SINAMICS G110 frequency inverter ........................ 14 4.7 Configuring and connecting the motor .............................................. 15
5 Operation of the Application ........................................................................ 16 5.1 Functions......................................................................................... 16 5.2 Activation types and operation using LOGO! cursor keys ................. 16
Activating the rolling shutter gate via weekly timer or key switch ....... 16 Activating and moving the rolling shutter gate in manual mode using
LOGO! cursor keys ........................................................... 17 5.3 Status displays and diagnostic messages ........................................ 17
Status display of the rolling shutter gate ........................................... 17 Diagnostic message of the rolling shutter gate ................................. 17
6 References .................................................................................................... 18 6.1 Bibliography..................................................................................... 18 6.2 Internet links .................................................................................... 19
7 History .......................................................................................................... 19
1 Task
4 LOGO! Set 18
Version 2.0, Entry ID: 23588559
Cop
yrig
ht
Sie
men
s A
G 2
013
All
right
s re
serv
ed
1 Task Introduction
LOGO! sets are functioning and tested automation configurations for simple, fast and inexpensive implementation of automation tasks for small-scale automation. The sets help you to obtain answers with regards to required products and the question of how they function when combined.
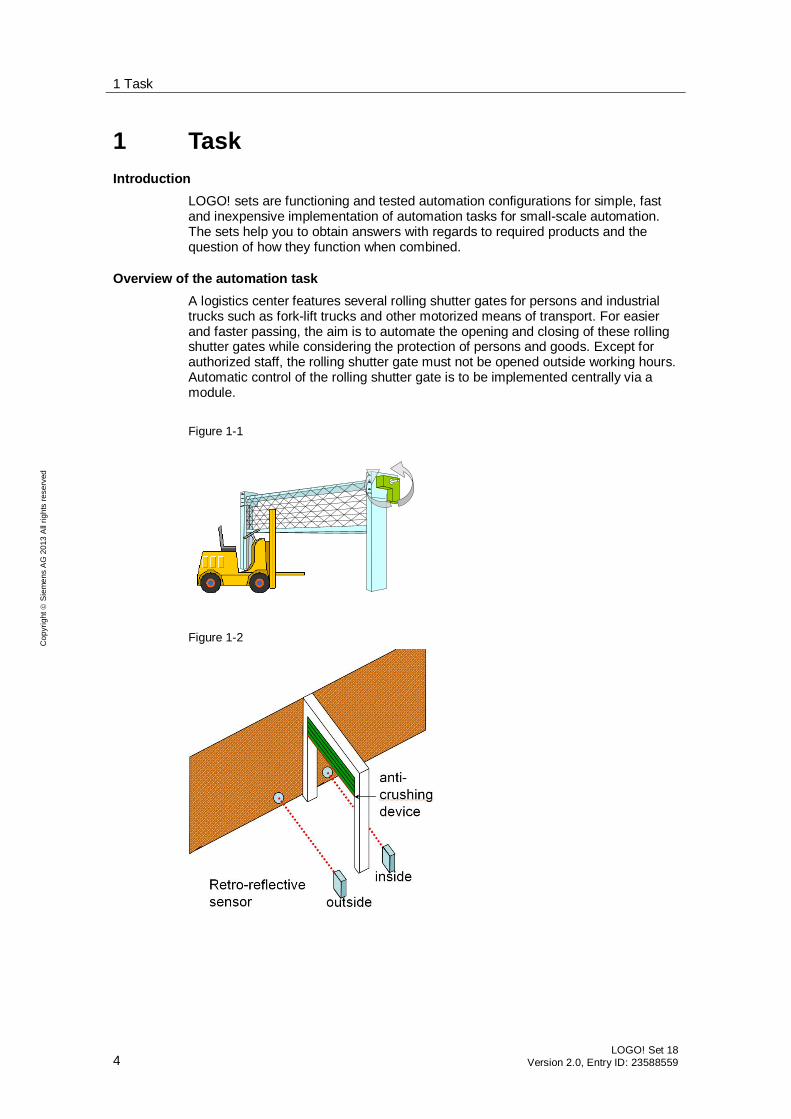
Overview of the automation task A logistics center features several rolling shutter gates for persons and industrial trucks such as fork-lift trucks and other motorized means of transport. For easier and faster passing, the aim is to automate the opening and closing of these rolling shutter gates while considering the protection of persons and goods. Except for authorized staff, the rolling shutter gate must not be opened outside working hours. Automatic control of the rolling shutter gate is to be implemented centrally via a module. Figure 1-1
Figure 1-2

2 Solution
LOGO! Set 18 Version 2.0, Entry ID: 23588559 5
Cop
yrig
ht
Sie
men
s A
G 2
013
All
right
s re
serv
ed
L1L2L3N
M M
LOGO! Power LOGO! logic module retro-reflectingsensors
keyswitch
SIRIUS contactors SIRIUS circuit breaker
anti-crushingdevice
limit switches
2 Solution Figure 2-1
2.1 Overview of the overall solution
Two retro-reflective sensors connected to the LOGO! logic module allow detection of incoming and outgoing objects and objects in the hazardous area. An anti-crushing device on the bottom of the rolling shutter gate provides additional protection for objects in the hazardous area. The LOGO! logic module direct the rolling shutter gate motor to OPEN or CLOSED by means of a reversing contactor combination that consists of two SIRIUS contactors. A SIRIUS circuit breaker protects the motor. The movement in the respective direction is stopped after 5 seconds. To control the rolling shutter gate motor, the automation solution uses a LOGO! logic module with a weekly timer. It allows locking the rolling shutter gate outside working hours. This function can be enabled or disabled using a key switch. The LOGO! display shows the position of the rolling shutter gate as a text and as a bar graph. In the event of a malfunction of the rolling shutter gate, a “gate malfunction” diagnostic message will appear on the display. The activation type that makes the rolling shutter gate ready for operation is displayed on the LOGO! display. In manual mode, the rolling shutter gate can be set to “open” and “closed” using the LOGO! cursor keys.
Fields of application Applications
Hoisting devices Transport equipment Rolling shutter gate controls Conveyor systems Access monitoring Automotive industry

2 Solution
6 LOGO! Set 18
Version 2.0, Entry ID: 23588559
Cop
yrig
ht
Sie
men
s A
G 2
013
All
right
s re
serv
ed
Advantages/benefits Cost-effective combination of sensor technology and control functions through
the LOGO! logic module Precise detection of objects by means of fast and accurate optical proximity
switches Direct display of messages and device states (e.g., motor operating hours,
rolling shutter gate malfunction) via the integrated display of the LOGO! logic module. The display has 4 lines with 16 characters each. “Ticker mode” allows the display of up to 32 characters per line.
Manual control with the LOGO! cursor keys (e.g., rolling shutter gate OPEN / CLOSED)
Unassigned digital outputs of LOGO! can be programmed, for example, for switching signal lamps.
2.2 Hardware and software components used
Products Table 2-1
Manufacturer Component Qty. Order no. Note
Siemens LOGO!Power 24V 1.3A
1
6EP1331-1SH03
Siemens LOGO! 12/24RC
1 6ED1052-1MD00-0BA6 6ED1052-1MD00-0BA7
Alternatively
Siemens LOGO! TD 1 6ED1055-4MH00-0BA0 Optionally - Retro-reflective
sensor with accessories
3 E.g., Pepperl + Fuchs 3RG7201-3CC00-PF
Alternatively, retro-reflective sensors with break contact can be used
- Anti-crushing device with accessories
1 - Optical or mechanical versions with break contact can be used
Siemens SIRIUS contactor, AC-3, 3KW/400V
1 3RT1015-1BB42 1NC, 24V DC, S00
Siemens CES SSG10 lock 1 3SB3000-4LD11 Siemens Closer for bottom
attachment 1 3SB3420-0B
Siemens Installation housing, gray 1 3SB3801-0AA3
Siemens SIRIUS circuit breaker
1
3RV1011-0KA10 0.9A ... 1.25A
Siemens Asynchronous motor
1 1LA7060-4AB10 230VD/400VY 0.12kW
Siemens 230V mains: SINAMICS G110 frequency inverter
1
6SL3211-0AB13-7BA1
* Attachment to DIN rail

2 Solution
LOGO! Set 18 Version 2.0, Entry ID: 23588559 7
Cop
yrig
ht
Sie
men
s A
G 2
013
All
right
s re
serv
ed
! Notice
All hardware components such as circuit breakers, retro-reflective sensors, anti-crushing device, contactors, motors, etc. must be adapted to the conditions in your plant.
The solution presented in this application is not suitable for controlling gates with requirements for the protection of persons in hazardous areas.
If there is such a requirement, the hardware components of the required safety category have to be selected. (E.g., safety sensors from Leuze electronic GmbH + Co. KG).
Accessories Table 2-2
Manufacturer Component Qty. Order no. Note
Siemens Miniature circuit breaker
1 5SL6116-6 1-pole, B, 16A
Siemens DIN rail mounting kit
1
6SL3261-1BA00-0AA0
For mounting SINAMICS G110
Siemens Basic Operator Panel
1
6SL3255-0AA00-4BA1
For mounting SINAMICS G110
Siemens LV HRC fuse link
1
3NA3803 + 3NH3030
10A + base When mounting SINAMICS G110
Siemens Feed-through terminal, beige
8WA1011-1DF11
Ø 2.5 mm², up to 24 A, >800V
Siemens Jumper 8WA1822-7VF01
Siemens PE feed-though terminal
8WA1011-1PF00 Ø 2.5 mm²
Siemens Standard 35 mm DIN rail
1 6ES5 710-8MA11 483 mm
* Attachment to DIN rail
Configuration software/tools Table 2-3
Manufacturer Component Qty. Order no. Note
Siemens LOGO!Soft Comfort V7.0 1 6ED1058-0BA02-0YA1 Siemens LOGO! PC cable 1 6ED1057 1AA00-0BA0 For
LOGO! 0BA6 - Standard Ethernet cable 1 - For
LOGO! 0BA7
Sample files and projects Table 2-4
Component Note
23588559_LOGO!_Set18_Opto_V2.0_en.lsc LOGO!Soft Comfort configuration for the LOGO! logic module

3 Function Mechanisms of this Application
8 LOGO! Set 18
Version 2.0, Entry ID: 23588559
Cop
yrig
ht
Sie
men
s A
G 2
013
All
right
s re
serv
ed
3 Function Mechanisms of this Application 3.1 Retro-reflective sensor
Measuring principle The optical proximity switches used here are retro-reflective sensors. Transmitter and receiver are located in one housing. A special reflector is necessary that rotates the polarized light by 90°. This ensures that even objects with a smooth reflective surface such as stainless steel are reliably detected although the light beam is reflected. Figure 3-1
21
3
4
Sensitivity setting In order to reliably detect even small objects in the light beam, you have to set the sensitivity of the retro-reflective sensor. For more information, please refer to the appropriate manual. Figure 3-2
1Transmitter light
Reflector lightsufficient
Object does not block light completely
2
Reflector light notsufficient
Switching outputs The retro-reflective sensor used here has 2 switching outputs. Output WH (2) provides a 1 signal when the light beam is interrupted. Output BK (4) provides a 1 signal when the light beam is not interrupted. The application uses the BK output.
3.2 Anti-crushing device
Types For all types, the anti-crushing device consists of a hollow rubber profile. They differ in the method of measurement of how contact is detected. Optically: The rubber profile’s change in shape reduces the light beam in the
hollow space. Mechanically: The rubber profile’s change in shape causes two conductors in
the hollow space to contact. For both methods of measurement, a module connected downstream detects the signal difference and signals the contact via a switching contact.
(1)Transmitter with polarization filter (2)Reflector, 90° polarizing (3)Receiver with polarization filter rotated by 90° (4)Object with a smooth reflective surface
(1)Receiver with high photosensitivity (2)Receiver with low photosensitivity

3 Function Mechanisms of this Application
LOGO! Set 18 Version 2.0, Entry ID: 23588559 9
Cop
yrig
ht
Sie
men
s A
G 2
013
All
right
s re
serv
ed
3.3 LOGO! logic module / LOGO! TD
Inputs and outputs Table 3-1
Inputs Function
I1 Contactor checkback signal, rolling shutter gate OPEN = 1 (NO) I2 Contactor checkback signal, rolling shutter gate CLOSED = 1 (NO) I3 Retro-reflective sensor outside, light beam interrupted = 0 (NC) I4 Retro-reflective sensor inside, light beam interrupted = 0 (NC) I5 Anti-crushing device, contact activated = 0 (NC) I6 Key switch, no calendar control = 1 (NO) I7 Limit switch OPEN (NO) I8 Limit switch CLOSED (NO)
Outputs Function
Q1 Set rolling shutter gate to OPEN = 1 Q2 Set rolling shutter gate to CLOSED = 1
Controlling the rolling shutter gate The rolling shutter gate opens when at least one of the two retro-reflective sensors is interrupted. When no retro-reflective sensor is interrupted, the rolling shutter gate closes after a delay time of 10 seconds. The downward movement of the rolling shutter gate stops and reverses for 0.5 seconds if the anti-crushing device on the bottom of the rolling shutter gate is activated. Opening the rolling shutter gate is restricted to working hours. The key switch can be used to work around this restriction. In manual mode, the rolling shutter gate can be set to “open” and “closed” using the LOGO! cursor keys as described in section 5.2. When doing so, the LOGO! cursor keys must be kept pressed for safety reasons. If the rolling shutter gate has been set to “open” using the cursor key, it cannot be closed by another activation type. Manual mode stops when the rolling shutter gate has been set to “closed” using the cursor key.
WARNING
The retro-reflective sensors are not active in manual mode (using the cursor keys of LOGO! or LOGO! TD).
The runtime for opening and closing the rolling shutter gate is limited to 5 seconds. After this time has elapsed, the relevant contactor will be deactivated. The counter-clockwise and clockwise rotation of the motor is controlled using a reversing contactor combination by reversing two of the three phases. The program includes mutual interlocking of the two contactors.
LOGO! display / LOGO! TD Diagnostics can be derived from comparing actual and setpoint state of the contactors. For this purpose, an auxiliary contact of the contactor is read in via a LOGO! input.

3 Function Mechanisms of this Application
10 LOGO! Set 18
Version 2.0, Entry ID: 23588559
Cop
yrig
ht
Sie
men
s A
G 2
013
All
right
s re
serv
ed
If this comparison yields a difference, a malfunction can be assumed – an appropriate “gate malfunction” diagnostic message will be displayed on the LOGO! display for 10 seconds. When the rolling shutter gate opens or closes and the new position has not been reached after 5 seconds, the “gate malfunction” diagnostic message will also be displayed on the LOGO! display for 10 seconds. In any case of “gate malfunction” the reason has to be solved. For clearance of the malfunction the rolling shutter gate must be relieved by driving in manual mode via LOGO! cursor keys in the opposite direction. The position of the rolling shutter gate is displayed as a text and as a bar graph. The position of the rolling shutter gate is emulated from the runtime of the rolling shutter gate and the signals of the limit switches. If there is a malfunction of the rolling shutter gate, the position of the rolling shutter gate is unknown. In this case, the bar graph is alternately displayed with 0 % or 100 %. The activation type of the rolling shutter gate, i.e. weekly timer, key switch or cursor keys, is also displayed on the LOGO! display.

4 Installation
LOGO! Set 18 Version 2.0, Entry ID: 23588559 11
Cop
yrig
ht
Sie
men
s A
G 2
013
All
right
s re
serv
ed
4 Installation 4.1 Connection to a 400V three-phase mains
Figure 4-1
1 23 4
1 23 4
L1
L2
L3
N
DC2 4V+DC24 V-
Motor
L1 L2 L3
3
7
89
62
5
4
12
LOGO! Set 18 consists of the components described in chapter 2.2: LOGO!Power (1) provides the power supply for the 24V loads and is protected by a miniature circuit breaker (2). The LOGO! logic module (3) has relay outputs and an integrated calendar and time function. Two digital outputs control the direction of rotation of the asynchronous motor (4) by means of a reversing contactor combination that consists of SIRIUS contactors (5). The contactor checkback signals are connected to two digital inputs (I1, I2) of the LOGO! logic module. A SIRIUS miniature circuit breaker (6) connected directly to the three-phase mains protects the asynchronous motor. Two retro-reflective sensors (7) are connected to two digital inputs (I3, I4) of the LOGO! logic module. The evaluation unit of the anti-crushing device (8) is connected to a digital input (I5) of the LOGO! logic module. A key switch (9) is connected to a digital input (I6) of the LOGO! logic module. Two limit switches (12) are connected to two digital inputs (I7, I8) of the LOGO! logic module.
Note Always follow the installation guidelines for LOGO! and all components shown here (see section 6.2 \5\).
4 Installation
12 LOGO! Set 18
Version 2.0, Entry ID: 23588559
Cop
yrig
ht
Sie
men
s A
G 2
013
All
right
s re
serv
ed
4.2 Connection to a 230V mains
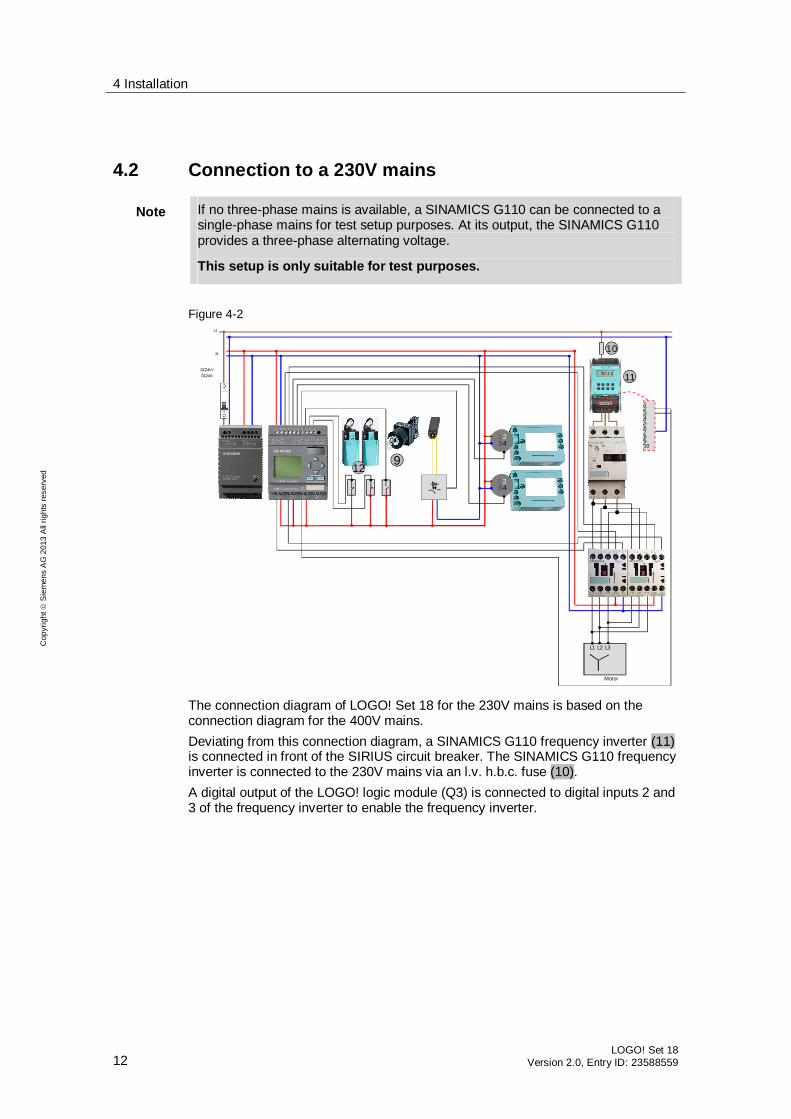
Note If no three-phase mains is available, a SINAMICS G110 can be connected to a single-phase mains for test setup purposes. At its output, the SINAMICS G110 provides a three-phase alternating voltage.
This setup is only suitable for test purposes.
Figure 4-2
L1
1 23 4
1 23 4
N
DC24V+DC24V-
Motor
L1 L2 L3
11
12345678910
10
912
The connection diagram of LOGO! Set 18 for the 230V mains is based on the connection diagram for the 400V mains. Deviating from this connection diagram, a SINAMICS G110 frequency inverter (11) is connected in front of the SIRIUS circuit breaker. The SINAMICS G110 frequency inverter is connected to the 230V mains via an l.v. h.b.c. fuse (10). A digital output of the LOGO! logic module (Q3) is connected to digital inputs 2 and 3 of the frequency inverter to enable the frequency inverter.

4 Installation
LOGO! Set 18 Version 2.0, Entry ID: 23588559 13
Cop
yrig
ht
Sie
men
s A
G 2
013
All
right
s re
serv
ed
4.3 Installing, wiring and parameterizing the hardware
Table 4-1
No. Action Remark
1. Install the components listed in chapter 2.2
Mount the components marked with * on a DIN rail
2. Wire all components. Do not switch on the power supply yet.
See • Chapter 4.1: Connection to a 400V mains • Chapter 4.2: Connection to a 230V mains
3. The motor must not yet be connected.
-
4.4 Parameterizing LOGO!
The program listed in Table 2-4 contains a parameterization for LOGO! 0BA6. If you are using LOGO! 0BA7, you have to set the following parameters: Table 4-2
No. Action Remark
1. In LOGO!Soft Comfort, go to the Tools > Select Hardware… menu option
2. Select the 0BA7 device 3. In LOGO!Soft Comfort, go to the Tools
> Ethernet Connections… menu option
4. Enter the IP address and subnet mask of your LOGO!
E.g., IP address: 192.168.1.11 Subnet mask: 255.255.255.0 see \5\
4.5 Configuring the SIRIUS circuit breaker
Table 4-3
No. Action Remark
1. If you are using the motor listed in chapter 2.2, set the setting screw of the SIRIUS circuit breaker to 0.9A. 0,9

4 Installation
14 LOGO! Set 18
Version 2.0, Entry ID: 23588559
Cop
yrig
ht
Sie
men
s A
G 2
013
All
right
s re
serv
ed
4.6 Configuring the SINAMICS G110 frequency inverter
Follow the steps in the table below only if you are using the SINAMICS G110 frequency inverter listed in chapter 2.2. The values in the “Value” column refer only to the asynchronous motor listed in chapter 2.2. Table 4-4
No. Action Value Parameter
1. Press the P parameter key on the BOP of the SINAMICS G110 to go to parameterization mode. Use the arrow keys to access the parameters listed below.
- P 0000
2. Start quick commissioning. 1 P 0010 3. Set the regional settings to Europe. 0 P 0100 4. Set the rated motor voltage to 230V. 230 P 0304 5. Set the rated motor current to 0.73A. 0.73 P 0305 6. Set the rated motor output to 0.12kW. 0.12 P 0307 7. Set the rated motor frequency to 50Hz. 50.00 P 0310 8. Set the rated motor speed to 1350 min-1. 1350 P 0311 9. As the command source of the SINAMICS G110, select
the terminal strip. 2 P 0700
10. As the frequency setpoint for the SINAMICS G110, allow fixed frequencies.
0 P 1000
11. Set the minimum frequency to 0Hz. 0.00 P 1080 12. Set the maximum frequency to 50Hz. 50.00 P 1082 13. Set the startup time from minimum to maximum speed
of the asynchronous motor to 1s. 1.00 P 1120
14. Set the ramp-down time from maximum to minimum speed of the asynchronous motor to 1s.
1.00 P 1121
15. Finish quick commissioning. 1 P 3900 16. Enable more parameters. 3 P 0003 17. Set the function for digital input 0 to “Fixed frequency +
ON”. 16 P 0701
18. Set the function for digital input 1 to “ON / OFF1”. 1 P 0702 19. Set the fixed frequency selected via digital input 0 to
50Hz. 50.00 P 1001
20. Save all values in the EEPROM. 1 P 0971
4 Installation
LOGO! Set 18 Version 2.0, Entry ID: 23588559 15
Cop
yrig
ht
Sie
men
s A
G 2
013
All
right
s re
serv
ed
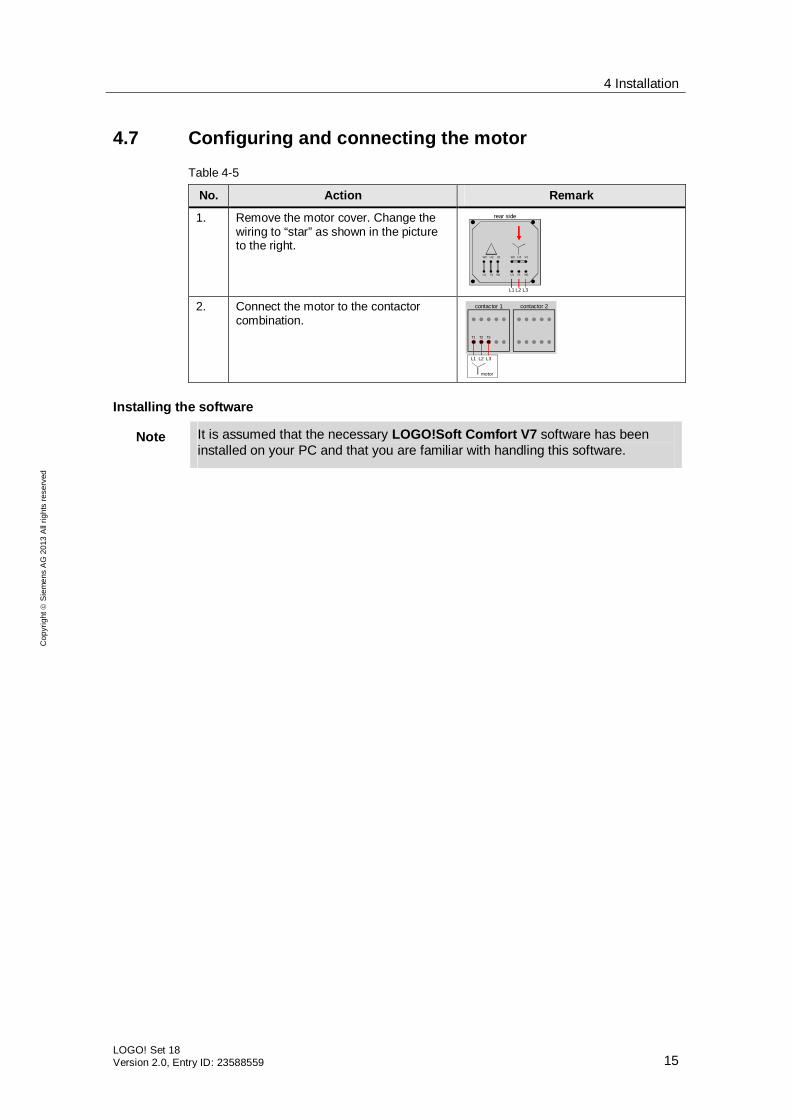
4.7 Configuring and connecting the motor
Table 4-5
No. Action Remark
1. Remove the motor cover. Change the wiring to “star” as shown in the picture to the right.
rear side
W2 U2 V2
U1 V1 W1
W2 U2 V2
U1 V1 W1
L1 L2 L3 2. Connect the motor to the contactor
combination. contactor 1 contactor 2
T1 T2 T3
motor
L1 L2 L3
Installing the software
Note It is assumed that the necessary LOGO!Soft Comfort V7 software has been installed on your PC and that you are familiar with handling this software.

5 Operation of the Application
16 LOGO! Set 18
Version 2.0, Entry ID: 23588559
Cop
yrig
ht
Sie
men
s A
G 2
013
All
right
s re
serv
ed
5 Operation of the Application 5.1 Functions
The following functions are included in this application: Manually setting the rolling shutter gate to OPEN and CLOSED using the
LOGO! cursor keys; alternatively, LOGO! TD can also be used for operation. Automatically setting the rolling shutter gate to OPEN and CLOSED by means
of retro-reflective sensors Anti-crushing device Access during working hours with the LOGO! weekly timer Access outside working hours with the key switch “Gate malfunction” diagnostics
5.2 Activation types and operation using LOGO! cursor keys
Activating the rolling shutter gate via weekly timer or key switch The activation type is displayed in line 4. Table 5-1
No. Description / activity Picture / explanation
1. The gate is not activated
gate position
2. The gate was activated … 3. by weekly timer
… during working hours by weekly timer
4. by key switch Use the key to activate the gate outside working hours
… by key switch

5 Operation of the Application
LOGO! Set 18 Version 2.0, Entry ID: 23588559 17
Cop
yrig
ht
Sie
men
s A
G 2
013
All
right
s re
serv
ed
Activating and moving the rolling shutter gate in manual mode using LOGO! cursor keys Table 5-2
No. Description / activity Picture / explanation
1. The gate was activated: gate activated … 2. Using LOGO! cursor keys
Press the following key combination: ESC +
gate activated …
3. Using LOGO! cursor keys Press the following key combination: ESC +
… by
cursor key
5.3 Status displays and diagnostic messages
Status display of the rolling shutter gate Table 5-3
No. Description / activity Picture / explanation
1. No malfunction of the gate
gate position
bar graph
2. Gate moves up or down
bar graph
Diagnostic message of the rolling shutter gate Table 5-4
No. Description / activity Picture / explanation
1. Malfunction of the gate
error message
bar graph changes between
black and
green

6 References
18 LOGO! Set 18
Version 2.0, Entry ID: 23588559
Cop
yrig
ht
Sie
men
s A
G 2
013
All
right
s re
serv
ed
6 References 6.1 Bibliography
This list is by no means complete and only presents a selection of related references. Table 6-1
Topic Title /1/ LOGO! LOGO! Practical Training
Authors: Uwe Graune; Mike Thielert; Ludwig Wenzl Publicis Corporate Publishing ISBN: 978-3-89578-338-8

7 History
LOGO! Set 18 Version 2.0, Entry ID: 23588559 19
Cop
yrig
ht
Sie
men
s A
G 2
013
All
right
s re
serv
ed
6.2 Internet links
This list is by no means complete and only provides a selection of useful information. Table 6-2
Topic Title \1\ LOGO! information http://www.automation.siemens.com/mcms/progra
mmable-logic-controller/en/logic-module-logo/Pages/Default.aspx
\2\ LOGO! Starter Kit http://www.automation.siemens.com/mcms/programmable-logic-controller/en/logic-module-logo/logo-starter-kit/Pages/Default.aspx
\3\ Reference to the entry http://support.automation.siemens.com/WW/view/en/23588559
\4\ Siemens Industry Online Support
http://support.automation.siemens.com
\5\ LOGO! manuals http://support.automation.siemens.com/WW/view/en/10805245/133300
\6\ LOGO! forum http://www.automation.siemens.com/WW/forum/guests/Conferences.aspx?Language=en&onlyInternet=False
\7\ LOGO! software updates http://www.automation.siemens.com/mcms/programmable-logic-controller/en/logic-module-logo/demo-software/Pages/Default.aspx
\8\ LOGO! application examples http://www.automation.siemens.com/mcms/programmable-logic-controller/en/logic-module-logo/application-examples/Pages/Default.aspx
\9\ SINAMICS G110 Operating Instructions
http://support.automation.siemens.com/WW/view/en/22102965
\10\ SINAMICS G110 Parameter List
http://support.automation.siemens.com/WW/view/en/20977026
\11\ Retro-reflective sensor data sheet
http://files.pepperl-fuchs.com/selector_files/navi/productInfo/edb/mdoc4720a.pdf
\12\ Leuze electronic GmbH + Co. KG, protective switches
http://194.175.173.197/fss/
7 History Table 7-1
Version Date Modifications
V1.0 09/2006 First version V2.0 03/2013 Restructured, adapted to current components, new features
added