Setting Up the ImageNow Scanner and ImageNow Printer To perform these procedures, you must be a manager or local admin in ImageNow. To create a scanning
profile, the user logged in to the local machine must have the Write permission for the [drive]:\Documents and Settings\All Users\Application Data\ImageNow\etc folder.
Configure a preexisting scanner station with a new computer
• Install ImageNow • If you are using Kofax/VRS, install the Kofax application as an administrator. • Make sure the scanner is connected to your computer and that it is turned on. • Go to C:\Documents and Settings\All Users\Application Data\ImageNow • Copy the inscan.xml and indevice.xml to a USB key • Place the inscan.xml and the indevice.xml on the new computer under C:\Documents and Settings\All
Users\Application Data\ImageNow • This will copy the ImageNow Printer, the Black and White Scanner and the Color Scanner profiles. • On the ImageNow toolbar, on the Settings menu, click Options. • In the ImageNow Options dialog box, in the left pane, click Capture and then in the right pane, under
Scanning Profiles, click Manage Device List. • In the Device Manager dialog box, perform one of the following actions:
o If you see a scanner device entry that will work for your scanning profile, click OK and skip to the following procedure.
o If there are no entries appear that will work for your capture profile, complete this procedure before creating your scanning profile. Click Create. Follow the steps through the wizard to select a Kofax, Pixel, or TWAIN driver to run your
scanning device. Next grab the license token and then type a concise and unique name for the device. Click Finish
• Click OK to close Device Manager • Skip Down to Create Scanner Settings and Create ImageNow Printer Settings
Configure a scanning device • Install ImageNow • If you are using Kofax/VRS, install the Kofax application as an administrator. • Make sure the scanner is connected to your computer and that it is turned on. • On the ImageNow toolbar, on the Settings menu, click Options. • In the ImageNow Options dialog box, in the left pane, click Capture and then in the right pane, under
Scanning Profiles, click Manage Device List. • In the Device Manager dialog box, perform one of the following actions:
o If you see a scanner device entry that will work for your scanning profile, click OK and skip to the following procedure.
o If there are no entries appear that will work for your capture profile, complete this procedure before creating your scanning profile. Click Create. Follow the steps through the wizard to select a Kofax, Pixel, or TWAIN driver to run your
scanning device. Next grab the license token and then type a concise and unique name for the device.

Click Finish • Click OK to close Device Manager.
Create a new Color scanning profile • On the ImageNow toolbar, on the Settings menu, click Options. • In the ImageNow Options dialog box, in the left pane, click Capture and then in the right pane, under
Scanning Profiles, click Manage Profile List. • In the Scanning Profile Manager dialog box, click Create. • In the Name box, type a unique profile name. • See Screen Shots Below for Scanner Profile Settings
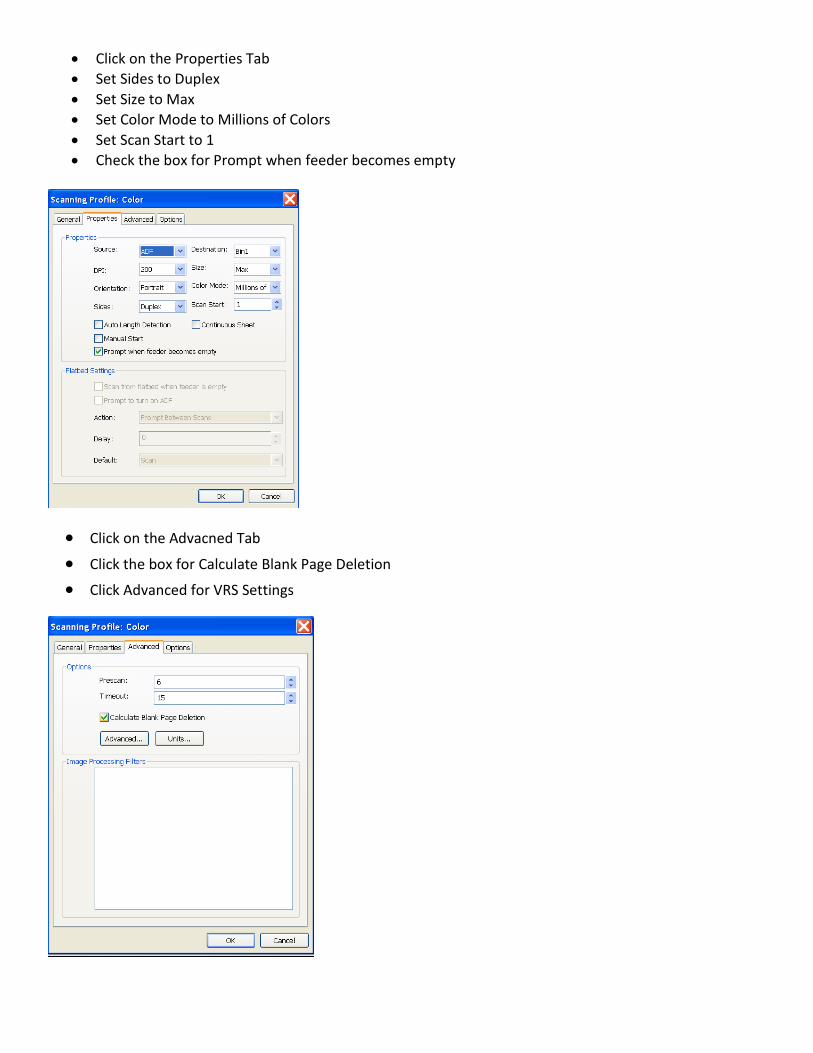
• Click on the Properties Tab • Set Sides to Duplex • Set Size to Max • Set Color Mode to Millions of Colors • Set Scan Start to 1 • Check the box for Prompt when feeder becomes empty
• Click on the Advacned Tab
• Click the box for Calculate Blank Page Deletion
• Click Advanced for VRS Settings
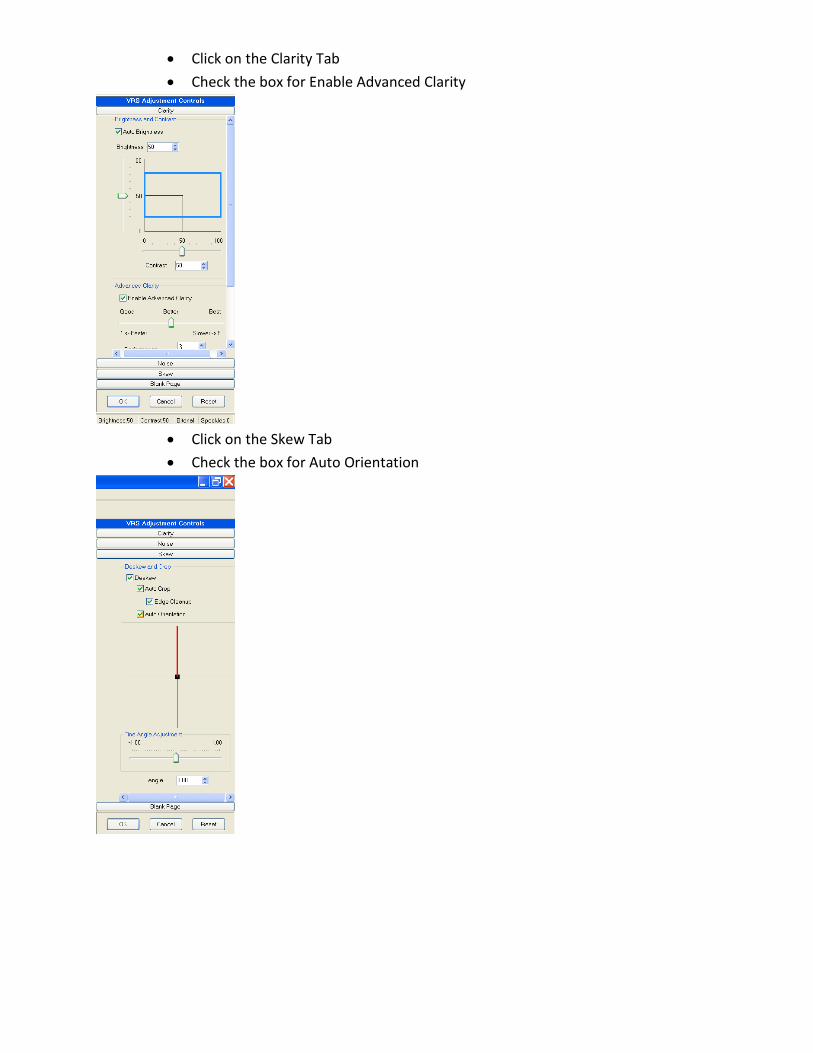
• Click on the Clarity Tab • Check the box for Enable Advanced Clarity
• Click on the Skew Tab • Check the box for Auto Orientation
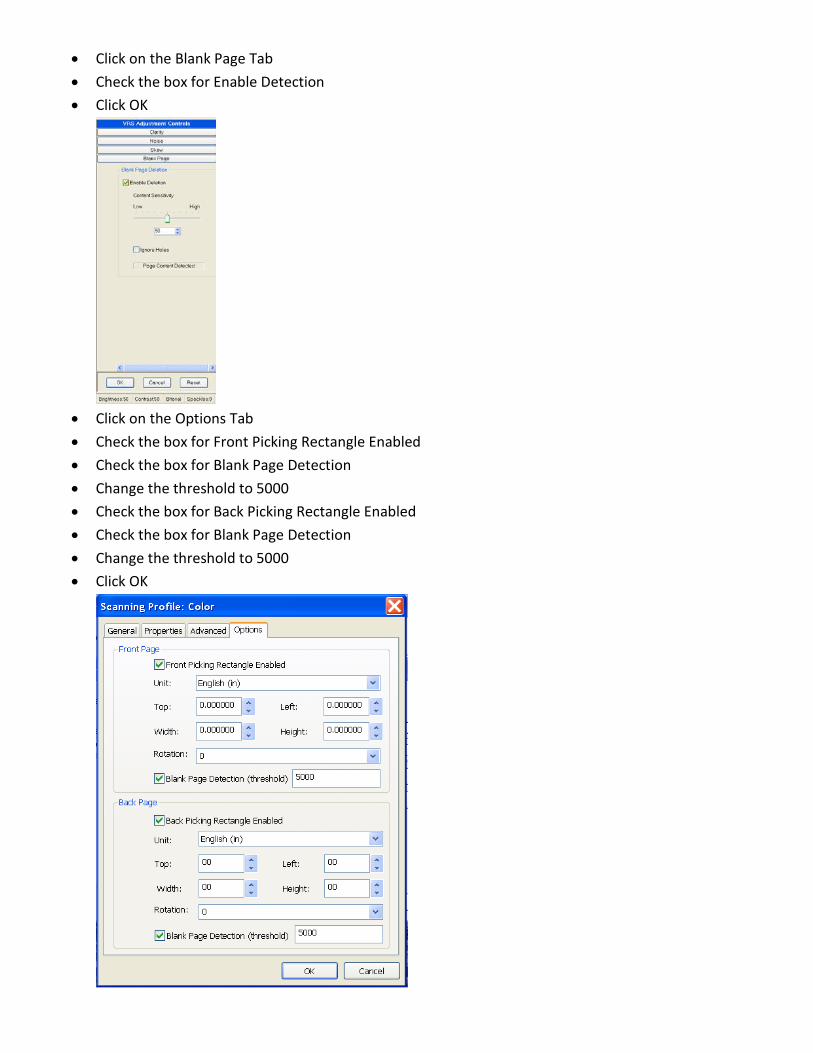
• Click on the Blank Page Tab • Check the box for Enable Detection • Click OK
• Click on the Options Tab • Check the box for Front Picking Rectangle Enabled • Check the box for Blank Page Detection • Change the threshold to 5000 • Check the box for Back Picking Rectangle Enabled • Check the box for Blank Page Detection • Change the threshold to 5000 • Click OK
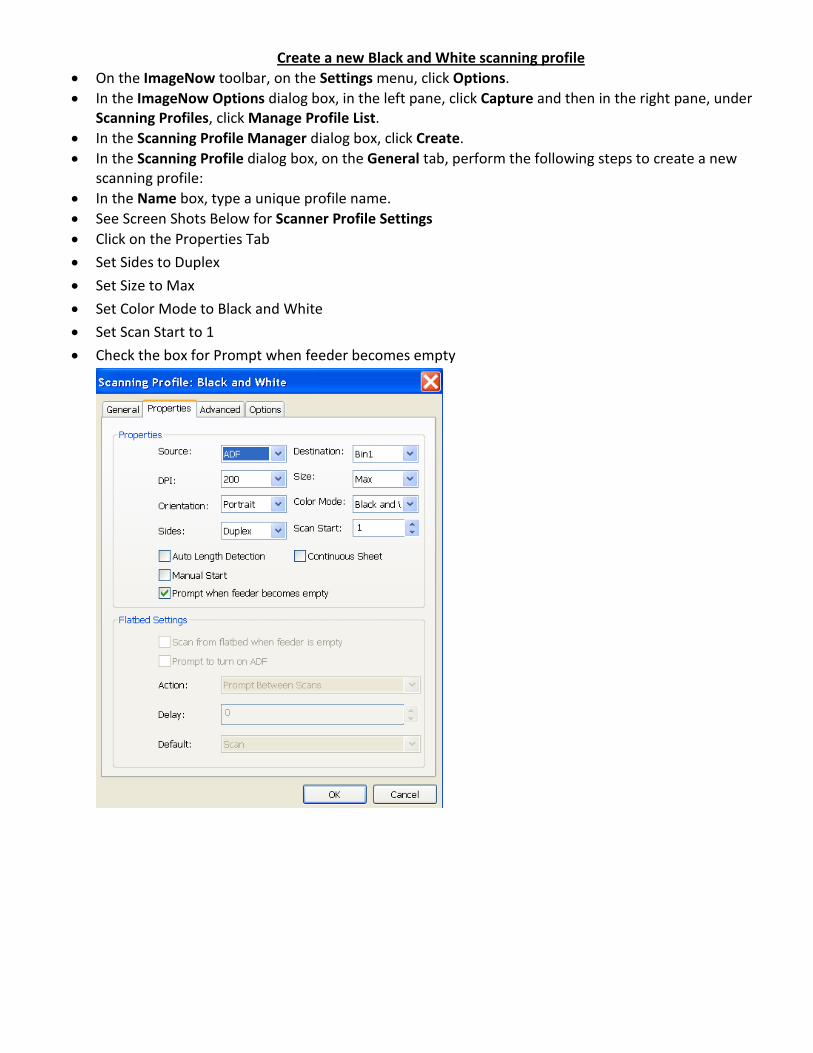
Create a new Black and White scanning profile • On the ImageNow toolbar, on the Settings menu, click Options. • In the ImageNow Options dialog box, in the left pane, click Capture and then in the right pane, under
Scanning Profiles, click Manage Profile List. • In the Scanning Profile Manager dialog box, click Create. • In the Scanning Profile dialog box, on the General tab, perform the following steps to create a new
scanning profile: • In the Name box, type a unique profile name. • See Screen Shots Below for Scanner Profile Settings • Click on the Properties Tab • Set Sides to Duplex • Set Size to Max • Set Color Mode to Black and White • Set Scan Start to 1 • Check the box for Prompt when feeder becomes empty
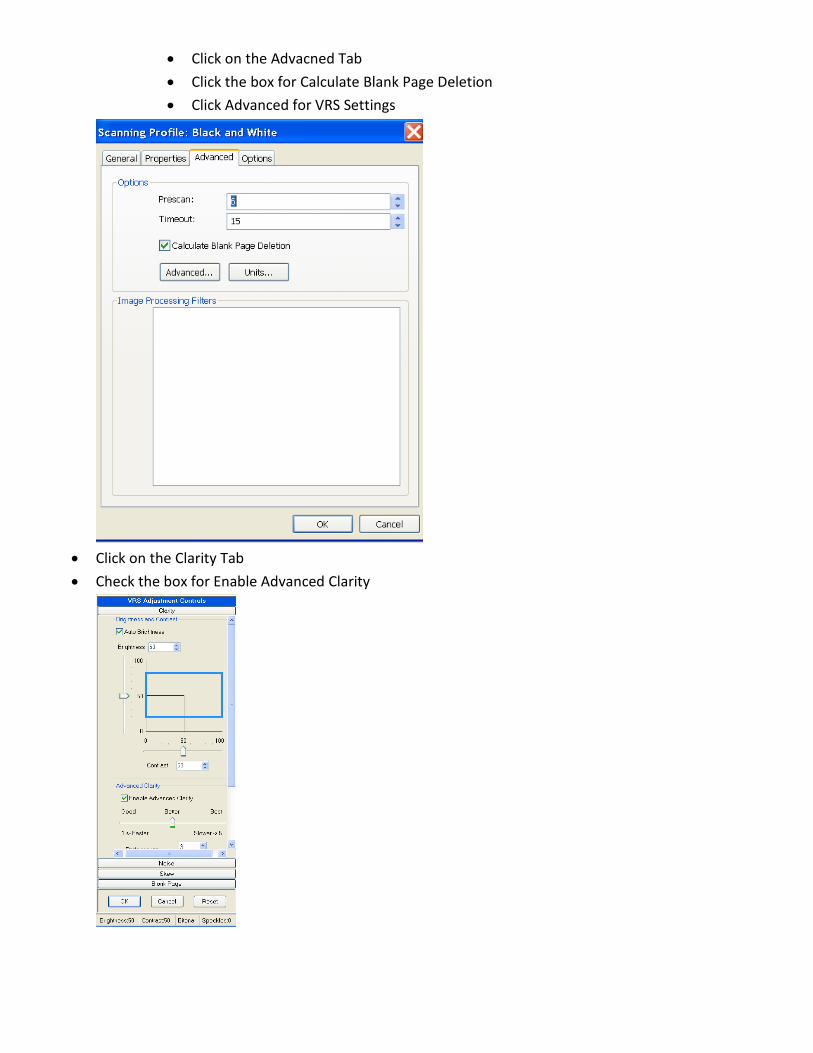
• Click on the Advacned Tab • Click the box for Calculate Blank Page Deletion • Click Advanced for VRS Settings
• Click on the Clarity Tab • Check the box for Enable Advanced Clarity

• Click on the Skew Tab • Check the box for Auto Orientation
• Click on the Blank Page Tab • Check the box for Enable Detection • Click OK
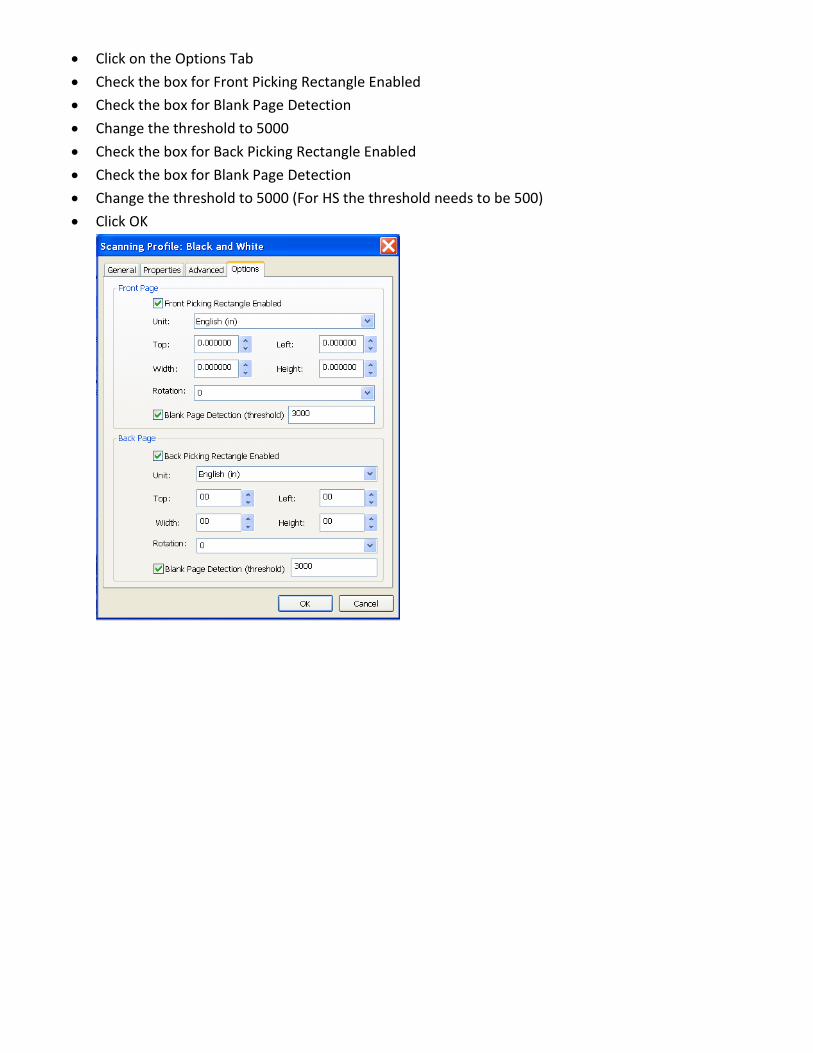
• Click on the Options Tab • Check the box for Front Picking Rectangle Enabled • Check the box for Blank Page Detection • Change the threshold to 5000 • Check the box for Back Picking Rectangle Enabled • Check the box for Blank Page Detection • Change the threshold to 5000 (For HS the threshold needs to be 500) • Click OK
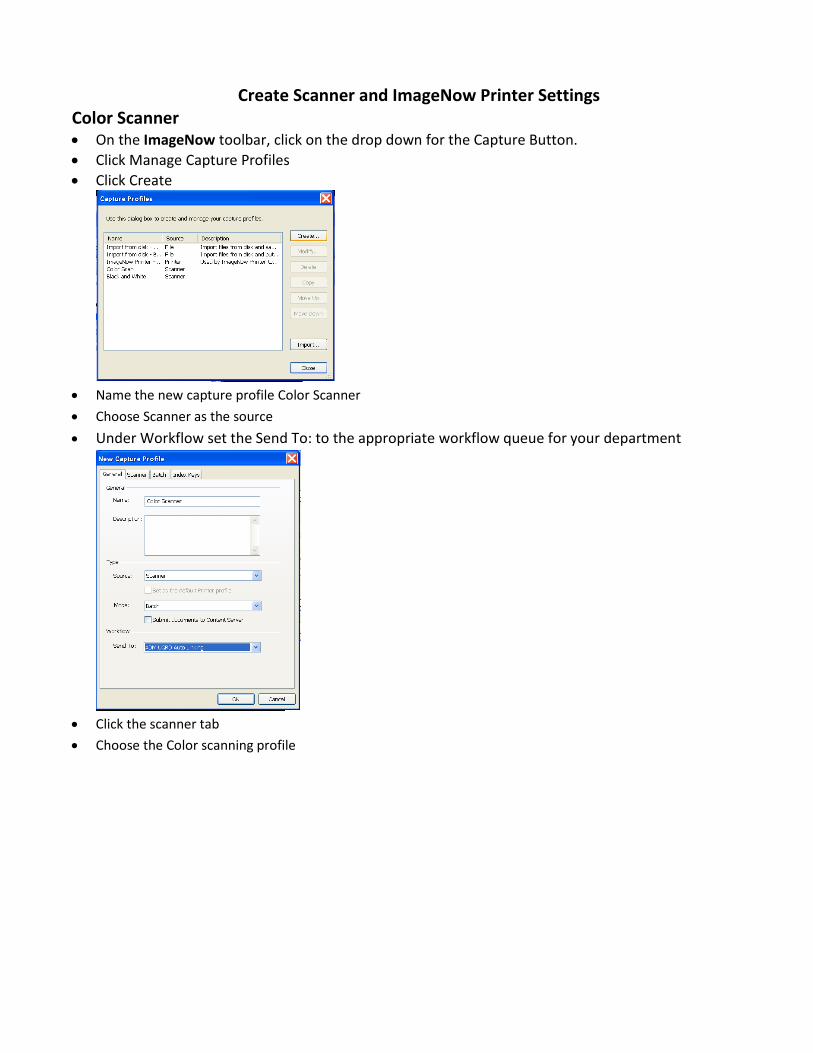
Create Scanner and ImageNow Printer Settings Color Scanner • On the ImageNow toolbar, click on the drop down for the Capture Button. • Click Manage Capture Profiles • Click Create
• Name the new capture profile Color Scanner • Choose Scanner as the source • Under Workflow set the Send To: to the appropriate workflow queue for your department
• Click the scanner tab • Choose the Color scanning profile
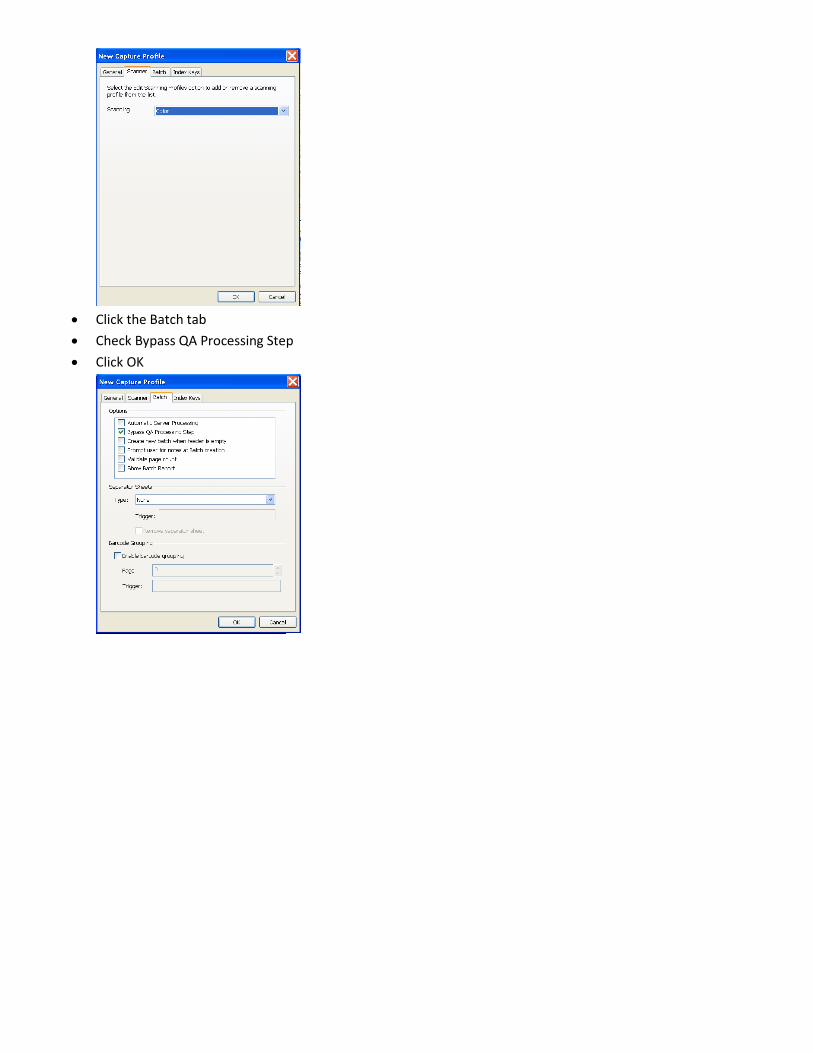
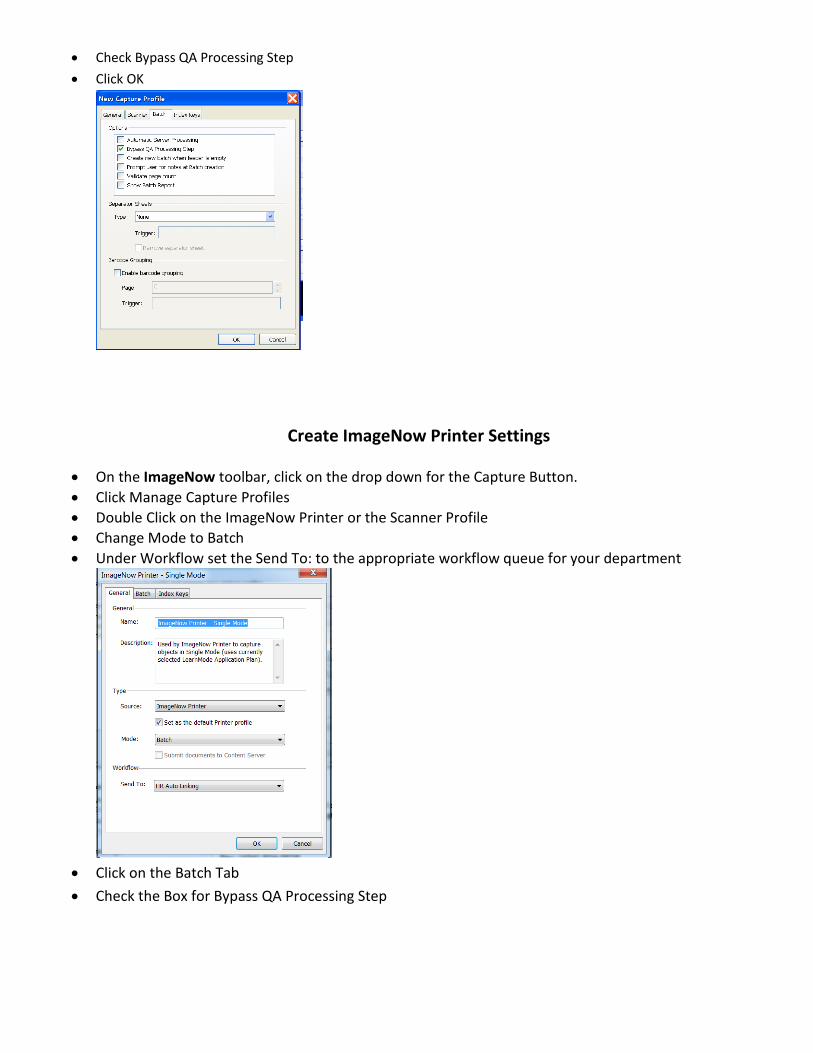
• Click the Batch tab • Check Bypass QA Processing Step • Click OK
Black and White Scanner
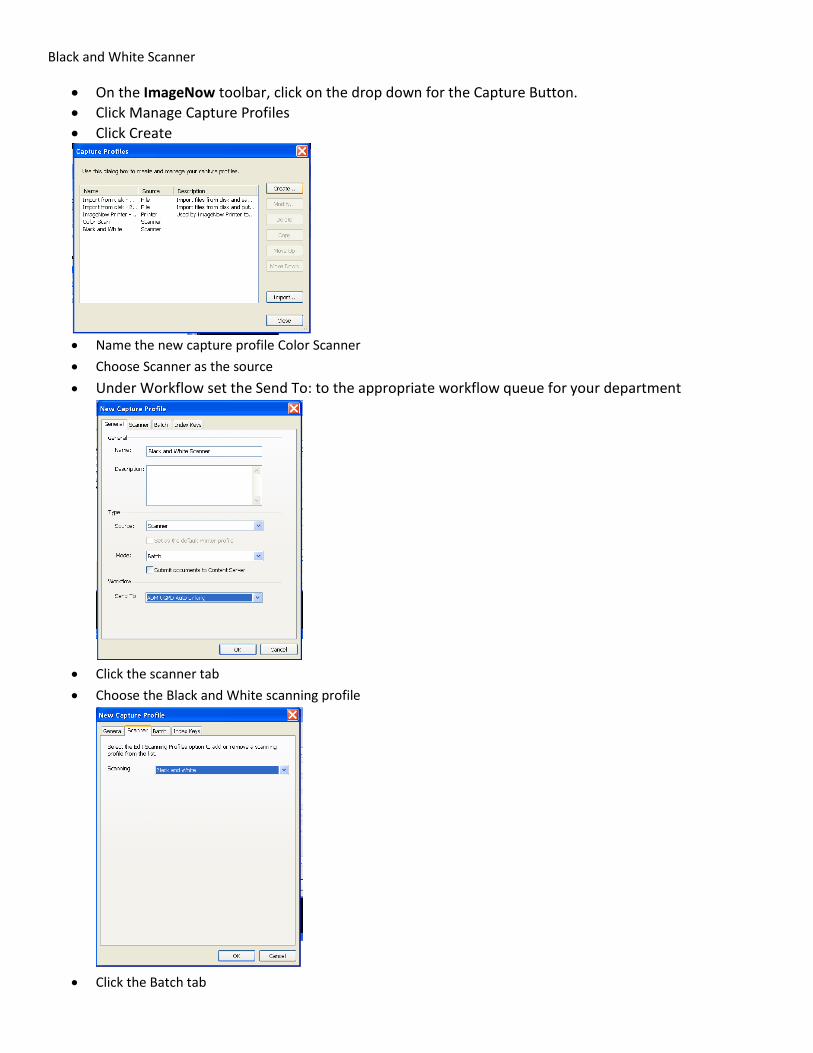
• On the ImageNow toolbar, click on the drop down for the Capture Button. • Click Manage Capture Profiles • Click Create
• Name the new capture profile Color Scanner • Choose Scanner as the source • Under Workflow set the Send To: to the appropriate workflow queue for your department
• Click the scanner tab • Choose the Black and White scanning profile
• Click the Batch tab
• Check Bypass QA Processing Step • Click OK
Create ImageNow Printer Settings • On the ImageNow toolbar, click on the drop down for the Capture Button. • Click Manage Capture Profiles • Double Click on the ImageNow Printer or the Scanner Profile • Change Mode to Batch • Under Workflow set the Send To: to the appropriate workflow queue for your department
• Click on the Batch Tab • Check the Box for Bypass QA Processing Step
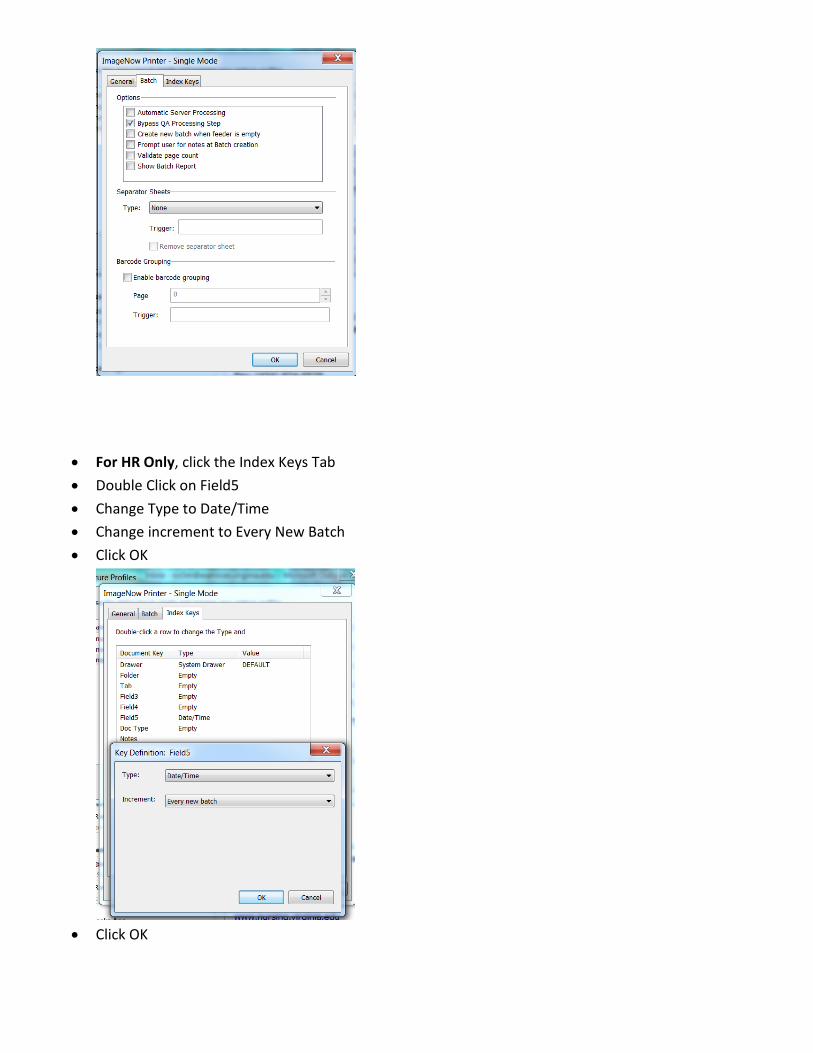
• For HR Only, click the Index Keys Tab • Double Click on Field5 • Change Type to Date/Time • Change increment to Every New Batch • Click OK
• Click OK
Recommended