erating ructions Instrucciones de manejo
(56 FA a BAS
vel betaine ai eed
FM-MW-SW1-Swe2 Stereo Radio Cassette Recorder
RX-5080F
National Panasonic Read these instructions completely before operating this set.

Printed in Japan
RADIO FREQUENCY RANGE:
POWER REQUIREMENT:
POWER OUTPUT:
SPEAKERS:
FREQUENCY RANGE:
RECORDING SYSTEM: TAPE SPEED: PROGRAM TIME: FAST FORWARD and REWIND TIME:
TRACK SYSTEM: JACKS:
INPUT;
OUTPUT;
OTHERS;
DIMENSIONS:
WEIGHT:
SPECIFICATIONS
FM; 88-108 MHz
MW; 525-1605 kHz
SW1; 2.3-7.0 MHz
SW2; 7-22 MHz
AC; 110-115/115—127/200-—-220/230-—250 V, 50/60 Hz
Power consumption; 26 W
Battery; 12 V (eight UM-1, ‘‘D”’ size batteries)
Car battery; with optional car adaptor RP-952
30 W (15 Wx2)... PMPO 15 W (7.5 Wx2)... RMS (max.)
Woofer; 16cm
Tweeter; 5cm
70—13,000 Hz (with normal tape)
60—14,000 Hz (with CrO2z tape) 60—14,000 Hz (with Metal tape)
AC bias, AC erase
4.8cm/s
1 hour with C-60 cassette tape
Approx. 90 seconds with C-60 cassette tape
4-track 2-channel stereo recording and playback
MIC; sensitivity 0.25 mV/applicable microphone impedance
2000-6002 (recommended microphone RP-8135)
LINE IN; sensitivity 200 mV/47 kf.
LINE OUT; sensitivity 420 mV/10 kQ
EXT SP; 3-802
HEADPHONES; 82
DC IN; 13.2 V
AC IN EXT ANTENNA and EARTH
53.4 cm (W)x 26.5 cm (H)x 17.8 cm (D)
21°’(W)x 104% (H)x7”’ (D)
§.7 kg (12 Ibs. 9 02.) without batteries
Specifications are subject to change without notice.
Matsushita Electric Trading Co., Ltd. P.O. Box 288, Central Osaka Japan
RQX6921ZA FO582N0
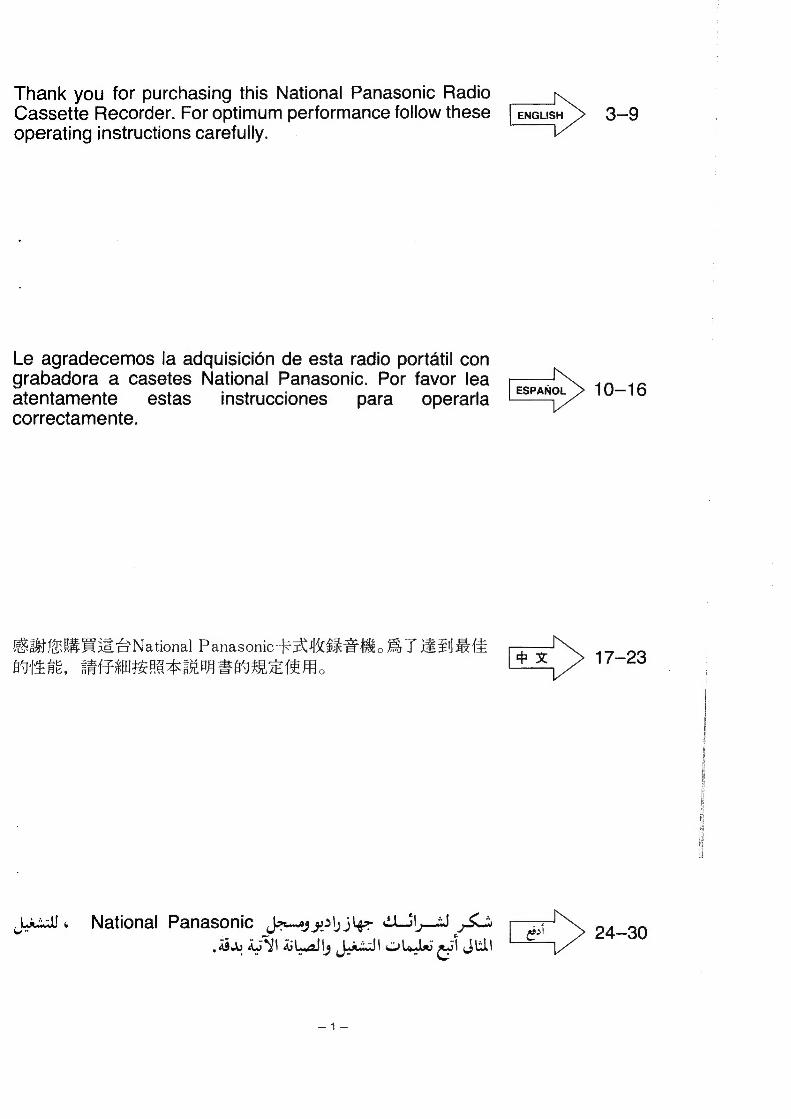
Thank you for purchasing this National Panasonic Radio Cassette Recorder. For optimum performance follow these 3-9 operating instructions carefully.
Le agradecemos la adquisicién de esta radio portatil con grabadora a casetes National Panasonic. Por favor lea 10-16 atentamente estas instrucciones para operarla correctamente.
Ie 2a 14s Bee El 38 TG National Panasonic RsU MER ES. FS S SE EV RE 17-23
ANVMERE, sa TPF AAAS AA BSAA EE.
Lac. National Panasonic Jews yo!) je CLL S: Ce > 24-30 Ady AT Tila ly prt Glade asl Stel
C Gy
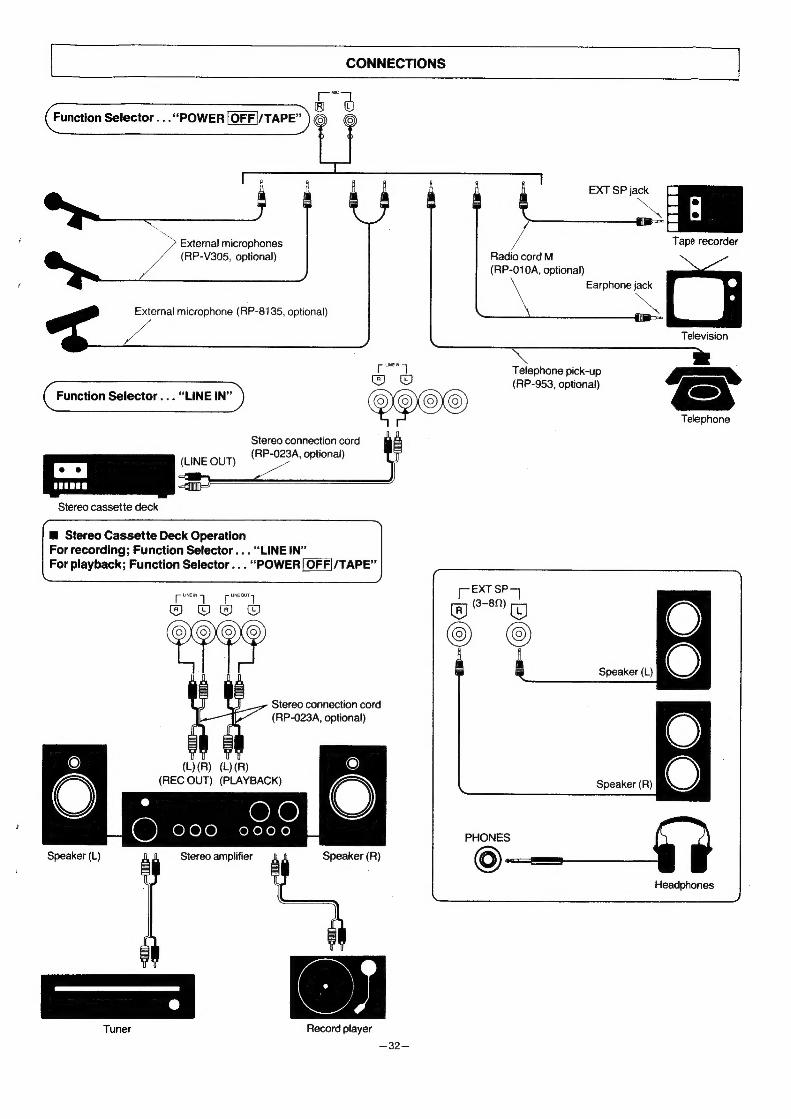
Function Selector ...“POWER [OFF|/TAPE” )©
Tape recorder
cnr
Radio cord M
(RP-010A, optional)
External microphones
(RP-V305, optional)
Earphone jack
External microphone (RP-8135, optional)
Television
Telephone pick-up y ——% (RP-953, optional) S&S
ene
Stereo connection cord
(RP-023A, optional)
Telephone
(LINE OUT)
Stereo cassette deck
@ Stereo Cassette Deck Operation For recording; Function Selector . . . “LINE IN” For playback; Function Selector . . . ““POWER[OFF|/TAPE”
EXT SP
Speaker (L)
Stereo connection cord
(RP-023A, optional)
Speaker (R)
PHONES
Speaker (L) Stereo amplifier Speaker (R)
Headphones
Tuner Record player
~—32—

LOCATION OF CONTROLS
Volume Control (VOLUME)
Bass Control (BASS) Treble Control (TREBLE) Power/Battery Check Indicator (POWER/BATT)
Tape Program Sensing (TPS) Indicator Tuning indicator (TUNING) Balance Control (BALANCE)
Level Meter (LEVEL) Function Selector (SELECTOR) Mode Selector/Beat Proof Switch (MODE/BEAT PROOF)
@ Tape Selector (TAPE) @® Band Selector (BAND) ® Record Muting Button (REC MUTE) @ FM Stereo Indicator (FM STEREO) @® Headphone Jack (PHONES) © Tweeters (Treble Speakers) @ Buit-in Microphones (MICROPHONE) @® Tuning Control (TUNING) ® Woofers (Bass Speakers) @ Fine Tuning Control (FINE TUNING)
BOO8OOSOO06
PRECAUTIONS
869 864608 8868898668888
Cassette Compartment
Record Button ( o [RECORD)) Rewind Button ( ¢< REWIND)
Fast Forward Button ( >» FF)
Playback Button (> PLAY) Stop/Eject Button (li STOP/ 4 EJECT) Pause Button (11 PAUSE)
Tape Counter and Reset Button (COUNTER)
Microphone Jacks (MIC) Line Input Jacks (LINE IN)
Line Output Jacks (LINE OUT) External Speaker Jacks (EXT SP 3-81)
Handle
Telescopic Antenna
External Antenna Terminals (SW ANT/FM ANT)
Battery Compartment Cover
DC Input Jack (DC IN 13.2 VO-5-®) AC Socket (AC IN ~ ) Voltage Selector (VOLTAGE SELECTOR)
@Avoid using or placing this unit near sources of heat. Do not leave it
in an automobile exposed to direct sunlight for a long time with the
doors and windows closed as this may deform the cabinet.
@Cassettes, both recorded and unrecorded, should not be stored in
locations with high temperature, high humidity or direct sunlight.
Never place a recorded cassette near a magnetic source, such as
a magnet or a TV set as this may affect tape performance.
e@Avoid using C-120 cassette tapes with this unit because they can
be easily broken, stretched or twisted if not used with extreme
care.
@Tape looseness can be corrected by inserting a pencil through one
of the cassette reels and turning it to take up the slack.
@When not in use, disconnect the power cord from the AC power
outlet.
40°C (104°F) over

fies: @ Battery Operation: 1) Open the battery compartment cover as shown in the figure.
2) Insert 8 ‘‘D’’ size (National UM-1 or equivalent) batteries into the
battery compartment, making sure that the batteries are installed
in the specified numerical order and that the proper polarities are
maintained.
3) Replace the compartment cover.
Battery removal
When removing the batteries, press the ® side of the number ‘‘8”
battery toward the © side. Then, remove the batteries in the reverse
order from installation.
Note:
To operate on battery power, unplug the AC power cord from
the household AC power outlet and the AC Socket on the
unit.
Battery life
When the batteries are weak, the tape speed will slow down, the
sound will become distorted, and the volume will decrease.
Set the Function Selector to ‘POWER |OFF//TAPE”.
Depress the Playback Button. When the Power/Battery Check
Indicator goes out or dims, it is time to replace all the batteries with
new ones.
POWER SOURCE |
POWER/BATT “0: NORMAL
POWER/BATT REPLACEMENT
Note: When the Function Selector or other controls are switched,
the indicator may tight. This does not indicate that anything is
wrong with the set.
@ AC Power Operation 1) First, check the AC Voltage Selector to insure that it is set to the
voltage which corresponds to your household AC voltage. If not,
adjust by inserting a small screwdriver into the slot provided and
turning the screwdriver until the desired voltage appears through the opening.
110-115 V 115-127V 200-220 V 230-250 V
2) Connect the accessory AC power cord to the AC Socket in the
unit and your household AC power outlet. Upon plugging the
power cord into the AC Socket, the unit will automatically switch from battery to AC operation.
AC power outlet
+
AC power cord
@ Car Battery Operation: 1) Insert the plug of the car battery adaptor cord into the DC Input
Jack.
2) Plug the other end into the cigarette lighter socket in your car.
Upon plugging the car battery adaptor cord in the DC Input Jack,
the unit will automatically switch from internal battery to car
battery operation.
© t\
DC IN 13.2V (O-2-®)
Cigarette lighter socket
Car Adaptor (RP-952, optional)
Note:
For the connection of an adaptor cord, follow the instructions
provided with it.

LISTENING TO THE RADIO
1) Set the Function Selector to “RADIO”. @The Power/Battery Check Indicator will light.
2) Set the Band Selector to the desired radio band. 3) Set the Mode Selector to “AMBIENCE", “STEREO” or
“MONO”’. 4) Set the Volume Control for the desired sound level. 5) Tune in your favorite station using the Tuning Control.
Adjust the. Tuning Contro! for optimum sound quality by observing which position lights the Tuning Indicator.
6) Adjust the Volume, Balance, Bass and Treble Controls.
7) The radio can be turned off by setting the Function Selector to
“POWER /TAPE”.
@ FM AFC
The Automatic Frequency Control (AFC) locks the tuned station
during FM and FM stereo reception. This assures additional stability
without frequency ‘drift’.
Notes:
@To receive FM stereo broadcasts, set the Mode Selector to
“AMBIENCE” or “STEREO”. The FM Stereo Indicator will
light during stereo broadcasts.
elf FM stereo reception is poor (excessive noise, FM Stereo
Indicator flickers), set the Mode Selector to “MONO”. This
will reduce the noise and provide clear reception; however,
the broadcast will not be heard in stereo.
@ Fine Tuning Control For short-wave broadcasts, tune to the approximate frequency with
the Tuning Control, and then use the Fine Tuning Control for more
precise tuning.
Note: When using the Tuning Control, be sure to set the Fine Tuning Control pointer at the vertical position (‘'0’’).
@ Antennas: FM:
@Pull out the Telescopic Antenna and adjust its length and angle for
optimum reception.
@To improve reception or receive very distant stations, connect an
FM antenna (FM dipole antenna, TV antenna) to the External
Antenna Terminals, as shown in the figure.
MW: e@The sensitive ferrite core antenna inside the set will provide
excellent MW reception in most areas. For optimum reception, turn
the set in the direction which gives the best results since the ferrite
core antenna is directional.
SW:
Extend the Telescopic Antenna fully, keep it vertical.
@To improve reception, connect a length of wire, to serve as an
antenna, to the External Antenna Terminals, as shown in the
figure. eWith the SW1 band, the built-in ferrite core antenna also has an
effect, and changing the direction of the set may improve reception
as with MW.
Note:
An antenna for SW bands can be constructed from a length of
wire. A long length of wire will provide better results; however,
a short length of wire is also suitable.
FM
Antenna wire
@How to Connect Antenna Wire to Terminal
$ Push
® 4 eee 13 > Insert wire
or
Push and Release ie wrk
- ae 3 UY wire

| PLAYBACK |
1) Open the Cassette Compartment cover by depressing the Stop/ Eject Button. Insert the cassette as shown in the figure, and then close the Cassette Compartment cover.
Full reel of tape
Note:
Make sure the exposed part of the cassette tape is face
down. If itis upside down, the Cassette Compartment cannot be closed.
2) Set the Function Selector to “POWER [OFF|/TAPE”. 3) Set the Tape Selector as shown in the table, according to the
cassette tape used.
@Tape Selector Settings for Various Tapes
Tape Selector position Tape +--+
METAL Metal tape
CrOz2 High bias chromium tape
or equivalent
NORMAL Low bias ferric oxide tape ae) i
4) Set the Mode Selector to “AMBIENCE”, “STEREO” or “MONO”.
5) Depress the Playback Button, and playback will begin. ©The Power/Battery Check Indicator will light.
6) Adjust the Volume, Balance, Bass and Treble Controls.
7) To stop playback, depress the Stop/Eject Button. Otherwise, at
the end of the tape, the Playback Buttan will release and the
power will shut off automatically.
@Tape Counter and Reset Button The digits return to ‘‘000"’ when the Reset Button is depressed. The
digits advance with the tape to provide a reference to quickly find a
desired part of the tape.
™@ Pause Button The Pause Button can be used to temporarily stop the tape from
moving during recording or playback.
Before beginning a recording, first depress and lock the Pause
Button. Then, depress the Record Button. (The tape will not move.)
When ready to record, depress the Pause Button to release it. This
will start the tape movement for immediate recording.
Note:
Do not use the Pause Button to stop the tape for along period
of time.
The power is not turned off when the Pause Button is
depressed. Always use the Stop Button to turn the power off.
@ Fast Forward and Rewind The tape will move rapidly forward when the Fast Forward Button is
depressed.
The tape will rewind rapidly when the Rewind Button is depressed.
Note:
Do not depress the Playback Button during fast forward or rewind, as this may jam the tape. Always depress the Stop
Button first, between functions.
@ Full Auto Stop System When the tape reaches the end during playback, recording, fast
forward or rewind, the automatic stop system will release all the
buttons and automaticlly turn the power off.
Note that the power is not turned off if the Function Selector is set to
“LINE IN" or “RADIO”; the Function Selector must be set to
“POWER [OFF]/TAPE”.
@ Ambience
The Ambience Sound System enhances the sound from a normal stereo sound source.
This unit increases the stereo imaging, thereby broadening the listening area of the stereo sound. Therefore, you can enjoy the
stereo sound as if you were in a concert hall.
@ Level Meter: The Level Meter lights up to indicate the source level in each mode; in the radio listening, tape playback, recording, using the set as an amplifier, and so on.

ae @ Tape Program Sensor System (TPS) The Tape Program Sensor system can be set to automatically find
and playback a predetermined selection on a recorded cassette tape. Procedure:
1) Follow the same procedure as described in step (1)—(6) of “PLAYBACK”.
2) Depress the Fast Forward or Rewind Button keeping the Playback Button depressed. TPS Indicator lights up.
Depress the Fast Forward Button. The tape will advance to the
next program and automatically begin to play.
{Ps}, FF PLAY
®Depress the Rewind Button. The tape will rewind to the
beginning of the present program and begin to play.
TPS
REWIND PLAY
TPS Intervais
The TPS function will operate with most pre-recorded tapes. For self
recorded tapes, follow the procedure below.
1) Set the unit to the recording mode (refer to ‘RECORDING’.
2) Depress and hold the Record Muting Button for 4—6 seconds
after a program has been recorded. (No sound will be recorded
while depressed, but the LED meter will function.)
3) Depress the Pause Button.
4) Release the Record Muting Button.
5) Depress to release the Pause Button to record again.
In the following instances the Tape Program Sensor system
may not operate normally. This does not, however, indicate a
failure.
eWith tapes of conversations having a great many gaps in the
dialog.
e@With tapes having tracks with extremely low sound levels.
@With tapes having portions among the tracks where no sound has
been recorded. @With tapes having intervals of less than 3 secods long.
@With tapes having a high level of noise during the intervals.
@When less than 10 seconds separate the program you are listening
to and the next program when you want to move on to listen to the
next program.
| RECORDING
@This unit has an Automatic Level Control system (tne recording
level is automatically adjusted).
@This unit has a variable-sound monitor system, which means that
the monitor sound can be adjusted using the Volume Control
without affecting the recording itself.
@This unit comes with a one-touch recording mechanism.
This means that when recording you need depress only the
Record Button. (In other words, you do not have to depress the
Playback Button.)
@ Recording Radio Broadcasts
1) Follow the procedure described in “LISTENING TO THE
RADIO”.
2) Insert the cassette into the Cassette Compartment. 3) Set the Tape Selector according to the cassette tape used.
4) Depress the Pause Button and then depress the Record Button.
5) Depress to release the Pause Button and the recording will
begin.
6) To stop the recording, depress the Stop/Eject Button.
7) Set the Function Selector to ‘POWER [OFF]/TAPE” to turn the unit off.
@Beat Proof switch
When an MW broadcast is recorded, the Beat Proof Switch can be
used to reduce unwanted ‘‘beat"’ signals which were not present
before recording. Set the switch to whichever position best reduces
these ‘‘beat"’ signals.
@ Recording through the Built-in Microphones The built-in condenser microphones in this unit are omni-directional
(all directions), so that recordings can be made from any direction.
1) Set the Function Selector to “POWER [OFFI/TAPE”. 2) Set the Mode Selector to “STEREO” or MONO".
3) Follow the procedure described in steps (2)—(6) of “Recording
Radio Broadcasts”"’.
Note: When recording through the Built-in Microphones, set the
Volume Control to its minimum position.
@ Recording through External Microphones 1) Connect the optional external microphones to the Microphone
Jacks. The Built-in Microphones will be automatically
disconnected.
2) Follow the procedure described in ‘Recording through the Built-
in Microphones”.
Notes:
@Use two microphones which have the same specifications.
@When only one external microphone is used for recording,
the sound will be heard only from the channel (left or right) to
which the microphone is connected.
To prevent recording of sounds through the Built-in Micro-
phone for the channel (left or right) to which the external
microphone is not connected, connect the erase plug
(optional) into the Microphone Jack not being used.

ee ed @ Recording from External Equipment
(Refer to page 32) 1) Connect the output terminal of the external equipment to the
Microphone jacks or Line Input jacks.
2) Set the Function Selector to the position which corresponds to
the source.
3) Set the Mode Selector to “STEREO” or “MONO” according to
the source.
4) Follow the procedure described in steps (2)—(7) of “Recording
Radio Broadcasts’”’.
Notes:
e@When recording from a TV, telephone, etc., the sound will
be recorded through the Built-in Microphone corresponding
to the side to which the connection is not made. To prevent
this, connect the erase plug (optional) into the Microphone
Jack not being used.
elf the volume level of the TV or other equipment is too loud
during recording, the recorded sound will be distorted. Set
the volume of the TV or other equipment to the usual
listening level.
@ Monitoring The monitor system enables you to listen, through the Built-in
Speakers, headphones, or external speakers, to the sound as it is
being recorded. Sound can be monitored in the following ways:
@When recording from the radio, the sound being recorded can be
monitored through the Built-in Speakers, headphones or external
speakers.
@When recording from a sound source connected to the
Microphone Jacks or Line Input Jacks, the sound being recorded
can be monitored through the Built-in Speakers, headphones or
external speakers.
To prevent feedback (howling) when recording through the Built-in
Microphones, the sound being recorded cannot be monitored
through the Built-in Speakers, headphones, external speakers.
@When recording through external microphones, use headphones
to monitor the sound.
If it is necessary to adjust the volume level of the sound being
monitored, do so by using the Volume Control.
Note:
if external microphones are placed too close to the speakers
in this unit, feedback (howling) may be heard. If so, place the
microphones as far away from the speakers as possible, or
reduce the volume.
@ Erasure of Recordings When recording, previously recorded signals on the tape will be
erased automatically.
To erase a tape without re-recording, use the following procedure.
(Make no connections to the Line input Jacks).
1) Set the Function Selector to “LINE IN”.
2) Set the Tape Selector according to the cassette tape used.
3) Depress the Record Button.
@ Amplifier Operation 1) Connect the equipment to be amplified to the Line Input Jacks.
2) Set the Function Selector to “LINE IN”.
3) Adjust the Volume, Balance, Bass and Treble Controls.
4) To turn the power off, set the Function Selector to “POWER
[OFFI/TAPE”.
RECORD PREVENTION TABS (KNOCK-OUT TABS)
Cassettes are provided with plastic tabs (as illustrated) to prevent
accidental erasing of a recording.
Recordings can be made only when the tab is intact.
There is one tab for each side (track) of the tape. To preserve a
valuable recording, the tab(s) should be broken off with a small
screwdriver. If you want to record on a track whose tab has already been broken
off, use adhesive tape to cover the hole, and record.
Tab
= i
~~“ «For side 2
x Screwdriver
22> ABSSRS
OG Adhesive tape

The head assembly, capstan, and pressure roller are in constant Tat contact with the tape. If these parts are dirty, the sound quality will be
impaired. Get into the habit of cleaning the parts regularly (after every 10 hours or so of use) in accordance with the procedure outlined below.
1) Open the Cassette Compartment cover by depressing the Stop/ Eject Button.
2) Depress the Playback Button.
The Recording/Playback Head, Erase Head, Capstan and the Pressure Roller can be seen. Clean them with a cotton swab, ora
piece of wood with a soft cloth wound around it.
Capstan
Pressure
Roller
Notes:
@lf the heads are extremely dirty, clean them with a soft cloth : : Cotton swab dampened with a little alcohol.
®Do not bring metal articles or magnetic material, such as a screwdriver, near the head assembly.
®Do not clean the plastic cabinet with benzine or thinner. Clean it with a solution of soap and water. ozs

SITUACION DE LOS CONTROLES
@ Control de volumen (VOLUME) © Control de graves (BASS) © Control de agudos (TREBLE) @ Indicador de alimentacién/comprobacion
de las pilas (POWER/BATT))
@ Indicador del sensor de programas grabados (TPS)
@ Indicador de sintonia (TUNING) @ Control de balance (BALANCE) © Medidor del nivel (LEVEL) © Selector de funcién (SELECTOR) @ Selector de modo/supresor de batido |
(MODE/BEAT PROOF)
® Selector de cintas (TAPE) ® Selector de banda (BAND) ® Botén de silenciamiento en grabacion (REC MUTE)
@ Indicador de FM en estéreo (FM STEREO) ® Toma para auriculares (PHONES) @ Altavoces de agudos @ Micréfonos incorporados (MICROPHONE)
® Control de sintonizacion (TUNING) @® Altavoces de graves @ Control de sintonia precisa (FINE TUNING)
@ Compartimiento del casete @® Tecla de grabacién ( o [RECORD)) @ Tecla de rebobinado ( << REWIND) @ Tecla de avance rapido ( >> FF) @ Tecla de reproduccién (> PLAY) @ Boton de de parada/expulsién (@ STOP/ 4 EJECT) @ Teclade pausa( 11 PAUSE) @ Cuentavueltas de la cinta y boton de reposicion
(COUNTER) @ Tomas para microfono (MIC) @ Tomas de entrada de linea (LINE IN) @ Tomas de salida de linea (LINE OUT) @ Asa € Antena telescopica @ Terminales para antena exterior (SW ANT/FM ANT) € Tomas para altavoz exterior (EXT SP 3-82) € Compartimiento de las pilas €p Toma de entrada de CC (DC IN 13.2 VO->-@) € Toma de CA (AC IN~) @ Selector de tension (VOLTAGE SELECTOR)
PRECAUCIONES
@Evitese la utilizaci6n o instalaci6bn de este aparato cerca de fuentes de calor. No dejarlo en el interior de un automévil expuesto
a la luz directa del so! durante mucho tiempo si las ventanas y
puertas estan cerradas, ya que de lo contrario se podria deformar
la caja.
@Las cintas casete, tanto grabadas como sin grabar, no deberan
dejarse en lugares con altas temperaturas, mucha humedad ni
bajo la luz directa del sol. No poner jamas casetes grabados cerca
de campos magnéticos, como puedan ser imanes 0 aparatos de TV ya que podrian afectar el rendimiento de Ia cinta.
@Evitese la utilizacién de cintas casete C-120 con este aparato,
porque pueden romperse, ponerse tensas, o retorcerse con gran facilidad si no se manejan con mucho cuidado.
@Las flojedades en la cinta podran corregirse insertando un lapiz
por uno de los carretes del casete y girandolo para extraer las partes laxas.
Cuando no se utilice, desconectar el cable de la alimentacién del
encufe de CA.
—10—

@ Funcionamiento con pilas 1) Abrir el compartimiento de las pilas tal y como se muestra en la
figura.
2) Insertar 8 pilas tamafio ‘‘D”’ (National UM-1 0 equivalentes) en el
compartimiento de las pilas, verificando que se instalan en el!
orden correcto y se respetan sus polaridades.
3) Volver a poner en su lugar la tapa del compartimiento.
@Extraccion de las pilas Al extraer las pilas, presionar el lado © de la pila numero 8” hacia
el lado O para extraerlas en el orden inverso al de su instalacion.
Nota:
Para hacer funcionar e! aparato con las pilas, desenchufar el
cable de la alimentacién de CA de la toma de la red eléctrica y
de la toma de CA del aparato ya que la toma de CA conecta
automaticamente las pilas.
eDuracion de las pilas
Cuando las pilas tienen poca potencia, se reducira la velocidad dela cinta, el sonido saldra distorsionado y disminuira el volumen.
Poner el selector de funcién en la posicién “POWER [OFFI/TAPE”.
Presionar la tecla de reproducciédn. Cuando el indicador de
alimentacién/comprobacidn de las pilas se apague o sea muy débil,
como en la figura. habra que cambiar todas las pilas por otras
nuevas.
POWER/BATT Boe NORMAL
é POWER/BATT RECAMBIARLAS
Nota:
Cuando se acciona el selector de funcidn u otros controles,
puede que se ilumine el indicador, lo cual no significa que
haya nada que funcione mal en el aparato.
@ Funcionamiento con CA 1) Comprobar primeramente el selector de tensién de CA para
asegurarse de que esta ajustado en la posicién correspondiente
a la tension de CA de su localidad. Si no lo estuviera, ajustarlo
usando un destornillador pequefo en la ranura provista y
girandolo hasta que aparezca por la abertura la nominaci6n dela
tensidn deseada.
110-115 V 115-127 V 200-220 V 230-250 V
2) Conectar el cable de alimentacién accesorio al enchufe de CA de la unidad y al tomacorrientes de la red. Al enchufar el cable de alimentacion al enchufe, la unidad cambiara automaticamente desde el funcionamiento a pilas al de CA.
Tomacorrientes de CA
*
AC IN~ Cable de alimentacion
Be @ Funcionamiento con la bateria del automévil 1) Insertar la clavija del adaptador para baterias de automovil en la
toma de alimentacién de CC.
2) Enchufar el otro extremo en el receptaculo del encendedor de cigarrillos del automovil.
Al enchufar el cable del adaptador para bateria de automéviles
en la toma de alimentaci6n de CC., la unidad cambiara
automaticamente desde el funcionamiento a pilas al de bateria
de automévil.
© t
DC IN 13.2V (O-2-2)
Adaptador para bateriade automévil | Receptaculo del (RP-952, opcional) encendedor de
cigarrillos
Nota:
Para conectar el cable adaptador, seguir las instrucciones
facilitadas con el mismo.

AUDICION DE LA RADIO
1) Poner el selector de funcidn en la posicidn “‘RADIO”’.
@E| indicador de alimentacién/comprobacién de las pilas se
iluminara. 2) Poner el selector de banda en la banda radiofénica deseada . 3) Poner el selector de modo en las posiciones “AMBIENCE”,
“STEREO” o “MONO”. 4) Ajustar el control de volumen al nivel sonoro deseado.
5) Sintonizar la emisora con el control de sintonizacion. Ajustar el
control de sintonizaci6n para obtener la mejor recepcién posible
observando la posicién en la que se ilumina el indicador de
sintonizacion. 6) Ajustar los controles de volumen, balance, graves y de agudos.
7) Laradio podra desconectarse poniendo el selector de funcién en
la posicién “POWER [OFF]/TAPE”.
@ Control automatico de la frecuencia en FM (FM AFC) El control automatico de la frecuencia (AFC) enclava la emisora
sintonizada durante la recepcién de FM en mono y en estéreo. Asi
se asegura una estabilidad adicional sin desplazamientos de la frecuencia.
Notas:
Para recibir radiodifusiones de FM en estéreo, poner el
selector de modo en las posiciones ‘“‘AMBIENCE” o
“STEREO”. El indicador de FM en estéreo se iluminara
durante las recepciones de FM en estéreo.
@Si la recepcién de FM en estéreo no es Satisfactoria (hay excesivo ruido, 0 el indicador de FM en estéreo parpadea),
poner el selector de modo en la posicién “MONO”. Asi se
reducira el ruido y se conseguira una recepcién mas clara,
pero la radiodifusién no se oira en estéreo.
@ Control de sintonia precisa Para sintonizar emisoras de onda corta, sintonizar la frecuencia aproximada con el mando de sintonia, y luego usar el control de
sintonia precisa para sintonizar correctamente.
Nota:
Al usar el mando de sintonia, asegurarse de ajustar el indicador del control de variacién de sintonia en su posicién
central (‘'0’’).
@ Antenas FM:
@Extender la antena telescdpica y ajustar su largura y Angulo de forma que se obtenga una recepcién éptima.
e@Para mejorar la recepcién o recibir emisoras muy distantes,
conectar una antena de FM (antena bipolar para FM, antena de
TV) a los terminales para antena exterior, tal como se ilustra en la figura.
MW (onda media):
@La sensible antena de nucleo de ferrita incorporada en el interior
del aparato proveera una excelente recepcion de MW en fa
mayoria de las areas. Para obtener una 6ptima recepcidn, debera
ajustar el aparato en la direccidn que proporcione los mejores
resultados, ya que la antena de ferrita incorporada es direccional.
SW (onda corta):
@Extender completamente la antena telescépica y mantenerla en posicién vertical.
@Para mejorar la recepcidén conectar un trozo de hilo eléctrico largo
a los terminales para antena exterior de la forma ilustrada, para
que este hilo haga las veces de antena.
@Con la banda SW1, la antena de ferrita incorporada tiene también efecto, y cambiando ia direccién del aparato puede mejorar la
recepcidn, como el caso de MW (onda media).
Nota: Puede construirse una antena para las bandas MW y SW con
un trozo de hilo eléctrico. Un trozo largo de hilo proveera
mejores resultados, pero uno corto también sera adecuado.
a pee
FM
Empujar
Insertar el ~ Empujar °
Empujar y Soltar 5 «= mantener
> Ip - df Insertar el hilo

REPRODUCCION
1) Abrir la tapa del compartimiento del casete presionando el botén
de parada/expulsién. Insertar el casete tal y como se muestra en
la figura y cerrar luego la tapa del compartimiento del casete.
Carrete leno de cinta
Nota:
Cerciorarse de que la parte expuesta de la cinta quede hacia
abajo. Si esta al revés, el compartimiento del casete no se podra cerrar.
2) Poner el selector de funcién en la posicién “POWER [OFFI/ TAPE”’.
3) Ajustar el selector de cintas tal y como se muestra en la tabla, de acuerdo con el tipo de cinta que se utilice.
@Ajustes del selector de cintas segun el tipo de cinta
Posicion del selector de cintas
polarizacién o equivalentes
NORMAL Cintas de 6xido férrico de baja polarizacién
4) Poner el selector de modo en las posiciones “AMBIENCE”, “STEREO” o “MONO”.
Presionar la tecla de reproduccién y se iniciara la reproduccién de la cinta.
@Se iluminara el indicador de alimentacién/comprobacién de las pilas.
6) Ajustar los controles de volumen, balance, graves y de agudos. 7) Para detener la reproduccién, presionar e! botén de parada/
expulsion. Si no se presiona, al finalizar la cinta se soltara el botén de reproduccién y la alimentacién se desconectara automaticamente.
5 =
Re
eCuentavueltas y boton de reposicion
Los digitos se reponen a ‘‘000” cuando se pulsa el boton de reposi-
cién. Los digitos avanzan con la cinta para que sirvan de referencia al buscar un programa deseado grabado en la cinta.
H Tecla de pausa La tecla de pausa puede utilizarse para detener momentaneamente
el movimiento de la cinta durante los modos de grabacién y de reproduccidn.
Antes de comenzar una grabacidn, presionar y enclavar la tecla de
pausa. Luego, presionar la tecla de grabacién. (La cinta no se
movera.) Cuando se esté preparado para grabar, presionar de nuevo la tecla de pausa para desactivarla. A continuacién la cinta se
pondra en movimiento iniciandose la grabacién.
Nota:
No utilizar la tecla de pausa para detener Ia cinta durante largos periodos de tiempo.
Al presionar la tecla de pausa la alimentacién no se
desconecta. Para desconectarla hay que presionar la tecla
de parada.
@ Avance rapido y rebobinado
La cinta se movera rapidamente hacia adelante cuando se pulse la tecla de avance rapido. La cinta se rebobinara rapidamente al pulsar la tecla de rebobinado.
Nota:
No pulsar la tecla de reproduccién durante las funciones de
avance rapido o de rebobinado, ya que esto puede provocar
que la cinta se atasque. Pulsar siempre la tecla de parada en primer lugar.
™ Sistema de parada completamente automatica Cuando finaliza la cinta durante su reproduccién, grabacién, avance
rapido o rebobinado, el sistema de parada automatica desactivara
todas las teclas y desconectara la alimentacién automaticamente.
Téngase presente que la alimentacién no queda completamente
desconectada si el selector de funcién esta en las posiciones “LINE
IN” o “RADIO”. El selector de funcién debera estar en la posicién “POWER [OFF]/TAPE”’.
@ Ambiente El sistema de sonido de ambiente mejora el sonido de una fuente normal de sonido estereofonico.
Este aparato acentua la imagen estereofénica, ampliando de este modo el area de audicién del sonido estereofénico. Por lo tanto, asi
se podra disfrutar de la estereofonia como si se estuviera en una sala de conciertos.
@ Medidor del nivel: El medidor det nivel se ilumina para indicar el nivel de la fuente en
cada modo, escuchando la radio, reproducciendo cintas, grabando,
usando la unidad como un amplificador, etc.

aes ei = nce M™ Sistema sensor de programas grabados (TPS) El sistema sensor de programas grabados puede ajustarse para
localizar automaticamente y reproducir una cancién de una cinta Casete grabada.
Procedimiento:
1) Seguir el mismo procedimiento descrito en los pasos (1) al (6)
del apartado ““REPRODUCCION”. 2) Presionar las teclas de avance rapido o de rebobinado
conservando la tecla de reproduccién presionada. El indicador de TPS se iluminara.
®Presionar la tecla de avance rapido. La cinta avanzara hasta la
siguiente cancién y se comenzara a reproducir automatica- mente.
TPS
FF PLAY
@Presionar la tecla de rebobinado. La cinta se rebobinara hasta
en principio de la cancién de ahora y se comenzara a
reproducir automaticamente.
TPS REWIND PLAY
Intervalos del sistema TPS La funcidn de TPS funcionara en la mayor partes de cintas. Para las cintas grabadas en casa, seguir los siguientes procedimientos. 1) Establecer el aparato en el modo de grabacién (referirse al
apartado “‘GRABACION’’). 2) Presionar y retener la tecla de silenciamiento en grabacién
durante 4 a 6 segundos después de haber finalizado la cancion.
(No se grabara ningun sonido mientras esté presionada, pero el
medidor de LED seguira funcionando.)
Presionar la tecla de pausa.
Soltar la tecla de silenciamiento en grabacién.
Presionar la tecla de pausa para desactivarla a fin de volver a
grabar. BLL
En los casos siguientes el sistema sensor de programas
grabados no funcionara con normalidad. Ello, sin embargo, no
indica que el aparato esté averiado.
eCon cintas de conversaciones en las que hay lapsos largos
durante el dialogo.
Con cintas grabadas a niveles muy bajos de grabacidén.
Con cintas con partes sin grabar entre las pistas.
®Con cintas con intervalos entre canciones de menos de 3
segundos de duracién. Con cintas con mucho ruido en los intervalos sin grabar.
e@Cuando separan la canciédn que se esta escuchando de la
siguiente menos de 10 segundos y se quiere pasar a escuchar la
cancién siguiente.
—14—
| GRABACION
@Este aparato esta provisto de un sistema de control automatico del
nivel (el nivel de grabaci6n se ajusta automaticamente).
@Este aparato esta dotado de un sistema de monitor variable, lo
cual significa que el sonido monitor puede ajustarse con el control
de volumen sin afectar la grabacién. e@Este aparato tiene un mecanismo de grabacién de un solo
accionamiento, lo cual significa que para grabar se tiene que
presionar solamente la tecla de grabacién. En otras palabras, no
hay que presionar la tecla de reproduccién.
™@ Grabacion de radiodifusiones 1) Seguir el procedimiento descrito en el apartado ““AUDICION DE
LA RADIO”.
2) Insertar el casete en el compartimiento del casete.
3) Ajustar el selector de cintas de acuerdo con el casete que se esté
utilizando. 4) Presionar la tecla de pausa y luego la de grabacién.
5) Presionar la tecla de pausa para desactivarla y se iniciara la
grabacidn. 6) Para detener la grabacién, presionar el botén de parada/
expulsion. 7) Poner el selector de funcién en la posicién “POWER [OFFI/
TAPE” para desconectar la alimentacion del aparato.
eSupresor de batido Al grabar una radiodifusi6n de MW, se puede utilizar el supresor de
batido para reducir el ruido de “‘batido’’ que no era audible durante
la grabacién. Poner el supresor en la posicién que mejor reduzca
estas sefales de “‘batido”’.
@ Grabacion con los micr6fonos incorporados Los micréfonos de condensador incorporados en este aparato son
omnidireccionales, por lo que se puede grabar desde cualquier direcci6n. 1) Poner el selector de funcién en la posicién “POWER [OFFI/
TAPE”. 2) Poner el selector de modo en las posiciones “STEREO” o
“MONO”. 3) Seguir los procedimientos descritos en los pasos (2) al (6) del
apartado ‘‘Grabacidn de radiodifusiones’’.
Nota:
Cuando se grabe con los microfonos incorporados, ajustar el
control de volume en su posicién minima.
@ Grabacion con microfonos exteriores 1) Conectar los micréfonos exteriores opcionales a las tomas para
micréfono. Los micréfonos incorporados quedaran automatica-
mente desconectados.
2) Seguir el procedimiento descrito en el apartado ‘‘Grabacién con los micréfonos incorporados”’.
Notas:
eUtilizar dos micréfonos que tengan las mismas especifi-
caciones.
@Cuando sdlo se utiliza un micréfono para la grabacién, el sonido solamente se oira por el canal (izquierdo o derecho)
al que se ha conectado el micrdfono.
Para evitar la grabacién de sonidos por el micrdéfono incorporado correspondiente al otro canal, conectar a la
toma de micréfono que no se esté utilizando una clavija de
borrado (opcional).

oe @ Grabacion de un equipo exterior
(Referirse a la pagina 32) 1) Conectar el terminal de salida del equipo exterior a las tomas
para micréfono o tomas de entrada de linea.
2) Poner el selector de funcién en la posicién correspondiente a la fuente de sonido.
3) Poner el selector de modo en la posicién “STEREO” o
“MONO”, de acuerdo con Ia fuente de sonido. 4) Seguir los procedimientos descritos en los pasos (2) al (7) de
“Grabacién de radiodifusiones”’.
Notas:
®@Cuando se grabe de un TV, teléfono, etc., ef sonido se
grabara por el micrdéfono incorporado correspondiente al
lado al que no se realiza la conexién. Para evitarlo,
conectar la clavija de borrado (opcional) a la toma para micréfono que no se esté utilizando.
Si el nivel de volumen del TV 0 de otro equipo es demasiado alto durante la grabacién, el sonido grabado sadra dis-
torsionado. Ajustar el volumen del TV 0 del otro equipo al nivel normal de audicidn.
@ Monitorizacion El sistema de monitor le permitira escuchar el sonido por los
altavoces incorporados, auriculares, o altavoces exteriores tal y
como se esta grabando. El sonido puede monitorizarse de los modos siguientes:
@Cuando se grabe de la radio, el sonido que se esté grabando
podra monitorizarse por los altavoces incorporados, auriculares o altavoces exteriores.
@Cuando se grabe de una fuente de sonido conectada a las tomas
para micréfono o tomas de entrada de linea, el sonido que se esté
grabando podra monitorizarse por los altavoces incorporados, auriculares o altavoces exteriores.
Para evitar realimentacién acustica (aullido) al grabar con los
micréfonos incorporados, el sonido que se esté grabando no se podra monitorizar por los altavoces incorporados, auriculares ni altavoces exteriores.
@Cuando se grabe con micréfonos exteriores, utilizar los auriculares para monitorizar e! sonido.
Es necesario ajustar el nivel de volumen del sonido que se esta monitorizando, por lo que habra que utilizar para ello el control de volumen.
Nota:
Si los micréfonos exteriores se ponen demasiado cerca de
los altavoces del aparato, se podra ocasionar realimentacion
acustica (aullido). Si asi sucede, poner los micréfonos lo mas
apartados que se pueda de los altavoces, o reducir el volumen.
@ Borrado de grabaciones Al grabar una cinta, el sonido previamente grabado quedara
automaticamente borrado. Para borrar una cinta sin realizar una nueva grabacién, seguir el
siguiente procedimiento. (No conectar nada a las tomas de entrada de linea).
1) Poner el selector de funcién en la posicién “LINE IN”. 2) Presionar el selector de cintas correspondiente a la cinta que se
esté borrando. 3) Presionar la tecla de grabacién.
UTILIZACION DEL APARATO COMO
AMPLIFICADCR
1) Conectar el equipo a amplificarse a las tomas de entrada de linea.
2) Poner el selector de funcién en la posicién “LINE IN’’.
3) Ajustar los controles de volumen, balance, graves y de agudos. 4) Para desconectar la alimentacién, poner el selector de funcién
en la posicién ‘POWER [OFFI/TAPE”.
—15—
LENGUETAS PROTECTORAS DE
GRABACIONES (LENGUETAS ROMPIBLES)
Los casetes estan provistos de lengiietas de plastico para evitar
borrados accidentales de grabaciones.
Las grabaciones pueden realizarse solamente cuando las lengiie- tas estén intactas.
Hay una lengUeta para cada lado (pista) de la cinta. Para conservar
las grabaciones que se estimen, deberan romperse las lengtetas
con un destorillador.
Si se desea grabar en una pista en la que se ha roto la lengteta,
utilizar cinta adhesiva para cubrir el orificio, y proceder con ta
Z as Lengueta
Para el lado 1
Para el lado 2
Destornillador
2.2» SSSSSe
Cinta adhesiva
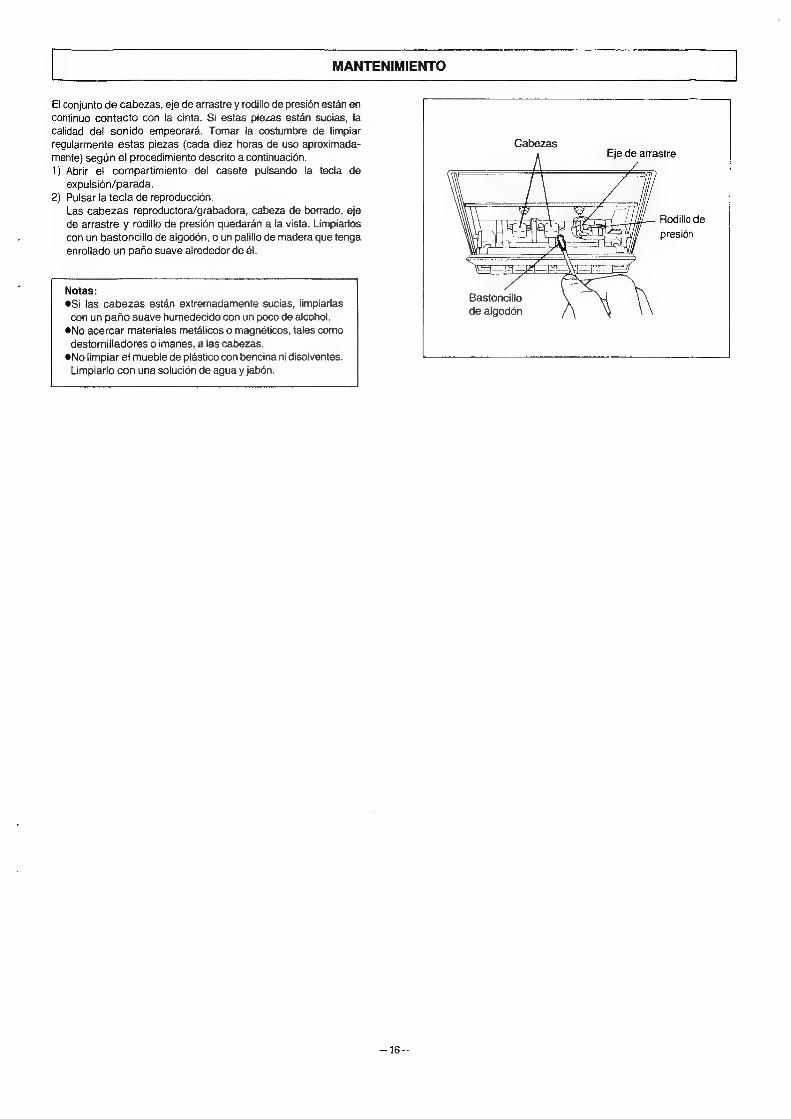
MANTENIMIENTO
El conjunto de cabezas, eje de arrastre y rodillo de presién estan en
continuo contacto con fa cinta. Si estas piezas estan sucias, !a
calidad del sonido empeorara. Tomar la costumbre de limpiar regularmente estas piezas (cada diez horas de uso aproximada- Cabezas
mente) segun el procedimiento descrito a continuaci6n.
1) Abrir el compartimiento del casete pulsando la tecla de
expulsion/parada.
Pulsar la tecla de reproducci6n.
Las cabezas reproductora/grabadora, cabeza de borrado, eje
de arrastre y rodillo de presién quedaran a la vista. Limpiarlos
con un bastoncillo de algod6n, o un palillo de madera que tenga
enrollado un pano suave alrededor de él.
Eje de arrastre
5;
2 a
is Rodillo de
presion
Notas: @Si las cabezas estan extremadamente sucias, limpiarlas
con un pano suave humedecido con un poco de alcohol.
@No acercar materiales metalicos o magnéticos, tales como
Bastoncillo
de algodén
destornilladores o imanes, a las cabezas.
®No limpiar el mueble de plastico con bencina ni disolventes.
Limpiarlo con una solucién de agua y jabon.
==

riRé Ze
O82} 8G (VOLUME) ® ERS (€4REWIND) @O & SiH (BASS) @ UR ATER (>> FF) OS Hit sah (TREBLE) ®KEES (> PLAY) OB F/B BiR (POWER/BATT) @ (21k /H--S (BESTOP/ EJECT) © hia BEA KMI TE (TPS) @ BFR (IIPAUSE) @ HARE (TUNING) @ Fa at i 35 Fs SR (COUNTER) © ¥ Gi}? HG (BAL ANCE) ® S52 BUBFL (MIC) OB Fieri (LEVEL) @ #296 AGBTL (LINE IN) © $3658 (SELECTOR) @ Sea TATL (LINE OUT) © x5 / 2 SRR (MODE /BEAT PROOF) @ HHS iat (EXT SP 3-80) @ Fah BAB (TAPE) @ hae s © ik F322 BABS (BAND) @DHisnKR ® 2 ARB (REC MUTE) @ IHEXRIER (SW ANT/FM ANT) @ HAW AT (FM STEREO) © Sie ®© FART A RATL (PHONES) @ BBM ARIL(DC IN 13.2VO-4) Osa823 @ HBR ARI (AC IN~) @ Am 5c Bl (MICROPHONE) @® BER (VOLTAGE SELECTOR) @® Wiz ie Gh (TUNING)
@kBBBR @ Phe Se He Gh (FINE TUNING) @ t= @ 88 (O [RECORD])
SITE IENERRMMRIREL A, TRIE AFB one casero) y CREAR TL PIATRA, LAS AT A AN Ye BBW. | aa | CCRAMARAN ARE , DRO i, BRR ICE HM HEA DSCREN KA BCE EA | BEBE URE,
[RL Ah 5s AR RAE A ASE HE.
@ AEE 90 (# FA 1204) $8 (C-120) HEA, AAT, BH
WRAS Rarer, Hee ite. @ PASS AT LAME, LI Beso Se i A Heh fs ae i, SARE CH, AROE RADE
@ MPH ARE, FIST rree
—17-

BERS : WBA, AMBRE T,
2) 4s 94H] = 2 uth (National UM-18¢/A]a#!) 2 ABMS, HE
RISE WE KEIO, Of RMN AMR,
3) #87 © Bie m BAL ONE, SHS AEA CD TE OSE Me Hee AY PLR MUEIG IC ABA
KASS, SC TR eR in ais. AAS Pe LA cn SR A, RE BB ee ee TROD LET 0
oSiteas BEM, BTR REE RE, BESRA, MA PEE. 1ST ERBA RSA “POWER[OFF|/TAPE” @9ftia, edz F KEE. BEE / SWRA amy, HATA Ay RR
—18—
: a
POWER/BATT -©€- rs
POWER/BATT a a He
itz :
HEA ER BH BS BM HL Ee Hl SBA a, TRACE EY BE BR Re i, 2RIERMRA.
ERKERAE 1) AE, ARAL TSE Es (AC VOLTAGE SELECTOR),
HEREC BAER CSAM AN ee, MARAE, RED Aaa, LI Bey ae Ta ARTE SL, BB) Memes, HFA MANE,
230
i
110-115 V 115-127V 200-220 V 230-250 V
2) HEBEL CA SC irs 2 Dk RSE TB LE AS A SCT FL ALB EN Cit RE LTE AIRE A CE, ARE Te BURP CAKE.
SC AUTH
t
AC IN~ 207i Se
BASS HRS 1) HSA EH Ha oe a Beh TA A ASB Eat A FB FL (DC INPUT JACK).
2) AG bea FA A SR A RATE EE Beas lijma DA AAR ELT SR ATSLR, ABE BIA AD HAA eR
1) t\
DC IN13.2V (C-*-€)
jE :
Soe FARRER, FAPRHR ATTRA E(B.

PMS aie hi A
1 NS HC GRA REA“ RADIO” AGE.
ok / BRE es.
2) RE UBE Pe ase FE Be Bea A Pr Fe RES (AMX FM) . 3 ase ae
Ae. iE ES BPE ll GH ALTA PT is BEA EE BRAK eH air] nfs Dre GH OR abel 1 2 PP Be BAY
if aelae bE SH aad EO (Aaa CRA, LSE] Rete EER.
4
5 wo
6) Meee, ES, Meee. 7) CRBS BS “POWER[OFF]|/TAPE” Mfr, ats
HT CEP RR
ASA BBA eit til Ri TEBE AeA IN aE TE ARTIS, El DARA Pe Hill Hae OT BS EE APB FIA BRIBE A. UEC RAE ST SABE AYES EE
JER :
@ SETI SSE TR Ee ERT, ARAKI “AMBI- ENCE” “STEREO” Aft. 4EIEIL EI VAG ER
HRHG, PASH ILRI ANS BE Ec, @ UR AAA BRE Ba (UREA, aS REM ISII TRE), AUGER BA RS “MONO”
AYRE HERR REAS REAR EU SE CR, (EBT YD
We EF TT TE ETS AEN
ee Epes ORATOR TE BG Bie, 76 Dal ae ire Sit aed 2B AAAS fir oe, FED foal nes Bee Smt a) EE = PAS SEE AIL Eo
3B :
SEM aa HEME, TER imeas bea Zia St, HS HH (“O”) MALES
Bk : A380 (FM) :
Onsite Kei, PERMA, PERE AK, @ AUER HEY (Ri EA, 25 AAAS (FA
KR, SLAG) OER GEEL, FSRIRIATA.
chiy (MW) : @ AACA 3 Oe Fe (BAU RED AAR, BER TSB HU eI,
FDA A AIM, ST BSE RRR, Tie
SOAR ML $38 (SW) :
SEAL AKER, PEARSE
O48 SURI, iE HERE EKG EIMEK
feRb, satel.
@RA HE URE, BARD KR eee, ali
ALR, OC ARRAY A ath BEC ERE AER
iz :
—{(ERT FREER KR, BRA Mus ete Ht
BUEHVOR, SAT, ATR AH
RAT ie Bia A “AMBIENCE”, “STEREO” “MONO”
ORS SRE
COBEARERERRN AK
o§ © fs sae
HENS RA Dl
® i fo ©
—19—

Ld Ree ib / RSET RAE ARSE. MOA a, BOAR, REALE RPE
RAS Ee aS AP BC, ARR, A ei RE RPE a
2) ASR BA RSLS “POWER[OFF]/TAPE” fit. 3) ARR FIT (6 OTE AR, PARR fe ch ip as AR ES BY
io |
CBAKSERA ZEAE
HABE METAL
Cr, CrO, BEARS
FRA — BARE
4) SRE RBA “AMBIENCE”, “STEREO” #%“MONO” ADL
SEP RS, BSR. eee / Bilie Aim es Bete.
6) ae a, ES, PAL Pe PE BUSH. 7) 2S LBS, PEER TIES. BAI, wea RE, AST A Sel, BOs Be.
K
—20-
@ mat Mant Se
Mtg Pee STR Ry, aT Bees hI ic Bo lel “000”, at Beas ho ir Raa ws re AE, AT PRS TM RR PE I
Bre FESR BOK HS, ESET FS I TERARGERE ZA, HEP SBE, PARRA PERSE. AB) LE RES, AKI PRE RE, FERRER ET
ia he ST DF
EB :
DAS FA EA BRA RS RS IEG AS
BR PES, RU AR OT. MRA, WEAR PE IE BE
BRR a Mk MRR BERENS, BOT Pe HEA Mite PR RERS, Re REEL,
jE :
Soe re ERR TER IBN, DEH PROSE, A338 Bc (SE a BEE BR FE ES —- PE, VE FEFENF 1 BE
BZ BaP iLRe TS, Ge, POR RIDE Rl wEA TE, BORE in ie, ASS Ik Ae ES RE A BY Dele ste Bas a dS
SAE, WM RIERH Be 7E “LINE IN’ “RADIO” HALE, URI ARO, Eee ba BSS “POWER [OFF] / TAPE” BY brio
ERUKSE RAV AR EEE AOE TARA RR BRR o HEARED T RR, AMMA T eR Hl, Ale, cay DL BY ae SS A PK A BYR
BEX SSE TERE LRT TEE, DUET TIS RARE 4 ; OLCPRURE, REPEC, Bak, (RADABRACoMEE Be.

feces ett eel Biase 8 SARK (TPS) KEW RG BE AO Ae A] A By HES ERE AS LE CRT ETS EK Hh, Ue a Spee.
aR:
1) ERR“ ee” HL) (6) LZ AEB
2) 4 BESSA TAREE FP AT ERE BL BERE, REAR RSA EIS AS ENE @ FE ES,
OF FIRTH ATHERE, BERPHE PRUE AE ES — REAP ASE mee A RAE
TPS FF PLAY
SIA eS @ 42 PIB BESE. ETRE Ra Lal ie ESE a Bt BY Se TTR Ape
TPS REWIND PLAY
ABH ESS Fe Bs
HS ret BG EL BR TL Pe CET SK BD (29 HE ERE BA A BE BEE DY HE A CSrehy, satZHe P TIABRERIE. L) AGAR RET RAK (BB “SREP” —BH) o 2) eeRTe (MAT Zi, HAS EBHE TH 4 E 6 BSH, (WHEREAS Se a BE Ee ERE, (BE IG aE BE eH EN) BS BEE IRE. )
3)4@ FF. 4) RAR ZE AER BE 5) FEI BEYER LUGS BABS Ti Ba ERE
TEP FIARES, BAR A RAMEE LE ERD HE, (is tkThRRAR ARE. @ (AEE A RS FAT AY ERB CARE iy HOB OEE CREE @ BEADS A ERE RETR ORAM CRAM AL 3 RHE TT CAMEAMAZAREMT ARERR ENE. © CAMARA TRE HB A RRP LOR SRT HE PRR BT ESE Uses? T Rar Bn Ae, SPP DW ae Bt El ZB LORD SHAE FRESE LEE L$ REAR RE, She ela fii
Bae) ae
RB
OCA AEE BPH Ai (ERE EO] A Bythae) ORR A—ARAERE Kit, RUE RRA REE OH] ee Pe Hl SIAR ale SS A 27S BIER Eo OCBRA “RE” MRA RE.
ISBN, CESRRRE RAGE PERETSEBI AT, (aaa, LAC YBIR FRE.)
SSveaRRiena 1) 4278 “BR RTE Bh A” GOR 2) SAHA RBS 0
3) ARSE AT ft A -S A, REEMBIES NE. A) FR FRESE, SARE PGRETEE. 5) BAK PF SRE EER, TMERERLBAGA. 6) SEILER, REE PHBE / HAGEL 7) AEC ER ES BSS “POWER [OFF] /TAPE SHS T AE,
oma HE FEGR A BTR A lA, Oi Ee BABS PY a FR Yak BR ae a PEE HREM RE, HUE BARAT BEI D> ee BE FE AI
BhARAS RASS AS AB AAD A aie ok JB A ET TENA, BY GE fal (ORS
1) APA SRBA BSA “POWER[OFF]/TAPE” #9. 2) HEN BARA “STEREO” st “MONO” ANKE Bo 3) HeHe “Ss Ee AR BB” (2) (6) PPS a BR,
BM SHEE ce SS 1) AE PRR Fe BLE BRED AE 5 LSA FL ARTA OE BUG
El By Hit BaF 2) 4 H8“ APRS 5 BSR ES” ATR ARR
3B :
@ (8 Ar A HI AS eaL. @ A0RR (HFA MER RR E, HER REESE
EGER eZ BRIAR (AA) o Oh T MERE EIA FYE #4 ETRE NAB RE oe BLE) BEES (A BAG) OA) ASK PBI ARE BEES, 8 RUHR CHT ESE) Fei AUR A EA ZR be BLTAFL 0

ene Biya RS (ae 4 i328)
1) sepa oh fae ee A) BE HS SS LF FL BR AHL. 2) AG SC Sk Be FS iS ATS Be SE FRR A 3) LR aE Ue A, HK ABSA “STEREO” 5% “MONO” IDLE
4) Hac BE Sitalsc Ee ABER SK BE” (2) (7) PITA ABR
S :
CCREM, BMS, RMB ZaA
OE BN -BN ARLE eRe, Ak RiE
FA, EPR BCT BE CRT ESE) FAAS (ai Ee
Flo OLEH, MRR WRN RE PAK, PRERAV REET AE IPAS RCH Oe A SE — ACHAT FSS
Bite EERE AY, EER REREAD eS, TAIN A ay Seba BE as OK ie IE EER SOTA PW A
ORS RURIEIS, TARA Eas, Sas A RRL te Dov tet TR is I TE GRAY BE ES
@ 7: A ida EE Ge PAL FL BA AS SL ae ek REF HS, Fe ag ae BERK LAE RMI b ie ia BE at FR Pees eee mee ASHER AR (URES), IE ERED HET ARTE ED BP BE AS, SEN Er NC ie ne eR EE
@ FYE SRE oe LG aE Hee, HY BER Hy Be aie Ba LE EERE Fo WAR Hes Be aE TP Es RP Re ee, SPD RE ld GAC Eo
tS : AUR IMR FE EU EEE AN Bean BE RS AGE, RS Ba aoe WERE, BERG BS Oe LR) Re Heh ok Pa Hy aS HS
ele
Bis ZE-Re ER SS, Dia a LAR BB eis
BET ES — ASE AF MG AES, 38 (EP ABR (Re
BAG AEIL) ©
1) RACER AA RSS A “LINE IN” WfL. 2.) BERR FT (58 FS 9 SS A A EP SR BS
3)te PERSE.
EAA RAR
1) ES EE EE SB ASL
2) GIRERFARS ER “LINE IN” AYht. 3) ASM, FS, (SAE Ha.
4) RBS Ue, RUILERBARS aR “POWER[OFF]/TAPE” Wii.
Saher
rh AE i AAA) RE, FLERE RS SRF o RAB MH sees, SRERE AEE. BW HSA ARMA, 2 TRE AR AE, LI Be UBB CFG A BPR spine rae a Pray eae L Sieh, 4 (58 FAP ee Te] Se eR, PAR AE
By Py Mier 1 ii fet FA
TS" ae 0 Tito FH
oN
pay mies PX
O @-@> FESS S
Bay
ee

REGR (Head Assembly), (4i)#i(Capstan), fa (Pressure
Rol ller), R35 FIRE APA), AN RSS ESAS EET, pas chia
ae a 1A eA (AEROS EEA),
ORF URE BREE
1) FRB AETT BAAR
2) FRESE.
SF / ORES, TREES, SAA ae BRK, KN — TRS BERBER EM.
TER :
ORR IA, ara eh, Fie AHS
FAPRTEIR EM
ORE ARM MET CANS By MRE hy EI
DA. @ 2 AGH (benzine), BAF (thinner) RRRE
{Flo Wii HR (6 FARE B 7k eee,
99=

—24—
shay 2 ae plSols Glad yi bral! Aare lint ul oaS)3 oI Belay Qh US cosas Sua dey pt Sytinn Lgslé elga VI oda ods 15 gla ee lela \> JS a) aleul, ely>VI oa als wud F Dpoll b3g>
Sig Aovagll Ady shlls 5 (Janta! gly SVS YI) fe bells cut! aula ols cial (1
glaia! jbial (Y
«pti SH equal aly farmatily/p Leia wigs Cn ES Ay 95 Sas Se digile doch jbled dala, gl db daLue pgils biall ALacy
watts! Cpe dale’
7 dS Wo
Luspade Lack lad daled agils dam Ugle Guys pi! cals 5! @ Jp>Sll yo ALG AS
degare Cpe call fio dawbiall of dusoall ov! sy @ ~yal ll San)
eUL Lgales nll of os jal aS ai wi! ALS! GbiSY @
Opell

(A286 aul) Sarr) dou!
spautill eae @th (qeddye gt LaS) bids Ghats syne owls! oI Aasall js bs
-glualll 13a ageg she dd frau (Sau
Biot boy tit! paile 0 (AS) ile JS fe toly glut segs wpe ide Uasulgs Glualll puS Grou. Lol gil emul
GeV dey yids psdciasd ad Gye alu puS aides ds fe Gaull oy! 1a! «Jepuaiill dylaas ad ad Aoaall daa
Goes yt
Sl=l=l==l=
cle gl cbigiy Sl! jusliio J! rope pipe ioe Jrruisic @ aa)» FARA AeS Coe ei
re Lam (> B5g>1 (ye Janu
(TY dnio aot)
aig Sell uli JI dap LSU! SyggSU Aatall ¢ AIT GLb) Ley (1 RbSh GSM cula s!
shall ao Gilgis sill aos! fe Gilbgll dite aSouul (7
pdrcrall Liddy ccgigon gl ge yin de Ula adie hisl (y
clad! Jrmauiin Juad G0 (I-Y) ol Sal § Sport agit! asl (£ 4s gost SI
2 OUD Wo
Sevan fly capil of Ca jabill jlge US pe Gumacill sae @ ol ggill lad a alga gelll call gig Sul! Lhaalgs yall ALiyall oda She tigir ail asd pig Sao col atiross at
wJastuall Cagiy Salt Gusde 9 boll Gusti Jou BES 9] ogy ALN GL ged Syl am pins LS Ii! @ Sagal! agiitiausd «Juruiill dloc JUS Laytre (6,591 dap Bl de Aaya 5g 2SU Spall are pluses Social AL fowl
glaic eg Laud! (Gyno
Aaiguall 2a5l yt cobeLauall gf Suk! cleLaull jy jbo Gem plaiaSU ASI! alas lias, Call Gyo Adam Lele’ ats ill pall da ld clelae gf dul it
AMGW GybaI) uu> Tall LY edge ala
Adasal gs aoratill agro Asl yo Sell yee gall Gye Garis! wie @ Ham LSS gh asl Nl gf RUS Iu cobeLaull
Aa gh duel cbeLaull of Asta! coleLaull Lawl ys Jrmuaill re Spall 4585 Sule! oa droll dys ail @
Aawulys Loyal! LIAL plait! (Sas WELLS olay dy SU Asm Ld gl Lal SI of Auld al) lela!
clelaull Jortul dias ld obbgds Sao dbuslys frrwillsic @ scogall Lat util
As ab OSIM Cyall gle (cyiune al Smciuad aU cps aaa 15!
Copal gle jaruse dal ys
7 AB>Yo
Srdrsd lela! pe yi dam LN! cligds SM raids 15!
adlils eleall cigas oydy Sut GAAS SiLel Leet plu veagaall (aad tl Yiy clelaudl Cpe Pies coligay Sul!
ONe>uall! cee
SURE AdLall Oeil eon’ ute aruutis alaill are
: Jl gegill al Baum chimes aLedll cogs Gyo day pill cel (Adu) SSN jase J! Janog cols agi)
«LINE IN» fe ailbsl dae ud (1
nay yl! Regs ae Coulis coll aagh! fede pill daecad (Y Japuuiill pj baal (Y
SMBS ab! eal lie SI le poet ogi ll lal Joy (1
@ LINE IN» ad Je ebb gl Cae cs (¥
Se sly lly OLS Vy pall gle Koel POWER [OFFY/TAPE gy Je tls see cS Gayall clad (1
—25—

fond pis) roma sginal SUG planus fe jlgoti lia spins © ASUE Jroutll gyiue
lady yadio igo gle 95 Aipall dil pall alls Je jlgali fia pos @
raul! cogil ghe Le uttill gs ye ~hrmuatill Bioly duels Jars alles fe jlgodl ia ads @
LR audit) 5 5 dad85 Gl y cbabele JS qfamuitll sie olin ling (cag! judy ¢ Lei! 5 bead clay)
4a gaol Hi olest! Jao «ga yl ela od 3 Upp! qgill aul (\
Aauie 3 cuwtSH foul (7
fasta) cotSN doy pl Udy bey pull die petal (7
wSpruuill pada ab cag coil Bayi 55 aS (£ «aul dulac 6 Atha g by poal 85h ey yvi yj dazal (°
gly d I /GULY! , jdatal fuouill dlec GLY (1 ub goal (POWER[OFF/TAPEy age fe aslbgt! odie ae (V
{GLU gos Bgl
geval prdal! aie clide @ gaball Bi> yj aladial Sal! cp2 Abuugill do gl! ola oui she
Bagage O9SSY silly Ls goo will Qy jladll ob, LEY! Jalil. jLaill Jalil Soll ga osdtiad oily adgll Je UA Noa cud beat Jas
Lohlayt
Rina! Ligig Sat! JUS Go Jarl w LLGUY Upla§s preed lS spat loa 2 clip iy SoM og Ss
NS oles cl ya Sas Jamaal GI ool olgodl lS Go clot! «POWER[OFF] / TAPE» je Silay! Gdcie ud (1
Ugagangl css yawn fe SVL dts cud (v
clball Jamun aad ya VY olged tl § prog! agit aust (1 4s gosh Sl
:dB>W,
pao ghia pSotol Mal ebjsy Sl UMS Ge bull wie spas Jal fe Syall
dup ylb olighy Sse Laulgs Jadu w lps Lol GLY JI (4 has) Xe BIT Skip iy Sat! Joy (
ASU AMS fall sbgdy Sal! Yoodts Stas jlgal AGT ciligdg Salt Alasutgs Jaomusiithy Juad 3 dyogll egill asl (Y
> Ola>Wo
Aamtighl olbol oll uid O13 Cuighy Si Jariul @
canal anti «femal soly p> ld pip See ladiut sic @ gall Juoy all LAMM (Z ILA AN gf a atl) Broly SLAF Gp
-Cogby Sal gS cipal!) Coll Sypg Soot La alys Jamil Sgs> ait B idol sli JST ccagig Sao alps pl coll (Lata
wJaniaan dll gg Sl psn
(TPs) les pall eels cau alas »
glaiw Yh alailly) Go 25Gb Syyuas Soul allaill Ia aids Sal G0 alsa al ye ccs ps yh Ls (Ag cde
> egal
«g Lais by Sad (yo (1-5) Lagnogh! olga uit asl (\
ASE ae eo ay pall AUN ELEN gl as pall asst jj baal (Y cab gM Guds plait 55
9 Qa pl agua 4528.5 she pall qaldzall pases tll padts @ ABLE Byes plata Aalace site
TPS
FF PLAY
EE [| || J Gp pul Sl oad ic «qeabiyall 4b Sy ehgll fides ts at, @
Sab By pos ela! Fulac rising
TPS
REWIND PLAY
SGA IES (TPS) des yl! Geol ys Cua AU) Cl id
geil Ae BY Ale 3 Adawull clint alas ae al bill lia Jars 1 JUN gag! ebal erat whakiy lplimdy pg
(Sapuiill Juad aml) Jsruill Ul 3 jlgall ao (\ aay lsh 6 Bal Jarauill “iis jj Jebiall § pial, bial (v Ball oda SWS Spe cl Jord agus). Le gealdys amin alas!
FLED csigeall yall geagiaun «Sly cai§M Bgl jakal (Y Samual! lad] 5 yy> (E
Habart paint (Sy 0) 55 7S ip dSgitl 5 Jebaal (0 deouitills
doy pA) he geal yall unas lbs ag oI Jato Ge Alli oY! 3 GAY! Le albu Jitd line laa Gad Sly Aras bypass
Ab gb jgSu lid de ggins (all asl db tl @ Nam jpaddie gle oS igo as gle aludl & clidb al @
A gabe Jamul! ats al aludl 15 dbl @ IBY Co Jil GySun hts GI ab al @
Gebyall Gale dalle clog ols db tl @
genus (gall quali yall ale Gigs V+ Gyo Jal S23 lia oy SslLesic @ dal SUGYI ags (oll JUN geald yall Lule

danadll Sule ) 54 das pill lus @ pat ae ala, YI ava bull Balel ) 5 badd she (000) 555 als Jas
Dees Sue cya Ryans 9 capil eal) so gf LES ag ebb g dng pt -aayl! dara ellay
CoBhLI Bgl! ) 5
aie 8 yyucs day pill AS > GLLY caa§I agRI 45 pladial GSaLl Gye wSapwutill gf g Laisa! JS el gu
ASLds (ye Gh Sy COU Spi al sl me eos Jd 9S Leakey (Ly pl! oid Gy) emul} GusSl at Lhe,
eae WS 9 0) .55 4S lhl Bagi yj bol oouitl call livin
wSpuuill Aulae pty ES ,oSL Loy pil
2 dbba>We
CAN Gye Ay gle Bsedas yt BS gi) GRU RSgill 5 atu Y Sls odhLI Sgt a ie AES ap Sg A GS
BgHll aba) Gli YI 5 Jostial
xo) Got qual aval | 5 ate RYws el Jide pws by ttt asia,
we AL Sled jade sre Ae puss des pti!
2 db>Wo
Babel gf ay pull av still ddoe Lidl pLeiw! yas Igloo
9) asual dLaSls wb patel p4a J! U3 (gthy Loy La ail
oaishac JS Ga Vol cl SW alis YI
pA) SL SU alas Slog GUN BaLeT gf as jul aaitll feouaill «plat Aulac elgiil sie Geer 205 de SUE ola, YI plbs Jars atislys Stes hI Jprey (GUN gos Jyoti al Spill GF peoaoY ASU 8 gas Sgill lady 51,59! WY LS «RADION 9h “LINE IN» fe SSUbs ll dake alS ial 25 15)
«(POWER [OFF] / TAPE” edge je Silbg!l dtie alSoiual (ys
desma ps
Apel! jalall ope cugatl sap> 3 Subs I tc boat alls dol
AGsLac YI
cupall elas Qaaill wises ell! (S92 pew alaall 5Lg a! laa 85S,
As gdaull dclé 3 bis, (sa pw
Ob giul! sac w Ul> 3 dll JSG jaa cine erdgal obs gill ssc clase gayi Slee Slanted Jamul day ill fT ple cgolyll jlyad plates YI
gl .AadaaS
—27~—
dat gl SY (Gli Yj jada, Wy CoulSI auc cle ial (\ Coast SH arate GLEF a5 poy «JSAIL dowogll Aa, yall 3 cat
Se glall las yll 555,
dB > We
Saul gos dege Coplay pb Gye Gay abl esol ol Ge aS eal aula GLY Bagi LungSane GS 13)
«POWER [OFF] /TAPE» ady je iilbg!l ate cud (7
(id, «Jaw! Josoul 3 THO 5h LaS dos tat tne aSoiul (¥
» forts! bes pt)
Uo bY) Gti das pill dite al Social @
i
jas! le des yt CrO2 Sheed! gle grey Sten ot
Alubul, gi
sotodl suuSgl Jas pth NORMAL zm “a “
cgigen gh gg sium Uasodly audy fe Ulead! odiielaual (
plait Alec estas plainly) uns! (0
Ay slay agall ond Case ois @ gigi cipal pe clpauae Sout (1
duSay y cl SYGLE YI jecal pleiw¥i dalee GLY (V porBiy ASLEG & yyecas SyGll aladinny CG im des tN peta
9! ayee

Bymadll Satie gl! Ce 7 dB>We
SS ulio Jobe 93 lls dno Sipe Jac jSes gueg hail ST yySs SUI WL gle clLudll GIS LalSy Alaug ill
Laas cuskie parol gles lbs U3 ell
S)
LLY! ae silggll lls Jos’ dass @
gual pL eloiw yl Td “RADION antsy fe lbs! adtie Soil (1
4p MeN SgGll od Case Gas @ gh al GY days) ALaall ds gall dag! fe dogll Gotiebual (7
Uawgill Lgl! «(5354) 9] (52 sins) sddasely Ul» Je Ulall cote ae (T
gl Squall cgiudl le Capall amo plas Soil (£ Bulg! jose Aasulgs Yall plats agi ail dalle cally (0
Ady cape ily Jaail Le Jyaodl! Aba) alg! plas pSoctil LMS 8 yyy Aagill pane ab gebgiy all gpl quagl! Adley
jG opal ame Glbmwelauol (1
he Silay! bth pl Social ally GLI you goal ll Ue gos Sey (V «POWER [TAPED acy
(ai aus lal Jo yA plows
Slaial ath daghyll bot (AFC) 5 ELH say 5t jae G1, Sys Geual yl BLEW! SEN Na og sow al al) 9((cule pl Gl)ab a»
Jay Basle eas
> Gla>Wo
che Ua! Gdihe aid gs pis al GT lbs e JLpiiul oY @
Mg yuu» gh Cassthy aes
pla Su5 clare Jlidinl she gy yaw al aT Gane @ayiows
eloga) dane (soe nV al 34) alba soo JlLitinu! ols 13}
pe Ula) dts aid (gs gis al GT Gas las | Ba elogall bai fle Je Qedgll Soa clin cc gigean ULs
lip Raat pau Sas igual fall gual sg gy yu
Gaiait Gals jaa w us pail! Sayll he Sgt! ally So SI! doygtl olLal luda
aoa sal) alg lassae Jastual 93 cay scalp! lagsue X aulys 1Go) Byres agli apc dadghl
: da>YWo
lil jayne plSocel Gyo SIG wiglsill Josue Jel aie (On) gagartl aSgll Je gS!
GLiIlogtt =
al wy! d>50
22 Gilg S ailioal Ay gly Atle daaly os gSuulill tlgg!l oul @ Shite! Jail Je Jposll g até,
cilyades I ASU stall Jliiul Jo yl JELLY! age qauoal @ al pbT we (cope palall Sly gh al GSU OUbSY! 5U5 pthga) al cal
JSAM 3 cudge pt LS cco slall Ig!
> dlawgit! dogt! cde Jperll LitS So pall PUSAN gy cull padi lye gS @ ool adiaul at be gaol “Sb! MAS 35 clamall atl, Jlaiual 99 Sa pall lg gl GY cellS cll Faas sil Las! 555 jl go!
Aualosl daub
Jas YI Jl 5 eS anal Jay! ols Gb 3 plu! sie @ elles aay ASL GLEN gf Ladall oltls dbeall SEL gl 5 put Cedys ga LSy ilygS colada po jloul slggil yb JI Ju gb
SSA
33 psaall d>gt!
Ayagac Bygas dary fe Udilare LIS (5 gSustill celal onal e
ws ees Sl gglt Bhyb) Yl als roy Jai! Suge 3 ss 51 @
JSAM 3 edge ya LeSy Siogll dais, agi 13] Baye Adel GS. pall tlygll gS \ Syma deg g @ gals Jail Judd le heed gl atoll (pad jlgal alec! oye
Alasusitl Aogll 3 JLoul

24s Ua! A5Us le fad m
Sdn SSI 3 edge yt LS AL Ua! aude clad cial (’ t
POWER/BATT -O- tr
POWER/BATT
7 dB> Wo
staged US col agg eve las May cual geagtano Lay 3 (Adobagks gf National UM-1 51,6) «Dy are ol Lbs (A) ao (¥ (Aapghly Abul) URS! aBlye done (ye LaStie dy lout! puis
do Gh! Lo) ASU REP At ae ae qeecwally jaall casts onS, 8 AL Ud ly ARI gLI Alydll LG) yo aSte sail Lal Lays Gosalagl (1
elke Jlduab Wg GSE Satu auSery Ql Lal oS ae gill Llyill fe aos im olill july sgegll GGAI § pedo
Asaall JS ye
aly VV0-)\ > alga YO*-YY>
wail ja ay god JI lg! ae Rial sal Litt ALey oo (Y
Seed Jats pecan say Lill ay go (3 Syl Ubey und sie Asti jah Lill dat Je 2 lla! @alb oye
ealiaieg eu eld acl (Y
caly laut! £35 @ (-) leat! lad! olesl 3 (A) ad, Ay Una! Jeratily Lnall p54)
* RisLall Lis yl GuSel a4 4 plat! yb
wall jLall JS Gy go suyall jLall 35H ALog
Bec
S ylauall dy Ues ASU fe farceill
cpetoald Lill & p> unile 3 Sylaull Ay llas auld Sout (1 Sgrtine tb has 3 pluull Leds ds p05 3 6 SY git! Gail (¥ de Jeti GPS al ob Ua! ABUb fe Gao jy Jats
( AUSUEE B grey 8 Lal! dy Us
7dB> Wo
SLAM jrero cyo shill By8 Ahoy ¢ 55) dy Ua! dal Je partitl EN
DC IN 13.2V (OS) Jit Gals GI LS Glgel gyo oayill JUS Guadiay ay Jp.
scaly Ul he ilgell aka Joy su,tll
Byluuall e palge Silo au Unll pos
RP-952 «eg Lidl a e ees Anns Sie 9 pall api y ly phil Le yaw JS ly Ul) Gea Lote
«POWER[OFF]/TAPED ase fe ily! dibs cut
Base 6 Pb ob sles!
:dBo Mo
Ngee dM old, YI acl dog! Juogil
—29-

| CH plaaut! a5lge |
ComslSH auaio QD) (VOLUME) Cpall ar> jaro @
(O[RECORD) Jaruwill 55 (BASS) jai! pouwe @ ( dq REWIND) AU Sutel 5 (TREBLE) Jy yill jose @
(PP FF) ee pall asl 5) (POWER/BATT) 43 )Uaall/3gGi yard Ceo @ (PLAY) elainy! 55 B® (TPS) das pitied) Zeal ys (pause Cone
(MSTOP A EJECT) oan W545 = aad aves ® (1EPAUSE) CS§kI AS giIt )5 BALANCE) (43/9! yaaa
(COUNTER) Janall 59 doy pull sluc GD (LEVEL) Gti git! vlc @ (MIC) GLigdg Sut! yusldo GD (SELECTOR) LailBgll oaxike ©
(LINE IN) 4abed Js use (MODE/BEAT PROOF) ,p3 Lai! padi! aie /AlLoul raters coi ® (LINE OUT) 4ab> & >> Wusli ms ney ipiriiaa ®
EXT SP 3-82) Aad )l5d! lela! (yasliis BAND) 4> gh! a>nine ( LenS, aia ® (REC MUTE) Jaruail! O>1) 5
gee pSuali gil ® (FM STEREO) 93 yius al Si caso Q
(SW ANT/EM ANT) .,>)Uul .319q4) 31 pol 4 (PHONES) Assi yl) de Lous ce dy Ua! auido s Uae gegia
(pc1N 132V0-3-) pola ill ner @ (MICROPHONE) dine Ole low (ACIN ~) ost LU Gu go @ (TUNING) -bulgill jose Q)
(VOLTAGE SELECTOR) 4,ig8)!) udaie & 399 ale Laws G (FINE TUNING) 63901! CaalgGll passe @
A599 Csl pa a
BY dy youl joball Gye Gydll jlgadl lia audy gl Jats ins @ egal Loyally ARAL Lasley bys YI tb Sy Lauall ily ol
HigsISN ogi aaa gly Uy gle 5a SLU juwetl dae Sylodl QSL! 3 Uuee pill Uru olinuwlS 55d @
Bytiles Syguas untill egal Lyall gl Lae Zab! GUS duubidll joloall je yl cul SH fons asd
hs pil Bay he 9355.28 Jilly Cpe jail Bjgal qsulse¥! Naa aa gitar (VV +~ pu) cuwlS b5lt alisiul siet @
eats al 131 Yilyill 1 Lassad gf abs gual! Ge dees l gol Ail Gia
Se Gilg Golo, ali Joby dN Los) el isa, © oel5i)) sty dey pti
Jaf jLIII joe 2 Syl Aboy 653) Jlariwil psc dlls @
—~30—

SCHEMATIC DIAGRAM
ici Os 02 ic2 o2 ics cs 1c? ice 1cé eu ANT213 MAi50 RVDSDIIZ AN7220A 2SC1684 RVIBAI330 RVIBAG133 RVIBA6GI54 BA338 RVIUPCI277H
MIX AGC AFT FM/AM IF AMP ‘AF AMP MPX AMBIENCE LEVEL METER TPS POWER AMP
TELESCOPIC - = is ee 4, e aM OSE .MIX ANTENNA oa 2 = = OIS~ 28 920 2 4R2 220 . C50 Sov! LNIOI72P1 2SC1684 2SA564
RB 490K ey x =z = i LEO LED ORIVE LEO DRIVE
i 3 (8S SSE cs ov
ap 188 3 ODO-O-O-6-0-O}
EXT ANTENNA
& 2 u 2 sl [2
I6 H g s3 ¥e 3 3 oa BY FR Fs & i a4 :
= | 7 Gar eR 4K 20 {
ie Rig 490K HOOKS eared () Ts eS) em Te 22 Sq
2 ao Sf 4 oo, OF SH : &
& ‘ & 2 Nos Ss-1 ooo 30
Req 22K $3-4
R28 100K
C1 K330P Gq K330P
R32 22K
%&Rig0_ 4.9K S4-2 R227 BK &¢ J3
e101 $0¥0.22 re
bart
= 2 ‘7
8 R103 68K 3
ich — g
LINE IN #203 68K 3S i Reh
: b= 2 — ait bea ie a ,2 coe SP #32) K e
Vv * § 8h oP d 3
R/p HEAD ! Std Shs om g i
9 yaya 3 3Ry Pi Lk
Lch == 4G Cos bd at
~<a He] Bh © at
ap | ak nS nd og Bi /ot-} | sve Pe siels * e
RCh 1} a ° oh
CPs Ree 58 Cs s 2) 8 Id Crit 40.0015, 8
eal Seafe =| E ft + Ruts, 12K] < . Fe Pre,
zs
2%
| : ats ele
' S |e t dls z
ee rat By soth st 2 lS 15
Ff Ome Se Pp pee Gan 40.0015 : 3 oe EST MO: =| *
R j & Fs & #]s¢-4 L 1 R25 I ot <Be
y fe 4 ho 15K 2 g
=O
cd Lag se2 x = rears | sN,
Be 38 eis ee *
ae
nut C6
YEEc69 Q
*REW 6.8K 4
‘Rew 12K 10 Le a
ae a rg 5 8 i] rey a a
GSOSSHSO}
[ STP LY | allPt bis 030 . : ‘ Se ie Se Sted RVDIN4003 —s RVDIOEt
pay Serew PROTECTOR PROTECTOR
Q? 5,6 ea Q9,10 Q~ 13 4 O03,5~7 a4 ,i5 DIO, Qs os ais Qi8 ol2 Qlr DIGIT
2SA564 2SC2634 2SCIG84 2SCIZI7 2SCI684 AN73I0 MAI50 2SCI684 MAI50 250439 MAI9I 2SA564 2SCI684 MAI5O 2SD594 = RVDIOEI SWITCHING TAPE AMP ‘SWITCHING SIAS OSC AGC TAPE AMP AGC SWITCHING SWITCHING REGULATOR REGULATOR SWITCHING SWITCHING SWITCHING TPS DRIVE RECT
Notes: @Components identified by A, mark have special characteristics important safety.
When replacing any of these components, use only manufacturer’s specified parts.
@This schematic diagram is subject to change.
Recommended